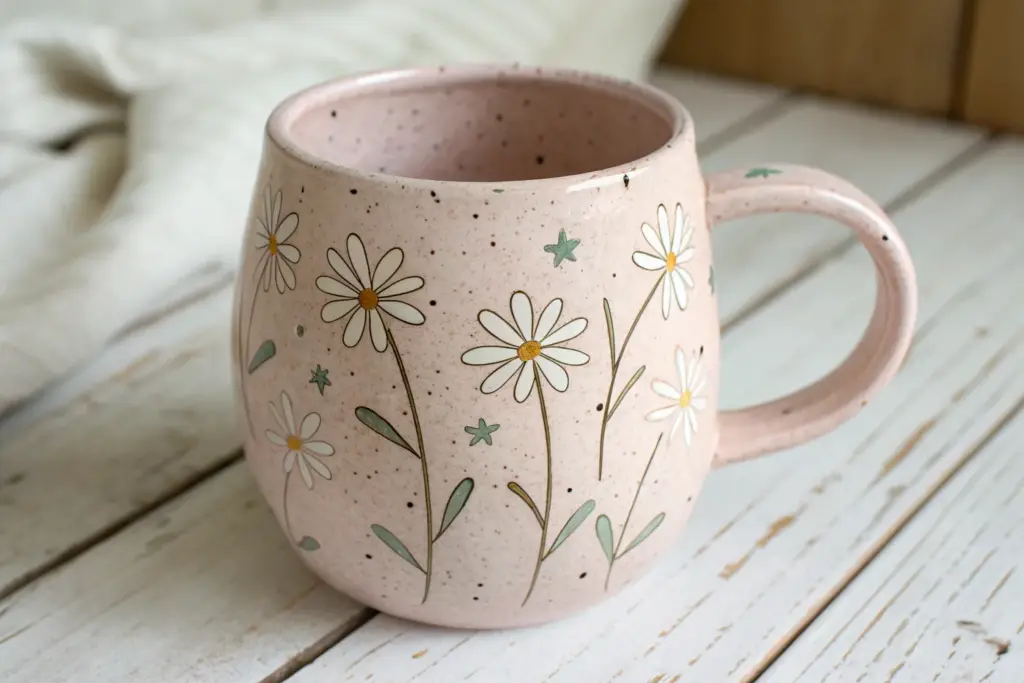
If you’re craving pottery that feels soft, modern, and instantly pretty on a shelf, you’re in the right headspace. These aesthetic pottery ideas lean into playful shapes, dreamy color palettes, and those tiny details that make a piece feel like a little collectible.
Pastel Wavy-Rim Plates
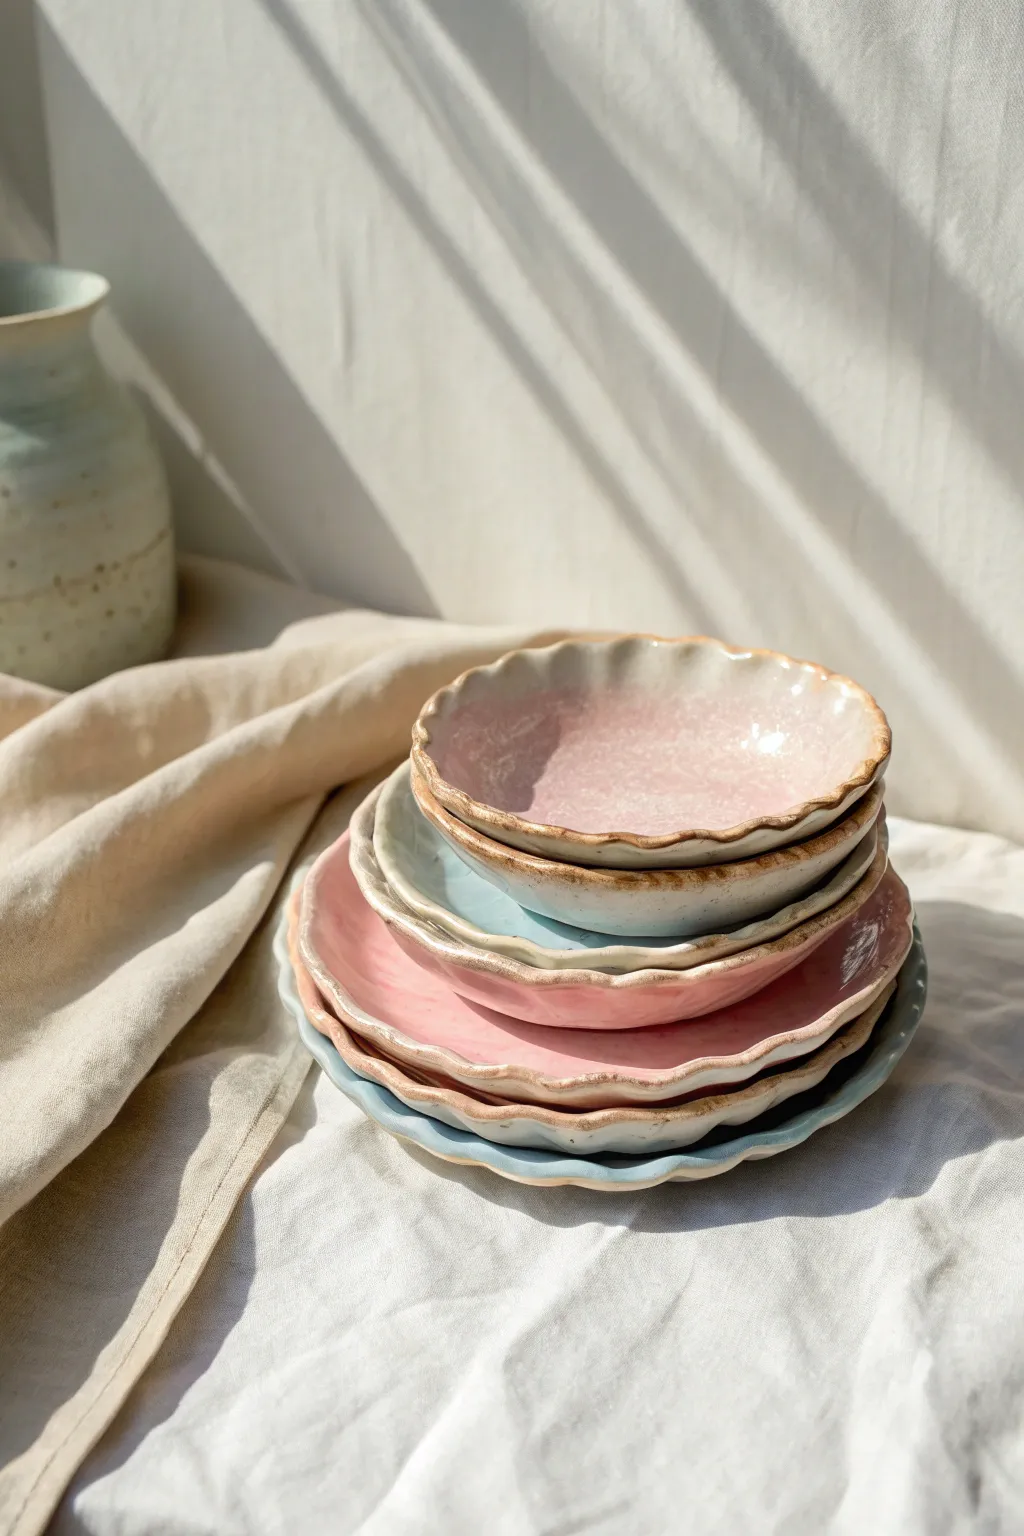
Embrace the imperfect beauty of wabi-sabi with these charming, hand-built ceramic plates. With their gentle, undulating rims and soft pastel glazes, they evoke the delicate feeling of flower petals, perfect for serving treats or holding trinkets.
Step-by-Step
Materials
- White stoneware clay body (cone 5/6)
- Pastel pink glaze (glossy)
- Pastel blue glaze (glossy)
- Iron oxide wash or brown underglaze
- Rolling pin
- Canvas work surface or slab mat
- Guide sticks (approx. 1/4 inch thick)
- Rib tool (rubber or silicone)
- Sponge
- Fettling knife or needle tool
- Variety of slump molds or simple diverse bowls for shaping
- Kiln access
Step 1: Forming the Slab Base
-
Wedge the clay:
Begin by thoroughly wedging your white stoneware clay to remove any air bubbles. This is crucial for preventing explosions in the kiln and ensuring a smooth surface. -
Roll out the slab:
Place your clay on the canvas between two guide sticks. Roll the clay out firmly until the rolling pin rests on the guides, creating a perfectly even slab about 1/4 inch thick. -
Smooth the surface:
Take your rubber rib tool and gently compress the clay slab on both sides. This aligns the clay particles to prevent warping and erases the canvas texture. -
Cut the circles:
Using a needle tool, cut out rough circles. They don’t need to be perfect geometric circles; in fact, a slightly organic shape works better for this aesthetic.
Warping Woes
If plates warp during drying, ensure they dry slowly and evenly. Keep them away from drafts and consider weighing down the center with a small sandbag while drying.
Step 2: Shaping the Rim
-
Creating the wave:
Hold the clay disc in your hand. Using your thumb and forefinger, gently pinch and pull the rim outward and upward in equidistant sections to create a fluted, wavy edge. -
Refining the undulations:
Go around the rim a second time, smoothing the peaks and valleys with a damp sponge so the waves look soft and melted rather than sharp. -
Slump molding:
Drape your clay forms inside your slump molds or chosen bowls. Press gently so the bottom flattens slightly, but let the wavy rim rest naturally against the sides. -
Drying to leather hard:
Allow the pieces to dry slowly to the leather-hard stage. I usually cover them loosely with plastic for the first day to equalize moisture. -
Refining edges:
Once leather hard, remove them from the molds. Use a slightly damp sponge to smooth away any sharp edges or rough spots on the rim and foot. -
Bisque fire:
Load the bone-dry pieces into the kiln and bisque fire them according to your clay body’s specifications (usually cone 04).
Step 3: Glazing and Finishing
-
Wipe down ceramic:
After the bisque fire, wipe the plates with a clean, damp sponge to remove any kiln dust that could repel the glaze. -
Applying the vintage rim:
Dip a small brush into iron oxide wash or brown underglaze. Carefully paint a thin line along the very edge of the wavy rim. It can be uneven; that adds character. -
Wipe back the rim:
Using a sponge, gently wipe back the brown line you just painted so it stains the clay rather than sitting on top as a heavy solid line. -
Glazing the interior:
Pour your pastel pink or blue glaze into the center of the plate, swirl it to coat the interior, and pour out the excess. Wiping the rim again lightly ensures the brown accent peeks through. -
Glazing the exterior:
Brush or dip the exterior of the plates. Create a set by alternating which color is on the inside versus the outside, or keep them solid. -
Cleaning the foot:
Thoroughly sponge off any glaze from the bottom of the plate where it will touch the kiln shelf to prevent sticking. -
Glaze fire:
Fire the pieces to the final temperature required for your glaze and clay body (typically cone 5 or 6 for stoneware).
Dual-Tone Effect
Layer a translucent white glaze over your pastel blue or pink. The areas where the glaze breaks over the rim texture will create stunning depth and color variations.
Stack your finished set on open shelving to show off those lovely, organic edges


Cloud-Shaped Bowls
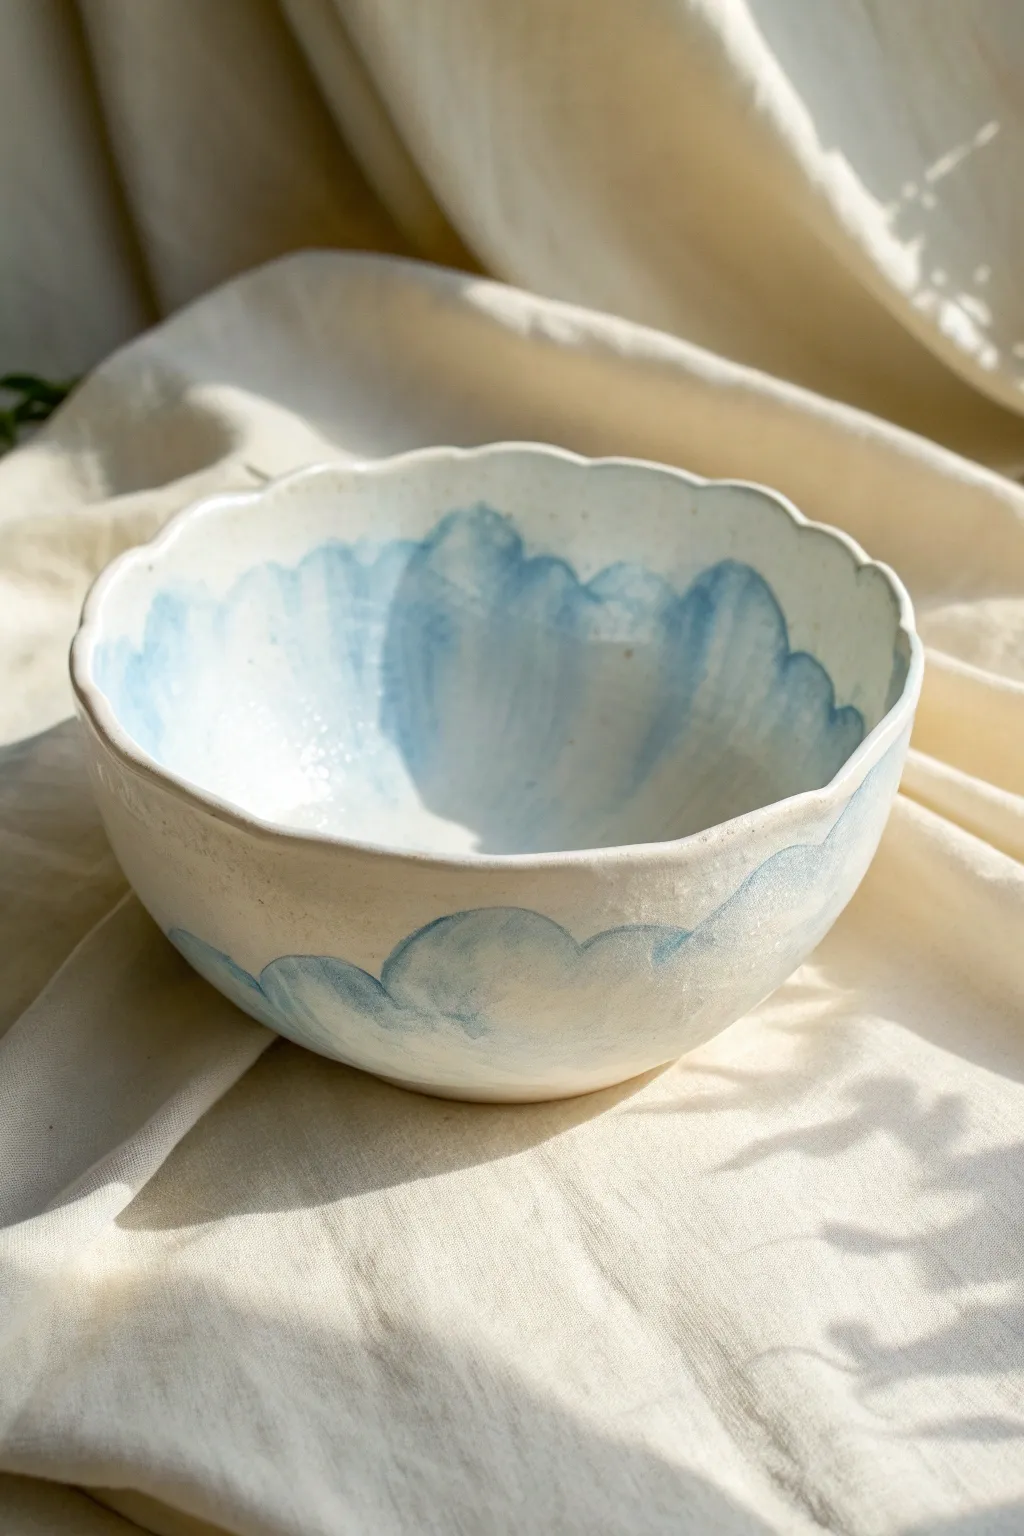
Bring a piece of the sky into your kitchen with this dreamy, hand-built ceramic bowl featuring a unique scalloped edge. The soft blue watercolor-style glazing creates fluffy cloud formations that drift across the interior and exterior, perfect for serving morning cereal or matcha.
Step-by-Step Tutorial
Materials
- White stoneware or porcelain clay
- Rolling pin and guide sticks (approx. 1/4 inch)
- Small elevated bowl mold or hump mold
- Needle tool or fettling knife
- Rib tool (soft kidney)
- Sponge
- Fine grit sandpaper
- Cobalt blue underglaze or mason stain wash
- Wide, soft watercolor-style brush
- Clear matte or satin food-safe glaze
Step 1: Shaping the Cloud Form
-
Roll the slab:
Begin by wedging your white clay thoroughly to remove air bubbles. Roll it out into a smooth, even slab about 1/4 inch thick, using guide sticks to ensure uniform thickness. -
Smooth the surface:
Take a soft rib tool and compress the clay slab on both sides. This removes the canvas texture and aligns the clay particles, preventing future warping. -
Drape over mold:
Gently lift your clay slab and drape it over your chosen hump mold or slump it inside a bowl mold. Press it gently against the mold’s curve without stretching the clay too thin. -
Trim the excess:
Using a needle tool, trim away the excess clay at the base of the mold to establish a rough circular rim, leaving about an inch of extra material to work with. -
Carve the scallops:
To create the cloud silhouettes, use your needle tool to cut a series of connected semi-circles around the entire rim. Vary the sizes of the humps slightly so they look organic rather than mechanical. -
Soften the edges:
Once the rim is cut, dip a small sponge in water and meticulously smooth the sharp cut edges. You want the rim to feel rounded and soft, like a fluffy cloud. -
Dry to leather hard:
Let the bowl sit on the mold until it becomes leather hard—stiff enough to hold its shape but still cool to the touch. Remove it carefully.
Uneven Rim?
If the scalloped rim feels sharp after the bisque firing, gently sand it with 220-grit wet/dry sandpaper under running water before glazing to get that soft touch.
Step 2: Painting the Sky
-
Clean the bisque:
After your bowl has been bisque fired, wipe it down with a damp sponge to remove any dust that might resist the glaze. -
Prepare the blue wash:
Dilute your cobalt blue underglaze with a little water. You want a watercolor consistency that is semi-transparent rather than an opaque solid block of color. -
Map out the clouds:
Visualize where your clouds will sit. The painted blue areas will represent the sky, while the unpainted white clay will act as the clouds. -
Paint the background sky:
Using a wide soft brush, apply the blue wash in the negative spaces. Paint up towards the scalloped rim but leave the ‘humps’ of the rim white. -
Follow the contours:
Let your brushstrokes mimic the curve of the bowl. Apply the blue heavily at the bottom of the cloud shapes and fade it out slightly as you move away to create depth. -
Add interior details:
Repeat the process on the inside of the bowl. Start the blue wash deep in the varying curves of the scallops and pull the color downward toward the center of the bowl. -
Create soft gradients:
While the underglaze is still damp, use a clean, slightly wet brush to soften the bottom edges of your blue patches so the sky fades gently into the white clay. -
Glaze application:
Once the underglaze is fully dry, dip the entire bowl into a clear matte or satin glaze. A glossy glaze can work, but matte finishes tend to look softer and more ethereal. -
Clean the foot:
Wipe the bottom foot ring of the bowl perfectly clean with a sponge to prevent it from sticking to the kiln shelf during firing. -
Final smooth:
Check the rim one last time for any sharp glaze drips and smooth them down with your finger before loading it into the kiln.
Create Depth
Layer your underglaze! Apply one watery wash first, let it dry, then apply a slightly more saturated blue in the deepest crevices of the clouds for a 3D effect.
Once fired, you will have a beautiful vessel that captures the serenity of a cloudy day in permanent form


Face Mugs With Blushing Cheeks
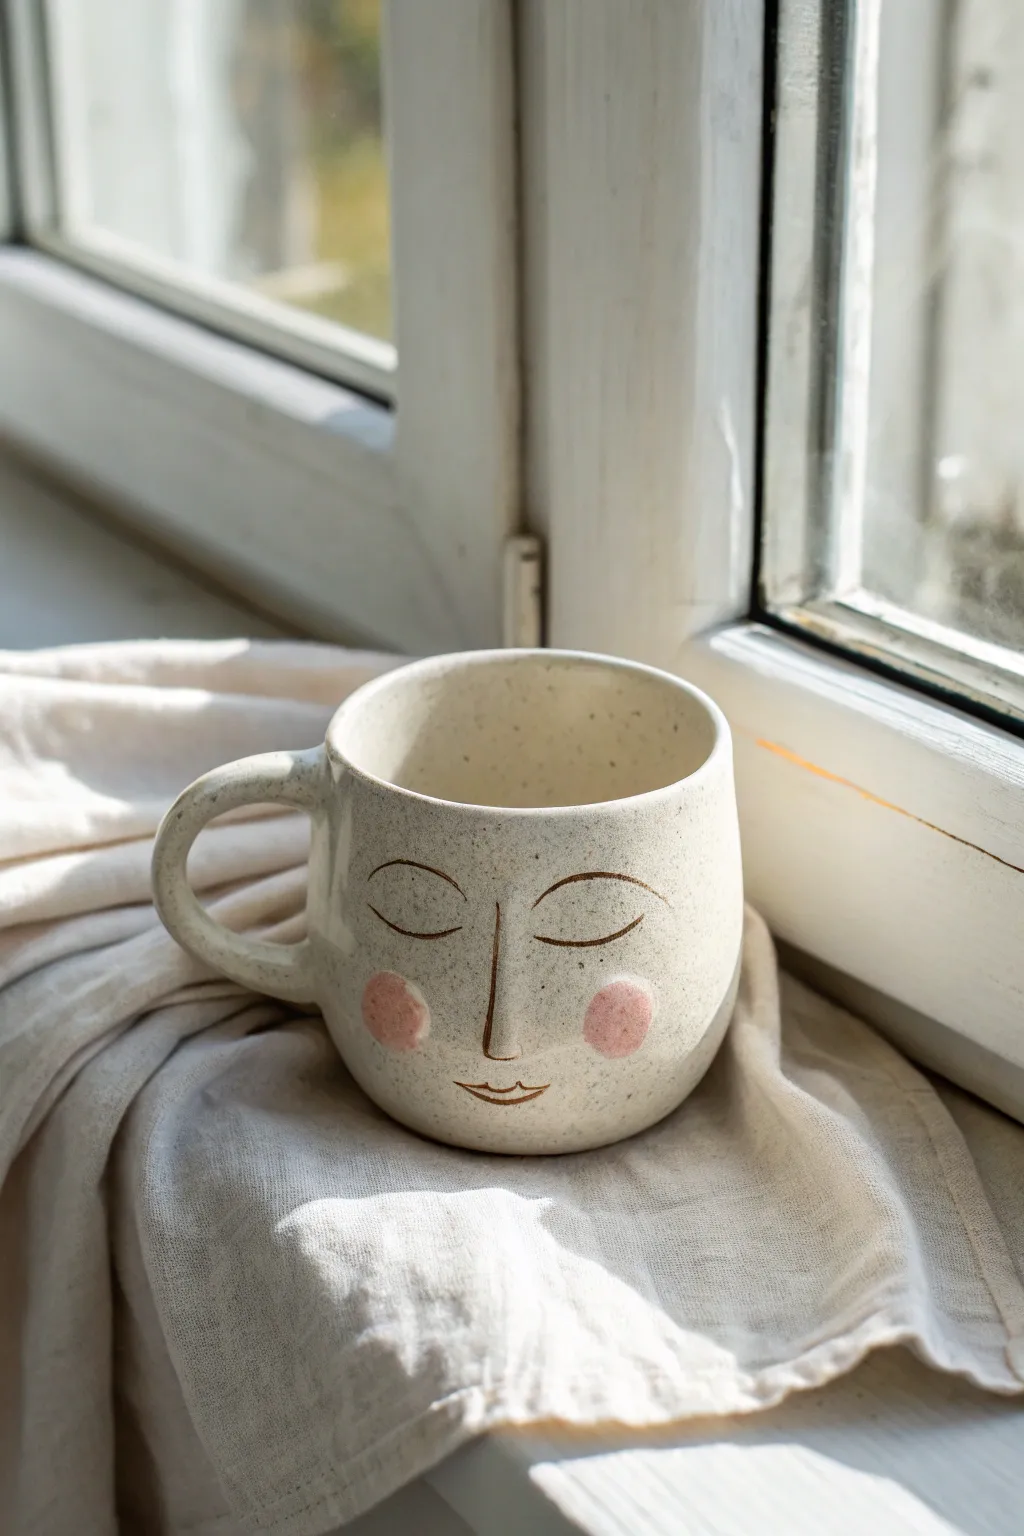
Capture a moment of tranquility with this hand-built ceramic mug, featuring a gentle, sleepy face and sweet pink cheeks. The speckled clay body adds a natural, rustic charm that perfectly complements the minimalist facial features.
Step-by-Step Guide
Materials
- Speckled stoneware clay (mid-fire)
- Pottery wheel (or rolling pin for hand-building)
- Rib tool
- Pin tool or needle tool
- Sponge
- Small loop tool or carving tool
- Underglaze (Black or Dark Brown)
- Underglaze (Pink or Coral)
- Fine detail brush
- Small round brush
- Clear matte or satin glaze
- Kiln
Step 1: Forming the Mug Body
-
Prepare the clay:
Begin by wedging your speckled stoneware clay thoroughly to remove air pockets. For this mug size, start with about 1 to 1.25 pounds of clay. -
Throw the cylinder:
Center the clay on the wheel and open it up. Pull the walls to create a cylinder with a slightly rounded bottom. Aim for a gentle curve that widens slightly at the belly before tapering back in just a bit at the rim. -
Refine the shape:
Use a rib tool on the outside while supporting the inside with your hand to smooth the surface and perfect that soft, rounded silhouette. The walls should be even but sturdy enough to handle carving later. -
Trim the rim:
Compress the rim using a piece of chamois or your sponge to ensure it is smooth and pleasant to drink from. -
Wire off:
Use a wire tool to cut the mug from the bat, but leave it on a ware board to stiffen up to leather-hard consistency.
Fixing Smudged Lines
If the black underglaze smears when wiping back, your sponge is too wet. Squeeze it out almost completely and wipe perpendicular to the carved lines to clean the surface effectively.
Step 2: Adding the Handle
-
Pull a handle:
While the body firms up, pull a handle from a lug of clay. Aim for a simple strip style that complements the minimalist mug. Let it curve naturally on a table to set into an arch. -
Attach the handle:
Once both pieces are leather-hard, score the attachment points on the mug and the handle ends. Apply slip and press the handle firmly onto the mug. -
Smooth the connection:
Use a damp sponge or your finger to smooth the seams where the handle meets the body, making it look seamless.
Creative Twist
Make a matching pair! Create a second mug with ‘awake’ eyes by carving open ovals with pupils, or change the expression to a little ‘o’ shape for a surprised look.
Step 3: Creating the Face
-
Plan the placement:
Lightly sketch the facial features onto the leather-hard clay with a pencil. The pencil marks will burn off in the kiln, so don’t worry about mistakes. Position the face relatively low on the ‘belly’ of the mug. -
Carve the lines:
Using a needle tool or a very fine carving tool, gently incise the lines for the closed eyelids, the long simple nose, and the small curved mouth. You want distinct grooves but don’t cut too deep. -
Clean up burrs:
Wait until the clay is bone dry or very firm, then gently brush away any clay crumbs or ‘burrs’ created by the carving tool to keep the lines crisp.
Step 4: Glazing and Finishing
-
Apply the dark underglaze:
Using a fine detail brush, carefully paint black or dark brown underglaze into the carved lines of the eyes, nose, and mouth. I find it helpful to steady my hand against the table for this part. -
Wipe back excess:
If you painted outside the lines, use a slightly damp sponge to wipe the surface. The underglaze will remain in the recessed carved lines, creating a sharp illustration. -
Add the cheeks:
Dip a small round brush into pink underglaze. Dab two perfect circles onto the cheeks. You can do one or two coats depending on how opaque you want the blush to be. -
Bisque fire:
Load the mug into the kiln for a bisque firing (usually Cone 04) to set the shape and the underglaze. -
Clear glaze application:
Once bisqued, dip the entire mug into a clear matte or satin glaze. This will seal the clay and make it food-safe while allowing the speckles and face design to show through clearly. -
Final firing:
Fire the mug to maturity (likely Step Cone 5 or 6, depending on your clay body). Let the kiln cool completely before opening to reveal your finished piece.
Enjoy your comforting cup of tea in your new favorite handmade mug


Strawberry Trinket Dishes
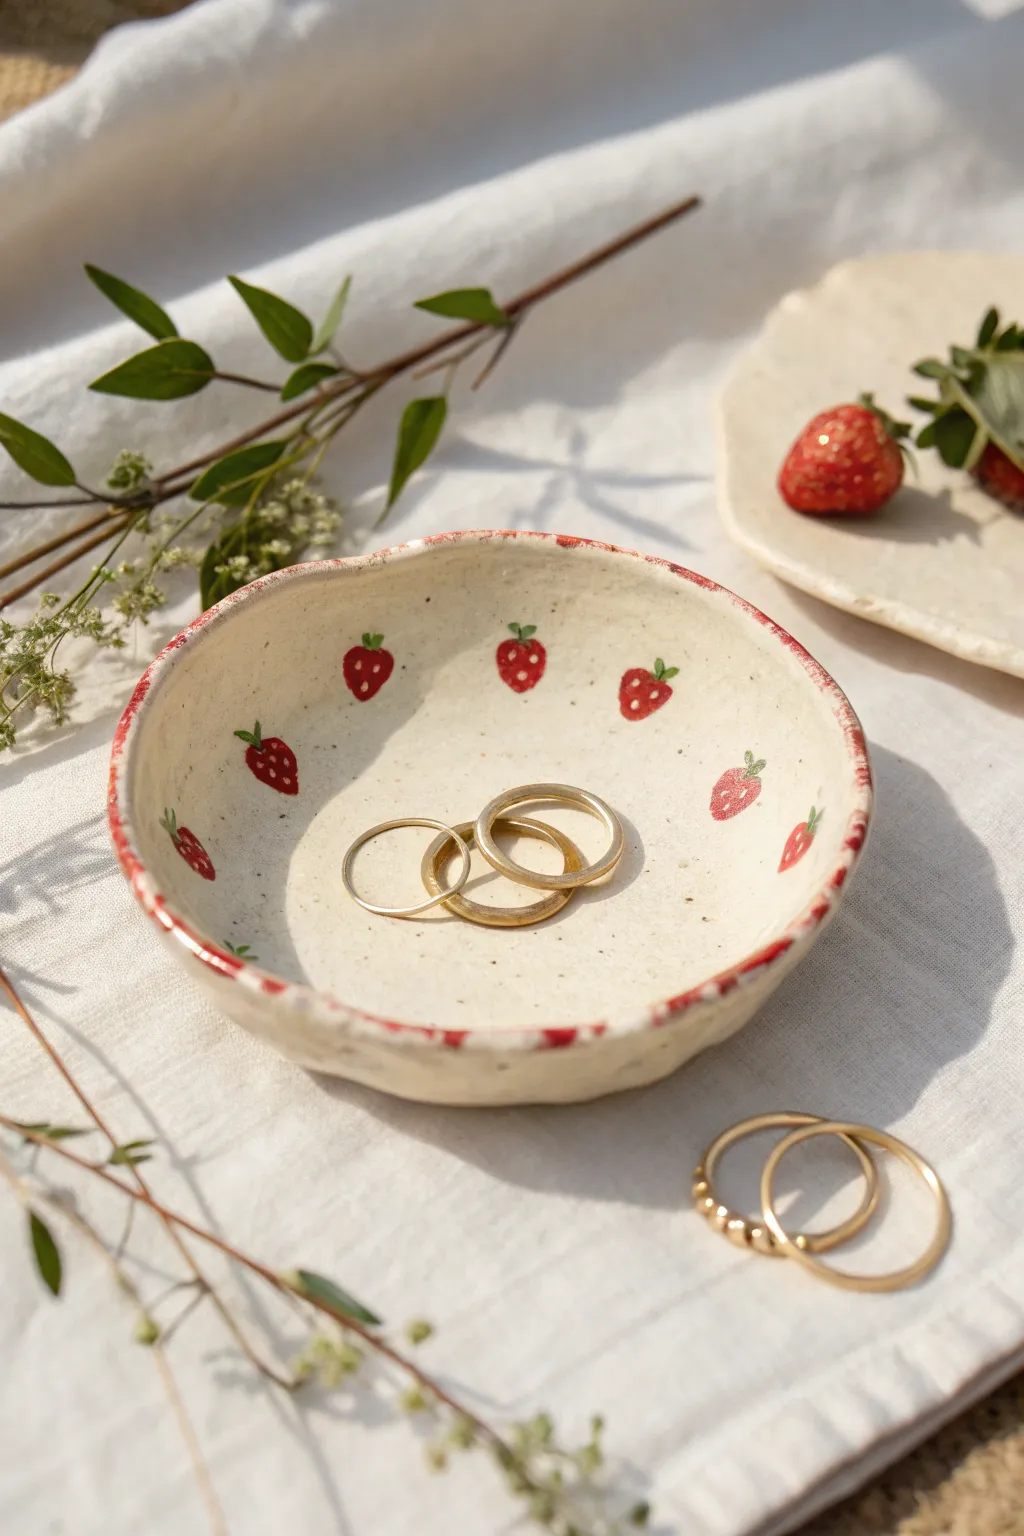
Capture the sweetness of summer with this charming, handmade ceramic bowl featuring delicate painted strawberries and a rustic red rim. Perfect for holding your favorite rings or dainty jewelry, its organic shape and speckled finish give it an undeniably cozy, cottagecore aesthetic.
Step-by-Step Tutorial
Materials
- White stoneware or earthenware clay (speckled clay recommended)
- Rolling pin
- Canvas mat or wooden board (for rolling)
- Small bowl or round template (approx. 4-5 inches)
- Needle tool or fettling knife
- Sponge
- Underglaze (Red and Green)
- Small round paintbrush (size 0 or 1)
- Clear transparent glaze
- Kiln access
Step 1: Shaping the Form
-
Condition the clay:
Cut a manageable chunk of clay and wedge it thoroughly on your canvas mat to remove air bubbles and ensure a uniform consistency. -
Roll out a slab:
Using your rolling pin, flatten the clay into a slab that is roughly 1/4 inch thick. Try to keep the thickness even across the entire surface. -
Cut the circle:
Place your small bowl or round template gently onto the clay slab. Trace around it with a needle tool to cut out a perfect circle. -
Create the organic rim:
To get that handmade look shown in the photo, refrain from smoothing the edge too perfectly. Instead, pinch the rim gently between your thumb and forefinger to slightly thin it out and create gentle waves. -
Form the bowl shape:
Place the clay circle into a shallow mold or simply cup it in your hands, pressing the center down gently while curving the edges upward to create a shallow bowl depth. -
Let it firm up:
Allow the clay to dry to a ‘leather-hard’ state. This usually takes a few hours or overnight depending on humidity. It should be firm enough to hold its shape but still cool to the touch. -
Smooth the surface:
Once leather-hard, take a slightly damp sponge and wipe down the interior and rim to remove any sharp bits or harsh textures, prepping the surface for painting.
Step 2: Painting the Strawberries
-
Plan your placement:
Visualize where your strawberries will go. Spacing them evenly around the interior wall of the bowl creates a pleasing rhythm. -
Paint the strawberry bodies:
Load your small brush with red underglaze. Paint small, inverted triangular shapes with rounded tops to form the strawberry bodies. I find doing one coat, waiting for it to dry, and then adding a second makes the red really pop. -
Add the leafy tops:
Rinse your brush thoroughly. Using green underglaze, carefully paint two or three tiny leaves on top of each red berry shape. -
Create the seeds:
For the seeds, you can either scratch through the red underglaze with a needle tool to reveal the clay underneath (sgraffito) or use a tiny dot of white or yellow underglaze. The scratching method gives it that textured look. -
Paint the rim:
Dip your brush back into the red underglaze. Hold the brush steady against the rim and rotate the bowl, or dab it along the edge for a looser, more painterly red border.
Clay Choice Matters
Use a ‘speckled buff’ clay body. When fired through a clear glaze, the natural iron speckles appear, giving the dish that lovely vintage, spotted eggshell texture without extra painting.
Step 3: Firing and Glazing
-
Bisque fire:
Allow the painted bowl to dry completely (bone dry). Fire it in the kiln to a bisque temperature (usually cone 04) to harden the clay. -
Apply clear glaze:
Once the bisque firing is cool, dip the entire bowl into a clear transparent glaze. This will seal the clay and make the underglaze colors vibrant and glossy. -
Wipe the foot:
Use a sponge to wipe the glaze off the very bottom of the bowl so it doesn’t stick to the kiln shelf. -
Glaze fire:
Fire the piece a final time to the temperature required for your specific clay and glaze body (often cone 5 or 6 for stoneware).
Wobbly Lines?
If your hand shakes while painting the red rim, embrace it! The charm of this aesthetic comes from the imperfections. A variation in line thickness makes it look authentically handmade.
Enjoy using your sweet new dish to organize your favorite trinkets

What Really Happens Inside the Kiln
Learn how time and temperature work together inside the kiln to transform clay into durable ceramic.
Checkered Pattern Tumblers
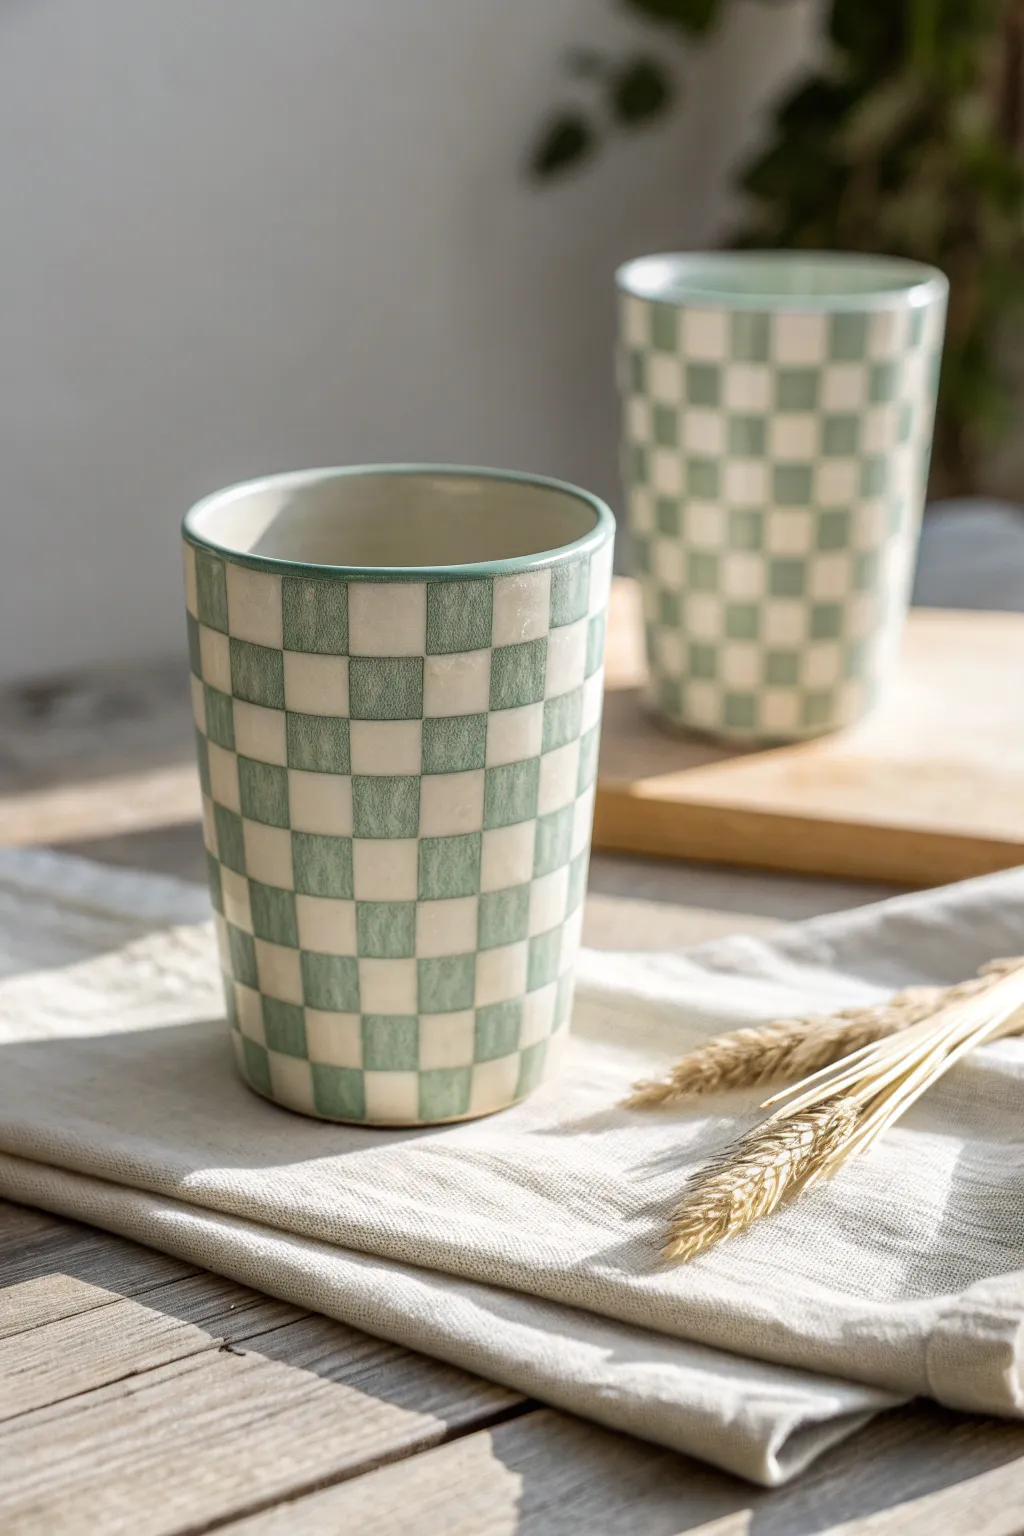
These charming tumblers feature a classic checkered pattern softened by a handcrafted feel and a soothing sage green palette. The result is a cozy yet modern ceramic piece that makes your morning coffee feel extra special.
Step-by-Step Guide
Materials
- White stoneware clay body
- Pottery wheel (or slab roller/rolling pin for hand-building)
- Modeling tools and rib
- Underglaze (Sage Green or Celadon)
- Clear transparent glaze
- Flat shader brush (small/medium size)
- Fine liner brush
- Pencil for sketching on bisque
- Ruler or measuring tape
- Wanter and sponge
Step 1: Forming the Vessels
-
Prepare the Clay:
Begin by wedging your white stoneware clay thoroughly to remove air pockets. Weigh out two equal balls of clay, roughly 1 to 1.5 lbs each depending on your desired tumbler size. -
Throw the Cylinder:
Center your clay on the wheel and open it up. Pull the walls straight up to form a tall cylinder. Aim for straight sides rather than a tapered form to make the grid pattern easier to apply later. -
Refine the Shape:
Use a straight rib tool against the outside of the spinning wall to smooth the surface and ensure the sides are vertical. Compress the rim with a chamois or sponge for a comfortable drinking edge. -
Trim the Foot:
Once leather hard, trim away excess weight from the bottom and create a clean definition between the wall and the base. Smooth the surface with a damp sponge to remove any grog or tool marks. -
Bisque Fire:
Allow the tumblers to dry completely (bone dry) before loading them into the kiln. Bisque fire to cone 04 (or your clay body’s recommendation) to prepare the surface for decoration.
Step 2: Creating the Grid
-
Clean and Prep:
Wipe the bisque-fired tumblers with a damp sponge to remove any kiln dust. This ensures your underglaze will adhere properly without crawling. -
Establish Vertical Lines:
Using a pencil and a flexible ruler, lightly mark vertical lines around the circumference. Divide the space evenly—you want an even number of sections so the pattern connects seamlessly. -
Mark Horizontal Bands:
Measure horizontal bands up the height of the tumbler. Try to make the height of these bands match the width of your vertical sections to create squares rather than rectangles. -
Sketch the Checkers:
Lightly mark an ‘X’ in every other square with your pencil. This simple visual guide prevents the heartbreaking mistake of painting two adjacent squares the same color.
Use Tape for Precision
For ultra-crisp lines, use thin automotive masking tape or dedicated pottery tape to grid out the pot. Peel it off gently when the underglaze is leather-hard but not fully dry.
Step 3: Painting and Glazing
-
Outline the Squares:
Start with your sage green underglaze and a fine liner brush. Carefully outline the squares you marked with an ‘X’. Keep a steady hand to maintain crisp edges. -
Fill the Pattern:
Switch to a flat shader brush. Fill in the outlined squares with the green underglaze. I prefer to apply three thin, even coats rather than one thick one to avoid brush strokes showing through. -
Clean the Edges:
If you smudge any green onto the white squares, wait for it to dry and gently scratch it off with an X-Acto knife or a stiff clean brush. -
Rim Detail:
Use the liner brush to paint a very thin, consistent line of green underglaze along the very top rim of the tumbler to frame the design. -
Applying Clear Glaze:
Once the underglaze is fully dry, dip the entire tumbler into a clear transparent glaze. Shake gently to remove excess drips and clean the foot of the mug. -
Final Firing:
Load the glazed tumblers into the kiln for the glaze firing (typically cone 5 or 6 for stoneware). Ensure they don’t touch other pots.
Mix Up the Palette
Don’t stop at green! Try alternating colors for a harlequin look, or use a gently speckled clay body to add rustic texture to the unpainted white squares.
Enjoy the rhythmic process of painting these squares and admire your beautiful handiwork
Ombre Glaze Mini Vases

Bring a breath of fresh air to your home decor with these charming, handcrafted mini vases featuring soft ombre glazes. Their subtle gradient finishes, ranging from creamy speckles to gentle pinks and oceanic blues, make them the perfect vessels for delicate dried florals.
Step-by-Step Tutorial
Materials
- White stoneware clay body (cone 5/6 recommended)
- Potter’s wheel and throwing tools (rib, sponge, wire cutter)
- Trimming tools
- Bisque kiln and Glaze kiln
- Glossy white glaze (base)
- Pastel pink dipping glaze or underglaze
- Soft teal or aqua dipping glaze
- Speckled cream glaze (optional for the top section)
- Wax resist
- Sponge for smoothing
- Spray bottle with water (optional)
Step 1: Throwing the Forms
-
Center the clay:
Start with balls of clay weighing approximately 0.75-1 lb each. Securely center the clay on the wheel head, ensuring it feels steady and balanced before opening. -
Open and lift:
Open the clay and begin pulling up the walls. Aim for a narrow, cylindrical base, keeping the walls relatively thick at the bottom to support the curve you will create next. -
Shape the belly:
Using a rib on the inside and a sponge on the outside, gently push the clay outward to create a rounded ‘belly’ for the vase. Maintain a smooth curve that tapers back in toward the top. -
Collar the neck:
Slow the wheel down slightly. Using both hands, gently choke or collar the clay inward at the shoulder to form a narrow neck. Compress the rim frequently to keep it level. -
Refine the lip:
Create a distinct, slightly flared lip at the very top. Use a chamois or a wet sponge to ensure the rim is exceptionally smooth and rounded, which gives the finished piece a refined look. -
Cut and dry:
Undercut the base with a wooden tool, then slide your wire cutter underneath. Set the vases aside to dry until they reach the leather-hard stage.
Step 2: Trimming and Bisque
-
Trim the foot:
Once leather-hard, center the vase upside down on the wheel. Trim away excess clay from the bottom to create a clean foot ring. This lifts the form and adds visual lightness. -
Smooth the surface:
Wipe the entire exterior with a slightly damp sponge to remove any throwing lines or grog, creating a pristine canvas for your ombre effect. -
Bisque fire:
Allow the vases to dry completely to the bone-dry stage. Load them into the kiln and bisque fire to approximately cone 04.
Mastering the Fade
To get that ultra-smooth blur between glaze colors, dampen the sponge slightly and very gently dab the seam where the two glazes meet before firing.
Step 3: Glazing the Ombre Effect
-
Wax the foot:
Apply wax resist to the bottom contact ring and about 1/8 inch up the side of the foot to prevent glaze from fusing the pot to the shelf. -
Apply base glaze:
For the pink vase, pour a glossy white glaze inside, swirl it to coat, and pour it out. Dip the top half of the exterior into the same white glaze. -
Dip the gradient:
Dip the bottom third of the vase into your pastel pink glaze. Hold it for a brisk 3-second count to ensure coverage without excessive thickness. -
Create the fade:
I find the best transition happens using a spray bottle. While the glaze is still damp, lightly spray the area where the white meets the color to soften the line. -
Speckled variation:
For the blue vases, glaze the interior white. Dip the top half into a speckled cream glaze first. Let it dry to the touch. -
Dip the blue base:
Dip the bottom half into the teal/aqua glaze, overlapping the speckled cream section by about an inch. The overlap creates a third blending color. -
Clean the foot:
Use a damp sponge to wipe any stray glaze droplets off the waxed foot ring effectively.
Glaze Crawling?
If the second layer of glaze pulls away (crawls) from the first, your first layer was likely too dry. Dip the second color while the first is barely damp.
Step 4: Final Firing
-
Load the kiln:
Place the glazed vases into the kiln, ensuring they don’t touch each other. Leave a little extra space for these as overlapping glazes can sometimes run. -
Glaze fire:
Fire the kiln to your clay body’s maturation temperature (likely cone 5 or 6). Allow the kiln to cool naturally before unloading. -
Sand the bottom:
Once cool, use a diamond sanding pad or sandpaper to smooth the unglazed foot ring, ensuring it won’t scratch your furniture.
Fill your new trio of vases with dried baby’s breath to capture that airy, minimalist aesthetic perfectly.


The Complete Guide to Pottery Troubleshooting
Uncover the most common ceramic mistakes—from cracking clay to failed glazes—and learn how to fix them fast.
Speckled Cream Breakfast Set
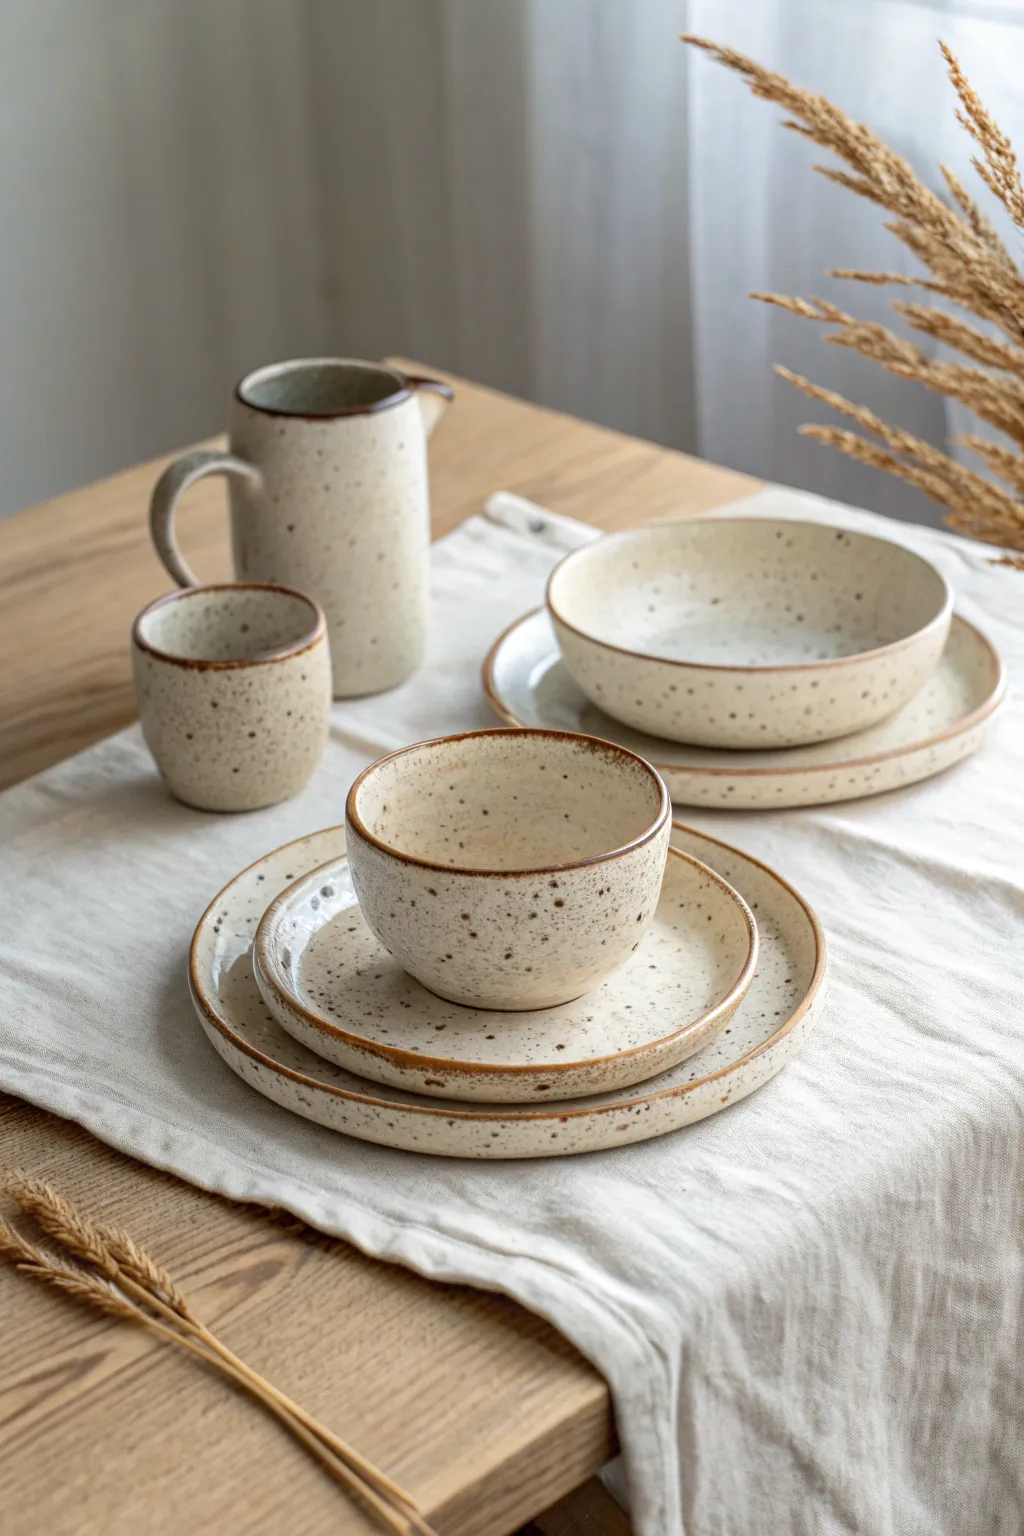
Bring the warmth of artisanal ceramics to your home with this lovely speckled breakfast set featuring a cream glaze and distinct brown rims. This project focuses on wheel-throwing simple, modern forms and finishing them with a classic iron-speckled aesthetic that feels both cozy and sophisticated.
Step-by-Step
Materials
- Speckled buff stoneware clay (or white stoneware with added iron oxide/granular manganese)
- Pottery wheel
- Throwing tools (sponge, needle tool, rib, wire cutter)
- Trimming tools
- Satin matte cream glaze
- Iron oxide wash (red iron oxide mixed with water)
- Medium paintbrush
- Sponge for smoothing
- Kiln
Step 1: Throwing the Forms
-
Design the silhouette:
Visualize the set before you start: a deep cereal bowl, a side plate, a dinner plate, a small handleless cup, and a creamer jug. Aim for clean, slightly cylindrical walls rather than perfectly round bowls to maintain a modern look. -
Center the clay:
Wedge your speckled stoneware clay thoroughly. For the cereal bowl, center about 1.5 lbs of clay on the wheel head, ensuring a strong seal at the base. -
Open and pull the bowl:
Open the clay and compress the floor. Pull the walls upward and slightly outward, keeping the rim distinct and substantial. Use a metal rib to steepen the sides for that contemporary profile seen in the photo. -
Throw the plates:
For the plates, center larger amounts of clay (2-3 lbs typically). Flatten the distinct floor first, then pull a low, shallow rim. Keep the rim slightly upturned to catch sauces. -
Create the creamer and cup:
Throw the small cup and the pitcher using taller, narrower cylinders. For the pitcher, use a damp finger or a chamois to pull a small, precise spout while the clay is still plastic on the wheel. -
Attach the handle:
Once the pitcher is leather hard, pull a simple C-shaped handle from a lug of clay. Score and slip the attachment points on the pitcher body and press the handle firmly into place, smoothing the seams.
Step 2: Trimming and Refining
-
Trim the foot rings:
Wait until your pieces are leather hard. Center them upside down on the wheel and trim a clean, defined foot ring on each piece. This elevates the form and gives it a professional shadow line. -
Smooth the rims:
Before bisque firing, take a slightly damp sponge and run it gently over all rims. This ensures there are no sharp edges and prepares the surface for the brown oxide detail later. -
Bisque fire:
Load your bone-dry pieces into the kiln and bisque fire them to Cone 04 (or your clay body’s specific requirement) to prepare them for glazing.
Oxide running?
If the brown rim runs too much during firing, your oxide wash is too watery or applied too thickly. Try a mix with a consistency closer to heavy cream next time.
Step 3: Glazing and Finishing
-
Prepare the glaze:
Mix your satin matte cream glaze. If your clay body doesn’t have specks, you can mix a small amount of granular ilmenite into the glaze itself, though using speckled clay is easier. -
Dip or pour glaze:
Dip each piece into the cream glaze for an even coating. For the pitcher, pour glaze inside, swirl to coat, pour it out, and then dip the exterior. Let them dry briefly. -
Clean the foot:
Use a damp sponge to wipe any glaze off the foot ring and the bottom of the pots to prevent them from sticking to the kiln shelf. -
Apply the oxide rim:
Mix a small amount of red iron oxide with water to create a thin wash. Dip a medium brush into the wash and hold it steady against the rim of the pot while rotating it—carefully—on a banding wheel. -
Enhance the imperfections:
I like to gently dab the oxide wash slightly down the side in a few random spots to mimic the organic variations seen in the inspiration image. -
Glaze fire:
Load the glazed pieces into the kiln. Make sure they aren’t touching. Fire to the maturity temperature of your clay and glaze (typically Cone 5 or 6 for stoneware). -
Sand the bottoms:
Once cooled and unloaded, use high-grit sandpaper or a diamond pad to smooth the unglazed foot rings so they won’t scratch your table.
Make it a full set
Create a matching butter dish or a shallow spoon rest using the same clay and rim technique to expand your breakfast collection seamlessly.
Now you have a stunning, cohesive breakfast set ready for your morning coffee and toast
Color-Blocked Planters
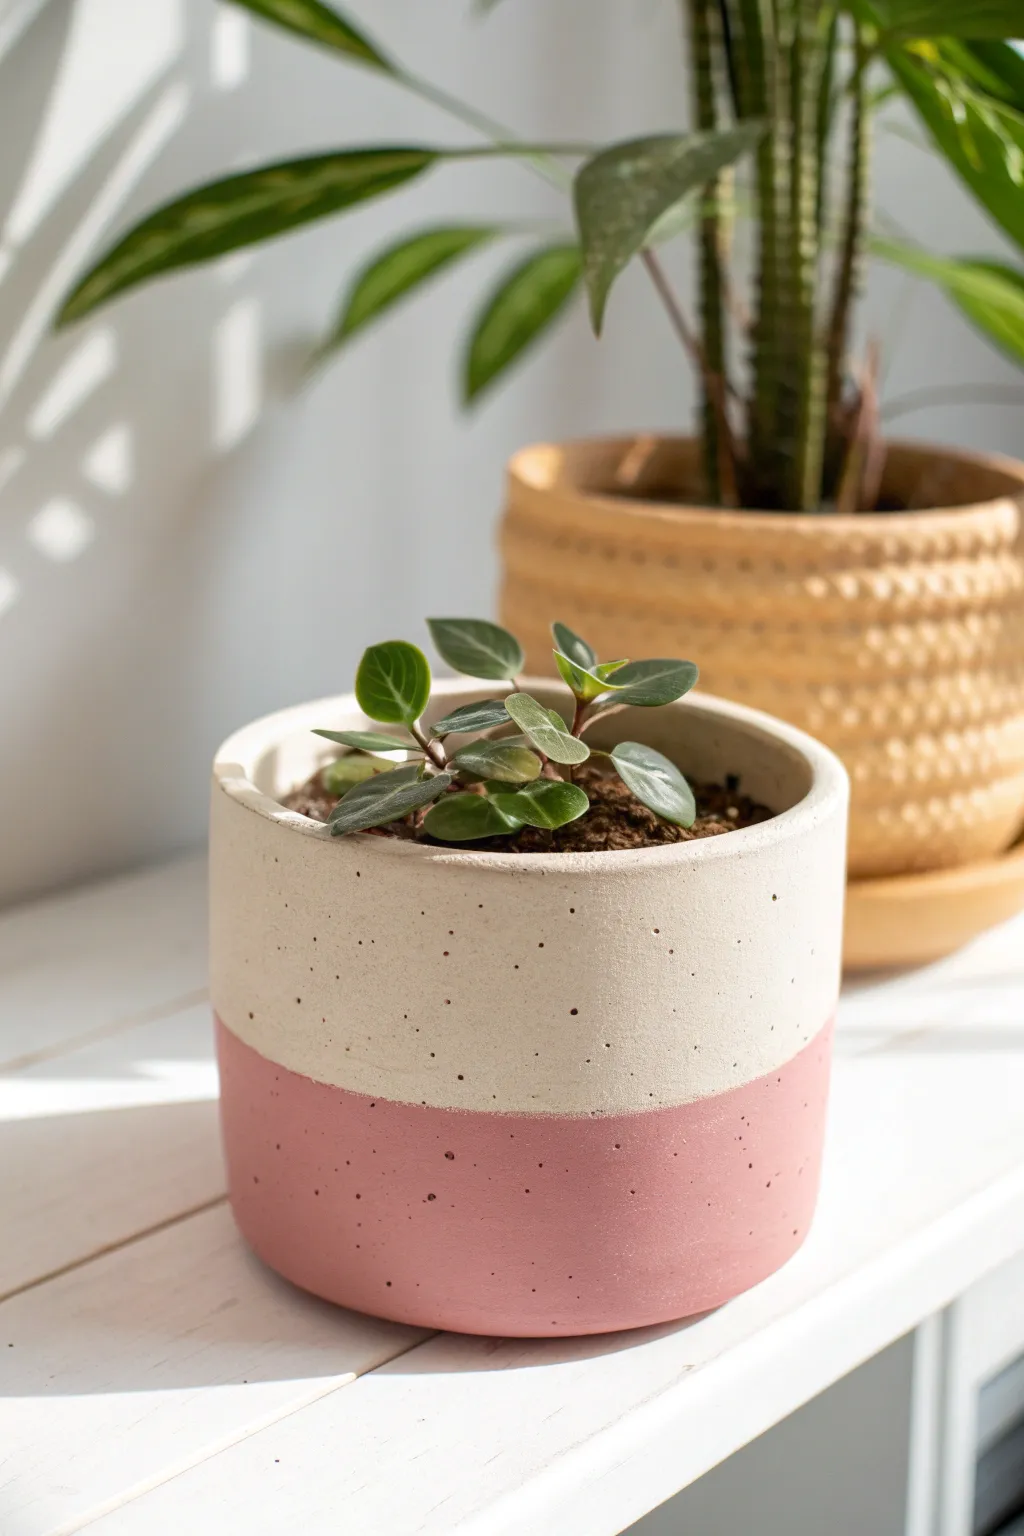
Achieve a modern, minimalist aesthetic with this charming two-tone cement planter featuring a dusty pink base and creamy top. The subtle speckled finish adds an organic texture that mimics expensive artisanal ceramics.
Detailed Instructions
Materials
- White Portland cement or crafting cement
- Fine sand or silica sand
- Dusty pink powder pigment (for concrete)
- Black decorative sand or fine terrarium gravel (for speckles)
- Two nesting plastic containers (outer mold and inner mold)
- Cooking spray or mold release
- Mixing bowls and stir sticks
- Sandpaper (medium and fine grit)
- Water
- Masking tape
- Weights (stones or coins)
Step 1: Preparation & Mixing the Pink Base
-
Prepare the molds:
Clean your plastic containers thoroughly. Apply a thin, even coat of cooking spray to the inside of the larger container and the outside of the smaller container to ensure easy release later. -
Measure base materials:
In a mixing bowl, combine 1 part cement with 1 part fine sand. This ratio provides strength while keeping the finish relatively smooth. -
Add color pigment:
Mix in your dusty pink concrete pigment while the mixture is still dry. Add small amounts gradually until you reach a shade slightly darker than your desired finish, as concrete lightens when dry. -
Create the speckles:
Stir in a pinch of black decorative sand or fine gravel. You don’t need much—just enough to create scattered visual interest throughout the pink layer. -
Mix with water:
Slowly add water while stirring constantly. You are aiming for a consistency similar to thick pancake batter or peanut butter—pourable but not watery.
Clean Lines Tip
To get a truly sharp horizon line, wait until the pink base is quite firm, then gently wipe the inside walls of the mold above the pink line before pouring white.
Step 2: Pouring the Pink Layer
-
Pour the base layer:
Pour the pink mixture into the bottom of your larger mold. Fill it up to the point where you want the color transition to happen—roughly one-third to one-half of the final height. -
Insert the inner mold:
Press the smaller container into the center of the wet cement. Push it down, but ensure there is at least a half-inch of cement at the bottom for the planter floor. -
Weigh it down:
Place stones or weights inside the inner cup to stop it from floating up. Center the cup carefully to ensure the walls will be even. -
Let it set deeply:
Allow this bottom layer to set for about 30-45 minutes. You want it firm enough to support the next layer without mixing, but wet enough to bond vertically.
Air Bubble Troubles
If you see too many holes after demolding, make a slurry paste with cement and water, rub it into the holes, let dry, and sand smooth.
Step 3: Mixing & Pouring the Cream Top
-
Mix the top layer:
In a clean bowl, mix a fresh batch of cement and sand. This time, leave out the pink pigment to keep the natural creamy white color of the Portland cement. -
Add speckles to the top:
Stir in the same amount of black sand speckles as you did for the base to ensure continuity in texture across the color block. -
Hydrate the mixture:
Add water to achieve the same batter-like consistency. I prefer to make this batch slightly more fluid to help it settle around the partially set base. -
Pour the second layer:
Carefully pour the white mixture into the gap between the molds, right on top of the pink layer. Fill it to the top rim. -
Tap out bubbles:
Gently tap the sides of the mold and vibrate the table to release trapped air bubbles. This creates a smoother final surface.
Step 4: Demolding & Finishing
-
Cure the concrete:
Let the planter sit undisturbed in a cool, shaded spot for at least 24 to 48 hours. Rushing this step can cause cracks. -
Remove the inner mold:
First, carefully twist and pull out the inner cup. You might need to use pliers to grip the edge if it’s slippery. -
Remove the outer mold:
Turn the larger container upside down and tap gently. If it doesn’t slide out, run a little hot water over the outside of the plastic to expand it slightly. -
Initial sand:
Using medium-grit sandpaper, smooth down the top rim and any rough seams. Sanding also helps expose the black speckles more clearly. -
Refine the surface:
Switch to fine-grit wet sandpaper to polish the outside walls. This will make the color transition line crisp and the surface velvety to the touch. -
Seal (Optional):
If you plan to plant directly inside, apply a clear concrete sealer to the interior to prevent water seepage.
Pop in your favorite peperomia or succulent and enjoy your handmade modern decor piece

TRACK YOUR CERAMIC JOURNEY
Capture glaze tests, firing details, and creative progress—all in one simple printable. Make your projects easier to repeat and improve.
Tiny Star and Moon Dish Set
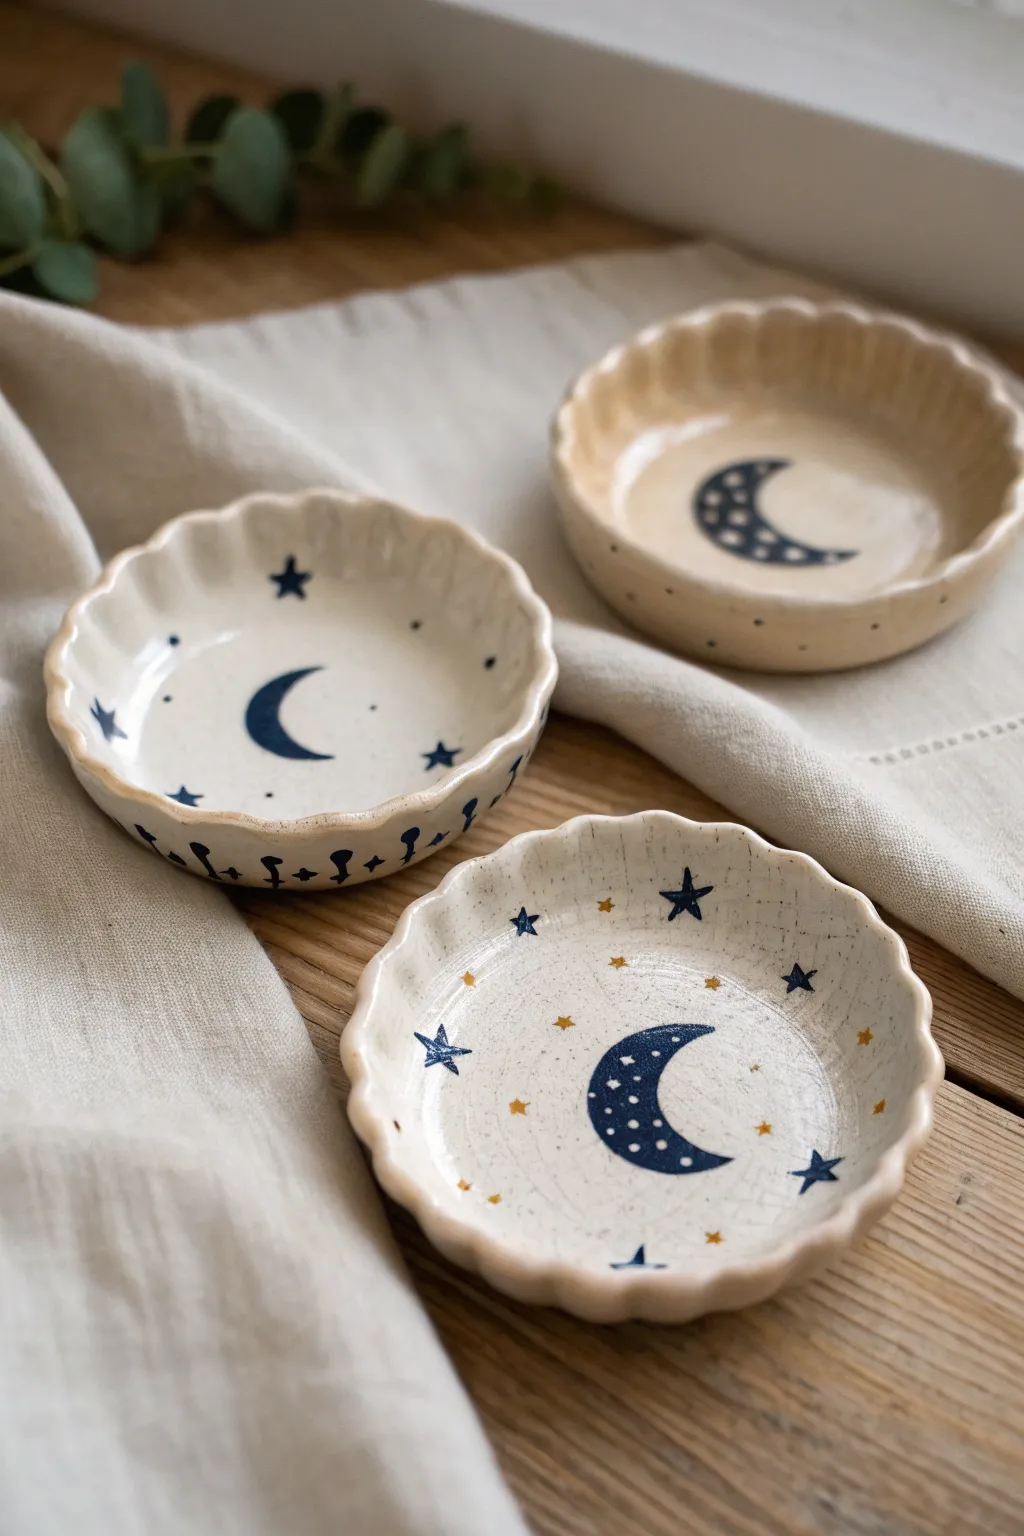
Capture the magic of the night sky with this charming set of fluted ceramic dishes, perfect for holding rings or small treasures. With their delicate scalloped edges and whimsical hand-painted moons and stars, these tiny bowls bring a dreamy, artisanal touch to any nightstand.
Step-by-Step Tutorial
Materials
- Air-dry clay (white or cream)
- Small rolling pin
- Fluted tart tin (approx. 4-5 inches) or silicone mold
- Sandpaper (fine grit)
- Acrylic paints (dark navy blue, gold/mustard yellow, cream)
- Fine detail paintbrushes (size 0 and 00)
- Gloss varnish or sealant (specifically clay-compatible)
- Small sponge
- Bowl of water
- Vegetable oil or release agent
Step 1: Forming the Dishes
-
Condition the Clay:
Begin by taking a handful of air-dry clay and kneading it in your hands until it becomes warm, pliable, and free of cracks. -
Roll It Out:
On a smooth, flat surface, roll the clay out to an even thickness of about 1/4 inch. If the clay sticks, you can dust your surface lightly with cornstarch. -
Cut the Circles:
Find a bowl or round cutter slightly larger than your tart tin mold. Cut out three circles from your rolled slab. -
Prepare the Molds:
Lightly brush the inside of your fluted tart tins with a tiny bit of vegetable oil. This ensures your clay won’t fuse to the metal as it dries. -
Shape the Clay:
Gently press the clay circles into the tart tins. Work from the center outward, pressing the clay firmly into the bottom corners and up the fluted sides to capture that scalloped edge detail. -
Trim the Rim:
Use a craft knife or a needle tool to trim any excess clay hanging over the edge of the tin, creating a clean, wavy lip. -
Smooth the Surface:
Dip your finger in a little water and run it over the inside surface and the rim to smooth out any fingerprints or rough spots. I like to spend extra time here to ensure a professional finish before drying.
Step 2: Painting the Galaxy
-
Drying Phase:
Allow the clay to dry in the molds for 24-48 hours. Once firm, carefully pop them out and let them air dry completely upside down for another day. -
Sand for Perfection:
Once fully cured and bone-dry, use fine-grit sandpaper to gently smooth the rim and any bumps on the interior surface. Wipe away the dust with a slightly damp sponge. -
Base Coat (Optional):
If your clay isn’t naturally cream-colored, apply a wash of diluted cream acrylic paint to get that soft, earthy background tone shown in the reference. -
Draft the Designs:
Using a very light pencil touch, sketch a crescent moon in the center of each dish. Add star placements around the moons. -
Paint the Moons:
Load a size 0 brush with dark navy blue paint. Carefully fill in the crescent shapes. For variety, paint a solid blue moon on one dish, and a pattern-filled moon on another. -
Add Moon Details:
If painting a detailed moon, wait for the blue base to dry slightly, then use a pin or the very tip of a clean brush to add tiny white or unpainted dots within the crescent for texture. -
Starry Accents:
Using the dark navy, paint small five-point stars scattered across the basin. Mix in some simple dots to represent distant stars. -
Gold Highlights:
Rinse your brush and switch to the gold or mustard yellow paint. Add tiny yellow stars interspersed with the blue ones to create depth and warmth. -
Rim Detail:
On one of the dishes, create a border pattern. Paint small hash marks or tiny stylized crosses along the bottom edge of the interior wall using the navy paint.
Smooth Release Tip
If you’re worried about the clay sticking to the metal tin, place a layer of plastic wrap inside the tin before pressing the clay in. It leaves a slight texture but guarantees easy removal.
Step 3: Sealing and Finishing
-
Final Dry:
Let all the paint cure completely for at least an hour to prevent smearing during the glazing process. -
Apply Varnish:
Apply a coat of high-gloss varnish to the inside of the dishes. This gives them that ceramic-like shine and protects the paint from chipping. -
Seal the Exterior:
Don’t forget the outside; apply a matte or satin varnish to the exterior for a nice tactile contrast, or stick with gloss for a uniform look.
Make It Functional
Want to use these for snacks? Swap the acrylics and varnish for food-safe ceramic glazes and fire them in a kiln if you have access to pottery studio equipment.
Enjoy arranging your new celestial dishes to hold your favorite rings or crystals
Bow-Handle Mugs
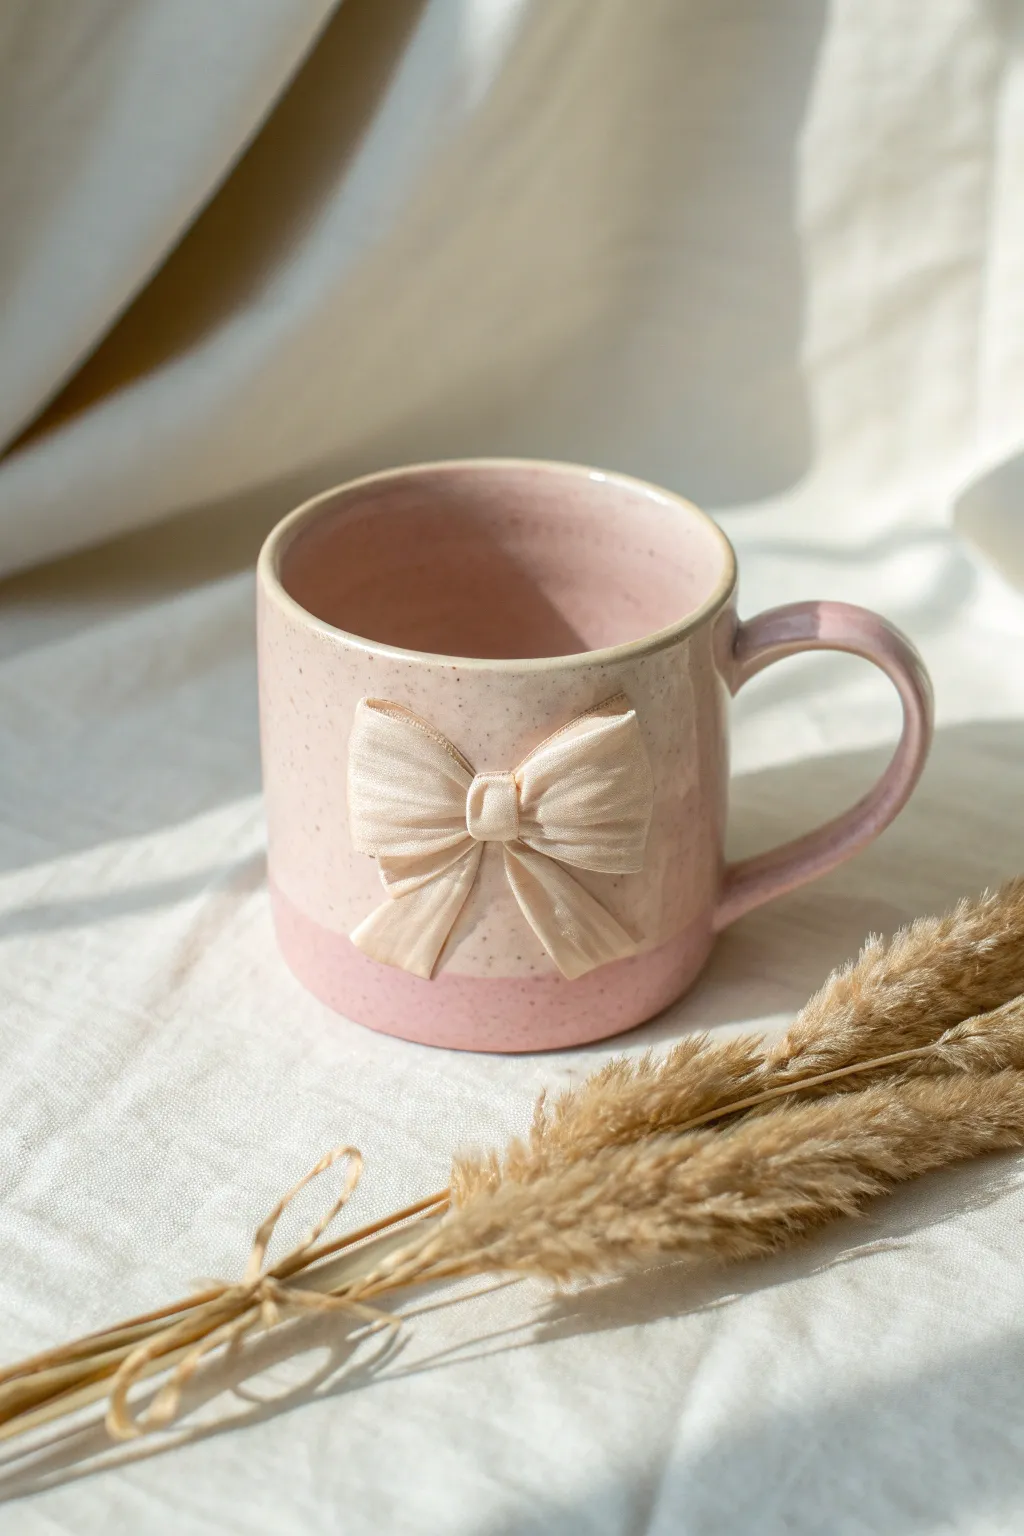
This dreamy, speckled pink mug features a sculpted 3D bow, tapping into the trending coquette aesthetic with handmade charm. The two-tone glaze effect and delicate ceramic ribbon create a sweet, feminine vessel perfect for your morning routine.
Step-by-Step
Materials
- Light-colored stoneware clay
- Rolling pin and guide sticks (approx. 5mm)
- Needle tool
- Potter’s knife or fettling knife
- Scoring tool or serrated rib
- Slip (clay + water slurry)
- Sponge
- Speckled light pink/beige glaze (for top)
- Solid dusty pink glaze (for bottom and bow)
- Kiln access
Step 1: Forming the Mug Body
-
Roll the Slab:
Begin by wedging your clay to remove air bubbles, then roll it out into a smooth, even slab about 5-6mm thick using guide sticks. -
Cut to Size:
Cut a rectangle for the mug walls (approx. 10x30cm for a standard mug) and a separate circle for the base. -
Form the Cylinder:
Score the short ends of your rectangle and apply slip. Curve the clay into a cylinder, overlapping the ends slightly or pressing them together to form a seamless join. -
Attach the Base:
Score and slip the bottom edge of your cylinder and the outer edge of your base circle. Press the cylinder onto the base firmly. -
Smooth the Seams:
Use a modeling tool or your finger to blend the clay at the bottom seam, ensuring a watertight seal. Smooth the vertical seam on the wall as well. -
Refine the Rim:
Gently compress the rim with a damp sponge or piece of chamois leather to smooth it out and make it comfortable for drinking.
Clay Texture Tip
To get the natural speckles seen in the image, use a clay body containing iron flecks or ‘speckles’ rather than relying entirely on glaze.
Step 2: Sculpting the Bow
-
Roll Thin Strips:
Roll a smaller piece of clay slightly thinner than your mug body (about 3-4mm). Cut a long, narrow strip about 2cm wide. -
Form the Loops:
Cut a segment for the main bow loops. Fold both ends toward the center to create that classic bow shape, pinching the middle gently. -
Add the Center Knot:
Cut a small rectangle of clay. Wrap it vertically around the pinched center of your loops to create the ‘knot’ of the bow. -
Create the Tails:
Cut two shorter strips for the ribbon tails. Cut a V-shape notch or an angled cut at the bottom of each for a realistic fabric look. -
Attach the Bow:
Score the back of the bow and the spot on your mug wall. Apply slip and press the bow onto the mug. I like to tuck the tails slightly under the loops for dimension. -
Add Texture:
Use a modeling tool to gently press creases into the ‘fabric’ of the bow loops, simulating the tension of gathered ribbon.
Step 3: Handle & Finishing
-
Pull the Handle:
Pull or roll a coil of clay to create a standard C-shaped handle. Ensure it’s thick enough to support the mug’s weight. -
Attach Handle:
Score and slip the attachment points on both the handle and mug. Press firmly to attach opposite the bow. -
Bisque Fire:
Allow the mug to dry slowly and completely before bisque firing to cone 04 (or per your clay body’s instructions). -
Glaze Application:
Dip the bottom inch of the mug in a solid dusty pink glaze. Then, pour or brush a speckled cream or light pink glaze on the interior and top exterior. -
Detail the Bow:
Carefully brush the bow with a creamy pearlescent or light beige glaze to make it stand out against the speckled background. -
Final Firing:
Fire the mug again to glaze temperature (typically Cone 5 or 6). Make sure to wipe the bottom of the foot clean before loading the kiln.
Make it Yours
Swap the classic bow for a thicker, more exaggerated shape or paint the bow in real gold luster for a touch of heavy luxury.
Enjoy your lovely new handmade mug with your favorite warm drink
Sculptural Animal Planters
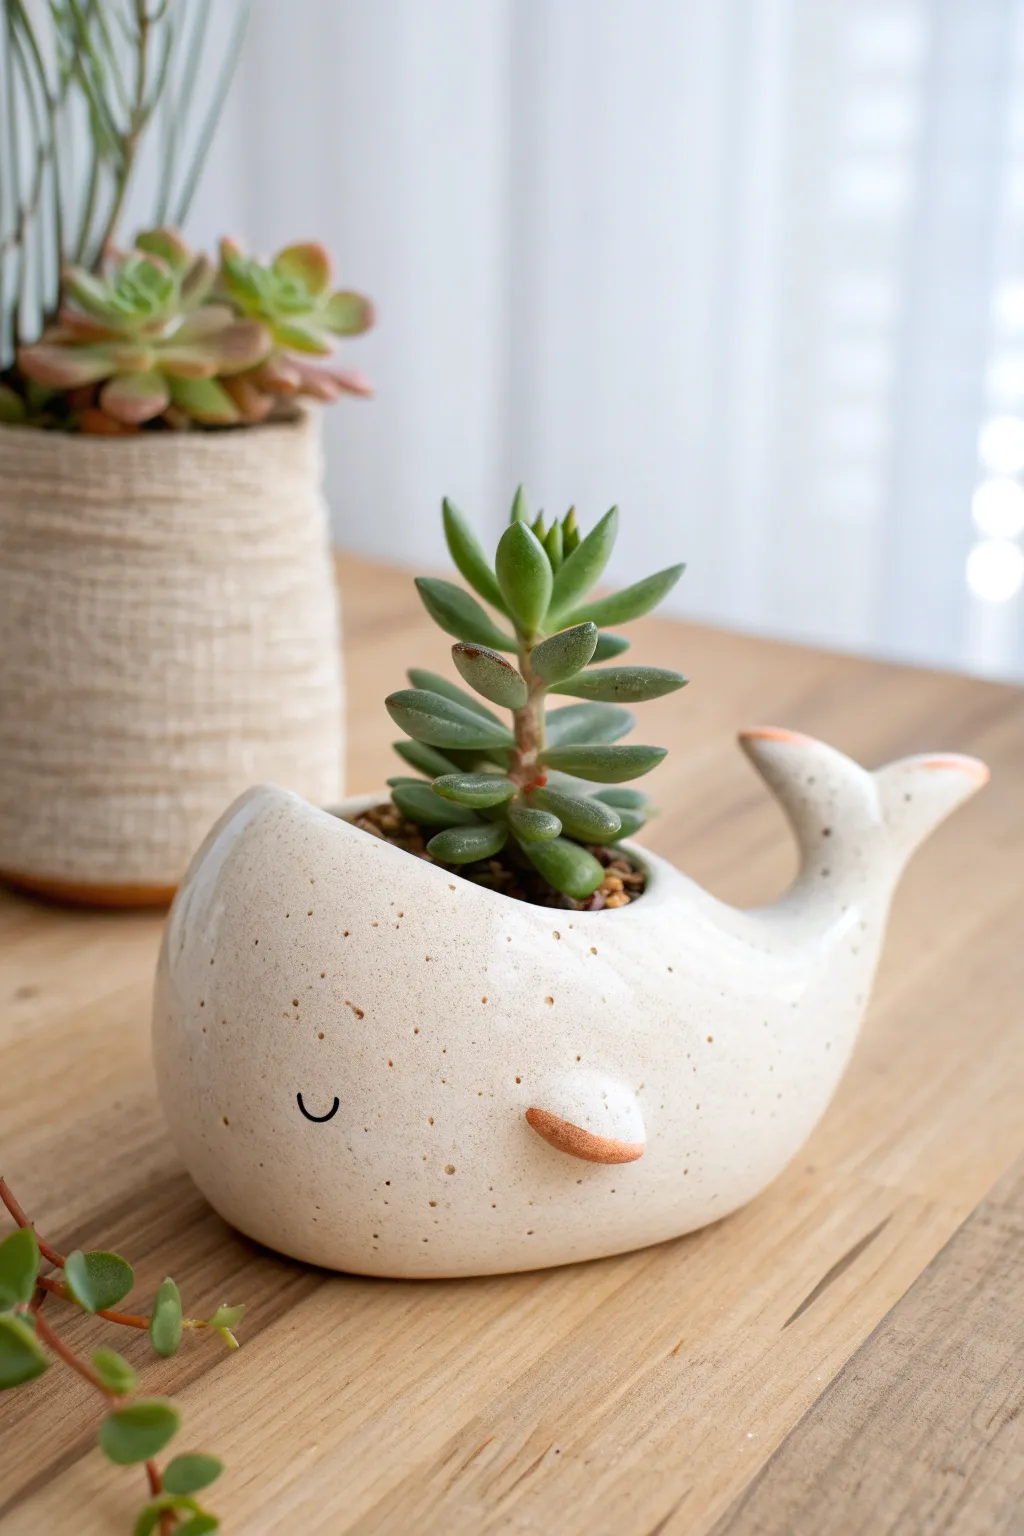
This whimsical ceramic planter combines a minimalist, glossy aesthetic with the charm of aquatic life. With its speckled cream glaze and subtle terracotta accents, it forms the perfect happy home for a small succulent.
How-To Guide
Materials
- White stoneware clay body (cone 5/6)
- Pottery wheel (optional, can be hand-built)
- Needle tool
- Rib tool (wooden and rubber)
- Scoring tool or fork
- Slip (clay and water mixture)
- Underglaze (Black and Terracotta/Rust)
- Speckled White Glaze (glossy)
- Small fine-point liner brush
- Sponge
- Loop tool for carving
Step 1: Forming the Body
-
Center the clay:
Start with about 1-1.5 lbs of white stoneware clay. Center it on the wheel head, ensuring a strong, stable mound. -
Open and pull:
Open the clay to create a wide, rounded bowl shape. Pull the walls up, keeping them relatively thick (about 1/4 inch) to support the sculptural additions later. -
Close the form:
Collaring gently, bring the rim inward to create a slightly enclosed, bulbous shape resembling a whale’s body. Don’t close it completely; leave the opening wide enough for your plant. -
Trim and curve:
Use a rib tool to smooth the outside curve, emphasizing a round, friendly belly shape. Cut the pot off the bat and let it firm up to leather-hard. -
Alternative: Pinch pot method:
If hand-building, create two pinch pots and join them together, or simply form one large, deep pinch pot and smooth the exterior with a paddle or rib until round.
Tail Drooping?
If the tail sags while attaching, prop it up with a piece of foam or a wad of newspaper underneath until the clay stiffens.
Step 2: Sculpting Features
-
Shape the tail:
Roll a coil of clay that tapers at one end. Flatten the wide end specifically to form the flukes of the tail. Curve the tapered end upward. -
Attach the tail:
Score the back of your whale body and the base of the tail heavily. Apply slip to both sides and press the tail firmly into place, blending the clay seams until invisible. -
Create the fins:
Form two small, teardrop-shaped pieces of clay for the side pectoral fins. Slightly flatten them so they aren’t too bulky. -
Secure the fins:
Position the fins low on the sides of the body. Score, slip, and attach them, making sure they angle slightly backward for a streamlined look. -
Smooth the surface:
Using a slightly damp sponge, go over all your joins and the main body to remove fingerprints and ensure a unified surface texture.
Add a Water Spout
Before bisque firing, add a tiny hole or a small tube at the top of the head for air plant placement to mimic a water spout.
Step 3: Decoration & Glazing
-
Bisque fire:
Once bone dry, fire the piece to cone 04 (or your clay’s specific bisque temperature). -
Apply wax resist:
Wax the foot of the pot and the rim if you want a clean edge, though glazing the rim is recommended here for a smooth finish. -
Paint the details:
Using the terracotta underglaze, carefully paint the very tips of the tail flukes and the outer edge of the side fins. Let this layer dry completely. -
Add the smile:
With a fine liner brush and black underglaze, paint a small, simple ‘U’ shape for the eye on each side. Keep it low and near the front for a cute expression. -
Glaze application:
Dip the entire piece into a glossy speckled white glaze. If your glaze is opaque, wipe it back gently over the eye and fin tips so the underglaze shows through, or use a semi-translucent glaze. -
Glaze firing:
Fire the piece to cone 5 or 6 depending on your clay and glaze specifications. Ensure the tail isn’t touching the kiln shelf or other pots.
Once fired, fill your new aquatic friend with sandy soil and a succulent to complete the look
Leggy Pottery Planters
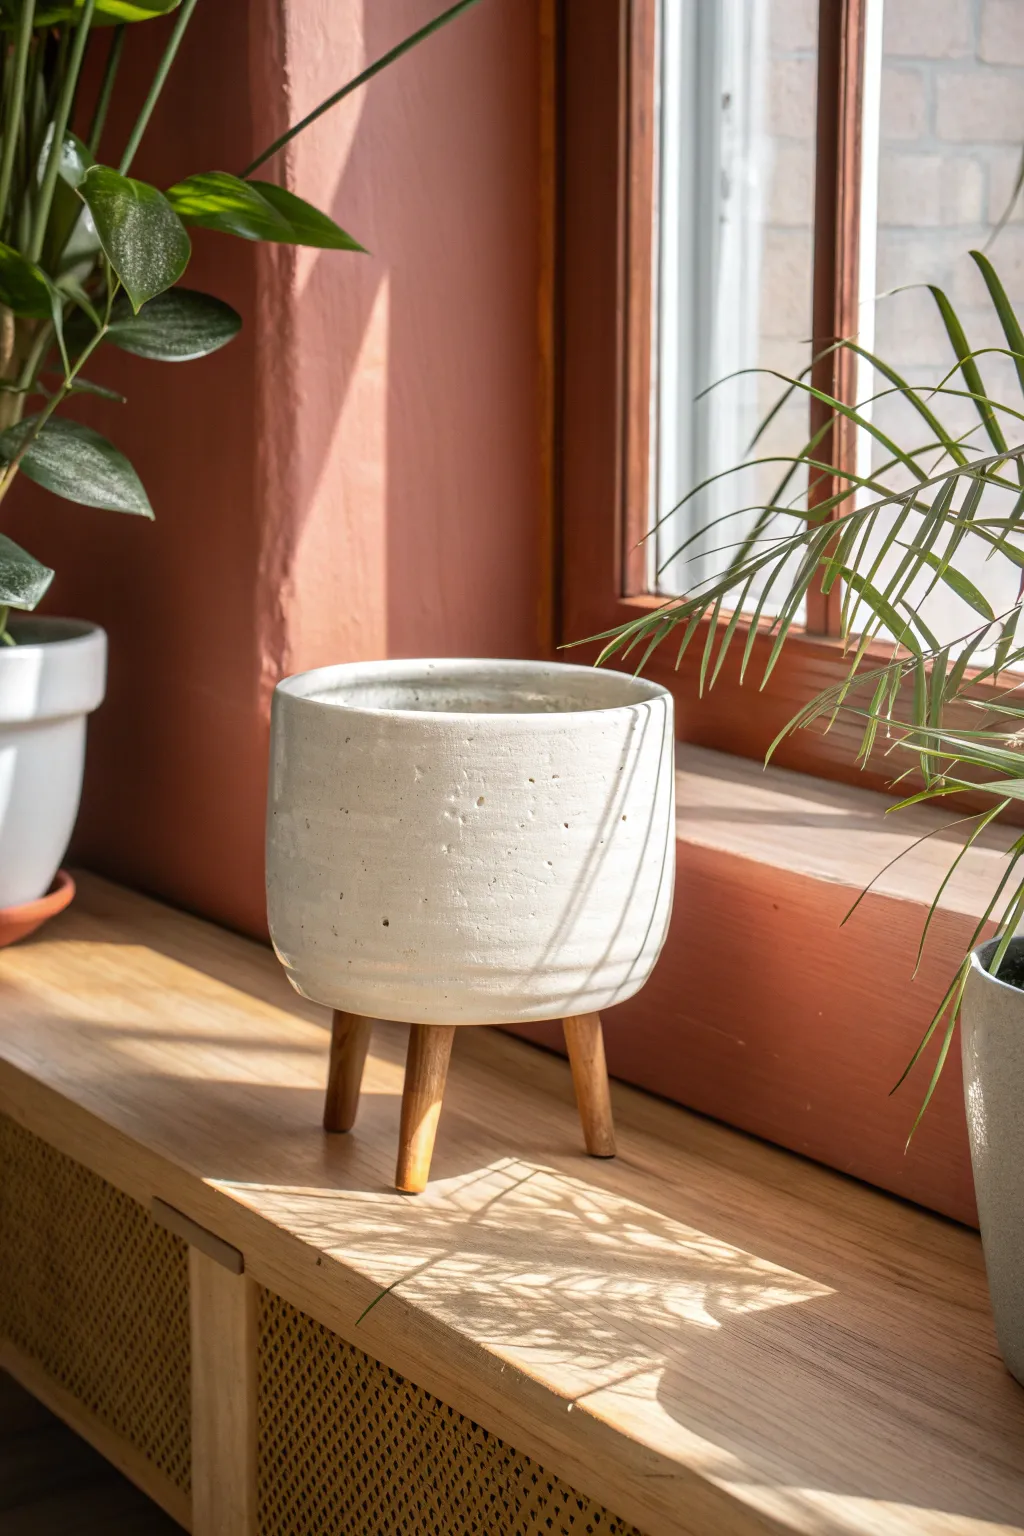
Elevate your favorite houseplant with this chic, minimalist planter that combines rustic textures with clean lines. The white, concrete-look finish serves as a perfect canvas for the warm wood tones of the tapered legs, creating a timeless mid-century modern aesthetic.
Step-by-Step Guide
Materials
- White air-dry clay or polymer clay (oven-bake)
- Round cookie cutter or template (6-inch diameter)
- Rolling pin
- Canvas mat or parchment paper
- Slip (clay and water mixture) and scoring tool
- Three 4-inch pre-turned wooden tapered legs
- Strong epoxy adhesive or construction glue
- Sandpaper (medium and fine grit)
- Small sponge
- Matte white acrylic paint (optional, for enhancing whiteness)
- Clear matte sealant spray
- Sharp knife or clay blade
Step 1: Shaping the Vessel
-
Roll the base:
Begin by rolling out a portion of your white clay to a uniform thickness of about 1/4 inch. Use your round cutter or a paper template to cut a perfect circle for the base of the pot. -
Prepare the walls:
Roll out a long, rectangular slab of clay for the body of the planter. Aim for the same 1/4 inch thickness as the base. The length needs to match the circumference of your base circle plus a little extra for the seam. -
Add texture:
Before assembling, lightly tap the surface of the clay slab with a coarse sponge or crumpled aluminum foil. This creates that lovely organic, pockmarked texture seen in the reference image. -
Score and slip:
Using a needle tool or fork, rough up the edges of the circular base and the bottom long edge of your wall slab. Apply a dab of clay slip (or liquid clay for polymer) to these scored areas to act as glue. -
Assemble the cylinder:
Carefully wrap the rectangular slab around the circular base. Press the scored edges together firmly to create a seal, ensuring the wall stands straight up. -
Close the seam:
Score the vertical ends where the wall meets itself. Apply slip and press the ends together, blending the clay with your finger or a modeling tool until the seam disappears completely on both the inside and outside.
Step 2: Refining and Baking
-
Smooth the rim:
Run a damp finger along the top rim to soften any sharp edges, but don’t smooth it too perfectly; a slight waviness adds to the handmade charm. -
Enhance surface details:
Inspect the outer walls. If you lost some texture during assembly, gently re-dab the surface with your texturing tool to create those distinct little craters and imperfections. -
Dry or bake:
If using air-dry clay, let the pot dry slowly away from direct heat for 24-48 hours. I prefer to cover it loosely with plastic wrap for the first day to prevent cracking. If using polymer clay, bake according to the package instructions. -
Light sanding:
Once fully cured or dry, use fine-grit sandpaper to remove any unwanted rough burrs or sharp spots, particularly around the rim and bottom edge. -
Optional painting:
If your clay isn’t bright enough or looks uneven, apply a thin wash of matte white acrylic paint. Dab it with a rag rather than brushing it on to keep the textured look natural. -
Seal the interior:
To make the pot water-resistant, coat the interior thoroughly with a waterproof sealant. Apply two to three coats, allowing proper drying time between each layer.
Wobbly Pot?
If the legs create a wobble, wait for the glue to dry, then use coarse sandpaper on the bottom of the longest leg to sand it down until all three sit flush on a flat surface.
Step 3: Attaching the Legs
-
Prepare the legs:
Take your three wooden tapered legs. If they are unfinished, you can stain them a warm honey tone and seal them, or leave them raw for a lighter look. -
Mark placement:
Flip the dried pot upside down. Use a ruler to mark three points on the base that form an equilateral triangle, ensuring they are equidistant from the center for stability. -
Mix adhesive:
Prepare a strong two-part epoxy adhesive in a well-ventilated area. This bond needs to be very secure to hold the weight of soil and a plant. -
Glue the legs:
Apply a generous amount of epoxy to the flat top of each wooden leg. Press them firmly onto your marked spots on the pot’s base. -
Let it cure:
Check that the legs are standing straight (or angled outwards uniformly if intended). Let the pot sit upside down undisturbed until the glue has fully cured, usually 24 hours. -
Final clear coat:
Finish the entire exterior with a light spray of matte clear varnish to protect the surface from dirt and moisture without adding shine.
Style Upgrade
Dip the bottom inch of the wooden legs in white or gold paint before attaching them for a modern ‘dipped’ look that adds an extra layer of design detail.
Place your favorite fern or succulent inside and enjoy the warm, artisanal touch this planter brings to your windowsill
Painter’s Palette Trinket Trays
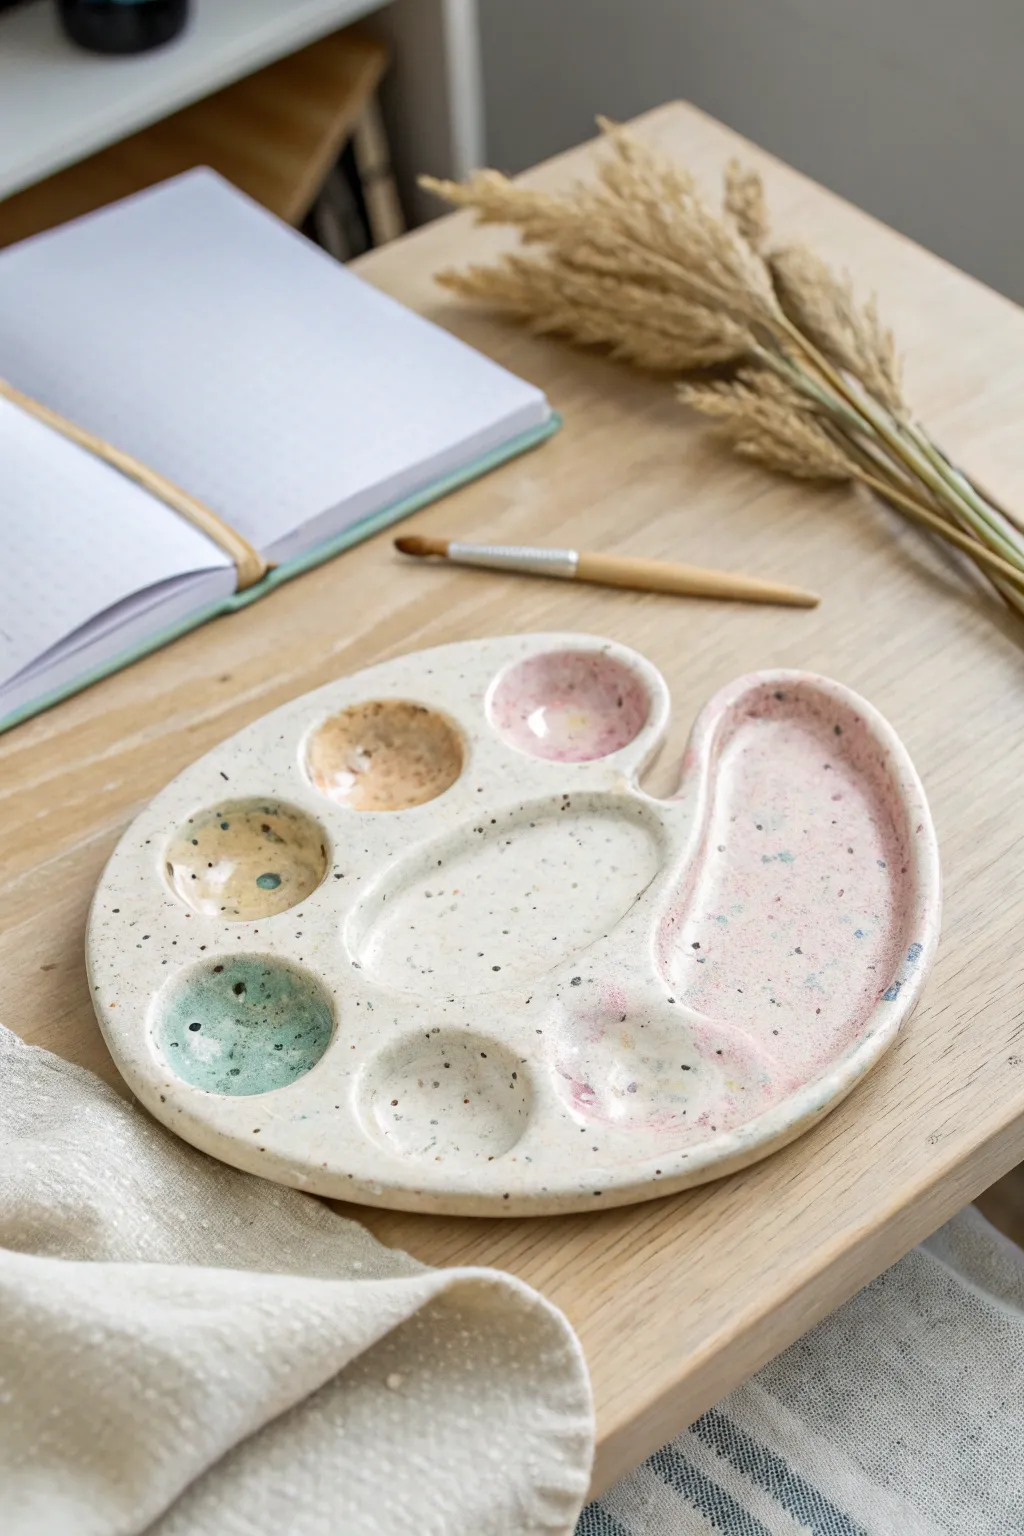
This charming, kidney-shaped trinket tray mimics a traditional artist’s palette but serves as a delightful catch-all for jewelry or desk accessories. The speckled clay body and soft watercolor-like glazing in the wells give it a dreamy, handmade aesthetic perfect for any creative space.
How-To Guide
Materials
- White or buff speckled stoneware clay
- Rolling pin
- Needle tool or fettling knife
- kidney rib (metal or rubber)
- Small sponges
- Carving loop tool (small and medium)
- Pastel underglazes (pink, teal, soft orange)
- Clear transparent glaze
- Canvas work surface
- Paper template (optional)
Step 1: Forming the Base
-
Roll the slab:
Begin by rolling out your speckled clay on a canvas surface until it is an even slab, approximately 1/4 to 3/8 inch thick. Compress the clay with a rib on both sides to align particles and prevent warping. -
Cut the shape:
Using a needle tool, cut out the classic kidney bean or palette shape. You can sketch lightly on the clay first or use a paper template to ensure symmetry. -
Add the thumb hole:
Cut a small oval or circle near the curved indentation of the shape to represent the traditional thumb hole found on palettes. Smooth the edges immediately with a damp finger. -
Smooth the perimeter:
Run a damp sponge along the cut edges of the entire slab to soften the sharpness and create a rounded, finished rim.
Warping Woes
If the tray curls up during drying, flip it over and place a small weighted board on top (sandwiched between drywall or wood) for a day to flatten the memory of the clay.
Step 2: Creating the Wells
-
Mark the positions:
Lightly trace where you want your ‘paint wells’ to sit. This design features smaller circular wells around the left edge, a larger oval in the center, and a long curved section on the right. -
Pinch and depress:
Instead of adding clay, gently press your thumbs into the marked areas to create depressions. Support the clay from underneath with your other hand to avoid distorting the slab’s flatness. -
Define the edges:
Use a small loop tool to carefully scrape away excess clay from inside the depressions if pressing alone didn’t create enough depth. Aim for a depth of about 1/8 inch. -
Refine the walls:
Smooth the interior of each well with a slightly wet fingertip or a tiny piece of sponge. The transition from the flat surface to the well should be soft and gradual, not a sharp 90-degree angle. -
Dry slowly:
Cover the piece loosely with plastic and allow it to dry to a bone-dry state. Drying slowly prevents the flat shape from curling up at the edges.
Natural Speckles
Don’t have speckled clay? Mix 1-2 teaspoons of granular manganese or ilmenite into plain white clay to create your own custom speckled body.
Step 3: Glazing and Firing
-
Bisque fire:
Fire the bone-dry piece in the kiln to cone 04 (or your clay’s specific bisque temperature). -
Clean the bisque:
Once cool, wipe the entire piece with a damp sponge to remove any kiln dust that might resist glaze application. -
Apply pink underglaze:
Paint the large right-hand curved well and the top right circular well with a soft pink underglaze. Apply 2-3 coats for opacity. -
Apply warm tones:
Fill the top-left center well with a pale orange or peach underglaze. -
Apply cool tones:
Paint the bottom-left circular well with a muted teal or seafoam green underglaze. Leave the central oval and the bottom-center well unpainted to show the raw speckled clay, or add a very sheer wash of pink if desired. -
Clear glaze application:
Once the underglaze is dry, dip or brush the entire piece with a clear, glossy transparent glaze. This will make the colors pop and seal the clay body. -
Wipe the foot:
Ensure the bottom of the tray is completely free of glaze so it doesn’t stick to the kiln shelf. -
Final fire:
Glaze fire the piece to the temperature recommended for your specific clay and glaze combination (typically Cone 5 or 6 for stoneware).
Once fired, fill your new ceramic palette with rings, coins, or paperclips explicitly designed to brighten your desk
Mini House Planters
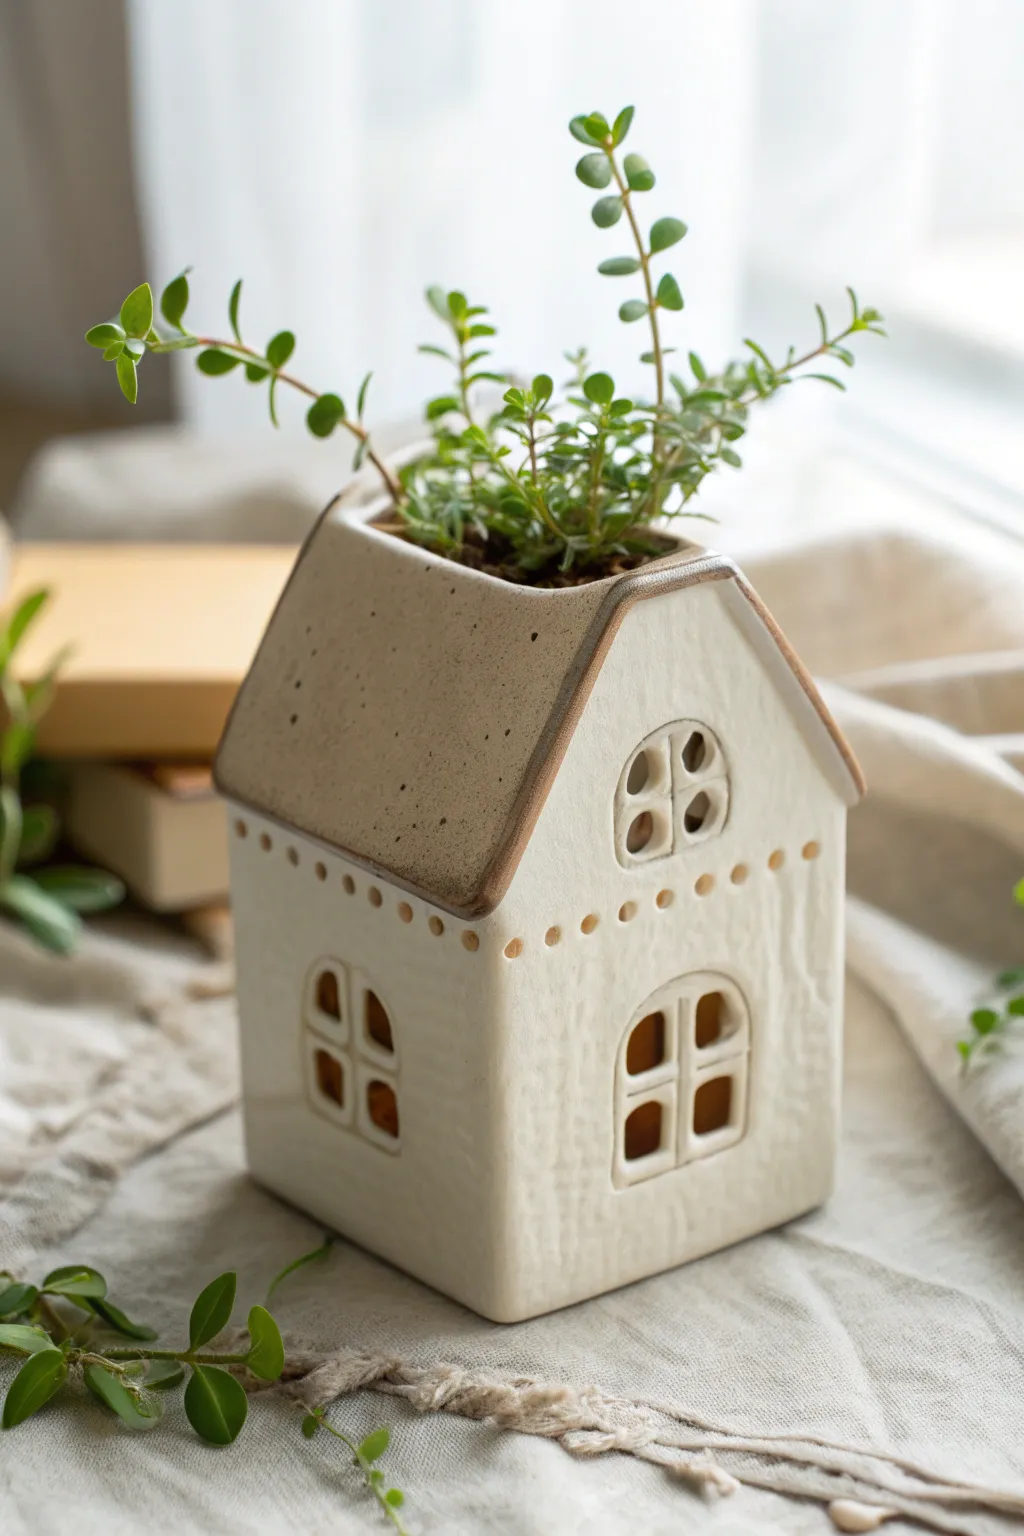
Bring a touch of storybook charm to your windowsill with this ceramic house planter. Featuring arched windows, a speckled roof, and a natural textured finish, it provides a cozy home for your favorite succulents or trailing vines.
Step-by-Step Tutorial
Materials
- White stoneware clay (mid-fire)
- Speckled buff or oatmeal glaze
- Glossy clear glaze
- Slab roller or rolling pin with thickness strips
- Fettling knife
- Needle tool
- Scoring tool (or serrated rib)
- Slip (clay and water mixture)
- Paper template (cardstock)
- Small square and round clay cutters (optional)
- Canvas work surface
Step 1: Slab Preparation & Cutting
-
Design your template:
Sketch a house profile on cardstock. You will need: two pentagon shapes (front and back walls with gable), two rectangular side walls, one base rectangle, and two roof rectangles that are slightly wider than the house body. Cut these out with scissors. -
Roll the clay:
Roll your white stoneware clay into an even slab, approximately 1/4 inch thick. Compress the clay on both sides with a rib to prevent warping later. -
Cut the shapes:
Place your templates onto the leather-hard clay slab. Trace around them with a needle tool and cut cleanly with a fettling knife. Let these pieces stiffen slightly until they can hold their shape without slumping. -
Add surface texture:
Before assembly, gently paddle the exterior walls with a wooden paddle or roll a textured fabric over them to create the subtle, stucco-like finish seen in the image.
Slumping walls?
If walls buckle during assembly, the clay is too wet. Let the slabs sit under plastic for an hour to reach a firmer ‘leather hard’ state before trying again.
Step 2: Assembly & Detailing
-
Scoring joints:
Score the vertical edges of your wall pieces and apply a generous amount of slip. This creates the ‘glue’ for your ceramic house. -
Construct the structure:
Assemble the four walls onto the base slab. Press the joints firmly together. Reinforce the inside corners with tiny coils of clay, blending them smoothly so they disappear. -
Carve the windows:
Once the box structure is firm, use a needle tool or small cutters to carve out arched windows on the front and sides. Be careful not to warp the walls as you press through. -
Add window mullions:
Roll very thin coils or cut tiny strips of clay. carefully attach them inside the window arches to create the cross-pane (mullion) detail. Use a dab of slip to secure them. -
Install the roof:
Attach the two roof slabs to the top angles of the house. Leave a gap or opening at the very peak if you want to plant directly into the roof cavity as shown, or leave the top open entirely. -
Decorative drilling:
Using a small drill bit or hole punch tool, add a horizontal row of small decorative dots just under the roofline for extra architectural interest.
Level Up: Night Light
Cut a hole in the base large enough for an LED tea light. When not used as a planter, the house becomes a glowing ceramic luminary.
Step 3: Finishing & Glazing
-
Smooth the edges:
Once bone dry, gently sponge the edges to remove any sharp burs, specifically around the delicate window frames. -
Bisque fire:
Fire the piece in the kiln to cone 04 (or your clay body’s bisque temperature). -
Wax resist:
Apply wax resist to the bottom of the planter to prevent glaze from sticking to the kiln shelf. -
Glaze the body:
Dip the main body of the house into a matte or satin white glaze. Alternatively, leave the raw white clay unglazed on the outside if it is vitrified for a pure, texture-rich look. -
Glaze the roof:
Carefully brush a speckled oatmeal or sandy beige glaze onto the roof panels. I like to let this overlap slightly onto the white walls to create a soft, rustic transition. -
Final firing:
Glaze fire the piece to the maturity temperature of your clay (likely cone 5 or 6). Once cool, add soil and your plants to bring the house to life.
This charming planter adds a handmade warmth to any room and looks especially sweet when grouped in a tiny ceramic village
Potion-Style Bud Vases
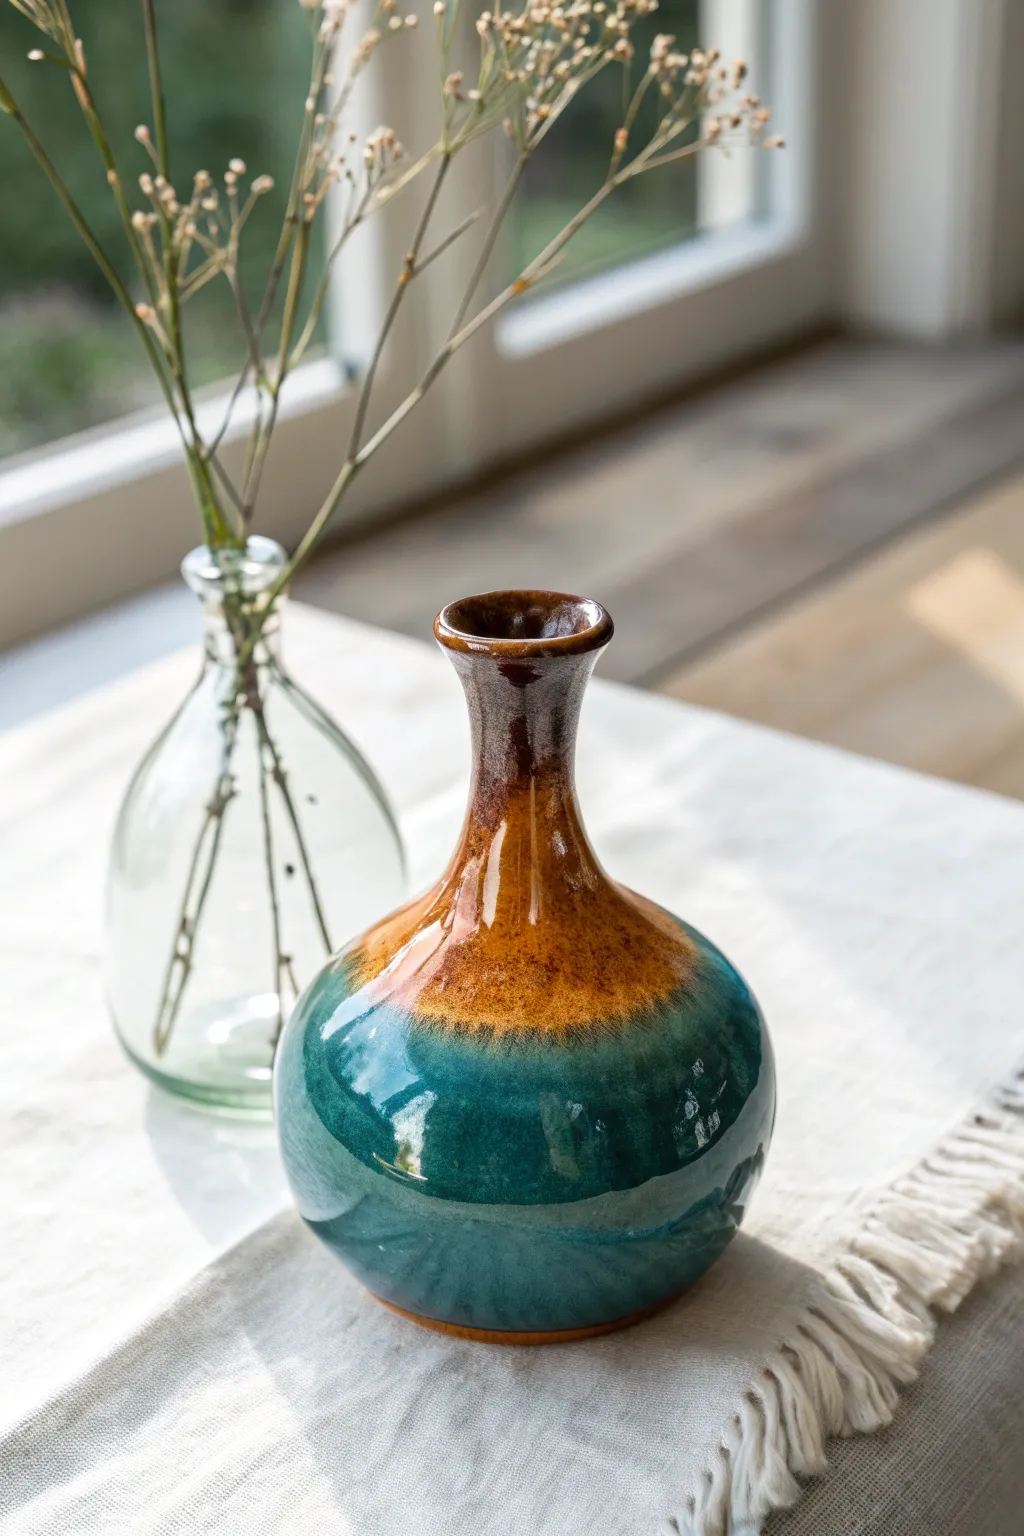
Capture the magic of alchemy with this charming, potion-style bud vase featuring a distinct two-tone glaze. Its bulbous base and slender, flared neck create an elegant silhouette perfect for holding a few dried stems or wildflowers.
How-To Guide
Materials
- Stoneware clay (smooth body recommended)
- Pottery wheel
- Throwing sponge
- Needle tool
- Wire cutter
- Rib tool (wooden or metal)
- Trimming tools
- Teal/Deep Green gloss glaze
- Amber/Brown runny glaze (for the top)
- Wax resist
- Glaze brushes
Step 1: Throwing the Form
-
Center the clay:
Start with a small ball of clay (about 1-1.5 lbs). Center it firmly on the wheel head, coning up and down to ensure the particles are aligned and no air bubbles remain. -
Open the vessel:
Drill your thumb into the center, leaving about a half-inch for the floor. Pull the floor out slightly, but keep it narrow since we want a bulbous belly, not a wide bowl. -
Pull the walls:
Begin pulling the walls upward. Focus on maintaining a consistent thickness. Don’t worry about the shape yet; just get a cylinder with slightly tapering walls. -
Belly out the base:
Using a rib tool on the outside and your fingers inside, gently push the clay outward from the inside to create that rounded, spherical bottom section. -
Collar the neck:
As you move up past the belly, use both hands to gently squeeze or “collar” the clay inward to form the narrow neck. Do this gradually to avoid buckling the clay. -
Define the lip:
Once the neck is narrow and tall enough, use your fingertips or a chamois to flare the rim outward slightly, creating a soft, rounded lip that looks like a classic bottle top. -
Refine the profile:
Run a metal rib over the exterior one last time to remove finger marks and smooth the curve between the belly and the neck. -
Cut from wheel:
Use your wire tool to slice under the pot and carefully transfer it to a ware board to dry to leather-hard.
Glaze Running Too Much?
If the top glaze runs off the pot onto the shelf, reduce the dip time for the second layer or stop the dip higher up on the neck next time.
Step 2: Trimming and Bisque
-
Trim the foot:
Once leather-hard, center the pot upside down on the wheel. Trim away excess weight from the bottom and carve a neat foot ring to give the vase a visual lift. -
Smooth the surface:
Sponge away any trimming burrs or rough spots. I personally like to burnish the surface lightly with a flexible rib here for extra smoothness. -
Bisque fire:
Fire the piece in the kiln to cone 04 (or your clay’s specific bisque temperature) to prepare it for glazing.
Smooth Transitions
Feather the edge of the top glaze dip with a fan brush while it’s still wet to encourage a softer gradient rather than a harsh line.
Step 3: Glazing Technique
-
Wax the foot:
Apply wax resist to the bottom of the foot ring and a few millimeters up the side to prevent glaze from fusing the pot to the kiln shelf. -
Apply the base glaze:
Dip the entire vase into a deep teal or sea-green gloss glaze. Hold it by the foot (using tongs or your fingers if careful) and submerge it fully for 1-2 seconds. -
Base layer drying:
Allow this first layer of glaze to dry completely. It should be powdery to the touch before you proceed. -
Shoulder dip:
Hold the vase upside down and dip just the neck and upper shoulder into an amber or brown glaze. A ‘floating’ or ‘reactive’ glaze works best here. -
Layer overlap:
The magic happens where the amber overlaps the teal. Ensure the amber glaze is fluid enough to run slightly during firing, creating that drippy, organic transition. -
Clean up:
Check the foot ring one last time to ensure no stray glaze droplets are on the waxed area. Wipe with a damp sponge if needed. -
Glaze fire:
Fire the piece to cone 6 (or your clay/glaze maturity temperature). The heat will cause the top glaze to melt down over the bottom one, creating the beautiful dual-tone effect.
Enjoy styling your new handcrafted vessel with dried florals or letting it stand alone as a sculptural piece
Iridescent Luster Accent Details
Capture the serene beauty of morning light with this hand-thrown mug, featuring a creamy speckled glaze and subtle, shimmering accents. The magic lies in the delicate interplay between the rustic clay body and the faint, iridescent luster band that catches the light like dew.
Step-by-Step Tutorial
Materials
- Speckled stoneware clay (white or light buff)
- Pottery wheel and throwing tools
- Trimming tools
- Sponge
- Cream/White matte glaze (food safe)
- Iron wash or oxide (for the rim)
- Mother of Pearl luster (or low-fire iridescent overglaze)
- Soft fan brush
- Fine detail lustering brush
- Kiln
- Respirator mask (for luster application)
Step 1: Forming the Body
-
Center the clay:
Start with about 1 lb of speckled stoneware clay. Center it firmly on the wheel head, ensuring it feels stable and balanced before opening. -
Open and pull:
Open the clay and establish a flat bottom. Begin your pulls, aiming for a cylinder with slightly outward-sloping walls to give it a comfortable, open feeling. -
Shape the belly:
Gently press from the inside to create a subtle curve or ‘belly’ in the lower third of the mug, while keeping the top rim slightly narrower to hold heat. -
Refine the rim:
Using a chamois or sponge, compress the rim to make it smooth and rounded, which is crucial for comfortable sipping. -
Trim the base:
Once leather hard, trim the foot. I like to leave the bottom centimeter slightly textured or unrefined to contrast with the smooth glaze later. -
Attach the handle:
Pull a strap handle and attach it. Ensure the loop is large enough for two or three fingers, blending the attachment points seamlessly into the body.
Use Dedicated Brushes
Luster oils play poorly with water. Keep a specific set of brushes just for lusters and clean them with luster essence, never water, to avoid ruining the brush.
Step 2: Glazing and Firing
-
Bisque fire:
Load the bone-dry mug into the kiln and bisque fire to cone 04 (or your clay’s specific bisque temperature). -
Wax the foot:
Apply wax resist to the bottom foot ring and slightly up the side wall—about half an inch—to leave that raw clay exposed as seen in the photo. -
Apply base glaze:
Dip the mug into your cream-colored matte glaze. Hold it upside down for a few seconds to let excess drips run off, then turn it upright and wipe any stray glaze off the waxed bottom. -
Accent the rim:
Dip a sponge or brush into an iron wash. Lightly dab or run it along the very edge of the rim to create that warm, brownish borders. -
Glaze fire:
Fire the mug to maturity (likely cone 5 or 6 depending on your clay/glaze combo). Let the kiln cool completely.
Add a Hidden Gem
Paint a tiny heart or initial with the Mother of Pearl luster on the inside bottom of the mug. It will appear like a secret watermark after the final firing.
Step 3: The Luster Detail
-
Clean surface:
Wipe the fired glaze surface with rubbing alcohol to remove any oils or dust that might interfere with the luster adhesion. -
Apply luster band:
Using a dedicated fine brush and wearing your respirator, paint a thin, steady band of Mother of Pearl luster just below the iron rim accent. Keep the layer thin; thick luster can drip or turn cloudy. -
Dry time:
Allow the luster to dry untouched for at least 20 minutes before moving it to the kiln. It helps to avoid accidental smudges. -
Luster fire:
Place the mug back in the kiln for a third firing. Fire to cone 018 or 019 (check your specific luster’s instructions). Ensure excellent ventilation during this firing. -
Final reveal:
Once cool, wash the mug thoroughly to remove any luster essence residue.
Enjoy the gentle shimmer of your handmade mug alongside your morning coffee
Stackable Sculptural Totem Cups
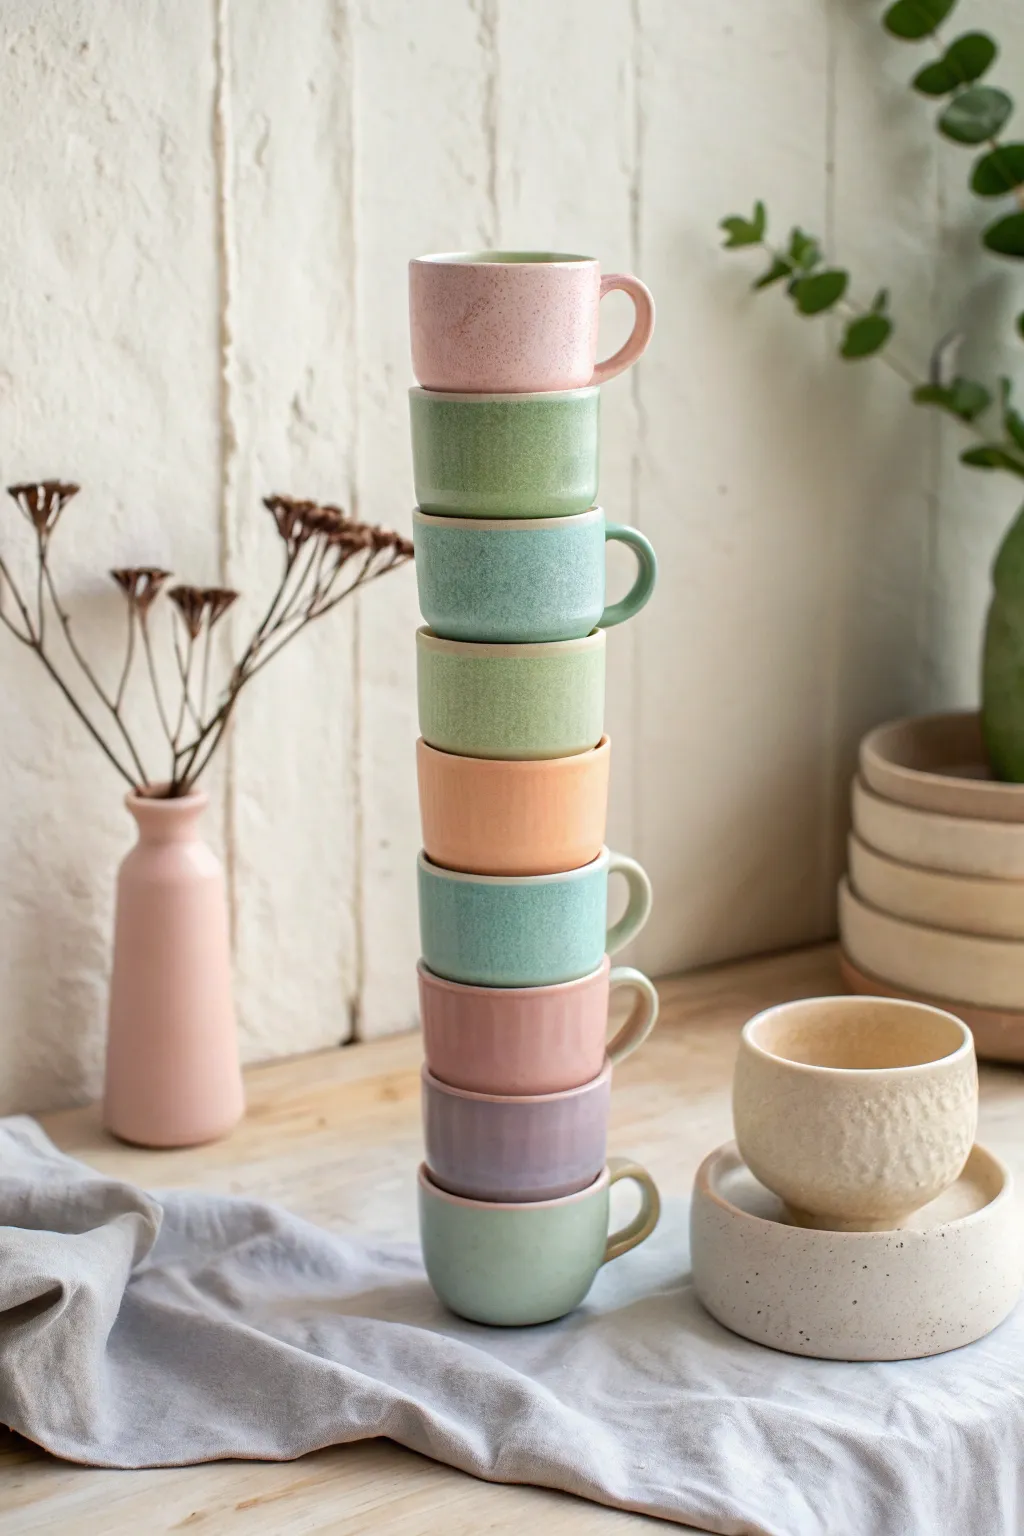
Create a whimsical focal point for your kitchen with this set of stackable stoneware mugs, designed to lock together into a sculptural totem. Featuring soft pastel glazes and a rustic speckled finish, these cups are as functional as they are beautiful.
Detailed Instructions
Materials
- Stoneware clay body (white or buff)
- Pottery wheel
- Throwing tools (sponge, rib, wire cutter)
- Trimming tools
- Needle tool
- Various pastel glazes (pink, mint, sage, peach, lavender)
- Speckled clay additive (if clay isn’t pre-speckled)
- Clear matte or satin glaze
- Kiln
Step 1: Throwing the Base Forms
-
Prepare Clay Balls:
Weigh out identical balls of clay, roughly 350-400g each. Wedging the clay thoroughly is crucial here to ensure walls throw evenly and the cups stack straight. -
Center and Open:
Throw the first ball on the wheel, centering it perfectly. Open the clay to a flat interior bottom about 2.5 inches wide, creating a sturdy base. -
Pull the Walls:
Pull up the walls to form a cylinder. Aim for straight vertical sides rather than a tapered shape, as straight sides are essential for the totem aesthetic. -
Shape the Locking Rim:
This is the most critical step for stackability. Carefully compress the rim and use a rib to create a slight inward shelf or bevel on the inside of the rim. -
Create the Foot Profile:
Before cutting the pot off, use a wooden tool to undercut the foot slightly. This outer diameter must be just slightly smaller than the inner diameter of your rim so they nest. -
Repeat for the Set:
Throw the remaining cups. Use calipers to measure the rim of the first cup and ensure the feet of subsequent cups will fit inside that measurement.
Stack Stability Tip
Use calipers! Measure the interior rim of cup A and lock the calipers. Ensure the exterior foot of cup B fits inside that measurement with 2mm of wiggle room.
Step 2: Trimming and Handles
-
Drying to Leather Hard:
Allow all cylinders to dry to a leather-hard state. They should be firm enough to handle without deforming but soft enough to carve. -
Trim the Foot Ring:
Invert the cups on the wheel. Trim a distinct foot ring that corresponds exactly to the inner bevel you created on the rims. Test fit them as you go. -
Pull Handles:
Pull handles from a separate lug of clay. Aim for a simple ‘C’ or ear shape that doesn’t protrude too far, keeping the silhouette compact. -
Attach Handles:
Score and slip the contact points on both the cup and handle. Press firmly to attach. I find attaching them slightly lower on the body helps with the visual balance of the stack. -
Smooth Connections:
Use a damp sponge or modeling tool to smooth the connection points, blending the clay for a seamless look.
Step 3: Glazing and Firing
-
Bisque Fire:
Load the bone-dry mugs into the kiln for a bisque fire (usually Cone 04 or 06). This prepares the clay to accept glaze. -
Wax the Feet and Rims:
Apply wax resist to the foot ring and the very top edge of the rim where the cups touch. This prevents them from fusing together if you venture to fire them stacked (though firing separately is safer). -
Mix Pastel Glazes:
Prepare your pastel glazes. If using commercial bottles, shake well. If mixing custom colors, test tiles are your best friend to ensure the hues harmonize. -
Dip and Pour:
Pour glaze inside first, swirl, and dump out. Then, use tongs to dip the exterior. Use a different pastel shade for each cup to create the rainbow effect seen in the photo. -
Clean Up:
Wipe away any glaze drips near the foot. Any unevenness here will make your totem wobbly. -
Final Glaze Fire:
Fire the mugs to the maturity temperature of your clay and glaze (typically Cone 5 or 6 for stoneware). -
Sand the Bottoms:
Once cool, use wet-dry sandpaper or a diamond sanding pad to smooth the unglazed foot rings perfectly flat.
Texture Play
Before the clay dries, gently press a rough sponge or fabric against the exterior walls to create a subtle tactile surface that glaze will break over beautifully.
Assemble your colorful tower on an open shelf and enjoy the sculptural beauty of your handmade collection