Whenever I need a quick creative win, I reach for small clay projects—they’re fast, forgiving, and ridiculously satisfying. Here are my go-to cute small clay ideas that stay simple, stay tiny, and still come out full of personality.
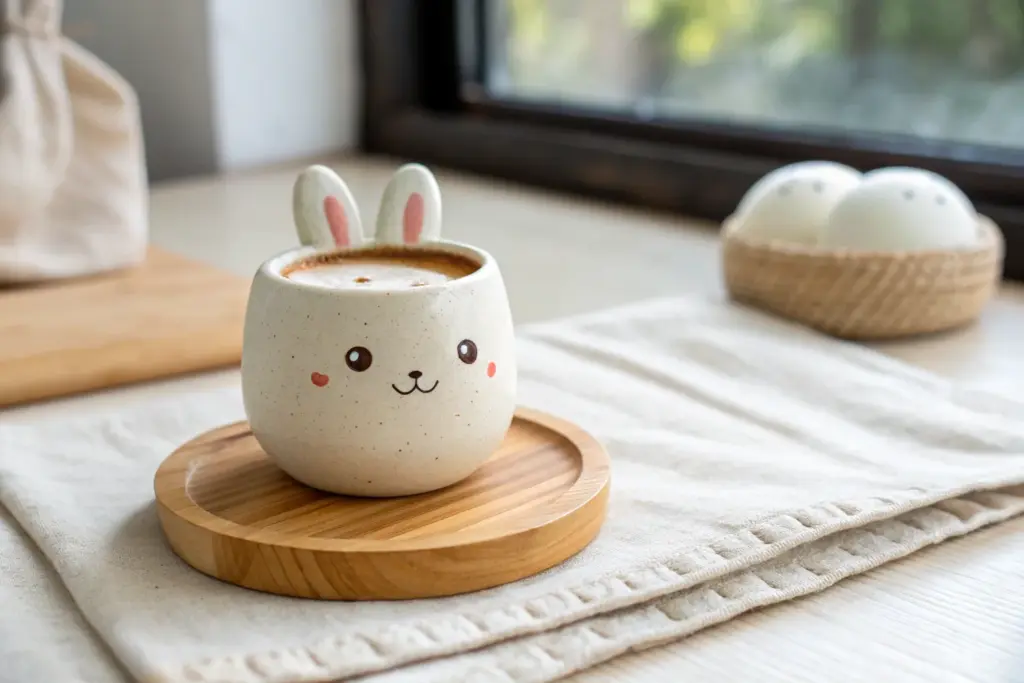
Tiny Bunny Charms With Sweet Faces

These adorable, round bunny charms look just like puffy marshmallows and are perfect for beginners. With their sweet, simple faces and soft pink details, they make delightful keychains or bag accessories.
Step-by-Step
Materials
- White polymer clay
- Translucent polymer clay (optional)
- Soft pink pastel chalk or pink eye shadow
- Black polymer clay (tiny amount)
- Small soft paintbrush
- Dotting tool or ball stylus
- Needle tool
- Gold screw eye pins
- Gold jump rings
- Oven for baking
- Gloss glaze or UV resin (optional)
Step 1: Shaping the Base
-
Condition the clay:
Start by kneading your white polymer clay until it is soft and pliable. If you want a slightly more ‘porcelain’ look like the image, mix in a very small pinch of translucent clay with the opaque white, though plain white works beautifully too. -
Form the body:
Roll a piece of conditioned clay into a smooth ball about the size of a large grape or a bouncy ball. Gently press the bottom against your work surface to flatten it slightly so the bunny sits upright without rolling away. -
Smooth imperfections:
Check the surface for any fingerprints or lint. You can gently rub the clay with a tiny bit of baby oil on your finger to smooth everything out perfectly.
Clean Clay Tip
White clay picks up dust instantly. Keep baby wipes nearby to clean your hands constantly, and roll a piece of scrap white clay in your palms first to pick up any unseen lint.
Step 2: Creating the Ears & Hardware
-
Shape the ears:
Roll two smaller balls of white clay, then elongate them into teardrop or tic-tac shapes. Flatten them slightly with your thumb to create the ear base. -
Add pink shading:
Scrape a small amount of pink pastel chalk into a powder. Use a small, soft paintbrush to dry-brush the pink powder onto the center of each ear. Creating a soft gradient looks better than a solid block of color. -
Attach the ears:
Place the ears on top of the head. I like to situate them fairly close together for a cuter look. Use a blending tool or the back of your fingernail to seamlessly blend the clay at the base of the ears into the head so they don’t pop off later. -
Insert eye pin:
Take a gold screw eye pin and trimming it if the stem is too long. Twist it gently into the center top of the head, right between the ears. Remove it, add a tiny dab of liquid clay or bake-and-bond to the threads, and screw it back in for a secure hold.
Step 3: Adding the Face Details
-
Mark eye sockets:
Use a medium-sized balled dotting tool to gently press two indentations where the eyes will go. Placing them slightly lower on the round face makes the character look younger and cuter. -
Make the eyes:
Roll two teeny-tiny balls of black clay. They should be identical in size. Place them into the eye sockets you created and press gently to secure them. -
Add highlights:
This step brings the bunny to life. Roll microscopic specks of white clay and place one on the upper right side of each black eye pupil. -
Sculpt the mouth:
Roll a very thin ‘snake’ of black clay for the mouth, or simply use a needle tool to gently etch a small ‘w’ shape between the eyes. If using clay threads, apply them with a steady hand or tweezers. -
Blush the cheeks:
Dip your soft brush back into the pink pastel powder. Gently dab round circles of pink on the cheeks, just below and to the outside of the eyes. -
Add texture (optional):
If you look closely at the image, there is a very subtle speckling. You can achieve this by flicking a toothbrush with diluted brown acrylic paint lightly over the clay before baking, but proceed with caution—less is more.
Troubleshooting: Ear Seams
If the ears break off after baking, you didn’t blend enough. Use a rubber-tipped tool to drag clay from the ear down onto the head until the seam disappears completely.
Step 4: Finishing Up
-
Bake:
Place your bunny on a ceramic tile or baking sheet covered with parchment paper. Bake according to your brand of clay’s specific instructions (usually around 275°F or 130°C for 15-30 minutes depending on thickness). -
Cool down:
Let the charm cool completely inside the oven or on the counter. Do not handle it while hot, as the clay is still fragile. -
Glaze (optional):
For extra durability and shine, coat the eyes with a drop of gloss glaze or UV resin. You can leave the body matte for that soft marshmallow look. -
Add hardware:
Open a gold jump ring using two pairs of pliers (twist sideways, don’t pull apart). Loop it through the eye pin on the bunny’s head and attach your keychain clasp or strap, then close the ring securely.
Now you have a sweet little companion ready to hang on your keys or gift to a friend


Chubby Dino Minis You Can Make Fast
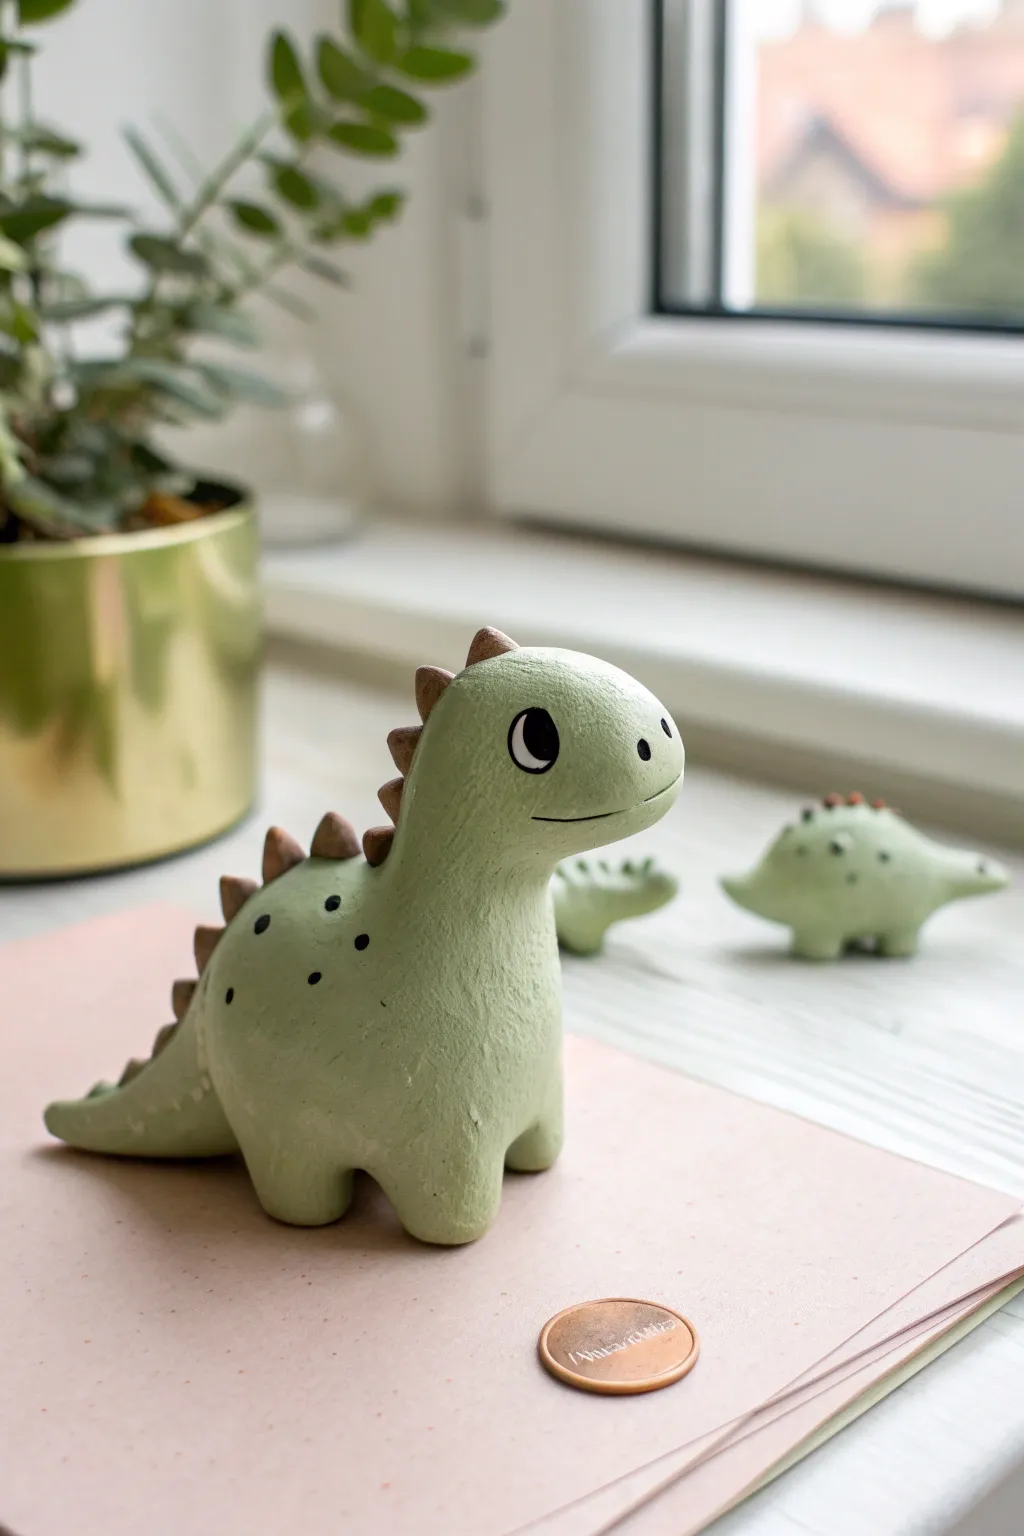
These adorable, palm-sized dinosaurs feature a gentle mint-green body with contrasting brown spikes and sweet, simple faces. Their chubby legs and smooth finish make them perfect little desk companions or additions to a fairy garden.
How-To Guide
Materials
- Polymer clay or air-dry clay (Mint Green)
- Polymer clay or air-dry clay (Chocolate Brown)
- Acrylic paint (Black and White)
- Fine detail paintbrush or dotting tool
- Modeling tools (or a toothpick)
- Parchment paper or smooth work surface
- Gloss or matte varnish (optional)
Step 1: Shaping the Body
-
Prepare the base:
Start by conditioning your mint green clay until it is soft and pliable. Roll a medium-sized ball of clay, roughly the size of a golf ball, between your palms until it is perfectly smooth and free of cracks. -
Form the torso:
Gently embrace the ball with your hands and begin to elongate one side slightly to imply a tail, while keeping the main body round and plump. The shape should resemble a very chubby teardrop. -
Pull the neck:
On the end opposite the tail, pinch and pull the clay upward to form a thick, sturdy neck. Smooth the transition area with your thumb so the neck flows seamlessly out of the body. -
Create the head:
At the top of the neck, shape a rounded, bulbous head. You want it to look slightly oversized to enhance the cuteness factor. Gently flatten the front to create a muzzle area. -
Sculpt the legs:
Roll four small, equal-sized logs of green clay for the legs. They should be quite short and thick, like marshmallows. -
Attach the legs:
Press the legs firmly onto the underside of the body. Use a modeling tool or your fingertip to blend the seams of the clay upward into the belly so the legs are securely attached and look like one solid piece. -
Refine the pose:
Set the dino down on your work surface. Press gently on the back to make sure all four feet sit flat and the figure is stable. Curve the tail slightly to one side for a bit of movement.
Cracks Appearing?
If using air-dry clay, smooth cracks with a drop of water as you work. For polymer, condition the clay longer. If cracks appear after drying, fill them with a soft clay paste.
Step 2: Adding Details
-
Making the spikes:
Take your brown clay and roll a thin snake. Cut small, equal segments from this snake. -
Shaping the spikes:
Roll each small brown segment into a tiny ball, then pinch one side to form a cone or triangle shape. You’ll need about 6-8 of these, graduating in size. -
Attaching the spine:
Starting from the top of the head and working down to the tail, press the brown triangles onto the center of the back. Place the largest spikes in the middle of the back and the smallest ones near the tail tip. -
Define the mouth:
Use a sharp blade or a thin modeling tool to press a curved line into the side of the muzzle for a smile. I usually curve the end slightly upward to give it a happy expression. -
Final smoothing:
Before curing or drying, dip your finger in a tiny bit of water (for air-dry) or baby oil (for polymer) and gently rub the surface to remove any fingerprints. -
Curing:
Bake your polymer clay according to the package instructions, or let your air-dry clay sit for 24-48 hours until fully hardened.
Make it a Trio
Vary the sizes to create a family like in the photo. Make a tiny baby version with just 3 spikes, or a ‘mama’ version with a longer neck and brighter colors.
Step 3: Painting the Face
-
Painting the eyes:
Once the figure is hard and cool, use a large dotting tool or the back of a brush to stamp two solid black circles on the face. -
Adding the sparkle:
Wait for the black paint to dry completely. Then, using a very fine point or a toothpick, add a tiny white dot in the upper corner of the black eye circle for a ‘glint’ of life. -
Adding spots:
Using a smaller dotting tool and black paint, add three or four random dots onto the body area below the spikes for texture. -
Sealing:
Finish by applying a coat of matte varnish over the body to protect the paint, or use gloss varnish just on the eyes to make them look wet and shiny.
Place your finished chubby dinosaur near a window or plant for a touch of prehistoric whimsy


Little Frog Buddies for Desk Decor
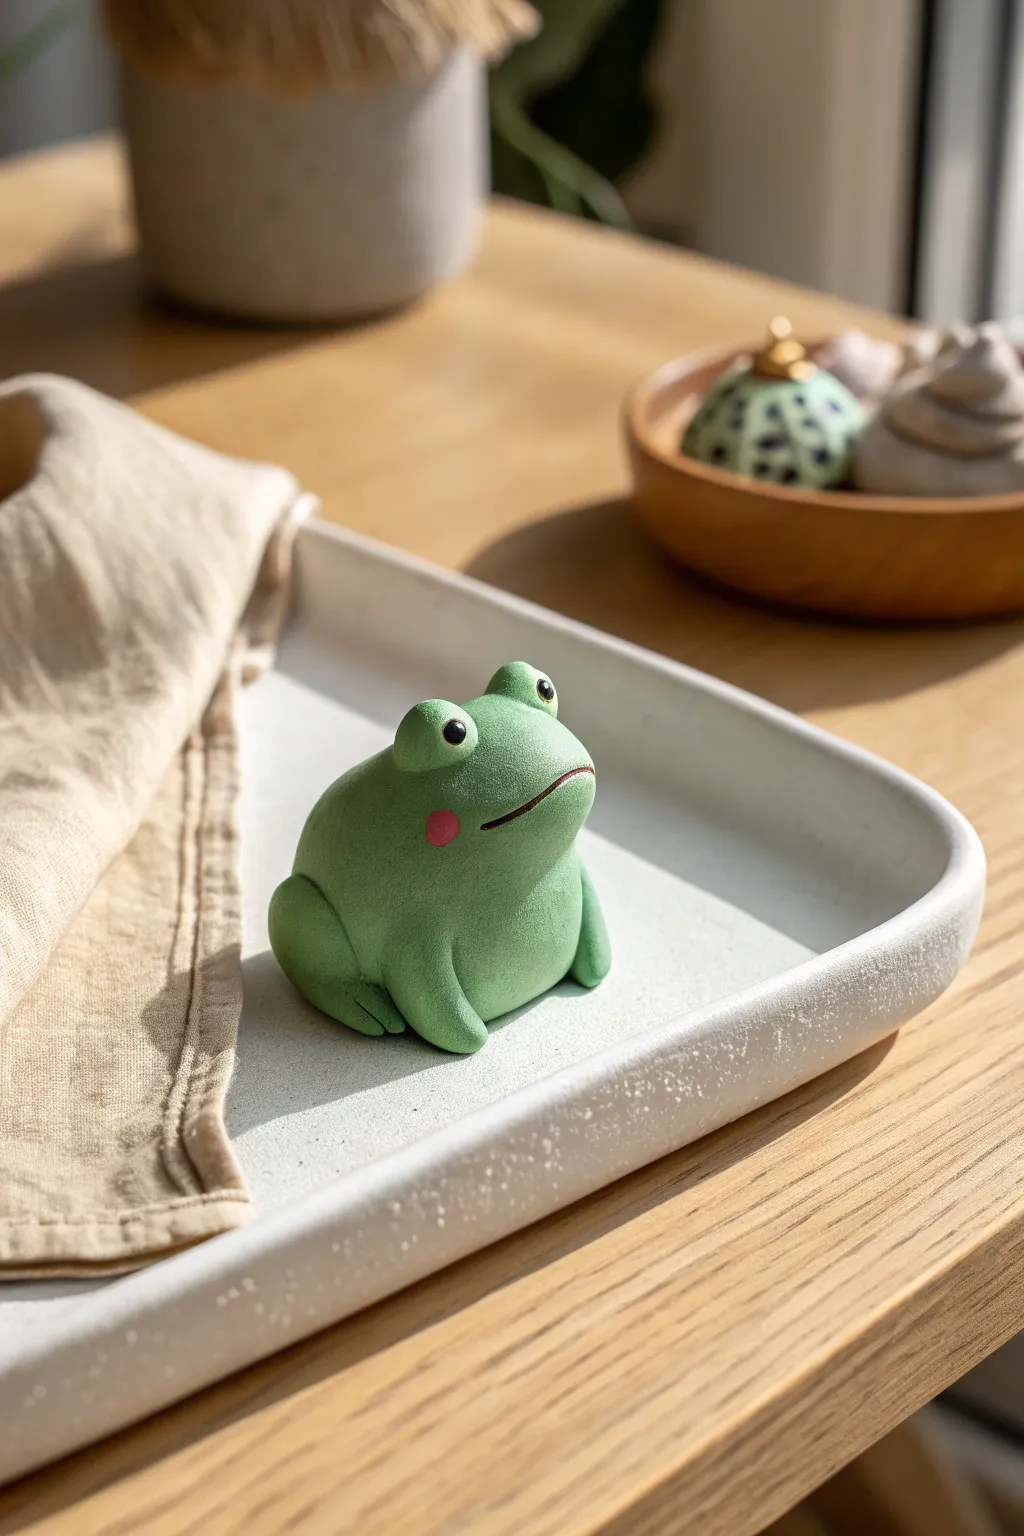
This charming little amphibian brings a touch of serenity and whimsy to any workspace with its smooth, matte finish and gentle expression. Sculpted from clay, this chubby frog buddy features soft, rounded curves and a delightful blush that makes him irresistibly cute.
Step-by-Step Guide
Materials
- Polymer clay (Sage Green or Moss Green)
- Polymer clay (Pink – very small amount)
- Black acrylic paint or black clay
- Basic sculpting tools (ball stylus, needle tool)
- Smooth work surface (ceramic tile or glass mat)
- Blade or craft knife
- Matte varnish (optional)
Step 1: Forming the Body
-
Condition the Green Clay:
Start by taking a generous chunk of your green clay and kneading it in your hands until it is warm and pliable. This conditioning step is crucial to prevent cracks later on. -
Shape the Main Body:
Roll the clay into a smooth ball about the size of a golf ball. Then, gently tap the bottom against your work surface to flatten it slightly so the frog sits stably. -
Taper the Head:
Using your thumb and forefinger, gently pinch the upper third of the ball to create a slight taper for the head area, keeping the overall shape rounded and chubby rather than distinct.
Step 2: Adding Features
-
Create Eye Sockets:
Roll two small, equal-sized balls of green clay for the eye mounds. Place them on top of the head, spaced slightly apart. -
Blend the Eyes:
Use a sculpting tool or your finger to smooth the bottom edges of the eye mounds into the main head shape so they look like organic bumps rather than stuck-on marbles. I find a silicone tool works best for seamless blending here. -
Insert the Eyes:
Take two tiny vegetative specs of black clay (or plan to paint later) and press them gently into the center front of the green eye mounds. -
Sculpt the Mouth:
Use a needle tool or a thin blade to press a wide, gentle curve into the face for the mouth. Angle the cuts slightly upward at the ends for a subtle smile. -
Add Cheeks:
Take two tiny flattened discs of pink clay. Press them gently onto the cheeks, just below the eyes and to the side of the mouth, smoothing the edges slightly so they sit flush.
Fixing Fingerprints
Can’t get a smooth finish? Lightly brush the raw clay with cornstarch or baby powder before your final smoothing pass. It acts as a buffer and helps achieve that soft matte texture.
Step 3: Limbs and Details
-
Form the Back Legs:
Roll two medium-sized teardrop shapes from the green clay. These will be the powerful back legs. -
Attach Back Legs:
Press the wider part of the teardrop against the side of the body near the back. Bend the narrower end forward to suggest the folded leg posture. -
Blend the Haunches:
Smooth the seams where the legs meet the body, ensuring the ‘thigh’ area bulges out slightly to maintain that signature frog silhouette. -
Create Front Arms:
Roll two smaller, thick cylinders for the front arms. They should be sturdy enough to support the visual weight of the frog. -
Position Front Arms:
Attach these cylinders to the front of the chest, positioning them so they extend straight down and rest on the ground. -
Shape the Feet:
Use a knife or needle tool to make two small indentations on the end of each front arm and back leg to create simple, stylized toes. -
Final Smoothing:
Dip your finger in a tiny bit of clay softener or baby oil and gently rub over the entire sculpture to remove fingerprints and dust.
Make Him a Gentleman
Give your frog some personality by sculpting a tiny top hat or a bowtie. You can even place him on a sculpted lily pad base for a complete pond scene.
Step 4: Finishing
-
Bake the Piece:
Bake the frog according to your polymer clay package instructions. Usually, this is around 275°F (135°C) for 15-30 minutes depending on thickness. -
Cool Down:
Let the frog cool completely in the oven before moving it. This prevents thermal shock cracks. -
Highlight the Mouth:
If you want the mouth to stand out, use a very fine brush with diluted brown or black acrylic paint to carefully line the indented mouth groove. -
Seal (Optional):
For a finish exactly like the photo, leave the clay bare or apply a very matte varnish. Avoid glossy finishes to keep the natural, ceramic-like look.
Now you have a quiet, green friend ready to keep you company while you work


Smiling Strawberry and Cherry Charms
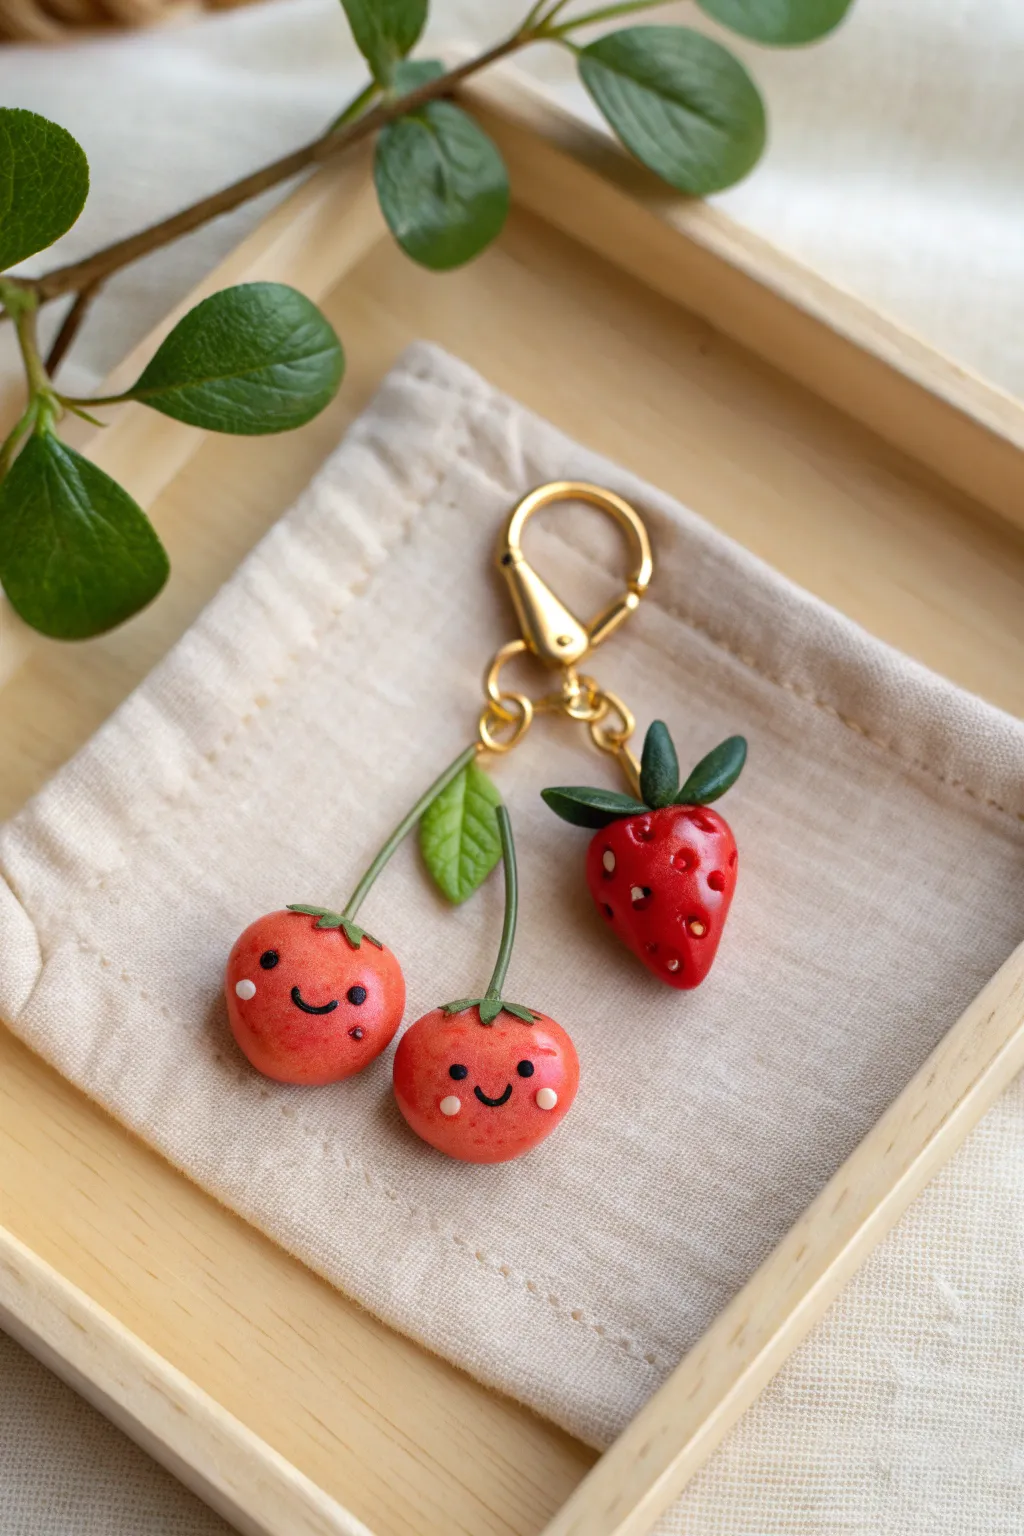
These adorable polymer clay charms capture the sweetness of summer with a pair of blushing cherries and a matching strawberry. The high-gloss finish and simple, kawaii faces make them perfect accessories for your keys or bag.
Detailed Instructions
Materials
- Polymer clay (Bright Red, Deep Green, Black, White, Translucent)
- Eye pins (gold finish)
- Lobster clasp keychain with chain links (gold)
- Needle sculpting tool or toothpick
- Dotting tool (small and medium)
- Gloss glaze or UV resin
- Soft paint brush
- Aluminum foil (for texture)
- Blade or X-Acto knife
- Green pastel chalk (optional)
- Jewelry pliers
Step 1: Sculpting the Cherries
-
Mix the red clay:
Start by conditioning your bright red clay until it is soft and pliable. If you want a slightly more organic look, I like to mix in a tiny pinch of translucent clay to give the fruit a juicy depth. -
Shape the spheres:
Roll two equal-sized balls of red clay, each about the size of a marble. Flatten them just slightly on the top so they aren’t perfectly round. -
Create the dimple:
Using the thick end of a needle tool or a small ball tool, press a gentle indentation into the top center of each cherry where the stem will connect. -
Add the stems:
Roll a thin snake of green clay. Cut two equal lengths (about 1 inch long) to serve as stems. Gently press one end of each stem into the dimples you created on the cherries. -
Connect the stems:
Bring the top ends of the two green stems together. Mash them slightly at the join point to secure them, forming an inverted ‘V’ shape. -
Leaf details:
Shape a small teardrop of green clay and flatten it to make a leaf. Use your needle tool to score vein lines onto the surface, then attach it securely to the top junction of the stems. -
Insert hardware:
Trim an eye pin if it’s too long. Insert it directly into the top of the stem junction where the leaf meets the stems. Ensure the loop is facing the right way for hanging.
Secure That Pin
Bend the bottom of your eye pin into a small ‘L’ or zigzag shape before inserting it into the clay. This acts as an anchor so the pin won’t pull straight out after baking.
Step 2: Sculpting the Strawberry
-
Form the berry base:
Roll a slightly larger ball of red clay and gently taper one end to create a rounded cone shape. -
Texture the surface:
Using a needle tool, poke small, shallow holes all around the strawberry to mimic seed pockets. keep the placement somewhat random but evenly spaced. -
Seed details:
Roll incredibly tiny specks of white or pale yellow clay. Carefully place one into each indentation. Alternatively, you can paint these in after baking if the clay pieces are too fiddly. -
Cap and leaves:
Create a small flattened circle of green clay. Use a small cutter or blade to cut triangular notches, creating a star shape. Place this on top of the berry and curve the points upward slightly for a lively look. -
Add the loop:
Insert an eye pin through the center of the green leafy cap, pushing it deep into the strawberry body for security.
Step 3: Faces & Finishing
-
Face placement:
Plan where the faces will go on the cherries. You want them low and centered for that cute ‘kawaii’ proportion. -
Making the eyes:
Roll tiny balls of black clay and press them onto the cherries. It’s crucial to keep them wide-set. -
Adding the smiles:
Roll a microscopically thin thread of black clay. Cut tiny ‘U’ shapes and gently press them between the eyes. Use a needle tool to curve the corners up. -
Blushing cheeks:
Add tiny flattened dots of pale pink or white clay underneath the eyes for cheeks. This adds instant personality. -
Baking:
Preheat your oven according to your clay manufacturer’s instructions (usually 275°F/130°C). Bake the charms for 15-20 minutes. Let them cool completely. -
Glazing:
Once cool, apply a coat of gloss glaze or UV resin to the red fruit parts only, leaving the green leaves matte for a nice textural contrast. -
Assembly:
Use your pliers to open the jump rings on your keychain lobster clasp. Attach the strawberry and the cherry pair to the same ring or adjacent links.
Pastel Shading
Before baking, brush a tiny amount of dark red chalk dust near the stems and bottom of the strawberry. This adds a realistic ripening gradient.
Clip these cheerful fruity friends onto your backpack and enjoy a little artisan sweetness wherever you go.

The Complete Guide to Pottery Troubleshooting
Uncover the most common ceramic mistakes—from cracking clay to failed glazes—and learn how to fix them fast.
Happy Mushroom Minis in Pastels
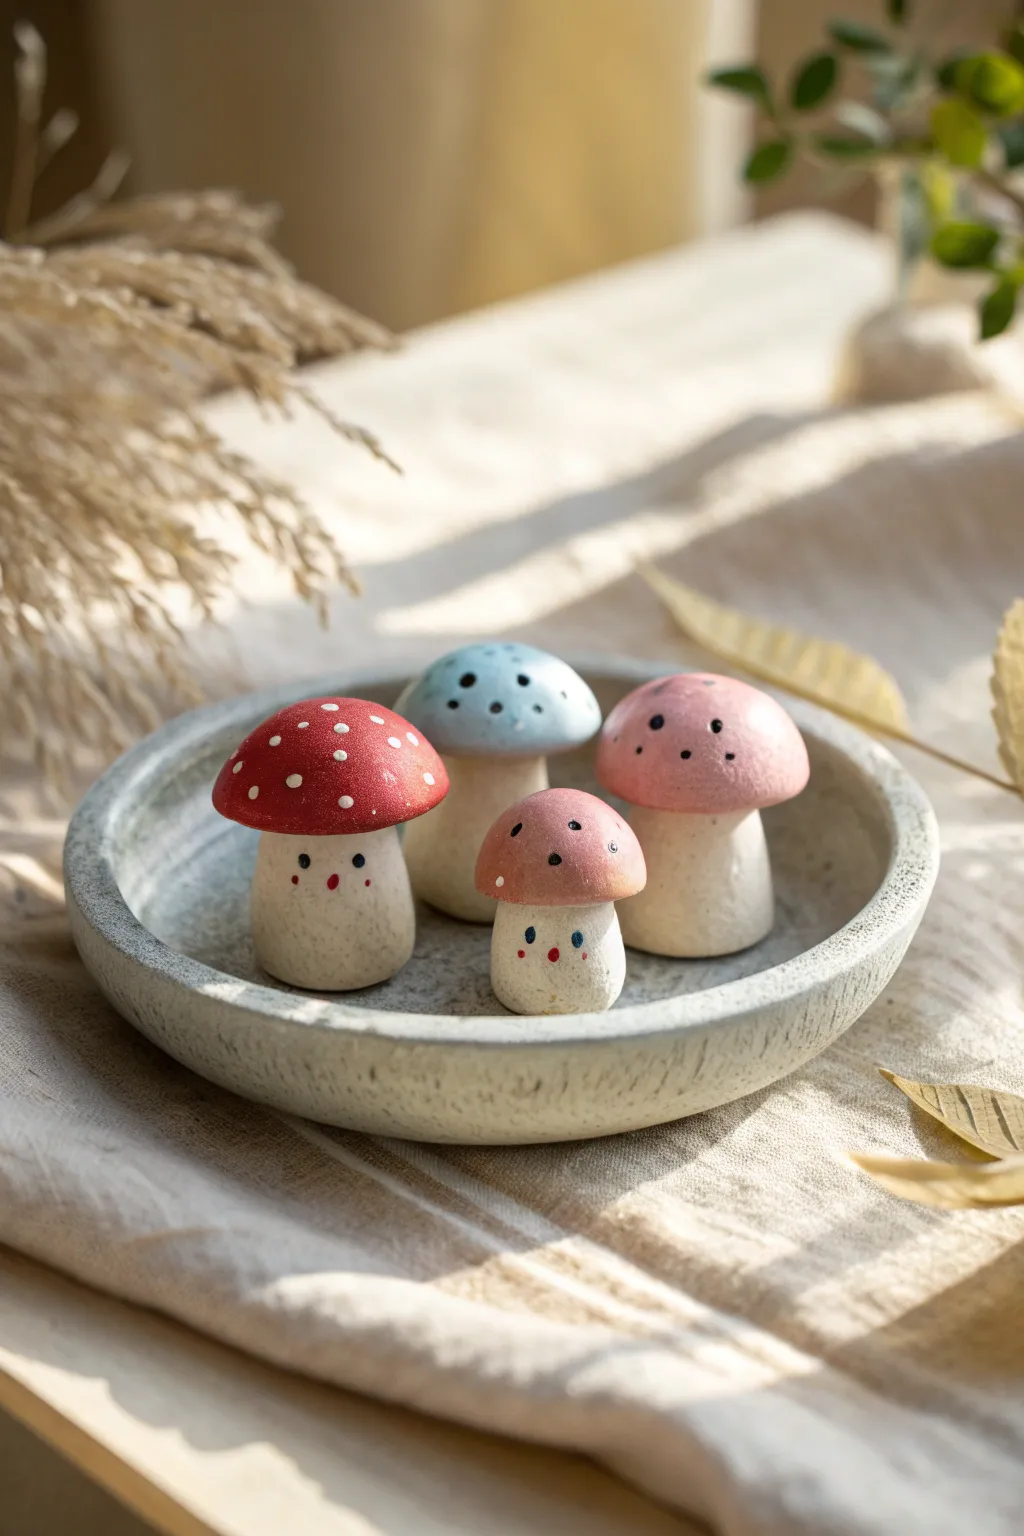
Bring a touch of forest charm into your home with this delightful set of four clay mushrooms. Featuring a mix of painted caps and sweet little faces, they sit perfectly in a small dish as a cheery autumnal display.
Detailed Instructions
Materials
- White air-dry clay or polymer clay
- Acrylic paints (red, baby blue, soft pink, terracotta, white, black)
- Small round paintbrushes (sizes 0 and 2)
- Dotting tool or toothpick
- Aluminum foil (optional for armatures)
- Fine-grit sandpaper
- Matte varnish or sealant
- Cup of water and palette
Step 1: Shaping the Stems
-
Prepare clay portions:
Begin by dividing your white clay into four unequal portions for the stems. You want variety in height and thickness to give the group character, so make two slightly chunky bases and two more petite ones. -
Roll the bases:
Roll each portion into a smooth ball first to remove cracks, then gently roll it back and forth on your work surface to create a thick cylinder. Taper the top slightly so it’s narrower than the bottom, creating a stable ‘stipe’ or stalk shape. -
Flatten the bottoms:
Press the bottom of each stem firmly against your table to ensure they stand upright on their own without wobbling. Smooth out any fingerprints with a drop of water if using air-dry clay.
Cracking Up?
If air-dry clay cracks while drying, mix a small amount of fresh clay with water to make a paste (slip) and fill in the gaps. Smooth it over with a finger and let dry again.
Step 2: Sculpting the Caps
-
Form the cap balls:
Take four new pieces of clay, roughly corresponding to the sizes of your stems. Roll them into spheres. -
Shape the domes:
Gently press each sphere into a dome shape. For the red mushroom, aim for a classic rounded top; for the blue and pink ones, you might flatten the curve just a tiny bit for variety. -
Hollow the underside:
I like to use my thumb or a modeling tool to create a small indentation underneath each cap. This helps the cap sit securely on top of the tapered stem later. -
Attach cap to stem:
Score the top of the stem and the underside of the cap (scratch hatching lines), apply a dab of water or liquid clay, and press them together. Smooth the seam underneath if you want a seamless look, or leave it distinct for a two-part effect. -
Dry or bake:
If using polymer clay, bake according to the package instructions. For air-dry clay, set them aside in a warm, dry spot for 24-48 hours until completely hardened.
Step 3: Painting the Details
-
Base coat the stems:
Once dry, paint the stems an off-white or cream color. This gives a softer, more natural finish than leaving the raw white clay exposed. -
Paint the red cap:
Select your largest mushroom and paint the cap a vibrant red. You may need two thin coats to get opacity without brushstrokes showing. -
Pastel caps:
Paint one medium mushroom cap in baby blue and the other large one in soft pink. For the smallest mushroom, mix a little terracotta with pink for a warm, earthy tone. -
Add white dots:
Dip a dotting tool or the non-brush end of your paintbrush into white paint. Add small, scattered dots to the red and blue caps. Keep the dots irregular for a hand-crafted feel. -
Add black dots:
For the large pink mushroom and the smallest one, switch to black paint for the dots on the cap. This creates a cute visual contrast within the group.
Weight at the Bottom
To prevent your mushrooms from being top-heavy and tipping over, press a small metal washer into the base of the stem before the clay dries or stick it on after.
Step 4: Adding Faces and Finishing
-
Draft the faces:
Lightly mark where the eyes will go on the red and small earthy-pink mushrooms using a pencil. They should be positioned low on the stem for maximum cuteness. -
Paint the eyes:
Use your smallest brush (size 0) or a toothpick to dab two tiny black dots for eyes. Ideally, place them slightly wide apart. -
Add cheeks:
Mix a watery red or pink paint. Gently dab tiny rosy cheeks just below and outside the eyes. On the smallest mushroom, you can add a tiny red dot for a nose or mouth. -
Finishing touches:
Add a tiny speck of white highlight to the black eyes to bring them to life. Finally, coat all mushrooms with a matte varnish to protect the paint and give them a smooth, finished texture.
Arrange your little fungal family on a shelf or in a planter for an instant smile
Mini Cloud and Star Stud Earrings
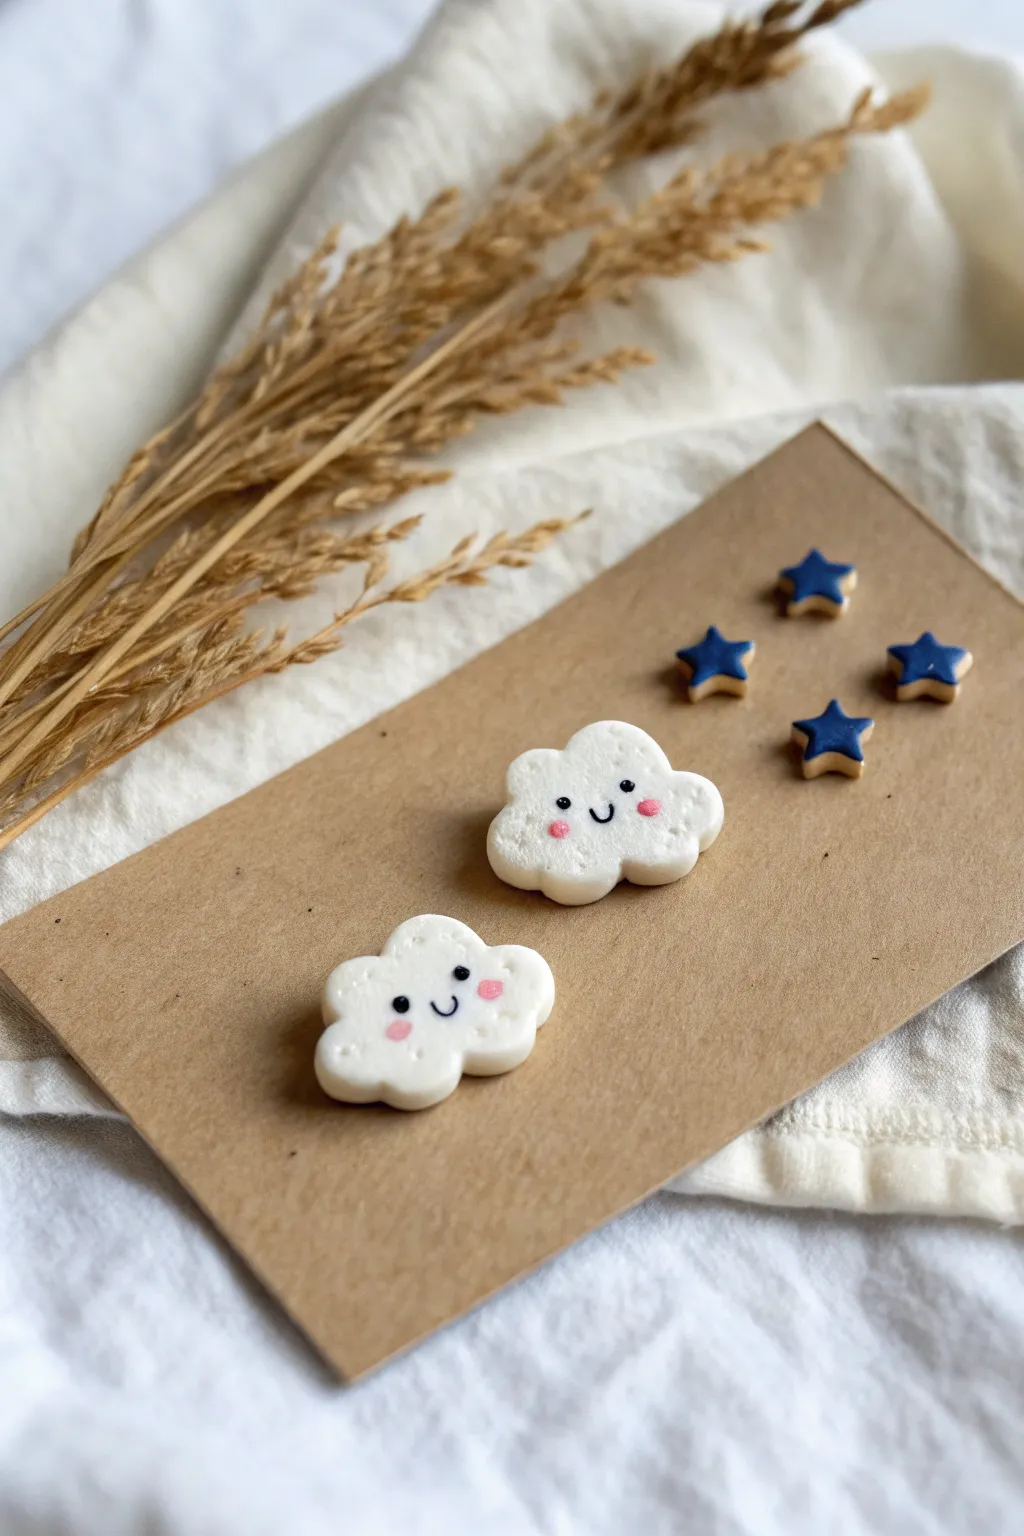
Bring a little sunshine to your jewelry collection with these adorable clay studs featuring happy clouds and deep blue stars. Their tiny size and sweet expressions make them perfect for adding a subtle pop of whimsy to any outfit.
Step-by-Step
Materials
- White oval polymer clay
- Deep blue polymer clay
- Translucent liquid clay or Bake & Bond
- Black acrylic paint (fine tip)
- Pink soft pastel chalk or pink clay
- Gloss varnish or UV resin
- Standard earring posts (studs)
- Small star cookie cutter (approx. 5-7mm)
- Small cloud cookie cutter (or X-Acto knife)
- Dotting tool or toothpick
- Clean ceramic tile or baking mat
- Super glue (gel type recommended)
Step 1: Shaping the Clouds
-
Condition the Clay:
Begin by kneading your white polymer clay until it is soft and pliable. This prevents cracking later on. -
Roll the Sheet:
Roll out the white clay to a thickness of about 3-4mm. You want it thick enough to hold the earring post securely but light enough to wear comfortably. -
Cut the Shapes:
Using a small cloud cutter, press firmly into the clay to cut two identical shapes. If you don’t have a cutter, you can trace a cloud shape lightly with a needle tool and carefully cut it out with an X-Acto knife. -
Soften the Edges:
Gently tap the edges of your clay clouds with your fingertip to round them off slightly. This removes the sharp ‘cookie cutter’ look and makes the clouds appear soft and puffy.
Step 2: Creating the Stars
-
Prepare Blue Clay:
Clean your hands thoroughly or use a baby wipe to remove any white residue, then condition the deep blue clay. -
Roll and Cut:
Roll the blue clay to the same 3-4mm thickness as the clouds. Use your mini star cutter to punch out four small stars. -
Refine the Stars:
Like the clouds, gently smooth the sharp edges of the stars with your finger so they have a nice, rounded finish.
Clean Clay Tip
Keep baby wipes handy! White clay picks up dust easily. Wipe your hands and tools before touching the white clay to keep your clouds pristine.
Step 3: Adding Faces & Details
-
Prepare the Cheeks:
Scrape a small amount of pink soft pastel chalk onto a piece of paper to create a fine powder. -
Apply Blush:
Dip a small, dry paintbrush or a Q-tip into the pink powder. Gently dab two small circles onto each cloud to create rosy cheeks. -
Baking:
Place all your cloud and star pieces on a ceramic tile or baking sheet lined with parchment paper. Bake according to your clay manufacturer’s instructions (usually around 275°F/130°C for 15-30 minutes). -
Cool Down:
Allow the pieces to cool completely before handling them. The clay hardens fully as it cools. -
Paint the Faces:
Once cool, use a very fine detail brush or a toothpick dipped in black acrylic paint to add the eyes and smiles. Two tiny dots for eyes and a small ‘u’ shape for the mouth sit perfectly between the pink cheeks.
Sparkle Upgrade
Mix a tiny pinch of fine iridescent glitter into the white clay before rolling it out to give your clouds a magical, shimmering effect.
Step 4: Assembly
-
Seal the Design:
Apply a thin layer of gloss varnish or UV resin over the front of the clouds and stars to protect the paint and give them a shiny, finished look. If using resin, cure it under a UV lamp. -
Attach Posts:
Flip the clay pieces over. Apply a dab of super glue or strong jewelry adhesive to the flat pad of an earring post. -
Secure the Backs:
Press the glued post firmly onto the center of the back of each clay piece. I like to hold this for a few seconds to ensure a good initial bond. -
Reinforce (Optional):
For extra durability, you can place a tiny drop of liquid clay or resin over the earring post pad (encasing it slightly) and cure it again.
Enjoy wearing your own little patch of blue sky and puffy clouds


What Really Happens Inside the Kiln
Learn how time and temperature work together inside the kiln to transform clay into durable ceramic.
Tiny Heart Trinket Dishes With Faces
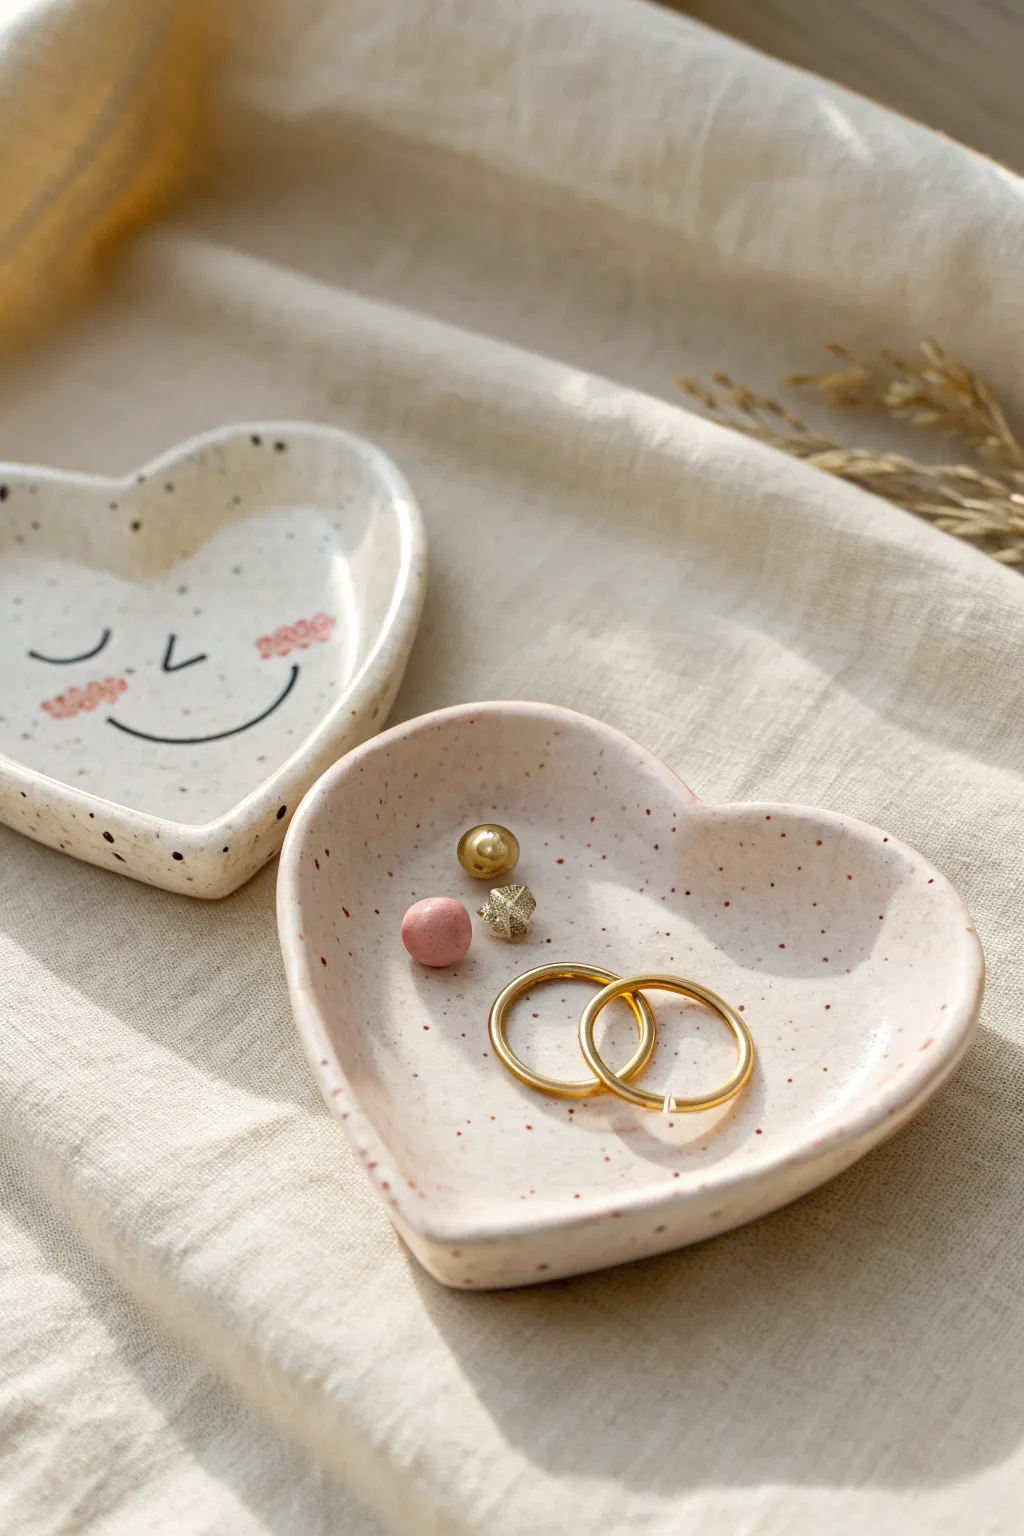
These adorable heart-shaped trinket dishes are the perfect handmade resting spot for your favorite rings and studs. Featuring a charming hand-painted expression and a delicate speckled finish, they combine functional storage with a sweet, minimalist aesthetic.
Step-by-Step Tutorial
Materials
- Polymer clay (white and light beige/pink)
- Faux granite clay or black heavy-body paint (for speckling)
- Rolling pin or pasta machine
- Heart-shaped cookie cutter (medium size)
- Sandpaper (fine grit)
- Black acrylic paint
- Pink acrylic paint
- Fine detail paintbrush (size 00 or similar)
- Toothbrush (if speckling manually)
- Gloss or matte glaze (optional)
Step 1: Shaping the Clay
-
Condition the clay:
Begin by kneading your chosen clay color—either simple white or a soft beige—until it is warm, pliable, and free of cracks. -
Add the speckled effect:
If your clay isn’t pre-speckled, mix in a tiny amount of black pepper or crushed dried herbs for a natural look, or flick watered-down black paint onto the flattened clay sheet with a toothbrush later. -
Roll it out:
Roll your conditioned clay into a smooth slab that is approximately 1/4 inch thick, ensuring evenness throughout to prevent weak spots. -
Cut the shape:
Press your medium heart-shaped cookie cutter firmly into the clay slab to create a clean, crisp outline. -
Smooth the edges:
Gently run your finger dipped in a little cornstarch or water around the raw edges of the heart to soften any sharp cuts left by the cutter. -
Curve the edges:
To transform the flat heart into a dish, gently pinch and pull the edges upwards, using your thumbs to create a concave center. -
Refine the form:
I find it helpful to cup the clay heart in my palm while smoothing the interior with my other thumb to ensure the curve is gradual and organic.
Uneven Rims?
If the edges warp while baking, gently sand the rim flat against a sheet of sandpaper placed on a table to level it out.
Step 2: Baking and Painting
-
Bake the dish:
Place your formed heart on a parchment-lined baking sheet and bake according to your specific clay package instructions, usually around 275°F (135°C) for 15-30 minutes. -
Cool and sand:
Once fully cooled, lightly sand the rim and back of the dish with fine-grit sandpaper to remove any fingerprints or imperfections. -
Paint the eyes:
Using a very fine detail brush and black acrylic paint, create two small ‘U’ shapes for closed, sleepy eyes near the center-left of the heart. -
Add the nose:
Just below and between the eyes, paint a tiny angled ‘L’ shape to serve as a cute button nose. -
Draw the smile:
Paint a sweeping, wide curve underneath the nose to create a contented smile, connecting the expression together. -
Add rosy cheeks:
Dip a small, clean brush or a dotting tool into pink paint and gently dab two textured patches at the ends of the smile to create blushing cheeks. -
Add decorative speckles:
If you didn’t add speckles into the clay earlier, use a toothbrush to lightly splatter diluted black and brown paint over the entire piece for a ceramic look. -
Let paint dry:
Allow the acrylic details to dry completely before handling, which usually takes about 20 minutes. -
Seal the piece:
Protect your painted details by applying a thin coat of water-based polyurethane varnish or clay glaze, choosing a matte or gloss finish depending on your preference.
Make it Luxe
Paint the very edge of the rim with gold leaf liquid or a gold paint pen for an elegant, high-end ceramic finish.
Place this sweet little dish on your nightstand to keep your treasures safe and sound
Cute Paw Print Magnets in Mini Sizes

These adorable little magnets are the perfect way to use up polymer clay scraps while adding a touch of whimsy to your fridge. With their soft matte finish and raised paw pad details, they look almost like sweet candy buttons.
Detailed Instructions
Materials
- Polymer clay in pastel shades (mint, peach, cream, light blue, soft pink)
- Polymer clay in slightly darker contrasting shades (mocha, dark teal, terracotta, grey)
- Small circle cutter (approx. 1 inch / 2.5 cm)
- Acrylic roller or pasta machine
- Small ball stylus tool (or round-headed pin)
- Dotting tool or toothpick
- Strong craft glue (E6000 or similar)
- Small round neodymium magnets (approx 8mm)
- Parchment paper or baking tile
- Oven (for baking clay)
Step 1: Prepping the Base
-
Condition the base clay:
Start by warming up your pastel base colors in your hands until they are soft and pliable. This conditioning step prevents cracks later. -
Roll out sheets:
Using your acrylic roller or pasta machine on a thick setting, roll the conditioned clay into sheets about 1/4 inch (6mm) thick. You want them chunky enough to hold the magnet. -
Cut the circles:
Use your small circle cutter to punch out discs from the clay sheets. If the edges are sharp, gently tap them with your finger to round and smooth them slightly.
Sticky Situation?
If a magnet pops off later, the glue didn’t bond to the smooth clay. Scuff the back of the baked clay with sandpaper before gluing to create a grip.
Step 2: Creating the Paw Impressions
-
Make the main pad indentation:
Take a large ball stylus tool and gently press into the lower center of the clay disc to create a rounded triangular or heart-shaped depression. Don’t go all the way through; just create a shallow ‘bed’ for the contrasting clay. -
Make the toe indentations:
Using a slightly smaller ball tool, press three or four smaller circular indentations in an arch above the main pad impression. -
Clean up edges:
If pressing the tools distorted the circle shape, gently nudged the outer edges back into a perfect round with your fingers.
Clean Lines Pro Tip
Chill your clay rolled sheets in the fridge for 10 minutes before cutting circles. This prevents the clay from dragging or distorting for a perfect round shape.
Step 3: Filling the Details
-
Prepare accent colors:
Take your darker, contrasting clay colors and roll tiny little balls. You’ll need one larger ball for the main pad and three or four tiny ones for the toes for each magnet. -
Fill the main pad:
Place the larger contrasting ball into the main depression. Press it down gently so it fills the space but still puffs up slightly above the surface level. -
Shape the heart:
Use a toothpick or a very small tool to gently indent the top of the main pad clay, giving it that characteristic subtle heart shape of a paw print. -
Fill the toes:
Drop the tiny contrasting clay balls into the toe indentations. Press them down lightly to secure them. -
Final smoothing:
Check for any fingerprints. I find that lightly brushing the surface with a tiny bit of baby oil on my finger removes prints without ruining the matte texture before baking.
Step 4: Baking and Assembly
-
Bake the pieces:
Place your paw prints on a ceramic tile or baking sheet lined with parchment. Bake according to your clay manufacturer’s instructions (usually around 275°F/135°C for 15-30 minutes). -
Cool down:
Let the clay pieces cool completely in the oven or on the counter. They are fragile when hot. -
Attach the magnet:
Flip the cooled paw print over. Apply a small dot of strong craft glue to the center of the back. -
Press and dry:
Press a neodymium magnet into the glue. Let it cure fully—usually 24 hours for maximum strength—before sticking them to your fridge.
Now you have a charming set of custom magnets to organize your notes with style

TRACK YOUR CERAMIC JOURNEY
Capture glaze tests, firing details, and creative progress—all in one simple printable. Make your projects easier to repeat and improve.
Pocket-Size Octopus With Curly Arms
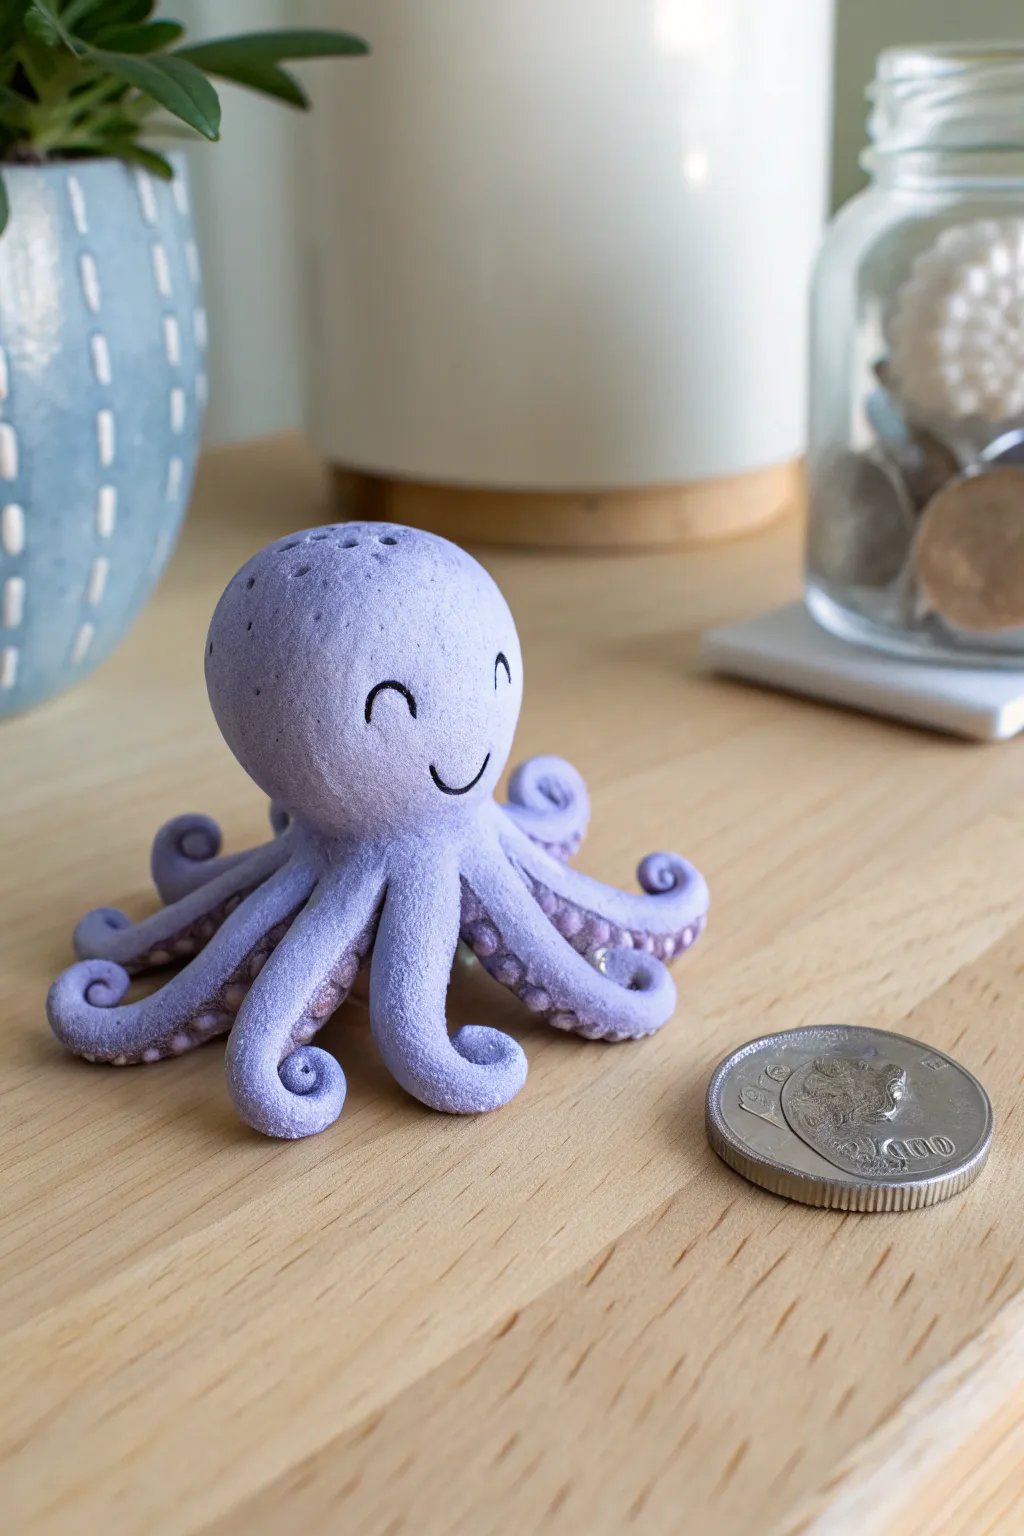
This charming, pocket-sized sea creature features a lovely textured finish and adorable curly tentacles that give it a playful personality. With its serene smile and soft lilac hue, this little octopus makes for a perfect desk companion or a sweet handmade gift.
How-To Guide
Materials
- Polymer clay (lilac purple)
- Polymer clay (lighter purple or pinkish-purple for underside)
- Black acrylic paint
- Semi-gloss or matte varnish (optional)
- Needle tool or toothpick
- Ball stylus tool (small)
- Fine-grit sandpaper or a stiff brush (for texturing)
- Oven for baking
- Tiny paintbrush
Step 1: Shaping the Head
-
Create the base:
Start by conditioning your lilac polymer clay until it is soft and pliable, then roll a smooth ball about the size of a walnut. -
Form the head shape:
Gently shape the ball into a slightly oval teardrop form, keeping the bottom wide and the top rounded to create a cute, bulbous head. -
Add texture:
Before attaching legs, tap the surface of the head gently with a stiff brush or a crumpled ball of aluminum foil to give it that stone-like, matte texture seen in the photo. -
Create the air vents:
Using a needle tool, poke three or four tiny holes near the top or back of the head to mimic the siphon holes often found on cartoon sea creatures.
Fixing Cracks
If you see tiny hairline cracks after baking, mix a small amount of raw clay with liquid clay/Bake & Bond to make a paste. Fill the crack, smooth it out, and re-bake briefly.
Step 2: Crafting the Curly Tentacles
-
Prepare tentacle logs:
Roll out eight tapered snakes of clay, each about 2 inches long, making sure they are thicker at one end (to join the body) and pointed at the tip. -
Detail the suckers:
Flip each tentacle over and press tiny flattened balls of the lighter purple clay along the underside. -
Indent the suckers:
Use your small ball stylus to press into the center of each light purple dot, creating a cup-like sucker shape. -
Curl the tips:
Gently roll the pointed tip of each tentacle inward into a tight spiral. Vary the tightness of the curls so each arm looks unique and dynamic. -
Curve the arms:
Add gentle S-curves to the bodies of the tentacles so they look like they are wriggling, rather than lying straight.
Step 3: Assembly and Baking
-
Attach the legs:
Arrange the eight tentacles in a radial star pattern on your work surface, ensuring the curled tips are facing upwards. -
Secure the head:
Press the head firmly onto the center of the star pattern. You can blend the clay from the head downward into the legs with a modeling tool for a seamless connection. -
Adjust the posture:
Lift a few tentacle ends off the ground slightly to give the octopus a lively, floating appearance. -
Bake the piece:
Bake your octopus according to the clay manufacturer’s instructions (usually around 275°F/135°C for 15-30 minutes depending on thickness). -
Cool down:
Let the piece cool completely inside the oven before removing it to prevent any thermal shock cracks.
Glow Up
Mix glow-in-the-dark powder into your lighter suction cup clay. Your little octopus will look cute by day, but become a bioluminescent deep-sea creature at night.
Step 4: Final Touches
-
Paint the face:
Using a very fine brush and black acrylic paint, carefully draw two small semicircles for closed, happy eyes. -
Add the smile:
Paint a small, simple U-shape mouth between the eyes to complete the joyful expression. -
Dry and seal:
Allow the paint to dry fully. If you want to protect the finish, apply a thin coat of matte varnish, or leave it bare for the raw stone look shown in the image.
Now you have a delightful little desk buddy ready to keep your spare change company
Mini Sleeping Bear on a Pebble Base
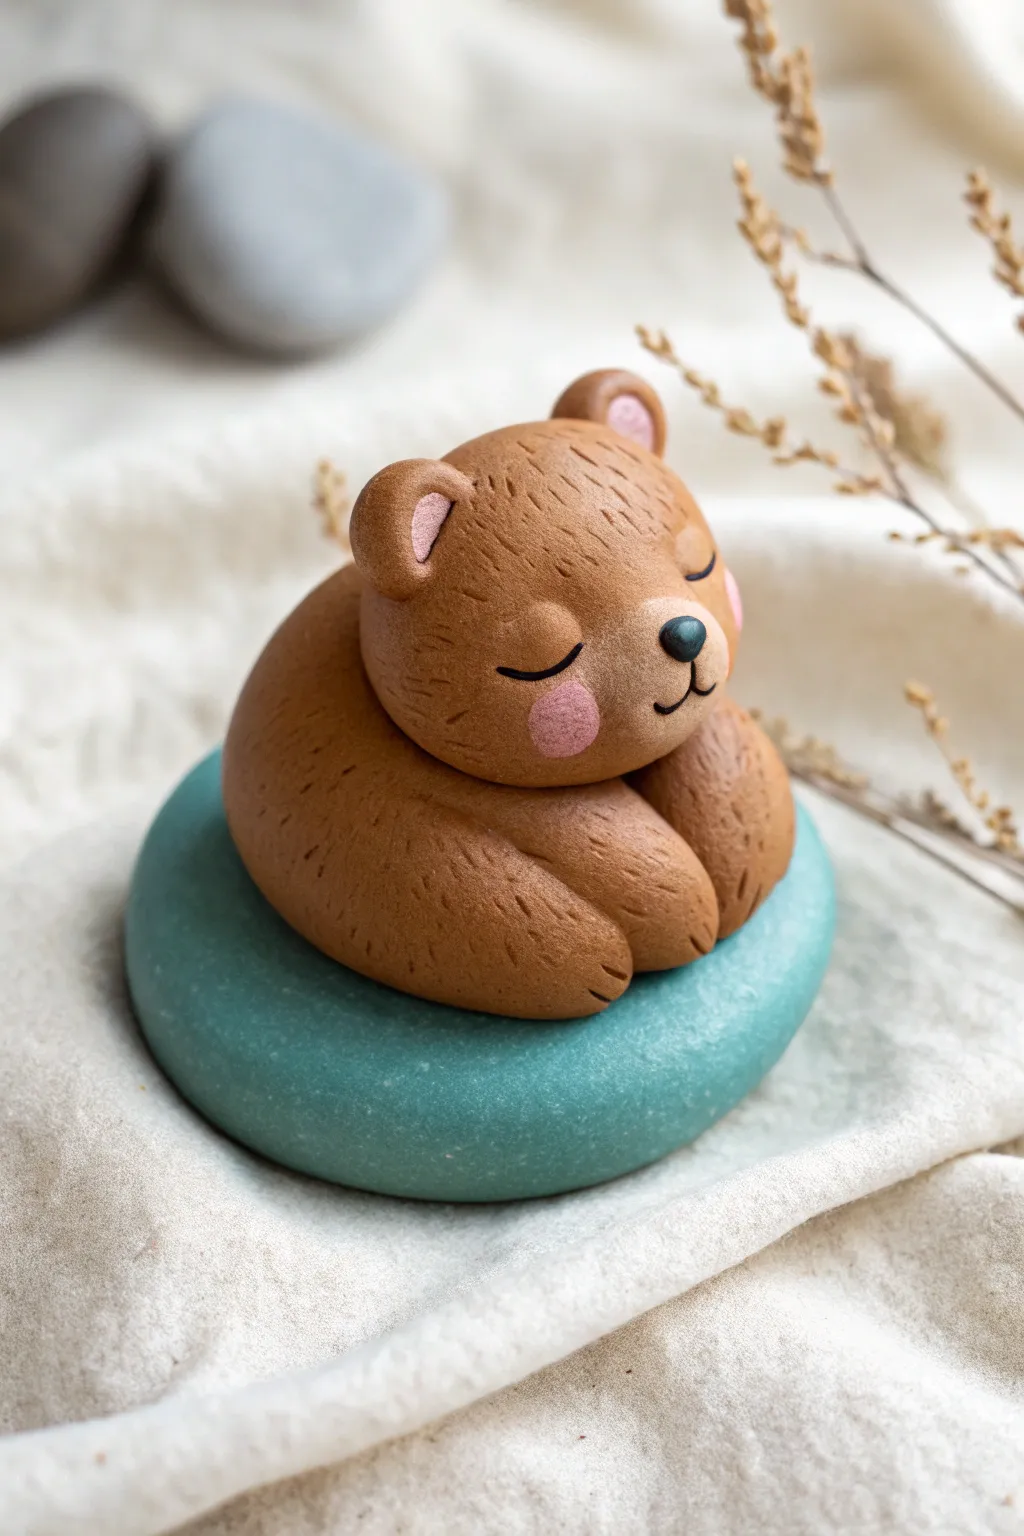
Capture the essence of coziness with this adorable clay sculpture of a sleeping bear resting peacefully on a smooth stone. This project combines simple shapes with delicate texturing techniques to create a heartwarming desk companion or gift.
Step-by-Step Tutorial
Materials
- Polymer clay (Cocoa brown, Teal/Jade green, Light pink, Black)
- Acrylic rolling pin
- Sculpting tools (needle tool, ball stylus)
- Blade or craft knife
- Soft pastel chalk (pink) and a small brush
- Aluminum foil (optional, for core)
- Baking sheet and parchment paper
- Matte varnish (optional)
Step 1: Shaping the Pebble Base
-
Condition the Clay:
Begin by kneading your teal or jade green polymer clay until it is soft and pliable. If the clay feels too stiff, warm it in your hands for a few extra minutes to prevent cracking. -
Form the Base:
Roll the conditioned green clay into a smooth ball, roughly 2 inches in diameter. Gently flatten it into a thick disc shape, smoothing the edges with your thumb to mimic the look of a water-worn river stone. -
Add Texture:
Take a rough sponge or a toothbrush and lightly tap it over the surface of the green base. This subtle stippling gives the clay a realistic, stony texture rather than looking like plastic.
Fixing Fingerprints
If you smudge the texture while handling, lightly brush the area with a tiny bit of baby oil or clay softener, then re-apply the needle dashes
Step 2: Sculpting the Sleeping Body
-
Create the Body Shape:
Take a portion of cocoa brown clay and roll it into a large teardrop or pear shape. The fat end will be the bear’s rear, and the tapered end will curve inward. -
Curve the Posture:
Place the brown teardrop onto the center of your pebble base. Gently bend the tapered end around so the shape curls into a circle, creating a curled-up sleeping position. -
Form the Hind Leg:
Roll a smaller sausage of brown clay for the hind leg. Press it against the wider side of the body, blending the upper seam so it looks connected. -
Detail the Paws:
Using a needle tool, make two or three small indentations on the end of the leg to define the toes. Repeat this for the front paw, tucking it neatly under where the head will go.
Seasonal Twist
Turn this into a holiday decoration by adding a tiny red Santa hat on the bear or sculpting a small holly leaf to place on the pebble base
Step 3: Creating the Head and Features
-
Shape the Head:
Roll a sphere of brown clay slightly smaller than the body. Determine the front face area and gently flatten it just a tiny bit to create a snout area. -
Attach the Head:
Place the head securely onto the curled body. I like to press it down firmly to ensure a good bond without squashing the round shape. -
Add Ears:
Make two tiny balls of brown clay and flatten them slightly. Press a smaller dot of light pink clay into the center of each for the inner ear. Attach these to the top of the head. -
Sculpt the Snout:
Roll a tiny oval of lighter brown clay (or use the base color if you prefer a uniform look) and press it onto the face area. Add a tiny black triangle nose on top. -
Draw the Face:
Use a needle tool or a very fine black clay snake to create two U-shaped curves for the sleeping eyes. Use a tiny tool to impress a small smile line under the nose.
Step 4: Texturing and Finishing
-
Apply Fur Texture:
Using your needle tool, make short, shallow dashes all over the brown clay surface. Follow the curve of the body to make the fur look natural and directional. -
Skip Vital Areas:
Avoid texturing the nose, inner ears, and the very center of the snout to keep the face looking soft and focused. -
Add Rosy Cheeks:
Scrape a little pink soft pastel chalk into a powder. Use a soft, dry brush to gently dab this powder onto the bear’s cheeks for a blushing effect. -
Bake the Piece:
Preheat your oven according to the manufacturer’s instructions for your specific brand of clay. Place the bear on parchment paper and bake for the recommended time (usually 15-30 minutes). -
Cool and Protect:
Let the sculpture cool completely inside the oven if possible to prevent thermal shock. Once cool, you can apply a matte varnish to protect the surface if desired.
Now you have a peaceful little friend to keep you company on your desk or shelf
Tiny Snails With Bright Swirly Shells

Brighten up your desk or planter with this cheerful, hand-sculpted snail featuring a mesmerizing spiral shell. The project combines simple shapes with vibrant painting techniques to create a charming, textured keepsake.
How-To Guide
Materials
- Beige or stone-effect polymer clay (approx. 50g)
- Acrylic paints (teal, yellow, red, black, white)
- Fine detail paintbrush (size 0 or 00)
- Needle tool or toothpick
- Small ball stylus tool
- Baking sheet and foil
- Matte or satin varnish (optional)
- Small rolling pin
Step 1: Sculpting the Body
-
Form the base:
Start by conditioning a walnut-sized ball of beige clay until it’s soft and pliable. Roll it into a smooth sphere, then gently elongate it into a teardrop shape for the snail’s main body. -
Shape the foot:
Flatten the wider bottom part of your teardrop to create the ‘foot’ or base the snail will rest on. Gently pull the narrower end upward and curve it slightly to form the head and neck area. -
Refine the surface:
Smooth out any fingerprints with your thumb. If you want a slightly textured stone look like the photo, you can gently tap the surface with a stiff toothbrush or a crumpled piece of aluminum foil. -
Add the eye stalks:
Roll two very small, thin logs of clay. Attach them to the top of the head, blending the clay at the join so they stand upright but angle slightly forward. -
Create the shell base:
Roll a larger ball of clay for the shell and flatten it into a thick disc shape. It should look like a wheel that fits proportionally on the snail’s back. -
Attach the shell:
Press the disc firmly onto the center of the snail’s back. Use a modeling tool to blend the bottom edge of the shell into the body clay so they fuse together seamlessly.
Step 2: Adding Details & Baking
-
Carve the spiral:
Using a needle tool or a sharp toothpick, start from the center of the shell disc and carve a continuous spiral groove outward to the edge. Make the groove deep enough to hold paint later. -
Detail the shell rim:
Around the outer edge of the spiral, use your needle tool to press small vertical lines or indentations, creating the segmented texture seen on the outer ring. -
Sculpt the face:
Use a small ball tool or the tip of a toothpick to indent two tiny spots for eyes at the base of the stalks. Carve a gentle, curved line for a smiling mouth. -
Bake the piece:
Place your snail on a baking sheet lined with foil. Bake according to your polymer clay package instructions (usually around 230°F – 275°F for 15-30 minutes). Let it cool completely before painting.
Clean Lines Pro Tip
If your carving creates jagged clay edges, dip your finger in a little rubbing alcohol (or water for air-dry clay) and gently smooth the grooves before baking.
Step 3: Painting & Finishing
-
Base coat the spiral:
Mix a creamy yellow acrylic paint. Carefully paint filling in the spaces between your carved spiral lines, focusing on the outer sections of the shell coil first. -
Add the teal ring:
Paint the segmented outer ring of the shell with a bright teal color. Use a very fine brush to get the paint into the vertical indentations you carved earlier. -
Paint the inner spiral:
Using a deep red or maroon paint, carefully fill in the central spiral line. I find it helpful to steady my hand on the table while painting these thin curves. -
Highlight the ridges:
Once the base colors are dry, use a lighter teal or mix white with your teal to dry-brush the raised ridges on the outer shell ring, making the texture pop. -
Detail the face:
Dip a toothpick or fine brush into black paint and gently dot the tips of the eye stalks. Use a tiny amount of black to fill in the carved mouth line. -
Final touches:
Add tiny dots of white to the black eye tips for a lively ‘shine’. Paint a subtle dark line or wash inside the deep spiral groove to separate the colors clearly. -
Seal the piece:
Once all paint is thoroughly dry, apply a thin coat of matte or satin varnish to protect your work and give it a finished, professional sheen.
Wobbly Snail Help
If the snail keeps tipping over, gently press the base onto a flat surface before baking to flatten the underside slightly, creating a stable platform.
Place your little snail among some succulents or on a windowsill to enjoy its cheerful company
Cute Mini Toothbrush Holder Critters
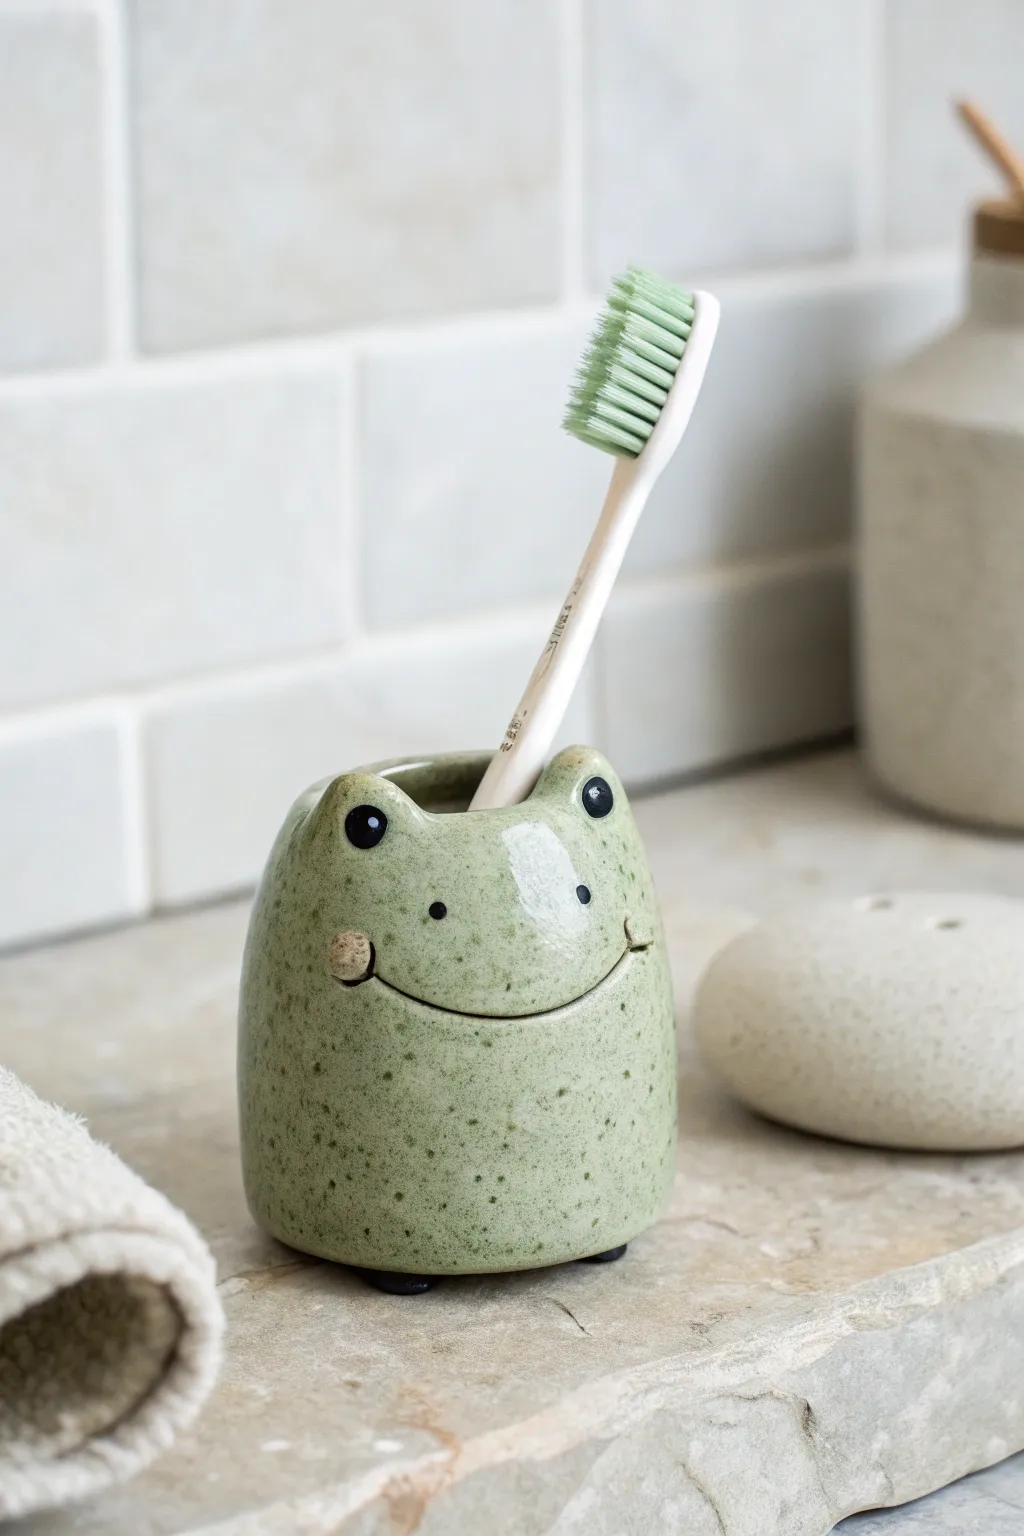
Brighten your morning routine with this adorable, wide-mouthed frog friend who is always happy to hold your toothbrush. The simple cylindrical shape and charming speckled glaze make this a perfect beginner project that adds a touch of whimsy to any bathroom counter.
Step-by-Step Tutorial
Materials
- Stoneware or earthenware clay (approximately 1 lb)
- Pottery wheel (optional, can be hand-built)
- Needle tool
- Sponge
- Small loop tool
- Green speckled glaze (food safe)
- Black underglaze
- Fine detail brush
- Small round sculpting tool
- Kiln
Step 1: Forming the Body
-
Prepare the clay:
Begin by wedging a softball-sized amount of clay to remove any air bubbles, ensuring a smooth and consistent texture. -
Structure the base:
If throwing on a wheel, center the clay and pull a cylinder that is approximately 3 inches wide and 3.5 inches tall. If hand-building, roll a slab and form a tube, or use the pinch pot method to create a tall, open cup shape. -
Shape the rim:
While the clay is still plastic, gently push the rim inward slightly to create a tapered look, making the top opening just slightly narrower than the base. -
Create the eye sockets:
Using your fingers, gently push upward from the inside of the rim at two distinct points to create two raised bumps. These will become the prominences for the frog’s eyes. -
Refine the surface:
Smooth out the exterior using a damp sponge or a flexible metal rib to remove any fingerprints or throwing lines, creating a clean canvas for the face.
Step 2: Sculpting the Features
-
Carve the smile:
Using a needle tool, lightly sketch a wide, curved smile across the front of the piece. Once you’re happy with the placement, deepen the line slightly for better definition. -
Add cheek dimension:
Roll a very small pea-sized ball of clay. Score and slip the end of the smile line on the left side, then attach the ball and press it flat to create a cute cheek dimple. -
Form the eyes:
Roll two small balls of clay. Score and slip the tops of the raised bumps on the rim, then attach the balls firmly. Smooth the seams where they join the main body so they look integrated. -
Add texture:
Before the clay dries completely, you can gently tap the surface with a stiff brush or a coarse sponge to add a subtle texture that mimics skin, though the glaze will do most of the work later. -
Dry slowly:
Cover the piece loosely with plastic and let it dry slowly to the leather-hard stage, then uncover to let it become bone dry. This prevents cracking, especially around the added eyes. -
Bisque fire:
Fire the bone-dry piece in the kiln to bisque temperature (usually cone 04) to prepare it for glazing.
Keep it Clean
Make sure to sponge the inside bottom frequently while throwing or building. Trapped water can weaken the base and cause cracks during drying.
Step 3: Glazing and Finishing
-
Clean the bisque:
Wipe the fired piece down with a damp sponge to remove any kiln dust, which helps the glaze adhere properly. -
Apply base glaze:
Dip the piece into a green speckled glaze, or brush on 2-3 even coats. Make sure to coat the interior as well so it’s watertight. -
Detail the eyes:
Using a fine detail brush and black underglaze or a specialty black glaze, carefully paint the pupils onto the protruding eye balls. -
Detail the nostrils:
Paint two tiny dots between the eyes for nostrils using the same black detail color. -
Highlight the cheeks:
If you want the cheek dimple to stand out, you can leave it slightly lighter or dab a tiny bit of clear glaze over it if the main glaze is matte. -
Clean the foot:
Use a sponge to wipe any glaze off the very bottom of the piece (the foot) to prevent it from sticking to the kiln shelf. -
Final firing:
Place the frog in the kiln for the glaze firing, following the temperature guidelines for your specific glaze (typically cone 5 or 6 for stoneware).
Lil’ Lily Pad
Create a separate flat disk shape with a V-notch cut out of it. Glaze it dark green to act as a matching coaster or ‘lily pad’ for your frog to sit on.
Now you have a charming little sink companion ready to greet you every morning
Tiny Photo Holders With Smiley Shapes
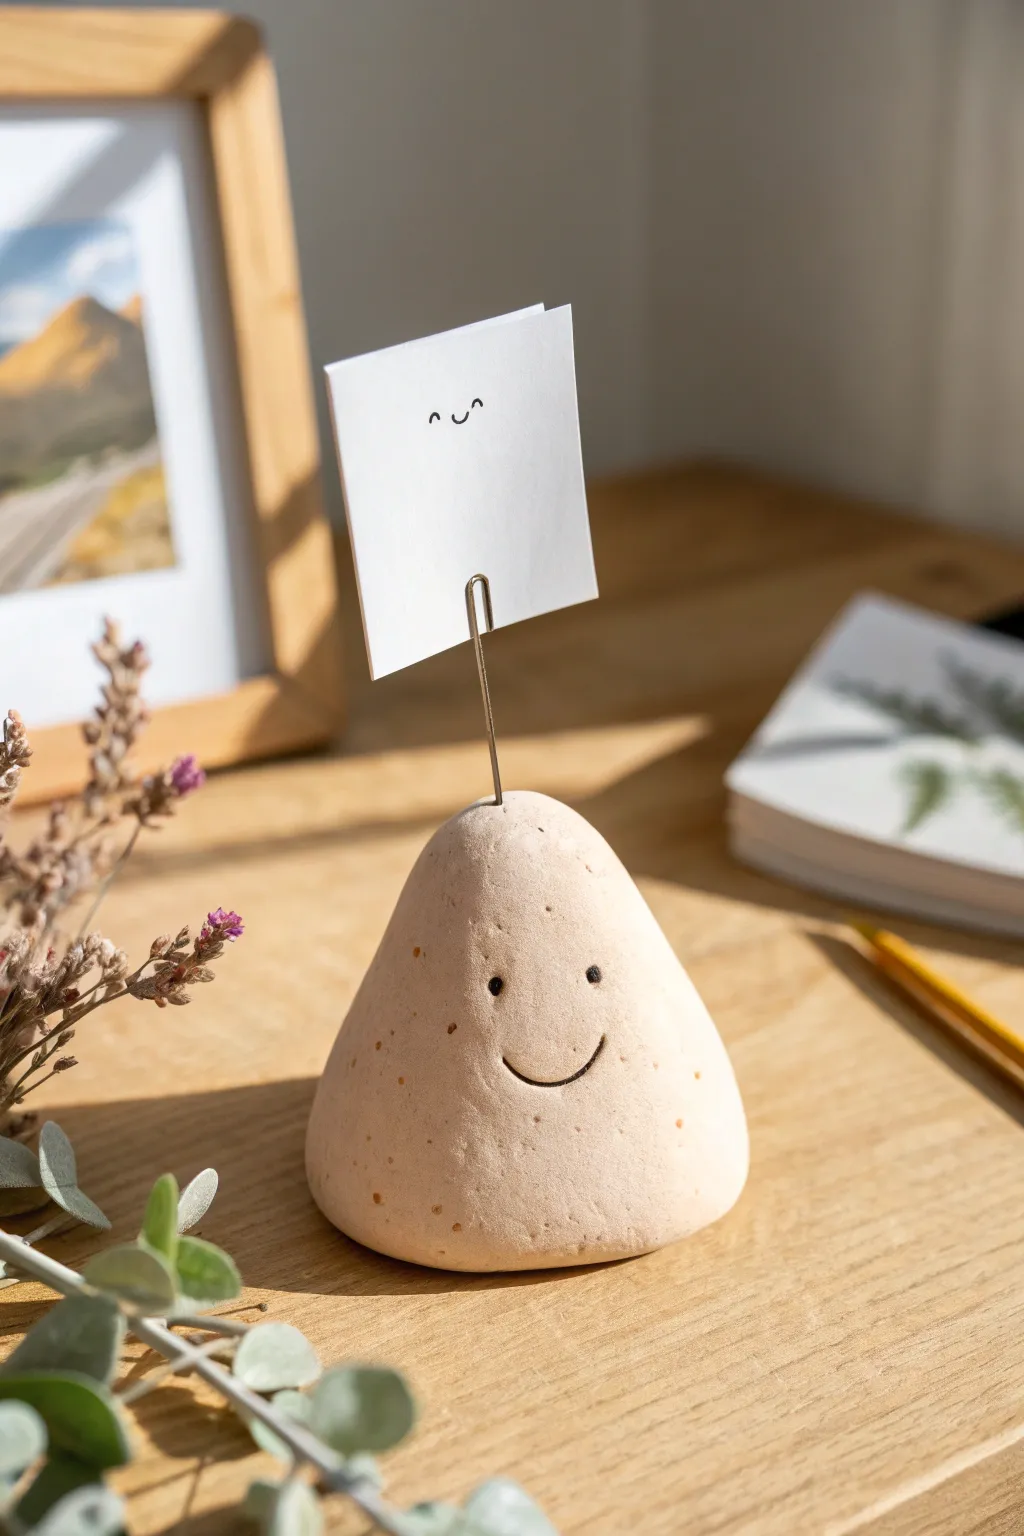
Add a touch of whimsy to your desk with this adorable, stone-like photo holder that beams a permanent smile back at you. Its organic, speckled finish and minimalist wire clip make it the perfect functional friend for displaying tiny notes or cherished polaroids.
How-To Guide
Materials
- Light beige polymer clay (approx. 50g)
- Black pepper or dried tea leaves (for speckling)
- Black acrylic paint
- Fine detail paintbrush or toothpick
- 20-gauge craft wire (silver or gold)
- Wire cutters
- Needle nose pliers
- Oven (for baking)
- Piece of cardstock (for the note)
- Fine-tip black pen
Step 1: Shaping the Base
-
Prepare the Clay:
Start by conditioning your beige polymer clay until it is soft and pliable. If your clay doesn’t come pre-speckled, mix in a tiny pinch of ground black pepper or finely crushed dried tea leaves. Knead this thoroughly to distribute the ‘speckles’ evenly, giving it a natural stone look. -
Form the Mound:
Roll the clay into a smooth ball between your palms to remove any seams or cracks. -
Shape the Cone:
Gently gently roll the ball on your work surface while applying slightly more pressure to the top half. You want to create a rounded, soft cone shape—think of a friendly gumdrop or a smooth river stone rather than a sharp pyramid. -
Flatten the Bottom:
Press the shape firmly onto your work surface to create a flat, stable base. Tap it gently a few times to ensure it won’t wobble.
Step 2: Adding the Hardware
-
Cut the Wire:
Cut a piece of craft wire approximately 3 to 4 inches long using your wire cutters. -
Create the Spiral Clip:
Using your needle nose pliers, grip one end of the wire and gently bend it into two concentric loops to form a flat paperclip-style spiral. Leave a small gap between the loops so a piece of paper can slide in easily. -
Insert the Wire:
Ideally, you insert the straight end of the wire directly into the top center of your clay mound. Push it down about halfway into the clay body for stability. -
Secure the Connection:
Gently pinch the clay around the base of the wire to ensure a tight seal so the wire doesn’t wiggle loose after baking.
Wire Wobble Fix
If the wire feels loose after baking, pull it out gently, add a drop of superglue to the end, and reinsert it into the hole.
Step 3: Baking and Decorating
-
Bake the Clay:
Place your clay holder on a baking sheet lined with parchment paper. Bake according to your specific clay package instructions (usually around 275°F or 130°C for 15–30 minutes). -
Cool Down:
Allow the piece to cool completely before handling. The wire will be hot, so be careful. -
Paint the Face:
Using a very fine detail brush or the tip of a toothpick dipped in black acrylic paint, gently dab two small dots for the eyes. -
Draw the Smile:
Paint a simple, thin curved line between the eyes for the smile. I find it helpful to practice the curve on paper first to get the proportions right. -
Let Paint Dry:
Let the paint dry fully for about 10–15 minutes.
Smoother Stone Texture
Before baking, lightly brush the clay surface with baby oil or cornstarch to remove any stubborn fingerprints for a professional finish.
Step 4: The Final Touch
-
Create the Note:
Cut a small square of cardstock, roughly 2×2 inches. -
Add a Design:
Use a fine-tip black pen to draw a matching smiley face or a little motivational doodle on the paper. -
Assemble:
Slide your little note into the wire loops at the top of your new clay friend.
Now you have a charming little desktop companion ready to hold your most important reminders
Teeny Donut Beads for Charm Bracelets
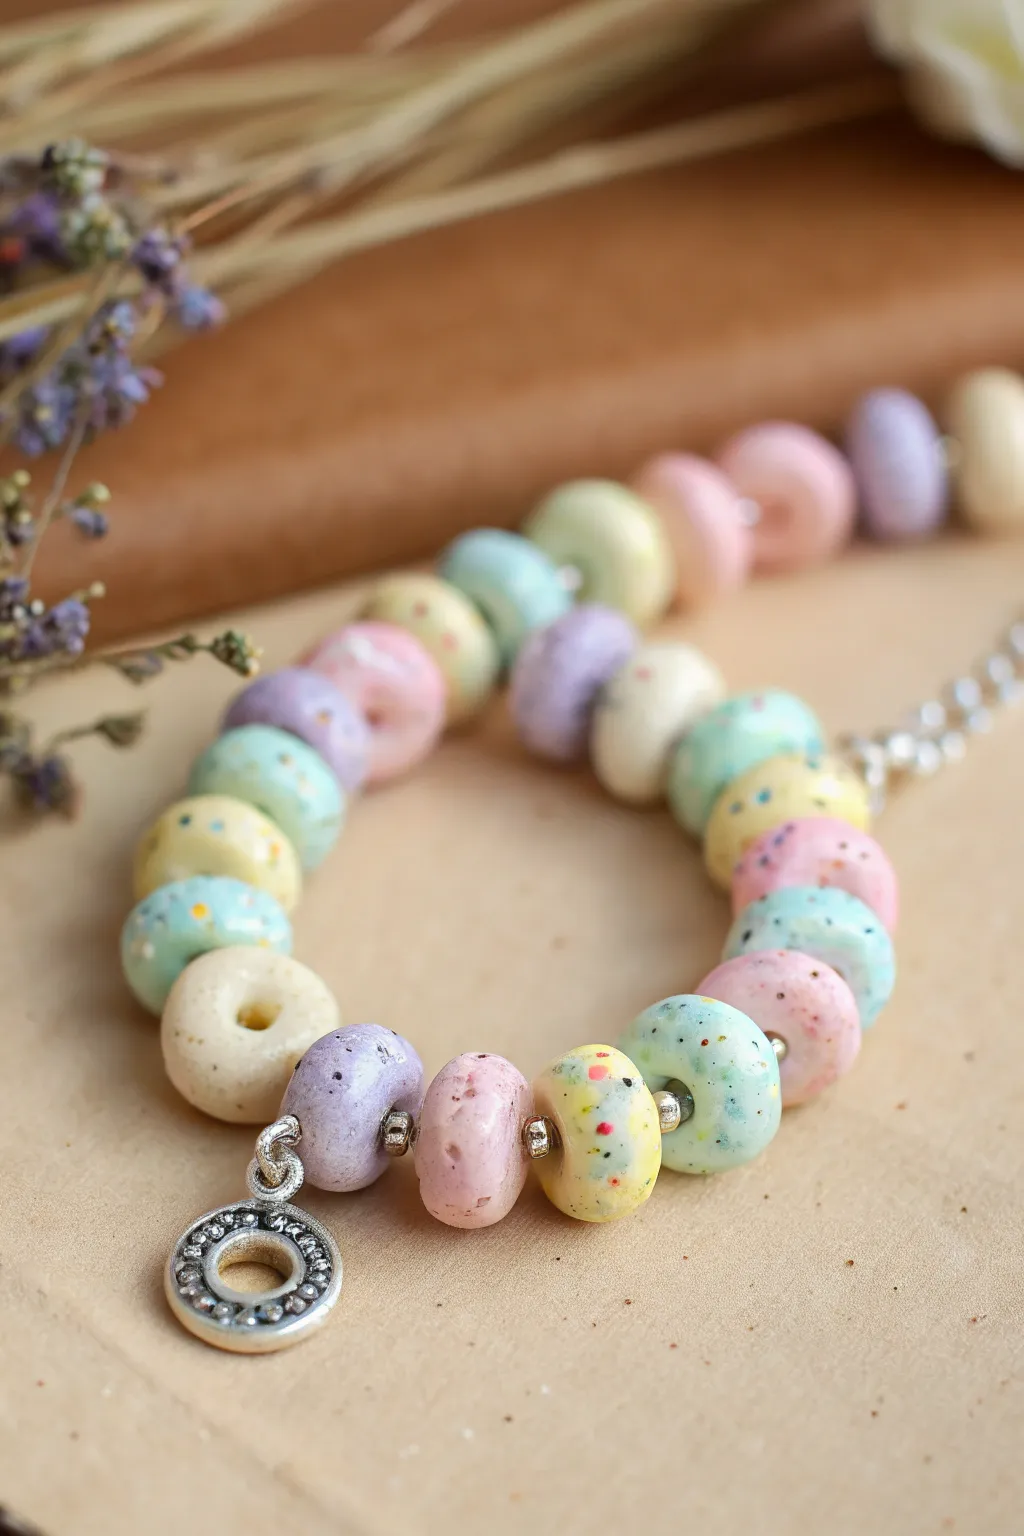
Transform tiny bits of clay into a string of sweet treats with this charming bracelet project. These miniature donut beads feature a soft, speckled pastel finish that mimics ceramic glaze, perfect for a whimsical accessory.
Step-by-Step Guide
Materials
- Polymer clay in pastel colors (yellow, pink, blue, lavender, mint, cream)
- Black pepper or black embossing powder (for speckles)
- Pottery needle tool or toothpick
- Small round cutter (approx. 1cm diameter)
- Bead pins or thin knitting needle (for piercing)
- Glossy polymer clay varnish or UV resin
- Small paintbrush
- Silver spacer beads
- Silver chain and jump rings
- Silver donut charm (optional)
- Jewelry pliers
- Baking tile or parchment paper
Step 1: Prepping and Shaping the Dough
-
Mix the Speckles:
Condition your pastel clay blocks individually. To achieve that realistic ceramic ‘stone’ look, mix a tiny pinch of ground black pepper or black embossing powder into each color. Fold and knead until the specks are evenly distributed. -
Roll Snakes:
Take a small portion of each color and roll them on your work surface into smooth logs about 8mm thick. Ensure the thickness is consistent so your beads are uniform size. -
Portion the Clay:
Cut the logs into equal segments, roughly 1cm long each. I find rolling each segment into a perfect ball between my palms helps create a smoother final shape before flattening. -
Form the Donut Shape:
Gently press down on each ball to create a thick disc shape. Don’t flatten them too much; you want them to look plump like a donut, not flat like a washer. -
Create the Bead Holes:
Using a needle tool or toothpick, pierce exact center of each disc. Wiggle the tool slightly in a circular motion to widen the hole enough to resemble a donut center, ensuring it’s large enough for your threading material later. -
Smooth the Edges:
Pick up each bead and gently smooth the edges of the hole with your fingertip to remove any harsh ridges or displacement from the piercing tool.
Uneven Bead Holes?
If drilling distorts the bead shape, try piercing the hole halfway, flipping the bead over, and piercing from the other side. This keeps the exit hole clean.
Step 2: Baking and Finishing
-
Bake the Beads:
Arrange your donut beads on a baking tile, making sure they aren’t touching. Bake according to your brand of clay’s instructions (usually around 275°F/130°C for 15-30 minutes). Let them cool completely. -
Add the Glaze:
Once cool, brush a thin layer of glossy varnish or UV resin over each bead. This enhances the pastel colors and gives them that distinct ceramic shine seen in the photo. -
Cure the Finish:
Allow the varnish to dry fully, or cure the UV resin under a UV lamp for a few minutes until hard and tack-free.
Step 3: Assembly
-
Plan the Pattern:
Lay out your shiny beads on a bead board or cloth. Arrange them in a repeating color sequence—light yellow, pale blue, lavender, pink, mint—to find a flow that pleases you. -
Prepare the Chain:
Cut a length of jewelry wire or chain that fits your wrist plus a little extra for movement. Attach a jump ring and clasp to one end to act as a stopper while beading. -
Thread the Beads:
Begin stringing your beads. Insert a small silver spacer bead between every clay donut to separate the colors and allow the bracelet to drape more fluidly. -
Finish the Ends:
Once the strand is full, crimp the final end or attach your jump ring securely. Make sure the tension isn’t too tight; the beads should be able to rotate slightly. -
Attach the Charm:
Using a small jump ring, attach your metal alloy donut charm to the clasp end of the bracelet for a cute, thematic finishing touch.
Use Bead Pins
Bake your beads directly on a bead pin suspended over a foil tray. This prevents flat spots from forming on the bottom of the donut during baking.
Wear your sweet new creation stacked with other silver jewelry or gift it to a friend with a sweet tooth
Tiny Ghost Friends Holding Mini Pumpkins
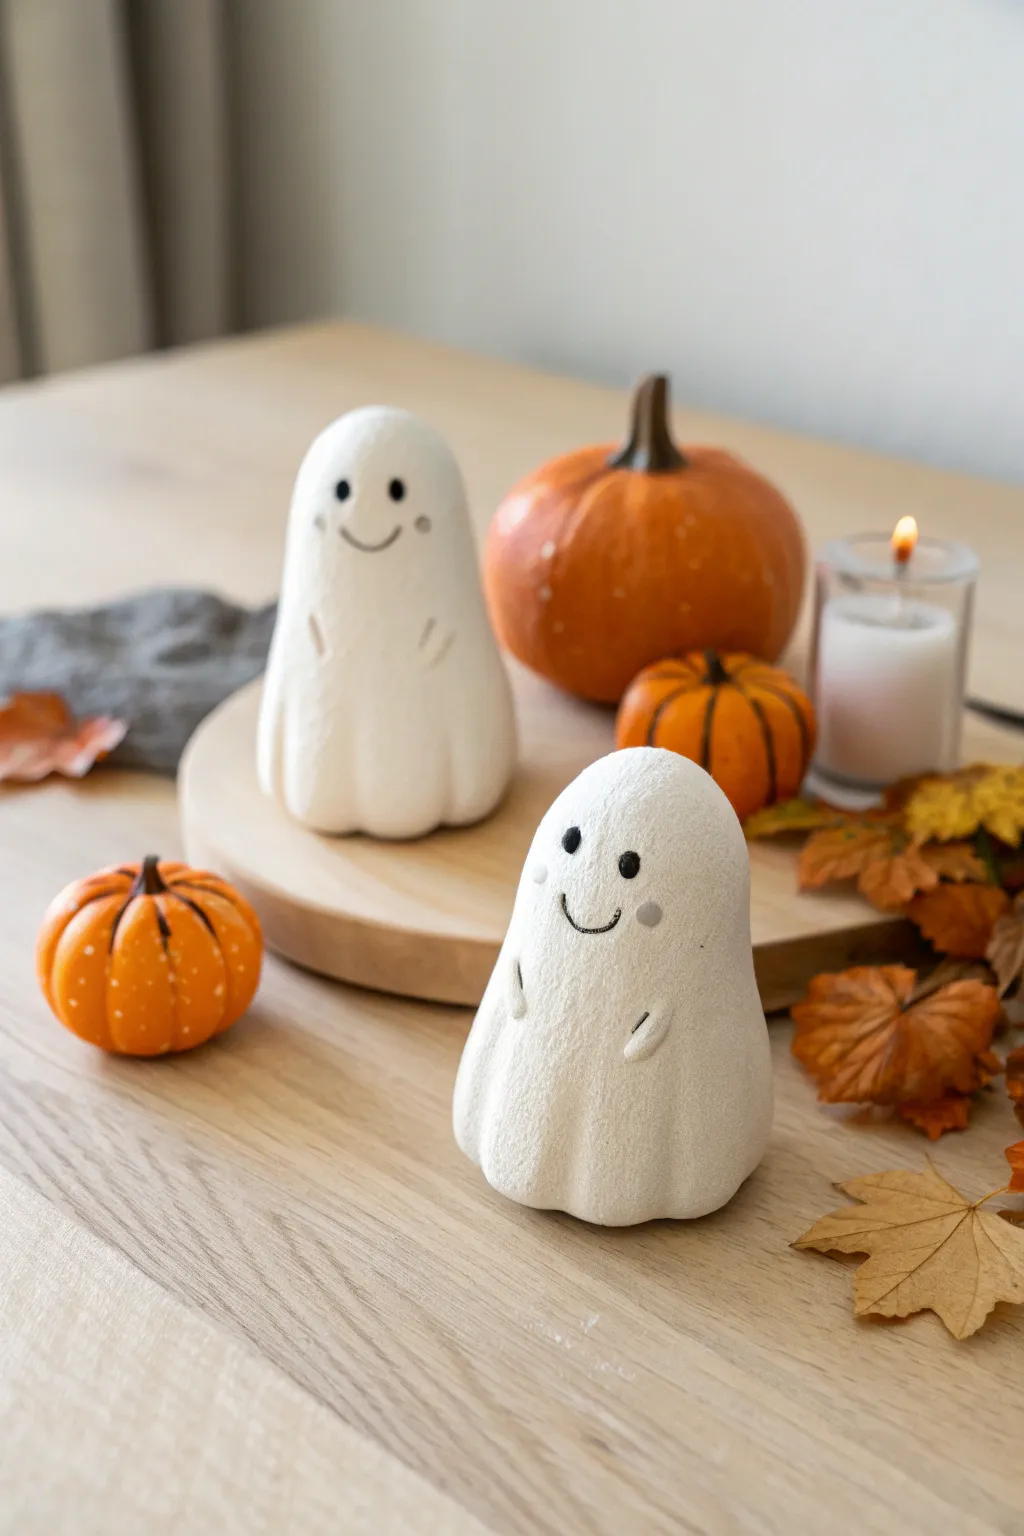
These charming little ghosts bring a touch of friendly spookiness to any autumn display, featuring soft, rounded shapes and a gently textured finish that looks almost like stone or unglazed ceramic. Their simple, happy expressions and tiny hands make them perfect companions for your miniature pumpkin patch.
Step-by-Step
Materials
- White air-dry clay (or polymer clay)
- Small bowl of water
- Modeling tools (or a toothpick)
- Fine-grit sandpaper (optional)
- Black acrylic paint
- Grey acrylic paint
- Fine-point paintbrush
- Toothbrush or texturing sponge
- Matte sealant spray
Step 1: Shaping the Bodies
-
Prepare the Clay:
Start by conditioning your clay. Knead a palm-sized amount until it is soft, pliable, and free of cracks. Divide the clay into two slightly unequal portions to create one taller ghost and one shorter companion. -
Form the Base Shape:
Take one portion of clay and roll it into a smooth ball. Slowly begin to elongate it into a rounded cone or teardrop shape, keeping the bottom wide and stable so it stands upright easily. -
Smooth the Edges:
Gently tap the base on your work surface to flatten it. Use a little water on your finger to smooth out any fingerprints or seams, aiming for a consistent, seamless dome at the top. -
Create the Draped Look:
To mimic the look of a sheet or robe, use your fingers or a modeling tool to gently press vertical indentations starting from the bottom edge and fading out halfway up the body. This creates soft folds.
Cracks Appearing?
If you see small cracks forming while air-drying, mix a tiny bit of fresh clay with water to make a paste (slip) and fill the cracks, then smooth over.
Step 2: Adding Details
-
Position the Arms:
For the tiny arms, roll two very small, rice-sized logs of clay. Attach them to the front of the body, positioning them slightly low as if the ghost is shyly keeping its hands close. -
Blend the Seams:
Use a small modeling tool or a toothpick to blend the clay from the back of the arms into the main body, ensuring they are securely attached. I like to keep the front of the little hands distinct and rounded. -
Adding Texture:
To recreate the matte, slightly stoned-washed texture seen in the photo, gently tap the entire surface of the semi-soft clay with a dry toothbrush or a coarse sponge. Avoid pressing too hard; you just want a subtle stipple effect. -
Drying Time:
Set your figures aside in a dry, room-temperature area. Let them air dry completely for 24-48 hours, or bake according to package instructions if using polymer clay.
Make Them Glow
Before drying, hollow out the bottom and use a straw to poke eye-holes instead of painting them. Place over an LED tea light for a glowing lantern effect.
Step 3: Bringing Them to Life
-
Sanding (Optional):
Once fully cured, inspect your ghosts. If there are any sharp peaks or rough patches you dislike, lightly buff them with fine-grit sandpaper, wiping away the dust with a damp cloth afterward. -
Painting the Eyes:
Dip the very tip of a fine paintbrush or a dotting tool into black acrylic paint. Place two small, solid dots on the upper third of the face. Space them widely for that cute, innocent look. -
Adding the Smile:
Using your finest brush, paint a thin, simple ‘U’ shape between the eyes. Keep the line weight delicate to match the minimalist style. -
Rosy Cheeks:
Mix a tiny amount of grey paint with white (or use a very diluted grey wash). Paint small, soft circles just outside the smile line to give them subtle, ghostly rosy cheeks. -
Sealing the Work:
Finish by spraying the ghosts with a matte sealant. This protects the paint and preserves that lovely, non-shiny texture that makes them look so elegant.
Arranging these little spirits alongside mini pumpkins creates a heartwarming festive corner you can enjoy all season