When I’m in a preppy clay mood, I reach for soft pastel colors, cute patterns, and pieces that make everyday life feel a little more put-together. Here are my go-to preppy clay ideas—from classic trinket dishes to fun desk decor you’ll actually use.
Heart-Shaped Trinket Dish
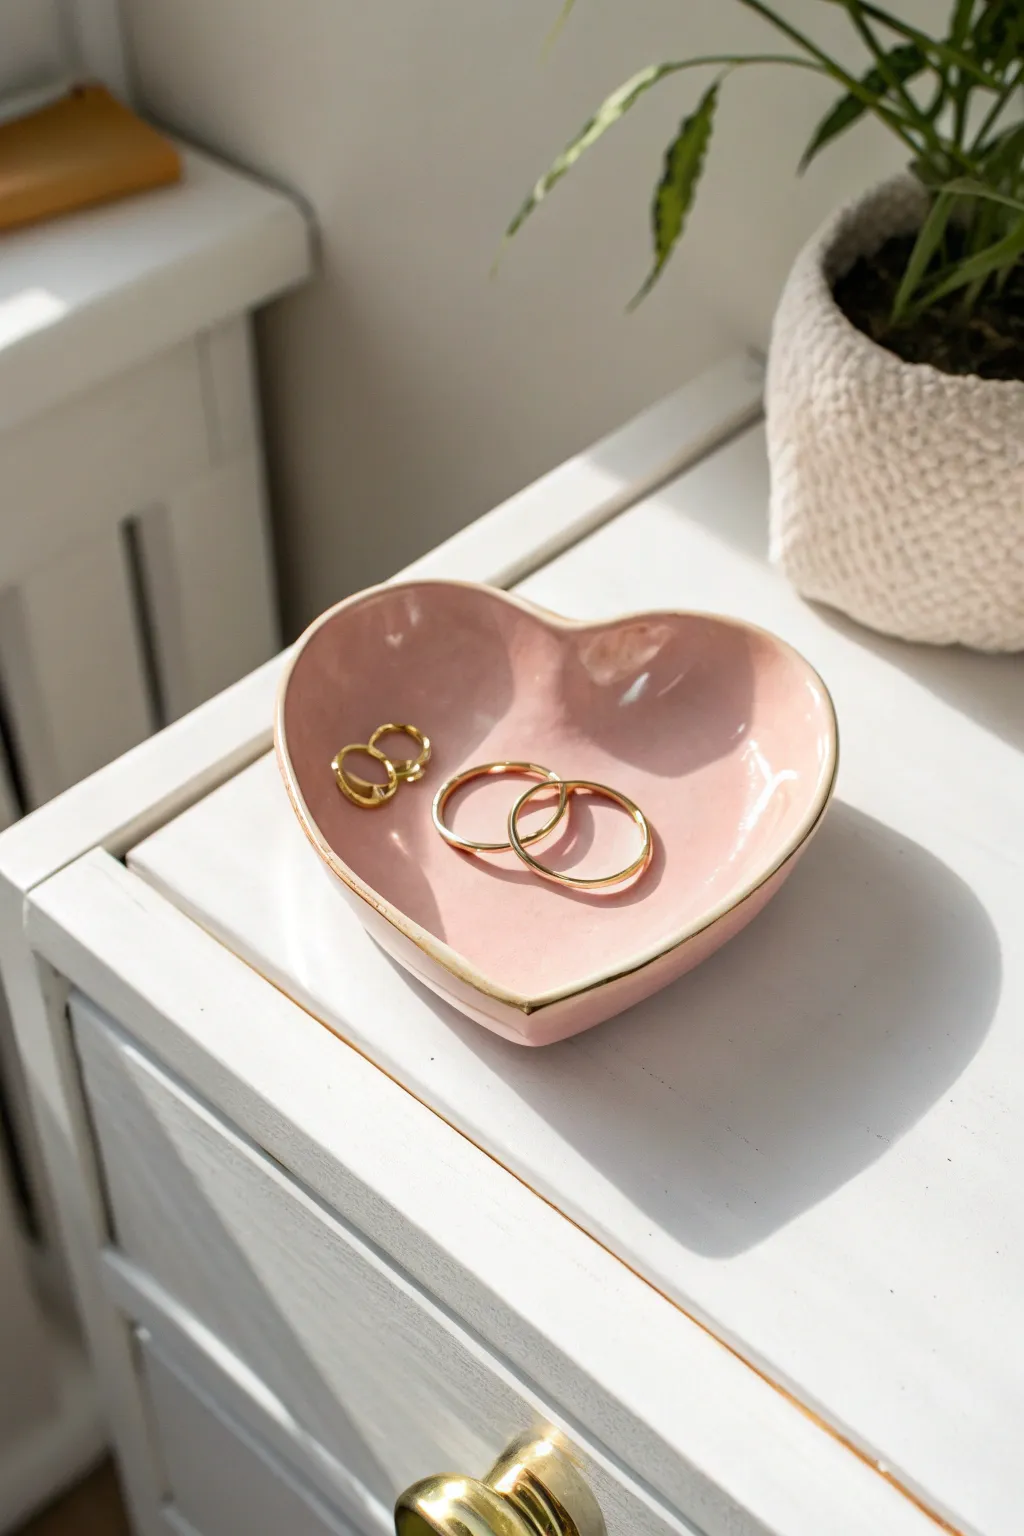
This elegant heart-shaped dish brings a touch of preppy sophistication to your nightstand with its soft pink hue and chic gold rim. It looks like high-end ceramic, but you can easily craft this smooth, glossy organizer right at home using clay.
Step-by-Step Guide
Materials
- White air-dry clay or polymer clay
- Rolling pin
- Heart-shaped cookie cutter (large) or paper template
- Craft knife
- Fine-grit sandpaper (400-600 grit)
- Small bowl of water
- Soft pink acrylic paint
- Gold metallic liquid leaf or acrylic paint
- High-gloss varnish or glaze (polyurethane or resin)
- Small flat paintbrush
- Fine detail paintbrush
Step 1: Shaping the Clay
-
Condition the clay:
Begin by taking a handful of white clay and kneading it thoroughly in your hands until it becomes warm, soft, and pliable, which helps prevent cracks later on. -
Roll it out:
Place the clay on a smooth surface or silicone mat. Use your rolling pin to flatten it into an even slab, aiming for a thickness of about 1/4 inch. -
Cut the heart shape:
Press your large heart-shaped cookie cutter firmly into the clay. If using a paper template instead, place it lightly on the clay and trace around it carefully with a craft knife. -
Smooth the edges:
Dip your finger into a small bowl of water and gently run it along the cut edges of the heart to soften any sharp angles or rough bits left by the cutter. -
Form the curve:
Lift the clay heart gently and cradle it in your palm. Carefully pinch and curve the edges upwards about half an inch to create a shallow bowl shape. -
Refine the rim:
Continue smoothing the raised rim with a damp finger, ensuring the walls are even all the way around and the transition from the base to the wall is seamless. -
Final drying setup:
Place the dish on a drying rack or a sheet of parchment paper. If you want a more pronounced curve, you can dry it inside a slightly larger bowl to help it hold its shape. -
Let it cure:
Allow the clay to dry completely according to the package instructions. For air-dry clay, this usually takes 24-48 hours; ensure it is bone dry before proceeding.
Step 2: Painting and Finishing
-
Sand for smoothness:
Once fully dry, take your fine-grit sandpaper and very gently buff the surface of the dish to remove any fingerprints or bumps. -
Remove dust:
Wipe the dish down with a slightly damp cloth or a dry tack cloth to remove all sanding dust so your paint goes on flawlessly. -
Apply the base color:
Using a flat paintbrush, apply a coat of soft pink acrylic paint to the entire top and inside of the dish. I prefer to paint the bottom last. -
Add a second coat:
Let the first layer dry to the touch, then add a second or even third coat until the pink color is completely opaque and streak-free. -
Paint the rim:
Dip a fine detail brush into your gold metallic paint or liquid leaf. Carefully trace firmly along the very edge of the rim to create a gilded border. -
Refine the gold line:
Go over the gold rim one more time to ensure it is solid and reflects light beautifully, fixing any slips with a touch of pink paint if needed. -
Seal with gloss:
Once all paint is perfectly dry, apply a generous layer of high-gloss varnish or glaze over the entire piece to protect it and give it that ceramic-like shine. -
Final cure:
Let the varnish cure completely in a dust-free area for the time recommended on your specific topcoat bottle.
Pro Tip: Avoid Stickiness
If your high-gloss varnish feels tacky after drying, try wiping it very gently with rubbing alcohol or add a second thin layer of a different brand of sealer.
Troubleshooting: Cracks
Tiny cracks while drying? Mix a small amount of fresh clay with water to make a paste (slip) and fill the crack, then smooth it over and let it dry again.
This charming dish is now ready to hold your favorite rings and studs in style


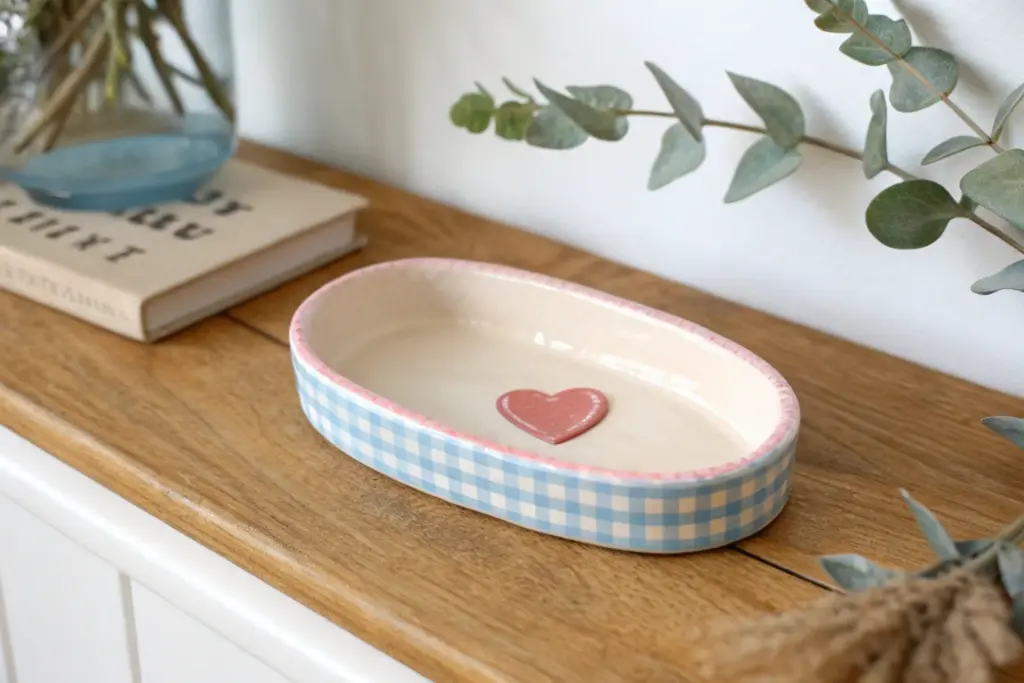
Wavy-Edge Catchall Tray
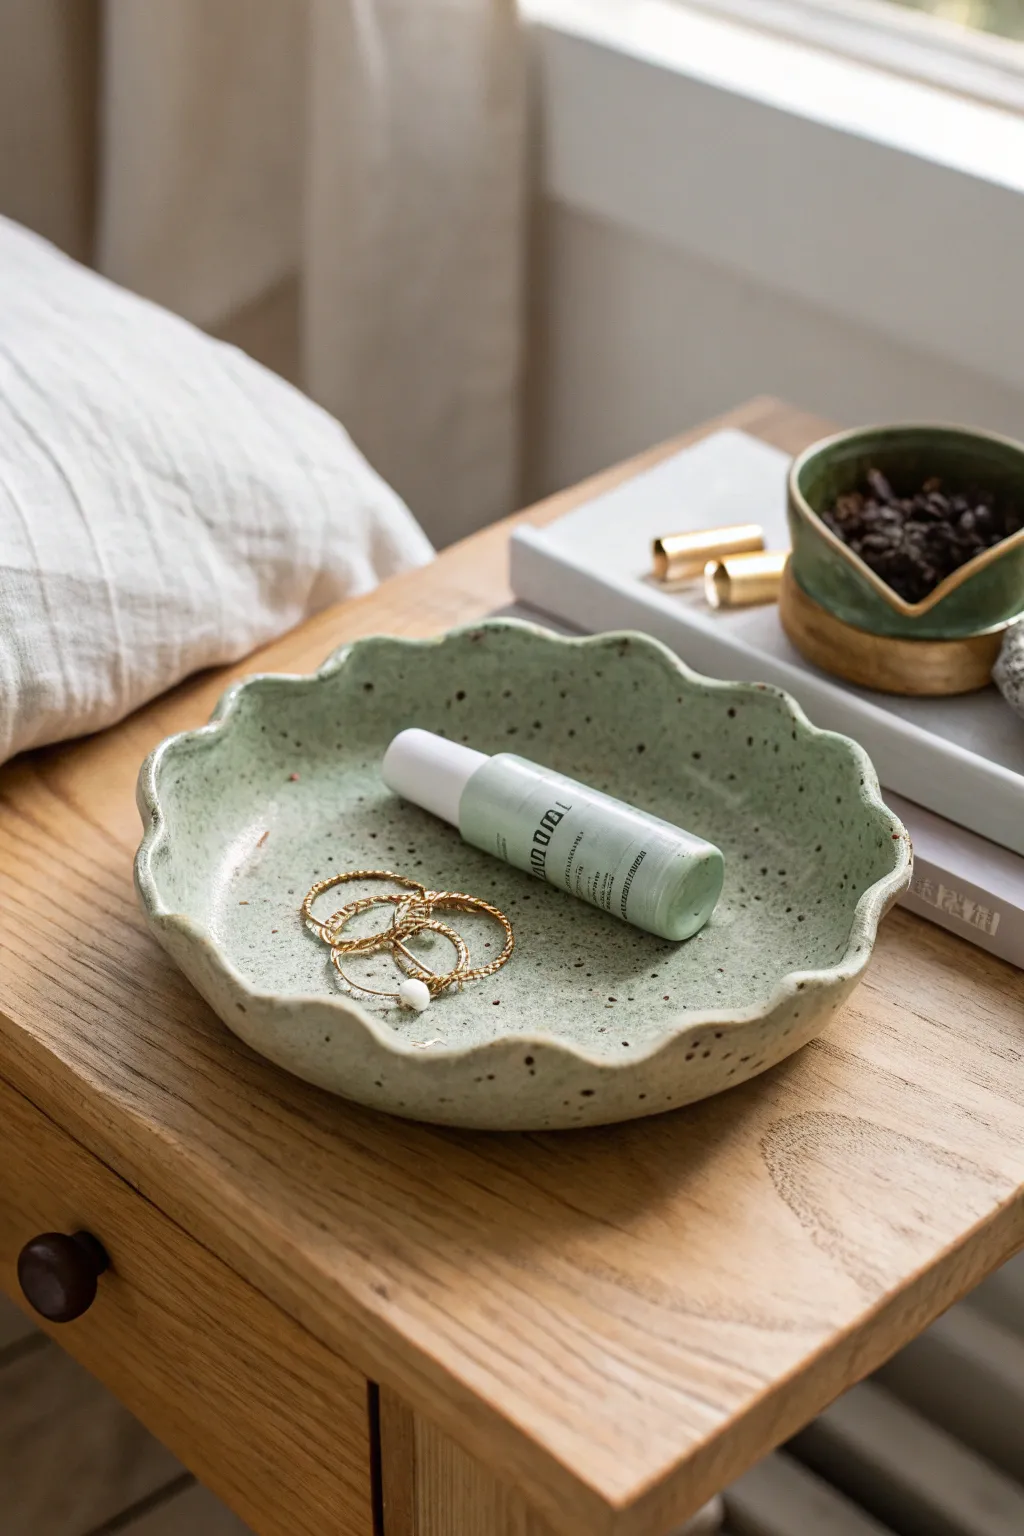
This trendy catchall features a charming, undulating rim and a subtle speckled finish that feels both modern and handmade. It is perfect for corralling everyday jewelry or display items on a bedside table.
Step-by-Step
Materials
- Air-dry clay (white or light grey)
- Rolling pin
- Canvas mat or parchment paper
- Circle template (bowl or plate approx. 6-7 inches)
- Craft knife or needle tool
- Small bowl of water
- Sponge or soft paintbrush
- Acrylic paints (Mint/Sage Green, Black/Dark Brown, White)
- Old toothbrush
- Gloss varnish or sealant
Step 1: Shaping the Clay
-
Condition the clay:
Start by taking a generous handful of air-dry clay. Knead it in your hands for a few minutes to warm it up and remove any air pockets, ensuring it’s pliable and smooth. -
Roll out the slab:
Place your clay on a canvas mat or parchment paper to prevent sticking. Use a rolling pin to flatten the clay to an even thickness of about 1/4 inch. -
Cut the circle:
Place your circle template (a bowl works perfectly) onto the clay slab. Trace around the edge with a needle tool or craft knife to cut out a perfect circle, then remove the excess clay. -
Create the rim:
Gently lift the edges of the flat circle upwards to create a shallow bowl shape. Pinch the sides up slightly so you have a defined wall, about 1 inch high. -
Form the waves:
To make the signature wavy edge, use your thumb and index finger. Gently push the clay rim outward with your index finger while supporting it on either side with your thumb and middle finger, creating a fluted pattern. -
Refine the shape:
Continue this pinching motion around the entire circumference. Aim for organic, soft waves rather than sharp, uniform spikes. -
Smooth the edges:
Dip your finger or a small sponge into water. Run it along the top rim and the inside of the bowl to smooth out any cracks, fingerprints, or rough texture.
Step 2: Drying and Finishing
-
Initial dry:
Let the tray dry undisturbed for 24-48 hours. I find that flipping it over halfway through the drying process helps the bottom dry evenly and prevents warping. -
Sand for smoothness:
Once fully cured and hard, use fine-grit sandpaper to gently buf away any remaining sharp edges or bumps on the rim and surface. -
Base coat mixing:
Mix a soft sage or mint green acrylic paint. You want a pastel tone, so add white to your green if it’s too vibrant. -
Apply base color:
Paint the entire tray—inside, outside, and bottom—with your mixed green. You may need two coats for full opacity, letting it dry between layers. -
Prepare the speckles:
Dilute a small amount of black or dark brown paint with water until it is the consistency of ink. Dip an old toothbrush into this mixture. -
Splatter effect:
Hold the toothbrush over the tray and run your thumb across the bristles to flick tiny droplets of paint onto the surface. Test on a scrap paper first to control the spray. -
Vary the density:
Rotate the tray while splattering to ensure the speckles are distributed naturally, rather than clustered in one spot. -
Allow paint to cure:
Let the paint dry completely. The splatter droplets can be thicker than normal paint, so give them extra time. -
Seal the piece:
Apply a coat of gloss varnish to give the tray that ceramic-like sheen shown in the photo. This also protects the paint from chipping.
Smooth Moves
Use a damp makeup sponge instead of a brush for the final water smoothing step. It eliminates brush strokes and leaves a porcelain-smooth finish.
Cracking Up?
If small cracks appear while the clay dries, make a ‘slurry’ of clay and water. Fill the cracks with this paste, let dry, and sand it smooth.
Place your favorite rings or trinkets inside to enjoy your new handcrafted décor piece


Daisy Flower Ring Dish
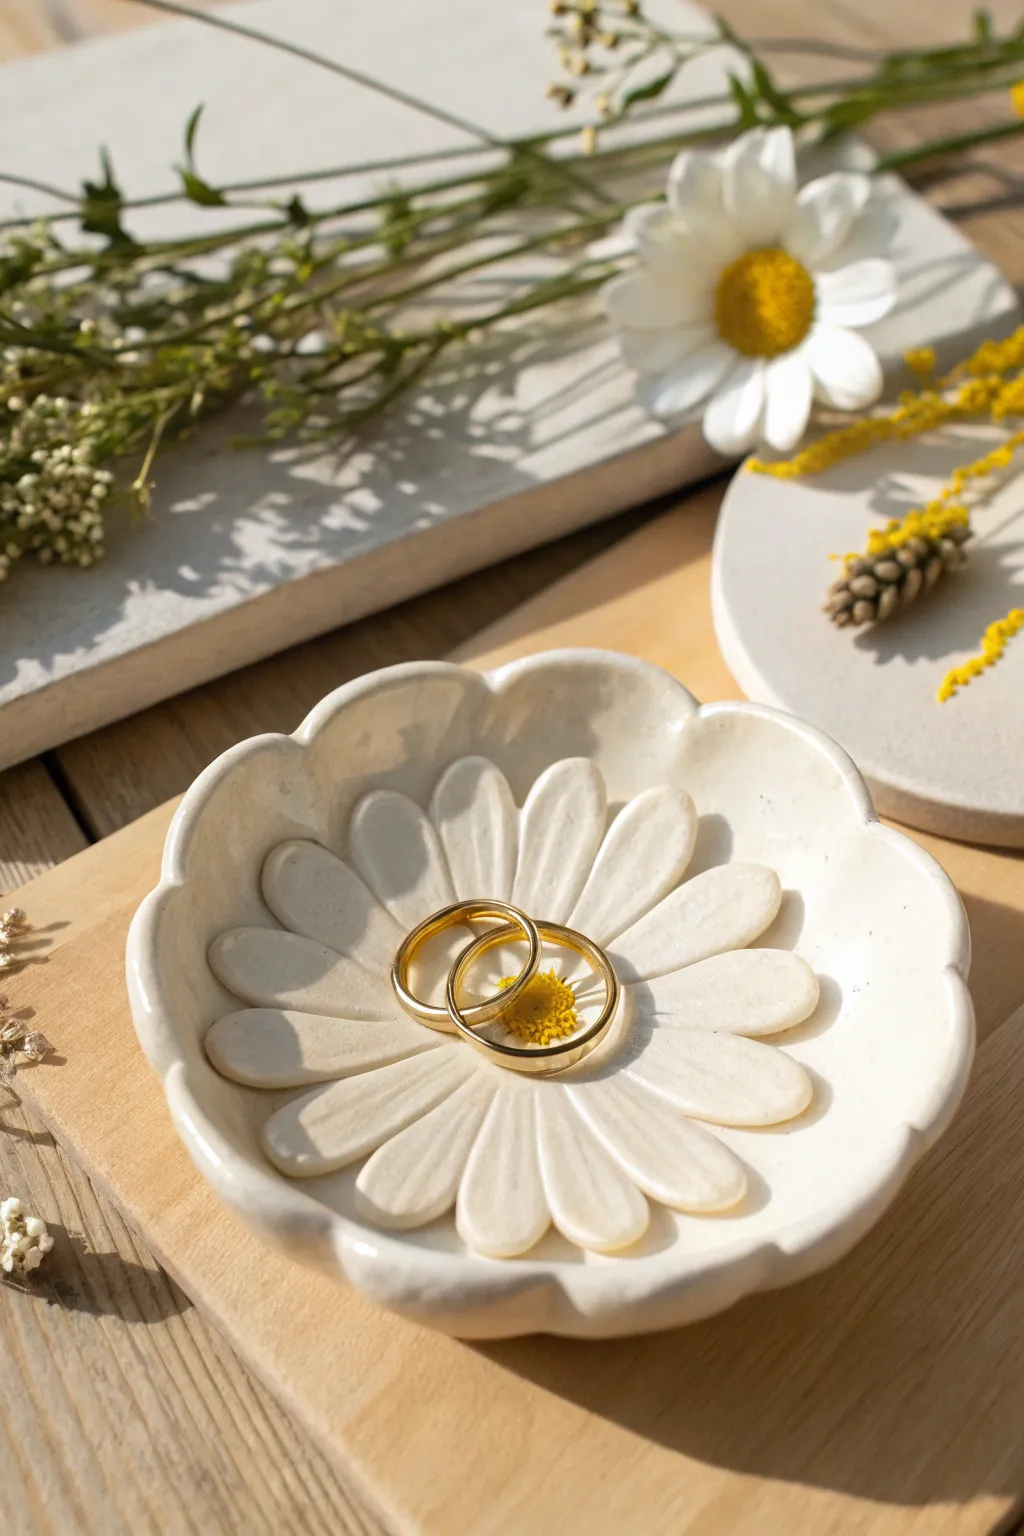
Capture the essence of spring with this delicate, daisy-shaped ring dish made from air-dry clay. Its gentle curving petals and sunny center create the perfect nesting spot for your favorite jewelry pieces.
Step-by-Step Tutorial
Materials
- White air-dry clay
- Rolling pin
- Small bowl or dish (for shaping)
- X-acto knife or clay cutting tool
- Small paintbrush
- Sponge
- Yellow acrylic paint
- Glossy varnish or glaze
- Water (for smoothing)
- Sandpaper (fine grit)
- Texturing tool or toothpick
Step 1: Shaping the Base
-
Prepare the Clay:
Start by kneading a ball of white air-dry clay until it’s soft, pliable, and free of air bubbles. -
Roll it Out:
Using your rolling pin, roll the clay out to an even thickness of about 1/4 inch. If you want a smoother surface, roll it out on a piece of parchment paper. -
Cut the Circle:
Find a circular object or use a template to cut out a perfect circle, roughly 4-5 inches in diameter, which will form the overall footprint of your flower.
Pro Tip: Seamless Petals
Use a damp paintbrush to blend the seams where the inner petals meet the base. This creates a solid, unified look rather than pieces just stuck on top.
Step 2: Sculpting the Petals
-
Mark the Petals:
Lightly sketch petal shapes onto your clay circle with a toothpick. Aim for rounded, elongated ovals that radiate from the center. -
Cut Out Petals:
carefully cut along your sketched lines using the X-acto knife, removing the excess clay between the petals. -
Add Dimension:
Gently lift each petal and smooth the cut edges with a finger dipped in a little water to soften any harsh angles. -
Create Inner Petals:
Roll smaller, tear-drop shaped pieces of clay to form a second, inner layer of petals. -
Attach Inner Layer:
Score the back of these smaller petals and the center of your base. Add a drop of water as ‘glue’ and press them firmly into place, radiating outward. -
Refine the Shape:
Use a modeling tool or the back of a spoon to gently press indentations down the center of each petal, giving them a realistic, concave curve.
Step 3: Forming the Center
-
Create the Core:
Roll a small ball of clay for the flower’s center and flatten it slightly into a disc shape. -
Texture the Center:
Press this disc into the middle of your flower. Use a needle tool, toothpick, or an old toothbrush to stipple the surface, creating a bumpy, pollen-like texture. -
Lift the Edges:
Carefully transfer your clay daisy into a small, shallow bowl. Let it slump naturally into the curve; this will ensure the dish holds rings securely once dry. -
Final Smooth:
Before leaving it to dry, do one last check for fingerprints and smooth them away with a damp sponge. -
Dry Time:
Let the piece dry completely in the bowl for at least 24-48 hours. I find letting it air dry slowly helps prevent cracking.
Level Up: Gold Rim
After the glaze dries, paint a very thin line of liquid gold leaf along the very edge of the outer petals for a luxurious, high-end finish.
Step 4: Finishing Touches
-
Sand Imperfections:
Once fully cured and hard, gently sand any rough edges with fine-grit sandpaper until the porcelain-like surface is buttery smooth. -
Paint the Center:
Dip a small brush into yellow acrylic paint and carefully color just the textured center disc. -
Add a Second Coat:
If the first layer of yellow looks streaky, add a second coat to make the center pop. -
Seal the Dish:
Apply a coat of glossy varnish or glaze over the entire dish. This not only adds a lovely shine but also protects the clay from moisture and scratches. -
Cure the Varnish:
Allow the varnish to dry according to the manufacturer’s instructions before placing any jewelry inside.
Now you have a charming spot to keep your treasures safe and organized on your nightstand


Cow Print Mini Tray
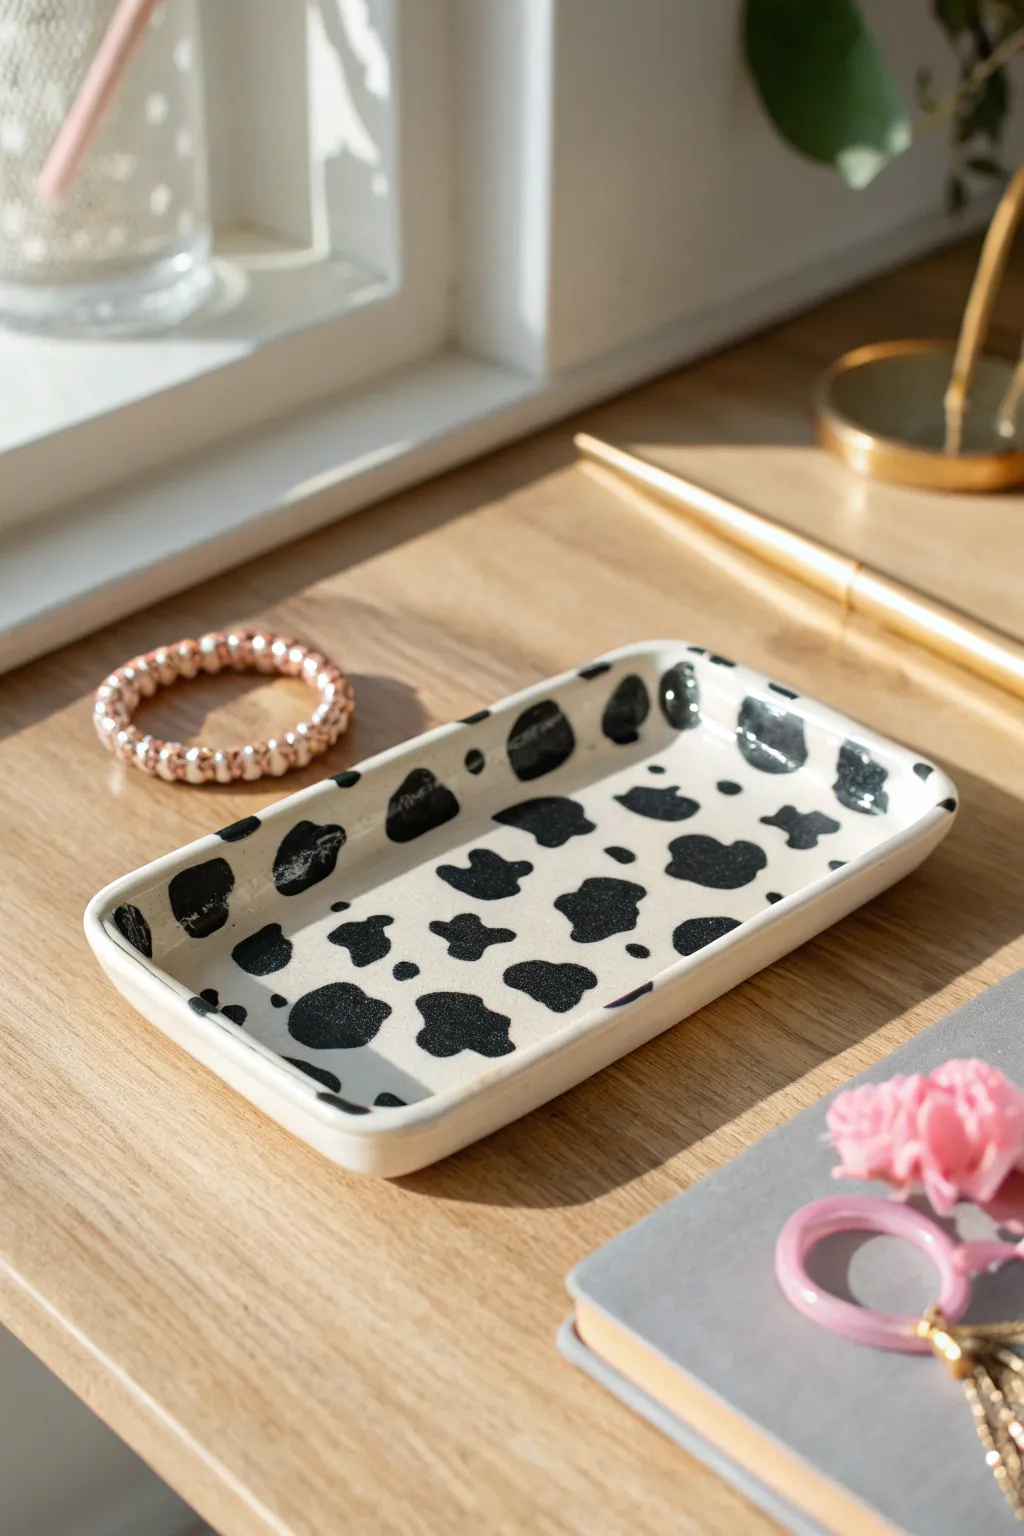
Embrace the fun and trendy aesthetic of this black and white catch-all dish, perfect for holding jewelry or desk essentials. The glossy finish and organic cow spots make this simple rectangular tray feel professionally crafted yet undeniably charming.
Step-by-Step Guide
Materials
- White air-dry clay or polymer clay
- Rolling pin
- sharp craft knife or clay slicer
- Small bowl of water
- Rectangle template (cardstock or paper)
- Black acrylic paint
- Small round paintbrush
- Fine-grit sandpaper
- High-gloss varnish or glaze
- Soft flat brush for sealing
Step 1: Shaping the Tray
-
Condition the Clay:
Start by kneading a generous clearer of white clay in your hands until it becomes soft, pliable, and free of any air pockets. -
Roll out the Slab:
Place the clay on a smooth work surface. Use your rolling pin to flatten it into an even slab, aiming for a consistent thickness of about 1/4 inch. -
Cut the Shape:
Lay your rectangular cardstock template over the clay. Using a sharp craft knife, trace around the edges to cut out a clean rectangle. Remove the excess clay. -
Smooth the Edges:
Dip your finger lightly in water and run it along the cut edges of the rectangle to soften any sharpness or jagged bits left by the knife. -
Form the Lip:
Gently pinch the edges of the clay upward to create a rim. I find it helpful to support the clay from underneath while using my thumb to press the center down slightly, creating a shallow basin. -
Refine the Corners:
Curve the corners slightly inward as you lift the sides, ensuring they join the walls smoothly without cracking. If cracks appear, smooth them out immediately with a damp finger. -
Final Smoothing:
Do a final pass over the entire surface with a damp sponge or finger to ensure the bottom is flat and the inside walls are seamless.
Natural Spot Placement
Avoid making your spots too round or evenly spaced. Wobbly edges and random clustering make the cow print look authentic rather than like polka dots.
Step 2: Painting the Pattern
-
Dry Completely:
Allow the clay tray to dry fully according to the package instructions. This usually takes 24-48 hours for air-dry clay. It must be bone dry before painting. -
Sand Imperfections:
Once dry, gently sand any rough spots, especially around the rim, using fine-grit sandpaper. Wipe away all dust with a slightly damp cloth. -
Outline the Spots:
Using a small round brush and black acrylic paint, begin painting irregular, organic shapes scattered across the surface. Let some spots wrap over the rim or disappear off the edge for a realistic textile look. -
Vary sizes:
Make sure to mix large, blob-like shapes with smaller dots to create a natural, unbalanced pattern. -
Fill the Spots:
Fill in your outlines with solid black paint. You may need a second coat of black to ensure full opacity without streaks. -
Add Tiny Details:
Use the very tip of your brush to add tiny, stray specks of black in the larger white areas to balance the negative space.
Step 3: Finishing
-
Dry the Paint:
Let the black acrylic paint dry completely, which should only take about 15 to 20 minutes. -
Apply Varnish:
Pour a small amount of high-gloss varnish into a dish. Using a soft flat brush, apply a thin, even coat over the entire top surface of the tray. -
Seal the Edges:
Carefully brush the glaze over the rim and sides, watching for drips. A glossy finish is key to making the clay look like ceramic. -
Final Cure:
Allow the first coat to dry, then apply a second coat for extra durability and shine. Let the tray cure fully before placing any items inside.
Uneven Clay Surface?
If your tray bottom isn’t drying flat, place a light book on top of it (with parchment paper in between) during the first few hours of the drying process.
Now you have a chic, speckled accessory ready to organize your space

The Complete Guide to Pottery Troubleshooting
Uncover the most common ceramic mistakes—from cracking clay to failed glazes—and learn how to fix them fast.
Smiley Face Trinket Bowl
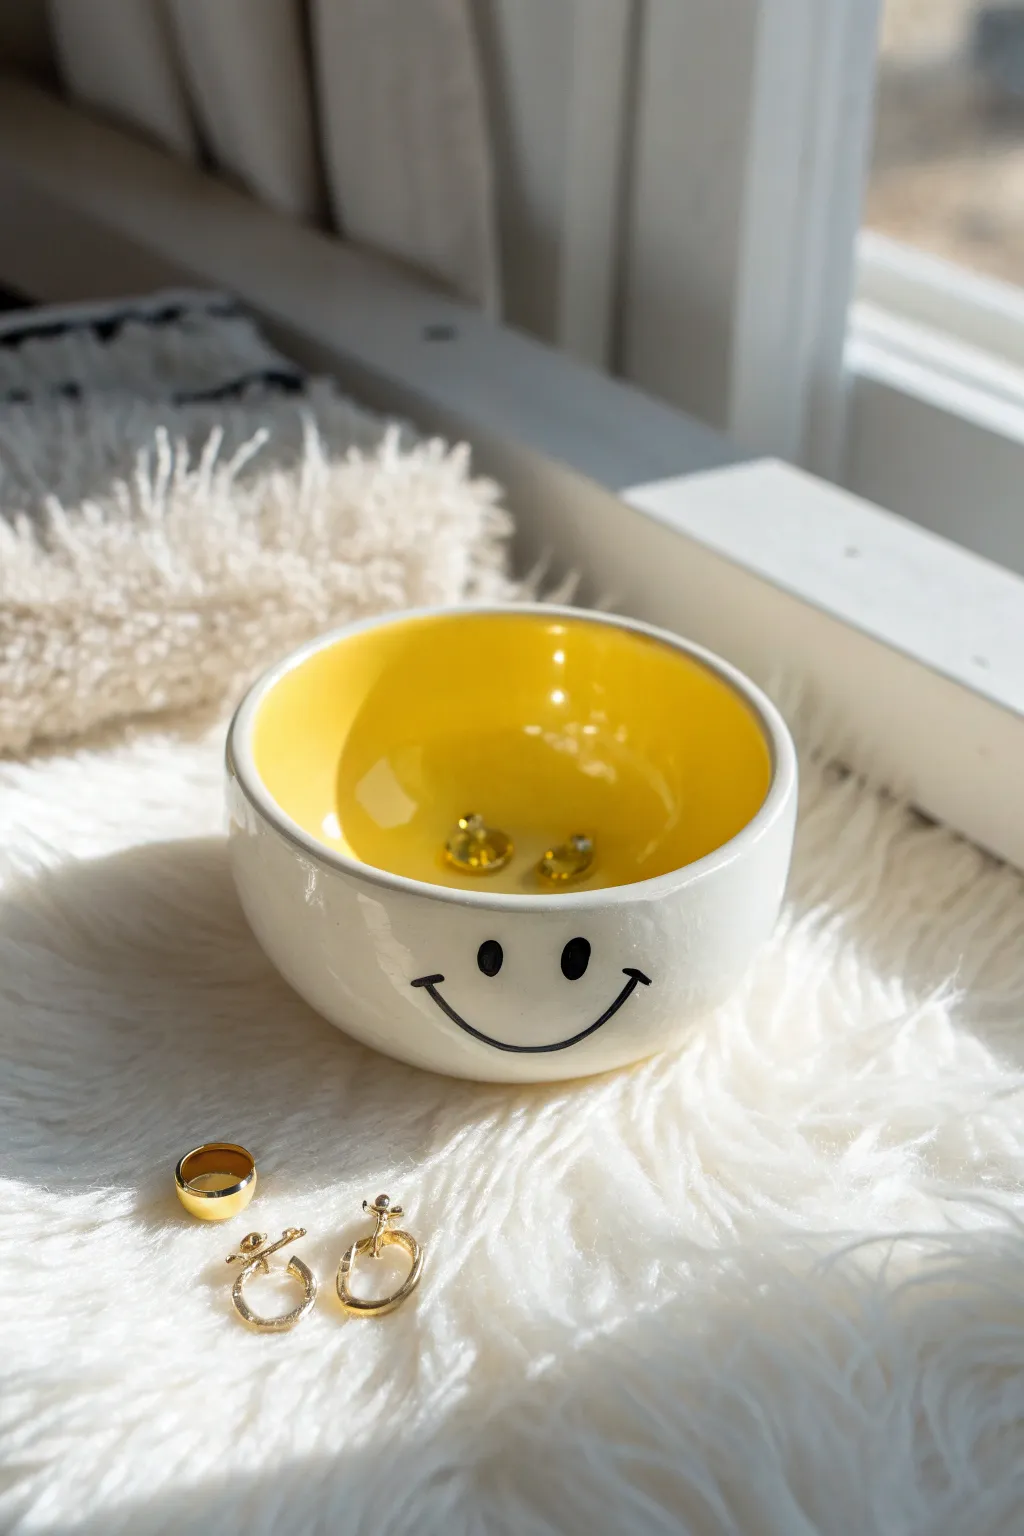
Bring a dose of dopamine to your nightstand with this cheerful ceramic trinket dish. Featuring a glossy yellow interior and a minimalist smiley face, it’s the perfect preppy spot to catch your favorite gold rings.
Step-by-Step
Materials
- White low-fire earthenware clay
- Rolling pin
- Small bowl (approx. 4-5 inches diameter) to use as a slump mold
- Pottery sponge
- Clay knife or fettling knife
- Rib tool (smooth ceramic or silicone)
- Underglaze (Sunshine Yellow and Jet Black)
- Clear dipping glaze or brush-on clear gloss glaze
- Soft fan brush
- Fine detail paintbrush (size 0 or 00)
- Kiln (or access to a firing service)
Step 1: Forming the Bowl
-
Roll the slab:
Begin by wedging your white earthenware clay to remove any air bubbles. Roll it out into an even slab, approximately 1/4 inch thick. I like to rotate the clay every few rolls to ensure it stretches evenly without warping. -
Cut the circle:
Find a circular object slightly larger than your slump mold bowl—a pot lid works well. Place it gently on the slab and cut around it using your fettling knife to get a clean clay circle. -
Smooth the edges:
Take a slightly damp sponge and run it along the cut edge of your clay circle. This softens the sharp angle created by the knife and prevents chipping later. -
Slump the clay:
Gently lift your clay circle and place it inside your chosen bowl mold. Press it down softly into the curve, starting from the center and working outward to avoid trapping air pockets. -
Refine the shape:
Use your rib tool to compress the clay against the mold’s interior. This smoothing action aligns the clay particles and creates that perfectly smooth surface you’ll need for glazing. -
Let it firm up:
Set the mold aside and allow the clay to dry until it reaches a leather-hard state. It should be firm enough to hold its shape but not brittle. -
Remove from mold:
Carefully pop the clay dish out of the mold. If the rim feels rough or uneven, use your damp sponge to do a final pass of smoothing. -
Bisque fire:
Allow the bowl to dry completely to the bone-dry stage. Load it into the kiln for a bisque firing to cone 04 (or according to your clay’s specifications).
Step 2: Painting and Glazing
-
Clean the bisque:
Once your bowl is out of the bisque firing and cool, wipe it down with a damp sponge to remove any kiln dust that could interfere with the glaze application. -
Apply yellow interior:
Using a soft fan brush, apply three even coats of Sunshine Yellow underglaze to the inside of the bowl. Let each coat dry to the touch before applying the next to ensure solid, opaque coverage. -
Clean the rim:
If any yellow underglaze drifted onto the rim or the outside, carefully wipe it away with a clean, damp sponge so the white clay body remains pristine. -
Draft the face:
Lightly sketch the position of the eyes and smile on the outside of the bowl using a regular pencil. The graphite will burn off in the kiln, leaving no trace. -
Paint the smile:
Load your fine detail brush with Jet Black underglaze. Paint the smile first, using a confident, sweeping motion to get a smooth curve rather than a shaky line. -
Add the eyes:
Paint two small, vertical ovals for the eyes just above the smile. Ensure they are fully opaque; you may need a second dab of black once the first dries. -
Clear glaze application:
Once the underglaze is completely dry, apply a clear gloss glaze over the entire piece. You can dip the bowl if you have a large bucket, or brush on two to three coats if using brush-on glaze. -
Glaze fire:
Stilt the bowl in the kiln so the glazed bottom doesn’t stick to the shelf. Fire to cone 05/06 (or the temperature recommended for your clear glaze). -
Final inspection:
Unload the kiln once cool. Check for any sharp spots on the foot of the bowl and sand them down if necessary.
Glaze Crawling?
If the yellow glaze pulls away revealing white spots, you likely had dust on the bisque or applied the glaze too thick. Wipe bisque thoroughly next time.
Make It Personal
Swap the yellow interior for hot pink or lilac for a different vibe, or paint tiny initials on the bottom of the bowl for a custom gift.
Now you have a happy little home for your jewelry that smiles back at you every morning
Pastel Charm Keychain Tags
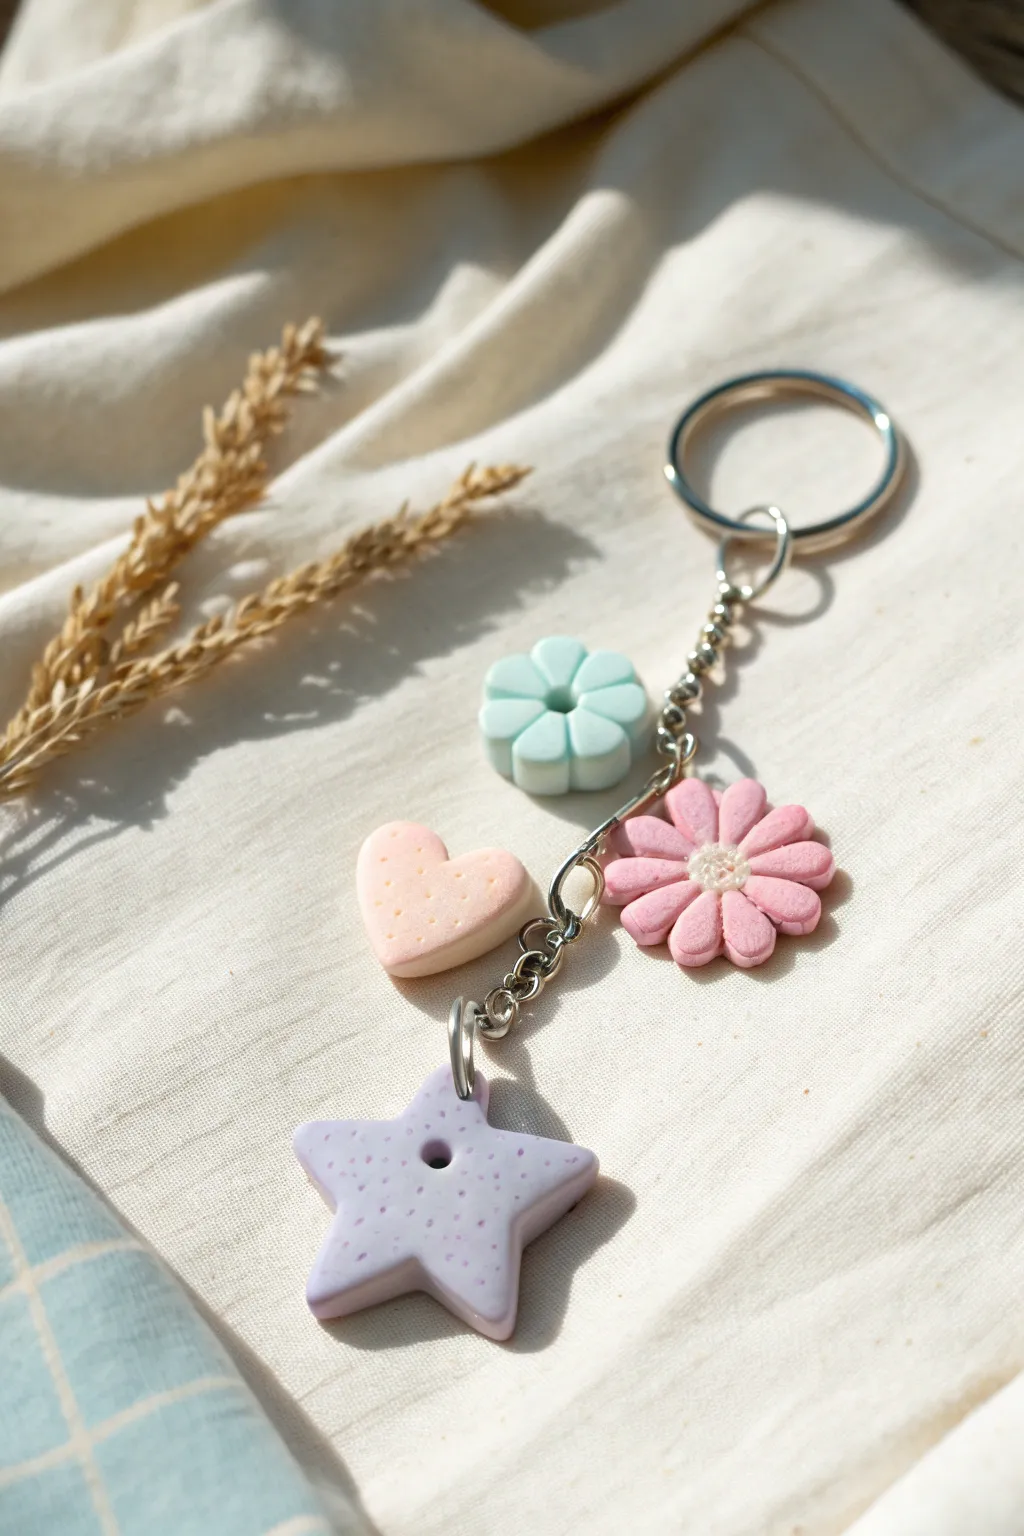
Embrace the soft, preppy aesthetic with this sweet collection of handmade polymer clay charms. Featuring a chunky star, a delicate heart, and two different floral designs, this keychain makes for a perfect backpack accessory or a thoughtful handmade gift.
Step-by-Step Guide
Materials
- Polymer clay in pastel pink, mint green, purple, and white
- Silver keychain ring with chain links
- Jump rings (silver, 6-8mm)
- Eye pins (silver)
- Clay roller or pasta machine
- Small cookie cutters (star, heart, small flower)
- Needle tool or toothpick
- Dotting tool
- Liquid polymer clay (optional, for connecting)
- Glaze or UV resin (optional for shine)
- Pliers (round nose and flat nose)
- Parchment paper and baking tray
Step 1: Prepping and Shaping the Clay
-
Condition the colors:
Begin by kneading your pastel pink, mint green, and purple clays separately until they are soft and pliable. If the colors feel too dark, mix in a small amount of white clay to achieve that soft, milky pastel straight from the preppy mood board. -
Roll out the slabs:
Roll each color out onto a clean surface or parchment paper to a thickness of about 4-5mm. You want these charms to be chunky and durable, almost like little cookie bites. -
Cut the basic shapes:
Use your heart cutter on the pink clay and the star cutter on the purple clay to stamp out your main shapes. Gently smooth the edges with your finger to remove any sharp lines left by the cutter.
Fixing Fingerprints
Noticed prints on your clay? Lightly brush the raw clay with baby oil or cornstarch and smooth it out before baking.
Step 2: Sculpting the Floral Charms
-
Create the mint flower bead:
For the mint green charm, roll a small ball of clay and slightly flatten it into a thick disc. -
Detail the mint petals:
Using a knife tool or the side of a toothpick, press indentations around the edge of the disc to divide it into five or six sections, creating a simple, puffy flower shape. -
Make the hole:
Press a larger dotting tool into the center of the mint flower to create a distinct central divot that mimics a bead look. -
Form the pink daisy petals:
For the pink daisy, roll 8-10 tiny teardrop shapes from pink clay. Arrange them in a circle on your work surface with the points meeting in the center. -
Add the daisy center:
Roll a tiny ball of white clay and flatten it gently over the center points of the pink petals to lock them together. -
Texture the daisy:
Use a needle tool to gently prick the surface of the white center to give it a realistic, pollen-like texture.
Step 3: Adding Texture and Hardware
-
Speckle the star:
To get the speckled cookie dough effect on the star, create tiny crumbs of darker purple or pink clay and press them randomly into the surface of the purple star. I find rolling over it lightly helps embed them smoothly. -
Add texture to the heart:
Use a toothbrush or a ball of aluminum foil to gently tap the surface of the pink heart, giving it a soft, baked texture similar to a sugar cookie. -
Insert eye pins:
Carefully trim your eye pins to size. Insert an eye pin into the top of the heart, the pink daisy, and the mint flower. For the daisy, insert it horizontally through a petal or behind the flower if thicker. -
Pierce the star:
Instead of an eye pin, use a straw or a tool to poke a clean hole directly through the top point of the star charm. This variation adds visual interest to how the charms hang.
Reinforce the Pins
For extra durability, pull the eye pin out after baking, add a drop of superglue, and slide it back in immediately.
Step 4: Baking and Assembly
-
Bake the charms:
Arrange all your pieces on a parchment-lined baking sheet. Bake according to your clay manufacturer’s instructions—usually around 275°F (135°C) for 15-30 minutes depending on thickness. -
Cool down:
Let the pieces cool completely before handling. They are fragile while warm. -
Attach jump rings:
Using your pliers, twist open a jump ring (don’t pull it apart) and loop it through the eye pin of the mint flower. -
Connect to the chain:
Attach the mint flower to the upper part of the keychain chain. Repeat this process for the pink daisy and the heart, spacing them out along the chain links. -
Attach the feature charm:
Finally, use a slightly larger jump ring to connect the purple star through its punched hole to the very bottom of the chain as the anchor piece. -
Secure everything:
Go back and ensure every jump ring is closed tightly so your charms stay secure on your bag.
Now clip your new creation onto your bag or keys and enjoy the pastel vibes you’ve crafted


What Really Happens Inside the Kiln
Learn how time and temperature work together inside the kiln to transform clay into durable ceramic.
Bow-Shaped Hair Clip Tray
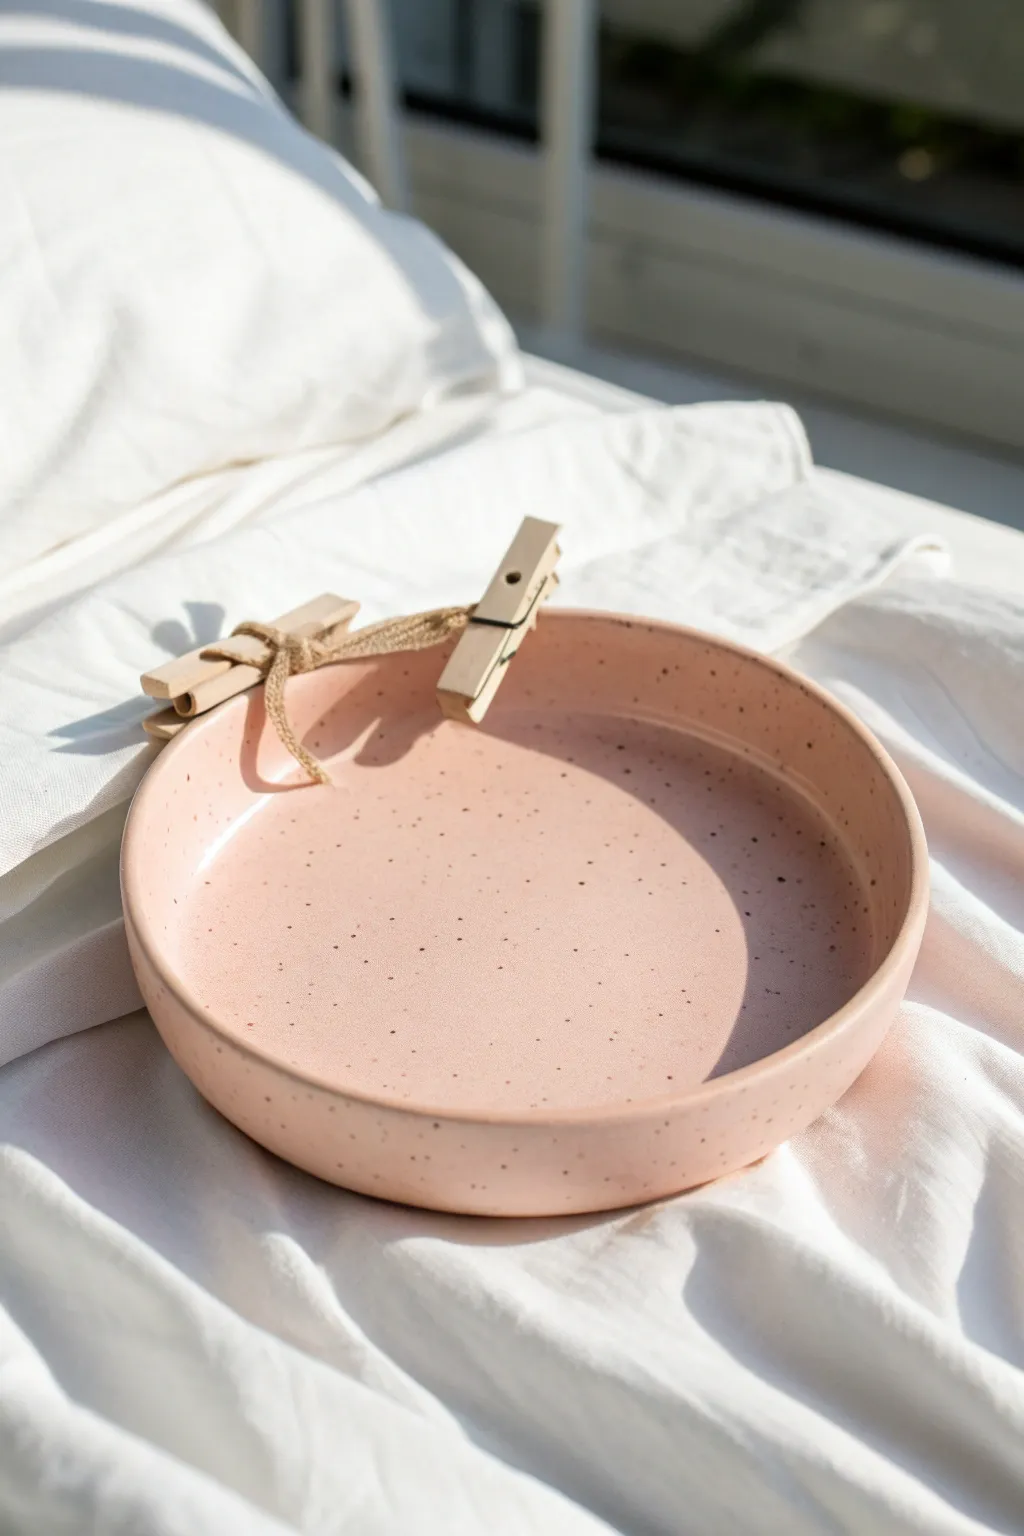
This charming, shallow tray features a soft blush pink finish dotted with playful speckles, perfect for holding hair clips or jewelry. The addition of wooden accents and twine gives it a sweet, rustic-preppy vibe that looks lovely on a nightstand.
Detailed Instructions
Materials
- Air-dry clay (white)
- Acrylic paint (blush pink, dark brown/black)
- Clay roller or rolling pin
- Circle template or bowl (approx. 6 inches)
- Clay knife or craft knife
- Sponge or fine-grit sandpaper
- Old toothbrush
- Matte or satin sealant/varnish
- Small wooden clothespins (2)
- Jute twine
- Water cup
Step 1: Shaping the Base
-
Condition the clay:
Start by taking a generous handful of white air-dry clay and kneading it in your hands until it is warm, pliable, and free of cracks. -
Roll it out:
Place the clay on a smooth surface or craft mat. Use your roller to flatten the clay into an even slab, aiming for a thickness of about 1/4 inch. -
Cut the circle:
Place your bowl or circle template onto the rolled clay. Use your craft knife to trace around the edge, cutting out a perfect circle. Remove the excess clay. -
Create the rim:
Rather than rolling a coil, create a seamless rim by gently lifting the edges of your circle. Use your thumbs to press the center down while pulling the outer edge up to form a shallow wall, about 1 inch high. -
Smooth the edges:
Dip your finger in a little water and run it along the top rim and the transition curve inside the bowl to smooth out any distinct fingerprints or cracks. Aim for a clean, perpendicular wall. -
Let it dry:
Set the tray aside in a dry, safe spot. Allow it to air dry completely for 24-48 hours, flipping it over halfway through to ensure the bottom dries evenly.
Step 2: Refining and Painting
-
Sand for smoothness:
Once fully dry, take your fine-grit sandpaper or a sanding sponge and gently buff the entire surface. Pay special attention to the rim to ensure it feels soft to the touch. -
Wipe clean:
Use a slightly damp cloth or dry brush to remove all the sanding dust from the bowl before painting. -
Apply the base color:
Paint the entire bowl—inside, outside, and bottom—with your blush pink acrylic paint. You will likely need 2-3 coats for full opacity; let each coat dry before adding the next. -
Prepare the speckle mix:
Mix a small amount of dark brown or black acrylic paint with a few drops of water. You want a fluid consistency, similar to heavy cream or melted ice cream. -
Splatter texture:
Dip the bristles of an old toothbrush into the watered-down paint. Hold the brush over the bowl and run your thumb across the bristles to flick tiny speckles onto the surface. I like to practice on a paper towel first to control the spray. -
Seal the piece:
After the paint is completely dry, apply a coat of matte or satin varnish to protect the surface from scratches and give it a finished ceramic look.
Splatter Control
For finer speckles, hold the toothbrush closer to the clay. For larger, more dramatic spots, load the brush with more water and flick from a greater distance.
Step 3: Adding the Accents
-
Tie the bow:
Take a short length of jute twine and tie it into a small, simple bow. Trim the tails so they are relatively short. -
Clip the clothespins:
Take two small wooden craft clothespins. Clip one directly onto the rim of the bowl. -
Attach the bow:
Take the second clothespin and clip it right next to the first one, capturing the center knot of your jute bow inside the jaws of the clip to hold it in place. -
Final adjustment:
Adjust the angle of the clips slightly so they sit nicely together, adding a mixed-media element to your clay creation.
Gloss it Up
Swap the matte varnish for a high-gloss glaze or UV resin. This mimics the look of fired ceramic glazing and makes the pink color pop even more.
Place this on your vanity to keep your favorite accessories organized in style
Mini Succulent Planter With Tiny Flowers

This adorable mini planter brings a touch of cottagecore charm to any windowsill with its soft sage green finish and delicate raised relief details. You’ll create a custom-sculpted pot featuring tiny heart borders and sweet dimensional flowers that look like they’re blooming right from the clay.
Step-by-Step Tutorial
Materials
- Air-dry clay or polymer clay (white)
- Small round clay cutter or jar lid (approx. 3-4 inch diameter)
- Rolling pin
- Clay tools (needle tool, small ball stylus)
- Slip (clay mush) or liquid clay adhesive
- Sage green acrylic paint (matte finish)
- Acrylic paints: soft pink, white
- Small paintbrushes (detail rounds and a flat shader)
- Clear matte varnish
- Small saucer mold or additional clay for base
- Potting soil and mini succulents/flowers
Step 1: Forming the Pot Base
-
Roll the base:
Begin by rolling out a slab of clay to about 1/4 inch thickness. Use your round cutter or jar lid to cut a perfect circle for the bottom of your pot. -
Create the walls:
Roll a long rectangular strip of clay, also 1/4 inch thick. The length should match the circumference of your base circle, plus a tiny bit of overlap for joining. -
Construct the cylinder:
Wrap the rectangular strip around the circular base. Carefully score (scratch) and slip the edges where they meet the base and where the wall overlaps itself to create a strong seal. -
Smooth the seams:
Use your fingers or a modeling tool to blend the seams on both the inside and outside until they are invisible. Gently flare the rim outward slightly if you prefer a less cylindrical look.
Clay Smoothing Strategy
Use a slightly damp sponge or finger to smooth the clay surface before adding relief details. This saves sanding time later and creates a professional finish.
Step 2: Sculpting Relief Details
-
Make the heart rim:
Roll a very thin snake of clay. Cut tiny segments and form them into microscopic ‘V’ shapes to create hearts. Attach these evenly around the upper rim using a tiny dab of slip. -
Form the petals:
For the side flowers, roll tiny balls of clay and flatten them into teardrop shapes. Arrange five of these in a circle on the side of the pot to form a flower. -
Add flower centers:
Roll a tiny ball of clay and press it into the center of your petal ring. Use a needle tool to add texture to the center if desired. -
Create stems and leaves:
Roll extremely thin snakes of clay for stems and attach them trailing from the flowers. Add small flattened ovals for leaves, using a knife tool to impress vein lines. -
Sculpt the saucer:
Create a simple shallow dish slightly wider than your pot using the same slab method as the base. Keep it simple as it serves as a visual anchor.
Step 3: Painting and Finishing
-
Dry the clay:
Allow your clay to dry completely according to package instructions (air dry usually takes 24-48 hours; bake polymer clay as directed). -
Base coat:
Paint the entire outside of the pot with the sage green acrylic paint. Avoid thick globs so you don’t obscure your raised details. -
Paint the relief details:
Using a very fine detail brush, paint the raised hearts on the rim white. Paint the flower petals white, shading the centers with soft pink. -
Enhance the vines:
Carefully highlight the stems and leaves with white paint. A dry-brush technique works well here to catch just the raised textures. -
Paint the saucer:
Paint the separate saucer base in a dusty rose pink color that complements the flower centers on the pot. -
Seal the project:
Once all paint is totally dry, apply a coat of clear matte varnish to protect the finish from moisture. -
Plant:
Fill the pot with suitable cactus soil and carefully arrange your succulent and small blooming stems inside.
Add Drainage
Before drying, use a straw to punch a hole in the bottom center. This is crucial for succulent health to prevent root rot from overwatering.
Place your new mini planter in a sunny spot to enjoy the charming details every day

TRACK YOUR CERAMIC JOURNEY
Capture glaze tests, firing details, and creative progress—all in one simple printable. Make your projects easier to repeat and improve.
Rainbow Pencil Cup
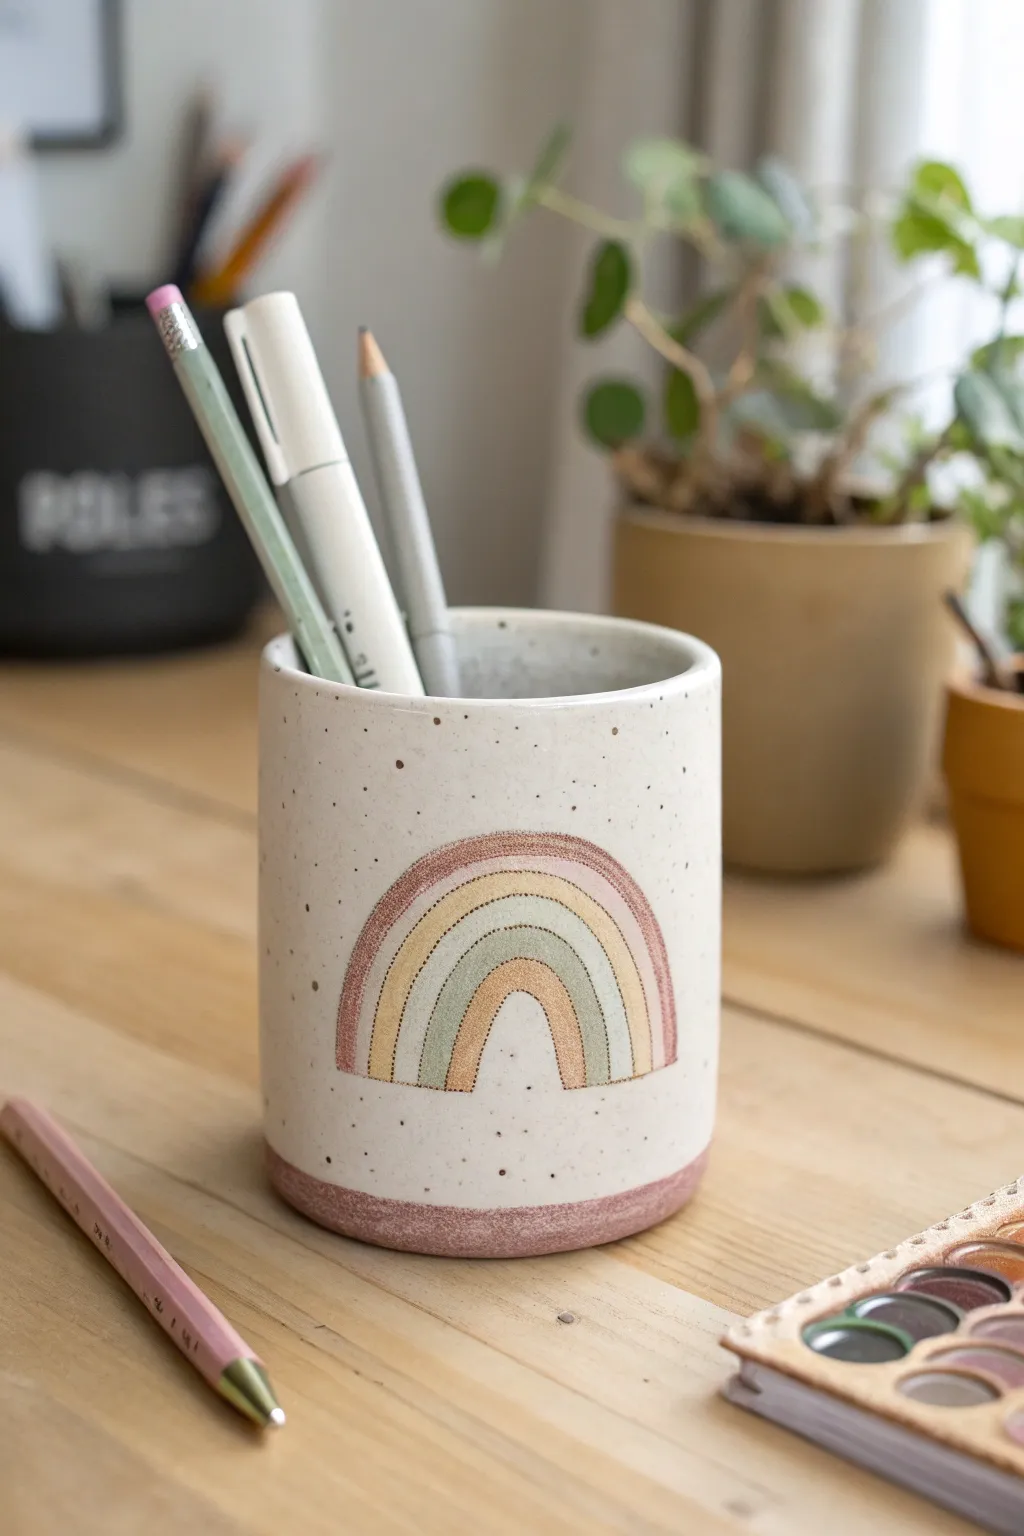
Bring a touch of muted magic to your desk with this handmade pencil holder, featuring a cozy, speckled finish and a subtle earthy rainbow. It mimics the look of high-end ceramic stoneware without needing a kiln, using clever polymer clay techniques to get that perfect pottery texture.
Detailed Instructions
Materials
- White polymer clay (large block)
- Fimo effect ‘Grantie’ or black pepper for speckling
- Polymer clay in muted earth tones: terracotta, sage green, mustard yellow, blush pink
- Acrylic roller or pasta machine
- Empty soda can or glass jar (to use as a form)
- Parchment paper
- Needle tool or toothpick
- Clay slicer or craft knife
- Liquid polymer clay (optional)
- Matte water-based varnish
Step 1: Creating the Speckled Base
-
Prepare the speckle mix:
Condition a large block of white clay until soft. To achieve that ceramic stoneware look, mix in a small amount of granite-effect clay or cracked black pepper. Knead thoroughly until the specks are evenly distributed. -
Roll the slab:
Roll out your speckled clay into a long, even rectangular slab about 1/4 inch thick. Make sure it is long enough to wrap completely around your chosen form (like a soda can) with a little overlap. -
Cut to size:
Use a long blade or ruler to cut a clean rectangle from your slab. The height should be roughly 4-5 inches depending on how tall you want your cup. -
Form the cylinder:
Wrap parchment paper around your soda can or jar form. Then, wrap your clay rectangle around it carefully. Join the two ends by slicing through both layers at an angle and removing the excess, then smoothing the seam with your finger or a tool until invisible. -
Add the base:
Roll a circular piece for the bottom. Place your cylinder on top of it and trim the excess around the edge. Blend the seams upward securely so the bottom is fully attached to the walls.
Step 2: Designing the Rainbow
-
Mix muted colors:
Prepare your accent colors. If your clays are too bright, mix in a tiny bit of brown or translucent clay to desaturate them for that earthy, bohemian vibe seen in the photo. -
Roll coils:
Roll thin, even snakes of distinct colors: a terracotta for the outer arch, followed by blush, mustard, sage green, and a smaller terracotta center. -
Flatten the arches:
Gently flatten your clay snakes with a roller so they become flat ribbons rather than round tubes. This makes them look like an embossed design. -
Apply the first arch:
Start with the smallest central arch. Press it gently onto the side of your clay cylinder. I find it easiest to work from the center outward to keep the shape symmetrical. -
Build the rainbow:
Layer the subsequent colored ribbons over the first one, pressing them snugly against each other so there are no gaps between the arches. -
Trim the bottom edges:
Once all arches are applied, use your blade to slice strictly horizontally across the bottom of the rainbow legs so they end in a straight line.
Seamless Seams
When joining the clay cylinder, use a little liquid polymer clay on the cut edges before pressing them together. It acts like glue and prevents cracking during baking.
Step 3: Adding Texture & Finishing
-
Create the base rim:
Take a portion of the terracotta or pinkish-brown clay and roll a medium-thickness band. Wrap this around the very bottom of the cup to create the dipped base effect. -
Texture the rainbow:
Using a needle tool, gently scratch vertical lines or tiny dots into the rainbow bands to give them a rougher, stone-like texture compared to the smooth cup. -
Smooth imperfections:
Check the rim of the cup. Use your finger and a little cornstarch or baby oil to smooth the top edge so it is rounded and professional-looking. -
Bake carefully:
Bake the piece according to your clay package instructions (usually 275°F for 30 minutes), keeping the can inside for support. Let it cool completely before removing the form. -
Optional glaze:
For extra durability and a true ceramic feel, apply a coat of matte varnish to the white areas, leaving the rainbow slightly rougher for contrast.
Sticky Situation?
If the clay sticks to your creative surface or roller, dust everything lightly with cornstarch. It washes off after baking and won’t affect the final color or strength.
Fill your new creation with your favorite pens and enjoy the satisfaction of a tidy, stylish workspace
Toothbrush Holder With Preppy Pattern Band
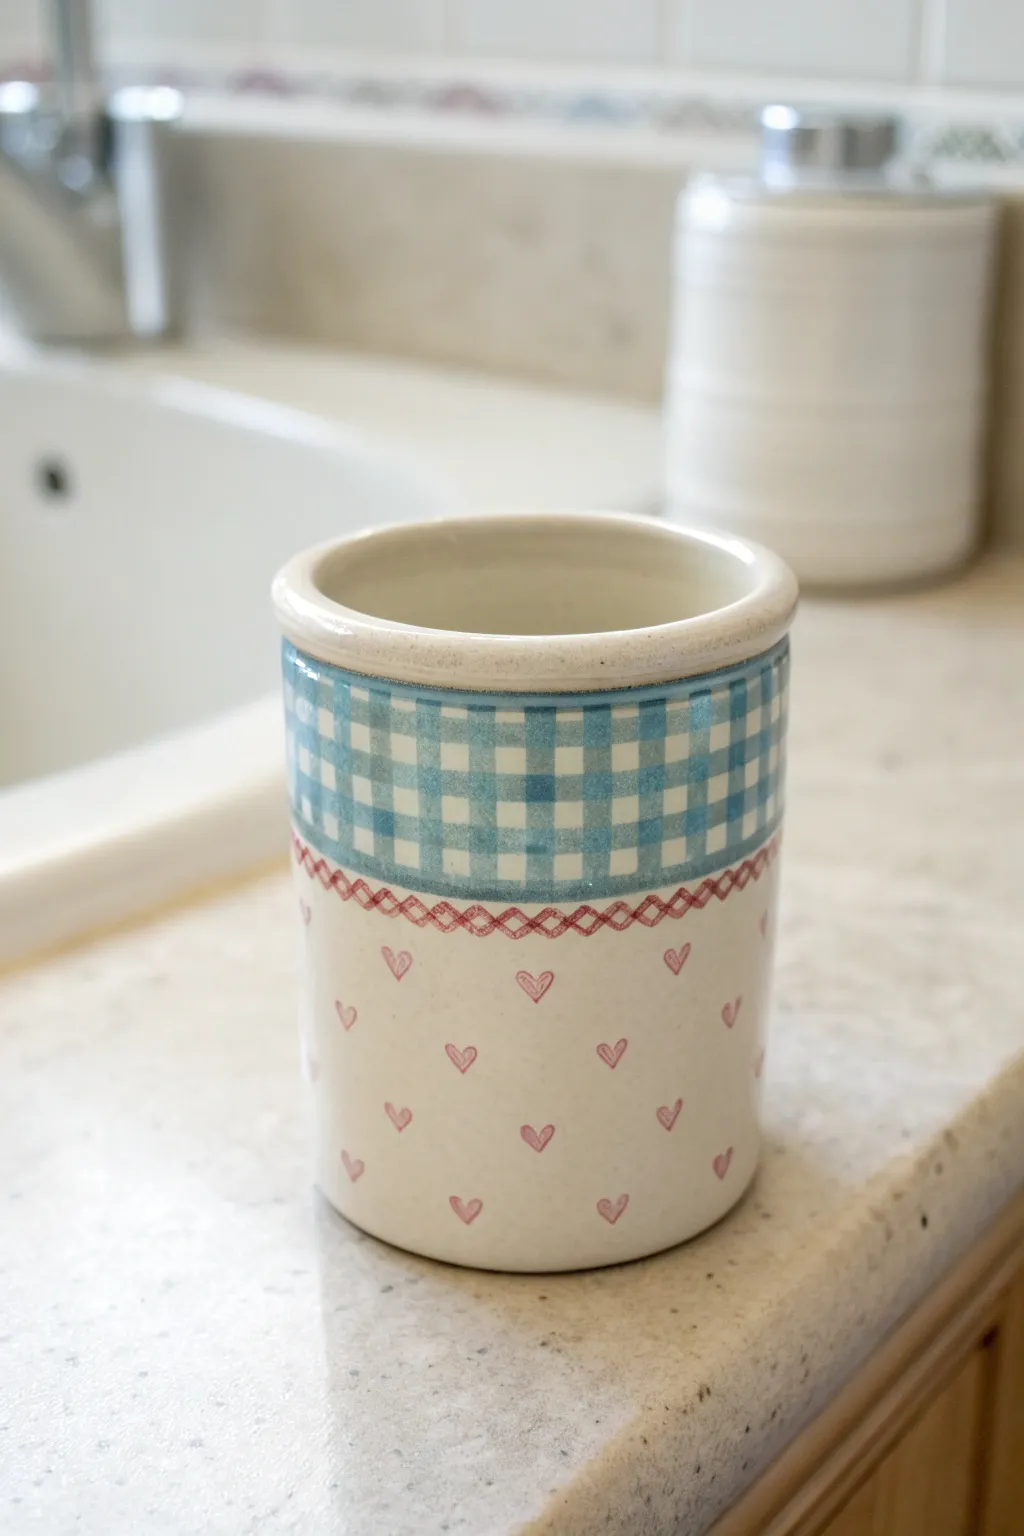
Brighten up your bathroom vanity with this charming, farmhouse-inspired toothbrush holder. Featuring a classic blue gingham band and sweet hand-painted hearts, this functional piece perfectly blends preppy style with handmade warmth.
Step-by-Step
Materials
- White or cream polymer clay (approx. 4-6 oz)
- Straight-sided drinking glass or metal cutter (for forming)
- Acrylic rolling pin
- Gingham patterned transfer paper OR blue acrylic paint and fine liner brush
- Red and pale pink acrylic paint
- Detail paintbrush (00 or 000 size)
- Fine-grit sandpaper
- Polymer clay gloss glaze or waterproof varnish
- X-acto knife or clay blade
- Ruler
- Oven for baking
Step 1: Forming the Vessel
-
Condition the Clay:
Begin by conditioning your white or cream polymer clay in your hands until it is soft and pliable. This prevents cracks later on. -
Roll the Slab:
Roll out the clay on a clean, flat surface to a uniform thickness of about 1/4 inch. A thicker wall makes the final cup sturdier for holding items. -
Cut the Base:
Use a round cutter or trace the bottom of your forming glass to cut a perfect circle for the base of the holder. -
Cut the Wall:
Measure the circumference of your base. Cut a rectangle from your rolled clay that is exactly that length plus a tiny overlap, and as tall as you want the holder to be (usually 4-5 inches). -
Assemble the Cylinder:
Wrap the rectangular slab around your glass form (you can wrap the glass in parchment paper first for easy removal). Join the vertical seam by gently smoothing the clay together with your thumb or a clay tool. -
Attach the Base:
Place the cylinder onto the round base. Blend the clay from the walls down into the base on the outside until the seam disappears completely. -
Create the Lip:
Roll a thin snake of clay and attach it to the top rim to create a rounded, finished lip. Smooth it thoroughly into the main body so it looks like one cohesive piece. -
Bake the Form:
Bake the clay cylinder according to the manufacturer’s instructions. I usually prop it up with some crumpled foil inside so it doesn’t slump. Let it cool completely.
Step 2: Painting the Design
-
Prepare the Surface:
Once cool, lightly sand any bumps or fingerprints with fine-grit sandpaper, then wipe clean with a damp cloth. -
Mark the Gingham Zone:
Using a pencil, lightly mark a horizontal line about 1.5 inches down from the top rim. This defines where your blue pattern will go. -
Paint the Vertical Stripes:
Mix a translucent blue (or water down your acrylic paint). Paint vertical stripes about 1/4 inch wide along the top section. Let this layer dry fully. -
Paint the Horizontal Stripes:
Paint horizontal stripes of the same width and color transparency over the vertical ones. Where the stripes cross, the blue will naturally appear darker, creating that classic gingham effect. -
Add Dimension:
If the ‘crossed’ squares aren’t dark enough, dab a little full-strength blue paint onto those specific intersections to make the check pattern pop. -
Paint the Border:
Using your finest brush and red paint, create the decorative band just below the blue gingham. Paint a series of small ‘X’ shapes that touch each other, mimicking a cross-stitch pattern. -
Add the Hearts:
On the bottom cream section, paint small, scattered hearts using pale pink paint. Keep them random but evenly spaced for a delicate look. -
Seal the Project:
Since this will live in a bathroom, apply 2-3 coats of a waterproof varnish or polyurethane gloss, letting each coat dry completely. This protects the paint from water splashes.
Wobbly Lines?
If painting straight gingham lines is tough, use thin masking tape or washi tape to mask off the stripes. Paint, let dry, peel, and re-tape for the horizontal set.
Pro Sealing Tip
Don’t skip the bottom! When varnishing, flip the holder over and seal the base thoroughly. This prevents trapped water on the counter from softening the clay over time.
Now you have a custom, boutique-style accessory to organize your morning routine
Mushroom Ring Cone in Pastel Colors
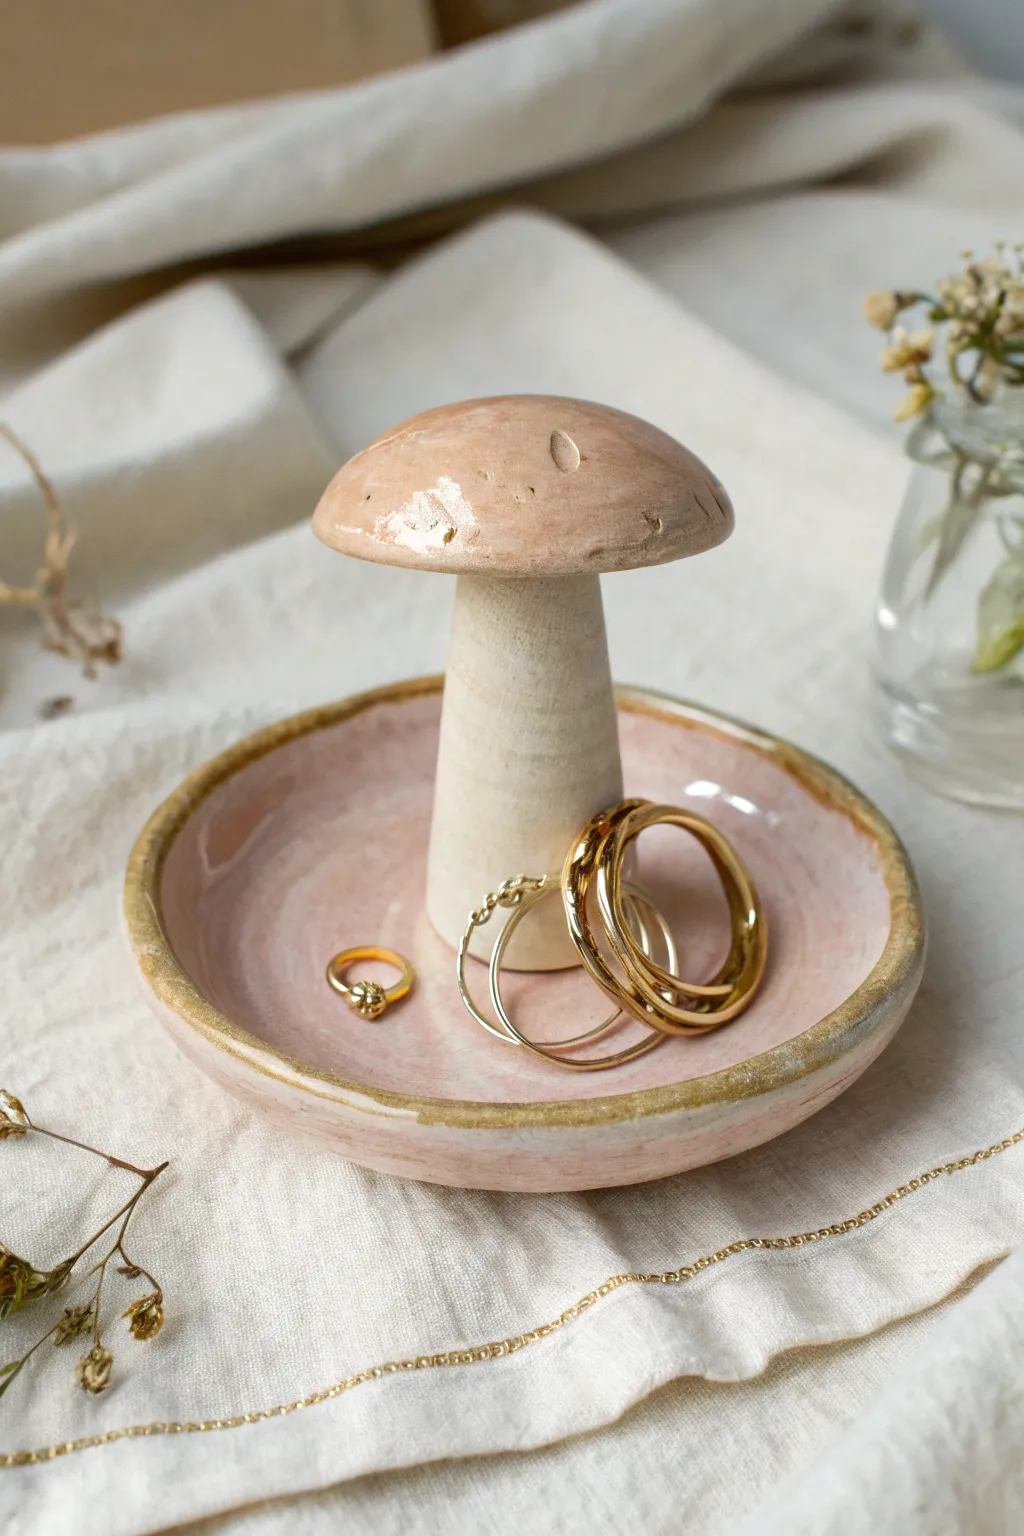
Embrace the cottagecore aesthetic with this adorable mushroom-shaped jewelry holder. Combining a functional ring cone with a shallow catch-all dish, this piece features soft blush tones and a touch of gold for an elegant finish.
How-To Guide
Materials
- Polymer clay (white or translucent)
- Acrylic paints (pastel pink, cream, beige)
- Gold metallic paint or liquid gold leaf
- Glossy varnish or UV resin
- Clay roller or pasta machine
- Circle cutter (approx. 4-5 inches)
- Modeling tools (or a toothpick)
- Small paintbrush
- Oven (for baking)
- Sandpaper (fine grit)
- Strong craft glue or liquid clay
Step 1: Sculpting the Base Dish
-
Prepare the clay:
Begin by conditioning your white polymer clay until it is soft and malleable. Roll it out into a flat, even sheet, aiming for about 1/4 inch thickness. -
Cut the circle:
Use your circle cutter or trace around a bowl to cut out a perfect circle, which will serve as the tray base. -
Form the rim:
Gently pinch and lift the edges of the circle upwards to create a shallow rim. Smooth out any fingerprints with a little bit of water or baby oil on your fingertips. -
Create texture:
If you want that handcrafted pottery look, leave the rim slightly uneven or add subtle indentations.
Step 2: Forming the Mushroom
-
Shape the stem:
Roll a cylinder of clay that is thicker at the bottom and slightly tapered at the top. Ensure the base is flat so it sits flush against the dish. -
Create the cap:
Roll a ball of clay and flatten it slightly into a dome shape. This will be the mushroom cap. -
Add cap details:
Using a modeling tool or a toothpick, press small, random indentations into the top of the cap to mimic natural textures. -
Attach the cap:
Score the top of the stem and the underside of the cap. Apply a dab of liquid clay or bond, then press the cap firmly onto the stem. Smooth the seam underneath if necessary. -
Attach to dish:
Center the mushroom stem in the middle of your clay dish. Press firmly to bond them, or use liquid clay for a stronger hold. Double-check that it stands straight. -
Bake:
Bake the entire structure according to your clay package instructions. I essentially use an oven thermometer to ensure the temperature creates a durable finish.
Uneven Glaze?
If your gloss varnish creates bubbles, pop them instantly with a lighter or heat gun before it dries, or apply two very thin layers instead of one thick one.
Step 3: Painting and Glazing
-
Base coat the dish:
Once cool, paint the interior of the dish and the mushroom cap with a soft pastel pink acrylic paint. You may need two coats for opacity. -
Paint the stem:
Use a cream or beige color for the mushroom stem to create a natural contrast against the pink. -
Add distressed details:
To achieve the rustic look shown in the photo, gently dry brush a darker beige or light brown into the crevices of the dish rim and the cap indentations. -
Apply the gold rim:
carefully paint the very edge of the dish rim with gold metallic paint or liquid gold leaf. This elevates the preppy vibe instantly. -
Seal:
Finish by coating the entire piece with a high-gloss varnish or UV resin. This gives it that ceramic-like shine and protects the paint.
Speckled Effect
Mix black pepper or dried tea leaves into the clay before sculpting for a faux-stone, speckled pottery look without needing special paint.
Now you have a charming spot to keep your favorite rings safe and displayed
Breakfast-Themed Mini Magnets
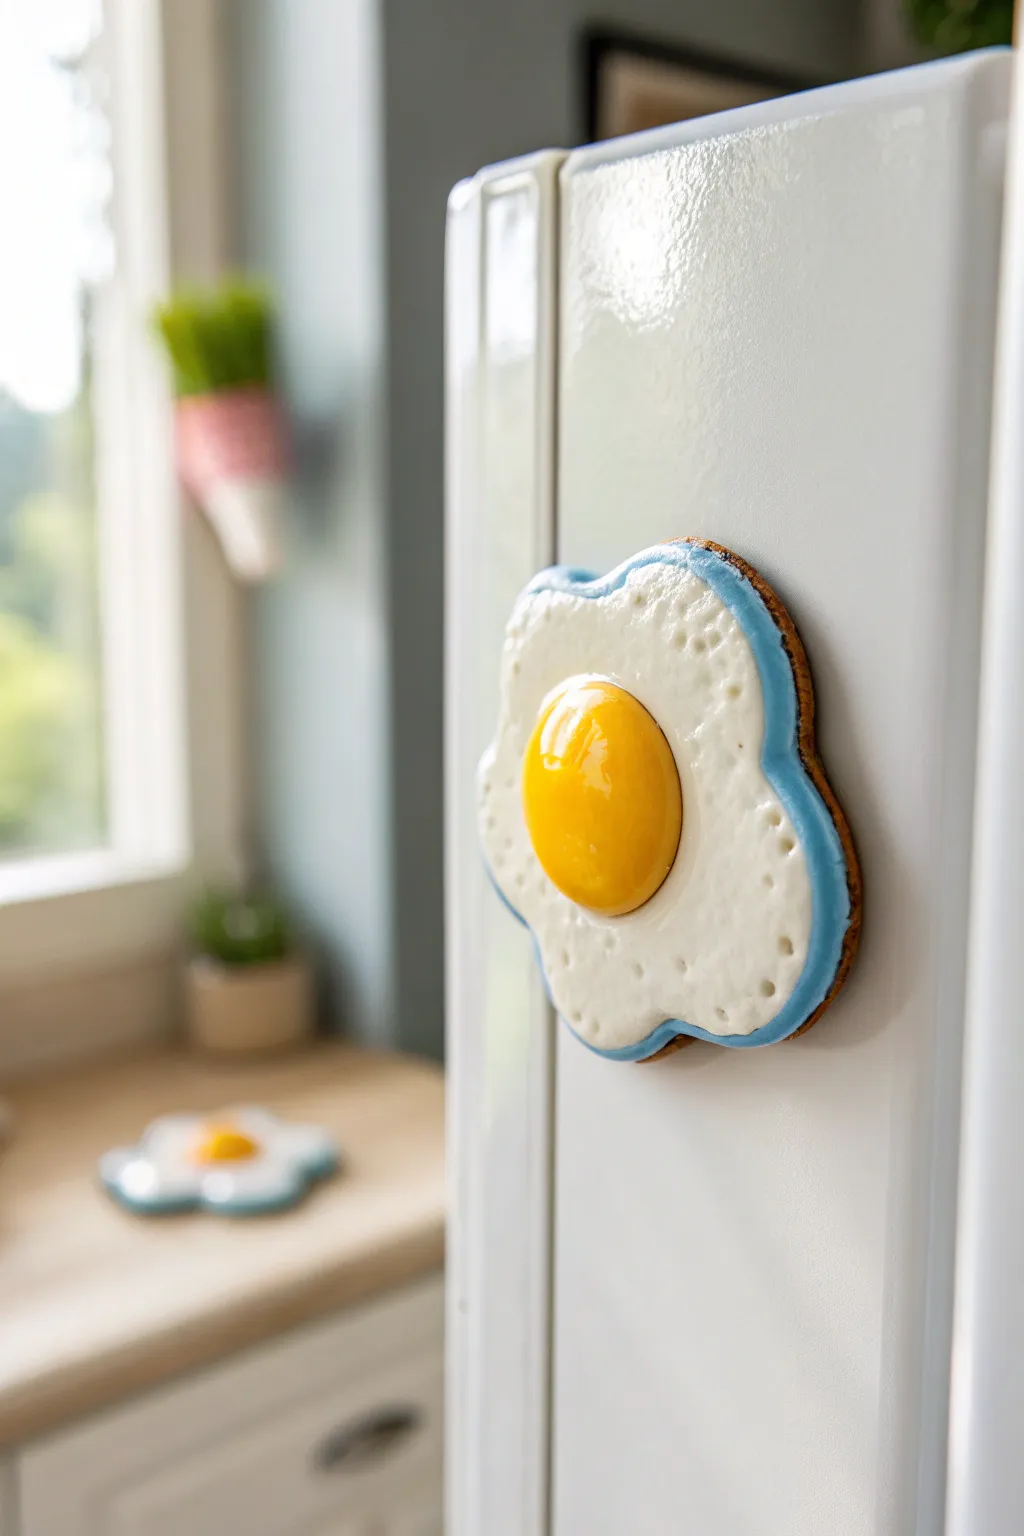
Add a playful pop of protein to your kitchen decor with these adorable fried egg magnets. Their glossy yolks and textured whites mimic the real thing so well, you might just get hungry looking at them.
Step-by-Step
Materials
- White polymer clay
- Yellow polymer clay (translucent or solid)
- Tan or light brown polymer clay
- Liquid polymer clay (white)
- Gloss glaze or UV resin
- Small round magnet
- Super glue or E6000
- Needle tool or toothpick
- Small circle cutter
- Flower or scalloped cookie cutter (approx. 2 inches)
- UV lamp (if using resin)
- Soft paintbrush
- Baby blue acrylic paint (optional for rim)
- Rolling pin
Step 1: Shaping the Base
-
Condition the clay:
Begin by kneading your tan or light brown clay until it is soft and pliable. This will form the sturdy backing of your magnet, resembling a perfectly toasted piece of toast or a crispy edge. -
Roll out the slab:
Using your rolling pin, flatten the tan clay to about 1/4 inch thickness. You want it substantial enough to hold the magnet but not too heavy. -
Cut the shape:
Use a flower-shaped or scalloped cutter to punch out the base shape. This scalloped edge gives it a whimsical, stylized look rather than a messy realistic splatter. -
Texture the edge:
For a realistic baked look, gently tap the sides of the clay shape with a stiff toothbrush or a ball of aluminum foil to add a slight texture.
Pro Tip: Bubbling Up
Mix a tiny pinch of baking soda into liquid white clay and dab it on the ‘whites’ before baking. It will naturally puff and bubble in the oven for hyper-realistic texture.
Step 2: Creating the Egg White
-
Prepare the white layer:
Clean your hands thoroughly to avoid transferring lint, then condition the white polymer clay. Roll it out slightly thinner than your base layer. -
Cut and trim:
Use the same flower cutter to cut a white shape. Using a craft knife, trim just a millimeter off the entire perimeter so the tan base will peek through slightly when you stack them. -
Attach layers:
Press the white layer gently onto the tan base. Smooth it down from the center outward to remove any trapped air bubbles. -
Add surface texture:
Now for the fun part: take your needle tool or a toothpick and gently poke small, shallow indentations all over the white clay. Vary the depth to mimic the bubbling texture of a frying egg white. -
Add a blue rim (optional):
If you want to replicate the specific look in the photo, roll a very thin snake of blue clay (or paint it later) and outline the edge of the white layer, pressing it gently into the seam.
Step 3: The Perfect Yolk
-
Form the yolk:
Roll a ball of yellow clay about the size of a marble. I prefer mixing a tiny bit of translucent clay into the yellow to give it that realistic, jammy depth. -
Shape into a dome:
Slice the bottom of the ball off to create a flat surface, forming a perfect dome shape. -
Attach the yolk:
Place the yellow dome in the center of your textured white clay. Press gently to secure it without flattening the dome too much. -
Integrate the seams:
If there’s a gap between the yolk and white, use a tiny amount of liquid polymer clay to bridge the gap, smoothing it with a silicone tool.
Level Up: Breakfast Set
Create a whole balanced breakfast by making companion magnets: a strip of bacon, a slice of avocado, and a tiny waffle to complete the morning menu.
Step 4: Baking and Finishing
-
Bake:
Preheat your oven according to the clay manufacturer’s instructions (usually 275°F or 130°C). Bake your egg on a ceramic tile or index card for about 20-30 minutes. -
Cool down:
Let the piece cool completely before handling. It will be slightly soft when hot but hardens as it cools. -
Glaze the yolk:
Apply a thick coat of gloss glaze or UV resin specifically to the yellow yolk. If using resin, cure it under a UV lamp for 2-3 minutes until hard and glassy. -
Glaze the white:
Apply a satin or matte glaze to the white part if desired, or leave it natural for a cooked texture contrast against the shiny yolk. -
Attach the magnet:
Flip the egg over and apply a strong dab of E6000 or super glue to the center. Press your magnet firmly into the glue and let it cure fully, preferably overnight.
Pop this sunny creation on your fridge to start every morning with a smile
Preppy Wall Hook Set With Matching Icons
Brighten up your entryway or bedroom with this cheerful wall hook set featuring preppy icons in soft, trendy colors. This project combines simple woodworking with polymer clay sculpting to create a custom organizational piece that is as functional as it is cute.
Step-by-Step Tutorial
Materials
- Rectangular wooden board (approx. 18″ x 4″)
- White acrylic paint and paintbrush
- Polymer clay (light pink, yellow, white, sage green)
- Circle clay cutters (large approx. 2.5″)
- Small flower fondant or clay cutters
- Metal wall hooks (matte black or bronze)
- Strong craft glue (E6000) or super glue
- Clay sculpting tools (dotting tool, knife)
- Jute twine or rope
- Rolling pin or pasta machine
- Drill and screws for mounting
- Baking sheet and parchment paper
- Key ring (optional)
Step 1: Preparing the Base
-
Prep the Wood:
Sand your wooden board until smooth, paying attention to the edges to avoid splinters. -
Paint the Base:
Apply two coats of white acrylic paint to the front and sides of the board. Allow the first coat to dry completely before applying the second for a crisp, opaque finish. -
Mark Hook Positions:
Once the paint is dry, measure and mark equal spacing for your metal hooks. Don’t screw them in yet; we need to make the clay covers first.
Smooth Moves
Before baking, wipe your raw clay gently with a little baby oil or rubbing alcohol on a q-tip. This removes fingerprints and dust for a professional matte finish.
Step 2: Sculpting the Icons
-
Condition the Clay:
Knead your polymer clay colors until they are soft and pliable. This prevents cracks during baking. -
Roll the Circles:
Roll out slabs of the pink, yellow, and sage green clay to about 1/4 inch thickness. Use your large circle cutter to punch out three discs. Smooth the edges with your finger to remove any sharp cuts. -
Create the Heart:
For the pink disc, lightly press a heart shape into the center using a small cutter or freehand it with a sculpting tool. I like to indent it deeply but not cut all the way through. -
Make the Smileys:
For the yellow and green discs, use a curved tool or a small cutter to impress a wide smile. Use a dotting tool or the back of a paintbrush to press in oval eyes. -
Sculpt the Flowers:
Roll out white clay and use flower cutters to make daisies. Roll tiny balls of yellow and pink clay for the centers and press them firmly into the middle of the flowers. -
Add Texture (Optional):
If you want a tactile look like the pink flower in the photo, gently score lines on the petals using a needle tool. -
Make the Key Charm:
If recreating the key holder, make one smaller double-sided flower. Sandwich a loop of jute twine between two clay flower layers before pressing them together. -
Attach Backing Hardware:
IMPORTANT: Press the top of your metal hooks firmly into the back of the clay circles while the clay is raw to create a perfect impression for gluing later, then remove the hook. -
Bake the Clay:
Arrange all pieces on a parchment-lined baking sheet. Bake according to your clay package instructions (usually 275°F / 135°C for 15-30 minutes).
Step 3: Assembly
-
Cool Down:
Let the clay pieces cool completely on the baking sheet to regain their hardness. -
Install the Hooks:
Screw the metal hooks into the marked spots on your white wooden board. -
Glue the Icons:
Apply a strong adhesive like E6000 to the front flat face of the metal hook. -
Secure the Faceplates:
Press the corresponding baked clay circle (heart, smiley, etc.) onto the glued hook face. Hold in place for a minute and let cure fully according to glue instructions. -
Decorate the Board:
Glue the flat clay flowers directly onto the white wooden board in the spaces between the hooks for that extra preppy flair. -
Add Rope Detail:
To mimic the hanging style, you can tie loops of jute twine around the neck of the hook if you plan to hang S-hooks, or attach your key charm to a keyring.
Glaze It Up
After baking and cooling, brush a layer of UV resin or glossy polyurethane varnish over the smileys and hearts to make them shiny and durable against scratches.
Mount your new organizer on the wall and enjoy the happy vibes every time you grab your keys