
I love a clay jewelry dish because it’s the kind of little project that feels instantly useful the second it dries or bakes. If your rings and earrings tend to wander, these clay jewelry dish ideas will give them a cute, handmade “home” you’ll actually use.
Classic Round Ring Dish
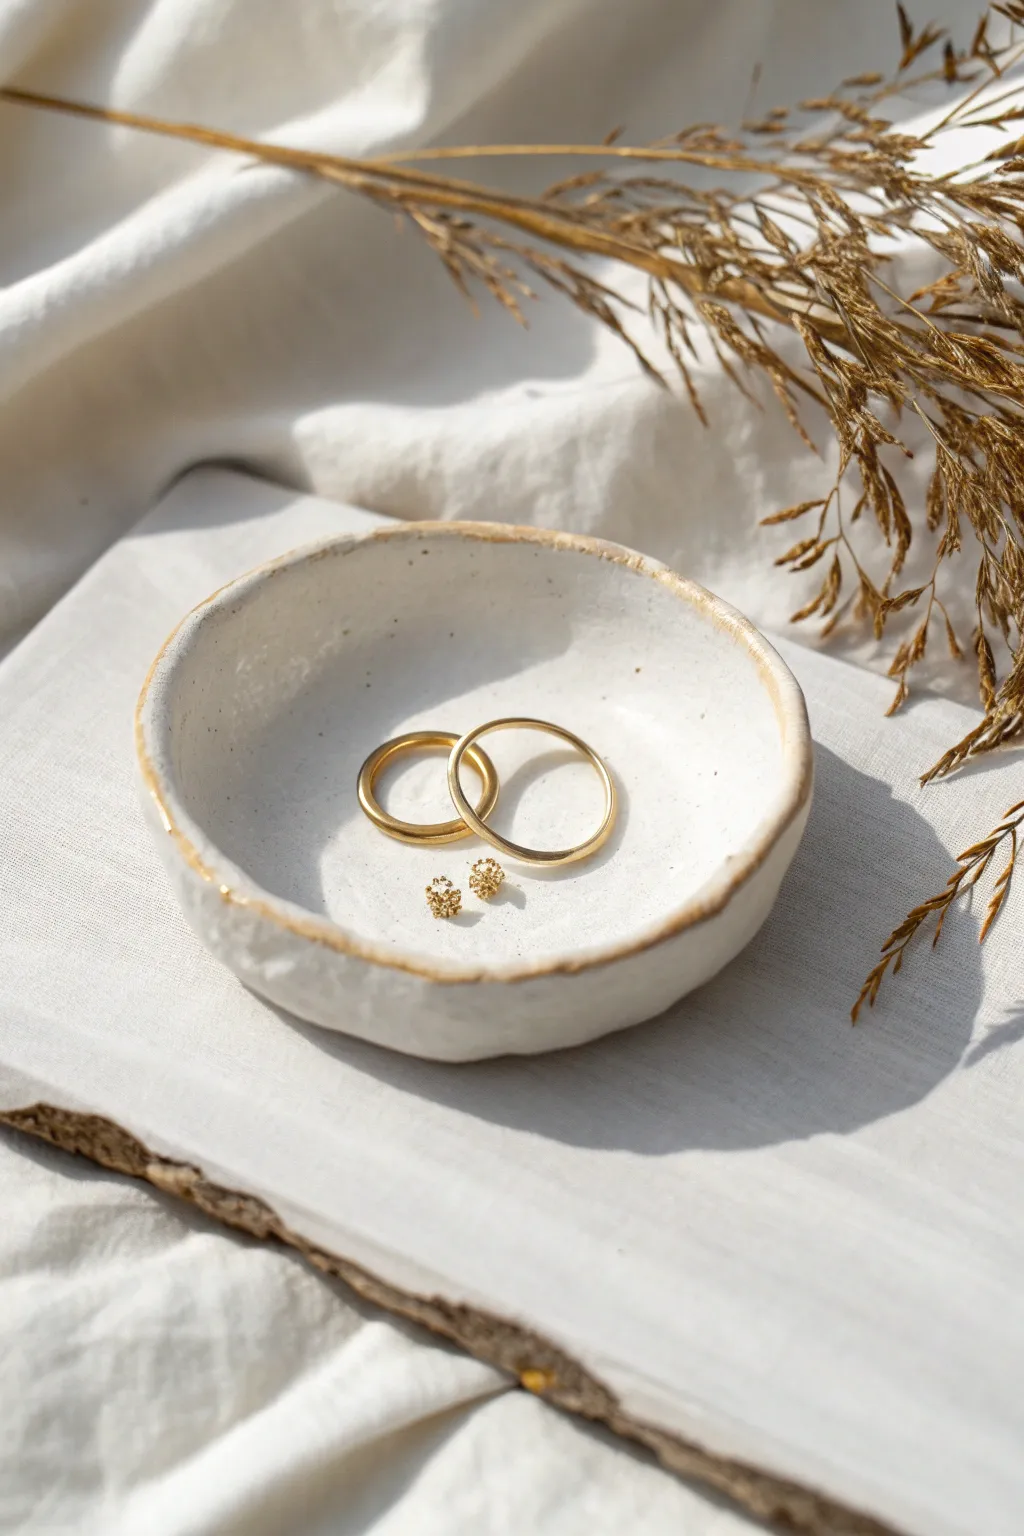
This classic round ring dish features a charmingly organic shape and a delicate gilded edge that catches the light beautifully. Its minimalist white finish makes it the perfect neutral backdrop for your favorite gold jewelry pieces.
Step-by-Step Guide
Materials
- White or cream air-dry clay (or polymer clay)
- Small rolling pin
- Circle cutter or small bowl (appx. 3-4 inches diameter)
- Craft knife
- Small bowl for molding (slightly larger than your cutter)
- Sandpaper (fine grit)
- Liquid gilding or gold leaf paint
- Small round paintbrush
- Gloss varnish or clear sealant
- Water and sponge (for smoothing)
Step 1: Shaping the Base
-
Condition the Clay:
Begin with a ball of clay about the size of a golf ball. Knead it in your hands for a minute or two until it is warm, pliable, and free of cracks. -
Roll it Out:
Place the clay on a smooth surface or canvas mat. Use your rolling pin to flatten the ball into an even slab, aiming for a thickness of about 1/4 inch (5-6mm). -
Cut the Circle:
Press your circle cutter or place a small bowl upside down onto the clay slab to use as a template. Gently cut around it with the craft knife to create a clean circle. -
Smooth the Edges:
Dip your finger in a tiny bit of water and run it along the cut edge of the circle. This softens the sharp cut lines and prevents future cracking.
Step 2: Creating the Form
-
Mold the Clay:
Take your cut clay circle and gently press it into the bottom of your molding bowl. Let gravity help settle it into a curve, but don’t press too hard or you might thin out the bottom. -
Refine the Shape:
With your fingers, gently pinch and shape the rim. The dish in the image has a slightly uneven, organic edge rather than a perfect factory finish, so allow for some natural waviness. -
Texture the Rim:
If you want that slightly rustic look seen in the photo, lightly tap the rim with your fingertip to create subtle undulations rather than smoothing it perfectly flat. -
Initial Drying:
Leave the clay in the bowl to dry for roughly 24 hours. This ensures it holds that cupped shape while the moisture evaporates. -
Remove and Finish Drying:
Once the clay is firm to the touch but likely still cool (indicating moisture), pop it out of the mold. specific drying times vary by brand, but I prefer to let it air dry upside down for another 24 hours to ensure the bottom is solid.
Smooth Operator
Use a damp makeup sponge instead of your fingers to smooth the clay before drying. It erases fingerprints perfectly without adding too much water.
Step 3: Finishing Touches
-
Sanding:
Once bone dry, take your fine-grit sandpaper and gently buff any rough spots on the rim or the underside. Wipe away the dust with a slightly damp cloth. -
Painting the Rim:
Shake your liquid gilding or gold paint well. Dip a small round brush into the gold and carefully paint along the very top edge of the rim. -
Creating the Dripped Look:
To mimic the image precisely, allow the brush to slip slightly over the edge in random spots, creating a thin, irregular line of gold that isn’t perfectly uniform. -
Sealing the Dish:
After the gold paint is fully dry, apply a coat of gloss varnish or clear sealant over the entire dish. This protects the clay from moisture and gives it a finished ceramic look. -
Final Cure:
Let the varnish cure completely according to the bottle instructions before placing any jewelry inside.
Speckled Effect
Before rolling, mix pinch of dried tea leaves or black pepper into the white clay. It creates a trendy ‘faux-stone’ speckled stoneware look.
This simple elegant dish is now ready to hold your daily treasures


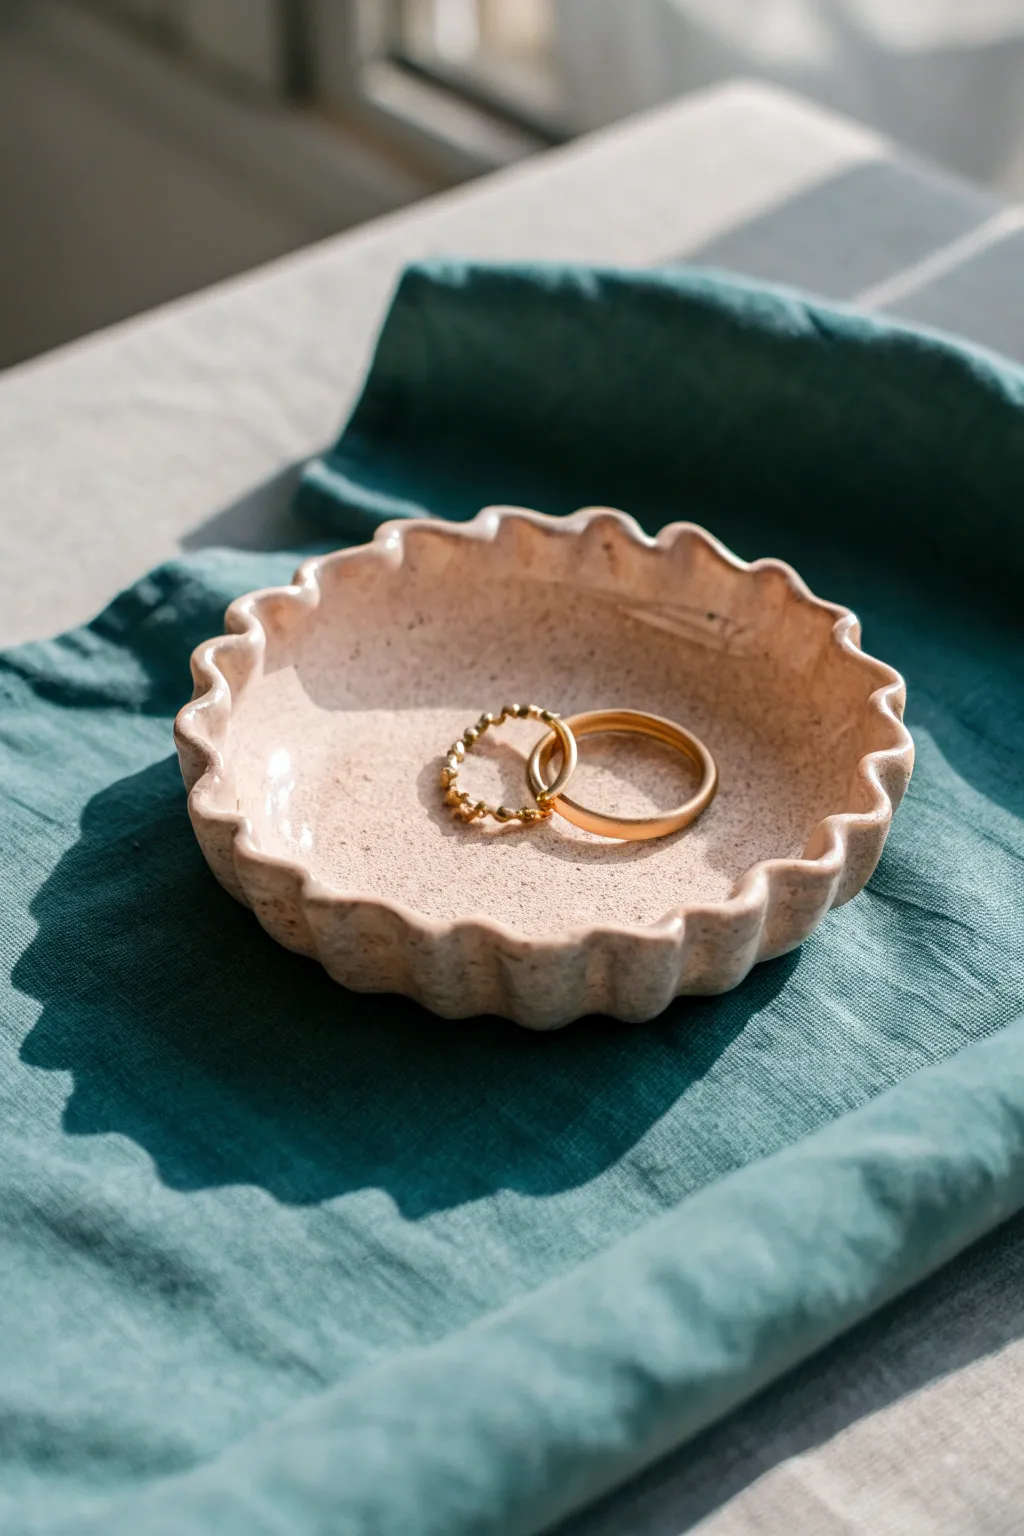
Gold Rim Accent Dish
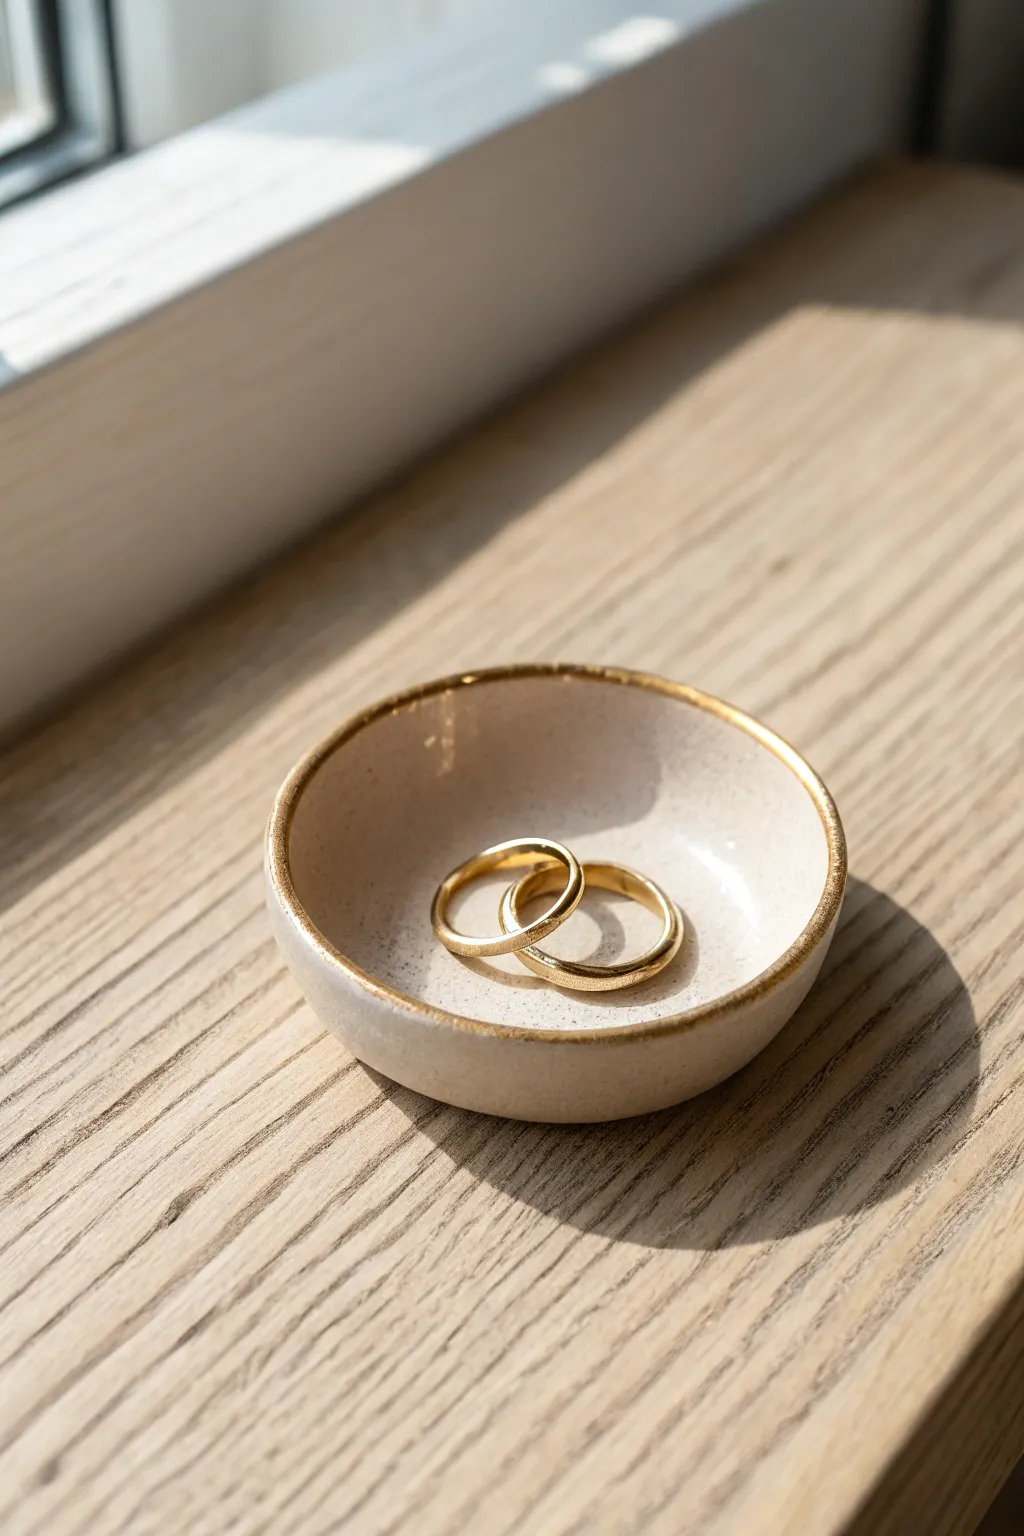
This elegant little organizer combines the raw, speckled beauty of unglazed stoneware with a luxurious flash of gold leaf. Its perfectly imperfect organic shape and warm undertones make it a stunning spot to rest your most precious bands by the windowsill.
Step-by-Step
Materials
- Speckled cream polymer clay or air-dry clay
- Rolling pin
- Small round cookie cutter (approx. 3-4 inches)
- Small bowl or sphere (for molding)
- Fine-grit sandpaper (400-600 grit)
- Liquid gold leaf or gold glaze pen
- Small, fine-tipped paintbrush
- Gloss varnish (optional, for the interior)
- Wax paper or craft mat
Step 1: Shaping the Clay Base
-
Condition the Clay:
Start by warming up a ball of speckled clay in your hands. Knead it thoroughly until it is soft, pliable, and free of any air bubbles that could cause cracks later. -
Roll it Out:
Place the clay on your wax paper or craft mat. Use a rolling pin to flatten it into an even sheet, aiming for a thickness of about 1/4 inch. Don’t go too thin, or the rim might be fragile. -
Cut the Circle:
Press your round cookie cutter firmly into the clay sheet to create a clean circle. If you don’t have a cutter, trace a glass rim with a needle tool. -
Soften the Edges:
Before shaping, use your fingertip dipped in a tiny bit of water to gently smooth the sharp, cut edge of the circle. This creates that lovely organic, hand-thrown ceramic look. -
Create the Cuvre:
Gently lift the clay circle and place it inside a small bowel or over a sphere mold. I prefer pressing it gently into a small dipping bowl to ensure the curve isn’t too steep. -
Refine the Shape:
Use your thumbs to lightly press the center down and ensure the clay conforms to the mold. The goal is a shallow, gentle curve rather than a deep cup.
Clean Lines Pro Tip
Rest your painting hand’s pinky finger on the table or the center of the dish as an anchor. This stabilizes your hand for a much smoother gold rim application.
Step 2: Drying and Refining
-
Let it Dry:
Allow the clay to dry according to package directions. For air-dry clay, this usually takes 24-48 hours. If using oven-bake polymer clay, bake it now following the manufacturer’s specific temperature and time instructions. -
Cool Down:
If you baked the clay, let it cool completely in the oven with the door cracked open to prevent thermal shock cracks. -
Initial Sanding:
Once fully cured and hard, inspect the rim. Take your fine-grit sandpaper and very gently buff away any rough spots or fingerprints on the edge to ensure a smooth surface for the gold. -
Wipe Clean:
Use a slightly damp cloth or a soft brush to remove all sanding dust. It is critical that the surface is dust-free so the paint adheres properly.
Step 3: Applying the Golden Touch
-
Prepare the Gold:
Shake your liquid gold leaf or gold paint pen vigorously. If using liquid leaf, decant a tiny drop onto a palette or piece of foil. -
Paint the Upper Rim:
Dip your fine-tipped brush into the gold. Carefully paint the very top flat surface of the rim. Keep your hand steady and move in short, connected strokes. -
Extend to the Outside:
Purposefully allow the brush to drag just slightly over the outer edge of the rim. This creates that charming, uneven ‘dipped’ handmade aesthetic seen in the photo. -
Check the Interior Edge:
Do the same regarding the inner edge—paint just a hairline width inside the bowl so the gold is visible when looking down into the dish. -
Dry the Gold:
Let the gold accent dry completely. Liquid leaf usually dries quickly, but give it an hour to be safe so you don’t smudge it. -
Seal the Dish (Optional):
If you want a glossy finish like ceramic, apply a coat of gloss varnish to the inside of the bowl, avoiding the gold rim if the varnish isn’t compatible with metallic leaf.
Level Up: Texture
Before baking or drying, gently press a piece of coarse linen or sandpaper into the clay surface to enhance the speckled, stone-like texture.
Place your finished dish on a sunny ledge and enjoy the way the light catches that beautiful golden edge


Marbled Clay Jewelry Dish
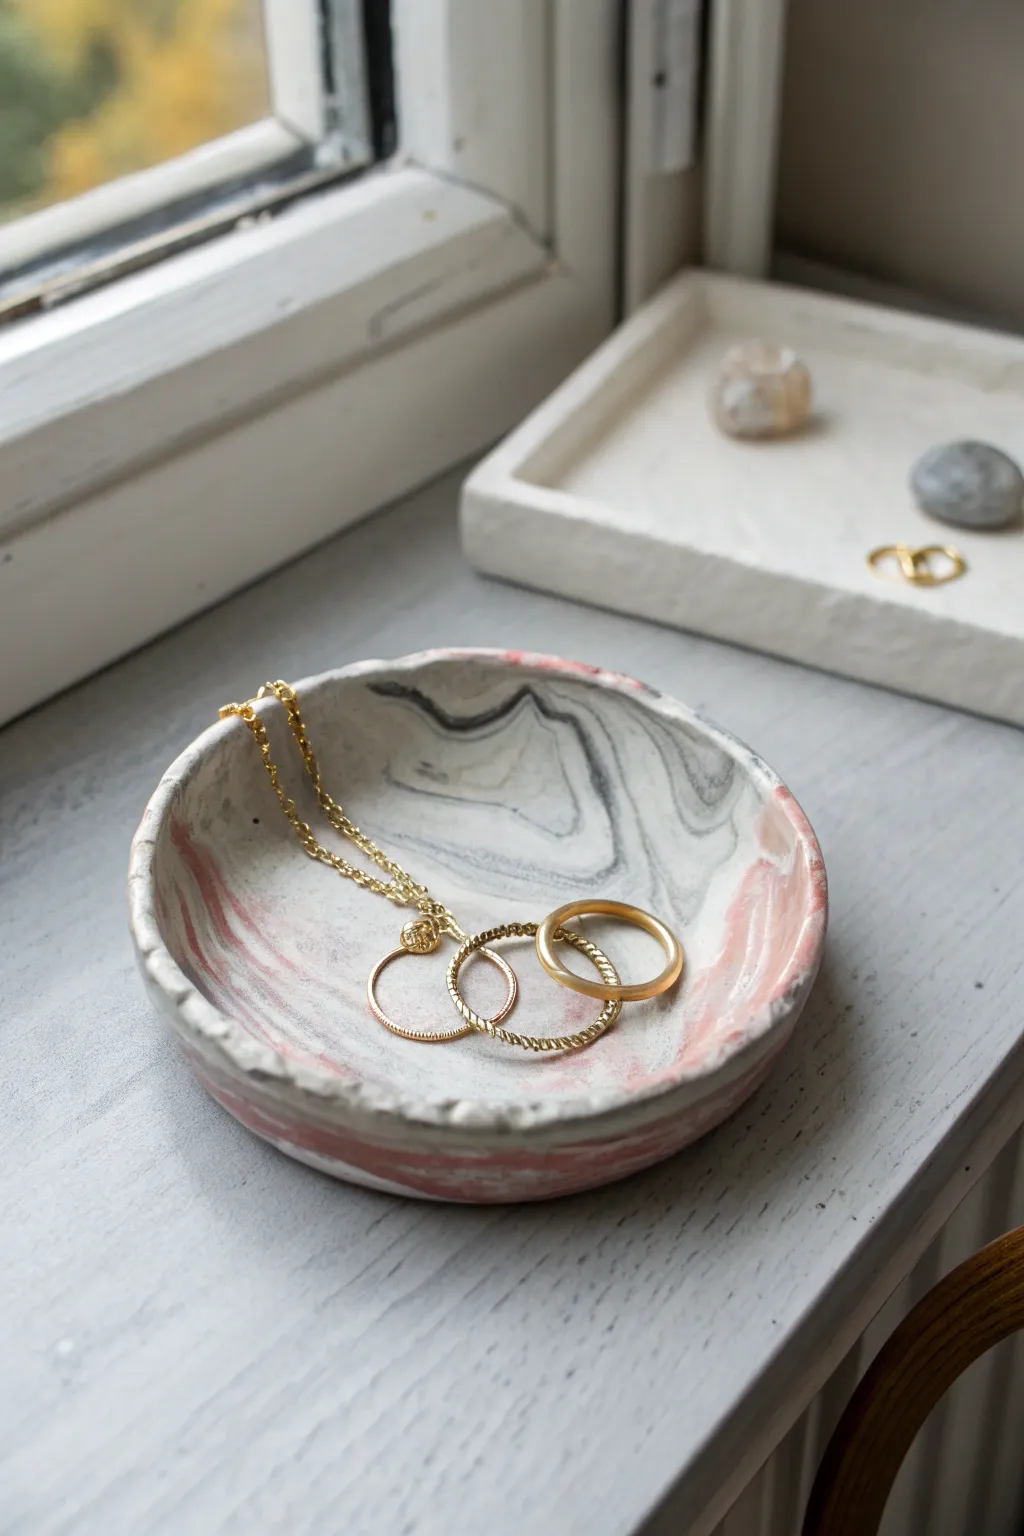
Elevate your vanity with this sophisticated catch-all dish featuring swirls of white, grey, and soft pink clay. The organic marbled pattern ensures every piece is unique, creating a modern home for your favorite rings and necklaces.
How-To Guide
Materials
- Polymer clay (white)
- Polymer clay (black or dark grey)
- Polymer clay (blush pink)
- Rolling pin or acrylic roller
- Round cookie cutter or bowl (approx. 4-5 inches)
- Small craft knife
- Oven-safe bowl or baking dish (for shaping)
- Parchment paper
- Fine-grit sandpaper (optional)
- Gloss or matte glaze (optional)
Step 1: Prepping the Clay
-
Condition the white clay:
Start by taking a generous amount of white clay—this will be your base color so use more of this than the others. Knead it in your hands until it is soft, warm, and pliable. -
Prepare accent colors:
Take smaller amounts of the black and blush pink clay. Condition them separately until soft. -
Create snakes:
Roll each color into long, thin snake-like shapes. You should have one thick white snake and two much thinner snakes in black and pink.
Clean Lines Pro-Tip
Wipe your hands and roller with a baby wipe when switching between colors, and especially before handling the white clay, to prevent ‘dirty’ smudges.
Step 2: Marbling Technique
-
Twist together:
Lay the three clay ropes side by side. Twist them together into one large, multi-colored rope. -
Fold and roll:
Fold this twisted rope in half, and then roll it into a snake again. I like to repeat this twist-fold-roll process about 3-4 times to get thin, intricate lines. -
Form a ball:
Once you see enough striations in the clay rope, smoosh the entire piece into a compact ball. -
Check the pattern:
Look at the ball’s surface. If the colors seem too separated, knead it gently just a few more times, but stop before it turns into a muddy grey mixture. -
Roll out the slab:
Place the ball on a piece of parchment paper. Using your rolling pin, flatten the ball into a smooth slab about 1/4 inch thick. This is when the magic reveals itself.
Why does it look muddy?
Over-kneading causes colors to blend into one ugly hue. Stop twisting and rolling as soon as you see distinct fine lines. Less is more here.
Step 3: Shaping and Baking
-
Cut the circle:
Place your round cutter or a small bowl upside down on the most attractive part of your marbled slab. Press down or trace with a craft knife to cut out a perfect circle. -
Smooth the edges:
Lift the excess clay away. Gently run your finger along the cut edge of the circle to soften any sharp corners or jagged bits. -
Create the curve:
Carefully pick up your clay circle and place it inside your oven-safe bowl. Let it slump naturally to take the curve of the bowl’s bottom. -
Add texture (optional):
Looking at the reference image, the rim has a slightly organic, textured feel. You can gently pinch the very edge of the clay or tap it lightly to make it look less ‘manufactured’. -
Bake:
Follow the baking instructions on your specific package of clay (usually 275°F for 15-30 minutes). Bake the jewelry dish while it is still inside the shaping bowl. -
Cool down:
Remove the bowl from the oven and let it cool completely before trying to pop the clay dish out. Clay is fragile when hot.
Step 4: Finishing Touches
-
Sand rough spots:
Once cool, inspect the edges. If there are any sharp points or fingerprints, lightly buff them away with fine-grit sandpaper under running water. -
Seal (optional):
For a glossy look like ceramic, apply a thin coat of polymer clay glaze. For a matte, natural stone look, you can leave it raw. -
Paint the rim:
If you want to create a highlighted edge, you can carefully brush a thin line of metallic gold or silver paint along the rim, though the original exudes a simple matte charm.
Now you have a stunning, functional piece of art ready to hold your treasures on a nightstand.


Speckled Terrazzo-Style Dish
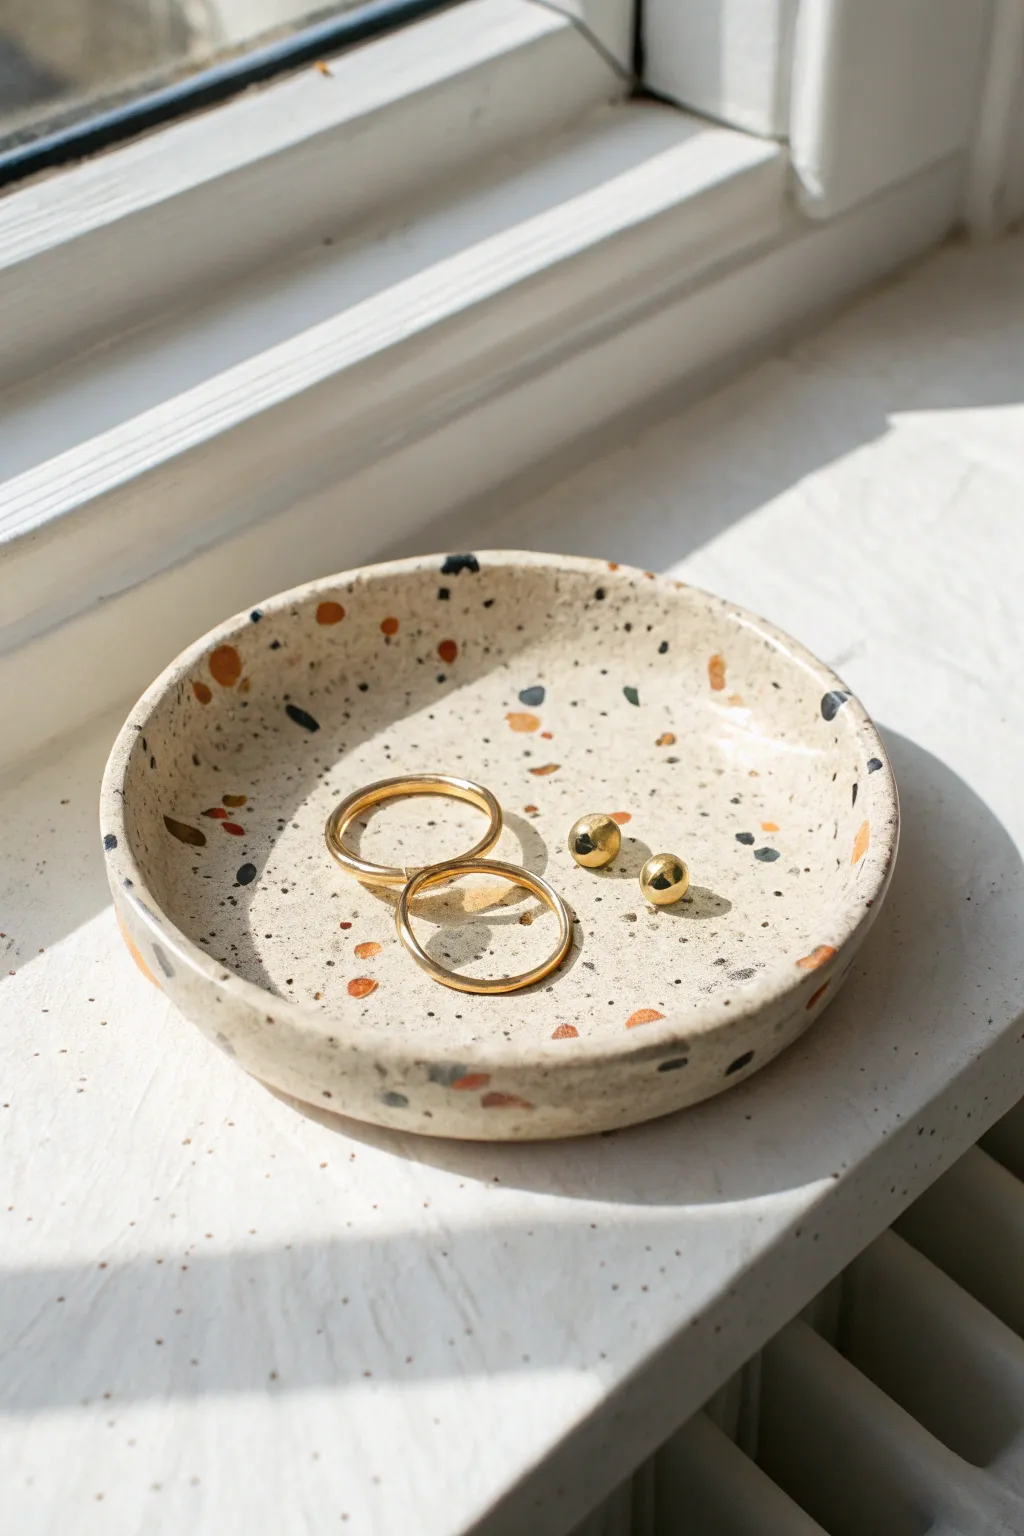
This chic little catch-all combines the timeless appeal of terrazzo with the modern warmth of hand-formed clay. Its creamy base, dotted with organic flecks of earthy orange, black, and slate grey, creates the perfect resting spot for your favorite gold loops and studs.
Step-by-Step Guide
Materials
- White or beige polymer clay (large block)
- Black polymer clay
- Burnt orange or terracotta polymer clay
- Grey or slate polymer clay
- Rolling pin or pasta machine
- Round cookie cutter (approx. 4-5 inches) or a bowl to trace
- Craft knife
- Oven-safe bowl (for shaping)
- Sandpaper (fine grit, 400-1000 wet/dry)
- Gloss or matte varnish (optional)
Step 1: Prepping the ‘Chips’
-
Condition the accent colors:
Start by taking small amounts of your black, orange, and grey clay. Knead them until they are soft and pliable. -
Create thin sheets:
Roll each colored piece out as thin as possible. You want these to be almost paper-thin so they integrate well into the base later. -
Tear and chop:
Using your fingers or a craft knife, tear and chop these thin sheets into random, jagged little bits. Aim for variety—some tiny specks, some larger chunks. -
Set aside:
Keep these piles of colorful confetti separate for now so you can control the distribution.
Natural Texture
Add real black pepper or dried tea leaves into your white base clay before rolling. It adds tiny, realistic grit that mimics real stone texture perfectly.
Step 2: Forming the Base
-
Prepare the base clay:
Take a large chunk of your white or beige clay. Condition it thoroughly by kneading until it’s warm and soft. -
Roll the slab:
Roll the white clay into a slab, keeping it slightly thicker than your desired final result, about 1/4 inch thick. -
Sprinkle the terrazzo:
Scatter your chopped colored bits onto the white slab. Be random! I like to cluster a few colors together in spots to look more natural. -
Embed the chips:
Gently run your rolling pin over the slab to press the colored chips into the surface. Don’t press too hard yet; just get them flush. -
Repeat on the back:
Flip the slab over and repeat the sprinkling process on the other side if you want the pattern to be visible underneath. -
Final roll:
Roll the slab again firmly in different directions. This stretches the colorful chips into irregular shapes and smooths everything into a unified flat surface.
Step 3: Shaping and Curing
-
Cut the circle:
Use your large round cutter or trace a bowl with a craft knife to cut a perfect circle from your patterned slab. -
Smooth the edges:
Dip your finger in a little bit of water (or baby oil) and run it along the cut edge to soften any sharp corners. -
Form the curve:
Gently drape your clay circle inside an oven-safe bowl to give it a curved, dish-like shape. Ensure it’s centered so the rim height is even. -
Bake:
Place the bowl with the clay inside into your oven. Bake according to your brand of clay’s specific instructions (usually 275°F/135°C for 15-30 minutes). -
Cool completely:
Let the clay cool fully inside the bowl before trying to remove it. This prevents warping while it’s still soft.
Gold Rim Upgrade
After baking and cooling, paint just the very top rim of the dish with metallic gold leaf paint for a high-end, elegant finish.
Step 4: Finishing Touches
-
Sand the surface:
Once cool, use fine-grit sandpaper under running water (wet sanding) to buff the surface. This removes fingerprints and really makes the terrazzo pattern pop. -
Rinse and dry:
Wash off any milky sanding residue and pat the dish completely dry with a towel. -
Seal (optional):
If you want a glossy ceramic look, apply a thin coat of polymer clay varnish. For a natural matte stone look, leave it as is.
Place your new dish in a sunny spot and enjoy the organized beauty of your handmade creation

The Complete Guide to Pottery Troubleshooting
Uncover the most common ceramic mistakes—from cracking clay to failed glazes—and learn how to fix them fast.
Leaf-Imprint Trinket Dish
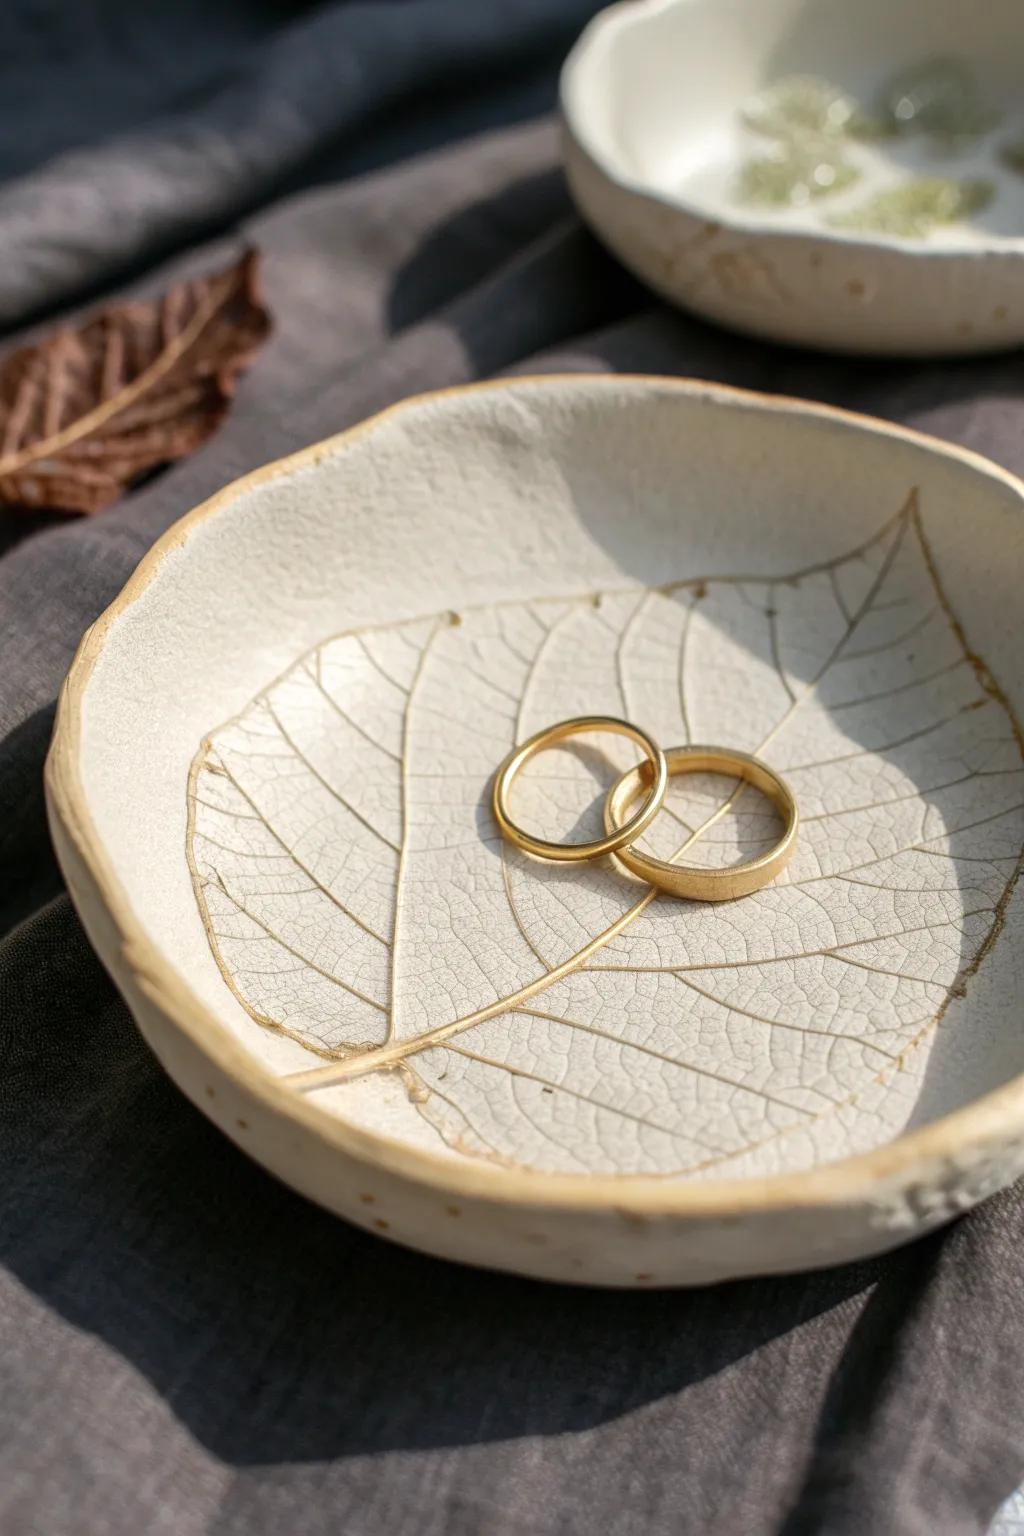
Capture the delicate beauty of nature forever with this elegant leaf-imprint dish. The subtle craquelure finish and hand-painted gold detailing highlight the organic veins, creating a sophisticated resting place for your favorite rings.
How-To Guide
Materials
- White polymer clay or air-dry clay (smooth texture)
- Fresh, deeply veined leaf (like a hydrangea or birch leaf)
- Rolling pin
- Parchment paper or clay mat
- Scalpel or sharp craft knife
- Small bowl (for shaping)
- Fine-grit sandpaper (400-600 grit)
- Gold leaf paint or liquid gilding
- Very fine detail paintbrush (size 0 or 00)
- Glossy varnish (optional for finish)
- Pottery sponge or damp cloth
Step 1: Preparation & Impression
-
Condition the clay:
Begin by warming a ball of white clay in your hands. Knead it thoroughly until it is soft, pliable, and free of any air bubbles. -
Roll out the slab:
Place the clay between two sheets of parchment paper. Roll it out evenly until it is about 1/4 inch thick. Aim for a thickness that feels substantial but not chunky. -
Select your leaf:
Choose a fresh leaf with prominent veins on the underside. Clean it gently to ensure no dirt debris gets transferred to your pristine white clay. -
Position the leaf:
Place the leaf vein-side down onto your rolled clay slab. Pass the rolling pin over it firmly once or twice to embed the veins deep into the clay surface. -
Cut the shape:
Using a sharp craft knife or scalpel, carefully trace a wide circle around the leaf imprint. You aren’t cutting out the exact leaf shape; instead, create a soft, organic round or oval that frames the botanical print nicely. -
Remove the leaf:
Gently peel the leaf away by the stem to reveal the impression. Use a tweezer if the stem is too short to grasp. -
Soften the edges:
Dip your finger in a little water (or clay softener) and run it along the cut rim of the dish to smooth out any sharp ridges left by the knife.
Uneven Impressions
If the leaf imprint looks too faint in some spots, don’t re-roll. Instead, use a sculpting tool to manually deepen the main vein lines before drying.
Step 2: Shaping & Curing
-
Form the curve:
Carefully lift your clay circle and drape it inside a shallow bowl. Press it gently to conform to the bowl’s curve, giving your dish its concave shape. -
Initial drying:
Allow the clay to dry according to package instructions. If using polymer clay, bake it in the oven; if air-dry, let it sit for 24-48 hours until hardened. -
Sanding:
Once fully cured and cool, take your fine-grit sandpaper and lightly buff the rim and the underside of the dish to ensure a professional, smooth finish. -
Wipe down:
Use a slightly damp sponge or cloth to remove all sanding dust. The surface must be perfectly clean for the gold paint to adhere properly.
Step 3: Gilding & Finishing
-
Prepare the details:
Shake your liquid gilding or gold leaf paint well. Dip your finest detail brush into the paint, removing excess on the rim of the bottle. -
Paint the veins:
With a steady hand, trace the indented veins of the leaf impression. I find it easiest to start from the center stem and work outward. -
Work in sections:
Paint slowly, filling the deep depressions with gold. Don’t worry if the line isn’t razor-sharp; a little fluctuation adds to the hand-painted charm. -
Gild the rim:
Load your brush with a bit more gold paint and run it along the very edge of the bowl’s rim. A slightly uneven, organic line here looks beautiful. -
Let it set:
Allow the gold paint to dry completely. This usually takes just a few hours, but check your specific paint brand’s label. -
Optional glaze:
If you want a glossy, ceramic-like look, apply a thin coat of varnish over the entire piece, or just on the white clay parts to let the matte gold pop.
Faux-Ceramic Texture
Before baking, lightly tap a crumpled ball of aluminum foil over the non-imprinted areas of the clay to give it a speckled, stone-like texture.
Place your finished dish on a bedside table to catch the morning light and your favorite jewelry pieces
Pressed Flower Keepsake Dish
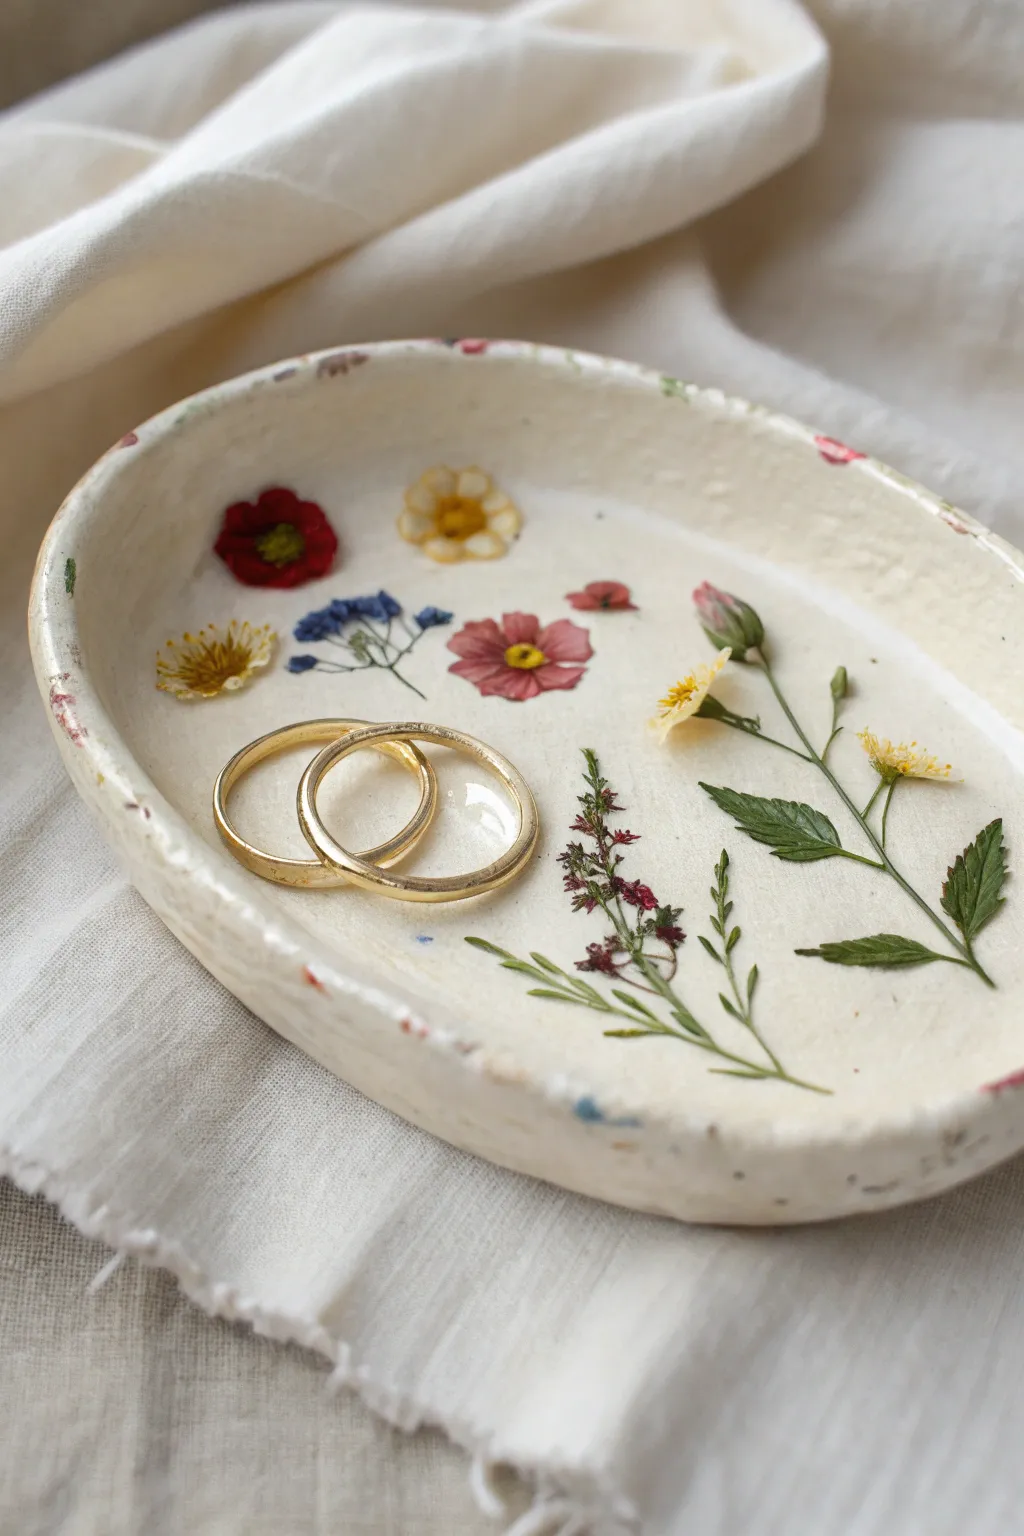
Preserve the delicate beauty of a garden forever with this enchanting jewelry dish. By pressing real blooms into air-dry clay and sealing them with a glossy finish, you create a personalized heirloom perfect for holding your favorite rings.
Detailed Instructions
Materials
- White polymer clay or air-dry clay
- Rolling pin
- Oval template (paper or cardboard)
- Craft knife
- Small bowl of water
- Fine grit sandpaper (320 or 400)
- Assorted dried pressed flowers (small blooms, leaves, ferns)
- Mod Podge (Matte or Gloss) or liquid polymer clay sealer
- Soft synthetic paintbrush
- Tweezers
- Clear polyurethane varnish or resin (optional for waterproofing)
Step 1: Shaping the Clay Base
-
Condition the CLay:
Begin by taking a handful of white clay and kneading it in your hands until it becomes soft, pliable, and warm. This prevents cracks later on. -
Roll it Out:
Place the clay on a clean, smooth surface or parchment paper. Use a rolling pin to flatten it into an even sheet, aiming for about 1/4 inch thickness. -
Cut the Oval:
Lay your oval paper template lightly onto the clay sheet. Using a craft knife, carefully trace around the template to cut out your dish shape. -
Create the Rim:
Gently lift the edges of the oval upward with your fingertips to create a shallow basin. I find using a small pinching motion helps to thin the rim slightly, giving it that delicate, handmade pottery look. -
Smooth the Edges:
Dip your finger into a bowl of water and run it along the rim and the interior surface to smooth out any fingerprints or jagged cuts. -
Dry the Base:
Let the clay dry completely according to package instructions. For air-dry clay, this usually takes 24-48 hours. Turn it over halfway through to ensure even drying.
Fixing Cloudy Sealer
If your Mod Podge looks milky after drying, humidity is likely the culprit. Move the piece to a drier, warmer room and wait 24 hours. The cloudiness often clears up as moisture evaporates fully.
Step 2: Applying the Botanicals
-
Prepare the Surface:
Once fully dry, lightly sand any rough spots on the rim or surface with fine-grit sandpaper. Wipe away all dust with a barely damp cloth. -
Plan Your Arrangement:
Before gluing, lay your pressed flowers onto the dry dish to test your composition. I try to balance larger flowers like the red and pink ones with delicate stems of greenery and tiny yellow buds. -
Apply Base Coat:
Lift the flowers off and set them aside in their approximate positions. Brush a thin, even layer of Mod Podge or clay sealer onto the interior floor of the dish. -
Place the Flowers:
Use clean tweezers to pick up each flower and gently place it onto the wet sealer. Start with the stems and larger leaves first, layering blossoms on top where necessary. -
Press Down:
Very gently press the petals down with your finger or a dry soft brush to ensure they make full contact with the clay surface and lie flat.
Gold Leaf Accents
Elevate the look by brushing a tiny amount of liquid gold leaf onto the uneven rim of the dish. This highlights the handmade texture and adds a luxe touch that matches gold jewelry perfectly.
Step 3: Sealing and Finishing
-
First Sealant Layer:
Once the flowers are positioned, carefully brush a layer of Mod Podge or sealer over the top of them. Work from the center of the flower outward to avoid crumpling the petals. -
Dry and Repeat:
Allow the first coat to dry until it is clear. Apply a second coat to ensure the delicate plant matter is fully encapsulated and protected. -
Protect the Rim:
Don’t forget to brush sealer over the rim and the outside of the dish as well, giving the entire piece a uniform sheen. -
Add Speckles (Optional):
To mimic the speckled pottery look in the photo, you can flick a tiny amount of diluted brown or grey paint onto the dish using a stiff toothbrush before the final varnish. -
Final Varnish:
For a durable, glass-like finish that resists yellowing, apply a final top coat of clear polyurethane varnish or a thin layer of resin. Let this cure completely in a dust-free area.
Now you have a stunning, nature-inspired vessel ready to cradle your most treasured jewelry pieces


What Really Happens Inside the Kiln
Learn how time and temperature work together inside the kiln to transform clay into durable ceramic.
Heart-Shaped Jewelry Dish
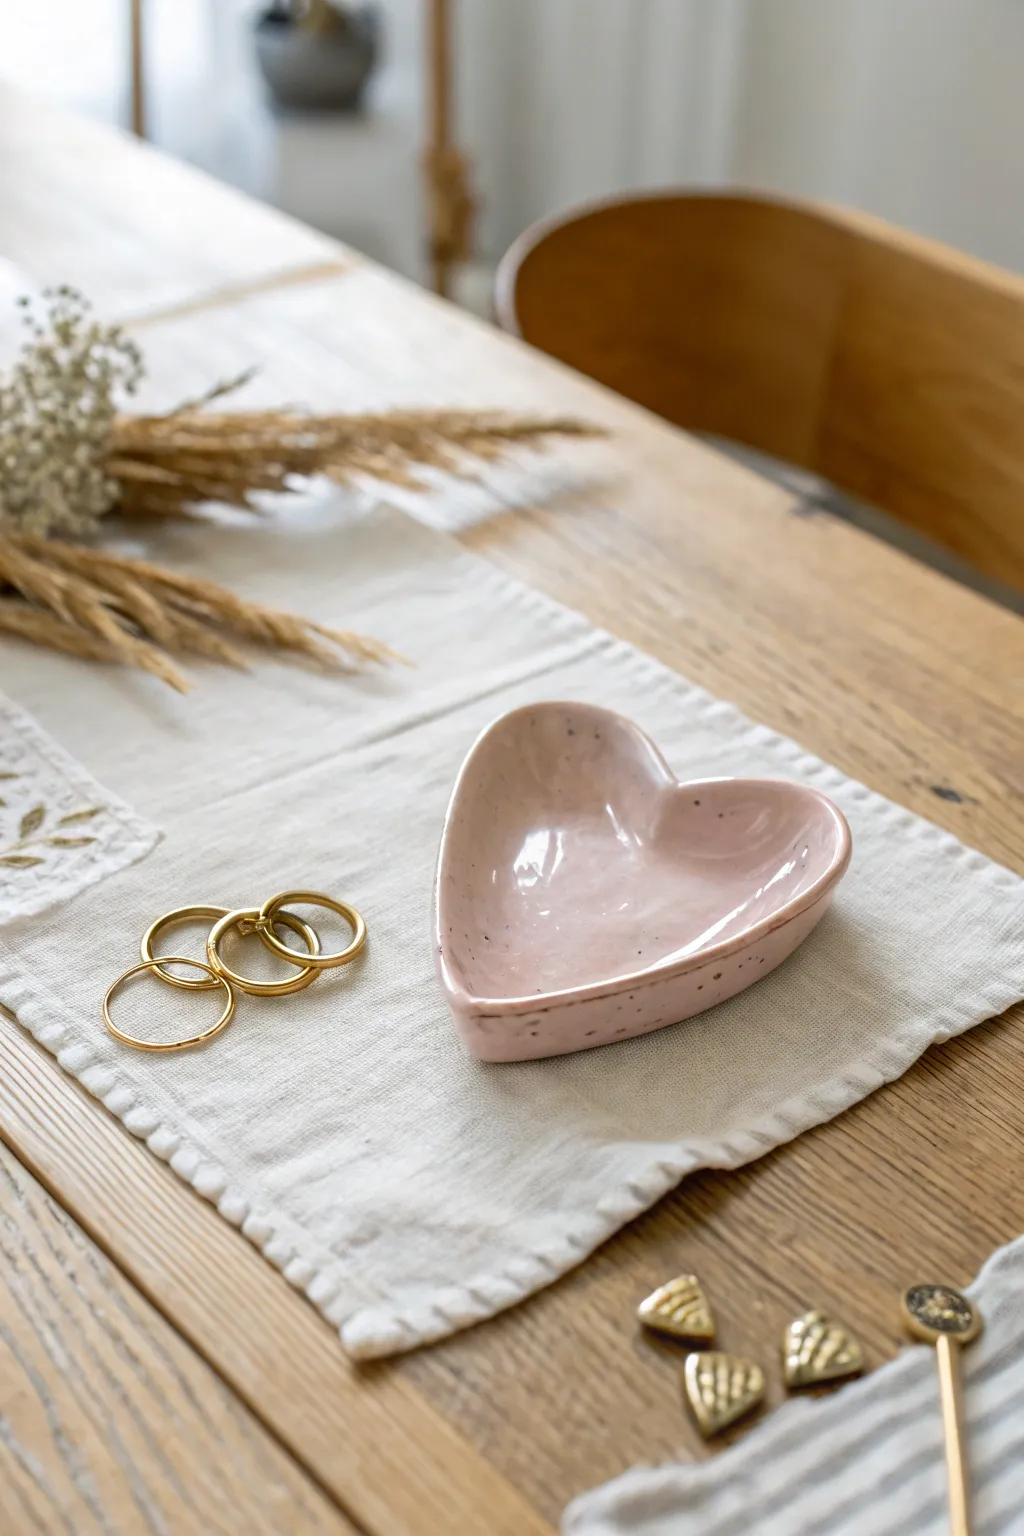
Capture a soft, romantic aesthetic with this handmade jewelry dish, featuring organic edges, a glossy finish, and delicate speckling. The gentle pink glaze paired with natural clay textures creates a warm, vintage-inspired piece perfect for holding your favorite rings.
How-To Guide
Materials
- White or light-colored air-dry clay or polymer clay
- Rolling pin
- Heart-shaped cookie cutter (large) or paper template and knife
- Small bowl with water
- Sponge or smoothing tool
- Pale pink acrylic paint (gloss finish) or ceramic glaze
- Dark brown or grey acrylic paint (for speckles)
- Old toothbrush
- High-gloss varnish or sealant
- Fine-grit sandpaper
Step 1: Shaping the Base
-
Condition the clay:
Begin by taking a handful of your chosen clay and kneading it thoroughly until it is soft, pliable, and free of air bubbles. If using polymer clay, the warmth of your hands will make it easier to work with. -
Roll it out:
Place the clay on a smooth, non-stick surface. Use your rolling pin to flatten it into an even slab, aiming for a thickness of about 1/4 inch (6mm). Avoid rolling it too thin, as this can make the edges fragile. -
Cut the heart shape:
Press a large heart-shaped cookie cutter firmly into the slab. Alternatively, place a paper template on the clay and carefully trace around it with a craft knife to cut out your heart. -
Soften the edges:
Dip your finger or a small sponge into a little water and run it along the cut edges of the heart. This removes any harsh lines left by the cutter or knife, giving the piece that organic, handmade look. -
Create the curvature:
To give the dish its cupped shape, gently lift the edges of the heart upward. You can use your thumbs to press into the center while pulling the sides up slightly.
Step 2: Refining and Drying
-
Smooth the interior:
Use a damp sponge to smooth out any fingerprints inside the dish. The surface should be perfectly seamless before it dries. -
Enhance the rim:
I like to gently pinch the rim between my thumb and forefinger to create a slightly irregular, artisanal thickness, rather than a machine-perfect edge. -
Initial drying phase:
Place the shaped heart on a piece of parchment paper to dry. If you are using air-dry clay, let it sit for 24-48 hours until bone dry. For polymer clay, bake according to the package instructions. -
Sand for smoothness:
Once fully cured or dried, take fine-grit sandpaper and lightly buff the entire surface, paying special attention to the rim to ensure there are no sharp burrs.
Dry Curving Tip
To keep the curved shape while drying, rest the clay heart inside a small bowl lined with plastic wrap. This supports the sides so they don’t slump flat.
Step 3: Glazing and Speckling
-
Apply the base color:
Using a soft brush, apply a coat of pale pink paint to the entire dish. Let the first coat dry completely before adding a second coat for opaque, even coverage. -
Create the speckle mix:
Dilute a small amount of dark brown or grey acrylic paint with water until it has a sheer, inky consistency. -
Flick the speckles:
Dip an old toothbrush into the diluted paint mixture. Hold the brush over the dish and run your thumb across the bristles to flick tiny droplets onto the surface. Practice on a paper towel first to control the size of the splatters. -
Clean any heavy spots:
If any large globs land on your dish, quickly dab them away with a damp paper towel before they dry to maintain the delicate speckled look. -
Apply the gloss:
Once the paint is fully dry, apply two to three coats of high-gloss varnish. This mimics the look of a fired ceramic glaze and protects the dish from scratches. -
Final cure:
Allow the varnish to cure completely in a dust-free area for at least 24 hours before placing any jewelry inside.
Gilded Edges
For a luxurious upgrade, paint the very rim of the dish with liquid gold leaf after the pink glaze dries but before you seal it with varnish.
Now you have a charming, personalized spot to keep your treasured rings safe and sound
Scalloped Edge Jewelry Dish
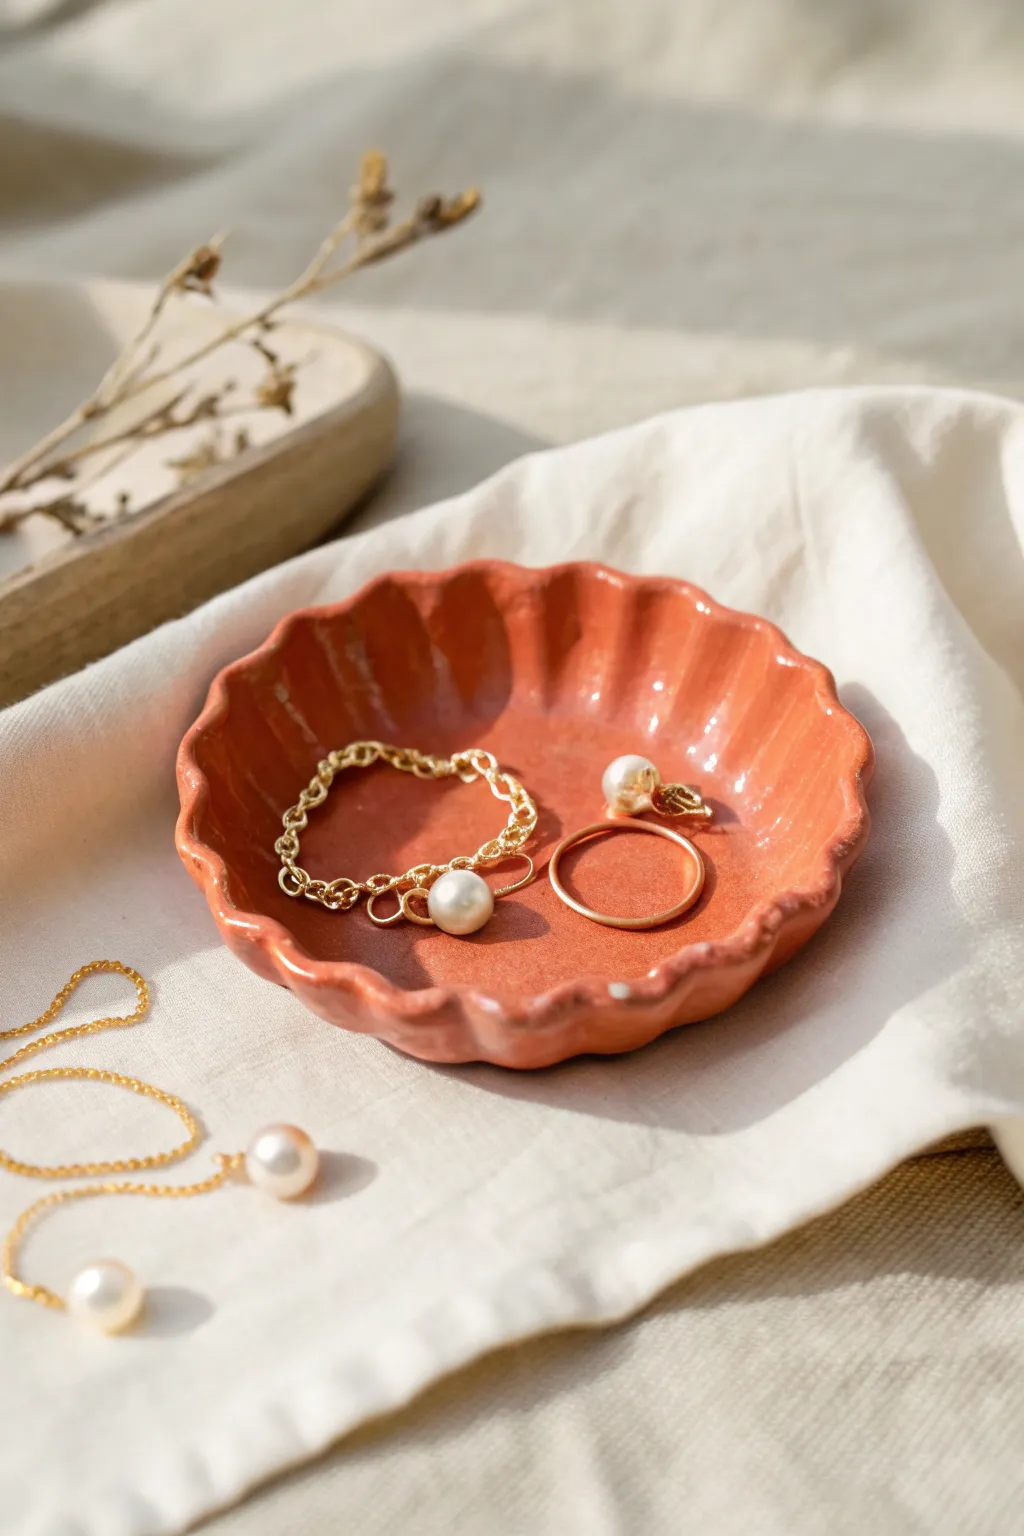
Embrace the warmth of terracotta tones with this charming scalloped jewelry dish, perfect for holding your everyday pearls and rings. Its gentle, wavy rim and glossy amber glaze give it an organic feel that looks lovely on any vanity.
Detailed Instructions
Materials
- Air-dry clay (terra cotta color) or polymer clay in a similar shade
- Rolling pin
- Circular cookie cutter or a small bowl to trace (approx. 4-5 inches diameter)
- Craft knife
- Small bowl for shaping (to drape the clay over)
- Small cup of water
- Sponge or smoothing tool
- Glossy varnish or glaze (transparent)
- Soft synthetic paintbrush
- Sandpaper (fine grit)
Step 1: Shaping the Base
-
Prepare the clay:
Begin by taking a handful of your terracotta-colored clay and conditioning it in your hands until it is soft, pliable, and free of cracks. If using air-dry clay, keep your hands slightly damp. -
Roll it out:
Place the clay on a smooth surface or canvas mat. Roll it out evenly to a thickness of about 1/4 inch; you want it sturdy but not chunky. -
Cut the circle:
Use your circular cookie cutter or trace around a small bowl with a craft knife to cut out a perfect circle. Remove the excess clay. -
Smooth the edges:
Dip your finger in a little water and run it along the cut edge of the circle to smooth out any sharpness or roughness.
Cracking Up?
If small cracks appear while drying, mix a tiny bit of fresh clay with water to make a paste perfectly suited for filling gaps.
Step 2: Creating the Scallops
-
Pinch the rim:
To create that distinctive wavy edge, use your thumb and index finger to gently pinch the clay rim upwards at regular intervals. -
Refine the waves:
Work your way around the entire circle, pushing the clay slightly inward between your pinch points to accentuate the scalloped effect. -
Check symmetry:
Look at the dish from above. The waves don’t need to be mathematically perfect—in fact, I think slightly irregular spacing adds to the handmade charm—but try to keep the height consistent. -
Add depth:
Gently press the center of the dish downwards with your palm to create a slight concavity, ensuring it can actually hold rounded items like beads. -
Smooth the interior:
Take a damp sponge and very lightly wipe the interior surface to remove any fingerprints left during the pinching process.
Step 3: Drying and Finishing
-
Let it dry:
Place your dish in a safe, dry spot away from direct sunlight. If you want a deeper bowl shape, you can let it dry resting inside a slightly larger curved bowl. -
Wait patiently:
Allow 24 to 48 hours for drying, depending on your humidity. The clay should lighten in color and feel hard to the touch. -
Sand imperfections:
Once fully dry, take fine-grit sandpaper and gently buff the edges or any rough spots on the rim to ensure a professional finish. -
Wipe clean:
Use a dry brush or cloth or remove all sanding dust before moving on to the glazing step. -
Apply the glaze:
Dip your soft brush into a high-gloss varnish. Apply a generous, even coat to the inside of the dish, working the liquid into the crevices of the scalloped rim. -
Coat the rim:
Don’t forget to paint the very top edge of the rim, as this catches the light beautifully. -
Second coat:
Let the first coat dry according to the bottle instructions. Apply a second coat to achieve that super-shiny, wet-look finish seen in the photo. -
Final cure:
Allow the glaze to cure completely before placing any jewelry inside to prevent sticking.
Gold Rim Magic
For an elevated look, paint just the very edge of the scallops with liquid gold leaf after the glaze dries for a touch of luxury.
Now you have a warm, glossy catch-all that turns your jewelry storage into a piece of art

TRACK YOUR CERAMIC JOURNEY
Capture glaze tests, firing details, and creative progress—all in one simple printable. Make your projects easier to repeat and improve.
Minimal Oval Vanity Tray Dish
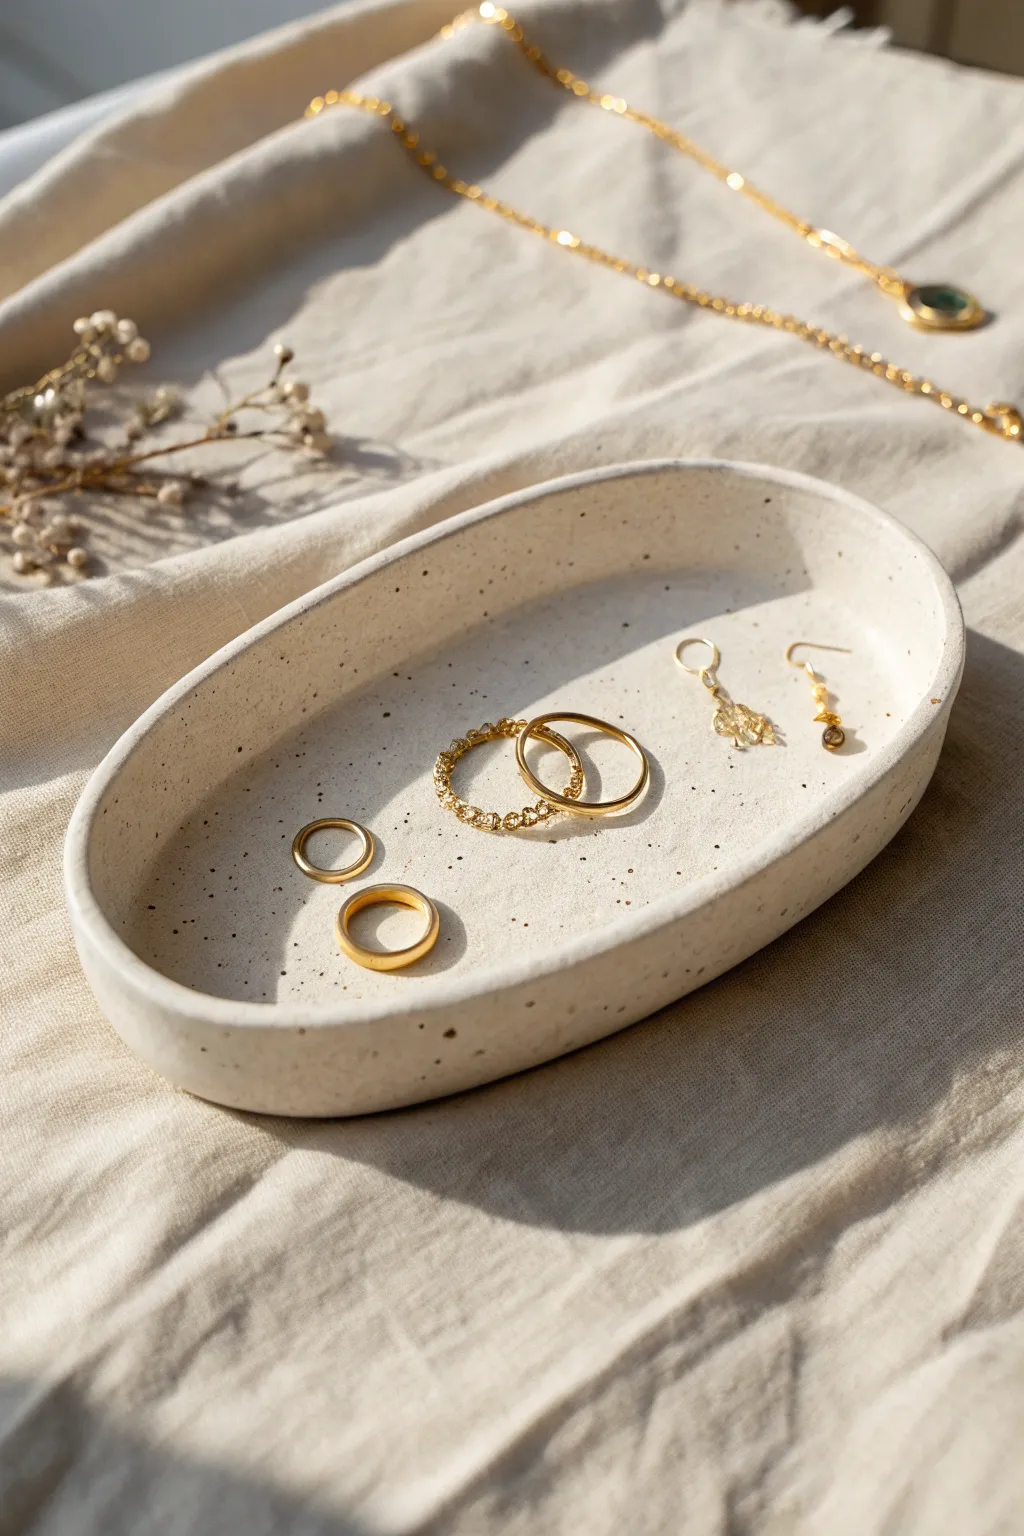
This elegant tray embraces minimalism with its smooth, organic curves and subtle speckled texture, making it the perfect home for your everyday gold jewelry. The understated cream finish mimics high-end stoneware, bringing a touch of modern sophistication to your vanity or bedside table.
How-To Guide
Materials
- White air-dry clay or polymer clay (approx. 200g)
- Black pepper or dried coffee grounds (for speckles)
- Rolling pin
- Sharp craft knife or clay slicing blade
- Oval paper template
- Small bowl of water
- Sponge or soft paintbrush
- Fine-grit sandpaper (400-600 grit)
- Matte or satin waterproof varnish
- Soft bristle brush for sealing
Step 1: Preparing the Clay
-
Condition the base:
Begin by warming up your white clay in your hands. Knead it thoroughly until it is soft, pliable, and free of any air bubbles. -
Add texture:
Flatten the clay slightly and sprinkle a small pinch of black pepper or dried coffee grounds onto the surface. Fold the clay over itself to trap the particles inside. -
Distribute the speckles:
Knead the clay again for several minutes. Keep folding and pressing until the speckles are evenly distributed throughout the entire ball of clay, creating that faux-stone look. -
Roll it out:
Place the clay on a smooth, non-stick surface or a piece of parchment paper. Use a rolling pin to roll it out to a uniform thickness of about 1/4 inch (6mm).
Natural Speckles
For realistic stone texture, vary your speckle size. Mix fine pepper with slightly coarser tea leaves or dried herbs to create depth and visual interest.
Step 2: Shaping the Form
-
Cut the oval:
Place your oval paper template gently onto the rolled clay. Using a sharp craft knife held vertically, carefully trace around the template to cut out the base shape. -
Smooth the cut edges:
Remove the excess clay. Dip your finger in a little water and run it along the cut edge to smooth out any sharpness or drag marks from the knife. -
Lift the edges:
Gently lift the clay oval. Using your thumb and forefinger, pinch the outer rim upwards to create a raised wall. Work your way around the entire perimeter slowly. -
Refine the curve:
Once the wall is raised, use the pad of your thumb to smooth the transition between the flat base and the wall on the inside. You want a seamless, gentle curve rather than a sharp 90-degree corner. -
Level the rim:
Place the tray back on your work surface. Look at it from eye level to check if the rim is wavy. Gently press down high spots or nudge up low spots to ensure an even height. -
Final smoothing:
Dip a sponge or soft brush in water (very sparingly) and wipe the entire surface to erase fingerprints and create a flawless, matte texture.
Warped Bottom?
If the base doesn’t sit flat after drying, tape a sheet of sandpaper to a table and rub the bottom of the dry dish over it in circular motions to level it.
Step 3: Finishing Touches
-
Dry properly:
Let the dish air dry in a cool, dry place away from direct sunlight. To prevent warping, I usually flip it over gently after about 12 hours so the bottom can dry evenly. -
Sand for perfection:
Once the dish is bone dry (usually 24-48 hours depending on humidity), take your fine-grit sandpaper and lightly buff the rim and edges. This makes the piece feel professional and smooth to the touch. -
Dust off:
Wipe the dish with a slightly damp cloth or a dry tack cloth to remove every bit of sanding dust before sealing. -
Seal the piece:
Apply a thin coat of matte or satin varnish to protect the clay from moisture and oils. Use long, even strokes to avoid brush marks. -
Second coat:
Allow the first coat to dry completely according to the varnish instructions, then apply a second coat for added durability.
Now you have a chic, modern vessel ready to display your favorite rings and necklaces with style
Ring Cone Center Dish
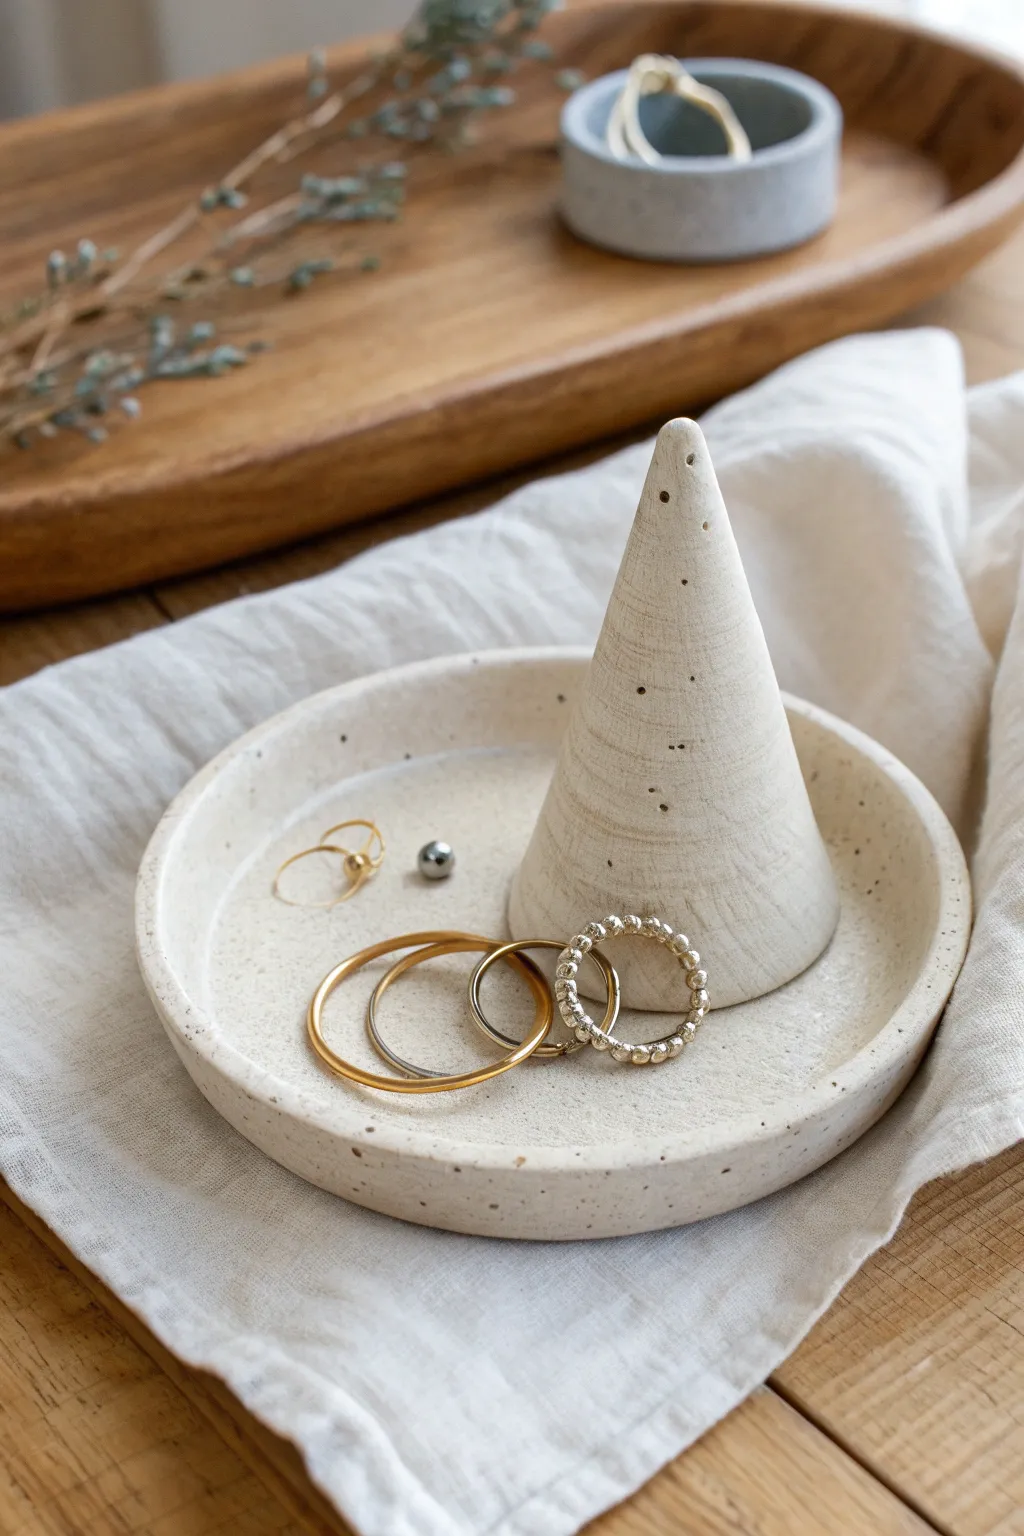
This minimalist jewelry dish combines modern simplicity with functional design, featuring a convenient center cone perfect for stacking rings. The speckled oatmeal clay gives it an organic, artisanal feel that looks beautiful on any bedside table or vanity.
Step-by-Step Tutorial
Materials
- Polymer clay (white or beige)
- Black pepper or dried coffee grounds (for speckling)
- Rolling pin or clay machine
- Round cookie cutter or bowl (approx. 4-5 inches)
- X-Acto knife or clay blade
- Parchment paper
- Sandpaper (fine grit)
- Oven
- Optional: Matte varnish
Step 1: Preparing the Clay
-
Condition the clay:
Start by kneading your white or beige polymer clay in your hands until it becomes soft, pliable, and warm to the touch. -
Create the speckles:
Sprinkle a small pinch of ground black pepper or very fine dried coffee grounds onto the clay. Fold the clay over itself and knead thoroughly to distribute the speckles evenly throughout the block. -
Roll it out:
Place the conditioned speckled clay on a sheet of parchment paper. Use a rolling pin to flatten it into an even slab, aiming for a thickness of about 1/4 inch.
Uneven Rim?
If your rim keeps slumping while shaping, place the clay circle inside a slightly larger shallow bowl to support it while you work on the center cone attachment.
Step 2: Forming the Base Dish
-
Cut the circle:
Press your round cookie cutter or place a bowl upside down onto the rubbed-out slab to cut a perfect circle. Remove the excess clay from around the edges, but save it for the cone. -
Soften the edges:
Dip your finger in a tiny bit of water or baby oil and run it gently around the cut edge of the circle to smooth out any sharpness or roughness. -
Lift the rim:
Gently pinch the outer edge of the circle upwards to create a small rim. You want a shallow wall that will keep your jewelry contained. -
Refine the shape:
Go around the rim once more, smoothing the transition between the base and the wall with your thumb to ensure it looks seamless and organic rather than pinched.
Level Up: Marbling
Mix a tiny amount of grey or beige clay into your white base but stop kneading halfway through for a subtle marble effect alongside the speckles.
Step 3: Creating the Cone
-
Shape a cylinder:
Take the excess clay you set aside and roll it into a thick cylinder between your palms. -
Form the point:
Use your fingers to taper one end of the cylinder, rolling it back and forth on your work surface while applying more pressure to the top side until you have a smooth cone shape. -
Check the proportions:
Place the cone temporarily in the center of your dish to check the size. It should be tall enough to hold rings but balanced with the width of the dish. -
Flatten the base:
Tap the bottom, wider end of the cone firmly against your table to create a perfectly flat surface for attachment.
Step 4: Assembly and Finishing
-
Score the surfaces:
take a needle tool or toothpick and scratch rough hatch marks into the center of the dish and the bottom of the cone. This texture helps them bond. -
Attach the cone:
Press the cone firmly onto the center of the dish. I like to use a blending tool or my finger to verify the seam is tight, ensuring no gaps remain at the base. -
Texture match:
If your smoothing motions smoothed away too many speckles or texture, gently press the surface with a piece of light sandpaper to bring back that matte, stone-like finish. -
Bake carefully:
Transfer the dish (still on parchment paper) to a baking sheet. Bake according to your polymer clay package instructions, typically around 275°F (135°C) for 15-30 minutes. -
Cool down:
Let the dish cool completely in the oven with the door strictly slightly ajar to prevent cracking from sudden temperature changes. -
Sand for perfection:
Once cool, use fine-grit sandpaper under running water to smooth any imperfections on the rim or the tip of the cone. -
Optional seal:
If you want extra durability, apply a thin coat of matte varnish, though leaving it raw preserves the stone aesthetic shown in the photo.
Enjoy styling your new minimalist dish with your favorite everyday rings and studs
Moon Phase Jewelry Dish
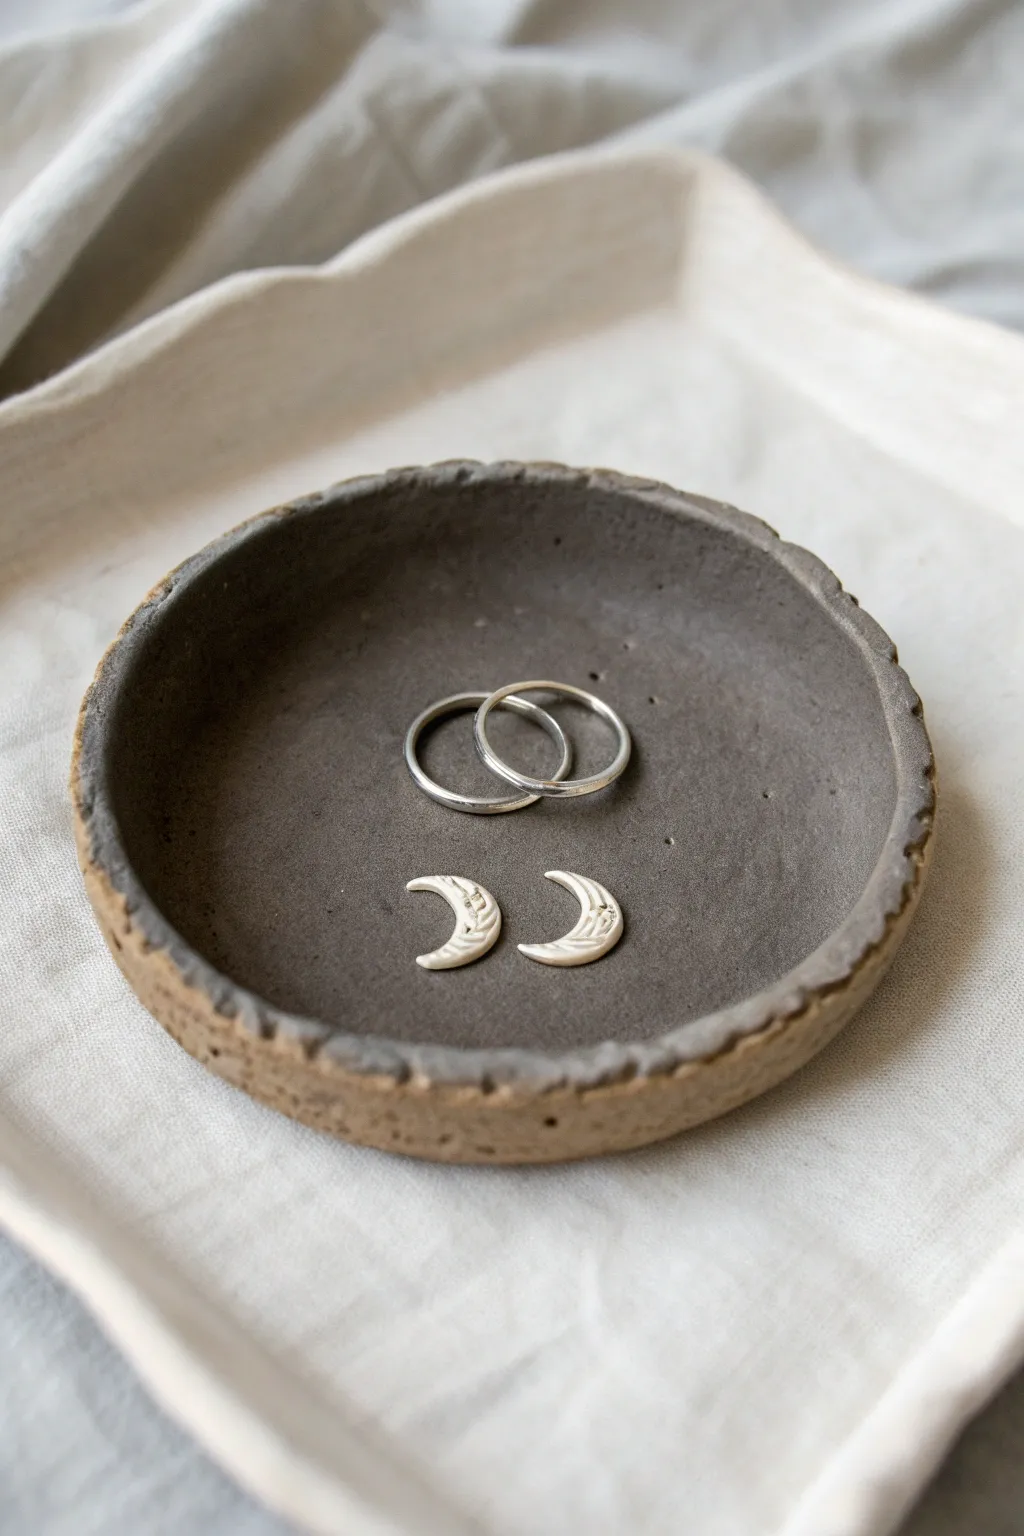
Embrace the moody elegance of the night sky with this striking two-tone jewelry dish. Featuring a raw, textured sandstone exterior and a deep, glossy charcoal interior, this piece is the perfect resting place for your favorite silver treasures.
How-To Guide
Materials
- Speckled stoneware clay or sandy textured clay
- Rolling pin
- Circle template (approx. 4 inches) or large cookie cutter
- Pottery needle tool or craft knife
- Small elevated mold or hump mold (a small bowl works well)
- Sponge
- Rib tool or old credit card
- Deep charcoal or dark grey ceramic glaze
- Soft fan brush for glazing
- Kiln (if using traditional stoneware) or oven (if using polymer/oven-bake alternatives)
Step 1: Forming the Base
-
Prepare the clay:
Start by wedging a ball of speckled or gritty stoneware clay to remove any air bubbles. You want a clay body that has some ‘tooth’ or texture to it, as the rim will remain unglazed to show off this character. -
Roll out the slab:
Roll the clay out into an even slab, aiming for a thickness of about 1/4 inch. Keep your pressure consistent so the bottom of your dish is uniform. -
Cut the circle:
Place your 4-inch circle template or cookie cutter onto the slab. Using your needle tool, cut cleanly around the shape. If the edges are sharp, gently tap them with your finger, but don’t smooth them completely—we want a slightly rustic edge. -
Add texture (optional):
If your clay is smooth but you want the look in the photo, lightly press a coarse sandpaper or a textured fabric onto the outer rim area before shaping.
Step 2: Shaping and Refining
-
Form the curve:
Gently lift your clay circle and drape it over your hump mold or press it into a small bowl form. The goal is a shallow curve, not a deep bowl. The sides should rise just enough to hold budding jewelry securely. -
Refine the rim:
While the clay is in the mold, use your thumb to roughen the very edge of the rim. Create small indentations or a ‘pinched’ look to mimic the organic, handmade aesthetic seen in the image. -
Smooth the interior:
Take a slightly damp sponge and run it over the interior surface only. You want this area to be perfectly smooth so the glaze will lay flat and glossy later. -
Dry slowly:
Cover the dish loosely with plastic and let it dry slowly to the leather-hard stage. This prevents warping. Once leather-hard, remove it from the mold. -
Bisque fire:
Allow the piece to dry completely (bone dry) before firing it in the kiln according to your clay’s specific bisque schedule.
Rim Texture Hack
To get that rough, sandy rim edge without special tools, lightly tap the edge of the damp clay with a stiff toothbrush or a clean rock from your garden.
Step 3: Glazing and Finishing
-
Select your glaze:
Choose a food-safe, high-gloss dark charcoal or midnight grey glaze. The contrast between the dark interior and the light exterior is key to this look. -
Apply the first coat:
Using a soft fan brush, apply a generous coat of glaze to the *interior* of the dish only. I prefer to start from the center and spiral outwards. -
Create the border:
Carefully paint the glaze up to the rim, but stop just short of the very top edge. You want a millimeter or two of the raw clay to be visible between the glaze and the rim’s top. -
Clean the exterior:
If any glaze dripped onto the textured outer rim or the bottom, wipe it away immediately with a damp sponge. The outside must remain raw clay. -
Apply subsequent coats:
Let the first coat dry until it’s chalky (touch dry), then apply 2-3 more coats depending on the glaze instructions to ensure a solid, opaque color. -
Final Fire:
Load the kiln again for the glaze firing. Ensure the unglazed bottom is clean so it doesn’t stick to the kiln shelf. -
Cooling down:
Let the kiln cool completely before removing your dish. The dark glaze should now be a glassy pool against the matte, sandy texture of the rim.
Level Up: Celestial Details
Before glazing, paint tiny constellations or moon phases inside the bowl using white underglaze or a wax resist for a hidden starry night effect.
Place your favorite silver rings inside to see how they pop against the dark, moody background
Geometric Faceted Jewelry Dish
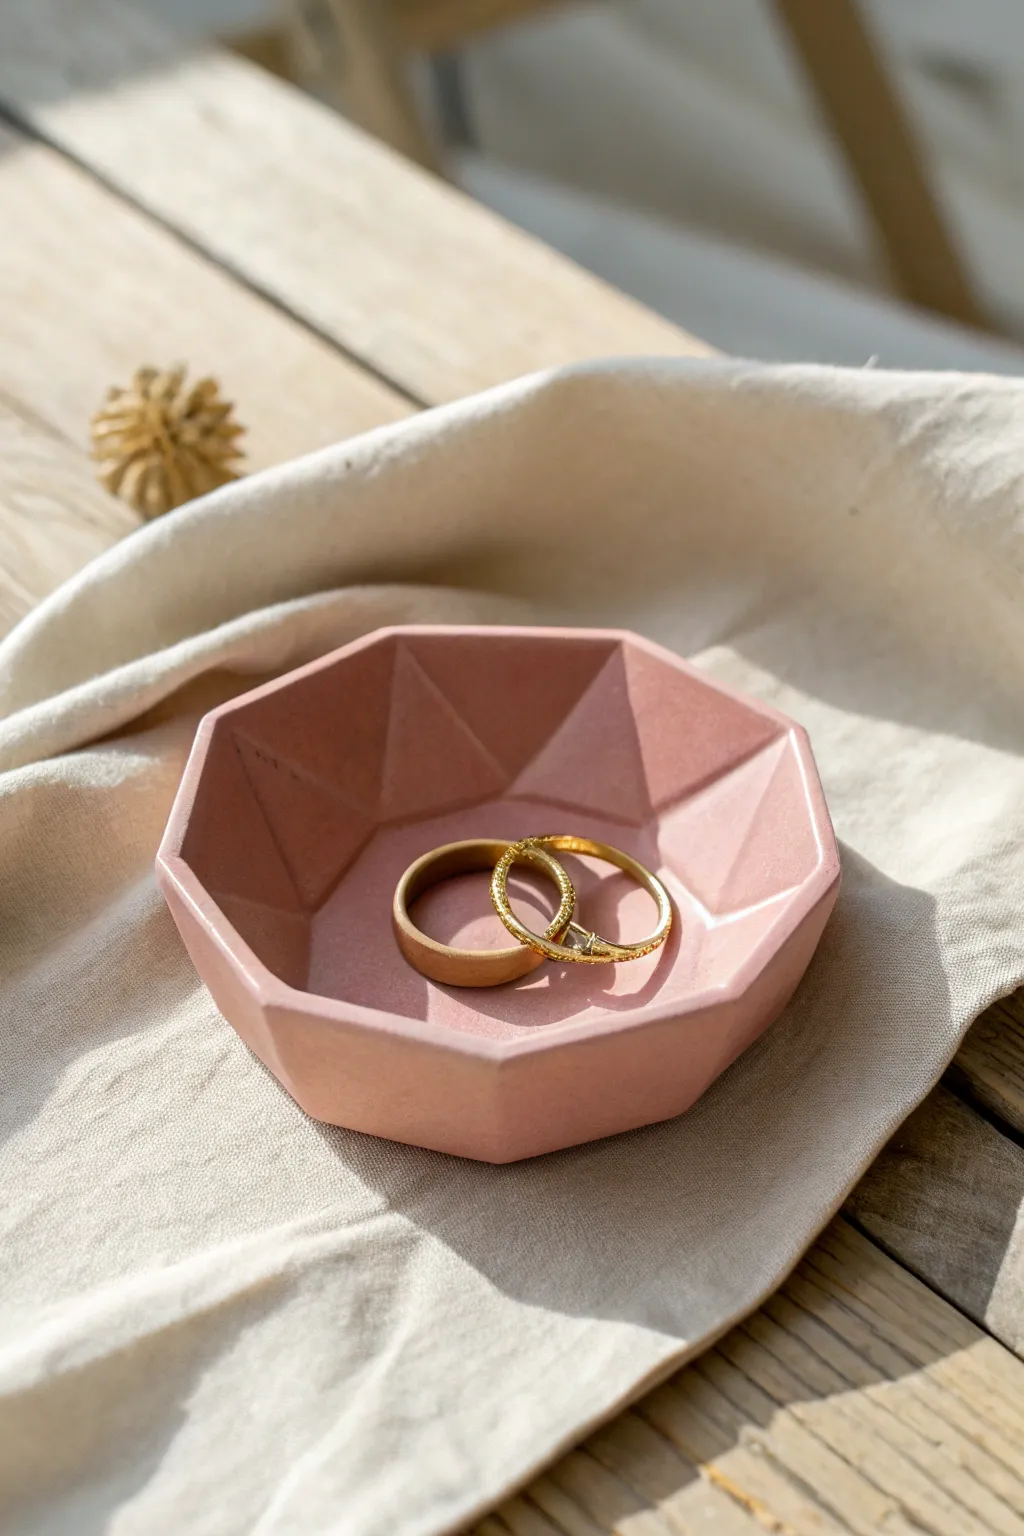
This modern jewelry dish combines soft, blush-pink tones with crisp, architectural lines for a striking contrast. Its geometric facets catch the light beautifully, making it the perfect resting spot for your favorite rings.
Step-by-Step
Materials
- Polymer clay (blush pink or terracotta)
- Acrylic rolling pin
- Sharp craft knife or scalpel
- Geometric template (octagon) printed on paper
- Ruler
- Fine-grit sandpaper (400 and 800 grit)
- Small oven-safe bowl (for shaping)
- Parchment paper
Step 1: Preparation and Base Shape
-
Condition the clay:
Start by warming the polymer clay in your hands, kneading it thoroughly until it is soft, pliable, and free of any air bubbles. This conditioning step is crucial to prevent cracks later. -
Roll out a slab:
Place the clay on a clean, flat surface or parchment paper. Use your acrylic roller to flatten it into an even slab, aiming for a thickness of about 1/4 inch (6mm) to ensure the facets have enough depth. -
Cut the octagon:
Lay your printed paper octagon template gently on top of the clay slab. Using your craft knife and a ruler for stability, cut straight down around the template to create a clean eight-sided shape.
Step 2: Creating the Facets
-
Mark the center:
Lightly mark the exact center of your clay octagon with a pin or the tip of your knife. Do not puncture all the way through; just create a guide point. -
Score the radial lines:
Use the ruler to lightly score lines from the center point to each of the eight corners of the octagon. These lines will serve as the ridges between your facets. -
Carve the first facet:
Now comes the sculpting. Carefully slice away thin layers of clay within one of the triangular sections created by your score lines. Angle your blade to slope downwards from the outer edge toward the center, creating a depression. -
Refine the slope:
Work slowly, shaving off small amounts at a time. The goal is to make the center of the triangle the deepest point, or create a planar slope depending on your preferred geometric look. I prefer to slope these inward to meet in the middle. -
Repeat the carving:
Continue this carving process for each of the eight triangular sections. Try to keep the depth and angle consistent for all sections to maintain symmetry. -
Smooth the ridges:
Once carved, run your finger very lightly along the ridges where the facets meet. You want them sharp, but not jagged. If you have tool marks, gently buff them out with your fingertip.
Fixing Uneven Facets
If you carve too deep, don’t panic. Add a tiny snake of fresh clay into the divot, smooth it down seamlessly with a tool, and re-carve the angle gently.
Step 3: Shaping and Curing
-
Form the bowl shape:
To give the flat slab its dish shape, carefully drape the clay into your oven-safe bowl. Gently press the center down so the clay takes on a concave form without distorting your fresh carving. -
Adjust the rim:
Check the rim of your dish while it sits in the mold. If the sides have warped, gently push them back into a clean octagonal alignment. -
Bake the clay:
Preheat your oven according to the manufacturer’s instructions on your clay package (usually around 275°F or 130°C). Bake the dish while it is still inside the shaping bowl to hold its form. -
Cool down:
Once the baking time is up, turn off the oven and let the dish cool completely inside. Removing it while hot can cause warping or cracking.
Make It Marble
Mix white and translucent clay into your pink base before rolling. Stop kneading when streaks appear for a stunning faux-stone effect.
Step 4: Finishing Touches
-
Initial sanding:
Remove the cooled dish. Dip your 400-grit sandpaper in water and gently sand the edges and the flat bottom to remove any rough texture or fingerprints. -
Polishing:
Switch to the finer 800-grit sandpaper for a final polish. Focus on the faceted interior to make the geometric planes feel smooth and satiny to the touch. -
Rinse and dry:
Wash off any sanding residue with water and dry the dish thoroughly with a soft cloth.
Place your new faceted creation on your nightstand to admire its clean lines every day
Two-Tone Color-Blocked Dish
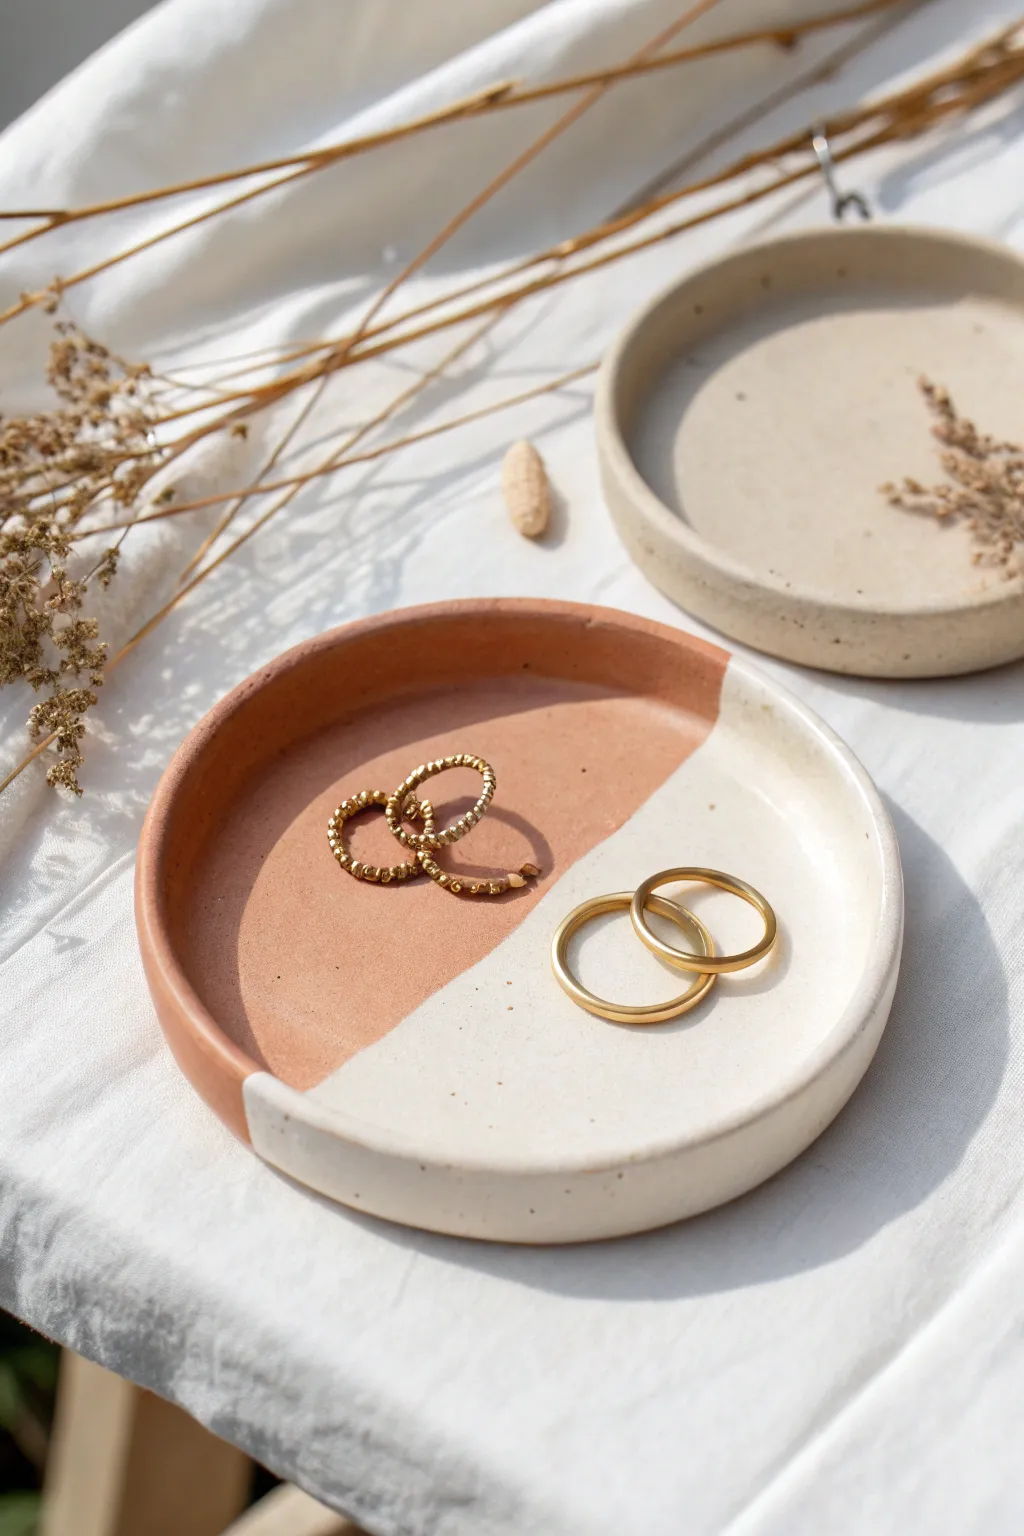
Embrace the beauty of raw textures with this minimalist clay jewelry dish featuring a striking diagonal dip effect. The blend of warm terracotta and crisp white glaze creates an organic yet modern silhouette perfect for holding your favorite rings.
Detailed Instructions
Materials
- Air-dry clay (terracotta color)
- Air-dry clay (white) or White acrylic paint/glaze
- Rolling pin
- Circle cutter or a bowl to trace
- Sharp craft knife
- Sandpaper (medium and fine grit)
- Masking tape or painter’s tape
- Glossy varnish or sealant
- Small bowl of water
- Sponge or paintbrush
Step 1: Shaping the Base
-
Prepare the Clay:
Start by taking a generous amount of terracotta-colored air-dry clay. Knead it in your hands for a minute or two to warm it up and make it pliable, removing any air bubbles. -
Roll it Out:
Place the clay on a smooth, non-stick surface or a piece of parchment paper. Use your rolling pin to flatten the clay to an even thickness of about 1/4 inch (6mm). -
Cut the Circle:
Place your circular cutter or an upside-down bowl onto the rolled clay to serve as a template. Press down firmly or trace around the bowl with a sharp craft knife to cut out a perfect circle. -
Create the Lip:
Gently lift the edges of the circle with your fingers. Use a pinching motion along the perimeter to raise the clay slightly, creating a shallow rim that will keep your jewelry contained. -
Smooth the Edges:
Dip your finger into a small bowl of water and run it along the rim and the interior surface. This will smooth out any cracks or fingerprints; I find this is the best moment to ensure the transition from base to rim is seamless. -
Let it Dry:
Set the dish aside in a cool, dry place. Allow it to air dry completely for 24-48 hours. Turning it over halfway through the drying process helps prevent the bottom from staying damp.
Smooth Operator
To get that super-smooth rim shown in the photo, use a slightly wet sponge instead of just fingers during the shaping phase. It acts like a potter’s rib tool.
Step 2: Refining and Color Blocking
-
Sand the Surface:
Once fully bone dry, take your medium-grit sandpaper and gently sand down any rough spots on the rim or surface. Follow up with fine-grit sandpaper for a silky smooth finish. -
Dust Off:
Wipe the entire dish with a barely damp sponge or cloth to remove all clay dust. This is crucial for getting a crisp paint line later. -
Mask the Diagonal:
Apply a strip of masking tape or painter’s tape diagonally across the dish. Press the tape down firmly, especially where it meets the rim and the inner corner, to prevent paint from bleeding underneath. -
Mix the Glaze:
Prepare a creamy white acrylic paint or a white ceramic glaze. If the paint is too thick, thin it slightly with water so it flows smoothly without leaving heavy brushstrokes. -
Apply the White Layer:
Paint the exposed half of the dish white. Brush away from the tape edge rather than into it to minimize bleed-through. You may need two or three coats for full opacity, letting each layer dry in between. -
Remove the Tape:
While the final coat of paint is still slightly tacky (not fully hard), carefully peel back the tape at a 45-degree angle. This helps ensure a sharp, clean line between the terracotta and the white. -
Clean Up Edges:
If there was any tiny bleed-through, use the tip of a craft knife to gently scrape it away, or touch it up with a tiny bit of terracotta paint if you have a match.
Step 3: Finishing Touches
-
Seal the Dish:
Once the paint is completely cured, apply a clear gloss varnish over the entire dish—both the painted and unpainted sections. This protects the clay and gives it that finished ceramic look. -
Final Cure:
Let the varnish dry according to the manufacturer’s instructions before placing any jewelry inside.
Speckled Elegance
Flick a stiff toothbrush dipped in diluted brown paint over the white section before varnishing to create a trendy ceramic speckle effect.
Now you have a chic, handmade spot to safeguard your daily treasures or gift to a friend
Stamped Pattern Texture Dish
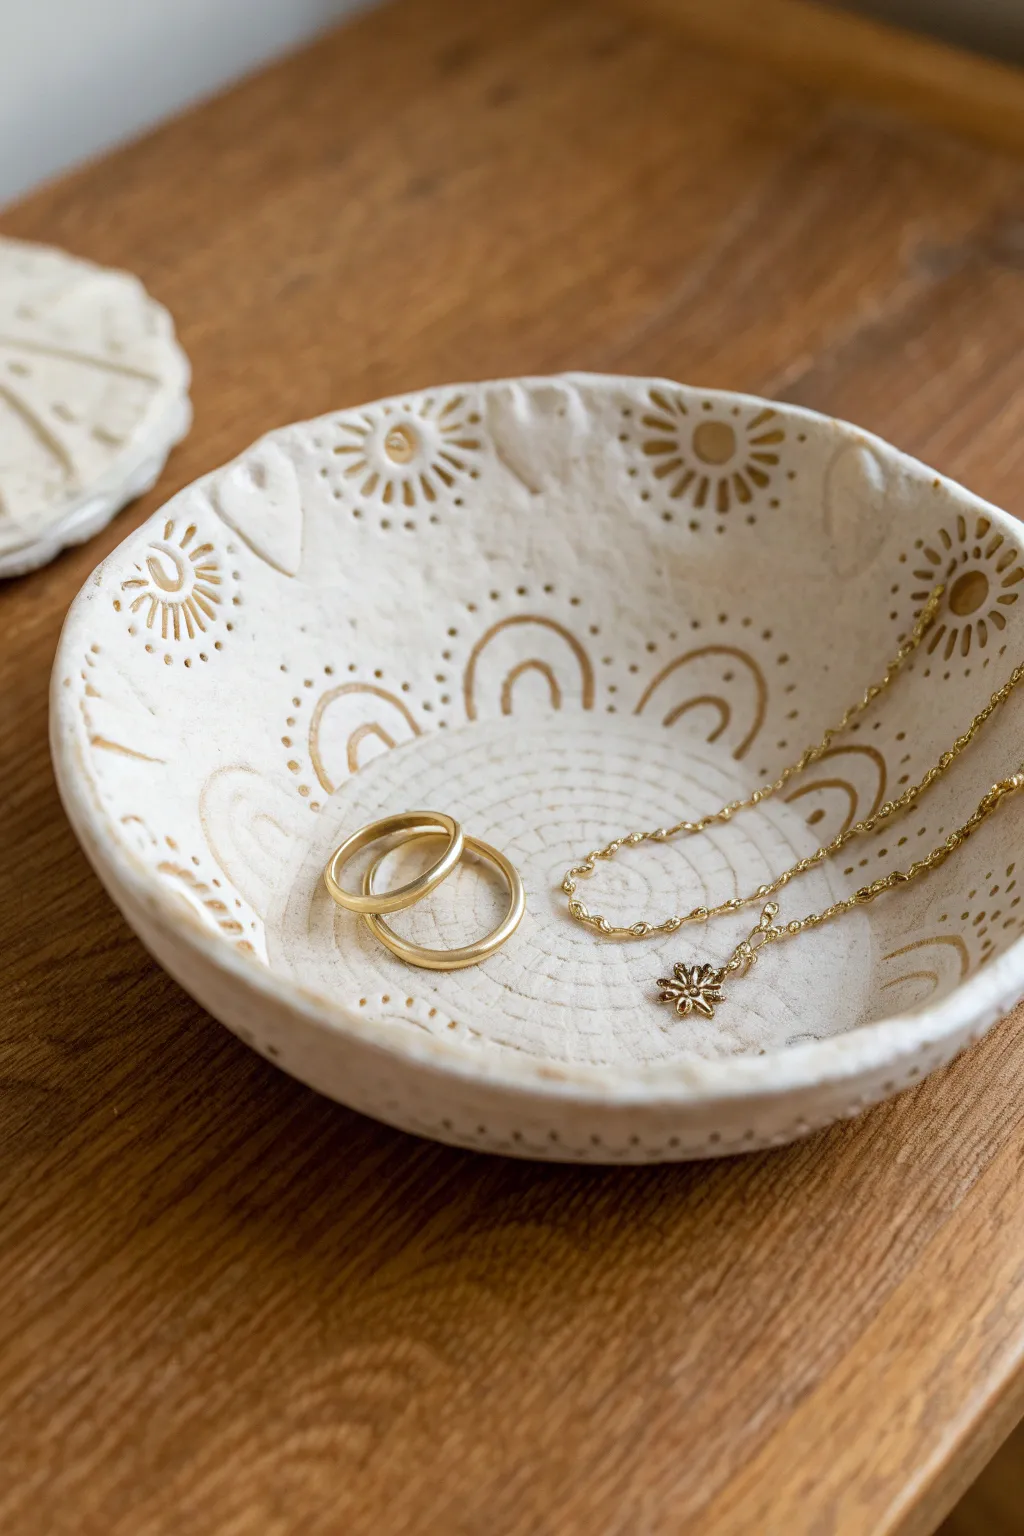
This charming trinket dish combines classic pottery vibes with playful bohemian motifs like sunbursts, rainbows, and hearts. The textured, stamped design is elevated with gold paint accents, making it the perfect spot to safe-keep your favorite rings and necklaces.
Step-by-Step
Materials
- Air-dry clay (white or cream)
- Rolling pin
- Small bowl (to use as a mold)
- Circle layout template or round cookie cutter (approx. 4-5 inches)
- Clay sculpting tools or a craft knife
- Various stamps (sunburst, rainbow arches, small heart)
- Dotting tool or toothpick
- Fine-grit sandpaper
- Gold acrylic paint or liquid gold leaf
- Fine detail paintbrush
- Clear sealant (varnish or Mod Podge)
Step 1: Shaping the Base
-
Roll the slab:
Begin by conditioning a handful of air-dry clay until it’s pliable. Roll it out on a smooth surface to an even thickness of about 1/4 inch. If you want a textured underside like canvas, roll it out on a piece of fabric. -
Cut the circle:
Place your circle template or a large bowl upside down on the clay and trace around it with a craft knife to cut out a perfect circle. Remove the excess clay. -
Smooth the edges:
Dip your finger in a little water and run it along the cut edge of the circle to smooth out any sharpness or roughness. A smooth edge is key for a professional finish. -
Establish the spiral center:
Using a needle tool or a fine stylus, gently score a spiral starting from the very center of the disk, winding outwards about an inch. This creates the subtle texture visible at the bottom of the dish.
Uneven Stamping?
If a stamp doesn’t impress deeply enough, don’t try to double-stamp exactly over it. Instead, use a needle tool to manually deepen the existing lines.
Step 2: Stamping the Design
-
Start with the suns:
Using a sunburst stamp, press firmly into the clay near the outer rim. I prefer to space these out evenly first, perhaps at the 12, 3, 6, and 9 o’clock positions, then fill in the gaps. -
Add the rainbow layer:
Below the rim design, stamp a row of rainbow arches. If you don’t have a specific stamp, you can press the side of a rounded tool or pen cap three times to create the concentric arches. -
Incorporate hearts:
In the spaces between the sunbursts near the top rim, stamp small hearts. Varying the orientation slightly gives it a more organic, handmade feel. -
Final textural details:
Use a dotting tool to add rows of small indentations following the curve of your rainbow arches and sun rays. These tiny dots add great depth. -
Form the bowl shape:
Carefully lift your decorated clay circle and gently press it into your bowl mold. Ensure it curves upward naturally without distorting your stamped patterns too much. -
Dry thoroughly:
Let the clay dry completely inside the mold. This usually takes 24-48 hours depending on humidity. Resist the urge to remove it too early to prevent cracking.
Step 3: Refining and Painting
-
Sand imperfections:
Once fully dry and removed from the mold, inspect the edges. Use fine-grit sandpaper to gently smooth any rough spots on the rim. -
Prepare the gold paint:
Whether using liquid gold leaf or metallic acrylic, shake the bottle well. You want the pigment to be rich and opaque. -
Highlight the grooves:
Dip a fine detail brush into the gold. Carefully paint inside the impressed lines of the suns, hearts, and rainbow arches. You don’t need to paint the flat surface, just the indented stamp lines. -
Paint the dots:
Dab a tiny amount of gold into each of the small dotted indentations you made earlier. This makes the texture pop vividly against the white clay. -
Seal the piece:
After the paint is fully creating, apply a coat of clear sealant or varnish to protect the clay from moisture and give it a finished sheen.
DIY Tools
No stamps? No problem. Use everyday items like marker caps for circles, the edge of a credit card for straight lines, or a bent paperclip for arches.
Place your finished dish on your bedside table to catch your jewelry at the end of the day
Ruffled Pinch-Edge Jewelry Dish
This charming little jewelry dish features a soft, undulating rim that looks effortless yet elegant. With its sandy pink hue and subtle speckled finish, it makes a perfect minimalist catch-all for your favorite rings.
Step-by-Step Guide
Materials
- Air-dry clay (white or terra cotta)
- Acrylic paint (beige/flesh tone, brown, white)
- Small rolling pin
- Glossy varnish or glaze (polyurethane or resin)
- Old toothbrush
- Medium sandpaper
- Small bowl (for water)
- Sponge
- Circular cookie cutter or large glass (approx. 4-5 inches diameter)
- Canvas mat or parchment paper
Step 1: Shaping the Base
-
Condition the Clay:
Begin by taking a handful of air-dry clay and kneading it in your hands to warm it up. This conditioning process prevents cracks later on. -
Roll out a Slab:
Place the clay on your canvas mat or parchment paper. Use your rolling pin to flatten it into an even slab, aiming for a thickness of about 1/4 inch. -
Check Consistency:
Ensure the slab is uniform in thickness so the dish dries evenly; run your fingers over it to feel for lumps or divots. -
Cut the Circle:
Press a large round cookie cutter or the rim of a wide glass firmly into the clay. Lift away the excess clay from the outside to reveal your perfect circle. -
Smooth the Edges:
Dip your finger partially in water and run it gently around the cut rim to soften the sharp angle created by the cutter.
Step 2: Creating the Ruffles
-
Lift and Curve:
Gently peel the clay circle off your work surface. Cup it loosely in one hand to start forming a very shallow bowl shape. -
Pinch the First Wave:
Using your thumb and forefinger, gently pinch a section of the rim upward while pressing down slightly on either side with your other hand. -
Continue the Pattern:
Move about an inch along the rim and repeat the pinching motion. I like to work directly opposite my first pinch to keep things symmetrical, then fill in the gaps. -
Refine the Undulations:
Go around the entire circumference, adjusting the waves so they are relatively uniform in height and spacing. The look should be organic, not mechanically perfect. -
Smooth the Form:
Use a slightly damp sponge to smooth out any fingerprints inside the bowl or on the ruffled edges. -
Dry Completely:
Set the dish aside in a cool, dry place for 24-48 hours until the clay turns chalky white and is completely hard.
Slumping Rims?
If the ruffles keep falling flat while wet, prop them up with small balls of crumpled foil or plastic wrap until the clay stiffens enough to hold its shape.
Step 3: Painting and Finishing
-
Sand Imperfections:
Once fully dry, take medium sandpaper and gently buff away any rough spots on the rim or bottom of the dish. -
Mix the Base Color:
Mix white acrylic paint with a small drop of brown and a touch of orange or pink to achieve a sandy, pale beige tone. -
Apply Base Coat:
Paint the entire dish, front and back. You may need two thin coats for full opacity. -
Create the Speckles:
Dilute a small amount of dark brown paint with water. Dip an old toothbrush into it. -
Splatter Effect:
Hold the toothbrush over the dish and run your thumb across the bristles to flick tiny specks of paint onto the surface. Practice on paper first to control the spray. -
Seal the Dish:
Once the paint is totally dry, apply a glossy varnish or glaze. This gives it that ceramic-like shine shown in the photo and protects the paint.
Achieve a Stone Look
Mix dried coffee grounds or sand directly into the wet clay before rolling. This creates texture that looks like real speckled stoneware once glazed.
Place your new dish on a bedside table to keep your daily treasures safe and stylish
Shell-Inspired Jewelry Dish
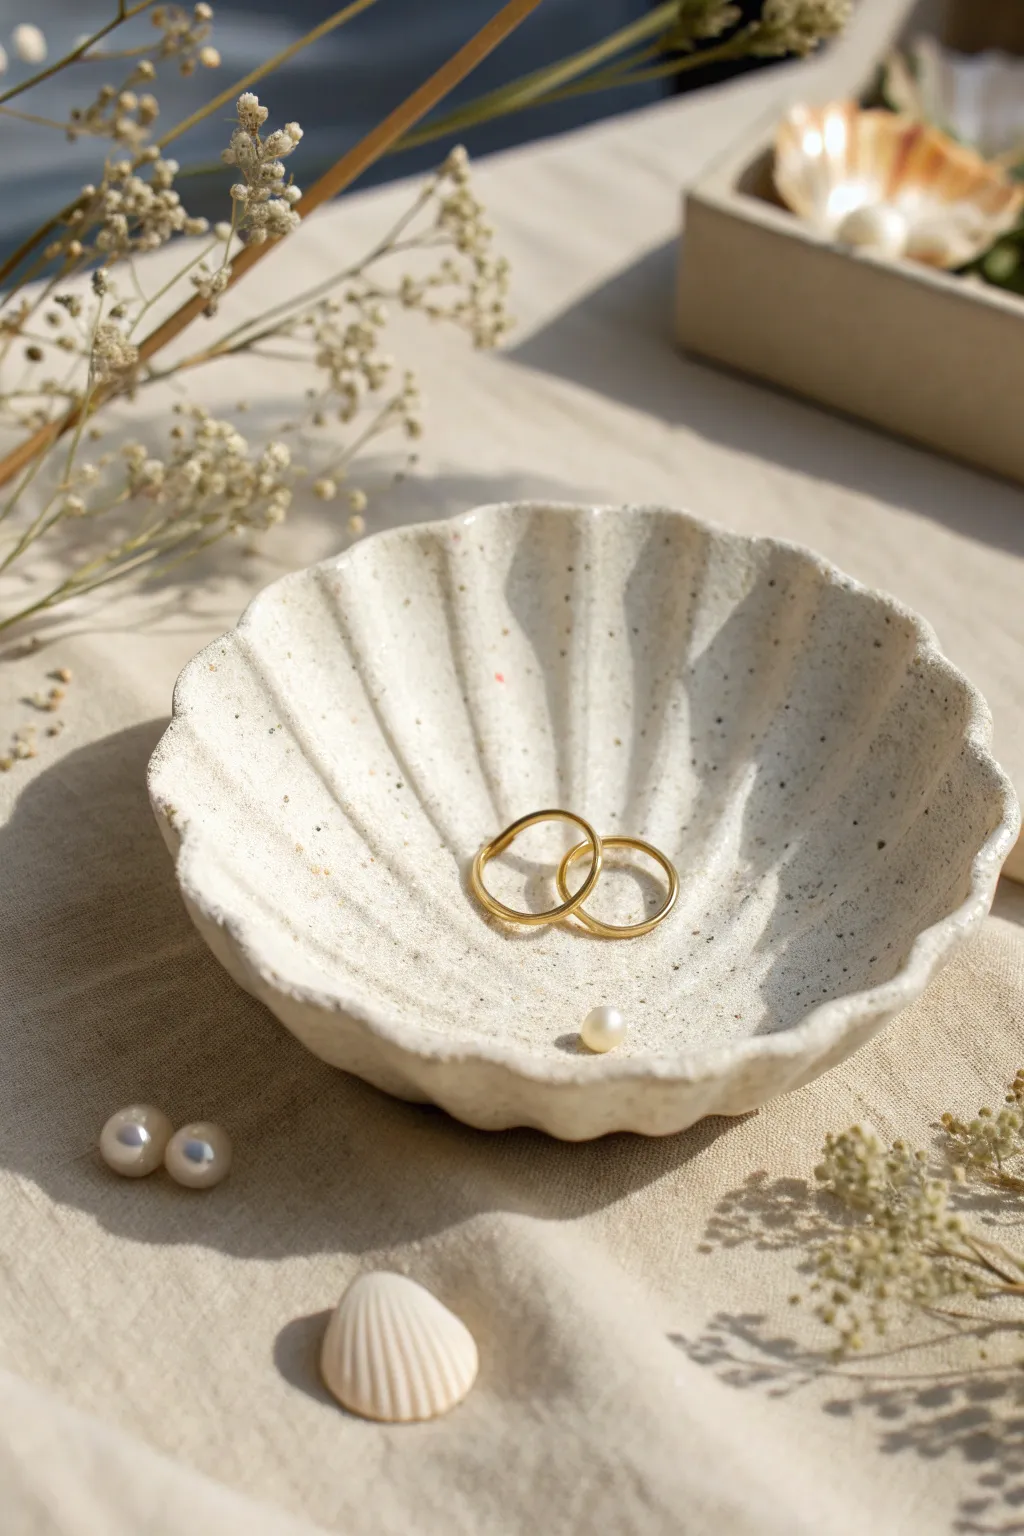
Bring the serene vibes of the shoreline to your vanity with this speckled, shell-shaped jewelry dish. Its organic curves and sandy texture make it the perfect minimalist catch-all for your favorite gold rings.
Step-by-Step
Materials
- White or cream polymer clay (approx. 2 oz)
- Speckled clay or black pepper/sand for faux texture
- Rolling pin or acrylic roller
- Large scallop seashell (for use as a mold) or a printed template
- Ball stylus tool or rounded sculpting tool
- Craft knife or clay blade
- Fine-grit sandpaper (400-600 grit)
- Parchment paper
- Oven (for baking polymer clay) or air-drying space
- Matte varnish (optional)
Step 1: Preparation & Texturing
-
Condition the Clay:
Begin by warming the white or cream clay in your hands. Knead it thoroughly until it is soft, pliable, and free of cracks. -
Create the Speckled Effect:
If you aren’t using pre-speckled clay, flatten your conditioned clay and sprinkle a tiny pinch of coarse black pepper or fine, clean sand onto it. Fold the clay over and knead until the specks are evenly distributed. -
Roll it Out:
Place the clay between two sheets of parchment paper. Roll it out to an even thickness of about 1/4 inch (6mm). Avoid going too thin, as the ridges need structure.
Step 2: Shaping the Shell
-
Cut the Basic Shape:
If you have a real scallop shell, press it gently onto the clay to leave an imprint, then cut around it leaving a small border. Alternatively, cut a freehand circle that tapers slightly at the bottom. -
Define the Edges:
Use your craft knife to cut gentle scallops along the top and side edges of your circle to mimic the fluted rim of a seashell. -
Create the Ribs:
Using a ball stylus or a blunt modeling tool, press radiating lines into the clay. Start deep at the center spread out towards the scalloped edges. I like to make these grooves wider as they reach the rim. -
Form the Bowl Shape:
Gently lift the clay circle. If you have a real shell, drape your clay *inside* the shell (lined with a bit of cornstarch to prevent sticking) to take its curved form. -
Manual Forming:
If forming by hand, cup the clay in your palm. Gently press the center down while curving the edges upward to create a shallow bowl depth. -
Refine the Rim:
Smooth the edges of your scallops with your finger. The rim should look soft and weathered, not sharp or freshly cut. -
Add Texture:
Take an old toothbrush or a stiff bristled brush and gently tap it over the entire surface. This removes fingerprints and adds a stone-like, matte texture.
Natural Texture Hack
Mix dried used coffee grounds into the clay instead of pepper. It adds a subtle brown speckle that looks incredibly like natural beach sand.
Step 3: Finishing Touches
-
Bake or Dry:
If using polymer clay, place the dish (still supported by the real shell or a crumpled foil nest) on a baking sheet. Bake according to the manufacturer’s instructions, usually around 275°F (135°C) for 15-30 minutes. -
Cool Down:
Allow the piece to cool completely in the oven before removing it. This helps prevent thermal shock cracks. -
Sanding:
Once cool, inspect the edges. Use fine-grit sandpaper to gently buff away any rough spots on the rim or underside. -
Seal (Optional):
To protect the clay from makeup or oils, apply a thin coat of matte water-based varnish. Avoid gloss, as the natural sandy look is key here.
Gilded Edge
After baking, paint just the very rim of the shell with liquid gold leaf. The metallic accent creates a stunning contrast against the matte clay.
Now you have a serene little spot to keep your most treasured rings safe
Mini Set of Nesting Jewelry Dishes
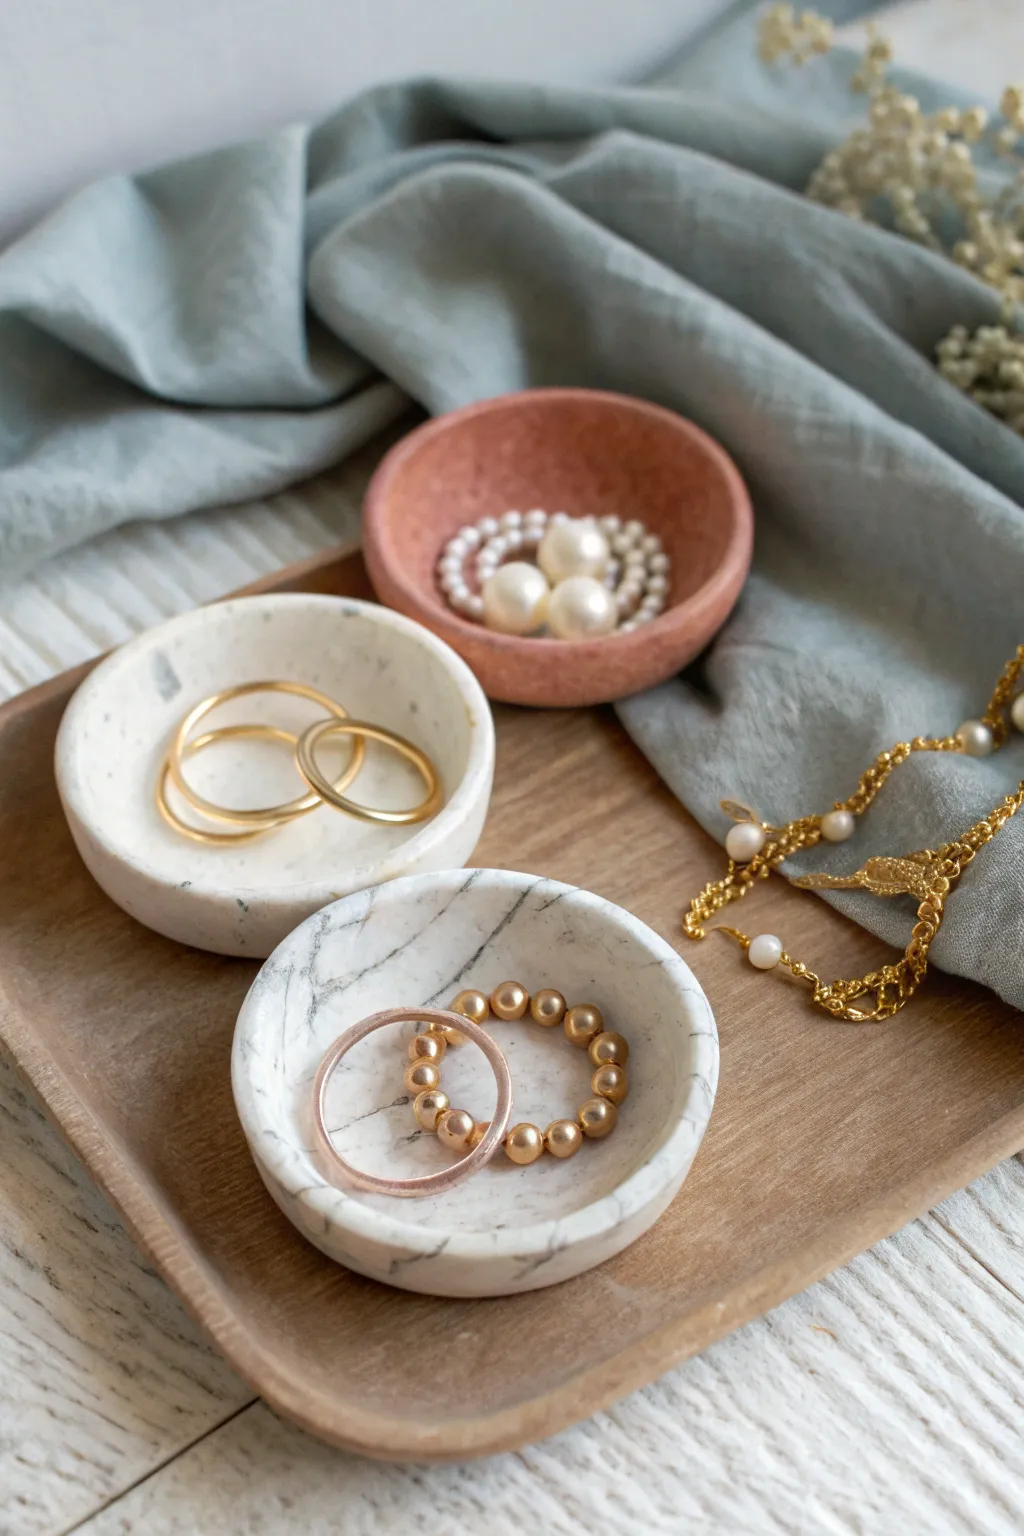
These elegant, shallow dishes mimic the look of natural stone and marble, creating a sophisticated home for your favorite rings and pearls. By using polymer clay, you can achieve that high-end speckled quartz and veined marble effect right at your kitchen table.
Step-by-Step Guide
Materials
- White polymer clay (approx. 2oz)
- Translucent or pearl polymer clay (small amount)
- Black acrylic paint
- Terracotta or dusty pink polymer clay (approx. 1oz)
- Coarse salt or sand (for texturing)
- Rolling pin or acrylic roller
- Circular cookie cutters (approx. 2.5 – 3 inches)
- Small bowl or sphere for shaping (e.g., a lightbulb or melon baller)
- Fine-grit sandpaper (400 and 800 grit)
- Gloss glaze or polyurethane varnish (optional)
- Paintbrush
- Oven and baking sheet
Step 1: Preparing the Faux-Marble Clay
-
Condition the base:
Begin by conditioning your white polymer clay until it is soft and pliable. I like to mix in a tiny pinch of translucent clay here to give the ‘stone’ a bit more depth rather than a flat, opaque white. -
Create the veins:
Roll the white clay into a log. Flatten it slightly. Apply a very small amount of black acrylic paint to a toothpick and draw thin, random lines across the clay, or mix a tiny crumb of black clay into the white. -
Twist and marble:
Twist the log of clay like a candy cane, then fold it in half. Repeat the twisting and folding process 2-3 times. Be careful not to overmix, or you will get grey clay instead of distinct marble veins. -
Check the pattern:
Slice the log in half to check the cross-section. If the veining looks natural, ball it up loosely, ready for rolling.
Muddled Marble?
If your veins turned grey and muddy, you likely over-kneaded. Stop mixing as soon as you see streaks. Next time, try chopping the clay block instead of twisting.
Step 2: Creating the Terracotta Texture
-
Texture the pink clay:
Condition your terracotta or dusty pink clay. To achieve the stone-like texture seen in the photo, sprinkle a little coarse salt or sand onto your work surface. -
Embed the texture:
Roll the pink clay ball over the grit, pressing firmly so the particles embed into the surface. This creates that organic, pitted look once baked.
Step 3: Shaping the Dishes
-
Roll out slabs:
Roll out your marbled white clay and your textured pink clay into slabs that are approximately 1/4 inch thick. Aim for an even thickness throughout. -
Cut the circles:
Using your circular cookie cutter, punch out two circles from the marble slab and one from the pink slab. If the edges are rough, smooth them gently with your finger. -
Create the curve:
Gently press each clay circle into the curve of a small bowl or over a round object like a large lightbulb. You want a shallow, gentle curve, not a deep bowl shape. -
Refine the rim:
While the clay is on the form, tap the rim gently to blunt any sharp cut edges, giving it a more tumbled, hand-hewn stone appearance.
Gold Rim Upgrade
Use a liquid gold leaf pen to paint the very top edge of the rim after baking. This adds a luxurious metallic definition that contrasts beautifully with the matte stone textures.
Step 4: Baking and Finishing
-
Bake the pieces:
Place your clay pieces (still on their forms if oven-safe, or carefully transferred to a baking sheet) into a preheated oven. Follow the specific temperature and time instructions on your package of clay. -
Cool down:
Allow the dishes to cool completely inside the oven with the door slightly ajar. This prevents thermal shock and cracking. -
Sand the marble:
Once cool, take the white marble dishes and sand them under running water. Start with 400 grit to smooth bumps, then switch to 800 grit for a silky finish. -
The salt technique:
For the pink dish, if you used salt for texture, wash it under warm water now; the salt will dissolve, leaving behind realistic stone pits. -
Seal the marble:
Apply a thin coat of gloss glaze or varnish to the marble dishes only. This highlights the ‘veins’ and mimics the sheen of polished stone, while leaving the pink dish matte.
Arranged on a tray, these little nesting bowls make a stunning display for your daily accessories