If you’re just starting out with modeling clay, the trick is picking projects that feel doable but still look like something you’d proudly keep on your desk. I teach beginners to build everything from simple balls, coils, and slabs—because cute results don’t require complicated sculpting.
Little Star and Moon Charms
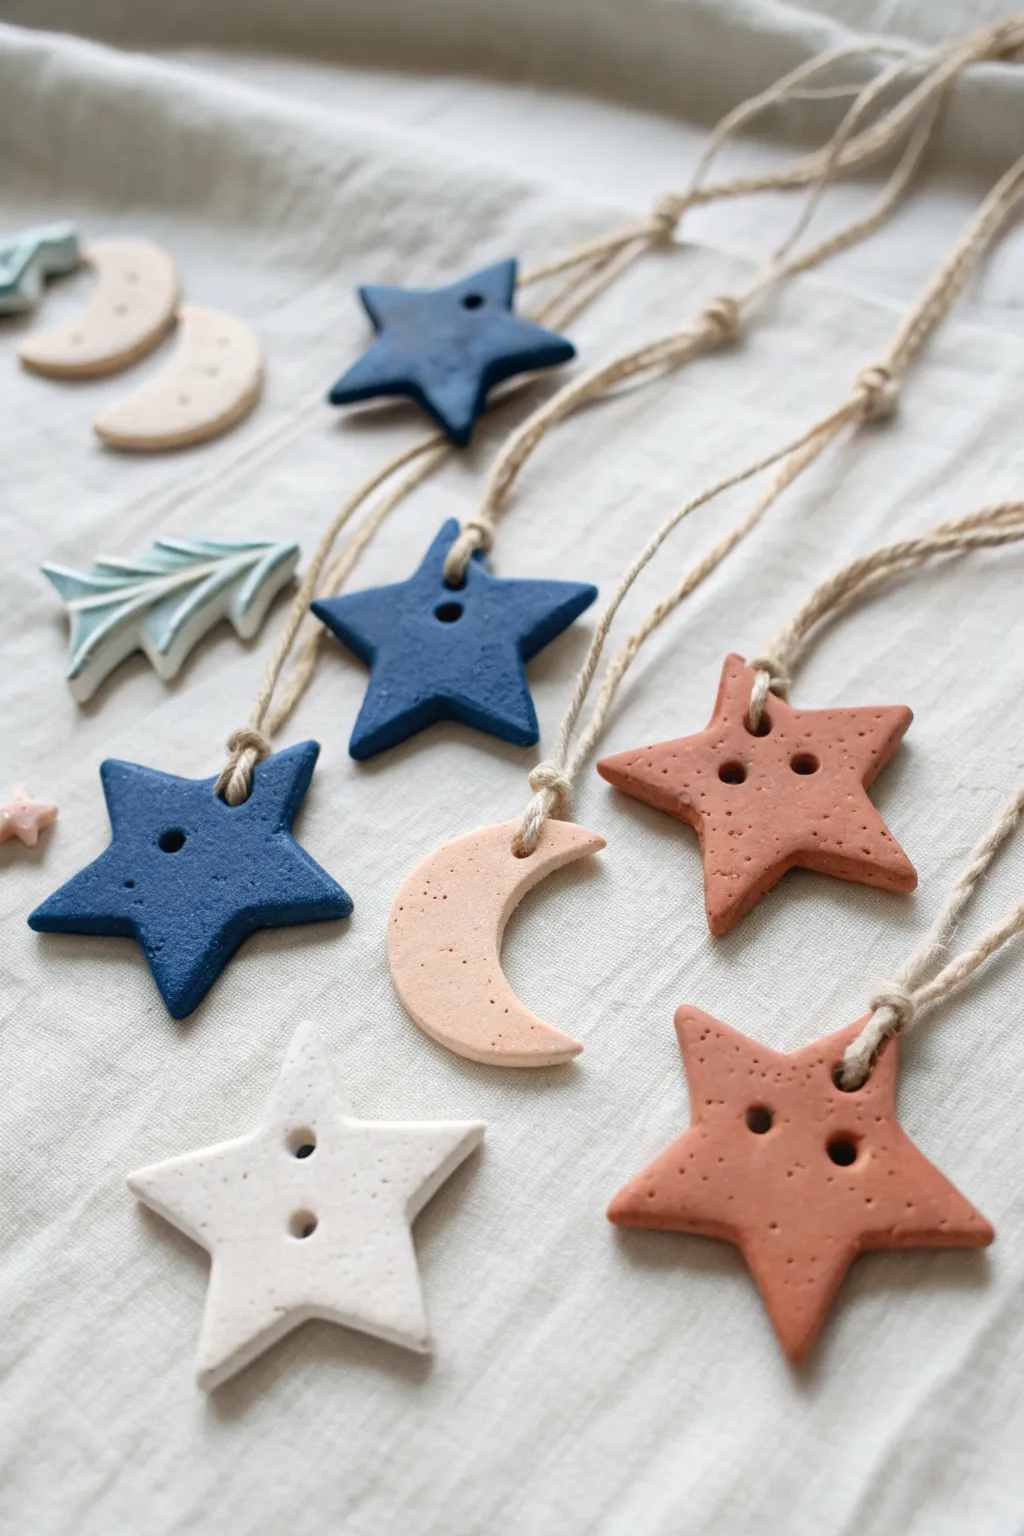
Capture the magic of the night sky with these rustic, textured charms shaped like stars and crescent moons. Their organic feel and soft colors make them perfect as gift toppers, ornaments, or unique jewelry pendants.
Step-by-Step Tutorial
Materials
- Air-dry clay or polymer clay (white or terracota)
- Acrylic paints (navy blue, terracotta orange, cream/beige)
- Rolling pin
- Star and moon cookie cutters (various sizes)
- Straw or toothpick (for creating holes)
- Jute twine or hemp cord
- Fine-grit sandpaper
- Matte varnish (optional)
- Parchment paper or silicone mat
- Small round paintbrush
Step 1: Shaping the Celestial Bodies
-
Prepare your workspace:
Lay down a sheet of parchment paper or a silicone mat to prevent the clay from sticking to your table. -
Condition the clay:
Take a handful of your chosen clay and knead it thoroughly in your hands until it becomes warm, soft, and pliable. -
Roll it out:
Use a rolling pin to flatten the clay into an even slab. Aim for a thickness of about 1/4 inch (6mm) to ensure the charms are sturdy but not too heavy. -
Cut the shapes:
Press your star and crescent moon cookie cutters firmly into the clay. Give them a little wiggle before lifting to get a clean cut. -
Freehand (optional):
If you don’t have cutters, you can use a craft knife or a toothpick to carefully trace and cut out your shapes freehand for a more organic look. -
Smooth the edges:
Dip your finger in a little bit of water and gently run it along the cut edges of each shape to smooth out any ragged bits or sharp corners. -
Create hanging holes:
Use a drinking straw to punch a clean hole near the top of one of the star’s points or the curve of the moon. For the ‘button’ style stars, punch two holes in the center. -
Add texture:
To mimic the speckled look in the photo, gently tap a clean toothbrush or a crumpled ball of foil against the wet clay surface.
Cracked Clay?
Cracks often happen if clay dries too fast. Repair hairline cracks by filling them with a slip made of water and fresh clay, then smooth over.
Step 2: Drying and Refining
-
Let them dry:
Place your cutouts on a flat surface away from direct heat. Allow them to air dry completely, which usually takes 24-48 hours depending on humidity. -
Flip occasionally:
I like to flip the pieces over halfway through the drying process to ensure they dry evenly and don’t curl at the edges. -
Sand imperfections:
Once fully hard, inspect your charms. Use fine-grit sandpaper to gently buff away any remaining rough spots on the edges. -
Wipe clean:
Use a slightly damp cloth or a dry soft brush to remove the dust created by sanding before you start painting.
Add Sparkle
Mix a tiny amount of gold mica powder or extra-fine glitter into your varnish coat to give your celestial bodies a subtle, starry shimmer.
Step 3: Painting and Assembly
-
Apply base coats:
Paint your stars in deep navy blue or terracotta orange, and your moons in a soft cream or beige. Apply two thin coats for opaque coverage. -
Create the speckled effect:
Load a toothbrush with slightly watered-down contrasting paint (like dark brown on the light moon). Run your thumb over the bristles to flick tiny specks onto the charms. -
Seal the work (optional):
For longevity, especially if these will be handled often, brush on a coat of matte varnish to protect the paint without making it too shiny. -
Cut the twine:
Cut lengths of jute twine or hemp cord, roughly 8-10 inches long, depending on how you plan to use the charms. -
Thread the loop:
Fold a piece of twine in half. Push the folded loop through the hole in the charm from front to back. -
Secure the knot:
Pass the loose ends of the twine through the loop and pull tight to create a lark’s head knot, securing the charm. -
Finish the ends:
Tie a simple overhand knot at the very end of the twine strands to join them together.
Now you have a beautiful set of handmade charms ready to decorate your home or delight a friend


Cute Face Magnets From Clay Discs
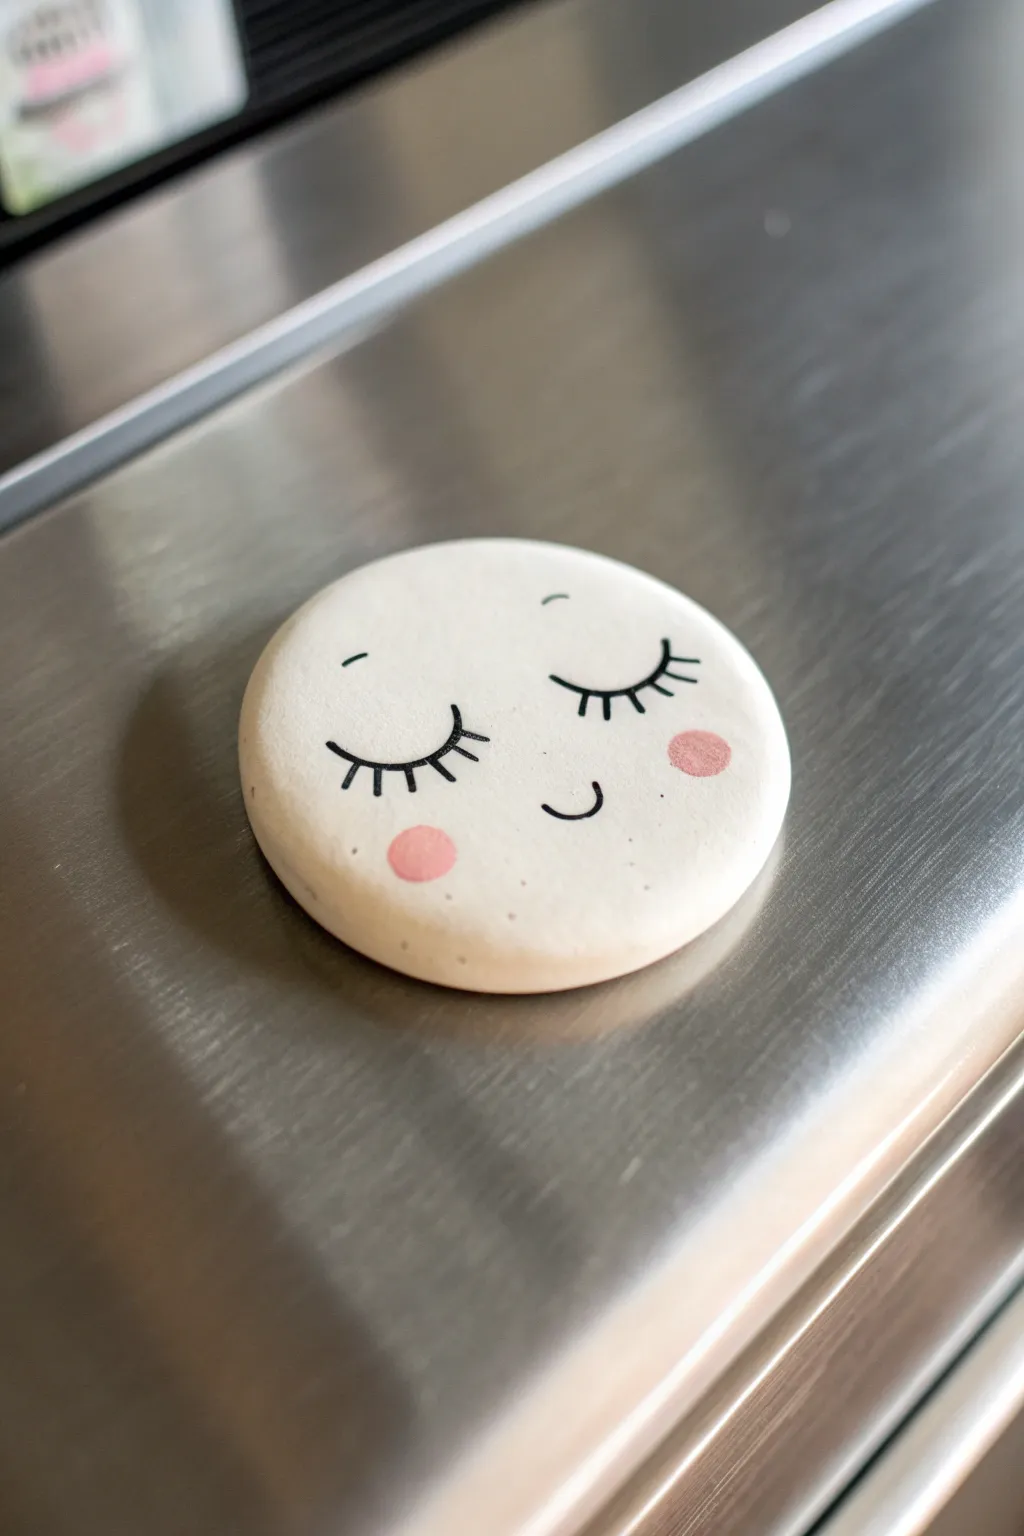
These soothing clay magnets add a touch of calm whimsy to any metallic surface with their sweet, sleeping expressions. The minimalist design requires only basic shaping and simple line work, making it perfect for beginners looking for a quick and satisfying win.
Step-by-Step
Materials
- White air-dry clay (or polymer clay)
- Small rolling pin
- Circle cookie cutter (approx. 2-3 inches)
- Fine grit sandpaper
- Black permanent fine-point marker (or black acrylic paint with fine brush)
- Pink acrylic paint
- Cotton swab or small round sponge applicator
- Strong craft magnet
- Strong craft glue (e.g., E6000 or super glue)
- Clear matte varnish (optional)
Step 1: Shaping the Base
-
Condition the clay:
Start by kneading a small ball of white clay in your hands until it becomes warm, soft, and pliable. This prevents cracks from forming later. -
Roll it out:
Place the clay on a smooth surface and use your rolling pin to flatten it. Aim for a consistent thickness of about 1/4 inch so the magnet will be sturdy but not too heavy. -
Cut the circle:
Press your circle cookie cutter firmly into the rolled clay. Give it a tiny wiggle before lifting to ensure a clean cut. -
Smooth the edges:
Dip your finger in a tiny bit of water and gently run it around the circumference of the clay disc to smooth down any rough or sharp edges left by the cutter. -
Dry completely:
Set the disc aside on a piece of parchment paper to dry. If using air-dry clay, this usually takes 24-48 hours. Flip it halfway through to ensure even drying. -
Sand for perfection:
Once fully hardened, use fine-grit sandpaper to buff the surface and edges gently. You want a buttery smooth canvas for drawing the face.
Step 2: Adding the Expression
-
Plan the face:
Lightly sketch the position of the eyes and mouth with a pencil if you are nervous about freehanding. Center the features slightly lower than the middle for a cuter look. -
Draw the lash line:
Using your fine-point black marker, draw two downward-curving arcs for the closed eyelids. Keep your hand steady and apply even pressure. -
Add eyelashes:
Draw three to four small, straight lines radiating downward from the center of each eyelid arc to create the lashes. -
Create eyebrows:
Add two tiny, floating curves high above the eyes for eyebrows. These should be very subtle markings. -
Draw the smile:
Place a small, simple ‘u’ shape directly between and slightly below the eyes for a content little smile. -
Prepare the blush:
Squeeze a tiny dot of pink acrylic paint onto a palette or scrap paper. You need very little paint for this step. -
Apply the cheeks:
Dip a cotton swab or a round sponge dabber into the paint, blot off the excess on paper, and gently stamp two pink circles on the cheeks. -
Add freckles (optional):
If you want extra detail, create tiny dots near the cheeks using the very tip of your black marker. -
Seal the design:
Once the paint and ink are totally dry, apply a thin coat of clear matte varnish to protect the face from smudging over time.
Pro Tip: Marker Choice
Use an oil-based paint marker instead of a standard permanent marker. Traditional Sharpies can sometimes turn purple or bleed on porous air-dry clay over time.
Step 3: Final Assembly
-
Prepare the back:
Flip the dried and decorated disc over. Ensure the back is clean and free of dust. -
Apply adhesive:
Place a pea-sized dot of strong craft glue onto the center of the back of the clay disc. -
Attach the magnet:
Press the magnet firmly into the glue. I like to hold it there for about 30 seconds to ensure it grabs initially. -
Cure time:
Let the glue cure completely according to the manufacturer’s instructions before placing your new art on the fridge.
Troubleshooting: Curling
If your clay disc curls up at the edges while drying, place a lightweight book on top of it once it’s semi-dry (leather-hard) to force it to dry flat.
Now you have a charming little companion to hold up your grocery lists or favorite photos


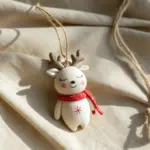
Tiny Mushroom Desk Buddy
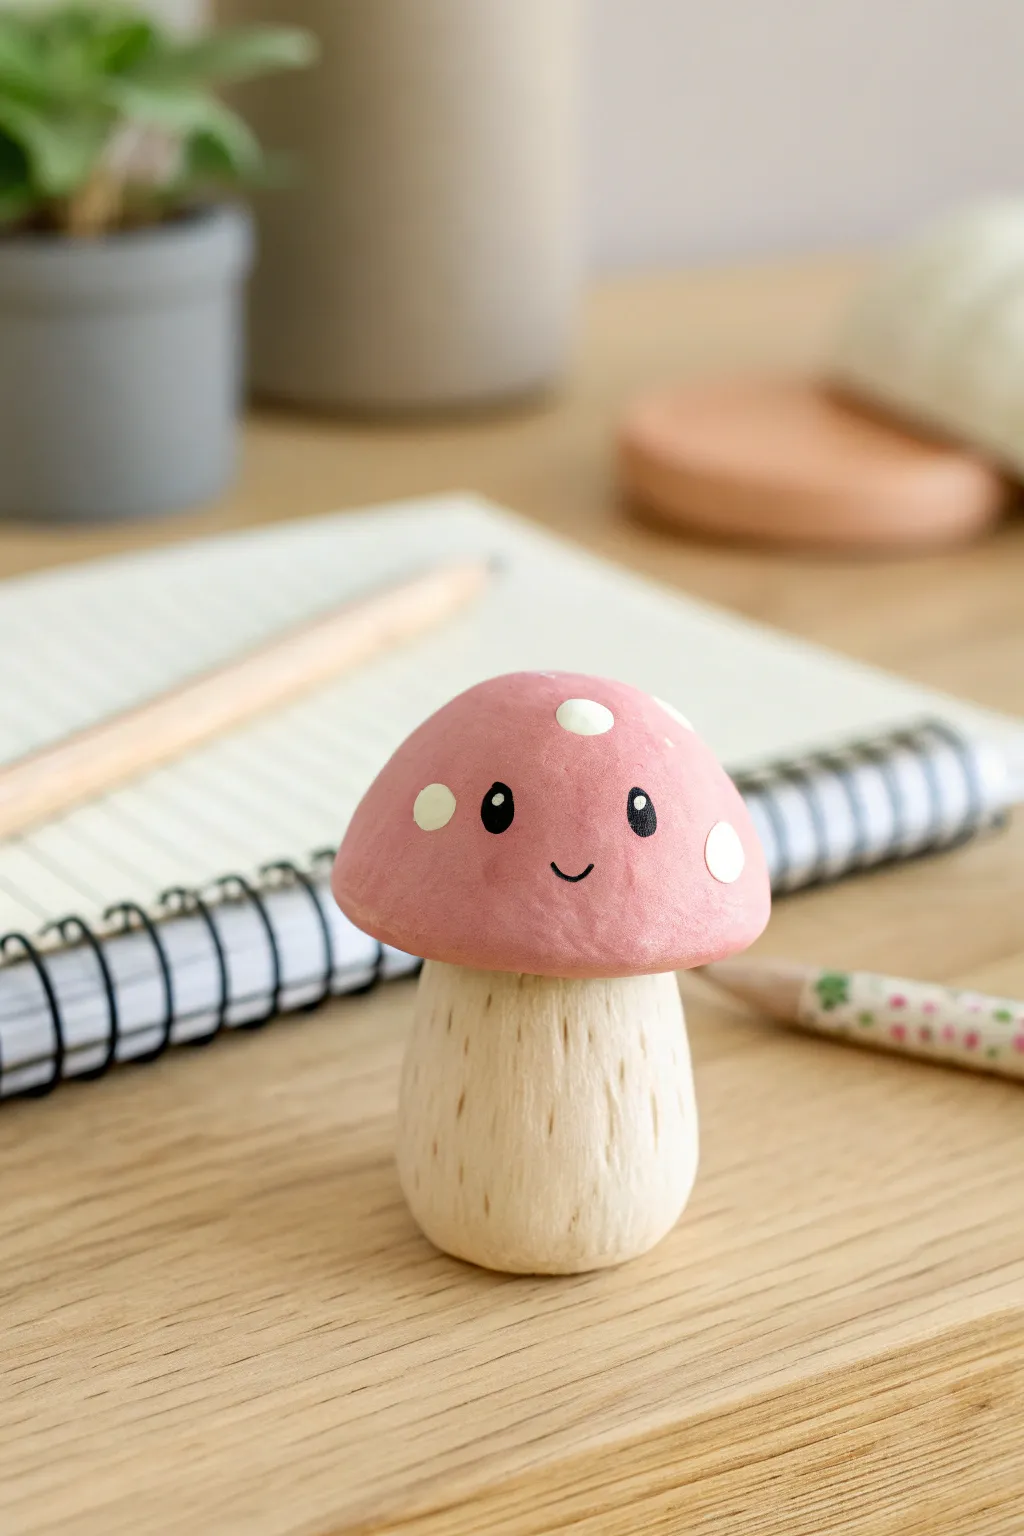
This adorable desk buddy combines natural wood textures with soft modeling clay for a charming, rustic look. With its sweet smiling face and classic toadstool spots, it’s the perfect beginner project to brighten up your workspace.
Step-by-Step Guide
Materials
- Unfinished wooden peg doll body (mushroom shape) or plain wooden mushroom form
- Pink air-dry modeling clay (or polymer clay)
- White acrylic paint
- Black acrylic paint
- Fine detail paintbrush
- Fine-grit sandpaper
- Mod Podge or clear matte varnish
Step 1: Preparing the Base
-
Sand the wood:
Start by taking your wooden mushroom form and giving it a gentle sanding with fine-grit sandpaper. You want the stalk to be smooth to the touch. -
Add texture:
Using a craft knife or a thick needle tool, carefully scratch vertical lines up and down the wooden stalk. Vary the lengths and pressure to create a natural, bark-like texture. -
Clean the surface:
Wipe away any sawdust with a dry cloth or tack cloth to ensure a clean surface for the clay to adhere to later.
Clay Cracking?
If your air-dry clay develops small cracks as it dries, mix a tiny bit of fresh clay with water to make a paste and smooth it into the cracks.
Step 2: Sculpting the Cap
-
Condition the clay:
Take a small ball of pink modeling clay and knead it in your hands until it becomes soft, pliable, and free of cracks. -
Form a dome:
Flatten the ball slightly into a thick pancake shape that is large enough to cover the top of your wooden mushroom. -
Attach the cap:
Press the clay firmly onto the top of the wooden form. Gently mold the edges down so it curves around the wood, creating a classic mushroom cap shape. -
Smooth the surface:
Dip your finger in a tiny bit of water (if using air-dry clay) to smooth out any fingerprints or bumps on the pink cap. I like to spend an extra minute here to get it perfectly round. -
Refine the rim:
Use your thumb to gently round off the bottom edge of the pink clay so it doesn’t look sharp or ragged against the wood. -
Let it cure:
Allow the clay to dry completely according to the package instructions. This usually takes 24 hours for air-dry clay.
Step 3: Painting Details
-
Paint the spots:
Dip the handle end of a paintbrush into white acrylic paint. Dot it onto the pink cap to create perfect circles. -
Vary the sizes:
Add a few smaller white dots between the larger ones for a more organic, whimsical look. -
Outline the eyes:
Using your finest detail brush and black acrylic paint, carefully paint two small, vertical oval shapes for the eyes on the front of the cap. -
Add the smile:
Paint a tiny, thin ‘U’ shape between the eyes for the mouth. Keep the line weight very delicate. -
Highlight the eyes:
Once the black paint is dry, use a toothpick or a needle tool dipped in white paint to add a tiny ‘sparkle’ dot to the top corner of each eye. -
Seal the project:
Finish by applying a coat of clear matte varnish or Mod Podge over the entire piece to protect the paint and clay.
Pro Tip: Eye Placement
Place the eyes lower on the mushroom cap (the ‘forehead’ area) rather than the center to achieve that extra cute ‘kawaii’ aesthetic instantly.
Now you have a sweet little companion ready to keep you company while you work


Snail Figure Built From Spirals
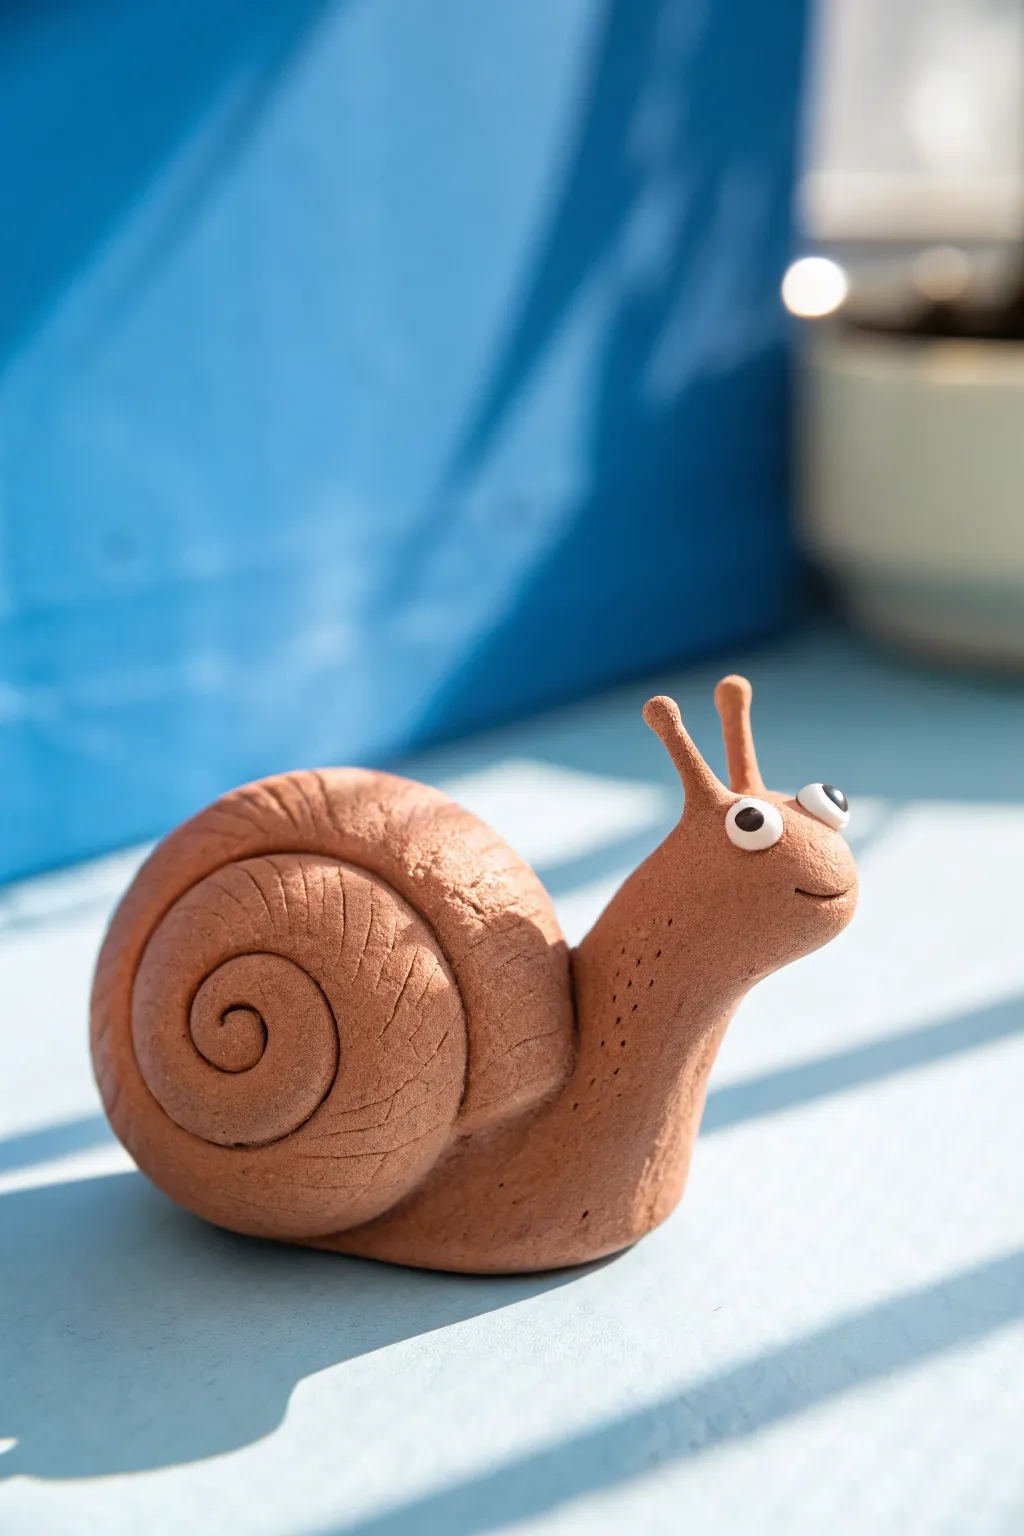
Create a charming garden companion using simple rolling and coiling techniques. This terracotta-colored snail features a classic spiral shell and an expressive face that brings personality to any shelf or planter.
Step-by-Step
Materials
- Terracotta-colored modelling clay (air-dry or polymer)
- White modelling clay (small amount)
- Black modelling clay (tiny amount)
- Sculpting tool or toothpick
- Rolling surface (mat or parchment paper)
- Small cup of water (if using air-dry clay)
Step 1: Body & Head Construction
-
Prepare the base clay:
Start by kneading a medium-sized ball of terracotta clay until it is soft and pliable. This warmth makes it easier to shape without cracking. -
Form the main shape:
Roll the ball into a thick sausage shape, approximately 3-4 inches long, making one end slightly thicker than the other. -
Create the neck:
Gently bend the thicker end upwards to create an L-shape. This vertical section will become the snail’s head and neck. -
Refine the tail:
Using your thumb, flatten the bottom of the horizontal section slightly so the snail sits stably. Taper the tail end to a smooth, rounded point. -
Shape the head:
Round off the top of the vertical section to form a distinct head shape. I like to gently pinch the snout area forward just a bit to give it more character. -
Add texture:
Use a toothpick or a small needle tool to poke shallow, random holes along the neck and lower body to simulate natural skin texture.
Shell Slipping off?
If the heavy shell keeps sliding or falling off the body, insert a short piece of toothpick or wire between the body and shell to act as an internal anchor structure.
Step 2: Creating the Shell
-
Roll the coil:
Take a separate, larger chunk of terracotta clay and roll it into a very long ‘snake’ or coil. Try to keep the thickness even, about the width of a marker. -
Flatten the coil:
Gently press down on the coil along its entire length to flatten it slightly. This makes the shell look more segmented and less like a tube. -
Start the spiral:
Tightly curl one end of the flattened coil inward to begin the shell’s center. Keep the coil tight as you roll. -
Build the shell:
Continue wrapping the clay around the center point until you have a large, spiraled disk. Smooth the outer end onto the previous ring to seal it. -
Add detail lines:
Use your sculpting tool to gently score curved lines across the width of the spiral coil. These ridges imitate growth lines on a real snail shell. -
Attach the shell:
Score (scratch) the side of the body where the shell will sit and the back of the shell. Press the shell firmly onto the body’s side.
Varnish Finish
Once your snail is fully dry or baked, apply a coat of clear gloss varnish only to the shell area. This makes it look slimy and realistic while keeping the body matte.
Step 3: Face & Details
-
Make the eyestalks:
Roll two small, thin cylinders of terracotta clay. Attach them to the top of the head, blending the clay at the base so they stand upright. -
Form the eyes:
Roll two tiny balls of white clay and press them gently onto the front of the eyestalks, slightly below the tips. -
Add pupils:
Place minuscule dots of black clay onto the white balls to create the pupils. Positioning them slightly cross-eyed can add a goofy, friendly look. -
Carve the mouth:
Use the edge of your tool or a toothpick to press a curved smile into the snout area. -
Final smoothing:
Check over your snail for any fingerprints. Dip your finger in a tiny bit of water to smooth out rough areas before letting the project dry or baking it according to package instructions.
Enjoy finding the perfect spot for your friendly new garden creature to slowly explore

The Complete Guide to Pottery Troubleshooting
Uncover the most common ceramic mistakes—from cracking clay to failed glazes—and learn how to fix them fast.
Ladybug Using Two Clay Balls
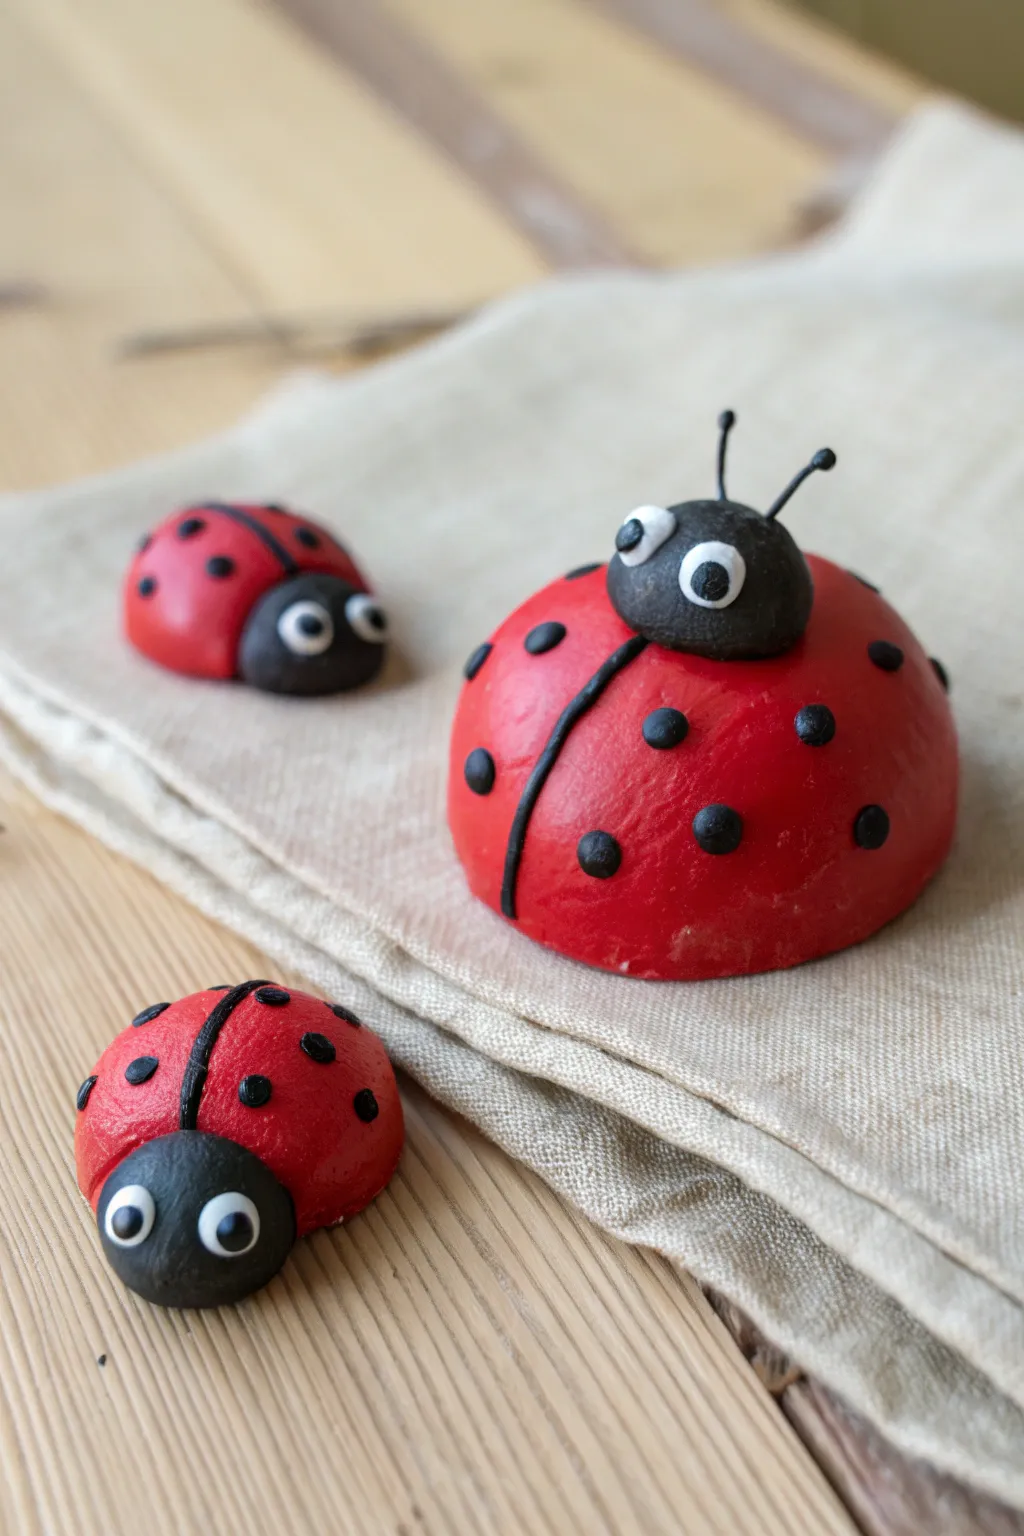
Create this charming little family of ladybugs using simple round shapes and striking color contrasts. These vibrant red and black creations have a wonderful smooth finish and personality-filled eyes that make them perfect for beginners.
Detailed Instructions
Materials
- Red modeling clay (air-dry, polymer, or plasticine)
- Black modeling clay
- White modeling clay
- Clay sculpting tool or small knife
- Smooth work surface or mat
- Toothpick (optional, for support)
Step 1: Forming the Body and Head
-
Shape the main body:
Start by taking a large chunk of red clay. Roll it firmly between your palms until you have a smooth, crack-free sphere. -
Create the dome shape:
Place the red sphere on your work surface and press down gently to flatten the bottom, creating a sturdy semi-circle dome. Smooth out any fingerprints. -
Form the head base:
Roll a piece of black clay into a smaller ball, roughly one-third the size of your red body piece. -
Attach the head:
Press the black ball slightly to flatten the back side, then firmly press it against the front lower edge of the red body so the two shapes merge securely.
Step 2: Adding Wing Details
-
Prepare the dividing line:
Roll a very thin, spaghetti-like string of black clay. This will become the line that separates the ladybug’s wings. -
Apply the wing divider:
Lay the thin black string starting from the center base of the black head, running straight down the middle of the red back to the bottom edge. -
Blend the line:
Gently press the string down so it adheres to the red surface without flattening it completely. You want it to look raised but integrated. -
Create the spots:
Pinch off tiny pieces of black clay and roll them into small, varying-sized balls for the spots. -
Attach the spots:
Press these small black balls onto the red body in a random pattern on both sides of the dividing line. Flatten them gently as you attach them so they look like painted dots.
Clean Color Seams
Red and black clay can smudge easily. Wash your hands or wipe your tools thoroughly between switching colors to keep the red bright and the white eyes pure.
Step 3: Bringing It to Life
-
Make the eye whites:
Roll two small balls of white clay. They should be large enough to look expressive but fit comfortably on the black head. -
Position the eyes:
Press the white balls onto the upper front part of the black head, spacing them slightly apart. -
Add pupils:
Roll two extremely tiny speck-sized balls of black clay. Place these into the center or slightly off-center of the white eyes to create a gaze direction. -
Form the antennae:
Roll two short, thin tapered logs of black clay. They should look like little stalks. -
Attach antennae:
Stand these stalks upright on top of the black head, just behind the eyes. I like to angle them slightly outward for a cuter look. -
Make the babies:
Repeat the entire process using smaller amounts of clay to create the little companion ladybugs shown in the image.
Glossy Finish
Once your ladybugs are fully cured or dry, apply a coat of clear acrylic gloss varnish or Mod Podge to the red shell to mimic the shiny hard casing of a real beetle.
Set your finished ladybug family on a shelf or fake leaf to enjoy their cheerful presence
Caterpillar Made From Clay Spheres
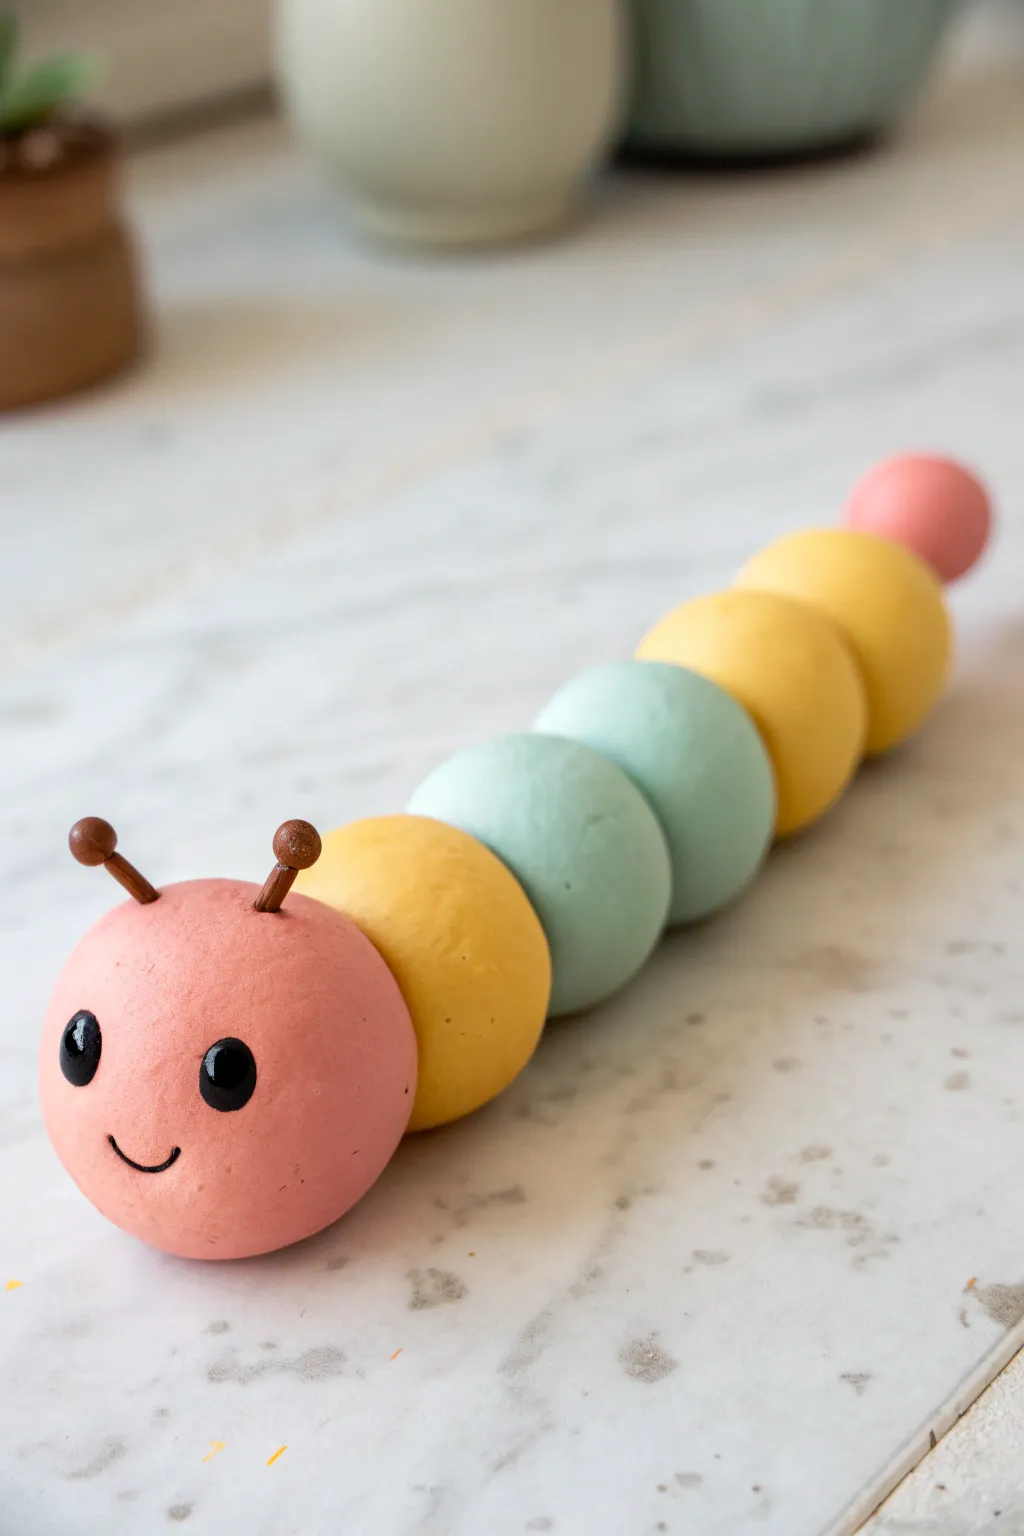
This cheerful caterpillar is the perfect introductory project for clay modeling, featuring a simple segmented body made from gentle pastel spheres. With its bright, smiling face and smooth, matte finish, it makes for a delightful desk companion or a playful decorative piece.
How-To Guide
Materials
- Modeling clay (air-dry, polymer, or playdough) in pink, light yellow, mint green, and coral
- Small amount of black clay (for eyes/mouth)
- Small amount of brown clay (for antennae)
- Short piece of brown floral wire or toothpicks (for antenna structure)
- Needle tool or toothpick
- Rolling tool or smooth surface
- Clear craft glue (optional)
- Gloss varnish (optional for eyes)
Step 1: Preparing the Segments
-
Mix your colors:
Start by mixing your clay to achieve soft pastel shades if you don’t have them pre-mixed. You’ll need a soft pink, a sunny yellow, a minty blue-green, and a slightly darker coral pink. -
Roll the head:
Take a portion of the pink clay and roll it between your palms to create a smooth, perfect sphere. This should be the largest ball, roughly the size of a golf ball, to serve as the head. -
Create the body spheres:
Roll five or six additional spheres in graduating sizes. Start with a yellow one slightly smaller than the head, then two mint green ones, followed by another yellow, and finish with a small coral pink one for the tail. -
Check for smoothness:
Inspect each ball for cracks or seams. If you spot any, gently rub them out with your finger and a tiny drop of water (if using air-dry clay) or baby oil (if using polymer).
Keep it Round
To prevent the bottom of your spheres from flattening while the clay is soft, rest your finished caterpillar on a bed of cornstarch or soft foam while it dries.
Step 2: Assembly & Detailing
-
Arrange the sequence:
Line up your spheres on your work surface to test the look. A nice pattern is Pink (Head) -> Yellow -> Mint -> Mint -> Yellow -> Yellow -> Coral (Tail). -
Connect the segments:
Gently press the yellow sphere against the back of the pink head. I like to twist them slightly as I push to create a better bond without flattening the shapes too much. -
Continue the body:
Attach the remaining spheres in your chosen order, pressing each firmly into the one before it. You can create a slight ‘S’ curve in the body line to make it look like it’s crawling. -
Form the antennae stems:
Take two small pieces of brown wire or break the tips off a toothpick. Cover them with a very thin layer of brown clay, leaving a tiny bit exposed at the bottom for insertion. -
Make antenna tips:
Roll two tiny brown clay balls and press them onto the top ends of your stems. -
Attach antennae:
Poke two small guide holes into the top of the pink head using a needle tool. Insert the antennae pressing them in securely.
Texture Time
Before the clay dries, gently press a clean toothbrush against the body segments (but not the face) to give the caterpillar a fuzzy, soft texture.
Step 3: Creating the Face
-
Position the eyes:
Roll two small balls of black clay. Press them onto the front of the face, spacing them somewhat wide apart for a cute expression. -
Flatten the eyes:
Gently press the black balls flat against the head so they don’t protrude too much, integrating them into the surface. -
Mark the mouth:
Using a needle tool or an edged modeling tool, gently press a small curved line into the clay below the eyes to form a simple smile. -
Fill the smile:
Roll an incredibly thin thread of black clay. Carefully lay it into the indented smile groove you just made, trimming away any excess. -
Refine the surface:
Do a final check over the whole caterpillar, smoothing out any fingerprints that might have occurred during assembly. -
Add shine (Optional):
Once your project is dry or baked (depending on your clay type), paint a tiny dot of gloss varnish specifically on the black eyes to give them a lively sparkle.
Now you have a charming little critter ready to brighten up any shelf or windowsill


What Really Happens Inside the Kiln
Learn how time and temperature work together inside the kiln to transform clay into durable ceramic.
Simple Frog From Balls and Ovals

This delightful minimalist frog sculpture is a perfect starter project because it relies entirely on basic geometric shapes like balls and ovals. With its clean white finish and expressive big eyes, it brings a cheerful, modern touch to any shelf or desk.
Detailed Instructions
Materials
- White modeling clay (air-dry, polymer, or porcelain clay)
- Small amount of black clay or black acrylic paint
- Rolling tool or smooth cylinder
- Modeling tool with a curved blade or a plastic knife
- Small ball stylus tool
- Toothpick or small wire for support (optional)
- Water or liquid clay (for joining pieces)
Step 1: Shaping the Foundation
-
Prepare the main body:
Start by conditioning a large chunk of white clay until it is soft and pliable. Roll it into a smooth, seamless ball about the size of a tangerine. Once round, gently press it down on your work surface to create a flat bottom so it sits stably without rolling. -
Form the head:
Take a second piece of clay, slightly smaller than the body. Roll this into a ball and then gently flatten it into a thick, rounded disc or hamburger shape. This will become the frog’s wide, friendly face. -
Attach head to body:
Place the head piece on top of the body. If you are using water-based clay, score the touching surfaces and add a drop of water. Gently press them together, smoothing the seam at the back slightly to ensure a strong bond.
Keep it Clean
White clay picks up dust instantly. Keep baby wipes or a damp cloth nearby to clean your hands and tools often while working to maintain that pure white look.
Step 2: Creating the Face
-
Sculpt the smile:
Using a curved modeling tool or the edge of a plastic knife, press a long, wide smile into the center of the head piece. Make the cut fairly deep to create that charming shadown line, curving it slightly upward at the ends. -
Make the eye sockets:
Roll two medium-sized balls of white clay for the eye bases. Place them on top of the head, positioning them close together but distinct. Press them down firmly so they adhere to the curve of the head. -
Add the eyeballs:
Roll two slightly smaller balls of white clay. Press these onto the front of the eye bases you just made. They should bulge out slightly to give that classic froggy look. -
Create the pupils:
Take two tiny pieces of black clay and roll them into small spheres. Press these gently into the center of the white eyeballs. Alternatively, you can use a small dab of black paint after the sculpture is fully dry.
Head Slumping?
If the head feels too heavy and starts to squash the body, insert a toothpick or a crumpled ball of foil into the center of the body for internal support.
Step 3: Adding the Limbs
-
Form the rear legs:
Roll two large balls of clay and flatten them into thick oval shapes. Adhere these to the sides of the body, near the back. These represent the powerful folded thighs of the frog. -
Shape the feet:
Create two smaller ovals for the feet. Place them at the base of the body, tucked just under the front and slightly to the side. -
Detail the toes:
Using your knife tool, gently press two indentations into the front edge of each foot to create three simple toes. Smooth out any sharp edges with your fingertip. -
Final smoothing:
Dip your finger in a tiny bit of water (or baby oil for polymer clay) and gently run it over the entire sculpture to remove fingerprints and ensure a matte, flawless finish. -
Drying or baking:
If using air-dry clay, set the frog in a safe, draft-free spot to dry for 24-48 hours. If using polymer clay, bake according to the manufacturer’s instructions on the package.
Once dry, this minimalist little friend is ready to guard your desk or hop into a display
Tiny Penguin From Stacked Shapes
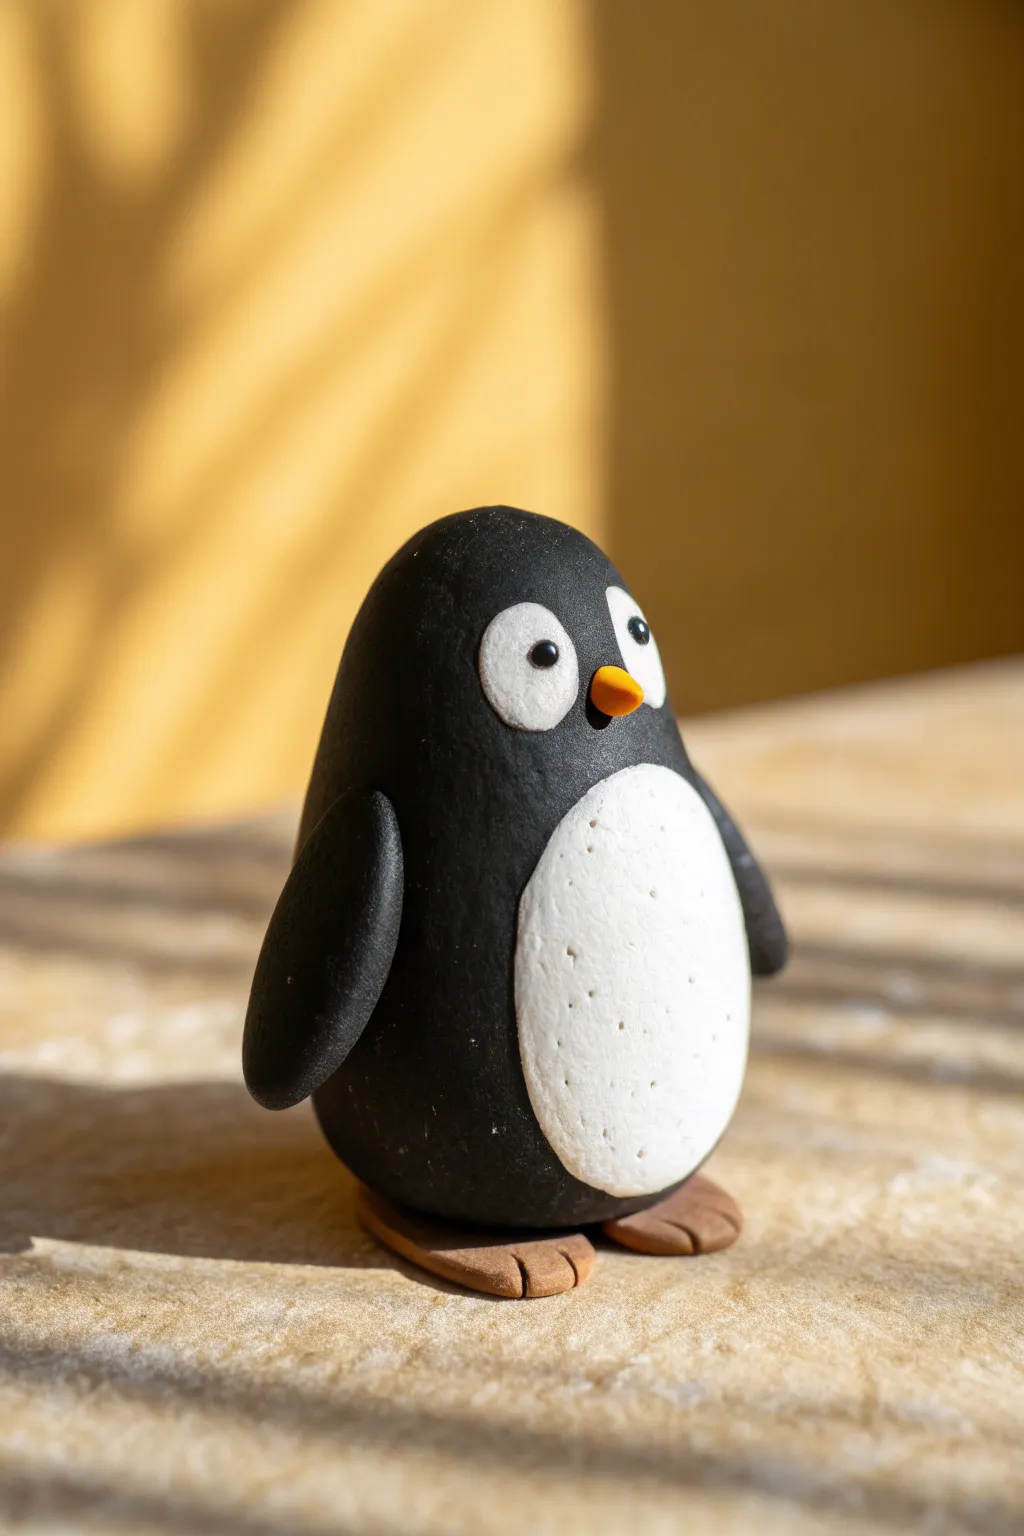
This adorable penguin uses simple stacked shapes to create a charming desk companion or gift. The clean lines and minimal parts make it perfect for getting comfortable with smoothing and joining clay.
Step-by-Step
Materials
- Black modeling clay (polymer or air-dry)
- White modeling clay
- Orange/yellow modeling clay
- Light brown modeling clay
- Clay sculpting tool or toothpick
- Smooth work surface
Step 1: Shaping the Core
-
Roll the main body:
Start by taking a medium-sized ball of black clay. Roll it between your palms until it is perfectly smooth and free of major cracks. -
Create the teardrop shape:
Gently gently roll one end of the ball slightly more to taper it, creating a rounded teardrop or egg shape. This will be the penguin’s combined head and body. -
Flatten the base:
Tap the wider bottom end of your egg shape firmly against your work surface. This creates a flat base so your penguin stands upright without wobbling.
Smudged White Clay?
Black clay stains white clay easily. Wash hands thoroughly or use baby wipes before switching from the black body to the white belly to keep colors crisp.
Step 2: Adding the Belly
-
Form the belly patch:
Take a smaller piece of white clay and roll it into a ball, then flatten it into a thin, oval pancake with your fingers. -
Attach the white clay:
Press this white oval onto the front of the black body. It should sit lower down, covering the stomach area but leaving space at the top for the face. -
Refine the edges:
Use your thumb or a smoothing tool to gently blend the edges of the white clay so it looks like it is part of the body, rather than just sitting on top. Poking tiny texture dots with a needle tool adds a nice feather effect.
Add Winter Flare
Give your penguin personality by sculpting a tiny red scarf or a textured woolly hat using bright colors to contrast with the black and white.
Step 3: Face and Features
-
Make the eye bases:
Roll two very small balls of white clay. Flatten them slightly into discs. -
Position the eyes:
Place these discs side-by-side near the top of the black body shape, ensuring they touch slightly in the middle for a cute look. -
Add pupils:
Take tiny specs of black clay—smaller than peppercorns—and roll them into tiny balls. Press these into the center of the white eye discs. -
Sculpt the beak:
Roll a small piece of orange clay into a tiny cone. Gently flatten the bottom so it isn’t too sharp. -
Attach the beak:
Press the orange cone just below and between the two eyes. I find a slight upward angle gives the penguin a curious expression.
Step 4: Limbs and Details
-
Create wings:
Roll two equal-sized balls of black clay. Flatten and elongate them into teardrop or leaf shapes. -
Attach wings:
Press the wider end of each wing onto the sides of the penguin’s body, smoothing the seam so they stick securely. -
Curve the wings:
Gently curve the tips of the wings slightly inward or backward to give them a natural resting pose. -
Form the feet:
Using light brown clay, create two flat, semi-circle shapes or flattened ovals. -
Add toe details:
Use a toothpick or clay knife to press two indentations into the front edge of each brown foot to imply toes. -
Final assembly:
Place the penguin body onto the two brown feet. Press down gently to ensure a strong bond between the body and the feet.
Once baked or dried according to your clay type, sit your penguin on a shelf to enjoy your handiwork

TRACK YOUR CERAMIC JOURNEY
Capture glaze tests, firing details, and creative progress—all in one simple printable. Make your projects easier to repeat and improve.
Chubby Dino Buddy With Stubby Legs
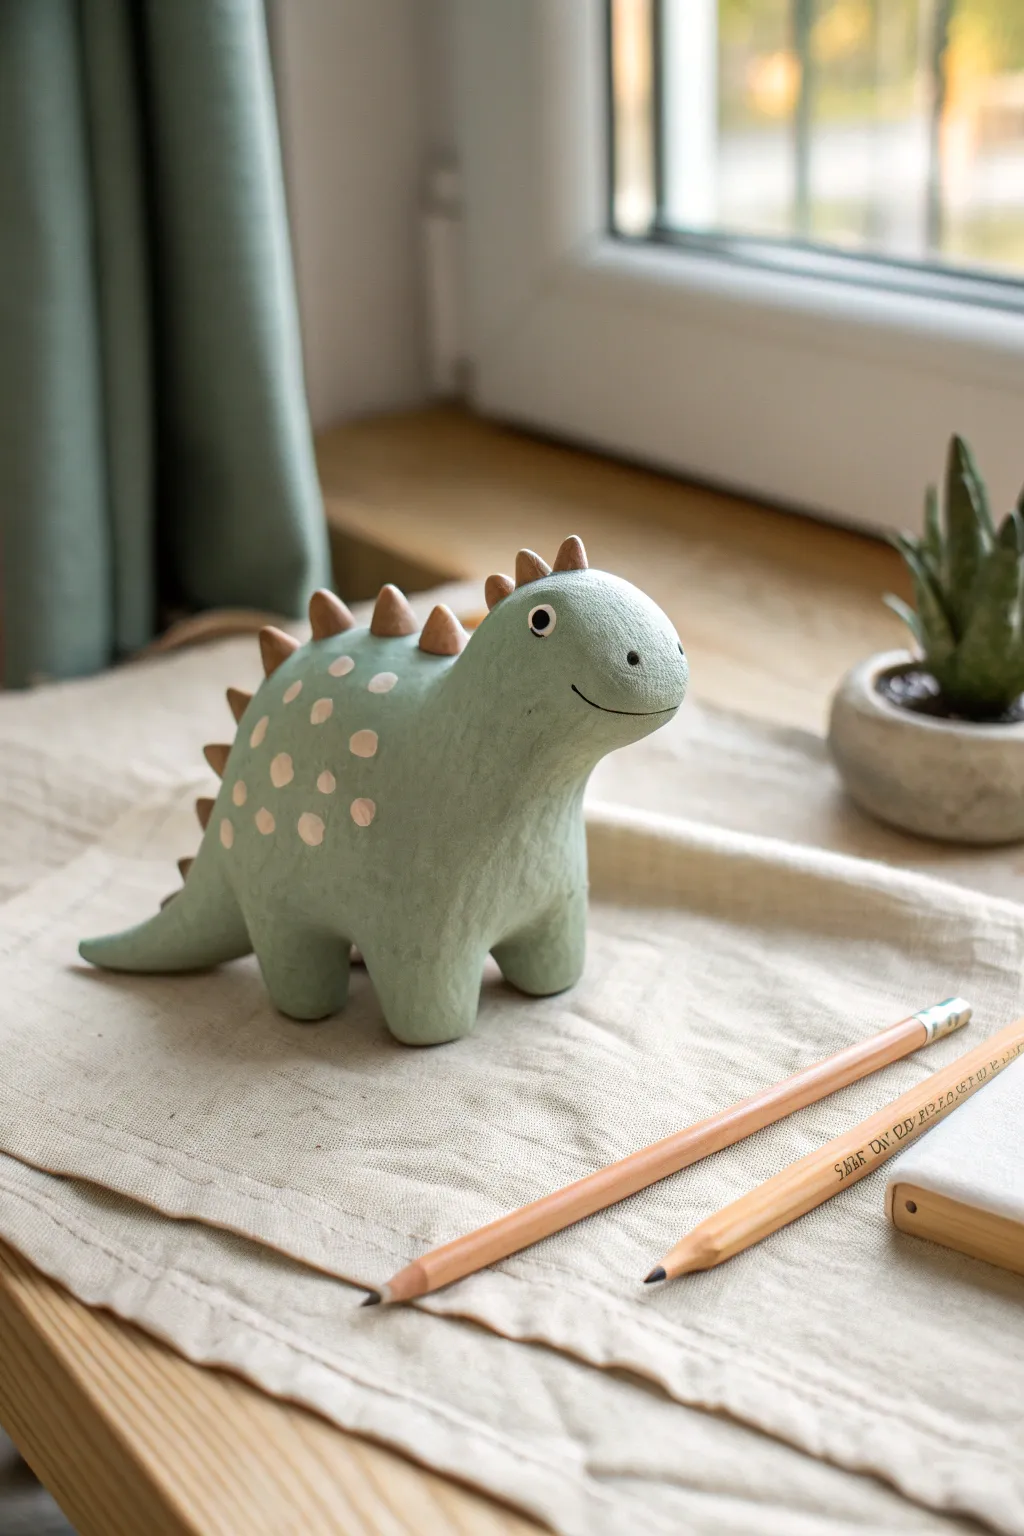
This endearing dinosaur figurine features a delightful, hand-sculpted texture and soft pastel coloring that looks perfect on any desk. With its friendly smile and stout, sturdy legs, this little green friend is a charming introduction to character sculpting.
Detailed Instructions
Materials
- Air-dry clay or polymer clay (white or light grey base)
- Acrylic paints (Sage green, warm beige, dark brown, black)
- Sculpting tools (needle tool, smoothing tool)
- Small ball tool or end of a paintbrush
- Aluminum foil (for the core)
- Fine-grit sandpaper
- Matte varnish or sealant
- Soft paintbrushes (flat and detail)
Step 1: Forming the Body
-
Create the core:
Start by crumpling a piece of aluminum foil into a rough egg shape about the size of a lemon. This acts as an armature, saving clay and reducing weight. -
Cover the armature:
Flatten a sheet of clay and wrap it completely around your foil egg. Smooth out the seams until you have a solid, seamless oval shape. -
Pull the neck:
Gently pinch and pull the clay on one end upwards and slightly forwards to form the neck and head area. The head should flow seamlessly from the body rather than being a separate ball. -
Shape the snout:
Round off the front of the head to create a soft, blunt snout. Use your thumb to smooth the curve from the forehead down to the nose. -
Pull the tail:
On the opposite end, pull the clay outwards to form a tapered, pointed tail. Curve it slightly so it touches the ground, helping with stability.
Uneven Standing?
If your dino wobbles, place a sheet of sandpaper on the table and gently rub the feet in a circular motion until they act as a flat, stable base.
Step 2: Legs and Details
-
Form the legs:
Roll four equal-sized cylinders of clay. These should be short and stubby, like marshmallows. Attach two near the front and two near the back underside of the body. -
Blend the seams:
Using a modeling tool or your fingers, blend the clay from the top of the legs into the main body so they look integrated, not just stuck on. This is where I like to check that the dino stands flat without wobble. -
Make the spikes:
Roll several small cones of clay for the back plates. You’ll need about 6-8, starting larger for the middle of the back and getting smaller towards the head and tail. -
Attach the spikes:
Score the bottom of each spike and the spine of the dinosaur slightly. Press them firmly in a row along the back ridge. Blend the base of each spike into the body for a smooth transition. -
Add facial expression:
Use a needle tool or small blade to carve a simple, curved line for the smile on the side of the snout. The higher the curve, the happier he looks. -
Texture the surface:
Before the clay dries, take a stiff-bristled brush or a crumpled ball of aluminum foil and gently press it all over the green areas of the skin to create a pitted, stone-like texture. -
Dry and refine:
Let the sculpture dry completely according to your clay’s instructions. Once hard, use fine-grit sandpaper to knock back any overly sharp bumps or rough fingerprints.
Prehistoric Texture
Mix baking soda into your green paint for a gritty, realistic stone texture without needing to sculpt the surface details beforehand.
Step 3: Painting
-
Base coat:
Paint the entire body with a sage green acrylic paint. You may need two coats for full opacity, letting each layer dry in between. -
Paint the spikes:
Carefully paint the triangular spikes on the back using a warm, medium brown tone. A small flat brush works best to keep the edges neat. -
Add the spots:
Dip the handle end of a paintbrush or a dotting tool into a creamy beige paint. Dab varied sizes of dots onto the dinosaur’s flank to create the spotted pattern. -
Paint the eyes:
Paint a small white circle for the eye. Once dry, add a slightly smaller black circle inside it, and finally, a tiny white pin-dot highlight to bring him to life. -
Seal the work:
Once all paint is thoroughly dry, apply a coat of matte varnish. This protects the paint and unifies the sheen, giving it that professional finished look.
Place your new prehistoric friend near a window or plant for a cozy display
Mini Cactus Sculpture With Dot Texture
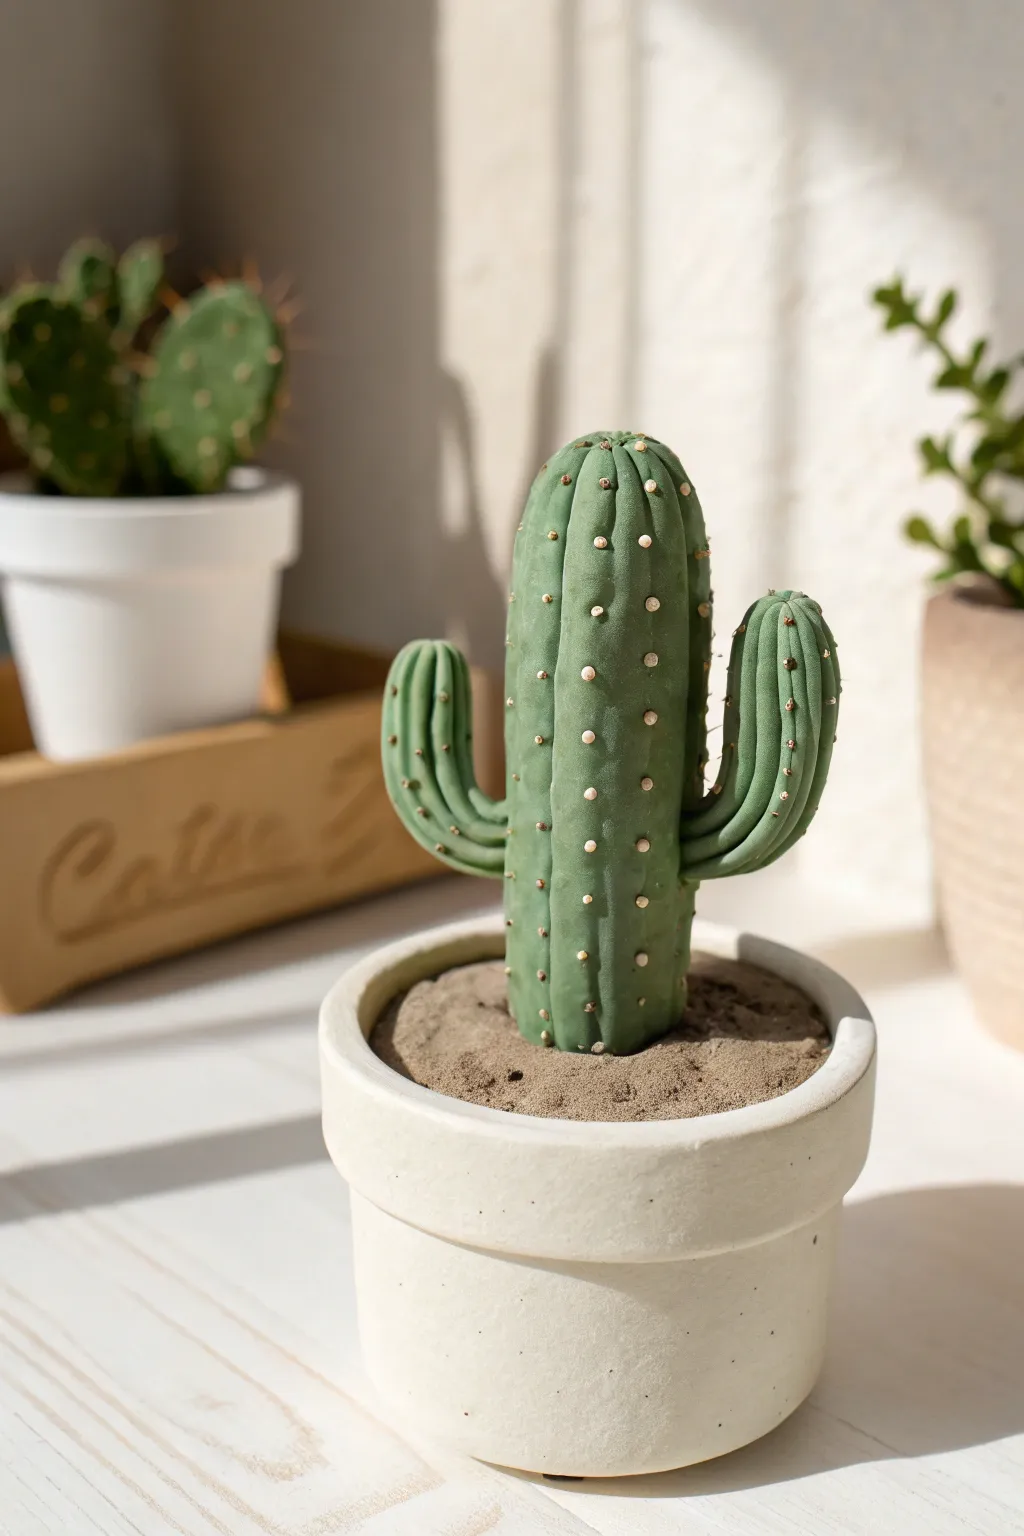
Sculpt a charming, drought-tolerant friend that never needs watering using basic modeling clay techniques. This project focuses on clean lines, symmetrical ridges, and precise textural details to create a stylized, matte-finish cactus pot.
Step-by-Step
Materials
- Green polymer clay or air-dry modeling clay
- Beige or off-white clay (for the pot)
- Brown clay (for the soil)
- White clay (tiny amount for spines)
- Modelling tools (needle tool, smooth blending tool)
- Rolling pin
- Small circle cutter (optional, for pot base)
- Ball stylus tool
Step 1: Sculpting the Pot
-
Form the base:
Start with a ball of beige clay about the size of a golf ball. Roll it into a smooth cylinder, slightly tapering the bottom so it’s narrower than the top. -
Hollow the vessel:
Use your thumb or a large ball tool to press int the center of the cylinder, creating a hollow space for the soil. Don’t go too deep; you just need a shallow well. -
Create the rim:
Roll a separate snake of beige clay and flatten it slightly with a rolling pin. Wrap this strip around the very top edge of your pot to create a distinct, raised rim. Blend the seam gently at the back. -
Smooth the surface:
I like to use a tiny bit of water (for air-dry clay) or baby oil (for polymer) on my fingertip to smooth out the pot’s exterior until it looks like thrown ceramic.
Step 2: Creating the Cactus Body
-
Shape the main column:
Take a large piece of green clay and roll it into a thick sausage shape with a rounded top. This will be the main trunk of your cactus. -
Add vertical ridges:
Using the side of a needle tool or a dull knife, gently press vertical lines from the base to the center of the top dome. Repeat this all around the cactus to create segmented ribs. -
Soften the lines:
Run your finger gently over the grooves you just made. You want distinct ridges, but not sharp cuts, to mimic the plump look of a succulent. -
Create the arms:
Roll two smaller green sausages for the arms, curving each into an ‘L’ shape. Make one slightly larger than the other for a natural, asymmetrical look. -
Texture the arms:
Add the same vertical ridge pattern to both arms, ensuring the lines follow the curve of the clay. -
Attach the arms:
Score the side of the main trunk and the base of the arms. Press them firmly onto opposite sides of the trunk at different heights. Smooth the clay connection point so it looks seamless.
Uneven Ridges?
If your vertical lines look wobbly, use a piece of string or dental floss. Pull it taut and press gently into the clay to create perfectly straight guide lines before deepening them.
Step 3: Assembly and Details
-
Prepare the soil:
Roll a ball of brown clay and flatten it into a disc that fits inside your pot’s rim. Press a piece of sandpaper or a toothbrush onto the surface to give it a grainy, dirt-like texture. -
Plant the cactus:
Place the brown soil disc into the pot. Press your green cactus firmly into the center of the soil so it stands straight. -
Prepare the spines:
Take a tiny amount of white clay and roll extremely small balls—think the size of a pinhead. You will need dozens of these. -
Apply the spines:
Using a small ball stylus or needle tool, pick up a white dot and press it gently onto the high point of a green ridge. It naturally flattens slightly into a perfect circle. -
Create the pattern:
Continue placing white dots down each ridge in evenly spaced rows. Repeat this process for the main trunk and both arms. -
Final texture check:
Inspect the pot and cactus for any accidental fingerprints. Lightly buff them away before the clay sets or is baked according to the package instructions.
Level Up: Flowering Top
Add a pop of color by attaching a small pink or yellow clay flower to the very top or on one of the arms. Use a tiny ball tool to ruffle the petals for realism.
Place your finished sculpture on a sunny windowsill where it can be admired without fear of sunburn
Kawaii Fruit Minis With Simple Faces
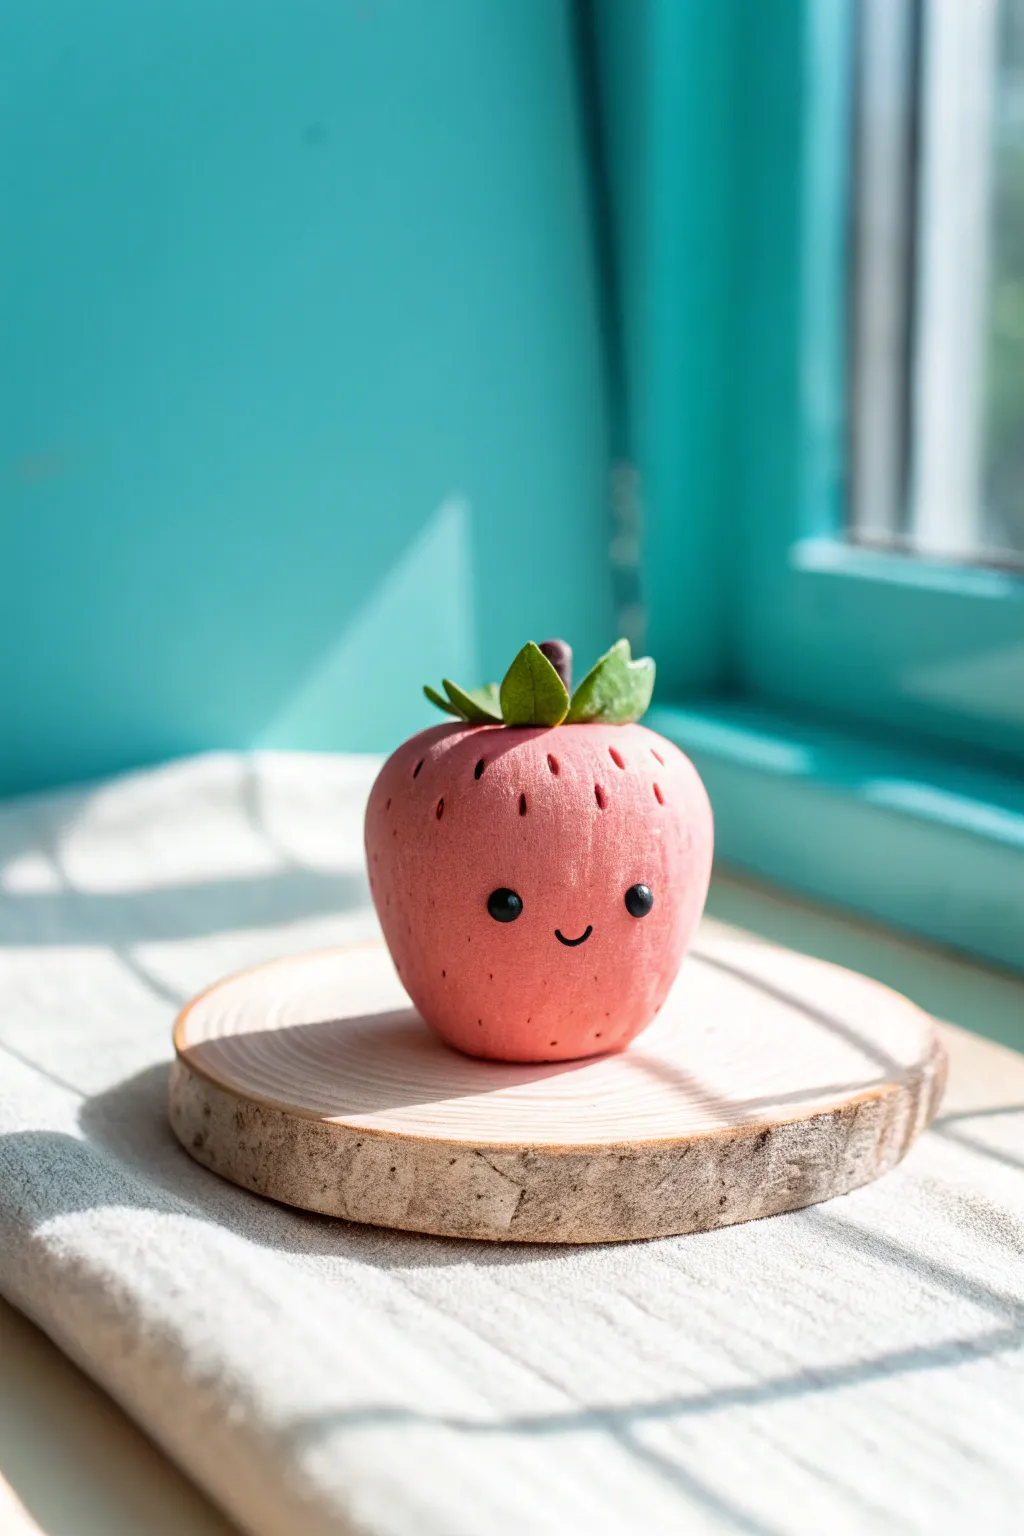
This adorable little strawberry friend adds a pop of kawaii charm to any desk or windowsill. With its soft, textured finish and sweet, simple face, it’s the perfect beginner project to practice basic shaping and detailing.
Detailed Instructions
Materials
- Polymer clay (pink or light red, green, black)
- Needle tool or toothpick
- Ball stylus tool (small)
- Aluminum foil
- Acrylic rolling pin
- Oven for baking (if using polymer clay)
Step 1: Shaping the Berry
-
Prepare the core:
Start by crumpling a small piece of aluminum foil into a tight ball, then shape it slightly into a rounded cone. This saves clay and makes the final piece lighter. -
Condition the clay:
Take your pink or light red clay and knead it in your hands until it becomes soft and pliable. Warm clay is much less likely to crack. -
Cover the core:
Flatten the pink clay into a pancake and wrap it completely around your foil core. Roll it between your palms to smooth out any seams until you have a seamless ball. -
Refine the shape:
Gently gently roll the ball on your work surface while applying more pressure to the bottom half, tapering it into a soft, rounded strawberry shape. The top should remain wider and flatter.
Step 2: Adding Texture
-
Planning the seeds:
Before poking holes, visualize where the seeds will go. You want a somewhat random pattern that covers the entire surface. -
Create the texture:
Using a needle tool or toothpick, gently press small, vertical indentations all over the pink body. I like to angle the tool slightly downward to create a teardrop-shaped impression for each seed. -
Clean up:
If adding the texture distorted the overall shape of your berry, gently cup it in your hands to round it back out without smushing the details.
Fixing Fingerprints
Can’t get rid of fingerprints? Lightly brush the unbaked clay with a tiny amount of baby oil or cornstarch, then gently smooth the area.
Step 3: The Kawaii Face
-
Mark eye placement:
Choose a smooth spot on the front of the berry where the texture isn’t too deep. Use a ball tool to verify where you want the eyes to sit before committing with clay. -
Make the eyes:
Roll two tiny, equal-sized balls of black clay. They should be very small to maintain the cute scale. -
Attach the eyes:
Press the black balls firmly onto the face area. You can flatten them slightly so they look flush with the fruit’s surface. -
Create the smile:
Roll a very thin, short snake of black clay. Curve it into a gentle ‘U’ shape. -
Place the mouth:
Position the smile centered between and slightly below the eyes. Press it gently to adhere it to the pink clay.
Glossy Finish
Make your fruit look juicy by coating the finished, baked piece with a layer of UV resin or glossy water-based varnish for a high-shine look.
Step 4: Topper & Baking
-
Make the leaves:
Condition a small amount of green clay. Divide it into 4 or 5 small, tear-drop shapes. -
Flatten and shape leaves:
Flatten each teardrop between your fingers. Use your needle tool to press a center vein down the middle of each leaf. -
Attach the calm:
Arrange the leaves in a star pattern on the top center of the strawberry. Press the ends down so they curve slightly over the rounded top. -
Add the stem:
Roll a small cylinder of black or dark brown clay for the stem. Press it into the very center where all the leaves meet. -
Final check:
Look over your strawberry for any fingerprints. You can smooth them away lightly with your finger or a little baby oil. -
Bake:
Bake your creation according to the instructions on your specific package of polymer clay. Let it cool completely before handling.
Now you have a sweet little fruit companion to brighten your day
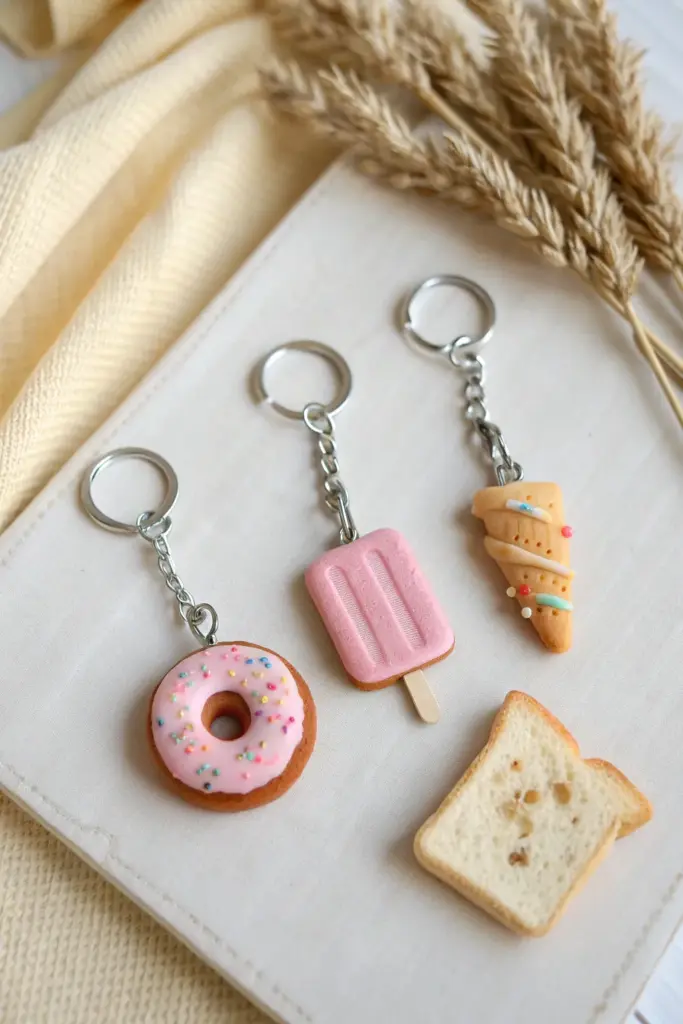
Tiny Food Keychain Toppers

Transform simple modeling clay into adorable, bite-sized accessories with this trio of dessert-themed keychains. These miniature donut, popsicle, and waffle cone designs feature realistic textures and pastel icing that look good enough to eat.
Step-by-Step Guide
Materials
- Polymer clay (tan/beige, light pink, white, mint green, bright pink)
- Liquid clay or bake and bond
- Silver keychain rings with screw-eye pins
- Needle tool or toothpick
- Small dotting tool
- Sandpaper or a toothbrush (for texturing)
- Rolling pin or pasta machine
- Gloss glaze (optional)
- Small craft knife
Step 1: Shaping the Donut
-
Create the base:
Start by conditioning a small ball of tan or beige clay until it is soft and pliable, then flatten it slightly into a thick disk about 1 inch in diameter. -
Texture the dough:
To mimic a fried dough texture, gently tap the surface of the clay with a toothbrush or piece of sandpaper, focusing on the curved edges. -
Make the hole:
Use a medium-sized dotting tool or the back of a paintbrush to press a hole through the center, widening it slightly to get that classic donut shape. -
Add the icing:
Roll out a thin sheet of light pink clay and cut a wavy circle that is slightly smaller than your donut. Place this over the top, smoothing the edges down so it looks like dripped glaze. -
Sprinkle time:
Roll extremely tiny snakes of mint green, bright pink, and white clay. Chop them into tiny specks with your craft knife and gently press them onto the pink icing.
Step 2: Crafting the Popsicle
-
Form the stick:
Mix a tiny amount of tan clay with white to create a light birch wood color. Flatten a small strip to serve as the popsicle stick. -
Shape the ice cream:
Take a larger piece of the pink clay used for the donut icing and shape it into a rounded rectangle. Flatten it to about 1/4 inch thickness. -
Add dimension:
Using a needle tool or a blunt knife edge, press two parallel vertical indentations down the front of the popsicle to create that classic molded treat look. -
Texture the surface:
For a frosty effect, I like to lightly stipple the surface using sandpaper, just enough to take away the glossy clay shine. -
Assembly:
Cut a small slit in the bottom center of the pink rectangle and insert your clay stick. Secure it with a tiny dab of liquid clay if needed.
Clean Clay Tip
Keep baby wipes nearby! Whenever you switch from a dark color to the light tan dough, wipe your hands and tools to avoid color transfer and keep your bakery goods looking fresh.
Step 3: Building the Waffle Cone
-
Roll the cone:
Shape a piece of tan clay into a long, tapered cone. Flatten the front side slightly so it isn’t too bulky. -
Create the waffle pattern:
Use a needle tool to gently scratch diagonal lines across the cone in one direction, then cross them in the other direction to form a grid pattern. -
Add the wrap:
Roll a very thin snake of tan clay and wrap it diagonally around the cone twice to create a spiraling ridge. -
Decorate:
Add two small strips of white and mint green clay across the ridges to look like melted drizzle. Finish with a few tiny pink clay balls for detail.
Dust Magnets?
If your unbaked clay attracts lint or dust, use a cotton swab dipped in a tiny bit of rubbing alcohol or acetone to gently wipe the surface debris away before baking.
Step 4: Finishing Up
-
Insert hardware:
Before baking, carefully screw the eye-pins of your keychain attachments into the top center of each charm. -
Secure the pin:
Pull the pin back out, add a drop of liquid clay or bake-and-bond to the threads, and screw it back in. This ensures it won’t fall out after baking. -
Bake:
Bake the pieces according to your clay package instructions (usually 275°F or 135°C for 15-30 minutes). -
Cool down:
Let the pieces cool completely inside the oven or on the tray before handling them, as hot clay is fragile. -
Final touches:
For extra durability and shine, you can brush a coat of gloss glaze over the ‘icing’ parts of the charms once they are fully cool.
Attach your new savory and sweet creations to your keys or bag and enjoy your handmade miniature art