If you love how model magic clay feels like a soft little cloud, you’re going to have a blast with these quick projects. I’m sharing my favorite air-dry clay ideas that start super beginner-friendly and slowly ramp up into the fun, “wait, I made that?” kind of cute.
Smiley Pizza Slices
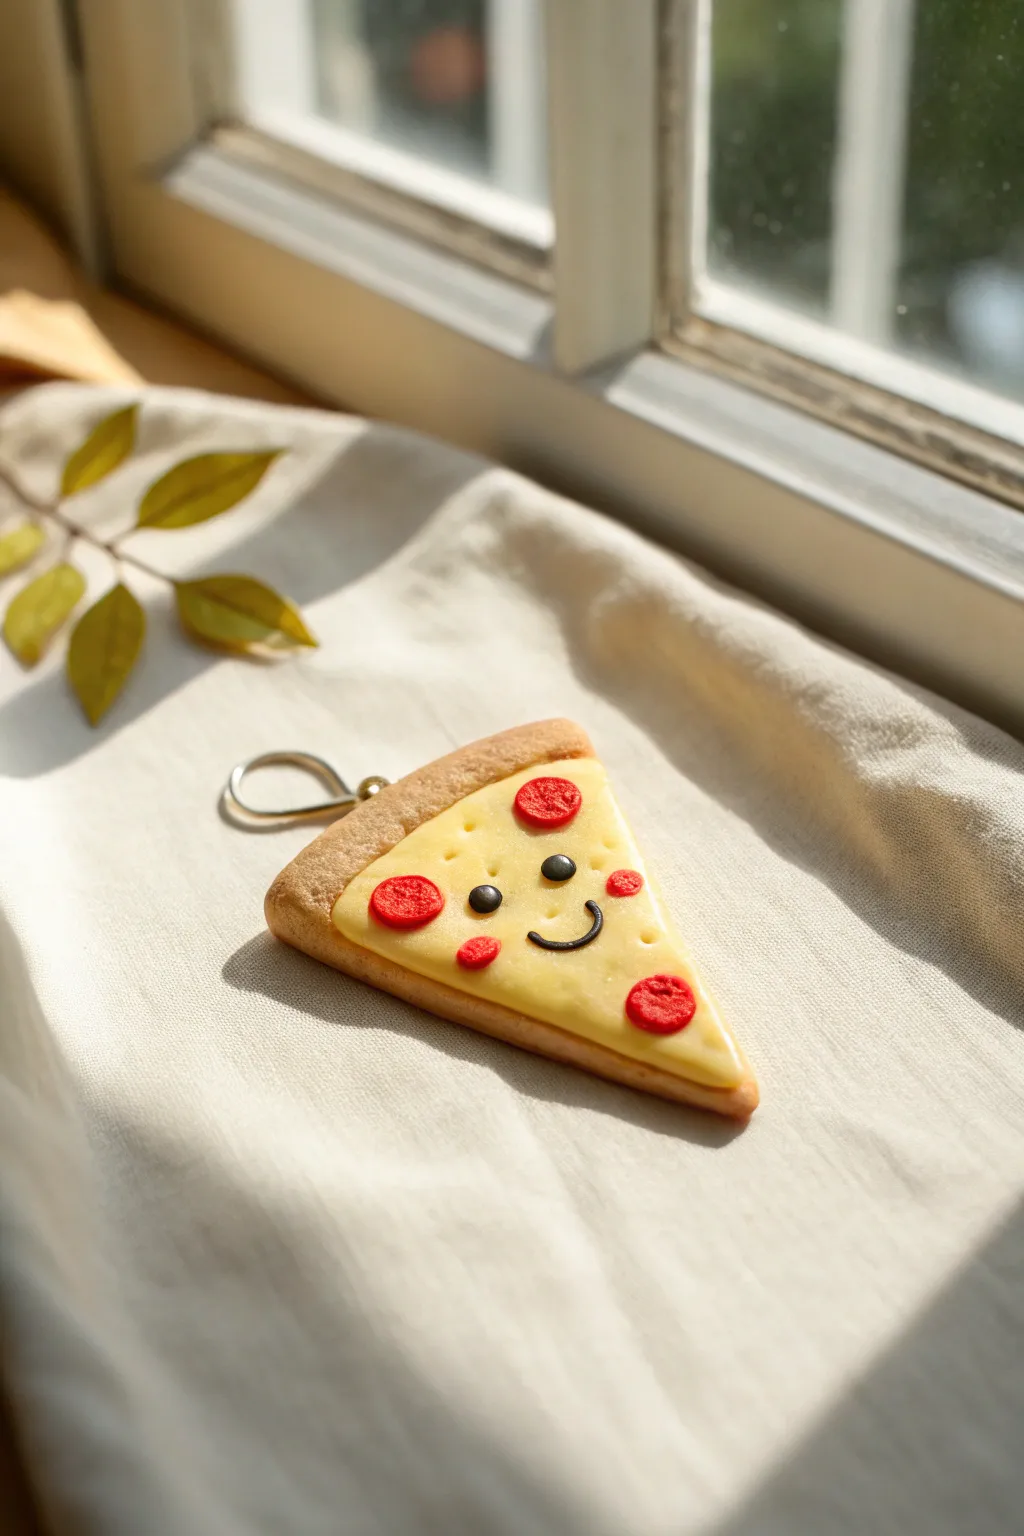
This adorable pizza slice charm brings a smile to everyone’s face with its golden crust and happy expression. It features a realistic melted cheese effect and tiny pepperoni details, making it a perfect accessory for backpacks or keychains.
How-To Guide
Materials
- Model Magic clay (white, yellow, red, brown, black)
- Jump ring and keychain attachment
- Pointed sculpting tool or toothpick
- Rolling pin or smooth round marker
- Clear nail polish or glossy glaze (optional)
- Baking parchment or non-stick work surface
Step 1: Forming the Crust
-
Mix the Dough Color:
Start by kneading a small amount of brown clay into a larger ball of white clay. Add just a pinch of yellow to warm it up. You want a light, sandy biscuit color that looks like baked dough. -
Shape the Triangle:
Roll your mixed dough color into a ball, then flatten it slightly. Pinch one side to form a soft triangle shape with rounded corners. It should be about 1/4 inch thick. -
Create the Crust Rim:
Gently push the top (widest part) of the triangle slightly thicker than the pointed tip. Use your finger to smooth and round this top edge specifically, creating that classic puffed pizza crust look. -
Add Texture:
For a realistic baked texture, take a stiff-bristled toothbrush or a crumpled ball of aluminum foil and very lightly tap it over the crust area only. This removes the artificial smoothness of the clay.
Cracks in the Crust?
If your Model Magic starts cracking while shaping, wet your fingertips slightly with water and smooth the fissure. The moisture reactivates the clay surface.
Step 2: Applying the Cheese
-
Mix the Cheese Color:
Take a fresh piece of white clay and mix in a small amount of yellow. I like to keep this color quite pale, like mozzarella, rather than neon cheddar. -
Flatten the Cheese:
Roll the yellow clay very thin. It needs to be thinner than your crust base so it doesn’t look bulky. -
Cut the Shape:
Place your crust on top of the rolled yellow clay as a template. Cut a triangle slightly smaller than the crust, leaving the top ‘puffed’ edge exposed. -
Melt the Edges:
Lay the cheese layer onto the dough base. Use your thumb to gently smear the edges of the yellow clay down onto the dough, making it look like it has melted and fused together.
Step 3: Adding Toppings & Face
-
Make Pepperoni:
Roll out a tiny bit of red clay. Use a small straw or roll tiny balls and flatten them to create three or four pepperoni slices. Press them gently into the cheese layer. -
Texture the Pepperoni:
Use a needle tool or toothpick to stipple the surface of the red circles, giving them that meaty texture. -
Create the Smile:
Roll a microscopically thin snake of black clay. Cut a small curved segment and press it into the center of the slice for the mouth. -
Add the Eyes:
Roll two tiny balls of black clay and place them above the mouth. Press them down gently so they aren’t bulging too far out. -
Blush Cheeks:
Make two very small circles of red or pink clay. Place them just under the eyes and slightly to the side for rosy cheeks. -
Insert Hardware:
While the clay is still soft, carefully push a jump ring into the top center of the crust. Ensure the opening is embedded or use a screw-eye pin for better security. -
Dry and Glaze:
Let the piece dry for at least 24-48 hours. Once fully hard, apply a deliberate coat of clear glaze or nail polish only to the cheese and pepperoni areas to make them look greasy and delicious.
Spice It Up
Make it a “supreme” pizza by adding tiny green squares for peppers or brown crumbles for sausage. A dusting of real pastel chalk can add ‘toasted’ spots to the cheese.
Now you have a charming slice of pizza that will never go stale


Tiny Burger and Fries Set

Sculpt your way to a delicious-looking miniature meal with this adorable tiny burger and fries set made from Model Magic. The clean lines and vibrant colors give it a charming, almost cartoon-like appeal that is perfect for play or display.
Step-by-Step
Materials
- Model Magic clay (White, Red, Yellow, Brown, or mix your own)
- Modeling tools (or a toothpick)
- Rolling pin or smooth round marker/pen
- Texture tool (soft toothbrush or crumpled foil)
- Small circular cutter (optional)
- Small knife tool or plastic blade
Step 1: Sculpting the Burger Buns
-
Mix the bun color:
Start by mixing yellow, a tiny bit of red, and a touch of brown into white clay to create a golden, baked-bread tan color. You want enough for both the top and bottom buns. -
Form the bottom bun:
Pinch off a portion of your tan clay and roll it into a ball. gently flatten it into a thick disc shape for the bottom bun. Keep the edges slightly rounded so it looks soft. -
Shape the top bun:
With the remaining tan clay, roll a second ball. Flatten the bottom side against your work surface but keep the top domed and high to create that classic burger bun shape. -
Add sesame seeds:
Take tiny, microscopic bits of white or pale yellow clay. Roll them into tiny teardrops or ovals and press them gently onto the top of the domed bun. I like to scatter them randomly for a natural look.
Step 2: Assemble the Burger Fillings
-
Create the patties:
Mix brown clay with a tiny speck of black to get a rich, cooked beef color. Divide this into two equal balls and flatten them into discs that are roughly the same circumference as your buns. -
Texture the meat:
Use a toothbrush or a ball of crumpled foil to tap texture onto the edges of the patties. This rough surface mimics ground beef perfectly. -
Slice the cheese:
Roll out a small piece of bright yellow clay until it’s thin. Cut a square shape that is slightly larger than your burger patties so the corners will peek out. -
Make the tomato:
Flatten a small ball of red clay into a disc. It should be slightly smaller than the patty but thick enough to be visible in the stack. -
Stack the layers:
Begin assembly by placing one patty on the bottom bun. Next, add the cheese, gently drooping the corners down as if it’s melting. Add the tomato slice, followed by the second patty. -
Top it off:
Place the seeded top bun on your stack. Press down very gently to secure the layers without squishing the shapes too much.
Realistic Texture Pro Tip
For ultra-realism, lightly brush the very top of the burger bun with a tiny bit of brown pastel chalk dust to make it look toasted.
Step 3: Cooking up the Fries
-
Shape the fry container:
Roll a thick sausage or cylinder of bright red clay. This will be the holder. You can slightly flatten the bottom so it stands upright on its own. -
Detail the container:
Use a knife tool to press horizontal grooves around the red cylinder. This simple step mimics the folded cardboard design of a fry cup. -
Prepare the fries:
Roll out a snake of bright yellow clay. Cut it into short segments of varying lengths, roughly 1 inch long each. -
Square them up:
Gently pinch the sides of each yellow segment to give them a square cross-section, making them look like cut potatoes rather than round worms. -
Fill the cup:
Begin pressing the fries into the top of the red cylinder. Place them vertically, clustering them tightly together so they look like they are bursting out of the container. -
Final touches:
Arrange a few fries to lean slightly outward for a realistic, overflowing appearance. Let the entire set dry for 24-48 hours until hardened.
Level Up: The Full Menu
Don’t stop here—sculpt a tiny clay soda cup with a straw and a small side of clay ketchup to complete your miniature combo meal.
Once dry, these cute clay foods are ready to be displayed on a tiny plate or used in pretend play scenarios


Soft-Serve Cones With Impressed Texture
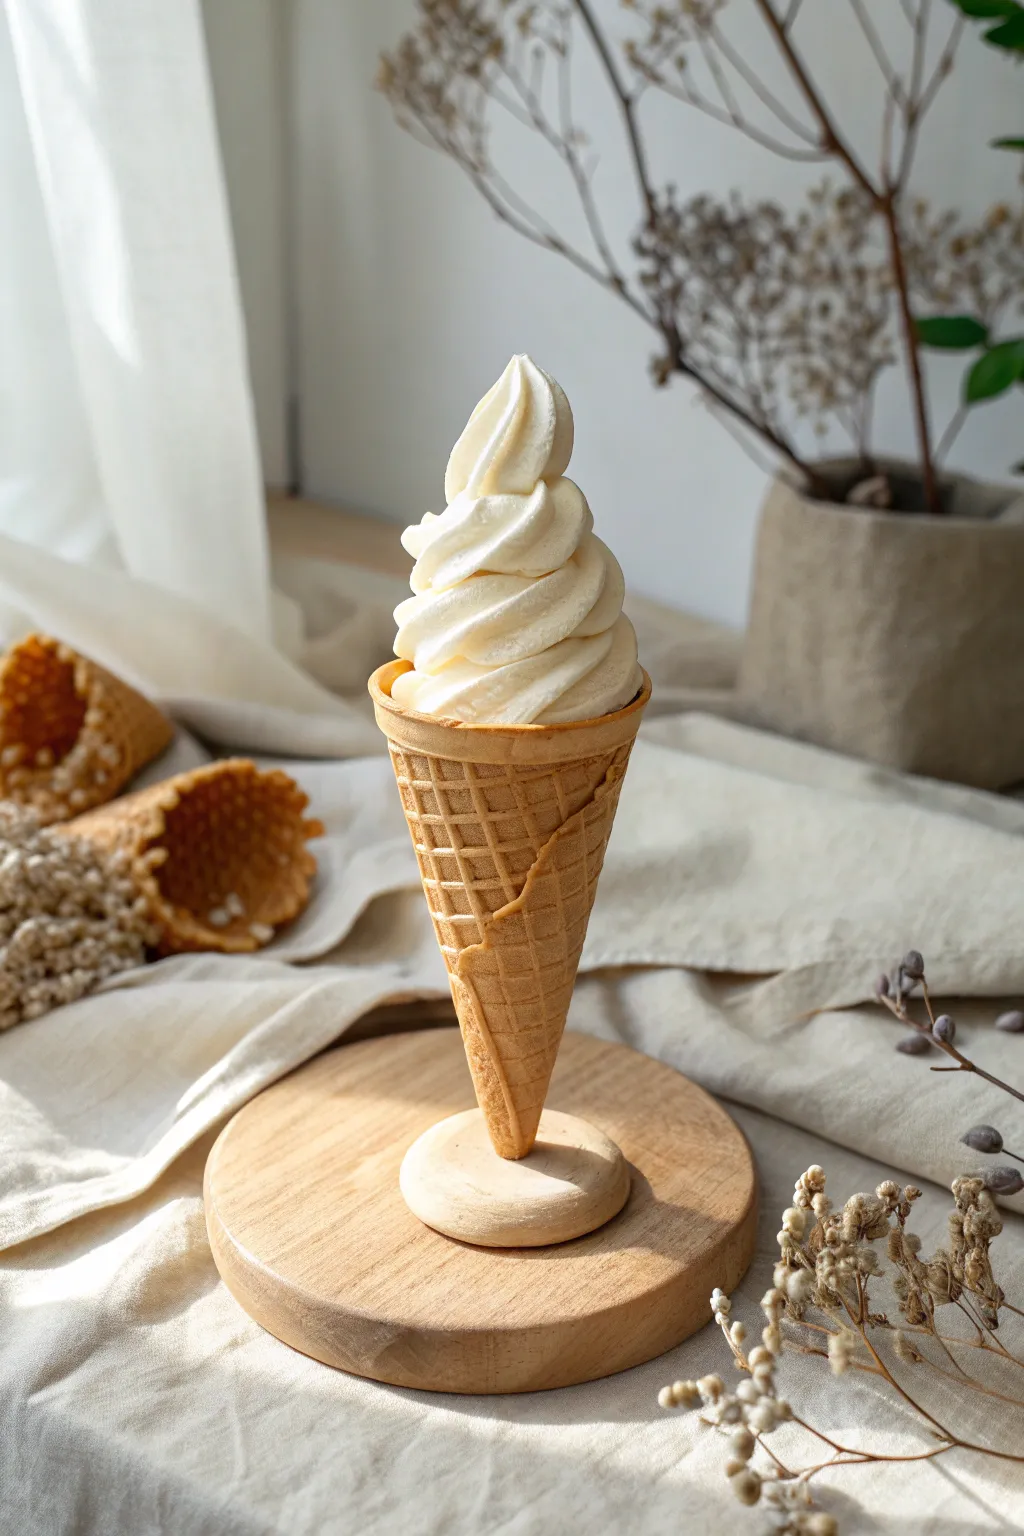
Capture the creamy, swirling delight of soft-serve ice cream without the melting mess using lightweight clay. This project focuses on texture, achieving a realistic waffle cone grid and delicate dairy-like folds that look good enough to eat.
Step-by-Step Tutorial
Materials
- White Model Magic clay (or similar lightweight air-dry clay)
- Biscuit or tan colored acrylic paint
- Rolling pin
- Plastic grid mesh (or a dedicated waffle texture mat)
- Craft knife
- Cardstock or thick paper
- Tape
- Matte varnish (optional)
- Pastel chalks (browns and oranges) for shading
Step 1: Creating the Waffle Cone
-
Prepare the clay:
Start by taking a medium-sized bal of white clay. To get that perfect baked-cone color, kneading a very small drop of biscuit or tan acrylic paint directly into the white clay until the color is uniform. -
Roll it out:
Roll the colored clay flat on a smooth surface until it is about 1/8 inch thick. Try to keep the thickness even so the cone shape holds up later. -
Add texture:
Press a piece of plastic grid mesh or a clean waffle texture mat firmly into the rolled clay. Peel it back reveal the grid pattern. -
Make a cone form:
Roll a piece of cardstock into a cone shape to serve as an internal support structure. Tape it securely so it doesn’t unravel. -
Cut the clay shape:
Using your craft knife, cut a large triangle shape from the textured clay. The long edge should be curved slightly, similar to a pie slice. -
Wrap the cone:
Gently wrap the textured clay around your cardstock form. Overlap the edges slightly at the seam. -
Blend the seam:
Press the overlapping seam gently. You don’t want to smooth it out completely, as real cones have visible seams, but ensure the clay bonds together. -
Trim the top:
Use the craft knife to trim the top edge of the cone so it is level and flat, providing a sturdy base for the ice cream.
Drooping Swirls?
If the ice cream creates too much weight and slumps, insert a toothpick into the center of the cone and build the swirls around it for invisible support
Step 2: Sculpting the Soft Serve
-
Prepare the white clay:
Take a large portion of fresh white Model Magic. It should be soft and very pliable. If you want a vanilla bean look, you can mix in tiny speckles of black paint, but plain white works beautifully. -
Create a snake:
Roll the white clay into a long, thick snake. One end should remain fairly thick, while the other creates a tapered point. -
Flatten the edges:
Gently pinch along the length of the snake to create a dull ridge. This mimics the shape extruded from soft-serve machines. -
Begin coiling:
Start coiling the thick end of the clay snake directly onto the top rim of the dried cone. Press down slightly to adhere it to the waffle rim. -
Build height:
Continue coiling upward in a spiral motion. Each loop should be slightly smaller than the one below it to create the classic tapered shape. -
Form the peak:
When you reach the top, pull the clay slightly upward and twist to create that iconic soft-serve curl at the very peak. -
Refine the swirls:
Use a modeling tool or your finger to smooth any harsh transitions between the coils while maintaining the definition of the swirls.
Make it Sweet
Mix simulated ‘sprinkles’ into the white clay before coiling, or paint clear glue on the finished swirls and dip in glitter for a sugar-crystal effect
Step 3: Finishing Touches
-
Shade the cone:
I like to scrape some brown pastel chalk into a powder and brush it lightly over the waffle grid to enhance the ‘baked’ look. -
Final drying:
Allow the entire piece to dry for at least 24-48 hours. Model Magic shrinks slightly as it dries, which tightens the texture.
Display your finished cone on a small stand for a delightful piece of faux food art


Kawaii Fruit Minis for Desk Decor

Brighten up your desk space with these irresistibly cute fruit figurines made from lightweight air-dry clay. This project features a happy strawberry, a round tangerine, a juicy slice, and a cheerful banana, all sporting adorable smiles.
Step-by-Step Guide
Materials
- Model Magic or lightweight air-dry clay (red, orange, yellow, green, white, black, pink)
- Clay tools (needle tool, small ball tool)
- Toothbrush or texturing sponge
- Rolling pin
- Small scissors
- Clean work surface or silicone mat
Step 1: Shaping the Banana
-
Form the base:
Start with a medium ball of yellow clay and roll it into a thick log, slightly tapering both ends. -
Create the curve:
Gently bend the log into a classic crescent moon shape. Flatten the bottom side slightly against your table so it will sit stable without rolling over. -
Add the stem:
Pinch one end to elongate it into a stem shape. Take a tiny bit of brown or green clay (or mix yellow with a speck of black) to add a small cap to the very tip.
Clay Cracking?
If your clay starts cracking while you work, wet your fingers with a tiny amount of water (or lotion) and smooth the surface. Don’t add too much liquid or it gets slimy.
Step 2: Sculpting the Whole Tangerine
-
Roll the body:
Take a chunk of orange clay and roll it into a perfect smooth sphere. Press it gently onto your surface to create a flat base. -
Texture the skin:
Using a clean toothbrush or texturing tool, gently tap the entire surface of the orange ball to mimic the pitted texture of citrus peel. -
Make the leaves:
Roll a small ball of green clay and flatten it into a disk. Use scissors or a knife tool to cut out a star shape with 4-5 points. -
Attach the greenery:
Place the green star on top of the orange sphere. Gently curve the leaf tips down. Add a tiny brown stalk in the center.
Turn them into Charms
Before the clay dries, twist a small screw eye pin into the top of the fruit. Once dry, you can attach jump rings to make keychains or jewelry.
Step 3: Crafting the Orange Slice
-
Create the segments:
From orange clay, form a thick disk. Use a knife tool to impress deep radial lines from the center outward, dividing the circle into equal wedges. -
Add the pith:
Roll very thin snakes of white clay. Press these into the indented lines between the orange segments for the white pith detail. -
Wrap the rind:
Roll a long, flat strip of darker orange clay. Wrap this around the outer edge of your slice to form the skin, smoothing the seam where the ends meet. -
Texture the inside:
Use a needle tool to scratch tiny dots and lines into the orange segments to make them look juicy.
Step 4: Modeling the Strawberry
-
Shape the berry:
Form red clay into a rounded cone or teardrop shape. Flatten the wider bottom slightly so it stands upright. -
Seed details:
Using a small tool, press tiny indentations all over the surface. You can fill these with tiny specks of black clay or paint them later. -
Top it off:
create another green star shape like the tangerine, but make the leaves slightly shorter. Press onto the top of the berry and add a short stem.
Step 5: Adding Kawaii Faces
-
Make eyes:
Roll tiny spheres of black clay. Press two onto each fruit to serve as eyes. Place them somewhat wide apart for maximum cuteness. -
Create smiles:
Roll incredibly thin threads of black clay. Curve them into small U-shapes and press them between the eyes. -
Rosy cheeks:
Flatten tiny dots of pink clay into ovals. Press these onto the ‘face’ area, just below and outside the eyes. -
Final drying:
Let all your fruit friends sit undisturbed for 24-48 hours until the clay feels firm and dry to the touch.
Arrange your little fruit family on a shelf or desk for a daily dose of vitamin C—cute

The Complete Guide to Pottery Troubleshooting
Uncover the most common ceramic mistakes—from cracking clay to failed glazes—and learn how to fix them fast.
Simple Penguin Pals From Two Shapes
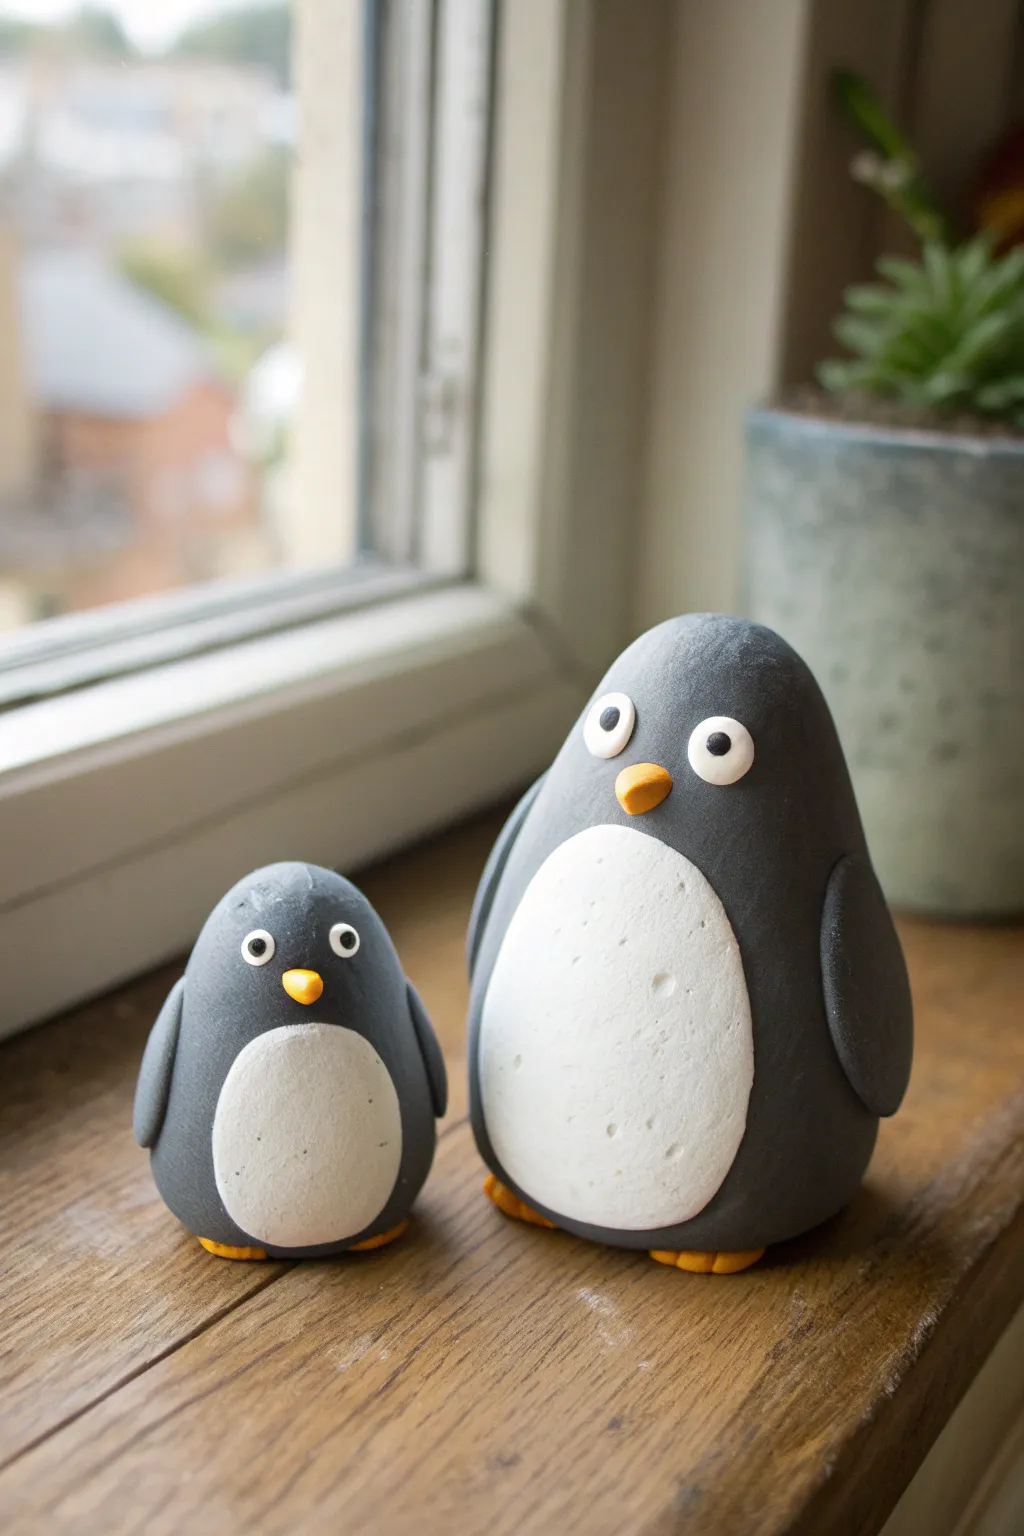
Transform simple egg shapes into an adorable duo of flightless birds with this straightforward modeling project. These smooth, matte-finish penguins rely on basic forming techniques to create a charming minimalist look perfect for a windowsill display.
Step-by-Step
Materials
- Model Magic clay (Dark Grey or Black mixed with White)
- Model Magic clay (White)
- Model Magic clay (Orange or Yellow)
- Black marker or tiny beads (for pupils)
- Modeling tool or toothpick
- Parchment paper or smooth work surface
Step 1: Shaping the Bodies
-
Mix the perfect grey:
Start by mixing black and white clay together until you achieve a solid, dark charcoal grey. If you are using pre-mixed grey, you can skip this step, but I like mixing my own to get that stony, natural shade. -
Form the large body:
Take a large handful of the grey clay and roll it into a smooth ball between your palms to remove any cracks or lines. -
Refine the egg shape:
Gently taper the top of the ball to create a tall, smooth egg shape. Flatten the bottom exclusively by tapping it gently on your work surface so it stands upright on its own. -
Create the small body:
Repeat the previous two steps with a smaller amount of grey clay to make the little penguin chick. Aim for it to be about half the height of the adult.
Step 2: Adding the Bellys and Wings
-
Prepare the white patches:
Pinch off two pieces of white clay. Roll them into balls, then flatten them into thin ovals. Each oval should be proportional to the penguin it belongs to. -
Attach the white bellies:
Press the white oval onto the lower front of the grey body. Gently smooth the edges with your thumb so the white layer seems to merge seamlessly with the grey, rather than just sitting on top. -
Add texture:
Use a toothpick or a small dotting tool to add tiny, subtle indentations into the white belly area for a bit of feathered texture. -
Make the wings:
Create teardrop shapes from the grey clay—two larger ones for the adult and two tiny ones for the chick. Flatten them slightly. -
Attach the wings:
Press the wings onto the sides of the bodies. Curve the tips slightly forward to give them a natural, relaxed posture.
Smooth Operator
To remove fingerprints from Model Magic without distorting the shape, lightly wet your fingertip with water and glide it over the surface.
Step 3: Creating the Faces
-
Form the eye bases:
Roll tiny balls of white clay for the eyes. The adult needs slightly larger eyes to maintain the cartoonish style. -
Position the eyes:
Press the white balls onto the grey head area, spacing them somewhat wide apart for a cute expression. Flatten them gently. -
Add pupils:
Place a minuscule dot of black clay into the center of the white eyes. Alternatively, wait for the clay to dry and use a marker, but clay dots create a nice 3D effect. -
Sculpt the beaks:
Take a small pinch of orange clay and roll it into a cone. Flatten the underside slightly so it isn’t perfectly round. -
Attach the beaks:
Press the orange cone between the eyes, pointing slightly downward. Ensure it adheres well by giving it a firm little push.
Winter Wear
Give your penguins personality by sculpting tiny accessories like a red scarf or a small top hat out of colored clay.
Step 4: The Final Details
-
Create the feet:
Roll four small balls of orange clay. Flatten them into little discs to serve as feet. -
Detail the toes:
Use your modeling tool or a credit card edge to press two lines into the front of each orange disc, creating the look of webbed toes. -
Mount the penguins:
Lift your penguins and place the feet underneath the front edge of their bodies. Press the body down gently so the feet stick securely. -
Smooth everything out:
Do a final check for fingerprints. Because Model Magic is soft, you can gently rub any accidental dents to smooth the finish before letting them air dry completely.
Set your new arctic friends on a shelf to dry for at least 24 hours and enjoy their company
Wide-Eyed Owls With Layered Face Discs
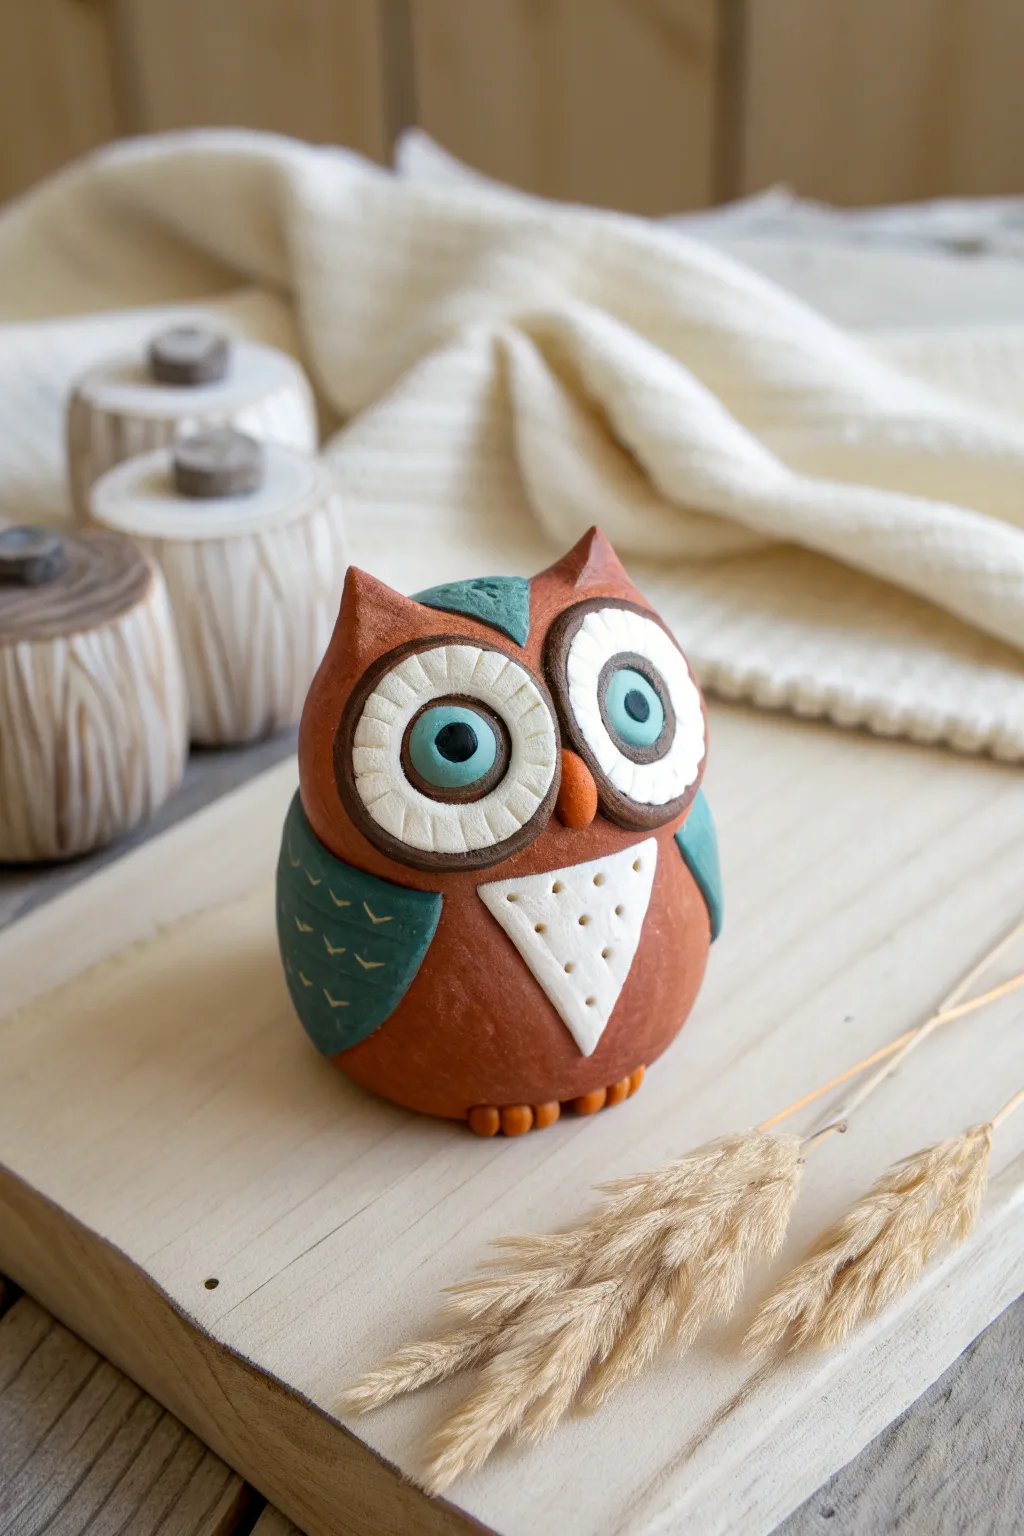
This charming little owl combines rustic terracotta tones with pops of teal and white for a delightful woodland vibe. Its most striking feature is the layered facial discs that give it a uniquely expressive, wide-eyed look.
How-To Guide
Materials
- Model Magic clay (Terracotta/Brown, Teal, White, Black, Orange)
- Clay sculpting tools (specifically a small pointed tool or needle tool)
- Small round cutter (or a bottle cap)
- Rolling pin
- Parchment paper or craft mat
Step 1: Base Body Shape
-
Form the core:
Start with a generous ball of terracotta-colored clay. Roll it between your palms until it is smooth and free of cracks. -
Shape the owl:
Gently gently flatten the bottom of the ball against your work surface so it sits upright. Pinch the top corners slightly to suggest the beginning of ear tufts, creating a rounded egg-like silhouette. -
Create the chest:
Roll a small piece of white clay into a ball, then flatten it into a triangle with rounded corners. Press this onto the lower center of the owl’s body. -
Add chest texture:
I like to use the tip of a pointed tool to gently poke small, evenly spaced holes into the white chest triangle for a feather-like texture.
Keep It Clean
White Model Magic stains easily! Wiping your hands with a wet wipe before handling the white clay for the eyes and chest ensures the colors stay bright.
Step 2: The Expressive Eyes
-
Make the outer rings:
Take dark brown clay and roll it into two thin snakes. Form these into circles and press them onto the upper face area to create the frames for the eyes. -
Add the white sclera:
Roll two balls of white clay and flatten them into discs that fit perfectly inside the brown rings you just made. Press them gently into place. -
Texture the eyes:
Using your needle tool or a dull knife, carefully etch radiating lines into the white discs, moving from the center outward to the rim. -
Create the teal irises:
Roll two smaller balls of teal clay. Flatten them slightly and place them in the center of the white layered discs. -
Finish the pupils:
Add tiny balls of black clay to the center of the teal circles for the pupils. Press them down firmly so the eyes look focused.
Step 3: Wings & Head Details
-
Shape the wings:
Create two teardrop shapes from teal clay. Flatten them slightly with your thumb to create the wing base. -
Texture the feathers:
Use a specialized clay tool or a toothpick to press small ‘V’ shapes or curved lines into the teal wings to simulate layers of feathers. -
Attach the wings:
Press the wings onto the sides of the body, curving them slightly around the belly shape. -
Add the head patch:
Roll a small triangle of teal clay and place it centrally on the forehead, just above the eyes, blending it slightly towards the back.
Woodland Perch
Sculpt a simple tree stump or a thick branch from swirled brown and tan clay for your owl to sit on, adding tiny green clay leaves for detail.
Step 4: Beak & Feet
-
Form the beak:
Roll a tiny piece of orange clay into a cone or carrot shape. Place it vertically right between the two large eye discs, point facing down. -
Make the toes:
Roll six very small balls of orange clay. Group them into two sets of three. -
Attach the feet:
Place these sets of three underneath the front of the body so they poke out just slightly, anchoring your owl. -
Refine ear tufts:
Finally, go back to the top of the head and pinch the terracotta clay a bit more sharply to define the ear tufts, ensuring they frame the face nicely. -
Final smoothing:
Check for any fingerprints and gently smooth them out with a light touch before setting the piece aside to dry completely.
Set your new feathered friend on a shelf or desk where its big eyes can keep you company


What Really Happens Inside the Kiln
Learn how time and temperature work together inside the kiln to transform clay into durable ceramic.
Tiny Turtles With Patterned Shells
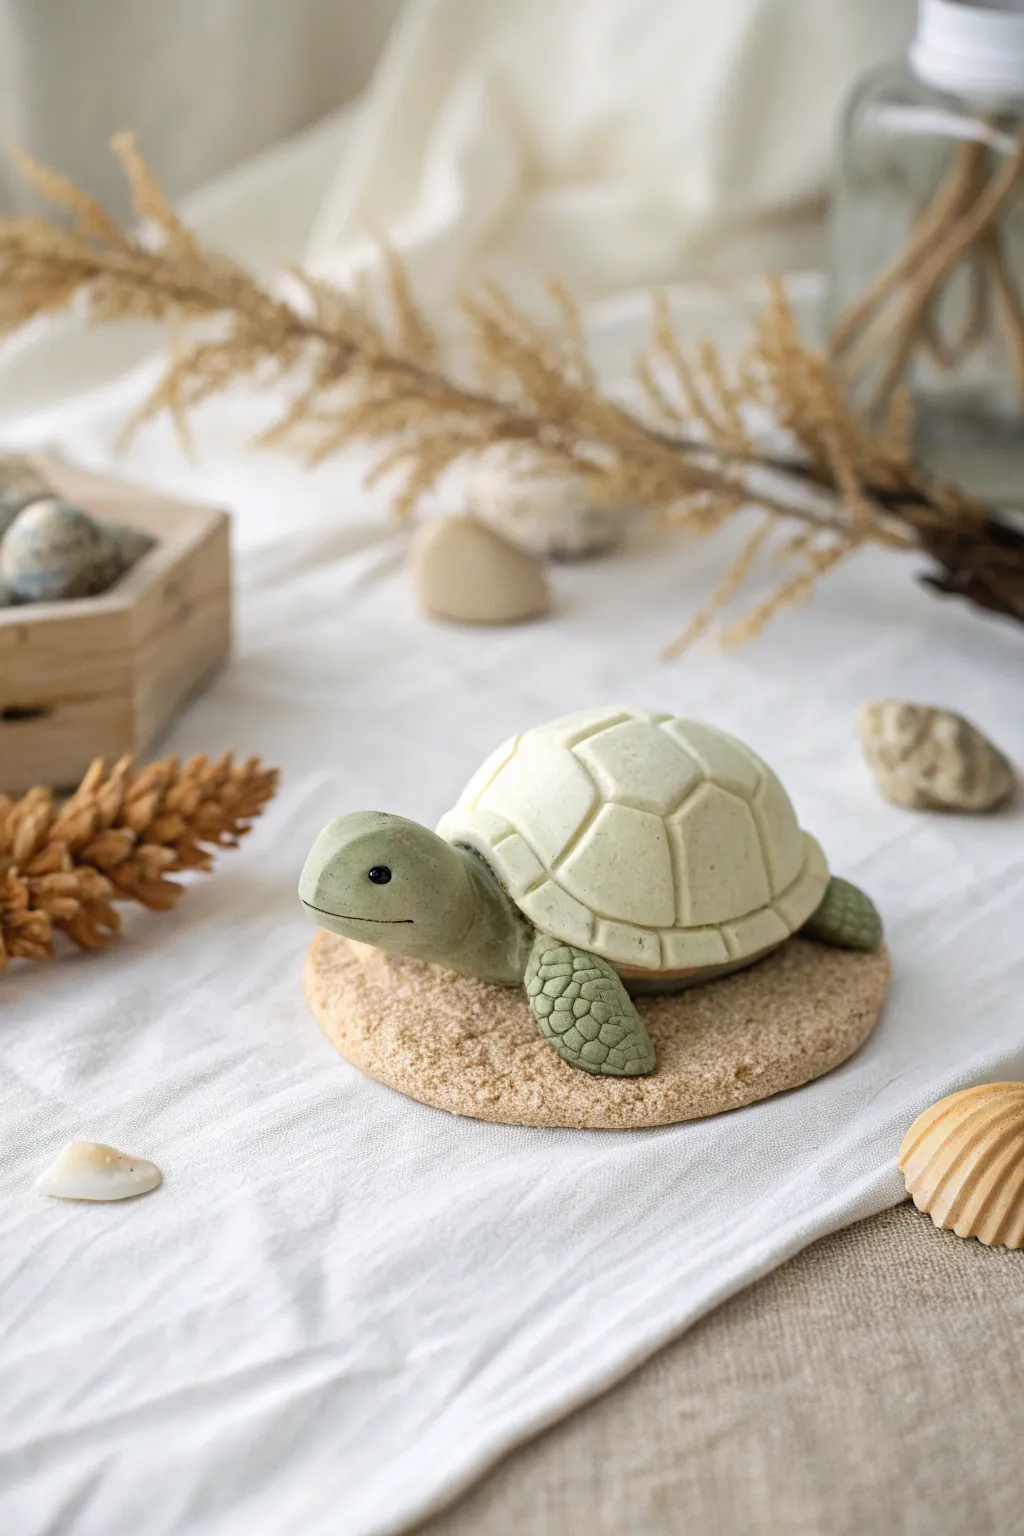
This adorable sea turtle features a sculpted sage-green body and a creamy white shell with a precise geometric pattern. Resting on a textured, sandy-looking base, the finished piece captures the calm essence of marine life in a soft, matte clay finish.
Detailed Instructions
Materials
- Model Magic clay (white, green, beige/tan)
- Clay carving tools or a plastic knife
- Small rolling pin
- Toothpick or needle tool
- Ball stylus tool
- Black bead or black clay for eyes
- Clean work surface (parchment paper works well)
- Old toothbrush or texture sponge
Step 1: Creating the Sandy Base
-
Mix the sand color:
Start by mixing white Model Magic with a small amount of beige or tan. You want a very light, natural sandy tone. Knead it thoroughly until the color is consistent. -
Form the disc:
Roll your sand-colored clay into a ball about the size of a golf ball, then flatten it gently with your palm or a rolling pin into a disc about 1/4 inch thick. -
Add texture:
To create the realistic grainy look, tap the entire surface of the disc with an old toothbrush or a stiff texture sponge. Press firmly enough to leave deep stippling marks, which mimics sand perfectly.
Cracking Geometries?
If your shell pattern lines look rugged or cracked, dip your tool in a tiny bit of water or lotion before pressing into the clay. This helps it glide smoothly without tearing the foam.
Step 2: Sculpting the Body
-
Mix the sage green:
Blend green clay with a significant amount of white (and a tiny touch of black or brown if needed) to achieve a muted, dusty sage green color. -
Shape the main body:
Form a flattened oval for the main body piece that will sit underneath the shell. This acts as the anchor for the head and flippers. -
Form the flippers:
Create four teardrop shapes from the green clay. Flatten them slightly. Two should be larger for the front flippers, and two smaller for the back. -
Texture the flippers:
Using a blunt needle tool or a small carving tool, gently press a pattern of small, irregular polygons onto the top surface of each flipper to resemble scales. I like to focus the detail on the tips. -
Attach the limbs:
Press the flippers onto the underside of your main body oval. Position the front ones sweeping backward slightly and the rear ones tucked near the back. -
Create the head:
Roll a smooth, rounded teardrop shape for the head. Gently curve the narrower end upward to give the turtle an alert posture. -
Add facial details:
Use a knife tool to press a simple horizontal line for the mouth. Use a ball tool to make small indents for the eyes, then press in tiny black beads or tiny balls of black clay.
Pro Tip: Eye Shine
To make eyes look alive, add a microscopic dot of white paint or white clay to the black bead. This ‘catchlight’ instantly gives the turtle a sweet personality.
Step 3: Crafting the Shell
-
Prepare the shell clay:
For the shell, use plain white Model Magic or mix in a tiny whisper of yellow for a creamy off-white tone. Roll it into a smooth ball. -
Shape the dome:
Flatten the bottom of the ball against your table to create a perfect dome shape. Ensure it is wide enough to cover the turtle’s back but leaves the flippers exposed. -
Define the scutes:
Using a plastic knife or clay tool, gently press lines into the dome to create the shell pattern. Start with a hexagon in the very center top. -
Complete the pattern:
From each point of that central hexagon, draw lines extending downward toward the rim. Connect these with a ring of lines near the bottom edge to form the border scutes. -
Add the rim:
Roll a thin snake of the same cream clay. Wrap it around the bottom edge of the dome and blend it slightly to create a defined rim for the shell.
Step 4: Assembly
-
Combine body and base:
Place your green turtle body (with flippers attached) onto the center of your textured sandy base. Press gently so it adheres. -
Attach the head:
Press the neck end of the head piece onto the front of the body. You can blend the clay slightly at the connection point underneath so it’s seamless. -
Place the shell:
Position the patterned dome on top of the green body. Press down firmly but carefully, ensuring you don’t squash your beautiful scute lines. -
Final touches:
Inspect your turtle from all angles. Smooth out any fingerprints and ensure the head is lifted slightly so your turtle looks like it’s crawling across the sand.
Allow your little sea voyager to air dry for at least 24 hours before moving it to a shelf for display
Rainbow Snails With Spiraled Shells
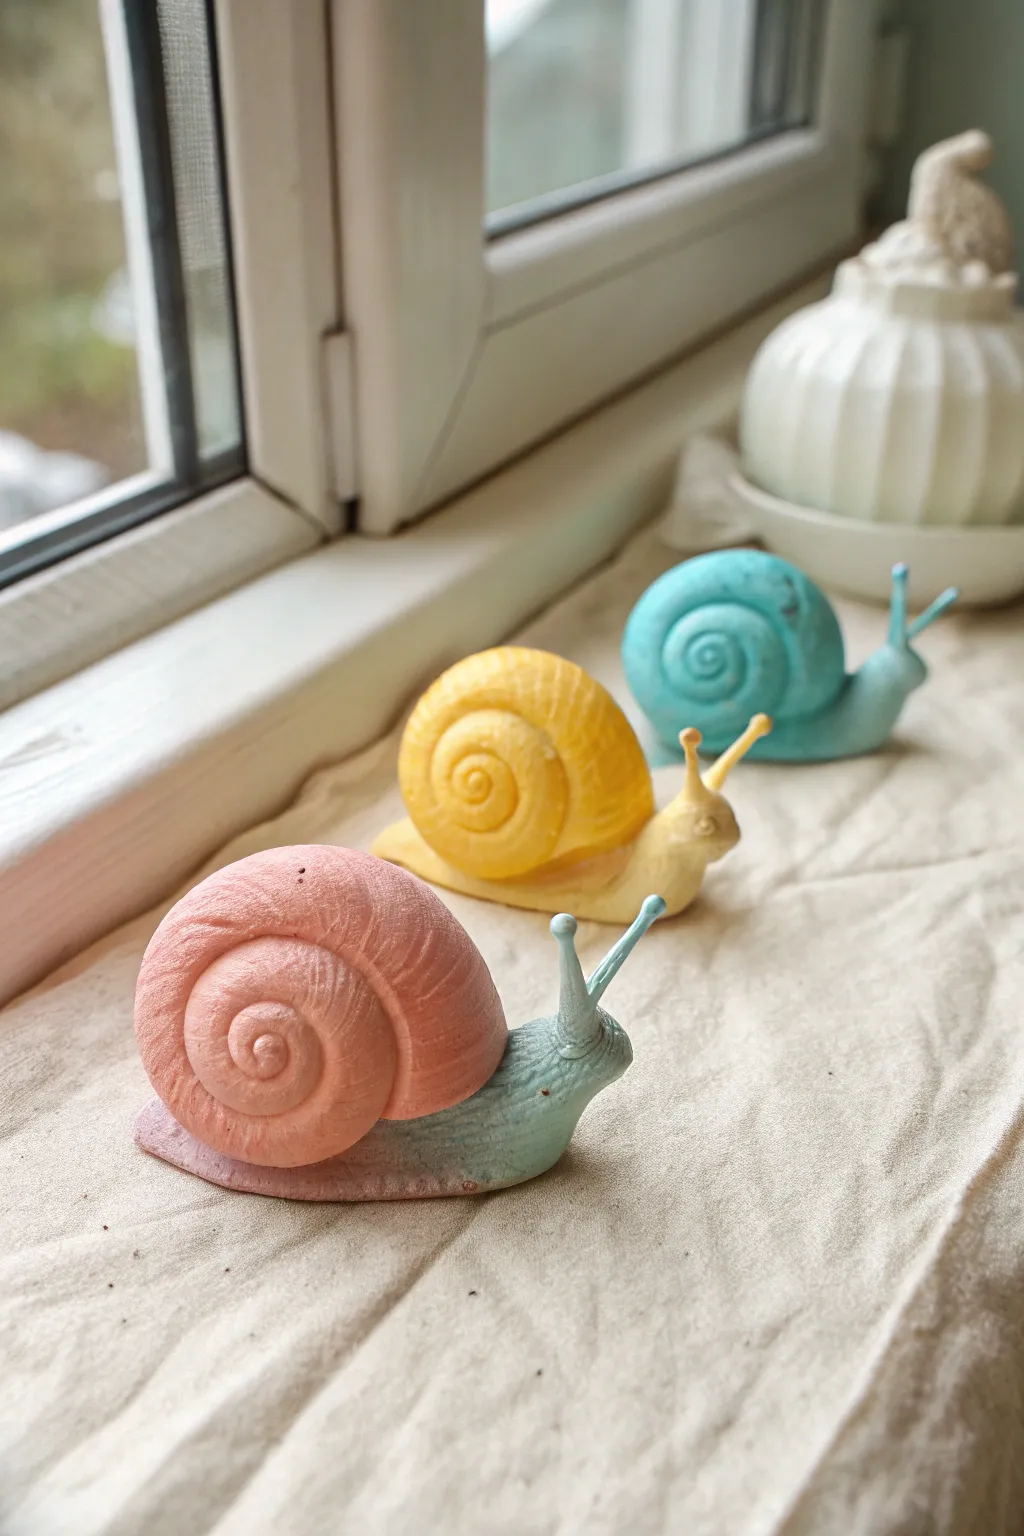
These charming little gastropods bring a touch of whimsy to any windowsill with their soft, pastel colors and beautifully spiraled shells. Using Model Magic clay allows for a lightweight, smooth finish that captures the delicate ridges perfectly.
Step-by-Step Guide
Materials
- Model Magic clay (white, pink, yellow, blue, black)
- Clay sculpting tools (needle tool, small ball stylus)
- Smooth work surface or craft mat
- Aluminum foil (optional, for core structure)
- Toothpicks (optional, for support)
Step 1: Preparing the Colors
-
Mix pastel shades:
Begin by creating your custom pastel palette. For the pink snail, mix a small amount of pink clay into a larger ball of white clay until you achieve a soft, rosy hue. -
Create the body color:
For the contrasting body, take a bit of blue clay and mix it with a tiny speck of black and a large amount of white to get a muted, grey-blue tone. -
Repeat for other snails:
If making the trio, mix a sunny yellow for the second shell and a cream color for its body. For the third, use a bright teal for both the body and shell, perhaps varying the shade slightly.
Drooping Eye Stalks?
If the eye stalks keep flopping over, cut a small piece of a toothpick or wire to insert inside them. This internal armature will keep them perky while drying.
Step 2: Sculpting the Shell
-
Roll a coil:
Take your shell-colored clay (e.g., the pastel pink) and roll it into a long, tapered snake. One end should be thicker than the other. -
Begin the spiral:
Starting from the thinnest end, begin rolling the clay coil tightly upon itself to form a spiraled disc. -
Build the shape:
As you continue rolling toward the thicker end, slightly angle the coil so the shell becomes three-dimensional and domed, rather than a flat pancake. -
Smooth the seams:
Gently press the coils together as you wind so they adhere well. You want the spiral ridges to remain visible, but the structure to be solid. -
Finish the shell:
Tuck the thickest end of the coil underneath the shell to create a neat finishing point where it will attach to the body.
Marble Effect
Don’t fully blend your colors when mixing! Stopping early leaves streaks of white or other colors, creating a beautiful marbled stone effect for the shell.
Step 3: Forming the Body
-
Shape the base:
Using the body-colored clay, roll a shorter, thicker log. Flatten the bottom slightly against your work surface to create a stable ‘foot’ for the snail. -
Create the tail:
Gently pinch and taper one end of the log to form a pointed tail. -
Lift the head:
Curve the other end of the log upwards to create the snail’s neck and head area. Smooth out any fingerprints. -
Attach the shell:
Place the shell onto the center of the body. Press down firmly but gently to bond the clays together without crushing the spiral.
Step 4: Adding Details
-
Make the eye stalks:
Roll two very tiny, thin snakes of body-colored clay for the antennae or eye stalks. -
Place the stalks:
Carefully attach these stalks to the top of the head. I find using a needle tool helps gently blend the clay at the base of the stalks into the head. -
Add eye tips:
Roll tiny balls of clay—either the same color or slightly lighter/darker—and attach them to the tips of the stalks. -
Texture the body:
Use a sculpting tool or a toothpick to gently etch horizontal lines along the side of the snail’s body, mimicking the wrinkled texture of a real snail. -
Refine the spiral:
If the shell’s spiral lines have softened too much during handling, use a needle tool to gently re-define the grooves. -
Add texture spots:
For extra realism, create tiny indentations or ‘pores’ on the shell surface using a ball stylus or the blunt end of a toothpick. -
Final dry:
Set your snails aside in a safe, dry place. Model Magic typically dries to the touch in 24 hours but may take up to 72 hours to fully cure depending on thickness.
Let your little trio dry completely before arranging them in a sunny spot to brighten your day

TRACK YOUR CERAMIC JOURNEY
Capture glaze tests, firing details, and creative progress—all in one simple printable. Make your projects easier to repeat and improve.
Baby Chick in a Cracked Egg
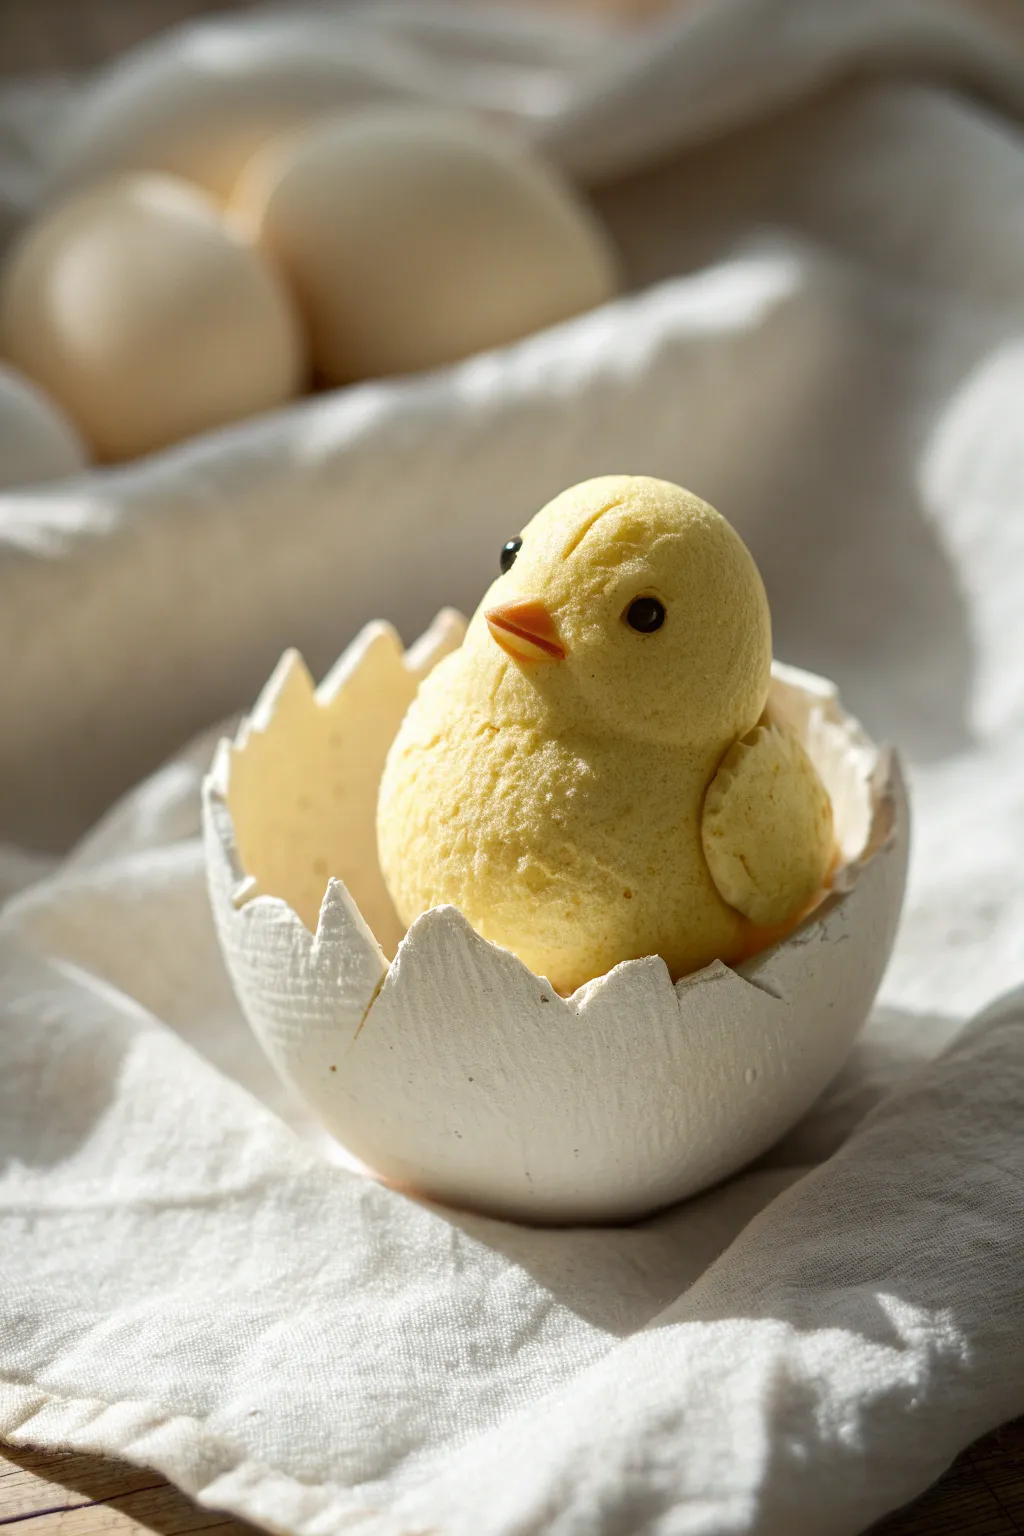
Capture the magic of new life with this adorable Model Magic sculpture featuring a fluffy yellow chick peeking out from its shell. The soft, airy texture of the clay perfectly mimics downy feathers, making it a sweet addition to any spring display.
How-To Guide
Materials
- White Model Magic clay
- Yellow Model Magic clay (or food coloring to tint white clay)
- Orange Model Magic clay (tiny amount)
- Black beads or black clay for eyes
- Toothbrush or texturing tool
- Rolling pin
- Plastic knife or clay tool
- Small bowl or rounded object (for shaping the shell)
Step 1: Crafting the Eggshell
-
Prepare the Clay:
Take a generous ball of white Model Magic and knead it until soft. Roll it out into a flat, even sheet about 1/4 inch thick. -
Form the Base:
Drape the flattened white clay over a small, rounded object like a ping-pong ball or the back of a measuring spoon to create a cup shape. -
Create the Cracks:
Using a plastic knife or clay tool, cut a zigzag pattern around the top edge of your cup shape to simulate a cracked eggshell. -
Refine the Edge:
Gently pull the jagged points slightly outward or inward to make them look organic and broken, rather than perfectly cut. -
Add Texture:
Lightly tap the outside of the shell with a toothbrush to give it a matte, realistic eggshell texture rather than a smooth plastic look. -
Let it Set:
Set the eggshell aside to firm up slightly while you work on the chick. It doesn’t need to be fully dry, just stable enough to hold weight.
Texture Secret
Use a clean, dry toothbrush to tap the clay surface. This creates a perfect ‘fluffy’ look for the chick and a realistic matte finish for the eggshell.
Step 2: Sculpting the Chick
-
Mix the Color:
If you don’t have pre-colored yellow clay, I like to mix a drop of yellow food coloring into white clay for a softer pastel hue. -
Shape the Body:
Roll a large ball of yellow clay for the body. It should be sized to fit snugly inside your prepared eggshell. -
Texturize the Body:
Before assembling, thoroughly tap the entire surface of the yellow ball with a stiff toothbrush or a ball of crumbled foil to create a fluffy, feathery look. -
Form the Head:
Roll a slightly smaller ball for the head. Texturize this piece as well, ensuring it matches the body. -
Attach the Head:
Press the head firmly onto the body. Since Model Magic sticks to itself well, you shouldn’t need glue, but a dab of water can help if it’s dry. -
Create Wings:
Flatten two small balls of yellow clay into teardrop shapes. Texturize them and press one onto each side of the body.
Nest Upgrade
Add sophistication by shredding brown paper bag strips or dried grass to place inside the shell before seating the chick.
Step 3: Bringing it to Life
-
Place the Chick:
Gently nestle the finished yellow body into the white eggshell cup. Press down lightly so it seats securely. -
Make the Beak:
Take a tiny pinch of orange clay and roll it into a small cone. Press it gently to flatten the bottom slightly. -
Position the Beak:
Attach the beak to the center of the face. You can use a tool to create a tiny horizontal indentation for a mouth if desired. -
Add the Eyes:
Press two small black beads into the face for eyes. If using black clay, roll tiny balls and press them flat against the head. -
Final Feathers:
If any texture was smoothed out during assembly, go back with your toothbrush and gently re-texture those spots. -
Curve the Posture:
Give the head a slight tilt to the side or upward to create a curious expression before the clay fully hardens.
Now you have a charming little hatchling ready to brighten up your desk or shelf
Wiggly Worms on a Mini Garden Base
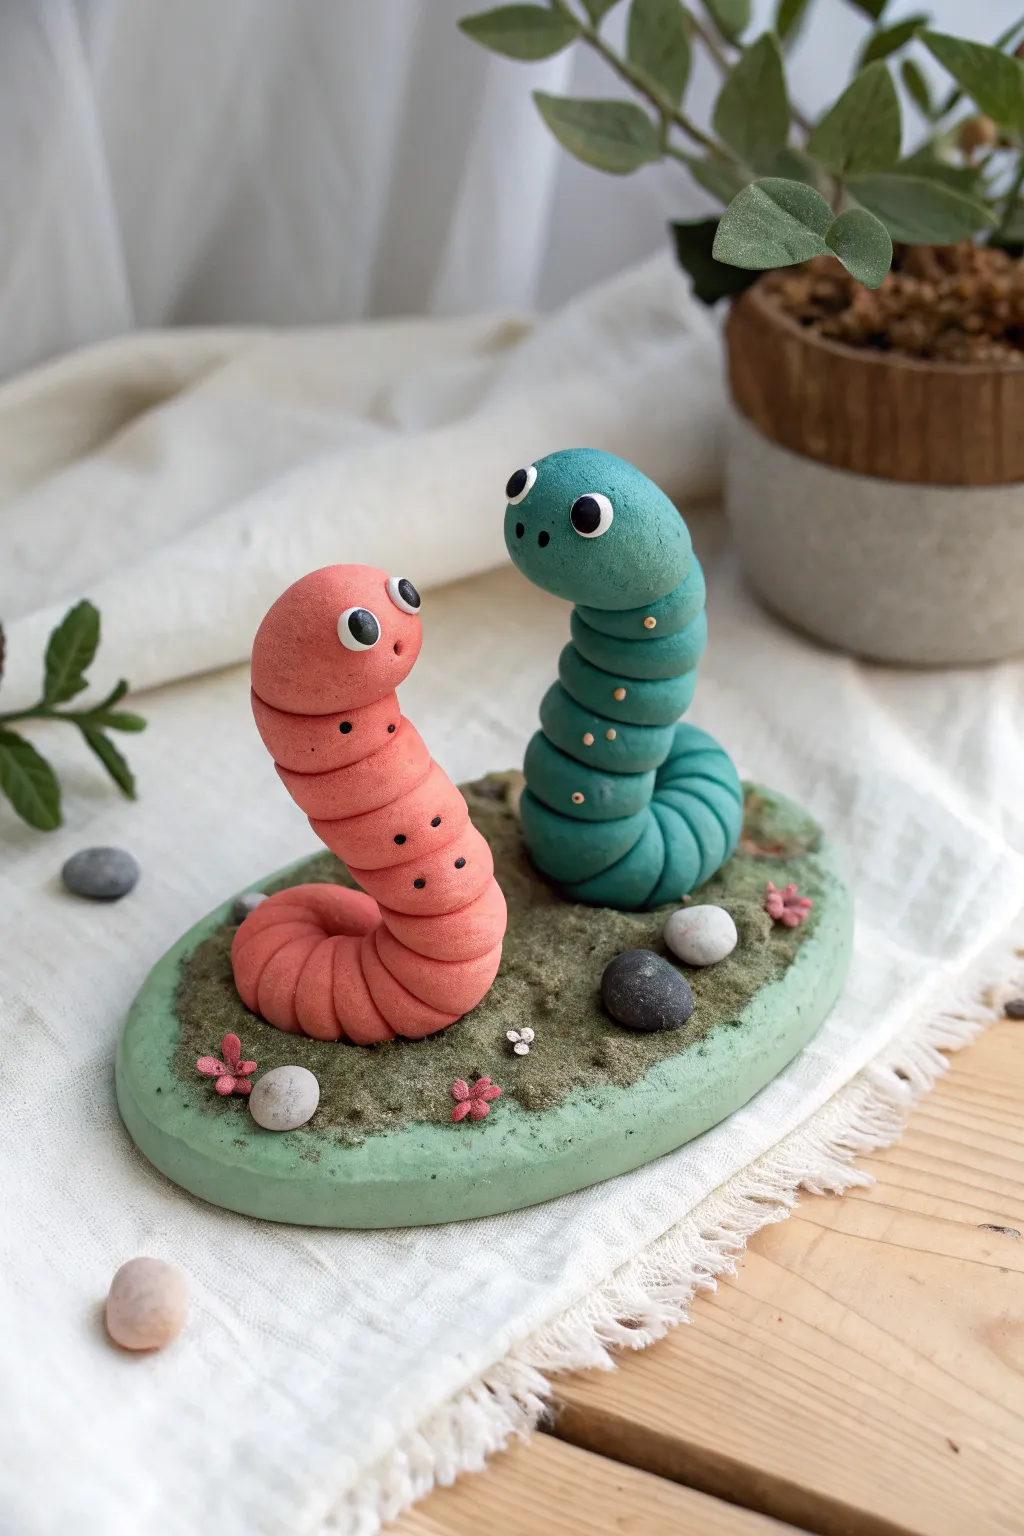
These charm-filled critters bring a touch of whimsy to any desk or shelf with their expressive eyes and coiled bodies. By combining simple rolling techniques with textured base layering, you will create a delightful miniature scene that looks surprisingly professional.
Step-by-Step
Materials
- Model Magic clay (coral pink, teal green, light green, white, black)
- Small oval wooden base or cardboard cutout
- Texturing tool (old toothbrush or stiff paintbrush)
- Small pebbles or grey clay for rocks
- Brown paint or pastel chalk (optional for dirt effect)
- Craft glue
- Toothpick or sculpting tool
Step 1: Setting the Scene
-
Base Preparation:
Start with a light green clay mixture to serve as the grassy foundation. Flatten a generous amount into an oval shape, approximately 4-5 inches wide and 1/2 inch thick. -
smoothing the Edges:
Use your thumb to gently round off the edges of the base so distinct fingerprints disappear, giving it a soft, finished look. -
Texturing the Grass:
Take an old toothbrush or a stiff-bristled brush and tap it repeatedly all over the surface of the green clay. This stippling motion creates a realistic mossy or grassy texture. -
Adding Earthy Tones:
If you want a dirt effect like in the photo, lightly brush some brown pastel chalk dust or diluted brown paint into the middle area of the texture before the clay dries.
Sagging Worms?
If the worms won’t stand up straight, insert a toothpick or a piece of crafting wire into the center of the coil and up into the neck to act as an internal armature.
Step 2: Sculpting the Worms
-
Creating the Bodies:
Roll out two long snake shapes—one in coral pink and one in teal green. Aim for about 6 inches in length, keeping one end slightly bulbous for the head. -
Segmenting the Clay:
Using the side of a toothpick or a plastic knife, gently press indentation lines all along the length of both snakes to create the segmented worm look. Don’t press too hard; you just want surface lines. -
Coiling the Pink Worm:
Take the pink rope and coil the bottom half into a flat circle directly onto the left side of the base. Gently press it down so it adheres. -
Positioning the Head:
Curve the upper half of the pink worm upward so it stands tall, leaning slightly back as if looking up. -
Coiling the Teal Worm:
Repat the process with the teal worm on the right side. Coil the base tightly and curve the head section so it faces the pink worm, creating an interaction between them. -
Securing the Sculptures:
If the model magic feels too dry to stick to the base, add a tiny dab of white craft glue under the bottom coils for security.
Step 3: Adding Personality
-
Making the Eyes:
Roll four tiny balls of white clay. Flatten them slightly and press two onto each worm’s head. -
Adding Pupils:
I prefer to use tiny specks of black clay for the pupils rather than marker, as it adds dimension. Press these small black dots onto the white eyes, looking in whichever direction you choose. -
Textural Details:
Use a toothpick to add tiny dots or ‘freckles’ on the worms’ bodies. For the teal worm, you might add small light-colored spots using tiny bits of leftover clay. -
Pink Worm Spots:
Add small black dots down the front of the pink worm’s chest segments using a fine-tip marker or tiny clay bits.
Realistic Moss
Mix fine sand into your green base clay before flattening it. This adds grit and texture that mimics real earth much better than stippling alone.
Step 4: Garden Embellishments
-
Placing Stones:
Roll small balls of grey clay (or use real pebbles) and press them into the grassy base around the worms. Vary sizes for a natural look. -
Tiny Flowers:
Create miniature flowers by flattening tiny pink clay balls and pressing a toothpick into the center to shape petals. Scatte these around the base. -
Final Adjustments:
Step back and check the balance. If the heads are drooping, prop them up with a hidden toothpick or crumpled paper until the clay firms up.
Allow your clay garden to dry undisturbed for at least 24 hours before moving it to its new home.
Finger Puppets With Bold Cartoon Faces
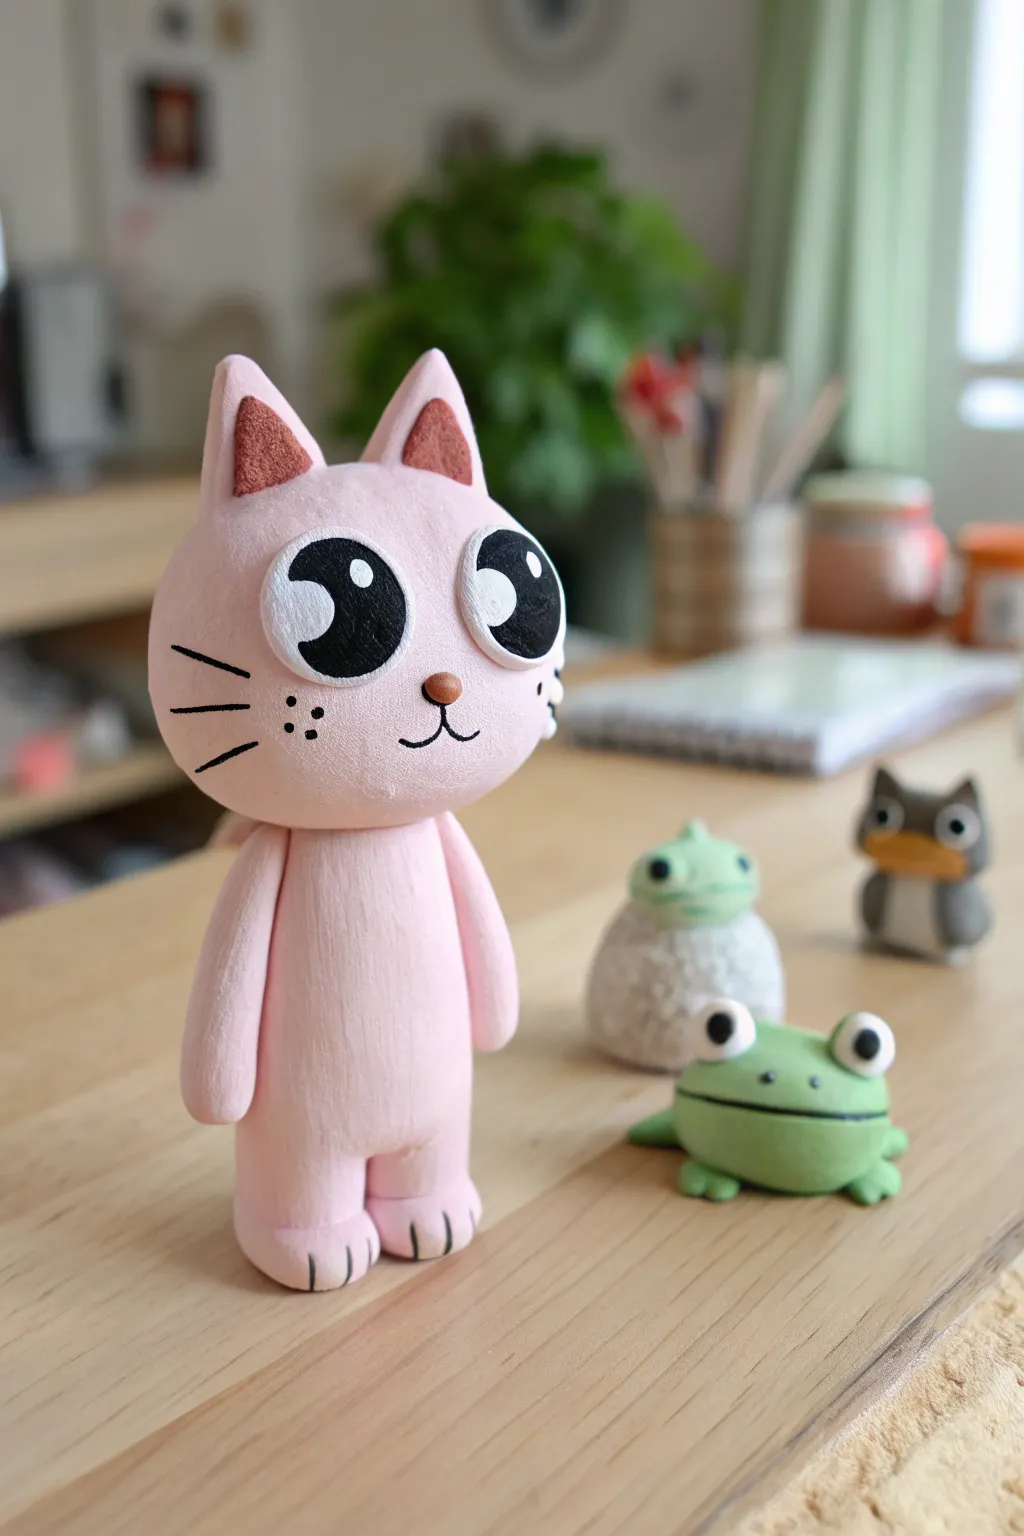
Create a charming, wide-eyed pink cat character that looks like it stepped right out of a cartoon. This project uses lightweight clay to sculpt a smooth, matte-finish figurine with expressive painted details and a simple standing pose.
How-To Guide
Materials
- Model Magic clay (white)
- Acrylic paint (pink, black, white, brown)
- Sculpting tools (needle tool, smoothing tool)
- Fine detail paintbrush
- Medium flat paintbrush
- Toothpicks or armature wire (optional for support)
- Water based varnish (matte)
Step 1: Sculpting the Base Form
-
Mix your base color:
Since Model Magic is usually white, you can either knead a small drop of pink acrylic paint directly into the clay before sculpting for a solid color, or sculpt in white and paint later. For this smooth look, I prefer kneading the color in first. -
Form the head:
Roll a sphere of pink clay about the size of a tangerine. Gently flatten the front face area just slightly so the features will sit nicely, but keep the overall roundness. -
Shape the body:
Create a slightly elongated cylinder for the body. It should be a bit narrower than the head at the top and widen slightly towards the bottom for stability. -
Attach head to body:
Press the head firmly onto the body. If the clay feels dry, dampen the connection point slightly. For extra stability, insert a toothpick half into the body and half into the head. -
Add the legs:
Roll two short, thick sausages for legs. Attach them to the bottom of the body. Press down firmly so the figurine stands flat on your work surface. -
Create the arms:
Roll two longer, thinner sausage shapes for the arms. Attach them to the sides of the body, just below the neck, letting them hang down naturally. -
Definition:
Use a sculpting tool or a dull knife to gently press vertical lines into the bottom of the legs to create simplified toes.
Step 2: Ears and Facial Features
-
Make the ears:
Shape two small triangles of pink clay. Pinch them slightly to give them dimension, rather than leaving them completely flat. -
Attach the ears:
Place the ears on top of the head, spacing them widely apart. Smooth the seams at the back with your finger or a tool so they look integrated. -
Add the nose:
Take a tiny speck of brown clay (or paint white clay brown) and roll it into a small oval. Press this into the center of the face. -
Dry the figure:
Let the entire sculpture dry completely. Model Magic can take 24-72 hours to fully cure depending on thickness.
Cracks Appearing?
If Model Magic dries with cracks, mix a tiny bit of water with fresh clay to make a paste. Fill the cracks, smooth it over, and let it dry again.
Step 3: Painting the Details
-
Paint the eyes:
Using a medium brush, paint two large white ovals on the face. Steps for painting on clay work best when you let the first layer dry fully before adding the next. -
Add the pupils:
Once the white is dry, paint large black circles inside the white ovals. These should take up most of the eye space for that bold cartoon look. -
Eye highlights:
Add a crisp white dot near the top of each black pupil to bring the character to life. -
Line work:
Using a very fine liner brush and black paint, draw the mouth extending down from the nose in a ‘w’ shape, tiny freckles on the cheeks, and three whiskers on each side. -
Ear details:
Paint the inner triangles of the ears with a dark reddish-brown paint. -
Paw details:
Use the fine brush to paint thin black lines over the toe indentations you made earlier. -
Seal it:
Finish with a coat of matte varnish to protect the paint and give the clay a unified texture.
Smoother Finish
Dip your finger in water and gently rub the clay surface before it dries. This removes fingerprints and creates that porcelain-like look.
Now you have an adorable desk companion ready to watch you work.
Flat-Back Magnets: Suns, Stars, and Clouds
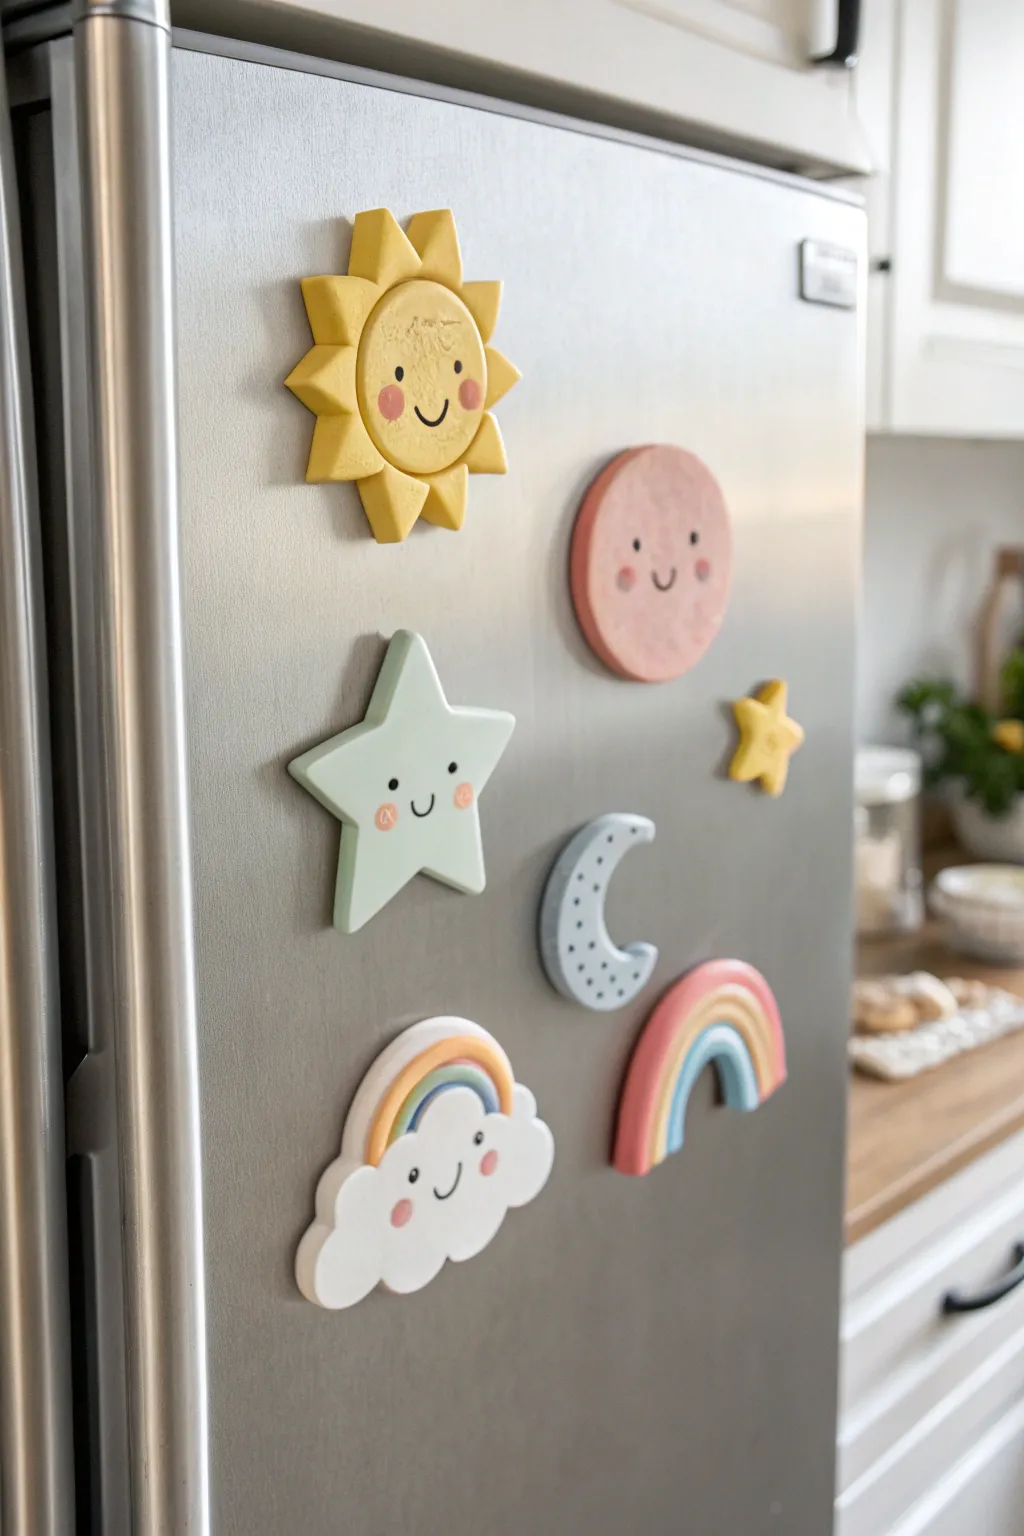
Brighten up your refrigerator door with this charming set of celestial magnets crafted from lightweight Model Magic. This project features smiling suns, pastel clouds, and friendly stars that are simple enough for kids to shape but polished enough to be cute decor.
Step-by-Step
Materials
- Model Magic or similar air-dry foam clay (white, yellow, pink, light blue, mint green)
- Small rolling pin
- Clay sculpting tools (or a plastic knife and toothpick)
- Round magnet discs (strong ceramic or neodymium)
- Strong craft glue (like E6000) or a hot glue gun
- Fine-point black marker or black acrylic paint pen
- Pink acrylic paint and a small detail brush (for cheeks)
- Circle cookie cutters (optional, various sizes)
- Parchment paper or non-stick silicone mat
Step 1: Sculpting the Sun
-
Shape the Base:
Start by taking a medium ball of yellow clay. Roll it into a smooth sphere and then flatten it gently against your work surface until it’s a thick disc, about 1/2 inch thick. -
Create the Rays:
Roll out a separate piece of yellow clay into a flat sheet. Cut out 8-10 small triangles. Alternatively, you can pinch small balls of clay into triangle shapes. -
Assemble the Sun:
Attach the triangles around the circumference of your central disc. Press them firmly into the back edge of the circle so they bond together seamlessly. -
Add Texture:
If you want that slightly textured look seen in the photo, gently dab the surface with a crumpled piece of aluminum foil or a stiff paintbrush before the clay hardens.
Cracking Clay?
If your clay starts cracking while shaping, create a “slip” by mixing a tiny bit of water into a scrap piece of clay until it’s paste-like, and use it to smooth fissures.
Step 2: Forming the Moon and Stars
-
Make the Pink Moon:
Mix a tiny bit of red or pink marker ink into white clay to get a soft pink tone, or use pre-colored pink clay. Flatten a ball into a perfect circle. -
Shape the Green Star:
Using mint green clay, roll out a thick slab. You can use a star-shaped cookie cutter for precision, or cut a star shape freehand with a plastic knife. Soften the sharp points by tapping them gently with your finger. -
Create the Crescent Moon:
Roll a blue snake of clay, tapered at both ends. Curve it into a ‘C’ shape and flatten it slightly. Use the end of a paintbrush handle to poke small indentations for craters. -
Shape the Small Yellow Star:
Create a miniature version of the green star using yellow clay. This one should be quite small, about the size of a quarter.
Glitter Upgrade
Knead a pinch of fine iridescent glitter directly into the clay before shaping for a subtle shimmer, or brush specifically on the crescent moon for extra magic.
Step 3: Crafting the Rainbows and Cloud
-
Roll Rainbow Arches:
For the standalone rainbow, roll three thin snakes of clay: one pink, one yellow, and one blue. Stack them in an arch shape, pressing the sides together so they stick. -
Trim the Rainbow:
Use a straight crafting blade or knife to cut the bottom of the rainbow arch straight across so it sits evenly. -
Form the Cloud Base:
For the cloud magnet, flatten a large piece of white clay into an organic puffy shape. Pinch and round out the edges to look like fluffy cumulus bumps. -
Add the Cloud’s Rainbow:
Create a thinner, smaller rainbow arch (similar to the previous step) and press it firmly onto the top edge of your white cloud base.
Step 4: Finishing Touches
-
Dry Completely:
Allow all your clay pieces to dry undisturbed on parchment paper for at least 24 to 48 hours. I usually flip them over halfway through so the backs dry evenly. -
Draw Faces:
Once fully hard, use a fine-point black marker or paint pen to draw simple smiley faces. Place the eyes wide apart and the mouth high up between them for that cute ‘kawaii’ look. -
Paint Cheeks:
Dip the back end of a paintbrush or a Q-tip into pink acrylic paint and dab small circles onto the prominent pieces like the sun, cloud, and stars to give them rosy cheeks. -
Seal (Optional):
To protect the marker faces from smudging later, you can apply a thin coat of matte mod podge or spray sealer. -
Attach Magnets:
Flip the pieces over. Apply a strong dab of glue to the back of each shape and press your magnet disc firmly into place. Let the glue cure completely before sticking them to the fridge.
Your fridge is now home to a happy little sky scene that makes grabbing a snack just a bit more cheerful
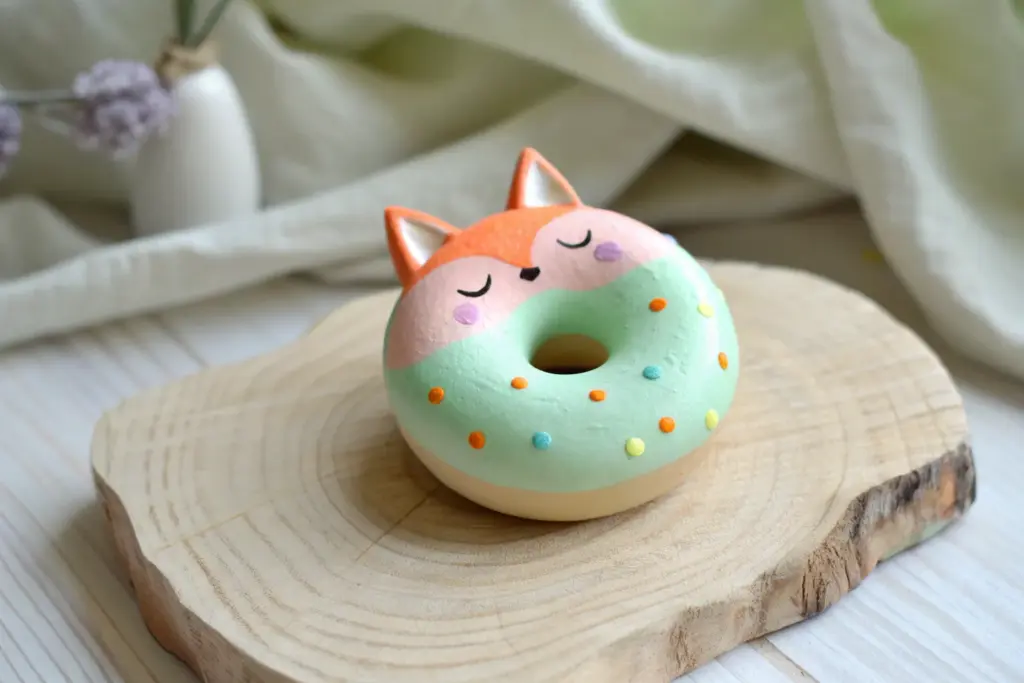
Lightweight Charms for Keychains and Zippers
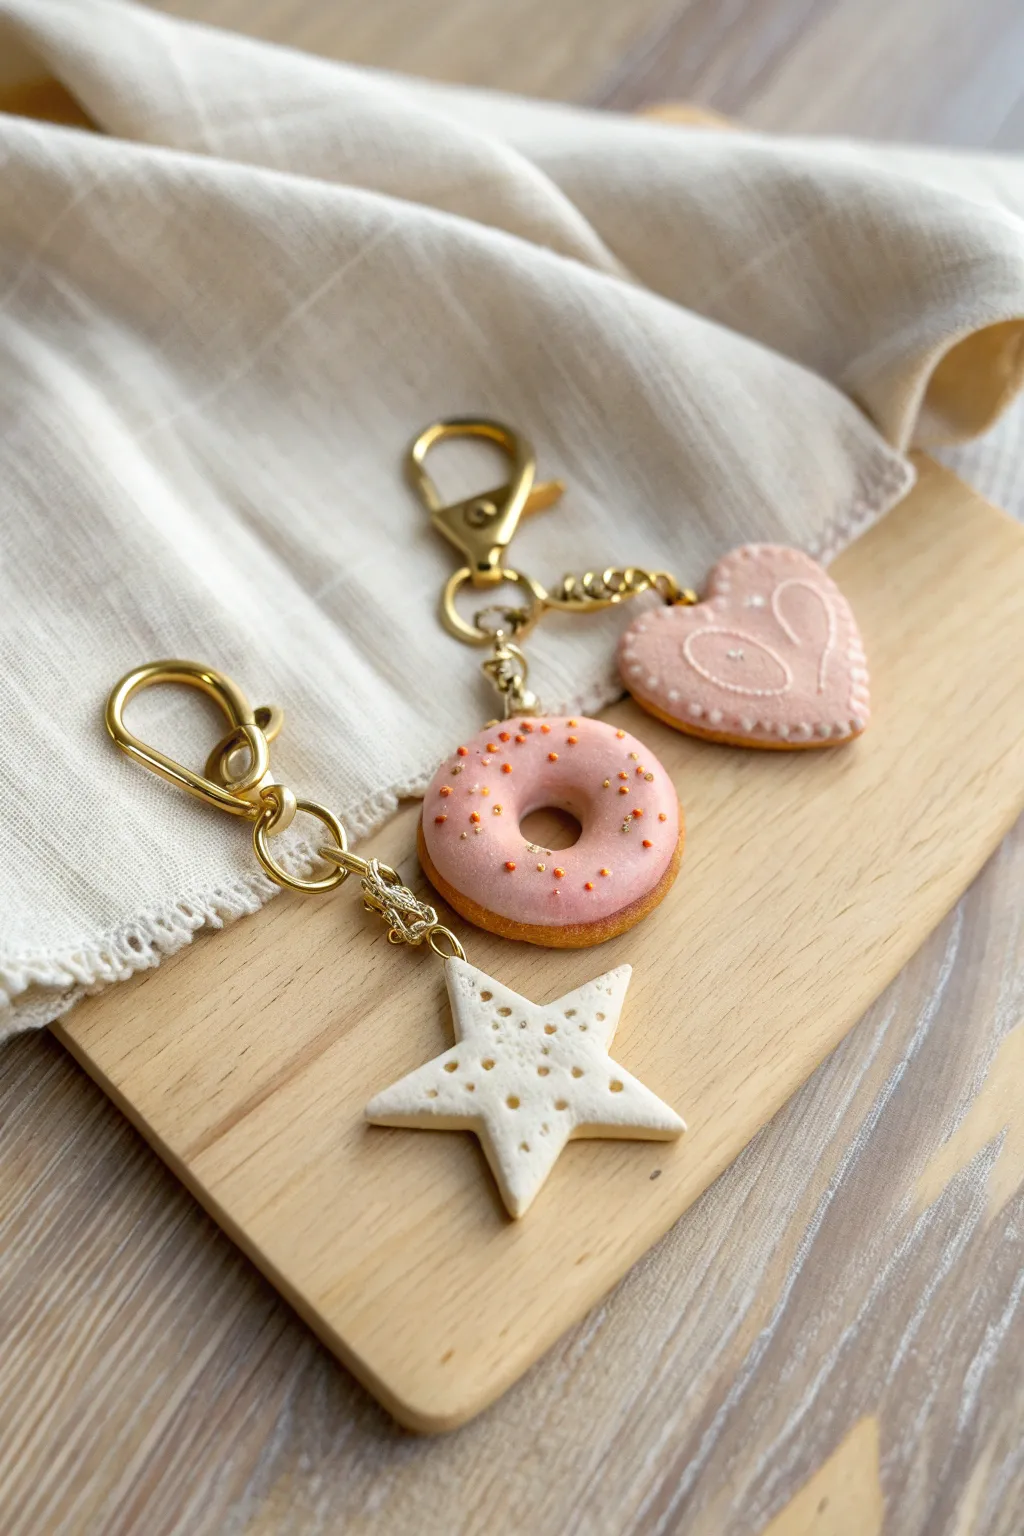
These adorable, bakery-inspired charms look good enough to eat but are actually lightweight accessories perfect for keychains or zippers. Using air-dry clay like Model Magic, you can craft realistic-looking donuts, stars, and heart cookies detailed with faux icing and sprinkles.
Step-by-Step Tutorial
Materials
- White Model Magic or similar lightweight air-dry clay
- Acrylic paints (pastel pink, golden brown/ochre, white)
- Glossy glaze or varnish (polyurethane or resin)
- Gold keychain hardware (clasps, jump rings, chains, eye pins)
- Small needle tool or toothpick
- Rolling pin
- Small cookie cutters (star, circle, heart)
- Soft pastel chalks (optional, for shading)
- Super glue or strong craft glue
- Gold glitter or microbeads
Step 1: Prepping the Dough
-
Mix base colors:
Start by tinting a portion of your white clay with a tiny drop of golden brown or ochre acrylic paint. Knead it thoroughly until you achieve a consistent ‘baked cookie’ dough color. -
Roll out the slab:
Use a rolling pin to flatten your dough-colored clay to a thickness of about 1/4 inch. If you want a uniform thickness, place two popsicle sticks on either side of the clay as guides while rolling. -
Cut the shapes:
Using small cookie cutters, press out your desired shapes. For this set, you’ll need one star, one heart, and two circles (a larger one for the donut base). -
Smooth the edges:
Gently rub the cut edges of your clay shapes with your finger to soften any sharp ridges left by the cutter, giving them a more realistic baked look. -
Create the donut hole:
Take one of your circle shapes and use a smaller cutter (or even a straw) to punch a clean hole directly in the center to form the donut shape.
Loose Eye Pins?
If the eye pin pulls out after drying, remove it, put a dab of super glue on the stem, and re-insert it firmly into the same hole.
Step 2: Adding Details & Texture
-
Texture the star:
For the star charm, keep it white or very light cream. Use a small needle tool to poke shallow, random holes across the surface to mimic the porous texture of a sugar cookie or cracker. -
Create pink icing mix:
Mix a separate small ball of clay with pastel pink paint. Or, for a smoother ‘icing’ look, create a paste by mixing Model Magic with a little bit of water and glue until it’s spreadable. -
Frost the donut:
Apply the pink clay (or paste) to the top of the donut shape. If using clay, roll it thin, cut a wavy edge, and drape it over the top. Smooth it down so it looks like it has melted slightly. -
Decorate the heart:
Paint the top of the heart cookie with pastel pink acrylic paint. Once dry, use white dimensional fabric paint or a very thin roll of white clay to create the delicate swirling icing lines on top. -
Add sprinkles:
While the donut ‘frosting’ is still tacky, gently press gold microbeads or sprinkle gold glitter onto the surface to mimic edible sprinkles. -
Shade edges:
To enhance realism, I like to use a soft brush and shaved brown pastel chalk to lightly dust the edges of the beige cookie parts. This creates a convincing ‘baked’ gradient.
Step 3: Assembly
-
Insert eye pins:
Carefully screw or push a small gold eye pin into the top of each charm while the clay is still soft. If the clay is too distinctively spongy, dip the pin in super glue first for a permanent hold. -
Allow to dry:
Set your charms on a clean surface and let them air dry completely. For Model Magic, this usually takes 24 to 72 hours depending on thickness. -
Seal the charms:
Once fully rigid, coat the donut icing and the heart cookie with a glossy glaze to make them shine. Leave the star cookie matte for textural contrast. -
Attach hardware:
Using jewelry pliers, open your gold jump rings. Connect the star charm to one keychain clasp. -
Link the duo:
For the second keychain, attach the donut directly to the chain, and link the heart charm slightly higher up or on a secondary jump ring so they cluster together nicely. -
Final check:
Ensure all jump rings are closed tightly so your charms stay secure on your bags or keys.
Level Up: Scented
Knead a drop of vanilla or strawberry essential oil into the clay before shaping. Your charms will smell sweet like real pastries!
Now you have a set of delightful, lightweight accessories ready to sweeten up your day
Marbled Color-Mix Pendants

Capture the elegance of natural stone with this marbled pendant project, featuring a sophisticated palette of terra cotta, teal, and cream. The organic swirls create a high-end look that transforms simple modeling clay into wearable art.
Step-by-Step Guide
Materials
- Model Magic clay (white, red, blue, yellow, brown)
- Small rolling pin or acrylic roller
- Teardrop-shaped cookie cutter (approx. 2 inches long)
- Parchment paper or non-stick craft mat
- Glossy glaze or Mod Podge (gloss finish)
- Soft paintbrush
- Gold tone bail
- Gold tone chain (20-24 inches)
- Jewelry jump ring (8mm or 10mm)
- Needle tool or toothpick
- Small jewelry pliers
- Fine grit sandpaper (optional)
Step 1: Mixing the Palette
-
Prepare the White Base:
Start by taking a generous chunk of white Model Magic. This will be your primary mixing agent and helps achieve those soft, milky pastel tones seen in the reference. -
Mix the Terra Cotta:
Take a small ball of red clay and mix in a tiny pinch of brown and a heavy amount of white. Knead thoroughly until you achieve a muted, dusty pink or light terra cotta shade. -
Create the Teal:
Combine blue clay with a very small amount of yellow to make green, then add white to soften it. Adjust with more blue to deepen it into a rich teal color. -
Blend the Cream:
Instead of using pure white for your contrast, mix a tiny speck of yellow and brown into a large ball of white clay to create a warm, creamy beige.
Clean Cuts Pro Tip
Before using your cookie cutter, rub the cutting edge with a tiny bit of cornstarch or baby powder. This prevents the sticky clay from dragging and ensures a sharp, clean edge.
Step 2: Marbling the Clay
-
Create Snakes:
Roll each prepared color—terra cotta, teal, cream, and a plain white—into snake-like ropes about 4 inches long. -
Twist Together:
Gather the ropes into a single bundle and twist them together tightly, like a candy cane. -
Double Fold:
Fold the twisted rope in half and twist it again. Repeat this folding and twisting process 3 or 4 times. Be careful not to over-twist, or the colors will turn into ‘mud’ rather than distinct streaks. -
Form a Ball:
Roll the twisted rope into a smooth ball. You should see interesting veins of color appearing on the surface. -
Flatten the Clay:
Place the ball on your parchment paper. Using your roller, flatten the clay to an even thickness of about 1/4 inch. -
Check the Pattern:
Look at your flattened slab. If you don’t like the swirl placement, you can gently fold it once more and re-roll, but remember that Model Magic dries quickly, so work efficiently.
Step 3: Shaping and Finishing
-
Cut the Shape:
Position your teardrop cutter over the section of clay with the most pleasing swirl pattern. Press down firmly to cut the shape. -
Smooth the Edges:
Remove the excess clay. If the edges are slightly rough from the cutter, gently tap them smooth with your finger while the clay is still pliable. -
Pierce the Hole:
Use a needle tool or toothpick to create a hole at the very top, narrow point of the teardrop. Ensure the hole is large enough to fit your jump ring. -
Dry Completely:
Let the pendant air dry on a flat surface for at least 24-48 hours. I find flipping it over halfway through helps it dry evenly without warping. -
Glaze the Surface:
Once fully dry and hardened, apply a coat of glossy glaze or Mod Podge. This seals the porous clay and gives it that polished, ceramic-like shine shown in the photo. -
Attach Hardware:
Using your pliers, open the jump ring and loop it through the hole in the pendant. -
Add the Bail:
Slide the gold bail onto the jump ring before twisting the ring closed securely. -
Final Assembly:
Thread your gold chain through the bail to complete your necklace.
Level Up: Speckled Effect
Mix dried coffee grounds or black pepper into the cream clay before marbling. This mimics real stone impurities and adds beautiful gritty texture to the final look.
Wear your new stone-effect pendant with pride and enjoy the compliments on your handcrafted jewelry
Marbled Beads and Puffy “Pearls”
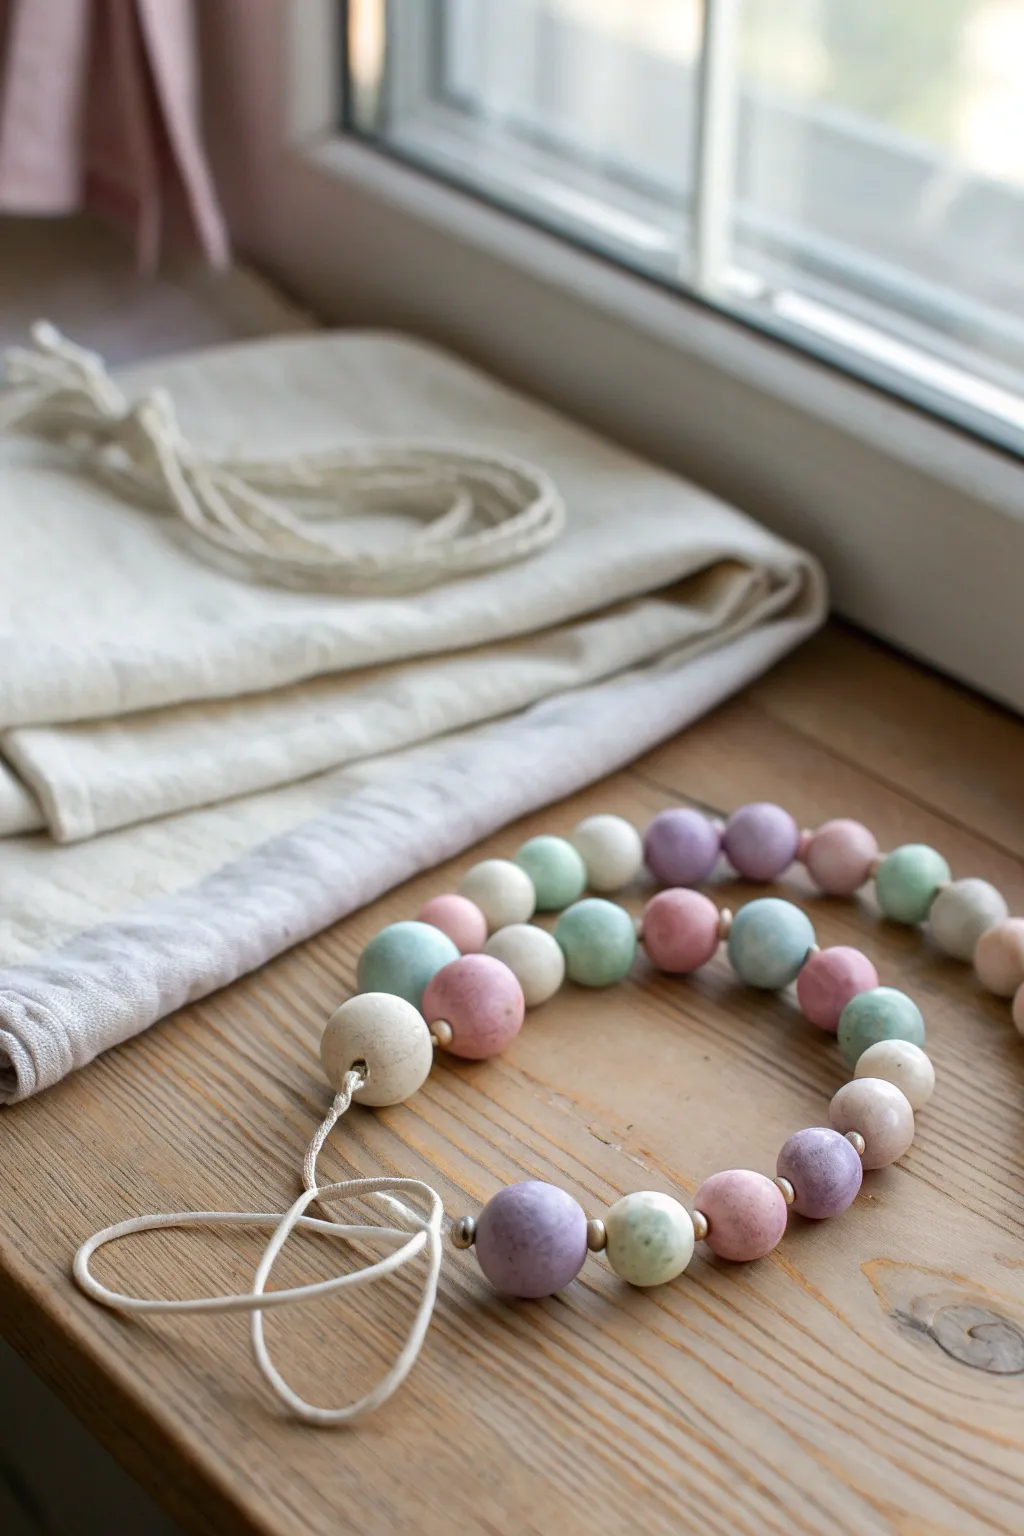
Create a charming, rustic garland using Model Magic clay to mimic the look of unpolished stone or tumbled pebbles. These chunky beads feature soft pastel hues and a gentle texture, strung together to make lovely decor for a nursery or draped over a shelf.
Step-by-Step
Materials
- Model Magic clay (White)
- Acrylic paints (Pastel Pink, Lavender, Mint Green, Cream)
- Bamboo skewers or a thick toothpick
- Wax paper or parchment paper
- Soft jute twine or white macrame cord
- Drying rack or floral foam block
- Matte finish sealant (optional)
Step 1: Preparing the Clay Colors
-
Divide the Base:
Start by taking a large pack of white Model Magic clay and dividing it into four equal portions. Keep one portion pure white for now. -
Tint the Clay:
To color the clay, flatten a portion into a pancake shape. Add just a tiny drop of acrylic paint into the center—start with less than you think you need, as you want muted pastel tones, not bright primaries. -
Knead Thoroughly:
Fold the edges of the clay over the paint to trap it inside to avoid messy hands initially. Knead the clay repeatedly until the color is distributed. For a solid color, knead until uniform; for a marbled look, stop just before the color fully blends. -
Create Variations:
Repeat this process for your pink, lavender, and mint green portions. You can leave one portion naturally white or tint it cream for warmth.
Pro Tip: Clean Holes
Let the beads dry directly on the skewer balanced across a bowl. This prevents flat spots and keeps the bead hole perfectly round.
Step 2: Forming the Beads
-
Portion Control:
Pinch off small pieces of clay roughly the size of a large grape or a bouncy ball. Try to keep them somewhat consistent in volume, though slight size variations add to the organic charm. -
Roll Spheres:
Roll each piece between your palms to create a sphere. Model Magic often develops small surface wrinkles; you can smooth these out with a localized rubbing motion or embrace them for texture. -
Creating the Hole:
While the bead is still soft in your hand, gently pierce the center with a bamboo skewer. Using a twisting motion helps the skewer go through cleanly without squashing the sphere shape. -
Enlarge the Opening:
Wiggle the skewer slightly to ensure the hole is wide enough for your twine. Remember that the clay might shrink very slightly as it dries. -
Texturing (Optional):
For that stone-like finish seen in the image, lightly tap the surface of the wet bead with a stiff-bristled toothbrush or roll it gently over a piece of canvas fabric.
Troubleshooting: Cracking?
If surface cracks appear while rolling, wet your fingertips slightly with water. This rehydrates the clay surface just enough to smooth it out.
Step 3: Drying and Assembly
-
Set to Dry:
Slide the beads off the skewers and place them on parchment paper. Rotate them every few hours so they don’t develop a flat spot on the bottom. -
Wait Patiently:
Let the beads cure for at least 24-48 hours. Model Magic feels dry to the touch quickly, but the center needs time to harden completely. -
Seal (Optional):
If you want the beads to be more durable, apply a thin coat of matte varnish. Avoid glossy finishes if you want to maintain the natural, matte aesthetic shown in the photo. -
Prepare the Cord:
Cut a length of white macrame cord or soft twine to your desired length, adding an extra 10 inches for knots and loops. -
Stringing:
Thread the beads onto the cord. I like to alternate colors randomly rather than following a strict pattern to keep the look relaxed and playful. -
Finishing Knots:
Once all beads are strung, tie a secure overhand knot at both ends of the beaded section to keep them in place. -
Create Loops:
Tie large loops at the very ends of the cord if you plan to hang the garland, or simply knot the ends and fray the remaining cord for a tassle effect.
Now you have a serene, handcrafted accent piece ready to add softness to any corner of your home
Ring Holder Cones With Ombre Swirls
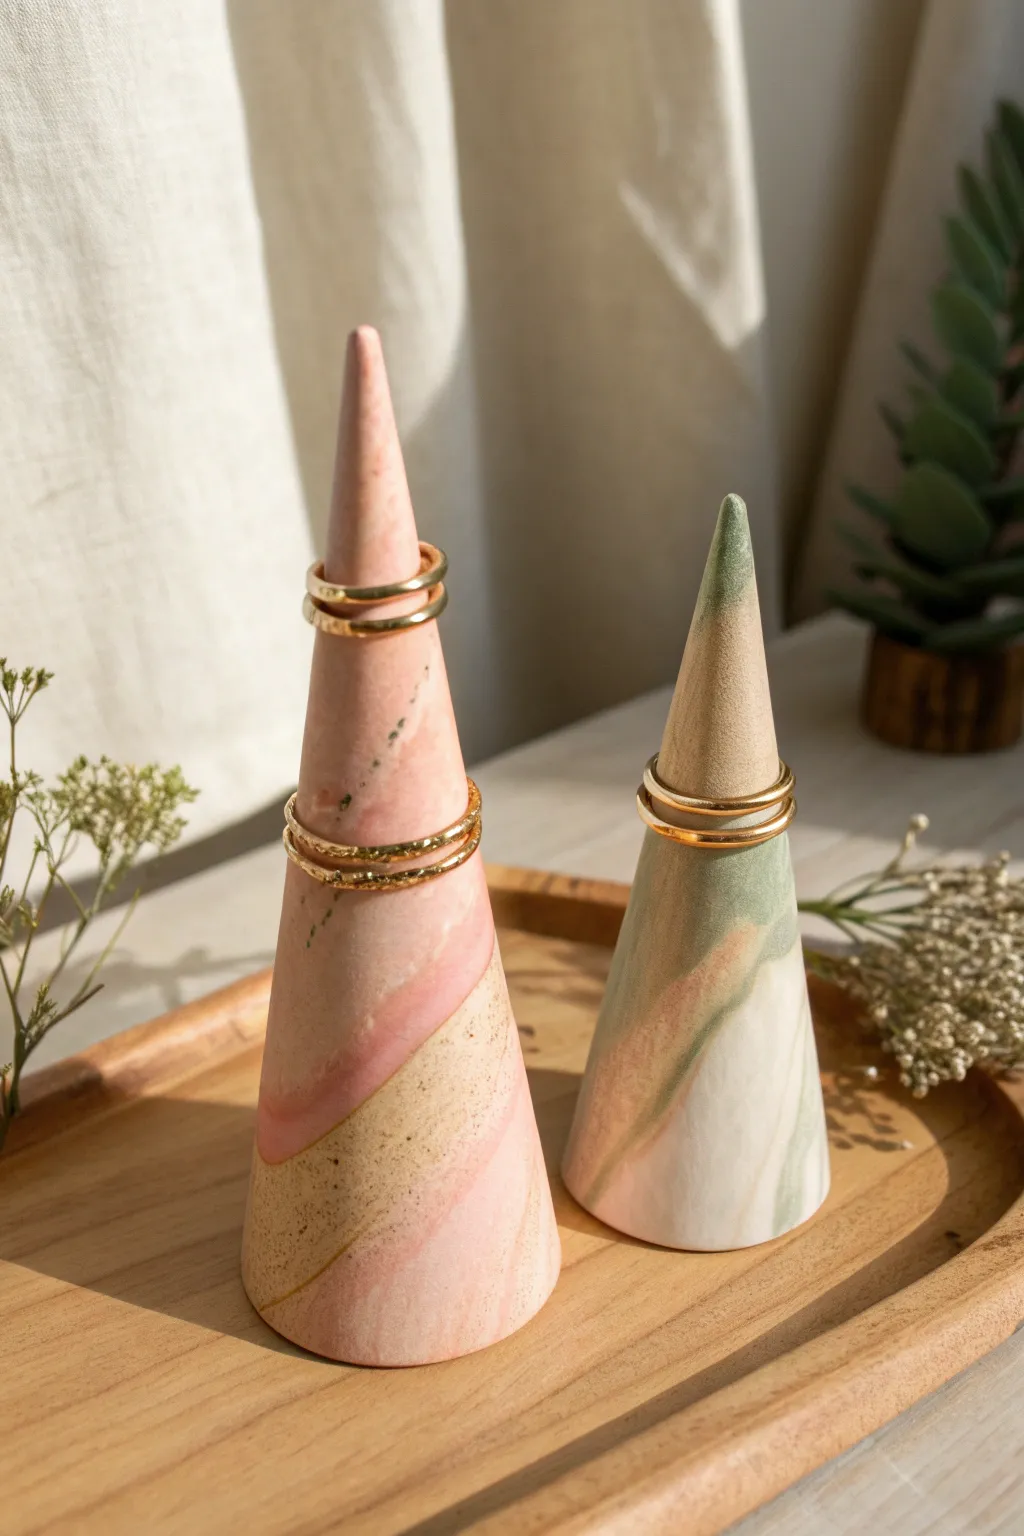
Transform simple Model Magic clay into chic, minimalist decor with these swirled ring holder cones. The technique creates a soft, organic marbling effect that looks like high-end ceramic or polished stone.
Step-by-Step Tutorial
Materials
- White Model Magic clay
- Model Magic clay in accent colors (pink, green, or beige)
- Rolling pin or smooth glass jar
- Craft knife or plastic clay tool
- Smooth work surface (silicone mat or parchment paper)
- Fine-grit sandpaper (optional)
- Matte sealant spray (optional)
Step 1: Basic Preparation
-
Portioning the clay:
Start by separating your white clay into two balls, one slightly larger than the other. This will be the base for your two different sized cones. For the accent colors, you’ll need much less—think marble-sized amounts of pink, beige, and sage green. -
Conditioning:
Knead each piece of clay in your hands for about a minute. The warmth helps the Model Magic become more pliable and prevents cracking later on.
Clean Swirls Tip
Stop mixing sooner than you think! Model Magic blends quickly. If you over-mix, the colors will muddy together. You want distinct streaks of color against the white.
Step 2: Creating the Marble Effect
-
Making ropes:
Roll your white clay into a thick log. Then, roll your colored clays into very thin, worm-like snakes. The thinner these colored snakes are, the more delicate your final swirl will be. -
Combining colors:
Lay the colored snakes lengthwise along your white log. For the pink cone, use pink and beige strands. For the green cone, use green and beige. Twist the entire bundle together like a candy cane. -
Folding and rolling:
Fold the twisted log in half and roll it out again. Repeat this ‘fold, twist, and roll’ motion 3-4 times. Stop when you see the colors streaking through the white without becoming completely blended into a solid new color. -
Forming the ball:
Once you are happy with the marbling striations, roll the clay into a smooth, tight sphere. Check that there are no major cracks or seams on the surface.
Step 3: Shaping the Cones
-
Initial cone shape:
Place the ball on your work surface. Using the flat of your palm, apply pressure to one side of the ball while rolling it back and forth. You want to elongate one side into a point while keeping the bottom broad. -
Refining the height:
I prefer to use a flat tool or a ruler to gently tap the sides as I roll, which helps straighten the edges. Continue rolling until you have a tall, tapered cone shape. -
Flattening the base:
Pick up the cone and tap the wide bottom firmly against your table to create a flat, stable base. Check that it stands perfectly straight and doesn’t lean. -
Smoothing the surface:
Dip your finger in a tiny bit of water and gently run it over the clay to smooth out any fingerprints or tiny imperfections. The water acts like a polish for Model Magic.
Gold Accents
For a luxe upgrade, paint the very tip of the cone or the bottom rim with liquid gold leaf or metallic acrylic paint after the clay has dried completely.
Step 4: Drying and Finishing
-
Drying time:
Set your cones aside in a dry area. Model Magic needs air to set, so let them sit undisturbed for at least 24 to 48 hours. Turn them on their sides occasionally to ensure the bottom dries evenly. -
Sanding (optional):
Once fully hardened, you can use fine-grit sandpaper to buff away any remaining lumps or textural inconsistencies for a stone-like finish. -
Sealing:
To protect the surface from oils in your jewelry/skin, give the cones a light coat of matte sealant spray. This preserves that soft, unglazed pottery look shown in the photo.
Your beautiful ring cones are now ready to organize your jewelry with a touch of modern elegance
Mini Dioramas in a Clear Little Case
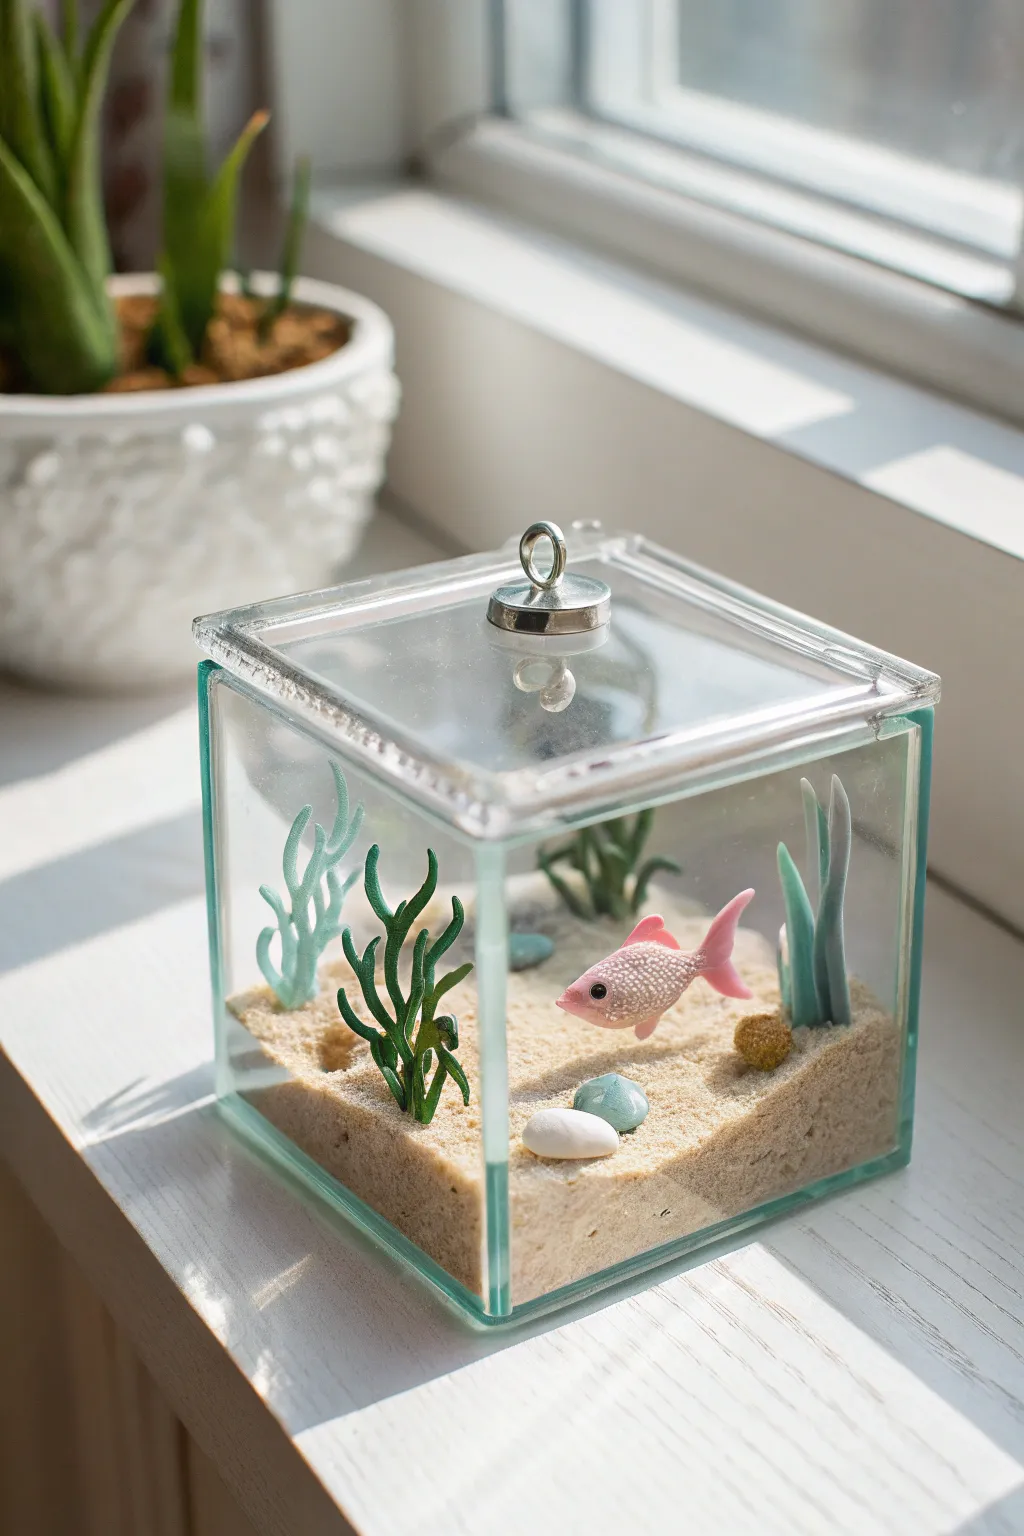
Capture the serenity of an underwater world without the maintenance of a real tank. This charming project uses clear acrylic and colorful clay to create a suspended moment in time, perfect for brightening up a windowsill or desk.
Step-by-Step
Materials
- Clear square acrylic or glass box with lid (approx. 4-inch cube)
- Model Magic clay (White, Pink, Green, Blue, Pale Teal)
- Fine beige crafting sand
- Liquid school glue or tacky glue
- Clear fishing line or invisible thread
- Small sculpting tools (or a toothpick)
- Black acrylic paint or a tiny black bead (for the eye)
- Hot glue gun (optional, for securing the line)
- Small smooth pebbles (optional)
Step 1: Setting the Scene
-
Prepare the base:
Clean the inside of your clear box thoroughly to ensure there are no fingerprints or dust before you begin. -
Mix the sand layer:
Take a handful of white Model Magic clay and flatten it into a square that fits the bottom of your container. -
Texture the floor:
Coat the top of the clay square with a thin layer of liquid glue, then press your crafting sand firmly into the surface until the clay is completely hidden. -
Install the seabed:
Place the sand-covered clay square into the bottom of the box, pressing the edges gently so it looks like a natural sandy bottom.
Step 2: Sculpting the Life
-
Shape the fish body:
Roll a small ball of pink clay and flatten it slightly into an oval shape, pinching one end to form the tail fin. -
Add fin details:
Pinch small bits of pink clay to create a dorsal fin on top and side fins along the body, smoothing the seams with your finger or a tool. -
Scale texture:
Using a small, blunt tool or the end of a straw, gently press a scale pattern into the sides of the fish for added realism. -
The eye:
Press a tiny black bead into the face for an eye, or wait for the clay to dry and add a dot of black paint later. -
Mounting mechanism:
While the clay is still wet, embed a loop of clear fishing line into the top of the fish’s dorsal fin so it can hang later. -
Seaweed strands:
Roll thin snakes of green and pale teal clay. Pinch and twist them gently to make them look like waving kelp or seagrass. -
Coral structures:
Create a staghorn coral shape using darker green clay, branching it out to look organic and three-dimensional. -
Clay pebbles:
Form small rounded shapes from white and light blue clay to act as sea stones.
Clearer Waters
Use UV resin instead of glue to attach the fishing line to the lid. It creates a stronger, completely invisible bond that won’t yellow over time.
Step 3: Assembly & Finishing
-
Planting the vegetation:
Press the base of your seaweed and coral pieces firmly into the sand floor before the clay fully hardens, or use a dab of glue to secure them. -
Arranging elements:
Place your clay pebbles and any real stones around the plants to create a balanced composition. -
Suspending the fish:
Thread the fishing line attached to your fish through a tiny spot of hot glue on the underside of the box lid. -
Adjusting height:
Adjust the length of the string so the fish ‘swims’ in the middle of the tank, creating that floating illusion. -
Closing the tank:
Carefully lower the lid, ensuring the fish does not bump into the plants, and seal the box.
Glow Up
Mix glow-in-the-dark powder into your light blue clay pebbles or the fish’s scales for a magical bioluminescent effect at night.
Now you have a peaceful slice of ocean life to enjoy every time you look at your desk
Solar System Mobile With Puffy Planets
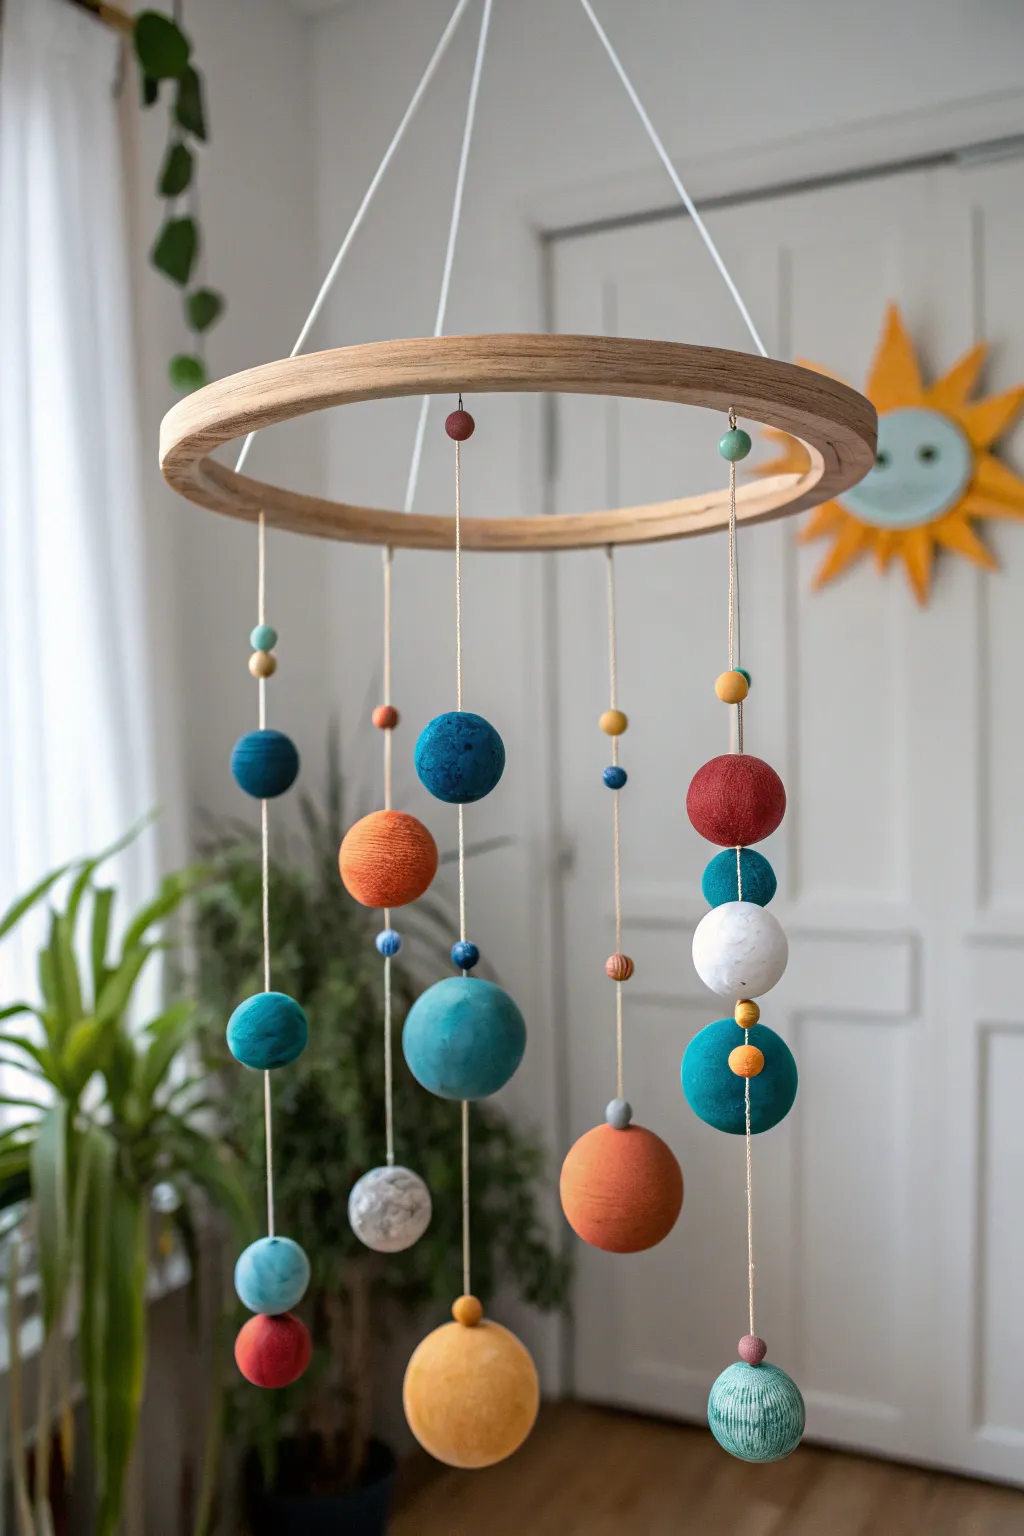
Bring the cosmos into any room with this charming hanging mobile. By using lightweight clay, you create ‘puffy’ textured planets that float effortlessly from a simple wooden hoop.
Step-by-Step Guide
Materials
- Model Magic or similar lightweight air-dry clay (various colors: blue, red, orange, white, yellow)
- Wooden embroidery hoop (inner ring only, 8-10 inches diameter)
- White or cream cotton string/twine
- Wooden beads (assorted small sizes)
- Acrylic paints (optional, for detailing)
- Small paintbrush
- Large-eye needle
- Scissors
- Sandpaper (fine grit)
- Toothpick or skewer
Step 1: Shaping the Planets
-
Mix your colors:
Start by mixing your clay to achieve the desired palette. For the marbled planets, twist white clay with grey or blue but stop before they fully blend. You want distinct swirls to mimic cloud cover or rocky surfaces. -
Roll the spheres:
Create spheres in varying sizes ranging from 1 inch to about 2.5 inches in diameter. You’ll need about 5 large main ‘planets’ and several smaller spheres to act as moons or decorative spacers. -
Add texture:
While the clay is still soft, gently roll some spheres on a textured fabric or dab them with a stiff brush to create a cratery surface. Keep others smooth for variety. -
Create holes:
Use a toothpick or skewer to pierce a hole completely through the center of each sphere. This is much easier to do while the clay is wet than trying to drill it later. Ensure the hole is wide enough for your string. -
Drying time:
Set all your clay components aside to dry completely. Model Magic can take 24-48 hours to fully cure depending on thickness; flip them occasionally so the bottom sides dry evenly.
Step 2: Preparing the Frame
-
Sand the hoop:
Take your wooden embroidery hoop ring and lightly sand any rough edges to give it a polished, professional look. You can leave it raw or stain it for a darker finish. -
Mark hanging points:
With a pencil, lightly mark five or six equidistant points along the wooden ring where your vertical strings will attach. Mark three additional points on the top edge for the suspension strings. -
Prepare the suspension strings:
Cut three lengths of string, each about 20 inches long. Tie one end of each to the three top marks on your hoop, ensuring the knots are secure. -
Create the hanging loop:
Bring the three suspension strings together at the top, ensuring the hoop hangs level. Tie them into a strong loop for hanging the finished mobile and trim any excess.
Weight Hack
If a large planet is causing the mobile to tilt, construct its core from a ball of aluminum foil and wrap a thin layer of clay around it to reduce weight.
Step 3: Assembly
-
Cut vertical strings:
Cut five or six long pieces of string for the planet strands. Vary the lengths between 15 and 25 inches to create a staggered, cascading effect. -
Thread the bottom spheres:
Start constructing a strand by threading the bottom-most planet onto a string. Tie a large double knot (or knot around a small bead) underneath the sphere to hold it in place. -
Add midway elements:
Move up the string a few inches and add a small knot. Thread a smaller clay bead or wooden bead so it rests on this knot. Continue adding elements, spacing them out visually. -
Secure larger planets:
When threading larger planets midway up a string, I find it helpful to use a hidden knot inside the bead hole or a decorative wooden bead underneath to support the weight. -
Attach to the hoop:
Once a strand is complete, tie the top end securely to one of your marked points on the wooden hoop. Repeat this for all strands. -
Balance the mobile:
Before tightening the final knots on the hoop, hold the mobile up to check the balance. Adjust the string positions slightly if one side feels too heavy. -
Final trim:
Snip off any loose string ends close to the knots for a clean finish. A tiny dab of clear glue on the knots can ensure they never slip.
Cracked Clay?
Minor surface cracks can occur as the clay shrinks during drying. Fill these cracks with a tiny bit of fresh, wet clay and smooth over with a damp finger.
Hang your new solar system near a window or crib to watch the planets gently orbit in the breeze