
If you’ve got a little lump of polymer clay or air-dry clay, you can totally make a tiny sculpture in one sitting. These ideas are my go-tos for beginners because they lean on basic shapes and simple, cute details that still look polished when you’re done.
Tiny Frog on a Lily Pad
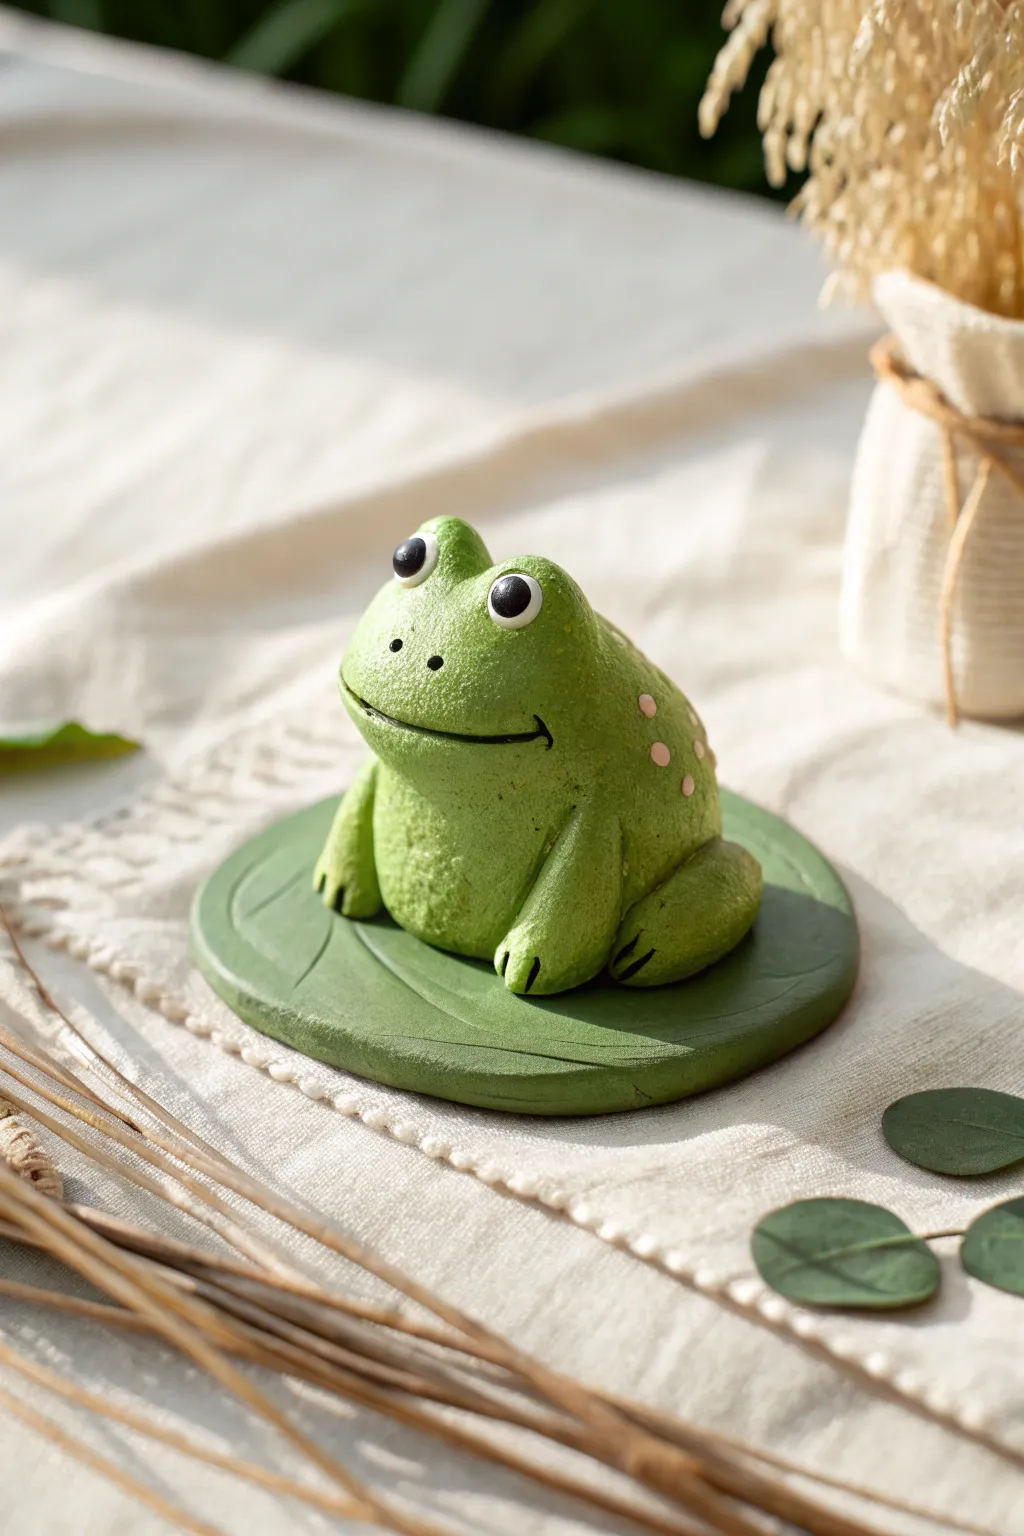
Create a charming desk companion with this adorable clay frog sculpture resting peacefully on its own lily pad. Its rounded, chubby shape and simple details make it a perfect beginner-friendly project that captures a sense of whimsical calm.
Step-by-Step
Materials
- Green polymer clay (light green for body, slightly darker green for lily pad)
- White polymer clay
- Black polymer clay
- Pink polymer clay or soft pastels
- Needle tool or toothpick
- Ball stylus tool
- Rolling pin or pasta machine
- Circle cutter (approx. 3 inches)
- Baking sheet and parchment paper
- Oven (if using polymer clay)
Step 1: Shaping the Lily Pad Base
-
Condition the dark green clay:
Begin by kneading your darker green clay until it is soft and pliable. This conditioning step is crucial to prevent cracks later on. -
Roll out the base:
Flatten the clay using a rolling pin until it’s about 1/4 inch thick. Aim for an even thickness throughout. -
Cut the circle:
Use your circle cutter to punch out a perfect round shape. If you don’t have a cutter, trace a glass rim and cut around it with a craft knife. -
Texture the leaf:
Using a needle tool, gently etch curved veins into the surface of the circle. Start from one edge and curve outward like a fan to mimic a real lily pad leaf. -
Soften the edges:
Run your finger lightly around the cut edge of the circle to smooth out any sharp angles, giving it a more organic feel.
Fixing Fingerprints
If you see fingerprints on your smooth frog, lightly brush the raw clay with a drop of baby oil or clay softener. This melts the top layer slightly and erases prints.
Step 2: Sculpting the Frog Body
-
Form the main body:
Take a large ball of light green clay and roll it between your palms into a smooth, slightly squat teardrop shape or a rounded gumdrop form. -
Position on the pad:
Place this body shape firmly onto the center of your prepared lily pad base. Press down gently to ensure it adheres. -
Create the front legs:
Roll two smaller logs of green clay. Attach these vertically to the front of the body, blending the top seam into the body so they look seamless. -
Add frog toes:
At the bottom of each front leg, use your needle tool to make two small indents, creating three little toes on each foot. -
Shape the hind legs:
Form two flattened oval shapes for the crouching hind legs. Press these against the lower sides of the body, wrapping them slightly around the back. -
Detail the hind feet:
Just like the front legs, use your needle tool to indent toes into the bottom of these back leg shapes.
Step 3: Adding the Face and Details
-
Sculpt the eye sockets:
Roll two small balls of green clay and place them on top of the head. Blend the bottom edges downward into the head so they look like raised bumps. -
Carve the mouth:
Using the needle tool or a flexible blade, carefully press a wide, curved smile into the face. Make the corners turn up slightly for a happy expression. -
Add the eye whites:
Flatten two tiny balls of white clay into discs and press them onto the front of the raised green eye bumps. -
Place the pupils:
Add smaller discs of black clay onto the white circles. Position them looking slightly to the side or up for a cute effect. -
Add nose holes:
Poke two tiny holes with a needle tool right above the mouth line for nostrils. -
Apply blush spots:
Roll extremely tiny balls of pink clay and press three delicate dots onto the frog’s cheek area, or use a brush with pink pastel powder for a softer blush effect. -
Finishing texture:
I like to take a clean toothbrush or a piece of crumpled foil and very gently tap the green skin of the frog to give it a subtle, realistic skin texture. -
Bake the sculpture:
Follow the baking instructions on your specific package of polymer clay (usually 275°F/135°C for 15-30 minutes). Let it cool completely before handling.
Pro Tip: Eye Shine
After baking, add a tiny dot of UV resin or glossy varnish to the black part of the eyes. This ‘catchlight’ brings the character to life instantly!
Once cooled, your little green friend is ready to bring a touch of nature to your shelf.


Simple Cat Loaf Figurine
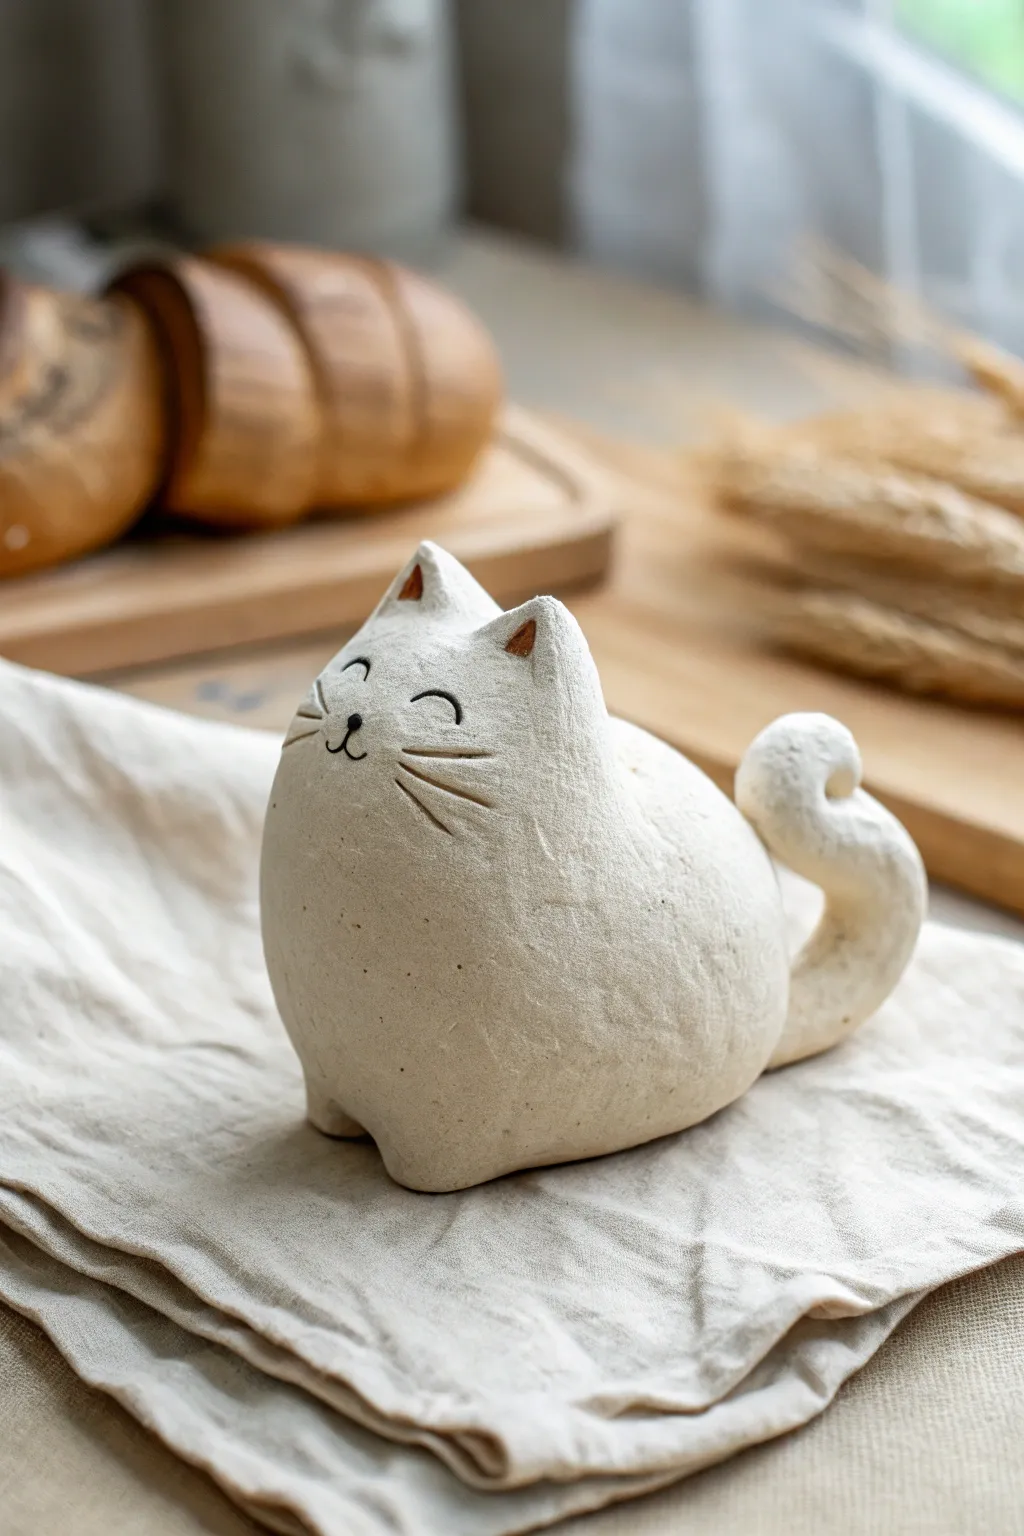
Embrace the charming simplicity of this round, minimalist kitty figurine. Its smooth, pebble-like shape and sweet expression make it a perfect beginner sculpting project that captures the cozy essence of a cat at rest.
Step-by-Step Guide
Materials
- White air-dry clay or polymer clay (approx. 200g)
- Small cup of water (for smoothing)
- Needle tool or toothpick
- Small loop tool or carving knife
- Fine-grit sandpaper (300-400 grit)
- Black acrylic paint or fine-tip black marker
- Brown acrylic paint (optional for ears)
- Small round paintbrush
- Matte varnish (optional)
Step 1: Shaping the Base
-
Prepare the Clay:
Start by taking a handful of clay, roughly the size of a large lemon. Knead it thoroughly in your hands to warm it up and remove air bubbles, ensuring it’s pliable and smooth. -
Form the Body:
Roll the clay into a smooth ball first, then gently begin to elongate it slightly into an egg shape. This will be the main body of the cat. -
Flatten the Bottom:
Gently tap the wider end of your egg shape onto your work surface. You want a flat, stable base so your kitty sits upright without wobbling. -
Refine the Loaf Shape:
Using your palms, smooth the sides upwards to create a domed ‘loaf’ look. The shape should be chubby and continuous, with no distinct separation between head and body.
Cracks Appearing?
If small drying cracks appear, mix a tiny bit of fresh clay with water to make a paste (slip). Fill the crack, smooth it over, and let it dry again.
Step 2: Adding Details
-
Pinch the Ears:
At the narrower top end of the body, use your thumb and forefinger to pinch up two small triangles of clay. Position them slightly forward-facing. -
Shape the Ears:
Refine the triangles into ear shapes by smoothing the clay back down into the head, ensuring there are no cracks at the base. Gently press a small indentation into the front of each ear. -
Create the Legs:
At the bottom front of the sculpture, gently push two small mounds of clay forward with your thumb to suggest paws tucked underneath the chest. -
Form the Tail Coil:
Roll a separate snake of clay, about 3-4 inches long, tapering at one end. Curl the tapered end into a spiral, resembling a cinnamon roll or a fern frond. -
Attach the Tail:
Score the back of the cat and the base of the tail with your needle tool (make cross-hatch scratches). Add a dab of water or slip, press the tail firmly onto the rear, and smooth the seam completely so it looks like one piece. -
Smooth the Surface:
Dip your finger in water and gently run it over the entire sculpture. I really take my time here to erase fingerprints and ensure that soft, matte finish.
Textured Fur Effect
Before the clay dries, gently dab the surface with a stiff-bristled toothbrush or a crumpled ball of foil to give the cat a soft, fuzzy texture.
Step 3: Face & Finish
-
Carve the Whiskers:
Using your needle tool, carefully carve three radiating lines on each cheek area. Keep the lines relatively deep as clay can shrink and make shallow marks disappear. -
Mark the Face:
Lightly sketch the position of the eyes and nose with a very light touch of the needle tool before committing to the final marks. -
Carve the Features:
Press a small dot for the nose. For the mouth, carve a tiny inverted ‘Y’ shape beneath the nose. Carve two arched curves for the happy, sleeping eyes. -
Dry Completely:
Let the sculpture dry. For air-dry clay, this usually takes 24-48 hours depending on thickness. Wait until it is uniform in color and feels room temperature to the touch. -
Sand Imperfections:
Once bone dry, take your fine-grit sandpaper and gently buff away any rough spots or sharp edges, particularly around the ears and tail coil. -
Paint the Details:
Using a very fine brush and black acrylic paint (or a marker), carefully fill in the carved lines of the eyes, nose, mouth, and whiskers. -
Tint the Ears:
Mix a small amount of brown paint with water to create a transparent wash. Lightly paint the inside triangles of the ears for a subtle pop of color.
Set your cheerful little cat on a shelf where its smiling face can greet you every day


Mini Penguin Buddy
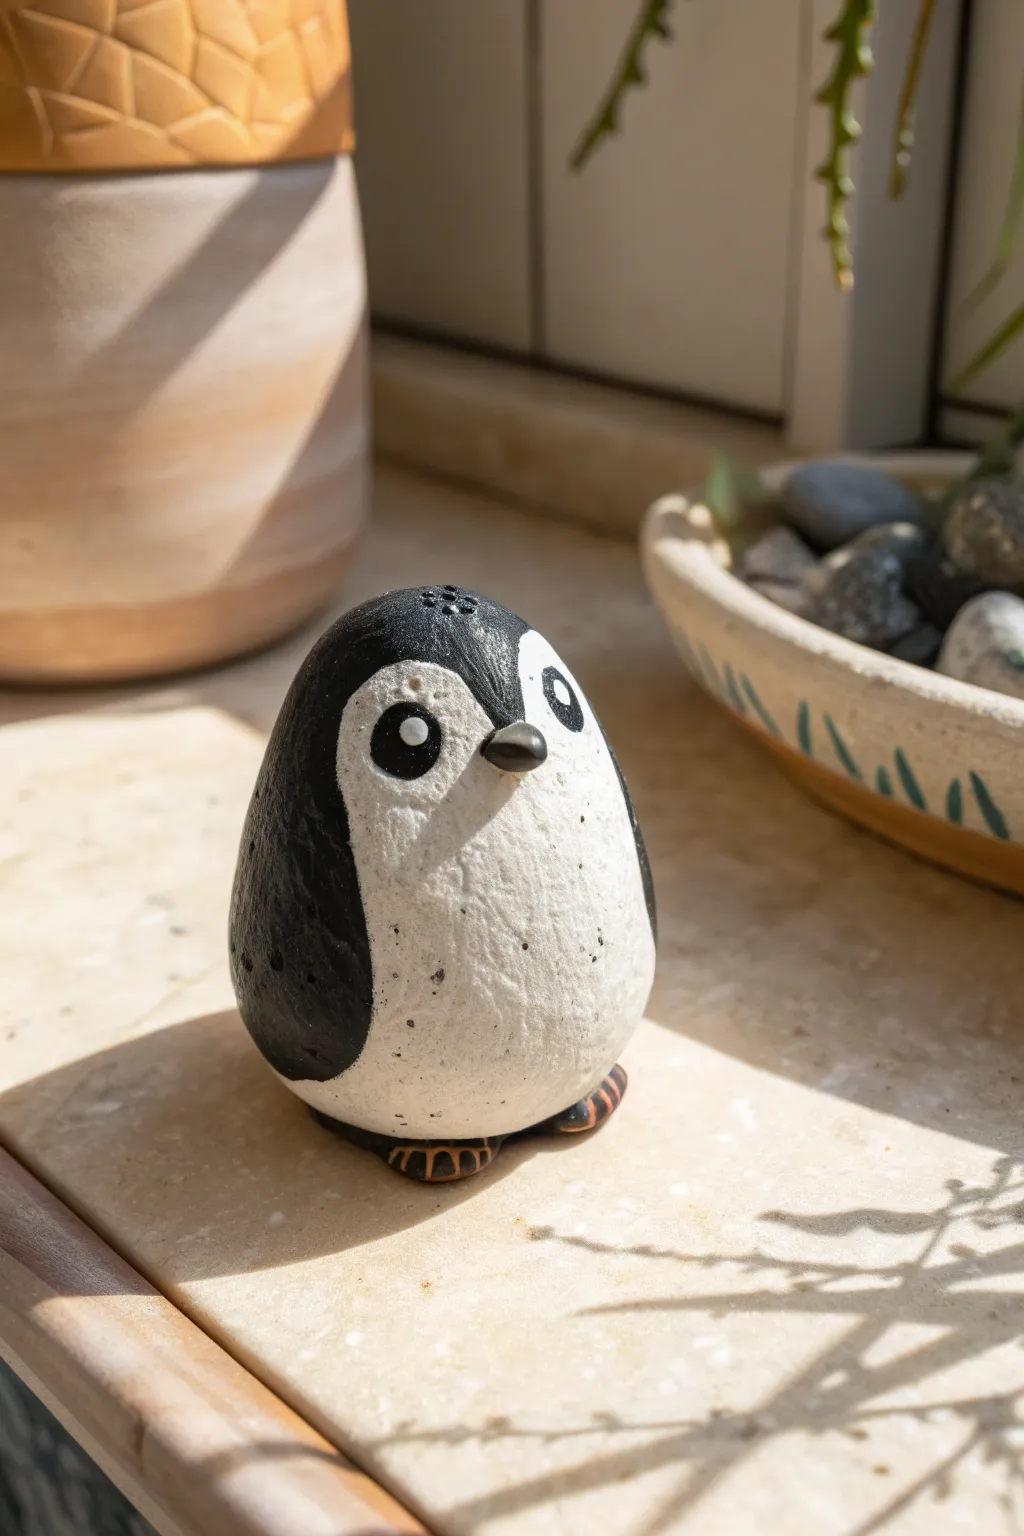
This adorable, chubby penguin figurine is the perfect beginner project to practice simple shapes and facial details. With its smooth, egg-like body and expressive eyes, this tiny friend brings a wintry charm to any desk or shelf.
How-To Guide
Materials
- White air-dry clay or polymer clay
- Acrylic paints (black, white, orange/yellow)
- Small detail paintbrush
- Toothpick or needle tool
- Ball stylus tool
- Water cup (for smoothing)
- Aluminum foil (optional, for core)
- Matte or satin varnish
Step 1: Shaping the Base
-
Prepare the core:
Start by conditioning your clay until it is soft and pliable. If you want to save clay, you can crumple a small ball of aluminum foil to act as the center. -
Form the body:
Roll a smooth ball of white clay roughly the size of a large egg. Slightly flatten the bottom by tapping it gently on your work surface so the penguin stands up straight without rolling over. -
Taper the head:
Gently gently squeeze the top third of the ball to create a slight taper for the head area, keeping the overall shape very round and chubby rather than tall and thin. -
Smooth the surface:
Dip your finger in a tiny bit of water and rub away any fingerprints or cracks on the surface. You want the clay to be as smooth as a river stone before moving on.
Uneven Paint Lines?
If your black paint wobbles onto the white belly, wait for it to dry completely. Then, use white paint to tidy up the edge—it acts like an eraser.
Step 2: Adding Details
-
Create the wings:
Roll two small, tear-drop shapes of clay. Flatten them slightly against your work surface. -
Attach the wings:
Press the wings onto the sides of the body. Blend the top edge of the wing into the body using your finger or a tool so it looks like one seamless piece, but leave the bottom tips slightly raised. -
Form the beak:
Roll a tiny, rice-grain-sized piece of clay. Pinch one end to make it pointy and press the wider end onto the center of the face area. -
Make the feet:
Create two small flattened ovals for feet. Place them under the bottom edge of the body so they just barely peek out. -
Texture the feet:
Use your toothpick or needle tool to press two or three lines into each foot to create toe separation. -
Refine the surface:
Check over the entire sculpture for rough spots. I like to give it one last smoothing pass with a damp brush to ensure a perfect canvas for painting. -
Dry or bake:
Follow the instructions for your specific clay. If using air-dry clay, let it sit for 24-48 hours. If using polymer, bake according to the package directions.
Texture Play
Before baking, gently roll a piece of sandpaper over the white belly area. This gives the clay a faux-stone texture that looks great when painted.
Step 3: Painting & Finishing
-
Outline the pattern:
Once fully dry or cool, use a pencil to very lightly sketch the ‘heart-shaped’ face line where the black feathers meet the white belly. -
Paint the black coat:
Use a small brush to paint the back, wings, and top of the head black. Carefully follow your pencil line around the face and belly. -
Add white details:
Paint the belly and face white. Even if the clay is white, painting it ensures the finish and texture match the rest of the body. -
Paint the beak:
Paint the tiny beak a dark grey or black. -
Paint the feet:
Carefully paint the peeking feet with orange paint. Add tiny black stripes or claws if you want extra detail. -
Paint the eyes:
Using a dotting tool or the back of a brush, place two large black circles for eyes. Once dry, add a tiny white dot in each for a sparkle highlight. -
Add freckles:
For that realistic stone-like look, dip an old toothbrush or stiff brush in diluted black paint and gently flick it (splatter technique) over the white belly area to create tiny speckles. -
Seal the piece:
Protect your penguin with a coat of matte or satin varnish to prevent the paint from chipping.
Now you have a charismatic little companion ready to keep you company during your creative sessions


Little Bunny With Long Ears
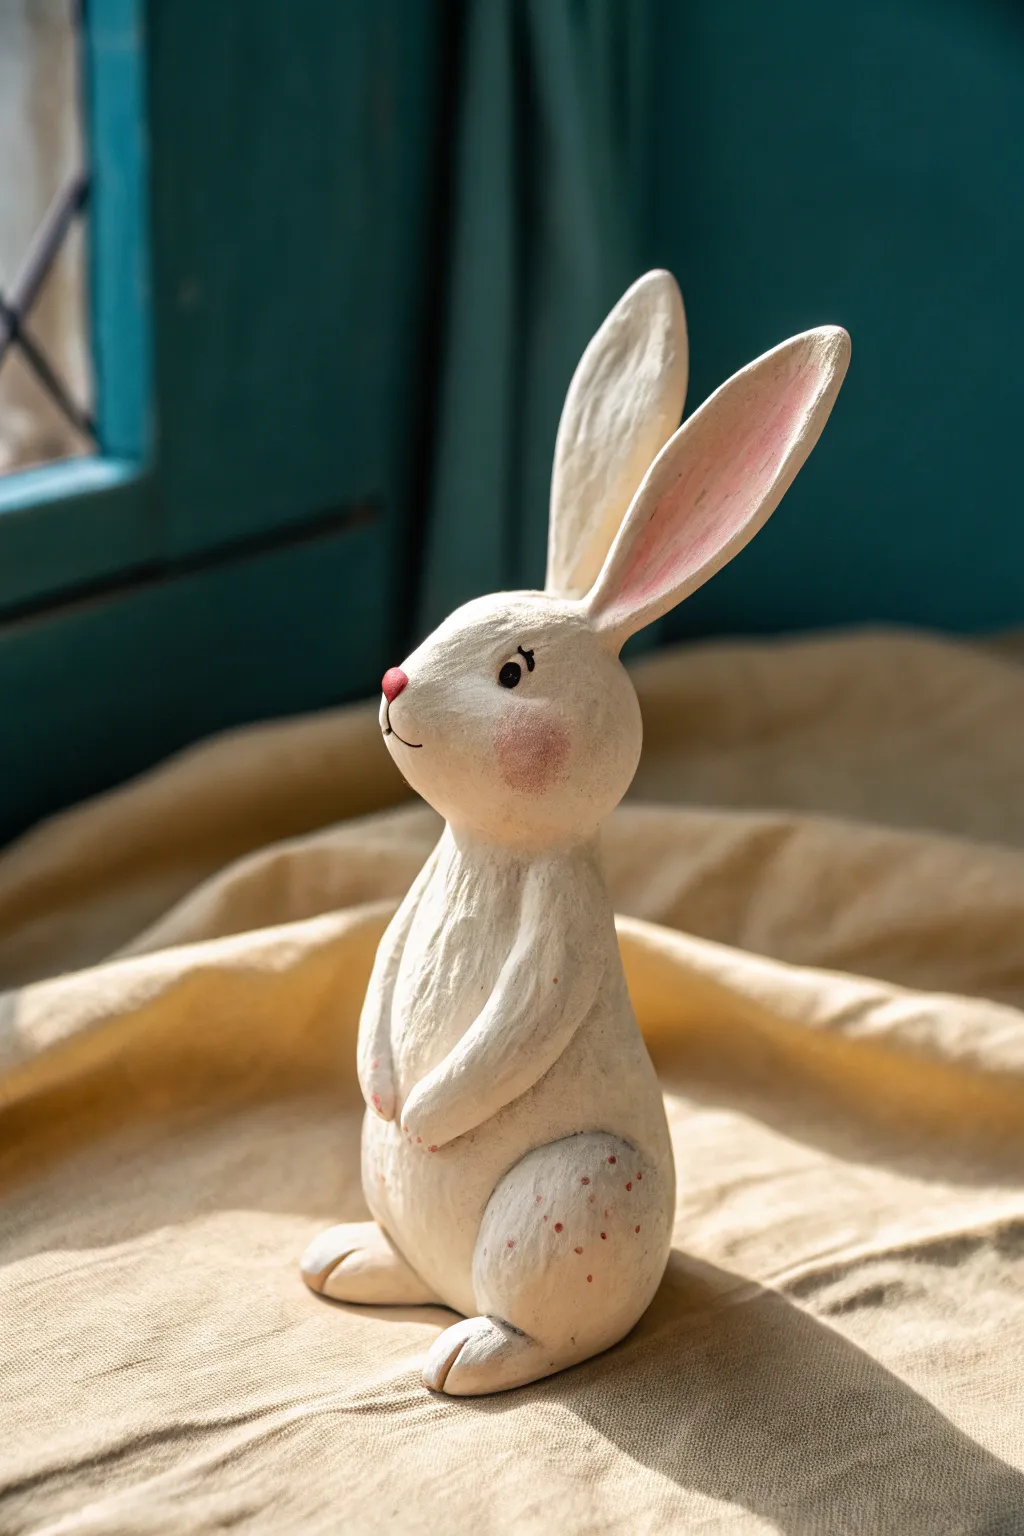
This charming, upright rabbit sculpture captures a sense of curiosity with its perky ears and gentle expression. Its smooth, slightly textured finish and delicate pink accents make it a perfect beginner-friendly project that feels both rustic and refined.
Detailed Instructions
Materials
- White creative paperclay or air-dry clay
- Aluminum foil (for armature)
- Clay sculpting tools (needle tool, smoother)
- Water in a small cup
- Acrylic paints: white, soft pink, black, reddish-brown
- Fine grit sandpaper
- Small paintbrushes (fine tip and flat)
- Matte varnish or sealant
Step 1: Building the Form
-
Create the core:
Crumple a piece of aluminum foil into an elongated pear shape to form the main body. Make a smaller, slightly flattened sphere for the head. This saves clay and keeps the sculpture lightweight. -
Cover the body:
Roll out a sheet of clay and wrap it completely around the foil body armature. Smooth the seams with a little water on your finger until the surface is uniform. -
Add the head:
Cover the foil head with a layer of clay as well. Attach the head to the narrower top of the body. You may need to insert a small piece of toothpick or wire between them for stability, blending the clay at the neck so it looks like one solid piece. -
Form the legs:
Roll two thick, short logs of clay for the hind legs. Press these onto the lower sides of the body, creating the look of the rabbit’s haunches. Blend the edges seamlessly into the main body. -
Shape the feet:
For the feet, shape two flattened ovals and attach them to the bottom of the hind legs. Use a sculpting tool to press in slight indentations for the toes. -
Add the arms:
Roll two smaller, thinner logs for the front paws. Attach them to the upper chest area, angling them slightly downward so they rest gently against the belly.
Smooth Operator
Keep a small bowl of water nearby while sculpting. Dipping your finger in it helps smooth cracks instantly.
Step 2: Ears and Details
-
Sculpt the ears:
Roll two long, tapered teardrop shapes for the ears. Flatten them gently, creating a shallow groove down the center of each to mimic the inner ear structure. -
Attach the ears:
Score the top of the head and the base of the ears to roughen the clay. Apply a dab of water or slip, then press the ears firmly onto the head. Blend the clay at the join so it’s invisible. -
Refine the face:
Add a tiny triangle of clay for the nose. Use a modeling tool to gently shape the muzzle area, creating a soft roundness cheeks. -
Create texture:
While the clay is still damp, take a stiff bristle brush or a texture tool and lightly tap all over the surface. This mimics the look of short, soft fur rather than perfectly smooth porcelain. -
Let it dry:
Allow the sculpture to dry completely. Depending on the thickness and humidity, this could take 24 to 48 hours. Turn it occasionally to ensure even drying.
Make it a Scene
Sculpt a tiny carrot or a flower for the bunny to hold in its front paws to add extra narrative charm.
Step 3: Painting and Finishing
-
Sand imperfections:
Once fully dry, check for any unintended rough spots. I like to use fine grit sandpaper to gently smooth these down without removing the intentional fur texture. -
Base coat:
Paint the entire rabbit with an off-white or creamy white acrylic paint. This unifies the color and prepares it for details. -
Blush the cheeks:
Mix a very diluted wash of soft pink paint. Gently dab this onto the cheek area with a dry brush to create a rosy, embarrassed flush. -
Paint the ears:
Use the same soft pink to paint the inner elongated section of the ears. Feather the edges so the pink fades naturally into the white. -
Face details:
Paint a small heart or triangle shape in reddish-brown or dark pink for the nose. Use black paint and a very fine brush to draw the round eye, adding a tiny white highlight dot for life, and a thin line for the mouth. -
The speckled finish:
Using the reddish-brown paint, add tiny, random speckles on the haunches and lower body. This adds a lovely handmade ceramic feel to the piece. -
Seal:
Finish with a coat of matte varnish to protect the paint and give the bunny a professional, finished look.
Set your finished bunny on a sunny windowsill where its cheerful expression can greet you every day

The Complete Guide to Pottery Troubleshooting
Uncover the most common ceramic mistakes—from cracking clay to failed glazes—and learn how to fix them fast.
Chubby Turtle Buddy
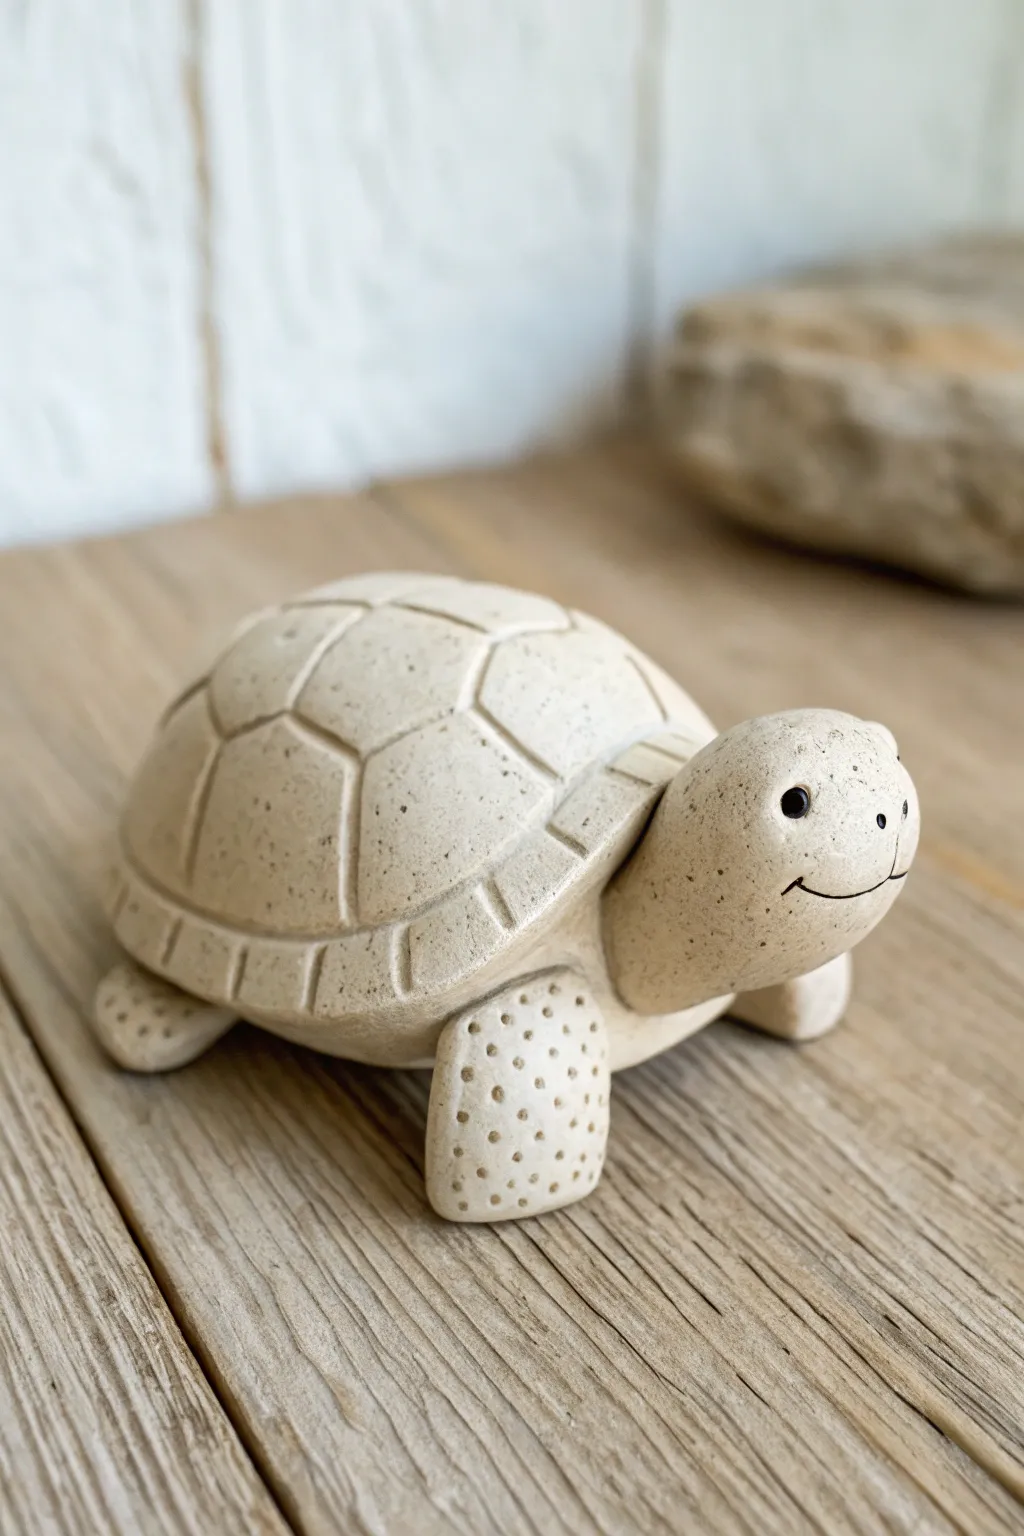
This adorable speckled turtle figurine features a charming, smooth shell and a friendly carved smile. Its stone-like texture and simple geometric shell pattern make it a delightful desk companion that’s surprisingly easy to sculpt.
Step-by-Step Guide
Materials
- Speckled beige polymer clay (e.g., Fimo Granite or Premo Accents)
- Clay carving tools (basic knife tool, needle tool)
- Small ball stylus tool
- Aluminum foil (for armature)
- Smooth work surface or ceramic tile
- Wet wipes (for smoothing)
Step 1: Forming the Body
-
Prepare the core:
Start by crumpling a small piece of aluminum foil into a tight ball, slightly flattened at the bottom. This saves clay and keeps the sculpture lightweight while preventing cracking during baking. -
Condition the clay:
Take a generous chunk of your speckled beige clay and knead it in your hands until it is warm and pliable. Warm hands make this process much faster. -
Create the shell base:
Flatten the clay into a pancake thick enough to cover your foil ball. Drape it over the foil, smoothing the seams underneath until you have a perfect, seamless dome shape. -
Shape the head:
Roll a smaller ball of clay for the head step. I like to gently pinch one side to create a slight teardrop shape where it will attach to the body, keeping the face round and chubby. -
Attach the head:
Press the tapered end of the head onto the front of the shell. Blend the clay at the seam using your finger or a modeling tool to ensure a secure bond.
Step 2: Adding Details
-
Detail the face:
Using a needle tool or small knife, carefully carve a wide, curved smile into the face. Use a ball stylus to press smooth, shallow indentations for the eyes. -
Insert the eyes:
Roll two tiny, microscopic balls of black clay. Press them gently into the eye sockets you just created for that bright-eyed look. -
Sculpt the legs:
Roll four equal-sized small cylinders of beige clay. flatten the tops slightly so they fit snugly against the underside of the shell. -
Texture the legs:
Before attaching, use a small dotting tool to press random, shallow dimples all over the visible parts of the legs to give them a rough, textured skin appearance. -
Attach the limbs:
Press the legs firmly onto the underside of the body. Position them so the turtle looks like it is standing up slightly, bearing the weight of its shell. -
Add the tail:
Roll a tiny cone for the tail and attach it to the rear center of the underside, blending the seam well.
Cracking Seams?
If seams won’t blend, your clay is too dry. Add a drop of clay softener or baby oil to that spot and massage it in to restore stickiness.
Step 3: Carving the Shell
-
Outline the rim:
Use your knife tool to gently score a line around the bottom edge of the shell, creating a distinct rim that separates the main dome from the base. -
Mark the segments:
Use the knife tool to press vertical lines along that rim at regular intervals, creating rectangular segments all around the turtle’s skirt. -
Draft the pattern:
Very lightly scratch a hexagon in the center top of the shell. Surround this central shape with connected pentagons or trapezoids to create the classic tortoise pattern. -
Deepen the cuts:
Go back over your scratched lines with firm pressure to carve deep, deliberate grooves. This gives the shell dimension and creates shadows. -
Smooth the edges:
Gently rub your finger over the carved lines to soften any sharp ridges of clay that pushed up during carving. -
Final check:
Look over the whole sculpture. Smooth out any accidental fingerprints with a little baby oil or a light touch before baking. -
Bake:
Bake the figurine according to your specific clay brand’s package instructions. Let it cool completely before handling.
Make It Look Ancient
After baking, apply a wash of diluted brown acrylic paint and wipe it off quickly. The paint stays in the grooves, highlighting the shell pattern.
Place your little stone friend on a shelf or planter where he can watch over your space
Small Duck With a Flat Beak
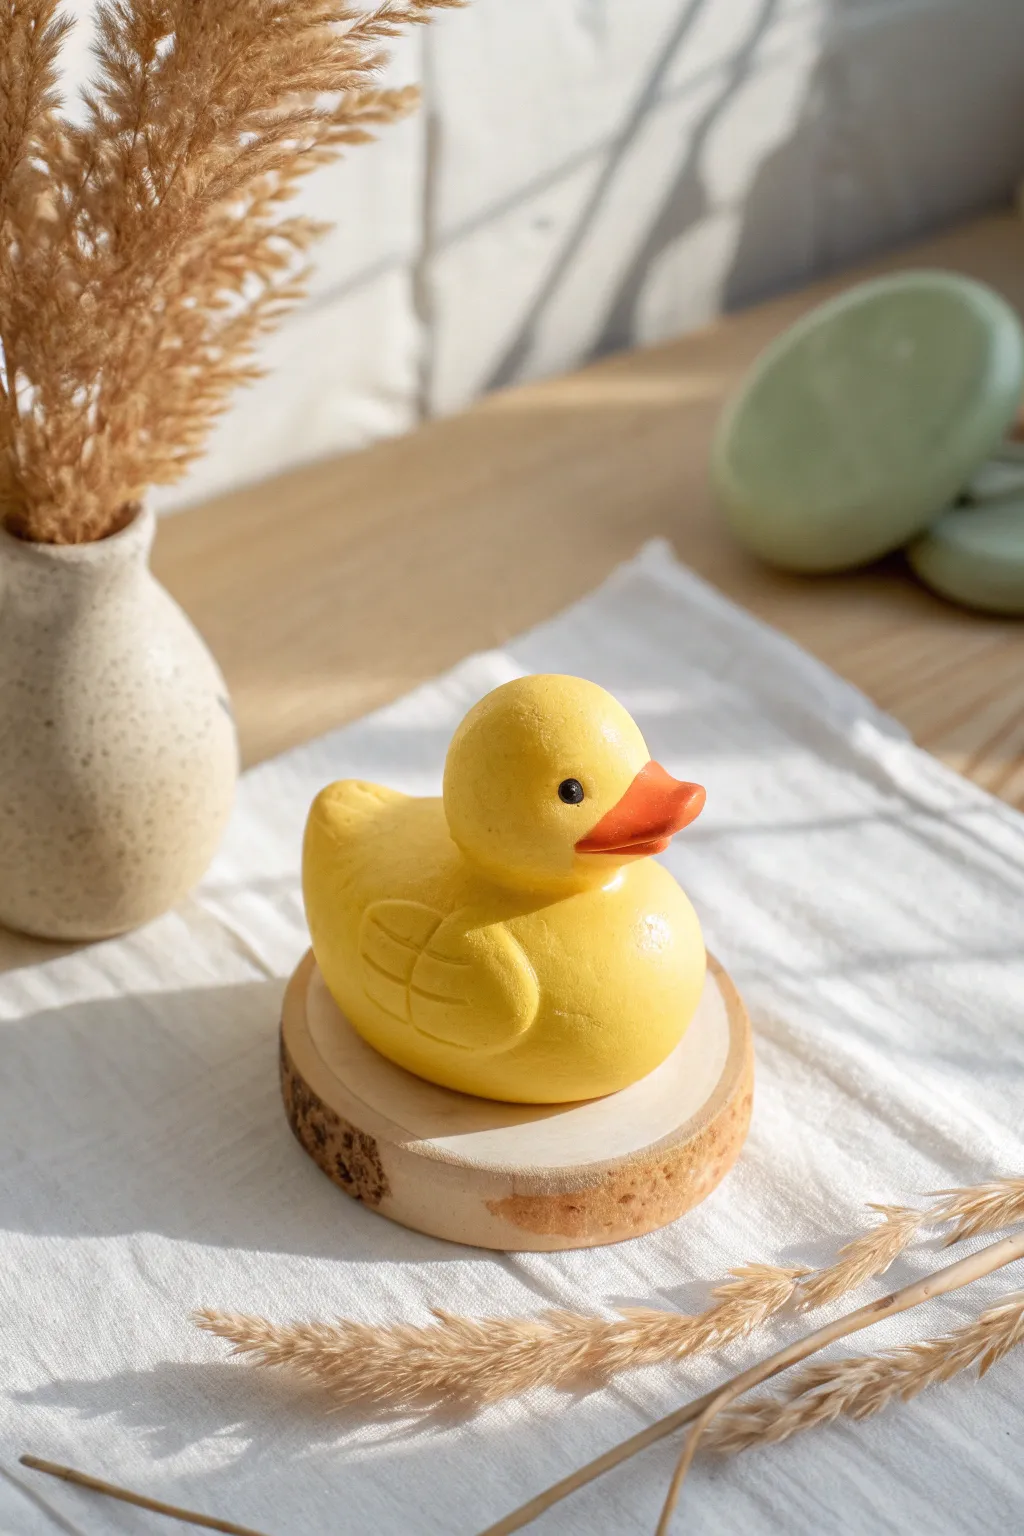
This cheerful little duck features a smooth, matte finish and a distinctively flat, wide beak that gives it plenty of personality. Sitting atop a natural wood slice, it makes for a minimalist and adorable desk companion.
Step-by-Step Tutorial
Materials
- Bright yellow polymer clay
- Orange polymer clay
- Black polymer clay (tiny amount)
- Small wooden slice (for display)
- Clay sculpting tools (needle tool, small ball tool)
- Acrylic roller
- Wet wipes
- Oven and baking sheet
- Matte varnish (optional)
Step 1: Sculpting the Body
-
Condition the Clay:
Begin by kneading your yellow polymer clay until it is soft and pliable. This prevents cracking later on. Roll it into a smooth, seamless ball about the size of a walnut. -
Shape the Base:
Gently press the ball onto your work surface to flatten the bottom. Use your palms to taper one end slightly upwards to create the tail area, forming a teardrop shape that is fuller at the chest. -
Form the Tail Feather:
Pinch the tapered end delicately to sharpen the tail point. Curve it slightly upward for a perky look. -
Create the Head:
Roll a second, slightly smaller ball of yellow clay for the head. It should be proportional to the body but large enough to look cute. -
Attach the Head:
Place the head onto the front, rounded part of the body. Press down firmly but gently to adhere the pieces. I like to use a silicone tool or my finger to blend the clay slightly at the neck seam for a stronger bond.
Dirty Yellow Clay?
Yellow clay picks up lint easily. Keep a pack of wet wipes nearby and clean your hands and tools thoroughly before handling lighter colors to keep them pristine.
Step 2: Adding Details
-
Shape the Wings:
Create two small flattened teardrop shapes from yellow clay. These should mirror the curve of the body. -
Detail the Wings:
Using a needle tool or a dull knife, lightly press two curved lines into each wing to simulate feathers. Don’t cut all the way through; just create an impression. -
Attach the Wings:
Press one wing onto each side of the body. Angle them so the top curves around the shoulder area and the tips point toward the tail. -
Prepare the Beak:
Take a small amount of orange clay and roll it into a short oval. Flatten it significantly—this duck is known for that flat, wide bill. -
Sculpt the Bill Shape:
Pinch the front corners of the orange oval slightly to square it off, then gently press the center to give it a slight concave curve. -
Attach the Beak:
Center the orange piece on the lower half of the head face. Press it on securely. -
Add Beak Details:
Use a needle tool to scratch a tiny horizontal line on the sides of the beak to suggest a mouth opening, or poke two tiny nostrils on top. -
Create the Eyes:
Roll two microscopic balls of black clay. These need to be tiny to maintain the cute scale. -
Place the Eyes:
Press the black beads into the clay just above the beak corners. Embedding them slightly ensures they won’t pop off later.
Step 3: Finishing Touches
-
Smooth Fingerprints:
Before baking, gently rub the entire surface with a drop of baby oil or clay softener on your finger to remove any stray fingerprints or lint. -
Bake the Sculpture:
Place your duck on a baking sheet lined with parchment paper or cardstock. Bake according to your specific clay package instructions (usually 275°F/135°C for 15-30 minutes per 1/4 inch thickness). -
Cool Down:
Let the duck cool completely in the oven with the door cracked open to prevent thermal shock cracking. -
Optional Varnish:
If you want to protect the surface, brush on a thin layer of matte varnish. Avoid glossy finishes to keep the soft look from the photo. -
Final Display:
Once dry, place your finished duck onto the small wooden slice to complete the rustic, charming presentation.
Make it a Family
Create a whole row of ducks by varying the size of the clay balls. Make a tiny duckling version and glue it to the wood slice right next to the mother.
Enjoy the simple charm this sunny little character brings to your space


What Really Happens Inside the Kiln
Learn how time and temperature work together inside the kiln to transform clay into durable ceramic.
Pocket-Sized Octopus With Big Eyes
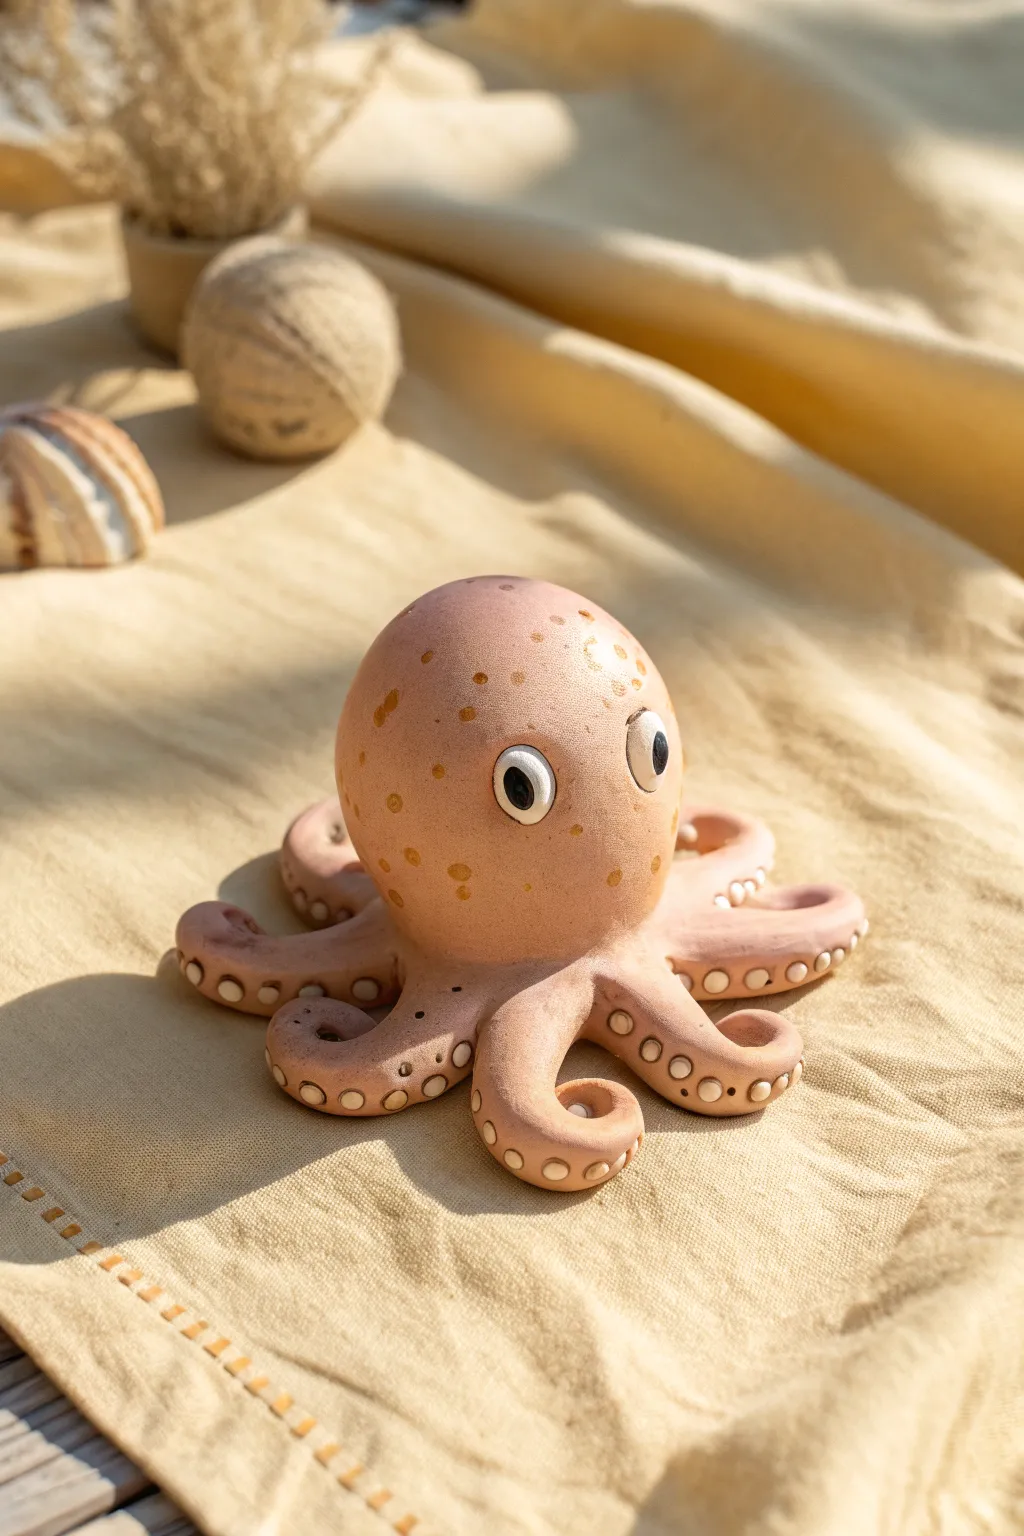
This charming, rosy-hued octopus is a perfect beginner sculpture that focuses on simple shapes and expressive details. With its speckled skin and wide, curious eyes, this little sea creature brings a touch of whimsy to any shelf or desk.
Step-by-Step
Materials
- Pink or terracotta colored polymer clay
- White polymer clay
- Black polymer clay
- Gold acrylic paint
- Modeling tools (ball tool, needle tool)
- Small paintbrush
- Work surface (tile or mat)
- Oven (for baking according to clay package)
Step 1: Body Formation
-
Prepare the main clay:
Start by conditioning your pink or terracotta clay until it is soft and pliable. Roll it into a smooth, round ball about the size of a golf ball or a large walnut. -
Shape the head:
Gently roll the clay between your palms to elongate it slightly into a teardrop or egg shape. The wider, rounded end will become the top of the head. -
Divide the tentacles:
Set aside the main head shape. Roll eight smaller, equal-sized sausages of clay for the tentacles. They should be thicker at one end and taper down to a point. -
Attach the tentacles:
Turn the head upside down. Press the thicker ends of the eight tentacles onto the bottom center of the head shape, arranging them in a circle. -
Blend the seams:
Use a modeling tool or your thumb to smooth the clay where the tentacles join the head. I find blending downward creates a seamless transition so the octopus looks like one solid piece. -
Pose the tentacles:
Flip the octopus upright. Curl the ends of the tentacles outward and upward in playful spirals to give the sculpture movement and life.
Clean Clay Pro Tip
Keep wet wipes handy! White clay picks up dust easily. Wipe your hands and tools thoroughly before handling the white clay for the eyes and suction cups.
Step 2: Adding Details
-
Review the shape:
Check the symmetry of the head and the spread of the legs. Adjust the pose now before adding delicate details. -
Create suction cups:
Roll many tiny balls of white or light cream clay. These will be the suction cups. Make them varying sizes, with slightly larger ones for the thicker parts of the tentacles. -
Apply suction cups:
Press the tiny balls onto the underside and curling edges of the tentacles. Flatten them slightly with your fingertip to ensure they stick well. -
Indent the cups:
Use a small ball tool or the rounded end of a paintbrush to press a dimple into the center of each white suction cup ball, giving them their characteristic ring shape. -
Make the eyes:
Roll two balls of white clay for the eyes. Flatten them slightly into thick discs and press them securely onto the front of the face. -
Add pupils:
Roll two very small balls of black clay. Press these onto the center of the white eye discs to create the pupils. -
Add texture holes:
Use a needle tool or small toothpick to poke tiny, random holes across the top of the head and upper tentacles for textural pores.
Step 3: Finishing Touches
-
Bake the sculpture:
Place your finished octopus on a baking sheet or tile. Bake it in the oven according to the specific temperature and time instructions on your brand of polymer clay. -
Cool down:
Allow the sculpture to cool completely before handling it again, as the clay is fragile while hot. -
Prepare the paint:
Squeeze a small amount of gold acrylic paint onto a palette or scrap paper. -
Add speckles:
Dip a fine-tip brush into the gold paint. Dab irregular groups of dots across the forehead and the tops of the tentacles. -
Seal the piece (optional):
If you want extra durability or shine, coat the cooled piece with a matte or satin varnish, being careful not to let it pool in the suction cup indentations.
Tentacle Trouble?
If tentacles droop or flatten too much while working, prop them up with bits of foil or tissue paper during sculpting and baking to maintain their curl.
Now you have a whimsical little sea creature ready to guard your desk treasures
Tiny Snail With a Spiral Shell
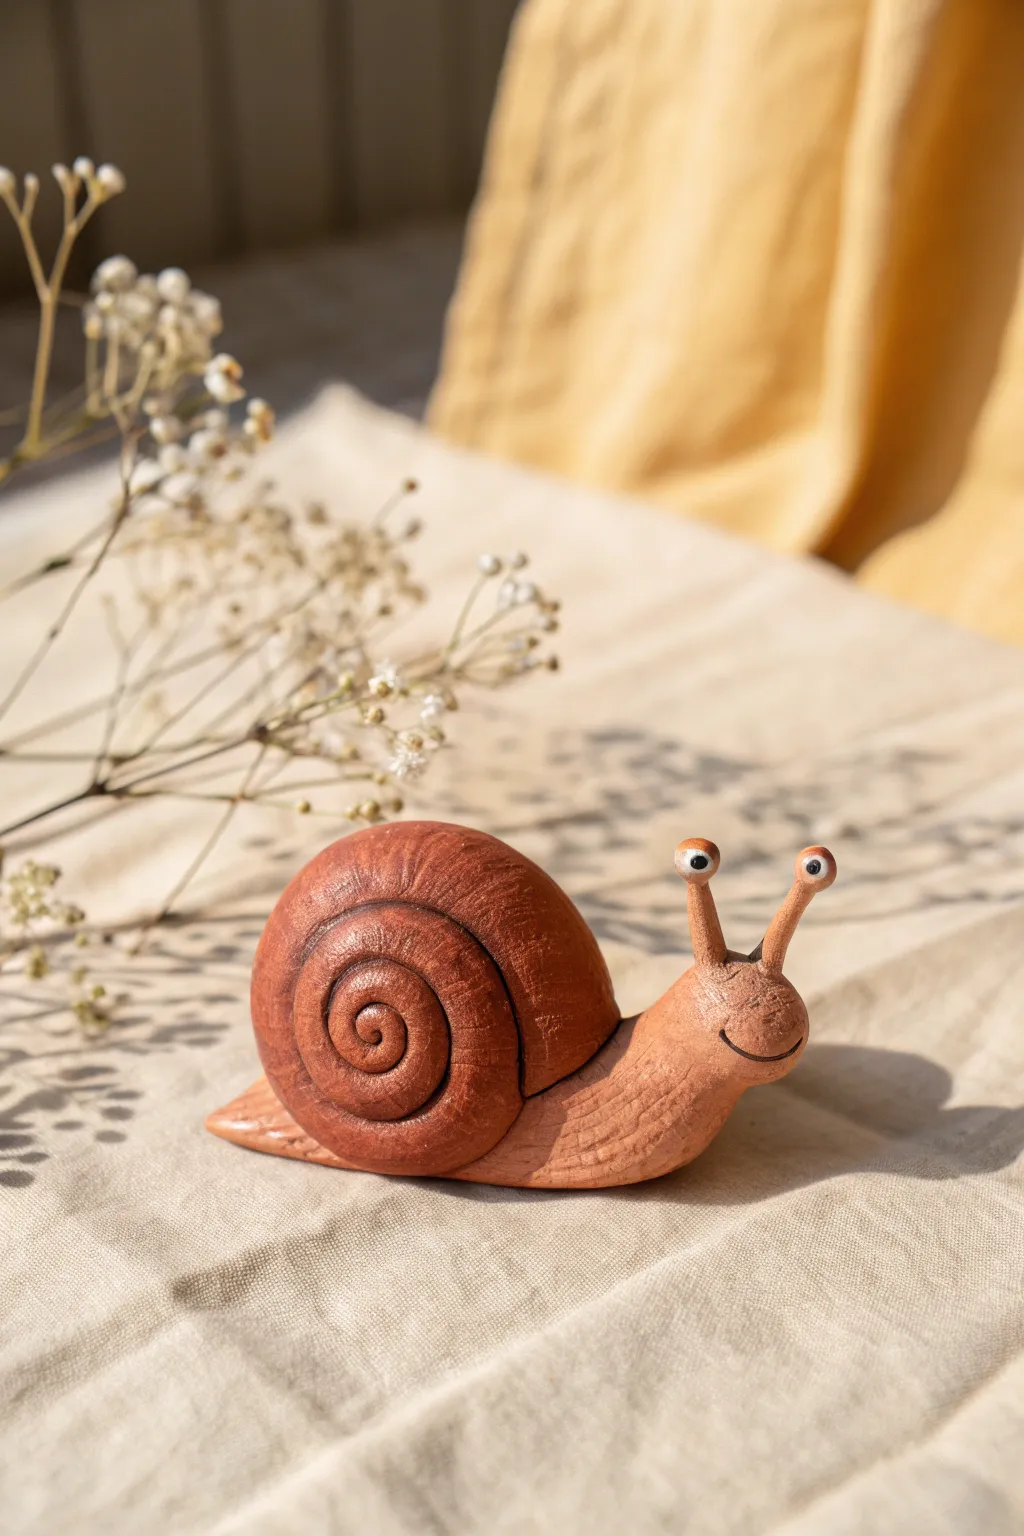
This charming little snail combines a textured, wood-like finish with a whimsical expression. Perfect for beginners, this project teaches you how to create distinct textures and assembling multiple components into a cohesive, adorable sculpture.
Step-by-Step Guide
Materials
- Polymer clay (terracotta or reddish-brown color)
- Polymer clay (lighter beige or tan color)
- Small amount of white and black clay (for eyes)
- Needle tool or toothpick
- Ball stylus tool
- Acrylic paint (dark brown/burnt umber)
- Paintbrush
- Paper towel or sponge
- Craft knife
- Baking sheet/tile
Step 1: Forming the Body
-
Shape the base:
Start with a ball of the beige or tan clay about the size of a walnut. Roll it into a thick log shape that tapers slightly at one end to form the tail. -
Design fine texture:
Using a needle tool, gently scratch fine, horizontal lines all along the sides of the body. These lines should mimic the wrinkled skin of a real snail or fine wood grain. -
Create the chest:
Gently press the front part of the log upward to create an elevated neck area where the head will attach. -
Flatten the base:
Tap the bottom of the body on your work surface to create a flat belly so the snail sits stable without tipping over.
Step 2: Sculpting the Head & Eyes
-
Form the head:
Roll a smaller ball of beige clay and attach it to the elevated neck area, blending the seam with your finger or a smoothing tool until it looks like one piece. -
Make the stalks:
Roll two small, thin cylinders for the eye stalks. Attach them firmly to the top of the head, blending the clay at the base. -
Carve the smile:
Use a needle tool or a small knife to carve a wide, curved smile into the side of the head. I like to make it slightly asymmetrical for extra character. -
Add eyeballs:
Roll two tiny balls of white clay and press them onto the tips of the stalks. Add distinct, microscopic dots of black clay for the pupils.
Texturing Tip
Vary the pressure on your needle tool when creating the body lines. Deeper lines catch more antique wash later, creating a richer, more realistic wood look.
Step 3: Crafting the Spiral Shell
-
Prepare the shell clay:
Take a large ball of the darker terracotta clay. Roll it into a very long, tapered snake, thicker at one end and getting thinner toward the tail. -
Coil the spiral:
Starting from the thinnest end, roll the snake inward tightly to form a flat spiral disc. Try to keep the coils snug against each other. -
Dome the shape:
Once coiled, gently press the center of the spiral outward (from the ‘back’ or inside) to give the shell a domed, 3D shape rather than a flat disc. -
Add shell texture:
Use your needle tool to score radial lines across the coils, following the curve of the shell to simulate growth ridges. -
Attach shell to body:
Score the back of the snail’s body and the underside of the shell to create a rough surface. Press the shell firmly onto the back of the body.
Try a Gloss Coat
After the paint wash is fully dry, apply a high-gloss varnish only to the eyeballs and the shell. This contrast makes the snail look slimy and alive.
Step 4: Finishing Touches
-
Refine visible seams:
Check where the shell meets the body. Use a small tool to tuck the clay in so the shell looks like it’s resting naturally on the back. -
Bake the piece:
Bake your snail according to the package instructions for your specific brand of polymer clay. Let it cool completely. -
Apply an antique wash:
Dilute a small amount of dark brown acrylic paint with water. Brush this wash over the entire fully cooled sculpture. -
Wipe away excess:
Quickly wipe the surface with a paper towel or sponge before the paint dries. The dark paint will stay in the textured grooves, highlighting the ‘wood’ grain effect.
Now you have a rustic little friend ready to sit on a shelf or in a plant pot

TRACK YOUR CERAMIC JOURNEY
Capture glaze tests, firing details, and creative progress—all in one simple printable. Make your projects easier to repeat and improve.
Sleepy Owl Perch Figurine
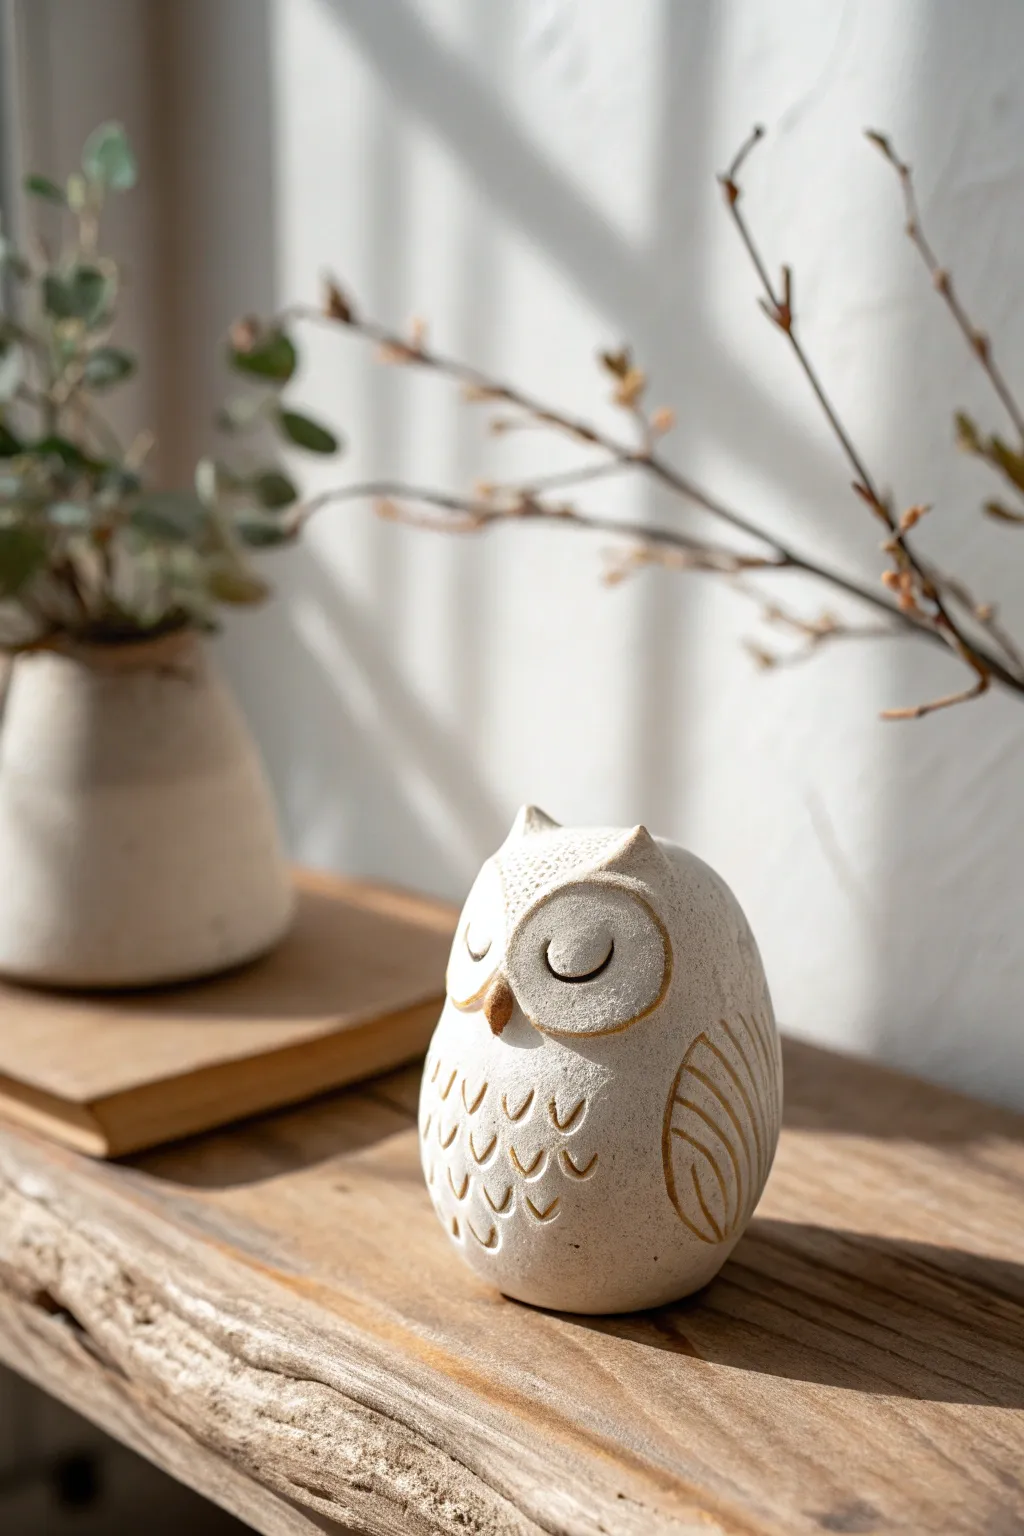
Capture the essence of peaceful slumber with this minimalist clay owl sculpture. Its smooth, rounded form and delicate carved feathers make it a charming addition to any bookshelf or bedside table, offering a serene vibe with its simplistic design.
Detailed Instructions
Materials
- White air-dry clay or polymer clay (approx. 200g)
- Clay modeling tools (specifically a needle tool and a small loop tool)
- Small rolling pin
- Water (for smoothing)
- Fine-grit sandpaper
- Acrylic paint (warm white/cream and brown gold)
- Small detail paintbrush
- Protective varnish (matte)
Step 1: Shaping the Base Form
-
Form the body:
Start with a ball of white clay about the size of a tennis ball. Roll it between your palms until it is smooth and crack-free, then gently shape it into a rounded egg shape, slightly flatter on the bottom so it stands securely. -
Create the head slope:
Using your thumb, gently press into the upper third of the egg shape to define where the head merges into the body. You want a continuous, organic slope rather than a segmented snowman look. -
Pinch the ear tufts:
At the very top of the head, pinch two small sections of clay upwards to create the distinct horned owl ear tufts. Smooth the clay downwards so they integrate seamlessly with the forehead. -
Refine the surface:
Dip your finger in a tiny bit of water and rub it over the entire surface of the owl to smooth out any fingerprints or uneven bumps. The goal is a matte, stone-like finish.
Step 2: Carving the Details
-
Define the face mask:
Using a modeling tool or the back of a spoon, carve a shallow, heart-shaped indentation for the face mask area. This should be subtle, just enough to frame the eyes. -
Add the beak:
Roll a tiny, grain-of-rice-sized piece of clay into a cone. Score the center of the face area and use a dab of water to attach the beak firmly, smoothing the edges into the face. -
Sculpt the eyes:
With a needle tool, carve two U-shaped curves for the closed eyelids. Make these lines deep enough to hold a paint wash later but not so deep they distort the face. -
Add the wing outlines:
On the sides of the body, use a loop tool or needle to carve a large oval shape for the wing. Draw curved lines inside this oval to suggest folded primary feathers. -
Texture the chest:
I like to start from the bottom and work my way up for this step. Use a small U-shaped carving tool or the tip of a straw cut in half to press rows of ‘V’ or ‘U’ shapes into the chest area to mimic fluffy feathers. -
Detail the forehead:
Use a needle tool to create tiny, stippled dots on the forehead area between the ears for added texture contrast.
Clean Lines
If your carving tool drags or creates crumbs, let the clay dry for about 30 minutes to firm up slightly before carving the finer details like the chest feathers.
Step 3: Finishing Touches
-
Let it dry:
Allow the clay to dry completely according to package instructions. For air-dry clay, this usually takes 24-48 hours. Turn it occasionally to ensure even drying. -
Sand imperfections:
Once bone dry, use fine-grit sandpaper to gently smooth any rough ridges or sharp bits left from the carving process. -
Apply the base wash:
Mix a warm white or cream acrylic paint with a little water. Paint the entire owl to give it a unified, stony color. Wipe away excess with a paper towel if you want the raw clay texture to show through. -
Highlight the carving:
Dilute a brown-gold acrylic paint until it’s very watery. Carefully run this wash into the carved lines of the eyes, wings, and chest feathers. -
Wipe back:
Immediately wipe the surface with a damp cloth. The dark paint will stay trapped in the crevices, highlighting your texture, while the raised surfaces return to the creamy white color. -
Seal the work:
Finish with a coat of matte protective varnish to seal the paint and protect the clay from moisture.
Make it a Trio
Create a family of owls by making two smaller versions in varying heights. Try slightly different wing patterns on each to give them individual personalities.
Place your little owl near a window to catch the light on its textured feathers
Mini Hedgehog With Dot Spines
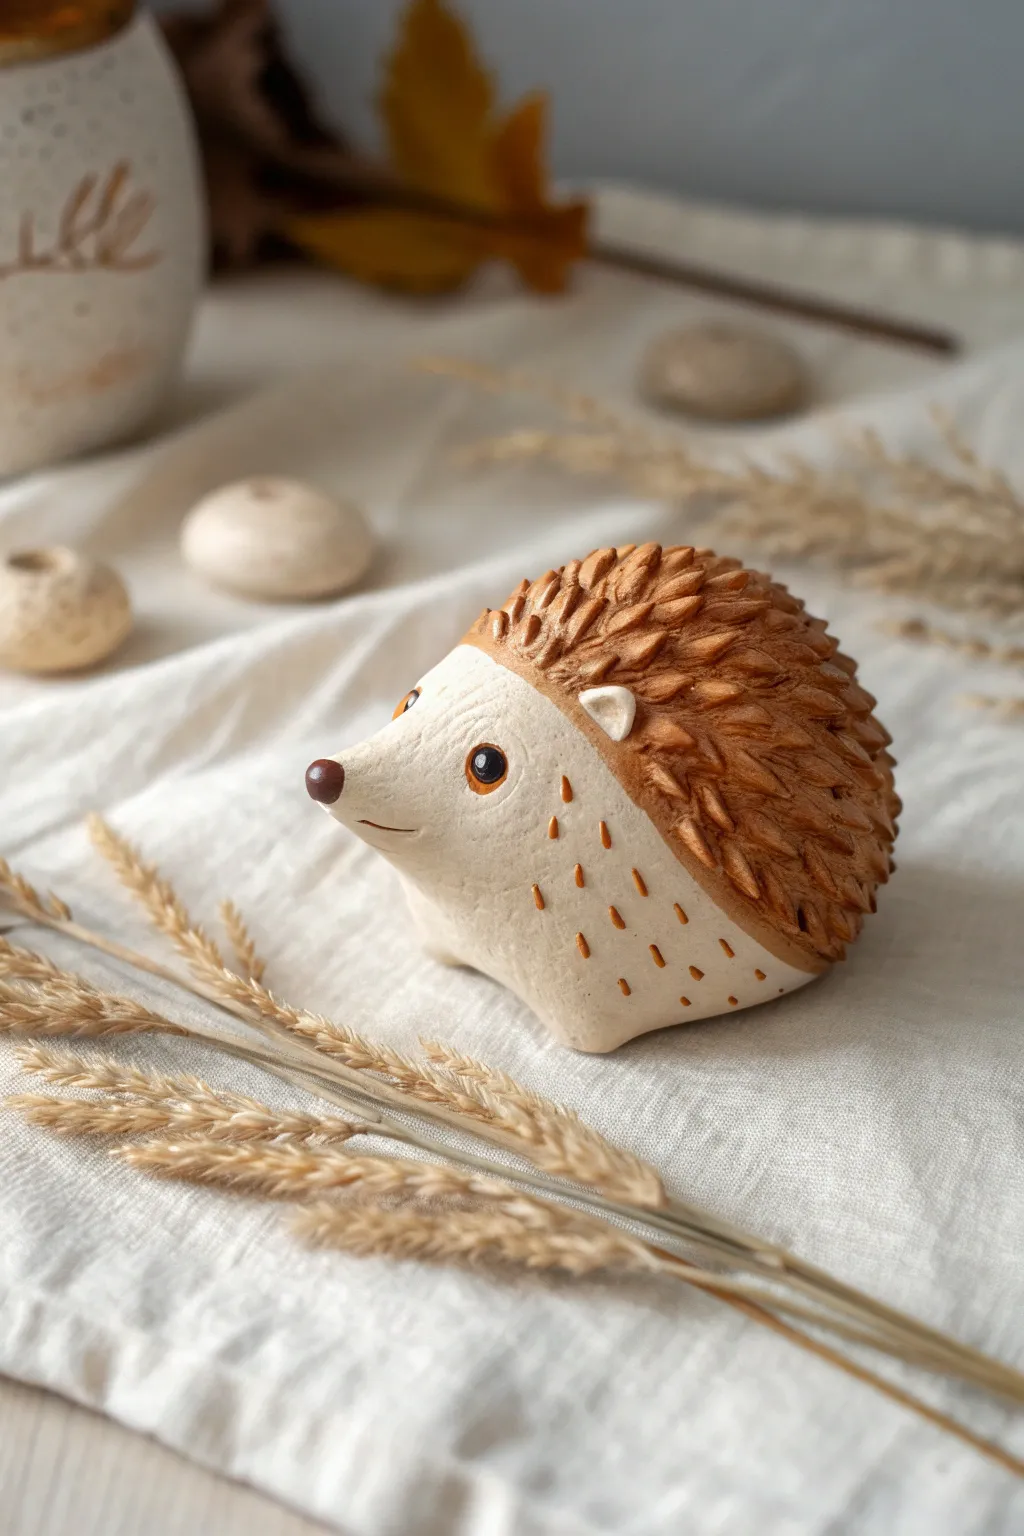
This adorable little hedgehog brings a touch of woodland whimsy to any shelf with its carefully textured spines and gentle expression. The contrast between the smooth, creamy face and the rugged, toasted brown back makes for a sophisticated yet simple piece.
How-To Guide
Materials
- Polymer clay or air-dry clay (White/Cream)
- Polymer clay (Brown) or brown acrylic paint
- Modeling tool (small pointed or spoon-shaped)
- Needle tool or toothpick
- Small ball stylus
- Acrylic paints (Dark brown, Black, Orange-brown)
- Fine detail paintbrush
- Aluminum foil (for core)
- Gloss Varnish (optional)
Step 1: Shaping the Base
-
Create the core:
Start by scrunching a small piece of aluminum foil into a rough egg shape. This saves clay and keeps the sculpture lightweight. -
Mix your base color:
If using polymer clay, condition your white or cream clay until soft. If you want a specific warm beige like the photo, mix a tiny dot of brown into a large chunk of white. -
Cover the foil:
Flatten your light clay into a sheet and wrap it completely around the foil egg. Roll it between your palms until it is perfectly smooth and seamless. -
Form the snout:
Gently pinch and pull one end of the egg shape to form a slightly upturned, pointed snout. The hedgehog’s nose should lift just a tiny bit. -
Flatten the base:
Tap the bottom of the figure on your work surface to create a flat base so the hedgehog stands stably on its own.
Step 2: Adding the Spines
-
Prepare the back piece:
Roll out a sheet of brown clay about 1/4 inch thick. If you are using white air-dry clay, you can do this part in white and paint it later, but using colored clay is easier. -
Apply the ‘cap’:
Drape the brown sheet over the back two-thirds of the body, shaping it like a rounded cap or hood. Smooth the edges down, blending them slightly or leaving a clean, curved line where the spines meet the face. -
Texture the spines:
Using a small pointed modeling tool or a sculpting spatula, press into the brown clay and flick upward to create raised, triangular tufts. Start at the bottom edge and work your way up to the top in overlapping rows. -
Refine the texture:
Go back over the spines to ensure they look layered, resembling pinecone scales. The texture should feel organic and directional, flowing from front to back.
Cracking Issues?
If using air-dry clay, smooth water over any seams before drying. Minor cracks can be filled with a ‘slip’ made of clay mixed with water, then sanded smooth.
Step 3: Details & Features
-
Add the ears:
Roll two huge tiny balls of the light clay. Flatten them slightly and press them onto the sides of the head, just where the brown ‘cap’ meets the face. Use a ball tool to indent the centers. -
Attach the nose:
Take a tiny sphere of dark brown clay and press it onto the very tip of the snout. I find that flattening the back of the nose ball helps it stick better. -
Sculpt the mouth:
Use a needle tool or a thin blade to carefully incise a small smile line under the snout. -
Add side dashes:
For the decorative dashes on specific side of the body, press slight indentations using a needle tool in a scattered pattern. -
Bake or Dry:
If using polymer clay, bake according to the package directions (usually 275°F for 15-30 mins). If using air-dry clay, let it sit for 24-48 hours until fully hard.
Texture Trick
Don’t have sculpting tools? A standard cuticle pusher or the tip of a teaspoon handle makes excellent curved indentations for the spines.
Step 4: Painting & Finishing
-
Paint the eyes:
Using a fine brush, paint round black eyes. Once dry, add a tiny white dot for a highlight to bring the character to life. -
Enhance the spines:
If you used a solid brown clay, dry brush a lighter tan or orange-brown paint over just the tips of the raised spines to accentuate the texture. -
Paint the dashes:
Carefully fill the small indentations on the side of the body with orange-brown paint using your finest brush tip. -
Gloss the nose:
Apply a tiny dab of gloss varnish to the nose and eyes to make them look wet and shiny.
Place your finished hedgehog among some dried leaves or on a cozy windowsill to complete the autumnal vibe
Mini Bee With Striped Body
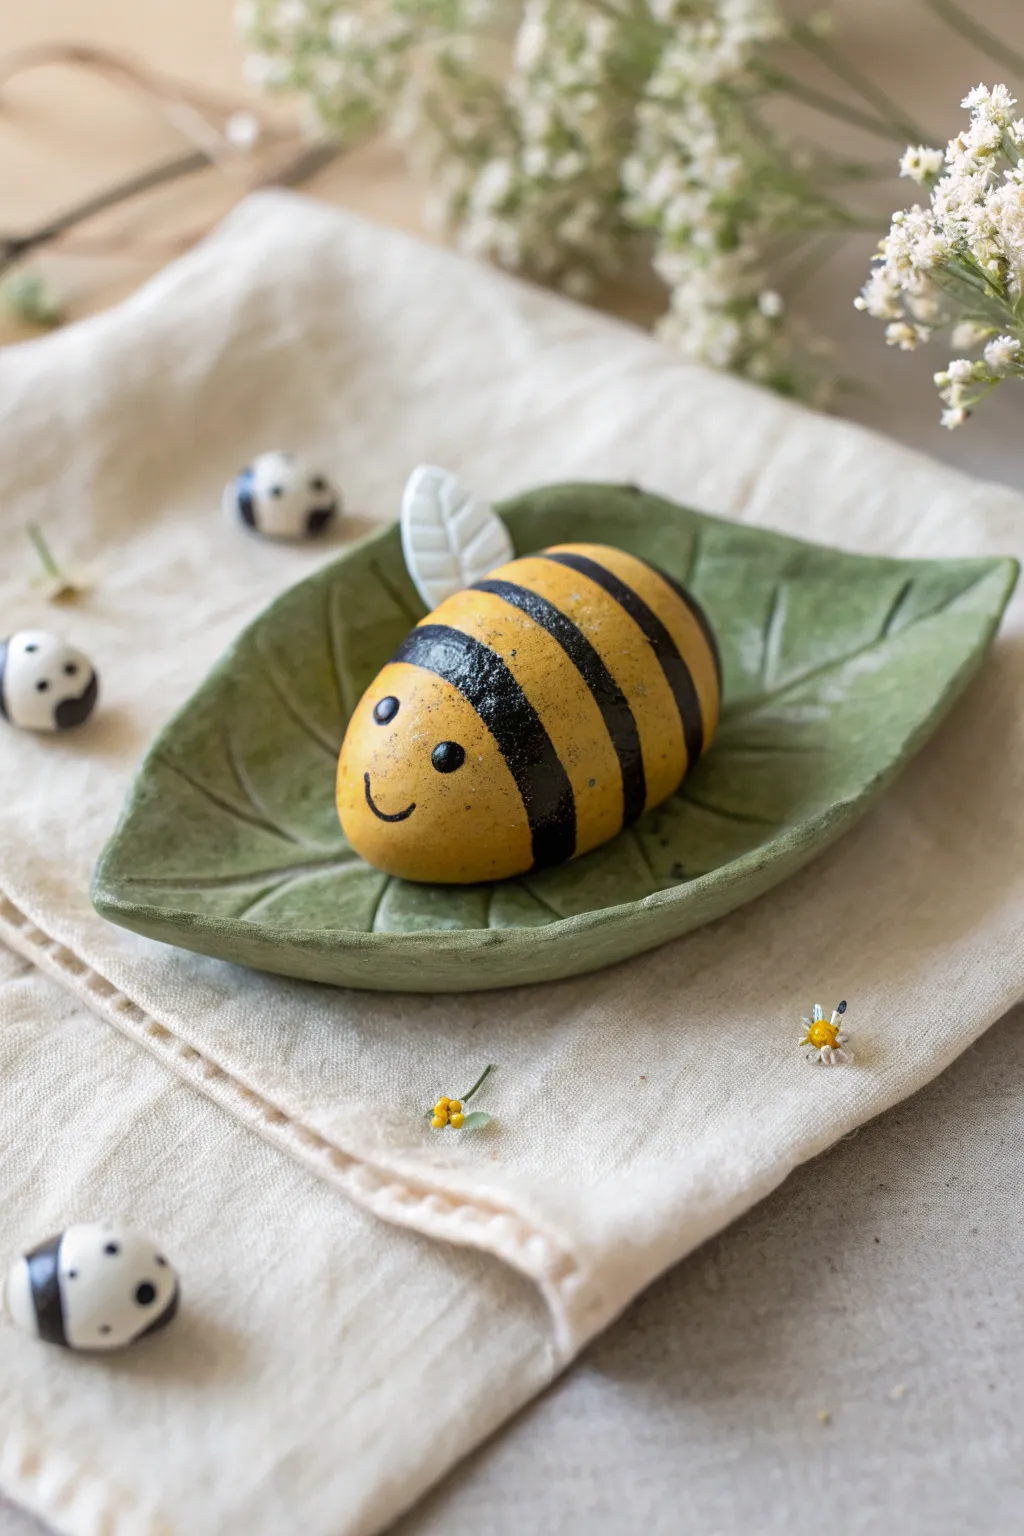
This cheerful little bee rests comfortably on a textured leaf dish is perfect for bringing a touch of nature indoors. With its bright yellow body and friendly painted face, it makes for a delightful desk companion or a sweet handmade gift.
Step-by-Step
Materials
- Air-dry clay or polymer clay (white)
- Acrylic paints (mustard yellow, black, white, sage green)
- Sculpting tools (needle tool, smooth modeling tool)
- Small paintbrush (fine tip)
- Rolling pin
- Real leaf (for texture impression)
- Clear varnish or sealant (glossy for the bee, matte for the leaf)
Step 1: Sculpting the Leaf Base
-
Prepare the Clay:
Condition a ball of white clay until it is soft and pliable. Roll it out into a flat slab that is roughly 1/4 inch thick. -
Create Texture:
Take a real leaf from your garden—one with prominent veins works best—and press it firmly onto the clay slab. Go over it gently with a rolling pin to transfer the detailed texture. -
Cut the Shape:
Using a needle tool or a craft knife, carefully cut around the outline of the leaf impression. Peel away the excess clay. -
Form the Dish:
Gently lift the clay leaf and pinch the ends slightly to curve them upward. This creates a shallow bowl shape that will cradle your bee.
Smoothing Trick
Before drying, use a barely damp finger or brush to smooth out fingerprints on the bee’s round body for a flawless finish.
Step 2: forming the Bee
-
Roll the Body:
Take a fresh piece of clay about the size of a walnut. Roll it into a smooth oval shape, tapering it slightly at one end to create the bee’s abdomen. -
Shape the Wings:
Create two very small teardrop shapes from white clay. Flatten them slightly and use a needle tool to press a simple vein pattern into the center or create a grid texture. -
Attach the Wings:
Press the narrow end of the wings onto the upper back of the bee body. I like to score the clay slightly where they join to ensure a strong bond. -
Dry the Pieces:
Set both the leaf dish and the bee aside to dry completely. If using oven-bake clay, bake according to the manufacturer’s instructions.
Step 3: Painting & Details
-
Base Coat the Bee:
Paint the entire body of the bee with a warm mustard yellow acrylic paint. You may need two coats for full opacity. -
Paint the Stripes:
Using a fine-tip brush and black acrylic paint, carefully draw horizontal stripes across the bee’s back. Try to keep the lines slightly curved to emphasize the roundness of the body. -
Paint the Leaf:
Mix a sage green color and paint the entire leaf dish. While the paint is still wet, you can wipe it back slightly with a paper towel to let the paint settle into the vein textures for depth. -
Add the Face:
Dip the very end of a paintbrush handle or a dotting tool into black paint. Dot two eyes near the front of the face. -
Draw the Smile:
paint a tiny, curved smile underneath the eyes using your finest brush. -
Add Highlights:
Once the black eyes are dry, add a minuscule dot of white paint to each eye to bring the character to life. -
Paint the Wings:
Paint the wings solid white. This helps them stand out against the yellow body. -
Seal the Project:
Finish by applying a glossy varnish to the bee to make it look shiny and bug-like. Use a matte varnish for the leaf to keep it looking natural.
Make a Colony
Use tiny scraps of leftover clay to make miniature ladybugs (like in the photo) to scatter around the main display.
Place your finished bee onto its leaf perch and enjoy your new desk pet
Tiny Whale With a Water Spout
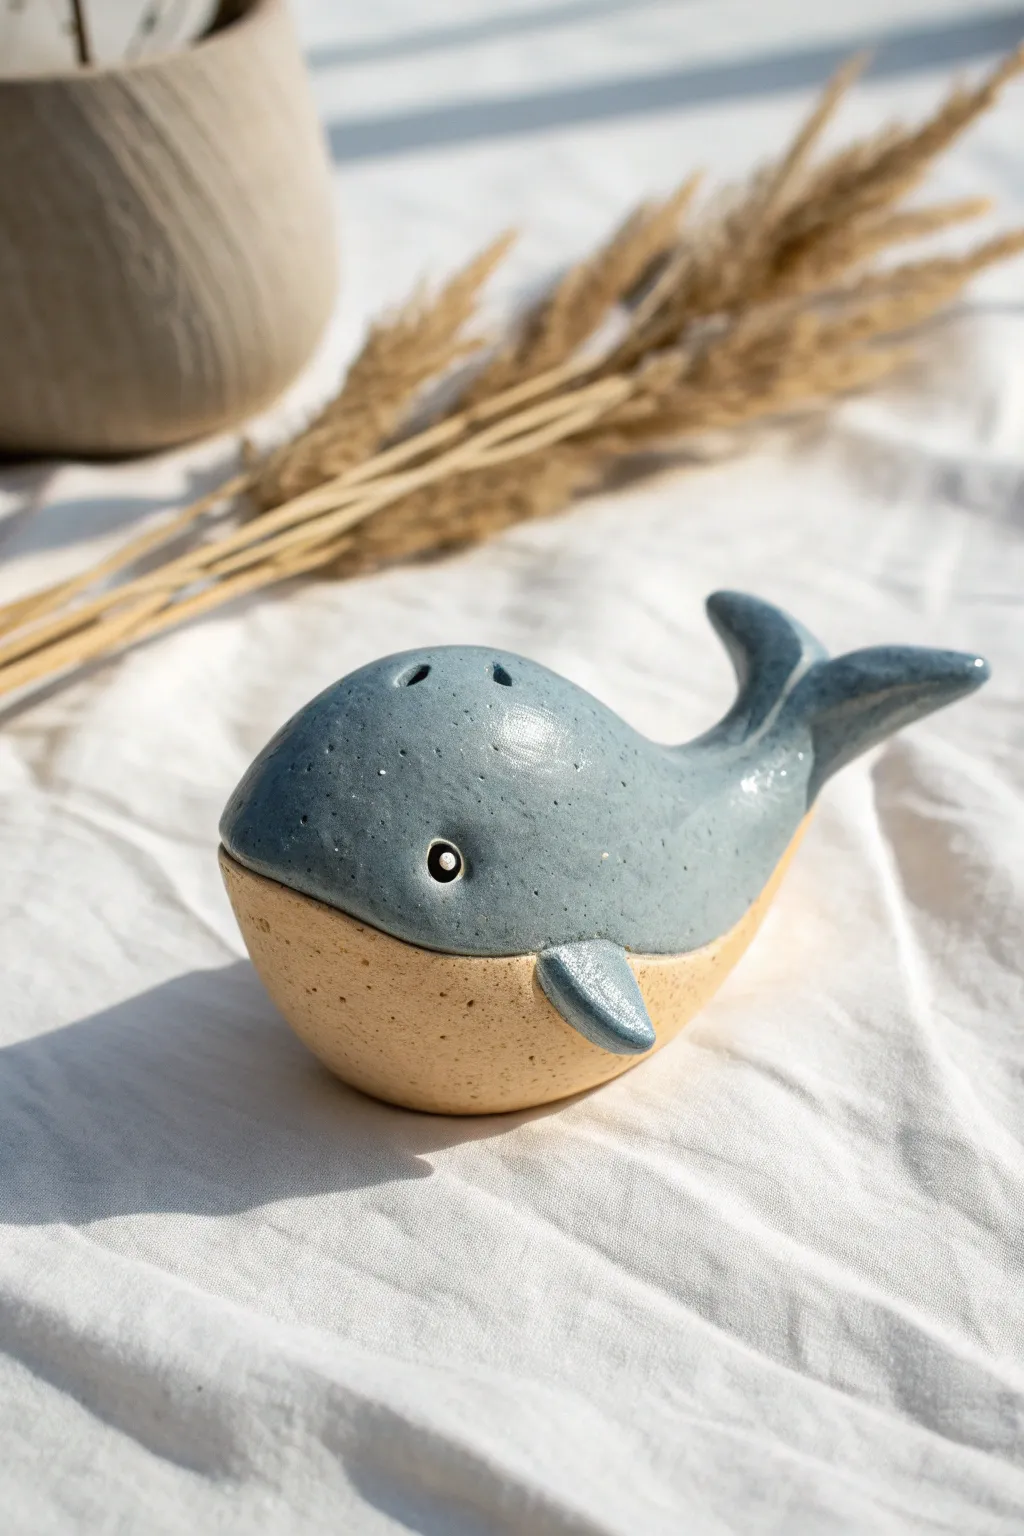
This charming little whale brings the ocean to your shelf with its smooth, glossy blue-grey back and sandy textured belly. It features delicate speckling and a sweet expression, making it a perfect beginner-friendly project for exploring two-tone glazing techniques.
Detailed Instructions
Materials
- White stoneware or polymer clay (beige/tan color for base)
- Blue-grey glossy glaze (or acrylic paint + gloss varnish)
- Speckled clay body or speckle glaze additive (optional)
- Needle tool or toothpick
- Small sponge
- Scoring tool (or an old toothbrush)
- Clay slip (if using ceramic clay)
- Small paintbrush
Step 1: Shaping the Body
-
Form the base shape:
Begin with a ball of clay about the size of a tangerine. Gently roll it between your palms to smooth out any cracks. -
Create the teardrop:
Roll one side of the ball slightly more to create a tapered teardrop shape. The fatter end will be the head, and the tapered point will become the tail. -
Flatten the base:
Tap the belly of the whale gently on your work surface to create a flat bottom so it sits stable without rolling over. -
Curve the tail:
Gently bend the tapered tail end upward. You want a smooth, organic curve that looks like the whale is about to dive. -
Form the flukes:
Pinch the very tip of the tail to flatten it horizontally. Use your needle tool to cut a small ‘V’ notch in the center, then round off the edges of the two resulting flukes.
Step 2: Adding Details
-
Make the fins:
Roll two small pea-sized balls of clay. Flatten them into small triangular shapes with rounded corners to create the pectoral fins. -
Attach the fins:
Score the side of the body and the back of the fin (scratch the surface to rough it up). Apply a dab of slip or water, then press the fins onto the lower sides of the whale, smoothing the seams with your finger or a tool. -
Create the eyes:
Use the handle end of a small paintbrush or a rounded tool to press a circular indentation for the eye. Use a needle tool to poke a tiny hole in the center for the pupil. -
Add the blowhole:
On the very top of the head, use a needle tool to pierce two small holes close together to represent the blowhole. -
Smooth the surface:
Take a slightly damp sponge and gently wipe over the entire piece to remove fingerprints and harsh tool marks.
Uneven Glaze Line?
If your line between the belly and back looks shaky, don’t worry. Use a damp stiff brush to tidy the edge before the paint or glaze dries, creating a clean curve.
Step 3: Finishing and Glazing
-
Bisque fire or bake:
If using ceramic clay, fire to bisque temperature. If using polymer clay, bake according to the package instructions and let cool completely. -
Mask the belly:
We want to keep the bottom raw or matte. Use wax resist (for ceramics) or painter’s tape (for acrylics) to cover the bottom third of the whale in a curved line. -
Mix the blue-grey color:
Prepare your blue-grey glaze or paint. If you want that speckled look and your clay isn’t already speckled, mix in some ‘speckle additive’ or flick dark paint flecks into your mix. -
Apply the top coat:
Brush the blue-grey color over the top two-thirds of the whale, covering the fins and tail. I like to apply two to three thin coats for even coverage. -
Highlight the eye:
Carefully paint the rim of the eye white using a detail brush to make it pop against the blue skin. -
Reveal the belly:
Peel off the tape or wipe away any glaze drips from the waxed area. The contrast between the painted top and the natural sandy bottom is key. -
Final gloss:
If using polymer clay/acrylics, apply a high-gloss varnish only to the blue painted areas, leaving the belly matte. For ceramics, perform your final glaze firing.
Make it Functional
Make the whale hollow and enlarge the blowhole slightly. Now your sculpture can double as a tiny incense holder or a single-stem dried flower vase.
Now you have a serene little ocean friend to keep you company on your desk
Cute Mushroom Friend Sculpture
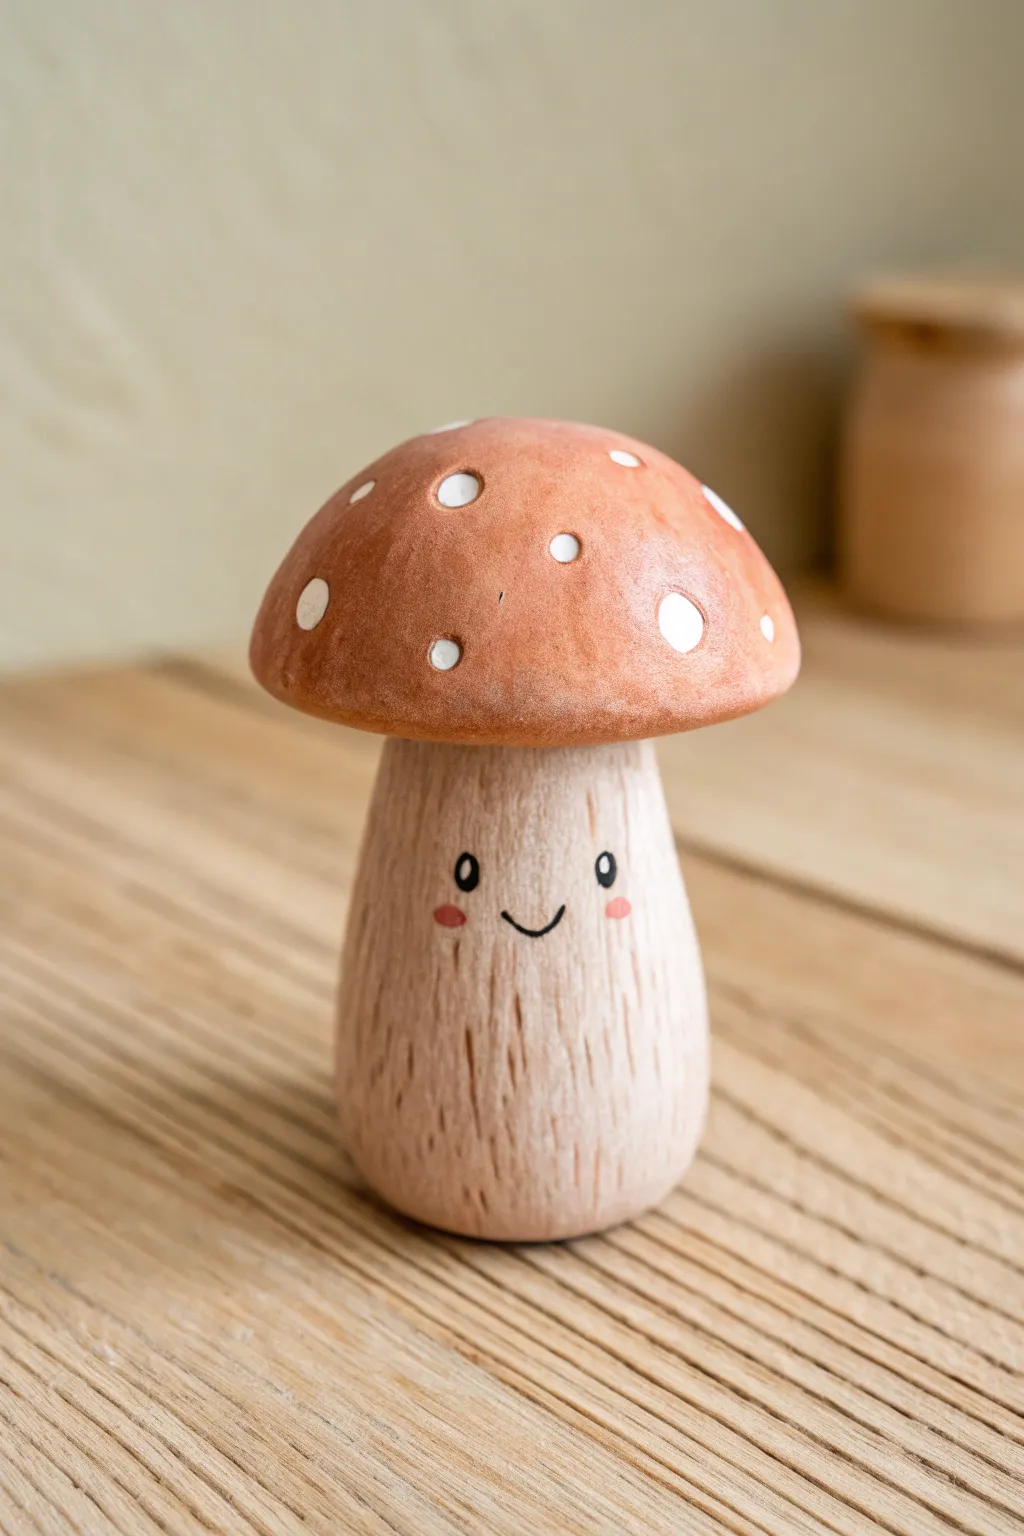
This adorable little fungus friend brings a touch of the forest indoors with its charming smile and faux-wood texture. By using clever carving and painting techniques, you’ll transform simple clay into something that looks like it was whittled by hand.
How-To Guide
Materials
- Polymer clay or air-dry clay (white or beige)
- Acrylic paints (burnt sienna, raw umber, cream/beige, white, black, pink)
- Small detail paintbrush
- Sculpting tools (needle tool and a dedicated dull knife tool)
- Clear matte varnish
- Aluminum foil (optional, for armature)
- Sponge or stiff bristle brush
Step 1: Shaping the Base
-
Form the Stem:
Start by taking a generous ball of clay and rolling it into a cylinder. The cylinder should be thicker at the bottom and slightly tapered toward the top, creating a sturdy base for your mushroom to stand on. -
Create the Cap:
Roll a separate ball of clay for the cap. Flatten the bottom against your table and gently round the top with your palms until you have a smooth, dome shape that matches the width of your stem. -
Join the Pieces:
Score the top of the stem and the bottom of the cap with a needle tool to rough up the surfaces. Press them firmly together, blending the clay at the seam underneath the cap just slightly to ensure a strong bond.
Step 2: Adding Texture
-
Texturing the Stem:
This is the most crucial step for the ‘wood’ effect. Using a needle tool or a dull knife tool, drag vertical lines down the length of the stem. Vary the pressure—some lines should be deep gouges, while others are faint scratches. -
Refining the Grain:
Add smaller, shorter lines in between the long ones to mimic natural wood grain. Don’t worry about being perfect; irregularity makes the wood texture look more authentic. -
Cap Texture:
The cap should look slightly worn but smoother than the stem. Gently tap the surface with a stiff bristle brush or a ball of crinkled aluminum foil to give it a subtle, porous texture rather than a perfectly smooth polish. -
Drying or Baking:
If using polymer clay, bake according to the package instructions. If using air-dry clay, set your mushroom aside in a dry spot for 24-48 hours until fully hardened.
Uneven Texture?
If the clay feels too rough after texturing, lightly brush it with a little water (for air-dry) or baby oil (for polymer) to soften sharp burrs before painting.
Step 3: Painting the Wood Look
-
Base Coat:
Mix a creamy beige color and paint the entire stem. Get the paint deep into all those textured grooves you created earlier. -
Washing the Stem:
Create a watery wash using raw umber paint. Brush this over the dried beige stem, then quickly wipe most of it off with a paper towel or sponge. The dark paint will stay in the vertical cracks, instantly revealing the wood grain. -
Painting the Cap:
Use a burnt sienna or reddish-brown paint for the cap. Apply it somewhat unevenly or sponge it on to create a natural, dappled look rather than a flat, plastic-like finish. -
Adding Spots:
Once the red paint is dry, use a small dotting tool or the back of a paintbrush handle dipped in white paint. Add jagged, irregular circles to the cap. I like to press harder on some to create ‘crater’ effects.
Make it a Family
Make a whole forest family by varying the shapes. Try tall, skinny stems with small caps or wide, stubby stems with huge, flat caps.
Step 4: Bringing it to Life
-
Drafting the Face:
Before painting, lightly mark where the eyes and mouth will go with a pencil to ensure symmetry. Place them centrally on the stem. -
Painting Eyes:
Paint two small, vertical ovals in black for the eyes. Once dry, add a tiny white dot in the upper corner of each oval for a sparkle reflective highlight. -
The Smile:
Using your finest detail brush and thinned black paint, draw a simple, small ‘U’ shape between the eyes for the smile. -
Rosy Cheeks:
Dip a rounded brush tip into pink paint and dab off the excess. Gently stamp two small pink circles just below the outer corners of the eyes for blushing cheeks. -
Final Seal:
Protect your work with a coat of clear matte varnish. This removes any shiny paint finish and unifies the sheen, making the faux-wood texture look even more realistic.
Set your cheerful little mushroom on a shelf or desk to add a cozy woodland vibe to your space
Little Fox With a Curled Tail
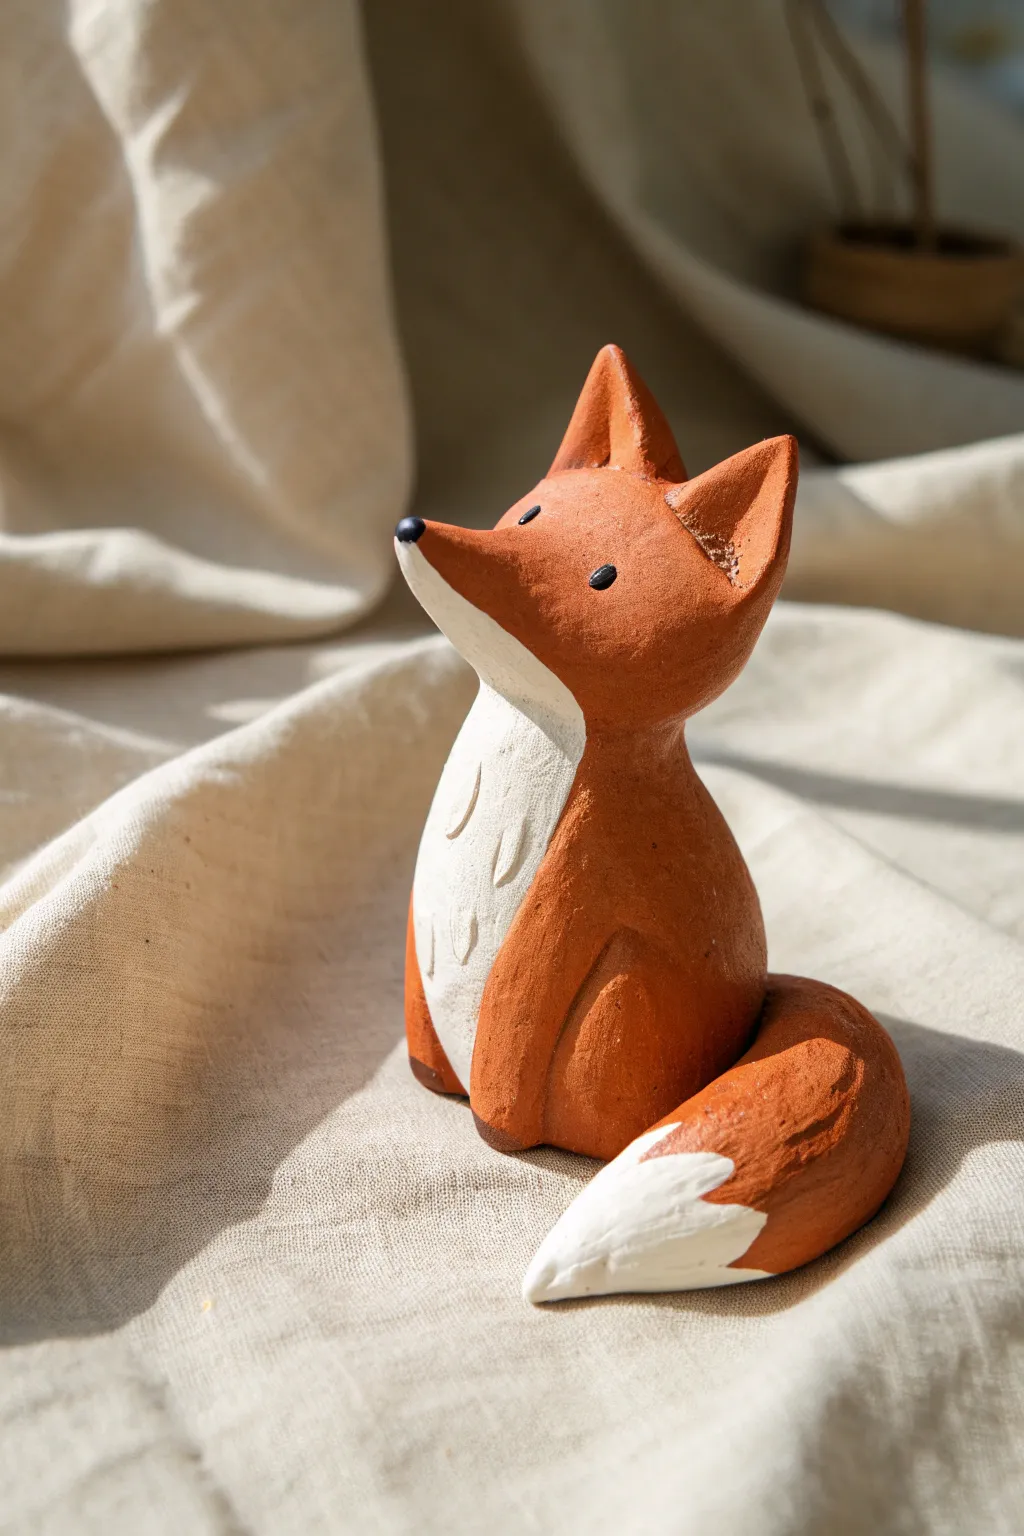
This adorable little fox features a smooth, elongated body and a charming curled tail, capturing a moment of curiosity as he gazes upward. With his warm terracotta tones and simple white markings, he brings a touch of woodland whimsy to any shelf or desk.
Step-by-Step Guide
Materials
- Terracotta-colored air-dry clay (or polymer clay)
- White acrylic paint
- Black acrylic paint
- Small detail paintbrush
- Clay carving tools or a toothpick
- Water in a small cup (for smoothing)
- Aluminum foil (optional, for armature)
- Matte varnish (optional)
Step 1: Shaping the Head and Body
-
Form the base shape:
Start with a medium-sized ball of terracotta clay about the size of a tangerine. Roll it until it is smooth, then gently elongate it into a thick pear shape. This will become the main body and chest. -
Define the neck and head:
Pinch the narrower top part of your pear shape to distinguish the head from the body. You want a smooth transition, not a separate ball, so gently pull the clay upwards to suggest a neck. -
Create the snout:
Gently pull the clay at the very top of the head forward and slightly upward to create the pointy snout. It should look like he is sniffing the air, so aim for a slightly upturned angle. -
Shape the ears:
Take two small, equal-sized pieces of clay and flatten them into triangles. Attach these to the top of the head. Use your fingers or a clay tool to blend the seams perfectly so they look like part of the head, not add-ons. -
Hollow the ears:
Use the rounded end of a small tool or your pinky finger to press a shallow indentation into the front of each ear triangle, giving them depth. -
Refine the pose:
Sit the fox on your work surface. Press down gently so the base flattens and he sits stably. You might want to arch the back slightly to emphasize his alert posture.
Seamless Blending
When attaching the ears or tail, use a drop of water (or ‘slip’ made of wet clay) as glue. Smear the clay across the seam until the join is invisible.
Step 2: Adding Markings and Tail
-
Shape the tail:
Roll a thick sausage of clay, tapering it to a point at one end. This needs to be quite substantial—almost half the size of the body—to get that plush fox look. -
Attach the tail:
Curve the tail around the right side of the fox’s body. Press the thicker end firmly against the lower back/bottom of the fox. Blend the clay seams thoroughly with a little water on your finger. -
Form the back legs:
Roll two small ovals of clay and flatten them slightly. Press these onto the sides of the lower body to create the haunches of the back legs. Blend the edges into the main body so they look like muscles under fur. -
Carve the chest details:
Use a needle tool or toothpick to lightly etch the outline of the white chest patch. Inside this area, press in three or four small, curved indentations to mimic tufts of fur texture. -
Refine the surface:
I always take a moment here to dip my finger in water and smooth out any fingerprints or bumps. The clay should look matte and relatively smooth before drying. -
Let it dry:
Allow your sculpture to dry completely. For air-dry clay, this usually takes 24-48 hours depending on thickness. It will turn a lighter color when fully dry.
Step 3: Painting the Details
-
Paint the chest:
Using white acrylic paint, carefully fill in the chest area you outlined earlier. You may need two coats to get a solid, opaque white against the darker clay. -
Paint the tail tip:
Paint the tapered tip of the tail white. Use a jagged, brush-stroke edge where the white meets the terracotta color to simulate the texture of fur. -
Add the face mask:
Paint the underside of the snout white, extending it down to meet the chest. Keep the line crisp along the jaw. -
Paint the nose:
With a very fine brush or the tip of a toothpick, paint a small, black nose right at the very tip of the snout. -
Add the eyes:
Paint two small black oval eyes on the sides of the head. Place them relatively wide apart to enhance the cute, whimsical expression. -
Protect your work:
Once the paint is fully dry, you can apply a coat of matte varnish to protect the paint and give the clay a unified finish.
Cracks While Drying?
If small hairline cracks appear as the clay dries, mix a tiny amount of fresh clay with water to make a paste and fill the cracks, then smooth it over.
Enjoy the quiet companionship of your new handmade fox friend on your desk
Tiny Toothbrush Holder Monster

Brighten up your bathroom counter with this charming little monster who’s happy to hold your toothbrushes. Modeled from reddish-orange clay, this whimsical character features big goofy eyes, a toothy grin, and a playful ruffled base.
Step-by-Step
Materials
- Terracotta or orange polymer clay
- White polymer clay
- Black polymer clay
- Ball stylus tools (various sizes)
- Needle tool
- Aluminum foil
- Rolling pin
- Two toothbrushes (for sizing)
- Sandpaper (optional)
- Matte varnish
Step 1: Forming the Body
-
Create the core:
Ball up a piece of aluminum foil into a tall, rounded oval shape to act as an armature. This saves clay and keeps the figure lightweight. -
Prepare the base clay:
Condition your orange clay until it is soft and pliable, then roll it into a thick sheet, about 1/4 inch thick. -
Cover the armature:
Wrap the clay sheet around the foil core, smoothing the seams completely with your thumb so the surface is seamless. -
Shape the silhouette:
Gently roll the clay form on your work surface to taper it slightly toward the top, creating a gumdrop shape. -
Create the toothbrush holes:
Use the handle of a paintbrush or the actual toothbrushes to press two distinct, deep holes into the top of the monster’s head. Wiggle them slightly to ensure the opening is wide enough for easy use. -
Form the wavy base:
Along the bottom edge, use your thumb or a large ball tool to press indentations upward at regular interval to create the ruffled, ghost-like skirt effect.
Clean Look Pro-Tip
Before baking, wipe the clay with a little rubbing alcohol on a brush or your finger. This removes fingerprints and dust, leaving a professional smooth finish.
Step 2: Adding the Face
-
Make eye sockets:
Press two large indentations into the upper front of the body where you want the eyes to sit. -
Add the whites:
Roll two balls of white clay, flatten them slightly, and press them firmly into the sockets you just made. -
Add the pupils:
Roll two smaller balls of black clay. Flatten them and place them onto the white circles. I like to position them slightly off-center to give him a goofy expression. -
Create the eye highlights:
Place a tiny speck of white clay on each black pupil to bring the character to life. -
Carve the mouth:
Use a needle tool or clay knife to carve a wide, curved crescent shape for the mouth opening. Remove the clay from inside this shape to create depth. -
Insert teeth:
Roll tiny balls of white clay and shape them into small cones or rounded squares. Press these individually into the bottom lip of the mouth cavity.
Waterproofing Help
Since this will hold wet brushes, line the holes with a thin layer of liquid polymer clay or resin after baking to ensure water doesn’t seep into the core.
Step 3: Details and Finishing
-
Add texture:
Use a small needle tool to poke tiny, random dots over the ‘forehead’ area and near the horns for a porous, organic texture. -
Make the horns:
Roll two small cones of orange clay and blend them onto the top of the head, positioning them just outside the toothbrush holes. -
Mini monster companion:
If you have leftover clay, use the same steps (skipping the foil core and toothbrush holes) to make a smaller, shorter version to sit nearby. -
Bake the project:
Bake exactly according to your clay package instructions. Usually, this is around 275°F (135°C) for 30 minutes per 1/4 inch of thickness. -
Cool and finish:
Let the monster cool completely inside the oven to prevent cracking. Once cool, apply a coat of matte varnish to protect it from bathroom moisture.
Place your new monster friend near the sink and enjoy a smile every time you brush
Mini Scene on a Pebble Base
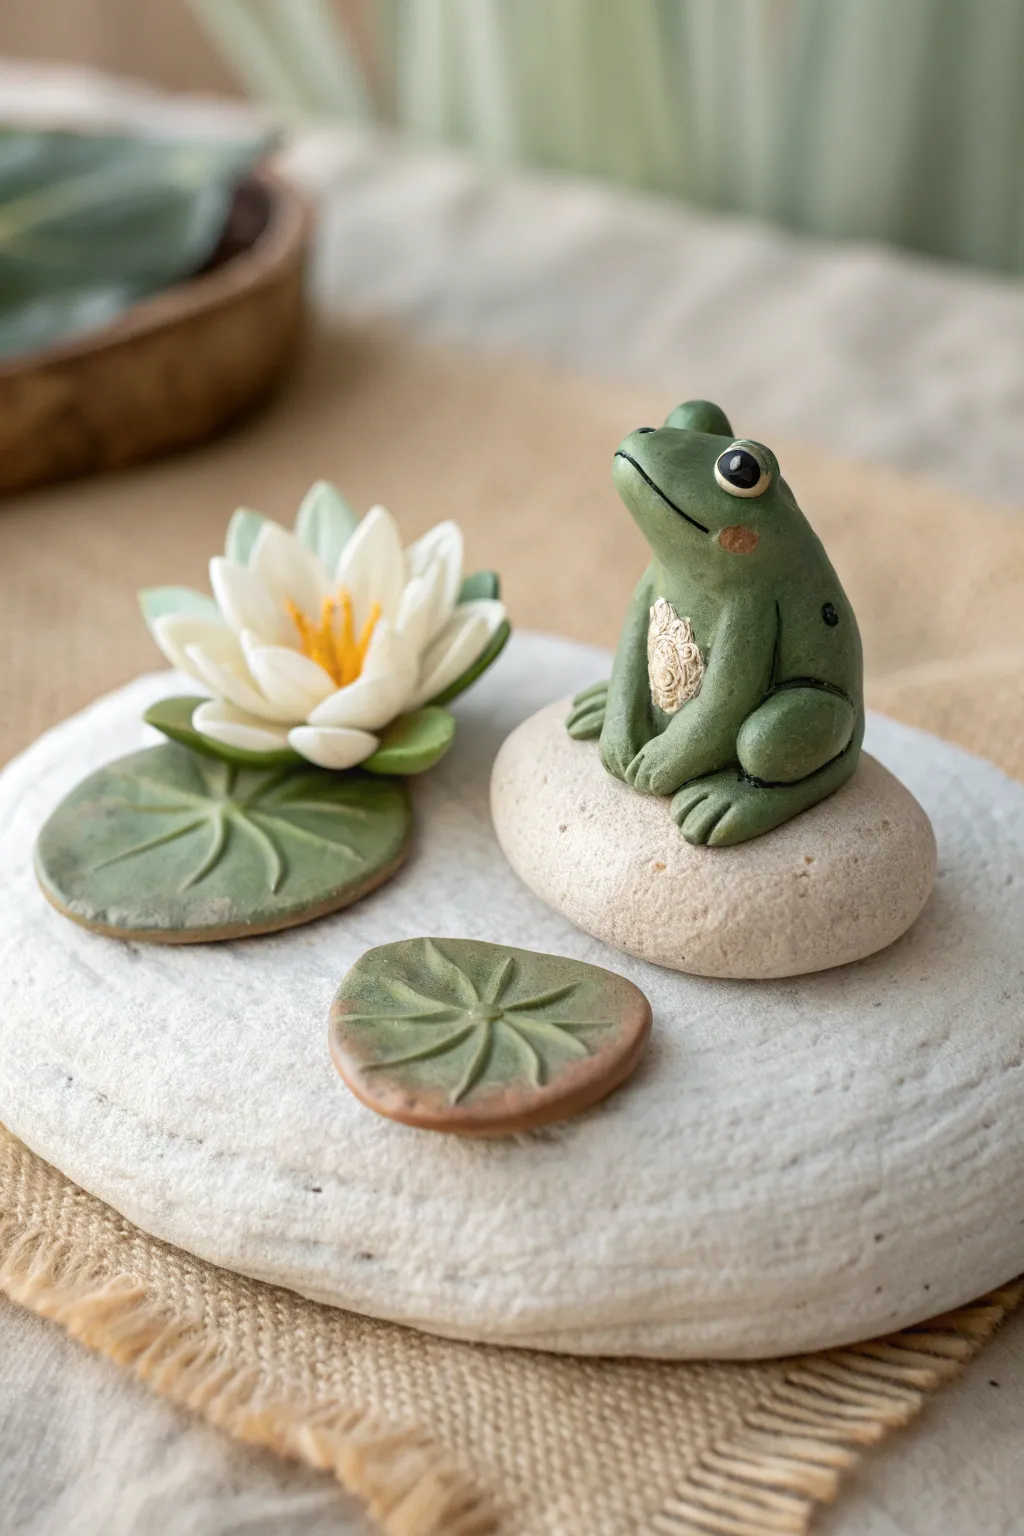
Create a serene miniature world with this charming clay scene featuring a happy frog resting on his own pebble throne. Resting on a larger stone gathered from nature, this project combines natural elements with simple clay sculpting for a delightful desk companion.
How-To Guide
Materials
- Polymer clay (greens, white, yellow, black, pink)
- Large flat garden stone (clean and dry)
- Smaller smooth pebble (for the frog seat)
- Clay sculpting tools (needle tool, ball stylus)
- Liquid clay adhesive or strong craft glue
- Soft pastel chalk (for shading, optional)
- Matte varnish
- Small paintbrush
- Texture sponge or toothbrush
Step 1: Shaping the Base Elements
-
Prepare the lily pads:
Mix green clay with a tiny touch of brown to get realistic pond-leaf color. Flatten two small balls of clay into discs—make one slightly larger than the other. -
Texture the pads:
Using a needle tool, gently press indentations radiating from the center of each disc to the edges to mimic veins. If you like, tint the edges with reddish-brown pastel dust for extra realism. -
Position the base rocks:
Choose where your small pebble will sit on the large flat stone. I find it helpful to mark the spot lightly with a pencil so I don’t lose the arrangement later.
Clay Won’t Stick?
If the clay keeps falling off the smooth river stone before baking, use a tiny dab of PVA glue or liquid clay on the rock surface to create a tacky base layer.
Step 2: Creating the Lotus Flower
-
Form the petals:
Roll white clay into a teardrop shape and flatten it gently. Repeat this about 8-10 times to create individual petals of varying sizes. -
Assemble the flower:
Arrange the larger petals in a circle first, pressing their bases together. Layer smaller petals inside the ring, curving them slightly upward. -
Add the center:
Insert tiny strands of yellow clay into the center of the bloom to create the stamen. Place the finished flower onto the larger lily pad.
Natural Texture
Before baking, lightly tap the frog’s green skin with a piece of rough sandpaper or a coarse sponge. This removes fingerprints and adds a fantastic organic skin texture.
Step 3: Sculpting the Frog
-
Shape the body:
Take a lump of green clay and roll it into a pear shape. Flat the bottom slightly so it sits securely on the small pebble. -
Form the legs:
Roll two small sausages of green clay for the back legs. Bend them into a ‘V’ shape and attach them to the sides of the body, pressing the thigh area smooth against the torso. -
Create the front arms:
Roll two thinner cylinders for the front arms. Attach them under the ‘chin’ area, extending down between the back legs. -
Define the toes:
Use a craft knife or needle tool to make two small indents on the end of each limb, creating three distinct toes. -
Add the tummy detail:
Flatten a tiny oval of whiter or lighter green clay. Texture heavily with a toothbrush or needle tool to look bumpy, then press it onto the frog’s chest. -
Give him a face:
Press a wide, shallow line with a modeling tool for the mouth. Add two small balls of white clay for eyes, topping them with tiny black pupils. -
Final touches:
Add tiny pink blush spots to the cheeks. Gently place the frog onto the small pebble to ensure he fits before baking.
Step 4: Assembly and Finishing
-
Bake the clay:
Most polymer clays can be baked right on the stones (check your packaging instructions for temperature). Bake the frog on his small pebble and the lily pads separately on a tile. -
Cool down:
Let everything cool completely inside the oven to prevent cracking. -
Assemble the scene:
Use strong glue or liquid clay to adhere the lily pads directly to the large stone. Glue the frog-topped pebble onto the large stone next to the flower. -
Seal the work:
Brush a coat of matte varnish over the frog and lily pads to protect the clay and give it a finished, professional look.
Now you have a tranquil pond scene that perfectly captures the stillness of nature