When I’m stuck or short on time, a good clay challenge is my favorite way to get my hands moving and my ideas flowing. These prompts are all about quick, cute, achievable projects you can knock out in mini sessions and still feel ridiculously proud of.
Chibi Animal Squad Challenge
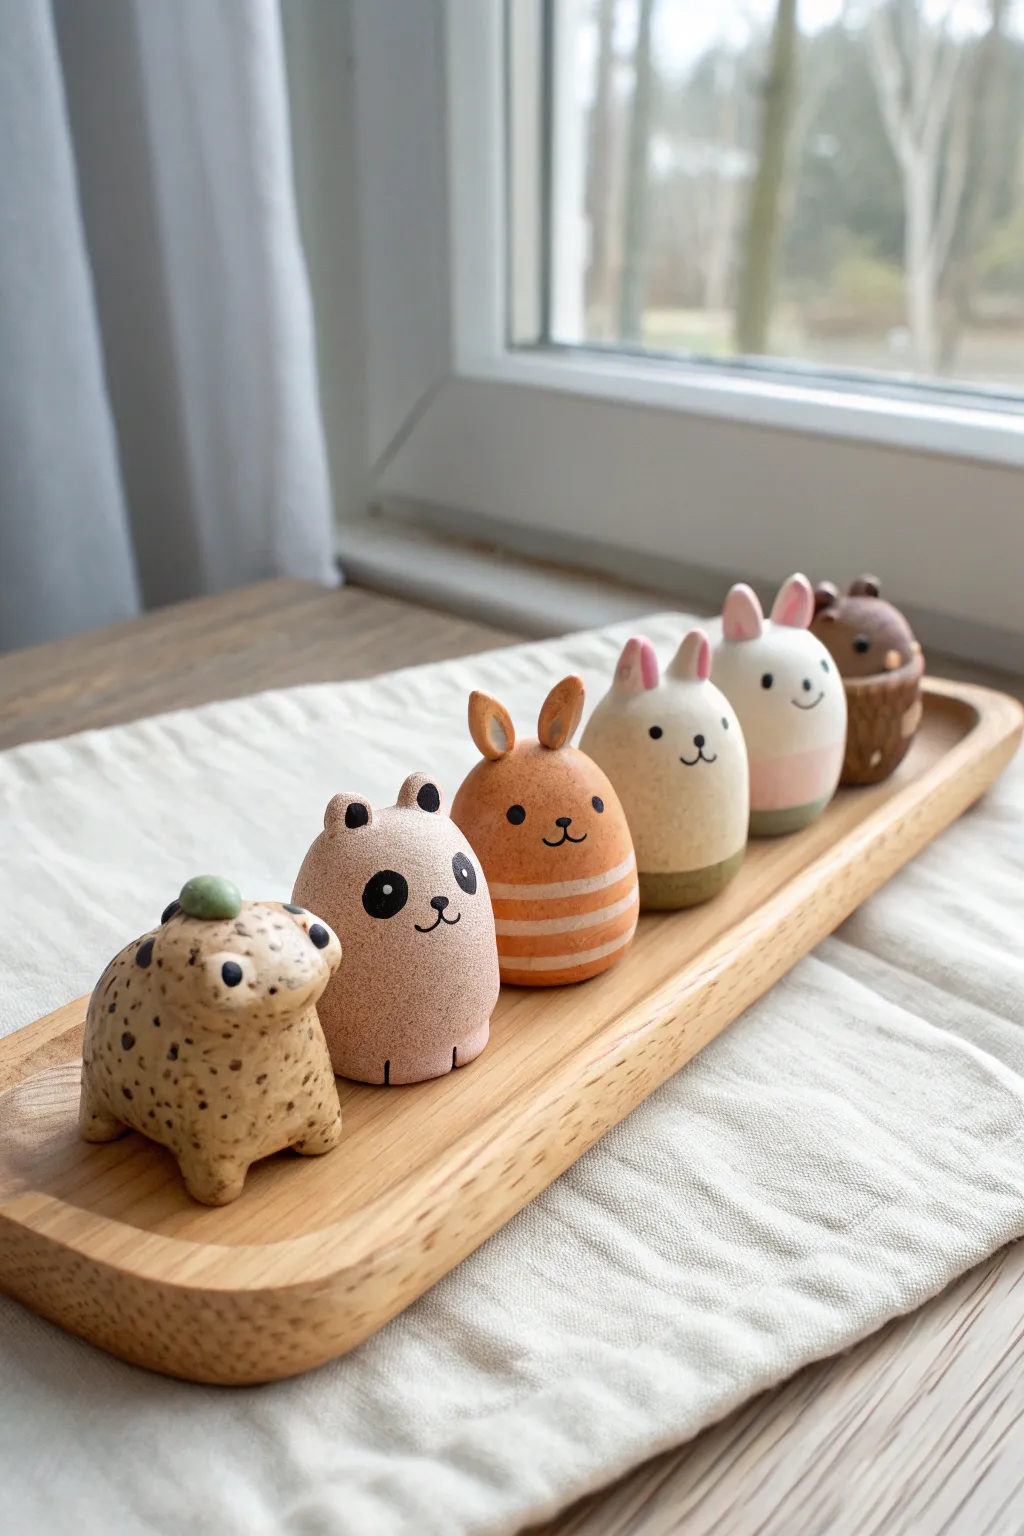
Create a charming lineup of chibi animal figurines characterized by their smooth, egg-shaped bodies and delightfully minimalist faces. This project mimics the look of speckled stoneware pottery using accessible oven-bake clay, resulting in a serene, earthy set of collectibles.
Step-by-Step Guide
Materials
- Polymer clay (Beige/tan ‘granite’ or ‘speckled’ effect, orange, white, dark brown)
- Acrylic paints (Black, pink, dusty green, earthy tones)
- Matte varnish or sealant
- Fine detail paintbrush (size 00 or 000)
- Dotting tools or ball stylus
- Aluminum foil (for armature cores)
- Oven and baking sheet
- Smoothing tools (silicone shapers)
Step 1: Basic Body Sculpting
-
Core Creation:
Begin by rolling small balls of aluminum foil, roughly 1 inch in diameter. Compress them tightly to remove air pockets. This saves clay and prevents the thick figurines from cracking during baking. -
Conditioning the Clay:
Take your speckled beige or granite-effect polymer clay and condition it in your hands until it’s soft and pliable. Roll it into a sheet about 1/4 inch thick. -
Wrapping the Base:
Wrap the clay sheet around your foil ball. Roll it gently between your palms to smooth out seams, forming a solid egg shape. Repeat this process six times to create the base for each animal friend.
Stone Texture Trick
Mix varying amounts of ground black pepper or dried used coffee grounds into your clay before sculpting to get realistic faux-granite speckles.
Step 2: Shaping Characteristic Features
-
The Spotted Toad:
For the first figure, gently pinch the front of the egg shape to pull out a slight snout. Attach four small, stubby legs to the bottom so it stands on four feet rather than sitting flat. -
Toad Details:
Roll a tiny ball of green clay and flatten it slightly on top of the toad’s head for a little sprout or leaf accent. Press two small indentations where the eyes will go. -
The Panda:
Take a beige egg base and flatten the bottom so it sits upright. Create two tiny semi-circles of clay and attach them to the top of the head for ears. Blend the seams downward with a silicone tool until invisible. -
The Striped Rabbit:
Use orange-tinted clay for this base (or mix orange into your beige). Roll two long teardrop shapes for ears and attach them to the top of the head. I like to press a dotting tool into the center of the ears to give them depth. -
The White Rabbits:
Create two bases using white clay with speckles (mix in pepper if you need homemade speckles). Attach long bunny ears to both. For the second white rabbit, make the body slightly rounder. -
The Acorn Bear:
For the final figure, shape a small brown cup that looks like an acorn cap. Place a small round bear head inside it. Add tiny round ears to the head.
Step 3: Baking and Refining
-
Pre-Bake Texturing:
Before baking, use a toothbrush to gently tap the surface of all figures. This removes fingerprints and enhances the stone-like texture. -
Baking:
Place all figures on a baking sheet lined with parchment paper. Bake according to your polymer clay package instructions (usually 275°F for 15-30 minutes depending on thickness). Let them cool completely.
Display Ideas
Create a matching long, shallow tray out of wood-colored clay to display your squad perfectly in a line on your windowsill.
Step 4: Painting and Finishing
-
The Toad’s Spots:
Using diluted brown/black acrylic paint, flick tiny specks onto the toad’s body or hand-paint larger irregular spots. Paint the eyes simple black dots. -
Panda Markings:
Take your fine detail brush and black paint. Carefully paint two large oval patches for the panda eyes, then add a tiny white dot inside once dry. Paint a small ‘w’ mouth and nose. -
Bunny Stripes:
On the orange rabbit, mix a lighter cream paint and carefully paint horizontal stripes around the lower body. Keep the lines soft and slightly organic. -
Blushing Cheeks:
For the white rabbits, paint the inner ears pink. Add a soft pink band around the belly of one rabbit. Use a very dry brush with a tiny amount of pink paint to dust rosy cheeks onto all the animals. -
The Dip-Dye Effect:
For the second white rabbit, paint the bottom third in a muted olive green to simulate clothes or a ‘dipped’ ceramic look. -
Final Faces:
Use the finest brush or a toothpick to add the tiny, minimalist faces—usually just two wide-set dots for eyes and a small nose/mouth. The simplicity is key to the chibi style. -
Matte Finish:
Once all paint is dry, coat the figurines with a matte varnish. Avoid glossy finishes, as the matte look mimics the natural stoneware aesthetic shown in the photo.
Enjoy arranging your quiet little ceramic creatures on a shelf where they can watch the world go by


Anthropomorphic Food Friends Challenge
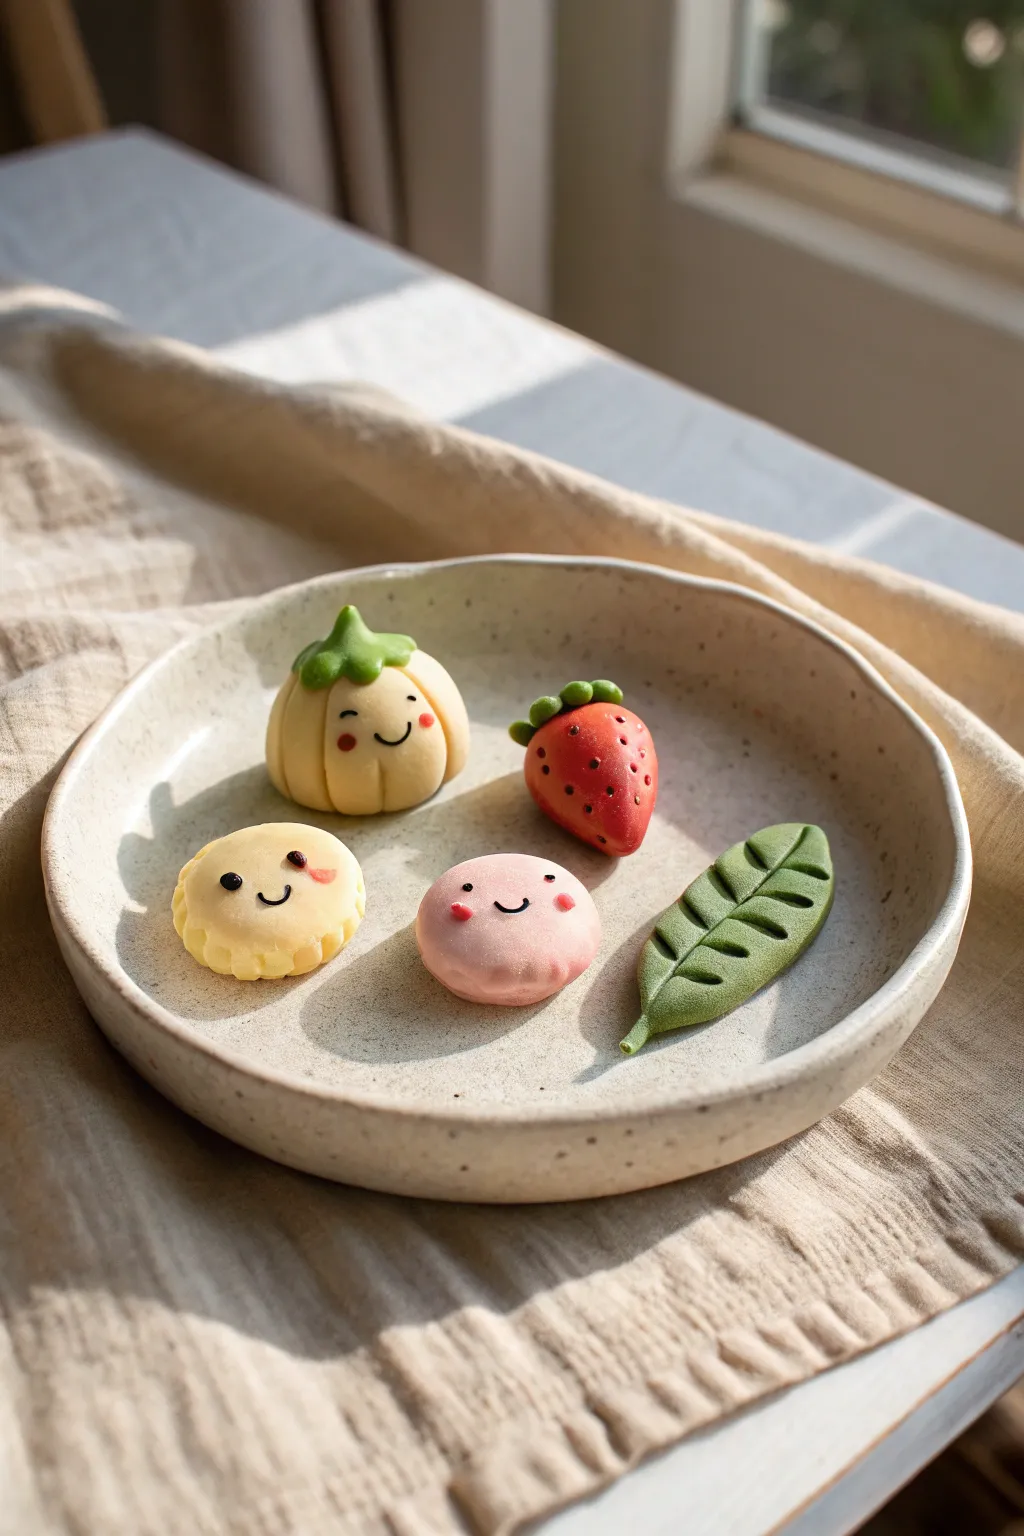
Create a charming collection of tiny, smiling food characters that are almost too cute to be fake. This project helps you practice sculpting basic shapes and adding personality with simple, expressive facial features.
Step-by-Step Tutorial
Materials
- Polymer clay (cream, yellow, pink, red, two shades of green, black)
- Needle tool or toothpick
- Ball stylus tool (small)
- Small craft knife
- Soft pastel chalks (pink or red) for blushing cheeks
- Small soft paintbrush
- Gloss glaze (optional)
- Flat baking sheet
- Parchment paper
Step 1: Shaping the Bases
-
Prep your clay:
Begin by conditioning each color of clay until soft and pliable. Roll a walnut-sized ball of cream clay for the pumpkin, a slightly smaller red ball for the strawberry, a flattened yellow disc for the tart, a pink flattened sphere for the mochi, and a green teardrop for the leaf. -
Sculpt the pumpkin:
Take the cream ball and gently press vertical indentations all around the sides using the side of a toothpick or a needle tool created that ribbed pumpkin texture. Flatten the bottom slightly so it sits upright. -
Form the strawberry:
Refine the red ball into a soft triangular shape with rounded corners, slightly wider at the top and tapering gently to a crude point at the bottom. -
Create the tart crust:
Take your yellow disc and pinch the edges all around to create a fluted pie-crust effect. Gently dome the top center slightly to make it look full and baked. -
Shape the mochi:
Smooth out your pink sphere into a soft, slightly flattened bun shape. Ensure there are no fingerprints by lightly rolling your finger over the surface.
Step 2: Adding Greenery & Details
-
Pumpkin stem:
Using light green clay, shape a small star pattern and place it on top of the cream pumpkin. Pinch the center upwards to form a tiny twisted stem. -
Strawberry leaves:
With darker green clay, roll three or four tiny teardrops. Press them onto the top of the strawberry create the calyx, then add a tiny stem in the middle. -
Strawberry seeds:
Use your needle tool to poke shallow, tiny holes scattered across the red surface of the strawberry to mimic seeds. -
Leaf details:
Take the green teardrop you made earlier and flatten it. Use a craft knife to gently score a central vein line and diagonal veins branching out on either side to complete the leaf look.
Lint Magnet?
Light clay colors like cream and yellow show dust easily. Keep a pack of baby wipes nearby to clean your hands and tools often, or use a piece of scrap clay to lift lint off your work.
Step 3: Adding Faces & Finishing
-
Position the eyes:
Roll extremely tiny specks of black clay—smaller than poppy seeds—into balls. Place two on each food item, spacing them widely for that signature kawaii look. -
Add the mouths:
Roll tiny, thin threads of black clay. Curve them into ‘U’ shapes for smiles and gently press them onto the clay between the eyes using your needle tool. -
Apply blush:
Scrape a little pink or red soft pastel into a powder. Dip a dry, soft brush into the powder and gently dab ‘rosy cheeks’ onto the pumpkin, tart, and mochi right next to their smiles. -
Optional pink paint:
For the pumpkin specifically, you can use tiny dots of pink clay or a dot of pink paint for cheeks if the powder is too subtle against the cream color. -
Final smooth:
Do a final check for lint or dust. You can use a bit of baby oil on your finger to smooth out any unwanted texture before baking. -
Bake:
Place all your friends on a baking sheet lined with parchment paper. Bake according to your specific clay manufacturer’s instructions (usually 275°F/130°C for 15-30 minutes). -
Cool and seal:
Let the pieces cool completely before handling. If you want a shiny finish, apply a thin coat of gloss glaze to the strawberry or the eyes, leaving the baked goods matte.
Make Them Functional
Before baking, gently press a strong neodymium magnet into the back of each piece to turn your food friends into an adorable set of refrigerator magnets.
Arranging these little friends together on a small dish makes for a delightful display that brightens up any desk


Mini Ring Dish Shape Challenge
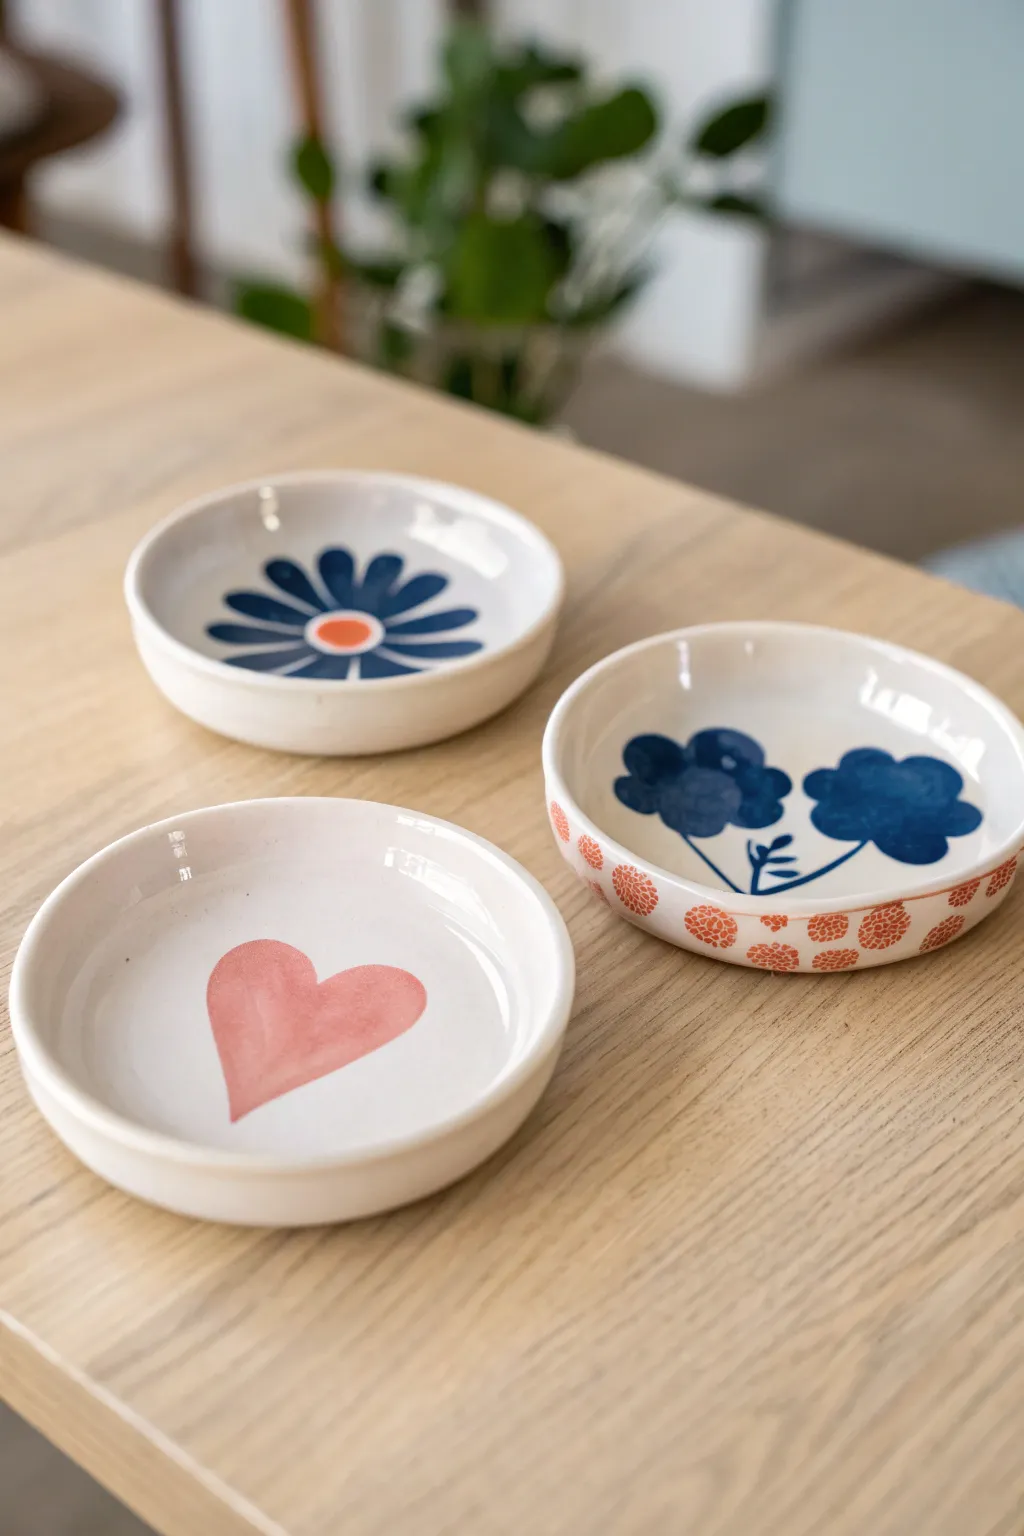
These charming little catch-all bowls prove that good things come in threes, featuring simple shapes and playful, hand-painted floral and heart motifs. With a milky white glaze finish and folk-art inspired designs, they make the perfect bedside home for your favorite jewelry pieces.
Step-by-Step Guide
Materials
- White polymer clay or air-dry clay (approx. 1lb block)
- Acrylic paints (Navy Blue, Coral/Orange, Soft Pink, White)
- Fine detail paintbrushes (round size 0 and 2)
- glossy varnish or glaze (clay-compatible)
- Rolling pin
- Circular cookie cutter (approx. 3-4 inches) or a glass rim
- Small bowl or sphere for shaping (mold)
- Sandpaper (fine grit)
- Palette for mixing
Step 1: Shaping the Clay Base
-
Condition and Roll:
Begin by conditioning your white clay until it is pliable and smooth. Roll it out on a clean, flat surface to an even thickness of about 1/4 inch. -
Cut the Circles:
Using your cookie cutter or the rim of a glass, press firmly into the clay to cut out three perfect circles of the same size. -
Soften the Edges:
Dip your finger in a tiny bit of water (for air dry) or baby oil (for polymer) and gently run it along the cut edge of each circle to smooth out any sharpness or roughness. -
Form the Curve:
Gently press each clay circle into the palm of your hand to start curling the edges upward. Alternatively, drape them over a small, rounded object like a tennis ball or the bottom of a small bowl to create a uniform concave shape. -
Define the Walls:
For the dish that will feature the exterior pattern, pinch the walls slightly higher and straighter than the others to create a distinct rim surface. -
Final Smoothing:
Inspect the surfaces for fingerprints. Lightly buff them away with a damp sponge or your finger before setting the pieces aside. -
Dry or Bake:
Follow your specific clay’s instructions to cure the pieces. If baking polymer clay, tent with foil to prevent yellowing. If using air-dry clay, allow 24-48 hours for complete drying.
Clean Edges Pro-Tip
After cutting your clay circles, use a piece of plastic wrap over the clay before pressing the cutter down again. This creates a soft, rounded bevel on the rim instantly.
Step 2: Painting the Designs
-
Prepare the Surface:
Once fully cured and cooled, lightly sand any uneven spots on the rims. Wipe away dust with a barely damp cloth. -
Base Coat (Optional):
If your clay isn’t bright white, apply two thin coats of white acrylic paint to the interior to create a clean canvas for your designs. -
Heart Dish: The Outline:
For the first dish, use a soft pink paint. Sketch a simple, slightly tilted heart shape in the center using a very light pencil stroke or diluted paint. -
Heart Dish: Filling In:
Fill the heart shape with the pink paint. I like to keep the paint slightly sheer here to mimic the look of a watercolor wash rather than an opaque block of color. -
Daisy Dish: Petals:
On the second dish, us navy blue paint and a round brush. Start from the center and press the brush down, pulling outward to create teardrop-shaped petals radiating in a circle. -
Daisy Dish: Center:
Once the blue petals are dry, paint a solid coral-orange circle in the very center of the flower. -
Double Flower Dish: Stems:
On the third dish, use your finest brush and navy blue paint to draw two thin, curved stems meeting at the bottom, adding small leaves. -
Double Flower Dish: Blooms:
Paint a puffy, cloud-like flower shape at the top of each stem in navy blue. Keep the shapes loose and organic. -
Rim Pattern:
For the Double Flower dish finish, mix a coral shade. Using the tip of a small brush, dab clusters of tiny dots along the exterior vertical rim to create a textured pattern.
Step 3: Finishing Touches
-
Sealing:
Once all paint is completely dry, apply a coat of glossy varnish or glaze over the entire dish. This gives it that ceramic-like shine and protects the paint. -
Second Coat:
apply a second coat of glaze for extra durability, paying special attention to the rims where jewelry will slide in and out.
Level Up: Gold Accents
Add a touch of luxury by painting the very top rim of each bowl with liquid gold leaf or metallic gold paint after the main designs have dried.
Now you have a set of custom trinket dishes ready to organize your treasures on a vanity or desk


Three Handbuilding Methods Mini Challenge
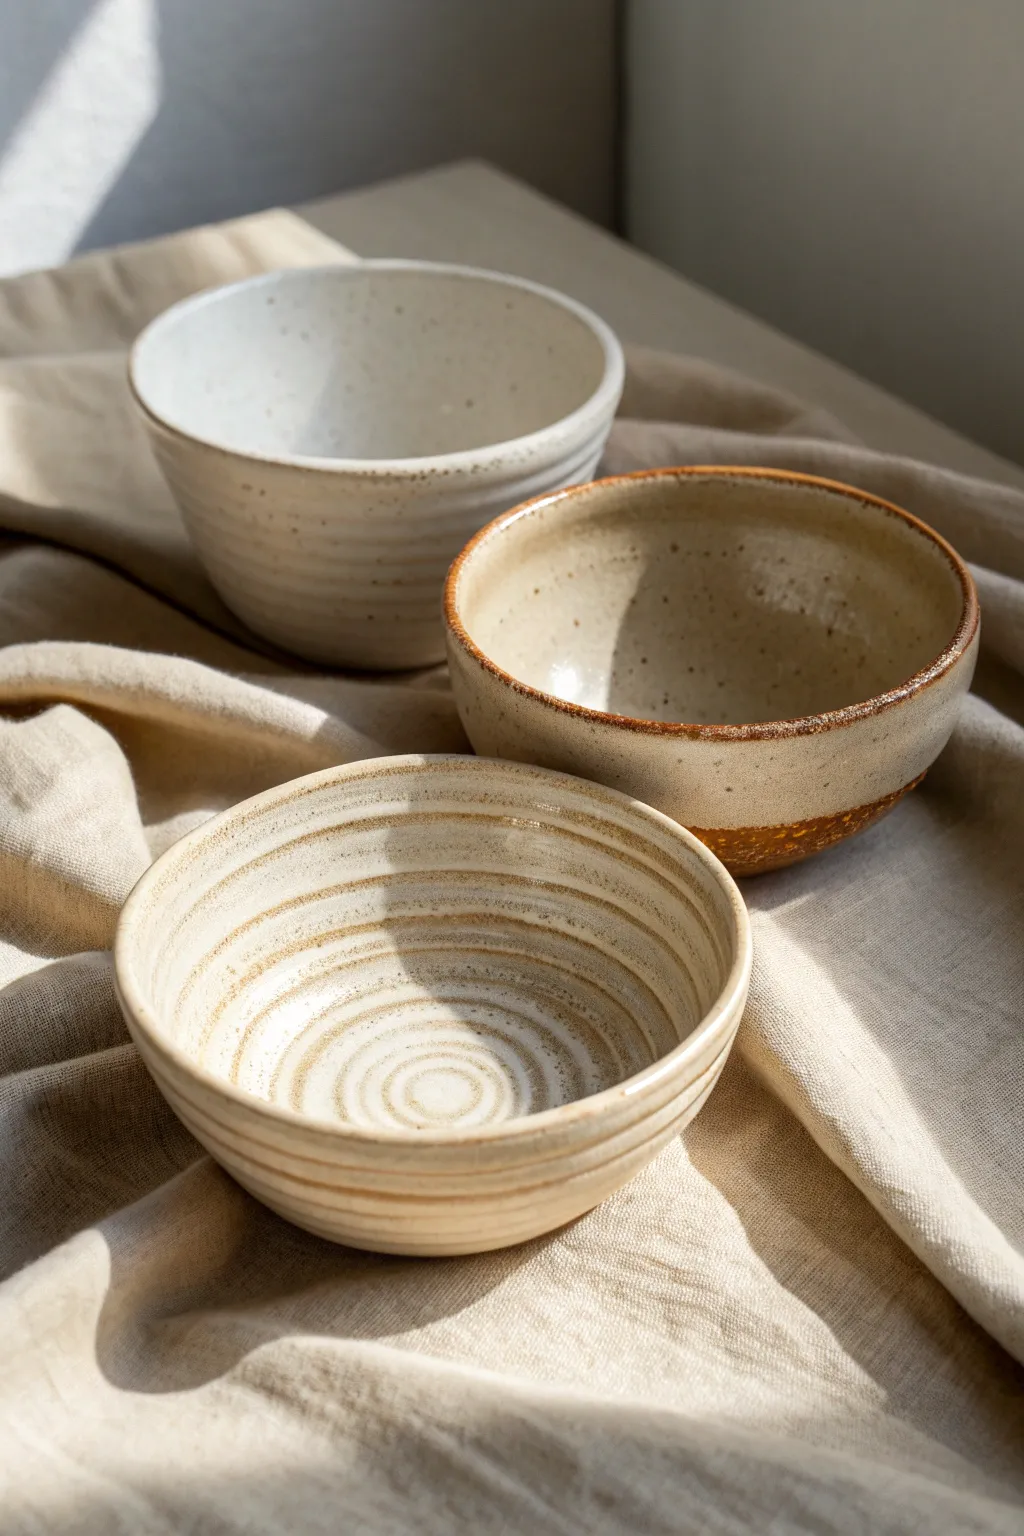
Challenge your handbuilding skills by creating three distinct bowls, each showcasing a fundamental technique while maintaining a cohesive, earthy aesthetic through speckled stoneware and warm glazes. These vessels highlight the beauty of raw clay bodies and simple, repetitive textures that catch the light beautifully.
Step-by-Step
Materials
- Speckled stoneware clay (approx. 3-4 lbs)
- Pottery sponge
- Metal kidney rib
- Wooden modeling tool or chamois
- Needle tool
- Rolling pin and guide sticks (for slab bowl)
- Bowl mold or existing bowl (for slab bowl)
- Scoring tool or serrated rib
- Slip (clay and water mixture)
- Clear or translucent white glossy glaze
- Iron oxide wash (optional for rims)
Step 1: Bowl 1: The Textured Pinch Pot (Front Center)
-
Prepare the clay ball:
Start with a ball of well-wedged speckled clay about the size of a large orange. -
Open the form:
Hold the ball in your non-dominant hand and press your thumb into the center, stopping about a half-inch from the bottom. -
Pinch the walls:
Gently pinch and rotate the clay between your thumb and fingers, working from the bottom up to thin the walls evenly. -
Shape the curve:
Continue pinching outward to create a wide, open bowl shape, keeping the rim slightly thicker than the walls for stability. -
Add the spiral texture:
Using a wooden modeling tool or the pad of your thumb, press a continuous spiral groove starting from the center bottom and winding up to the rim on the interior. Repeat this on the exterior if desired.
Step 2: Bowl 2: The Coiled Vessel (Back Left)
-
Create the base:
Flatten a small piece of clay into a disk about 3 inches wide and score the outer edge. -
Roll your coils:
Roll out several snake-like coils of clay on a table, aiming for the thickness of your pinky finger. -
Build the walls:
Layer the coils on top of the scored base edge. As you add each layer, score and slip between coils to ensure a strong bond. -
Blend the interior:
Supporting the outside with one hand, use your thumb or a tool to smear the coils downward on the inside surface until completely smooth. -
Refine the exterior ridges:
Instead of smoothing the outside completely, leave the horizontal definition of the coils visible. Use a damp sponge to soften the sharp edges while keeping the ribbed texture intact.
Smooth Moves
Use a damp chamois leather strip to compress the rims of your bowls. This prevents sharp edges after firing and gives that professional, finished look.
Step 3: Bowl 3: The Slab-Draped Bowl (Middle Right)
-
Roll the slab:
Roll out a slab of clay to an even ¼-inch thickness using guide sticks or slats. -
Cut the circle:
Place a template or paper plate over the slab and cut out a perfect circle. -
Form the shape:
Drape your clay circle over a hump mold (or an upside-down kitchen bowl covered in plastic wrap). Gently press it down to conform to the shape. -
Refine the rim:
While the clay is leather hard on the mold, trim the bottom edge evenly and smooth it with a chamois. -
Adding feet (optional):
If you want the slight lift seen in the pinched bowl, add a small coil ring to the bottom of this slab bowl before flipping it over.
Wax Resist Magic
Paint wax resist in a pattern over the raw biscque before dipping in glaze. The glaze will bead off the wax, leaving exposed raw clay designs.
Step 4: Finishing and Glazing
-
Bisque fire:
Allow all three bowls to dry slowly under plastic, then bisque fire them to your clay body’s specifications (usually Cone 04 or 06). -
Apply the glaze:
Dip or pour a translucent white or clear glaze over the interiors and upper exteriors. The goal is to let the clay’s natural speckles show through. -
Detailed rim work:
For the darker rim effect seen on the middle right bowl, wipe a sponge dipped in iron oxide wash along the lip. -
Final wipe down:
Ensure the foot rings are completely free of glaze to prevent sticking to the kiln shelf. -
Glaze fire:
Fire the pieces to the glaze maturity temperature (typically Cone 5 or 6 for speckled stoneware).
Once cooled, these three distinct bowls will sit beautifully together as a testament to the versatility of handbuilding

The Complete Guide to Pottery Troubleshooting
Uncover the most common ceramic mistakes—from cracking clay to failed glazes—and learn how to fix them fast.
One Shape, Ten Variations Challenge
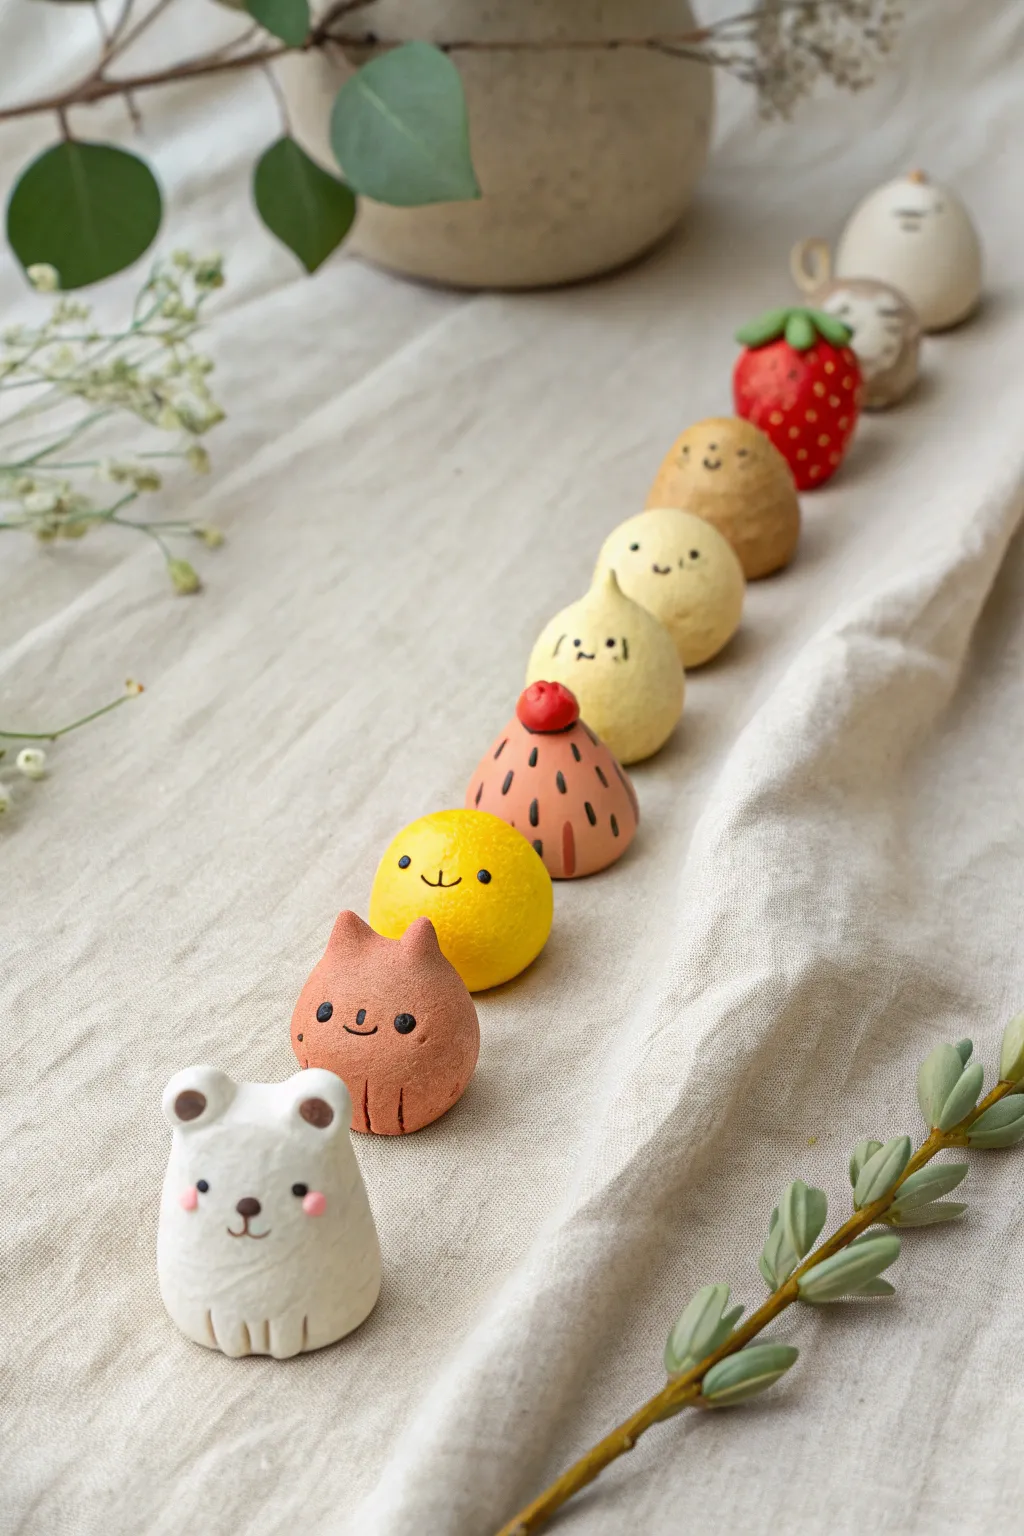
Challenge your creativity by transforming a simple sphere into a delightful parade of characters, from blushing bears and cats to anthropomorphic strawberries. This project explores minor modifications to a base form to create distinct personalities, all finished with a soft, matte texture.
Step-by-Step Guide
Materials
- Polymer clay (white, beige, terracotta, yellow, pale yellow, red, light pink)
- Acrylic paints (black, pink, brown) for details
- Fine detail paintbrush or dotting tool
- Rubber shaping tools or clay blending tools
- Needle tool
- Small rolling pin
- Matte varnish or sealant (optional)
- Baking sheet and parchment paper
- Aluminum foil (for armature core, optional)
Step 1: The Base Form Challenge
-
Conditioning:
Begin by thoroughly conditioning your clay colors. Warm them in your hands until they are soft and pliable to prevent cracking later. -
Standardize size:
Create ten equal-sized balls of clay roughly 1 to 1.5 inches in diameter. Using a visual guide or a small scale ensures your line-up looks consistent. -
Form the teardrops:
Roll each ball slightly on one side to create a fat, rounded squat teardrop shape—resembling a slightly melted Hershey’s kiss or a heavy raindrop. This is your universal base.
Fingerprint Fix
Work surface getting messy? Lightly brush your raw clay figures with a little cornstarch or baby oil before baking to smooth out accidental fingerprints.
Step 2: Animal Variations
-
Sculpting the White Bear:
Take a white base. Attach two tiny, flattened discs to the top for ears. Gently press a slight indentation near the bottom for legs and use a needle tool to mark vertical lines for paws. -
Sculpting the Terracotta Cat:
Using a terracotta base, pinch the top gently to pull up two triangular ears directly from the main body, smoothing the transition so there are no seams. Mark the paws similar to the bear. -
Sculpting the Beige Hamster:
For the beige figure at the far end, add tiny, rounded ears. You can create a ‘tail’ by attaching a tiny coil to the back, though it might not be visible from the front.
Step 3: Food & Object Variations
-
The Lemon & Onion:
For the bright yellow lemon and pale onion, pinch the very top of the teardrop into a sharper, distinct point. For the onion, pinch the tip slightly askew for a natural look. -
The Strawberry:
Take a red base. Indent tiny seeds all over the surface using a needle tool. Create a leafy calyx from green clay by cutting a small star shape and pressing it onto the top. -
The Pudding:
For the flan-style character, flatten the top of a beige base slightly. Add a thin disc of darker brown clay on top to represent the caramel sauce. -
The Patterned Blob:
Use a salmon or pinkish-clay base. Create a small red bead for the top ‘cherry’. The vertical stripes will be painted on later, so keep the surface smooth.
Texture Play
Before baking, gently roll a textured sponge or sandpaper over the bear or biscuit characters to give them a fuzzy or baked-good surface feel.
Step 4: Baking and Finishing
-
Pre-bake check:
Line up your creations to ensure they sit flat. Gently tap the bottom of each figure on your work surface to flatten the base so they don’t roll over. -
Baking:
Bake the figures according to your clay manufacturer’s specific instructions. I usually tent them with aluminum foil to prevent any scorching or color darkening. -
Cooling:
Allow the clay to cool completely before touching it; warm clay is fragile and can easily dent. -
Painting Faces:
Using your finest brush and black acrylic paint, add the tiny faces. Keep eyes wide-set and aligned low on the body for maximum cuteness. Use simple dots for eyes and tiny curves for mouths. -
Adding Details:
Paint the vertical stripes on the pink character and add blushing cheeks to the bear using a dot of pink paint or dry pastel powder. -
Sealing:
Once the paint is fully dry, apply a coat of matte varnish. Avoid glossy finishes, as the charm of these figures lies in their soft, natural biscuit-like texture.
Arrange your finished troupe on a shelf or windowsill to bring a daily dose of cheer to your space
Miniature Dessert Counter Challenge
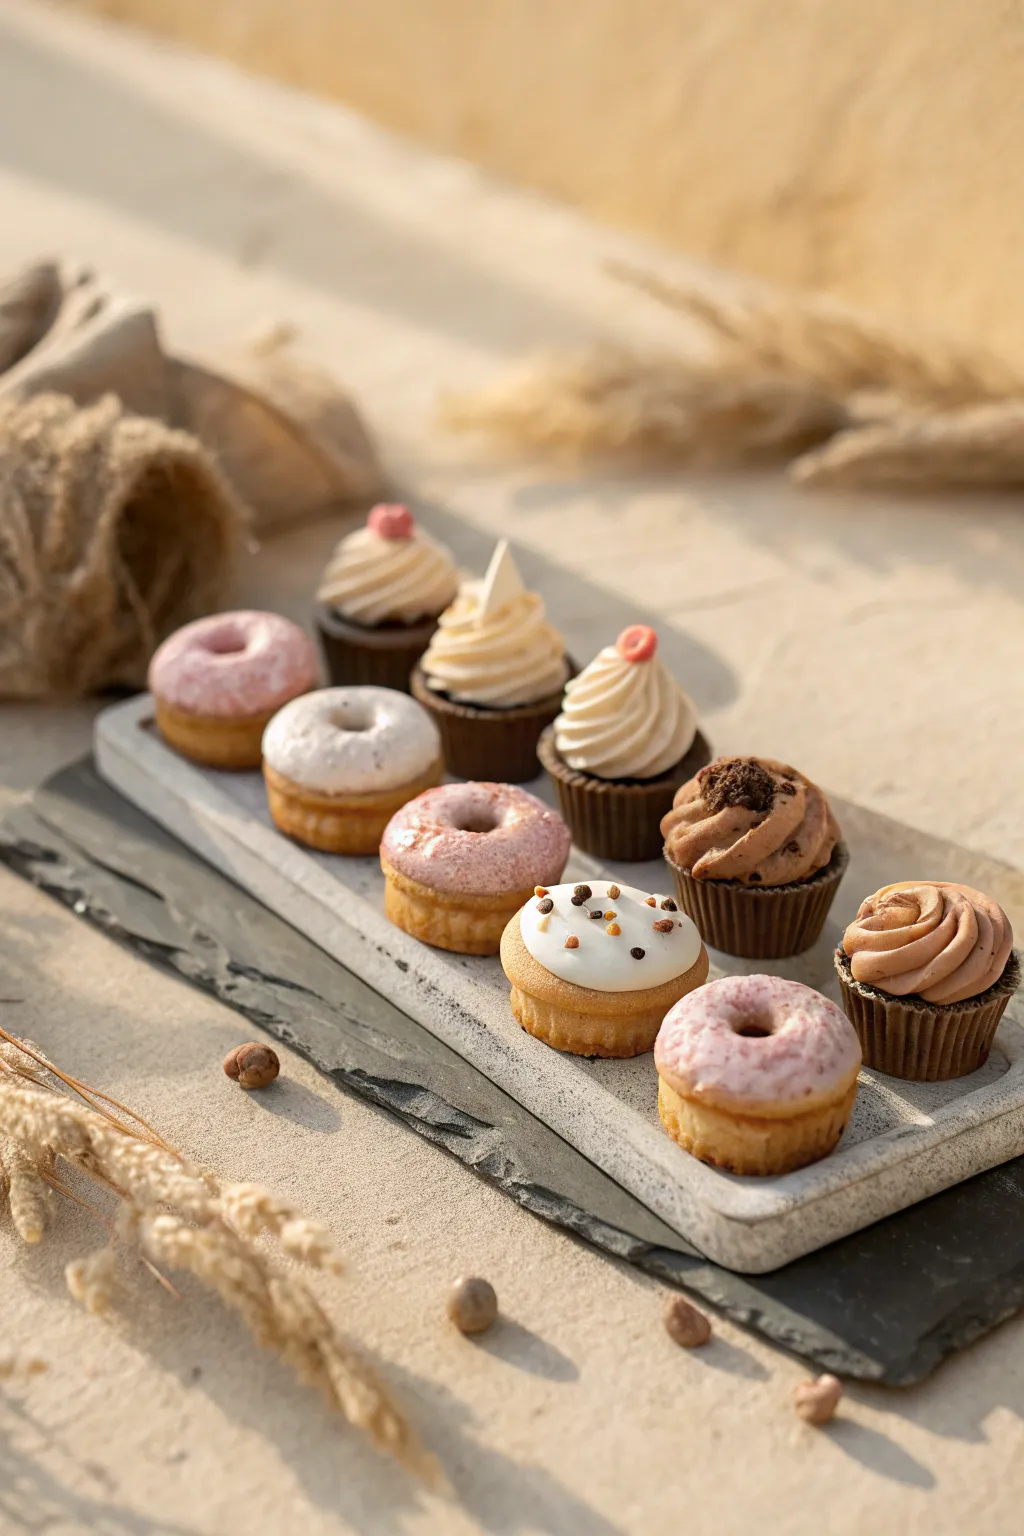
Master the art of tiny treats with this collection of hyper-realistic polymer clay donuts and cupcakes. The soft pastel frosting and intricate toppings make these miniatures perfect for a charming bakery counter display.
How-To Guide
Materials
- Polymer clay (tan, white, pink, dark brown, translucent)
- Liquid polymer clay (various colors)
- Needle tool or toothpick
- Ball stylus tool
- Soft pastel chalks (oranges, browns)
- Small paintbrush
- Tinfoil or texture sponge
- Miniature star piping tip (or DIY clay mold)
- Gloss glaze or UV resin
- Rectangular slab of grey clay (for the tray)
Step 1: Shaping the Bases
-
Mix the Dough Color:
Start by mixing translucent clay with white and a tiny bit of yellow-ochre or tan to create a realistic ‘baked goods’ base color. This translucency is key to avoiding a flat, plastic look. -
Form Donut Rings:
Roll small snakes of your dough clay and join the ends to form rings. Alternatively, flatten a small ball and press a hole through the center with a stylus. -
Texture the Donuts:
Gently gently tap the surface of the donuts with a toothbrush or a ball of crumbled tinfoil. Focus on the midline where the ‘fried’ texture would be prominent. -
Create Cupcake Bases:
Roll small cylinders of dark brown clay for chocolate bases and tan clay for vanilla. Press these into miniature cupcake liners made from paper, or simply texture the sides with a needle tool to mimic ridges. -
Pre-bake Shading:
Using a soft brush, dust the tops of the vanilla cupcakes and the edges of the donuts with shaved orange and brown pastel chalk to simulate a golden-brown baked finish.
Step 2: Frosting & Decoration
-
Prepare Liquid Clay:
Mix liquid polymer clay with white, pink, and chocolate acrylic paints or clay chunks in separate small containers. You want a thick, icing-like consistency. -
Dip the Donuts:
Carefully dip the top of your donut shapes into the pink or white liquid clay mixture, or apply it with a toothpick, letting it drip slightly down the sides for realism. -
Creating Whipped Cream:
To make the stiff frosting swirls, mix regular clay with a small amount of liquid clay until it’s soft like chewing gum. I prefer to push this through a miniature piping tip, but you can also twist a tiny snake into a spiral shape manually. -
Assemble Cupcakes:
Press your clay frosting swirls onto the cupcake bases using a dab of liquid clay as glue. -
Micro-Toppings:
For the garnishes, create microscopic crumbs from baked dark brown clay, tiny balls for sprinkles, or slice thin triangular shards of white clay to mimic white chocolate pieces. -
Apply Toppings:
While the frosting is still raw or wet, gently press your chosen toppings onto the cupcakes and donuts. Use tweezers for precision.
Texturing Tip
For the most realistic cake texture, tear a small piece of natural sponge and gently dab it over the ‘baked’ areas of the clay before shading with pastels.
Step 3: The Display Tray
-
Form the Slate:
Roll out a slab of grey granite-effect clay (or mix black and white clay incompletely). Cut a long, narrow rectangle approximately 3 inches by 1 inch. -
Texturing Stone:
Press a real rock or coarse sandpaper onto the surface to give it a slate texture. -
Rough Edges:
Use a craft knife to chip away at the edges of the rectangle, creating an uneven, natural stone look. -
Final Arrangement:
Place your finished raw treats onto the clay tray. Leave equal spacing between them for a professional bakery look. -
Final Bake:
Bake the entire piece according to your clay manufacturer’s instructions, usually around 275°F (130°C) for 15-20 minutes.
Make It Glossy
After baking, brush a thin layer of UV resin or localized gloss glaze only on the frosting parts to make them look wet and sugary while keeping the dough matte.
Enjoy displaying your delightful miniature patisserie collection on a shelf or dolls house counter


What Really Happens Inside the Kiln
Learn how time and temperature work together inside the kiln to transform clay into durable ceramic.
The Smooth Surface Perfection Challenge
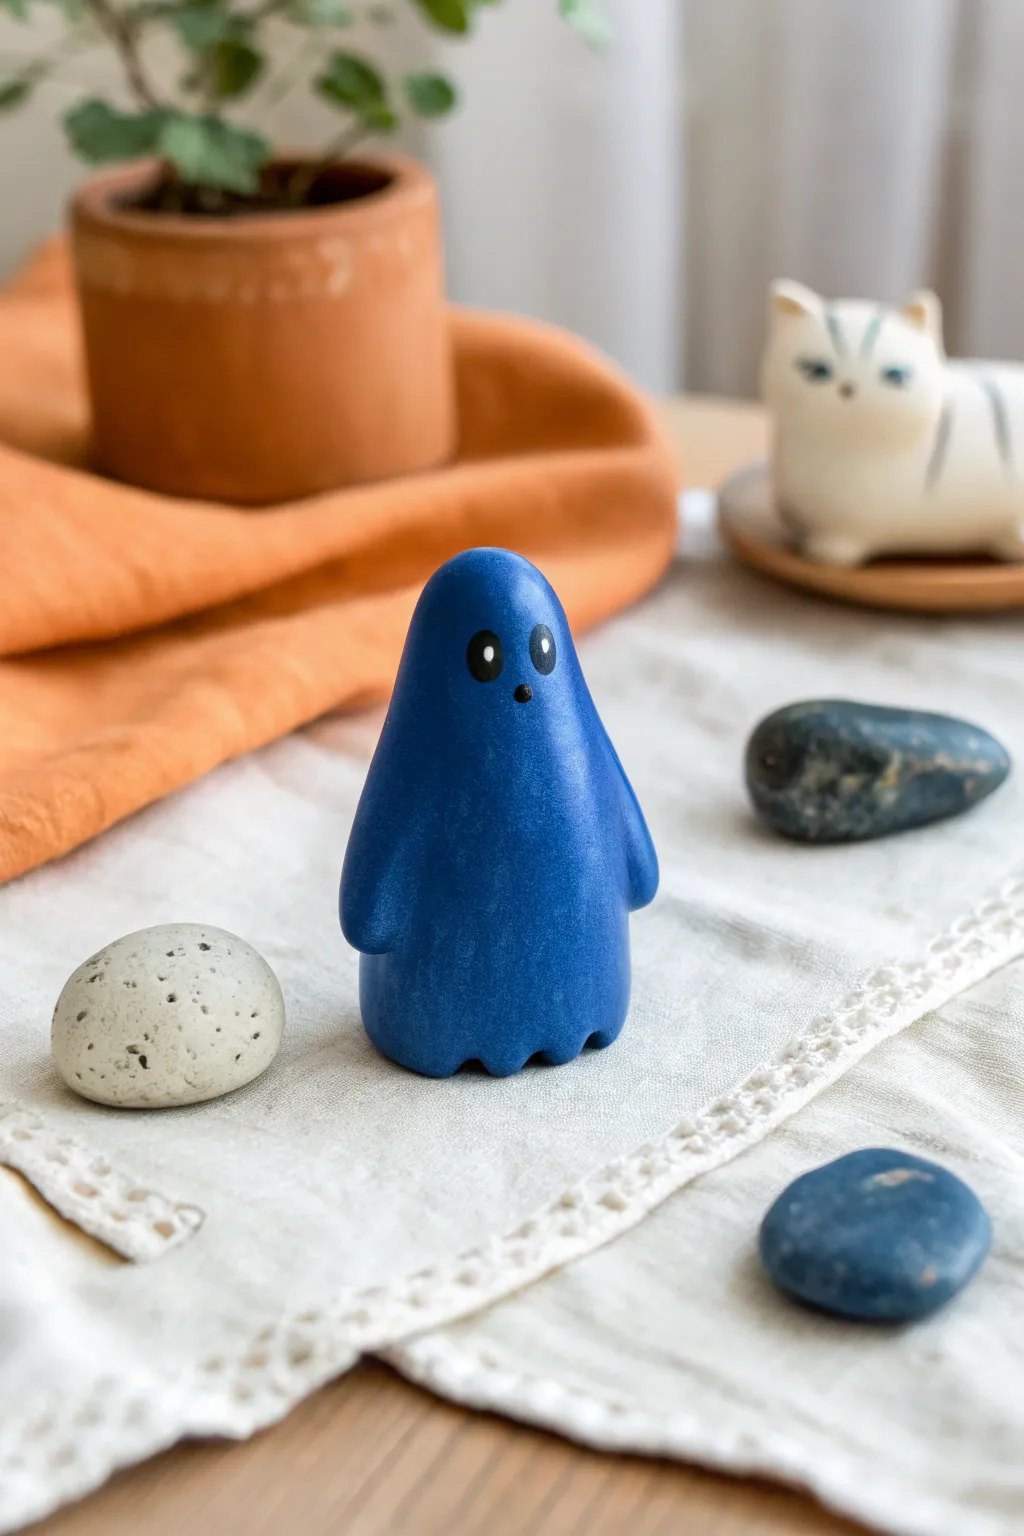
Embrace the “Smooth Surface Perfection Challenge” with this minimalist, matte-blue ghost figure. This project focuses entirely on achieving a flawless, bump-free finish and clean lines to create a charming desk companion.
Step-by-Step
Materials
- Polymer clay (translucent or white mixed with blue pigment)
- Acrylic paint (deep blue, black, white)
- Matte varnish or sealant
- Rolling pin or acrylic roller
- Precision knife or craft blade
- Small ball stylus or dotting tool
- Fine-grit sandpaper (400, 600, 1000 grit)
- Soft synthetic paintbrush
- Smoothing oil (baby oil or clay softener)
- Canvas or silicone work mat
Step 1: Shaping the Core
-
Condition the clay:
Begin by thoroughly conditioning your polymer clay until it is warm and pliable. This step is crucial for preventing cracks later on. -
Form a cylinder:
Roll the clay into a thick cylinder shape, approximately 2 inches tall and 1 inch wide. -
Taper the top:
Gently gently roll the top half of the cylinder between your palms to taper it into a rounded, dome-like head, creating a bowling pin silhouette. -
Flatten the base:
Press the figure firmly onto your work surface to ensure the bottom is perfectly flat so it stands upright without wobbling. -
Create the arms:
Using a modeling tool or your fingers, pull two small nubs out from the sides of the body to form subtle, drooping arms that blend seamlessly into the main shape.
Step 2: Refining the Surface
-
Smooth the seams:
Rub your finger lightly over the arm connections to erase any harsh lines; the transition should be invisible. -
Sculpt the hem:
Use a round tool or the handle of a paintbrush to press indentations into the bottom edge, creating a scalloped, wavy ‘sheet’ effect. -
Initial smoothing:
Apply a tiny drop of smoothing oil to your finger and rub it over the entire surface to remove fingerprints. -
Bake the figure:
Bake the clay according to the manufacturer’s package directions. I usually tent it with foil to prevent scorching. -
Cool down:
Let the figure cool completely before moving to the sanding phase.
Bumps showing up?
If sanding reveals divots, fill them with a mix of liquid clay and solid clay, bake again, and re-sand for a seamless repair.
Step 3: The Perfection Finish
-
Wet sanding:
Dip your 400-grit sandpaper in water and gently sand the surface in circular motions to remove any remaining bumps. -
Refine the polish:
Repeat the wet sanding process with 600-grit and finally 1000-grit paper until the clay feels like smooth glass. -
Base coat:
Paint the entire figure with a high-pigment deep blue acrylic paint. Use multiple thin layers rather than one thick one to avoid brushstrokes. -
Adding texture (optional):
To mimic the stone-like look in the photo, you can sponge on a very subtle, slightly lighter blue glaze before the base coat dries fully. -
Paint the eyes:
Using a small ball stylus dipped in black paint, dot two oval shapes for the eyes and a smaller dot for the mouth. -
Add highlights:
Once the black paint is dry, use a pin or toothpick to add tiny white reflection dots to the upper corners of the eyes. -
Seal the piece:
Finish with a high-quality matte varnish to protect the paint while maintaining that velvety, non-reflective look.
Fingerprint Zero
Wear latex or nitrile fingertip cots during the final sculpting phase to prevent last-minute prints on your smooth surface.
Place your little blue spirit on your desk for a calming presence
Mini Planter Buddy Challenge
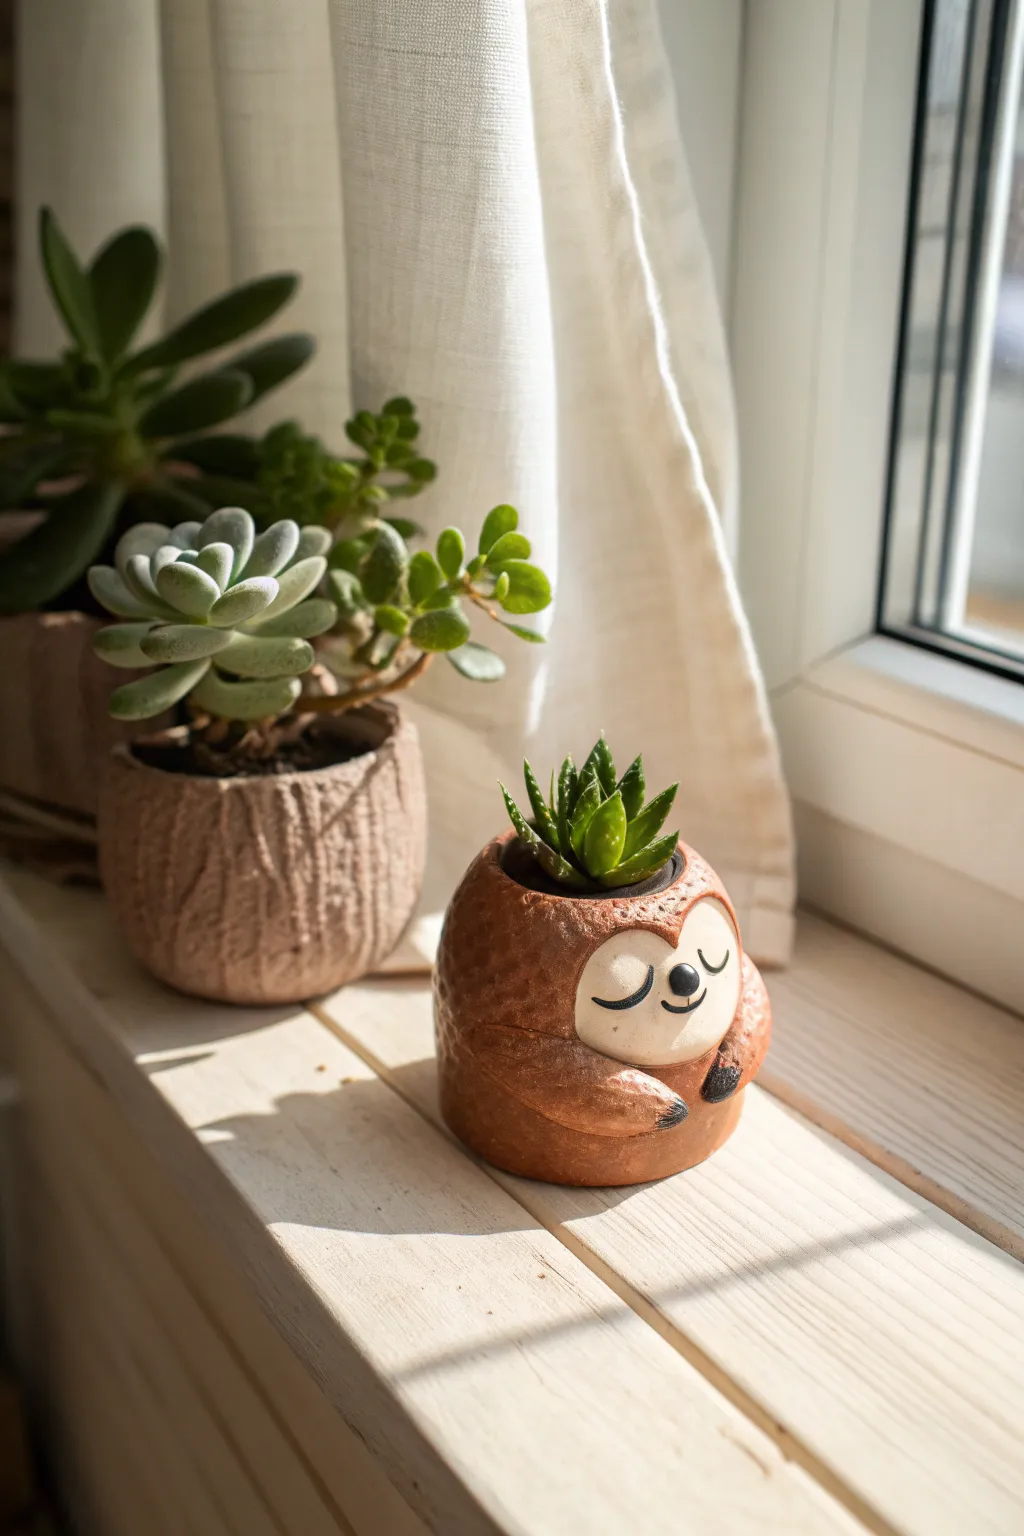
This adorable sloth planter brings a touch of calm to any windowsill with his serene, smiling expression and cozy hugging pose. Perfect for small succulents or cacti, the textured brown clay body contrasts beautifully with the smooth, pale cream face.
How-To Guide
Materials
- Polymer clay or air-dry clay (terracotta/brown and white/cream)
- Small rolling pin
- Modeling tools (or a toothpick and a small spoon)
- Texture tool (sponge or toothbrush)
- Black acrylic paint
- Fine detail paintbrush
- Gloss or matte varnish (optional)
- Small succulent or air plant for planting
Step 1: Basic Shape Structure
-
Form the base ball:
Start by conditioning a large chunk of brown clay until it is soft and pliable. Roll it into a smooth ball approximately the size of a tangerine. -
Create the pot opening:
Press your thumb deeply into the center of the ball to create the hollow space for the plant. Using a pinching motion, widen the walls evenly until you have a pot shape. -
Flatten the bottom:
Gently tap the base of your pot against your work surface. This ensures your sloth will sit stability on a shelf without rolling over. -
Refine the rim:
Smooth the upper rim of the pot with your finger or a little water if using air-dry clay. Aim for a slightly rounded, organic edge rather than a sharp one.
Cracking Up?
If using air-dry clay, cracks can appear while drying. Small surface cracks can be filled with a ‘slip’ paste made of wet clay and water, then smoothed over with a finger.
Step 2: Adding Character Details
-
Shape the face plate:
Roll out a small piece of cream or white clay into a flat, heart-shaped or oval disc. This will be the sloth’s face mask. -
Attach the face:
Press the cream clay onto the front of the brown pot body. Smooth the edges gently so it looks integrated, not just stuck on top. -
Add the nose:
Roll a tiny ball of black clay (or paint it later) and press it onto the center of the face for the nose. -
Create the arms:
Roll two small sausages of brown clay. Taper one end of each sausage slightly to form the hands. -
Position the arms:
Attach the arms to the sides of the body, curving them forward so the hands meet or rest on the belly just below the face area. -
Sculpt claws:
User a craft knife or toothpick to press three small indentations into the end of each arm to suggest sloth claws. You can paint these black later for contrast.
Step 3: Texturing and Finishing
-
Texture the fur:
Using a toothbrush, a coarse sponge, or a dedicated needle tool, gently tap or scratch the surface of the brown clay body. Avoid the cream face mask to keep it smooth. -
Bake or Dry:
Follow the manufacturer’s instructions for your specific clay. If baking polymer clay, support the hollow shape with a ball of foil so it doesn’t slump in the oven. -
Paint facial features:
Once the piece is fully cured or dry, use a fine detail brush and black acrylic paint to draw two curved lines for sleeping eyes and a small smile. -
Paint the paws:
Carefully paint the tips of the paws black to highlight the claws you sculpted earlier. -
Seal:
Apply a coat of varnish to protect your paint job. A matte varnish looks natural, but gloss adds a ceramic feel. Ensure the inside is sealed well if you plan to use real soil. -
Plant:
Add a small succulent directly into the pot, or place a tiny air plant inside for a low-maintenance hairdo.
Hanging Out
Before baking or drying, poke holes on either side of the rim and thread twine through them later. This turns your desk buddy into a hanging planter perfect for trailing vines.
Now you have a tranquil little friend to keep your succulents safe and add charm to your home

TRACK YOUR CERAMIC JOURNEY
Capture glaze tests, firing details, and creative progress—all in one simple printable. Make your projects easier to repeat and improve.
Tiny Tile Set Challenge
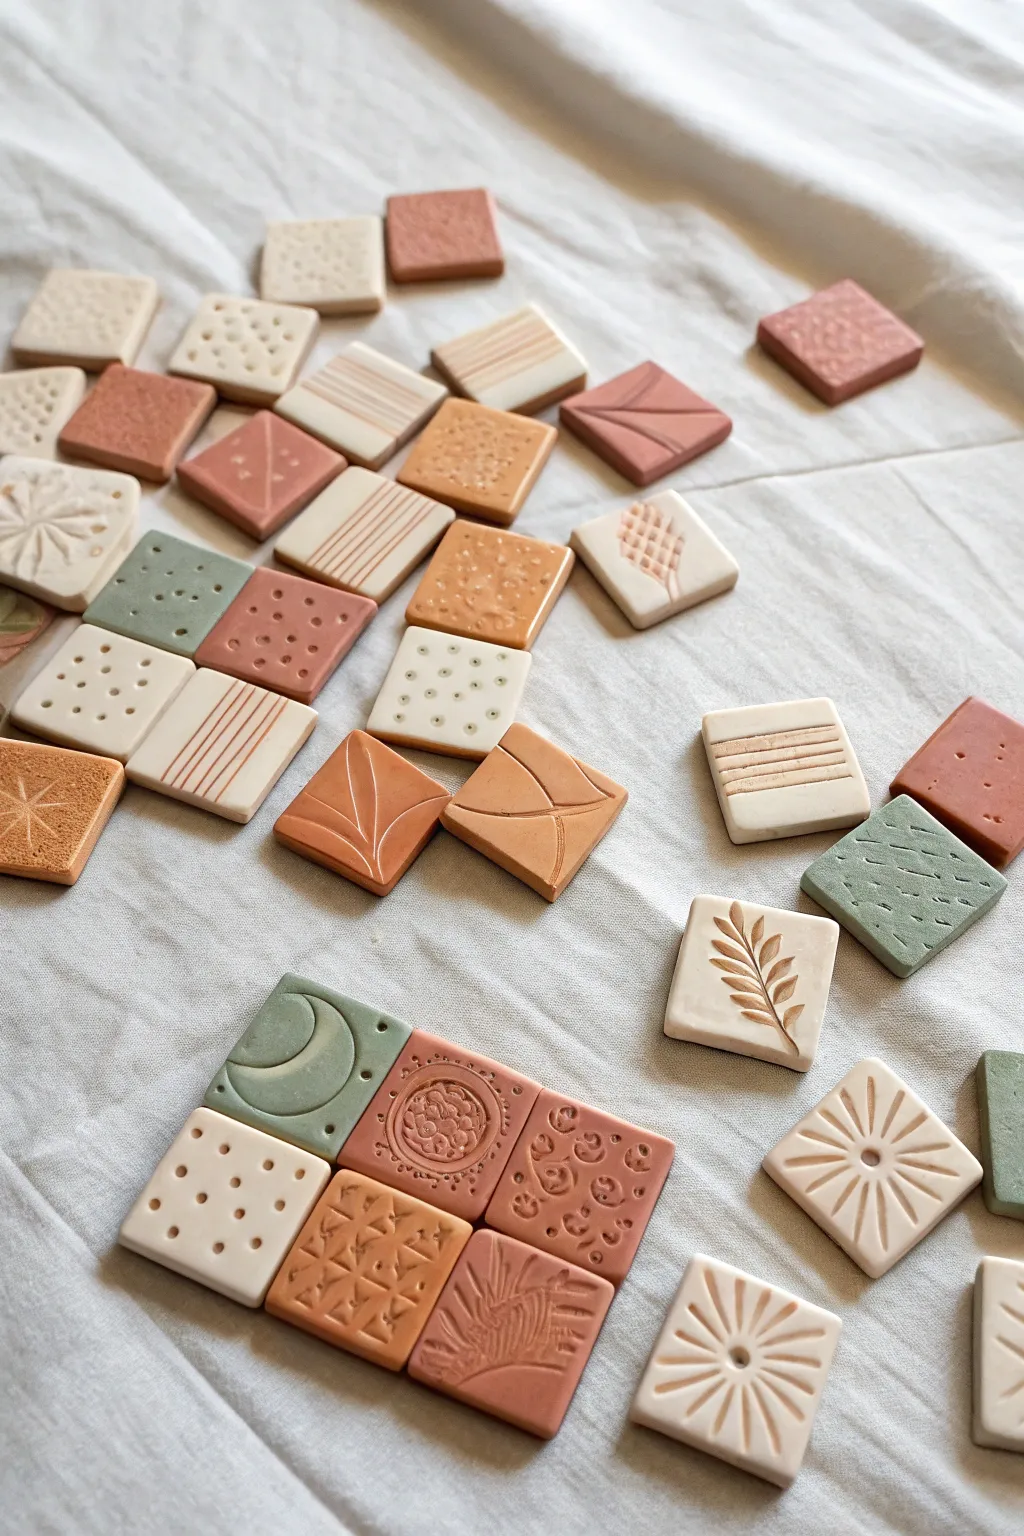
These charming, bite-sized tiles are a perfect way to experiment with texture and pattern without committing to a massive ceramic piece. With their soothing palette of terracotta, sage, and cream, they can be arranged into endless configurations or used as individual magnets and game pieces.
Step-by-Step
Materials
- Polymer clay or air-dry clay (terracotta, white, sage green, beige)
- Square cookie cutter (approx. 1 inch)
- Acrylic rolling pin
- Parchment paper or clay mat
- Needle tool or toothpick
- Various texturing tools (stamps, textured fabrics, leaves, found objects)
- Ball stylus tool
- Detail knife
- Sandpaper (fine grit)
- Matte varnish or sealant (optional)
Step 1: Preparation & Shapes
-
Condition the Clay:
Begin by conditioning your clay. Warm it in your hands and knead it until it is soft and pliable. If you are mixing custom colors to achieve those muted earth tones, now is the time to blend them thoroughly. -
Roll an Even Slab:
Place the clay on your parchment paper or work mat. Using the acrylic rolling pin, roll the clay out to a uniform thickness, aiming for about 1/4 inch (6mm). Using depth guides or playing cards stacked on either side can help you get perfectly even slabs. -
Cut the Squares:
Press your square cutter firmly into the clay slab to create your tiles. Cut as many as you like—create a variety of colors by repeating this with your different clay blocks. Don’t separate them just yet; leaving them in place can sometimes help keep the shape square while texturing.
Warped Tiles?
If air-drying tiles start curling up at the corners, place a light book or board over them (with parchment paper in between) as they finish drying to weight them flat.
Step 2: Texturing & Design
-
Create Dotted Patterns:
For the domino-like tiles, use a ball stylus or the blunt end of a small paintbrush. Press gently into the clay to create uniform divots. You can create grids, random sprays, or borders of dots. -
Carve Linear Accents:
Use a needle tool or a dull knife to press straight lines into the clay. I find that rocking the blade gently rather than dragging it creates a cleaner line without raising burrs on the clay surface. -
Stamp Botanical Motifs:
If you have small rubber stamps or even real leaves with thick veins, press them into the surface to create the botanical tiles. The leaf imprint should be deep enough to catch shadows but not punch through the tile. -
Etch Celestial Shapes:
Freehand the moon and sun designs using a needle tool. For the crescent moon, you can also use a small round cap to impress two overlapping circles, smoothing out the unwanted lines to reveal the crescent shape. -
Refine the Edges:
Once all textures are applied, gently lift the tiles away from the excess clay. Use your fingertip to softly smooth the cut edges of each square, removing any sharp angles or crumbs left by the cutter.
Make it Magnetic
Glue small, strong disc magnets to the back of your finished tiles. They make beautiful, custom refrigerator magnets or a functional magnetic mosaic puzzle.
Step 3: Finishing Touches
-
Bake or Dry:
If using polymer clay, arrange the tiles on a baking sheet lined with parchment paper. Bake according to the manufacturer’s instructions (usually 275°F/135°C for 15-30 minutes). If using air-dry clay, let them sit in a cool, dry place for 24-48 hours, flipping them occasionally to prevent warping. -
Cool and Sand:
Allow the tiles to cool completely if baked. Check the edges for any remaining sharpness or roughness. Lightly sand the sides with fine-grit sandpaper for a professional, smooth finish. -
Enhance Texture (Optional):
To make the patterns pop, you can apply a subtle wash of diluted acrylic paint (a dark brown or grey) into the grooves, then immediately wipe the surface clean with a damp cloth, leaving pigment only in the recessed areas. -
Seal the Surface:
Finish by applying a thin coat of matte varnish. This protects the clay from fingerprints and dust while preserving the natural, earthy look of the unglazed ceramic aesthetic.
Arrange your finished tiles into a coaster set or simply display them as a miniature art installation on your desk
One Tool Only Challenge
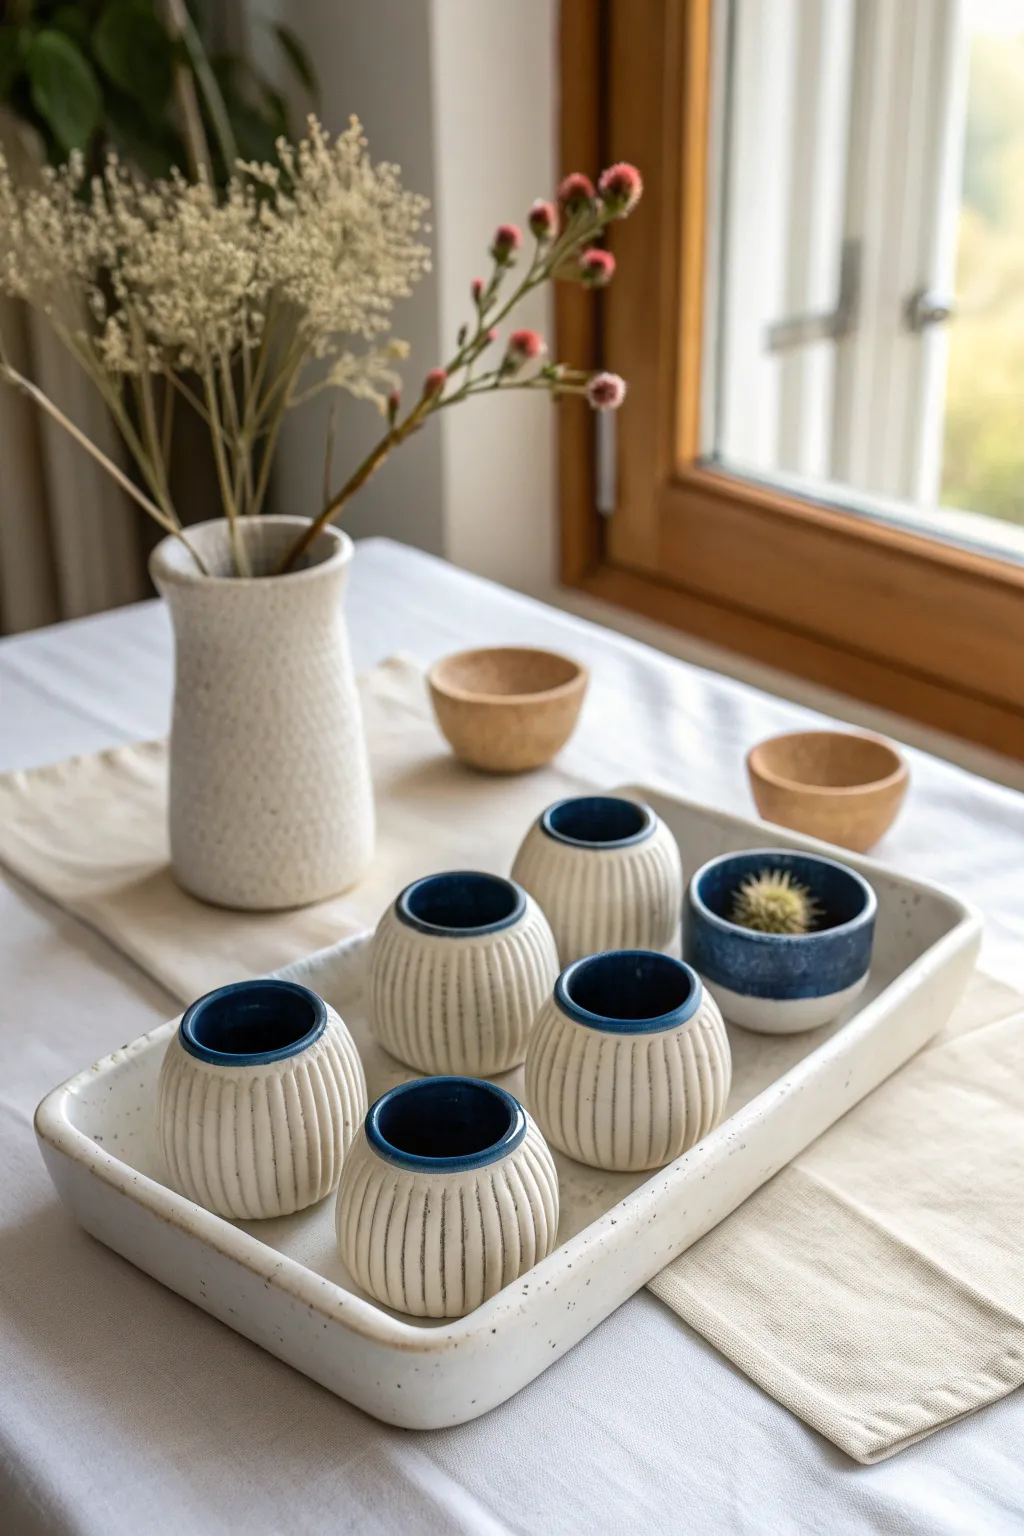
Embrace the simplicity of texture with these charming, ribbed mini-pots nesting in a matching tray. The contrast between the raw, creamy stoneware exterior and the glossy, deep indigo interior creates a striking modern aesthetic that feels both rustic and refined.
How-To Guide
Materials
- White stoneware clay (medium grog for stability)
- Small loop tool or carving tool (for the one-tool challenge)
- Pottery wheel (or tabletop wheel)
- Sponge
- Wire cutter
- Deep blue/Indigo glaze (cone 5/6 recommended)
- Clear matte glaze (optional for exterior)
- Kiln access
Step 1: Throwing the Forms
-
Prepare your clay balls:
Weigh out approximately 3/4 lb (350g) of clay for each mini-pot to ensure they are uniform in size. Wedge them thoroughly to remove air pockets. -
Center and open:
Secure a ball of clay on the wheel head. Center it firmly, then open the clay down to a depth of about 3 inches, leaving a centimeter for the base thickness. -
Pull the walls:
Pull the walls up, keeping them relatively thick (about 1/2 inch) to allow depth for the carving later. Aim for a slightly bulbous, rounded shape that tapers inward at the rim. -
Refine the rim:
Compress the rim with a sponge or chamois to make it smooth and distinct. Creating a small ‘gallery’ or defined lip helps separate the interior glaze from the exterior later. -
Repeat for the set:
Repeat this process for as many pots as you desire (the image shows five). Try to keep the height and belly width consistent. -
Throw the matching tray:
Using a larger amount of clay (approx 3-4 lbs), throw a low, wide platter with a flat bottom and a simple, vertical 1-inch wall to hold your set.
Uneven Carving Lines?
Don’t panic! Since this is handmade, slight wiggles add character. If a line goes really astray, use a little soft clay to fill the groove, smooth it, and re-carve.
Step 2: Carving Texture
-
Leather hard stage:
Allow the pots to dry to a leather-hard state. They should be firm enough to hold their shape but soft enough to carve easily without chipping. -
Map your lines:
Lightly mark vertical guidelines around the pot if you are nervous about spacing, though freehanding yields a lovely organic look. -
Carve the ribs:
Using your chosen carving loop tool, drag it vertically from just under the rim down to the base. Press firmly to create a deep groove. -
Maintain spacing:
Leave a ridge of uncarved clay between each groove. The rhythm of groove-ridge-groove creates that signature ribbed texture. -
Clean up burrs:
Once carved, gently wipe the surface with a barely damp sponge to smooth down any sharp clay crumbs or burrs created by the tool.
Level Up: Mix & Match
Try glazing the interior of each pot in a different shade of the same color family (e.g., navy, teal, sky blue) for an ombre effect across the set.
Step 3: Glazing & Firing
-
Bisque fire:
Load your bone-dry pieces into the kiln and bisque fire them (usually to cone 04) to prepare them for glazing. -
Wax the exterior:
Apply wax resist to the entire exterior ribbed surface and the rim. This ensures the blue glaze only sticks to the inside. -
Pour the interior:
Pour your deep indigo glaze into the pot, swirl it to coat the entire inner surface, and pour the excess back out immediately. -
Wipe the rim:
Use a damp sponge to meticulously wipe any blue glaze droplets off the rim or the exterior ribs. The line between blue and white needs to be crisp. -
Tray glazing:
For the tray, use a speckled white or matte clear glaze to keep it neutral, allowing the pots to stand out. -
Final wipe:
I always do one last check of the bottoms to ensure no glaze is on the foot ring before loading the kiln. -
Glaze fire:
Fire the pieces to the temperature required by your specific clay and glaze body (typically cone 6 for stoneware).
Now you have a stunning, functional set perfect for morning espresso or propagating tiny succulents
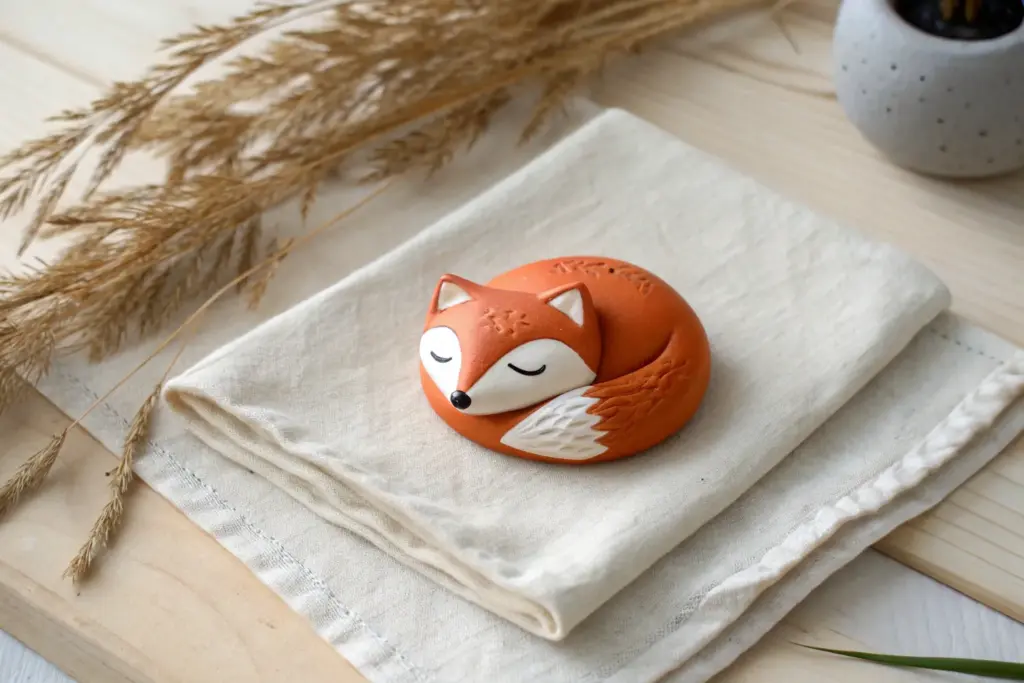
Seasonal Mascot Mini Challenge
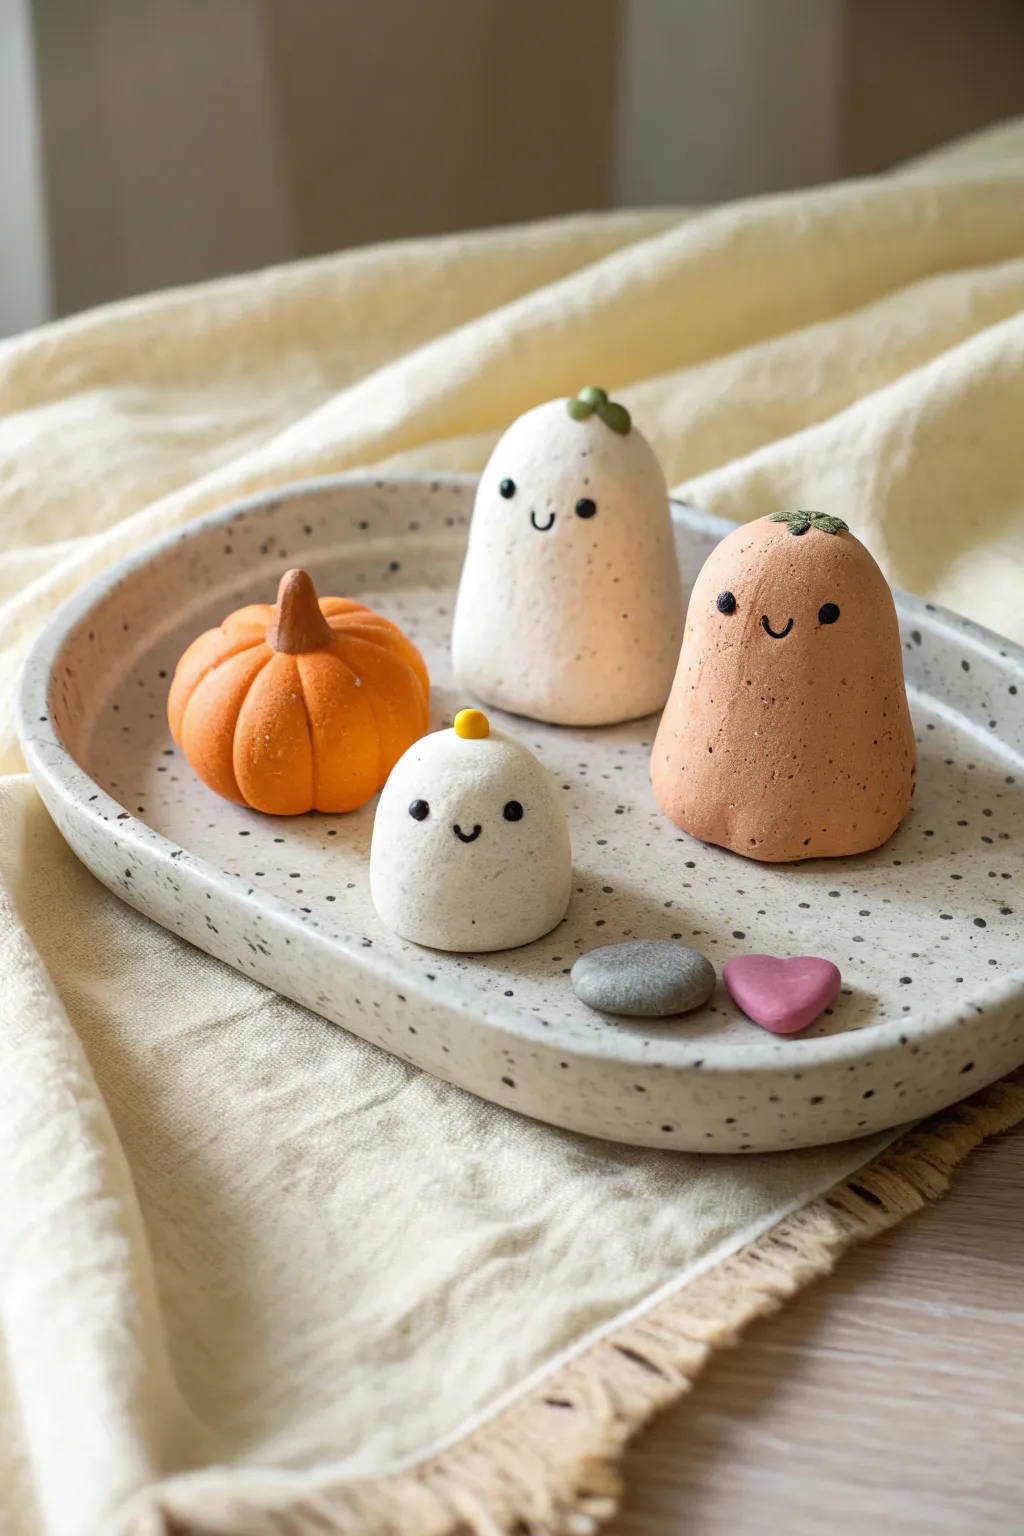
Embrace the cozy side of autumn with this trio of friendly clay ghosts and their pumpkin companion. These delightful, smooth-finished figurines feature charming minimalist faces and sit perfectly on a simple speckled tray.
Detailed Instructions
Materials
- White air-dry clay or polymer clay
- Terracotta or orange-tinted clay
- Speckled clay (or black pepper to mix in)
- Acrylic paints (black, orange, green, yellow, pink)
- Fine-grit sandpaper
- Small detail brush or dotting tool
- Clay sculpting tools
- Matte sealant or varnish
Step 1: Shaping the Ghost Trio
-
Prepare the speckled dough:
If you don’t have pre-speckled clay, knead a tiny pinch of cracked black pepper or dried coffee grounds into your white clay to achieve that earthy, stone-like texture seen in the photo. -
Form the tall ghost body:
Take a walnut-sized ball of standard white clay (or light beige) and roll it into a smooth cylinder, slightly wider at the base, creating a soft gumdrop shape about 2 inches tall. -
Add the sprout detail:
Roll two tiny teardrops of green clay. Press them gently onto the very top of the tall ghost’s head to look like a small sprouting leaf. -
Sculpt the terracotta ghost:
Using the terracotta-colored clay, form a slightly squatter, wider gumdrop shape. Smooth the bottom so it sits flat and stable. -
Top the orange figure:
Create a tiny, flat star shape from green clay and press it onto the center of the terracotta ghost’s head to mimic a pumpkin stem base. -
Create the baby ghost:
Make a much smaller white clay mound, roughly half the size of the others. Make sure it’s round and chubby. -
Add the yellow accent:
Roll a tiny sphere of yellow clay and press it firmly onto the center of the baby ghost’s head like a small button or fruit.
Cracking Clay?
If you see small cracks forming while the clay dries, smooth a tiny amount of water (or a clay-water slurry) over the crack with your finger to seal it.
Step 2: Crafting the Pumpkin & Tokens
-
Start the pumpkin:
Roll a ball of bright orange clay. flatten it slightly at the poles to create a squat, round shape. -
Define the segments:
Use a sculpting tool or the back of a knife to press vertical indentations all around the pumpkin, running from top to bottom to create the ribbed segments. -
Attach the stem:
Form a small cone from brown clay and attach it to the center indentation on top, blending the clay slightly at the seam for a secure hold. -
Make the pebble:
Roll a small piece of grey clay into a smooth, oval stone shape, flattening it just enough so it doesn’t roll away. -
Form the heart:
Shape a tiny piece of pink clay into a classic heart shape, smoothing the edges so they are soft and rounded, not sharp.
Step 3: Finishing Touches
-
Dry properly:
Allow all pieces to dry completely according to your clay package instructions. I find waiting an extra few hours ensures the surface is truly ready for detailing. -
Smooth the surfaces:
Once dry, gently rub the surfaces with fine-grit sandpaper to remove any fingerprints or sharp ridges, giving them that soft-matte look. -
Paint the eyes:
Using a dotting tool or the handle end of a paintbrush dipped in black paint, place two small, wide-set dots for eyes on each ghost character. -
Paint the smiles:
With your finest brush, paint a tiny, U-shaped mouth between the eyes. Keep the line thin and delicate for the cutest expression. -
Seal the work:
Apply a coat of matte varnish to all pieces. This protects the paint and unifies the sheen without making them look like glossy plastic.
Pro Tip: Weighted Base
Before sealing the bottom of your ghosts, press a small metal washer or coin inside the base. This adds weight and prevents them from tipping over easily.
Now you have an adorable autumnal family ready to decorate your desk or shelf
Mini Creature Face Swap Challenge
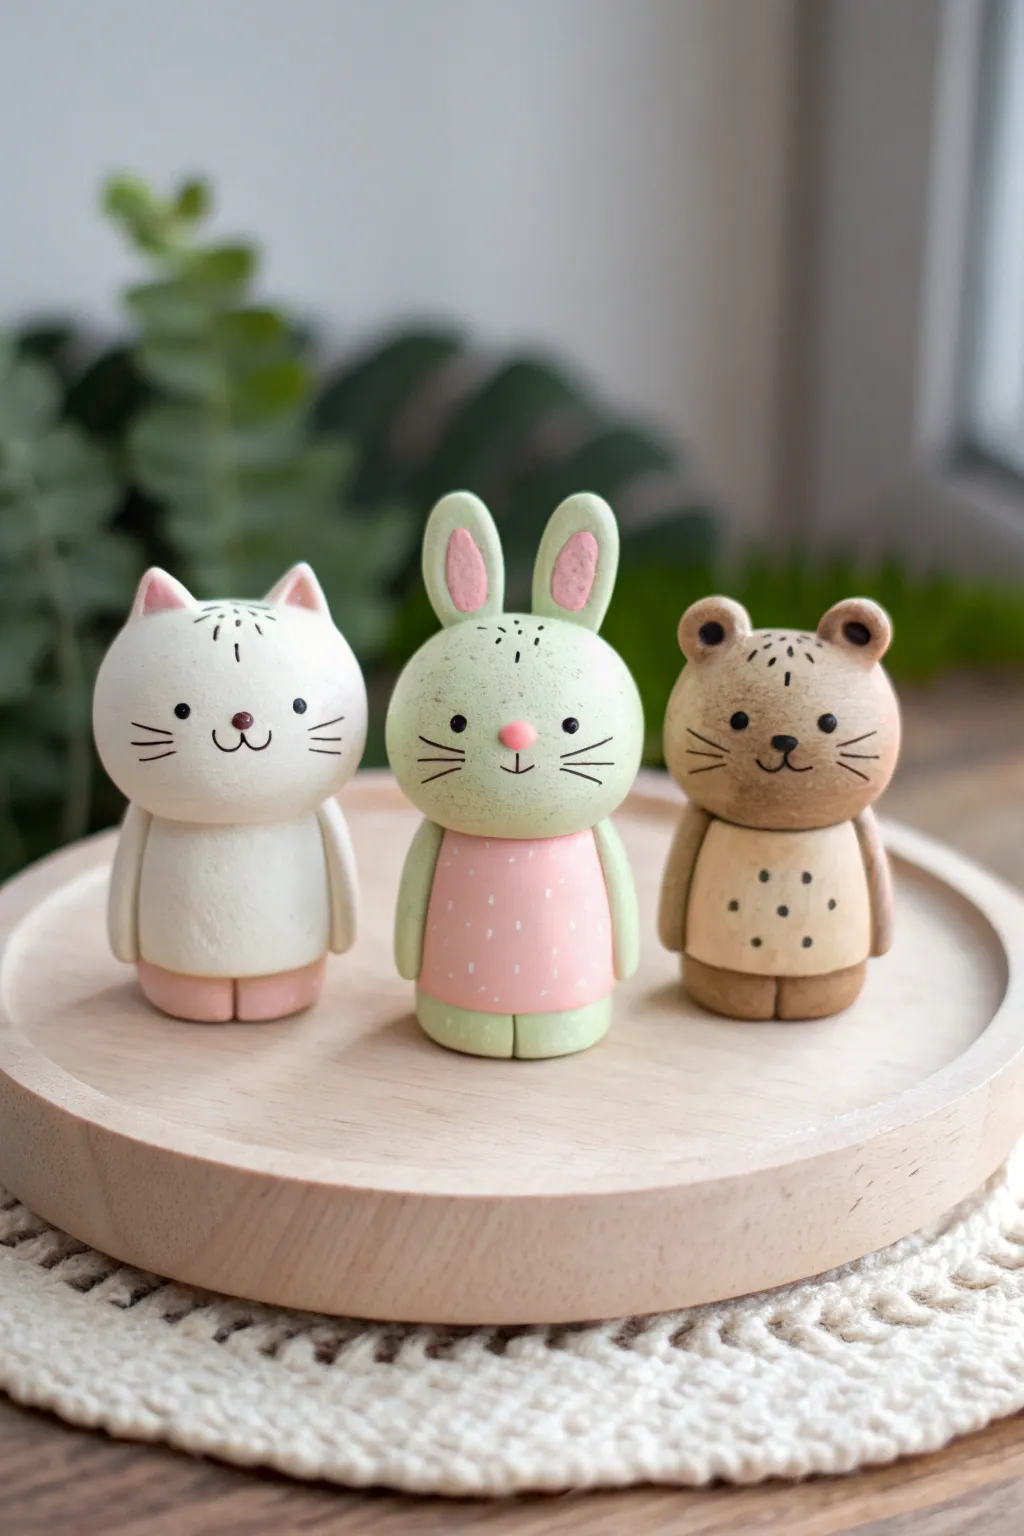
These charming, minimalist animal figurines—a cat, rabbit, and bear—make for a delightful modeling project with their soft pastel tones and simple, rounded forms. The ‘face swap’ element comes from their uniform body shapes, meaning you could easily mix and match features to create entirely new hybrid creatures.
Step-by-Step Tutorial
Materials
- Polymer clay (white, light green, tan/beige, baby pink, black)
- Small dotting tool or toothpick
- Pointed modeling tool
- Acrylic rolling pin
- Blade or craft knife
- Fine-grit sandpaper (optional)
- Needle tool
- Soft brush for smoothing
- Oven for baking (if using polymer clay)
Step 1: Fearsome Foundations
-
Prepare the clay:
Begin by conditioning your white, light green, and tan clay until soft and pliable. You want to ensure there are no air bubbles trapped inside. -
Form the head spheres:
Roll three equal-sized spheres of clay—one white (cat), one green (rabbit), and one tan (bear)—each about 1 to 1.5 inches in diameter. -
Shape the heads:
Gently press each sphere onto your work surface to flatten the bottom slightly, creating a stable base for the head to rest on the body. -
Create the body cylinders:
Roll three cylinders of corresponding clay colors. These should be slightly narrower than the heads and about the same height. For the rabbit, swap the green body for a pink cylinder to create the dress. -
Assemble the core:
Attach the heads to the bodies. I like to insert a small piece of toothpick or wire between the head and body for internal support before pressing them together. -
Add the feet:
Roll tiny balls of clay for the feet. Use pink for the cat, green for the rabbit, and tan for the bear. Flatten them slightly and attach them to the bottom of the bodies, smoothing the seams gently with a modeling tool.
Step 2: Ears & Limbs
-
Cat ears:
Form two small triangles of white clay. Press a smaller pink triangle into the center of each, then attach them to the top of the white head. -
Rabbit ears:
Roll two longer logs of green clay and flatten them into long ovals. Press pink clay ovals into the centers. Attach these upright on the green head. -
Bear ears:
Make two small semi-circles of tan clay. Use a dotting tool to create an indentation in the center of each ear. Attach them to the tan head. -
Arms:
Roll slender sausage shapes for the arms (white for cat, green for rabbit, tan for bear). Press them vertically against the sides of the bodies so they hang down naturally.
Problem: Cracking Seams
If limbs detach or cracks appear at the neck after baking, use a tiny amount of liquid polymer clay as ‘glue’ and re-bake for a short period to seal the gap.
Step 3: Finer Details
-
Face preparation:
Before adding features, ensure the face area is smooth. A light brush with baby oil or clay softener can remove fingerprints. -
Noses:
Place a tiny dot of clay for the nose in the center of each face. Use brown for the cat, pink for the rabbit, and black for the bear. -
Eyes:
Using a very small ball tool or the tip of a needle, press tiny indentations for the eyes. Insert minuscule balls of black clay into these spots for a flush finish. -
Whiskers and mouths:
For the whiskers, you can roll incredibly thin threads of black clay or use a fine-tip permanent marker after baking. Gently incise the mouth lines using a needle tool. -
Upper head details:
Use a needle tool or black paint to add tiny dashed lines on the forehead of the cat and bear, and similar markings on the rabbit’s head for texture. -
Patterning the bodies:
For the bear, press tiny black clay dots onto the belly. For the rabbit, add small white dots to the pink dress using tiny specks of clay or white acrylic paint later. -
Final baking:
Bake your figurines strictly according to the manufacturer’s instructions for your specific brand of clay. Let them cool completely before handling.
Level Up: Magnetic Swap
Embed small magnets in the neck and head joints instead of joining them permanently. This lets you genuinely swap the heads between bodies for endless fun.
Display your trio on a small wooden coaster to complete the natural, minimalist aesthetic
Tiny Totem Stack Challenge
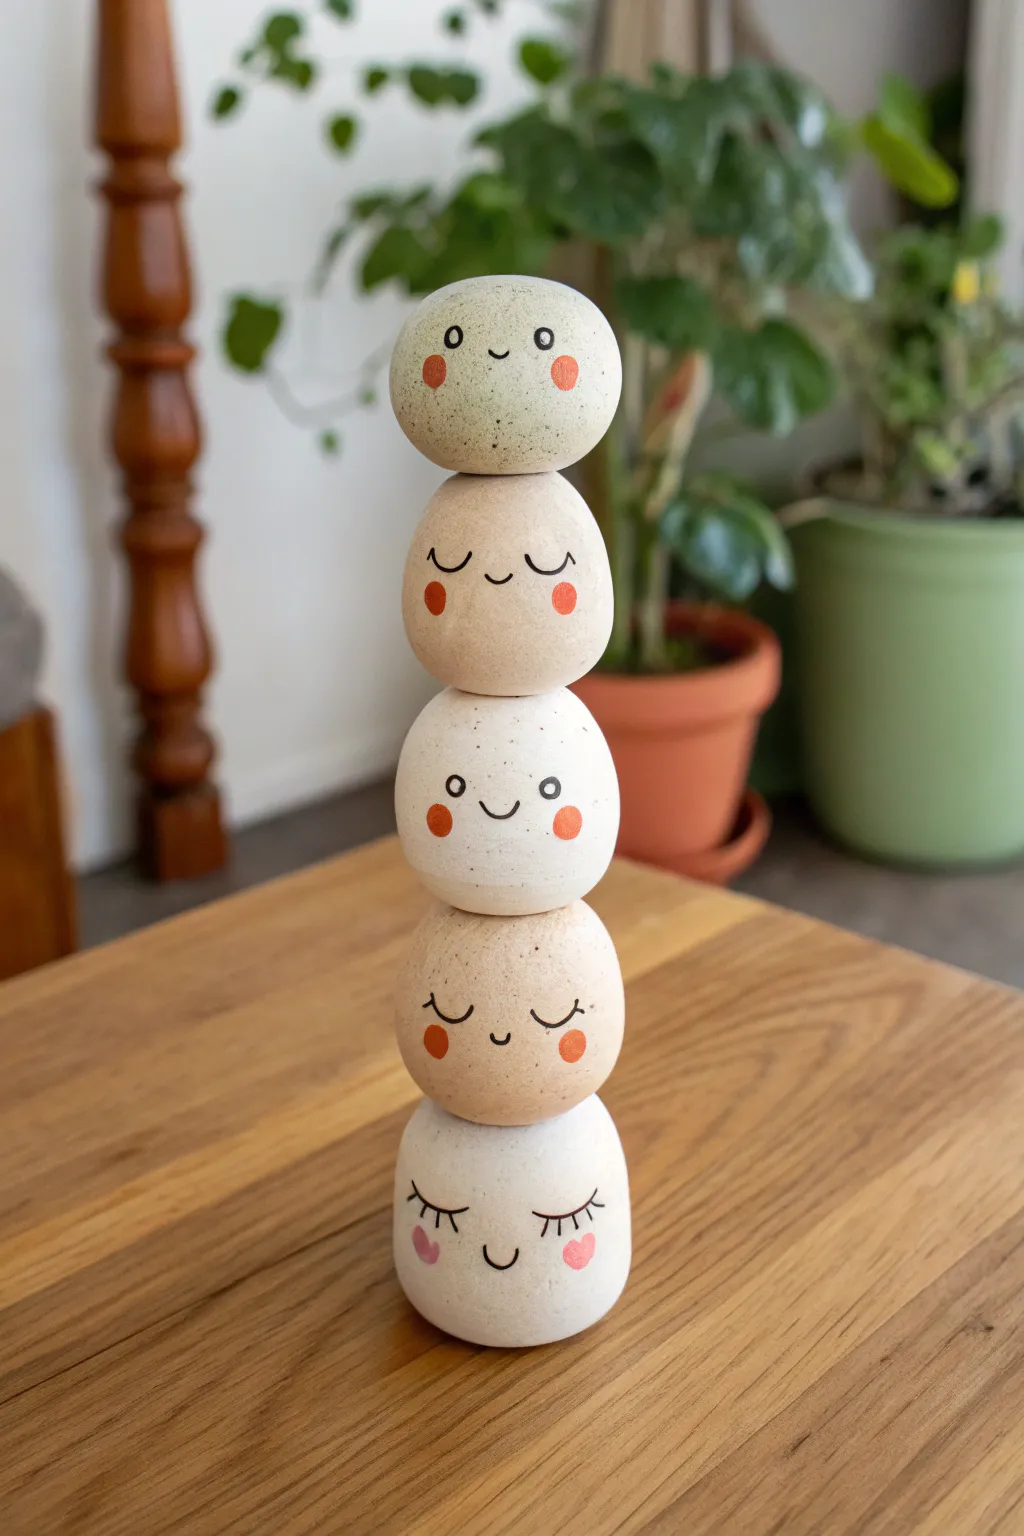
Challenge your balance and design skills with this adorable stack of five expressive clay stones. Featuring a mix of sleepy and wide-eyed faces in gentle earthy tones, this totem makes for a charming shelf accent or desk buddy.
Step-by-Step
Materials
- Polymer clay (white, beige, translucent, and speckled varieties)
- Acrylic rolling pin
- Aluminum foil
- Needle tool or toothpick
- Fine-grit sandpaper (400-800 grit)
- Acrylic paints (black, coral/pink, brown)
- Fine detail paintbrush (size 00 or 000)
- Matte polyurethane varnish
- Oven for baking
Step 1: Shaping the Stones
-
Create foil cores:
Crumple aluminum foil into five small, tight balls of roughly equal size. Creating a core helps save clay and makes the final pieces lighter for stacking. -
Condition the clay:
Knead your chosen clay colors until soft and pliable. For the speckled look seen in the top and middle stones, mix white clay with a small pinch of black pepper or black sand. -
Cover the cores:
Flatten sheets of clay to about 1/4 inch thickness. Wrap each foil ball completely, smoothing the seams until invisible. -
Refine the shapes:
Roll each ball gently between your palms to smooth it resulting in a slightly flattened, pebble-like sphere rather than a perfect ball. This organic shape aids stacking. -
Test the stack:
Gently stack the raw clay balls to ensure they balance well. If they wobble too much, gently tap the top and bottom of each piece to create very subtle flat spots. -
Bake the clay:
Arrange the pieces on a baking sheet or ceramic tile. Bake according to your manufacturer’s instructions (usually 275°F/135°C for 15-30 minutes per 1/4 inch). -
Cool down:
Turn off the oven and let the stones cool completely inside. This gradual cooling prevents thermal shock cracks.
Step 2: Adding Personality
-
Sand for smoothness:
Once cool, use fine-grit sandpaper under running water to gently buff away any fingerprints or lint. Dry them thoroughly. -
Plan the faces:
Before painting, arrange your stack in its final order. Lightly sketch the eyes and mouth positions with a pencil to ensure they align nicely vertically. -
Paint cheeks on the sleepy faces:
For the closed-eye faces (bottom, middle-bottom, second-from-top), paint round coral or pink cheeks first. For the bottom stone, paint little heart shapes instead of circles. -
Paint cheeks on the awake faces:
Using the same coral color, add round cheeks to the ‘awake’ faces (middle and top stones). -
Paint the eyes:
Using a very fine brush and black paint, carefully draw the eyes. Use simple ‘U’ shapes for sleeping eyes and open circles for awake eyes. Add tiny lashes to the bottom stone for variety. -
Add smiles:
Paint a tiny, curved line between the cheeks for the mouth. Keep the strokes delicate and centred. -
Let paint cure:
Allow the acrylic paint to dry fully. I usually give this at least an hour to ensure no smudging happens during varnishing. -
Seal the totem:
Apply a thin coat of matte polyurethane varnish to each stone to protect the paint and give the clay a finished ceramic look. -
Final assembly:
Once dry, stack your totem. For a permanent sculpture, you can glue them together with E6000, or leave them loose for an interactive desk toy.
Balance Buddy Pro-Tip
Before baking, gently press the stones together in their stack formation. This creates natural indentations that make them lock together perfectly later.
Level Up: Mix Textures
Use coarse sandpaper on just the beige stones after baking to create a stone-like texture, contrasting with the smooth white pieces for tactile variety.
Enjoy the calming presence of your new little clay family on your desk or shelf
Monochrome Mini Series Challenge
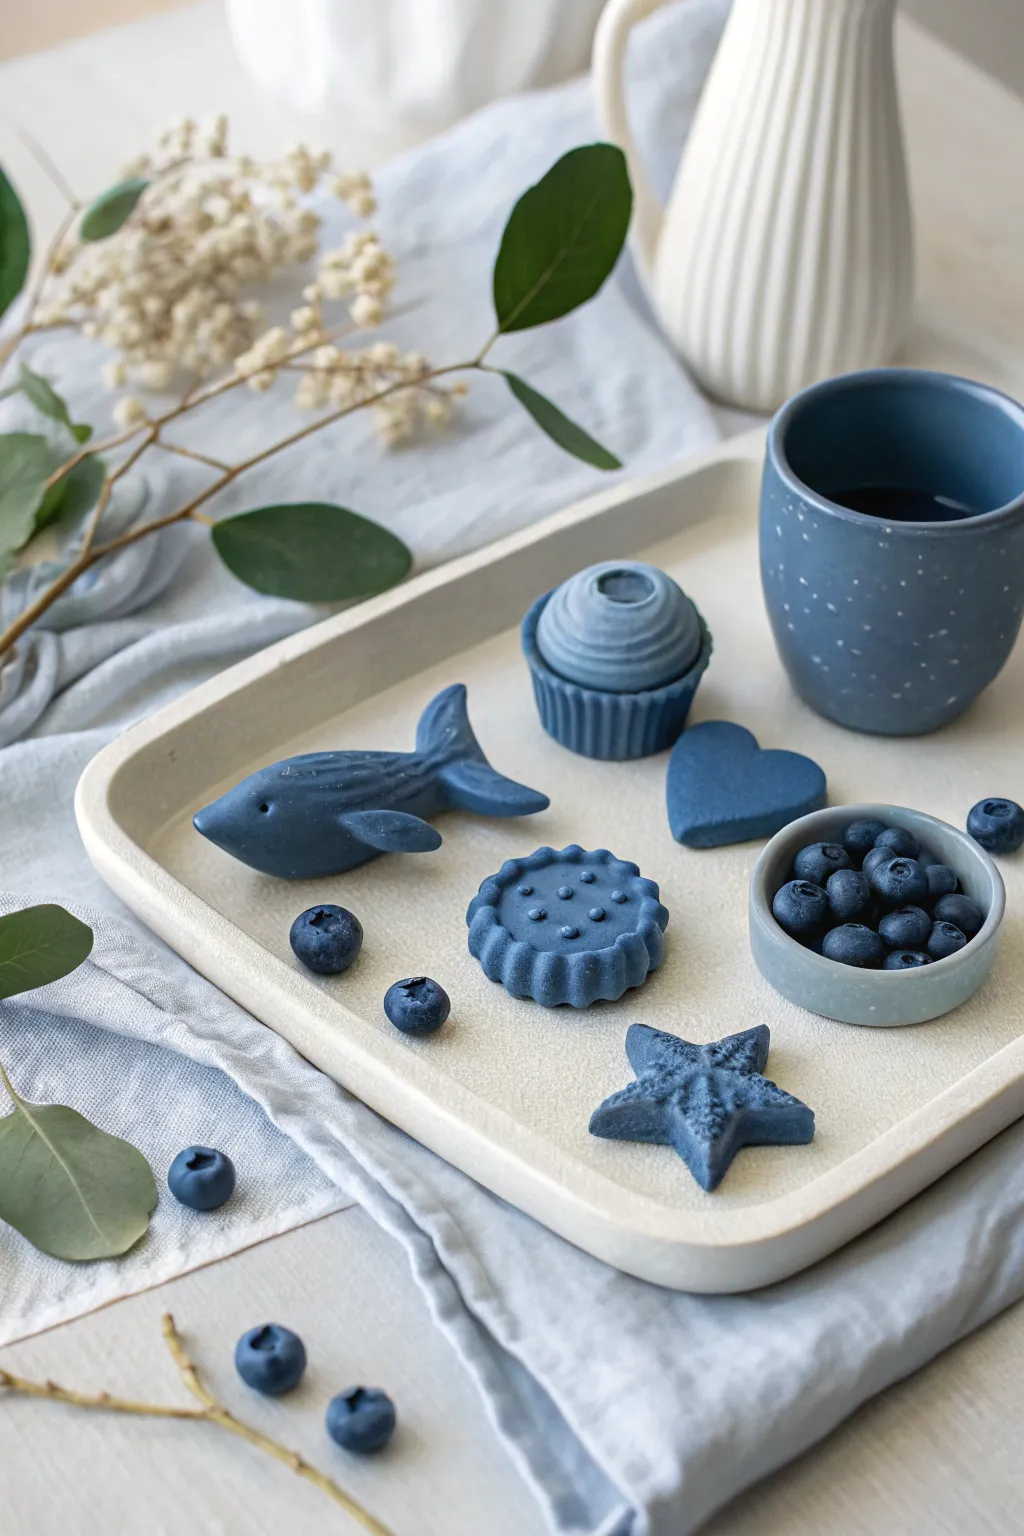
Dive into this soothing monochrome challenge by sculpting a collection of miniature items united by a single, dusty blueberry shade. This project focuses on texture and consistent coloring to create a cohesive set featuring sea life and sweet treats.
Step-by-Step Guide
Materials
- Polymer clay (white and dark blue or pre-mixed dusty blue)
- Clay blending machine or rolling pin
- Liquid clay or bake and bond
- Needle tool
- Ball stylus tools (various sizes)
- Star-shaped cutter (optional)
- Small round cutter or bottle cap
- Sandpaper (fine grit)
- Matte varnish (optional)
Step 1: Color Mixing and Prep
-
Create the Custom Shade:
Begin by conditioning your clay. To achieve the specific dusty blue seen in the image, mix a large ratio of navy blue with a touch of white and a tiny speck of black to desaturate it. Knead until the color is completely uniform. -
Divide the Portions:
Separate your conditioned clay into five main balls for the whale, cupcake, cookie, heart, and starfish, plus a little extra for the blueberries and bowl.
Clean finish
Before baking, brush your raw clay pieces with a little cornstarch or baby powder. This removes fingerprints and gives that soft, matte velvet texture seen in the photo.
Step 2: Sculpting the Sea Life
-
Form the Whale Body:
Roll a smooth log of clay that tapers at one end. Gently curve the tapered end upward to form the tail section. -
Add Fins and Fluke:
Flatten the tip of the tail and cut a notch in the center to create flukes. Shape two small triangles for the pectoral fins and attach them to the sides, blending the seams with a silicone tool. -
Detail the Whale:
Use a needle tool to press a small eye indentation near the front. Carefully drag the tool along the belly area to create the grooved texture characteristic of baleen whales. -
Shape the Starfish:
Flatten a ball of clay slightly and pinch out five points. If you have a star cutter, cut the shape and then soften the sharp edges with your finger. -
Texture the Starfish:
Using a small ball stylus, press a line of dots down the center of each arm. Add rough texture to the rest of the surface by gently tapping with an old toothbrush or sandpaper.
Add shading
Once baked, brush white or light blue soft pastel dust over the textured areas (like the whale belly or cookie dots) to highlight the details.
Step 3: Creating the Sweet Treats
-
Build the Cupcake Base:
Roll a cylinder for the cupcake liner. Use the side of a needle tool or a blade to press vertical ridges all around the cylinder to mimic paper folds. -
Swirl the Frosting:
Roll a long, thin snake of clay. Coil it onto the base, spiraling upward to a peak. Smooth the join between the snake and the base securely. -
Indent the Top:
Press a medium ball tool directly into the center of the frosting swirl to create a hollow top, perfect for holding a tiny clay blueberry later. -
Form the Cookie Base:
Flatten a ball of clay into a thick disk. Use a scalloped cutter or manually indent the edges with a tool handle to create the wavy crust look. -
Add Cookie Details:
Using a small ball tool, press a distinct pattern of dots into the top surface of the cookie. I like to keep this symmetrical for a classic baked look. -
Cut the Heart:
Roll a sheet of clay to about 1/4 inch thickness. Use a heart cutter or a blade to cut a simple heart shape, smoothing the edges to make it look like a sugar cookie or chocolate.
Step 4: Finishing Touches
-
Make the Bowl:
Form a small pinch pot from a ball of clay. Ensure the walls are even and the rim is smooth. -
Roll Tiny Blueberries:
Roll several tiny spheres of clay. Press a messy star shape into the top of each using a needle tool to mimic the blossom end of a blueberry. -
Fill the Bowl:
Pile the clay blueberries into the small bowl. Use a drop of liquid clay to secure them in place so they don’t roll away during baking. -
Bake the Set:
Arrange all your pieces on a ceramic tile or baking sheet. Bake according to your polymer clay manufacturer’s instructions, usually at 275°F (130°C) for 15-30 minutes. -
Cool and Protect:
Allow the pieces to cool completely. For a natural finish like the photo, leave them matte, or apply a very thin layer of matte varnish to protect the surface.
Arrange your finished monochrome collection on a tray for a satisfying display of form and color
Negative Space Cutout Charm Challenge
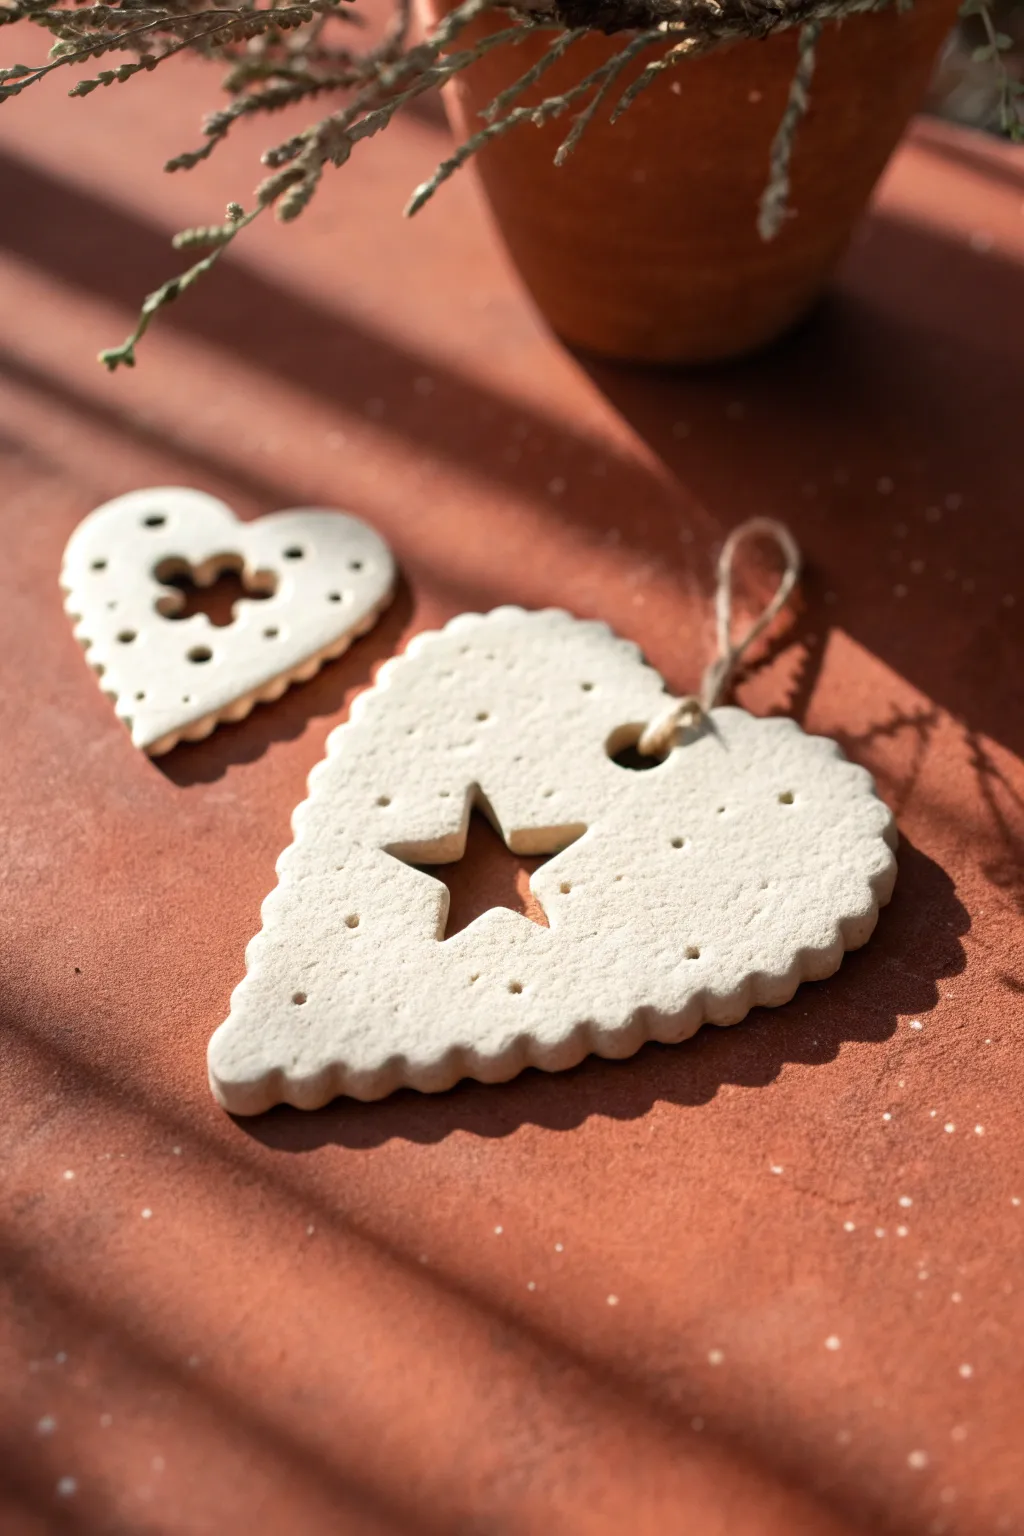
Embrace the beauty of negative space with these charming white clay hearts. Featuring delicate scalloped edges and whimsical central cutouts, these textured ornaments create a lovely play of light and shadow wherever they hang.
Step-by-Step
Materials
- Air-dry clay (white) or polymer clay
- Rolling pin
- Heart-shaped cookie cutter (scalloped edge)
- Small star-shaped cookie cutter
- Small flower or cross-shaped cookie cutter
- Canvas mat or parchment paper
- Toothpick, skewer, or needle tool
- Small straw or drinking straw (for the hanging hole)
- Fine-grit sandpaper (optional)
- Jute twine or ribbon
Step 1: Preparation & Rolling
-
Condition the clay:
Begin by kneading a ball of white clay in your hands until it becomes soft, pliable, and free of cracks. Warm clay is much less likely to tear during the cutting process. -
Prepare your surface:
Lay down a piece of parchment paper or a canvas mat. This prevents sticking and makes it easier to move the delicate shapes later without distorting them. -
Roll the slab:
Use your rolling pin to flatten the clay into an even slab. Aim for a thickness of about 1/4 inch (6mm)—too thin and it might crack, too thick and it will look chunky. -
Check for bubbles:
Inspect the surface for any air bubbles. If you find one, gently pierce it with a needle tool and smooth the area over with your finger.
Fixing Cracks
If hairline cracks appear while drying, make a slip paste (water + clay) and smooth it into the crack with a finger, then let dry again.
Step 2: Cutting & texturing
-
Cut the main shape:
Press the large, scalloped heart cutter firmly into the clay. Give it a tiny wiggle to ensure a clean separation from the surrounding slab, but don’t lift the cutter yet. -
Remove excess clay:
While the cutter is still in place, peel away the excess clay from the outside. This helps keep the scalloped edges perfectly defined. -
Lift the cutter:
Gently lift the heart cutter straight up. If the clay sticks inside, lightly push it out from the top edges, being careful not to dent the surface. -
Create the negative space:
Take your smaller cutter—either the star or the flower shape—and position it slightly off-center or right in the middle, depending on the look you want. -
Punch the center:
Press the small cutter all the way through, wiggle slightly, and remove the center piece of clay. Clean up any rough edges inside the cutout with a damp fingertip. -
Add dotted details:
Using a blunt toothpick or a small stylus tool, gently press small dots into the surface of the clay. I like to scatter them randomly for a rustic feel, avoiding the very edges. -
Make the hanger hole:
Use a straw to punch a clean hole near the top right lobe of the heart. Ensure it’s not too close to the edge, or the clay might break when hung.
Add Scent
After the clay is fully dry, drop essential oils onto the unsealed back of the ornament to turn it into a hanging air freshener.
Step 3: Finishing Touches
-
Smooth the edges:
Dip your finger in a tiny bit of water and run it lightly over any sharp edges or burrs left by the cutters to give the piece a professional finish. -
Dry the ornaments:
Transfer the hearts to a flat surface to dry. If using air-dry clay, flip them over after 12 hours to ensure even drying and prevent warping. -
Sand imperfections:
Once fully cured (24-48 hours usually), you can lightly sand any rough spots with fine-grit sandpaper. -
Attach the twine:
Cut a length of jute twine, thread it through the hole, and tie a simple loop knot.
Hang these lovely textured hearts in a window or on a branch to enjoy the simple elegance of your handiwork
Miniature Room Decor Challenge
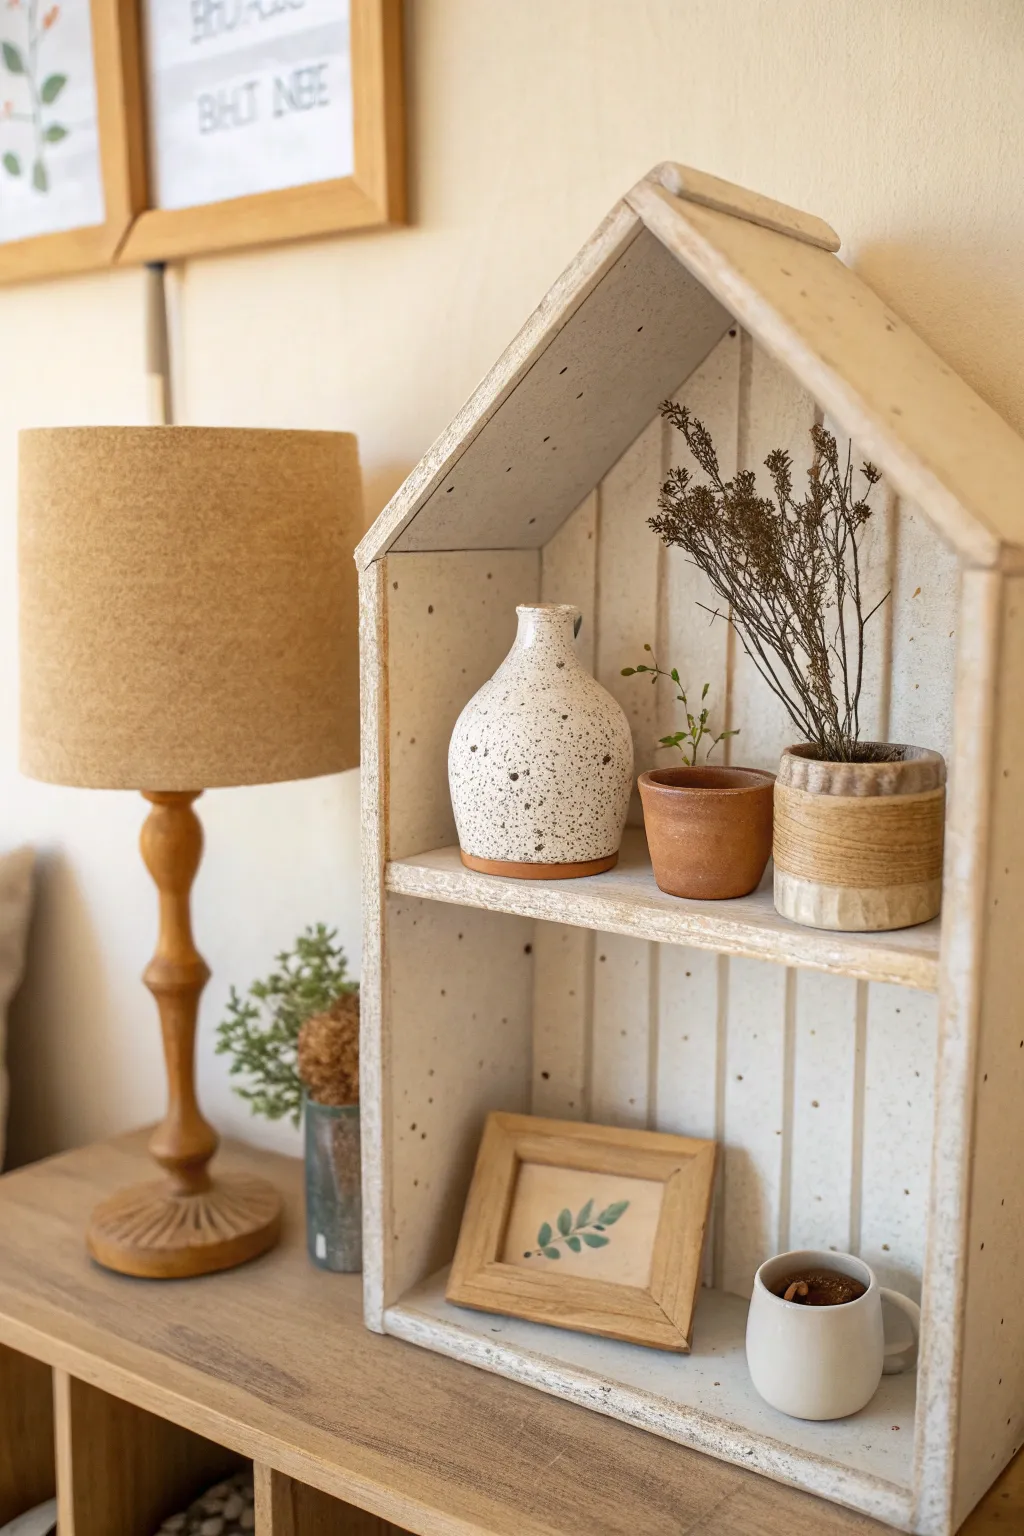
This charming project combines woodwork and clay modeling to create a cozy, rustic vignette perfect for a bookshelf or mantel. You’ll build a simple house-shaped shelf and fill it with handmade miniature pottery and decor for a serene, natural look.
Step-by-Step Tutorial
Materials
- Balsa wood sheets (1/4 inch thick) or craft plywood
- White acrylic paint
- Air-dry clay (white and terracotta colored)
- Speckled pottery glaze or black acrylic paint for speckling
- Small dried twigs and baby’s breath
- Craft glue or wood glue
- Sandpaper (fine grit)
- X-Acto knife or craft saw
- Small wooden picture frame (miniature)
- Watercolor paper and green paint (or a printed leaf image)
- Miniature white mug (can be store-bought or clay)
- Modeling tools
- Ruler and pencil
Step 1: Constructing the House Shelf
-
Measure and Cut Pieces:
Begin by measuring and cutting your wood. You will need a base, two side walls of equal height, a center shelf piece, and two angled roof pieces. For the back panel, cut a piece that matches the outline of the assembled house shape. -
Add Texture to the Back:
Before assembling, take the back panel piece and use a ruler and a dull pencil or scoring tool to press vertical lines into the wood. This mimics the look of beadboard or plank siding. -
Distress the Wood:
Lightly sand edges and surfaces to remove splinters. For a rustic feel, you can gently dent the wood in random spots with a tool handle to simulate age. -
Assemble the Frame:
Using wood glue, attach the side walls to the base. Then, glue the center shelf in place, ensuring it is level. I find it helpful to use small clamps or masking tape to hold the pieces while the glue sets. -
Attach the Roof and Back:
Glue the two roof pieces together at the peak and attach them to the top of the walls. Finally, glue the scored back panel to the rear of the entire structure. -
Whitewash Painting:
Mix white acrylic paint with a little water to create a wash. Apply this coat roughly over the entire shelf. Once dry, sand areas specifically on the corners and edges to let the natural wood peek through, enhancing the shabby-chic aesthetic.
Clean Speckles
Make a cardboard ‘shield’ with a hole in the center. Hold it over your vase while flicking paint to control where speckles land and protect your table.
Step 2: Creating the Miniature Pottery
-
Forming the Speckled Vase:
Take a walnut-sized ball of white air-dry clay. Roll it into a smooth sphere, then gently pinch and pull the top upwards to form a narrow neck. Flatten the bottom so it stands stable. -
Detailing the Vase:
Smooth out any fingerprints with a slightly damp finger. Once the clay is dry, paint it creamy white. To get the speckled effect, flick a toothbrush loaded with diluted black or brown paint over the surface. -
Modeling the Terracotta Pot:
Using terracotta-colored clay, roll a smaller ball and press your thumb into the center to create a hollow pot shape. Shape a slightly flared rim for a classic flowerpot look. -
Sculpting the Textured Planter:
Create a cylindrical shape with white or beige clay. Use a needle tool or the edge of a ruler to press horizontal grooves around the body of the pot, giving it a ribbed texture. Let all clay pieces dry completely (usually 24 hours). -
Finishing the Planter:
Once the textured planter is dry, paint the bottom half and rim with a darker beige or light brown wash to accentuate the texture and give it an earthy, two-tone appearance.
Step 3: Final Assembly and Styling
-
Adding Greenery:
Glue a few tiny dried twigs or brown floral stems into the textured planter. For the terracotta pot, add a tiny sprig of preserved green moss or a faux leave to mimic a sprouting plant. -
Preparing the Art Frame:
Take your miniature wooden frame. Paint a tiny leaf motif on a scrap of watercolor paper, or cut out a small botanical image. Insert this into the frame. -
Arranging the Top Shelf:
Place the speckled vase on the left side of the top shelf. Arrange the terracotta pot and the textured planter with dried twigs on the right side. -
Styling the Bottom Shelf:
Lean the miniature framed artwork against the back wall on the bottom shelf. Place a small white mug next to it; you can fill the mug with brown resin or paint to look like coffee. -
Final Touches:
Step back and assess the composition. If needed, use a tiny dab of tacky wax or museum putty under the items to keep them securely in place for display.
Cozy Lighting
Drill a tiny hole in the back of the house peak and thread through a single fairy light LED to create a warm, illuminated interior for your shelf.
Enjoy the peaceful atmosphere this tiny handmade dwelling brings to your own home
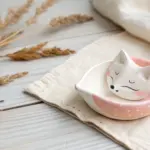
Whistle or Bell Character Challenge

This adorable ceramic bell features a speckled white glaze and sweet hand-painted details, transforming a simple pinch pot shape into a charming woodland character. With its gentle chime and rustic twine hanger, it makes a perfect seasonal decoration or a thoughtful handmade gift.
How-To Guide
Materials
- White earthenware or stoneware clay
- Rolling pin
- Small round cookie cutter or cup (optional)
- Needle tool
- Scoring tool (or fork)
- Slip (clay mixed with water)
- Sponge
- Underglaze (Pink and Black)
- Fine detail brush
- Clear glaze (glossy or satin)
- Jute twine
- Ceramic bead (for the clapper)
- Kiln for firing
Step 1: Forming the Bell Body
-
Prepare the Clay:
Start with a ball of clay about the size of a tennis ball. Wedging it thoroughly is crucial to remove air bubbles, which is especially important for the thin walls of a bell. -
Create a Pinch Pot:
Push your thumb into the center of the ball and gently pinch the walls while rotating the clay. Aim for a distinct bell shape: slightly narrower at the top and flaring out gently toward the bottom rim. -
Smooth and Refine:
Use a damp sponge or your fingers to smooth out any fingerprints inside and out. The walls should be even, roughly a 1/4 inch thick, to ensure a good sound when fired. -
Create the Hanger Hole:
Using a needle tool or a small straw, punch a hole directly through the very top center of the bell. This will be used later for the twine and clapper assembly.
Clean Rims
Always wipe the very bottom rim of the clay with a damp sponge after glazing. Even a tiny bit of glaze on the bottom can fuse your bell to the kiln shelf during firing.
Step 2: Adding Character Details
-
Shape the Ears:
Roll two small, elongated teardrop shapes from leftover clay for the ears. Flatten them slightly so they look like soft bunny ears. -
Attach the Ears:
Score the bottom of the ears and the top of the bell where you want them to sit. Apply a dab of slip and press firmly to attach. I like to blend the clay at the seam with a modeling tool for a seamless look. -
Bisque Fire:
Allow your piece to dry completely (bone dry). This usually takes a few days. Once dry, fire it to bisque temperature in your kiln according to your clay body’s specifications.
Step 3: Glazing and Decoration
-
Apply Base Glaze:
Dip the entire bisque-fired bell into a white glaze. Ideally, use a glaze that has small speckles in it, or flick a stiff brush with iron oxide wash over the white glaze to achieve that speckled eggshell effect. -
Paint the Ears and Nose:
Using pink underglaze or glaze, carefully paint the inner parts of the ears and a small, soft triangular nose right in the center of the face. -
Add Facial Features:
With a very fine brush and black underglaze (or a black underglaze pencil), draw two small oval eyes, the mouth extending down from the nose, and three whiskers on each cheek. -
Paint the Polka Dots:
Dip the rounded end of a paintbrush handle into the pink glaze. Dot a row of pink spots around the very bottom edge of the bell to create a decorative border. -
Glaze Fire:
Place the bell on a stilt in the kiln (to prevent the glazed rim from sticking to the shelf) and fire it to the glaze maturity temperature.
Mix It Up
Try changing the ear shapes to make different animals. Round ears for a bear, triangular for a cat, or long floppy ones for a hound dog create a whole forest choir.
Step 4: Final Assembly
-
Prepare the Clapper:
Cut a length of jute twine roughly 12 inches long. Thread a ceramic bead onto the twine and position it in the middle. -
Secure the Clapper:
Fold the twine in half so the bead hangs at the bottom of the loop. Tie a large knot just above the bead to keep it in place. -
Check the Length:
Hold the twine loop next to the bell to measure. You want the bead to hang just inside the rim of the bell so it strikes the edge. -
Thread and Hang:
Feed the two loose ends of the twine up through the hole in the top of the bell from the inside out. Tie a secure knot at the top to create the hanging loop.
Hang your finished bunny bell in a breezy spot or on a handle to enjoy its cheerful chime
Mystery Prompt Jar Challenge
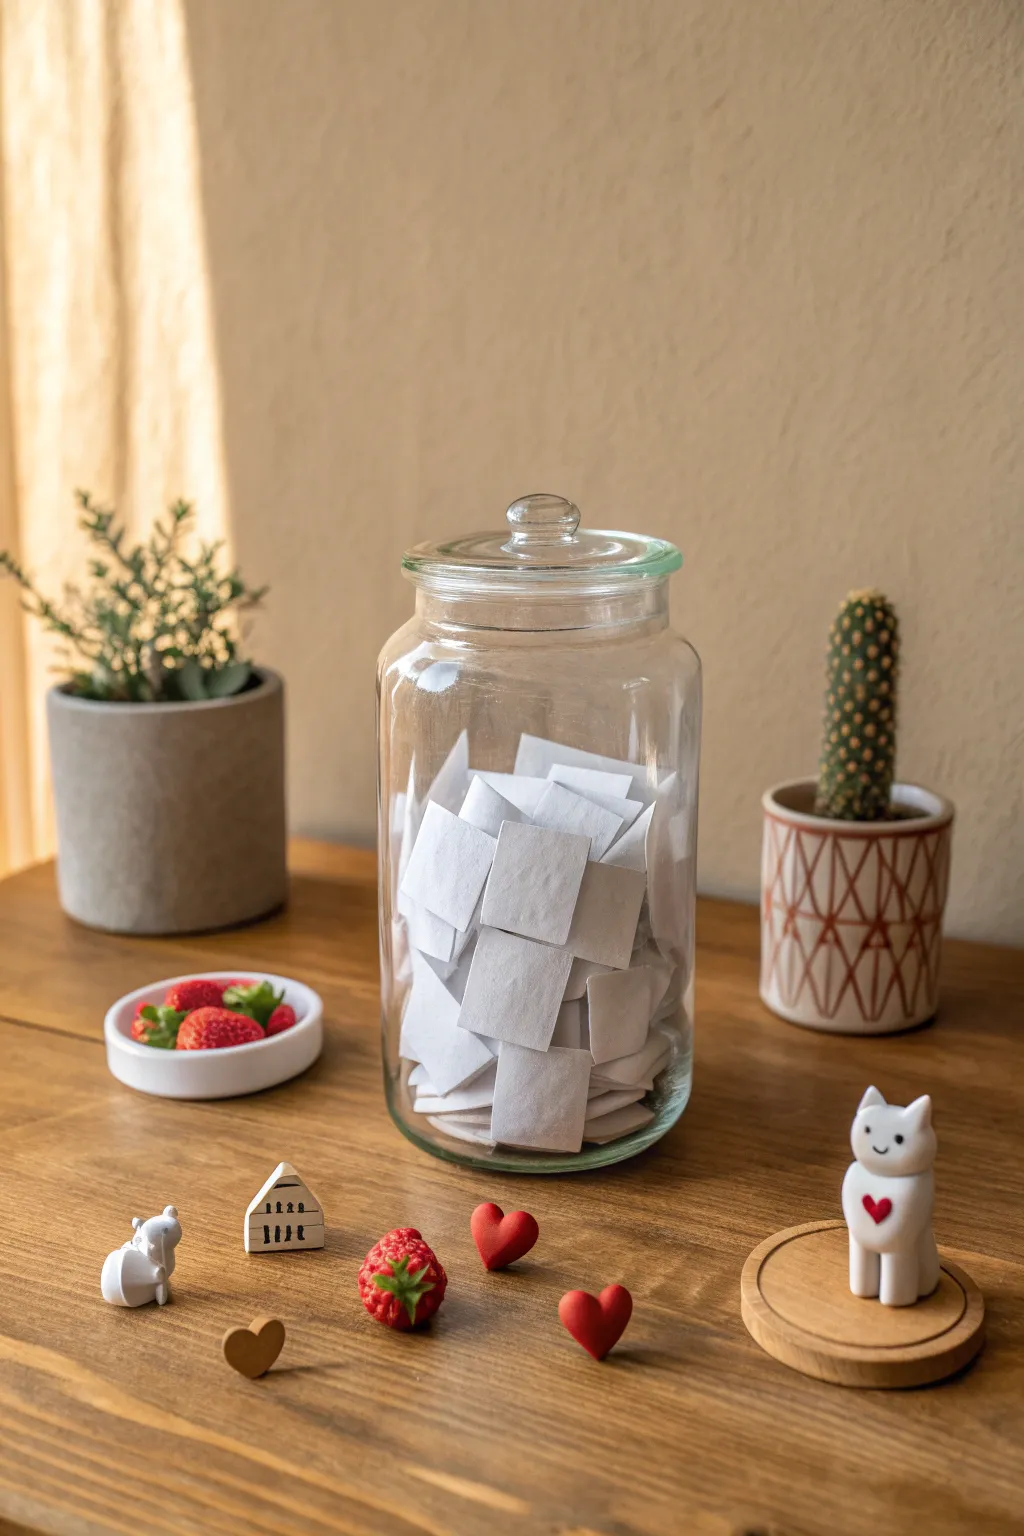
This interactive project combines a simple storage solution with the thrill of the unknown, perfect for sparking creativity when you’re feeling stuck. By filling a classic glass jar with folded paper prompts, you create a beautiful and functional centerpiece that serves as a constant invitation to sculpt.
Step-by-Step Guide
Materials
- Large clear glass apothecary jar with lid
- High-quality white paper (printer paper or light cardstock)
- Scissors or a paper trimmer
- Black pen or fine-liner marker
- Polymer clay (white, red, green, brown)
- Clay sculpting tools
- Liquid clay or strong craft glue
- Acrylic paint (black)
- Fine detail paintbrush
- Small wooden coaster base (optional)
- Rolling pin or pasta machine for clay
Step 1: Preparing the Prompts
-
Cutting the paper:
Begin by cutting your white paper into uniform squares or rectangles. Aim for pieces about 3 inches by 3 inches, or slightly smaller depending on your jar’s opening. -
Brainstorming ideas:
Write a unique clay sculpting prompt on the center of each piece of paper. These can be specific nouns like ‘House’ or ‘Strawberry,’ or abstract concepts like ‘Love’ or ‘Tiny.’ -
Folding the slips:
Fold each piece of paper in half once, and then fold it in half again to create a neat, small square that hides the text inside. Press the creases firmly so they stay flat. -
Filling the vessel:
Drop the folded papers loosely into the glass jar until it is comfortably full but not packed tight, allowing you to shake them up later.
Use a Template
Cut one perfect square out of cardstock first and use it as a tracing guide for your prompt papers. This ensures uniform folds and a cleaner look in the jar.
Step 2: Sculpting the Mascots
-
Shaping the cat body:
Condition a piece of white polymer clay until soft. Roll it into a smooth cylinder, slightly wider at the bottom for stability, to form the cat’s body. -
Adding the head:
Roll a sphere of white clay about the same width as the body. Gently press it onto the top of the cylinder, blending the clay at the neck seam so it’s seamless. -
Forming the ears:
Pinch two tiny triangles of white clay. Attach them to the top of the head, smoothing the joins so they stand perkily upright. -
Creating the heart detail:
Taking a very small amount of red clay, shape a tiny heart. Gently press this onto the center of the cat’s chest. I like to use a needle tool to refine the indentation at the top of the heart. -
Sculpting the house:
Form a cube of white clay. Flatten a small triangle of clay and attach it to the top to create the roof. Smooth the seams. -
Making the strawberry:
Roll a ball of red clay and taper one end to create a strawberry shape. Texture the surface by poking it gently with a tool to mimic seeds. -
Adding leaves:
Flatten tiny pieces of green clay into star-like shapes and press them onto the top of the red strawberry form. -
Creating loose hearts:
Sculpt a few standalone hearts from red clay to sprinkle around your composition. Keep them plump and rounded for a cute aesthetic.
Uneven Clay Surface?
If your white clay picks up dust or fingerprints, clean it gently with a cotton swab dipped in rubbing alcohol or acetone before baking to smooth it out.
Step 3: Finishing Touches
-
Baking:
Bake all your clay pieces according to the manufacturer’s instructions on the package. Usually, this is around 275°F (135°C) for 15-30 minutes. -
Cooling:
Let the pieces cool completely before handling them to avoid accidental distortion or fingerprints. -
Painting details:
Using a fine detail brush and black acrylic paint, carefully paint simple faces on your characters. Two dots for eyes and a small curved line for a smile work perfectly. -
Painting the house:
Paint small black rectangles regarding windows and a door on the house sculpture. Keep the lines crisp and minimal. -
Sealing (optional):
If desired, apply a matte varnish to the baked clay pieces to protect the paint and give them a finished look. -
Setting the scene:
Place the jar on your workspace and arrange your finished clay mascots around it. You can glue the cat to a wooden coaster base for extra stability if you wish.
Now you have a charming endless source of inspiration sitting right on your desk