Clay figurines are my favorite kind of project because you can finish something adorable in one sitting and actually feel proud of it. If you’re craving cute, beginner-friendly makes, here are my go-to clay figurine ideas that start simple and get delightfully quirky.
Frog Desk Buddy Figurines With Big Eyes
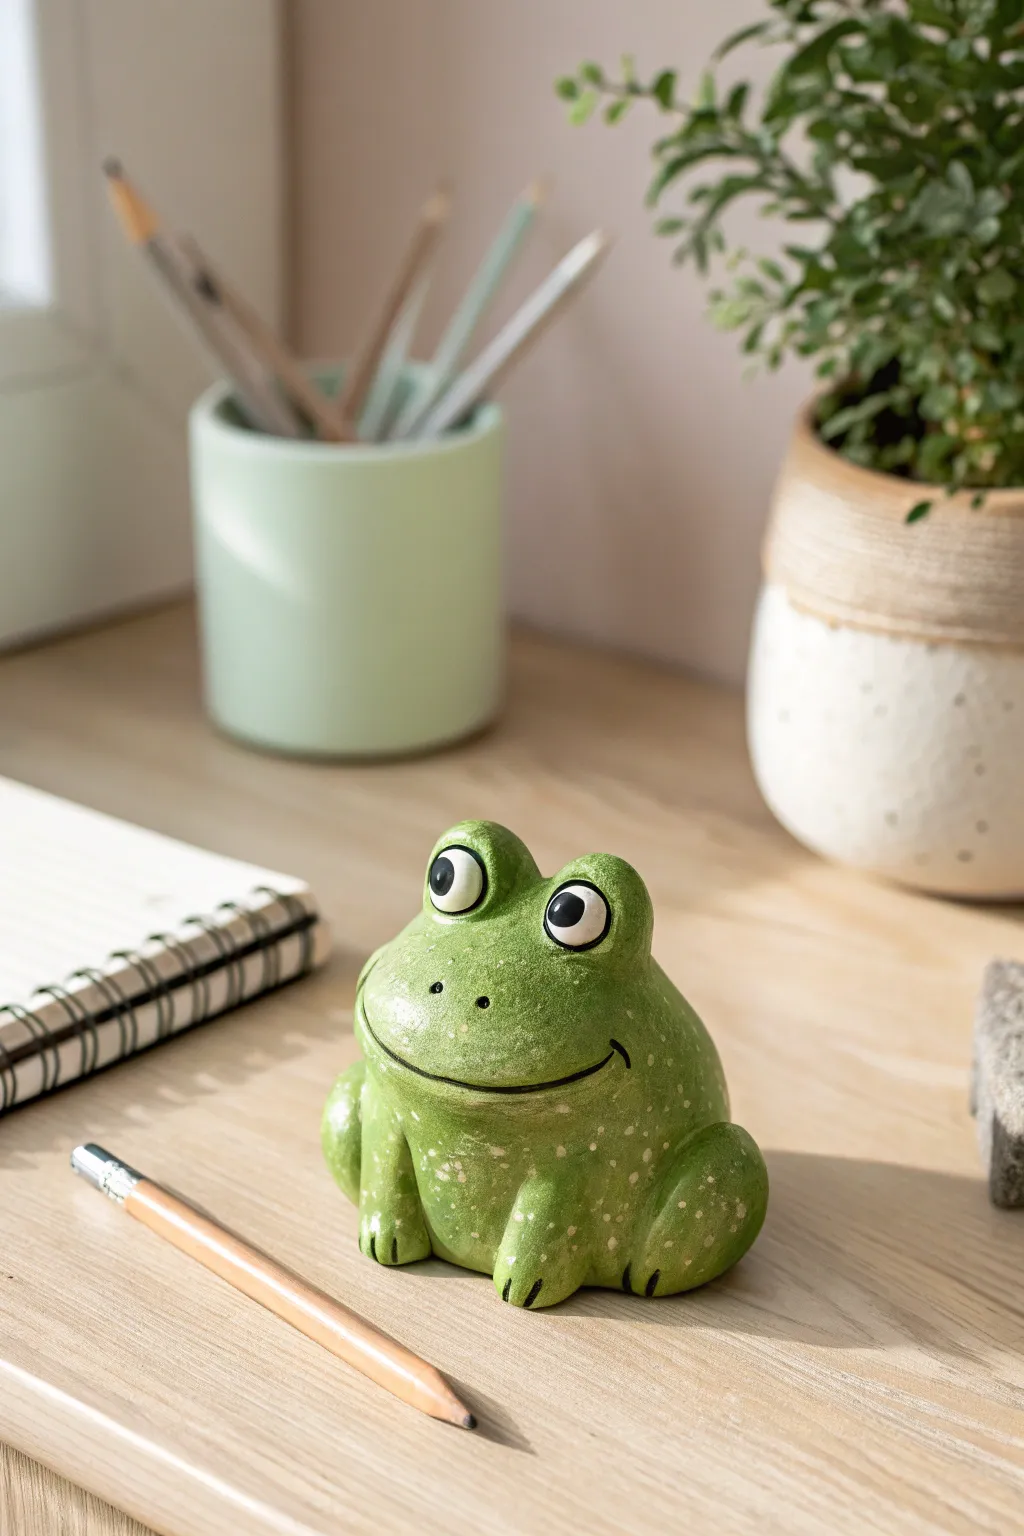
Bring a touch of whimsical charm to your workspace with this adorable, wide-eyed frog figurine. Sculpted from clay and painted in cheerful greens with subtle speckled details, this friendly little amphibian is the perfect silent companion for your study sessions.
Step-by-Step Guide
Materials
- White air-dry clay or polymer clay
- Acrylic paints (light green, olive green, black, white)
- Small detail paintbrushes
- Sculpting tools (needle tool, smooth modeling tool)
- Aluminum foil (for armature)
- Cup of water
- Fine-grit sandpaper
- Gloss varnish or sealant
Step 1: Shaping the Base Form
-
Create a foil core:
Start by crumpling a piece of aluminum foil into a rough egg shape. This saves clay, reduces drying time, and keeps the figurine lightweight. The wider end will be the frog’s bottom. -
Cover with clay:
Roll out a slab of clay about 1/4 inch thick. Wrap this sheet around your foil core, pressing it firmly to remove air pockets and smoothing the seams until you have a seamless, egg-like lump. -
Define the head and body:
Gently squeeze the upper third of the shape to create a slight indentation, separating the head area from the rotund body while keeping it all one solid piece. -
Form the legs:
Roll two thick sausages of clay for the hind legs. Press them onto the sides of the body, blending the upper thigh area smoothly into the main form. Bend the lower part forward to create the foot base. -
Add the front legs:
Create two shorter, vertical cylinder shapes for the front legs. Attach them to the front of the chest, blending the top seams so they look like they are emerging naturally from the body. -
Sculpt the toes:
Using a needle tool or knife, make small indentations in the foot pads to separate them into three little toes on each foot. Round off the edges so they look soft, not sharp.
Step 2: Adding Facial Features
-
Make the eye sockets:
Roll two medium-sized balls of clay for the eye mounds. attach these to the very top of the head. Blend the clay downwards into the skull so they aren’t just sitting on top but are part of the head structure. -
Insert the eyeballs:
Press a smooth modeling tool into the center of each mound to create a socket, then roll two smaller white balls of clay and press them gently inside. They should bulge out slightly. -
Carve the smile:
Use a needle tool to draw a wide, sweeping smile that curves up towards the eyes. Deepen this line slightly to ensure it stays visible after painting. -
Add nostrils:
Poke two tiny, shallow holes just above the smile line for the nostrils. -
Smooth and dry:
Dip your finger in a little water and run it over the entire sculpture to remove fingerprints. Let the clay dry completely according to package instructions (usually 24-48 hours for air-dry clay).
Eye Alignment Trick
Before gluing or blending the eye mounds, look at your frog from directly above. This perspective helps ensure the eyes are symmetrical and facing the same direction.
Step 3: Painting and Finishing
-
Apply the base coat:
Once fully dry, sand any rough spots lightly. Paint the entire body (skipping the eyeballs) with a solid coat of light grassy green. You may need two coats for full opacity. -
Add depth shading:
Mix a tiny bit of brown or dark green into your base color. Gently dry-brush this darker shade into the crevices where the legs differ from the body to create shadow and dimension. -
Paint the eyes:
Paint the eyeballs purely white. Once dry, carefully paint a large black circle in the center of each for the pupil. I prefer to leave a tiny white dot in the black pupil, or add one later, for a reflection highlight. -
Detail the face:
Use a very fine liner brush and black paint to trace the smile line and fill in the nostril dots. This defined line gives him his distinct expression. -
Create texture:
Dilute some white or very pale yellow paint. Using an old toothbrush or a stiff bristled brush, flick tiny speckles across the frog’s back and sides to mimic skin texture. -
Seal the piece:
Once all paint is bone dry, apply a coat of gloss varnish. This mimics the wet look of an amphibian and protects your new desk buddy from dust and scratches.
Cracking Clay?
If you notice small cracks forming as the clay dries, don’t panic. Mix a small amount of fresh clay with water to make a paste (slip) and fill the cracks, then sand smooth.
Place your shiny new friend next to your pencil cup and enjoy the company while you work


Mini Penguin Figurines With Scarves
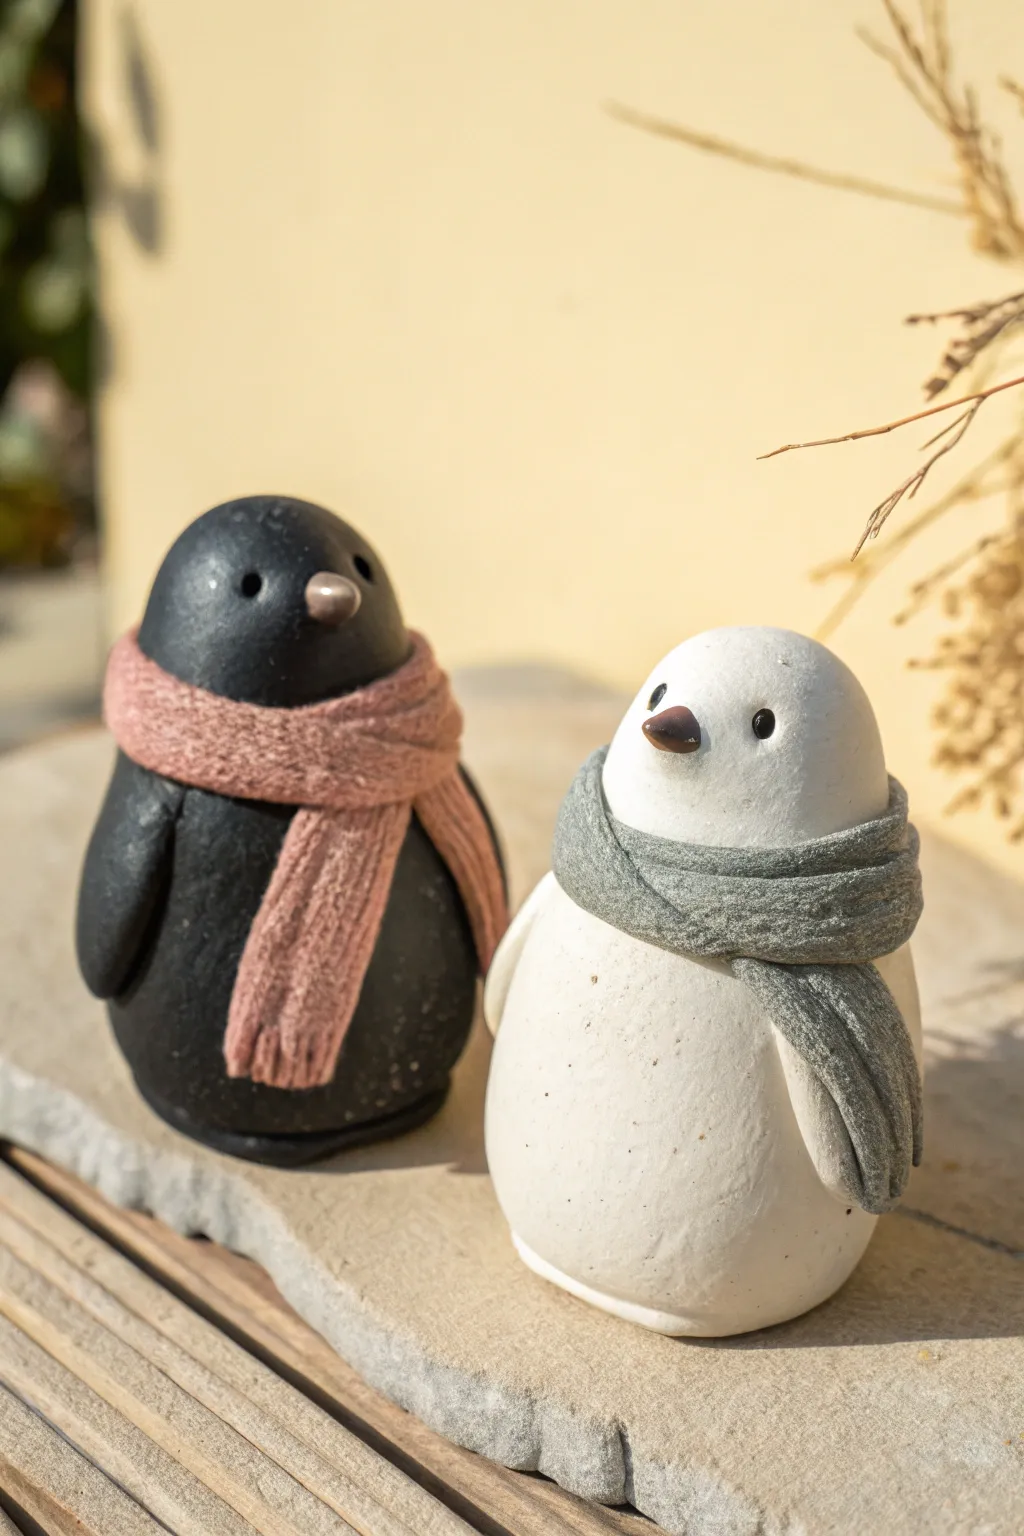
These adorable, minimalist penguin figurines make for a charming winter decoration or a thoughtful handmade gift. With simple shapes and cozy knit-effect scarves, you’ll create a contrasting duo that captures the playful spirit of the season.
Step-by-Step
Materials
- Black polymer clay
- White or cream polymer clay
- Dusty pink polymer clay
- Grey polymer clay
- Small amount of brown or orange clay (for beaks)
- Small ball tool or dotting tool
- Needle tool or toothpick
- Clay roller or pasta machine
- Tiny black beads (optional, for eyes)
- Texture tool or coarse sponge (for fabric effect)
- Oven for baking
Step 1: Shaping the Bodies
-
Condition the clay:
Begin by thoroughly kneading your black and white clays separately until they are soft and pliable. This prevents cracking later on. -
Form the main shape:
Roll a ping-pong ball sized amount of black clay into a smooth sphere. Gently roll one side slightly narrower to create a fat teardrop or egg shape. Repeat this same process with the white clay for the second penguin. -
Flatten the base:
Tap the wider bottom end of your egg shapes gently onto your work surface. You want them to stand upright securely without wobbling. -
Create the wings:
Roll two small pea-sized balls of black clay and two of white clay. Flatten them into elongated teardrops to form flippers. -
Attach the flippers:
Press one black flipper onto each side of the black penguin’s body, blending the top seam gently so it looks seamless. Do the same with the white flippers on the white penguin.
Why is my white clay dirty?
Lint and dust love white clay. To keep it pristine, clean your hands and work surface thoroughly with baby wipes before handling the white clay, specifically after using the black clay.
Step 2: Adding Facial Features
-
Make the beaks:
Take a tiny amount of brown or orange clay and roll it into a very small cone. Press this gently into the center of the face area, slightly higher up on the body. -
Create the eye sockets:
Using a small ball tool or the end of a paintbrush, make two small indentations on either side of the beak. -
Insert the eyes:
Roll extremely tiny balls of black clay and press them into the sockets. I find it helpful to use the tip of a craft knife to place these tiny pieces accurately. Alternatively, gently press small black beads into the clay.
Pro Tip: Realistic Texture
Mix a tiny pinch of black pepper or dried used coffee grounds into the white clay before rolling. This creates the speckled, organic stone-like effect seen on the white penguin.
Step 3: Crafting the Scarves
-
Prepare the scarf clay:
Condition the pink and grey clays. Roll each out into a long, thin snake, then flatten them with a roller to create long, flat ribbons about 1/4 inch wide. -
Fix the edges:
Trim the sides of your ribbons with a blade to ensure they are straight and even, removing any raggy edges. -
Add knit texture:
Before wrapping, use a needle tool to scratch delicate, parallel lines heavily along the length of the strips to mimic a woolly knit texture. -
Wrap the scarves:
Drape the pink strip around the neck area of the black penguin. Cross the ends over one another at the front, letting one end hang lower than the other. -
Wrap the grey scarf:
Repeat the process with the grey strip on the white penguin. Adjust the drape so it looks natural and snug. -
Detail the fringe:
Use your needle tool to press vertical indentations into the very ends of the scarves to create a fringe effect.
Step 4: Finishing Touches
-
Texturing the bodies:
For a stone-like or rustic finish visible in the photo, gently tap the surface of the white penguin with a coarse sponge or a toothbrush. This removes the shiny plastic look. -
Final inspection:
Check for any fingerprints. You can smooth these out with a tiny bit of baby oil on your finger before baking. -
Bake carefully:
Bake the figurines according to your clay manufacturer’s instructions, usually around 275°F (135°C) for 15-30 minutes depending on thickness. -
Cool down:
Let them cool completely in the oven before moving them to prevent any thermal shock cracks.
Set your new little friends on a shelf together for a cozy display that warms up any room


Bunny Figurines With Oversized Ears
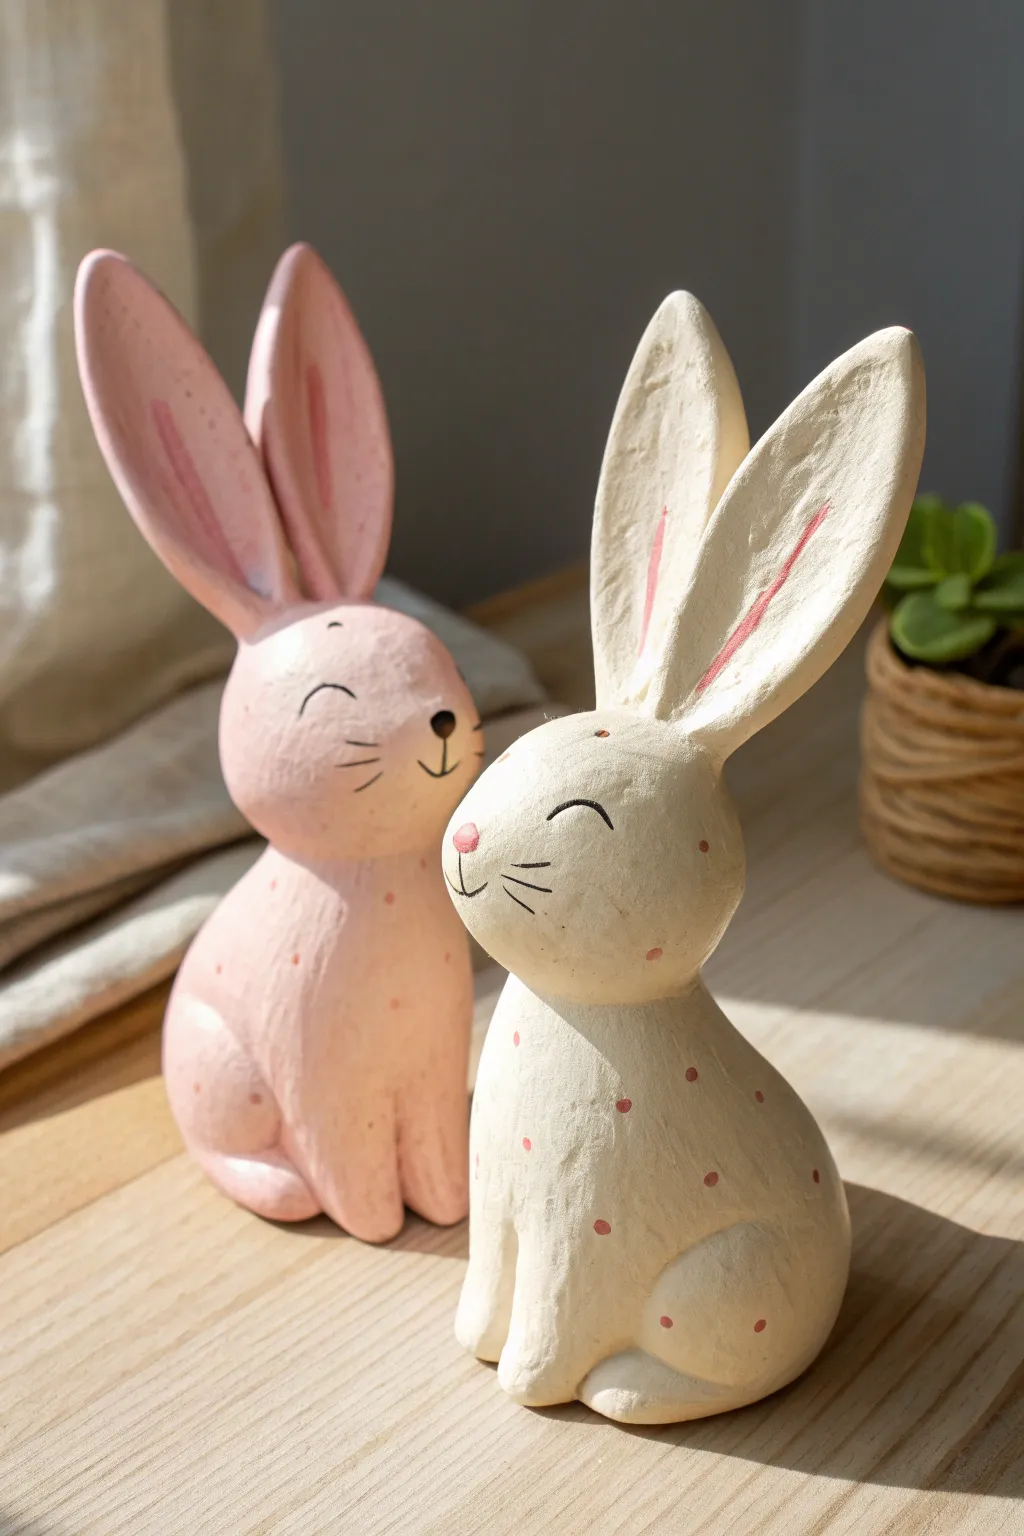
These charming clay bunnies capture the heart with their exaggerated ears and sweet, sleepy expressions. Their smooth, matte finish and delicate polka dots make them a perfect spring decoration or a thoughtful handmade gift.
How-To Guide
Materials
- Air-dry clay (white or terracotta)
- Acrylic paints (pastel pink, cream/off-white, dark brown, rose pink)
- Small paintbrush (flat and fine round)
- Clay sculpting tools (soft ribs, needle tool)
- Cup of water
- Sandpaper (fine grit)
- Matte varnish or sealant
- Wire armature or toothpicks (optional for ear support)
Step 1: Sculpting the Base
-
Form the body:
Start with a ball of clay roughly the size of a tangerine. Roll it on your work surface to create a teardrop shape with a flattened bottom so it sits securely without tipping. -
Create the head:
Roll a second, slightly smaller ball for the head. Flatten the bottom of this sphere slightly where it will join the body. -
Attach head to body:
Score the top of the body and the bottom of the head with a needle tool to scratch up the texture. Apply a little water or slip to the scored areas and press the head firmly onto the body. -
Smooth the seams:
Use your thumb or a modeling tool to drag clay across the seam between the head and body, blending them until the neck connection is seamless and smooth. -
Shape the hind legs:
Roll two small marble-sized balls. Flatten them into ovals and press them onto the lower sides of the body to create the hunched hind legs. Blend the edges into the main body so they look integrated, not just stuck on. -
Add the front paws:
Create two small elongated teardrops. Attach these to the front chest area, positioning them vertically so the bunny looks like it is sitting politely.
Supporting the Ears
If the long ears droop while the clay is wet, prop them up with crumpled paper towels or sponges. Remove the props only once the clay has hardened completely.
Step 2: Ears & Details
-
Make the oversized ears:
Roll two long coils of clay, tapering them at both ends. Flatten them gently with your palm or a rolling pin until they are wide and resemble tall leaves. These should be nearly as tall as the bunny’s body. -
Shape the ear curve:
Gently pinch the bottom of each ear to create a curve that will fit the head. You can add a subtle fold or curve to the length of the ear for a natural, organic look. -
Attach the ears:
Score and slip the top of the head and the base of the ears. Press them on firmly. If the ears are heavy, I sometimes insert a small piece of toothpick or wire into the head to act as a hidden anchor before sliding the ear onto it. -
Smooth the ear connections:
Carefully blend the clay at the base of the ears onto the head, ensuring there are no visible cracks. This adds structural integrity. -
Dry the sculpture:
Let the bunnies dry completely. This usually takes 24-48 hours depending on the thickness of the clay and humidity. Rotate them occasionally so the bottom dries evenly. -
Sanding:
Once bone dry, use fine-grit sandpaper to gently smooth out any fingerprints, bumps, or rough texture, paying close attention to the roundness of the face and the edges of the ears.
Make it a Texture Set
Before the clay dries, gently press a piece of lace or linen fabric into the body area to give the bunny a subtle, woven texture to catch the paint.
Step 3: Painting & Finishing
-
Base coat:
For the pink bunny, mix a soft pastel pink acrylic. For the white bunny, use a warm cream or off-white. Apply two thin coats to the entire sculpture, letting the paint dry fully between layers. -
Paint the inner ears:
Mix a slightly darker shade of pink. Using a flat brush, paint a long, tapered stroke inside the center of each ear to represent the inner ear cartilage. -
Paint the nose:
Using a small detail brush, paint a tiny pink oval or rounded triangle for the nose. Placement is key—keep it slightly lower on the face for a cute look. -
Draw the face features:
Dip a fine round brush (or use a paint pen) into dark brown or black paint. Paint two curved arches for sleepy, smiling eyes and a simple vertical line extending down from the nose, branching into a smile. -
Add whiskers:
With the very tip of your finest brush, flick three light lines horizontally from each cheek area to create delicate whiskers. -
Add polka dots:
Using the dark pink paint for the pink bunny or a soft brown/pink for the cream bunny, add small dots sporadically across the body. The back of a paintbrush handle works perfectly as a stamp for this. -
Seal the project:
Finish with a coat of matte varnish to protect the paint and give the bunny a professional, soft ceramic look.
Now you have a sweet duo of long-eared rabbits ready to brighten up any shelf or desk


Little Turtle Figurines With Textured Shells
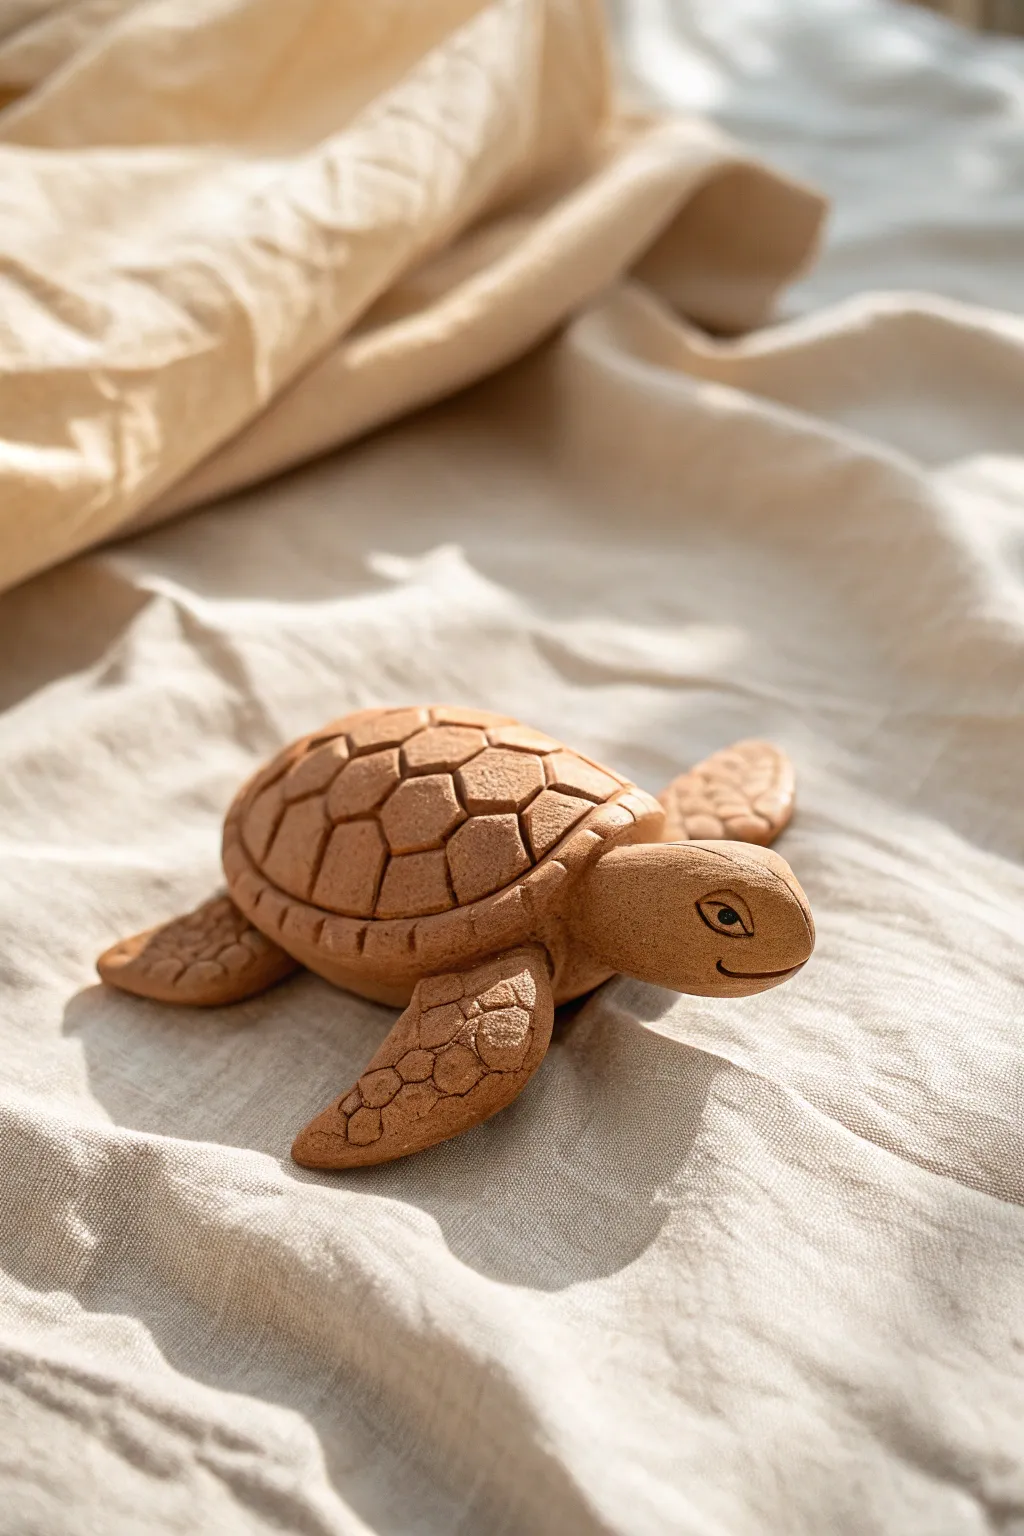
Sculpt a charming sea turtle with a distinct, segmented shell pattern and friendly expression. This project uses the natural warmth of terracotta-colored clay to create a timeless, handcrafted look perfect for display.
Detailed Instructions
Materials
- Terracotta-colored polymer clay or air-dry clay
- Basic sculpting tools (needle tool, small ball stylus)
- Black acrylic paint
- Fine detail paintbrush
- Rolling pin or pasta machine
- Aluminum foil (for armature)
- Texture sponge or rough sandpaper
Step 1: Forming the Body Structure
-
Create the core:
Start by crumpling a small piece of aluminum foil into a flattened oval shape. This acts as an armature to save clay and keep the turtle lightweight. -
Cover the shell:
Roll out a sheet of terracotta clay to about 1/4 inch thickness. Wrap this smoothly over your foil dome, smoothing out any seams underneath so the top is perfectly rounded. -
Form the underbelly:
Flip the shell over and add a flat oval of clay to seal the bottom. Blend the edges where the top and bottom sheets meet to create a seamless join around the rim of the shell.
Cracks Appearing?
If you see tiny cracks while carving the shell, smooth them immediately with a drop of baby oil (polymer) or water (air-dry) on your finger.
Step 2: Sculpting the Head and Flippers
-
Shape the head:
Roll a smooth ball of clay and elongate it slightly into a teardrop shape for the head. Press the wider end gently against the front of the shell, blending the clay at the neck to secure it. -
Create front flippers:
Form two medium-sized teardrops of clay. Flatten them significantly so they look like paddles. Attach these to the front sides of the body, angling them slightly backwards as if swimming. -
Add rear flippers:
Make two smaller, flatter teardrops for the back legs. Attach these near the rear of the shell, peeking out just slightly. -
Smooth connections:
Use a modeling tool or your finger to smooth the seams where all the limbs attach to the body, ensuring a strong bond.
Step 3: Detailing the Texture
-
Outline the shell rim:
Using a needle tool, carefully incise a continuous line around the perimeter of the shell, creating a distinct border or rim. -
Carve the scutes:
Lightly sketch a hexagon in the center of the shell’s back. From there, radiate lines outward to create the classic tortoiseshell pattern of connecting geometric shapes. -
Deepen the lines:
Once you are happy with the pattern, go over the lines again with a blunt tool to create deep, definitive grooves between the shell segments. -
Detail the flippers:
Use a small ball stylus to gently impress random, pebble-like shapes onto the top surface of the front flippers to mimic reptilian skin scales. -
Add surface texture:
I like to gently press a rough sponge or sandpaper over the un-carved areas of the clay to give it a matte, realistic grainy finish rather than leaving it perfectly smooth.
Make It Glossy
For a ‘wet’ look, apply a satin or gloss varnish only to the shell segments and eyes after the clay is fully cured and painted.
Step 4: Facial Features and Finishing
-
Carve the smile:
Use the edge of a curved tool or a needle to carve a simple, upward-curving smile line near the bottom of the face. -
Define the eyes:
Press a small oval indentation on each side of the head for the eyes. Use a needle tool to outline an almond shape around this indentation. -
Bake or dry:
Follow the manufacturer’s instructions for your specific clay. If using polymer clay, bake at the recommended temperature. If using air-dry, let it sit for 24-48 hours. -
Paint the eyes:
Once cured and cool, dip a fine brush into black acrylic paint. Carefully paint inside the carved eye outline and define the pupil with a small dot. -
Highlight the smile:
Use a very thin wash of dark brown or black paint to run into the groove of the mouth line, wiping away excess surface paint to accentuate the smile.
Now you have a sturdy, textured little friend ready to navigate your desk or shelf

The Complete Guide to Pottery Troubleshooting
Uncover the most common ceramic mistakes—from cracking clay to failed glazes—and learn how to fix them fast.
Smiling Octopus Figurines With Curly Tentacles
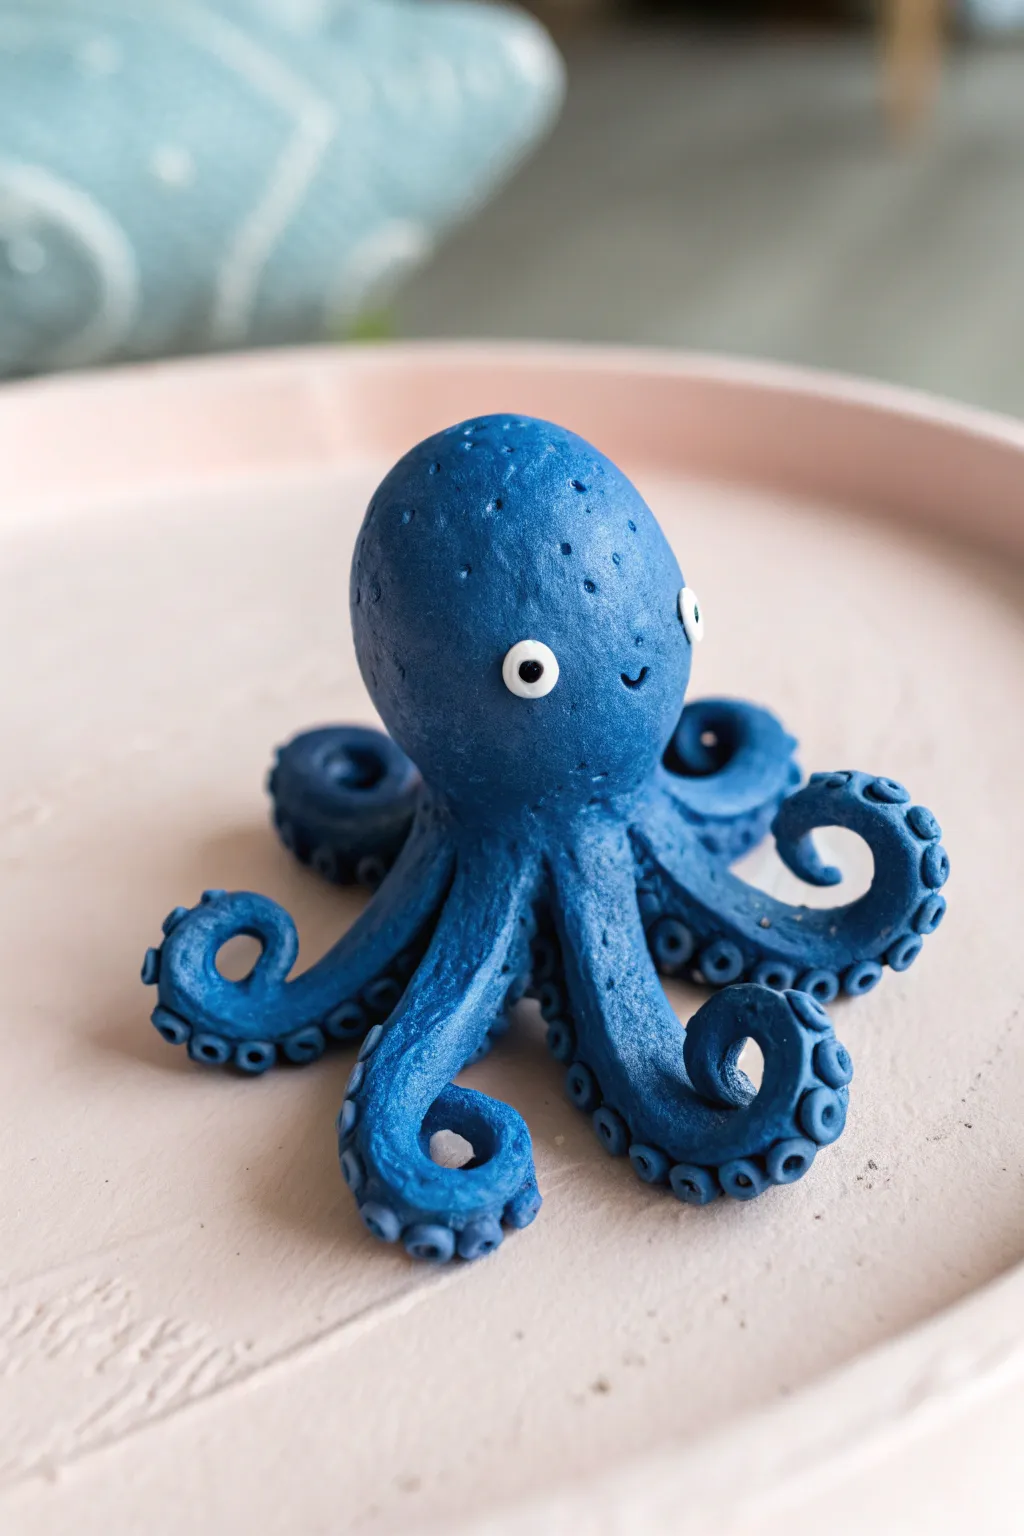
Sculpt a charming cephalopod with a rich, textured blue finish and playfully curled tentacles. This project focuses on creating fluid motion in the legs and adding tiny, suction-cup details for a realistic yet whimsical touch.
Step-by-Step Guide
Materials
- Polymer clay (white or pre-colored blue)
- Deep ocean blue acrylic paint
- Glossy varnish or glaze (optional)
- Small ball stylus tool
- Detail paintbrush
- Thin wire or aluminum foil (for armature)
- Black and white acrylic paint (for eyes)
Step 1: Forming the Body
-
Prepare the core:
Start by rolling a ball of aluminum foil about the size of a walnut to serve as the core. This keeps the head lightweight and saves clay. -
Cover the core:
Condition your clay until soft, then flatten a sheet and wrap it completely around the foil ball. Roll it generally in your palms to smooth out any seams until you have a perfect egg shape. -
Shape the head:
Gently pinch and roll the bottom third of the egg shape to create a slightly narrower ‘neck’ area where the tentacles will attach, keeping the top bulbous and round.
Drooping Tentacles?
If the clay gets too warm and the legs sag, pop the whole sculpture in the fridge for 10 minutes to firm it up before baking or painting.
Step 2: Creating Tentacles
-
Roll the coils:
Roll out eight tapered snakes of clay. They should be thicker at the base and gradually thin out to a point at the tail end. -
Attach the legs:
Press the thick ends of the tentacles onto the underside of the head’s base. Blend the clay upwards into the body using your thumb or a modeling tool so the connection is seamless. -
Curl the tips:
This is the fun part: gently take the tip of each tentacle and curl it inward or outward. Vary the tightness of the curls to give the octopus a sense of movement. -
Position the legs:
Arrange the legs so they splay out naturally. Ensure the figurine is balanced and can stand on its own without tipping over.
Go for Glitter
Mix a tiny amount of fine silver glitter into your blue paint or the clay itself to give your octopus a shimmering, magical underwater quality.
Step 3: Adding Details
-
Create suction cups:
Roll many tiny balls of clay, very small in size. Press these incrementally down the underside of each tentacle. -
Indent the cups:
Use a small ball stylus or the end of a paintbrush to press a small indentation into the center of each tiny ball, turning them into little ring-shaped suction cups. -
Texture the skin:
Lightly tap the surface of the head with a stiff-bristles brush or a crumpled ball of aluminum foil to give the skin a natural, porous texture. -
Bake the clay:
Bake the figurine according to your specific polymer clay manufacturer’s instructions. Let it cool completely before painting.
Step 4: Painting and Finishing
-
Apply base coat:
Paint the entire octopus with a deep blue acrylic paint. You might need two layers to get that solid, opaque coverage. -
Highlighting:
I like to dry-brush a slightly lighter blue over the top of the head and the tops of the tentacles to accentuate the skin texture we created earlier. -
Paint the eyes:
Using a small detail brush or dotting tool, place two white circles for the eyes. Once dry, add a tiny black dot in the center of each pupil. -
Add the smile:
Paint a very fine, small black curved line between the tentacles for a shy smile, or indent it for a 3D effect before painting. -
Seal the piece:
Protect your paint job with a coat of matte varnish. If you want a wet look, use a glossy glaze instead.
Place your happy little octopus on a shelf to bring a splash of ocean joy to your room
Tiny Whale Figurines With Minimal Details
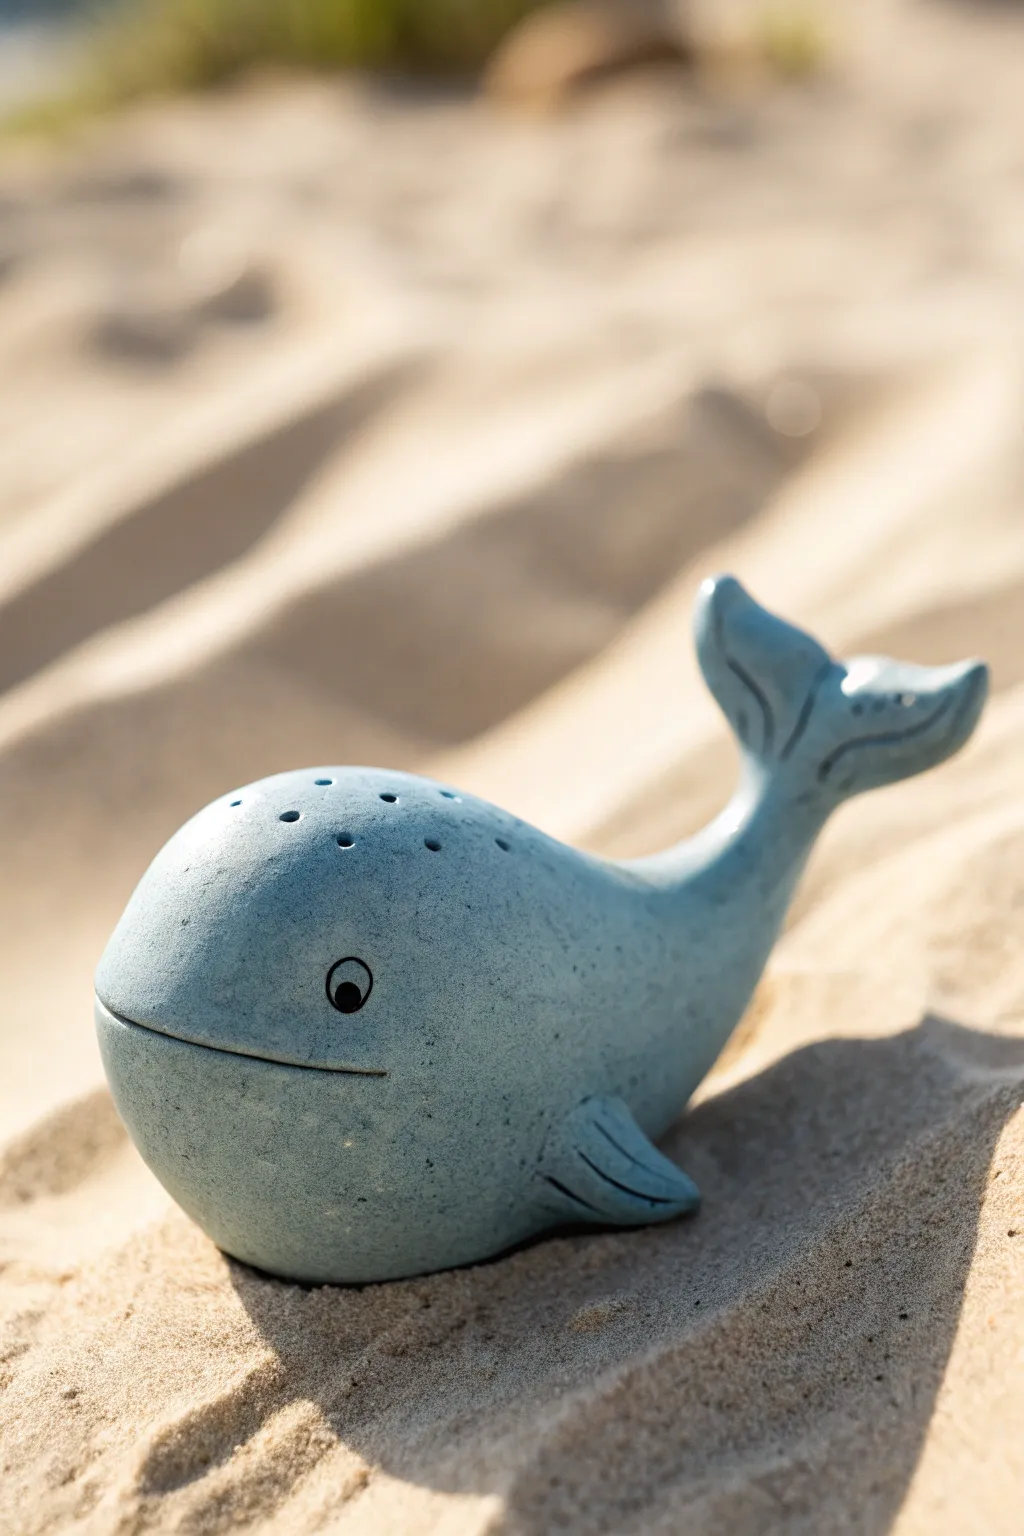
Capture the essence of the ocean with this charming, speckled blue whale figurine. Its smooth curves and minimalist details make it a perfect project for beginners looking to practice shaping organic forms.
How-To Guide
Materials
- Polymer clay or air-dry clay (light blue)
- Acrylic paint (black, white, darker blue for speckles)
- Old toothbrush or stiff bristle brush
- Fine detail paintbrush
- Clay sculpting tools (needle tool, smoothing tool)
- Aluminum foil (for the core)
- Water (if using air-dry clay) or clay softener
- Matte or satin varnish
Step 1: Shaping the Body
-
Create the core:
Start by crumpling a small piece of aluminum foil into a teardrop shape. This saves clay and keeps the figurine lightweight while providing a solid structure. -
Condition the clay:
Knead your light blue clay until it is soft and pliable. If it feels too stiff, add a drop of clay softener or water depending on your clay type. -
Cover the foil:
Flatten the clay into a sheet and wrap it completely around your foil core. Smooth out any seams with your thumbs so you have a seamless, egg-like base. -
Taper the tail:
Gently roll one end of the shape between your palms to elongate it into a tapering tail section, leaving the front bulbous and round for the head. -
Curve the posture:
Bend the tapered tail section upwards to give the whale a dynamic, swimming pose. The bottom should remain slightly flattened so the figurine sits stable on a surface.
Cracking Up?
If you see cracks while drying air-dry clay, mix a tiny bit of fresh clay with water to make a paste and fill the gaps. Sand smooth once dry.
Step 2: Sculpting the Details
-
Form the tail flukes:
Flatten a small separate ball of clay into a rough triangle. Cut a notch in the wide end and smooth the edges to create the flukes. -
Attach the tail:
Score the tip of the tapered body and the base of the flukes. Press them together firmly and blend the clay with a smoothing tool until the join is invisible. -
Add the fins:
Shape two small triangles for the side fins. Attach them low on the body’s sides, blending the top edge into the body but leaving the other edges distinct. -
Detail the fins:
Using a needle tool or knife, gently press two or three lines into the flukes and the side fins to mimic cartilage texture. -
Create the blowhole:
On the very top of the head, use a needle tool to poke a small cluster of 5-6 tiny holes. -
Carve the mouth:
Use a curved tool or the edge of a credit card to press a long, gentle smile line into the clay. It should wrap slightly around the front.
Step 3: Finishing Touches
-
Smooth the surface:
I find that doing a final pass with a slightly damp finger (or baby oil for polymer clay) helps remove any lingering fingerprints. -
Bake or dry:
Follow the manufacturer’s instructions to cure your clay. If baking, let it cool completely before painting. -
Add the speckled texture:
Dilute a darker blue paint slightly. Dip an old toothbrush into it and flick the bristles with your thumb to spray fine speckles over the whale’s back. -
Paint the eyes:
Paint a simple black circle for the eye. Once dry, add a tiny white reflection dot and a thin black outline on the clay around it for depth. -
Seal the work:
Apply a coat of satin or matte varnish to protect the paint and give the whale a finished, ceramic-like look.
Make it a Set
Create a whole pod by varying the sizes! Try making a tiny calf with lighter blue clay to swim alongside the larger whale.
Place your finished whale on a shelf or desk where its friendly smile can brighten your day


What Really Happens Inside the Kiln
Learn how time and temperature work together inside the kiln to transform clay into durable ceramic.
Bear Figurines Holding a Heart
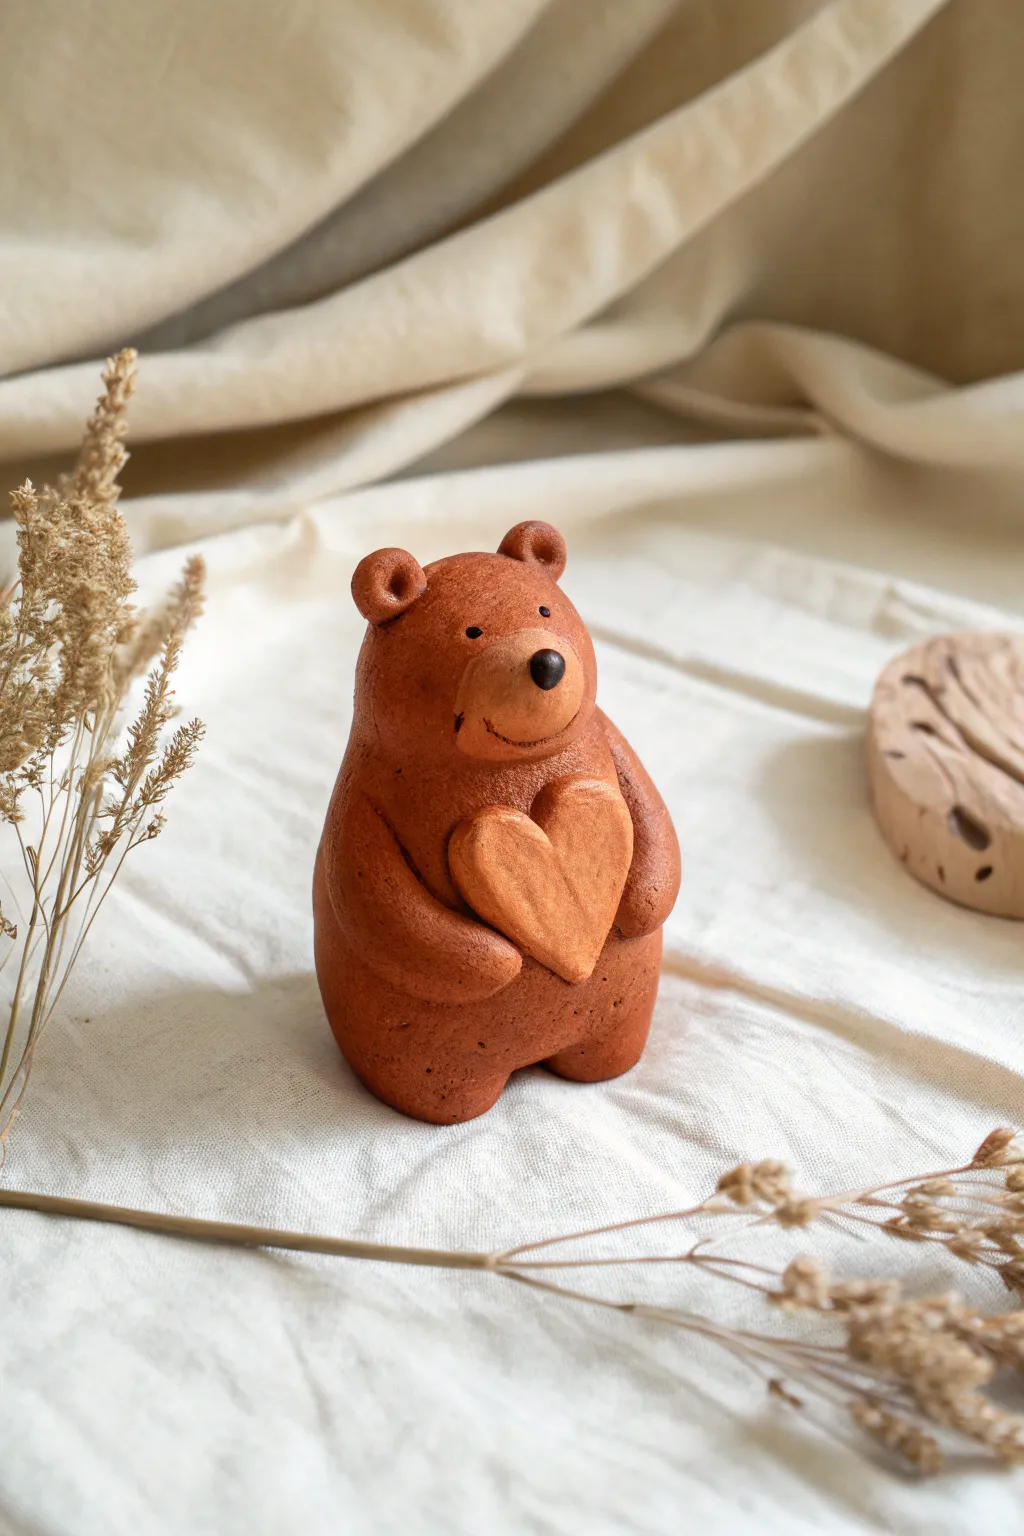
This charming, rustic bear figurine captures a sense of warmth with its simple curves and gentle expression. Crafted to resemble textured terracotta or gingerbread, he holds a heart close, making him the perfect little guardian of love for a desk or shelf.
Step-by-Step
Materials
- Polymer clay (warm brown/terracotta color)
- Polymer clay (lighter tan/beige color)
- Black acrylic paint or clay (for details)
- Basic sculpting tools (needle tool, ball stylus)
- Course sandpaper or stiff toothbrush (for texture)
- Aluminum foil (for armature core)
- Oven (if using polymer clay)
Step 1: Forming the Body
-
Prepare the core:
Start by crumpling a small piece of aluminum foil into a tight egg shape. This saves clay and keeps the figurine lightweight. -
Condition the clay:
Take your main warm brown clay and knead it until it’s soft and pliable. Flatten a large portion into a pancake. -
Cover the armature:
Wrap the flattened clay around your foil egg, smoothing out any seams completely until you have a solid, egg-like pear shape that stands sturdily on its own. -
Refine the shape:
Gently taper the top part of the oval slightly to define where the head area begins, keeping the overall silhouette continuous and chubby without a distinct neck. -
Create the legs:
Instead of attaching separate legs, use a modeling tool to create an inverted ‘V’ indent at the bottom center of the figurine, suggesting two stubby legs while maintaining balance.
Texturing Tip
For that specific speckled look, mix slight amounts of dark pepper or coffee grounds into the clay before sculpting to create natural speckles.
Step 2: Adding Features & Texture
-
Sculpt the ears:
Roll two small balls of brown clay. Press them onto the top of the head area. -
Detail the ears:
Use a ball stylus tool to create an indentation in the center of each ear, giving them a cupped shape. -
Form the snout:
Roll a smaller ball of the same brown clay, flatten it slightly into a thick oval, and press it onto the face area. -
Blend the snout:
Gently smooth the back edges of the snout onto the face so it looks integrated rather than just stuck on. -
Texture the surface:
Before adding arms, gently tap a stiff toothbrush or coarse sandpaper all over the body. This gives it that wonderful, stone-like pitted texture seen in the photo. -
Shape the arms:
Roll two elongated teardrop shapes from the brown clay. Attach them to the sides of the body, curving them forward as if reaching for a hug.
Step 3: The Heart & Finishing Touches
-
Make the heart:
Using the lighter tan or beige clay, shape a flat heart. It should be large enough to be held securely by the bear’s arms. -
Position the heart:
Place the heart on the bear’s chest/belly area. Gently press the bear’s arms over the edges of the heart to secure it in place. -
Add the nose:
Roll a tiny speck of black clay (or simple brown clay you can paint later) into a ball and press it onto the top center of the snout. -
Create the eyes:
Use a needle tool to poke two small holes for eyes above the snout. You can fill these with tiny bits of black clay or leave them as indents to paint later. -
Carve the smile:
Use a small curved tool or blade to press a gentle, crooked smile into the snout, extending slightly up one side for a jaunty look. -
Final texture check:
I like to go back over any smooth spots created by handling (like the arms or heart) with your texturing tool to ensure the finish is consistent. -
Bake/Dry:
Bake according to your polymer clay package instructions. If using air-dry clay, let it sit for 24-48 hours.
Make it a Gift
Before baking, gently press a small letter stamp into the heart to add an initial, turning the bear into a personalized keepsake.
Once cooled, your little bear is ready to offer his heart to anyone walking by
Mushroom Gnome Figurines With Stubby Boots
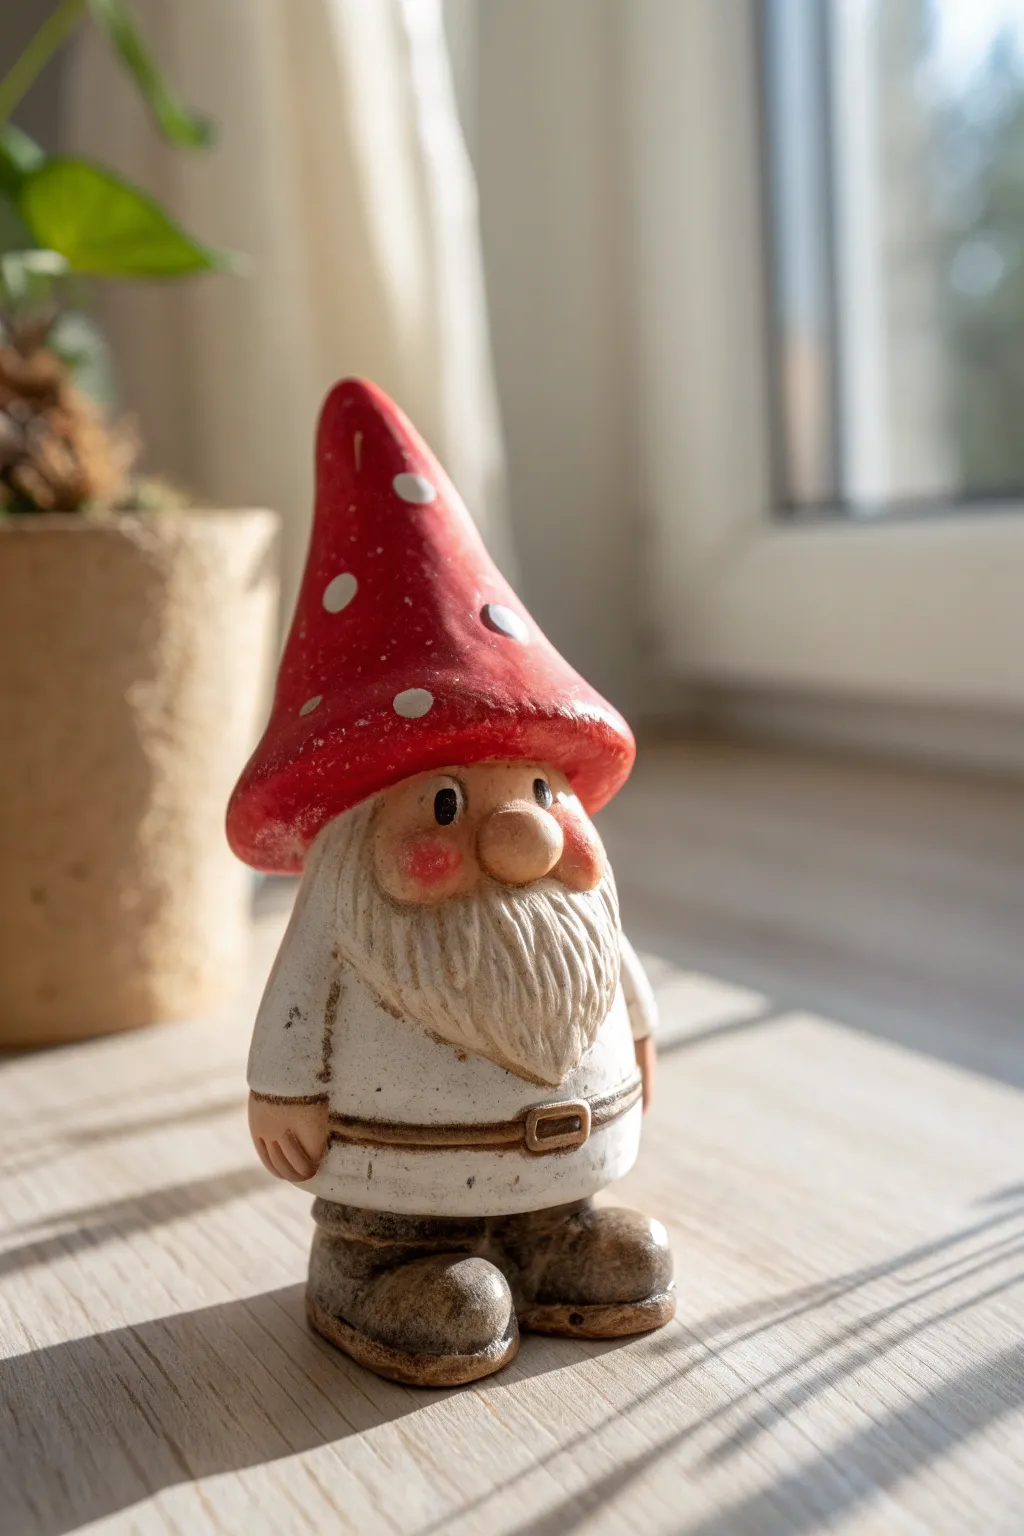
Bring a touch of forest charm to your windowsill with this adorable clay gnome, complete with a spotted mushroom cap and distinctive stubby boots. This project combines simple shapes with delightful textures to create a character full of warmth and personality.
Step-by-Step Tutorial
Materials
- White or light-colored polymer clay (or air-dry clay)
- Acrylic paints (Red, White, Brown, Flesh tone, Black)
- Clay sculpting tools (needle tool, small ball stylus)
- Small fine-bristle paintbrush
- Rolling pin
- Aluminum foil (for armature core)
- Gloss varnish or sealant (optional)
Step 1: Shaping the Base and Boots
-
Form the core:
Begin by scrunching a small piece of aluminum foil into a stout oval shape. This will serve as the inner structure for the gnome’s body, saving clay and reducing weight. -
Cover the body:
Roll out a sheet of white clay to about 1/4 inch thickness. Wrap this smoothly around your foil core, blending the seams until you have a smooth, egg-like cylinder for the main torso. -
Shape the boots:
Create two thick, flattened ovals from clay to serve as the boots. These should be chunky and slightly oversized. -
Detail the footwear:
Using a knife tool, gently press a line around the sole of each boot to distinguish the sole from the shoe. Add a few creases near the ankles for a worn leather look. -
Attach boots to body:
Score the bottom of the torso and the tops of the boots. Press them firmly together so the gnome stands stable and flat. I find gently rocking the figure on a flat surface ensures he won’t tip over later.
Hat Balance
If the heavy hat makes your gnome tip over backward, hollow out more clay from inside the cone before attaching, or add a small coin inside the boots for counterweight.
Step 2: Sculpting the Face and Beard
-
Position the nose:
Roll a generous ball of clay for the nose—don’t be shy with the size! Attach it to the upper third of the body. -
Add the cheeks:
Place two smaller, flattened rounds of clay on either side of the nose to create full, merry cheeks. -
Form the beard:
Shape a triangular wedge of clay and attach it below the nose, covering the chest area. Smooth the top edge into the face. -
Texturize the beard:
Using a needle tool or a sharp toothpick, drag deep vertical lines through the beard clay to simulate hair. vary the length and depth for a natural flow.
Rustic Texture Trick
Before painting, gently tap the surface of the hat and coat with a stiff toothbrush or stippling brush. This creates a porous, stone-like texture that catches paint beautifully.
Step 3: Adding the Mushroom Hat
-
Create the cone:
Roll a large cone shape that is wider at the base than the gnome’s head. Hollow out the bottom slightly so it sits snugly. -
Shape the brim:
Pinch and pull the bottom edge of the cone outwards to create a flared, mushroom-like brim. It doesn’t need to be perfectly symmetrical; a little waviness adds character. -
Attach the hat:
Place the hat firmly over the top of the head, letting the brim rest just above the nose and cheeks. Blend the clay at the back if necessary to secure it. -
Final assembly details:
Roll a thin snake of clay for the belt and wrap it around the gnome’s waist. Add a tiny rectangle for the buckle and two small sausage shapes for arms sticking out the sides.
Step 4: Painting and Finishing
-
Bake or dry:
Follow the manufacturer instructions for your specific clay type to bake or air-dry the figurine completely hard. -
Base coat the hat:
Paint the entire hat with a vibrant red acrylic paint. You may need two thin coats for opaque coverage. -
Paint facial features:
Use a flesh tone for the nose and cheeks. While the paint is still slightly wet, dab a tiny bit of red onto the cheeks and blend for a rosy glow. -
Add the dots:
Dip the non-brush end of your paintbrush into white paint and stamp polka dots onto the red hat. Varying the pressure creates different sized dots. -
Detailing the clothes:
Paint the boots a dark, earthy brown, perhaps dry-brushing a lighter tan over the top to highlight the texture. Use a steady hand to paint the belt brown and the buckle gold or yellow. -
Final touches:
Use a small dotting tool to add two black eyes just under the brim of the hat. A tiny white highlight in each eye brings him to life.
Once sealed with a matte or satin varnish, your sturdy little gnome is ready to guard your indoor plants

TRACK YOUR CERAMIC JOURNEY
Capture glaze tests, firing details, and creative progress—all in one simple printable. Make your projects easier to repeat and improve.
Cactus Pot Figurines With Cute Faces
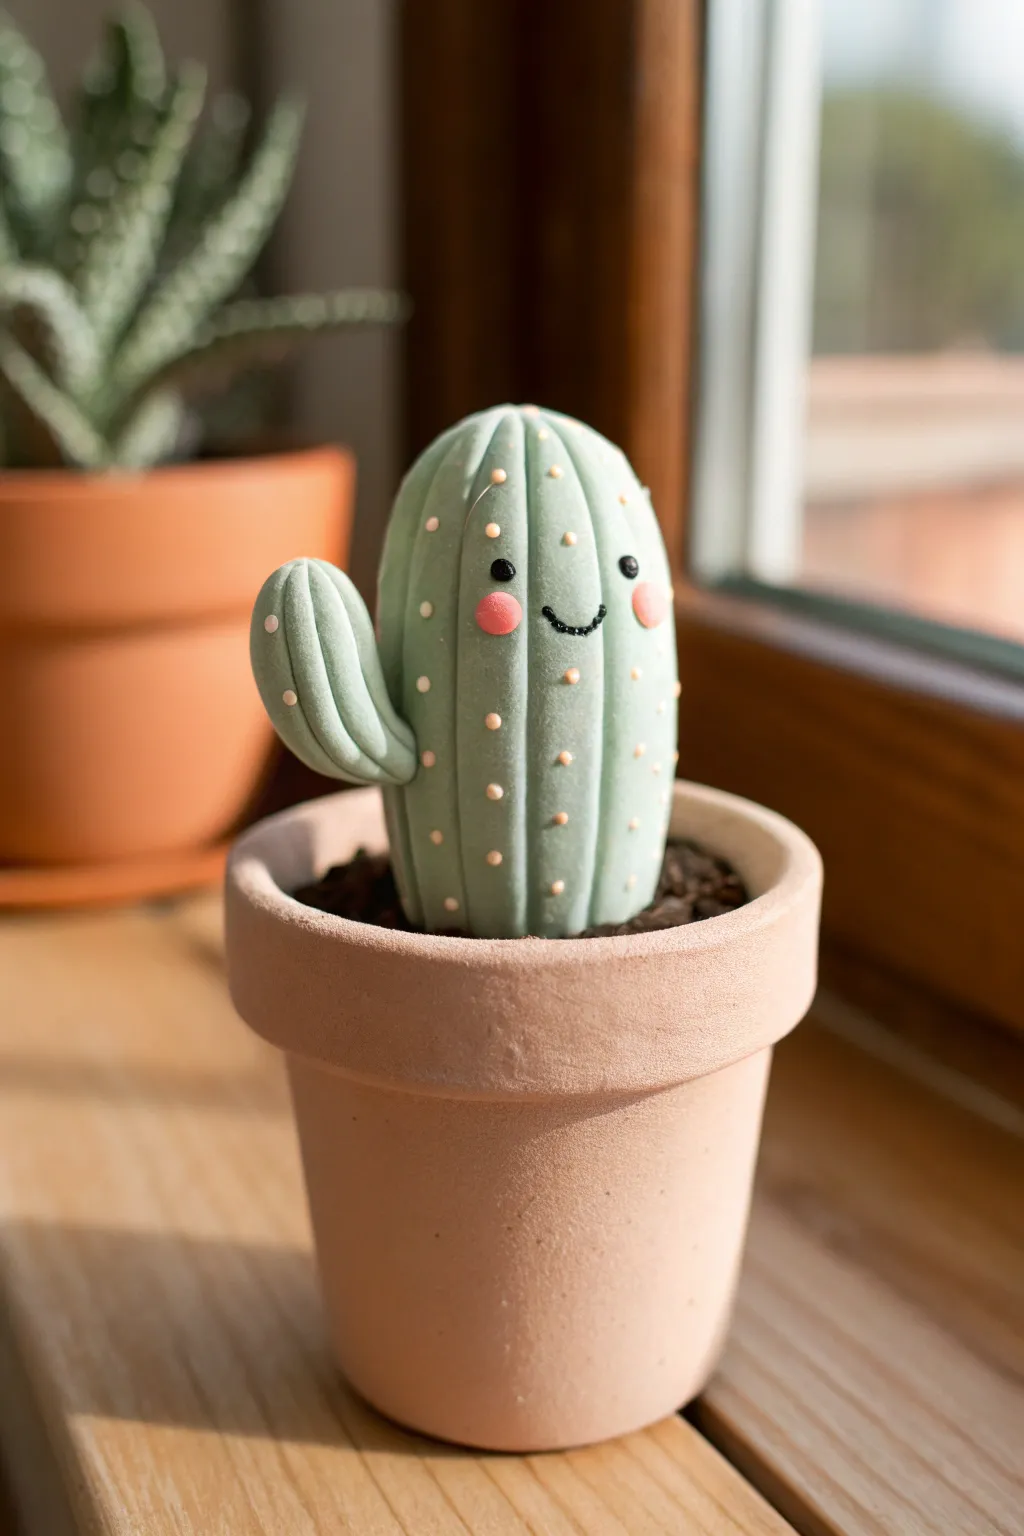
Bring a touch of desert charm to your windowsill with this adorable, never-prickly cactus friend. With its soft pastel green hue and cheerful expression, this beginner-friendly clay project adds personality to any space without needing a drop of water.
Step-by-Step Guide
Materials
- Light green polymer clay (or white clay mixed with green)
- Small amount of pink polymer clay
- Black polymer clay or black acrylic paint
- White acrylic paint
- Small terracotta pot (approx. 2-3 inches)
- Brown polymer clay (for the soil)
- Needle sculpting tool or toothpick
- Ball stylus tool
- Fine-grit sandpaper (optional)
- Matte varnish (optional)
Step 1: Sculpting the Base Form
-
Condition the Clay:
Begin by warming the light green clay in your hands, kneading it until it is soft and pliable to prevent cracking later. -
Form the Main Body:
Roll a large ball of green clay and then gently elongate it into a pill or cylinder shape with a rounded top. This will be the main trunk of your cactus. -
Check the Size:
Place your clay cylinder into your terracotta pot to ensure the fit is correct; it should sit comfortably with space around the edges for the ‘soil’. -
Create the Arm:
Roll a smaller ball of the same green clay and shape it into a slightly curved, smaller cylinder for the cactus arm. -
Attach the Appendage:
Press the arm onto the left side of the main body, smoothing the seam with your finger or a sculpting tool so the two pieces become one.
Clean Clay Tip
Keep baby wipes handy! Wipe your hands and tools before switching from a dark color (like the brown soil) to the light green to keep your colors crisp.
Step 2: Adding Texture and Details
-
Score the Ridges:
Using a needle tool or toothpick, gently press vertical lines down the length of the cactus body and the arm to mimic the natural ridges of a cactus. -
Create the Potting Soil:
Roll a ball of brown clay and flatten it into a disc that fits snugly inside the rim of your terracotta pot. -
Texture the Soil:
Stipple the surface of the brown clay with an old toothbrush or a ball of aluminum foil to give it a realistic, grainy dirt texture. -
Assemble the Pieces:
I prefer to gently press the green cactus firmly onto the center of the brown soil disc before baking to ensure a strong bond.
Step 3: Creating the Face
-
Add the Eyes:
Roll two impossibly tiny balls of black clay and press them onto the upper third of the cactus body, spacing them somewhat wide apart for a cute look. -
Create the Smile:
Roll a very thin, short snake of black clay and curve it into a ‘U’ shape. Press it gently between the eyes using your needle tool. -
Apply Rosy Cheeks:
Flatten two small dots of pink clay and press them just below and slightly completely outside of the eyes. -
Bake the Project:
Place the entire assembly (clay and pot) on a baking sheet. Bake according to your polymer clay package instructions—usually around 275°F (135°C) for 15-30 minutes. -
Cool Completely:
Let the sculpture cool down fully before handling, as the clay builds its final strength during the cooling process.
Pot Fit Issues?
If the clay shrinks slightly after baking and rattles in the pot, secure the brown base to the terracotta with a drop of super glue or E6000.
Step 4: Finishing Touches
-
Paint the Spines:
Dip the tip of a toothpick or a very fine spotting brush into white acrylic paint. -
Dot the Pattern:
Carefully apply small white dots down the vertical ridges of the cactus, spacing them evenly to resemble soft spines. -
Highlight the Cheeks:
Add a tiny speck of white paint to the upper corner of the pink cheeks for a shiny highlight effect. -
Seal (Optional):
Once the paint is completely dry, you can brush on a coat of matte varnish to protect your work and remove any fingerprints.
Place your new smiling friend on a shelf or desk where he can brighten your day
Avocado Character Figurines With a Pit Belly

Sculpt your own charming kitchen companion with this delightful avocado character figurine, complete with a prominent pit belly and a sweet smiling face. Its smooth, rounded form and glossy finish make for a satisfying tactile project perfect for beginners.
How-To Guide
Materials
- Air-dry clay or polymer clay (white or light grey)
- Acrylic paints (light green, dark green, brown, black, pink/red, white)
- Small jars of water for smoothing and rinsing
- Sculpting tools (needle tool, small ball stylus)
- Fine grit sandpaper
- Paintbrushes (medium flat, fine detail round)
- Gloss varnish or sealant
- Aluminum foil (optional for core)
Step 1: Sculpting the Base Form
-
Create the core:
Start by rolling a ball of aluminum foil about the size of a golf ball, compressing it tightly to remove air pockets. This saves clay and keeps the figurine lightweight. -
Wrap the core:
Flatten a sheet of clay to about 1/4 inch thickness and wrap it fully around your foil ball, smoothing the seams together until you have an even sphere. -
Shape the pear body:
Gently roll the top half of the sphere between your palms while leaving the bottom round, tapering it upward to create the classic pear-like avocado silhouette. -
Flatten the base:
Tap the bottom of your pear shape gently against your work surface so the figurine stands upright on its own without wobbling. -
Create the pit hollow:
Using your thumb, press a gentle, circular indentation into the lower front center of the body where the belly will go.
Step 2: Adding Details
-
Form the pit:
Roll a separate small ball of clay, slightly flattening it into a disc shape that fits perfectly into the indentation you just made. -
Attach the pit:
Score the back of the pit and the indentation with a needle tool, add a tiny dab of water or slip, and press the pit firmly into place. -
Shape the arms:
Roll two small, thin logs of clay for the arms. Taper one end of each log to be slightly thinner where it will attach to the body. -
Attach the arms:
Blend the tapered ends of the arms onto the sides of the body using a sculpting tool or your thumb, angling them slightly backwards for a relaxed pose. -
Add the feet:
Create two tiny, flattened spheres for feet. Attach them to the bottom of the figurine, ensuring they are spaced widely enough to maintain stability. -
Smooth the surface:
Dip your finger in a little water and gently run it over the entire sculpture to erase fingerprints and smooth out any bumpy transitions. -
Allow to dry:
Let your avocado dry completely according to package instructions. I usually give air-dry clay at least 24-48 hours to ensure the core is dry.
Smoother blending
Use a slightly damp paintbrush instead of your finger to smooth the seams where the arms attach. It gets into tight crevices better without denting the clay.
Step 3: Painting and Finishing
-
Sanding:
Once fully dry, lightly sand any rough patches with fine-grit sandpaper, then wipe away the dust with a damp cloth. -
Base coat:
Paint the entire body (excluding the pit) with a light lime green acrylic paint. You may need two coats for full opacity. -
Paint the pit:
carefully fill in the round belly area with a warm medium-brown acrylic paint. -
Add texture detail:
Mix a slightly darker shade of green and dry-brush it gently over the main body, focusing on the back and sides to mimic skin texture. -
Paint the face:
Using your finest brush, paint two small black circles for eyes and a curved line for the smile. Add tiny white dots in the eyes for a ‘sparkle’ effect. -
Add rosy cheeks:
Using the tip of a small brush or a dotting tool, dab two small spots of pink or red paint on either side of the smile. -
Varnish:
Seal the entire piece with a high-gloss varnish to give it that fresh, wet avocado look and protect the paint.
Cracks happen
If you see small cracks after drying, mix a tiny bit of fresh clay with water to make a paste. Fill the crack, smooth it over, and let it dry again before painting.
Now you have a happy little green friend to brighten up your desk or shelf
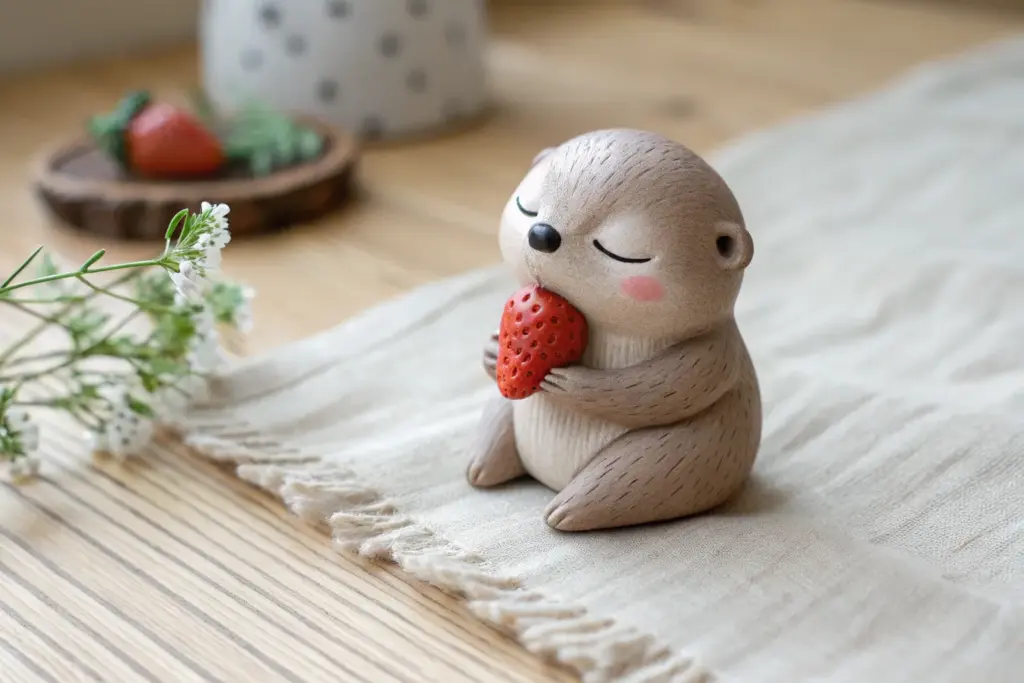
Strawberry Figurines With Seed Dots and Blush

These perpetually cheerful strawberries add a splash of sweetness to any desk or shelf. With their smooth, rounded forms and simple painted faces, they capture a kawaii aesthetic that is surprisingly easy to sculpt.
Step-by-Step Guide
Materials
- Red polymer clay (or air-dry clay)
- Green polymer clay
- Acrylic paints (black, white, pink)
- Fine detail paintbrush
- Ball stylus tool or toothpick
- Gloss varnish or glaze
- Sculpting tools (needle tool, flexible blade)
- Aluminum foil (for armature core, optional)
Step 1: Sculpting the Base
-
Form the core:
Start by conditioning your red clay until it is soft and pliable. Roll a large portion into a smooth ball about the size of a golf ball or slightly larger, depending on your desired final size. -
Shape the strawberry:
Gently taper the bottom half of the ball by rolling it between your palms with slightly more pressure on the lower side. You want a rounded, inverted teardrop shape that is still plump at the top. -
Flatten the bottom:
Tap the tapered point gently on your work surface to create a small flat spot. This ensures your figurine will stand upright on its own without tipping over. -
Smooth the surface:
Run your thumb over the clay to remove any fingerprints. If you are using air-dry clay, a tiny bit of water can help smooth out imperfections here.
Smooth Surface Secret
Before baking polymer clay, brush it lightly with baby oil or clay softener. This melts away fingerprints and creates a professional finish.
Step 2: Adding the Foliage
-
Prepare the stem:
Take a small piece of green clay and roll it into a short, thin cylinder for the stem. Attach this vertically to the very center of the strawberry’s top. -
Create leaf teardrops:
Form five or six small pea-sized balls of green clay. Flatten each one into a teardrop shape to serve as individual sepals (leaves). -
Attach the leaves:
Place the leaves around the base of the stem, pressing them down so they drape slightly over the red shoulder of the fruit. They should radiate outward like a star. -
Texture the greenery:
Using a needle tool or a dull knife edge, gently press a central vein line down the middle of each leaf. -
Add side veins:
Detail the leaves further by pressing faint diagonal lines branching off the center vein. This adds a nice bit of realism to contrast the cartoon face.
Make it a shaker
Hollow out the inside of the berry before baking and add ceramic beads to create a cute functional rattle or maraca for kids.
Step 3: Painting and Finishing
-
Bake or dry:
If using polymer clay, bake according to the package instructions (usually 275°F/135°C for 15-30 minutes). If using air-dry clay, allow it to dry completely for 24-48 hours. -
Mix the blush color:
While the clay cools or dries, mix a soft pastel pink acrylic paint. I like to add a tiny drop of white to my pink to make it look creamy and opaque. -
Paint the cheeks:
Dip a round brush or a large dotting tool into the pink paint. Stamp two confident circles on the lower third of the strawberry to create the rosy cheeks. -
Draft the face:
Once the cheeks are dry, you can very lightly sketch the mouth and eyes with a pencil if you are nervous about freehand painting. -
Paint the smile:
Using your finest liner brush and black acrylic paint, draw a wide ‘U’ shape exactly between the two pink cheeks. -
Add the eyes:
Paint two small curved arches above the cheeks for closed, happy eyes. Add a tiny perpendicular dash at the outer corner of each eye to suggest eyelashes. -
Dot the seeds:
Using a toothpick or a fine styling tool dipped in white paint, create the seed pattern. Arrange the dots in loose, alternating rows all over the red surface, avoiding the face area. -
Seal the work:
Once all paint is fully dry, apply a coat of gloss varnish or glaze. This protects the paint and gives the strawberry that shiny, juicy look.
Place your new fruity friends near a window where the light can catch their glossy finish
Broccoli Buddy Figurines With Puffy Florets
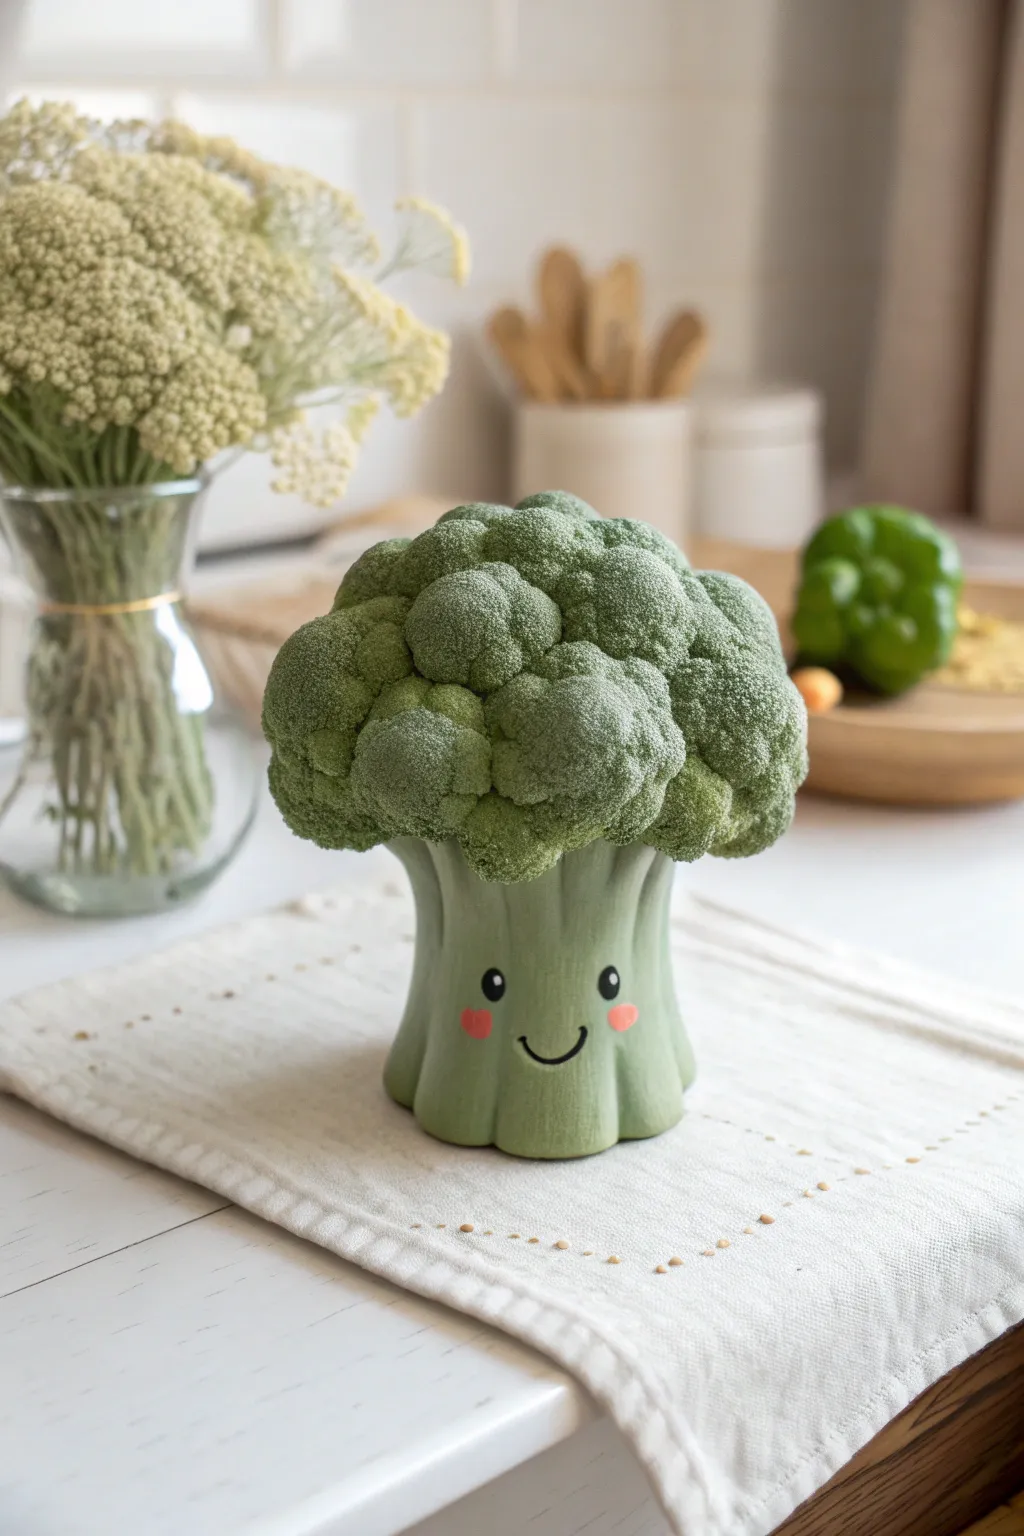
Sculpt a charming kitchen companion that looks good enough to eat but is purely for decoration. This broccoli figurine features a sturdy, ridged stalk base and a wonderfully textured florets crown, finished with a kawaii-style smiling face.
Detailed Instructions
Materials
- Polymer clay (light green, medium green, and dark green)
- Aluminum foil
- Basic sculpting tools (needle tool, ball stylus)
- Toothbrush or stiff bristle brush (for texture)
- Black acrylic paint
- Pink acrylic paint or pink clay
- Fine detail paintbrush or dotting tool
- Matte varnish (optional)
- Clay roller or pasta machine
Step 1: Forming the Stalk Base
-
Create the core:
Start by crumpling a piece of aluminum foil into a cylinder shape that flares out slightly at the bottom. This acts as an armature to save clay and keep the figurine lightweight. -
Condition the base clay:
Mix light green and a touch of medium green clay to create a pale stalk color. Condition it thoroughly until soft and pliable. -
Cover the armature:
Roll your mixed clay into a sheet about 1/4 inch thick. Wrap this sheet around the foil cylinder, smoothing the seams together so the foil is completely hidden. -
Shape the flared bottom:
Press the bottom of the cylinder onto your work surface to create a flat base. Gently pinch and pull the clay outward at the bottom to exaggerate the flared shape, mimicking a cut broccoli stalk. -
Add vertical ridges:
Using a modeling tool or the handle of a paintbrush, press vertical indentations up the sides of the stalk. These should look like the natural fibrous ridges found on broccoli stems, curving slightly at the flared base.
Realistic Texture Hack
For ultra-realistic florets, press a crumpled ball of aluminum foil or a piece of rough sandpaper against the green clay instead of using a brush.
Step 2: Sculpting the Crown
-
Prepare the floret clay:
Create a marbled green effect by taking your medium and dark green clays and twisting them together partially. Don’t overmix; you want natural variations in the color. -
Form the main dome:
Roll a large ball of your marbled green clay and flatten the bottom. Press this firmly onto the top of your pale green stalk, blending the clay downwards slightly to secure the connection. -
Add individual florets:
Roll several smaller balls of green clay in varying sizes. Press these onto the main dome to build up volume and create that bumpy, irregular broccoli silhouette. -
Create the texture base:
Take a toothbrush or a stiff-bristled brush and firmly tap it all over the green dome. This is the most crucial step for realism—don’t be afraid to press hard to create deep poken marks. -
Refine the texture:
Go back in with a needle tool to accentuate the separations between the small floret clumps. I find this helps distinguish the individual ‘branches’ of the vegetable head. -
Final texturing check:
Inspect the crown from all angles. Add tiny bits of clay to fill any gaps and texture them immediately so the entire surface looks puffy and moss-like.
Fixing Smudged Paint
If you mess up the painted face, simply wipe it away quickly with a wet wipe or a cotton swab dipped in rubbing alcohol before it dries.
Step 3: Adding the Face and Finishing
-
Bake the figurine:
Bake your creation according to the instructions on your specific brand of polymer clay. Let it cool completely before painting. -
Paint the eyes:
Using a fine detail brush or a dotting tool dipped in black acrylic paint, create two small, solid oval eyes on the smooth section of the stalk. -
Add the smile:
With the very tip of a fine liner brush and black paint, carefully draw a simple, U-shaped smile centered between the eyes. -
Apply blushing cheeks:
Dip a dotting tool or the end of a brush handle into pink paint. Dab two small circles gently onto the cheeks, just below the outer corners of the eyes. -
Highlight the eyes:
Once the black paint is dry, add a tiny white dot to the upper right corner of each eye to give your buddy a sparkling, lively expression. -
Seal the piece:
Protect your paint job by applying a thin coat of matte varnish over the face area, or over the entire figurine if you prefer a unified finish.
Place your happy little veggie on a kitchen shelf to brighten up your cooking space
Tiny Toast Figurines With Butter Drips
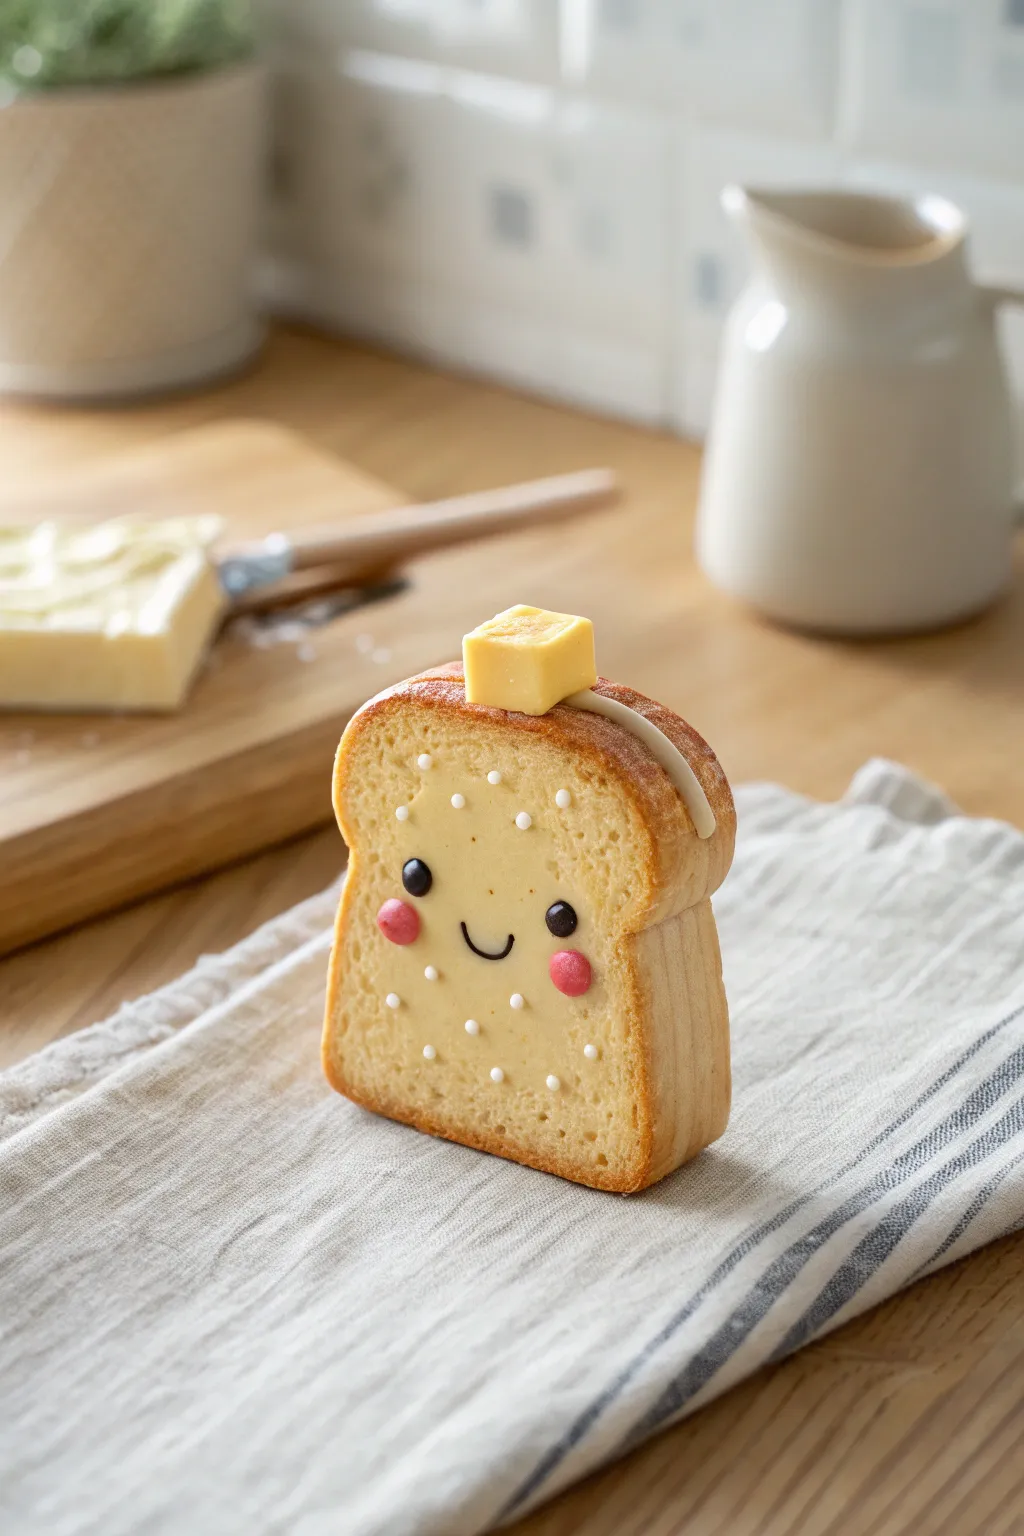
Start your crafting day right with this adorable polymer clay toast slice, complete with a perpetually melting pat of butter and a sweet smiling face. The textured crust and kawaii details make this little figurine an irresistible addition to any miniature food collection.
How-To Guide
Materials
- Polymer clay (translucent, white, beige, yellow, pink, black)
- Soft pastel chalks (golden brown, reddish-brown)
- Liquid clay (translucent or white)
- Toothbrush or texturing tool
- Needle tool
- Small dotting tool
- Craft blade
- Gloss glaze (optional)
- Small paintbrush
Step 1: Shaping the Loaf
-
Mix the dough color:
Begin by conditioning your clay. Mix a large amount of white with a small pinching of beige and a tiny speck of translucent clay to create a realistic, airy bread color. -
Form the basic shape:
Roll the clay into a thick slab, about half an inch thick. Cut out a square shape, but gently round off the bottom corners with your fingers. -
Create the crust ridge:
Indent the top edge slightly to create the signature dip of a bread slice. Push the sides in slightly to give it a ‘waisted’ look, mimicking how bread naturally rises. -
Add the crust wrapping:
Roll out a thin strip of slightly darker beige clay. Wrap this strip around the sides and top of your bread shape, leaving the front and back faces exposed. Blend the seams smoothly on the bottom. -
Texture the surface:
Using a clean toothbrush or a crumpled ball of aluminum foil, tap the entire front face of the toast firmly to create a porous, bread-like texture.
Realism Tip
For a more realistic texture, tear a piece of sponge and use it to texture the bread face instead of a toothbrush. It creates deeper, uneven crevices.
Step 2: Toasting and Details
-
Apply the toast effect:
Shave some golden brown and reddish-brown soft pastels into a powder. Using a dry paintbrush, gently dust the edges of the bread face, focusing heavily on the crust rim to make it look perfectly browned. -
Form the butter pat:
Mix yellow clay with a bit of white for a creamy butter color. Cut a small, precise cube. I like to soften just the very corners of the cube so it doesn’t look too sharp and geometric. -
Create the melting drip:
Mix a small amount of liquid clay with white clay (or use white liquid clay) to create a thick, creamy paste. Apply a line of this across the top edge of the crust, letting it naturally ooze down the side. -
Place the butter:
Gently press your butter cube into the center of the liquid clay ‘melt’ on the top edge. The liquid clay will act as an adhesive.
Step 3: Bringing it to Life
-
Add the eyes:
Roll two tiny balls of black clay. Press them onto the face area, spacing them widely apart for maximum cuteness. Flatten them slightly against the textured surface. -
Add the smile:
Roll an extremely thin snake of black clay. Carefully shape it into a ‘U’ and press it between the eyes using your needle tool. -
Apply rosy cheeks:
Take two small balls of pink clay and flatten them into ovals. Place them just below and outside the eyes. -
Add the sprinkles:
Roll tiny specks of white clay into spheres. Arrange these randomly across the face of the toast to simulate crumbs or sugar sprinkles. -
Final baking:
Bake the figurine according to your specific clay manufacturer’s instructions, usually at 275°F (135°C) for about 15-20 minutes.
Make it a Charm
Insert a metal eye screw into the top center of the crust before baking. Once cooled, attach a keychain or phone strap to take your breakfast buddy on the go.
Now you have a charming little breakfast companion that will never go stale
Stacked Animal Totem Figurines
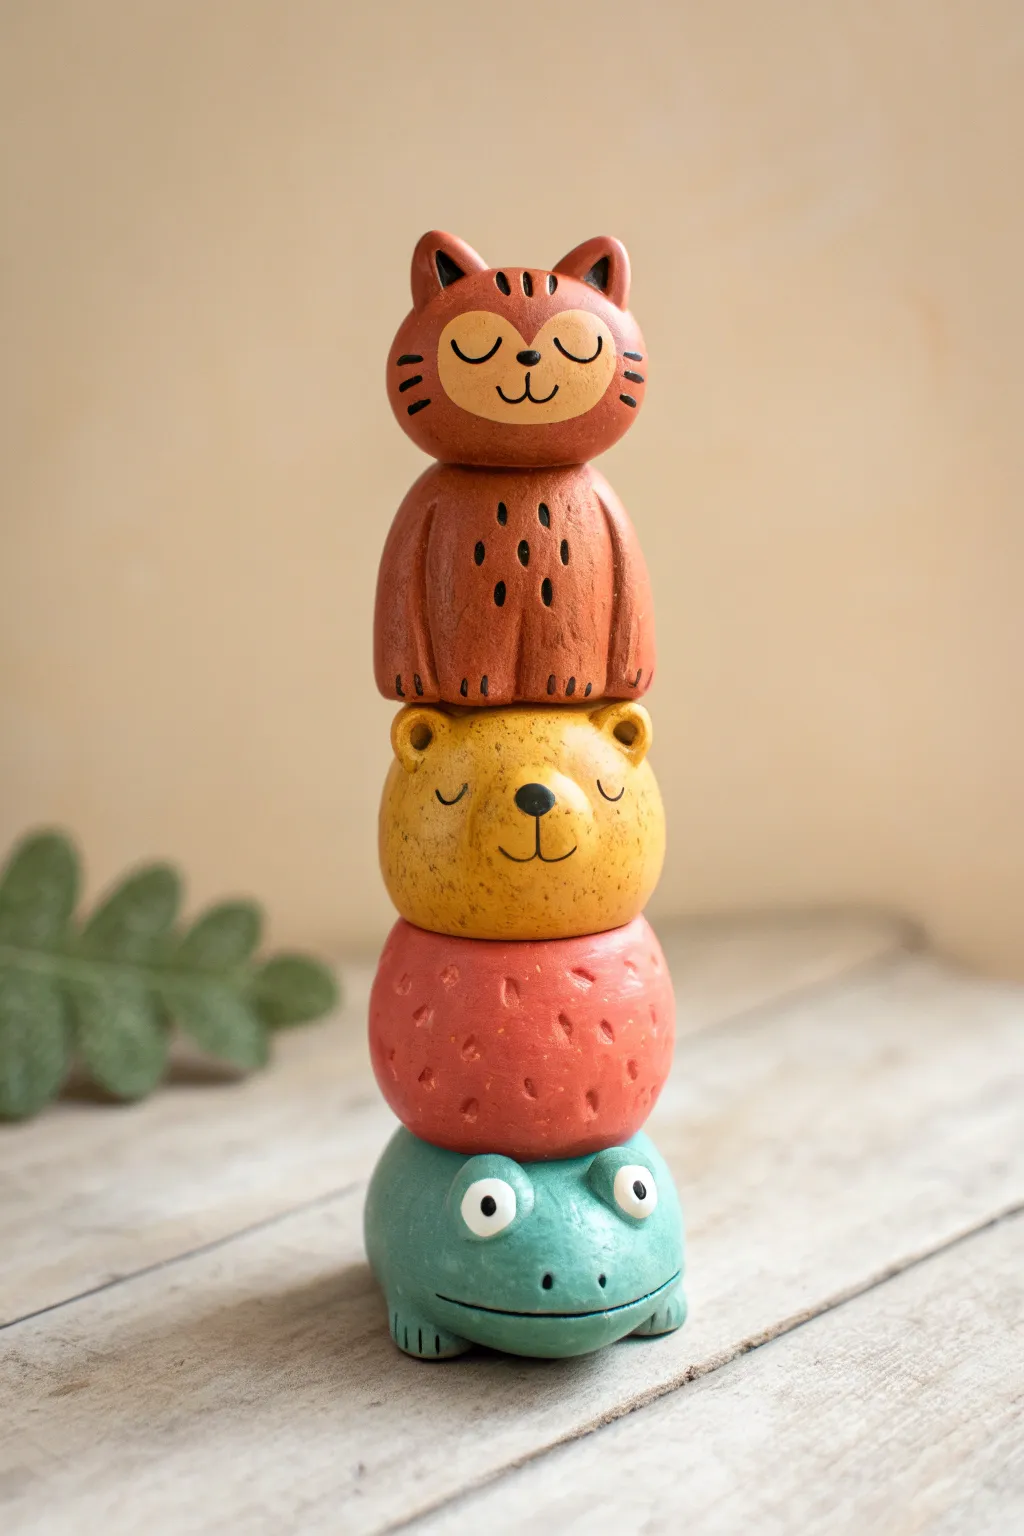
Create a charming vertical sculpture featuring a friendly trio of stacked creatures: a wide-eyed frog, a strawberry-red cushion, a golden bear, and a sleepy cat perched on top. This project focuses on balance and simple shapes to build an adorable totem perfect for a desk or shelf.
Detailed Instructions
Materials
- Polymer clay (Green, Red, Yellow/Ochre, Brown, Tan/Beige)
- Acrylic paints (Black, White)
- Fine detail paintbrushes
- Dotting tools or ball stylus
- Clay sculpting tools (needle tool, blending tool)
- Aluminum foil (for armature/core)
- Liquid polymer clay or Bake & Bond
- Matte varnish or sealant
Step 1: Base and Frog
-
Form the Frog Base:
Start with a generous ball of teal-green clay. Flatten the bottom slightly to create a stable base so your totem doesn’t wobble. Shape the top into a gentle dome. -
Sculpt Frog Features:
Use a needle tool or the edge of a spatula to press a long, horizontal mouth line low on the face. Add two tiny indentations for nostrils just above the mouth. -
Add Frog Eyes:
Roll two small balls of white clay for the eyes. Press them onto the top sides of the head. Add tiny black clay pupils or leave them blank to paint later (painting is often cleaner). -
Create Frog Feet:
Shape two small, flattened ovals of green clay. Use a knife tool to mark three toes on each, then attach them to the bottom front of the body so they peek out.
Leaning Tower?
If your clay is too soft and the stack sags, insert a toothpick or wire vertically through the center of all pieces before baking to act as an internal spine.
Step 2: Middle Tier: Berry and Bear
-
Shape the Red Spacer:
Roll a medium ball of reddish-pink clay. Flatten it slightly into a thick disc or bun shape. This acts as a decorative cushion or berry between the animals. -
Texture the Red Tier:
Use a small, round-tipped tool to press random indentations all over the surface of the red clay to give it an organic, pitted texture. -
Form the Bear Head:
Roll a smooth ball of yellow-ochre clay. This should be slightly smaller than the red tier. Press it gently to ensure it sits flat. -
Add Bear Ears:
Attach two small half-circles of yellow clay to the top of the head. Use a ball tool to indent the centers slightly to give them depth. -
Sculpt the Bear Snout:
Add a small, flattened circle of lighter yellow or the same ochre clay to the lower center of the face for the snout. Press a tiny triangle of black clay on top for the nose.
Step 3: Top Tier: The Sleepy Cat
-
Build the Cat Body:
Form a rounded cone shape from brown clay for the cat’s body. The bottom should be wide enough to sit securely on the bear’s head. -
Detail the Cat Body:
Use a needle tool to scratch vertical lines into the brown body to suggest fur texture. Add small vertical dashes, like little rain drops, for a stylized look. -
Make the Cat Head:
Roll a flattened sphere of brown clay for the head. Prepare a heart-shaped piece of lighter tan clay and press it onto the face area for the muzzle. -
Attach Cat Ears:
Shape two triangular ears from brown clay. Attach them firmly to the top of the head, blending the seams at the back so they don’t pop off.
Make it a Set
Don’t stop at one totem! Create smaller side-totems (like a bird on a mushroom) to create a whole woodland scene on your shelf.
Step 4: Assembly and Finishing
-
Stack the Elements:
I prefer to use a dab of liquid clay or Bake & Bond between each layer (Frog -> Red Ball -> Bear -> Cat Body -> Cat Head) to ensure they fuse permanently during baking. -
Check Alignment:
Look at the totem from all sides. Ensure the stack isn’t leaning. The charm comes from a slightly imperfect, handmade look, but it needs to stand upright. -
Bake the Piece:
Bake strictly according to your polymer clay package instructions. A sculpture this thick may need a longer, slower bake; consider tenting it with foil to prevent scorching. -
Paint Details:
Once fully cooled, use a very fine brush and black acrylic paint to add the sleepy eyes to the bear and cat, whiskers, and the stitched mouth details. -
Varnish:
Protect your paint work with a coat of matte varnish. Avoid glossy finishes to maintain the rustic, earthen aesthetic seen in the original.
Place your finished totem in a spot where its peaceful, sleepy expressions can bring a moment of calm to your day
Pocket-Sized Zodiac Creature Figurines
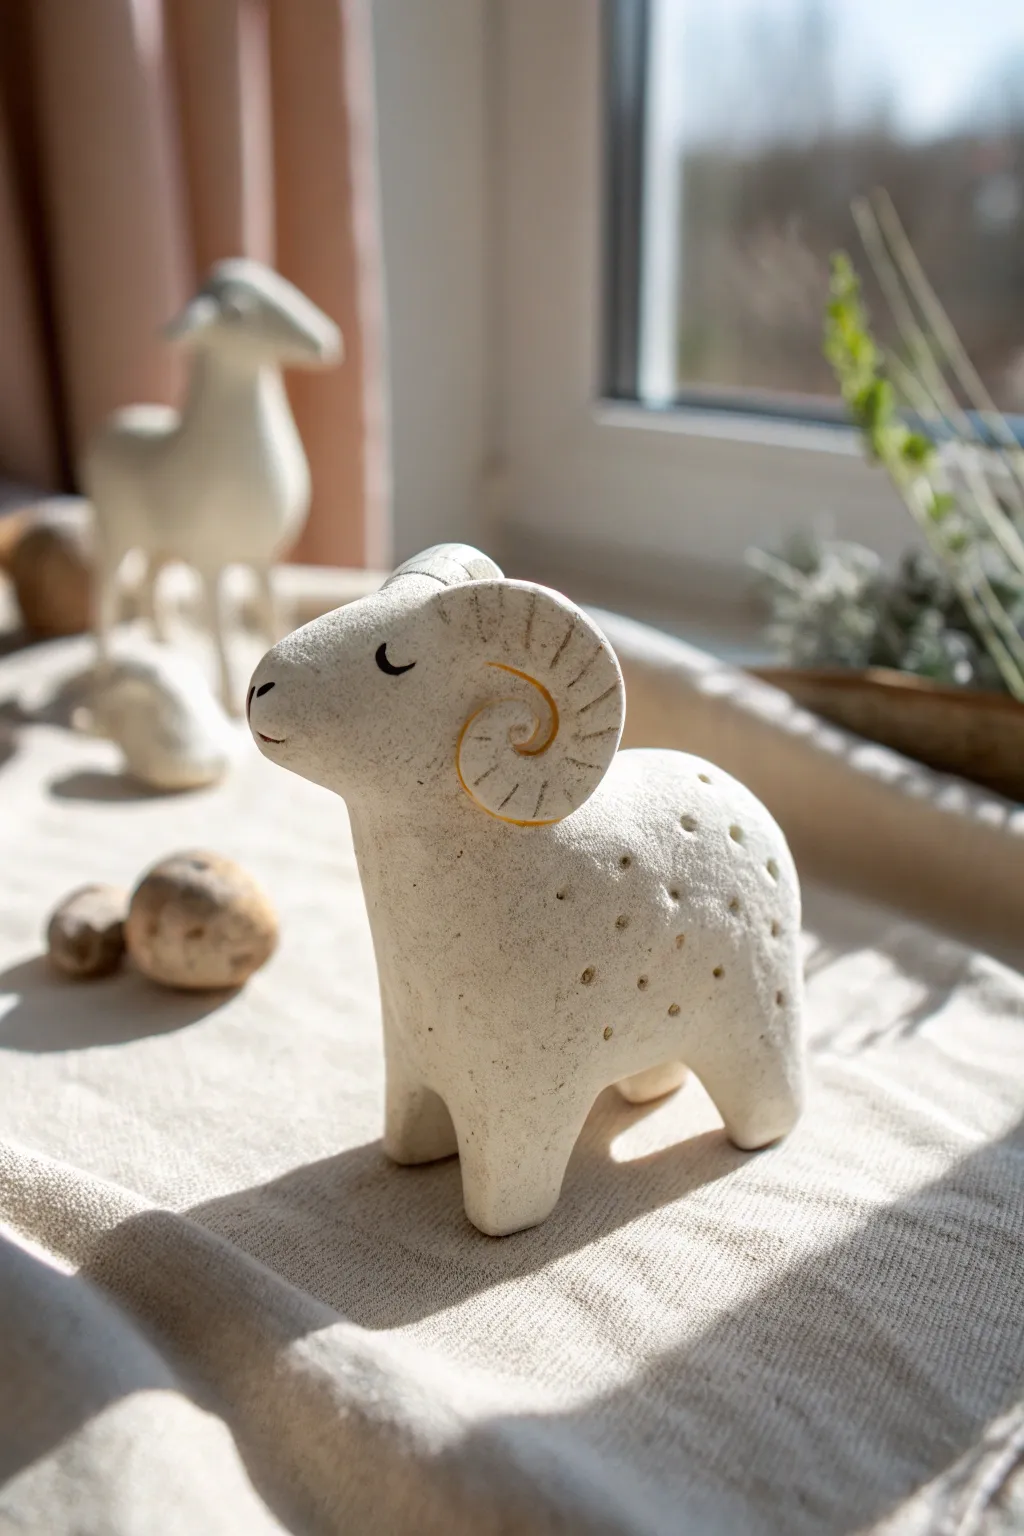
This charming, rustic ram figurine captures the spirit of Aries with its sturdy stance and prominent curled horns. Its textured surface and simple, sleepy expression give it a timeless, handmade folk-art appeal perfect for a windowsill display.
How-To Guide
Materials
- White stoneware or air-dry clay (stone texture preferred)
- Clay carving tools (needle tool, small loop tool)
- Small sponge
- Water slip (clay mixed with water)
- Black acrylic paint or fine-tip pottery underglaze pen
- Yellow ochre acrylic paint or underglaze
- Matte varnish (optional)
- Sandpaper (fine grit)
Step 1: Forming the Body
-
Shape the torso:
Begin with a golf-ball-sized lump of clay. Roll it into a smooth oval, then gently flatten the bottom against your work surface to create a stable base. -
Create the legs:
Instead of attaching separate legs, we will pull them from the main body. Gently pinch and pull four short, sturdy stumps from the bottom corners of your oval. Tap the figurine on the table to flatten the feet. -
Refine the stance:
Smooth the transition between the legs and the belly. The legs should look thick and integrated, not stuck on. Ensure the figure stands level without wobbling. -
Form the head:
Roll a smaller ball of clay, about one-third the size of the body. Shape it into a rounded teardrop to form the snout and head. -
Attach the head:
Score the neck area of the body and the back of the head piece with a needle tool. Apply a dab of slip and press the head firmly onto the body, angled slightly upward. Smooth the seam completely with your thumb or a modeling tool.
Clean Texture Tip
When making the ‘wool’ holes, twist your tool slightly as you pull it out. This prevents the clay from lifting up and creating jagged little ridges around the holes.
Step 2: Sculpting the Horns
-
Roll the coils:
Roll two small, tapered coils of clay. They should be thicker at one end and reach a fine point at the other, roughly 2 inches long. -
Curl the shape:
Take the thick end of the coil and begin spiraling the thin end around it to create that classic ram horn shape. Do this for both coils, ensuring they spiral in opposite directions (mirror images). -
Attach the horns:
Score the sides of the head where the horns will sit. Using slip, press the thick center of the spiral onto the head. The horns should curve backward and down, framing the face. -
Blend the seams:
Carefully blend the clay from the back of the horn base onto the head so they are secure. I usually use a small wooden tool for this tight space to avoid smashing the spiral.
Make it Shine
Turn this into a luminary! Make the body hollow using the pinch pot method, cut out the bottom, and poke the texture holes all the way through for light to escape.
Step 3: Adding Details & Texture
-
Texture the horns:
Using a needle tool or small knife, gently press radial lines into the horns to mimic the natural ridges of a ram’s horn. -
Create the coat:
To mimic the wool texture seen in the photo, use a small, non-sharp tool (like the back of a paintbrush or a dull pencil) to poke random indentations across the back and sides of the body. -
Refine the face:
Use a damp sponge to smooth the face area, keeping it distinct from the textured body. Use your finger to gently round off the nose. -
Drying:
Let the piece dry completely. If using air-dry clay, this takes 24-48 hours. If firing in a kiln, follow your specific clay’s firing schedule.
Step 4: Decorating
-
Sanding:
Once fully dry (or bisqued), lightly sand any sharp burrs or rough spots on the feet or underbelly. -
painting the face:
Use a fine liner brush with black paint (or an underglaze pen) to draw a simple ‘U’ shape for the sleeping eye and a small curved line for the mouth handle. -
Highlighting the horns:
Dilute a tiny amount of yellow ochre paint with water. Carefully paint inside the recessed spiral line of the horn to add depth and warmth. -
Finishing touches:
If using air-dry clay, seal your ram with a matte varnish to protect the surface while maintaining that earthy, raw clay look.
Now you have a serene little guardian for your shelf to bring a sense of nature indoors.
Funny “Melted” Snow Creature Figurines
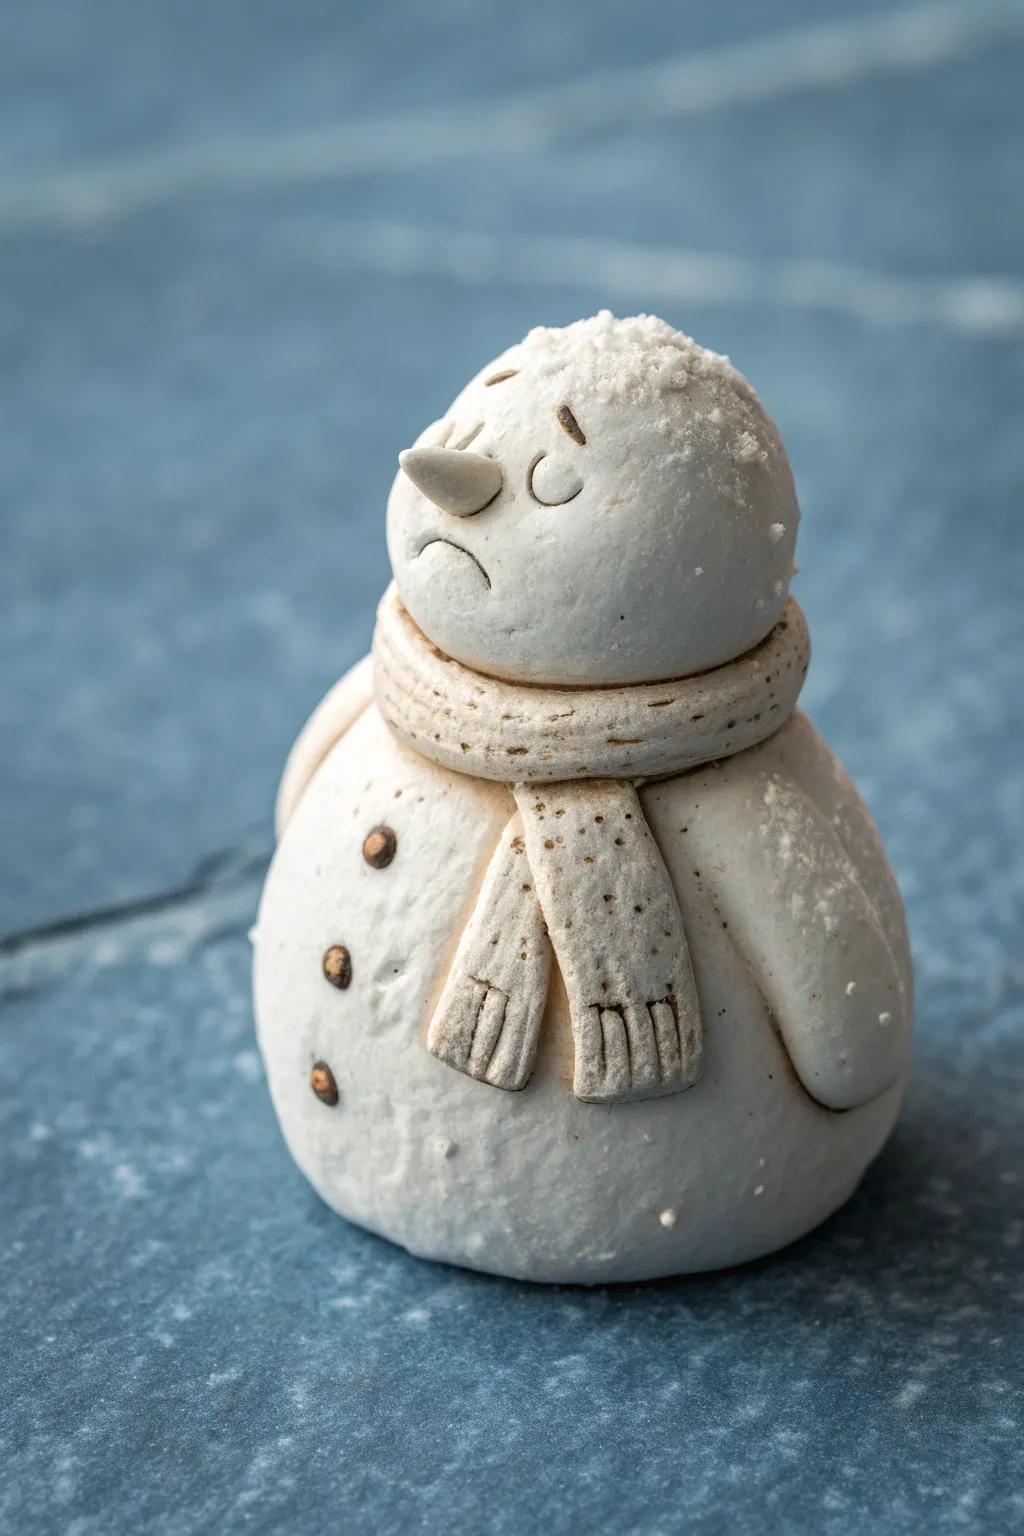
This charmingly forlorn snowman figurine captures a whimsical moment of winter melancholy with its slumped posture and expressive face. Crafted from white clay with subtle texturing, it features a unique dusted finish that mimics freshly fallen snow on an old stone statue.
Step-by-Step
Materials
- White polymer clay or air-dry clay
- Small amount of orange clay (for nose)
- Small amount of brown clay (for buttons)
- Sculpting tools (needle tool, ball stylus)
- Texture sponge or toothbrush
- Soft paintbrush
- White pastel chalk or cornstarch (for the snowy dust effect)
- Matte varnish (optional)
Step 1: Forming the Body
-
Create the base:
Start by rolling a ball of white clay approximately the size of a golf ball for the body. Gently tap the bottom against your work surface to create a flat base so it stands securely. -
Shape the torso:
Press the ball slightly to flatten it into a rounded gumdrop shape. It shouldn’t be a perfect sphere; a slightly slumped, heavy look adds to the character’s mood. -
Add the head:
Roll a slightly smaller ball for the head. Press it firmly onto the top of the body. If you are using air-dry clay, score the connecting surfaces and add a dab of water or slip; for polymer, a drop of liquid clay ensures a strong bond. -
Blend the neck:
Don’t blend the clay completely smooth between the head and body. Instead, gently press them together so the head looks like it’s sinking slightly into the snow of the body.
Step 2: Sculpting the Expression
-
Create the nose socket:
Use a small ball tool to make a tiny indentation in the center of the face where the nose will go. -
Form the carrot nose:
Take a tiny pinch of orange clay—or white clay you plan to paint later—and roll it into a small cone. Attach this to the indentation, pressing firmly. -
Shape the eyes:
Using a needle tool or a very small carving tool, press two curved lines just above the nose. Angle the outer edges downwards to create that signature sad, worried expression. -
Carve the mouth:
Beneath the nose, carve a distinct frown using a curved tool. Make the line slightly deeper at the corners to emphasize the pout. -
Texture the surface:
I find that texture is key for this piece. Gently dab the entire surface of the white clay with a toothbrush or a texture sponge. This breaks up the smooth plastic look and makes it resemble packed snow or stone.
Texturing Tip
To get that stony, packed-snow look, let the clay firm up slightly (leeching it on paper helps) before texturing with the toothbrush.
Step 3: Dressing the Snowman
-
Make the scarf coil:
Roll a long snake of white clay. Flatten it slightly with your fingers or a rolling pin until it’s a consistent ribbon shape. -
Wrap the neck:
Wrap this ribbon around the neck area, covering the seam between head and body. It should look thick and cozy, like a heavy woolen scarf. -
Add scarf tails:
Cut two shorter strips of the flattened clay. Attach these to the front of the body, tucked just under the main neck loop, so they drape downwards naturally. -
Detail the scarf:
Use a needle tool to press tiny vertical lines into the ends of the scarf tails to mimic fringe. You can also add light horizontal lines across the scarf for a fabric texture. -
Add the arms:
Create two teardrop shapes from white clay. Press these flat against the sides of the body. They shouldn’t stick out much; keep them close to the torso to maintain the round, compact silhouette.
Make It Melancholy
Change the eyebrows! Flipping the curve of the eyebrow lines from arching up to arching down drastically changes the mood from happy to worried.
Step 4: Details & Finishing
-
Insert buttons:
Roll three tiny balls of brown clay. Press these into the front of the body in a vertical row. Use a needle tool to add texture or tiny holes to them. -
Antique wash (optional):
If you want the crevices to pop, specificially on the scarf, apply a very diluted wash of brown acrylic paint and wipe it off immediately, leaving pigment only in the deeper grooves. -
Bake or dry:
Follow the instructions for your specific clay type to harden the figurine completely. -
The snowy dusting:
To achieve the frosted look seen in the image, shave some white pastel chalk into a fine powder. If you don’t have pastels, cornstarch works for a temporary effect. -
Apply the frost:
Brush a very thin layer of matte varnish or liquid glue on the top of the head and shoulders. While wet, sprinkle your white powder over these areas. -
Final texture check:
Blow away excess powder. The remaining white dust should settle into the textures you created earlier, giving the snowman a cold, frozen appearance.
Place your worried friend on a shelf to evoke a cozy, sympathetic winter mood
Mini Story Scene Figurines on a Small Base
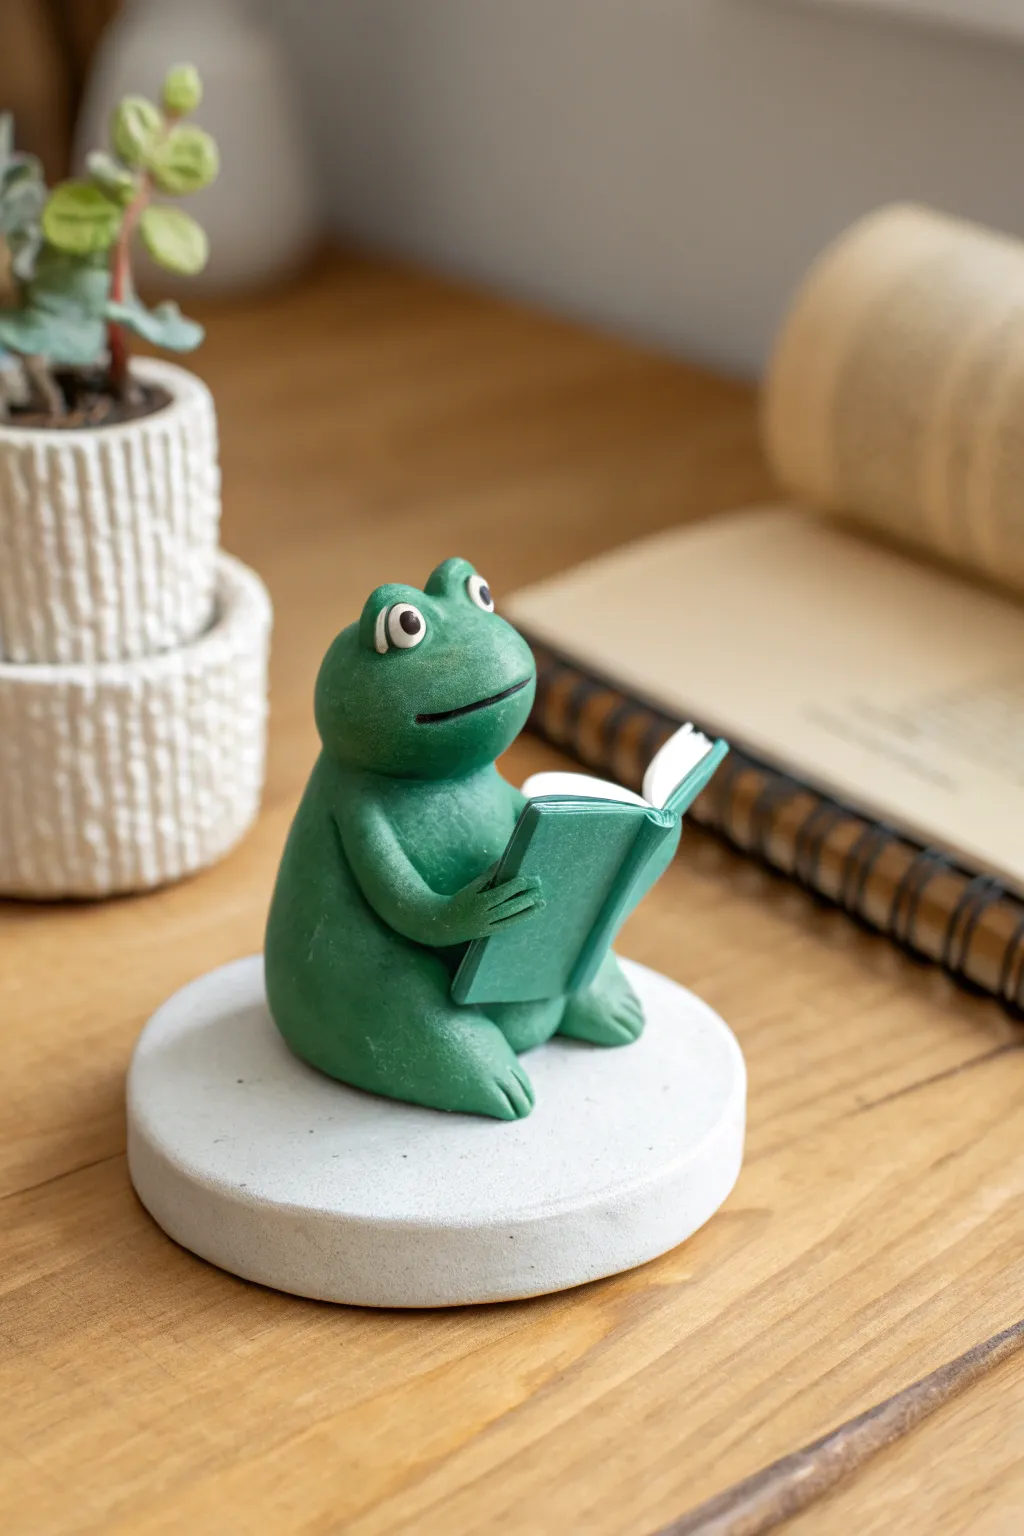
Capture the charm of a quiet reading moment with this delightful figurine featuring a round, green frog engrossed in a tiny book. Perched on a simple white base, this mini scene makes a perfect desk companion or a gift for book lovers.
Detailed Instructions
Materials
- Polymer clay (forest green, white, black, and a lighter sage green for the book)
- Clay sculpting tools (needle tool, ball stylus)
- Acrylic rolling pin
- Circle cutter (approx. 3 inches diameter)
- Craft knife or blade
- Aluminum foil (for armature core)
- Baking sheet and parchment paper
- Oven (for baking polymer clay)
Step 1: Creating the Base
-
Prepare the foundation:
Start by conditioning a large chunk of white polymer clay until it is soft and pliable. Roll it into a smooth ball to remove any air bubbles. -
Shape the disc:
Flatten the ball into a thick disc, about 0.5 inches high. You can use an acrylic roller to get the top perfectly flat while keeping the sides slightly rounded for a stone-like look. -
Texture the surface:
Gently tap the surface with a stiff toothbrush or a ball of crumpled foil to give the white base a subtle, concrete-like texture.
Sagging Clay?
If the frog’s posture slumps while working, insert a small ball of crumpled aluminum foil inside the body as a core. This reduces weight and helps hold the shape.
Step 2: Sculpting the Frog
-
Form the body:
Take a portion of forest green clay and roll it into a pear shape. Flat the bottom slightly so it sits securely on the white base. -
Add the legs:
Roll two thick sausages of green clay for the hind legs. Attach them to the sides of the body, blending the upper thigh into the torso while curving the bottom forward to form feet. -
Detail the feet:
Use a needle tool or small knife to press three indentations into the end of each hind leg to create simple toes. -
Create the arms:
Roll two smaller, thinner logs of green clay for the arms. Attach them near the top of the ‘pear’ shape, positioning them so they are reaching forward as if holding something. -
Shape the head:
The head is integrated into the body shape, but you can define the jawline by gently pressing under the chin area with a modeling tool to create a slight separation. -
Add the mouth:
Use a flexible blade or a thin tool to press a wide, gentle smile into the face. Curve it slightly upwards at the corners for a happy expression. -
Make the eyes:
Roll two small balls of green clay and press them onto the top of the head. Add flattened white circles onto these mounds, followed by tiny black pupils placed in the center.
Step 3: Crafting the Book & Assembly
-
Create the book cover:
Roll out a thin sheet of the lighter sage green clay. Cut a rectangular strip that is long enough to cover both the front and back of the book, plus a spine. -
Add the pages:
Create a small rectangular block of white clay that fits inside your green cover. Use a needle tool to scratch fine parallel lines along the edges of the white block to mimic pages. -
Assemble the book:
Wrap the green cover around the white page block. Open the book slightly so it looks like it is being read. -
Position the book:
Place the book into the frog’s hands. Gently press the clay arms and hands against the cover to ensure they bond. I sometimes use a drop of liquid clay here for extra security. -
Final touches:
Check the figurine from all angles. Smooth out any fingerprints using a little baby oil on your finger or a soft brush. -
Bake the project:
Preheat your oven according to the clay manufacturer’s instructions (usually 275°F or 130°C). Bake the figurine on parchment paper for the recommended time, typically 15-30 minutes per 1/4 inch of thickness. -
Cool down:
Turn off the oven and open the door slightly, letting the figurine cool down completely inside before moving it to prevent cracking.
Literary Twist
Customize the book cover! After baking, use a fine-tip paintbrush and acrylic paint to add a tiny title or a specific color pattern to match your favorite real-life novel.
Once cooled, your studious little frog is ready to bring a sense of peace and curiosity to your shelf