If you’re in the mood to make something small, satisfying, and totally wearable, clay pendants are the sweet spot. Here are my go-to clay pendant ideas—starting with the classics and drifting into the fun, unexpected stuff.
Minimal Geometric Cutout Pendant
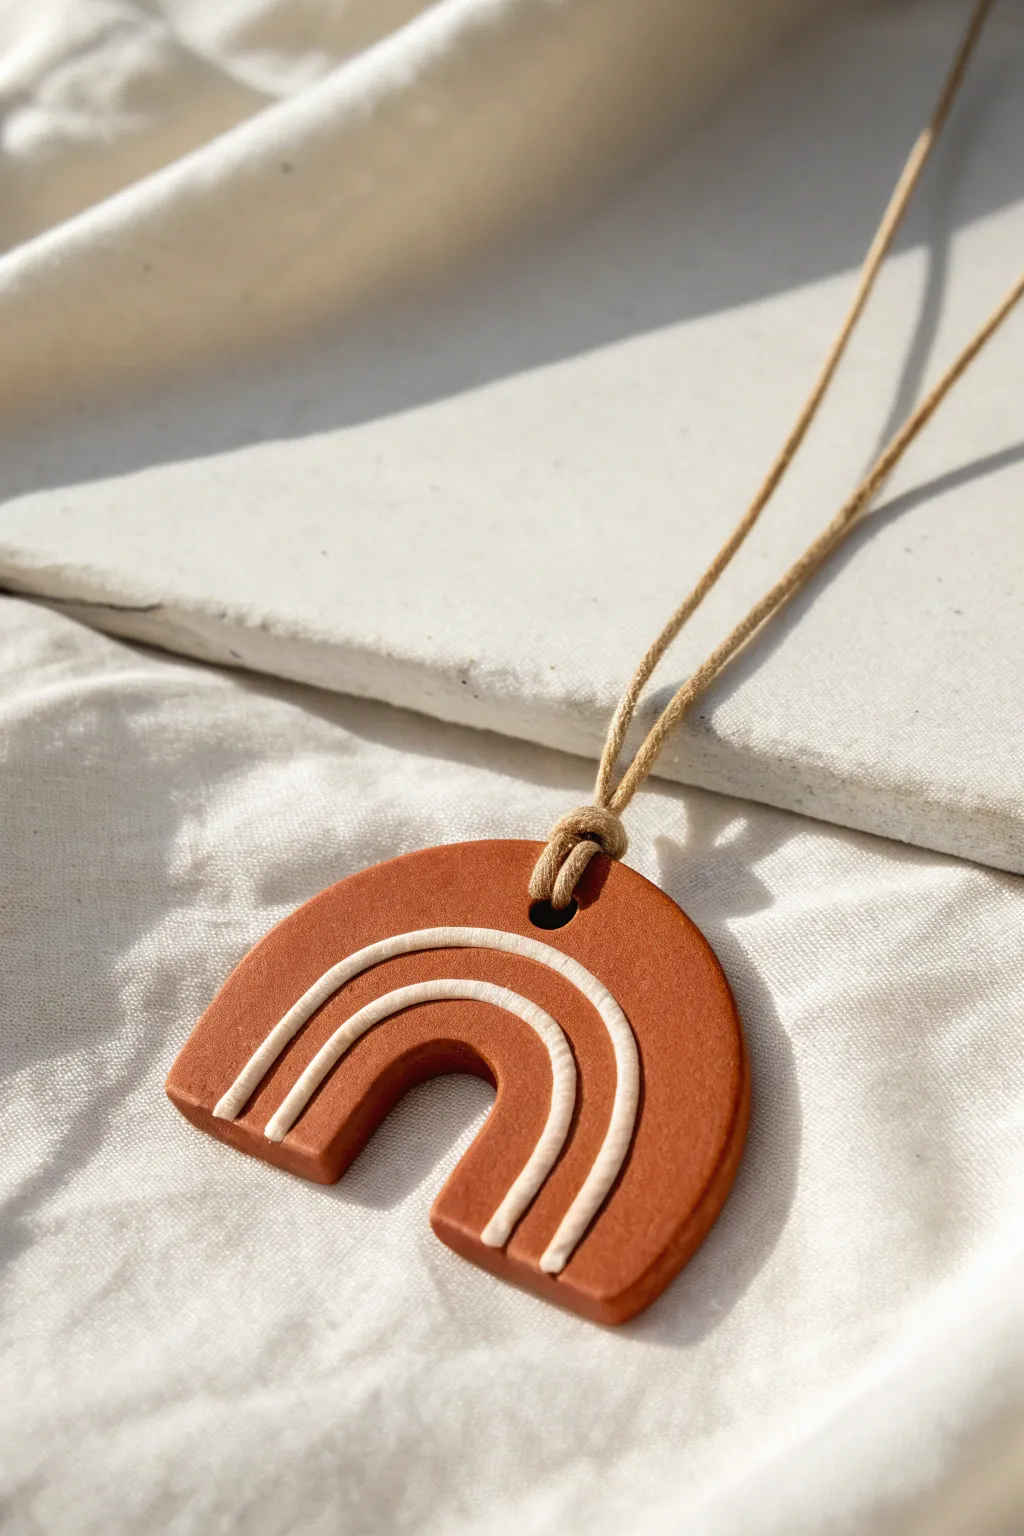
This warm, earthy pendant captures the trendy bohemian arch design with a minimalist twist. Combining rich terracotta hues with crisp inlaid cream lines creates a sophisticated geometric piece that pairs perfectly with casual linen or cozy knits.
Step-by-Step Guide
Materials
- Terracotta colored polymer clay
- Cream or white polymer clay
- Acrylic roller or pasta machine
- Flexible tissue blade or craft knife
- Shape cutter (large arch/U-shape) or cardstock template
- Small round cutter (approx. 2-3mm for the string hole)
- Needle tool or toothpick
- Sandpaper (grit 400 to 1000)
- Beige waxed cotton cord
- Oven and baking sheet
Step 1: Base Construction
-
Condition the base clay:
Begin by taking a chunk of your terracotta polymer clay and kneading it in your hands until it becomes soft and pliable. Warm clay is essential for preventing cracks during the shaping process. -
Roll the slab:
Using your acrylic roller or a pasta machine on a medium setting, roll the terracotta clay into an even slab. Aim for a thickness of about 4-5mm to ensure the pendant feels substantial but not heavy. -
Cut the arch shape:
Press your arch-shaped cutter firmly into the slab. If you don’t have a cutter, I like to trace a simple paper template onto the clay lightly with a needle tool, then carefully cut along the lines with a craft knife. -
Smooth the edges:
Before moving on, gently run your finger along the cut edges of the clay to smooth down any sharpness or irregularities left by the cutter. -
Cut the suspension hole:
Use your smallest round cutter or a straw to punch a hole at the top center of the arch. Make sure it’s at least 3-4mm away from the edge to prevent the clay from tearing later.
Step 2: Inlay Detail Work
-
Carve the channels:
Using a needle tool or a specialized carving tool, carefully score two parallel arched lines into the face of your pendant to mimic a rainbow shape. Widen these scores slightly to create small channels or grooves. -
Prepare the accent clay:
Condition a very small amount of cream or white polymer clay. Roll it into an extremely thin snake or ‘noodle’ on your work surface until it matches the width of the channels you just carved. -
Insert the first stripe:
Gently lay the cream clay noodle into the first carved channel. Use your finger or a soft sculpting tool to press it down gently, ensuring it bonds with the terracotta base. -
Insert the second stripe:
Repeat the process for the second channel. Don’t worry if the cream clay sits slightly higher than the base surface right now; we’ll fix that next. -
Flatten the inlay:
Take your acrylic roller and gently roll over the entire pendant surface one last time. This pushes the cream stripes flush with the terracotta background, creating that seamless inlaid look. -
Trim excess:
If the cream stripes extended past the bottom edge of the arch during rolling, use your tissue blade to slice them cleanly off so they are flush with the pendant’s bottom edge.
Clean Lines Pro Tip
To prevent the cream light clay from picking up terracotta smudges, wipe your hands and roller with a baby wipe or alcohol before handling the accent color.
Step 3: Finishing and Assembly
-
Bake the piece:
Place your pendant on a baking sheet lined with parchment paper or a ceramic tile. Bake according to your specific clay manufacturer’s instructions, usually around 275°F (135°C) for 30 minutes. -
Cool down:
Allow the pendant to cool completely in the oven with the door cracked, or remove it and let it sit. The clay hardens fully only as it cools. -
Sand for perfection:
Once cool, create a silky finish by wet-sanding the surface. Start with 400 grit sandpaper to remove fingerprints, then move to 800 or 1000 grit for a matte sheen. Rinse and dry. -
Prepare the cord:
Cut a length of beige waxed cotton cord (about 24-30 inches depending on your desired length). Fold the cord in half to find the center point. -
Create the lark’s head knot:
Push the folded loop end of the cord through the hole in the pendant from front to back. Then, pull the loose tails of the cord up and through that loop, tightening it securely against the top of the pendant. -
Tie the closure:
Finish the necklace by tying the two loose ends of the cord into a simple overhand knot or adding a sliding knot closure if you prefer adjustable length.
Troubleshooting Distortion
If the arch shape warps while you are pressing in the stripes, simply place your original cutter back over the shape to gently nudge it back into perfect alignment.
Now you have a stunning, modern piece of wearable art ready to anchor your favorite outfit


Classic Marbled Disc Pendant
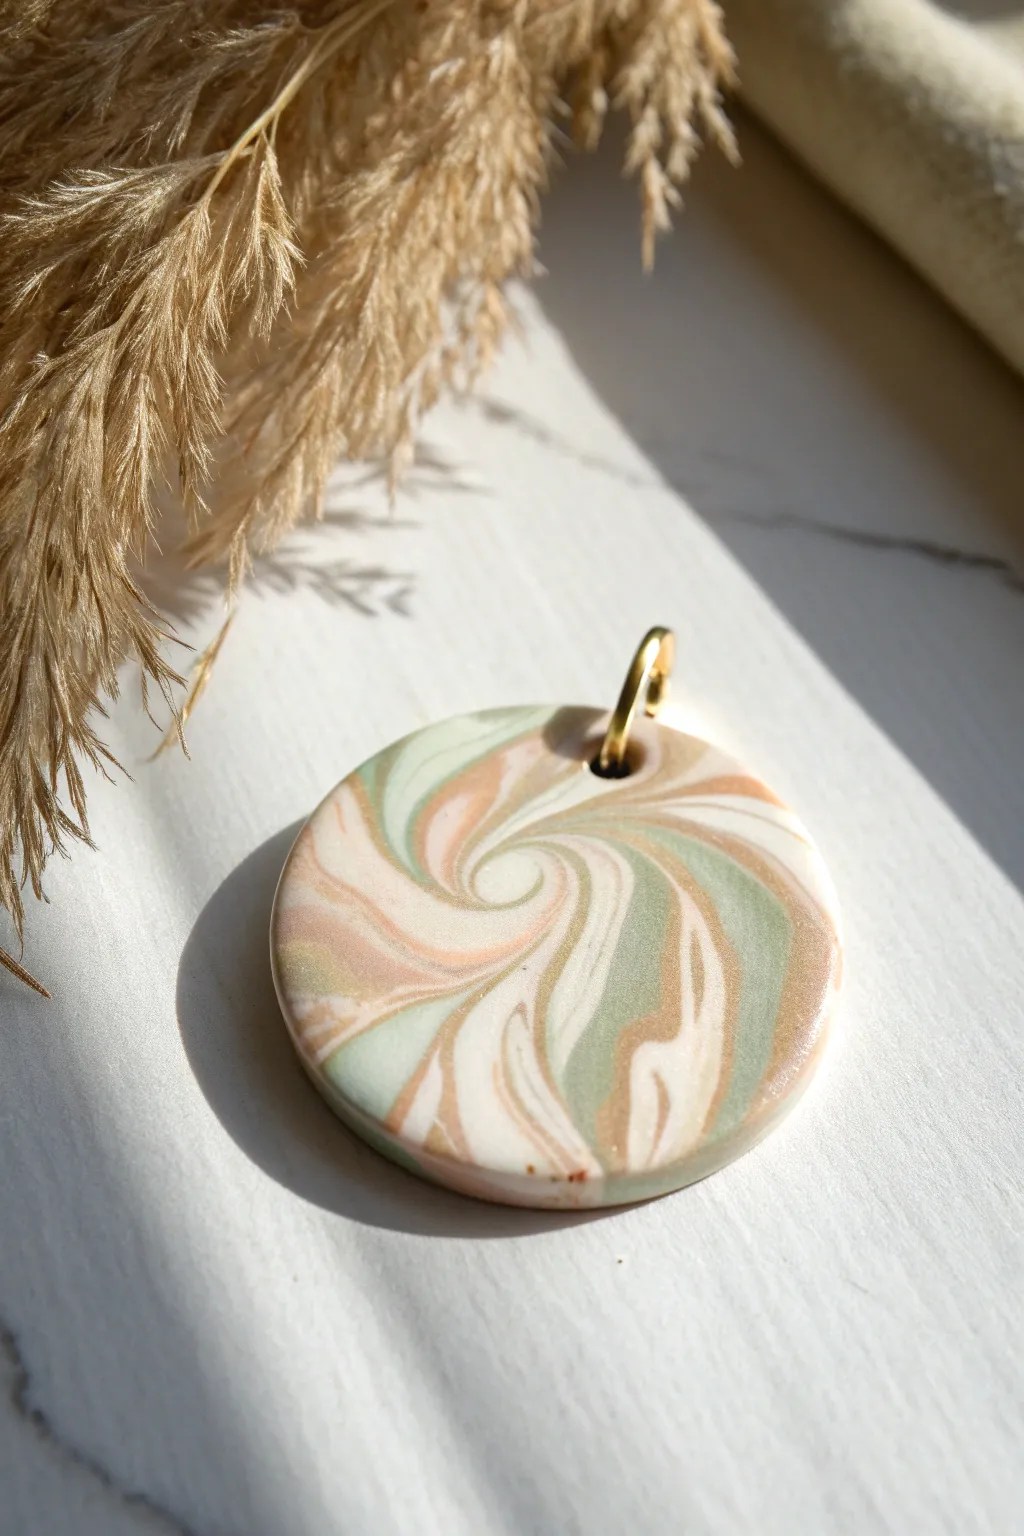
This elegant pendant captures the soft, natural beauty of sage green and warm peach tones swirled into creamy white. The mesmerizing spiral pattern makes a sophisticated statement piece that looks incredibly high-end despite being beginner-friendly.
Step-by-Step
Materials
- Polymer clay (white, sage green, peach or terracotta)
- Acrylic rolling pin or pasta machine
- Circle clay cutter (approx. 1.5 – 2 inches)
- Needle tool or toothpick
- Blade or X-Acto knife
- Ceramic tile or glass work surface
- Oven for baking
- Sandpaper (400 to 1000 grit)
- Gold jump ring (6-8mm)
- Pliers (flat nose and round nose)
- Gloss glaze or resin (optional)
Step 1: Preparing the Clay Palette
-
Condition the white base:
Begin by conditioning a block of white polymer clay until it is soft and pliable. This will act as the primary color to separate the other tones, so prepare slightly more of this than the colored clays. -
Prepare the colors:
Condition smaller amounts of sage green and peach/terracotta clay. If your peach is too vibrant, mix in a tiny pinch of brown or translucent clay to mute it slightly for that earthy look shown in the photo. -
Roll into snakes:
Roll each color into thin, even ‘snakes’ or logs. You’ll want about two logs of white, one log of sage green, and one log of peach. Aim for about 1/4 inch thickness. -
Twist the logs:
Bundle the logs together, alternating colors with the white to prevent the green and peach from muddying each other. Twist the entire bundle tightly like a candy cane. -
Refine the cane:
Gently roll the twisted bundle on your work surface to lengthen it and smooth out the ridges. Fold it in half, twist again, and roll it out one more time to create finer lines of color.
Step 2: Creating the Swirl Pattern
-
Form the spiral:
Take one end of your twisted clay rope and begin coiling it flat tightly around itself, like a snail shell. Keep the coils tight so there are no gaps. -
Compress the coil:
Once the coil is large enough for your cutter, gently press down on it with your palm to flatten it slightly and ensure the strands fuse together. -
Roll into a slab:
Using your acrylic roller, roll the coil flat. Roll in different directions—up, down, left, right—to stretch the swirl pattern organically without distorting the circle shape too much. -
Check density:
Aim for a thickness of about 3mm to 4mm. I find that going too thin makes the final piece feel fragile, while this thickness gives it a nice ceramic weight.
Lentil Swirl Technique
For a perfect spiral, use the ‘Lentil Bead’ method: place a ball of swirled clay under a flat acrylic block and rotate the block in small circles. It forces the pattern into a vortex.
Step 3: Cutting and Refining
-
Select the best spot:
Hover your circle cutter over the slab to find the most pleasing composition. Look for the center of the vortex to be slightly offset or perfectly centered depending on your preference. -
Cut the shape:
Press the circle cutter firmly into the clay. Give it a tiny wiggle before lifting to ensure a clean separation from the surrounding clay. -
Smooth the edges:
Gently pick up the disc and use your fingertip to lightly smooth the sharp cut edge, rounding it off just a little bit for a professional finish. -
Create the hole:
Use a needle tool or small straw to punch a hole near the top edge. Make sure the hole is big enough to accommodate your jump ring, keeping the opening at least 2-3mm away from the edge to prevent tearing.
Dirty Clay Blues
If you see lint or dust on your white clay before baking, use a cotton swab dipped in rubbing alcohol/nail polish remover to gently wipe the surface clean.
Step 4: Baking and Finishing
-
Bake the piece:
Place the pendant on a ceramic tile or parchment-lined baking sheet. Bake according to your specific clay brand’s instructions (usually 275°F/130°C for 30 minutes). -
Cool and inspect:
Allow the piece to cool completely in the oven or on a wire rack. Check for any sharp edges or rough spots. -
Wet sand the edges:
Dip a piece of 400-grit sandpaper in water and sand the edges and back of the pendant. Process up to 1000-grit for an ultra-smooth, glass-like rim. -
Buff or glaze:
For the subtle sheen seen in the image, buff the surface vigorously with a denim cloth. Alternatively, apply a very thin layer of satin or gloss glaze. -
Attach hardware:
Using two pairs of pliers, twist open the gold jump ring (never pull it apart). Slide it through the hole in the pendant and twist it closed until the ends meet perfectly flush.
String this beautiful disc onto a gold chain or leather cord to complete your naturally inspired accessory


Botanical Leaf-Imprint Medallion

Capture the delicate details of nature with this rustic and earthy clay pendant featuring a vivid leaf impression. The finished piece combines the matte texture of stone-like clay with a subtle wash of green to highlight the organic veins, creating a wearable piece of garden art.
Detailed Instructions
Materials
- Air-dry clay (white or light grey)
- Fresh leaf with prominent veins (e.g., mint, sage, or hydrangea)
- Rolling pin
- Circular cookie cutter (approx. 2-3 inches)
- Straw or small circular tool for the hole
- Fine-grit sandpaper
- Green acrylic paint (sage or moss tone)
- Dark grey or black acrylic paint (optional for speckling)
- Old toothbrush
- Paper towel or sponge
- Soft paintbrush
- Matte varnish or sealant
- Twisted hemp or jute cord
Step 1: Shaping the Base
-
Condition the clay:
Begin by taking a small handful of air-dry clay and kneading it in your hands until it is soft, pliable, and free of cracks. If it feels too dry, dip your finger in water and work it in. -
Roll the slab:
Place the clay on a smooth, non-stick surface or a piece of parchment paper. Use a rolling pin to flatten it into an even slab, aiming for a thickness of about 1/4 inch (6mm). -
Position the leaf:
Select a fresh leaf that isn’t too dry or brittle. Place it vein-side down onto your rolled clay slab. The vein side will create the deepest and most detailed impression. -
Impress the design:
Gently roll over the leaf with your rolling pin once or twice. Apply enough pressure to embed the veins into the clay, but not so much that you distort the slab’s thickness significantly. -
Remove the botanical:
Carefully lift the stem of the leaf and peel it away from the clay to reveal the intricate imprint left behind. -
Cut the shape:
Center your round cookie cutter over the leaf impression to frame the composition exactly how you want it. Press down firmly to cut the circle, then pull away the excess clay from the edges. -
Create the hanging loop:
While the clay is still wet, use a straw or a small circular tool to punch a hole near the top edge. Ensure it is large enough to accommodate your thick hemp cord later. -
Smooth the edges:
Dip your finger in a tiny bit of water and run it gently around the cut rim of the circle to soften any sharp edges left by the cutter.
Sticky Leaf Issues?
If the leaf sticks to the clay and tears, lightly dust the vein side with cornstarch or baby powder before pressing it down. This acts as a release agent.
Step 2: Decorating and Finishing
-
Drying time:
Allow the pendant to dry completely according to your clay package instructions. This usually takes 24-48 hours. I like to flip it over halfway through the process to ensure both sides dry evenly. -
Sand for perfection:
Once fully cured and hard, use fine-grit sandpaper to gently buff the edges and surface, removing any roughness or fingerprints. -
Apply the wash:
Dilute a small drop of sage green acrylic paint with water to create a thin wash. Brush this over the entire leaf impression, ensuring the liquid settles into the deep crevices of the veins. -
Wipe back excess:
Immediately take a damp paper towel or sponge and wipe the surface of the clay. This technique leaves the green pigment inside the recessed veins while revealing the white clay on the raised surfaces. -
Add speckling effect:
To mimic the stone-like texture in the photo, dip an old toothbrush into slightly watered-down dark grey or green paint. Run your thumb across the bristles to flick tiny speckles onto the pendant surface. -
Seal the piece:
After the paint is bone dry, apply a coat of matte varnish or sealant to protect the clay from moisture and preserve the paint job without making it look glossy. -
Prepare the cord:
Cut a length of twisted hemp or jute cord. Fold it in half to find the center loop. -
Attach the cord:
Push the folded loop of the cord through the hole in the pendant from front to back. Then, pass the loose ends of the cord through the loop and pull tight to create a secure lark’s head knot at the top of the medallion.
Make It Marble
Knead a tiny pinch of black or grey clay into your white base clay before rolling. Stop before it’s fully blended to create natural stone-like marble streaks.
Now you have a permanent piece of nature to wear or gift, capturing the beauty of the outdoors in stone


Pressed Flower Texture Pendant
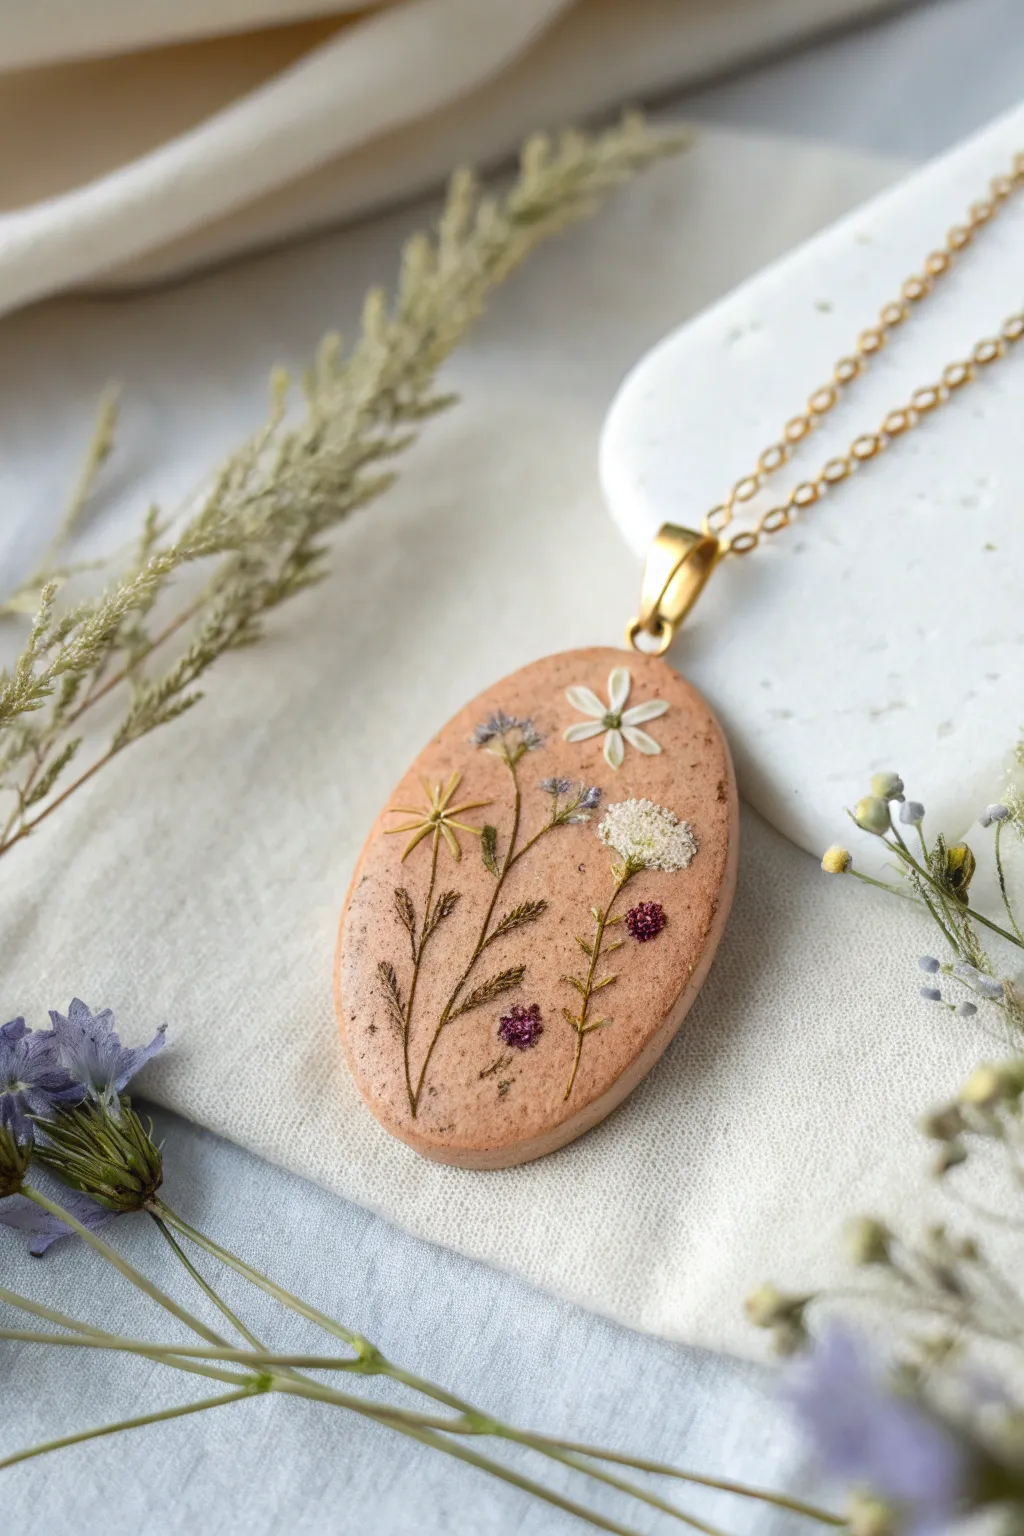
Capture the fleeting beauty of a wildflower meadow in this charming polymer clay pendant. By embedding tiny, dried flowers into a textured clay base, you’ll create a wearable piece of nature that feels both rustic and refined.
Step-by-Step Tutorial
Materials
- Polymer clay (beige or light terracotta color)
- Dried pressed flowers and leaves (miniature varieties like Queen Anne’s Lace, forget-me-nots, ferns)
- Oval clay cutter (approx. 1.5 – 2 inches)
- Acrylic rolling pin
- Liquid polymer clay (translucent) or UV resin
- UV lamp (if using resin)
- Small paintbrush
- Needle tool or tweezers
- Jump ring (gold)
- Pendant bail (gold)
- Sandpaper (fine grit)
- Coffee grounds or black pepper (optional for texture)
Step 1: Preparing the Base
-
Condition the clay:
Start by warming the beige polymer clay in your hands, kneading it until it is soft and pliable. If the color seems too flat, I sometimes mix in a tiny pinch of brown or translucent clay to give it depth. -
Add speckling (optional):
To achieve the organic, speckled potter’s clay look seen in the photo, sprinkle a very small amount of dried coffee grounds or coarse black pepper into the clay and knead it thoroughly until evenly distributed. -
Roll the slab:
Using your acrylic rolling pin, roll the clay out into a smooth slab. Aim for a thickness of about 4mm to ensure the pendant feels substantial but not heavy. -
Cut the shape:
Press your oval cutter firmly into the clay slab. Wiggle it slightly to ensure a clean cut, then remove the excess clay from around the shape before lifting the cutter. -
Smooth the edges:
Gently run your finger around the perimeter of the oval to soften any sharp ridges left by the cutter. The edges should look rounded and natural.
Keep it Clean
Work on a clean ceramic tile or glass sheet. This allows you to bake the piece directly on the surface without lifting it, preventing accidental distortion of the oval shape.
Step 2: Designing the Bouquet
-
Plan your arrangement:
Before committing to the clay, lay out your dried flowers on a separate surface to test your composition. Aim for varying heights to mimic a wild garden. -
Place the foliage first:
Using tweezers, gently pick up your pressed ferns or green stems. Press them lightly onto the clay surface to check placement. -
Embed the stems:
Once satisfied with the position, use the back of your tweezers or a rolling tool to gently press the greenery flush into the clay. Do not push too deep; you just want them to stick. -
Add focal flowers:
Place the main white flower near the top right, pressing the petals gently flat. Add the smaller purple or pink accents lower down to balance the visual weight. -
Secure the edges:
Inspect all the botanical elements. If any petal edges are sticking up, gently tamp them down so they don’t catch or tear later. -
Create the hole:
Use a needle tool or a small straw to puncture a hole at the very top center of the oval for the hardware. Ensure the hole is clean on both the front and back.
Step 3: Finishing and Assembly
-
Bake the piece:
Transfer the pendant to a baking sheet lined with cardstock or parchment paper. Bake according to your brand of polymer clay instructions (usually 275°F/135°C for 15-30 minutes). -
Cool down:
Let the piece cool completely. This is crucial as warm clay is fragile. -
Apply sealant:
The flowers are delicate and need protection. Apply a thin, even layer of liquid polymer clay or UV resin over the entire front surface. -
Cure the sealant:
If using liquid clay, bake again for about 10 minutes at a high temp (check bottle instructions). If using UV resin, cure under a UV lamp for 2-4 minutes until hard and glossy. -
Sand edges (if needed):
If there are any rough spots on the sides, lightly sand them with fine-grit sandpaper for a professional finish. -
Attach hardware:
Open a gold jump ring using pliers. Thread it through the hole in the pendant and attach your bail. Close the jump ring securely. -
Add the chain:
Thread your gold chain through the bail to complete the necklace.
Add Subtle Shimmer
Before baking or sealing, brush a very light dusting of gold mica powder over the raised parts of the flowers to give the botanical arrangement a magical, sun-kissed glow.
Now you have a timeless botanical pendant ready to wear or gift to a nature lover

The Complete Guide to Pottery Troubleshooting
Uncover the most common ceramic mistakes—from cracking clay to failed glazes—and learn how to fix them fast.
Stamped Initial Tag Pendant
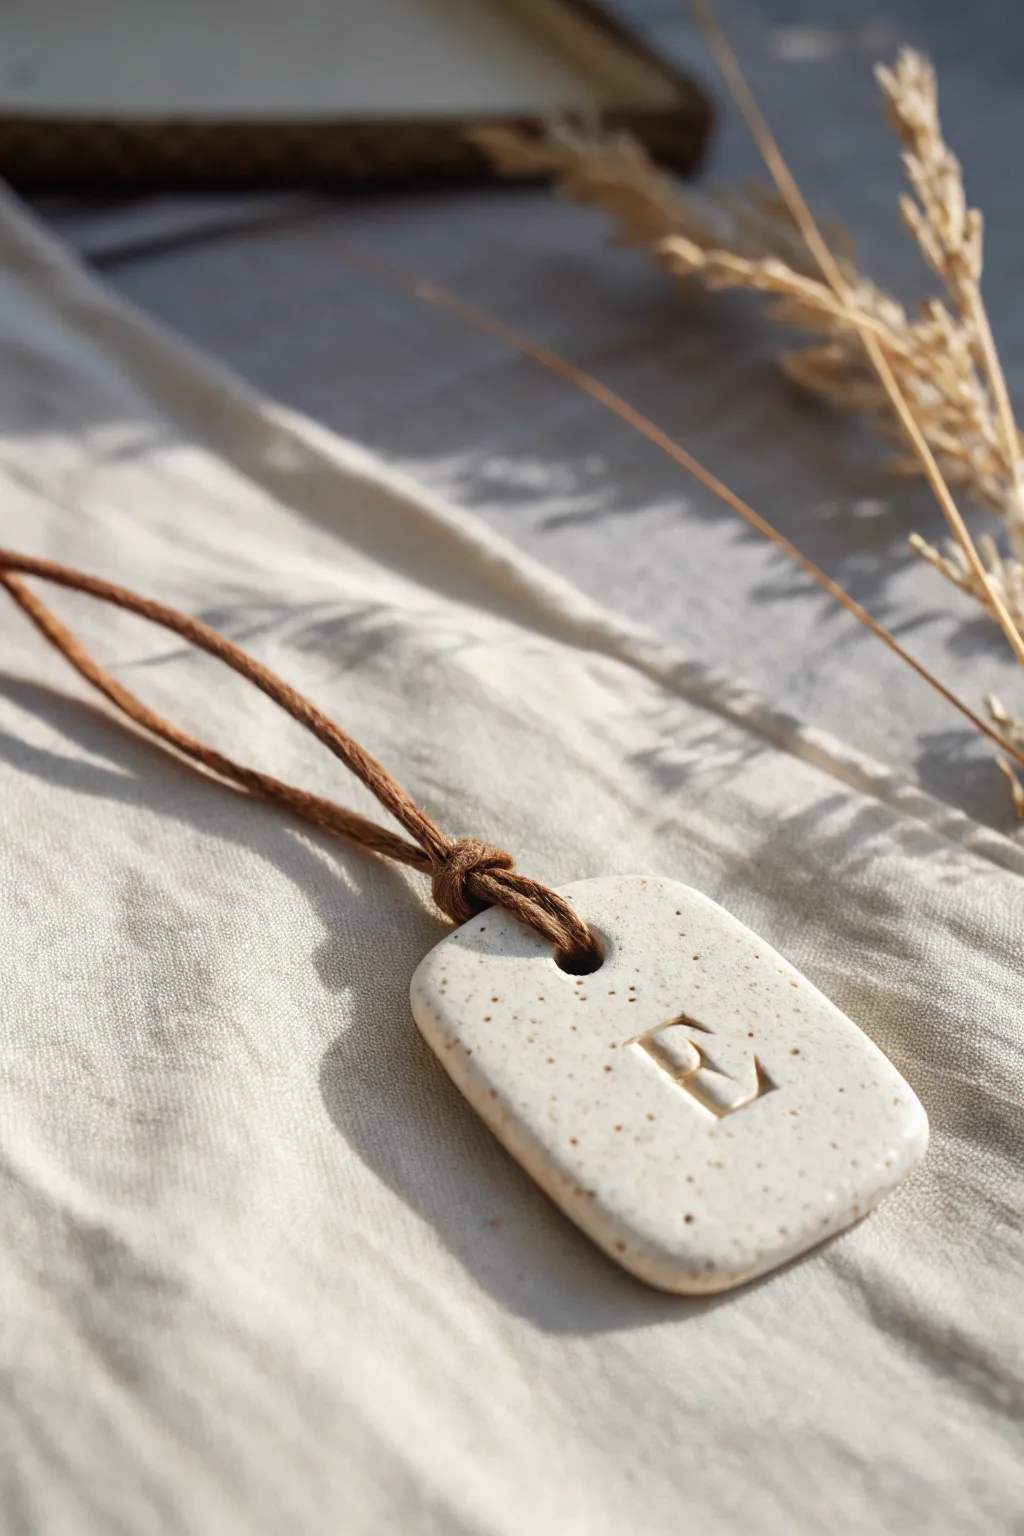
Create a beautifully minimalist necklace that perfectly balances rustic charm with modern simplicity. Using speckled clay and a simple leather cord, you’ll craft a personalized tag that looks effortlessly organic and high-end.
How-To Guide
Materials
- Speckled granite or sand polymer clay
- Rolling pin or acrylic roller
- sharp craft blade or clay cutter
- Small letter stamp set (initial)
- Straw or small circle cutter (for the hole)
- Fine-grit sandpaper (optional)
- Brown leather or suede cord
- Oven (for baking)
- Parchment paper
Step 1: Shaping the Clay
-
Condition the clay:
Begin by taking a small portion of your speckled polymer clay. Knead it in your hands until it becomes soft, pliable, and warm to the touch, which helps prevent cracking later. -
Roll it out:
Place the clay on a clean, flat surface or a piece of parchment paper. Use your roller to flatten the clay to an even thickness of about 4-5mm. You want it substantial enough to be durable but not too heavy. -
Cut the basic shape:
Using a sharp blade, cut a rectangle shape. Aim for dimensions around 1 inch by 1.5 inches, but don’t worry about perfection; slight irregularity adds to the organic aesthetic. -
Soften the corners:
Gently tap the corners of your rectangle with your fingertip to round them off. I find lightly running a finger along the sharp cut edges also helps soften the overall look. -
Refine the surface:
Check the surface for any fingerprints. Lightly smooth them away with a drop of baby oil on your finger or simply by buffing gently with a piece of paper.
Fixing Distortion
If your rectangle warped while lifting it off the surface, bake it directly on the parchment paper or tile you worked on to avoid moving it while raw.
Step 2: Stamping and Detailing
-
Create the hanging hole:
Take a straw or a very small circular cutter. Center it near the top edge of your rectangle—leaving enough margin so the clay won’t break—and press straight down to create a clean hole for the cord. -
Position the stamp:
Select your desired initial stamp. Hover it over the bottom center of the pendant to visualize placement before committing. -
Make the impression:
Press the stamp firmly and evenly into the clay. You want a deep, crisp impression that will catch the light, but be careful not to push all the way through the back. -
Clean up edges:
Sometimes stamping distorts the surrounding clay slightly. If the rectangle shape bulged out, gently nudge the sides back into straight lines with your blade. -
Inspect the hole:
Ensure the hole is still perfectly round and open; re-insert the straw gently if needed to clear any debris.
Stamp Clarity
Lightly dust your stamp with cornstarch or dip it in water before pressing into the clay. This prevents the clay from sticking inside the letter crevices.
Step 3: Finishing and Assembly
-
Bake the pendant:
Transfer the pendant on parchment paper to a baking sheet. Bake according to your clay package instructions (usually around 275°F or 130°C for 15-30 minutes). -
Cool down:
Allow the clay to cool completely inside the oven or on a cooling rack. It hardens fully as it cools. -
Sand for smoothness:
Once cool, use fine-grit sandpaper to lightly buff the edges and the back of the pendant. This removes any sharp bits and gives it a professional, tumbled stone feel. -
Prepare the cord:
Cut a length of brown leather cord to your desired necklace length, adding a few extra inches for knotting. -
Create a lark’s head knot:
Fold the cord in half to find the center loop. Push this loop through the hole in your pendant from the front to the back. -
Secure the pendant:
Thread the loose ends of the cord through the loop you just pushed through. Pull the ends tight so the knot snugs up against the top of the clay tag. -
Double check the knot:
Adjust the leather so the knot sits centered and symmetrical, mirroring the clean lines of the initial below it. -
Tie the ends:
Finish the necklace by tying the two loose ends together with a simple overhand knot or adding a clasp finding if you prefer.
Now you have a charming, earth-toned accessory ready to wear or gift.
Terrazzo Confetti Pendant
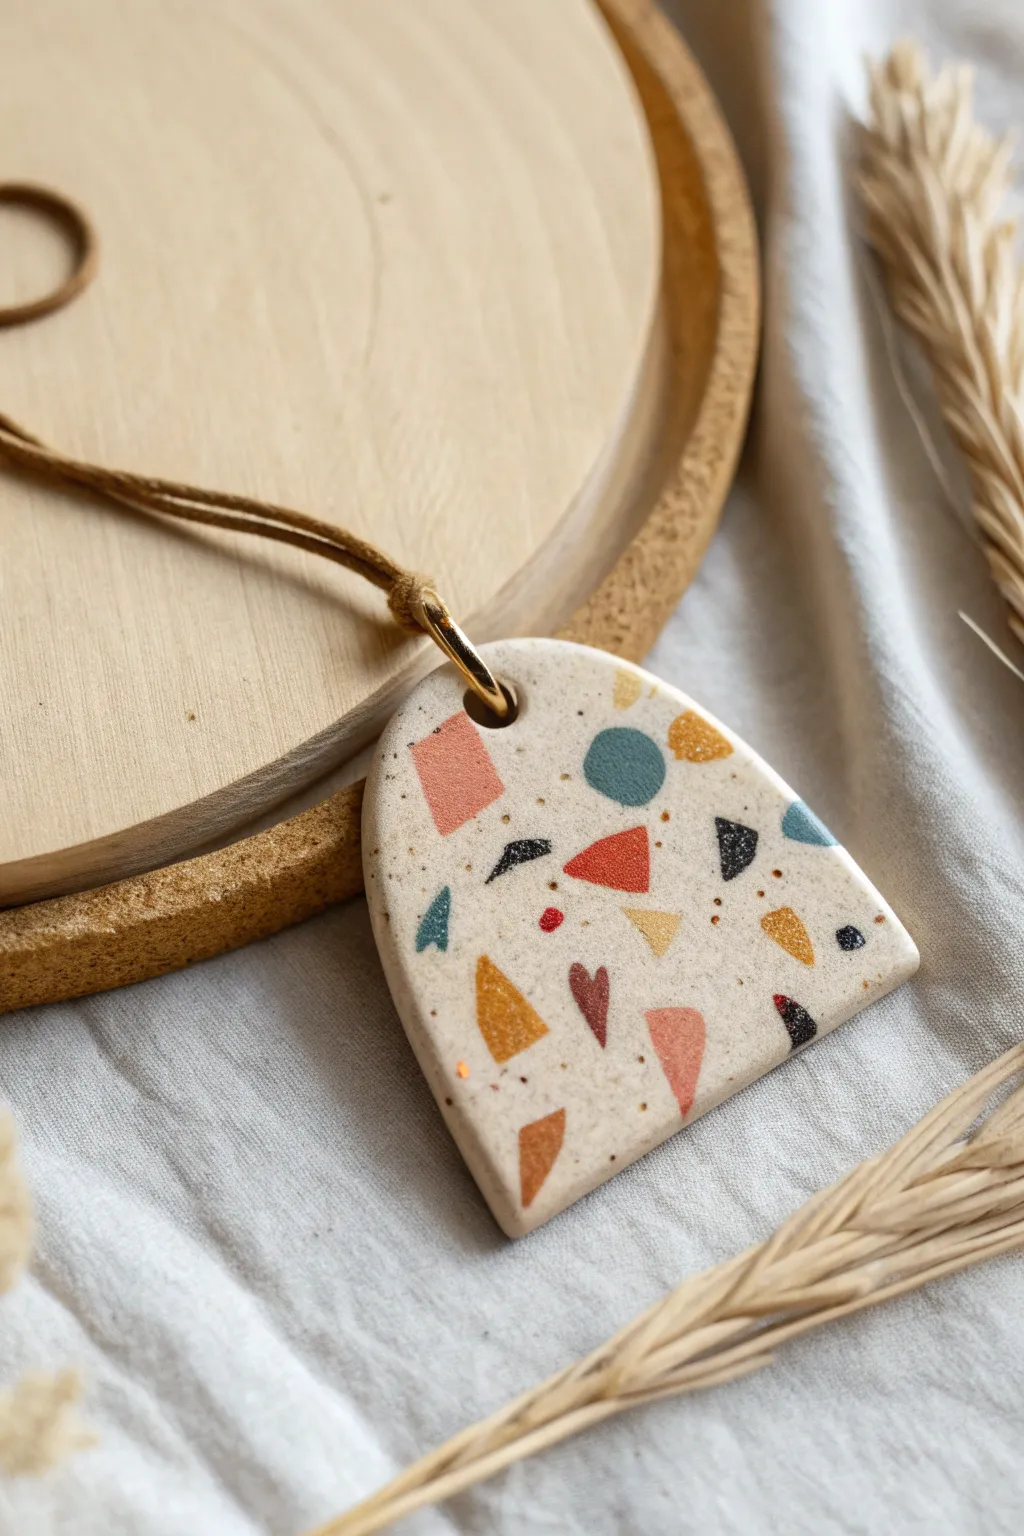
This trendy pendant captures the playful and modern aesthetic of terrazzo flooring in a wearable piece. By embedding tiny, colorful geometric scraps into a speckled neutral base, you will create a unique, slightly retro accessory full of personality and charm.
Detailed Instructions
Materials
- Polymer clay (white or beige for the base)
- Polymer clay scraps (various colors: teal, rust, mustard, pink, black)
- Black pepper or dried vanilla bean specks (optional, for texture)
- Clay roller or pasta machine
- Tissue blade or X-Acto knife
- Arch-shaped clay cutter (approx. 2 inches)
- Small circle cutter or straw (for the hole)
- Sandpaper (various grits from 400 to 1200)
- UV resin or clear gloss varnish (optional)
- Jump ring (gold)
- Faux suede cord (brown)
Step 1: Preparing the Confetti
-
Mix your colors:
Select about 5-6 complementing colors for your confetti. For this look, aim for a palette of muted earth tones like mustard yellow, terracotta rust, dusty pink, teal, and touches of black. -
Create thin sheets:
Roll each colored piece of clay into a very thin sheet. You want these to be paper-thin so they embed easily into the base clay later. -
Bake the sheets (optional technique):
For crisp, sharp edges like real stone chips, partially bake these thin colored sheets for about 10 minutes. If you prefer a softer, more integrated look, leave them raw. I personally like to bake them briefly to make chopping easier. -
Chop the confetti:
Use your tissue blade to chop the colored sheets into irregular geometric shapes. Create a mix of tiny triangles, small rectangles, and uneven shards. Vary the sizes, but keep them generally small (under 5mm).
Step 2: Creating the Base
-
Condition the base clay:
Take your white or beige clay and condition it until it is soft and pliable. This warmth prevents cracking during the embedding process. -
Add speckles:
To achieve the stone-like texture seen in the photo, mix in a pinch of ground black pepper or tiny specks of black clay/dried vanilla bean into your white base. Knead thoroughly until the specks are evenly distributed. -
Roll the slab:
Roll out your speckled base clay into a slab that is approximately 3-4mm distinct. It needs to be thick enough to hold the hardware without breaking.
Clean Cuts Pro-Tip
To prevent the clay from sticking inside your cutter or distorting the shape, dip the cutting edge into a small pile of cornstarch or water before pressing it into the slab.
Step 3: Assembling the Pattern
-
Arrange the chips:
Place your chopped confetti pieces onto the raw base slab. Don’t overthink the placement—randomness is key. Leave plenty of negative space between the shapes. -
Embed the confetti:
Place a piece of parchment paper over the slab. Use your acrylic roller to gently press the chips down into the base clay until the surface is completely flat and smooth. -
Inspect the surface:
Run your finger over the clay. If you feel bumps, roll again. The confetti should be flush with the white background clay.
Troubleshooting Smears
If your colors smeared during rolling, you likely didn’t let the chips harden enough or rolled too aggressively. Next time, try the ‘pre-bake’ method for the chips so they stay crisp.
Step 4: Cutting and Baking
-
Cut the shape:
Position your arch-shaped cutter over the most pleasing section of your pattern. Press down firmly to cut the pendant shape. -
Create the hole:
Use a small circle cutter or a straw to punch a hole at the very top center of the arch. Ensure the hole is large enough for your chosen jump ring. -
Smooth the edges:
Before baking, gently rub the edges of the cut shape with your finger or a little cornstarch to remove any sharp burrs left by the cutter. -
Bake:
Place the pendant on a ceramic tile or baking sheet lined with paper. Bake according to your clay manufacturer’s instructions (usually 275°F/135°C for 30-45 minutes).
Step 5: Finishing Touches
-
Cool down:
Let the piece cool completely before handling. It will be fragile while still warm. -
Sand for smoothness:
In a bowl of water, wet sand the surface using sandpaper, starting with 400 grit and working up to 1000 or 1200 grit. This reveals the crisp shapes of the confetti and makes the surface buttery smooth. -
Buff or glaze:
For a matte finish, buff the dry clay with a denim cloth. For a glossy finish like the image, apply a thin layer of UV resin or gloss varnish and cure. -
Attach hardware:
Using pliers, open a large gold jump ring and thread it through the hole. Loop your brown suede cord through the jump ring to complete the necklace.
Wear your new terrazzo art piece proudly and enjoy the custom pop of color it adds to your outfit


What Really Happens Inside the Kiln
Learn how time and temperature work together inside the kiln to transform clay into durable ceramic.
Faux Granite Speckle Pendant
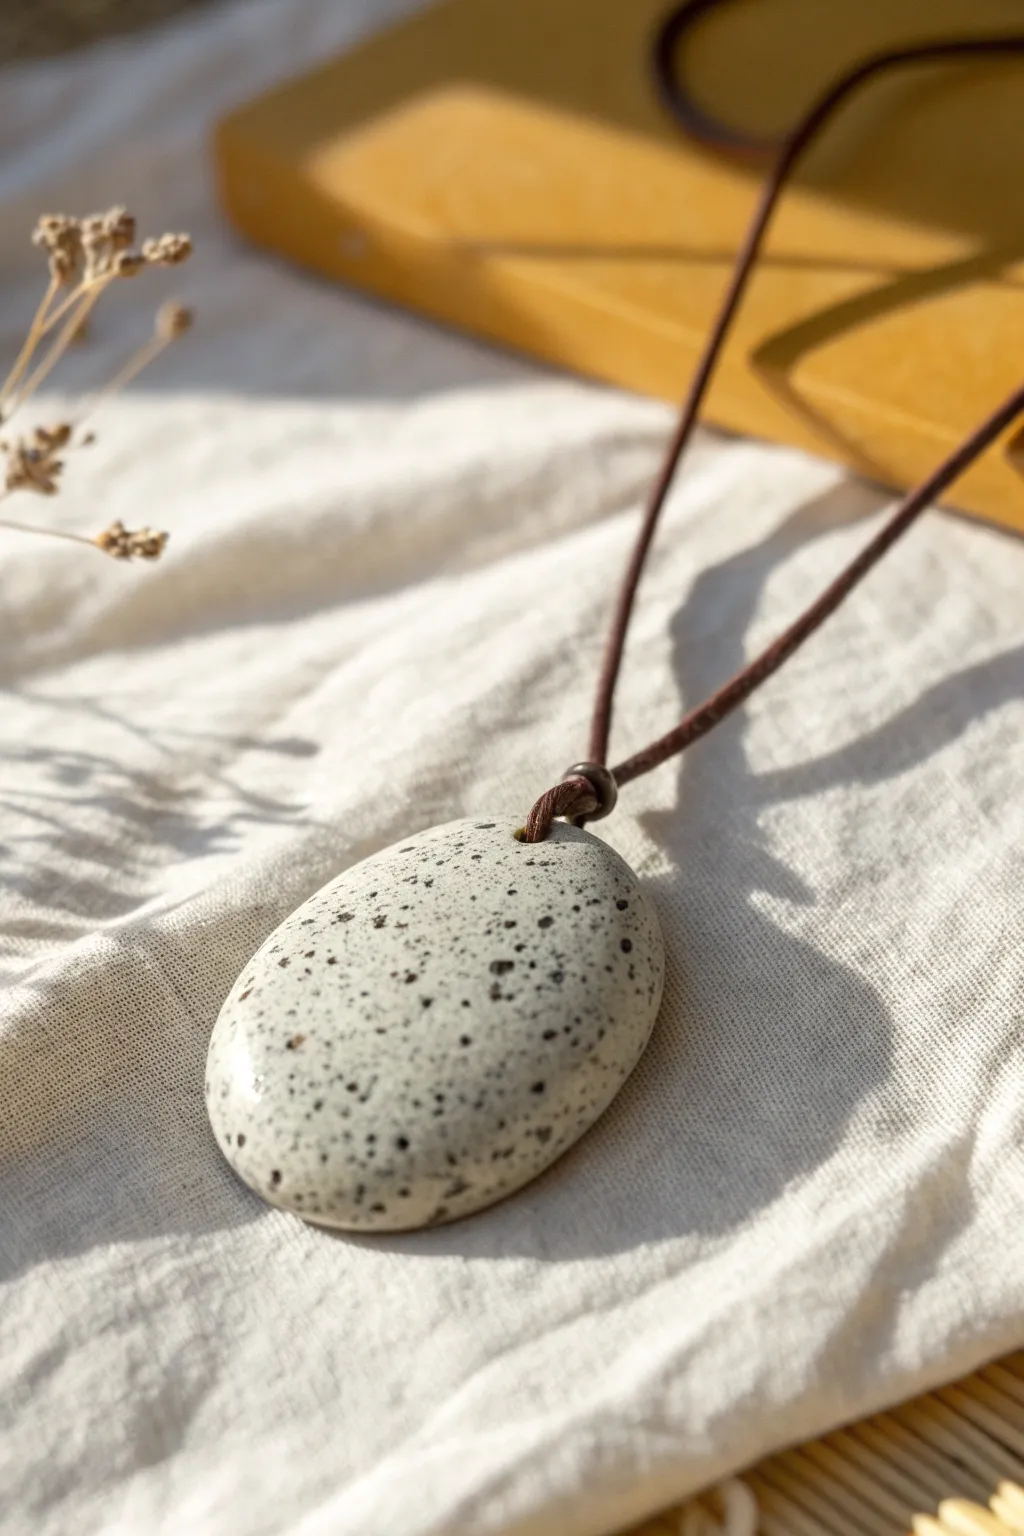
Achieve the sophisticated look of polished granite using nothing but polymer clay and few simple spices. This smooth, speckled pendant mimics a river stone’s natural beauty, making it a perfect minimalist accessory for any outfit.
Step-by-Step Tutorial
Materials
- White or translucent white polymer clay
- Coarsely ground black pepper or dried potting soil
- Rolling pin or acrylic roller
- Small oval clay cutter or a craft knife
- Medium-grit sandpaper (400-600 grit)
- Fine-grit sandpaper (1000-2000 grit)
- Hand drill or needle tool
- Gloss or satin polyurethane varnish
- Soft brush
- Brown waxed cotton cord or leather lace
Step 1: Preparing the Faux Stone Mix
-
Condition the Clay:
Begin by warming up your white polymer clay in your hands. Knead it thoroughly until it is soft, pliable, and free of any cracks or air bubbles. -
Add Texture:
Flatten the clay slightly and sprinkle a generous pinch of coarsely ground black pepper onto the surface. For a more varied ‘granite’ look, you can also add a tiny pinch of dried, sterilized potting soil or even embossing powder. -
Incorporate the Speckles:
Fold the clay over the inclusions and knead again. Continue folding and rolling until the black specks are evenly distributed throughout the white clay block. -
Check the Density:
Slice the clay in half to check the internal pattern. If the speckles look too sparse for your taste, add a little more pepper and knead again until satisfied.
Step 2: Shaping the Pendant
-
Form the Base Shape:
Roll the clay into a smooth ball between your palms to ensure there are no seams. -
Flatten Slightly:
Gently press the ball onto your work surface with your palm or a roller. You don’t want a flat pancake; aim for a thick, domed shape about 1/4 inch thick to resemble a smooth river skipping stone. -
Refine the Outline:
Use your fingers to gently shape the flattened circle into an organic oval. Smooth the edges with your fingertip to round them off, removing any sharp angles. -
Create the Hanger Hole:
Using a needle tool or a narrow straw, pierce a hole through the top of the oval, about 1/4 inch from the upper edge. Twist the tool gently as you push through to keep the hole clean.
Sticky Sanding?
If sanding drags, add a drop of dish soap to your water bowl. It acts as a lubricant, preventing the sandpaper from clogging and keeping the clay cool.
Step 3: Baking and Finishing
-
Baking:
Place your pendant on a ceramic tile or a baking sheet lined with parchment paper. Bake according to your brand of clay’s specific instructions (usually 275°F/130°C for 15-30 minutes for this thickness). -
Cool Down:
Allow the piece to cool completely in the oven or on a wire rack. The clay needs to be fully cool to harden properly before sanding. -
Initial Sanding:
Dip your 400-grit sandpaper in water and gently sand the entire surface of the pendant. This wet-sanding technique prevents dust and reveals the embedded specks more clearly. -
Polishing:
Switch to your 1000-grit (or higher) fine sandpaper. Continue wet-sanding in a circular motion until the surface feels incredibly smooth to the touch and has a soft, stone-like matte finish. -
Wash and Dry:
Rinse the pendant under cool water to remove any clay residue or sludge from sanding. I always pat it dry immediately with a lint-free cloth to check for scratches. -
Varnishing:
Apply a thin, even coat of gloss or satin polyurethane varnish. This will not only protect the inclusions but also make the ‘stone’ look wet and polished, highlighting the contrast. -
Adding the Cord:
Measure a length of brown waxed cotton cord or leather lace that fits comfortably over your head. Thread it through the hole in the pendant. -
Secure the Knot:
Tie a secure overhand knot right above the pendant to keep it centered, or create a sliding knot at the ends of the cord for an adjustable fit.
Add Metallic Life
Mix in tiny flakes of gold leaf or translucent glitter before baking. When sanded down, they will catch the light and look like mineral deposits.
Wear your polished faux-stone masterpiece with pride, knowing you created nature’s look by hand
Color-Block Arch Pendant
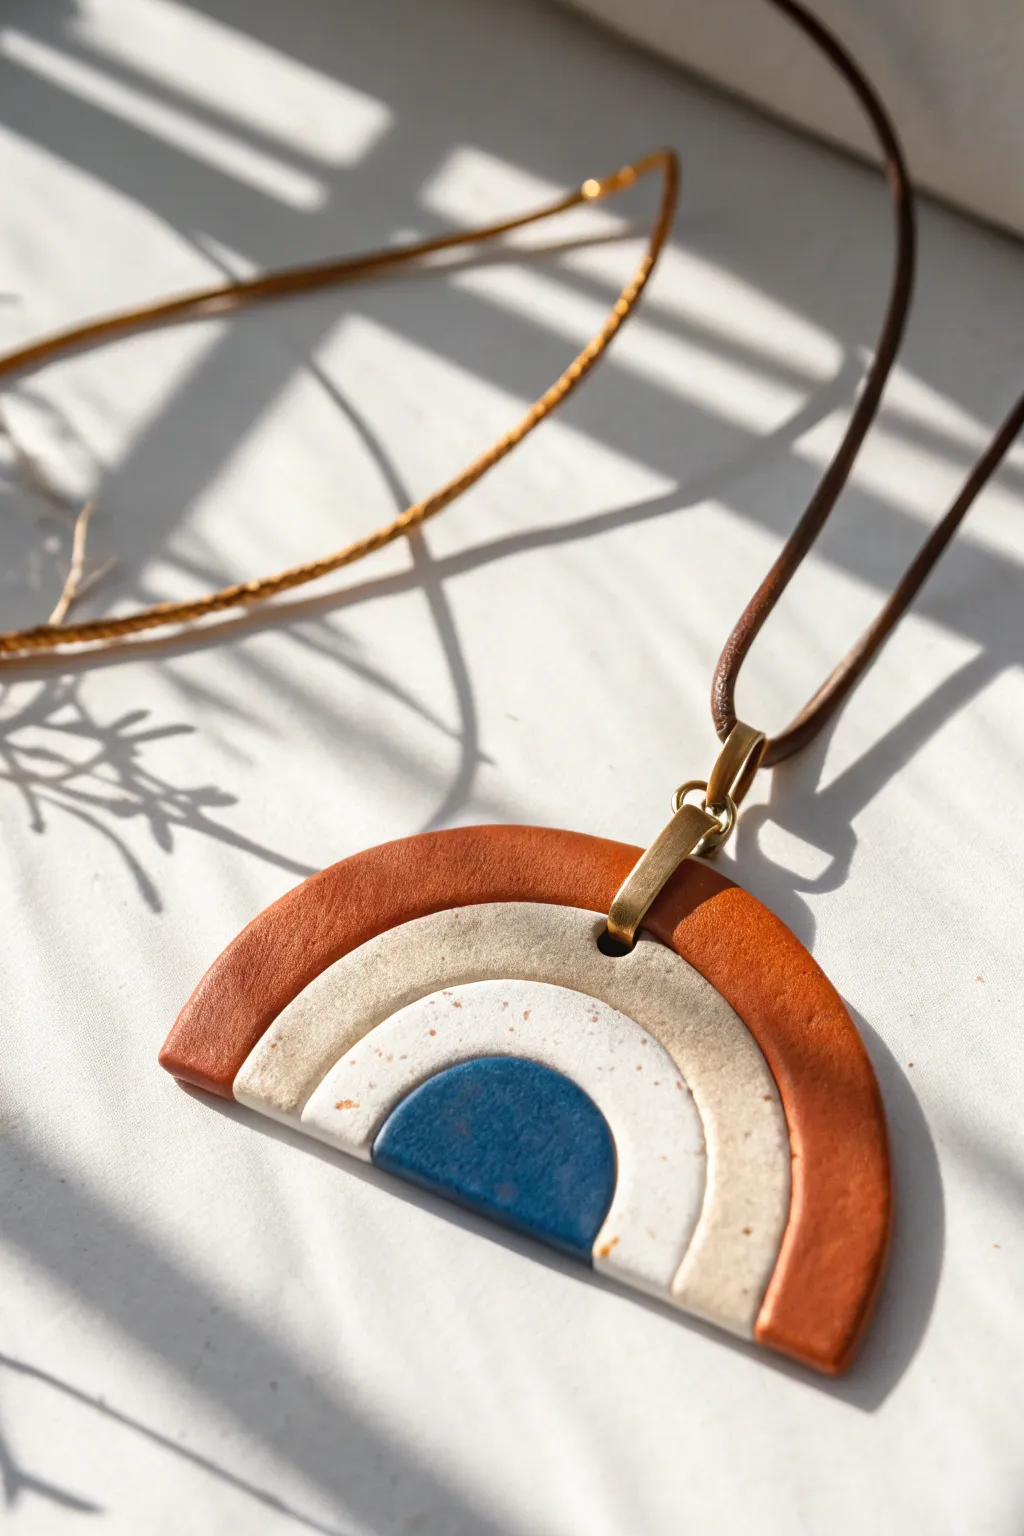
Embrace earthy, bohemian vibes with this striking four-tier arch pendant. Featuring a sophisticated palette of terracotta, sand, speckled cream, and deep teal-blue, this project uses a simple nesting technique to create clean, graphic lines.
Detailed Instructions
Materials
- Polymer clay (Terracotta/Rust, Beige/Sand, White with speckles/granite effect, Deep Teal/Navy)
- Acrylic rolling pin or clay sleek/pasta machine
- Circle cutters (set of graduating sizes ranging from 1 inch to 2.5 inches)
- Flexible tissue blade or rigid clay blade
- Ceramic tile or glass work surface
- Clay extruder (optional but helpful for consistent thickness)
- Brass pendant bail (pinch bail style)
- Brown leather or waxed cotton cord
- Oven for baking
- Fine grit sandpaper (400-800 grit)
Step 1: Preparation & Condition
-
Condition the clay:
Begin by kneading each of your four clay colors separately until they are soft and pliable. This prevents cracking later. -
Roll out sheets:
Roll each color into a flat sheet. Aim for a thickness of about 3mm to 4mm for all colors to ensure the surface of the pendant is perfectly level. -
Check surface quality:
Inspect your rolled sheets for any air bubbles. If you find one, gently pierce it with a needle tool and smooth it down with your finger.
Step 2: Cutting the Arches
-
Cut the center:
Use your smallest circle cutter (approx. 1 inch diameter) to cut a full circle from the deep teal/navy clay. -
Create the second band:
Select the next size up in your cutter set. Cut a circle from the speckled white clay. -
Create the nested effect for band two:
Take the smallest cutter you used for the blue clay and center it inside the white circle you just cut. Press down to remove the inner circle, leaving a perfect ring. -
Assemble the first two layers:
Place the blue solid circle inside the speckled white ring on your work tile. Gently press the seam together so they bond. -
Cut the third band:
Using the third largest cutter, punch a circle from the beige/sand clay. -
Nest the third band:
Use the second largest cutter (the one used for the white ring’s outer edge) to cut the center out of the beige circle. Fit this beige ring around the white ring. -
Cut the outer band:
Finally, use your largest cutter (approx. 2.5 inches) on the terracotta clay. -
Final nesting:
Remove the center of the terracotta circle using the third largest cutter. Place this final ring around the beige layer to complete the bullseye.
Seamless Smoothness
To get those seams perfectly flush, place a piece of printer paper over the clay before rolling. It prevents the roller from sticking and dragging the separate colors.
Step 3: Shaping & Baking
-
Smooth the seams:
Lay a piece of parchment paper over your clay bullseye. Using an acrylic roller or your fingertips, gently rub over the concentric circles to meld the seams together without distorting the shapes. -
Cut the horizon line:
Remove the parchment. Take your long, rigid tissue blade and position it directly across the diameter of the circle. Press down firmly to slice the entire assembly in half, creating two identical rainbows. -
Create the hole:
Use a small straw or a specific hole-punch tool to create an opening at the very top center of the terracotta arch, piercing through to the beige layer if needed depending on your bail size. -
Bake the clay:
Transfer the tile to your oven. Bake according to the manufacturer’s instructions for your specific brand of clay (usually 275°F/135°C for 30 minutes). -
Cool down:
Allow the piece to cool completely inside the oven or on a wire rack before handling, as warm clay is fragile.
Textured Terrazzo
Before cutting your rings, mix tiny shavings of gold leaf or contrasting clay colors into the white band to create a custom terrazzo stone effect.
Step 4: Finishing Touches
-
Sand the edges:
Once cool, use fine-grit sandpaper to smooth the flat bottom edge and the outer curved rim. I prefer doing this under running water to keep dust down. -
Attach hardware:
Open your brass pinch bail and insert the prongs into the hole you created. Squeeze it shut firmly with pliers so it grips the pendant securely. -
String the pendant:
Thread your leather or waxed cotton cord through the loop of the brass bail.
Now you have a stunning geometric statement piece ready to wear with your favorite outfit

TRACK YOUR CERAMIC JOURNEY
Capture glaze tests, firing details, and creative progress—all in one simple printable. Make your projects easier to repeat and improve.
Lace-Texture Statement Pendant
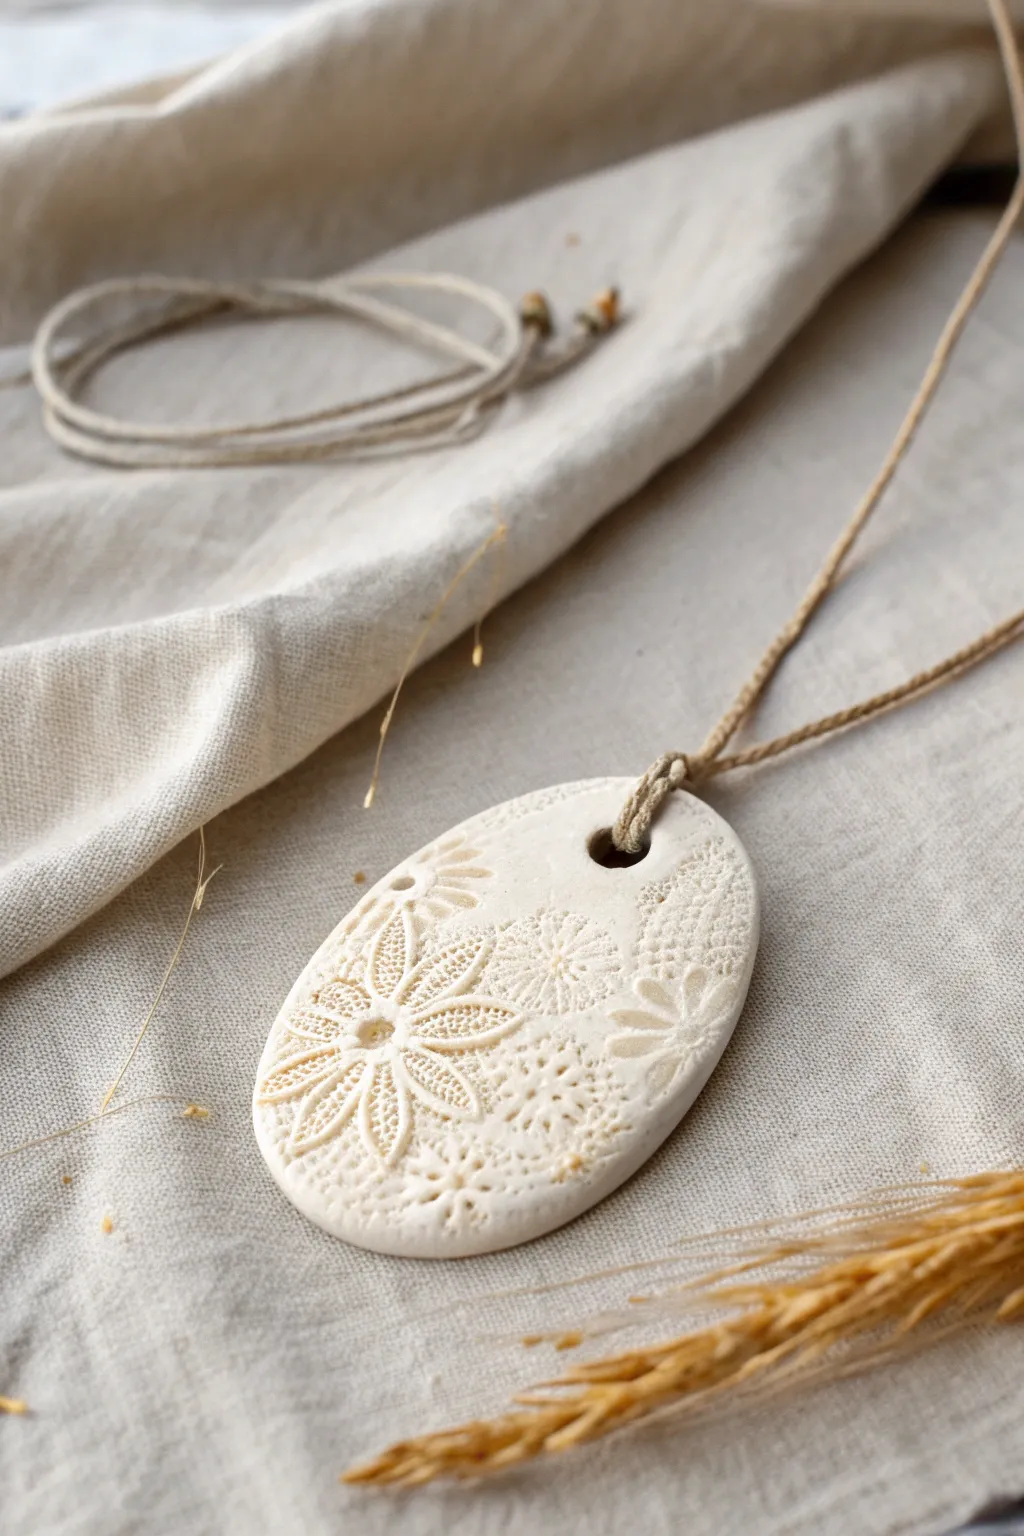
Capture the delicate beauty of vintage lace in a modern, wearable piece with this simple clay pendant project. The natural white clay combined with intricate floral textures creates an earthy, elegant accessory perfect for everyday wear.
Step-by-Step
Materials
- White bake-oven clay (like Sculpey or Fimo) or high-quality air-dry clay
- Rolling pin or acrylic roller
- Piece of textured lace (cotton crochet lace works best)
- Oval cookie cutter (approx. 2-3 inches long)
- Drinking straw or small circular tool
- Fine-grit sandpaper (400 or 600 grit)
- Hemp or jute cord
- Parchment paper or baking mat
- Damp sponge
Step 1: Clay Preparation
-
Condition the Clay:
Begin by taking a chunk of your white clay and kneading it thoroughly in your hands. You want it to be warm, soft, and pliable to ensure it takes the impression well without cracking. -
Roll out the Slab:
Place the clay on a sheet of parchment paper. Using your rolling pin, roll the clay out into an even slab. Aim for a thickness of about 1/4 inch (6mm) so the pendant feels substantial but not heavy. -
Inspect Surface:
Check the surface of your clay slab for any air bubbles, lint, or fingernail marks. Use your finger to gently smooth out any imperfections before proceeding to texture.
Sticky Situation?
If the lace sticks to the clay, dust the clay surface very lightly with cornstarch (or water for polymer) before laying down the fabric. This acts as a release agent.
Step 2: Texturing and Cutting
-
Position the Lace:
Select a section of your lace that has a prominent floral or geometric motif. Lay the lace flat directly onto the clay slab, arranging it so the desired pattern will fall in the center of your future pendant. -
Imprint the Texture:
Take your rolling pin and roll over the lace with firm, even pressure. You only need to roll over it once or twice; rolling back and forth too many times might shift the lace and blur the pattern. I like to peek under one corner to ensure the impression is deep enough. -
Remove the Lace:
Carefully peel the lace off the clay. Pull it sraight up rather than dragging it across to keep the crisp edges of the floral imprint intact. -
Cut the Shape:
Position your oval cutter over the most attractive part of the textured area. Press down firmly to cut the shape. Wiggle the cutter slightly before lifting it to ensure a clean separation. -
Create the Hanging Hole:
Use a drinking straw or a small circular cutting tool to punch a hole near the top of the oval. Make sure not to get too close to the edge; leave at least 3-4mm of clay above the hole for strength. -
Clean Edges:
Gently lift the pendant from the work surface. Use your finger or a slightly damp sponge to smooth the cut edges of the oval, softening any sharp ridges left by the cutter.
Step 3: Finishing and Assembly
-
Dry or Bake:
If using polymer clay, bake according to the package instructions (usually around 275°F/135°C for 15-30 minutes). If using air-dry clay, let it sit in a cool, dry place for 24-48 hours, flipping it halfway through to ensure even drying. -
Cool Down:
Allow the baked pendant to cool strictly inside the oven with the door slightly ajar, or wait until the air-dry version is completely bone dry. Rushing this can lead to brittleness. -
Sand for Smoothness:
Once fully cured, take your fine-grit sandpaper and gently sand the edges and the back of the pendant. Do not sand the front, or you risk erasing the delicate lace details. -
Prepare the Cord:
Cut a length of hemp or jute cord (around 24-30 inches, depending on desired length). Fold the cord in half to find the center point if doing a lark’s head knot, or keep it single for a simple tie. -
Attach the Cord:
Thread the cord through the hole in the pendant. Tie a secure knot at the base of the hole, or loop it through itself to secure the pendant in place. -
Tie the Ends:
Finish the necklace by tying the two loose ends of the cord together using a sliding knot or a simple overhand knot so it is ready to wear.
Antique Wash
To make the texture pop, dilute brown acrylic paint with water. Brush it over the texture, then wipe the surface immediately with a damp cloth, leaving paint only in the crevices.
Now you have a stunning, handcrafted piece of jewelry that looks intricate but was surprisingly simple to make
Raised Pattern With Simple Stamps
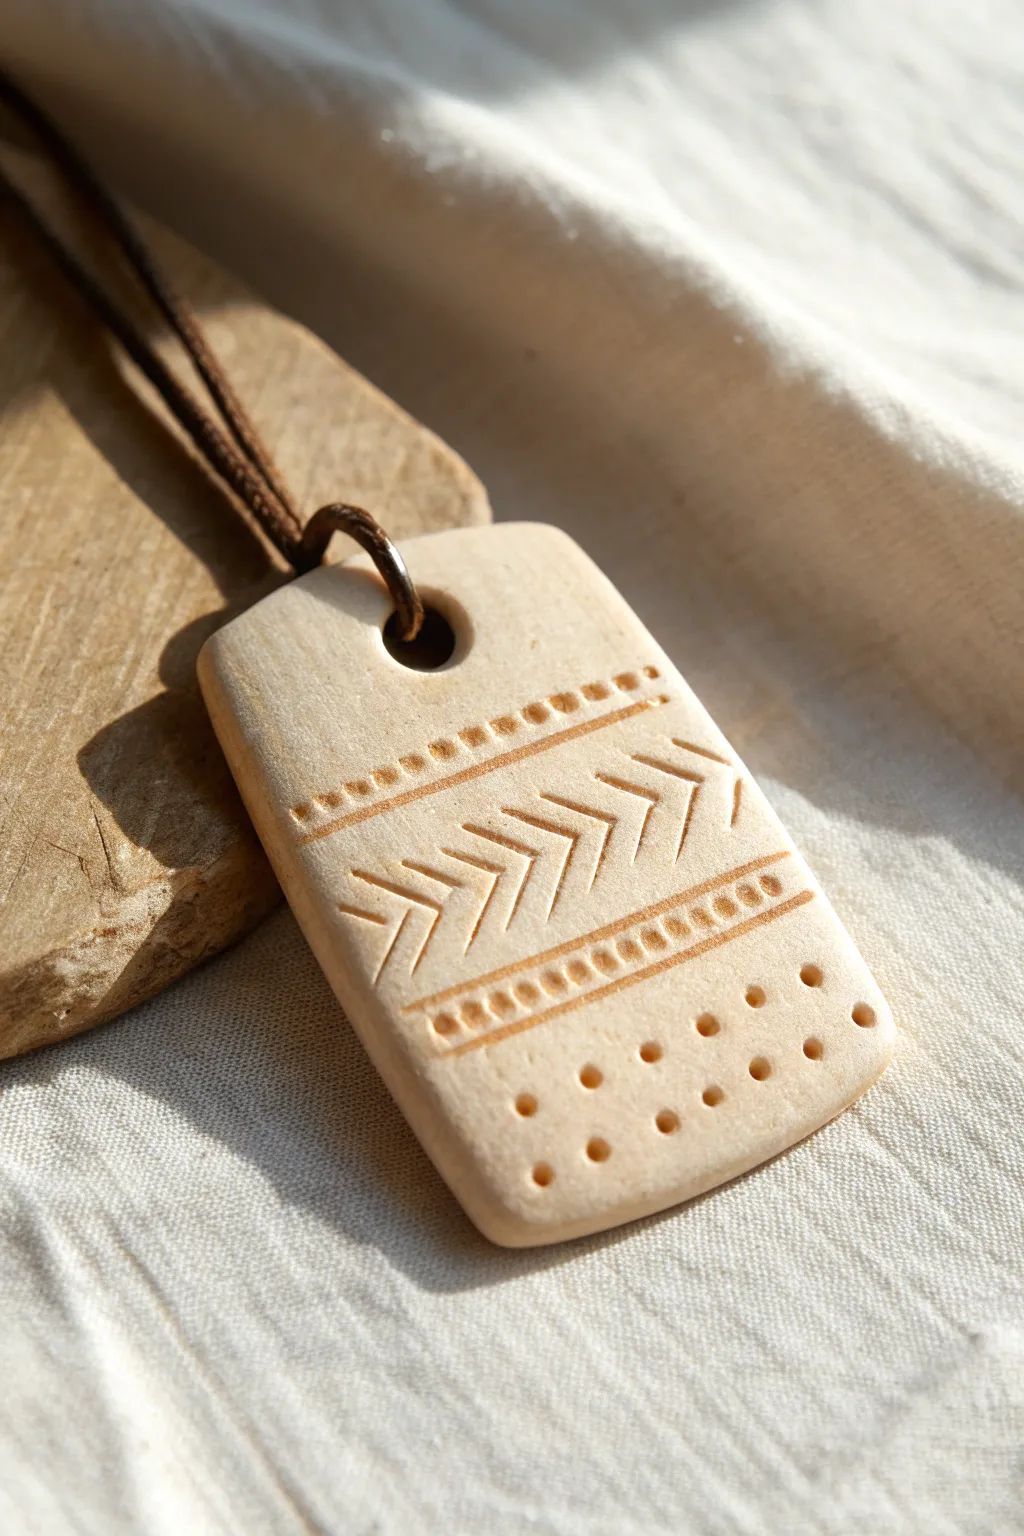
This earthy rectangular pendant features a subtle, debossed geometric pattern that feels both ancient and modern. The design uses simple lines and dots to create texture, finished with a soft finish that highlights natural clay tones.
Step-by-Step Tutorial
Materials
- White or beige air-dry clay (or polymer clay)
- Rolling pin
- Sharp craft knife or clay blade
- Small circular tool (like a blunt toothpick or dotting tool)
- Small flat-head sculpting tool or mini screwdriver
- Fine-grit sandpaper
- Brown waxed cotton cord or leather cord
- A straw or small round cutter (for the hanging hole)
- Optional: Clear matte varnish
Step 1: Shaping the Base
-
Condition the Clay:
Begin by taking a small ball of your clay and kneading it in your hands until it is warm, pliable, and free of cracks. -
Roll the Slab:
Roll the clay out on a smooth, clean surface until it is an even slab, approximately 1/4 inch (6mm) thick. -
Cut the Shape:
Using your sharp craft knife or blade, cut a clean rectangle. For the look in the image, aim for roughly 1.5 inches wide by 2.5 inches tall. -
Soften the Edges:
Dip your finger in a tiny bit of water and gently run it along the cut edges to smooth out any sharpness or crumbs, rounding the corners slightly. -
Create the Hole:
Use a straw or a small circular cutter to punch a hole near the top center of the rectangle. Ensure it’s large enough to thread your cord through later.
Stamp Hack
Don’t have sculpting tools? Standard household items work great. Try the tip of a Phillips screwdriver for the dots and the edge of a plastic gift card for the straight lines.
Step 2: Designing the Pattern
-
Plan the Layout:
Visually divide your pendant into horizontal sections. You’ll be creating a central band of arrows flanked by lined borders. -
Impress Upper Border Line:
Using a flat tool or the side of a credit card, gently press a horizontal line into the clay about a third of the way down from the top. -
Add Upper Dots:
Just above that line, use your small dotting tool to press a row of evenly spaced small circles. -
Impress Lower Border Line:
Repeat the horizontal line impression, this time towards the bottom third of the pendant. -
Add Lower Dots:
Press a matching row of dots just below this second line.
Step 3: Detailing and Finishing
-
Carve the Chevrons:
In the central empty band between your two borders, use a sharp tool to carve or press a series of arrows (chevrons) pointing to the right. I find it easiest to do the top line of the arrow first, then the bottom meeting at the point. -
Add Decorative Base Dots:
In the empty space at the very bottom of the pendant, create a 3×4 grid of dots using your dotting tool for extra visual weight. -
Refine Markings:
Go back over your impressed lines and dots gently to ensure they are crisp and deep enough to show up once dry. -
Dry the Piece:
Place the pendant on a clean wire rack or parchment paper. Let it dry completely according to package directions (usually 24-48 hours for air-dry clay). -
Sand Smooth:
Once bone dry, use fine-grit sandpaper to gently smooth the edges and surface. Be careful not to sand away your texture. -
Seal (Optional):
To protect the piece from moisture and skin oils, apply a thin coat of clear matte varnish. -
Attach the Cord:
Cut a length of brown cord. Fold it in half, push the loop through the pendant hole from front to back, and pull the loose ends through the loop to create a lark’s head knot.
Preventing Curles
If using air-dry clay, your flat rectangle might try to curl upward at the edges as it dries. Flip the piece over halfway through the drying process to keep it perfectly flat.
Now you have a custom piece of wearable art that looks beautifully bohemian and handcrafted
Hand-Painted Mini Canvas Pendant
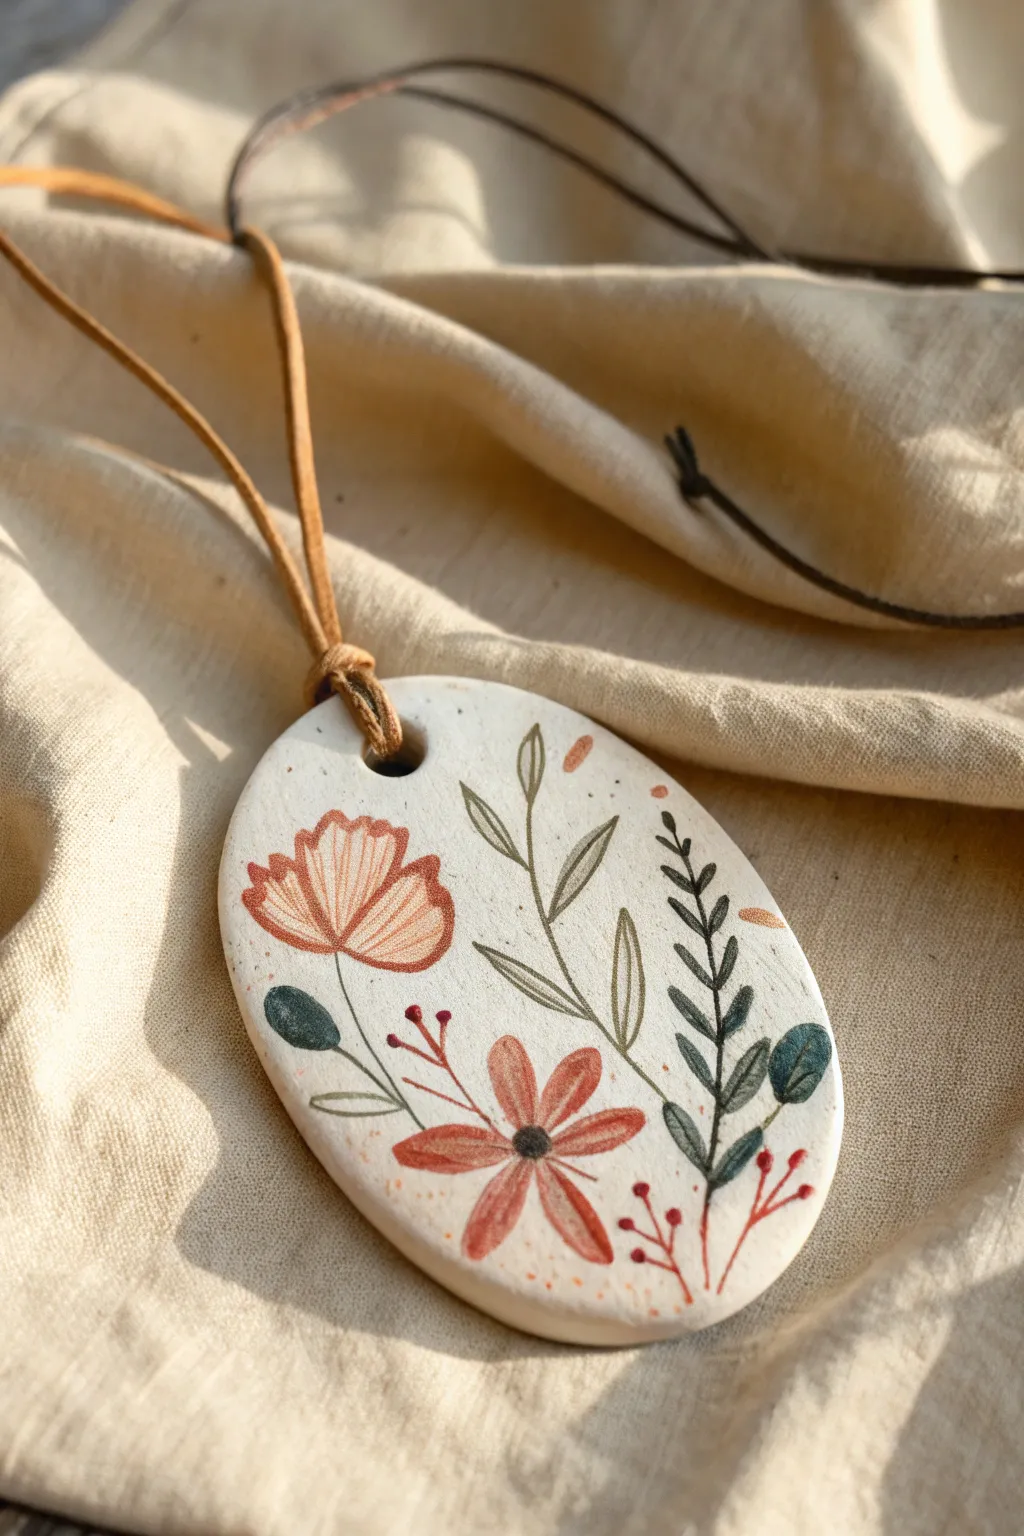
Transform a simple piece of clay into wearable art with this hand-painted botanical pendant. Featuring warm, rustic wildflower motifs on an organic oval shape, this piece serves as a charming mini canvas for your creativity.
Detailed Instructions
Materials
- White air-dry clay or white polymer clay
- Rolling pin
- Oval clay cutter (or a knife and paper template)
- Straw or small circular tool (for the hole)
- Fine-grit sandpaper (400-600 grit)
- Acrylic paints (terracotta, warm orange, olive green, dark green, black)
- Fine detail paintbrushes (size 0 and 00)
- Matte or satin varnish/sealant
- Leather or suede cord
- Palette for mixing
Step 1: Shaping the Base
-
Condition the clay:
Start by kneading a small ball of white clay until it is smooth and pliable. If you are using air-dry clay, keep your hands slightly moist to prevent cracking. -
Roll out the slab:
Roll the clay out on a smooth surface to a thickness of about 1/4 inch (6mm). Aim for an even thickness so the pendant hangs straight. -
Cut the shape:
Use an oval cutter to punch out your pendant shape. Alternatively, lightly trace an oval onto the clay and carefully cut it out with a craft knife for a more organic, hand-formed look. -
Create the hanging hole:
Use a straw or a small circular tool to punch a hole near the top of the oval. Ensure it’s large enough for your leather cord and positioned centrally but not too close to the edge. -
Smooth the edges:
Dip your finger in a little water and gently run it along the cut edges of the clay to round them off and remove any sharp angles. -
Dry or bake:
If using polymer clay, bake according to the package instructions. For air-dry clay, let it dry flat for 24-48 hours, flipping it occasionally to prevent warping.
Steady Hand Trick
Rest your pinky finger on the table or a dry part of the pendant while painting. It acts as an anchor, giving you much more control for those tiny stems.
Step 2: Painting the Design
-
Prepare the surface:
Once fully cured or dry, lightly sand the surface with fine-grit sandpaper if there are any bumps. Wipe away the dust with a barely damp cloth. -
Sketch the layout:
Very lightly sketch your botanical design with a pencil directly on the hardened clay. Draw a large curved stem on the right and focal flowers on the left and bottom center. -
Paint the main stems:
Using a size 0 brush and thinned olive green paint, carefully trace the main stem lines. Keep your hand steady and let the lines taper naturally at the ends. -
Add the focal flower base:
Mix a warm terracotta orange. Paint the petals of the top-left flower and the bottom-center flower. Don’t worry about details yet; just get the solid shapes down. -
Paint green leaves:
Switch back to your greens. Paint filled-in leaves on the right-hand fern-like stem using a darker green. Use a lighter, more muted olive tone for the outline-style leaves in the center. -
Add floral details:
Once the orange base is dry, use a tiny amount of darker reddish-brown paint to add thin lines inside the petals for texture. -
Paint berries and buds:
Using the tip of your smallest brush or a dotting tool, add small red berries on the delicate sprigs at the bottom right and center. -
Finalize outlines:
With a very fine brush and diluted black or dark brown paint, add the flower centers and any necessary definition lines to the stems and leaves. -
Add finishing specks:
I like to dilute a bit of the terracotta paint with water and carefully flick a few tiny specks onto the background for a vintage, speckled ceramic look.
Nature Inspired
For a thoughtful gift, research the recipient’s birth month flower and paint that specific bloom instead of generic wildflowers.
Step 3: Assembly
-
Seal the artwork:
Allow the paint to dry completely (at least an hour). Apply two thin coats of matte or satin varnish to protect the painting from moisture and wear. -
Attach the cord:
Cut a length of leather cord. Fold it in half, push the loop through the pendant hole, and pull the loose ends through the loop (a lark’s head knot) to secure it. -
Finish the necklace:
Tie the loose ends of the leather cord with a simple sliding knot or attach metal crimp ends and a clasp if you prefer a more finished look.
Now you have a beautiful, wearable piece of art that looks like delicate ceramic pottery
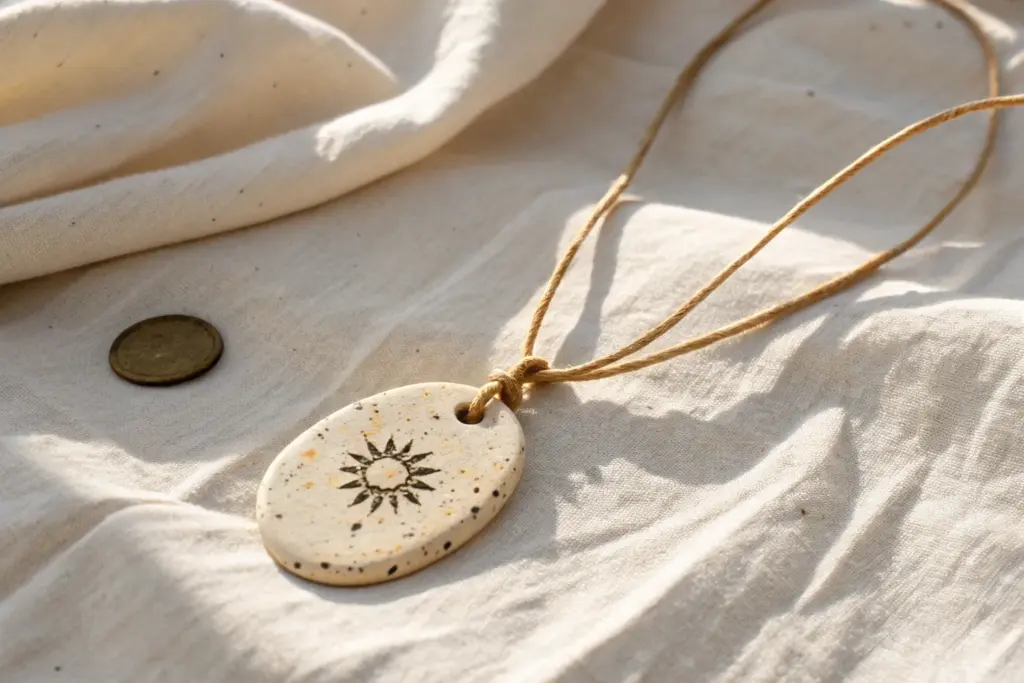
Essential Oil Diffuser Pendant
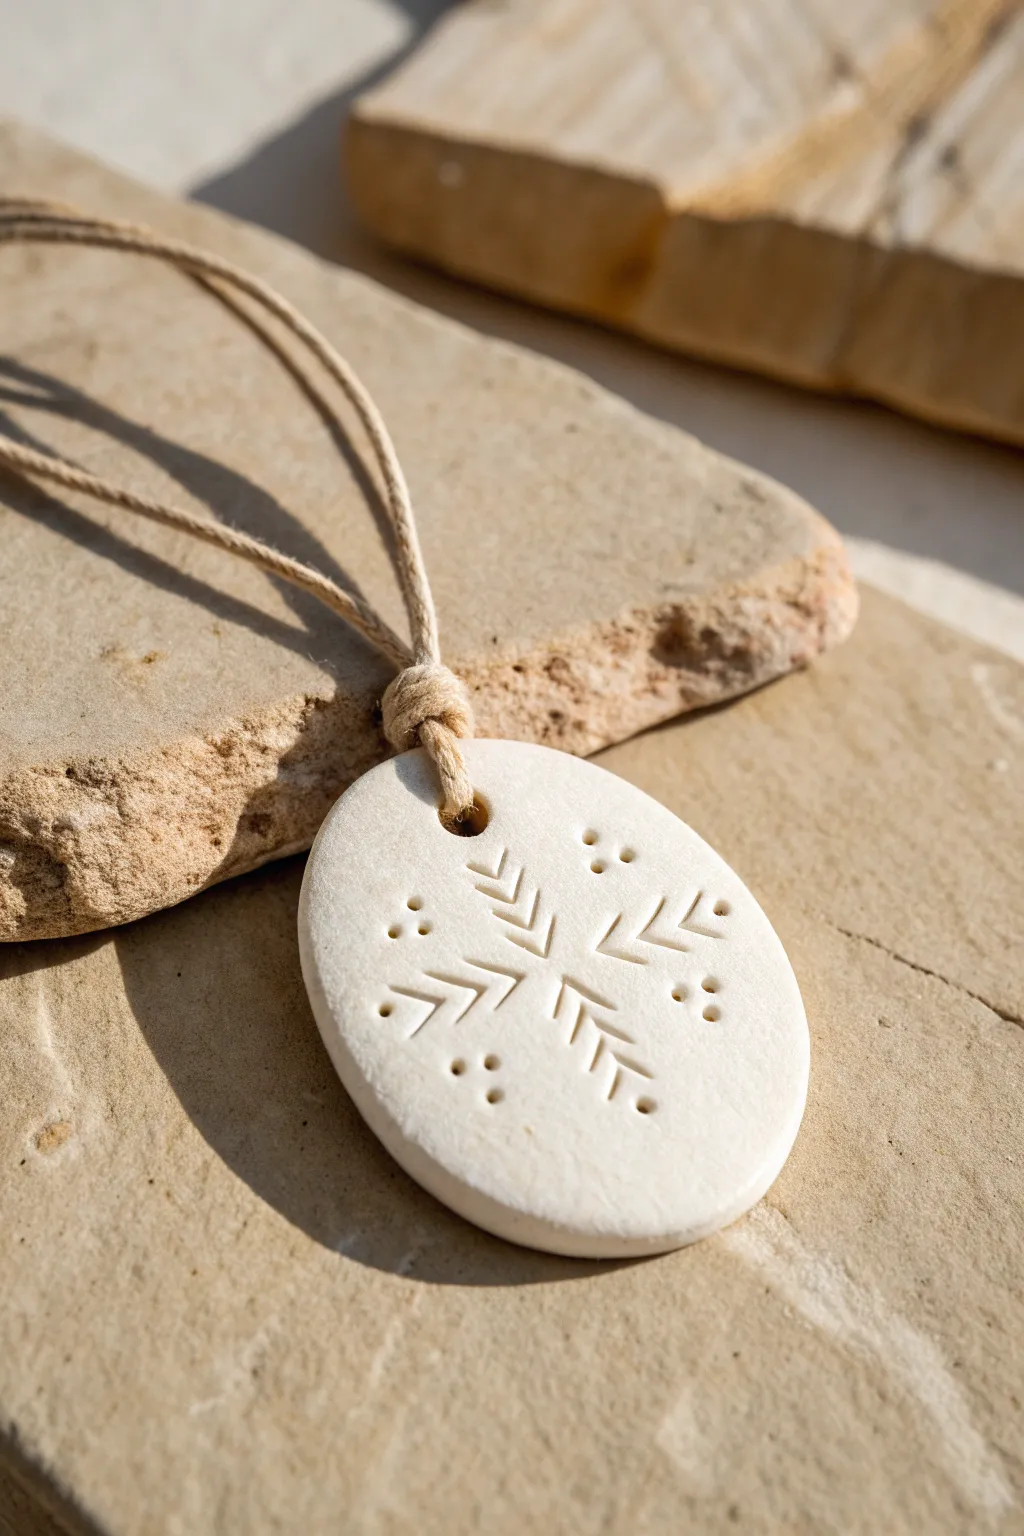
This rustic, nature-inspired pendant doubles as a portable aromatherapy diffuser thanks to the porous nature of air-dry or bisque clay. The design features a delicate, etched snowflake motif on a soft white oval, hung simply on a natural cord.
How-To Guide
Materials
- White air-dry clay (or terracotta clay)
- Small rolling pin
- Oval cookie cutter (approx. 2 inches)
- Clay needle tool or a dull toothpick
- Straw or small circle punch (for the hole)
- Fine-grit sandpaper
- Natural hemp or jute cord
- Parchment paper or smooth work mat
- Water in a small cup
- Essential oils (for finished use)
Step 1: Shaping the Base
-
Prepare the clay:
Start with a ball of white air-dry clay about the size of a walnut. Knead it briefly in your hands to warm it up and ensure there are no air bubbles trapped inside. -
Roll the slab:
Place the clay ball on a piece of parchment paper to prevent sticking. Using your rolling pin, roll the clay out evenly until it is approximately 1/4 inch thick. You want it substantial enough to be durable but not too heavy. -
Cut the shape:
Press your oval cookie cutter firmly into the clay slab. If you don’t have an oval cutter, you can lightly sketch an oval with a toothpick and cut it out carefully with a craft knife. -
Smooth the edges:
Dip your finger into a little bit of water and run it gently around the cut edge of the oval. This smooths out any harsh ridges left by the cutter giving it a stone-like finish. -
Create the suspension hole:
Using a drinking straw or a small circular tool, punch a clean hole near the top, centered horizontally. This is where your cord will thread through later.
Step 2: Etching the Design
-
Mark the center:
Visualize the center of your oval below the hole. You can make a tiny, faint prick with your needle tool to mark where the snowflake arms will intersect. -
Draw the main axis:
Using the needle tool, gently press a vertical line through the center point. Don’t drag the tool like a pencil; instead, press it into the clay to create an indentation. -
Add the cross axis:
Press a horizontal line intersecting the first one. You should now have a simple cross shape. -
Create the diagonal lines:
Add two diagonal lines crossing through the center point, creating an eight-spoke star shape. Keep the pressure consistent for clean lines. -
Add the chevrons:
At the end of each spoke, press two small ‘V’ shapes (chevrons) pointing inward toward the center. This creates the feathery, snowflake look shown in the image. -
Detail with dots:
Using the blunt end of a toothpick or a small dotting tool, press three small dots in the empty spaces between the main directional arms of the snowflake. -
Refine the surface:
If any clay burrs popped up during the etching process, gently tap them down with your finger. Avoid rubbing, or you might erase your design.
Clean Lines Pro-Tip
If using a sticky clay, lightly dust your needle tool with cornstarch before pressing it into the surface. This ensures the tool releases cleanly without pulling up edges.
Step 3: Finishing Up
-
Drying time:
Allow the pendant to dry completely on a flat surface. Depending on humidity and your specific clay brand, this usually takes 24 to 48 hours. I find turning it over halfway through helps it dry evenly. -
Sanding:
Once fully dry and hard, use fine-grit sandpaper to gently buff the edges and back of the pendant. This removes any final roughness and makes it comfortable to wear. -
Preparing the cord:
Cut a length of hemp or jute cord long enough to slip over your head comfortably (usually about 24-30 inches). -
Attach the pendant:
Fold the cord in half to find the center loop. Thread this loop through the hole in the pendant from front to back. -
Secure the knot:
Pull the loose ends of the cord through the loop you just pushed through the hole. Pull tight to create a lark’s head knot that sits securely at the top of the clay piece. -
Add the scent:
To use, place 1-2 drops of your favorite essential oil onto the back or front of the porous clay and let it absorb for a few minutes before wearing.
Add Color
For a pop of color, mix a tiny drop of acrylic paint into your white clay before rolling, or rub a dark wax into the etched grooves after drying to highlight the pattern.
Enjoy your beautiful, functional piece of jewelry that carries a calming scent with you throughout the day
Layered Two-Part Dangle Pendant
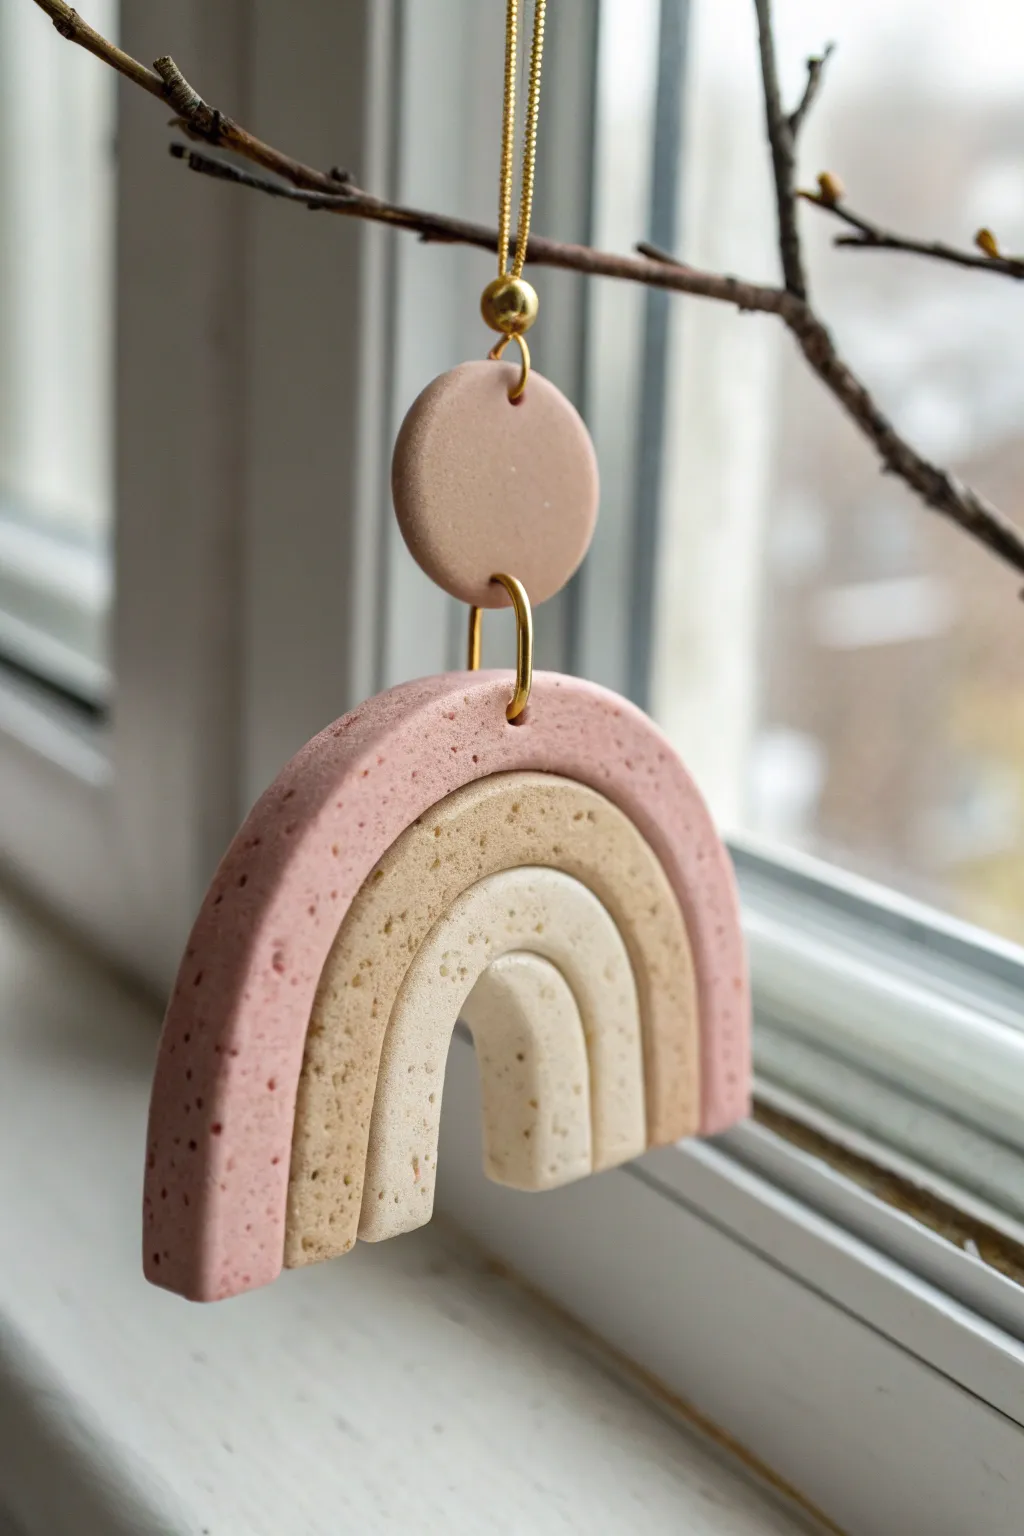
Embrace earthy tones and textured finishes with this delightful two-part polymer clay pendant. The speckled, stone-like effect gives it a modern ceramic look without the need for a kiln, making it a perfect statement piece for your home or jewelry collection.
Step-by-Step
Materials
- Polymer clay (pale pink, deep sand/beige, cream/white)
- Faux granite or speckled clay (or coarse black pepper/dried coffee grounds to mix in)
- Acrylic rolling pin or pasta machine
- Nested arch cutters (or a craft knife and paper templates)
- Small circular clay cutter (approx. 1 inch)
- Liquid polymer clay (translucent)
- Needle tool or toothpick
- Gold jump rings (1 large, 1 small)
- Jewelry pliers
- Pin hand drill (optional, strictly for post-bake holes)
- Fine-grit sandpaper (400-600 grit)
- Gold string or chain for hanging
Step 1: Preparing the Speckled Clay
-
Condition the base colors:
Start by thoroughly conditioning your three colors of clay—pink, sand, and cream—until they are soft and pliable. Warm clay prevents cracking later on. -
Create the speckled effect:
If you aren’t using pre-speckled clay, flatten each color and sprinkle a tiny amount of black pepper or dried coffee grounds onto them. Fold the clay over and knead until the ‘speckles’ are evenly distributed throughout. -
Roll out slabs:
Roll each color out to a consistent thickness, roughly 3mm to 4mm thick. A pasta machine on a medium setting works best for uniformity.
Step 2: Constructing the Rainbow Arch
-
Cut the arches:
Using nested arch cutters, cut a large arch from the pink clay, a medium arch from the sand clay, and a small arch from the cream clay. If using a single cutter or knife, cut concentric shapes that fit snugly inside one another. -
Assemble the bottom piece:
Place the three arches on your work tile. Gently nudge them together so they touch. Apply a tiny amount of liquid polymer clay between the seams to act as glue. -
Secure the back:
To ensure the rainbow holds together strongly, I like to smooth a thin layer of scrap clay across the back of the entire assembly, gently rolling over it to bond the seams without distorting the front. -
Add texture (optional):
If your clay looks too smooth, lightly tap the surface with an old toothbrush or sandpaper to enhance that stone-like texture. -
Create the suspension hole:
Use a needle tool or a small straw to punch a hole at the very top center of the pink arch. Make sure the hole is large enough for your heavy-gauge jump ring.
Uneven Seams?
If gaps appear between your rainbow arches, gently push the clay together from the outer edges inward before baking. A little liquid clay in the cracks helps bond them seamlessly.
Step 3: Making the Top Connector
-
Cut the circle:
Using the sand/beige clay slab, cut a perfect circle using your small round cutter. Smooth the edges with your finger to remove any sharp cut marks. -
Pierce the holes:
Create two holes in this circle: one near the top edge (for the hanging string) and one near the bottom edge (to connect to the rainbow). Ensure they align vertically so the pendant hangs straight.
Level Up: Glossy Accent
Apply a thin layer of UV resin or glossy glaze only to the center cream arch after baking. This creates a beautiful contrast between matte stone and shiny ceramic textures.
Step 4: Baking and Assembly
-
Bake the pieces:
Place your clay pieces on a ceramic tile or baking sheet lined with parchment paper. Bake according to your clay manufacturer’s instructions—usually 275°F (130°C) for about 30 minutes depending on thickness. -
Cool and finish:
Allow the pieces to cool completely. If there are any rough edges or fingerprints, gently wet sand them with fine-grit sandpaper under running water. -
Connect the parts:
Open the large gold jump ring with your pliers using a twisting motion (never pull apart). Thread it through the top hole of the rainbow and the bottom hole of the circle, then close it securely. -
Add the hanger:
Attach the smaller jump ring or a gold bail to the top hole of the circle piece. Thread your gold metallic string or chain through this final loop.
Hang your finished pendant in a window or on a jewelry stand to catch the light and show off those beautiful textures
Miniature Relief Scene Pendant
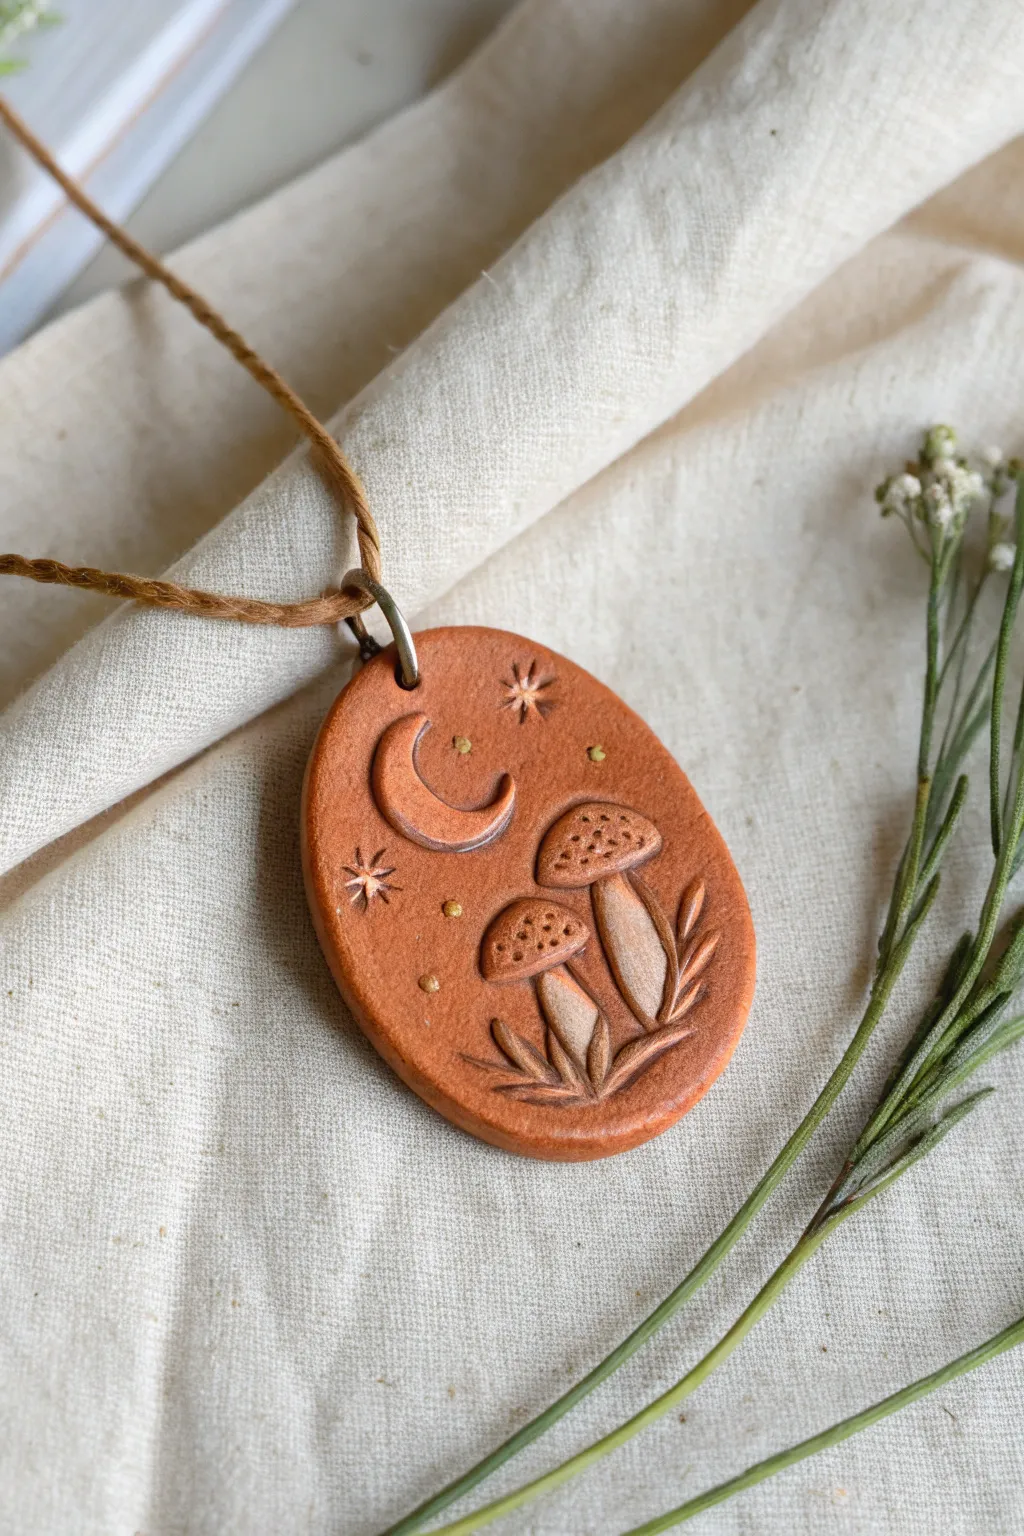
Capture the magic of a forest floor at night with this leather-effect clay pendant featuring raised relief mushrooms and a celestial moon. The warm, terracotta tones and intricate carving give it a rustic, organic charm perfect for nature lovers.
How-To Guide
Materials
- Polymer clay (terracotta or leather-effect)
- Oval shape cutter (approx. 1.5 – 2 inches)
- Needle tool or fine-point carving tool
- Small ball stylus tool
- Acrylic roller or pasta machine
- Small star-shaped stamps (optional)
- Gold mica powder or acrylic paint
- Jump ring (antique bronze)
- Brown waxed cotton cord
- Oven and baking sheet
Step 1: Shaping the Base
-
Condition and roll:
Begin by conditioning your terracotta polymer clay until it is soft and pliable. Roll it out into a sheet approximately 4-5mm thick; you want enough depth to carve into without making the pendant too heavy. -
Cut the shape:
Place your oval cutter on the clay sheet and press down firmly to cut out the base shape. Smooth the edges with your fingertip to remove any harsh cut lines. -
Create the hanging loop:
Use a needle tool or a small straw to punch a hole at the very top center of the oval. Make sure the hole is large enough for your heavy-gauge jump ring.
Smooth Operator
Before baking, lightly brush the clay with a little baby oil or cornstarch. This smooths out fingerprints and tool marks for a professional finish.
Step 2: Sculpting the Scene
-
Outline the design:
Lightly sketch your design onto the raw clay using the very tip of a needle tool. Draw a crescent moon in the upper left, a large mushroom on the right, and a smaller one tucked to its left. -
Carve the moon:
To create the relief look, use a small carving tool to press down the clay surrounding the crescent shape, leaving the moon itself raised. Smooth the transition area so it looks like the moon is emerging from the background. -
Form the mushroom caps:
For the mushrooms, press small extra balls of clay onto your sketched locations if you want high relief, or simply carve around the cap outlines to make them stand out. I prefer to add a tiny bit of extra clay for the caps to give them dimension. -
Texture the caps:
Use a needle tool to stipple the tops of the mushroom caps, creating a porous, realistic texture. -
Detail the stems:
Carve the stems below the caps. Use vertical strokes to suggest the fibrous texture of mushroom stalks. -
Add vegetation:
At the base of the stems, carve stylized grass blades or leaves radiating outward. Press deeply with your tool to create strong shadows.
Gilded Edges
After baking, paint the very edge of the oval with liquid gold leaf or metallic paint to frame the scene and add a touch of elegance.
Step 3: Finishing Details
-
Stamp the stars:
If you have tiny star stamps, press one above the moon and one to the left. Alternatively, scratch starburst shapes manually with your needle tool. -
Add celestial dots:
Use a small ball stylus to press tiny indentations scattered around the sky area to represent distant stars. -
Apply subtle shimmer:
Dip your finger or a small brush into gold mica powder and lightly buff it onto the raised areas—the moon and mushroom caps—to highlight the texture. -
Bake:
Bake the pendant according to the clay manufacturer’s instructions. Usually, this is around 275°F (130°C) for 30 minutes. Let it cool completely. -
Antiquing (Optional):
If you want more contrast, wash a diluted brown acrylic paint over the piece and wipe it off quickly, leaving dark paint in the carved recesses. -
Assembly:
Twist open your heavy jump ring with pliers and thread it through the top hole. Close the ring securely. -
Stringing:
Thread the brown waxed cotton cord through the jump ring to finish your necklace.
Wear your new woodland treasure and enjoy the earthy vibes it brings to any outfit
Inlaid Mosaic Chip Pendant
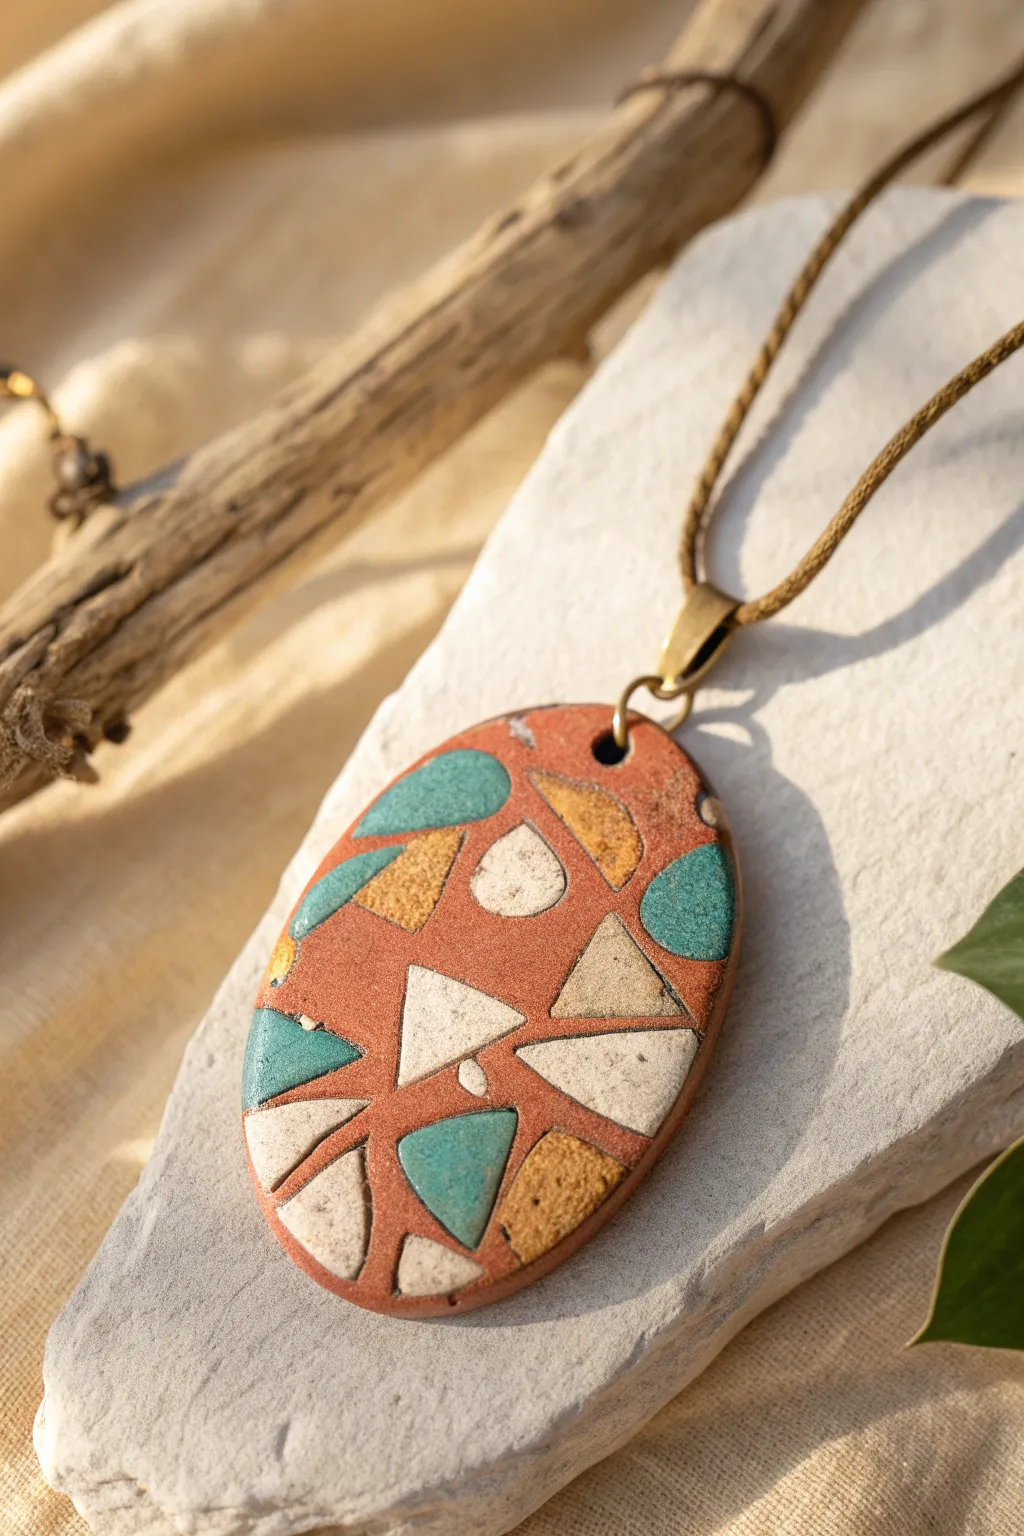
Capture the charm of ancient terrazzo and mosaic art with this striking inlaid pendant. Using a base of warm terracotta clay, you’ll embed sharply defined geometric chips in teal, cream, and mustard for a modern-primitive aesthetic.
Detailed Instructions
Materials
- Polymer clay (terracotta/brick red)
- Polymer clay (teal blue)
- Polymer clay (cream or ecru)
- Polymer clay (mustard yellow or gold mica)
- Oval shape cutter (approx. 2 inches long)
- X-Acto knife or sharp clay blade
- Rolling pin or pasta machine
- Parchment paper or ceramic tile work surface
- Fine grit sandpaper (400, 600, 800 grit)
- Hand drill or pin vibe (if not pre-punching hole)
- Bronze finish bail and jump ring
- Waxed jewelry cord
- Matte varathane or liquid clay (optional sealant)
Step 1: Creating the Chips
-
Condition the accent colors:
Start by thoroughly kneading your teal, cream, and mustard clays separately. You want them pliable but not sticky. -
Roll out thin sheets:
Roll each color into a thin sheet, about 1-2mm thick. Uniformity is key here so your inlays sit evenly. -
Cut the geometric shapes:
Using your sharp blade, cut random triangles, irregular quadrilaterals, and softened almond shapes from each color sheet. Vary the sizes from tiny specks to larger focal pieces. -
Partial bake (optional):
I find it helpful to bake these thin chips for just 5-10 minutes. This hardens them slightly, making them easier to press into the raw base clay without distorting their sharp edges.
Clean Lines Hack
If your inlaid chips are getting smudged during sanding, always sand under running water. This washes away colored dust immediately so it doesn’t stain the lighter cream sections.
Step 2: Assembling the Mosaic Base
-
Prepare the terracotta base:
Condition the brick-red clay and roll it out into a slab slightly thicker than your final desired pendant (around 4-5mm). -
Cut the oval form:
Use your oval cutter to punch out the main pendant shape. Keep the cutter nearby; you might need it again to neaten the edges later. -
Placement planning:
Gently lay your pre-cut geometric chips onto the raw oval base. Arrange them in a pleasing puzzle-like pattern, leaving small channels of red clay visible between them like grout lines. -
Embedding the chips:
Once you are happy with the arrangement, use a roller to firmly press the chips down into the base. You want the surfaces to become flush. -
Re-cutting the shape:
The rolling pressure likely distorted the oval slightly. Place your oval cutter back over the clay (lining it up perfectly) and trim away any spread. -
Pierce the specific hole:
Use a needle tool or small straw to create a hole at the top center for the jump ring. Ensure it is wide enough for your hardware.
Fixing Gaps
If tiny gaps appear between the chips and base after baking: mix some base-color clay with liquid clay into a paste, fill the gaps, re-bake for 10 min, and re-sand.
Step 3: Finishing and Refining
-
Bake the pendant:
Bake the piece according to your specific clay brand’s instructions (usually 275°F for at least 30 minutes). Tent with foil to prevent scorching. -
Cool down:
Let the pendant cool completely before handling. It is fragile while warm. -
Initial sanding:
Dip the pendant in water to keep dust down, and start sanding the surface with 400 grit paper. Your goal is to reveal the sharp shapes and make the surface perfectly flat and unified. -
Refining the surface:
Move to 600 and then 800 grit wet-dry sandpaper. The surface should feel smooth to the touch, and the transition between red clay and accent chips should be seamless. -
Wash and dry:
Scrub the piece gently with a drop of dish soap to remove any sanding residue or white film. -
Buff (optional):
For a natural stone look, leave it matte. If you want a slight sheen, buff briskly with a denim cloth or apply a very thin layer of matte varnish. -
Attach the hardware:
Open a bronze jump ring using two pairs of pliers. Thread it through the hole in the pendant and attach your bail. -
String it up:
Thread your waxed cord through the bail and tie the ends with a sliding knot for adjustable length.
Now you have a stunning, stone-like artifact to wear or gift.
Spinner or Shaker Pendant With Movement
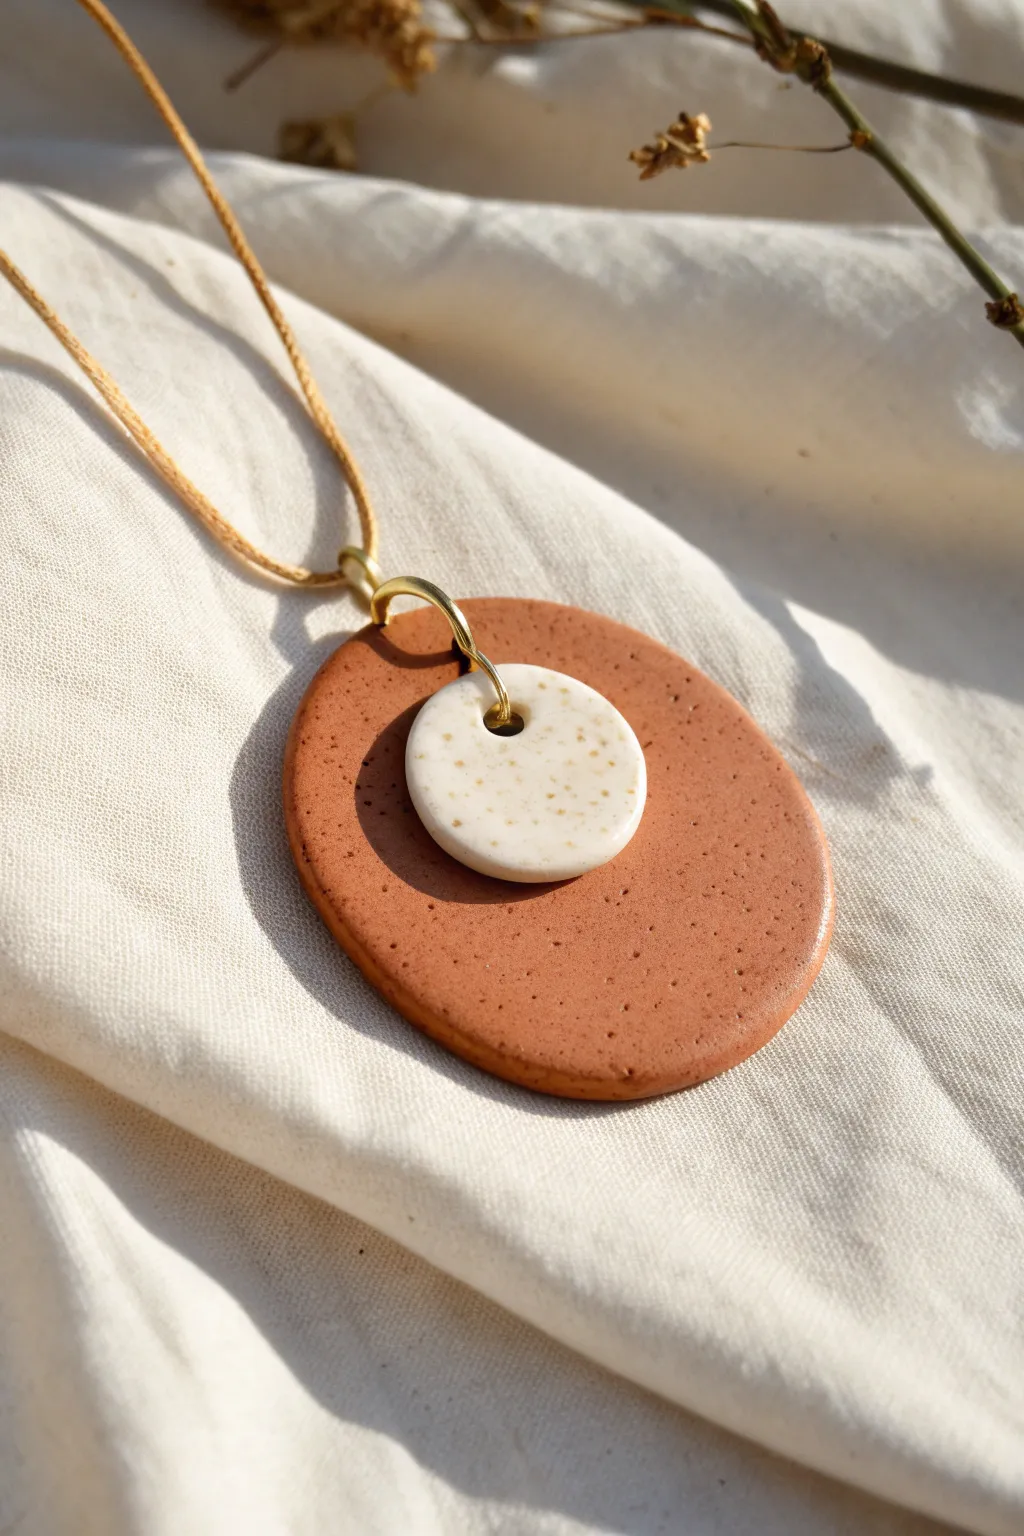
Embrace the tactile charm of polymer clay with this elegant shaker-style pendant. Featuring a warm terracotta base and a speckled cream focal point, the layered design creates gentle movement that feels soothing to wear.
Step-by-Step
Materials
- Terracotta colored polymer clay
- White or cream polymer clay (ideally with speckles like ‘granite’ or ‘sand’ effect)
- Acrylic rolling pin
- Oval clay cutter (approx. 2 inches)
- Small circle clay cutter (approx. 0.75 inches)
- Large gold open jump ring (10-12mm)
- Toothpick or small straw (for piercing holes)
- Tan suede or waxed cotton cord
- Oven baking sheet and parchment paper
- Fine grit sandpaper (optional)
- Jewelry pliers
Step 1: Shaping the Base
-
Condition the terracotta clay:
Start by warming the terracotta clay in your hands, kneading it until it is soft, pliable, and free of any air bubbles. -
Roll out the slab:
Use your acrylic roller to flatten the clay on a smooth surface. Aim for a thickness of about 3mm to 4mm—thick enough to be sturdy but not too heavy. -
Cut the main oval:
Press your oval cutter firmly into the terracotta slab. Give it a gentle wiggle before lifting to ensure a clean cut. -
Smooth the edges:
Dip your finger in a tiny bit of water or cornstarch and gently run it along the cut edges of the oval to soften any harsh lines. -
Pierce the anchor hole:
Using a toothpick or a small tool, create a hole near the top edge of the oval. Make sure the hole is large enough to accommodate your thick jump ring comfortably.
Step 2: Creating the Focal Point
-
Prepare the speckled clay:
Condition your speckled white or cream clay just as you did the terracotta. This contrasting color adds a lovely organic feel. -
Roll the second slab:
Roll this piece out slightly thinner than the base, perhaps around 2-3mm, to keep the visual weight balanced. -
Cut the small circle:
Use the small circle cutter to punch out the accent piece. Lift it carefully to maintain the perfect round shape. -
Create the secondary hole:
Pierce a hole near the edge of the small circle. It’s crucial that this hole is slightly larger than the wire gauge of your jump ring so the piece can swing freely.
Sticky Situation?
If clay sticks to your cutter, dip the cutter in cornstarch or water before pressing down. This helps it release cleanly without distorting the shape.
Step 3: Baking and Finishing
-
Bake the pieces:
Arrange both clay shapes on a parchment-lined baking sheet. Bake according to your specific clay brand’s instructions (usually around 275°F/130°C for 15-30 minutes). -
Cool down completely:
Allow the pieces to cool fully on the baking sheet. Moving them while warm can cause warping. -
Sand for perfection:
If there are any rough spots or fingerprints, I like to lightly buff the edges and surface with fine-grit sandpaper under running water. -
Open the jump ring:
Using two pairs of pliers, twist the large gold jump ring open laterally (twist ends away from each other, don’t pull apart). -
Thread the smaller disc:
Slide the small speckled circle onto the open jump ring first. -
Attach to the base:
Loop the jump ring through the hole in the large terracotta oval. The small circle should now rest on top of the oval. -
Close the ring:
Use your pliers to twist the jump ring closed again, ensuring the ends meet perfectly flush so the cord doesn’t slip out. -
Add the cord:
Thread your tan cord through the jump ring. You can simply tie the ends or add cord ends and a clasp for a more polished finish.
Add Some Texture
Before baking, gently press coarse sandpaper or a toothbrush onto the terracotta oval to enhance the earthy, stone-like texture.
Now you have a stylish, minimalist accessory that adds a touch of artisan flair to any outfit