When kids get a lump of clay in their hands, the magic usually starts with a ball, a coil, and a little squish—and suddenly it’s a whole character. Here are my favorite easy clay sculptures that stay super kid-friendly, build confidence fast, and still look adorable on the shelf when they dry.
Simple Turtle With a Patterned Shell
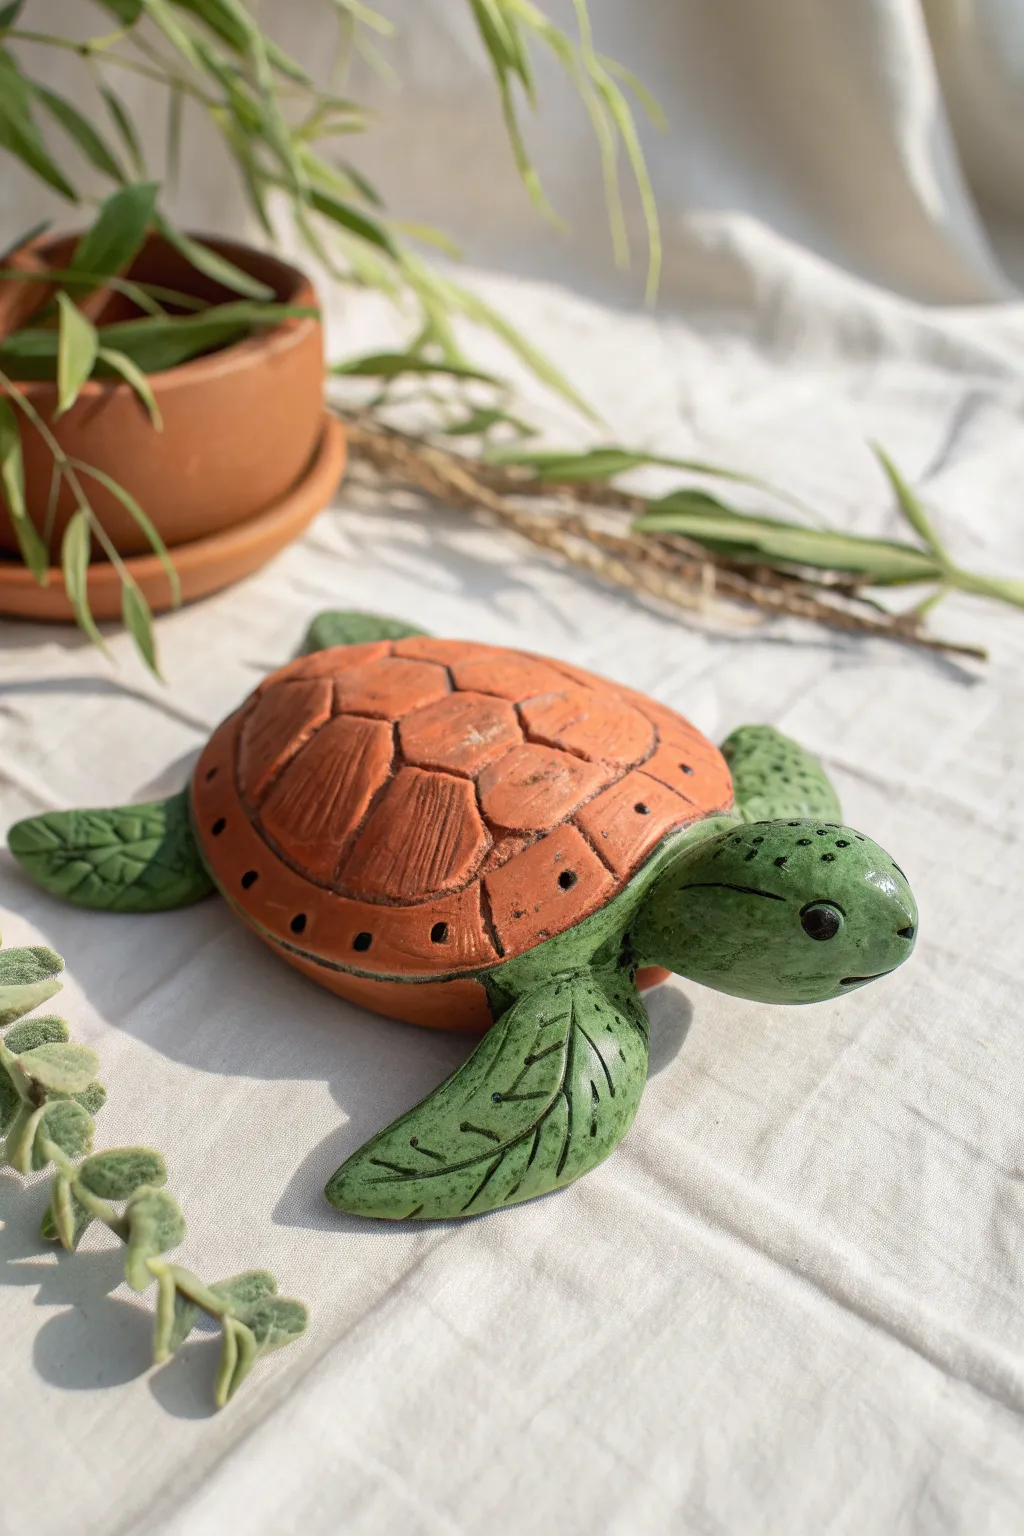
This charming turtle combines a realistic shape with simple texturing techniques that kids will love mastering. The contrast between the warm, terracotta-colored shell and the deep green flippers makes this little swimmer look like a piece of classic garden pottery.
Step-by-Step
Materials
- Terracotta-colored air-dry clay (or polymer clay)
- Green air-dry clay (or white clay to be painted later)
- Black fine-point tool or needle tool
- Modeling tools (or a butter knife)
- Black acrylic paint
- Fine detail paintbrush
- Glossy varnish or sealant (optional)
- Water in a small cup (for smoothing)
Step 1: Sculpting the Body
-
Form the shell base:
Start with your terracotta clay. Roll a ball about the size of a tangerine, then gently press it against your work surface to flatten the bottom while keeping the top nice and domed. -
Shape the head:
Take a walnut-sized piece of green clay. Roll it into a smooth ball and then gently elongate one side to create a slight teardrop shape for the neck connection. -
Attach the head:
Press the tapered end of the green head firmly under the front edge of the terracotta shell. You may need to score the clay (scratching tiny cross-hatch marks) where they join to ensure a strong grip. -
Make the flippers:
Create four balls of green clay—two medium ones for the front flippers and two smaller ones for the rear. Flatten them into leaf-like paddle shapes. -
Curve the flippers:
Give the front flippers a slight backward curve (like a boomerang) to simulate a swimming motion. The back flippers can remain straighter/shorter. -
Attach the limbs:
Slide the flat ends of the flippers under the shell body. Smooth the clay seams underneath with your finger or a tool so they don’t fall off later. -
Create the tail:
Roll a tiny cone of green clay and attach it to the very back center, just peeking out from under the shell.
Seamless Smoothness
Keep a small dish of water nearby. Dip your finger in it and rub gently over the clay to erase fingerprints before the clay starts to harden.
Step 2: Detailing & Texturing
-
Outline the scutes:
Using a blunt modeling tool or toothpick, draw a hexagon in the center top of the shell. Surround this hexagon with connecting lines to form the tortoise-shell pattern (scutes) radiating outward. -
Add shell texture:
Within the central scutes, use your tool to gently scratch fine, parallel lines. This gives the shell a weathered, realistic texture rather than a smooth plastic look. -
Create the heavy rim:
Use your tool to firmly press a groove about a quarter-inch up from the bottom edge of the shell, creating a distinct rim all the way around. -
Add rim dots:
Poke small, decorative holes or dimples evenly spaced along that bottom rim section you just defined. -
Texture the skin:
Moving to the green clay, use a needle tool to gently scratch leaf-vein patterns onto the flippers. Start with a central line and add diagonal lines branching off. -
Detail the head:
Use the needle tool to stipple small dots on top of the head for a scaly texture. -
Carve the mouth:
Pres a curved line into the front of the face to give your turtle a gentle smile.
Secret Stash
Before attaching the bottom, hollow out the underside of the shell slightly. It helps the clay dry faster and makes the turtle lighter!
Step 3: Finishing Touches
-
Initial wash:
If you want to emphasize the deep grooves, brush a very watery black paint over the shell and flippers, then immediately wipe the surface clean with a paper towel. The dark paint will stay stuck in the cracks. -
Paint the eyes:
Dip the handle end of a paintbrush into black acrylic paint and dot on two eyes. I prefer placing them slightly on the sides of the head for a more realistic look. -
Let it dry:
Allow the sculpture to dry completely. For air-dry clay, this usually takes 24-48 hours depending on thickness. -
Varnish:
Once bone dry, apply a coat of glossy varnish to the shell and eyes to make them look wet, while leaving the skin matte if you prefer.
Your little garden friend is now ready for display on a shelf or among your indoor plants


Chubby Frog With Big Eyes
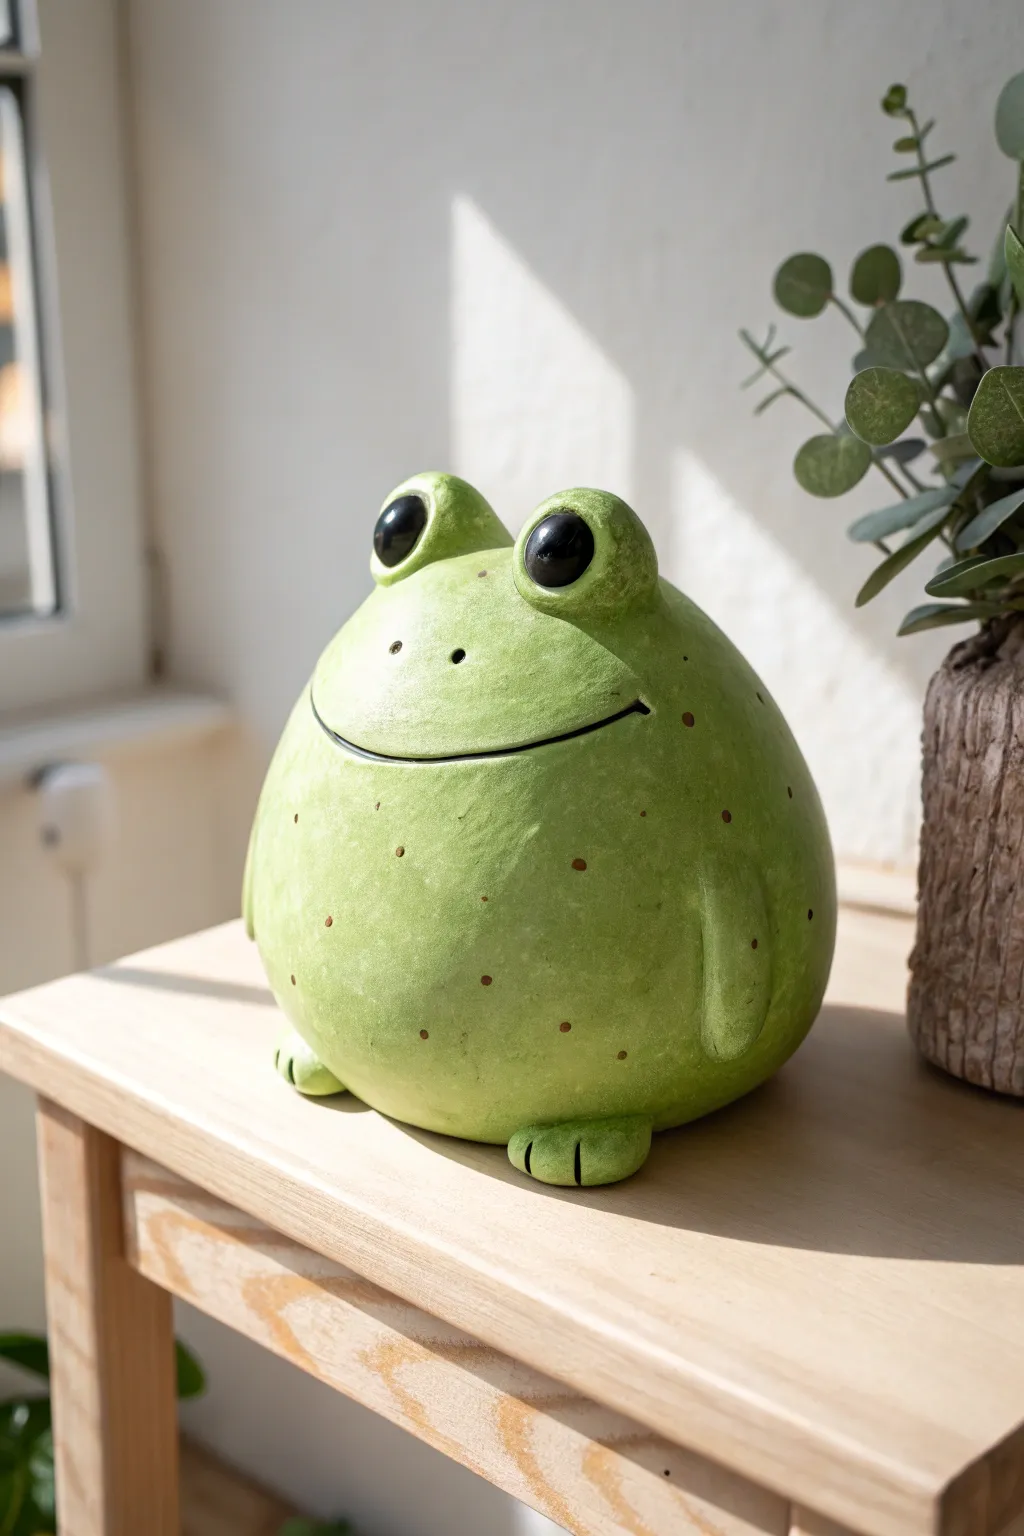
This adorably plump frog sculpture is guaranteed to bring a smile to anyone’s face with its wide grin and curious eyes. Its simple, rounded shape makes it a perfect starter project for young sculptors learning to balance forms.
Step-by-Step Tutorial
Materials
- Air-dry clay or polymer clay (green)
- Black clay or beads (for the eyes)
- Modeling tools (or a butter knife and toothpick)
- Small rolling pin
- Water (for smoothing)
- Brown acrylic paint
- Fine-tipped paintbrush or toothpick
- Clear varnish (optional)
Step 1: Forming the Body
-
Prepare the Clay:
Start by taking a large handful of green clay and kneading it until it is soft and pliable. If you are using air-dry clay, keep your hands slightly damp to prevent cracking. -
Shape the Base:
Roll the clay into a large, smooth ball. Once it’s round, gently tap the bottom against your work surface to flatten it slightly so the frog sits stable without rolling away. -
Taper the Top:
Using your palms, gently narrow the top half of the ball just a tiny bit to create a subtle pear shape. This wider bottom gives him that signature chubby look. -
Smooth imperfections:
Dip your finger in a little water and run it over the surface to erase any fingerprints or cracks. Getting the surface smooth now is much easier than fixing it later.
Smooth Seams
When attaching the eyes or limbs, scoring (scratching) both surfaces before pressing them together works best. Adding a tiny bit of water or clay slip acts like glue.
Step 2: Sculpting the Face
-
Create Eye Sockets:
Pinch off two smaller balls of green clay, about the size of large marbles. Press these firmly onto the top of the head, spacing them slightly apart. -
Blend the Eyes:
Use a sculpting tool or your thumb to blend the bottom edges of these eye mounds into the main body so they look attached, not just stuck on. -
Add the Pupils:
Make two small, flattened discs from black clay. Press one onto the front of each green eye mound. I like to place them slightly off-center to give him a goofy expression. -
Carve the Smile:
Use a curved tool or the edge of a plastic spoon to press a long, wide smile into the clay. The smile should stretch almost from one side of the face to the other. -
Add Nostrils:
With a toothpick or narrow tool, poke two small holes just above the smile line for nose holes.
Step 3: Details & Limbs
-
Make the Feet:
Roll two medium-sized balls of green clay. Flatten them slightly into oval shapes. -
Detail the Toes:
Use a knife tool to press two lines into the front of each oval, creating three simple toes. -
Attach the Feet:
Press the feet firmly underneath the front of the body so they poke out just enough to be seen. -
Create Arms:
Roll two small sausage shapes of green clay. Attach these vertically to the sides of the body. -
Blend the Arms:
Smooth the clay so the arms look like slight ridges on the side of the frog rather than separate pieces, essentially just hinting at limbs.
Garden Guardian
Make this frog hollow by pinching a pot shape first, then flipping it over. Once dry and sealed, it can hide a spare house key in your garden planter.
Step 4: Finishing Touches
-
Darken the Smile:
If you want the smile to really pop, take a tiny snake of black clay and press it deep into the smile groove you carved earlier. -
Add Highlights:
Press a tiny speck of white clay onto the black pupil of each eye to simulate a light reflection, bringing the character to life. -
Let it Dry:
Allow the clay to dry completely according to the package instructions (usually 24-48 hours for air-dry clay). -
Paint the Spots:
Once dry, dip a toothpick or fine brush into brown acrylic paint. Dot small speckles randomly all over the frog’s body for texture. -
Seal the Work:
Finish by applying a coat of clear varnish or Mod Podge to protect the paint and give the frog a slimy, amphibious shine.
Place your new green friend on a windowsill or shelf where he can survey the room.


Tiny Penguin With a White Belly
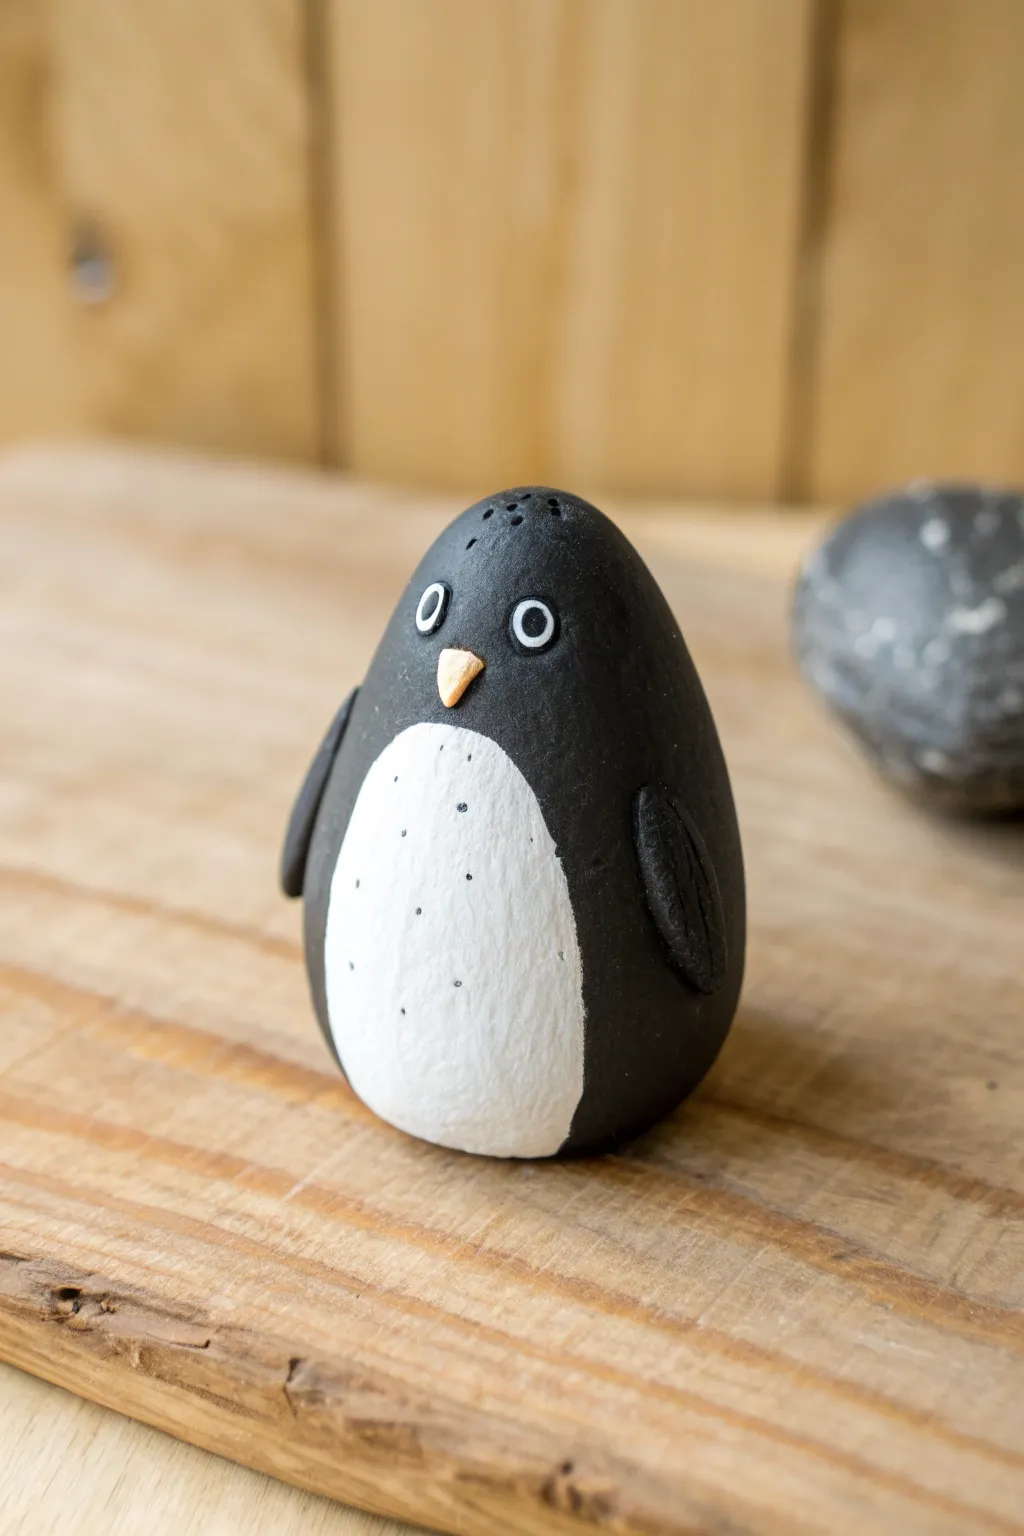
This adorable little penguin is a perfect starter project, featuring a simple egg shape and minimal details. With its smooth matte finish and tiny speckled belly, it makes a charming paperweight or desk companion.
How-To Guide
Materials
- Black polymer clay (or air-dry clay)
- White polymer clay (or white acrylic paint)
- Small amount of orange clay
- Ball stylus tool or a toothpick
- White and black acrylic paint (if detailing painted eyes)
- Fine detail paintbrush
- Clay roller or smooth round object
- Parchment paper or a ceramic tile (work surface)
Step 1: Shaping the Body
-
Form the base:
Start with a chunk of black clay roughly the size of a golf ball. Roll it firmly between your palms until it creates a smooth, crack-free sphere. -
Create the egg shape:
Gently taper the top of the sphere by rolling just the upper half between your fingers, creating a teardrop or egg shape that is slightly wider at the bottom so it sits stable. -
Flatten the base:
Tap the bottom of your egg shape lightly against your work surface to create a flat bottom. This ensures your penguin won’t wobble or roll away.
Smudge Alert
Black clay leaves residue! Wash hands thoroughly before handling the white belly clay, or use baby wipes to clean your fingers between colors to keep the white pristine.
Step 2: Adding the Belly
-
Prepare the white clay:
Take a smaller piece of white clay and roll it into a ball. Use your roller to flatten it into a thin, oval-shaped pancake. -
Attach the tummy:
Press the white oval onto the front of the black body. It should start near the bottom and reach up about two-thirds of the way. -
Blend the edges:
Use your thumb or a smoothing tool to gently press the edges of the white clay into the black clay so they adhere well, but try to keep the distinct oval shape intact.
Step 3: Wings and Beak
-
Make the wings:
Roll two small, pea-sized balls of black clay. Flatten them into teardrop shapes to form the flippers. -
Attach the wings:
Press one wing onto each side of the body, just where the black meets the white belly line. Curve the bottom tips slightly inward to hug the body. -
Detail the feathers:
Using a toothpick or a dull knife tool, press two or three shallow lines into the bottom of each wing to suggest feathers. -
Form the beak:
Take a tiny pinch of orange clay—really tiny!—and roll it into a small cone or triangle shape. -
Place the beak:
Attach the orange beak to the center of the face, right above the top curve of the white belly patch.
Winter Wear Upgrade
Before baking, sculpt a tiny scarf using a thin snake of red or blue clay. Wrap it around the penguin’s neck and texture the ends to look like fringe.
Step 4: Finishing Details
-
Texture the head:
Use a toothpick to poke three tiny holes at the very top of the head for a cute, textured hair effect. -
Bake or dry:
If using polymer clay, bake according to package instructions (usually around 275°F/135°C for 15-30 minutes). If using air-dry clay, let it sit undisturbed for 24 hours. -
Paint the eyes:
Once cool or dry, use the handle end of a paintbrush dipped in white paint to stamp two small circles above the beak. -
Add pupils:
When the white paint is dry, use a toothpick dipped in black paint to add a tiny dot in the center of each white eye. -
Speckle the belly:
Using a very fine brush or toothpick, add tiny, random black dots onto the white belly area to give it a natural, speckled texture.
Place your new chilly friend on a shelf or gift it to someone who loves animals


Snail With a Swirly Coil Shell
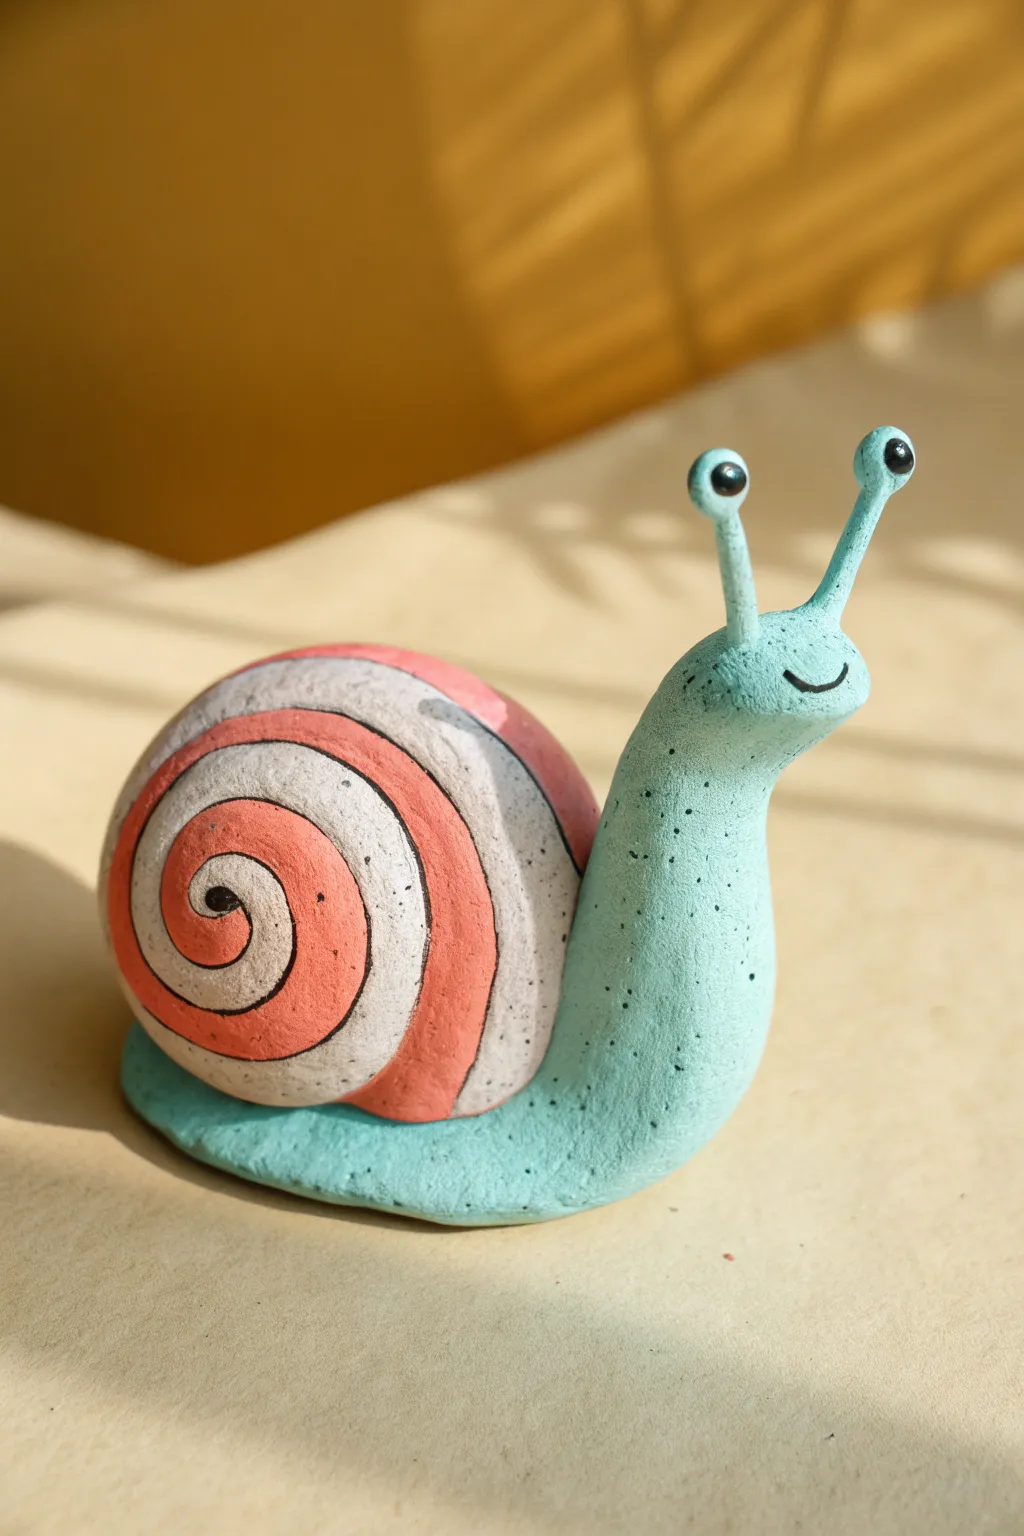
This cheerful garden friend features a smooth, pastel blue body and a striking spiral shell painted in alternating bands of coral and cream. The speckled texture throughout gives it a lovely, stone-like finish that looks professional yet is simple to achieve.
Step-by-Step Tutorial
Materials
- Air-dry clay (white or light grey)
- Acrylic paints (pastel blue/turquoise, coral pink, cream/white, black)
- Fine grit sandpaper
- Small paintbrush
- Old toothbrush (for texture)
- Small rolling pin
- Toothpick or sculpting tool
- Water cup
- Gloss or matte varnish (optional)
Step 1: Sculpting the Body
-
Shape the base:
Start with a medium ball of clay and roll it into a thick sausage shape, about 4-5 inches long. Gently flatten one end to create the tail and keep the other end raised and thicker for the head. -
Curve the neck:
Bend the thicker end upwards to form the snail’s upright neck. Smooth out any creases that form at the bend with a little bit of water on your fingertip. -
Form the eye stalks:
Create two small, thin snakes of clay for the eye stalks. Attach two tiny balls of clay to the tops of these stalks. -
Attach the eyes:
Press the eye stalks firmly onto the top of the head. Use a sculpting tool or your finger to blend the clay at the base of the stalks so they are seamless with the head. -
Add a smile:
Use the side of a toothpick or a small sculpting loop to gently press a curved smile into the snail’s face.
Step 2: Creating the Shell
-
Form the shell shape:
Roll a large ball of clay and flatten it slightly into a thick disk. It needs to be substantial enough to sit on the snail’s back. -
Carve the spiral:
Using a toothpick or a sharp sculpting tool, carve a deep spiral groove into both sides of the disk, starting from the center and working your way out to the edge. -
Attach shell to body:
Score (scratch) the bottom of the shell and the spot on the snail’s back where it will sit. Add a dab of water to the scratched areas and press the shell firmly onto the body. -
Smooth the join:
Roll a very thin snake of clay and wrap it around the seam where the shell meets the body, blending it in to secure the connection. -
Dry completely:
Let your sculpture dry for at least 24-48 hours. I find placing it on a wire rack helps the bottom dry faster.
Cracking Up?
If small cracks appear as the clay dries, don’t panic. Mix a tiny bit of fresh clay with water to make a paste (slip) and fill in the cracks, then smooth it over with a finger.
Step 3: Painting and Finishing
-
Base coat the body:
Paint the entire head, neck, and tail section with a smooth coat of pastel blue or turquoise acrylic paint. -
Base coat the shell:
Paint the entire shell with a cream or off-white color. You might need two coats to get good coverage. -
Paint the spiral:
Carefully paint inside the spiral groove using a coral pink color. Extend this color slightly onto the bands of the shell to create the striped pattern shown in the photo. -
Keep the lines clean:
Use a fine liner brush to outline the spiral groove with a very thin black line to make the definition pop. -
Paint the face:
Paint the eyeballs white with black pupils, and carefully trace the smile line with black paint. -
Add speckles:
Dip an old toothbrush into slightly watered-down black paint. hold it near the sculpture and run your thumb over the bristles to flick tiny specks all over the snail for a stone effect. -
Seal it up:
Once the paint is fully dry, apply a coat of varnish to protect your new friend.
Make It Sparkle
Mix some fine iridescent glitter into your varnish before applying the final coat. This gives the snail a slimy, shimmering trail effect across its body.
Set your finished snail on a sunny windowsill or a bookshelf to bring a slow and steady calm to your room

The Complete Guide to Pottery Troubleshooting
Uncover the most common ceramic mistakes—from cracking clay to failed glazes—and learn how to fix them fast.
Caterpillar Made From Repeat Clay Balls
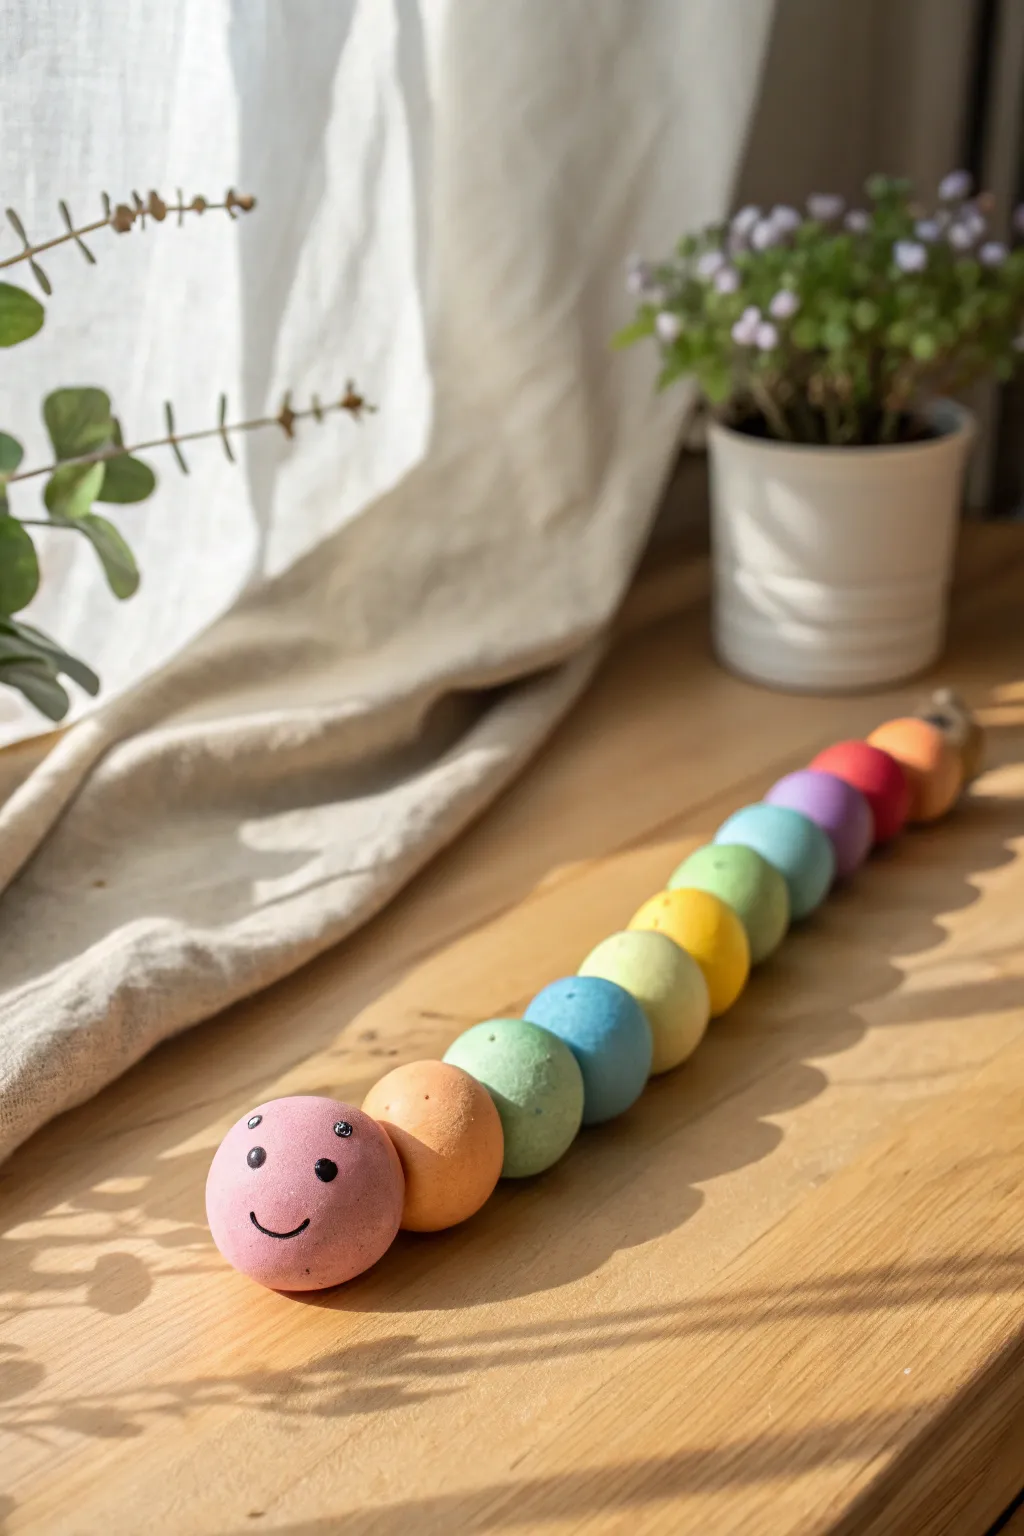
This cheerful caterpillar brings a splash of color to any windowsill with its bright, matte-finish rainbow segments. It’s a fantastic exercise in sculpture basics, teaching kids how to form uniform spheres and mix vibrant colors.
Detailed Instructions
Materials
- Air-dry clay (white)
- Acrylic paints (pastel pink, orange, teal, blue, yellow, green, purple, red)
- Fine-grit sandpaper
- Bamboo skewer or toothpick
- Fine-point black marker or black acrylic paint with a detail brush
- Clear matte varnish (optional)
- String or twine (optional, for connecting)
Step 1: Shaping the Spheres
-
Prepare the Clay:
Start by kneading a large lump of white air-dry clay until it is soft and pliable. This warms it up and prevents cracks from forming later. -
Portion the Segments:
Divide your clay into roughly 10-12 equal pieces. You’ll need one piece slightly larger than the rest for the head. -
Roll the Balls:
Take the first piece of clay and roll it between your palms. Use a gentle circular motion to create a smooth, perfect sphere. Repeat this for every segment. -
Check for Uniformity:
Line up your spheres to check their sizes. The body segments should be relatively uniform, while the head should stand out just a bit. -
Create Holes (Optional):
If you want a flexible caterpillar that wiggles, carefully pierce each ball through the center with a bamboo skewer while the clay is still wet. If you prefer a static sculpture, skip this step and you can glue them later. -
Dry Completely:
Set the clay balls on a clean surface to dry. Rotate them every few hours so the bottoms don’t flatten. I usually let these dry for at least 24 hours depending on humidity.
Cracked Clay Crisis?
If small cracks appear as the clay dries, mix a tiny amount of fresh clay with water to make a paste (slip) and smooth it over the cracks.
Step 2: Adding Color
-
Smoothing the Surface:
Once fully dry, inspect your spheres. If there are any rough bumps or fingerprints, gently buff them away with fine-grit sandpaper for a professional finish. -
Head Color:
Paint the largest sphere (the head) a soft pastel pink. You may need two thin coats to get solid coverage. -
Body Gradient:
Paint the remaining spheres in a rainbow sequence. Start with orange for the neck, then move to teal, blue, yellow, and so on. The image shows a fun mix, but a gradient looks great too. -
Matte Finish:
To achieve the look in the photo, stick to matte acrylics. If your paint is too glossy, you can mix in a tiny bit of cornstarch or apply a matte varnish later. -
Drying Time:
Allow the paint to dry completely. Since the spheres roll, I find it helpful to paint one half, let it dry, and then flip them over to paint the other side.
Step 3: Assembly and Details
-
Drawing the Face:
On the pink head sphere, use a fine-point black marker to draw a simple, happy face. Place two wide-set eyes and a simple U-shape smile low on the face for a cute expression. -
Adding Highlights:
For extra personality, add tiny white dots inside the black eyes using the tip of a toothpick dipped in white paint. -
Stringing Together:
If you made holes, thread a piece of twine through the spheres, tying a knot at the tail end and the head end to secure them. -
Gluing Alternative:
If you didn’t make holes, use strong craft glue or a hot glue gun to attach the spheres in a line. Press them together firmly for a few seconds to ensure a tight bond. -
Curving the Body:
If gluing, try arranging the balls in a slight S-curve before the glue sets to give the impression that the caterpillar is crawling. -
Final Sealing:
Protect your artwork with a layer of spray matte varnish if desired, which helps keep the colors vibrant over time.
Perfectly Round
To keep the balls from getting flat spots while drying, place them in a cardboard egg carton or on a soft foam pad instead of a hard table.
Place your colorful new friend in a sunny spot to brighten up your room
Easy Octopus With Eight Stubby Legs
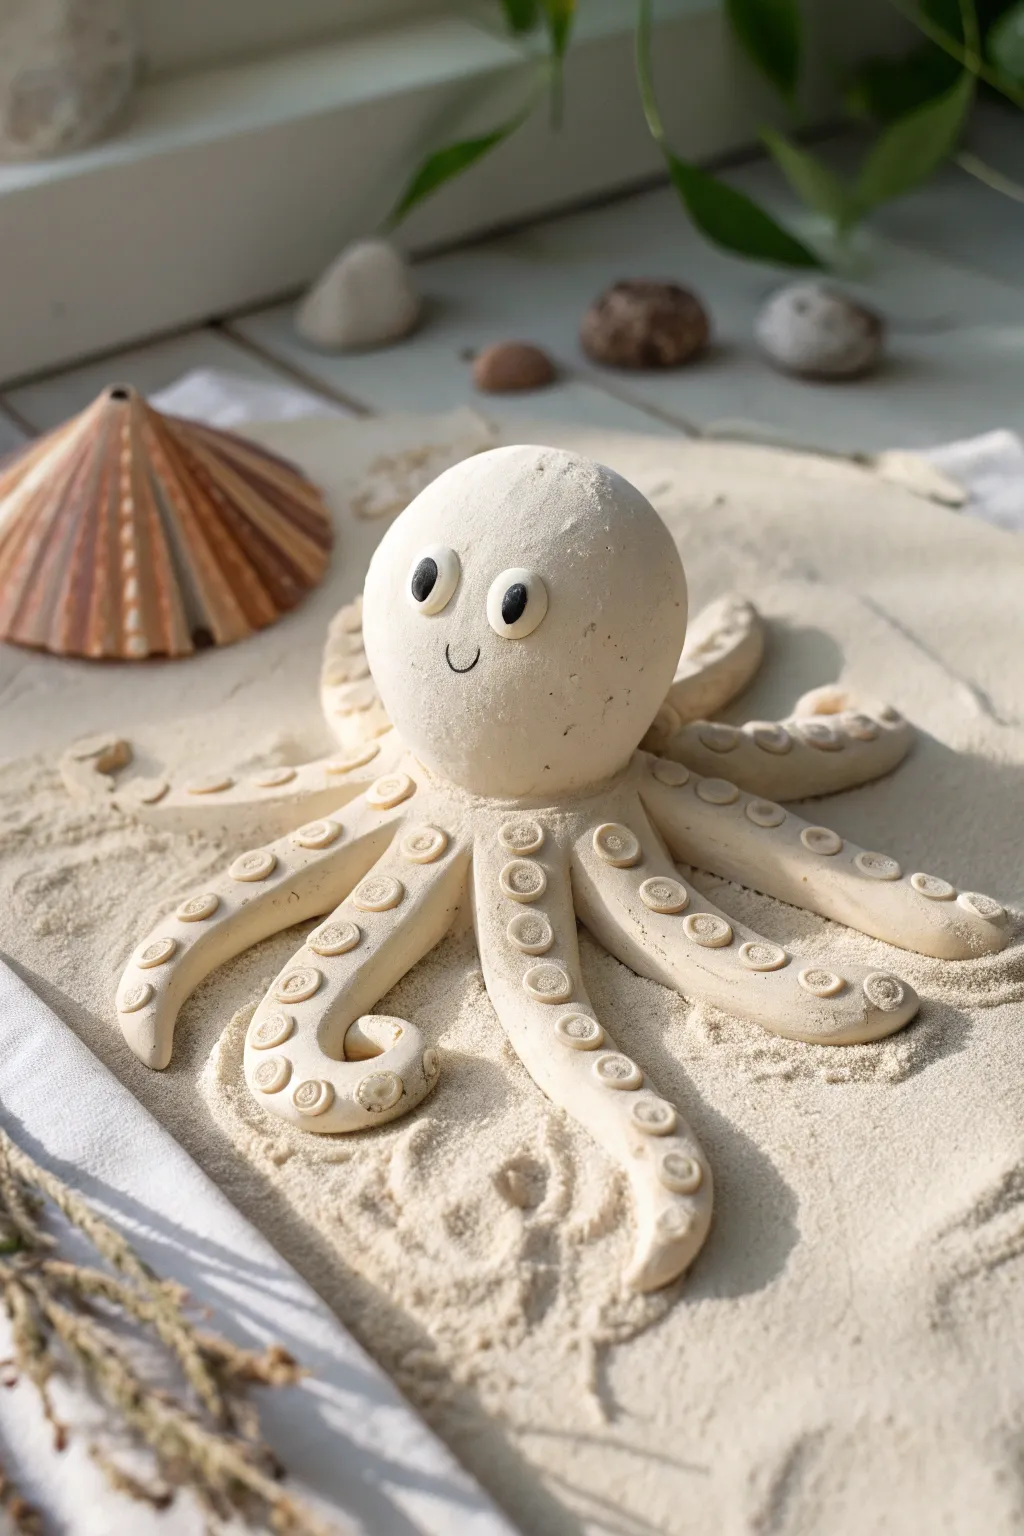
Bring the beach home with this adorable sea creature made from light, sandy-colored clay. With its friendly smile and textured tentacles, this little octopus looks like it just crawled out of a sandcastle.
How-To Guide
Materials
- Air-dry clay (white or light beige/sand)
- Black clay or small black beads (for eyes)
- Modeling tools (or a plastic knife and a straw stub)
- Fine sand (optional, for texture)
- Water (for smoothing)
- Parchment paper or work mat
Step 1: Shaping the Head
-
Prepare the Clay:
Start by kneading a large handful of your light-colored clay until it is soft and pliable. If the clay is too dry, dip your fingers in water and work it in. -
Roll the Head:
Take about two-thirds of your clay and roll it between your palms to form a smooth, round ball. -
Refine the Shape:
Gently tap the bottom of the ball on your work surface to flatten it slightly, creating a stable base, but keep the top nice and round like an egg. -
Add Texture (Optional):
For that realistic sandy look shown in the photo, you can lightly roll your clay ball in a dusting of fine sand, or gently press sand onto the surface.
Step 2: Creating the Tentacles
-
Form the Base Coils:
Take the remaining clay and divide it into eight roughly equal portions. Roll each portion into a ‘snake’ shape, making one end thicker and tapering the other end to a point. -
Arrange the Star:
Arrange the eight tentacles in a starburst pattern on your work surface, with the thicker ends meeting in the center. -
Attach the Head:
Place your head ball onto the center where all the tentacles meet. Gently press down and smooth the clay from the head onto the tentacles to secure them together. -
Shape the Movement:
Give your octopus some life by curving the tentacles. Curl some ends inward like a spiral and maximize the spread of others to make it look like it’s crawling.
Keep it Clean
Work on a piece of parchment paper or a silicone mat. This prevents the tentacles from sticking to your table and lets you rotatethe project easily.
Step 3: Adding Details
-
Make Suckers:
Roll tiny balls of clay and flatten them into small discs. Place a row of these discs along the top of each tentacle. -
Indent the Suckers:
Use the end of a small straw or a round modeling tool to press an indentation into the center of each disc, creating perfect little suction cups. -
Create Eye Sockets:
Use your thumb to press two shallow indentations on the front of the head where you want the eyes to go. -
Add the Eyes:
Roll two small balls of white clay for the base of the eyes and press them into the sockets. Add tiny pupils using black clay or small beads. -
Carve the Smile:
Use a curved sculpting tool or the edge of a plastic spoon to carve a small, joyful ‘u’ shape for the mouth right between the tentacles. -
Final Smoothing:
Check for any rough seams. I find that a slightly damp finger works wonders for blending connections and erasing fingerprints. -
Let it Dry:
Allow your sculpture to dry completely according to your clay package instructions, usually 24-48 hours, before moving it.
Beach display
Once the clay is fully dry, display your octopus on a tray filled with real sand and seashells to complete the seaside scene.
Enjoy your new sandy friend and maybe even make a whole family of sea creatures to keep it company


What Really Happens Inside the Kiln
Learn how time and temperature work together inside the kiln to transform clay into durable ceramic.
Hedgehog With Toothpick Spikes
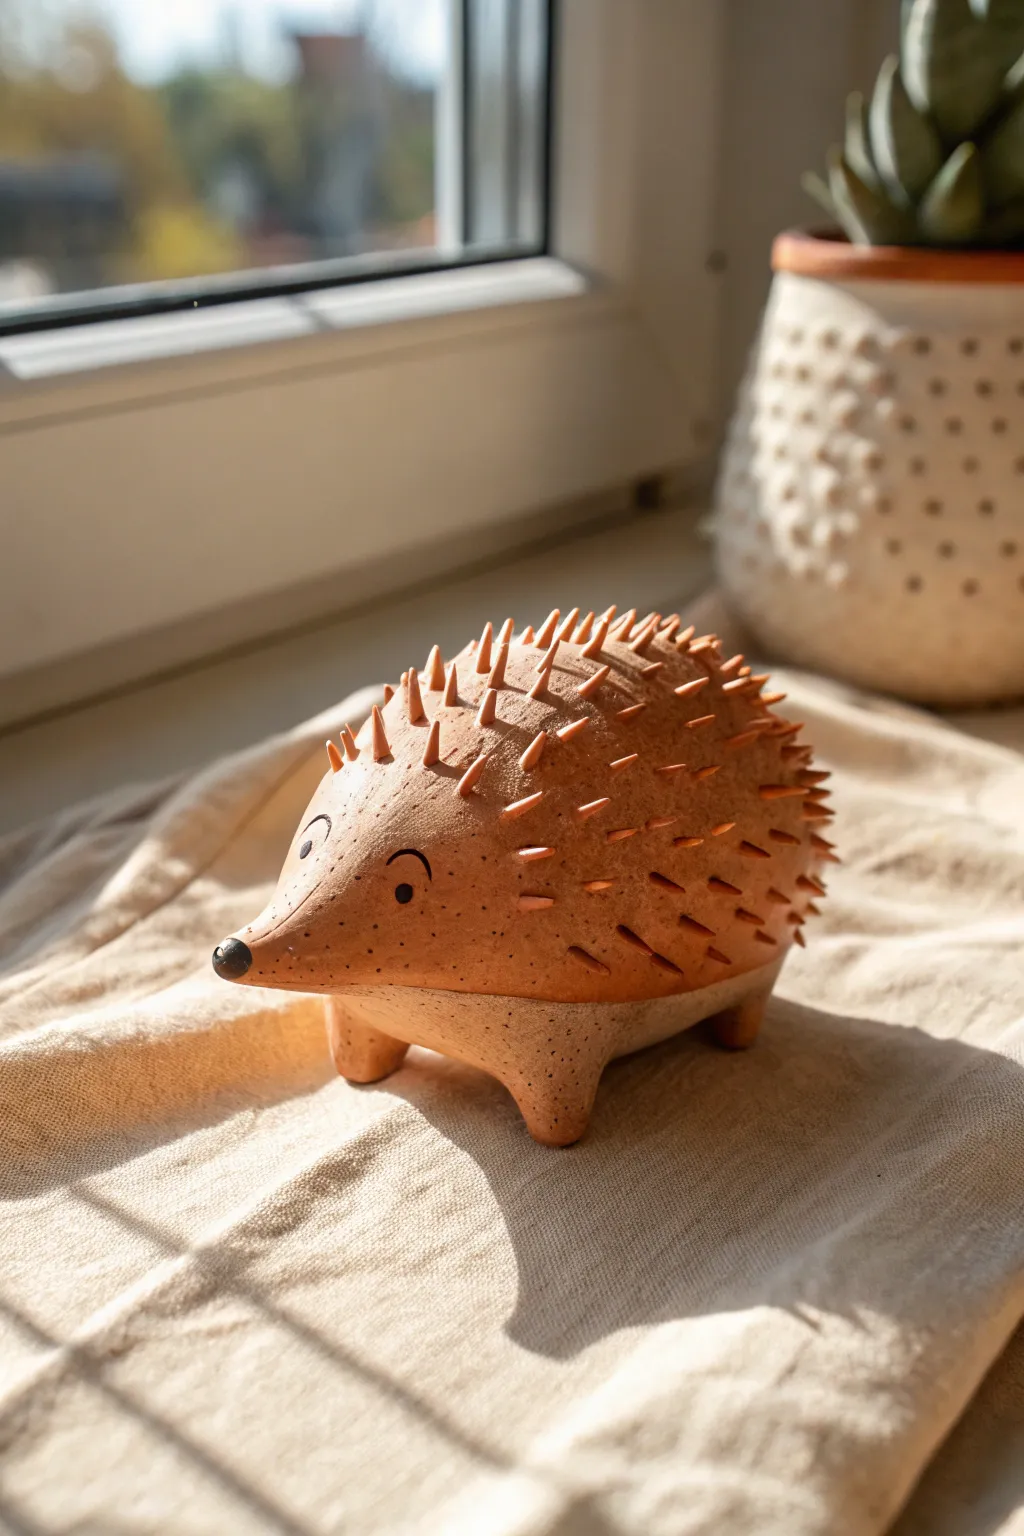
This charming little hedgehog combines smooth, hand-shaped clay with textured spikes for a delightful tactile finish. Its warm, earthy tones and simple sculpted face make it a perfect beginner project that retains an artistic, handcrafted feel.
Detailed Instructions
Materials
- Red-brown air-dry clay or terracotta polymer clay
- Wooden toothpicks (box)
- Small bowl of water
- Modeling tool or butter knife
- Black acrylic paint
- Fine-point paintbrush
- Parchment paper or work mat
Step 1: Shaping the Base
-
Form the main body:
Start with a ball of clay roughly the size of a large orange. Roll it between your palms until it is smooth and free of cracks. -
Create the egg shape:
Gently press and roll one side of the ball to elongate it slightly, creating a shape resembling a large egg or a teardrop. This tapered end will become the face. -
Flatten the bottom:
Tap the bottom of your egg shape against your work surface to create a flat base so the hedgehog stands stably without rolling over. -
Refine the snout:
Pinch the narrow end of the egg shape to pull it out slightly, curving it upward just a bit to form a cute, inquisitive snout.
Step 2: Adding Extremities
-
Prepare the legs:
Roll four small balls of clay, each about the size of a marble. These will become the legs. -
Attach the legs:
Turn your hedgehog over gently. Score (scratch) the clay where the legs will go and press the four small balls onto the underside of the body. -
Blend the seams:
Using your thumb or a modeling tool, smooth the clay from the legs onto the body so they are essentially one piece, ensuring they don’t fall off later. -
Check the stance:
Flip the hedgehog back onto its feet. Press down gently to ensure it stands evenly on all four legs. -
Detail the face:
Roll a tiny, peppercorn-sized ball of clay and attach it to the very tip of the snout for the nose.
Smooth Seams
To prevent cracks, dip your finger in water (or slip) and rub it over any joined areas until the seam completely disappears.
Step 3: Creating the Spikes
-
Mark the spike boundary:
Use a modeling tool to lightly draw a curved line behind the face area. This marks where the smooth face ends and the spiky back begins. -
Prepare the toothpicks:
Take a handful of toothpicks. I prefer to snap them in half if they are too long, aiming for pieces about an inch long. -
Insert the first row:
Starting right behind your boundary line, press the broken end of the toothpicks into the clay so the pointed ends stick out. Angle them slightly backward. -
Cover the back:
Continue inserting toothpicks in rows, working your way from the front to the back of the hedgehog. Keep them somewhat dense for a full look. -
Clay-coat the spikes (Optional):
To match the image exactly, take tiny bits of wet clay and wrap them around the exposed toothpicks, tapering them to a point. This creates that seamless ceramic look. -
Smooth the transition:
Check the area where the spikes meet the smooth face clay. Use a damp finger to smooth out any bumps caused by the insertion. -
Add speckles:
For extra texture, you can use a dry toothbrush to flick tiny specks of darker watered-down clay or paint onto the body before drying.
Make it Functional
Before the clay dries, use a large spoon to press a hollow into the top of the back to turn your hedgehog into a cute succulent planter.
Step 4: Finishing Touches
-
Let it dry:
Allow the sculpture to dry completely according to your clay’s package instructions. This usually takes 24-48 hours for air-dry clay. -
Paint the eyes:
Dip a fine paintbrush into black acrylic paint. Paint two small black circles for eyes and create an arch above them for eyebrows. -
Paint the nose:
Carefully paint the clay nose ball completely black. -
Highlights:
Once the black paint is dry, add a tiny white dot to each eye to bring the character to life.
Place your finished hedgehog on a sunny windowsill where the light can catch the texture of the spikes
Wide-Eyed Owl on a Stump
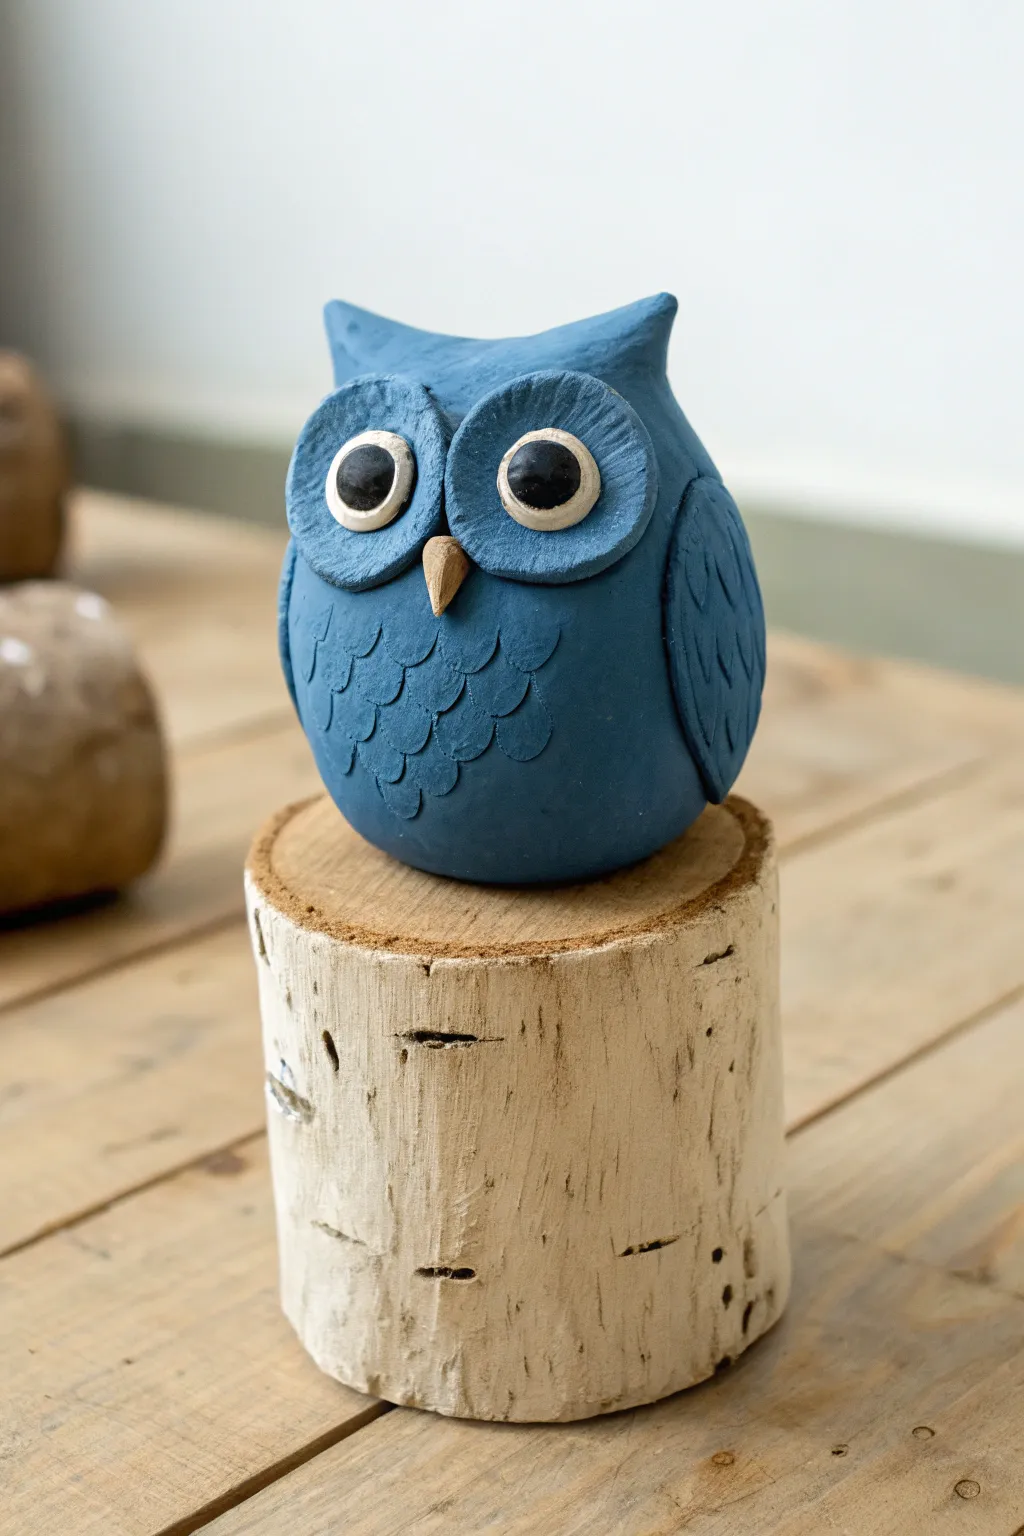
Perched patiently on its very own wooden log, this charming blue owl features oversized eyes and textured feathers that add delightful character. It’s a wonderful introductory sculpture project that teaches basic shapes and simple detailing techniques without becoming overwhelming.
How-To Guide
Materials
- Blue polymer clay (or air-dry clay)
- White clay
- Black clay
- Small piece of tan or orange clay (for the beak)
- Rolling pin
- Small circular wood slice (birch works beautifully)
- Clay modeling tools (specifically a small spoon-shaped tool or U-gouge)
- Toothpick or needle tool
- Strong craft glue (e.g., E6000 or super glue)
Step 1: Shaping the Head and Body
-
Form the base:
Start with a generous ball of blue clay, rolling it between your palms until it is smooth and free of cracks. Gently curve the bottom so it sits flat, and slightly narrow the top to create a simplified egg shape that will serve as the entire body. -
Pinch the ears:
At the very top of your oval, use your thumb and forefinger to pinch up two distinct points on the left and right side. These tufts create the classic horned owl silhouette. -
Smooth the curve:
Gently press down the clay between the two ear tufts to create a smooth, concave dip. Run a finger along the edges to soften any sharp points so the owl looks friendly rather than fierce.
Clean Clay Tip
Keep wet wipes handy! Blue pigment can transfer easily. Wipe your hands thoroughly before handling the white clay for the eyes to keep them bright.
Step 2: Adding the Eyes and Beak
-
Create eye sockets:
Roll two medium-sized balls of blue clay and flatten them into thick discs. Press these firmly onto the upper half of the face, ensuring they touch in the middle. -
Texture the sockets:
Using a needle tool or toothpick, gently scratch radiating lines from the center of each blue disc outward to the edge to mimic short feathers. -
Add the whites:
Roll two pieces of white clay into balls, flatten them slightly, and press them into the center of your textured blue discs. They should be large enough to look expressive but leave the blue border visible. -
Place the pupils:
Take two small balls of black clay and press them into the center of the white circles. Flatten them just enough so they don’t protrude too much. -
Form the beak:
Roll a very small piece of tan clay into a carrot shape or cone. Place this directly between the eyes, pointing downward, and press firmly to attach it.
Step 3: Creating Feathers and Texture
-
Define the wings:
Roll a small snake of blue clay and flatten it significantly to create a teardrop shape for the wing. Press this onto the right side of the owl’s body. -
Carve wing details:
Use a clay tool or the side of a toothpick to press elongated ‘U’ shapes into the wing clay to simulate long flight feathers. -
Texture the chest:
I find using a small U-shaped gouge or the tip of a small spoon tool works best here. Press the tool gently into the chest clay in rows, creating a scalloped pattern that looks like layered breast feathers. -
Refine the surface:
Check the back and sides of the owl for any unintentional fingerprints. Lightly smooth them away with a fingertip dipped in a tiny bit of water or baby oil.
Clay Is Cracking?
If your clay cracks while shaping the body, it’s too dry. Add a tiny drop of baby oil (polymer) or water (air-dry) and knead it well to restore flexibility.
Step 4: Assembly and Display
-
Bake or dry:
If using polymer clay, bake the owl according to the package instructions (usually around 275°F for 15-30 minutes). If using air-dry clay, allow it to dry completely for 24-48 hours. -
Prepare the perch:
While the artwork cures, ensure your wooden log slice is clean and dust-free. If the top is rough, give it a quick sanding. -
Attach the owl:
Place a generous dab of strong craft glue on the center of the wood slice. -
Final placement:
Press the finished owl firmly onto the glue spot. Hold it in place for a minute to ensure a good initial bond, then let the glue cure fully before displaying.
Now your wise little bird has the perfect rustic perch to watch over your room

TRACK YOUR CERAMIC JOURNEY
Capture glaze tests, firing details, and creative progress—all in one simple printable. Make your projects easier to repeat and improve.
Pocket-Size Cat With Triangle Ears
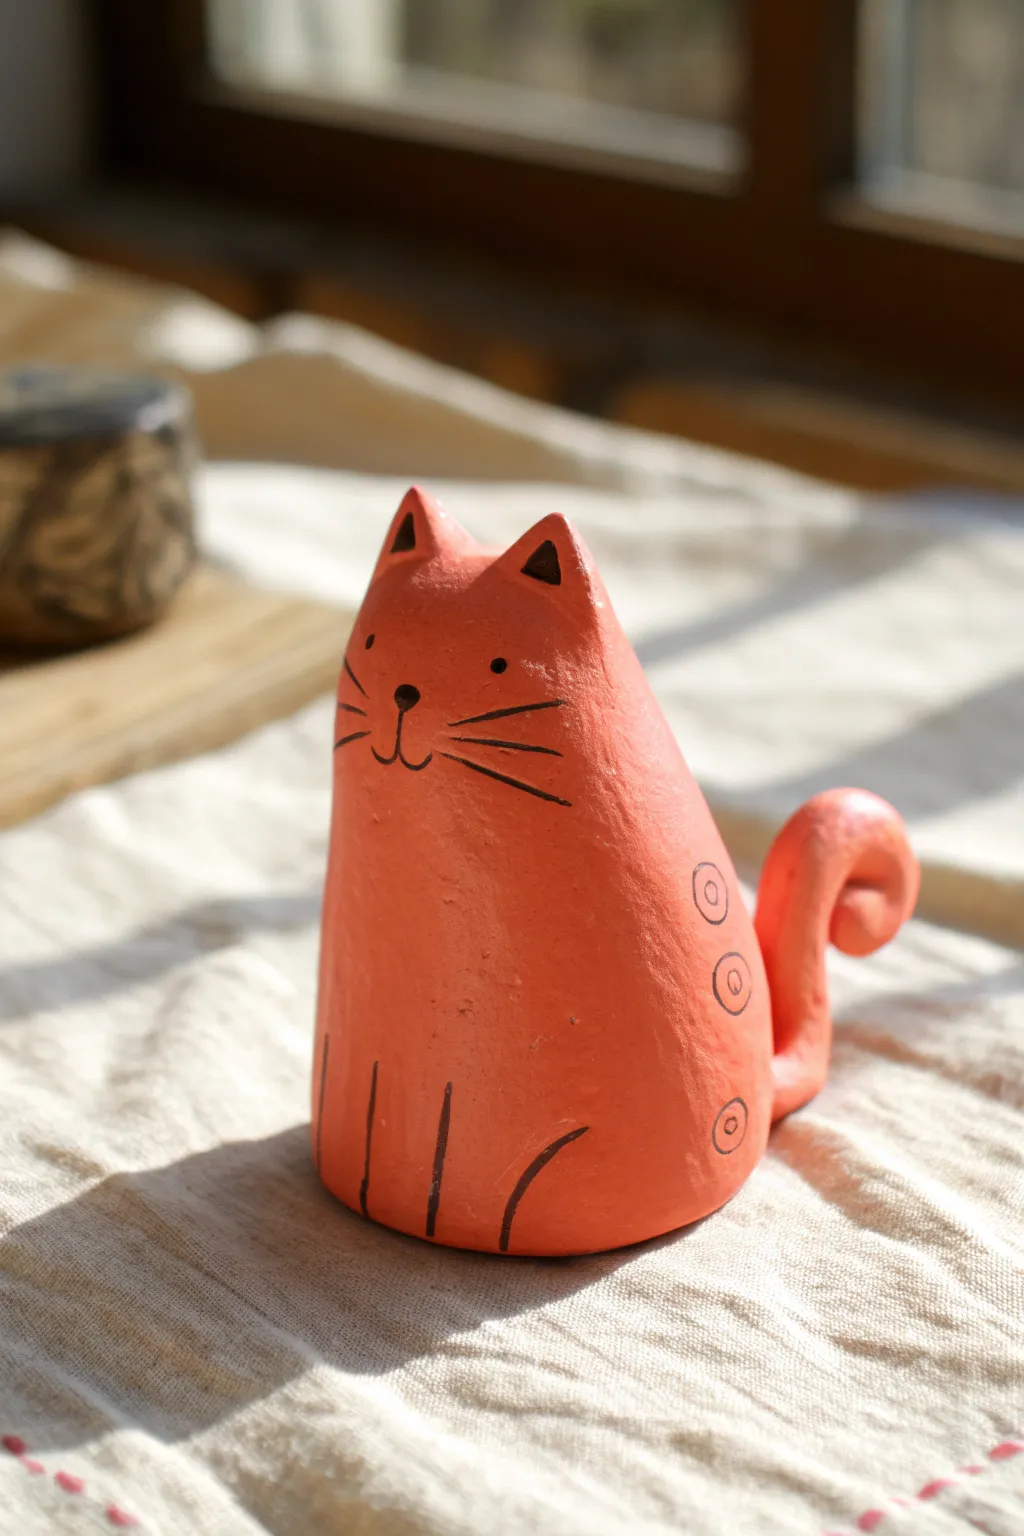
This charming little feline sculpture features a simple, smooth body shape that is perfect for beginners to mold. Its cheerful personality comes to life with a bright coral-orange finish and minimalist painted details.
Step-by-Step Tutorial
Materials
- Air-dry clay or polymer clay (white or terracotta)
- Acrylic paint (coral/orange and black)
- Small paintbrush
- Fine-point black permanent marker or detail brush
- Water cup (for smoothing)
- Small rolling pin (optional)
- Varnish or sealant (matte or satin finish)
Step 1: Sculpting the Body
-
Form the base:
Start with a ball of clay roughly the size of a tangerine. Roll it between your palms until it is smooth and round. -
Create the taper:
Place the ball on your work surface and gently roll it back and forth while applying more pressure to one side. You want to create a cone shape that is wider at the bottom and narrower at the top. -
Flatten the bottom:
Tap the wider end of your cone firmly against the table so the cat sits flat and stable. The body should stand upright on its own without wobbling. -
Round the top:
Use your thumb to gently round off the pointy tip of the cone. This will become the top of the cat’s head.
Step 2: Adding Details
-
Pinch the ears:
At the top of the head, gently pinch upward on the left and right sides to pull out two small triangles. These will be the ears. -
Refine the shape:
Smooth the clay between the ears so there is a slight dip. I like to use my pinky finger here to softly curve the space between them. -
Make the tail coil:
Roll a smaller snake of clay, about the thickness of a pencil and two inches long. Taper one end slightly. -
Attach the tail:
Press the thicker end of the tail onto the lower back of the body. Blend the clay seams together with your finger or a tool so it stays attached securely. -
Curl the tail:
Curl the tail upward and create a small spiral at the tip, giving the cat a playful posture. -
Smooth everything out:
Dip your finger in a little bit of water and rub it over the entire sculpture to remove fingerprints and cracks before letting it dry completely according to package instructions.
Smooth Moves
If you have persistent cracks, make a ‘slip’ by mixing a tiny bit of clay with water until it’s paste-like, then paint it over the cracks.
Step 3: Painting and Finishing
-
Base coat:
Once the clay is fully dry, paint the entire sculpture with a bright coral or orange acrylic paint. You may need two coats for full coverage. -
Draw the face:
Using a fine-point black marker or a very thin brush, draw two small dots for eyes and a small inverted triangle for the nose about halfway down the face. -
Add whiskers:
Draw three straight lines stemming outward from each cheek area to create the whiskers. -
Add the mouth:
Draw a small ‘w’ shape stemming from the bottom of the nose to give your cat a sweet smile. -
Detail the ears:
Paint small black triangles inside the sculpted ears to create depth. -
Add body patterns:
Draw three small circles with dots in the center going down the side of the cat’s body for a decorative touch. -
Draw the legs:
At the very bottom front, draw three simple vertical lines to suggest front paws. -
Seal the work:
Protect your paint job with a layer of matte or satin varnish.
Play with Patterns
Instead of circles on the side, try painting stripes, polka dots, or even tiny flowers to give each cat a unique personality.
Place your colorful clay kitty on a windowsill where it can greet you every day
Happy Puppy With Floppy Ears
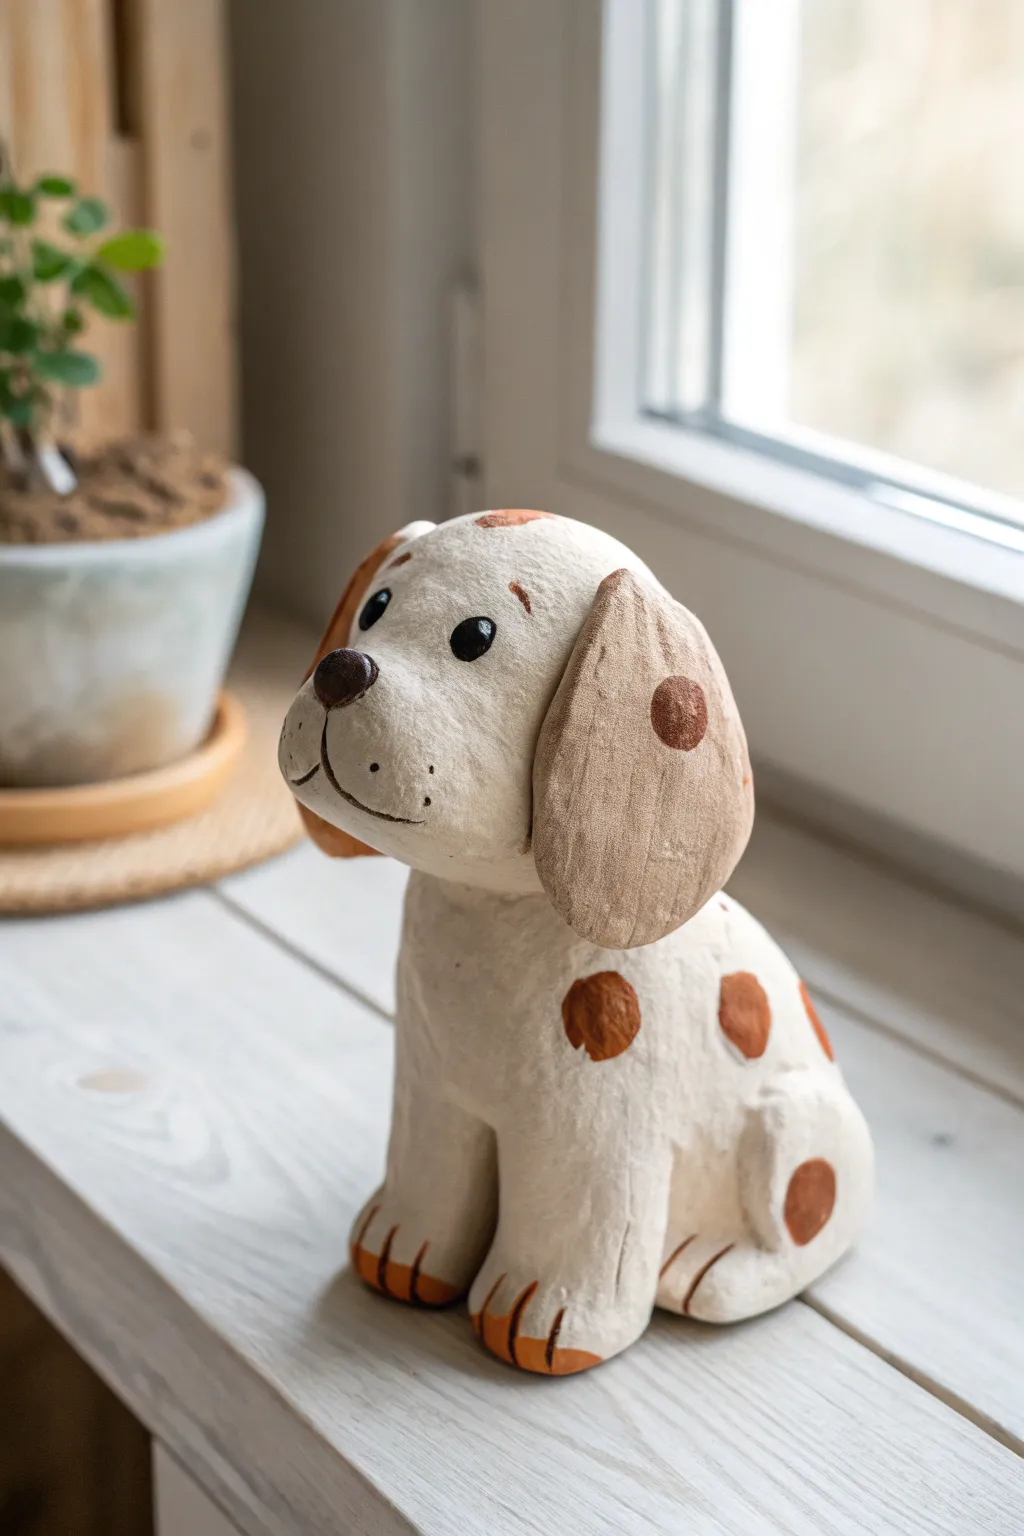
Create an adorable companion with this textured clay puppy project, featuring sweet floppy ears and playful brown spots. The finish has a lovely rustic feel that makes it look like a treasured keepsake straight from a storybook.
Step-by-Step Guide
Materials
- White organic air-dry clay or paper clay
- Water in a small cup
- Brown acrylic paint (medium shade)
- Black acrylic paint
- Fine detail paintbrush
- Flat shader paintbrush
- Toothpick or clay sculpting tool
- Matte varnish (optional)
Step 1: Shaping the Body
-
Form the base:
Start with a ball of clay roughly the size of a tennis ball. Roll it until it is smooth, then gently elongate it into a thick pear shape to form the seated body and neck. -
Create the head:
Roll a second, slightly smaller ball for the head. Flatten the front slightly to define the muzzle area, giving it a soft, rounded boxy shape rather than a perfect sphere. -
Attach head to body:
Score the top of the body and the bottom of the head with a toothpick (scratching cross-hatch lines). Dab a little water on the scored areas and press them firmly together. Smooth the clay across the seam with your finger to lock it in place. -
Add front legs:
Roll two thick sausage shapes for the front legs. Attach them to the front of the body, blending the clay at the top shoulder area so they look like part of the chest. -
Form hind legs:
For the back legs, make two balls of clay and flatten them into thick discs. Attach one to each side of the lower body, blending the edges to create the look of bent haunches.
Cracks Appearing?
If you see small cracks forming while the clay dries, mix a tiny bit of fresh clay with water to make a paste and smooth it into the cracks with your finger.
Step 2: Adding Features
-
Sculpt the ears:
Flatten two pieces of clay into teardrop shapes. These should be generous in size. Attach the narrow end to the top sides of the head, letting the wide ends flop down naturally against the cheeks. -
Tail time:
Roll a small, short snake of clay for the tail. Attach it to the lower back, blending the connection point so it doesn’t fall off. -
Define the face:
Roll a tiny ball of clay for the nose and press it onto the tip of the muzzle. It should stick out slightly. -
Add texture:
Using a slightly damp stiff brush or a textured sponge, gently pat the entire surface of the puppy. This gives it that lovely ‘fur’ texture rather than being perfectly smooth. -
Detail the paws:
Use a toothpick or a clay knife to press two indentations into the bottom of each front leg and back foot to create toes. -
Dry thoroughly:
Let the sculpture dry completely. Depending on the thickness and your climate, this can take 24 to 48 hours. I usually rotate it occasionally so the bottom dries evenly.
Step 3: Painting and Finishing
-
Paint the ears:
Using the brown acrylic paint, color the ears entirely. You can dry-brush slightly for a softer look, or paint them solid. -
Add the spots:
Paint round brown spots randomly on the body. Try placing one on the back, one on the haunch, and maybe a small one near the eye for character. -
Paw details:
Paint the very tips of the toes brown to match the spots. -
Facial features:
Paint the nose nose-ball dark brown. Use a thin brush to paint a curved line for the mouth and three tiny dots for whisker holes on the muzzle. -
Eyes and brows:
Dip the handle end of a paintbrush into black paint and dot two eyes onto the face. Once dry, add tiny white highlights if you like. Paint small, floating eyebrows above the eyes for expression. -
Seal (Optional):
If you want to protect your puppy, apply a coat of matte varnish once all the paint is completely dry.
Pro Tip: Heavy Head
Create a stronger neck by inserting a toothpick halfway into the body and pushing the head onto the exposed half. This acts like a hidden skeleton.
Place your finished puppy on a shelf near a window to enjoy its sweet expression
Donut With Icing and Sprinkles
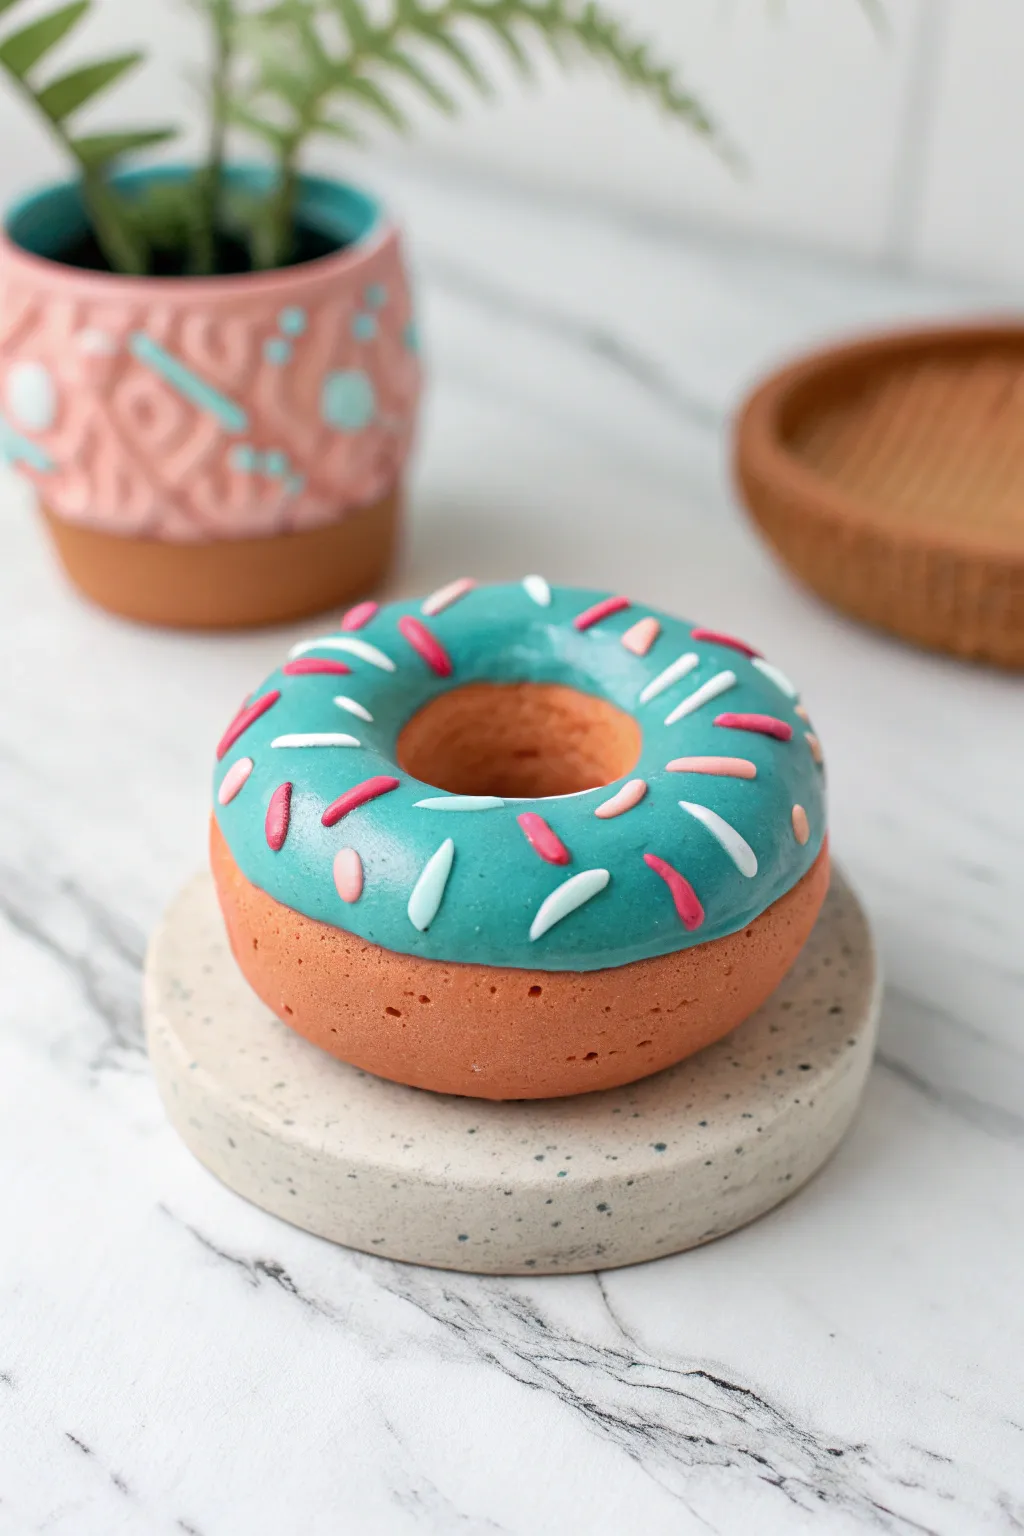
This charming little sculpture looks almost good enough to eat with its smooth teal icing and pop-art style sprinkles. It is a fantastic beginner project that teaches basic shaping and smoothing techniques for clean, professional-looking results.
Step-by-Step
Materials
- Light terracotta or biscuit-colored clay (polymer or smooth air-dry)
- Teal or turquoise clay
- White, pink, and light coral clay for sprinkles
- Clay roller or rolling pin
- Circle cutters (one large, one small)
- Smoothing tool or modeling spoon
- Needle tool
- Gloss glaze or varnish (optional)
Step 1: Shaping the Base
-
Condition the clay:
Start by warming up your terracotta-colored clay in your hands. Knead it thoroughly until it is soft, pliable, and free of cracks. -
Form a ball:
Roll the conditioned clay into a smooth, tight sphere about the size of a golf ball or slightly larger, depending on how big you want your final donut to be. -
Flatten the sphere:
Gently press the ball down against your work surface with your palm to flatten it into a thick disc. Aim for a thickness of about 1 inch to give it that fluffy donut look. -
Round the edges:
Use your fingers or a smoothing tool to gently round off the sharp edges created by flattening the ball. The goal is a soft, bun-like shape. -
Create the center hole:
Take your small circle cutter (or the back of a large piping tip) and press it directly into the center of the disc. Twist slightly and lift to remove the core. -
Smooth the interior:
The cut might leave sharp edges inside. soften these by gently rubbing the inside of the hole with your fingertip or a rounded modeling tool. -
Add texture (optional):
To mimic the texture of a baked cake donut, you can lightly tap the surface with a stiff toothbrush or a texturing sponge, leaving tiny realistic pores.
Fixing Cracks
If the clay starts cracking while you shape it, dip your finger in a tiny bit of water (for air-dry) or baby oil (for polymer) and smooth the fissure immediately.
Step 2: Creating the Icing
-
Roll the icing clay:
Take your teal clay and roll it out into a thin, even sheet. Avoid making it paper-thin, as it needs to handle a bit of manipulation without tearing. -
Cut the icing shape:
Use your large circle cutter—the one that matches the width of your donut base—to cut a perfect circle from the teal sheet. -
Center the icing:
Place the teal circle on top of your donut base. Press gently in the center to locate the hole, then use the small cutter again to remove the clay from the middle. -
Create the drip effect:
This is the fun part. Gently press the edges of the teal clay down onto the sides of the donut. Use your thumb to smudge and smooth the clay downward slightly to create an organic, drippy ‘glazed’ look. -
Refine the edges:
Ensure the icing adheres completely to the base so there are no gaps. I like to smooth the seam just a tiny bit so it looks like liquid that has set.
Make it a Magnet
Before drying or baking, press a strong round magnet into the back of the donut. Secure it with a dab of glue after curing for a sweet fridge decoration.
Step 3: Adding Sprinkles
-
Prepare sprinkle colors:
Roll out very thin ‘snakes’ or logs of your white, pink, and light coral clay. They should be spaghetti-thin. -
Cut the sprinkles:
Using a craft knife or blade, cut small, uniform segments from your clay logs. Keep them relatively short, like grains of rice. -
Place the decorations:
Pick up the sprinkles one by one with a needle tool or tweezers and press them gently into the teal icing. -
Vary the pattern:
Arrange the sprinkles randomly, ensuring they point in different directions for a confetti effect. Don’t be afraid to let some overlap the edges of the icing. -
Embedded finish:
Once all sprinkles are placed, lightly roll your finger or the rolling pin over the top. This presses them flush into the ‘icing’ rather than just sitting precariously on top. -
Final cure:
If using polymer clay, bake according to the package instructions. If using air-dry clay, set it in a safe, dry spot for 24-48 hours. -
Gloss coat (optional):
For an extra sugary shine, apply a coat of gloss glaze only to the teal icing area after the piece is fully cured.
Now you have a permanent sweet treat that captures that perfect pastry shop vibe forever.
Banana With a Peel Twist
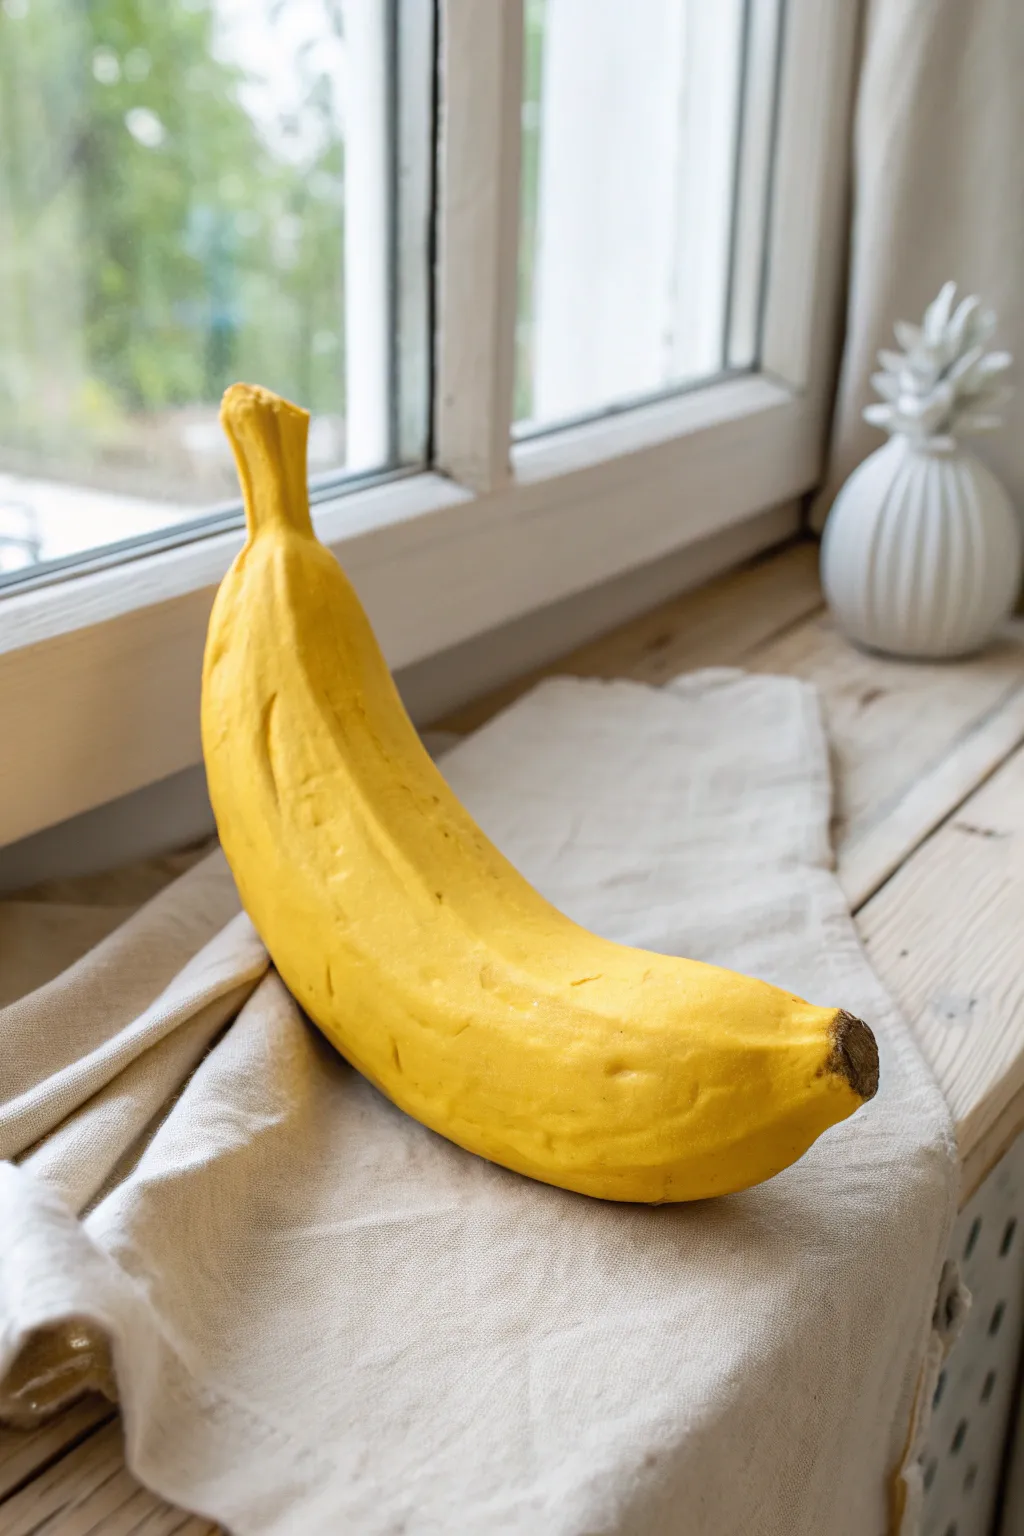
Sculpt a remarkably lifelike banana that looks good enough to eat but is actually a fun clay project for kids. This simple shape is perfect for practicing texture and realism without needing complex tools.
Detailed Instructions
Materials
- Air-dry clay (white or yellow)
- Acrylic paint (bright yellow, brown, raw umber)
- Sculpting tools (needle tool or toothpick)
- Small paintbrush
- Sponge (optional for texture)
- Matte varnish (optional)
Step 1: Basic Form
-
Prepare the Clay:
Start with a handful of clay, roughly the size of a real banana. If you are using white air-dry clay, knead it until it’s soft and pliable. If using colored clay, ensure the yellow is consistent throughout. -
Roll a Log:
Roll the clay into a thick cylinder or log shape between your palms or on a table surface. It should be about 6 to 7 inches long. -
Taper the Ends:
Gently gently roll just the ends of the log to make them thinner than the middle section, creating distinct tapering points on both sides. -
Create the Curve:
Bend the entire clay log into a gentle ‘C’ shape. Bananas have a distinct curve, so look at a real one or the photo for reference to get the angle right.
Smooth & Strong
Work a small ball of aluminum foil inside the center of your clay banana. This saves clay, makes the sculpture lighter, and helps it dry faster from the inside out.
Step 2: Shaping and Refining
-
Form the Ridges:
Bananas aren’t perfectly round cylinders; they have ridges. Use your fingers to pinch and press along the length of the fruit to create 4-5 longitudinal ridges or facets. -
Define the Stem:
At the top end (the stem), pinch the clay into a squared-off, slightly elongated stalk. I like to make sure the cut end looks a bit ragged, just like a real stem snapped off the bunch. -
Sculpt the Bottom Tip:
Pinch the bottom end into a small, rounded nub. This is the little black dried flower remnant found on real bananas. -
Smooth the Surface:
Use a tiny bit of water on your finger to smooth out any unwanted cracks or fingerprints, but don’t make it too perfectly smooth—organic texture is good.
Go Green
Want a less ripe look? Blend a very small amount of bright green paint into your yellow base near the stem and tip to look like an unripe banana.
Step 3: Adding Texture
-
Add Imperfections:
Using a toothpick or a needle tool, gently press random little dents and scratches into the skin. Real fruit gets bumped around, so these small marks add realism. -
Texture the Stem:
Scratch vertical lines into the stem area to mimic the fibrous texture where it would connect to the main bunch. -
Drying Time:
Let your sculpture dry completely. Depending on the clay thickness, this usually takes 24 to 48 hours. Turn it over halfway through so the bottom dries evenly.
Step 4: Painting and Finishing
-
Base Coat:
If you used white clay, paint the entire banana with a coat of bright yellow acrylic paint. You may need two coats for solid coverage. -
Adding Dimension:
Mix a tiny dot of brown into your yellow paint. Lightly brush this slightly darker shade along the ridges you created earlier to define the shape. -
Painting the Ends:
Paint the tip of the stem and the bottom nub with a dark brown or raw umber color. Feather the paint slightly onto the yellow skin so it doesn’t look like a hard line. -
Bruising Details:
For extra realism, create small brown spots. Dip a toothbrush or stiff brush in watered-down brown paint and flick tiny speckles onto the banana skin. -
Seal the Work:
Once the paint is fully dry, apply a layer of matte varnish to protect your sculpture. Avoid glossy finishes, as real banana peels have a satin or matte look.
Now you have a piece of everlasting fruit that adds a pop of color to any room
Hot Dog With Wavy Toppings
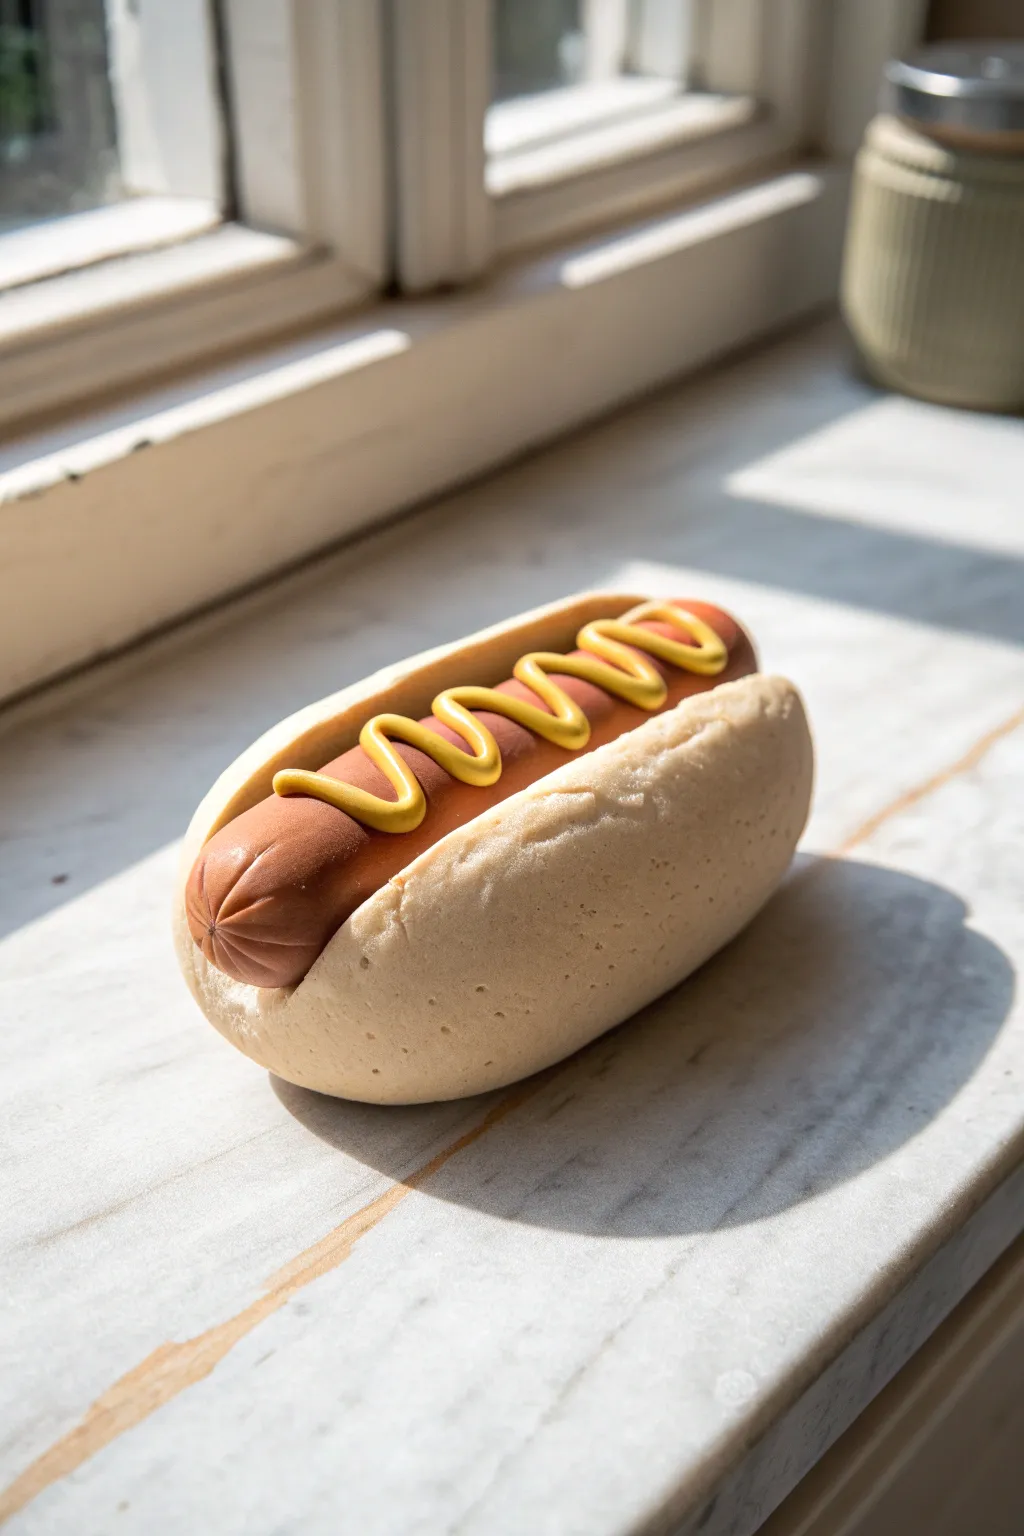
This realistic-looking hot dog sculpture features a smooth, toasted-looking bun and a perfectly wavy mustard squiggle. It makes for a fun, whimsical desk accessory or a great addition to a faux-food collection.
Step-by-Step Tutorial
Materials
- Polymer clay or air-dry clay (tan/beige color)
- Polymer clay or air-dry clay (reddish-brown/terracotta color)
- Polymer clay or air-dry clay (bright yellow)
- Clay texture tool or toothpick
- Rolling pin or smooth round marker
- Soft-bristled brush
- Pastel chalk (brown and orange) for shading (optional)
Step 1: Forming the Bun
-
Prepare the dough:
Start by taking a medium-sized ball of tan or beige clay. Condition it well by kneading it in your hands until it is soft, pliable, and free of cracks. -
Create the base shape:
Roll the clay into a thick cylinder or log shape, roughly 3 to 4 inches long. Keep the ends rounded rather than flat. -
Flatten slightly:
Gently press the log down against your work surface to flatten the bottom so the bun sits stable without rolling away. -
Make the incision:
Using a plastic knife or a clay tool, cut a slit down the center of the top. Ensure you cut deep enough to hold the frankfurter but not all the way through to the bottom. -
Shape the opening:
Widen the cut gently with your fingers or a smoothing tool. Round off the sharp edges of the cut to make the bread look fluffy and baked, rather than sliced.
Step 2: Crafting the Frankfurter
-
Roll the sausage:
Take a smaller amount of reddish-brown clay. Roll this into a cylinder that is slightly longer than your bun. -
Detail the ends:
Use a toothpick or a small detailing tool to create the signature gathered texture at the ends of the hot dog. Press small radiating lines from the very center point of each end outward. -
Dry fit the piece:
Place the sausage into the bun to check the fit. It should nestle snugly inside. If it’s too long, trim the ends slightly or squish them in; I usually prefer to trim to keep the proportions realistic. -
Add subtle texture:
If you want ultra-realism, lightly roll the hot dog over a very fine sandpaper or fabric to remove fingerprints and give it a matte skin texture before placing it permanently. -
Assemble the base:
Press the hot dog firmly into the bun. You can add a dab of liquid clay or water (for air-dry types) to act as glue.
Sticky Situation?
If your clay is too soft and sticky, particularly the yellow mustard, pop it in the fridge for 10 minutes. This firms it up, making it easier to roll thin coils without breaking.
Step 3: The Mustard Topping
-
Create the mustard rope:
Roll a thin, even snake of bright yellow clay. Aim for a consistent thickness, roughly the width of a piece of spaghetti. -
Shape the waves:
Drape the yellow rope over the hot dog in a distinct zigzag or wave pattern. Start at one end and let gravity help the curves fall naturally against the sides of the sausage. -
Refine the topping:
Gently press the yellow clay down so it adheres to the hot dog without flattening the rope shape. Trim any excess at the very ends.
Customize Your Dog
Make tiny green clay squares for relish or white translucent bits for onions. You can even mix translucent clay into the red sausage color to make the ‘meat’ look more authentic.
Step 4: Final Touches
-
Texture the bread:
Use a toothbrush or a ball of aluminum foil to gently tap the surface of the bun. This creates a realistic baked bread texture. -
Add shading (Optional):
For a baked look, shave a little brown pastel chalk into a powder. Use a soft brush to dust it lightly onto the high points of the bun. -
Clean up:
Check for any stray fingerprints on the smooth sausage or mustard areas and smooth them out with a drop of baby oil or water. -
Bake or Dry:
Follow the specific instructions for your clay type. If baking polymer clay, ensure you use an oven thermometer to prevent scorching your artwork.
Once totally dry or cooled, your delicious-looking sculpture is ready to trick your friends
French Fries in a Little Holder
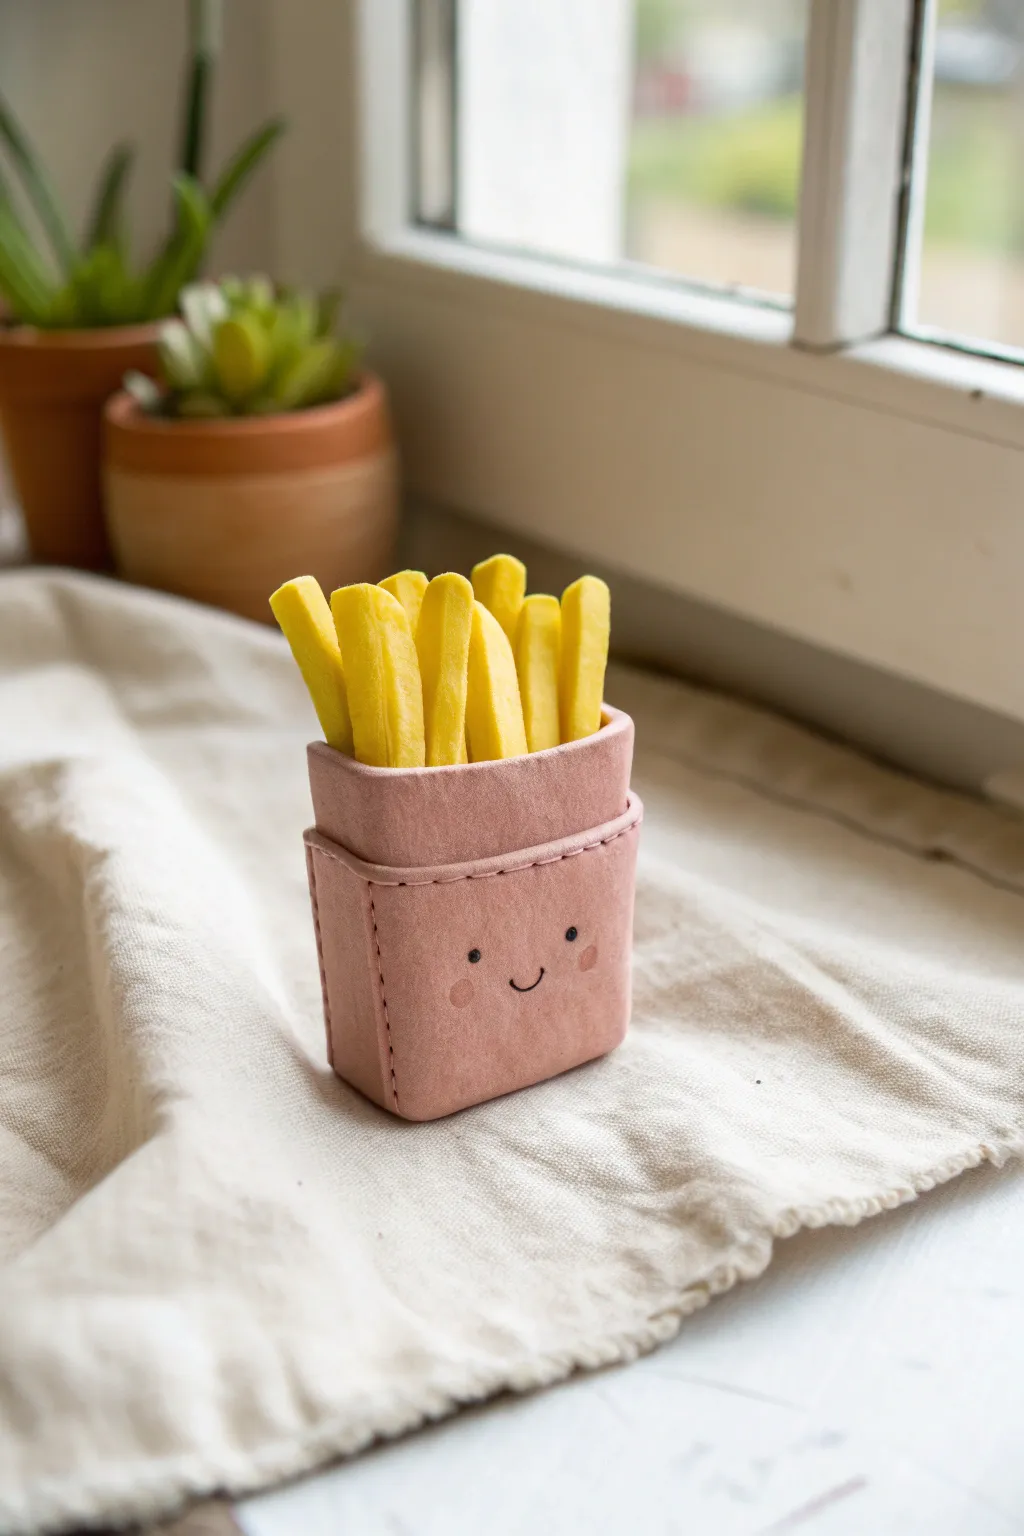
Brighten up your desk with this adorable clay sculpture of French fries nestled in a cheerful pink carton. The simple shapes and friendly face make this a perfect beginner project that results in a charming, stylized snack that never goes stale.
Step-by-Step Guide
Materials
- Polymer clay (Yellow, Dusty Pink/Light Terracotta, Black, Light Pink)
- Clay rolling pin
- sharp craft knife
- Clean work surface (ceramic tile or glass)
- Needle tool or toothpick
- Fine-point black marker (optional)
- Ball stylus tool/dotting tool
- Ruler
Step 1: Shaping the Fries
-
Prepare Yellow Clay:
Start by conditioning a generous amount of yellow clay until it is soft and pliable. Roll it into a thick sheet, approximately 1/4 inch thick. -
Cut Strips:
Using your craft knife and ruler, cut the sheet into long strips about 1/4 to 1/3 inch wide. These will become your individual fries. -
Add Texture:
To make them look realistic, gently pinch the corners of each rectangular strip to soften the edges, giving them a distinct ‘potato cut’ shape rather than being perfectly geometric blocks. -
Vary the Lengths:
Cut your long strips into shorter segments of varying lengths. Having some tall and some short pieces will create a nice, natural arrangement inside the holder. -
Curve Gently:
Take a few of the fries and give them a very subtle bend or twist. Real fries are rarely perfectly straight, and this adds character. -
Pre-Bake Fries (Optional):
I like to bake the fries partially at this stage (for about 10 minutes) if using polymer clay. This hardens them so they don’t get squished when you assemble the container later.
Slumping Sides?
If the clay box walls sag while you work, cut a small piece of cardstock to place inside as a temporary support structure. Remove it before baking unless it’s oven-safe paper.
Step 2: Forming the Fry Holder
-
Roll Pink Clay:
Condition your dusty pink clay. Roll it out into a smooth, even sheet that is slightly thinner than your fries were, about 1/8 inch thick. -
Cut Front and Back Panels:
Cut two identical rectangles for the main body of the holder. The width should be enough to hold your bundle of fries, and the height should cover about two-thirds of the fry length. -
Create Side Strips:
Cut a long strip of the same pink clay to serve as the sides and bottom of the box. The width of this strip determines how deep your fry container will be. -
Assemble the Box:
Attach the long strip along the edges of one rectangle panel to create a U-shape wall. Then place the second rectangle on top to close the box. Smooth the seams gently with your finger or a clay tool. -
Add the Cuff:
Roll another strip of pink clay, slightly wider than the box itself. Wrap this around the top edge of the box to create the folded-over cuff look seen in the photo. -
Create Stitch Details:
Using a needle tool, gently press small, evenly spaced dashes along the top edge of the cuff and down the side seams. This mimics the look of stitched leather or fabric. -
Fill the Holder:
Insert your yellow fries into the container. Arrange them so the taller ones are in the back and they fan out slightly. Pack them in snugly.
Step 3: Adding the Kawaii Face
-
Create Eyes:
Roll two impossibly tiny balls of black clay. Press them gently onto the front of the holder, spacing them wide apart for maximum cuteness. -
Add the Smile:
Roll a very thin ‘snake’ of black clay and cut a tiny U-shape segment. Place this delicately between the eyes. Alternatively, you can indent a smile with a needle tool. -
Blush Cheeks:
Take extremely small amounts of light pink clay and flatten them into ovals. Press these onto the cheeks, just outside the eyes. -
Final Surface Check:
Before baking, give the pink holder a quick check for fingerprints. You can smooth them away with a tiny drop of baby oil on your finger. -
Bake:
Bake the entire sculpture according to your clay package instructions (usually around 275°F/135°C for 15-30 minutes, depending on thickness). -
Cool Down:
Let the piece cool completely in the oven or on a wire rack before handling, as warm clay is fragile.
Make it a Magnet
Make the back of the fry box completely flat instead of 3D. Once baked and cooled, glue a strong neodymium magnet to the back for adorable fridge decor.
Now you have a charming little desk buddy that looks good enough to eat
One-Eyed Monster That Loves Mistakes
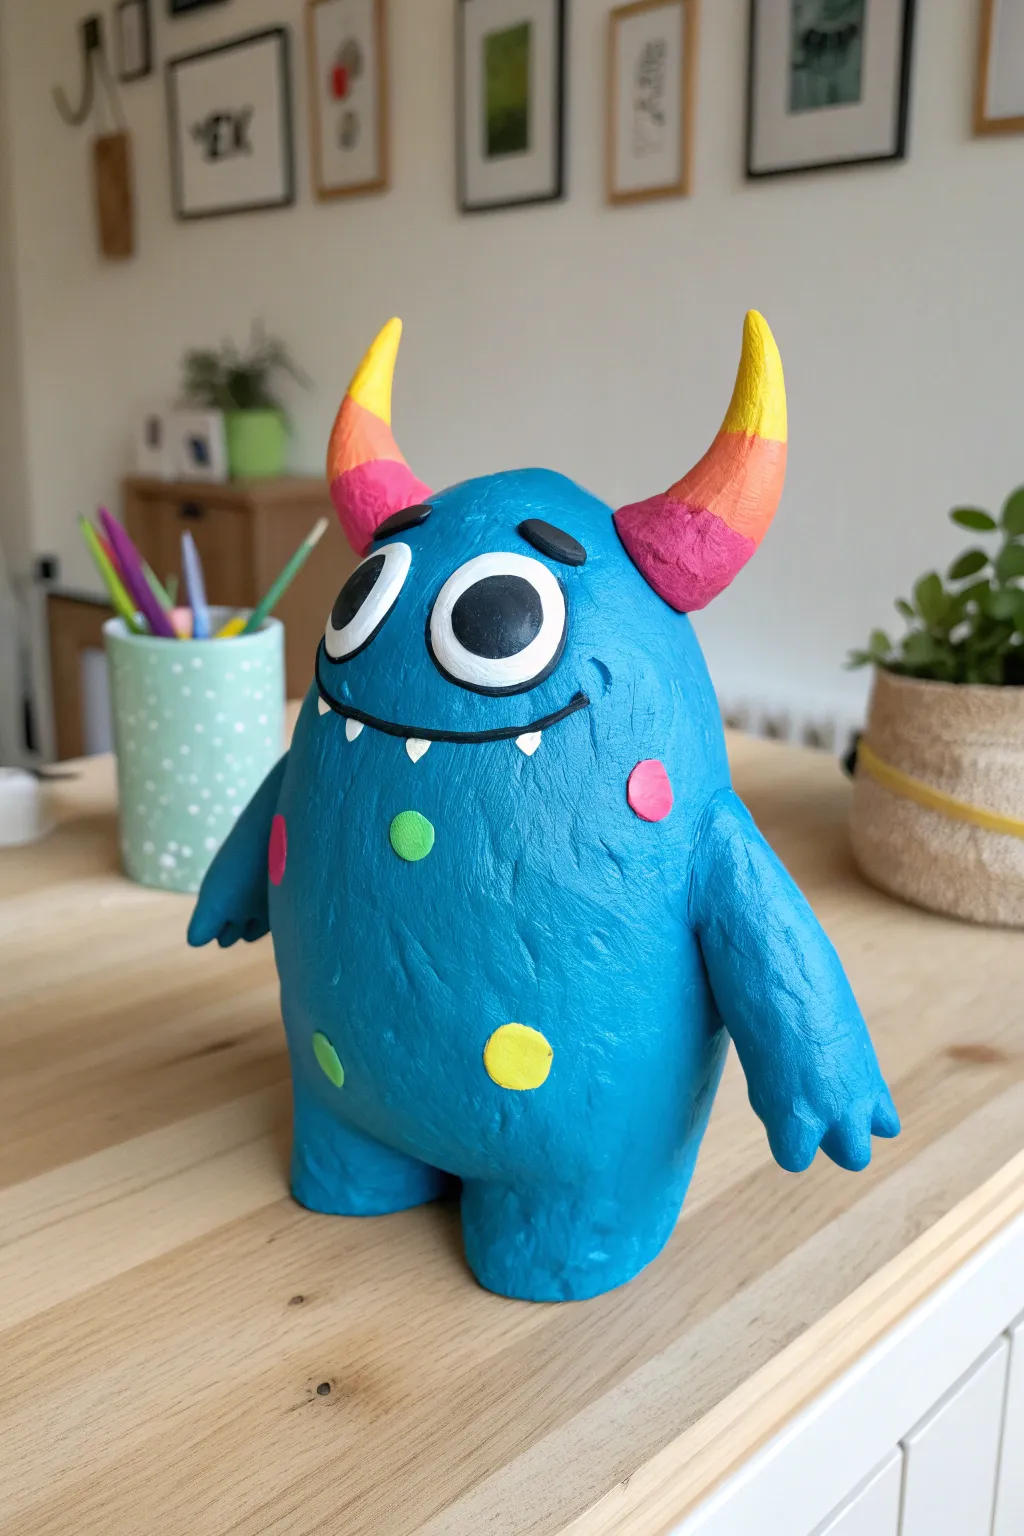
This cheerful blue monster is ready to gobble up your worries and replace them with a smile. With its textured fur, rainbow horns, and bright spots, it makes for a fantastic desk companion or a guardian for your bookshelf.
Step-by-Step Tutorial
Materials
- Air-dry clay (white or pre-colored blue)
- Acrylic paints (bright blue, white, black, yellow, orange, pink, green)
- Sculpting tools (needle tool, ball stylus)
- Aluminum foil
- Water and a small bowl
- Paintbrushes (flat shader and fine detail)
- Varnish or sealant (optional)
Step 1: Building the Body
-
Create the core:
Start by crumpling a ball of aluminum foil into a pear shape. This saves clay and keeps the sculpture lightweight. -
Cover with clay:
Roll out a thick sheet of clay and wrap it completely around your foil core. Smooth the seams with a little water until you have a solid, pear-shaped body. -
Form the feet:
Roll two small balls of clay and flatten them slightly. Attach them to the bottom of the body so your monster can stand up on its own. Blend the clay upwards into the body for a seamless look. -
Add the arms:
Roll two cone shapes for arms. Attach them to the sides of the body, letting them hang down casually. Pinch the ends gently to form little claws or fingers. -
Texture the fur:
Use a needle tool or a stiff bristled brush to scratch short, irregular lines all over the blue body. Leave the tummy area slightly smoother if you prefer, but texturing everywhere gives it a fuzzy look.
Cracked Clay?
If cracks appear while drying, mix a tiny bit of fresh clay with water to make a paste. Fill the crack, smooth it over, and let it dry again.
Step 2: Sculpting the Face and Horns
-
Make the eyes:
Roll two large white balls of clay for the eyes. Press them firmly onto the upper part of the face, making sure they touch each other. -
Add pupils:
Add smaller flat discs of black clay to the center of the white eyes, or save this step for painting later if you want a smoother finish. -
Sculpt the mouth:
Roll a very thin snake of clay for the mouth line and press it onto the face in a wide, happy curve. Add two tiny triangles pointing down for friendly fangs. -
Eyebrows:
Create two small arches of clay and place them just above the eyes to give the monster an expressive look. -
Shape the horns:
Roll two tapered cones for horns. Gently curve them outwards. Attach them firmly to the top of the head using a bit of water or slip (clay and water paste). -
Dry completely:
Let the sculpture dry for at least 24-48 hours. I find that turning it occasionally helps the bottom dry thoroughly.
Make it a Bank
Before drying, cut a slot in the back and ensure the inside is hollow (remove foil after cutting a bottom hole) to turn this into a coin bank.
Step 3: Painting and Details
-
Base coat:
Paint the entire body a bright, vibrant blue. You might need two coats to get into all the textured fur grooves. -
Paint the horns:
Paint the horns in a gradient or striped pattern. Start with pink at the base, blend into orange in the middle, and finish with yellow at the tips. -
Detail the face:
Use white paint for the eyes and teeth. Once dry, use black for the pupils, eyebrows, and the thin line of the mouth. -
Add the spots:
Using pink, green, and yellow paint, dab colorful polka dots scattered across the monster’s belly and sides. -
Add light reflections:
For a spark of life, add a tiny white dot to the black pupil of each eye. -
Seal it up:
Once all paint is fully dry, apply a coat of matte or glossy varnish to protect your new friend.
Now you have a colorful, custom monster to brighten up the room
Unicorn Head With a Twist Horn
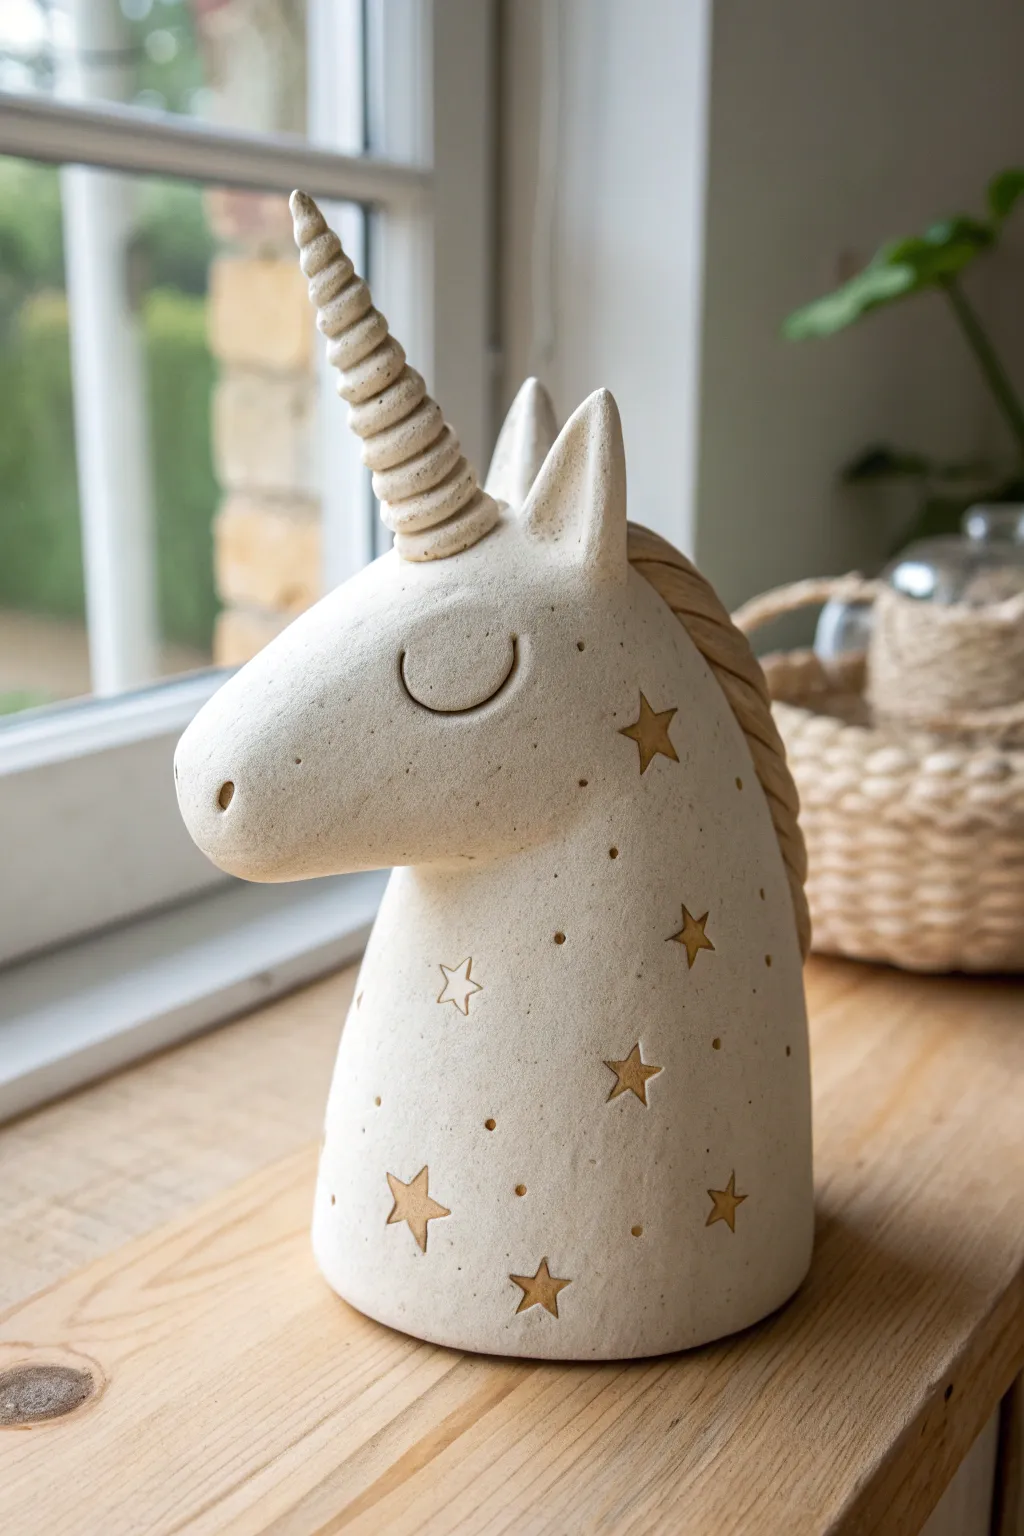
This enchanting unicorn sculpture captures a peaceful moment with its gently closed eyes and celestial details. The matte finish and carved stars give it a timeless, handcrafted feel that creates a lovely decorative piece for a bedroom shelf.
How-To Guide
Materials
- Air-dry clay (white) or polymer clay
- Aluminum foil (for armature)
- Clay sculpting tools (needle tool, loop tool)
- Small star-shaped cookie cutters (optional)
- Water and a small sponge
- Acrylic paints (cream/off-white, metallic gold)
- Fine grit sandpaper
- Paintbrushes (detail and broad)
Step 1: Forming the Base Structure
-
Create the Armature:
Crumple aluminum foil into a thick, slightly tapered cylindrical shape for the neck and a rounded, elongated oval for the head. This saves clay and keeps the sculpture lightweight. -
Connect the Forms:
Attach the head foil piece to the neck piece at a 90-degree angle. Use masking tape to secure them firmly together so the head doesn’t wobble. -
Cover with Clay:
Roll out a slab of clay about 1/4 inch thick. Wrap it entirely around your foil armature, smoothing the seams together with your thumbs and a little water until the foil is completely hidden. -
Refine the Silhouette:
Shape the snout to be slightly narrower than the cheeks. Smooth the transition between the neck and the head so it looks like one organic piece rather than two blocks stuck together.
Cracks appearing?
If small cracks appear while drying, mix a tiny bit of clay with water to make a paste (slip) and fill them in with a brush, then smooth over.
Step 2: Adding Key Features
-
Sculpt the Ears:
Form two triangular wedges of clay. Use your thumb to create a shallow indentation in the front of each. Attach them to the top of the head using the score-and-slip method (scratching both surfaces and adding water) to ensure they stick. -
Create the Twisted Horn:
Roll a tapered coil of clay (like a long carrot). Gently twist it starting from the base to create ridges. -
Attach the Horn:
Score the center of the forehead and the base of the horn. Press the horn firmly into place. I like to smooth a tiny snake of clay around the base to reinforce the connection. -
Detail the Mane:
Roll several long, thick strands of clay. Twist or braid them loosely, then attach them running down the back of the neck. Use a sculpting tool to deepen the hair texture lines.
Step 3: carving Details
-
Carve the Eyes:
Using a curved loop tool or a coffee straw cut in half, press two semi-circles into the face for the closed eyelids. They should curve downward for a sleeping look. -
Add Nostrils:
Use the rounded end of a paintbrush handle to gently press two small indentations at the very front of the snout. -
Imprint the Stars:
If you have tiny cutters, gently press them into the neck and cheeks. If freehanding, use a needle tool or small knife to carefully carve 5-point star outlines. Vary the sizes for interest. -
Add Texture:
Take a clean, stiff-bristled toothbrush or a texturing sponge and dab it lightly all over the clay surface. This removes fingerprints and gives it that stone-like appearance. -
Poke Tiny Dots:
Using a needle tool, poke random small holes scattered among the stars to look like distant stardust. Let the sculpture dry completely (24-48 hours depending on clay thickness).
Turn it into a lamp
Before the clay dries, cut a hole in the bottom and poke the star holes all the way through. Place an LED tea light inside for a glowing nightlight
Step 4: Finishing Touches
-
Sand Smooth:
Once bone dry, lightly sand any sharp edges or rough distinct bumps, but leave the overall surface texture alone. -
Base Coat:
Paint the entire sculpture with a creamy off-white or light beige matte paint. This unifies the color and seals the clay. -
Highlight the Recesses:
Dip a fine brush in metallic gold paint. Carefully fill in the carved star shapes, the eye lines, and the nostrils. -
Wipe Back (Optional):
If you get paint outside the lines, quickly wipe the surface with a damp paper towel. This leaves the gold only in the deep crevices for a clean, professional look.
Place your finished unicorn in a spot where it can catch the light and show off those golden stars
Dragon Egg With Textured Scales
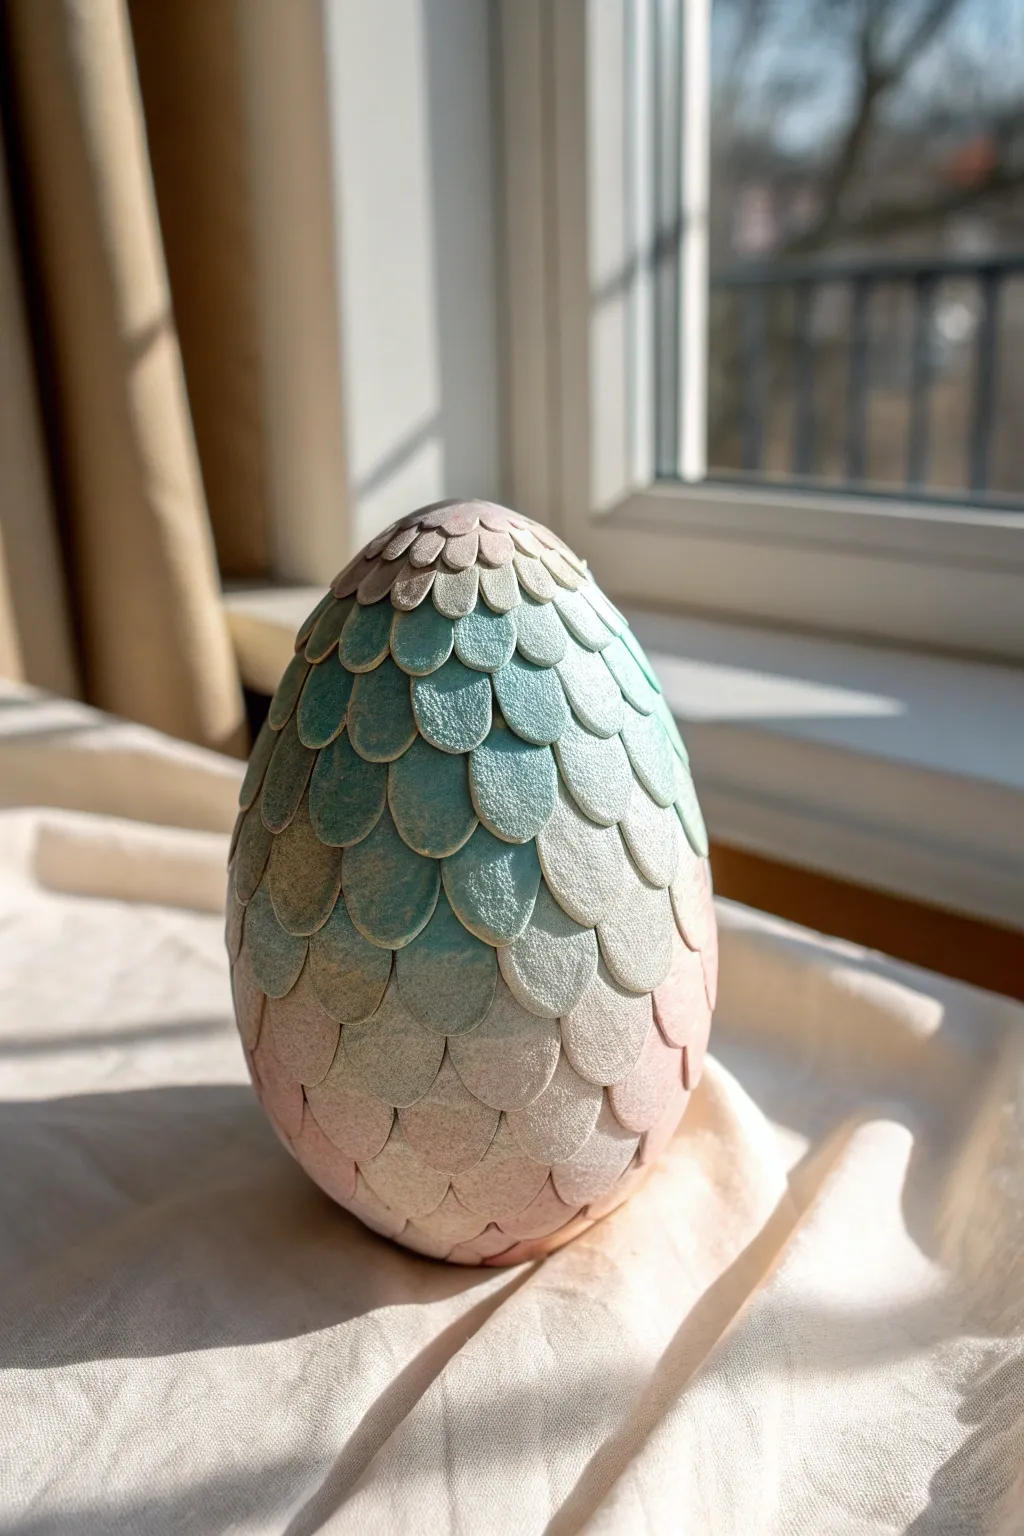
Transform a simple egg shape into a mystical artifact with this stunning textured sculpture. The overlapping scales create a mesmerizing ombre effect that catches the sunlight beautifully.
Step-by-Step Tutorial
Materials
- Air-dry clay (white) or polymer clay
- Aluminum foil
- Small rolling pin or smooth jar
- Small circle cutter (approx. 1 inch) or a small bottle cap
- Acrylic paints (pale pink, teal, white, metallic gold/silver)
- Iridescent medium or pearlescent mixing medium
- Soft paintbrushes
- Sponge dabber (optional)
- Water cup (for smoothing)
Step 1: Base Construction
-
Form the core:
Crumple aluminum foil into an egg shape about the size of a large avocado. Pack it tightly so it creates a firm base; this saves clay and keeps the sculpture lightweight while reducing drying time. -
Cover the core:
Roll out a thin sheet of your clay and wrap it completely around the foil egg. Use a bit of water on your fingertips to smooth out any seams or cracks until you have a perfect, smooth egg surface.
Step 2: Creating the Scales
-
Roll the clay:
Roll out more clay on a clean surface until it is about 1/8 inch thick. Consistency is key here so all your scales look uniform. -
Cut the shapes:
Use your small circle cutter to punch out many small circles. You will need dozens of these, so make a large batch at once. -
Shape into scales:
Take a circle and gently pinch one side to create a slight teardrop or shield shape, slightly flattening the bottom edge where it will attach to the egg. -
Texture application (Optional):
If you want extra texture like in the photo, gently press a piece of coarse fabric or sandpaper onto each scale before attaching it.
Scales Falling Off?
If using air-dry clay, apply a tiny dab of white PVA glue or water-mixed ‘slip’ to the back of each scale before attaching it to the base egg for extra grip.
Step 3: Assembly
-
Start at the top:
Begin placing your first scale at the very top point of the egg. This acts as the capstone. -
Begin the layering:
Work your way down in concentric circles, tucking the top of each new scale underneath the loose edge of the scale above it, just like roofing tiles. -
Alternate positions:
As you start a new row, place the center of the new scale directly below the gap between the two scales above it. This staggered brick-pattern creates a natural reptilian skin look. -
Secure the bond:
Press firmly on the upper half of each scale to adhere it to the egg base, leaving the bottom rounded edge slightly lifted for dimension. -
Finish the bottom:
Continue until you reach the very bottom. You may need to trim the final scales to make them sit flat so the egg doesn’t wobble. -
Dry completely:
Follow your clay package instructions to let it dry or bake fully. Air-dry clay often needs 24-48 hours for a piece this thick.
Add a Hidden Surprise
Before sealing the foil core, you can place a small rattle insert or a few dried beans inside deeply. The egg will make a mysterious sound when shaken!
Step 4: Painting & Finishing
-
Base coat:
Once dry, paint the entire egg with a mix of metallic white or pearl paint to start with a glowing foundation. -
Mix pastel gradients:
Prepare a palette with pale pink, soft teal, and a silvery champagne color. I prefer to mix a little iridescent medium into each color to ensure they shimmer. -
Apply the ombre:
Creating a gradient, sponge the pink near the bottom third, blend into the silvery-gold in the middle, and finish with the soft teal near the top. -
Blend the transitions:
While the paint is still wet, use a clean, slightly damp brush to gently blur the lines where the colors meet so the transition looks seamless. -
Dry-brush highlights:
Dip a dry stiff brush into pure metallic silver or white, wipe most of it off on a paper towel, and lightly graze only the raised edges of the scales to make the texture pop.
Place your finished egg near a window to watch the iridescent colors shift as the light changes throughout the day
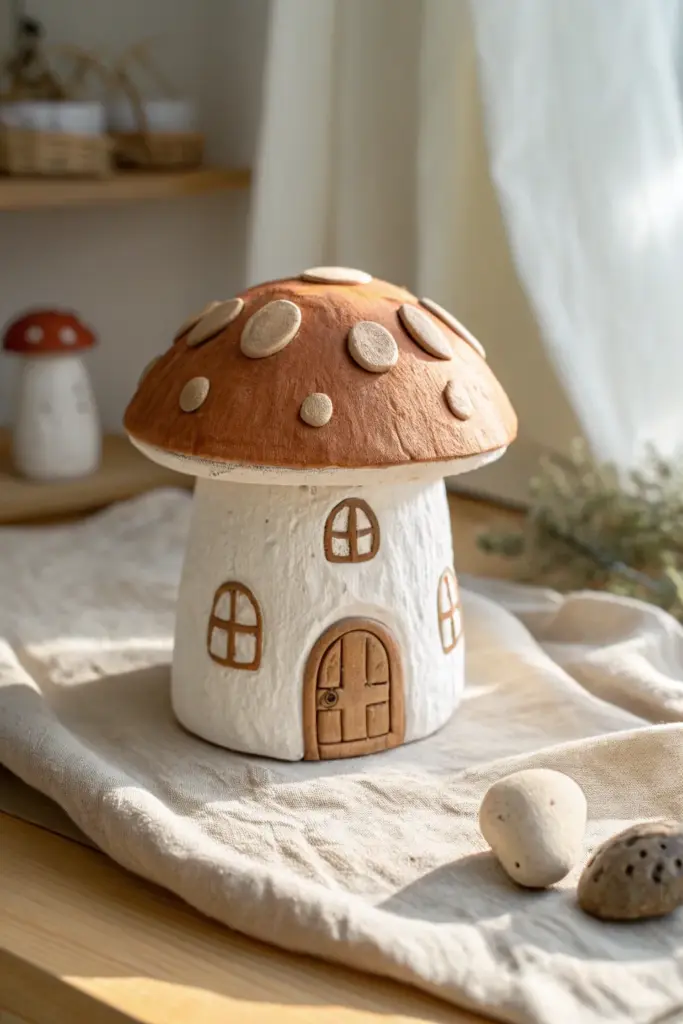
Mushroom Cottage for Storytime Play

This charming toadstool dwelling features a textured terracotta-syle roof dotted with cream spots and a cozy white-washed cottage base. With its sweet arched door and windows, it’s the perfect centerpiece for a fairy garden or an imaginative playset.
Detailed Instructions
Materials
- Air-dry clay (white or light grey)
- Acrylic paints (burnt orange, white, dark brown)
- Sculpting tools (needle tool, small spatula)
- Texturing brush or old toothbrush
- Rolling pin
- Small bowl of water
- Aluminum foil (for armature)
- Fine-grit sandpaper
- Clear matte varnish (optional)
Step 1: Shaping the Base
-
Prepare the core:
Begin by crinkling a sheet of aluminum foil into a stout cylinder shape that tapers slightly towards the top. This saves clay and keeps the sculpture lightweight. -
Cover with clay:
Roll out a slab of white air-dry clay to about 1/4 inch thickness. Wrap this slab around your foil cylinder, trimming away excess. -
Smooth the seams:
Dip your finger in a little water and smooth out the vertical seam where the clay joins, blending it until it disappears. Ensure the bottom is flat so it stands sturdily. -
Create texture:
Using a stiff-bristled brush or an old toothbrush, gently tap the surface of the wet clay all over. This creates a realistic, stucco-like plaster texture for the cottage walls.
Cracks in the Clay?
If small cracks appear as the clay dries, mix a tiny amount of fresh clay with water to make a paste (slip) and fill them in with a brush.
Step 2: Sculpting the Roof
-
Form the cap shape:
Create a second ball of foil, flattening it into a wide dome shape. Roll out a larger circle of clay and drape it over this dome. -
Refine the edges:
Trim the edges of the roof so they are mostly even but retain a slightly organic, uneven feel. Curl the very bottom edge slightly upward to give it character. -
Texture the roof:
For the mushroom cap, you want a slightly velvety look. I like to use a dense sponge to dab the surface gently, softer than the texture used on the base. -
Attach the spots:
Roll out small bits of clay into flat, imperfect circles of varying sizes. Score the back of each spot and the roof surface, add a drop of water, and press them firmly onto the mushroom cap. -
Dry partially:
Let both the base and the roof dry separately for about an hour so they firm up before assembly.
Step 3: Windows and Door
-
Craft the door:
Roll a small oval slab for the door. Use a needle tool to carve vertical wood-grain lines and a horizontal line through the middle. -
Make the frame:
Roll a very thin snake of clay and wrap it around the door slab to create a raised doorframe. Attach a tiny clay bead for the doorknob. -
Attach the door:
Score and slip the back of the door, then press it onto the bottom center of your cottage base. Blend the edges of the frame into the wall slightly. -
Form windows:
Make small arched shapes for windows. Add thin strips of clay in a cross shape over them to create windowpanes. -
Mount the windows:
Attach three windows to the base using the score-and-slip method—one above the door and two on the sides. -
Join the pieces:
Once the components are firm but not fully dry, place the roof onto the base. You can use a little wet clay slurry as glue between the two parts to secure them.
Pro Tip: Hidden Storage
Don’t glue the roof to the base! If you create a lip on underneath the roof cap, it stays secure but lifts off, turning the base into a secret jar.
Step 4: Painting and Finishing
-
Base coat the roof:
After the clay is fully dry (24-48 hours), paint the entire roof cap with a burnt orange or terracotta acrylic paint. -
Highlight the spots:
Paint the raised circles on the roof with a creamy beige color. You might need two coats to cover the orange underneath completely. -
Paint the woodwork:
Use a light brown paint for the door and window frames. Once dry, wash over it with watery dark brown paint and wipe it off quickly to highlight the wood grain grooves. -
Whiten the walls:
If your clay dried greyish, give the base walls a coat of white acrylic, dabbing it on so you don’t fill in the textured stucco effect. -
Protect the piece:
Finish with a clear matte varnish spray to seal the paint and give the mushroom a unified, soft finish.
Now you have a whimsical little home ready for woodland creatures or fairies to move right in