If you’ve got a plain plate and a little urge to paint something pretty, flowers are always a solid idea. Here are my go-to floral plate painting approaches—from classic, beginner-friendly blooms to a few fun twists that feel extra special.
Classic Daisy Rim Border
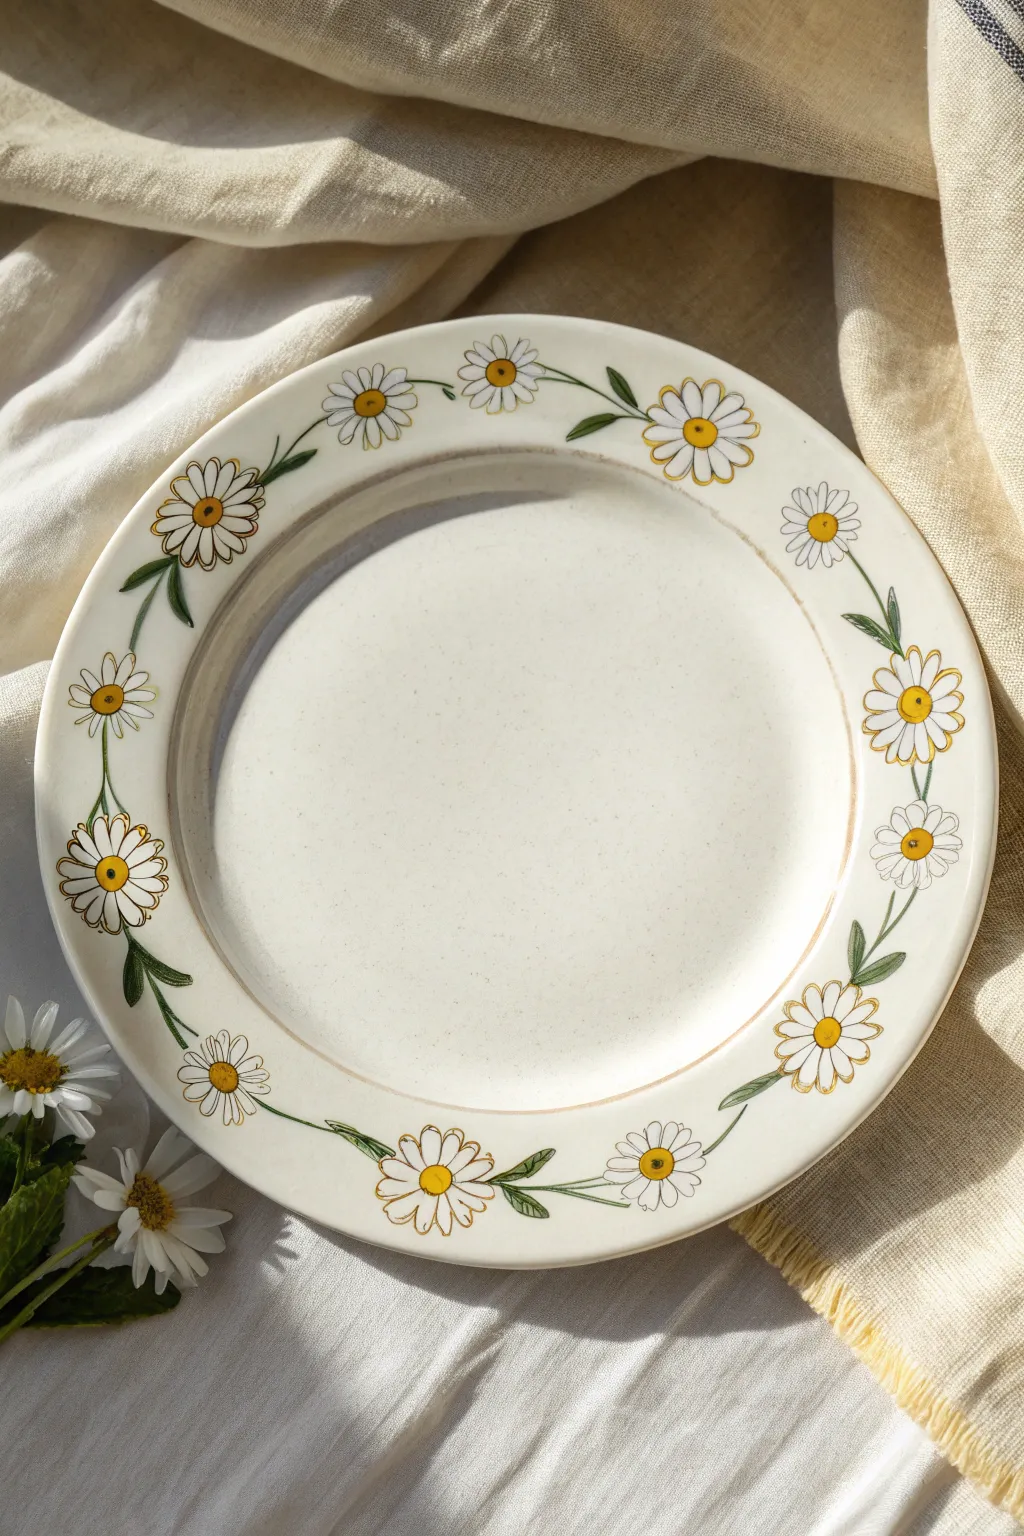
Transform a plain ceramic plate into a charming cottage-core centerpiece with this delicate daisy chain design. The illustrative style features simple yellow centers, white petals, and flowing green vines that dance around the rim for a classic, timeless look.
Step-by-Step
Materials
- White or cream ceramic plate (glazed)
- Pebeo Porcelaine 150 paints (or similar ceramic paints)
- Colors: Ivory or Warm White, Sun Yellow, Olive Green
- Fine liner brush (size 00 or 0)
- Small round brush (size 2)
- Rubbing alcohol and cotton pads
- Fine-tip ceramic marker (black or dark brown) – optional
- Paper towels
- Palette or small dish
- Oven (for curing)
Step 1: Preparation & Planning
-
Clean the surface:
Before you begin, wipe the entire rim of the plate thoroughly with rubbing alcohol on a cotton pad. This removes invisible oils or fingerprints that could prevent the paint from adhering properly. -
Map out spacing:
Roughly visualize where your daisies will sit. You want them evenly spaced around the rim. You can lightly mark small dots with a washable marker to plan out 12-14 flower locations before committing with paint.
Step 2: Painting the Flowers
-
Paint the centers:
Load your round brush with Sun Yellow paint. At each designated spot, paint a small, solid circle. These don’t need to be perfectly round; a little irregularity adds to the hand-painted charm. -
Let centers dry:
Allow the yellow centers to dry to the touch (usually 15-20 minutes) so your white petals don’t smudge into them. -
Outline the petals:
Using your fine liner brush and the Ivory/Warm White paint mixed with a tiny drop of water for flow, paint outline shapes of petals radiating from the yellow centers. Keep the petals slightly separated. -
Fill the petals:
I prefer to use the same liner brush to gently fill in the petals. Don’t make them too opaque; a slightly translucent wash looks more like vintage china. -
Add petal details:
Once the white is semi-dry, use a very fine brush or a ceramic marker to add subtle definition lines. The reference image uses thin, brownish-black outlines to define individual petals, giving it that distinct illustrative look. -
Detail the centers:
Add a tiny crescent shape or a few dots of a darker orange-yellow (or thinned brown) to the bottom edge of each yellow center to give them dimension.
Brush Control Secret
For the finest lines on the stems and outlines, rest your pinky finger on the dry center of the plate to steady your hand while you paint the rim.
Step 3: Adding Greenery
-
Connect the vine:
Using the Olive Green paint and your liner brush, paint a single, thin curving stem that connects one flower to the next. Let the line have a natural ‘bounce’ rather than drawing it ruler-straight. -
Add primary leaves:
Paint small, elongated leaves sprouting from the main vine stem. Place them near the base of the flower heads. -
Layer secondary leaves:
Fill in any large gaps on the rim with extra leaves or tiny budding stems. Keep the stroke swift—press down for the belly of the leaf and lift up for the tip. -
Define the veins:
If you used a ceramic pen for the petals, use it here to draw a central vein down the middle of the larger green leaves for consistency.
Make It a Set
Mix up the design for a salad plate by painting just three large daisies clustered on one side, leaving the rest of the rim white.
Step 4: Finishing Touches
-
Clean up edges:
Dip a cotton swab in rubbing alcohol or water to gently wipe away any paint splatters or wobbly lines while the paint is still workable. -
Dry time:
Allow the plate to air dry for at least 24 hours. This is crucial for the paint to settle before baking. -
Bake to cure:
Place the plate in a cool oven, then turn it to 300°F (150°C). Bake for 35 minutes (or per your paint manufacturer’s instructions). Turn the oven off and let the plate cool down completely inside the oven to prevent cracking.
Once baked and cooled, your beautiful custom dinnerware is ready to be admired at your next brunch


Wildflower Meadow Around the Edge
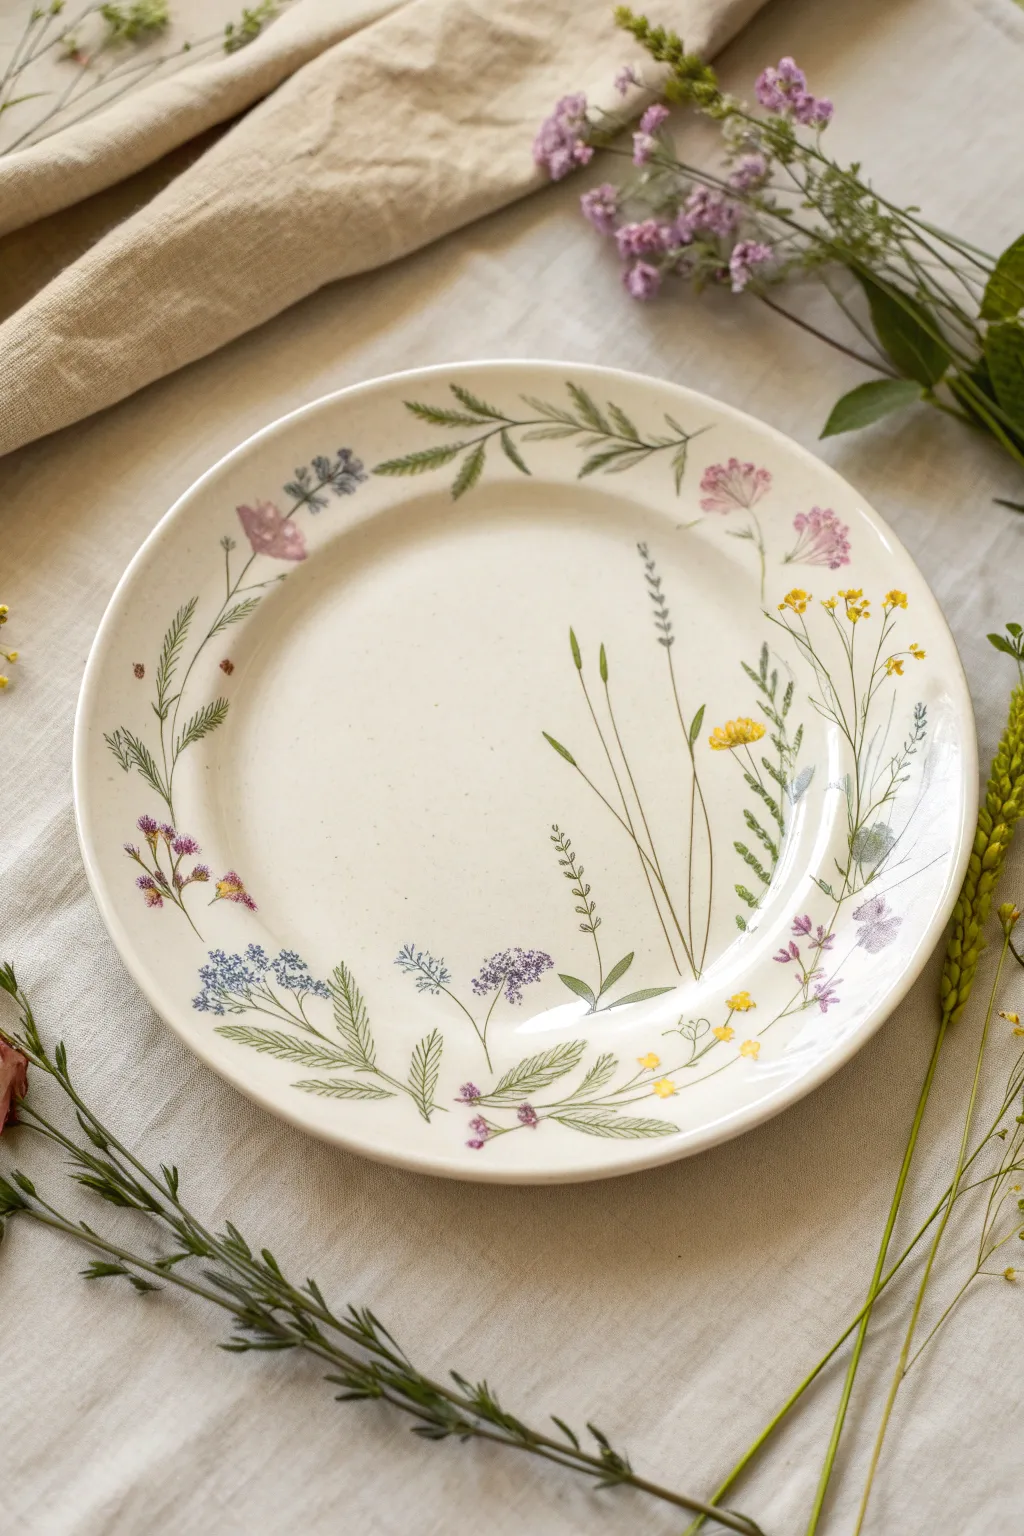
Capture the airy beauty of a summer field with this botanical plate design. By painting individual wildflower stems that dance around the rim, you create a natural, organic border that frames your food beautifully.
Detailed Instructions
Materials
- White or cream ceramic plate (oven-safe)
- Pebeo Porcelaine 150 paints (or similar ceramic paints)
- Colors: Olive Green, Sap Green, Deep Purple, Lavender, Golden Yellow, Rose Pink, Periwinkle Blue
- Fine detail brushes (size 0 and 00 round)
- Small liner brush
- Isopropyl alcohol and paper towels
- Palette or small ceramic tile for mixing
- Cotton swabs for cleanup
- Domestic oven for curing
Step 1: Preparation & Layout
-
Clean surface:
Before you begin, wipe the entire plate surface thoroughly with isopropyl alcohol. This removes any finger oils or dust that might prevent the paint from adhering properly. -
Plan the flow:
Visualize the rim as a clock face. Instead of sketching directly, plan to place your largest stems at the 3, 6, 9, and 12 positions first to ensure balance, leaving negative space in the very center of the plate.
Natural Variety Pro-Tip
Don’t rinse your brush perfectly between green stems. Allowing slight mixing of olive, sap, and brown created variances in the greenery that look much more realistic than a single flat color.
Step 2: Painting the Greenery
-
Mix your greens:
Mix a touch of Olive Green with Sap Green to create a natural, muted stem color. You want it to look organic, not electric green. -
Paint long grass stems:
Using your liner brush, paint thin, sweeping lines starting from the inner well of the plate and extending outward toward the rim. Vary the lengths and curves so they don’t look like soldiers in a row. -
Add leafy textures:
Switch to a size 0 round brush. On some of your stems, add small, alternating tear-drop shaped leaves. For others, create fern-like textures by painting tiny, short strokes perpendicular to the main stem. -
Create variation:
I like to leave some stems completely bare to represent tall grasses or reed-like plants. This variation keeps the design feeling light and airy.
Step 3: Adding Floral details
-
Clusters of purple:
Dip a fine brush into Deep Purple. Create tiny clusters of dots at the top of a few stems to resemble flowering herbs. Keep the dots loose and not too perfectly round. -
Yellow buttons:
Use Golden Yellow to paint small, flat-topped flower heads. These should look like yarrow or tansy. Add tiny green stems connecting them to the main stalk. -
Pink accents:
Mix Rose Pink with a tiny bit of water or thinner (specific to your paint brand) to make it translucent. Paint soft, bell-shaped blooms on drooping stems for a gentle pop of color. -
Blue sprigs:
Using Periwinkle Blue, add small, multi-petaled flowers on the lower section of the rim. Use quick, short dabs of the brush rather than painting detailed petals. -
Lavender stalks:
For vertical variety, paint a few tall, straight stems. Along the top third, add tiny dashes of Lavender on either side of the stem to mimic a lavender sprig.
Uneven Paint Application?
If your paint looks streaky or too thick, dip your brush in a tiny drop of paint thinner or medium, not water. Water can break down the binder in ceramic paints and weaken the final bond.
Step 4: Refining & Curing
-
Add depth:
Once the base layers are slightly dry, go back with a darker green and add thin shadow lines to the bottom of the larger leaves. This adds dimension without heaviness. -
Clean edges:
If any paint strayed into the center eating area where you want it plain, use a damp cotton swab to wipe it away immediately for a crisp edge. -
Dry thoroughly:
Let the plate sit undisturbed for 24 hours. The paint needs to be completely bone-dry before the baking process begins. -
Bake to set:
Place the plate in a *cold* oven. Set temperature to 300°F (150°C) – or per your paint manufacturer’s instructions. Once the oven hits temp, bake for 35 minutes. -
Cool down:
Turn the oven off and leave the plate inside until it is completely cool. Removing it while hot can cause thermal shock and crack your beautiful work.
Now you have a stunning piece of functional art that brings the garden to your table settings


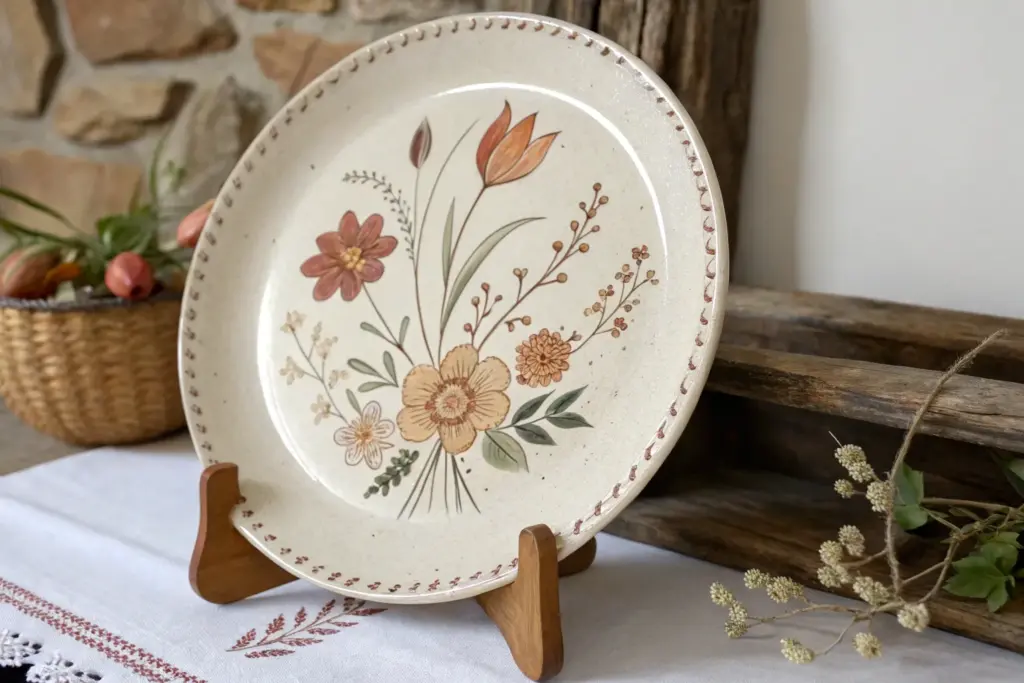
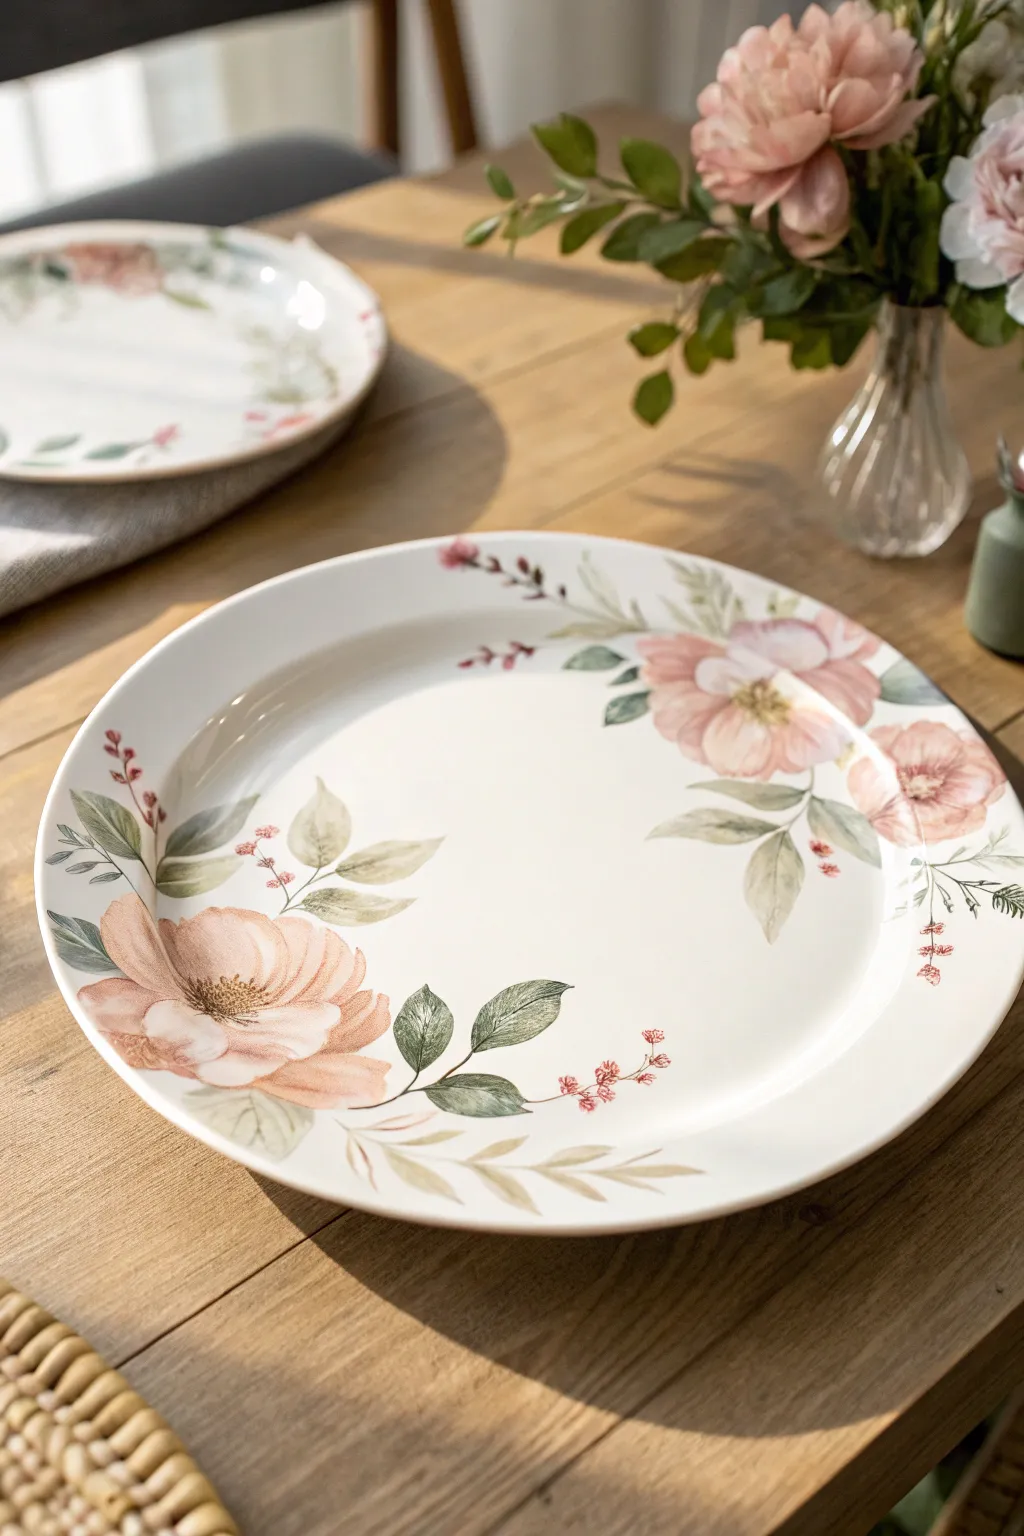
Asymmetrical C-Curve Floral Vine
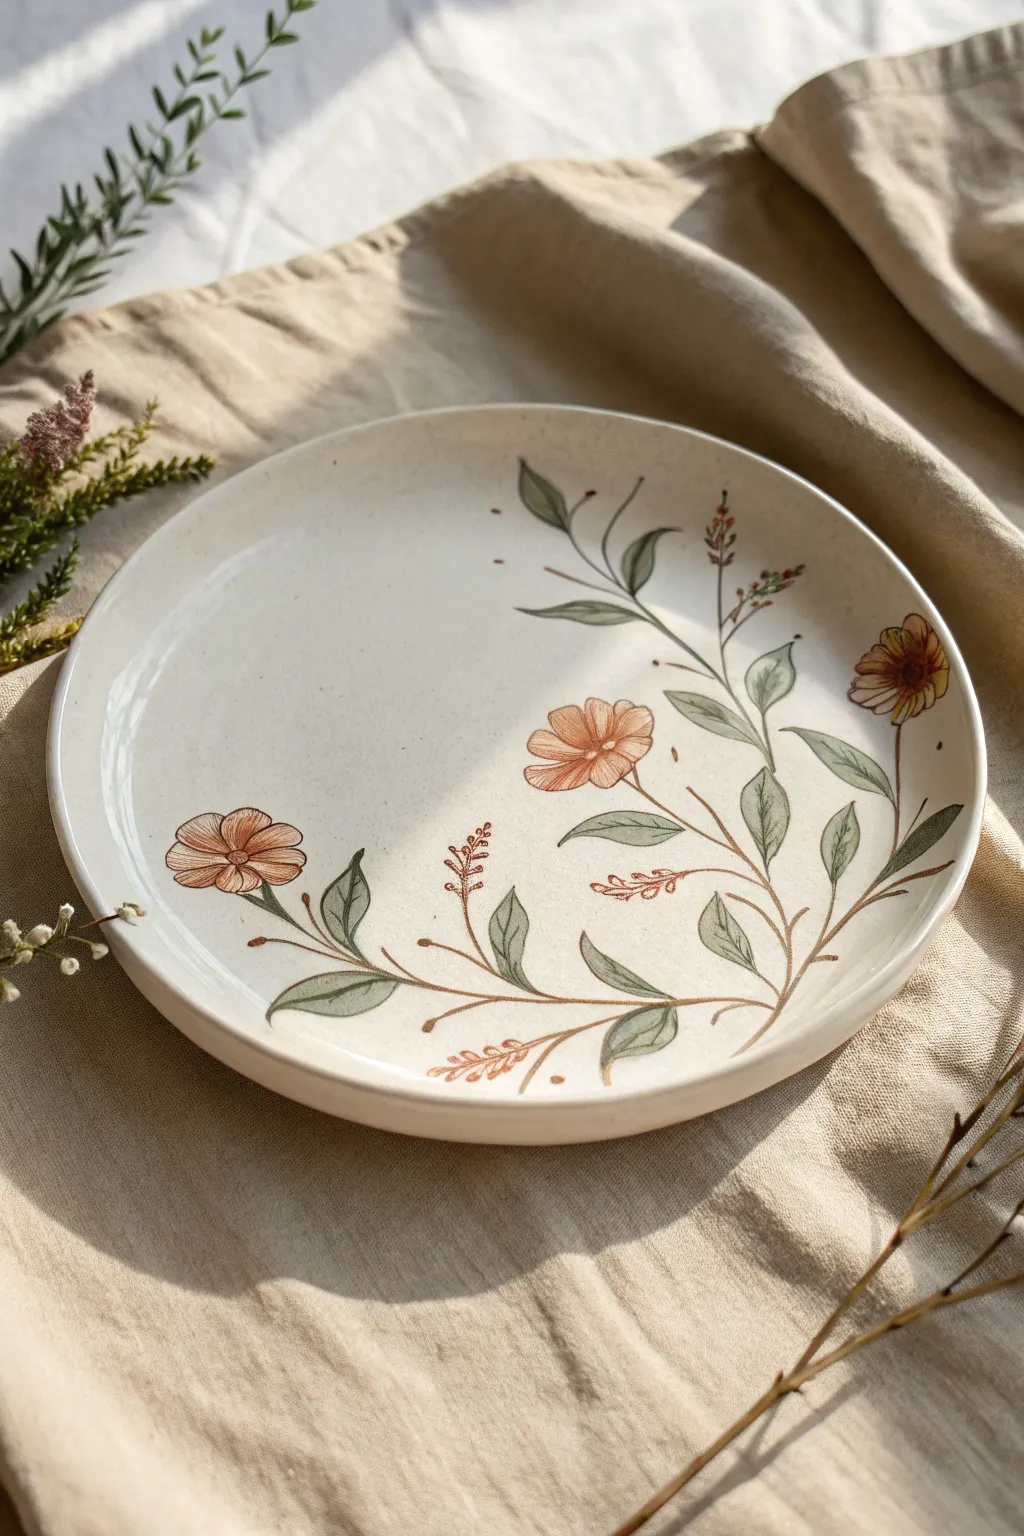
This elegant project transforms a plain ceramic plate into a botanical masterpiece using a graceful, asymmetrical vine composition. It features warmth-filled terracotta blooms and sage green foliage that sweep across the rim in a natural, organic curve.
Step-by-Step Guide
Materials
- Glazed ceramic plate (cream or off-white)
- Pebeo Porcelaine 150 paints (or similar high-quality ceramic enamel)
- Colors: Terracotta/Burnt Orange, Sage Green, Deep Brown, Yellow Ochre
- Fine liner brush (size 00 or 0)
- Small round brush (size 2)
- Rubbing alcohol and paper towel
- Palette for mixing
- Oven (for curing)
Step 1: Preparation & Mapping
-
Clean the surface:
Before laying down a single stroke, wipe the entire plate surface with rubbing alcohol on a paper towel. This removes invisible oils and fingerprints that could prevent the ceramic paint from adhering propertly. -
Plan the C-curve:
Visualize a majestic crescent shape starting heavily at the bottom center and sweeping up the right rim, tapering off near the top. You can lightly mark the main stem line with a waxy pencil or a very faint wash of watered-down brown paint as a guide.
Step 2: Painting the Structure
-
Base stems:
Using your fine liner brush and thin, fluid brown paint, draft the main vine. Start from the bottom, creating a central curved branch that reaches towards the right rim. Add smaller offshoot branches that will eventually hold the leaves and flowers. -
Leaf placement:
Switch to the size 2 round brush mixed with a sage green. Paint almond-shaped leaves along the stems. Keep the leaves slightly translucent; ceramic paint is often best when not applied too thickly. -
Leaf detailing:
While the green is still slightly tacky or just dry, use your fine liner with a darker green or brown to draw a central vein down each leaf. Keep these lines incredibly thin for that delicate, botanical illustration look. -
Adding delicate sprigs:
Intersperse tiny, fern-like sprigs along the main vine using the brown liner. These look like little feathery accents that fill the negative space without overpowering the main flowers.
Fixing Shaky Lines
If your stem lines feel wobbly, wait for them to dry, then use a wooden toothpick to gently scratch and ‘carve’ the edges back into smooth curves.
Step 3: Adding Blooms
-
Blocking the main flowers:
Mix a warm terracotta orange. Paint three main flowers: one facing left near the bottom curve, one central facing upward, and one smaller bud or bloom near the top right. Use short, sweeping strokes to mimic petals radiating from a center. -
Layering petal details:
Once the base orange is dry to the touch, mix a slightly darker, reddish-orange. Use the fine liner to trace delicate outlines around the petals and draw lines from the center outward to create texture and volume. -
Painting the centers:
Dot the centers of the open flowers with a mix of yellow ochre and brown. I like to stipple these dots to give them a pollen-like texture. -
Bud clusters:
At the ends of the feathery brown sprigs you painted earlier, add tiny dots of burnt orange or red-brown to represent unbloomed buds or berries.
Add Vintage Speckles
For a rustic pottery feel, flick a toothbrush loaded with watered-down brown paint over the finished dry design before baking.
Step 4: Refinement & Curing
-
Final stem connections:
Check your composition to ensure all flowers and leaves are physically connected to a stem. Extend any brown lines needed to join floating elements to the main vine. -
Cleanup:
If there are any stray marks or smudges, use a damp cotton swab or a toothpick to gently scrape or wipe away the mistake before the paint fully hardens. -
Air drying:
Allow the plate to air dry for at least 24 hours. The paint needs to be completely moisture-free before baking. -
Baking process:
Place the plate in a cool oven. Turn the oven to 300°F (150°C) or the temperature specified by your paint manufacturer. Bake for 35 minutes. -
Cooling down:
Turn the oven off and leave the door closed. Let the plate cool down completely inside the oven to prevent cracking from thermal shock.
Once baked, this floral plate is ready to bring a touch of handcrafted elegance to your table setting


Single Center Bloom Statement
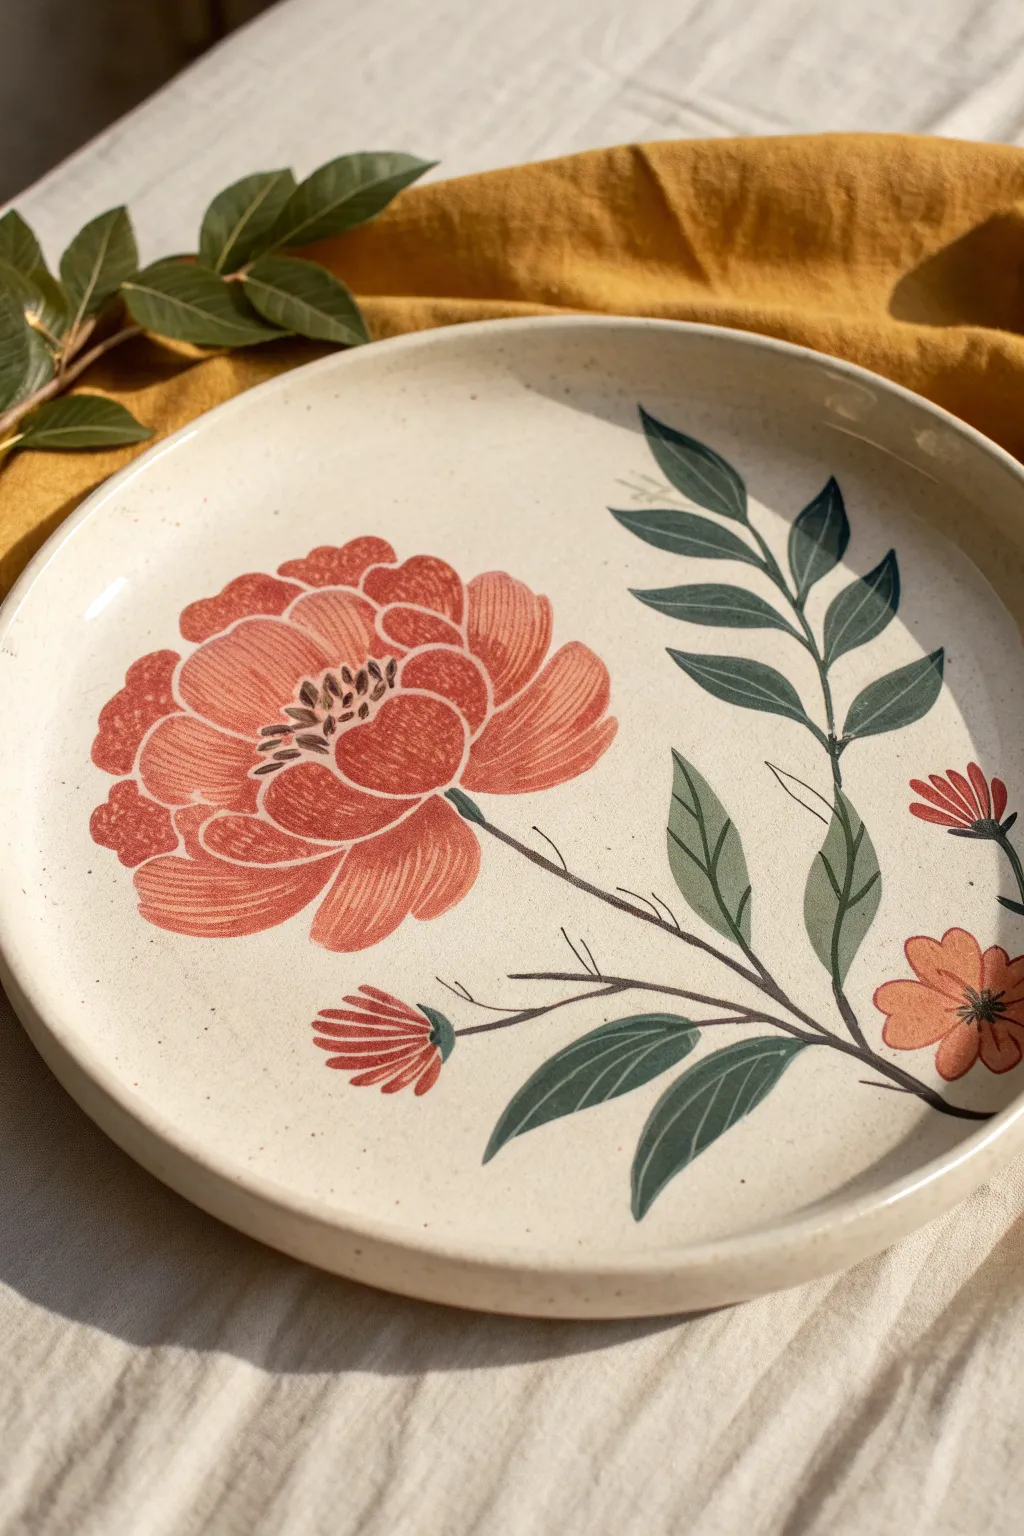
Transform a plain ceramic blank into a stunning botanical centerpiece with this elegant peony design. Featuring a large, textured red bloom and delicate trailing greenery, this project uses ceramic underglazes to create a warm, artisanal look that feels both classic and modern.
How-To Guide
Materials
- Bisque ceramic plate (8-10 inch diameter, cream or speckled clay body)
- Ceramic underglazes: Warm Red/Coral, Deep Green, Sage Green, Dark Brown/Black
- Pencil for sketching
- Round brush (size 4 or 6) for filling shapes
- Fine liner brush (size 0 or 00) for detailing
- Clear dipping glaze
- Pottery kiln access
- Sponge and water bowl
Step 1: Preparation and Sketching
-
Clean the surface:
Begin by wiping down your bisque plate with a slightly damp sponge. This removes any dust that might resist the underglaze application. -
Map out the composition:
Using a regular pencil, lightly sketch the main stem extending diagonally from the bottom right towards the center left. Don’t worry about erasing; pencil marks burn off in the kiln. -
Define the bloom:
Sketch a large, circular shape to the left of the center for the main peony. Divide it loosely into petal layers, making the ones closer to the center smaller and tighter. -
Add foliage placement:
Draw the secondary stem branching upwards to the right. Sketch the outlines of pointed, elongated leaves along this branch and near the base.
Smudged Lines?
If you smudge a fine line while detailing, don’t wipe it while wet! Let it dry completely, then gently scrape the mistake off with an X-Acto knife or needle tool.
Step 2: Blocking in Color
-
Paint the first petal layer:
Using your warm red or coral underglaze and the round brush, fill in the petal shapes. Apply the color somewhat semi-opaquely; a slightly uneven application adds to the illustrated charm. -
Layer the color:
Once the first coat is dry to the touch, apply a second coat to the outer edges of the petals to create subtle depth. -
Paint the leaves:
Switch to your deep green underglaze. Fill in the leaf shapes with smooth, confident strokes, following the direction of growth from stem to tip. -
Add secondary blooms:
There are two smaller buds: one near the bottom and one on the right edge. Paint these with the same coral red used for the main flower. -
Let it dry completely:
Wait until the blocked-in colors are matte and dry before starting the detail work. Wet underglaze can smudge easily.
Step 3: Line Work and Detailing
-
Outline the petals:
To achieve that specific illustrative style, thin your red underglaze slightly with water. Use a fine liner brush to outline each individual petal with thin, delicate lines. -
Add petal texture:
Within each petal, paint very fine, closely spaced lines following the curve of the petal. This hatching technique gives the flower its texture and volume. -
Detail the flower center:
Using the dark brown or black underglaze and your finest brush, paint the stamen in the center of the peony. Little dots and tiny dashes work best here to suggest pollen. -
Define the stems:
Using the dark brown underglaze, carefully trace over your main stem lines. Keep the pressure light so the line varies in thickness naturally, like a real branch. -
Vein the leaves:
Mix a tiny bit of black into your green or use the straight dark brown to paint a central vein down each leaf. Keep these lines extremely thin. -
Create the smaller bud details:
Add the sepals (the green base of the flower) to the smaller red buds using your green underglaze.
Sgraffito Twist
Instead of painting the white lines on top, paint a solid shape and use a carving tool to scratch through the underglaze to reveal the white clay beneath for texture.
Step 4: Finishing
-
Check for mishaps:
I like to take a moment here to gently scratch away any stray droplets of underglaze with a needle tool or a clean, stiff brush. -
Apply clear glaze:
Dip the entire plate into a clear transparent glaze using tongs. Shake off the excess gently to ensure an even coat. -
Fire the piece:
Load the plate into the kiln and fire it to the temperature required by your specific clay and glaze body (usually Cone 5 or 6 for stoneware).
Once fired, your plate is food-safe and ready to hold your favorite treats

The Complete Guide to Pottery Troubleshooting
Uncover the most common ceramic mistakes—from cracking clay to failed glazes—and learn how to fix them fast.
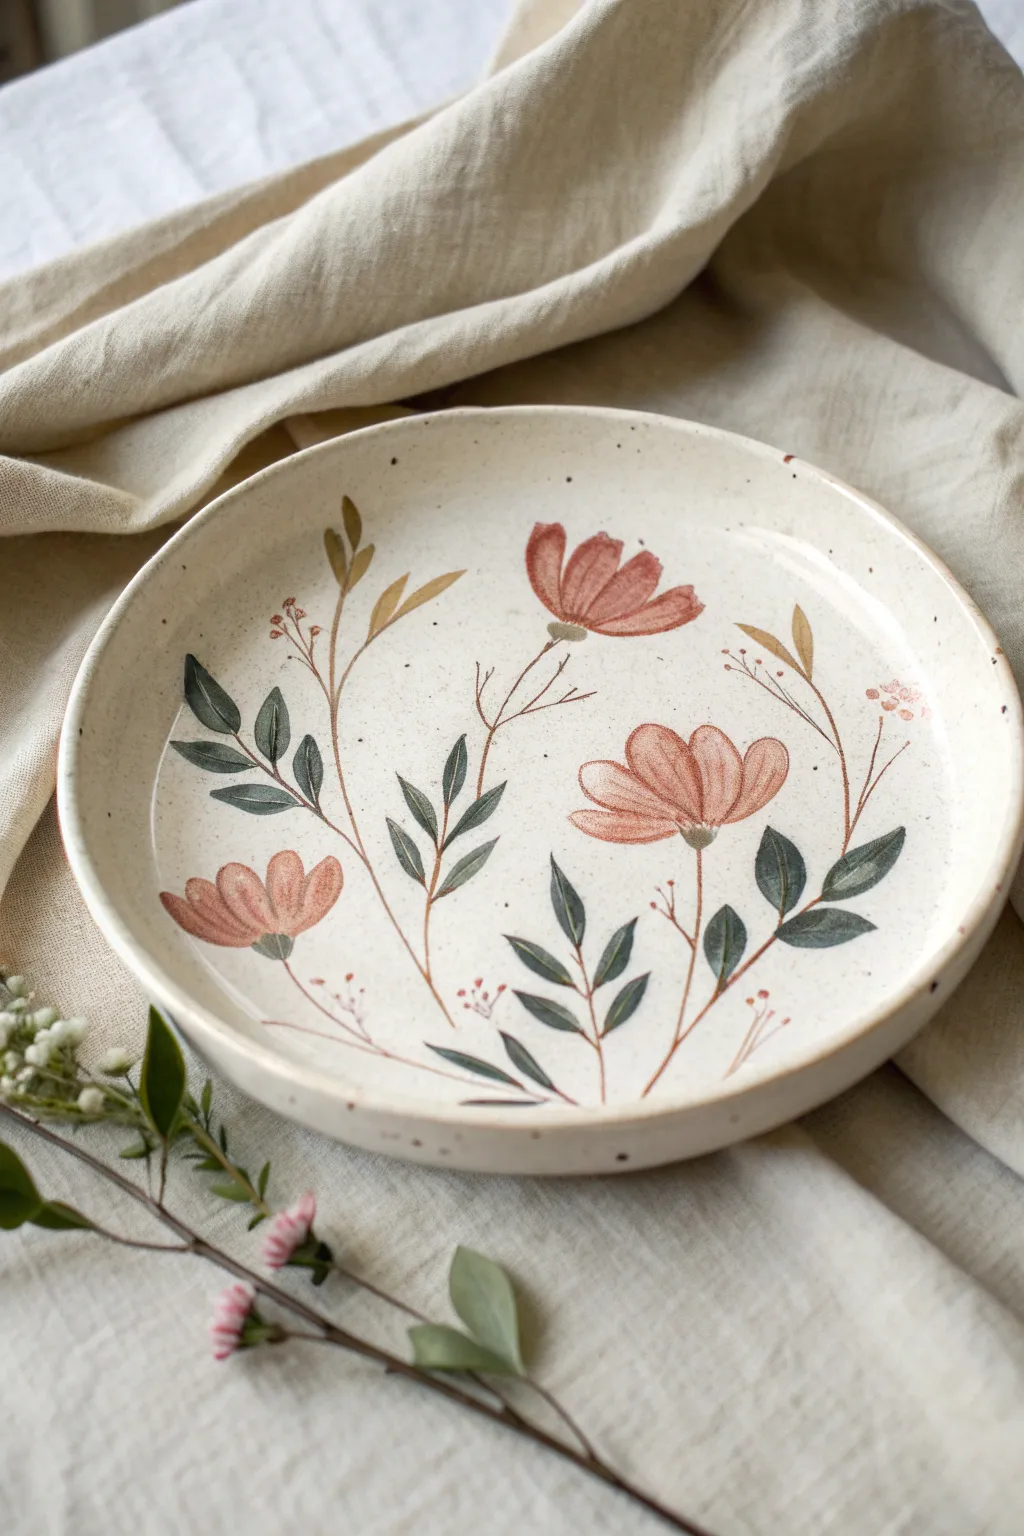
Full-Rim Botanical Garland
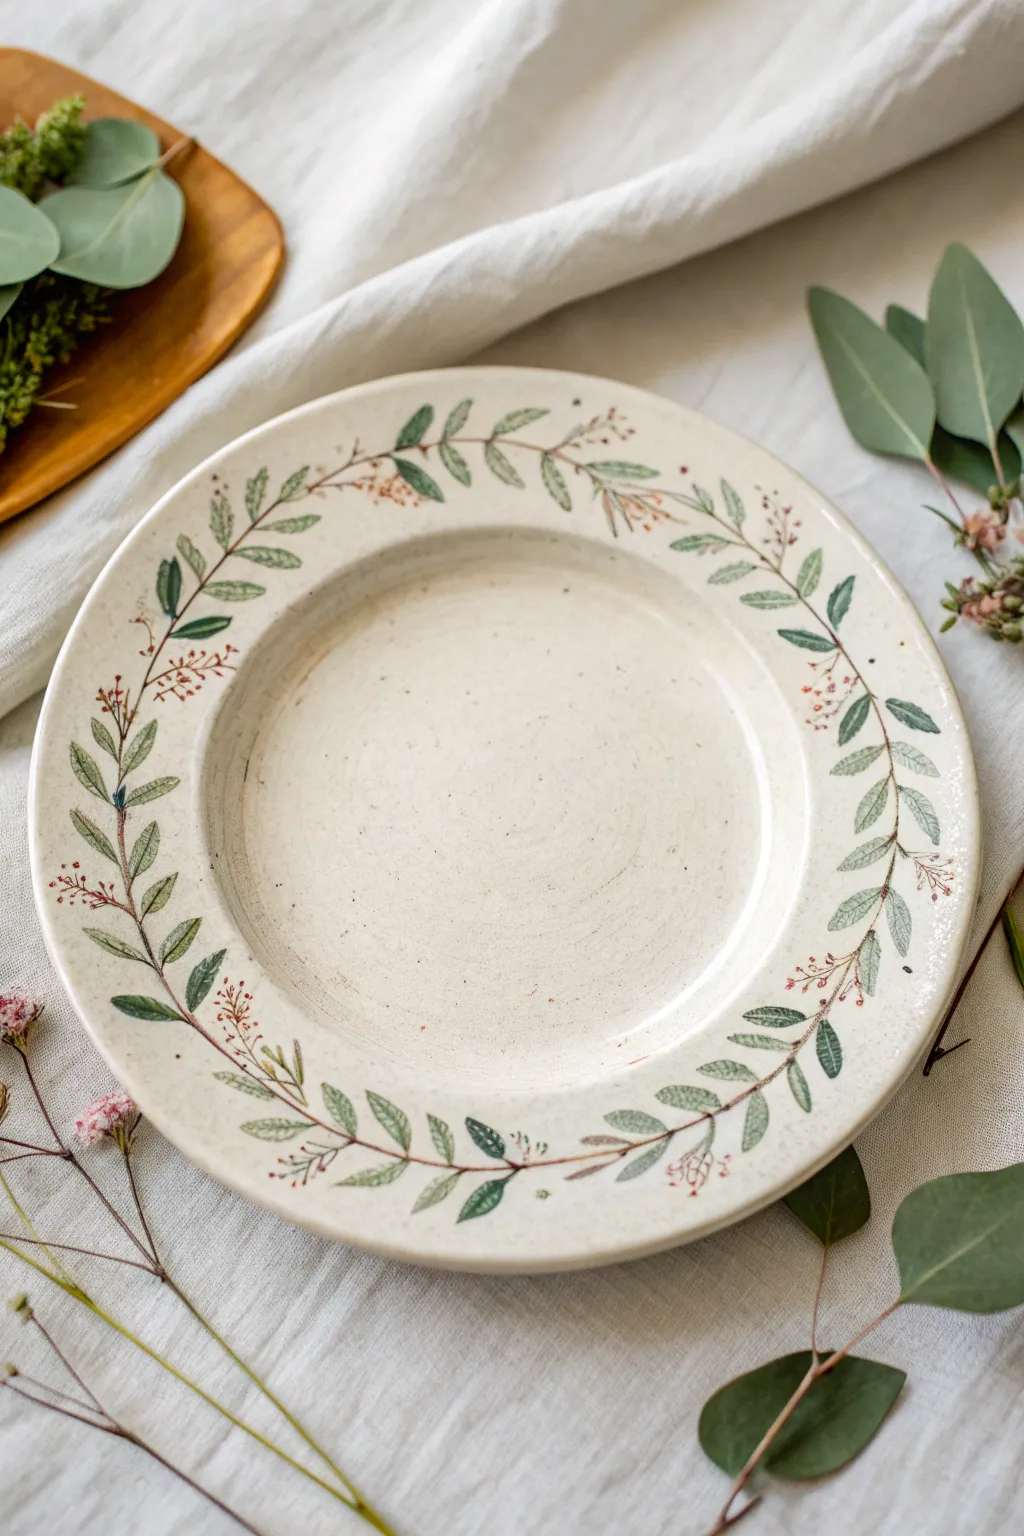
Transform a plain ceramic plate into an heirloom-quality piece with this delicate, full-rim garland design. Using earthy greens and subtle reddish-browns, this project captures the organic, slightly imperfect beauty of a hand-sketched vine circling the edge.
Step-by-Step Tutorial
Materials
- Bisque-fired ceramic plate (featuring a wide, flat rim)
- Underglaze pencil (dark brown or charcoal)
- Underglazes in earthy tones: Sap Green, deep Olive, Burnt Sienna, and darker brown
- Fine liner brush (size 00 or 0)
- Round brush (size 2 or 4)
- Clean water for rinsing
- Palette for mixing paint
- Clear dipping glaze (food safe)
- Kiln access (for firing)
Step 1: Planning the Vine Structure
-
Clean the Surface:
Before thinking about paint, wipe your bisque plate down with a barely damp sponge. This removes any ceramic dust that could repel the glaze or create rough spots. -
Sketch the Main Stem:
Using your underglaze pencil, lightly sketch a meandering line that travels around the center of the rim. Don’t try to make a perfect circle; a slightly wavy, organic line looks more natural for this rustic style. -
Mark Branching Points:
Along your main stem, make tiny tick marks every inch or so to indicate where clusters of leaves or berries will sprout. I usually alternate sides—left, then right—to keep the visual weight balanced.
Natural Imperfection
Don’t stress about shaky hands. A slightly wobbly line actually enhances the organic aesthetic of botanical pottery, making it look authentically hand-thrown and painted.
Step 2: Painting the Foliage
-
Mix Your Greens:
On your palette, prepare your greens. You want variations, not a flat color. Mix a little dark brown into your sap green to desaturate it, or water down the olive tone slightly for a watercolor effect. -
Outline the Leaves:
With the fine liner brush and thin dark brown underglaze, paint the outlines of your leaves. Keep them almond-shaped and relatively small. Let the lines be sketchy and broken in places rather than solid and cartoonish. -
Fill with First Green:
Using the round brush, wash a light layer of your sap green mixture into about half of the leaves. It creates a lovely depth if you don’t fill them completely to the edges—let the white ceramic peek through. -
Add Depth with Darker Green:
Switch to your deeper olive shade. Paint the remaining leaves and add tiny shadows at the base of the light green leaves where they connect to the stem. -
Connect the Stems:
Go back over your initial pencil sketch with the fine liner brush and the brown underglaze. Connect all your floating leaves to the main vine with thin, delicate twig lines.
Step 3: Adding Details and Berries
-
Create Berry Sprigs:
Identify empty spaces between the leaf clusters. Paint tiny, thin branching lines—like little chicken feet—extending outward from the main vine using the brown liner. -
Dot the Berries:
Dip the tip of your round brush or a dotting tool into the Burnt Sienna underglaze. Place small clusters of dots at the ends of those tiny branches to mimic wild berries or buds. -
Vary Berry Tone:
Add a tiny amount of water to your red underglaze for a few of the berries to make them lighter pink, creating variety in the clusters. -
Add Veining:
Once the green inside the leaves is dry to the touch, use your finest liner brush with slightly watered-down brown to add a simple central vein to the larger leaves. -
Splatter Texture (Optional):
For a truly rustic pottery look, load a stiff brush with watered-down brown, hold it over the plate, and tap it to create tiny speckles on the rim. Keep this minimal to avoid a messy look.
Fixing Heavy Lines
If your vine line gets too thick, don’t wipe it all off. Wait for it to dry, then gently scratch the edges with a needle tool or toothpick to thin the line back down.
Step 4: Glazing and Firing
-
Check for Smudges:
Inspect the white negative space in the center and on the rim. Use a clean, damp brush or a precision Q-tip to wipe away any stray dots of glaze. -
Bisque Fix (If Needed):
If you made a major mistake with the underglaze, you can sand it off gently once dry, but be careful not to inhale the dust. -
Apply Clear Glaze:
Once the underglaze is bone dry, dip the entire plate into a bucket of clear, food-safe glaze. Hold it by the foot ring to ensure an even coat. -
Clean the Foot:
Wipe the bottom foot ring completely clean of glaze with a sponge so it doesn’t fuse to the kiln shelf during firing. -
Final Fire:
Load the plate into the ceramic kiln and fire to the temperature specific to your clay and glaze (usually Cone 5 or 6 for stoneware). This melts the glaze into that glossy, durable finish.
Once fired, you will have a stunning, durable piece of tableware ready to impress at your next dinner party
Scattered Sprigs Tossed Pattern
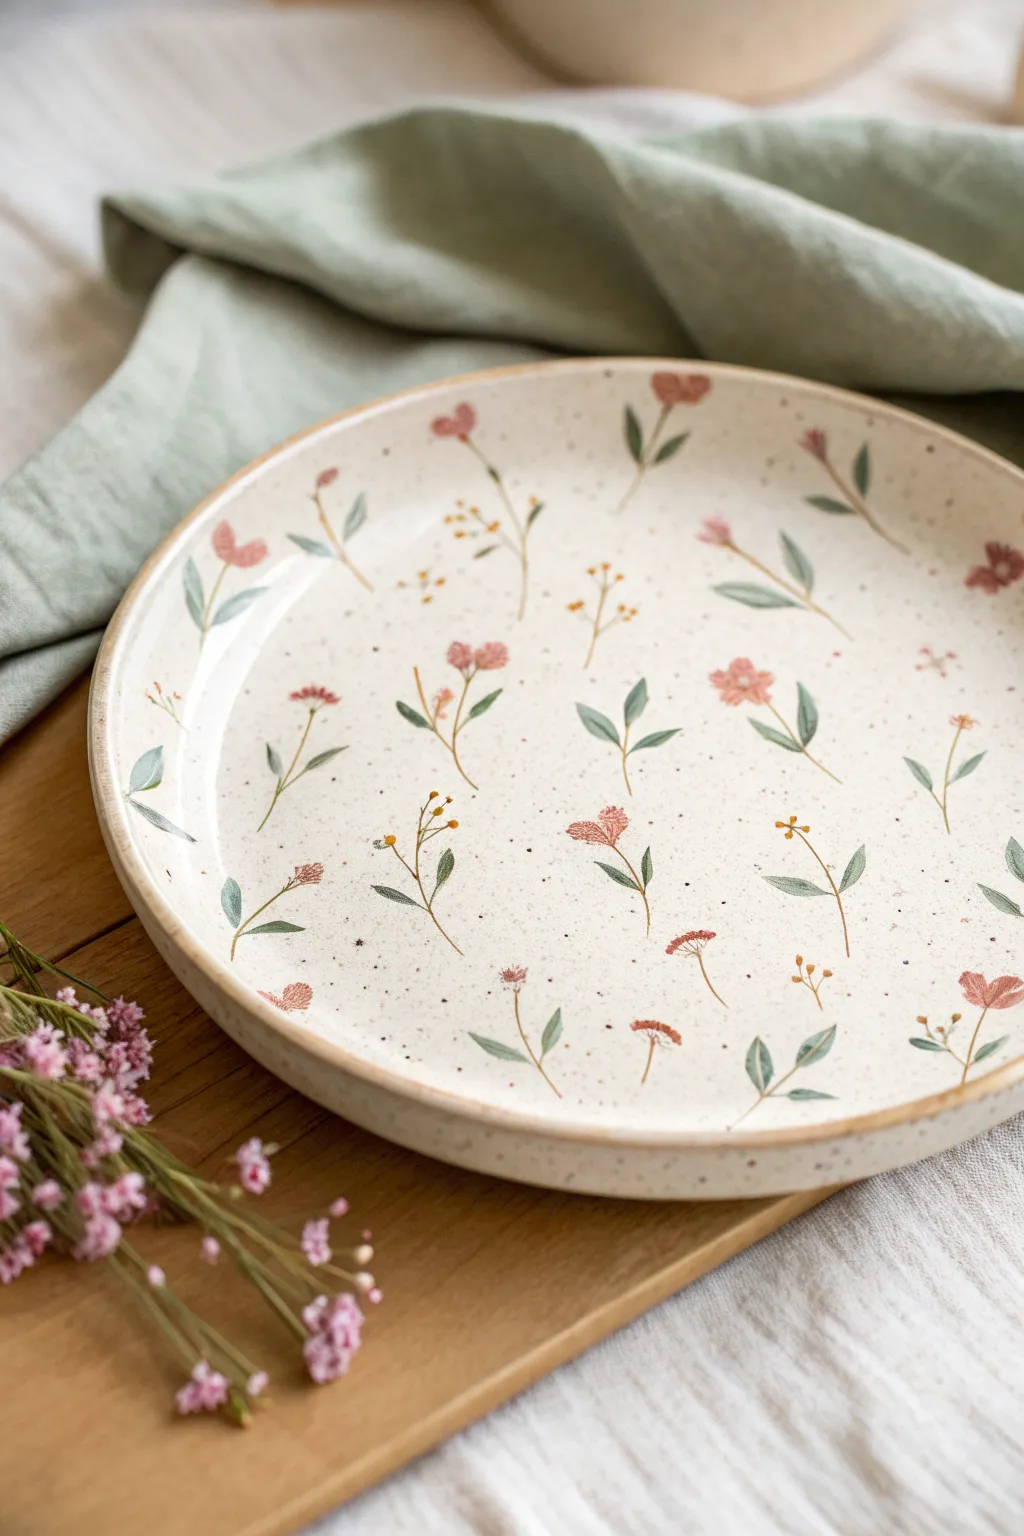
Capture the airy elegance of a meadow with this delicate tossed pattern design, featuring scattered floral sprigs on a speckled cream base. The result is a charming, rustic piece of dinnerware that looks like it was plucked straight from a cottage garden.
Step-by-Step Guide
Materials
- Bisque ceramic plate (dinner or salad size)
- Cream or off-white ceramic glaze (matte finish recommended)
- Speckled brown glaze or underglaze (for the splatter effect)
- Underglazes: Dusty rose/muted pink, sage green, deep forest green, mustard yellow, burnt orange
- Small round detail brushes (sizes 0, 1, and 2)
- Rigger or liner brush (optional, for stems)
- Toothbrush or splatter brush
- Clear dipping glaze (if using underglazes)
- Kiln access (or oven-bake ceramic paints if adapting for home oven)
Step 1: Base Preparation
-
Clean the Bisque:
Begin by wiping down your bisque plate with a barely damp sponge. This removes any dust that might prevent the glaze from adhering properly. -
Apply the Base Coat:
Using a soft, wide brush, apply 2-3 even coats of your cream or off-white glaze. Allow each coat to dry to the touch before applying the next to ensure a solid, opaque background. -
Create the Speckles:
Dip a toothbrush or stiff bristled brush into slightly watered-down brown glaze. Run your thumb over the bristles to flick tiny speckles across the entire surface of the plate. Aim for a fine mist rather than large blobs. -
Seal the Speckles:
Let the speckles dry completely. If you are worried about them smudging during the painting process, you can lightly dab a tiny bit of clear gum solution over them, though usually, letting them dry fully is sufficient.
Smudge Control
If you smear a painted flower, don’t wipe it! Let it dry completely, then gently scratch the mistake off with a toothpick or a clean, stiff brush.
Step 2: Painting the Foliage
-
Plan the ‘Toss’:
Visualize a random, multidirectional pattern. The key to a ‘tossed’ print is that there is no up or down. Rotating the plate constantly as you work helps achieve this organic look. -
Paint Main Stems:
Load a size 1 or liner brush with sage green underglaze. Paint thin, curving stems scattered across the plate. Keep your pressure light to ensure the lines remain delicate. -
Add Variation:
Mix a tiny bit of brown into your sage green to create a second, darker stem color. Paint a few additional stems with this darker shade to add depth to your field. -
Paint Leaves:
Using a size 2 round brush, press down and lift up to create simple leaf shapes attached to your stems. Use the sage green for most, but intersperse some darker forest green leaves for contrast. -
Floating Leaves:
Paint a few single leaves or small clusters of leaves that aren’t attached to major stems to fill in empty negative spaces without overcrowding the design.
Step 3: Adding the Blooms
-
Paint Pink Posies:
Dip a size 2 brush into dusty rose underglaze. Create small flowers by dabbing 4-5 petals in a circle. Don’t worry about perfect symmetry; rough shapes prefer the rustic aesthetic. -
Create Closed Buds:
At the ends of some stems, paint small teardrop shapes in the same dusty rose color to represent flowers that haven’t bloomed yet. -
Add Yellow Accents:
Using mustard yellow and a very fine size 0 brush, paint tiny clusters of dots at the ends of the finer stems. These mimic mimosa or wildflower pollen puffs. -
Detail the Centers:
Once the pink flowers are dry, add a tiny dot of burnt orange or deep red to their centers to ground the petals. -
Add Whispy Florals:
With the burnt orange underglaze, paint fan-shaped or flat-topped flower heads (like yarrow) using tiny vertical strokes. -
Refine and Clean:
Check the rim of the plate. I like to sponge off any stray marks on the very edge for a clean look, or intentionally paint a thin, uneven brown line around the rim to frame the design.
Custom Palette
Swap the dusty rose for periwinkle blue or lavender to change the season from summer to spring while keeping the same ‘tossed’ layout.
Step 4: Glazing and Firing
-
Dry Completely:
Allow the underglaze design to dry for at least 24 hours to ensure no moisture is trapped. -
Clear Glaze Application:
If your base cream was an underglaze, apply a clear dipping glaze over the entire piece. If you used a glaze base with underglazes on top, check your specific product instructions—many are designed to be fired without a top coat. -
Fire the Piece:
Load the kiln and fire according to the clay and glaze specifications (typically Cone 5 or 6 for stoneware style durability).
Enjoy using your new plate for a slice of cake or hanging it on the wall as a piece of permanent spring decor


What Really Happens Inside the Kiln
Learn how time and temperature work together inside the kiln to transform clay into durable ceramic.
Sweet Lavender and Herb Florals
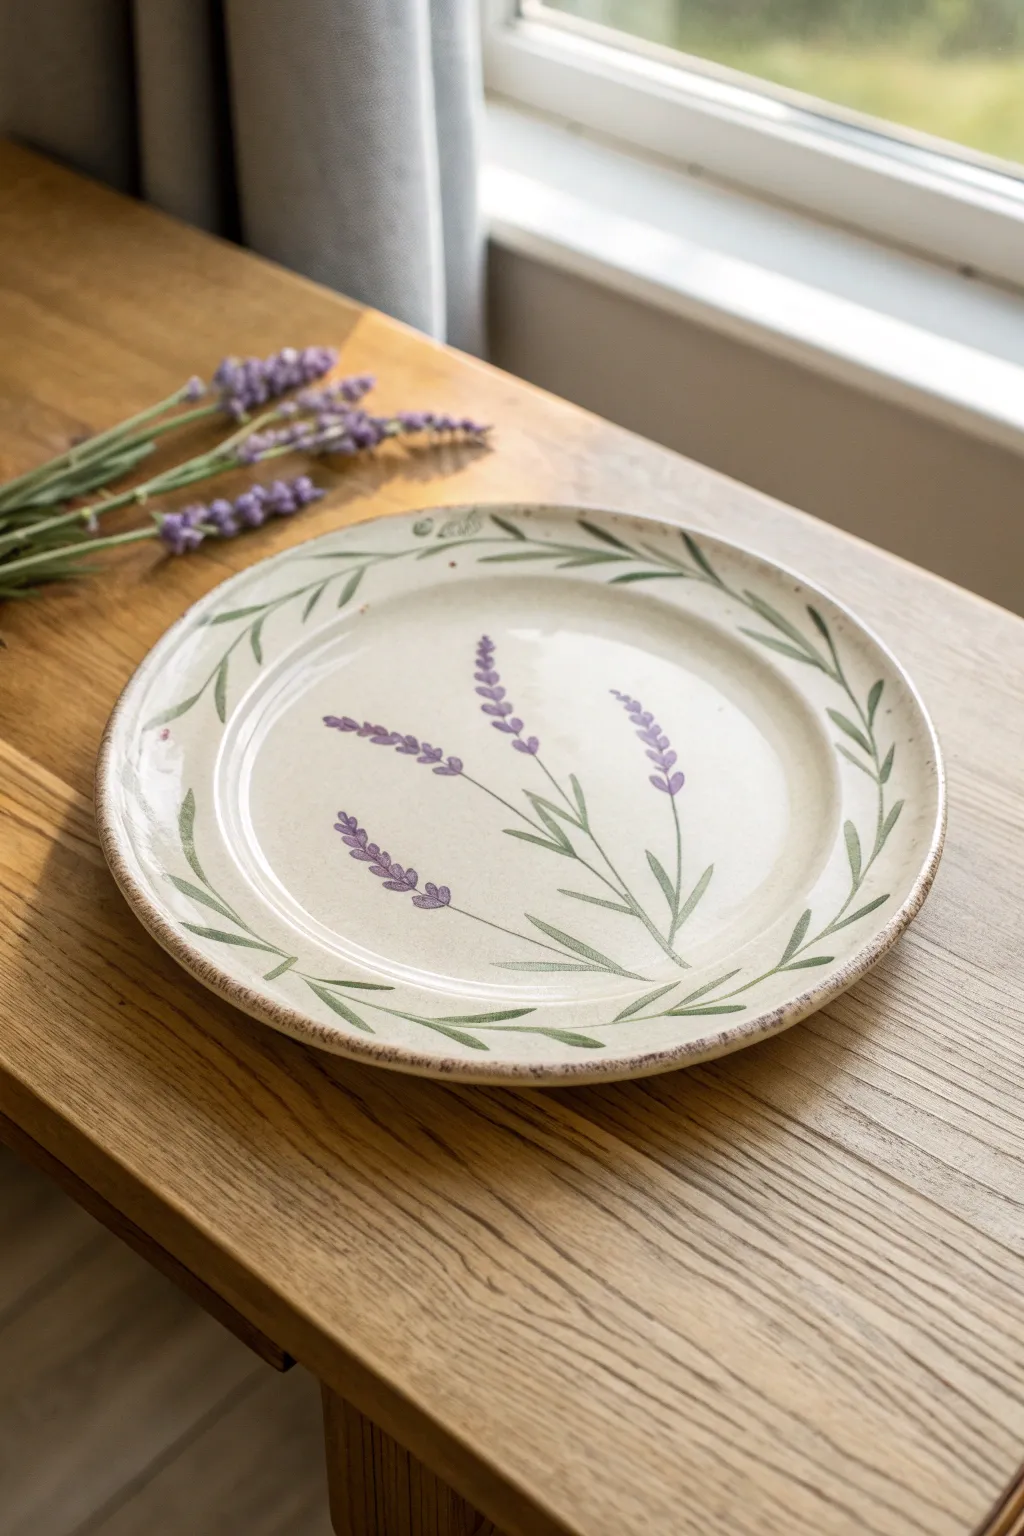
Bring the soothing charm of a French garden into your kitchen with this delicate hand-painted plate featuring graceful lavender sprigs. The design pairs a simple central floral arrangement with a rustic, leafy border for an authentic farmhouse feel.
Detailed Instructions
Materials
- White or cream ceramic plate (oven-safe if baking)
- Pebeo Porcelaine 150 paints (or similar ceramic paints)
- Colors: Lavender/Purple, Olive Green, Deep Green, Warm Brown
- Fine liner brush (size 0 or 00)
- Small round brush (size 2)
- Rubbing alcohol and cotton pads
- Paper palette or tile
- Pencil (optional)
- Q-tips for cleanup
Step 1: Preparation and Planning
-
Clean surface:
Before you begin, wipe your plate thoroughly with rubbing alcohol on a cotton pad to remove any oils or fingerprints. This ensures the paint adheres properly to the ceramic glaze. -
Plan the composition:
Visualize four sprigs of lavender rising from the bottom right quadrant of the plate center, fanning out gently towards the top left. You can lightly sketch the main stem lines with a pencil if you need a guide, but freehand looks more organic.
Natural Texture
Don’t overmix your greens. Picking up two shades on the brush at once creates natural streaks that mimic real stems.
Step 2: Painting the Center Motif
-
Mix your greens:
Place a dollop of Olive Green and a tiny bit of Deep Green on your palette. I like to mix them slightly but leave some separation so each brushstroke has natural tonal variation. -
Paint main stems:
Using your fine liner brush and the mixed green, paint four long, thin stems originating from a central point. Let them curve naturally; they shouldn’t be perfectly straight lines. -
Add lower leaves:
Switch to the size 2 round brush. Near the base of the stems, press down gently and lift up quickly to create slender, elongated leaves that taper to a fine point. -
Prepare the purple:
Load your small round brush with the Lavender/Purple paint. Ensure the brush isn’t overloaded; you want control for the tiny buds. -
Create flower buds:
Starting at the top of a stem, dab small spots of purple in pairs on opposite sides of the stem. Work your way down about an inch or two. -
Build density:
Go back over the purple sections and add a few more dabs in the gaps to make the flower heads look fuller, but keep the very top tip of the flower delicate and thin. -
Add detail:
Mix a tiny amount of white or a lighter purple if you have it, and add tiny highlights to just the tops of the flower buds for dimension.
Step 3: Creating the Leafy Rim
-
Start the border stem:
Using the liner brush and your green mix, paint a continuous, waving line that travels around the flat rim of the plate. It helps to tackle this in sections rather than one long stroke. -
Add rim leaves:
Along this vine, paint small, single-stroke leaves using the round brush. Angle them to follow the direction of the vine, alternating sides for a balanced look. -
Rustic edging:
Dip a fairly dry brush into the Warm Brown paint. Lightly drag the side of the bristles along the very outer edge of the plate to create a weathered, rustic rim effect. -
Clean up:
Check for any stray marks or smudges. Use a damp Q-tip to wipe them away before the paint sets fully.
Scented Set
Paint a matching mug or saucer with thyme or rosemary sprigs to create a complete herbal tea set.
Step 4: Finishing
-
Dry time:
Allow the plate to air dry for at least 24 hours. Don’t rush this step, as the paint needs to harden before baking. -
Bake to cure:
Place the plate in a cool oven, then set the temperature to 300°F (150°C). Once it reaches temperature, bake for 35 minutes. Turn the oven off and let the plate cool completely inside.
Your finished plate is now a durable piece of functional art ready for teatime or display
Sunflower Ring With Big Petals
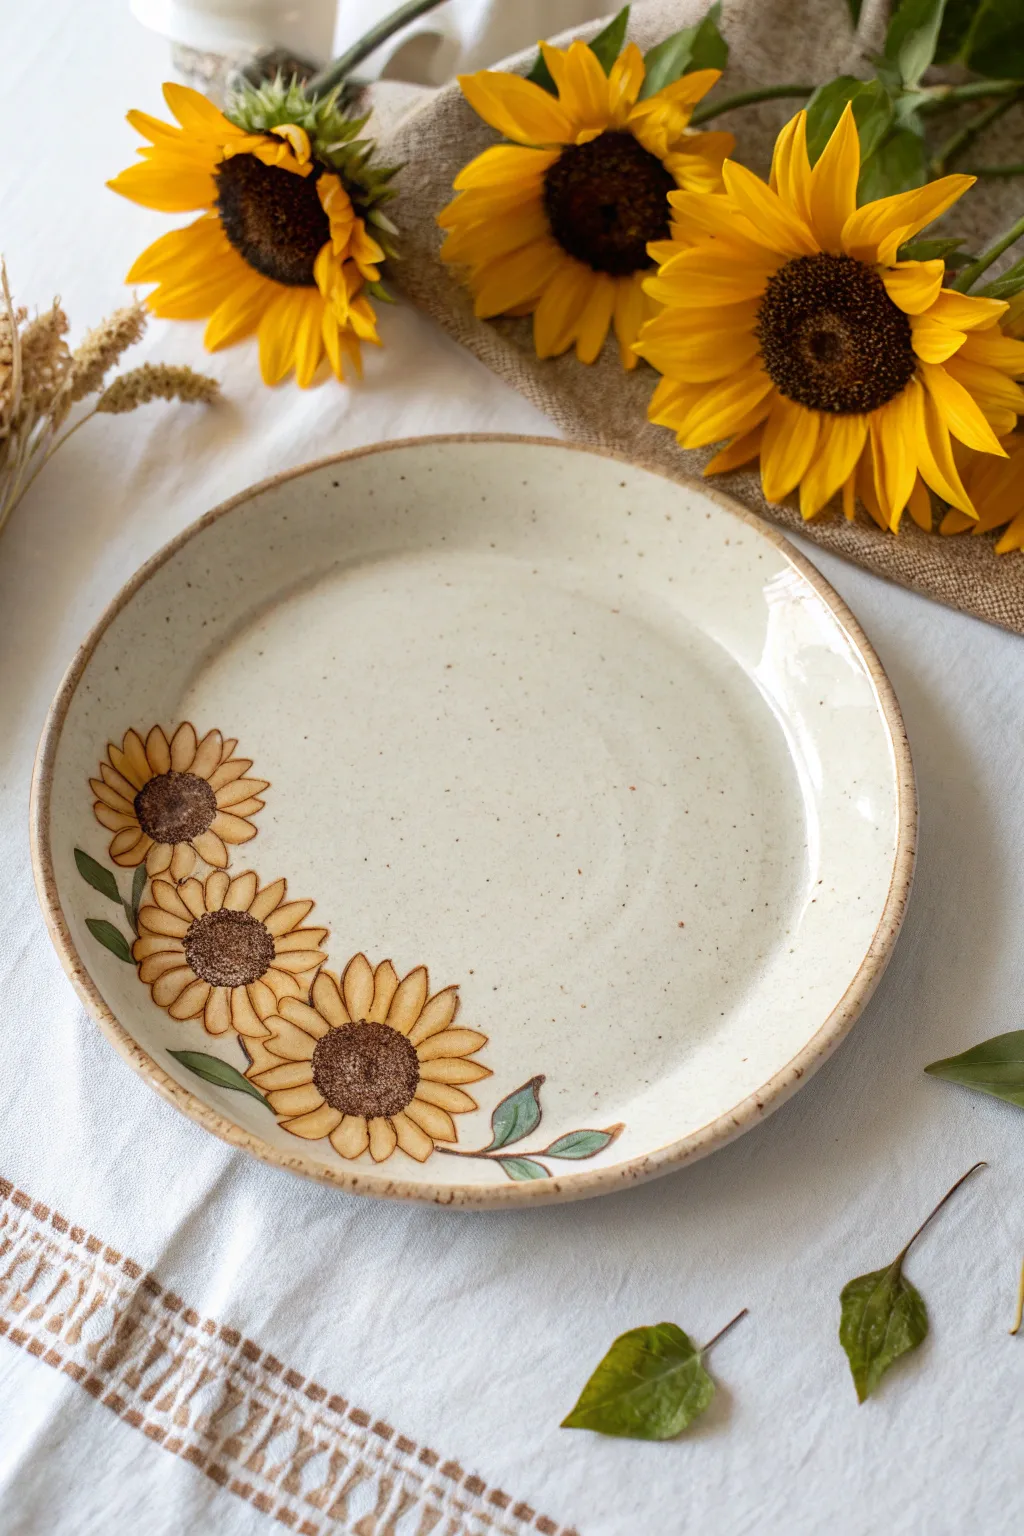
Bring the warmth of a late summer garden to your table with this lovely hand-painted ceramic plate design. Featuring a trio of gently curving sunflowers against a speckled cream background, this project uses simple brushstrokes and outlining to create a rustic, artisanal look.
Step-by-Step
Materials
- Ceramic bisque plate (smooth rim style)
- Underglazes: Golden Yellow, Warm Ochre, Dark Brown, Forest Green
- Clear dipping glaze
- Ceramic pencil or soft graphite pencil
- Fine liner brush (size 0 or 00)
- Round brush (size 4 or 6)
- Sponge
- Clean water
- Palette
Step 1: Planning and Sketching
-
Prepare the surface:
Begin by wiping down your bisque plate with a barely damp sponge. This removes any ceramic dust that might resist the paint and ensures a smooth application. -
Mark the flower centers:
Using a ceramic pencil, lightly mark the position of the three flower centers along the lower-left curve of the plate. Place the largest one at the bottom-center of the grouping, with slightly smaller ones flanking it above and to the right. -
Sketch the petals:
Lightly sketch the petals radiating outward from your center circles. Aim for petals that are slightly shorter on the side facing the center of the bloom to give the flowers a tilted, three-dimensional perspective.
Step 2: Adding Color
-
Base coat the petals:
Load your round brush with Golden Yellow underglaze. Fill in each petal, applying the stroke from the tip inward toward the center. -
Apply second coat:
Once the first yellow layer is dry to the touch, apply a second coat to ensure the color is opaque and vibrant. I like to keep my strokes loose here to maintain a painterly feel. -
Paint the centers:
Using the Dark Brown underglaze, fill in the round centers of each flower. Use a dabbing motion rather than a sweeping stroke to suggest the texture of seeds. -
Add shadows:
Mix a tiny amount of Warm Ochre with your Golden Yellow. Paint a few thin strokes at the base of the petals where they meet the brown center to create depth and shadow. -
Paint the leaves:
With the Forest Green underglaze, paint the small leaves tucking out from underneath the blooms. Keep the shapes simple—just varied almond shapes pointed at the ends.
Opaque Petals
If your yellow looks transparent or streaky after the second coat, don’t rush. Let it dry completely and add a third thin layer. Yellow pigments are notoriously sheer.
Step 3: Detailing and Finishing
-
Outline the petals:
Switch to your fine liner brush and dilute a small amount of dark brown underglaze with a drop of water for better flow. Carefully outline each yellow petal with thin, delicate lines. -
Detail the leaves:
Use the same diluted brown mixture to outline the green leaves and add a central vein line to each one. -
Texture the centers:
Dip the very tip of your fine brush into black or a very dark brown underglaze. Stipple tiny dots over the brown centers, concentrating them on the lower right side of each circle to simulate a shadowed texture. -
Create the speckled effect:
Dilute some brown underglaze with water on an old toothbrush or stiff brush. Run your thumb over the bristles to flick tiny specks across the entire plate surface, focusing on the empty cream areas to mimic speckled stoneware. -
Clean the rim:
If you want a defined edge like the reference, paint a thin, uneven line of light brown around the very rim of the plate. -
Clear coat:
Allow all underglaze design work to dry completely. Apply a coat of clear dipping glaze over the entire plate according to the manufacturer’s instructions. -
Fire the piece:
Fire the plate in a kiln to the appropriate cone temperature for your clay and glazes (typically Cone 06 or Cone 6 depending on materials used).
Vintage Vibe
Swap the stark white background for a matte oatmeal glaze before painting. It warms up the yellow tones and makes the final piece feel like vintage pottery.
Once fired, you will have a durable, cheerful piece of tableware perfect for brightening up any meal

TRACK YOUR CERAMIC JOURNEY
Capture glaze tests, firing details, and creative progress—all in one simple printable. Make your projects easier to repeat and improve.
Loose Rose Clusters for Beginners
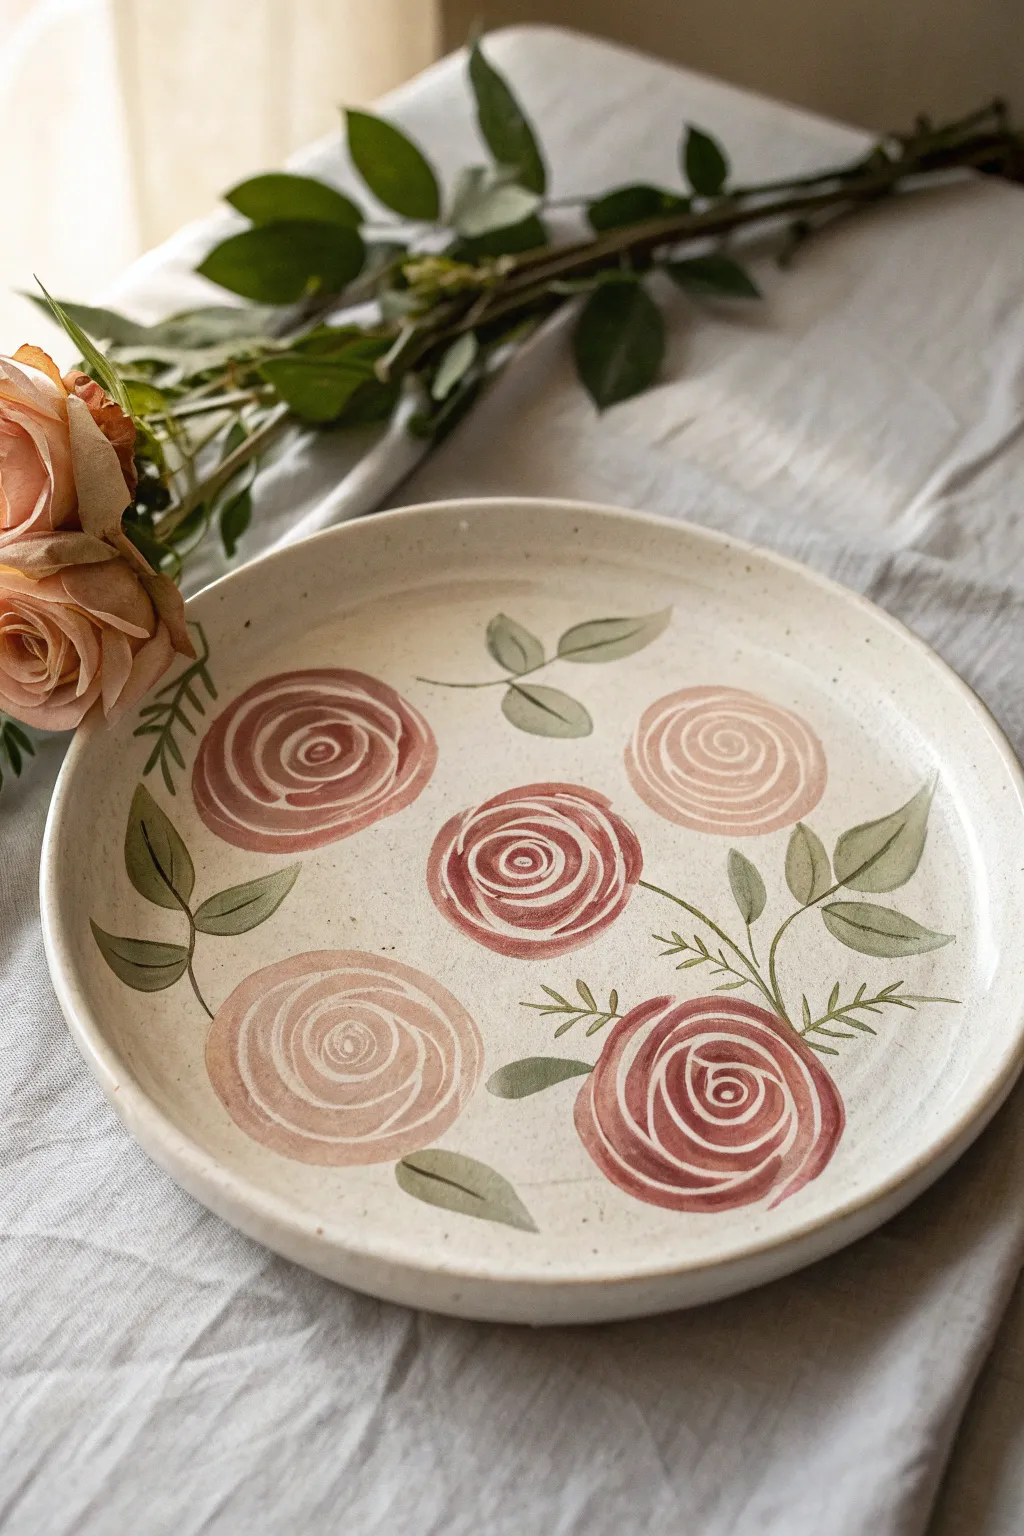
Capture the soft elegance of a garden party with this beginner-friendly ceramic painting project. Using simple swirl techniques and muted tones, you’ll transform a plain piece of bisque ware into a charming display of loose, stylized roses.
How-To Guide
Materials
- Bisque ceramic plate (preferably a speckled clay body)
- Underglazes: Dusty Rose, Deep Maroon, Terracotta, Sage Green, Olive Green
- Round watercolor brushes (Size 4 and 8)
- Fine liner brush (Size 0 or 1)
- Palette for mixing
- Water cup and paper towels
- Clear dipping glaze (for post-painting firing)
- Pencil (optional for light sketching)
Step 1: Planning the Arrangement
-
Clean surface:
Begin by wiping down your bisque plate with a slightly damp sponge to remove any kiln dust, which ensures the underglaze adheres properly. -
Visualize placement:
Imagine a loose pentagon shape on the plate’s surface. You want to place five main roses in a ring, leaving the center relatively open but balanced. -
Light sketching:
If you are nervous about freehanding, use a pencil to very lightly mark circles where your five flowers will sit. Don’t worry about erasing; the graphite will burn off in the kiln.
Step 2: Painting the Roses
-
Mix pink tones:
Create two shades of pink on your palette: a soft Dusty Rose mixed with a tiny bit of white for the lighter flowers, and a pure Dusty Rose for the medium ones. -
Start the center swirl:
Using your Size 8 round brush, load it with the lighter pink mix. Start at the center of one of your plotted circles and paint a small, tight ‘C’ shape. -
Build the bloom:
Paint concentric, overlapping curved strokes around that center point. Leave small gaps of the raw clay showing between strokes to create definition and petals. -
Vary the colors:
Repeat the swirl process for all five flowers. Alternate between your pale pink mix, the plain Dusty Rose, and perhaps a Deep Maroon mix for variety, just like the reference image. -
Add depth:
While the paint is still slightly damp, take a smaller brush with a darker shade (Deep Maroon or Terracotta) and add thin accent lines inside the swirls to emphasize the petal edges. -
Refine the shape:
Ensure the outer edges of your roses are somewhat irregular and round, mimicking the organic feel of a real bloom.
Brush Pressure Tip
For better leaves, practice the ‘press and lift’ motion on scrap paper first. Heavy pressure makes the leaf wide; lifting creates the tip.
Step 3: Adding Foliage
-
Mix green shades:
Prepare your greens. Mix Sage Green with a touch of brown for stems, and keep a brighter Olive Green ready for the leaves. -
Paint stems:
With the liner brush, paint thin, curving stems connecting the roses or trailing off toward the rim. Keep your hand loose to avoid stiff lines. -
Create main leaves:
Switch back to the Size 4 round brush. Load it with Olive Green, press down firmly to create the belly of the leaf, and lift as you pull away to create a sharp point. -
Add groupings:
Paint leaves in clusters of two or three around the roses. I like to vary the size, making some leaves large and bold while others are just small accents. -
Detail the fern sprigs:
Using the liner brush again, add delicate, fern-like sprigs with tiny ticks coming off a central stem to fill empty negative spaces between the main blooms. -
Leaf detailing:
Once the green leaves are dry to the touch, use the liner brush and a very dark green or black underglaze to paint a single thin vein down the center of the larger leaves.
Gold Luster Accent
Add a third firing with gold luster on the rim or the very center of the roses for a luxurious, vintage fine-china aesthetic.
Step 4: Finishing Touches
-
Clean up:
Check the rim of the plate. If you accidentally smudged any paint there, wipe it away cleanly with a damp sponge or cotton swab to keep a professional border. -
Dry completely:
Let the underglaze dry completely for at least an hour. It should look chalky and matte. -
Glaze and fire:
Dip the plate into clear glaze according to your studio’s instructions and fire it to the appropriate cone temperature for your specific clay body.
Once fired, this lovely hand-painted plate will be ready to serve your favorite treats or hang as a piece of wall art
Tulip Trio Minimal Motif
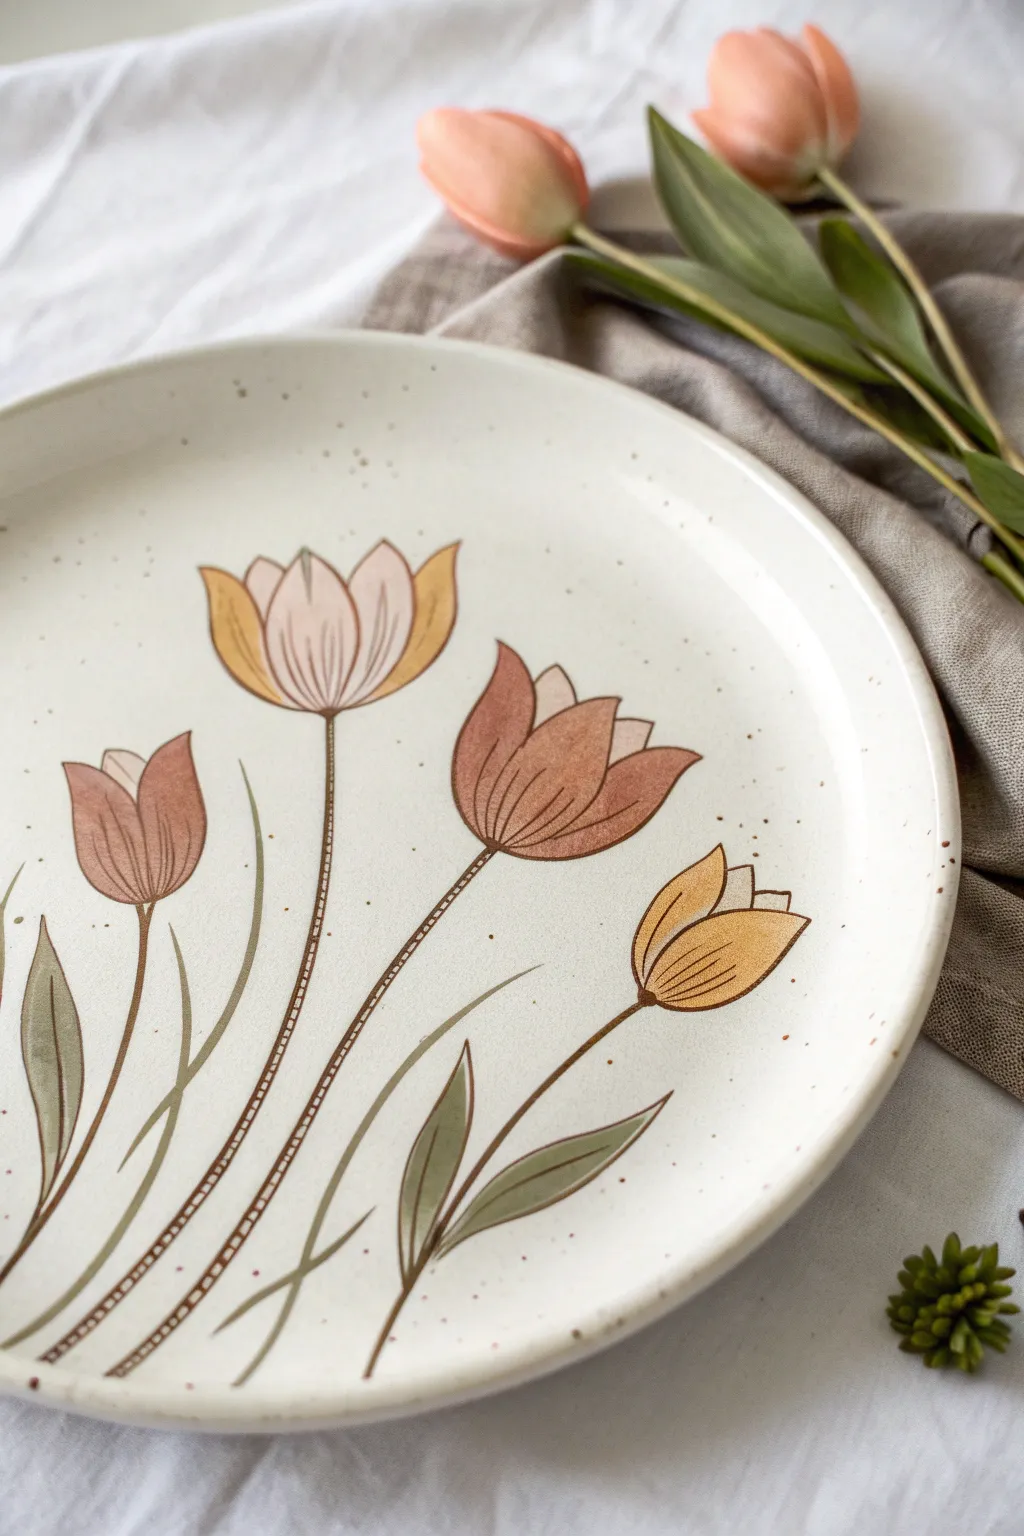
Capture the essence of spring with this understated, retro-inspired tulip design on a speckled cream plate. The project uses earthy tones and delicate line work to create a piece that feels both modern and handmade.
Step-by-Step Tutorial
Materials
- Plain white ceramic plate (matte or satin finish preferred)
- Ceramic paints (terracotta, ochre yellow, cream/light beige, sage green, dark brown)
- Small flat brush (size 4 or 6)
- Fine liner brush (size 0/00)
- Old toothbrush (for speckling technique)
- Palette or small dishes
- Paper towels
- Pencil (HB for light sketching)
- Oven (if using heat-set paints) or sealant
Step 1: Preparation & Base Coat
-
Clean surface:
Begin by thoroughly cleaning your ceramic plate with rubbing alcohol or warm soapy water to remove any oils or fingerprints. Dry it completely with a lint-free cloth. -
Mix base tone:
Create a warm, off-white base by mixing white ceramic paint with a tiny drop of ochre or beige. You want a creamy, vintage tone, not a stark white. -
Apply background:
Using a wide, soft brush, paint the entire surface of the plate with the cream mixture. Apply two thin, even coats, allowing the first to touch-dry before adding the second. This creates that smooth, pottery-like canvas. -
Add speckling:
Mix a very watery dark brown paint. Dip an old toothbrush into it, then run your thumb across the bristles to flick tiny speckles onto the plate. Keep the splatter random and focused near the edges for a natural clay look. -
Dry completely:
Allow the base and speckles to dry fully, usually for at least an hour, so your pencil sketch won’t scratch the paint.
Brush Control Tip
For the steadiest lines, rest your pinky finger on a dry part of the plate while painting to stabilize your hand.
Step 2: Blocking the Tulips
-
Sketch the layout:
Lightly sketch four tulip shapes with a pencil. Place the tallest one slightly off-center, with two flanking it and one smaller bloom lower down. -
Paint the first petal base:
Use the size 4 flat brush to fill in the left-hand tulip with a muted terracotta or dusty rose shade. Paint vertical strokes following the curve of the petals. -
Paint the central bloom:
For the largest center flower, use a pale blush or cream color for the inner petals and the ochre yellow for the outer tips. -
Add warmth:
Fill the third tulip (on the right) with a deeper rust-orange tone. I like to keep the paint slightly translucent here to mimic watercolor. -
Paint the yellow bud:
Color the smallest, lowest tulip on the far right with a solid ochre yellow. -
Add leaves:
Switch to a sage green. Paint long, sweeping leaves at the base of the stems. Use a single stroke, pressing down and lifting up to create the tapered leaf shape. -
Let shapes set:
Wait for these color blocks to dry completely. They must be smudge-proof before outlining.
Paint Too Thick?
If your fine lines are breaking or looking clumpy, thin your brown paint with a drop of water or flow medium for smoother strokes.
Step 3: Detailed Line Work
-
Mix liner color:
Prepare a dark brown paint with a fluid, inky consistency. It should flow easily off your fine liner brush without being transparent. -
Draw stems:
Using the liner brush, paint thin, possibly segmented lines for the stems. Instead of a solid line, try small dashes or a ‘stitched’ look for texture. -
Outline petals:
Outline the tulip heads with very delicate lines. Don’t worry if the lines aren’t perfectly smooth; a shaky hand adds to the character. -
Add inner details:
Paint the defining vertical lines inside the petals to separate them, giving the flower its cup shape. -
Veining on leaves:
Add a simple central vein line to the green leaves you painted earlier, keeping the stroke extremely thin. -
Final cure:
Once finished, follow your paint manufacturer’s instructions to cure the piece. This often involves baking it in a home oven for 30-40 minutes.
Now you have a charming piece of botanical art ready to display on your wall or shelf
Cherry Blossom Branch Arc
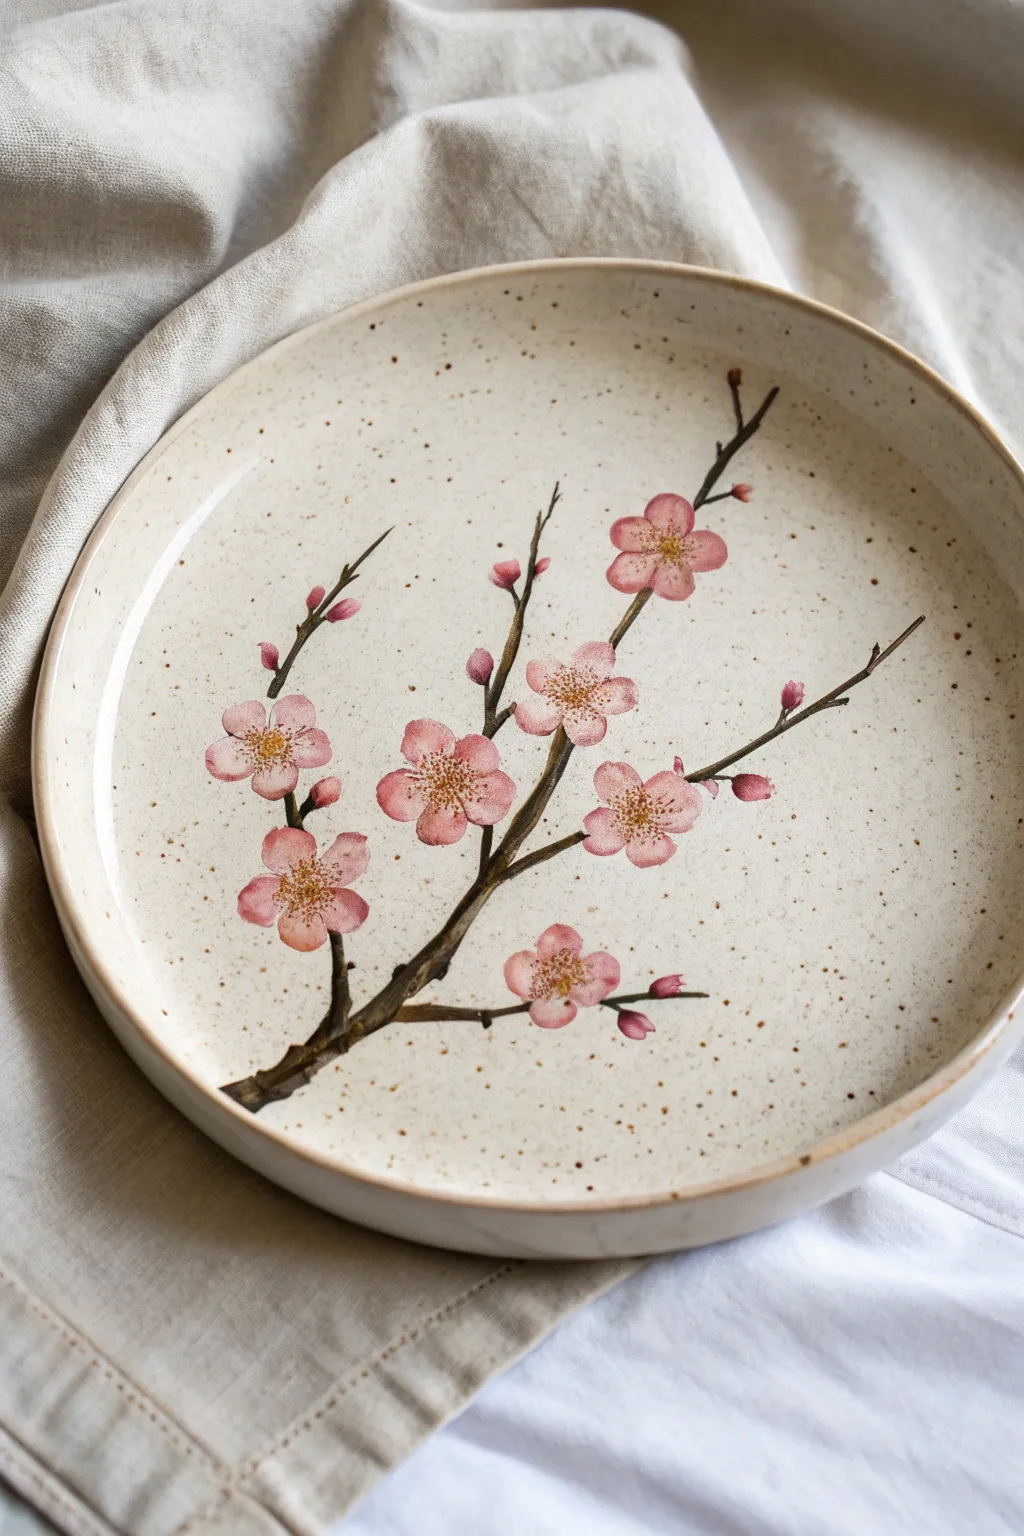
Transform a plain ceramic dish into a piece of fine art with this graceful cherry blossom study. The design features a realistic, textured branch that naturalistically curves across the plate, adorned with soft pink blooms and speckled details for an organic, handmade feel.
Step-by-Step
Materials
- Bisque-fired ceramic plate (cream or bone white)
- Underglaze paints (Dark Brown, Sepia, Deep Pink, Shell Pink, Yellow Ochre, White)
- Small round brushes (size 0 and 2)
- Fine liner brush (size 00)
- Stiff bristle brush (e.g., an old toothbrush or stiff fan brush) for speckling
- Clear glazing medium
- Palette for mixing ceramic paints
- Pencil for light sketching
Step 1: Planning and Branch Structure
-
Map the arc:
Begin by lightly sketching the main ‘spine’ of the branch with a pencil directly on your bisque plate. Aim for a diagonal composition that starts near the bottom left rim and reaches toward the upper right, curving gently upward. -
Sketch the offshoots:
Draw three or four smaller sub-branches extending from the main stem. Keep these lines slightly jagged rather than perfectly smooth to mimic the natural growth patterns of wood. -
Mix your wood tones:
On your palette, mix a small amount of Dark Brown with a touch of Sepia underglaze. You want a deep, earthy tone that isn’t quite black but has richness. -
Paint the main stems:
Using your size 2 round brush, carefully follow your pencil lines to paint the thickest parts of the branch. Vary the pressure on your brush—press down for thicker sections near the base and lift up for tapering ends. -
Add the spindly tips:
Switch to your fine liner brush (size 00) for the very ends of the branches. Pull the paint outward in quick, confident strokes to create sharp, delicate points.
Step 2: Painting the Blooms
-
Prepare the petal colors:
Create two piles of pink underglaze: one pure Shell Pink and one mixed with a tiny drop of Deep Pink for shading. You’ll want these slightly watered down for a watercolor effect. -
Lay down base shapes:
With a clean size 2 brush, paint five-petal flower shapes along the branches. Start with the lightest pink, leaving the centers somewhat translucent. -
Add subtle depth:
While the first layer is still slightly damp, drop tiny touches of the darker pink mix near the center of each flower and let it bleed outward slightly. -
Paint the buds:
Identify the tips of the smaller twigs and add teardrop shapes using the Deep Pink mix. These represent tight, unopened flower buds. -
Refine the stamens:
I like to wait until the petals are fully dry before this step. Using the liner brush and a mix of Yellow Ochre and White, dot the very centers of the open flowers. -
Add pollen details:
Use the liner brush with a very faint amount of brown to draw hair-thin lines radiating from the yellow centers, anchoring the pollen.
Natural Petal Edges
Don’t outline your petals. Instead, let the paint naturally pool at the edges or fade out. This softness mimics real cherry blossom petals better than hard lines.
Step 3: Texture and Finishing
-
Shadowing the branch:
Go back over the bottom edges of your main branch with the darkest brown underglaze to give the wood a three-dimensional, cylindrical appearance. -
Layering the sepals:
Paint tiny green-brown cups (sepals) at the base of every flower and bud where it connects to the wood. This small detail grounds the flowers so they don’t look like they are floating. -
Prepare the speckle mix:
Dilute your Dark Brown underglaze with water until it has an inky consistency. -
Apply the speckles:
Dip your stiff bristle brush into the diluted paint. Hold it over the plate and run your thumb across the bristles to flick tiny dots across the entire surface. -
Control the splatter:
Focus the densest speckling slightly around the main branch and clearer areas, but ensure the whole plate gets a fine misting of dots for that rustic stoneware look. -
Clear coat application:
Once all underglaze design work is completely bone dry, apply a coat of clear dipping glaze or brush-on clear glaze over the entire plate. -
Final wipe:
Clean the foot of the plate (the bottom ring) with a damp sponge to prevent it from sticking to the kiln shelf.
Metallic Accent
For a luxurious twist, apply a tiny dot of real gold luster to the center of each flower after the main glaze firing, then fire again at a lower temp.
Fire your plate according to the clay and glaze specifications, and enjoy serving treats on your timeless floral creation
Tropical Hibiscus Pop
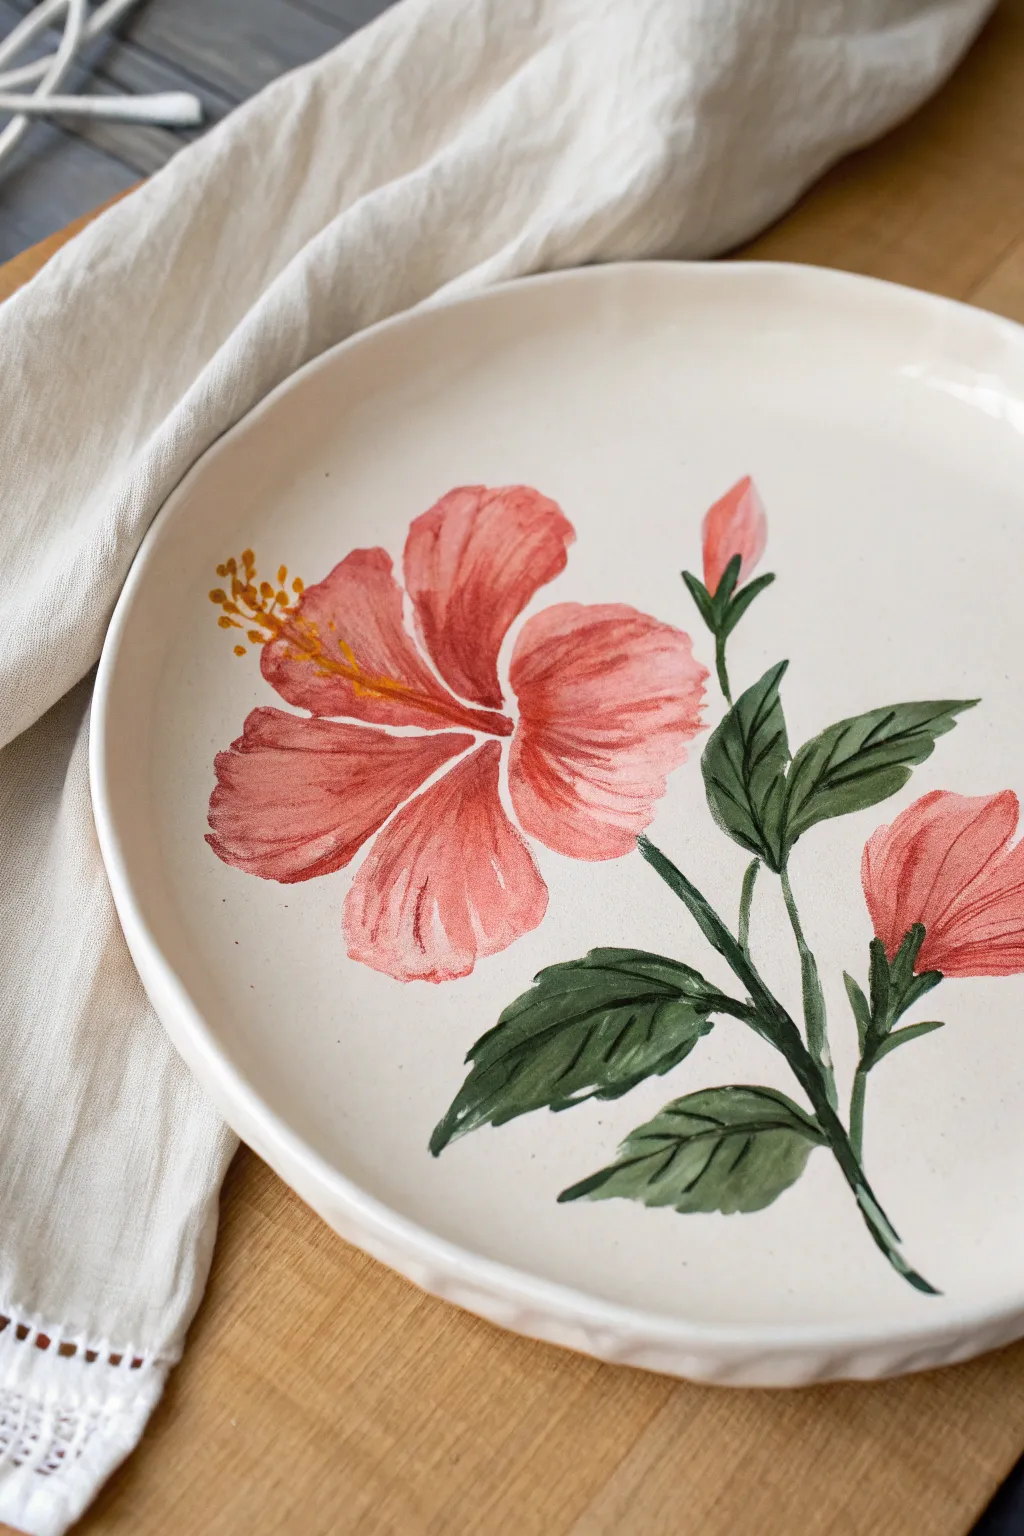
Bring a touch of island flair to your dining table with this hand-painted hibiscus design. The soft pink petals and deep green foliage standout beautifully against a natural clay background, creating a piece that feels both organic and artistic.
Step-by-Step Tutorial
Materials
- Light beige or cream ceramic bisque plate
- Underglaze paints: coral pink, deep rose, dark hunter green, olive green, yellow, orange
- Clear dipping glaze
- Round watercolor-style brushes (sizes 4 and 8)
- Fine liner brush (size 0 or 00)
- Palette for mixing
- Pencil
- Water cup
- Paper towels
Step 1: Sketching the Layout
-
Establish the curve:
Visualize a gentle ‘C’ curve running from the bottom right to the center left of your plate. This will be the main stem line that anchors your composition. -
Place the main bloom:
Lightly sketch a large, open circular shape slightly off-center to the left. This placeholder marks the boundaries of your main hibiscus flower. -
Add bud placement:
Draw two smaller oval shapes to the right of the main bloom—one slightly higher (almost floating) and one lower down, connected to the imaginary stem line. -
Outline the petals:
Refine the main flower sketch by drawing five large, overlapping ruffled petals. Keep the edges wavy and organic rather than perfectly round. -
Leaf structure:
Sketch pointed, serrated leaves branching out from the lower stem area and around the buds. Aim for a mix of sizes to keep the composition dynamic.
Step 2: Painting the Blooms
-
Pink base coat:
Load your size 8 brush with watered-down coral pink underglaze. Wash this color over the entire flower and the bud shapes. It should be semi-transparent. -
building depth:
While the base is still damp, pick up the deep rose color. Apply this darker shade starting from the center of the hibiscus, flicking the brush outward to create radiating streaks. -
Defining petal edges:
Use the size 4 brush and the deep rose color to outline the edges of individual petals. Add a few extra lines within the petals to suggest folds and texture. -
Painting the buds:
Treat the buds similarly, keeping the base light pink and adding darker rose streaks at the bottom where the sepals will cup them. -
Adding the stigma:
With the yellow underglaze and a liner brush, paint a long, curved line extending from the center of the hibiscus. Add tiny yellow dots at the very tip for the pollen. -
Stamen details:
If you want extra definition, mix a tiny bit of orange into your yellow and dab it gently at the base of the yellow line where it meets the red center.
Muddy colors?
If your pinks look brown where they meet green, let the pink sections dry completely before beginning the foliage. Painting wet green touching wet pink encourages unwanted mixing.
Step 3: Foliage and Finish
-
Green base layer:
Switch to your clean size 8 brush. Paint the leaves solid with the olive green underglaze. -
Adding shadows:
I prefer to work wet-on-wet here; immediately lay strips of the dark hunter green along one side of each leaf’s central vein to create a shadowed effect. -
Vein details:
Using the liner brush and dark green, paint the central vein of the leaves and the serrated edges. Keep your hand loose so the lines vary in thickness. -
Connect the stems:
Draw the main stem connecting all the elements using the dark green and the liner brush. Ensure the connection points to the leaves and flowers transition smoothly. -
Sepals:
Don’t forget the small green cups (sepals) at the base of the pink buds. Paint these with small, jagged strokes of dark green. -
Clean up:
Check for any stray paint drops. If you see pencil lines, don’t worry—the graphite will burn off in the kiln firing. -
Glazing:
Once the underglaze is completely dry to the touch, dip the entire plate into clear glaze (or brush on three coats if using brush-on glaze). -
Final fire:
Fire the piece according to your clay and glaze specifications (usually Cone 06 or Cone 6).
Layer it up
For a more vibrant finish, do a second pass of the Deep Rose streaks after the first layer dries. This layering builds opacity and makes the flower truly pop off the beige background.
Enjoy serving your next meal on this delightful slice of the tropics
Folk Art Flowers in Bold Blocks
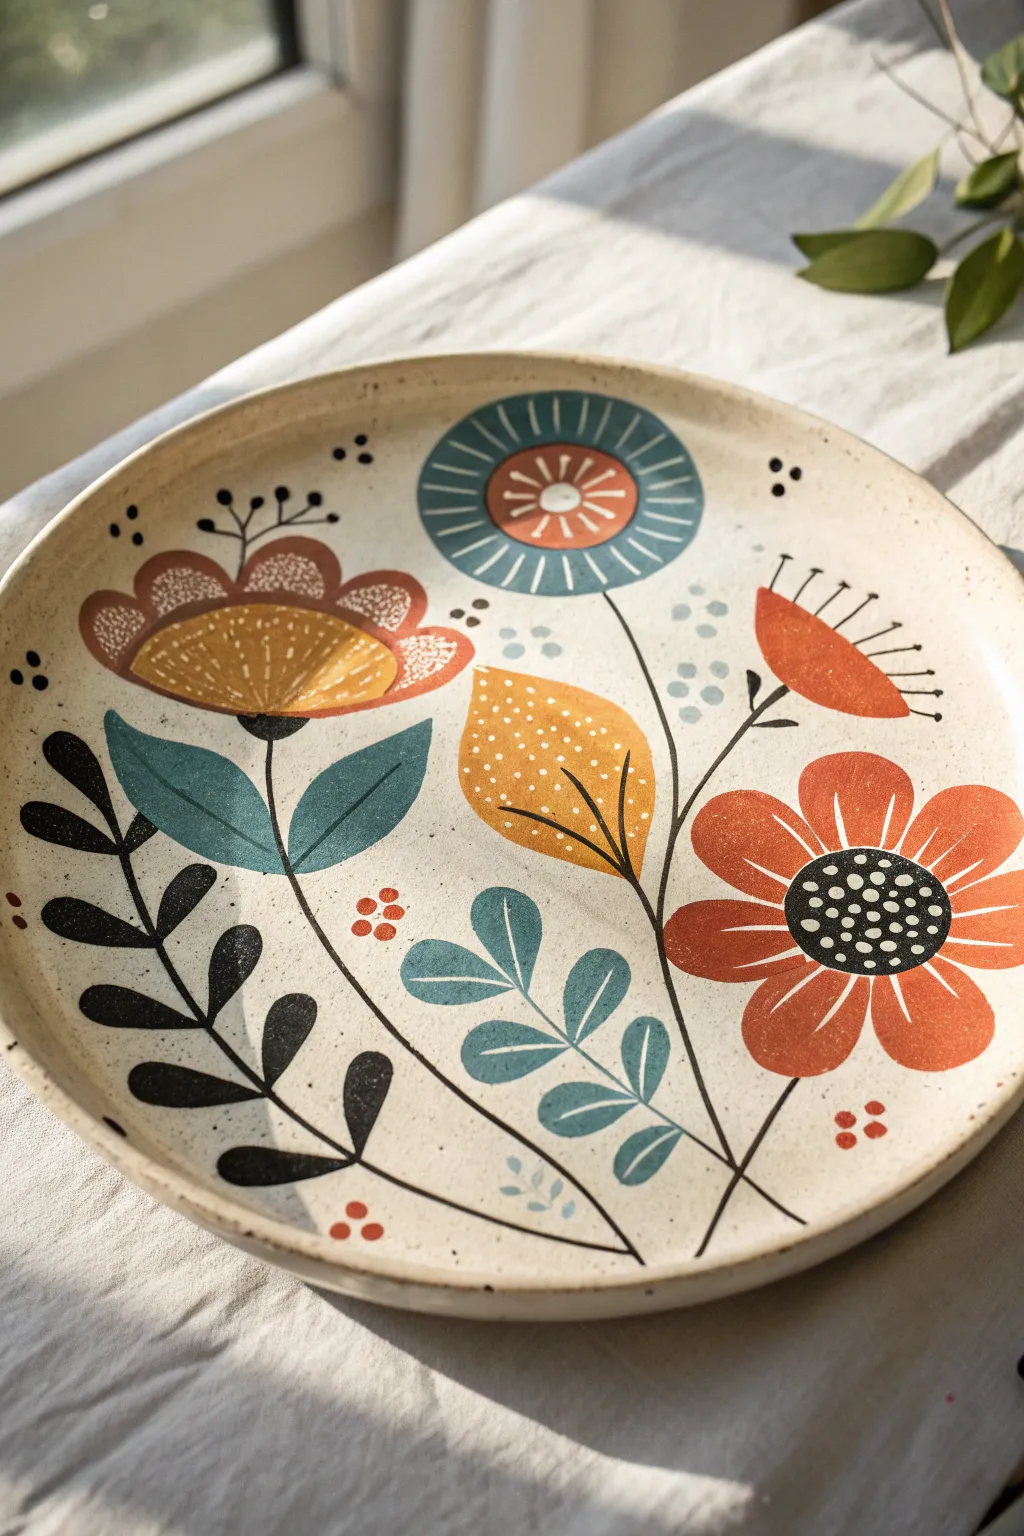
Bring the warmth of Scandinavian-inspired design to your table with this charming hand-painted plate project. Featuring earthy tones of burnt orange, teal, and charcoal, these bold folk art blocks create a cozy, handcrafted look that transforms simple ceramic ware into a work of art.
Detailed Instructions
Materials
- Ceramic bisque plate (unglazed) or a glazed plate (if using porcelain paints)
- Underglazes or porcelain paints (terracotta, mustard yellow, teal blue, black/charcoal, white)
- Round synthetic brushes (sizes 2, 4, and 6)
- Fine liner brush (size 0 or 00)
- Pencil
- Palette or ceramic tile
- Water container
- Paper towels
- Clear gloss glaze (if using bisque/underglaze method)
Step 1: Planning and Base Layers
-
Sketch basic shapes:
Lightly sketch your main floral elements directly onto the plate using a pencil. Focus on large shapes first: a large circle for the top flower, a semi-circle bowl shape for the left flower, and a teardrop for the central leaf. -
Map out stems:
Draw the curving stem lines connecting your floral heads. These anchor the composition, starting from the bottom center and reaching outwards. -
Paint the teal flower:
Using a size 4 brush, paint the large circular flower head at the top in teal blue. Keep the edges clean, but don’t worry about the center detail yet. -
Fill the large orange flower:
Mix a bright terracotta or poppy orange. Paint the large, five-petaled flower on the right side of the plate. Apply two thin coats for opaque coverage if needed. -
Create the left bloom:
For the cup-shaped flower on the left, use a rust-red or brown tone for the outer petals. Then, fill the center semi-circle with mustard yellow. -
Add the central leaf:
Paint the large, central teardrop-shaped leaf using the mustard yellow paint. This acts as a bright focal point in the middle of the design.
Wobbly Lines?
If your fine lines look shaky, slightly thin your black paint with a drop of water. Ink-like consistency flows better from liner brushes than thick paint.
Step 2: Leaves and Secondary Elements
-
Paint teal foliage:
Using the teal color again, paint the two pointed leaves attached to the left flower stem. Then, paint the fern-like sprig growing near the bottom center. -
Add the red bud:
Paint the small, upward-facing semi-circle bud on the right side using your rust-red paint. -
Create the black fern:
Switch to your charcoal or black paint. On the far left, paint a long, curving stem with simple oval leaves attached symmetrically on either side. -
Add small red accents:
Dot small clusters of three red berries near the stems using the tip of a small brush.
Step 3: Fine Details and Linework
-
Outline the stems:
Using your fine liner brush and black paint, carefully trace over your pencil stem lines. I like to keep the pressure light to ensure the lines remain delicate. -
Detail the top flower:
Add a rust-red circle inside the teal flower. Once dry, use white paint to add radiating lines and a small sunburst pattern in the center. -
Detail the right flower:
Paint a black center on the large orange flower. While the black is wet or after it dries, add small white dots for pollen. Add white veining lines to the orange petals. -
embellish the left bloom:
Use white paint to add small dotted textures to the rust-red petals. On the yellow center, paint delicate white radiating lines. -
Decorate the central leaf:
On the large yellow leaf, use black paint to draw a central vein. Add small white dots scattered across one half of the leaf for texture. -
Final black accents:
Use the liner brush to add stamens to the red bud on the right and small decorative dots around the top flower rim. -
Glaze and fire (or cure):
If using bisque, apply a clear gloss glaze and fire in a kiln according to manufacturer instructions. If using bake-on porcelain paints, let the plate cure for 24 hours before baking in a home oven.
Pro Tip
Rest your pinky finger on a dry part of the plate while painting details. This stabilizes your hand and gives you much more control over fine brushwork.
Once fired or cured, this beautiful piece is ready to be displayed as a wall hanging or used for special occasions
One-Stroke Petals and Leaves
Recreate the charm of a spring meadow with this delicate floral plate design. Featuring soft coral blooms and sweeping greenery on a rustic speckled background, this project uses simple one-stroke techniques to achieve an elegant, hand-painted look.
How-To Guide
Materials
- Ceramic plate (bisque or glazed, depending on paint choice)
- Porcelain or multi-surface acrylic paints (Coral, Sage Green, Dark Green, Burnt Umber, Cream/Beige)
- Round synthetic brushes (Size 2 and 4)
- Fine liner brush (Size 0 or 00)
- Old toothbrush (for speckling effect)
- Palette or ceramic tile
- Water cup and paper towels
- Clear glazing medium (optional)
- Oven (if baking is required by paint manufacturer)
Step 1: Preparing the Canvas
-
Clean surface:
Begin by thoroughly washing your ceramic plate with soap and water. Dry it completely and wipe it down with rubbing alcohol to remove any oily residues that might prevent paint adhesion. -
Base speckling:
Mix a small amount of Burnt Umber paint with a drop of water to make it fluid. Dip an old toothbrush into this mixture, hold it over the plate, and run your thumb across the bristles to flick tiny speckles across the surface. This creates that lovely rustic, stoneware appearance. -
Dry speckles:
Let the speckles dry completely for about 15-20 minutes so they don’t smear when you paint the floral elements over them.
Transparency Trick
Mix a tiny drop of glazing medium into your acrylics. This lowers opacity, giving your acrylics a delicate, watercolor-like finish perfect for floral petals.
Step 2: Painting the Flowers
-
Mix petal color:
On your palette, mix a soft coral shade. If your paint is too saturated, soften it with a touch of Cream or White. You want the color to look slightly translucent, like watercolor. -
First bloom placement:
Using a size 4 round brush, paint the first flower on the right side. Press the belly of the brush down to create the widest part of the petal and lift as you pull toward the center. Create 3-4 distinct petals for an open bloom shape. -
Adding variation:
While the paint is still wet, you can touch a tiny bit of darker coral to the base of the petals. This adds instant depth without complex shading. -
Second bloom:
Paint a second flower near the top center. Angle this one slightly differently, perhaps making the petals point upward as if reaching for the sun. -
Third bloom:
Add a third flower on the lower left. Make this one slightly smaller or more cup-shaped to vary the composition. -
Drying time:
Allow the flower heads to dry to the touch before moving on to stems to avoid muddied colors.
Make It a Set
Paint a matching mug using just the tiny bud clusters and a single leaf sprig for a cohesive but not identical breakfast set.
Step 3: Stems and Greenery
-
Stem mixing:
Load your fine liner brush with thinned Burnt Umber. The consistency should be inky so the lines flow smoothly without dragging. -
Drafting stems:
Paint thin, graceful lines connecting your flowers. Let the lines curve naturally rather than making them stiff and straight. Add a few extra branching lines that will hold leaves later. -
Leaf mixing:
Mix a muted Sage Green with a tiny drop of your Burnt Umber to create an earthy, natural green. Load your size 2 round brush. -
Painting leaves:
Use the one-stroke method for leaves: touch the tip of the brush to the stem, press down to widen the stroke, and lift up to a point. Paint these in pairs or alternating patterns along your stems. -
Leaf details:
For added realism, paint the lower half of some leaves with a slightly darker green mixture. I find this subtle contrast really makes the foliage pop. -
Golden accents:
Using a brownish-yellow or ochre shade, paint a few smaller, simpler leaves near the top flower to mimic drying foliage or different plant varieties.
Step 4: Final Details
-
Tiny buds:
Dip the tip of a toothpick or the very end of your liner brush into pink or coral paint. Dot tiny clusters of three or four dots at the ends of your thinnest branch lines to represent buds or berries. -
Flower centers:
Once the main petals are dry, add a small semi-circle or dot of green or brown at the base of each flower where it meets the stem. -
Detail lines:
Use your liner brush with very faint, watered-down brown paint to add delicate interior lines to a few petals, suggesting veins. -
Curing:
Follow the instructions on your specific paint bottle for curing. This often involves letting the piece air dry for 24 hours and then baking it in a home oven to set the design permanently.
Enjoy your beautiful new piece of functional art alongside your morning coffee
Blue-and-White Botanical Linework
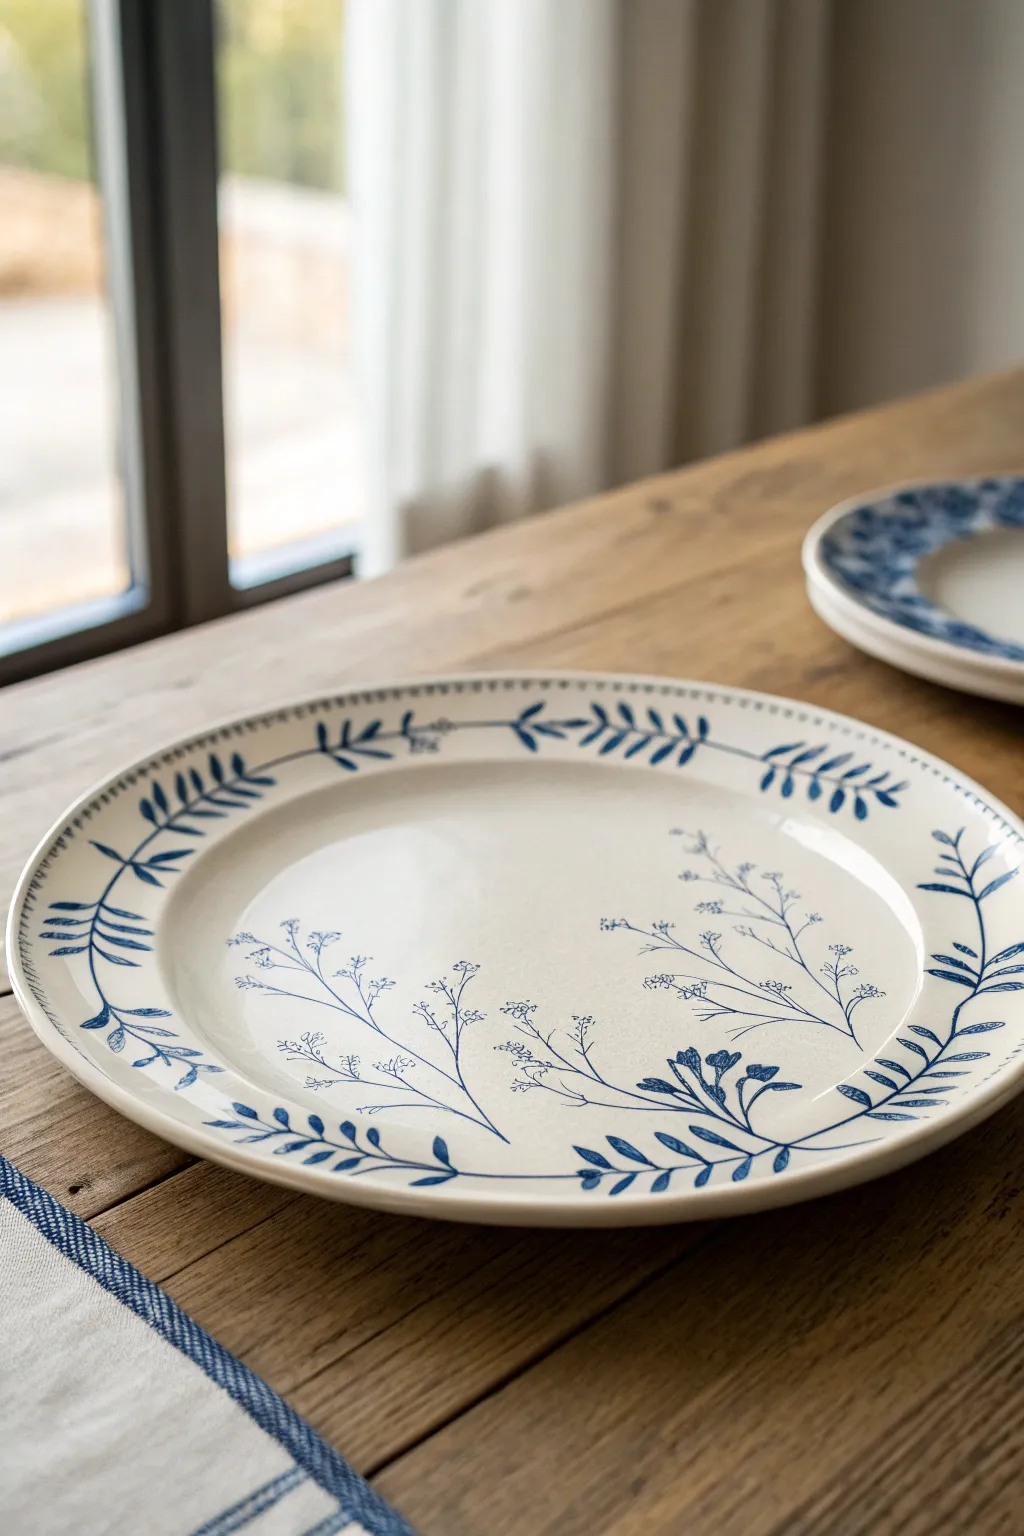
Achieve the timeless elegance of classic blue-and-white porcelain with this delicate hand-painted project. The design combines a structured leafy rim with airy, free-flowing wildflowers in the center for a balanced, heirloom-quality look.
Step-by-Step Guide
Materials
- White or cream ceramic plate (glazed)
- Pebeo Porcelaine 150 paint (Navy Blue or Deep Blue)
- Fine liner brush (size 0 or 00)
- Round brush (size 1)
- Rubbing alcohol
- Paper towels
- Palette or small dish
- Pencil (optional for sketching)
- Oven (for curing)
Step 1: Preparation & Planning
-
Clean surface:
Before painting, wipe the entire plate surface thoroughly with rubbing alcohol on a paper towel. This removes oils and fingerprints that could prevent the paint from adhering properly. -
Mix paint consistency:
Squeeze a small amount of deep blue porcelain paint onto your palette. If the paint feels too thick for fine lines, add a tiny drop of thinner or water (check your specific paint brand’s instructions) to improve flow. -
Practice lines:
Since this design relies on confident linework, practice a few strokes on a spare piece of glass or tile. You want to get comfortable making thin, consistent vines.
Fixing Smudges
Made a mistake? Don’t wipe large areas. Use a slightly damp cotton swab to precisely lift wet paint without ruining the surrounding design.
Step 2: Border Design
-
Establish the rim vine:
Using your fine liner brush, paint a continuous, thin line that circles the entire rim of the plate. It helps to rest your pinky on the table for stability as you rotate the plate with your other hand. -
Add rim leaves:
Switch to your size 1 round brush. Along the main vine line you just painted, add pairs of small, elongated leaves. Press down at the base of the leaf and lift as adjustments to create a tapered point. -
Create flow direction:
Paint the leaves in small clusters of three or four, angling them slightly forward to create a sense of movement around the rim. -
Detail the rim:
Around the very outer edge of the plate, add tiny dots or dashes using the tip of your liner brush to frame the vine design.
Variations
Try a different monochromatic scheme like sage green or sepia for a vintage farmhouse look, or mix two shades of blue for added depth.
Step 3: Central Wildflowers
-
Anchor the stems:
Start the inner design by painting three or four long, sweeping curves originating from the bottom right area. These stems should arch gracefully toward the center and left. -
Paint secondary branches:
Add smaller, shorter branches splitting off from your main stems. Keep these lines very delicate—I find that holding the brush higher up the handle helps keep the pressure light. -
Create flower heads:
At the tips of the stems, paint clusters of tiny dots and minuscule dashes to resemble baby’s breath or meadow rue. -
Shape larger blooms:
For variety, select two or three stems to feature slightly larger flowers. Use simple teardrop shapes to form petals, grouping 3-5 together to make a bloom. -
Balance with grass:
Fill in any awkwardly empty spaces near the base of the design with a few single blades of grass or phantom leaves, keeping them lighter than the main flowers.
Step 4: Finishing Touches
-
Review and refine:
examine your work for any breaks in the lines or uneven paint distribution. You can gently scrape away mistakes with a toothpick while the paint is still wet. -
Dry time:
Allow the plate to air dry completely for at least 24 hours. The paint needs to fully settle before baking. -
Cure in oven:
Place the plate in a cool oven, then set the temperature to 300°F (150°C). Bake for 35 minutes once it reaches temperature. -
Cool down:
Turn the oven off and leave the plate inside to cool down gradually with the oven. Removing it too quickly can cause the ceramic to crack.
Once baked, your botanical plate is ready to be displayed as art or used for a lovely afternoon tea service
Monochrome Florals With Shading
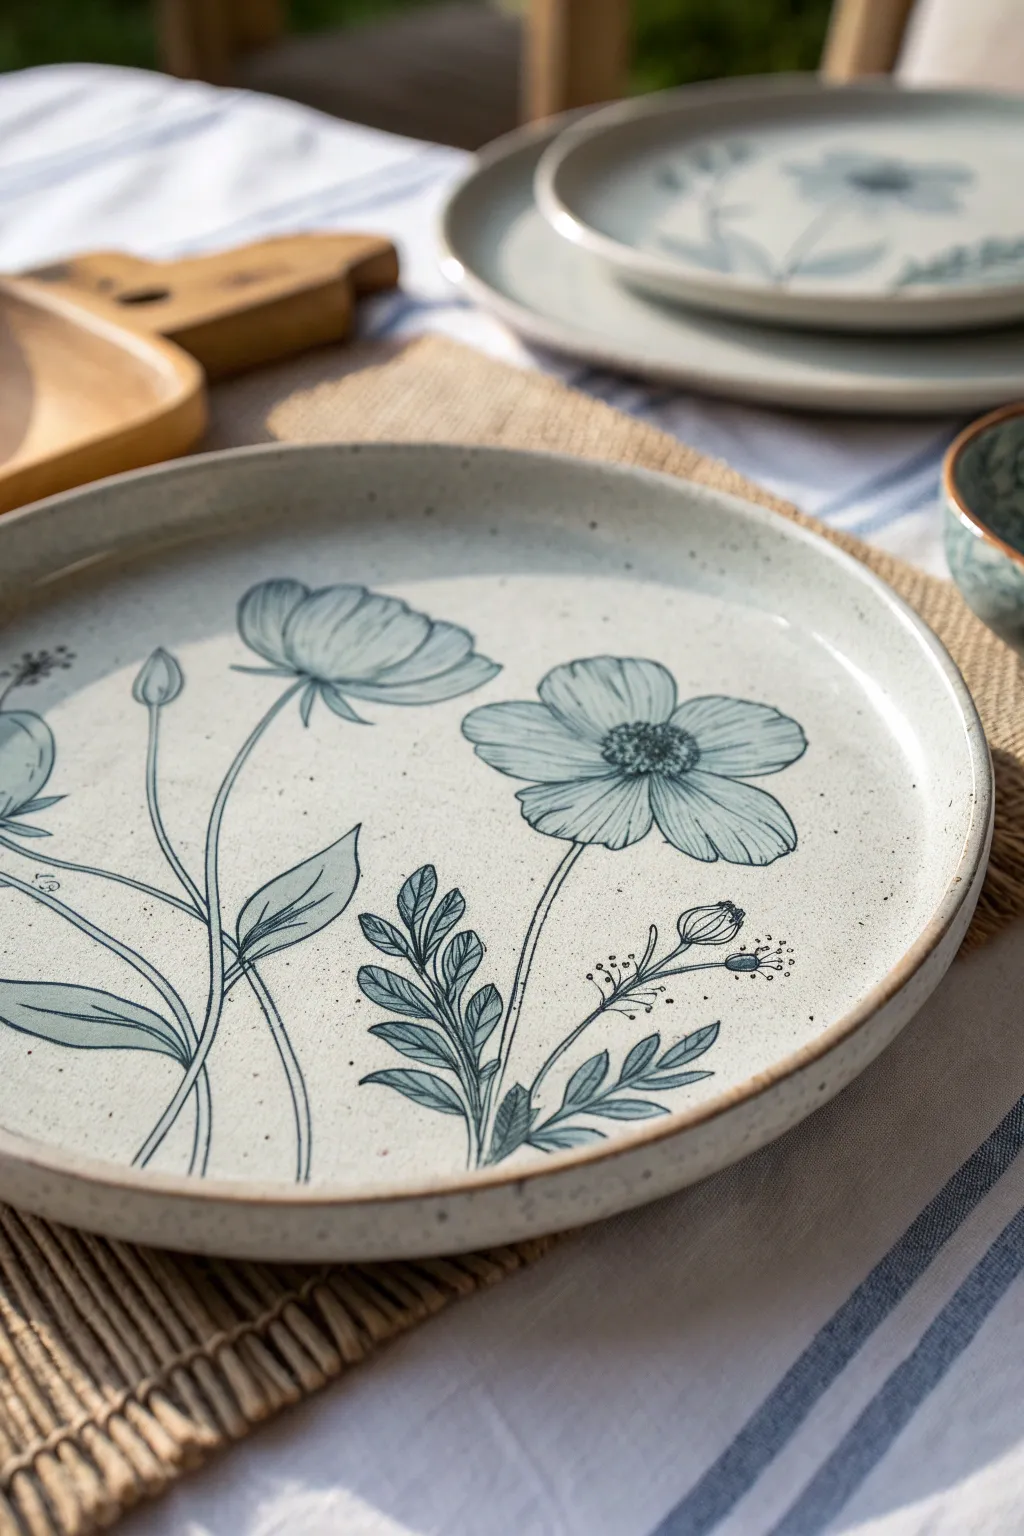
Embrace the elegance of simplicity with this monochrome floral plate design, featuring delicate wildflowers and anemones painted in a serene dusty blue. The speckled cream background adds a rustic charm, while the black linework provides crisp definition to the soft, washed petals.
Step-by-Step Tutorial
Materials
- Bisque-fired ceramic plate (speckled clay body recommended)
- Underglaze pencil or fine liner (Dark Blue or Black)
- Underglaze paint (Dusty Blue or Teal)
- Translucent or clear dipping glaze
- Fine detail brush (Size 0 or 00)
- Round shader brush (Size 4 or 6)
- Pencil for sketching
- Water container
- Sponge
Step 1: Preparation & Sketching
-
Clean surface:
Begin by wiping down your bisque plate with a slightly damp sponge to remove any dust or oils that might resist the glaze. -
Plan composition:
Visualize three main floral elements: two large open blooms and one smaller bud or sprig. Roughly place these in your mind to create an asymmetrical, organic flow. -
Light sketch:
Using a standard pencil, lightly sketch the main stems and flower centers directly onto the bisque. Don’t worry about erasing; the graphite will burn off in the kiln. -
Petal shapes:
Draw the basic petal shapes for the large blooms. Keep them loose and slightly irregular to mimic nature, rather than perfect geometric circles.
Step 2: Painting the Washes
-
Mix the wash:
Dilute your dusty blue underglaze with a small amount of water. You want a consistency similar to watercolor paint—translucent but pigmented. -
Fill petals:
Using the round shader brush, gently fill in the petals of the two large flowers. Apply the wash unevenly, letting it pool slightly in some areas for natural variation. -
Leaf details:
Paint the leaves with the same wash mixture. For the fern-like sprig at the bottom, use small, dabbing strokes to create individual leaflets. -
Add shading:
While the first layer is still slightly damp, add a touch more concentrated underglaze to the base of the petals near the center. This creates depth. -
Dry completely:
Allow the painted washes to dry fully. The surface should look chalky and matte before you move on to the linework.
Watercolor Effect
To get softer shading, wet the bisque slightly with clean water before applying the blue wash. This helps the color bleed and soften like real watercolor on paper.
Step 3: Adding Line Definition
-
Prepare liner:
Shake your underglaze liner bottle well or prepare a very fine brush with fully concentrated dark blue or black underglaze. -
Outline stems:
Start by tracing the long, sweeping stems. Use confident, continuous strokes to keep the lines smooth rather than shaky. -
Petal contours:
Outline the petals you previously painted. Don’t try to outline perfectly; if the line misses the paint edge slightly, it adds to the illustrative charm. -
Center details:
For the flower centers, use stippling (small dots) or tiny circles to create texture. This mimics the stamens and pollen. -
Veining:
Add simple center veins to the larger leaves using a quick flick of your fine brush. -
Bud details:
Draw the small buds and the tiny seed pods on the secondary sprigs, adding little dots around them for a whimsical, airy effect. -
Rim accent:
I like to finish the piece by running a semi-dry brush along the very rim of the plate with the dark underglaze to frame the artwork.
Add Variety
Try mixing a tiny drop of green underglaze into your blue for the leaves to create a very subtle color shift between the blooms and the foliage.
Step 4: Glazing & Firing
-
Check dryness:
Ensure all underglaze work is completely bone dry. Any moisture can cause smudging during the dipping process. -
Clear glaze application:
Dip the plate into a clear or transparent glaze. A dipping motion ensures an even coat without smearing your delicate lines. -
Clean the foot:
Wipe the bottom foot ring of the plate entirely clean with a wet sponge to prevent it from sticking to the kiln shelf. -
Fire:
Fire the plate in the kiln according to your clay and glaze specifications (typically Cone 5 or 6 for stoneware).
Once fired, you will have a stunning, food-safe piece of art ready for your next dinner party
Watercolor-Style Floral Wash
Capture the delicate beauty of a spring garden with this watercolor-style plate design. Using translucent layers of specialty porcelain paint, you’ll create soft, dreamy floral motifs in peach and sage hues that seem to float across the ceramic surface.
Step-by-Step Guide
Materials
- White ceramic dinner plate (oven-safe)
- Pebeo Porcelaine 150 paints (or similar bake-to-set ceramic paints)
- Colors: Ivory, coral/peach, olive green, warm brown, deep red
- Paint thinner or blending medium (specific to paint brand)
- Round synthetic brushes (sizes 2, 4, and 6)
- Fine liner brush (size 0 or 00)
- Rubbing alcohol and paper towels
- Palette or ceramic tile for mixing
- Oven for curing
Step 1: Preparation & Planning
-
Clean surface:
Wipe the entire plate down thoroughly with rubbing alcohol and a paper towel. This removes any invisible oils or fingerprints that could prevent the paint from adhering properly. -
Map the composition:
Since we want a loose, organic look, avoid heavy pencil lines. Instead, you can lightly mark the placement of the three main flower clusters—one large bloom on the left, a medium one on the right, and a smaller bud near the top—using a very faint wash of diluted ivory paint.
Fixing Mistakes
Smudged a petal? Don’t panic. While wet, use a cotton swab dipped in rubbing alcohol to lift the paint clean off the ceramic. Let the spot dry before repainting.
Step 2: Painting the Blooms
-
Mix the base wash:
On your palette, mix a small amount of coral paint with a generous amount of thinning medium. You want a consistency that looks like watery watercolor, not thick acrylic. -
Lay the first petals:
Starting with the large flower on the left rim, use the size 6 brush to lay down broad, sweeping petal shapes. Keep the center empty for now and let the edges be naturally uneven. -
Add the second flower:
Repeat this process for the flower on the right side, slightly varying the angle so the bloom faces inward towards the center of the plate. -
Layering depth:
While the first layer is still tacky but not wet, mix a slightly more saturated version of the coral with a touch of deep red. Apply this to the base of the petals near the center to create a shadow effect. -
Soften the blend:
Clean your brush, dampen it slightly with thinner, and gently drag the darker pigment outwards into the pale petals. This prevents harsh lines and maintains that soft watercolor aesthetic I really love for florals. -
Paint the centers:
Once the petals are dry to the touch, mix warm brown with a tiny dot of yellow or ivory. Using your size 2 brush, stipple small dots into the center of the flowers to create the pollen area.
Gold Rim Upgrade
For an elegant touch, paint a thin, uneven line of metallic gold ceramic paint along the very edge of the plate rim once the florals are dry.
Step 3: Adding Foliage & Details
-
Mix foliage greens:
Create two shades of green: a pale, dusty sage using olive mixed with thinner and white, and a deeper forest green for veins and shadows. -
Paint main leaves:
Using the size 4 brush and the pale sage mix, paint flexible, curving leaves extending from under the blooms. Let some leaves drift onto the rim and others point inward. -
Add vine accents:
Switch to your fine liner brush. With the deeper green, paint very delicate, thin stems that trail off from the main clusters. Keep your wrist loose to get natural, organic curves. -
Detail the berries:
Dip a small round brush or the handle end of a brush into a reddish-brown mix. Dot tiny clusters of berries along the thin vine stems you just painted, varying their size for interest. -
Leaf veining:
Once the pale leaves are dry, use the liner brush and the thinned deep green to add subtle central veins. Keep these lines broken and faint so they don’t overpower the softness. -
Final highlights:
Mix a tiny amount of white or ivory. Add very sparing highlights to the tops of the berry clusters and the edges of the focal flower petals to bring them forward.
Step 4: Curing
-
Dry time:
Let the plate dry completely for at least 24 hours. The paint must be fully dry before baking to prevent bubbling. -
Bake to set:
Place the plate in a cool oven. Set the temperature to 300°F (150°C) or the manufacturer’s specific instruction. Once the temperature is reached, bake for 35 minutes. -
Cool down:
Turn the oven off and leave the plate inside until it is completely cool. Removing it while hot can cause the ceramic to crack due to thermal shock.
Now you have a stunning, food-safe piece of art ready for your next dinner party
Dot-Painted Floral Mandala
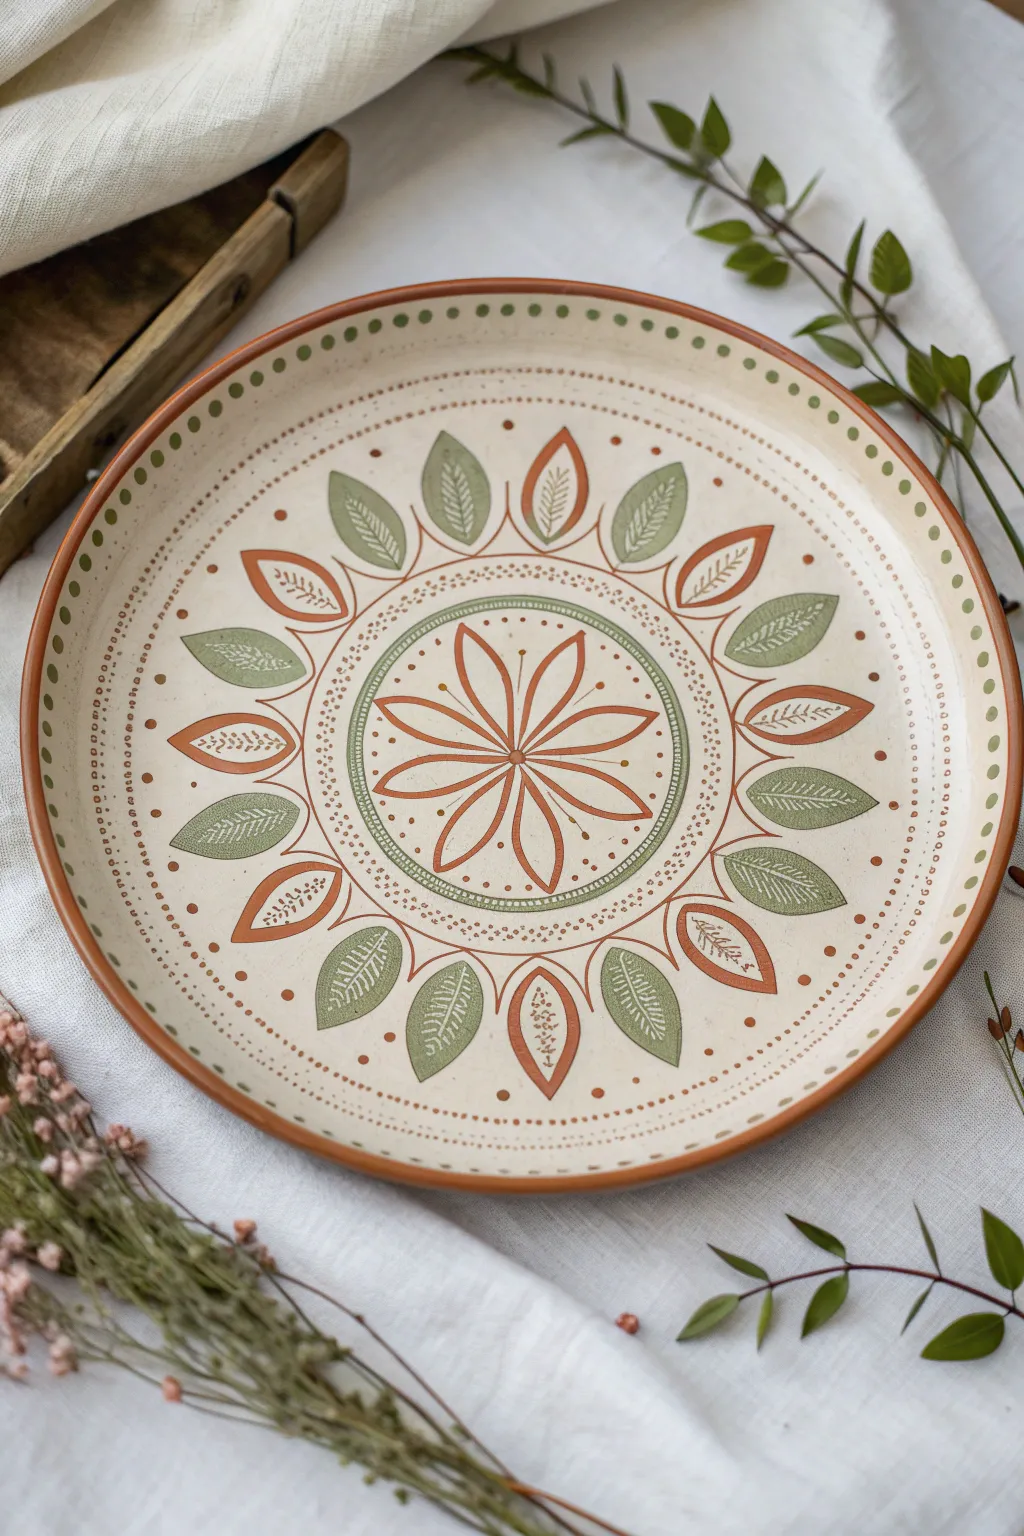
This project combines the rhythmic charm of a mandala with natural floral motifs, perfect for creating a warm, artisanal piece. Using a palette of rust orange and sage green, you’ll layer intricate dot work over simple geometric shapes to build a stunning, cohesive design.
Step-by-Step Tutorial
Materials
- Bisque ceramic plate (cream or beige) or a plain ceramic plate
- Ceramic paints (Rust/Terracotta, Sage Green, Deep Green)
- Small round paintbrushes (sizes 0 and 2)
- Dotting tool set (various sizes)
- Pencil
- Compass or round objects for tracing
- Paper towel
- Eraser
- Clear glaze (if firing) or sealant (if using acrylics)
Step 1: Setting the Structure
-
Mark the center:
Find the precise center of your plate and lightly mark it with a pencil. This small mark is crucial for keeping your mandala symmetrical. -
Draw the concentric circles:
Using a compass or by tracing round objects of varying sizes, draw three main concentric circles lightly around your center point. These will serve as guidelines for the flower center, the inner leaf ring, and the outer border. -
Section the design:
Lightly sketch lines dividing the plate into 16 equal pie slices. These guidelines help ensure your petals and leaves stay evenly spaced around the circle.
Paint Consistency Pro-Tip
For perfectly round dots that don’t cultivate peaks, mix a drop of water or flow medium into your paint. It should have the consistency of heavy cream before you dip your tool.
Step 2: Painting the Center Motif
-
Outline the central petals:
Using your size 0 brush and rust-colored paint, carefully paint the outline of eight thin, teardrop-shaped petals radiating from the center dot. Keep the lines crisp and thin. -
Add inner details:
Inside each petal, paint a single vertical line extending from the base halfway up. This simple detail adds depth without cluttering the airy center. -
Paint the dividing dots:
Dip a small dotting tool into sage green paint. Place three small, descending dots between the tips of each rust petal.
Uneven Spacing?
If your dots start getting too crowded or too spaced out, stop immediately. Wipe the wet paint away with a damp Q-tip, dry the spot, and re-measure your spacing before continuing.
Step 3: Creating the Leaf Borders
-
Paint the first green ring:
Mix a soft sage green. Paint a solid band about 1/4 inch thick around your central flower motif. Let this dry completely before moving to the next step to avoid smudging. -
Layer the second band:
Paint a thinner band of rust orange directly outside the green band. Once dry, use a fine tip white or cream paint to add tiny dots or dashed lines on top of the orange ring for texture. -
Sketch the leaves:
Around the central ring, sketch alternating large leaf shapes. Half should be painted solid muted green, and half should be outlined in rust orange. -
Fill the green leaves:
Using your size 2 brush, fill in the solid green leaves. I like to apply two thin coats here to ensure the color is solid and opaque. -
Detail the orange leaves:
Outline the alternating leaves with rust paint. Inside these outlines, paint small vein details—a central line with tiny branches—to mimic a skeletal leaf look. -
Add veins to green leaves:
Once the green leaves are fully dry, use a very fine brush to paint white or cream vein patterns on top of them, mirroring the style of the orange leaves.
Step 4: Applying Delicate Dot Work
-
Create the dotted halo:
Using a medium dotting tool and rust paint, create a ring of evenly spaced dots around the tips of your leaf layer. This frames the main design. -
Start the micro-dot border:
Switch to your smallest dotting tool. create two very close, concentric rings of tiny rust-colored dots further out towards the rim of the plate. -
Paint the rim accents:
Along the very outer rim of the plate, alternate painting medium-sized green dots. Spacing them perfectly can be tricky, so visualize them as pairs first to keep the rhythm steady. -
Add final flourishes:
Look for empty spaces between the large leaves. Add a single, tiny rust dot in these negative spaces to tie the whole composition together.
Step 5: Finishing
-
Erase guidelines:
Wait until the paint is bone-dry—ideally overnight. Gently erase any visible pencil marks, being careful not to scratch the paint. -
Seal or fire:
If using ceramic glazes, coat with a clear glaze and fire according to manufacturer instructions. If using acrylics for decorative use, apply a durable gloss varnish.
Display your finished mandala plate on a stand or hang it on the wall to add a touch of handcrafted warmth to your room
Seasonal Flower Set Mix-and-Match
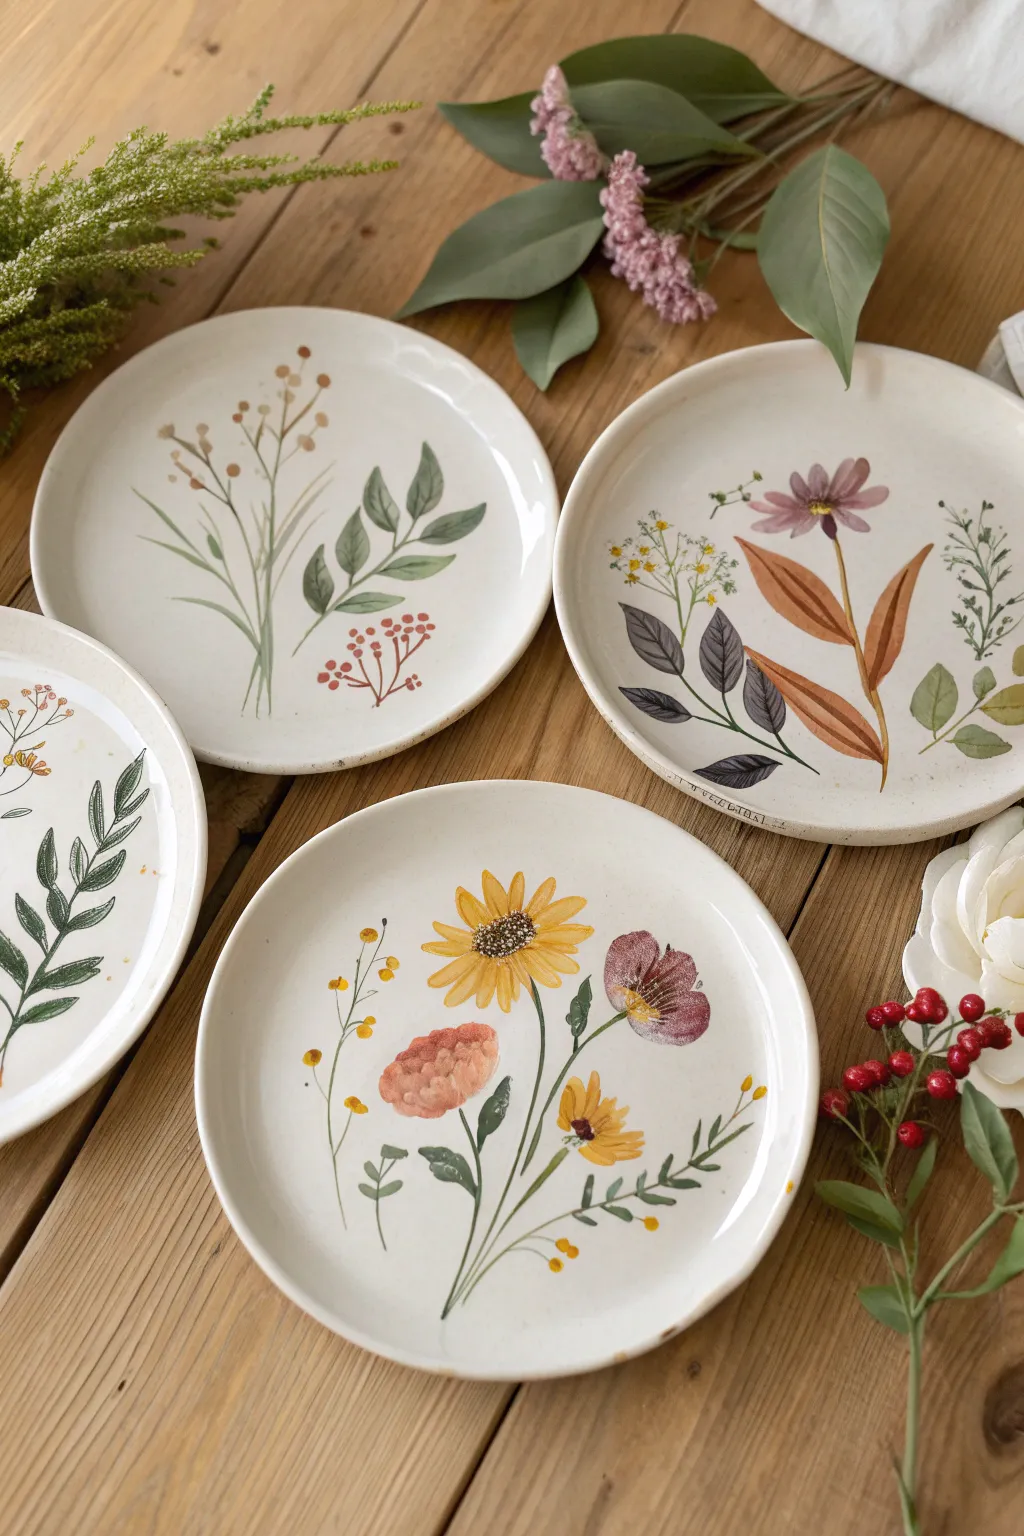
Embrace the natural beauty of the changing seasons with this mix-and-match set of four hand-painted ceramic plates. Featuring delicate botanical illustrations ranging from summery sunflowers to autumnal leaves, this project uses ceramic paints to create durable, functional art perfect for any tablescaping theme.
Detailed Instructions
Materials
- 4 White ceramic plates (salad or dessert size, oven-safe)
- Pebeo Porcelaine 150 paints (or similar bake-on ceramic paint)
- Paint colors: Oxide Green, Leaf Green, Yellow Gold, Dark Brown, Rust Orange, Dusty Pink, Lavender, Deep Red
- Rubbing alcohol and paper towels
- Fine detail brushes (sizes 00, 0, and 1)
- Small round synthetic brush (size 2)
- Ceramic mixing palette
- Water cup for rinsing
- Pencil (optional for sketching)
- Domestic oven for curing
Step 1: Preparation & Planning
-
Clean surface:
Before allowing a single drop of paint to touch the ceramic, wipe down all four plates thoroughly with rubbing alcohol and a paper towel. This removes oils and fingerprints that could prevent the paint from adhering properly. -
Plan designs:
Visualize distinct themes for each plate to ensure variety. We are aiming for a mix: one with warm autumnal leaves and cosmos, one with a central sunflower bouquet, one with airy green ferns, and one with delicate berry sprigs. -
Drafting:
If you aren’t confident painting freehand, lightly sketch the main stems and flower placements using a regular pencil. The graphite will burn off in the oven later, so don’t worry about erasing perfectly.
Step 2: Plate 1: The Sunflower Garden
-
Main blooms:
Start with the focal point: the yellow sunflower. Using a size 2 brush and Yellow Gold, paint elongated petals radiating from a center point. Keep the paint somewhat translucent to mimic watercolor. -
Adding companions:
While the yellow dries, paint a Dusty Pink poppy shape and a smaller Lavender bud nearby. Keep the edges soft and organic. -
Stems and leaves:
Switch to your size 0 brush and Leaf Green. Draw thin, sweeping lines connecting your flowers to a central ‘bouquet’ point at the bottom. Add small tear-drop shaped leaves along the stems. -
Detail work:
Once the flower centers are dry, use the size 00 brush to stipple Dark Brown dots into the sunflower center and add delicate stamens to the poppy.
Oops! Runny Paint?
If paint spreads too much, use a damp cotton swab to wipe away mistakes instantly. If it’s already tacky, gently scrape it off with a craft knife or toothpick.
Step 3: Plate 2: Autumnal Cosmos
-
Prominent leaves:
This design features bolder foliage. Mix Rust Orange with a touch of Brown. Paint two large, elongated leaves that sweep upward from the bottom right. -
Contrast foliage:
Balance the warm tones by painting a dark, greyish-purple branch of leaves on the left side using a mix of Lavender and Dark Brown. -
Cosmos flower:
Paint a single, detailed cosmos flower at the top using a watered-down Dusty Pink or light purple. Add a yellow center once the petals are touch-dry. -
Filler sprigs:
Fill the white space with tiny sprigs of greenery and small yellow dots to represent pollen or tiny buds.
Level Up: Gold Rims
For a vintage look, paint a thin, uneven rim around the edge of the plates using metallic gold ceramic paint before the final baking step.
Step 4: Plate 3 & 4: Greenery & Berries
-
Ferns and fronds:
For the greenery-focused plate, mix Oxide Green with a little water. Paint long, arching stems, then add symmetrical leaflets all the way up the stem to create a fern look. -
Berry accents:
On the final plate, combine delicate green stalks with clusters of berries. Use the back end of your paintbrush dipped in Deep Red or Rust Orange to stamp perfect little circles for the berries. -
Layering colors:
I like to go back over some of the green leaves on all plates with a slightly darker shade of green to add veins and depth, but only after the base layer is completely dry to avoid muddiness.
Step 5: Curing
-
Air dry:
Allow the plates to air dry for at least 24 hours. The paint needs to be completely moisture-free before baking. -
Baking process:
Place the plates in a cool oven. Turn the heat to 300°F (150°C) and bake for 35 minutes (or per your paint manufacturer’s specific instructions). -
Cool down:
Turn the oven off and leave the plates inside until the oven is completely cool. Removing them while hot can cause the ceramic to crack due to thermal shock.
Enjoy styling your table with these custom seasonal designs that celebrate nature’s variety