A plain ceramic plate is basically the best low-pressure canvas—big, forgiving, and instantly useful. If you want something that looks impressive without needing fancy drawing skills, these easy ceramic plate painting ideas will get you there fast.
Classic Polka Dot Rim
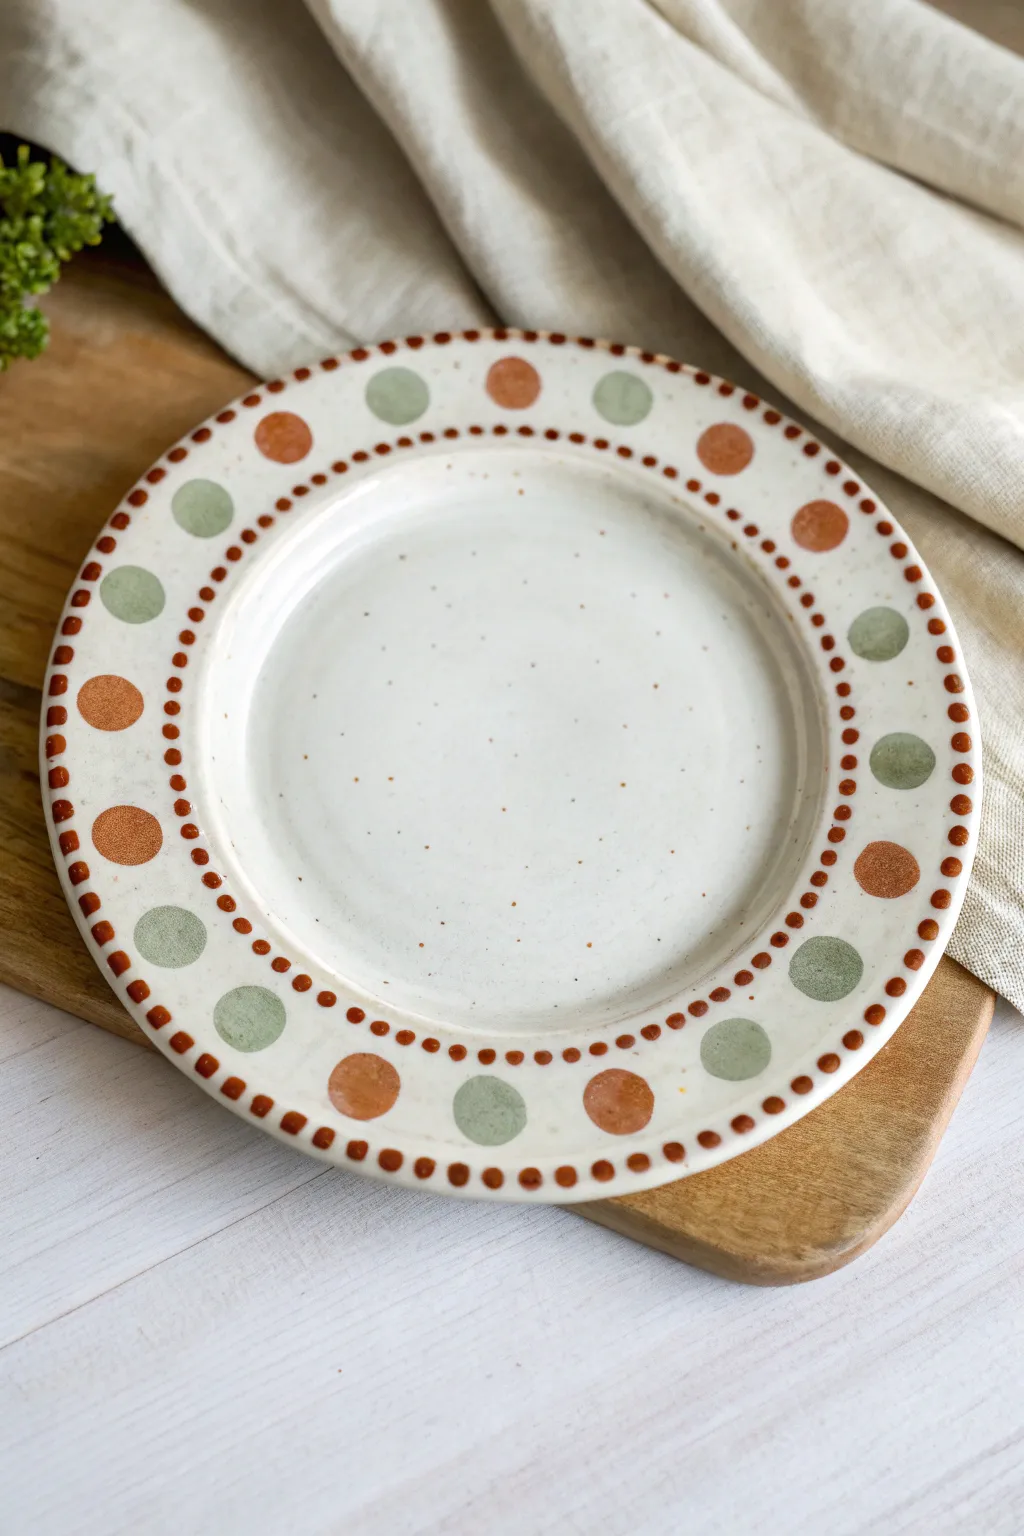
This project embraces a warm, earthy aesthetic by combining soft sage greens and terracotta oranges in a rhythmic pattern. The result is a charming, folk-inspired rim design that feels handmade and cozy, perfect for adding a touch of personality to plain white dinnerware.
How-To Guide
Materials
- White or cream ceramic plate (bisque or glazed, depending on paint type)
- Ceramic paints or underglazes (Terracotta/Rust Orange, Sage Green)
- Small round paintbrush (size 2 or 4)
- Detail liner brush or dotting tool
- Pencil (optional for marking)
- Palette for mixing
- Water cup and paper towels
- Clear glazing medium (if using underglazes)
Step 1: Preparation & Planning
-
Clean the surface:
Before you begin, ensure your ceramic plate is completely free of dust, oils, or grease. Wipe it down thoroughly with a damp sponge or an alcohol wipe and let it dry. -
Plan the spacing:
Visualize the rim as a clock face to help space out your main dots evenly. You can adhere small pieces of painter’s tape or make faint pencil marks at the 12, 3, 6, and 9 o’clock positions, then fill in the gaps between them. -
Prepare your palette:
Squeeze out a nickel-sized amount of your terracotta orange and sage green paints. If the paint feels too thick, thin it slightly with a drop of water or medium so it flows smoothly.
Pro Tip: Perfect Circles
For perfectly round large dots, use the eraser end of a pencil or a round foam pouncer as a stamp. Dip it in paint, dab off the excess on foil, and press firmly.
Step 2: Painting the Large Polka Dots
-
Start the green dots:
Load your round brush (size 2 or 4) with the sage green paint. Gently press the brush onto the rim to create a circle about the size of a dime. -
Continue the pattern:
Paint your next green dot, leaving enough space for two dots (one orange, one green) in between, but don’t fill them yet. I prefer to do all one color first to maintain consistency in paint load. -
Complete the green cycle:
Continue around the entire rim with the green paint, aiming for even spacing. Don’t worry if circles aren’t perfectly round; the organic shape adds to the rustic charm. -
Switch to orange:
Rinse your brush thoroughly. Load it with the terracotta orange paint and place a dot directly in the center of the spaces between your green dots. -
Check for opacity:
Ceramic paints can sometimes be translucent. If the first coat looks streaky, let it dry for a few minutes and apply a second thin coat to make the colors solid.
Level Up: Texture Play
Instead of flat paint, use a dimensional ceramic writer bottle (like a puffy paint for pottery) for the tiny orange border dots to give the rim a raised, tactile texture.
Step 3: Adding the Detail Borders
-
Load the detail tool:
Switch to your fine liner brush or a small dotting tool. Dip it into the terracotta orange paint. -
Start the outer rim:
Begin placing tiny dots along the very outer edge of the plate rim. These should be much smaller than the main polka dots—think of them as beads. -
Establish rhythm:
Try to place roughly two or three tiny dots for every large polka dot space. Keep them close to the edge but fully on the rim surface. -
Complete the outer circle:
Work your way around the entire outer circumference. Rotate the plate as you go to keep your hand angle comfortable and steady. -
Begin the inner border:
Now, move to the inner edge of the rim where the flat part meets the bowl of the plate. You will create a matching ring of tiny orange dots here. -
Create alignment:
Try to align these inner dots roughly with the outer dots, though they don’t need to match perfectly. The goal is to frame the large polka dots. -
Keep dots consistent:
Reload your brush frequently. If the dots start getting smaller and fainter, you are running out of paint.
Step 4: Finishing Touches
-
Add speckles (optional):
For that true stoneware look seen in the photo, dilute a tiny bit of brown or orange paint with water on an old toothbrush. Run your thumb over the bristles to flick a very fine mist of speckles over the center of the plate. -
Inspect the work:
Look closely for any smudges or unwanted drips. You can usually scratch these off with a toothpick or wipe them with a damp Q-tip while the paint is still semi-wet. -
Dry properly:
Allow the plate to dry completely according to your paint manufacturer’s instructions. This usually takes at least 24 hours. -
Bake or fire:
To make the design permanent and food-safe, bake the plate in a home oven (for porcelain paints) or fire it in a kiln (for glazes) exactly as the bottle directs.
Now your plate is ready to bring a lovely handcrafted warmth to your next meal


Simple Stripes Around the Edge
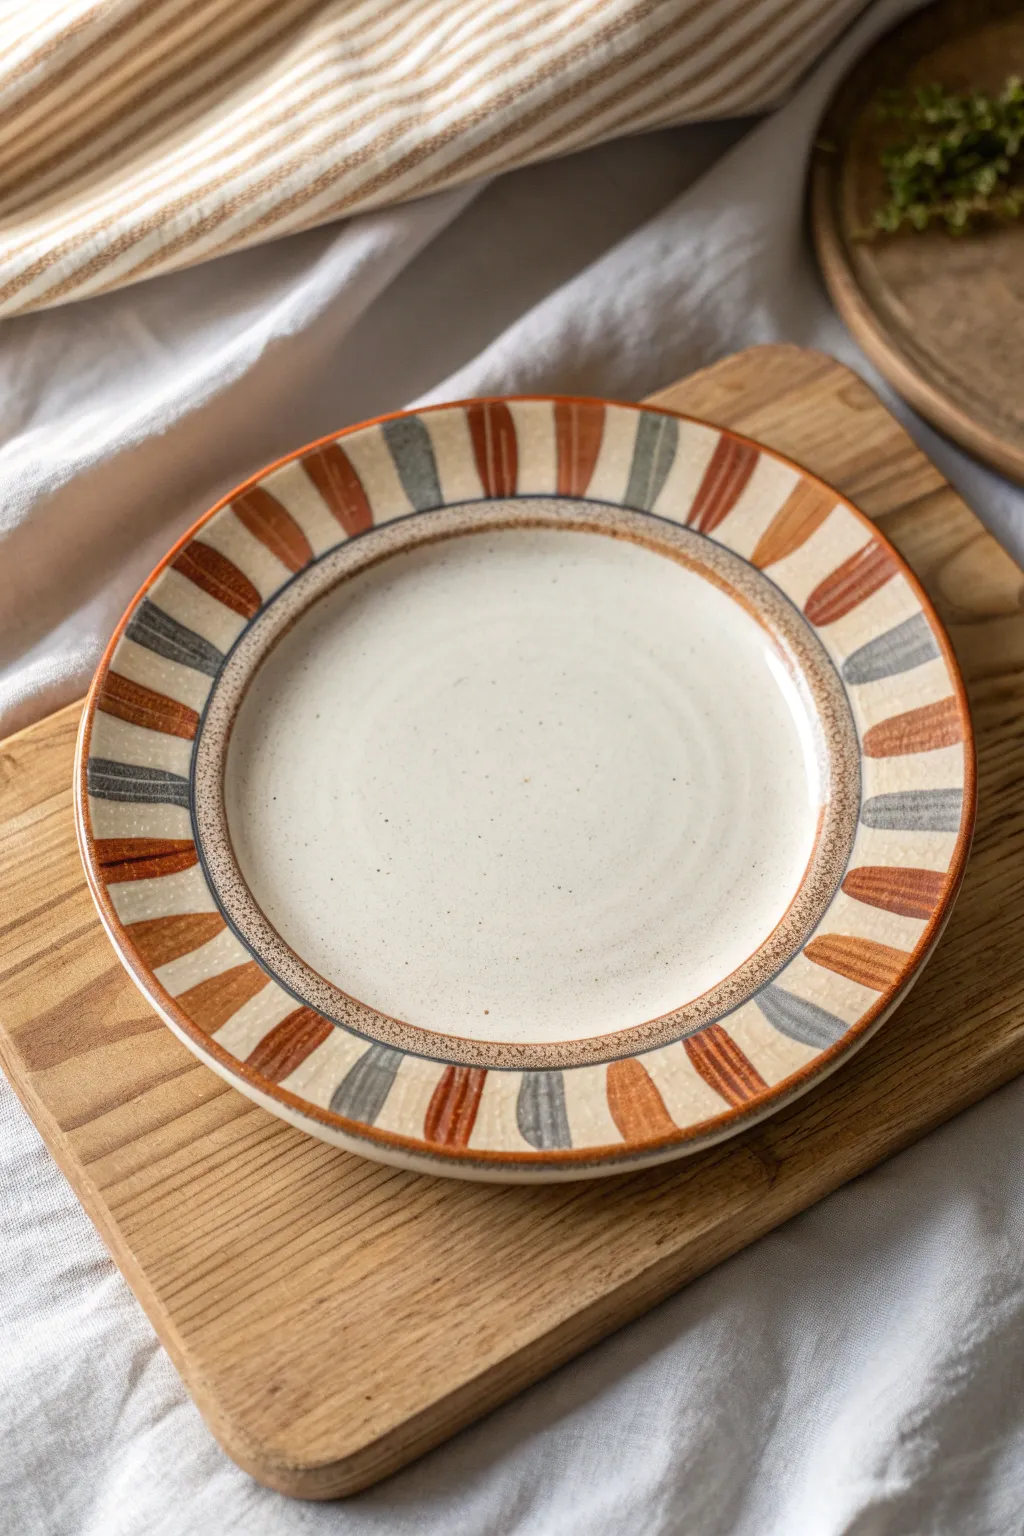
Bring warmth to your table setting with this rustic, hand-painted ceramic design featuring loose, organic stripes in a palette of burnt orange, terracotta, and soft grey. This project celebrates imperfection, using freehand brushwork to create a cozy, artisanal feel perfect for everyday dining.
Step-by-Step
Materials
- Bisque-fired ceramic dinner plate (with a wide, flat rim)
- Underglazes: Burnt Sienna, Terracotta/Deep Orange, Slate Blue/Grey
- Clear dipping glaze (food safe)
- Medium square-tipped shader brush (approx. 1/2 inch width)
- Small round detail brush (size 2 or 3)
- Small sponge
- Water container
- Lazy Susan or banding wheel (optional but helpful)
Step 1: Preparation & Base Ring
-
Clean the bisque:
Start by wiping down your bisque plate with a slightly damp sponge. This removes any kiln dust or oils from handling, ensuring your underglaze adheres perfectly without crawling. -
Define the center:
Locate the ridge where the rim meets the central eating surface. We will accentuate this transition. If you have a banding wheel, center the plate on it now. -
Mix the ring color:
Create a mixture of your Burnt Sienna underglaze with a tiny drop of water to improve flow. It should be the consistency of heavy cream. -
Paint the inner ring:
Using your small round detail brush, paint a thin, continuous line right in the groove separating the rim from the center. Don’t worry if it’s slightly wobbly—that adds to the handmade charm. -
Stipple the edge:
While the ring is still damp, lightly tap the tip of a dry bristle brush or a stiff sponge along the outer edge of that line to create a speckled, textured border rather than a hard edge.
Step 2: Creating the Rim Pattern
-
Plan your palette:
Pour small puddles of your three main colors: Burnt Sienna, Terracotta, and Slate Blue onto your palette. -
Understanding the stroke:
The stripes on the rim are thick and slightly tapered. Practice on paper first: press the square brush down firmly at the outer edge, pull inward, and lift up as you near the inner ring. -
Start the sequence:
Load your square shader brush with the Burnt Sienna. Paint your first stripe at the 12 o’clock position, extending from the outer plate edge toward your painted inner ring, leaving a small gap before touching it. -
Establish the rhythm:
Paint a second Burnt Sienna stripe at the 6 o’clock position. Then fill in 3 o’clock and 9 o’clock. This anchors your spacing. -
Apply the next color:
Switch to the Terracotta/Deep Orange. Clean your brush thoroughly or use a second brush. Paint a Terracotta stripe next to each existing Sienna stripe, maintaining that freehand spacing. -
Add the cool tone:
Now introduce the Slate Blue. Paint a blue stripe next to the Terracotta ones. The pattern doesn’t need to be mathematically perfect; variety in the gap size is desirable. -
Fill the gaps:
Continue rotating the plate and filling in the remaining white space on the rim with alternating colors until the full circle is complete. Aim for a mix where no two identical colors touch. -
Refine the edges:
If any stripe looks too faint, go back over it with a second coat. I like to keep the brushstrokes visible, so don’t over-smooth the paint.
Fixing Smudges
If you make a mistake with the underglaze, don’t panic. Let the spot dry completely, then gently scratch it off with a toothpick or a stiff, dry brush before repainting the area.
Step 3: Finishing Touches
-
Speckle the center:
Dilute a tiny bit of the Burnt Sienna or a dark brown underglaze with water on an old toothbrush. Flick the bristles with your thumb to mist tiny speckles across the creamy center of the plate. -
Paint the rim edge:
Using the Burnt Sienna and a steady hand (or the banding wheel), run a line of underglaze along the very outer lip of the plate to frame the entire design. -
Dry completely:
Let the underglaze dry for at least an hour. It should look chalky and matte when fully dry. -
Glaze application:
Dip the entire plate into a clear, food-safe glaze. Shake gently to remove excess drips, then clean the foot of the plate with a sponge. -
Final fire:
Fire the plate in the kiln according to the clay and glaze manufacturer’s instructions (usually Cone 5 or 6 for stoneware).
Mix It Up
Try varying the width of the stripes for a more modern look. Use a wider brush for the darker colors and a thinner brush for the accent colors to create a dynamic rhythm.
Once fired, you’ll have a stunning, durable piece of tableware that perfectly balances rustic charm with modern design


Easy Checkerboard Blocks
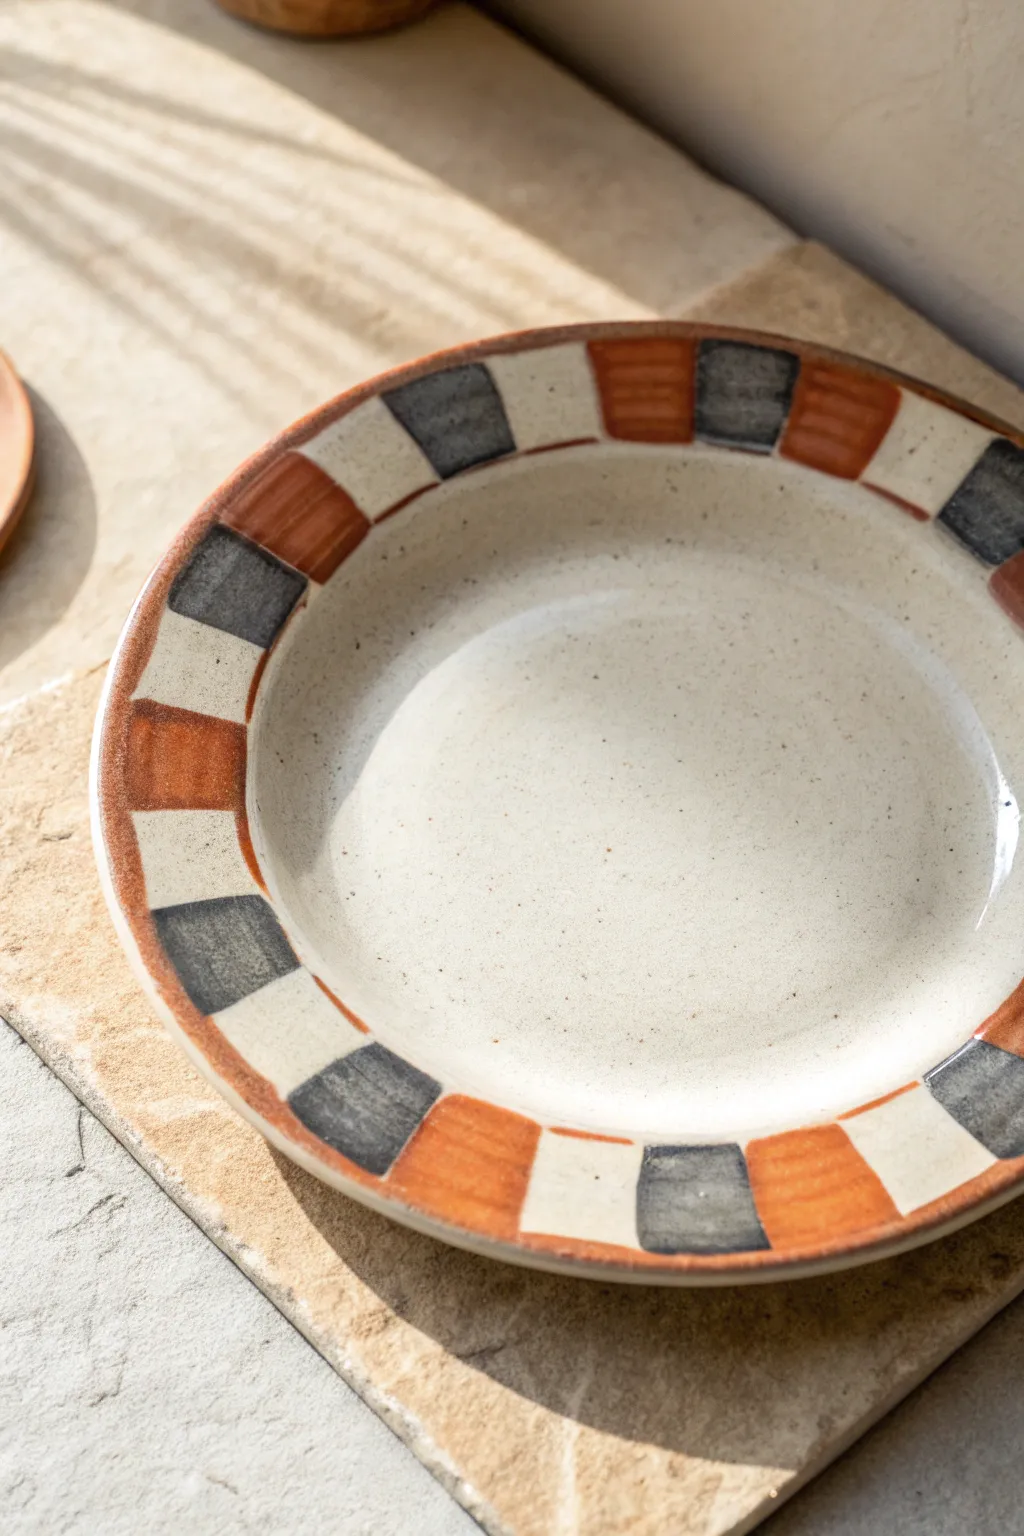
Embrace the charm of imperfection with this earthy, hand-painted plate design. By alternating warm terracotta and cool charcoal blocks along the rim, you create a cozy, folk-art feel that’s perfect for everyday dining.
Step-by-Step Tutorial
Materials
- Ceramic bisque plate with a wide, flat rim
- Underglaze (Terracotta or Rust Orange)
- Underglaze (Charcoal or Soft Black)
- Clear dipping glaze or brush-on clear glaze
- Flat shader brush (approx. 1/2 inch wide)
- Pencil (for light sketching)
- Damp sponge
- Ruler or measuring tape (optional)
Step 1: Prep and Planning
-
Clean surface:
Begin by wiping down your bisque plate with a damp sponge. This removes any ceramic dust that could prevent the underglaze from adhering properly. -
Visualizing the rim:
Look at the rim of your plate. You’ll be dividing this circular space into even segments. I find it helpful to visualize a clock face to keep spacing consistent. -
Mark quadrants:
Using a pencil, lightly mark four points on the rim at the 12, 3, 6, and 9 o’clock positions. Pencil marks burn off in the kiln, so don’t worry about them showing later. -
Subdivide sections:
divide each quadrant in half, and then perhaps in half again depending on how wide you want your blocks. Aim for roughly 1.5 to 2-inch segments. -
Designate colors:
Lightly mark inside your sketched boxes with a ‘T’ for terracotta, ‘G’ for gray/black, and ‘W’ for white (unpainted) so you don’t lose track of your pattern.
Uneven Spacing?
If you reach the end and your last gap is too small, just paint two colored blocks next to each other. It looks like an intentional design quirk!
Step 2: Applying Color
-
Load the brush:
Dip your flat shader brush into the rust-orange underglaze. Ensure the bristles are fully loaded but not dripping. -
Paint the first block:
Starting at the outer edge of the rim, pull the brush inward toward the center well of the plate to create your first terracotta block. The flat brush helps create those distinctive square edges naturally. -
Continue the pattern:
Skip two spaces (one for the gray block, one for the cream space) and paint the next terracotta block. Repeat this all the way around the rim. -
Second coat:
Once the first layer is dry to the touch, apply a second coat of rust orange to ensure opaque, rich coverage. -
Switch colors:
Wash your brush thoroughly. Now, load it with the charcoal or soft black underglaze. -
Add the contrast:
Fill in the designated gray blocks. These should be separated from the orange blocks by the unpainted ‘white’ segments. -
Refine edges:
Don’t stress about laser-sharp lines. The charm of this piece comes from the hand-painted look, so slightly wobbly edges are actually desirable. -
Layer the darks:
Apply a second or third coat of the dark underglaze. Darker pigments can sometimes look streaky if applied too thin. -
Clean up:
If any paint smudged into the white areas or the center of the plate, gently scratch it off with a toothpick or wipe with a barely damp brush.
Step 3: Finishing
-
Dry completely:
Let the underglaze dry fully. It should look chalky and matte. -
Clear glaze application:
Apply a clear glaze over the entire plate. If brushing, use a fan brush and apply 2-3 even coats, crossing directions with each coat to minimize brushstrokes. -
Kiln fire:
Follow the manufacturer’s instructions for firing your specific clay and glaze, usually to Cone 06 or Cone 6 depending on your materials.
Texture Twist
Before painting, scratch textures into the wet underglaze blocks with a needle tool for a sgraffito effect that reveals the clay beneath.
Once fired, you will have a beautiful, artisan-style plate ready to serve your favorite meals


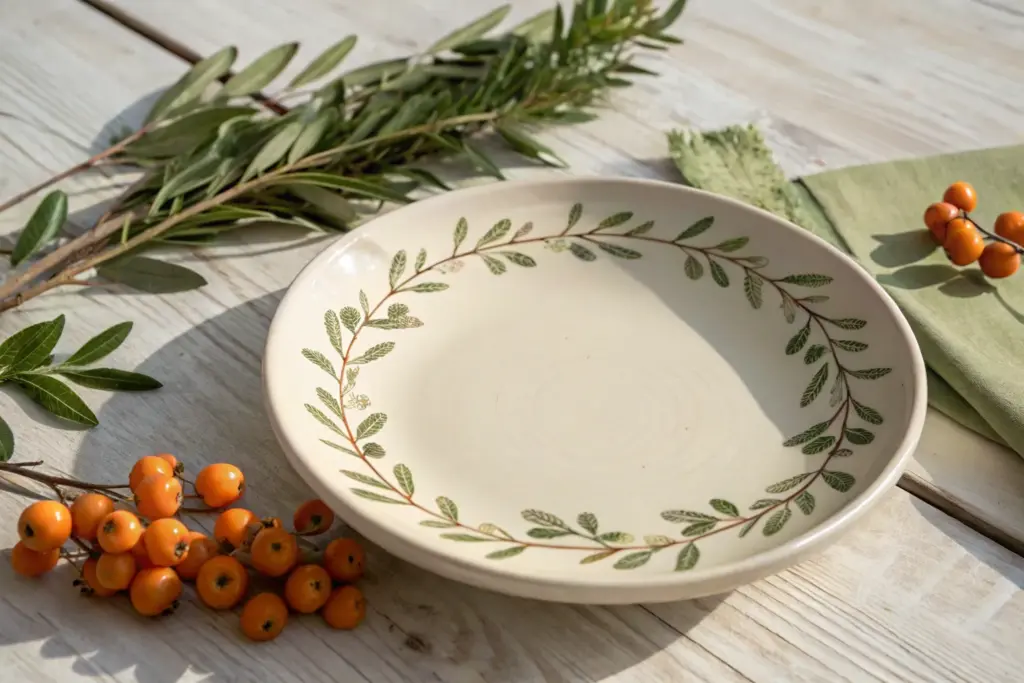
Leafy Vine Border
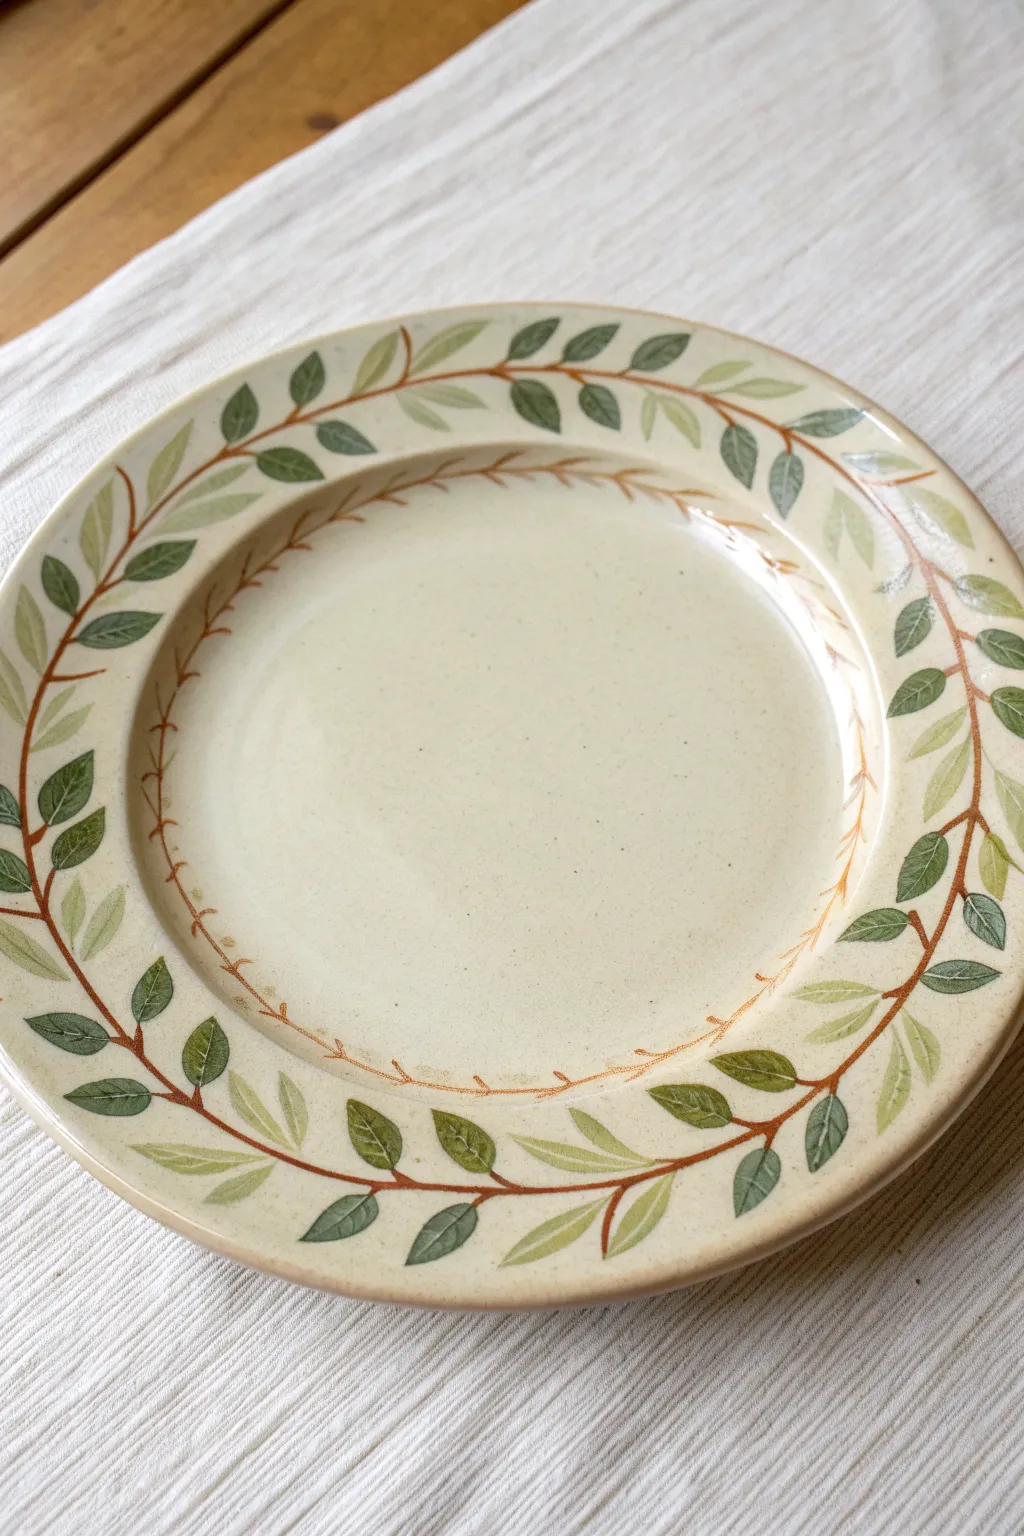
Transform a plain ceramic plate into a charming piece of tableware with this delicate leafy vine design. The interplay of soft sage greens and deep forest hues against distinct copper-toned stems creates a rustic, nature-inspired border perfect for any season.
Step-by-Step Tutorial
Materials
- Bisque-fired ceramic plate (cream or speckled base preferred)
- Underglazes: light sage green, dark forest green, coppery-brown
- Round brushes (sizes 2 and 4)
- Fine liner brush (size 0 or 00)
- Glazed palette or ceramic tile for mixing
- Clear dipping glaze
- Water cup and paper towels
- Pencil (for light sketching)
- Sponge
Step 1: Preparation and Planning
-
Surface Prep:
Begin by wiping down your bisque plate with a barely damp sponge. This removes any ceramic dust or oils from your hands that might repel the underglaze. -
Sketch the Flow:
Using a soft pencil, lightly mark a wavy line around the broad outer rim of the plate. This will serve as the main ‘spine’ for your leafy vine. Don’t worry about perfection; pencil lines burn off during firing. -
Inner Rim Guide:
Sketch a second, much finer circle or gentle wave pattern on the inner ridge of the plate, framing the central eating area. This secondary border adds depth to the design.
Uneven Brushstrokes?
If your vine looks shaky, don’t panic. Go over it once more to thicken the line slightly, intentionally adding ‘knots’ or bumps to make it look like real wood texture.
Step 2: Painting the Vine Structure
-
Mixing the Stem Color:
Pour a small amount of the coppery-brown underglaze onto your palette. If it feels too thick, add a drop of water to improve flow, aiming for an ink-like consistency. -
Main Vine Line:
Using your fine liner brush, trace over your outer pencil guide with the brown underglaze. Keep your hand loose to create a natural, organic waiver rather than a rigid geometric line. -
Adding Branchlets:
Paint small, short sprigs extending outward and inward from the main vine line. Vary their lengths slightly, placing them about an inch apart to leave room for the leaves. -
Inner Border Detail:
Switch back to the inner rim circle. Paint delicate, tiny tick marks or a very thin chain pattern in the same brown tone. This area should look much lighter and more delicate than the outer rim.
Seasonal Twist
Swap the sage greens for burnt orange, mustard yellow, and deep red underglazes to transform this pattern into a warm, harvest-themed autumn dinner plate.
Step 3: Adding the Foliage
-
Prepare Green Tones:
Dispense your light sage and dark forest green underglazes. I like to mix a tiny bit of the light into the dark to create a transitional mid-tone green on the palette. -
First Leaf Layer:
Load a size 4 round brush with the light sage green. Paint almond-shaped leaves on about half of the branchlets. Press the belly of the brush down and lift up to create a tapered point naturally. -
Second Leaf Layer:
Switch to the dark forest green. Paint leaves on the remaining empty branchlets. Allow some leaves to slightly overlap the vine or touch their neighbors for a lush look. -
Two-Tone Effect:
For added dimension, double-load your brush with both greens or paint a few leaves with a streak of the contrasting color while the first layer is still wet. -
Inner Leaves:
Using the smaller size 2 brush, add very tiny, single-stroke leaves to the inner rim border. Keep these sparse and light green to prevent overcrowding the center of the plate.
Step 4: Refining and Finishing
-
Leaf Detailing:
Once the green leaves are dry to the touch, use your liner brush and the brown stem color to paint a thin central vein down the center of the larger leaves. -
Cleaning Up:
Check the underside of the plate for any stray smudge marks and wipe them away with a clean, damp sponge. -
Clear Glaze Application:
Dip the entire plate into clear dipping glaze using tongs. Ensure an even coat and shake off excess drips gently. -
Checking the Foot:
Use a sponge to wipe the foot ring (the bottom ridge the plate sits on) completely clean of glaze so it doesn’t stick to the kiln shelf. -
Wait for Firing:
Let the plate dry completely before firing it in the kiln according to your clay and glaze specifications (usually Cone 06 or Cone 6).
Once fired, the glossy finish will make your hand-painted vine vibrant and ready for your next dinner party

The Complete Guide to Pottery Troubleshooting
Uncover the most common ceramic mistakes—from cracking clay to failed glazes—and learn how to fix them fast.
Single Botanical in the Center
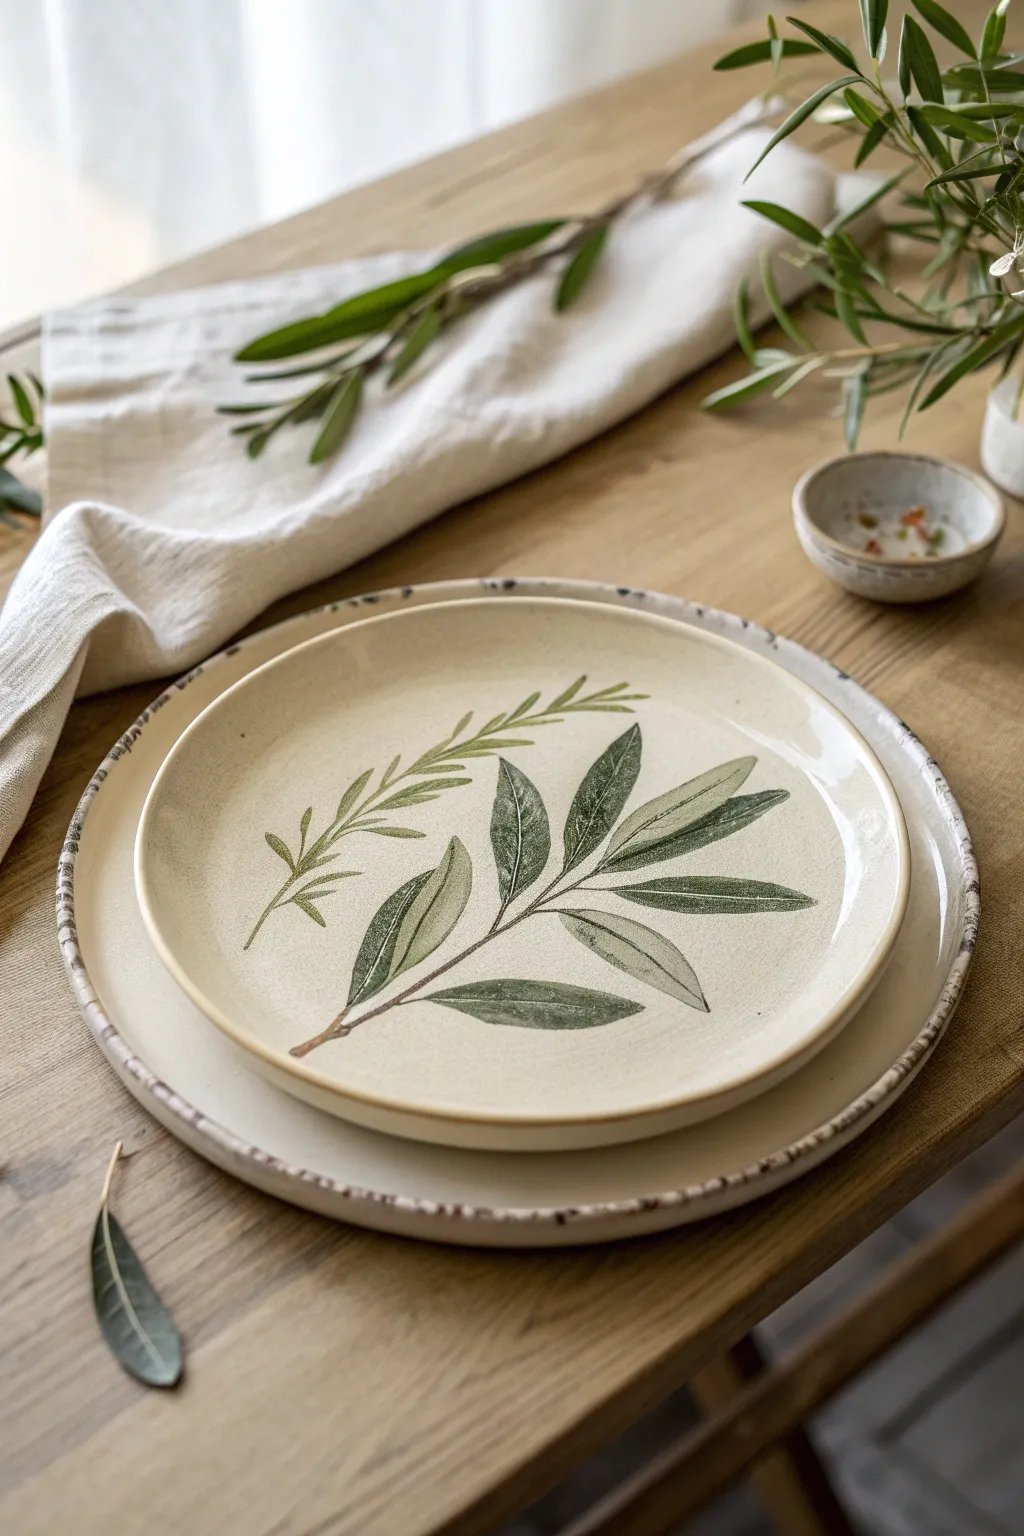
Bring a touch of the Mediterranean to your table with this elegantly simple botanical plate design. Using earthy greens and flowing brushstrokes, you’ll create a single, stunning olive branch motif that perfectly complements rustic stoneware.
How-To Guide
Materials
- Bisque ceramic dinner plate (with irregular/organic rim)
- Underglazes: Dark Hunter Green, Sage Green, Olive Green, Warm Brown
- Round watercolor brush (size 6 or 8)
- Liner brush (size 0 or 1)
- Pencil (for sketching)
- Clear dipping glaze
- Palette for mixing
- Water cup
- Sponge
Step 1: Preparation & Sketching
-
Clean surface:
Begin by wiping down your bisque plate with a slightly damp sponge to remove any dust or oils from your hands, ensuring the underglaze adheres properly. -
Plan the composition:
Visualise the placement of your main branch. It should sweep diagonally across the plate, starting near the bottom rim and reaching towards the upper right. -
Lightly sketch:
Using a pencil, very faintly draw the main stem line and small ovals where the leaves will sit. Don’t worry about erasing mistakes; graphite burns off in the kiln. -
Add the secondary sprig:
Sketch a thinner, lighter branch—resembling rosemary or a young olive shoot—curving parallel above the main branch to add visual interest.
Step 2: Painting the Main Branch
-
Mix your stem color:
On your palette, water down a small amount of Warm Brown underglaze until it has an inky consistency. -
Paint the stem:
Using the liner brush, drag the paint along your pencil line. I like to vary the pressure slightly to make the branch look natural and woody, thicker at the base and thinner at the tip. -
Prepare leaf colors:
Mix Dark Hunter Green to a creamy consistency. Have your Olive Green ready as well for variation. -
Paint the first leaf:
Load your round brush with the dark green. Touch the tip to the stem, press down to widen the bristles for the belly of the leaf, and lift up as you reach the tip to create a point. -
Add veining detail:
While the paint is still damp but not wet, use the clean back end of your brush or a sgraffito tool to gently scratch a center vein line through the green paint, revealing the cream clay beneath. -
Continue the leaves:
Work your way up the stem, painting leaves on alternating sides. Vary the size slightly to mimic nature. -
Create color variation:
For a few random leaves, mix a little Olive Green into your dark green or water the pigment down slightly to create a more translucent, lighter look. -
Detail the veins:
Repeat the scratching technique on each leaf immediately after painting it. Doing this while the paint is leather-hard ensures clean lines.
Paint Dried Too Fast?
If the paint dries before you can scratch the veins, re-wet the area very slightly with a damp brush, wait ten seconds, and try scratching again.
Step 3: Painting the Secondary Sprig
-
Mix a lighter shade:
Combine Sage Green with a touch of the Olive Green. This branch should look younger and fresher than the main one. -
Paint the rosemary stem:
Use the liner brush with this lighter mix to paint the thin, curving stem above your main olive branch. -
Add needle leaves:
Using quick, flicking motions with the very tip of your round brush or liner brush, add the thin needle-like leaves extending from the stem. -
Keep it delicate:
Ensure these leaves are significantly smaller and thinner than the bold olive leaves to prevent the design from feeling crowded.
Pro Tip: Watercolor Effect
Water down your underglaze significantly for the leaves. It creates a beautiful, semi-transparent watercolor look that lets the clay texture show.
Step 4: Finishing and Glazing
-
Dry thoroughly:
Allow the underglaze design to dry completely ensuring no moisture remains in the painted areas. -
Inspect and clean:
Check for any unwanted smudges of paint on the background. Gently scrape them away with a craft knife or wipe with a barely damp detail sponge. -
Apply clear glaze:
Dip the entire plate into a bucket of clear dipping glaze. Ensure an even coat and shake off excess drips gently. -
Fire the piece:
Load the plate into the kiln and fire to the temperature appropriate for your clay body and glaze (typically Cone 5 or 6 for stoneware).
Once fired, you will have a durable, dishwasher-safe piece of art ready for your next dinner party
Easy Lemon Slices and Dots
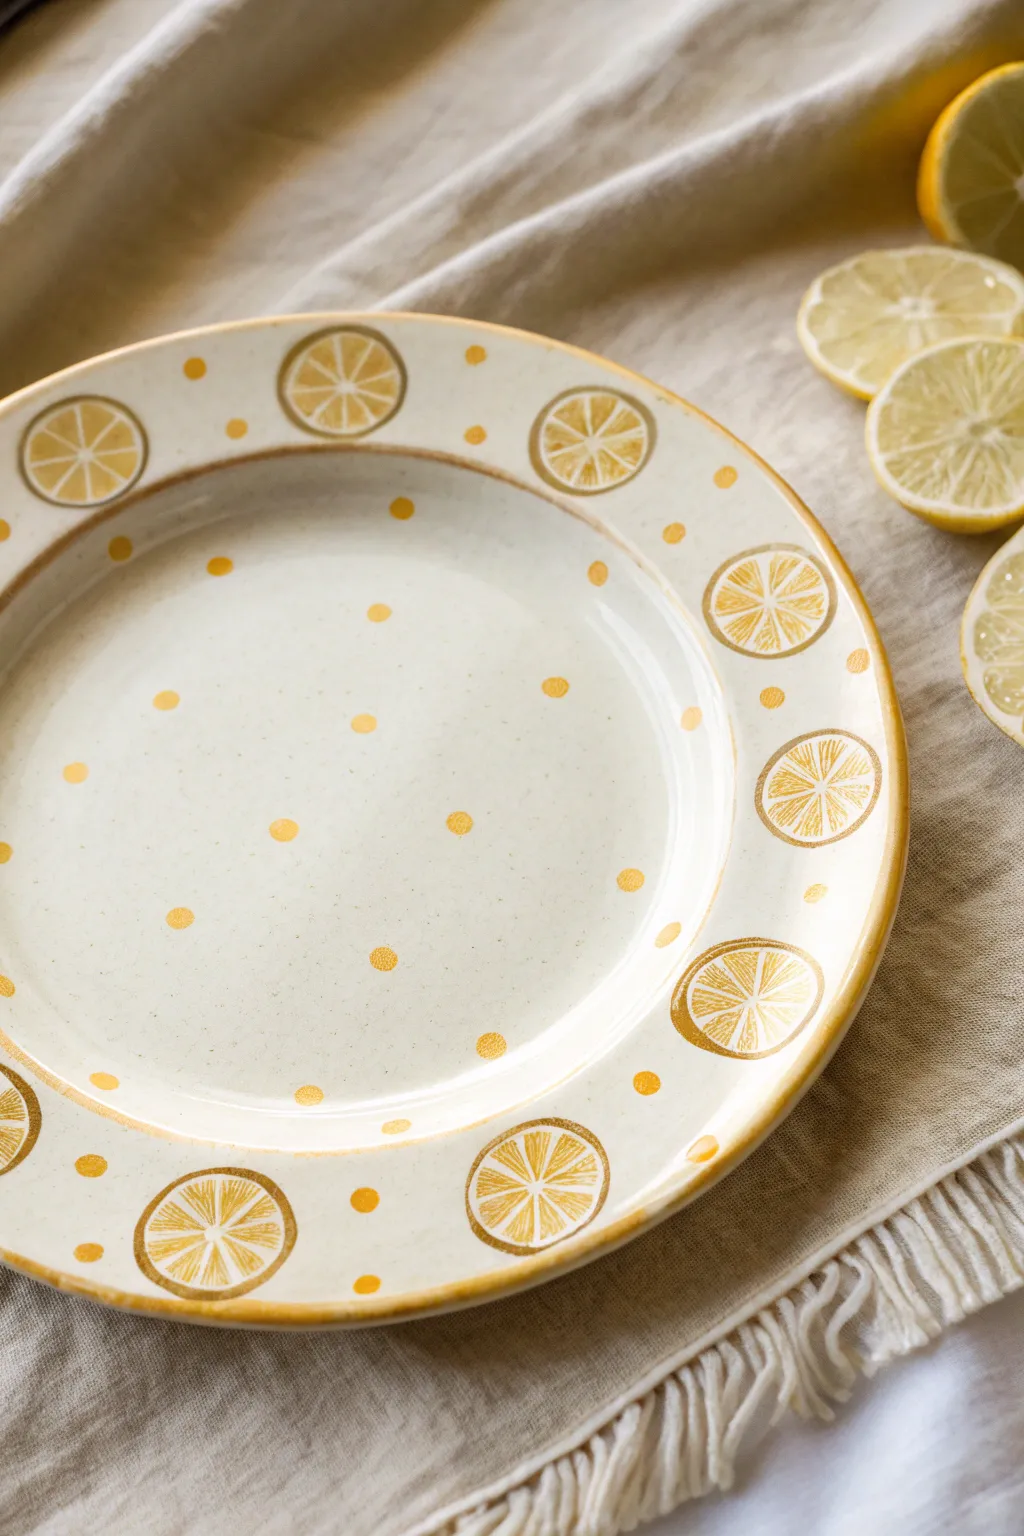
Brighten up your table setting with this cheerful design featuring hand-painted lemon wheels and delicate polka dots. The warm yellow tones against a creamy ceramic background create a sunny, artisanal feel perfect for summer dining.
Detailed Instructions
Materials
- Light-colored ceramic plate (bisque or glazed, depending on paint choice)
- Ceramic paints or porcelain markers (Yellow, Light Brown/Ocher)
- Small round paintbrush (size 2 or 4)
- Fine liner brush (size 0 or 00)
- Palette or small dish for mixing
- Water cup and paper towels
- Pencil (optional for sketching)
- Oven (if using heat-set paints)
Step 1: Planning the Layout
-
Clean the surface:
Before you begin, ensure your ceramic plate is thoroughly washed and dried. Wipe it down with rubbing alcohol to remove any oily fingerprints, which helps the paint adhere better. -
Visualize the rim pattern:
Imagine a clock face on the rim of the plate to help spacing. You’ll be painting larger lemon slices spaced evenly around the outer edge. -
Lightly sketch positions:
If you’re nervous about freehanding, use a pencil to lightly mark where the center of each lemon slice will go on the rim. The pencil marks will burn off in the oven later.
Juicy Texture Tip
When filling the lemon segments, leave tiny specks of white space unpainted in the middle. These little highlights mimic the light hitting the juicy interior of the fruit.
Step 2: Painting the Lemon Slices
-
Paint the outer rind circles:
Using your round brush and yellow paint mixed with a tiny touch of ocher for warmth, paint a circle for each lemon slice on the rim. These don’t need to be perfect circles; a slightly organic shape adds charm. -
Add the inner rind:
Paint a second, smaller concentric circle just inside the first one. Leave a small gap of unpainted ceramic between these two rings to represent the white pith of the lemon. -
Define the segments:
Switch to your fine liner brush. Dip it in the slightly darker ocher-yellow mix. Paint thin, straight lines radiating from the center of the lemon circle out to the inner rind ring, dividing the lemon into 8 pie-slice segments. -
Round the corners:
Inside each triangular segment, use the fine brush to gently round off the outer corners near the rind. This subtle detail makes the segments look juicy and realistic rather than geometric. -
Fill the segments:
Using a very dilute wash of yellow paint, lightly fill in the segments. You want this to be semi-transparent so the segment lines remain visible. I like to let the brush strokes show a bit here for texture.
Step 3: Adding the Polka Dots
-
Paint rim accents:
Between each large lemon slice on the rim, paint two or three small yellow dots. Vary their position slightly—some closer to the edge, some closer to the center—to keep it playful. -
Start the center field:
Move to the main eating surface of the plate. Dip the handle end of a paintbrush into your yellow paint to act as a dotting tool. -
Create a random scatter:
Stamp dots across the center of the plate. Avoid creating straight lines; instead, aim for a random, confetti-like distribution. -
Vary dot sizes:
For visual interest, press harder for some dots to make them larger, and use a lighter touch for others to keep them petite. -
Detail the rim edge:
Take your round brush with the ocher-yellow mix and run it along the very outer physical edge of the plate. This creates a solid rim band that frames the entire design.
Make It a Set
Use this same technique on varied citrus fruits for a full set. Try orange paint for oranges, green for limes, and pink for grapefruits to create a colorful summer collection.
Step 4: Finishing Up
-
Check for consistency:
Look over your lemon slices. If the segment lines have been obscured by the fill color, go back with your fine liner brush and re-state those dividing lines to make them pop. -
Clean up strays:
If you made any accidental smudges, use a damp cotton swab or a toothpick to gently scrape or wipe away the mistake before the paint fully sets. -
Allow to dry:
Let the plate dry completely for at least 24 hours. The paint needs to be fully cured before any heat setting. -
Bake to set:
Place the plate in a cool oven, then set the temperature according to your paint manufacturer’s instructions (usually around 300°F–350°F). Bake for 30 minutes, then turn the oven off and let the plate cool down inside completely to prevent cracking.
Once baked and cooled, your custom citrus plate is ready to serve up a slice of sunshine at your next meal


What Really Happens Inside the Kiln
Learn how time and temperature work together inside the kiln to transform clay into durable ceramic.
Blue-and-White Inspired Linework
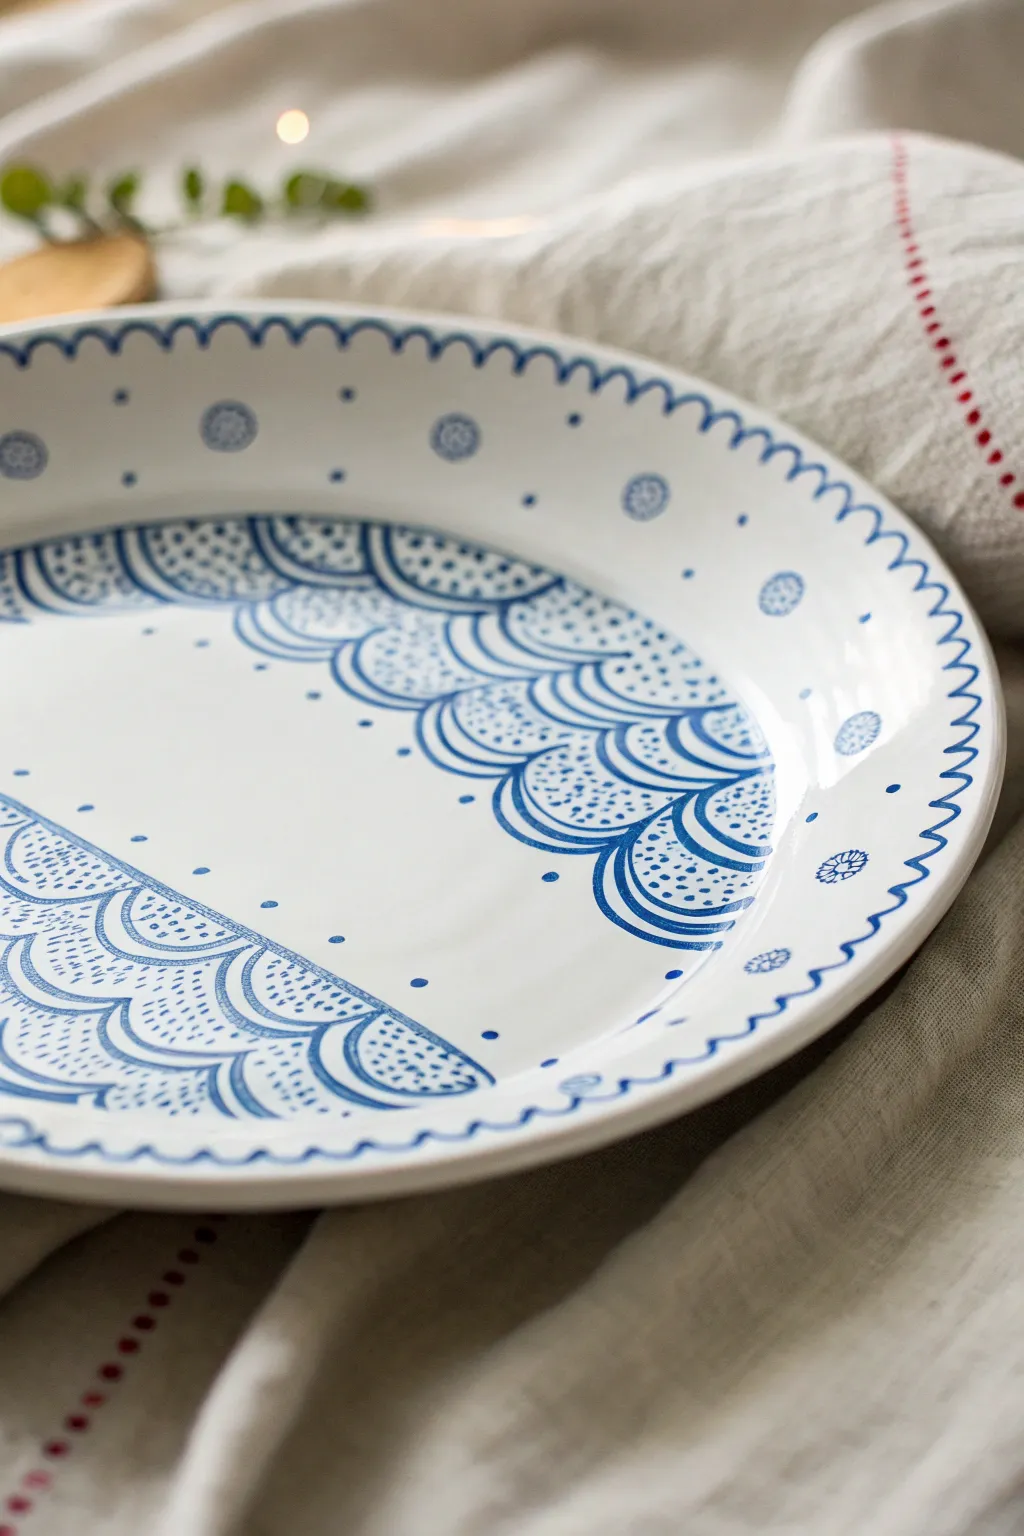
Channeling the timeless elegance of Delftware with a modern twist, this project transforms a simple white plate into a stunning piece of art using only blue ceramic paint. The design features rhythmic semi-circles and delicate dots that create a soothing, ocean-inspired movement perfect for any dining table.
Step-by-Step
Materials
- White ceramic plate (glazed, oven-safe)
- Pebeo Porcelaine 150 paint (Marsielle Blue or Lapis Blue)
- Fine liner brush (size 0 or 00)
- Small round brush (size 2)
- Rubbing alcohol
- Cotton pads or paper towel
- Pencil (optional for sketching)
- Paper palette or small dish for paint
- Cotton swabs (for clean-up)
Step 1: Preparation & Planning
-
Clean the Surface:
Begin by thoroughly wiping down your ceramic plate with rubbing alcohol and a cotton pad. This step is crucial as it removes any invisible oils or fingerprints that could prevent the paint from adhering properly. -
Map the Design Zones:
Visualize your plate as having three zones: an outer rim, a middle decorative band, and a central ‘wave’ section. You can lightly sketch guideline circles with a pencil if you wish, though freehanding adds organic charm.
Clean Lines Hack
Rest your pinky finger on the dry parts of the plate while painting. This anchors your hand, reducing shakiness for smoother curves.
Step 2: Border & Rim Details
-
Paint the Wave Border:
Load your fine liner brush with blue paint. Starting at the very edge of the plate’s rim, paint a continuous, loose squiggly line all the way around. Keep your wrist loose to maintain a playful, consistent rhythm. -
Add Inner Rim Dots:
Moving inward about half an inch from your squiggle border, dip the opposite end (the handle) of your paintbrush into the paint. Stamp small, solid dots in a circle around the plate, spacing them roughly 2 inches apart. -
Create Floral Motifs:
Between every two or three solid dots, paint a small floral medallion. Use your fine liner brush to draw a tiny circle, then surround it with small petal-like dashes or dots to create a simple flower shape.
Level Up: Gold Accents
Once the blue design is baked and cooled, add tiny dots of gold ceramic paint to the center of the floral motifs for a regal touch.
Step 3: The Central Wave Pattern
-
Establish the Base Arches:
The main feature consists of two wide bands of scalloped waves facing each other. Start with the top band. Using the size 2 round brush, paint a row of connected semi-circles (scallops) across the upper third of the plate’s interior. -
Layer the Arches:
Paint a second and third row of scallops directly beneath the first, following the same curve. Don’t worry if lines overlap slightly; it adds to the hand-painted textile look. -
Repeat on the Bottom:
Mirror this process on the lower third of the plate, creating a matching band of scalloped waves. Leave a wide band of negative white space running horizontally through the very center of the plate. -
Thicken Lines:
Go back over the outermost curves of your scallop shapes to thicken the lines slightly, giving the waves more definition and visual weight.
Step 4: Texture & Finishing details
-
Stipple the Waves:
This is the meditative part. Dip your fine liner brush and fill the interior of your scalloped arches with tiny stippled dots. I like to keep the dots denser near the curved line and sparser as they move outward. -
Add Floating Accents:
In the negative white space between your two wave bands, add a few scattered dots or tiny dashes to bridge the gap without cluttering the design. -
Clean Up Edges:
Inspect your lines. If you made a smudge or a line went astray, dip a cotton swab in rubbing alcohol or water (depending on your paint type) and gently wipe it away before it dries. -
Dry Completely:
Allow the paint to air dry for at least 24 hours. Do not rush this step, as moisture trapped underneath can cause bubbles during baking. -
Bake to Set:
Place the plate in a *cold* oven. Turn the heat to 300°F (150°C). Once the oven hits that temperature, bake for 35 minutes. Turn the oven off and let the plate cool completely inside before removing.
Now you have a piece of custom tableware that looks like a collected antique ready for your next dinner party
Negative Space Arches
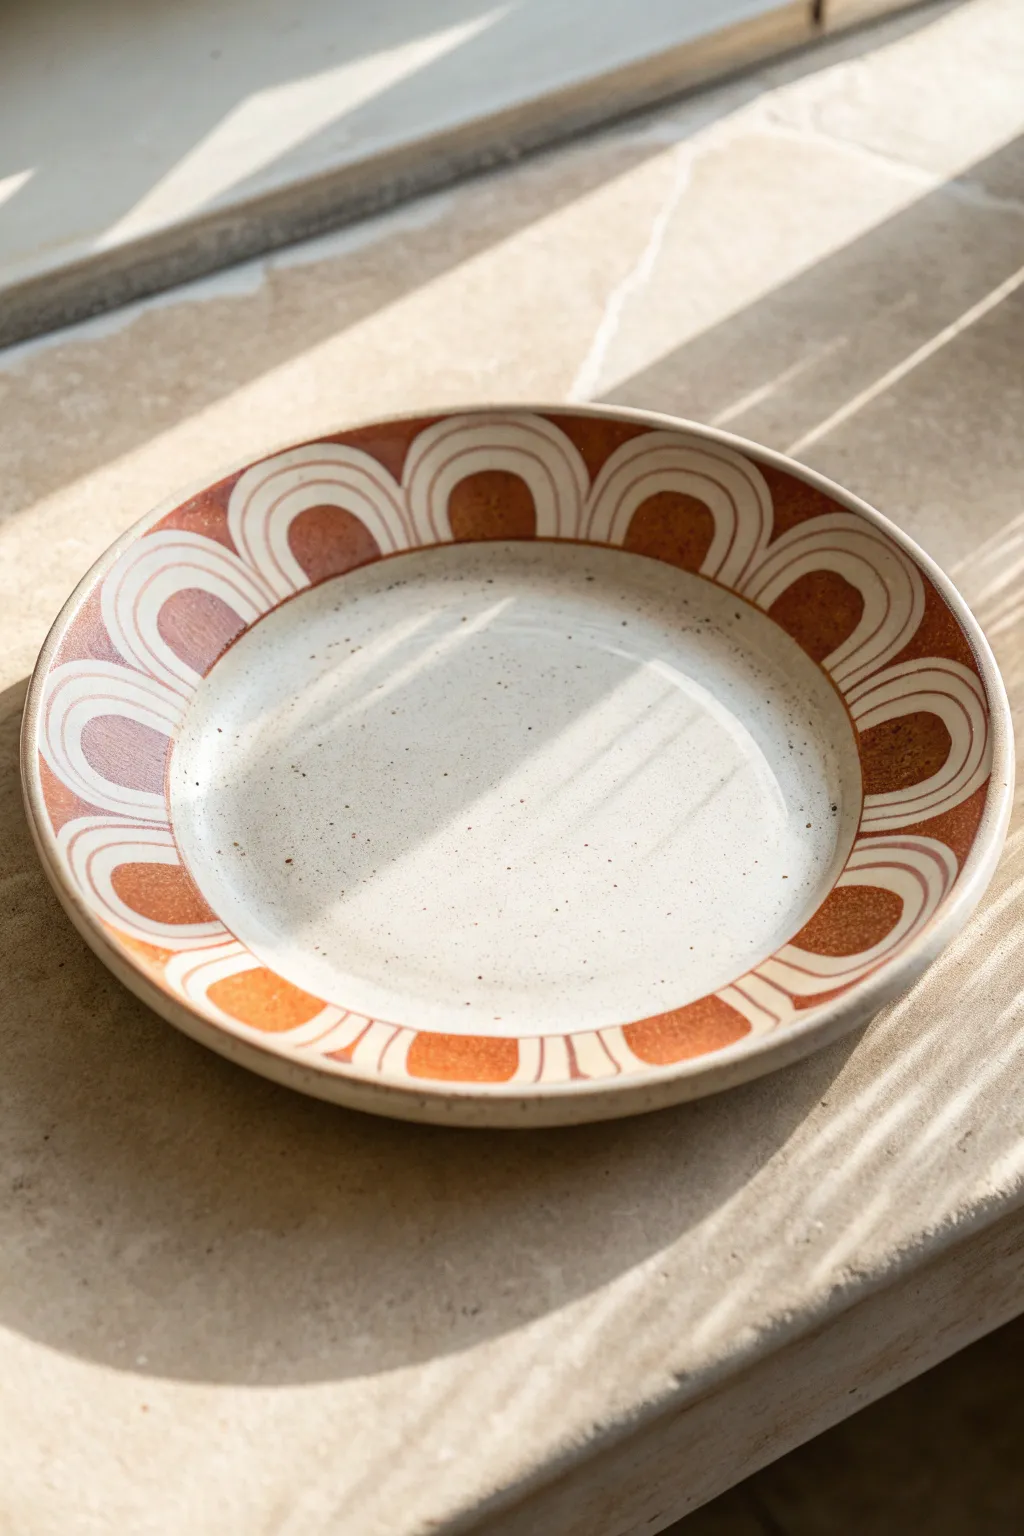
Transform a simple plate into a warm, bohemian statement piece with this negative space arch design. The pattern relies on the contrast between raw ceramic tones and rich, rusty glazes to create a rhythmic, retro-inspired border.
Step-by-Step Tutorial
Materials
- Bisque-fired ceramic plate (speckled clay body recommended)
- Glaze tape (1/8 inch or 3mm width)
- Ceramic underglazes (burnt orange, terracotta red, light peach)
- Clear or speckled white dipping glaze
- Small flat brush (size 4 or 6)
- Clean sponge
- Pencil
- Wax resist (optional)
Step 1: Planning and Taping
-
Clean surface:
Begin by wiping down your bisque plate with a barely damp sponge. This removes any dust that might prevent the glaze from adhering properly. -
Mark the center:
Using a pencil, lightly mark the center point of the plate. This will help you visualize where the rim pattern ends and the inner bowl begins. -
Draft the arches:
Lightly sketch the outlines of your arches along the rim with a pencil. Aim for semicircles that touch side-by-side, radiating outward from the center bowl area. -
Apply vertical tape lines:
Cut short strips of your thin glaze tape. Place them along the pencil lines that define the concentric curves of your rainbows. These taped areas will become the negative space lines. -
Secure the edges:
Press down firmly on all tape edges, especially where the rim curves, to prevent paint from bleeding underneath.
Uneven Arches?
If your pencil sketches look wonky, trace a round object like a bottle cap or cookie cutter to keep your initial arch sizes consistent around the rim.
Step 2: Painting the Pattern
-
Mix your palette:
Pour out small amounts of your terracotta, orange, and peach underglazes. You can use them straight or mix them slightly for a tonal, varied look like the example. -
Paint the inner arch:
Start with the small semi-circle at the base of the rainbow. Fill this area with your darkest terracotta shade using the flat brush. -
Paint the middle band:
Move to the next section of the arch between your tape strips. Apply a slightly lighter burnt orange shade here. -
Paint the outer band:
Fill the largest, outermost band of the arch with a mix of peach and light terracotta to create a soft gradient effect. -
Fill the gaps:
Paint the triangular spaces between the arches (the spandrels) with the darkest terracotta color to create a continuous border effect. -
Apply second coat:
Let the first layer dry until it’s chalky and matte. Apply a second coat to all painted areas to ensure solid, opaque color coverage. -
Dry thoroughly:
Allow the underglaze to dry completely. This usually takes about 15-20 minutes depending on humidity.
Step 3: Revealing and Finishing
-
Remove tape:
Carefully peel back the tape strips. I find that using tweezers here helps grab the edge without scratching the paint. -
Clean lines:
If any glaze bled under the tape, gently scrape it away with a cleanup tool or a stiff brush dipped in water to restore the crisp negative space. -
Wax resist application:
Apply wax resist carefully over your entire painted rim design. This will protect your arches when you glaze the rest of the plate. -
Glaze the center:
Pour speckled white or clear glaze into the center of the plate, swirling it to coat the bottom, then pouring out the excess. -
Wipe the rim:
Use a damp sponge to wipe any stray white glaze off the waxed rim area. The wax will resist the glaze, but droplets can sit on top. -
Final fire:
Place your plate in the kiln for the final glaze firing according to your clay and glaze specifications (usually cone 6).
Clean Lines Secret
Peel the tape when the paint is ‘leather hard’—dry to the touch but not bone dry. If it’s too dry, the paint might chip; too wet, and it will smear.
Once fired, you will have a beautiful, durable plate perfect for serving warm meals

TRACK YOUR CERAMIC JOURNEY
Capture glaze tests, firing details, and creative progress—all in one simple printable. Make your projects easier to repeat and improve.
Confetti Speckles All Over
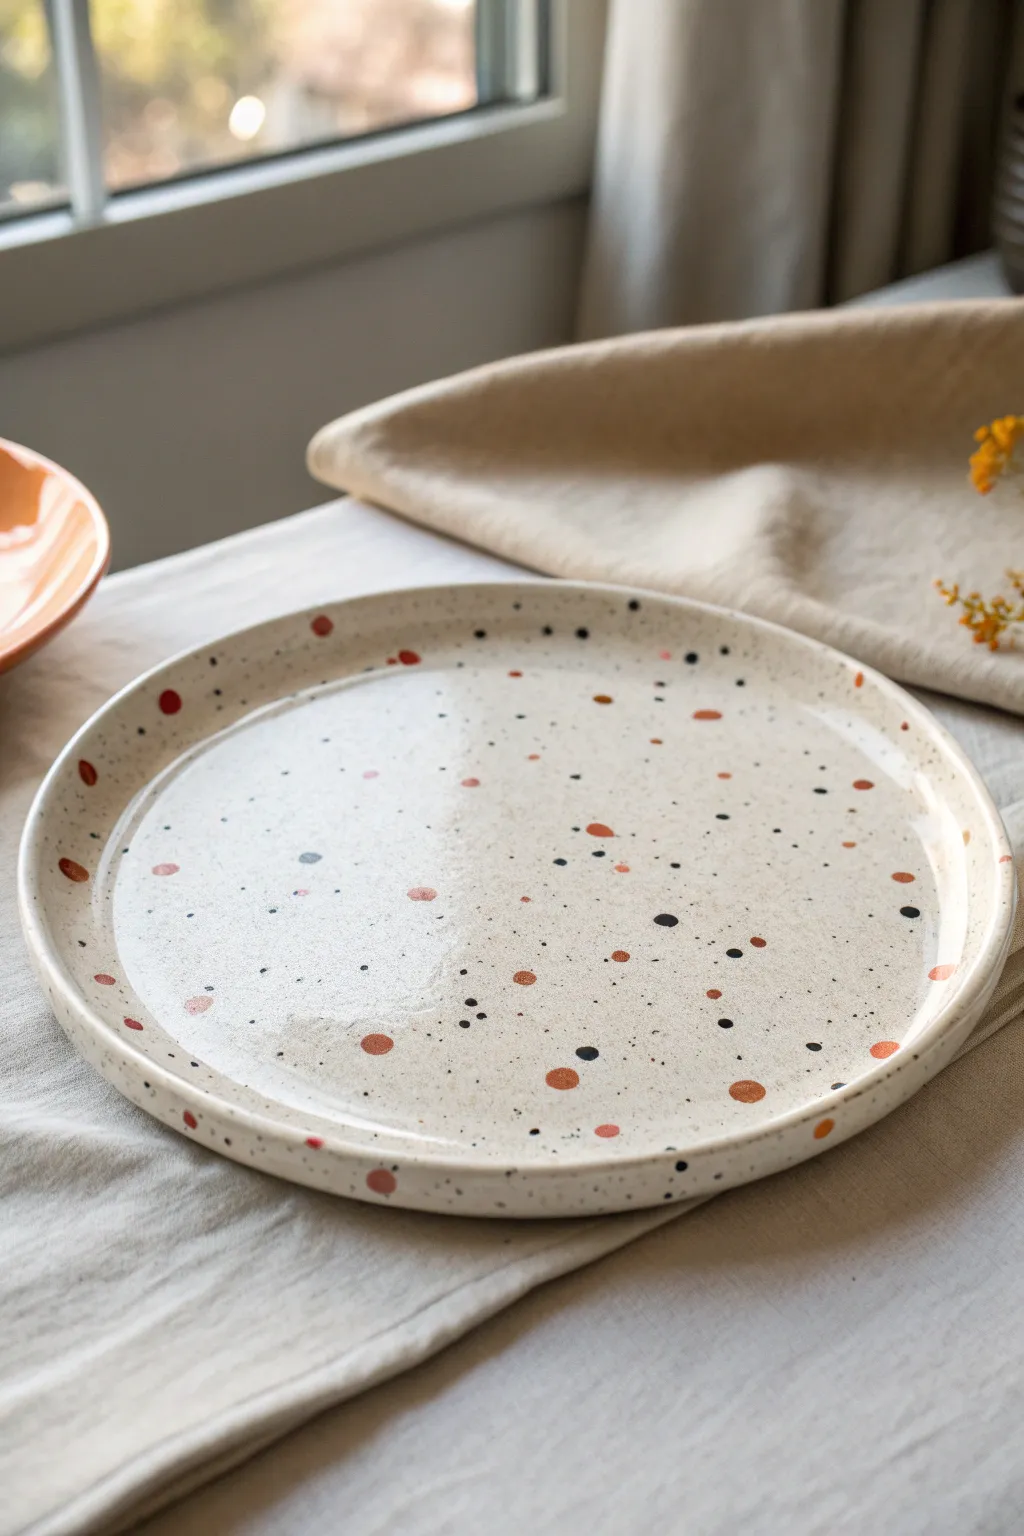
Achieve a look reminiscent of terrazzo stone with this surprisingly simple speckling technique. The combination of warm terracotta and bold black dots on a creamy base creates a modern, playful pattern that feels both organic and polished.
Detailed Instructions
Materials
- Bisque-fired ceramic plate (flat rim style recommended)
- Cream or off-white underglaze (for the base)
- Terracotta or warm orange underglaze
- Black underglaze
- Wide hake brush or soft fan brush
- Small round detail brush (size 1 or 2)
- Small stiff-bristled brush (like a toothbrush or stencil brush)
- Clear dipping or brush-on glaze
- Sponge and water bowl
Step 1: Base Preparation
-
Clean the bisque:
Before you start painting, take a damp sponge and gently wipe down the entire bisque plate. This removes any kiln dust or oils from your hands that might repel the glaze. -
Mix your base color:
Stir your cream or off-white underglaze thoroughly. It should be the consistency of heavy cream; if it’s too thick, add a drop or two of water. -
Apply the first coat:
Using a wide fan brush or hake brush for smooth coverage, apply an even coat of the cream underglaze to the top of the plate. Work in long, single strokes to minimize texture. -
Let it dry:
Allow the first layer to dry until it is chalky and no longer shiny. This usually takes about 5-10 minutes depending on humidity. -
Apply additional coats:
Apply two more coats of the cream base, alternating the direction of your brush strokes with each layer (horizontal, then vertical) to ensure a completely opaque background. Let it dry fully.
Flick don’t swing
When splattering, use your thumb to flick the bristles rather than swinging your arm. This gives you much more control over where the paint lands.
Step 2: Creating the Confetti
-
Prepare the accent colors:
Pour a small amount of terracotta and black underglaze onto a palette. You won’t need much for this step. -
Paint large terracotta spots:
Dip your clean detail brush into the terracotta underglaze. Randomly paint small, imperfect circles across the plate surface. Vary the sizes slightly, making some about the size of a pencil eraser and others tiny dots. -
Spacing is key:
Keep the larger spots relatively sparse. I like to leave plenty of negative space between them so the design doesn’t feel cluttered. -
Paint large black spots:
Rinse your brush or grab a fresh one for the black underglaze. Add a few deliberate black dots, slightly smaller than the terracotta ones, filling in some of the larger gaps. -
Add detail to the rim:
Don’t forget the edges. Paint a few half-circles wrapping over the lip of the plate to give the design a continuous look.
Go Geometric
Instead of round dots, try painting small scattered triangles or uneven polygons for a sharper, 1980s Memphis-style aesthetic.
Step 3: Splattering & Finishing
-
Prepare the splatter tool:
Take your stiff-bristled brush or an old toothbrush and dip just the tips of the bristles into the black underglaze. It helps if the glaze is slightly thinned with water here. -
Test the spray:
Flick the bristles with your thumb over a piece of scrap paper first to test the density of the spray. -
Apply fine speckles:
Hold the brush about 6 inches above the plate and gently flick the bristles to create a fine mist of tiny black speckles. Move your hand around to ensure even distribution. -
Repeat with terracotta:
Wash the splatter brush thoroughly, load it with thinned terracotta underglaze, and add a second layer of fine mist. This creates depth and mimics natural stone texture. -
Clean up underneath:
Once the top design is bone dry, flip the plate over and use a clean, damp sponge to wipe away any stray paint marks from the bottom foot ring. -
Clear glaze application:
If you are brushing on your clear glaze, use a very soft brush and pat the glaze on rather than dragging it, so you don’t smear your dots. -
Final fire:
Fire the plate according to the specific temperature guidelines of your clear glaze and clay body.
Once fired, you will have a durable piece of art perfect for serving bright salads or morning toast
Easy Mandala Dot Rings
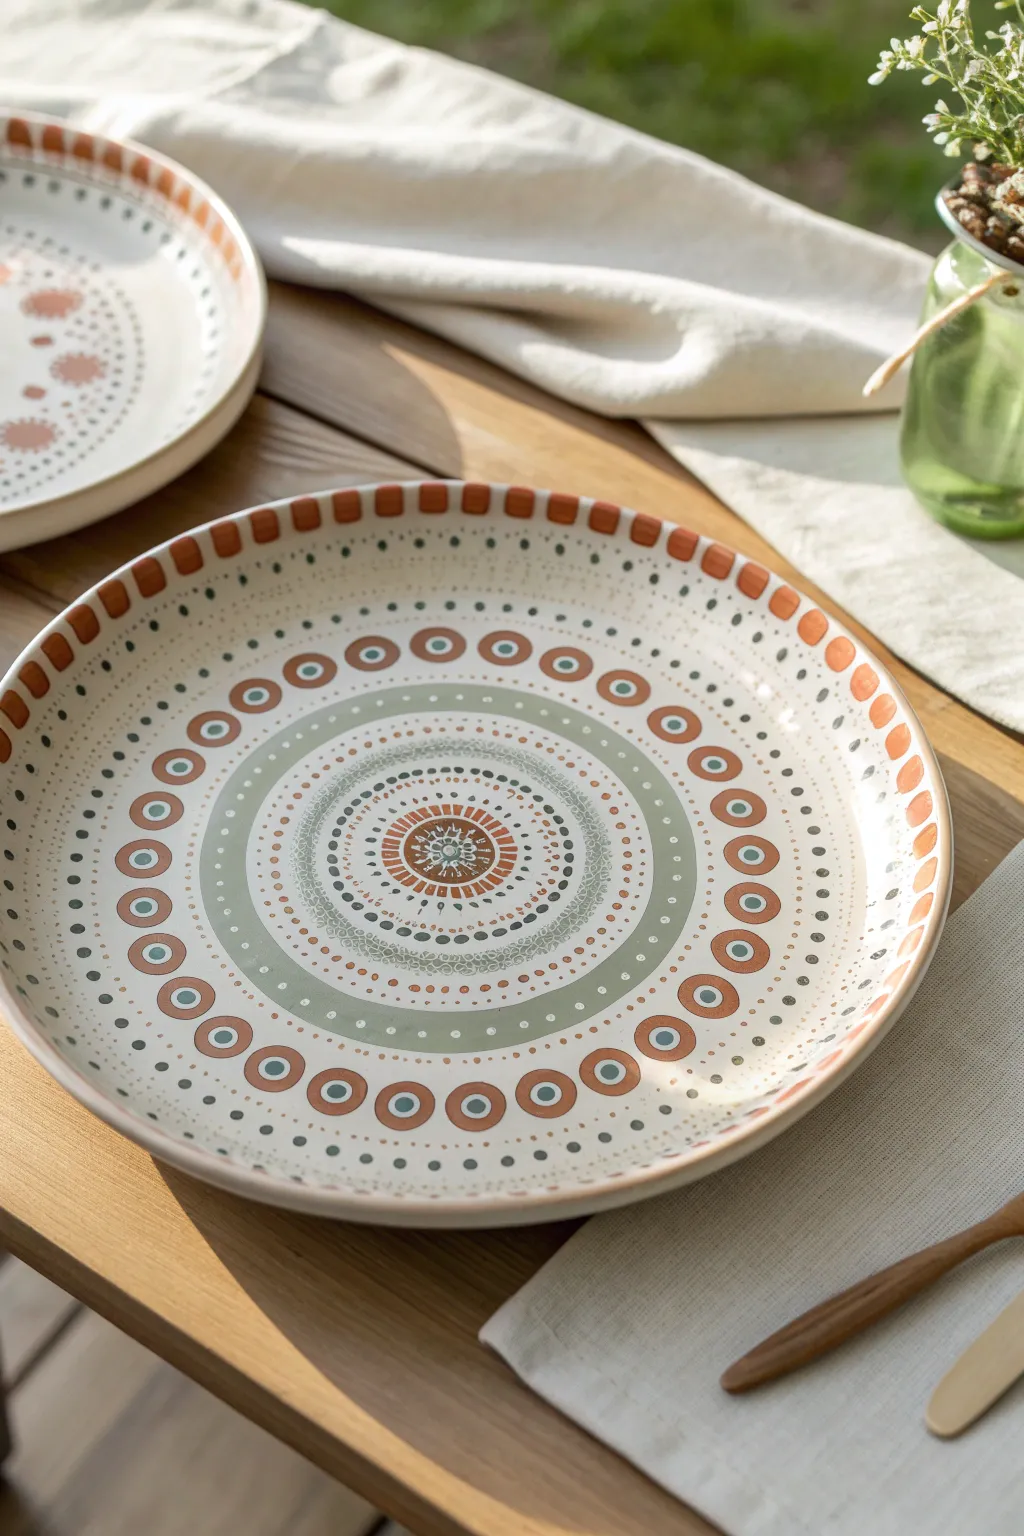
Transform a plain ceramic plate into a stunning centerpiece with this relaxing dot mandala design. Featuring a soothing palette of terracotta rust, sage green, and grey-blue, this project relies on rhythmic repetition to build intricate-looking rings that are actually quite simple to paint.
How-To Guide
Materials
- Plain white ceramic plate (dinner or platter size)
- Pebeo Porcelaine 150 paints (or similar ceramic acrylics): Rust/Terracotta, Sage Green, Grey-Blue, White, Deep Grey
- Rubbing alcohol and paper towel
- Various dotting tools (stylus set preferred)
- Fine detail paintbrush (size 0 or 00)
- Flat paintbrush (medium size)
- Pencil for light guidelines (optional)
- Turntable (lazy susan) (optional but helpful)
- Oven for baking (if using heat-set paints)
Step 1: Preparation & Centerpiece
-
Surface prep:
Begin by thoroughly wiping your ceramic plate with rubbing alcohol on a paper towel. This removes invisible oils or fingerprints that prevent paint adhesion. Handle the plate by the edges from now on. -
Find the center:
Visually locate the center of the plate. You can lightly mark distinct concentric circles with a pencil if you feel unsure about freehanding, but the beauty of this style is its organic feel. -
Central medallion:
Using a fine brush and rust-colored paint, create a small central circle about the size of a coin. Within this, use your smallest dotting tool to add a tiny white starburst pattern. -
Inner ring details:
Surround your central medallion with two rings of very fine dots using deep grey paint. I find it easiest to work on opposite sides (north/south, then east/west) to keep the spacing even. -
Create the sage border:
Mix a generous amount of sage green with a tiny drop of grey for a muted tone. Paint a wide, solid band around your central design, approx. 1 inch thick. Let this base layer dry completely before moving to the next step.
Pro Tip: Consistency
If your paint is too thick, dots will have peaks. Mix in a drop of thinning medium so the paint self-levels into smooth, flat domes.
Step 2: Layering the Middle Rings
-
Dotting the green band:
Once the green band is dry, take a medium dotting tool dipped in white paint. Create a ring of dots right in the middle of the green color block. -
Grey accents:
Using your grey-blue paint, place smaller dots in between the white ones on the green band to create a dense, textured look. -
The circle-in-circle ring:
Moving outward onto the white ceramic surface again, paint a ring of medium-sized rust circles. These should be hollow rings, not filled dots. Use a fine brush to carefully paint the circumference of each small circle. -
Filling the hollow circles:
Inside each of those rust rings, place a solid dot of grey-blue paint. Ensure the dot doesn’t touch the rust outline; leave a tiny breathing room of white space. -
Micro-dot detailing:
Use your smallest stylus and deep grey paint to add tiny filler dots between the large rust circles. This high-contrast detail makes the pattern pop.
Step 3: Outer Rim & Finishing
-
The spacing ring:
Paint a ring of small, solid deep grey dots about half an inch outward from your rust circles. Keep the spacing consistent. -
Outer rim pattern:
For the outermost design on the plate rim, switch back to your flat brush and the rust paint. Paint small vertical rectangular tabs along the very edge. -
Rim spacing:
Leave a small gap of white space between each rust tab. Try to keep them uniform in width, roughly the size of a fingernail. -
Final clean-up:
Check for any smudges or uneven dots. You can use a damp Q-tip or a toothpick to carefully scrape away mistakes while the paint is semi-wet. -
Curing:
Let the plate air dry for at least 24 hours. Once dry, place the plate in a cool oven, set temperature to 300°F (150°C), and bake for 35 minutes (or follow specific instructions on your paint bottle) to make it dishwasher safe.
Level Up: Texture Play
After baking, outline the rust-colored rectangular tabs on the rim with a gold ceramic relief outliner for a touch of metallic luxury.
Once baked and cooled, your beautiful mandala plate is ready to serve snacks or hang as wall art.
Soft Ombre Sunset Band
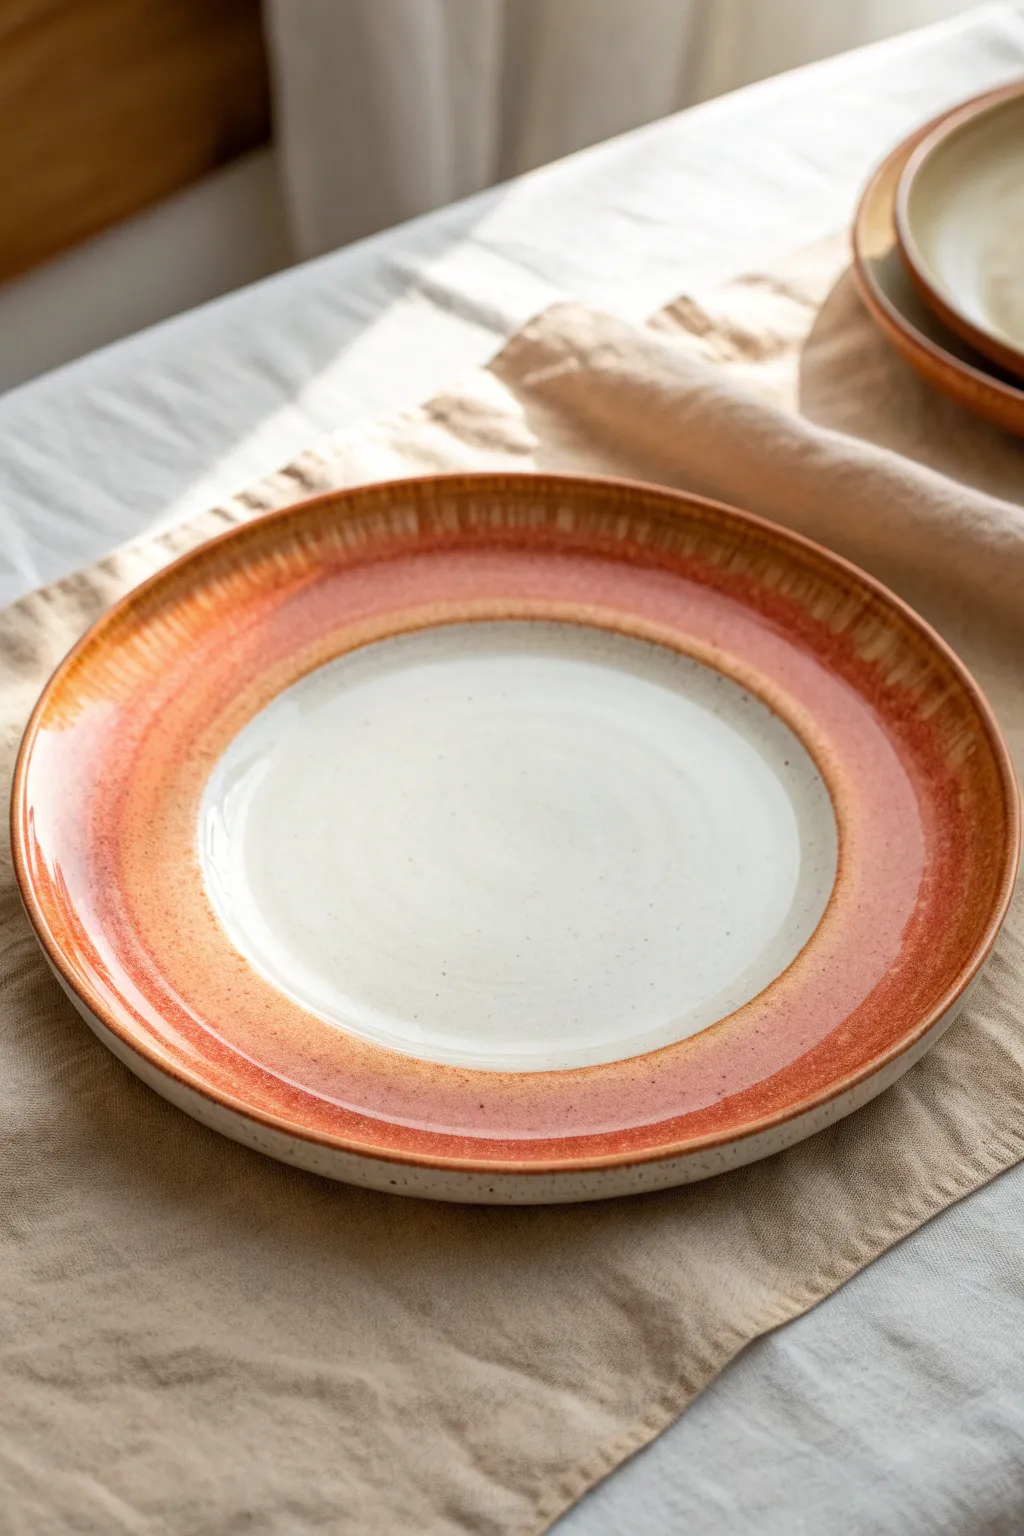
Capture the warmth of golden hour with this stunning ombré plate design, featuring a smooth transition from deep terracottas to soft, sunny oranges. This beginner-friendly technique uses a simple brush method to create a professional-looking banded rim that frames your food beautifully.
Detailed Instructions
Materials
- Bisque-fired ceramic dinner plate (with a wide rim)
- Ceramic underglazes: Deep Burnt Orange, Terracotta, Golden Yellow, and Creamy White
- Speckled pottery glaze (clear or semi-transparent with iron flecks)
- Wide, soft fan brush (synthetic hair)
- Medium round brush
- Sponge
- Palette for mixing
- Potter’s wheel or banding wheel (optional but recommended)
- Bowl of water
- Clear dipping glaze (if not using brush-on)
Step 1: Base Preparation
-
Clean the Bisque:
Start by wiping your bisque-fired plate with a damp sponge. This removes any dust or oils from handling and ensures your underglazes adhere perfectly without crawling. -
Center the Plate:
If you have a banding wheel, center the plate on it now. While you can paint freehand, spinning the plate allows for a much smoother, more uniform application of color bands. -
Apply the Creamy Center:
Load your cleaned wide fan brush with the Creamy White underglaze. Paint the central well of the plate, extending just slightly up the inner slope of the rim. -
Second Coat:
Let the first layer dry until it loses its sheen, then apply a second coat of the white to ensure solid, opaque coverage in the middle.
Spin It Right
No banding wheel? Place your plate on a lazy susan or an old turntable. The momentum helps creating those seamless circular bands.
Step 2: Creating the Ombré Band
-
Mix the Transition Color:
On your palette, mix a little Golden Yellow with the Creamy White. This soft, pale orange will be the first transition ring. -
Paint the Inner Ring:
With the plate spinning slowly (or rotating it by hand), apply a band of this pale mixture right where the flat center meets the rising rim. Overlap slightly with the white center to blur the edge. -
Prepare the Mid-Tone:
Clean your brush thoroughly. Now, load it with the Golden Yellow mixed with a touch of Terracotta to create a vibrant mid-orange hue. -
Apply the Middle Band:
Paint a wider band covering the main slope of the plate’s rim. While the paint is still wet, gently drag your brush back and forth into the previous pale ring to encourage the colors to bleed together. -
Mix the Darkest Tone:
For the outer edge, use the Deep Burnt Orange straight from the bottle or mix it with a tiny dot of brown for extra depth. -
Paint the Outer Rim:
Apply this dark, rich color to the very outer edge of the rim. I like to let the brush bristles naturally streak heavily here, creating that textured, radial pattern visible in the photo. -
Feather the Edges:
With a dry, clean brush, very lightly feather the boundary between the dark orange rim and the mid-tone orange. Use quick, short strokes moving from the center outward to create the streak effect. -
Refine the Streaks:
If the outer rim looks too solid, take a slightly damp brush and lift off tiny slivers of the dark paint, revealing the lighter clay body or underglaze beneath to emphasize the radial texture.
Texture Twist
Before painting, use a stiff brush to scratch radial lines into the raw clay rim. The glaze will pool in these grooves for extra depth.
Step 3: Speckling and Glazing
-
Create the Speckles:
Dilute a tiny amount of dark brown underglaze with water on an old toothbrush or stiff brush. Flick the bristles to spray a very fine mist of specks over the white center area. -
Dry Thoroughly:
Let the entire plate dry completely. The underglaze should feel chalky and room temperature to the touch. -
Clear Glaze Application:
Apply two or three coats of clear brush-on glaze over the entire design. If you used a speckled clay body, use a transparent glaze to let the natural iron spots show through. -
Clean the Foot:
Use a damp sponge to meticulously wipe any glaze off the foot ring (the bottom ridge) of the plate so it doesn’t stick to the kiln shelf. -
Fire:
Fire the plate in the kiln according to the clay and glaze manufacturer’s instructions (typically Cone 5 or 6 for stoneware).
Once fired, the glossy finish will deepen the oranges and seal your artwork for everyday dining use
Stencil-Look Geometric Triangles
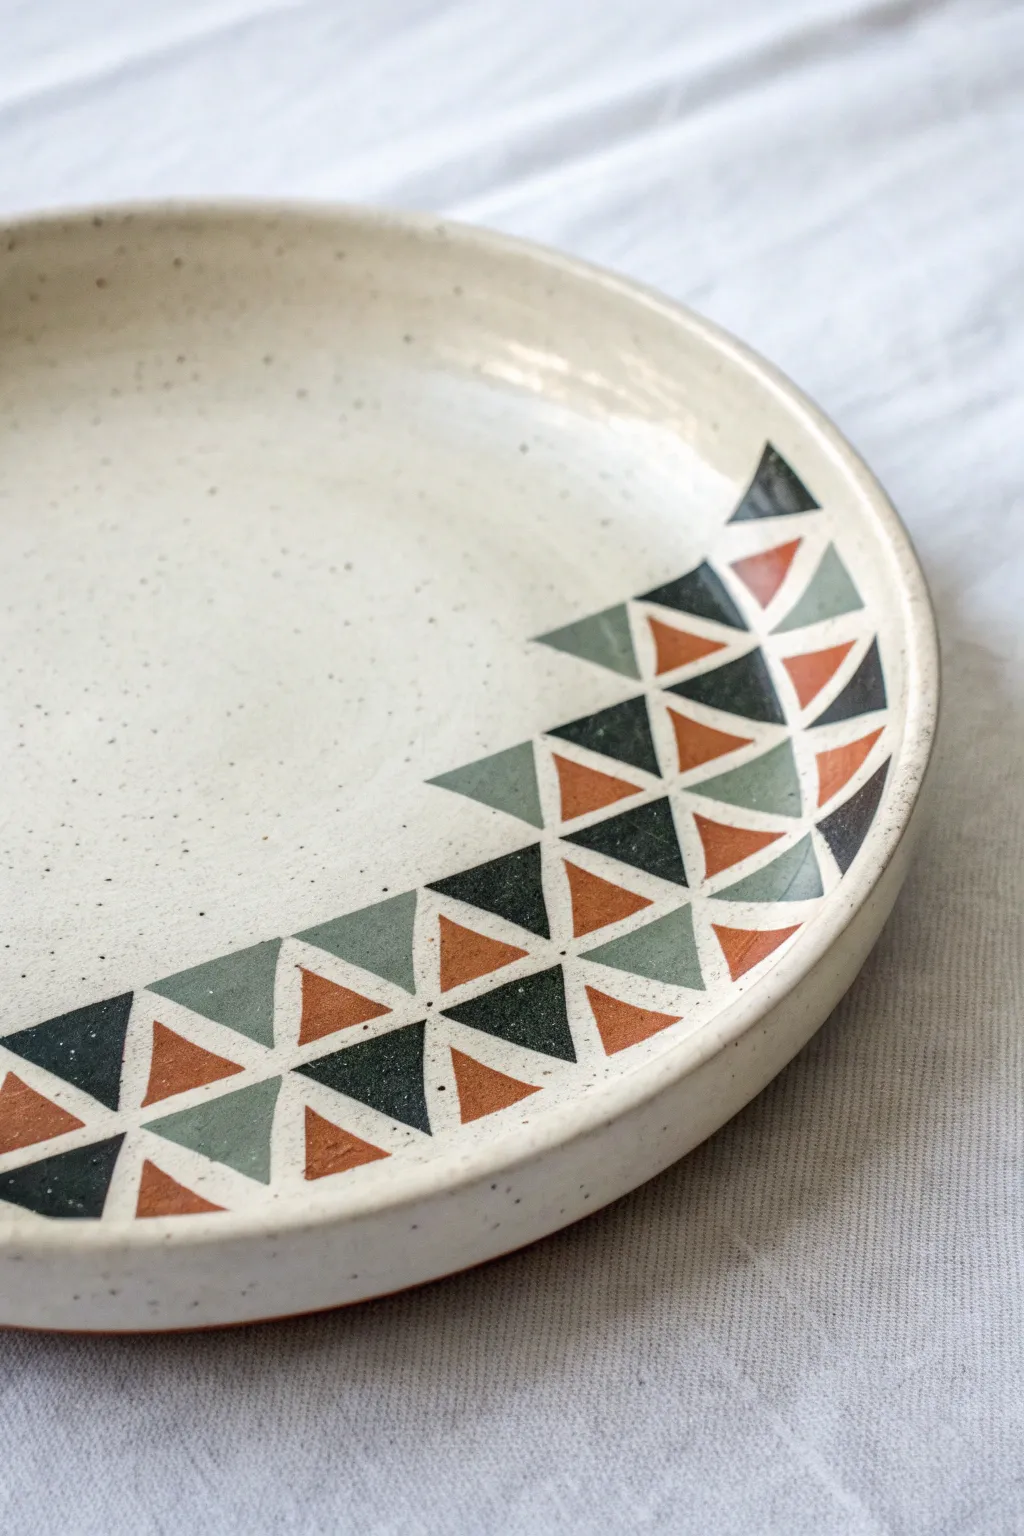
This modern ceramic project transforms a simple speckled plate into a piece of art using a crisp, tessellating triangle pattern. The combination of charcoal, sage, and rust tones creates a sophisticated, earthy palette that feels both retro and contemporary.
Step-by-Step Tutorial
Materials
- Bisque-fired ceramic plate (speckled clay body recommended)
- Underglazes: Charcoal Black, Sage Green, Burnt Orange
- Clear transparent glaze (food safe)
- Small flat shader brush (size 2 or 4)
- Detail liner brush
- Pencil (HB or lighter)
- Ruler or flexible measuring tape
- Paper template (optional but helpful)
- Clean water and sponge
- Kiln (or access to a firing service)
Step 1: Planning the Grid
-
Clean surface:
Begin by wiping down your bisque-fired plate with a damp sponge to remove any dust or oils that might resist the underglaze. -
Define the curve:
Using a light pencil, sketch a gentle curve starting from one side of the rim and sweeping inward towards the center, then back out. This will be the upper boundary of your design. -
Mark horizontal rows:
Lightly draw 3-4 parallel curved lines below your initial boundary line. Keep the spacing consistent—about 3/4 inch apart—to create the rows for your triangles. -
Create the triangles:
Draw diagonal lines intersecting your horizontal curves to form a grid of triangles. Alternate the direction of the diagonals to create classic isosceles triangles pointing up and down. -
Refine the shape:
Erase any grid lines that fall outside your desired design area so you have a clean ‘stencil’ look to fill in.
Wobbly Lines?
If freehanding straight lines is difficult, use thin automotive masking tape (1/8 inch) to tape off the grid. Peel it off carefully before the underglaze is completely dry to avoid chipping.
Step 2: Painting the Pattern
-
Color mapping:
Before painting, lightly mark which color goes where. I like to mark a ‘B’ for black, ‘G’ for green, and ‘O’ for orange to ensure the pattern stays random yet balanced. -
First color: Charcoal:
Start with the darkest color. Using your flat shader brush, fill in the designated black triangles. Outline the shape first with the edge of the brush, then fill the center. -
Second coat:
Let the first coat dry until matte, then apply a second coat of charcoal to ensure solid, opaque coverage. -
Second color: Sage:
Switch to a clean brush and apply the sage green underglaze to its specific triangles. Be careful nicely touch the edges of the black triangles without overlapping. -
Sage coverage:
Apply 2-3 coats of the sage green, allowing drying time between layers. Lighter colors often need that extra layer to avoid streakiness. -
Third color: Rust:
Finally, paint the burnt orange triangles. These pop against the cooler tones, so take extra care to keep the points sharp. -
Cleanup lines:
If you went over the lines, use a clean, stiff brush slightly dampened with water or a rubber clean-up tool to gently scrape or wipe away the excess paint. -
Leave negative space:
Remember to leave the spaces between triangles unpainted (showing the raw speckled clay) to create the white ‘grout’ lines that define the geometric look.
Step 3: Glazing and Firing
-
Burn out pencil:
Don’t worry about the visible pencil lines; the graphite will burn away completely in the kiln. -
Clear glaze application:
Once the underglaze is bone dry, dip the entire plate into a clear, food-safe overglaze. Alternatively, brush on three even coats. -
Check thickness:
Ensure the glaze isn’t too thick over the detailed triangles, as it could cause the design to run or blur during firing. -
Clean the foot:
Wipe the bottom foot ring of the plate completely clean of glaze with a sponge to prevent it sticking to the kiln shelf. -
Final fire:
Fire the plate in the kiln according to the clay and glaze manufacturer’s instructions (usually Cone 5 or 6 for stoneware).
Add Texture
For a tactile finish, use a sgraffito tool to scratch tiny patterns or lines into just the black triangles before glazing to reveal the white clay underneath.
Now you have a stunning, geometric plate ready to elevate your next dinner party
Whimsical Starburst Dots
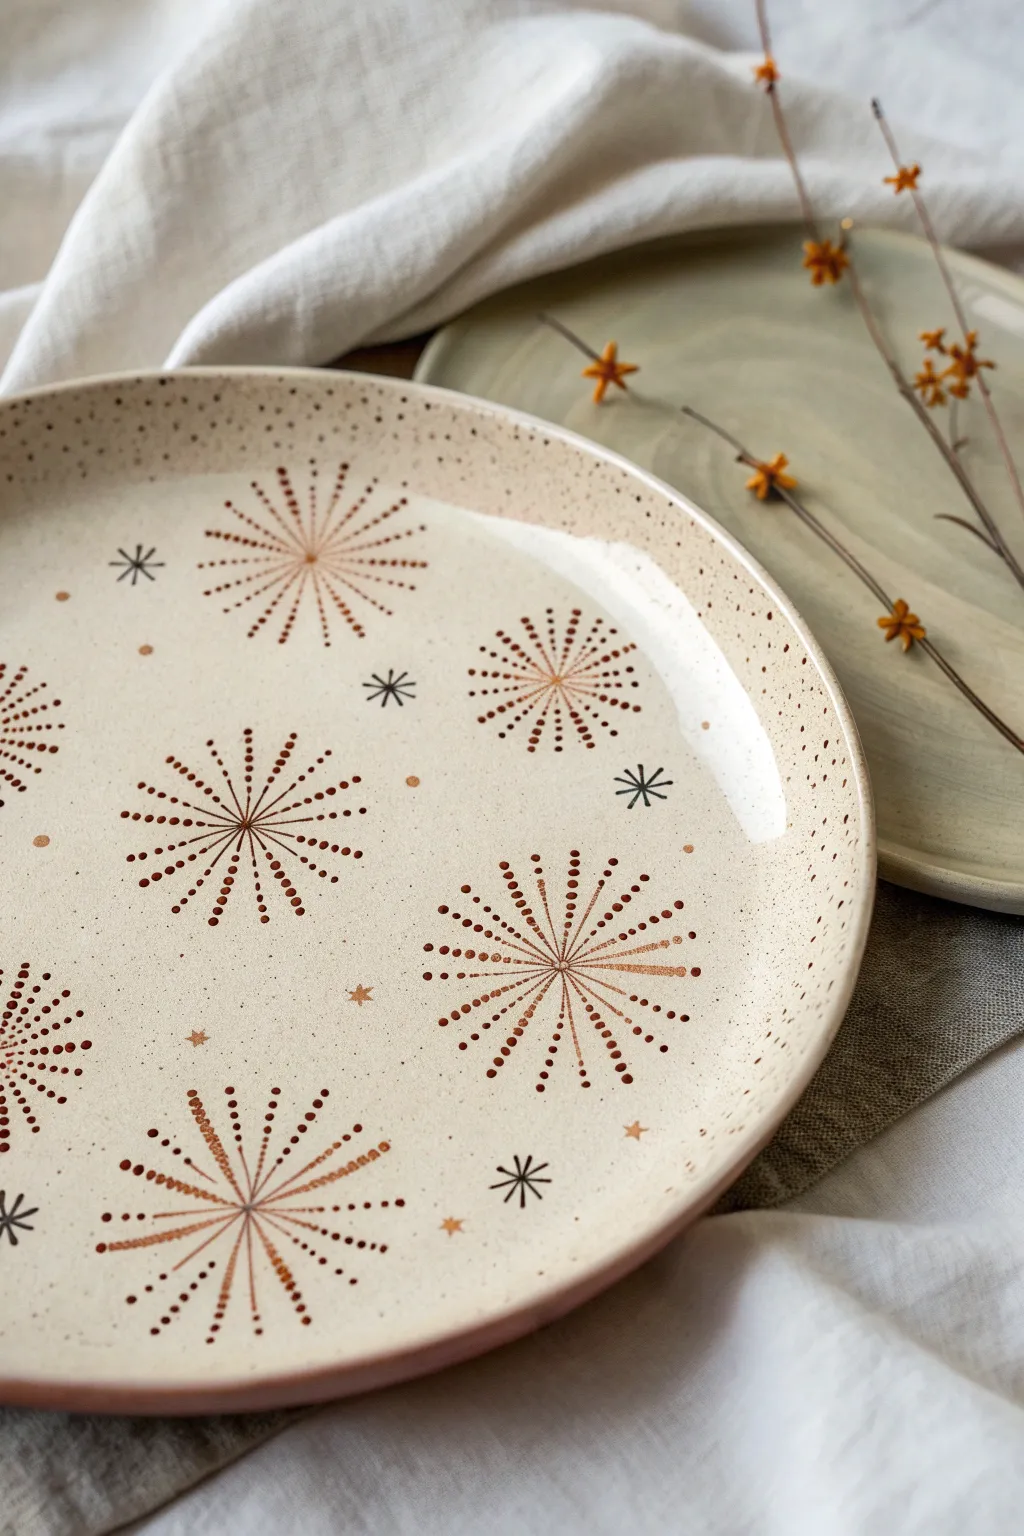
Capture the magic of retro-inspired fireworks with this charming plate design that combines fine line work with delicate stippling. The warm, earthy tones and playful speckles create a cozy, handmade feel perfect for brightening up any table setting.
Step-by-Step
Materials
- Bisk or glazed ceramic plate (cream or off-white base)
- Ceramic paint or porcelain markers (Rust Red/Terracotta)
- Ceramic paint or porcelain markers (Black)
- Fine liner brush (size 0 or 00)
- Small dotting tool or toothpick
- Old toothbrush (for splashing)
- Palette or small dish
- Paper towels
- Rubbing alcohol
- Cotton pads
Step 1: Preparation & Planning
-
Clean the Surface:
Before you begin, wipe the entire surface of your plate with rubbing alcohol on a cotton pad. This removes any oils or dust that might prevent the paint from adhering properly. -
Map the Layout:
To ensure your starbursts are evenly distributed, you can lightly mark the center point of each major motif with a tiny dot of pencil lead, which will burn off during baking or wash off later.
Pro Tip: Steady Hands
Rest your pinky finger on a dry part of the plate while painting. This anchors your hand and gives you much better control for drawing those super fine radiating lines.
Step 2: Painting the Starbursts
-
Load Your Brush:
Dip your fine liner brush into the rust red ceramic paint. You want the paint to be fluid but not dripping, allowing for crisp, thin lines. -
Draw the Central Spokes:
Start at one of your planned center points. Draw 8 to 10 thin lines radiating outward from the center, like the spokes of a wheel. Keep them relatively short for now. -
Add Secondary Lines:
Between your main spokes, add shorter lines. Variation in length creates that explosive, dynamic look, so don’t worry about making them perfectly uniform. -
Begin the Dotting:
Switch to your dotting tool or a toothpick. Dip it into the rust red paint and place a line of graduating dots extending from the end of several spokes. -
Fill the Gaps:
Add free-floating rows of dots between the solid lines. This creates the illusion that the starburst is expanding outward into space. -
Repeat the Motifs:
Move to your next center point and repeat the line and dot process. I find it helpful to rotate the plate constantly as I work to keep my hand angle comfortable. -
Vary sizes:
Make some starbursts slightly larger and some smaller to keep the composition interesting and organic.
Step 3: Adding Accents
-
Draw Tiny Stars:
Using a very fine tip marker or the tip of your brush with black paint, draw small, simplisitic eight-point stars (like an asterisk) in the empty spaces between the large red bursts. -
Add Micro-dots:
Using the rust color again, randomly place single, tiny dots in the negative spaces. These act as distant stars or confetti. -
Create the Speckled Effect:
Dilute a small amount of your rust paint with a tiny drop of water. Dip an old toothbrush into this mixture. -
Splatter Technique:
Hold the toothbrush over the plate and run your thumb across the bristles to flick a fine mist of speckles across the surface. Test this on paper first to gauge the spray. -
Clean Edges:
If any splatter went onto the rim where you don’t want it, quickly wipe it away with a damp cotton swab.
Level Up: Metallic Pop
Once the initial design is dry, add a tiny dot of gold ceramic paint to the absolute center of each starburst. The subtle shimmer adds an elegant finish.
Step 4: Preservation
-
Initial Drying:
Let the plate sit undisturbed for at least 24 hours to allow the paint to fully cure on the surface. -
Bake to Set:
Place the plate in a cool oven, then set the temperature to 300°F (150°C). Once it reaches temperature, bake for 35 minutes. -
Cool Down:
Turn the oven off and leave the plate inside until it is completely cool. Removing it while hot can cause the ceramic to crack.
Enjoy your beautiful new custom dinnerware for your next gathering or quiet meal at home
Modern Abstract Color Blobs
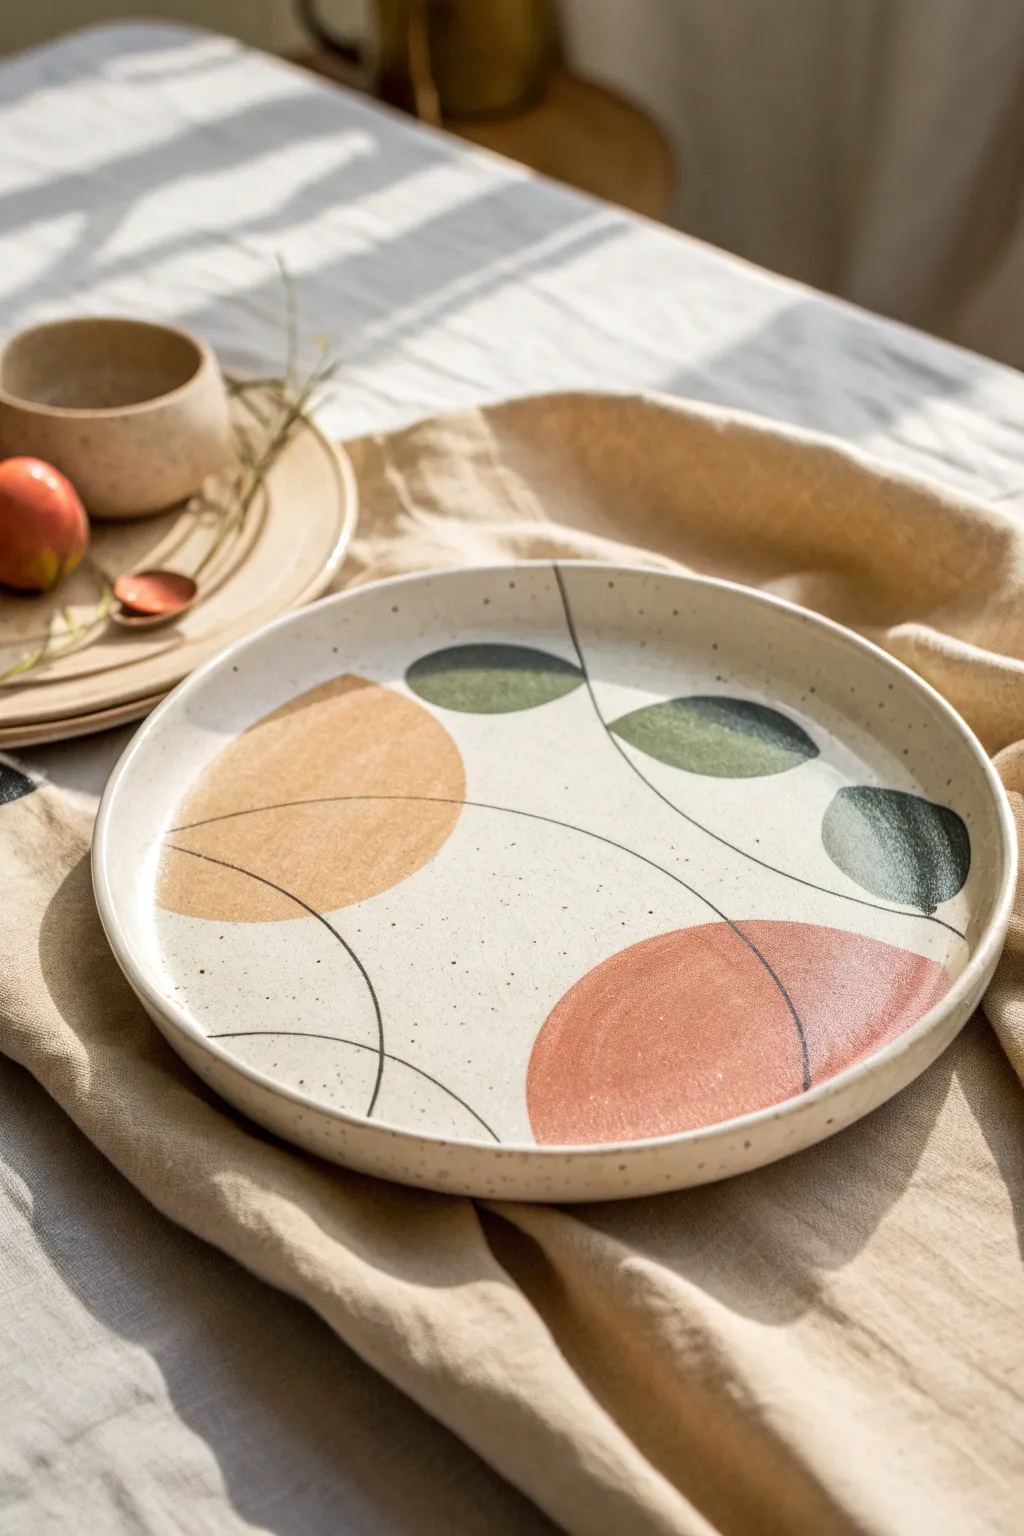
This project transforms a simple ceramic blank into a piece of modern art using earthy tones and fluid lines. The design combines organic color blobs with delicate, sketch-like stems for a look that feels both grounded and airy.
Step-by-Step Tutorial
Materials
- Bisque-fired ceramic plate (preferably speckled clay)
- Underglazes: Sage Green, Deep Forest Green, Ochre/Mustard, Terracotta
- Food-safe clear dipping or brushing glaze
- Soft round brushes (sizes 4 and 6)
- Fine liner brush or underglaze applicator bottle with a fine needle tip
- Pencil (for sketching)
- Sponge and water bowl
Step 1: Preparation and Sketching
-
Clean surface:
Begin by wiping down your bisque plate with a damp sponge. This removes any dust that could prevent the glaze from adhering properly. -
Plan composition:
Visualize three main focal points. You’ll want a balance between the large circular shapes and the smaller leaf-like ovals. I like to keep the center relatively open to create negative space. -
Light sketch:
Using a pencil, very lightly map out the general location of your color blobs. Don’t worry about perfection; pencil marks will burn off in the final firing.
Smooth Moves
To get those perfectly circular curves on the color blobs, load your brush fully and rotate the plate on a banding wheel while holding your hand steady.
Step 2: Applying Color Basics
-
Mix the ochre:
Start with your Ochre or Mustard underglaze. Ensure it’s the consistency of heavy cream; add a drop of water if it seems too thick. -
Paint the large circle:
Using a size 6 round brush, fill in the large circular shape on the left side of the plate. Use long, smooth strokes to minimize texture. -
Second coat:
Let the first coat dry until it’s matte and cool to the touch. Apply a second coat in a cross-hatch direction for solid opacity. -
Add the terracotta:
Switch to a clean brush and apply the Terracotta color to the bottom right area. Create a semi-circle or organic blob shape here, repeating the two-coat process.
Make it Matte
For a more modern, rustic finish, leave the raw clay unglazed on the rim and only apply clear glaze to the interior food surface.
Step 3: Creating the Leaves
-
Sage leaf layer:
Now for the greenery. Paint a flat oval shape near the top center using the Sage Green. This will be the lighter of your two leaf colors. -
Forest leaf layer:
Paint a darker oval using the Deep Forest Green on the right side. Slightly varying the shades of green adds depth to the simple composition. -
Layering transparency:
For a painterly effect, you can water down one of the green glazes slightly and paint a third shape that overlaps the ochre circle just a bit. This creates a lovely transparency in the final firing. -
Dry thoroughly:
Allow all the colored shapes to dry completely. This is crucial before adding the fine lines so the colors don’t smear.
Step 4: Line Work and Finishing
-
Prepare black detail:
Load a fine liner brush with black underglaze, or prepare a squeeze bottle with a fine needle tip. I prefer the bottle for consistent line width. -
Draw the main stem:
Draw a thin, confident line starting from the top edge, curving down through the green leaves and ending near the bottom center. -
Connect the shapes:
Draw a second, intersecting curve that runs through the ochre circle and swoops towards the terracotta shape. Let the lines feel loose and organic rather than rigid. -
Add texture marks:
Add tiny speckles or stray marks near the edges of the plate if your clay body isn’t naturally speckled, using a toothbrush to flick a tiny bit of brown underglaze. -
Final drying:
Let the underglaze design dry for at least 24 hours to ensure all moisture has evaporated from the clay pores. -
Clear glaze application:
Dip the plate into a clearer dipping glaze, or brush on three even coats of brush-on clear glaze. Avoid dragging the brush too hard over the black lines. -
Fire:
Fire the piece according to the instructions for your specific clay body and glaze, typically to Cone 5 or 6 for durability.
Once fired, you will have a stunning, durable plate that brings a touch of abstract nature to your table setting