
Whenever I need a quick, happy project, I reach for air dry clay and start making miniature food—it’s basically instant joy in tiny form. These air dry clay food ideas are beginner-friendly, super customizable, and perfect for building your own little snack collection.
Mini Donuts with Icing and Sprinkles
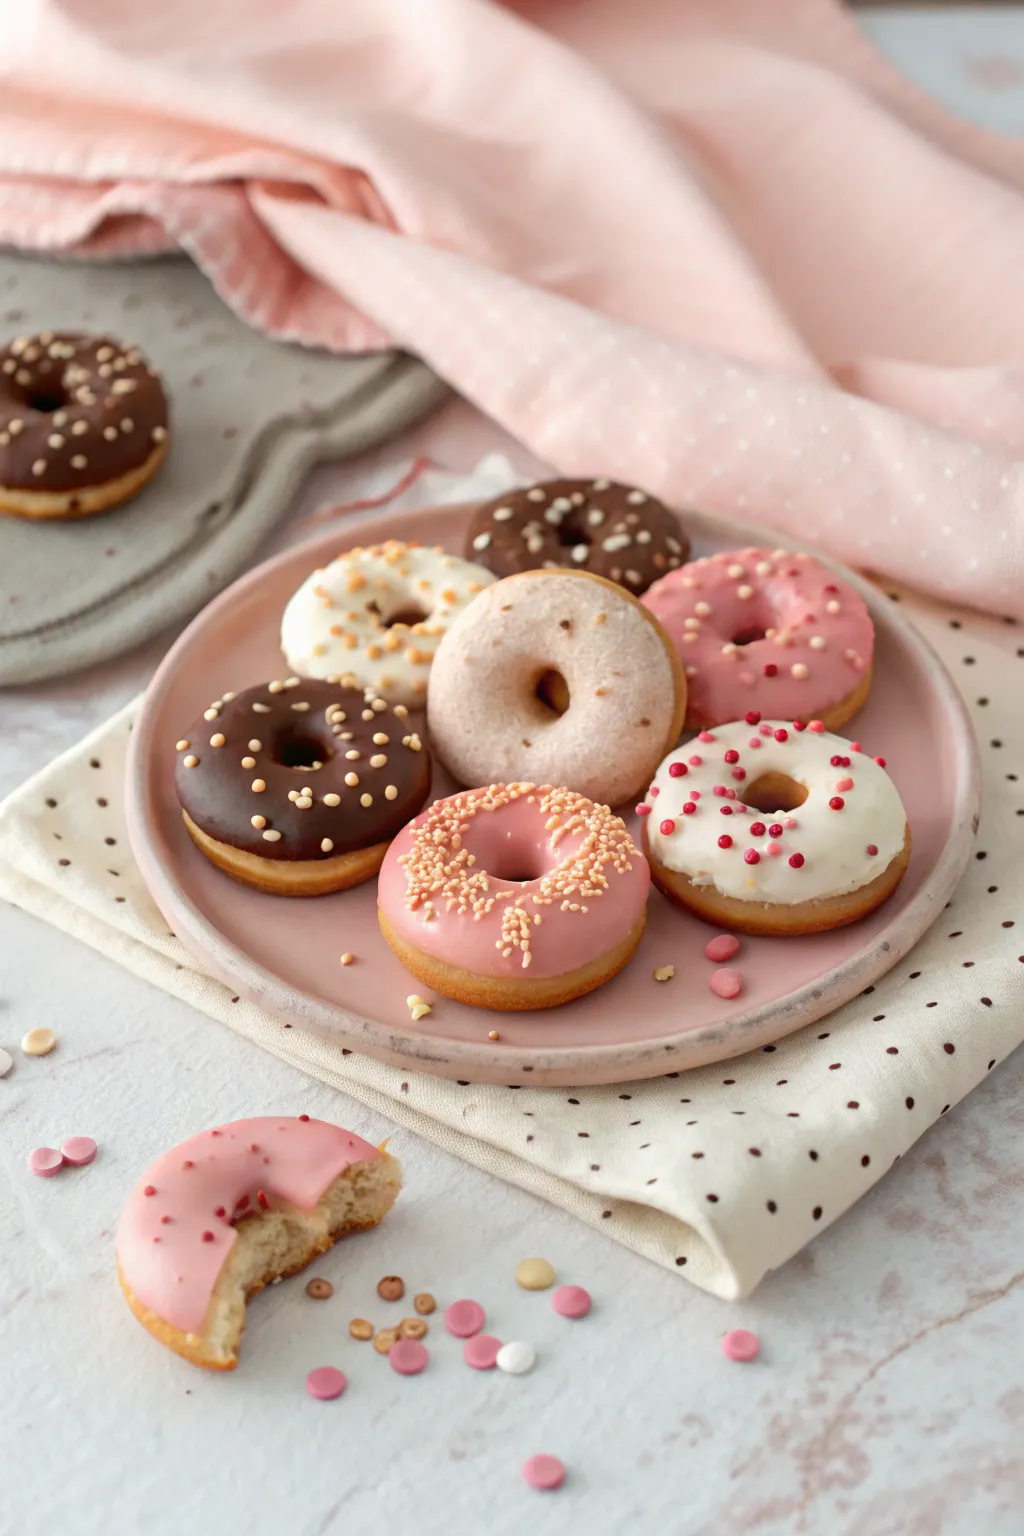
These delightful mini donuts look good enough to eat, showcasing a variety of realistic glazes and delicate sprinkles. Perfect for dollhouse enthusiasts or cute desk decor, this project transforms simple air-dry clay into an irresistible bakery assortment.
Step-by-Step
Materials
- White air-dry clay (smooth texture)
- Acrylic paints (Tan, Dark Brown, White, Pink, Red)
- Mod Podge or gloss varnish
- Puffy paint (Pink, White, Brown) or a fluid medium mixed with acrylics
- Small round piping tip or a straw
- Detail brushes (various sizes)
- polymer clay sprinkles or micro beads
- Sandpaper (fine grit)
- Toothpick or needle tool
- Palette for mixing
Step 1: Shaping the Dough
-
Portion the clay:
Start by pinching off small, equal-sized pieces of white air-dry clay, rolling each into a smooth ball about 1.5 inches in diameter. -
Form the patty:
Gently flatten each ball between your palms until it resembles a thick, round patty; don’t make them too thin, as you want a fluffy donut look. -
Create the hole:
Use a small round piping tip or a sturdy straw to punch a hole directly in the center of each flattened circle, twisting slightly to remove the excess clay cleanly. -
Soften the edges:
Dip your finger in a tiny bit of water and smooth the outer edges and the inner hole to remove any sharp angles or cracks, giving the donut a rounded, baked appearance. -
Add a realistic bite (Optional):
For the bitten donut, use a scalloped cookie cutter or a needle tool to tear away a jagged section, then use a tool to texture the inside ‘crumb’ to look like cake. -
Texture the surface:
Lightly tap the surface of the clay with a clean toothbrush or crumpled foil to create a very subtle baked texture, avoiding a perfectly plastic finish. -
Initial drying:
Place your raw donuts on a flat surface lined with parchment paper and let them dry completely, which usually takes 24-48 hours depending on humidity.
Cracked Clay?
Make a ‘slip’ by mixing a small amount of clay with water into a paste. Fill any cracks with this paste, smooth with a wet finger, and let re-dry.
Step 2: Baking
Step 3: Color & Glazing
-
Sand imperfections:
Once fully dry, use fine-grit sandpaper to gently buff away any remaining rough spots or fingerprints. -
Base coat mixing:
Mix a ‘dough’ color using plenty of white acrylic paint with a drop of tan or yellow ochre; you want a light, golden-baked hue. -
Painting the base:
Paint the entire surface of each donut, including the bottom and inside the hole. I often do two thin coats for better coverage. -
Shading for realism:
With a dry brush and a slightly darker golden-brown shade, lightly dust the edges where a real donut would brown the most in the fryer. -
Mixing the icing:
Prepare your icing colors in separate small cups. Mix acrylic paint (dark brown for chocolate, light pink for strawberry, white for vanilla) with a gloss medium or Mod Podge to create a thick, glossy liquid. -
Dipping the donuts:
Carefully spoon the icing mixture onto the top half of the donut, or dip the donut face-down into the mixture, letting it drip naturally down the sides slightly. -
Fixing the drip:
Use a toothpick to guide the ‘icing’ into nice, rounded drips, ensuring it looks distinct from the dough underneath. -
Applying sprinkles:
While the icing layer is still wet, sprinkle on your polymer clay sprinkles, micro beads, or even seeds painted in bright colors. -
Creating the powdered look:
For the plain sugar donut seen in the middle, apply a matte varnish and dust with real cornstarch or white pastel powder before the varnish dries. -
Final gloss:
Once the paint is dry, add a top coat of high-gloss varnish specifically over the icing parts to make them look wet and sticky.
Scented Donuts
Mix a drop of vanilla, strawberry, or chocolate detailed fragrance oil into the acrylic paint used for the icing to make them smell real.
Display your new bakery treats on a tiny plate or turn them into sweet magnets for your fridge


Tiny Chocolate Bars with Square Segments
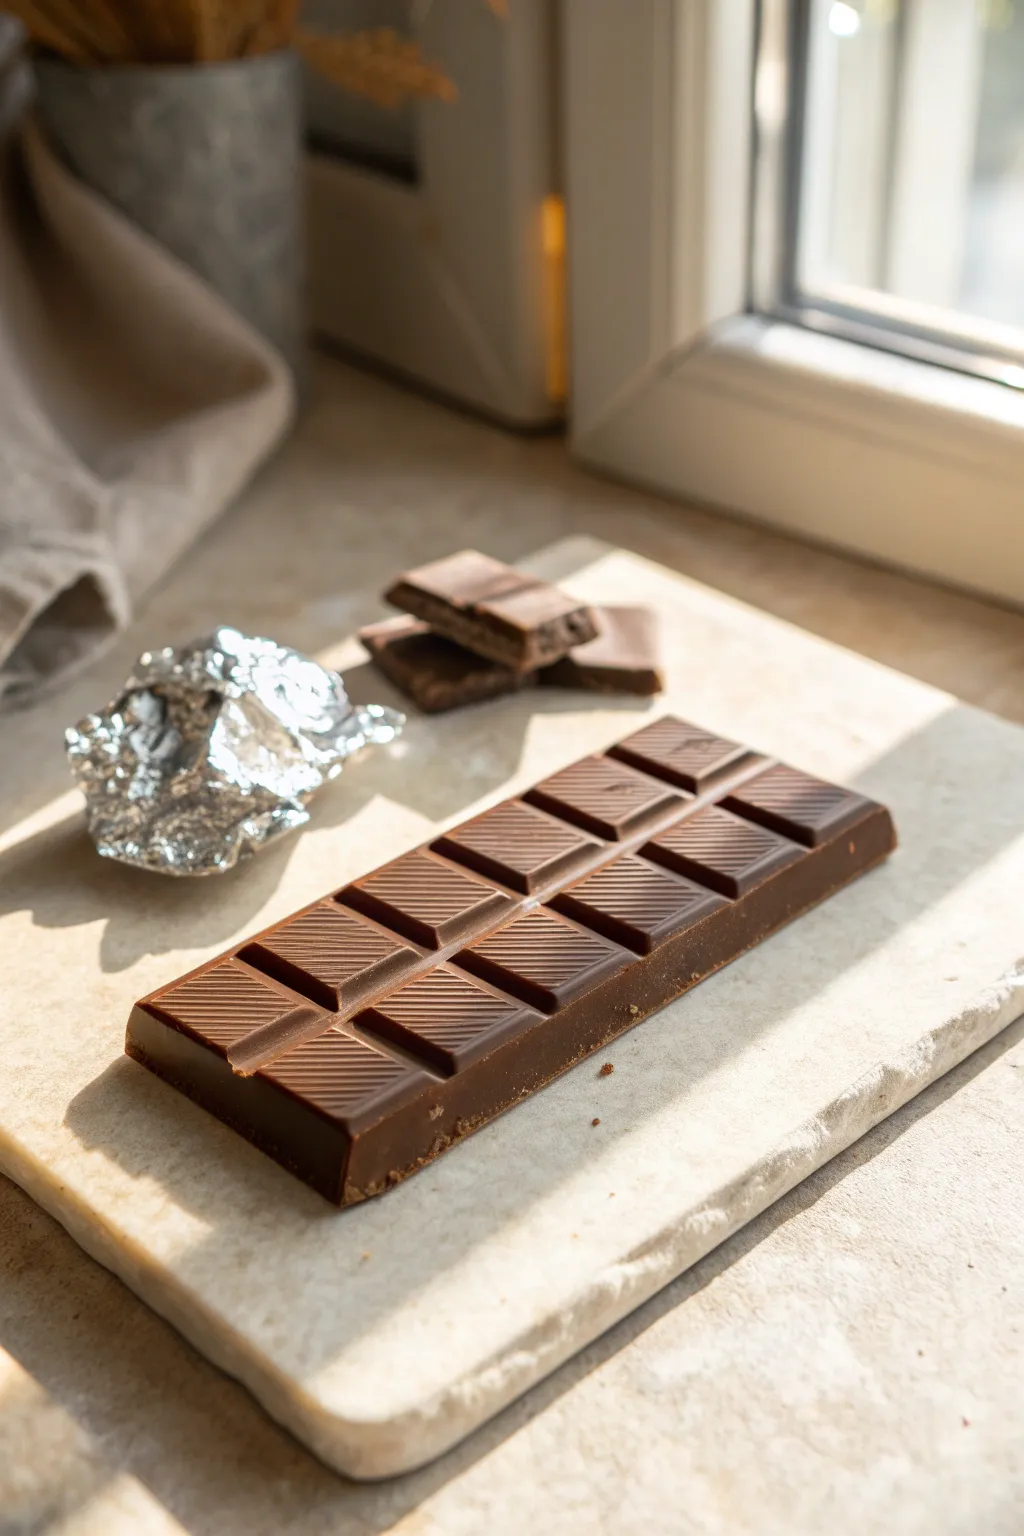
Chocolate is one of the most satisfying foods to replicate in clay because the texture and color are naturally similar to the medium itself. This project guides you through sculpting a classic rectangular bar with grid lines and a convincing matte finish.
Step-by-Step
Materials
- Brown air dry clay (or white clay mixed with brown acrylic paint)
- Ruler or straight edge
- Rolling pin
- Craft knife or clay blade
- Modeling tool with a fine, flat edge
- Needle tool
- Soft paintbrush
- Dark brown acrylic paint
- Matte varnish
- Silver aluminum foil (optional for styling)
Step 1: Forming the Base
-
Prepare the Clay:
Start by conditioning your brown air dry clay. Knead it thoroughly until it is warm and pliable to prevent cracking later. -
Roll it Out:
Roll the clay onto a smooth surface to a thickness of about 1/4 inch (6mm). Try to keep the thickness consistent across the entire slab. -
Cut the Rectangle:
Use your ruler and craft knife to cut a clean, perfect rectangle. For a standard bar look, aim for dimensions around 2 inches by 5 inches, or scale down for miniatures. -
Smooth the Edges:
Gently run your finger along the cut sides to soften sharp burrs, but keep the corners relatively crisp so it looks like molded chocolate.
Crumbly Edges?
If your ‘broken’ pieces look too smooth, tear the wet clay quickly rather than cutting it. Use a needle tool to pick at the torn edge for a crumb texture.
Step 2: Creating the Segments
-
Measure the Grid:
Lightly mark even intervals along the length and width of the bar with a needle tool to guide your segment lines. A 2-column grid works well for this style. -
Press main Channels:
Using the back of a craft knife or a thin ruler, firm press down into the clay at your marked intervals to create the deep channels that separate the chocolate squares. -
Bevel the Squares:
Chocolate molds usually have slanted edges. Use a flat modeling tool to gently press the four edges of each individual square inward, creating a raised, flat top and beveled sides. -
Refine the Deep Lines:
Go back over your main separating channels with your tool to ensure they are clean and distinct after beveling the squares. -
Distress the Surface (Optional):
If you want a slightly imperfect, handmade chocolate look, lightly tap the surface with a finger to remove perfectly smooth tool marks. -
Create Diagonal texture:
Look closely at the reference; the squares have faint diagonal ridges. Gently press a fine-toothed tool or textured fabric very lightly onto just the top surface of each square.
Step 3: Finishing Details
-
Sculpt Broken Pieces:
Use your leftover clay scraps to form smaller, irregular chunks. Stack two or three small squares together and break the edges to simulate a snapped bar. -
Dry Completely:
Let the clay dry for 24-48 hours. I find flipping the bar over halfway through helps it dry flat without warping. -
Paint the Base Coat:
Mix a rich, dark brown acrylic paint. Apply an even coat over the entire bar, ensuring you get paint into the deep grooves. -
Add Depth:
Mix a tiny drop of black into your brown paint and carefully paint just the deepest parts of the grid lines to create artificial shadow. -
Simulate Bloom (Optional):
For an aged chocolate look, dry brush a tiny amount of light tan paint very sparingly over the highest points of the texture. -
Varnish:
Apply a matte varnish to seal the piece. Chocolate isn’t naturally glossy, so avoid high-gloss finishes unless you want it to look melted. -
Wrapper:
Take a piece of real aluminum foil, crumple it slightly, and glue it to the underside or corner of the bar for final realism.
Bite Marks
Use a scalloped cookie cutter or the end of a straw to remove a curved section from one corner, making it look like someone took a bite.
Place your finished bar near a window to catch the light and enjoy your zero-calorie treat


Burger and Fries Combo

Recreate the charm of a gourmet pub meal with this realistic air dry clay miniature. This project combines careful texturing techniques and layer-stacking to build a mouth-watering burger accompanied by crispy-looking fries, all served on a chic faux-slate platter.
How-To Guide
Materials
- Air dry clay (white or light beige)
- Acrylic paints (burnt umber, rich brown, golden yellow, red, green, cream, black, dark grey)
- Texture tools (toothbrush, needle tool, crumpled foil)
- Rolling pin
- Small round cutter or bottle cap
- Craft knife or scalpel
- Gloss varnish or clear nail polish
- Matte varnish
- Toothpick (optional, for internal support)
- Soft pastel chalks in brown and orange (for shading)
Step 1: Sculpting the Burger Components
-
Form the Bun Base:
Mix a small amount of yellow ochre and a tiny dot of brown paint into white clay to create a ‘baked dough’ color. Roll a ball and flatten the bottom slightly for the bottom bun, texturing the sides gently with a toothbrush. -
Shape the Patty:
Color a portion of clay dark brown. Roll it into a thick disc to match the bun size. Use a needle tool or stiff brush to stipple the edges thoroughly, creating that ground meat texture. -
Create the Cheese Slice:
Color a small piece of clay bright yellow-orange. Roll it out very thinly and cut a perfect square. Drape this over the burger patty while the clay is still fresh so the corners droop naturally. -
Add Lettuce and Tomato:
For the tomato, slice a thin red disc. For lettuce, roll green clay paper-thin and tear the edges roughly to mimic leafy ruffles. Stack these on top of the cheese. -
Top Bun and Seeds:
Shape the top dome using the same dough-colored clay as step 1. Before placing it, press the top gently with crumpled foil for a baked texture. Roll tiny, rice-sized grains of plain clay and press them onto the top for sesame seeds.
Preventing Cracks
If you see tiny cracks forming as the buns dry, smooth them immediately with a damp finger or a slick of water mixed with fresh clay.
Step 2: Making the Fries and Dip
-
Cut the Fries:
Roll out a slab of pale yellow clay to about 2mm thickness. Use your craft knife to slice narrow, rectangular strips. Vary the lengths slightly so they look hand-cut. -
Texturing the Fries:
Gently pinch the edges of a few fries or twist them very subtly. Use a toothbrush to add a slight roughness to the surface so they don’t look like plastic strips. -
Craft the Ramekin:
Using brown clay (or painting it later to look like wood), form a small, thick bowl shape. Fill the center with textured beige clay to represent a dipping sauce like hummus or mustard.
Step 3: The Serving Board and Assembly
-
Base Tray Construction:
Roll out a large slab of black or dark grey clay. Cut a rectangle with rounded corners. Roll a thin snake of clay and attach it around the perimeter to create a raised rim, smoothing the seam with a little water. -
Slate Texture:
While the tray is wet, press a real stone or crumpled foil firmly into the surface to mimic the rough texture of slate or cast iron. -
Miniature Slate Plate:
Cut a smaller circle from the same dark clay. Texture it heavily to look like rough stone. This will sit under the burger for elevation. -
Dry Assembly:
Once all components are fully dry (usually 24 hours), glue the round slate plate to the left side of the tray and heap the fries on the right.
Pro Tip: Realistic Glue
Mix white glue with a little yellow ochre paint to attach the sesame seeds. It holds them in place and dries looking like an egg wash finish.
Step 4: Painting and Finishing
-
Shading the Buns:
Use soft pastel chalks (shaved into powder) or watered-down brown paint. Brush a ‘toasted’ golden-brown color onto the top of the bun and the edges of the fries. -
Detailing the Fries:
Lightly dry-brush some white or very pale yellow on the sharp edges of the fries to make them look crispy and salted. -
Meat Juice Glaze:
Mix a tiny drop of gloss varnish with dark brown paint. Apply this sparingly to the edges of the meat patty to make it look juicy and greasy. -
Sauce Gloss:
Add a coat of satin or gloss varnish to the tomato slice and the dipping sauce in the ramekin for a wet look. -
Tray Finish:
Dry-brush the black tray with a tiny amount of white or light grey paint to highlight the ‘stone’ texture, then seal the entire tray with a matte varnish.
Place your finished gourmet meal on a shelf and enjoy the zero-calorie deliciousness


Pizza Slices with Toppings
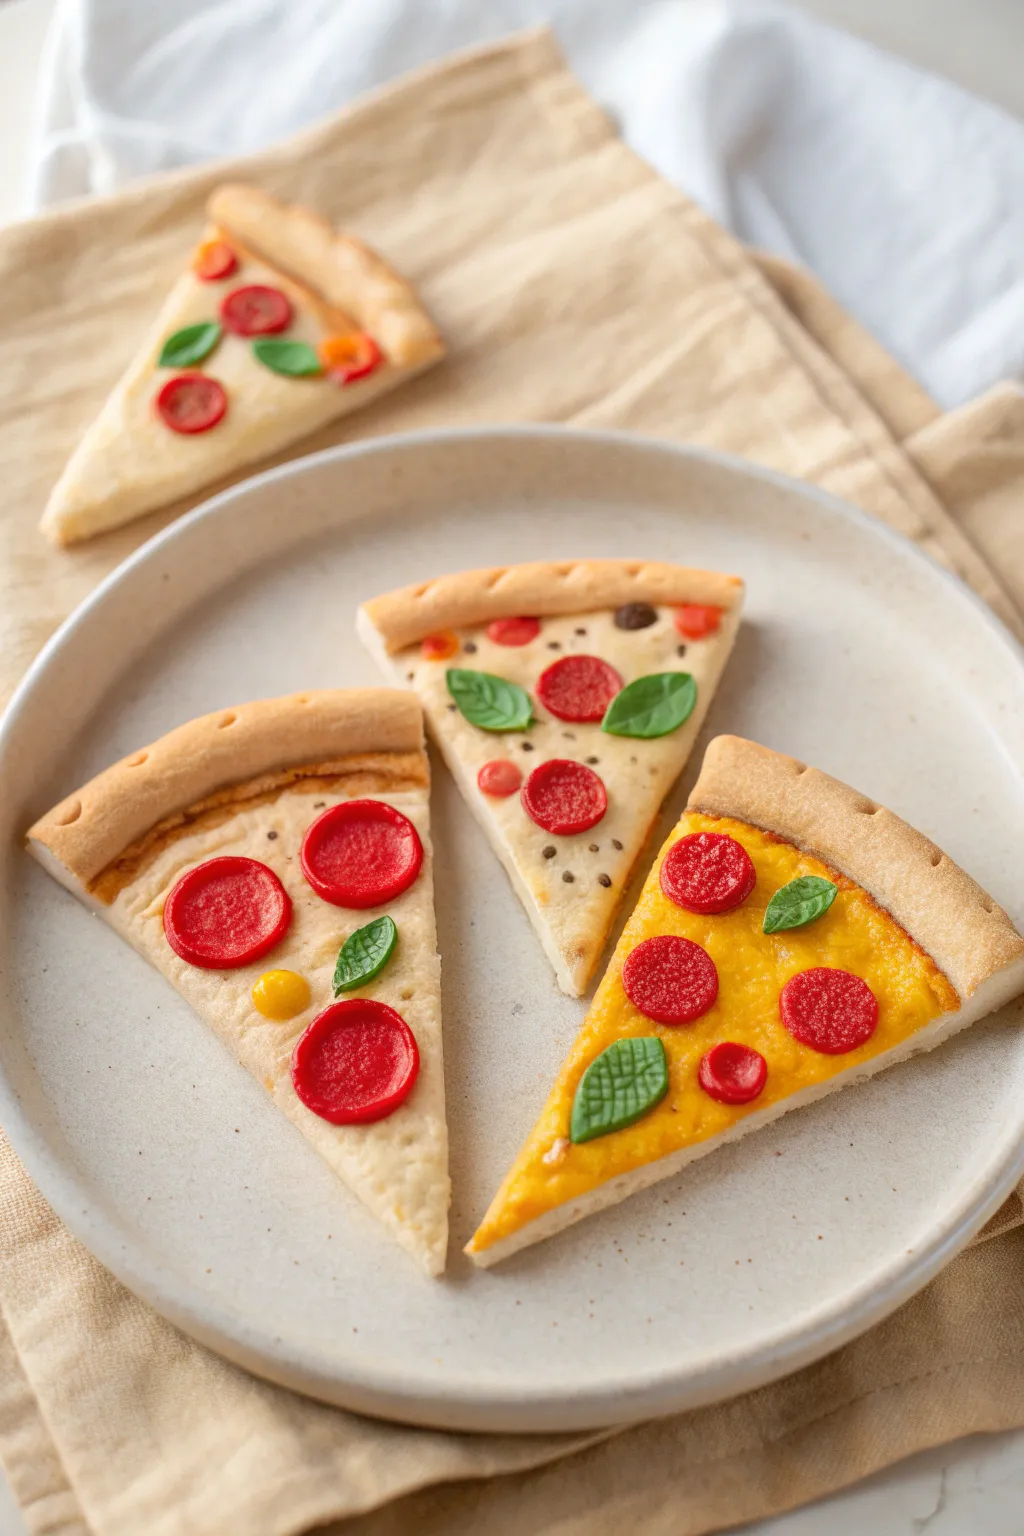
Whip up a batch of these amazingly realistic pizza slices using air dry clay, perfect for play food collections or cute kitchen décor. You’ll sculpt detailed crusts, mix custom colors for sauce and cheese, and top them off with miniature pepperoni and basil leaves.
Step-by-Step
Materials
- White air dry clay
- Acrylic paints (Yellow ochre, bright yellow, red, deep green, brown, white)
- Clay tools (needle tool, ball tool, rolling pin)
- Old toothbrush or stiff bristle brush
- Small circle cutter (approx. 1/2 inch) or a large straw
- Craft knife or plastic knife
- Fine grit sandpaper (optional)
- Gloss varnish or clear nail polish
Step 1: Sculpting the Base
-
Coloring the Dough:
Start by mixing a small amount of yellow ochre and a tiny dot of brown acrylic paint into a ball of white air dry clay. Knead it thoroughly until you have a uniform, light beige ‘dough’ color. -
Shaping the Slice:
Roll your clay out into a thick circle, about 1/4 inch thick. Use your craft knife to cut a triangular slice shape, mimicking a real slice of pizza. -
Forming the Crust:
Roll a separate snake/coil of the same beige clay. Attach this to the wider curved edge of your triangle to form the crust rim. Blend the seam on the bottom side so it attaches firmly, but leave the top seam visible for realism. -
Texturing the Dough:
Take an old toothbrush and gently tap it all over the surface of the clay, especially on the crust rim. This creates a baked bread texture. You can also use a needle tool to make tiny holes on the underside or cut edge for an airy crumb look. -
Adding Crust Details:
Using a dull knife or clay tool, press shallow, diagonal indentations along the crust rim to mimic the rolling or folding of dough.
Fixing Cracks
If the clay shrinks and creates cracks where the crust meets the slice, fill the gap with a ‘slip’ made of wet clay and water, then smooth it out.
Step 2: Creating the Toppings
-
Mixing Red Clay:
Mix red paint with a fresh piece of clay to create a deep pepperoni color. I like to add a tiny touch of brown to keep it from looking neon. -
Making Pepperoni:
Roll the red clay very thin. Use your small circle cutter or a straw to punch out pepperoni slices. Gently tap the surface with your toothbrush to give them a meaty texture. -
Sculpting Basil Leaves:
Color a small amount of clay deep green. Pinch off tiny bits and flatten them into teardrop shapes. Use a needle tool to score a central vein and smaller side veins into each leaf. -
Drying Components:
Let your pizza base, pepperoni slices, and basil leaves dry completely. This usually takes 24-48 hours depending on humidity.
Step 3: Painting and Assembly
-
Base Coat for Crust:
Once dry, lightly dry-brush the crust rim with a mix of brown and yellow ochre paint. Focus on the high points of the texture to make it look ‘baked’ and golden. -
Applying the Sauce:
For a tomato-sauce base slice (like the left slice in the image), paint the inner triangle area with a creamy light beige or off-white to represent melted mozzarella, leaving the texture visible. -
Applying the Cheddar:
For a cheesy slice (like the right slice in the image), mix bright yellow and a drop of orange paint. Paint a thick, opaque layer over the inner triangle. -
Attaching Pepperoni:
While the ‘cheese’ paint is still wet, press your pre-made pepperoni slices onto the pizza. If the paint has dried, use a dab of white glue. -
Attaching Basil:
Glue the green basil leaves onto the slices. Place them slightly over the pepperoni or near the crust for a natural arrangement. -
Adding Spices:
Create ‘oregano’ by using a fine brush to stipple tiny dots of dark brown or grey paint onto the cheese area. Vary the spacing so it looks random. -
Final Glaze:
To make the sauce and pepperoni look juicy and greasy, apply a coat of gloss varnish or clear nail polish strictly to the toppings and cheese area. Leave the crust matte.
Make it a Magnet
Before the clay dries, press a strong neodymium magnet into the back of the slice. Secure with glue after drying for adorable fridge decor.
Now you have a delicious-looking set of slices that will never go stale

What Really Happens Inside the Kiln
Learn how time and temperature work together inside the kiln to transform clay into durable ceramic.
Breakfast Plate: Egg, Toast, and Bacon
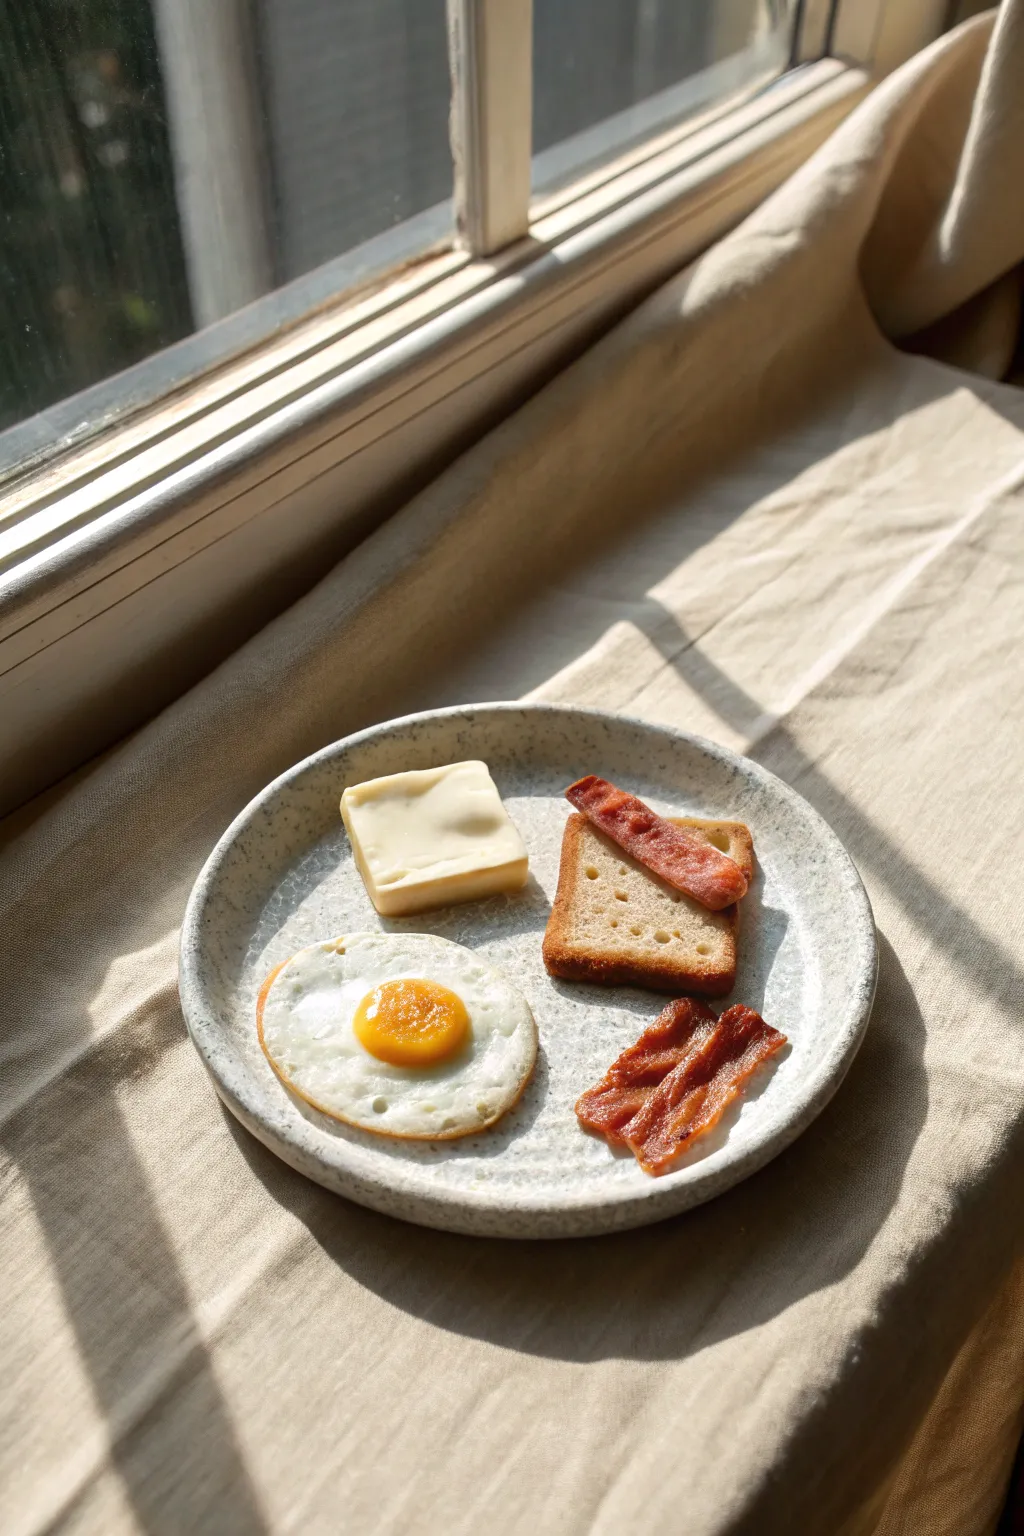
Create a remarkably realistic plate of classic breakfast staples using simple air dry clay and thoughtful painting techniques. This project captures the texture of crispy toast, the translucency of an egg white, and the glossy sheen of cooked bacon, all arranged on a hand-sculpted speckled plate.
Step-by-Step
Materials
- White air dry clay
- Acrylic paints (white, yellow, orange, burnt sienna, brown, red, black)
- Gloss varnish or clear nail polish
- Matte varnish
- Sculpting tools (needle tool, small ball stylus)
- Old toothbrush or stiff bristle brush
- Small craft knife
- Fine grit sandpaper
- Flat and fine detail paint brushes
- Rolling pin
Step 1: Sculpting the Ceramic Plate
-
Roll the base:
Start by conditioning a ball of white clay and rolling it out to an even thickness of about 4mm. Use a circle cutter or trace around a jar lid to cut a perfect circle for your plate base. -
Shape the rim:
Gently curve the edges of the circle upwards to create a slight rim. Smooth any cracks with a little water on your fingertip to ensure the plate looks like fired ceramic. -
Add texture:
To mimic the speckled stoneware look in the photo, dip an old toothbrush in watered-down grey or brown acrylic paint and flick tiny speckles onto the wet clay. Let the plate dry completely before moving on.
Clay Shrinkage Check
Air dry clay shrinks as it dries. Make your food items about 10-15% larger than you want them to be to ensure they fit the plate perfectly after drying.
Step 2: Creating the Toast & Butter
-
Form the bread slice:
Roll a small amount of clay into a square shape, roughly 3mm thick. Use your fingers to urge the top edge into a subtle ‘muffin top’ curve characteristic of sandwich bread. -
Texture the crumb:
Take a stiff bristle brush or a crumpled ball of aluminum foil and press it firmly all over the surface of the clay square to create a porous bread texture. -
Poke air bubbles:
Use a needle tool or small ball stylus to poke a few larger holes scattered across the surface, simulating the larger air pockets found in baked bread. -
Sculpt the butter:
Cut a thick, rectangular slab of clay for the butter pat. Soften the top edges just slightly so it doesn’t look too sharp, and press a very subtle indentation in the center as if it’s beginning to melt.
Step 3: Sculpting the Bacon & Egg
-
Shape bacon strips:
Roll out two thin strips of clay. Use your craft knife to cut uneven, wavy edges. Twist and undulate the strips to make them look cooked and crispy, rather than lying perfectly flat. -
Form the egg white:
Take a small ball of clay and flatten it irregularly. Thin out the edges significantly so they look delicate, while keeping the center slightly thicker to support the yolk. -
Add the yolk:
Roll a tiny ball of clay for the yolk and press it gently onto the center of the white. Use a texturing tool to roughen the surface of the yolk just slightly, which catches the light better when painted. -
Crispy edges:
Use a needle tool to tear and fray the very edges of the egg white, mimicking the crispy, frilly texture of a fried egg.
Level Up: Pepper
Mix black acrylic paint with a tiny amount of clear glue or glaze. Use a needle to dot tiny ‘black pepper’ flakes onto your egg and bacon for extra detail.
Step 4: Painting & Finishing
-
Base coat the toast:
Mix a pale cream color and paint the entire bread slice. While wet, dab a darker golden-brown mix around the crust edges, feathering it inward. -
Detail the crust:
Use a dry brush with burnt sienna to stipple dark, toasted spots on the crust and lightly across the surface texture to highlight the ‘toasted’ peaks. -
Paint the butter:
Paint the butter block a pale, creamy yellow. I find that keeping this color very light makes it look more realistic against the darker toast. -
Color the bacon:
Paint the bacon strips with a mix of deep red and brown. While the paint is wet, drag streaks of lighter pinkish-white through it to represent the fat marbling. -
Paint the egg:
Paint the egg white purely white. For the yolk, use a sunny yellow at the center, blending into a warm orange at the edges to create depth. -
Add burnt bits:
With a very fine brush, add tiny touches of brown to the frilly edges of the egg white to show it has been fried in a hot pan. -
Glazing:
Once the paint is fully dry, apply a high-gloss varnish to the egg yolk and the bacon strips to make them look oily and wet. Use a matte varnish for the toast and egg white. -
Final assembly:
Glue all your dry, painted components onto the speckled plate. Place a strip of bacon on the toast for that casual, lived-in breakfast look.
Set your finished miniature breakfast on a windowsill to catch the light and fool everyone with your realistic creation
Popsicles with Bite Marks
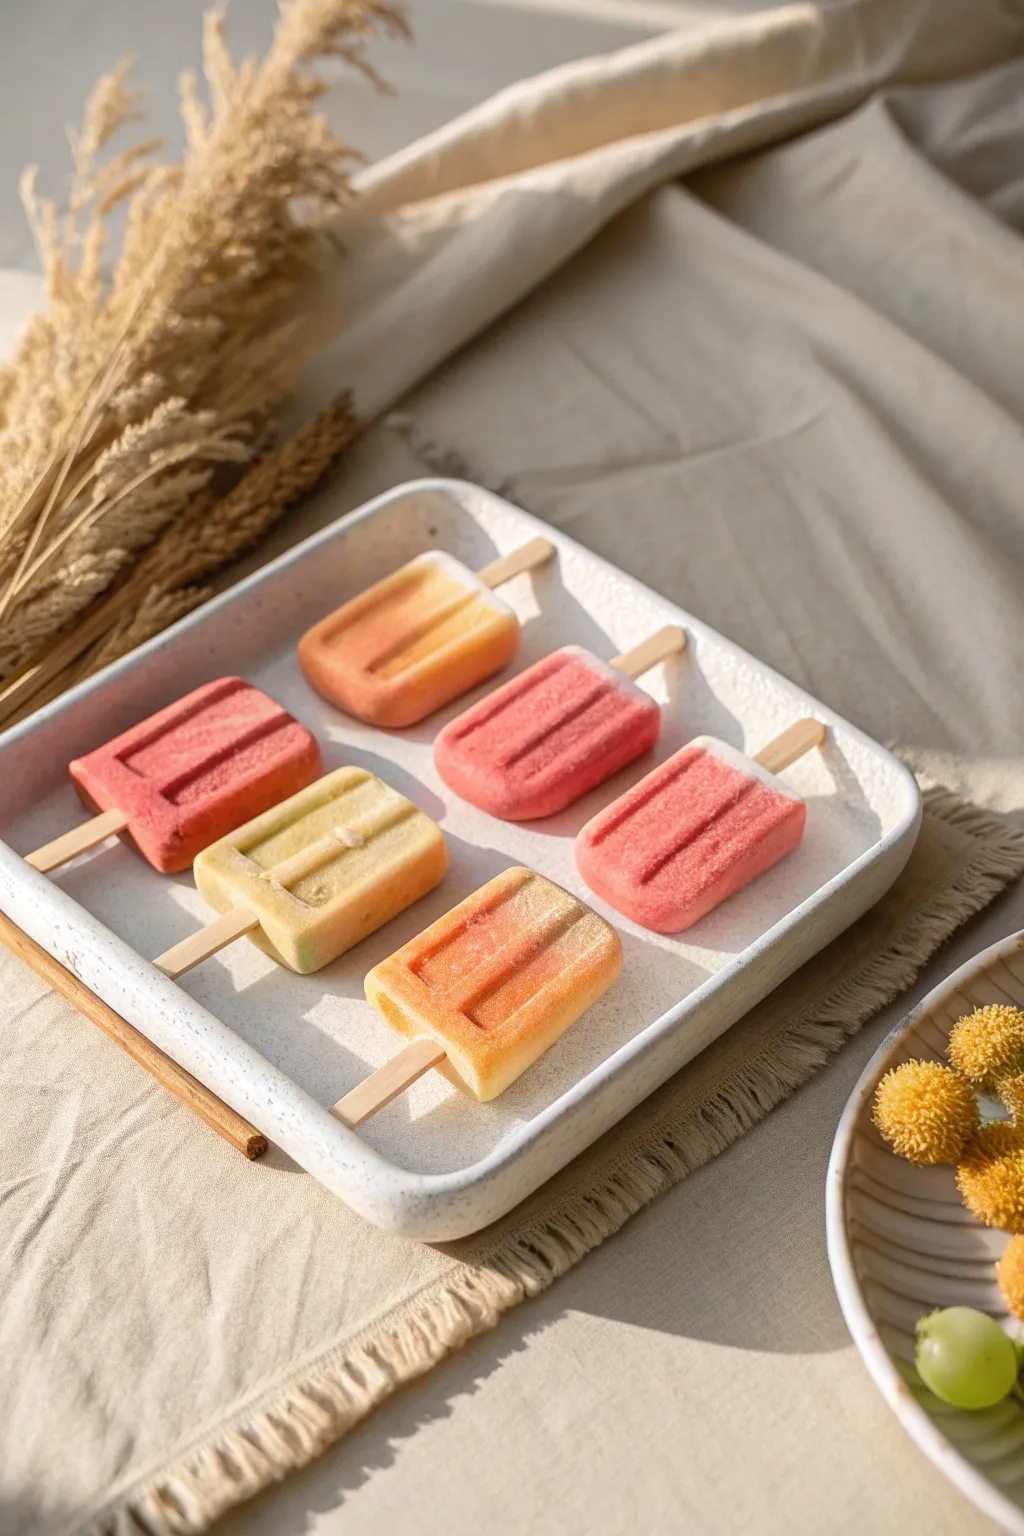
Create a tray of refreshingly realistic miniature sorbet bars that look good enough to eat but will last forever. These delightful faux treats feature convincing frosty textures and soft, summery color gradients perfect for display.
Step-by-Step Tutorial
Materials
- White air dry clay
- Wooden popsicle sticks (or coffee stirrers cut to size)
- Acrylic paints (coral, pale yellow, pink, orange, white)
- Old toothbrush or stiff bristle brush
- Needle tool or toothpick
- Soft pastel chalks (orange, pink, yellow)
- Soft makeup brush
- Matte mod podge or matte varnish
- Fine glitter or translucent embossing powder (optional for frost effect)
- Craft knife
- Rolling pin
Step 1: Shaping the Base
-
Prepare the clay:
Begin by conditioning a chunk of white air dry clay until it is smooth and pliable. Determine how many popsicles you want to make and divide the clay into equal portions, rolling them into initial balls to ensure consistent sizing. -
Form the rectangle:
Take one ball and gently flatten it into a thick rectangle shape using your fingers or a rolling pin. Aim for a thickness of about 1/2 inch, keeping the edges slightly rounded rather than sharp and geometric to mimic a frozen mold shape. -
Refine the shape:
Tap the sides of the rectangle on your work surface to square them up slightly. Smooth the top surface with a little water if any cracks appear. Repeat this process for all six popsicle bases. -
Add the stick:
Cut your wooden sticks to the appropriate miniature scale. Applying a tiny dot of glue to the tip, carefully insert the stick into the bottom center of each clay rectangle, pushing it about halfway in for stability. -
Create the signature indentations:
Most classic fruit bars have those iconic indentations on the front. Use the side of a toothpick or a sculpting tool to press two parallel vertical grooves into the front face of the popsicle. Soften the edges of these grooves with a wet finger so they look molded, not carved.
Frost Factor
For extreme realism, use cornstarch instead of glitter for the frost. Dust it onto wet matte varnish for a powdery, believable ‘deep freeze’ appearance that isn’t sparkly.
Step 2: Texturing
-
Add surface texture:
Real fruit bars aren’t perfectly smooth plastic; they have an icy texture. Take an old toothbrush and firmly tap it all over the surface of the clay. This creates microscopic pores that will later help catch the paint and simulate ice crystals. -
Refine the texture:
For areas that need more definition, specifically around the indentations, use a stiff bristle brush in a stippling motion. Be careful not to flatten the overall shape while you texturize. -
Initial drying:
Let the popsicles air dry completely. This usually takes 24-48 hours depending on humidity. Flip them occasionally so the back dries evenly.
Step 3: Painting and Finishing
-
Base coat:
Mix your acrylic paints to create soft, milky fruit colors. You want a coral-pink, a sunny yellow, and an orange-red. Paint each popsicle in a solid base color. The paint should be slightly watered down so it settles into the texture you created. -
Create gradients:
To achieve that realistic frozen look, the color shouldn’t be uniform. While the base coat is tacky, dry brush a lighter version of the color (mixed with white) near the top and edges of the popsicle to simulate frost accumulation. -
Adding depth with pastels:
Once the paint is dry, use a craft knife to scrape some powder from your soft pastel chalks. I like to use a slightly darker shade than the paint. Use a soft makeup brush to dust this powder into the grooves and the bottom edge near the stick for depth. -
Frosty finish:
This is the secret sauce: apply a thin coat of matte varnish or Mod Podge over the painted popsicle. While it’s wet, act quickly for the next step. -
The sugar ice effect:
Dust a tiny pinch of very fine white glitter or translucent embossing powder over the wet varnish. Tap off the excess immediately. This mimics the icy frost layer perfectly. -
Dry touch-ups:
If the frost looks too heavy, brush over it lightly with a clean, dry brush once the varnish is set to knock back the sparkle. You want a matte frost, not a disco glitter look.
Cracked Clay?
If you see cracks forming as the clay dries around the wooden stick, fill them immediately with a slurry made of clay and water, then re-texture with your toothbrush.
Arrange your assortment of frozen treats on a ceramic tray for a summer decoration that never melts


The Complete Guide to Pottery Troubleshooting
Uncover the most common ceramic mistakes—from cracking clay to failed glazes—and learn how to fix them fast.
Avocado Halves with Cute Pits

Sculpt a remarkably lifelike set of avocado halves using air dry clay and careful texturing techniques. This project focuses on achieving that perfect gradient of green and the unique bumpy skin texture of a ripe avocado.
Step-by-Step
Materials
- White or light grey air dry clay
- Aluminum foil
- Acrylic paints (Dark hunter green, light yellow-green, cream/off-white, burnt sienna, dark brown)
- Texture tools (stiff bristle brush, sandpaper, or a real avocado skin)
- Sculpting tools (needle tool, ball stylus)
- Matte mod podge or varnish
- Gloss varnish
- Fine grit sandpaper
Step 1: Forming the Base
-
Create foil cores:
Start by scrunching two pieces of aluminum foil into pear-like shapes. This saves clay and keeps the sculpture lightweight while helping it dry faster. -
Cover with clay:
Roll out a sheet of air dry clay to about 1/4 inch thickness. Wrap this smoothly around your foil cores, sealing any seams with a bit of water and your fingers. -
Shape the halves:
While the clay is still pliable, slice your pear shape in half lengthwise using a clay wire or sharp blade to create two flat surfaces. -
Refine the shape:
Smooth out the cut edges so they are slightly rounded, mimicking how the flesh curves into the skin. Ensure the overall silhouette looks like a classic teardrop avocado shape.
Real Skin Texture
For the most convincing texture, let the clay dry for 30 minutes until leathery, then press a coarse sandpaper sheet over the exterior curve.
Step 2: Details and Texture
-
Create the pit hollow:
On one half, use a large ball tool or the back of a measuring spoon to press a deep, circular indentation into the center of the widest part of the avocado. -
Sculpt the pit:
Roll a separate ball of clay that fits snugly but protrudes slightly from the hollow you just made. Adhere this permanently to the *other* half of the avocado using a little water or slip. -
The cute sidekick:
If you want to recreate the tiny sphere character shown in the scene, roll a very small ball of clay and attach two microscopic clay dots for eyes. Let this dry alongside your main pieces. -
Texture the skin:
Turn the avocado halves over to work on the curved ‘skin’ side. Use a stiff toothbrush or a crumpled ball of aluminum foil to tap texture all over the surface. For hyper-realism, I sometimes press a piece of real avocado skin against the clay. -
Smooth the flesh:
Use a little water on your finger to make the flat ‘flesh’ face of the avocado as smooth as possible, removing any fingerprints. -
Dry thoroughly:
Allow the pieces to dry completely for at least 24-48 hours. Turn them occasionally so air reaches all sides.
Step 3: Painting and Finishing
-
Base coat the flesh:
Mix a pale yellow-green color using cream and a tiny dot of green. Paint the entire flat surface of the avocado flesh. -
Create the gradient:
While the center is still pale, mix a slightly darker, grassier green. Apply this to the outer rim of the flesh, blending it inward with a damp brush to create a soft transition from green edge to yellow center. -
Paint the skin:
Using a dark hunter green or almost-black green, paint the textured outer skin. Be careful to a keep a crisp line where the skin meets the flesh. -
Color the pit:
Paint the pit with a base of light brown. While wet, stipple on darker brown and burnt sienna shades to create a woody, fibrous look. -
Add pit details:
Dry brush a lighter tan color on the very center highlight of the pit to make it look rounder and more dimensional. -
Seal the piece:
Coat the green skin and the flesh with a matte varnish to protect the paint without making it look artificial. -
Gloss the pit:
For a fresh look, apply a coat of high-gloss varnish only to the brown pit. This contrast makes the seed look realistically moist compared to the creamy flesh.
Make it Functional
Before drying, embed small rare earth magnets into the flat side of each half. They will snap together to form a whole avocado for a cute desk toy.
Now you have a botanically beautiful set of clay produce that will stay fresh forever