
Air-dry clay is my favorite way to crank out a whole batch of Christmas ornaments in one cozy weekend without needing a kiln. Think of it like a blank, snowy canvas you can press, paint, stamp, and personalize until your tree looks completely one-of-a-kind.
Classic Cookie Cutter Shapes
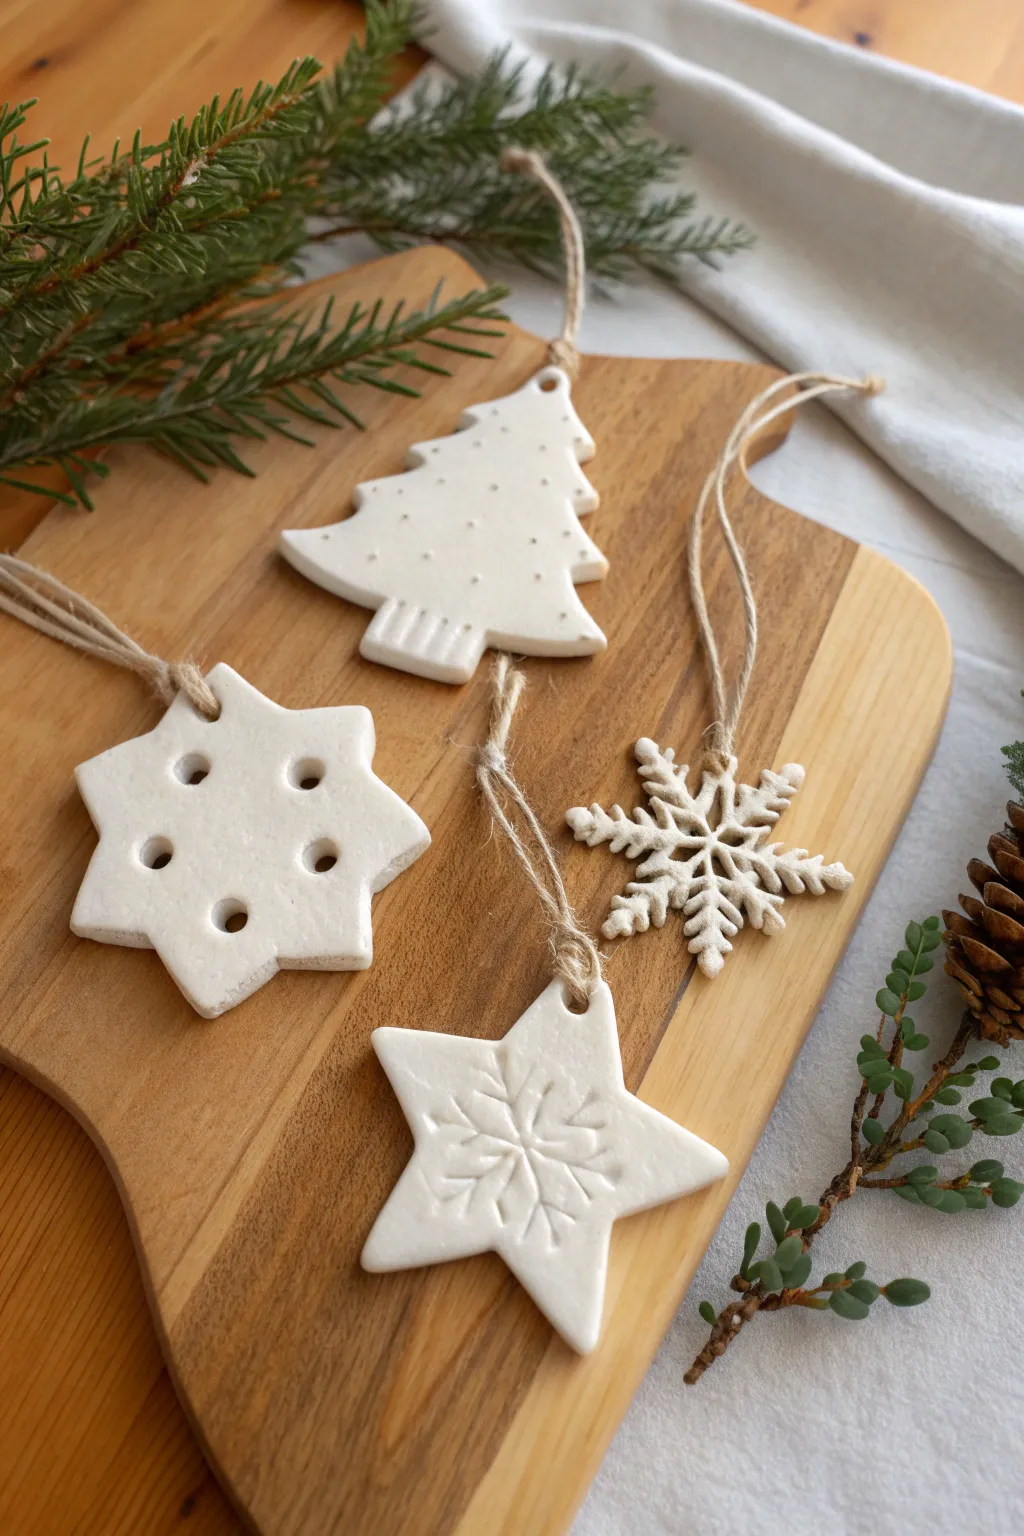
Embrace the simplicity of Scandinavian-style decor with these minimalist air dry clay ornaments. Featuring classic holiday shapes like stars, trees, and intricate snowflakes, this project relies on texture rather than color to create a stunning, cohesive set for your tree.
How-To Guide
Materials
- White classic air dry clay (e.g., DAS or Crayola)
- Rolling pin
- Parchment paper or silicone work mat
- Cookie cutters: 6-pointed star, Christmas tree, 5-pointed star, detailed snowflake
- Wooden skewer, toothpick, or chopstick
- Rubber stamp with snowflake design (small)
- Drinking straw (for hanging holes)
- Jute twine
- Small cup of water
- Fine grit sandpaper (optional)
Step 1: Preparing and Shaping
-
Prepare your workspace:
Lay down a sheet of parchment paper or a silicone mat. This prevents the clay from sticking to your table and makes it easier to peel the wet forms off later. -
Condition the clay:
Take a handful of white air dry clay and knead it in your hands for a minute or two. The warmth of your hands will make it more pliable and reduce the chance of cracks appearing as it dries. -
Roll it out:
Using your rolling pin, flatten the clay to a uniform thickness, ideally about 1/4 inch (5-6mm). If the clay is too thin, the ornaments will be fragile; too thick, and they get heavy. -
Cut the basic shapes:
Press your cookie cutters firmly into the clay. Cut out a variety of shapes: the six-pointed star, the solid Christmas tree, and the five-pointed star. For the delicate snowflake, check if your cutter has a plunger mechanism to help release the intricate details. -
Smooth the edges:
Dip your finger in a tiny bit of water and run it gently along the cut edges of each ornament to smooth out any roughness or loose bits of clay.
Fixing Cracks
Make a ‘clay slip’ by mixing a tiny bit of clay with water until it’s a paste. Fill any unwanted cracks with this paste, smooth with a finger, and let dry again.
Step 2: Adding Texture and Details
-
Texture the five-pointed star:
Take your small rubber stamp with a snowflake design. Gently but firmly press it into the center of the wet five-pointed star clay cutout to emboss the pattern. Don’t push all the way through. -
Decorate the six-pointed star:
For the geometric star, use the end of a chopstick or a small dowel to poke a series of decorative holes. Create a pattern, such as one central hole surrounded by six indentations or holes on the points. -
Detail the Christmas tree:
Use a toothpick or a skewer to poke shallow, tiny dots all over the surface of the tree ornament to mimic lights or snow. For the trunk, press the side of the toothpick vertically to create ribbing lines. -
Refine the delicate snowflake:
If you used a complex snowflake cutter, use a toothpick to gently clean out any tiny bits of clay stuck in the intricate corners of the design to sharpen the shape. -
Create hanging holes:
Use a drinking straw to punch a clean, round hole at the top of each ornament (except the delicate snowflake if it has open lattice work already). Position the hole about a quarter-inch from the edge to ensure the clay doesn’t snap under the weight.
Add Subtle Sparkle
While the clay is still wet, lightly brush pearlescent mica powder or fine white glitter over the textured areas for a frosty, shimmering finish.
Step 3: Drying and Assembly
-
Initial drying:
Place the ornaments on a clean, flat surface away from direct heat sources. Let them air dry for 24 hours. -
Flip for even drying:
After the first day, gently flip the ornaments over. This exposes the bottom side to air, which helps prevent curling and ensures the core dries completely. I find this step crucial for flat results. -
Sanding (optional):
Once fully dry (usually 48 hours total), check the edges. If there are any sharp spots, very lightly sand them down with fine-grit sandpaper. -
Prepare the twine:
Cut lengths of jute twine, each about 8-10 inches long. -
Attach the hangers:
Thread a piece of twine through the hole of an ornament. Bring the ends together and tie a simple overhand knot near the ends to create a loop. -
Secure the loop:
Pull the knotted end so the loop is secure, creating a rustic, natural hanger that complements the matte white clay.
Hang these beauties on a branch or use them as sophisticated gift tags for your holiday presents.


Evergreen Sprig Imprint Ornaments
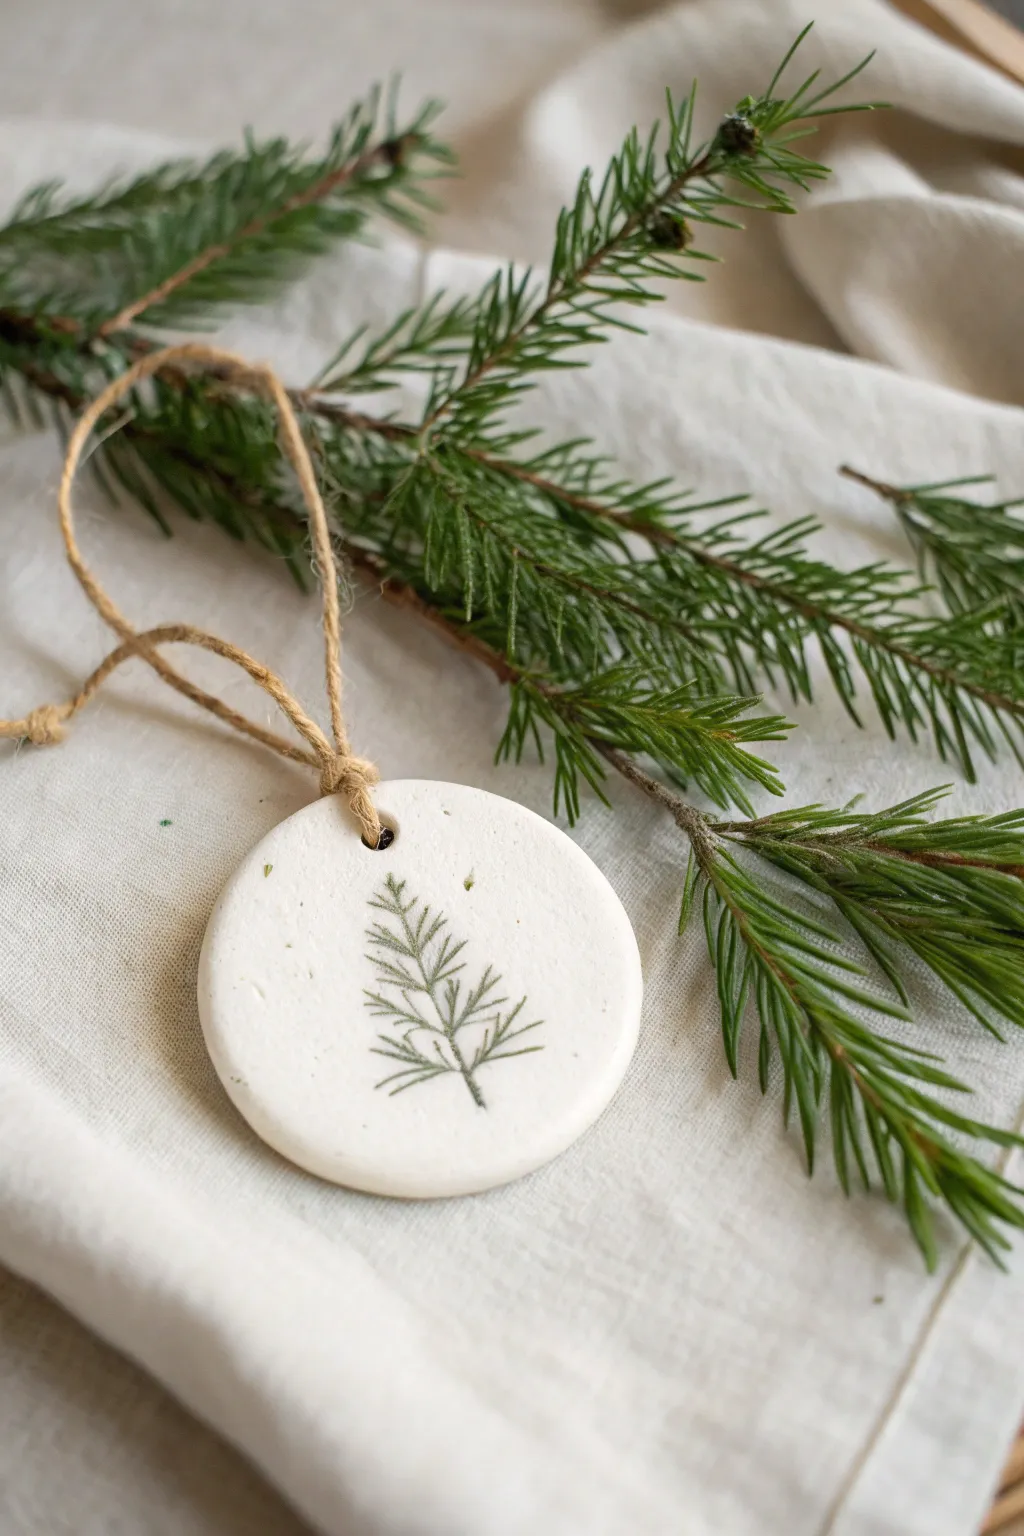
Capture the delicate beauty of winter greenery with these minimalist clay ornaments. The stark white clay provides the perfect backdrop for the subtle texture of an evergreen sprig, creating a rustic yet elegant decoration.
Step-by-Step Tutorial
Materials
- White or terracotta air-dry clay
- Small rolling pin
- Round cookie cutter (approx. 2.5-3 inches)
- Fresh evergreen sprigs (pine, spruce, or fir)
- Parchment paper or canvas mat
- Straw or toothpick (for the hole)
- Jute twine or rustic string
- Small bowl of water
- Fine-grit sandpaper (optional)
- Clear matte varnish or sealant (optional)
Step 1: Preparation & Rolling
-
Surface setup:
Begin by laying down a sheet of parchment paper or a canvas mat on your work surface. This prevents the clay from sticking and ensures you can move the ornaments later without warping them. -
Condition the clay:
Take a handful of air-dry clay and knead it gently in your hands. You want it to be pliable and smooth, without any cracks. If it feels too stiff, adding a tiny drop of water can help loosen it up. -
Roll it out:
Use your rolling pin to flatten the clay. Aim for a thickness of about 1/4 inch (approx. 5-6mm). Try to keep the thickness consistent so the ornament dries evenly.
Cracking Issues?
Cracks often happen if clay dries too fast. Keep ornaments away from heaters or direct sun. If minor cracks appear, patch them with a tiny amount of wet clay slip before fully dry.
Step 2: Creating the Impression
-
Select your botanical:
Choose a small sprig of fresh evergreen. Look for a piece that is flat and has well-defined needles. Snip off any woody stems that might be too thick to press comfortably. -
Position the sprig:
Place the sprig gently onto the rolled-out clay where you intend to cut your circle. Think about the composition; centering it usually looks best, but an off-center placement can be artistic too. -
Press gently:
Use your rolling pin to roll directly over the sprig one time with firm, even pressure. This embeds the greenery into the clay surface. Avoid rolling back and forth, as this can create a double image. -
Reveal the design:
Carefully lift the evergreen sprig away from the clay using the tip of a knife or tweezers if needed. You should see a crisp, detailed impression left behind.
Add Subtle Color
Before sealing, dry brush a tiny amount of dark green acrylic paint into the depression of the leaves, then quickly wipe the surface clean to leave color only in the grooves.
Step 3: Cutting & Refining
-
Cut the shape:
Position your round cookie cutter over the impression, centering the branch design. Press down firmly to cut the circle. Give it a little wiggle before lifting to ensure a clean cut. -
Remove excess clay:
Peel away the scrap clay from around the outside of the cutter. Lift the cutter carefully; if the clay sticks inside, gently push it out from the top without denting the surface. -
Smooth the edges (wet):
Dip your finger in a small bowl of water and run it lightly around the raw edge of the clay circle. I like to do this now while the clay is wet to save sanding time later. -
Create the hanging hole:
Using a straw or a toothpick, punch a hole near the top edge of the ornament. Make sure it’s not too close to the rim (leave at least 1/4 inch buffer) to prevent it from breaking later.
Step 4: Drying & Finishing
-
Initial drying:
Place the ornament on a flat, clean surface or a wire cooling rack. Let it dry undisturbed for at least 24 hours. Keep it away from direct heat sources to prevent cracking. -
Flip for evenness:
After the first day, flip the ornament over so the bottom side is exposed to the air. This helps prevent the edges from curling upward as moisture evaporates. -
Assess dryness:
The clay should look chalky white and feel hard to the touch when fully dry. This usually takes 2-3 days total depending on humidity. -
Sand edges (optional):
If there are any remaining rough spots on the rim, take a piece of fine-grit sandpaper and lightly buff the edges until they are perfectly smooth. -
Seal (optional):
For longevity, brush a thin coat of matte varnish or diluted white glue over the surface. This seals the porous clay against humidity. -
Add the hanger:
Cut a length of jute twine or rustic string. Thread it through the hole and tie a simple overhand knot or a lark’s head knot to create a loop for hanging.
Hang these natural beauties on your tree alongside twinkling lights for a cozy woodland feel

Leaf Vein Fossil Discs
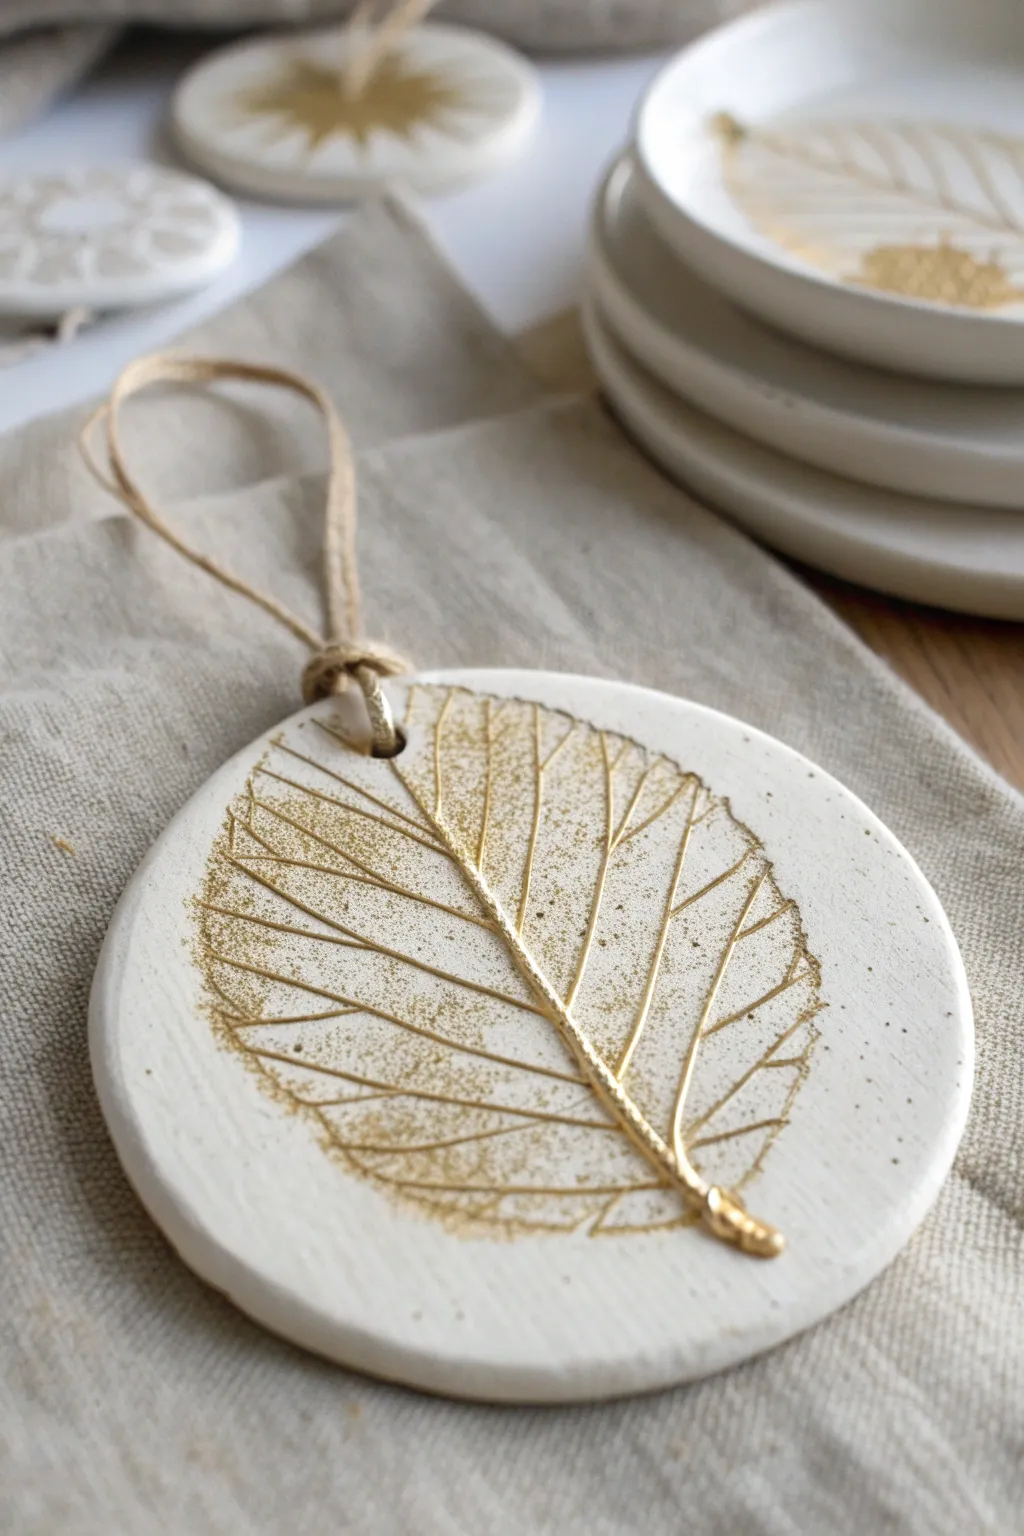
Capture the delicate beauty of nature by pressing real leaves into air-dry clay, creating subtle, fossil-like textures. Finished with a touch of gold pigment, these elegant discs highlight every vein and stem for a sophisticated, minimalist holiday decoration.
How-To Guide
Materials
- White or off-white air-dry clay
- Rolling pin
- Round cookie cutter (approx. 3-4 inches diameter)
- Fresh leaves with prominent veins (beech, elm, or birch work well)
- Metallic gold paint or gilding wax
- Fine detail paintbrush
- Straw or skewer (for creating the hole)
- Jute twine or thin cord
- Parchment paper or non-stick craft mat
- Bowl of water (for smoothing)
- Fine-grit sandpaper
Step 1: Shaping the Clay Base
-
Prepare your workspace:
Lay down a sheet of parchment paper or a non-stick craft mat to prevent sticking. This also helps you move the ornaments later without warping them. -
Condition the clay:
Take a handful of air-dry clay and knead it briefly in your hands until it feels pliable and smooth. If dry, add a tiny drop of water. -
Roll it out:
Roll the clay into a slab that is about 1/4 inch thick. Try to keep the thickness consistent; if it’s too thin, the ornament might crack as it dries. -
Select your leaf:
Choose a leaf that fits comfortably within your planned circle size. Turn the leaf over so the prominent veins on the backside are facing down toward the clay. -
Press the leaf:
Place the leaf onto the rolled slab. Gently roll over the leaf with your rolling pin once or twice to press it firmly into the clay. -
Cut the shape:
Position your round cookie cutter over the leaf impression, centering the design nicely. Press down firmly to cut the circle, then peel away the excess clay from the outside edges. -
Reveal the texture:
Carefully peel the leaf off the clay surface using the stem as a handle. Do this slowly to ensure you don’t smudge the crisp impression left behind. -
Smooth the edges:
Dip your finger in a little water and gently run it along the cut edge of the circle to smooth out any roughness or stray clay burrs. -
Create the hanging hole:
Use a straw to punch a clean hole near the top edge of the circle, centered above the stem of the leaf design.
Vein Definition Tip
Use leaves with hard, thick veins instead of soft ones. Rubbery leaves (like ivy or rhododendron) often leave much clearer impressions than thinner leaves.
Step 2: Drying and Gilding
-
Let it dry:
Place the ornament on a flat surface to dry completely. This usually takes 24-48 hours depending on humidity. I recommend flipping it over halfway through so both sides dry evenly. -
Refine the surface:
Once fully hard and white, use fine-grit sandpaper to lightly buff the edges or surface if there are any unwanted bumps. -
Prepare the gold accent:
Pour a small amount of metallic gold paint onto a palette, or get your gilding wax ready on a cloth. -
Highlight the veins:
Using a very fine detail brush, carefully paint the gold into the deep impressions of the main stem and leaf veins. You want the gold to settle into the grooves. -
Add texture splatter:
For the speckles seen in the image, load a stiff brush with a dry-ish amount of gold paint and flick the bristles with your thumb to create a fine mist of gold dots over the textured area. -
Feather the edges:
Dry brush a tiny amount of gold onto the surface immediately surrounding the veins to create that soft, glowing transition rather than a stark line. -
Dry the paint:
Allow the paint or wax to set completely, which should only take about 30 minutes. -
Attach the hanger:
Cut a length of jute twine, thread it through the hole, and tie a simple knot at the base near the ornament to secure it loop.
Natural Dye Wash
Before gilding, brush a very diluted brown watercolor wash over the impression and wipe it back immediately. It settles in the cracks for an antique fossil look.
Hang your new botanical ornaments on the tree or use them as elegant gift toppers for special presents


Stamped Snowflake Medallions
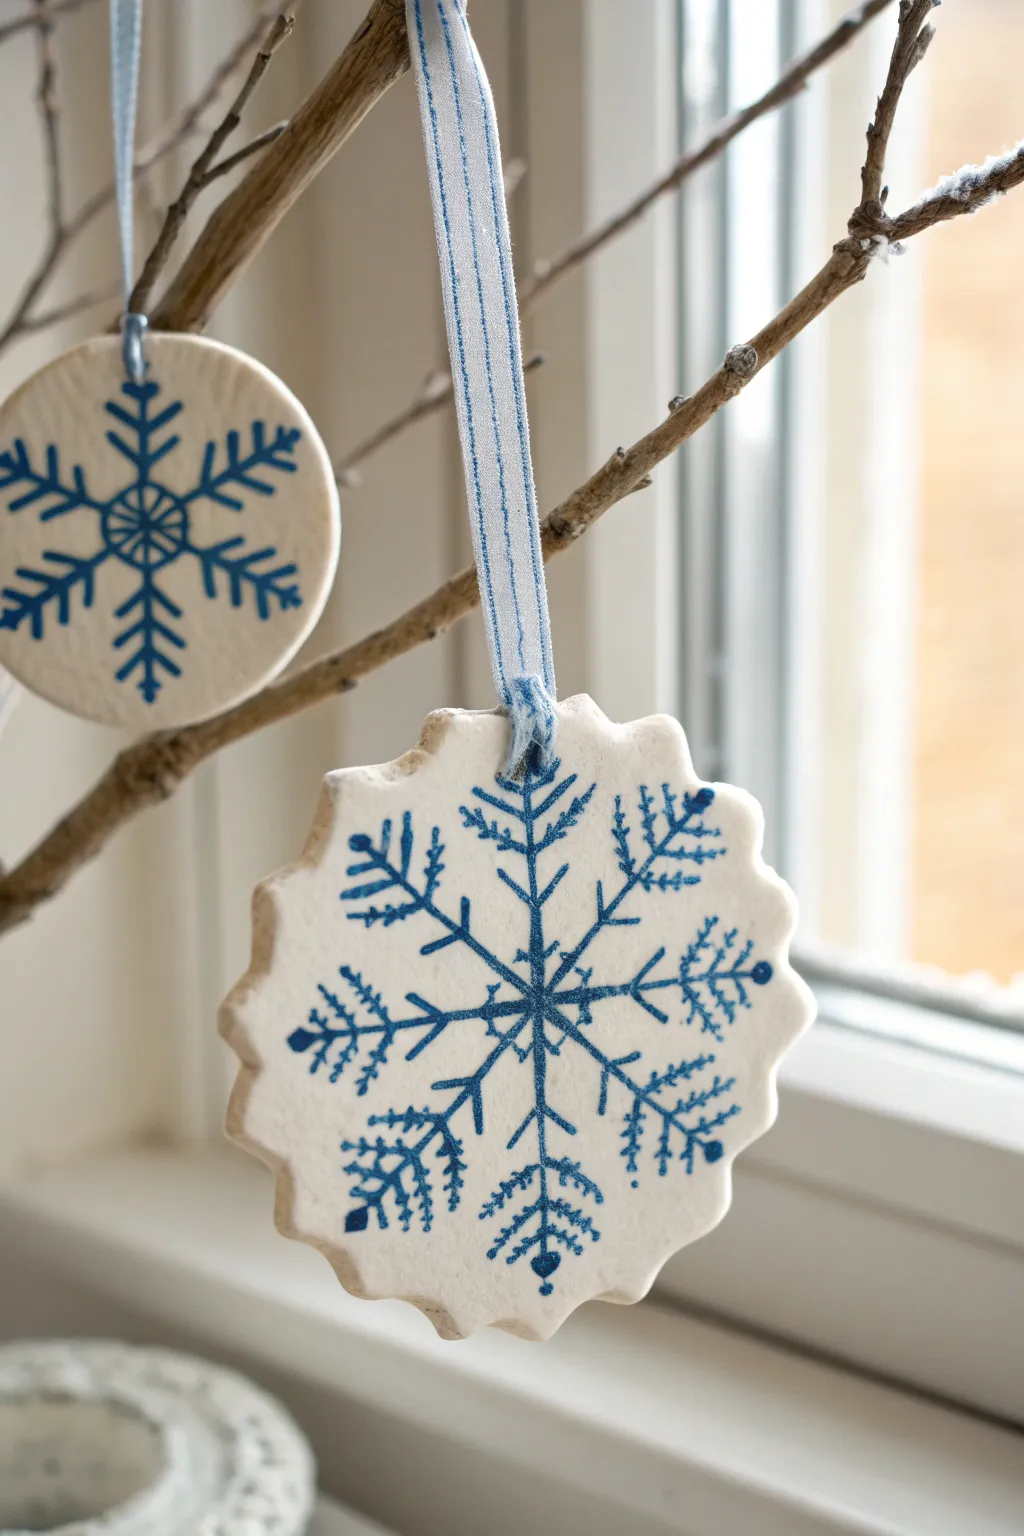
Capture the crisp beauty of winter with these elegant air-dry clay ornaments. Featuring delicate blue snowflake motifs stamped onto smooth white clay, they offer a classic, porcelain-like finish that brightens up any holiday display.
Detailed Instructions
Materials
- White air-dry clay
- Rolling pin
- Parchment paper or silicone mat
- Cookie cutters (round and scalloped edge)
- Rubber stamps with snowflake designs
- Blue ink pad (permanent or archival ink recommended)
- Straw or cocktail stick
- Fine grit sandpaper (optional)
- Blue and white striped ribbon
- Scissors
Step 1: Shaping the Clay Base
-
Prepare your workspace:
Lay down a sheet of parchment paper or a silicone mat to prevent the clay from sticking to your table. -
Condition the clay:
Take a handful of air-dry clay and knead it in your hands for a minute until it feels soft, warm, and pliable. -
Roll it out:
Using your rolling pin, roll the clay out to an even thickness of about 1/4 inch (approx. 5-6mm). Try to keep it consistent so it dries evenly. -
Smooth the surface:
If you see any cracks or textures from the rolling pin, dip your finger in a tiny bit of water and glide it over the surface to create a perfectly smooth canvas. -
Cut the shapes:
Press your round and scalloped cookie cutters firmly into the clay. Give them a little wiggle before lifting to ensure a clean cut. -
Create the hanging hole:
Use a straw to punch a neat hole near the top edge of each ornament. Twist the straw slightly as you pull it out to remove the clay plug cleanly. -
Clean the edges:
Gently run a damp fingertip around the cut edges of your shapes to smooth down any roughness left by the cutter.
Stamp Before Cutting
For perfect centering, try stamping the clay sheet first, then centering your cookie cutter over the stamped image to cut it out.
Step 2: Stamping and Finishing
-
Ink the stamp:
Press your snowflake rubber stamp firmly onto the blue ink pad. Ensure the entire design is coated evenly with ink, but not pooling in the crevices. -
Align the design:
Hover the stamp over your clay cutout to center it visually. I find it helps to look directly from above to get the alignment just right. -
Press and print:
Press the stamp straight down into the soft clay with firm, even pressure. Do not rock the stamp, or the image might blur. You want the ink to transfer and the stamp to leave a very slight impression for texture. -
Lift carefully:
Lift the stamp straight up to reveal your crisp blue snowflake. -
Repeat the process:
Continue stamping all your cutouts. If the ink looks faint on the rubber, re-ink between every press. -
Let them dry:
Place the ornaments on a flat surface to air dry. This typically takes 24-48 hours depending on humidity. Flip them over halfway through so the bottom breathes. -
Sanding (Optional):
Once fully hard, check the edges. If there are any sharp bits, lightly buff them away with fine-grit sandpaper. -
Add the ribbon:
Cut a length of blue and white striped ribbon, about 8 inches long. -
Thread and knot:
Pass the ribbon through the hole, bringing the ends together. Tie a secure knot at the end to create a loop, or tie it directly onto a branch.
Vintage Patina
For an antique look, lightly brush watered-down brown acrylic paint over the dried ornament and wipe it off immediately with a cloth.
Hang your beautiful medallions in a sunny window or on a branch to enjoy their crisp winter pattern

The Complete Guide to Pottery Troubleshooting
Uncover the most common ceramic mistakes—from cracking clay to failed glazes—and learn how to fix them fast.
Lace Texture Christmas Ornaments
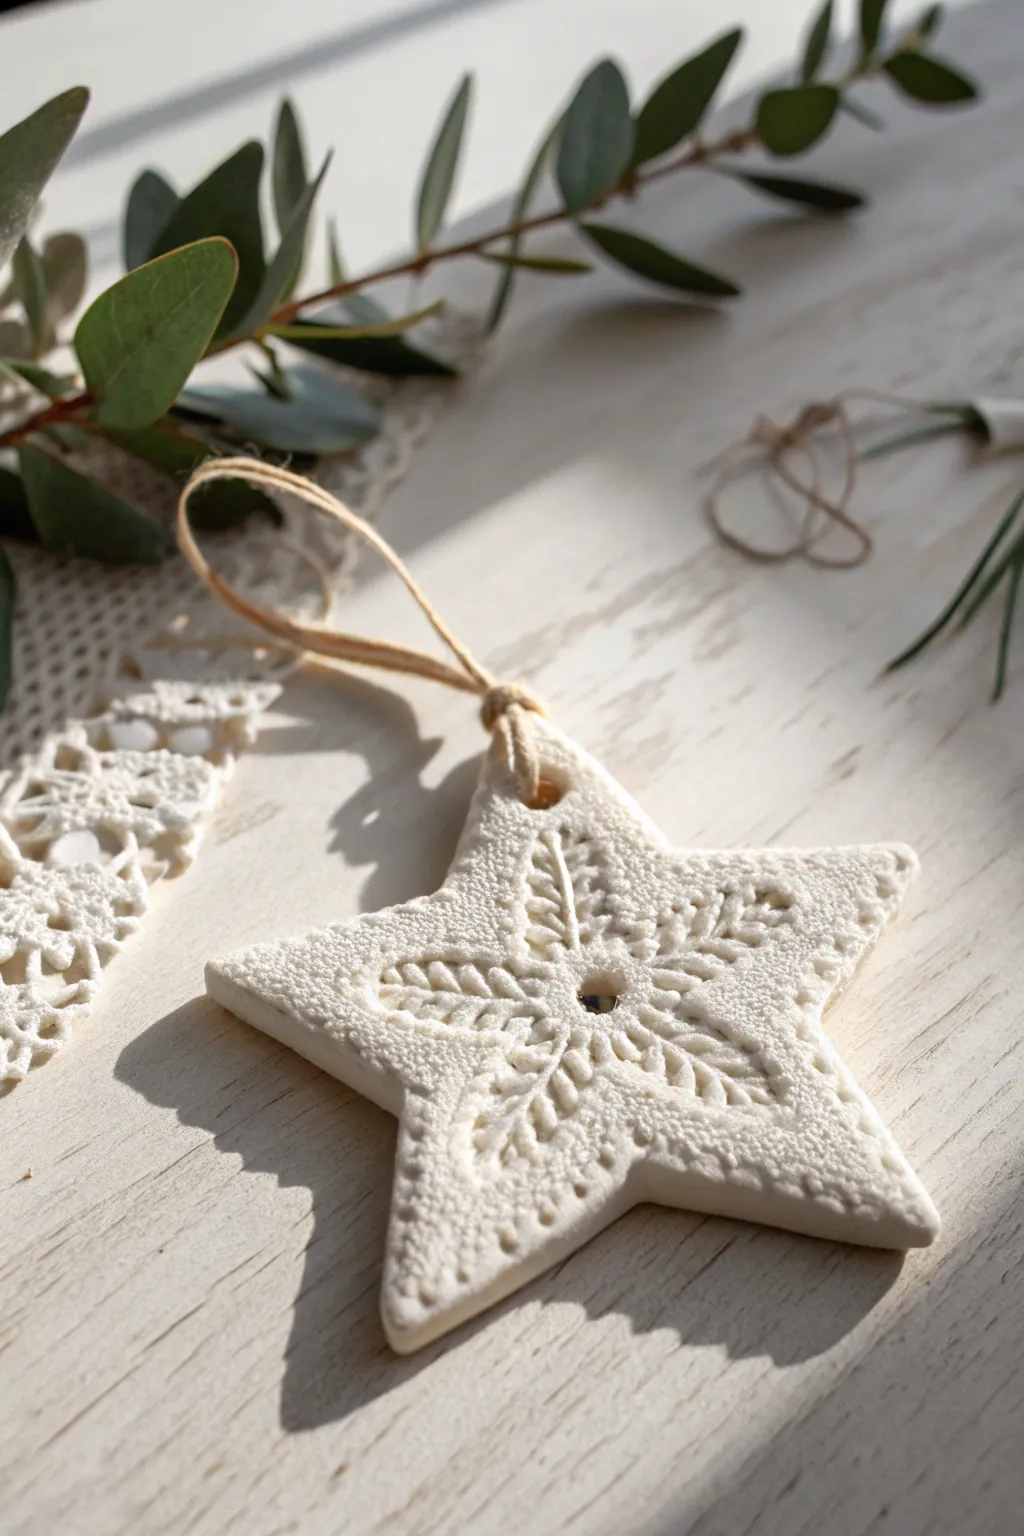
Capture the delicate beauty of winter with this elegant star ornament, featuring intricate lace textures embossed directly into white clay. The result is a sophisticated, minimalist decoration that mimics the look of a gently fallen snowflake.
How-To Guide
Materials
- White classic air-dry clay (e.g., DAS or Crayola)
- Small rolling pin
- Parchment paper or silicone craft mat
- Star-shaped cookie cutter (medium size)
- Scrap of textured lace, doily, or a lace ribbon
- Small straw or toothpick (for the hanging hole)
- Fine-grit sandpaper (optional)
- Jute twine or thin ribbon
- Small bowl of water
- Clear acrylic matte varnish (optional)
Step 1: Preparation and Rolling
-
Prepare your workspace:
Lay down your parchment paper or silicone mat on a flat surface. This prevents the clay from sticking and keeps your table clean. -
Condition the clay:
Take a handful of air-dry clay and knead it in your hands for a minute until it feels soft, warm, and pliable. Getting rid of air bubbles now prevents cracks later. -
Initial rolling:
Place the clay on your mat and use the rolling pin to flatten it out. You want an even thickness of about 1/4 inch (6mm). -
Smooth the surface:
Dip your finger slightly in water and gently rub it over the surface of the rolled clay to remove any minor imperfections or dryness cracks.
Step 2: Creating the Texture
-
Position the lace:
Lay your piece of lace or doily directly on top of the smooth clay slab. Ensure it is flat and covers the area where you plan to cut your star. -
Impress the design:
Roll over the lace with your rolling pin firmly. Go over it just once or twice with steady pressure to embed the pattern deep into the clay without making the slab too thin. -
Reveal the pattern:
Very carefully peel the lace away from the clay. I find lifting from one corner slowly works best to avoid distorting the pattern underneath.
Fixing Cracks
If tiny cracks appear while drying, don’t panic. Mix a tiny bit of fresh clay with water to make a paste (slip) and smooth it into the cracks with your finger.
Step 3: Cutting and Refining
-
Cut the shape:
Position your star cookie cutter over the most attractive part of the textured pattern. Press down firmly and cut out the shape. -
Release the shape:
Wiggle the cutter slightly to ensure separation, then lift it away. Remove the excess clay from around the star. -
Soften edges:
Dip your finger in water again and gently run it along the cut edges of the star to smooth out any sharpness or jagged bits left by the cutter. -
Create the hanging hole:
Use a heavy straw or a toothpick to poke a hole near the top point of the star. Make sure it’s large enough for your twine to pass through later. -
Add central detail (Optional):
To mimic the image exactly, use the blunt end of a small paintbrush or the straw to create a small indentation in the very center of the star.
Vintage Look
After drying, lightly brush a watered-down brown acrylic paint over the texture and wipe it off immediately with a damp cloth to highlight the lace details.
Step 4: Drying and Finishing
-
Begin drying:
Move the star (still on the parchment paper) to a safe, dry place away from direct sunlight or heat sources, which can cause cracking. -
Flip for evenness:
After about 12 hours, flip the star over gently. This helps the air circulate and prevents the edges from curling upward as it dries. -
Wait for full cure:
Allow the ornament to dry completely for another 24 to 48 hours. The clay should turn a pure, chalky white when fully dry. -
Sand edges:
If there are still rough spots on the sides, lightly buff them away with fine-grit sandpaper. -
Seal the piece:
Apply a thin coat of clear matte varnish if you want to protect the ornament from humidity or yellowing over time. -
Add the hanger:
Cut a length of jute twine, thread it through the hole at the top, and tie a simple loop knot.
Hang this charming star on your tree for a touch of handmade warmth this holiday season
Gingham Ribbon Hanger Upgrade
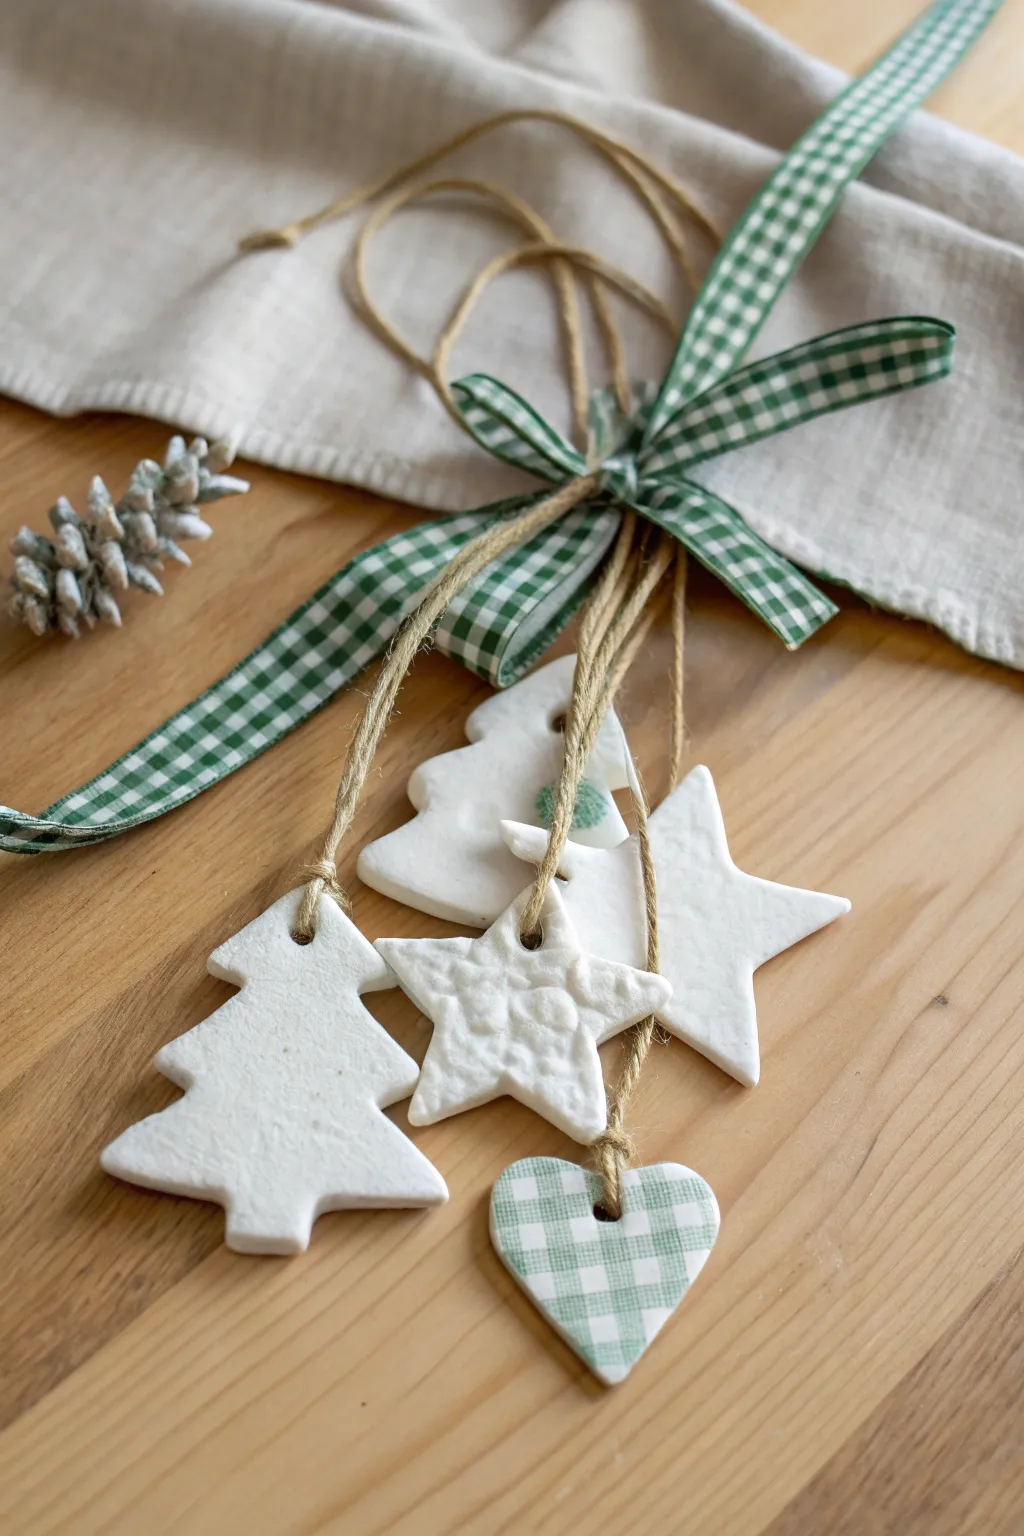
Elevate simple white clay ornaments by grouping them onto a single statement hanger. This cluster features textured stars, sleek trees, and a special focal piece with a patterned gingham finish, all tied together with matching ribbon.
Step-by-Step Tutorial
Materials
- White polymer clay or air-dry clay
- Rolling pin
- Cookie cutters (Christmas tree, star, heart)
- Textured rolling pin or lace doily (for texture)
- Small straw or skewer (for holes)
- Green and white gingham paper napkin (or similar tissue paper)
- Decoupage glue (like Mod Podge)
- Small flat paintbrush
- Scissors
- Natural jute twine
- Green and white gingham ribbon (approx. 1 inch width)
- Fine grit sandpaper
Step 1: Shaping the Clay
-
Condition the clay:
Start by kneading your white clay until it is soft, pliable, and free of any cracks. If using air-dry clay, keep your hands slightly damp to prevent sticking. -
Roll out the slab:
Roll the clay out onto a smooth surface to a uniform thickness of about 1/4 inch. For consistent thickness, you can place wooden craft sticks on either side of the clay as guides for your rolling pin. -
Create texture (optional):
For the textured star, lightly press a piece of lace or a textured rolling pin into a section of the rolled clay before cutting. This adds lovely dimension to the final cluster. -
Cut the shapes:
Press your cookie cutters firmly into the clay. You will need a mix of shapes; the example uses two trees, one textured star, one smooth star, and one heart. -
Smooth the edges:
Gently lift the shapes and use a fingertip dipped in water to smooth down any rough or jagged edges left by the cutters. -
Pierce the holes:
Use a straw or skewer to poke a hole near the top of each ornament for hanging. Make sure the hole is big enough for your twine to pass through easily. -
Dry the ornaments:
Let the clay dry completely according to package instructions. Air-dry clay usually takes 24-48 hours. Turn them over halfway through to ensure even drying and prevent curling.
Clean Edges Tip
For the decoupage heart, use a nail file to sand off excess paper in a downward motion. This cuts the paper perfectly along the clay edge.
Step 2: Adding the Gingham Detail
-
Sand imperfections:
Once fully dry, lightly sand the edges of all ornaments with fine-grit sandpaper to ensure a professional finish. Wipe away any dust. -
Prepare the napkin:
Separate the layers of your gingham napkin; you only want the very top printed ply. -
Apply adhesive:
Take the heart ornament and brush a thin, even layer of decoupage glue over the entire front surface. -
Adhere the pattern:
Gently lay the single ply of gingham napkin over the wet glue. Smooth it out very carefully from the center outward with your finger or a dry brush to remove air bubbles. -
Trim excess:
Allow it to dry until slightly tacky, then trim the excess paper away from the edges using scissors or by sanding downwards along the edge with sandpaper. -
Seal the surface:
Apply a top coat of decoupage glue over the gingham heart to seal it and let it dry completely.
Step 3: Assembly & Ribbons
-
Cut twine lengths:
Cut five lengths of jute twine, varying the lengths slightly so the ornaments will hang at different heights when clustered. -
Attach twine:
Thread a piece of twine through each ornament and tie a secure knot at the ornament’s top. -
Cluster the strands:
Gather all the loose ends of the twine together. Adjust the separate strands so the ornaments stagger nicely—some higher, some lower. -
Knot the bundle:
Tie all the twine strands together into one large overhand knot about 3-4 inches above the highest ornament. -
Create the bow:
Cut a generous length of gingham ribbon. Tie it firmly around the large knot of the twine bundle, finishing with a classic bow. -
Trim the tails:
Snip the ends of the ribbon at an angle or into a dovetail shape for a neat finish, leaving the tails long enough to drape behind the clay shapes.
Scented Clay
Add a drop of cinnamon or pine essential oil into the clay while kneading to make ornaments that smell as festive as they look.
Hang this charming bundle on a doorknob or a prominent branch to show off your handcrafted work


What Really Happens Inside the Kiln
Learn how time and temperature work together inside the kiln to transform clay into durable ceramic.
Wood Bead and Twine Ornament Tops
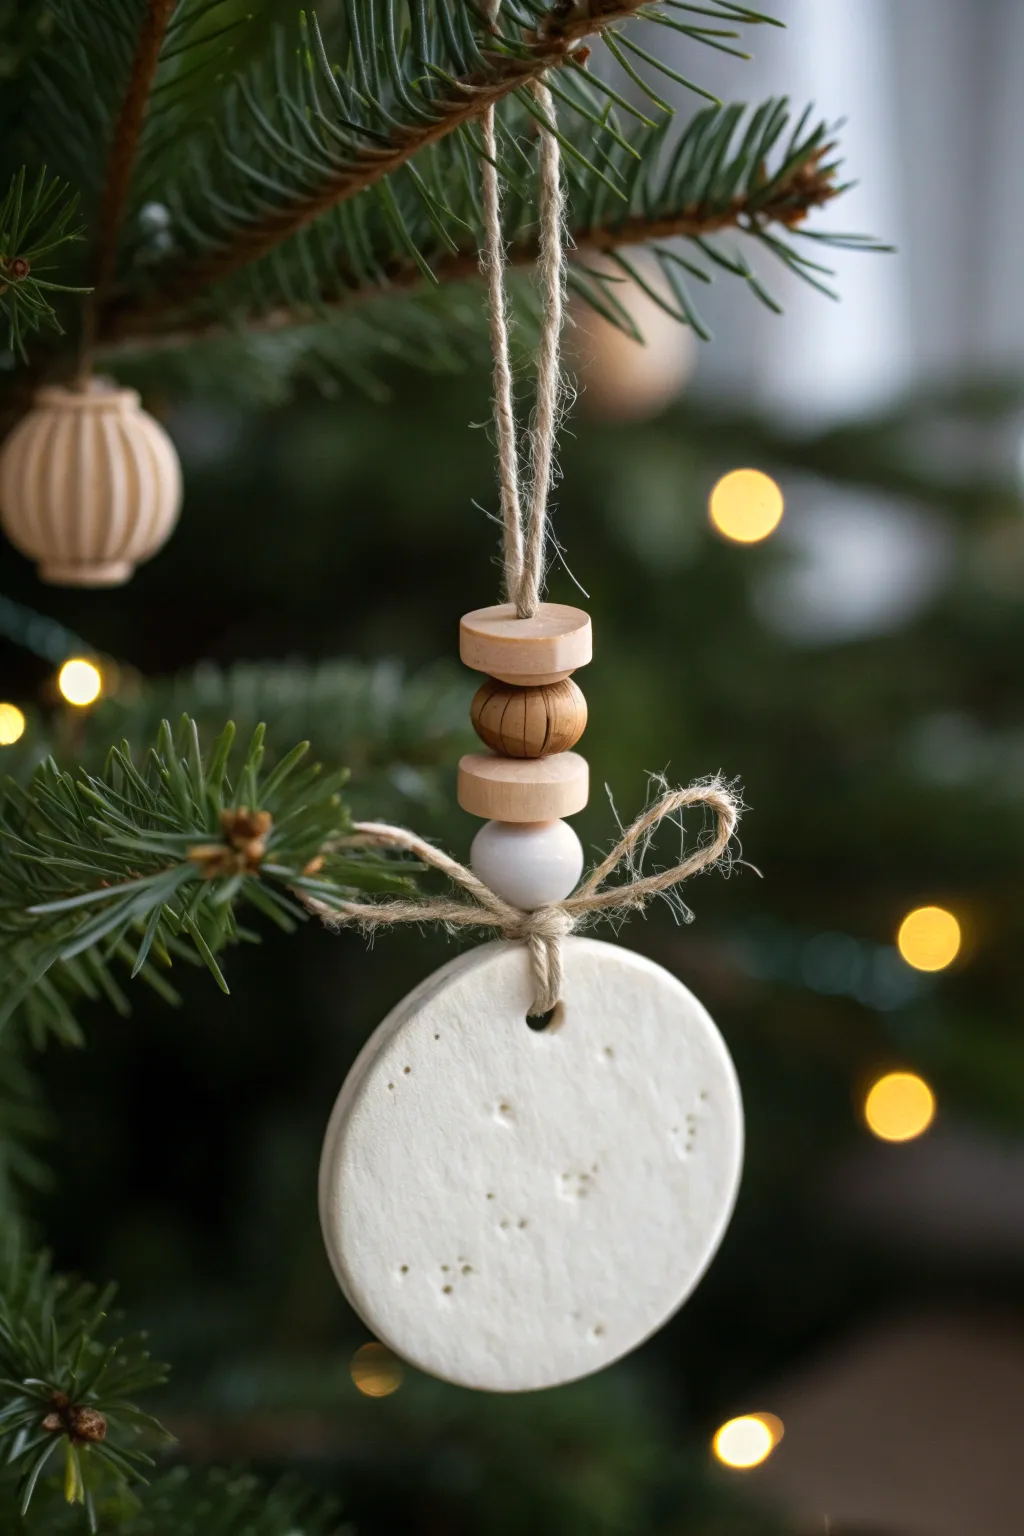
Embrace the natural beauty of Scandinavian-style decor with this earthy ornament. By combining a textured air-dry clay base with a stacked wood bead topper, you get a charming piece that looks high-end but is incredibly simple to craft.
Step-by-Step Guide
Materials
- White air-dry clay
- Jute twine or hemp cord (thin)
- Round cookie cutter (approx. 2.5 inches)
- Rolling pin
- Toothpick, skewer, or straw
- Wooden beads: 2 flat disc beads (natural wood), 1 round bead (stained wood), 1 round bead (white painted)
- Scissors
- Fine grit sandpaper (optional)
Step 1: Creating the Clay Base
-
Prepare the clay:
Take a small handful of white air-dry clay and knead it until it’s soft and pliable. If it feels too dry, you can wet your hands slightly. -
Roll it out:
Roll the clay flat on a clean surface until it is about 1/4 inch thick. Aim for an even thickness so it dries without warping. -
Cut the shape:
Press your round cookie cutter firmly into the clay to create a clean circle. Peel away the excess clay from around the cutter before lifting. -
Add texture:
Using the tip of a toothpick or a small stylus tool, gently press random, tiny dots into the surface of the clay circle to create a subtle, starry texture. Don’t press too hard; just enough to make an indentation. -
Create the hanging hole:
Use a straw or a skewer to poke a hole near the top edge of the circle. Make sure the hole is large enough for your twine to pass through easily. -
Smooth the edges:
Dip your finger in a little water and run it along the cut edge of the circle to smooth out any roughness or loose bits of clay. -
Let it dry:
Place the clay circle on a wire rack or parchment paper to dry. This usually takes 24-48 hours depending on humidity; flipping it halfway through helps it dry evenly.
Step 2: Assembling the Ornament
-
Prepare the twine:
Cut a length of jute twine approximately 12-14 inches long. -
Fold and thread:
Fold the twine in half to create a loop. Insert the folded end through the hole in your dried clay circle from front to back, pulling it through just an inch or so. -
Secure the loop:
Take the two loose ends of the twine and thread them through the small loop you just pushed through the hole. Pull tight to create a lark’s head knot at the top of the clay disk. -
The first bead:
Thread both loose ends of the twine through the white painted round bead. Slide it down until it sits directly on top of the knot. -
The second bead:
Thread both ends through one of the flat, natural wood disc beads and slide it down. -
The third bead:
Thread the ends through the darker, stained round wood bead. This adds a nice contrast to the lighter elements. -
The final bead:
Top the stack with the second flat, natural wood disc bead. -
Tie the top knot:
Tie a simple overhand knot with both twine ends just above the final wooden bead to secure the stack in place. -
Create the hanging loop:
Tie another knot near the very end of your twine strands to create the loop that will hang on the tree branch. -
Add the bow:
Cut a separate, smaller piece of twine (about 6 inches). Tie a small bow around the twine stem, right between the clay circle and the first white bead. -
Trim the ends:
Trim the tails of your bow so they are neat and short, ensuring they don’t overpower the ornament.
Smooth Operator
If your dried clay has rough edges despite smoothing, a quick rub with fine-grit sandpaper or a clean nail file will perfect the circumference.
Fragrance Boost
Add a few drops of essential oil (like pine, cinnamon, or orange) to the unpainted wood beads for an ornament that smells as good as it looks.
Hang this charming ornament on a sturdy branch where the light can catch the subtle texture of the clay
Metallic Rub Highlighted Imprints
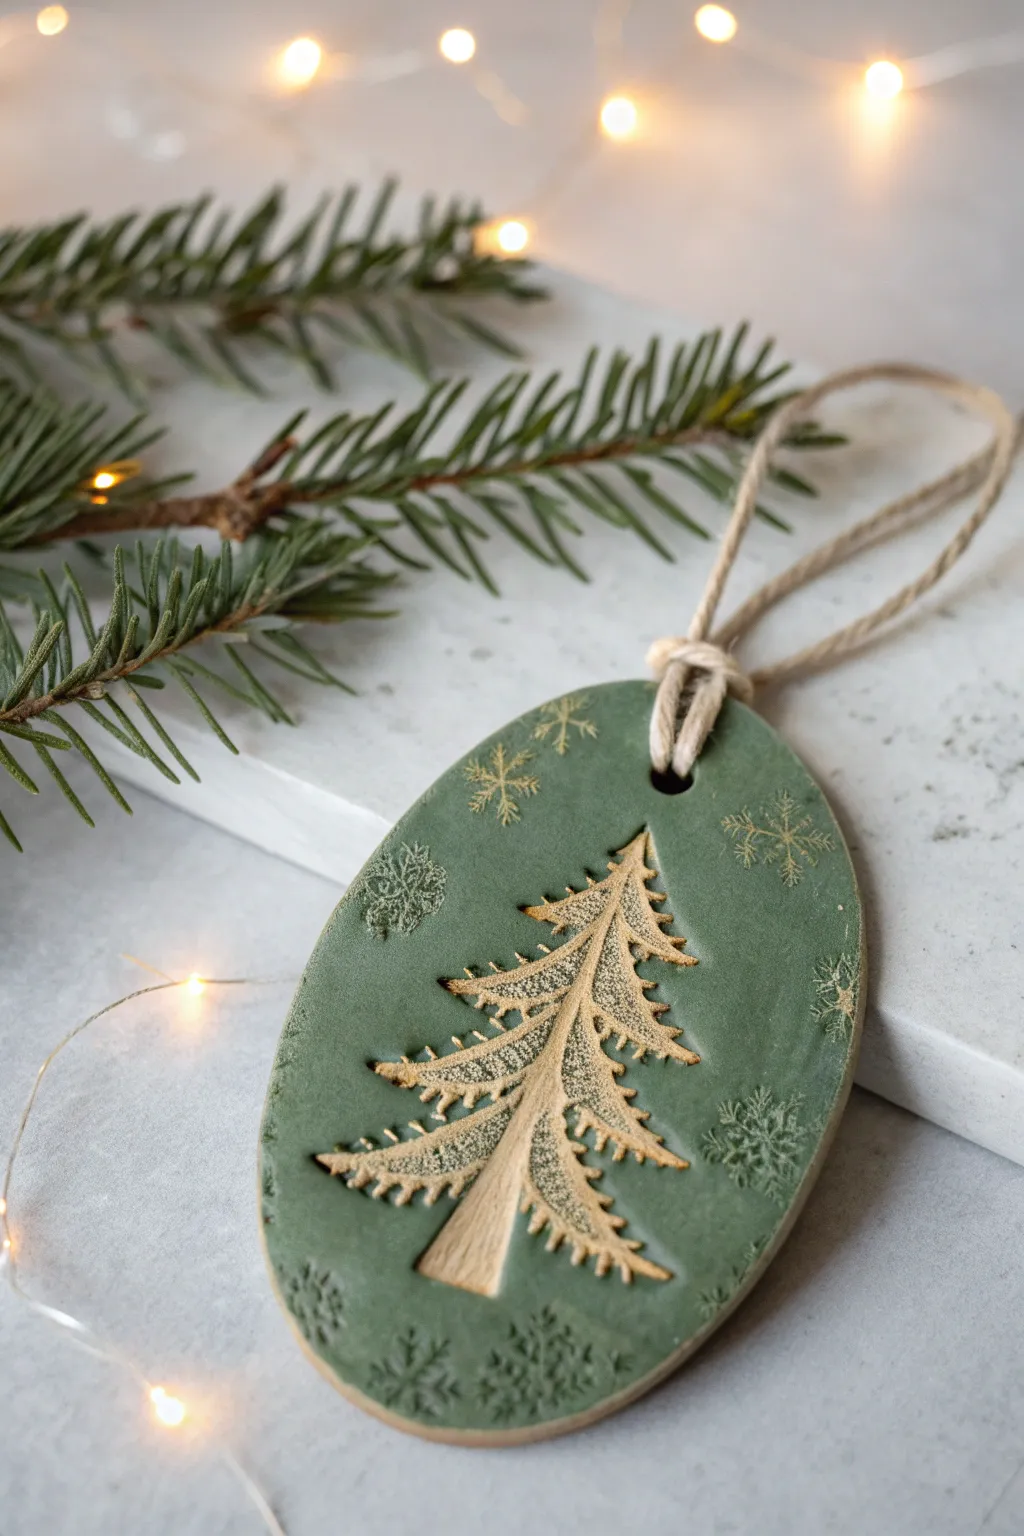
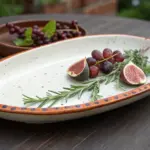
These elegant oval ornaments combine the rustic look of moss-green clay with the sophistication of metallic highlights. By using a simple wax rub technique, you can make stamped details pop with a warm, golden glow against the matte surface.
Step-by-Step Guide
Materials
- White polymer clay or air dry clay (tinted green)
- Green acrylic paint (if using white clay)
- Small Christmas tree rubber stamp or fondant cutter
- Snowflake rubber stamps (various sizes)
- Metallic gold lustre wax or gilding wax
- Oval cookie cutter
- Rolling pin
- Parchment paper or smooth work surface
- Plastic drinking straw or small circular cutter
- Jute twine or craft cord
- Sandpaper (fine grit)
- Matte spray varnish (optional)
Step 1: Preparing the Base
-
Condition the Clay:
Begin by kneading your clay until it is soft, pliable, and free of cracks. If you are starting with white clay, knead in a small amount of dark green acrylic paint or alcohol ink until you achieve a uniform, muted forest green color. -
Roll it Out:
Place the clay on parchment paper to prevent sticking. Use a rolling pin to flatten the clay to an even thickness of about 1/4 inch (6mm). Consistency here ensures the ornament won’t be too fragile. -
Cut the Shape:
Press your oval cookie cutter firmly into the clay. Give it a gentle wiggle before lifting to ensure clean edges, then carefully remove the excess clay around the shape.
Step 2: Creating the Impressions
-
Center the Tree:
Take your Christmas tree stamp. Position it visually in the center of the oval, leaving some room at the top for the hanging hole. Press down firmly and evenly, but not so hard that you distort the oval shape. -
Add Snowflake Details:
Using the smaller snowflake stamps, create a pattern around the central tree. I like to vary the pressure slightly—some deep adjacent to the tree, and some lighter ones swirling near the edges for depth. -
Create the Hanging Hole:
Use a plastic straw or a small circular clay cutter to punch a clean hole near the top of the oval. Make sure it isn’t too close to the edge to prevent tearing later. -
Smooth the Edges:
Dip your finger in a little bit of water (for air dry clay) or baby oil (for polymer) and gently run it along the cut edges of the oval to smooth out any roughness.
Stamp Release Trick
Dust your rubber stamps lightly with cornstarch or baby powder before pressing them into the clay to prevent them from sticking and tearing the fine details.
Step 3: Drying and Finishing
-
Dry the Ornament:
If using air dry clay, place the ornament on a wire rack and let it dry for 24-48 hours, flipping halfway through. If using polymer clay, bake according to the manufacturer’s package instructions. -
Check for Imperfections:
Once fully cured or dry, inspect the edges. If there are any sharp points or burrs, gently buff them away with fine-grit sandpaper. -
Apply the Gold Highlight:
Dip the tip of your finger or a soft cloth into the gold lustre wax. You need very little product. -
Rub the Surface:
Gently rub your finger over the surface of the ornament. The wax should catch on the raised texture of the clay and settle slightly into the upper ridges of the imprinted tree and snowflakes. -
Target the Details:
For the tree specifically, you can press a bit harder to ensure the gold gets into the indented branches, creating that high-contrast look shown in the photo. -
Buff and Seal:
Let the wax set for a few hours, then gently buff with a clean cloth. If you want to protect the finish, lightly mist with a matte spray varnish. -
String It Up:
Cut a length of jute twine, fold it in half to create a loop, and pass the folded end through the hole. -
Secure the Loop:
Pull the loose ends of the twine through the loop you just pushed through the hole (a lark’s head knot) and tighten it securely against the clay.
Scented Ornament Upgrade
Knead a few drops of pine or cinnamon essential oil into the air dry clay before rolling. Your tree will smell like a real forest throughout the holidays.
Hang these shimmering botanical beauties on your tree for a sophisticated touch of handmade charm

TRACK YOUR CERAMIC JOURNEY
Capture glaze tests, firing details, and creative progress—all in one simple printable. Make your projects easier to repeat and improve.
Black Ink Doodle Christmas Ornaments
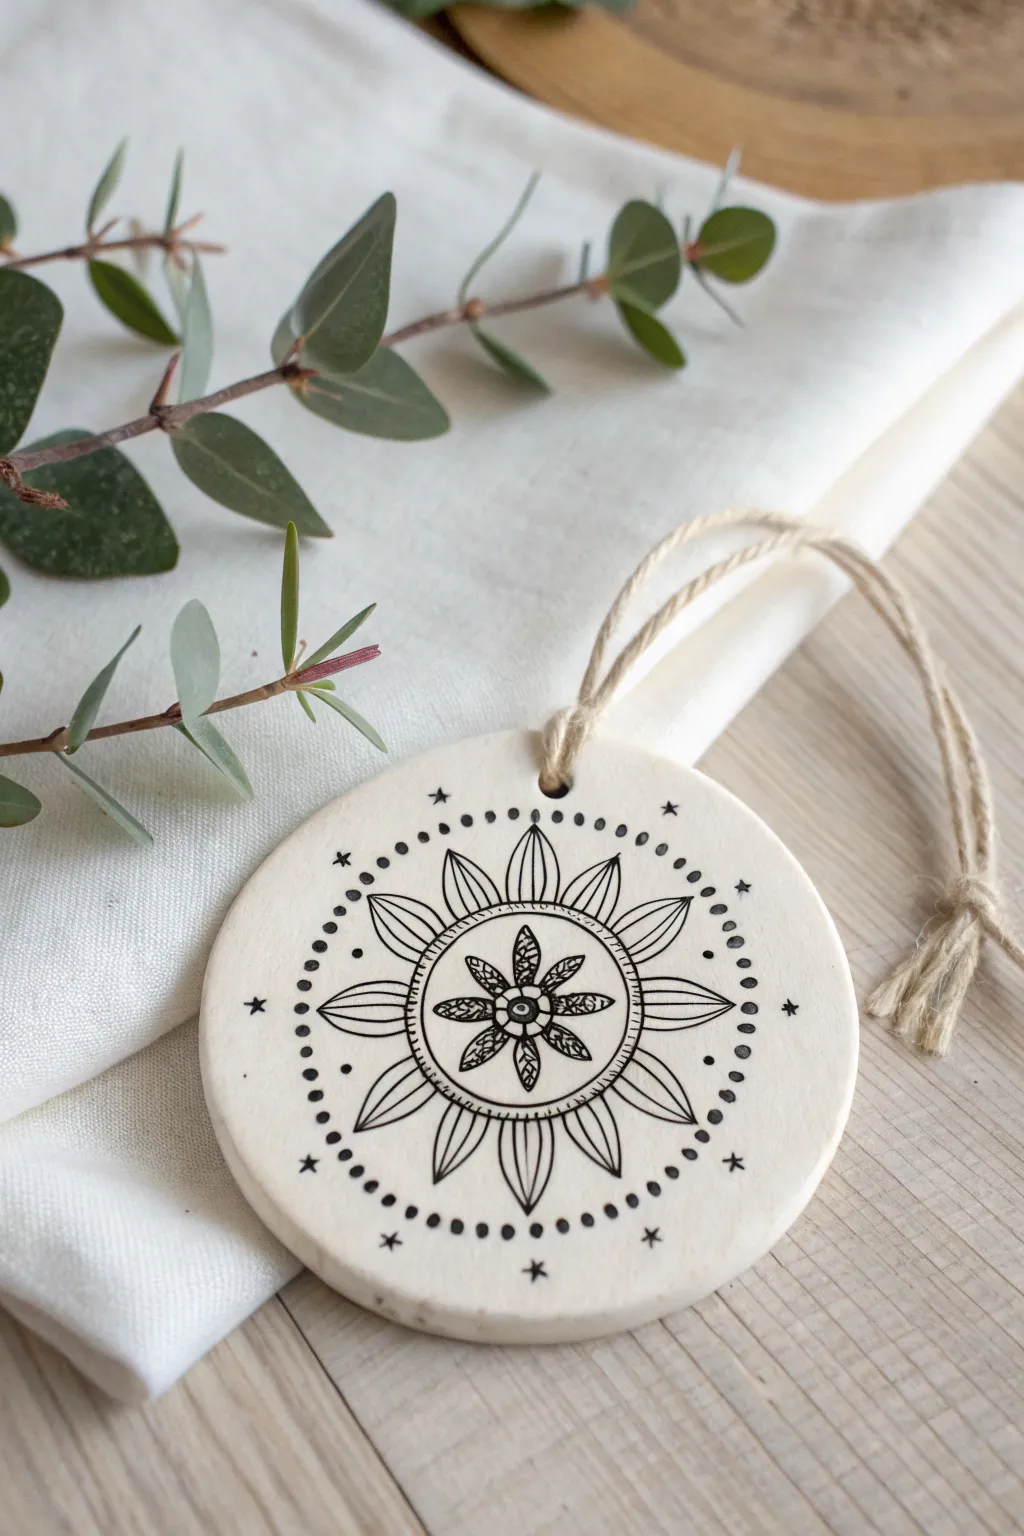
Embrace simplicity with this stunning black and white doodle ornament that turns plain clay into a piece of art. The crisp black lines of the floral mandala design against the smooth white air-dry clay create a modern, bohemian look perfect for any tree.
Detailed Instructions
Materials
- White smooth air-dry clay
- Rolling pin
- Circle cookie cutter (approx. 3-4 inches)
- Fine-grit sandpaper (400-600 grit)
- Fine point black permanent marker or archival ink pen (0.5mm or 01 size)
- Straw or small round tool for hole punching
- Jute twine or ribbon
- Water in a small cup
- Clear matte varnish (optional)
Step 1: Shaping the Base
-
Roll the clay:
Begin by kneading a ball of white air-dry clay until it’s pliable and smooth. Roll it out evenly to a thickness of about 1/4 inch (5-6mm). -
Cut the circle:
Use your circle cookie cutter to punch out a clean, round shape. If the edges are slightly rough, dip your finger in water and gently smooth them out. -
Create the hanging hole:
While the clay is still wet, use a straw to punch a hole near the top edge. Position it about a half-inch down so the clay doesn’t crack under the weight later. -
Let it dry completely:
Place the clay circle on a flat surface to dry. I find that flipping it over halfway through the drying process helps keep it perfectly flat. Allow 24-48 hours depending on humidity. -
Sand for smoothness:
Once fully dry and hard, use fine-grit sandpaper to gently buff the surface. You want a very smooth canvas for your ink pen so it doesn’t snag.
Ink Control Tip
Test your pen on a dried scrap piece of clay first. If the ink bleeds into the clay, seal the clay with a light coat of matte sealer BEFORE drawing.
Step 2: Drawing the Mandala
-
Find the center:
Eye the center of your circle. Draw a very small circle in the middle using your fine point black pen. -
Draw the central flower:
Around that center dot, draw six small petals to form a simple daisy shape. -
Add petal details:
Inside those six petals, scratch in a tiny crisscross or hatched texture to make them look darker and textured. -
Border the center:
Draw a circle around your flower. Then, draw a second circle slightly larger than the first, creating a narrow band. -
Fill the band:
Inside that narrow double-circle band, draw tiny diagonal hash marks all the way around. -
Create the sunburst petals:
Draw larger, pointed petals radiating outward from your banded circle. Aim for about 12-14 petals evenly spaced around the ring. -
Add dimension lines:
Inside each of these larger petals, draw a simple straight line down the center to give them a leaf-like appearance. -
Stipple the border:
Now for the dotted frame. Moving about a half-inch inward from the clay’s edge, start adding dots in a large circle. Alternate between larger dots and smaller dots for visual interest. -
Add starry accents:
In the negative space between your petal tips and the dotted border, draw tiny five-point stars or asterisks spaced evenly apart. -
Final outer stars:
Add a final ring of small stars near the very outer edge of the clay, outside of your dotted circle, to frame the entire piece.
Make It 3D
Instead of drawing the center details, press a small stamp or texture tool into the wet clay for the middle flower, then paint it black after drying.
Step 3: Finishing Touches
-
Seal the ink:
To protect your drawing, you can apply a very thin layer of clear matte varnish. Ensure the ink is 100% dry first to avoid smearing. -
Add the hanger:
Cut a length of natural jute twine, loop it through the hole at the top, and tie a secure knot to finish your rustic ornament.
Hang this delicate piece on your tree or use it as a sophisticated gift tag for a special present
Santa Handprint Keepsake Ornaments
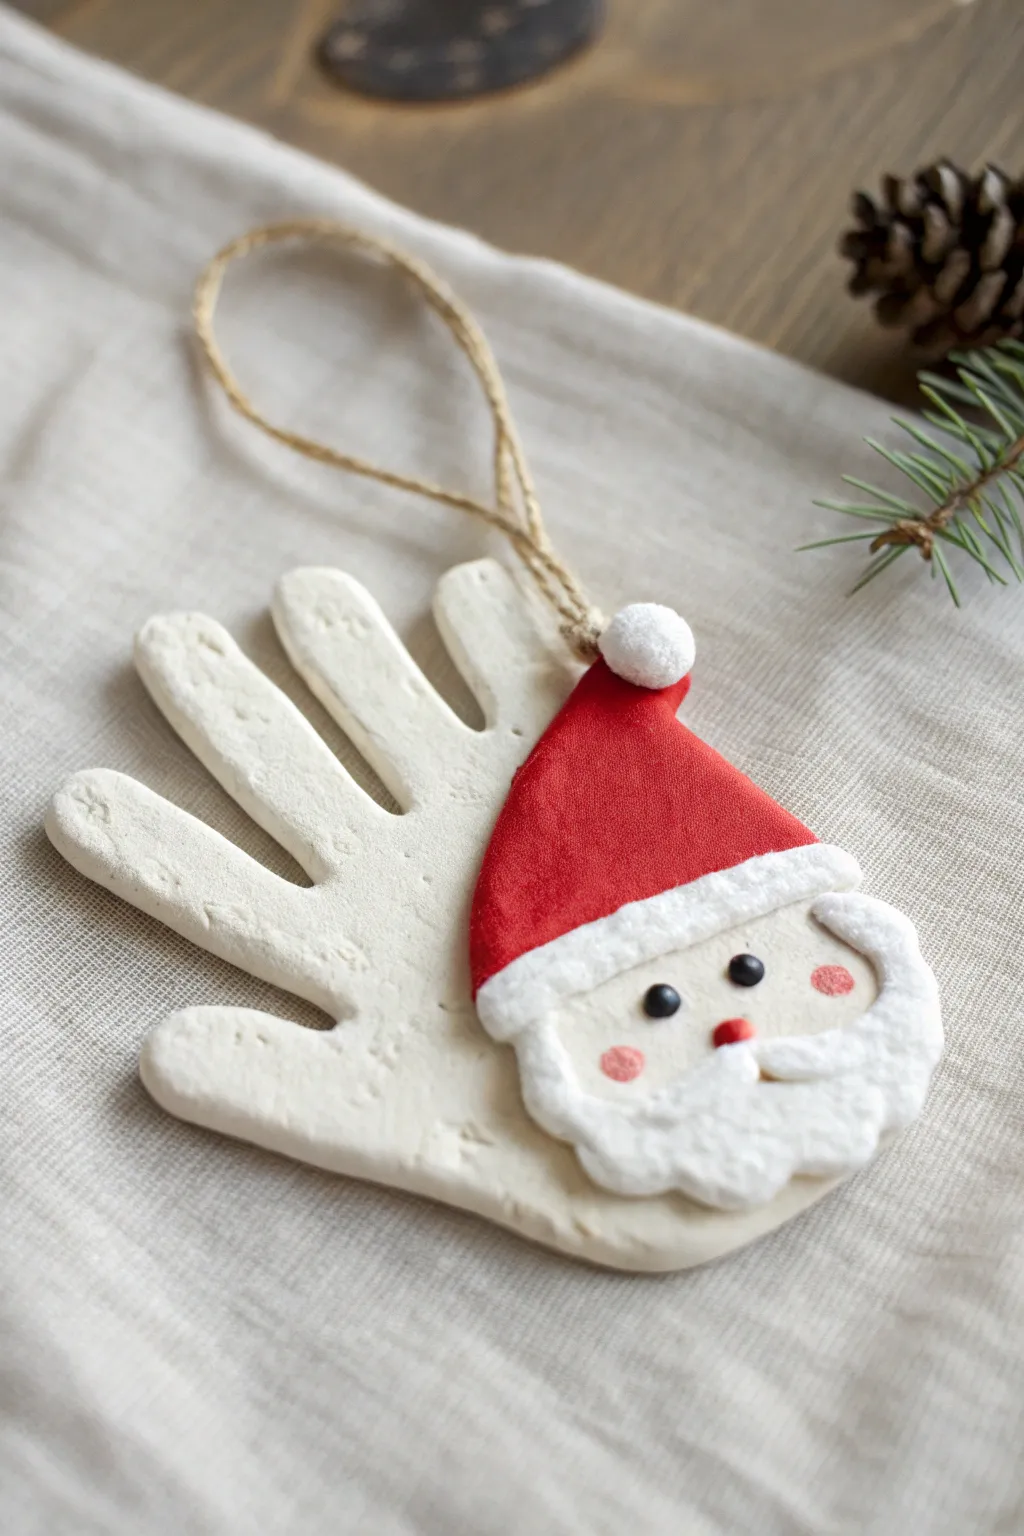
Capture a moment in time with this adorable handprint ornament that transforms tiny fingers into a festive Santa Claus. The natural white clay provides a rustic, textured base, while painted details bring the jolly character to life, creating a precious memory you’ll hang on the tree year after year.
How-To Guide
Materials
- White air-dry clay (or salt dough)
- Rolling pin
- Parchment paper
- Knife or clay cutting tool
- Drinking straw (for the hole)
- Red acrylic paint
- Black acrylic paint
- Pink acrylic paint
- White dimensional puffy paint (or thick white acrylic)
- Fine detail paintbrush
- Flat shader paintbrush
- Jute twine or ribbon
- Fine-grit sandpaper (optional)
- Clear matte sealer (optional)
Step 1: Shaping the Handprint
-
Prepare your workspace:
Lay down a sheet of parchment paper on a flat, stable surface. Take a ball of white air-dry clay about the size of a grapefruit and knead it briefly until it is smooth and pliable. -
Roll the slab:
Using a rolling pin, flatten the clay into an even slab. Aim for a thickness of about 1/4 inch; if it’s too thin, the fingers might be fragile, but too thick and it will take days to dry. -
Make the impression:
Place your child’s hand firmly onto the clay with fingers slightly spread. Press down gently but firmly on the palm and each individual finger to ensure a deep, clear impression. -
Cut out the shape:
Carefully lift the hand away. Use a knife or clay tool to cut around the outline of the handprint, leaving a smooth border of about 1/8 inch around the edge. -
Smooth the edges:
Dip your finger in a little water and run it along the cut edges of the clay to smooth out any rough spots or burrs left by the knife. -
Create the hanging hole:
Before the clay creates a crust, use a drinking straw to punch a hole near the base of the palm (which will become the top of Santa’s hat). Twist the straw slightly as you pull it out for a clean cut. -
Let it dry:
Allow the ornament to dry completely according to package instructions. This usually takes 24-48 hours. I recommend flipping it over halfway through the drying process to prevent curling.
Smooth Impressions
If the clay feels sticky, lightly dust the child’s hand with cornstarch before pressing it down. This prevents the clay from lifting up when you remove their hand.
Step 2: Painting Santa
-
Sand imperfections:
Once fully dry, lightly sand any sharp edges with fine-grit sandpaper if needed. Wipe away dust with a dry cloth. -
Outline the hat area:
Visualize the ornament upside down—the fingers are the beard, and the thumb is part of the beard side. The palm area will be the face and hat. -
Paint the red hat:
Using a flat shader brush and red acrylic paint, color the top portion of the palm (near the wrist/hole area). Paint a triangular (or rounded triangle) shape that tapers toward the hole. -
Apply the white brim:
Using white dimensional puffy paint, squeeze a thick, textured line across the bottom edge of the red hat area to create the fluffy brim. Dab it slightly to simulate fur texture. -
Paint the beard base:
Using the same dimensional paint or thick white acrylic, paint a swirly, cloud-like beard shape that covers the bottom of the palm and connects to the fingers. Leave a central oval of unpainted clay exposed for the face. -
Add the pom-pom:
Squeeze a dollop of white puffy paint right over the hanging hole area (leaving the hole clear) to act as the pom-pom on the hat. -
Create the eyes:
Using a very fine detail brush or the handle end of a paintbrush, dip into black paint and dot two small eyes in the center of the unpainted face area. -
Add rosy cheeks:
Mix a tiny amount of red with white (or use pink paint) and dab two soft, rosy circles just below and outside the eyes. -
Paint the nose and mouth:
Add a small red dot between the cheeks for a chilly nose. If you like, paint a tiny smile, though the puffy beard often covers the mouth area naturally.
Step 3: Finishing Touches
-
Dry the paint:
Let the paint dry completely. Dimensional puffy paint can take several hours to set fully, so be patient. -
Seal (Optional):
For longevity, coat the front and back with a clear matte sealer spray. This protects the raw clay from moisture over the years. -
Attach the hanger:
Thread a piece of jute twine through the hole at the top of the hat. Tie a secure knot to create a loop for hanging.
Date It
Don’t forget to use a fine-tip permanent marker to write the child’s name and the year on the back of the ornament once the paint is fully dry!
Hang this charming keepsake on your tree and enjoy seeing how much that little hand has grown by next Christmas.
Fingerprint Christmas Tree Lights
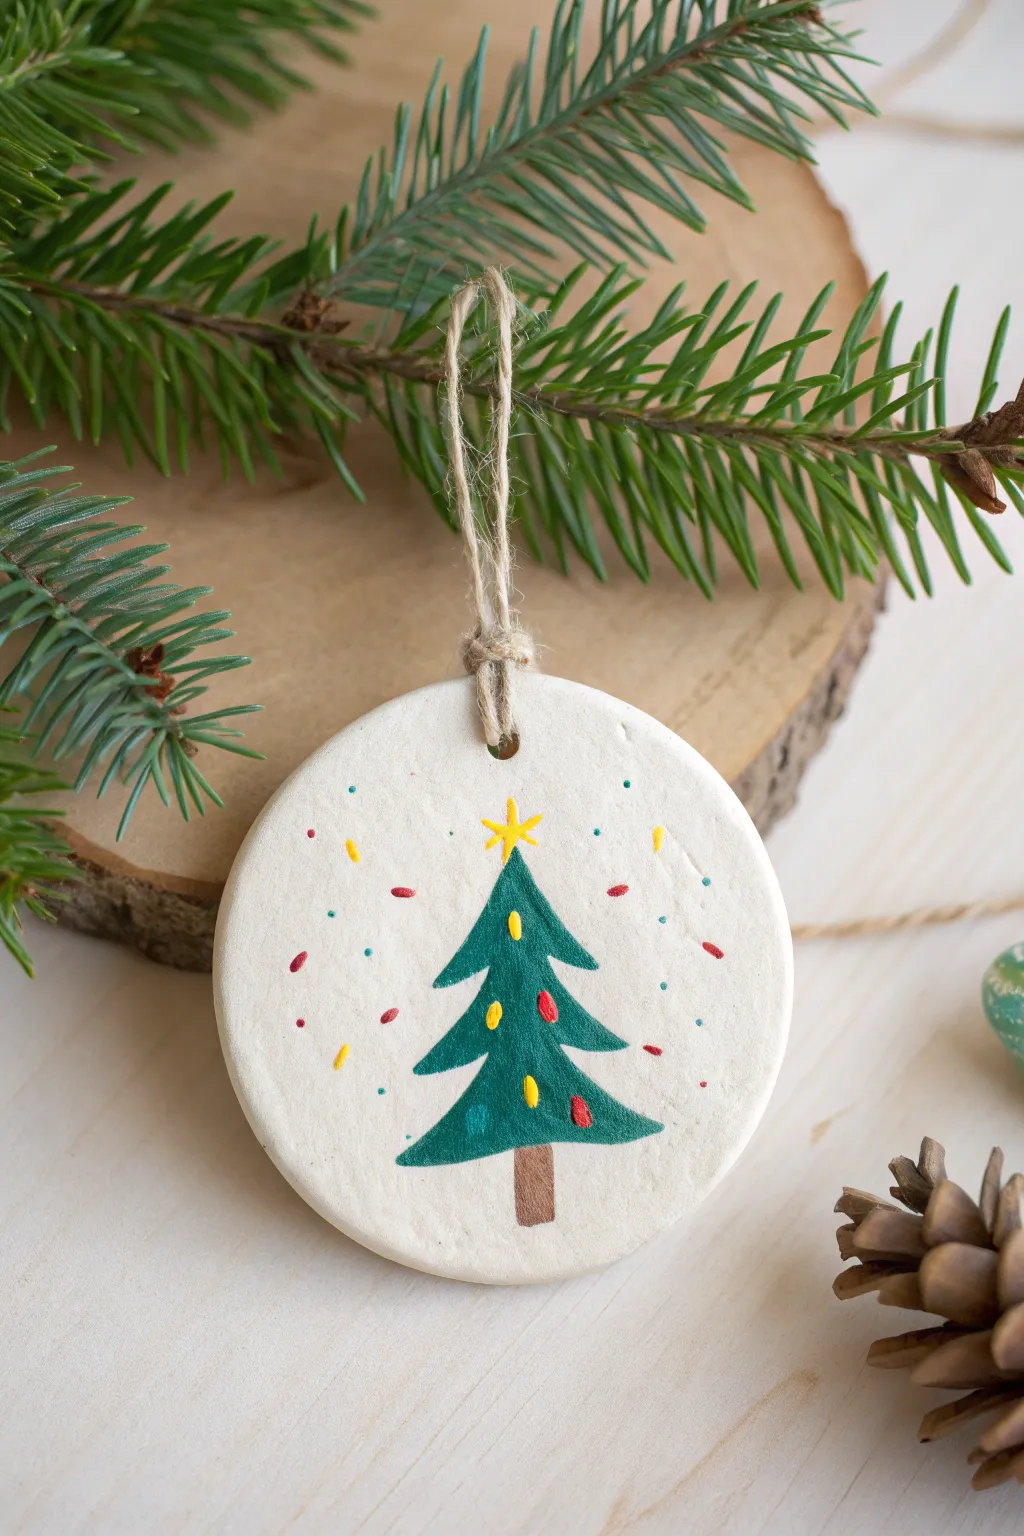
Create a charmingly imperfect holiday keepsake with this simple flat disc ornament featuring a stylized Christmas tree. The opaque white clay provides a beautiful, clean canvas for the vibrant green tree and its festive confetti-like decorations.
Step-by-Step
Materials
- White air-dry clay (or polymer clay)
- Circular cookie cutter (approx. 3-4 inches)
- Rolling pin
- Sandpaper (fine grit)
- Acrylic paints: Forest Green, Brown, Gold/Yellow, Red, Teal
- Fine detail paintbrushes (round tip)
- Jute twine or rustic string
- Straw or skewer (for hole punching)
- Matte sealer or varnish (optional)
Step 1: Shaping the Base
-
Roll the clay:
Start by taking a ball of white air-dry clay and rolling it out on a smooth surface. Aim for an even thickness of about 1/4 inch to ensure the ornament is sturdy but not too heavy. -
Cut the circle:
Using your circular cookie cutter, press firmly into the clay to create a clean, round disc. If the edges are slightly rough, smooth them gently with a bit of water on your finger. -
Create the hanging hole:
While the clay is still wet, use a straw or a skewer to punch a hole near the top edge. Make sure it’s not too close to the rim to prevent cracking later. -
Dry completely:
Set the clay disc aside on a flat surface to dry. Depending on your humidity and clay brand, this usually takes 24-48 hours. Adding a book on top once it’s mostly dry can help keep it perfectly flat. -
Sand for smoothness:
Once fully cured, use fine-grit sandpaper to lightly buff the surface and edges. This creates a professional finish and helps the paint glide on smoothly.
Cracking Up?
If small hairline cracks appear as the clay dries, mix a tiny bit of fresh clay with water to make a paste. Fill the cracks, smooth it over, and let it dry again before painting.
Step 2: Painting the Design
-
outline the tree shape:
Using a very fine brush and forest green acrylic paint, lightly sketch a triangle shape in the center of the disc. This guides your painting without leaving pencil marks. -
Paint the foliage:
Fill in the tree with the green paint using sweeping, downward strokes that flare out at the bottom to mimic branches. The shape shouldn’t be a perfect triangle; create three distinct tiered sections for a more natural look. -
Add the trunk:
With a small brush and brown paint, add a simple rectangular trunk at the base of your tree. Keep it short and centered. -
Let the base layers dry:
Allow the green and brown paint to dry completely to the touch. This prevents your decorative colors from muddying the background. -
Add the star:
Dip a fine brush into bright yellow or gold paint. Create a five-pointed star at the very peak of the tree. -
Paint the ornaments:
Using red, yellow, and teal paints, dab small oval shapes onto the green branches. I find that alternating colors and angles makes the tree look more playful and decorated.
Add Sparkle
For a festive twist, mix a pinch of fine glitter into your gold paint for the star, or dab a little clear glitter glue over the colored ‘ornament’ spots after the paint dries.
Step 3: Final Details
-
Create background confetti:
To fill the white space, add tiny dashes and dots of red, teal, and yellow around the tree. Keep them sparse and random to look like falling confetti or distant lights. -
Seal the artwork:
Once all paint is bone dry, apply a thin layer of matte varnish or sealer. This protects the clay from moisture and keeps the colors vibrant for years to come. -
Attach the hanger:
Cut a length of jute twine, roughly 6 inches long. Fold it in half to create a loop. -
Secure the loop:
Thread the folded end through the hole in the ornament from front to back, then pass the loose ends through the loop and pull tight (a lark’s head knot). -
Knot the top:
Tie the two loose ends of the twine together in a simple overhand knot to close the hanger loop.
Now you have a charming, hand-painted ornament ready to hang on the tree or give as a gift
Gingerbread-Inspired Clay Ornaments
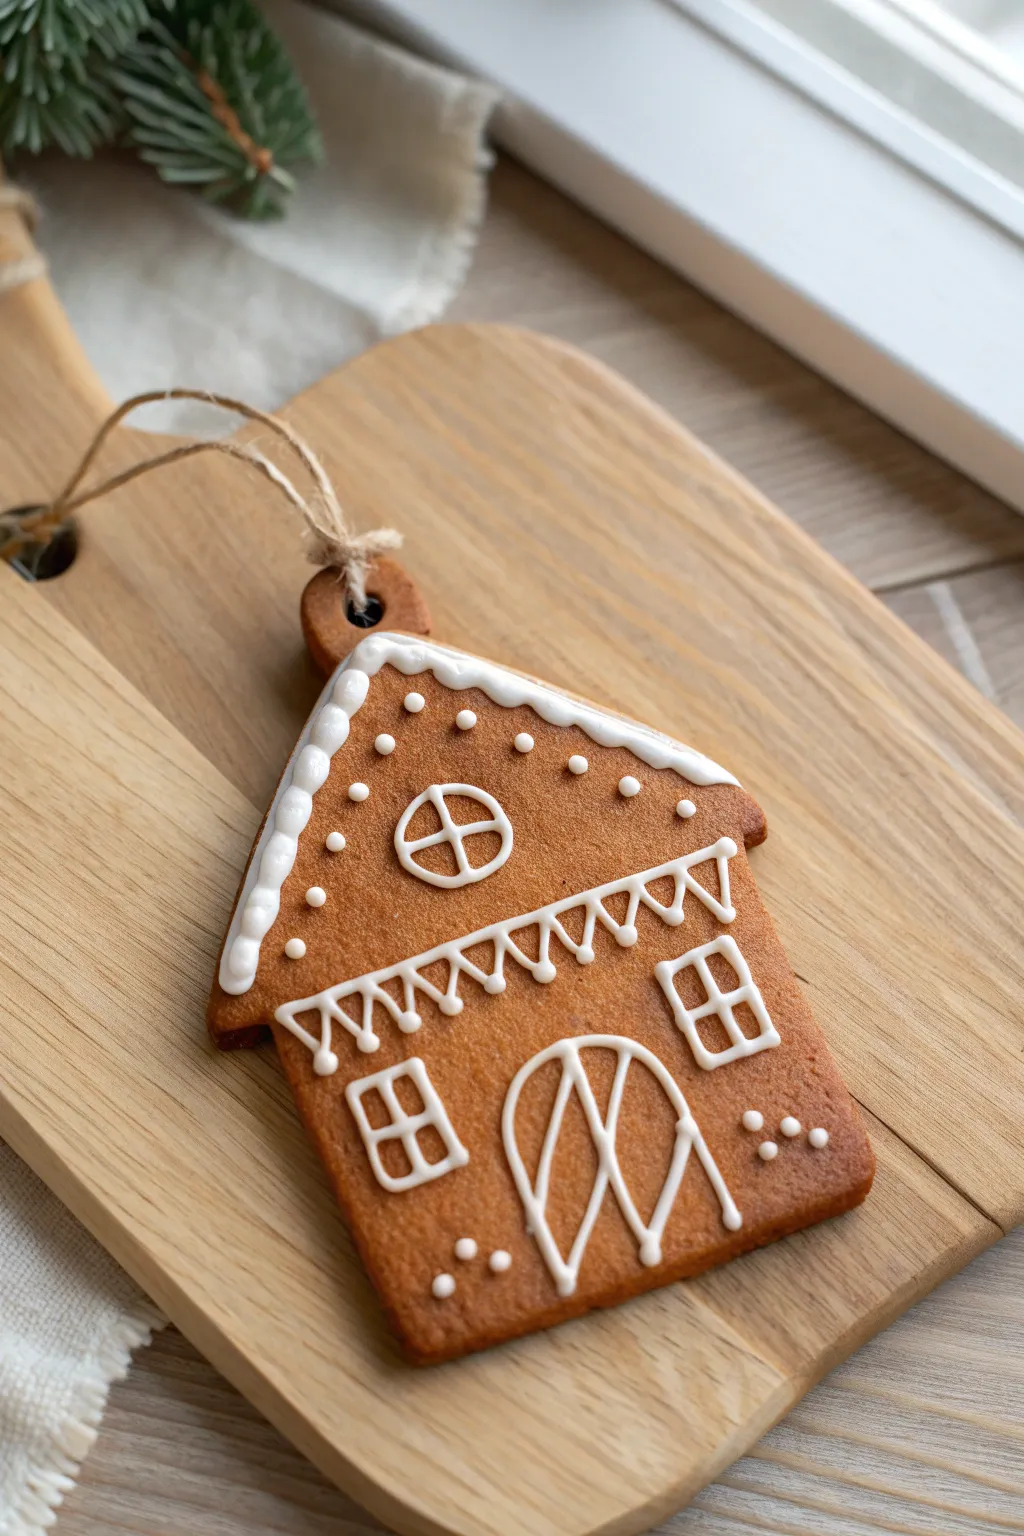
This charming ornament captures the cozy warmth of real gingerbread without the crumbs. With its rich, toasted brown finish and delicate white “icing,” it looks realistic enough to eat but will last for holiday seasons to come.
Detailed Instructions
Materials
- Air dry clay (white or terracotta)
- Acrylic paint (Burnt Umber, Yellow Ochre, Red Oxide, White)
- Small rolling pin
- House-shaped cookie cutter (or craft knife)
- Straw or cocktail stick for the hanging hole
- Puffy paint (white) or dimensional fabric paint
- Sandpaper (fine grit)
- Matte varnish or sealant
- Small sponge or foam brush
- Twine
- Parchment paper
Step 1: Shaping the Dough
-
Condition the clay:
Start by kneading your air dry clay until it is soft, pliable, and free of cracks. If you are using white clay, you can pre-tint it now by kneading in a small amount of brown acrylic paint, though painting it later gives a more realistic baked look. -
Roll it out:
Roll the clay onto a sheet of parchment paper until it is about 1/4 inch thick. Aim for a thickness similar to a real cookie—not too thin, or it might be brittle. -
Cut the shape:
Press your house-shaped cookie cutter firmly into the clay. If you don’t have a cutter, print a simple house silhouette on paper, cut it out, place it on the clay, and trace around it with a craft knife. -
Refine the edges:
Lift the house shape carefully. Dip your finger in a little water and smooth out any rough edges or ragged bits left by the cutter to ensure a clean outline. -
Add the hanging hole:
Use a straw to punch a clean hole at the top of the roof, or wiggle a cocktail stick to create an opening large enough for your twine. Make sure it isn’t too close to the edge to prevent breakage. -
Texture the surface (optional):
For an ultra-realistic cookie look, gently pat the surface with a crumpled ball of aluminum foil or a stiff bristle brush. This removes the artificial smoothness of the clay. -
Dry completely:
Let the ornament dry flat on parchment paper for 24-48 hours. Flip it over halfway through the drying process to ensure both sides dry evenly and to prevent warping.
Clean Lines Hack
Rest your wrist on a book or block while piping the dimensional paint. This stabilizes your hand, giving you steadier lines and much better control over the flow.
Step 2: Baking the Color
-
Mix the base color:
Create a ‘gingerbread’ color by mixing burnt umber, a touch of yellow ochre, and a tiny bit of red oxide. The goal is a deep, warm brown rather than a flat chocolate color. -
Apply the first coat:
Using a sponge or foam brush, dab the paint onto the dried clay. Using a dabbing motion rather than brushing helps maintain the texture and avoids streak marks. -
Add dimension:
While the paint is still slightly wet, dab a slightly darker shade of brown just around the very edges of the house. This mimics the way cookies brown faster at the edges in the oven. -
Seal the color:
Once the paint is fully dry, apply a coat of matte varnish. This seals the clay and provides a smooth, non-porous surface for the ‘icing’ piping.
Cracked Clay?
If small cracks appear as the clay dries, mix a tiny bit of fresh clay with water to make a paste (slip). Fill the cracks, smooth with a finger, and let dry again.
Step 3: Piping the Details
-
Prepare the ‘icing’:
Take your bottle of white puffy paint or dimensional fabric paint. Squeeze a small amount onto a scrap piece of paper first to remove air bubbles and practice your flow control. -
Outline the roof:
Begin by piping a line along the roof edges. I like to make this line slightly wavy or scalloped to mimic heavy, dripping royal icing. -
Create roof tiles:
Add small dots underneath the roof line to represent decorative architectural details or gumdrops. -
Draw the attic window:
In the upper triangle of the house, pipe a circle. Add a cross inside it to form a round window. -
Add the trim:
Pipe a horizontal line across the middle of the house, adding a zigzag or ‘garland’ pattern hanging from it. -
Pipe the door and windows:
Draw an arched door at the bottom center with some simple lines for detailing. Flank the door with two square windows, adding a simple cross in each for panes. -
Add final dots:
Fill in any empty spaces with small clusters of three dots near the bottom corners for balance. -
Dry and hang:
Allow the puffy paint to dry completely (usually overnight) so it hardens. Thread a piece of rustic natural twine through the hole and tie a knot.
Hang this sweet creation on your tree next to the lights for a warm, homey touch
Mini Nativity Silhouette Ornaments
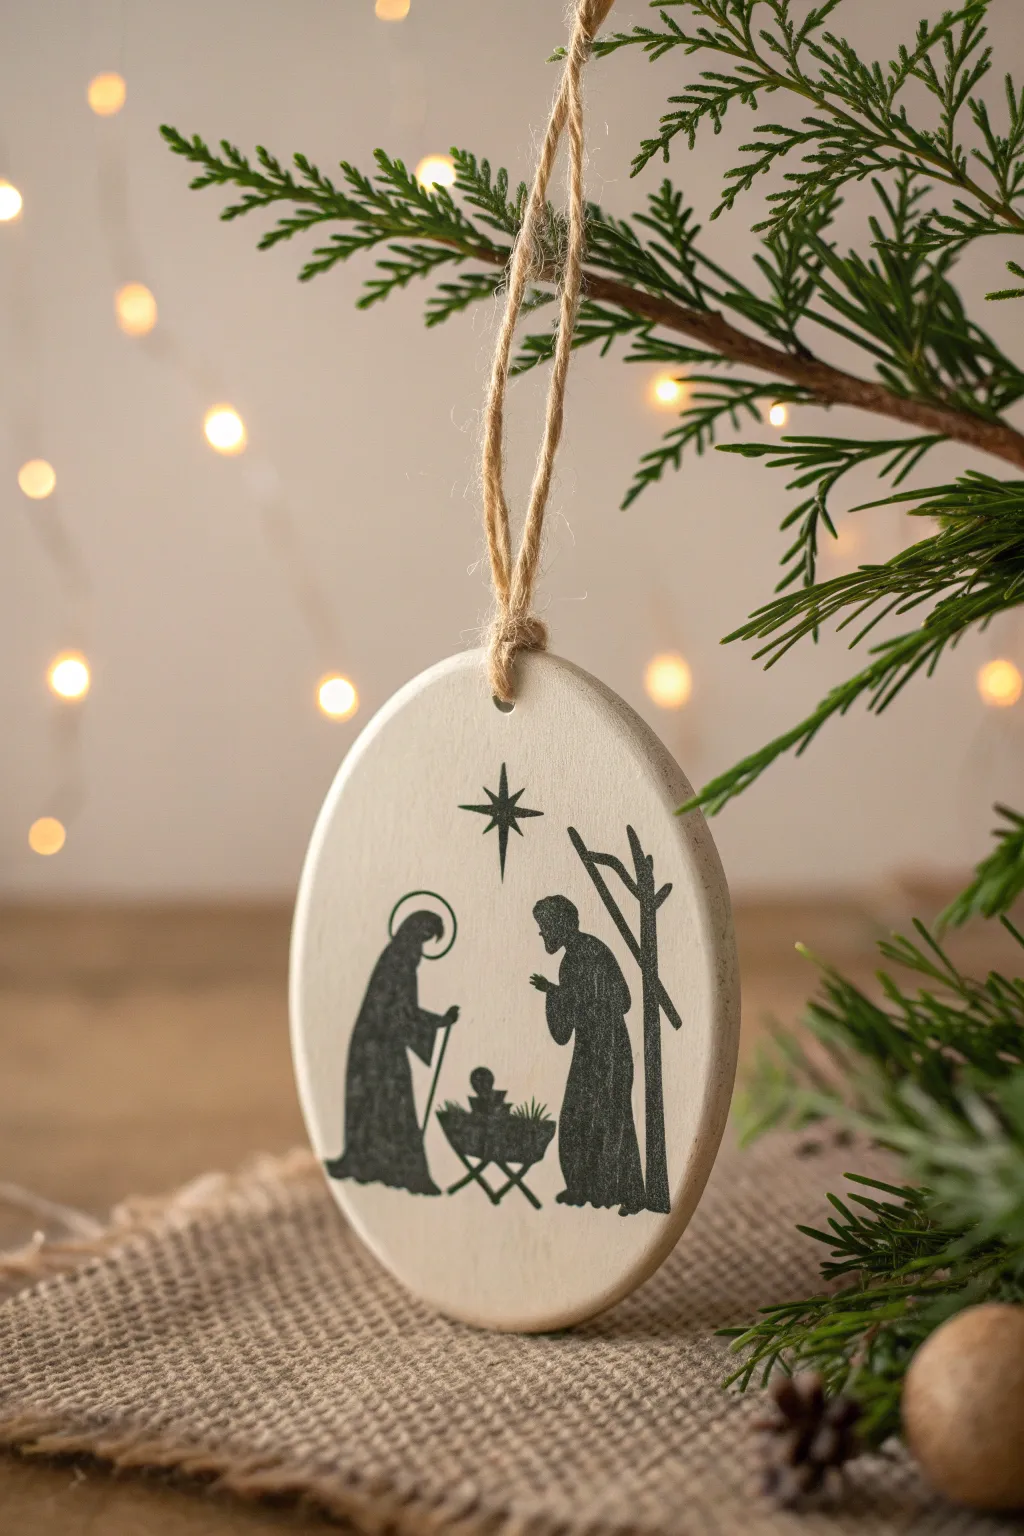
Capture the essence of Christmas with this minimalist, elegant ornament that looks like modern ceramic pottery. The stark contrast between the creamy white clay and the crisp black silhouette creates a timeless piece perfect for rustic or traditional decor.
How-To Guide
Materials
- White air-dry clay (smooth texture)
- Small rolling pin
- Round cookie cutter (approx. 3 inches)
- Parchment paper or non-stick craft mat
- Fine-grit sandpaper (400 grit)
- Fine-tip black permanent marker or acrylic paint pen
- Pencil and eraser
- Printed nativity template (optional)
- Straw or skewer (for the hole)
- Jute twine
- Acrylic matte varnish (optional)
Step 1: Clay Shaping
-
Prepare your surface:
Lay down a piece of parchment paper or a silicone mat. This prevents the clay from sticking and ensures the back remains smooth while you work. -
Condition the clay:
Take a handful of white air-dry clay and knead it gently in your hands until it warms up and becomes pliable. This reduces the chance of cracks forming later. -
Roll it out:
Using your rolling pin, roll the clay out to an even thickness, roughly 1/4 inch thick. Try to keep the pressure consistent so one side isn’t thinner than the other. -
Cut the shape:
Press your round cookie cutter firmly into the clay. Give it a tiny wiggle before lifting to ensure a clean cut, then carefully peel away the excess clay from the outside edges. -
Create the hanging hole:
Use a straw or a skewer to poke a hole near the top center of the circle. Make sure it’s not too close to the edge—leave at least a quarter-inch of clay above the hole for strength. -
Smooth the edges:
Dip your finger in a tiny bit of water and run it gently around the rim of the circle to smooth out any roughness from the cutter. -
Dry thoroughly:
Place the clay circle on a flat surface to dry. I find that flipping the ornament over halfway through the drying process (usually after 12 hours) helps keep it perfectly flat. Let it cure for roughly 24-48 hours.
Step 2: Sketching & Painting
-
Sand for smoothness:
Once bone dry, lightly buff the surface and edges with fine-grit sandpaper. This creates the perfect smooth canvas for your ink. -
Outline or trace:
Use a pencil to very lightly sketch the positions of the figures. Draw a kneeling figure on the left (Mary), a standing figure on the right (Joseph), and a small manger in the center. If you aren’t confident drawing freehand, cut out a paper template and trace the outline lightly. -
Add the star and tree:
Sketch a simple four-point star centered near the top. To the right of Joseph, sketch a lean, angular tree trunk or branch to balance the composition. -
Inking the outlines:
Using your fine-tip black marker or paint pen, carefully trace over your pencil outlines. Start from the top (the star) and work your way down so you don’t smudge the wet ink with your hand. -
Fill in the silhouettes:
Gently color inside the lines to create solid black silhouettes. Use light strokes to avoid scraping up the surface of the clay. For the halo on Mary, simply draw a thin circle outline rather than filling it in. -
Clean up:
Once the ink is completely dry, gently erase any visible pencil marks. Be careful not to rub too hard over the inked areas. -
Seal (Optional):
If you want to protect the ornament for years to come, apply a thin coat of matte acrylic varnish. This seals the clay and prevents the ink from fading, though the raw matte look is also beautiful on its own.
Transfer Trick
Can’t draw freehand? Print the design, rub pencil graphite heavily on the back of the paper, place it over the clay, and trace firmly.
Step 3: Finishing Touches
-
Adding the hanger:
Cut a length of jute twine, roughly 6 inches long. -
Looping:
Thread one end of the twine through the hole in the ornament. -
Knotting:
Bring the two ends together and tie a secure overhead knot. Trim any uneven fraying at the ends to keep it looking tidy.
Rustic Texture
Before the clay dries, gently press a piece of linen or burlap onto the surface to give the background a woven texture before painting.
Hang this serene piece on your tree and enjoy the peaceful simplicity it brings to your holiday collection