I’m constantly amazed at how air dry clay can go from a humble lump to something that looks clean, modern, and genuinely display-worthy. If you’re craving projects that feel a little more elevated than basic crafts, these cool air dry clay ideas will keep your studio table happily busy.
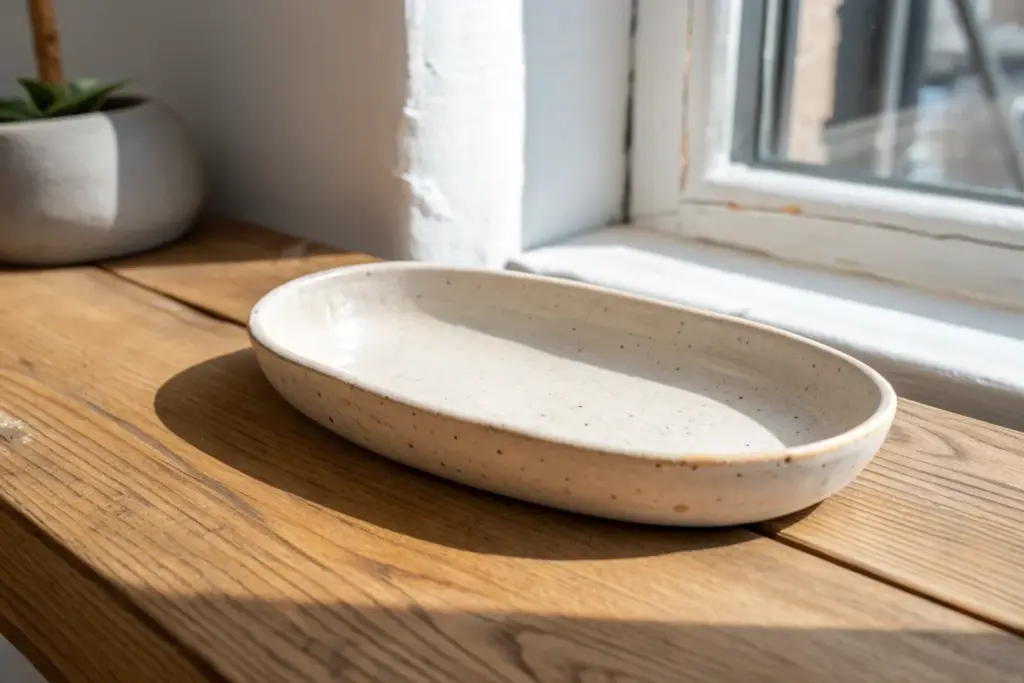
Minimalist Trinket Dishes
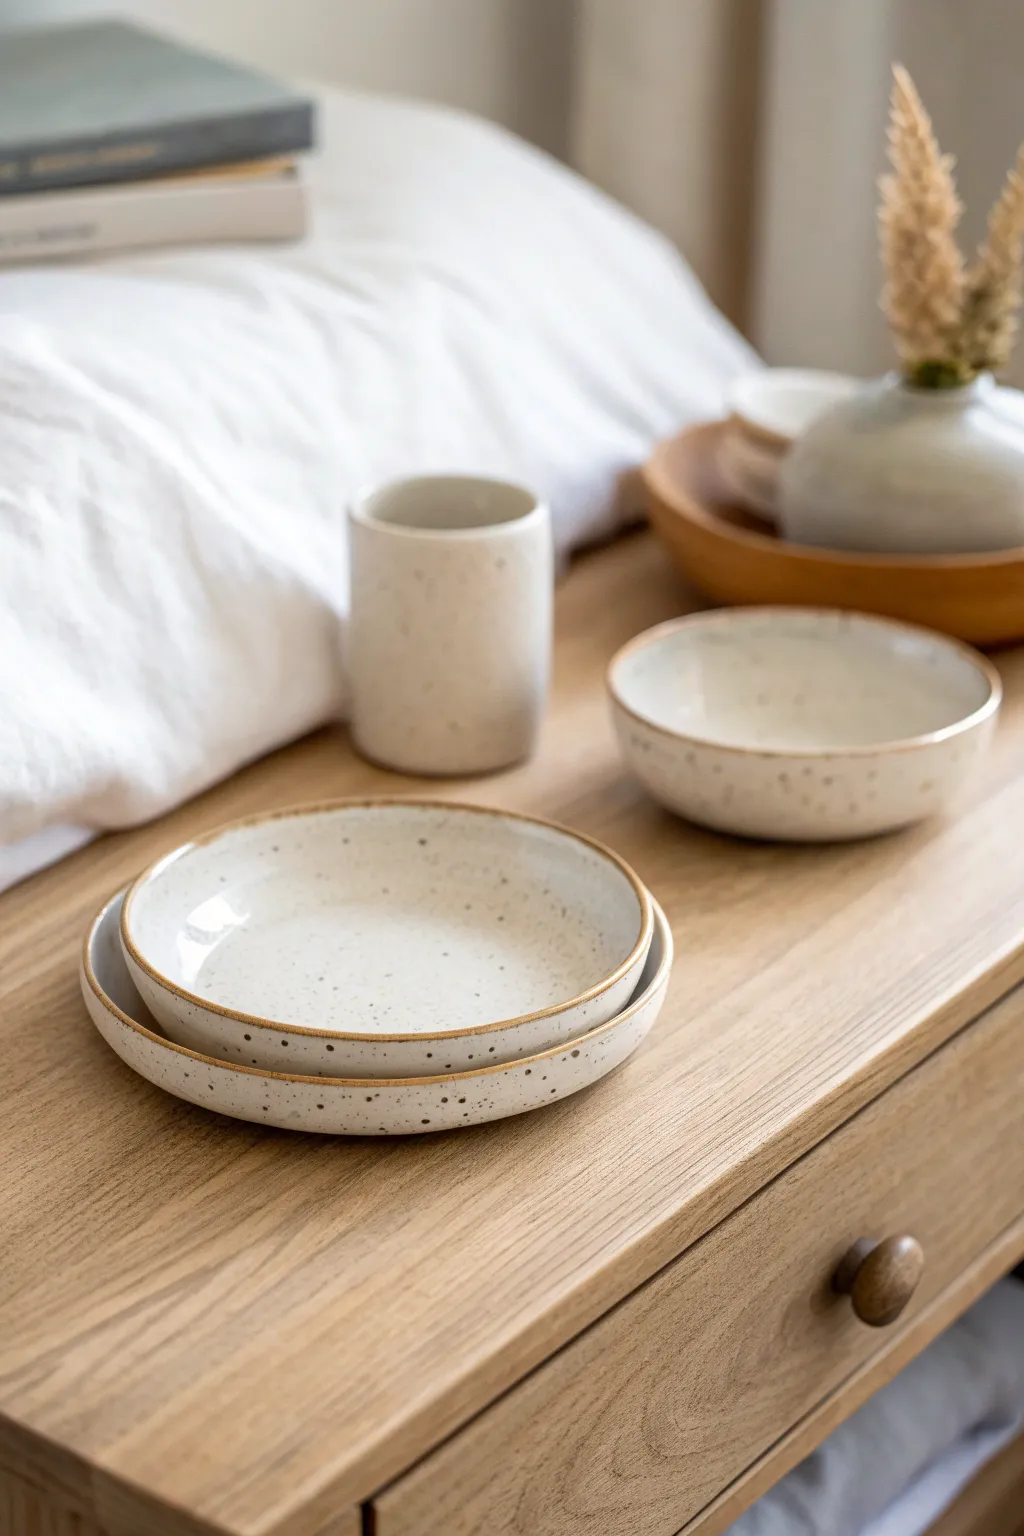
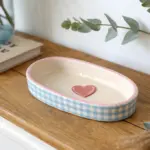
Achieve the high-end look of speckled ceramic pottery without a kiln using simple air dry clay. This minimalist set features organic shapes, a creamy stone-like finish, and a delicate gold rim perfect for holding jewelry or keys.
How-To Guide
Materials
- White air dry clay
- Rolling pin
- Canvas mat or parchment paper
- Circle templates (bowls or jar lids)
- Craft knife or clay cutter
- Small bowl of water
- Sponge
- Fine grit sandpaper
- Acrylic paint (Cream/Off-White)
- Acrylic paint (Dark Brown/Black for speckles)
- Acrylic paint (Gold or Bronze metallic)
- Old toothbrush
- Small detail paintbrush
- Gloss varnish or sealant
Step 1: Shaping the Clay
-
Prep the clay:
Begin by kneading a fist-sized ball of white air dry clay until it is warm and pliable. If it feels too stiff, dip your fingers in water and work the moisture in. -
Roll it out:
Place your clay on a canvas mat or parchment paper to prevent sticking. Roll it out to an even thickness of about 1/4 inch. Try to keep the pressure consistent so one side isn’t thinner than the other. -
Cut the circles:
Select two different sized circle templates—a larger bowl for the base plate and a smaller one for the top dish. Press your templates gently into the clay or trace around them with a craft knife to cut out clean circles. -
Smooth the edges:
Dip your finger in water and run it along the cut edge of your clay circles to smooth out any sharpness or roughness left by the knife. -
Form the rim:
To create the shallow dish shape, gently curl the edges of the circle upward with your fingertips. I like to work my way around the circle twice, pinching very slightly to create a subtle vertical lip. -
Refine the shape:
Use a damp sponge to smooth the interior and exterior surfaces. Ensure the transition from the flat bottom to the raised rim is seamless and soft, not angular. -
Dry the pieces:
Place your formed dishes on a flat surface to dry. Let them rest for 24-48 hours until they are completely white and hard to the touch throughout.
Step 2: Sanding & Painting
-
Sand for smoothness:
Once fully dry, take your fine grit sandpaper and gently buff the entire surface. Pay special attention to the rim to ensure it feels like shaped stone. -
Wipe down:
Use a slightly damp cloth or dry brush to remove all sanding dust. You want a clean surface for the paint to adhere to. -
Base coat:
Mix a warm cream or off-white acrylic paint. Apply 2-3 thin, even coats to the entire dish, allowing each coat to dry completely before adding the next. -
Create the speckles:
Dilute a small amount of dark brown or black acrylic paint with water until it is very runny. Dip an old toothbrush into this mixture. -
Splatter application:
Hold the toothbrush over your dishes and run your thumb across the bristles to flick tiny droplets of paint onto the surface. Practice on a paper scrap first to control the density of the speckles. -
Rim detail:
Pour a small amount of metallic gold or bronze paint onto your palette. Using a fine detail brush, carefully paint just the very top edge of the rim. -
Soften the rim:
Immediately after applying the gold, you can tap it gently with your finger to make the line look less manufactured and more like a natural glaze break.
Pro Tip: Texture Trick
Mix a tiny pinch of real dried coffee grounds into your white clay before rolling it out. This adds a natural, embedded speckled texture that looks incredibly realistic.
Step 3: Sealing
-
Apply varnish:
Once all paint is perfectly dry, apply a coat of gloss varnish. This gives the piece that ceramic ‘fired’ look and protects the paint. -
Final cure:
Let the varnish cure according to the bottle instructions (usually 24 hours) before placing any jewelry or trinkets inside.
Troubleshooting: Warping
If the edges curl up too much while drying, gently weigh the center down with a small bean bag or rice bag during the first few hours of the drying process.
Now you have a stunning set of faux-ceramic dishes that add a touch of handcrafted elegance to your bedside table


Speckled Terrazzo-Style Coasters
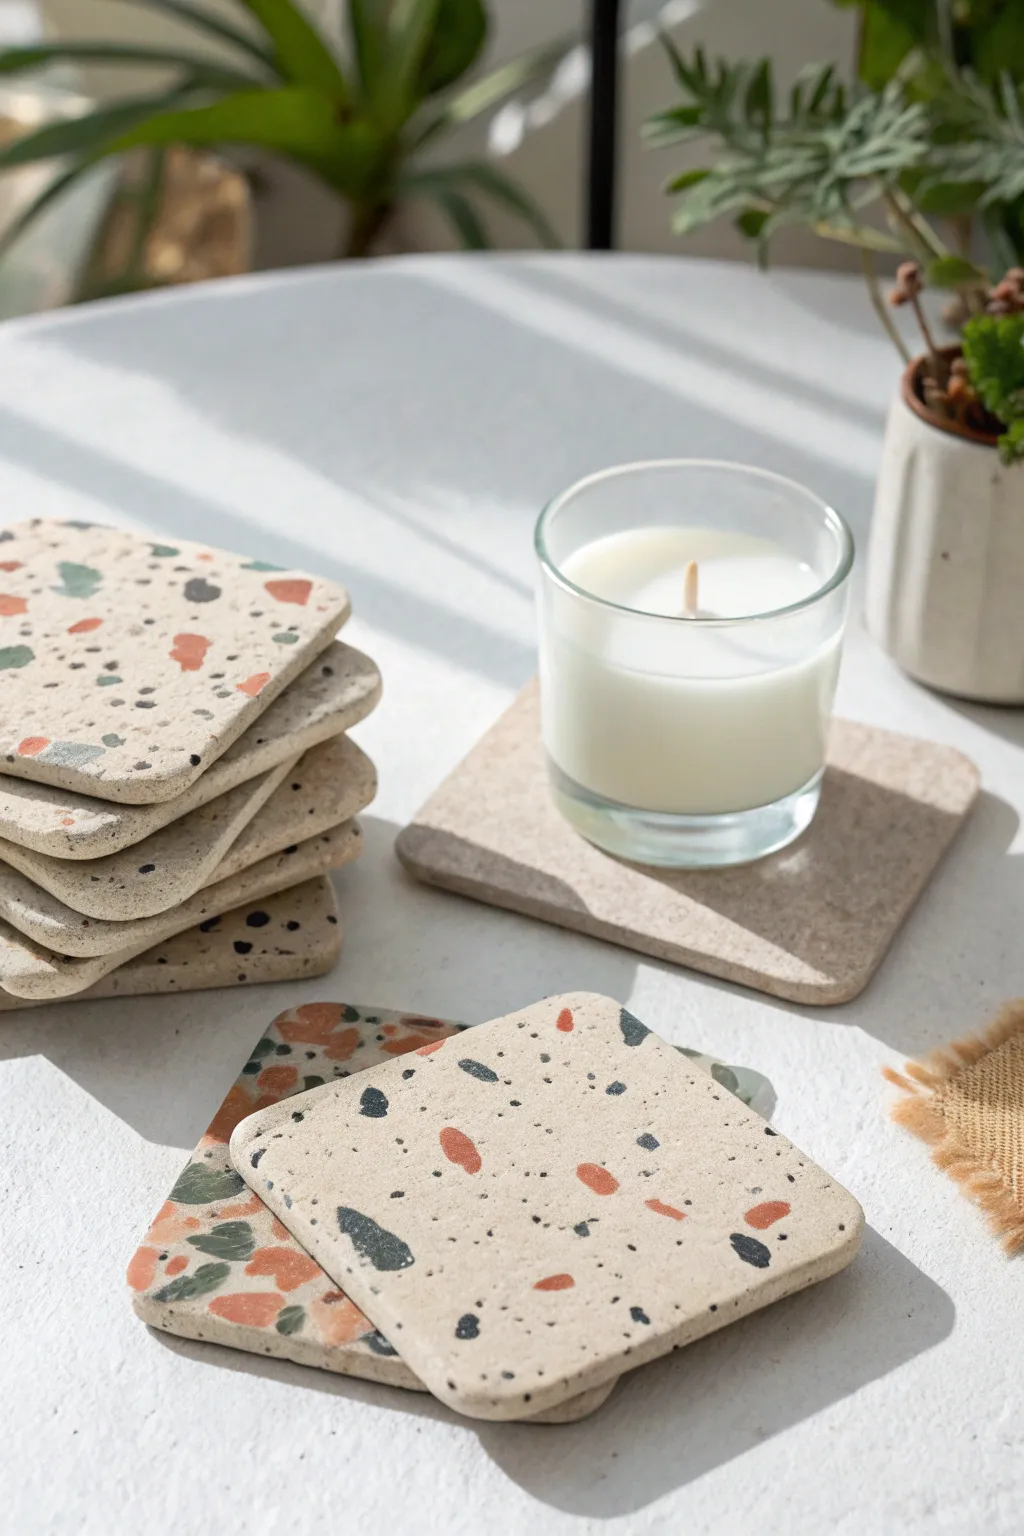
Bring the trendy, stone-flecked look of terrazzo into your home without the heavy concrete work. These air-dry clay coasters use colored clay chips to mimic the beautiful aggregate texture of real terrazzo.
Step-by-Step Tutorial
Materials
- White or beige air-dry clay (main base)
- Air-dry clay in accent colors (terracotta, slate blue, black, sage green)
- Acrylic rolling pin
- Square cookie cutter or craft knife
- Parchment paper or silicone mat
- Fine-grit sandpaper (around 220-400 grit)
- Matte or satin sealant (Mod Podge or varnish)
- Small bowl of water
- Rolling slats or depth guides (optional)
Step 1: Preparing the Chips
-
Roll accent colors:
Start by taking small amounts of your colored clays—terracotta, blue, green, and black. Roll each color out individually until they are very thin, about 1-2mm thick. -
Dry briefly:
Let these thin sheets sit out for about 10-15 minutes. You want them to firm up slightly so they tear cleanly rather than smushing, but don’t let them dry completely. -
Create the aggregate:
Once firm, tear or cut the colored sheets into small, irregular chips. Vary the sizes from tiny specks to larger, distinct ‘stones’ to create realistic variety. -
Sort and set aside:
Keep your piles of colored chips separate so you can control the distribution later.
Clean Rolling Tip
If your chips are smearing when you roll over them, place a sheet of wax paper between the clay and the rolling pin to keep the colors crisp.
Step 2: Constructing the Base
-
Condition base clay:
Take a large chunk of your white or beige base clay and knead it until it’s soft and pliable. -
Initial rolling:
Roll out the base clay on parchment paper to a thickness of about 1/4 inch (6-7mm). It doesn’t need to be perfect yet. -
Apply the chips:
Scatter your prepared colored chips over the surface of the wet white clay. I prefer to place the larger pieces first, then fill in the gaps with the smaller speckles for a balanced look. -
Embed the pattern:
Gently roll over the surface again with your rolling pin. Press firm enough to embed the chips flush into the base clay, creating a smooth, unified surface. -
Flip and repeat (optional):
If you want the terrazzo pattern on both sides, carefully flip the slab over and repeat the scattering and rolling process on the back.
Add Some Sparkle
Mix in a few pinches of gold leaf flakes or dried flower petals alongside the colored clay chips for a glamorous or botanical twist.
Step 3: Shaping and Refining
-
Cut the shapes:
Use a square cookie cutter or a sharp craft knife and ruler to cut out your coasters. For the soft rounded look in the photo, gently tap the sharp corners with your finger. -
Smooth the edges:
Dip your finger in a little water and run it along the cut edges of the coasters to smooth out any roughness or drag marks from the knife. -
Drying phase:
Place the coasters on a wire rack or leave them on parchment paper to dry. Flip them every few hours during the first day to prevent curling. -
Wait for full cure:
Allow them to dry completely for 24-48 hours. The clay will look lighter in color and feel room-temperature to the touch when fully dry.
Step 4: Finishing
-
Sand the surface:
Once bone dry, take your fine-grit sandpaper and lightly sand the top surface. This is key—it removes the thin film of white clay haze over your colored chips and makes the colors pop. -
Dust off:
Wipe the coasters down with a slightly damp cloth or dry brush to remove all sanding dust. -
Apply sealant:
Apply 1-2 thin coats of a matte or satin varnish. This protects the clay from moisture, which is essential for a coaster.
Now you have a set of chic, modern coasters ready to protect your table in style


Abstract Arch Earrings
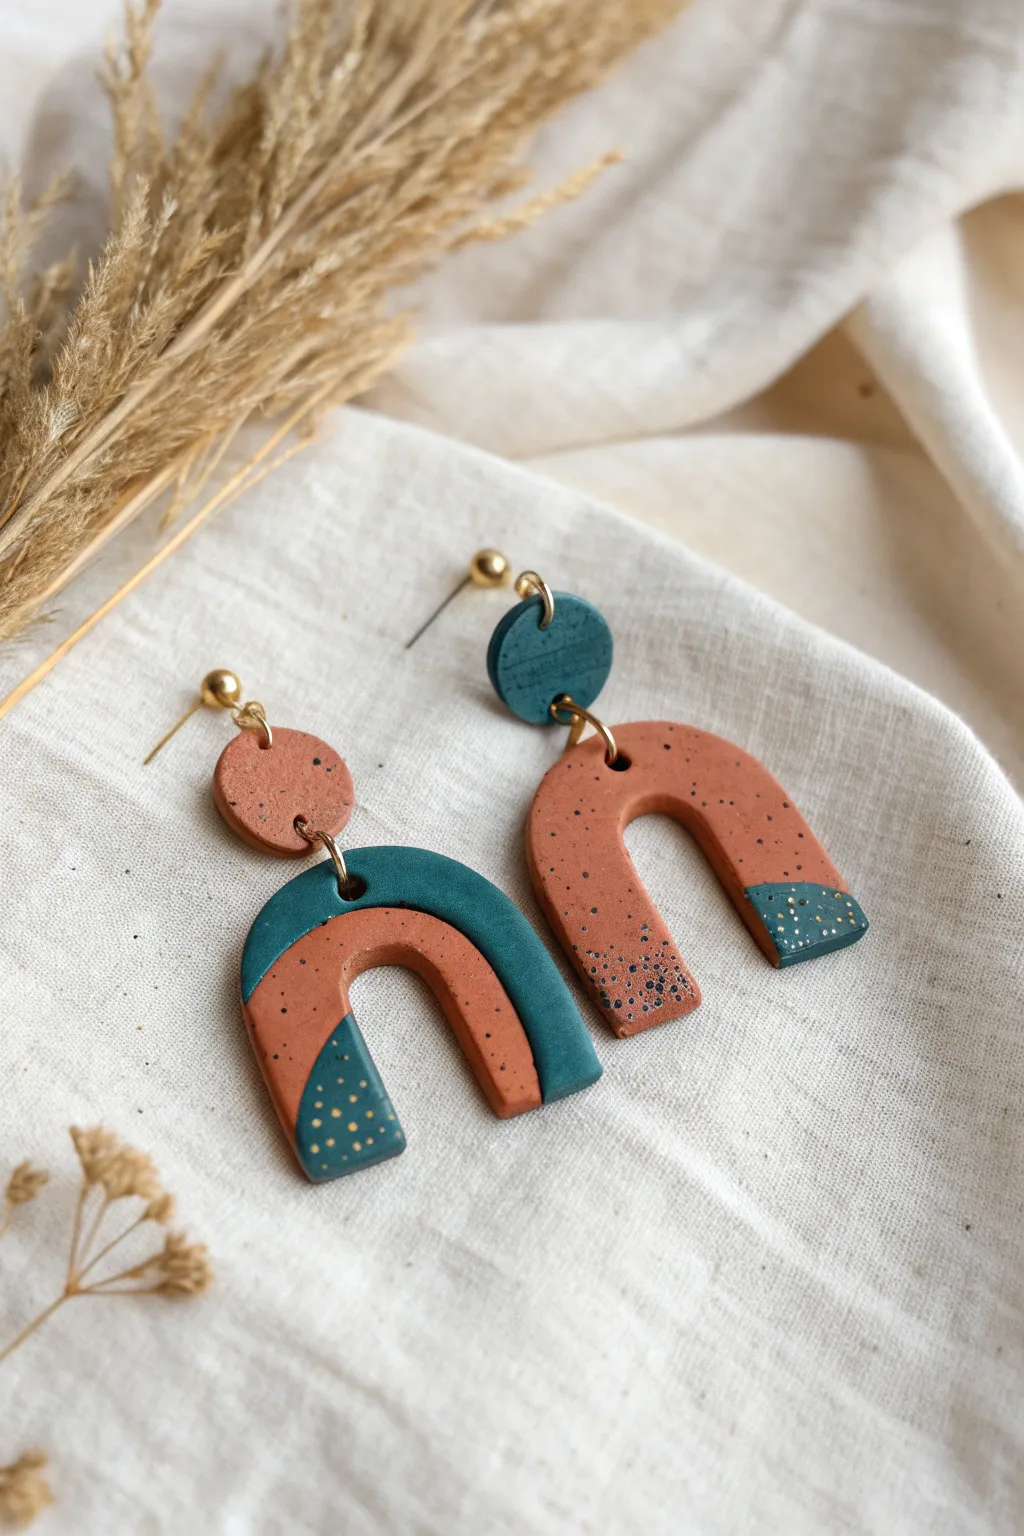
Embrace earthy tones and modern shapes with these stunning abstract arch earrings, featuring a blend of warm terracotta and deep teal. The sophisticated speckled finish and subtle metallic accents give them a professional, boutique-quality look.
How-To Guide
Materials
- Air dry clay (terracotta/rust color + teal/dark cyan color)
- Acrylic rolling pin
- Clay cutters (circle and arch shapes)
- Craft knife or flexible tissue blade
- Needle tool or toothpick
- Sandpaper (fine grit)
- Acrylic paint (black for speckles, gold for accents)
- Old toothbrush or stiff paintbrush
- Earring posts and jump rings (gold finish)
- Jewelry pliers
- Gloss varnish or sealant (optional)
Step 1: Shaping the Clay
-
Condition the clay:
Begin by kneading your terracotta air dry clay until it becomes soft, pliable, and free of cracks. Depending on your brand, you may need to mix white clay with acrylic paint to achieve the custom rust and deep teal shades if you can’t find them pre-colored. -
Roll out the slab:
Roll the terracotta clay out into a smooth slab, aiming for a thickness of about 3-4mm. Ensure an even surface, as this forms the base for your main arches. -
Cut the main arches:
Use your arch-shaped cutter to punch out two identical shapes. If you don’t have a specific cutter, you can trace a U-shape on paper, place it over the clay, and carefully cut around it with your craft knife. -
Cut the top circles:
For the stud portion, cut out two small circles. For the mismatched look shown, cut one circle from the terracotta clay and one from the teal clay. -
Create the color-block overlays:
Roll out your teal clay to the same thickness. Use the same arch cutter to cut a shape, then use your craft knife or distinct curved cutters to slice off ‘dip’ sections or abstract angles that will sit on top of the terracotta arches. -
Attach the overlays:
Score the back of the teal pieces and the front of the terracotta arches where they will overlap. Add a tiny dab of water to create a slip, and gently press the teal pieces onto the terracotta base to fuse them. -
Pierce holes:
Before the clay dries, use a needle tool to poke holes for your jump rings. Place one hole at the top center of each arch and one at the bottom of each circle stud. Make sure the holes are large enough to fit your jump rings freely.
Clean Cuts Pro Tip
Before cutting your shapes, lay a sheet of plastic wrap over the clay slab. When you press the cutter down, the plastic rounds the edges for a smoother, pillowy finish.
Step 2: Adding Texture and Detail
-
Create speckles:
Dilute a small amount of black acrylic paint with water. Dip an old toothbrush into the mixture, blot the excess on a paper towel, and gently flick the bristles with your thumb to spray fine speckles over the wet clay. -
Drying time:
Allow your clay pieces to dry completely according to the package instructions. Flip them over halfway through the drying process to prevent curling. -
Sand the edges:
Once fully dry and hard, use fine-grit sandpaper to smooth any rough edges or irregularities on the sides of your shapes. -
Add gold accents:
Using a fine detail brush or a toothpick, dab tiny dots of gold paint onto specific sections—focusing on the teal overlays—to mimic the look of gold leaf or metallic terrazzo.
Cracking Issues?
If your air dry clay cracks while drying, mix a tiny bit of fresh clay with water to make a paste and fill in the cracks. Smooth with a finger and let dry again.
Step 3: Assembly
-
Seal the pieces:
I prefer to apply a thin coat of matte or gloss varnish to protect the paint and give the clay a finished look, though this is optional. -
Connect the components:
Open a gold jump ring using two pairs of jewelry pliers. Thread it through the hole in the arch and the hole in the corresponding circle stud, then close the ring securely. -
Attach earring posts:
Use a strong craft adhesive (like E6000) to glue flat-pad earring posts to the back of the top circle pieces. Let the glue cure for at least 24 hours before wearing.
Once assembled, these chic, lightweight earrings are ready to add an artistic touch to your daily outfit


Beaded-Edge Jewelry Trays
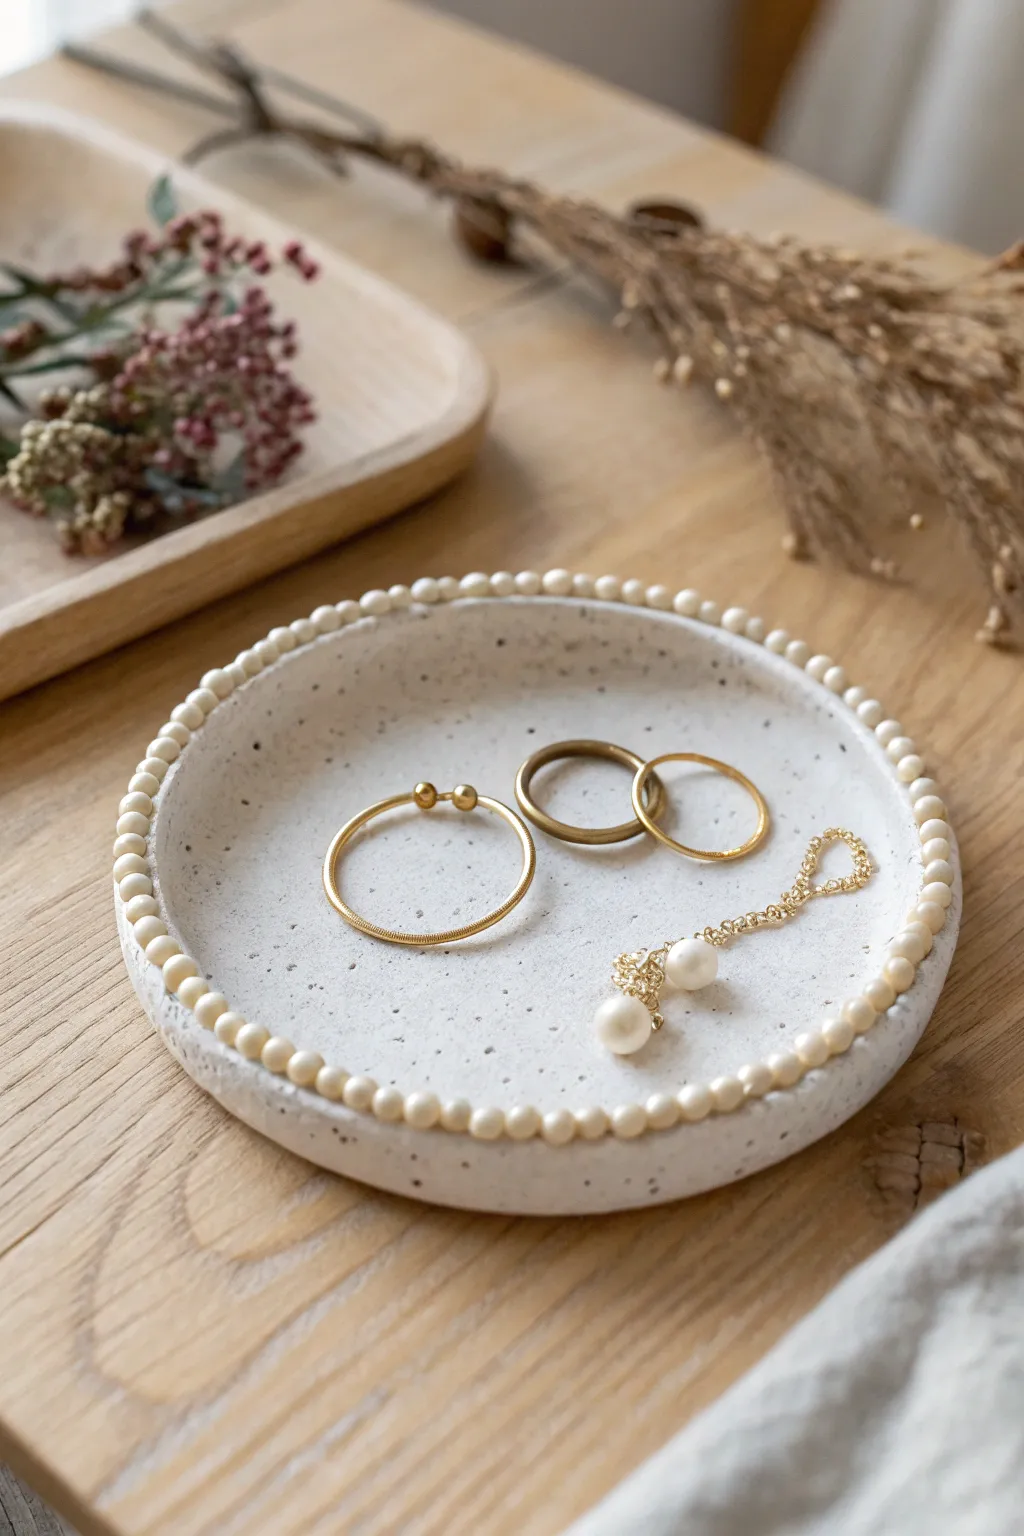
This elegant little tray mimics the look of high-end speckled stoneware but can be made right at home without a kiln. The faux pearl rim adds a delicate, vintage-inspired touch that perfectly frames your favorite rings and necklaces.
Detailed Instructions
Materials
- White AIR DRY clay
- Rolling pin
- Small bowl or circle template (approx. 4-5 inches)
- Faux pearl beads (small, ivory or pearlescent)
- Craft knife or clay cutter
- Water in a small cup
- Sponge or fine sandpaper
- Black acrylic paint
- Stiff bristle brush or old toothbrush
- Matte sealant or varnish
- Strong craft glue (e.g., E6000 or super glue)
Step 1: Shaping the Clay Base
-
Condition the Clay:
Begin by taking a handful of white air dry clay. Knead it in your hands for a minute or two until it is warm, pliable, and free of any large cracks. -
Roll it Out:
Roll the clay onto a smooth surface or a silicone mat. You want an even thickness of about 1/4 inch. If the clay sticks, you can lightly dust your surface with cornstarch. -
Cut the Circle:
Place your bowl or circle template onto the rolled clay. Use a craft knife to trace around the edge, cutting out a perfect circle. -
Smooth the Edges:
Dip your finger in a little bit of water and run it along the cut edge of the clay circle to smooth out any roughness or sharp corners. -
Create the Lip:
Gently curve the edges of the circle upward to create a shallow dish shape. You can do this by placing the clay circle inside a slightly larger bowl to help it hold its concave form while drying.
Clean Bead Holes
If using beads with holes, position them so the holes run parallel to the rim. This hides them better than if they face up or out.
Step 2: Adding the Speckled Finish
-
Dry the Base:
Allow your clay dish to dry completely according to the package instructions. This usually takes 24-48 hours. Flip it occasionally to ensure even drying. -
Sand for Smoothness:
Once bone dry, use a fine-grit sandpaper or a sanding sponge to buff away any fingerprints or uneven spots on the surface and rim. -
Prepare the Splatter:
Dilute a small amount of black acrylic paint with water. It should be thin enough to splatter easily but not so watery that it’s transparent. -
Splatter Effect:
Dip a stiff brush or old toothbrush into the paint mixture. Use your thumb to flick the bristles over the dish, creating fine black speckles. I recommend doing this inside a cardboard box to contain the mess. -
Let Paint Dry:
Allow the paint speckles to dry completely. This should only take about 15-20 minutes. -
Seal the Dish:
Apply a coat of matte sealant or varnish over the entire dish, front and back. This protects the clay from moisture and gives it that finished stoneware look.
Step 3: Attaching the Beaded Rim
-
Dry Fit the Beads:
Before gluing, arrange your faux pearl beads around the rim of the dish to ensure you have enough and to gauge the spacing. -
Apply Glue:
Working in small sections so the glue doesn’t dry too fast, apply a thin line of strong craft glue along the very top edge of the dish rim. -
Place the Beads:
Carefully press the pearls into the glue one by one. Try to keep the holes of the beads (if visible) facing sideways along the rim track so they are less noticeable. -
Adjust Position:
As you work your way around, gently nudge the beads together to minimize gaps. Ensure they sit evenly on the rim. -
Final Cure:
Let the glue cure fully according to the manufacturer’s directions before placing any jewelry into your new tray.
Cracking While Drying?
This happens if the clay dries too fast. Repair cracks by filling them with a slip mixture (water + clay) and smoothing it out with a damp finger.
Now you have a sophisticated place to keep your treasures safe and organized

The Complete Guide to Pottery Troubleshooting
Uncover the most common ceramic mistakes—from cracking clay to failed glazes—and learn how to fix them fast.
Organic Pinch Pots With Wavy Paint
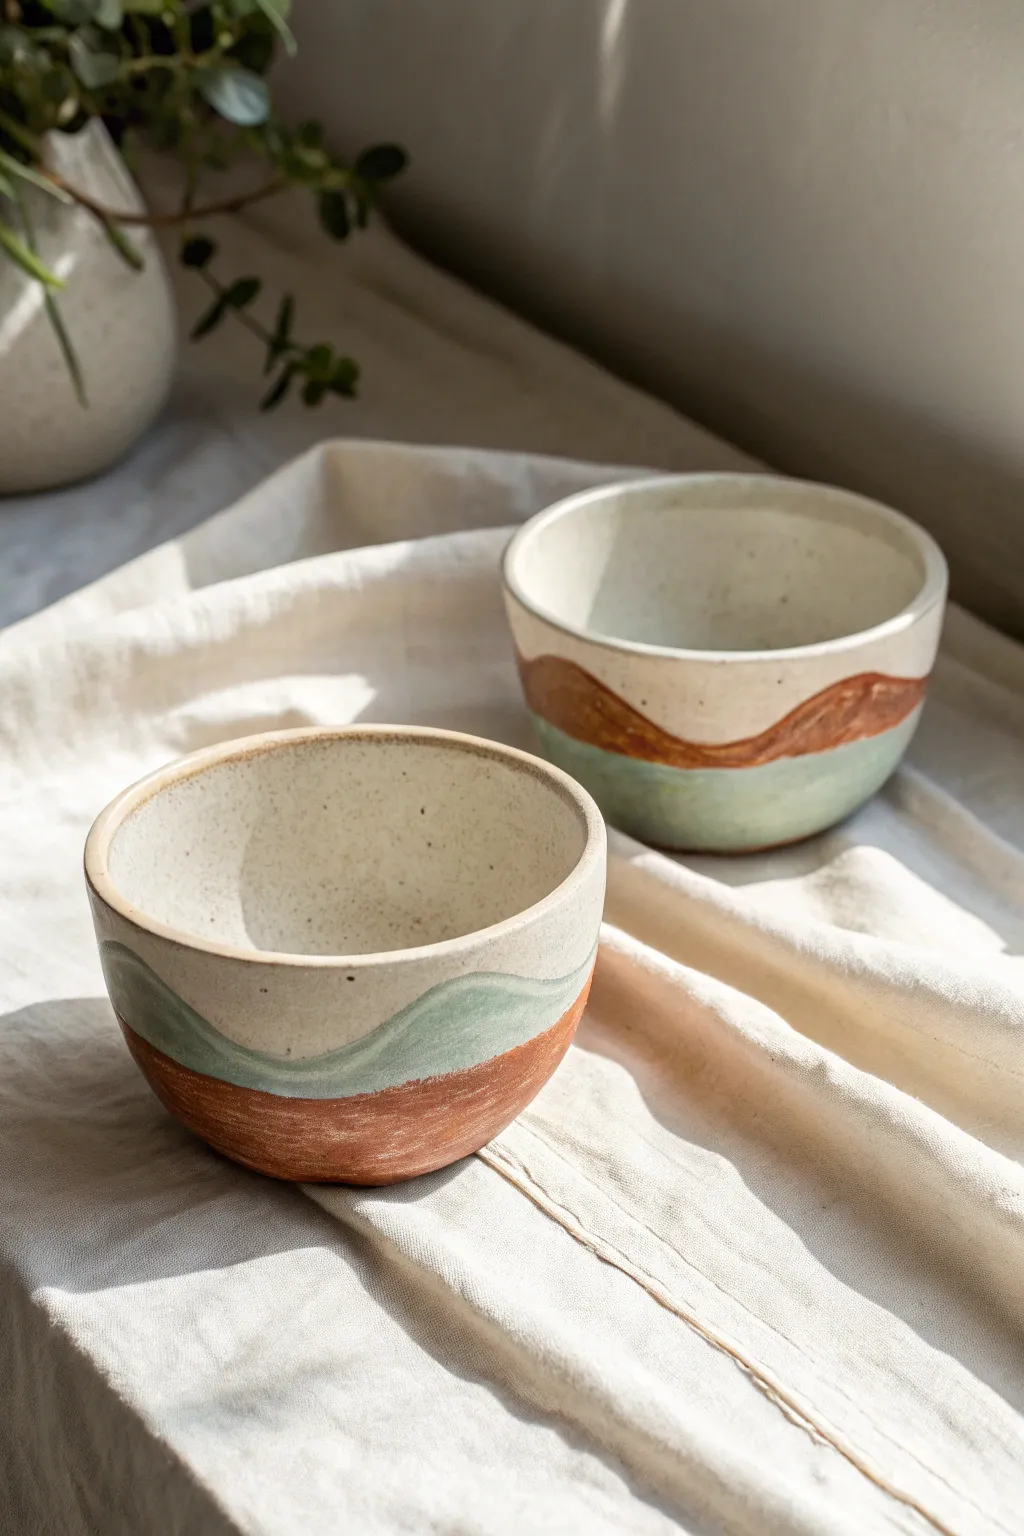
These simple yet elegant bowls feature gentle, wavy bands of earthy colors that evoke rolling hills or desert landscapes. Using basic pinch techniques and clever painting, you can create organic vessels that look high-end without needing a kiln.
Step-by-Step Tutorial
Materials
- White or light grey air dry clay
- Acrylic paints (Cream/White, Sage Green, Terracotta/Rust Brown)
- Small sponge
- Soft synthetic paintbrush (medium size)
- Small cup of water
- Potter’s needle tool or toothpick
- Fine grit sandpaper
- Matte or satin varnish
Step 1: Shaping the Clay
-
Prepare the clay:
Start by cutting off a piece of air dry clay about the size of a tennis ball. Knead it in your hands for a minute to warm it up and ensure it’s pliable and free of air bubbles. -
Form the initial sphere:
Roll the clay between your palms until you have a smooth, round ball. Try to smooth out any major cracks with a little water on your finger. -
Open the pot:
Hold the ball in your non-dominant hand. With your dominant thumb, press gently into the center of the ball, pushing down about three-quarters of the way through, leaving a thick base. -
Pinch the walls:
Using your thumb on the inside and fingers on the outside, gently pinch and rotate the clay. Work your way from the bottom up to the rim in a spiral motion. -
Even out thickness:
Continue pinching until the walls are roughly 1/4 inch thick. Aim for consistent thickness throughout, but remember that organic imperfections are part of the charm. -
Smooth the surfaces:
Dip your finger in a tiny bit of water and run it over the interior and exterior to smooth out fingerprints. If the rim is too jagged, gently tap the pot upside down on your table to level it. -
Dry slightly:
Let the pot sit for about 24-48 hours until it turns white and feels dry to the touch. I like to rotate them occasionally so the bottom dries evenly.
Cracks while drying?
Mix a tiny amount of fresh clay with water to make a paste (slip). Fill the crack with this paste, smooth it over with a finger, and let it dry again.
Step 2: Refining and Painting
-
Sand for smoothness:
Once fully dry, take fine-grit sandpaper and gently sand away any harsh ridges or bumps. Wipe away the dust with a slightly damp cloth or sponge. -
Trace the design:
Using a pencil, very lightly sketch two wavy lines around the circumference of the bowl. These will guide your paint layers. Make them flow organically rather than perfectly straight. -
Base coat:
Paint the entire interior and the top section of the exterior (above your first line) with the Cream or White paint. Allow this to dry completely. -
Add texture (optional):
To mimic the speckled clay look in the photo, dip a toothbrush in diluted black or brown paint and flick tiny specks onto the cream painted areas. -
Paint the middle wave:
Fill in the middle section between your pencil lines with the Sage Green paint. Use a soft brush to get a crisp edge against the cream section. -
Paint the base:
Paint the bottom section with the Terracotta/Rust color. Let the brush follow the wavy pencil line to create that rolling landscape effect. -
Distress the edges:
For a rustic look, you can lightly dab a dry sponge along the transition lines between colors to soften the boundaries slightly. -
Seal the piece:
Apply two coats of matte or satin varnish to protect the paint and give it a finished ceramic feel. Let the first coat dry fully before adding the second.
Mix it up
Reverse the color palette for a second bowl, putting the terracotta on top and cream on the bottom, or try shades of blue for an ocean wave theme.
Place these lovely bowls on a shelf to hold trinkets or just enjoy their calm, earth-toned beauty
Desk Organizer Set
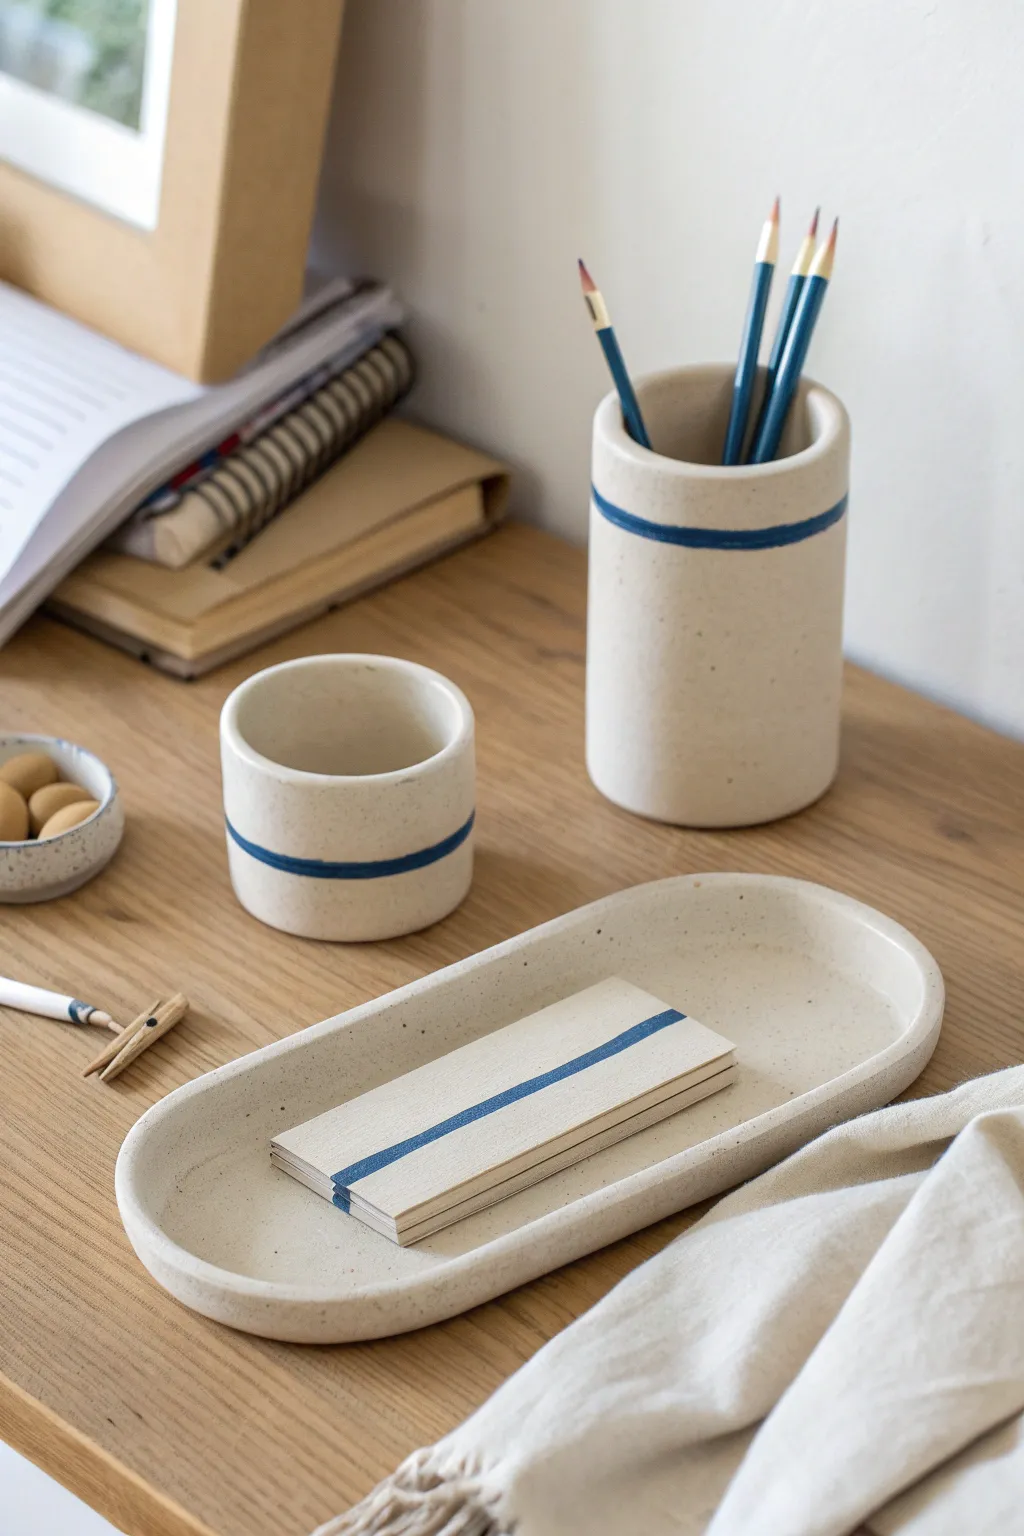
Bring a touch of modern simplicity to your workspace with this coordinated three-piece organizer set. Featuring a natural stone finish and bold cobalt stripes, these air dry clay vessels look just like high-end ceramics.
Step-by-Step Tutorial
Materials
- White or natural air dry clay (approx. 1kg)
- Rolling pin
- Clay knife or craft knife
- Slip (clay mixed with water)
- Two cylindrical forms (e.g., a glass and a spice jar) for shaping
- Sandpaper (medium and fine grit)
- Cobalt blue acrylic paint
- Fine detail paintbrush
- Sealant or varnish (matte finish)
- Faux stone spray paint (optional, for texture)
- Ruler
Step 1: Shaping the Pencil Cup
-
Roll the base:
Start by rolling out a slab of clay to an even thickness of about 1/4 inch. Use a circular cutter or trace around your larger cylindrical form to cut out the base for your pencil holder. -
Create the wall:
Roll out a long rectangular strip of clay. Measure the circumference of your base and cut the strip to length, adding a little extra for the seam. Ensure the height is around 4-5 inches. -
Assemble the cylinder:
Score (scratch) the edges of your base and the bottom edge of your wall. Apply slip to the scored areas. Wrap the wall around the base, pressing firmly to join them. -
Smooth the seam:
Join the vertical seam where the wall ends meet. Use your finger or a modeling tool to blend the clay together until the seam disappears. I find wetting my finger slightly helps create a smooth finish here.
Cracks happen!
If small cracks appear while drying, don’t panic. Mix a tiny bit of fresh clay with water to make a thick paste and fill the crack. Let dry and sand smooth.
Step 2: Creating the Tray and Bowl
-
Form the small cup:
Repeat the previous process but using a smaller form (like a spice jar) and cutting the wall shorter, roughly 2 inches high to create the small catch-all cup. -
Roll the tray slab:
For the oval tray, roll a larger slab of clay. Cut a long oval shape using a paper template or freehand. This will be the bottom of your tray. -
Add the rim:
Roll a long, thin snake or coil of clay. Place it directly on top of the outer edge of your oval base. You can score and slip this, but for low rims, blending firmly is often enough. -
Blend and smooth:
Use your thumb to smear the clay coil downward onto the base on the inside, and upward from the base onto the coil on the outside. Smooth everything out so it looks like one solid piece with a gently raised lip.
Pro Tip: Getting Straight Lines
Put your pot on a lazy susan or turntable. Hold your paintbrush steady in one spot and slowly rotate the table to get a perfectly straight painted line.
Step 3: Refining and Drying
-
Initial smoothing:
Dip a sponge in water and wring it out almost completely. Gently wipe all three pieces to remove fingerprints and harsh tool marks. -
Let it dry:
Allow all pieces to dry completely. This usually takes 24-48 hours depending on humidity. Rotate them occasionally so the bottoms dry evenly. -
Sanding:
Once bone dry, use medium grit sandpaper to level out any bumps on the rims or seams. Finish with fine grit sandpaper for a professional, smooth surface.
Step 4: Decorating
-
Base texture:
To achieve the speckled look in the photo, lightly mist the pieces with a ‘stone texture’ spray paint or flick brown diluted paint onto them with a toothbrush. Let this base coat dry fully. -
Mark the stripe:
Use a ruler and a pencil to lightly mark a horizontal line around the pencil cup and small bowl. For the tray, mark the line straight down the center. -
Paint the stripe:
Load a fine detail brush with cobalt blue acrylic paint. Carefully paint a consistent, medium-width stripe following your pencil guides. You can use painter’s tape for crisper edges if you have unsteady hands. -
Seal:
Protect your work with a coat of matte varnish. This seals the clay and makes your organizers durable enough for daily desk use.
Arrange your new custom set on your desk and enjoy the satisfaction of an organized, handmade workspace


What Really Happens Inside the Kiln
Learn how time and temperature work together inside the kiln to transform clay into durable ceramic.
Initial Stamped Napkin Rings
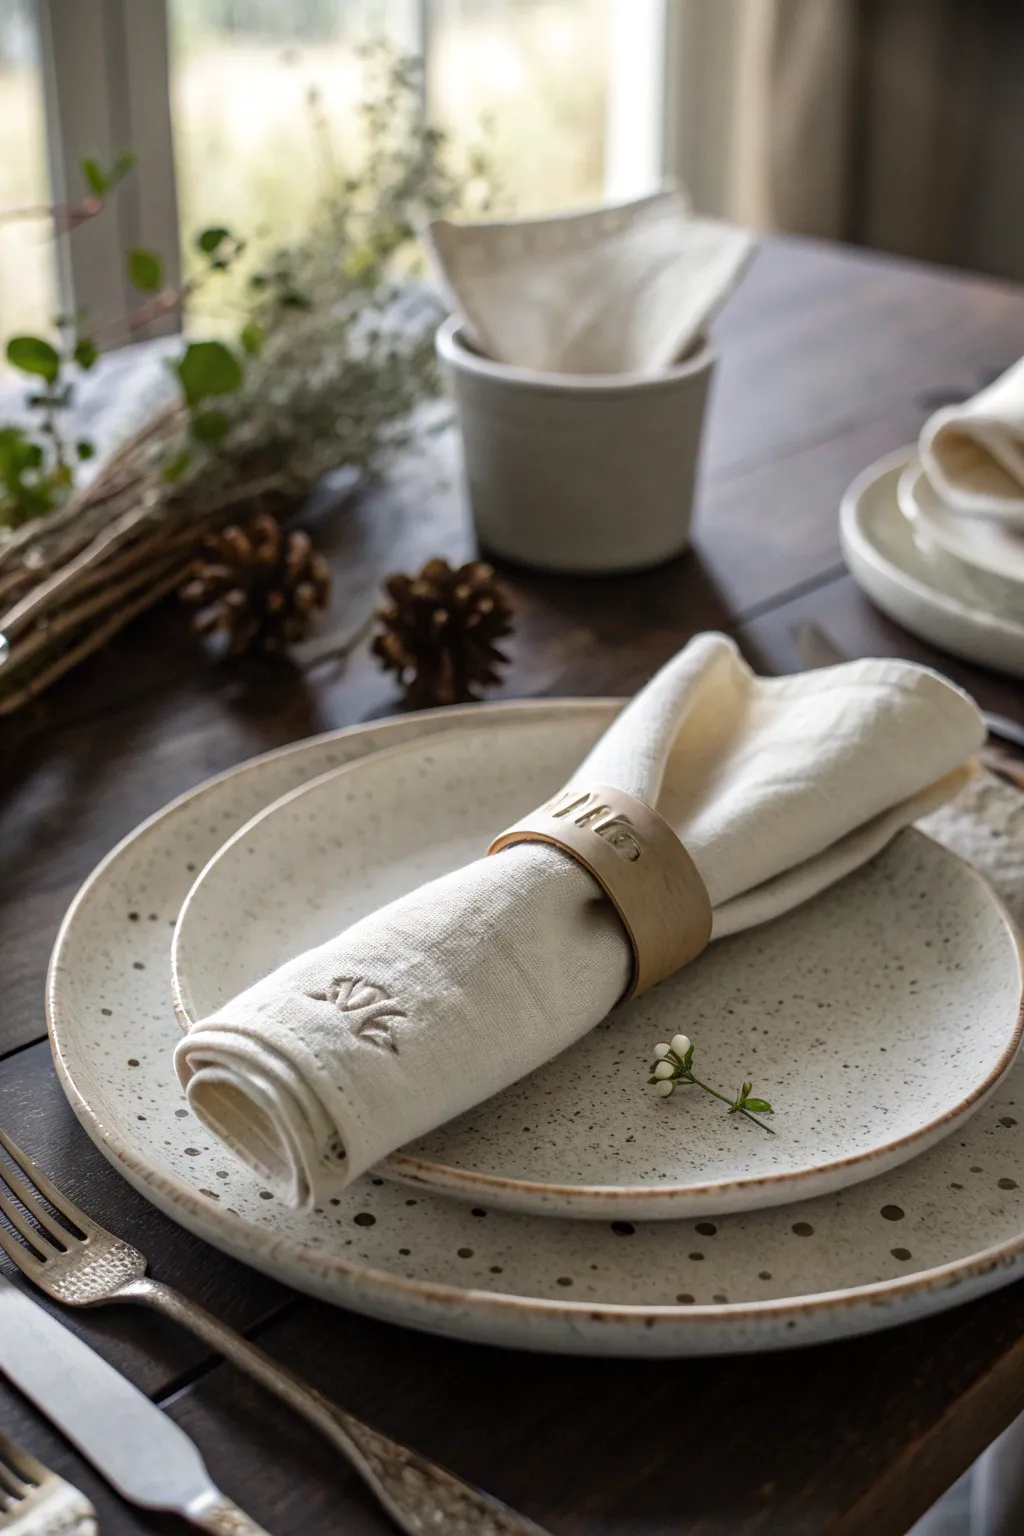
Elevate your table setting with these personalized napkin rings that mimic the warm, organic look of natural leather. Using air dry clay, you’ll create a simple yet sophisticated accessory featuring custom stamped initials for a bespoke touch.
Step-by-Step Guide
Materials
- White or terracotta air dry clay
- Rolling pin
- Parchment paper or craft mat
- Sharp craft knife or clay blade
- Ruler
- Alphabet stamp set
- Fine-grit sandpaper (400 grit)
- Acrylic paint (burnt umber, raw sienna, and white)
- Matte sealant or Mod Podge
- Small sponge or foam brush
- Empty paper towel roll or PVC pipe (about 1.5 inches diameter)
Step 1: Shaping the Rings
-
Condition the Clay:
Begin by taking a handful of air dry clay and kneading it thoroughly in your hands until it becomes warm, pliable, and free of any cracks. -
Roll it Out:
Place the clay on a sheet of parchment paper to prevent sticking. Use a rolling pin to flatten the clay into an even slab, aiming for a thickness of about 1/8 to 1/4 inch. -
Measure and Cut:
Using your ruler as a guide, cut a long rectangular strip with your craft knife. For a standard napkin ring, aim for dimensions around 1.5 inches wide and 6 inches long. -
Refine Edges:
Dip your finger in a little bit of water and gently run it along the cut edges of the clay strip to smooth out any sharpness or roughness. -
Stamp the Initials:
Locate the center of your clay strip. Press your alphabet stamps firmly into the damp clay to create the monogram. Be careful not to press so hard that you distort the overall shape. -
Form the Ring:
Carefully pick up the clay strip and wrap it around your paper towel roll or PVC pipe form. -
Seal the Seam:
Overlap the ends slightly at the back. Score both touching surfaces with your knife (make little scratches), add a drop of water, and press them together firmly to bond. -
Smooth the Join:
I like to use a specialized clay tool or just the back of a spoon to smooth the seam on the inside and outside so it looks seamless and strong.
Clean Lettering
Dust your rubber stamps with a tiny bit of cornstarch before pressing them into the clay. This prevents the clay from sticking to the intricate crevices of the letters.
Step 2: Drying and Finishing
-
Let it Dry:
Leave the ring on the tube form to dry. This ensures it keeps a perfect circle shape. Allow it to air dry for at least 24-48 hours until completely hard and white. -
Sand for Perfection:
Once fully dry, slide the ring off the form. Use fine-grit sandpaper to gently buff the surface and edges, removing any fingerprints or uneven spots. -
Mix the Leather Tone:
To achieve that faux leather aesthetic, mix a beige-brown tone. Combine a drop of burnt umber with plenty of white and a touch of raw sienna. -
Apply Base Coat:
Paint the entire ring, inside and out, with your mixed color. A sponge brush works best here to avoid visible brushstrokes. -
Add Depth:
While the paint is still slightly tacky, use a dry cloth or paper towel to gently wipe some paint off the raised surface, leaving darker pigment in the stamped letters. -
Seal the Project:
Protect your work from food stains and moisture by applying a coat of matte sealant or Mod Podge over the entire surface. -
Final Cure:
Let the sealant cure completely according to the bottle instructions before using them with your best linens.
Texture Trick
Before cutting the clay strip, gently press a piece of real faux leather or coarse fabric onto the slab to imprint a subtle, realistic leather grain texture.
Set your table with these charming handmade rings and enjoy the rustic elegance they bring to your meal
Boho Rainbow Decor Pieces
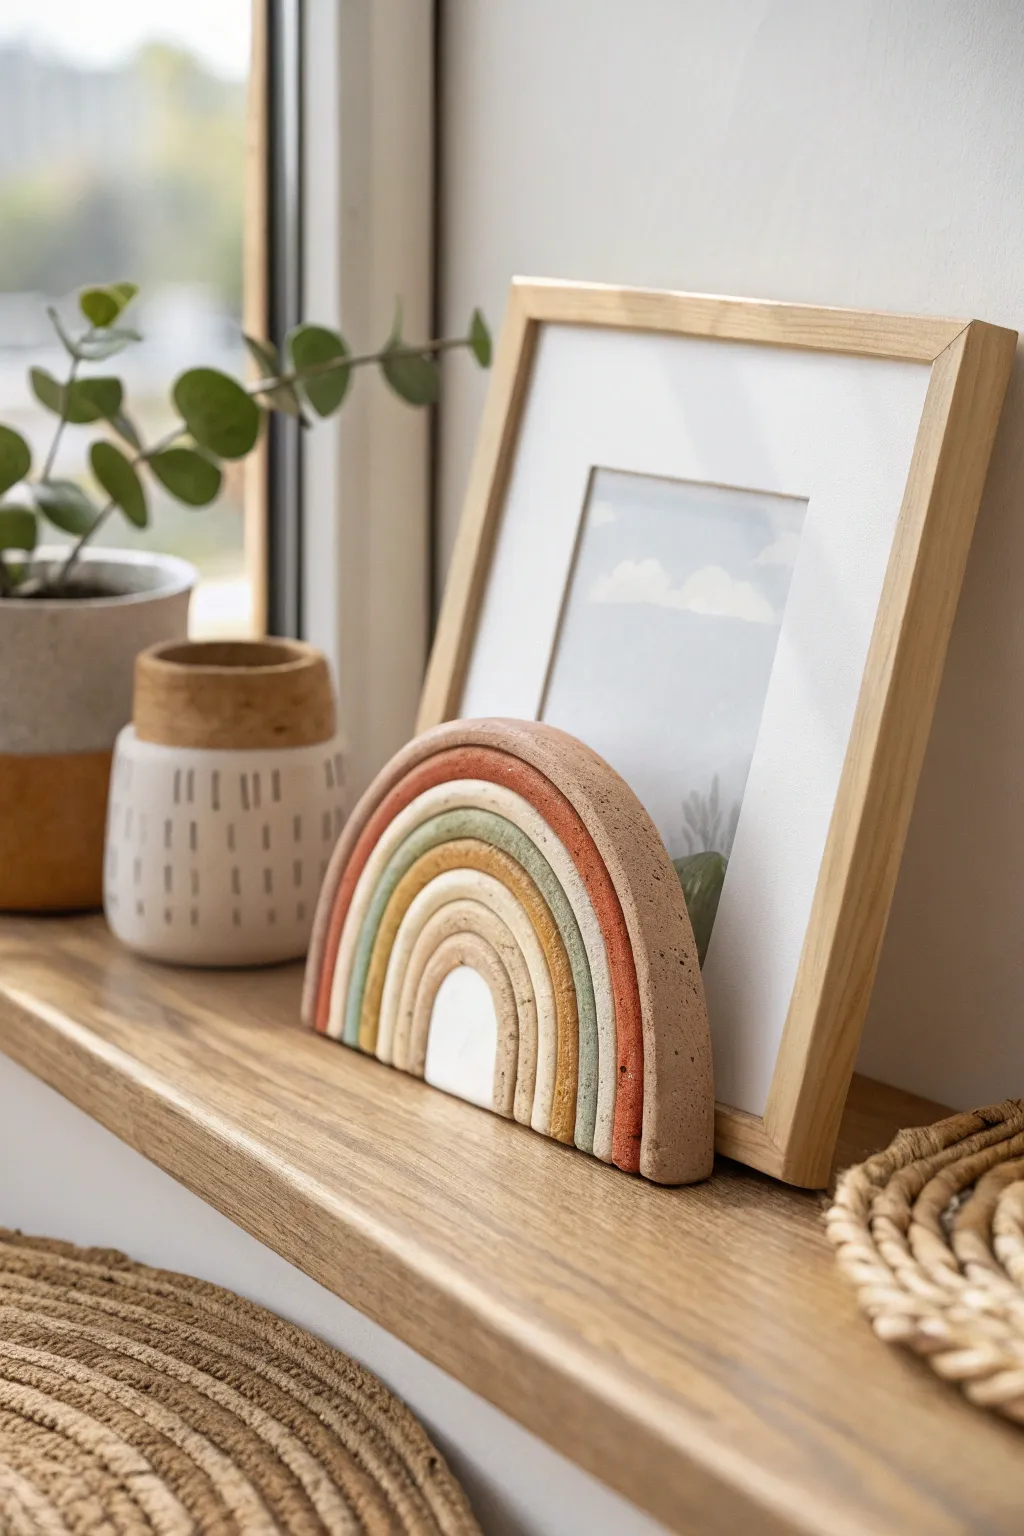
Add a touch of earthy warmth to your shelves with this standing terracotta-style rainbow. This project mimics the texture and tones of natural stone, creating a minimalist piece that looks lovely supporting a picture frame or standing solo.
Step-by-Step
Materials
- Air-dry clay (white or terracotta color)
- Acrylic paints (terracotta, sage green, mustard yellow, cream, beige)
- Baking soda (to add texture)
- Rolling pin
- Craft knife or clay cutter
- Small bowl of water
- Fine-grit sandpaper
- Palette for mixing paints
- Paintbrushes (flat and detail)
- Ruler
- Parchment paper or silicone mat
Step 1: Shaping the Arches
-
Prepare your workspace:
Lay down parchment paper or a silicone mat to prevent sticking. Grab a large chunk of air-dry clay and knead it until it’s pliable and smooth. -
Roll the snakes:
Divide your clay into five balls, graduating in size from small to large. Roll each ball into a long, even snake (log) about 1/2 inch to 3/4 inch thick. Aim for consistent thickness across all logs. -
Form the first arch:
Take the smallest log and bend it into a tight U-shape to form the center arch. Place it flat on your work surface. Use a ruler to trim the bottom ends so they are perfectly flat and even. -
Build the rainbow:
Take the next largest log and curve it snugly over the first arch. Press them gently together so they adhere slightly, but don’t smash the roundness. Continue this process with the remaining three logs until you have five nested arches. -
Trim the base:
Once all arches are nested, take your long ruler and lay it across the bottom legs of the rainbow. Use your craft knife to slice straight across all the legs at once, ensuring the rainbow will stand up straight when dry. -
Smooth the seams:
If you want the pieces to be permanently joined, dip your finger in water and gently smooth the clay on the *back* side where the arches touch, blending the clay together to create a solid unit. -
Refine the front:
On the front, keep the distinct rounded shape of each log visible. Just dab a tiny bit of water between arches to help them stick without losing definition. -
Let it dry:
Instructions vary by brand, but generally, let the piece dry for 24-48 hours. Flip it over halfway through the drying process to ensure the back dries evenly and prevents warping.
Step 2: Adding Color & Texture
-
Prepare textured paint:
To achieve that stony, matte look seen in the photo, mix baking soda into your acrylic paints. The ratio is roughly 1 part baking soda to 2 parts paint. It creates a fluffy, gritty texture. -
Mix your palette:
Create muted, boho shades. You’ll need a deep terracotta rust, a soft sage green, a mustard ochre, a warm beige, and a creamy white. -
Paint the outer arch:
Start with the largest, outermost arch. Apply the plain beige or sandy color first as a base if your clay isn’t already neutral. I prefer to paint the back edge first to test the color. -
Apply the rust tone:
Paint the second arch (moving inward) with your textured terracotta rust mix. Dab the paint on rather than stroking it to enhance the stone-like texture. -
Paint the middle arches:
Paint the third arch with the sage green mixture, and the fourth with the mustard ochre. Be careful near the seams; a small detail brush helps keep the lines crisp. -
Finish the center:
Paint the smallest, central arch with the creamy white mixture. This brightens the center and adds contrast. -
Speckling effect:
For the final stone effect, mix a tiny bit of dark brown paint with water until it’s runny. Dip a stiff brush (or toothbrush) in it and flick the bristles with your thumb to spray tiny speckles over the entire dried rainbow. -
Final cure:
Allow the paint to dry completely. The baking soda paint dries very matte and hard, mimicking ceramic.
Rainbow Won’t Stand?
If the base isn’t perfectly flat after drying, tape fine-grit sandpaper to a table. Rub the bottom of the rainbow back and forth over it until it sits flush.
Level Up: Bookend Style
Make two rainbows and glue a heavy L-shaped metal bookend bracket to the back of each. Now you have functional, heavy-duty bookends for your shelf.
Place your finished rainbow on a windowsill or shelf to bring a natural, calming vibe to your space

TRACK YOUR CERAMIC JOURNEY
Capture glaze tests, firing details, and creative progress—all in one simple printable. Make your projects easier to repeat and improve.
Moon Phase Wall Hanging
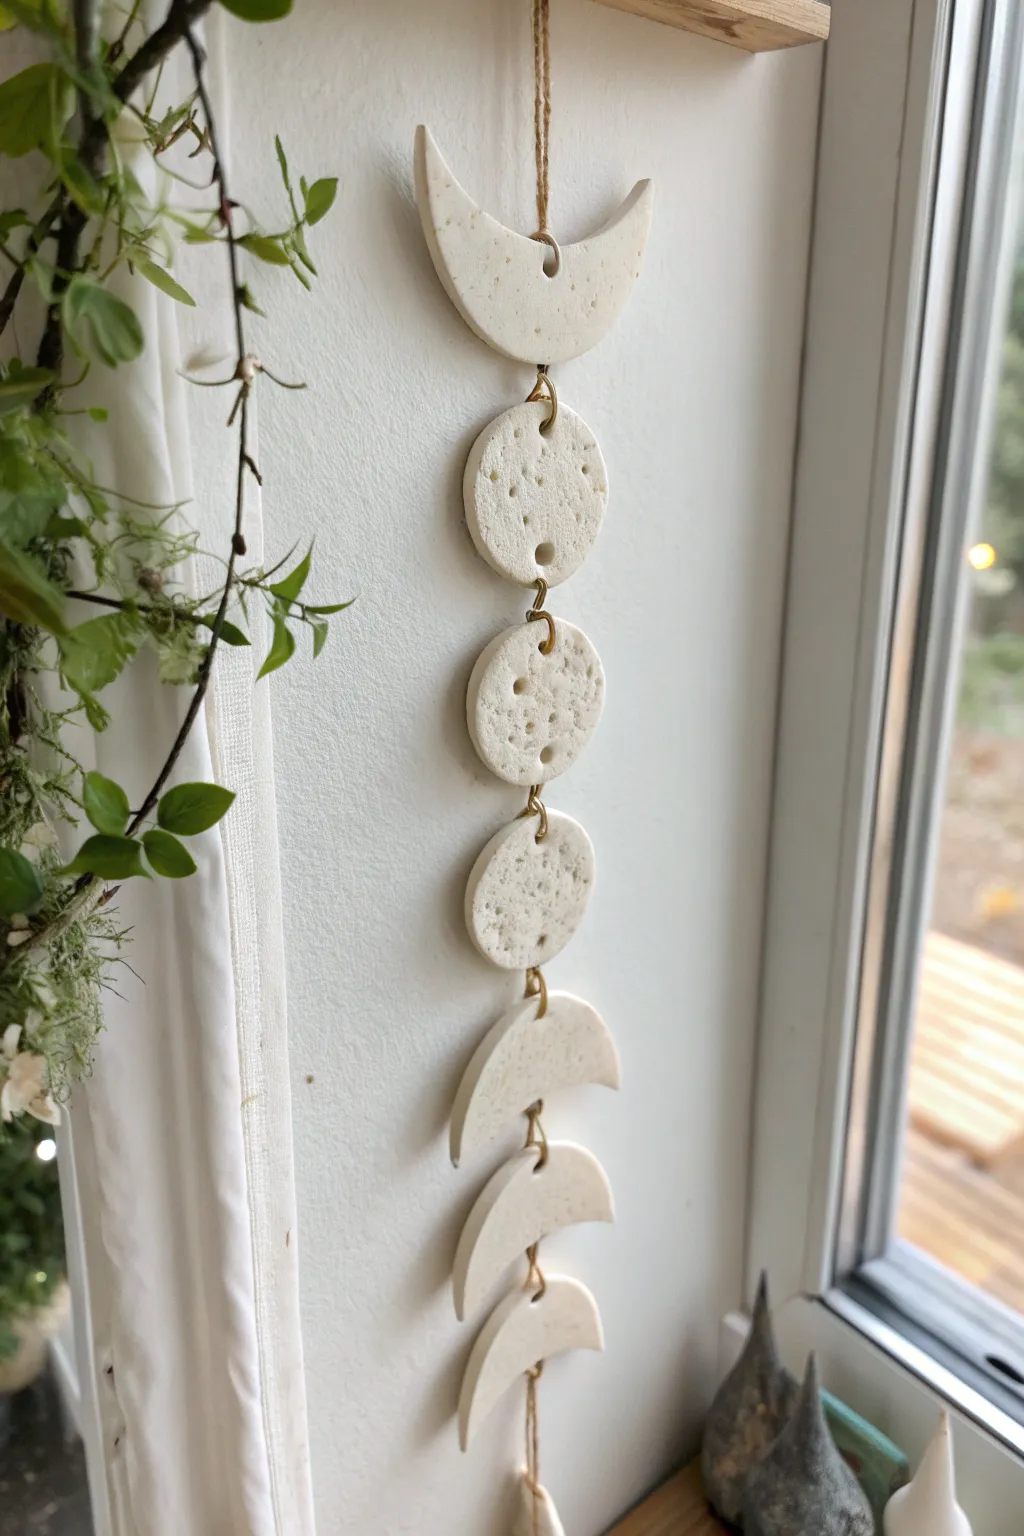
Bring the calming energy of the lunar cycle into your home with this textured wall hanging. The speckled white clay and brass accents create a modern, bohemian piece that looks far more expensive than it is to make.
Step-by-Step Guide
Materials
- White stone-effect or speckled air dry clay
- Rolling pin
- Circle cookie cutter (approx. 2-3 inches)
- Craft knife or clay tool
- Small straw or cocktail stick (for holes)
- Sandpaper (fine grit)
- Gold or brass jump rings (10-12mm)
- Jewelry pliers
- Jute twine or cord
Step 1: Shaping the Moons
-
Prepare the workspace:
Lay down a sheet of parchment paper or a silicone mat to prevent sticking. This makes it much easier to lift your delicate moon shapes later without warping them. -
Roll out the clay:
Take a large chunk of your speckled clay and knead it briefly to warm it up. Roll it out into an even slab, aiming for a consistent thickness of about 1/4 inch. -
Cut the central circles:
Using your circle cookie cutter, press firmly into the clay to cut out three perfect circles. These will represent the full moon and the gibbous phases. -
Create the crescent shapes:
Cut out four more circles with the same cutter. To turn these into crescents, offset the cutter over the clay circle you just made and cut again, slicing away a football-shaped section to leave a crescent moon behind. -
Add surface texture:
The charm of this piece is its crater-like texture. Use the end of a paintbrush, a scrunched-up ball of foil, or coarse sandpaper to gently press random indentations and divots into the surface of each shape.
Preventing Curling
If your clay starts lifting at the edges while drying, place a lightweight book or board on top of the pieces (sandwich them in parchment paper first) to keep them perfectly flat.
Step 2: Refining and Drying
-
Pierce holes for hanging:
Using a straw or a cocktail stick, poke holes in the pieces. The top crescent needs one hole at the top and one at the bottom. The middle five pieces need a hole at the very top and very bottom. The final crescent only needs a top hole. -
Check hole alignment:
Lay the pieces out in a vertical line to ensure your holes are centered; if they are off-center, the finished mobile will hang crookedly. -
Smooth the edges:
Dip your finger in a little bit of water and gently run it along the cut edges of your clay pieces to smooth out any roughness or loose bits before drying. -
Allow to dry completely:
Let the pieces air dry flat on a wire rack for at least 24-48 hours. Flip them over halfway through the drying process to ensure even drying and prevent curling. -
Sand for finish:
Once fully bone dry, lightly sand the edges with fine-grit sandpaper to remove any sharp burrs or irregularities.
Step 3: Assembly
-
Open the jump rings:
Using two pairs of jewelry pliers (or pliers and your fingers), twist the brass jump rings open sideways rather than pulling them apart, which helps maintain their circular shape. -
Connect the top phases:
Start with the top crescent. Loop a jump ring through its bottom hole and the top hole of the first circle piece below it. Close the ring securely. -
Complete the chain:
Continue working your way down, connecting each moon phase to the next with the brass rings until the full vertical chain is assembled. I like to double-check that all “front” sides are facing the same way. -
Prepare the hanging loop:
Cut a length of jute twine, about 10 inches long. Fold it in half to create a loop and tie a knot at the loose ends. -
Attach the twine:
Thread the loop end of the twine through the very top hole of the first crescent moon, then pull the knotted end through the loop to secure it with a lark’s head knot.
Faux Stone Look
Can’t find speckled clay? Mix spent coffee grounds or cracked black pepper into plain white air dry clay before rolling it out to achieve that organic, stony texture.
Hang your new lunar artwork near a window to catch the light and enjoy the handmade atmosphere it adds to your room
Clay Suncatcher Charm Garlands
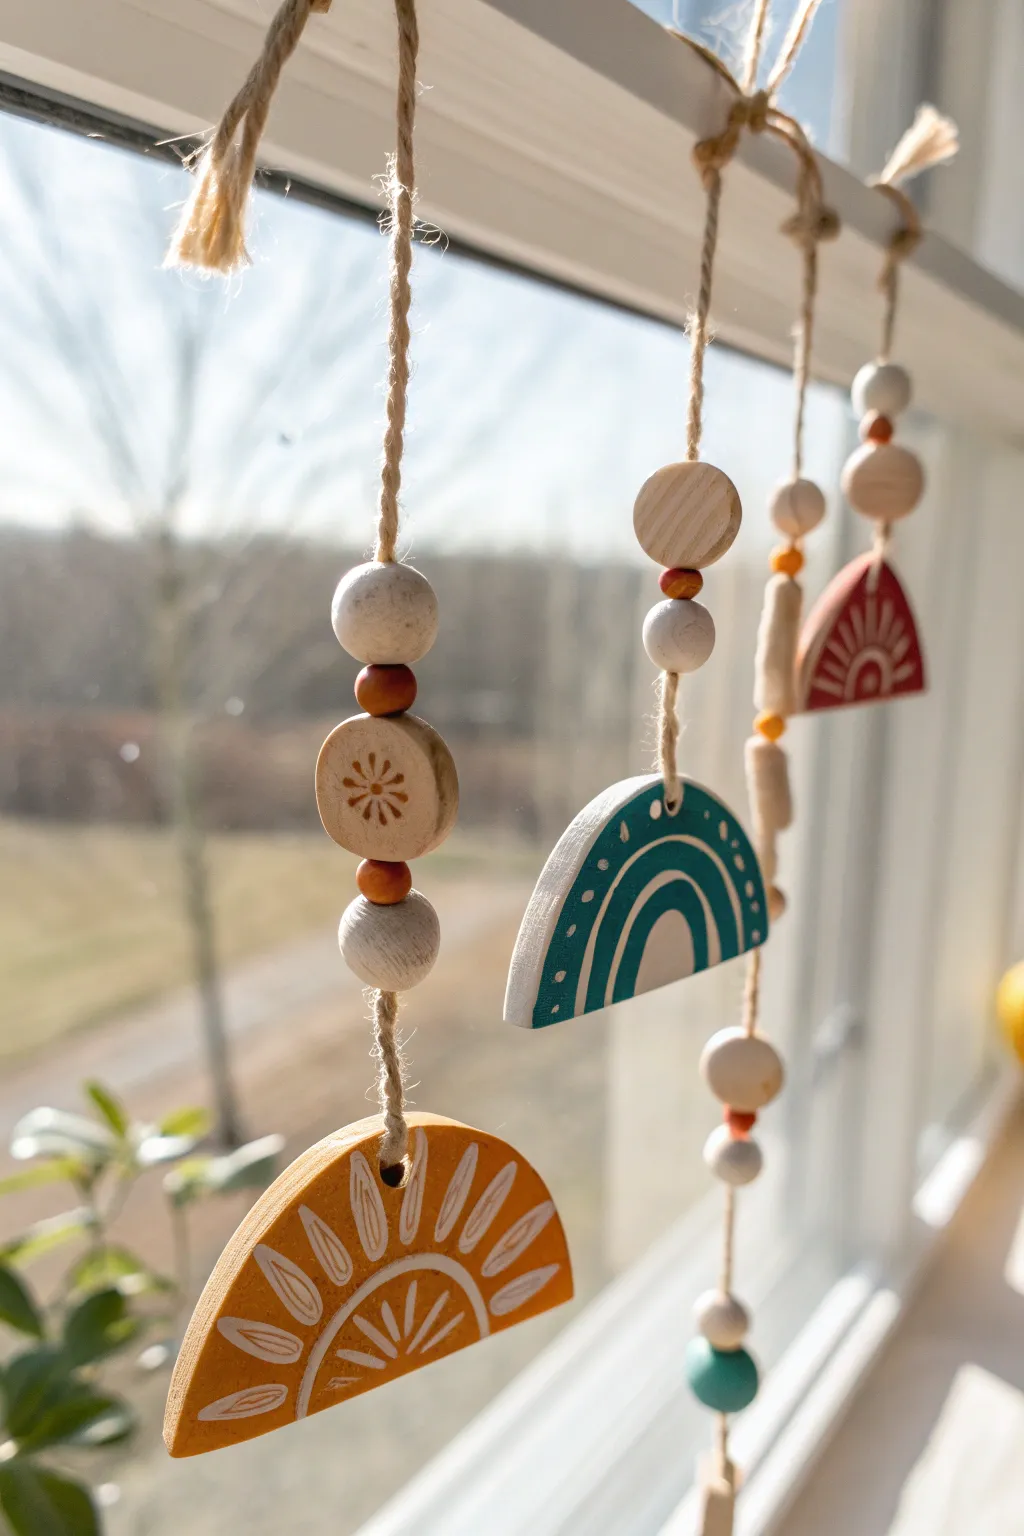
Bring a touch of whimsical sunshine into your window with these delightful air-dry clay garlands. Featuring hand-painted celestial and rainbow motifs strung with natural wooden beads, they add a warm, artisanal vibe to any room.
Detailed Instructions
Materials
- Air-dry clay (white or terracotta)
- Rolling pin
- Circle cookie cutters or a drinking glass
- Sharp craft knife or clay tool
- Jute twine or hemp cord
- Wooden beads (various sizes, round and flat)
- Acrylic paint (Mustard Yellow, Teal, Burnt Orange, White)
- Fine detail paintbrush (size 0 or 00)
- Skewer or straw (for making holes)
- Sandpaper (fine grit)
- Matte sealant or varnish (optional)
Step 1: Shaping the Clay Elements
-
Roll and cut:
Begin by rolling out your air-dry clay on a smooth surface to an even thickness of about 1/4 inch. Use circle cutters to punch out several round shapes. -
Create semi-circles:
Using your craft knife, cut the circles in half to create the semi-circle shapes used for current rainbows and suns. You can also create smaller, coin-sized circles for spacer beads if desired. -
Pierce holes:
While the clay is still wet, carefully poke a hole through the top center of each piece using a skewer or straw. Ensure the hole is large enough for your twine to pass through. -
Smooth the edges:
Dip your finger in a little water and run it along the cut edges of your clay pieces to smooth out any roughness. -
Let them dry:
Place your clay pieces on a wire rack or parchment paper to dry completely. This usually takes 24-48 hours, depending on humidity; flip them halfway through to prevent curling.
Cracking Clay?
If your clay cracks while drying, mix a tiny bit of fresh clay with water to make a paste (slip) and fill in the cracks, then smooth over.
Step 2: Painting the Designs
-
Sand for smoothness:
Once fully bone-dry, lightly sand any sharp edges or bumps with fine-grit sandpaper for a professional finish. -
Base coats:
Paint the semi-circles in solid block colors. Use mustard yellow for the sun, deep teal for the rainbow, and burnt orange for the abstract shapes. Apply two coats for full opacity. -
Leave some natural:
For the smaller round disc beads shown in the design, leave the clay raw or paint it a neutral beige to mimic wood. -
Paint the sun rays:
Using your finest brush and white paint, add details to the yellow piece. Paint alternating tear-drop shapes and thin lines radiating from the bottom center to create a stylized sunburst. -
Detail the rainbow:
On the teal piece, paint concentric white arches. I like to vary the line styles—adding dots between solid lines adds lovely visual interest. -
Seal the work:
After the paint is completely dry, apply a thin coat of matte varnish to protect the artwork from fading in the sunlight.
Step 3: Assembly and Hanging
-
Prepare the twine:
Cut three lengths of jute twine, each about 24 inches long. Tie a sturdy loop at the top of each piece for hanging. -
Start threading:
Begin threading your components. Use intended patterns from the image: alternating wooden beads, small clay discs, and your main painted charms. -
Secure with knots:
To keep beads floating at different heights, tie a simple overhand knot in the twine right underneath where you want a bead to sit. -
Attach the main charm:
Tie the main painted semi-circle (sun or rainbow) at the very bottom of the strand. Secure it with a firm double knot. -
Top spacers:
Add a few final wooden beads near the top loop to balance the weight visually. -
Trim excess:
Trim any excess twine from the bottom knots, leaving a short tail if you like the rustic look, or fraying the end slightly for texture.
Make It Sparkle
Add crystal beads or glass prisms between the clay pieces to catch the sunlight and throw rainbows around your room.
Hang your new creations in a sunny spot and enjoy the handmade charm they bring to your space