Whenever I want a project that feels a little magical, I reach for silver clay—it lets you press real-world textures right into your design and then fire it into solid metal. Here are my favorite silver clay ideas for turning leaves, shells, and everyday textures into wearable keepsakes you’ll actually want to make (and remake).
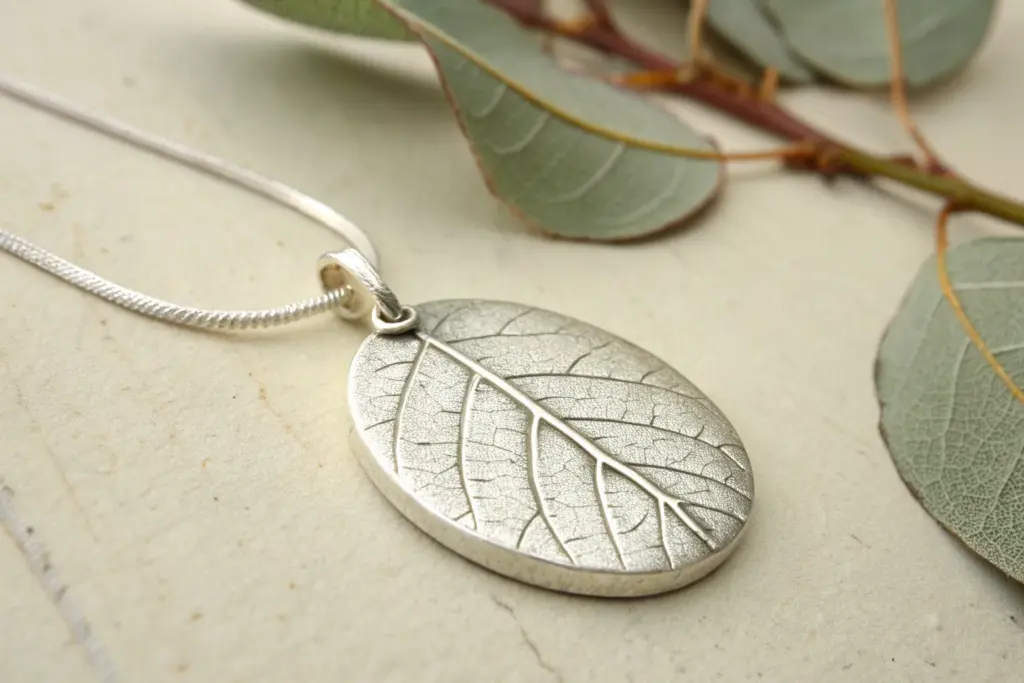
Leaf-Imprint Pendant
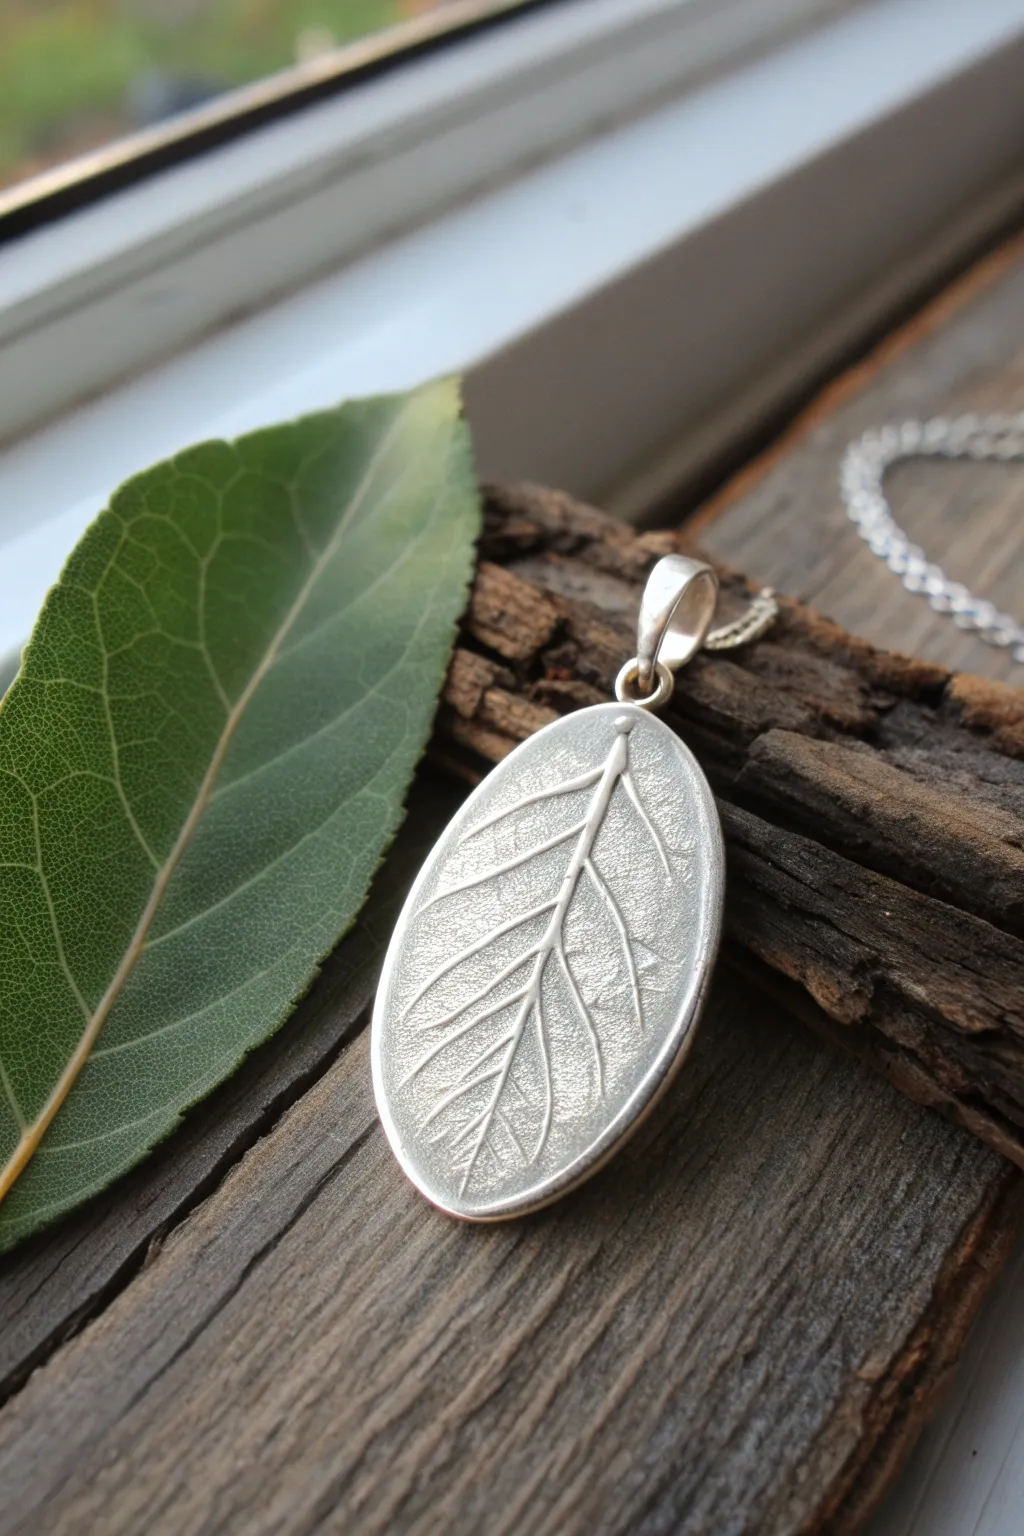
Capture the intricate details of nature with this elegant silver clay pendant featuring a deep leaf impression. The smooth, raised border frames the botanical texture beautifully, creating a sophisticated keepsake that looks professionally cast.
Step-by-Step Guide
Materials
- Silver metal clay (approx. 10g package)
- Fresh leaf with prominent veins (e.g., sage, hydrangea, or bay)
- Oval clay cutter or geometric template
- Rolling pin or acrylic roller
- Playing cards or spacers (1.5mm and 1mm thick)
- Olive oil or badger balm (release agent)
- Needle tool or craft knife
- Clay shaper or small paintbrush
- Small kiln or butane torch
- Stainless steel wire brush
- Agate burnisher
- Sterling silver jump ring or bail
- Fine grit sandpaper (600-1200 grit)
Step 1: Preparation & Imprinting
-
Leaf Selection:
Choose a fresh, sturdy leaf with a distinct vein structure on the back. The back of the leaf always provides a sharper texture than the front. -
Lubricate Surfaces:
Lightly coat your work surface, your rolling pin, and your hands with a tiny amount of olive oil or badger balm to prevent stickiness. -
Roll the Base:
Take your lump of silver clay and roll it out onto a playing card or spacer stack about 1.5mm thick. This initial slab needs to be slightly larger than your intended cutter. -
Impressing the Texture:
Place the leaf vein-side down onto the clay slab. Roll over the leaf firmly once with your roller to embed the texture deeply into the silver. -
Cutting the Shape:
Position your oval cutter over the most interesting part of the leaf pattern. Press down firmly to cut the shape, but leave the cutter in place for a moment. -
Removing Excess:
While the cutter is still pressing down, peel away the excess clay from the outside. Then, carefully lift the cutter and peel the leaf off the clay to reveal the design.
Step 2: Adding the Border & Refinement
-
Creating the Rim Coil:
Roll a thin, even snake of fresh clay on your work surface. It should be long enough to go around the entire circumference of your pendant. -
Attaching the Rim:
Apply a tiny amount of water or clay paste along the very edge of your oval pendant. Gently press the snake onto this wet edge to form a raised frame. -
Securing the Seam:
Use a rubber-tipped clay shaper to blend the outside edge of the coil downward into the base clay, ensuring a seamless bond. I like to keep the inside edge of the coil distinct to frame the leaf. -
Attaching the Bail:
Create a small loop or embed a pre-made fireable bail at the top of the oval. Secure it with plenty of clay paste so it integrates fully with the rim. -
Drying:
Allow the piece to dry completely on a warming plate or simply overnight. The clay must be bone dry before firing. -
Pre-Fire Sanding:
Once dry, gently sand the edges and the rim with fine-grit sandpaper to smooth out any fingerprints or sharp angles. Be careful not to sand away the leaf texture.
Keep it Cool
Work quickly! Silver clay dries out fast. Keep a damp paper towel over any clay you aren’t currently manipulating to prevent cracking.
Step 3: Firing & Finishing
-
Firing:
Fire the piece according to your specific clay brand’s instructions. A kiln is ideal for maximum strength (usually around 1200°F/650°C), but a butane torch works well for a piece of this size. -
Quenching:
After firing, quench the hot piece in a bowl of water (unless your clay instructions advise air cooling) to instantly cool it. -
Brushing:
The silver will look white and matte initially. Scrub it vigorously with a stainless steel wire brush and a drop of dish soap to bring out the metallic silver shine. -
Burnishing Details:
Use an agate burnisher to rub the raised rim and the high points of the leaf veins. This polishes the silver to a mirror shine, creating contrast against the textured background. -
Final Polish:
If desired, apply a liver of sulfur patina to darken the recesses, then polish the high points again with a polishing cloth to make the leaf design pop.
Make it Shine
After firing, tumble the pendant with steel shot and water for 1-2 hours. This work-hardens the silver and creates a brilliant, uniform shine effortlessly.
String your new pendant onto a delicate chain and enjoy wearing a permanent piece of nature


Fern Frond Stud Earrings
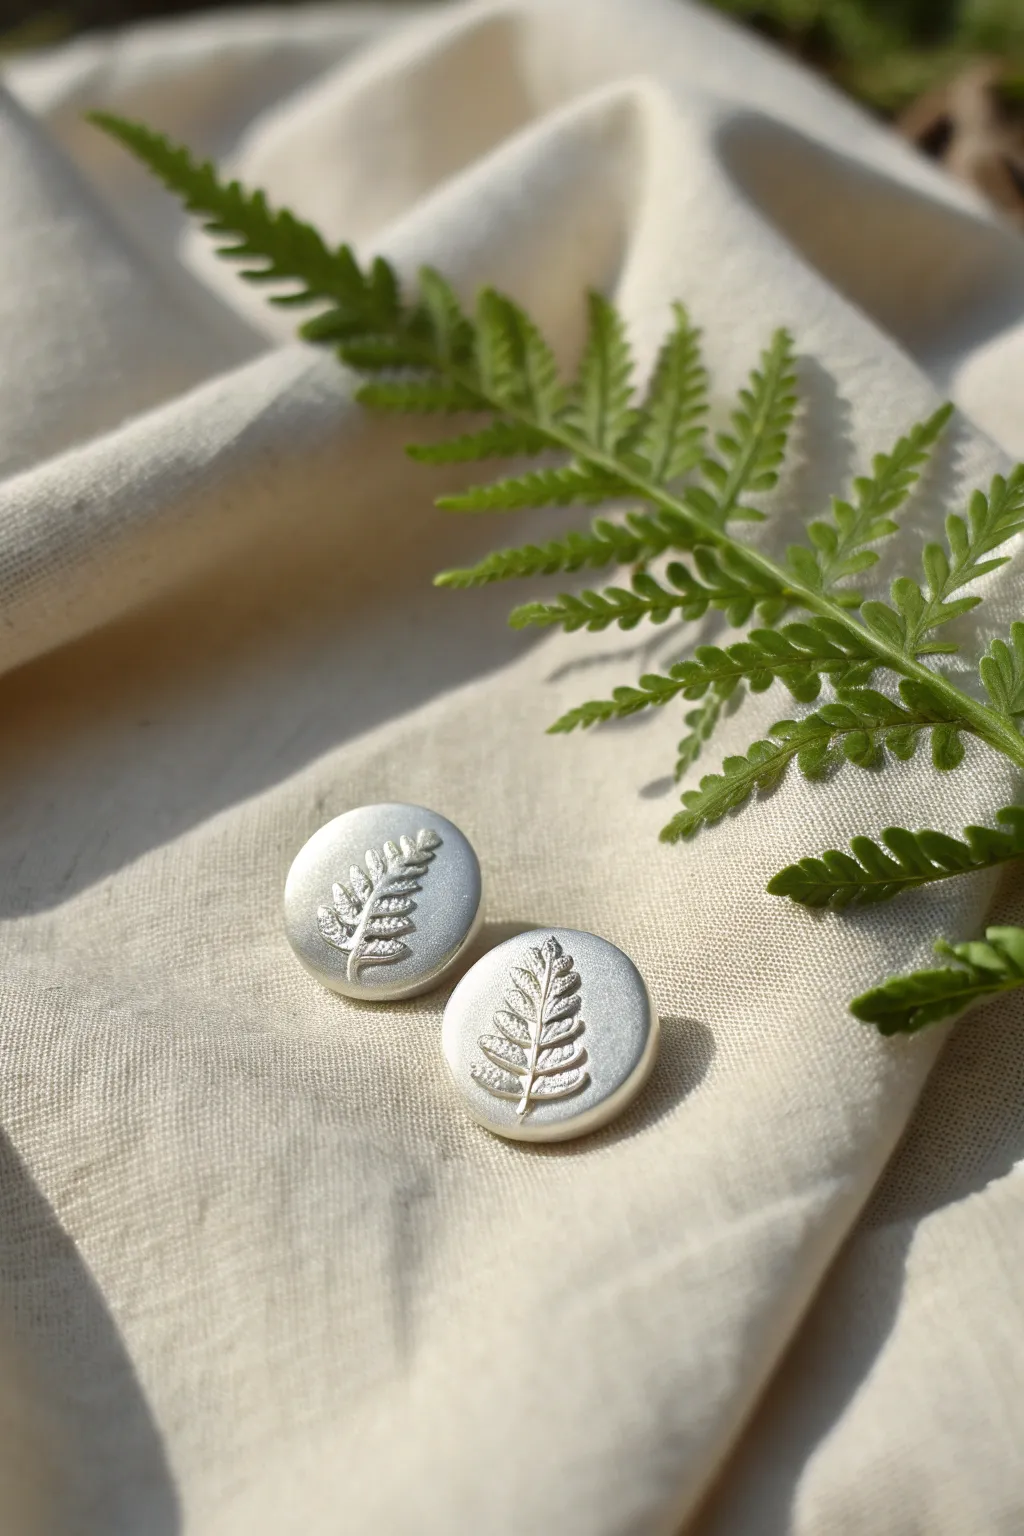
Capture the delicate details of nature with these simple yet elegant silver clay earrings. Using a fresh fern frond to create a distinct texture, you’ll craft durable fine silver studs that have a beautiful organic feel.
How-To Guide
Materials
- Silver metal clay (approx. 5g to 7g)
- Small fern frond or similar botanical leaf
- Rolling pin or acrylic roller
- Playing cards (or spacers) for thickness
- Small round cutter (approx. 10mm – 12mm)
- Olive oil or Badger Balm (release agent)
- Craft knife or needle tool
- Sanding sponges (fine and superfine)
- Sterling silver earring posts
- Torch or kiln for firing
- Agate burnisher
- Two-part epoxy glue
- Liver of sulfur (optional for antiquing)
- Polishing cloth
Step 1: Preparation & Shaping
-
Prepare your workspace:
Begin by setting up a clean, non-stick work surface. A Teflon sheet or a laminated card works perfectly. Make sure your hands are clean and slightly lubricated with a tiny bit of olive oil or Badger Balm to prevent the clay from sticking to your skin. -
Condition the clay:
Take your lump of silver clay out of the package. Knead it gently in your fingers for a few moments until it feels pliable and smooth, ensuring there are no cracks. If it feels dry, touch a drop of water to it, but don’t over-wet. -
Roll the base slab:
Place your clay on the work surface. Set a stack of 3 to 4 playing cards on either side of the clay to act as depth guides. Roll the clay into a smooth slab using your acrylic roller, ensuring an even thickness across the piece. -
Position the botanical:
Select a small, perfect section of your fern frond. Gently press it onto the clay slab where you want the impression. I find it helpful to lightly roll over the leaf once to ensure it makes full contact before the final heavy roll. -
Create the texture:
Remove one card from each stack to make the guides slightly thinner. Roll over the fern leaf firmly and steadily in one single pass. This compresses the clay around the leaf veins, creating a deep, sharp impression. -
Remove the leaf:
Carefully lift the edge of the fern with a needle tool or tweezers and peel it away from the clay. Do this slowly to avoid distorting the fresh impression. -
Cut the shapes:
Using your small round cutter, position the circle over the best part of the fern pattern. Press down firmly to cut out two identical circles. Lift the cutter; usually, the clay stays inside or on the surface.
Step 2: Refining & Firing
-
Dry the pieces:
Let the clay circles dry completely. You can leave them on a warmer for 20 minutes or air dry for 24 hours. They must be bone dry before firing to prevent exploding. -
Refine the edges:
Once dry, use a fine sanding sponge or a nail file to gently smooth the edges of the circles. Remove any burrs or sharpness left by the cutter, but be careful not to sand away the delicate fern texture on the face. -
Fire the clay:
Follow the manufacturer’s instructions for your specific brand of silver clay. You can torch fire these small pieces by placing them on a fire brick and heating until they glow a pale orange for at least 2 minutes, or kiln fire them for maximum strength. -
quench and brush:
After firing, quench the pieces in water (if torch fired) or let them cool. They will look white and matte. Brush them vigorously with a brass wire brush and a little soapy water to reveal the silver shine.
Clay feels dry?
If cracking occurs while rolling, the clay is too dry. Mash it back into a ball, poke a hole, add one drop of water, and knead well.
Step 3: Finishing touches
-
Burnish the design:
To make the fern really pop, rub the raised surfaces of the leaf design with an agate burnisher. This compresses the silver further and creates a bright, mirror-like highlight against the matte background. -
Attach the posts:
Mix a small amount of two-part epoxy glue. Apply a dab to the flat pad of a sterling silver earring post and press it firmly onto the center of the back of your fired silver piece. -
Allow to cure:
Let the glue cure undisturbed for the full time recommended on the epoxy package (usually 24 hours for full strength) before wearing them. -
Final polish:
Give the earrings one last rub with a soft polishing cloth to remove any fingerprints and enhance the luster.
Sharper Impressions
Lightly mist the back of your leaf with olive oil spray before rolling. This prevents the leaf from sticking and tearing the clay upon removal.
Wear your new silver fern studs with pride, knowing you’ve preserved a tiny piece of nature forever


Botanical Wrap Ring Band
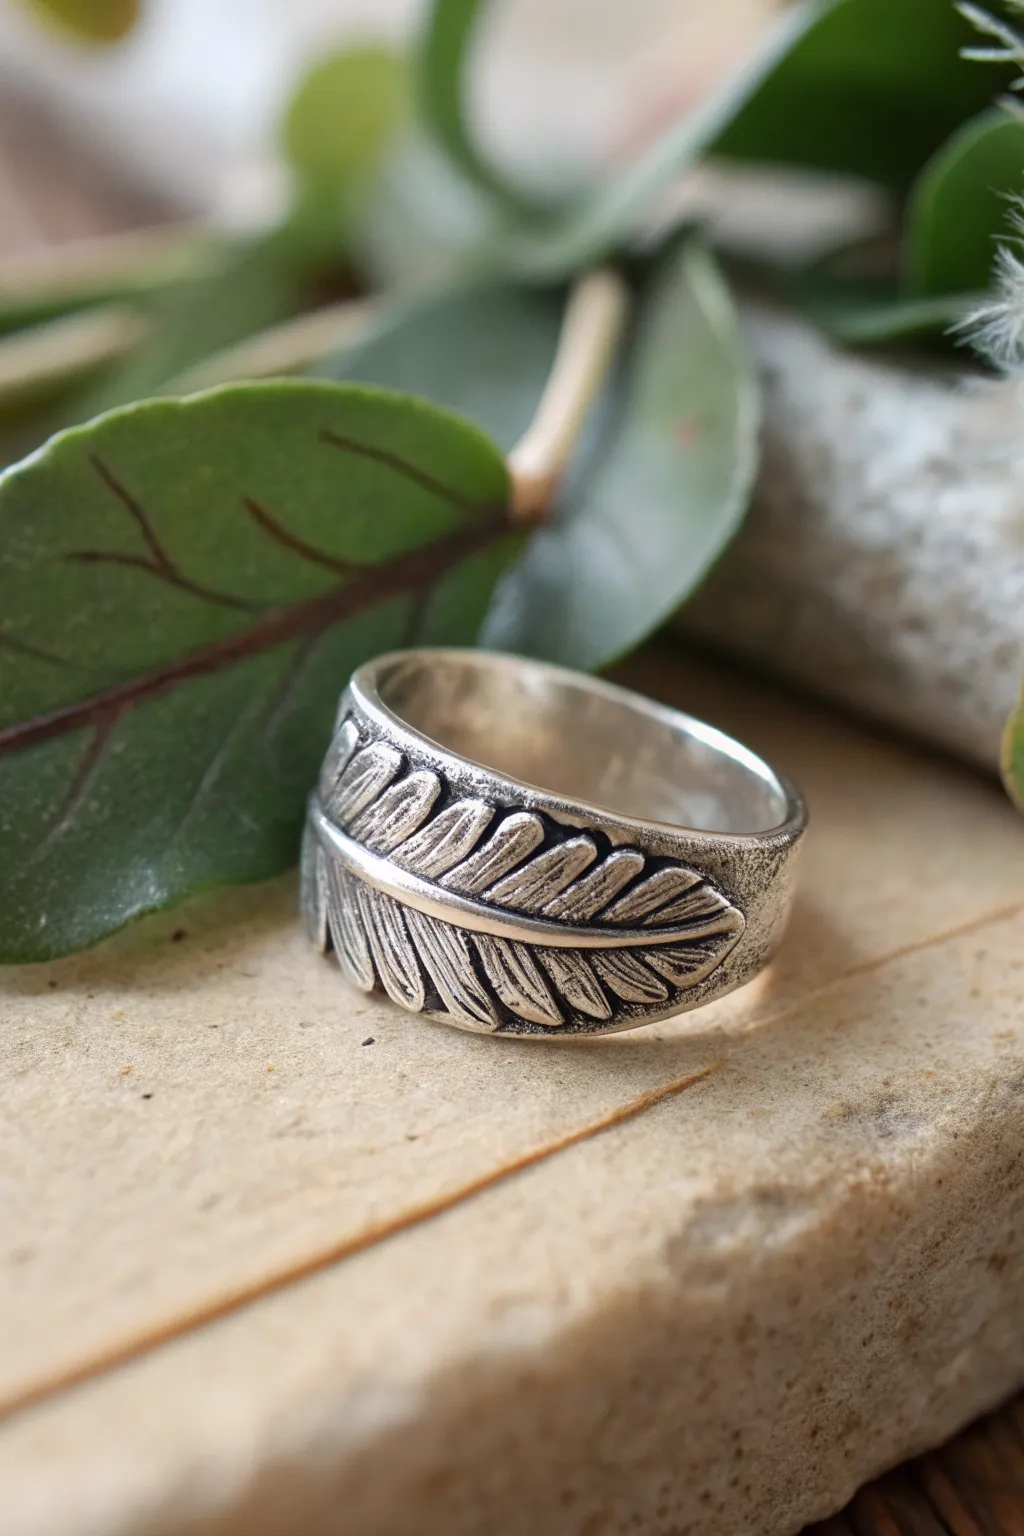
Capture the organic elegance of nature with this textured wrap ring, featuring a stylized feather motif that curves gently around the finger. The design uses the pliability of silver clay to create deep, oxidized details contrasting against polished high points for a timeless, rustic look.
Step-by-Step Guide
Materials
- Silver metal clay (approx. 7-10g depending on ring size)
- Ring mandrel (wood or stainless steel)
- Post-it note or sticky paper strip (for sizing)
- Releasing agent (Badger balm or olive oil)
- Texture sheet or rubber stamp with a feather/leaf pattern (or a carving tool)
- Needle tool or craft knife
- Rolling pin or clear acrylic roller
- Playing cards or spacers (1.5mm thickness)
- Clay shaper / silicone tipped tool
- Small paintbrush and water
- Sanding sponges (varied grits: fine to glowing)
- Liver of Sulfur (gel or chunks)
- Polishing cloth
Step 1: Sizing and Preparation
-
Measure your ring size:
Since metal clay shrinks during firing (usually 8-15%, depending on the brand), you need to account for this. Wrap a Post-it note around your mandrel at your desired size, then add roughly 2 to 3 sizes upward to compensate for shrinkage. Mark this spot on the mandrel. -
Create a paper template:
Cut a strip of paper the width you want your ring to be (around 8-10mm provides good stability). Wrap it around the enlarged size on your mandrel to determine the length needed, adding a little extra for the overlap if you want the feather tip to cross over. -
Prepare your workspace:
The clay dries quickly, so have everything ready. Lightly grease your hands and your work surface with a small amount of badger balm or olive oil to prevent sticking.
Clean Lines Pro-Tip
Before firing, refine the central quill line with a slightly damp very fine paintbrush. It smooths out micro-burrs and makes the ‘stem’ look naturally organic rather than mechanically cut.
Step 2: Forming the Band
-
Roll out the clay:
Place your clay between two stacks of playing cards (about 5-6 cards thick) or 1.5mm spacers. Roll the clay out into a long snake, then flatten it into a strip wide enough for your template. -
Apply the texture:
This is crucial for that botanical look. Press your texture sheet firmly into the clay strip. Alternatively, if you are sculpting by hand, leave the surface smooth for now—we will carve the feather details later. -
Cut to shape:
Lay your paper template over the textured clay. Using your needle tool, cut along the edges. For the feather design, shape one end into a rounded point and the other into a slightly narrower ‘quill’ end. -
Carving the details (if not texturing):
If you are hand-carving, use a needle tool to draw a central curved spine down the strip. Make angled indentations flowing outward from the spine to mimic barbs. Keep the lines deep, as shallow marks can disappear during sanding.
Cracking While Wrapping?
If small cracks appear when wrapping the clay around the mandrel, don’t panic. Quickly brush a tiny amount of water or clay paste over the crack and smooth it with a silicone tool immediately.
Step 3: Shaping and Refining
-
Wrap the mandrel:
Wrap a Post-it note closely around the mandrel at your marked size to prevent the clay from sticking to the wood or steel. Gently lift your clay strip and wrap it around the note. -
Form the overlap:
Arrange the ends so the pointed feather tip overlaps the quill end slightly, creating that ‘wrapped’ aesthetic shown in the photo. Press the underside of the overlap gently onto the band beneath it to ensure a bond, using a tiny dab of water. -
Smooth the edges:
Diagonally stroke the edges of the band with a wet brush or a red rubber shaper. You want to round off any sharp cuts from the blade so the ring is comfortable to wear. -
Dry completely:
Let the ring dry on the mandrel for several hours, or use a dehydrator/mug warmer to speed up the process. The clay must be bone dry before firing. -
Refine the dry clay:
Once dry, gently slide it off the mandrel. Use fine sanding sponges to smooth the interior and the rim. Be very delicate with the feather details on the surface.
Step 4: Firing and Finishing
-
Fire the ring:
Place the ring in a kiln or use a torch firing method tailored to your specific clay brand’s instructions (typically 1650°F / 900°C for 2 hours in a kiln for maximum strength). -
Brush down:
After firing and cooling, the ring will be white. Vigorously brush it with a brass wire brush and a little soapy water to bring out the silver shine. -
Burnish for shine:
For the highlights on the feather spine and edges, rub a steel burnisher over the high points. This compresses the silver and makes it gleam. -
Apply patina:
Prepare a hot Liver of Sulfur bath. Dip the ring until it turns a dark gray or black. This oxidization is what makes the feather texture pop. -
Final polish:
Rinse and dry the ring. Use a polishing cloth or a fine sanding block to remove the black patina from the raised surfaces—the spine and feather ribs—leaving the dark color deep in the recesses to define the design.
Slip on your new botanical creation and enjoy having a permanent piece of nature wrapped around your finger


Textured Stacking Rings Set
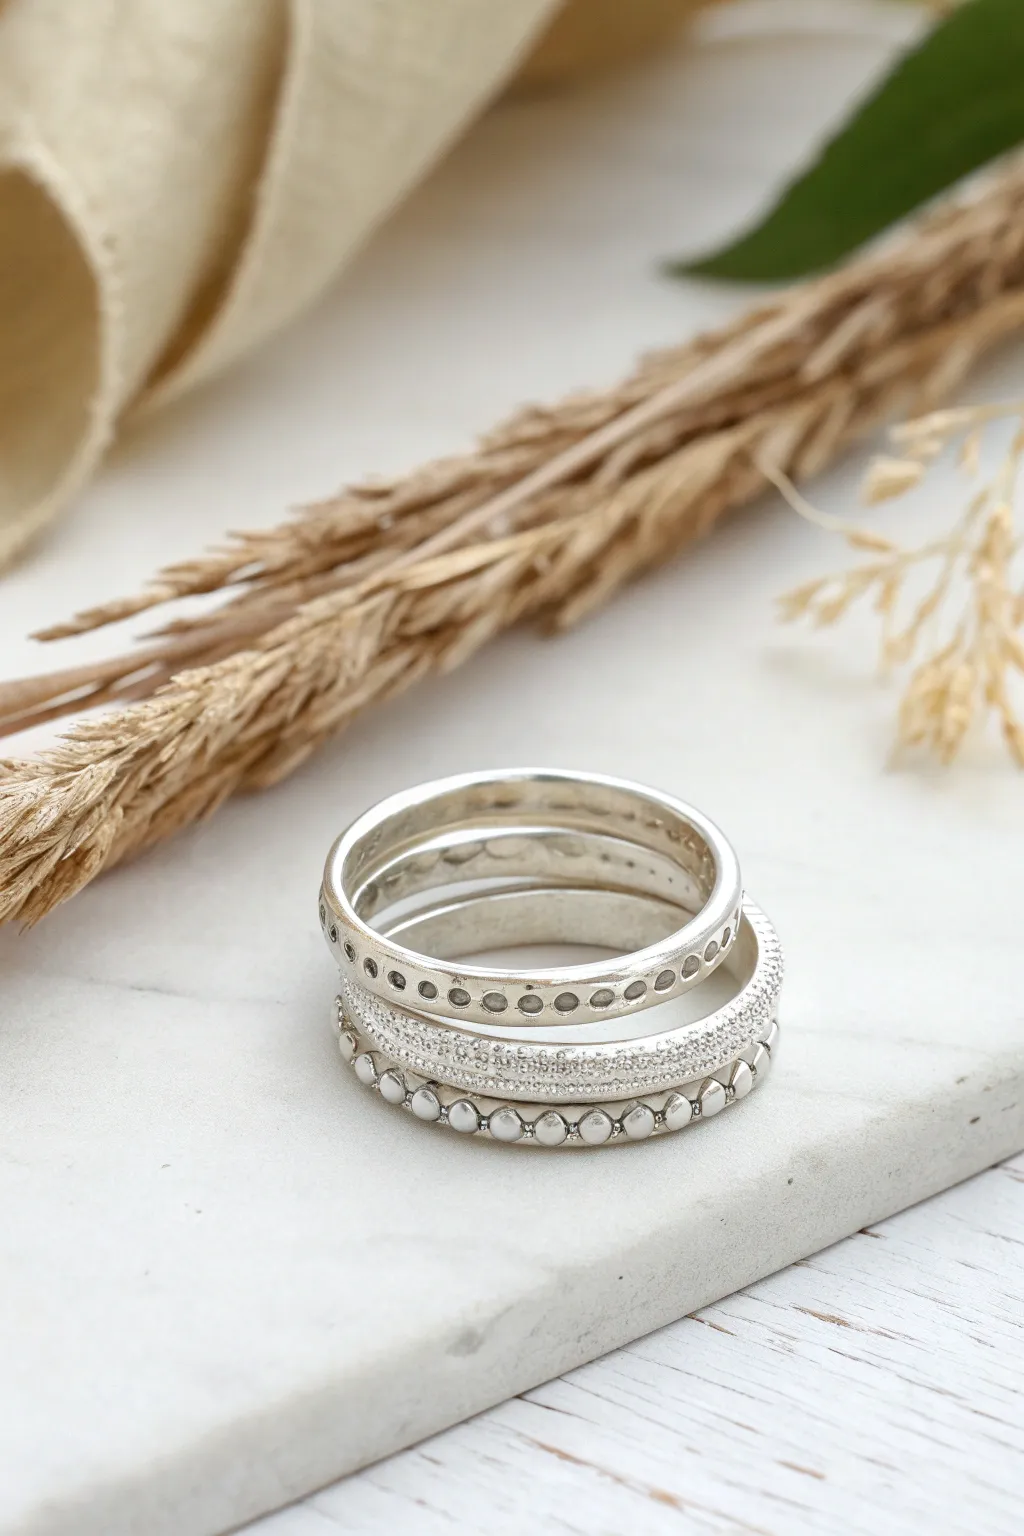
Create a set of three beautifully coordinated stacking rings using the versatility of silver clay. This project results in a polished, tactile trio featuring smooth bands with striking stamped, beaded, and sand-textured details that look stunning worn together or separately.
Detailed Instructions
Materials
- Silver metal clay (approx. 10g-15g depending on ring size)
- Ring mandrel (wooden or Teflon)
- Post-it notes or paper strips for sizing
- Rolling pin and spacers (cards or slats, 1.5mm thickness)
- Craft knife or clay cutter
- Tiny circle cutter or drinking straw
- Coarse sandpaper or texturing plate (for the sand texture)
- Leather hard tool or stylus
- Olive oil or badger balm (release agent)
- Water and paintbrush
- Rubber block or work surface
- Firing equipment (torch or kiln)
- Polishing tools (agate burnisher, sanding sponges, polishing cloth)
Step 1: Preparation & Basic Band Formation
-
Determine your size:
Measure your finger using a paper strip or ring sizer. Since metal clay shrinks during firing (typically 8-15% depending on the brand), wrap a sticky note around your mandrel about 2 sizes larger than your actual finger size to account for this shrinkage. -
Condition the clay:
Rub a tiny amount of olive oil on your hands and work surface. Take your lump of silver clay and knead it gently until it’s smooth and pliable, minimizing any cracks. -
Roll the first strip:
Using your 1.5mm spacers, roll the clay out into a long, even snake. Flatten it gently with the roller to create a strip that is approximately 3-4mm wide and long enough to wrap around your sized mandrel. -
Cut to length:
Wrap the strip around the mandrel where your sticky note is placed. Overlap the ends slightly, then use a sharp craft knife to cut through both layers of the overlap at a diagonal angle. Remove the excess clay. -
Join the seam:
Apply a tiny drop of water to the cut ends. Press them together gently on the mandrel. Use a rubber-tipped tool or your finger to smooth the seam until it disappears completely, blending the clay across the join. Repeat this process two more times to create three basic ring bands.
Seamless Seams
To ensure your ring seams are invisible, add a tiny ‘snake’ of fresh clay over the join line and blend it outwards with a wet brush before drying.
Step 2: Texturing the Trio
-
Dry partially:
Let the rings dry on the mandrel for about 10-15 minutes until they are firm but still leather-hard. This makes them easier to texture without squashing the shape. -
Ring 1: Recessed Dots:
Carefully slide the first band off the mandrel. Using a very small circle cutter or a tiny straw, gently press into the surface of the clay to create a row of recessed circles. Don’t cut all the way through; just make a deep impression. Evenly space these dots around the entire circumference. -
Ring 2: Sand Texture:
For the middle ring, I usually prefer to apply texture while the clay is still flat, but if your band is already formed, brush a little water on the surface to reactivate it slightly. Press a piece of coarse sandpaper or a rough texture plate firmly against the exterior of the band to create that sparkling, grainy finish seen in the center ring. -
Ring 3: Raised Bead Effect:
Roll tiny little balls of fresh clay, keeping them consistent in size. Apply a small amount of clay paste (slip) to the surface of the third ring band. Place the tiny balls side-by-side along the center line of the band, pressing them down gently so they adhere well without flattening completely. Let this dry thoroughly. -
Refining:
Once all textures are applied, let the rings dry completely (either air dry for 24 hours or use a dehydrator/mug warmer). Use fine sanding sponges to smooth the interior of the rings and the side edges, ensuring they will be comfortable to wear.
Step 3: Firing & Finishing
-
Fire the rings:
Follow the manufacturer instructions for your specific clay. If torch firing, place the ring on a fiber brick and heat until it glows a pale peach color, holding that temperature for the recommended time (usually 2-5 minutes). If kiln firing, follow the schedule for your clay type. -
Cool and brush:
Quench the rings in water (if the manufacturer allows) or let them air cool. Use a brass wire brush with soapy water to vigorously scrub the white crystalline surface off the silver. This reveals the metal underneath. -
Burnish for shine:
Rub an agate burnisher over the high points of the rings—specifically the raised beads and the rims of the recessed dots. This compresses the silver and creates a high-shine mirror finish that contrasts with the recessed areas. -
Review texture:
Check the sand-textured ring. If you want more sparkle, use the burnisher tip to polish just the very tips of the grainy texture. -
Final polish:
Finish by buffing all three rings with a polishing cloth to bring out the final luster and ensure the insides are perfectly smooth against the skin.
Fixing Cracks
If you see hairline cracks while the clay dries (greenware stage), simply brush a little water into the crack and fill it with fresh clay paste.
Stack your new creations on one finger to admire how the different textures interplay with the light

The Complete Guide to Pottery Troubleshooting
Uncover the most common ceramic mistakes—from cracking clay to failed glazes—and learn how to fix them fast.
Pressed Wildflower Charm Necklace
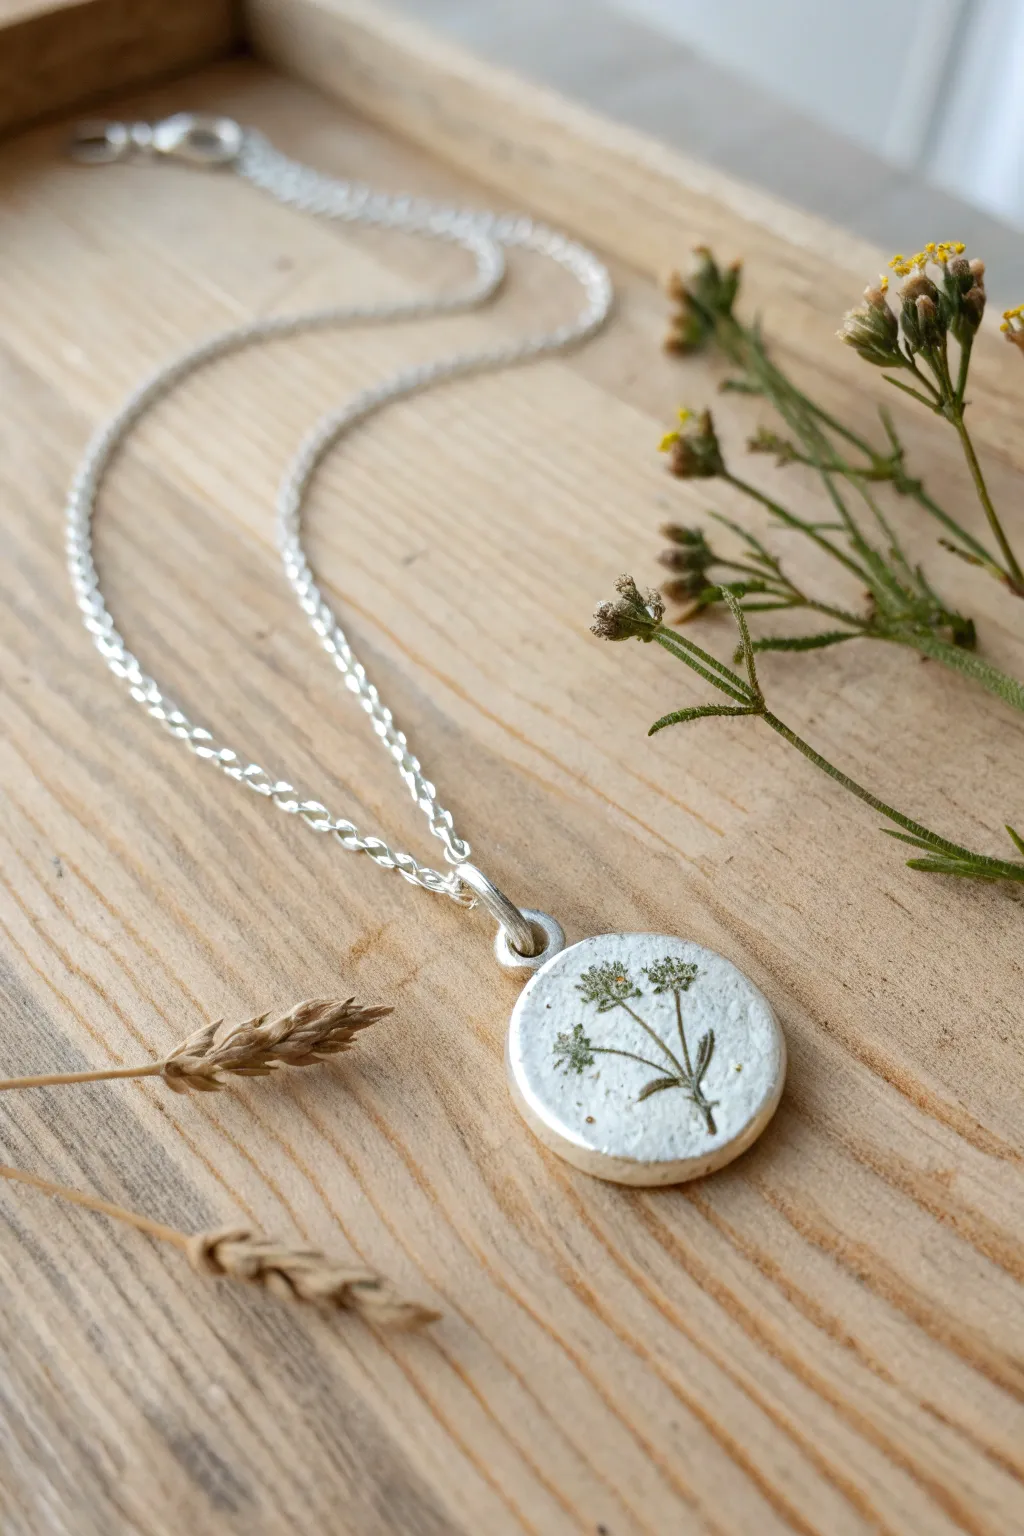
Capture the delicate beauty of nature forever with this rustic yet elegant silver clay pendant. By pressing a real wildflower into soft metal clay, you create a one-of-a-kind fossilized treasure that feels both modern and timeless.
Step-by-Step Guide
Materials
- Silver metal clay (approx. 5-7g)
- Small fresh or dried wildflower/herb sprig (sturdy stems work best)
- Small round cutter or shape template
- Rolling pin or acrylic roller
- Playing cards or slat spacers (1.5mm thick)
- Olive oil or badger balm (release agent)
- Work surface (Teflon sheet or laminated card)
- Small drinking straw or 3mm manual drill (for jump ring hole)
- Torch or kiln for firing
- Brass brush
- Liver of Sulfur (patina gel)
- Polishing cloth or fine sandpaper
- Silver jump ring
- Sterling silver chain
Step 1: Preparation and Texturing
-
Prepare your workspace:
Begin by setting up a clean, clutter-free work surface. Lightly coat your hands and your roller with a tiny amount of olive oil or badger balm to prevent sticky situations. -
Condition the clay:
Remove your silver clay lump from its package. Quickly knead it in your fingers for a few seconds until it feels pliable and crack-free, but don’t overwork it as it dries fast. -
Roll the slab:
Place your spacer slats or playing cards (a stack of about 3-4 cards) on either side of the clay. Roll the clay into a smooth, even slab about 1.5mm thick. -
Position the botanical:
Select your wildflower sprig. Place it carefully onto the clay slab, thinking about how the composition will look inside a circle. A slightly diagonal placement often looks dynamic. -
Impress the design:
Gently roll over the plant material with your roller once. Apply enough firm pressure to push the stem and buds flush with the clay surface, but not so hard that you distort the slab’s shape entirely. -
Reveal the imprint:
Use tweezers or a needle tool to very carefully lift the plant material out of the clay. Do this slowly to ensure you get a crisp impression without dragging firmly embedded bits.
Sticky Situation?
If the clay sticks to the plant, let it sit for a minute before pulling. The clay shrinks slightly as it dries, often releasing the organic material naturally.
Step 2: Shaping and Refining
-
Cut the shape:
Center your round cutter over the botanical impression. Press down firmly to cut the circle, then remove the excess clay from around the edges. -
Add the hanging mechanism:
There are two ways to do this. You can use a small straw to punch a hole near the top edge now, or attach a small molded clay loop. For this specific look, I prefer attaching a small, separate clay loop to the top edge using a little water/paste. -
Refine the edges:
Dip your finger in a little water and gently smooth the cut edges of the circle to remove hardness, giving it that soft, organic feel shown in the photo. -
Dry completely:
Let the piece dry for at least 24 hours at room temperature, or use a dehydrator/mug warmer for 20 minutes. The clay must be bone dry before firing. -
Pre-fire sanding:
Once bone dry, use a very fine sanding sponge to gently touch up any rough spots on the sides or back. Be careful not to sand away your flower detail.
Step 3: Firing and Finishing
-
Fire the piece:
Fire the clay according to the manufacturer’s instructions. You can use a butane torch for intricate small pieces like this—heat until it glows a peachy-orange color and hold for the recommended time (usually 2-3 minutes). -
Brush firmly:
After cooling, the piece will look white. Scrub it vigorously with a brass brush and a little soapy water to burnish the silver and bring out the metallic shine. -
Apply patina:
Prepare a hot water bath with a drop of Liver of Sulfur. Dip the pendant until it turns dark gray or black. This darkness will sit deep in the flower impression. -
Polish highlights:
Use a polishing cloth or a high-grit sanding pad to buff the high points of the surface. This removes the black patina from the flat silver, leaving the dark color only inside the recessed flower stems for contrast. -
Assembly:
Open a sturdy silver jump ring using two pairs of pliers. Thread it through the loop on your pendant and the end of your chain, then close it securely.
Depth Perception
Choose plants with thick veins or sturdy stems (like lavender or rosemary). Delicate petals often disappear; hardy herbs make the deepest, clearest impressions.
Wear your new piece of botanical art with pride, knowing you’ve preserved a tiny piece of the wild garden.
Acorn and Seed Pod Charms
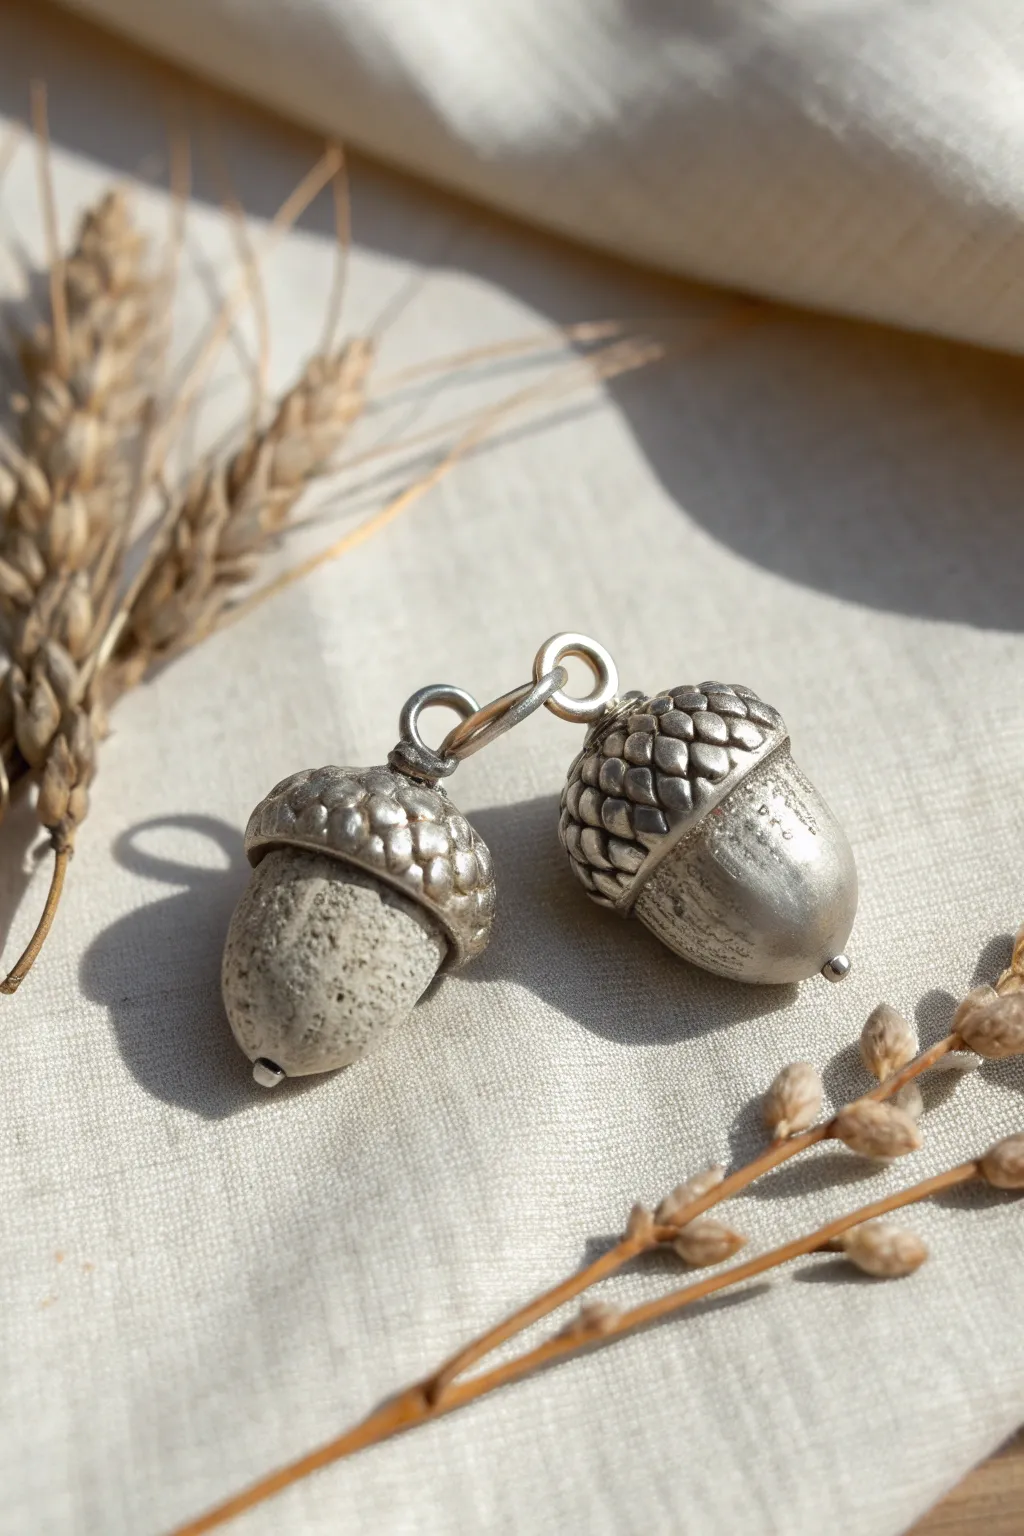
Capture the delicate beauty of autumn with these realistic acorn charms made from silver clay. By using a mold-making technique, you can replicate the intricate texture of real acorn caps for a stunning, nature-inspired finish.
Step-by-Step Tutorial
Materials
- Silver metal clay (PMC or Art Clay Silver)
- Two-part molding compound (silicone putty)
- Real acorn caps (dried and clean)
- Olive oil or badger balm (release agent)
- Textured stone paste or thick slip (for the textured nut version)
- Small paintbrush
- Precision needle tool or scalpel
- Baking soda and water paste
- Sanding sponges (fine and superfine)
- Small jump rings or embedded wire eyelets
- Kiln or butane torch
- Agate burnisher
- Liver of sulfur (patina)
Step 1: Creating the Molds
-
Select your specimens:
Choose real acorn caps that have deep, distinct textures. Clean them gently with a dry brush to remove any dirt without damaging the scales. -
Mix the silicone putty:
Take equal parts of the two-part molding compound. Knead them together quickly until the color is uniform and streak-free. -
Form the mold:
Press a small ball of the mixed putty into the acorn cap, ensuring it reaches all the deep crevices. Create a second mold of the acorn body itself if you plan to make the all-silver version. -
Curing time:
Allow the putty to set completely. Refer to the manufacturer’s instructions, but it usually takes about 10–20 minutes. Once firm, gently pop the natural acorn pieces out.
Step 2: Forming the Silver Caps
-
Prepare the clay:
Take a pea-sized amount of silver clay. Keep the rest wrapped tightly to prevent drying. Condition the clay briefly in your palms. -
Apply release agent:
Lightly brush a tiny amount of olive oil or balm into your silicone mold to prevent sticking. -
Pressing the clay:
Push the silver clay firmly into the acorn cap mold. You want a hollow shape, not a solid nugget, so use your finger or a ball tool to press the clay against the mold walls, leaving the center empty. -
Refining the edge:
While the clay is still in the mold, use a needle tool to trim any excess clay overflowing the rim, creating a clean, flat edge for the nut to attach to later. -
Adding the loop:
Roll a tiny snake of clay or use a pre-made silver wire eyelet. Attach this to the top center of the textured cap using a dab of water or clay paste to secure it. If using clay, shape it into a small loop. -
Drying:
Let the caps dry completely in the mold or carefully remove them if they seem sturdy enough. Air drying for 24 hours or using a dehydrator/warmer is best.
Sticky Situation?
If clay sticks to your silicone mold excessively, you likely used too much release agent, which creates suction. Wash the mold with soap, dry thoroughly, and use only the faintest smear of oil.
Step 3: Creating the Nuts
-
The smooth silver nut:
For the all-silver charm, mold a solid bullet shape of clay that fits inside your dried cap. Or, press clay into your acorn body mold if you made one earlier. -
The textured stone nut:
For the contrasting charm, use a textured stone paste or a different colored metal clay. Form it into the acorn nut shape. Surface texture can be added by rolling the wet clay on sandpaper or a sponge. -
Assembly:
Once the nut parts are dry, check the fit with your caps. Sand the top of the nut flat if necessary. Apply silver clay paste (slip) to join the nut inside the cap securely. -
Cleanup:
Smooth the seam between the cap and nut with a damp brush or a rubber shaper tool for a flawless transition.
Natural Variations
Make a ‘twin’ set by intentionally varying the nut length or cap depth. Real acorns aren’t identical. You can also press a tiny cubic zirconia into the bottom tip of the nut before firing for sparkle.
Step 4: Firing and Finishing
-
Firing the pieces:
Place your dry acorns in a kiln or fire with a butane torch according to your clay brand’s specific temperature schedule. Ensure the organic binders burn off completely. -
Brushing:
Once cool, brush the fired silver with a brass wire brush. It will look white initially; brushing reveals the silver metal underneath. -
Apply patina:
Prepare a warm liver of sulfur solution. Dip the charms briefly until they darken. This is crucial for highlighting the scale texture on the caps. -
Polishing features:
Use a polishing cloth or fine steel wool to buff the high points of the acorn cap scales, leaving the recessed areas dark for contrast. -
Final burnish:
For the smooth silver nut, use an agate burnisher to rub the surface until it gleams with a high mirror shine.
String your finished acorns onto a simple chain or attach earring hooks to wear a piece of the forest wherever you go


What Really Happens Inside the Kiln
Learn how time and temperature work together inside the kiln to transform clay into durable ceramic.
Shell-Imprint Drop Earrings
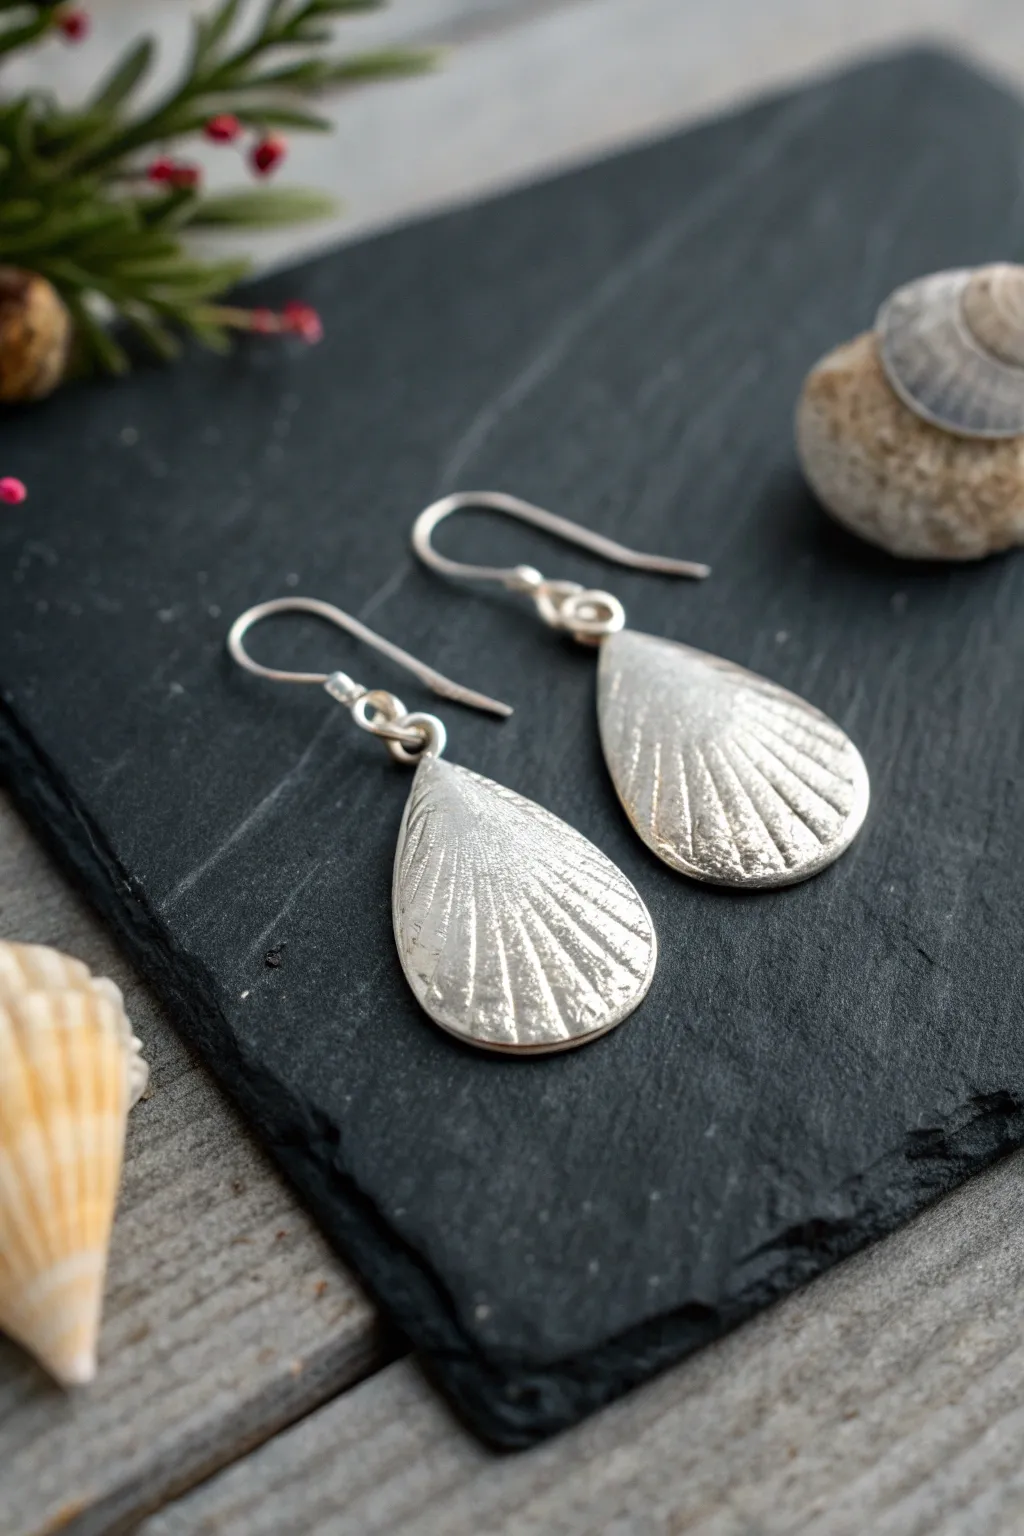
Capture the delicate beauty of the ocean with these stunning silver drop earrings featuring a realistic shell texture. By pressing natural forms into silver clay, you’ll create a sophisticated, organic accessory that looks like a high-end casting.
Step-by-Step
Materials
- Silver metal clay (approx. 7-10g)
- Small seashell (scallop or cockle shape works best)
- Teardrop template or craft knife
- Olive oil or Badger balm (release agent)
- Rolling pin and spacers (1.5mm thickness)
- Small drill bit or drinking straw (for holes)
- Sanding sponge or emery board
- Silver wire ear hooks
- Jump rings
- Butane torch or kiln
- Brass wire brush
- Burnisher or spoon back
Step 1: Texturing and Shaping
-
Prepare the workspace:
Begin by cleaning your work surface and coating your hands, roller, and the seashell lightly with olive oil or balm. This prevents the precious silver clay from sticking where you don’t want it. -
Roll the clay:
Take a lump of silver clay and roll it out into a smooth slab. Use your 1.5mm spacers (or a stack of playing cards) to ensure an even thickness throughout the piece. -
Create the texture:
Press your oiled seashell firmly into the clay slab. I like to rock it slightly from side to side to ensure the ridges leave a deep, crisp impression. -
Cut the shape:
Place your teardrop template over the most attractive part of the textured area. Use a needle tool or craft knife to cut around the shape cleanly. -
Make the pair:
Repeat the rolling and texturing process for the second earring. Try to align the shell stripes similarly so they look like a matched set, but embrace small organic differences. -
Pierce the hole:
While the clay is still wet, use a small straw or a drill bit (twisted by hand) to create a hole at the top point of the teardrop. Remember that clay shrinks, so make the hole slightly larger than your jump rings require. -
Dry completely:
Set the pieces aside to dry for at least 24 hours, or place them on a mug warmer for 20 minutes. They must be bone dry before firing to prevent cracking.
Clean Edges Instantly
Before drying, run a slightly damp paintbrush over the cut edges of the wet clay. This smooths them out immediately and minimizes the amount of sanding you’ll need to do later.
Step 2: Refining and Firing
-
Refine the edges:
Once dry, gently sand the edges with fine-grit sandpaper or a sanding sponge. Smooth out any rough cutting marks, but be careful not to sand down your beautiful shell texture. -
Fire the silver:
Place the pieces on a firing brick. Ignite your butane torch and heat the pieces evenly until they glow a peachy-orange color. Hold this temperature for the time recommended by your clay manufacturer (usually 2-5 minutes). -
Cool and brush:
Quench the fired pieces in water or let them air cool. They will look white and matte. Vigorously brush them with a brass wire brush and soapy water to reveal the silver shine underneath.
Step 3: Polishing and Assembly
-
Burnish for shine:
To get that high-contrast look seen in the photo, use a steel burnisher or the back of a spoon to rub the raised ridges of the shell pattern. This makes the high points gleam while leaving the recesses matte. -
Tumble (optional):
If you have a rock tumbler with steel shot, you can tumble the pieces for an hour to work harden the silver and create an all-over sparkle. -
Attach jump rings:
Open a sterling silver jump ring using two pliers (twist, don’t pull). Thread it through the hole at the top of your silver drop. -
Add ear wires:
Before closing the jump ring, slide on your ear wire loop. Close the jump ring securely so there is no gap. -
Final check:
Inspect your work to ensure the drops hang forward correctly. Adjust the loop on the ear wire slightly with pliers if they need to twist to face front.
Add a Patina
Apply liver of sulfur gel to the darkened recesses of the shell pattern, then polish the ridges again. This increases the contrast and makes the texture pop vividly.
Wear your coastal creations with pride and enjoy the compliments on your silversmithing skills
Personalized Initial Tag Charm
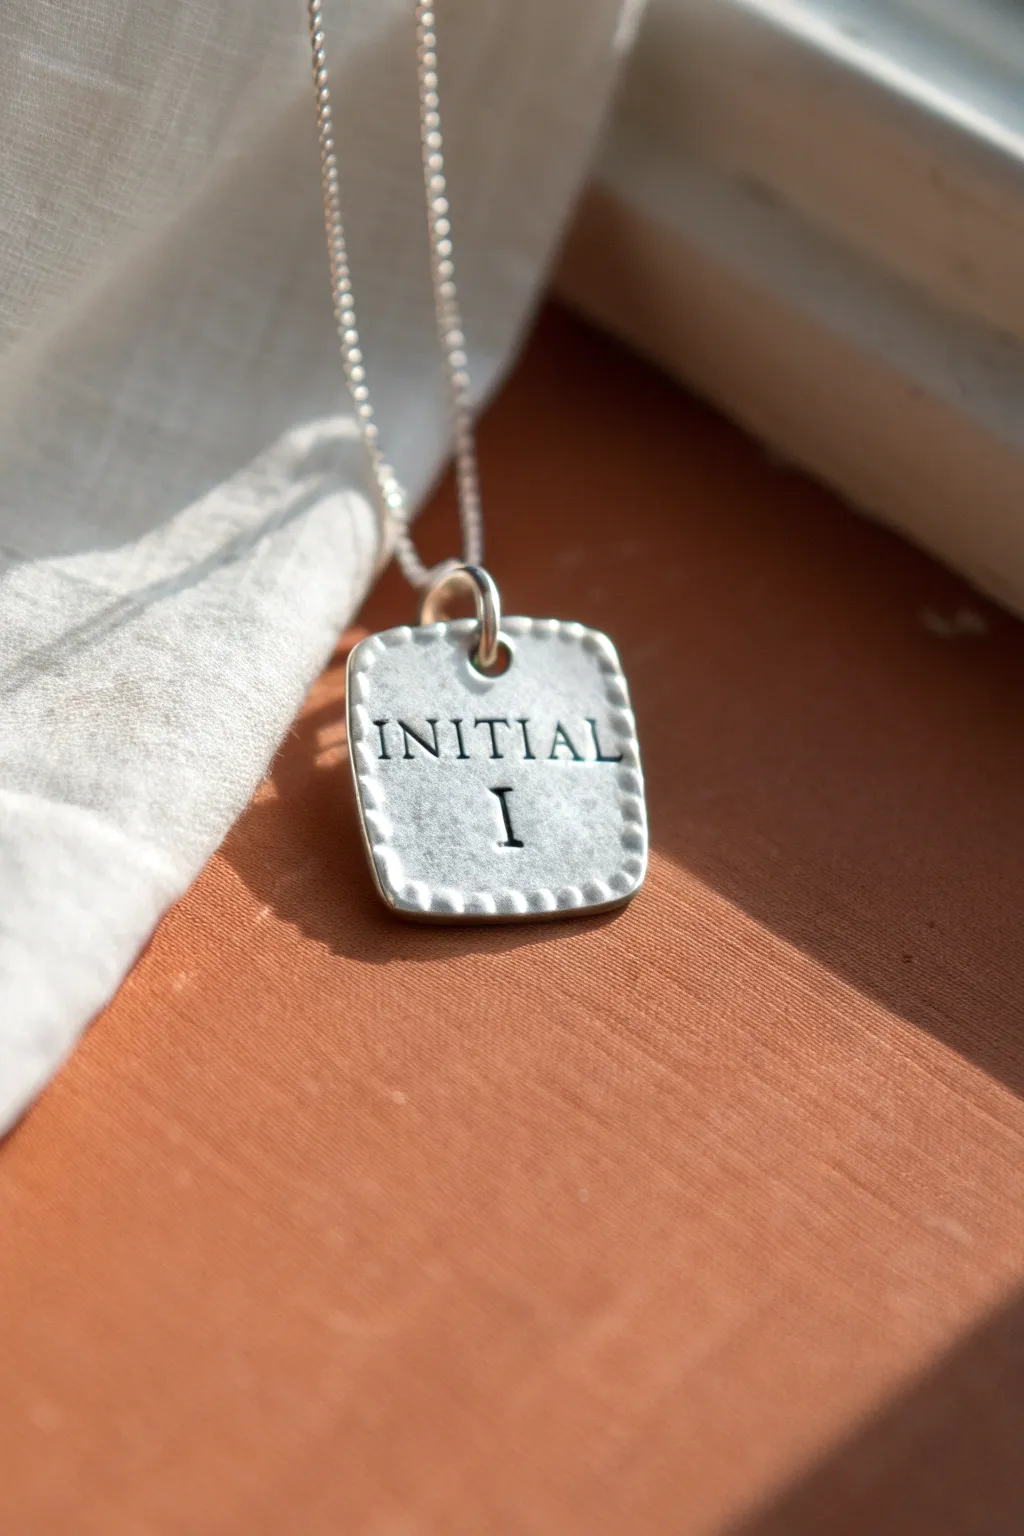
Create a timeless keepsake with this simple yet elegant silver clay project. The finished piece features a soft, square shape with a charming dotted border and classic serif typography, perfect for a personalized necklace.
Step-by-Step Tutorial
Materials
- Silver metal clay (approx. 5-7g)
- Small acrylic roller or clay roller
- Playing cards or 1.5mm spacers
- Small square shape cutter (approx. 20mm with rounded corners)
- Rubber alphabet stamp set (serif font)
- Small dotting tool or a toothpick with a blunt end
- Badger balm or olive oil (release agent)
- Plastic work surface or Teflon sheet
- Small straw or 3mm drinking straw (for the hole)
- Various grades of sanding sponges (coarse to fine)
- Metal clay kiln or butane torch
- Stainless steel brush
- Liver of sulfur (patina gel)
- Polishing cloth
- Sterling silver jump ring (6mm)
Step 1: Shaping the Base
-
Prepare your surface:
Begin by lightly coating your work surface and your hands with a tiny bit of badger balm or olive oil to prevent the silver clay from sticking. -
Roll the clay:
Take your lump of silver clay and place it between two stacks of playing cards (about 3-4 cards high) or use 1.5mm spacers. Roll the clay out until it is a smooth, even slab. -
Cut the shape:
Using your square cutter, press firmly into the clay to cut out the base shape. If you don’t have a cutter with rounded corners, cut a sharp square first and gently tap the corners with your finger to soften them. -
Smooth the edges:
Dip your finger in a little water and very gently run it along the cut edges of the fresh clay to remove any burrs or sharpness. You want a soft, organic look. -
Create the hanging loop:
Use a small straw or a specialized hole cutter to punch a hole centered near the top edge. Ensure there is at least 3mm of clay between the hole and the edge for strength.
Step 2: Adding Detail
-
Stamp the text:
Lightly oil your rubber alphabet stamps. Carefully press ‘INITIAL’ in a small font near the top, and a larger ‘I’ (or your chosen letter) in the center. Press just deep enough to make a clear impression without deforming the shape. -
Add the border texture:
Using a small ball-tip tool or a blunt toothpick, verify the spacing first, then gently press small divots around the perimeter of the square to create the dotted border effect. -
Dry the piece:
Place the charm on a warmer or allow it to air dry completely for 24 hours. The clay must be bone dry before firing to prevent cracking. -
Refine before firing:
Once dry, gently sand the edges and the back with a fine sanding sponge. Be very careful around the stamped area so you don’t sand away the lettering.
Stamp Alignment Trick
Compose your word on a piece of clear sticky tape first. Stick the tape onto a clear acrylic block, then press the whole block into the clay at once for perfectly straight text.
Step 3: Firing and Finishing
-
Fire the clay:
Fire the piece according to your silver clay manufacturer’s instructions. You can use a butane torch for about 3-5 minutes at a peach-colored glow, or kiln fire it for maximum strength. -
Brush the silver:
After the piece has cooled completely, it will look white and matte. Vigorously brush it with a stainless steel wire brush to burnish the surface and reveal the silver shine. -
Apply patina:
Prepare a hot water bath with a drop of Liver of Sulfur. Dip the charm briefly until it turns dark gray or black. Rinse immediately in cold water to stop the reaction. -
Polish the highlights:
Use a polishing cloth or a sanding sponge to remove the dark patina from the high points of the surface. The patina will remain deep inside the stamped letters and the dotted border, creating high contrast. -
Assemble:
Gently twist open your sterling silver jump ring using two pairs of pliers. Insert it through the hole in your charm and close it securely. -
Final buffing:
Give the entire piece one last rub with a polishing cloth to make the silver gleam before sliding it onto a chain.
Make it Double-Sided
Before drying, carefully flip the charm and gently press a texture mat or a leaf skeleton into the back. This adds a hidden detail for the wearer without adding bulk.
Now you have a beautifully personalized silver charm ready to wear or gift.

TRACK YOUR CERAMIC JOURNEY
Capture glaze tests, firing details, and creative progress—all in one simple printable. Make your projects easier to repeat and improve.
Fingerprint Keepsake Pendant
Immortalize a loved one’s unique touch with this tactile and deeply personal silver pendant. Using metal clay techniques, you will transform a fleeting impression into a solid, polished fine silver heirloom featuring a striking, darkened fingerprint texture.
Step-by-Step Guide
Materials
- Silver metal clay (approx. 7-10g for a thick coin)
- Olive oil or Badger balm (release agent)
- Acrylic roller or small PVC pipe
- Playing cards or 1.5mm spacers
- Circle cutter (approx. 20-25mm)
- Small straw or drinking straw (for the bail hole)
- Fine grit sandpaper or sanding sponges
- Torch or kiln for firing
- Stainless steel brush
- Agate burnisher
- Liver of Sulphur (patina gel)
- Polishing cloth
Step 1: Preparing the Impression
-
Conditioning the Clay:
Begin by rubbing a small amount of olive oil or balm onto your hands and your work surface. Take your silver clay out of the package and knead it quickly but thoroughly until it feels smooth, pliable, and crack-free. -
Rolling the Slab:
Place the ball of clay on your lubricated surface. Set a stack of playing cards (about 4-5 cards thick) on either side to act as depth guides. Use your acrylic roller to roll the clay into a smooth, even slab. -
Taking the Print:
Lightly oil the finger you intend to use. Press the finger firmly and steadily straight down into the center of the clay slab. Rock it extremely slightly to catch the sides, then lift straight up to avoid smudging the ridges. -
Checking Quality:
Inspect the impression immediately. You want deep, clear ridges. If it looks faint or smudged, balled up the clay, knead it briefly, and re-roll to try again while the clay is still moist.
Muddy Print?
If the print lacks detail, the clay might be too dry or the finger too oily. Use a spritz of water to rehydrate the clay surface and wipe the finger clean before trying again.
Step 2: Shaping and Refining
-
Cutting the Shape:
Center your circle cutter over the best part of the fingerprint. Press down firmly to cut the disc. Remove the excess clay from around the cutter before lifting the tool away. -
Adding the Bale Hole:
Use a small straw or a needle tool to punch a hole near the top edge of the pendant. Ensure there is at least 2-3mm of clay between the hole and the edge to prevent breakage later. -
Drying:
Set the piece aside to dry completely. This can take 24 hours at room temperature, or you can speed it up using a dehydrator or a cup warmer. The clay must be bone dry before the next step. -
Pre-Fire Sanding:
Once dry, gently sand the edges and the back of the pendant with fine-grit sandpaper to smooth out any roughness. Be very careful around the fingerprint ridges to maintain their crispness.
Step 3: Firing and Finishing
-
Firing the Piece:
Fire the piece using a torch or kiln according to your specific clay brand’s instructions. For a torch, heat evenly until it glows a peachy-orange color and hold that temperature for the recommended time (usually 2-5 minutes). -
Cooling and Brushing:
Allow the silver to cool completely. It will look white and powdery. Briskly brush the entire piece with a stainless steel brush to burnish the surface and reveal the metallic silver underneath. -
Burnishing the High Points:
For that mirror-like shine seen in the photo, rub an agate burnisher firmly over the smooth areas around the fingerprint and on the back. This compresses the silver particles further. -
Applying Patina:
Prepare a hot solution of Liver of Sulphur. Dip the pendant until it turns a dark gray or black. This creates the necessary contrast to make the fingerprint pop. -
Final Polish:
Use a polishing cloth or a sanding sponge to remove the patina from the high spots (the surface silver), leaving the dark color only deep within the grooves of the fingerprint. -
Assembly:
Attach a sterling silver jump ring through the hole you created. I find soldering this ring closed ensures the pendant never gets lost, then thread it onto a simple cord or chain.
Double Sided
Make the pendant reversible by texturing the back before cutting! Roll the slab on a textured mat or piece of lace so the reverse side has a pattern instead of being plain.
Wear your customized silver token close to your heart as a constant reminder of connection
Tiny Botanical Texture Beads
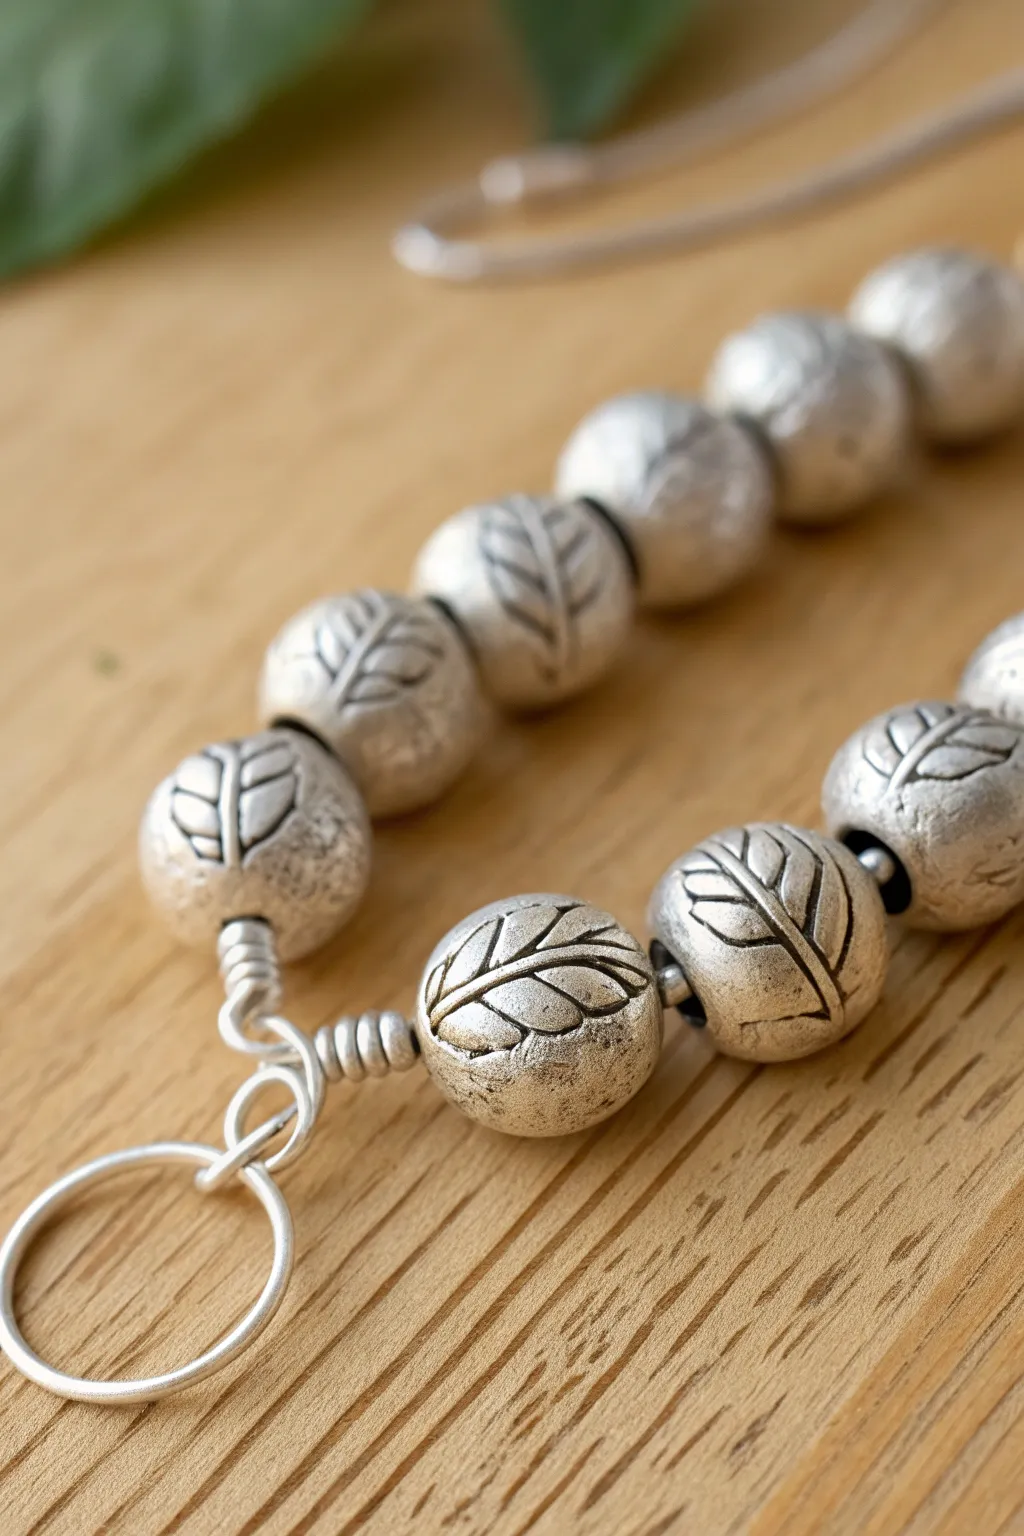
These substantial silver beads have a wonderful primitive charm characterized by their matte finish and deep botanical imprints. The technique turns simple clay spheres into a textured heirloom piece that feels both organic and modern.
Step-by-Step
Materials
- Silver metal clay (approx. 20g-30g for a focal section)
- Small rubber leaf stamp or leaf texture mat
- Drinking straw or piercing tool
- Badger balm or olive oil (release agent)
- Playing cards or spacers (for rolling)
- Clay roller
- Water and a small paintbrush
- Sanding sponges (medium to fine grit)
- Kiln or butane torch
- Stainless steel wire brush
- Liver of sulfur (patina)
- Polishing cloth
- Heavy gauge silver wire (for assembly)
Step 1: Forming the Beads
-
Prep the Clay:
Begin by conditioning your silver clay. Knead it briefly in your hands, keeping them lightly oiled with balm to prevent sticking, until the clay is pliable and crack-free. -
Portion Control:
Divide your clay into equal portions. For the size shown in the image, aim for balls roughly the size of a large marble or a small grape. Roll them into smooth spheres between your palms. -
Apply the Texture:
Lightly oil your leaf stamp or texture mat. Hold a clay sphere gently but firmly and press the stamp into the curved surface. Rock the stamp slightly to follow the curve of the bead rather than flattening it completely. -
Repeat Pattern:
Rotate the bead and stamp again, creating a pattern. Aim for three or four leaf impressions around the circumference. Don’t worry if they overlap slightly; it adds to the organic look. -
Piercing the Holes:
While the clay is still wet, carefully drill a hole through the center. I find that piercing halfway from one side, then flipping and piercing from the other, keeps the hole centered and prevents distortion. -
Enlarge for Shrinkage:
Remember that silver clay shrinks during firing. Make your holes slightly larger than the final wire you intend to use. A standard drinking straw removes a clean plug of clay and creates a generous hole size. -
Refine the Shape:
If the stamping or piercing flattened your sphere, gently roll it between your fingers to restore roundness without squashing the texture details. -
Deep Drying:
Set the beads on a warming plate or dehydrator. Let them dry completely until they are bone dry. This is crucial for thick beads to prevent exploding in the kiln.
Step 2: Refining and Firing
-
Pre-Fire Sanding:
Once dry, use a fine-grit sanding sponge to gently smooth the surface between the leaf impressions. Remove any sharp edges around the bead holes or fingerprints. -
Firing:
Place the beads in a kiln. Follow the specific firing schedule for your brand of clay (typically 1650°F / 900°C for two hours for maximum strength). If torch firing, ensure you heat long enough for the core to sinter. -
Cooling Down:
Allow the beads to cool completely. They will appear white and chalky when they first come out of the kiln; this is normal crystallized silver. -
Brushing:
Vigorously brush the fired beads with a stainless steel wire brush. This compresses the surface and transforms the white chalky finish into a gleaming satin silver.
Cracking Clay?
Silver clay dries fast. If cracks appear while rolling, dab a drop of water on the crack and smooth it. Keep unused clay tightly wrapped in cling film under a damp wipe.
Step 3: Finishing Touches
-
Patina Application:
Prepare a warm liver of sulfur solution. Dip the beads until they turn a dark gray or black. This darkness will settle into the deep recesses of the leaf veins. -
Highlight Polish:
Rinse and dry the beads, then polish the high points with a polishing cloth or a sanding block. This reveals bright silver on the surface while leaving the dark patina inside the stamped leaves for contrast. -
Loop Creation:
Using heavy-gauge sterling silver wire, create a wrapped loop at one end. Thread your first bead onto the wire. -
Linking the Beads:
You can string these directly or create wire-wrapped links between them. The image shows a tight assembly, likely strung on a flexible core or linked with hidden internal loops. -
Final Buff:
Give the entire piece one final rub with a soft cloth to remove any oils from handling and maximize that soft, satiny glow.
Level Up: Double Texture
Before stamping the leaves, roll the wet clay sphere lightly over sandpaper or a concrete block. This adds a subtle, stony ‘background’ texture behind the smooth leaf imprints.
Enjoy the weight and warmth of your handcrafted silver bead necklace
Torn-Edge Texture Medallion
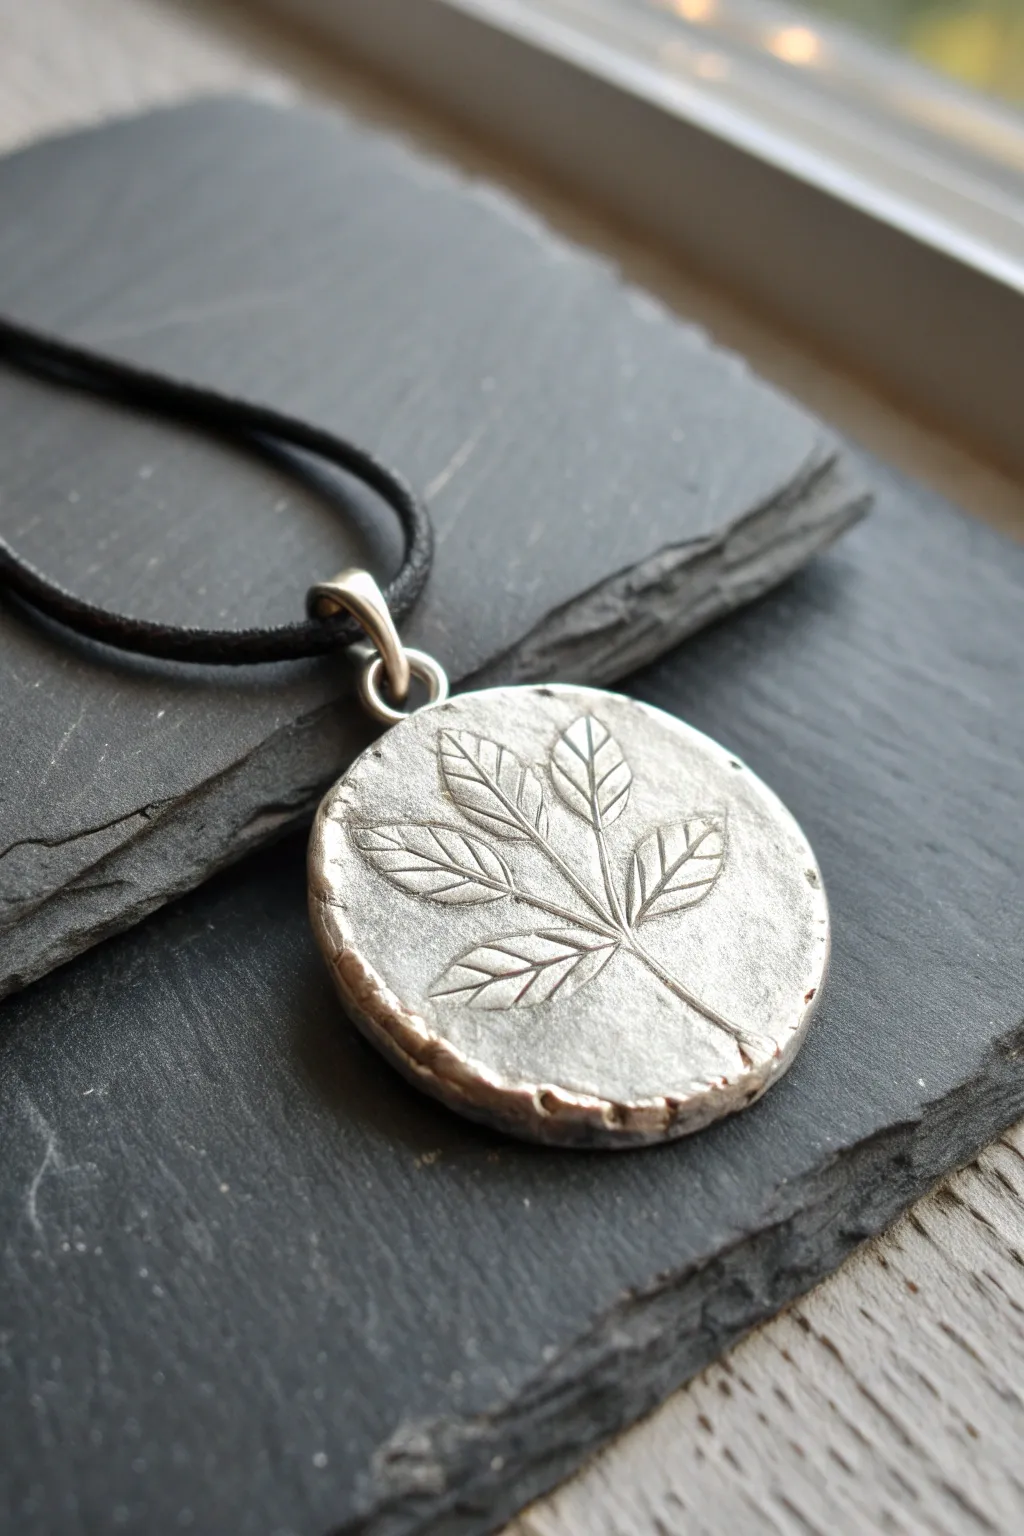
Capture the delicate details of nature in fine silver with this rustic, textured pendant project. The piece features a deep leaf impression on a thick, irregularly shaped disk that mimics the feel of an ancient coin or artifact found in the earth.
Detailed Instructions
Materials
- Silver metal clay (approx. 10g-15g)
- Fresh leaf with prominent veins (e.g., ash, walnut, or rose)
- Rolling pin or clear acrylic roller
- Playing cards or spacers (1.5mm and 1mm thick)
- Olive oil or badger balm (release agent)
- Needle tool or clay knife
- Small straw or metal tubing (for the bail hole)
- Fine sandpaper or sanding sponges
- Gas torch or kiln
- Brass wire brush
- Burnisher or polishing cloth
- Liver of sulfur (patina gel)
- Jump ring and leather cord
Step 1: Preparation and Rolling
-
Prepare the Clay:
Begin by removing your silver clay from the package. Knead it briefly in your hands to ensure it is pliable and free of cracks, but work quickly to prevent it from drying out. -
Lubricate Surfaces:
Lightly coat your work surface, roller, and hands with a tiny amount of olive oil or badger balm. This ensures the clay won’t stick and tear during the process. -
Initial Roll:
Place the clay between two stacks of playing cards (about 5-6 cards high) or 1.5mm spacers. Roll the clay into a smooth, even slab. Don’t worry about the edges being perfect; we want a natural look.
Step 2: Creating the Texture
-
Select the Leaf:
Choose a fresh leaf with strong, raising veining on the back. Ensure the leaf is smaller than your clay slab so the entire design fits comfortably. -
Impressing the Design:
Place the leaf vein-side down onto the clay slab. rolling over it firmly once with your roller. I find a single, committed pass prevents ‘ghost’ images. -
Remove the Leaf:
Carefully lift the leaf away using tweezers or the tip of a needle tool to reveal the detailed impression left behind in the silver. -
Shaping the Edges:
Use a round cutter slightly larger than your leaf design to cut a circle. Instead of leaving the sharp cut edge, gently push the edges inward with your finger or a tool to create a raised, ‘torn’ or thickened rim effect. -
Refining the Shape:
Pat down any areas of the rim that became too high. The goal is a slightly irregular, ‘found artifact’ aesthetic rather than a perfect factory-made circle.
Cracking Edges?
If the edges crack too much while shaping the rim, moisten your finger with a tiny bit of water and smooth them immediately. A little cracking adds character, but deep fissures weaken the piece.
Step 3: Finishing and Firing
-
Add the Hanging Hole:
Using a small straw or a piece of metal tubing, punch a hole near the top of the medallion. Ensure there is at least 2-3mm of clay between the hole and the edge for strength. -
Dry Completely:
Set the piece aside to dry for at least 24 hours, or use a dehydrator/mug warmer. The clay must be bone dry before firing to prevent exploding. -
Refine Before Firing:
Once dry, use fine sandpaper to gently smooth the back and the outer rim. Be careful not to sand over the leaf texture itself. -
Fire the Piece:
Place the dry piece on a kiln brick. Fire with a butane torch until it glows a peachy-orange color, holding that heat for 2-3 minutes (or kiln fire according to package directions usually 1650°F for two hours). -
Cool and Quench:
Allow the silver to cool naturally or quench it in water. The piece will appear white and matte at this stage.
Level Up: Double Texture
Before rolling the leaf into the top, texture the *back* of the pendant with a piece of coarse sandpaper or fabric. This gives the reverse side a professional finish and prevents slippage.
Step 4: Polishing and Patina
-
Brush Finish:
Scrub the fired silver vigorously with a brass wire brush and a bit of soapy water. This burnishes the surface, turning the matte white into shining silver. -
Apply Patina:
Prepare a hot water solution with a drop of Liver of Sulfur. Dip the pendant or paint the solution onto the leaf area until it turns dark gray or black. -
Highlighting:
Rinse the piece, then use a polishing cloth or fine sanding sponge to remove the dark patina from the high points of the leaf and the rim, leaving the recesses dark for contrast. -
Final Assembly:
Insert a sturdy sterling silver jump ring through the hole and thread it onto a simple black leather cord to complete the rustic look.
Enjoy wearing your unique silver medallion that preserves a tiny piece of the forest forever
Reversible Two-Texture Pendant
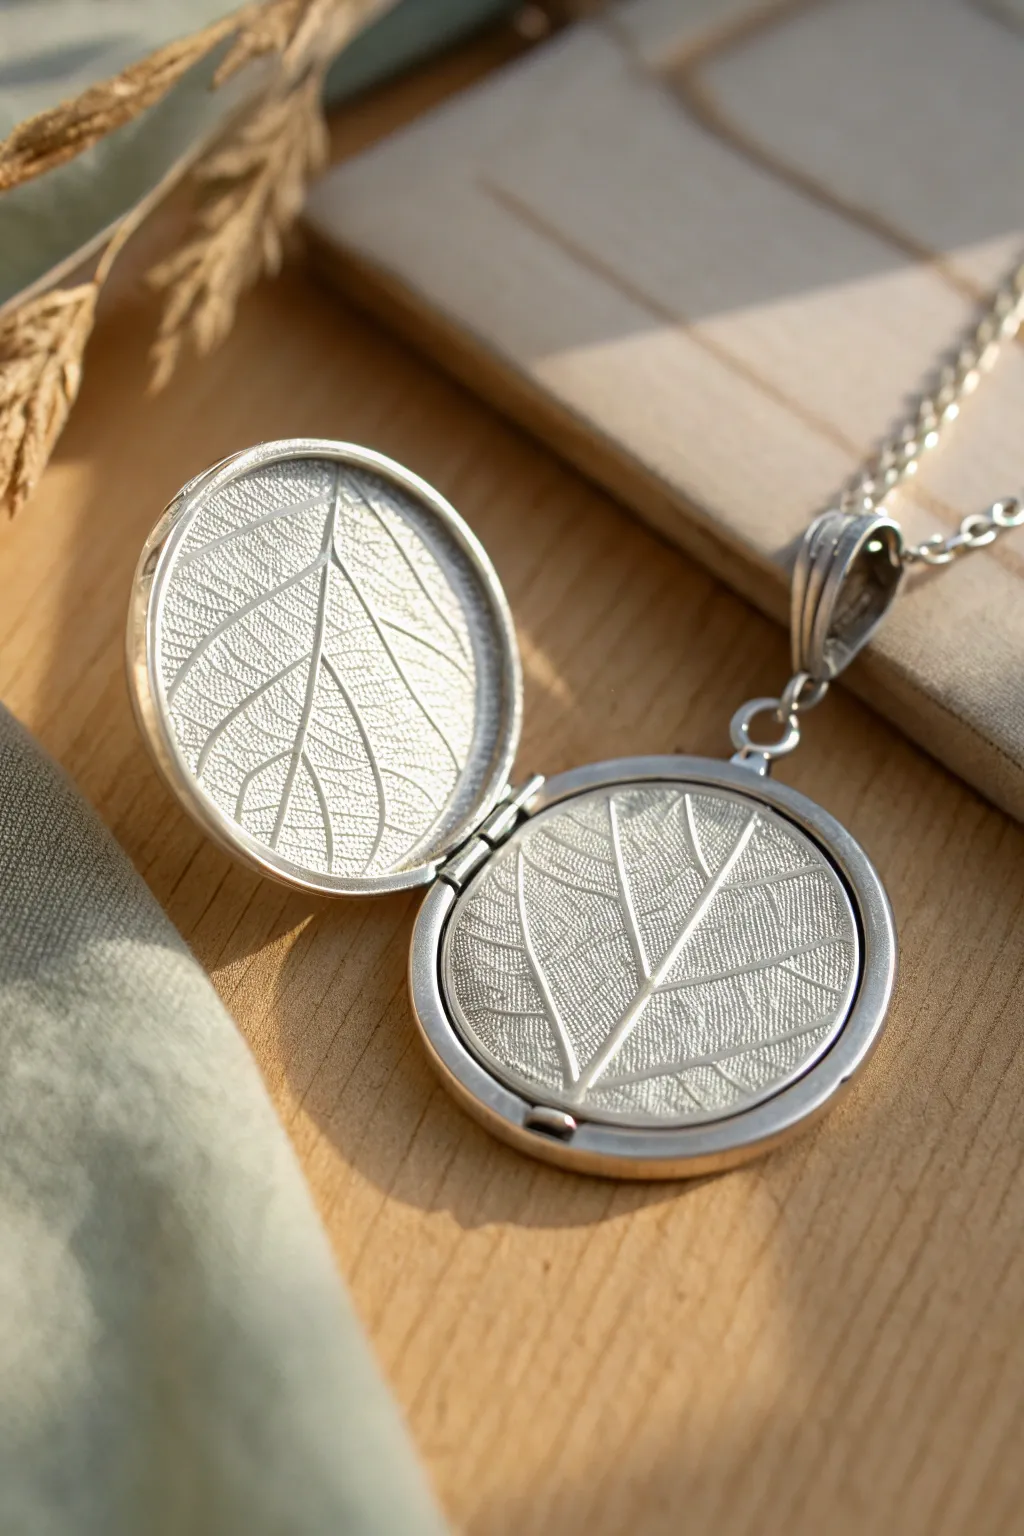
Create a stunning heirloom piece that captures the delicate veins of nature permanently in fine silver. This hinged locket features a detailed leaf skeleton texture imprinted on the interior, making it a secret garden you can wear close to your heart.
How-To Guide
Materials
- 20g Silver metal clay (Art Clay Silver or PMC3)
- Small hinged locket mold or template
- Real skeleton leaves (or a high-quality rubber texture mat)
- Olive oil or badger balm (release agent)
- Scalpel or needle tool
- Fine silver hinge mechanism (embedded) or silver wire for handmade hinge
- Fine silver bail
- Clay roller and spacers (1.5mm thickness)
- Sanding sponges (fine to superfine)
- Kiln (recommended) or butane torch
- Burnisher and polishing cloth
- Liver of sulfur (optional for patina)
Step 1: Preparation and Texturing
-
Prepare the workspace:
Begin by lightly coating your work surface, roller, and hands with a release agent like olive oil or badger balm to prevent the silver clay from sticking. -
Roll the clay:
Roll out your silver clay to a consistent thickness of about 1.5mm using spacers or playing cards. -
Texture the clay:
Place your skeleton leaf or texture mat onto the clay slab. Roll over it firmly once to imprint the deep vein patterns, ensuring you don’t shift the leaf during the process. -
Cut the shapes:
Using a circle cutter or a template and needle tool, cut two identical circles from the textured clay. These will form the two halves of your locket.
Hinge Alignment
Use a piece of pencil lead or a toothpick inside your clay hinge tubes while building. It burns away during firing but keeps the channel clear.
Step 2: Construction and Refining
-
Shape the domes:
Gently place the clay circles into a shallow dome mold or lay them over a household object like a lightbulb to create a subtle concave shape. I check to ensure the texture remains crisp during this transfer. -
Dry the halves:
Allow the clay pieces to dry completely on a warmer or simply air dry for 24 hours. They must be bone dry before the next step. -
Sand the edges:
Once dry, use a fine sanding sponge to smooth the rims of both circles so they will meet flush when closed. -
Create the walls:
Roll a thin snake of fresh clay and flatten it into a strip. Attach this strip to the *rim* of one dome using a little water as glue to create a lip that helps the locket snap shut (optional, but adds security).
Smooth Seams
To check if your locket halves are truly flat, gently rub the dry clay rims on 600-grit sandpaper placed on a glass surface.
Step 3: Hinge and Bail Assembly
-
Prepare the hinge:
If using a pre-made embedded hinge, carve small recesses into the clay wall where the hinge will sit. Paste the hinge components in place using silver clay paste. -
Make a handmade hinge:
Alternatively, attach small tubes of clay (knuckles) to the edges—two on one half, one on the other—aligned so a pin can pass through them later. -
Attach the bail:
Secure a fine silver bail to the top of the back half of the locket using firm pressure and a little clay paste to ensure a strong bond. -
Final refining:
Inspect all joins and smooth away any excess paste with a damp brush. Verify the alignment of the two halves one last time.
Step 4: Firing and Finishing
-
Fire the piece:
Fire the assembled pieces in a kiln according to your clay brand’s instructions (usually 1650°F/900°C for 2 hours for maximum strength). If torch firing, ensure you heat evenly for the required time. -
Brush finish:
Once cool, brush the silver with a brass wire brush and soapy water to remove the white oxidation layer and reveal the silver shine. -
Patina (optional):
Dip the locket in a warm liver of sulfur solution to darken the recessed veins of the leaves, then polish the high points to create dramatic contrast. -
Assemble the mechanism:
insert a sterling silver wire through your hinge knuckles and rivet or ball up the ends to secure the moving parts. -
Final polish:
Give the entire piece a final buff with a polishing cloth to achieve a high-gloss, professional finish.
Wear your beautiful new botanical locket with pride knowing you engineered a complex mechanical piece entirely by hand
Hidden-Bail Botanical Pendant
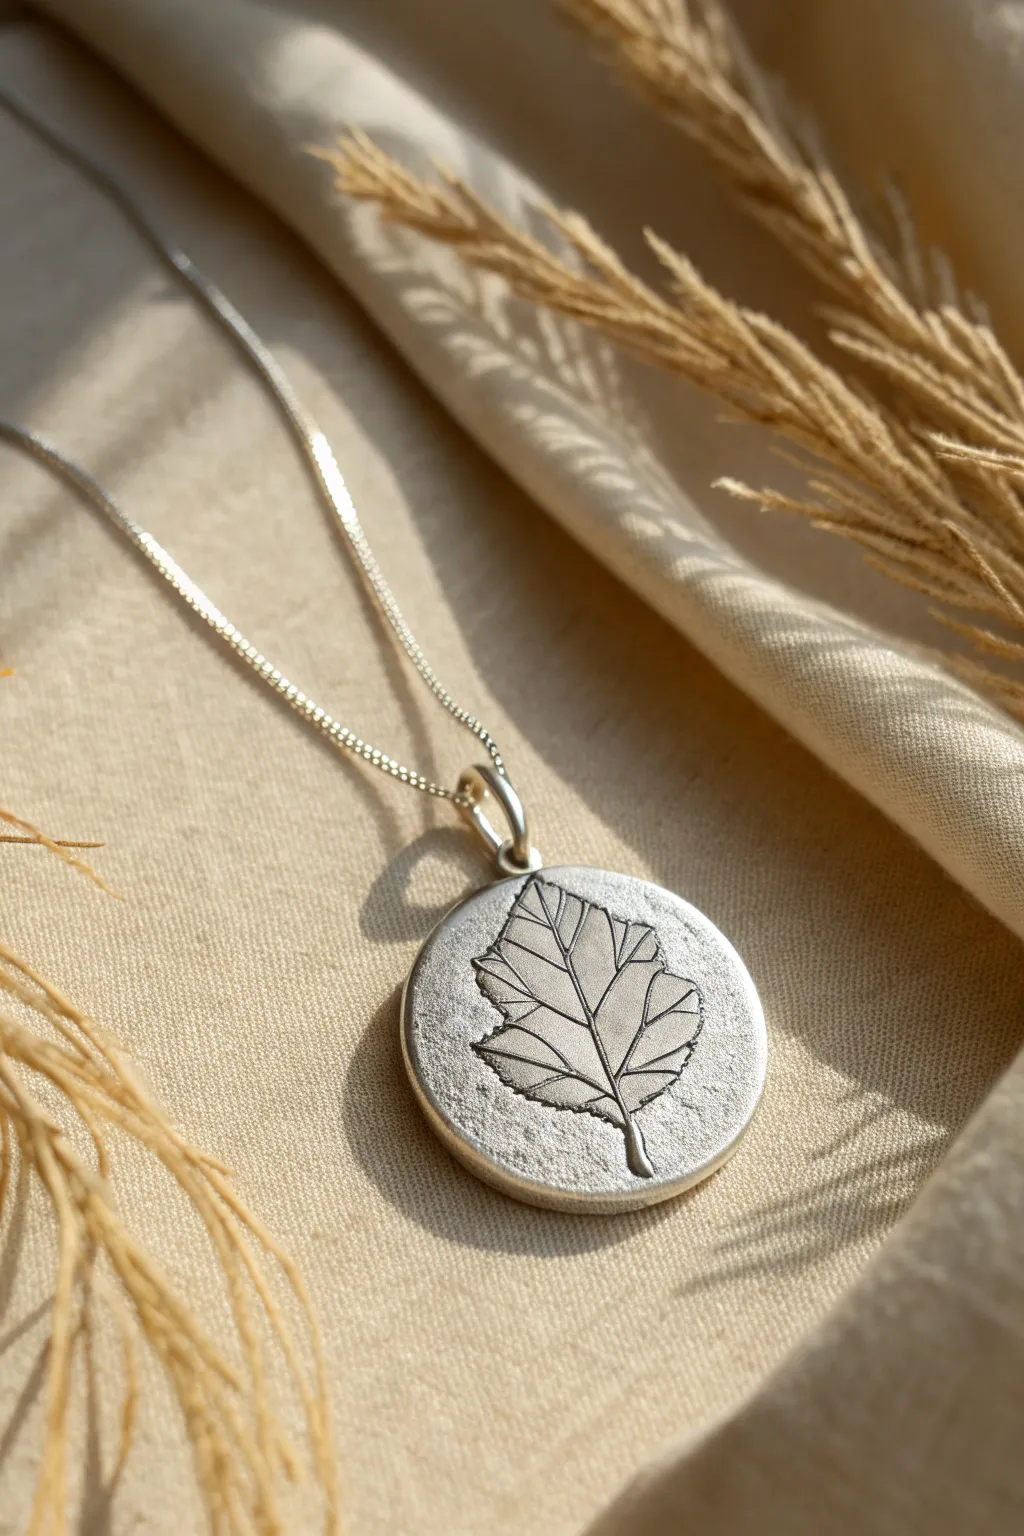
Capture nature’s fleeting beauty forever with this elegant fine silver pendant. By pressing a real leaf into silver clay, you’ll create a reversible texture that highlights organic veins against a softly stippled background.
Step-by-Step Guide
Materials
- 20g Silver metal clay (PMC or Art Clay Silver)
- Small sturdy leaf with prominent veins (like Birch or Rose)
- Roller and 1.5mm thickness spacers (playing cards work)
- Round clay cutter (approx. 25-30mm)
- Small drinking straw or specialized bail cutter
- Badger balm or olive oil
- Texture sheet or sandpaper for the reverse side
- Torch or kiln for firing
- Fine sandpaper or sanding sponges
- Liver of sulfur (patina solution)
- Polishing cloth and agate burnisher
Step 1: Preparing the Impression
-
Conditioning:
Begin by rubbing a tiny amount of badger balm or olive oil onto your hands and work surface to prevent sticking. Unwrap your silver clay and knead it briefly until it feels pliable and smooth, ensuring there are no cracks. -
Rolling out:
Place your 1.5mm spacers on either side of the clay ball. Using your roller, flatten the clay into a consistent slab. Lift and turn the clay once to ensure it isn’t sticking to the work surface. -
Leaf selection:
Select a fresh leaf with a strong vein structure; dried leaves tend to crumble. Lightly coat the vein side of the leaf with a lubricant like olive oil so it releases easily later. -
Creating the impression:
Place the leaf vein-side down onto the center of your clay slab. Gently roll over the leaf once with firm pressure to embed it, but don’t roll back and forth or you might create a ‘ghost’ image.
Step 2: Shaping and Refining
-
Cutting the pendant:
Position your round cutter over the leaf impression to frame it nicely. Press down firmly to cut the shape, wiggle slightly to separate, and remove the excess clay (keep this for the bail). -
Removing the leaf:
Carefully lift the edge of the leaf with tweezers or a needle tool and peel it away to reveal the detailed impression. I prefer to do this immediately while the clay is moist. -
Attaching the hidden bail:
Roll a small snake of excess clay and form a ‘U’ shape or small loop. Turn the pendant over and attach this loop to the upper back using a drop of water and paste (slurry), pressing firmly to ensure a strong bond. -
Drying:
Place the piece on a warming plate or simply let it air dry for 24 hours. The clay must be bone dry before firing; it should feel room temperature to the touch, not cool. -
Pre-fire sanding:
Once dry, gently sand the edges of the circle with fine grit sandpaper to remove any burrs or sharp angles from the cutting process. Be gentle to avoid breaking the delicate bail.
Broken Bail?
If the hidden bail snaps off during the greenware (dry) stage, use a thick paste of clay and water to reattach it. Reinforce the join with a small coil of fresh clay for extra strength.
Step 3: Firing and Finishing
-
Firing:
Fire the piece according to your clay manufacturer’s instructions. For most silver clays, this means torch firing until it glows a peachy-orange for 2-3 minutes, or kiln firing at 1650°F (900°C) for two hours. -
Brushing:
After cooling, the silver will look white and chalky. Vigorously brush it with a stainless steel brush to burnish the surface and reveal the metallic silver shine underneath. -
Applying patina:
Prepare a warm liver of sulfur solution. Dip the pendant until it turns a dark gray or black. This oxidation is crucial for making the leaf veins pop visually. -
Polishing:
Using a polishing cloth or sanding sponge, remove the black patina from the high points of the pendant. Leave the dark color inside the deep veins and the textured background. -
Burnishing edges:
Take an agate burnisher and rub it firmly along the raised rim and the leaf stem to create a high-shine, mirror-like finish that contrasts with the matte texture.
Gemstone Sparkle
Before drying, press a small cubic zirconia into the clay near the leaf stem. Ensure the stone’s girdle is fully embedded so the metal shrinks around it during firing.
Wear your botanical necklace as a reminder of the quiet beauty found in the forest
Hollow Slab-Built Locket
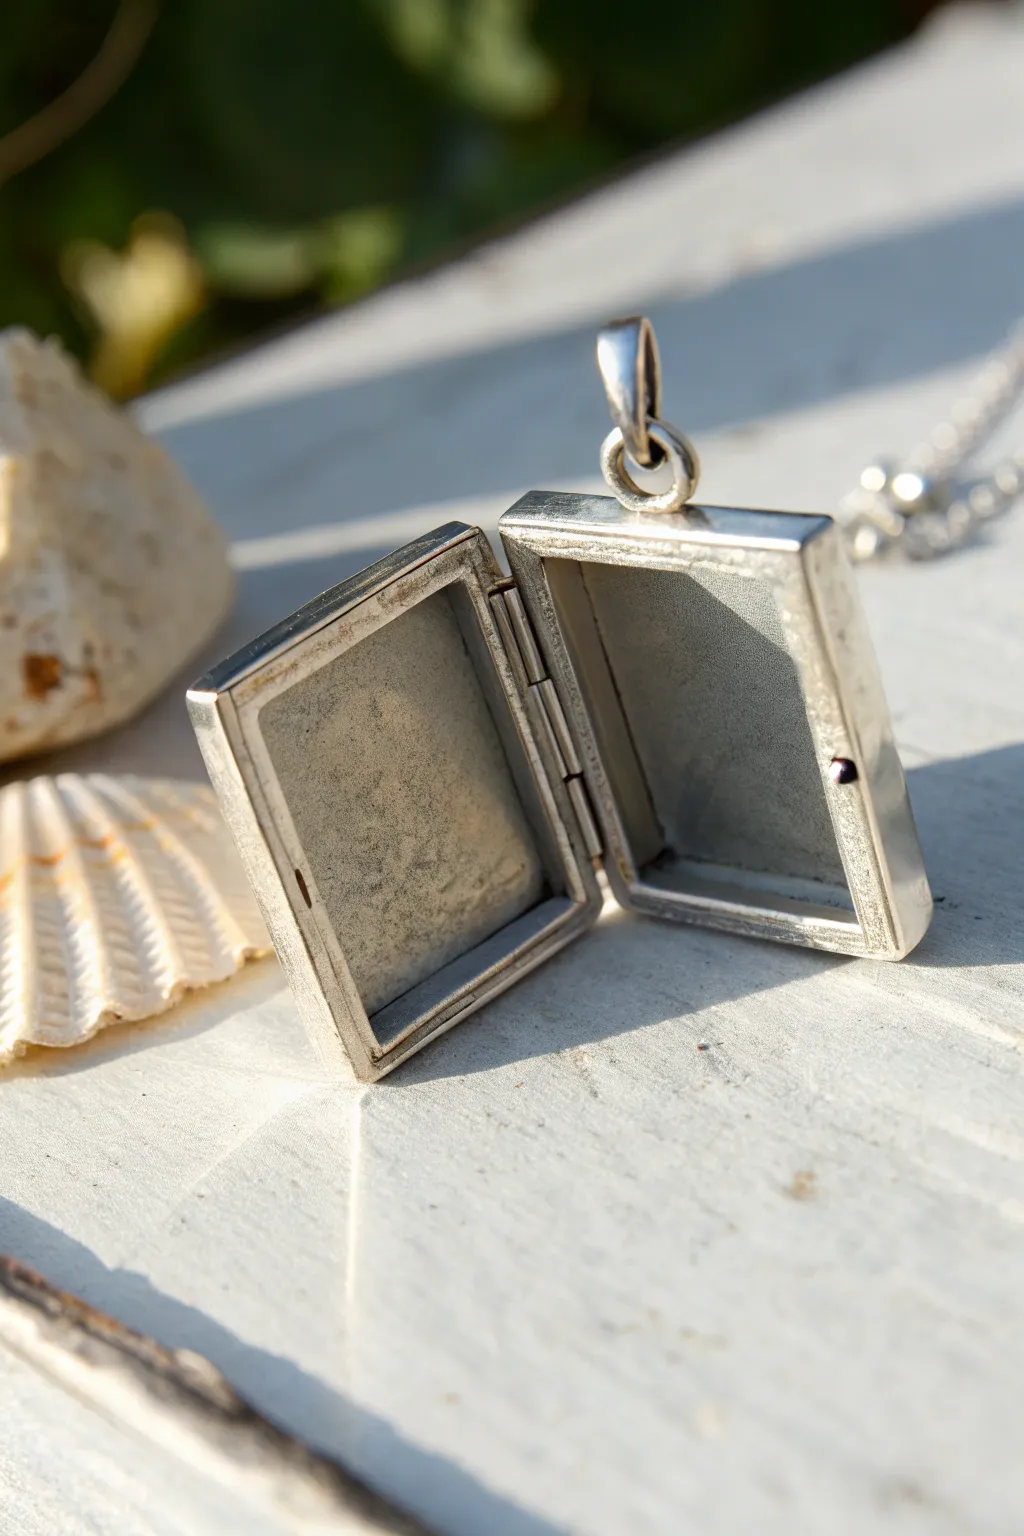
This elegant, clean-lined locket uses slab-building techniques to create a classic rectangular shape with a sturdy hinge mechanism. The interior offers deep, shadow-box style compartments perfect for holding photos, resin, or tiny keepsakes.
Step-by-Step Tutorial
Materials
- Silver metal clay (approx. 20-30g)
- Fine silver bezel wire (rectangular or strip)
- Fine silver tubing (for the hinge)
- Sterling silver wire (approx. 18-gauge, fitting inside the tubing)
- Clay roller and thickness spacers (slat/playing cards)
- Sharp clay craft knife or scalpel
- Agate burnisher
- Metal clay paste (slip)
- Small paintbrush
- Needle files and sandpaper (various grits)
- Handheld torch or kiln
- Wire cutters
- Soldering setup (optional, if soldering the hinge pin)
- Masking tape
Step 1: Creating the Box Halves
-
Roll the Slabs:
Roll out your silver clay to a medium thickness (about 3-4 playing cards thick). You need enough surface area to cut two identical rectangles for the backplates of your locket. -
Cut the Base Rectangles:
Using a template or a ruler, cut two identical rectangles. These will form the back walls of the two locket halves. Keep the edges sharp and straight. -
Form the Walls:
Roll out a long strip of clay, slightly thinner than the base plates, or use flattened fine silver bezel wire for crisper edges. Measure the perimeter of your base rectangles and cut strips to create walls. -
Assemble the Boxes:
Apply a small amount of clay paste along the edges of your base rectangles. Place the wall strips on top, meeting at the corners. Ensure the walls stand perpendicular to the base. -
Reinforce the Seams:
With a fine-tip brush, run a bead of clay paste along the inside seams where the walls meet the floor to ensure a strong bond. Smooth the outside corners with a rubber shaper. -
Dry Completely:
Allow both box halves to dry completely. Once dry, sand the top edges of the walls on a flat piece of sandpaper to ensure both halves are perfectly flush when closed.
Hinge Alignment
Use a graphite pencil lead instead of silver wire as your placeholder while drying the hinge. Clay won’t stick to graphite, ensuring the tube stays clear.
Step 2: Constructing the Hinge
-
Cut the Tubing:
Cut your fine silver tubing into three segments: a longer center piece (representing about 50% of the hinge length) and two shorter side pieces. -
Embed the Tubing:
Carve a small semi-circular groove into the side wall of each locket half where the hinge will sit. This helps the tubing sit flush against the box. -
Attach the Knuckles:
Using thick clay paste, attach the center tube segment to one locket half and the two outer segments to the other half. Use a dummy wire (coated in olive oil or graphite) through the tubes to keep them aligned while pasting. -
Refine the Alignment:
Carefully remove the dummy wire before the paste fully hardens. Clean up any excess paste that might block the hinge movement. Let everything dry thoroughly. -
Add the Bail Loop:
Form a small U-shape or loop from a coil of clay or extruded clay. Attach this to the top center of one of the box halves using paste to serve as the necklace bail.
Step 3: Firing and Assembly
-
Fire the Components:
Fire the two clay halves in a kiln according to the clay manufacturer’s instructions for maximum strength (usually around 1650°F/900°C for 2 hours) since this is a mechanical piece. Torch firing is risky for boxed shapes. -
Assemble the Hinge:
Once fired and cooled, brush the pieces with a brass brush. Align the hinge knuckles and insert your sterling silver wire to connect the two halves. -
Secure the Pin:
Trim the wire so only a tiny amount protrudes. You can either gently deform (rivet) the ends of the wire with a hammer or laser/soldering tack the ends so the pin doesn’t slide out. -
Polish to a Shine:
Use an agate burnisher to rub the flat surfaces until they gleam. Follow up with polishing papers or a tumbler to achieve the high-shine finish seen in the photo. -
Final Adjustments:
Check the closure. If it feels loose, you can add a tiny dot of solder or a small friction nub on the inner lip opposite the hinge to help it snap shut.
Clean Corners
For super sharp internal corners on your box, use a square needle file after the clay is dry but before firing. It’s much easier to shape greenware than metal.
Now you have a timeless silver keepsake ready to hold your most precious memories
Syringe-Drawn Lace Pendant
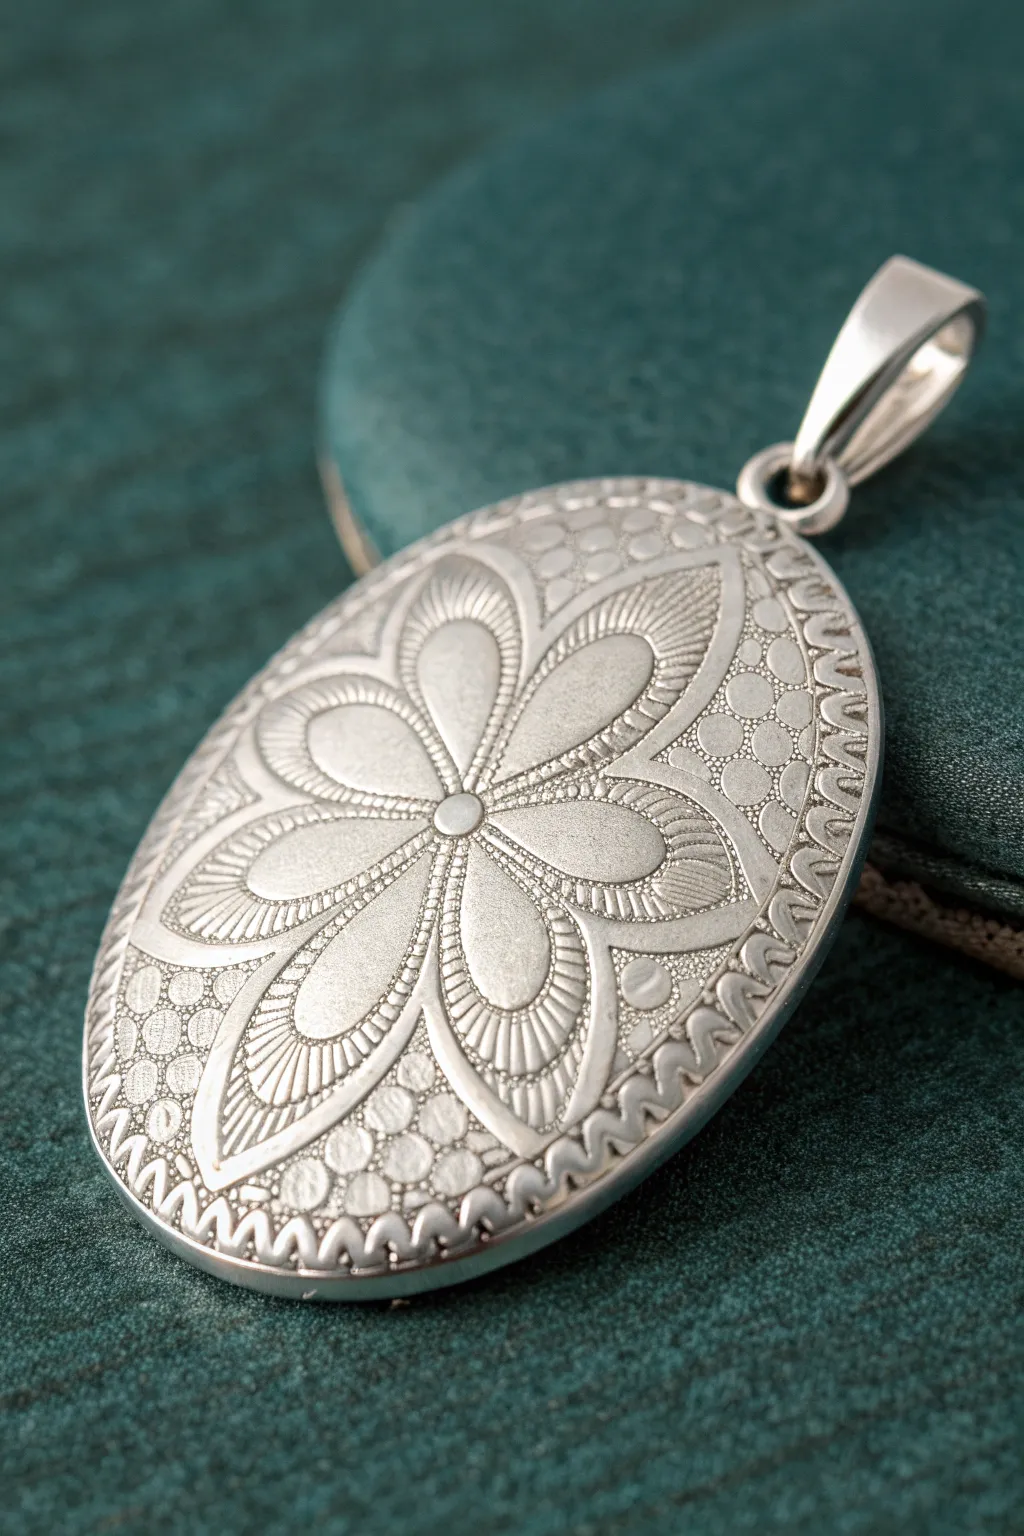
This elegant oval pendant showcases the delicate art of piping silver clay, resulting in a piece that feels both vintage and organic. With its raised floral motif and dotted texture set against a smooth background, it captures the intricate beauty of lace in solid fine silver.
Detailed Instructions
Materials
- Silver metal clay (lump form, ~10g)
- Silver metal clay in a syringe (with fine tip)
- Rolling pin or clay roller
- Playing cards or spacers (1mm and 1.5mm thickness)
- Oval shape cutter
- Trace and transfer paper (optional)
- Small stylus or needle tool
- Work surface (Teflon sheet or laminated card)
- Olive oil or Badger Balm
- Rubber shaping tool or small paintbrush
- Small drill bit or drinking straw (for bail hole)
- Fine sandpaper or sanding sponges
- Kiln or butane torch
- Burnishing tool and stainless steel wire brush
- Liver of sulfur (patina)
- Polishing cloth
Step 1: Preparing the Base
-
Condition the Clay:
Begin by taking your lump clay and kneading it briefly in your hands. Ensure your hands and work surface are lightly coated with olive oil or balm to prevent sticking. The clay should feel plain and crack-free. -
Roll the Slab:
Place the clay between two spacers roughly 1.5mm thick (about 4-5 playing cards deep). Roll it out smoothly with your roller to create a consistent, flat slab. -
Cut the Shape:
Using your oval cutter, press firmly into the rolled clay to cut your base shape. Remove the excess clay around the outside and immediately wrap it up to keep it fresh. Lift the oval gently and place it on a clean working surface. -
Smooth the Edges:
Before the clay dries, use a slightly damp finger or a rubber shaper to smooth the cut edges of the oval, ensuring there are no sharp burrs.
Keep it Flowing
Keep a small dish of water nearby. Periodically dip the tip of your syringe into it to prevent the clay inside the nozzle from drying out and clogging.
Step 2: Designing the Pattern
-
Mark the Center:
Lightly mark the center of your oval with a needle tool. This will be the anchor point for your flower petals. -
Plan the Petals:
You can now either freehand the design or lightly trace a petal pattern onto the clay. Outline six distinct petals radiating from the center dot, ensuring they are symmetrical. -
Add the Bail Hole:
At the top of the oval, use a small straw or drill bit to punch a hole for the jump ring. Make sure it’s not too close to the edge to ensure strength. -
Dry the Base:
Let the base dry completely (either air dry for 24 hours or on a cup warmer). I find working on a dry base makes the syringe work much easier as you won’t accidentally deform the shape.
Step 3: Piping the Details
-
Prepare the Syringe:
Attach a fine tip to your silver clay syringe. Press the plunger slightly until a smooth worm of clay emerges, ensuring there are no air bubbles. -
Outline the Petals:
Carefully pipe a line of clay over your traced petal outlines. Keep the tip slightly above the surface, letting the clay ‘fall’ into place for smoother lines. -
Create the Radiating Lines:
Inside each petal, pipe finer lines radiating from the center outward to create the striated texture seen in the reference. If a line goes astray, lift it off immediately with a tool and retry. -
Dot the Background:
In the negative space between the petals and the edge, pipe tiny dots of clay. Varying the size slightly creates a lovely organic texture. -
Pipe the Border:
Finish the syringe work by piping a zig-zag or scalloped border around the very edge of the oval to frame the design. -
Refine the Lines:
If any syringe lines have sharp peaks from lifting the tool, tap them gently with a moistened brush to settle them down.
Add a Gemstone
Before drying the syringe work, press a small, fireable cubic zirconia into the center of the flower for a touch of sparkle.
Step 4: Finishing
-
Full Dry:
Allow the entire piece to dry completely again. The added syringe work must be bone dry before firing to prevent steam explosions. -
Pre-Fire Sanding:
Gently sand the edges and back of the pendant with fine sandpaper to perfect the shape. Be extremely careful not to sand off your piped design. -
Fire the Piece:
Fire the pendant according to your clay manufacturer’s instructions (typically 1650°F / 900°C for 2 hours in a kiln, or glow orange for a few minutes with a torch). -
Brush and Burnish:
Once cool, the silver will look white. Scrub it vigorously with a stainless steel wire brush and water to reveal the silver shine, then burnish the high points (the petals) for extra gleam. -
Apply Patina:
Dip the pendant in a warm liver of sulfur solution. This will darken the recessed areas and the background grid, making the shiny raised petals pop. -
Final Polish:
Polish the high spots one last time with a polishing cloth to remove the dark patina from the raised lace lines, leaving the depth in the crevices.
Attach a sterling silver bail to your finished pendant and enjoy wearing your handmade silver lace.