When I’m craving an easy, feel-good project, I always reach for cute simple clay ideas that start with basic shapes and end with a tiny personality. These are the kinds of quick little makes that look adorable on a shelf, desk, or as a sweet handmade gift.
Smiley Strawberry Charm
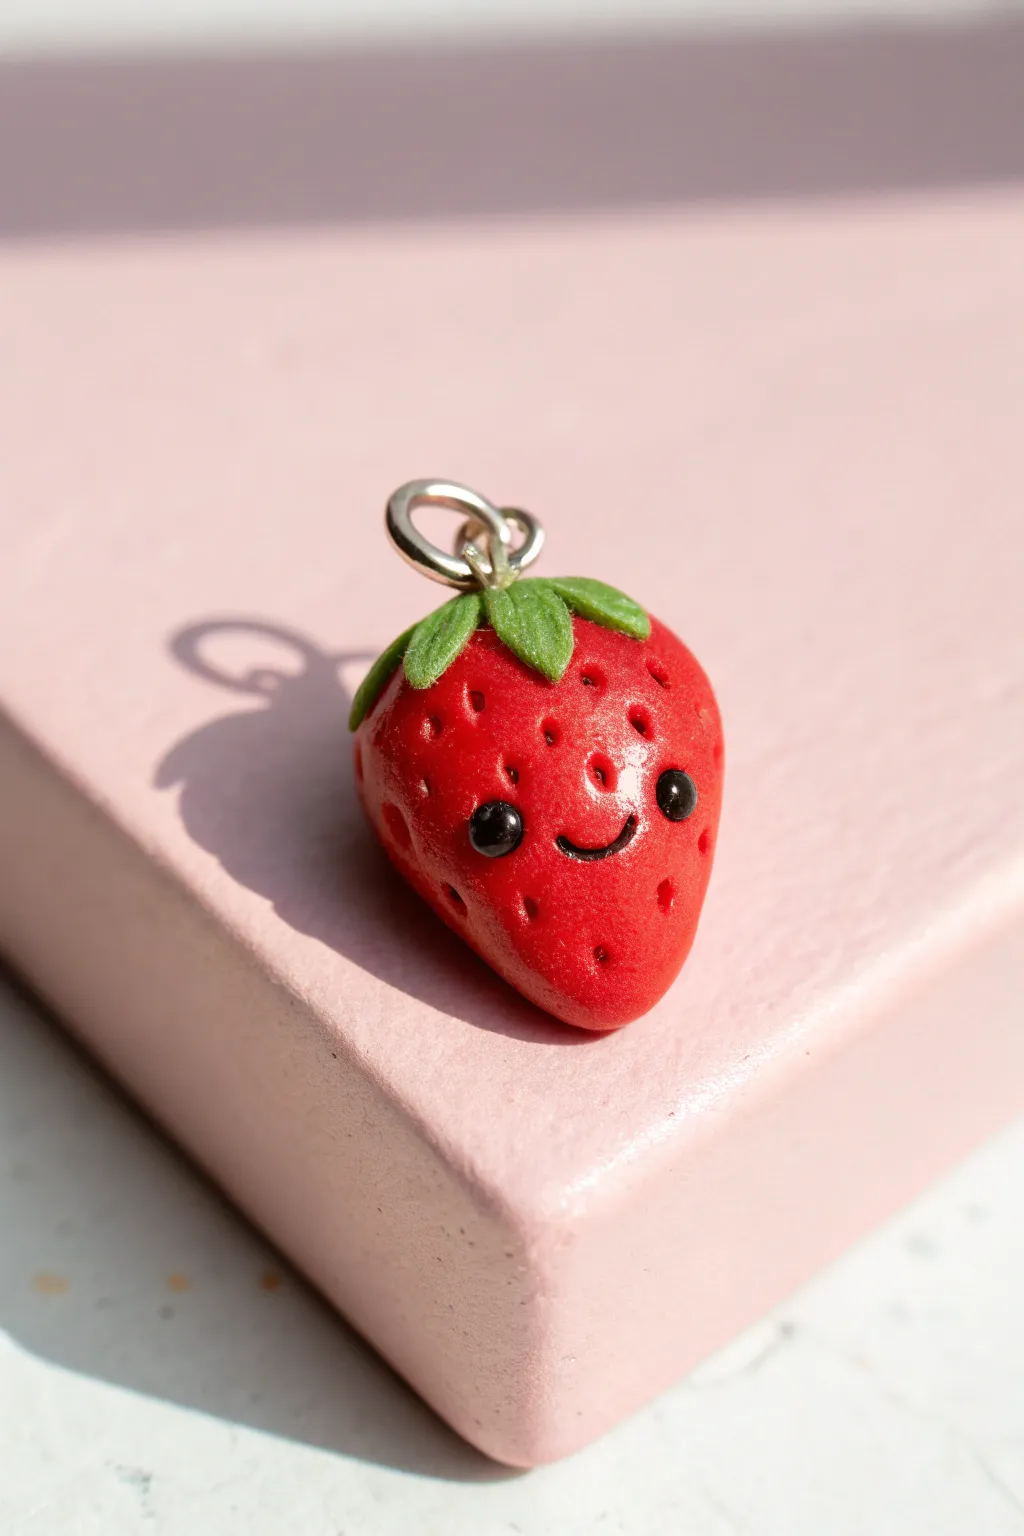
Brighten up your keychain or necklace with this adorably happy little fruit. This simple polymer clay strawberry features a classic pitted texture, a cute leafy crown, and a cheerful face that’s sure to make you smile.
Step-by-Step Tutorial
Materials
- Red polymer clay
- Green polymer clay
- Black polymer clay or small black beads/safety eyes
- Translucent liquid polymer clay (optional)
- Headpin or eye screw
- Needle tool or toothpick
- Dotting tool
- Gloss glaze or varnish
- Acrylic rolling pin
- Blade or craft knife
Step 1: Shaping the Berry
-
Prepare the red clay:
Start by conditioning a small chunk of red polymer clay until it is soft and pliable. Roll it into a smooth ball about the size of a large marble, ensuring there are no cracks. -
Form the strawberry shape:
Gently gently roll one side of the ball between your fingers to taper it, creating a soft cone or teardrop shape. Make sure the bottom is slightly rounded rather than sharp. -
Flatten the top:
Press the wider end of the teardrop slightly against your work surface to create a flat area where the leaves will eventually sit.
Step 2: Adding Texture and Details
-
Create the seed indentations:
Using a needle tool or a very fine dotting tool, press small holes all over the surface of the red cone to mimic strawberry seeds. Leave a small clear space in the middle for the face. -
Position the eyes:
Identfy the smooth patch you left for the face. Take two tiny black beads or roll two minuscule balls of black clay and press them firmly into the clay. Be sure to space them somewhat widely for that cute ‘kawaii’ look. -
Carve the smile:
Use the edge of a small straw, a tiny curved tool, or your needle tool to carefully impress a U-shaped smile right between and slightly below the eyes. I find a light touch works best here to avoid distorting the face.
Seed Depth Trick
Press the needle tool inward and slightly upward when making seed holes. This creates a shadowed tear-drop shape that looks much more like real strawberry seeds than a simple poke.
Step 3: crafting the Leaves
-
Prepare the green clay:
Condition a small amount of green clay and flatten it into a thin sheet. -
Cut the leaf shape:
You can use a tiny star cutter if you have one, or simply cut a small 5-pointed star shape freehand using your craft knife. -
Texture the leaves:
Use your needle tool to gently scratch a central vein down the middle of each leaf point for realistic detail. -
Attach the leaves:
Place the green star on top of the red berry. Gently press the points of the star down so they curve over the ‘shoulders’ of the strawberry. -
Add a stem (optional):
Roll a tiny cylinder of green clay and attach it to the center of the leaves to look like a cut stem.
Make it Juicy
Before baking, lightly brush distinct pink chalk pastel dust over the ‘cheeks’ of the strawberry to give it a sweet, blushing effect that adds character.
Step 4: Finishing Up
-
Insert the hardware:
Take a metal eye pin or eye screw. If using a pin, trim it to size and bend a small hook at the bottom or add a dab of liquid clay for grip, then push it vertically into the top center of the strawberry. -
Bake the charm:
Bake your piece according to the temperature and time instructions on your specific package of polymer clay. Usually, this is around 275°F (130°C) for 15-30 minutes. -
Cool down:
Let the strawberry cool completely before handling it, as the clay helps harden as it returns to room temperature. -
Add a glossy finish:
For that juicy fruit look, apply a coat of gloss glaze or polyurethane varnish over the red part of the strawberry, avoiding the green leaves for a nice texture contrast.
Attach a jump ring to your finished charm and it is ready to hang on a bag or necklace


Chubby Dino Desk Buddy
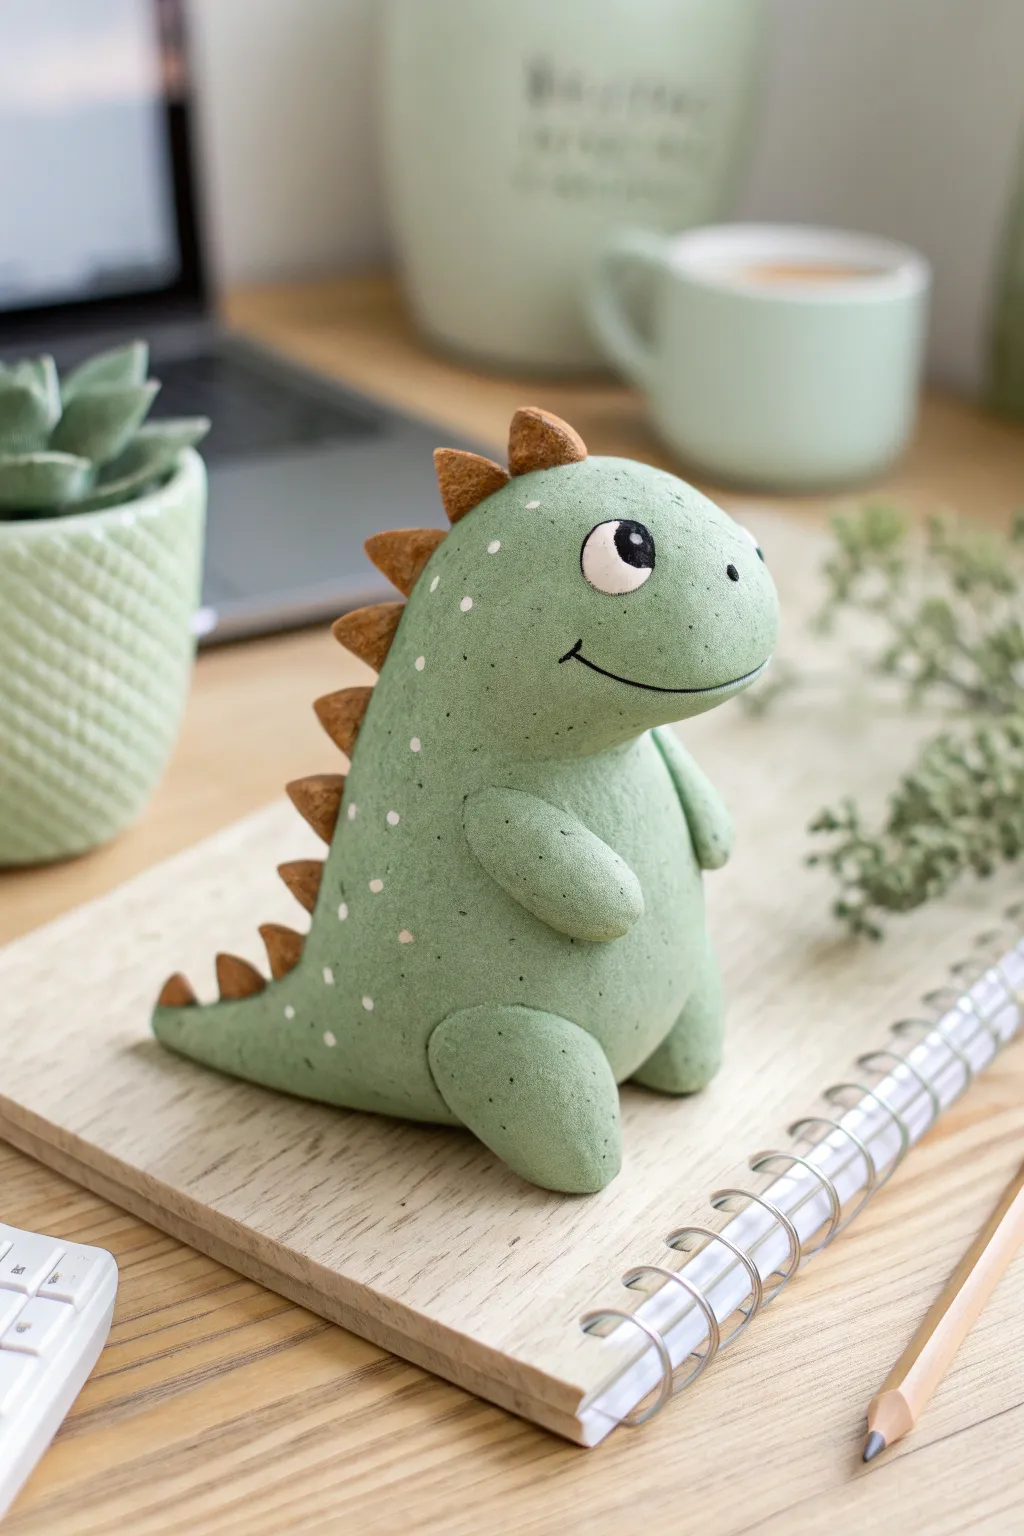
Brighten up your workspace with this adorable prehistoric friend who looks more ready for a hug than a hunt. With its textured green skin, friendly smile, and earthy brown spikes, this chubby dinosaur is a delightful beginner sculpting project.
Step-by-Step
Materials
- Polymer clay (sage green, teddy bear brown, white, black)
- Aluminum foil (for armature core)
- Sculpting tools (needle tool, ball stylus)
- Old toothbrush or stiff bristle brush (for texture)
- Acrylic rolling pin
- Blade or craft knife
- Oven for baking
Step 1: Forming the Body
-
Create the core:
Crumple a piece of aluminum foil into a tight egg shape. This saves clay and keeps the figurine lightweight while helping it bake evenly. -
Condition the clay:
Knead your sage green clay until it is soft and pliable. Roll it into a smooth ball slightly larger than your foil core. -
Cover the core:
Flatten the green clay and wrap it completely around the foil egg. Roll it between your palms to smooth out any seams until you have a perfect, chubby teardrop shape. -
Shape the head:
Gently manipulate the narrower top part of the teardrop to distinguish the head from the body. You want a seamless transition, but with a slight definition for the neck area. -
Add texture:
Taking an old toothbrush, gently tap the bristles all over the surface of the green clay. This creates a realistic, stone-like skin texture rather than a shiny plastic look.
Loose Spikes?
If the spikes aren’t sticking well to the curved back, apply a tiny dab of liquid polymer clay or ‘Bake and Bond’ to the base of each triangle before pressing it down.
Step 2: Adding Limbs and Facial Features
-
Make the feet:
Roll two medium-sized balls of green clay. Flatten slightly into oval shapes and press them firmly onto the bottom front relative to where the face will be, blending the back seams so they stick. -
Attach the arms:
Create two smaller sausage shapes for the arms. Press them onto the sides of the chest area, angling them slightly inward as if the dino is clutching its tummy. -
Texture the limbs:
Don’t forget to extend your toothbrush texturing to the newly added arms and legs so they match the body perfectly. -
Sculpt the mouth:
Using a needle tool or a clay blade, carefully slice a curved line for the smile. I like to gently press the tool inward to open the mouth just a tiny bit for extra cuteness. -
Create the eyes:
Press a small ball tool into the head to make eye sockets. Fill these with small flattened distinct circles of white clay. -
Add pupils:
Place tiny black clay dots onto the white circles. Add an even tinier speck of white on the black pupils to create a life-like reflection.
Step 3: Spikes and Details
-
Make the spikes:
Condition your brown clay. Roll out a small snake and cut it into small, equal triangular segments, or hand-shape about 6-8 small cones. -
Attach the spikes:
Starting from the top of the head and working down the back to the tail, press the brown triangles firmly onto the spine. Ensure the base of each spike bonds well with the green body. -
Apply spots:
Roll extremely tiny balls of white clay. Press these randomly over the dinosaur’s back and sides, flattening them so they look like painted speckles. -
Texture the spikes:
Use your toothbrush to lightly tap the brown spikes, giving them a rough texture that contrasts slightly with the white spots. -
Final check:
Look over your dino from all angles. Smooth out any accidental fingerprints and ensure the figure sits flat and stable. -
Bake:
Bake according to your clay package instructions (usually 275°F/135°C for 15-30 minutes depending on thickness). Let it cool completely before handling.
Make it a Memo Holder
Before baking, insert a coiled wire memo clip into the top of the dinosaur’s head. It turns your cute desk buddy into a functional note holder for your workspace.
Place your new chubby friend on your desk to guard your pencils and bring a smile to your workday


Tiny Octopus With Stubby Legs
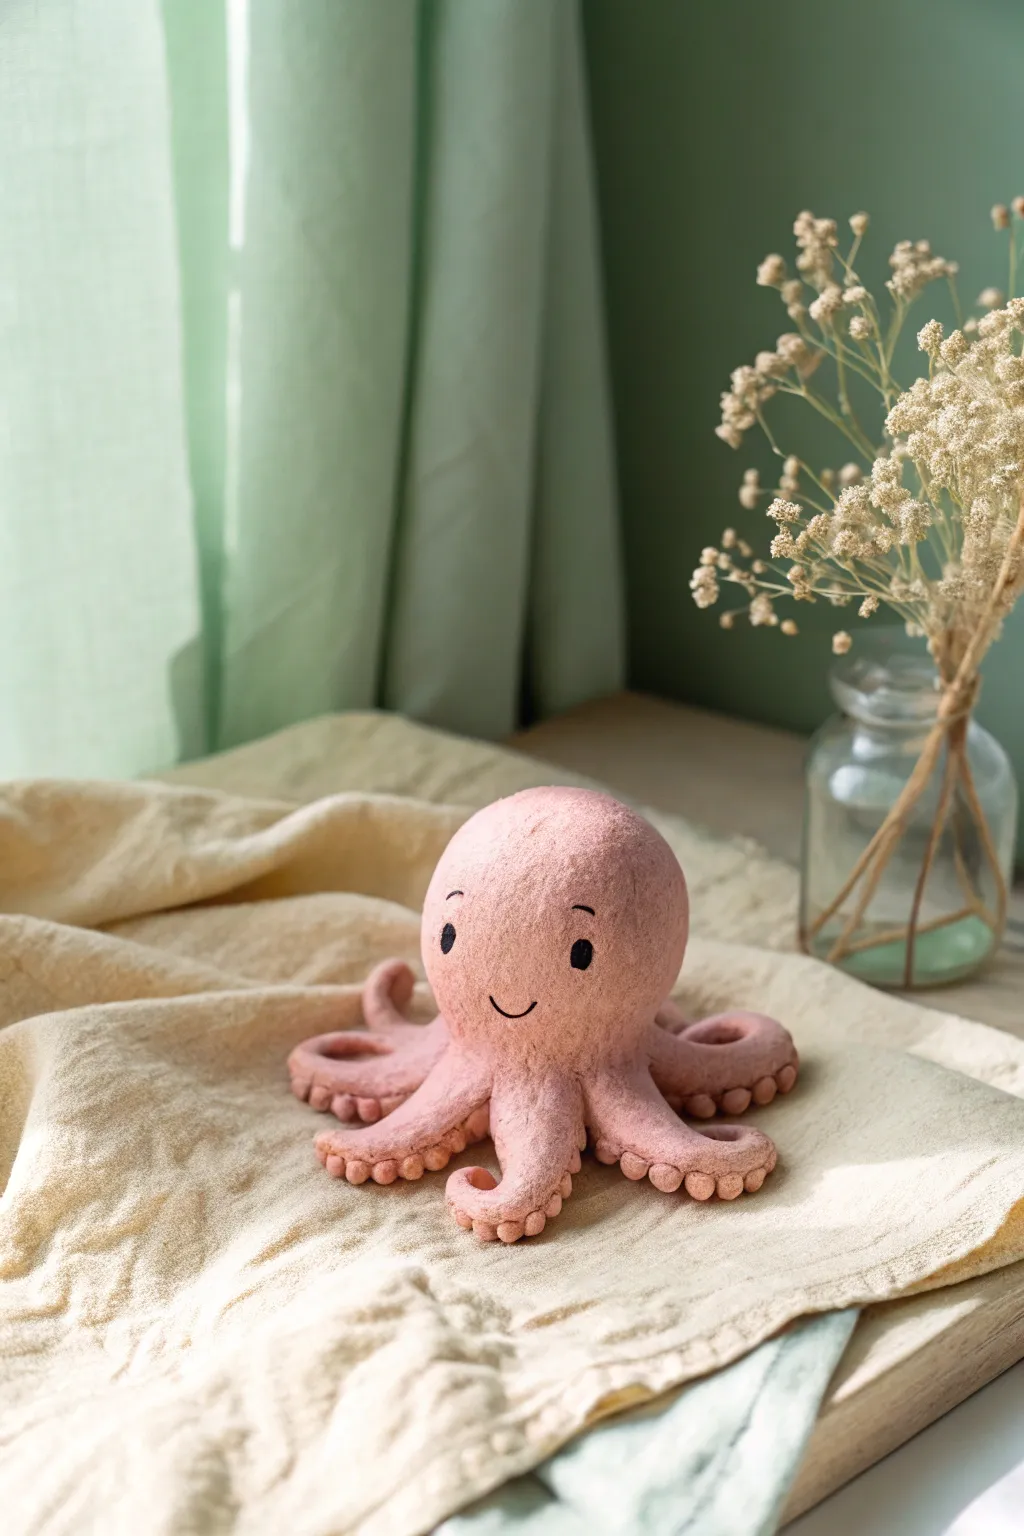
This charming octopus figurine features a delightful textured finish that mimics the feel of felt or stone, giving it a cozy and organic look. With its gentle pink hue and friendly, stubby tentacles, it makes for a perfect desk companion or shelf decoration.
Step-by-Step Guide
Materials
- Air-dry clay (stone effect or terracotta works well)
- Acrylic paint (pastel pink, black)
- Texture sponge or stiff bristle brush
- Ball stylus tool (medium size)
- Fine detail paintbrush
- Water cup
- Aluminum foil (for armature core)
- Matte varnish spray
Step 1: Shaping the Core Body
-
Form the armature:
Crumple a piece of aluminum foil into a tight ball about the size of a tennis ball. This saves clay and keeps the figurine lightweight. -
Cover the core:
Roll out a slab of clay about 1/4 inch thick. Wrap this sheet completely around your foil ball, smoothing out any seams with a little water until you have a perfect sphere. -
Refine the head shape:
Gently gently flatten the bottom of the sphere so it sits stable. Use your palms to taper the top slightly, creating a soft, rounded dome shape for the head.
Step 2: Creating the Tentacles
-
Roll the coils:
Roll out eight thick, sausage-like coils of clay. They should be roughly 2-3 inches long and tapered at one end. -
Attach the legs:
Score the underside of the head and the thicker end of each tentacle. Add a dab of water or slip and press the tentacles firmly onto the base of the body. -
Arrange the pose:
Gently curl the tips of the tentacles outward and upward. Aim for a symmetrical, radial arrangement so they sprawl out like a flower from the base. -
Blend the seams:
Use a modeling tool or your finger to smooth the clay where the legs join the body. The transition should be seamless, making the head and legs look like one solid piece.
Texture Pro Tip
If your sponge isn’t creating enough texture, try crushing a ball of aluminum foil and rolling it firmly over the wet clay surface for a deeper, stone-like finish.
Step 3: Adding Details and Texture
-
Add suckers:
Roll many tiny balls of clay (about pea-sized). Press these in two parallel rows along the underside of each curling tentacle. -
Indent the suckers:
Using the ball stylus tool, press into the center of each tiny sucker ball to create a cup shape. -
Apply texture:
This is crucial for the stone/felt look. Take a rough sponge or a stiff bristle brush and stipple (poke repeatedly) the entire surface of the octopus. Don’t smooth it out; you want that pitted, organic surface. -
Create the face:
While the clay is still soft, lightly mark where the eyes will go. Use a clay tool to incise a small, curved smile right in the center. -
Dry completely:
Let the sculpture dry for 24-48 hours. I usually rotate it occasionally so the bottom gets air too.
Sea Floor Base
Create a simple textured coaster out of clay painted sandy beige to sit underneath your octopus, making it look like it’s resting on the ocean floor.
Step 4: Painting and Finishing
-
Base coat:
Paint the entire octopus with a pastel pink acrylic paint. Use a dabbing motion rather than brushing to ensure paint gets into all those texture pits. -
Dry and repeat:
Allow the first coat to dry, then apply a second coat if necessary for opaque coverage. -
Paint the eyes:
Using a fine detail brush and black paint, carefully fill in two small oval eyes. Add tiny ‘eyebrows’ above them for expression. -
Define the smile:
Run a very thin line of black paint into the smile groove you created earlier. -
Seal the work:
Once all paint is totally dry, finish with a matte varnish spray to protect the surface without making it shiny.
Enjoy your adorable new handcrafted friend sitting on your desk


Mini Mushroom Couple
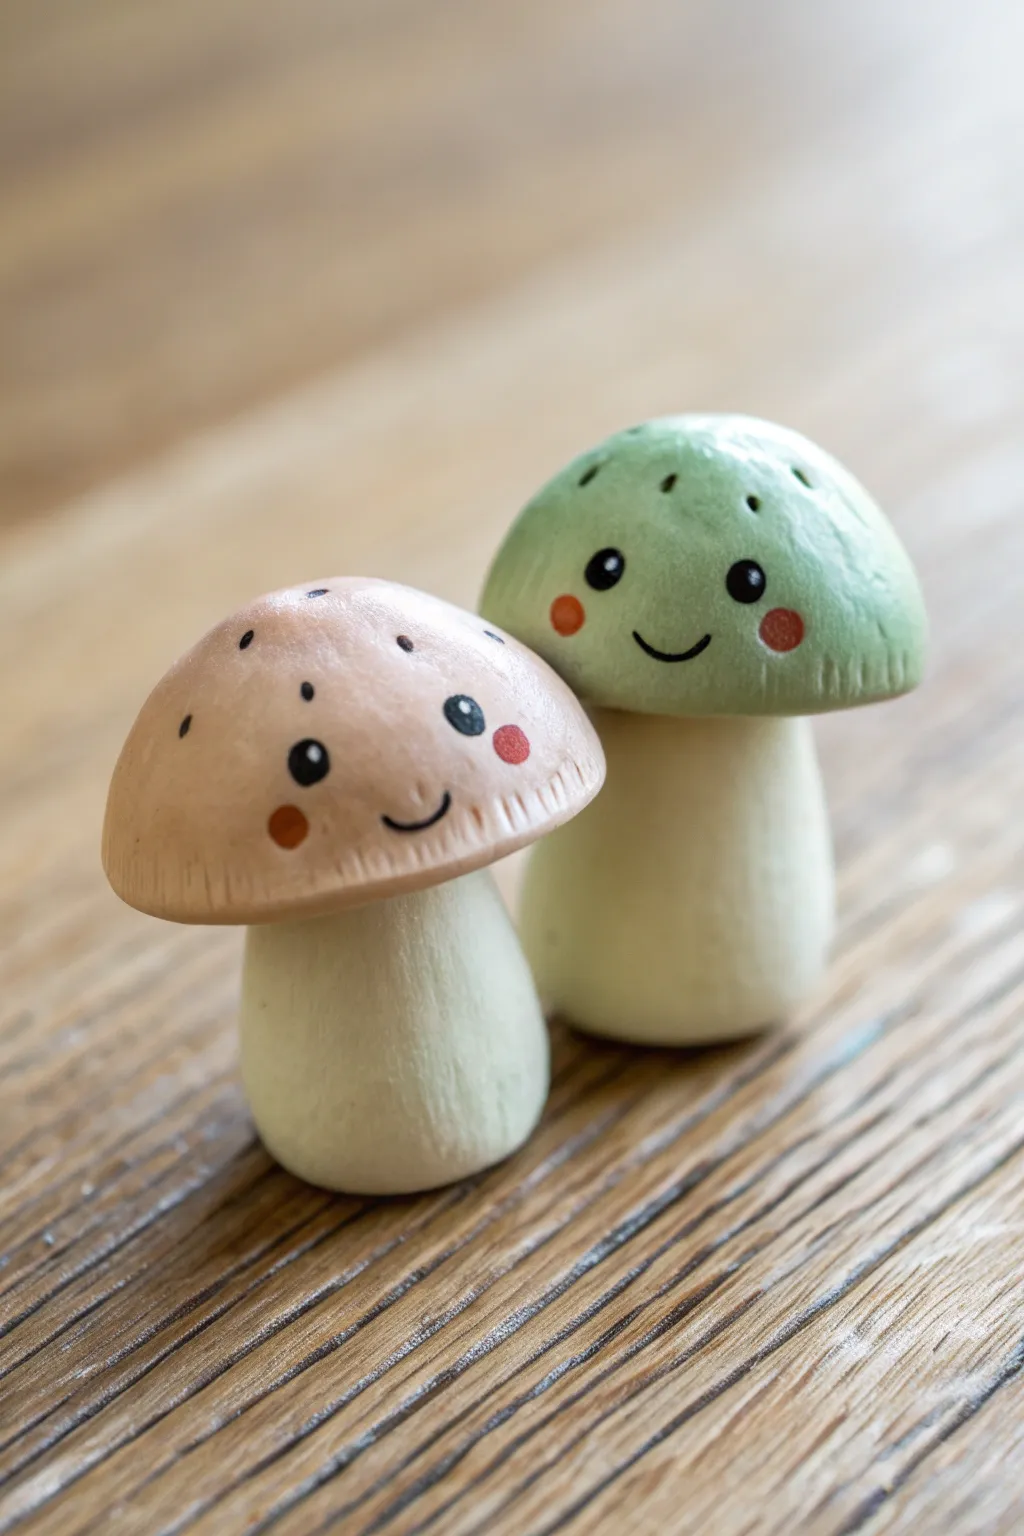
These charming little mushroom figurines bring a touch of the forest enchantment right to your desk or shelf. With their gentle pastel caps and shy smiles, this mini couple is a perfect beginner project for mastering simple shapes and delicate painted details.
How-To Guide
Materials
- Polymer clay (white)
- Acrylic paints (pale peach, pastel green, black, white, coral/pink)
- Gloss varnish or clear coat
- Sculpting tools (needle tool, small ball stylus)
- Fine detail paintbrush (size 0 or 00)
- Aluminum foil
- Baking sheet and parchment paper
- Soft pastel chalks (optional, for shading)
Step 1: Sculpting the Stems
-
Condition the white clay:
Start by taking a chunk of white polymer clay and kneading it in your hands until it is soft, pliable, and free of any cracks. -
Form the base shapes:
Divide the clay into two equal portions. Roll each portion into a smooth ball, then gently roll it back and forth on your work surface to create a thick cylinder. -
Shape the slight taper:
Focus your rolling slightly more on the top third of the cylinder so it becomes a little narrower than the delightfully chubby base. Ensure the bottom is flattened so they stand upright securely. -
Add texture:
Using a needle tool, lightly scratch vertical lines up and down the stem to mimic organic mushroom fibers. Don’t worry about making these perfectly straight; a little waviness adds character.
Smooth Operator
Before baking, lightly brush your raw clay with a little baby oil or cornstarch. This helps smooth out fingerprints and removes lint, ensuring a porcelain-like finish.
Step 2: Forming the Caps
-
Prepare the cap clay:
Take two new balls of white clay. Flatten them slightly into thick discs, then gently press your thumb into the center of one side to dome them, creating a classic mushroom cap shape. -
Create the underside gills:
Turn the caps upside down. using your needle tool or a dull knife edge, press many fine lines radiating from the center hole out to the rim. This creates the gill texture hidden underneath. -
Fit the caps:
Press the caps firmly onto the tapered tops of your stems. If the fit feels loose, you can use a tiny drop of liquid clay or ‘bake and bond’ adhesive to secure them. -
Smooth the transition:
Gently blend the clay where the stem meets the underside of the cap just slightly so they look like one cohesive organism rather than two stuck-together parts. -
Add textural rim details:
Around the very bottom edge of the caps, make small, short impressions with your needle tool to give the rim a slightly rough, natural look. -
Bake the figurines:
Place your mushrooms on a parchment-lined baking sheet and bake according to your specific clay brand’s manufacturer instructions (usually 275°F/135°C for 15-30 minutes per ¼ inch).
Forest Floor Base
Glue your finished mushrooms to a slice of wood or a flat stone. Add some dried moss or tiny pebbles around the base to create a complete miniature diorama.
Step 3: Painting and Finishing
-
Base coat the caps:
Once cool, paint one cap with a soft, diluted peach or pale beige color and the other with a pastel mint green. I prefer doing two thin coats rather than one thick one for a smoother finish. -
Add cap details:
Using the very tip of your brush or a toothpick, add tiny darker flecks or dots scattered across the top of the caps for texture. -
Map out the faces:
Visualize where the eyes will go—placing them wide apart creates that super ‘kawaii’ look. You can use a pencil to very lightly mark the spots. -
Paint the eyes:
Dip the back end of a paintbrush into black acrylic paint and dot it onto the stems to create perfect circles for eyes. Wait for this to dry completely. -
Add the sparkle:
Using a needle tool or toothpick dipped in white paint, add a tiny white reflection dot to the upper corner of each black eye. -
Draw the smiles:
With your finest brush (size 00) and watered-down black paint (ink consistency), carefully paint a small, thin ‘U’ shape between the eyes for the mouth. -
Rosy cheeks:
Dip a Q-tip or a dry brush into coral or pink paint, dab most of it off on a paper towel, and gently stipple rosy cheeks right next to the eyes. -
Seal the project:
Once all paint is bone dry, apply a coat of matte or satin varnish to protect your work. Using a satin finish on just the eyes makes them look bright and alive.
Now you have a sweet pair of fungi friends ready to brighten up any corner of your home

The Complete Guide to Pottery Troubleshooting
Uncover the most common ceramic mistakes—from cracking clay to failed glazes—and learn how to fix them fast.
Pocket Heart Worry Tokens
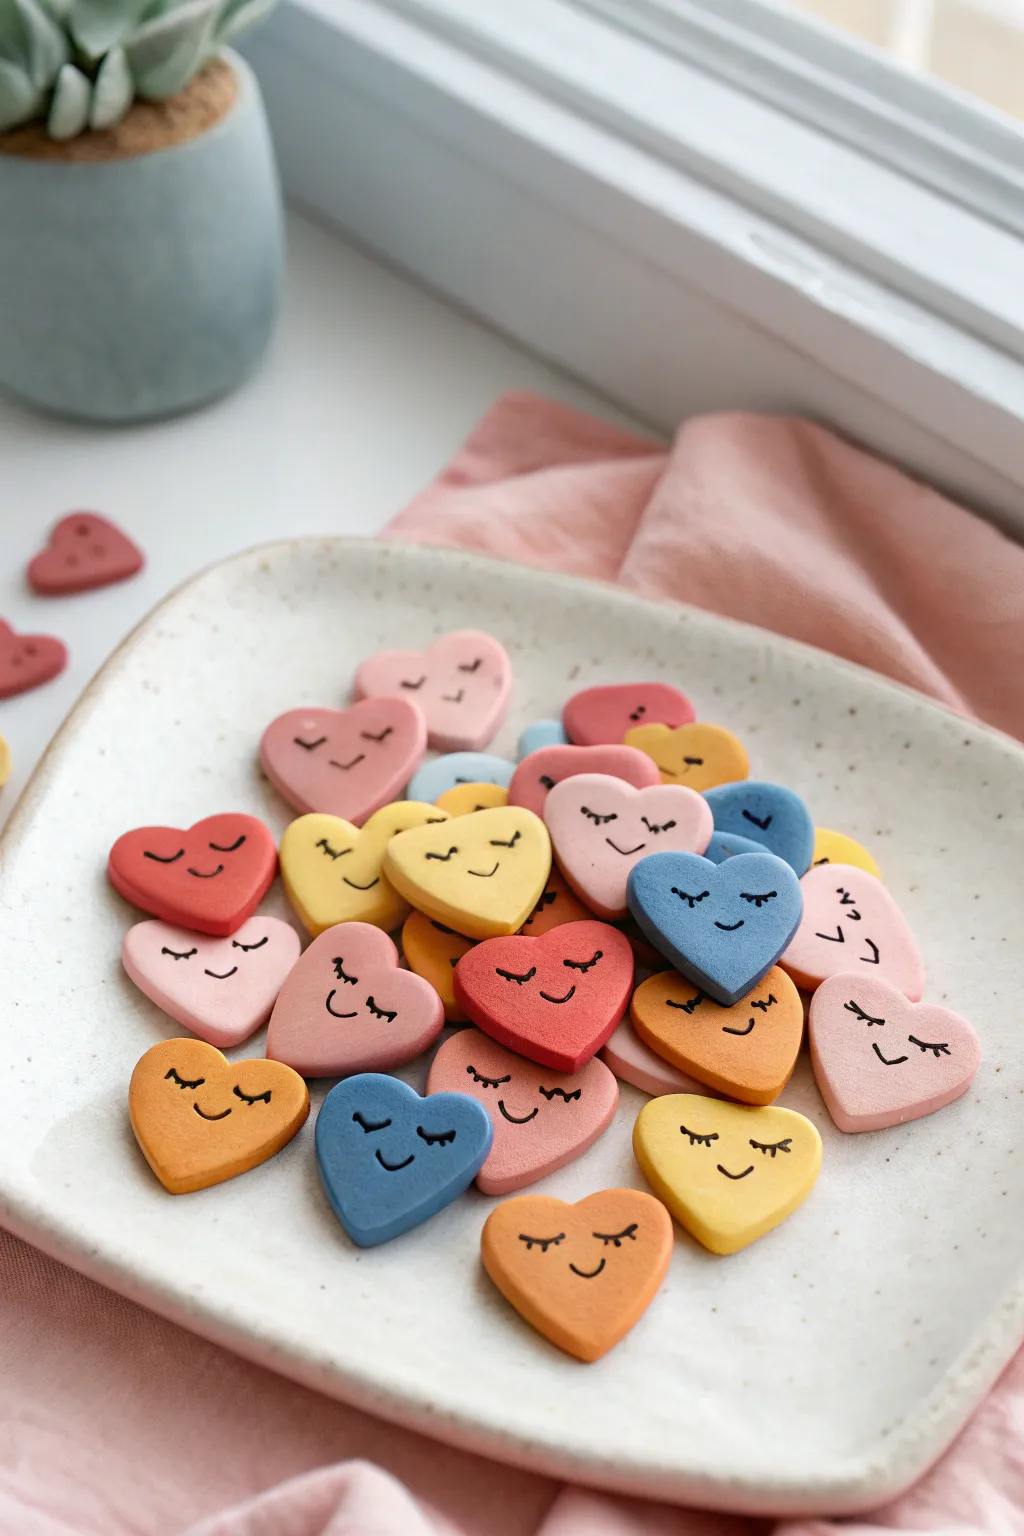
These sweet little pocket hearts act as soothing worry tokens, perfect for carrying a little extra comfort wherever you go. With their soft, matte finish and sleepy smiling faces, they make wonderful gifts for friends or a calming tactile tool for yourself.
Step-by-Step Guide
Materials
- Polymer clay (white, peach, pink, yellow, blue, terra cotta)
- Black fine-point permanent marker or black acrylic paint with a fine liner brush
- Small heart-shaped cookie cutter (approx. 1 inch)
- Acrylic rolling pin or clay machine
- Parchment paper or ceramic tile for baking
- Oven (for baking polymer clay)
- Fine grit sandpaper (optional)
- Matte varathane or glaze (optional)
Step 1: Preparing and Shaping
-
Condition the Clay:
Begin by selecting your color palette. You’ll want a mix of soft pastels and warm earth tones. Take a small amount of each color and work it in your hands until it becomes soft and pliable. -
Mix Custom Shades:
If you are using primary colors, mix them with a generous amount of white clay to achieve the muted, chalky pastel look seen in the photo. For the terra cotta color, try mixing a little orange with brown and white. -
Roll Out the Clay:
Roll your conditioned clay into a flat sheet. Aim for a thickness of about 1/4 inch (6mm). You want these to feel substantial and chubby in the hand, not thin or brittle. -
Cut the Hearts:
Use your small heart cutter to punch out shapes. Press firmly and wiggle slightly to ensure a clean cut all the way through the sheet. -
Soften the Edges:
Once cut, gently tap the edges of each heart with your fingertip. This removes the sharp ‘machined’ look from the cutter and gives the heart a softer, pillowy appearance. -
Check for Imperfections:
Inspect the surface for any fingerprints or lint. You can gently smooth these away with a drop of baby oil on your finger or by lightly rolling a scrap piece of clay over the surface to lift debris.
Step 2: Baking and Decorating
-
Prepare for Baking:
Arrange your clay hearts on a parchment-lined baking sheet or a ceramic tile. Ensure they aren’t touching each other. -
Bake the Clay:
Bake according to your polymer clay package instructions. Typically, this is around 275°F (135°C) for 15-30 minutes depending on thickness. Do not overbake, or the colors may darken. -
Cool Down:
Allow the hearts to cool completely in the oven with the door slightly ajar, or on a wire rack. They must be room temperature before you draw on them. -
Plan the Faces:
Practice drawing the sleepy faces on a piece of paper first. The design is simple: two curved ‘U’ shapes for closed eyes and a small curved smile centered below them. -
Draw the Eyes:
Using a fine-point permanent marker or a very thin brush with black acrylic paint, draw the two closed eyelids. Keep them low on the heart, roughly in the middle vertical section. -
Add Lashes:
Carefully add two or three tiny tick marks to the outer corner of each eyelid to create delicate eyelashes. -
Draw the Smile:
Place a small, gentle smile right between and slightly below the eyes. I find a smaller smile makes them look sweeter. -
Let Ink Dry:
If using paint, let it dry completely. If using a marker, let it set for a few minutes to prevent smudging. -
Optional Sanding:
If there are any rough spots on the edges after baking, you can lightly sand them with fine-grit sandpaper for a professional finish. -
Seal (Optional):
The hearts in the image have a very matte finish, so sealing isn’t strictly necessary. However, if you want to protect the painted face, apply a very thin coat of matte varnish.
Smudged Ink?
If your marker bleeds into the clay, it might be the wrong type. Use an oil-based marker or acrylic paint. If you mess up, quickly wipe away with rubbing alcohol before it sets.
Uniform Thickness
To ensure every heart is exactly the same thickness, place two stacks of playing cards on either side of your clay as you roll, resting the rolling pin on the cards.
Now you have a handful of comforting tokens ready to be gifted or kept in a pocket for a rainy day
Bear Pencil Topper
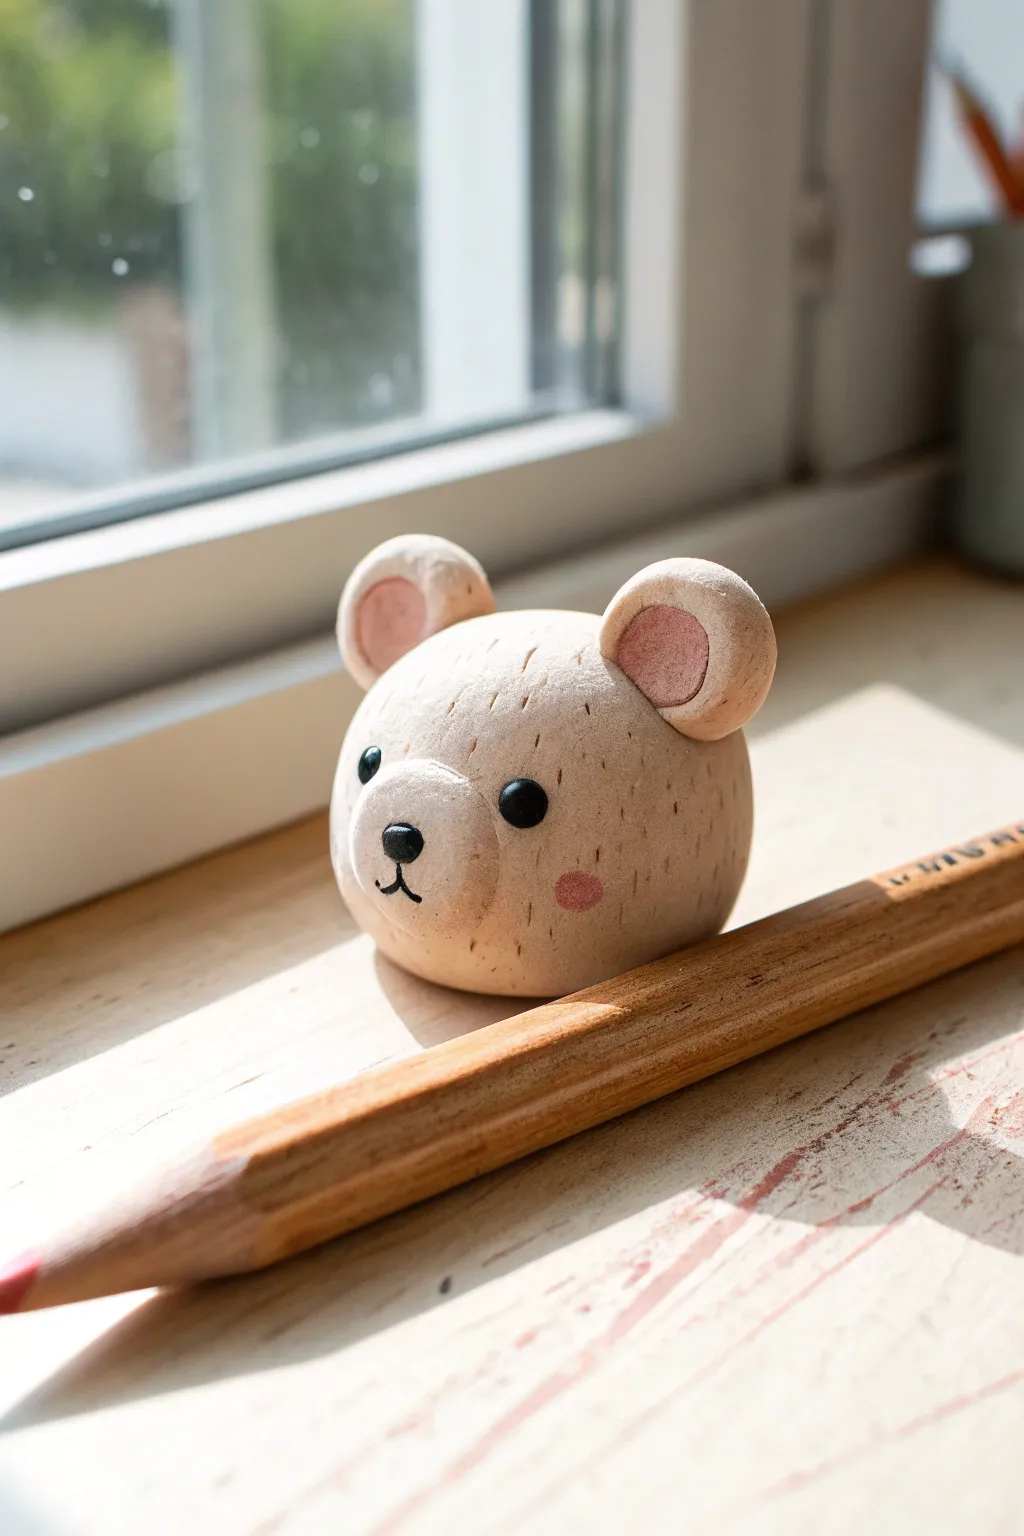
Transform a plain pencil into a charming companion with this simple, textured bear sculpture. This little clay friend features a sweet expression and a unique scratch-finish that mimics soft fur.
Detailed Instructions
Materials
- Polymer clay (beige/tan, pink, black)
- Wooden pencil
- Detailing needle tool or toothpick
- Ball stylus tool
- Soft pastel chalk (pink) or pink acrylic paint
- Small paintbrush
- Clear matte varnish (optional)
- Oven for baking
Step 1: Shaping the Base
-
Condition the clay:
Start by warming up a walnut-sized amount of beige polymer clay in your hands until it becomes soft and pliable. -
Form the head:
Roll the clay into a smooth, seamless sphere. Check for any air bubbles or cracks and smooth them out with your thumb. -
Shape the silhouette:
Gently flatten the sphere just slightly on two opposite sides to create a softer, more oval head shape rather than a perfect circle. -
Create the mounting hole:
While the clay is still soft, carefully press the unsharpened end of your pencil into the bottom of the head. Twist gently to widen the hole slightly so the pencil fits snugly but can be removed for baking.
Clean Start
Work with lighter colors first (beige) and finish with black. Dark clay pigment stains easily, so wash your hands before switching back to touch up the face.
Step 2: Adding Features
-
Prepare the ears:
Roll two small pea-sized balls of beige clay. Flatten them into thick discs for the ears. -
Indent the ears:
Using a ball stylus or the round end of a paintbrush, press into the center of each ear disc to create a cup shape. -
Add pink centers:
Take a tiny amount of pink clay, roll into smaller balls, and press them into the indented centers of the ears. -
Attach the ears:
Press the ears firmly onto the top of the head. Smooth the clay at the join point on the back of the ears to ensure they stick well. -
Form the muzzle:
Roll a small oval of beige clay and flatten it slightly. Press this onto the lower center of the face to create the muzzle area. -
Make the nose:
Roll a tiny speck of black clay into a triangle with rounded corners. Press this onto the top center of the muzzle. -
Add eyes:
Create two small spheres of black clay. Press them onto the face above the muzzle, spacing them somewhat widely for a cute look.
Step 3: Texturing and Finishing
-
Draw the mouth:
Use a very thin snake of black clay or draw lines with a needle tool to create a ‘Y’ shape extending down from the nose. -
Texture the fur:
This is the signature step. Using a sharp needle tool, gently scratch short, random vertical dashes all over the beige surfaces of the head. Keep the pressure light to create a fur-like texture. -
Avoid the features:
Be careful to leave the eyes, nose, and inner pink ears smooth. I find it helps to work slowly around the muzzle area to keep the expression clean. -
Blush the cheeks:
Scrape a little pink pastel chalk into a powder. Use a soft brush to dab rosy circles onto the cheeks, simulating a soft blush. -
Bake the piece:
Remove the pencil carefully if it isn’t oven-safe. Bake the clay head according to the package instructions (usually 275°F/135°C for 15-20 minutes). -
Cool and mount:
Let the bear cool completely before handling. Once hard, add a drop of super glue into the hole and reinsert the pencil for a permanent hold.
Make it a Set
Create a whole forest family by swapping the ear shapes! Pointy ears for a fox (orange clay) or long floppy ears for a bunny (white clay).
Now you have an adorable study buddy to keep you company while you write or draw


What Really Happens Inside the Kiln
Learn how time and temperature work together inside the kiln to transform clay into durable ceramic.
Egg-Shaped Penguin Pal
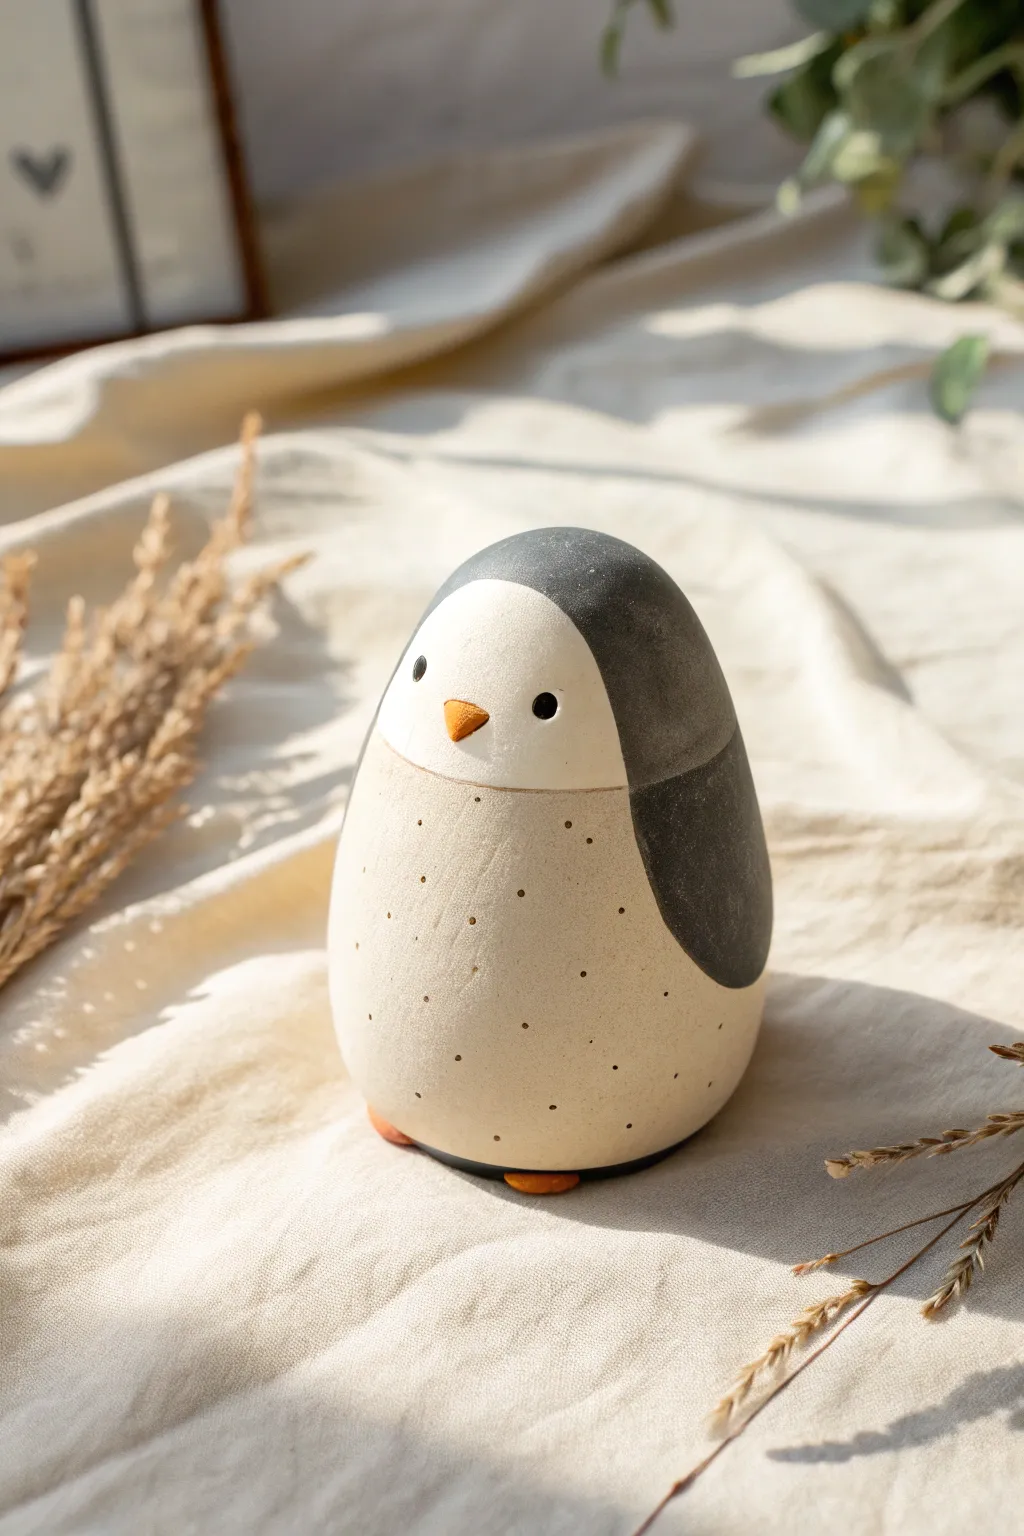
Sculpt this minimalist, heartwarming penguin figurine using simple shapes and natural textures. Its smooth, egg-like form and speckled belly give it a modern, artisan ceramic feel that looks lovely on any shelf.
How-To Guide
Materials
- White air-dry clay or polymer clay
- Dark grey or black acrylic paint (or black clay)
- Small amount of orange clay (or paint)
- Pottery needle tool or toothpick
- Small round sculpting tool or ball stylus
- Fine-grit sandpaper
- Matte varnish or sealant
- Stiff bristle brush (e.g., old toothbrush) for speckling
- Water and sponge for smoothing
Step 1: Basic Form Sculpting
-
Ideally Condition the Clay:
Begin by kneading a large handful of white clay until it is warm, pliable, and free of air bubbles. If using polymer clay, this conditioning step is crucial to prevent cracks later. -
Roll the Primary Shape:
Roll the clay into a smooth ball between your palms, then gently elongate it into a solid egg shape. The bottom should be slightly wider than the top to give the penguin a stable, heavy base. -
Flatten the Base:
Tap the wider end of the egg gently on your work surface. You want creates a flat bottom so the figurine stands upright without wobbling, but try to keep the rounded edges soft. -
Mark the Face Line:
Using a needle tool, very lightly scribe a curved horizontal line about one-third of the way down from the top. This guideline separates the head area from the body.
Clean Lines Pro-Tip
Use thin masking tape or washi tape to block off the white face and belly before painting the dark grey hood. This guarantees crisp, symmetrical curves.
Step 2: Adding Details & Features
-
Create Eye Sockets:
With a small ball stylus or the back of a paintbrush, press two deep, symmetrical indentations into the face area for the eyes. These should be spaced comfortably apart. -
Form the Beak:
Roll a tiny, rice-sized piece of clay into a cone. If you aren’t using pre-colored orange clay, just use white clay for now. Press it firmly into the center of the face, slightly below the eyes. -
Shape the Feet:
Create two small, flattened oval discs from clay. Attach them to the very bottom edge of the penguin’s body so they just barely peek out from underneath the belly. -
Smooth the Connections:
Dip your finger in a little water (for air-dry clay) or baby oil (for polymer) and gently rub the seams where the beak and feet attach. The goal is to make them look integral to the piece rather than just stuck on. -
Refine the Surface:
Inspect the egg shape for fingerprints or lumps. I smooth everything over with a slightly damp sponge at this stage to get that polished, professional ceramic look. -
Dry or Bake:
If using air-dry clay, let the piece dry for 24–48 hours until completely hard and white. If using polymer clay, bake according to the manufacturer’s instructions and let it cool completely.
Step 3: Painting & Finishing
-
Sanding for Smoothness:
Once fully cured or dry, gently sand the surface with fine-grit sandpaper to remove any remaining bumps or lint particles. -
Paint the Hood:
Using dark grey or soft black paint, carefully fill in the ‘hood’ area. Paint the top of the head down to the wings, creating swooping curves on the sides that act as the penguin’s wings. Leave the face and belly natural white. -
Detail the Face:
Paint the inside of the eye indentations black. If you didn’t use colored clay, paint the beak and the little feet a muted, earthy orange tone. -
Create the Speckles:
Dilute a tiny bit of brown or grey paint with water. Dip a stiff toothbrush into the mix, and flick the bristles with your thumb to spray tiny, subtle speckles across the white belly area. -
Simulate Texture:
For extra depth, you can use a needle tool to add extremely faint, tiny pockmarks randomly on the belly before sealing, mimicking natural stone texture. -
Seal the Project:
Finish with a coat of matte varnish. Avoid glossy finishes, as the matte look preserves the organic, stone-like aesthetic of the reference image.
Fixing Cracks
If small cracks appear in air-dry clay while drying, mix a tiny bit of fresh clay with water to make a paste (slip) and fill the cracks, then sand smooth.
Place your finished penguin on a windowsill or desk for a touch of handmade charm that brings a smile every time you see it
Kawaii Avocado Fridge Magnet
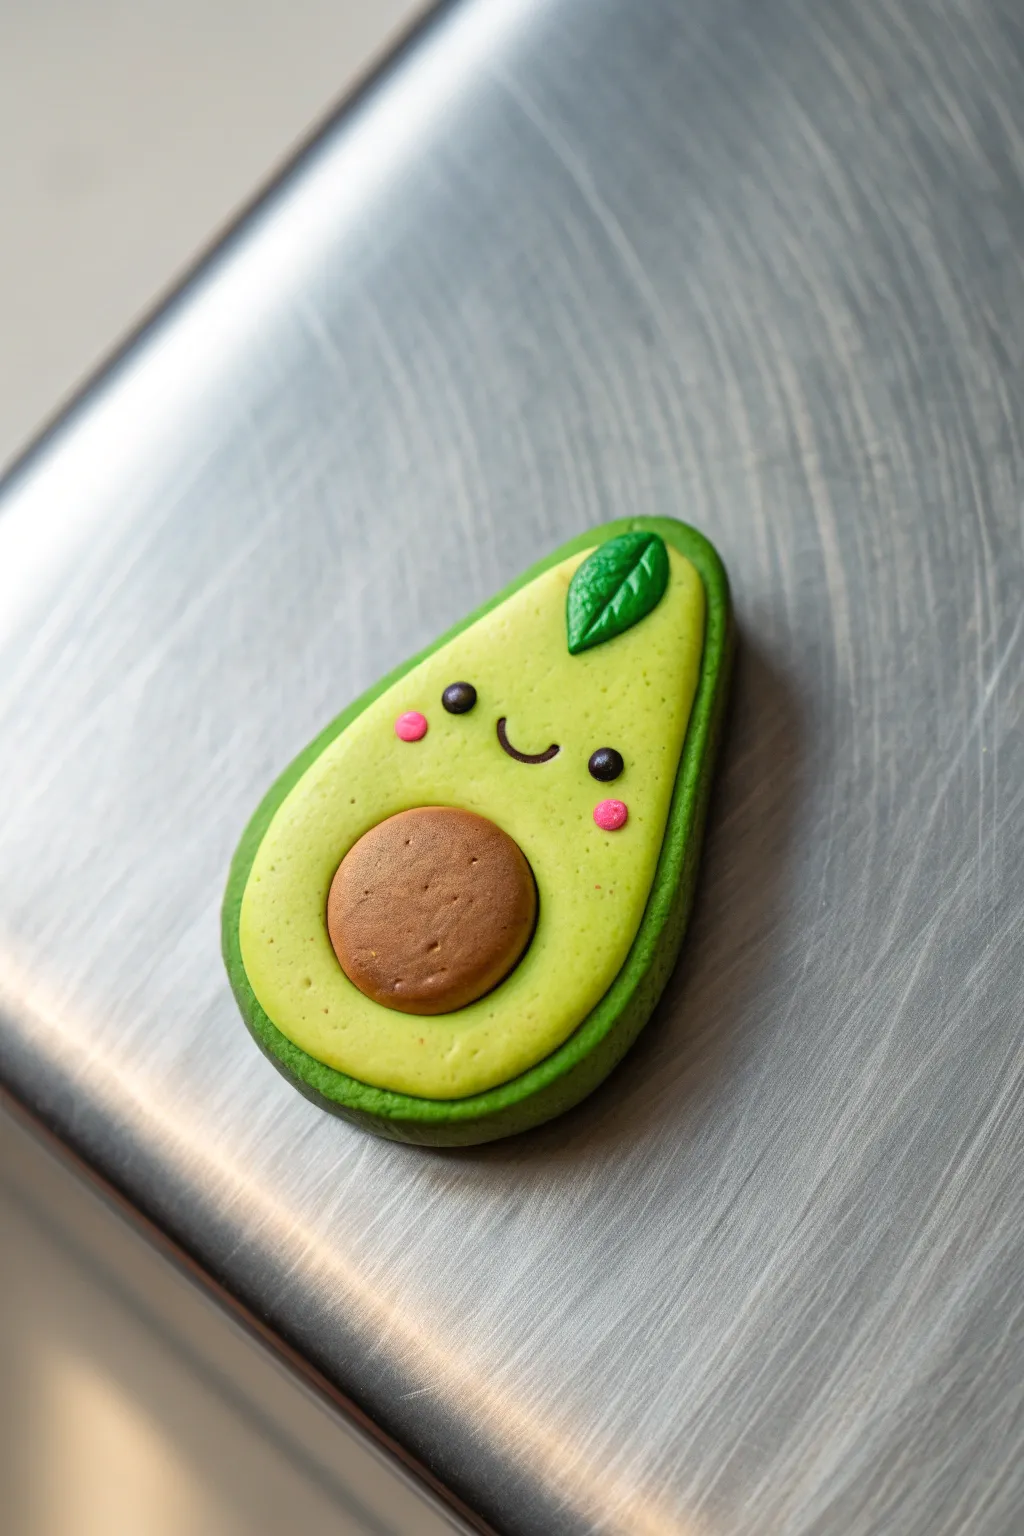
Brighten up your kitchen with this adorable, smiling avocado magnet that captures the essence of kawaii charm. This project uses simple shapes and layering techniques to create a smooth, clean finish that looks almost good enough to eat.
Detailed Instructions
Materials
- Polymer clay (dark green, light lime green, brown, black, leafy green, pink)
- Clay roller or pasta machine
- Avocado-shaped cookie cutter (or a craft knife and template)
- Small round cutter (approx. 1 inch)
- Needle tool or toothpick
- Ball stylus tool
- Strong craft glue (e.g., E6000)
- Round magnet
- Baking sheet and parchment paper
- Sculpting tool or texture sponge (optional)
Step 1: Forming the Base
-
Condition the Greens:
Begin by conditioning both your dark green and light lime green polymer clay until they are soft and pliable. This prevents cracking later. -
Roll the Sheets:
Roll out the dark green clay to about 1/4 inch thickness for the outer skin. Roll the lime green clay slightly thinner, around 1/8 inch. -
Cut the Dark Base:
Use your avocado-shaped cutter to punch a shape from the thick dark green clay. If you don’t have a cutter, print a small avocado silhouette, place it on the clay, and trace around it with a craft knife. -
Cut the Light Flesh:
Cut the same avocado shape from the lime green clay. Using a craft knife, carefully trim roughly 2-3mm off the entire perimeter of this light green piece so it’s slightly smaller than the dark base. -
Create the Pit Socket:
Position your small round cutter near the bottom of the lime green piece—where the pit naturally sits—and cut out a circle. Gently lift the lime green layer and center it on top of the dark green base, pressing lightly so they adhere.
Clean Fingerprints
Before baking, lightly brush the surface with a tiny bit of rubbing alcohol or baby oil to melt away any accidental fingerprints or dust specks.
Step 2: Adding the Pit and Features
-
Sculpt the Pit:
Roll a ball of brown clay and flatten it into a thick disc that fits snugly into the hole you cut earlier. It should dome slightly upward, rising just above the surface of the fruit. -
Texture the Pit:
I like to take a coarse texture sponge or a crumpled ball of aluminum foil and tap it gently over the brown clay to give the pit a realistic, nutty texture. -
Make the Leaf:
Take a tiny amount of medium leafy green clay and shape it into a teardrop. Flatten it slightly and press it onto the top right curve of the avocado. -
Detail the Leaf:
Use a needle tool or the back of a craft knife to impress a central vein line and small diagonal veins into the leaf. -
Embed the Eyes:
Roll two miniscule balls of black clay for the eyes. Use a small ball stylus to make tiny indentations on the face where you want them, then press the black clay into these hollows so they sit flush. -
Add that Smile:
Roll a microscopic ‘snake’ of black clay. Curve it into a ‘U’ shape and gently press it into the clay between the eyes using your needle tool. -
Cheeky Details:
Finally, add two tiny flattened circles of pink clay under the eyes for that classic blushing kawaii look.
Glossy Highlight
Add a tiny dot of white acrylic paint to the black eyes after baking to make them look wet and sparkly, adding extra life to the expression.
Step 3: Baking and Assembly
-
Bake:
Place your avocado on a parchment-lined baking sheet. Bake according to your clay manufacturer’s instructions (usually 275°F/135°C for 15-30 minutes). -
Cool Down:
Let the piece cool completely on the baking sheet. Moving it while hot can cause the clay to warp or crack. -
Attach Magnet:
Flip the hardened avocado over. Apply a dab of strong craft glue to the center of the dark green back and press your magnet firmly into place. -
Final Dry:
Allow the glue to cure for at least 24 hours before sticking your new friend to the fridge.
Your fridge is now much happier with this sweet little green companion hanging around

TRACK YOUR CERAMIC JOURNEY
Capture glaze tests, firing details, and creative progress—all in one simple printable. Make your projects easier to repeat and improve.
Tiny Succulent Pot With a Face
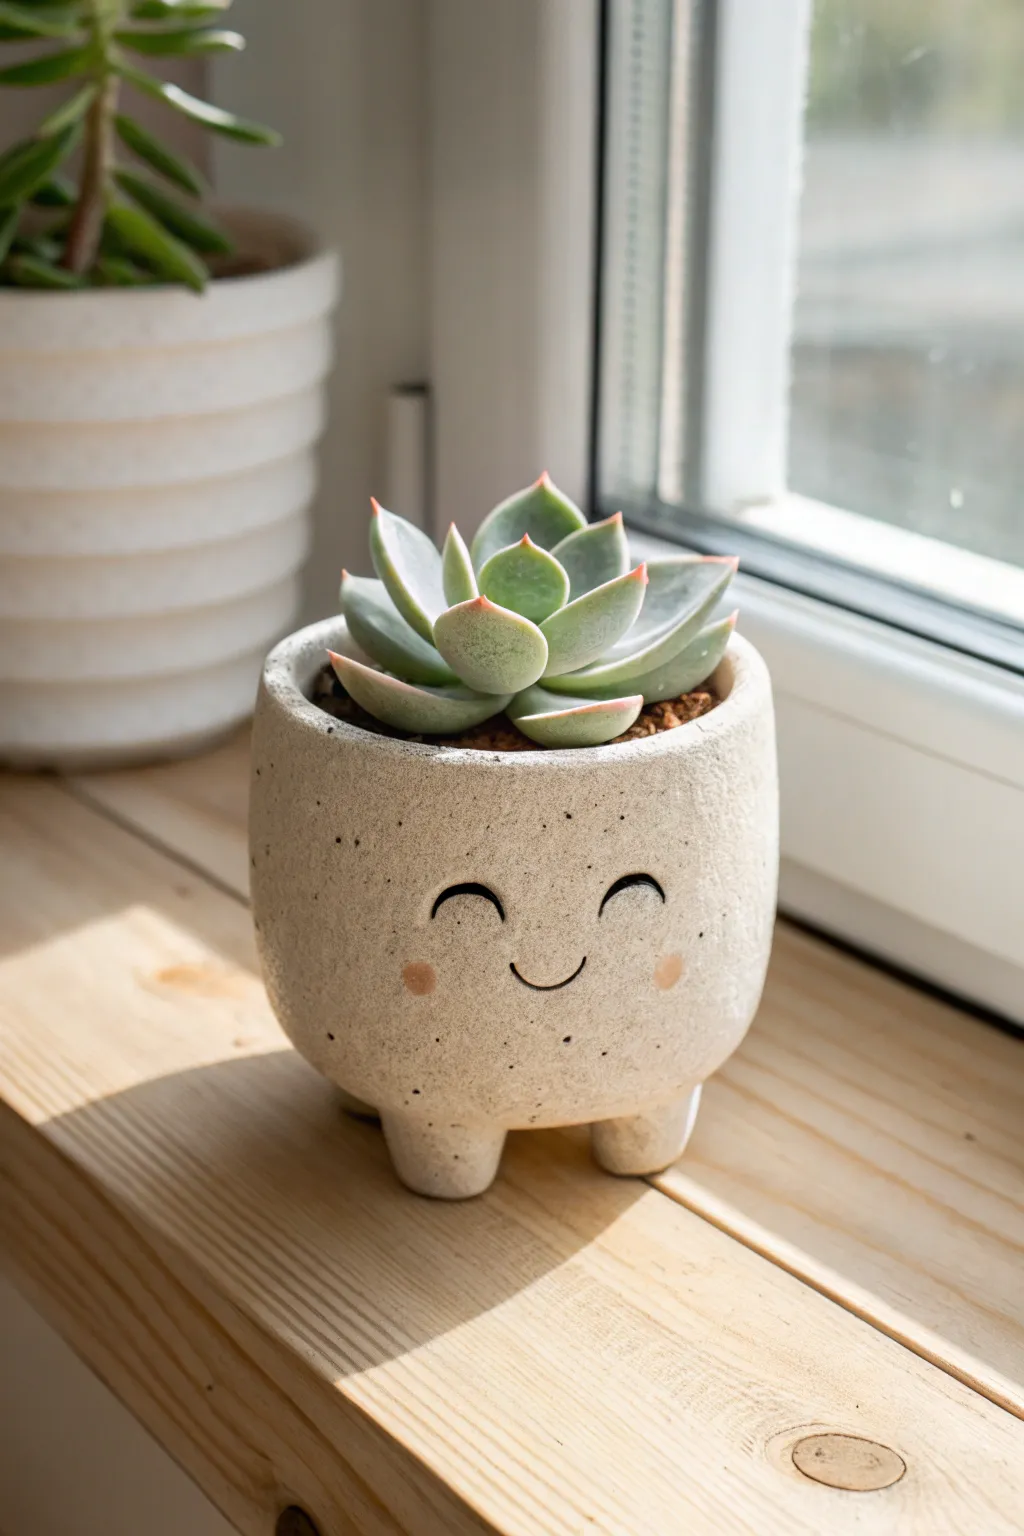
This adorable mini planter brings a dash of personality to your succulent collection with its cheerful smile and rosy cheeks. The textured, speckled finish gives it a charming stone-like appearance while the tiny feet add whimsical character.
Detailed Instructions
Materials
- Air-dry clay or polymer clay (white or light beige)
- Faux speckled stone spray (optional) or black pepper/dried tea leaves
- Rolling pin
- Small circular cookie cutter or jar lid (approx. 3 inches)
- Clay knife or craft blade
- Small ball tool or end of a paintbrush
- Black acrylic paint
- Fine detail paintbrush
- Pink soft pastel chalk or pink acrylic paint
- Water and sponge (for smoothing)
- Medium-grit sandpaper
Step 1: Shaping the Base
-
Prepare the Clay:
Start by conditioning a ball of clay roughly the size of a tangerine until it is soft and malleable. If you want that natural speckled look built right in, I like to knead in some cracked black pepper or dried tea leaves at this stage. -
Roll the Slab:
Roll out the clay on a flat surface to an even thickness of about 1/4 inch. Ensure the thickness is uniform so the walls of your pot will be sturdy. -
Cut the Base:
Use your circular cutter or jar lid to cut a perfect circle from the slab. This will be the bottom of your pot. -
Create the Wall:
Roll out a long rectangular strip from the remaining clay. The width determines the height of your pot (about 2.5 inches works well), and the length should match the circumference of your base circle. -
Assemble the Cylinder:
Wrap the rectangular strip around the circular base. Carefully score and slip the edges where the clay meets to create a strong bond, pressing the wall firmly onto the base. -
Seamless sides:
Blend the vertical seam where the wall sides meet by dragging clay across the join. Smooth it entirely with a damp sponge or finger until the join is invisible.
Step 2: Adding Feet and Features
-
Form the Feet:
Roll three small balls of clay, each about the size of a marble. Slightly flatten the tops and bottoms to create sturdy little cylinders. -
Attach the Legs:
Flip the pot upside down. Score the bottom of the pot and the tops of the feet, add a dab of water or slip, and press the three legs onto the base in a triangular formation for stability. -
Smooth the Join:
Use a modeling tool to blend the clay of the feet onto the base of the pot so they look like one continuous piece rather than attachments. -
Curve the Rim:
Turn the pot right-side up. Gently press and round the top rim with your fingers to soften any sharp edges, giving it that comfy, handmade feel. -
Drying:
Allow the clay to dry completely according to package instructions. Usually, 24-48 hours is best for air-dry clay. -
Sanding:
Once fully dry, use medium-grit sandpaper to gently smooth out any bumps or uneven areas on the outside surface.
Legs Keep Falling Off?
Make sure you really roughen both surfaces (scoring) before adding water/slip. If they still wobble, add a tiny snake of clay around the join for extra support.
Step 3: Bringing It to Life
-
Sketch the Face:
Lightly mark where you want the eyes and mouth using a pencil. Aim for the center of the pot’s height for maximum cuteness. -
Paint the Features:
Using a very fine detail brush and black acrylic paint, carefully paint two closed, curved eyelids for a happy expression. -
Add the Smile:
Paint a small, simple ‘U’ shape for the mouth centered between the eyes. -
Rosy Cheeks:
For the blush, scrape a little powder from a pink soft pastel chalk. Rub this powder gently onto the cheeks with your finger or a dry brush for a soft, diffused look. -
Sealing:
Apply a matte sealant spray or varnish over the entire pot to protect the paint and clay from moisture. -
Speckle Effect:
If you didn’t mix speckles into the clay earlier, you can now lightly flick a toothbrush loaded with diluted brown or black paint over the pot for a stone texture.
Stone Texture Trick
After shaping but before drying, gently press a clean sanding sponge or a rough stone against the clay surface to imprint a realistic rock-like texture instantly.
Pop in your favorite little succulent and enjoy the instant cheer this little pot brings to your space
Sleepy Whale Phone Rest
Keep your desk tidy and your phone visible with this serene, minimalist whale sculpture. Its smooth, speckled clay finish and sleepy expression add a calming touch to any workspace while securely cradling your device.
Step-by-Step Tutorial
Materials
- Air-dry clay or polymer clay (white or light grey)
- Speckled pottery clay (optional, for that stone effect)
- Black acrylic paint or a fine-tip permanent marker
- Rolling pin
- Modeling tools (knife, smoothing tool)
- Small bowl of water
- Fine-grit sandpaper
- Matte varnish or sealant
Step 1: Shaping the Body
-
Form the base:
Start with a large ball of clay about the size of a grapefruit. Roll it between your palms to smooth out any cracks, then gently flatten the bottom against your work surface to create a stable base. -
Elongate the form:
Gently pull one side of the ball outward to create a teardrop shape. The rounded, bulbous end will become the head, while the tapered end will eventually become the tail. -
Create the slot:
Take your phone (or a piece of cardboard of similar thickness) and press it firmly into the center of the whale’s back at a slight angle. Create a deep groove where the phone will sit. Wiggle it slightly to ensure the slot is wide enough for easy insertion. -
Refine the slot:
Remove the phone and use your fingers or a flat tool to smooth the inside walls of the groove. Ensure the bottom of the slot is flat so the phone stands stable. If I feel the clay is too soft, I like to let it firm up for 15 minutes before refining the edges.
Slumping tail?
If the tail droops while the clay is wet, prop it up with a small crumpled ball of aluminum foil or a sponge. Leave the support in place until the clay is leather-hard.
Step 2: Adding Details
-
Sculpt the tail:
Pinch the tapered end of the body and curve it upward. Split the very tip into two flukes, smoothing them into a gentle ‘Y’ shape that points towards the sky. -
Attach the fins:
Roll two small, marble-sized balls of clay and flatten them into teardrops. Score the side of the whale’s body and the back of the fin, apply a dab of water (slip), and press the fins onto the lower sides of the body. -
Blend the seams:
Use a modeling tool or your finger to blend the clay from the fins onto the main body until the seam disappears completely. The transition should look seamless and organic. -
Define the mouth:
Using a needle tool or a thin blade, carve a subtle horizontal line low on the face. This cut separates the ‘belly’ from the top lightly, mimicking the whale’s jawline shown in the reference. -
Create the blowhole:
Use a needle tool or the tip of a toothpick to poke three tiny holes in a triangle pattern on the very top of the head, just in front of the phone resting slot.
Make it functional
Carve a small channel or hole at the bottom of the phone slot that leads out the back of the whale. This allows you pass a charging cable through while the phone rests.
Step 3: Finishing Touches
-
Smoothing:
Dip your finger in a little water and run almost no pressure over the entire sculpture to remove fingerprints. Aim for a matte, stone-like texture. -
Dry thoroughly:
Let the sculpture dry completely. For air-dry clay, this may take 24-48 hours. Turn it occasionally so the bottom dries evenly. -
Sand for perfection:
Once bone dry, use fine-grit sandpaper to gently buff away any remaining roughness, especially around the rim of the phone slot and the tail edges. -
Draw the face:
Using a fine brush with black acrylic paint or a reliable permanent marker, carefully draw two small ‘U’ shapes for the sleepy eyes and a tiny curve for the smile. -
Add speckles (optional):
If you didn’t use speckled clay, you can flick a toothbrush loaded with diluted grey or brown paint across the surface to create that faux-stone look. -
Seal the piece:
Apply a coat of matte varnish to protect the clay and paint. This ensures your phone rest stays durable against daily use.
Now you have a charming desktop companion ready to hold your device
Tiny Turtle Trinket Box
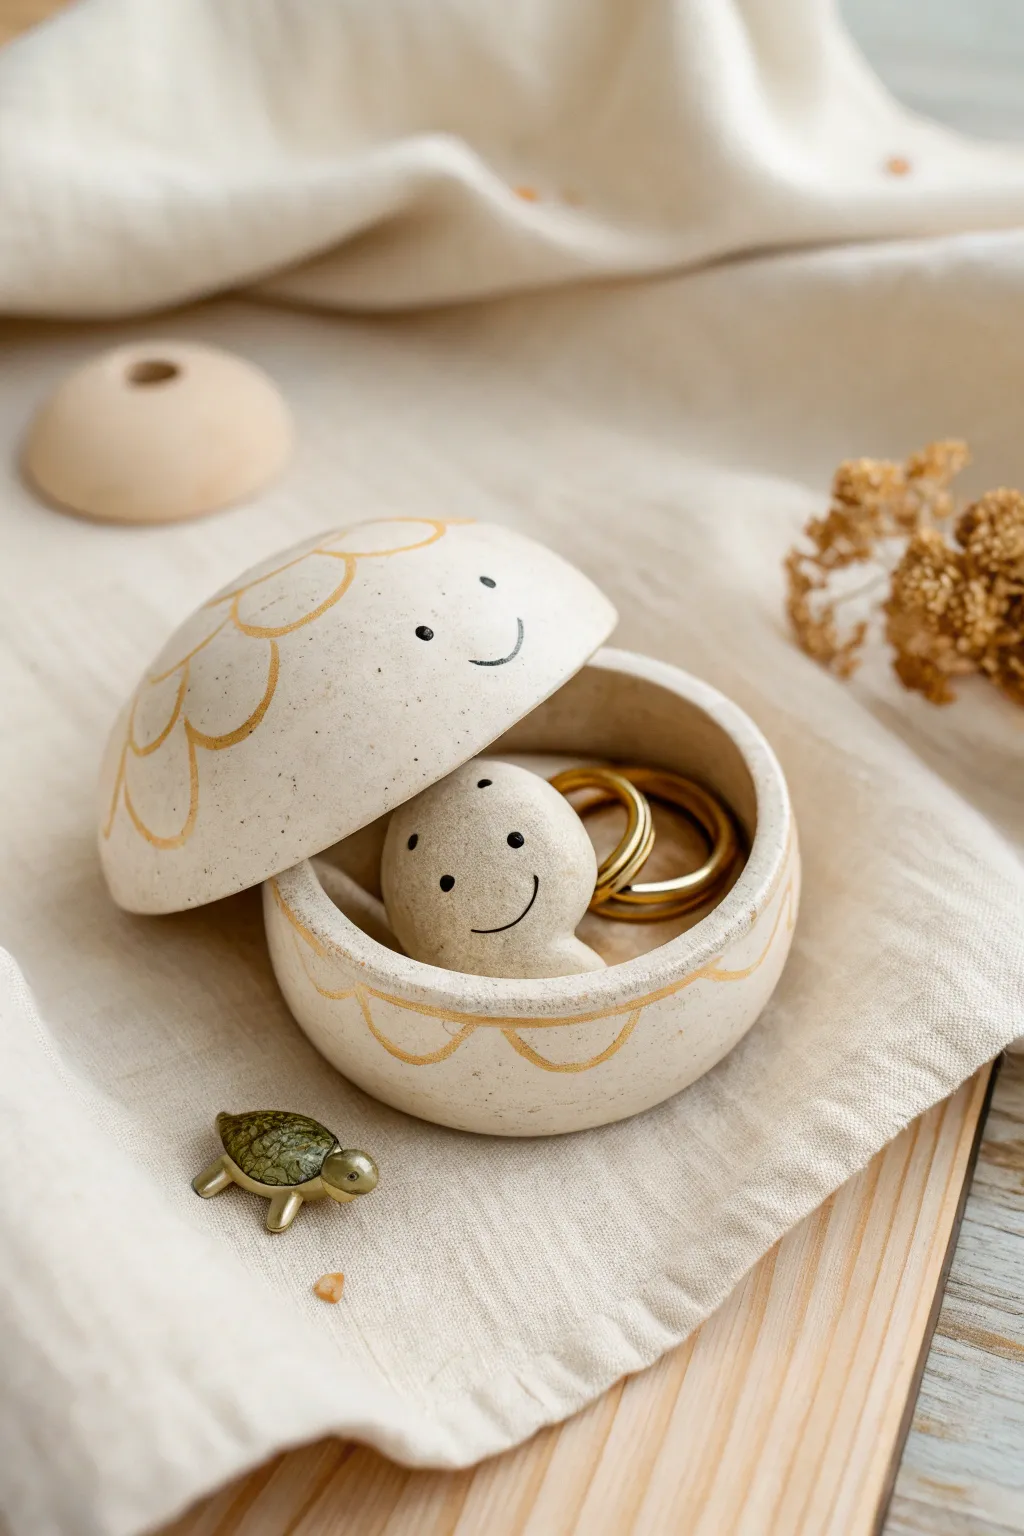
Craft a whimsical home for your rings and treasures with this adorable two-part trinket box. The smooth, speckled clay finish gives it a polished look, while the simple line-drawn face and golden scalloped details add a touch of sweet personality.
Step-by-Step
Materials
- Speckled pottery clay (or white polymer clay mixed with black pepper/sand)
- Round cookie cutter (approx. 3-4 inches diameter)
- Rolling pin
- Slip and scoring tool (if using ceramic clay)
- Small sphere of clay (for the inner turtle)
- Black underglaze pencil or fine-tip black acrylic marker
- Gold luster or gold metallic paint
- Clear glaze (if ceramic) or semi-gloss sealant (if polymer)
- Small paintbrush
- Modeling tools (or a toothpick)
Step 1: Shaping the Pod
-
Roll the Slabs:
Start by rolling out your clay to an even thickness of about 1/4 inch. You will need enough for two circles of the same size. -
Cut the Circles:
Using your round cookie cutter, punch out two identical circles. One will become the base, and the other will form the domed lid. -
Form the Base Wall:
Roll a long, thin coil or cut a strip of clay about 1 inch wide. This will be the wall of your bottom container. -
Attach the Wall:
Score and slip the edge of one clay circle (or use liquid clay for polymer). Attach the strip around the circumference to create a shallow bowl shape, smoothing the seam on the inside and outside so it’s invisible. -
Create the Lid:
Take the second clay circle and gently drape it over a sphere mold, a smooth stone, or a ball of aluminum foil to give it a gentle dome shape. Smooth it with your fingers to ensure a nice curve.
Step 2: Sculpting the Turtle Surprise
-
Mold the Head:
Roll a small ball of clay, roughly the size of a large grape. Flatten the bottom slightly so it sits stable. -
Refine the Shape:
Gently pinch one side to create a hint of a neck or simply keep it as a stylized, round nub. This little ‘stone’ shape will act as the friendly face inside. -
Position the Turtle:
Place this small mound inside the center of your bowl base. Prepare the surface by scoring and adding slip, then press it firmly in place so it fuses with the bottom. -
Smooth Components:
Use a damp sponge or finger to smooth all rims and edges of both the lid and the base. You want a soft, organic feel rather than sharp angles. -
First Firing or Baking:
If using ceramic clay, let the pieces dry slowly to bone dry, then bisque fire. If using polymer clay, bake according to the package instructions now.
Uneven Lid?
If the lid slides off, add a tiny inner rim or ‘flange’ made of a thin clay coil to the underside of the lid to keep it locked in place.
Step 3: Decorating and Finishing
-
Draw the Faces:
Once fired (or baked and cooled), use a black underglaze pencil or fine-tip marker to draw a simple smiley face. Place one on the exterior of the domed lid and one on the little turtle mound inside. -
Add Scalloped Details:
Sketch a scalloped pattern around the rim of the base and the edge of the lid. Keep the lines loose and hand-drawn for charm. -
Paint the Gold:
Go over your scalloped pencil lines with gold luster (for ceramics) or metallic gold paint. I like to keep the brush fairly dry to get a slight texture. -
Glazing:
If working with ceramics, apply a clear matte or satin glaze over the entire piece (avoiding the gold luster if it’s an overglaze). Fire again. For polymer clay, coat with a durable varnish to seal the paint. -
Final Assembly:
Once everything is dry and set, test the fit. The lid should sit comfortably on the rim, hiding the smiling turtle inside until opened.
Texture Play
Mix clean sand or used coffee grounds into white polymer clay before rolling to mimic the speckled stoneware look perfectly.
Place your favorite ring inside for safe keeping and enjoy the smile that greets you every time you open it
Mood Pebble Face Set
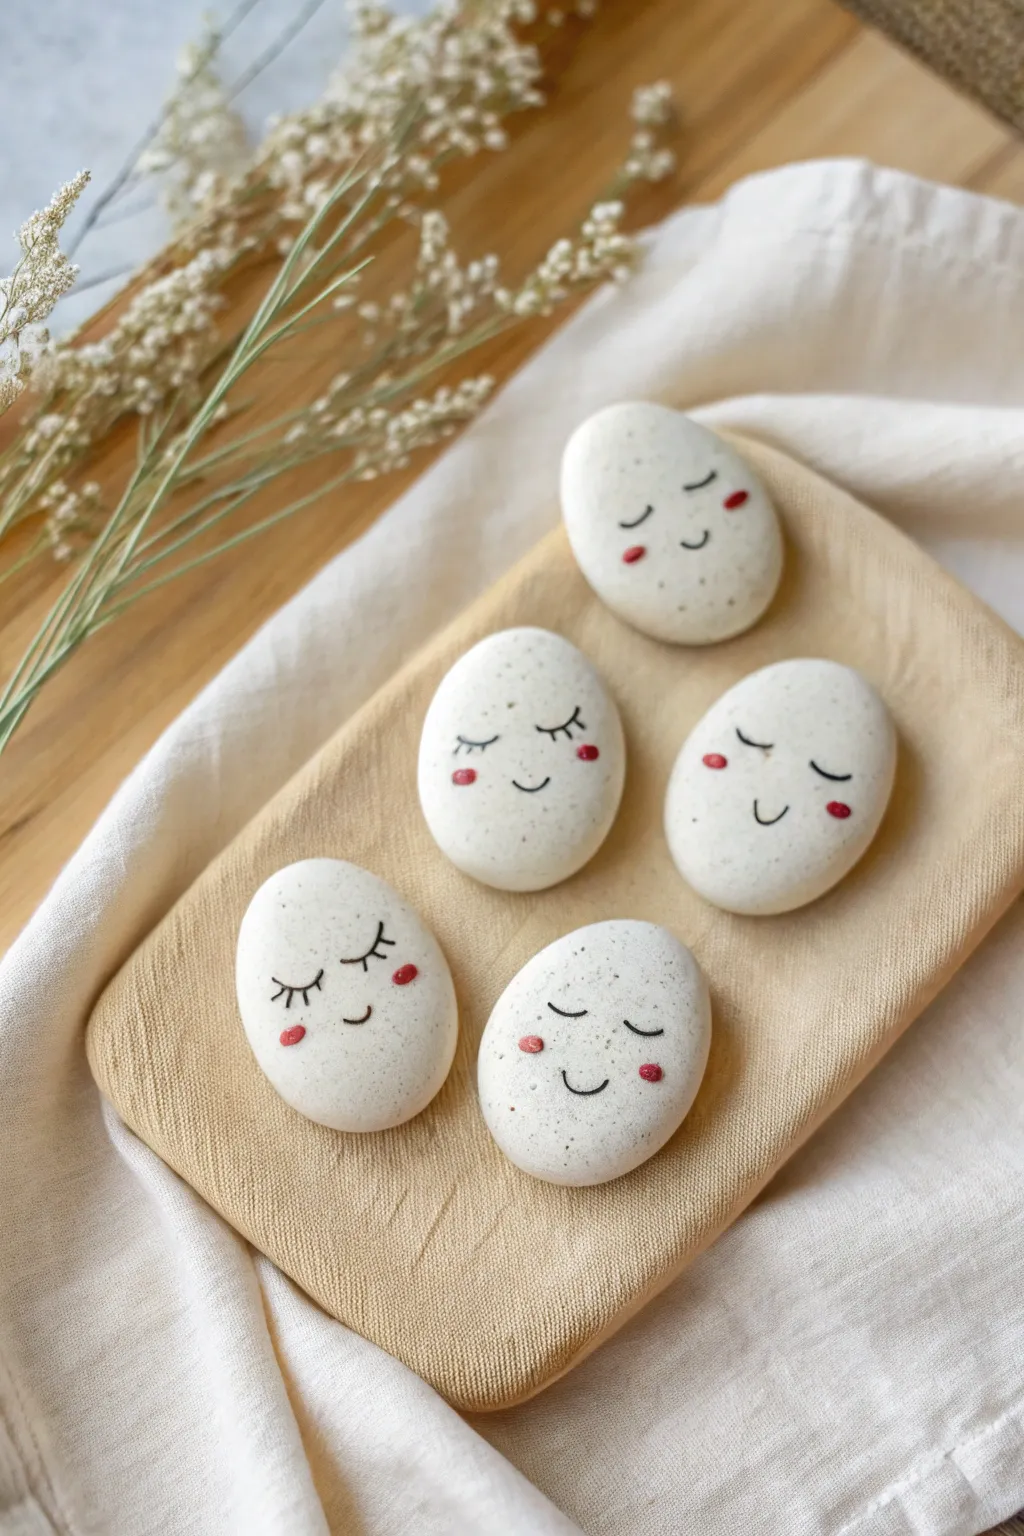
These charming pebble-shaped faces are perfect for adding a touch of personality to your desk or potted plants. Their speckled, stone-like finish and sweet expressions make them an adorable and beginner-friendly clay project.
How-To Guide
Materials
- White polymer clay (or air-dry clay)
- Black pepper or dried tea leaves (for speckling)
- Rolling pin
- Fine-grit sandpaper
- Black fine-point permanent marker or acrylic paint
- Pink acrylic paint
- Small dotting tool or toothpick
- Matte varnish (optional)
Step 1: Preparing the Clay
-
Condition the clay:
Start by kneading your white polymer clay until it is soft and pliable. The warmth from your hands will make it easier to work with and prevent cracking later on. -
Create the speckles:
To achieve that natural, stony look, sprinkle a small pinch of ground black pepper or dried loose-leaf tea into your clay. Fold the clay over and knead it thoroughly until the specks are evenly distributed throughout the batch. -
check distribution:
Pause and examine your clay. If the speckles look too sparse, add a tiny bit more pepper. Be careful not to overdo it; you want a subtle texture, not a dark gray lump.
Natural Texture
Use coarse-ground black pepper for larger, more distinct speckles, or fine-ground pepper for a subtle ‘granite’ dust effect.
Step 2: Shaping the Pebbles
-
Divide the clay:
Separate your speckled clay into five equal portions. I usually eyeball this, but you can use a kitchen scale if you want them to be identical in size. -
Roll into balls:
Take one portion and roll it between your palms to form a smooth sphere. Ensure there are no deep creases or fold lines visible. -
Flatten into ovals:
Gently press the sphere onto your work surface using the palm of your hand. Shape it into a slightly flattened oval, mimicking the organic look of a river stone. It should be about 1/2 inch thick. -
Smooth the edges:
Run your finger lightly around the edges of the oval to soften any fingerprints or sharp ridges. The goal is a super-smooth, rounded perimeter. -
Repeat the process:
Continue rolling and shaping the remaining four portions until you have a set of five smooth, stone-like shapes.
Magnet Magic
Before baking, press a small, strong magnet into the back of each pebble to create an adorable set of fridge magnets.
Step 3: Baking and Refining
-
Bake the clay:
Place your clay pebbles on a baking sheet lined with parchment paper. Bake according to the instructions on your specific package of clay (usually around 275°F or 135°C for 15-30 minutes). -
Cool down:
Once baked, let the pebbles cool completely on the baking sheet. They will harden fully as they return to room temperature. -
Light sanding:
If you notice any fingerprints or imperfections after baking, gently buff the surface with fine-grit sandpaper. Wipe away any dust with a damp cloth before proceeding.
Step 4: Adding the Expressions
-
Plan the faces:
Before drawing directly on the clay, sketch out a few simple face designs on paper. Think of closed sleepy eyes, happy curves, or straight neutral mouths. -
Draw the eyes:
Using a black fine-point permanent marker or a very thin brush with black acrylic paint, carefully draw the eyes on the upper third of the pebble. Vary the designs—some can have lashes, others simple arcs. -
Add the smile:
Just below the center, draw a small, simple curve for the mouth. Keep the lines thin and delicate to maintain the cute aesthetic. -
Create rosy cheeks:
Dip a small dotting tool or a toothpick into pink acrylic paint. Gently dab two small dots on either side of the mouth to create blushing cheeks. -
Dry the details:
Allow the paint or marker ink to dry completely to avoid smudging your hard work. -
Seal the surface:
For longevity, coat your finished pebbles with a thin layer of matte varnish. This seals the paint and gives the ‘stone’ a finished, professional look.
Arrange your little family of stone faces on a tray or shelf to bring a smile to your face every time you see them