When you’re craving fresh ceramics projects ideas, it helps to have a mix of classic forms and a few playful curveballs. Here are my go-to projects that feel doable, satisfying, and full of room for your own style.
Pinch Pot Bowls With Personality
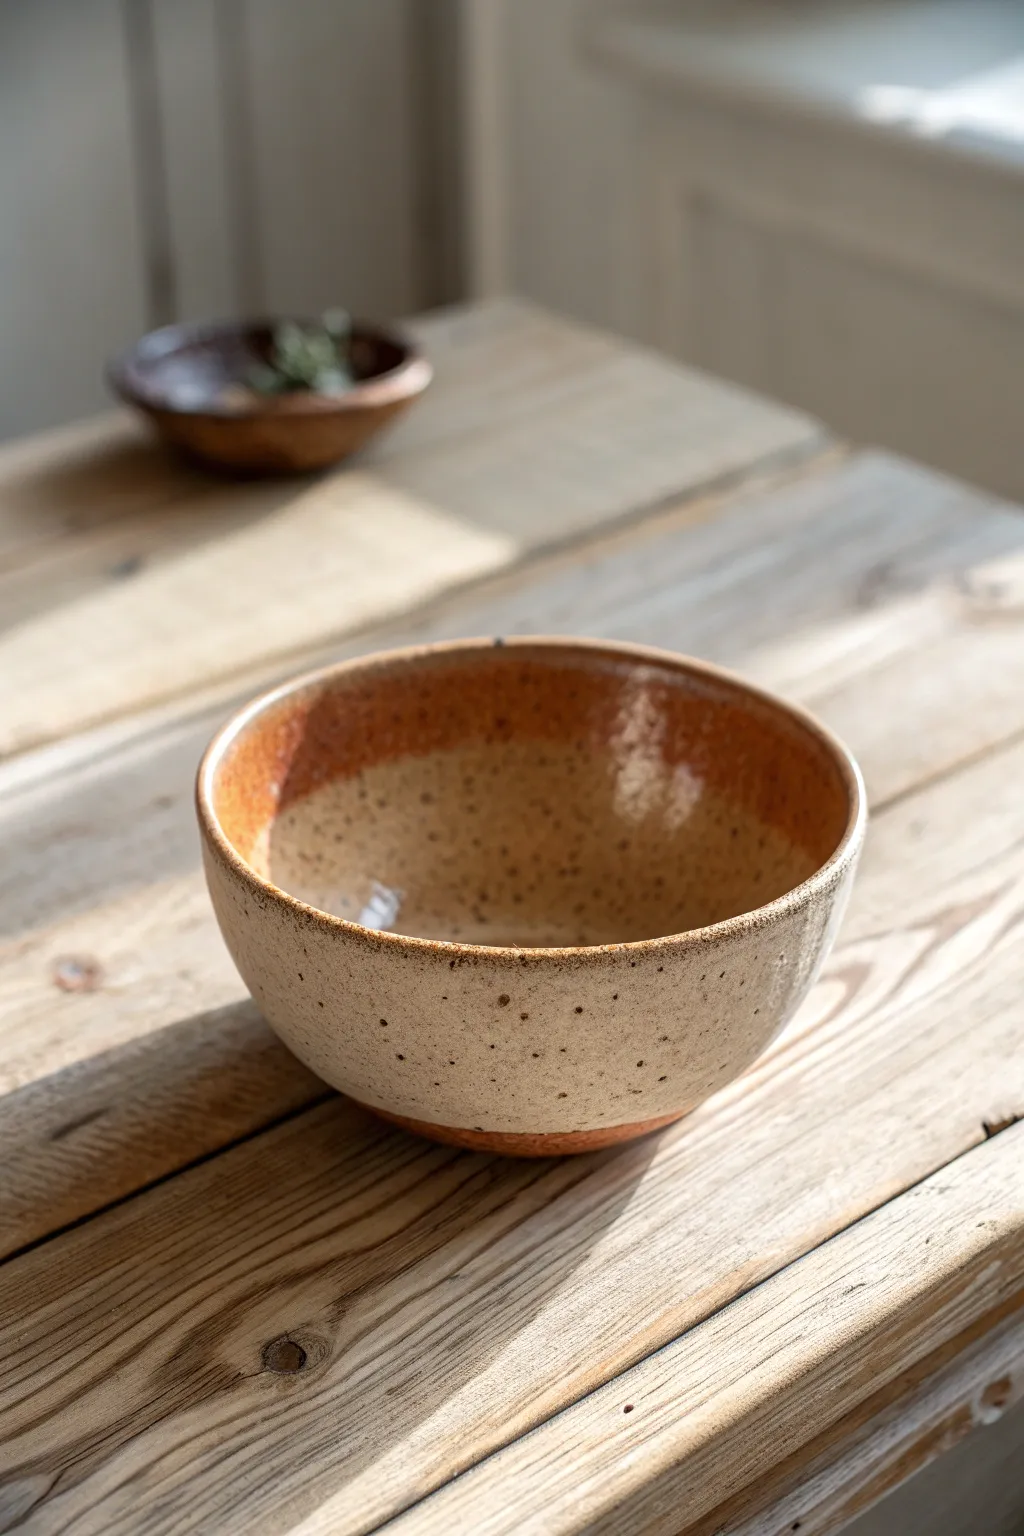
Embrace the natural warmth of hand-built pottery with this charming speckled bowl project. Features a distinct burnt orange rim that melts beautifully into a creamy, spotted body for a cozy, earthy aesthetic.
Detailed Instructions
Materials
- Speckled stoneware clay (mid-fire)
- Pottery sponge
- Rib tool (metal or rubber)
- Fettling knife
- Loop tool (for trimming)
- Glossy cream/beige glaze
- Iron oxide wash or terracotta glaze
- Wax resist (optional)
- Kiln access
Step 1: Forming the Bowl
-
Prepare the clay:
Start with a ball of speckled stoneware clay roughly the size of a large orange. Wedge it thoroughly to remove air bubbles and ensure the speckles are evenly distributed. -
Open the form:
Hold the clay ball in one hand and press your thumb into the center, stopping about a half-inch from the bottom. This establishes your base thickness. -
Pinch the walls:
Slowly rotate the ball while gently pinching the clay between your thumb (inside) and fingers (outside). Work from the bottom up to thin the walls evenly. -
Shape the curve:
As you pinch, gently push the walls outward to create a rounded, open bowl shape. Aim for a slightly wider diameter at the top. -
Refine the surface:
Once the general shape is achieved, use a flexible rib tool to smooth the interior and exterior walls. This compresses the clay and removes deep fingerprints. -
Check the rim:
Tap the rim gently with a wooden paddle or flat tool to even it out, but keep the slight organic undulation that gives pinch pots their character. -
Dry to leather hard:
Set the bowl aside until it reaches a leather-hard state. I like to cover it loosely with plastic so it doesn’t dry too quickly at the rim.
Rim Reaction
Layering glazes at the rim creates magic. If the orange glaze is runny, overlap it slightly more heavily over the base cream to encourage beautiful mingling and drips.
Step 2: Trimming and Bisque Firing
-
Define the foot:
Flip the leather-hard bowl upside down. Using a loop tool, carve away excess weight from the bottom to create a small, defined foot ring. -
Smooth the transition:
Use a damp sponge to soften any sharp edges created during trimming, especially around the new foot ring. -
Bone dry:
Allow the piece to dry completely until it is bone dry and lighter in color. It should feel room temperature to the touch, not cool. -
Bisque fire:
Fire the bowl in the kiln to bisque temperature (usually cone 04 or 06) to prepare it for glazing.
Step 3: Glazing
-
Clean the bisque:
Wipe the bisque-fired bowl with a damp sponge to remove any dust that might prevent the glaze from adhering properly. -
Wax the foot:
Apply wax resist to the bottom foot ring and slightly up the side wall to create that raw clay line seen in the reference image. -
Apply the base glaze:
Dip the entire bowl into a glossy cream or beige glaze. Shake off excess drips and let it dry for a few moments. -
Apply the rim color:
Dip just the top inch of the rim into a burnt orange glaze or iron oxide wash. Hold it briefly to ensure a good coat. -
Clean up:
Use a sponge to wipe away any glaze droplets that may have landed on the waxed foot area. -
Final fire:
Fire the bowl to the maturity temperature of your clay and glaze (typically cone 5 or 6 for stoneware).
Cracking Base?
If S-cracks appear on the bottom during drying, you likely didn’t compress the base enough. Use a wooden tool to firmly press and smooth the inside bottom while wet.
Now you have a stunning, functional bowl ready for your morning cereal or evening soup


Everyday Mugs With Simple Handles
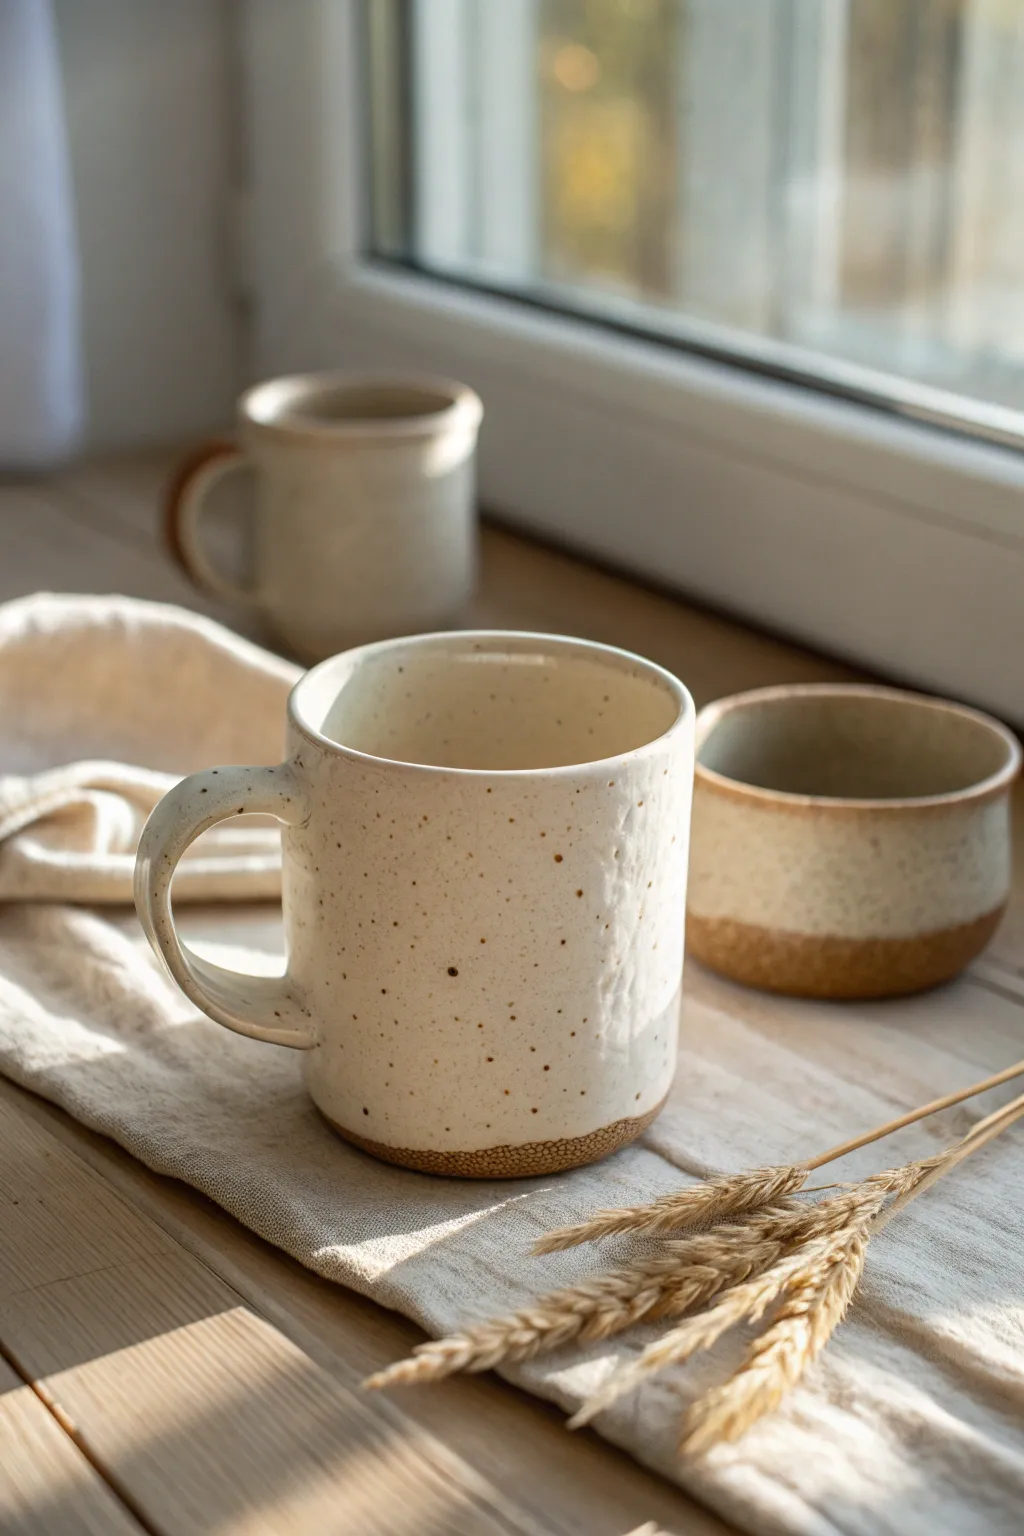
Embrace the beauty of simplicity with these warm, earthy mugs featuring a charming speckled glaze and raw clay bases. The design highlights the natural texture of the clay body while offering a smooth, comforting surface for your daily coffee or tea ritual.
Step-by-Step Guide
Materials
- Speckled stoneware clay (mid-fire)
- Pottery wheel (or slab roller/rolling pin for hand-building)
- Needle tool
- Rib tool (smooth wood or metal)
- Sponge
- Wire cutter
- Loop tool (for trimming)
- Speckled cream or matte white glaze
- Bucket of water
- Kiln
Step 1: Throwing the Cylinder
-
Wedge and Center:
Begin by thoroughly wedging about 1 to 1.5 pounds of speckle clay to remove air bubbles. Throw the clay onto the wheel head and center it using steady pressure and water for lubrication. -
Open the Form:
Press your thumbs into the center of the clay mound, opening it up while leaving about a 1/2 inch of thickness at the bottom for the foot. -
Pull the Walls:
Using your fingertips or a knuckle, gently pull the clay upward to create a cylinder. Aim for even wall thickness from bottom to top, keeping the rim slightly compressed to prevent cracking. -
Shape the Profile:
Once you have height, use a rib tool on the outside while supporting the inside to create a straight-sided cylinder with just a hint of a curve near the bottom for a comfortable hold. -
Refine the Rim:
Smooth the drinking rim with a small piece of chamois or a damp sponge. A slightly rounded rim feels best against the lips.
Handle Cracking?
If handles crack at the seams during drying, your clay was likely too dry. Wrap the handle joint with a tiny strip of damp paper towel under the plastic.
Step 2: Trimming and Handling
-
Leather Hard Drying:
Allow the mug to dry to a leather-hard state. It should be firm enough to handle without deforming but still cool to the touch. -
Trim the Foot:
Invert the mug on the wheel. Using a loop tool, trim away excess weight from the bottom, creating a clean, flat foot ring. Leave the texture slightly rough if you want to emphasize the raw clay look later. -
Pull the Handle:
Take a separate lug of clay and pull a strap handle using water and wet hands. The handle should taper slightly and be wide enough for a comfortable grip. -
Shape the Curve:
Bend the pulled handle into a classic ‘C’ or ear shape and let it stiffen up slightly on a board until it holds its curve. -
Attach the Handle:
Score the attachment points on both the mug body and the handle ends. Apply slip to both surfaces and press the handle firmly onto the mug body, blending the seams seamlessly with a modeling tool or your finger. -
Final Smoothing:
Wipe away any excess slip or crumbs around the handle attachments with a barely damp sponge. I find checking the alignment from above helps ensure the handle is perfectly straight.
Sprinkle the Speckle
If your glaze isn’t speckled enough, add granular ilmenite or iron oxide to a plain white glaze. Test small batches first to dial in the density.
Step 3: Glazing and Firing
-
Bisque Fire:
Once the mug is bone dry, load it into the kiln for a bisque firing (typically Cone 04-06). -
Wax Resist:
After the mug cools, apply wax resist to the bottom inch or half-inch of the exterior. This crucial step creates that beautiful contrast between the glazed body and the raw, textured base shown in the image. -
Glaze Application:
Dip the mug into a speckled cream or matte white glaze. Hold it upside down by the foot for a few seconds to let excess glaze drip off, ensuring the glaze line meets your wax resist cleanly. -
Clean the Foot:
Use a damp sponge to wipe any stray glaze droplets off the waxed bottom area. The wax repels most of it, but a final wipe ensures a crisp line. -
Glaze Fire:
Load the mug into the kiln for the final glaze firing (temperature depends on your specific clay and glaze, usually Cone 5-6 for stoneware). -
Cool and Sand:
After firing, let the kiln cool completely. If the raw clay bottom feels too rough, lightly sand it with wet-dry sandpaper to protect your table surfaces.
Now you have a set of cozy, handmade mugs ready to warm up your morning routine


Spoon Rests for Stove-Side Style
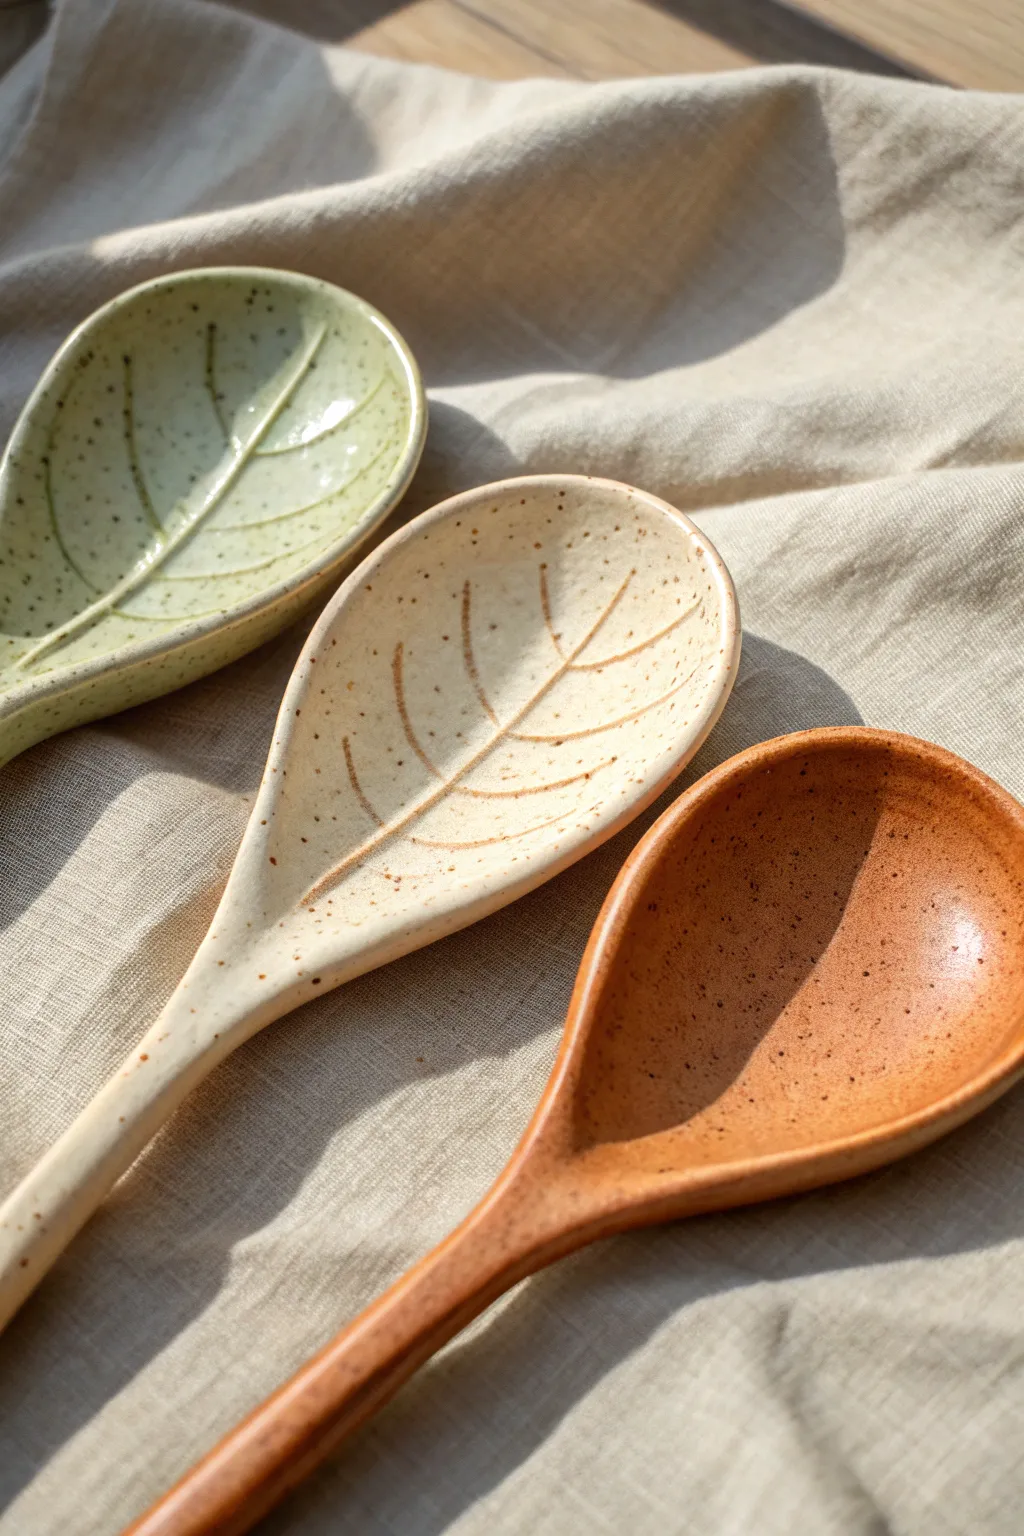
These charming spoon rests bring a touch of organic beauty to your kitchen counter with their gentle leaf veining and speckled glaze finish. Perfect for keeping messy ladles off your surfaces, they strike a balance between functional pottery and nature-inspired art.
Detailed Instructions
Materials
- Speckled Stoneware Clay (e.g., Lagana or Speckled Buff)
- Pottery sponge
- Rolling pin
- Canvas mat or slab roller
- Needle tool or fettling knife
- Rib tool (kidney)
- Leaf Vein or Leaf Shape Mold (or real leaves)
- Spoon Slump Mold (or makeshift mold)
- Amaco Celadon Glazes (Snapdragon, Snow, Tangelo)
- Clear Glaze (optional)
- Kiln access
Step 1: Shaping the Form
-
Prepare the Clay:
Begin by wedging a softball-sized ball of speckled stoneware clay to remove any air bubbles. This ensures a strong finished piece that won’t crack during firing. -
Roll the Slab:
Roll your clay out onto a canvas mat or through a slab roller until it is uniform and approximately 1/4 inch thick. You want it sturdy enough to handle daily use but elegant enough to look refined. -
Cut the Spoon Shape:
Using a needle tool, lightly sketch an oversized spoon shape onto the slab. Remember that clay shrinks about 10-15%, so cut the shape slightly larger than your desired final size. Once happy with the outline, cut it out cleanly. -
Smooth the Edges:
Take a damp sponge or your finger and run it along the cut edges to compress and round them over. Sharp edges in raw clay become razor-sharp after firing, so smoothing now is crucial. -
Texture the Surface:
For the leaf design, lightly press a large, veined leaf or a specialized texture mat into the bowl section of the spoon. Use a small pony roller to ensure the impression is deep enough to catch the glaze later. -
Enhance the Veins:
If the impression is faint, or if you are freehanding the design like the ones in the photo, use a needle tool to gently carve the central stem and branching veins. Keep the lines fluid and organic. -
Add the Handle Detail:
If you want the handle to look like a stem, gently pinch and round the clay handle, pulling it slightly to elongate it. You can flatten the very end slightly for a comfortable grip.
Clean Those Veins
Glaze loves to pool thick in texture lines. If you carved deep veins, gently trace them with a needle tool after the glaze dries but before firing to ensure the lines stay crisp.
Step 2: Drying and Firing
-
Form the Curve:
Place your clay cutout onto a gentle slump mold or rest the bowl of the spoon inside a shallow bowl to give it a curved shape. Propping the handle up on a small piece of foam helps maintain an elegant arch. -
Slow Dry:
Cover the pieces loosely with plastic to let them dry slowly. Uneven drying can cause warping, especially with flat slab pieces like spoon rests. -
Bisque Fire:
Once bone dry (greenware), load the pieces into the kiln for a bisque fire to Cone 04. This hardens the clay and prepares it for glazing. -
Clean the Bisqueware:
After the kiln cools, wipe the bisque pieces with a damp sponge to remove any dust, which can prevent the glaze from adhering properly.
Step 3: Glazing
-
Select Translucent Glazes:
Choose translucent or celadon-type glazes to highlight the speckles in the clay and the texture of the veins. Opaque glazes will hide these details. -
Apply the Glaze:
Brush on 3 coats of your chosen glaze. Let each coat dry until it loses its sheen before applying the next. For the green leaf look, use a soft celadon green; for the cream, a transparent white works beautifully. -
Wipe the Foot:
Using a wax resist or a damp sponge, meticulously clean the entire bottom surface where the spoon rest will touch the kiln shelf. Any glaze left here will fuse the piece to the shelf. -
Glaze Fire:
Fire the glazed pieces to Cone 5 or 6 (depending on your clay and glaze specifications). Ensure the pieces aren’t touching each other in the kiln. -
Final Polish:
Once cool, check the bottom for any rough spots. I like to sand the unglazed foot with 400-grit wet/dry sandpaper to ensure it won’t scratch a countertop.
Real Nature Texture
Instead of freehand carving, press a real large sage or basil leaf into the wet clay. Burn the leaf out in the bisque fire for an incredibly realistic fossilized texture.
Now you have a set of durable, beautiful spoon rests ready to handle your messiest cooking adventures


Soap Dishes With Drainage Ridges
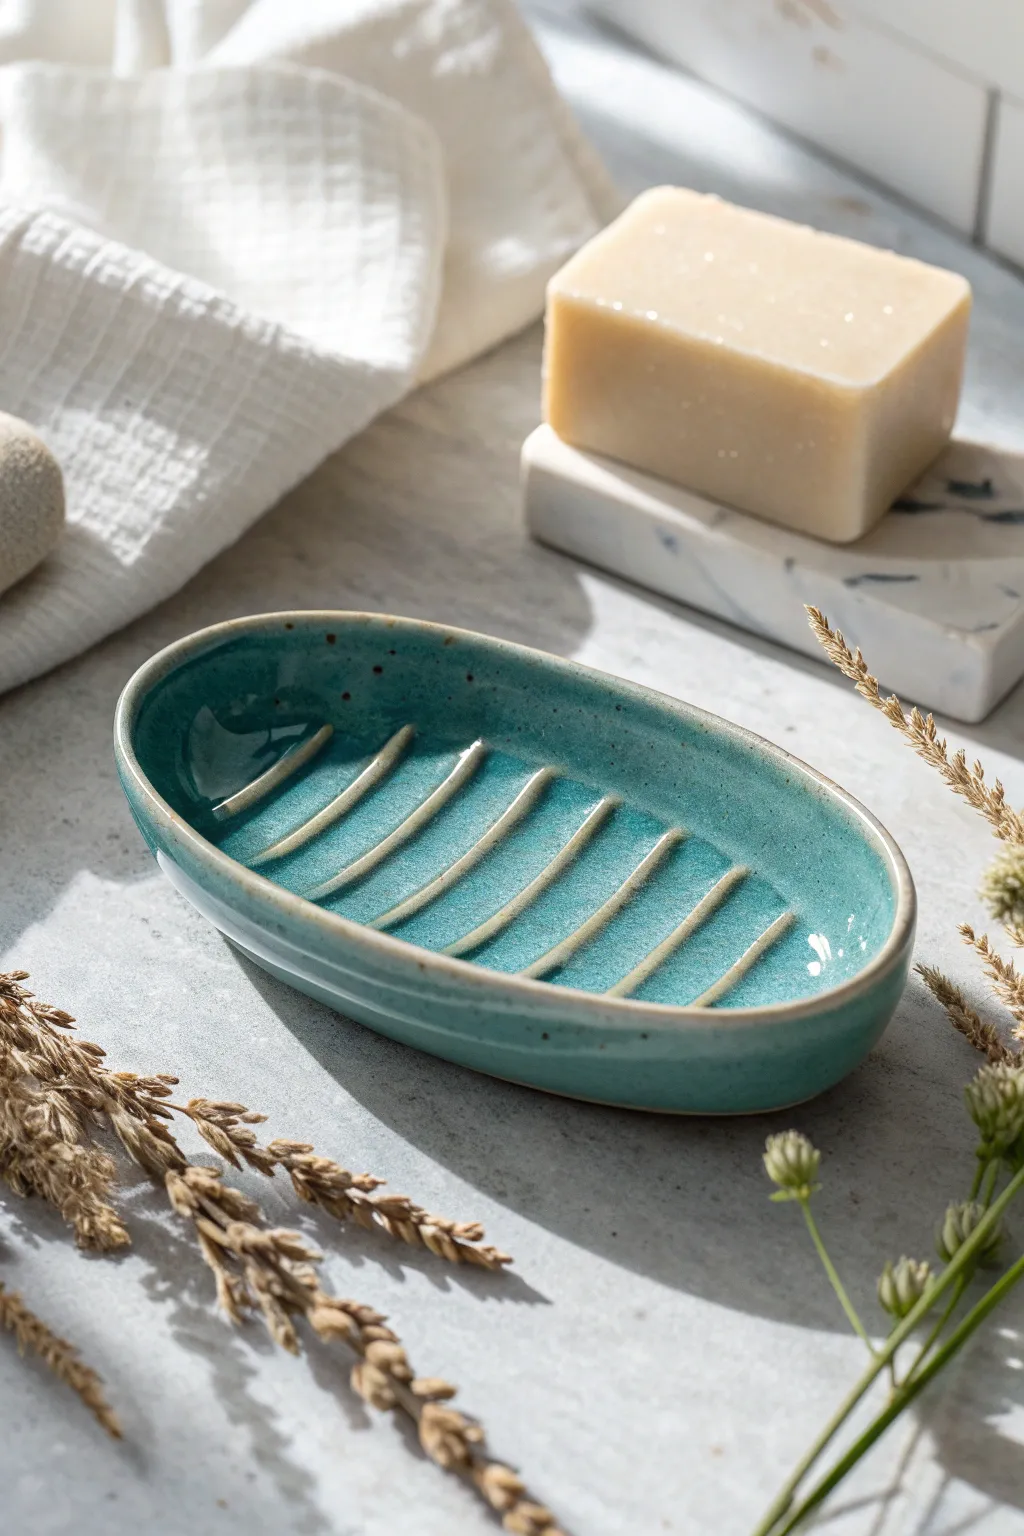
This classic oval soap dish blends function with handcrafted beauty, featuring prominent drainage ridges that keep your soap dry and extend its life. The vibrant teal glaze, pooling in the recesses and breaking over the ridges, creates a stunning sense of depth and movement.
Step-by-Step Guide
Materials
- Light-colored stoneware clay (with fine speckles if desired)
- Oval template (paper or cardstock)
- Rolling pin and guide sticks (approx. 1/4 inch)
- Small coils of clay (for ridges)
- Rib tool (kidney shaped)
- Sponge
- Fettling knife or needle tool
- Scoring tool (serrated rib or needle)
- Slip (clay mixed with water)
- Teal reactive glaze (specifically one that breaks over texture)
- Carving tool (optional, for shaping ridges)
- Stiff brush or modeling tool
Step 1: Forming the Base
-
Prepare the slab:
Begin by wedging your stoneware clay thoroughly to remove air bubbles. Roll it out into a smooth slab using your rolling pin and guide sticks to ensure an even thickness of about 1/4 inch. -
Cut the shape:
Place your oval template onto the slab. Using a needle tool or fettling knife, trace around the template to cut out the base shape. -
Smooth the edges:
Take a damp sponge and gently run it along the cut edge of the oval to round off the sharp corners. This compression step is key to preventing future cracks. -
Lift the walls:
Gently lift the edges of the oval slab upwards to create a shallow dish form. You can do this by cupping it in your hands or pressing it into a foam mold if you have one. -
Refine the rim:
Use a damp chamois or your thumb to compress the rim, ensuring it is slightly thicker than the walls for durability. I like to smooth it until it feels perfectly rounded to the touch.
Step 2: Adding the Drainage Ridges
-
Roll small coils:
Roll out several thin coils of clay, approximately the thickness of a pencil lead or slightly thicker. These will become the raised ridges. -
Mark the ridge placement:
Lightly sketch lines across the inside of the dish where you want the ridges to sit. Aim for even spacing, leaving a small gap between the ridge ends and the dish wall. -
Score and slip:
Use your scoring tool to scratch up the surface along your sketched lines. Apply a generous amount of slip to these scored areas. -
Attach the coils:
Place the clay coils firmly onto the slipped lines. Gently press them down to ensure a solid bond without flattening them completely. -
Shape the ridges:
Using a modeling tool or your fingers, shape the coils into clean, rounded ridges. Taper the ends downwards so they blend smoothly into the dish floor. -
Clean connection points:
Take a small, slightly damp brush and run it along the base of each ridge where it meets the floor of the dish. This cleans up excess slip and creates a seamless transition. -
Final smooth:
Give the entire piece a final pass with a barely damp sponge to remove any fingerprints or sharp burrs on the ridges.
Ridges Popping Off?
If ridges detach during drying, use vinegar instead of water in your slip. Vinegar breaks down clay particles for a stronger bond. Ensure both surfaces are deeply scored.
Step 3: Glazing and Finishing
-
Bisque fire:
Allowed the piece to dry slowly and completely before bisque firing it to cone 04 (or your clay body’s recommendation). -
Clean for glazing:
Once fired, wipe the bisqueware down with a damp sponge to remove any kiln dust that might resist the glaze. -
Apply the glaze:
Pour or dip the interior of the dish with your reactive teal glaze. Ensure the glaze gets into the valleys between the ridges. -
Wipe the ridges (optional):
For a dramatic effect similar to the example, you can very lightly wipe the top of the ridges with a damp sponge. This thins the glaze there, allowing the clay color to show through after firing. -
Glaze the exterior:
Glaze the outside of the dish. Be careful not to let glaze run too close to the bottom foot. -
Rim detail:
If your glaze tends to run, make sure the rim has a slightly thinner coat so the brown clay body highlights the edge, framing the piece. -
Final fire:
Glaze fire the piece to the temperature required by your specific glaze (typically cone 5 or 6 for stoneware).
Make It a Set
Create a matching toothbrush holder by using the same clay and glaze. For the holder, use a vertical cylinder shape but add a textured rim that mimics the drainage ridges.
Once cooled, your new soap dish is ready to bring a splash of functional art to your bathroom sink

The Complete Guide to Pottery Troubleshooting
Uncover the most common ceramic mistakes—from cracking clay to failed glazes—and learn how to fix them fast.
Trinket Dishes for Tiny Treasures
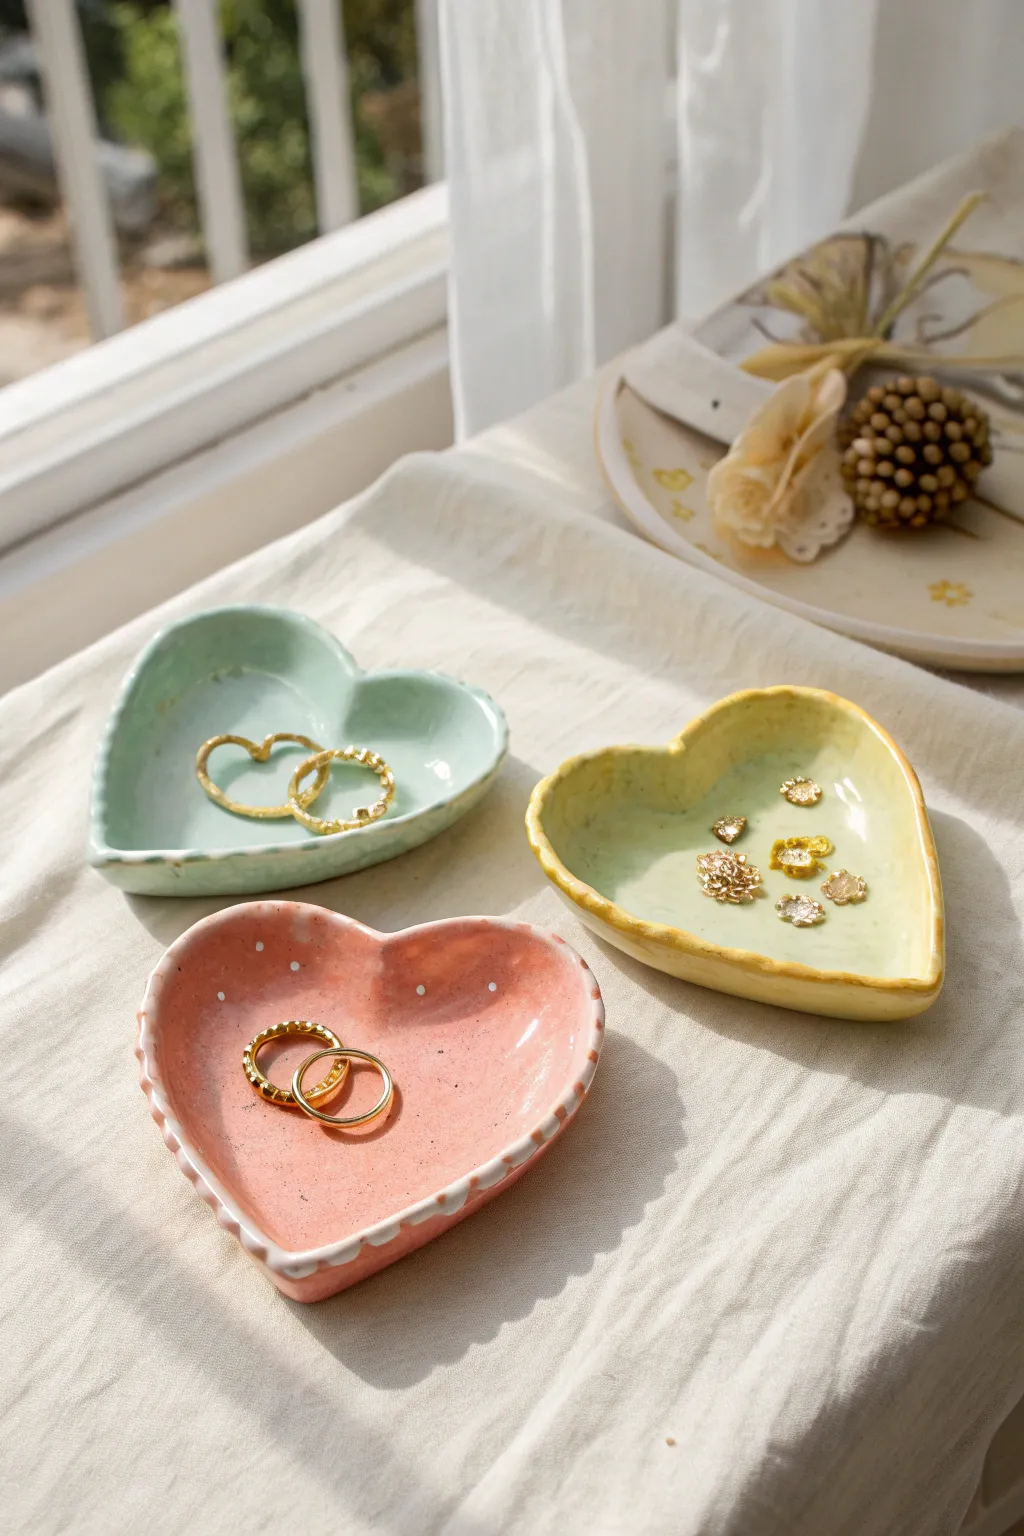
These sweet, heart-shaped dishes are the perfect catch-all for your tiniest treasures. With soft pastel glazes and delicate rim detailing, they offer a charming handmade touch to any vanity or bedside table.
Detailed Instructions
Materials
- White or light-colored earthenware clay
- Rolling pin
- Two wooden guide slats (approx. 1/4 inch thick)
- Heart-shaped paper template or cookie cutter
- Fettling knife or needle tool
- Small sponge
- Wooden modeling tool with a small round end (or a dull pencil)
- Soft paintbrush for glazing
- Pastel ceramic glazes (Mint Green, Salmon Pink, Butter Yellow)
- Clear glaze (optional, if your colors aren’t glossy)
- Kiln access
Step 1: Shaping the Clay
-
Prepare your slab:
Begin by wedging a ball of white earthenware clay to remove air bubbles. Place it on a canvas board or cloth between your two wooden guide slats to ensure even thickness. -
Roll it out:
Use your rolling pin to flatten the clay until the pin rests on the guide slats. This ensures your slab is a uniform thickness, crucial for preventing warping later. -
Cut the shape:
Place your heart template or cookie cutter onto the slab. If using a template, trace around it carefully with a needle tool or fettling knife. Cut out three distinct hearts. -
Smooth the edges:
Dip your finger or a small piece of sponge into water—just a tiny bit—and run it along the cut edges of each heart to soften any sharp angles or burrs left by the knife. -
Create the rim:
Gently pinch and lift the edges of the heart upwards with your thumb and forefinger. You aren’t building a wall, just creating a slight curve to keep jewelry contained. -
Refine the curve:
Once lifted, smooth the interior curve with a damp sponge so the transition from the base to the rim is seamless and organic.
Rim Perfecter
If your raised edges keep slumping down while wet, bolster them with small coils of clay or rolled-up paper towels tucked underneath the rim until the clay stiffens.
Step 2: Adding Texture & Firing
-
Detail the rim:
Using the rounded end of a wooden tool or the back of a small paintbrush, press gently into the top edge of the rim. Create small indentations or ‘dots’ spaced evenly apart all the way around the perimeter. -
Alternative texture:
For a different look, as seen on the pink dish, try adding tiny balls of clay to the rim instead of indentations, blending them thoroughly so they don’t pop off. -
Dry slowly:
Place your hearts on a ware board loosely covered with plastic. Let them dry slowly over several days to the ‘bone dry’ stage to prevent cracking. -
First firing:
Load your bone-dry hearts into the kiln for a bisque fire (usually Cone 04). This hardens the clay and prepares it to accept glaze.
Gold Luster Luxe
For extra elegance, apply a real gold luster overglaze to just the textured rim after the glaze firing. It requires a third, low-temp firing but adds incredible shine.
Step 3: Glazing
-
Clean the bisque:
Wipe the fired pieces with a damp sponge to remove any kiln dust. This ensures the glaze adheres properly without crawling. -
Apply base color:
Brush 2-3 coats of your chosen pastel glaze onto the interior and rim of each heart. I like to brush in alternating directions for each coat to get smooth, even coverage. -
Highlight the texture:
As the glaze settles, notice how it pools slightly in the indentations of the rim or breaks over the raised dots. This natural variance highlights your texture work. -
Wipe the foot:
Use a wet sponge to completely wipe away any glaze from the bottom of the dish where it will touch the kiln shelf. Any leftover glaze here will fuse your piece to the shelf. -
Final firing:
Fire the dishes again to the temperature recommended by your glaze manufacturer (typically Cone 05 or 06 for earthenware).
Once cooled, these delicate dishes are ready to organize your rings and studs in style
Slab Plates With Clean Edges

These elegant, minimalist plates feature a beautiful contrast between smooth, speckled cream glaze and raw toasted stoneware rims. The slightly upturned edges create a functional form perfect for everyday meals, while the slab-building technique ensures a delightful, handmade uniformity.
Step-by-Step Tutorial
Materials
- Speckled stoneware clay (buff or toasted)
- Circular GR Pottery Form (or DIY MDF circle templates)
- Slab roller or rolling pin with thickness strips
- Deep dish banding wheel (optional but helpful)
- Yellow aesthetic sponge
- Metal kidney rib
- Rubber kidney rib
- Needle tool
- Fettling knife
- Surform tool (for rim refinement)
- Matte cream or white speckled glaze
- Wax resist
- Large kiln sponge or foam block
Step 1: Preparing the Slabs
-
Roll the clay:
Begin by rolling out your speckled stoneware clay into a large, even slab. Aim for a thickness of about 1/4 inch to 3/8 inch. Consistency is key here, so use thickness strips or a slab roller if available. -
Compress the slab:
Using a flexible rubber rib, firmly compress the clay on both sides. This aligns the clay particles, preventing future warping in the kiln, and removes any canvas texture from your rolling surface. -
Cut the circles:
Place your circular template onto the slab. Using a needle tool, cut around the template, holding the tool perpendicular to the table for a straight edge. Cut slightly larger than your mold if you plan to trim later, or exact size for a softer edge. -
Smooth the edges:
Before draping, run a damp sponge or your finger along the cut edge of the clay circle to soften the sharpness. It’s much easier to do this now while the slab is flat.
Step 2: Forming the Plates
-
Place on the form:
Center your clay circle on top of the GR Pottery Form or your chosen mold. If you are using a plaster or MDF mold, ensure the clay is leather hard enough not to stick, or sprinkle a tiny bit of cornstarch. -
Shape the rim:
Gently press the clay down over the edges of the form. Use a damp sponge to smooth the clay against the mold, establishing the break where the plate bottom meets the rim. -
Compress the foot area:
While the plate is inverted on the mold, use a rubber rib to compress the bottom flat area again. If you want to add a foot ring, score and slip a coil onto the bottom now, though these specific plates sit flat. -
Drying phase:
Allow the clay to stiffen to a soft leather-hard stage while still on the mold. I verify this by checking if the rim holds its shape when slightly lifted. -
Refining the rim:
Once stiffened, remove the plate from the form. Place it on a banding wheel and use a surform tool or a fettling knife to true up the rim edge if it became uneven during forming. -
Sponge finish:
Use a tightly squeezed aesthetic sponge to wipe down the rim one last time, exposing the grog or speckles in the clay body and ensuring a smooth lip for eating.
Weighted Drying
To prevent slab plates from warping upward during drying, place a small bag of sand or rice in the center of the plate once it’s off the mold to keep the bottom perfectly flat.
Step 3: Glazing and Firing
-
Bisque fire:
Load the thoroughly dried greenware plates into the kiln for a bisque fire (usually Cone 04). Stack carefully to avoid stress on the rims. -
Apply wax resist:
Once bisqued, apply wax resist generously to the entire bottom of the plate and, crucially, coat the rim edge. This creates that distinct raw clay border seen in the image. -
Glaze interior:
Pour your matte cream glaze into the center of the plate, swirl it to coat the interior, and pour the excess out. Alternatively, dip the plate face-down if you have a large enough bucket. -
Clean up:
Use a damp sponge to wipe away any glaze beads that sat on top of the wax resist on the rim. The line between glaze and raw clay should be crisp. -
Glaze firing:
Fire the plates to your clay body’s maturity temperature (typically Cone 5 or 6 for stoneware). Ensure no glaze touches the kiln shelf. -
Sanding:
After firing, the raw clay rim might feel slightly rough. Use 400-grit wet/dry sandpaper under running water to polish the unglazed rim until it feels silky smooth to the touch.
Add Texture
Before cutting your circles, roll a textured fabric or lace gently into the top surface of the slab. The glaze will break beautifully over the subtle pattern.
Stack your finished set on open shelving to show off those beautiful raw rims


What Really Happens Inside the Kiln
Learn how time and temperature work together inside the kiln to transform clay into durable ceramic.
Coil-Built Planters for Succulents
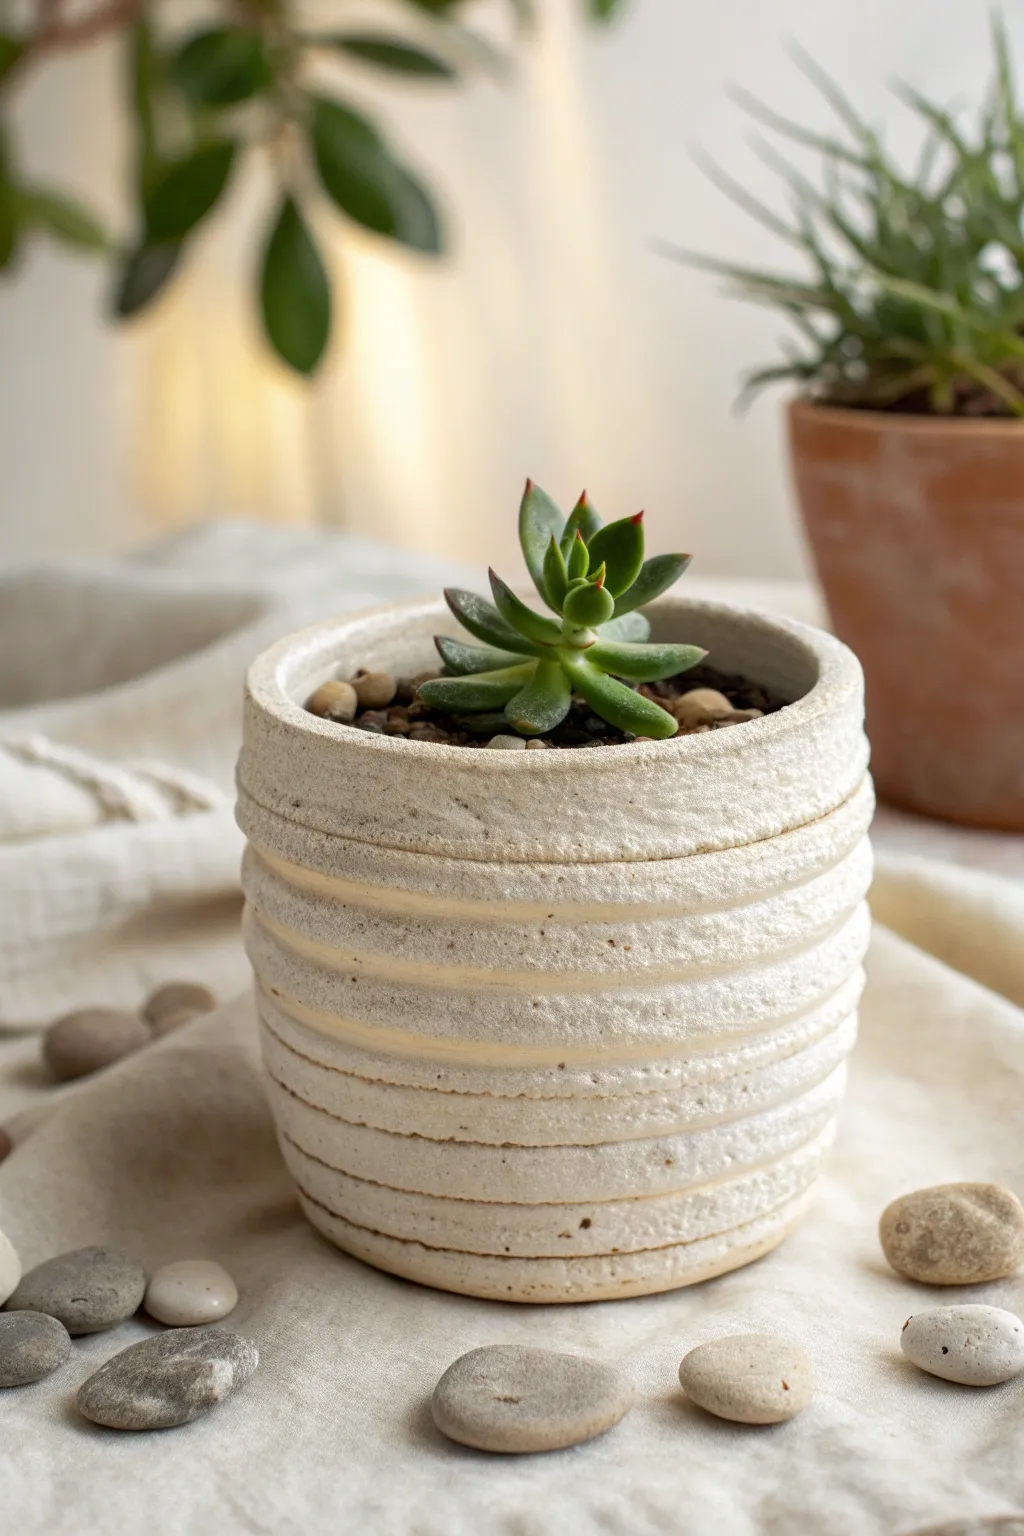
This charming, rustic planter highlights the beauty of visible construction methods with its distinct horizontal ridges. The creamy, stonelike finish allows the texture of the coils to shine, creating a perfect, earthy home for small succulents.
How-To Guide
Materials
- Stoneware clay (groggy or speckled body recommended)
- Scoring tool (needle tool or serrated rib)
- Slip (clay and water slurry)
- Wooden modeling tool
- Sponge
- Rolling pin (optional)
- Canvas or ware board
- Matte white glaze or underglaze
Step 1: Base Construction
-
Prepare the Clay:
Begin by wedging your clay strictly to remove any air bubbles. This ensures your coils will roll out evenly without cracking later. -
Form the Base Slab:
Flatten a ball of clay into a disk about 1/4 inch thick. You can use a rolling pin or just pat it out with your palm for a more organic feel. -
Cut the Circle:
Use a needle tool or a cookie cutter to cut a perfect circle for the base, approximately 3-4 inches in diameter. -
Score the Edge:
Rough up the outer 1/4 inch perimeter of your base disk using your scoring tool. Apply a generous dab of slip to this scratched area.
Step 2: Building the Walls
-
Roll the First Coil:
Roll a snake of clay on your table until it is roughly the thickness of your pinky finger. Try to keep the pressure even so the coil doesn’t get lumpy. -
Place the First Ring:
Lay the coil directly onto the scored edge of the base. Cut the ends at an angle where they meet to increase the surface area for joining. -
Blend the Interior:
This is crucial: While supporting the outside with one hand, use your thumb or a wooden tool to smear the clay from the coil down onto the base on the *inside* only. Do not smooth the outside; we want those ridges visible. -
Continue Stacking:
Roll more coils. Score and slip the top of the previous ring, then place the new coil on top. I find lightly tapping the coil down helps it adhere before blending. -
Align the Walls:
Stack the coils directly on top of one another to create straight vertical walls. If you want a slight taper, you can place them slightly inward, but this pot is quite cylindrical. -
Smooth the Inside Seams:
After every 2-3 coils, take a moment to thoroughly smooth the interior seams. A strong interior wall is necessary since the exterior seams remain unblended. -
Check the Height:
Continue building until the pot is about 3-4 inches tall. This usually takes about 6-8 coils depending on their thickness.
Seamless Seams
When joining coil ends, cutting them at a 45-degree angle rather than straight across creates a stronger bond and hides the connection point better.
Step 3: Finishing Touches
-
Refine the Rim:
For the top rim, you can leave the final coil rounded or gently flatten it with a moist sponge for a more finished look. -
Clean the Exterior:
Use a slightly damp sponge to gently run over the exterior coils. You aren’t trying to smooth them away, just softening any sharp burrs or crumbs of clay. -
Add Drainage:
Don’t forget to poke a hole in the center of the bottom slab using a drinking straw or a hole cutter toolkit so your plant doesn’t drown. -
Slow Drying:
Loosely cover the pot with plastic to let it dry slowing. Uneven drying can cause coil pots to separate at the seams. -
Bisque Fire:
Once bone dry, fire the piece to bisque temperature (usually centered around cone 04). -
Glazing:
Dip or brush on a matte white or cream glaze. A glaze that breaks over texture is ideal here, as it will pool slightly between the coils and highlight the horizontal lines. -
Final Fire:
Fire again to the maturity temperature of your clay body and glaze.
Texture Twist
Before rolling your coils, roll the clay snake over a textured fabric or canvas. The resulting imprint adds incredible detail to the visible exterior rings.
Once fired and cooled, pot your favorite succulent and enjoy the natural, handcrafted vibe this planter brings to your space
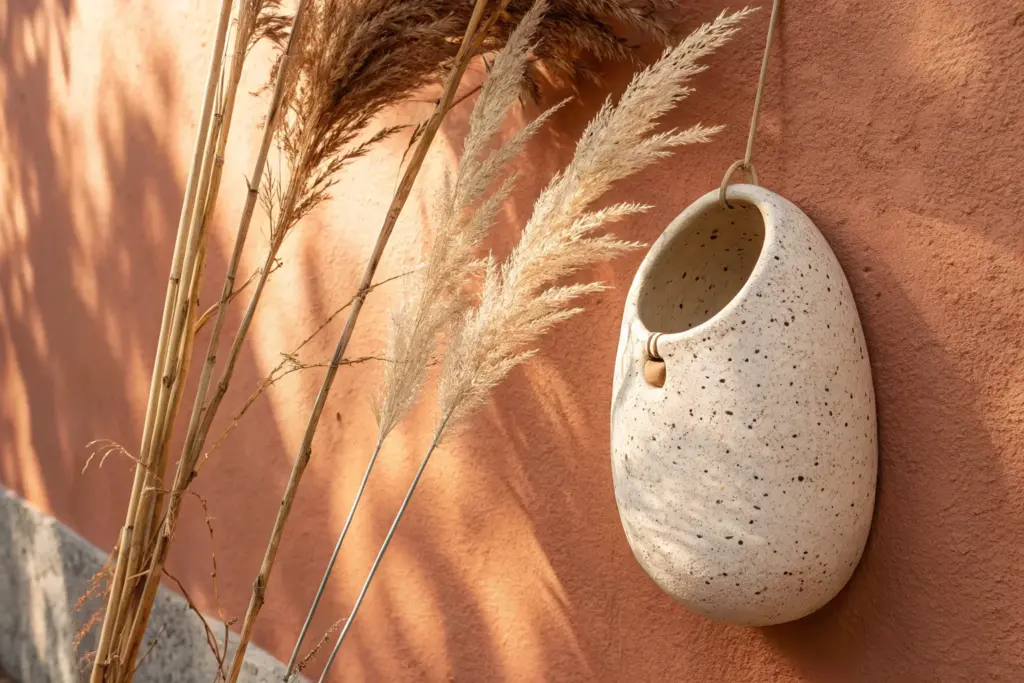
Mini Bud Vases for Single Stems
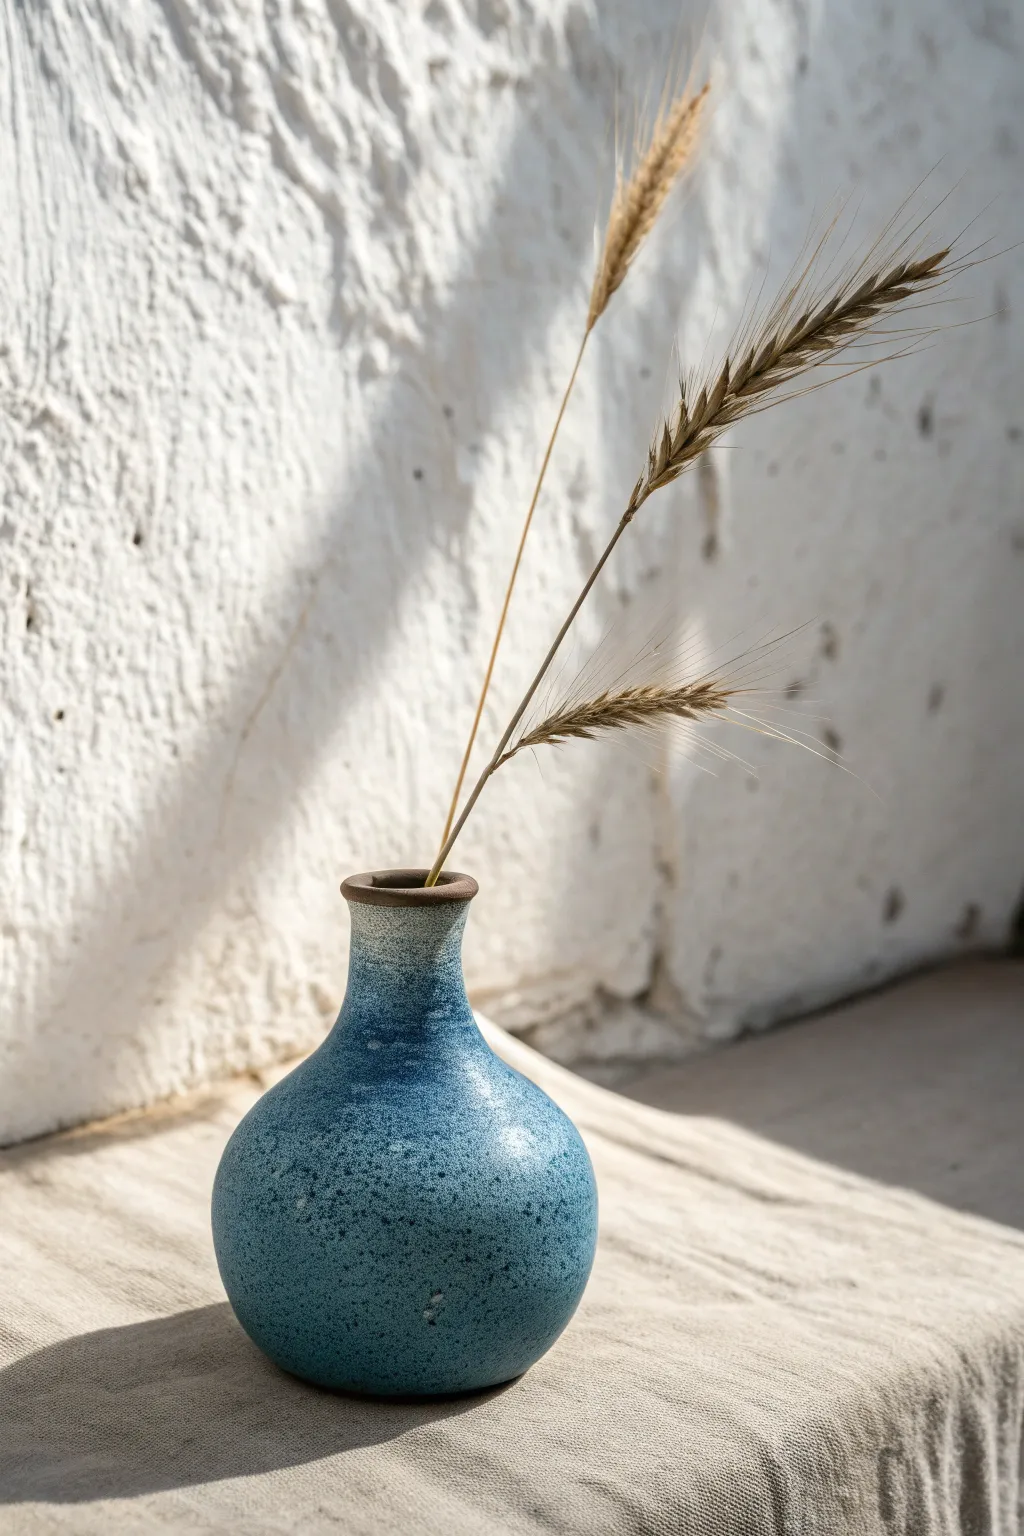
This charming miniature vessel features a classic bulbous base and a narrow neck perfect for holding delicate dried grasses. The finish combines a rich, speckled blue glaze with a raw clay rim for a rustic, organic aesthetic.
Step-by-Step Tutorial
Materials
- Stoneware clay (smooth or light grog)
- Pottery wheel
- Throwing tools (sponge, needle tool, rib, wooden knife)
- Wire cutter
- Trimming tools
- Bisque kiln firing
- Wax resist
- Speckled blue stoneware glaze (glossy or satin)
- Clear glaze (optional)
Step 1: Throwing the Form
-
Prepare the Clay:
Start with a small ball of clay, roughly 1 pound (450g) or slightly less. Wedging it thoroughly is crucial to remove air bubbles, especially for small forms where imperfections show easily. -
Center on the Wheel:
Secure the clay to the wheel head and center it. For a bud vase, keep your centered mound relatively narrow and tall, rather than wide and flat. -
Open the Clay:
Open the hole, leaving about a half-inch of clay at the bottom for the foot. Compress the floor well to prevent cracks. -
Establish the Base:
Pull the walls up, focusing on creating a globe-like shape at the bottom. Leave the clay slightly thicker near the base to support the curve. -
Collar the Neck:
Once you have the desired height on the belly, begin collaring the top third of the clay inwards. Use lubricated hands to gently choke the clay narrower with each rotation. -
Refine the Profile:
Use a metal or wooden rib on the outside while pushing gently from the inside to round out the belly of the vase. This gives it that pleasant, full shape. -
Finish the Rim:
Continue collaring until the neck is quite narrow, about 1 inch diameter. Use a chamois or your fingertip to compress and round the rim so it is smooth. -
Cut Off:
Undercut the base with a wooden knife to create a bevel, then slide your wire cutter underneath and remove the pot from the wheel.
Collaring Collapse?
If the neck twists or collapses while narrowing, the clay is too thin or you are pushing too hard. Keep the top rim slightly thicker during the initial pulls to support the stress of collaring.
Step 2: Trimming and Drying
-
Leather Hard Stage:
Allow the vase to dry slowly under plastic until it reaches a leather-hard state. It should be firm enough to handle without deforming. -
Trim the Foot:
Place the vase upside down on the wheel (you may need a chuck or a foam bat due to the narrow neck). Trim the excess clay from the bottom to create a defined foot ring. -
Bisque Fire:
Let the piece dry completely to bone dry. Fire it in a bisque cycle (usually Cone 04 or 06) to prepare it for glazing.
Use A Chuck
Trimming a narrow-necked bottle upside down is wobbly. Make a ‘chuck’ (an hourglass-shaped clay cylinder) to hold the vase securely upside down while you trim the foot.
Step 3: Glazing
-
Wax the Rim:
To achieve the look in the photo, apply a careful line of liquid wax resist to the very top rim of the vase. This will prevent glaze from adhering there, exposing the raw brown clay. -
Wax the Foot:
Don’t forget to wax the bottom foot ring as well to prevent the pot from sticking to the kiln shelf. -
Prepare the Glaze:
Mix your speckled blue glaze thoroughly. The speckles often settle at the bottom, so ensure a good suspension. -
Dip the Vase:
Holding the vase by the waxed foot, dip it entirely into the glaze bucket. Hold it for 3-4 seconds to get a good coverage thickness, then lift it out. -
Clean Up:
Once the glaze is dry to the touch, use a damp sponge to wipe any stray droplets off the waxed rim and foot. The wax helps, but a quick wipe ensures crisp lines. -
Glaze Firing:
Fire the vase to the temperature required by your specific clay and glaze boad (often Cone 5 or 6 for stoneware).
Now you have a stunning, minimal vessel ready to showcase your favorite dried botanicals

TRACK YOUR CERAMIC JOURNEY
Capture glaze tests, firing details, and creative progress—all in one simple printable. Make your projects easier to repeat and improve.
Tile Coasters With Carved Patterns
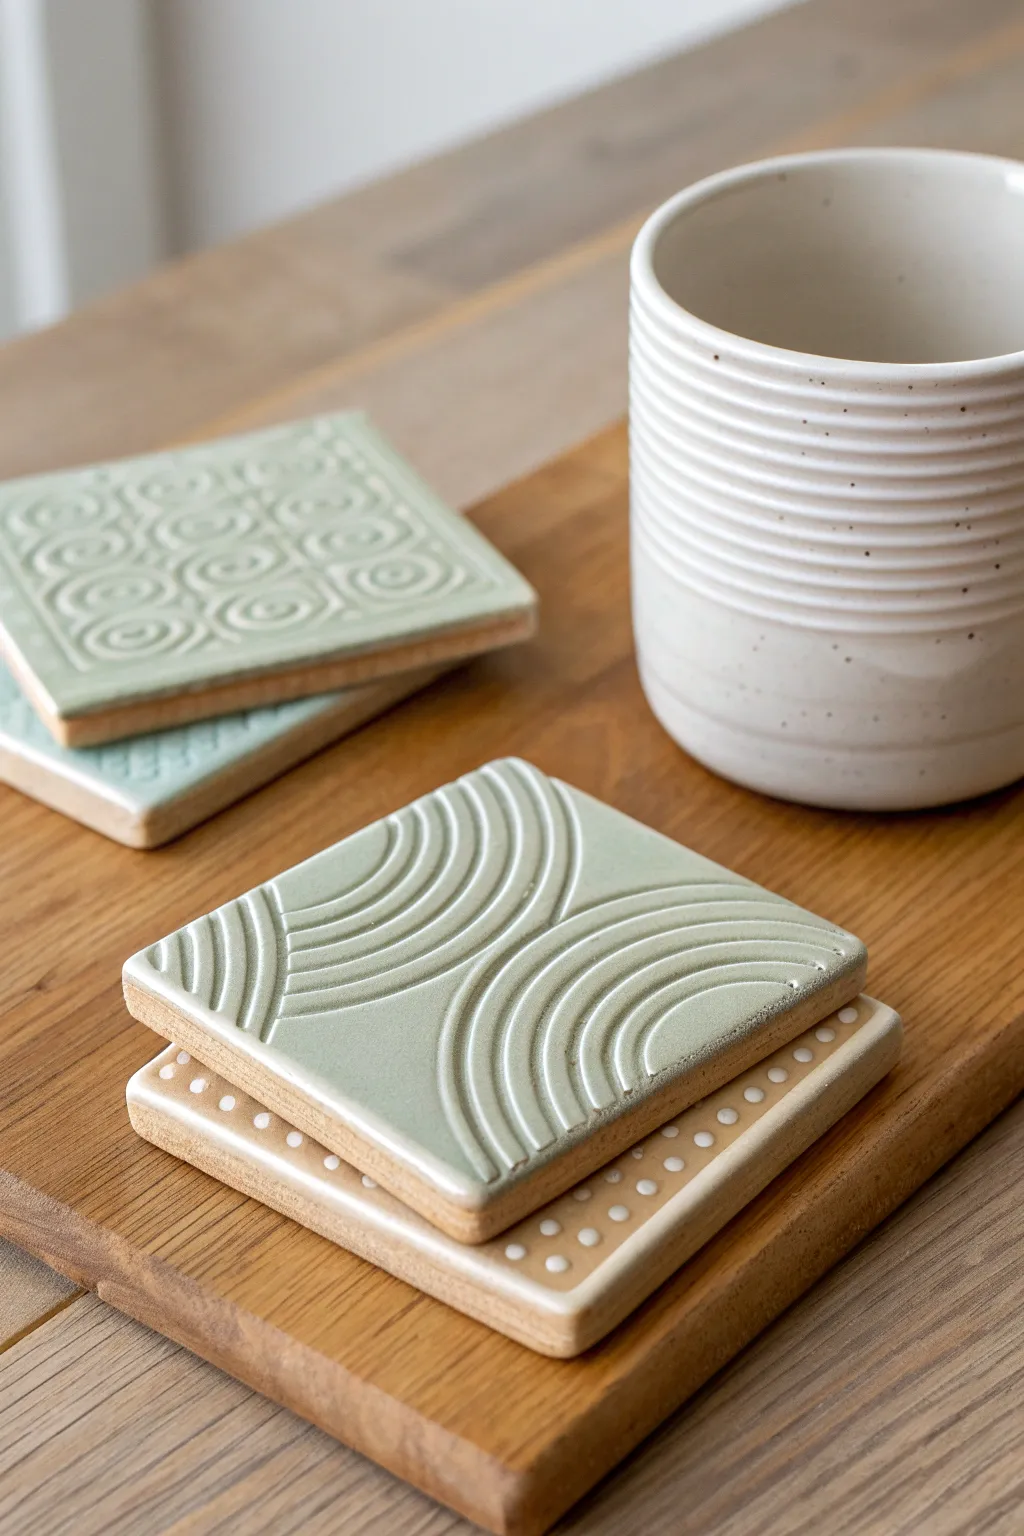
These charming ceramic coasters blend tactile carved textures with soft, earthy glazes for a functional piece of art. The project focuses on creating relief patterns—like mesmerizing arches and playful dots—that feel wonderful under your favorite coffee mug.
Step-by-Step
Materials
- White stoneware or light-colored clay body
- Rolling pin
- Square cookie cutter (approx. 4 inches) or fettling knife and template
- Two 1/4 inch wooden texture slats/thickness guides
- Loop tool or carving tool (small U-shape)
- Small ball stylus or drill bit (for dot patterns)
- Clean sponge and water
- Sheet of canvas or heavy fabric
- Celadon or semi-transparent glaze (sage green suggested)
- Clear glaze (optional)
- Kiln
Step 1: Preparation & Shaping
-
Prepare the workspace:
Lay out your canvas on a sturdy table. Place the 1/4-inch thickness guides on either side of your working area to ensure your clay slab is perfectly even. -
Roll the slab:
Take a manageable chunk of clay and wedge it briefly to remove air bubbles. Roll it out between the guides until the rolling pin rests flat on the wood strips. -
Smooth the surface:
Before cutting, take a damp sponge or a rib tool and compress the clay surface. This removes the canvas texture and prevents warping later on. -
Cut the shapes:
Press your square cookie cutter firmly into the slab. Alternatively, place a 4×4 inch paper template on the clay and cut around it with a fettling knife. Make a few extras just in case. -
Soften the edges:
Once cut, run a damp finger or a barely wet sponge along the sharp 90-degree edges of each square to round them off slightly. This prevents chipping after firing. -
Leather hard stage:
Place the squares on a ware board and cover them loosely with plastic. Let them dry slowly until they reach a ‘leather hard’ state—firm enough to hold shape but soft enough to carve.
Warping Woes?
If coasters curl up at corners while drying, flip them over daily and dry them very slowly under plastic. Use a weighted board on top during the leather-hard stage to keep them flat.
Step 2: Carving & Decoration
-
Plan the arch design:
For the arched design shown in the foreground, lightly sketch two semi-circles on opposite sides of the tile using a needle tool or pencil. These will guide your deep carving. -
Carve the arches:
Using a U-shaped loop tool, carve grooves following your guide lines. Apply steady, moderate pressure to create deep channels. I find it helps to pull the tool towards your body for steadier lines. -
Create the concentric circles:
Continue carving parallel curved lines outward from your initial arches until the pattern fills the designated quadrants. Keep the spacing consistent. -
Dot pattern variation:
For the dotted coaster underneath, use a ball stylus or the back of a drill bit. Press gently to create uniform divots in a grid pattern. Don’t press all the way through; just create indentations. -
Clean up burrs:
Wait until the clay is bone dry. Then, gently brush away the little crumbs (burrs) created by the carving tools with a soft stiff brush or a dry scour pad. Don’t use water here, or you’ll wash away the sharp lines. -
Bisque fire:
Load your bone-dry coasters into the kiln and bisque fire them to your clay body’s recommended temperature (usually Cone 04).
Step 3: Glazing & Finishing
-
Wipe down:
After the bisque fire, wipe each coaster with a damp sponge to remove any kiln dust. This ensures the glaze adheres properly. -
Glaze application:
Select a celadon or semi-transparent glaze—like the sage green seen here—that ‘breaks’ over texture. This means it pools darker in the carved grooves and stays lighter on the high points, accentuating your design. -
Dip or brush:
Dip the coaster into the glaze for 3 seconds, or apply 2-3 even coats with a soft fan brush. Ensure the glaze gets into all the carved crevices. -
Dot pattern glazing:
For the dotted coaster, you can fill the divots with a white underglaze or slip before the first firing, then cover with a clear glaze now, or simply let the glaze pool in the dots. -
Clean the foot:
Wipe the bottom of the coaster completely clean of glaze with a sponge. Any glaze left on the bottom will fuse the coaster to your kiln shelf. -
Final fire:
Fire the glazed pieces to the maturity temperature of your clay and glaze (often Cone 5 or 6). Once cool, add small felt or cork pads to the bottom to protect your furniture.
Mishima Magic
Try ‘Mishima’ on the dots: Fill carved dots with colored slip, let dry, then scrape the surface flush. This leaves crisp colored dots embedded in the smooth clay surface.
Stack your new set on the coffee table and enjoy how the glaze highlights every hand-carved ridge
Leaf-Impressed Trays and Platters
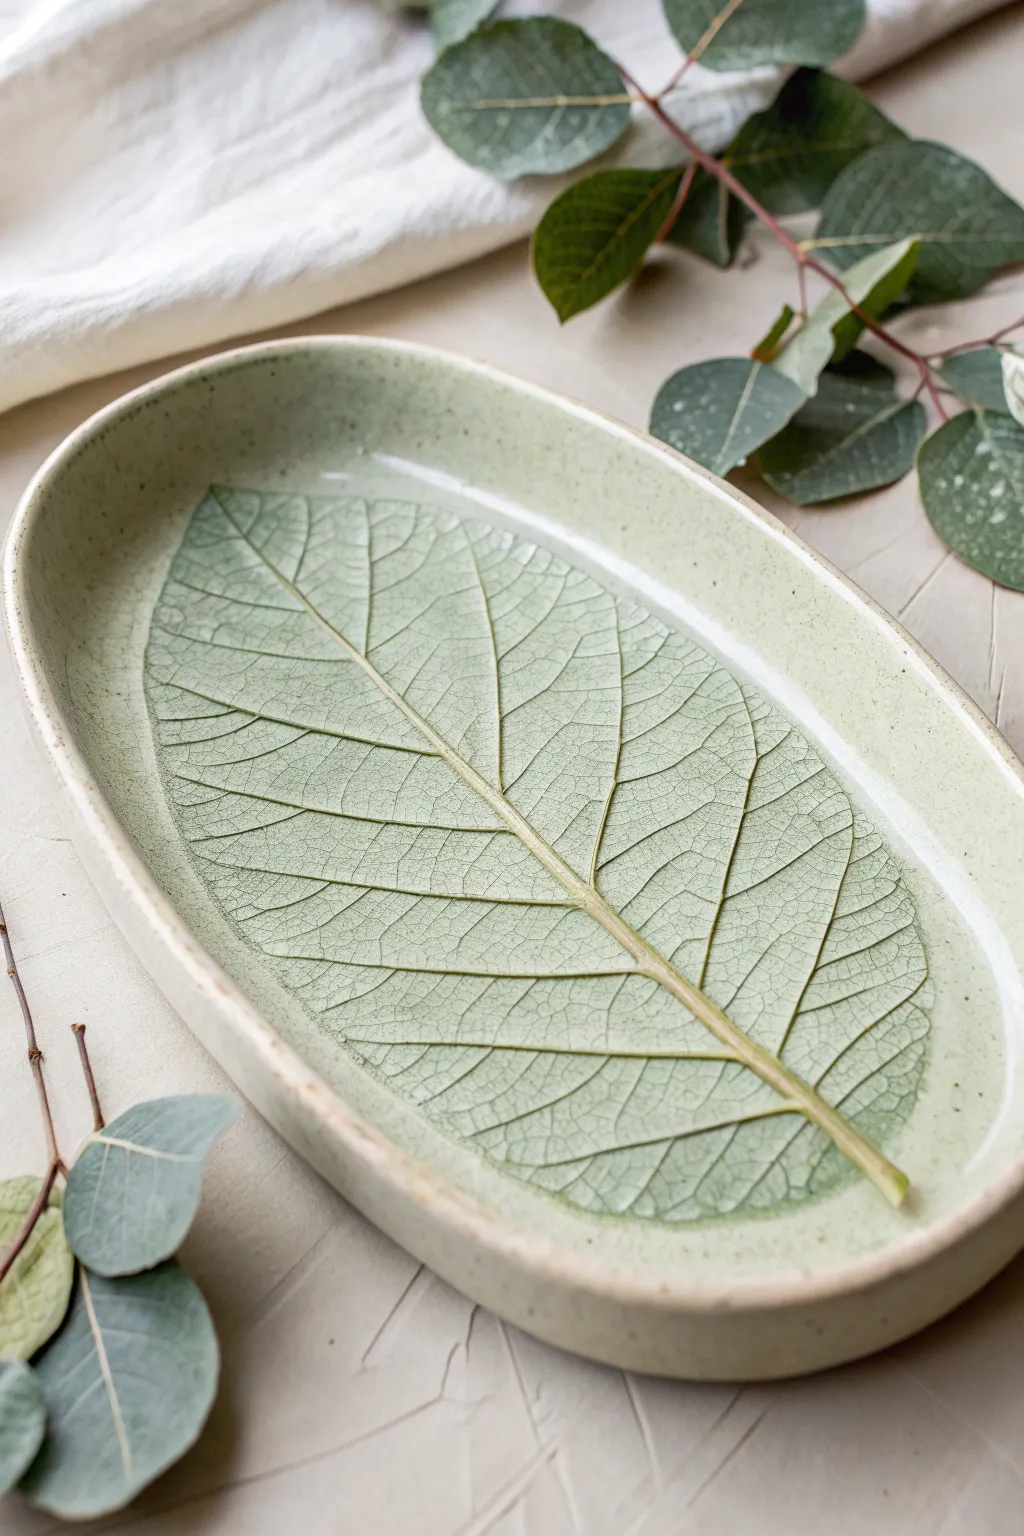
Capture the ephemeral beauty of nature in durable stoneware with this elegant, leaf-impressed tray project. By pressing a real leaf into soft clay, you’ll create a functional serving piece that highlights intricate vein patterns with a subtle, pooling celadon glaze.
How-To Guide
Materials
- Light-colored speckled stoneware clay (about 1.5 – 2 lbs)
- Large, fresh leaf with prominent veins (e.g., Hydrangea, Hosta, or Magnolia)
- Rolling pin
- Canvas mat or slab roller
- Needle tool or fettling knife
- Rib tool (soft silicone or rubber)
- Sponge
- GR Pottery Form (oval) or a slump mold
- Cornstarch or powdered clay (as a release agent)
- Small weighted sandbag (optional)
- Pale green celadon glaze (translucent)
- Clear gloss glaze (optional)
Step 1: Preparing the Slab
-
Wedge the clay:
Begin by thoroughly wedging your stoneware clay to remove any air pockets and ensure a consistent texture, which is crucial for preventing warping later. -
Roll the slab:
Roll out a slab of clay to an even thickness of approximately 1/4 inch. If you are using a rolling pin, use guide sticks on either side to keep the thickness uniform. -
Compress the surface:
Using a soft rib tool, gently compress the clay surface in multiple directions. This aligns the clay particles and creates a smooth canvas for your leaf impression. -
Select and prep the leaf:
Turn your fresh leaf over so the vein side is facing up. The back of the leaf always has the most dramatic texture. Inspect it for any tears or bug holes you might want to avoid.
Pro Tip: Vein Definition
If the veins aren’t popping enough after removing the leaf, gently deepen the main stem line with a modeling tool while the clay is still wet to enhance the glaze pooling effect.
Step 2: Impression & Shaping
-
Position the leaf:
Place the leaf vein-side down onto the center of your clay slab. Think about the composition; I prefer creating a slight asymmetry, but a centered look is classic. -
Initial press:
Gently press the leaf down with your hand to tack it in place so it doesn’t shift during the main rolling. -
Roll in the texture:
Take your rolling pin and roll firmly over the leaf one single time. Do not roll back and forth, as this can cause a ‘ghost’ image. You want to embed the leaf until it is flush with the clay surface. -
Cut the shape:
Using a needle tool, cut a clean oval shape around the leaf, leaving a generous margin of about 1 to 1.5 inches of negative space around the leaf edges. -
Smooth the edges:
Run a damp sponge or your finger along the cut rim to soften the sharp edge created by the needle tool. -
Remove the leaf:
Carefully find the stem of the leaf and peel it upwards to reveal the impression. Use a tweezer if the stem is slippery or hard to grasp. -
Prepare the mold:
Dust your oval slump mold or form lightly with cornstarch to prevent sticking. -
Form the tray:
Gently lift your clay slab and place it onto the mold. If using a slump mold, let gravity help it settle; if using a drape mold, smooth the sides down gently. -
Refine the curve:
Use a small sandbag or a soft sponge to gently press the center of the tray down if slumping, ensuring the curve is continuous and smooth.
Step 3: Finishing & Glazing
-
Dry slowly:
Loosely cover the piece with plastic and let it dry slowly to the leather-hard stage before removing it from the mold to avoid warping. -
Bisque fire:
Once bone dry, fire the piece to bisque temperature (usually cone 04) according to your clay body’s specifications. -
Clean the bisque:
Wipe the bisque-fired tray with a damp sponge to remove any kiln dust ensuring the glaze adheres properly. -
Apply glaze:
Pour or dip the tray in a translucent celadon glaze. This type of glaze is essential because it is transparent enough to show the clay specks but pools darker in the deep leaf veins. -
Wipe the rim (optional):
For a rustic touch, you can lightly wipe the glaze off the very edge of the rim with a sponge, exposing the raw, stony texture of the clay. -
Glaze fire:
Fire the piece to maturity (typically cone 5 or 6 for stoneware). Ensure the tray is well-supported on the kiln shelf.
Troubleshooting: Sticky Leaves
If the leaf tears when you try to peel it off the wet clay, use a tiny ball of sticky clay to dab and lift the stuck plant matter out of the impression without marring the texture.
Once cooled, your tray is ready to bring a permanent touch of the garden into your home.
Textured Rolling Pin Bowls
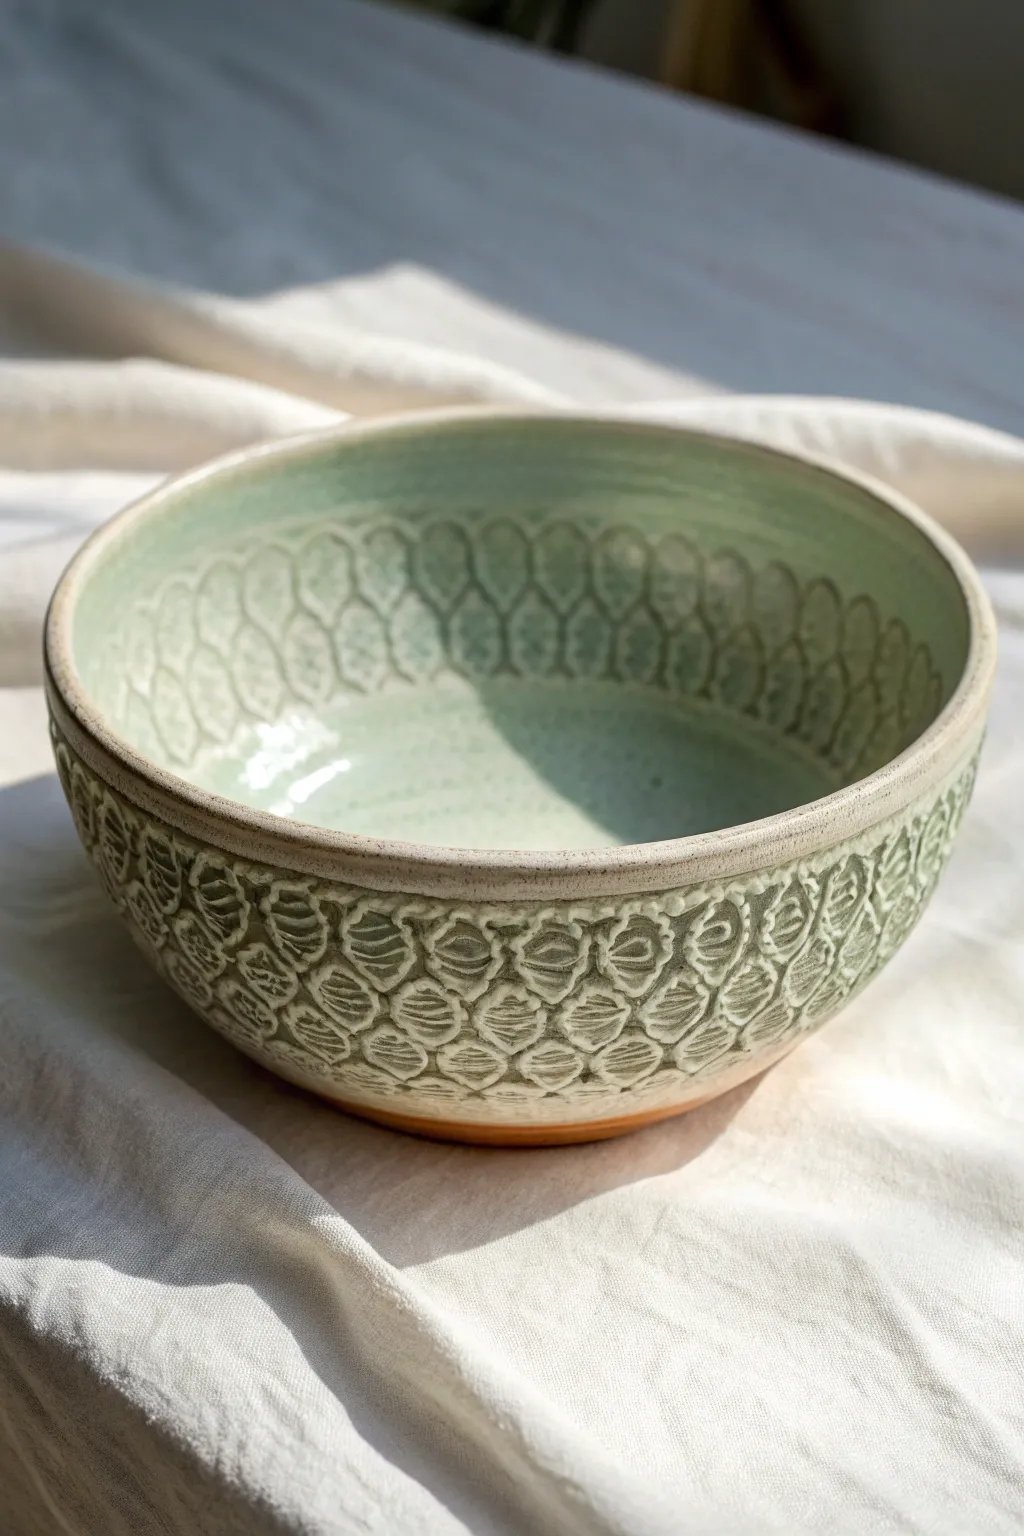
This stunning bowl features a deeply impressed scale-like pattern that wraps entirely around the exterior, highlighting the interplay between raw clay and celadon glaze. The texture creates beautiful pools of color, while the smooth interior ensures it remains functional for everyday use.
Step-by-Step Guide
Materials
- Mid-fire stoneware clay (buff or white)
- Textured rolling pin (scallop or fish scale pattern)
- Plain rolling pin
- Circle template or slump mold
- Fettling knife
- Scoring tool or serrated rib
- Slip
- Celadon glaze (light green/mint)
- Sponge
- Clear wax resist
- Kiln
Step 1: Slab Preparation
-
Roll out the primary slab:
Start by wedging your clay to remove air bubbles. Using your plain rolling pin, roll out a large slab of clay to a thickness of approximately 3/8 of an inch. Ensure the slab is wide enough to accommodate your bowl mold. -
Compress the clay:
Run a rubber rib tool over the surface of the clay in multiple directions. This compression aligns the clay particles, preventing warping during firing. -
Apply the texture:
Take your textured rolling pin featuring the scallop or scale pattern. With firm, even pressure, roll it across the slab in a single continuous motion. Do not stop or lift the roller, as this creates breaks in the pattern. -
Smooth the reverse side:
Carefully flip the slab over so the textured side is face down on a clean canvas or board. Lightly rib the back side smooth again, as the texturing process often distorts the flatness of the slab.
Depth Control
If the texture is too shallow, the glaze won’t pool effectively. If you’re pressing manually instead of using a roller, lean in with your body weight for a deep impression.
Step 2: Forming the Bowl
-
Cut the clay circle:
Place your circle template over the slab or use the rim of your slump mold as a guide. Using a fettling knife held vertically, cut a clean circle out of the clay. -
Drape into the mold:
Lift the clay circle and gently lower it into your slump mold, ensuring the textured side faces outward (against the mold surface) if using a press mold, or upward if using a drape mold. For this specific look, the texture is on the outside, so if you are using a bowl mold, lay the slab *inside* the bowl with the texture facing the mold wall. -
Secure the shape:
Gently press the clay into the curve of the mold. Use a small sponge or a soft rib to smooth the interior surface, careful not to press so hard that you flatten the texture on the exterior. -
Refine the rim:
The rim is a focal point on this piece. Use a damp sponge to round off the lip, compressing the edge. I like to run a finger along the rim to ensure it feels pleasant to the touch. -
Dry to leather hard:
Set the mold aside and let the clay stiffen to a leather-hard state. This usually takes a few hours or overnight depending on humidity. Once firm, remove the bowl from the mold. -
Clean up the foot:
Flip the bowl over. If needed, trim a slight foot ring or simply compress the bottom curve to ensure it sits flat on a table without rocking.
Step 3: Bisc & Glaze
-
Bisque fire:
Allow the bowl to dry completely until bone dry. Load it into the kiln and bisque fire to cone 04. -
Wax the rim and foot:
To achieve the raw clay accent seen in the image, apply a steady band of wax resist to the rim of the bowl and the bottom foot ring. Let the wax dry. -
Prepare the glaze:
Stir your celadon glaze thoroughly. Celadon is translucent, which is essential for showing off the texture. -
Dip the interior:
Pour glaze into the interior of the bowl, swirl it quickly to coat the entire inner surface, and pour the excess out. Wipe any drips off the exterior. -
Dip the exterior:
Holding the bowl by the foot (or using tongs), dip the exterior into the glaze bucket. The glaze should pool slightly in the deep impressions of the texture. -
Clean up:
Once the glaze is dry to the touch, use a damp sponge to wipe any glaze droplets off the waxed rim and foot. The wax recedes the glaze, but cleaning ensures a crisp line. -
Glaze fire:
Load the kiln for the final glaze firing, typically cone 5 or 6 for stoneware. Ensure no glazed parts touch the kiln shelf.
Make It a Set
Create a nesting set by using three different sizes of slump molds. Keep the green glaze consistent but try varying the rim wax line thickness for subtle variety.
Unload your kiln and enjoy the way the light catches those beautiful green pools of celadon glaze
Ring Cones and Jewelry Catch-Alls
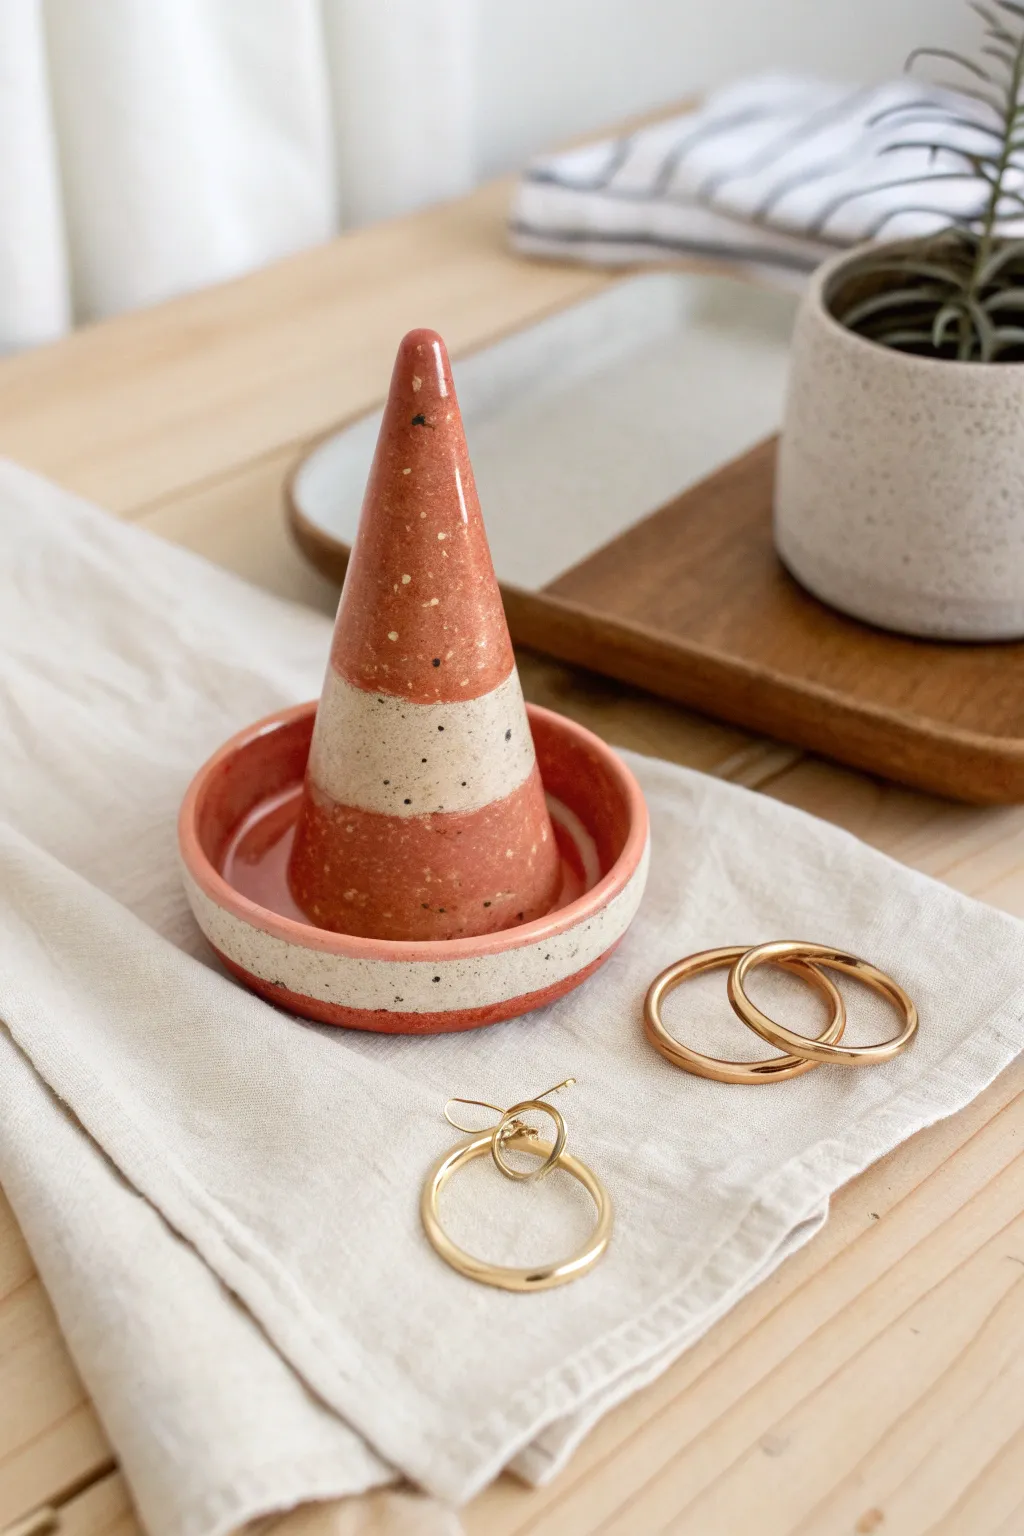
Keep your favorite rings and studs organized with this stylish two-in-one ceramic piece. Featuring a warm terracotta-toned clay body with a crisp cream stripe, this project combines a classic ring cone with a functional catch-all base.
Step-by-Step Tutorial
Materials
- Speckled clay body (Stoneware or earthenware)
- Needle tool
- Rolling pin
- Canvas working mat
- Fettling knife
- Rib tool
- Scoring tool (or serrated kidney)
- Slip
- Sponge
- Small bowl mold (approx. 3-4 inch diameter)
- Painter’s tape or wax resist
- Glaze: Glossy clear
- Glaze/Underglaze: Warm rusty-red
- Glaze/Underglaze: Creamy off-white
Step 1: Forming the Ring Cone
-
Roll a Coil:
Begin with a small ball of speckled clay, about the size of a golf ball. Roll it back and forth on your canvas to create a thick, short coil. -
Shape the Cone:
Stand the coil up on its end. Using your fingers, gently pinch and smooth the clay upward, tapering it into a point at the top while keeping the base wide and flat. -
Refine the Surface:
Roll the cone on the table surface very lightly to smooth out finger marks. Use a rib tool to straighten the sides so you have a clean geometric cone shape, roughly 3 inches tall. -
Hollow the Base:
To prevent explosions in the kiln, use a small loop tool or your thumb to create a hollow indentation in the bottom of the cone. It doesn’t need to be deep, just enough to remove excess mass.
Step 2: Creating the Catch-All Dish
-
Roll a Slab:
Roll out a fresh slab of clay to approximately 1/4 inch thickness. Make sure the thickness is consistent for even drying. -
Cut the Base:
Place your small bowl mold upside down on the slab and trace around it with a needle tool to cut a perfect circle. -
Form the Rim:
Cut a long strip from the remaining slab, about 3/4 inch wide. This will become the upright wall of your catch-all. -
Attach the Wall:
Score and slip the outer edge of your circular base. Do the same to one long edge of your strip. Join them together, wrapping the strip around the circle to create a shallow dish. -
Smooth the Seams:
Where the strip ends meet, cut them at an angle for a cleaner join. Score, slip, and smooth the vertical seam and the interior bottom seam so they disappear completely.
Clean Lines Pro-Tip
For crisp stripes, I prefer wax resist over tape. Paint wax where you want the raw clay or second color, let dry, then dip or paint your main color effortlessly.
Step 3: Assembly and Bisque
-
Find the Center:
Mark the exact center of your catch-all dish lightly with your needle tool. -
Join Components:
Score the bottom of your ring cone and the center spot of the dish aggressively. Apply slip and press the cone firmly into place. -
Clean Up:
Use a damp sponge or a small brush to wipe away any excess slip that squeezed out from under the cone base. Smooth everything one last time. -
Bisque Fire:
Once bone dry, fire the piece to bisque temperature (usually cone 04 or 06, depending on your clay body).
Level Up: Texture
Before glazing, leave the cream stripe area as raw, unglazed speckled clay for a beautiful matte textural contrast against the glossy red sections.
Step 4: Glazing the Stripes
-
Tape the Pattern:
Apply a strip of painter’s tape horizontally around the middle of the cone. This will mask off the area for the cream glaze later. -
Apply Red Glaze:
Brush the rusty-red glaze onto the tip of the cone (above the tape), the base of the cone (below the tape), and the entire interior rim of the dish. -
Glaze the Exterior:
Apply the red glaze to the very bottom edge of the exterior rim, creating a thin red stripe at the base. -
Reveal and Fill:
Once the red glaze is dry to the touch, peel off the tape. Carefully brush the cream/white glaze into the empty band you just revealed on the cone, and along the exterior side of the dish. -
Clear Coat:
If using underglazes, apply a clear gloss glaze over the entire piece. If using colored glazes, skip this step unless they require a clear cap. -
Final Fire:
Glaze fire the piece according to your clay and glaze specifications (usually Cone 5 or 6 for stoneware).
Now you have a stunning, modern organizational piece ready for your bedside table
Hanging Wall Tiles With Cutouts
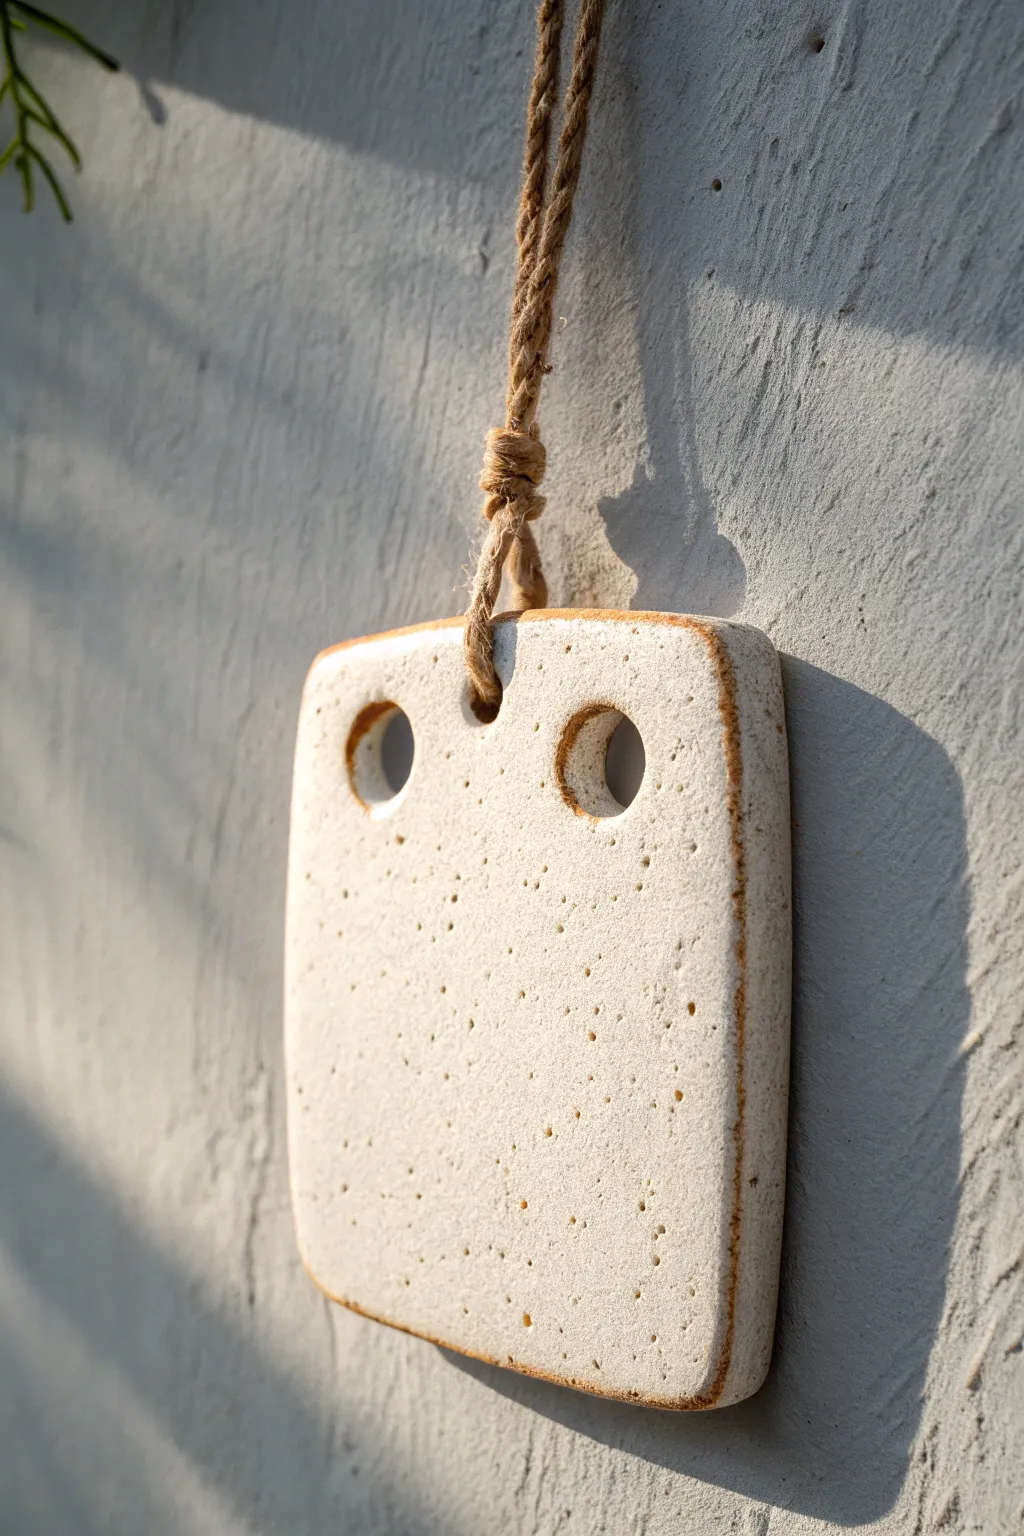
This project embraces the beauty of simplicity with a hanging ceramic tile featuring clean lines and a charming speckled finish. The aesthetic relies on the interplay between the raw, toasted clay edges and the smooth, creamy white glaze.
How-To Guide
Materials
- Speckled buff stoneware clay
- Rolling pin
- Canvas mat or slab roller
- Rectangular template (cardstock or plastic)
- Fettling knife or needle tool
- Circular clay cutters (approx. 1 inch and 0.25 inch)
- Smooth ribs (rubber and wood)
- Sponge
- Satin matte white glaze
- Jute twine or hemp cord
- Kiln
Step 1: Slab Construction
-
Prepare the slab:
Begin by rolling out a medium-sized slab of speckled buff stoneware clay. Aim for a consistent thickness of about 3/8 of an inch, which provides enough durability for a hanging piece without being too heavy. -
Smooth the surface:
Use a soft rubber rib to compress the clay on both sides. This is crucial for removing canvas textures and aligning the clay particles to prevent warping during drying. -
Cut the rectangle:
Place your rectangular template onto the smooth slab. Using a needle tool or fettling knife, cut straight down around the template to create your base shape. I find holding the blade perpendicular to the table gives the cleanest edge. -
Round the corners:
Gently tap the sharp corners of your rectangle with your finger or a wooded tool to soften them into rounded curves, giving the piece a friendlier, more organic silhouette. -
Create decorative cutouts:
Using a 1-inch circular cutter, punch two holes near the top corners of the tile. Position them symmetrically to create the ‘eyes’ of the design. -
Add the suspension hole:
With a smaller hole punch tool (about 1/4 inch), create a single hole centered perfectly between the two larger cutouts. This will be the anchor point for your twine. -
Refine the edges:
Once the clay has stiffened slightly to a leather-hard state, run a damp sponge along all cut edges and inside the holes to remove any sharp burrs or crumbs. -
Slow drying:
Place the tile on a piece of drywall or between boards to dry slowly and evenly. Flip it occasionally to ensure it remains perfectly flat. -
Bisque fire:
Once bone dry, load the tile into the kiln essential for a bisque firing to cone 04 (or your clay body’s recommendation).
Step 2: Glazing & Finishing
-
Clean the bisque:
Wipe the fired tile with a clean, damp sponge to remove any kiln dust that might resist the glaze application. -
Wax or mask edges (Optional):
If you want a very crisp exposed clay edge, you can carefully brush wax resist along the thin rim of the tile. Otherwise, you can simply wipe it back later. -
Apply the glaze:
Dip the tile into a satin matte white glaze. A satin finish works beautifully here as it feels soft to the touch and doesn’t reflect too much glare. -
Wipe the rim:
Before the glaze dries completely, take a damp sponge and firmly wipe the glaze off the very edge (the rim) of the tile. This reveals the raw clay body, creating that lovely toasted frame effect visible in the photo. -
Clean the holes:
Ensure no glaze is clogging the three holes. Use a small twist drill bit or a fettling knife to clear any drips inside the cutouts. -
Glaze fire:
Fire the piece to maturity (likely Cone 5 or 6 for stoneware). The heat will interact with the iron speckles in the clay, causing them to bleed through the white glaze. -
Attach the twine:
Cut a length of thick jute twine. Fold it in half to create a loop. -
Create the knot:
Feed the folded loop end through the small center hole from back to front. -
Secure the hanging mechanism:
Pull the loop through enough to pass the loose ends of the twine through it (a lark’s head knot), or simply tie a sturdy overhand knot right at the hole to secure it. -
Final trim:
Tie a knot at the top of the twine at your desired hanging length and trim any excess fraying for a tidy look.
Iron Spot Magic
The speckles come from the clay, not the glaze! Use a clay body labeled ‘Speckled Buff’ or ‘Reduction Speckle’ to get those lovely dots showing through a semi-opaque white glaze.
Go Geometric
Instead of round cutouts, try square or triangular punches for a modernist vibe. You can also layer a second, smaller slab shape on top for a low-relief 3D effect.
Hang your new ceramic tile in a spot that catches the afternoon sun to highlight the beautiful texture
Lidded Keepsake Boxes That Actually Fit
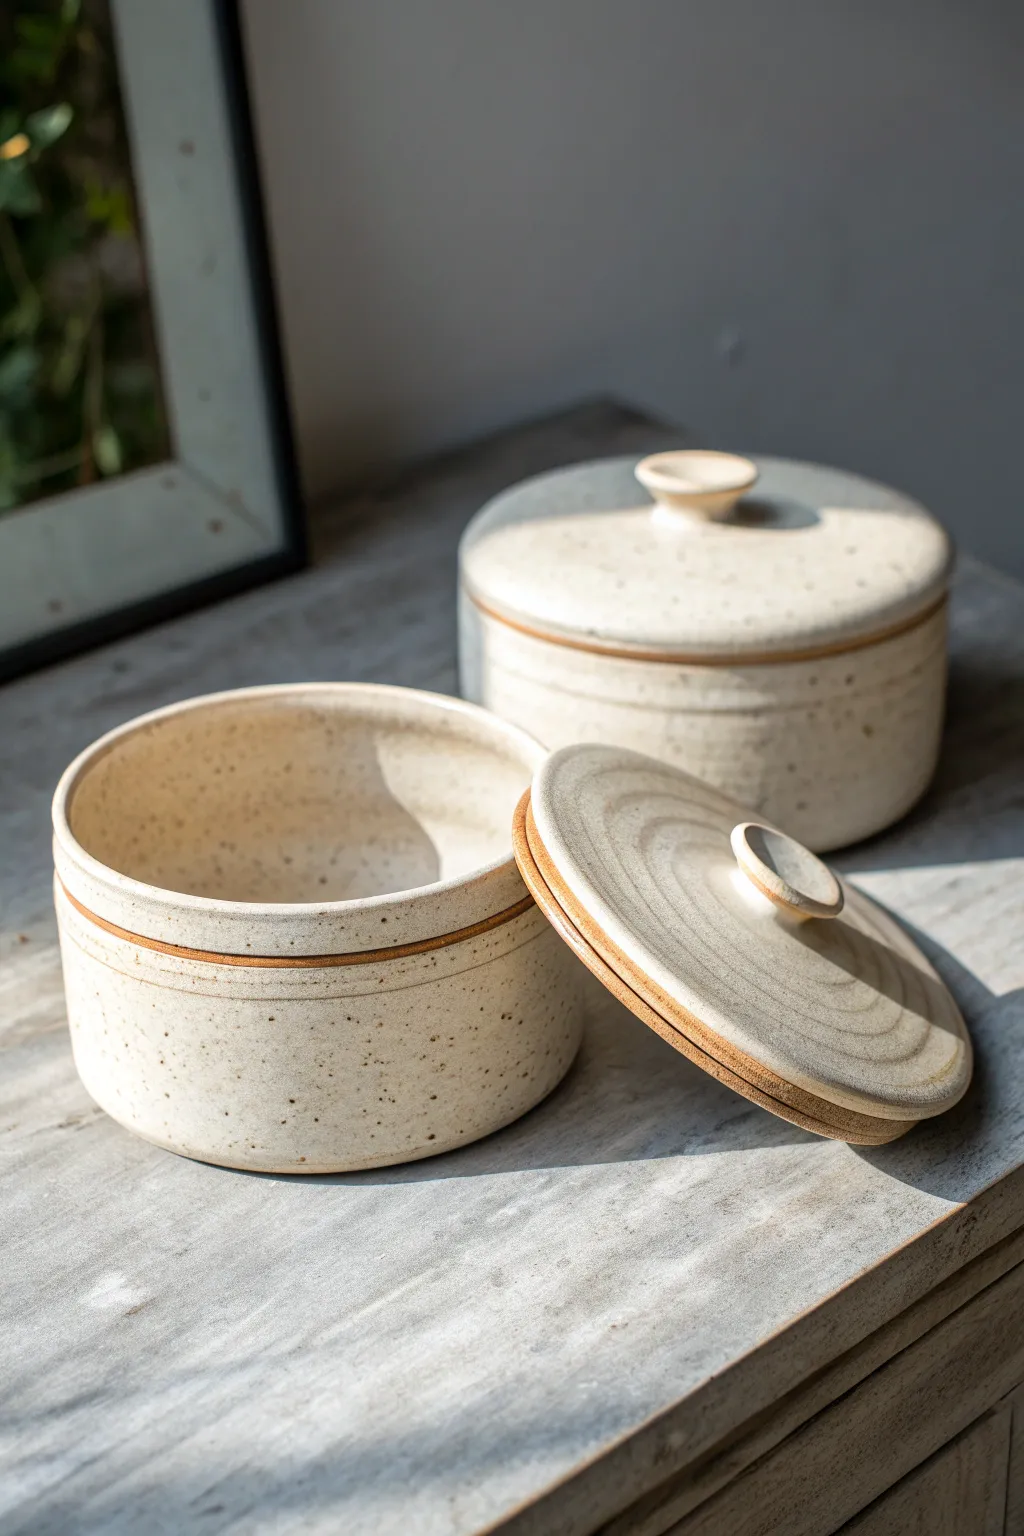
Learn to throw a charming set of speckled stoneware jars perfect for storing small treasures or dry goods. This project features a clean cylindrical form with a precise gallery rim and a snugly fitting lid topped with a classic knob.
Step-by-Step Guide
Materials
- Speckled Stoneware Clay (2-3 lbs)
- Pottery Wheel
- Throwing Sponge
- Pin Tool
- Rib Tool (wood or metal)
- Caliper tool
- Loop Trimming Tools
- Wire Clay Cutter
- Clear Matte or Gloss Glaze
- Wax Resist
Step 1: Throwing the Body
-
Center and open:
Begin with about 1.5 lbs of wedged speckled clay. Center it firmly on the wheel head and open the clay to create a flat, wide floor, compressing the bottom well to prevent S-cracks later. -
Pull the walls:
Pull the walls straight up into a cylinder. Aim for a height of about 3 to 4 inches, keeping the walls even in thickness from bottom to top. -
Shape the cylinder:
Use a rib on the outside against your hand on the inside to refine the cylinder profile, removing throwing lines if you prefer a smoother look, though leaving subtle rings adds character. -
Create the gallery:
At the rim, use the side of your finger or a specialized stick tool to split the rim slightly. Push the inner half down about a quarter-inch to create a ‘gallery’ or shelf where the lid will sit. -
Clean and measure:
Use a sponge to clean up the gallery ledge, ensuring it is a sharp 90-degree angle. Before removing the pot, use calipers to measure the exact inner diameter of the gallery rim—you’ll need this measurement for the lid. -
Cut off:
Wire the pot off the wheel and set it aside to stiffen to leather hard.
Shrinkage Rates
Clay shrinks as it dries. Measure your lid just a hair (~1-2mm) wider than the gallery. You can always sand it down later, but you can’t add clay back if it’s too loose.
Step 2: Throwing the Lid
-
Throw off the hump:
For small lids, I like to throw off the hump using a larger mound of clay. Center just the top portion of the mound. -
Form the lid disk:
Flatten the centered top portion into a thick disk. Use your calipers to check the width frequently; the outer edge of this disk needs to match the inner diameter of your jar’s gallery. -
Refine the fit:
Once the diameter is correct, compress the disk and ensure the underside (which will be the top visible side) has a slight curve or remains flat depending on your preference. -
Form the knob:
While the lid is still attached to the hump, gather a small nub of clay in the center to form the knob handle. Shape it into a small mushroom or button profile. -
Undercut and separate:
Use your needle tool to undercut the lid deeply, creating the flange that will drop into the jar. Use a wire to slice it off the hump carefully.
Step 3: Trimming and Finishing
-
Check the fit:
Once both pieces are leather hard, test the fit gently. If the lid is too tight, now is the time to carefully shave off a hair of clay from the lid’s edge. -
Trim the jar bottom:
Center the jar upside down on the wheel (using a chuck or foam bat if necessary). Trim the bottom to create a clear foot ring, defining the base and reducing excess weight. -
Trim the lid:
Flip the lid upside down, centering it on the knob (using a small chuck) or resting it on the rim of the leather-hard pot if sturdy enough. Trim the underside to remove excess weight and refine the curve. -
Sponge smooth:
Wipe down all sharp edges with a damp sponge to smooth the surface texture, exposing some of the speckles in the clay body. -
Bisque fire:
Allow the greenware to dry slowly and completely before loading it into the kiln for a bisque firing.
Textural Interest
While throwing the lid, use a metal rib to press a spiral pattern into the clay surface starting from the knob. The glaze will pool in these ridges for a ripple effect.
Step 4: Glazing
-
Wax resist application:
Apply wax resist carefully to the gallery shelf of the jar and the contact edge of the lid. This prevents the lid from fusing to the jar during firing. -
Apply glaze:
Dip or brush a clear or semi-opaque white glaze over the entire piece. The wax will repel the glaze on the contact points, leaving that lovely raw clay contrast line seen in the photo. -
Wipe back:
Use a damp sponge to wipe any stray glaze droplets off the waxed areas to ensure a clean separation. -
Final fire:
Load the pieces into the kiln for the final glaze firing according to your clay and glaze temperature guidelines.
Enjoy using your perfectly fitted ceramic box to hold jewelry, salt, or special keepsakes.
Cutout Lanterns That Glow at Night
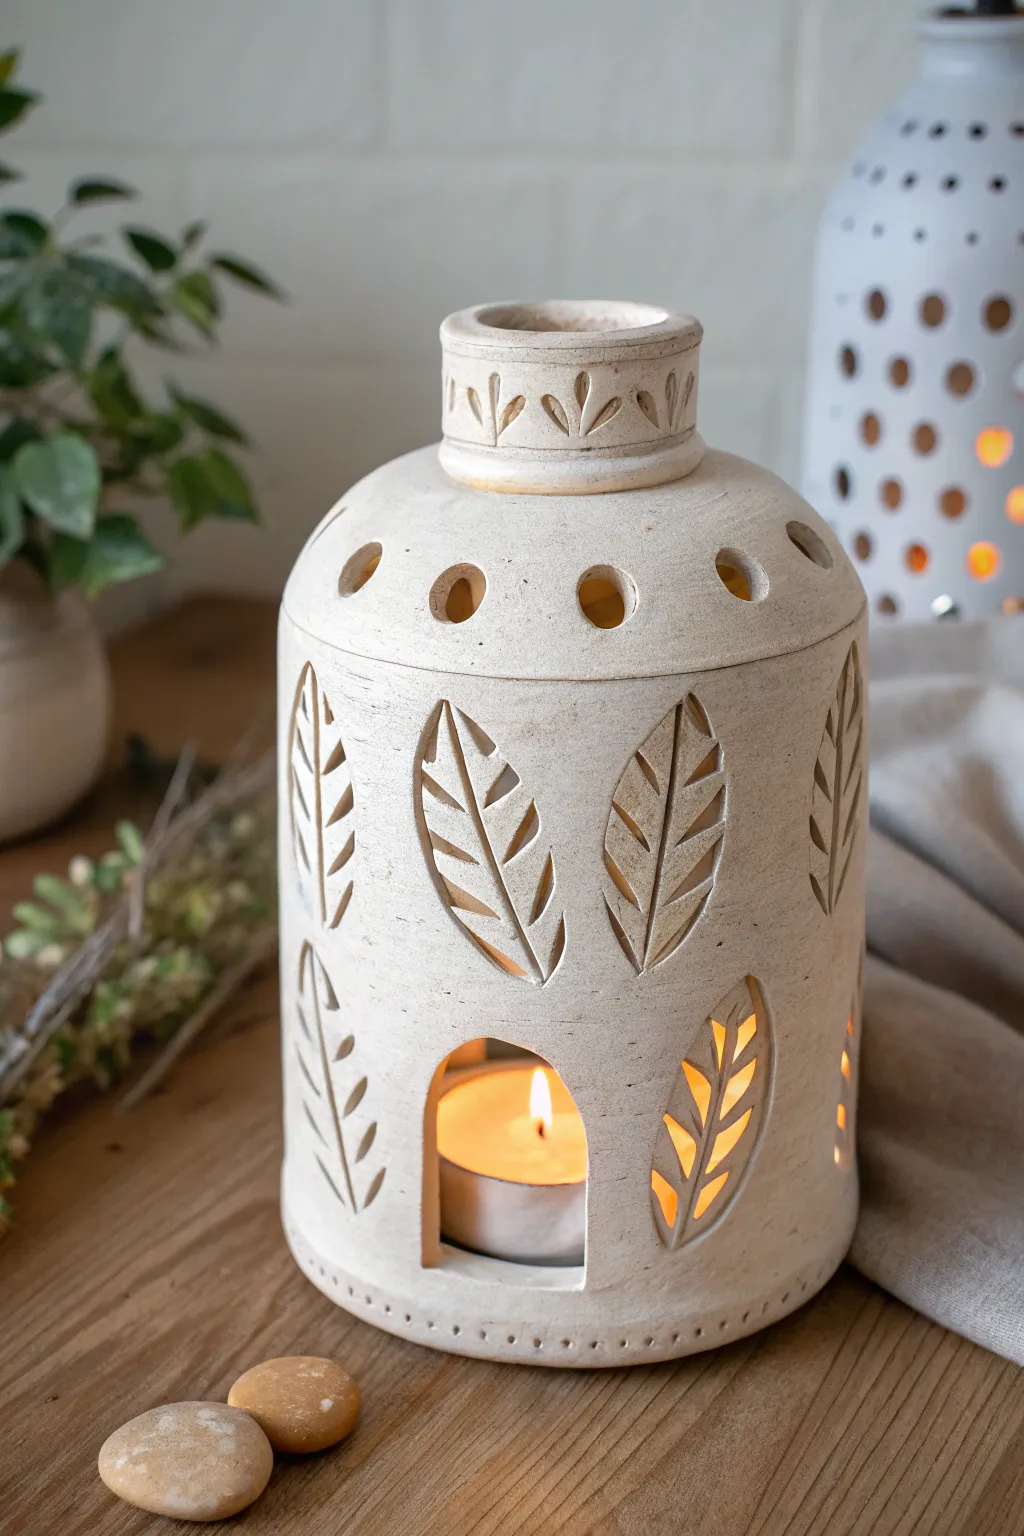
Bring a warm, earthy ambiance to your space with this hand-built ceramic lantern featuring delicate leaf cutouts. The natural clay texture combined with the soft candlelight creates enchanting shadows perfect for cozy evenings.
How-To Guide
Materials
- Stoneware clay (groggy or speckled body recommended)
- Rolling pin and guide sticks (about 6mm thickness)
- Clay slab roller (optional)
- Needle tool
- Fettling knife
- Leaf-shaped cookie cutters or paper templates
- X-acto knife or small scalpel
- Small hole punch tool (approx. 1cm)
- Scoring tool or serrated rib
- Slip (clay and water slurry)
- Small sponge
- Paintbrush for smoothing
- Glaze (matte white or cream, optional)
Step 1: Building the Cylinder Base
-
Prepare the Clay Slab:
Begin by rolling out a consistent slab of stoneware clay. Aim for a thickness of about 6mm (1/4 inch). Using guide sticks helps keep the thickness uniform, which is crucial for even drying. -
Cut the Rectangle:
Measure and cut a large rectangle. For a lantern similar to the photo, try dimensions around 30cm long by 16cm high. Save the excess clay for the top and base. -
Form the Cylinder:
Carefully lift your rectangle and curve it into a cylinder. Bevel the short edges at a 45-degree angle to create a stronger, cleaner seam where they overlap. -
Join the Seams:
Score the beveled edges aggressively and apply a generous amount of slip. Press the edges together firmly. I like to reinforce the inside with a tiny coil of clay blended smooth. -
Add the Top Dome:
Roll a slightly smaller slab for the top. Cut a circle slightly larger than your cylinder’s diameter. Gently curve it over a bowl or mold to create a slight dome shape, then attach it to the top of your cylinder using the slip-and-score method.
Step 2: Adding the Neck and Details
-
Create the Neck:
Roll a small strip of clay, about 2cm tall. Form this into a small ring and attach it to the center of your domed top. This mimics the neck of a bottle or jar. -
Smooth Everything Out:
Take a moment to refine the overall shape. Use a damp sponge or a soft rib tool to smooth the transition between the dome and the walls, and ensure the cylinder is perfectly round. -
Carve Neck Details:
Using a small carving tool or the tip of your needle tool, gently carve small leaf or petal motifs around the circumference of the neck ring. -
Punch Ventilation Holes:
Using your circular hole punch tool, punch a ring of holes around the shoulder of the lantern (where the wall meets the dome). These allow heat to escape and add a decorative element.
Slumping Walls?
If your cylinder starts to sag while working, the clay is too wet. Stuff the inside lightly with crumpled newspaper or foam to support the shape while it stiffens to leather-hard.
Step 3: Carving the Cutouts
-
Map Your Design:
Lightly trace your leaf patterns onto the leather-hard clay surface with a needle tool. Spacing them evenly creates a balanced look, alternating some leaves pointing up and others down. -
Cut the Leaf Shapes:
Using a sharp X-acto knife or scalpel, carefully cut out the main leaf outlines. Keep your blade perpendicular to the surface for clean walls. -
Add Leaf Veins:
For the specific look in the photo, don’t just cut an outline. Leave a thin strip of clay in the center of each leaf to act as the vein, cutting out the sections on either side of it. -
Create the Candle Door:
Near the base, cut a larger arched opening. This ‘mouse hole’ shape needs to be big enough to easily slide a tea light or small votive candle inside. -
Refine the Edges:
Once the clay stiffens a bit more, use a small, slightly damp paintbrush to smooth the sharp edges of your cutouts. This creates a professional, finished look. -
Add Base Texture:
Using the tip of a small tool, press a row of tiny dots around the very bottom rim of the lantern for a final detailed touch.
Crisp Cutouts
Wait until the clay is a firm leather-hard before cutting the leaves. If the clay is too soft, the knife will drag and distort the delicate vein details in the center of the leaves.
Step 4: Finishing and Firing
-
Slow Drying:
Cover the lantern loosely with plastic to dry very slowly. Because the walls have many cutouts, drying too fast can cause warping or cracking between the delicate leaf veins. -
Bisque Fire:
Once bone dry, fire the piece to bisque temperature (usually cone 04 or 06, depending on your clay). -
Glazing:
For the natural finish shown, apply a thin coat of matte white or cream glaze. Alternatively, leave the raw stoneware unglazed if the clay body is attractive, just wiping a sponge with white oxide over it for a whitewashed effect. -
Final Firing:
Fire to the maturity temperature of your clay body. If you left the bottom open, no stilts are needed, but ensure no glaze is on the foot.
Place a tea light inside your finished lantern and enjoy the dancing leaf shadows on your wall
Whimsical Pinch Pot Creatures
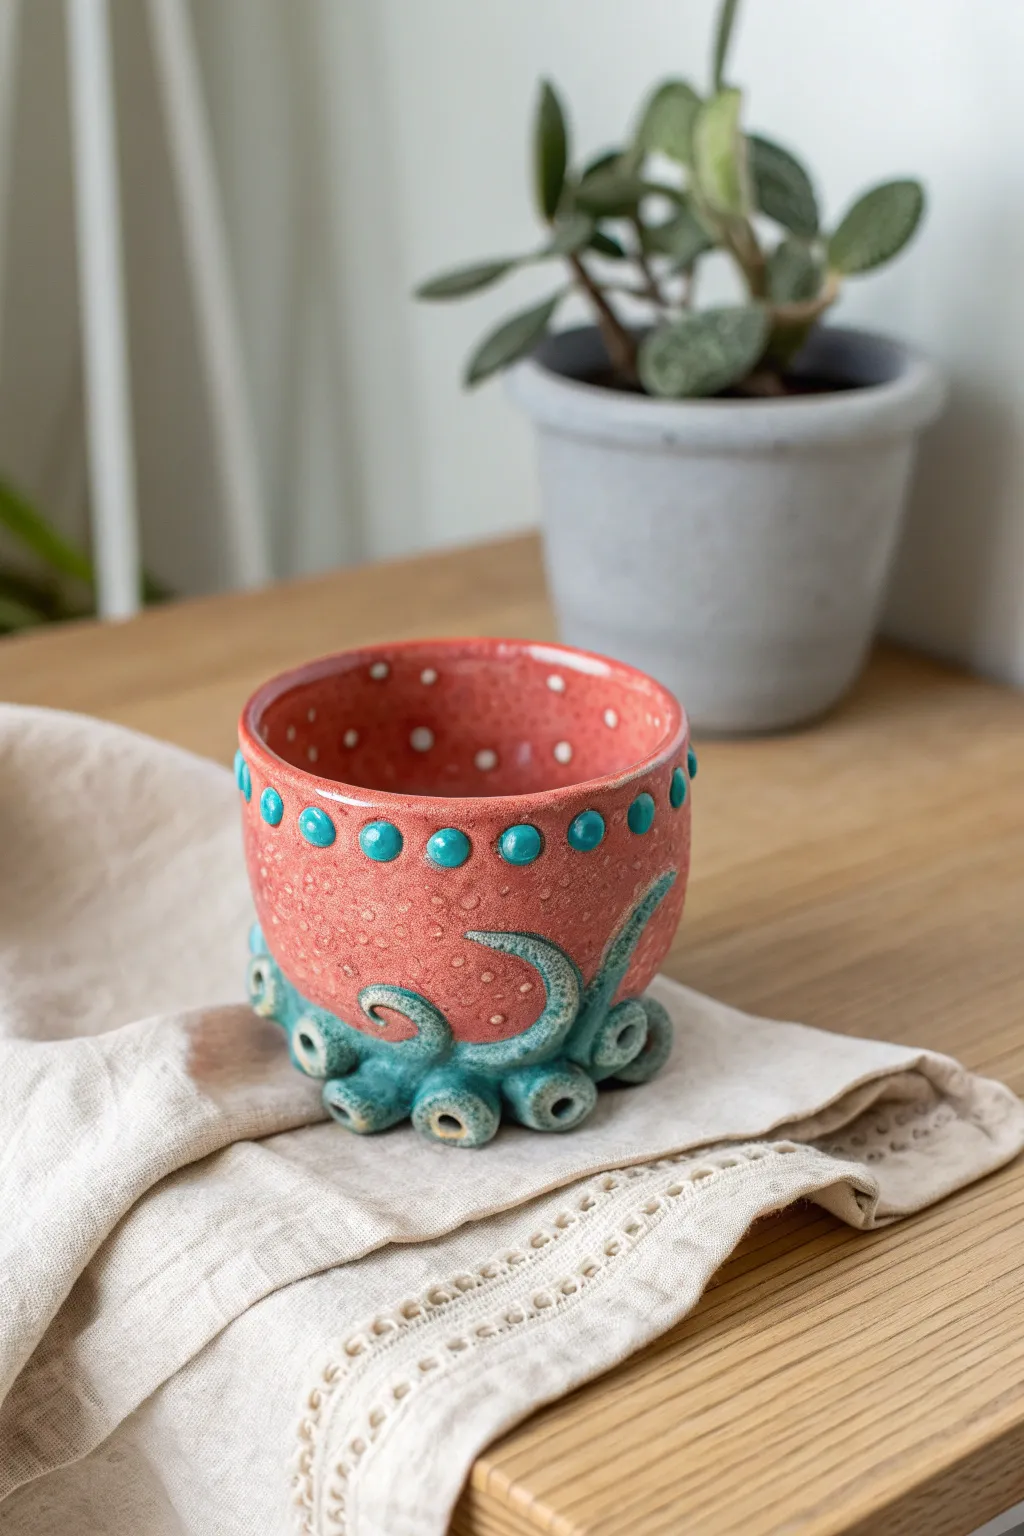
Transform a simple lump of clay into a delightfully strange vessel resembling an octopus or sea creature. This whimsical pinch pot features textured red glazing, distinct sucker impressions, and playful tentacle feet that add character to any small plant.
Detailed Instructions
Materials
- Stoneware or earthenware clay (white or light body recommended)
- Pottery tools (needle tool, rib tool, loop tool)
- Small sponge
- Slip (clay mixed with water)
- Scoring tool or old fork
- Underglazes: Red/Coral and Turquoise/Teal
- Clear transparent glaze
- Small paintbrush
- Kiln access
Step 1: Forming the Base
-
Roll a ball:
Start with a ball of clay roughly the size of a large orange. Pat it into a round, smooth sphere to ensure the clay particles are compressed. -
Open the hole:
Insert your thumb into the center of the ball, pushing down until you’re about a half-inch from the bottom. This establishes the interior depth. -
Pinch the walls:
Using your thumb on the inside and fingers on the outside, gently pinch and rotate the clay. Work from the bottom up to thin the walls evenly, aiming for about a quarter-inch thickness throughout. -
Smooth the lip:
Once the walls are risen, use a slightly damp sponge to smooth the rim of the pot. It should be level but can have a slightly rounded, organic feel. -
Shape the belly:
Gently push the walls outward from the inside to give the pot a rounded, bulbous shape, similar to an octopus’s head.
Sucker Punch
Instead of rolling tiny balls for suckers, use a small straw or piping tip to stamp circles directly into the wet clay coils for a faster, recessed texture.
Step 2: Sculpting the Tentacles
-
Create coils:
Roll out several small coils of clay, about the thickness of a pencil. Taper the ends slightly so they resemble tentacles. -
Attach the feet:
Score the bottom edge of your pot and the corresponding spots on your coils. Apply a dab of slip and press the coils onto the base, curling them upwards or outwards to create stabilizing feet. -
Blend the seams:
Use a small modeling tool or your finger to smooth the clay where the tentacles meet the pot body ensuring a strong bond that won’t crack during firing. -
Add suckers:
Roll tiny balls of clay and attach them along the tentacles using slip. Press the center of each ball with the back of a small paintbrush or stylus to create the hollow sucker look. -
Rim details:
Create uniform small balls of clay for the upper rim decoration. Score, slip, and attach them in a ring just below the lip of the pot. -
Flatten the rim dots:
Once attached, gently press each rim dot flat so they look like buttons or additional suckers.
Glow Up
Paint the interior suckers or rim dots with glow-in-the-dark acrylic paint after the final firing for a surprise bioluminescent effect at night.
Step 3: Decoration & Glazing
-
Bisque fire:
Allow the piece to dry slowly and completely (bone dry) before firing it in the kiln to bisque temperature (usually cone 04). -
Apply base color:
Sponge or brush a coral-red underglaze over the main body of the pot and the interior. You might want 2-3 coats for opacity. -
Glaze resist (optional):
If you want the dots to be super crisp, I find applying a tiny dab of wax resist over the red areas before painting the teal helps prevent smudging. -
Paint the accents:
Carefully paint the tentacle feet, suckers, and the rim dots with a turquoise or teal underglaze. Let the color flow slightly into the crevices of the suckers. -
Add white speckles:
For the interior texture seen in the photo, dip a toothbrush in white underglaze and gently flick it inside and onto the red exterior for a speckled, organic look. -
Clear coat:
Once the underglaze is dry, dip or brush the entire piece in a clear transparent glaze. -
Glaze fire:
Fire the piece a second time to the maturation temperature of your clay and glaze (often cone 5 or 6).
Pop a small succulent into your new cephalopod friend and watch it bring life to your shelf