A plain clay pot is basically a blank canvas that can look totally custom with just a few fun design choices. Here are my favorite clay pot design ideas I reach for when you want something cute, doable, and actually useful for your plants.
Solid Color With a Clean Matte Finish
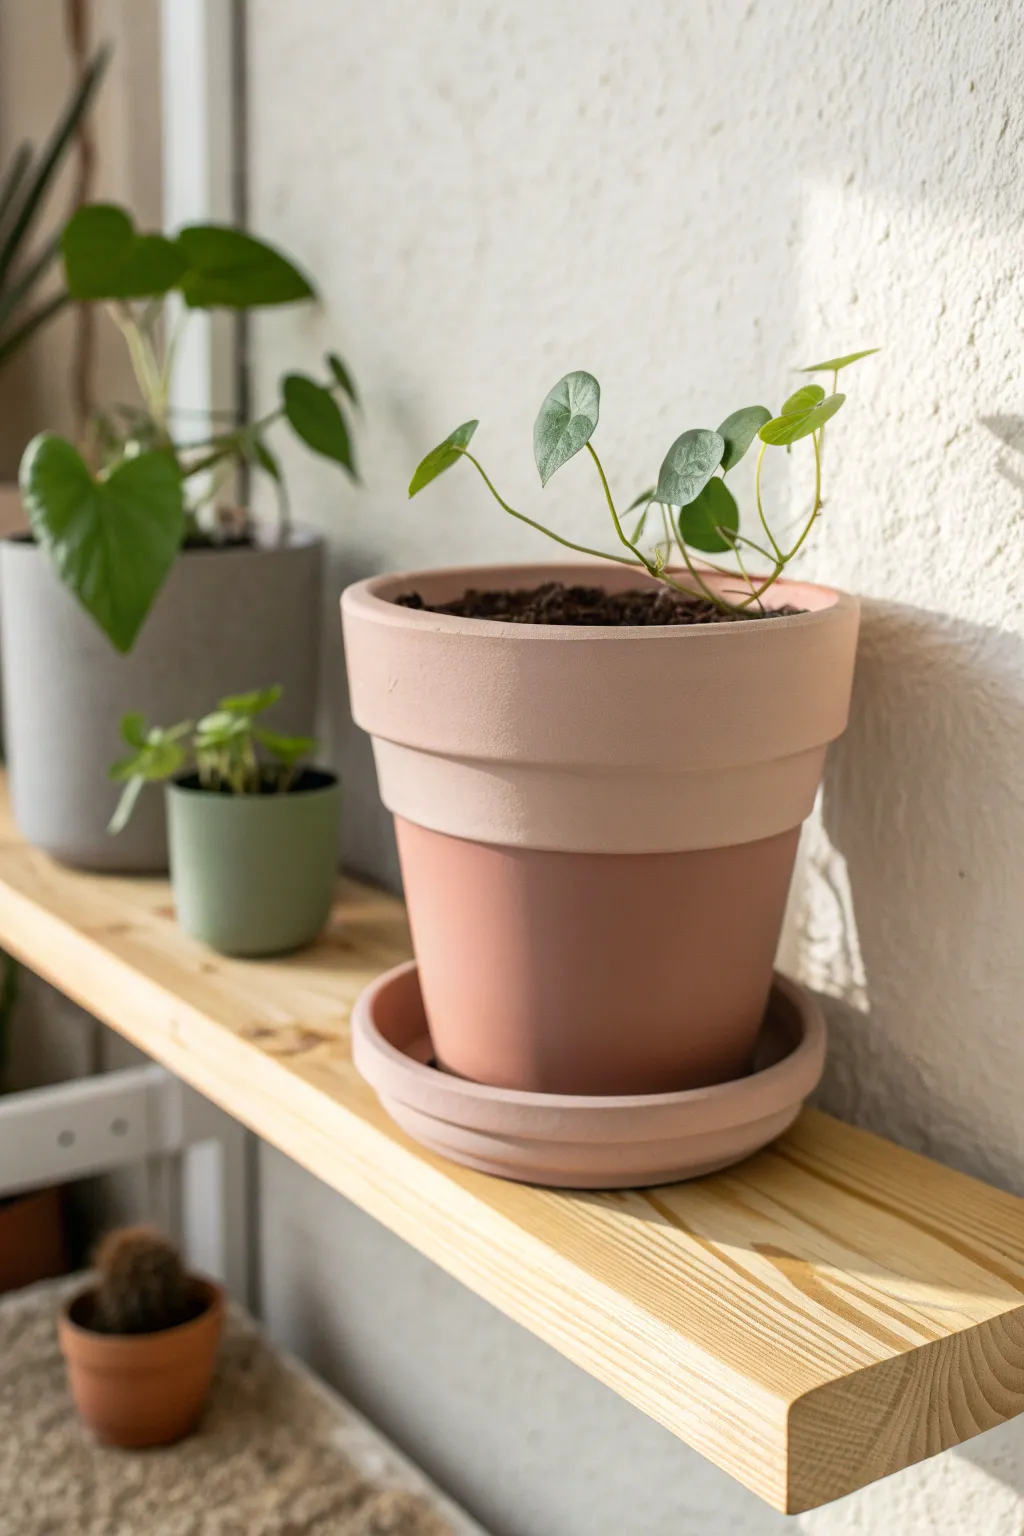
Elevate a standard garden staple into a chic, modern decor piece with this subtle two-tone design. By utilizing soft, earthy pinks and a flawless matte finish, you can create a vessel that feels both contemporary and timeless.
Step-by-Step Tutorial
Materials
- Standard terracotta pot (clean and dry)
- Matching terracotta saucer
- Adhesive remover or rubbing alcohol
- Fine-grit sandpaper (220-grit)
- Matte acrylic craft paint (Pale blush/beige)
- Matte acrylic craft paint (Terracotta/mauve)
- Painters tape (delicate surface)
- Wide flat paintbrush (synthetic)
- Small angled brush
- Matte clear sealant spray
Step 1: Prep Work
-
Clean surface:
Begin by removing any stickers or price tags from your pot. Use adhesive remover or a bit of rubbing alcohol on a cloth to ensure there is zero sticky residue left behind. -
Sand imperfections:
Lightly sand the entire exterior of the pot and saucer with fine-grit sandpaper completely smooth out the clay texture. -
Wipe down:
Using a damp lint-free cloth or tack cloth, wipe away every speck of sanding dust. This step is crucial for achieving that powdery, smooth finish. -
Dry completely:
Let the moisture from the wipe-down evaporate fully. Terracotta is porous and holds water, which can bubble your paint later if not perfectly dry.
Paint Tip
Mix baking soda into your acrylic paint (1 part baking soda to paint) for a textured, ultra-matte ceramic look that hides brushstrokes effortlessly.
Step 2: Painting the Base
-
Paint the rim:
Load your wide flat brush with the pale blush paint. Apply this color specifically to the wide upper band or rim of the pot. -
Extend inside:
Bring the pale blush color just over the top edge and about an inch down the inside of the pot so bare clay won’t show once filled with soil. -
Smooth strokes:
Work in long, horizontal strokes around the rim to minimize texture. Let this first coat dry for about 20 minutes. -
Second coat:
Apply a second coat of the pale blush to the rim to ensure opaque coverage. Let this dry completely—I usually give it at least an hour to be safe.
Step 3: Create the Color Block
-
Tape the line:
Once the rim paint is cured, carefully apply painter’s tape exactly beneath the rim’s ridge. Press the edge of the tape down firmly with your fingernail to prevent bleed-through. -
Paint the body:
Switch to your darker terracotta/mauve color. Paint the entire lower body of the pot below the taped line. -
Seal the tape:
Paint away from the tape edge initially to avoid forcing paint under it. Apply a thin, even layer. -
Paint the saucer:
While the pot body dries, paint your saucer with the same darker terracotta/mauve shade. Don’t forget the outer rim of the saucer. -
Second coats:
Apply a second coat to both the pot body and the saucer. You want rich, solid color here. -
Remove tape:
While the final coat on the pot is essentially dry but still slightly tacky, carefully peel back the painter’s tape at a 45-degree angle to reveal a crisp line.
Level Up
Before painting, use a waterproof sealant on the *inside* of the pot. This prevents moisture from seeping through the clay and bubbling your beautiful exterior paint.
Step 4: Finishing Touches
-
Inspect the line:
Check your color-block line for any tiny bleeds. Use a small angled brush and a tiny bit of the base color to touch up if necessary. -
Full cure:
Allow all paint to cure overnight. Acrylics dry to the touch quickly but take longer to fully harden on porous clay. -
Seal:
Take the pot and saucer outside or to a well-ventilated area. Spray them with a matte clear sealant. This protects the finish from water stains without adding unwanted shine.
Now your custom color-blocked planters are ready to house your favorite greenery


Classic Stripes in Two Colors
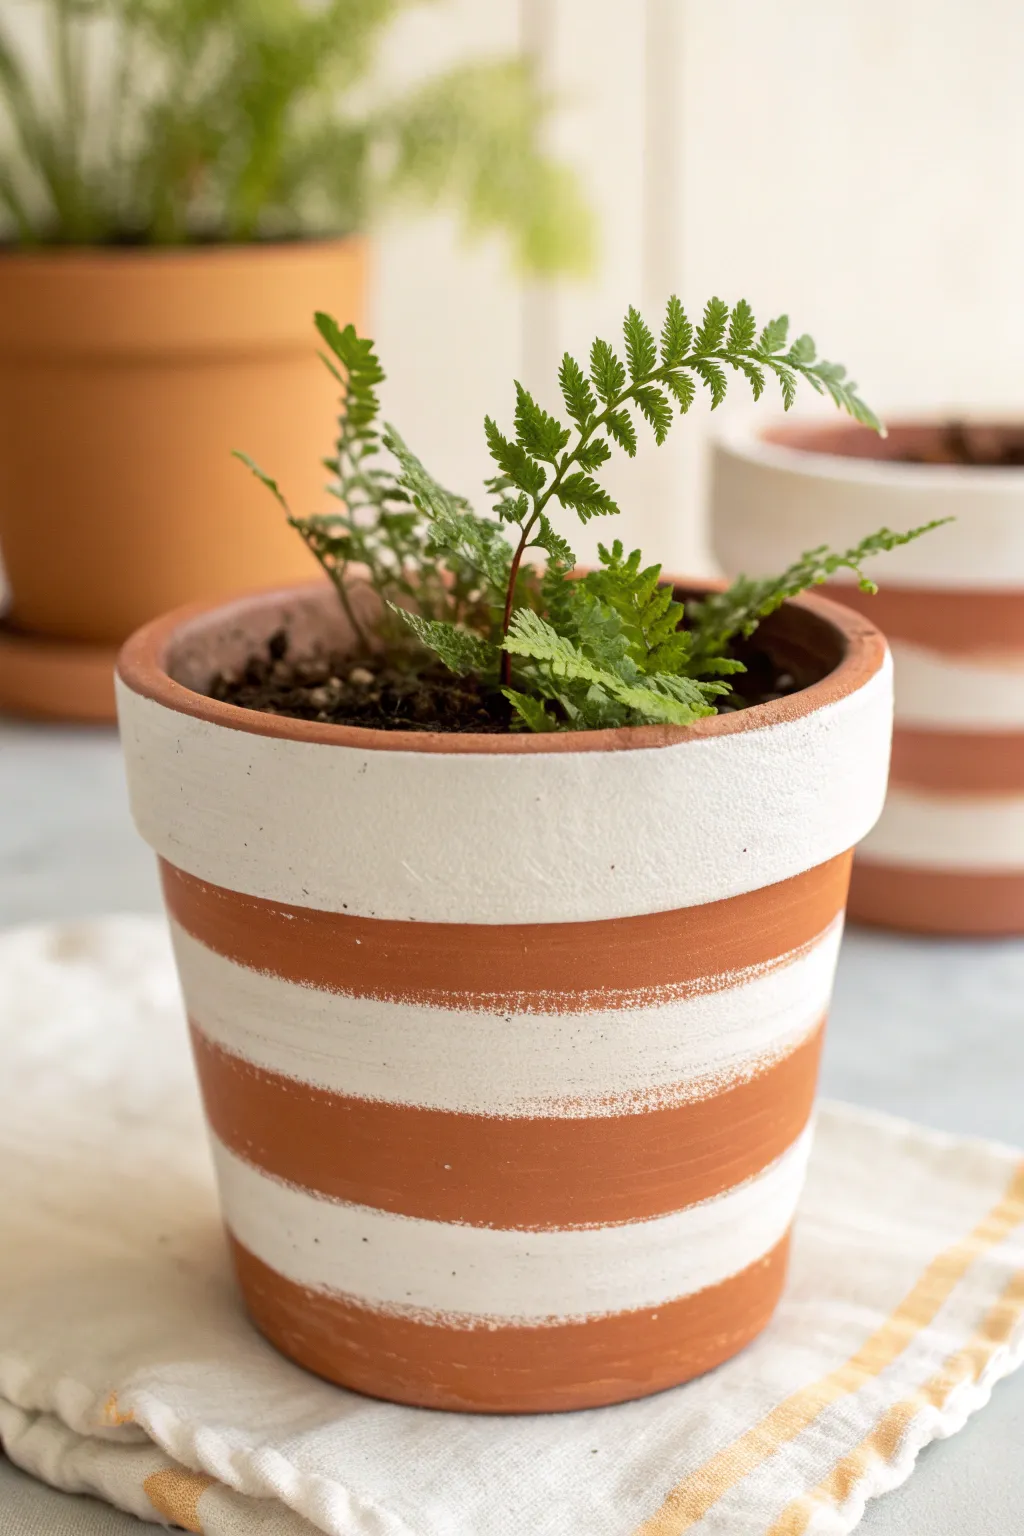
Transform a standard terracotta planter into a seaside-inspired accent piece with just a few simple stripes. This design embraces the natural texture of the clay, using crisp white bands to create a clean, classic contrast that fits any decor style.
Step-by-Step
Materials
- Clean terracotta pot
- White acrylic craft paint (matte finish)
- Painter’s tape (1/2 inch or 1 inch width)
- Flat paintbrush (medium size)
- Small round brush (optional for touch-ups)
- Sealer (matte or satin spray)
- Paper plate or palette
- Damp cloth
- Pencil or chalk (optional)
Step 1: Preparation & Planning
-
Clean the surface:
Before you begin, wipe down your terracotta pot with a damp cloth to remove any dust or sticker residue. Let it dry completely so the paint adheres properly. -
Plan your stripe placement:
Visualize where your stripes will go. For this look, we want a painted rim and three evenly spaced stripes on the body. -
Mark with guides:
If you’re worried about keeping things straight, use a pencil or piece of chalk to lightly mark where the bottom of your tape lines will sit. You can measure from the base up to ensure consistency.
Bleeding Lines?
Terracotta is textured, so tape doesn’t always seal perfectly. Embrace the rustic look, or use a damp Q-tip to wipe away wet bleeds immediately after peeling the tape.
Step 2: Taping the Design
-
Select your tape width:
Examine the reference image; the unpainted terracotta sections are roughly the same width as the painted sections. Using tape that matches your desired stripe width makes spacing much easier. -
Tape below the rim:
Place your first strip of painter’s tape directly under the pot’s rim. Press it down firmly, especially over any imperfections in the clay, to minimize bleeding. -
Create the spacing:
To get perfectly even gaps, I like to use a spare piece of tape as a spacer. Place a strip below your first line, adding your next masking strip below that, then peel away the middle spacer. -
Continue taping:
Repeat this spacing technique down the pot until you have sectioned off the areas you want to remain orange. -
Seal edges (Optional):
For extra crisp lines, paint a very thin layer of clear matte medium or sealer over the tape edges. This blocks paint from seeping under.
Step 3: Painting the Stripes
-
Load your brush:
Squeeze a dollop of white acrylic paint onto your paper plate. Load a flat paintbrush, but don’t overfill it—too much paint leads to drips. -
Paint the rim first:
Start by painting the entire rim of the pot white. Use horizontal strokes that follow the curve of the pot for the smoothest finish. -
Paint the inner rim:
Extend the white paint just over the top lip and down about an inch inside the pot. This gives it a clean, finished look when filled with soil. -
Paint the body stripes:
Fill in the exposed terracotta sections between your tape lines. Brush horizontally, ensuring you cover the clay texture well. -
Check opacity:
Standard acrylics often need two coats on porous clay. Let the first coat dry to the touch (about 10-15 minutes), then apply a second coat for solid, bright white coverage. -
Remove tape promptly:
Carefully peel off the painter’s tape while the second coat is still slightly wet. This helps prevent the paint from drying to the tape and peeling off in chunks.
Try Dry Brushing
Instead of solid white stripes, dip a dry brush in a tiny amount of paint and drag it lightly. This creates a weathered, distressed texture.
Step 4: Finishing Touches
-
Assess the edges:
Look closely at your lines. The charm of this pot is a slightly hand-painted feel, so don’t worry about microscopic perfection. -
Clean mishaps:
If paint bled significantly under the tape, you can gently scrape it away with a craft knife or touch it up with a small brush and a mix of orange/brown paint if you have one handy. -
Protect the pot:
Once fully dry, spray the entire pot with a clear matte or satin sealer. This protects the paint from water damage when you water your plants.
Now you have a freshly styled home for your favorite fern or succulent to thrive in


Playful Polka Dots That Pop
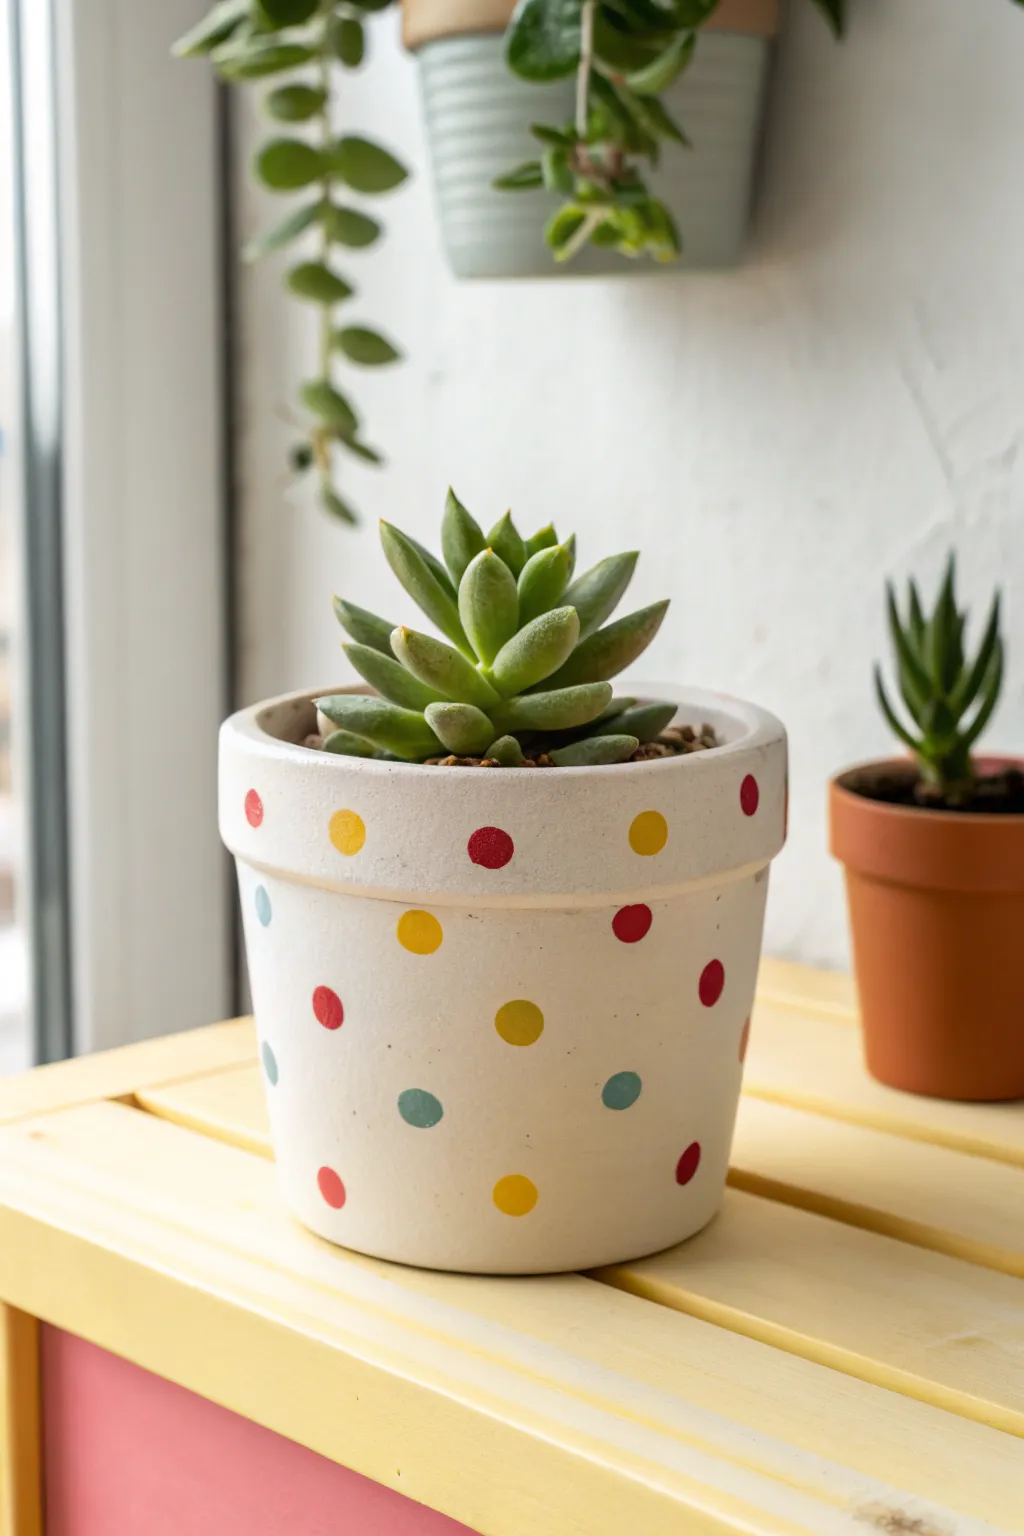
Bring a splash of playful charm to your windowsill with this bright and cheery polka dot design. The crisp white background makes the primary-colored dots truly pop, creating a modern yet nostalgic look for your succulents.
Step-by-Step Tutorial
Materials
- Terracotta pot (standard 4-inch size)
- White acrylic paint (matte or satin finish)
- Yellow acrylic paint
- Red acrylic paint
- Light blue/teal acrylic paint
- Medium flat paintbrush
- Round sponge pouncers (small size) or cotton swabs
- Fine detail brush
- Clear acrylic sealer spray (matte)
- Paper plate or palette
- Water cup and paper towels
Step 1: Base Preparation
-
Clean the surface:
Before passing a single brushstroke, wipe down your terracotta pot with a damp cloth to remove any dust or loose clay particles. Let it dry completely. -
Seal the inside (optional):
If you plan to plant directly in the pot, apply a coat of sealer to the interior walls. This prevents moisture from seeping through and bubbling up your exterior paint job later. -
First white coat:
Using your medium flat brush, apply a smooth layer of white acrylic paint to the exterior of the pot, including the top rim. -
Let it dry:
Allow the first coat to dry for about 20-30 minutes. It will likely look streaky at this stage, but don’t worry, that’s normal for terracotta. -
Second white coat:
Apply a second layer of white paint. Paint horizontally around the rim and vertically on the body for the best coverage. If the clay color still peeks through, a third coat may be necessary. -
Dry thoroughly:
Let the white base coat cure fully for at least an hour before starting the pattern. The surface needs to be dry to the touch so the dots don’t smear the background.
Oops! Smudged Dot?
Don’t panic! Let the smudge dry completely. Paint over the mistake with your white base color, let that dry, and then re-apply the colored dot fresh.
Step 2: Creating the Polka Dots
-
Prepare your colors:
Squeeze small dollops of red, yellow, and light blue paint onto your palette. Make sure you have enough space between them to dip your tools without mixing colors. -
Practice your technique:
I always recommend testing your dotting tool on a piece of scrap paper first. Dip a round sponge pouncer or the back end of a paintbrush into the paint and press straight down. -
Start with the rim:
Begin adding dots to the thick rim of the pot. Alternate colors—yellow, red, blue—spacing them evenly apart. Aim for about 1 inch of space between each dot. -
Move to the body:
start placing dots on the main body of the pot. Try to offset them from the dots on the rim to create a scattered, random effect rather than strict vertical lines. -
Vary the placement:
As you work your way around, ensure you don’t cluster too many of the same color together. If you place a red dot, try to make its neighbors yellow or blue. -
Touch up edges:
If your sponge pouncer leaves a textured ring or misses the center, use a fine detail brush to gently fill in the middle of the dot with a tiny bit more paint. -
Check for gaps:
Rotate the pot and look for any large empty white spaces. Add a dot there if needed, keeping the spacing visually balanced. -
Clean up drips:
If a dot runs slightly or isn’t perfectly round, wait for it to dry, touch it up with white paint to reshape the edge, and repaint the color.
Make It 3D
Use puffy paint instead of standard acrylics for the dots. This creates a fun, tactile texture that literally stands out from the pot’s surface.
Step 3: Finishing Touches
-
Full dry time:
Allow the polka dots to dry completely. Since these are thicker applications of paint, give them at least 2-3 hours to set properly. -
Apply sealer:
Take the pot to a well-ventilated area and spray it with a matte clear acrylic sealer. This protects the paint from water damage and UV fading. -
Add your plant:
Once the sealer is dry and no longer smells, pot your favorite succulent using well-draining soil, or simply drop in a plastic nursery pot designed to fit inside.
Enjoy your cheerful new planter as it brightens up your favorite sunny corner


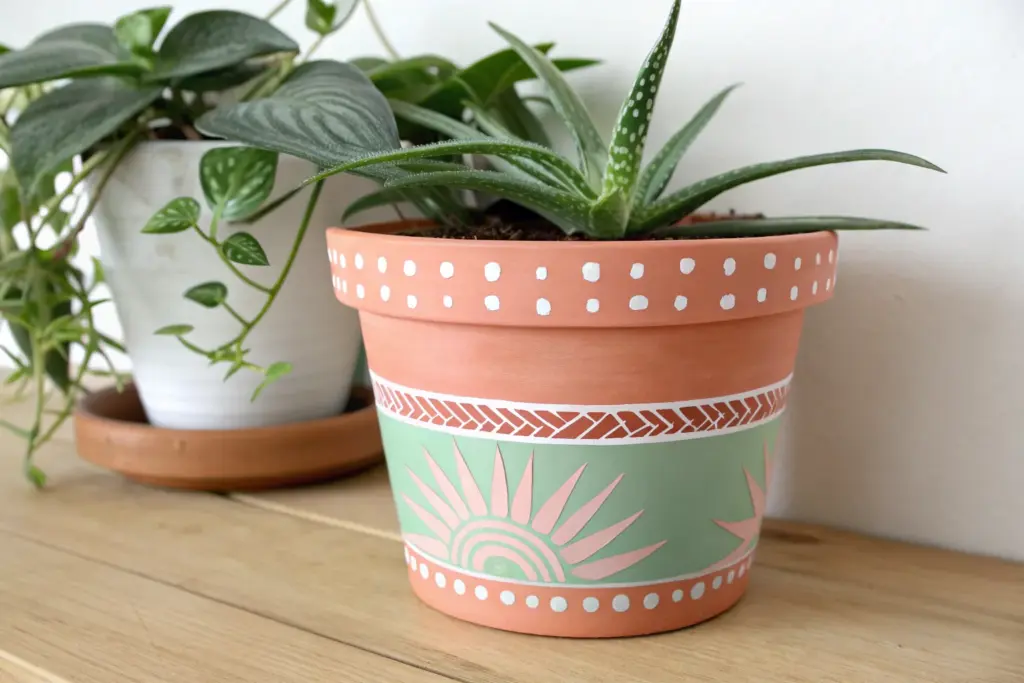
Modern Color-Blocking With Hard Edges
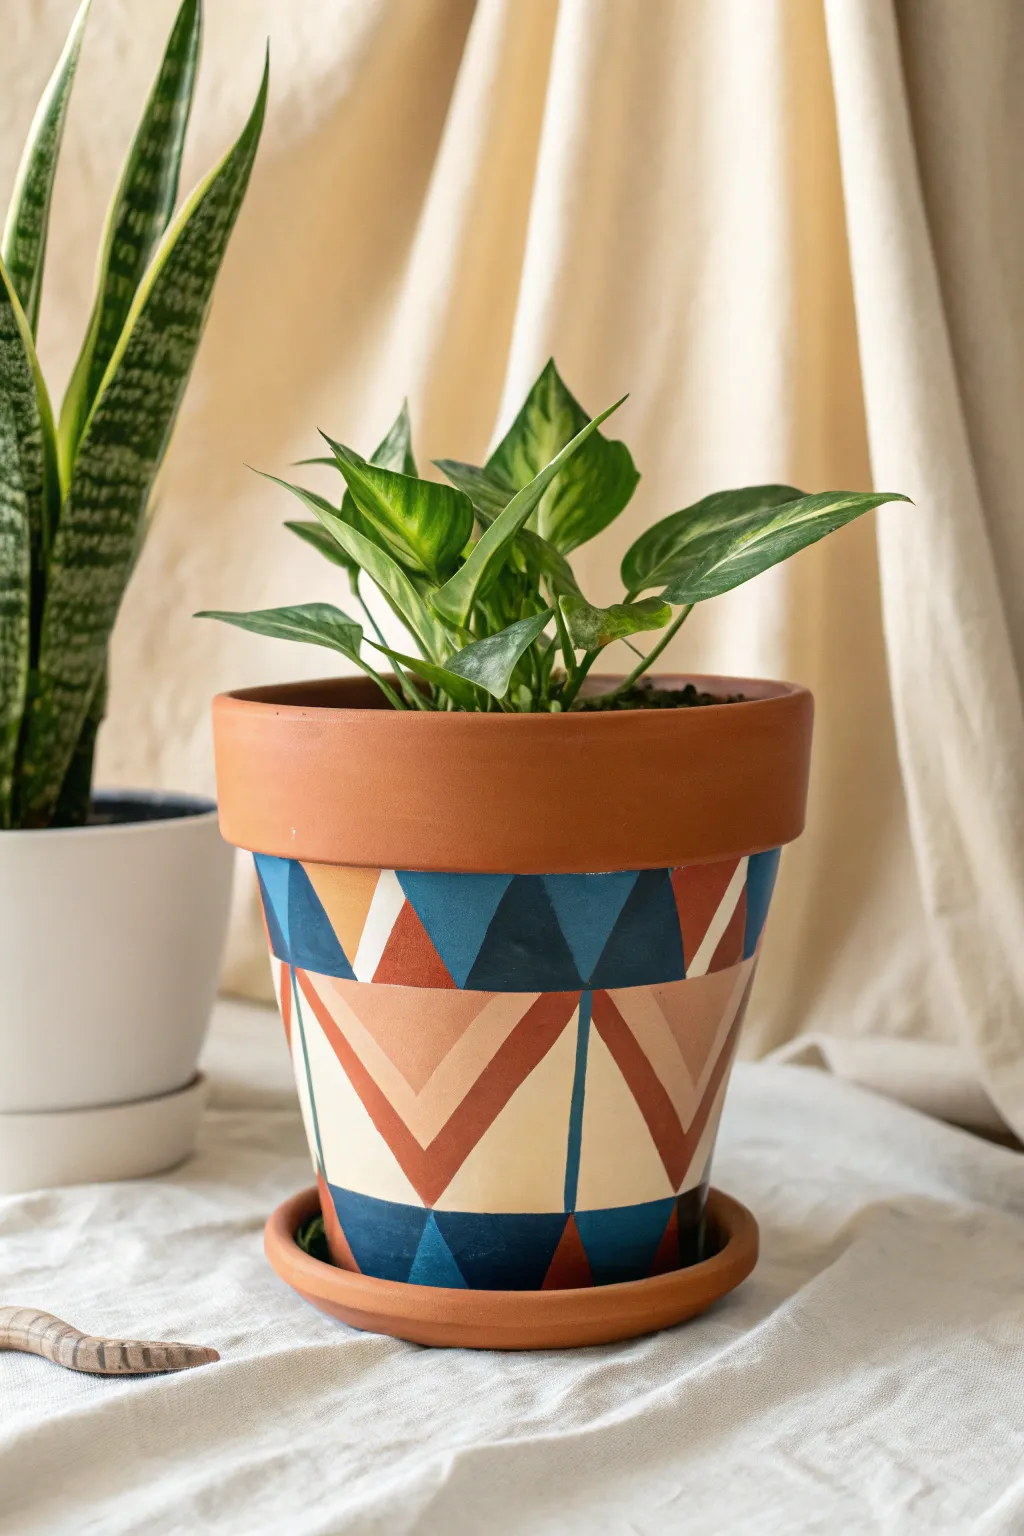
Transform a plain terracotta pot into a mid-century modern statement piece with this bold, hard-edge painting technique. Using tape to create crisp lines, you will build a sophisticated pattern of nesting triangles and chevrons in navy, cream, and sky blue.
Step-by-Step
Materials
- Terracotta pot and saucer (clean and dry)
- Acrylic craft paints (Navy Blue, Cream/Beige, Sky Blue)
- Painter’s tape or wash tape (various widths helpful)
- Flat shader brushes (medium and small)
- Pencil
- Ruler or flexible measuring tape
- Clear acrylic sealer spray (matte or satin)
- Palette or paper plate
Step 1: Preparation & Mapping
-
Clean surface:
Ensure your terracotta pot is thoroughly clean and completely dry. Any lingering dust will prevent the tape from sticking properly. -
Mark the rim:
Decide where the painted section begins. Measure about 1.5 to 2 inches down from the top rim and lightly draw a horizontal guideline all the way around the pot. -
Sketch the grid:
To keep the pattern symmetrical, measure the circumference of the pot at your guideline. Divide this number by 4 or 6 (depending on pot size) to determine the width of your main triangles. -
Draft the triangles:
Using a pencil, lightly sketch the large downward-pointing triangles first. Then, add the smaller interior triangles and the chevron shapes within them. Don’t worry about perfection; the tape will fix straight lines later.
Bleeding Lines?
If paint seeps under the tape, wait for it to dry completely. Then, scratch the excess away gently with an X-Acto knife or the tip of a toothpick to restore the hard edge.
Step 2: Painting Phase 1: The Base Layers
-
Tape the first shapes:
Apply painter’s tape along the outside lines of the areas intended for the lightest color (Cream/Beige). Press the edges of the tape down firmly with your fingernail to prevent bleed-under. -
Seal edges (optional):
For razor-sharp lines, I like to brush a tiny amount of clear matte medium or even the base terracotta color over the tape edge first to seal it. -
Apply Cream paint:
Paint the designated cream triangles. Use a flat brush and stroke away from the tape edge initially. This color may need two or three coats for full opacity. -
Remove tape:
Peel the tape off while the last coat is still slightly tacky to avoid pulling up dried paint chunks. Let this layer dry completely.
Step 3: Painting Phase 2: Adding Depth
-
Tape the Navy sections:
Once the cream paint is fully cured, tape off the sections for the Navy Blue triangles. This includes the top border triangles and the bottom base triangles. -
Paint Navy Blue:
Apply the navy paint. Since this is a dark pigment, you likely only need one or two smooth coats. Be careful where the navy meets the cream; rely on your tape placement for the hard edge. -
Address the Sky Blue:
Locate the small accent triangles in the pattern (often nested next to the navy). Tape these off precisely. -
Apply Sky Blue:
Fill in these smaller sections with the sky blue paint. This lighter blue adds a nice pop against the dark navy. -
Peel and dry:
Remove all tape from this phase carefully. Allow the pot to sit for at least an hour until the paint is dry to the touch.
Go Metallic
Replace the ‘sky blue’ accent triangles with gold leaf or metallic copper paint. The shine creates a stunning contrast against the matte terracotta and clay texture.
Step 4: Finishing Touches
-
Review the details:
Inspect your lines. If any paint bled under the tape, use a small detail brush or a toothpick to gently scrape away excess paint while it’s fresh, or touch it up with the neighboring color. -
The unpainted elements:
Check the unpainted terracotta sections (like the large V-shapes). Ensure no stray paint marks are visible; if there are, you can often sand them off specifically with a bit of fine-grit sandpaper. -
Clean the rim:
If the top rim got smudged, wipe it down with a damp cloth or lightly sand it to restore that clean clay look. -
Sealing:
Take the pot outdoors or to a well-ventilated area. Spray the entire exterior with a clear acrylic sealer. This protects the paint from water damage when you water your plant. -
Cure time:
Let the sealer cure for 24 hours before potting any soil or plants into your new vessel.
Enjoy the satisfying geometry of your new planter as it brightens up your shelf

The Complete Guide to Pottery Troubleshooting
Uncover the most common ceramic mistakes—from cracking clay to failed glazes—and learn how to fix them fast.
Marbled Swirl Paint for Instant Drama
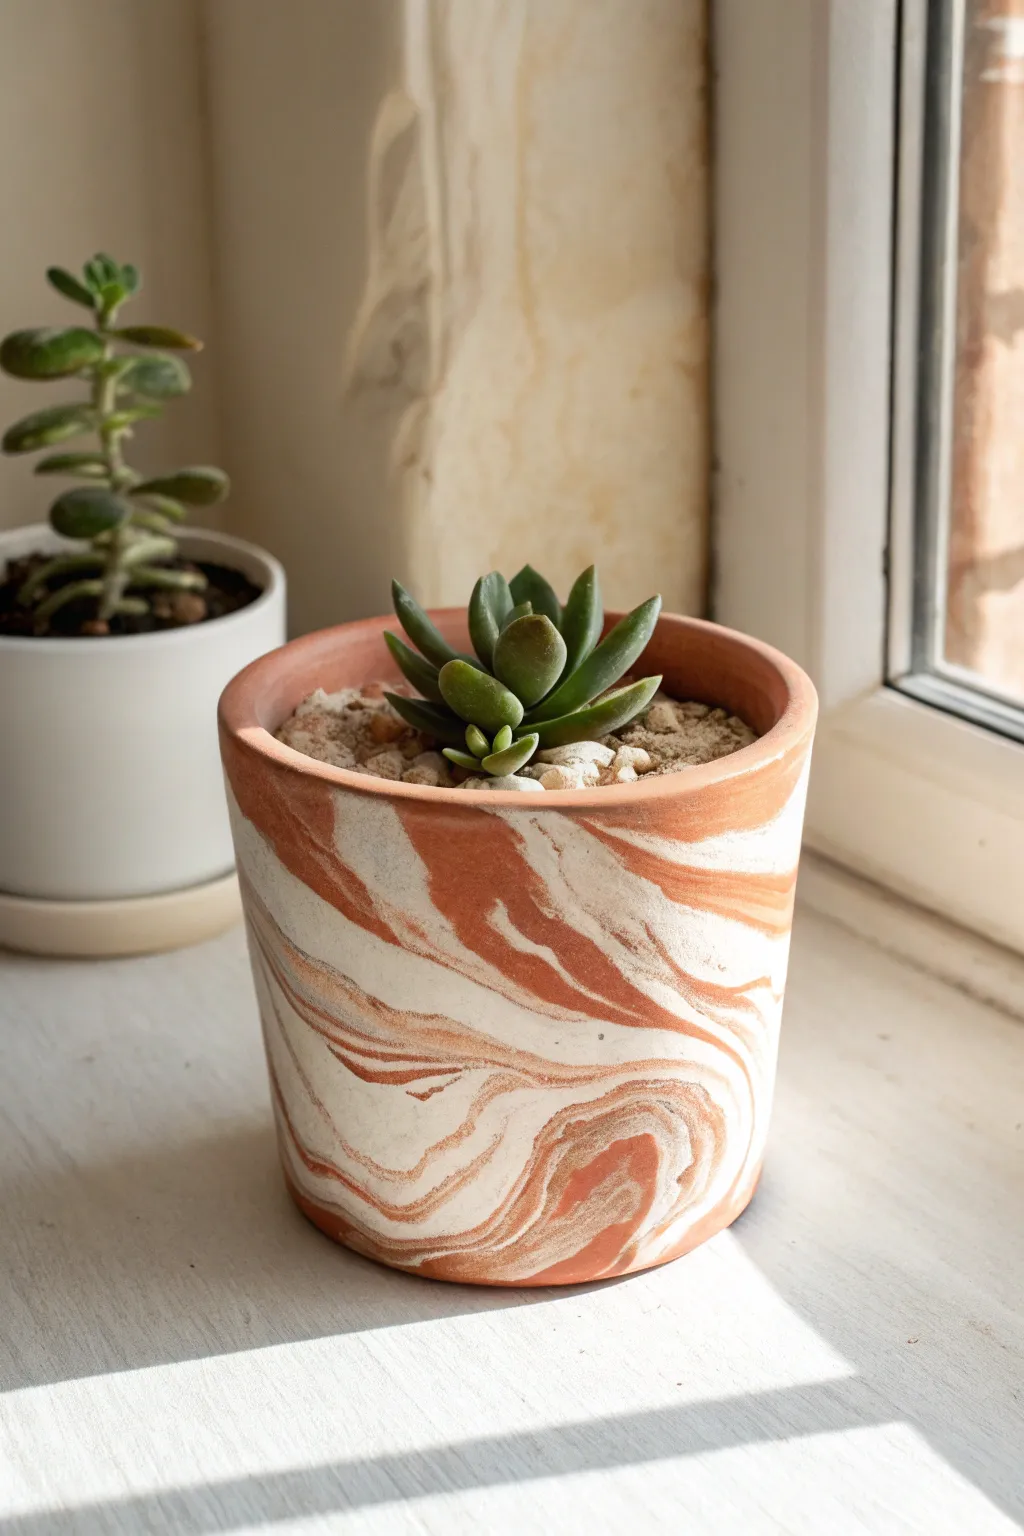
Transform a standard terracotta planter into a piece of modern art with this mesmerizing marbling technique. The organic swirls of white against the natural clay create a sophisticated, high-drama look that feels both earthy and elegant.
How-To Guide
Materials
- Standard terracotta pot (4-6 inch diameter)
- White acrylic paint (fluid or pouring medium mixed)
- Small plastic tub or bucket (deep enough to submerge the pot)
- Water
- Stirring stick or skewer
- Painter’s tape
- Paper towels
- Clear matte acrylic sealer spray
- Protective gloves
Step 1: Preparation
-
Clean surface:
Begin by thoroughly wiping down your terracotta pot with a damp cloth to remove any dust or manufacturing residue. Let it dry completely. -
Tape the interior:
Apply a strip of painter’s tape just below the rim on the inside of the pot. This keeps the marbling only on the exterior and top rim for a clean finish. -
Seal the drainage hole:
Flip the pot over and place a piece of tape securely over the bottom drainage hole. This prevents water from rushing inside during the dip.
Water Temp Tip
Use lukewarm water, not cold. Cold water can cause the acrylic paint literally to ‘shock’ and sink to the bottom, ruining the floating effect needed for the dip.
Step 2: Creating the Marbling Bath
-
Prepare the vessel:
Fill your plastic tub with room-temperature water. The water level should be high enough to cover the pot but leave enough displacement room so it doesn’t overflow. -
Mix the paint:
If using standard heavy-body acrylic, thin it with a little water or pouring medium until it has a consistency similar to heavy cream. -
Add paint to water:
Gently pour or drip the white paint onto the surface of the water. Do this slowly; you want the paint to float on top rather than sinking immediately. -
Create the swirl:
Take your skewer or stirring stick and very gently drag it through the floating paint. Create wide, lazy S-curves to mimic natural stone veins. -
Check the pattern:
Look for a balance of negative space (clear water) and paint. The clear areas will show the natural terracotta color, while the paint will provide the white contrast.
Gold Dust Upgrade
Add a drop of metallic gold paint into your water swirl alongside the white. It creates a stunning subtle shimmer that catches the light like quartz veins.
Step 3: The Dip
-
Position the pot:
Put on your gloves. Hold the pot securely by the inner rim or place your hand inside to grip it like a claw. -
Submerge:
Slowly lower the pot into the water at an angle. Rotating the pot slightly as it enters the water helps the paint wrap around the curved surface organically. -
Full immersion:
Continue pushing the pot down until the water line reaches the top rim. I find that pausing for a split second here helps the paint adhere better. -
Clear surface:
While the pot is still submerged, blow gently on the water’s surface to disperse any remaining floating paint away from the area where you will pull the pot out. -
Remove the pot:
Lift the pot strictly vertically out of the clean water area to avoid dragging a double layer of paint over your design.
Step 4: Finishing Touches
-
Drip dry:
Hold the pot upside down for a moment to let excess water drip off, then place it inverted on paper towels to dry. -
Remove tape:
Once the surface feels dry to the touch (usually about an hour), carefully peel off the tape from the drainage hole and the inner rim. -
Inspect and refine:
Check for any weird water bubbles or clumps. If the paint is still slightly damp, you can gently tap these down with a clean finger. -
Full cure:
Allow the pot to dry completely overnight. Terracotta is porous and holds water, so patience prevents the paint from bubbling later. -
Seal the deal:
Take the pot to a well-ventilated area and apply a light coat of clear matte sealer spray. This protects the raw terracotta color and keeps the white paint from chipping.
Now you have a stunning, custom planter ready to showcase your favorite succulent collection
Speckled “Terrazzo” Dots for a Trendy Look
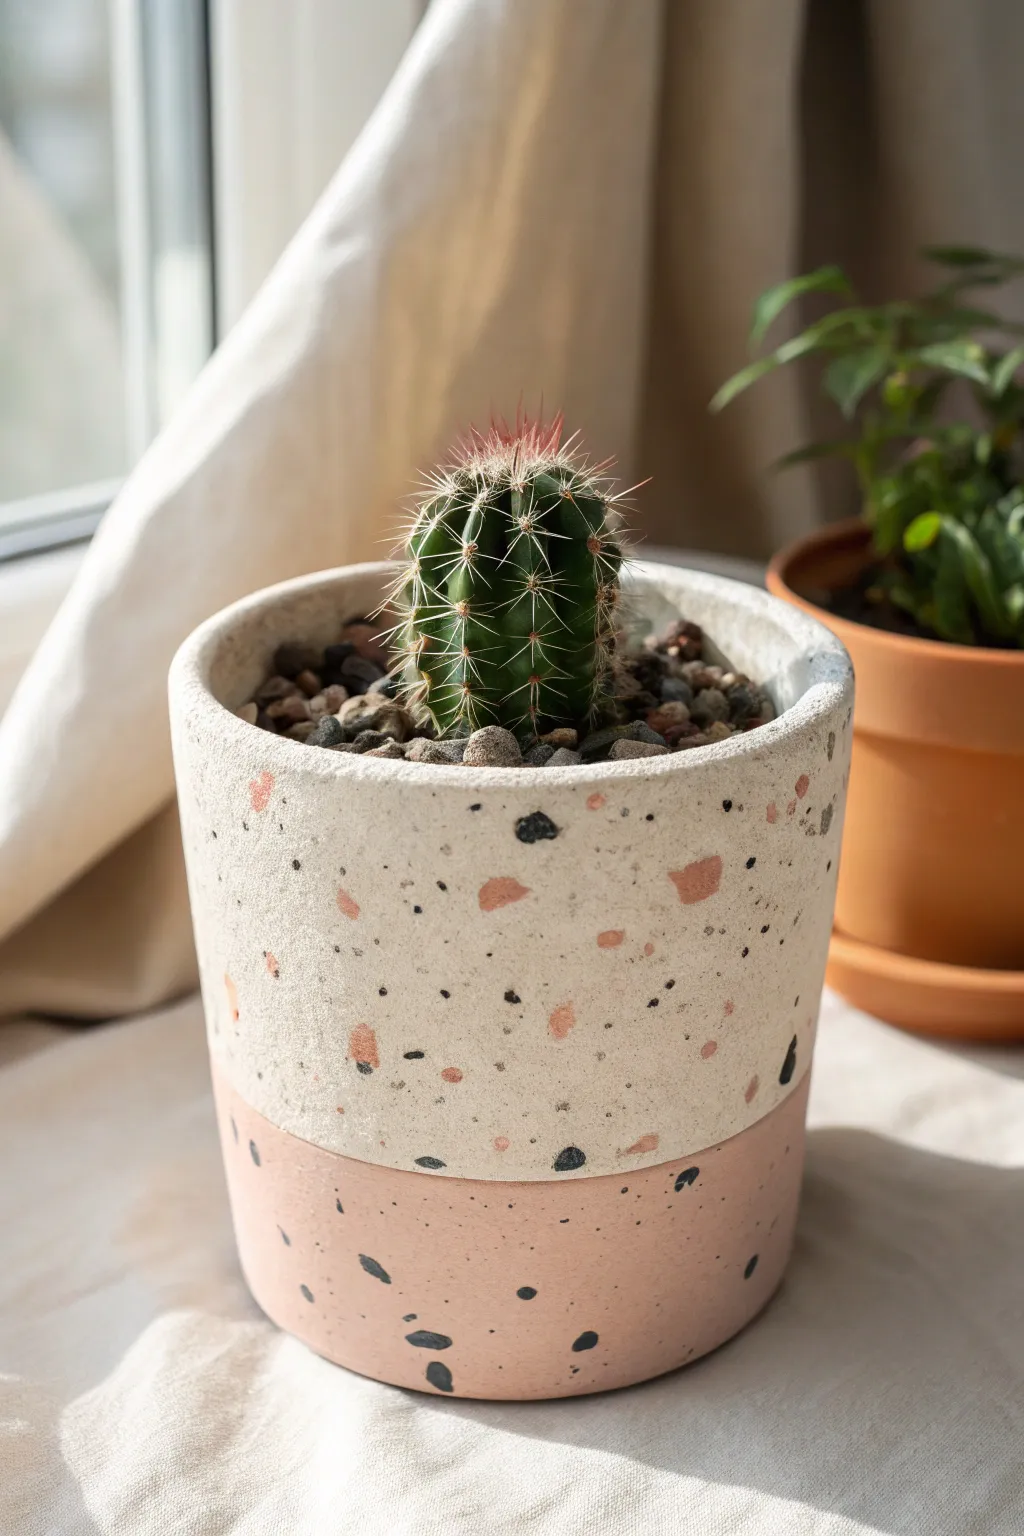
Transform a plain terracotta pot into a piece of modern art with this simple yet striking terrazzo effect. The two-tone base creates a soft, contemporary foundation, while the irregular speckled pattern mimics the look of high-end stone without the weight or cost.
Step-by-Step Guide
Materials
- Clean terracotta pot
- Matte acrylic craft paints (beige/cream, dusty pink, charcoal/black, terracotta/peach)
- Painter’s tape or masking tape
- Wide flat paintbrush
- Fine detail paintbrush or small round brush
- Pallet or paper plate
- Clear matte spray sealer
Step 1: Base Preparation
-
Clean surface:
Begin by wiping down your terracotta pot with a damp cloth to remove any dust or oils. Let it dry completely to ensure the paint adheres properly. -
Taping the line:
Decide where you want your color split to be. In the example, the bottom third is pink. Apply painter’s tape horizontally around the circumference of the pot at this level, pressing the edges down firmly to prevent bleed-through. -
Painting the top:
Paint the upper section of the pot with your beige or cream acrylic paint. Use horizontal strokes for a smooth finish. You will likely need 2-3 coats for full opacity, allowing about 15-20 minutes of drying time between each coat. -
Painting the rim:
Don’t forget to paint the top rim and a few inches inside the pot so the raw clay doesn’t show when soil is added. -
Remove tape:
Once the top section is dry to the touch, carefully peel away the painter’s tape. If any paint bled under, you can gently scrape it away or touch it up later. -
Painting the bottom:
Using your dusty pink paint, carefully fill in the bottom section. Use a smaller flat brush near the color line for precision, then switch to the wider brush for the rest. Apply 2-3 coats as needed for solid coverage.
Step 2: Creating the Terrazzo Effect
-
Mixing speckle colors:
Prepare your speckle colors on a palette. You’ll need a charcoal black and a peach tone that complements the pink base. You might even mix a touch of grey for variety. -
Applying large peach shapes:
Start with the peach/terracotta color. Using a small round brush, dab irregular, organic shapes onto the beige section. Keep them sparse and random—they shouldn’t look like perfect polka dots. -
Detailing the beige section:
Next, dip your fine brush into the black paint. Add tiny specks and slightly larger irregular shards around the peach shapes on the beige background. Varying the size is key to a realistic stone look. -
Transitioning downwards:
Continue the pattern onto the pink bottom section. Here, focus primarily on the black specks, as the peach ones won’t show up as well. I find that spacing the dots out more near the bottom keeps the design from looking too busy. -
Adding micro-specks:
The secret to the terrazzo look is texture. Load a very small amount of black paint onto an old toothbrush or stiff brush and gently flick it with your thumb to create a mist of tiny micro-dots over specific areas. -
Finishing touches:
Inspect your pot. If any areas look too empty, add a few more black shards. Use a tiny brush to sharpen any edges of your larger shapes that look too fuzzy.
Natural Stone Look
Don’t try to paint perfect circles. Terrazzo is made of crushed stone chips, so jagged, triangular, or oblong shapes look much more authentic than round polkadots.
Step 3: Sealing and Setting
-
Final drying:
Allow the entire pot to dry for at least 6-12 hours. Acrylic paint dries fast on the surface but needs time to cure on porous clay. -
Sealing the deal:
Take the pot outdoors or into a well-ventilated area. Apply a light, even coat of clear matte spray sealer. This protects the paint from water damage when you water your plant. -
Second coat:
Wait 20 minutes, then apply a second coat of sealer for extra durability.
Level Up: Metallic Pop
Add a third speckle color using metallic gold or copper leaf paint. A few shiny flakes mixed in with the matte stone colors adds an incredible high-end finish.
Now your trendy planter is ready to give your favorite cactus or succulent a stylish new home


What Really Happens Inside the Kiln
Learn how time and temperature work together inside the kiln to transform clay into durable ceramic.
Stencil Motifs for Crisp Patterns
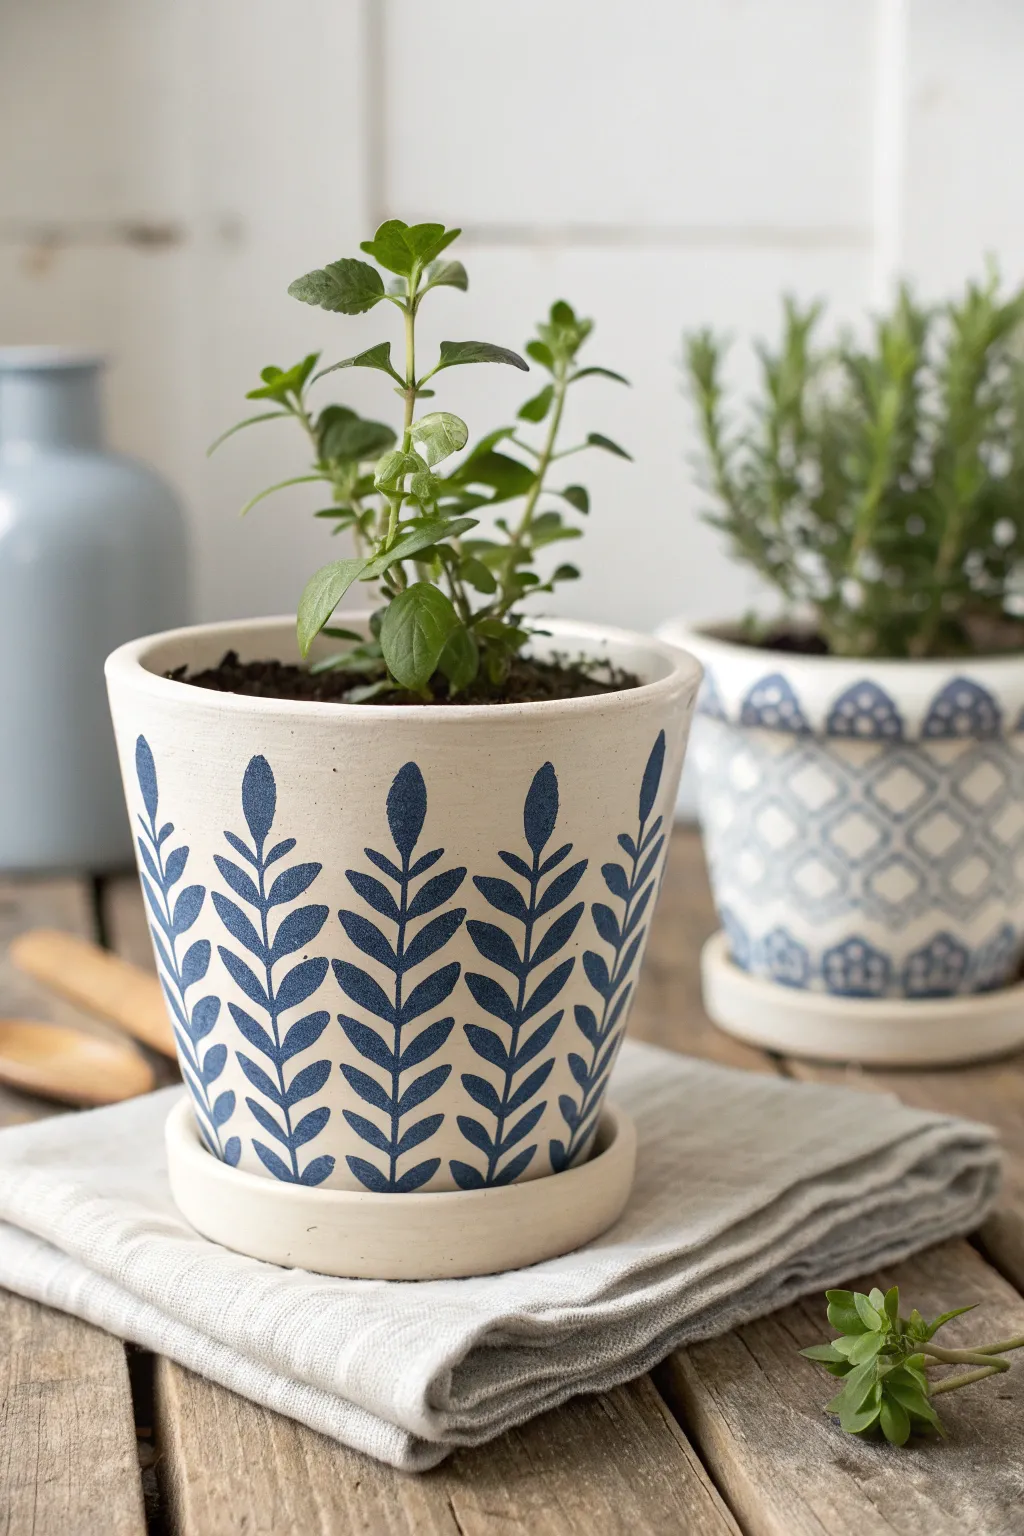
Transform a plain terracotta vessel into a modern farmhouse centerpiece with this striking botanical design. The crisp navy blue fern motif stands out beautifully against a warm cream base, creating a look that mimics expensive hand-painted ceramics.
Detailed Instructions
Materials
- Terracotta pot and matching saucer (4-inch or 6-inch)
- Cream or off-white chalk paint or matte acrylic paint
- Navy blue acrylic craft paint
- Adhesive stencil (fern or leaf branch design)
- Pouncer sponge or stencil brush
- Flat paintbrush (1-inch width)
- Small fine-liner brush (for touch-ups)
- Painter’s tape
- Matte spray sealer
- Paper towels
Step 1: Base Preparation
-
Clean surface:
Begin by wiping down your terracotta pot and saucer with a damp cloth to remove any dust or manufacturing residue. Let it dry completely. -
Prime the interior:
Paint the top two inches of the inside rim with your cream paint. This ensures the terracotta color doesn’t peek through once the plant is potted. -
Apply base coat:
Using the wide flat brush, apply a smooth, even coat of cream paint to the entire exterior of the pot and the saucer. Don’t forget the bottom edge. -
Dry and repeat:
Allow the first coat to dry for about 20-30 minutes. Apply a second coat to ensure opaque coverage so no orange clay shows through. Let this base cure for at least an hour.
Step 2: Stenciling the Pattern
-
Position the first stencil:
Peel your adhesive fern stencil and place it vertically on the pot. The bottom of the stem should align with the very bottom edge of the pot. -
Secure edges:
Press down firmly along all the cut edges of the design. If using a non-adhesive stencil, tape it securely with painter’s tape. -
Load the tool:
Dip your pouncer sponge or stencil brush into the navy blue paint. Dab off the excess onto a paper towel until the sponge feels almost dry. This is crucial for crisp lines. -
Apply vivid color:
Using a straight up-and-down pouncing motion, apply the paint over the stencil openings. I find that light, repeated tapping builds better color than pressing hard. -
Peel and reveal:
Immediately peel off the stencil while the paint is still wet. Lift it straight up to avoid smearing. -
Clean or dry:
If paint accumulated on the back of the stencil, wipe it tailored clean. Otherwise, fan it dry for a moment. -
Repeat the motif:
Move to the opposite side of the pot and apply the next fern. Continue around the pot, spacing them evenly so the leaves nearly touch. -
Handle the saucer:
For the saucer, simply leave it cream to frame the patterned pot, or add a thin navy stripe around the rim if desired.
Bleeding Lines?
If paint bleeds under the stencil, your brush was too wet. Wait for it to dry, paint over the error with the cream base color, and try again with a drier sponge.
Step 3: Refining and Sealing
-
Fix imperfections:
Once dry, inspect your lines. Use a fine-liner brush and a tiny bit of cream paint to cover any blue bleeding. Conversely, fill in any patchy blue areas. -
Dry completely:
Let the patterned paint dry for at least 2 hours, or overnight if possible, to ensure durability. -
Seal for protection:
In a well-ventilated area, spray the entire pot and saucer with a matte sealer. This protects the design from water damage when watering your plants.
Make it Hand-Painted
After stenciling, go back over the leaves with a thin brush to add tiny imperfections or extend the stems. This makes the crisp stencil look like custom artistry.
Place your favorite herb inside and enjoy the fresh pop of pattern on your windowsill
Botanical Line Art in Simple Black and White
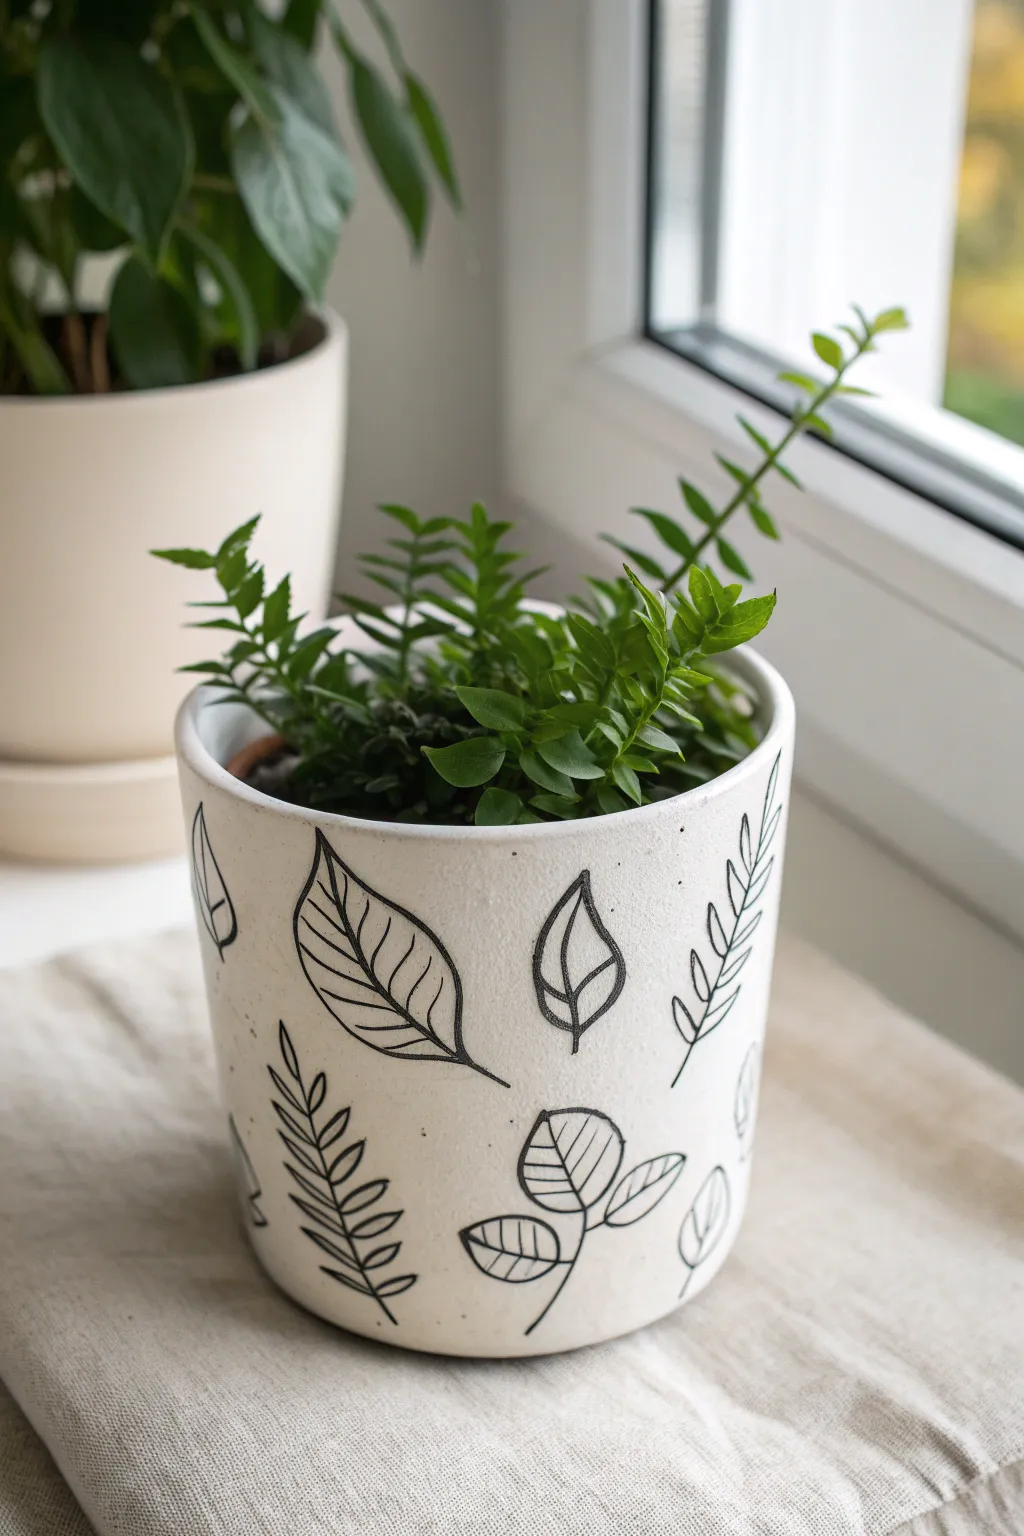
Transform a plain clay pot into a stylish modern planter using nothing but contrast and simple shapes. This project celebrates the elegance of botanical line art, featuring crisp black foliage drawings against a creamy white background for a look that is both organic and contemporary.
Step-by-Step Guide
Materials
- Terra cotta pot (clean and dry)
- White or cream matte acrylic paint
- Flat paintbrush (medium width)
- Black oil-based paint marker (fine tip)
- Black oil-based paint marker (medium tip)
- Pencil (HB or lighter)
- Clear matte spray sealer
Step 1: Preparing the Canvas
-
Clean surface:
Begin with a thoroughly clean terra cotta pot. If you are reusing an old pot, scrub it well with vinegar and water to remove mineral deposits, then let it dry completely for at least 24 hours. -
Base coat application:
Using your flat paintbrush, apply an even coat of white or cream matte acrylic paint to the exterior. Don’t forget to paint the top rim and just inside the lip where the soil line will be. -
Second coat:
Allow the first coat to dry for about 20-30 minutes. Apply a second coat to ensure solid, opaque coverage where the terra cotta orange doesn’t peek through, brushing in a horizontal direction for a smooth finish. -
Final drying:
Let the painted base cure completely. I prefer to leave it overnight if possible, or at least 2-3 hours, to ensure the paint creates a hard shell that won’t scratch off during the drawing phase.
Ink Smearing?
If your black marker tips start picking up white paint or smearing, the base coat isn’t dry enough. Stop immediately, wipe the nib to save the pen, and let the pot dry longer.
Step 2: Designing the Foliage
-
Sketching placement:
Lightly sketch your botanical shapes using a pencil. You don’t need detailed drawings yet; just mark the general placement and size of each leaf or vine to ensure a balanced composition around the pot. -
Drawing large leaves:
Start with the focal points using the medium-tip black paint marker. Draw the outline of the larger, teardrop-shaped leaves first. Create a central vein line down the middle of each. -
Adding details:
Switch to the fine-tip marker to add the delicate veins branching off the center line of the large leaves. Keep these lines swift and light for a natural look. -
Creating fern fronds:
Using the fine-tip marker, draw long, slightly curved stems for the fern-style plants. Along these stems, add small, narrow leaves in pairs, angling them slightly upward towards the tip of the stem. -
Drawing vine stems:
For the trailing vine element, draw a meandering line that curves gently. Add rounded or heart-shaped leaves at alternating intervals along this stem. -
Varying line weight:
Go back over the main outlines of your larger leaves with the medium marker if they look too thin. This variation between the thick outlines and thin interior veins mimics the style of professional illustrations.
Step 3: Finishing Touches
-
Fill the gaps:
Rotate the pot and look for large empty white spaces. Add smaller, single leaves or tiny sprigs in these areas to connect the design visually without overcrowding it. -
Clean up:
Check for any pencil marks that are still visible. If the paint is fully cured, you can gently erase them, or simply carefully paint over them with a tiny bit of white paint. -
Drying the ink:
Let the black paint marker ink dry completely for at least an hour. Oil-based markers are durable but can smear if sealed too quickly. -
Sealing the art:
Take the pot to a well-ventilated area. Spray it with a clear matte sealer using light, sweeping mists. Do not over-spray in one spot, as this can cause the black ink to run. -
Wait and pot:
Allow the sealer to cure according to the can’s instructions (usually 24 hours) before potting your plant to prevent moisture from bubbling the paint from the inside out.
Pro Tip: Practice First
Sketch your leaf shapes on a piece of paper first to get a feel for the hand movements. Draw with your whole arm, not just your wrist, for smoother curves.
Now you have a chic, custom-designed planter that highlights the natural beauty of your greenery

TRACK YOUR CERAMIC JOURNEY
Capture glaze tests, firing details, and creative progress—all in one simple printable. Make your projects easier to repeat and improve.
Chalkboard Label Band for Herbs
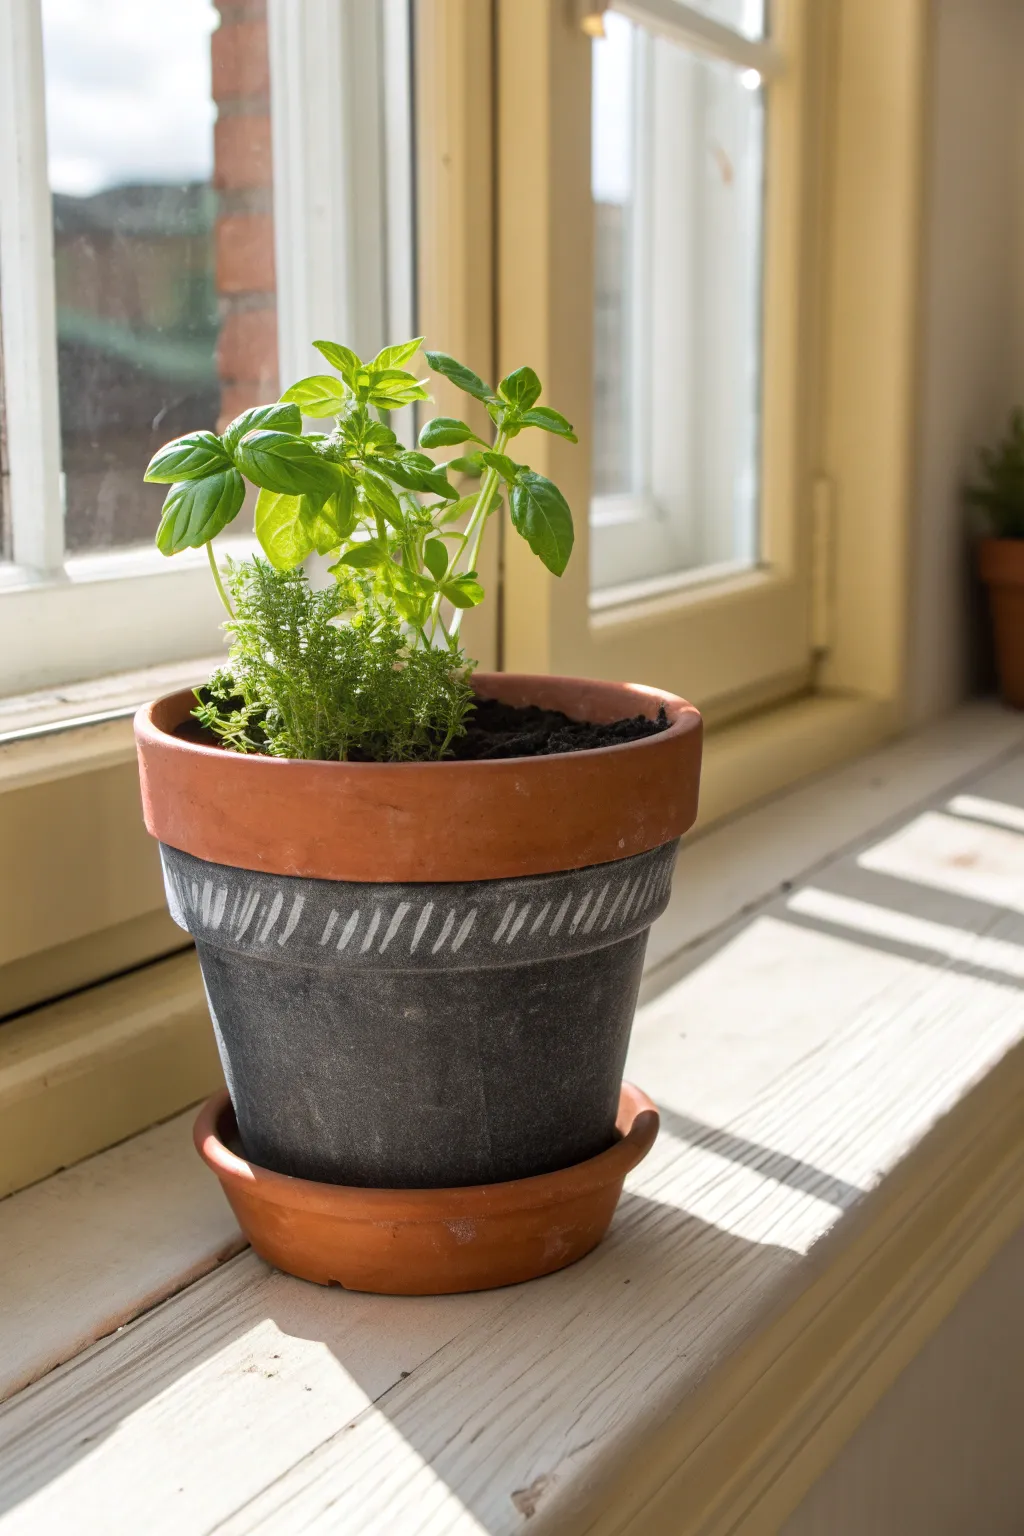
Transform a plain terracotta vessel into a modern, customizable planter perfect for your kitchen windowsill. This project features a bold, matte charcoal dipped effect accented with a hand-painted white geometric band.
Step-by-Step Tutorial
Materials
- Standard 6-inch terracotta pot with matching saucer
- Chalkboard paint (black or dark charcoal)
- Painter’s tape or masking tape
- Medium flat paintbrush
- Small round detail brush (size 1 or 2)
- White liquid chalk marker or white acrylic paint
- Newspaper or drop cloth
- Pencil (optional)
- Damp cloth
Step 1: Preparation & Base Coat
-
Surface Prep:
Begin by wiping down your terracotta pot and saucer with a damp cloth to remove any warehouse dust or loose clay particles. Let the clay dry completely; moisture trapped inside can cause the paint to bubble later. -
Define the Rim:
Decide how wide you want the natural terracotta band at the top to be. In the inspiration image, the rim itself defines the line. Place a strip of painter’s tape horizontally around the pot, tucking it right under the protruding rim to ensure a crisp, straight line. -
First Coat of Chalkboard Paint:
Stir your chalkboard paint thoroughly to redistribute the matting agents. Using the medium flat brush, apply the first coat of paint to the main body of the pot below the tape line. Don’t forget to paint the exterior of the saucer as well, but leave the bottom unpainted for drainage. -
Refine the Edges:
Pay close attention to the area right next to the tape. Brush away from the tape edge rather than towards it to prevent paint from bleeding underneath. -
Let it Dry:
Allow this initial coat to dry for at least one hour. Chalkboard paint tends to be thick, and rushing this step can result in a tacky finish. -
Second Coat Application:
Apply a second coat of the charcoal paint to ensure opaque, solid coverage where no orange clay shows through. I find that brushing in the opposite direction of the first coat (vertical vs. horizontal) helps create a smoother texture. -
Tape Removal:
Carefully peel off the painter’s tape while the second coat is still slightly damp. This trick helps ensure the paint film doesn’t lift off with the adhesive, leaving you with a sharp, professional edge. -
Saucer Touch-ups:
Check the saucer for any missed spots. Since it sits horizontally, ensure the inner rim (where the pot sits) is neat, though the very bottom center doesn’t need paint since it will be covered.
Step 2: Decorative Detailing
-
Cure Time:
Let the pot sit overnight if possible, or at least 4-6 hours. The dark paint needs to be fully cured and hard before you start drawing the delicate white patterns on top. -
Plan the Pattern:
The design involves a band of angled hatch marks just below the rim. You can lightly mark a guideline with a pencil about 1 to 1.5 inches below the color block line if you’re worried about keeping the pattern straight. -
Prepare the Markers:
If using a liquid chalk marker, shake it vigorously and press the nib down on a scrap piece of paper to get the flow started. If using acrylic paint and a brush, thin the white paint slightly with a drop of water for smoother lines. -
Start the Hatching:
On the dark painted section, right near the top edge, begin making short, diagonal strokes. These should be roughly half an inch long and angled to the right. -
Create Texture:
Notice how the lines in the image aren’t solid opaque blocks; they have a sketch-like quality. Make swift, confident strokes rather than slow, heavy ones to replicate this chalk-drawn aesthetic. -
Spacing the Lines:
Keep the spacing tight but irregular. Leave a tiny gap between each white dash so the dark background shows through, creating a rhythm around the pot circumference. -
Varying the Height:
Don’t worry about every line being perfectly identical in length. Slight variations add to the organic, handmade charm suitable for a garden item. -
Complete the Circle:
Work your way around the entire pot, turning it as you go. Try not to rest your hand on the freshly painted white lines to avoid smudging. -
Final Cure:
Let the white detailing dry completely. Since the main body is chalkboard paint, you can adhere to the manufacturer’s final curing instructions (often 24 hours) before exposing it to moisture or soil.
Bleeding Lines?
If paint bled under your tape, don’t panic. Wait for it to dry fully, then use a small piece of fine-grit sandpaper or a craft knife to gently scrape the excess paint off the raw terracotta
Label It
Since you used chalkboard paint, use the blank space below the white pattern to write the herb name (like ‘Basil’ or ‘Thyme’) in large chalk letters, making it functional and stylish
Now your custom planter is ready to be filled with fragrant herbs and displayed in a sunny spot
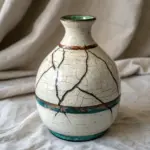
Distressed Vintage Finish That Looks Collected
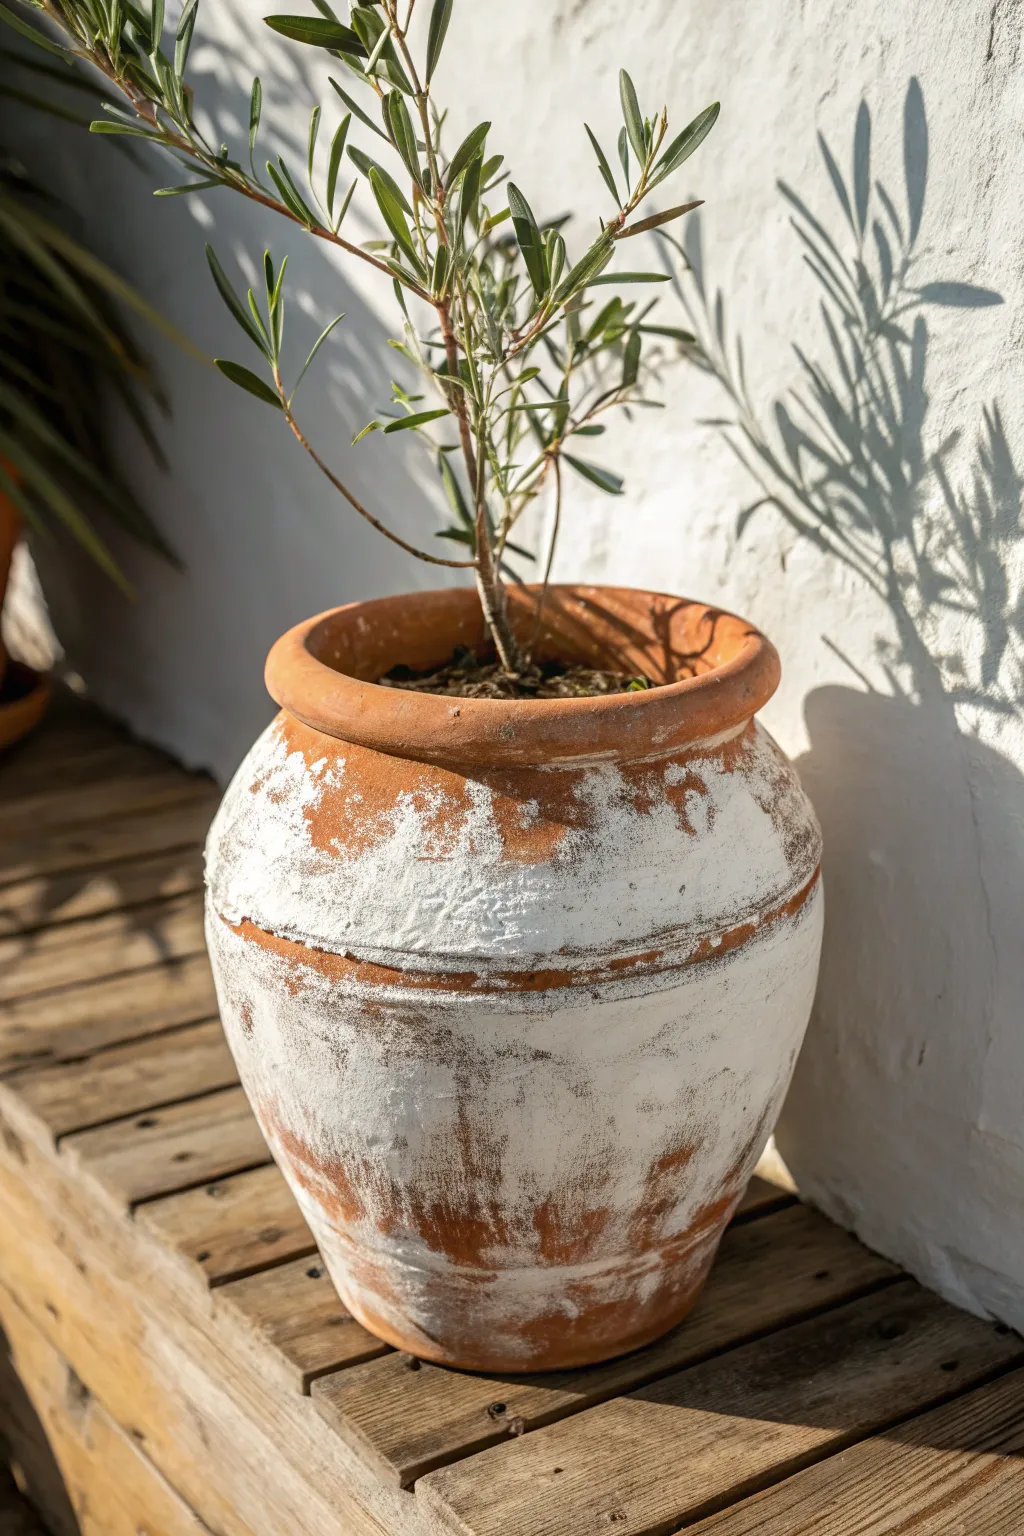
Transform a standard terracotta planter into a sun-bleached relic reminiscent of a Greek villa or Italian countryside garden. This technique uses a clever layering method to create authentic looking age, where the white finish clings to texture but reveals the warm clay beneath in all the right places.
Step-by-Step Tutorial
Materials
- Unseal terracotta pot (bulbous shape preferred for authenticity)
- Matte white chalk paint or mineral paint
- Plaster of Paris or joint compound
- Coarse sandpaper (60-80 grit)
- Medium sandpaper (120 grit)
- Chip brush or old stiff-bristled brush
- Plastic cup for mixing
- Paper towels or cotton rag
- Matte clear spray sealer (outdoor rated)
- Palette knife or plastic scraper
Step 1: Creating Texture
-
Clean surface:
Begin with a clean, dry terracotta pot. If the pot was previously used, scrub off any dirt or mineral deposits and let it dry completely. -
Texture mix:
In your plastic cup, mix a small amount of white chalk paint with Plaster of Paris or joint compound. You aim for a thick, oatmeal-like consistency rather than a smooth liquid. -
Rough application:
Using a palette knife or scraper, randomly smear patches of this thick mixture onto the pot. Focus on the belly of the vase and leave the rim mostly bare. -
Drag and stipple:
Before the patches dry, use your chip brush to drag the texture outward, stippling vertically to create ridges. This initial layer creates the physical ‘crust’ of an old pot. -
Initial dry time:
Allow this texture layer to dry completely, which should take about 30-45 minutes depending on thickness.
Step 2: Applying the Wash
-
Prepare the whitewash:
Dilute your white chalk paint with water in a roughly 1:1 ratio. It should be runny enough to drip easily. -
Generous coating:
Using the chip brush, slather the watered-down paint over the entire pot, covering both the textured patches and the plain terracotta areas. -
Rim detailing:
Pay special attention to the rim, painting just under the lip and slightly inside the top edge where soil won’t reach. -
Wipe back:
Wait just until the watery paint starts losing its wet sheen, then take a crumpled paper towel and blot—don’t rub—random areas to lift the wet paint.
Too much white?
If you over-painted and lost too much terracotta color, wet a sanding sponge slightly. The moisture reactivates chalk paint, stripping it back faster than dry sanding.
Step 3: Distressing Process
-
Full cure:
Let the pot sit until fully dry to the touch. I usually give this at least an hour to ensure we don’t accidentally peel off wet slough. -
Aggressive sanding:
Take the coarse 60-grit sandpaper and attack the pot’s belly vigorously. You want to scratch through the texture patches down to the naked clay. -
Rim exposure:
Sand the very top edge of the rim and the raised ring detail underneath it until the orange clay is clearly visible, mimicking handling wear. -
Scraping technique:
Use the edge of your metal palette knife to scrape vertically down the sides. This chips off larger flakes of the dried paint, creating that ‘flaking plaster’ look. -
Softening edges:
Switch to the medium 120-grit sandpaper and lightly swirl it over the remaining white areas to soften brush strokes without removing the color. -
Dusting off:
Brush off all the sanding dust with a dry cloth. You’ll see the brilliant contrast between the powdery white recesses and the rich terracotta.
Authentic Wear
Concentrate your heaviest sanding on ‘high points’ like the belly and rim. These are spots where a pot would naturally rub against things over decades of use.
Step 4: Finishing Touches
-
Strategic darkening:
If the white looks too pristine, mix a tiny drop of brown paint with water and flick it onto the pot, or rub a little garden soil into the deep crevices. -
Sealing:
Spray the entire pot with a matte outdoor sealer. This locks in the flaky texture so it doesn’t continue to chip off messily over time.
Now you have a piece that looks like it has weathered decades of Mediterranean sun, ready for your olive tree or herbs
Decoupage With Napkins for Instant Florals
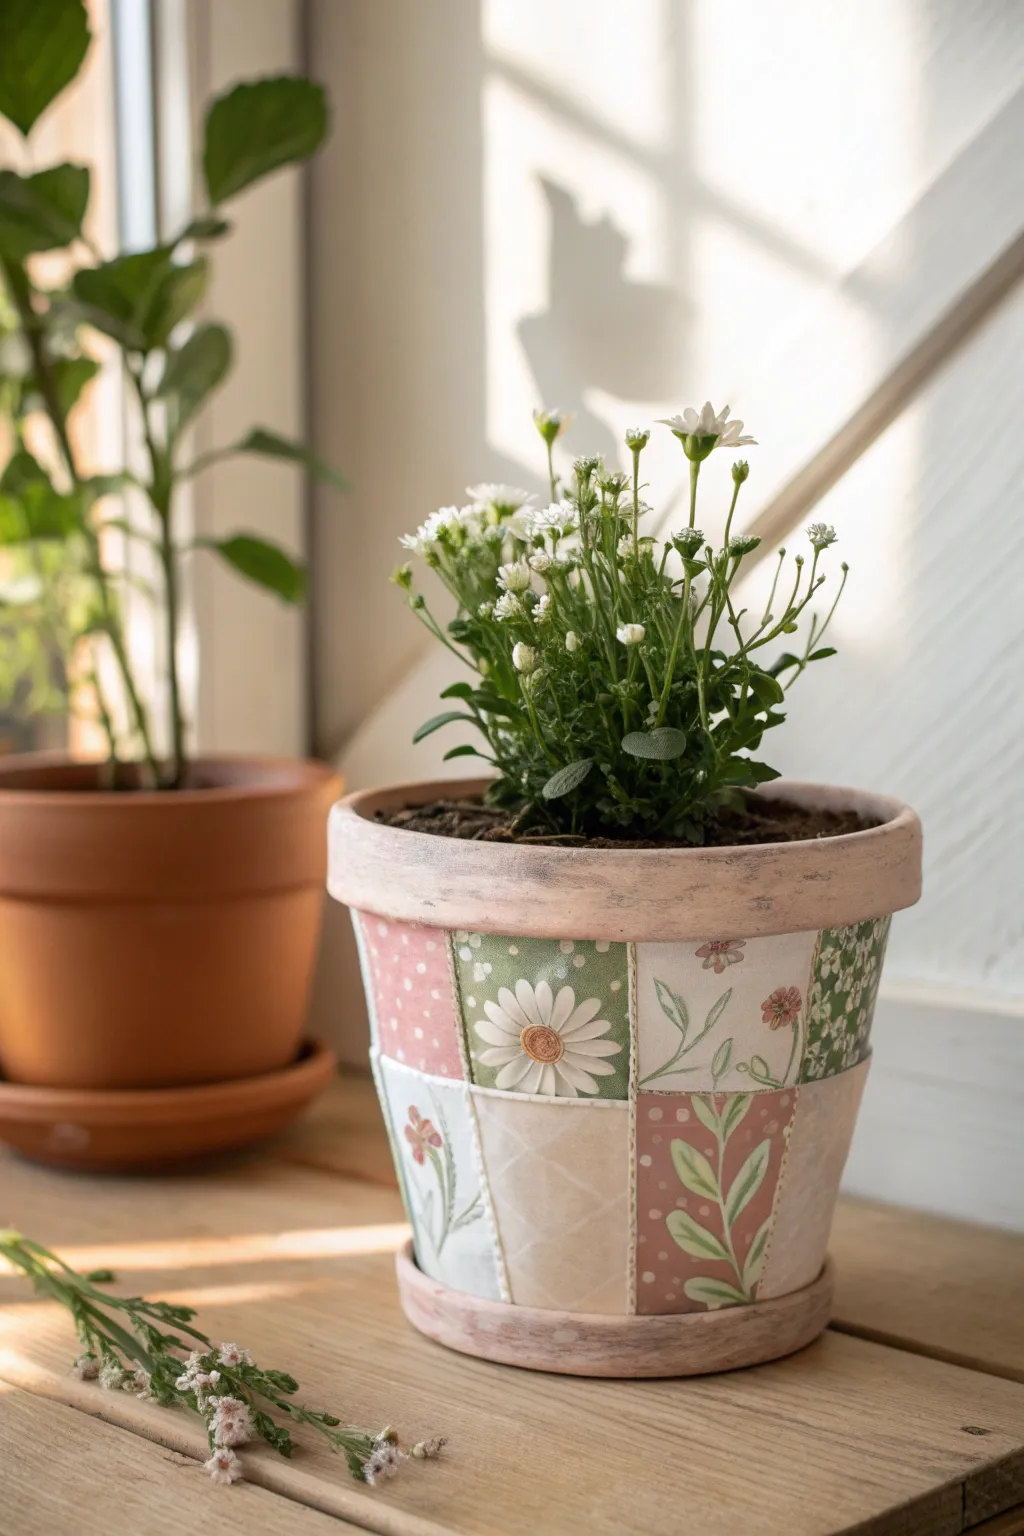
Transform a standard terracotta vessel into a cozy, cottage-core masterpiece using the art of decoupage. By layering paper napkin squares in a patchwork grid, you’ll create the illusion of a soft, hand-stitched quilt wrapped around your favorite plant.
Step-by-Step
Materials
- Standard terracotta pot (cleaned and dried)
- White acrylic craft paint
- Cream or off-white acrylic craft paint
- Paper napkins with various small floral/vintage prints (2-3 contrasting patterns)
- Decoupage medium (like Mod Podge Matte)
- Flat paintbrush (1-inch width)
- Small foam sponge brush
- Scissors
- Fine-grit sandpaper
- Small faux stitch tool or fine-point brown marker (optional)
- Clear matte sealer spray
Step 1: Preparation and Base Coat
-
Clean the Surface:
Begin by thoroughly wiping down your terracotta pot to remove any dust or oils. If it’s an old pot, scrub it well and let it dry completely overnight to ensure good adhesion. -
Apply the Whitewash:
Mix a small amount of water into your white acrylic paint until it has a milky consistency. Brush this casually over the entire exterior, including the rim. -
Wipe Back:
Before the paint dries fully, use a paper towel or rag to wipe away some of the excess. You want the natural clay color to peek through slightly for a rustic, aged look. -
Paint the Rim:
For the thick rim at the top, apply a slightly more opaque coat of a cream or dusty pink shade to frame the artwork below. I like to sponge this on for texture rather than brushing it. -
Dry Completely:
Set the pot aside to dry fully for at least one hour.
Step 2: Creating the Patchwork
-
Prepare Napkin Squares:
Take your floral paper napkins and separate the plies. You only want the very top, printed layer. Discard the white backing layers. -
Cut the Grid:
Cut the thin napkin layers into uniform squares or rectangles. Size them so they will fit roughly two rows deep on the body of your pot. -
Plan the Layout:
Lay your cut squares out on a table first to balance the patterns. Alternate between busy floral prints, simple polka dots, and solid colors to mimic a real quilt. -
Apply First Square:
Brush a thin layer of decoupage medium onto a spot on the pot’s body. Gently press your first napkin square onto the wet glue. -
Smooth Gently:
Using your finger wrapped in plastic wrap (to prevent tearing), gently smooth the napkin from the center outward to remove big wrinkles. Small wrinkles add character, so don’t worry about perfection. -
Top Coat Adhesion:
Immediately brush a very thin layer of decoupage medium over the top of the adhered square to seal it. -
Build the Grid:
Continue adding squares side-by-side, ensuring the edges touch or slightly overlap. Work your way around the circumference of the pot. -
Second Row:
Repeat the process for the bottom row of squares, aligning them with the top row to maintain the grid structure.
Tear, Don’t Cut
For a softer, less geometric look, wet a fine paintbrush and trace your cutting lines on the napkin with water. Gently tear along the wet line for a fuzzy edge that blends seamlessly.
Step 3: Finishing Touches
-
Dry and Seal:
Allow the decoupage layer to dry for 2-3 hours until it is no longer tacky. -
Add ‘Stitching’:
To enhance the quilt effect, verify the grid lines are dry. If you wish, use a very fine brown marker to draw tiny dashes along the seams where the squares meet, looking like thread. -
Distress the Edges:
Take fine-grit sandpaper and very lightly scuff the rim and the bottom edge of the pot. This softens the look and blends the paper into the clay. -
Final Wash (Optional):
If the colors look too bright, mix a very watery brown or grey paint wash and brush it quickly over the whole design, wiping it off immediately. This acts as an antique glaze. -
Weatherproof:
Finish the project by spraying the entire pot—inside and out—with a clear matte acrylic sealer. This is crucial to protect the paper from water damage when you water your plant.
Level Up: Texture
Before painting the rim, mix a pinch of baking soda into your acrylic paint. This creates a gritty, stone-like texture that contrasts beautifully with the smooth decoupaged body.
Once the sealer has cured, fill your new quilted vessel with potting soil and bright white blooms for a charming display
Fabric-Wrapped Panels for Cozy Texture
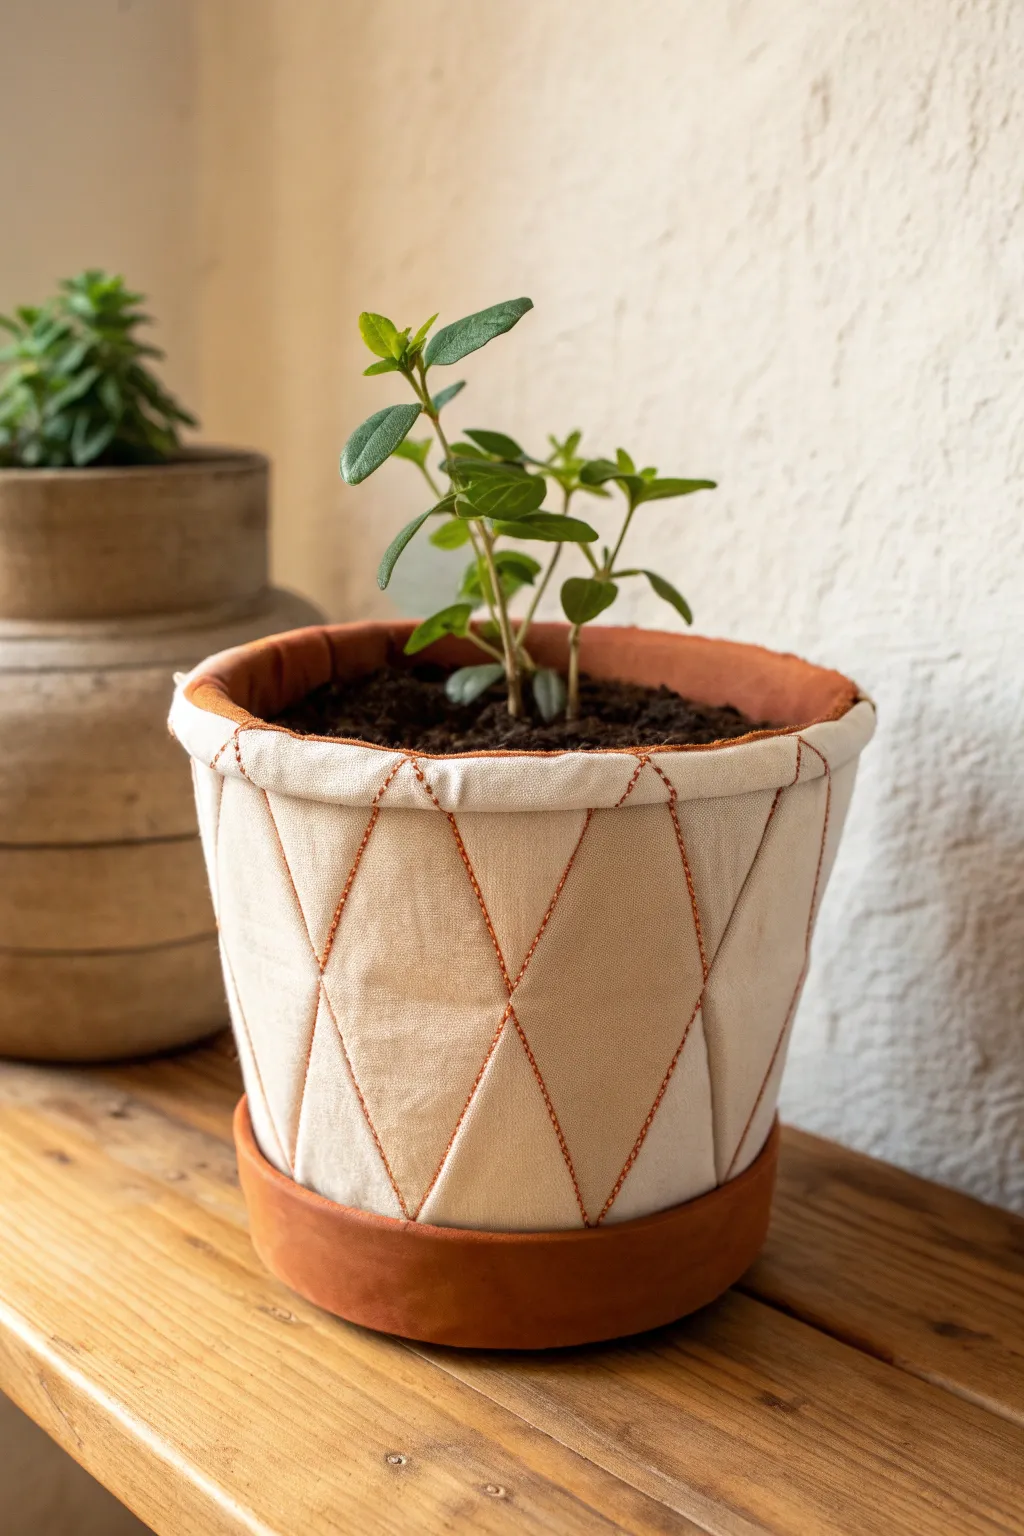
Transform a standard terracotta pot into a cozy, textured statement piece with a custom fabric wrap. By piecing together simple canvas panels with decorative topstitching, you create a quilted effect that wraps perfectly around the vessel’s curved surface.
Step-by-Step Tutorial
Materials
- Standard terracotta pot (cleaned)
- Heavyweight cotton canvas or linen fabric (beige/cream)
- Embroidery floss or thick upholstery thread (terracotta/rust color)
- Fabric glue or heavy-duty craft adhesive
- Paper (for making a template)
- Pencil and ruler
- Tailor’s chalk or disappearing ink pen
- Sharp fabric scissors
- Sewing needle (large eye for thick thread)
- Iron and ironing board
- Binder clips or clothespins
Step 1: Drafting the Pattern
-
Create a paper template:
First, map out the shape of your pot. Wrap a piece of paper around the pot and trace the top rim and bottom edge to capture the slight curve. Cut this shape out; this is your master pattern. -
Calculate panels:
Measure the circumference of the pot’s widest point. Divide this number by how many diamond sections you want (e.g., 8 or 10) to determine the width of each panel. -
Subdivide the template:
Fold your paper master pattern vertically into equal sections based on your calculation. Unfold it and trace these fold lines with a pencil to visualize your vertical seams. -
Draw the diamonds:
Using a ruler, draw diagonal lines connecting the top corners of one section to the bottom center of the next, creating a lattice or diamond grid on your paper template.
Pro Tip: Crisper Folds
Before ironing your vertical creases, lightly mist the canvas with water. The steam helps the heavy fabric hold a sharp edge, enhancing the panel effect.
Step 2: Preparing the Fabric
-
Cut the fabric base:
Lay your canvas fabric flat and place the full paper template on top. Pin it in place and cut out the fabric shape, leaving an extra 1 inch of allowance on the top edge to fold over later. -
Transfer the design:
I find it helpful to poke small holes at the intersections of the diamond pattern on the paper. Use these holes to mark dots on your fabric with a pencil, then connect the dots with a ruler to draw your stitching guidelines directly onto the canvas. -
Press vertical folds:
To give the pot that distinct panel-like structure, fold the fabric along the vertical lines where the panels will meet. Press these folds sharply with an iron to create permanent creases.
Troubleshooting: fabric bunching?
If the fabric ripples near the bottom, your pattern curve might be off. Cut small vertical slits in the bottom seam allowance to help it fan out and lay flat.
Step 3: Stitching the Texture
-
Thread the needle:
Cut a long length of your terracotta-colored embroidery floss. Thread your needle and knot the end securely. -
Stitch the diamonds:
Using a simple running stitch or backstitch, sew along your diagonal pencil guidelines. Make your stitches fairly large and visible to mimic the rustic look in the image. -
Stitch the vertical spines:
Sew running stitches down the vertical pressed creases you made earlier. This emphasizes the separate ‘panels’ of the design. -
Secure threads:
Tie off your threads on the backside (the wrong side) of the fabric. It doesn’t need to be neat back there since it will be glued down.
Step 4: Assembly
-
Apply adhesive to the pot:
Brush an even layer of fabric glue onto the surface of the terracotta pot, avoiding the very bottom rim if you want that exposed clay look. -
Position the wrap:
Carefully align the bottom edge of your stitched fabric with the lower section of the pot. Smooth the fabric upwards, pressing firmly to remove air bubbles. -
Join the seam:
Where the two ends of the fabric meet, overlap them slightly. Fold the raw edge of the top layer under for a clean finish and glue it down securely. -
Wrap the rim:
Apply glue to the inside rim of the pot. Take that extra 1-inch allowance at the top, fold it over the pot’s lip, and press it onto the inner wall. -
Clamp and dry:
Use binder clips all around the top rim to hold the folded fabric in place while the glue sets. Let it dry completely according to your glue’s instructions.
Now your plain planter has a warm, tactile finish that adds instant charm to your shelf
Raised Texture Bands Using Simple Carved Patterns
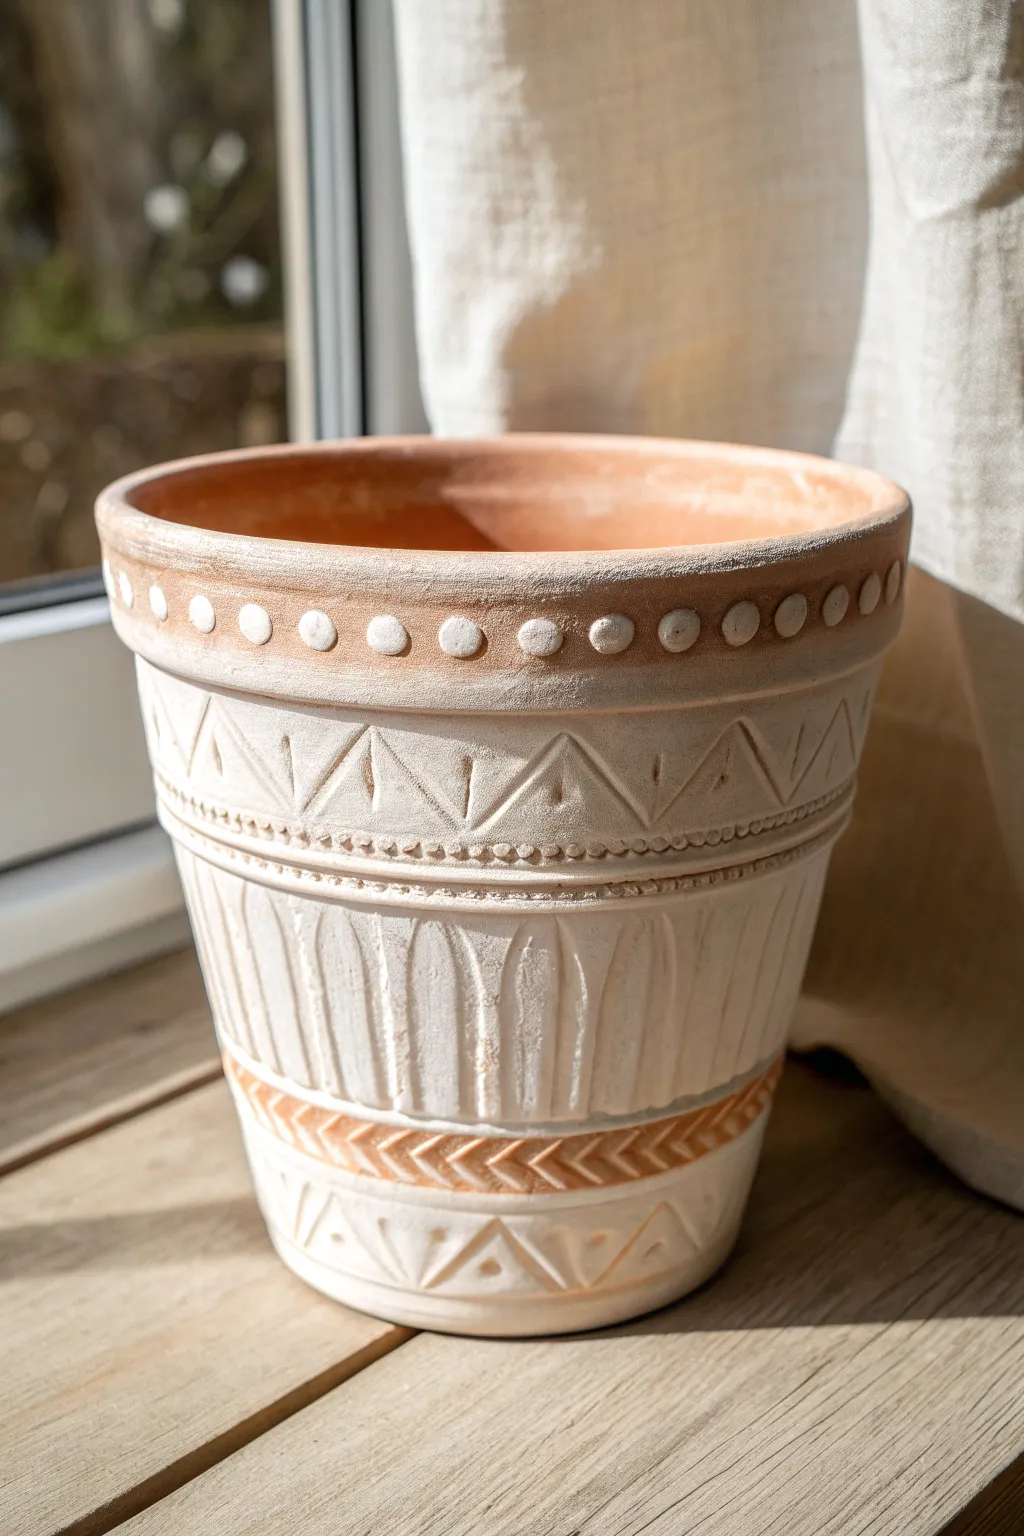
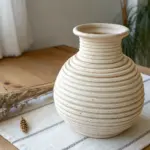
Transform a plain terracotta vessel into an artisanal masterpiece using thick texture paste and simple carving tools. This project creates a stunning high-relief effect where creamy white bands contrast beautifully against smooth, raw clay, perfect for adding a touch of rustic elegance to your windowsill.
How-To Guide
Materials
- Standard terracotta pot (clean and dry)
- White texture paste, modeling paste, or thick gesso
- Palette knife or flat spatula
- Carving tools (loop tool, needle tool, or even a toothpick)
- Painter’s tape
- Small round paintbrush
- Fine-grit sandpaper
- Matte clear sealer spray
Step 1: Preparation & Base Texture
-
Clean surface:
Begin by wiping down your terracotta pot with a damp cloth to remove any dust or oils. Let it dry completely so the texture medium adheres properly. -
Map the bands:
Use painter’s tape to mark off the sections you want to keep as raw clay. For this design, tape off the very top rim, a thin band about 2 inches down, and a section near the base. -
Apply texture paste:
Using a palette knife, spread a thick, even layer of white texture paste onto the exposed terracotta areas. Aim for a thickness of about 1/8 inch to allow for deep carving. -
Smooth the surface:
Gently glide the palette knife over the paste to create a relatively smooth canvas. Don’t worry about perfection; a little handmade texture adds character. -
Initial set time:
Let the paste sit for about 15-20 minutes. You want it firm enough to hold a shape but soft enough to carve easily without chipping.
Clean Lines Hack
Keep a damp sponge nearby while carving. Wipe your tools frequently to prevent buildup of the texture paste, ensuring every carved line stays crisp and sharp.
Step 2: Carving the Design
-
Carve the top dots:
Starting just below the rim, use a small loop tool or the back of a paintbrush to press circular divots into the paste, creating a row of raised dots. -
Create the zigzag band:
Below the dots, define the main decorative band. Use a needle tool to carve a continuous zigzag line all the way around the pot. -
Detail the triangles:
Inside each lower triangle formed by the zigzag, carve a small vertical dash or teardrop shape for added dimension. -
Define the borders:
Carve two horizontal parallel lines below the zigzag section. Then, use a needle tool to create tiny, repetitive dots between these lines for a beaded look. -
Carve vertical fluting:
For the large middle section, use a wide loop tool to carve vertical arches. Remove the white paste in these arches to reveal the terracotta color underneath, creating a fluted column effect. -
Refine the flutes:
I find it helpful to go back over the edges of these vertical arches to sharpen them, ensuring a clean contrast between the white relief and the clay background. -
Lower herringbone band:
Near the bottom, carve a band of chevron or herringbone arrows pointing to the right, creating a sense of movement. -
Bottom zigzag finish:
Finish the design with a final row of simple zigzag triangles at the very base, similar to the top band but slightly smaller.
Step 3: Finishing Touches
-
Remove tape:
Carefully peel away the painter’s tape while the paste is still slightly pliable to prevent cracking the edges. -
Clean up edges:
Use a damp brush to gently wipe away any unwanted smudges of paste on the raw terracotta sections. -
Full dry:
Allow the pot to dry completely overnight. The thick paste needs time to harden fully. -
Light sanding:
Once dry, very lightly rub fine-grit sandpaper over the highest points of the white texture to knock down any sharp burrs. -
Seal the work:
Spray the entire pot with a matte clear sealer. This protects the relief work and prevents the raw terracotta from wicking moisture too quickly when you water your plants.
Color Wash Finish
After the white texture dries, apply a watered-down brown or grey acrylic wash over the entire pot, then wipe it back. It settles in crevices for an antique look.
Now simpler plants like ferns or succulents will have a beautifully textured home that feels both ancient and modern
Twine-Wrapped Base for Rustic Charm
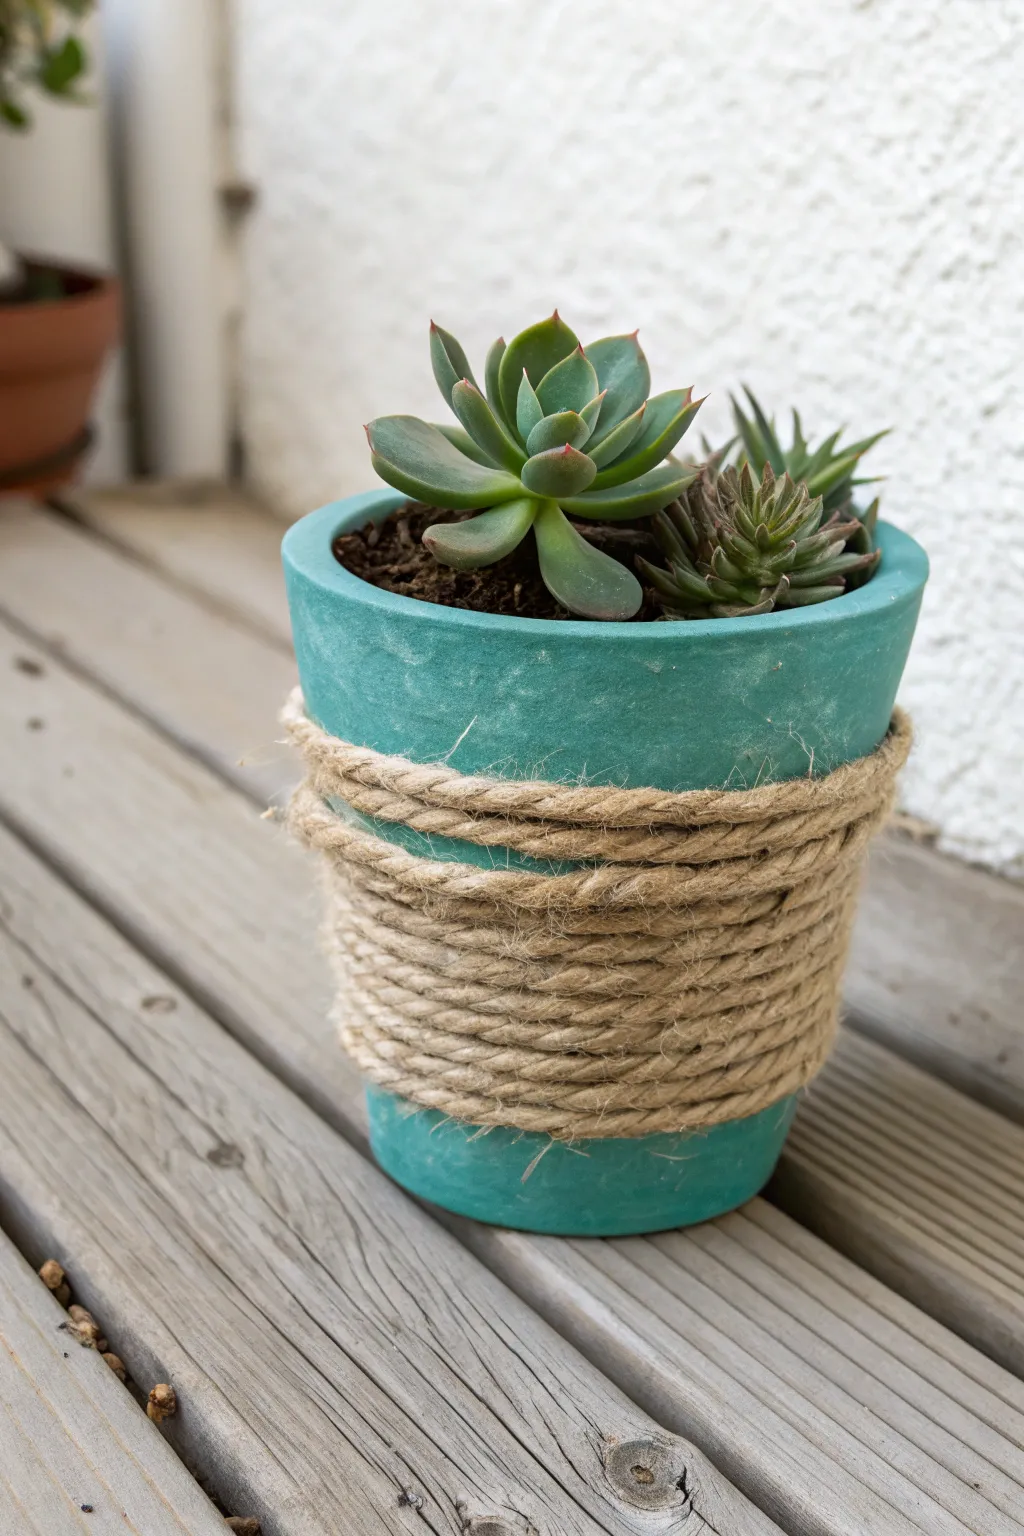
Transform a standard terracotta planter into a beachy, rustic accent piece with just a splash of paint and some texture. This project combines a breezy turquoise matte finish with the natural warmth of jute twine for a look that feels right at home in a coastal or farmhouse setting.
Step-by-Step Guide
Materials
- Small terracotta pot (approx 4-6 inches)
- Matte acrylic paint (turquoise or seafoam green)
- Medium flat paintbrush
- Thick jute twine or sisal rope
- Hot glue gun and glue sticks
- Scissors
- Succulent potting soil
- Small succulent plants (e.g., Echeveria)
Step 1: Painting the Base
-
Clean the surface:
Begin by wiping down your terracotta pot with a damp cloth to remove any dust or manufacturing residue. Let it dry completely so the paint adheres properly. -
Apply the first coat:
Dip your flat brush into the turquoise matte acrylic paint. Apply a smooth, even layer around the exterior of the pot, brushing horizontally to minimize visible strokes. -
Paint the rim:
Don’t forget to paint the top rim and about an inch down the inside of the pot, as this area will be visible once the soil is added. -
Dry and repeat:
Allow the first coat to dry for about 20-30 minutes. If the terracotta color is still peeking through, apply a second coat for opaque coverage. -
Create a weathered look (optional):
For a slightly rustic texture like the original image, you can dab a dry paper towel over the wet paint in random spots to create subtle surface variation.
Sliding Rope?
If the tapered shape makes the rope slide down, use more frequent glue dots. You can also lightly sand the painted surface where the rope goes to give the glue better grip.
Step 2: Wrapping the Twine
-
Determine placement:
Visualize where you want the twine band to sit. On this pot, it covers the central third, leaving the painted rim and base exposed. -
Anchor the start:
Apply a small bead of hot glue to the back of the pot where you want the wrapping to begin. Press the raw end of the jute twine firmly into the glue. -
Begin the wrap:
Wrap the twine around the pot horizontally. Keep the first loop straight and tight, as it will guide the rest of the layers. -
Secure as you go:
Apply small dots of hot glue every few inches to keep the rope from slipping down the tapered sides of the pot. -
Stack the coils:
Continue wrapping the twine, stacking each new coil directly beneath the previous one. Push them upward gently with your fingers to ensure there are no gaps showing the paint underneath. -
Create the bulk:
Wrap until you have a band approximately 2-3 inches wide. The thickness adds a nice tactile contrast to the smooth painted surface. -
Finish the wrap:
Once you reach your desired width, cut the twine. Apply a final dab of hot glue on the back side (lined up with your starting point) and tuck the raw end underneath the previous coil to hide it. -
Clean up glue strands:
Check the twine for any wispy hot glue spiderwebs and pull them off for a clean finish.
Step 3: Planting
-
Add drainage:
If your pot has a large drainage hole, place a small mesh screen or a shard of broken pottery over it to keep soil in while letting water out. -
Fill with soil:
Fill the pot about three-quarters full with a specific succulent or cactus potting mix, which ensures proper drainage. -
Arrange the succulents:
Gently remove your succulents from their nursery pots. Tease the roots slightly and nestle them into the soil. I find placing a taller rosette near the back and smaller ones forward creates a nice balanced look. -
Top off:
Add a little more soil around the base of the plants to secure them, pressing down gently with your fingers or a spoon. -
Final brush off:
Use a clean, dry paintbrush to sweep any stray soil particles off the succulent leaves or the turquoise rim.
Two-Tone Texture
Try painting the bottom third of the twine wrap with a diluted white paint for an ‘ombre’ dipped rope effect that blends into the turquoise base.
Place your new planter on a sunny windowsill where the texture of the twine can catch the light
Doodled Patterns for a Sketchbook Vibe
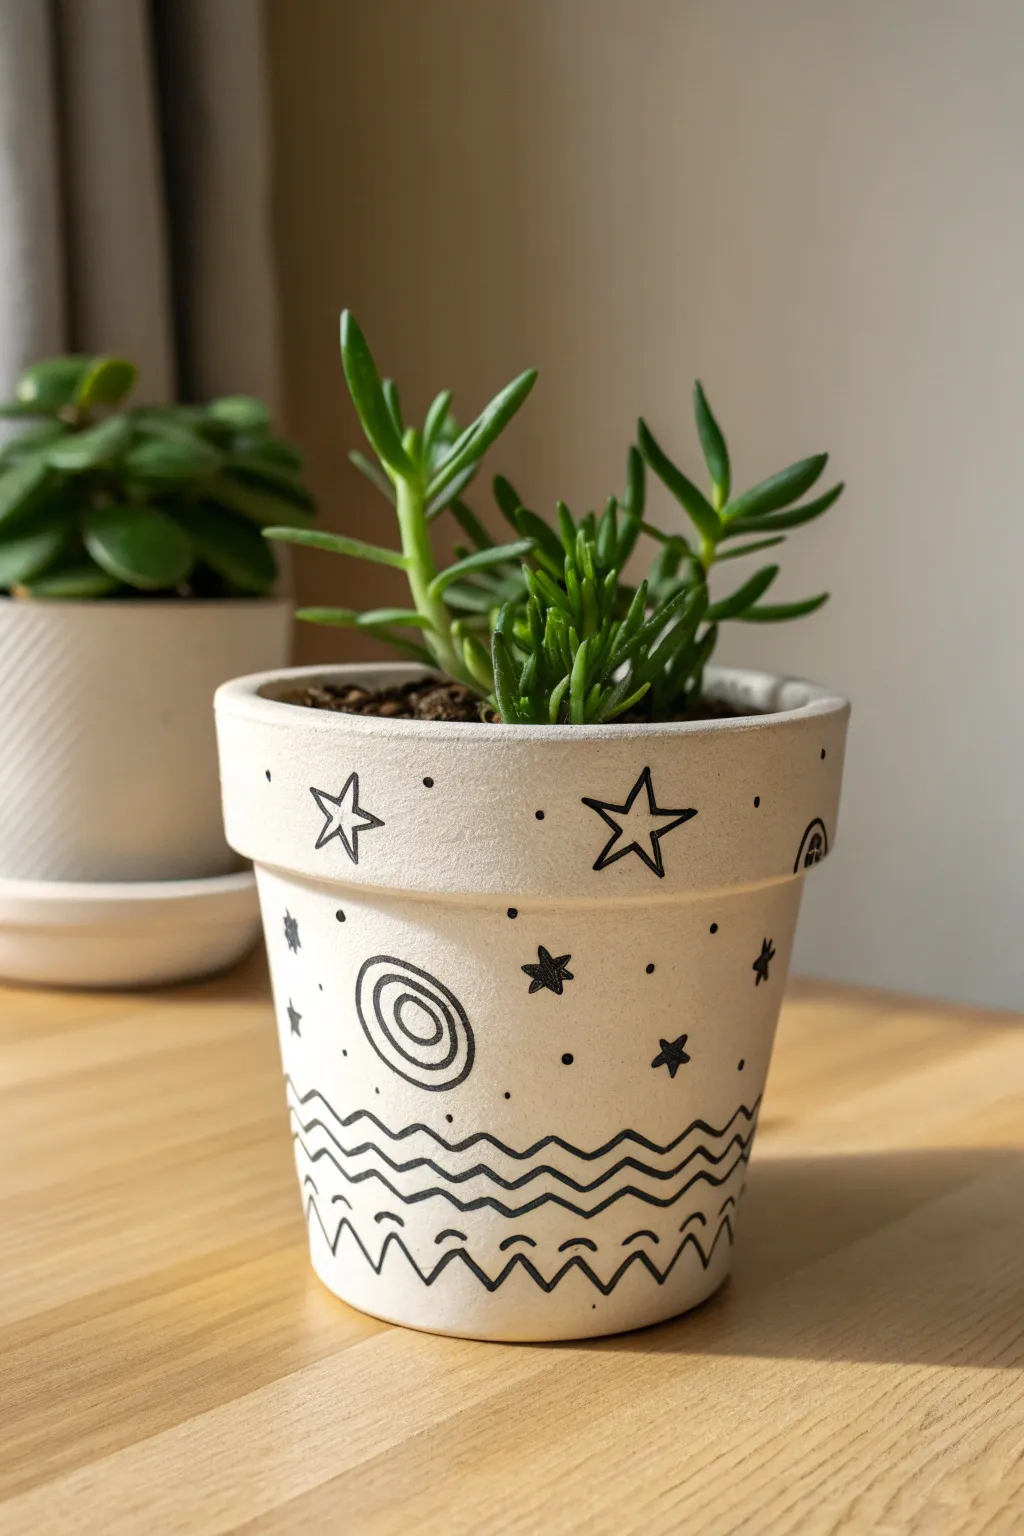
Turn a plain terracotta pot into a whimsical piece of art with this simple black-and-white design. The hand-drawn stars, squiggles, and planetary rings give off a charming sketchbook vibe that feels personal and playful.
Step-by-Step Tutorial
Materials
- Terracotta pot (standard size)
- White acrylic paint (matte finish)
- Black permanent marker or paint pen (fine tip)
- Flat paintbrush (medium size)
- Pencil
- Eraser
- Clear matte sealant spray (optional but recommended)
Step 1: Preparing the Canvas
-
Clean surface:
Begin by wiping down your terracotta pot with a damp cloth to remove any dust or oils. Let it dry completely so the paint adheres properly. -
Base coat:
Apply a coat of matte white acrylic paint to the exterior of the pot, including the top rim. Don’t worry about the inside, as soil will cover it. -
Dry and repeat:
Allow the first coat to dry for about 20 minutes. If the terracotta color is still peeking through, apply a second or third coat until you have a solid, opaque white surface. -
Rim check:
Make sure the top rim is fully covered, as this area frames the plant and is highly visible.
Pro Tip: Pen Choice
Use an oil-based paint marker rather than a standard office permanent marker. Paint markers are opaque and resist fading much better in sunlight.
Step 2: Sketching the Design
-
Pencil guidelines:
Lightly sketch your design with a pencil first. This takes the pressure off getting it perfect on the first try with ink. -
Rim stars:
Draw large, open five-pointed stars on the rim of the pot. Space them out generously. -
Main stars:
On the main body of the pot, sketch a mix of solid black stars and tiny open stars. Vary the sizes to create visual interest. -
Planetary rings:
Add a few circular motifs that look like planets or portals. Draw a small circle and surround it with two larger concentric rings. -
Bottom waves:
Near the bottom quarter of the pot, lightly draw three parallel wavy lines that go around the entire circumference. -
Zig-zags:
Below the wavy lines, sketch two rows of sharp zig-zags (chevron patterns) to anchor the design at the base.
Step 3: Inking the Doodles
-
Trace the rim:
Using your black permanent marker or paint pen, carefully trace over the large stars on the rim. Keep your hand steady and relaxed. -
Rim details:
Add small black dots randomly between the rim stars to fill the negative space without cluttering it. -
Body details:
Move to the main body and trace your pencil sketches. Fill in the solid stars completely with black ink. -
Scattered dots:
Sprinkle tiny dots around the planets and stars on the main body. I find that varying the density of these dots makes the design feel more organic. -
Wavy lines:
Trace the three wavy lines near the bottom. Try to keep the spacing between them relatively consistent, but remember that slight wobbles add to the hand-drawn charm. -
Zig-zag base:
Ink the zig-zag patterns at the very bottom. You can add small semi-circles or dots inside the crevices of the bottom-most zig-zag line for extra detail.
Troubleshooting: Smudges
If you accidentally smudge the black ink, let it dry completely, then paint over the mistake with a tiny dab of white paint before redrawing.
Step 4: Finishing Touches
-
Erase guidelines:
Once you are certain the ink is 100% dry (give it at least 15 minutes to be safe), gently erase any visible pencil marks. -
Seal the pot:
Take the pot to a well-ventilated area and apply a clear matte sealant spray. This protects your paint from water damage when you water your plant. -
Potting:
After the sealant is dry, add your soil and favorite succulent to complete the look.
Now you have a charming custom planter ready to showcase your favorite greenery
Cute Face Planters With Simple Expressions
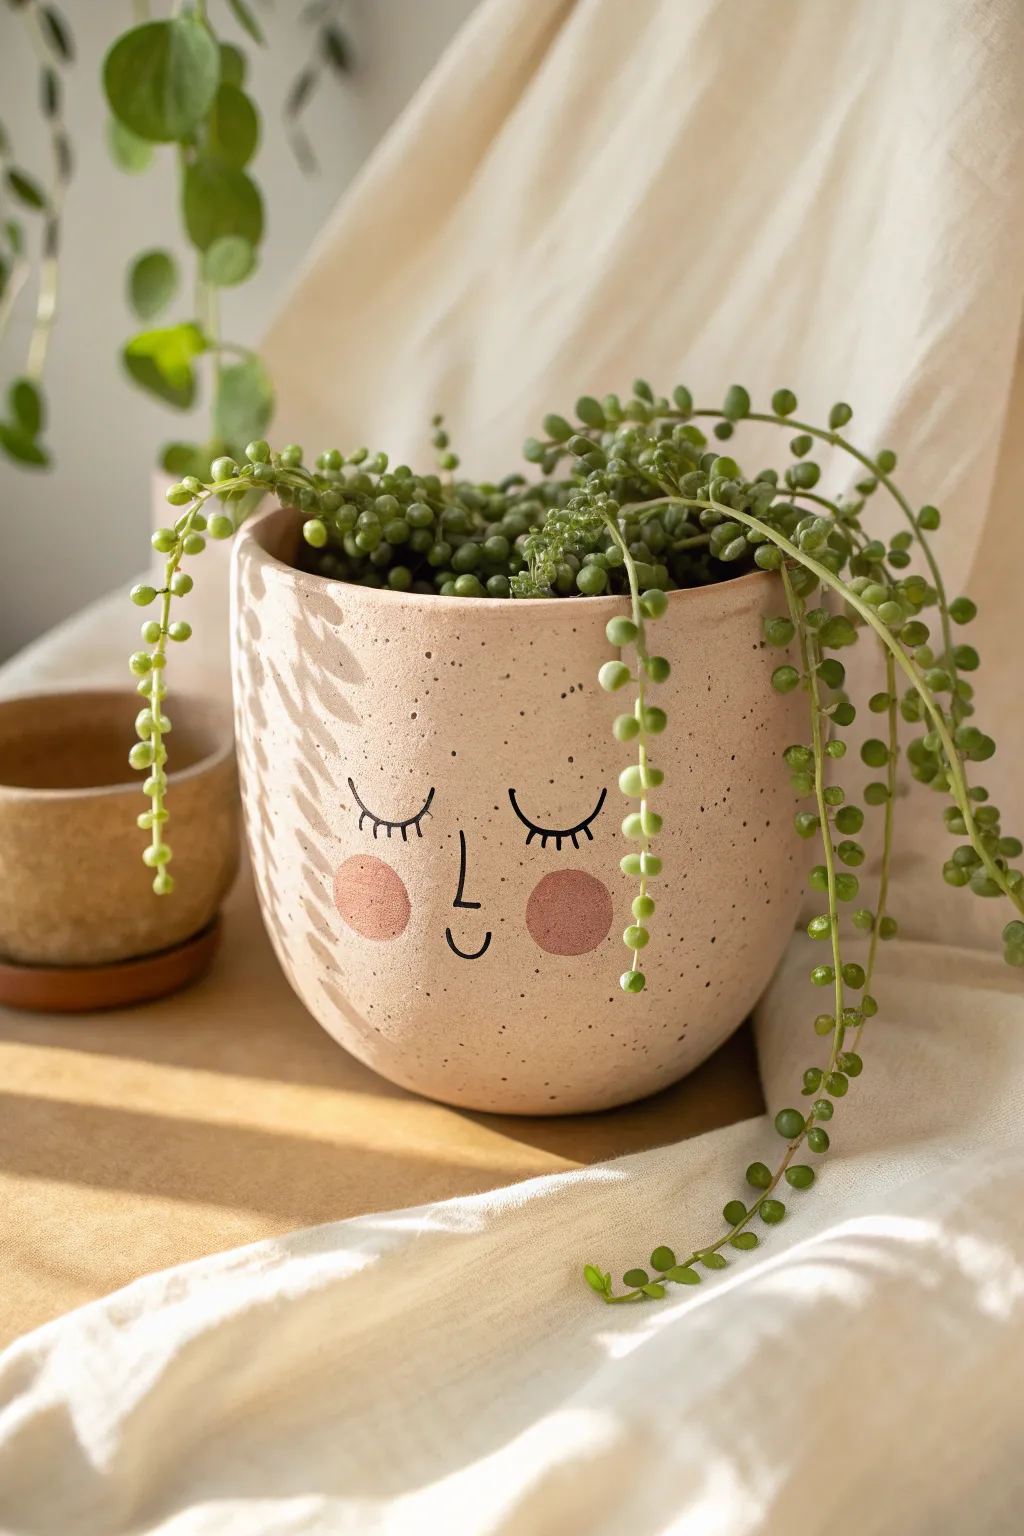
Bring a touch of whimsical personality to your indoor garden with this charming face planter project. Using simple painting techniques, you’ll transform a plain terracotta pot into a sweet, sleeping character featuring blushed cheeks and natural speckles.
Step-by-Step
Materials
- Plain terracotta or ceramic pot (rounded shape preferred)
- Acrylic paint: cream/beige, soft pink, black, dark brown
- Matte sealant spray or Mod Podge
- Old toothbrush or stiff bristle brush
- Fine liner paintbrush (size 0 or 00)
- Small round sponge or foam pouncer
- Medium flat brush
- Pencil and eraser
- Palette or paper plate
- Water cup and paper towels
Step 1: Base Coat & Texture
-
Clean the surface:
Begin by wiping down your pot with a damp cloth to remove any dust or manufacturing residue. Let it dry completely to ensure the paint adheres smoothly. -
Mix the base color:
On your palette, mix a generous amount of cream or beige acrylic paint. Adjust the shade until it mimics the warm, sandy tone of unglazed stoneware seen in the photo. -
Apply the first coat:
Using the medium flat brush, apply an even layer of the beige paint over the entire exterior of the pot. Don’t forget the top rim, as this will be visible even when planted. -
Dry and repeat:
Let the first coat dry for about 20 minutes. Apply a second or third coat until the original color of the pot is completely hidden and the finish looks solid and opaque. -
Prepare the speckle mix:
Mix a small amount of dark brown paint with a few drops of water to create a fluid, inky consistency. This needs to be thin enough to flick easily. -
Add the speckles:
Dip an old toothbrush or stiff brush into the thinned brown paint. Hold the brush about 6 inches from the pot and run your thumb across the bristles to flick tiny splatters onto the surface. Rotate the pot to cover all sides evenly.
Uneven Speckles?
If you get large blobs instead of mist, your paint is likely too thick. Add water drop by drop until it flicks easily. Test on paper first!
Step 2: Painting the Face
-
Draft the features:
Once the base and speckles are fully dry, use a pencil to very lightly sketch the face. Draw two wide U-shapes for closed eyes, a simple L-shape for the nose, and a small curve for the smile. Mark the spots for the cheeks on either side. -
Paint the cheeks:
Pour a small amount of soft pink paint onto your palette. Use a round sponge pouncer or a specialized stencil brush. Dab off excess paint onto a paper towel until the intricate texture of the sponge is barely wet. -
Stipple the blush:
Gently press the sponge onto the marked cheek areas. Use a straight up-and-down dabbing motion to create perfect circles with a soft, powdery edge rather than a hard line. -
Dry the cheeks:
Allow the pink paint to dry completely before moving on to the black details to prevent smudging. -
Outline the eyes:
Switch to your fine liner brush and black acrylic paint. Carefully trace over your pencil lines for the sleeping eyes, keeping the pressure consistent for a smooth line. -
Add eyelashes:
Paint three or four short, delicate strokes extending downward from the center of each eye curve to create the lashes. -
Define the nose:
Paint the nose using a single fluid motion if possible. Start the vertical line slightly higher than the eyes and curve it gently at the bottom. -
Paint the mouth:
Add the small smile just below the nose line. I find it helpful to anchor my pinky finger against the pot for stability while painting these tiny details. -
Clean up sketches:
Wait at least an hour for the black paint to cure fully. If any pencil marks are still visible, gently erase them now.
Hairdryer Hack
Use a hairdryer on a low, cool setting between paint layers to speed up drying time significantly, preventing smudges on the rounded surface.
Step 3: Finishing Touches
-
Seal the art:
To protect your design from water damage when watering plants, apply a coat of matte sealant spray or brush on a layer of matte Mod Podge over the entire painted exterior. -
Final cure:
Let the sealant cure for 24 hours before adding soil and your favorite trailing plant, like the string of pearls shown in the example.
Now you have a serene little friend ready to hold your favorite succulents on a bright windowsill
Mushroom House Pot for Whimsical Garden Decor

Transform ordinary terracotta into a fairytale dwelling with this charming mushroom house planter. Featuring a vibrant red toadstool roof and a detailed cottage base, this project adds a touch of magic to any garden nook or patio table.
Step-by-Step Tutorial
Materials
- Terracotta pot (base, standard shape)
- Terracotta saucer (roof, slightly wider than the pot rim)
- Small terracotta pot (side decoration)
- Outdoor acrylic paints (red, cream/off-white, black, brown)
- White paint pen or small detail brush
- Strong outdoor adhesive (E6000 or similar)
- Clear matte outdoor sealer spray
- Paintbrushes (sponge brush and fine liner brush)
- Potting soil
- Small trailing plants (like creeping thyme) and moss
Step 1: Preparing the Base Structure
-
Clean and Dry:
Begin by thoroughly wiping down your terracotta pots and saucer with a damp cloth to remove any dust or sticker residue. Let them dry completely, as moisture will prevent the paint from adhering properly. -
Base Coat Application:
Flip the main pot upside down; this will be the ‘house’ structure. Paint the entire surface with a cream or off-white acrylic paint. I usually apply two or three thin coats rather than one thick one to get an even, opaque finish. -
Roof Painting:
While the base dries, take the terracotta saucer and paint the top side (which will be the exterior roof) a vibrant, earthy red. Leave the rim unpainted or paint it a contrasting brown if you prefer. -
Texture the Roof:
To give the roof that organic, slightly weathered look seen in the photo, lightly sponge a tiny bit of brown or darker red paint over the bright red layer while it’s still tacky. -
Polka Do Re Mi:
Once the red roof is dry to the touch, use a white paint pen or a small brush to add the classic white spots. Don’t make them perfect circles; slightly irregular, sketched shapes look more distinctively handmade.
Paint Pen Trick
If your white spots look too transparent over the red, dot them once, let dry for 5 minutes, and dot them again for solid brightness.
Step 2: Adding Architectural Details
-
Outline the Door:
On the cream base pot, use a pencil to lightly sketch an arched door near the bottom rim. Outline this arch with a decorative brick pattern using reddish-brown paint. -
Door Details:
Fill in the door shape with white or light grey paint. Use your fine liner brush to add a black outline and a small red dot for the doorknob. This high contrast makes the details pop. -
Create Windows:
Paint small arched shapes in black around the upper middle section of the pot for windows. Once the black is dry, paint a thick cream or white border around them to create the effect of window frames. -
Window Panes:
Using your white paint pen or the finest brush you have, draw a cross or a grid pattern inside the black window shapes to simulate window panes. -
Base Rim:
Paint the thick rim at the very bottom of the upside-down pot (which is actually the pot’s original rim) a dark brown or grey to simulate a stone foundation.
Step 3: Designing the Side Pot
-
Mini Pot Prep:
Take the smaller terracotta pot intended for the side. You can leave the base natural terracotta for a rustic look or paint it to match the house. -
Matching Spots:
Tie the design together by painting white polka dots on the lower half of this small pot, mimicking the pattern on the mushroom roof.
Fairy Garden Magic
Add tiny polymer clay figurines, a miniature wooden ladder, or solar-powered string lights inside the roof for a nighttime glow.
Step 4: Assembly and Planting
-
Sealing the Work:
Before gluing anything, take all painted pieces outside and spray them with a clear matte outdoor sealer. This step is crucial to protect your artwork from rain and UV fading. -
Roof Installation:
Squeeze a generous ring of strong outdoor adhesive onto the bottom of the upside-down base pot. Center the red saucer on top and press down firmly. Allow this to cure according to the glue instructions. -
Planting the Crown:
Fill the saucer ‘roof’ with potting soil. Plant creeping thyme, sedum, or baby’s tears—anything that will spill over the edges like unruly thatch. -
The Moss Garden:
Fill the small side pot with soil and plant a small fern or grass. Pack fresh moss around the base of the plant for a lush, forest-floor appearance. -
Final Placement:
Arrange the main mushroom house and the small side pot together in your garden nook or on a stone step to complete the scene.
Now you have a delightful little habitat ready to welcome the local garden fairies to their new home
Stacked Tiered Pots for a Mini Planter Tower
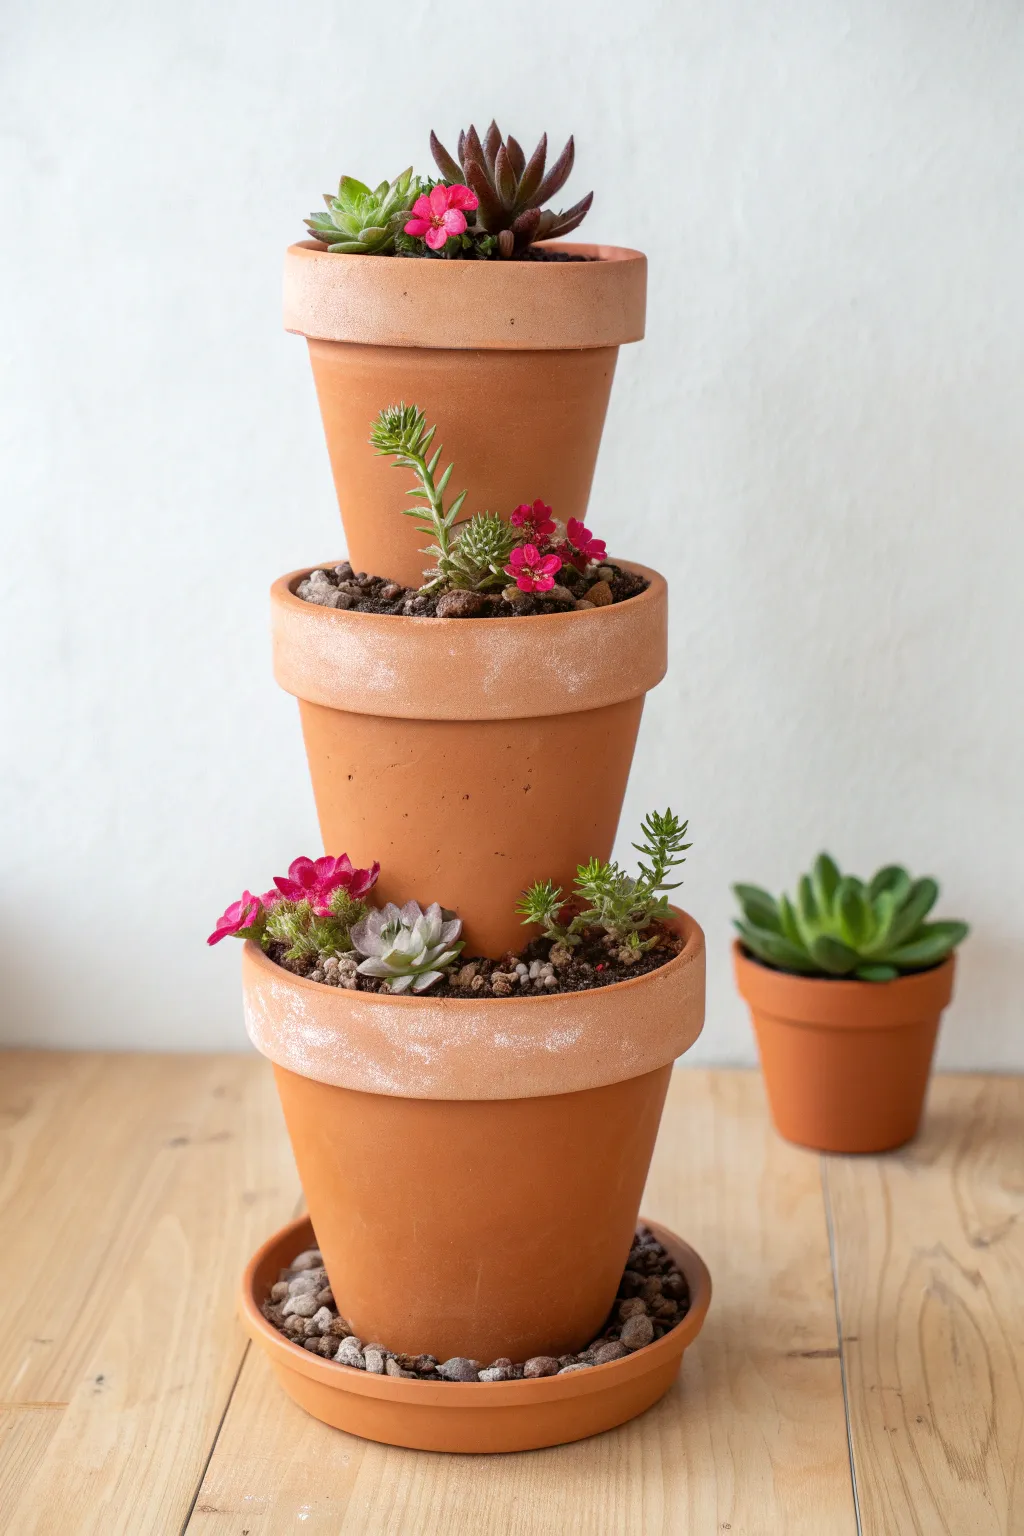
Maximize your vertical planting space with this charming tiered terracotta tower. By nesting pots of graduating sizes, you’ll create little pockets perfect for displaying distinct succulent varieties and bright flowering accents.
Step-by-Step
Materials
- One 8-inch terracotta pot with saucer
- One 6-inch terracotta pot
- One 4-inch terracotta pot
- Cactus potting mix
- Small pebbles or gravel
- Assorted small succulents (e.g., Echeveria, Sedum)
- Small flowering plants (e.g., Portulaca or Calandrinia)
- A sturdy central stake (rebar, metal rod, or thick dowel)
- Small trowel or spoon
Step 1: Base Preparation
-
Prepare the saucer:
Begin by placing your terracotta saucer on a flat, stable surface where you intend to display the tower, or on a moveable tray. Fill the saucer with a single layer of gravel to facilitate drainage and elevate the bottom pot slightly. -
Position the base pot:
Set your largest pot (the 8-inch one) directly onto the gravel-filled saucer. Ensure it sits level and isn’t wobbling. -
Insert the central rod:
Place your metal rod or stake through the drainage hole of the base pot. It needs to govern the stability of the whole tower. -
Anchor the rod:
While holding the rod straight, fill the base pot about halfway with soil. Pack the soil down firmly around the rod to keep it upright and centered.
Wobbly Tower?
If pots slip, drive the rod deeper into the ground beneath the saucer (if outdoors) or use a thicker layer of packed soil in the base pot to anchor the rod firmly.
Step 2: Stacking the Tiers
-
Add the first plants:
Before stacking the next pot, I like to plant the back section of the bottom pot now while it’s easily accessible. Add soil to the desired height and tuck in a succulent or two near the back rim. -
Thread the second pot:
Take the medium-sized pot (6-inch) and thread it onto the central rod through its drainage hole. -
Tilt and secure:
Slide the pot down until it rests on the soil of the base pot. Tilt it slightly forward or to one side to create a ‘pocket’ opening in the pot below. The rim of the top pot should rest against the inner wall of the bottom pot. -
Fill the middle tier:
Fill this second pot with soil, packing it down gently to secure its tilted position. Leave enough space at the top for your next layer. -
Add the top pot:
Thread the smallest pot (4-inch) onto the rod. Slide it down to rest on the soil of the middle pot. -
Oppose the tilt:
Tilt this top pot in the opposite direction of the middle one, or simply center it if you prefer a straight tower look depending on your rod length. Ensure it feels stable. -
Final soil addition:
Top off the smallest pot with cactus mix, leaving about half an inch of space below the rim for watering.
Step 3: Planting and Finishing
-
Plant the top tier:
Start planting at the very top. Place a dramatic, darker succulent like the pointed one shown in the image, paired with a small bright flower for contrast. -
Fill the pockets:
Work your way down to the exposed soil pockets of the middle and bottom pots. This is where you can get creative with trailing sedum or small rosettes. -
Add floral pops:
Tuck small flowering cuttings, like pink Portulaca, into the gaps between the succulents to mimic the vibrant splashes of color seen in the project photo. -
Top dress with gravel:
Carefully sprinkle a thin layer of fine gravel over any exposed soil in the tiers. This gives it a finished look and keeps the leaves off damp soil. -
Brush it clean:
Use a soft paintbrush to gently sweep away any loose soil particles that may have fallen onto the leaves or pot rims during planting. -
Secure the saucer:
Double-check the gravel in the bottom saucer. You can add larger decorative stones around the base of the main pot for extra decoration and stability.
Color Coordination
Match the flower colors to a specific theme. Try purple succulents with white flowers for a cool look, or red tips with orange blooms for warmth.
Now you have a stunning vertical garden that brings life to any small corner or patio table