Pinch pots are the quickest way to turn a simple lump of clay into something irresistibly sweet. Here are my favorite cute pinch pot ideas that keep the shaping beginner-friendly while adding tons of personality with tiny details.
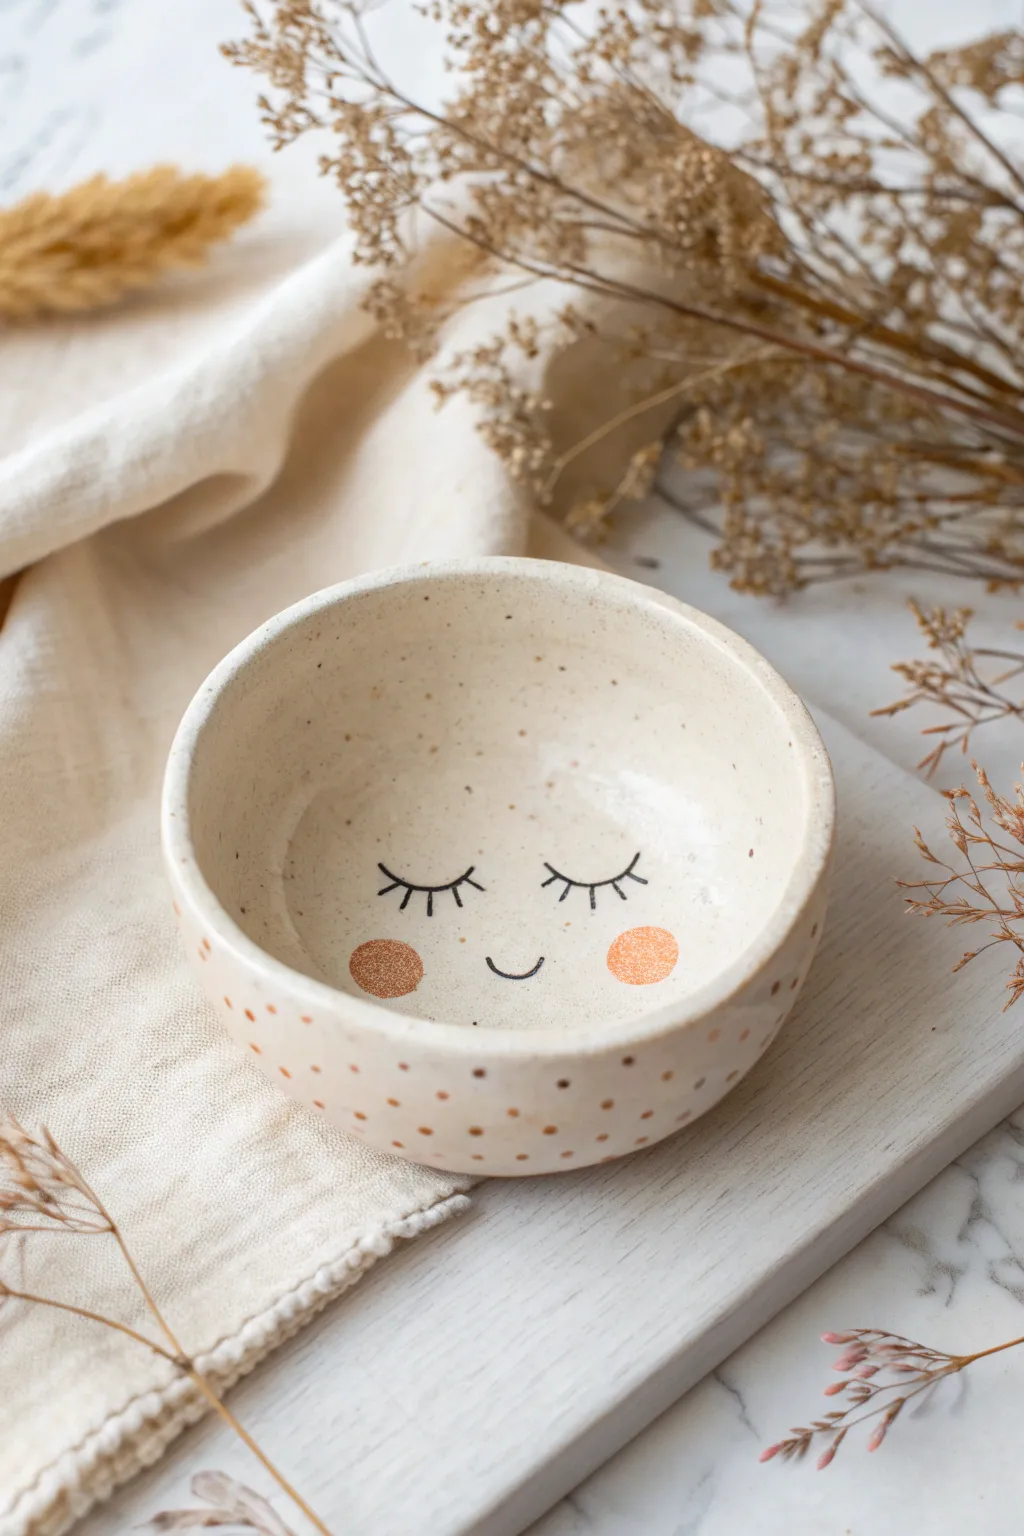
Sleepy Face Trinket Pinch Pot
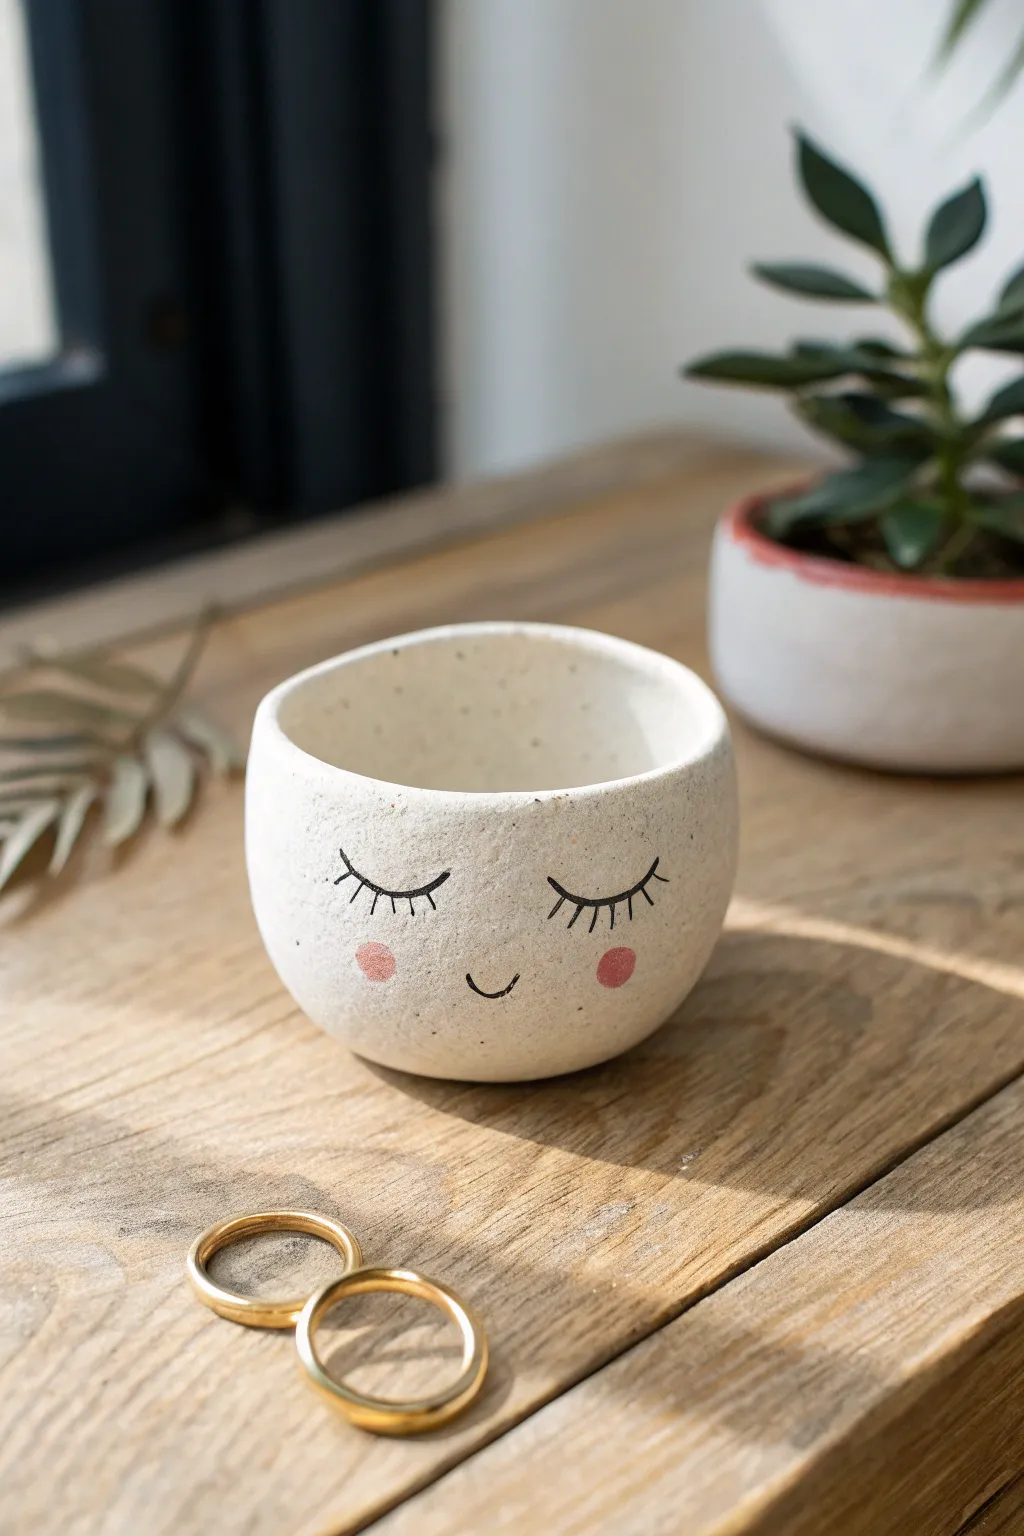
This charming little trinket dish features a serene, sleepy face painted delicately onto a speckled, matte surface that perfectly mimics high-end pottery. It’s the ideal size for holding rings, small earrings, or just bringing a bit of calm to your bedside table.
Detailed Instructions
Materials
- White classic air-dry clay (or polymer clay)
- Small bowl of water
- Synthetic sponge
- Fine-grit sandpaper (400 grit)
- Small round paintbrush (size 0 or 00)
- Black acrylic paint
- Rosy pink acrylic paint
- Speckled matte varnish (or standard matte varnish + brown paint)
- Old toothbrush (for speckling technique)
- Rolling pin (optional)
Step 1: Forming the Base
-
Prepare your clay ball:
Start with a lump of white air-dry clay about the size of a lemon. Knead it in your hands until it is warm, pliable, and free of cracks. Roll it into a smooth sphere. -
Open the pot:
Hold the clay sphere in one hand. With the thumb of your other hand, press gently into the center of the ball, stopping about a half-inch from the bottom. This creates the initial well. -
Pinch the walls:
Using your thumb on the inside and fingers on the outside, gently pinch the clay while rotating the ball. Work your way from the bottom up to the rim in a spiral motion. -
Shape the cylinder:
Aim for a slightly cylindrical shape rather than a wide bowl. Keep the walls even, about a quarter-inch thick all around. I like to tap the bottom gently on the table to create a flat, stable base. -
Smooth the surfaces:
Dip your finger or a slightly damp sponge into water and run it over the clay to smooth out any fingerprints or small cracks. Don’t use too much water, or the clay will become mushy. -
Refine the rim:
The rim in the photo is slightly organic but smooth. Gently compress the rim between your thumb and forefinger to round off any sharp edges. -
Drying time:
Set the pot aside to dry completely. For air-dry clay, this usually takes 24-48 hours depending on humidity. Rotate it occasionally so the bottom dries evenly.
Cracked Clay?
If cracks appear while drying, mix a tiny bit of fresh clay with water to make a paste (slip) and fill the crack. Smooth over and sand once dry.
Step 2: Sanding and Speckling
-
Sand for a ceramic finish:
Once fully dry, the clay will be white and chalky. Use fine-grit sandpaper to gently buff the entire surface. Focus on the rim and the outside curve to make it feel like smooth fired ceramic. -
Wipe away dust:
Use a barely damp cloth or sponge to wipe away all the sanding dust. The surface needs to be clean for the paint to adhere properly. -
Create the speckles:
Mix a tiny amount of brown paint with water until it’s very runny. Dip an old toothbrush into this mixture. Hold it near the pot and run your thumb across the bristles to flick tiny specks onto the surface. -
Control the density:
Apply the speckles lightly to mimic natural stoneware clay. You don’t want it to look polka-dotted, just subtly textured. Let this dry for about 10 minutes.
Step 3: Painting the Face
-
Position the features:
Lightly sketch the sleeping eyes and mouth with a pencil first. Place the eyes about halfway down the pot spaced comfortably apart. -
Paint the lashes:
Using your finest brush and black acrylic paint, trace the curved line for the closed eyelid. Add 5-6 small, vertical lashes extending upwards from each lid. -
Add the smile:
Paint a very small, simple ‘u’ shape between the eyes for the mouth. Keep the line weight thin and delicate. -
Apply the cheeks:
Dip the tip of a slightly larger round brush or a cotton swab into the rosy pink paint. Dab it gently once on each cheek area to create a soft, round blush circle. -
Seal the piece:
Once the face is completely dry, coat the entire pot (inside and out) with a matte varnish. This seals the clay and enhances the ‘stone’ look without making it glossy.
Waterproofing
Standard varnish isn’t waterproof! If you want to put a real plant inside, create a liner with foil or use a specialized dishwasher-safe sealer like Mod Podge.
Place your favorite rings inside and enjoy the peaceful vibe this little pot adds to your space


Kitty Cat Pinch Pot Planter
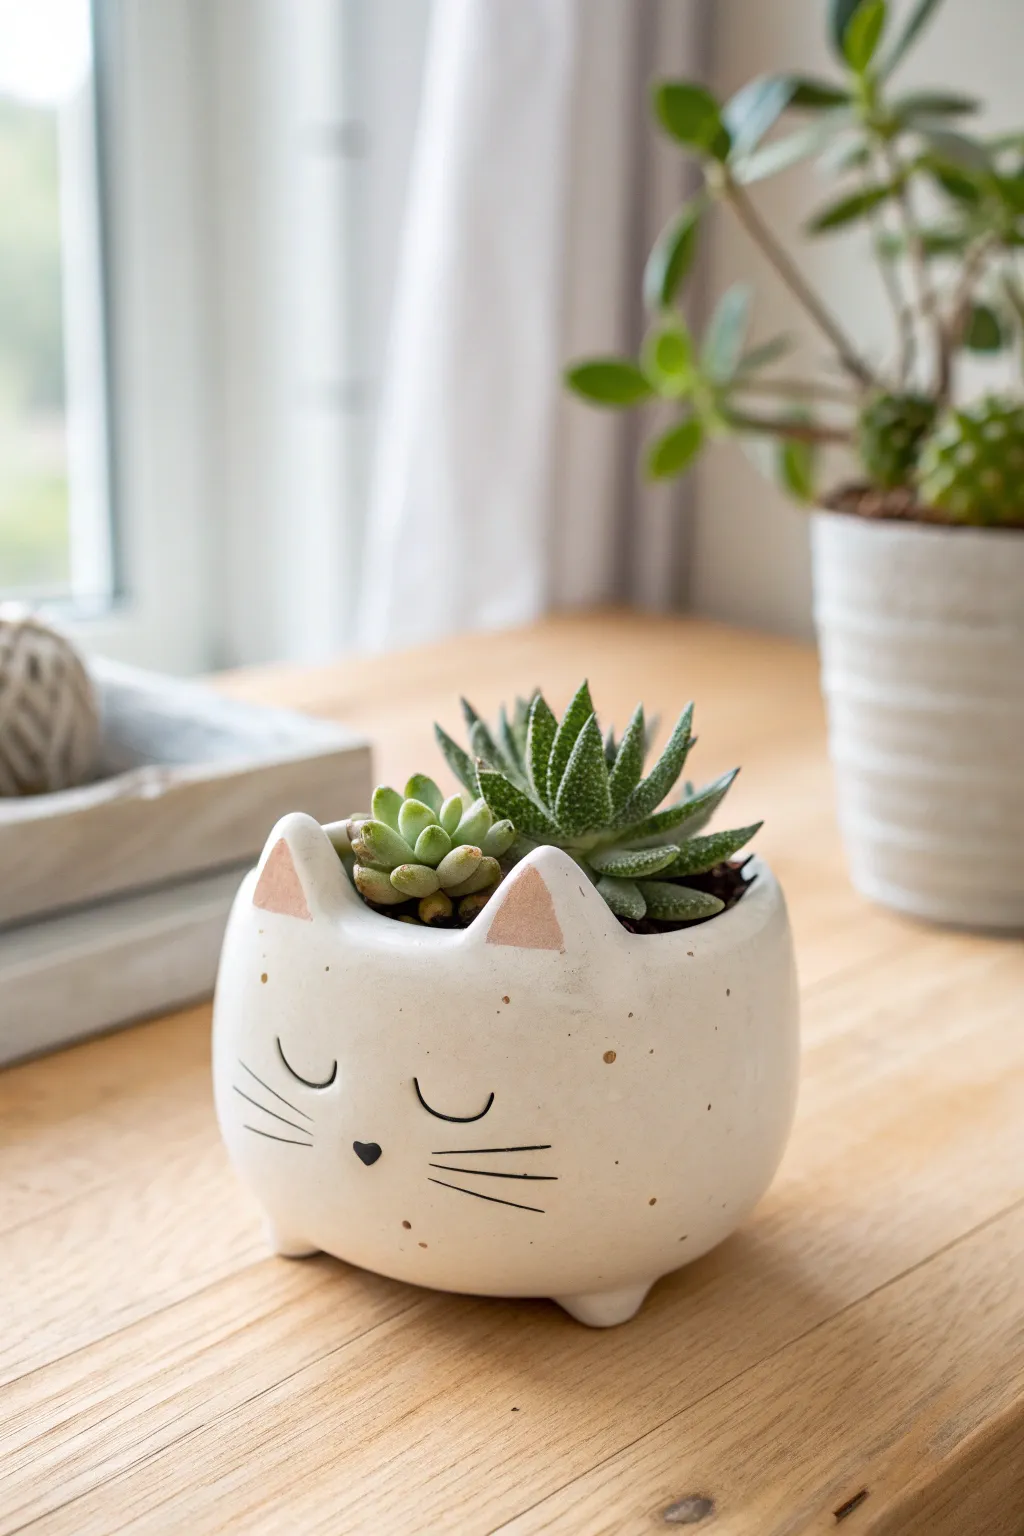
Transform a simple ball of clay into this adorable feline friend, perfect for housing your favorite small succulents. This sleepy kitty features a speckled white finish, dainty pink ears, and a sweet, minimalist face that adds charm to any windowsill.
Step-by-Step Tutorial
Materials
- Air-dry clay (white or light grey)
- Speckled clay addition (optional: coarse sand or crushed dried clay bits)
- Small bowl of water
- Sculpting tools (needle tool, small loop tool)
- Detail paintbrush (size 0 or 00)
- Medium flat paintbrush
- Acrylic paints: white, soft pink, black
- Matte or satin sealant/varnish
- Potting soil and small succulents
Step 1: Forming the Base
-
Prepare the clay:
Start with a ball of clay roughly the size of a grapefruit. If you want that lovely speckled texture seen in the photo, kneading in a small amount of coarse sand or dried, crushed clay bits at this stage creates a natural stoneware look. -
Create the pinch pot:
Insert your thumb into the center of the ball about three-quarters of the way down. Rotate the ball in one hand while gently pinching the clay between your thumb and fingers with the other, evenly thinning the walls as you go. -
Shape the body:
Continue pinching until the walls are about 1/4 inch thick. Gently gently tap the bottom on your work surface to create a flat base so the kitty sits upright without wobbling. -
Refine the rim:
Use a damp sponge or your wet finger to smooth the top rim. It doesn’t need to be perfectly level—a slight organic wave adds character—but ensure there are no sharp edges.
Cracks Appearing?
If small cracks form while drying, mix a tiny bit of clay with water to make a paste (slip) and fill them in. Smooth over with a finger and let dry again.
Step 2: Sculpting the Features
-
Form the ears:
Pinch two small, triangular pieces of clay from your excess stash. They should be roughly equilateral triangles with slightly rounded tips. -
Attach the ears:
Score the bottom of the ears and the corresponding spots on the rim of the pot. Apply a little water or slip (liquid clay) and press them firmly onto the front rim, smoothing the seams downward until they merge seamlessly with the main pot. -
Add the feet:
Roll four tiny marble-sized balls of clay. Flip the pot over and attach these to the bottom corners to act as little feet. This gives the planter a bit of lift and cuteness. -
Smooth the surface:
Dip your finger in water and run it over the entire exterior. I prefer to spend extra time here to remove fingerprints, ensuring the pot looks like a smooth ceramic piece. -
Drying time:
Let the pot dry completely. Depending on your humidity and clay type, this can take 24 to 48 hours. The clay must be bone dry before painting.
Step 3: Painting and Finishing
-
Base coat:
Paint the entire outside and the inner rim with a creamy white acrylic paint. If you didn’t add texture earlier, you can flick a stiff toothbrush loaded with watered-down brown paint to create faux speckles now. -
Inner ear details:
Mix a soft, dusty pink color. Using a small brush, paint triangular shapes inside the clay ears, leaving a white border around the edges. -
Drafting the face:
Lightly sketch the face placement with a pencil. The eyes should be closed crescents (u-shape), situated fairly low on the pot for a ‘cute’ proportion. -
Painting the eyes and nose:
Using your finest detail brush and black paint, carefully trace over your pencil lines for the sleepy eyes. Add a small, solid heart shape for the nose right between and slightly below the eyes. -
Adding whiskers:
Paint three thin, straight lines extending horizontally from each side of the cheeks. Keep your hand steady and lift the brush at the end of the stroke for a tapered look. -
Sealing the pot:
Once the paint is fully dry, apply uniform coats of matte or satin varnish. This protects the paint from water damage when you water your plants. -
Planting:
Fill the bottom with a little gravel for drainage (since air-dry clay shouldn’t sit in water) and top with succulent soil. Nestle your aloe or succulents into the top.
Pro Tip: Watercolor Effect
Water down your acrylics slightly for the pink ear detail. It creates a softer, more ‘glazed’ ceramic look than opaque paint.
Enjoy your new calming kitty companion sitting brightly on your shelf


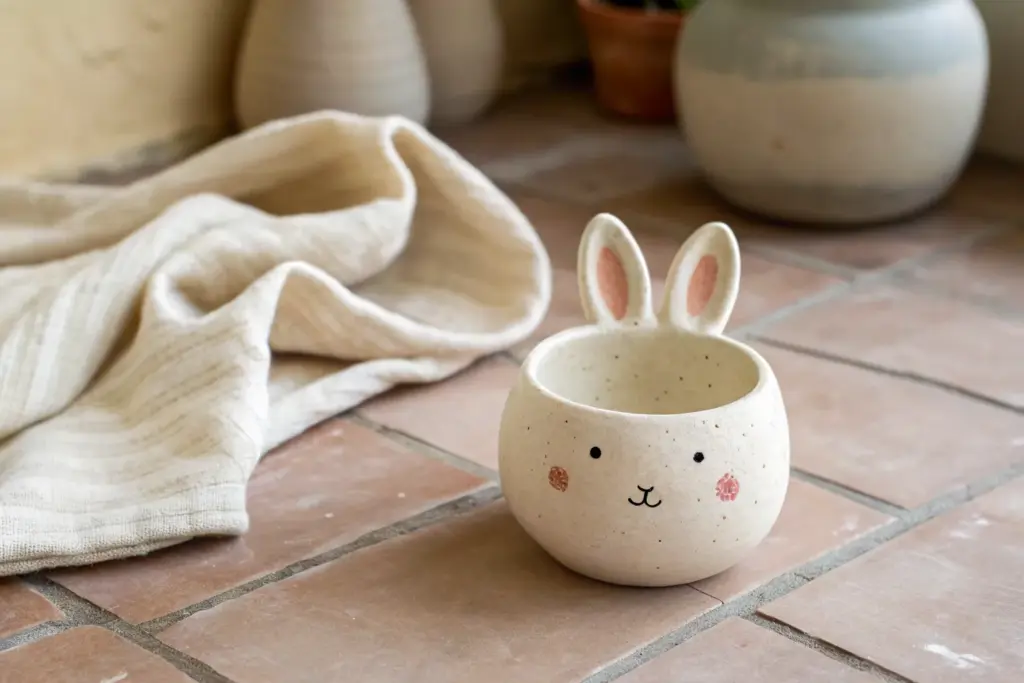
Bunny Pinch Pot With Perky Ears
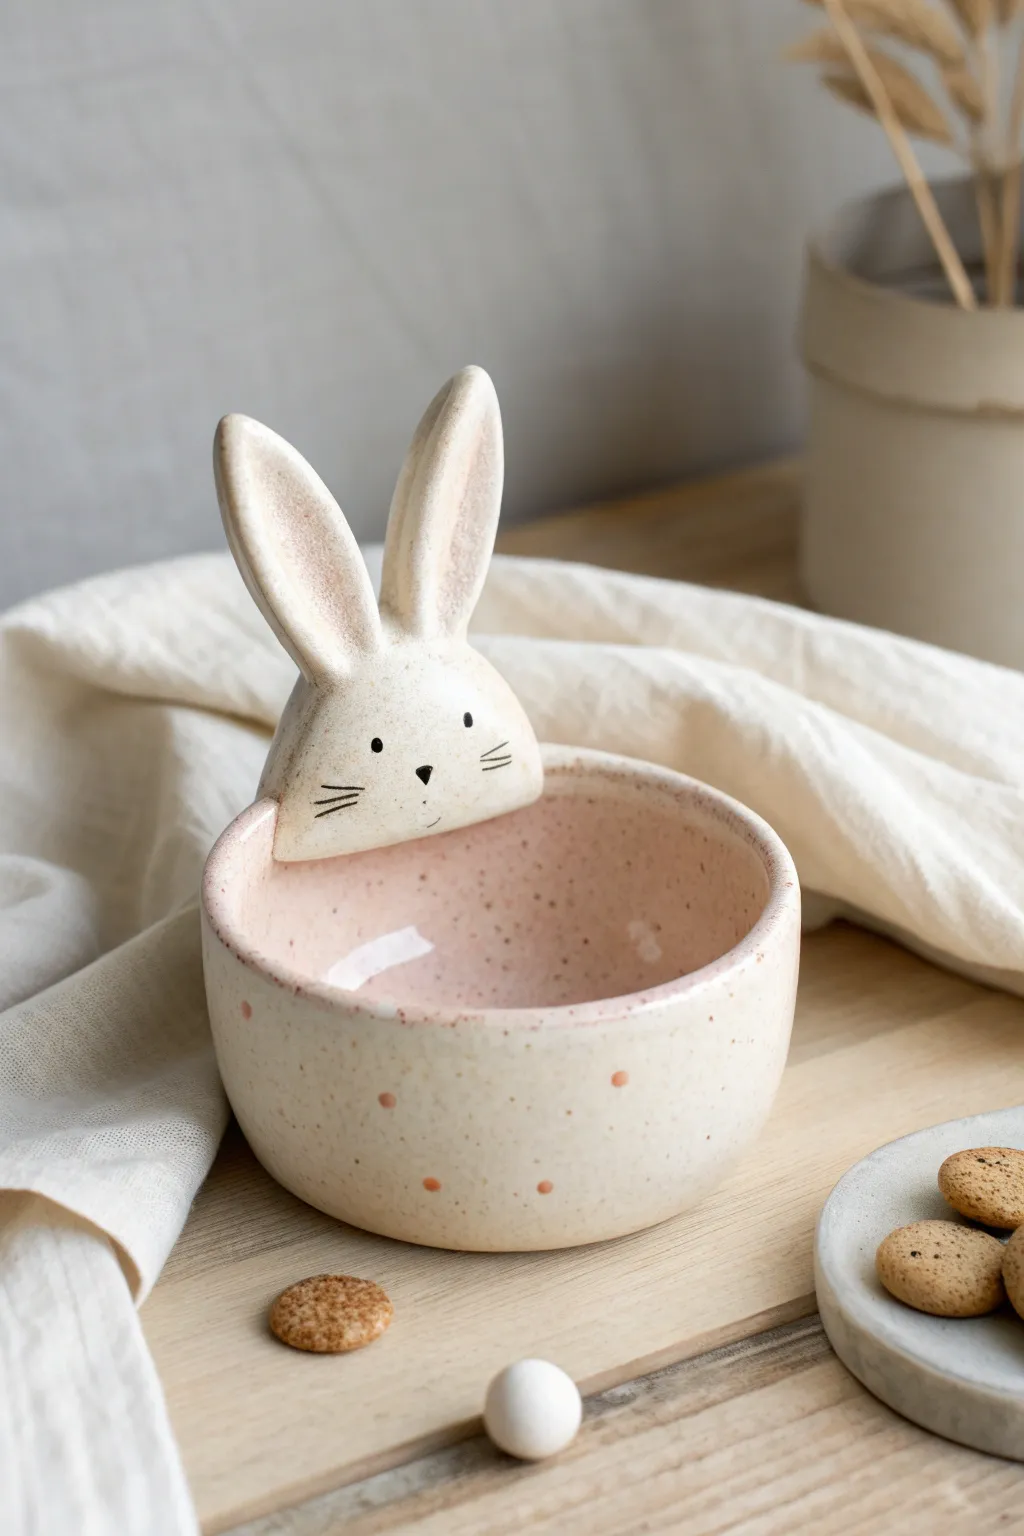
This adorable ceramic bowl features a sweet, speckled finish and a friendly rabbit peeking over the rim. With its soft pink interior and perky ears, it makes a perfect holder for Easter treats or small trinkets.
Detailed Instructions
Materials
- White earthenware or stoneware clay
- Pottery tools (needle tool, rib tool, scoring tool)
- Small sponge
- Bowl of water
- Underglaze (black for face details)
- Glazes (creamy white speckled, pale pink)
- Small paintbrushes (detail brush and glaze brush)
- Kiln for firing (or oven-bake clay alternative)
- Rolling pin (optional)
Step 1: Forming the Bowl Base
-
Prepare the clay ball:
Start by taking a lump of clay about the size of a tennis ball. Roll it firmly between your palms until it forms a smooth, crack-free sphere. -
Open the pot:
Hold the ball in one hand and press your thumb into the center, stopping about a half-inch from the bottom. This establishes the floor of your bowl. -
Pinch the walls:
Gently pinch the clay between your thumb and fingers, rotating the ball as you go. Work from the bottom up to thin the walls evenly, aiming for a consistent thickness of about 1/4 inch. -
Shape the rim:
As you pinch, widen the opening slightly to create a shallow bowl shape. Use your fingers or a damp sponge to smooth the rim so it is rounded and level. -
Smooth the surface:
Use a rubber rib tool or your thumb to smooth out any finger marks on the interior and exterior walls. A smooth canvas is essential for the speckled glaze later.
Ear Support
Are the ears flopping over? Prop them up with rolled balls of paper towel or small foam blocks while the clay dries to the leather-hard stage.
Step 2: Sculpting the Bunny Features
-
Shape the head:
Roll a smaller ball of clay, roughly the size of a walnut, and flatten it slightly into a rounded triangle shape. This will be the bunny’s face. -
Create the ears:
Roll two small coils of clay. Flatten and shape them into long, tapered ears. Use your thumb to create a gentle depression down the center of each ear for a realistic look. -
Score and slip:
Score the bottom of the ears and the top of the head piece where they will attach. Apply a dab of slip (clay and water slurry) and press the ears firmly onto the head. -
Blend the seams:
Use a small modeling tool or your finger to smooth the clay where the ears meet the head, ensuring a seamless connection so they don’t detach during drying. -
Attach to the bowl:
Identify a spot on the bowl’s rim. Score both the back of the bunny head and the chosen rim section. Apply slip and press the head onto the rim so it looks like the bunny is peeking over. -
Refine the connection:
Blend the clay from the back of the head onto the bowl’s exterior to secure it. If the head is heavy, you might need to prop it up with a small sponge while it stiffens.
Seasonal Switch
Adapt this design for other seasons by swapping the bunny for a small bear, a cat, or even a little ghost for Halloween decorations.
Step 3: Glazing and Finishing
-
Bisque fire:
Allow the piece to dry completely (bone dry) before firing it in the kiln for a bisque fire. This hardens the clay for glazing. -
Paint the face details:
Use a fine liner brush and black underglaze to paint two small dots for eyes, a tiny triangle nose, and fine whiskers on the bunny’s cheeks. Let this dry fully. -
Apply the interior glaze:
Pour pale pink glaze into the bowl, swirl it to coat the entire interior up to the rim, and pour out the excess. Clean any drips from the rim immediately. -
Glaze the exterior:
Brush 2-3 coats of a creamy white speckled glaze on the exterior of the bowl and the bunny head. Be careful not to smudge the black underglaze face details; dab the glaze gently over that area. -
Add pink accents:
Using a small brush, add subtle pink polka dots around the exterior of the bowl. You can also add a touch of pink inside the bunny’s ears for extra cuteness. -
Final wipe:
Use a damp sponge to wipe the very bottom of the bowl clean of any glaze to prevent it from sticking to the kiln shelf. -
Glaze fire:
Fire the piece again according to your glaze’s temperature instructions to achieve that glossy, durable finish.
Once fired, fill your charming new bowl with pastel candies to celebrate spring


Round Chick Pinch Pot Bowl
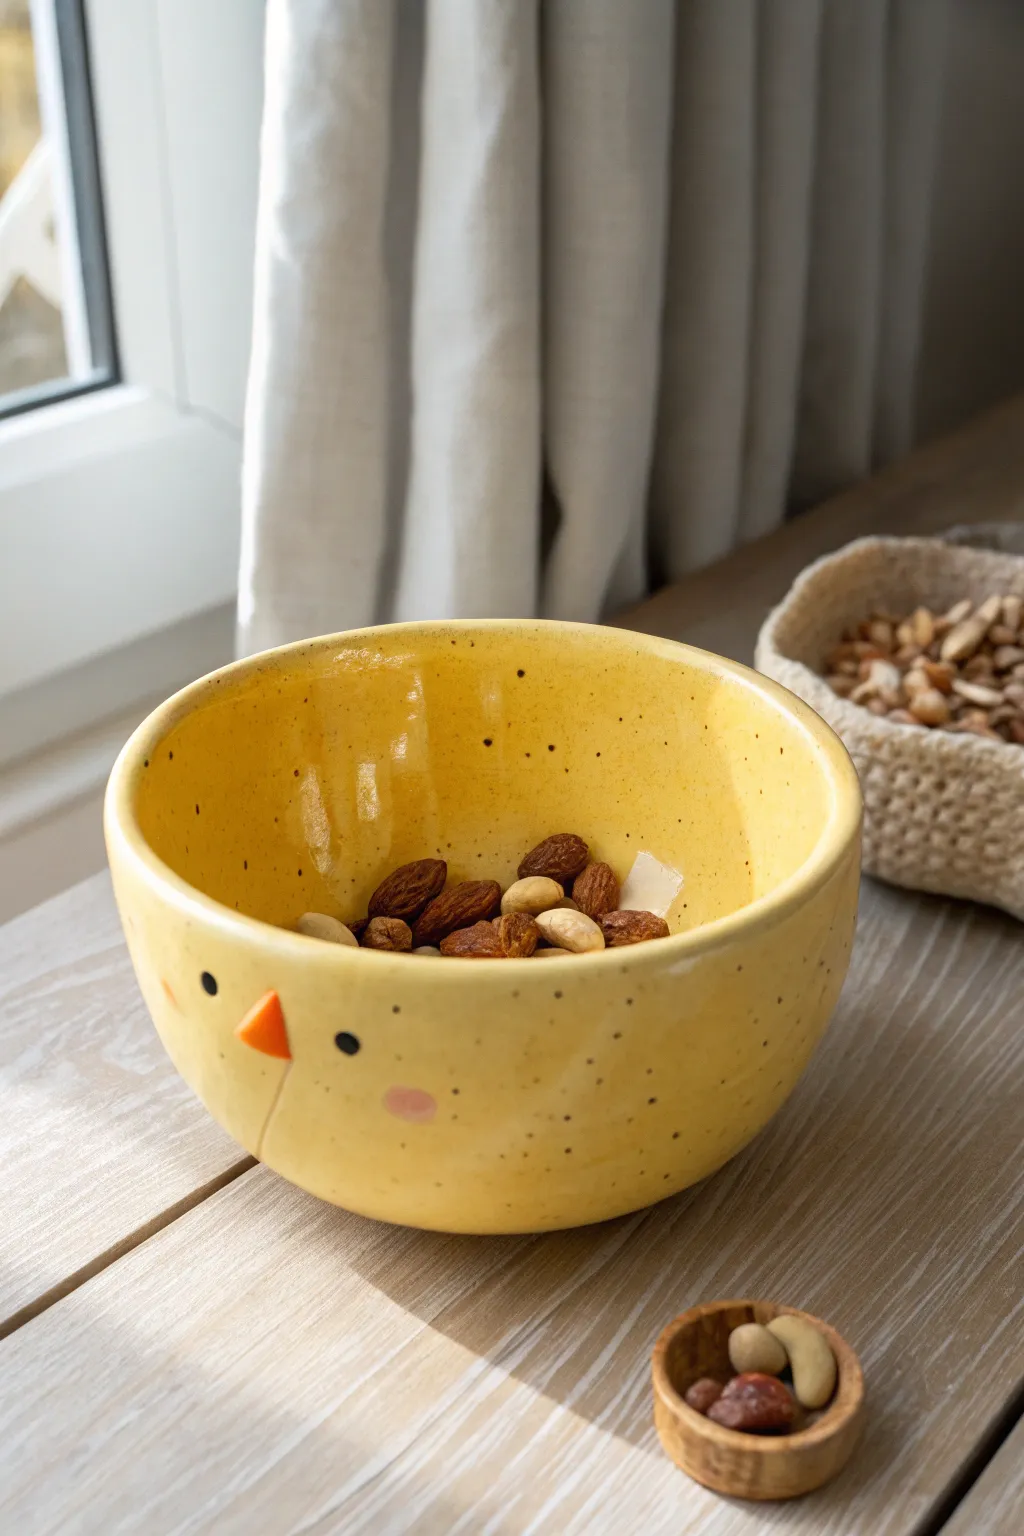
Bring a touch of springtime cheer to your table with this adorable ceramic chick bowl, perfect for holding nuts or trinkets. Its bright yellow glaze, speckled finish, and simple geometric face make it a charming beginner-friendly project that radiates personality.
Step-by-Step Guide
Materials
- White earthenware or stoneware clay
- Potter’s needle tool
- Small sponge
- Rib tool (kidney scraper)
- Slip (clay mixed with water)
- Scoring tool or old fork
- Yellow underglaze
- Orange underglaze
- Black underglaze
- Pink underglaze
- Clear food-safe glaze
- Soft fan brush
- Fine detail brush
- Old toothbrush (for speckling)
Step 1: Forming the Base
-
Prepare the clay:
Start with a ball of clay roughly the size of a large orange. Wedge it well to remove air bubbles, then pat it into a smooth, round sphere. -
Open the pot:
Hold the clay ball in one hand. Push your thumb into the center, stopping about a half-inch from the bottom to ensure a sturdy base. -
Pinch the walls:
Gently pinch the clay between your thumb and fingers, rotating the ball as you go. Work from the bottom up, aiming for an even wall thickness of about a quarter-inch. -
Shape the roundness:
As you pinch, cup the outside of the bowl with your palm to maintain a nice, round curvature. Avoid flaring the rim out too wide; keep it slightly tucked in for that spherical ‘chick’ shape. -
Smooth the surface:
Once you are happy with the shape, use a damp sponge or a flexible rib tool to smooth out cracks and finger marks on both the interior and exterior walls.
Uneven Walls?
If one side feels thicker, don’t just pinch that spot. Gently push clay from the thick area toward a thinner area to redistribute the mass evenly.
Step 2: Adding the Chick Features
-
Form the beak:
Take a tiny pinch of extra clay and roll it into a small cone or pyramid shape. Flatten the back side where it will attach to the bowl. -
Score and slip:
Choose the ‘front’ of your bowl. Use a needle tool to scratch the surface where the beak will go, and do the same on the back of the beak. Apply a dab of slip to both scored areas. -
Attach the beak:
Press the beak firmly onto the bowl. Use a small wooden tool or your finger to smooth the seam where the clay joins, ensuring it won’t pop off during firing. -
Refine the beak:
I find it helpful to gently pinch the tip of the beak again after attaching it to make sure it stays pointy and centered. -
Initial drying:
Let the bowl dry slowly to the leather-hard stage. Cover it loosely with plastic if you need to step away for a while.
Smooth Operator
For a glassy, professional finish, sand the bisque-fired ware lightly with fine sandpaper before glazing to remove any sharp burrs or rough clay bits.
Step 3: Painting and Glazing
-
Bisque fire:
Fire the piece to bisque temperature (usually cone 04) according to your clay’s instructions. -
Apply base color:
Using a soft fan brush, apply 2-3 coats of bright yellow underglaze to the entire bowl, inside and out. Let each coat dry before applying the next. -
Paint the face:
Switch to a fine detail brush. Paint the beak with orange underglaze. Add two small, solid black circles for eyes just above the beak line. -
Add rosy cheeks:
Dip your finger or a small round sponge into pink underglaze and gently dab two soft circles below the eyes to create blushing cheeks. -
Add the speckles:
Dilute a tiny bit of black or dark brown underglaze with water. Dip an old toothbrush into it, hold it near the bowl, and run your thumb across the bristles to flick tiny speckles over the surface. -
Clear glaze application:
Once the underglaze is completely dry, apply a coat of clear, food-safe glaze over the entire piece to seal it and give it a glossy shine. -
Final wipe:
Use a damp sponge to wipe any glaze off the very bottom of the bowl (the foot) so it doesn’t stick to the kiln shelf. -
Final firing:
Fire the piece again to the glaze temperature recommended for your specific clear glaze and clay body.
Fill your cheerful new bowl with snacks and enjoy the cozy charm it adds to your home

The Complete Guide to Pottery Troubleshooting
Uncover the most common ceramic mistakes—from cracking clay to failed glazes—and learn how to fix them fast.
Little Bird Pinch Pot With Beak Rim
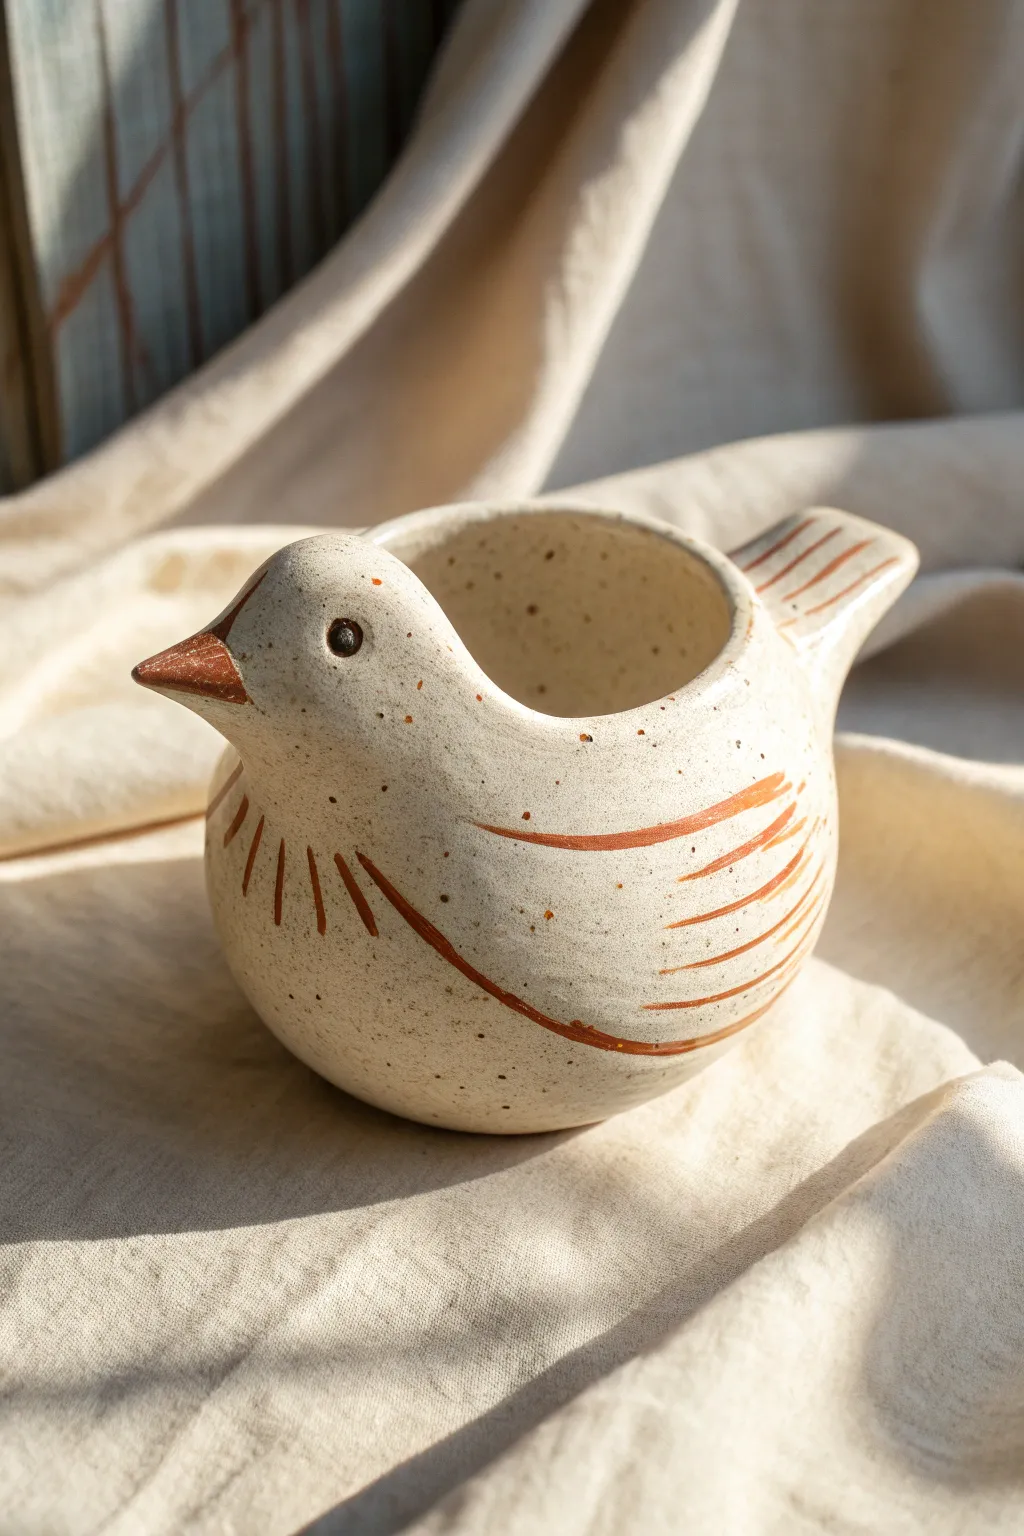
This charming little bird begins as a simple ball of clay and transforms into a delightful vessel perfect for succulents or trinkets. The specked clay body and minimalist red-brown brushstrokes give it a warm, folk-art feel that looks lovely on any windowsill.
Step-by-Step Tutorial
Materials
- Speckled Stoneware Clay (e.g., Laguna Speckled Buff)
- Pottery tools (needle tool, rib tool, scoring tool)
- Slip (clay mixed with water)
- Underglaze (Red-Iron Oxide or reddish-brown)
- Small round paintbrush
- Black underglaze (for the eye)
- Clear Glaze (matte or satin finish)
- Sponge and water
- Kiln access
Step 1: Forming the Body
-
Roll the base:
Start with a ball of speckled clay about the size of a large orange. Roll it between your palms until it is perfectly smooth and round. -
Open the pot:
Push your thumb gently into the center of the ball, stopping about half an inch from the bottom. Begin pinching the walls, rotating the ball in your hand to keep an even thickness. -
Shape the rim:
This particular bird has a unique opening—it isn’t perfectly round. Gently squeeze the rim into an oval shape, keeping the back slightly higher than the front. -
Smooth the interior:
Use a slightly damp sponge or a rubber rib tool to smooth out your fingerprints from the inside of the pot. A smooth interior makes cleaning easier later.
Weight & Balance
Before drying, set the bird on a flat surface. Tap it gently on the table to flatten the bottom slightly so it doesn’t rock or tip over.
Step 2: Sculpting the Features
-
Pull the tail:
On one end of the oval, gently pinch and pull the clay outward and slightly upward to form a short, flat tail. Keep it thick enough so it doesn’t become fragile. -
Form the head:
Opposite the tail, you need to create the head. Instead of attaching a separate piece, try to push the wall of the pinch pot outward and upward to create a rounded bulge for the head. -
Shape the beak:
From that head bulge, pinch a small, triangular point to form the beak. Refine it so it points slightly downward. -
Define the beak rim:
This is the signature detail: I like to use a modeling tool to gently press a line separating the beak from the head, making the beak look like a distinct, attached element rather than just a bump. -
Final smoothing:
Go over the entire exterior with a soft rib tool or a smooth stone. You want a very clean surface for the painted details. -
Add the eye:
Use a small rounded tool or the back of a paintbrush to press a small indentation where the eye will go. This adds physical depth before painting.
Step 3: Decoration and Glazing
-
Initial drying:
Let the bird dry to a leather-hard state. It should be firm to the touch but still cold. -
Paint the beak:
Using your reddish-brown underglaze or an iron oxide wash, paint the entire beak area. Be careful to stay within the lines you sculpted earlier. -
Detail the chest:
Paint a series of short, radiating lines on the bird’s chest using a fine liner brush. These represent the breast feathers. -
Paint the wings:
Paint a long, sweeping curve along the side of the body to define the bottom of the wing. Add 3-4 curved lines above it to suggest flight feathers. -
Detail the tail:
Paint parallel stripes across the top of the tail section you pulled earlier. -
Add the pupil:
Dip a fine tip into black underglaze and place a dot inside the indented eye socket. -
Bisque fire:
Once fully bone dry, fire the piece in a kiln to bisque temperature (usually Cone 04). -
Glaze and final fire:
Dip the entire bird into a clear matte or satin glaze. Wipe the foot (bottom) clean so it doesn’t stick to the kiln shelf, and fire to the glaze temperature (usually Cone 5 or 6 depending on your clay).
Cracking Beaks
If the beak cracks as it dries, you may have pulled the clay too thin or joined it poorly. Score and slip a small coil under the beak to reinforce it.
Now your little ceramic friend is ready to hold a tiny plant or brighten up your desk with its cheerful expression
Fox Pinch Pot With Pointy Ears
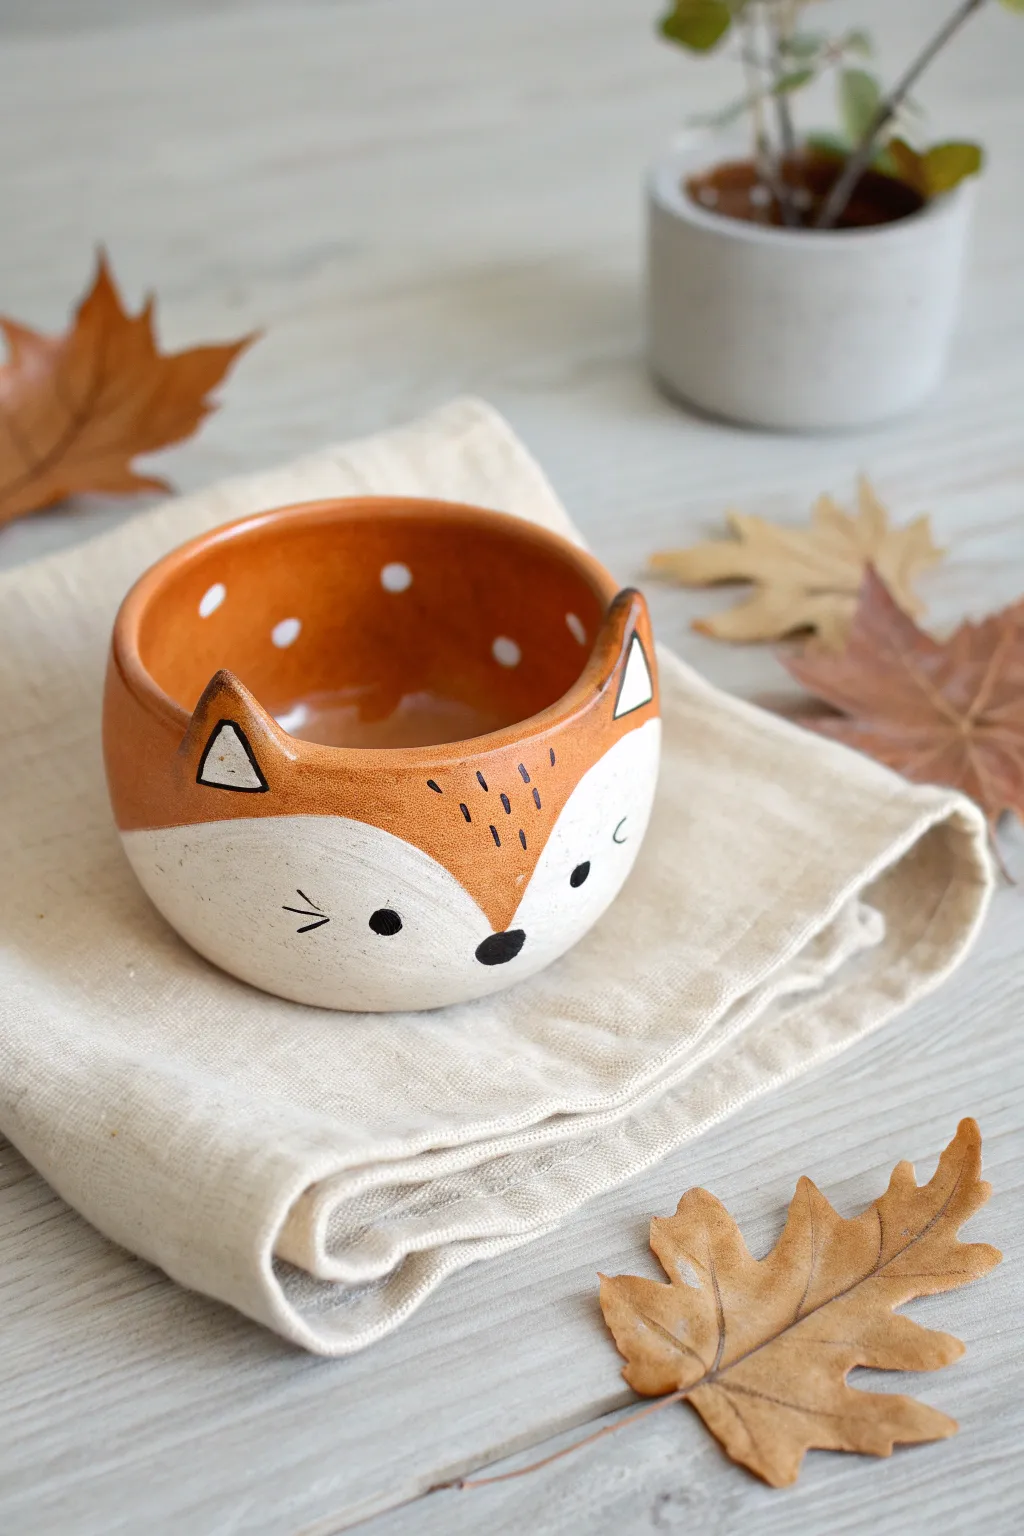
This adorable ceramic fox bowl combines simple pinch pot techniques with charming hand-painted details to create a woodland-inspired treasure. Its warm terracotta glaze and playful pointy ears make it perfect for holding trinkets or small succulents.
Step-by-Step
Materials
- Air-dry clay or kiln-fire clay (white or terracotta)
- Clay carving tools or a wooden skewer
- Slip (clay mixed with water)
- Sponge
- Small bowl of water
- White acrylic paint or underglaze
- Orange/terracotta acrylic paint or underglaze
- Black fine-tip paint pen or detail brush
- Clear sealant or glaze (food safe if using for food)
- Sandpaper (fine grit)
Step 1: Shaping the Base
-
Prepare the Clay:
Start with a ball of clay roughly the size of a tennis ball. Knead it well to remove air bubbles and make it pliable. -
Start the Pinch Pot:
Hold the clay ball in one palm. Press your thumb into the center, stopping about a half-inch from the bottom. This establishes the bowl’s depth. -
Pinch the Walls:
Gently pinch the clay between your thumb and fingers, rotating the ball as you go. Work from the bottom up to thin out the walls evenly. -
Refine the Shape:
Aim for a wall thickness of about 1/4 inch. Smooth the interior and exterior with a damp sponge to remove fingerprints and crate a nice round ‘U’ shape. -
Flatten the Bottom:
Gently tap the pot on your work surface to create a small, flat base so it sits stably without rocking.
Smooth Operator
Use a barely damp sponge to smooth the clay while shaping. Too much water weakens the walls and can cause cracking during drying.
Step 2: Adding Fox Features
-
Form the Ears:
Roll two small triangles of clay, about 1 inch tall. Pinch the edges slightly to taper them so they aren’t too blocky. -
Score and Slip:
Score (scratch) the bottom of the ears and the attachment points on the bowl’s rim. Apply a dab of slip to act as glue. -
Attach the Ears:
Press the ears firmly onto the rim. Use a modeling tool or your finger to blend the clay seams downward until the join is invisible. -
Smooth the Transition:
Run a damp finger over the ear connections to ensure a seamless look. The ears should look like they grew out of the pot, not just stuck on. -
Dry the Piece:
Let the clay dry completely. For air-dry clay, this usually takes 24-48 hours. If kiln-firing, follow your clay’s specific firing schedule now.
Step 3: Painting and Finishing
-
Sand Imperfections:
Once fully dry (and before painting), gently sand any rough spots or uneven edges with fine-grit sandpaper. -
Base Color – Orange:
Paint the entire interior of the bowl and the upper half of the exterior with a warm orange or terracotta color. Leave the bottom half of the exterior unpainted for now. -
Define the Face Mask:
Using the white paint, fill in the bottom half of the exterior. Carefully curve the paint line upward in the center to create the fox’s snout shape. -
Add Polka Dots:
Dip the back end of a paintbrush into white paint and dot the interior rim of the bowl to create the spotted pattern. -
Detail the Ears:
Paint small white triangles inside the orange ears. Once dry, outline these white triangles with a thin black line. -
Paint the Face:
Using a fine brush or black paint pen, add two small circles for eyes, a little oval nose at the point of the white mask, and simple whisker lines. -
Add Fur Details:
paint tiny black dashes on the orange forehead area to suggest fur texture. -
Seal the piece:
Apply a clear varnish or glaze to protect your paint job and give the fox a finished sheen.
Forest Friends Set
Make a trio of pots in different sizes: a bear with round ears, this fox, and a simple raccoon with a painted mask.
Enjoy displaying your charming fox bowl on a shelf or filling it with tiny treasures


What Really Happens Inside the Kiln
Learn how time and temperature work together inside the kiln to transform clay into durable ceramic.
Tiny Turtle Pinch Pot With Shell Texture
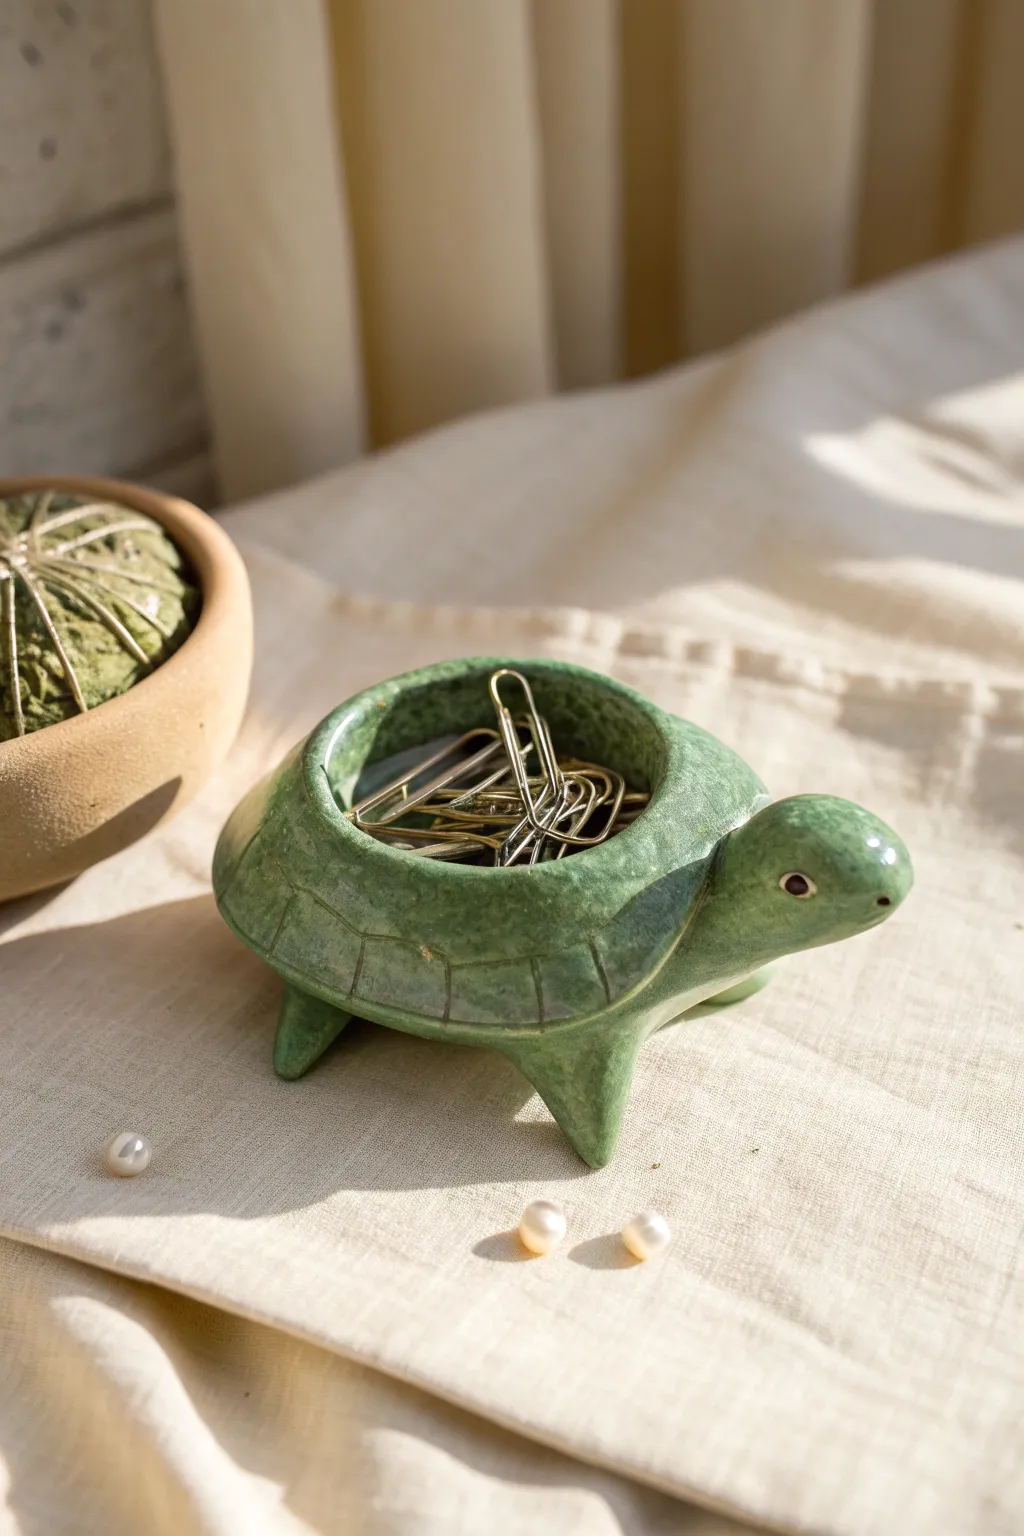
Transform a simple pinch pot into an adorable shelled companion perfect for holding paperclips or small jewelry. This glossy green turtle features charming carved details and tiny, sturdy legs that give it a whimsical personality.
How-To Guide
Materials
- Air-dry clay (or polymer/ceramic clay)
- Small bowl relative to hand size
- Rolling pin
- Pointed sculpting tool or toothpick
- Loop tool (optional)
- Small sponge
- Slip (clay mixed with water)
- Acrylic paints (moss green, black, white)
- High-gloss varnish or sealant
Step 1: Forming the Body
-
Create the base:
Start with a ball of clay roughly the size of a tangerine. Press your thumb into the center and rotate the ball in your palm, pinching the walls evenly to create a classic bowl shape. -
Thicken the rim:
Unlike a delicate tea cup, you want the rim of this shell to be slightly thick and rounded. Gently tap the rim against your work surface to flatten it just a little. -
Roll the appendages:
Roll out five smaller balls of clay: one slightly larger oval for the head, and four cone-shaped pieces for the legs. -
Attach the legs:
Score (scratch) the bottom of the pot where the legs will go and the flat side of your leg pieces. Apply a dab of water or slip, then press the legs firmly onto the body. -
Secure the stance:
Gently press the entire turtle down onto the table to ensure the legs are even and the pot sits level. Use a sculpting tool to smooth the seams where the clay joins. -
Add the head:
Score and slip the front of the shell and the back of the head piece. Press them together, blending the neck clay smoothly into the shell so it looks like one continuous piece.
Step 2: Detailing and Refining
-
Smooth the surface:
Dip a small sponge or your finger in water and run it over the entire sculpture to remove fingerprints and bumps, preparing it for texture. -
Carve the rim:
Using a pointed tool or toothpick, draw a continuous line around the top surface of the rim to define the shell’s edge. -
Create scutes:
Carve vertical lines down the side of the shell, spaced about an inch apart. Connect these with horizontal curved lines to mimic the pattern of turtle scutes. -
Face details:
Use the back of a small paintbrush or a dotting tool to gently press indentations into the sides of the head for eye sockets. -
Final smooth:
Run a barely damp finger over your carving lines to soften any sharp clay crumbs or jagged edges.
Smooth Seams
When attaching the head, roll a tiny ‘snake’ of clay and wrap it around the neck seam. Smear this extra clay across the gap for a rupture-proof bond.
Step 3: Finishing Up
-
Dry thoroughly:
Let the turtle dry completely. I like to let this dry for at least 24-48 hours if using air-dry clay, turning it occasionally so the bottom dries too. -
painting the base:
Apply a coat of moss green acrylic paint to the entire turtle, getting into all the carved grooves. -
Highlight the texture:
Once the base coat is tacky but not fully dry, lightly wipe the raised areas with a rag. This leaves more paint in the grooves, emphasizing the shell pattern. -
Paint the eyes:
Paint the inside of the eye sockets black. Once dry, add a tiny white dot for a ‘gleam’ to bring the turtle to life. -
Seal for shine:
Apply two generous coats of high-gloss varnish. This mimics the look of glazed ceramic shown in the photo.
Functional Twist
Before drying, insert a strong magnet into the clay on the inside bottom of the shell. This will hold paperclips in place so they don’t spill out.
Now you have a charming little desk friend ready to keep your trinkets safe
Hedgehog Pinch Pot With Spiky Imprints
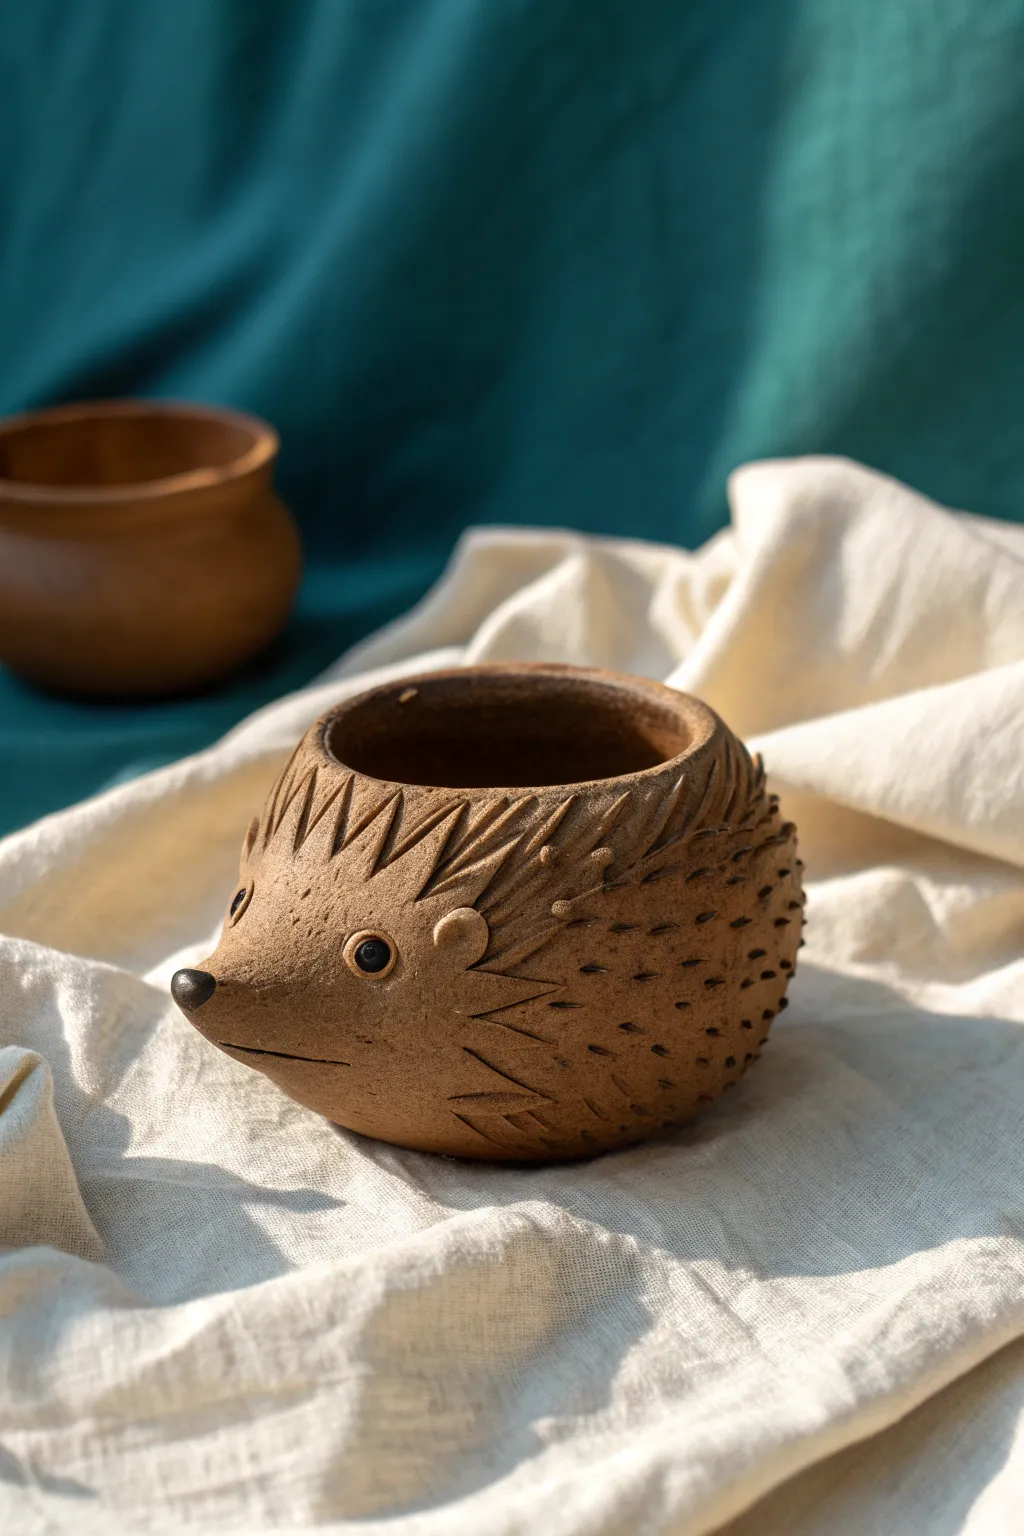
Transform a simple sphere of clay into this delightful woodland creature, featuring highly textured quills and a gentle expression. This earthy hedgehog pot is perfect for holding tiny succulents or organizing desk trinkets.
Step-by-Step Tutorial
Materials
- Earthenware or stoneware clay (grogged is fine for texture)
- Small bowl of water
- Pointed pottery tool (or a wooden skewer)
- Small loop tool or carving tool
- Sponge
- Black underglaze or slip (for eyes/nose)
- Fine detail brush
- Scoring tool (or fork)
- Clear matte glaze (optional)
Step 1: Forming the Base
-
Ball preparation:
Start with a ball of clay roughly the size of a large orange. Pat it firmly between your hands to remove air pockets and ensure it is perfectly round. -
Opening the pot:
Push your thumb into the center of the ball, stopping about half an inch from the bottom. This establishes the interior depth. -
Pinching the walls:
Using your thumb on the inside and fingers on the outside, gently pinch and rotate the clay. Work from the bottom up to create walls of even thickness. -
Smoothing the rim:
Once you have a cup shape, gently compress the rim with a damp sponge to smooth out any cracks that formed during pinching. -
Shaping the body:
Gently tap the bottom of the pot against your table to create a flat base so the hedgehog won’t roll over.
Clean Carving
Wait until the clay is ‘leather hard’ before carving the quill textures. If the clay is too wet, the tools will drag and create messy burrs rather than clean lines.
Step 2: Sculpting Features
-
Pulling the snout:
Choose one side of the pot to be the face. Gently pull and pinch the clay outwards to form a slightly pointed snout shape that protrudes from the round body. -
Adding the ears:
Roll two very small balls of clay and flatten them into discs. Score the clay where the ears will go (just behind the face area), add a dab of water, and press the ears on. -
Blending the ears:
Use a small modeling tool or your finger to smooth the seam where the ears attach, making them look like part of the main body rather than stuck-on pieces. -
Defining the face:
Use a damp sponge to smooth the face area specifically, removing any fingerprints so the texture contrast later will be more distinct.
Step 3: Texturing the Quills
-
Mapping the quills:
Lightly trace a curved line around the face area with your needle tool so you know where the smooth face ends and the spiky texture begins. -
Carving the long quills:
Using a pointed carving tool or wooden skewer, carve deep, triangular notches starting right behind the face line. I find flicking the tool upward creates a nice sharp point. -
Creating varied texture:
Continue carving these triangular notches across the top and sides. Vary the direction slightly to mimic natural fur growth. -
Stippling details:
For the back half of the hedgehog, switch to a smaller point or just the tip of your tool. Poke thousands of tiny, shallow dashes or dots into the clay to create a dense, prickly texture. -
Refining the carving:
Brush away any clay crumbs (burrs) created by carving using a dry, soft brush once the clay has stiffened slightly.
Autumn Vibes
Before the final firing, rub an iron oxide wash into the quill textures and wipe it back with a sponge to make the spiky details pop with a rustic, dark contrast.
Step 4: Final Details
-
Adding the nose:
Take a tiny pea-sized bit of clay, score the tip of the snout, and attach it securely. -
Carving the mouth:
Use a sharp knife tool or thin wire to cut a horizontal slit under the snout for the mouth. -
Sculpting eye sockets:
Press the rounded end of a tool gently into the face to create slight indentations for the eyes. -
Painting details:
Using a fine brush and black underglaze, carefully paint the nose tip and add small round eyes. Add a tiny white dot (glaze) later for a highlight if desired. -
Firing:
Allow the piece to dry slowly under plastic for a day, then uncover until bone dry. Bisque fire, apply a clear matte glaze if you want it waterproof, and glaze fire.
Your charming hedgehog is now ready to hold a tiny fern or keep your desk organized

TRACK YOUR CERAMIC JOURNEY
Capture glaze tests, firing details, and creative progress—all in one simple printable. Make your projects easier to repeat and improve.
Frog Pinch Pot With Big Eyes
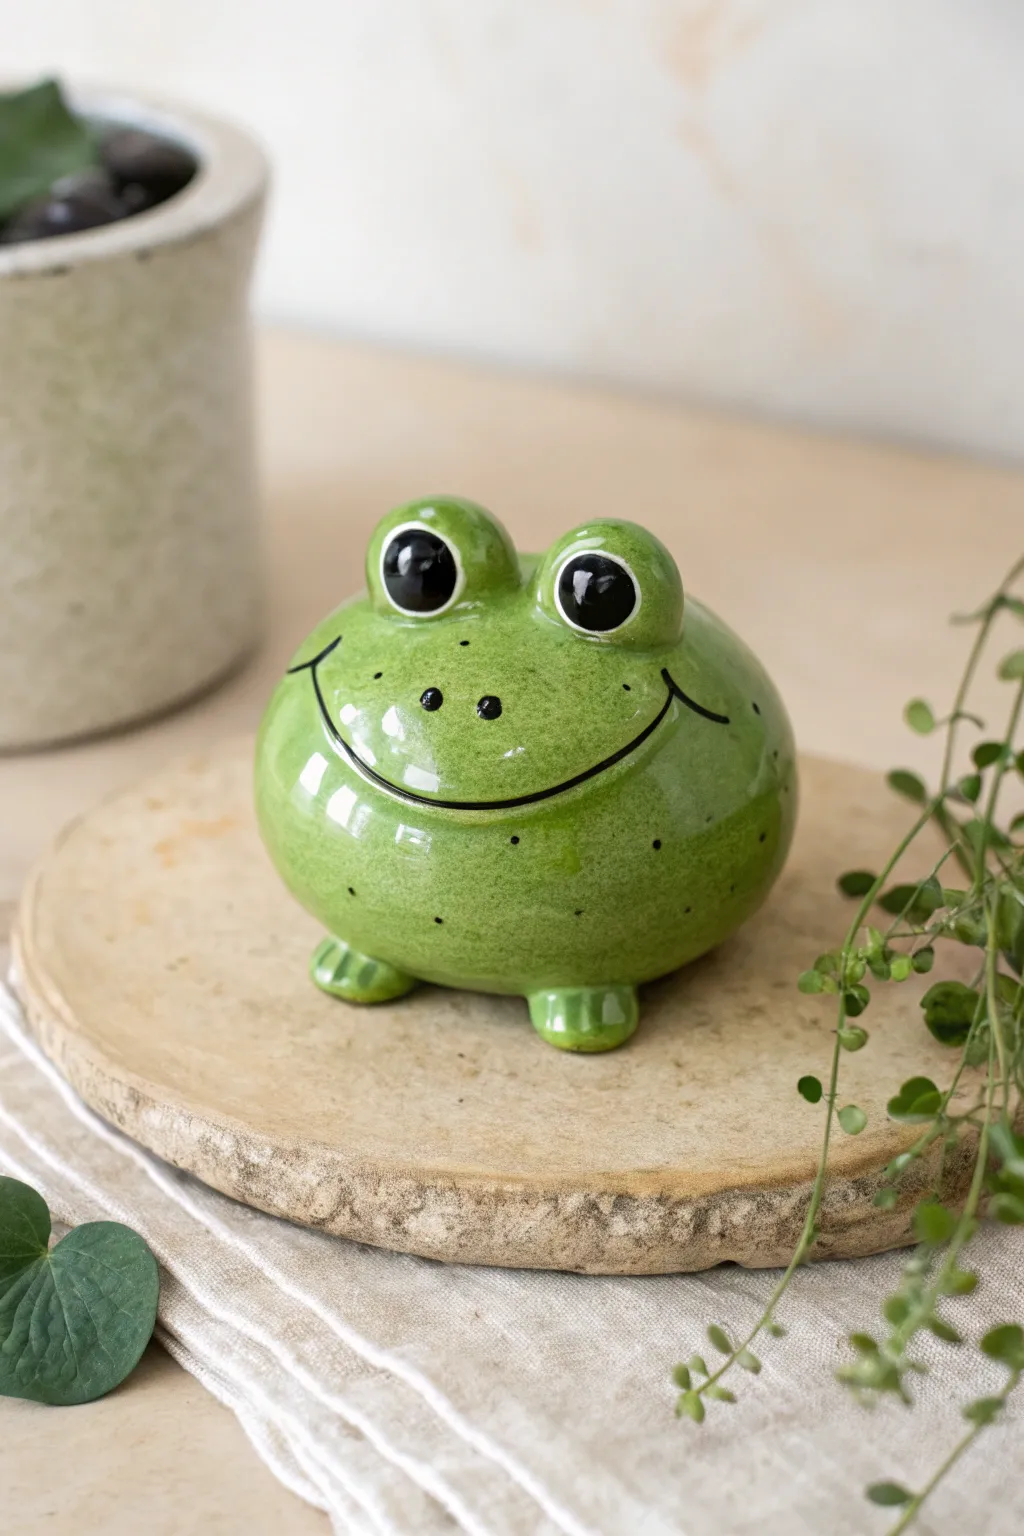
This ridiculously cheerful frog pinch pot features a satisfyingly round body, prominent goofy eyes, and a wide, charming smile. Using simple hand-building techniques and a glossy green glaze, you’ll create a friendly amphibian perfect for holding succulents or tiny treasures.
Detailed Instructions
Materials
- White earthenware or stoneware clay (low-fire or mid-fire)
- Clay needle tool or toothpick
- Small sponge
- Scoring tool (or serrated rib)
- Slip (clay and water mixture)
- High-gloss bright green glaze
- Gloss black underglaze or glaze (for eyes and mouth)
- Small fine-point liner brush
- Medium soft-bristle brush
- Kiln (or air-dry clay alternatives if not firing)
Step 1: Forming the Body
-
Create the base ball:
Start by taking a lump of clay about the size of a large orange. Wedge it well to remove air bubbles, then roll it between your palms until you have a smooth, perfect sphere. -
Open the pot:
Hold the sphere in one hand and gently press your thumb into the center, stopping about a half-inch from the bottom. This establishes the interior space. -
Pinch the walls:
Rotate the ball slowly while gently pinching the clay between your thumb and fingers. Work from the bottom up, aiming for an even wall thickness of about 1/4 inch. -
Shape the enclosure:
Unlike a bowl, you want this pot to curve inward at the top. Gently collar the rim (squeeze it inward) as you pinch, creating a partially closed, rounded sphere shape rather than an open cup. -
Smooth the exterior:
Use a damp sponge or a flexible rib to smooth out any fingerprints on the outside. The surface needs to be very smooth to achieve that polished look later.
Smoother Surfaces
Burnish the clay with the back of a spoon when it’s leather-hard. This compresses the surface and makes the final glaze look incredibly glassy and professional.
Step 2: Adding Features
-
Shape the eyes:
Roll two smaller balls of clay, roughly the size of large grapes or small walnuts. These will be the signature pop-out eyes. -
Score and slip:
To ensure strong attachment, scratch the top of the body and the bottom of both eye spheres with your scoring tool. Apply a dab of slip to the scratched areas. -
Attach the eyes:
Press the eye spheres firmly onto the top of the pot. Wiggle them slightly to lock the clay particles together, then smooth the seam where the eye meets the body using a modeling tool or your finger. -
Form the feet:
Roll two small, flattened oval shapes for the feet. Place them under the front of the pot to help stabilize it and give it a slight backward tilt. -
Add toe details:
Use a needle tool to gently press two or three indentations into the front of each foot to imply little frog toes. -
Carve the smile:
Using a needle tool, draw a long, wide arc across the front of the pot. Press deep enough to create a distinct groove, adding small ‘cheek’ marks at the corners of the mouth for extra cuteness.
Make It a Planter
If you plan to use this for a real plant, don’t forget to punch a drainage hole in the bottom during the ‘Forming the Body’ phase before the clay dries.
Step 3: Glazing and Finishing
-
Bisque fire:
Let the frog dry completely (bone dry) before firing it in the kiln to a bisque temperature suitable for your clay body. -
Apply base color:
Once cooled, apply 2-3 coats of a bright, semi-transparent green glaze to the entire body. I find that brushing in alternating directions helps avoid streaks. -
Detail the eyes:
Paint the white of the eye using a bright white underglaze (or glaze). Let it dry, then carefully paint a large black circle in the center for the pupil. -
Add reflection:
This is crucial: add a tiny dot of white inside the black pupil. This ‘catchlight’ brings the character to life. -
Define the mouth:
Use a very fine liner brush and black underglaze to carefully fill in the groove of the smile. Also, add two tiny dots for nostrils and speckles on the body if desired. -
Final fire:
Fire the piece again to your glaze temperature. The green glaze should become high-gloss and glassy, sealing the pot.
Now you have a charming little amphibious friend ready to brighten up your shelf
Panda Pinch Pot With Patchy Eyes
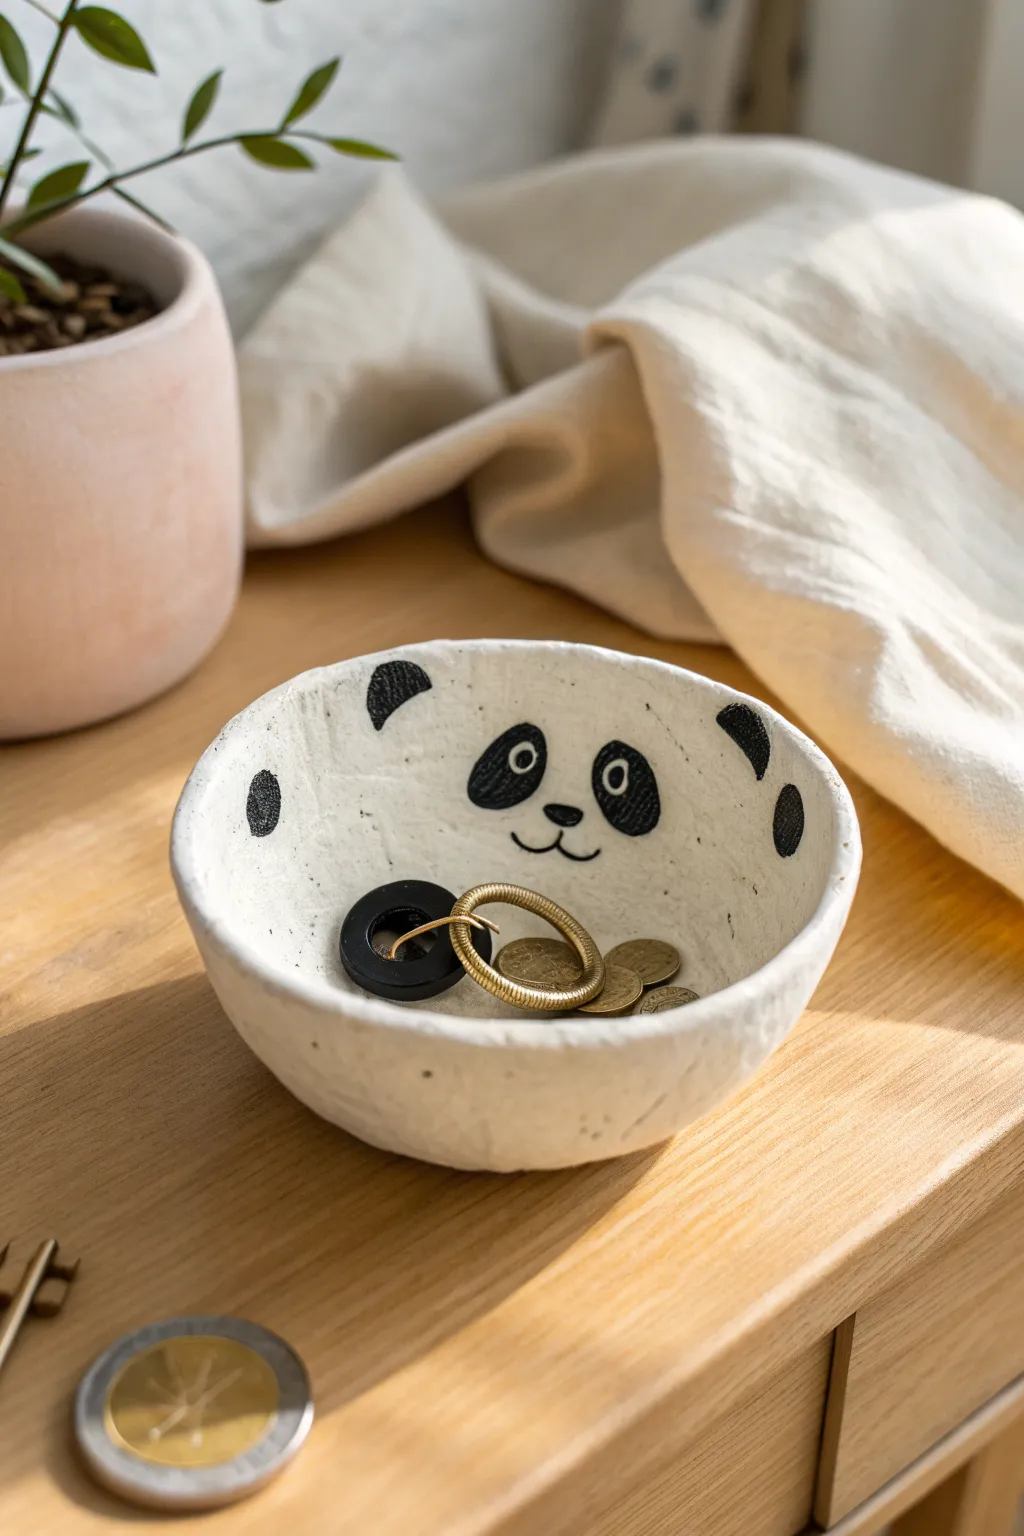
This adorable little dish combines the organic, handmade charm of a pinch pot with the simple, graphic sweetness of a panda face. It’s an ideal project for air-dry clay beginners, resulting in a perfect catch-all for coins, jewelry, or keys.
Step-by-Step
Materials
- White cosmetic-grade air-dry clay (or polymer clay)
- Small cup of water
- Synthetic sponge (cut into a small piece)
- Rolling pin (acrylic or wooden)
- Fine-grit sandpaper (220 to 400 grit)
- Black acrylic paint
- Fine-point round paintbrush (size 0 or 1)
- Small dotting tool or toothpick
- Matte or satin varnish/sealant
- Working mat or parchment paper
Step 1: Shaping the Clay
-
Prepare the ball:
Start by taking a chunk of white air-dry clay about the size of a tangerine. Roll it firmly between your palms until you have a smooth, crack-free sphere. -
Open the clay:
Hold the ball in your non-dominant hand. Press your thumb into the center of the ball, pushing down about three-quarters of the way to the bottom. -
Pinch the walls:
Begin rotating the ball in your hand while gently pinching the clay between your thumb (inside) and fingers (outside). Keep your pressure even to create walls of uniform thickness. -
Refine the shape:
Continue pinching and turning until you have a small bowl shape. Aim for walls that are roughly 1/4 inch thick—not too paper-thin, but not chunky. -
Flatten the bottom:
Once the bowl shape is established, gently tap the bottom of the pot onto your work surface. This creates a stable flat base so your panda won’t wobble. -
Smooth the imperfections:
Dip your finger or a small piece of sponge lightly into water. Gently rub the exterior and interior surfaces to smooth out any fingerprints or tiny cracks. -
Refine the rim:
For that organic look shown in the photo, you don’t want a knife-sharp edge. Gently run a damp finger along the rim to round it off slightly while keeping the overall circle shape. -
Dry partially:
Let the pot sit for about an hour to firm up slightly. This ‘leather hard’ stage makes it easier to do final smoothing without warping the shape.
Don’t Over-Wet
When smoothing clay with water, use very little moisture. Too much water weakens the structure and can cause cracks as it dries.
Step 2: Finishing and Painting
-
Full drying:
Allow the pot to dry completely. This usually takes 24-48 hours depending on humidity. The clay will turn from cool gray to a chalky white. -
Sand for texture:
Use fine-grit sandpaper to gently buff the surface. I like to leave a little bit of the natural texture visible rather than making it factory-smooth, as it adds character. -
Wipe down:
Use a slightly damp cloth to wipe away all the clay dust. This is crucial for getting crisp paint lines. -
Paint the eye patches:
Using black acrylic paint and a fine brush, paint two kidney-bean shapes on the interior wall of the bowl for the panda’s eye patches. Angle them slightly downward towards the center. -
Add the nose:
Paint a small, upside-down rounded triangle or oval between and slightly below the eye patches for the nose. -
Create the mouth:
From the bottom of the nose, draw a tiny vertical line down, splitting into a ‘W’ shape or two small curves for the classic panda smile. -
Detail the ears:
Paint two semi-circles on the upper rim (or just inside the rim) to suggest ears. In the reference image, extra black spots are added near the rim to balance the composition. -
Add the eye shine:
Once the black patches are fully dry, paint a white circle inside the black patch, then add a tiny black pupil inside that white circle. -
Final highlights:
Use a toothpick or dotting tool to add a miniscule dot of white paint to the black pupil for a lively ‘sparkle’ in the eyes. -
Seal the piece:
Coat the entire bowl (inside and out) with a matte or satin varnish. This protects the paint and makes the pot durable for holding metal keys or coins.
Add 3D Ears
Before drying, attach two small, flattened balls of clay to the rim using slip (water + clay mix) to create physical 3D ears instead of painted ones.
Place your new panda friend on a desk or entryway table to greet you with a smile every day
Cow Pinch Pot With Snout Detail
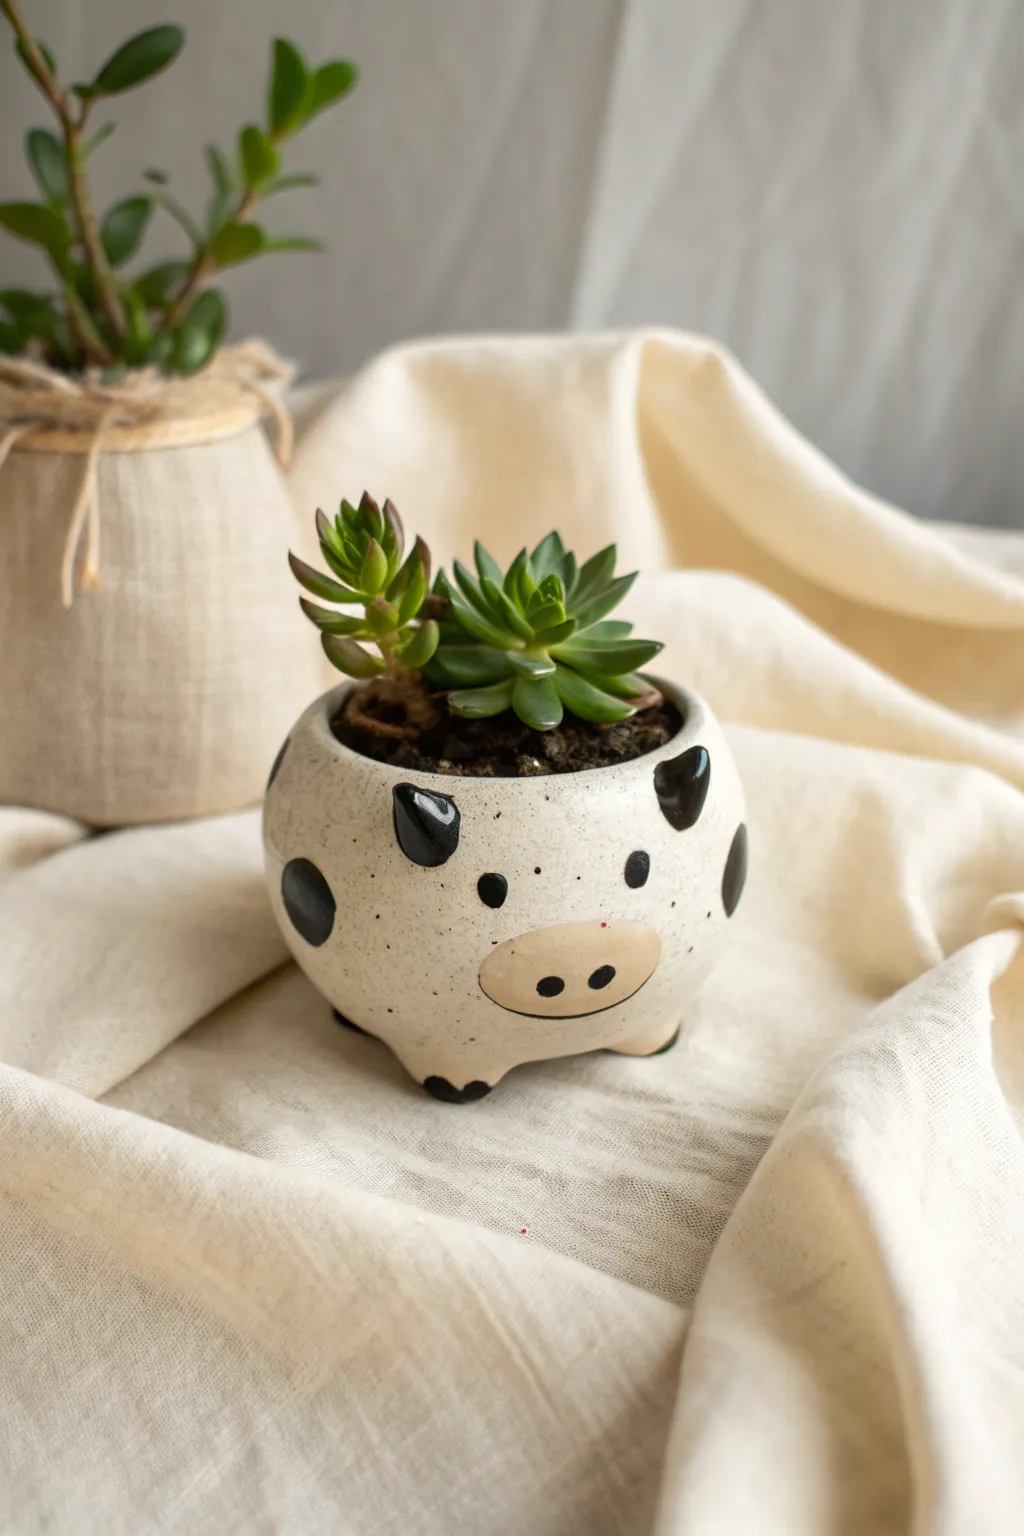
Transform a simple pinch pot into a charming barnyard friend with this sweet cow design. Featuring a distinct snout, playful spots, and tiny ears, this project is perfect for housing small succulents with personality.
Detailed Instructions
Materials
- Air-dry clay or polymer clay (white)
- Acrylic paints (black and light pink/flesh tone)
- Fine detail paintbrush
- Medium paintbrush
- Sculpting tool or needle tool
- Water in a small cup
- Clay varnish or sealant (gloss or matte)
- Sandpaper (fine grit)
Step 1: Forming the Cow Base
-
Create the Initial Ball:
Start with a chunk of clay about the size of a tennis ball. Roll it enthusiastically between your palms until you have a smooth, crack-free sphere. -
Pinch the Pot:
Insert your thumb into the center of the ball and gently pinch the walls while rotating the clay. Aim for a rounded, slightly bulbous shape rather than straight walls to give the cow a chubby look. -
Flatten the Bottom:
Gently tap the pot onto your work surface to create a flat base so it stands up sturdy and straight. -
Add Tiny Legs:
Roll four very small balls of clay. Attach two near the front bottom and two near the back bottom to act as little hooves, blending the clay seams upward onto the body with a little water so they stick securely.
Step 2: Sculpting the Features
-
Attach the Ears:
Shape two small triangles of clay for the ears. Attach them near the rim on opposite sides, curving them slightly forward for a perky expression. Use a sculpting tool to thoroughly blend the seams. -
Add Horns:
Roll two tiny cones for the horns. Place them just inside the ears, closer to the center of the forehead, and blend them securely into the rim. -
Smooth the Surface:
Dip your finger in a little water and run it over the entire pot to smooth out fingerprints and minor cracks. I like to spend extra time here to get a polished look before drying. -
Dry the Clay:
Let the pot dry completely according to your clay’s package instructions. If using air-dry clay, wait 24-48 hours until it is hard and turns a chalky white. -
Sand Imperfections:
Once fully dry, use fine-grit sandpaper to gently buff away any rough spots, especially around the rim and where the legs were attached.
Leg Stability Fix
If the tiny legs keep squishing under the weight of the pot while wet, prop the pot’s belly on a small object (like a bottle cap) to hover it while the legs dry firmly.
Step 3: Painting and Finishing
-
Paint the Snout:
Mix a light pink or flesh-tone acrylic paint. Paint a wide oval shape low specifically on the front center of the pot to create the snout area. -
Add Snout Details:
Using black paint and a fine detail brush, paint two small dots for nostrils inside the pink oval and a thin curved line underneath for a smile. -
Paint the Eyes:
Paint two small, widely spaced black dots above the snout for the eyes. Keeping them simple adds to the cute, cartoonish aesthetic. -
Color the Ears and Horns:
Carefully paint the tips of the horns and the ear triangles black. This adds instant contrast. -
Create the Spots:
Paint random black organic shapes around the body of the pot. Vary the sizes—some large blotches and some tiny speckles—to make the pattern look natural. -
Paint the Hooves:
Paint the very bottom of the four little leg nubbins black to define the hooves. -
Add Specific Speckles:
For texture, flick a tiny bit of black paint (spatter technique) or dot very tiny freckles with the tip of your brush around the face area. -
Seal the Project:
Once the paint is completely dry, apply a coat of varnish. A glossy finish mimics ceramic glaze, while matte looks more rustic. Ensure you seal the inside if you plan to put soil directly in.
Tail Twist
Make a thin snake of clay and attach it to the back as a little tail. Fray the very end with a needle tool to look like hair, then paint the tip black later.
Pop in a small succulent and enjoy your new potted pet
Owl Pinch Pot With Feather Stamps
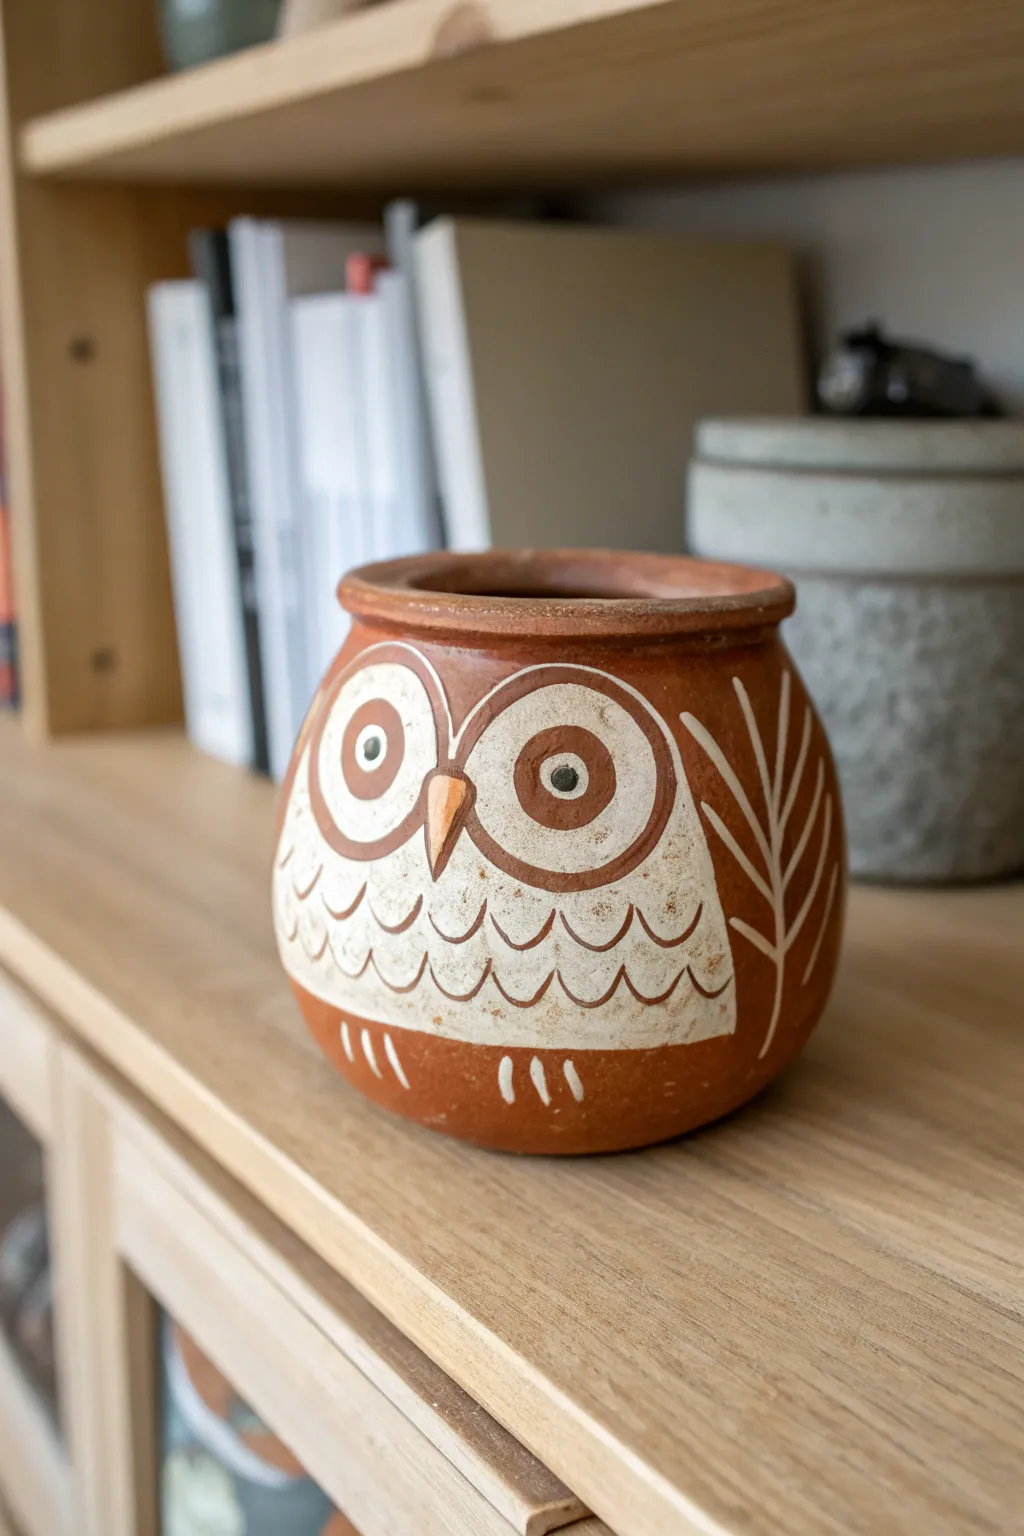
Transform a simple sphere of clay into a charming woodland friend with this delightful owl pinch pot. The natural reddish hue of the clay serves as the perfect backdrop for folk-art inspired white detailing and simple feather patterns.
Step-by-Step Tutorial
Materials
- Terracotta air-dry clay (or firing clay if you have access to a kiln)
- White acrylic paint
- Dark brown acrylic paint
- Orange acrylic paint
- Small round paintbrush
- Fine detail paintbrush
- Needle tool or toothpick
- Small sponge (optional)
- Matte varnish or sealant
Step 1: Shaping the Base
-
Form the ball:
Start with a ball of clay roughly the size of a tennis ball. Roll it between your palms until it is smooth and free of major cracks. -
Open the pot:
Push your thumb gently into the center of the ball, stopping about half an inch from the bottom. This creates the reservoir of your pot. -
Pinch the walls:
Rotate the ball in one hand while rhythmically pinching the clay between your thumb and fingers with the other. Aim for an even thickness of about 1/4 inch all around. -
Create the shape:
Instead of flaring the walls out like a bowl, gently curve them inward as you reach the top to create a rounded, bulbous jar shape. This roundness mimics the owl’s body. -
Refine the rim:
Thicken the rim slightly by tapping it gently or rolling a tiny coil of extra clay and blending it onto the top edge for a sturdy, finished lip. -
Smooth the surface:
Dip your finger in a tiny bit of water and run it over the exterior to smooth out fingerprints. Let the pot dry completely according to your clay package instructions (usually 24-48 hours).
Clean Lines
If your hand feels shaky while painting the fine feather details, rest your pinky finger against the dry surface of the pot to stabilize your brush strokes.
Step 2: Painting the Design
-
Outline the face:
Using a pencil, lightly sketch a large heart-like shape or two connected ovals on the front for the face mask, and a bib shape below it for the chest. -
Fill the white areas:
With a round brush and white acrylic paint, fill in the face mask and the chest area. This might need two coats to be opaque against the dark terracotta. -
Paint the eyes:
Once the white is dry, paint two large reddish-brown circles within the white face area. I find painting a thin outline first helps keep the circles round. -
Add pupils:
Dip the handle end of a paintbrush into black or dark brown paint and dot the center of each large eye circle to create the pupils. -
Detail the feathers:
Using your finest brush and reddish-brown paint (or the natural clay color if you left negative space), paint small scalloped ‘U’ shapes in rows across the white chest area to resemble feathers. -
Draw the beak:
Paint a sharp, downward-pointing triangle right between the eyes using orange paint. -
Add side wings:
On the unpainted terracotta sides of the pot, use white paint and a fine brush to draw a vertical line with diagonal branches coming off it, creating a stylized leaf or feather pattern. -
Final accents:
Add small white dashes near the bottom of the pot to suggest feet or tail feathers. -
Protect your work:
Seal the entire pot with a coat of matte varnish to protect the paint and give the clay a professional finish.
Use a Stamp
Instead of painting the side wing patterns, carve a simple leaf shape into a piece of eraser or potato and stamp the design onto the sides with white paint for a uniform look.
Now you have a charming little vessel perfect for holding pencils or small dried flowers
Smiling Monster Pinch Pot With Little Horns
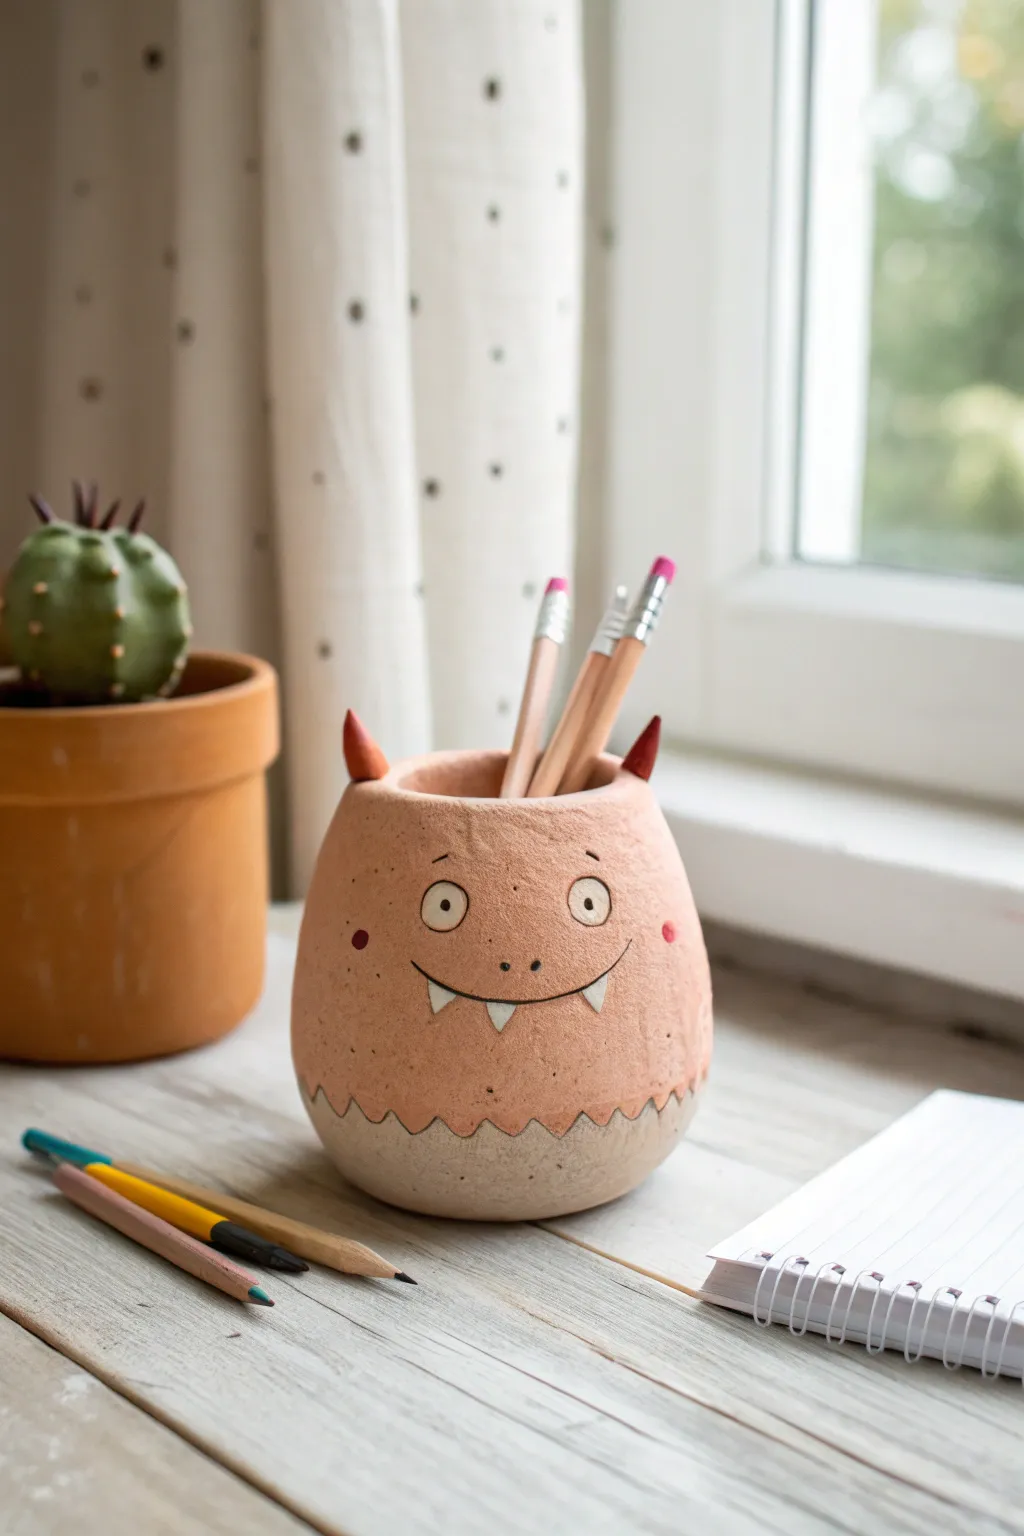
This whimsical pencil holder adds a playful touch to any desk with its charming grin and tiny horns. Using simple pinch pot techniques and thoughtful surface decoration, you can create a gentle monster friend with a lovely textured finish.
Step-by-Step
Materials
- Air-dry clay (terra cotta color or white)
- Acrylic paints (peach/salmon, white, black, red)
- Small paintbrushes (detail and flat shader)
- Clear matte sealant or varnish
- Small bowl of water
- Modeling tool or toothpick
- Sponge or textured fabric
- Sandpaper (fine grit)
Step 1: Shaping the Base Pot
-
Form the starting ball:
Begin with a fist-sized lump of air-dry clay. Roll it firmly between your palms until you have a smooth, round sphere with no major cracks. -
Create the opening:
Hold the sphere in one hand and push your thumb gently into the center, stopping about a half-inch from the bottom. This will be the interior space for your pencils. -
Pinch the walls:
Start pinching the clay between your thumb (inside) and fingers (outside). Rotate the ball as you work, gently thinning the walls and pulling the clay upward to create height. -
Refine the shape:
Aim for a slightly tapered egg shape that gets narrower at the top. Flatten the bottom gently against your table so it stands stable and straight. -
Smooth the surfaces:
Dip your finger in a little water and smooth out any deep cracks or bumps on the outside. Don’t make it perfectly slick; a little texture adds character.
Smooth Seams
When attaching horns, roll a very thin ‘snake’ of clay and wrap it around the base of the horn. Smooth this clay upward into the horn and downward onto the head for an invisible, strong joint.
Step 2: Adding Character Details
-
Draft the features:
Lightly sketch the placement of the eyes and the wide, curved smile using a toothpick or needle tool directly onto the soft clay. -
Form the horns:
Roll two small, marble-sized pieces of clay into cones. Score the bottom of the cones and the top rim of the pot with cross-hatching marks. -
Attach the horns:
Add a dab of water to the scored areas (slip) and press the horns onto the rim. Smooth the seam where the clay meets so the horns look integrated, not just stuck on. -
Define the bottom texture:
Use a modeling tool to carve a wavy, scalloped line around the bottom third of the pot. This separates the ‘body’ color from the base. -
Create texture:
Gently press a sponge or a piece of coarse fabric against the clay surface above your scalloped line to give the monster a slightly pitted, skin-like texture. -
Initial drying:
Let the pot dry completely. Depending on humidity and thickness, this usually takes 24 to 48 hours. It should feel light and room temperature when done.
Step 3: Painting and Finishing
-
Base coat the body:
Paint the upper portion of the pot (above the scalloped line) with a soft peach or salmon pink acrylic paint. Leave the bottom section unpainted for a raw clay look, or paint it a sandy beige. -
Paint the horns:
Use a darker terracotta or reddish-brown shade for the horns to make them stand out. I like to blend the base color slightly at the root of the horn for a natural transition. -
Paint the eyes:
Paint two circles with white acrylic. Once dry, use a fine detail brush or a paint pen to add small black dots for pupils. -
Add the smile:
Trace over your indented smile line with a thin black line. Add small vertical tick marks at the ends of the smile for cheeks. -
Detail the teeth:
Paint three small, downward-pointing triangles in white along the smile line to create the snaggletooth grin. -
Add cute accents:
Dot two small circles of reddish-pink on the cheeks for blush relative to the smile. -
Freckles and imperfections:
Use a splatter technique or a fine brush to add tiny brown speckles across the face to enhance the organic, pottery feel. -
Seal the project:
Once all paint is fully dry, apply a coat of clear matte varnish inside and out to protect your monster from pencil marks and dust.
Level Up: Tail Handle
Before drying, add a curved coil of clay to the back of the pot to resemble a monster tail. Loop it upward so it can function as a small handle for moving the pot around your desk.
Now your new monster friend is ready to keep your pencils organized and bring a smile to your workspace
Heart Cheeks Pinch Pot Character Bowl
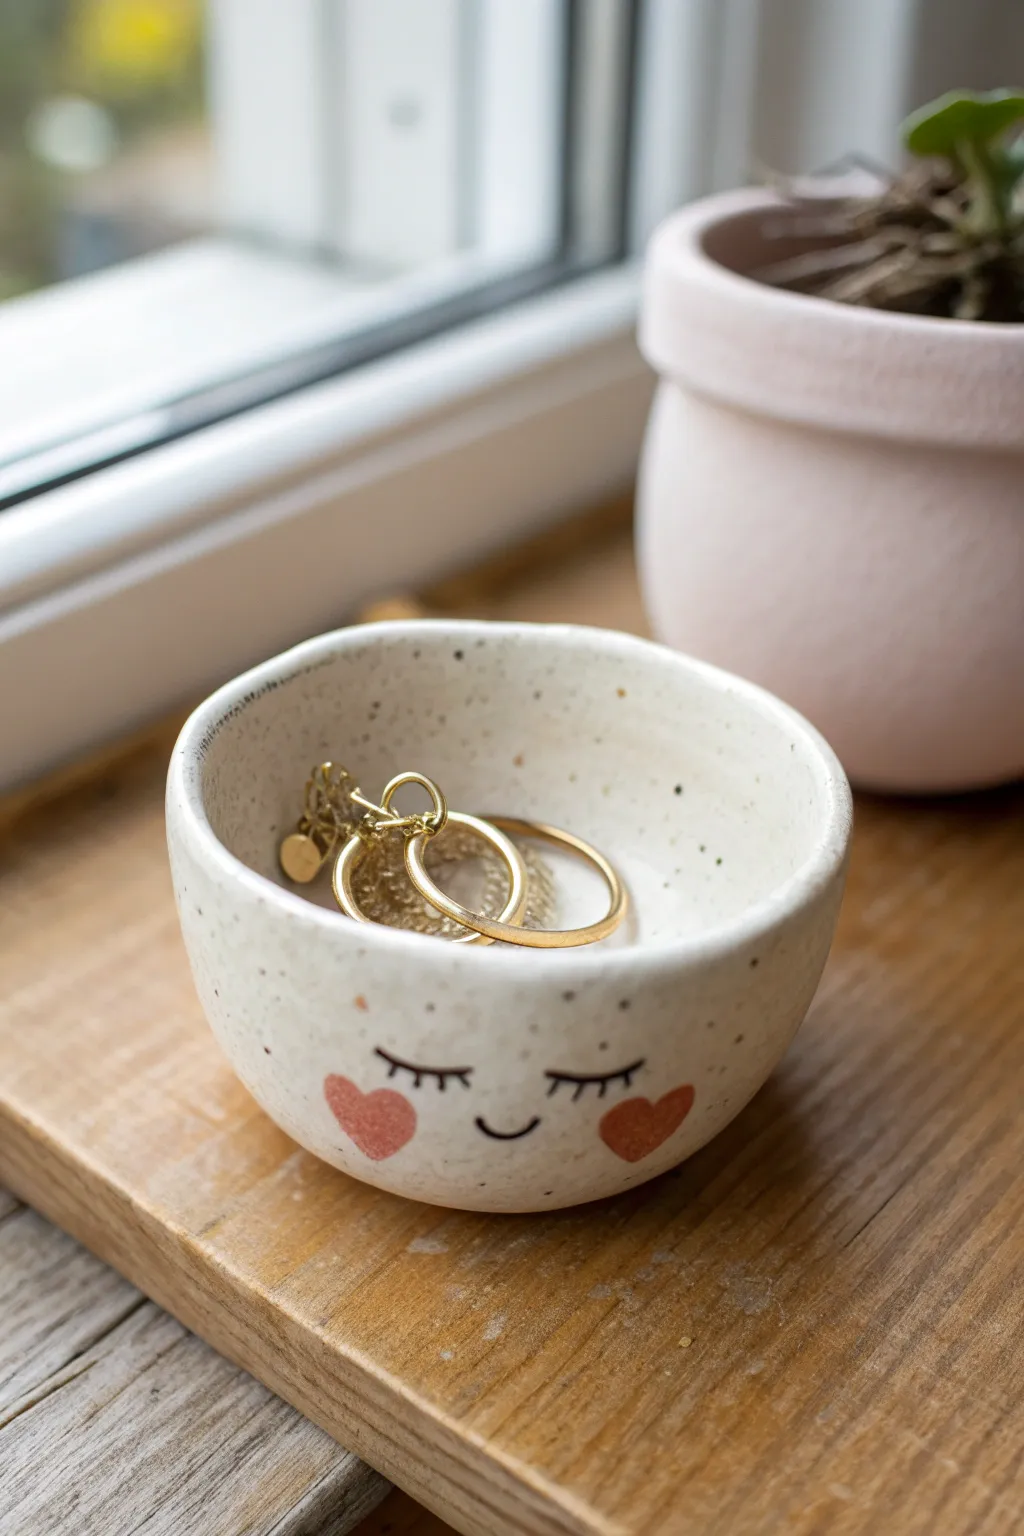
This adorable ring dish combines the rustic charm of speckled clay with a minimal, kawaii-style face design. It’s the perfect size for holding your daily earrings and features sweet heart-shaped cheeks that add a pop of color to the creamy ceramic.
Step-by-Step Guide
Materials
- Speckled cream polymer clay (or air-dry clay)
- Acrylic rolling pin
- Pottery sponge
- bowl of water
- Fine grit sandpaper (400-600)
- Black acrylic paint or paint pen
- Terracotta or muted red acrylic paint
- Small round paintbrush (size 0 or 00)
- Gloss varnish or polyurethane sealant
Step 1: Forming the Base
-
Prepare the Clay:
Start by conditioning a ball of speckled clay about the size of a tangerine. Warm it in your hands and knead until it feels pliable and smooth, ensuring there are no air bubbles trapped inside. -
Establish the Shape:
Roll the clay into a perfect sphere between your palms. Gently press your thumb into the center of the ball, stopping about a quarter-inch from the bottom to create the base thickness. -
Pinch the Walls:
Rotate the ball in one hand while pinching the clay between your thumb and fingers with the other. work your way from the bottom up, aiming for an even wall thickness of roughly 1/4 inch. -
Smooth the Rim:
Once you have a bowl shape, tap the bottom gently on your table to flatten it so it sits stable. Use a slightly damp sponge to smooth the rim, rounding off any sharp edges for a soft, organic look. -
Refine the Surface:
Inspect the bowl for any fingerprints. A light brush with a little water on your fingertip can buff these away. I like to spend an extra minute here ensuring the curve is symmetrical.
Fixing Wobbly Rims
If the rim isn’t even, place a piece of sandpaper flat on the table. Invert the raw clay pot onto it and gently rotate. This grinds the top perfectly flat.
Step 2: Curing and Sanding
-
Bake or Dry:
If using polymer clay, bake according to the package instructions (usually 275°F for 15-30 minutes). If using air-dry clay, let it sit in a cool, dry place for 24-48 hours until fully hardened and white. -
Cool Down:
Allow the pot to cool completely before handling. It should feel hard and sound slightly hollow when tapped. -
Sanding:
Take your fine-grit sandpaper and gently gently buff the rim and outside surface. You aren’t trying to change the shape, just creating a buttery smooth surface for the paint to adhere to. -
Clean Up:
Wipe the entire bowl with a barely damp cloth to remove any sanding dust. The surface needs to be perfectly clean for the face design.
Step 3: adding the Character
-
Draft the Face:
Lightly sketch the face placement using a pencil. Position the eyes slightly lower than the center line of the bowl to make the character look cuter. Mark two spots for cheeks and a tiny curve for the smile. -
Paint the Lashes:
Using a fine-tip paintbrush or a paint pen, draw two downward crescent curves for closed eyes. Add three small, vertical ticks to each curve for the eyelashes, keeping them delicate. -
Add the Smile:
Paint a very small, simple ‘u’ shape directly between and slightly below the eyes for the mouth. -
Paint the Cheeks:
Mix a muted red or terracotta acrylic paint. Paint a small heart shape on each outer cheek area. You can turn the pot sideways to get the angle of the hearts right. -
Let it Set:
Allow the paint to dry completely. Acrylics dry fast, but give it at least 20 minutes to be safe so you don’t smudge the lines.
Make It Glossy
For a true faux-ceramic look, apply 2-3 coats of thick gloss varnish (like Triple Thick), letting each layer dry fully. It creates a ‘glass-like’ finish.
Step 4: Finishing Touches
-
Apply Sealer:
Coat the entire bowl, inside and out, with a gloss varnish. This mimics the look of fired ceramic glaze and protects your paint. -
Final Cure:
Let the varnish dry for the recommended time (usually 24 hours for a full cure) before placing any jewelry inside.
Now you have a charming little spot to keep your favorite rings safe
Two-Headed Pinch Pot Buddy Bowl
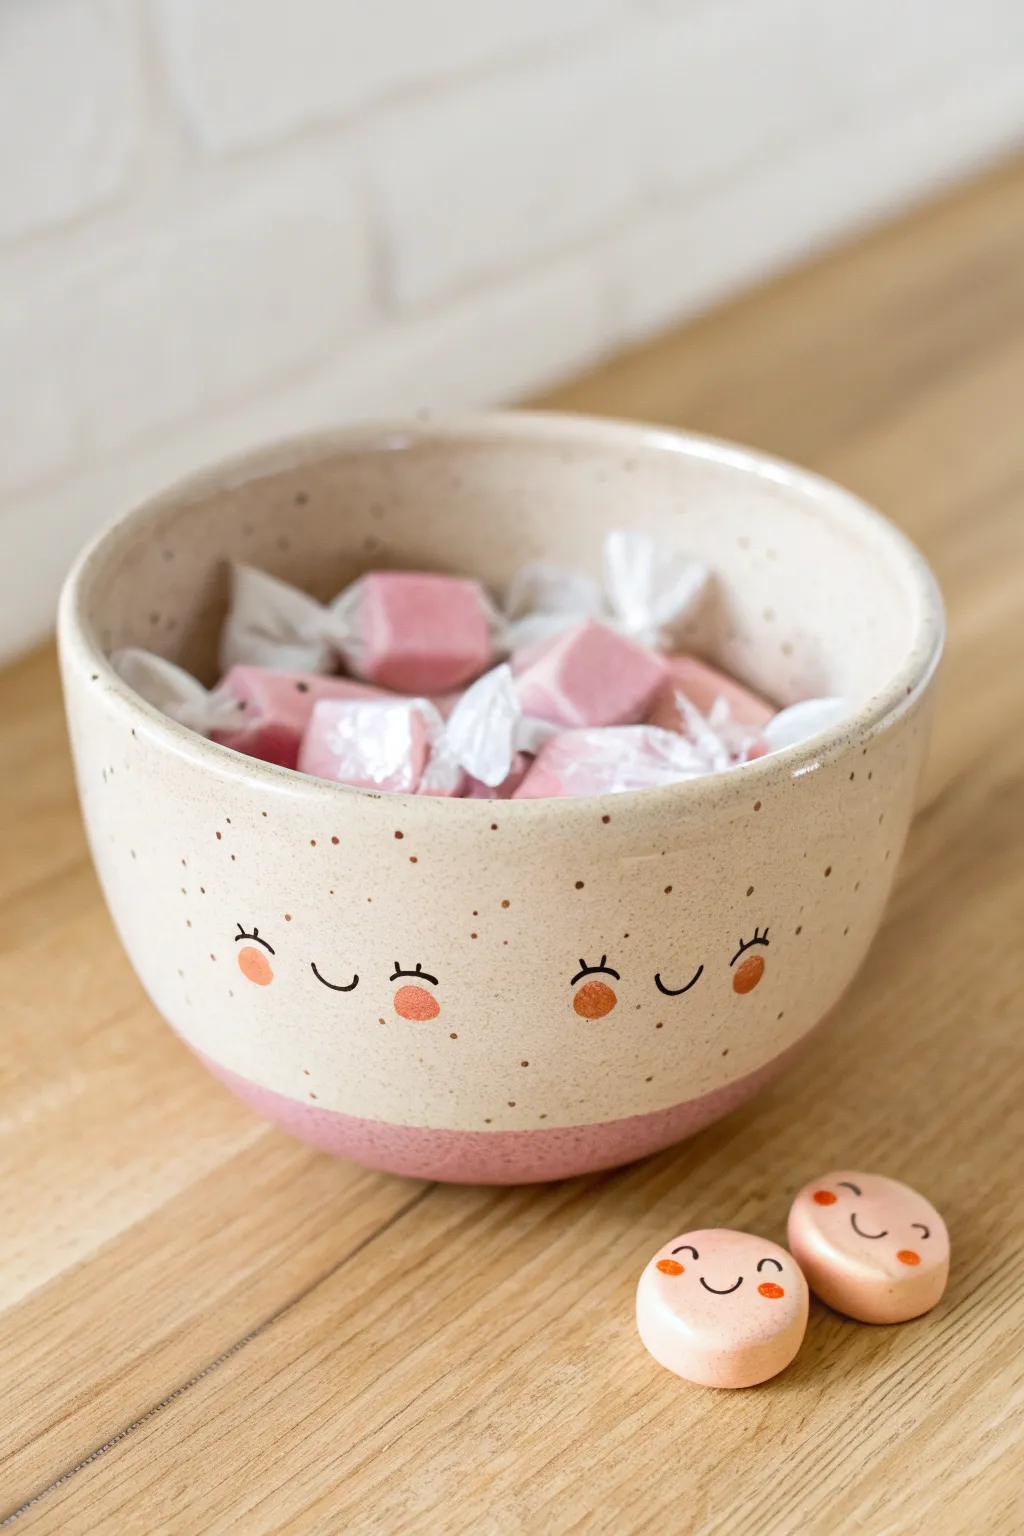
This adorable speckled bowl features two sweet faces smiling out at you, making it the perfect vessel for candy or trinkets. The dipped pink base and charming painted details give it a modern yet handmade ceramic look without needing a kiln.
Step-by-Step
Materials
- Air-dry clay (white or light beige)
- Water bowl and sponge
- Rolling pin
- Pottery needle tool or toothpick
- Sandpaper (medium and fine grit)
- Acrylic paint (pale pink, medium pink, black, and burnt orange)
- Small round paintbrush
- Fine-point detail brush
- Matte or satin sealant spray
- Old toothbrush (for speckling)
Step 1: Shaping the Bowl
-
Prepare the Clay:
Start with a ball of clay roughly the size of a large orange. Knead it in your hands to warm it up and remove any large air bubbles, ensuring the consistency is smooth and pliable. -
Open the Pinch Pot:
Push your thumb into the center of the ball, stopping about half an inch from the bottom. This will form the base thickness of your bowl. -
Pinch the Walls:
Using your thumb on the inside and fingers on the outside, gently pinch and rotate the clay. Work your way from the bottom up to the rim, aiming for an even thickness of about 1/4 inch all around. -
Refine the Rim:
Once you have the desired height, use your fingers to smooth the rim. I like to dampen my fingers slightly to round off any sharp edges for a softer, more polished look. -
Create a Flat Bottom:
Gently tap the bowl onto your work surface to flatten the bottom slightly so it sits stable and won’t wobble. -
Smooth the Surface:
Dip a sponge in water and wring it out well so it is just damp. Wipe the entire surface of the bowl to remove fingerprints and bumps, getting it as smooth as possible before drying. -
Form the Buddy Pieces (Optional):
If you want to make the matching tokens shown in the image, roll two small balls of clay and flatten them into thick discs to create the ‘buddy’ faces. -
Let it Dry:
Place your bowl and any small pieces in a safe spot to dry. Allow them to air dry for 24-48 hours until the clay turns a chalky white and feels room temperature to the touch.
Pro Tip: Liquid Eraser
If you smudge the black facial details, don’t panic! Use a wet Q-tip to gently wipe away the mistake immediately, or wait for it to dry and paint over it with the base color.
Step 2: Sanding and Painting
-
Sand for Smoothness:
Once fully dry, use medium-grit sandpaper to remove any major unevenness on the rim or sides. Follow up with fine-grit sandpaper to achieve a porcelain-smooth finish. -
Wipe Clean:
Use a dry cloth or a slightly damp paper towel to wipe away all the clay dust. A clean surface is crucial for the paint to adhere properly. -
Paint the Dipped Base:
Mix a medium pink acrylic shade. Carefully paint the bottom third of the bowl, creating a clean horizontal line around the circumference. You can use masking tape for a sharper edge, but a hand-painted line adds organic charm. -
Add Speckles:
Dilute a tiny amount of burnt orange or light brown paint with water. Dip an old toothbrush into this mixture and run your thumb across the bristles to flick tiny speckles over the unpainted top section of the bowl. -
Sketch the Faces:
Using a pencil very lightly, mark where you want the two faces to go on opposite sides of the bowl. Plan for sleeping eyes with eyelashes and a simple curved smile. -
Paint the Cheeks:
Dip your ring finger or a small round brush into the burnt orange paint. Dab simple round circles where the cheeks should be on both faces. -
Detail the Expressions:
Using your finest detail brush and black paint, carefully trace over your pencil lines to create the sleeping eyelids, eyelashes, and smiles. Keep your hand steady and use very light pressure. -
Paint the Buddy Discs:
Paint the small clay discs with a pale pink color. Once dry, add similar faces—one sleeping, one awake—using the same cheek and line techniques used on the main bowl. -
Seal the Project:
Take your project outside or to a ventilated area. Spray the entire bowl and the small discs with two coats of matte or satin sealant to protect the paint and give the clay a finished ceramic feel.
Troubleshooting: Cracks
Small cracks appearing during drying? Mix a tiny bit of fresh clay with water to make a paste (slip) and fill in the cracks. Let it dry again, then sand smooth before painting.
Now your charming buddy bowl is ready to safeguard your sweets and brighten your desk with its double dose of cheer
Surprise Peekaboo Pinch Pot Interior Face
Discover the delightful surprise waiting at the bottom of your breakfast bowl with this charming ceramic project. This hand-built pinch pot features a speckled cream finish, whimsical exterior polka dots, and a sweet, sleeping face painted directly on the interior base.
Step-by-Step Tutorial
Materials
- White stoneware or polymer clay (if not firing)
- Pottery tools (sponge, needle tool, rib)
- Underglaze (black, soft orange, warm brown)
- Clear or speckled cream glaze (food safe if using for food)
- Fine liner brush
- Small round brush
- Kiln (if using stoneware)
Step 1: Forming the Pinch Pot
-
Prepare the Clay:
Start with a ball of clay roughly the size of a large orange. Wedge it thoroughly to remove air bubbles, then pat it into a smooth, round sphere in your hands. -
Open the Form:
Hold the ball in your non-dominant hand. Press your thumb gently into the center, stopping about a half-inch from the bottom to ensure a sturdy base. -
Pinch the Walls:
Begin pivoting the clay in your hand while gently pinching the clay between your thumb and fingers. Work from the bottom up, maintaining an even thickness of about quarter-inch throughout the walls. -
Shape the Curve:
Aim for a gentle, rounded curve rather than straight vertical walls. Smooth the interior with a damp sponge to remove fingerprints and create a flawless canvas for your face design. -
Refine the Rim:
Use a damp chamois or sponge to compress and round the rim. This prevents sharp edges and gives the bowl a finished, professional look. -
Clean the Base:
Turn the pot over and tap the bottom gently against your work surface to flatten it slightly so it sits stable. Smooth out any roughness with a rib tool.
Smudged Smile?
If you mess up a line with underglaze on bisque ware, don’t panic. Let it dry completely, then gently scratch the error off with a needle tool or stiff brush.
Step 2: Painting the Surprise Face
-
Surface Prep:
Allow the clay to dry to a leather-hard stage. This makes painting crisp lines much easier than working on wet, soft clay. -
Draft the Face:
Lightly sketch the position of the eyes and mouth with a pencil. Don’t worry, the graphite burns off in the kiln. -
Paint the Lashes:
Load a fine liner brush with black underglaze. Paint two downward curves for closed eyes, adding three tiny lashes to each outer corner. -
Add the Smile:
Place a small, simple ‘u’ shape directly between and slightly below the eyes for a content little smile. -
Rosy Cheeks:
Dip a small round brush or a sponge dabber into soft orange underglaze. Stamp or paint circular cheeks on either side of the smile. I prefer to dab lightly to get a textured look.
Step 3: Exterior Details & Glazing
-
Apply Exterior Dots:
Using a warm brown underglaze, paint small freehand polka dots around the bottom exterior of the bowl. Concentrate them near the base and fade them out as you go up. -
Bisque Fire:
Once bone dry, fire the piece to bisque temperature (usually Cone 04) to set the shape and underglazes. -
Glazing:
Dip the entire bowl into a clear glaze or a semi-transparent speckled cream glaze. This seals the clay and makes the face detail pop. -
Wipe the Foot:
Use a wax resist solely on the bottom foot ring, or carefully sponge off any glaze from the bottom contact point to prevent sticking in the kiln. -
Final Fire:
Fire the piece again to your clay body’s maturity temperature (e.g., Cone 5 or 6). Let it cool completely before removing from the kiln.
Make it a Set
Create a row of nesting bowls, each with a different facial expression inside—winking, laughing, or surprised—to make stacking them away more fun.
Now you have a sweet little companion to greet you every time you finish your morning cereal or afternoon snack