When I’m craving crisp corners and clean lines, I reach for hard slab clay and start cutting like I’m building a tiny ceramic house. These ideas lean into stiff slabs, sharp edges, and satisfying slab joinery that looks modern but still feels handmade.
Classic Lidded Slab Box
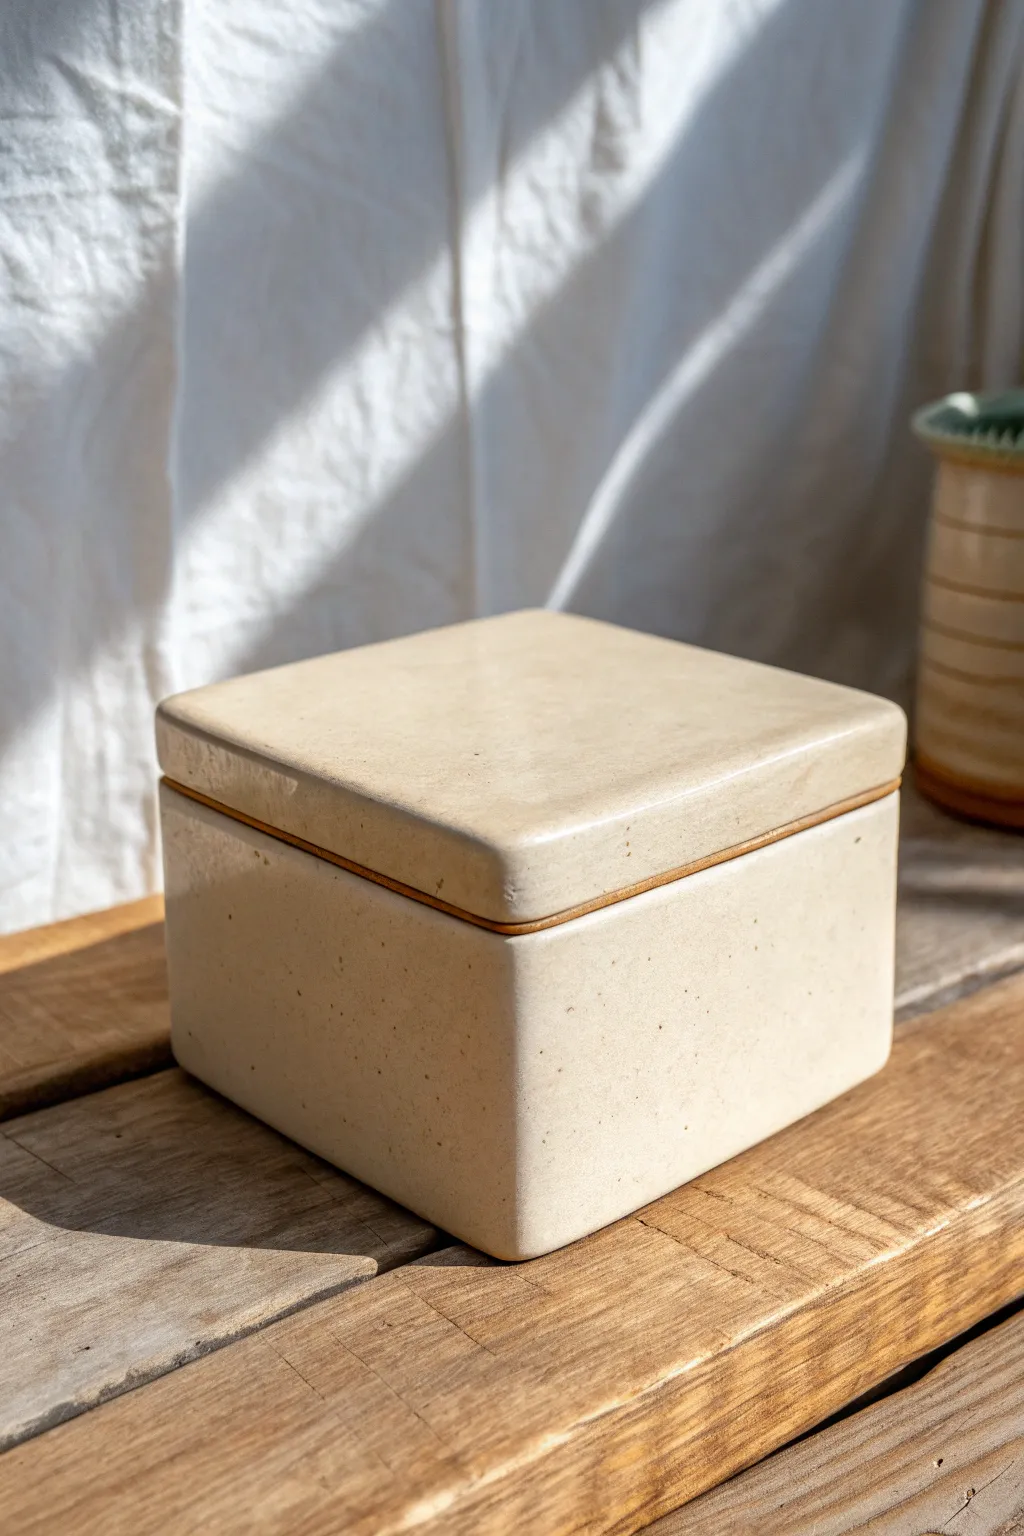
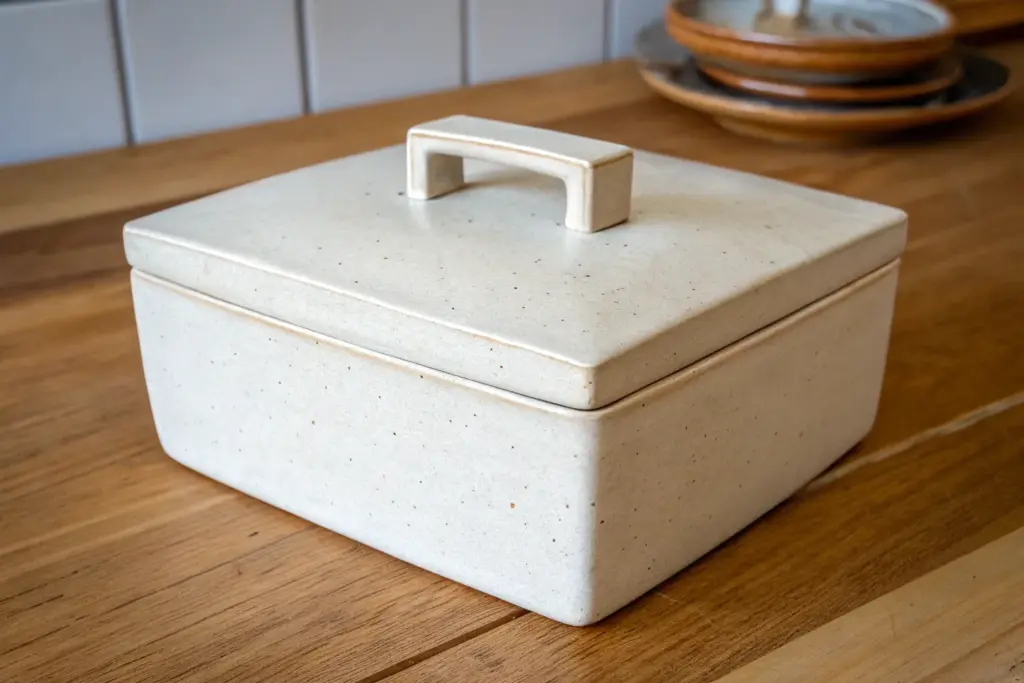
This project explores the elegance of simplicity with a smooth, square lidded box created using hard slab construction. The finished piece features softened corners and a warm, speckled cream glaze that emphasizes its clean architectural form.
Step-by-Step Guide
Materials
- Stoneware clay with fine grog (speckled works best)
- Rolling pin and guide sticks (approx. 1/4 inch thickness)
- Fettling knife or X-Acto blade
- Serrated rib and rubber kidney rib
- Slip or vinegar for joining
- Square template (cardstock or roofing felt)
- Needle tool
- Wooden paddle
- Cream matte glaze
Step 1: Preparing the Slabs
-
Roll and Compress:
Begin by rolling out a large slab of clay to an even thickness using your guide sticks. Once rolled, use a rubber rib to compress the clay on both sides; this aligns the clay particles and helps prevent warping later. -
Cut the Components:
Using your square template, cut out six identical squares. You will need four for the walls, one for the base, and one for the lid. I like to cut a few extra squares just in case one gets damaged during the stiffening phase. -
Stiffen to Leather Hard:
Allow your cut squares to dry slowly between boards or drywall until they reach a leather-hard state. They should be stiff enough to hold their shape without bending but still dark with moisture, like a block of cheddar cheese.
Warping Woes
If your lid curls up at the corners during drying, flip it upside down and weigh it down gently with a small sandbag. Slow down the drying process by keeping it under plastic.
Step 2: Assembling the Form
-
Bevel the Edges:
For the strongest corner joints, cut 45-degree angles (miters) on the vertical sides of your four wall pieces. Leave the top and bottom edges flat for now. -
Score and Slip:
Deeply score the beveled edges using a serrated rib or needle tool. Apply a generous amount of slip or vinegar to the scored areas. -
Construct the Walls:
Join the four walls together to create a hollow square tube. Press the corners firmly together from the inside and outside to ensure a tight bond. -
Attach the Base:
Score and slip the bottom edge of your wall structure and the outer perimeter of your base square. Place the walls onto the base. If the base is slightly larger, that’s fine; you can trim it flush once attached. -
Reinforce the Seams:
Roll very thin coils of soft clay and press them into the interior seams of the box. Smooth these out completely with a modeling tool or your finger to reinforce the structural integrity.
Step 3: Creating the Lid and Refining
-
Measure the Flange:
Flip your box upside down onto the remaining slab square (the lid). Lightly trace the box’s outline, then measure about 1/4 inch inward from that line to mark where your flange will go. -
Add the Flange:
Score and slip along your inner guidelines on the lid slab. Attach four strips of clay to create a square ‘fence’ that will fit snugly inside the box opening. This flange keeps the lid from sliding off. -
Test the Fit:
Once the flange is attached, test the lid on the box. It should fit without force. If it’s too tight, carefully shave down the outside of the flange until it sits perfectly. -
Paddle the Form:
With the lid on the box, gently tap the exterior walls with a wooden paddle. This helps square up the shape and ensures the lid and box exterior are perfectly flush with each other. -
Soften the Edges:
The image features soft, rounded corners rather than sharp edges. Use a slightly damp sponge or a soft rubber rib to round over all distinct corners and edges for that smooth, tactile finish. -
Final Smoothing:
Run a chamois or heavy plastic bag over the entire surface to compress the grit and create a silky-smooth texture before the final drying stage.
Make it a Set
Create a nesting set by making three boxes in graduating sizes. Use different earth-toned glazes for each to create a cohesive but varied visual gradient on your shelf.
Step 4: Glazing and Firing
-
Bisque Fire:
Fire the piece to cone 04 (or your clay body’s bisque temperature). Keep the lid on the box during firing to ensure they warp together if any movement occurs. -
Apply Wax Resist:
Paint a careful line of liquid wax resist along the rim of the box and the corresponding contact point on the lid to prevent them from fusing together during the glaze firing. -
Glaze Application:
Dip or spray the box with a satin or matte cream glaze. This finish highlights the speckles in the clay body without distracting glare. -
Final Fire:
Fire the piece to maturity (Cone 5/6 for most stonewares). Again, firing with the lid in place is risky for fusing but ensures the best fit; alternatively, fire side-by-side on leveled kiln shelves.
Once fired, this piece serves as a beautiful, functional object that proves simple geometry is timeless design


Square Dinner Plates With Raised Rim
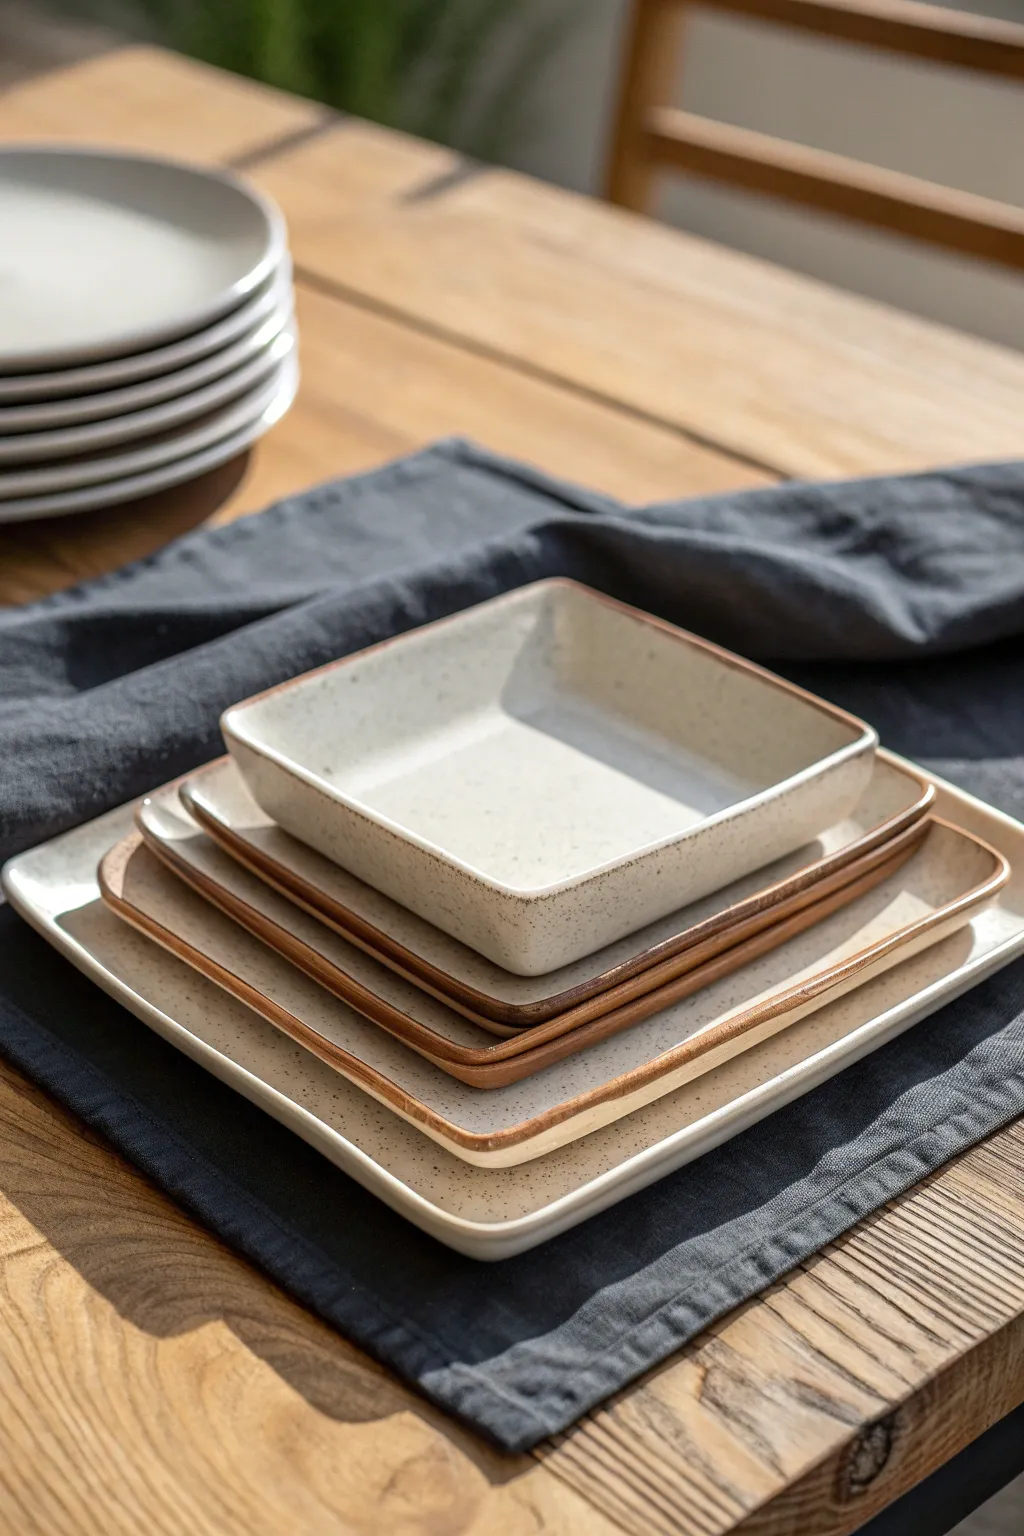
These elegant square plates feature a minimalist aesthetic with their clean lines, distinctively raised rims, and charming speckled clay body. The set creates a cohesive table setting while highlighting the beautiful contrast between the creamy interior glaze and the raw, toasted edges.
Step-by-Step Guide
Materials
- High-fire speckled stoneware clay
- Rolling pin or slab roller
- Two heavy canvas sheets
- Square slump molds or GR Pottery Forms (varying sizes)
- Fettling knife or needle tool
- Flexible metal kidney rib
- Rubber finishing rib
- Serrated rib
- Wooden modeling tool
- Sponge
- White or cream matte glaze
- Wax resist (optional)
Step 1: Prepping and Cutting Slabs
-
Roll the clay:
Begin by wedging your speckled stoneware thoroughly to remove air bubbles. Roll out a large slab of clay to a consistent thickness of about 1/4 inch. If you are rolling by hand, use wooden guide strips on either side to ensure evenness. -
Compress the slab:
Using a flexible metal kidney rib, compress the clay by dragging it firmly across the surface in multiple directions. This aligns the clay particles, which helps prevent future warping—crucial for flat plates. -
Let it firm up:
Allow the slab to stiffen slightly until it reaches a soft leather-hard stage; it should be flexible but not sticky. This ‘hard slab’ consistency is key to getting those sharp, upright rims. -
Cut the squares:
Place your square forms or templates onto the slab. For each plate, cut a square that is approximately 1.5 to 2 inches larger than the final desired base size to account for the rim height.
Keep it Flat
To prevent base warping, dry your plates on a piece of drywall or foam. Weight the centers down with a small sandbag during the first day of drying.
Step 2: Forming the Plates
-
Center the clay:
Place your square mold or form upside down on a work surface. Carefully center your cut clay slab over the form. -
Define the base:
Press the clay firmly against the bottom of the mold. Use a rubber rib to smooth this area, ensuring it is perfectly flat. -
Shape the rim:
Gently fold the overhanging clay down the sides of the form. Because the clay is slightly stiff, you may need to firmly pat it against the mold’s side to establish that sharp 90-degree or slightly obtuse angle. -
Refine the corners:
Pay special attention to the four corners. The clay will bunch up here; smooth and compress the excess clay into the corner seam, or cut a small dart/notch if necessary to keep the walls vertical without folding. -
Trim the edge:
While the clay is on the mold, use a needle tool or fettling knife to trim the rim to a uniform height all the way around. I like to support the wall from the inside with one hand while cutting with the other.
Step 3: Refining and Drying
-
Wait for leather hard:
Let the plates dry on the molds until they are stiff leather hard. They need to be strong enough to hold their shape when flipped over. -
Flip and release:
Remove the plates from the molds. Place them right-side up on a ware board. If the bottoms bulge slightly, gently tap the board on the table to flatten them. -
Smooth the rims:
Take a damp sponge and run it along the top edge of the rim. Round it off slightly to make it durable and pleasant to touch. This also exposes the grog/speckles for texture. -
Dry slowly:
Cover the rims with plastic or wax resist to slow their drying, as edges dry faster than the center. To prevent warping, dry the plates slowly under loose plastic for several days. -
Bisque fire:
Once bone dry, load the plates into the kiln for a bisque firing.
Rim Variation
Instead of wax resist, wipe the glaze off the rim with a sponge after dipping. This creates a softer, more organic transition between the glaze and raw clay.
Step 4: Glazing and Finishing
-
Wax the rim:
To achieve the look in the image, apply wax resist carefully to the very edge of the rim. This will keep the glaze off the lip, revealing the natural toasted color of the clay body. -
Apply glaze:
Dip or brush a creamy white matte glaze onto the plate. Ensure the coat is even, especially in the interior corners. -
Clean up:
Wipe away any glaze beads that may be sitting on the waxed rim with a damp sponge. -
Final fire:
Glaze fire the plates according to your clay and glaze specifications (typically Cone 6 or 10).
Enjoy styling your table with these clean, modern forms that showcase the natural beauty of the ceramic material


Rectangular Catchall Tray With Mitered Corners
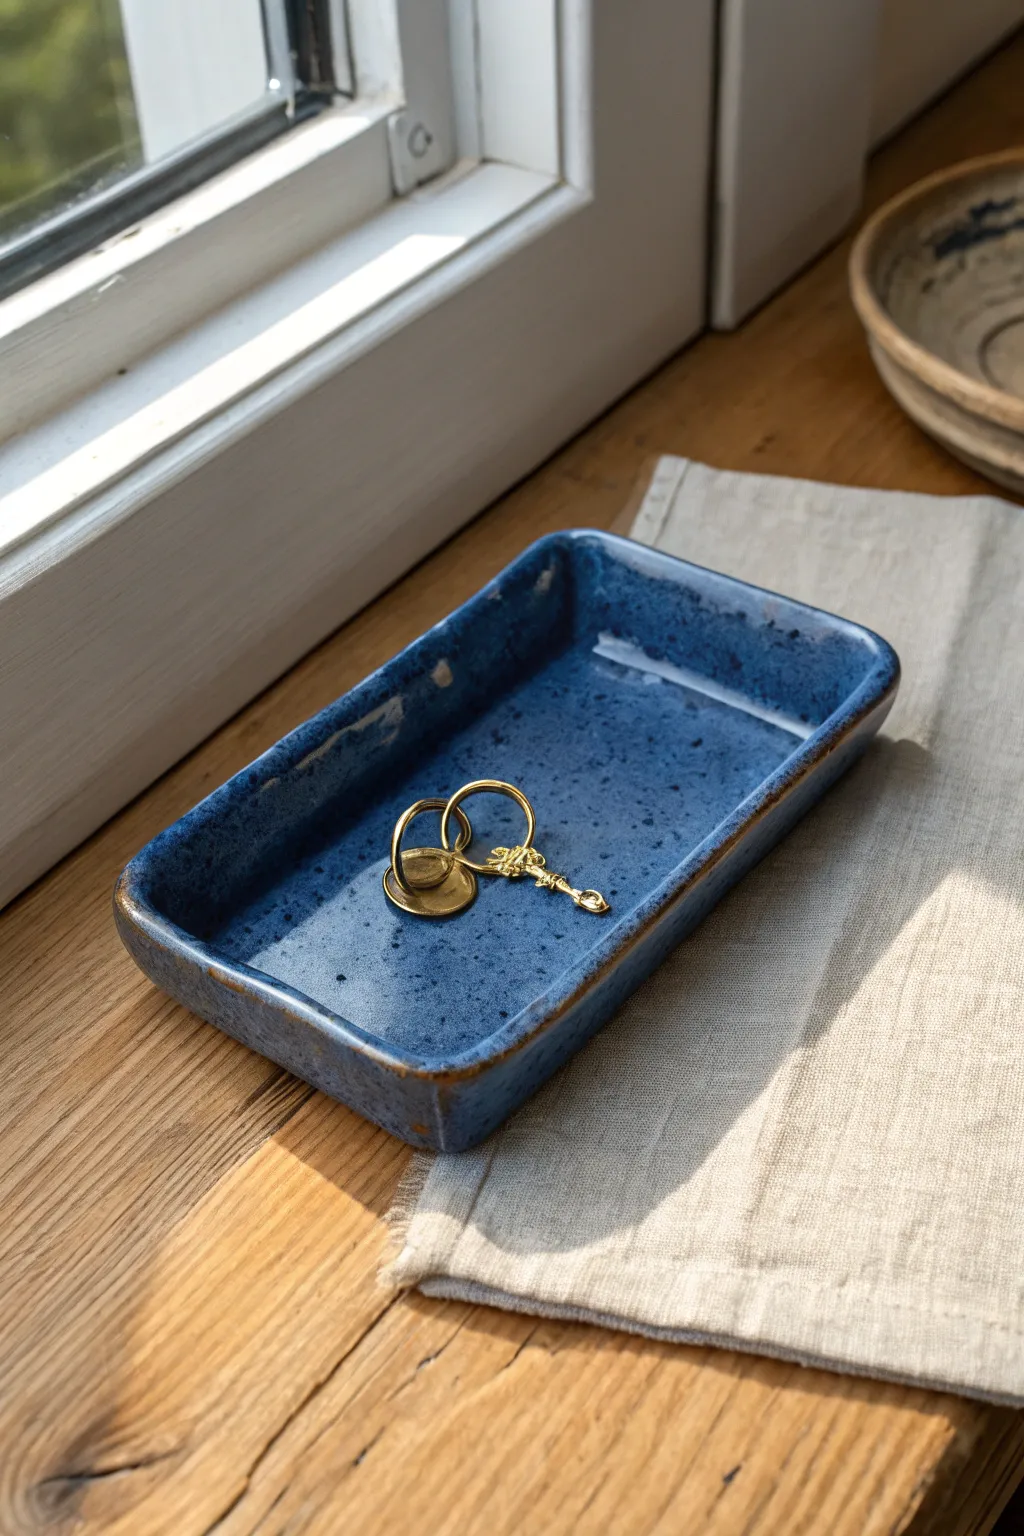
This elegant rectangular tray features crisp, geometric lines softened by an organic, speckled glaze. The precise mitered corners demonstrate skill in hard slab construction, creating a durable and sophisticated home for your everyday jewelry.
Step-by-Step Tutorial
Materials
- Stoneware clay body (smooth or lightly grogged)
- Rolling pin
- Two guide sticks (approx. 1/4 inch thick)
- Fettling knife or X-Acto blade
- Metal rib
- Serrated rib or scoring tool
- Slip or vinegar
- Ruler or straight edge
- 45-degree angle bevel cutter (optional but helpful)
- Blue speckled stoneware glaze (Glossy)
- Small paintbrush for cleanup
Step 1: Slab Preparation
-
Roll the clay:
Begin by wedging your clay to remove air bubbles, then roll out a slab using your guide sticks to ensure an even thickness of about 1/4 inch. -
Compress the slab:
Use a metal rib to firmly compress the clay on both sides. This aligns the clay particles, reducing warping later, and creates that smooth surface texture needed for a clean glaze finish. -
Let it firm up:
Set the slab aside on a ware board until it reaches a ‘leather hard’ state. Creating a crisp box shape requires the clay to be stiff enough to hold its own weight without slumping.
Step 2: Cutting and Mitering
-
Measure the base:
Cut a rectangle for the base of your tray, roughly 4 inches wide by 6 inches long (or your preferred dimensions). -
Cut the walls:
Cut two long strips and two short strips for the walls. These should match the length and width of your base exactly, with a height of about 1 inch. -
Bevel the base:
Using your knife or bevel tool, cut a 45-degree angle along all four edges of the base slab. The angle should slope inward. -
Miter the walls:
Cut 45-degree miter joints on the short ends of all four wall strips. Also, cut a 45-degree bevel along the bottom long edge of each wall strip to mate with the base.
Crack Control
If corners crack during drying, your clay was likely too dry during assembly or you didn’t score deeply enough. Use a ‘paper clay’ slip (slip mixed with toilet paper pulp) to patch minor cracks.
Step 3: Assembly
-
Score the edges:
Take your scoring tool and roughen up every beveled surface that will be joined. Be thorough here to ensure a strong bond. -
Apply slip:
Dab a generous amount of slip or vinegar onto the scored areas. It should look wet and tacky but not dripping. -
Attach the walls:
Press the long walls onto the base first, aligning the bevels. Apply firm pressure to bond them without deforming the clay. -
Close the corners:
Attach the short walls, pressing the mitered corners together tightly. I find holding the corner from the outside while pressing from the inside helps seal the seam perfectly. -
Reinforce dimensions:
Use a wooden paddle or a flat board to gently tap the exterior walls, ensuring they are perfectly straight and the corners are sharp 90-degree angles. -
Clean the seams:
Run a thin coil of soft clay along the interior seams if they look gapped, smoothing it down completely. On the outside, smooth the corner joins so they are invisible.
Added Texture
Before the clay gets leather hard, gently press a textured cloth or canvas into the interior slab step. The glaze will pool in the textures, adding visual depth similar to the speckles.
Step 4: Finishing and Glazing
-
Dry slowly:
Lightly drape plastic over the tray to let it dry slowly. Uneven drying causes warping in slab pots. -
Bisque fire:
Once bone dry, fire the piece to bisque temperature (usually cone 04/06). -
Glaze application:
Dip or brush your blue speckled glaze onto the piece. For the look in the image, ensure the glaze pools slightly in the bottom corners but wipe the rim lightly if you want the clay body to peek through solely on the sharpest edges. -
Rim detail:
If the glaze covers the rim too thickly, use a damp sponge to thin it out specifically on the top edge, mimicking the brown break lines seen in the photo. -
Final fire:
Glaze fire to the temperature appropriate for your clay and glaze (likely cone 5/6).
Enjoy styling your new tray on a windowsill where the light can catch those deep blue glazes


Angular Slab Mug With a Blocky Handle
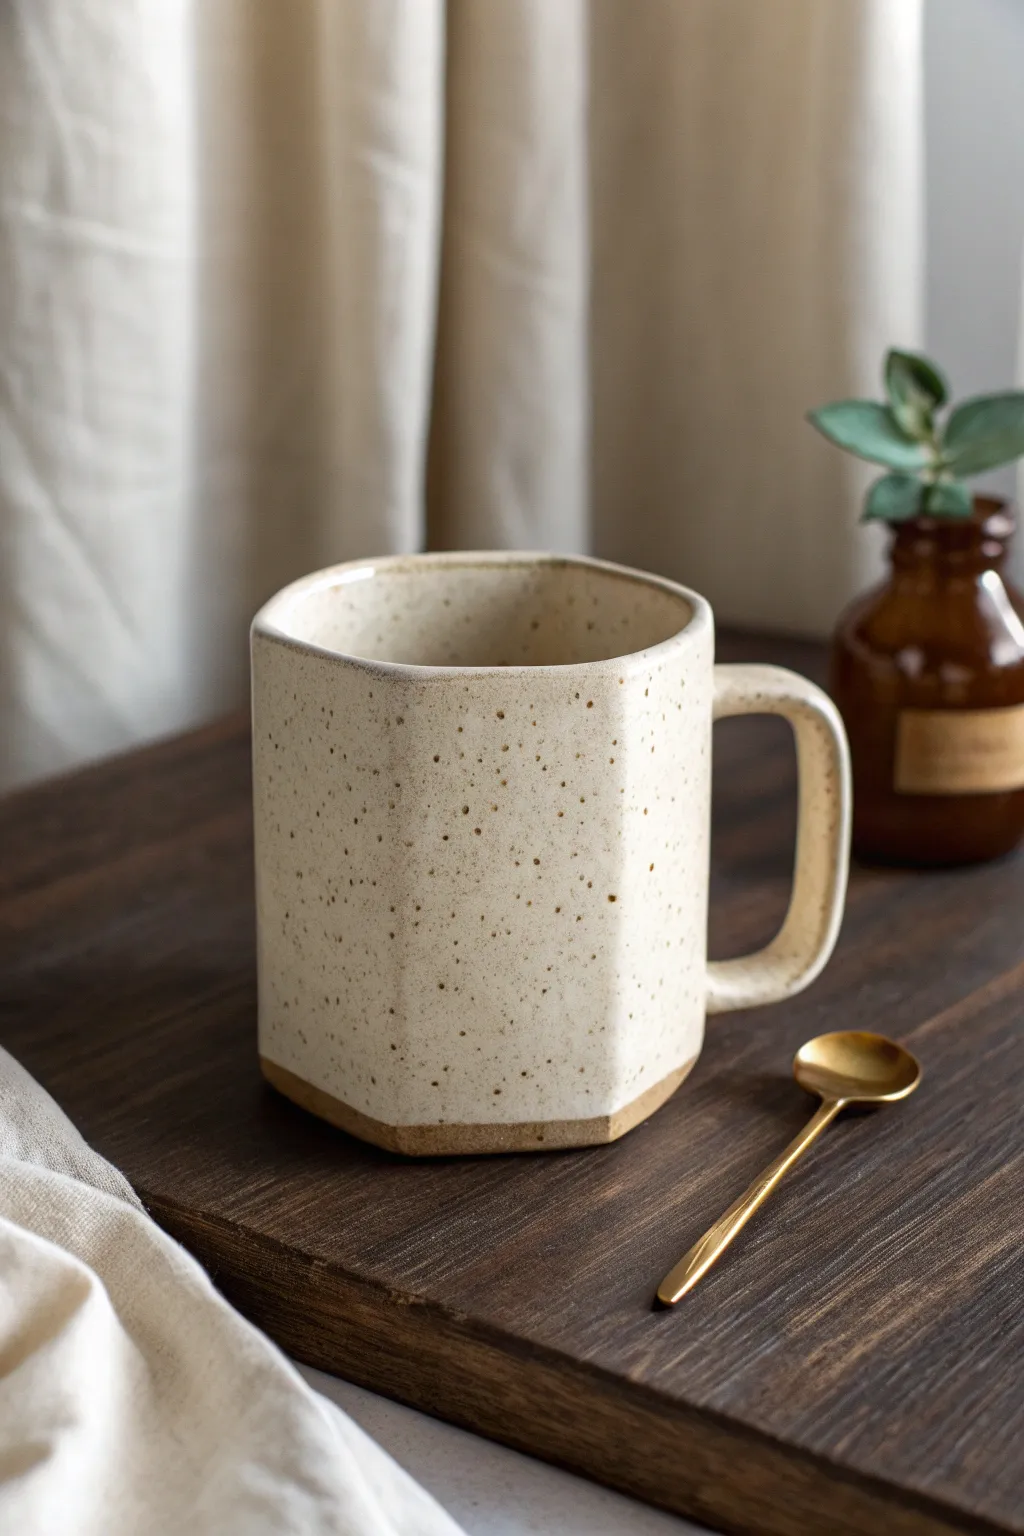
This project explores geometric forms through hard slab construction, resulting in a striking octagonal mug with subtle speckled texture. The creamy white glaze contrasts beautifully with the exposed raw clay at the base, giving it a modern yet rustic appeal.
Step-by-Step Guide
Materials
- Stoneware clay body (speckled or buff)
- Rolling pin
- Two wooden thickness strips (approx. 1/4 inch)
- Fettling knife or X-Acto blade
- Paper template (rectangle for body, circle for base)
- Scoring tool or serrated rib
- Slip (clay and water mixture)
- Wooden modeling tool
- Beamm ruler or straight edge
- Cream matte glaze
Step 1: Prepping the Leather Hard Slabs
-
Roll out the clay:
Begin by rolling out a uniform slab of clay using your rolling pin and thickness strips to ensure an even 1/4 inch thickness throughout. -
Smooth the surface:
Before cutting, compress the slab on both sides with a soft rib. This aligns the clay particles, preventing warping later, and creates a nice canvas for the speckled texture to shine through. -
Let it firm up:
Allow the slab to dry to a stiff leather-hard stage. This is crucial for hard slab construction; if the clay is too soft, the angular walls will sag and lose their crisp definition.
Clean Facets Tip
Use a metal rib or a flat wooden paddle to gently tap the flat sides of the mug after assembly. This corrects any warping from handling and sharpens the angles.
Step 2: Forming the Octagonal Body
-
Cut the main rectangle:
Using a straight edge, cut a long rectangle from your slab based on your desired mug height and circumference. -
Mark the facets:
Lightly measure and mark eight equal sections along the length of your rectangle. Do not cut through; these marks are guides for folding. -
Bevel the edges:
On the two short ends of the rectangle that will join together, cut a 45-degree bevel. This ensures a seamless connection that won’t disrupt the octagonal pattern. -
Score the fold lines:
Here I prefer to run a dull tool gently along the fold lines on the *inside* face of the slab to assist the fold without cracking the outer wall. -
Construct the cylinder:
Stand the slab up and fold it along your marked lines to create the octagon. Apply slip to the beveled ends, score them deeply, and press firmly to join. -
Reinforce the seam:
Roll a very thin coil of clay and press it into the interior corner of the seam, smoothing it completely so it disappears.
Cracking at Folds?
If the clay cracks on the outside while folding the octagon, your slab was likely too dry. Mist the fold zone with water and compress with a rib before trying again.
Step 3: Attaching the Base and Handle
-
Cut the base:
Place your octagonal tube onto the remaining slab and trace the shape or cut a matching octagon slightly larger than the walls. -
Attach the bottom:
Score and slip both the bottom edge of the walls and the perimeter of the base. Press the form onto the base firmly. -
Trim the excess:
Once attached, use your fettling knife to trim the excess clay from the base flush with the walls, keeping those sharp, angular facets clean. -
Create the handle strip:
Cut a strip of slab for the handle. Keep it rectangular and blocky to match the mug’s aesthetic, rather than pulling a round handle. -
Shape the handle:
Bend the strip into a ‘C’ or square-edged ‘D’ shape. Let it stiffen slightly so it holds its curve before attaching. -
Attach the handle:
Score and slip the attachment points on the mug body and handle. Press firmly, blending the clay at the joints for a secure bond.
Step 4: Finishing and Glazing
-
Refine the rim:
Use a damp sponge or chamois to soften the sharp edge of the rim just enough to make it comfortable for drinking, while maintaining the octagonal shape. -
Create the heavy bottom look:
If you want the exposed clay detail at the bottom shown in the photo, use a trimming tool to slightly bevel the very bottom edge of the exterior. -
Bisque fire:
Once bone dry, fire the piece to bisque temperature (usually cone 04). -
Wax resist the base:
Apply wax resist to the bottom inch of the mug’s exterior. This creates the straight line where the glaze stops and the raw clay begins. -
Glaze and fire:
Dip the mug into a cream matte glaze. The wax will repel the glaze at the bottom. Clean up any drips and glaze fire to maturity (likely cone 5/6).
Enjoy your morning coffee in a modern vessel that feels substantial and handmade in your palm

What Really Happens Inside the Kiln
Learn how time and temperature work together inside the kiln to transform clay into durable ceramic.
Hexagon Pencil Cup Desk Set
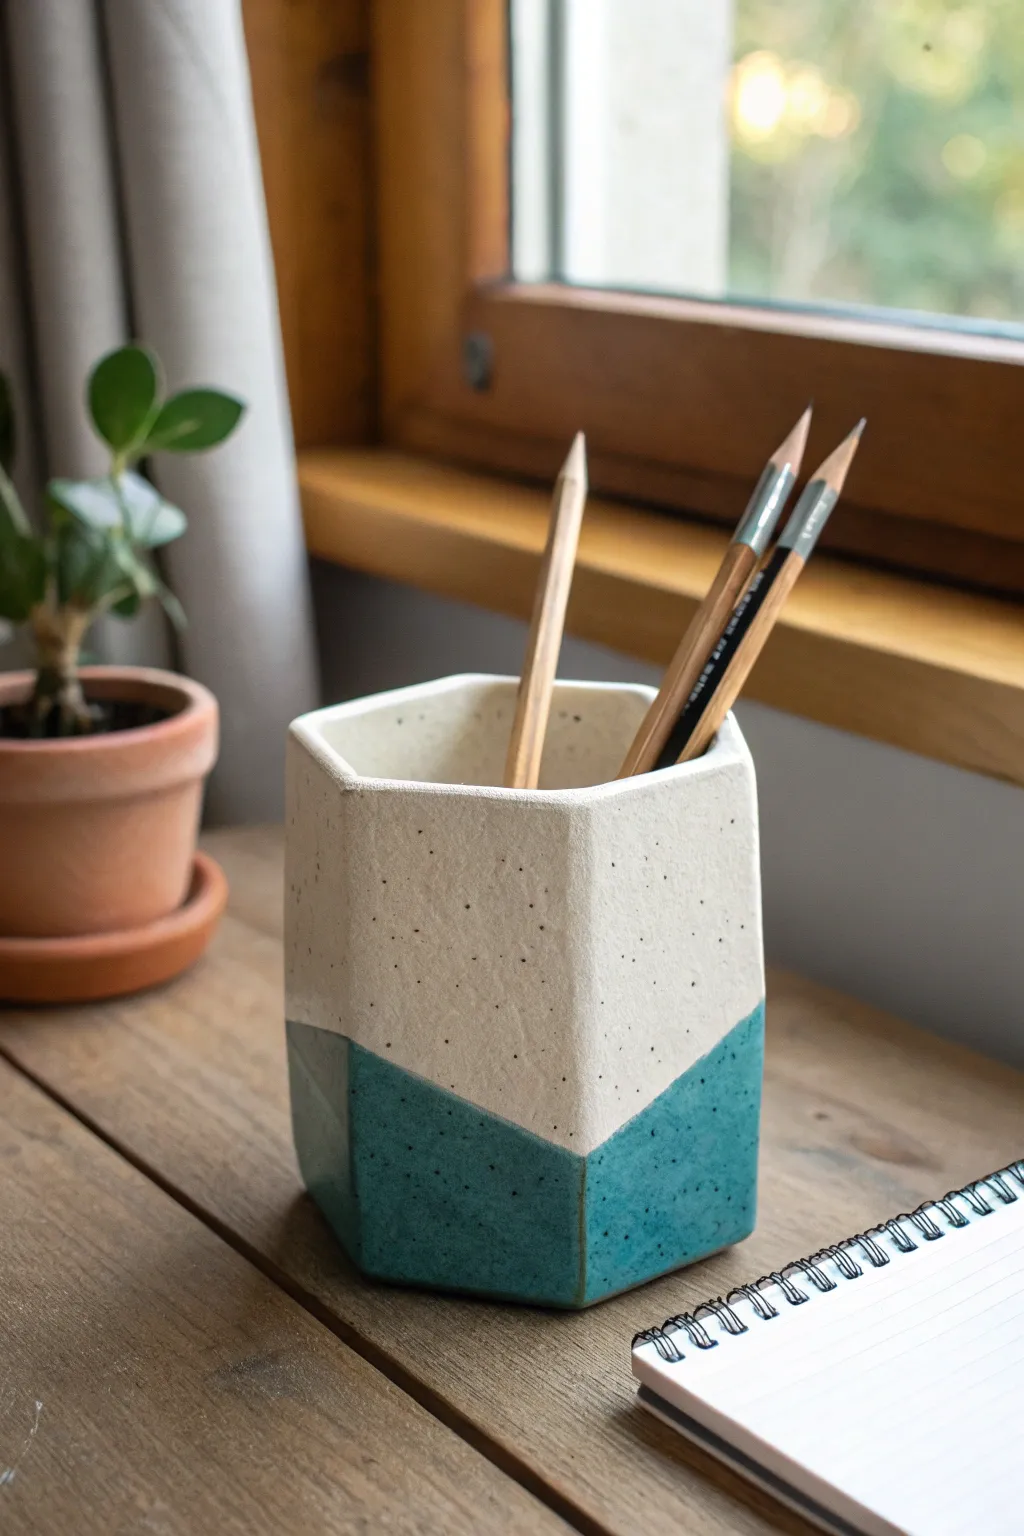
This geometric pencil cup combines clean modern lines with rustic charm, featuring a distinct two-tone glaze design. Built using hard slab construction techniques, the hexagonal form offers a perfect introduction to precise template work and sharp edge joining.
How-To Guide
Materials
- Speckled stoneware clay (mid-fire)
- Hexagon template (paper or cardstock)
- Rectangle template (approx. 2 inches wide by 4 inches tall)
- Fettling knife or X-Acto knife
- Rolling pin and guide strips (1/4 inch)
- Serrated rib or scoring tool
- Slip
- Soft bristle brush
- Miter cutter or bevel tool (45 degrees)
- Sponge
- Painter’s tape or wax resist
- Teal or Turquoise glaze (glossy)
- Matte white or clear glaze (for the top)
Step 1: Slab Preparation
-
Roll the slab:
Begin by rolling out your speckled stoneware clay into a large, even slab. Using 1/4 inch guide strips ensures the walls will be substantial enough to stand straight but not too heavy. -
Compress the clay:
Run a rubber rib firmly over both sides of the slab. This aligns the clay particles to prevent warping later and gives you a smooth canvas for the glaze. -
Initial firming:
Let the slab sit until it reaches a ‘leather-hard’ state. This is crucial for hard slab construction; if the clay is too soft, the straight walls of the hexagon will slump.
Step 2: Cutting and beveling
-
Cut the walls:
Using your rectangular template, cut out six identical rectangles. These will form the vertical faces of your cup. -
Cut the base:
Use your hexagon template to cut the base piece. Keep the template handy, as you might need it to check the shape during assembly. -
Bevel the vertical edges:
To create seamless 60-degree corners for a hexagon, you need to bevel the long sides of your wall pieces. Cut a 30-degree angle on both distinct long edges of every rectangle inward toward the planned interior face. -
Dry fit:
Stand the walls up on a flat surface in a hexagon shape to ensure your angles fit snugly together before applying any slip.
Wobbly Walls?
If walls slump during assembly, the clay was too wet. Use a hair dryer on the slab pieces for 2-3 minutes before cutting bevels to firm them up instantly.
Step 3: Assembly
-
Score and slip:
Score the beveled edges of the walls and the perimeter of the hexagonal base. Apply a generous amount of slip to these textured areas. -
Construct the perimeter:
Attach the first wall to the base. I find it easiest to attach a second wall immediately to the first one to provide structural support. -
Close the form:
Work your way around the base, attaching each wall segment. When placing the final wall, you may need to gently wiggle it into place to ensure a tight seal on both sides. -
Reinforce the interior:
Roll a very thin coil of wet clay. Place it inside along the bottom seam where the walls meet the floor, and smooth it down with a modeling tool to reinforce the join. -
Clean the seams:
On the exterior, run a smoothing tool or your finger along the vertical corners to compress the join. You want sharp angles, but the seam itself should disappear.
Level Up: Texture
Before the clay hardens, gently press a piece of canvas or linen into the exterior surface to give the unglazed or matte sections a subtle tactile fabric finish.
Step 4: Refining and Glazing
-
Smooth the rim:
Once the cup is bone dry, gently sand or sponge the top rim to ensure it is level and smooth. Sharp clay edges can be sharp after firing. -
Bisque fire:
Fire the piece to cone 04 (or your clay body’s specifications) to prepare it for glazing. -
Tape the design:
To achieve the sharp geometric line shown in the photo, apply painter’s tape (or automotive detailing tape for curves) in a chevron or mountain pattern around the lower third of the cup. -
Glaze the bottom:
Dip or brush the bottom section (below the tape) with a vibrant teal or turquoise glaze. Let it dry completely before removing the tape. -
Glaze the top:
Apply a matte white glaze to the upper section and the interior. If you want the raw speckled clay to show through like in some variations, use a clear matte glaze instead. -
Final fire:
Fire the piece to maturity (likely cone 5 or 6 depending on your stoneware). Ensure the bottom is wiped clean of glaze to prevent it from sticking to the kiln shelf.
Once fired, fill your new geometric cup with your favorite art supplies and enjoy the upgrade to your workspace
Textured Slab Box With a Sculptural Knob
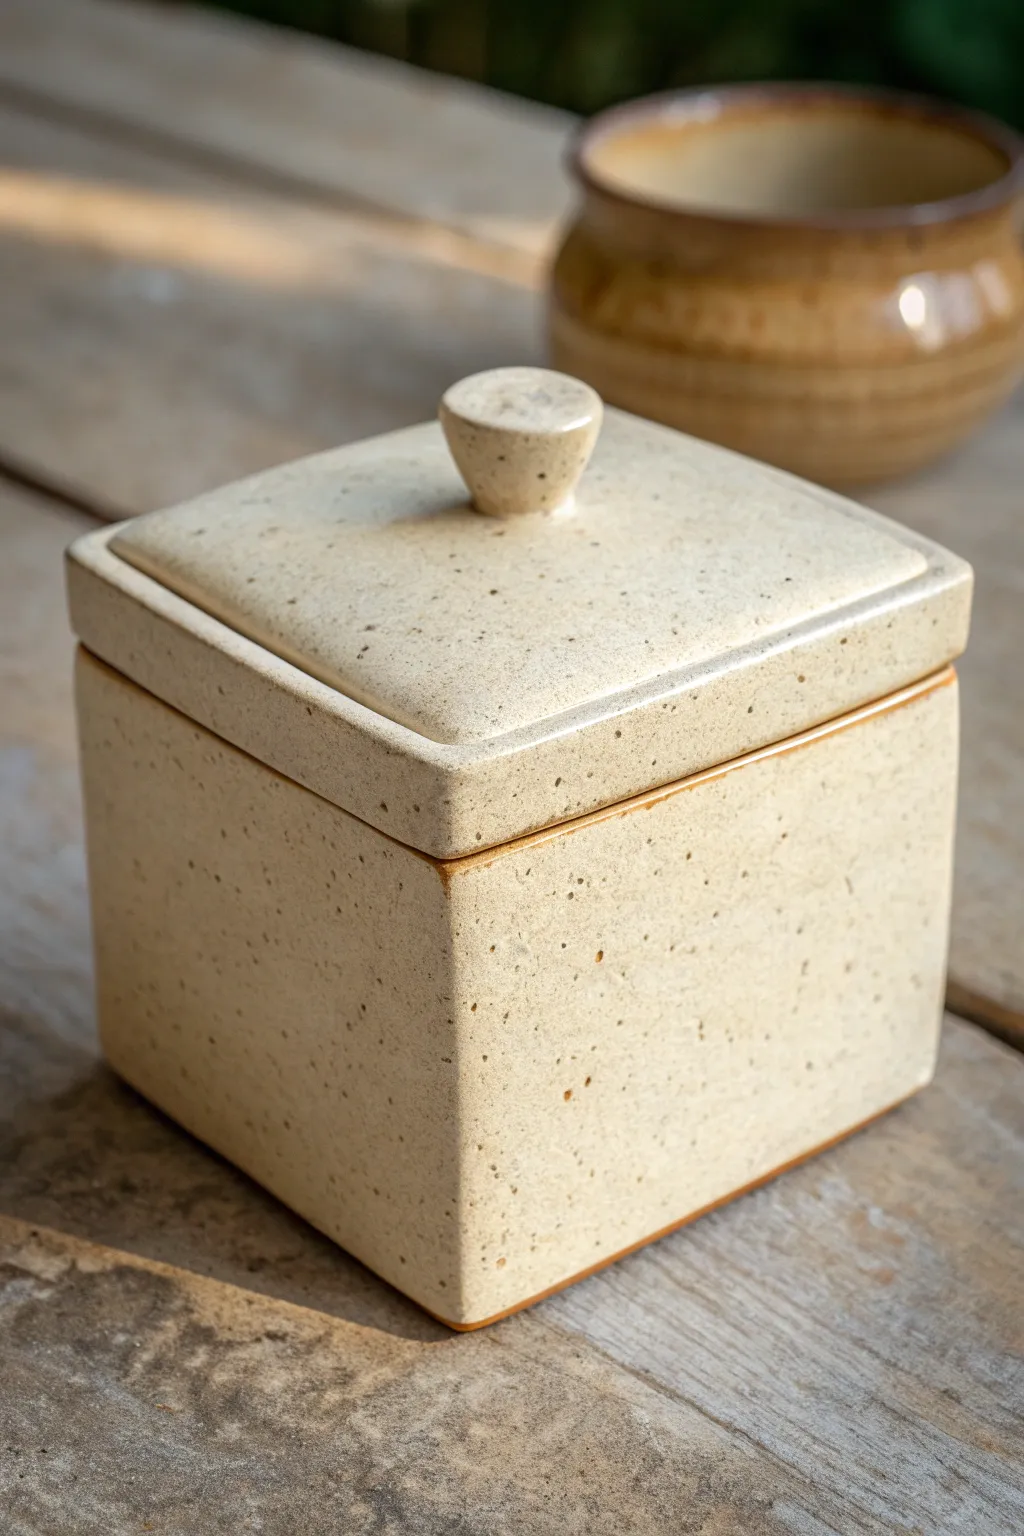
This elegant lidded box showcases the beauty of simplicity with its clean lines and warm, speckled glaze. Perfect for holding tea, sugar, or trinkets, the project teaches precise hard-slab construction techniques that result in a professional, gallery-worthy finish.
Detailed Instructions
Materials
- Speckled stoneware clay (mid-fire)
- Rolling pin with thickness strips (1/4 inch)
- Canvas work surface
- Fettling knife or X-Acto blade
- Ruler and set square
- Paper template (square)
- Scoring tool (serrated rib or needle tool)
- Slip (made from your clay body)
- Smoothing rib (soft silicone or rubber)
- Paddle tool
- Sponge
- Matte cream/beige glaze
Step 1: Planning and Preparation
-
Create templates:
Cut five identical square paper templates (e.g., 4×4 inches) for the base and walls, and one slightly larger square for the lid (e.g., 4.5×4.5 inches) to allow for the overhang. -
Roll out the slab:
Roll your speckled stoneware clay into a large, even slab about 1/4 inch thick. Compress the slab on both sides with a rib to align the clay particles, which helps prevent warping later. -
Cut the components:
Using your paper templates and a sharp knife, cut out the base, four wall pieces, and the lid. Keep the knife vertical for straight 90-degree cuts. -
Dry to leather hard:
Sandwich the cut pieces between pieces of drywall or wooden ware boards. Let them dry until they are ‘hard leather hard’—stiff enough to hold their shape without bending, but still attachable.
Step 2: Assembling the Box
-
Miter the edges:
For the crispest corner joints, cut a 45-degree angle (miter) on the vertical edges of all four wall pieces. Leave the bottom edges flat to sit on the base slab. -
Score and slip:
Aggressively score the mitered edges and the perimeter of the base slab. Apply a generous amount of slip to all scored areas. -
Join the walls:
Attach two walls to the base and to each other, pressing firmly to squeeze out excess slip. Use a set square to ensure they are perfectly perpendicular to the base. -
Complete the box form:
Attach the remaining two walls, closing the box. Use a paddle to gently tap the outside walls; this compresses the joints and sharpens the square shape. -
Reinforce the interior:
Roll a very thin coil of soft clay. Press this into the interior corners of the box and smooth it out with a modeling tool or your finger to reinforce the seams.
Clean Corner Pro-Tip
After joining your walls, run a lightly damp sponge along the sharp outer corners. This softens the edge just enough to prevent the glaze from crawling or chipping off the sharp 90-degree angle later.
Step 3: Lid and Clean Up
-
Create the flange:
Flip your lid slab over. Measure a square that is slightly smaller than the *inner* dimension of your box opening. Cut four small strips of clay and attach them here to create a flange that will prevent the lid from sliding off. -
Make the knob:
Form a small tapered cylinder or cone shape from a ball of clay. Flatten the top slightly and smooth the sides. Score and slip the center of the lid top and attach the knob securely. -
Dry fit:
Once the lid is leather hard, test the fit on the box. If the flange is too tight, use a rasp or surfacing tool to shave it down until it sits comfortably. -
Refine surfaces:
Smooth out any sharp edges on the rim and lid with a damp sponge. Run a soft rib over the flat surfaces to remove canvas marks and bring the clay’s grog to the surface for texture. -
Bisque fire:
Allow the piece to dry completely slowly (covered loosely with plastic for a day or two first) to prevent warping. Fire to cone 04/06 depending on your clay.
Level Up: Surface Depth
Before assembling, lightly paddle or roll a texture onto your slabs (like canvas or linen). When glazing, wipe the glaze back slightly with a sponge to leave more pigment in the texture’s recesses.
Step 4: Glazing
-
Wax the contact points:
Apply wax resist to the bottom of the box, the underside of the lid rim (where it touches the box), and the top rim of the box itself to prevent the lid fusing shut during firing. -
Apply glaze:
Dip or brush on a matte cream or beige glaze. This translucency works best to show off the natural speckles of the clay body. -
Final wipe:
Check the waxed areas and wipe away any rogue droplets of glaze with a damp sponge before loading into the kiln for the final glaze firing.
Once fired, the warmth of the speckled clay will give your structured box a lovely organic feel


The Complete Guide to Pottery Troubleshooting
Uncover the most common ceramic mistakes—from cracking clay to failed glazes—and learn how to fix them fast.
Nesting Slab Boxes That Stack Cleanly
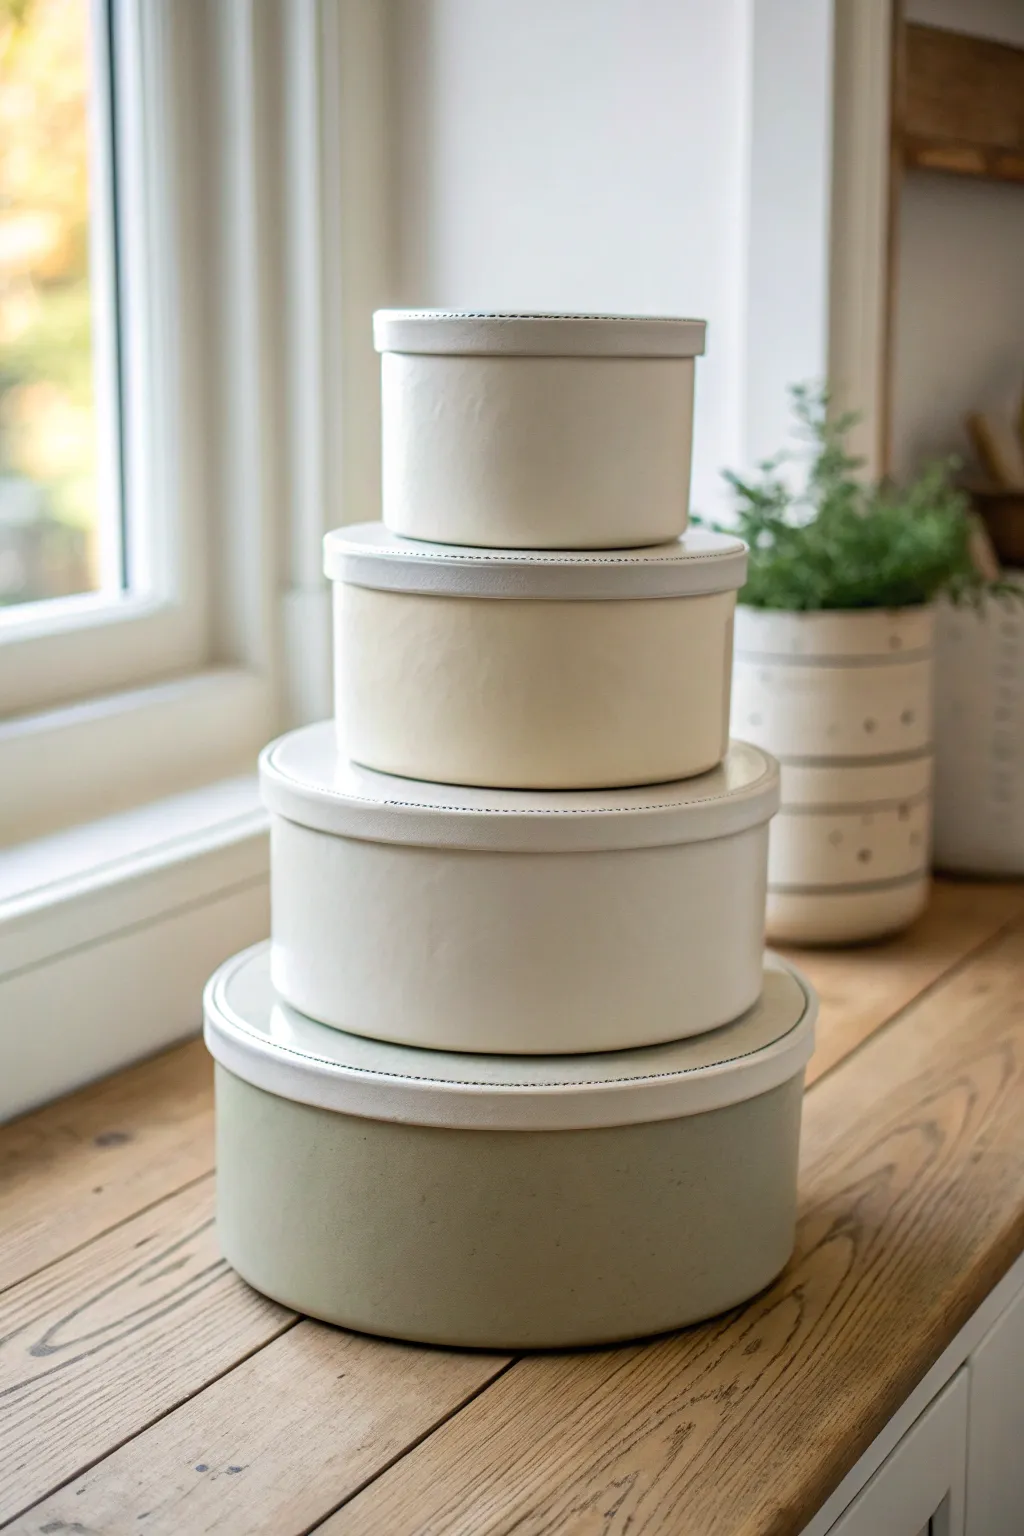
These elegant, nesting ceramic boxes merge functionality with a minimalist, clean-line aesthetic perfect for modern organization. The smooth, matte finish and subtle tonal shifts create a calming visual rhythm when stacked.
Step-by-Step
Materials
- Mid-fire stoneware clay (white or light buff)
- Slab roller or heavy rolling pin and canvas
- Circle templates (graduating sizes, 2-inch increments)
- Fettling knife
- Serrated rib tool
- Flexible metal rib
- Slip or vinegar
- Banding wheel
- Underglazes in cream, beige, and sage
- Matte clear glaze
Step 1: Planning and Slab Preparation
-
Determine dimensions:
Begin by deciding the diameter for your four graduated cylinders. For a good nesting effect, aim for 8, 6, 4, and 2 inches in diameter, or adjust based on your templates. -
Roll the slabs:
Roll out a large sheet of clay to an even 1/4-inch thickness. This thickness is crucial for stability without making the stack too heavy. -
Compress the clay:
Using a flexible metal rib, compress both sides of your slab firmly. This aligns the clay particles, preventing warping during firing—a critical step for flat lids. -
Cut the bases and lids:
Using your circle templates, cut two circles for every box size: one for the base and one slightly larger (about 1/4 inch larger diameter) for the lid.
Step 2: Forming the Cylinders
-
Measure wall lengths:
Calculate the circumference for each base circle (Distance = Diameter × 3.14). Cut rectangular strips for the walls, ensuring they are slightly longer than the circumference to allow for a bevel joint. -
Bevel the edges:
Use your fettling knife to cut 45-degree angles on the short ends of your wall strips so they will create a seamless flush joint when connected. -
Score and slip:
Score the perimeter of the base circles and the bottom edge of your wall strips. Apply a generous amount of slip or vinegar to the scored areas. -
Attach walls to bases:
Wrap the wall strip around the base circle. Join the beveled ends first, pressing them firmly together, then compress the wall onto the base. -
Reinforce the interior:
add a very thin coil of clay to the interior seam where the wall meets the floor. Smooth this coil out completely for a watertight seal.
Double-Check Fitting
Make your lids while the box bases are still leather-hard. Fit them immediately so they shrink at exactly the same rate during drying.
Step 3: Creating the Lids
-
Add flanges:
To keep the lids from sliding off, you’ll need an inner flange. Roll a thin strip of clay and attach it to the underside of the lid slab, insetting it just enough so it fits inside the box walls. -
Dry fit:
Once the clay is leather hard, gently test the fit of the lids on their respective boxes. They should fit snugly but not be tight, as glaze adds thickness later. -
Smooth surfaces:
Use a damp sponge or a soft rib to smooth out any connection marks or texture from the canvas. I like to spend extra time here to get that machine-like smoothness.
Add a Handle Detail
Before firing, attach a small leather loop or a tiny clay knob to the center of the top-most lid to act as a functional final flourish.
Step 4: Finishing and Glazing
-
Bisque fire:
Allow the greenware to dry slowly under plastic to prevent warping, then bisque fire to cone 04. -
Apply base color:
Apply underglazes to the exterior. For the bottom box, use a muted sage green. Transition to creams and lighter beige tones for the upper boxes to create the gradient effect. -
Refine the rims:
Wipe back the glaze slightly from the very edges of the lids if you want that subtle exposed clay line shown in the photo. -
Clear coat:
Dip or spray a matte clear glaze over the entire piece. A shiny glaze will reflect too much light; matte is essential for this soft, modern look. -
Final Hire:
Fire the pieces to maturity (likely cone 5 or 6). Use stilts if you glazed the bottoms, though simply wiping the foot clean is usually safer for flat-bottomed ware.
Once fired, stack your new ceramic set on a shelf or windowsill to enjoy the calm, organized beauty of your handiwork
Modern Wall Clock on a Slab Face
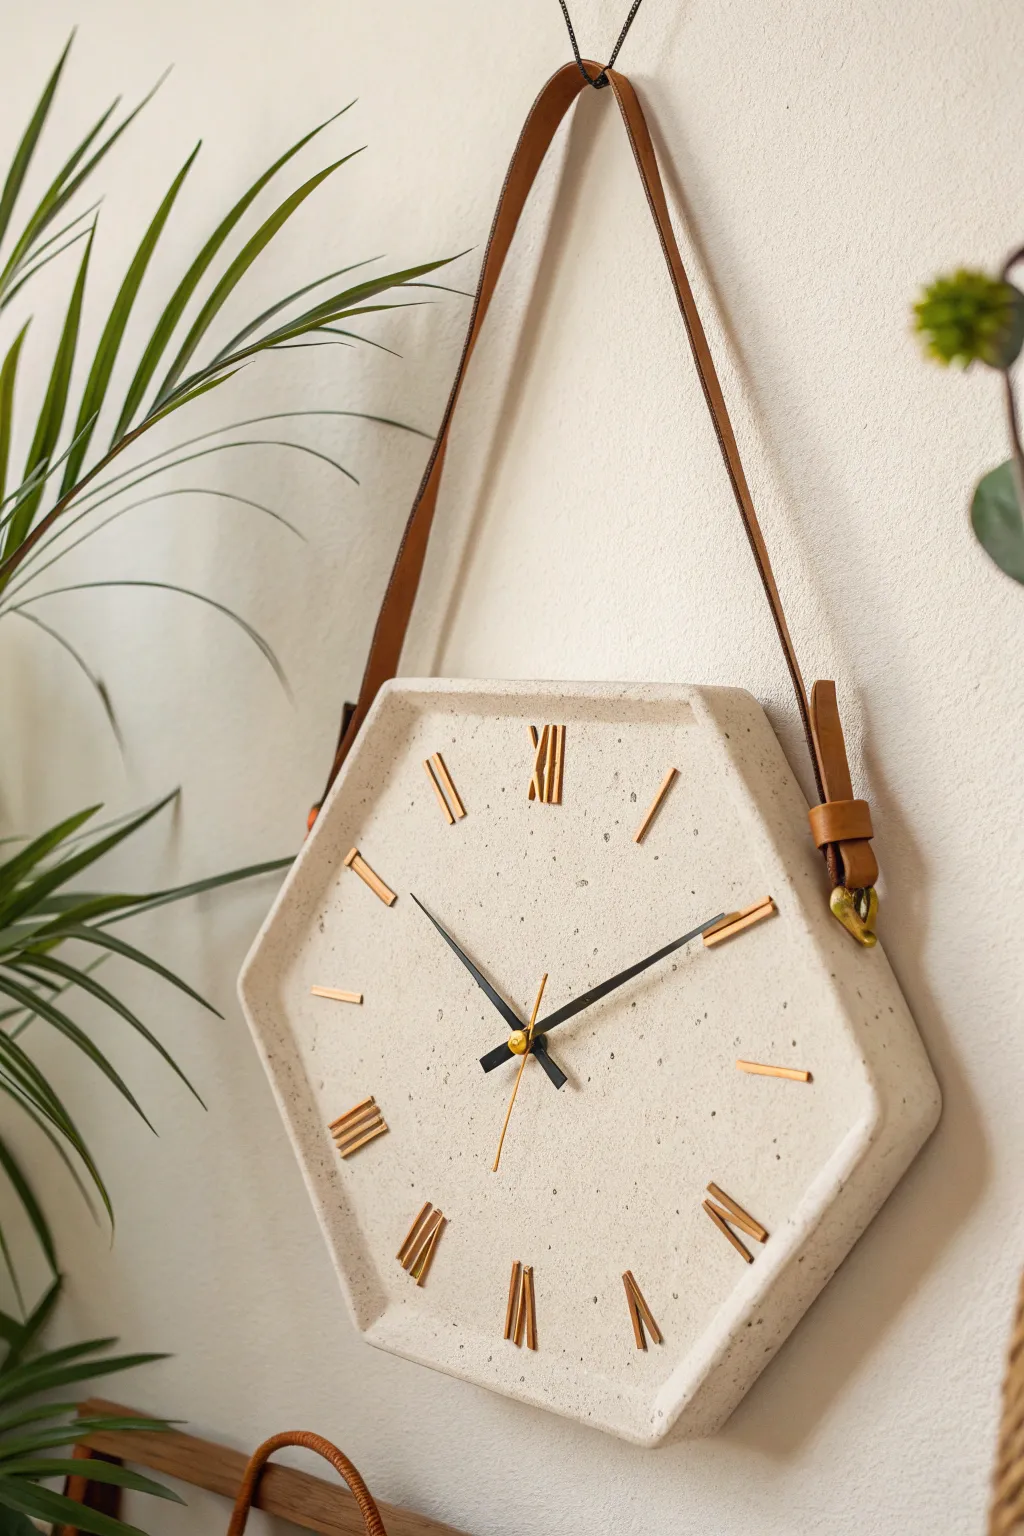
This project combines the sleek, modern lines of a hexagon with the organic warmth of speckled clay. The result is a minimalist hanging clock featuring elegant gold accents and a rugged leather strap suspension.
Step-by-Step Guide
Materials
- Speckled clay body (stoneware recommended)
- Rolling pin
- Canvas work surface
- Hexagon paper template (approx. 10-12 inches wide)
- Fettling knife or needle tool
- Ware board
- Sponge
- Clock mechanism kit (high torque recommended for heavy hands)
- Self-adhesive gold Roman numeral markers (or gold paint pen)
- Drill bit (sized to clock shaft)
- Leather strap (1 inch wide)
- Strong epoxy adhesive
- Gold finish clock hands
- Two D-rings or brass rivets
Step 1: Forming the Slab
-
Prepare the Clay:
Begin by wedging your speckled clay thoroughly to remove air bubbles. This step is crucial for ensuring the slab doesn’t warp during firing. -
Roll the Slab:
Roll out the clay on a canvas surface until it is approximately 1/4 to 3/8 inch thick. Use guide sticks on either side if you struggle to maintain even thickness. -
Compress the Clay:
Use a rib tool to compress the clay surface on both sides. This aligns the clay particles, smooths the texture, and further prevents warping. -
Cut the Shape:
Place your hexagonal paper template gently onto the slab. Using a fettling knife held vertically, carefully trace around the template to cut out your hexagon. -
Add a Rim:
For the raised edge shown in the image, cut long strips of clay about 3/4 inch wide. Score and slip the outer edge of your hexagon base. -
Attach the Rim:
Stand the strips upright along the scored edge, mitering the corners where the hexagon sides meet. Smooth the seams on the inside and outside thoroughly so the rim feels integral to the base. -
Make the Center Hole:
Locate the exact center of the hexagon. Using a specialized hole cutter or a drinking straw, punch a hole slightly larger than your clock mechanism’s shaft to account for shrinkage during firing.
Step 2: Finishing and Firing
-
Slow Dry:
Place the clock face on a ware board and cover it loosely with plastic. I like to let this dry very slowly over several days to ensure the flat surface remains perfectly true. -
Bisque Fire:
Once bone dry, bisque fire the piece to the appropriate cone for your specific clay body (usually Cone 04). -
Glaze or Wash (Optional):
Since the speckled clay is the star here, you likely want to leave it unglazed to show the texture. If you want a smoother finish, apply a clear matte glaze, but avoid the hole area. -
High Fire:
Fire the piece to maturity (Cone 5, 6, or 10 depending on your clay). Ensure the kiln shelf is perfectly flat.
Keeping it Flat
To prevent warping, flip the slab daily while drying. Use drywall boards to suck moisture evenly from both sides.
Step 3: Assembly
-
Install the Mechanism:
Insert the clock movement through the back of the ceramic face. Secure it with the washer and nut provided in the kit on the front side. -
Attach Markers:
Peel and stick the gold Roman numeral markers onto the face. Use a ruler to ensure the XII and VI are perfectly vertical and aligned with the center shaft. -
Attach Hands:
Press the hour, minute, and second hands onto the shaft in that order. Be gentle to avoid bending the delicate metal. -
Prepare the Strap:
Cut a length of leather strap (about 24-30 inches). Fold the ends over D-rings or simply create loops if you plan to rivet them directly. -
Mount the Leather:
Using strong epoxy, glue the ends of the leather strap to the sides of the ceramic hexagon (around 10 o’clock and 2 o’clock positions). Clamp in place until fully cured. -
Alternative Mounting:
For extra security, you can drill small holes in the ceramic rim before firing and attach the leather using rivets or decorative screws instead of glue.
Movement Won’t Fit?
If the clay shrunk too much and the hole is tight, gently use a diamond file or Dremel bit to widen it post-firing.
Now you have a timeless, handcrafted piece that functions as beautifully as it looks

TRACK YOUR CERAMIC JOURNEY
Capture glaze tests, firing details, and creative progress—all in one simple printable. Make your projects easier to repeat and improve.
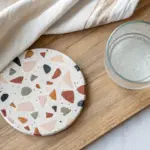
Slab Tile Coasters With Crisp Chamfered Edges
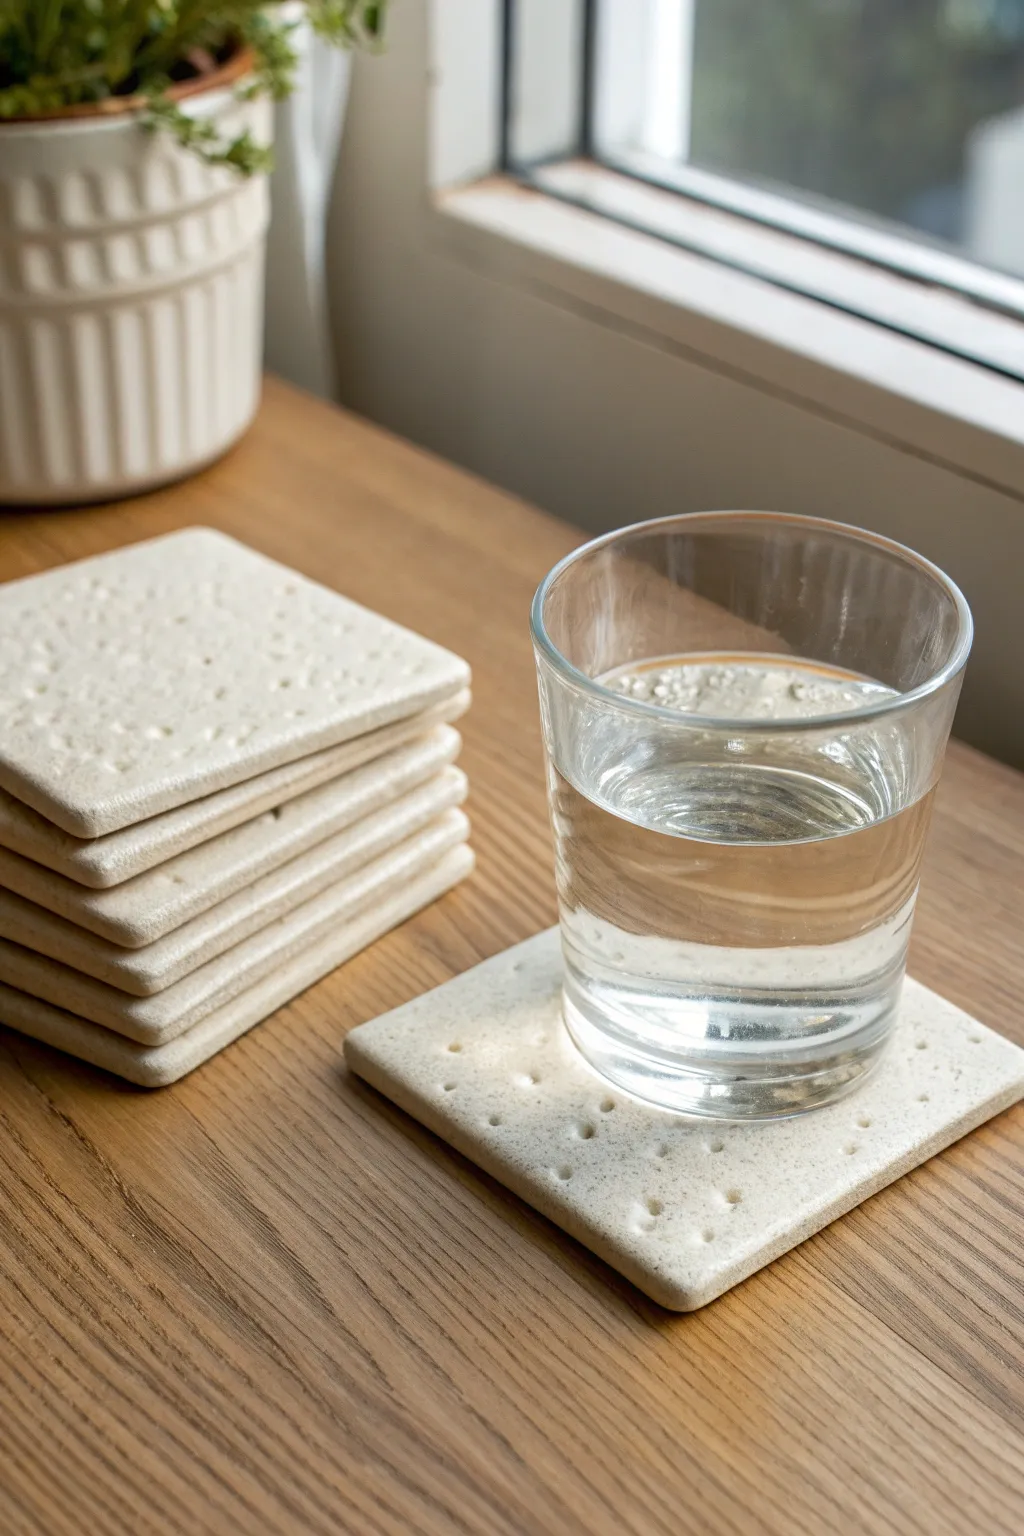
These playful coasters mimic the classic look of saltine crackers, adding a touch of whimsical charm to your coffee table. The project focuses on clean slab building techniques and precise detailing to create a durable, stackable set with a unique speckled finish.
How-To Guide
Materials
- Speckled stoneware clay (mid-fire)
- Rolling pin
- Two wooden guide slats (approx. 1/4 inch thick)
- Square cookie cutter or template (4×4 inch)
- Potter’s needle tool
- Fettling knife
- Cornstarch or canvas work surface
- Small drill bit or blunt dowel (approx. 3mm)
- Damp sponge
- Clear matte glaze
- Kiln
Step 1: Preparing the Slab
-
Wedge the Clay:
Begin with a well-wedged ball of speckled stoneware clay to remove any air bubbles. Ensuring the clay is consistent will prevent warping later on. -
Set Up Guides:
Place your two wooden guide slats on either side of your workspace. I prefer using guides that are roughly 1/4 inch thick to ensure the final coasters have a nice, substantial weight to them. -
Roll Out the Slab:
Roll the clay ball into a smooth, even slab using the rolling pin. The wooden slats will stop the rolling pin, ensuring the entire sheet is a uniform thickness. -
Compress the Clay:
Use a rib tool or a damp sponge to compress the surface of the slab on both sides. This aligns the clay particles, reducing the chance of warping during the firing process.
Step 2: Shaping and Detailing
-
Cut Squares:
Using a 4×4 inch square cutter or a template with a fettling knife, cut out your coaster shapes. Try to maximize space on your slab to get as many coasters as you can from one roll. -
Round the Corners:
Gently tap the sharp corners of each square with your finger or a smoothing tool to round them off slightly. This mimics the rounded corners of a real cracker and makes the coaster more chip-resistant. -
Create the Chamfer:
Hold the coaster gently and run a damp sponge or finger along the top edge at a 45-degree angle. This creates the ‘crisp chamfered edge’ mentioned in the section title, giving it a finished, professional look. -
Mark the Grid:
Lightly lay a ruler across the surface to visualize a grid pattern. You don’t need to press down; just use it as a visual guide for where your holes will go. -
Dock the Dough:
Using the blunt end of a small drill bit or a dowel, press rows of small indentations into the clay surface. Do not punch all the way through; these are decorative ‘docking’ holes like you see on saltines.
Pro Tip: Perfectly Flat
Drying is critical for flat coasters. Flip them over every few hours during the drying stage to ensure even airflow and prevent curling edges.
Step 3: Drying and Firing
-
Dry Slowly:
Place the coasters on a ware board. To keep them perfectly flat, sandwich them between two pieces of drywall or place a weighted board on top while they dry to leather hard. -
Bisque Fire:
Once fully bone dry, load the coasters into the kiln for a bisque firing (usually to Cone 04). Stack them carefully if needed, but flat is best. -
Glaze Application:
Wipe the bisque-fired coasters with a damp sponge to remove dust. Dip or brush on a clear matte glaze. The clear glaze allows the natural speckles of the clay body to shine through, enhancing the cracker effect. -
Clean the Bottoms:
Ensure the bottom of each coaster is completely free of glaze. You can use a wax resist before glazing or wipe it clean with a sponge afterward to prevent them from sticking to the kiln shelf. -
Glaze Fire:
Fire the coasters again to the maturation temperature of your clay and glaze (typically Cone 5 or 6 for stoneware). -
Final Sanding:
After the kiln has cooled and you’ve unloaded the coasters, check the bottoms. If there is any roughness, briefly sand the base with wet-dry sandpaper so they won’t scratch your table.
Level Up: Cheese Pairings
Make smaller, matching ‘cracker’ charms with a single hole to tie onto wine glasses or use as cheese markers for your next serving platter.
Stack your new set of ceramic crackers on the table and enjoy their charmingly realistic texture with your next glass of water
Architectural Mini House Tea Light Holder
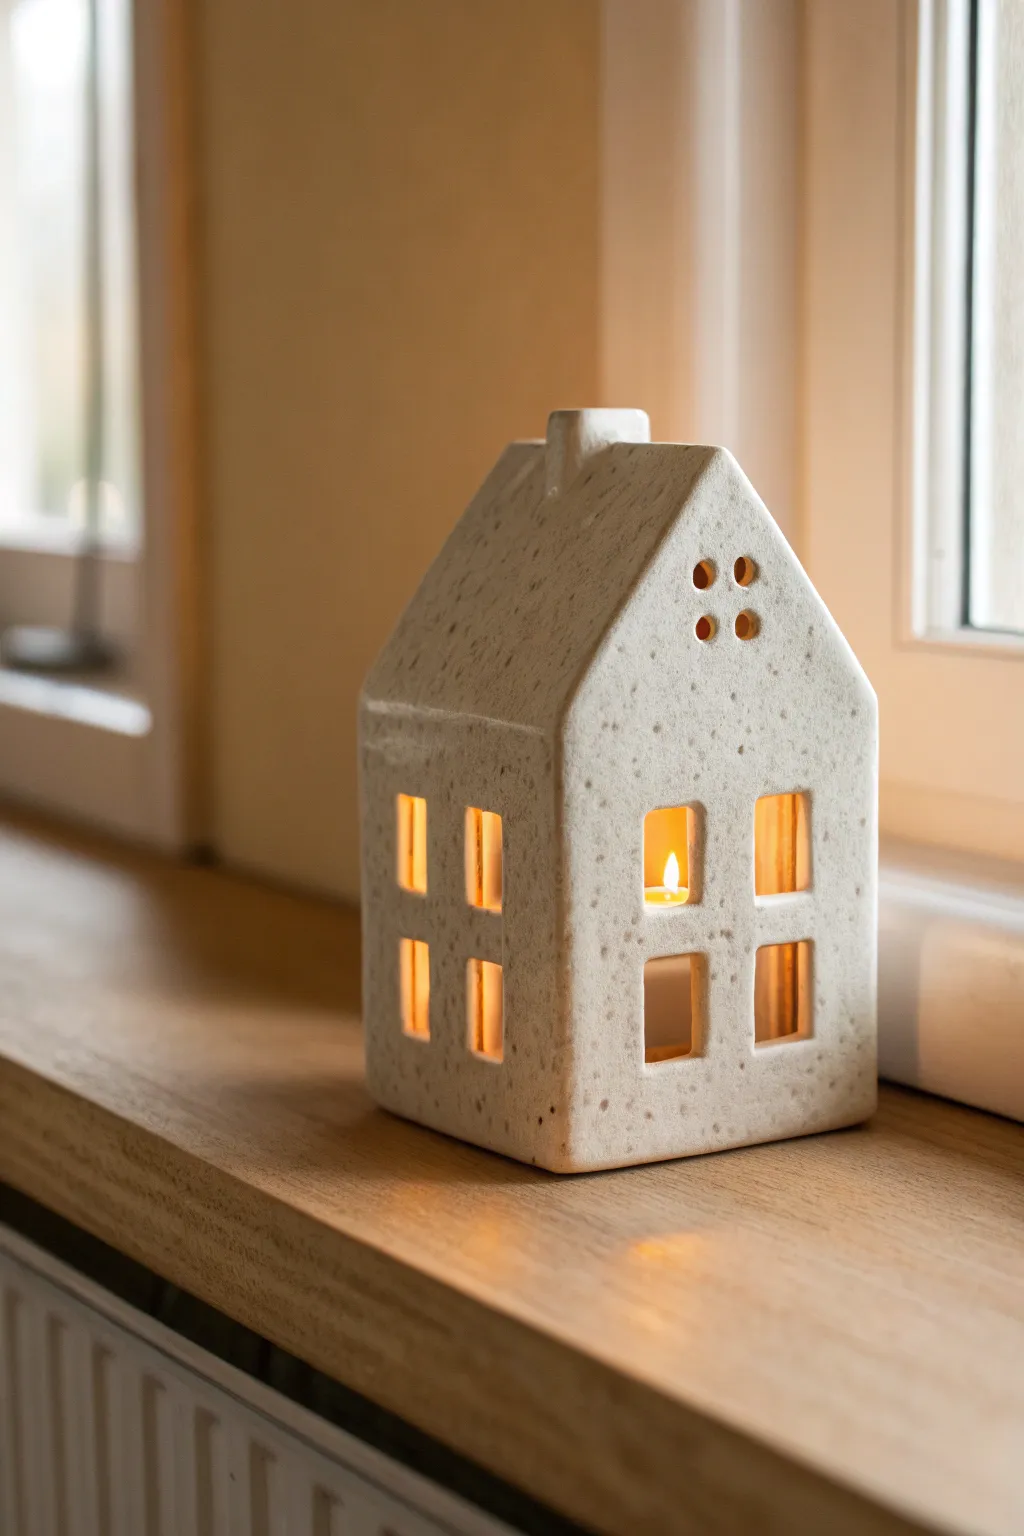
Bring the warmth of a cottage glow into your home with this charming hard slab ceramic house. Its speckled stoneware finish and minimalist window cutouts create lovely dancing shadows when a tea light flickers inside.
Step-by-Step Tutorial
Materials
- Speckled stoneware clay
- Rolling pin with thickness guides (approx. 1/4 inch)
- Fettling knife
- Straight edge or ruler
- Paper templates (cardstock recommended)
- Score and slip tool
- Wooden sculpting tool or clay shaper
- Sponge
- Small square cutter (optional)
- Small circular cutter or straw
Step 1: Slab Preparation & Cutting
-
Roll the Slabs:
Begin by wedging your speckled clay to remove air bubbles. Roll it out into an even slab about 1/4 inch thick. Compress the slab on both sides with a rubber rib to align the clay particles and prevent warping. -
Firm Up:
Here I prefer to let the slab sit between two boards of drywall or canvas for a few hours until it reaches a ‘leather hard’ state. Stiff slabs are essential for crisp geometric shapes. -
Cut the Components:
Using your cardstock templates, cut out two pentagonal shapes for the front and back gable walls, two rectangular side walls, and two rectangular roof pieces. Don’t forget a small strip for the chimney. -
Miter the Edges:
For a seamless look, cut 45-degree angles (miters) on the vertical edges where the walls will join. This hides the seams better than butt joints.
Step 2: Designing the Windows
-
Map the Openings:
Before assembling, lay your wall pieces flat. Lightly trace where you want your windows to be. Consistency is key, so measure carefully to align the top and bottom rows. -
Cut the Windows:
Using a sharp fettling knife or a small square clay cutter, carefully remove the clay for the windows. Keep your knife perpendicular to the table for clean, straight cuts. -
Add Ventilation:
On the front gable piece, near the peak, use a small circular cutter or a sturdy straw to punch out four holes in a square pattern. This adds a decorative touch and helps heat escape. -
Smooth the Edges:
Dip your finger or a small brush in water and smooth the sharp edges of every window cutout immediately, as this is much harder to do once the house is assembled.
Warped Walls?
If walls start bowing inward during assembly, gently stuff the house with crumpled newspaper or plastic bags to support the structure while the seams set up.
Step 3: Assembly and Refining
-
Score and Slip:
Deeply score all the mitered edges of your walls. Apply a generous amount of slip or vinegar to the scored areas. -
Erect the Walls:
Stand the walls up, pressing the mitered corners together firmly. Wiggle them slightly to lock the clay particles together. Use a small coil on the inside corners to reinforce the joints. -
Attach the Roof:
Score the top edges of the side walls and the angled slopes of the gable walls. Place your roof slabs on top, ensuring they meet perfectly at the peak. -
Adding the Chimney:
Form a small rectangular tube from your chimney strip. Cut the bottom at an angle that matches the roof’s slope, score the attachment point, and secure it to one side of the roof. -
Cleaning Seams:
Use a wooden tool to blend the exterior seams until they are invisible. Run a slightly damp sponge over the entire surface to smooth the texture and reveal the speckles in the clay. -
Dry and Fire:
Allow the house to dry slowly under loose plastic to prevent corner cracking. Once bone dry, bisque fire it, apply a clear matte or glossy glaze, and fire again to temperature.
Make it Shine
For extra warmth, apply a gold luster overglaze to the inside window sills after the glaze firing. It reflects the candlelight beautifully.
Place a tea light inside and enjoy the comforting ambiance of your handmade structure
Interlocking Slab Bookends With Negative Space
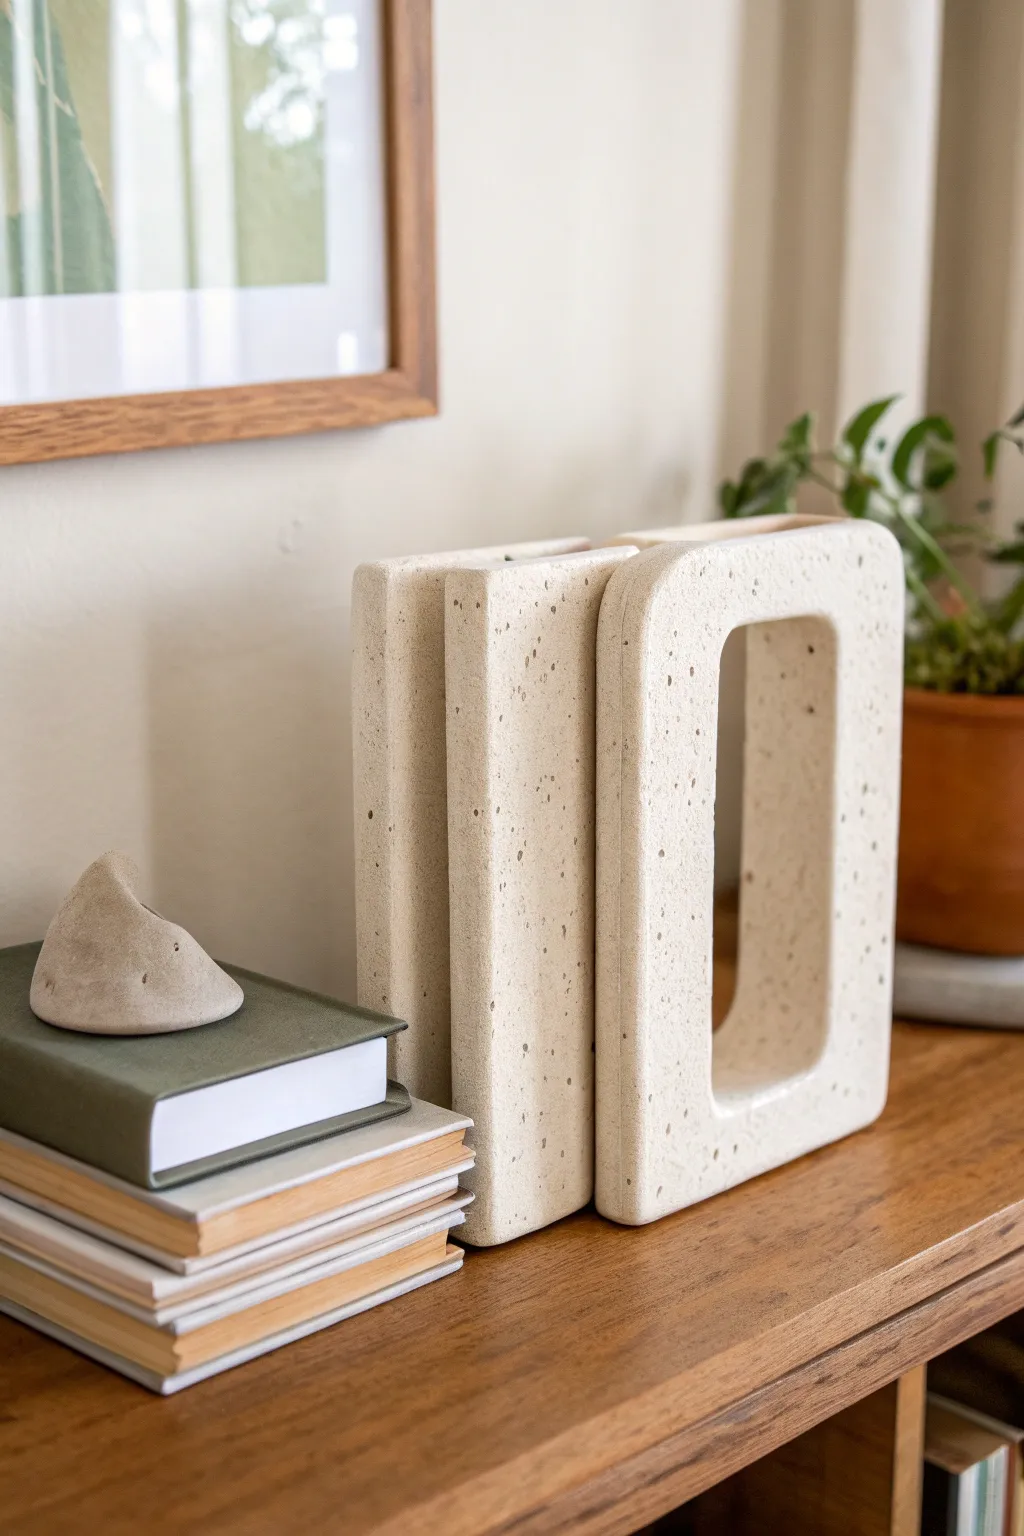
These structural bookends rely on precise hard slab construction to create a striking geometric silhouette. The speckled clay body adds organic texture to the clean lines, while the clever interlocking design creates functional weight and stability for your bookshelf.
How-To Guide
Materials
- Stoneware clay with grog or speckles (for texture)
- Rolling pin
- Thickness strips (1/4 inch)
- Fettling knife
- Metal rib
- Scoring tool
- Slip
- Large sponge for smoothing
- Paper or cardboard for templates
Step 1: Template and Slab Preparation
-
Design the interlocking shapes:
Begin by sketching your templates on cardstock or cardboard. You need two main profiles: a tall, solid rectangular arch and a rectangular ‘O’ shape with a cutout in the center. Ensure the interior width of the ‘O’ is slightly wider than the solid arch’s thickness so they can visually interlock if desired. -
Create the side panel templates:
Measure the perimeter of your main shapes to determine the length of the side strips needed to give the bookends depth. Create long rectangular templates for these side walls, matching the desired depth of your bookends (about 2-3 inches). -
Roll out the slab:
Roll your clay out onto a canvas board using 1/4-inch thickness strips. Since this is a hard slab project, consistency is key, so take your time to ensure the thickness is even across the entire surface. -
Compress the clay:
Use a metal rib to compress the clay on both sides. This aligns the clay particles, reducing the chance of warping later and creating that smooth, finished surface you see in the photo. -
Cut the components:
Lay your templates onto the leather-hard clay and carefully cut out two faces for each bookend (front and back) and the long strips for the side walls. Leave these pieces to firm up until they hold their shape without bending when lifted.
Step 2: Assembly and Finishing
-
Bevel the edges:
For crisp, sharp corners, cut a 45-degree angle (miter) on the edges where the faces will meet the side walls. This creates a stronger joint and a cleaner look than a simple butt joint. -
Score and slip the first joint:
Aggressively score the beveled edges of the back face plate and the side wall strip. Apply slip and press them together firmly, ensuring a tight seal. -
Reinforce the interior:
Once the walls are up, take a thin coil of soft clay and press it into the interior seams. Smooth this coil out with a modeling tool or your finger to ensure the structure won’t crack apart. -
Attach the front face:
Repeat the scoring and slipping process on the top edge of the side walls and the remaining face plate. Gently lower the face plate onto the walls, lining up the corners precisely. -
Paddle the form:
I like to use a wooden paddle to gently tap the joined edges. This squares up the form and helps compress the seams from the outside. -
Smooth the exterior seams:
Wait until the clay is leather hard, then use a metal rib to scrape away excess slip and smooth the joined corners until the seam line disappears completely. -
Refine the negative space:
For the ‘O’ shaped bookend, pay special attention to the inner window. Use a damp sponge or a chamois cloth to round over the sharp edges slightly for a soft, touchable finish. -
Final drying:
Let the pieces dry very slowly under plastic for several days to prevent uneven shrinkage, which can cause warping in flat slab pieces. -
Bisque fire:
Fire the pieces to bisque temperature once they are bone dry. -
Glaze application:
Apply a matte white or clear glaze to highlight the speckles in the clay body. If your clay isn’t naturally speckled, choose a glaze with added iron flecks to replicate the stone-like appearance shown.
Weighted Bottoms
Add extra stability by making the bottom slab slightly thicker than the walls, or by leaving a small hole to fill the hollow interior with sand after firing.
Clean Corner Hack
After assembling, wrap the sharp corners loosely with plastic strip bandages. As the clay shrinks, the plastic holds the tension, keeping seams from splitting open.
Once fired, place these sculptures on your shelf to bring architectural balance to your favorite reading collection
Modular Wall Relief From Layered Slab Panels
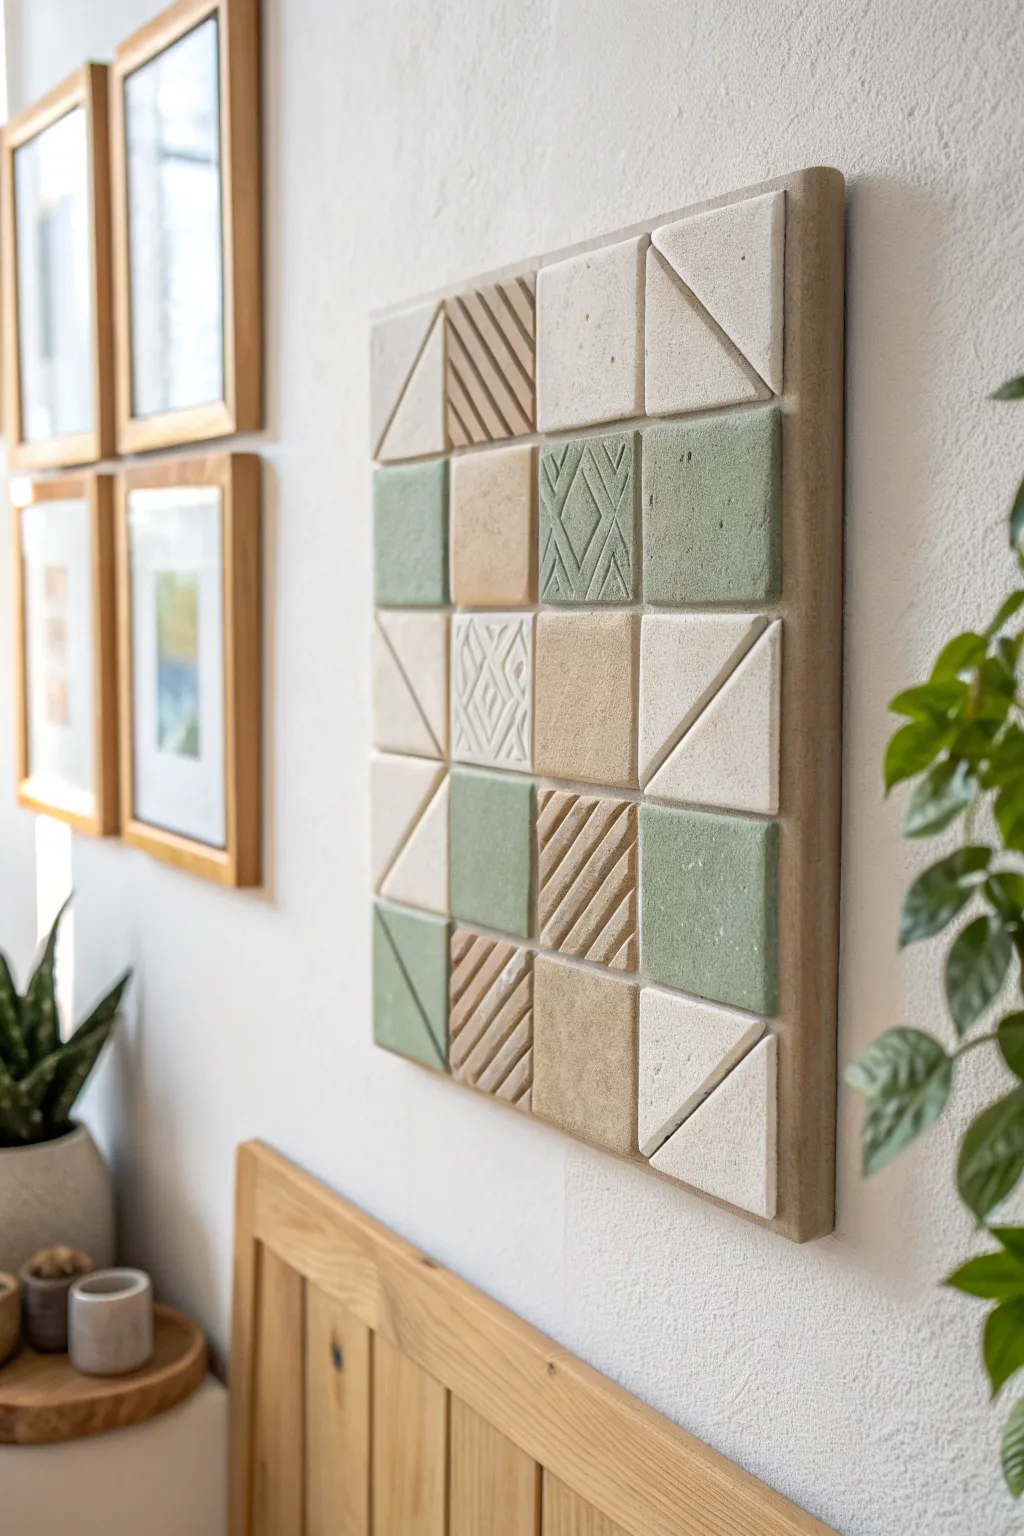
Bring the calming tones of nature indoors with this structured yet organic ceramic wall relief. By combining smooth, textured, and patterned modular tiles in soft sage, oatmeal, and cream, you’ll create a tactile masterpiece that feels both modern and handcrafted.
Step-by-Step Tutorial
Materials
- Mid-fire stoneware clay (white or buff color)
- Hard slab roller (or rolling pin with guide sticks)
- Fettling knife or craft knife
- Square tile cutter or rigid square template (approx. 3×3 inches)
- Texturing tools (combs, carved stamps, or found objects)
- Scoring tool (serrated rib)
- Slip (liquid clay)
- Underglazes (sage green, sandy beige, cream/off-white)
- Matte clear glaze
- Wooden or MDF backing board (cut to size)
- Strong construction adhesive (e.g., E6000 or Liquid Nails)
- Canvas mat or slab mat
- Ruler
Step 1: Creating the Base Tiles
-
Roll Your Slabs:
Begin by rolling out a consistent slab of clay, approximately 1/4 to 3/8 inch thick. Using guide sticks or a slab roller is crucial here to ensure every tile sits at the same height on the wall. -
Smoothing the Canvas:
Before cutting, compress the clay slab lightly with a rib tool to align the particles and create a smooth, defect-free surface. -
Cutting Squares:
Using your square template or cutter, measure and cut out at least 25 squares. It’s always smart to cut a few extras in case of warping or breakage during firing. -
Creating Triangles:
Take about 8-10 of your squares and slice them diagonally from corner to corner to create right-angled triangles. Some squares can be sliced into two smaller triangles, while others can be kept as full squares.
Shrinkage Rates
Clay shrinks about 10-15% during firing. If you need your finished piece to fit a specific pre-bought frame, measure your template 12-15% larger than the desired final size.
Step 2: Texturing and Refining
-
Applying Texture:
Select specific tiles to receive texture. Gently press a texturing comb or carved stamp into the clay damp surface. Aim for variety: diagonal stripes on some triangles and geometric diamond patterns on a few squares. -
Refining Edges:
Once the clay has stiffened to a soft leather-hard state, use a sponge or finger to smooth the sharp edges of every tile. Crisp edges look professional, but sharp burrs can be dangerous after firing. -
Drying Process:
Sandwich your tiles between two pieces of drywall or place a weighted board over them while they dry. This technique is my personal favorite for preventing the corners from curling up during the drying phase. -
Bisque Firing:
Once fully bone dry, load the tiles into the kiln for a bisque fire (typically cone 04). Stack them carefully if space is tight, but ensure they remain flat.
Step 3: Glazing and Assembly
-
Planning the Pattern:
Lay out your bisque-fired tiles on a table to determine your final arrangement. Balance the colors and textures—alternating between the sage green, beige, and the textured cream tiles creates a pleasing visual rhythm. -
Applying Color:
Apply your underglazes. Use a soft sage green for the smooth squares, a warm sandy beige for the plain triangles, and leave the textured pieces a natural creamy white. Apply 2-3 coats for opaque coverage. -
Matte Finish:
Coat the entire collection of tiles with a thin layer of matte clear glaze. This seals the clay without making it shiny, preserving that earthy, stone-like aesthetic. -
Glaze Firing:
Fire the tiles to the maturity temperature of your clay and glaze (often cone 5 or 6 for stoneware). -
Prepare the Backing:
While the kiln cools, cut a piece of wood or MDF to the exact dimensions of your planned mosaic. Paint the edges a neutral color if they will be visible. -
Framing the Edge:
The example piece features a clay border. If you made long rectangular strips during the rolling phase, adhere these to the edges of the board first to create a ‘frame’ for your mosaic. -
Final Mounting:
Using a strong construction adhesive, glue the tiles onto the backing board one by one. Start from the center and work outward to ensure the pattern stays centered. -
Setting the Bond:
Lay heavy books or weights on top of the mounted tiles (protected by a towel) and let the adhesive cure for at least 24 hours.
Relief Depth
Add dimension by rolling half of your slabs slightly thicker (e.g., 1/2 inch) than the others. The varying heights will create deeper shadows and more visual interest on the wall.
Now you have a stunning, architectural piece of ceramic art ready to hang in your entryway or bedroom