Clay candle holders are one of my favorite quick projects because they’re functional, decorative, and totally doable at home. Whether you’re into air-dry clay or polymer clay, these ideas will help you turn simple candles into little pieces of handmade decor.
Classic Taper Candle Ring Holder
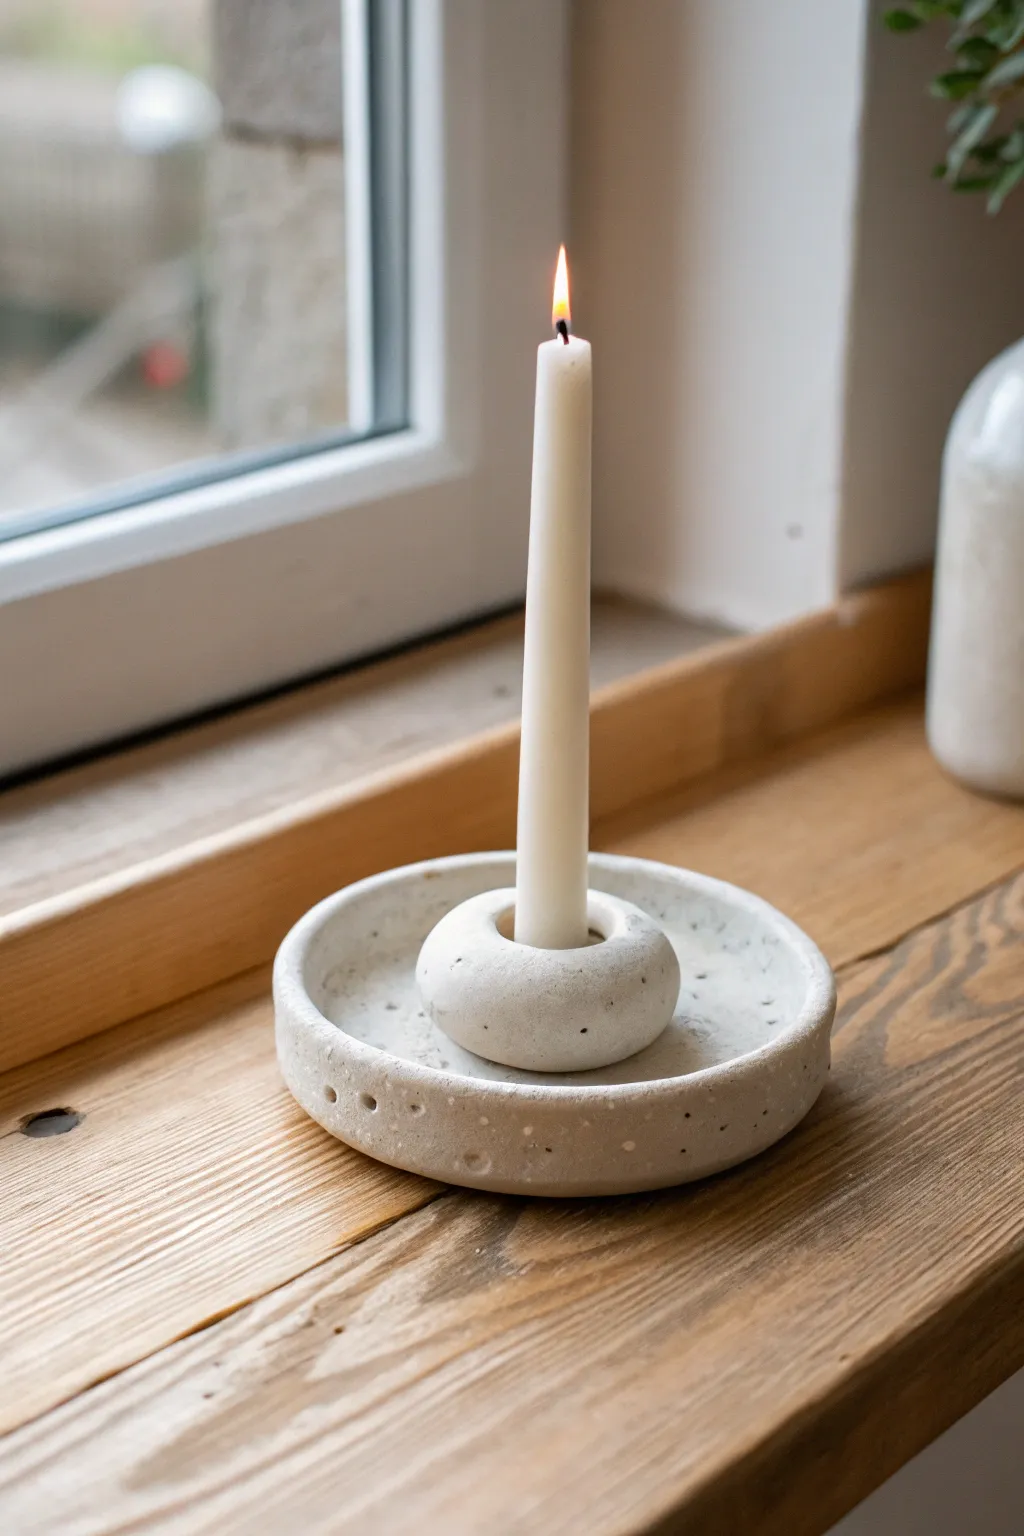
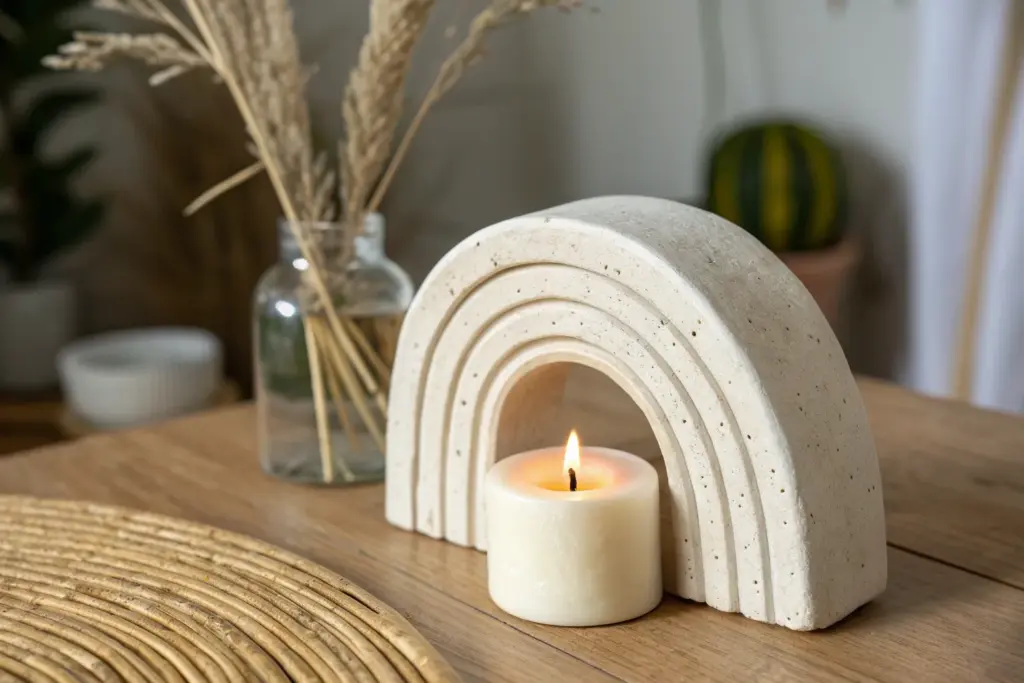
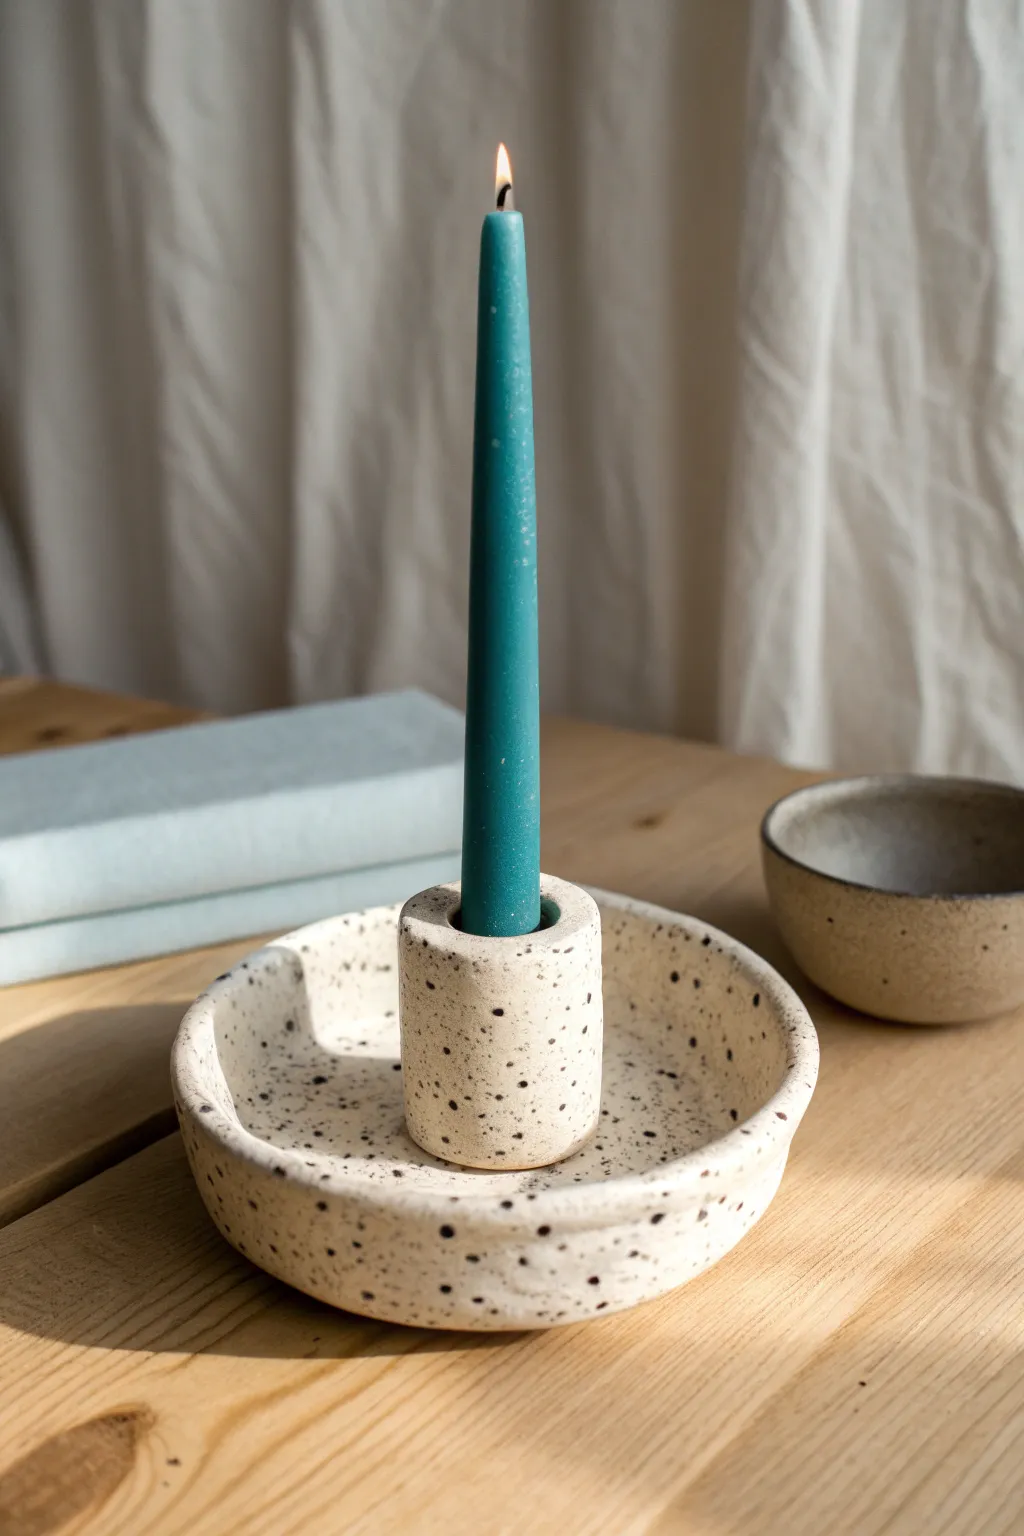
This elegant candle holder combines a classic saucer shape with a modern, pillowy center for a secure and stylish taper fit. The speckled finish gives it a trendy terracotta or ceramic look without needing a kiln, making it a perfect functional accent for any windowsill.
How-To Guide
Materials
- Air-dry clay (white or light grey)
- Acrylic rolling pin
- Circle cutter or bowl (approx. 5-6 inches diameter)
- Small circle cutter (approx. 2 inches diameter)
- Taper candle (for sizing)
- Craft knife
- Bowl of water
- Sponge
- Sandpaper (fine grit)
- Speckled paint (or black and brown slightly watered-down acrylics)
- Stiff bristle brush (e.g., old toothbrush)
- Matte sealant/varnish
Step 1: Base Construction
-
Prepare the Clay:
Start by taking a generous chunk of air-dry clay and kneading it in your hands until it becomes pliable and warm. This helps reduce cracking later on. -
Roll the Slab:
Using your acrylic rolling pin, roll the clay out on a smooth surface to an even thickness of about 1/4 inch. If you want a chunkier look, go slightly thicker. -
Cut the Base:
Place your larger circle cutter or bowl onto the rolled clay and press down firmly to cut out the main dish shape. Remove the excess clay. -
Form the Rim:
Roll a long, thin snake of clay, roughly the same thickness as a pencil. Gently score the outer edge of your circle base and apply a dab of water. -
Attach the Rim:
Lay the clay snake onto the wet edge to create a raised rim. Blend the clay downwards onto the base using your thumb or a modeling tool so there is no visible seam. -
Smooth the Edges:
Dip your sponge lightly in water and run it over the rim and the base to smooth out any fingerprints or tool marks. Let the base sit for a moment to firm up.
Cracks Appearing?
If small cracks appear while drying, mix a tiny bit of fresh clay with water to make a paste (slip) and fill them in, then sand smooth once dry.
Step 2: Center Holder
-
Shape the Center:
Take a smaller ball of clay and roll it into a thick, uniform snake. Form this snake into a ring or ‘donut’ shape that is roughly 2 inches in diameter. -
Size the Fit:
Before attaching, gently press the base of your actual taper candle into the center of the donut to ensure the hole is the correct size. Wiggle it slightly to create enough clearance for the candle. -
Score and Slip:
Use a craft knife or needle tool to scratch up the bottom of your donut ring and the center of your dish base. Dab water on both scratched areas. -
Attach the Ring:
Press the donut ring firmly into the center of the dish. Use a small tool or your finger to blend the bottom edge of the ring seamlessly into the floor of the dish. -
Refine the Shape:
Moisten your fingers and smooth the donut shape so it looks pillowy and organic, rounding off any sharp edges created during attachment.
Level Up: Texture
Before drying, gently press a coarse sponge or fabric into the wet clay surface to give it a stone-like texture that enhances the speckled paint effect.
Step 3: Finishing Touches
-
Air Dry:
Set the piece aside in a cool, dry place away from direct sunlight. Rotate it occasionally to ensure it dries evenly, which usually takes 24-48 hours. -
Sand Imperfections:
Once fully dry and chalky white, take your fine-grit sandpaper and gently buff away any rough spots, especially around the rim and the top of the candle holder ring. -
Prepare Speckle Paint:
Dilute a small amount of black and brown acrylic paint with water until it is quite runny. -
Apply Speckles:
Dip a stiff bristle brush or toothbrush into the watery paint. Hold it over the clay piece and flick the bristles with your thumb to spray tiny dots across the surface. I like to practice on paper first to control the density. -
Seal the Piece:
Allow the paint flecks to dry completely. Finally, apply a coat of matte varnish or sealant to protect the clay from moisture and give it a finished, professional look. -
Final Test:
Once the sealant is dry, place your taper candle inside to ensure it stands straight and secure.
Now you have a serene, minimalist piece of decor ready to light up your evening


Minimal Tea Light Dish Holder
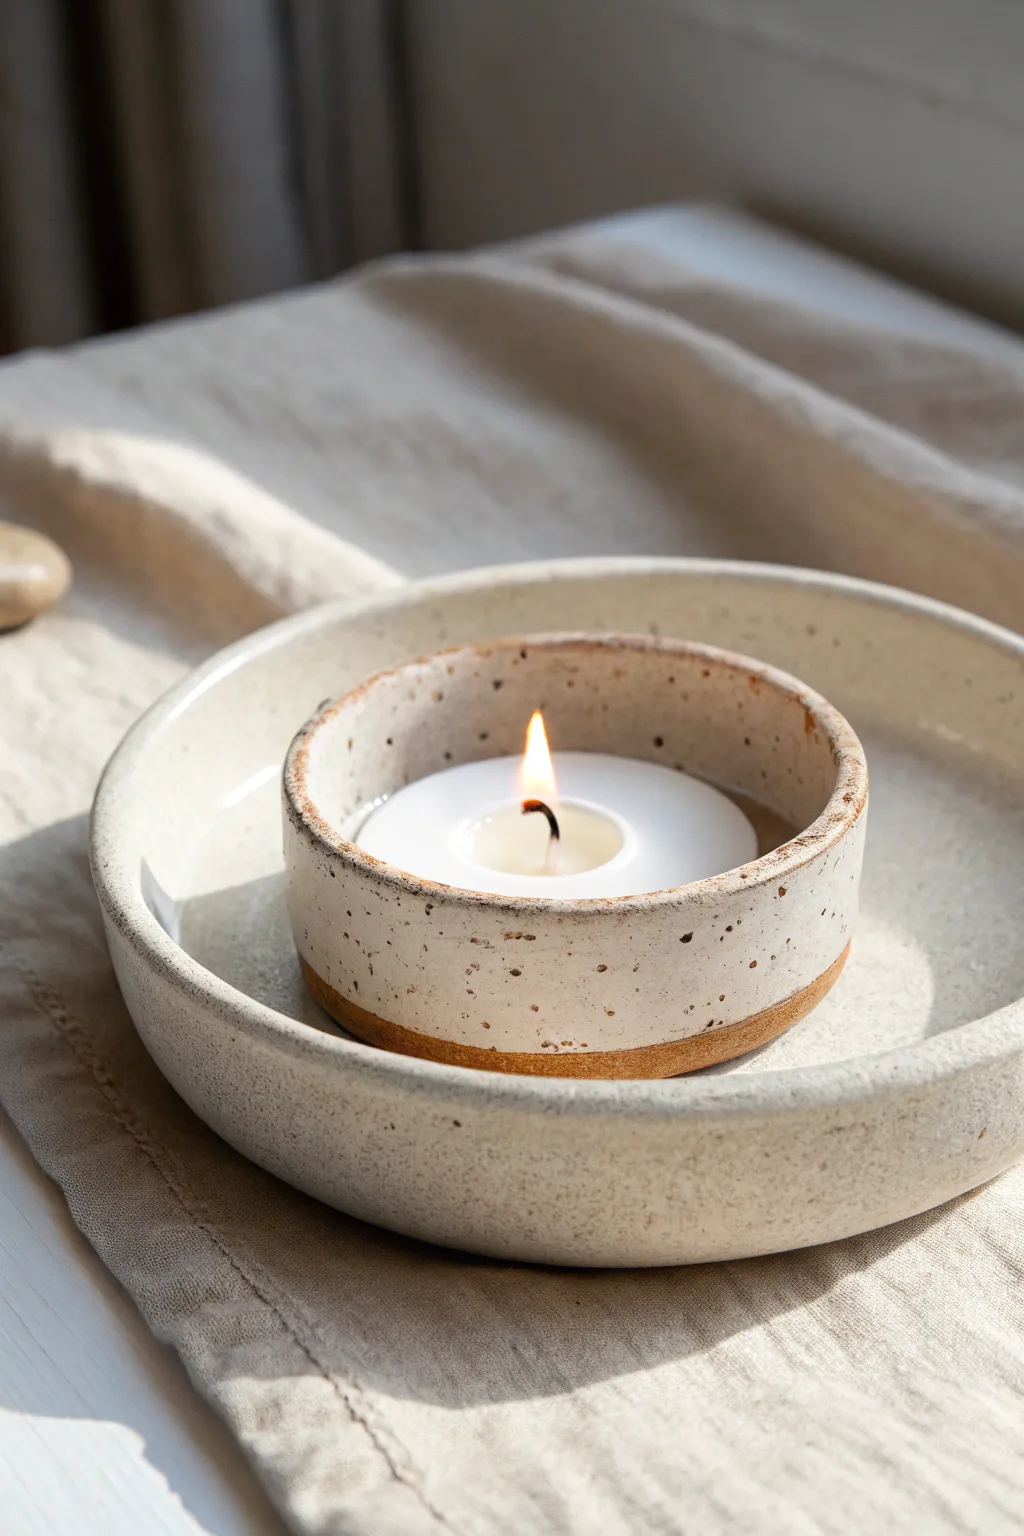
Embrace the beauty of raw textures with this two-piece nesting candle holder set. The project features a speckled clay body and a minimalist, double-vessel design that catches any errant wax while creating a serene, modern display.
Step-by-Step Guide
Materials
- Speckled cream clay body (stoneware or polymer clay with speckles)
- Small rolling pin
- Wooden guide strips (optional, for even thickness)
- Assorted circular cookie cutters (one approx. 5 inches, one approx. 3 inches)
- Fettling knife
- Score and slip tool (needle tool or serrated kidney)
- Bowl of water and sponge
- Tea light candle (for sizing)
- Matte clear glaze (if firing) or matte sealer (if air-dry)
Step 1: Forming the Base Dish
-
Roll the first slab:
Begin by rolling out a portion of your speckled clay until it is roughly 1/4 inch thick. Using wooden guide strips on either side of your roller can really help keep the surface perfectly level. -
Cut the base circle:
Using your largest circular cutter or a template, cut a clean circle about 5 to 6 inches in diameter. This will serve as the bottom of the larger outer dish. -
Create the rim strip:
Roll out a fresh strip of clay, maintaining that same 1/4 inch thickness. Use a ruler and your fettling knife to cut a long, rectangular strip about 1.5 inches tall. This will become the wall of your dish. -
Attach the wall:
Score the outer edge of your circular base and one long edge of your rectangular strip. Apply a little slip or water to the scored areas. -
Join the seams:
Wrap the strip around the base circle, pressing firmly to join them. Where the two ends of the strip meet, cut them at a 45-degree angle for a cleaner seam, score, and press them together. -
Smooth the exterior:
Using a slightly damp sponge or a modeling tool, blend the clay at the seams so the transition between the wall and base is invisible. Smooth the top rim with your finger to round it off gently.
Uneven Drying?
If your large dish warps while drying, place a small weighted bag of sand or rice in the center. This gently holds the bottom flat as the moisture evaporates.
Step 2: Crafting the Insert
-
Measure the inner cup:
For the smaller vessel that holds the candle, you’ll need the smaller circle cutter (around 3 inches). Cut a new base circle from your rolled clay slab. -
Test the fit:
Place a standard tealight in the center of your cutout circle just to ensure you have enough room. You want about half an inch of clearance around the candle. -
Cut the inner wall:
Cut another rectangular strip of clay. This one should be slightly shorter than the first—around 1.25 inches tall—to create a nice visual hierarchy when nested. -
Construct the cup:
Repeat the scoring and slipping process to attach this wall to your smaller base. I find that working slowly here prevents warping the circular shape. -
Refine the edges:
Carefully smooth the rim of this smaller cup. Since this piece sits in the center, the top edge will be a focal point, so take time to remove any sharp angles. -
Reveal the Speckles:
Take a slightly damp sponge and gently wipe the surfaces of both dry pieces. This removes the fine surface dust and helps expose the grog or speckles in the clay texture.
Highlighting Texture
For more visible speckles, wipe the bone-dry clay with a damp rib tool right before firing. This removes the finest surface particles and reveals the grit underneath.
Step 3: Finishing Touches
-
Dry properly:
Allow both pieces to dry slowly under loose plastic for a day or two to prevent cracking, then uncover them to dry completely to the bone-dry stage. -
Bisque fire:
If using kiln-fire clay, fire the pieces to bisque temperature (usually Cone 04). If using air-dry clay, simply wait until they are hard and light in color. -
Glaze application:
For the look in the photo, apply a matte clear glaze or a very transparent white glaze. You want to see the natural clay body, so avoid opaque colors. -
Leave the rim raw:
To achieve that nice contrast seen on the inner cup’s rim, gently wipe the glaze off the very top edge with a sponge, letting the raw, toasted clay color peek through. -
Final smooth:
Check the bottoms of your pieces for any sharp glaze drips before the final firing. Sanding the bottom after firing (or drying) ensures they sit perfectly flat without wobbling. -
Final fire or seal:
Fire the pieces to maturity (often Cone 5/6 for stoneware) or apply a matte acrylic varnish if you used air-dry clay.
Place your favorite tealight inside and enjoy the warm, grounded atmosphere this set brings to your table


Wavy Squiggle Taper Candle Base
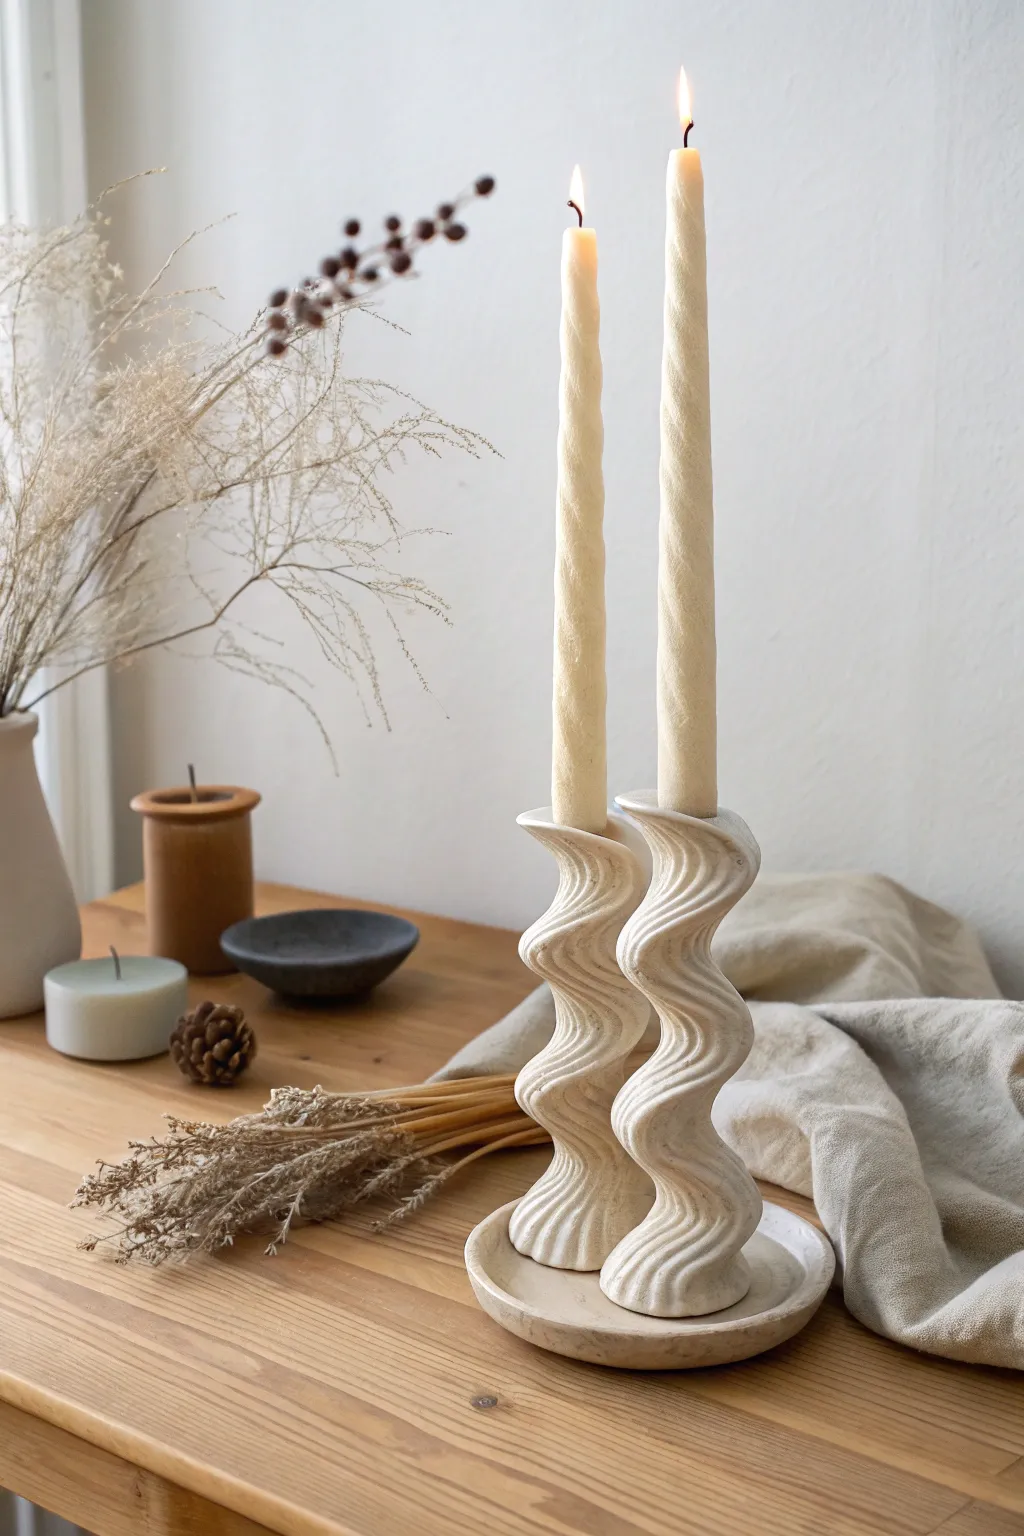
Embrace the fluid beauty of organic shapes with this wavy taper candle holder set. The design features two spiraling pillars anchored on a matching oval tray, creating a modern yet soft centerpiece that looks like it came straight from a pottery studio.
How-To Guide
Materials
- Air-dry clay (stone or white color)
- Rolling pin
- Clay knife or craft knife
- Wooden dowel (approx. 1-inch diameter)
- Small bowl of water
- Sponge
- Measuring tape or ruler
- Sandpaper (medium and fine grit)
- Matte acrylic sealant
- Taper candle (for sizing)
Step 1: Base Construction
-
Roll the Slab:
Begin by conditioning your clay, kneading it until it is pliable. Roll out a slab of clay to an even thickness of about 1/4 inch, ensuring it is large enough to cut out your oval base. -
Cut the Base Shape:
Sketch a soft oval shape onto the clay using a needle tool or toothpick. It should be wide enough to comfortably hold two candle pillars side-by-side. Cut along the line with your clay knife. -
Form the Rim:
Roll a long, thin coil of clay (about 1/4 inch thick). Score the outer edge of your oval base and wet it slightly with water. -
Attach the Rim:
Place the coil onto the scored edge to create a raised rim. Blend the clay downwards onto the base using your thumb or a modeling tool so the seam disappears completely. -
Smooth the Surface:
Dip your sponge in water and wring it out well. Gently wipe the base and rim to remove any fingerprints or harsh tool marks, then set the base aside on a flat board.
Keep it Straight
Insert a spare candle into the holder while attaching it to the base. Use a level or your eye to ensure it stands perfectly straight while the clay bonds.
Step 2: Creating the Spirals
-
Roll Clay Snakes:
Roll out two thick, long cylinders of clay. You want them to be substantial, roughly 1 inch in diameter, and long enough to wrap around your dowel multiple times. -
Flatten Slightly:
Gently press down on the cylinders with your palm to flatten them just a tiny bit; this ribbon-like shape helps create that defined wavy edge. -
Wrap the Dowel:
Take your wooden dowel and wrap the clay ribbon around it in a spiral motion. Leave small gaps between the loops for an airy look, or stack them tighter for a dense wave. -
Form the Inside Wall:
While on the dowel, use your fingers to smooth the *inside* seams where the spiral touches itself. This fuses the coil into a solid tube rather than a loose spring. -
Check Fit:
Insert your sample taper candle into the top of the spiral to ensure the opening is the correct size. Wiggle it slightly to create a little extra room for shrinkage. -
Make the Second Pillar:
Repeat the rolling and wrapping process for the second holder. I suggest making this one slightly shorter or taller than the first to add visual interest. -
Refine the Waves:
Carefully slide the clay spirals off the dowels. Use wet fingers to smooth the outer ridges, accentuating the undulating wave shape.
Step 3: Assembly and Finish
-
Score and Slip:
Determine where you want the holders to sit on the oval tray. Score the bottom of each spiral and the corresponding spots on the tray surface. Apply a dab of water or clay slip. -
Attach Components:
Press the spiral pillars firmly onto the base. Use a small modeling tool to blend the clay from the bottom of the spiral onto the tray floor, ensuring a rock-solid bond. -
Final Smoothing:
Do one last pass with a damp sponge over the entire piece. smooth out any new connection points and ensure the rim of the tray is neat. -
Slow Drying:
Let the piece dry slowly away from direct sunlight or heat sources. This usually takes 24-48 hours. Rotate it occasionally to ensure even airflow. -
Sanding:
Once bone dry, use sandpaper to buff away any remaining roughness. Be gentle around the spiral edges to maintain their crisp shape. -
Sealing:
Apply a coat of matte acrylic sealant to protect the clay and give it a finished, professional porcelain look.
Add Use Texture
Before the clay dries, gently press a piece of linen fabric onto the exterior surface. This leaves a subtle woven texture that mimics high-end ceramic finishes.
Place your favorite taper candles inside and enjoy the warm, artistic glow this handmade piece brings to your space


Geometric Block Tea Light Holder
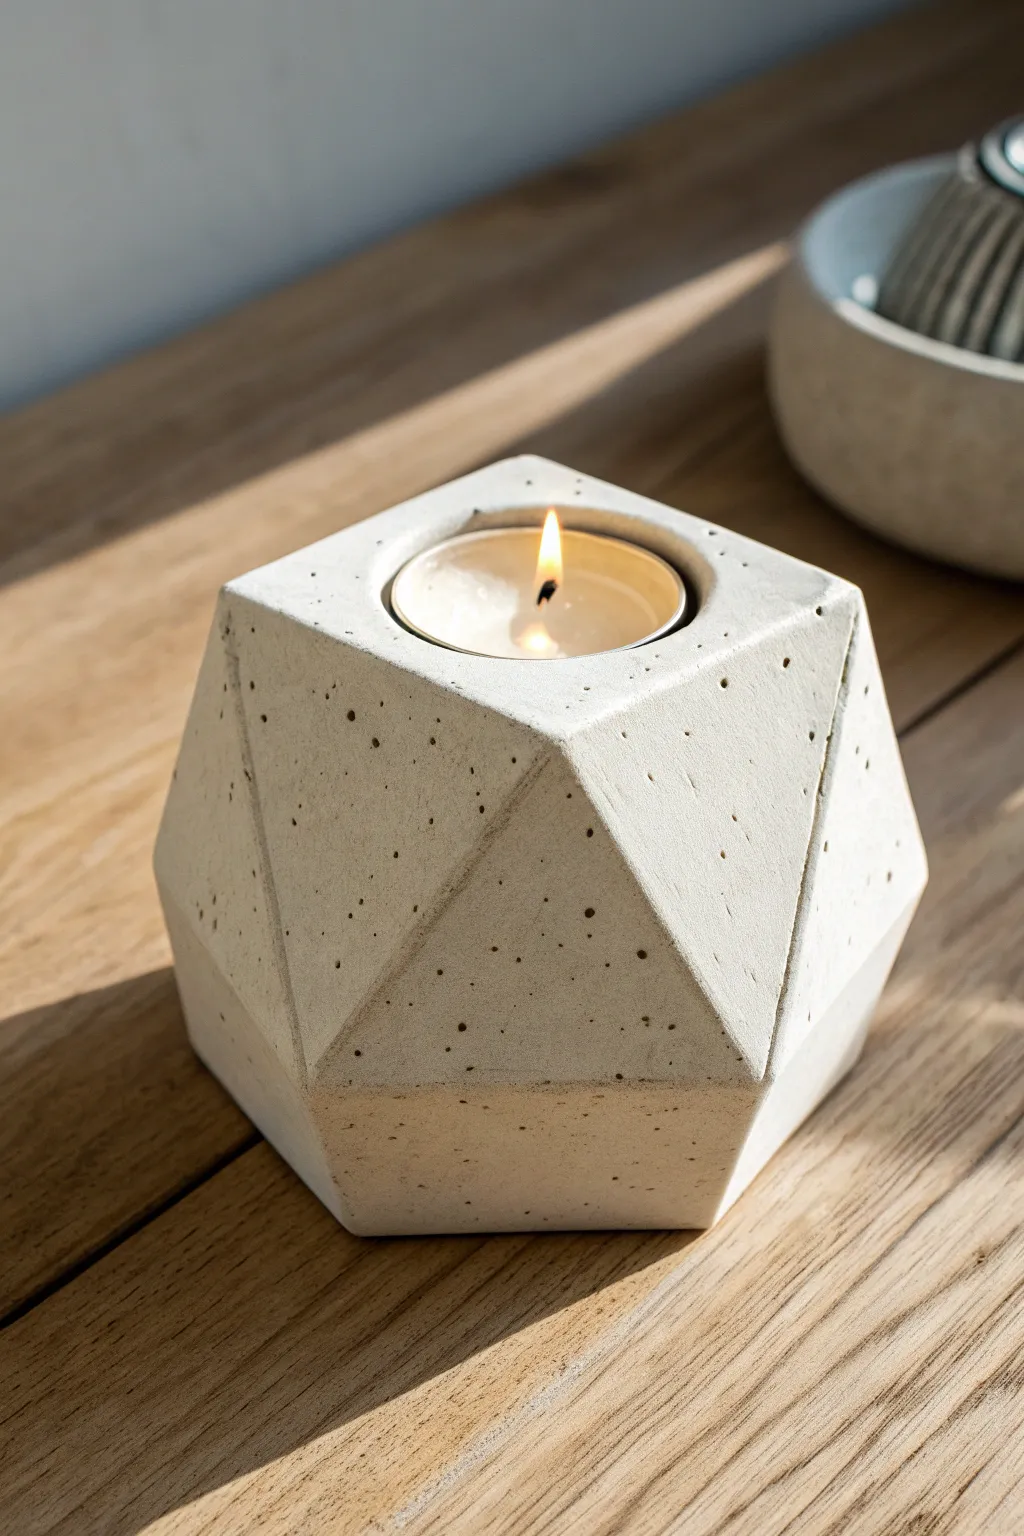
Bring modern architectural charm to your tabletop with this faceted geometric tea light holder. The clean lines and speckled concrete finish create a stunning interplay of light and shadow, perfect for a minimalist aesthetic.
How-To Guide
Materials
- White or grey casting concrete/cement mix (fine aggregate)
- Cardstock or thin cardboard for the mold
- Ruler and pencil
- Precision craft knife
- Packing tape or strong clear tape
- A standard tea light candle (for sizing)
- Small plastic cup or slightly larger candle (for the inner void)
- Cooking spray or petroleum jelly (release agent)
- Fine-grit sandpaper (200-400 grit)
- Bucket for mixing
- Stirring stick
Step 1: Designing and Building the Mold
-
Draft the template:
Begin by drawing your geometric pattern on cardstock. For this shape, start with a hexagon base, then draw rectangular side panels attached to each edge of the hexagon. From the top of those rectangles, draw connecting triangles to form the faceted upper slope. -
Score the fold lines:
Use the back of your craft knife or a dedicated bone folder to score every internal line where the paper needs to bend. Do not cut all the way through; you just want a clean, crisp fold. -
Cut out the shape:
Carefully cut along the absolute perimeter of your entire drawing using the craft knife. Be precise with your corners to ensure the final mold fits together tightly without gaps. -
Assemble the outer shell:
Fold along your scored lines to bring the 3D shape together. Secure every seam on the *outside* of the mold using packing tape. Ensure the tape seals fully so no wet concrete can leak out. -
Prepare the insert:
To create the hole for the candle, find a small plastic cup or object slightly larger than a tea light. Wrap it in a layer of tape or coat it heavily in petroleum jelly so it doesn’t stick permanently to the concrete.
Master the Texture
To get those distinct darker speckles seen in the photo, add a tablespoon of used (dried) coffee grounds or black grit to a white concrete mix.
Step 2: Casting the Concrete
-
Mix the concrete:
In your mixing bucket, combine the cement powder with water according to the package directions. Aim for a consistency similar to peanut butter or thick pancake batter—pourable but not watery. -
Add texture (optional):
If your mix is very smooth and you want the speckled look from the photo, I like to mix in a small handful of dark sand or fine decorative aggregate at this stage. -
Pour the base layer:
Pour the concrete mixture into your cardstock mold until it is about half full. Tap the mold gently on the table to help settle the mix. -
Position the void:
Press your prepared insert (the cup or spacer) into the center of the wet concrete. Push it down until the concrete rises to the rim of your mold, but ensure the insert doesn’t touch the bottom. -
Secure the insert:
The insert will want to float up. Tape it securely across the top of the mold to hold it in place, or weigh it down with small coins or rocks placed inside the cup. -
Release air bubbles:
Tap the sides of the mold repeatedly and firmly for about 1-2 minutes. You want to see small air bubbles rising to the surface; this prevents pockmarks on the finished face.
Bulging Sides?
Cardstock can bow under the weight of wet concrete. Double up your cardstock layers or support the outside of the mold with blocks for straighter lines.
Step 3: Demolding and Finishing
-
Allow to cure:
Let the project sit undisturbed for at least 24 to 48 hours. Concrete needs time to cure properly, and rushing this step can cause cracks or crumbled corners. -
Remove the insert:
Once hard, gently twist and pull the center insert out. If you used enough release agent, it should slide out with a bit of wiggling. -
Peel away the mold:
Carefully peel the tape and cardstock away from the concrete. This is the most satisfying part, revealing the sharp geometric facets beneath. -
Initial sand:
The bottom edge and the top rim might be a little rough. Place your sandpaper on a flat surface and rub the base of the candle holder against it in a circular motion to level it. -
Refine the surface:
Use a piece of fine-grit sandpaper to gently smooth any sharp edges or remove residue from the mold seams. Be gentle to maintain the crisp geometric lines. -
Wash and dry:
Wipe the holder down with a damp cloth to remove sanding dust. Let it dry completely before placing it on delicate surfaces. -
Add surface protection:
Stick small felt or cork pads to the bottom of the holder to protect your wooden furniture from the abrasive concrete.
Now pop in a tea light and enjoy the warm glow against your cool, modern creation

The Complete Guide to Pottery Troubleshooting
Uncover the most common ceramic mistakes—from cracking clay to failed glazes—and learn how to fix them fast.
Leaf-Imprint Tea Light Cup
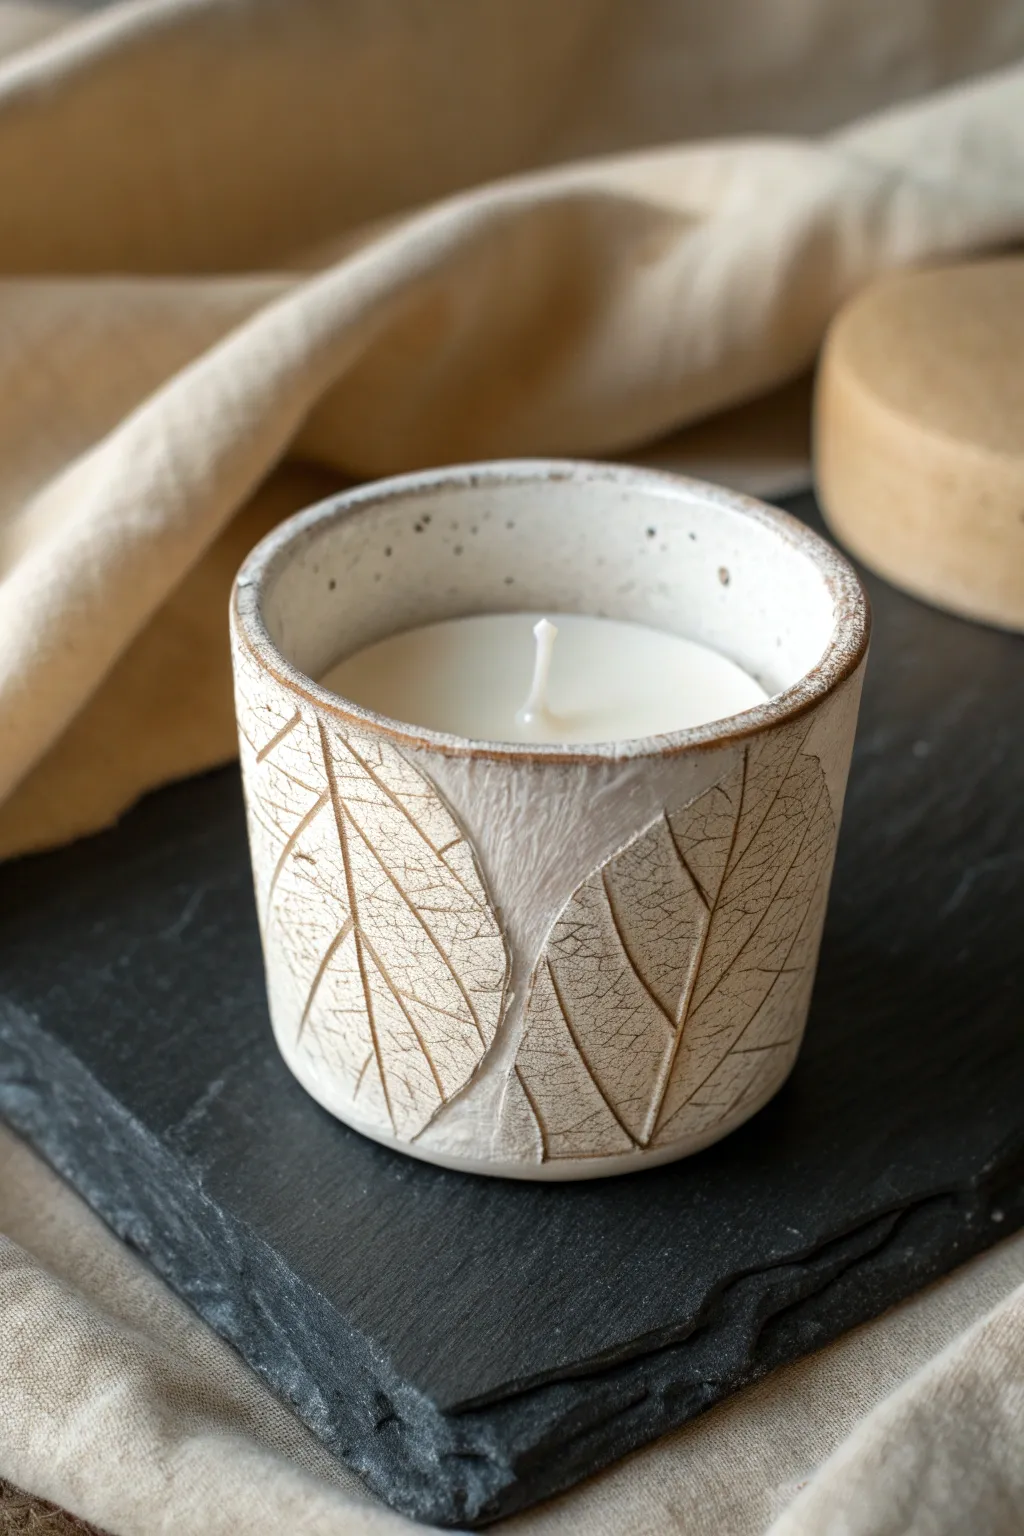
Bring the elegance of nature indoors with this handcrafted clay candle holder featuring delicate, textured leaf impressions. The earthy white finish and subtle brown accents highlight the vein details, making it a perfect cozy accent for any room.
Detailed Instructions
Materials
- White styling clay (air-dry or polymer depending on preference)
- Small rolling pin
- Real leaves with prominent veins (like salal or lemon leaves)
- Circular cookie cutter or a dedicated rim template
- Craft knife
- Small bowl of water
- Sponge
- Brown acrylic paint or antiquing wax
- Clear matte varnish
- Soy wax flakes and candle wick
- Double boiler setup for wax
- Sandpaper (fine grit)
Step 1: Shaping the Clay Base
-
Condition the Clay:
Start by kneading your white clay until it is soft, pliable, and free of cracks. If using air-dry clay, keep your hands slightly moist to prevent it from drying out too quickly. -
Roll out the Slab:
Roll the clay out on a flat surface to an even thickness of about 1/4 inch. Ensure it is long enough to wrap around your desired circumference. -
Select Your Leaves:
Choose fresh, flexible leaves with thick, raised veins on the back. Stiff or dried leaves tend to crack the clay rather than bending with it. -
Impress the Texture:
Arrange the leaves vein-side down onto the clay slab. Use your rolling pin to firmly press them into the surface. I like to roll over them a few times to ensure the finest details transfer. -
Remove the Botanicals:
Carefully peel back the leaves to reveal the imprint. Do this slowly so you don’t tear the clay surface. -
Cut the Rectangle:
Measure and cut a long rectangular strip from the textured slab. The height of the strip will determine the height of your candle holder. -
Create the Base:
Roll out a separate piece of plain clay and use a circular cutter to create the bottom base disc for your cup.
Clean Vein Trick
If clay sticks to your leaves, lightly dust the leaf underside with cornstarch before rolling. This acts as a release agent for sharper lines.
Step 2: Assembling the Vessel
-
Form the Cylinder:
Wrap your textured rectangular strip into a cylinder shape. Overlap the edges slightly or butt them together, pressing firmly to join the seam. -
Attach the Base:
Score the bottom edge of the cylinder and the outer edge of the base disc. Apply a little water (slip) and press the cylinder onto the base. -
Smooth the Seams:
Use your fingers or a modeling tool to smooth the inside seams so they are watertight. On the outside, blend the vertical seam carefully to avoid engaging the leaf pattern too much. -
Refine the Rim:
Run a damp sponge along the top rim to soften any sharp edges created by the knife. A slightly uneven, organic rim adds to the rustic charm. -
Dry Completely:
Allow the piece to dry fully according to the clay manufacturer’s instructions. This usually takes 24-48 hours for air-dry clay.
Fixing Cracks
Small cracks during drying? Mix a tiny bit of fresh clay with water to make a paste and fill the crack. Smooth it out and let it dry again.
Step 3: Finishing and Filling
-
Apply the Brown Wash:
Dilute brown acrylic paint with water. Brush it liberally over the textured leaf areas, ensuring it gets into all the deep crevices. -
Wipe Back:
Immediately wipe the surface with a damp sponge or cloth. The paint will remain in the recessed veins while cleaning up the high points, creating distinct contrast. -
Seal the Holder:
Once the paint is dry, apply a coat of clear matte varnish to seal the clay and protect it from heat and wax. -
Prepare the Wick:
Secure the metal tab of your wick to the center of the interior bottom of the dried cup using a dab of glue or melted wax. -
Pour the Wax:
Melt your soy wax flakes in a double boiler. Carefully pour the melted wax into the clay cup, stopping about half an inch from the rim. Let it cool and harden completely.
Light your new custom candle and enjoy the warm glow through the textured leaves
Floral Stamped Taper Candle Tray
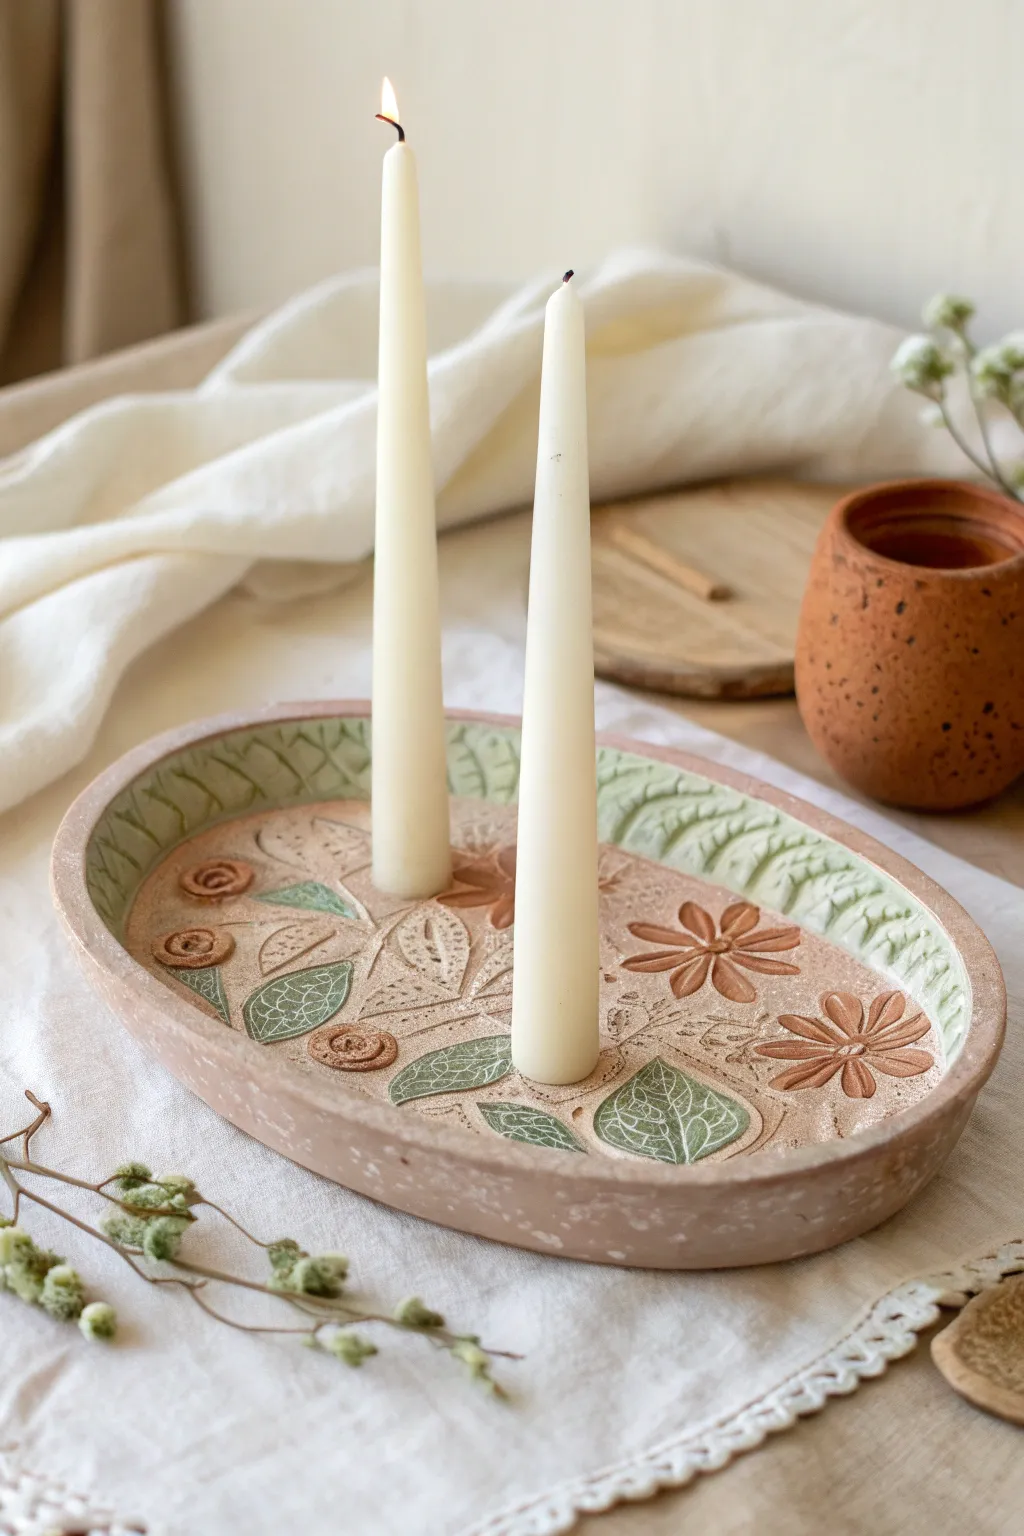
Bring a touch of botanical charm to your table setting with this shallow, oval candle tray featuring delicate floral imprints. The gentle blush and sage green tones create a natural, earthy aesthetic perfect for cozy evenings.
Step-by-Step Tutorial
Materials
- Air-dry clay (terra cotta or white color)
- Rolling pin
- Oval template or cookie cutter (large)
- Clay knife or craft knife
- Various floral stamps or real leaves and flowers
- Small carving tools or toothpicks
- Two taper candles (for sizing)
- Green and terracotta-colored acrylic paint
- White acrylic paint (for washing/tinting)
- Fine detail paintbrush
- Matte varnish or sealant
- Small bowl of water
- Sponge
Step 1: Planning and Base Construction
-
Prepare the clay:
Begin with a substantial lump of air-dry clay. Knead it in your hands until it is warm, pliable, and free of any air pockets or cracks. -
Roll out the slab:
Roll the clay out on a smooth surface to an even thickness of about 1/4 to 1/2 inch. Ensure it is thick enough to hold the candles steady but not overly chunky. -
Cut the oval shape:
Place your large oval template onto the rolled clay. Using a clay knife, carefully trace around the perimeter to cut out your base shape. Smooth the raw edges with a finger dipped in a little water. -
Form the rim:
Create a long snake or coil of clay. Attach this to the top outer edge of your oval base to create a raised rim. Blend the clay downwards onto the base on the inside and outside seams until the transition is seamless and smooth.
Step 2: Creating Texture and Holders
-
Position the candles:
Take your two taper candles and press them gently into the wet clay where you want them to stand to mark the spots. Don’t push all the way through. -
Build the supports:
Remove the candles. Build up a small mound of clay around these marked circles, then re-insert the candles (wrapped in a bit of plastic wrap to prevent sticking) to mold the clay snugly around the base. Remove the candles carefully to dry. -
Imprint the rim:
Using a leaf stamp or a carving tool, create a repetitive leafy pattern along the inner curve of the raised rim. Press firmly enough to leave a clear texture but not so hard that you deform the wall. -
Stamp the center:
Press your floral stamps or real botanical elements into the flat variety of the tray. Arrange flowers and leaves in a random, organic pattern around the candle holes. -
Add carved details:
Use a sharp tool or toothpick to hand-carve veins into the stamped leaves or add extra dots and swirls for texture. I find that deepening the lines slightly helps the paint settle better later. -
Dry completely:
Allow the piece to dry fully according to package directions, usually 24-48 hours. Turn it over halfway through to ensure the bottom dries evenly.
Stamp Cleanliness
Dust your rubber stamps or natural leaves with a tiny bit of cornstarch before pressing them into the clay. This prevents sticking and ensures a crisp, clean impression.
Step 3: Painting and Finishing
-
Base coat wash:
Mix a very watery wash of white and a tiny drop of terracotta paint. Brush this over the entire piece and wipe it back with a sponge, leaving a chalky, natural finish that highlights the clay’s texture. -
Paint the leaves:
Using a fine brush, carefully fill in the imprinted leaves on the rim and the center with a muted sage green acrylic paint. You don’t need to be perfectly opaque; a semi-transparent look adds character. -
Paint the flowers:
Fill in the floral stamps with a terracotta or rusty orange color. Again, keep the paint application light to maintain that rustic earthenware vibe. -
Adding definition:
Once the color is dry, you can lightly dry-brush a little white paint over the raised textures to make the carvings pop. -
Seal the piece:
Apply a coat of matte varnish to protect the paint and clay. This is crucial for durability, though remember that air-dry clay is not fireproof, so always monitor burning candles.
Vintage Patina
After painting, rub a bit of brown shoe polish or darker wax over the textured areas and wipe away the excess. It settles in the crevices for an aged, antique look.
Now you have a stunning, handcrafted centerpiece ready to warm up your space


What Really Happens Inside the Kiln
Learn how time and temperature work together inside the kiln to transform clay into durable ceramic.
Speckled Studio-Look Candle Holder
Capture the essence of modern pottery studio chic without needing a kiln with this simple yet elegant project. Using air-dry clay and a clever painting technique, you’ll create a functional piece that features a trendy, organic speckled finish perfect for showcasing tapered candles.
Step-by-Step Guide
Materials
- White air-dry clay (about 500g)
- Rolling pin
- Circle cutter or bowl (approx. 5-6 inches diameter)
- Fettling knife or clay tool
- Small cup or cylinder form (for the candle holder part)
- Taper candle (to size the hole)
- Water and sponge
- Fine grit sandpaper
- Cream or off-white acrylic paint
- Black or dark brown acrylic paint
- Old toothbrush or stiff bristle brush
- Matte or satin sealant/varnish
Step 1: Forming the Base
-
Condition the clay:
Start by kneading your white air-dry clay in your hands until it is warm, pliable, and free of air bubbles. -
Roll the slab:
Roll the clay out on a smooth surface to an even thickness of about 1/4 inch. If the clay sticks, you can use a little cornstarch or work on parchment paper. -
Cut the base circle:
Place your bowl or circle cutter onto the slab and cut around it to create a perfect circle for the tray base. -
Create the rim:
Gently pinch up the edges of your circle all the way around to create a shallow rim. Smooth the edge with a damp sponge or your finger to ensure it’s rounded and comfortable to touch. -
Smooth the interior:
Run your slightly damp sponge along the inside bottom of the tray to remove any fingerprints or canvas marks from the rolling process.
Step 2: Building the Candle Pillar
-
Form the cylinder:
Take a separate ball of clay and roll it into a thick log or cylinder shape, roughly 1.5 to 2 inches tall and 1.5 inches wide. -
Flatten the ends:
Tap both ends of the cylinder on your work surface to ensure they are perfectly flat and the piece stands straight up without wobbling. -
Create the candle recess:
Press the base of your taper candle firmly into the center of the cylinder to create the holding hole. Wiggle it slightly to make the hole just a hair larger than the candle, as clay can shrink when drying. -
Score and slip:
Use a needle tool or knife to scratch cross-hatch marks (scoring) on the bottom of the cylinder and the center of your tray base. Add a dab of water or liquid clay (slip) to these roughed-up areas. -
Attach the pieces:
Press the cylinder firmly onto the center of the tray. Use a modeling tool or your finger to smooth the seam where the two pieces meet, blending the clay so it looks like one solid unit.
Cracks Appearing?
Make a ‘slurry’ paste by mixing creative clay scraps with water. Apply this paste into any cracks, smooth it over, let it dry again, and then sand it flush.
Step 3: Finishing and Speckling
-
Allow to dry:
Let the piece dry completely for 24-48 hours. I usually flip it over halfway through the drying process to ensure the bottom dries evenly. -
Sand for smoothness:
Once fully dry, use fine-grit sandpaper to buff away any rough edges or uneven spots on the rim and cylinder. -
Apply base color:
Paint the entire holder with a creamy off-white acrylic paint. You may need two coats for full, opaque coverage. -
Prepare the speckle mix:
Dilute a small amount of black or dark brown acrylic paint with water until it has a very fluid, ink-like consistency. -
Flick the specks:
Dip an old toothbrush into the watered-down paint. Hold it over the candle holder and run your thumb across the bristles to flick tiny splatters of paint onto the surface. -
Vary the density:
Move your hand around to ensure random coverage. Add a few slightly larger dots manually with a toothpick if you want more variation in the pattern. -
Seal the piece:
After the paint is bone dry, coat the entire holder with a matte varnish to protect the surface and give it that finished ceramic look.
Level Up: Glazed Look
Swap the matte varnish for a high-gloss Triple Thick glaze. This mimics the shiny, fired surface of real kiln-fired pottery perfectly.
Now you have a stunning, artisanal-style display piece ready to hold your favorite tapered candles for a cozy evening
Marbled Polymer Clay Tea Light Holder
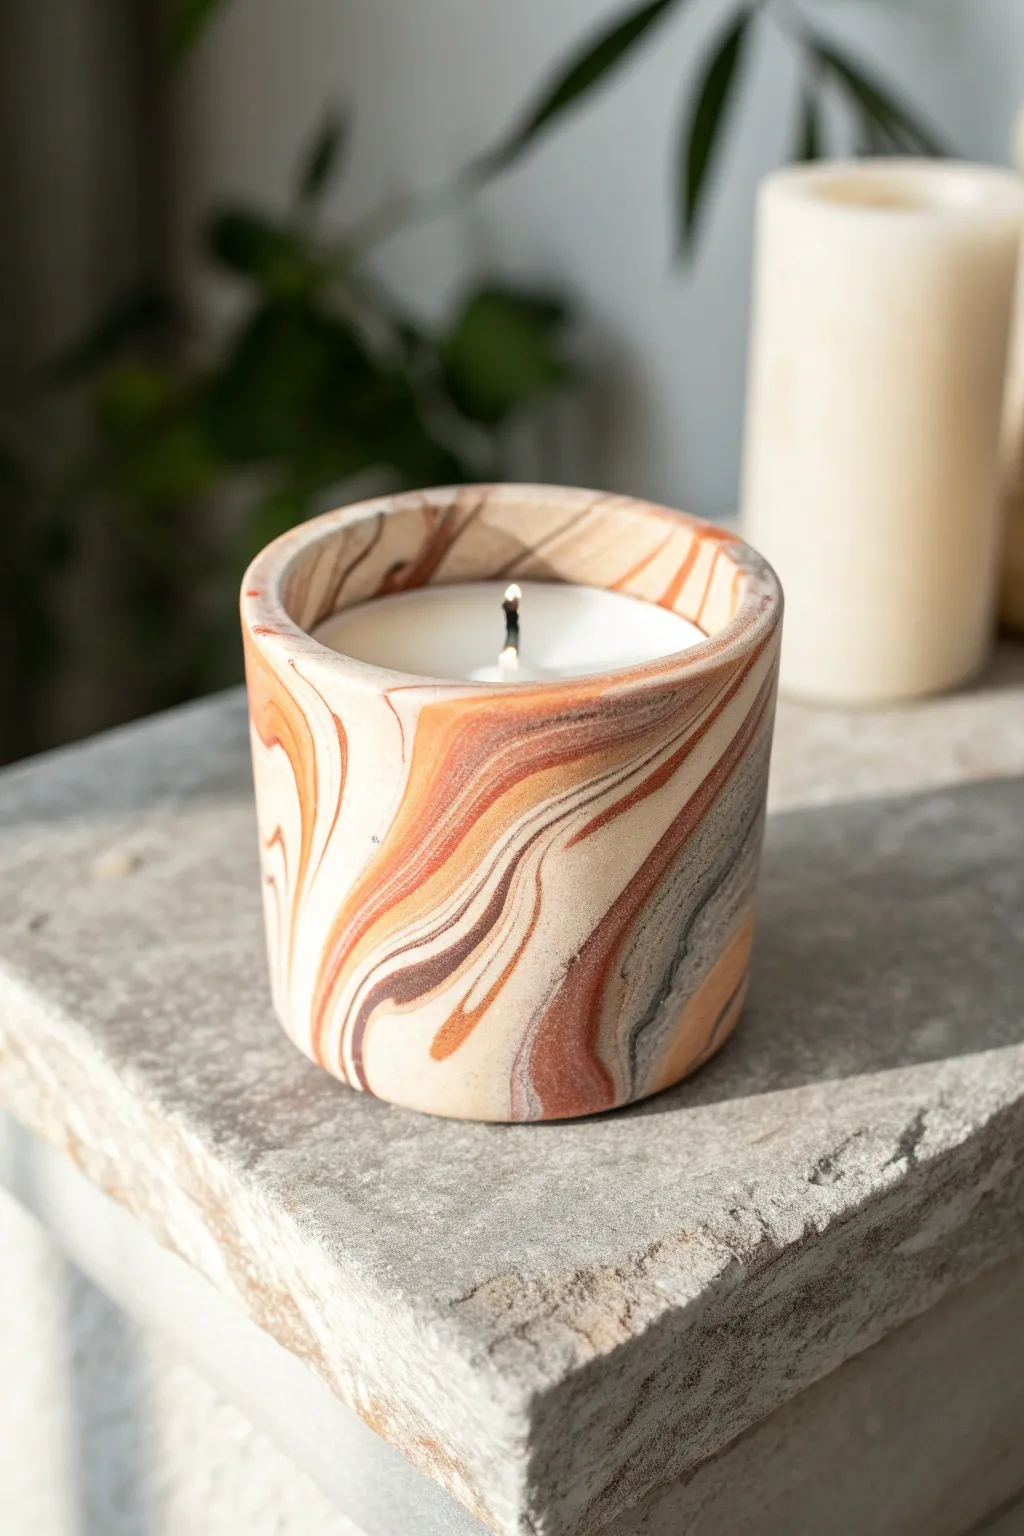
This project creates a sophisticated faux-stone vessel that looks far more expensive than the sum of its parts. By swirling warm browns, creams, and cool greys, you’ll mimic the organic beauty of agate or sandstone in a functional candle holder.
Step-by-Step
Materials
- Polymer clay (white, beige, translucent, chocolate brown, and charcoal gray)
- Straight-sided heatproof glass votive holder (to use as a mold/base)
- Acrylic rolling pin
- Ceramic tile or glass work surface
- Tissue blade or X-Acto knife
- Cornstarch or baby powder (as release agent)
- Wet sandpaper (grids 400, 800, 1000)
- Matte or satin polymer clay varnish (optional)
Step 1: Prepping the Palette
-
Condition the clay:
Start by thoroughly kneading each color of polymer clay separately until they are soft and pliable. This ensures they will blend smoothly without cracking. -
Mix custom shades:
To achieve that natural, earthy look shown in the image, mix a little white into your brown to create a tan shade, and mix a tiny bit of translucent clay into the beige for depth. -
Create logs:
Roll each color into a long, thin snake or log about 5 inches long. You’ll want thicker logs of the lighter colors (beige, white) and much thinner logs of the accent colors (dark brown, grey). -
Bundle the colors:
Gather all the clay logs together into one thick bundle. Twist this large log like a candy cane to begin merging the colors.
Step 2: Creating the Marble Effect
-
Double the twist:
Fold the twisted log in half and twist it again. Be careful not to over-twist, or the colors will become muddy; you want distinct striations like natural stone. -
Form a ball:
Roll the twisted clay into a smooth ball. I prefer to roll it between my palms to help eliminate any trapped air bubbles. -
Roll out the slab:
Place the ball on your work surface and use the acrylic roller to flatten it into a long rectangular strip. Aim for a thickness of about 1/4 inch. -
Check the pattern:
Examine your slab. If the marbling isn’t flowing enough for your taste, fold it once more and roll it out again until the swirls look organic and fluid. -
Trim to size:
Measure the height and circumference of your glass votive holder. Cut a rectangle from your marbled slab that matches these dimensions, adding a slight overlap for the seam.
Air Bubble Troubles?
If you see a bubble bump after baking, carefully pierce it with a pin, press the air out, and fill the tiny hole with a mix of liquid clay and shavings before re-baking briefly.
Step 3: Shaping and Finishing
-
Prepare the glass:
Lightly dust the outside of your glass votive holder with a little cornstarch so the clay doesn’t stick permanently if you plan to remove it later, though leaving the glass inside is safer for burning candles. -
Wrap the vessel:
Carefully lift your clay strip and wrap it around the glass cylinder. Gently press it against the glass to ensure good adhesion without distorting the pattern. -
Seal the seam:
Where the two ends meet, use your thumb or a smoothing tool to feather the clay across the join line until the seam disappears into the marble pattern. -
Smooth the rim:
For the top edge, fold a tiny bit of the clay over the rim of the glass and smooth it down for a polished, thick lip. This hides the glass insert completely. -
Bake the project:
Place the covered votive on a baking sheet and bake according to the polymer clay package instructions (usually 275°F/135°C for 15-30 minutes per 1/4 inch of thickness). -
Cool down:
Let the piece cool completely in the oven with the door open. This gradual cooling prevents thermal shock cracks. -
Sand for stone texture:
Once cool, take the piece to a sink. Use wet sandpaper, starting with 400 grit and moving to 1000 grit, to sand the outside until it feels as smooth as a river rock. -
Buff and seal:
Dry the piece thoroughly with a soft cloth. You can leave it matte for a raw stone look, or apply a thin layer of satin varnish if you prefer a polished agate appearance.
Add Metallic Veins
Before the final twist, press a sheet of gold or copper leaf onto the clay slab. As you roll and cut, the metal will break apart into realistic mineral veins.
Light a tea light inside and watch how the flame casts a warm glow against your new marble creation

TRACK YOUR CERAMIC JOURNEY
Capture glaze tests, firing details, and creative progress—all in one simple printable. Make your projects easier to repeat and improve.
Scalloped Pedestal Tea Light Stand
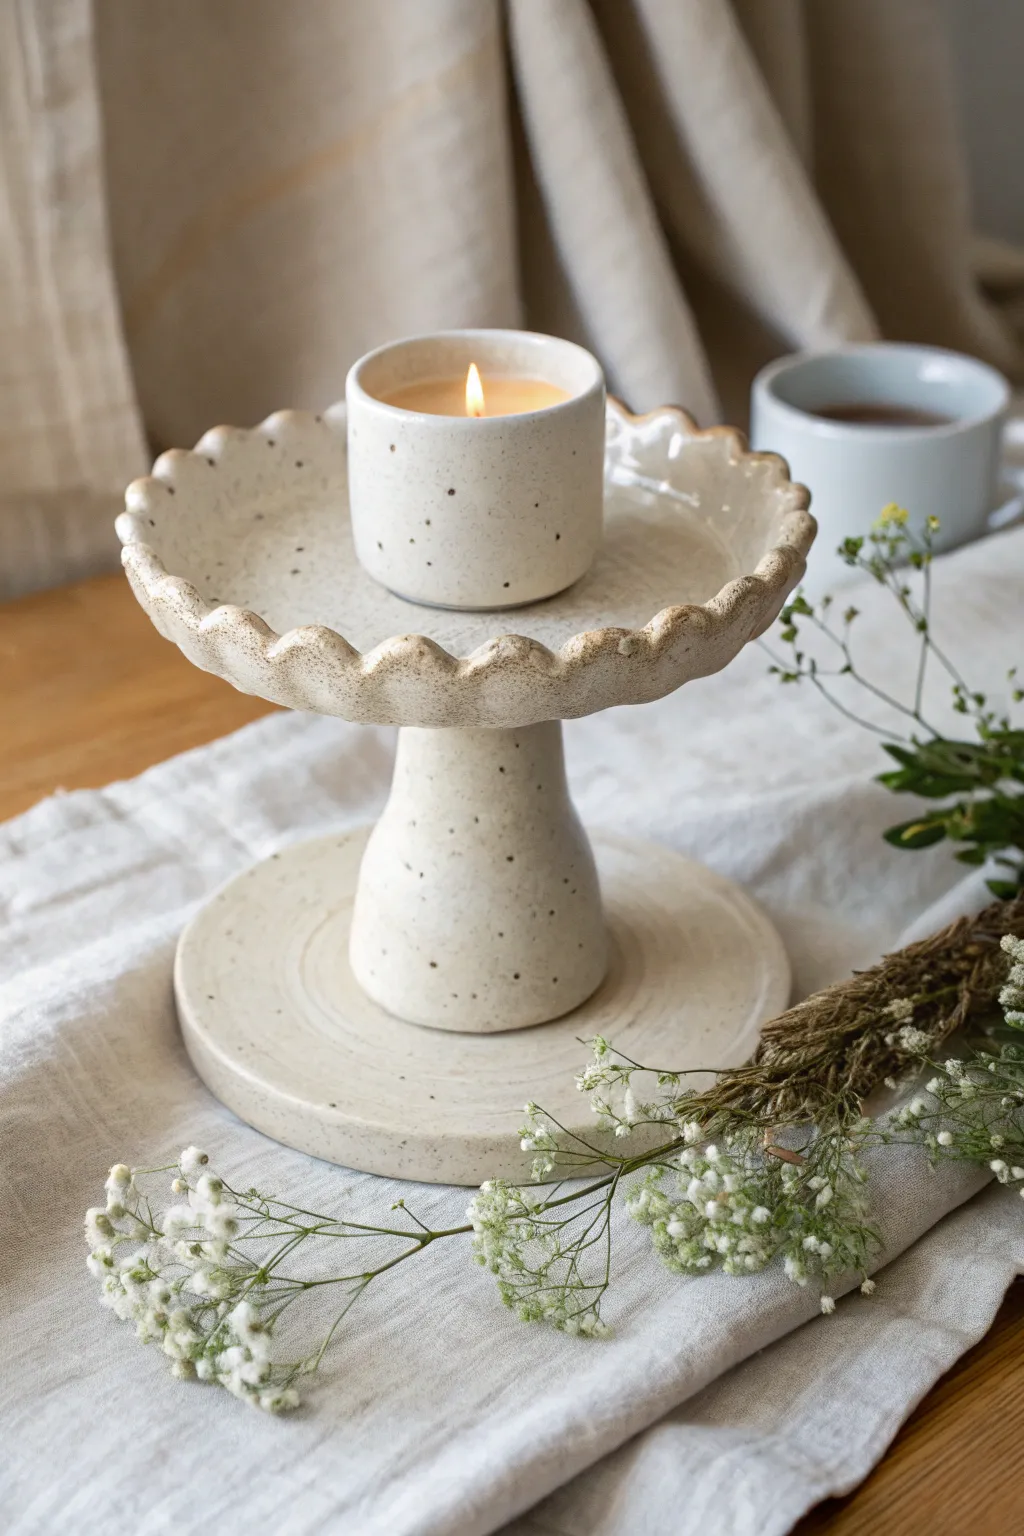
Elevate your tea lights literally and figuratively with this charming scalloped pedestal stand. Featuring a speckled finish and organic curves, this tiered piece serves as both a functional candle holder and a sculptural centerpiece.
Step-by-Step Guide
Materials
- Speckled pottery clay (or air-dry clay with faux speckles)
- Small cup or jar (for tealight holder mold)
- Rolling pin
- Circle cutters (large and medium)
- Fettling knife or craft knife
- Scoring tool and slip (or vinegar for air-dry clay)
- Sponge
- Glossy varnish or glaze
- Paintbrush
- Small bowl (for shaping the top curve)
Step 1: Forming the Base Components
-
Condition the clay:
Begin by wedging your clay thoroughly to remove air bubbles. This step is crucial for preventing cracks later on. Roll a portion of the clay into a smooth, even slab about 1/4 inch thick. -
Cut the base circles:
Using your largest circle cutter or a bowl as a template, cut out a circle for the bottom platform. It should be wide enough to support the structure, roughly 5-6 inches in diameter. -
Create the top platform:
Cut a second circle, slightly smaller than the base, for the scalloped top. Lay this circle carefully inside a shallow bowl lined with plastic wrap to give it a gentle, upward-curving rim. -
Form the central stem:
Roll a smaller slab and cut a rectangle. Wrap this around a cylinder tool or form a sturdy tube by hand. Flare the bottom slightly so it anchors well to the base, and taper the top just a bit for elegance.
Even Scallops Trick
Before pinching, lightly mark the rim with a toothpick at the 12, 3, 6, and 9 o’clock positions. Divide those sections in half again to ensure your ruffles are spaced equally.
Step 2: Sculpting the Details
-
Make the scallops:
Return to your top circle resting in the shallow bowl. Using your thumb and forefinger, gently pinch the edges at regular intervals to create the ruffled, scalloped effect. -
Refine the edges:
Dip your finger or a small sponge in water and smooth out the scalloped rim. Ensure the curves are soft and organic rather than sharp, mimicking the look of the reference image. -
Create the candle cup:
For the actual tea light holder, create a small cylinder or pinch pot. Use a real tea light to gauge the size—it should fit snugly with a little wiggle room. Smooth the rim so it’s perfectly level. -
Add texture:
If your clay isn’t pre-speckled, now is the time to add texture. I like to flick diluted brown acrylic paint or glaze onto the raw clay with a toothbrush for that authentic pottery look.
Sagging Rim?
If the scalloped top droops while drying, support the underside with bits of crumpled newspaper or balls of scrap clay until the structure stiffens enough to hold its shape.
Step 3: Assembly and Finishing
-
Score and slip the base:
Take the central stem and the large flat base. Score (scratch) the bottom of the stem and the center of the base heavily. Apply slip or water to the scored areas. -
Attach the stem:
Press the stem firmly onto the base. Use a modeling tool to blend the clay seams together on the inside and outside until the connection is invisible and seamless. -
Attach the scalloped top:
Score and slip the top of the stem and the underside center of the scalloped bowl. Press them together gently, supporting the bowl from underneath so you don’t ruin the curve. -
Secure the candle cup:
Finally, attach the small tea light holder to the exact center of the scalloped bowl using the same scoring and slipping technique. Verify it sits level. -
Final smoothing:
Go over the entire piece with a damp sponge. Smooth out any fingerprints, refine the connection points, and ensure the silhouette flows nicely from top to bottom. -
Dry slowly:
Loosely cover the pedestal with plastic to let it dry slowly over 2-3 days. This slow pace helps prevent warping, especially around the rim. -
Apply finish:
Once fully dry (and fired, if using kiln clay), apply a glossy glaze or a high-gloss varnish. This protects the piece and enhances the speckled clay body.
Light a candle in your new creation and enjoy the cozy, artisanal atmosphere it brings to your table
Lotus Petal Tea Light Holder

Capture the serenity of a blooming lotus with this layered clay candle holder. Featuring rows of delicately textured petals radiating from a central cup, this project creates a warm, organic centerpiece perfect for meditation or cozy evenings.
Step-by-Step Tutorial
Materials
- Air-dry clay (white or cream)
- Rolling pin
- Leaf-shaped cookie cutters (small, medium, large)
- Small bowl or sphere for shaping
- Clay sculpting tools (knife, smoothing tool)
- Small shallow cup or votive glass (as a mold)
- Sandpaper (fine grit)
- Texture sponge or coarse fabric
- Cream acrylic paint
- Brown antique wax or diluted brown paint
- Matte varnish
Step 1: Preparation & Center Cup
-
Condition the Clay:
Begin by kneading a good chunk of air-dry clay until it is warm, pliable, and free of cracks. If it feels too dry, mist it lightly with water. -
Roll the Base:
Roll out a slab of clay to an even thickness of about 1/4 inch. This sturdiness is important for the structural integrity of the base. -
Create the Central Holder:
Cut a strip of rolled clay roughly 1.5 inches tall and long enough to wrap around your chosen tea light candle with a little wiggle room. Join the ends to form a cylinder, blending the seam thoroughly with a smoothing tool. -
Attach the Base:
Cut a circle of clay slightly larger than your cylinder. Score both the bottom of the cylinder and the edge of the circle, wet them, and press together to seal the bottom of the candle cup.
Step 2: Forming the Petals
-
Cut the Petals:
Roll out more clay, slightly thinner this time (about 1/8 inch). Using your cutters or a knife, you will need about 8-10 large petals, 8-10 medium petals, and 6-8 small petals. -
Add Texture:
Before the petals dry, gently press a coarse sponge or a piece of textured fabric onto one side of each petal. This creates that lovely organic pitted surface seen in the reference. -
Shape the Petals:
Take each petal and gently pinch the bottom end to curve it slightly. For the top tips, use your fingers to curl them inward just a tiny bit, giving them a natural, cupped shape.
Floppy Petals?
If petals droop during assembly, prop them up with crumpled cling film or aluminum foil balls. Leave these props in place until the clay completely stiffens.
Step 3: Assembly
-
Attach the Inner Row:
Score and moisten the bottom of the *small* petals. Press them onto the outside base of your central cylinder, overlapping them slightly so they hug the cup tightest. -
Add Middle Layer:
Move to the *medium* petals. Attach this row slightly lower than the first, placing the center of each new petal directly over the seam between two petals from the previous row. -
Attach Outer Layer:
Attach the *large* petals for the final, outermost row. These should angle outward more dramatically, creating the open ‘bloom’ effect. I find placing the whole piece on a small bowl helps support these outer petals while they dry. -
Smooth Connections:
Turn the piece over gently (if stable) or use a tool to reach underneath and smooth the clay where all the petal bottoms meet the base. Reinforce with a small coil of clay if necessary. -
Final Shaping:
While the clay is still somewhat flexible, adjust the petals. push the outer ones down slightly and ensure the inner ones are upright enough to shield the flame. -
Drying:
Let the project dry completely in a cool, dry place. This acts as the ‘foundations’ phase for air-dry clay; rush it, and you risk cracks. Wait 24-48 hours.
Realistic Effect
For a more natural look, use a dry brush to lightly dust a golden-brown pigment or eyeshadow along only the very rims of the petals after the paint dries.
Step 4: Finishing
-
Sanding:
Once bone dry, use fine-grit sandpaper to smooth any rough edges on the petal tips or the rim of the candle cup. -
Base Coat:
Paint the entire sculpture with a creamy white or off-white acrylic paint. This unifies the color and seals the surface slightly. -
Antiquing:
To get the earthy look from the photo, dilute a small amount of brown paint or use antique wax. Brush it into the textured pits of the petals, then immediately wipe the surface with a damp cloth, leaving the dark color only in the recesses. -
Protecting:
Finish with a coat of matte varnish to protect the paint and give it a finished ceramic look.
Place a tea light inside and enjoy the soft glow illuminating your handcrafted lotus flower
Cozy Mug-Shaped Tea Light Holder
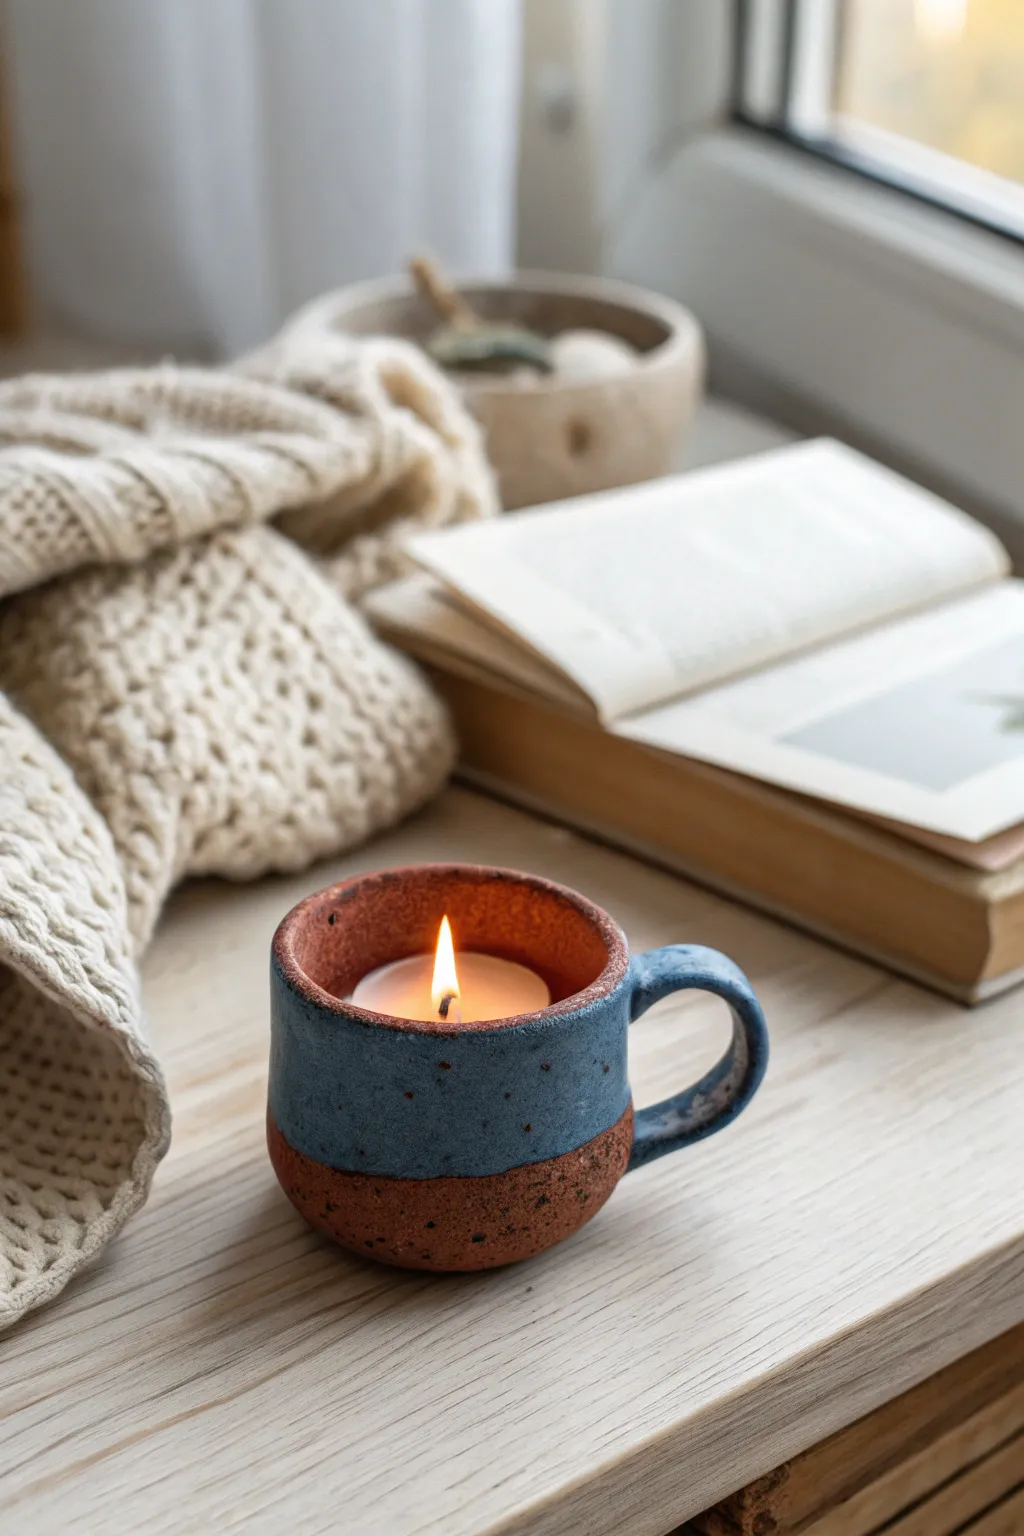
This charming project mimics the rustic appeal of hand-thrown pottery without needing a kiln or wheel. Using air-dry clay and clever painting techniques, you’ll craft a sweet little mug-shaped holder that adds immediate warmth and coziness to any reading nook.
How-To Guide
Materials
- White or terracotta air-dry clay (approx. 300g)
- Small rolling pin
- Clay sculpting tools (or a butter knife and toothpick)
- Small bowl of water
- Sponge
- Acrylic paints: Burnt Sienna, Deep Blue, Light Blue, White
- Old toothbrush
- Matte or satin varnish
- Tea light candle
- Sandpaper (fine grit)
Step 1: Sculpting the Mug Shape
-
Prepare the base:
Start by rolling a ball of clay roughly the size of a tangerine. Flatten it slightly on your work surface to create a stable base, then use your thumb to press into the center, creating a pinch pot. -
Form the walls:
Gently pinch and rotate the clay, working the walls upwards. Aim for a thickness of about 1/4 inch all around. Keep the shape relatively short and stout, like a small espresso mug rather than a tall coffee cup. -
Smooth the surfaces:
Dip your finger in a little water and smooth out any major cracks or fingerprints. I like to leave the texture slightly imperfect to enhance the handmade pottery look. -
Make the handle:
Roll a small snake of clay about 3 inches long. Flatten it slightly so it looks like a strap. Curve it into a ‘C’ shape. -
Attach the handle:
Score the attachment points on both the mug and the handle ends (scratch cross-hatch marks). Apply a dab of water or clay slip to these scored areas. -
Blend the seams:
Press the handle firmly onto the side of the mug. Use a sculpting tool or your finger to smooth the clay from the handle onto the mug body, ensuring a seamless and strong bond. -
Check the fit:
Take your tea light and gently press it into the bottom of the mug to ensure the opening is wide enough. Remove the candle before the clay shrinks and dries. -
Refine the rim:
Run a damp sponge around the top rim to soften any sharp edges. The rim should look rounded and comfortable, just like a real ceramic mug. -
Full dry:
Let the piece dry completely for 24-48 hours. Turn it upside down halfway through so the bottom dries evenly.
Use Water Sparingly
When smoothing air-dry clay, don’t use too much water or the clay can become slimey and weaken. A slightly damp sponge is better than wet fingers.
Step 2: Painting and Finishing
-
Sand imperfections:
Once bone dry, use fine-grit sandpaper to gently smooth any rough patches, paying special attention to the handle connection points. -
Create the raw clay look:
Paint the bottom third of the mug with Burnt Sienna mixed with a tiny drop of white. This mimics the reddish-brown earthy tone seen in the reference image. -
Speckle effect:
To get that gritty, speckled pottery texture, dip an old toothbrush into slightly watered-down dark brown or black paint. Run your thumb over the bristles to flick tiny specks onto the painted ‘raw’ section. -
Blue glaze base:
Mix Deep Blue with a touch of gray or white to create a dusty slate blue. Paint the top two-thirds of the mug, the inside rim, and the entire handle. Create a slightly uneven, wavy line where it meets the brown paint to look like dipped glaze. -
Add dimension:
Using a slightly lighter shade of blue, dry brush gently over the handle and the rim. This highlights the texture and makes it look like fired glaze. -
Speckle the glaze:
Repeat the toothbrush speckling technique over the blue section as well. This ties the whole piece together and makes it look like uniform stoneware clay. -
Seal the piece:
Apply a coat of satin or matte varnish over the entire piece. This protects the paint and gives it a finished ceramic sheen. -
Final touch:
Once the varnish is dry, pop in your tea light candle. Your cozy mug holder is ready for display.
Glossy Contrast
For a hyper-realistic dipped look, use a high-gloss varnish only on the blue section and a matte varnish on the brown ‘raw’ section.
Enjoy the warm glow of your new faux-ceramic creation
Mini House Luminary Tea Light Holder
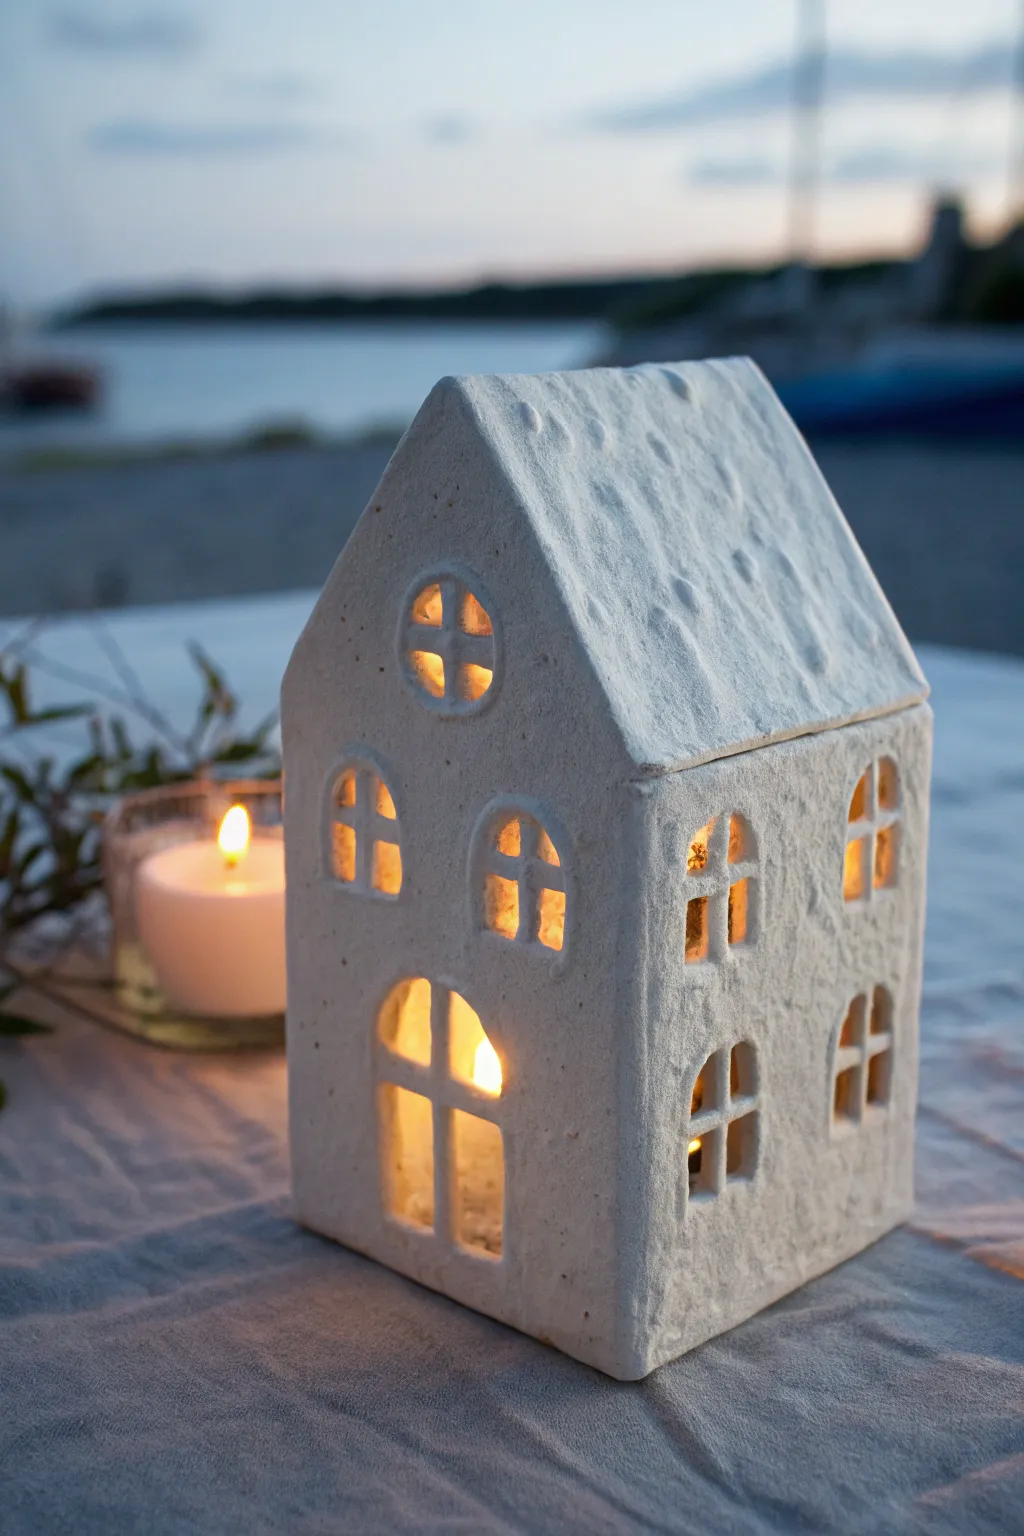
Bring a cozy glow to your evenings with this charming mini house tea light holder, boasting a rustic, textured white finish that recalls seaside cottages. Its simple architectural shape and warm, inviting windows make it a timeless centerpiece for any table setting.
Detailed Instructions
Materials
- Air-dry clay (white) or polymer clay
- Rolling pin
- Sharp craft knife or scalpel
- Ruler
- Cardstock or stiff paper (for templates)
- Texture sponge or coarse sandpaper
- Slip (clay mixed with water) for joining
- Acrylic white paint (matte)
- Baking soda (optional, for texture)
- Fine-grit sandpaper
- LED tea light
Step 1: Drafting and Cutting
-
Create templates:
Sketch your house panels on cardstock first. You will need two identical pentagon shapes for the front and back (the gable ends) and two rectangles for the side walls. Make the roof panels slightly larger than the footprint to allow for an overhang. -
Roll the clay:
Roll out your clay on a smooth surface to a uniform thickness of about 1/4 inch. If you want that rustic, stone-like texture right from the start, I like to press a coarse sponge or crumpled foil gently into the surface before cutting. -
Cut out the walls:
Place your cardstock templates onto the clay slab. Using a sharp craft knife and a ruler for guidance, slice cleanly around the edges of the front, back, and side walls. -
Window design:
While the walls are flat, use your knife to carefully cut out the arched windows. For the front facade, create a large arched door/window at the bottom, smaller arched windows in the middle, and a circular window near the peak. -
Add window panes:
Don’t discard the clay scraps yet. Roll thin little ‘snakes’ or strips of clay and carefully place them inside your window openings to create the cross-pane effect. Use a tiny bit of water to bond them to the window edges.
Step 2: Assembly and Texture
-
Dry fitting:
Let the pieces harden slightly for about 30 minutes so they aren’t floppy. Stand them up to check that the edges align correctly before you commit to joining them. -
Score and slip:
To join the walls, score the edges (scratch cross-hatch marks) and apply a dab of clay slip or water. Press the side walls against the front and back panels firmly. -
Secure the seams:
Roll a very thin coil of clay and press it into the interior corners where the walls meet. Smooth this out with your finger or a tool to reinforce the structure. -
Attach the roof:
Once the walls are stable, score and slip the top edges of the side walls and the peaked gable ends. Carefully place your two roof panels on top, ensuring they meet at the peak. -
Enhance the texture:
The charm of this piece is its imperfections. Use a toothbrush or a stiff bristle brush to tap all over the exterior, creating a stucco-like, pitted surface. Pay special attention to the roof to make it look weathered. -
Initial drying:
Allow the house to dry completely. For air-dry clay, this usually takes 24-48 hours. Keep it away from direct heat sources to prevent cracking as it shrinks.
Fixing Cracks
If hairline cracks appear during drying, create a loose paste of clay and water (slip). Fill the crack, smooth it over, and let it dry again before painting.
Step 3: The Finish
-
Sand edges:
Once bone dry, take fine-grit sandpaper and gently smooth any sharp or jagged edges around the roofline and corners, but leave the surface texture rough. -
Prepare the paint:
Mix white acrylic paint with a teaspoon of baking soda. This mixture creates a chalky, dimensional paint that mimics the look of plaster or limestone. -
Apply the finish:
Dab the paint mixture onto the house using a sponge or a stippling brush rather than stroking it on. This builds up that lovely, uneven crust seen in the photo. -
Add dimension:
While the paint is tacky, you can sprinkle a tiny pinch of sand or salt onto the wet roof for extra grit, then seal it with another thin coat of paint. -
Clean the windows:
Check the window openings for any paint drips that might block the light. Use a small detail brush or toothpick to clear out the corners of the window panes. -
Light it up:
Place an LED tea light—never a real flame, as the heat can damage air-dry clay or become a fire hazard—inside your new house and watch the warm glow spill through the windows.
Level Up: Village Life
Make a trio of houses in varying heights and roof angles. Use slightly different window shapes for each to create a cohesive but unique seaside village display.
Enjoy the peaceful ambiance created by your handcrafted architectural luminary.
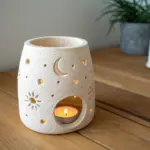
Cutout Shadow-Cast Votive Wrap

Create a warm, glowing atmosphere with this clay luminary featuring a delicate pattern of perforated arches and sunbursts. The creamy white finish mimics the look of high-end ceramic bisque, while the cutouts cast intricate shadows when a candle is lit inside.
Step-by-Step Guide
Materials
- Air-dry clay (white) or polymer clay
- Rolling pin
- Smooth work surface or silicone mat
- Craft knife or scalpel (X-Acto)
- Small round piping tip or straw (for dots)
- Length of PVC pipe or sturdy cardboard tube (approx. 3-4 inch diameter)
- Parchment paper
- Ruler
- Sandpaper (fine grit)
- Small bowl of water
- Sponge
Step 1: Preparing the Clay Slab
-
Roll out the clay:
Begin by conditioning your clay slightly if needed, then roll it out into a long rectangular slab. Aim for an even thickness of about 1/4 inch (6mm). If it’s too thin, the walls won’t support themselves; too thick, and cutting will be difficult. -
Measure the circumference:
Take your PVC pipe or tube form and wrap a piece of paper around it to determine the exact length needed for the cylinder. Allow for a slight overlap (about 1/4 inch) for the seam. -
Cut the rectangle:
Using a ruler and your craft knife, trim the clay slab into a clean rectangle based on your measurements. A height of about 5-6 inches works well for this votive style.
Step 2: Creating the Cutout Design
-
Mark the grid:
Lightly trace horizontal guidelines across the clay slab using the back of your knife (don’t cut through). This will ensure your rows of arches stay level. -
Outline the arches:
Using a needle tool or very light touch with the knife, sketch the mesmerizing semi-circle arch shapes. Stagger them row by row so the peak of one arch sits between the two arches below it. -
Punch the border dots:
Use a small round tool, like a piping tip or a straw, to punch a series of holes along the curved top edge of every arch outline. Remove the little plugs of clay as you go. -
Carve the sunburst rays:
Inside each semi-circle, carefully cut small, radiating slits. Start from the center of the arch’s baseline and cut outward toward the dotted border. These slits create the ‘sunray’ effect. -
Add center details:
Punch a single, slightly larger hole in the bottom center of each arch to anchor the sunburst design. -
Refine the edges:
Once all cuts are made, gently smooth any ragged edges with a damp finger or a small brush dipped in water. Clean cuts now save sanding time later.
Clean Cuts Hack
Let the clay dry for about 15-20 minutes after rolling it out but before cutting. Slightly firmer clay cuts cleaner and drags less, giving you sharper lines.
Step 3: Forming the Cylinder
-
Wrap the form:
Wrap your PVC pipe or tube in parchment paper. This crucial step prevents the clay from sticking to the mold. -
Lift the clay:
Carefully lift your patterned clay slab. I find it helpful to slide a piece of paper underneath to help transport it without stretching the delicate lattice work. -
Join the seam:
Wrap the clay around the parchment-covered tube. Score the overlapping edges (scratch them up a bit) and add a dab of water or slip. Press the edges together firmly to create the cylinder. -
Blend the join:
Use a modeling tool or your finger to smooth the seam inside and out until it is invisible. Be gentle so you don’t distort the circular shape.
Fixing Cracks
If you see a small crack forming during drying, mix a tiny bit of fresh clay with water into a paste (slip) and patch it immediately. Smooth with a damp finger.
Step 4: Finishing Touches
-
Dry on the form:
Let the candle holder dry on the tube for at least 1-2 hours until it is leather-hard and can hold its own weight. -
Remove the form:
Gently slide the tube and parchment paper out. If you leave it in too long while the clay shrinks, the clay might crack, so timing is key. -
Looking for flaws:
Inspect the interior seam one last time and smooth it if necessary while the clay is still slightly workable. -
Full cure:
Allow the piece to dry completely (24-48 hours for air-dry clay) or bake according to package directions if using polymer clay. -
Sand and smooth:
Once fully cured, use fine-grit sandpaper to buff away any fingerprints or sharp edges on the rim. Wipe away dust with a slightly damp sponge to reveal a pristine matte finish.
Place an LED flickering tea light inside to safely illuminate your beautiful new handcrafted luminary
Cactus-Shaped Tea Light Holder
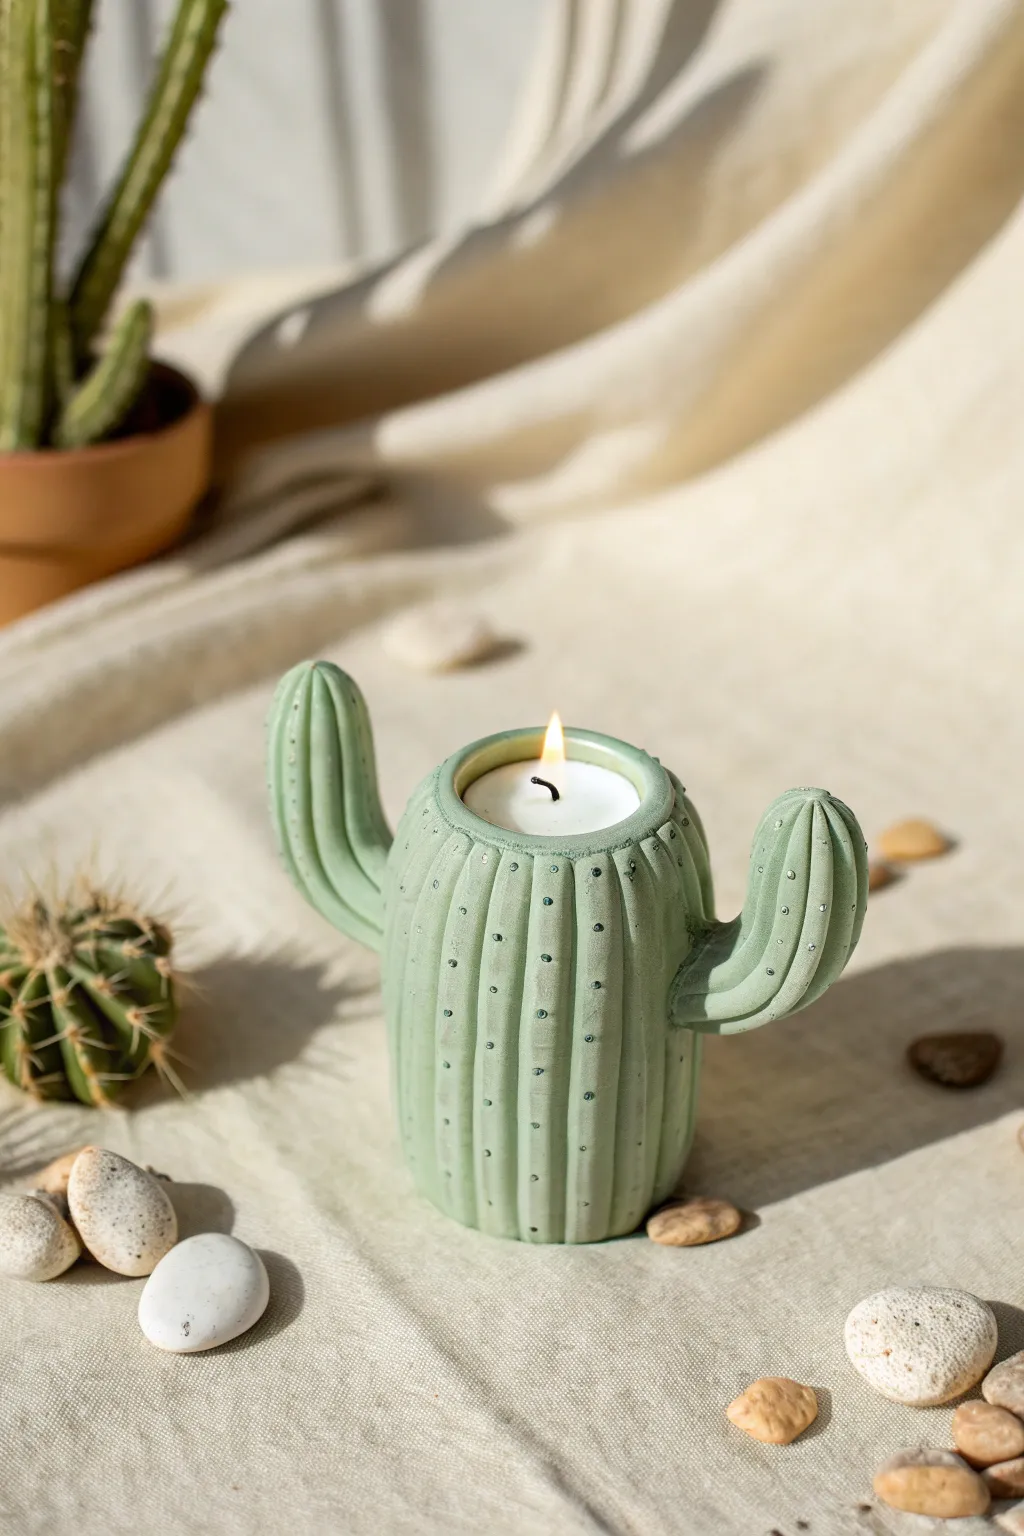
Bring the warmth of the desert into your home with this playful saguaro-shaped tea light holder. Sculpted from clay and finished with a soft sage green glaze, it features charming arm details and embossed spines for a delightful, tactile finish.
How-To Guide
Materials
- Air-dry clay or polymer clay (white or terracotta)
- Tea light candle (for sizing)
- Rolling pin
- Clay sculpting tools (specifically a needle tool and a small rounded tool)
- Water and sponge (for smoothing)
- Acrylic paints (Sage Green, White, Dark Green)
- Fine-grit sandpaper
- Matte or satin varnish
- Small paintbrush
Step 1: Forming the Body
-
Base Preparation:
Start by conditioning a large ball of clay until it is pliable and smooth. Roll it into a thick cylinder shape, approximately 3 inches wide and 4 inches tall. -
Creating the Well:
Take a spare tea light candle and gently press it into the top center of your cylinder to mark the diameter. Remove the candle. -
Hollowing the Top:
Using a sculpting tool or your thumb, carefully dig out the clay within the marked circle to create a recess deep enough for the tea light to sit flush with the rim. -
Smoothing the Rim:
Wet your finger slightly and run it around the top rim of the holder to smooth out any cracks or sharp edges created during the hollowing process.
Clean Edges Pro Tip
Keep the tea light candle inside the well (wrapped in plastic wrap) while you attach the arms. This supports the cylinder wall so you don’t accidentally squash the opening out of shape.
Step 2: Sculpting the Features
-
Shaping the Arms:
Roll two smaller sausages of clay, tapering them slightly at one end. Each should be about 2-3 inches long. -
Attaching the First Arm:
Score the side of the main body and the flat end of one arm using a needle tool. Apply a little water or slip (liquid clay) to the scored areas. -
Blending the Seams:
Press the arm firmly against the body and bend it upwards into a classic ‘L’ shape. Use a modeling tool to smear the clay across the seam until the join is invisible. -
Adding the Second Arm:
Repeat the attachment process with the second arm on the opposite side, perhaps positioning it slightly lower or higher to give the cactus a natural, asymmetrical look. -
Defining the Ribs:
Using a dull tool or the side of a popsicle stick, press vertical indentations running from the base of the cactus up to the rim. Repeat this all around the body and up the arms to create the ribbed texture.
Step 3: Detailing and Finishing
-
Adding Spines:
Take a small, rounded tool or the back of a paintbrush handle and press tiny dots along the ridges of the ribs. These indentations represent the cactus spines. -
Final Smoothing:
Give the entire piece a final check. Use a damp sponge to gently wipe away any fingerprints or rough crumbs of clay without erasing your texture. -
Drying:
Allow the sculpture to dry completely. For air-dry clay, this may take 24-48 hours depending on thickness. If using polymer clay, bake according to package instructions. -
Base Color Application:
Once solid, paint the entire cactus with a coat of sage green acrylic paint. You may need two coats for full opacity. -
Highlighting Texture:
Mix a tiny amount of white paint into your sage green. Dry brush this lighter shade gently over the raised ribs to accentuate the 3D form. -
Painting the Spines:
Dip a fine-point detailing brush into dark grey or dark green paint. Carefully dab a small dot inside each of the indented spine holes you created earlier. -
Sealing:
Protect your work with a coat of matte or satin varnish to seal the paint and give it a finished, ceramic-like sheen.
Level Up: Flowering Top
Before drying, sculpt small, flat petal shapes and arrange them around the rim of the candle opening. Paint them a vibrant pink or yellow for a cactus in full bloom.
Place your favorite scented tea light inside and enjoy the cozy desert vibes this little cactus brings to your space