Whenever I need a guaranteed mood boost, I reach for polymer clay and make the tiniest, happiest little characters I can. These cute cute polymer clay ideas are all about simple shapes, sweet faces, and mini projects you can finish in a cozy crafting session.
Chibi Cat and Bunny Mini Figures
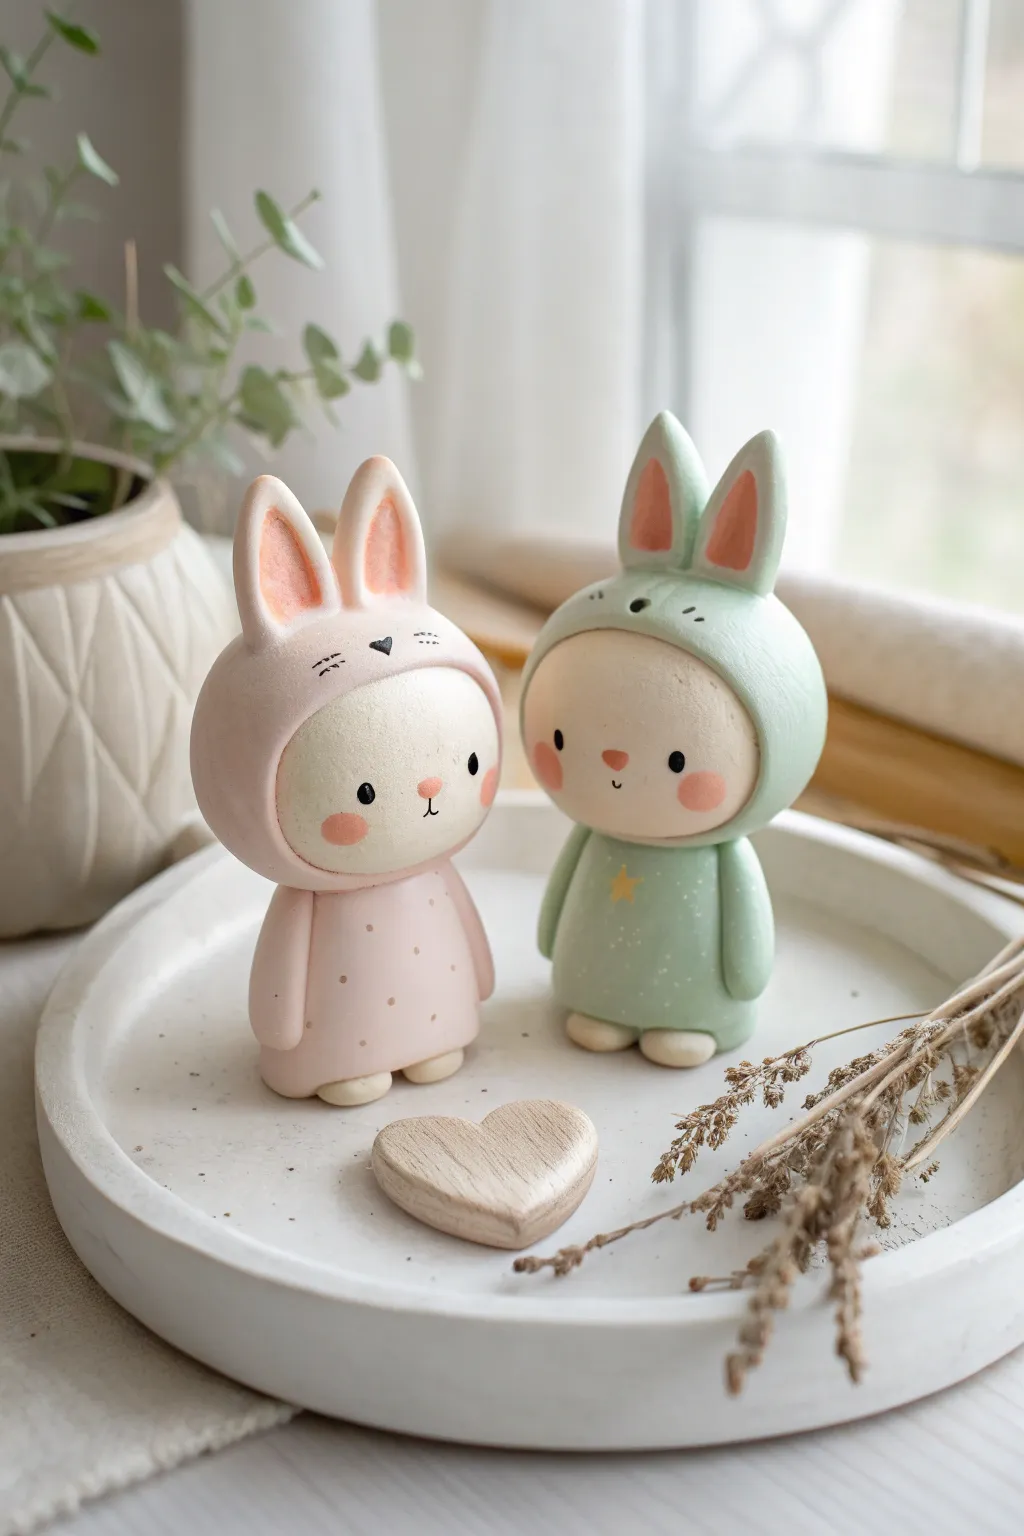
These adorable hooded figures merge the charm of woodland creatures with a sweet, minimalist chibi style. Featuring pastel pink and mint green tones, their smooth, matte finish gives them a soft, whimsical look perfect for any desk or shelf display.
Detailed Instructions
Materials
- Polymer clay (white, pastel pink, mint green, peach/flesh tone)
- Acrylic paints (black, pink, white, gold)
- Dotting tools or ball stylus (various sizes)
- Fine detail paintbrush (000 or liner)
- Modeling tools (needle tool, flexible blade)
- Matte varnish or sealant
- Baking tile or parchment paper
- Oven
Step 1: Shaping the Bodies
-
Create the base form:
Start by conditioning your clay. For the pink figure, roll a smooth ball of pastel pink clay for the body, slightly tapering it at the top like a very rounded gumdrop shape. Do the same with mint green for the second figure. -
Form the arms:
Roll two small, thin logs of clay in the matching body color. Attach them vertically to the sides of the body, blending the top seam gently so they look like sleeves of a onesie. Keep the look simple and cylindrical. -
Add tiny feet:
Roll two very small balls of white or cream clay for each figure. Flatten them slightly into ovals and attach them to the bottom front of the body so they poke out just a little.
Sticky Fingerprints?
Before baking, lightly brush the unbaked clay with a little baby oil or cornstarch to smooth out any accidental fingerprints or dust specks.
Step 2: Sculpting the Hooded Heads
-
Roll the head base:
Create a ball of the peach or flesh-tone clay for the face. It should be slightly larger and rounder than the body to achieve that cute chibi ratio. -
Make the hood:
Roll out a flat sheet of the pink (or mint) clay. Cut a circle large enough to cover the back and sides of the head ball. Carefully wrap it around the head, leaving the face exposed in a perfect circle. Smooth the seams at the back. -
Attach head to body:
Insert a short piece of wire or a toothpick into the body for support, then gently press the hooded head onto the neck area. Ensure it sits securely without squashing the body shape. -
Sculpt the ears:
For the pink bunny, shape two long, rounded teardrops from pink clay. Indent the centers with a modeling tool and fill with a smaller teardrop of darker pink or peach clay. For the green figure, make slightly shorter, more triangular ears. -
Attach the ears:
Press the ears firmly onto the top of the hood. You can use a tiny dab of liquid clay or bake-and-bond to ensure they stay put during baking. Smooth the join where the ear meets the hood.
Step 3: Baking and Painting
-
Bake the figures:
Place your creations on a ceramic tile or parchment paper. Bake according to your specific brand of clay’s instructions (usually around 275°F/130°C for 15-30 minutes). Let them cool completely before handling. -
Paint the eyes:
Using a small dotting tool dipped in black acrylic paint, place two wide-set dots for the eyes. Keep them relatively low on the face for a sweeter expression. -
Add rosy cheeks:
Mix a very watery pink paint or use chalk pastel dust. Gently dab circular blush spots just outside and slightly below the eyes to warm up the face. -
Detail the faces:
With your finest brush, paint a tiny black vertical line or a small ‘Y’ shape for the nose and mouth. Add three tiny whiskers on the hood forehead of the pink figure. -
Decorate the outfits:
Dip a toothpick in white or lighter pink paint to add tiny polka dots to the pink figure’s body. For the green figure, paint a small gold star on the chest and subtle speckles. -
Seal the work:
Once the paint is fully dry, coat the figures in a matte varnish. This protects the paint and gives that professional, soft finish seen in the photo.
Make It a Charm
Insert an eye pin into the top of the head before baking. Once cool, add a jump ring and lanyard to turn your figure into a cute bag charm or keychain.
Enjoy displaying your sweet little duo on a desk or gifting one to a best friend


Fruit Slices With Tiny Kawaii Faces
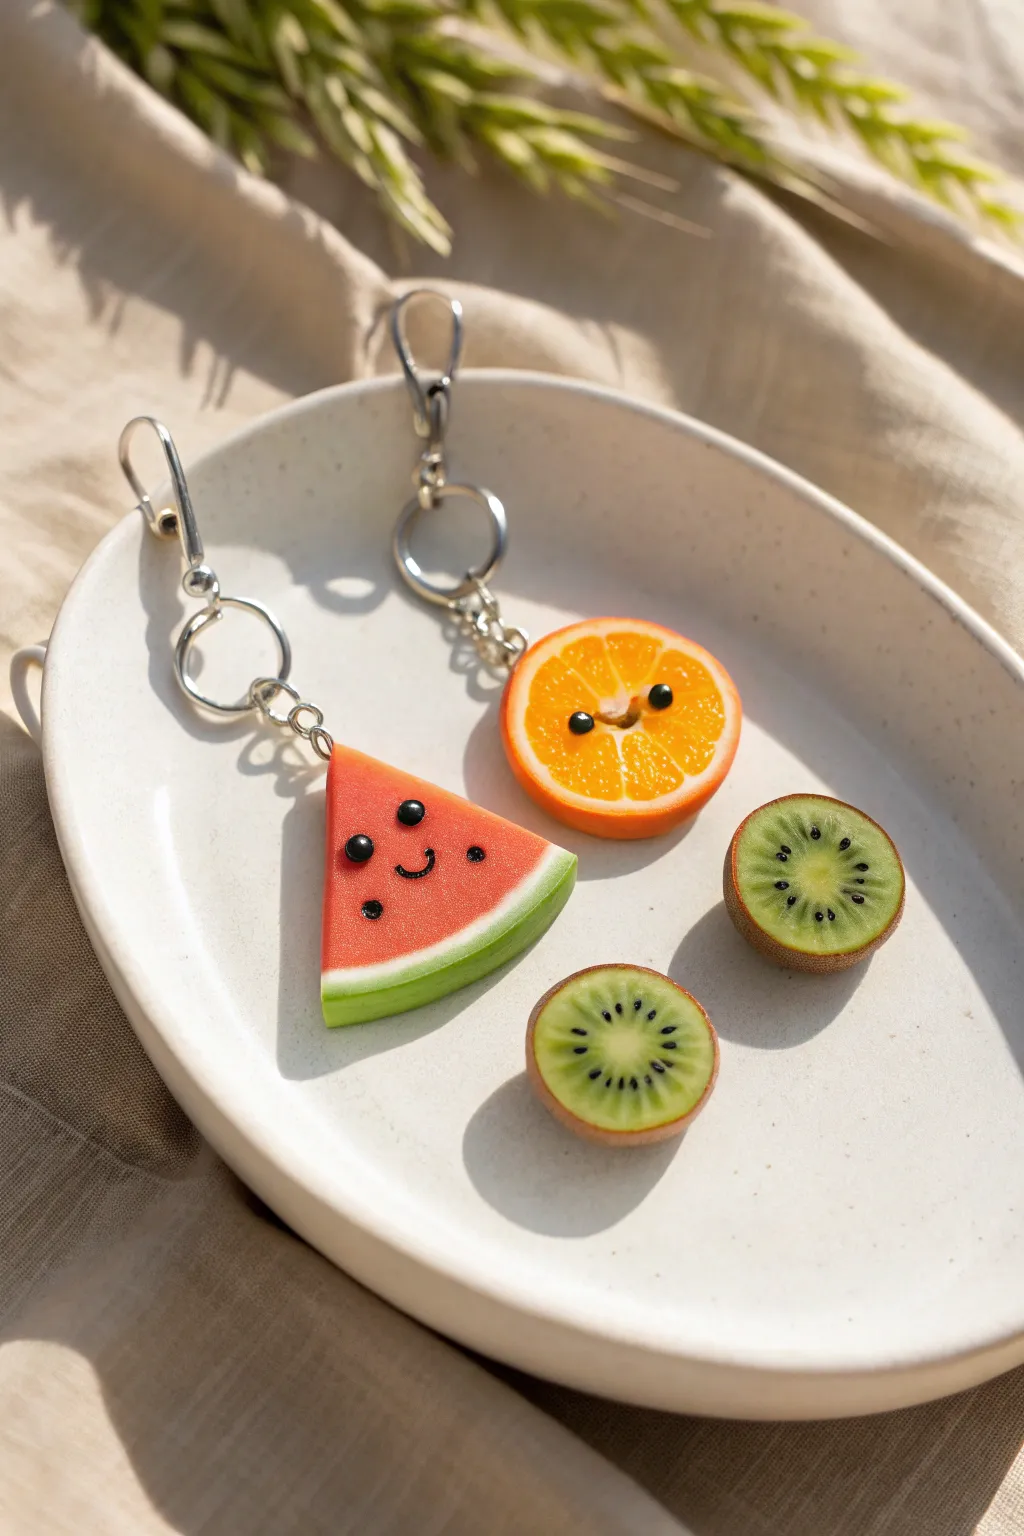
Bring a fresh burst of sweetness to your jewelry collection with these adorable fruit slice charms featuring tiny, expressive faces. The semi-translucent effect of the polymer clay gives them a juicy, realistic look that pairs perfectly with the whimsical kawaii style.
How-To Guide
Materials
- Polymer clay: translucent, red, orange, white, and lime green
- Liquid polymer clay (fimo liquid or similar)
- Black polymer clay (tiny amount for faces)
- Acrylic rolling pin or pasta machine
- Tissue blade or sharp craft knife
- Detail needle tool or dotting tool
- Eye pins or screw hooks
- Jump rings and keyring clasps or earring hooks
- UV resin or glossy glaze (optional)
- Sandpaper (fine grit)
Step 1: Making the Citrus Cane
-
Prepare the Colors:
Mix translucent clay with a small amount of orange clay. You want the color to look pigmented but still see-through once baked to mimic real fruit pulp. -
Form the Segments:
Roll the orange mix into a log, then flatten slightly into a teardrop or wedge shape log. This will be the base for individual orange segments. -
Create the Pith:
Roll out a very thin sheet of white clay. Wrap this sheet around your orange wedge log. Repeat this process until you have about 8 individual white-wrapped wedges. -
Assemble the Orange:
Arrange the 8 wedges in a circle, pointing the narrow ends inward to form a wheel. Fill the very center with a tiny snake of white clay to hold them together. -
Wrap the Exterior:
Wrap the entire wheel in a thin sheet of white clay (the inner pith), followed by a thicker sheet of solid orange clay (the zest). -
Reduce the Cane:
Gently squeeze and roll the cane to reduce its diameter, elongating it without distorting the pattern inside. Once it’s the right size for earrings, chill it in the fridge for 20 minutes to firm up.
Step 2: Crafting the Watermelon
-
Build the Base:
Mix translucent and red clay to create a juicy watermelon pink. Shape this into a triangular log. -
Add the Rind:
Roll out a thin sheet of white clay and a thicker sheet of lime green clay. Layer the white onto the green, then wrap this combo around the rounded side of your red triangle log. -
Slice and Texturize:
Using a very sharp tissue blade, slice your cane into uniform pieces about 4-5mm thick. For texture, gently stipple the red area with an old toothbrush or stiff brush.
Sticky Situation
Does your cane squash when cutting? Chill it in the freezer for 10-15 minutes first. The firmer clay resists the pressure of the blade, keeping your fruit segments perfectly round.
Step 3: Adding Kawaii Details
-
Slice Your Orange:
Take your chilled orange cane and slice a clean piece off. If you are making earrings, insure the slice is not too heavy. -
Create the Eyes:
Roll two minuscule balls of black clay. Press them gently onto the fruit slice. For the distinctive highlight shown in the photo, add an even tinier speck of white clay or white paint to the ‘pupil’. -
Sculpt the Smile:
Roll a microscopic snake of black clay for the smile. I find using a needle tool helps to curve it into a perfect ‘U’ shape before pressing it onto the clay. -
Add Seeds:
For the watermelon, roll small teardrops of black clay and press them randomly into the red flesh. Alternatively, you can embed black clay logs into the cane itself before slicing.
Make It Juicy
Mix ‘liquid clay’ with a tiny drop of alcohol ink that matches your fruit color. Drip this over the baked clay face before the resin step for an ultra-realistic, jammy texture.
Step 4: Finishing Touches
-
Insert Hardware:
Insert an eye pin or screw hook into the top of each fruit slice. Ensure it goes deep enough to be secure. -
Bake:
Bake according to your clay manufacturer’s instructions (usually around 275°F/130°C for 15-30 minutes). Let them cool completely. -
Glaze:
Apply a coat of UV resin or glossy glaze to the fruit ‘flesh’ areas to make them look wet and shiny. Cure the resin under a UV lamp if using. -
Assemble Jewelry:
Use pliers to open a jump ring and attach your finished fruit charm to the keyring clasp or earring findings.
Now you have a refreshing set of fruity accessories perfect for summer vibes


Avocado Besties With Pit Belly Buttons
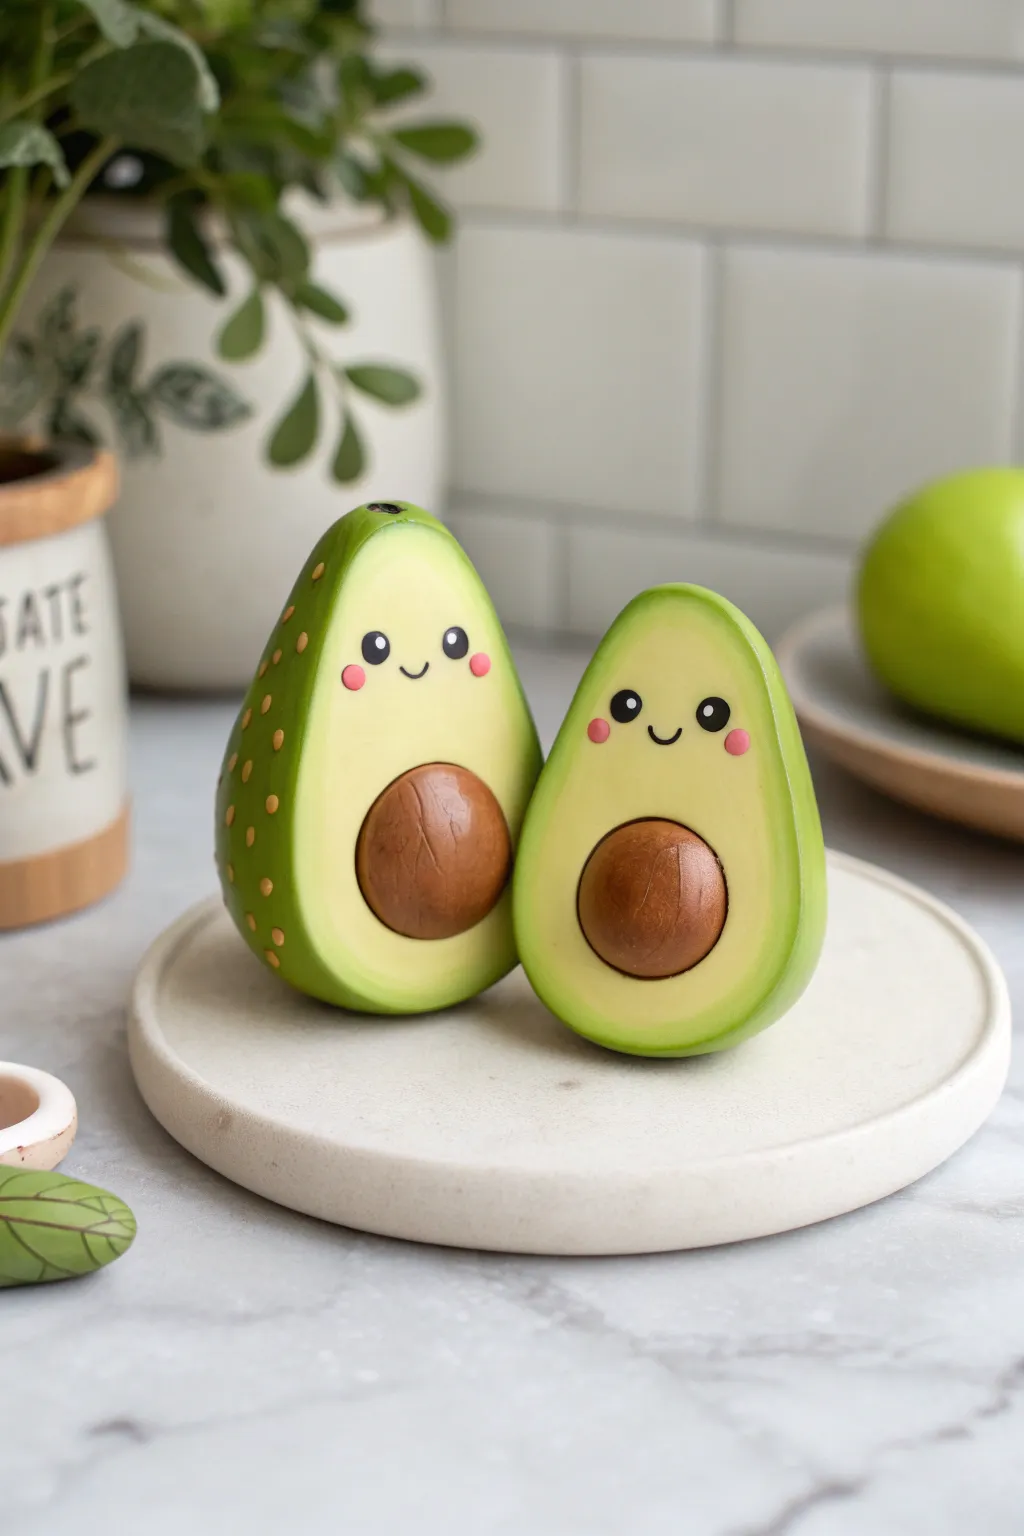
These adorable avocado friends are the perfect desk companions, featuring a smooth, creamy green interior and a happy little face. Their distinct personality comes from the large, tactile seed that doubles as a cute belly button.
Step-by-Step Guide
Materials
- Polymer clay: Light yellow-green (avocado flesh), Dark olive green (skin), Brown (pit), Black (eyes/mouth), Pink (cheeks)
- Dotting tool or ball stylus
- Pointed sculpting tool or toothpick
- Gloss glaze (optional)
- Small paintbrush
- Baking sheet and parchment paper
- Acrylic paint (optional for details)
Step 1: Shaping the Bodies
-
Mix the flesh color:
Start by conditioning your light yellow-green clay until it is soft and pliable. If you don’t have the perfect shade, mix a lot of white with a tiny bit of green and yellow. -
Form the core shapes:
Create two large teardrop shapes from the light green clay. Make one slightly taller and more elongated, and the other a bit shorter and rounder, just like a real avocado pair. -
Flatten the fronts:
Gently press the front of each teardrop against your work surface or use your thumb to flatten it slightly. This creates the ‘cut face’ of the avocado where the features will go. -
Create the skin layer:
Roll out a sheet of dark olive green clay. It should be relatively thin, about 2mm thick. -
Wrap the avocados:
Carefully wrap the dark green sheet around the back and sides of your light green shapes. Trim the excess neatly along the edge of the flat face so the dark skin frames the light flesh perfectly. -
Smooth the seams:
Use your finger or a smoothing tool to blend the transition where the dark skin meets the light flesh, ensuring there are no jagged edges.
Fixing Smudges
If dark green clay smudges onto the light face, use a Q-tip dipped in a tiny amount of rubbing alcohol or acetone to gently wipe the stain away before baking.
Step 2: Adding Pits and Details
-
Create the pit indentations:
Use a large ball tool or your thumb to press a deep, round indentation into the lower center of each avocado’s belly. This is the socket for the seed. -
Form the pits:
Roll two balls of brown clay. Make sure they fit snugly into the indentations you just made but protrude outward enough to look round and full. -
Texture the pits:
Before placing them permanently, I like to lightly scratch the surface of the brown balls with a toothbrush or needle tool to mimic the woody texture of a real avocado seed. -
Attach the pits:
Press the brown seeds firmly into the belly sockets. You can use a tiny dab of liquid clay or bake-and-bond if you want extra security. -
Add skin texture:
On the taller avocado, use a small dotting tool to add tiny indentations or light brown clay dots to the dark green skin, giving it that bumpy avocado skin look.
Step 3: Bringing the Faces to Life
-
Make the eyes:
Roll extremely tiny balls of black clay. Press them onto the upper part of the light green face, spacing them wide apart for a cute ‘kawaii’ look. -
Add eye sparkle:
Using your smallest tool or a needle, add a microscopic dot of white clay (or white paint after baking) to the top corner of each black eye. -
Create the smile:
Roll a very thin snake of black clay. Cut a tiny u-shape and gently press it onto the face between the eyes. -
Apply rosy cheeks:
Flatten two tiny discs of pink clay and place them just under the eyes at the outer edges of the face. -
Bake the figures:
Bake according to your polymer clay package instructions, usually around 275°F (135°C) for 30 minutes. Let them cool completely. -
Glaze the pit:
For a realistic touch, brush a coat of semi-gloss or gloss glaze only onto the brown pit to make it look smooth and slightly moist.
Make Them Magnets
Before baking, press strong ceramic magnets into the backs of the avocados. Bake them with the magnets in place for instant fridge decor with personality.
Place your avocado besties on a shelf or gift one to a friend to share the love


Toast and Egg Breakfast Buddies
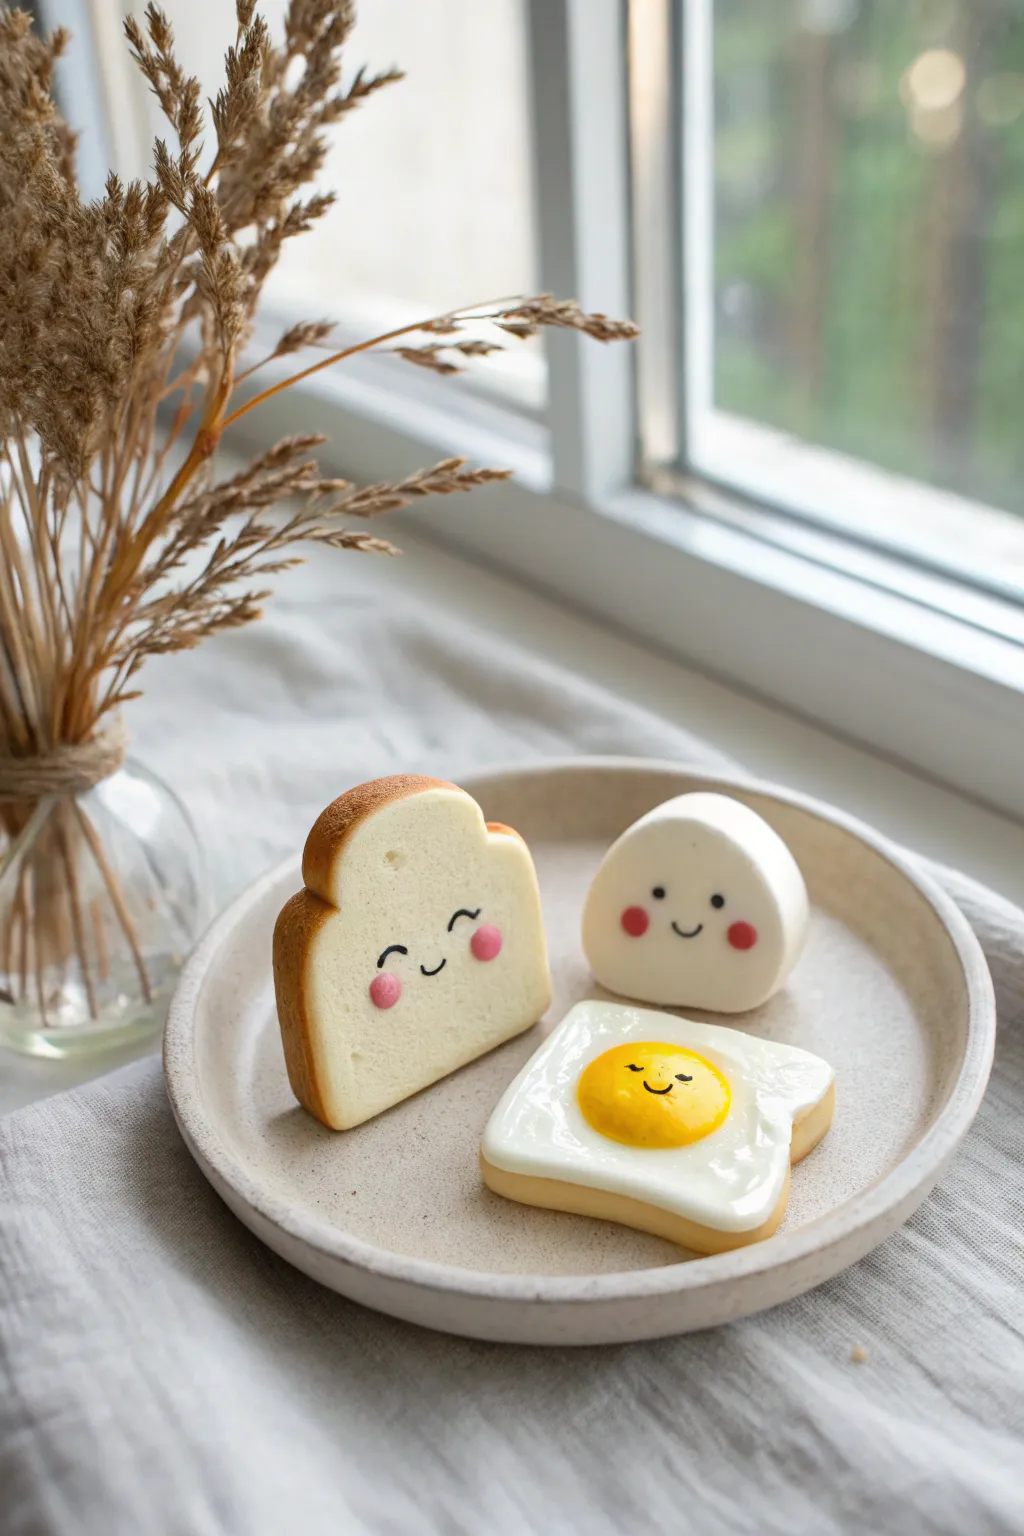
Brighten up your morning with this adorable set of kawaii breakfast foods made from polymer clay. This project features a cheerful slice of standing toast, a smiling rice ball, and a sunny-side-up egg on toast, all with sweet blushing faces.
Detailed Instructions
Materials
- Polymer clay (white, translucent, yellow, and tan/ochre)
- Soft pastels (brown, orange, and pink)
- Liquid polymer clay (white and translucent)
- Needle tool or toothpick
- Small soft paintbrush
- Black acrylic paint
- Fine detail paintbrush or dotting tool
- Gloss glaze (optional)
- Toothbrush (for texturing)
Step 1: The Standing Toast
-
Shape the Base:
Start by conditioning white clay and mixing in a tiny amount of yellow and translucent to create a doughy bread color. Roll it into a thick slab, about 1/2 inch thick. -
Cut the Shape:
Cut a rectangle for the base, primarily keeping the bottom straight so it can stand. Use your fingers to gently round the top corners into a classic loaf shape. -
Create the Crust:
Scrape some brown soft pastel into a powder. Using a soft dry brush, shade the outer edges of the toast heavily, fading slightly as you move toward the center, but leaving the face area clean. -
Add Texture:
Gently press a clean toothbrush or a balled-up piece of aluminum foil over the white surface of the bread to mimic airy bread texture. -
Face Details:
Use a dotting tool to lightly indent where the eyes will go. Shape two tiny flattened circles of pink clay and press them onto the cheeks for blush.
Step 2: The Happy Onigiri
-
Form the Rice Ball:
Roll a ball of pure white clay. While resting it on your work surface, gently press the sides to form a soft, rounded triangle shape. -
Round the Edges:
Smooth all the sharp edges with your finger so the rice ball looks puffy and soft rather than geometric. -
Add Blushing Cheeks:
Roll two small balls of pink clay, flatten them, and press them onto the lower half of the triangle face.
Clean Clay Tip
White clay picks up dust easily. Keep a pack of baby wipes nearby to clean your hands and tools before handling the white parts, especially for the rice ball.
Step 3: Egg-topped Toast
-
Shape the Toast Base:
Create a thinner slice of toast using the same dough-colored mix from the first phase. Cut it into a square shape with slightly wavy edges to look like a rustic slice. -
Shade the Crust:
Brush the edges with the brown pastel powder to give it a toasted look, making the edges slightly darker than the center. -
Make the Egg White:
Mix liquid white clay with a tiny bit of solid white clay to make a thick paste, or just use softened white clay pressed very thin. Apply an irregular, wavy shape on top of the toast slice. -
Form the Yolk:
Roll a small ball of yellow clay. Slightly flatten the bottom and press it gently into the center of the egg white. -
Add Yolk Texture:
I like to gently dab the yolk with a finger to remove fingerprints, ensuring it looks smooth and plump.
Make them Charms
Turn these into jewelry by inserting a small metal eye pin into the top of the toast or rice ball before baking. They make adorable earrings or keychains.
Step 4: Baking and Finishing
-
Bake:
Bake all three pieces according to your clay manufacturer’s instructions, usually at 275°F (130°C) for 15-30 minutes. -
Cool Down:
Let the pieces cool completely before painting. Painting on warm clay can make the acrylic verify clumpy. -
Paint the Faces:
Using a very fine detail brush and black acrylic paint, draw the happy expressions. Use small curves for smiling eyes and little ‘u’ shapes for the mouths. -
Glaze the Egg:
Apply a coat of gloss glaze specifically to the yellow yolk and the white part of the egg to make it look freshly fried and shiny. -
Final Touches:
If desired, add a tiny dot of white paint to the eyes for a ‘sparkle’ effect once the black paint is fully dry.
Arranging these little smiling friends on a miniature plate brings a delightful start to any day.

What Really Happens Inside the Kiln
Learn how time and temperature work together inside the kiln to transform clay into durable ceramic.
Pastel Popsicles With Sprinkle Details
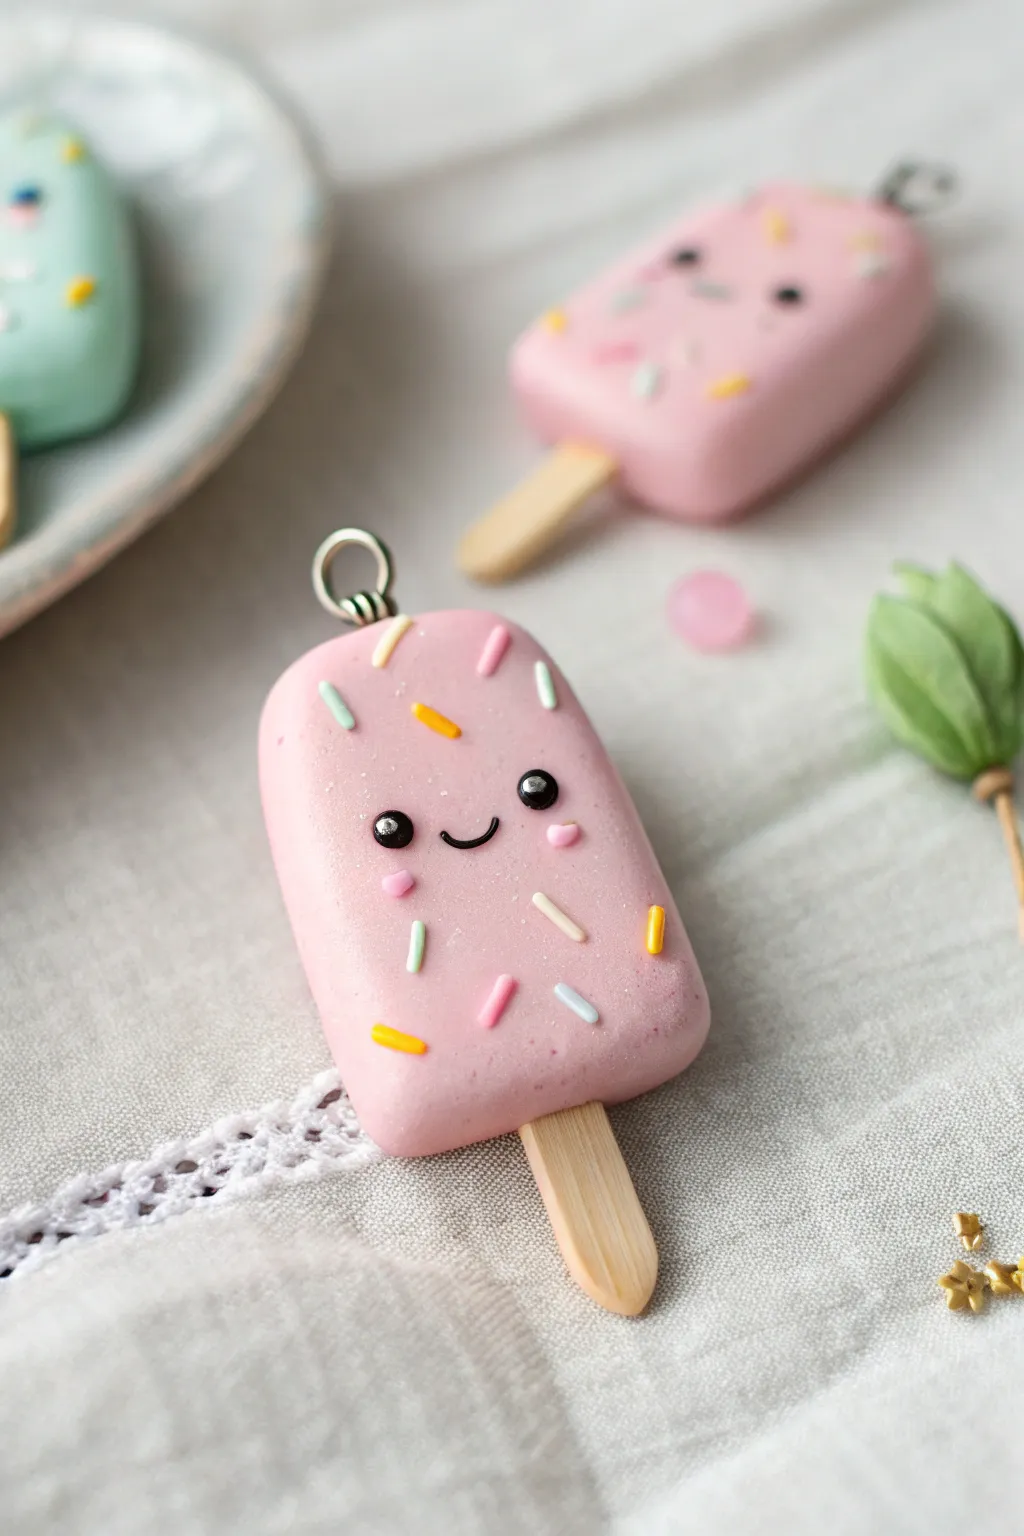
This adorable polymer clay popsicle charm captures the sweetness of summer with its soft pastel pink hue and friendly little face. Finished with realistic sprinkles and a tiny wooden stick, it makes for a perfect necklace pendant or keychain accessory.
How-To Guide
Materials
- Polymer clay (Pastel Pink, White, Black, Yellow, Mint Green)
- Liquid polymer clay (Translucent or Bake and Bond)
- Small wooden craft sticks or toothpicks
- Eye screw pin (silver)
- Dotting tools or ball stylus
- Needle tool or toothpick
- Craft knife or tissue blade
- Gloss glaze or polyurethane varnish
- Running pliers (optional, to trim stick)
- Small soft brush
Step 1: Shaping the Base
-
Prepare the Clay:
Begin by conditioning your pastel pink polymer clay until it is soft and pliable. If the pink is too vibrant, mix in a small amount of white clay to achieve that soft, creamy strawberry milk color shown in the image. -
Form the Rectangle:
Roll the clay into a smooth ball to remove air bubbles, then flatten it slightly. Use your fingers to shape it into a thick, rounded rectangle. It should be about 1.5 inches tall and 0.5 inches thick. -
Refine the Edges:
Gently tap the sides of your rectangle against your work surface to straighten them, while keeping the top corners nicely rounded like a classic ice cream bar. Smooth out any fingerprints with a light touch. -
Prepare the Stick:
Take a small wooden craft stick. If it’s too wide, carefully trim it with a craft knife to be proportional to your clay bar. Cut it to a length where about 0.5 inches will protrude from the bottom. -
Insert the Stick:
Dip the top end of the wooden stick into a tiny bit of liquid polymer clay for better adhesion. Carefully push it into the center of the bottom edge of your popsicle. I find that twisting slightly while pushing helps it go in straight without distorting the shape.
Baby Wipe Trick
Before handling the final pink clay, wipe your hands and tools with a baby wipe. This prevents stray dust or lint from getting stuck in the light-colored clay.
Step 2: Adding the Details
-
Create the Eyes:
Roll two tiny spheres of black clay. Position them on the upper middle section of the popsicle, spacing them slightly apart. Press them gently into the pink clay so they look embedded rather than just sitting on top. -
Add Eye Highlights:
Roll extremely tiny specks of white clay. Place one speck on the upper right side of each black eye. This ‘catchlight’ is crucial for that cute Kawaii look. -
Form the Mouth:
Roll a very thin snake of black clay. Cut a tiny U-shaped segment (no more than 2-3mm wide). Place it centered between and slightly below the eyes to create a smile. -
Apply Cheeks:
Select a slightly darker shade of pink than your base (or mix a tiny bit of red into your base pink). flattened two tiny ovals and place them directly under the eyes for blushing cheeks. -
Make the Sprinkles:
Roll very thin snakes of yellow, mint green, white, and pink clay. Bake these snakes for just 3-5 minutes to harden them slightly, which makes them easier to cut cleanly. -
Apply Sprinkles:
Cut the pre-baked snakes into tiny ‘sprinkle’ lengths. Apply a dab of liquid clay to the popsicle surface where you want a sprinkle, then press the colored bits on randomly using a needle tool or tweezers. -
Secure the Hardware:
Screw the metal eye pin into the center of the top curved edge. Remove it, add a drop of liquid clay or super glue to the threads, and screw it back in for a permanent hold.
Step 3: Finishing Touches
-
Texture Check:
Before baking, give the piece a final inspection. If you want a slight ‘frosty’ texture, you can lightly tap the pink surface (avoiding the face) with an old toothbrush, though smooth is also lovely. -
Bake:
Bake the charm according to your clay manufacturer’s instructions (usually around 275°F or 130°C for 15-30 minutes). Use an oven thermometer to ensure correct temperature to prevent scorching. -
Cool Down:
Let the piece cool completely inside the oven or on a wire rack. Polymer clay is fragile when hot and needs to cure fully. -
One Last Step:
Once cool, coat the eyes and mouth with a tiny drop of gloss glaze to make them shine. You can leave the rest matte for a soft look, or glaze the whole bar for a ‘melting’ effect.
Make it a Pair!
Create a second popsicle in mint green or baby blue to make ‘best friend’ charms. You can even cut a bite mark out of the corner using a small flower cutter.
Attach a jump ring to the eye screw and your sweet treat is ready to wear
Mini Ice Cream Scoops With Blushing Cheeks
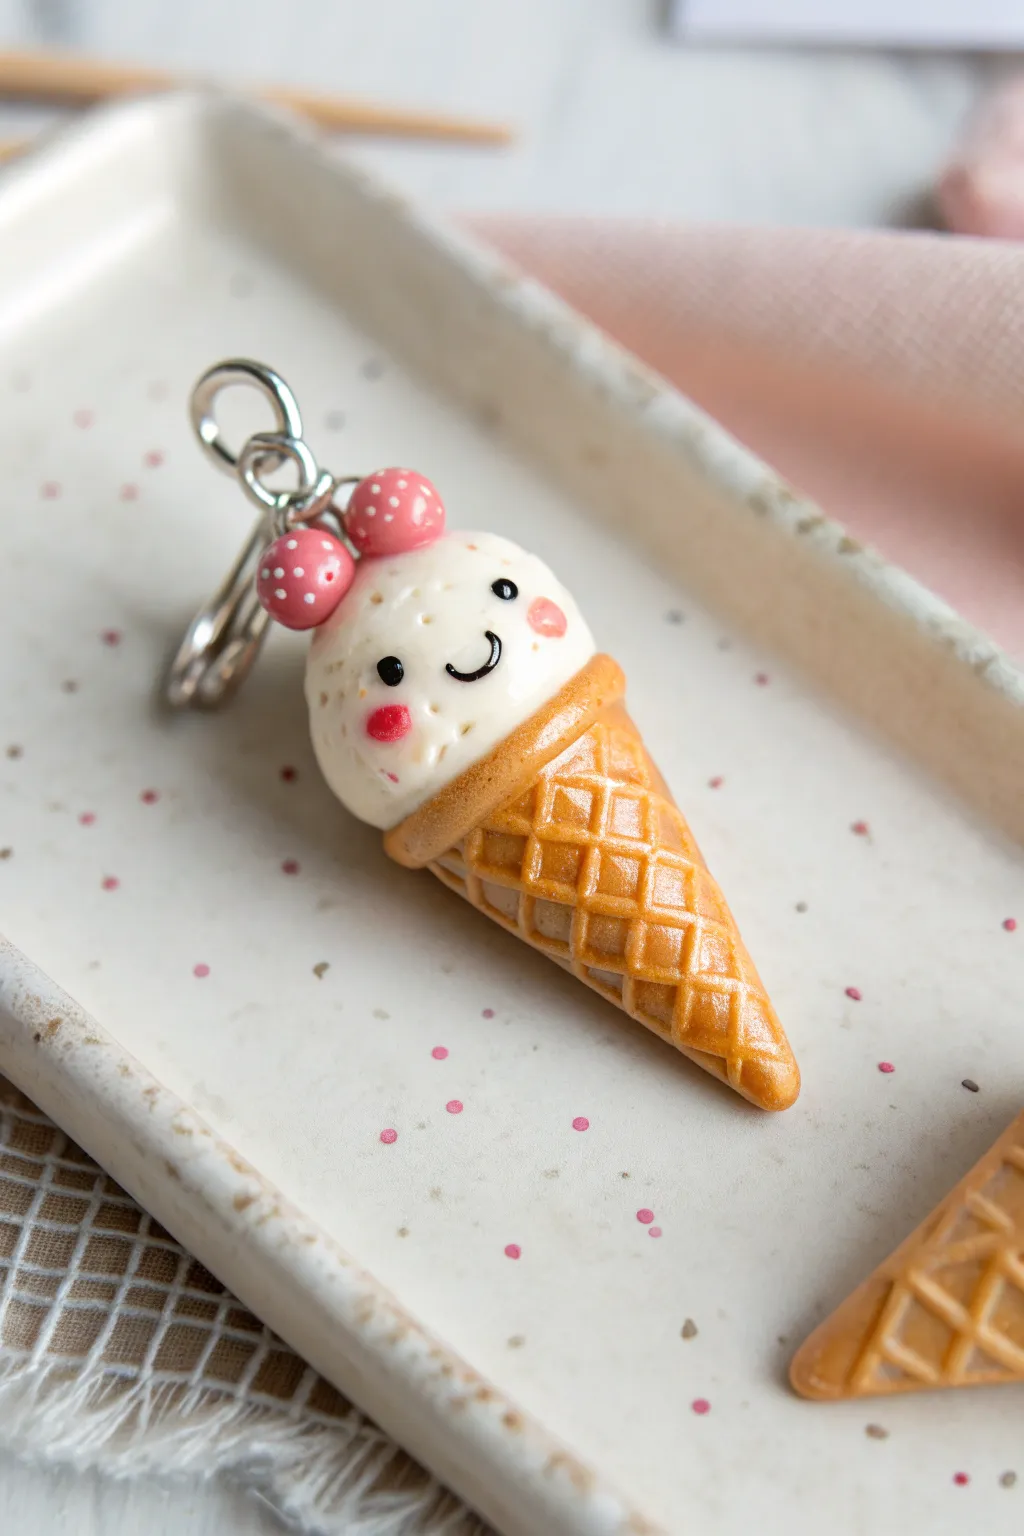
Turn a scoop of polymer clay into the sweetest little accessory with this adorable ice cream cone project. Featuring a textured waffle cone, a happy blushing face, and berry-like toppings, this charm is perfect for keychains or stitch markers.
Step-by-Step Tutorial
Materials
- Polymer clay (light tan/ochre for the cone, vanilla/white for the scoop, pink/red for berries)
- Black acrylic paint or polymer clay for the eyes/mouth
- Pink chalk pastel or blush for cheeks
- Texture tool (needle tool, toothbrush, or sandpaper)
- X-acto knife or blade
- Eye pin or screw eye
- Jump rings and keychain hardware
- Gloss glaze (UV resin or polyurethane)
- Oven for baking
Step 1: Sculpting the Cone
-
Mix the cone color:
Start by mixing a light tan or ochre color clay. You want it to look like a baked pastry, so a mix of translucent, white, and a tiny dot of brown often works best. -
Form the cone shape:
Roll a small ball of the tan clay, then gently taper one end to create a cone shape. Flatten the top slightly where the ice cream will sit. -
Texture the waffle pattern:
Using a dull blade or a designated texture tool, gently score diagonal lines across the surface of the cone in one direction. Then, cross them in the other direction to create a diamond waffle grid. -
Shade the cone:
For a baked look, lightly brush some orange or brown chalk pastel dust over the waffle texture. I like to focus on the indentations to make the pattern pop.
Fixing “Moon” Face
If the back of the scoop flattens while detailing the face, rest the charm in a bed of cornstarch or baking soda during the sculpting process to cradle the curves.
Step 2: Creating the Scoop & Face
-
Form the ice cream scoop:
Roll a ball of vanilla or white clay that is slightly wider than the top of your cone. Press it gently onto the flat top of the cone so they adhere. -
Create the ‘skirt’:
Using a needle tool or toothpick, drag the clay at the bottom of the scoop downward slightly over the top edge of the cone to mimic melting ice cream. -
Add realistic texture:
Take a toothbrush or a ball of crinkled aluminum foil and tap it all over the white clay. This removes fingerprints and gives it that airy, frozen texture. -
make the eye indentations:
Use a small dotting tool or the end of a paintbrush to press two shallow divots where you want the eyes to be. This helps place them symmetrically. -
Insert the eyes:
Roll two impossibly tiny balls of black clay and press them into the sockets. Alternatively, you can paint these on after baking. -
Add the smile:
Roll a very thin snake of black clay for the mouth and shape it into a ‘U’. Gently press it onto the face between the eyes. -
Make it blush:
Scrape a little pink chalk pastel into a powder. Use a soft brush or cotton swab to apply rosy cheeks right under the eyes.
Step 3: Toppings and Assembly
-
Create the berry ears:
Roll two small balls of pink or red clay. Press them gently onto the top left of the scoop, side-by-side. -
Detail the berries:
Use a needle tool to stipple tiny dots onto the berries for texture, or paint white polka dots on them later for a whimsical look. -
Insert hardware:
Trim an eye pin to the right length. Dip the end in a tiny bit of liquid clay or translucent liquid sculpey (TLS) for a secure bond, and push it into the top center of the charm. -
Bake carefully:
Bake the charm according to your clay manufacturer’s instructions. A lower temperature for a longer time often prevents white clay from scorching. -
Cool and glaze:
Once fully cooled, apply a coat of gloss glaze or UV resin to the cone (to make it look crispy) and the eyes (to make them shine). Use matte varnish for the scoop if you prefer a contrast. -
Attach the keychain:
Use pliers to open a jump ring, thread it through the eye pin loop and your keychain hardware, and close it securely.
Flavor Swirls
Marbelize your white clay with a tiny bit of pink or brown before rolling the ball to create a strawberry or chocolate swirl effect in the ice cream.
Attach this sweet charm to your bag and enjoy your miniature frozen treat year-round


The Complete Guide to Pottery Troubleshooting
Uncover the most common ceramic mistakes—from cracking clay to failed glazes—and learn how to fix them fast.
Clouds and Stars With Sleepy Faces
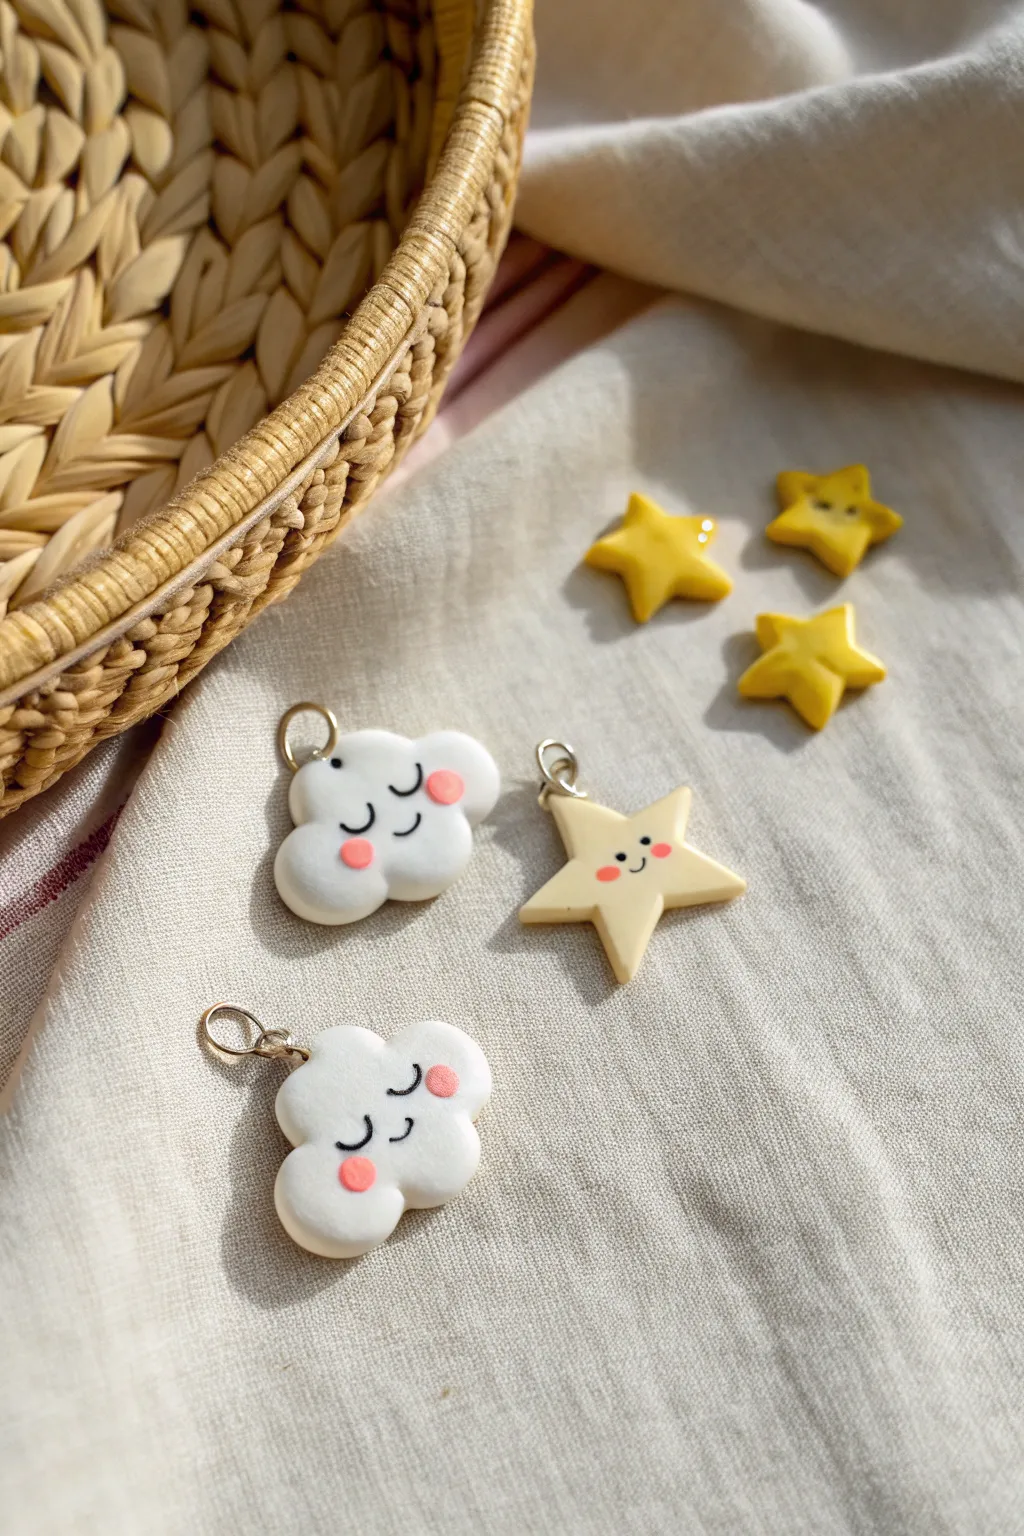
These sleepy polymer clay charms are the perfect addition to a whimsical keychain or a sweet necklace. With their gentle expressions and soft pastel cheeks, these clouds and stars capture a cozy, dreamy aesthetic that is surprisingly simple to recreate.
Step-by-Step
Materials
- White polymer clay
- Soft yellow (custard or pastel) polymer clay
- Pink polymer clay (for cheeks) or soft pastels
- Black acrylic paint or fine-tip permanent marker
- Small jump rings (gold or silver)
- Eye pins or small screw eyes
- Dotting tool or toothpick
- Clay roller or pasta machine
- Small cloud and star cutters (or a craft knife)
- Fimo gloss varnish (optional)
- Needle tool
Step 1: Shaping the Clouds
-
Condition the Clay:
Warm up a small portion of white polymer clay in your hands until it becomes soft and pliable. This conditioning step is crucial to prevent cracks later on. -
Roll to Thickness:
Roll out the white clay on a clean, smooth surface until it’s about 1/4 inch thick. You want it substantial enough to hold the eye pin securely. -
Cut the Shape:
Using a small cloud-shaped cutter, press firmly into the clay. If you don’t have a cutter, you can freehand the shape by forming 4-5 small balls of clay and pressing them together into a bubbly cloud form, smoothing the seams gently with your finger. -
Smooth the Edges:
Gently tap the edges of the cutout with your finger to round them off. The goal is a soft, puffy look rather than sharp, cookie-cutter edges. -
Insert Hardware:
Carefully insert a small metal eye pin into the top center of the cloud. I find twisting it slightly as you push helps it grip the clay better without distorting the shape.
Step 2: Creating the Stars
-
Prepare Yellow Clay:
Clean your hands or wear gloves to avoid transferring colors, then condition the yellow clay. -
Cut and Soften:
Roll the yellow clay to the same thickness as the clouds and cut out your star shape. Just like with the clouds, use your fingertip to gently soften the points of the star so they look friendly and rounded, not sharp. -
Add the Loop:
Insert an eye pin into the top point of the star charm, ensuring it goes in straight so it doesn’t poke out the side. -
Make Filler Stars:
Use leftover yellow clay to create smaller, simple stars without faces if you want extra beads for your jewelry assembly later.
Clean Clay Trick
White clay picks up dust easily. Keep a piece of scotch tape nearby to dab onto the raw clay surface; it lifts away lint and dust instantly before baking.
Step 3: Adding the Faces
-
Create Rosy Cheeks:
Take a tiny amount of pink clay and roll two microscopic balls for each charm. Press these flat onto the cloud or star face area to make blushing cheeks. -
Secure the Cheeks:
Use your finger or a flat tool to gently press the pink dots flush with the surface so they adhere completely. -
Bake the Clay:
Place your charms on a parchment-lined baking sheet or ceramic tile. Bake according to your specific brand of clay’s instructions (usually around 230°F to 265°F for 15-30 minutes). Let them cool completely before touching. -
Paint the Details:
Once cool, use a very fine detail brush with black acrylic paint to draw the sleepy closed eyelids (for the clouds) or open smiling eyes (for the star). A toothpick dipped in paint works great if you lack a detail brush. -
Final Expressions:
Add a tiny, curved smile between the cheeks. Keep the lines thin and delicate for the cutest result. -
Seal (Optional):
If you want a shiny finish or need to protect the paint, apply a thin coat of gloss varnish over the charms and let dry. -
Attach Jump Rings:
Open a jump ring with pliers, loop it through the eye pin of your finished charm, and close it securely. Your charm is now ready to hang.
Uneven Eyes?
Getting symmetrical eyes is tough. Lightly mark the curve of the eyelid with a needle tool first. If you mess up painting, wipe it off quickly with a wet cotton swab.
Now you have a handful of adorable sky companions ready to brighten up your day
Cubed Animals You Can Stack
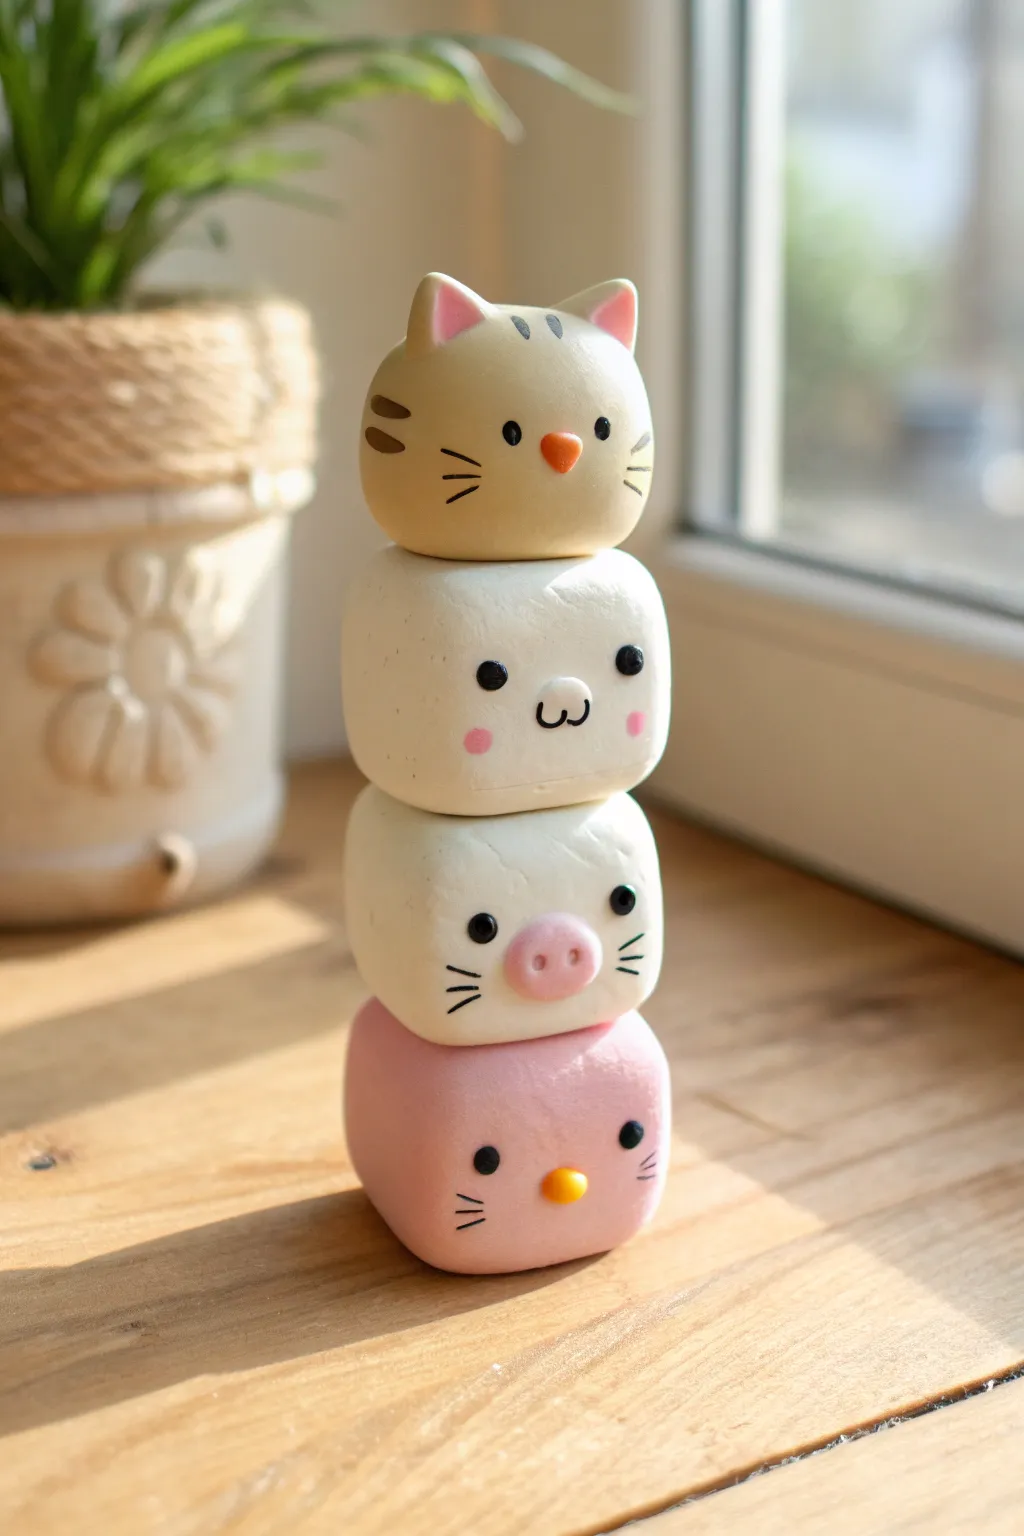
These adorable stacked creatures turn simple geometric shapes into a charming tower of friends. With soft pastel colors and minimalist faces, this polymer clay project is perfect for adding a touch of whimsy to your windowsill.
Step-by-Step Guide
Materials
- Polymer clay in beige/light tan, white, and soft pink
- Small amount of orange and pink clay for details
- Black acrylic paint or a fine-tip paint marker
- Gloss glaze (optional)
- Clay sculpting tools (needle tool, ball stylus)
- Aluminum foil (for core, optional)
- Blade or craft knife
- Fine sandpaper
Step 1: Forming the Base Cubes
-
Condition the Clay:
Begin by thoroughly conditioning your beige (cat), white (pig and bear), and pink (chick) clay until it is soft and pliable. This prevents cracks during baking. -
Shape the Cubes:
Roll four equal-sized balls of clay—one beige, two white, and one pink. Gently press each ball against your work surface to flatten the sides, forming rounded cubes with soft edges rather than sharp corners. -
Smooth the Surfaces:
Use your finger to gently rub away any fingerprints. I find that lightly dusting my finger with cornstarch helps glide over the clay without leaving marks. -
Check the Stack:
Briefly stack the unbaked cubes to ensure they sit flat on top of one another. Adjust the flatness of the top and bottom surfaces if they wobble.
Uneven Stacking?
If your baked cubes wobble when stacked, use a piece of coarse sandpaper on a flat surface. Rub the bottom of the wobbly cube against it in a circular motion until flat.
Step 2: Sculpting the Faces
-
Cat Ears:
For the top beige cube, shape two small triangles of beige clay. Add tiny pink triangles inside them for the inner ear. Press these firmly onto the top corners of the head. -
Cat Details:
Add a tiny orange triangle for the nose. Using black paint or a marker later is easier for whiskers, but you can indent the whisker lines slightly now if you prefer guides. -
Bear/Dog Features:
Take the first white cube. Create a very small, flattened oval of white clay for the muzzle area if you want dimension, or keep the face flat like the image. This character is all about the painted details later. -
Pig Snout:
For the second white cube, mix a tiny bit of pink into white clay to get a pale pink. Roll a small oval, flatten it, and press it onto the center of the face. Use a small ball tool to indent two nostrils. -
Chick Beak:
For the bottom pink cube, roll a tiny cone of orange clay. Press it onto the center of the face for a beak. -
Final Smoothing:
Double-check all attached parts (ears, noses) are blended or firmly pressed so they don’t pop off after baking. Soften any sharp join lines with a rubber shapers tool.
Use an Insert
If you want to save clay or make the cubes lighter, use a crumpled ball of aluminum foil as a core. Wrap your clay sheet around the foil and shape into a cube.
Step 3: Baking and Painting
-
Bake the Pieces:
Bake the cubes according to your clay manufacturer’s instructions (usually 275°F/130°C for 15-30 minutes). I recommend separating them for baking to ensure even heat distribution. -
Cool Down:
Let the pieces cool completely before handling. Polymer clay is fragile when hot and hardens as it cools. -
Paint the Eyes:
Using a fine ball stylus or a toothpick dipped in black acrylic paint, dot two wide-set eyes onto each face. Keep them roughly at the same height for that cute ‘kawaii’ look. -
Add Whiskers and Mouths:
Use a very fine liner brush or a paint marker to draw the whiskers on the cat, pig, and chick. Draw the ‘w’ shaped mouth on the white bear cube. -
Cheeky Details:
Dip a Q-tip into pink pastel chalk or very diluted pink paint and gently dab cheeks onto the white bear cube. -
Cat Stripes:
Paint three small stripes on each side of the cat’s face and three small dashes on the forehead using a light brown or grey paint. -
Varnish (Optional):
If you want a glossy finish like ceramic, coat the figures in a water-based polyurethane varnish. Matte varnish works too if you prefer a softer look.
Once the paint is dry, stack up your new friends and enjoy the custom cuteness you’ve created

TRACK YOUR CERAMIC JOURNEY
Capture glaze tests, firing details, and creative progress—all in one simple printable. Make your projects easier to repeat and improve.
Mini Donut Studs With Happy Faces
These adorable miniature donut earrings feature sweet pastel icing and charming little smiles that are sure to brighten anyone’s day. They are small, lightweight, and the perfect project for practicing fine details with polymer clay.
Detailed Instructions
Materials
- Polymer clay (beige/tan for dough, pink, mint green, black)
- Liquid polymer clay (translucent or white)
- Chalk pastels (orange, yellow ochre, brown)
- Soft paintbrush for shading
- Detailing needle tool or toothpick
- Small ball tool
- Dotting tool (very fine)
- Gloss glaze or UV resin
- Earring stud posts and backs
- Super glue or E6000
- Baking tile or parchment paper
- Oven
Step 1: Shaping the Donut Base
-
Mix the Dough Color:
Start by conditioning your beige polymer clay. If it looks too pale, mix in a tiny speck of yellow and translucent clay to achieve a realistic baked pastry color. -
Form the Rings:
Roll two equal-sized balls of the beige clay, each about the size of a pea. Flatten them gently into thick discs. -
Create the Center Hole:
Use your ball tool or the back of a paintbrush to press a hole directly into the center of each disc. Widen the hole slightly by rotating the tool, smoothing the edges so they look rounded like a real donut. -
Texture the Dough:
Take a toothbrush or a ball of crumpled aluminum foil and gently tap it all over the surface of the beige clay. This creates a realistic cake-like texture. -
Shade for Baking Effect:
Scrape some orange, yellow ochre, and brown chalk pastel into fine dust. Using a soft dry brush, gently dust the edges and bottoms of the donuts to give them a golden-brown, baked appearance.
Pro Tip: Tiny Eyes
For the eyes, instead of rolling clay balls, you can dip the tip of a sewing pin into black acrylic paint and dot them on after baking for perfect uniformity.
Step 2: Adding Icing and Details
-
Prepare the Pink Icing:
Mix a small amount of pink clay with a drop of liquid polymer clay. Stir until it reaches a sticky, frosting-like consistency similar to thick cream. -
Apply Pink Frosting:
Carefully apply the pink mixture to the top of one donut using a needle tool. Guide it towards the edges in an uneven, wavy pattern so it looks like it was dipped. -
Prepare the Mint Icing:
Repeat the mixing process with mint green clay and liquid clay to create the second icing color. -
Apply Mint Frosting:
Spread the mint icing onto the second donut base, ensuring you leave the golden-brown edges of the dough visible around the sides. -
Make the Sprinkles:
Roll extremely thin snakes of pink and mint clay. Bake these thin snakes for just 3-5 minutes to harden them slightly, then chop them into tiny bits with a blade to create realistic sprinkles. -
Decorate with Sprinkles:
Press the tiny chopped sprinkles into the wet liquid clay icing. Use tweezers for precision placement.
Step 3: Creating the Faces
-
Form the Cheeks:
Roll two microscopic balls of pink clay for each donut. Press them gently onto the icing to serve as rosy cheeks. Flatten them slightly so they aren’t too protruding. -
Add the Eyes:
Roll tiny balls of black clay for the eyes. Place them carefully on the icing. I like to place them fairly wide apart to enhance the cute factor. -
Sculpt the Smile:
Roll an incredibly thin thread of black clay. Cut a tiny U-shape segment and gently press it into the icing between the cheeks to create the smile. -
Bake the Pieces:
Place your finished donuts on a baking tile. Bake according to the temperature instructions on your specific brand of clay, usually for about 15-20 minutes.
Level Up: Scented Jewelry
Before baking, mix a tiny drop of vanilla or strawberry essential oil into the dough clay. The earrings will have a faint, sweet scent when worn.
Step 4: Finishing Touches
-
Cool and Glaze:
Let the donuts cool completely. Apply a thin layer of gloss glaze or UV resin only to the icing part to make it look sweet and sticky, leaving the dough matte. -
Attach the Posts:
Once the glaze is dry or cured, turn the donuts over. Apply a dab of strong glue (like E6000) to the flat pad of an earring post and press it firmly onto the back of the donut. -
Final Cure:
Allow the glue to cure for at least 24 hours to ensure the bond is secure before wearing.
Enjoy wearing your sweet little treats or package them up as a delightful handmade gift
Tiny Heart Charms With Shy Expressions
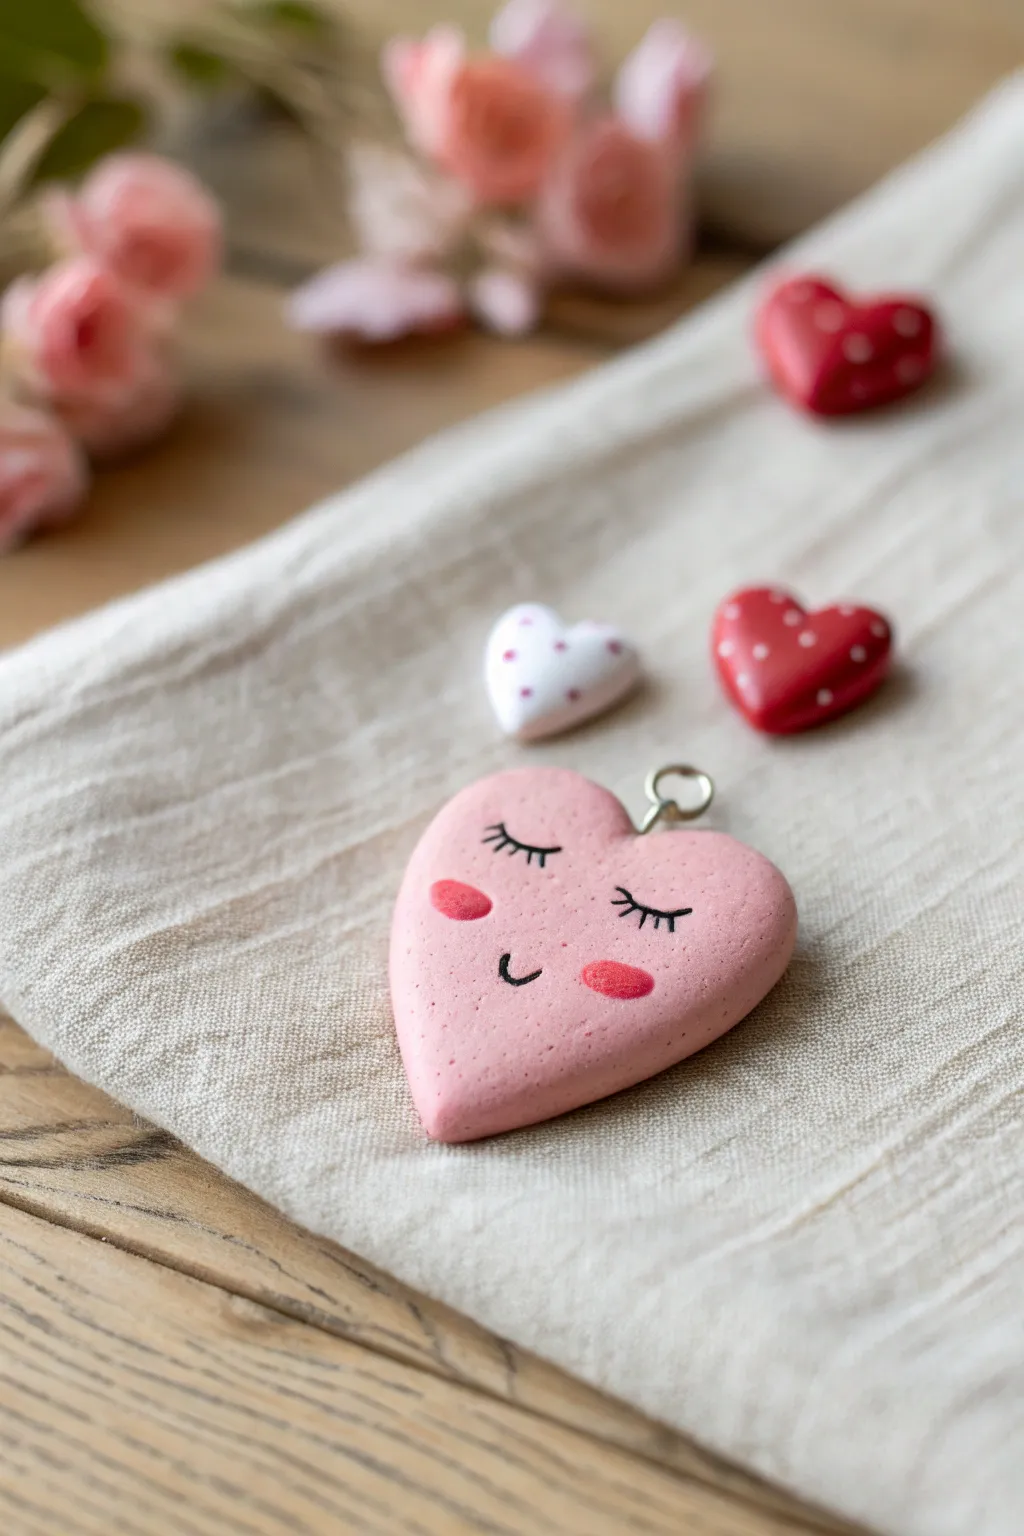
Capture the essence of sweetness with this adorable polymer clay heart featuring a gentle, sleepy expression. Its soft matte finish and delicate painted details make it a perfect charm for necklaces or keychains.
Step-by-Step Guide
Materials
- Soft pink polymer clay
- Small amount of white polymer clay (optional, for mixing)
- Rolling pin or pasta machine
- Heart-shaped clay cutter (medium size)
- Headpin or small screw eye pin
- Black acrylic paint or fine tip permanent marker
- Pink acrylic paint (slightly darker than the clay)
- Fine detail paintbrush (size 0 or 00)
- Dotting tool or toothpick
- Sandpaper (fine grit)
- Oven for baking
Step 1: Shaping the Base
-
Condition the Clay:
Start by warming the pink polymer clay in your hands. Knead it thoroughly until it is soft, pliable, and free of cracks. If you want a paler shade, mix in a pinch of white clay at this stage. -
Roll the Sheet:
Roll the clay out onto your work surface. Aim for a thickness of about 4-5mm. You want it to be slightly plump and rounded, not paper-thin. -
Cut the Heart:
Press your heart-shaped cutter firmly into the clay. Give it a tiny wiggle to ensure it separates cleanly, then lift the cutter away. -
Soften the Edges:
I like to gently tap the edges of the heart with my fingertip to remove the sharp cut marks. This gives the heart a softer, more ‘puffy’ look. -
Add the Hardware:
Take a small screw eye pin or a trimmed headpin bent into a loop. Carefully insert the stem into the center of the top cleft of the heart. -
Secure the Pin:
Gently pinch the clay around the metal pin to secure it inside. Ensure the loop is facing the direction you want for hanging.
Step 2: Painting the Face
-
Partial Bake (Optional):
To prevent smudging the clay while painting, you can bake the heart for 10 minutes and let it cool. This creates a hard surface for your artwork. -
Draft the Face:
Using a very light pencil touch, sketch the placement of the eyes and mouth. The eyes should be closed curves placed wide apart. -
Paint the Eyelashes:
Dip your fine detail brush into black acrylic paint. Paint two downward curves for the sleeping eyelids. Add three tiny, delicate lashes to the outer corner of each eye. -
Add the Smile:
Paint a very small, simple ‘U’ shape exactly centered between the eyes for the mouth. -
Create Rosy Cheeks:
Switch to your pink paint. It should be a few shades darker than the clay. Dip a dotting tool or the wrong end of a brush into the paint. -
Apply the Blush:
Gently press an oval-shaped mark onto the clay just below the outer corner of each eye. Don’t make perfect circles; slight ovals look more organic. -
Dry Completely:
Let the paint dry fully before moving to the final baking step.
Clean Clay Tip
Keep baby wipes or hand sanitizer nearby. Pink clay shows dust easily! Clean your hands and tools before starting to keep that pastel clay distinctively bright.
Step 3: Finishing Touches
-
Final Bake:
Bake the charm according to your clay manufacturer’s instructions (usually 275°F/135°C for 15-30 minutes depending on brand). -
Cool Down:
Allow the heart to cool completely in the oven or on a wire rack. Polymer clay is fragile while hot. -
Smooth the Texture:
Once cool, check for any fingerprints. You can gently buff the surface with fine-grit sandpaper or a piece of denim for a matte, stone-like finish. -
Seal (Optional):
If you want to protect the paint, apply a very thin layer of matte varnish over the face area, though leaving it raw gives it the natural look shown in the photo.
Make it a Set
Create smaller versions of the heart using the same technique to make matching stud earrings, or paint different expressions for a ‘mood’ bracelet.
Your shy heart charm is now ready to add a gentle touch of love to any accessory
Pocket Unicorn With Rounded Chibi Proportions
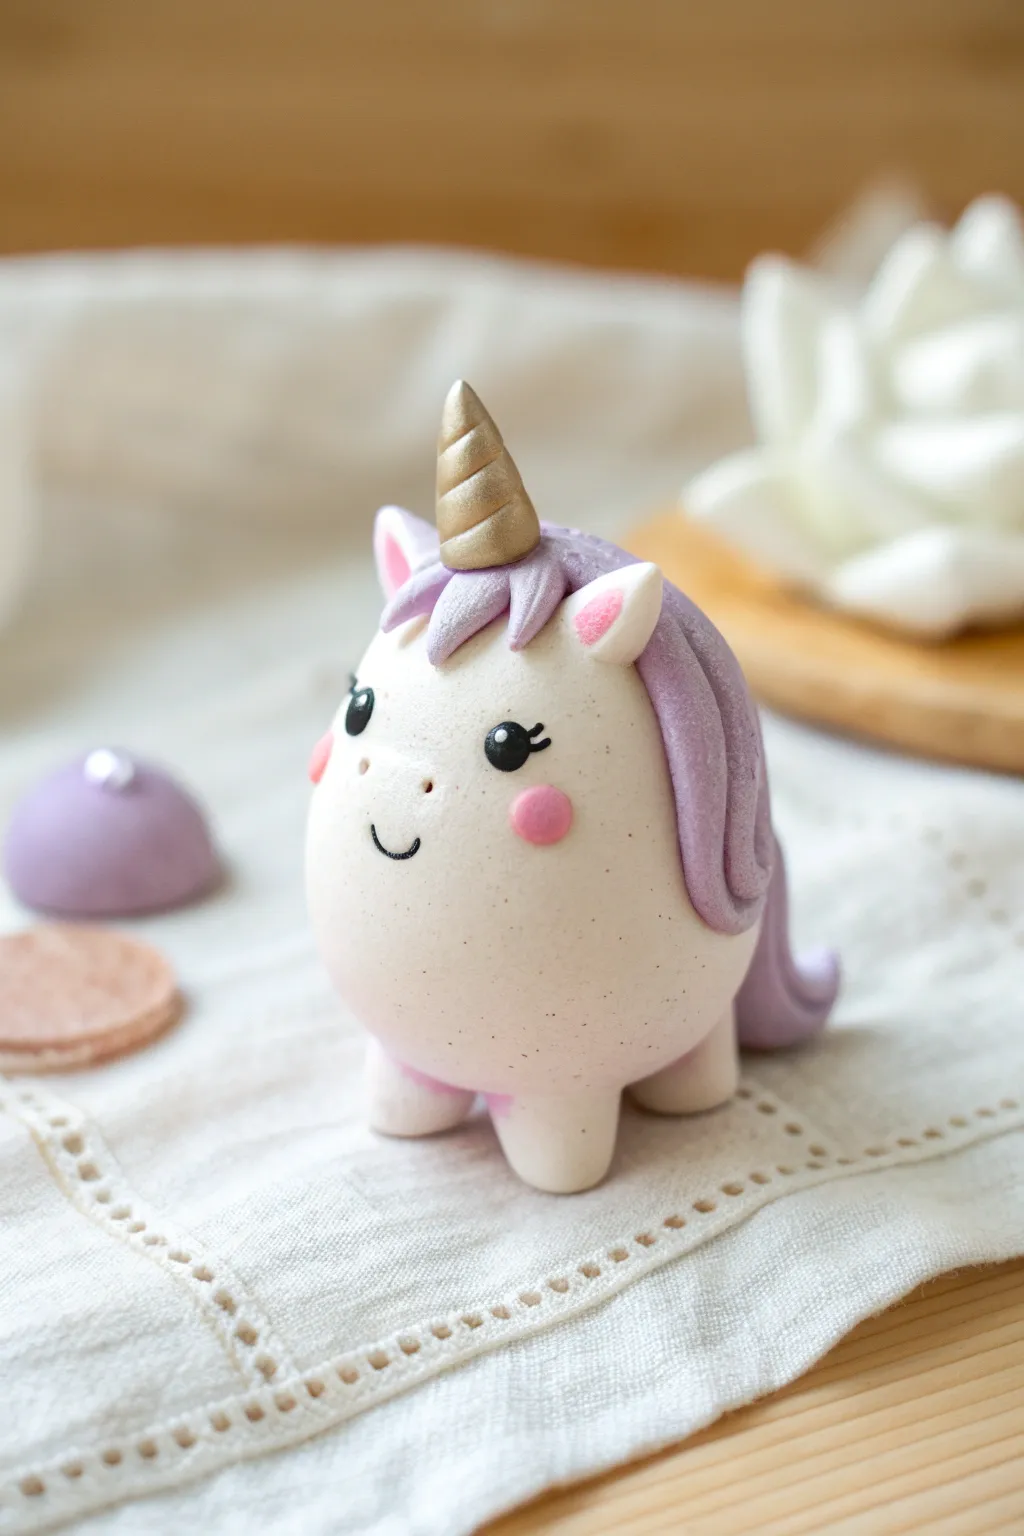
This pocket-sized creature features incredibly round, chibi-style proportions that fit perfectly in the palm of your hand. With its soft white body, purple mane, and sparkling gold horn, this project is all about achieving smooth curves and a sweet expression.
How-To Guide
Materials
- Polymer clay (White, Lilac/Light Purple, Pink, Scrap clay)
- Gold mica powder or gold acrylic paint
- Ball stylus tools (various sizes)
- Needle tool or toothpick
- Black acrylic paint
- Fine detail paintbrush
- Soft pastel (pink)
- Small soft brush for blushing
- Oven for baking
Step 1: Body & Base Structure
-
Form the core:
Start by conditioning a ball of scrap clay about the size of a walnut to serve as the core, keeping your good white clay clean. Roll it into a smooth, slightly tapered egg shape; this will be the main body. -
Cover with white:
Roll out a sheet of conditioned white polymer clay. Carefully wrap this around your core egg, smoothing the seams completely until you have a flawless, white egg shape. The bottom should be slightly wider than the top. -
Create the legs:
Roll four small, equal-sized balls of white clay. Press these onto the bottom of the body to form stubby, sturdy legs. Gently blend the seams upward into the body with a silicone tool or your finger so the transition is seamless. -
Check stability:
Stand the unicorn up on a smooth surface. Press down very gently to flatten the bottom of the feet slightly, ensuring it stands perfectly stable without tipping.
Step 2: Adding the Features
-
Sculpt the ears:
Make two tiny white teardrops and flatten them slightly. Use a small ball tool to indent the centers, then fill those indents with a tiny speck of pink clay. Attach these to the sides of the head area. -
Form the horn:
Roll a small snake of scrap or white clay that tapers to a point. Twist it gently to create a spiral texture, cut it to size, and attach it to the center of the forehead. -
Basic mane placement:
Condition your lilac clay. Roll several small teardrop shapes of varying sizes. Begin placing these behind the ears and down the back of the head, overlapping them slightly to build volume. -
Defining the bangs:
Create three smaller lilac teardrops for the bangs. Place them right in front of the ears, sweeping across the forehead but curving around the base of the horn. -
Texturing the hair:
Using a needle tool, gently impress soft lines into the purple mane sections to simulate hair strands. Keep the lines flowing in the same direction as the clay shapes. -
Add the tail:
Create a larger curved teardrop from lilac clay for the tail. Allow the tip to curl upward slightly and attach it to the lower back of the unicorn.
Keeping White Clay Clean
White clay attracts dust like a magnet. Keep a pack of baby wipes nearby and constantly clean your hands and tools before touching the white sections to avoid lint.
Step 3: Finishing & Baking
-
Gild the horn:
Before baking, carefully brush the horn with gold mica powder. Alternatively, you can paint it gold after baking if you prefer acrylics. -
Pre-bake smoothing:
I like to take a moment here to scan the white clay for fingerprints. Use a drop of baby oil on your finger to gently buff out any imperfections. -
Bake the piece:
Bake the unicorn according to your clay manufacturer’s instructions (usually 275°F/130°C for 15-30 minutes). Let it cool completely before handling. -
Paint the eyes:
Using a fine detail brush and black acrylic paint, add two small, round eyes set wide apart. Add tiny eyelashes at the outer corners for extra charm. -
Add highlights:
Once the black paint is dry, dip a toothpick in white paint and add a tiny reflection dot to the top right of each eye. -
Draw the smile:
Paint a tiny, fine ‘U’ shape between the eyes for the mouth. Keep the line very thin for a delicate look. -
Apply blush:
Scrape a little pink soft pastel into a powder. Use a soft, dry brush to gently dust rosy cheeks onto the baked clay, just below the eyes.
Make it a Charm
Before baking, insert a metal eye-screw into the top of the head through the mane. Once baked, you can attach a lanyard or chain to create a magical keychain.
Now you have an adorable pocket companion ready to bring a little magic to your desk or shelf
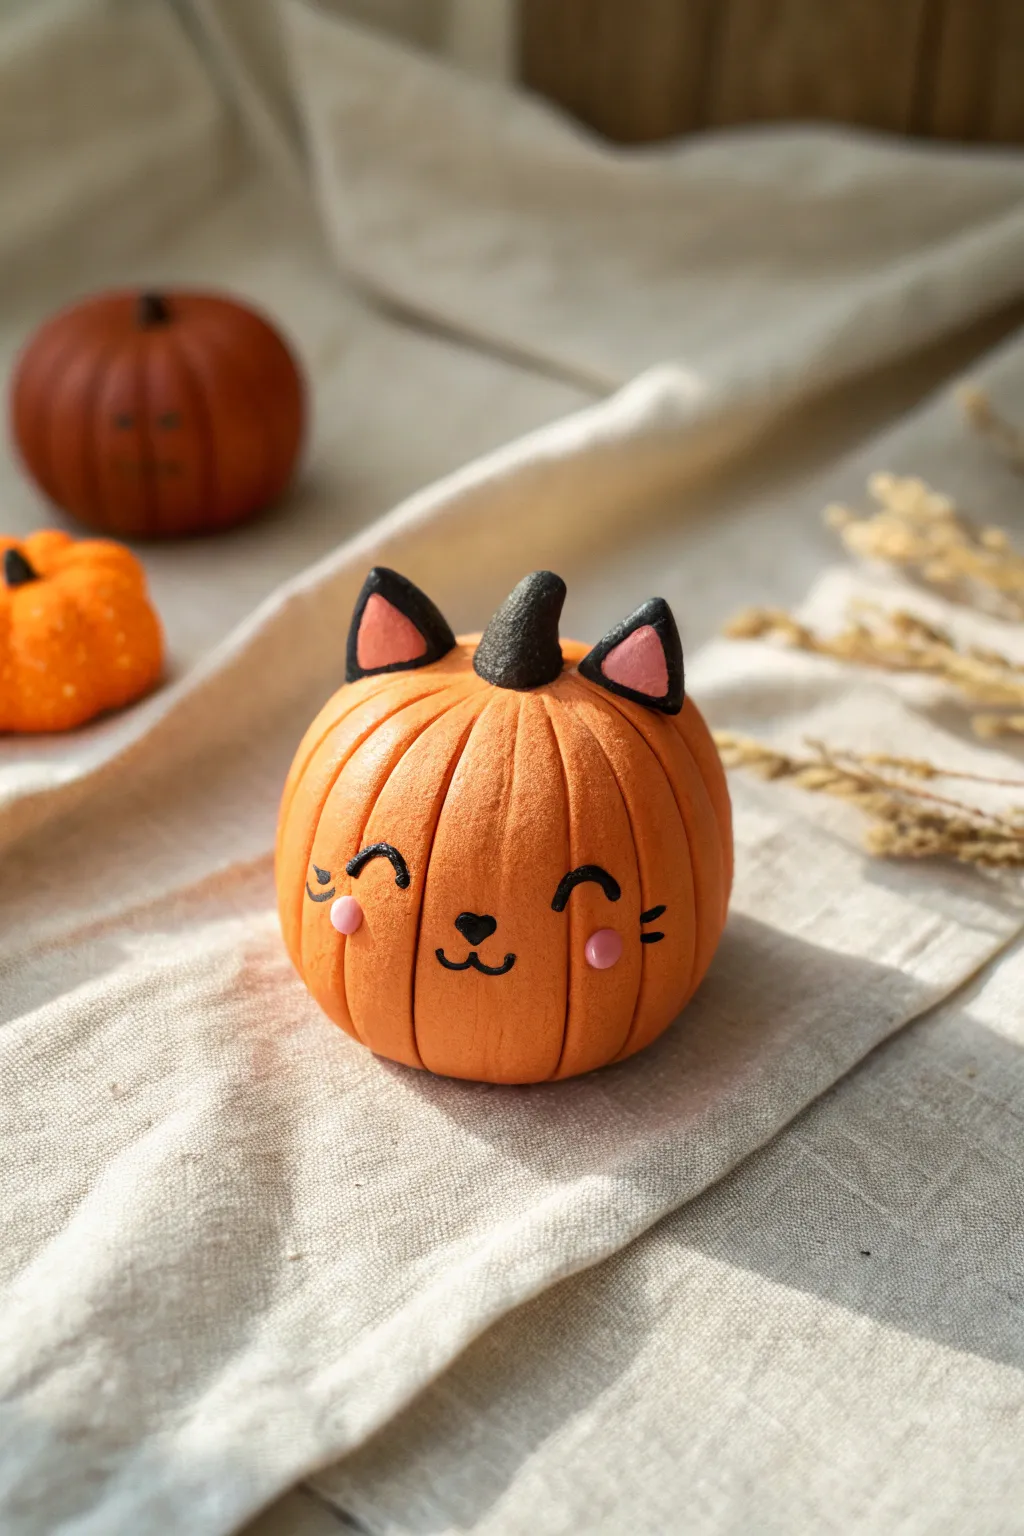
Cute Pumpkin Buddy With a Tiny Cat Face
This adorable autumn project transforms a simple clay pumpkin into a friendly feline character. With its grooved orange body, tiny cat ears, and a sweet painted face, it’s the perfect size for desk décor or a seasonal knick-knack.
Step-by-Step
Materials
- Orange polymer clay
- Black polymer clay
- Pink polymer clay (light shade)
- Sculpting tool (needle tool or toothpick)
- Modeling ball tool (small)
- Acrylic rolling pin (optional)
- Black acrylic paint or fine-tip permanent marker
- Small detail paintbrush
- Oven for baking
Step 1: Sculpting the Pumpkin Body
-
Form the Base:
Start by conditioning a chunk of orange polymer clay until it is soft and pliable. Roll it between your palms to create a smooth, round ball roughly the size of a golf ball or tangerine. -
Flatten Slightly:
Gently press the ball onto your work surface to create a flat bottom so it doesn’t roll away. Lightly tap the top to flatten it just a tiny bit for the stem. -
Create the Ribs:
Using a needle tool or the side of a toothpick, press vertical indentations all around the sphere. Start from the center top and pull the tool down to the bottom center to create the classic pumpkin ribs. -
Soften the Edges:
If your indentations look too sharp, gently run your finger over them to smooth the clay. I like to re-shape the fullness of the sections so they look puffed out like a real pumpkin. -
Indent the Top:
Use a small ball tool or the tip of your pinky finger to press a small dimple into the very center of the top where all the lines meet.
Use Cornstarch
If your clay is getting sticky or your tools are dragging, dust your tools lightly with cornstarch. It prevents sticking and brushes off easily after baking without leaving marks.
Step 2: Adding Character Details
-
Make the Stem:
Take a small pea-sized amount of black clay. Roll it into a short cone shape, curve the tip slightly to give it character, and press it firmly into the dimple on top of the pumpkin. -
Shape the Ears:
Create two small triangles out of black clay for the ears. They should be proportionate to the pumpkin body but small enough to look cute. -
Add Inner Ears:
Take tiny pinched bits of pink clay and flatten them into smaller triangles. Press these onto the front centers of your black ear pieces. -
Attach the Ears:
Position the ears on either side of the stem, near the top of the pumpkin interact. Blend the bottom edge of the black clay slightly into the orange clay to secure them, or use a dab of liquid clay if you have it. -
Texture Check:
Before baking, give the whole piece a once-over. Smooth out any fingerprints essentially by lightly buffing the clay with a tiny bit of baby oil on your finger. -
Bake:
Bake the clay according to the manufacturer’s instructions on your specific package of clay. Allow it to cool completely before proceeding to the face.
Make it a Trio
Make two smaller pumpkins in different colors (like white or dark green) and stack them totem-pole style, gluing the pumpkin cat securely on top.
Step 3: Painting the Face
-
Paint the Cheeks:
Using the pink clay color as a reference, mix a similar shade of pink paint (or just use pink paint). Dab two small, round circles on the cheeks using a dotting tool or the back end of a small paintbrush. -
Draw the Eyes:
Using a fine-tip black marker or very thin brush with black paint, draw two upward-curving semi-circles for happy, closed eyes. -
Add Whiskers:
Carefully draw two short horizontal dashes on the outer edge of each cheek for the whiskers. -
Create the Nose:
Paint a small, upside-down heart shape in black right between the cheeks. -
Finish the Mouth:
From the bottom point of the nose, draw two small curves extending outward (like a ‘w’ shape) to complete the classic kitty smile.
Now you have a charming little companion ready to celebrate the season on your shelf
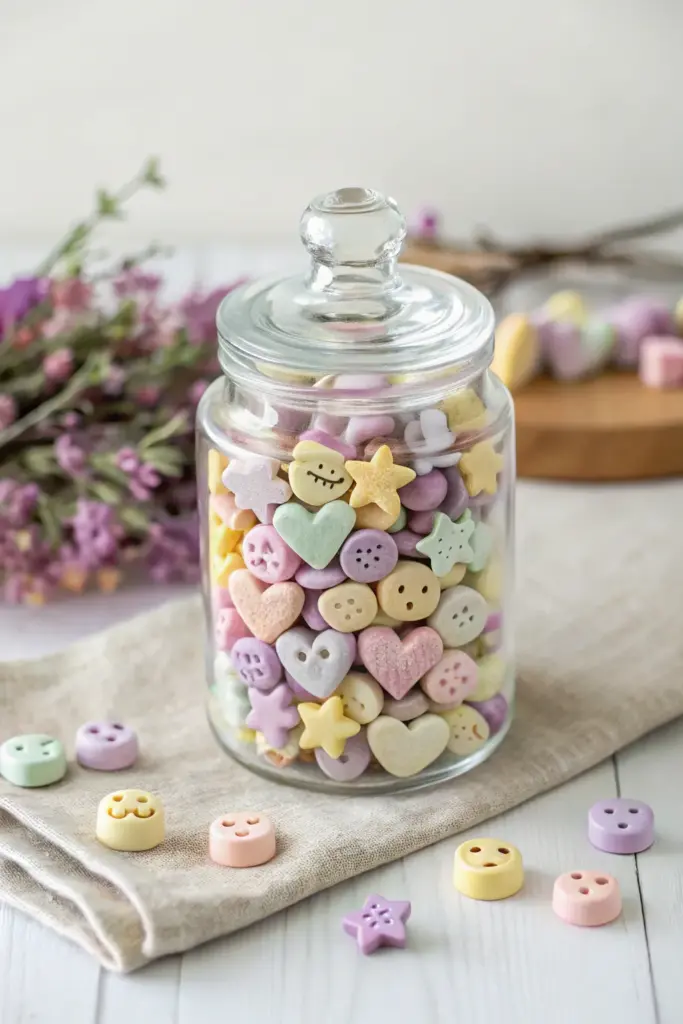
An Army of Mini Charms in One Color Palette

Create a delightful collection of pastel clay miniatures that look sweet enough to eat, perfect for filling a keepsake jar or turning into jewelry. This project focuses on simple shapes like buttons, hearts, and stars in a soft, cohesive color palette to achieve that satisfying candy-shop aesthetic.
Detailed Instructions
Materials
- Polymer clay (white, baby pink, mint green, lavender, pale yellow)
- Small glass apothecary jar with lid
- Miniature cookie cutters (heart, star, circle)
- Needle tool or toothpick
- Small dotting tool or ball stylus
- Acrylic rolling pin
- Clay blade or craft knife
- Parchment paper or ceramic tile for baking
- Cornstarch (optional, for non-stick)
- Oven (for baking clay)
- Matte varathane or glaze (optional)
Step 1: Preparing the Pastel Palette
-
Condition the white clay:
Start by conditioning a large block of white polymer clay until it is soft and pliable. This will be the base for all your pastels to ensure they have the same milky opacity. -
Mix custom pastels:
Divide your white clay into four or five equal portions. Mix a very small amount of colored clay (pink, green, purple, yellow) into each white portion. Knead thoroughly until the color is solid and streak-free; aim for very light, marshmallow-like shades. -
Create a marbled mix (optional):
For a few unique pieces, take tiny pinch-sized scraps of different colors and gently twist them together, stopping before they fully blend to create a soft marble effect. -
Roll out sheets:
Using your acrylic roller, flatten each color ball into a sheet approximately 1/4 inch thick. You want them chunky enough to look like little candies or thick buttons.
Sticky Situation?
If your clay gets too soft and sticky to hold sharp shapes, pop it in the fridge for 10 minutes. This firms it up, making cutting and detailing much easier.
Step 2: Shaping the Charms
-
Cut the basic shapes:
Use your miniature cutters to punch out hearts, stars, and circles from the various colored sheets. If the clay sticks to the cutter, dip the tool in a little cornstarch first. -
Soften the edges:
After cutting, gently run your finger around the edge of each piece to smooth out the sharp cut lines. This gives the charms a softer, more pillowy ‘moulded’ look. -
Create the button holes:
For the circular button charms, use a needle tool to poke two or four holes in the center. Make the holes large enough to be visible but not so large they distort the circle. -
Detail the smiley buttons:
For the smiley faces, use a small dotting tool to press two eye sockets. Then, use the needle tool or a small curved blade to press a smile shape below the eyes. -
Add stitched details:
On some of the hearts or stars, use the needle tool to gently press small dash marks around the perimeter, mimicking the look of stitching. -
Form the ‘puffy’ hearts:
For the thicker hearts seen in the jar, hand-mold a small ball of clay into a teardrop, then flatten slightly and indent the top center with a tool to create the lobes.
Pro Tip: Clean Cuts
Use a piece of plastic wrap over the clay before pressing your cutter down. This creates a beautifully rounded, beveled edge instantly—no sanding required!
Step 3: Finishing and Baking
-
Texture the surfaces (optional):
To mimic a sugar-coated or matte texture, you can gently tap the surface of some unbaked charms with an old toothbrush or sandpaper. I sometimes skip this for a smooth finish, but it adds great variety. -
Arrange for baking:
Place all your finished pieces on a ceramic tile or a baking sheet lined with parchment paper. Ensure none of the pieces are touching so they don’t fuse together. -
Bake the batch:
Bake the clay according to the manufacturer’s instructions on your specific package (usually 275°F/135°C for 15-30 minutes depending on thickness). Watch closely to ensure the light colors don’t brown. -
Cool completely:
Let the pieces cool down completely inside the oven with the door strictly slightly ajar, or on the counter. This helps prevent thermal shock cracking. -
Inspect and refine:
Once cool, check for any rough edges. You can use a nail file or fine-grit sandpaper to gently smooth away any fingerprints or sharp bits. -
Seal (optional):
The image shows a very matte, natural finish. However, if you want protection, apply a thin coat of matte varnish. Avoid glossy glaze to maintain the soft aesthetic. -
Fill the jar:
Gently tumble your finished collection into the glass apothecary jar. Mix the colors as you fill so the palette is evenly distributed throughout the container.
Display your jar of mini marvels on a shelf or desk for a daily dose of pastel cheer