If you’ve ever wished your painting setup felt a little more personal, making your own clay paint palette is such a satisfying little upgrade. I’m sharing my favorite clay palette ideas—from classic shapes to whimsical designs—so you can build something that’s genuinely fun to use.
Classic Round Palette With Center Well
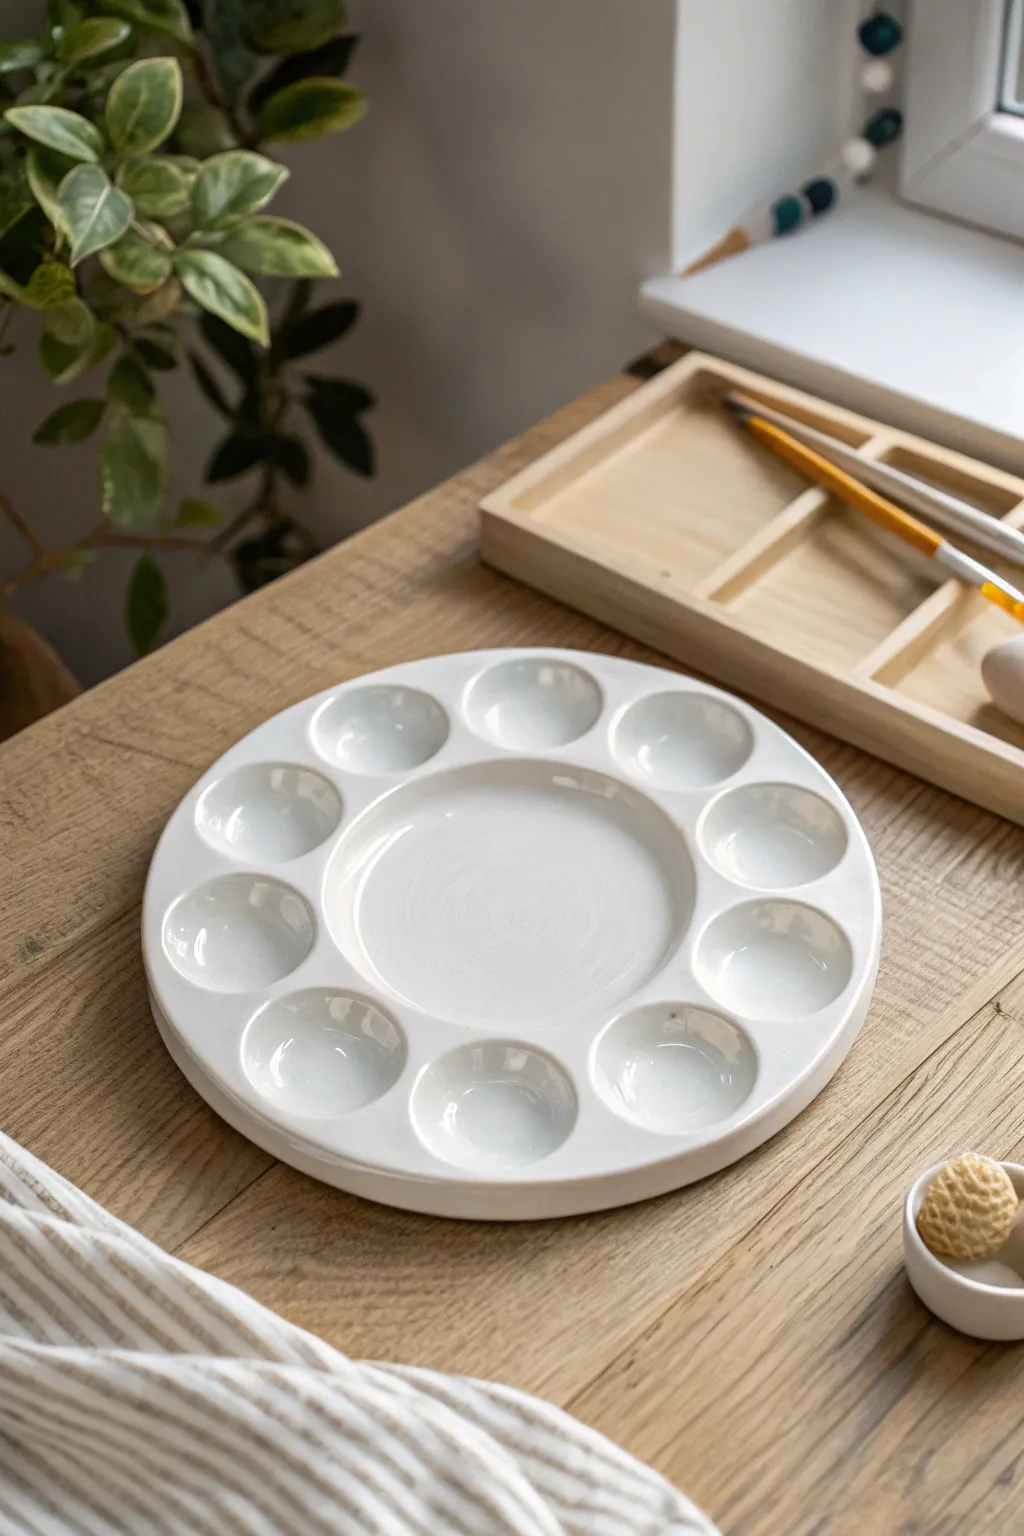
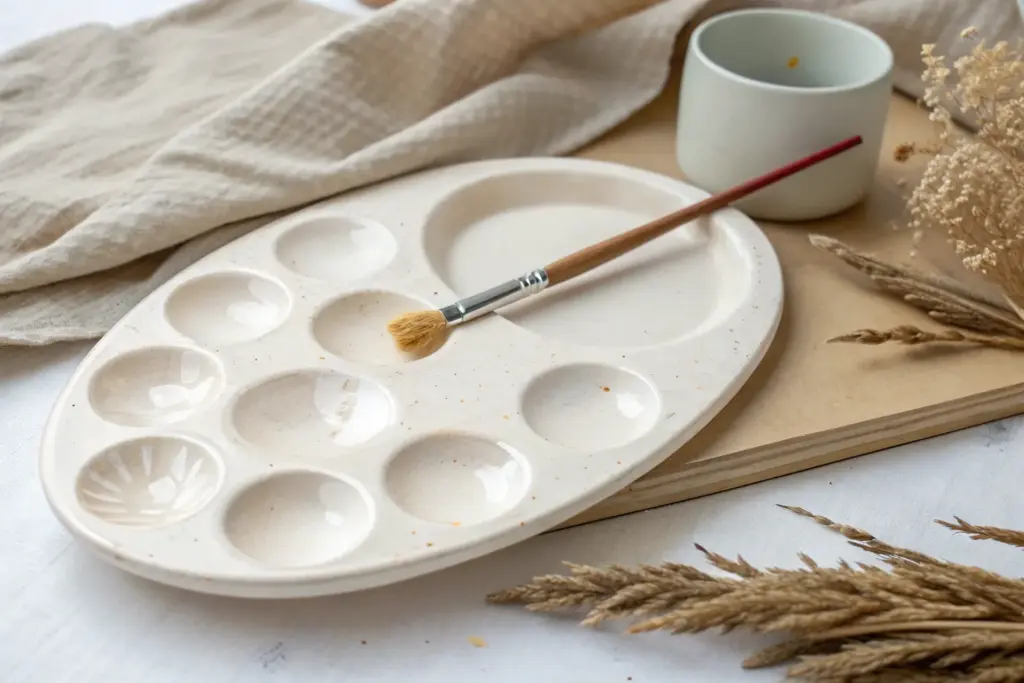
Every painter needs a dedicated space to mix their perfect shades, and this handmade clay palette offers just that with a clean, professional finish. Featuring ten individual paint wells and a generous central mixing area, its smooth white glaze ensures your colors stay true while you work.
Step-by-Step
Materials
- White earthenware or stoneware clay (approx. 1-1.5 lbs)
- Circular template or bowl (approx. 7-8 inches diameter)
- Small circular cutter or bottle cap (approx. 1 inch diameter)
- Large circular cutter or jar lid (approx. 3-4 inches diameter)
- Rolling pin
- Guide sticks (1/4 inch thick)
- Needle tool or fettling knife
- Loop tool for carving
- Sponge and water
- Rubber kidney rib
- Glossy white food-safe glaze
- Kiln (or access to a firing service)
Step 1: Forming the Base
-
Prepare the slab:
Begin by wedging your white clay thoroughly to remove any air bubbles. Place the clay between two 1/4 inch guide sticks on a canvas board and roll it out until it is perfectly flat and even. -
Smooth the surface:
Before cutting, take a rubber kidney rib and compress the clay slab. This aligns the clay particles, preventing future warping, and creates that ultra-smooth finish we want for mixing paint. -
Cut the main circle:
Place your large 7-8 inch circular template onto the slab. Simply trace around it with a needle tool or fettling knife to cut out your primary palette shape. -
Clean the edges:
Lift the circle gently and smooth the cut edge with a damp sponge or your finger to round it off slightly, removing any sharp angles.
Warping Woes?
Flat slabs often warp. Dry it on a slat board for airflow, and flip it over gently once a day while it’s drying to keep tension even.
Step 2: Creating the Wells
-
Mark the center:
Find the center of your clay circle. Place your large 3-4 inch cutter (or jar lid) gently in the middle to create an impression for the central mixing well—don’t cut through, just mark the perimeter. -
Mark outer wells:
Using the smaller 1-inch cutter or bottle cap, gently press impressions around the outer rim of the palette. Space them evenly; you should fit about 10 small wells comfortably. -
Carve the center well:
Using a loop tool, carefully scoop out the clay from the large central circle. I prefer to work from the center outward, leaving the floor of the well flat and smooth rather than concave. -
Refine the central floor:
Check the thickness of the central floor by gently feeling between your fingers. It needs to be sturdy, so don’t carve too deep. Use a wet finger to smooth out tool marks immediately. -
Carve the outer wells:
Switch to a smaller loop tool if you have one, or just clearer control, and scoop out the ten smaller circles. These should be concave, like little bowls, to hold liquid paint effectively. -
Sponge smooth:
This is a critical step for a professional look. Take a slightly wet sponge and meticulously smooth the insides of every well and the ridges between them. Remove all burrs and rough texture.
Step 3: Firing and Glazing
-
Dry slowly:
Place the palette on a ware board. To prevent warping (which flat objects love to do), place a light weight on the center or cover it loosely with plastic so it dries very slowly over several days. -
Bisque fire:
Once bone dry, fire the piece to bisque temperature (usually Cone 04) based on your specific clay body’s instructions. -
Clean stickiness:
After the kiln cools, wipe the bisque ware with a damp sponge to remove any dust, which could prevent the glaze from adhering properly. -
Apply glaze:
Pour a glossy white glaze over the palette or dip it if you have a large enough bucket. Ensure the wells are fully coated but not pooled so heavily that the glaze will crawl. -
Wipe the foot:
Use a wax resist on the bottom or meticulously wipe the glaze off the very bottom of the palette so it doesn’t fuse to the kiln shelf. -
Glaze fire:
Fire the piece again to the glaze maturity temperature (often Cone 5 or 6 for stoneware). Let it cool completely in the kiln before removing.
Smoother Mixing
For the absolute smoothest mixing area, burnish the central well with the back of a spoon when the clay is leather-hard, before it dries completely.
Once fired and cooled, your ceramic palette is ready to be loaded with paints for your next masterpiece


Rectangle Slab Palette With Big Mixing Area
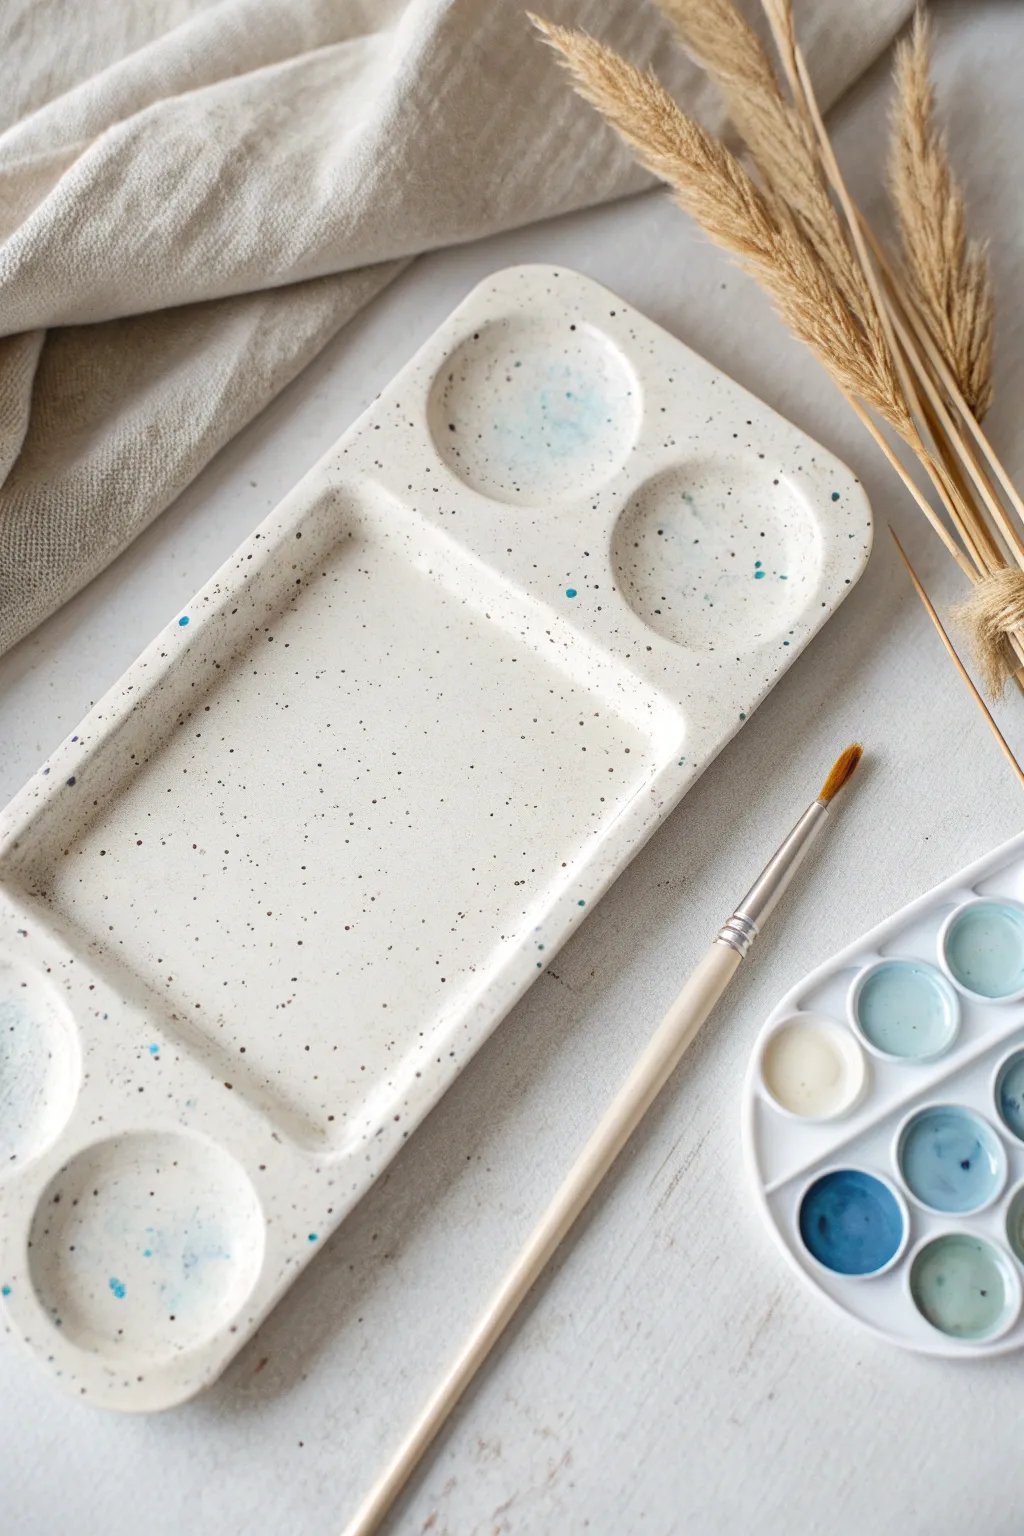
This minimalist rectangular palette features a generous central mixing area flanked by four circular wells for paint storage. Its creamy, speckled finish gives it a professional ceramic look while maintaining an organic, handmade charm.
Step-by-Step Tutorial
Materials
- Speckled stoneware clay (white or cream body)
- Rolling pin
- Two 1/4-inch wooden thickness strips (slats)
- Rectangle template (cardstock or paper)
- Needle tool or fettling knife
- Small round cookie cutter or a bottle cap
- Rectangle cookie cutter (optional) or ruler
- Sponge
- Rib tool (flexible metal or rubber)
- Carving tool or loop tool (small)
- Clear or transparent glossy glaze
- Kiln access
Step 1: Preparing the Slab
-
Wedge the clay:
Begin by thoroughly wedging your speckled stoneware clay to remove air bubbles and ensure a uniform consistency. -
Roll the slab:
Place your clay between two 1/4-inch thickness strips. Using your rolling pin, roll the clay out into a smooth, even slab. The strips ensure the palette has a uniform thickness throughout. -
Compress the clay:
Run a flexible rib tool gently over the surface of the slab in multiple directions. This compresses the clay particles, preventing warping during firing, and creates a silky smooth canvas for your palette. -
Cut the perimeter:
Lay your rectangular template onto the slab. Using a needle tool or fettling knife, cut straight down to define the outer shape of the palette. Clean up the edges with a slightly damp sponge to remove any burrs.
Prevent Warping
Dry flat slab projects on a piece of drywall or plaster board. These materials absorb moisture evenly from the bottom, reducing curling edges.
Step 2: Creating the Wells
-
Mark the layout:
Lightly trace the position of your central mixing area and the four corner circles on the surface of the clay. Don’t cut yet; just use the needle tool to gently scratch where the features will go. -
Define the central mixing area:
Using a loop tool or carving tool, carefully begin scooping out clay from the large rectangular center. Aim to go about halfway through the thickness of the slab. -
Refine the rectangle floor:
Once the bulk of the clay is removed, use a flat-edged modeling tool or your finger to smooth the floor of the rectangular well. I like to use a tiny bit of water on my fingertip to really burnish this area smooth so mixing paint later is effortless. -
Press the circular wells:
For the four circular wells, you can carve them out manually, or for cleaner lines, press a large bottle cap or small round cutter gently into the clay to create an impression. -
Hollow the circles:
Scoop out the clay from inside the circular impressions using a small loop tool, matching the depth of your central mixing area.
Add Splatter
If using plain clay, flick iron oxide wash or blue underglaze onto the raw clay with a toothbrush before bisquing to mimic the speckled look.
Step 3: Refining and Finishing
-
Smooth the interior walls:
Use a damp sponge or a soft brush with water to round over the sharp edges of your carved wells. The transition from the flat surface to the well should be soft, not sharp. -
Inspect the bottom:
Carefully flip the palette over (sandwich it between two boards if it’s still soft) and smooth the bottom. Ensure it sits perfectly flat. -
Slow drying:
Tent the palette loosely with plastic to let it dry slowly over several days. Fast drying leads to warping, especially with flat slabs like this. -
Bisque fire:
Once bone dry, fire the piece to bisque temperature (usually cone 04) according to your clay body’s specifications. -
Glazing:
Wipe the bisque piece with a damp sponge to remove dust. Dip or brush on a clear or transparent glossy glaze. This will seal the clay and allow the natural speckles to show through. -
Final wipe:
Ensure the bottom of the palette is completely free of glaze before firing to prevent it from sticking to the kiln shelf. -
Glaze fire:
Fire the palette a final time to the maturity temperature of your clay and glaze (often cone 5 or 6 for stoneware).
Once cooled, your durable ceramic palette is ready to be loaded with fresh watercolors for your next painting session


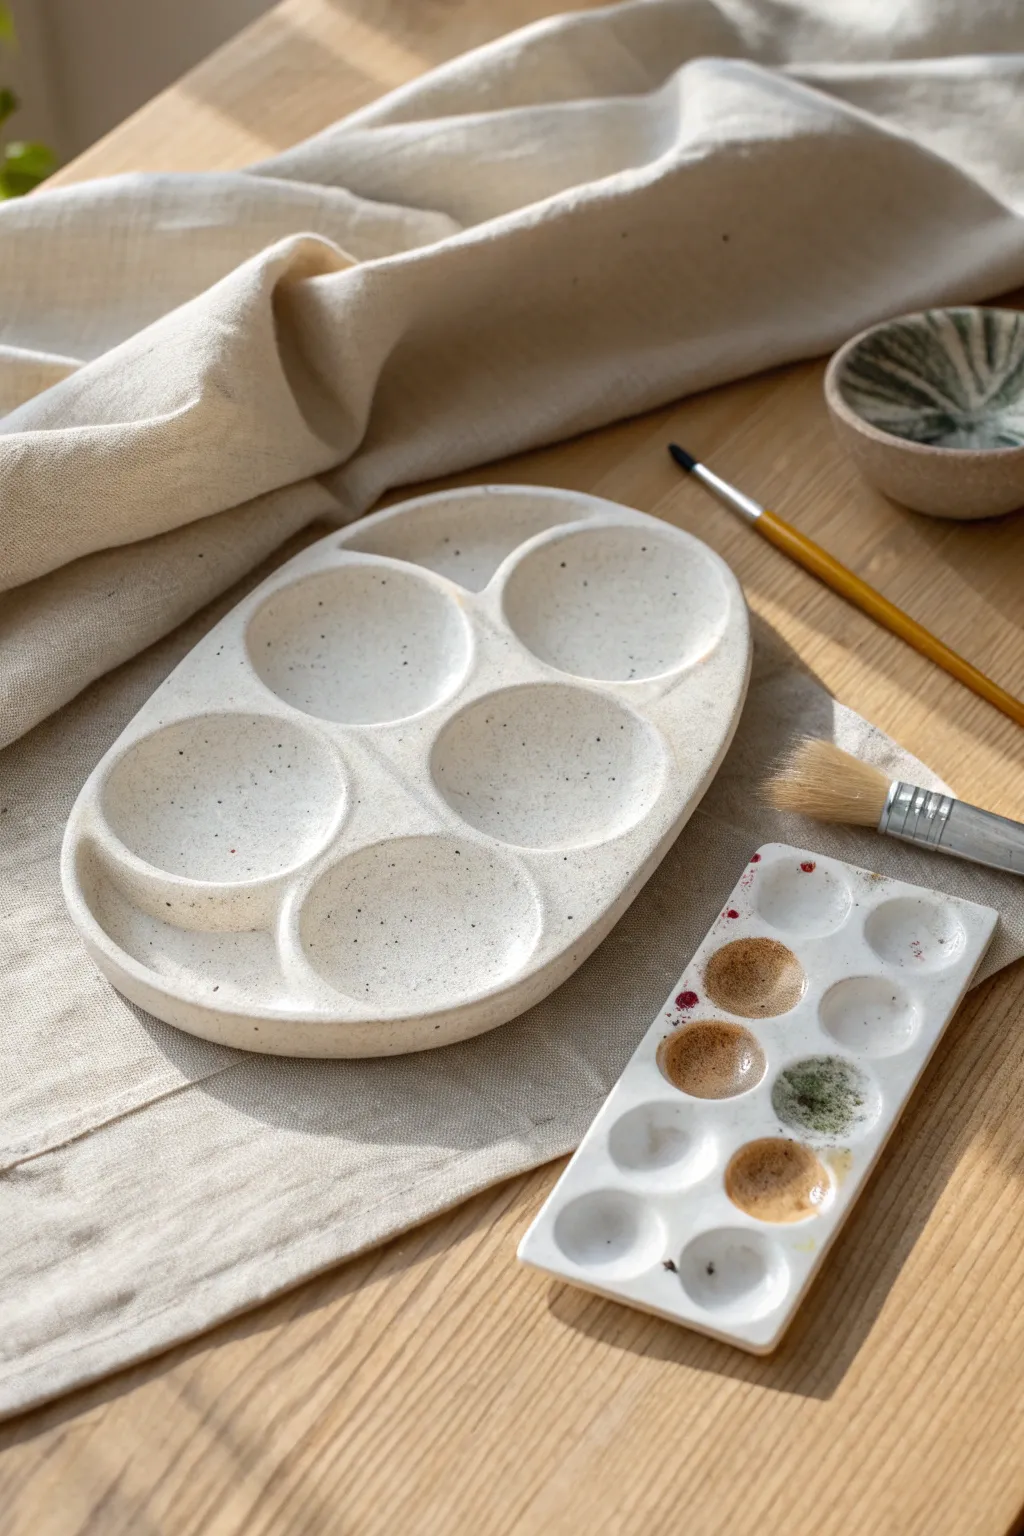
Oval Palette With Thumb Hole Grip
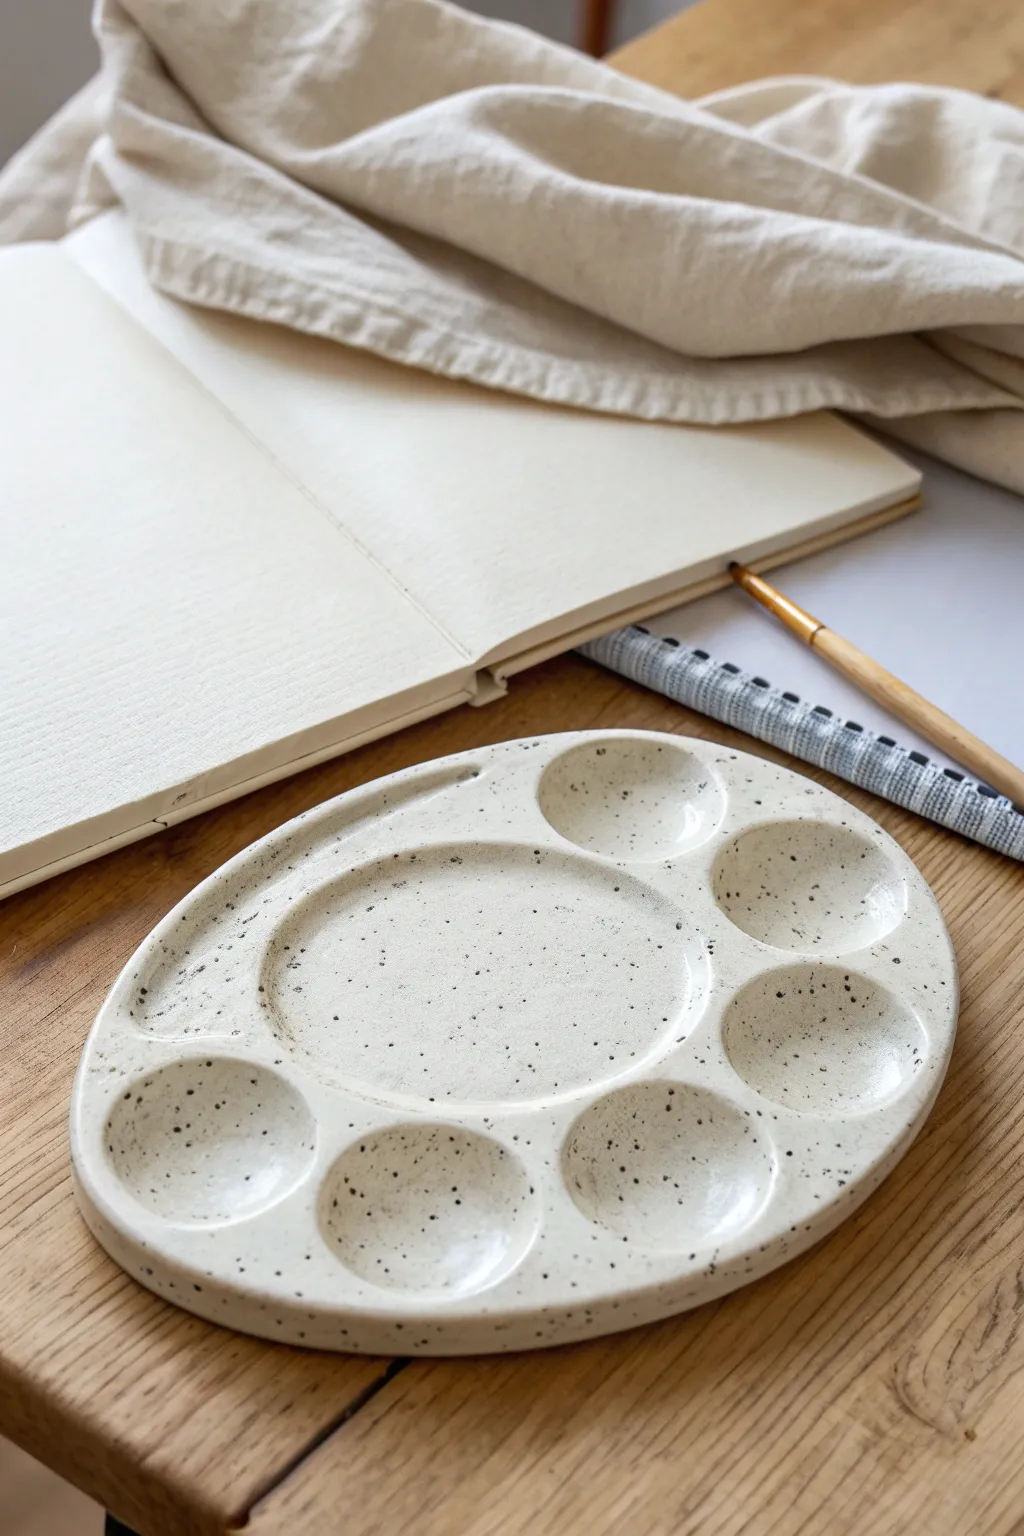
This charming oval palette features a generous central mixing area surrounded by smaller wells, perfect for separating your watercolors or gouache. Its speckled clay body and smooth, milky glaze give it a professional, studio-ceramic feel that is both functional and beautiful.
Step-by-Step
Materials
- Speckled stoneware clay (white with fine grog/speckles)
- Rolling pin
- Guide strips or slats (approx. 1/4 inch thick)
- Fettling knife or needle tool
- Oval paper template (approx. 8×5 inches)
- Small round cookie cutter or bottle cap (approx. 1 inch diameter)
- Large round cutter or bowl (approx. 3-4 inches diameter)
- Rib tool (kidney shaped, rubber or wood)
- Sponge
- Loop tool for carving
- Clear or transparent white glaze
- Kiln (if using ceramic clay)
Step 1: Shaping the Base
-
Roll the slab:
Begin by wedging your speckled clay to remove air bubbles. Place it between two guide strips and roll it out into a smooth, even slab about 1/4 inch thick. This ensures your palette will sit flat on the table. -
Cut the oval:
Lay your oval paper template onto the slab. Using a needle tool or fettling knife, trace around the template with a steady hand to cut out the main shape of the palette. -
Smooth the edges:
Dip your finger or a small sponge in water and gently run it along the cut edge to soften the sharp corners. You want a rounded, comfortable rim. -
Plan the layout:
Lightly sketch the positions of your wells on the surface without cutting. Place a large circle in the center for mixing, and arrange six smaller circles around the right and bottom perimeter. Leave space on the top left for the thumb grip.
Warping Woes
If your palette creates a ‘rocking’ motion after drying, it warped. Dry it slower next time, or place a weighted board on top during the leather-hard stage.
Step 2: Creating the Wells
-
Indent the small wells:
You can carve these out, but pressing them is cleaner. Lay a small piece of plastic wrap over the clay to prevent sticking. Press your small round cutter or a bottle cap firmly into the marked spots to create the six paint wells. Don’t go all the way through—just enough to hold paint. -
Define the mixing area:
For the large central area, you can use a shallow bowl or just your thumbs. If using thumbs, work in a spiral from the center outward, gently compressing the clay to create a shallow depression. -
Refine the depressions:
Use a damp sponge or your finger to smooth the bottom and sides of each well. I find that spending extra time here makes cleaning paint out of the finished palette much easier later. -
Carve the thumb grip:
On the top left side, use a loop tool or your thumb to create an elongated, indented groove rather than a full hole. This acts as a resting spot for your thumb to grip the palette securely without needing to poke a hole all the way through.
Step 3: Detailed Finishing
-
Clean up the surface:
Once the wells are formed, the clay might have distorted slightly. Retouch the outer oval shape if needed and use a rib tool to smooth the flat surfaces between the wells. -
Dry slowly:
Place the palette on a board covered with newspaper or canvas. Cover it loosely with plastic to let it dry slowly over a few days. This prevents warping, which is crucial for a flat palette. -
Bisque fire:
Once bone dry, fire the piece to bisque temperature (usually cone 04) based on your specific clay body’s instructions. -
Glazing:
Wipe the bisque-fired piece with a damp sponge to remove dust. Dip the entire palette into a clear or semi-transparent white glaze. This glossy finish is essential for mixing paint smoothly. -
Final wipe:
Ensure the bottom of the palette is wiped clean of glaze so it doesn’t fuse to the kiln shelf. Use a wax resist on the bottom if you prefer a cleaner line. -
Glaze fire:
Fire the palette again to the glaze temperature (often cone 5 or 6 for stoneware). Let it cool completely in the kiln before removing.
Brush Rests
Before firing, carve small notches on the rim near the mixing well. These act as perfect rests to keep wet brushes from rolling onto your table.
Enjoy mixing your colors on this beautiful custom surface


Petal-Well Flower Palette
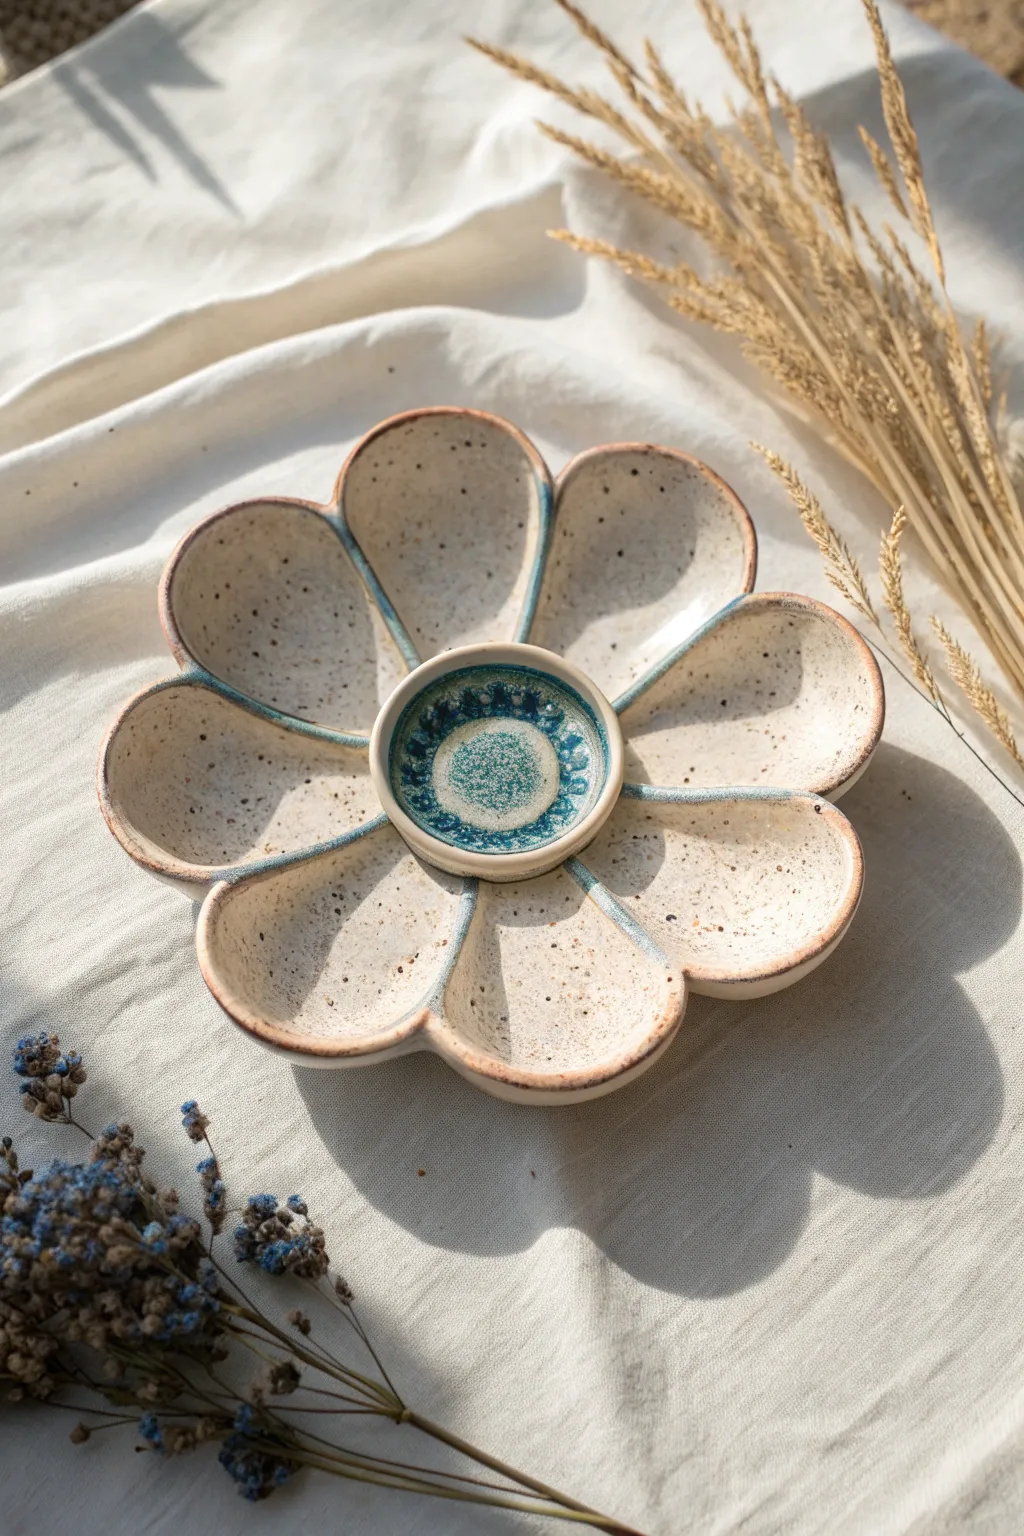
This charming flower-shaped palette features eight deep, petal-like wells surrounding a central mixing area, perfect for keeping watercolors separated yet accessible. The speckled clay body and teal accents give it an earthy, artisanal feel that makes painting sessions even more inspiring.
How-To Guide
Materials
- Speckled Stoneware Clay (cone 5/6)
- Rolling pin and guide sticks (approx. 1/4 inch)
- Needle tool or fettling knife
- Flower template (paper or cardstock)
- Sponge
- Rib tool (wooden or silicone)
- Loop tool for carving
- Small bowl or round cutter (approx. 2 inches)
- Scoring tool or fork
- Slip (liquid clay)
- Glossy White Glaze
- Teal/Turquoise Glaze (for accents)
- Small paintbrush for glazing
Step 1: Forming the Base
-
Roll the slab:
Begin by wedging your speckled clay thoroughly to remove air bubbles. Roll it out into an even slab using guide sticks to ensure a consistent thickness of about 1/4 inch. -
Smooth the surface:
Take a rib tool and compress the clay slab on both sides. This aligns the clay particles, preventing warping later, and creates a nice smooth canvas for your palette. -
Cut the flower shape:
Place your flower template—either hand-drawn or printed—onto the clay. Use a needle tool to trace and cut out the eight-petal flower shape. Remove the excess clay. -
Softening the edges:
Use a damp sponge to gently wipe around the entire perimeter of the flower. This softens the sharp cut lines and gives the petals a rounded, finished look.
Step 2: Shaping the Wells
-
Pinch the petals:
Gently lift the edges of each petal up to create a cupped shape. You want to curve the outer rim upward so it can hold liquid paint. -
Define the walls:
Using your thumb and forefinger, pinch the clay between the petals to create separation walls. Ensure these dividers are high enough so colors won’t accidentally bleed into each other. -
Create the center connection:
Smooth the inner points where all the petals meet in the middle. It should look like a small, flat depression waiting for the center cup. -
Form the central cup:
Roll a small ball of clay and flatten it, or cut a small circle from your leftover slab. Pinch up the edges to form a small, shallow bowl that fits comfortably in the center of your flower. -
Score and slip:
Score (scratch) the bottom of the central cup and the center of the flower base. Apply a dab of slip and press the cup firmly into place. -
Blend the seams:
Use a small modeling tool or your finger to smooth the seam where the cup meets the petals, ensuring a strong bond so it doesn’t pop off during firing.
Smooth Surface Trick
Burnish the petal wells with the back of a spoon when leather-hard. This compresses the clay further, creating an ultra-smooth surface that paint won’t stain.
Step 3: Refining and Drying
-
Smooth the interior:
Take a damp sponge or a soft brush and go over the inside of every petal well and the center cup. Perfection here makes cleaning paint out easier later. -
Slow drying:
Cover the palette loosely with plastic. Let it dry slowly for a few days to reach the bone-dry stage. This prevents the petals from curling or cracking. -
Bisque fire:
Once completely dry, fire the piece in a kiln to bisque temperature (usually Cone 04) to prepare it for glazing.
Brush Rest Notch
While the clay is still soft, gently press a paintbrush handle into the rim between two petals to create custom notches for resting your wet brushes.
Step 4: Glazing
-
Wax resist (optional):
If you want the raw clay rim shown in the photo, carefully apply wax resist to the very top edge of the petals and the rim of the center cup. -
Glaze the wells:
Pour or brush a glossy white glaze into the petal wells. I prefer brushing 2-3 coats to ensure it’s thick and opaque, letting the speckles show through slightly. -
Accent the center:
Apply a teal or turquoise glaze to the inside of the center cup. You can also carefully run a thin line of this blue glaze in the crevices between the petals for extra definition. -
Detail work:
Using a tiny brush, create dot details or a ring pattern inside the center blue well if desired, or let the natural pooling of the glaze create the variation. -
Clean the bottom:
Wipe the bottom of the palette completely clean of any glaze to prevent it from sticking to the kiln shelf. -
Final firing:
Fire the palette to the maturity temperature of your clay and glaze (likely Cone 5 or 6). Once cooled, it’s ready for your watercolors.
Now you have a stunning, handmade tool that is ready to be filled with your favorite pigments

The Complete Guide to Pottery Troubleshooting
Uncover the most common ceramic mistakes—from cracking clay to failed glazes—and learn how to fix them fast.
White Gloss Palette With Speckled Clay Body
This minimalist ceramic artist’s palette features a smooth oval shape with six generous wells for mixing paints. The charm lies in the speckled clay body, which adds organic warmth underneath a glossy, easy-to-clean white glaze.
Step-by-Step Guide
Materials
- Speckled Stoneware Clay (approx. 1-2 lbs)
- Rolling pin
- Canvas or mat for rolling
- Oval template (paper or cardstock)
- Fettling knife or needle tool
- Rib tool (metal or silicone)
- Sponge
- Carving tool or loop tool (optional for shaping wells)
- Small bowl of water
- Transparent or glossy white glaze
- Kiln access
Step 1: Shaping the Base
-
Wedge the clay:
Begin by thoroughly wedging your speckled stoneware clay to remove any air bubbles and ensure an even consistency. -
Roll out a slab:
On your canvas or rolling mat, roll the clay out into a smooth slab. Aim for a thickness of about 1/2 inch to 3/4 inch to allow depth for the paint wells. -
Smooth the surface:
Take a rib tool and gently compress the surface of the slab. This aligns the clay particles and creates a lovely smooth finish before cutting. -
Cut the oval shape:
Place your oval template onto the clay slab. Using a fettling knife or needle tool, carefully cut around the template. Peel away the excess clay. -
Soften the edges:
Use a damp sponge or your finger to gently round over the sharp cut edges of the oval. This prevents chipping later.
Step 2: Creating the Wells
-
Mark well positions:
Lightly trace six circles on the surface of your oval to map out where your paint wells will go. Keep them evenly spaced. -
Press or carve:
You have two options here: either press a rounded object (like a large spoon or a smooth stone) into the clay to form the depressions, or use a loop tool to carve them out. I prefer pressing to keep the clay compressed. -
Refine the shape:
Whether pressing or carving, make sure each well is deep enough to hold paint but not so deep that the bottom becomes thin. -
Smooth the interiors:
Use a slightly damp sponge or your finger to smooth the inside of each well. Spend extra time here to ensure there are no rough textures that could trap paint later. -
Smooth the transitions:
Blend the edges of the wells into the flat top surface of the palette so the transition feels seamless.
Keep it Clean
Use a glossy glaze rather than satin or matte. Glossy surfaces are much easier to wipe clean of dried acrylic or watercolor paints.
Step 3: Drying and Firing
-
Slow drying:
Place the palette on a ware board and cover it loosely with plastic. Let it dry slowly for several days to prevent warping. -
Bisque fire:
Once bone dry, fire the piece to bisque temperature (usually cone 04 or 06, depending on your clay body recommendations). -
Wipe down:
After the bisque firing, wipe the piece with a damp sponge to remove any dust that might interfere with glazing. -
Apply glaze:
Dip the palette into a clear or transparent glossy white glaze, or brush on three even coats. Ensure the glaze is food-safe and non-toxic if you might use it for anything other than art. -
Wipe the foot:
Carefully wipe the glaze off the very bottom of the palette so it doesn’t fuse to the kiln shelf. -
Glaze fire:
Fire the piece again to the maturity temperature of your clay and glaze (often cone 5 or 6 for stoneware).
Personalise It
Before the first firing, stamp your initials or a small logo into the underside of the palette for a custom maker’s mark.
Once cooled from the final firing, your custom palette is ready to be loaded with your favorite colors
Pastel Marbled Polymer Clay Palette
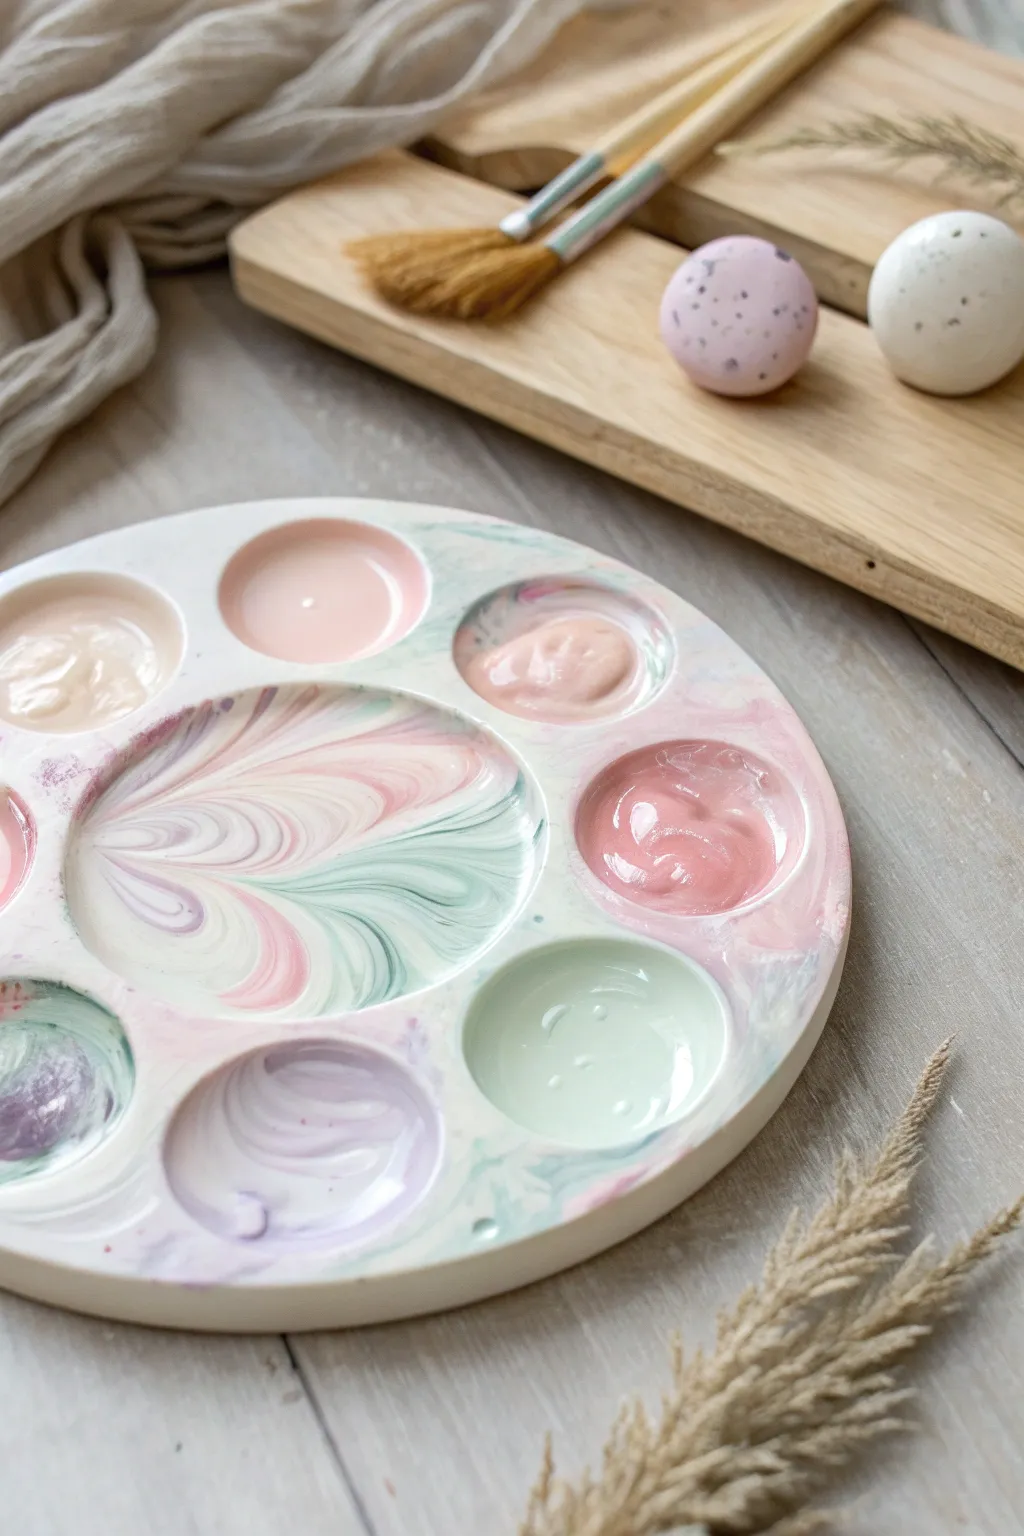
Embrace soft hues and functional art with this stunning polymer clay palette, featuring a mesmerizing marbled effect in blush pink, mint green, and lavender. This project combines practical studio tools with aesthetic beauty, resulting in a durable piece perfect for mixing your watercolors or gouache.
Detailed Instructions
Materials
- Polymer clay (White, Pastel Pink, Mint Green, Lavender)
- Acrylic rolling pin or pasta machine
- Large circular clay cutter (approx. 6-7 inches) or a bowl to trace
- Small circular cutters (various sizes for wells)
- Clean craft knife or scalpel
- Ceramic tile or glass baking sheet
- Smoothing tool or cornstarch (to prevent sticking)
- Fine-grit sandpaper (400 to 1000 grit)
- Water-based gloss varnish or resin (optional for sealing)
- Oven
Step 1: Marbling the Base
-
Condition the Clay:
Start by thoroughly conditioning your white polymer clay until it is soft and pliable. Do the same for your pastel accent colors (pink, mint, lavender), keeping the portions of colored clay much smaller than the white base. -
Form Snakes:
Roll the white clay into a thick log. Roll the colored clays into thinner snakes, about half the diameter of the white log. -
Combine Colors:
Twist the colored snakes around the white log. Fold the entire log in half and twist it again. Repeat this folding and twisting motion 3-4 times, but be careful not to over-mix, or the colors will turn muddy. -
Create the Slab:
Roll the twisted clay into a ball, then flatten it slightly on your work surface. Using your acrylic rolling pin or a pasta machine on a thick setting (about 1/4 inch), roll the clay out into a smooth, even sheet.
Clean Edges Top Tip
To fix fingerprints before baking without ruining the shape, lightly brush the raw clay with baby oil. It smooths the surface instantly.
Step 2: Shaping the Palette
-
Cut the Main Shape:
Place your large circular cutter or a bowl onto the marbled slab. Press down firmly to cut the outer edge of your palette. Remove the excess clay. -
Plan the Layout:
Before cutting, gently place your smaller cutters on top of the clay circle to visualize where you want your paint wells. Aim for a balanced arrangement with a larger area in the center for mixing. -
Form the Wells:
Instead of cutting holes *all the way through*, use the small cutters to make indentations. Alternatively, disable the cutter and use your thumb or a ball tool to gently press depressions into the clay to create soft, organic wells. -
Deepen the Center:
For the large central mixing area, use the palm of your hand or a large spoon back to gently press and smooth the clay down, creating a shallow basin without thinning the bottom too much. -
Smooth the Edges:
Dip your finger in a tiny bit of baby oil or cornstarch and run it along the rim of the palette and the edges of each well to remove any sharp lines or fingerprints.
Fixing Bubbles
If you see air bubbles trapped in the clay slab, pierce them gently with a craft knife and smooth the air out with your finger so the surface is flat.
Step 3: Baking and Finishing
-
Preheat:
Preheat your oven according to the specific temperature instructions on your brand of polymer clay (usually around 275°F or 130°C). -
Bake:
Place the palette on a ceramic tile or a parchment-lined baking sheet. Bake for 30-45 minutes. I prefer to bake slightly longer at a lower temperature to ensure durability without scorching the light colors. -
Cool Down:
Turn the oven off and let the palette cool down completely inside the oven. This gradual cooling prevents cracking. -
Wet Sanding:
Once cool, take your palette to a sink or bowl of water. Using wet fine-grit sandpaper, gently sand the edges and surface to achieve a silky smooth finish. -
Seal (Optional):
For extra protection and a glossy look like the reference image, apply a thin coat of water-based gloss varnish or UV resin. If serve-ware safe resin is used, it will be easier to clean paint off later. -
Final Cure:
If you used resin, cure it under a UV lamp. If you used varnish, let it air dry completely in dust-free area for 24 hours.
Now you have a gorgeous, custom-made palette ready for your next painting session


What Really Happens Inside the Kiln
Learn how time and temperature work together inside the kiln to transform clay into durable ceramic.
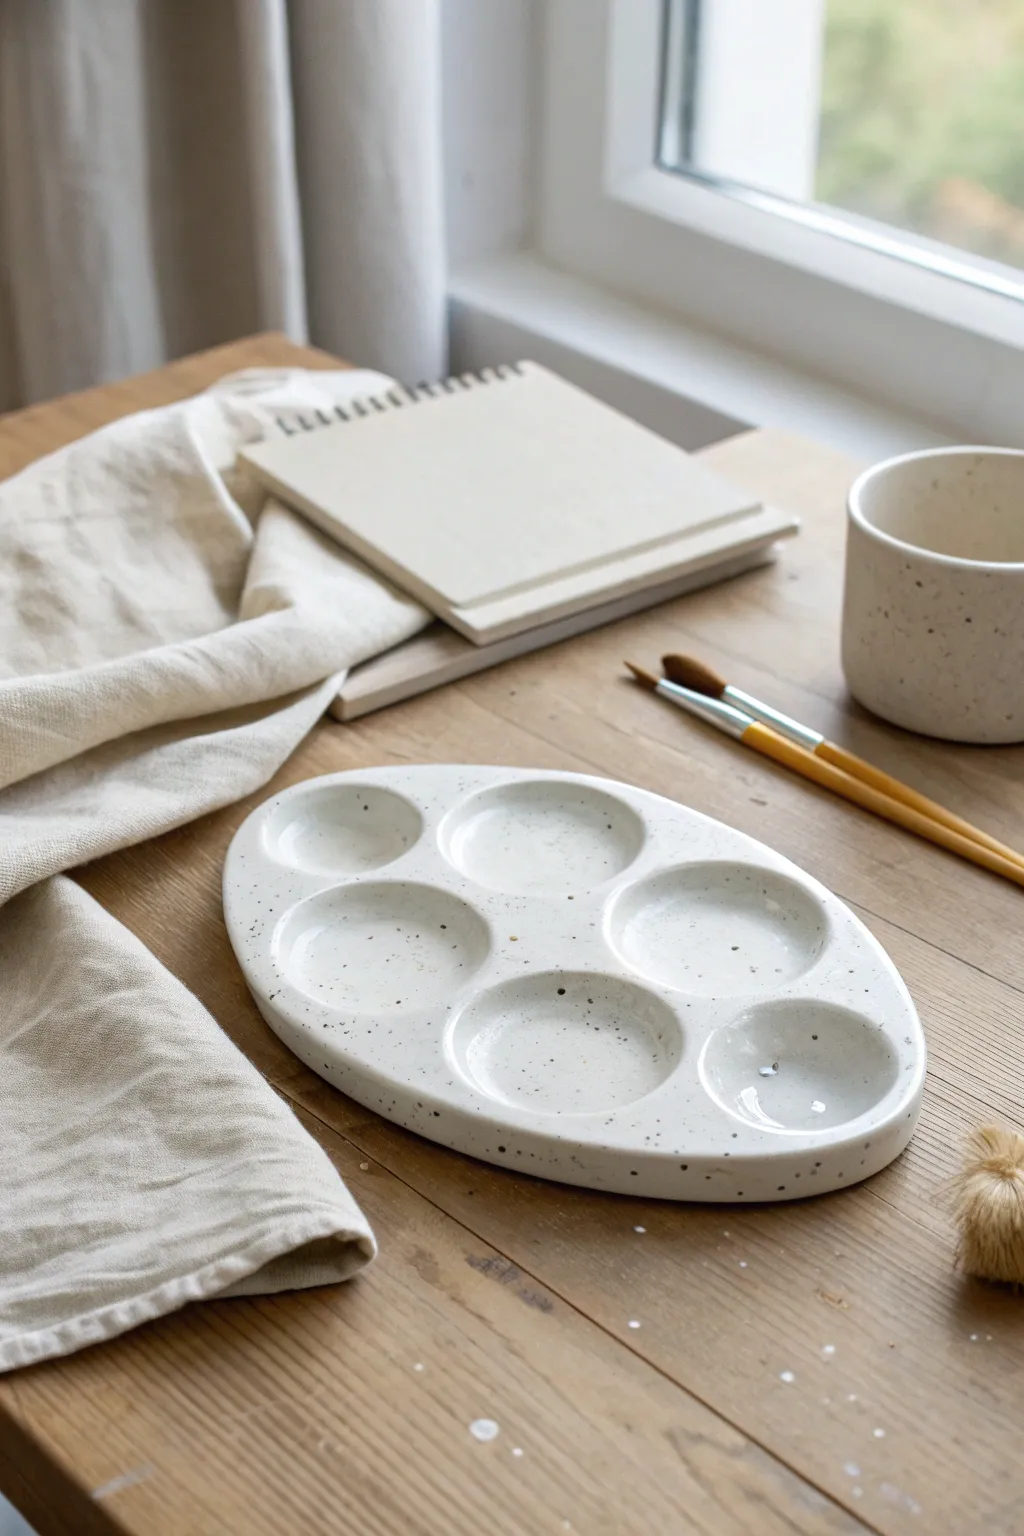
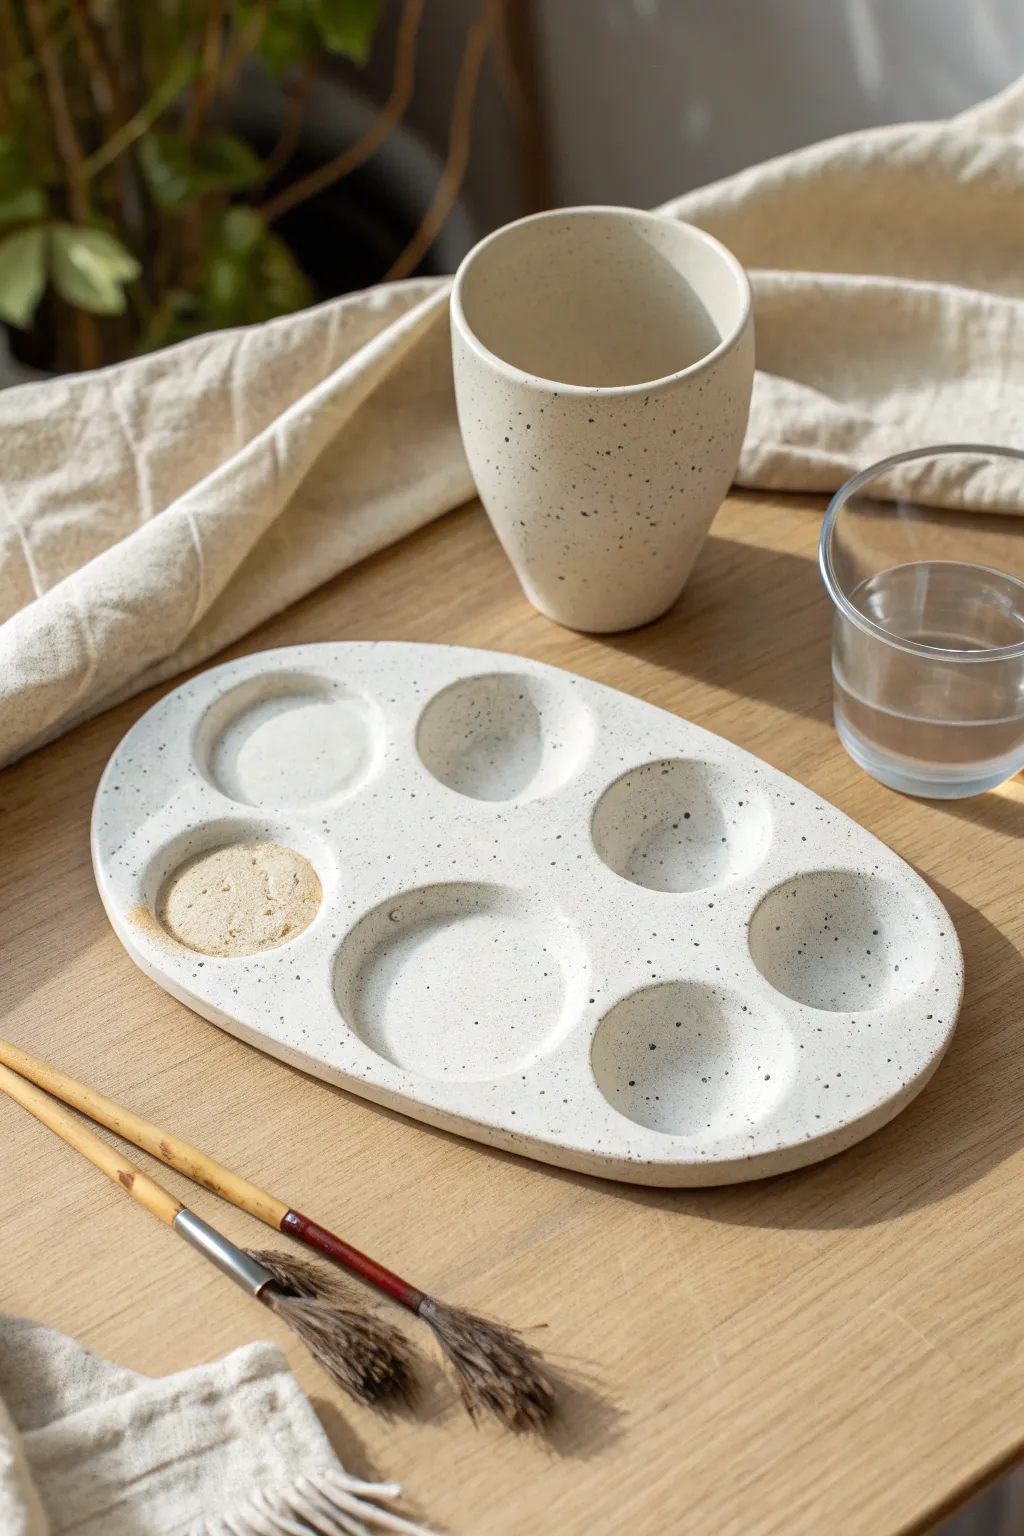
Air-Dry Mini Palette Set
This charming, speckled clay palette brings a touch of ceramic studio elegance to your watercolor practice without needing a kiln. Its organic oval shape and deep wells are perfect for mixing generous amounts of color while keeping your workspace looking beautiful.
Step-by-Step
Materials
- White or cream air-dry clay (approx. 200g)
- Black pepper or dried coffee grounds (for speckling)
- Rolling pin
- Parchment paper or canvas mat
- Circle cutters or small jar lids (approx. 1.5 inch diameter)
- Sponge
- Small bowl of water
- Pottery rib or old credit card
- Sandpaper (fine grit)
- Glossy acrylic varnish or resin
Step 1: Prepping and Shaping the Base
-
Create the speckle effect:
Before sculpting, we need to create that faux-stoneware look. Take a chunk of white air-dry clay and knead in a small pinch of cracked black pepper or dried coffee grounds. Fold the clay over repeatedly until the specks are evenly distributed. -
Roll the slab:
Place your clay on parchment paper. Roll it out to a uniform thickness of about 1/4 inch (6mm). Ensure it’s thick enough to support the wells but not too chunky. -
Cut the oval shape:
Freehand cut a large oval shape using a needle tool or knife. Aim for something roughly 6 inches by 4 inches. Smooth the cut edges immediately with a damp finger to remove any sharpness. -
Refine the perimeter:
Using a slightly damp sponge, run it along the outer rim of your oval to create a soft, rounded lip rather than a sharp angle.
Fixing Cracks
If hairline cracks appear while drying, mix a tiny amount of fresh clay with water to make a ‘slip’ paste. Fill the cracks, smooth over, and let dry again.
Step 2: Forming the Wells
-
Mark well positions:
Using a circle cutter or bottle cap, lightly press into the clay surface to mark where your six mixing wells will go. Arrange them in two rows of three, leaving room at the top or side for a smaller thumb grip or extra mixing area. -
Create indentation balls:
Roll six balls of clay that are slightly smaller than your desired well size. We will use these as pressing tools rather than adding clay. -
Press the wells:
Place a loose sheet of cling film over your slab to prevent sticking. Press the clay balls firmly into the marked spots to create smooth, concave depressions. Wiggle them slightly to widen the wells. -
Refine the shapes:
Remove the cling film. Dip your finger in water and smooth out the inside of each well, ensuring the transitions between the bottom of the well and the palette surface are seamless. -
Add the top section:
At the top of the oval, use your thumb to carve out a shallow, crescent-shaped depression. This is perfect for resting a brush or holding a small amount of mixing water. -
Final smoothing:
Give the entire piece a final pass with a damp sponge. Pay close attention to the ridges between the wells; they should be smooth and comfortable to touch.
Add a Resting Notch
Use a straw to press a horizontal groove into the rim on the right side. This creates a perfect little notch to rest your wet paintbrush so it doesn’t roll away.
Step 3: Finishing and Sealing
-
Slow drying:
Place the palette on a wire rack or leave it on parchment paper in a cool, dry spot. Let it air dry for 24-48 hours. I find turning it over halfway through helps prevent warping. -
Sand the imperfections:
Once fully bone dry, take your fine-grit sandpaper and gently buff away any fingerprints or rough edges. Be gentle, as dry clay can be brittle. -
Dust off:
Wipe the palette down with a dry cloth or soft brush to remove all sanding dust. The surface must be perfectly clean for the varnish to stick. -
Apply first coat:
Apply a thin layer of high-gloss acrylic varnish or a resin coating. The gloss is essential because it creates a non-porous surface that allows watercolour to bead up and mix properly. -
Dry and repeat:
Let the first coat dry completely according to the manufacturer’s instructions. Apply 2-3 additional coats to ensure the clay is fully waterproof. -
Cure time:
Allow the final sealant layer to cure for at least a few days before introducing any water or paint to your new tool.
Now you have a custom studio tool that looks as lovely as the art you’ll create with it
Palette With Built-In Brush Rest
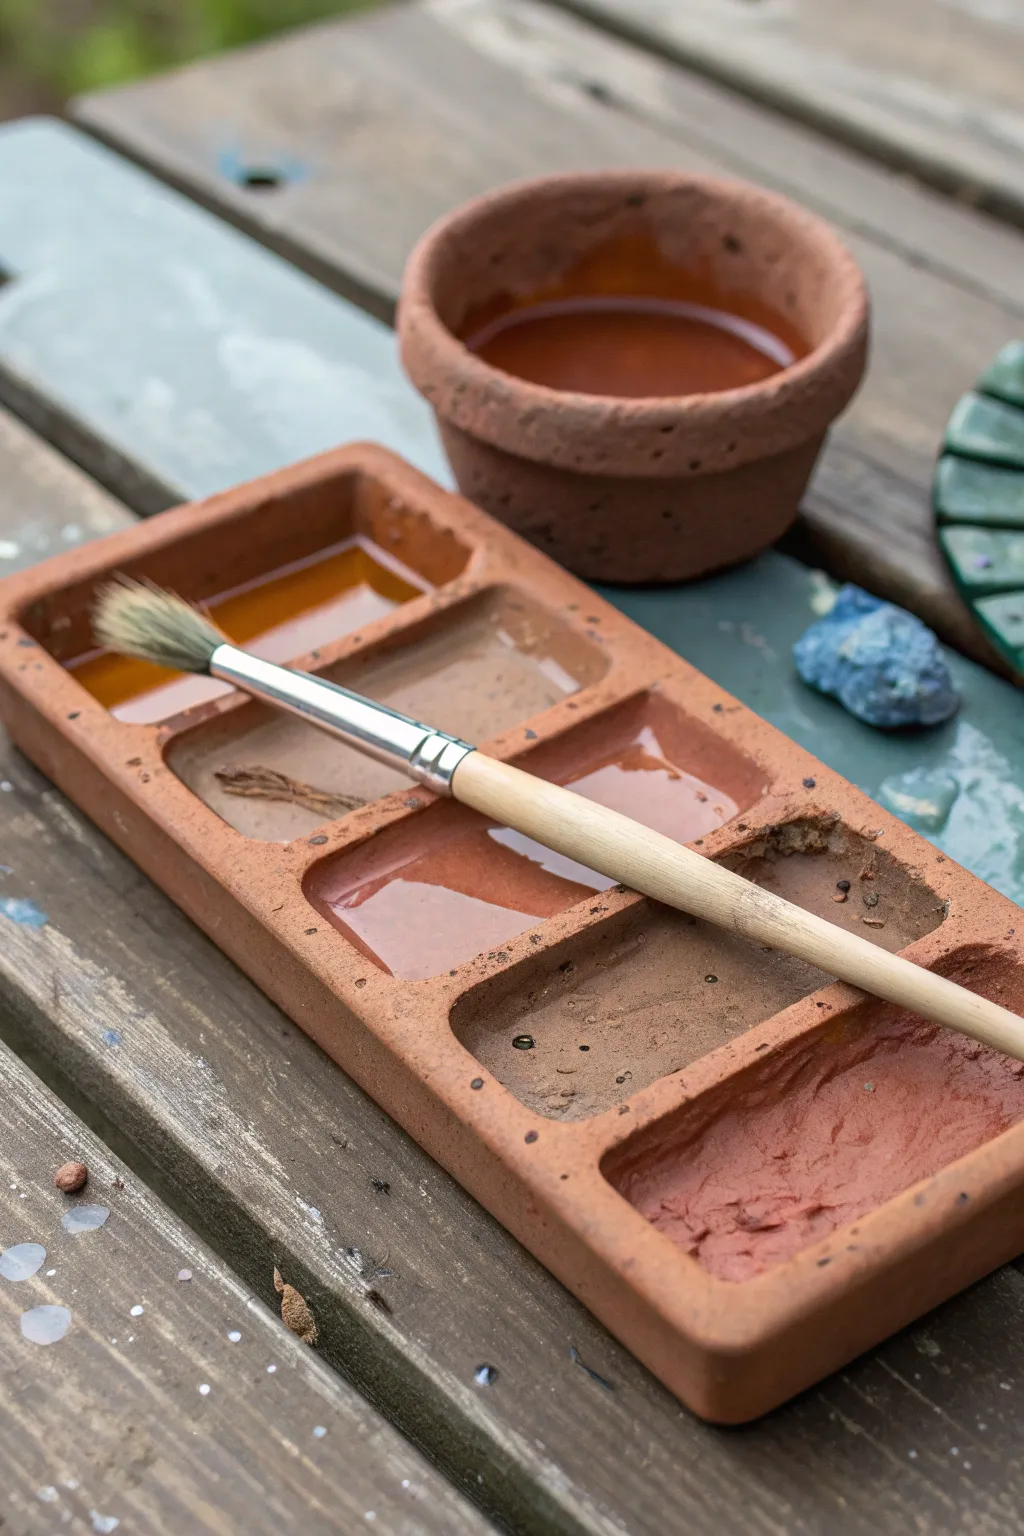
Bring an earthy, handmade touch to your studio with this rectangular clay palette featuring a clever integrated brush rest. Its warm terracotta tones and textured finish make it not just a tool, but a piece of art that ages beautifully with use.
How-To Guide
Materials
- Terracotta air-dry clay or polymer clay
- Rolling pin
- Clay knife or fettling knife
- Rectangle template (cardstock)
- Small bowl of water
- Sponge
- Loop tool or spoon for carving
- sandpaper (fine grit)
- Clear acrylic sealant or varnish (waterproof)
Step 1: Shaping the Base
-
Prepare the clay:
Begin by kneading a substantial chunk of terracotta clay to warm it up and remove any potential air bubbles. You want a smooth, pliable consistency that won’t crack easily when formed. -
Roll the slab:
Roll your clay out into a thick, even slab. Aim for a thickness of about 3/4 of an inch to 1 inch. This thickness is crucial because you need depth to carve out the paint wells later. -
Cut the rectangle:
Place your cardstock template on the slab and cut around it cleanly using your clay knife. A size of approximately 4×8 inches works well for a portable palette. -
Smooth the edges:
Dip your finger or a small sponge in water and run it along the cut edges to soften the sharp corners. The goal is a slightly organic, rounded look rather than sharp, industrial lines.
Fixing Cracks
If hairline cracks appear while drying, create a slip (clay mixed with water into a paste) and fill the cracks immediately, smoothing it over with a damp finger.
Step 2: Carving the Wells
-
Mark the layout:
Lightly scratch lines into the surface to map out your paint wells. A simple 2×3 grid or a single row of 5-6 rectangular wells fits nicely. -
Define the boundaries:
Leave a border of about 1/4 inch around the outside edge and between each well to ensure structural integrity. -
Scoop the clay:
Using a loop tool or a small spoon, carefully scoop out the clay from your marked sections. Work slowly, removing layers rather than trying to dig it all out at once. -
Refine the depth:
Continue scooping until the wells are about 1/2 inch deep. Try to keep the bottoms relatively flat, though a little texture adds character. -
Smooth the interiors:
Use a damp finger to smooth the inside walls and floor of each well. This makes cleaning the palette easier later on.
Step 3: Creating the Brush Rest
-
Locate the rest channel:
Visualize a straight line running lengthwise across the entire palette, cutting through the dividers you just created. -
Carve the groove:
Gently press a dowel, brush handle, or round tool into the wet clay along this line. You want to create a semi-circular indentation on the top of the partition walls and the outer edges. -
Deepen the notch:
I prefer to use a small carving tool to deepen these notches slightly, ensuring a paintbrush won’t roll off easily. -
Check alignment:
Lay a real paintbrush across the grooves to test the fit. It should sit comfortably without dipping into where the wet paint would be.
Custom Glazing
For a glossy, ceramic-like finish without a kiln, use a high-gloss resin or a generous layer of dimensional glaze like ‘Diamond Glaze’ in the wells.
Step 4: Finishing Touches
-
Add texture:
If you like the rustic look in the photo, gently tap the outside edges with a rough sponge or a crumpled ball of foil to remove perfect smoothness. -
Dry slowly:
Let the palette dry slowly away from direct heat or sunlight. If using air-dry clay, turning it over periodically helps prevent warping. -
Sand imperfections:
Once fully bone dry (or baked, if using polymer), lightly sand any sharp burrs or rough spots, especially around the rim. -
Seal the piece:
Apply 2-3 coats of a waterproof varnish or sealant. This is critical; unsealed clay will absorb moisture from your paints and eventually degrade. -
Final cure:
Allow the sealant to cure completely according to the manufacturer’s instructions before introducing any wet media to your new tool.
Now you have a durable, custom workstation that keeps your brushes safe and your colors ready for inspiration

TRACK YOUR CERAMIC JOURNEY
Capture glaze tests, firing details, and creative progress—all in one simple printable. Make your projects easier to repeat and improve.
Palette With Attached Water Cup
Create a serene, minimalist artist’s station with this handcrafted ceramic palette and matching water cup. Featuring a lovely speckled finish and a smooth matte glaze, this set is as beautiful as the art you’ll create with it.
Step-by-Step
Materials
- White stoneware clay with speckles (e.g., Laguna Speckled Buff)
- Rolling pin
- Canvas mat or cloth
- Needle tool
- Small sponge
- Rib tool (metal and rubber)
- Fettling knife
- Oval paper template
- Loop tool or trimming tools
- Transparent matte glaze
- Kiln access
Step 1: Shaping the Palette Base
-
Prepare the Clay:
Begin by wedging your speckled clay body thoroughly to remove any air bubbles. Pat it into a smooth, thick slab shape to prepare for rolling. -
Roll the Slab:
Roll the clay out on your canvas mat to a uniform thickness of about 1/2 to 3/4 inch. You want this piece substantial enough to carve wells into without breaking through the bottom. -
Cut the Oval:
Place your oval paper template onto the slab. Using a needle tool or fettling knife, cut straight down around the template to create a clean oval shape. -
Smooth the Edges:
Run a damp sponge or your finger along the sharp cut edges to round them off gently. Compression here helps prevent future cracking. -
Plan Your Wells:
Lightly trace circle shapes onto the surface of the clay where the paint wells will go. I like to arrange six smaller circles around the perimeter and one larger circle.
Step 2: Carving the Wells
-
Start Carving:
Using a loop tool, begin scooping out clay from the marked circles. Work from the center of each circle outward towards your traced lines. -
Check Depth:
Be careful not to carve too deep. Leave at least 1/4 inch of clay at the bottom of each well. -
Refine the Interior:
Once the bulk of the clay is removed, use a damp sponge or your finger to smooth the interior walls of each well, ensuring there are no sharp ridges where paint could get stuck. -
Dry Slowly:
Let this slab dry very slowly, covering it loosely with plastic, as thick slabs are prone to warping.
Clean Edges Tip
After carving the wells, compress the bottom of each well with the back of a spoon. This smooths the clay and aligns the particles to prevent cracks.
Step 3: Creating the Matching Cup
-
Roll a Thinner Slab:
Roll out a second piece of clay, but thinner this time—aim for about 1/4 inch thickness for the cup walls. -
Cut Wall and Base:
Cut a rectangular strip for the body of the cup and a circle for the base that matches the diameter you want. -
Assemble the Cup:
Score and slip the edges of the rectangle and the circle base. Wrap the rectangle into a cylinder, attaching it to the base and sealing the vertical seam. -
Shape the Form:
Gently gently press outward from the inside to create a slightly tapered, rounded form that mimics the softness of the palette. -
Smooth the Lip:
Using a chamois or a wet sponge, meticulously smooth the rim of the cup so it feels soft to the touch.
Make it Modular
Instead of a separate cup, carve a curved notch on the side of the palette that fits the cup base perfectly, creating a docking station.
Step 4: Firing and Glazing
-
Bisque Fire:
Once both pieces are bone dry, fire them in the kiln to a bisque temperature (usually cone 04). -
Clean the Bisque:
Wipe the fired pieces with a damp sponge to remove any kiln dust before glazing. -
Apply Glaze:
Dip or brush a transparent matte glaze over the entire piece. Using a clear glaze is crucial so the natural speckles of the clay body show through. -
Wipe the Bottoms:
Thoroughly wipe off any glaze from the bottom of the palette and the cup to prevent them from sticking to the kiln shelf. -
Final Fire:
Fire the pieces to the maturity temperature of your clay body (likely cone 5 or 6 for stoneware). -
Sand the Base:
After the final firing, use sandpaper to smooth the unglazed bottoms so they won’t scratch your table surface.
Now you have a custom studio tool that makes mixing colors a joy
Seashell Spiral Mixing Palette

Bring the ocean to your art desk with this stunning ceramic seashell palette, featuring a textured scallop design and five deep mixing wells. Its speckled clay body and touches of turquoise glaze create a serene, beach-combed aesthetic perfect for watercolor or gouache mixing.
Detailed Instructions
Materials
- Speckled stoneware clay (mid-fire)
- Scallop shell mold or real large scallop shell (optional, for reference)
- Modeling tool (needle tool and loop tool)
- Rib tool (kidney)
- Sponge
- Rolling pin
- Turquoise or sea glass celadon glaze
- Clear glaze (food safe)
- Slip and scoring tool
- Canvas or slab mat
- Small round object (like a bottle cap or dowel) for indenting wells
Step 1: Sculpting the Base
-
Roll your slab:
Begin by rolling out your speckled clay to an even thickness of about 1/4 inch. Ensure you roll in multiple directions to compress the clay platelets, which helps prevent warping later. -
Cut the primary shape:
Using a needle tool, cut out a large teardrop or rounded fan shape. This will form the main body of the scallop shell section. -
Create the palette extension:
Cut a separate semi-circle shape that fits snugly against the wider, bottom edge of your shell shape. This piece will hold your paint wells. Check the proportions to ensure it feels balanced. -
Join the pieces:
Score the connecting edges of both the shell shape and the semi-circle thoroughly. Apply clay slip and press them firmly together. Smooth the seam on both the top and bottom until the join is invisible.
Warping Woes?
If your palette curls up while drying, try drying it on a piece of drywall or placing a small sandbag weight in the center (on a piece of plastic) to hold it flat.
Step 2: Adding Texture and Detail
-
Form the shell ridges:
Using a modeling tool or your fingers, gently press radiating lines into the shell section, starting from the joined center and fanning out to the edges. Alternate between pressing down and leaving raised ridges to mimic a real scallop shell. -
Refine the edges:
Pinch the outer edges of the shell section slightly to give them a natural, ruffled look. Smooth any sharp bits with a damp sponge. -
Plan the wells:
Mark the positions for five circular wells on the semi-circle section. I usually place one large one in the center and two slightly smaller ones on each side. -
Indent the mixing wells:
Use a rounded object or your thumbs to press deep indentations into your marked spots. Support the clay from underneath with your other hand to prevent the slab from stretching too thin. -
Smooth the wells:
Use a damp sponge or your finger to smooth the inside of each well perfectly. Rough surfaces here will trap paint later, so take your time to get them glassy smooth.
Step 3: Firing and Glazing
-
Slow drying:
Place the finished greenware on a board and cover it loosely with plastic. Let it dry slowly for several days to prevent cracking at the seam or warping of the flat base. -
Bisque fire:
Once bone dry, fire the piece to the appropriate cone for your clay body (usually bisque cone 04). -
Clean the bisque:
Wipe the fired piece with a damp sponge to remove any kiln dust before glazing. -
Glaze the wells:
Carefully pour or brush a turquoise or sea-glass colored glaze into select wells. In the example, three wells are glazed with color for a pop of ocean vibes, while two are left natural. -
Apply clear coat:
Apply a clear, glossy glaze over the entire piece, including the colored wells and the raw clay areas. The clear coat will make the speckled clay pop and ensure the surface is non-porous and easy to clean. -
Wipe the foot:
Thoroughly wipe off any glaze from the very bottom of the palette so it doesn’t fuse to your kiln shelf. -
Glaze fire:
Fire the piece again to the final maturity temperature of your clay and glaze (typically Cone 5 or 6 for stoneware).
Oceanic Rim
Brush a tiny amount of iron oxide wash on the very edges of the shell ridges before the final clear glaze. It will break brown during firing, highlighting the texture remarkably.
Once cool, your coastal palette is ready to hold your paints and inspire your next seascape.
Color-Wheel Ring Palette
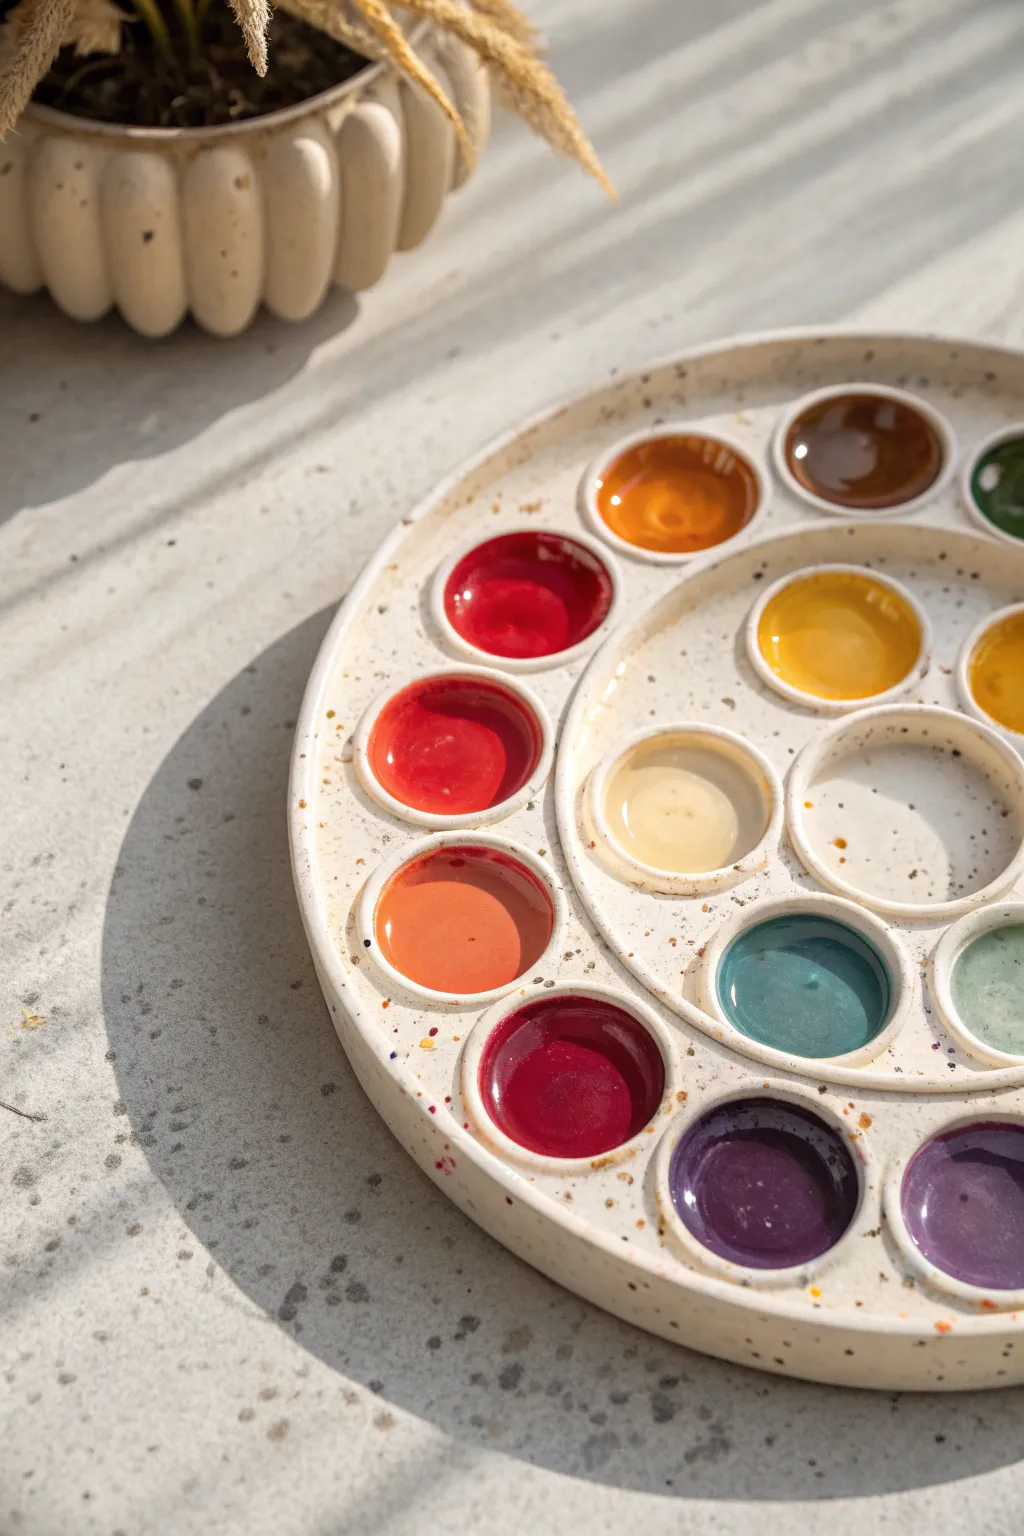
This elegant, wheel-inspired palette brings a professional touch to your studio with its speckled stoneware finish and thoughtful layout. Featuring deep wells for holding pigment rings and a generous central mixing area, it combines functionality with minimal, earthy aesthetics.
Step-by-Step Tutorial
Materials
- Speckled cream polymer clay or white air-dry clay with added speckles
- Rolling pin
- Two circle cutters (one large approx. 6-7 inches, one medium approx. 4 inches)
- Small circle cutter or measuring spoon (for pigment wells)
- Ball stylus tool or rounded paintbrush end
- Clay knife or scalpel
- Water and sponge (for smoothing)
- Fine-grit sandpaper
- Gloss glaze or varnish (water-resistant)
- Paintbrush for glazing
Step 1: Base Construction
-
Prepare the clay:
Begin by conditioning your speckled clay until it is soft and malleable. If you are using plain clay, knamd in small amounts of black pepper or dried coffee grounds to achieve that organic speckled look. -
Roll the slab:
Roll out the clay on a flat surface to a uniform thickness of about 1/4 inch. Ensure it is wide enough to accommodate your largest circle cutter. -
Cut the main shape:
Use your largest circle cutter (6-7 inches) to punch out the main base of the palette. Remove the excess clay and smooth the outer edges with a damp finger or sponge. -
Create the inner ring:
Roll a second slab of clay, slightly thinner than the base. Use the large cutter again to cut a circle, then immediately use the medium cutter centered inside it to create a ring. Remove the center circle. -
Attach the ring:
Score the outer edge of your base and the underside of the ring you just cut. Apply a little water or liquid clay (if using polymer) and press the ring onto the base to build up the outer rim height.
Step 2: Creating the Wells
-
Plan the layout:
Lightly mark where your paint wells will go. Looking at the design, you need a ring of small circles around the perimeter and a few sections in the center. -
Form the outer wells:
Take a small ball of clay for each well. flatten them slightly, and press them onto the outer ring area. I find using the back of a measuring spoon creates perfectly uniform concave indents. -
Refine the edges:
Use a damp brush or your finger to smooth the clay around each indentation, ensuring there are no sharp ridges where the paint might get stuck. -
Build the inner barrier:
Roll a thin snake of clay and form a circle in the middle of the palette to separate the outer paint ring from the central mixing area. Score and slip to attach it securely. -
Create the central mix area:
Inside that new inner barrier, use your fingers to gently depress the clay, creating a shallow, flat basin for mixing colors. -
Add central wells:
If desired, add one or two larger circular wells within the central area using the measuring spoon technique, or leave it entirely flat for mixing space.
Uneven Drying?
If using air-dry clay, your flat base might curl up at the edges. To prevent this, place a light weight (like a flat book) on top of the clay once it’s semi-dry to keep it perfectly level.
Step 3: Finishing and Sealing
-
Surface smoothing:
Before drying or baking, go over the entire piece with a damp sponge. Smooth out fingerprints and soften any harsh angles on the rims. -
Curing or drying:
If using polymer clay, bake according to package instructions (usually 275°F for 15-30 mins). If using air-dry clay, let it sit in a cool, dry place for 24-48 hours until fully hard. -
Sanding:
Once fully cured and cooled, use fine-grit sandpaper to gently buff the edges and surface. This is crucial for a professional feel. -
First coat of glaze:
Apply a thin, even coat of water-resistant gloss varnish or glaze. This is essential so the palette doesn’t absorb the watercolor paint later. -
Dry and recoat:
Let the first coat dry completely. Apply a second or even third coat to ensure a glass-like finish that is easy to wipe clean. -
Final cure:
Allow the varnish to cure fully (often 24 hours) before testing it with any wet paint.
Make it Functional
Add 3-4 small silicone bumpers to the underside of the finished palette. This stops it from sliding around your desk while you’re vigorously mixing colors and protects the table surface.
Now fill those little wells with your favorite pigments and enjoy the satisfying process of painting from your own handmade ceramics