High school clay projects are the sweet spot where skills get real and ideas get bold—your hands learn technique while your brain tells a story. These ideas are classroom-friendly, teen-appropriate, and built around hand-building fundamentals that still leave tons of room for your own style.
High School Trio of Hand-Built Bowls
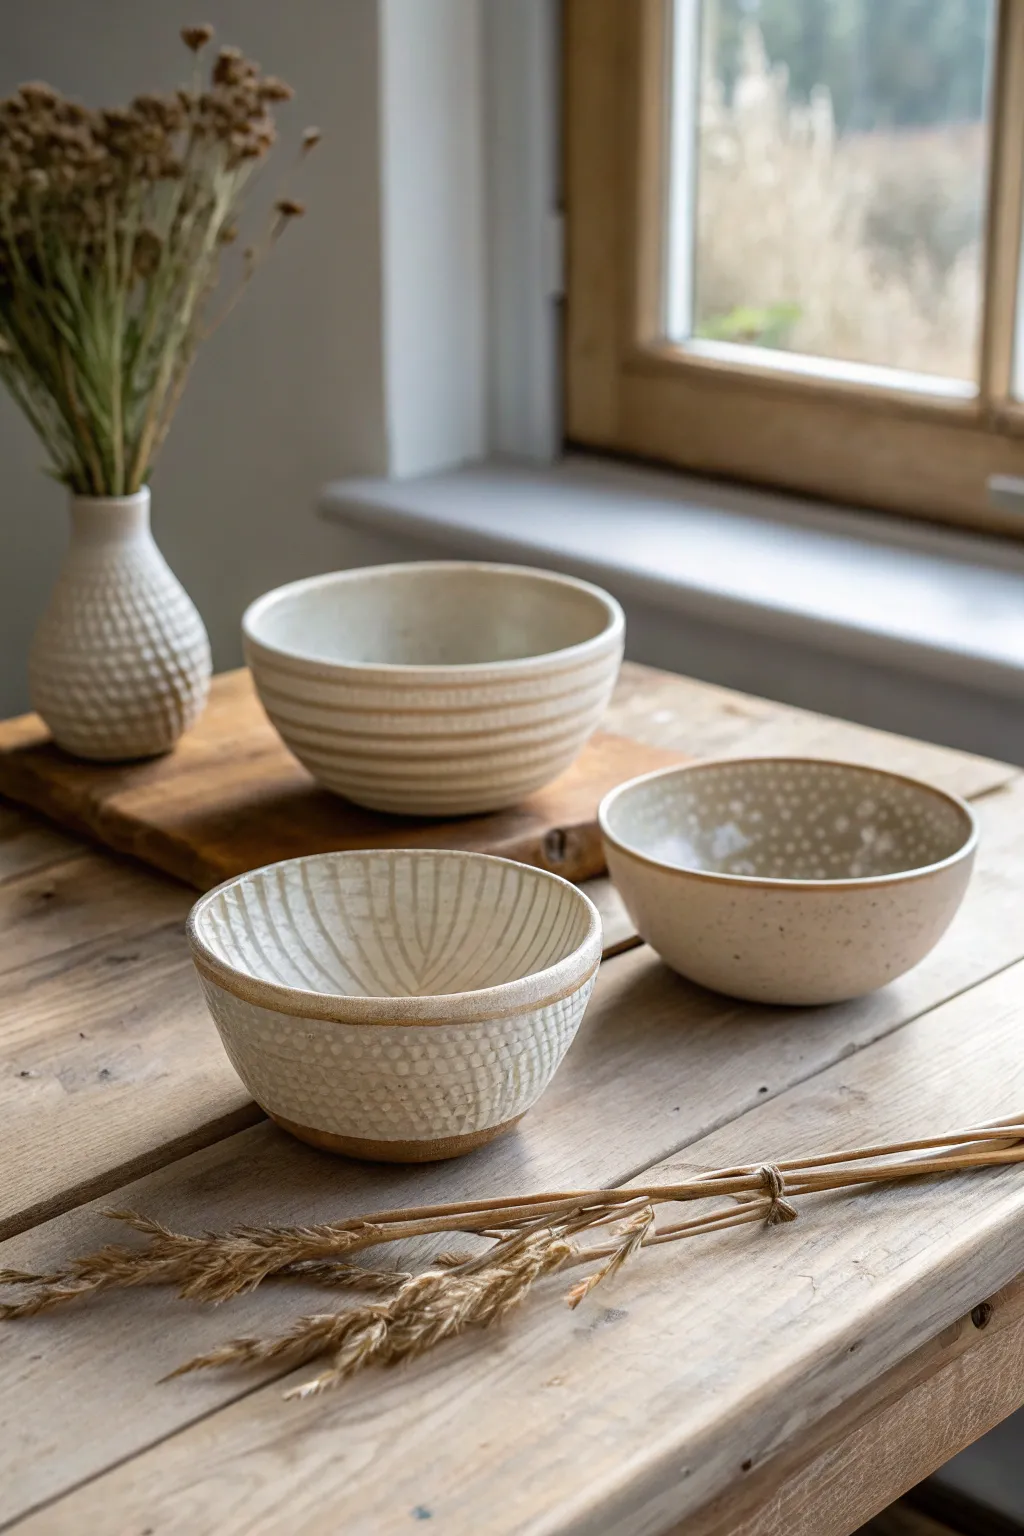
This project explores three distinct surface design techniques on simple, hand-built forms, resulting in a cohesive yet varied set of serving bowls. By using coil and pinch methods, you’ll create organic shapes that highlight the raw beauty of the clay body alongside subtle, tactile textures.
How-To Guide
Materials
- Stoneware clay (smooth or speckled body)
- Clay cutting wire
- Rolling pin
- Canvas mat or slab roller
- Rib tool (kidney shaped, wood or metal)
- Needle tool
- Loop tool for trimming
- Texture tools: comb tool, wooden stylus, dowel, or stamps
- Sponge
- Creamy white or oatmeal matte glaze
- Clear glaze (optional for interiors)
- Kiln for firing
Step 1: Forming the Base Bowls
-
Prepare your clay:
Wedge your clay thoroughly to remove air bubbles and ensure a consistent texture. Divide the clay into three equal portions, each roughly the size of a large grapefruit. -
Pinch pot basics:
For the first bowl (front left), start by forming a ball. Push your thumb into the center, stopping about a half-inch from the bottom. Gently pinch and rotate the clay walls to thin them out and raise the height. -
Coil building method:
For the wider bowls (back and right), I find coil building works best for control. Roll out a flat slab base about 1/2 inch thick and cut a circle. Score and slip the edge, then attach thick coils of clay, smoothing them upward to build the walls. -
Refine the shape:
Use a rib tool on both the inside and outside of your heavy bowls while the clay is soft. Provide support with your hand on the opposite side as you scrape to create a smooth, continuous curve without collapsing the form. -
Let them firm up:
Allow all three bowls to dry to a ‘leather-hard’ state. This is crucial—the clay should be firm enough to handle without warping but soft enough to carve into.
Step 2: Texturing the Surfaces
-
Bowl 1: The Combed Look:
Take the first bowl for the vertical texture. Using a wire loop tool or a specialized texture comb, carve vertical channels from the rim down toward the base. -
Adding detail to Bowl 1:
Vary the pressure slightly as you carve. For the lower section, switch to a small stylus to press a grid or honeycomb pattern of indentations near the foot, creating a contrast with the vertical lines above. -
Bowl 2: Horizontal Ribbing:
For the back bowl, place it on a banding wheel if you have one. Hold a loop tool or a notched rib steady against the side while rotating the wheel to carve deep, parallel horizontal grooves around the entire circumference. -
Bowl 3: Dotted Pattern:
For the final bowl on the right, focus on the interior and upper exterior. Use the back of a paintbrush or a rounded dowel to press random, organic divots into the clay surface. -
Refine the rims:
Check the rims of all three bowls. Run a damp sponge or a piece of chamois leather over the lip to ensure it is smooth and pleasant to touch. -
Trim the feet:
Turn the bowls over. If the bottoms are heavy, use a trimming tool to carve out a defined foot ring. This lifts the form visually and creates a stopping point for the glaze.
Cracks Appearing?
If you see cracks on the rim while expanding the form, your clay is too dry. Compress the rim with a damp sponge or cut the rim down to fresh clay and rebuild.
Step 3: Glazing and Firing
-
Bisque fire:
Load the bone-dry bowls into the kiln and bisque fire them according to your clay body’s specifications (usually Cone 04 or 06). -
Wax the feet:
Apply wax resist to the bottom foot of each bowl and about 1/4 inch up the side to prevent glaze from running onto the shelf. -
Apply the glaze:
Dip or brush a creamy white, satin-matte glaze onto the bowls. The glaze should be fluid enough to pool slightly in the textures but not so thick that it obscures your carving. -
Highlighting texture:
For the dotted bowl, wipe back the glaze gently with a damp sponge on the raised areas before firing. This exposes the raw clay specks and emphasizes the indentations where the glaze remains. -
Final wipe down:
Check the foot rings one last time to ensure no glaze droplets are sticking to the wax or the bare clay bottom. -
Glaze fire:
Fire the bowls to maturity (likely Cone 5 or 6). Once cool, sand the unglazed foot rings lightly to prevent them from scratching your table.
Try an Oxide Wash
Before glazing, brush iron oxide wash into the textures and wipe it away with a sponge. This darkens the grooves for high-contrast depth.
Enjoy using your custom set for serving snacks or simply displaying as a textural study


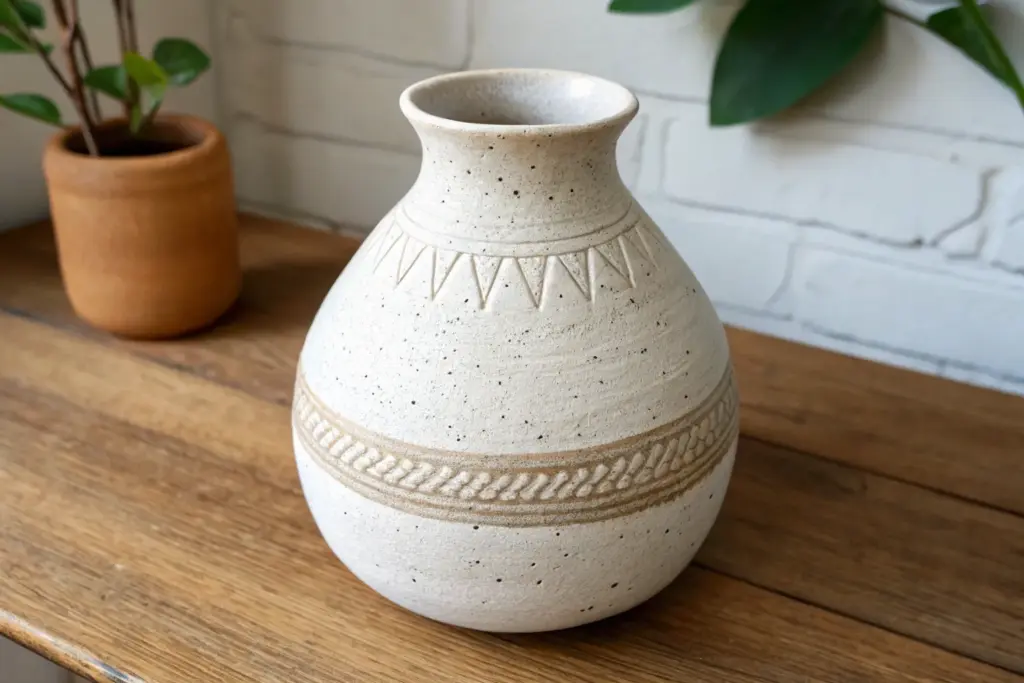
High School Coil-Built Texture Vessel
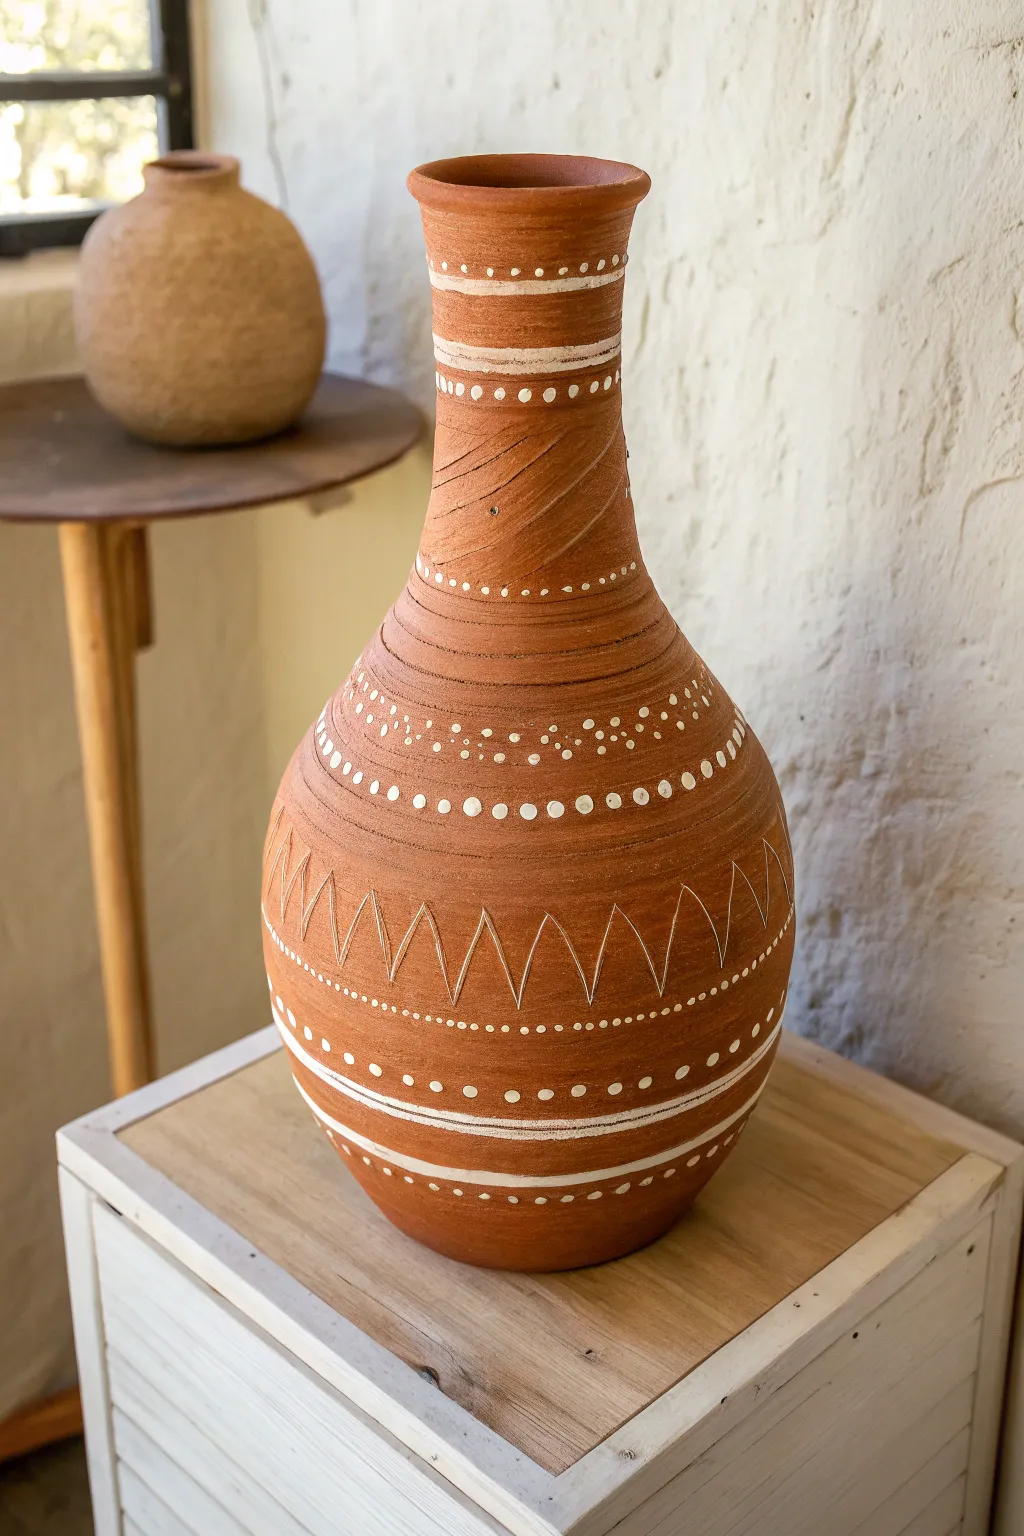
This project combines the ancient technique of coil building with delicate surface decoration to create a stunning, tall-necked vessel. The rich terracotta clay contrasts beautifully with crisp white underglaze details, giving the finished piece a timeless, handcrafted aesthetic.
Detailed Instructions
Materials
- Terracotta stoneware clay
- Serrated rib tool (metal or wood)
- Rubber kidney rib
- Needle tool
- Fettling knife
- Slip and scoring tool
- White underglaze
- Fine-point detail brush or underglaze applicator bottle
- Sponge
- Clear matte glaze (optional)
- Banding wheel
Step 1: Building the Form
-
Create the base:
Start by rolling out a slab of terracotta clay about 3/8 inch thick. Cut a circle roughly 4 inches in diameter to serve as the sturdy foot of your vessel. -
Score and slip:
Thoroughly score the outer edge of your base and apply a generous amount of slip. This first connection is crucial for stability. -
Roll your coils:
Roll out several long, even coils of clay, aiming for the thickness of your thumb or a thick marker. Keep them consistent to ensure the walls rise evenly. -
Build the belly:
Begin stacking coils directly on top of the scored edge. As you add the first few layers, place each coil slightly outward from the one below it to expand the form and create the rounded belly shape. -
Blend the coils:
After every 2-3 coils, stop to blend the clay together. Use your finger or a wooden tool to smudge the clay downwards on the inside and upwards on the outside, ensuring a seamless bond. -
Shape inward:
Once the belly reaches your desired width, begin placing coils slightly inward to taper the form back toward the center, creating the shoulder of the pot. -
Form the neck:
Continue stacking vertically to build the long, slender neck. I find it helpful to slow down here and check the profile often to keep the cylinder straight. -
Flare the rim:
For the final coil, gently flare the clay outward to create a soft, welcoming lip at the very top.
Wobbly Neck?
If the long neck starts to sag or wobble while building, stop immediately. Let the clay stiffen for 30-60 minutes or use a heat gun briefly before adding more weight.
Step 2: Refining and Decorating
-
Rough smoothing:
Use a serrated metal rib to scrape the entire exterior surface while the clay is leather hard. This removes the distinct coil bumps and evens out the wall thickness. -
Create texture:
Go back over the surface with the serrated rib in a diagonal or spiraling motion. Don’t smooth it out completely; leave some of those directional scrape marks visible to add the earthy texture seen in the reference. -
Carve the zig-zags:
Using a needle tool, lightly incise a band of zig-zag lines around the widest part of the belly. Use a banding wheel if you have one to keep the spacing consistent. -
Bisque fire:
Allow the vessel to dry completely—this may take a week for a piece this size—and then bisque fire it to cone 04. -
Apply the white bands:
With white underglaze and a detail brush, paint bands of solid horizontal lines near the bottom, neck, and rim. You may need two coats for opacity. -
Dot the details:
Using the back of a paintbrush or a specialized slip-trailing bottle, apply rows of small white dots. Place them above and below your painted bands and scattered around the neck for visual rhythm. -
Highlight the carving:
Carefully paint thin white lines directly over your incised zig-zag patterns to make them pop against the terracotta background. -
Final firing:
Fire the piece again to the temperature appropriate for your clay body. You can leave the exterior unglazed for a matte finish or apply a thin clear matte glaze to seal it.
Sgraffito Twist
Paint a band of white underglaze on the leather-hard clay, then carve through it to reveal the red clay beneath for a reversed color effect.
Display your tall vessel in a spot with natural light to highlight the subtle textures and crisp white patterns


High School Slab-Built Lidded Box
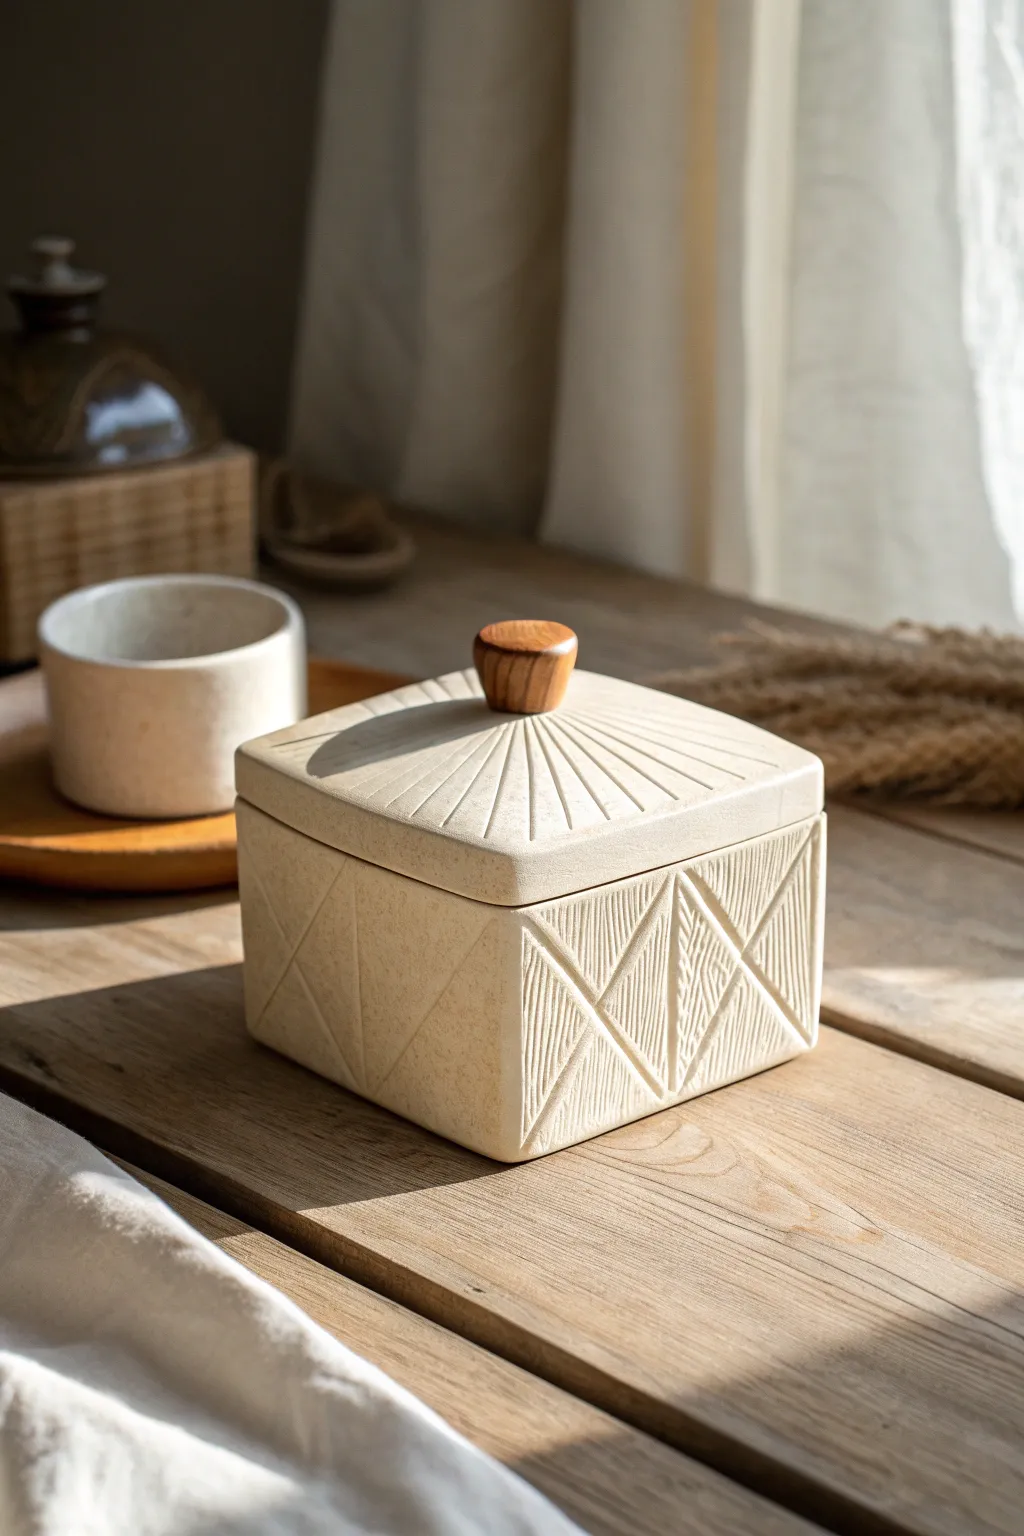
This elegant lidded box combines precise slab construction with textural carving, featuring radiating lines on the lid and geometric diamonds on the body. The addition of a warm wooden knob creates a sophisticated mixed-media finish that elevates it from a simple container to a centerpiece.
Step-by-Step Tutorial
Materials
- Light tan stoneware clay (with fine grog or speckles)
- Rolling pin and guide strips (approx. 1/4 inch thick)
- Fettling knife or needle tool
- Ruler and square tool
- Scoring tool and slip
- Loop tool or carving stylus (for surface design)
- Small wooden knob (pre-made or turned wood)
- High-strength epoxy glue
- Sanding sponge
- Matte white or clear glaze (optional)
Step 1: Slab Construction
-
Roll your slabs:
Begin by rolling out an even slab of clay, using guide strips to ensure a consistent thickness of about 1/4 inch. Compress the slab on both sides with a rib to align the clay particles and prevent warping. -
Cut the components:
Using a ruler and square, measure and cut your pieces. You will need a square base (e.g., 4×4 inches), four rectangular side walls (e.g., 4×3 inches), and a square lid slightly larger than the base (e.g., 4.25×4.25 inches) to account for the overhang. -
Leather hard transition:
Allow your cut slabs to stiffen to a soft leather-hard state. This is crucial for maintaining sharp, straight walls during assembly. -
Miter the edges:
For the cleanest corners, cut the vertical edges of your side walls at a 45-degree angle. This allows them to join seamlessly without exposing end-grain clay. -
Score and slip:
Thoroughly score the edges of the base and the mitered sides. Apply slip generously and press the first wall onto the base. -
Assemble the walls:
Attach the remaining walls, ensuring the corners meet perfectly at right angles. Reinforce the interior seams by pressing a thin coil of clay into the corners and smoothing it out. -
Refine the form:
Once the box is assembled, use a flat paddle or a wooden block to gently tap the walls straight and ensure the top rim is level.
Clean Lines Tip
Use a barely damp sponge to smooth the carved channels immediately after cutting. This prevents sharp, jagged edges that can be sharp to the touch after firing.
Step 2: Lid and Carving
-
Form the lid flange:
Flip your lid slab over. Create a flange (a smaller square of clay) or add small tabs on the underside that will fit snugly inside the box opening to keep the lid from sliding off. -
Dome the lid:
I like to gently press the center of the lid from the underside to create a very subtle dome shape; this adds elegance and strength to the flat slab. -
Map out the pattern:
Lightly sketch your design onto the leather-hard clay with a needle tool. Draw radiating lines from the center of the lid and a geometric diamond or triangle pattern on the side walls. -
Carve the relief:
Using a carving tool or small loop tool, carve out the negative space or incise deep lines. For the side walls, alternate the direction of texture within the triangles to create visual interest. -
Clean up burrs:
Let the piece dry a bit more, then gently brush away any clay crumbs or sharp burrs left from carving. Use a damp sponge to smooth sharp edges. -
Prepare the knob attachment:
Since we are using a wooden knob later, ensure the center of the lid is flat and smooth. Do not attach a clay knob.
Custom Twist
Instead of a generic store-bought knob, wander into nature to find a small, interesting piece of driftwood or a smooth river stone to epoxy onto the lid.
Step 3: Finishing and Assembly
-
Bisque fire:
Once bone dry, bisque fire the box and lid to your clay body’s specifications (usually Cone 04). -
Glazing:
Apply a matte white glaze or a transparent matte glaze to highlight the speckles in the clay. Wipe back the glaze slightly on the high points of the texture to accentuate the carving. -
Glaze fire:
Fire the piece for the final glaze firing. Ensure the lid is fired separately or with proper wadding to prevent it from sticking to the box. -
Attach the knob:
After the ceramic is completely cool, mix a small amount of high-strength epoxy. Apply it to the base of your wooden knob and press it firmly onto the center of the lid. -
Final cure:
Allow the epoxy to cure fully (usually 24 hours) before lifting the lid by the knob.
Once the epoxy sets, your mixed-media box is ready to hold treasures or simply sit beautifully on a shelf.


High School Pinch Pot Mug With Big Handle

This earthy, reddish-brown mug features striking geometric patterns carved into the surface, creating a beautiful contrast between the raw clay body and the glazed portions. The oversized handle adds both comfort and a distinct silhouette perfect for a cozy morning coffee.
How-To Guide
Materials
- Red stoneware clay (mid-fire or high-fire)
- Fettling knife
- Rib tool (kidney shaped, wood or rubber)
- Scoring tool or serrated kidney
- Slip (clay mixed with water)
- Sgraffito loop tool or fine carving needle
- Sponge
- Clear glaze (food safe)
- Kiln access
Step 1: Forming the Base
-
Start the pinch pot:
Begin with a ball of red stoneware clay roughly the size of a large orange. Insert your thumb into the center, stopping about a half-inch from the bottom. -
Pinch the walls:
Slowly rotate the ball in your hand while gently pinching the clay between your thumb and fingers. Aim for an even thickness of about 1/4 inch all the way up. -
Build height:
Since this is a taller mug, you likely can’t get all the height from just pinching. Roll a thick coil of clay and attach it to the rim of your pinch pot by scoring and slipping. -
Smooth and shape:
Use your fingers and a rib tool to blend the coil seamlessly into the pinch pot walls. Pull the clay upward to create straight, vertical sides rather than a bowl shape. -
Flat bottom check:
Gently tap the pot on your work surface to flatten the bottom. Make sure it sits level without wobble.
Cracks at the Handle?
If hairline cracks appear at the join while drying, cover the mug with plastic to slow drying down. You can compress the cracks with a damp finger to heal them.
Step 2: The Big Handle
-
Pull or roll the handle:
For that substantial look, pull a thick strip of clay or roll a coil that is slightly flattened. It should be about 3/4 inch wide. -
Shape the curve:
Bend the clay into a large ‘ear’ shape. I like to hold it up to the cup body to visualize the proportions before cutting anything. -
Attach the top:
Score the mug body near the rim and the end of the handle thoroughly. Apply slip and press the handle firmly into place, blending the clay with a wooden tool. -
Attach the bottom:
Connect the bottom of the handle lower down on the mug body, ensuring there is a large, comfortable semi-circle opening between the handle and the cup. -
Refine the join:
Clean up any excess slip around the connection points with a damp sponge or brush so the transition looks seamless.
Step 3: Carving the Design
-
Leather hard stage:
Allow the mug to dry until it is leather hard. It should be firm enough to hold its shape perfectly but still cool to the touch and carvable. -
Plan the grid:
Using a needle tool, lightly scratch a horizontal line around the middle of the mug and another near the bottom to guide your geometric triangles. -
Carve the triangles:
Use a fine loop tool or sgraffito tool to carve deep lines forming a zigzag pattern between your guidelines. This creates the alternating upright and inverted triangles. -
Add detail lines:
Inside each triangle, carve a vertical line down the center, flanked by two angled lines on each side that meet at the triangle’s point, resembling stylized wheat or leaves. -
Rim decoration:
Just under the rim, carve a continuous band of small overlapping ovals or loops to create a chain-like border. -
Clean up burrs:
Once the carving is dry, use a stiff brush or a slightly damp sponge to gently remove any clay crumbs (burrs) without smoothing out your crisp lines.
Keep Lines Crisp
Don’t try to brush away the little clay crumbs while you are carving! Wait until the pot is bone dry, then they will flake off cleanly without smudging your design.
Step 4: Firing and Glazing
-
Bisque fire:
Load the bone-dry mug into the kiln for a bisque firing (usually cone 04). -
Wax resist (optional):
If you want the carved lines to remain raw and unglazed like in the photo, apply wax resist carefully over the carved areas, although dipping works too if the glaze breaks well. -
Glaze application:
For the look in the image, the maker likely used a semi-transparent or breaking glaze that settles into the texture, or wiped back the glaze. Dip the mug in a clear or light rust-colored glaze. -
Wipe back method:
If you dipped the whole mug, take a clean, damp sponge and wipe the surface of the mug, leaving glaze deeper in the carved lines and pores but revealing the red clay body on the high distinct spots. -
Final fire:
Fire the mug to the maturity temperature of your clay and glaze (likely cone 5/6 for stoneware).
Enjoy your morning coffee in a mug that feels as good to hold as it looks on the shelf

The Complete Guide to Pottery Troubleshooting
Uncover the most common ceramic mistakes—from cracking clay to failed glazes—and learn how to fix them fast.
High School Slab Plate Inspired by Food Traditions
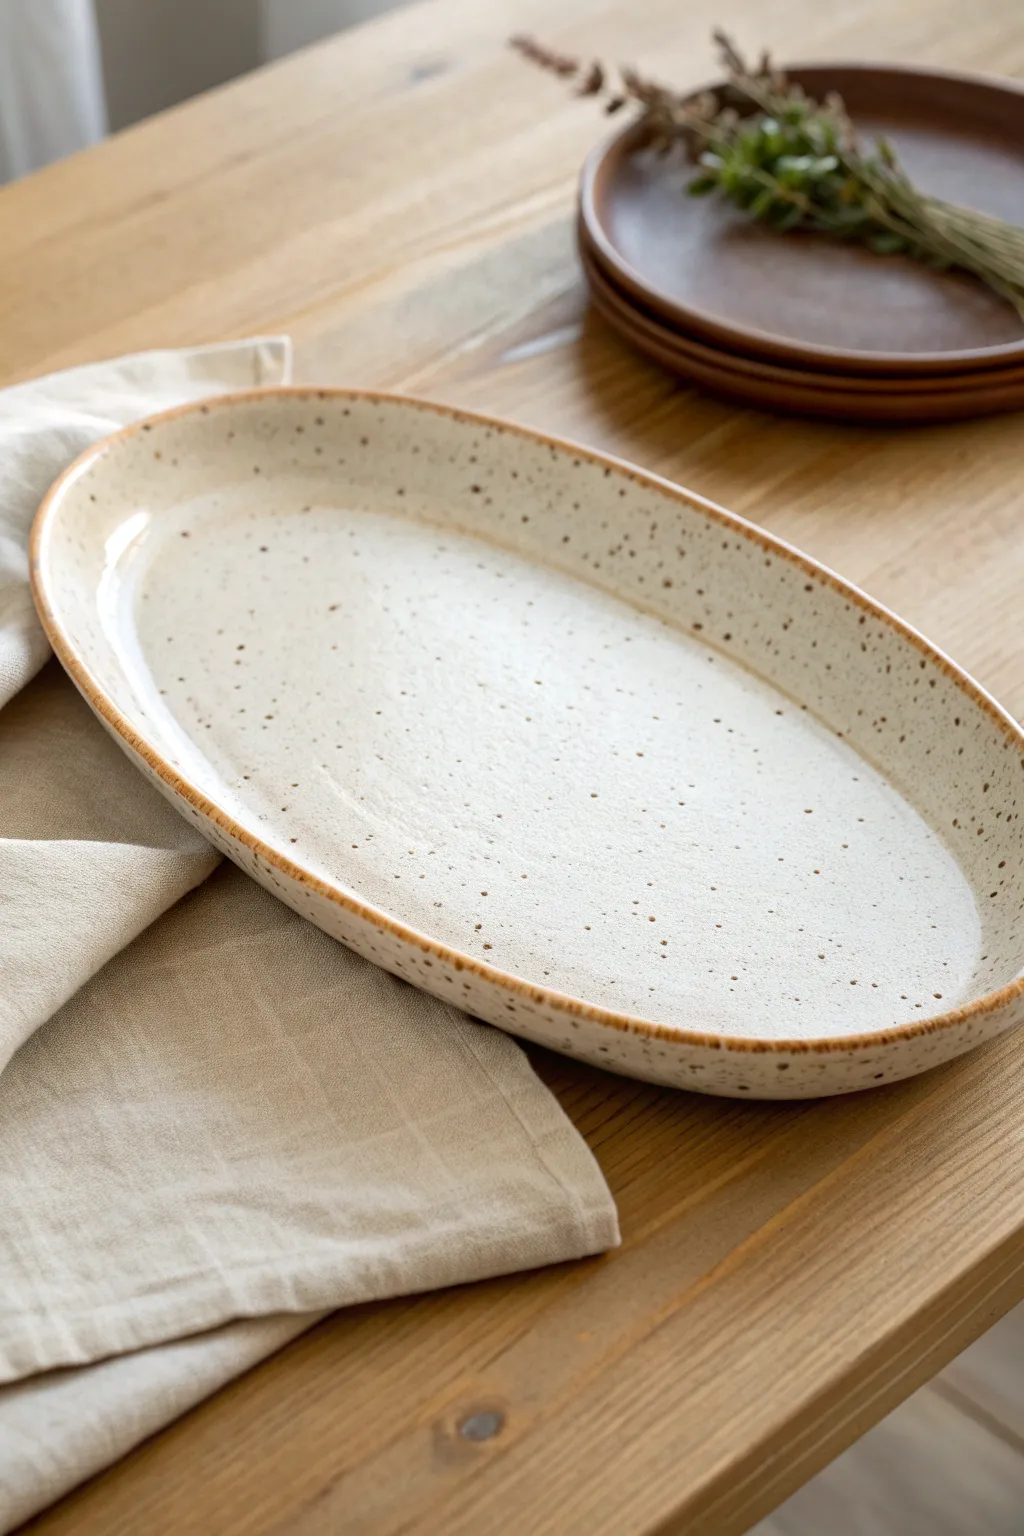
This project celebrates the simple elegance of functional pottery with a large, oval serving platter featuring a warm, speckled cream glaze and a rustic exposed rim. Built using hand-building slab techniques, its organic form and inviting texture make it a perfect centerpiece for family-style meals.
Step-by-Step Tutorial
Materials
- Stoneware clay (preferably a speckled body or buff clay)
- Rolling pin
- Canvas mat or slab roller
- Oval paper template (approx. 14×8 inches)
- Needle tool or fettling knife
- Yellow rib tool (soft rubber)
- Sponge
- Large slump mold OR thick foam sheet
- Speckled cream or ‘oatmeal’ matte glaze
- Iron oxide wash (optional, for rim)
- Kiln
Step 1: Preparing the Slab
-
Wedge the clay:
Begin with a substantial amount of stoneware clay, wedging it thoroughly to remove air bubbles and align the particles. -
Roll out the slab:
using a rolling pin and canvas (or a slab roller), flatten the clay into a large sheet. Aim for a consistent thickness of about 3/8 of an inch to ensure durability for a large platter. -
Compress the clay:
Take a rubber rib tool and drag it firmly across the surface of the slab in multiple directions. This compression is crucial for preventing warping during the firing process. -
Cut the shape:
Place your oval paper template onto the smooth slab. Tracing lightly first if needed, use a needle tool or fettling knife to cut vertically through the clay, removing the excess. -
Smooth the edges:
Run a damp sponge or your finger along the freshly cut rim to soften the sharp 90-degree angle into a gentle, rounded curve.
Uneven Wobble?
If your platter rocks on the table after firing, the bottom wasn’t compressed enough or dried too fast. Use sanding pads or a grinding stone on the foot to level it out.
Step 2: Forming and Refining
-
Lift the edges:
If using a foam sheet, place the slab on top and gently press the center down while lifting the outer rim to create a shallow curve. If using a slump mold, drape the clay into the mold. -
Define the rim:
Work your way around the oval, using your thumb and forefinger to slightly bevel or pinch the very edge, giving it that handmade, slightly irregular quality seen in the photo. -
Refine the surface:
While the clay is leather hard, use a slightly damp sponge to wipe away any tool marks or canvas texture, leaving a pristine smooth surface for the glaze. -
Dry slowly:
Loosely cover the platter with plastic to let it dry very slowly. Large flat pieces are prone to warping, so rushing this stage can crack the base. -
Bisque fire:
Once bone dry, fire the piece to Cone 04 (or your clay body’s bisque temperature).
Use a weighted bag
To keep the center flat while drying, place a small sandbag (gently!) in the middle of the plate while it sets up on the foam. This prevents the ‘floor’ from bowing upward.
Step 3: Glazing and Finishing
-
Clean the bisque:
Wipe the fired piece with a damp sponge to remove any dust that might prevent the glaze from adhering properly. -
Wax the foot:
Apply wax resist to the very bottom of the plate where it will sit on the kiln shelf. -
Apply the glaze:
Pour or dip the platter in a speckled cream or oatmeal matte glaze. I find pouring gives a more even coat on large surfaces. Tilt the plate to cover the entire interior and side walls. -
Enhance the rim:
Immediately wipe the glaze off just the very edge of the rim with a damp sponge. This exposes the raw clay body, creating that distinct brown outline. -
Optional oxide wash:
If your clay body isn’t naturally dark brown, carefully paint a thin line of iron oxide wash on the exposed rim to mimic the toasted look. -
Glaze fire:
Fire the piece to maturity (typically Cone 5 or 6 for stoneware). The heat will interact with the glaze to bring out the speckles.
Once cooled, your platter is ready to be loaded with bread or roasted vegetables, bringing a touch of artisan charm to your table
High School Coil Vessel With Negative Space
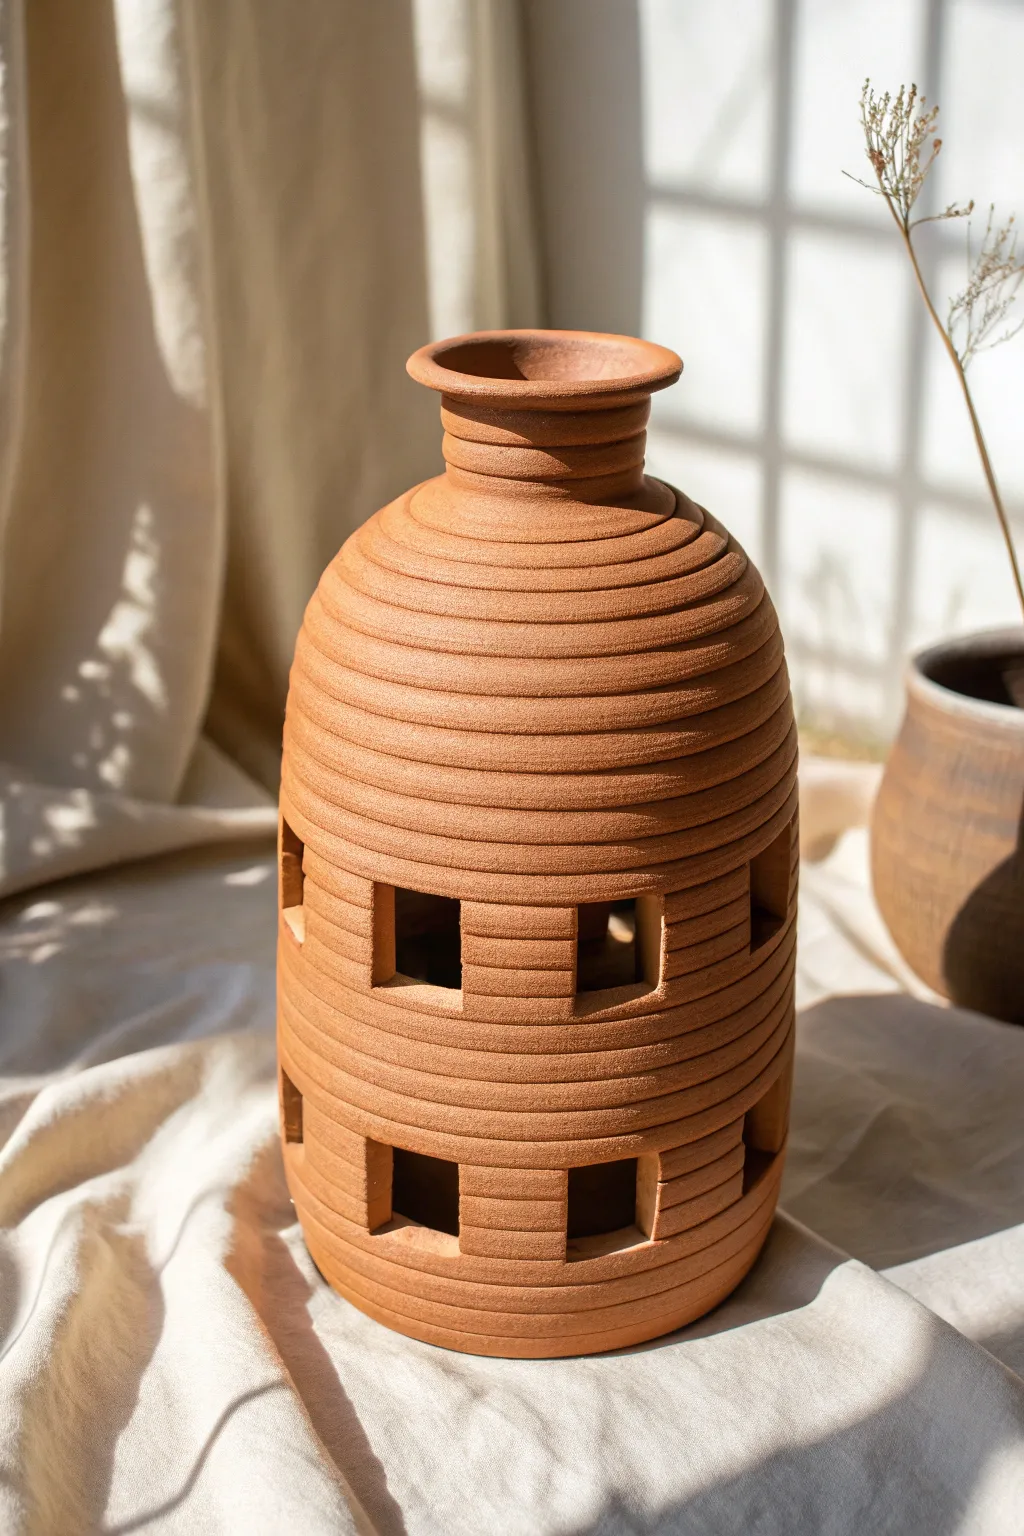
This project pushes traditional coil building into new territory by incorporating negative space directly into the structure. The result is a striking, warm-toned vessel that looks like an ancient architectural model, playing with light and shadow through its deliberate window cutouts.
Step-by-Step Guide
Materials
- Red earthenware or terracotta clay (low fire)
- Clay scoring tool or serrated rib
- Slip (clay mixed with water)
- Needle tool or fettling knife
- Rolling pin or slab roller (optional for base)
- Wooden modeling tool
- Rectangular template (cardstock or old credit card)
- Sponge
Step 1: Building the Foundation
-
Create the base slab:
Begin by rolling out a circular slab of clay about 1/4 to 3/8 inch thick. This will be the floor of your vessel. Cut it to your desired diameter—around 6 inches is a manageable size for this height. -
Roll your coils:
Roll out several long, even coils of clay. Aim for a thickness of about a finger’s width. Try to keep them consistent, as variations will show in the final texture. -
Score and slip the first layer:
Score the outer edge of your base slab and apply a generous amount of slip. Lay your first coil on top of this scored area, curving it to match the circle exactly. -
Blend the interior:
While preserving the coil texture on the *outside*, firmly smear the clay from the coil down onto the base on the *inside* using your thumb or a wooden tool. This internal blending is crucial for structural integrity. -
Build the first section:
Continue stacking coils, scoring and slipping between each layer. Build straight up for about 3-4 inches. Remember to smooth the inside seams as you go, but leave the exterior coils rounded and distinct.
Sagging Bridges?
If the coil bridging a window gap sags, prop it up with a small geometric shape of foam or a wad of newspaper. Leave this support in place until the clay stiffens.
Step 2: Creating the Negative Space
-
Plan your windows:
Once you have a solid lower cylinder, let the clay firm up slightly to a ‘soft leather hard’ state. Use a needle tool to lightly mark where your bottom row regarding windows will go. Spacing is key here for stability. -
Form the support columns:
Instead of cutting holes out of a solid wall, build the window sections using short, vertical logs or stacked clay blocks. Place these ‘columns’ on your rim, leaving gaps between them. -
Bridge the gap:
Once your columns are the desired height for the window (about 1.5 inches), lay a long coil across the top of all of them. This acts as a lintel beam. Score and slip aggressively at the contact points to ensure the bridge doesn’t sag. -
Refine the openings:
Use a rectangular template or a stiff card to square off the inside edges of your windows while the clay is still workable. Clean up any slip that squeezed out into the window openings. -
Build the middle section:
Stack several more continuous coils on top of your bridge coil. Build up another 2-3 inches of solid wall to create separation between the window tiers. -
Add the second tier:
Repeat the column-and-bridge process for the second row of windows. To create visual interest, try to align these windows directly above the ones below, or offset them like bricks for a different pattern.
Step 3: Finishing the Form
-
Close the form:
After the second window tier is secure, continue coiling up. Gradually decrease the diameter of your coils to create the tapering shoulder of the bottle shape. -
Form the neck:
Once the shoulders narrow sufficiently, build a vertical neck about 2 inches high. I like to make the coils slightly thinner here for a more delicate look. -
Flare the rim:
For the final touch, flare the last coil outward slightly to create a defined lip. Smooth this top edge carefully with a damp sponge or chamois strip. -
Refine the surface:
Wait until the piece is leather hard. Use a damp sponge to smooth out any rough score marks or burrs, particularly inside the window cutouts. Keep the exterior coil definition crisp. -
Dry slowly:
This vessel has variable drying rates due to the holes. Cover it loosely with plastic for several days to equalize moisture before letting it dry completely.
Sharp Corners
Use a fettling knife or a squared wooden tool to paddle the window interiors perfectly straight. Sharp, crisp right angles make the piece look intentional and professional.
Once fired, the warmth of the terracotta will make this architectural vessel a stunning centerpiece.


What Really Happens Inside the Kiln
Learn how time and temperature work together inside the kiln to transform clay into durable ceramic.
High School Personalized Desk Organizer Set
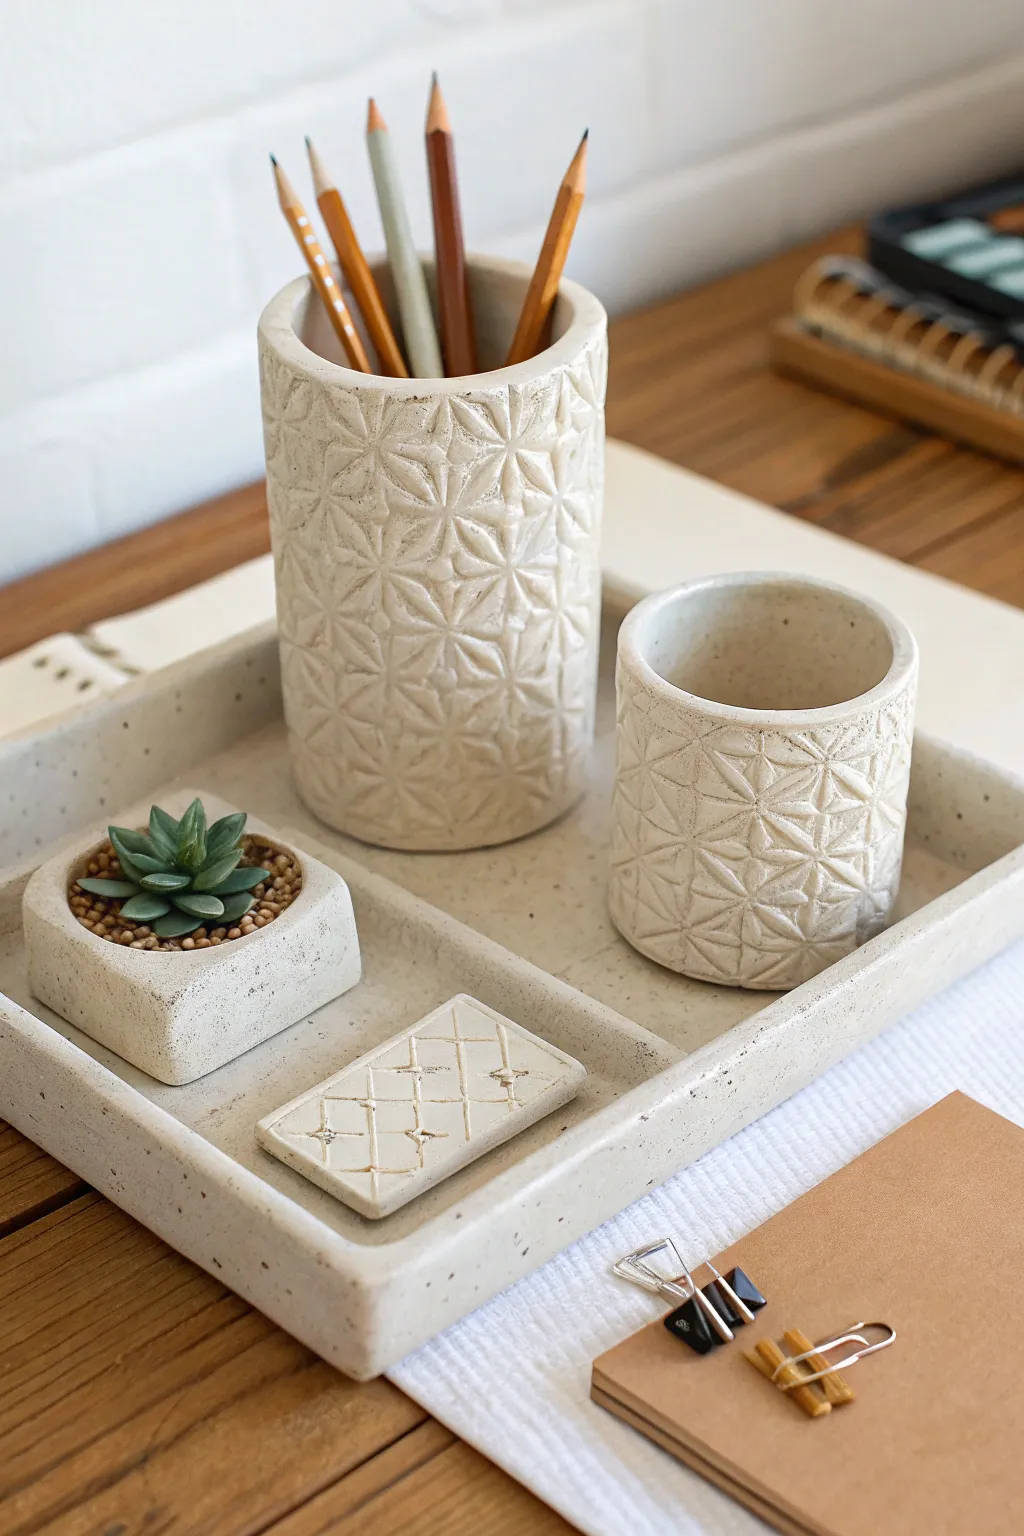
This sophisticated desk organizer combines functionality with a stunning geometric aesthetic, featuring a tray, two cylindrical holders, a planter, and a decorative tile. The consistent star-pattern texture unifies the pieces, while the speckled clay body adds a natural, modern touch perfect for any high schooler’s workspace.
Step-by-Step Tutorial
Materials
- Speckled stoneware clay (white or cream)
- Roller or rolling pin
- Guide sticks (1/4 inch thickness)
- Geometric texture mat or stamp (star/flower pattern)
- Circle cutters (various sizes)
- Fettling knife
- Ruler
- Slip and scoring tool
- Wooden modeling tools
- Sponge
- Clear matte glaze
Step 1: Creating the Base Tray
-
Roll out the slab:
Start by wedging your clay to remove air bubbles. Roll out a large slab of clay between two guide sticks to ensure an even 1/4 inch thickness. -
Cut the base:
Using a ruler and fettling knife, measure and cut a large rectangle for the tray base. Save the excess clay for the walls and other components. -
Build the walls:
Cut strips of clay approximately 1 inch tall. Place them upright around the perimeter of the rectangular base to form the walls. -
Join the seams:
Score and slip the contact points where the walls meet the base. Press firmly to adhere, then blend the clay on both the inside and outside seams until seamless. -
Round the corners:
Gently smooth the sharp corners of the tray with a damp sponge to create a soft, rounded rectangular shape. -
Add the divider:
Cut a smaller strip to fit the width of the tray. Score, slip, and attach it to create a separate compartment, blending the edges smooth.
Fixing Warped Slabs
If your tray starts bowing during drying, place a board with a light weight on the center. Ensure it dries very slowly away from drafts.
Step 2: Forming the Cylinders
-
Texture the clay:
Roll out a fresh slab. Firmly press your geometric texture mat or rolling stamp into the surface to create a deep, clear impression. -
Cut cylinder walls:
Measure and cut two rectangular strips from the textured clay. Make one taller (about 4-5 inches) for pencils and one shorter (about 2-3 inches) for small items. -
Cut cylinder bases:
Use circle cutters to create two clay discs that correspond to the desired diameter of your finished cylinders. -
Assemble the tubes:
Wrap a textured strip into a tube shape, resting it over the circular base. Be careful not to smudge the texture while handling. -
Seam the cylinders:
Score and slip the vertical seam and the connection to the base. I find using a wooden tool on the inside helps reinforce the heavy seam without ruining the outside pattern. -
Clean the edges:
Smooth the top rim with a damp sponge/chamois, ensuring it is level and comfortable to the touch.
Step 3: The Planter & Accessories
-
Build the square planter:
Using the slab method again, cut a small square base and four short walls. Assemble them just like the tray, blending the seams thoroughly. -
Create the rounded lip:
Add a small coil of clay to the top rim of the planter and smooth it downwards to create a thick, rounded lip that overhangs slightly. -
Make the tile:
Cut a small rectangle from your leftover clay. Use a scoring tool or knife to hand-draw a grid pattern, pressing small cross-hatches into the intersections for detail. -
Final drying:
Let all pieces dry slowly under plastic to preventing warping. Once bone dry, bisque fire the set. -
Glazing:
Apply a clear matte glaze to the entire set. This protects the piece while allowing the natural speckles of the clay body to mimic stone.
Pro Tip: Clean Texture
Dust your texture mat with cornstarch before pressing it into the clay. This prevents sticking and ensures the geometric lines stay crisp.
Once fired, fill your new organizer with pencils and a small succulent to instantly upgrade your study space
High School Wall Pocket Planter

Bring a touch of organic warmth to any room with this textured ceramic wall pocket. Featuring a creamy, matte glaze and hand-painted indigo patterns, this functional planter combines simple slab construction with bold surface design.
How-To Guide
Materials
- White or buff stoneware clay (with grog for strength)
- Rolling pin and guide sticks (1/4 inch thickness)
- Needle tool
- Fettling knife
- Large plastic bowl or plaster mold (for forming the curve)
- Serrated rib and scoring tool
- Slip (clay and water mixture)
- Sponge
- White matte glaze (dipping or brushing)
- Cobalt oxide wash or blue underglaze
- Small round paintbrush
- Jute twine or rope for hanging
- Clear matte varnish (optional, for non-fired finishes)
Step 1: Forming the Pocket
-
Roll the slab:
Begin by rolling out your clay into a smooth, even slab. Use your guide sticks to ensure a consistent 1/4 inch thickness throughout, which helps prevent cracking during drying. -
Cut the semi-circle shape:
Using a needle tool, cut a large semi-circle from the slab. A good size reference is about 10-12 inches wide at the top, depending on how deep you want your planter. -
Cut the back panel:
Measure the width of your semi-circle’s flat edge. Cut a rectangle or a matching D-shape for the back panel that is the same width, ensuring it will fit flush against the wall. -
Form the curve:
Drape your semi-circle slab into a plastic bowl or over a plaster mold designated for slump molding. Let it firm up slightly to leather-hard so it holds that nice, rounded ‘belly’ shape without collapsing. -
Prepare the joints:
Once the curved front is firm enough to handle, score the curved edges and the corresponding edges of your back panel aggressively. Apply a generous amount of slip to the scored areas. -
Assemble the pieces:
Press the back panel onto the curved front piece. Use a wooden tool or your thumb to blend the seams together on both the inside and outside ensuring a strong bond. -
Smooth and refine:
Use a damp sponge to smooth out the joined seams and soften the top rim. I like to run my finger along the rim to make sure it’s comfortable to the touch. -
Create hanging holes:
while the clay is still leather-hard, use a hole punch tool or a straw to create two holes on the back panel near the top corners. Make sure they are large enough to fit your jute rope after the clay shrinks.
Seam Security
Reinforce the inside seam where the back meets the front with a thin coil of extra clay. Blend it well for a leak-proof seal.
Step 2: Design and Finishing
-
Bisque fire:
Allow your planter to dry slowly and completely under loose plastic to prevent warping. Once bone dry, bisque fire the piece to cone 04 (or your clay’s specification). -
Apply base glaze:
Dip the entire planter into a matte white or cream glaze. Ensure an even coat and shake off any excess drops. If brushing, apply 2-3 even coats, letting each dry in between. -
Paint vertical stripes:
Dip a small round brush into your cobalt oxide wash or blue underglaze. Paint thin, vertical lines down the front of the planter, spacing them out unevenly for a hand-drawn look. -
Add geometric details:
Between the vertical lines, paint columns of simple shapes like circles or ovals. Don’t worry about perfect symmetry; the variation adds to the organic aesthetic. -
Refine the pattern:
For the specific look in the photo, create columns of solid blue ovals alternating with thin vertical lines. Keep the brush strokes loose. -
Clean the holes:
Check that your hanging holes are free of glaze. If glaze has filled them, use a small tool to carefully clear them out before firing. -
Glaze fire:
Fire the piece again to the maturity temperature of your clay and glaze (typically cone 5 or 6 for stoneware). This vitrifies the clay, making it watertight. -
Attach the rope:
Once the planter has cooled, cut a length of thick jute rope. Thread it through the holes from front to back, tying secure knots on the inside or splicing it for a cleaner look. -
Hang and plant:
Find a sturdy hook or knob to hang your planter. Fill it with a trailing plant like a String of Turtles or Ivy to complete the cascading effect.
Carve It Out
Instead of painting, try sgraffito. Paint blue underglaze over the raw clay, then carve the vertical lines to reveal the white clay beneath.
Now you have a stunning, handmade vessel ready to display your favorite trailing greenery on any sunlit wall

TRACK YOUR CERAMIC JOURNEY
Capture glaze tests, firing details, and creative progress—all in one simple printable. Make your projects easier to repeat and improve.
High School Pinch Pot Whistle Creature
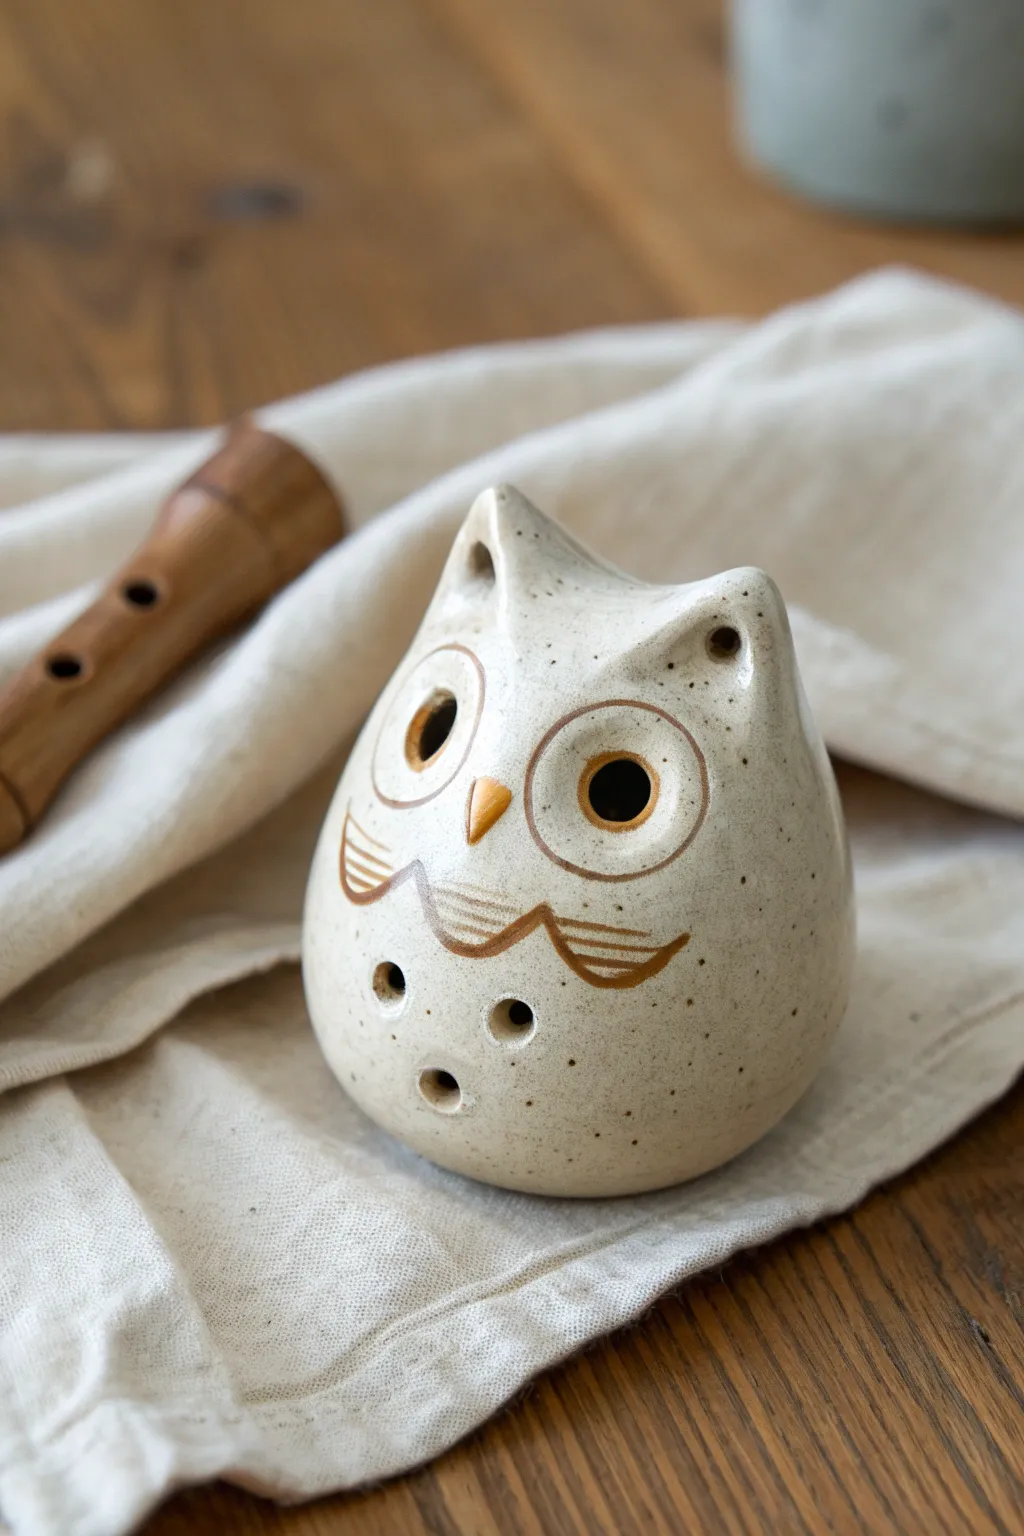
Transform a simple sphere of clay into a charming, functional instrument with this owl whistle project. Featuring a speckled creamy glaze and earthy brown details, this pinch pot creature is as delightful to play as it is to behold.
Step-by-Step Guide
Materials
- Stoneware clay (buff or white with speckles)
- Popsicle stick or modeling tool
- Fettling knife
- Slip (clay mixed with water)
- Scoring tool or needle tool
- Sponge
- Underglaze (brown, orange)
- Clear or translucent white glossy glaze
- Small round paintbrush
- Drill bit or hole cutter tool (small)
Step 1: Forming the Body
-
Create the pinch pots:
Start with two balls of clay roughly the size of golf balls. Press your thumb into the center of each and gently pinch the walls while rotating to create two even hemispheres. -
Join the halves:
Score the rim of both pinch pots with a needle tool and apply a liberal amount of slip. Press the two halves together firmly to create a hollow sphere. -
Seal and smooth:
Drag a bit of clay across the seam to lock the halves together, then smooth the entire surface with a rib tool or your thumb until the seam is invisible and the sphere is round. -
Shape the owl:
Gently tap the sphere on the table to create a flat base so it stands up. Then, gently squeeze top of the sphere to narrow it slightly, hinting at the owl’s head shape.
Step 2: Creating the Whistle Mechanism
-
Form the mouthpiece:
Add a small rectangular wedge of clay to the back of the owl (near the base) to serve as the mouthpiece. Blend it seamlessly into the body. -
Cut the air duct:
Insert a popsicle stick flat into the mouthpiece to create the airway. Then, cut a 45-degree angle notch (the fipple) on the underside of the owl where the stick ends. -
Check the sound:
Carefully clear away any clay crumbs from the airway. Blow gently to test the sound; adjust the angle of the bevel until you get a clear whistle tone. -
Add finger holes:
Using a small hole cutter or drill bit, create three or four holes on the front belly of the owl. These will allow you to change the pitch when played.
Silent Owl?
If it won’t whistle, the bevel edge is likely dull or misaligned. The air from the mouthpiece must hit the sharp edge of the window precisely to split the stream.
Step 3: Sculpting Details
-
Pinch the ears:
At the very top of the head, pinch the clay upwards on the left and right sides to form two distinct, pointed ear tufts. -
Define the face:
Use your thumbs to gently press indentations where the eyes will go, creating a slight brow ridge above. -
Pierce the ears:
Use a small tool or straw to poke a hole through the center of each ear tuft for a decorative touch. -
Smooth the surface:
I like to take a slightly damp sponge over the entire piece now to remove fingerprints and refine the shape before adding surface decoration.
Level Up: Multi-Tone
Tune your whistle! By varying the size of the finger holes on the belly, you can actually create a specific scale (like Do-Re-Mi) rather than random notes.
Step 4: Decoration and Glazing
-
Bisque fire:
Allow the clay to dry completely (bone dry) and fire it in the kiln to bisque temperature. -
Paint the details:
Using a fine brush and brown underglaze, paint circles around the eye indentations and add the scalloped feather pattern on the chest. -
Add the beak:
Paint a small, sharp triangle in orange underglaze between the eyes for the beak. -
Glaze the interior:
Carefully dab a little clear glaze into the eye holes (the tuning holes) to seal the interior slightly without clogging the airway. -
Apply main glaze:
Dip the owl into a translucent creamy white glaze that allows the speckles of the clay body to show through. Ensure the airway remains clear of glaze. -
Final firing:
Fire the piece again to the appropriate temperature for your specific clay and glaze combination.
Once cooled from the kiln, your little owl is ready to hoot its first song
High School Clay Bell With Carved Pattern
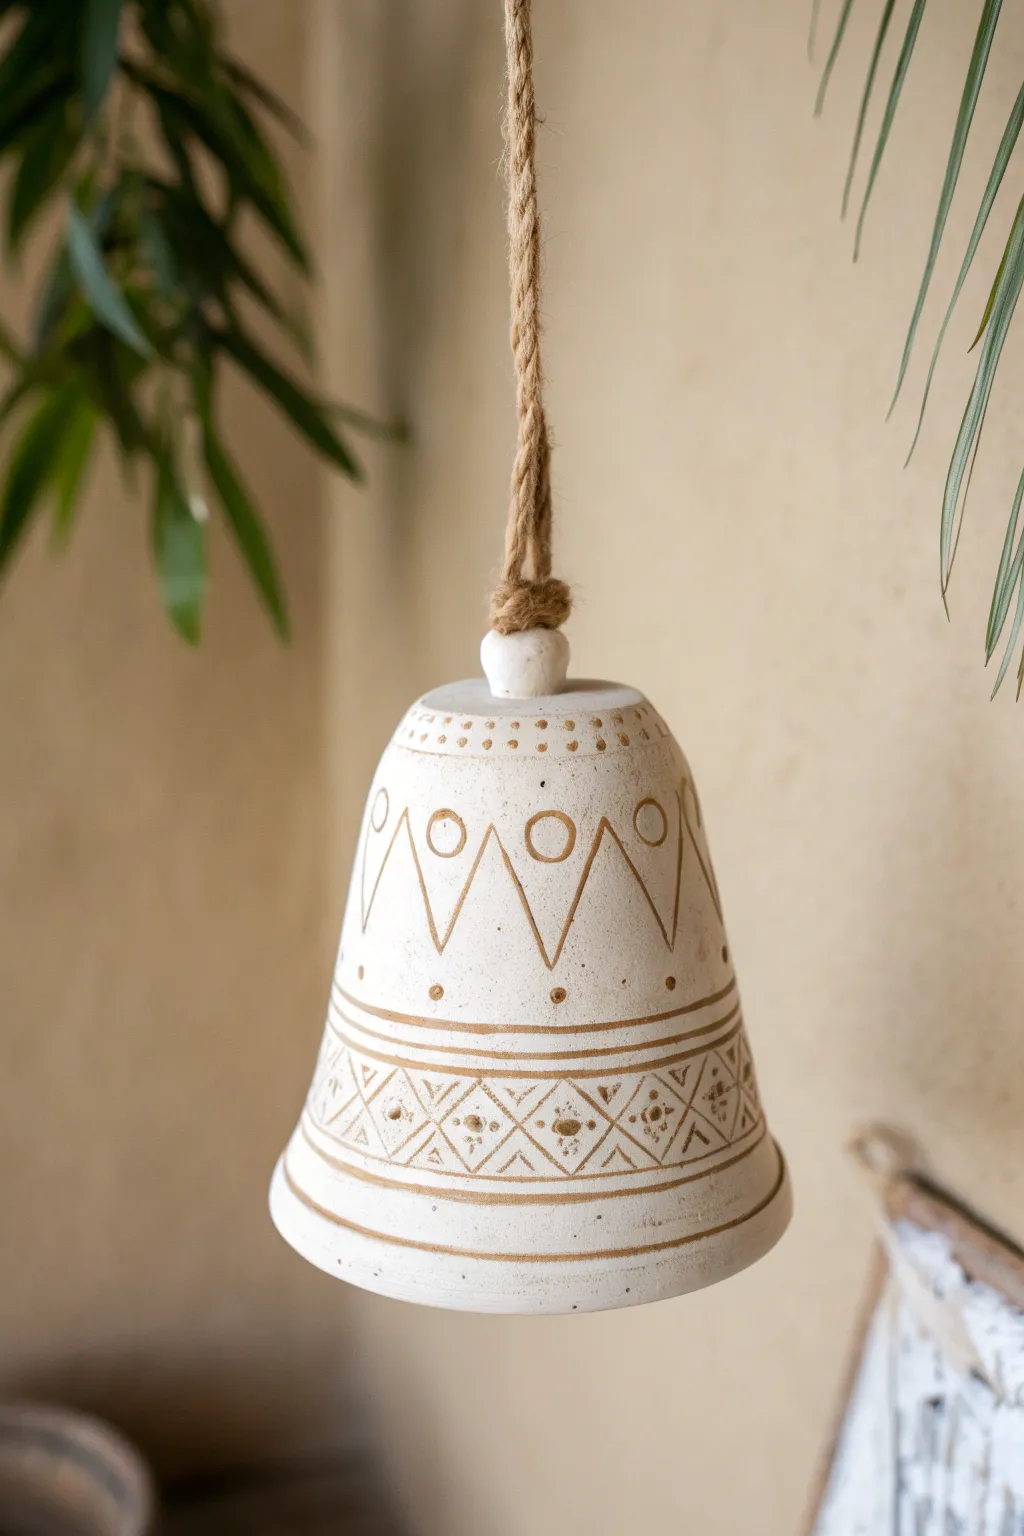
This rustic ceramic bell combines simple wheel-thrown or coil-built forms with an elegant, carved geometric motif. The earthy contrast between the white stoneware and the iron-oxide detailing gives it a timeless, artisanal look that works perfectly indoors or out.
Step-by-Step
Materials
- White stoneware clay
- Pottery wheel (or rolling pin for hand-building)
- Needle tool
- Wire cutter
- Loop trimming tools
- Sgraffito tool or small carving gouge
- Red iron oxide wash (or brown underglaze)
- Sponge
- Clear matte glaze (optional)
- Jute rope or twine
- Small clay bead (clapper)
Step 1: Forming the Bell Body
-
Prepare the clay:
Begin by wedging about 1-2 pounds of white stoneware clay to remove air bubbles and ensure consistency. If you use a wheel, center the clay on the bat. -
Throw or build the dome:
Shape the clay into a tall, domed cylinder. If throwing, open the center but leave the top closed and rounded. Pull walls to an even thickness, flaring slightly at the bottom rim. -
Refine the shape:
Use a rib tool to smooth the exterior surface while the wheel spins (or while blending coils), creating a gentle curve from the top shoulder down to the rim. -
Create the hanging loop:
At the very top apex of the dome, pinch and pull a small knob of clay. Use a needle tool to pierce a clean hole through this knob horizontally—this will hold your rope later. -
Make the clapper:
Roll a small sphere of clay (about the size of a marble) for the internal clapper. Poke a hole through its center for stringing and set it aside to dry alongside the bell. -
Dry to leather hard:
Allow the bell to dry slowly until it reaches a leather-hard state. I like to cover it loosely with plastic so the rim doesn’t dry out faster than the thicker top.
Uneven Carving Lines?
If your hand shakes while carving, brace your pinky finger against the clay surface for stability. Don’t worry about perfection; small wobbles add handmade charm.
Step 2: Carving the Design
-
Map the bands:
Place the bell on a banding wheel. While spinning it slowly, use a needle tool to lightly scribe horizontal guide lines: one near the top shoulder and two parallel lines near the bottom rim. -
Draft the zig-zags:
Lightly sketch a zig-zag or chevron pattern between the top shoulder area and the middle of the bell. Add small circles inside the upper triangles formed by the zig-zags. -
Carve the main lines:
Using a sharp carving tool or sgraffito stylus, carve firmly into your sketched lines. You want a groove deep enough to hold oxide, but not so deep it weakens the wall. -
Detail the bottom band:
Between the two bottom horizontal lines, carve structural X-patterns or diamonds. Add small dots or stippling inside the diamonds for extra texture. -
Clean up burrs:
Once the carving is complete, gently brush away clay crumbs. Use a slightly damp sponge to smooth any sharp burrs created by the carving tool.
Step 3: Finishing and Assembly
-
Bisque fire:
Let the bell dry completely to bone dry, then bisque fire it in the kiln according to your clay body’s specifications (usually Cone 04 or 06). -
Apply oxide wash:
Mix red iron oxide with water to create a thin wash. Brush this liberally over all the carved areas, ensuring it gets deep into the grooves. -
Wipe back:
Take a damp sponge and wipe the surface of the bell. The goal is to remove the oxide from the high points (the white surface) while leaving the dark color trapped in the carved lines. -
Glaze and final fire:
If you want a sealed surface, dip or brush a clear matte glaze over the exterior. Alternatively, leave the raw clay for a rougher texture. Fire to the final temperature (e.g., Cone 5/6). -
Prepare the rope:
Cut a length of thick jute rope. Thread it through the top loop of the bell from the outside going in, but don’t knot it yet. -
Attach the clapper:
Thread the interior end of the rope through your ceramic clapper bead. Tie a sturdy knot underneath the bead ensuring it hangs at the level of the bell’s rim to make sound. -
Secure the hanger:
Finish the top by braiding the remaining rope or tying a loop for hanging, securing it with a whip knot for a clean, finished look.
Project Level Up
Create a ‘wind chime’ effect by making three bells in graduating sizes and hanging them vertically, one inside the other, or clustered together on driftwood.
Hang your new bell near a window or porch beam and listen for the gentle clink of clay on clay
High School Tripod Pinch Pot Vessel
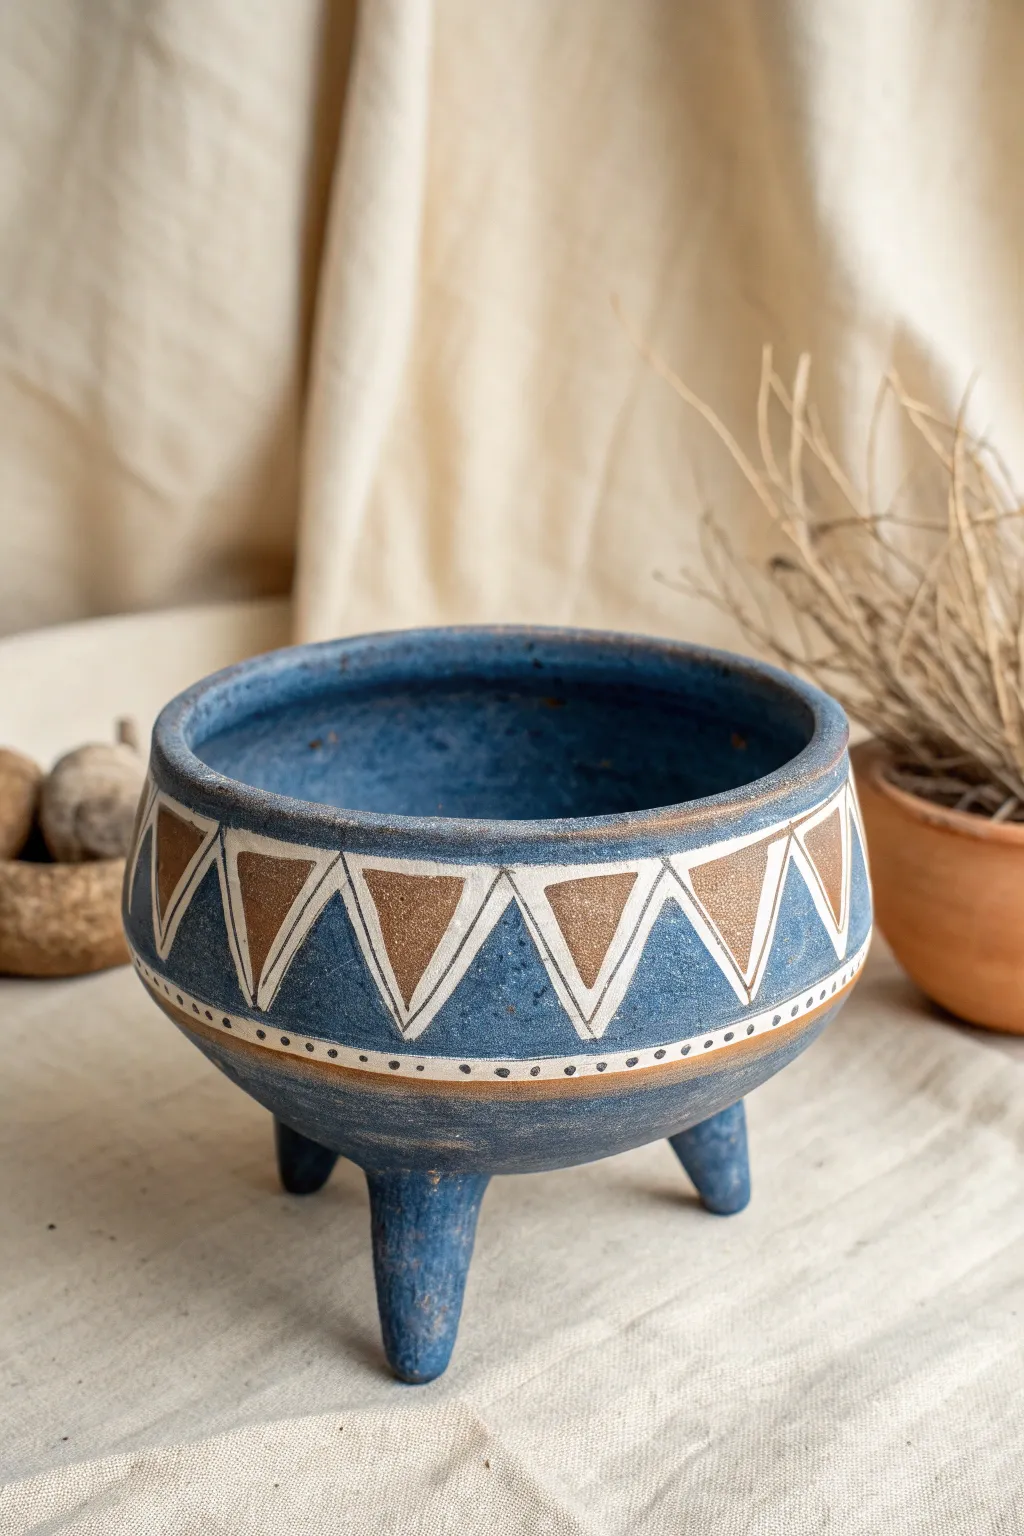
This project transforms a basic pinch pot into a sophisticated vessel with the addition of tripod legs and sgraffito-style decoration. The dusty blue finish and contrasting raw clay geometric patterns give it a distinctly modern yet earthy vibe perfect for holding small trinkets or succulents.
Step-by-Step Guide
Materials
- Stoneware clay (medium grog)
- Needle tool
- Loop tool (small)
- Serrated rib or scoring tool
- Slip (clay mixed with water)
- Blue underglaze (matte finish)
- Small paintbrush
- Sponge
- Bandin wheel (optional but helpful)
Step 1: Forming the Base
-
Prepare the clay:
Start with a ball of clay roughly the size of a large orange. Wedge it thoroughly to remove air bubbles, then pat it into a smooth, round sphere. -
Open the pot:
Hold the sphere in one hand and press your thumb into the center, stopping about a half-inch from the bottom. This thickness is crucial because we will be attaching legs later. -
Pinch walls evenly:
Rotate the ball while gently pinching the clay between your thumb and fingers. Work from the bottom up, aiming for an even wall thickness of about 1/4 to 3/8 inch throughout. -
Shape the rim:
Gently gently curve the rim inward slightly to create an enclosed bowl shape. Use a damp sponge to smooth the lip so it is rounded and uniform.
Wobbly Pot?
If the legs are uneven, place a piece of sandpaper on a flat surface. Gently rub the dried feet of the pot in a figure-8 motion over the paper to sand them perfectly level.
Step 2: Adding the Tripod Legs
-
Roll coils for legs:
Roll out a thick coil of clay, about the thickness of your thumb. Cut three equal segments, each about 2 inches long. Tap one end of each segment on the table to flatten it slightly. -
Mark placement:
Turn your pinch pot upside down. Mark three equidistant points on the bottom where the legs will attach, ensuring they are balanced. -
Score and slip:
Rough up the attachment points on the pot and the flat ends of the legs using a serrated rib or needle tool. Apply a generous amount of slip to both scored areas. -
Attach and blend:
Press the legs firmly onto the pot. Use your thumb or a modeling tool to smear the clay from the leg onto the pot body, blending the seam until it disappears completely. -
Refine the stance:
Flip the pot right-side up and gently tap it on the table to level the feet. Adjust the angle of the legs so the pot stands straight and feels stable.
Make It Pop
After the final firing, rub a dark oxide wash (like iron oxide) into the carved lines and wipe it back. This will darken the grooves and add distinct, antique contrast.
Step 3: Surface Decoration
-
Smooth the surface:
Once the pot is leather-hard (firm but still cool to the touch), use a smooth kidney rib to compress the surface and remove any fingerprints. -
Apply underglaze:
Paint 2-3 coats of matte blue underglaze over the entire exterior of the pot, including the legs. Let each coat dry until it’s no longer shiny before applying the next. -
Carve the guidelines:
Using a needle tool, lightly scribe two horizontal parallel lines around the belly of the pot to delineate the decoration band. I find using a banding wheel helps keep these lines straight. -
Outline triangles:
Carve a zigzag line between your parallel bands to create a row of connecting triangles. Carve deep enough to reveal the raw clay body beneath the blue underglaze. -
Add inner details:
Inside every other triangle (pointing down), carve a smaller V-shape. For the upward-pointing triangles, carve out the interior completely to expose the raw brown clay. -
Add dot accents:
Below the bottom horizontal line, use the tip of a small loop tool or a dull pencil to press a row of small, evenly spaced dots into the clay. -
Clean up burrs:
Wait until the pot is bone dry, then use a stiff brush or a slightly damp sponge to gently wipe away any clay crumbs or ‘burrs’ left from carving.
Step 4: Finishing
-
Bisque fire:
Load the bone-dry pot into the kiln for a bisque firing (usually cone 04). -
Glaze interior:
Pour a clear or functional liner glaze into the inside of the pot, swirl it to coat, and pour out the excess. Leave the exterior matte to highlight the texture. -
Final firing:
Fire the vessel to the maturation temperature of your specific clay body (e.g., Cone 5 or 6 for stoneware).
Your finished vessel will have a wonderful tactile quality that begs to be held
High School Storytelling Tile Set
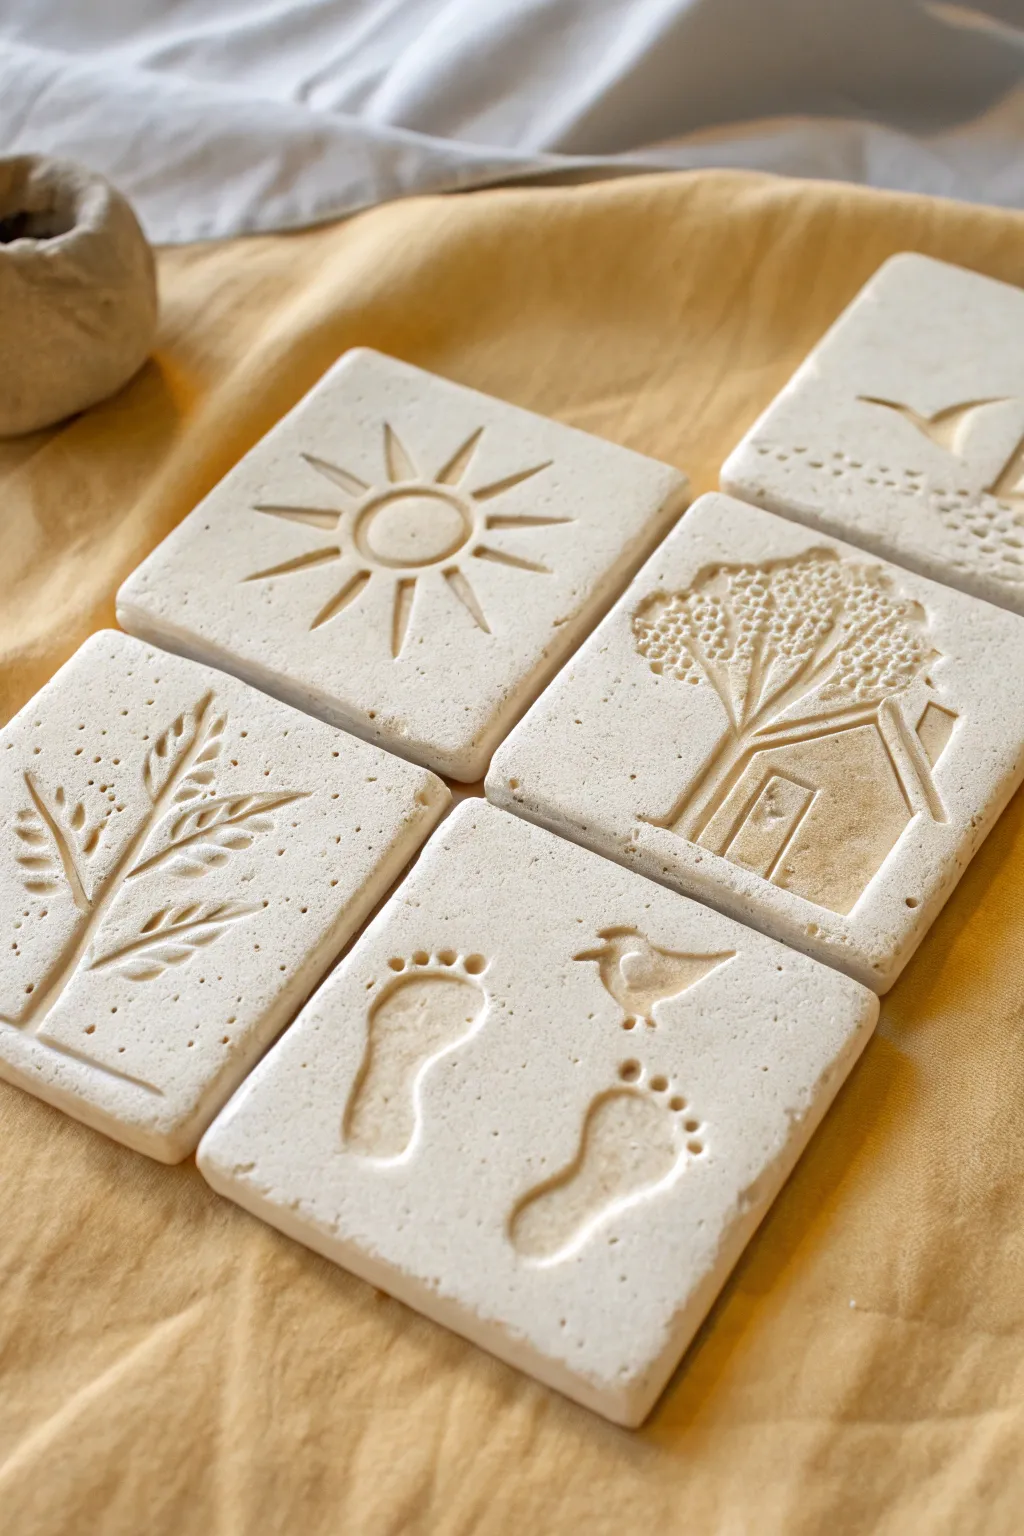
This project transforms simple clay squares into a cohesive storytelling series using relief carving and impression techniques. The finished result is a set of creamy, stone-like tiles that capture crisp, simplistic symbols like footprints, nature scenes, and celestial bodies.
Step-by-Step Tutorial
Materials
- White or cream stoneware clay (groog-free for smoother carving)
- Square tile cutter or ruler and knife
- Rolling pin
- Two 1/4-inch wooden slats (guide sticks)
- Loop tools (small and medium)
- Needle tool
- Rubber kidney rib
- Sponge
- Canvas mat or wooden board
- Wooden modeling tools (various tips)
- Clear matte glaze or wax resist (optional)
Step 1: Preparation & Shaping
-
Wedge the clay:
Begin by thoroughly wedging your white stoneware clay to remove any air bubbles. Consistent wedging is key to preventing cracks during the drying phase, especially for flat objects like tiles. -
Set up guides:
Place your canvas mat on a flat work surface. Position the two 1/4-inch wooden slats parallel to each other, slightly wider apart than your desired tile width. -
Roll the slab:
Place the clay ball between the slats. Roll the clay out until the rolling pin rests on the wooden guides, ensuring a perfectly even thickness across the entire slab. -
Compress the surface:
Take a rubber kidney rib and firmly drag it across the surface of the clay in multiple directions. I find this compression step vital as it aligns the clay particles and creates a smooth ‘canvas’ for your carving. -
Cut the squares:
Using a square cutter or a ruler and knife, cut out five equal squares, approximately 4×4 inches each. Clean up the edges with a damp sponge to remove any sharp burrs.
Warping Worries?
If corners curl up while drying, flip the tiles over and weigh them down with a small board or book during the leather-hard stage to flatten them back out.
Step 2: Design Transfer & Carving
-
Initial sketching:
Lightly sketch your designs onto the leather-hard clay using a needle tool. You need a sun, a tree with a house, a wheat stalk, footprints with a bird, and a seascape. Keep the lines very faint so they can be smoothed over if you make a mistake. -
Carving the sun:
For the sun tile, use a small loop tool to carve out a central circle. Instead of drawing lines for rays, carve deep, tapered gouges radiating outward to create a three-dimensional relief effect. -
Sculpting the tree and house:
Use a needle tool or fine point tool to outline the house shape. For the tree foliage, press a textured tool or the coarse end of a wooden tool repeatedly into the clay to simulate leaves, contrasting with the smooth walls of the house. -
Creating the wheat stalk:
For the grain tile, press the side of a small loop tool or a rounded wooden tool into the clay at angles to form the kernels. Add tiny poked dots around the stalk for texture using the needle tool. -
Impressing footprints:
The footprints require a different approach. Use your thumb to firmly press the main foot shape into the clay, then use a rounded tool end to press in the individual toes. This creates a soft, organic impression rather than a sharp carving. -
Carving the birds:
On both the footprint and ocean tiles, carve the birds deeply. Remove the clay inside the bird outline so the shape is recessed, creating a strong shadow when light hits the final piece. -
Detailing the ocean:
For the final tile, stipple the bottom half with a needle tool to represent sand or foam, and carve a smooth, sweeping curve for the shoreline.
Step 3: Refinement & Finish
-
Clean up debris:
Once all carving is complete, use a soft, dry brush to sweep away any clay crumbs or ‘beads’ left from the loop tools. Do not use water yet, as it will turn the crumbs into mud. -
Soften edges:
Gently run a damp fingertip over the carved ridges. You want to knock back the sharpest edges just slightly to give the piece a worn, stone-like aesthetic. -
Slow drying:
Sandwich the tiles between two pieces of drywall ware board or cover loosely with plastic. High school classrooms can be dry, so slowing this process prevents warping. -
Bisque fire:
Once bone dry, fire the tiles to cone 04. This hardens the clay and prepares it for the final finish. -
Final look:
To maintain the raw, natural look in the photo, you can leave the clay unglazed if it is a high-fire stoneware. Alternatively, apply a very thin matte clear glaze or a simple wax polish to seal the surface without adding shine.
Pro Tip: Depth Control
Don’t carve deeper than half the thickness of the tile. This weakens the structure and can lead to cracking during the firing process.
Now you have a stunning narrative set that feels like ancient stone artifacts
High School Mask or Face Plaque Wall Hang

This elegant relief sculpture captures a peaceful, meditative expression using simple carving techniques and contrasting slips. The project mimics the look of carved stone or wood with a smooth, neutral clay body accented by deep midnight blue details.
Step-by-Step
Materials
- Light-colored stoneware clay (buff or cream)
- Rolling pin and guide strips (approx. 1/2 inch)
- Needle tool
- Loop tools and ribbon tools for carving
- Rubber kidney rib for smoothing
- Dark blue underglaze or slip (midnight blue)
- Small round brushes for detailing
- Sponge
- Newspaper or paper towels
- Bowl of water
- Matte clear glaze (optional)
Step 1: Forming the Base
-
Roll the slab:
Start by rolling out a slab of light stoneware clay to a uniform thickness of about half an inch. Use guide strips to ensure the surface is perfectly even, as lumps will distract from the smooth finish. -
Cut the oval:
Using a needle tool, cut out a long, symmetrical oval shape. It should measure roughly 8-10 inches tall and 5-6 inches wide to approximate a face shape. -
Create the volume:
To give the mask its convex shape, gently drape the clay oval over a mound of crumpled newspaper or a plaster hump mold. Smooth the edges downward so it creates a gentle curve rather than lying flat. -
Refine the surface:
Use a damp sponge and a soft rubber kidney rib to compress the clay surface. Remove any canvas textures or fingerprints until the ‘skin’ of the clay is flawless.
Step 2: Sculpting the Features
-
Map out the features:
Lightly sketch the position of the eyes, nose, and mouth using the very tip of your needle tool. Keep the eyes closed with a gentle downward curve and place the nose long and narrow. -
Add clay for the nose:
Score and slip a long, triangular wedge of clay down the center for the nose bridge. Blend the edges seamlessly into the cheeks so it looks like it emerged from the slab. -
Build the eyelids:
Roll two small, flattened football shapes of clay. Score and slip them onto the eye area, smoothing them down to create the volume of closed eyelids. -
Define the eye slit:
Use a modeling tool to press a deep, curved line across the center of each eyelid mound. This creates the ‘sleeping’ expression. -
Shape the lips:
Add a small mound of clay for the mouth area. Use a wooden tool to press the center line, defining the upper and lower lips into a soft pout shape. -
Create the brow ridge:
Instead of adding clay, use a carving tool to gently subtract clay just above the eyes, creating a subtle shadow that implies a brow bone.
Uneven Drying?
Masks love to warp. Dry very slowly. Place the mask on a piece of foam or a crumpled bag of vermiculite so the air circulates underneath the curve while it dries.
Step 3: Decorative Carving
-
Outline the forehead band:
Carve a curved line across the top of the forehead to create a headband or hairline area. Inside this band, carve regular, vertical lines to simulate fringe or hair texture. -
Carve the eyebrows:
Above the eyelids, carve arched eyebrows. I like to use a small V-gouge tool here to impart a texture that looks like braided rope or twisted cord. -
Add the central leaf:
In the center of the forehead, between the brows, carve a leaf shape. Add internal veins to the leaf for extra detail. -
Detail the cheeks:
Using the tip of a small loop tool, carve a stylized leaf branch pattern curving up the sides of the cheeks. Keep the cuts clean and purposeful. -
Stipple texture:
Along the cheek patterns, use a blunt point tool to press small dots (stippling) into the clay. These dots add a wonderful rhythmic quality to the design. -
Chin details:
Carve a semi-circle at the very bottom of the chin and fill it with radiating vertical lines, mirroring the texture on the forehead.
Sgraffito Twist
Paint the entire face with blue slip before carving. When you carve your designs, the light clay will reveal itself through the dark layer for a bold, negative-image effect.
Step 4: Finishing and Color
-
Bisque fire:
Allow the mask to dry slowly under plastic to prevent warping, then bisque fire it to cone 04. -
Apply the dark slip:
Using a small detail brush, carefully paint the dark midnight blue underglaze into the carved recesses: the eyebrows, the forehead band, the leaf vein, the cheek patterns, the lips, and the chin detail. -
Wipe back:
If you get color on the raised areas, use a slightly damp, clean sponge to wipe it away gently. This technique leaves the color deep in the crevices while highlighting the relief. -
Final firing:
Apply a clear matte glaze if you want to seal the piece, or leave the raw clay exposed for a stone-like texture. Fire to the maturity temperature of your clay body.
Hang this serene visage on a wall where you need a touch of calm and artistry
High School Surreal Face Jug
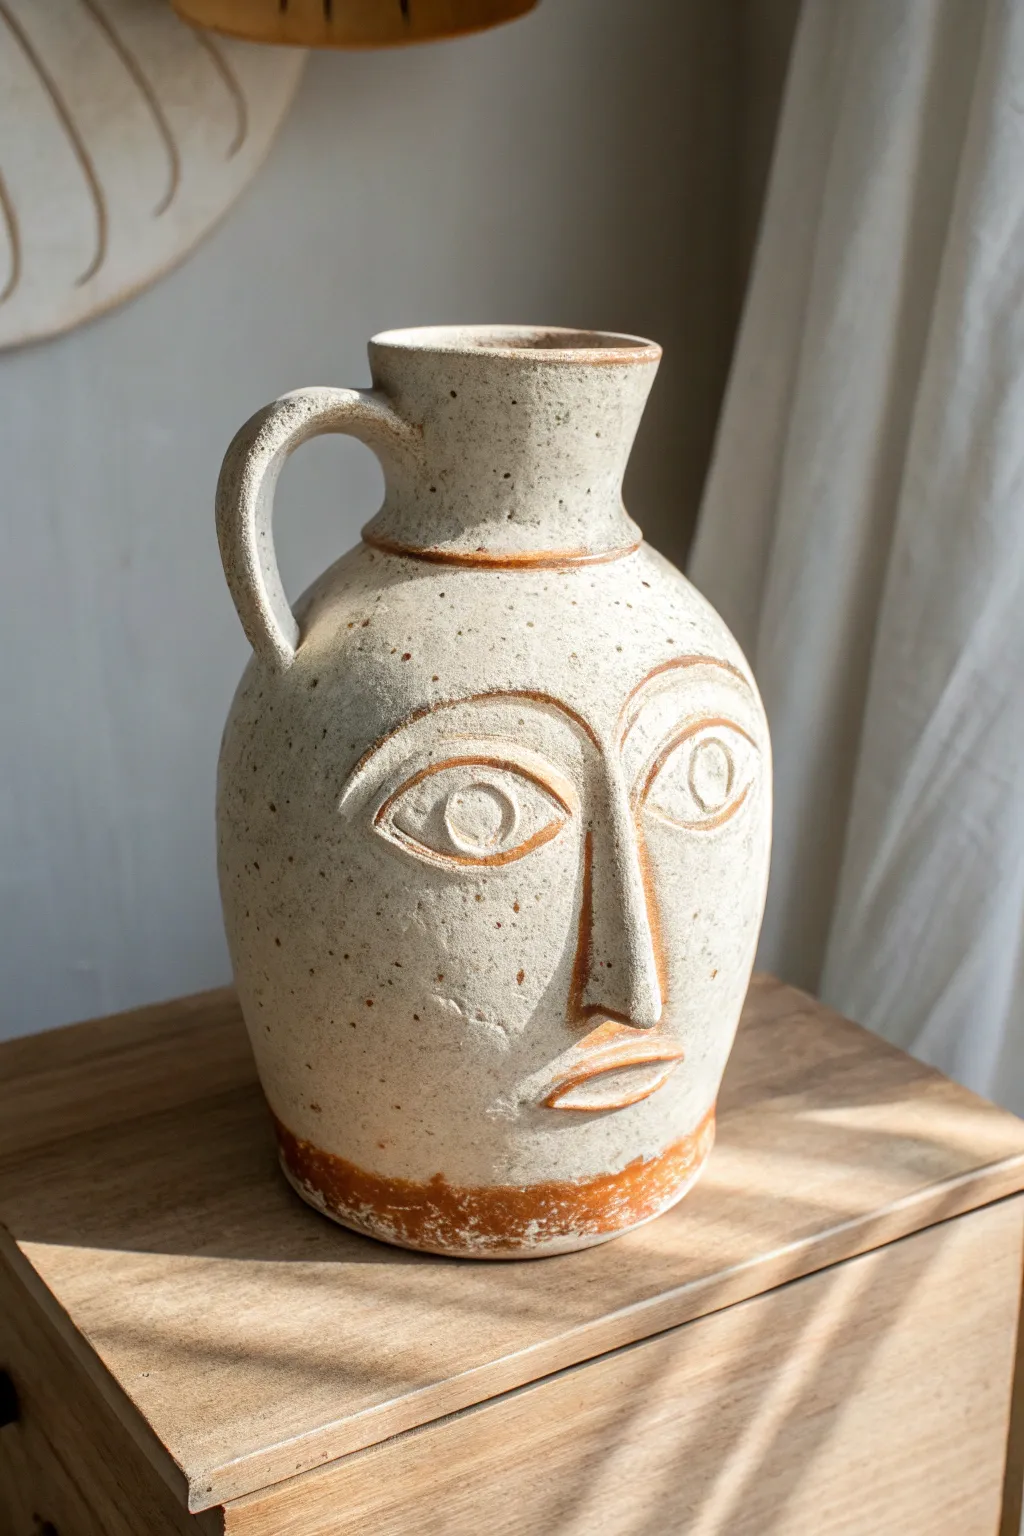
This project combines the functional form of a traditional pitcher with the expressive, primitive stylings of surrealist sculpture. The result is a stunning character jug featuring a speckled clay body, elongated facial features, and warm terracotta accents that bring the vessel to life.
Step-by-Step Guide
Materials
- Speckled stoneware clay (approx. 3-4 lbs)
- Pottery wheel (or coil building supplies)
- Needle tool
- Wooden modeling tool
- Loop tool
- Scoring tool (or fork)
- Slip
- Sponge
- Red iron oxide wash or terracotta underglaze
- Matte white or clear glaze (depending on clay body)
Step 1: Forming the Vessel
-
Throw the base cylinder:
Begin by centering your clay on the wheel. Open and pull up a tall, sturdy cylinder, keeping the walls relatively thick (about 1/4 to 3/8 inch) to support the later addition of facial features. -
Shape the belly:
Belly out the cylinder gently from the inside to create a rounded, organic shape for the jug’s body. I like to leave the shoulder somewhat high to give the ‘head’ good posture. -
Collar the neck:
Slowly collar in the top section to define the neck, then flare the rim outwards slightly to create a functional spout area. Smooth the surface with a rib tool to remove throwing lines. -
Trim the foot:
Once leather hard, trim a clean foot ring at the bottom to give the piece lift and visual weight. -
Add the handle:
Pull a sturdy handle from a lug of clay. attach it securely from the top of the neck to the shoulder of the jug using the score and slip method. Ensure the curve complements the vessel’s silhouette.
Clean Lines
When carving features, drag a damp paintbrush over the cut edges immediately. This smooths out burrs without losing the sharpness of the line work.
Step 2: Sculpting the Face
-
Map out the features:
Lightly sketch the position of the eyes, nose, and mouth directly onto the leather-hard clay surface with a needle tool. -
Build the nose bridge:
Roll a long coil of clay for the nose. Score and slip it onto the face, blending the edges seamlessly into the jug body. It should be long, straight, and prominent. -
Create the eye sockets:
Roll two coils for the upper eye ridges and attach them in broad arches connected to the nose bridge. This creates the ‘brow bone’ structure. -
Sculpt the eyes:
Form almond-shaped slabs for the eyes and attach them inside the brow arches. Add small, flat circles for pupils to give the face a focused gaze. -
Form the mouth:
Attach a small, oval pad of clay for the mouth area. Use a wooden tool to carve a line across the center and shape the upper and lower lips, keeping the expression neutral and stoic. -
Refine the lines:
Use a modeling tool to deepen the crevices around the nose, eyes, and mouth. The goal is to make the features look like they are emerging from the clay, rather than just stuck on.
Modern Twist
Try leaving the raised facial features unglazed (raw clay) and only glazing the smooth vessel body for a striking textural contrast.
Step 3: Finishing and Glazing
-
Highlighting with oxide:
Apply a red iron oxide wash or terracotta underglaze into the deep recesses: specifically the outlines of the eyes, the sides of the nose, the lip line, and the neck crease. -
Accent the base and rim:
Paint a band of the oxide wash around the bottom foot and the very top rim of the jug to frame the piece. -
Wipe back:
Using a slightly damp sponge, gently wipe away excess oxide from the high points of the face. This leaves the color only in the grooves, emphasizing the 3D relief. -
Bisque fire:
Fire the piece to cone 04 (or your clay’s specific bisque temperature). -
Glaze application:
Dip or pour a thin layer of matte white glaze designated for stoneware. Alternatively, if your clay body is naturally beautiful and speckled like the example, a clear matte glaze works perfectly. -
Final firing:
Fire to the final temperature (likely Cone 5/6 or Cone 10 depending on your clay). Ensure the foot is wiped clean so it doesn’t fuse to the kiln shelf.
Place your finished face jug on a shelf where the light can catch those deep sculpted shadows.
High School Slab-Built Character Planter
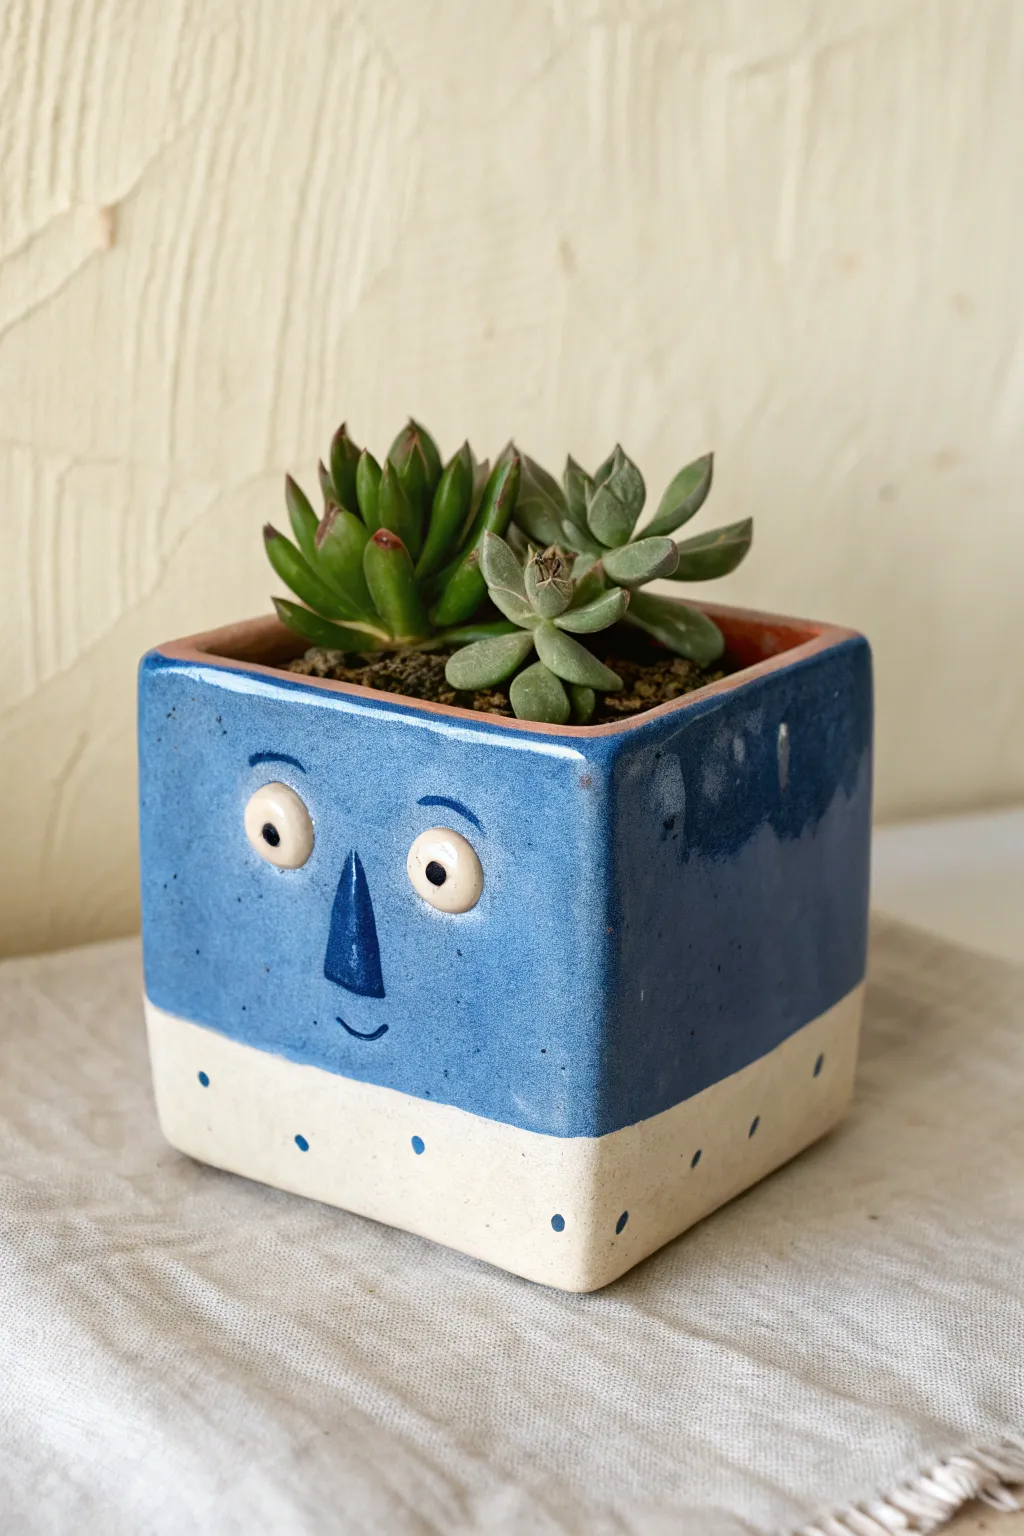
Give your favorite succulents a home with personality using this playful slab-building project. This square planter features a whimsical face with relief eyes and nose, finished in a striking two-tone blue and cream glaze design.
Step-by-Step
Materials
- Stoneware or earthenware clay (with grog)
- Rolling pin and canvas mat
- Wooden guide strips (1/4 inch thick)
- Fettling knife
- Square paper template (approx. 4×4 inches)
- Scoring tool or serrated rib
- Slip (clay and water slurry)
- Blue underglaze or glaze
- White or clear glaze
- Small round bristle brush
- Needle tool
- Sponge
Step 1: Slab Construction
-
Roll the clay:
Begin by wedging your clay to remove air bubbles. Lay out two 1/4 inch wooden guide strips on your canvas and roll a large slab of clay between them until it’s perfectly even. -
Cut the walls:
Using your square paper template, cut out five identical squares from the leather-hard slab. Four will be walls and one will be the base. -
Dry to leather hard:
Let these squares stiffen up slightly until they can hold their shape without bending. This is crucial for keeping your box square. -
Miter the edges:
For the cleanest corners, use your fettling knife to cut a 45-degree angle (miter) along the vertical edges of the four wall pieces. Leave the top and bottom edges straight. -
Score and slip:
Thoroughly score the mitered edges and the edges of the base piece. Apply a generous amount of slip to these rough areas. -
Assemble the box:
Press two walls onto the base and join them at the corner. Continue adding the remaining walls. Use a small coil of clay on the inside corners to reinforce the seams, smoothing it out completely. -
Refine the shape:
Use a wooden paddle to gently tap the outside walls, ensuring they are straight and the corners are crisp. Smooth the rim with a damp sponge.
Step 2: Adding Character
-
Form the eyes:
Roll two small balls of clay for the eyes. Flatten them slightly so they look like domes. Score the back of each and the placement area on the pot, then attach them firmly near the upper third of one face. -
Sculpt the nose:
Shape a small triangular prism or cone for the nose. I find it helpful to make this slightly exaggerated so it stands out under the glaze. Attach it centrally below the eyes using the score-and-slip method. -
Refine facial features:
Use a small tool to press creating ‘pupils’ into the eye domes. Smooth the connection points of the nose so it looks seamlessly part of the slab. -
Add eyebrows and mouth:
With a needle tool, gently incise curved lines above the eyes for eyebrows and a simple curved line for a smile. Don’t cut too deep; you just want a clear line. -
Dry and bisque fire:
Allow the piece to dry slowly to prevent warping, then bisque fire it according to your clay body’s specifications.
Pro Tip: Clean Seams
When joining your slabs, run a barely damp sponge along the corner seams immediately after joining. This compresses the clay particles and prevents future cracking during the firing process.
Step 3: Glazing
-
Wax resist bottom:
Apply wax resist to the very bottom of the pot to prevent glaze from sticking to the kiln shelf. -
Apply the white base:
Dip the bottom third of the pot into a white or cream glaze. Alternatively, brush on three even coats. Let this dry completely. -
Paint the blue section:
carefully apply blue glaze or underglaze to the top two-thirds of the pot, covering the face but being careful around the white section’s border. You want a relatively straight horizontal line separating the colors. -
Detail the face:
Leave the whites of the relief eyes unpainted (showing the raw clay or white glaze) but carefully dot the pupils black. Ensure the blue glaze gets into the incised eyebrows and mouth. -
Add polka dots:
Using the handle end of a paintbrush dipped in blue glaze, stamp small dots onto the lower white section in a regular pattern. -
Final fire:
Glaze fire the piece to the appropriate cone for your materials.
Level Up: Texture Play
Before assembling the box, roll a texture mat or lace onto the clay slab for the “hair” or back of the head to give the character 360-degree interest.
Now you have a charming, handmade character ready to hold your hardiest plants
High School Texture Test Cup With Bands
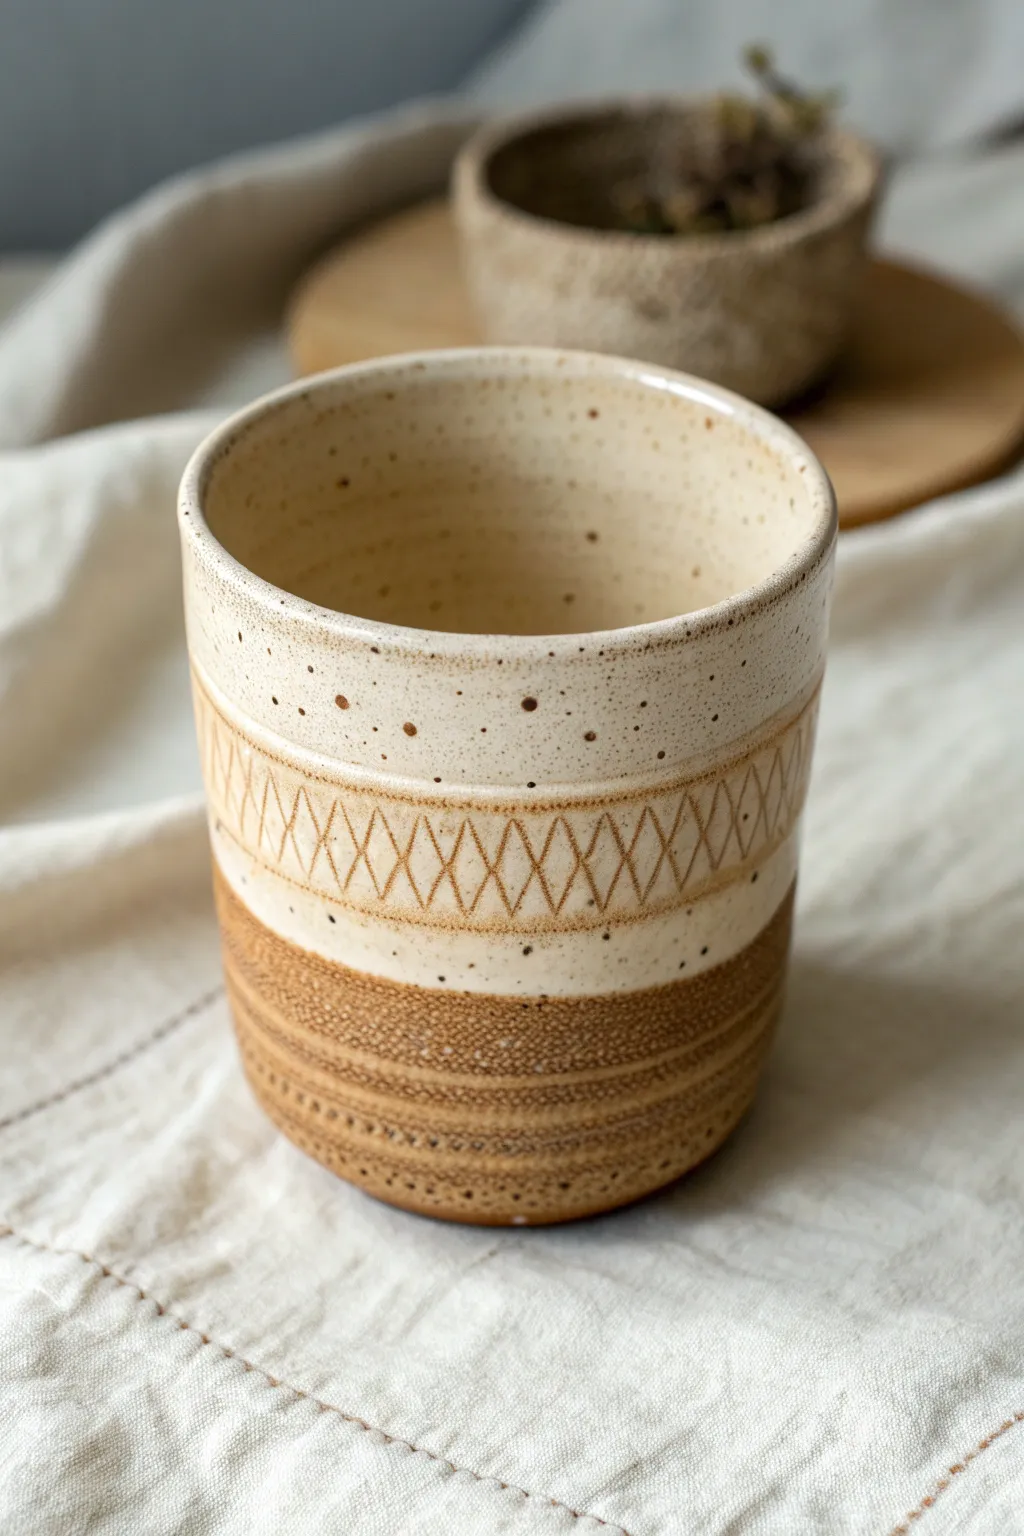
This project explores the interplay between raw clay, carved geometric patterns, and layered glazes. The result is an earthy, tactile vessel that serves as an excellent study in surface design and glazing precision.
Step-by-Step Guide
Materials
- Stoneware clay (smooth or speckled)
- Pottery wheel
- Throwing tools (sponge, rib, wire cutter)
- Needle tool
- Diamond-point carving tool or sgraffito loops
- Loop tool (for trimming)
- Wax resist
- Creamy matte white glaze
- Iron oxide wash (or a dark stain)
- Paintbrushes (small detail brush and glazing brush)
Step 1: Forming the Cylinder
-
Center and open:
Begin with about 1 lb of wedged clay. Center it firmly on the wheel head and open the drilled hole to create a flat inside bottom. -
Pull the walls:
Pull the clay up into a straight-sided cylinder. Aim for a height of about 4-5 inches and a width of 3-3.5 inches. Keep the walls even, roughly 1/4 inch thick. -
Refine the shape:
Use a straight wooden or metal rib on the outside while supporting the inside with your hand to remove throwing lines and create a smooth, vertical canvas for your texture work. -
Clean the rim:
Compress the rim with a chamois or your sponge to ensure it is rounded and pleasant for drinking. -
Wire off:
Run your wire tool under the pot to release it, then carefully set it aside until it reaches leather-hard consistency.
Step 2: Carving and Texturing
-
Trim the foot:
Once leather-hard, center the pot upside down on the wheel. Use a loop tool to trim a clean foot ring and refine the bottom curve. -
Define the bands:
While the pot is spinning slowly or centered on a banding wheel, use a needle tool to lightly score two horizontal guidelines around the middle section. These will frame your diamond pattern. -
Carve the diamonds:
Using a diamond-point tool or small carving loop, carve a continuous zigzag line between your guidelines. Then, cross back over it with an opposing zigzag to create the diamond lattice pattern. Keep your pressure consistent to ensure even depth. -
Texture the base:
For the bottom third of the cup, create horizontal bands of rough texture. You can press a comb tool, a serrated rib, or even a rough stone against the clay while slowly turning the banding wheel to create those gritty parallel lines. -
Add detailing:
Use your needle tool to poke small, decorative holes or dots randomly in the upper smooth section and along the borders of your textured bands for extra visual interest. -
Bisque fire:
Allow the piece to dry slowly and completely before loading it into the kiln for a bisque firing (usually Cone 06 or 04).
Clean Lines Pro-Tip
When carving the diamonds, wait until the clay is a firm leather-hard. If it’s too soft, the tools will drag and create burrs rather than clean, crisp lines.
Step 3: Glazing and Finishing
-
Apply oxide wash:
Mix iron oxide with water. Brush this dark wash over the carved diamond area and the rough texture at the bottom. -
Wipe back:
Using a damp sponge, gently wipe away the oxide from the raised surface areas. The dark color should remain only in the recessed carved lines and textures, accentuating the design. -
Wax the bottom:
Apply wax resist to the bottom third of the cup (the textured area) and the foot ring. This will keep the raw, earthy clay visible. -
Dip or pour glaze:
Dip the top two-thirds of the cup into a creamy matte white glaze. The glaze should cover the interior and the exterior down to the wax line. -
Clean the transition:
If the glaze dripped onto the waxed area, wipe it clean immediately. I personally check the rim at this stage to make sure the glaze isn’t too thick, which could cause running. -
Final fire:
Fire the piece to the maturity temperature of your clay and glaze (typically Cone 5 or 6 for stoneware). The glaze will break over the texture, revealing the speckled clay body beneath.
Troubleshooting Glaze
If your white glaze completely hides the texture, it was applied too thick. Briefly rinse the glaze off, let the pot dry, and try dipping it faster for a thinner coat.
Once cooled, you will have a stunning textural cup perfect for your morning tea or coffee
High School Mini Room Diorama Sculpture
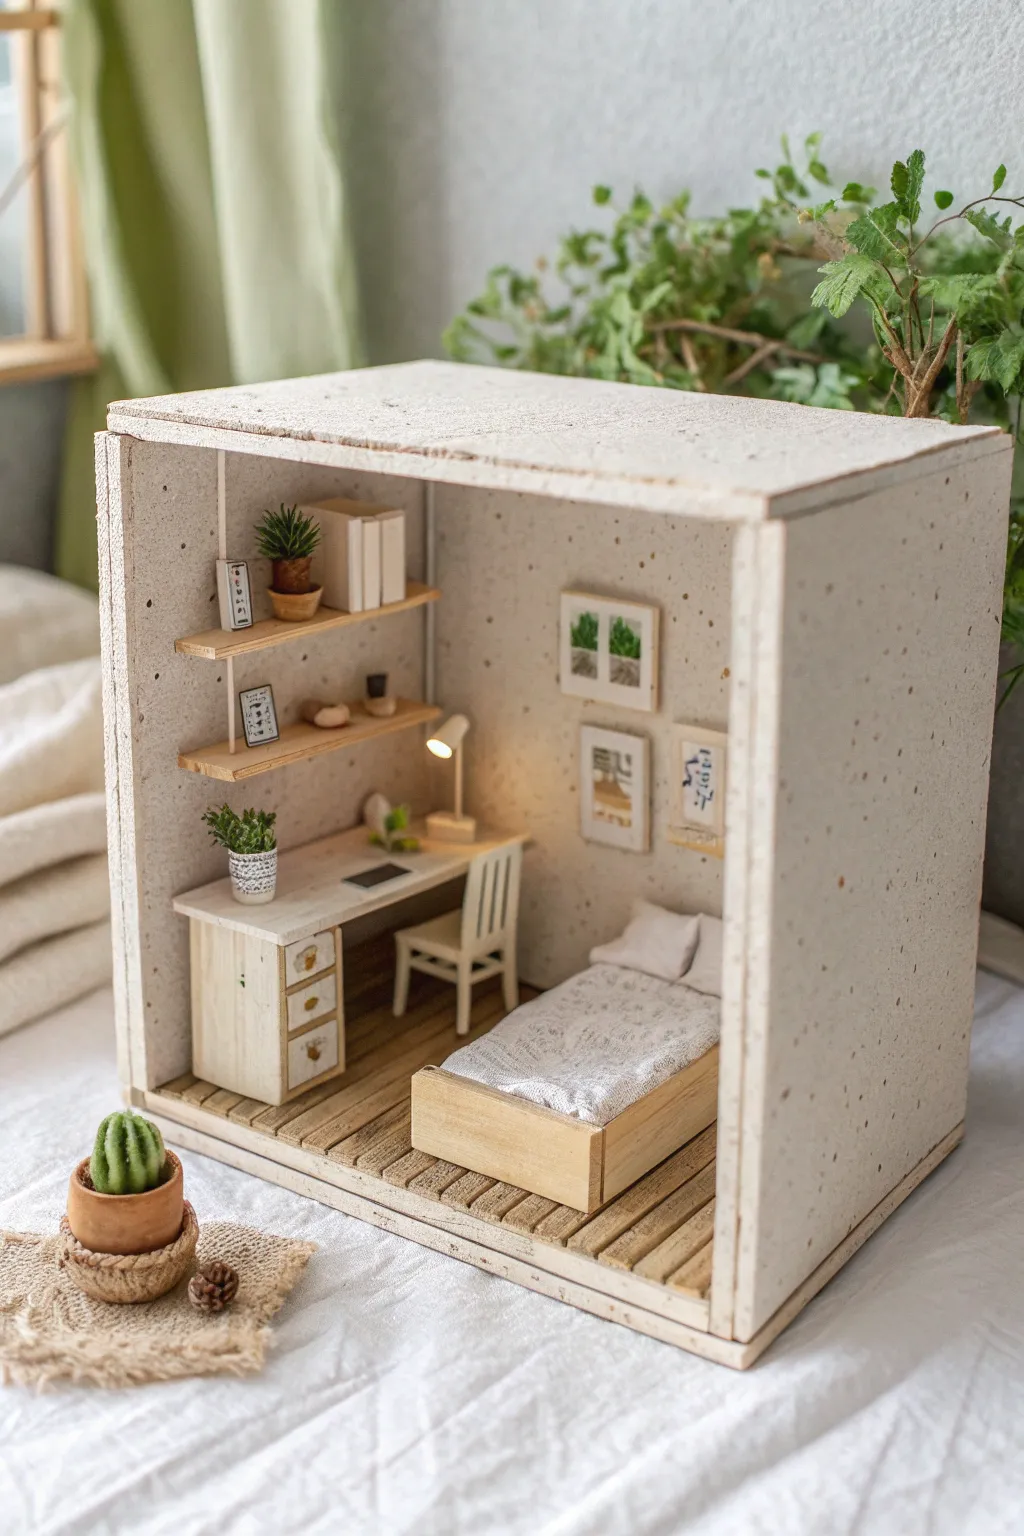
Create a cozy, miniature world with this Scandinavian-inspired room diorama, perfect for honing precision crafting skills. The final piece features textured walls, realistic wood flooring, and adorable tiny furniture, all housed within a sturdy box structure.
How-To Guide
Materials
- Thick foam core board (white)
- Balsa wood sheets and strips (various thicknesses)
- Popsicle sticks or coffee stirrers
- Acrylic paint (white, cream, brown, green)
- Textured paste, stucco medium, or fine sand mixed with PVA
- Polymer clay (green, terracotta, white)
- White fabric scraps and polyester stuffing
- Thin wire and beads (for lamp)
- Miniature pictures or printed cutouts
- Strong craft glue (Tacky Glue) and CA glue (Superglue)
- X-acto knife and cutting mat
- Fine grit sandpaper
- Ruler
Step 1: The Room Structure
-
Cut the walls and base:
Using your foam core, cut three large rectangular pieces for the walls (back, left, right) and two square pieces for the floor and ceiling. A standard size is about 8×8 inches for the opening, with depth around 6 inches, but adjust to your liking. -
Assembling the shell:
Glue the back wall to the floor piece first, ensuring a perfect 90-degree angle. Once stable, attach the side walls. Leave the ceiling off for now to make working inside easier. -
Creating the textured finish:
Mix white acrylic paint with a texture medium (or mix PVA glue, white paint, and fine sand). Dab this mixture onto all interior wall surfaces using a sponge or stiff brush to create a speckled, plaster-like effect. Let this dry completely.
Uneven Texture?
If your wall texture looks too clumpy, lightly sand the high spots once dry. You can then apply a second, thinner coat of the mixture to even it out.
Step 2: Flooring and Fixtures
-
Laying the floorboards:
Cut the round ends off popsicle sticks or use balsa strips. Glue them sequentially across the floor piece to mimic plank flooring, leaving tiny gaps between them for realism. -
Staining the wood:
Water down some brown acrylic paint to create a wash. Brush this over the floor planks, wiping away excess with a paper to let the grain show through. I like to vary the intensity slightly on different boards for a natural look. -
Attach the ceiling:
Once the interior walls and floor are dry, glue the ceiling piece on top. Coat the exterior of the entire box with your textured paint mix to give it a unified, stone-like finish.
Step 3: Furniture Construction
-
Building the desk base:
Cut a rectangular piece of balsa for the desktop. Construct a cabinet leg on the left side using small stacked rectangles of wood, painted cream or white. Add tiny beads or snipped wire for drawer handles. -
Mounting the shelving:
Cut two thin strips of balsa wood for shelves. Glue them to the left wall above where the desk will sit. Use tiny vertical wire pieces or slivers of wood as ‘brackets’ for support. -
Create the bed frame:
Build a simple box frame using balsa wood. Cut a headboard and footboard from thin wood sheets and glue them to the frame ends. Leave the wood natural or give it a light varnish. -
Crafting the chair:
This is delicate work. Cut a square seat and a backrest from balsa. Use matchsticks or toothpicks for the legs and back slats. Glue carefully and paint white once the glue cures.
Pro Tip: Realistic Wood
Before staining your balsa wood furniture or floors, scratch the surface lightly with a wire brush. The stain will settle into these scratches, creating a convincing wood grain effect.
Step 4: Soft Furnishings & Decor
-
Making the mattress and pillows:
Cut a piece of foam or folded fabric to fit inside the bed frame. Wrap it tightly in a white fabric scrap (maybe with a tiny pattern) and glue the seams underneath. Sew or glue tiny pillows using white fabric and a pinch of stuffing. -
Adding wall art:
Print out miniature artworks or draw tiny sketches on cardstock. Frame them with thin strips of balsa wood and glue them to the back wall. -
Sculpting the plants:
Use green polymer clay to form tiny succulents and cacti. For the pots, manipulate terracotta-colored clay into small cylinders. Bake according to package instructions before placing them on the shelves and desk. -
Constructing the desk lamp:
Bend a small piece of wire into an angled arm shape. Glue a bead or a tiny clay cone to the top as a shade, and a small button or clay disc as the base. Paint white. -
Final Assembly:
Glue the desk to the left wall and floor. Position the bed on the right. Place the chair at the desk. Finally, arrange all your small accessories—books (folded paper), plants, and the lamp—to bring the scene to life.
Place your finished room on a shelf near natural light to let the shadows play across your miniature architecture
High School Clay Dominoes With Custom Symbols
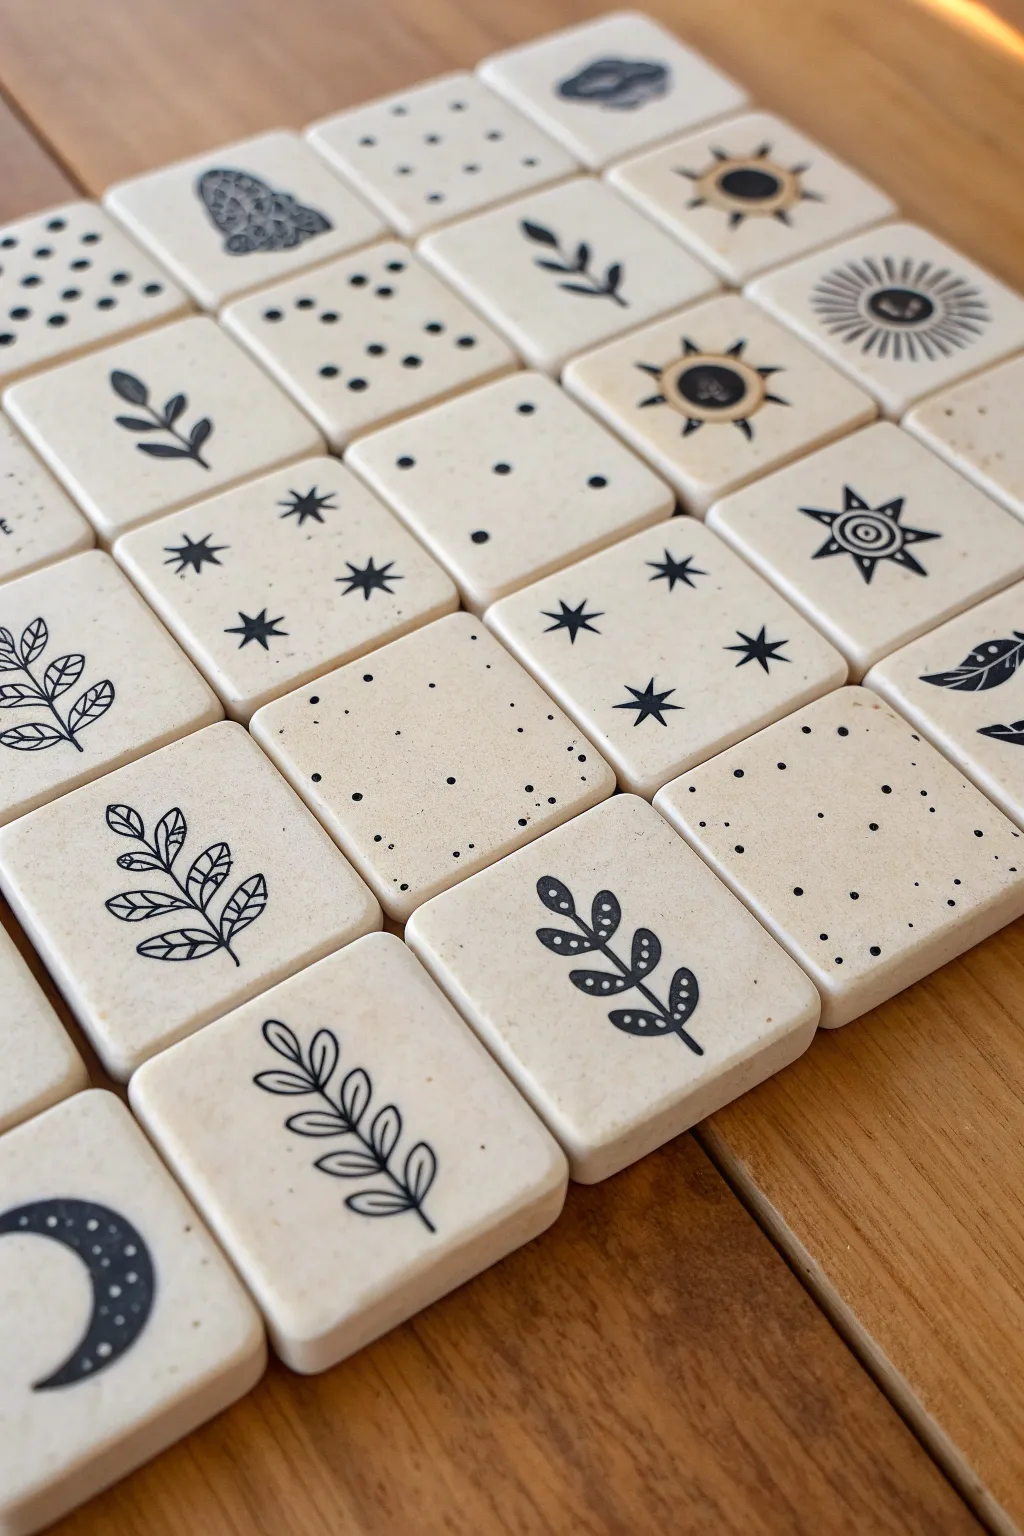
Create a sophisticated matching game or decorative set using smooth clay tiles adorned with minimalist black symbols. These tactile squares feature nature-inspired motifs like leaves, suns, and celestial elements, all finished with a clean, matte look that feels modern and artistic.
Step-by-Step Tutorial
Materials
- White air-dry clay or polymer clay (w/ granite effect optional)
- Rolling pin
- Square cookie cutter (approx. 1.5 – 2 inches)
- Sandpaper (fine grit)
- Black fine-tip acrylic paint marker or permanent ink pen
- Matte spray sealant or brush-on matte varnish
- Parchment paper or non-stick work mat
- Two thin wooden slats (optional, for even thickness)
- Bowl of water and sponge (for smoothing)
Step 1: Shaping the Tiles
-
Prepare the workspace:
Lay down your parchment paper or non-stick mat on a flat, stable surface to prevent the clay from sticking. -
Roll out the clay:
Condition your clay by kneading it slightly until pliable. Place the clay between two wooden slats (about 1/4 inch thick) to act as depth guides, and roll it out with the rolling pin for a perfectly uniform slab. -
Cut the shapes:
Using the square cookie cutter, press firmly into the clay slab to cut out your tiles. You will need an even number of tiles if you plan to make a matching game. -
Softening edges:
While the clay is still wet, dip your finger in a little water and gently run it along the cut edges of each square. This rounds them off slightly, removing the sharp ‘cookie cutter’ look and giving them a softer, tumbled stone appearance. -
Initial surface smoothing:
Inspect the top surface of each tile. If there are fingerprints, lightly buff them away with a damp sponge or your fingertip. -
Drying process:
Arrange the tiles on a flat board lined with parchment paper. If using air-dry clay, let them dry for 24-48 hours, flipping them halfway through to prevent warping. If using polymer clay, bake according to the package instructions.
Pro Tip: Better Ink Flow
If your paint pen skips on the clay texture, apply a very thin layer of gloss varnish first to create a smooth writing surface. Then, seal with matte varnish on top to return to the natural look.
Step 2: Refining and Decorating
-
Sand for perfection:
Once fully dry or cured and cooled, take a piece of fine-grit sandpaper and lightly sand the edges and corners. The goal is to make them feel smooth and pleasant to hold. -
Clean the dust:
Wipe every tile down with a slightly damp cloth to remove any clay dust from sanding. This is crucial for getting crisp lines with your marker. -
Plan your symbols:
Sketch out your symbol ideas on a piece of scratch paper first. Aim for pairs if making a game: simple leaf branches, sunbursts, crescent moons, stars, and dot patterns work beautifully. -
Draw the main outlines:
Using a fine-tip black acrylic paint pen or permanent marker, carefully draw your symbols onto the center of the tiles. Keep your hand steady and use light pressure to avoid snagging the clay surface. -
Fill in details:
Go back over your lines to thicken them where needed. For the leaf designs, you might thicken the main stem; for the suns, darken the center circle. -
Add texture with dots:
To mimic the style in the photo, add small stippled dots around some designs or fill entire squares with random dot patterns. I find this really helps tie the different simple illustrations together into a cohesive set. -
Let the ink set:
Allow the ink or paint to dry completely for at least an hour to ensure it won’t smear during the sealing process.
Level Up: Stone Effect
Before rolling, mix a pinch of cracked black pepper or dried used coffee grounds into your white clay. This creates a realistic ‘speckled ceramic’ or faux-granite texture throughout the tile.
Step 3: Finishing Touches
-
Apply sealant:
To protect the drawings and the clay from dirt and oils, apply a thin coat of matte varnish. A spray sealant is often easier to apply without smudging the ink. -
Dry the latch coat:
Let the first coat dry fully according to the manufacturer’s timeline. -
Final coat:
Apply a second light coat for overlapping protection, ensuring you get the sides of the tiles as well.
Now you have a stunning, durable set of art tiles ready for a game night or display.
High School Collaborative Stacked Totem Sculpture
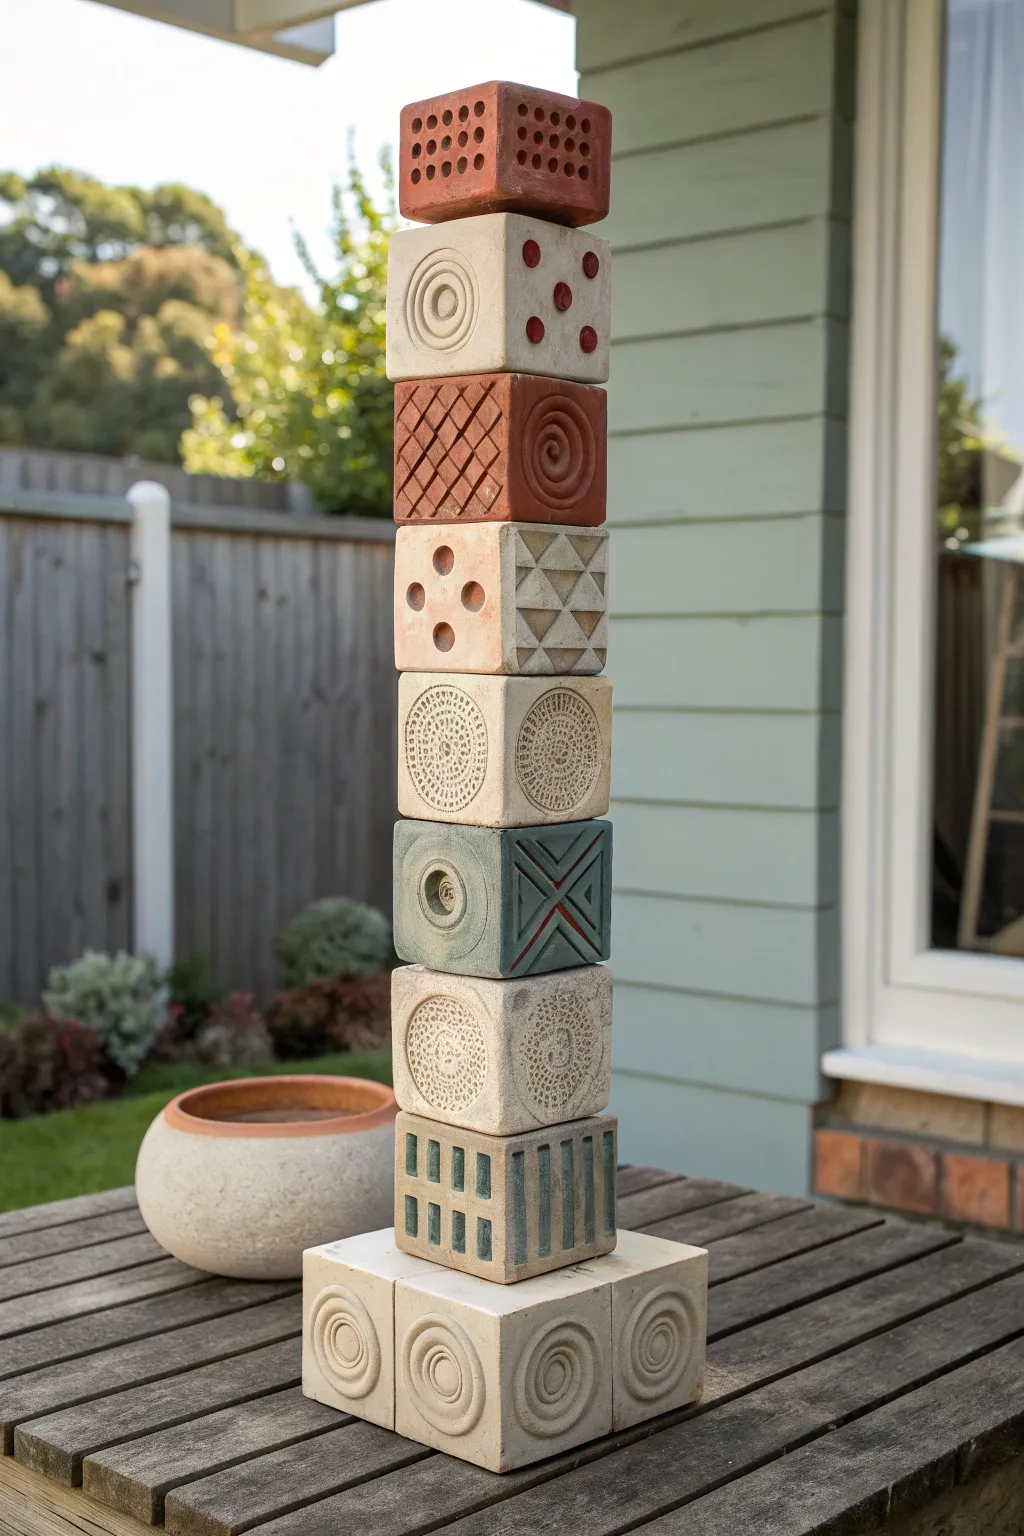
This striking outdoor sculpture is built from individually crafted ceramic cubes, stacked to form a unified totem that celebrates diverse textures and patterns. It’s an ideal collaborative project for a high school class, allowing each student to contribute a unique block to the final vertical masterpiece.
How-To Guide
Materials
- Stoneware clay (groggy clay holds shape better)
- Clay slab roller or heavy rolling pin
- Wooden guide strips (1/2 inch thickness recommended)
- Fettling knife
- Scoring tool and slip
- Clay carving tools (loop tools, needle tools)
- Various texture tools (stamps, rollers, found objects)
- Ruler and set square
- Underglazes (terracotta, slate blue, deep red, off-white)
- Clear matte glaze (optional)
- Epoxy adhesive (for permanent stacking outdoors)
- Bisque firing and glaze firing kilns
Step 1: Forming the Component Cubes
-
Prepare the Slabs:
Begin by rolling out large slabs of stoneware clay to a uniform thickness of about 1/2 inch. Using wooden guide strips or a slab roller ensures every wall has the same structural integrity, which is crucial for stacking later. -
Measure and Cut Templates:
Create a paper or cardboard template for a 5-inch square (or your chosen dimension). Use this template to cut out six square panels for each cube you intend to build. Ensure your cuts are perfectly straight or the cube will be wonky. -
Leather Hard Stage:
Let the cut squares sit until they reach a stiff leather-hard stage. They need to be firm enough to stand up without sagging but soft enough to be joined and carved. -
Bevel the Edges:
For the sharpest corners, use a bevel cutter or knife to cut a 45-degree angle on all joining edges of your squares. I prefer to do this carefully by hand to ensure a tight fit. -
Assemble the Cube:
Score the beveled edges aggressively and apply slip. Press the walls together to form a box, reinforcing the inside seams with a thin coil of soft clay. Leave one side open until the very end so you can access the interior seams, then seal it shut. -
Paddle into Shape:
Once sealed, the box might look a bit puffy. Use a wooden paddle to gently tap all six sides flat and sharpen the corners. Pierce a small hidden hole in one side to allow air to escape during firing so it doesn’t explode.
Clean Corners Tip
When assembling leather-hard slabs, use a set square against the outside corners while the clay is still workable to ensure your cube is perfectly 90-degrees before drying.
Step 2: Carving and Texturing
-
Plan the Faces:
Decide on a theme or pattern for each face of the cube. Looking at the example, you can see designs range from geometric grids and spirals to organic textures and deep concentric circles. -
Carve Deep Reliefs:
For blocks featuring geometric shapes like triangles or grids, use a sharp fettling knife or loop tool to carve away the negative space. Aim for significant depth (1/4 inch) to make the shadows pop in the sunlight. -
Add Stamped Textures:
For intricate details like the mandala-style circles, press stamps or textured rollers into the clay. If you need clean circles, verify the center point first before pressing. -
Create Faux Perforations:
The top block features a grid of deep holes. You can use a hole cutter tool for this, but be careful not to push too hard and collapse the box. Alternatively, carve these as deep dimples rather than through-holes to maintain structural strength. -
Refine the Surface:
Once all carving is done, use a damp sponge or soft brush to smooth out any sharp burrs or crumbs of clay left from the carving tools. Clean craftsmanship makes the final piece look professional.
Warping Issues?
If your slab walls are bowing inward while drying, stuff the leather-hard box with crumpled newspaper or plastic bags to support the walls until they stiffen completely.
Step 3: Finishing and Assembly
-
Bisque Fire:
Let the cubes dry slowly and completely under loose plastic to prevent warping. Once bone dry, bisque fire them to your clay body’s recommended temperature (usually Cone 04). -
Apply Underglaze:
Select earthy tones for your palette. Sponge or paint the underglaze onto the bisque ware. You can wipe back the high points with a damp sponge to leave color only in the recessed textures, enhancing the carved designs. -
Glaze Fire:
Fire the pieces again to Cone 5 or 6 (depending on your clay). Leaving the clay unglazed on the outside gives it a stony, architectural look, but a clear matte glaze can be used for durability. -
Arranging the Base:
Arrange four matching blocks in a square formation to create a wide, stable base level. This wider footprint is essential to prevent the totem from toppling over. -
Stack and Bond:
Using strong outdoor epoxy adhesive, glue the base blocks together. Then, begin stacking the single column of blocks centrally on top, gluing each layer as you go. Ensure each block is perfectly centered before the glue sets.
Now you have a monumental sculpture ready to stand guard in your garden or school courtyard