When I want a clay project that feels relaxing (and doesn’t require a wheel), I always reach for hand-building. Here are my favorite hand built clay ideas—from classic, use-every-day pieces to a few playful projects that feel like a little studio magic.
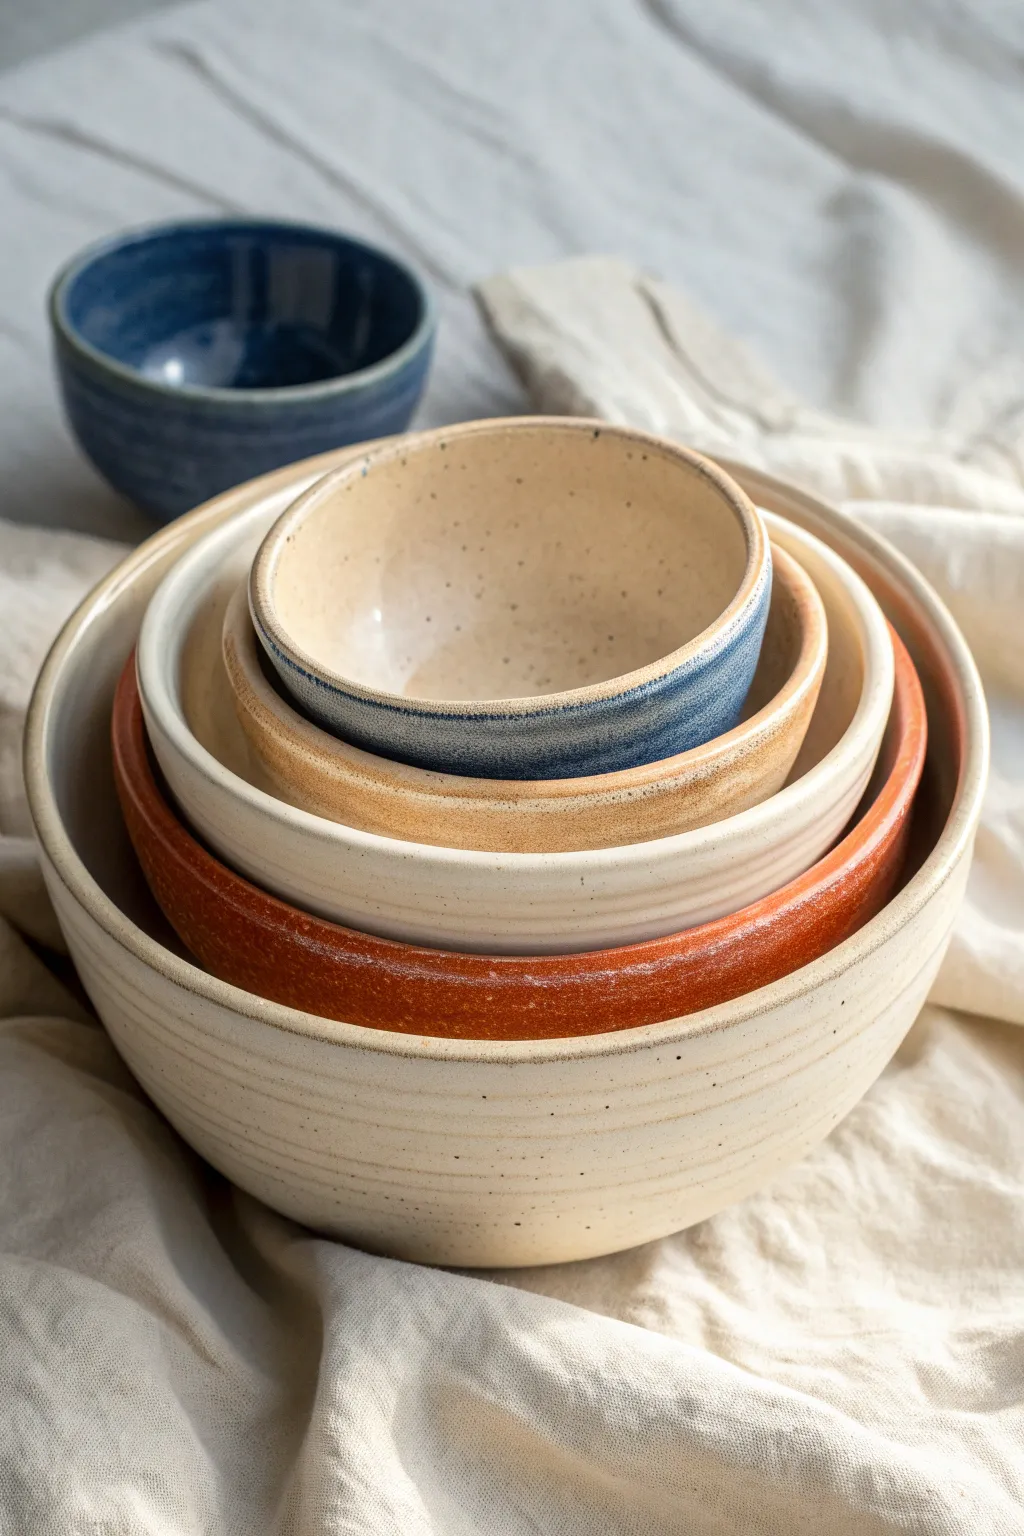
Pinch Pot Bowls With Personality

These charming, slightly asymmetrical bowls showcase the beautiful imperfection of hand-building. Featuring a creamy, matte glaze that lets the clay’s natural speckles shine through, this nesting trio is perfect for serving snacks or organizing small treasures.
Step-by-Step Guide
Materials
- Speckled stoneware clay (mid-fire)
- Small bowl related tools (ribs, sponge, wire cutter)
- Wooden paddle or flat wooden spoon
- Loop tool (for trimming)
- Matte white or transparent matte glaze
- Rolling pin (optional)
- Canvas or ware board
Step 1: Forming the Base Pots
-
Prepare your clay balls:
Cut three pieces of speckled stoneware clay. Since these are nesting bowls, size your clay balls in a graduation—for example, one the size of a tennis ball, one like a large lemon, and one slightly smaller like a lime. -
Establish the opening:
Starting with the largest ball, hold it in your non-dominant hand. Press your thumb firmly into the center to create a well, stopping about a half-inch from the bottom to ensure a sturdy base. -
Pinch the walls:
Begin pinching the clay between your thumb and fingers, rotating the ball as you go. Start from the bottom and work your way up to the rim, aiming for an even thickness of about 1/4 inch throughout. -
Stretch the form:
Instead of pinching straight up, gently coax the clay outward to create a wider, open bowl shape rather than a tall cup. Repeat this entire pinch process for the medium and small clay balls. -
Check the nesting fit:
Before the clay stiffens, test stack the bowls loosely to ensure the sizes graduate nicely.
Step 2: Refining and Shaping
-
Paddle for shape:
Once the bowls have stiffened slightly to a soft leather-hard stage, tap the exterior gently with a wooden paddle. This creates the subtle, organic angles seen in the photo and removes the distinct finger marks. -
Create the wobble:
The charm of these bowls is their uneven rim. Don’t smooth the top perfectly level; instead, use a damp sponge to soften the lip while pressing down gently in one or two spots to create a gentle wave or undulation. -
Refine the surface:
Use a flexible metal or rubber rib to scrape the interior smooth, removing loose crumbs of clay. For the exterior, I like to leave a bit of texture, but knock down any sharp ridges with a damp sponge. -
Construct the foot:
Turn the bowls upside down. You can either gently flatten the curved bottom against the table for stability or use a loop tool to carve a small, shallow ring foot for a bit of lift. -
Dry slowly:
Cover the bowls loosely with plastic to let them dry slowly. This is crucial for nesting sets to prevent them from warping into shapes that no longer fit together.
Iron Speckle Hack
Using plain white clay? Knead in a teaspoon of granular ilmenite or manganese before forming to fake that expensive speckled clay look.
Step 3: Glazing and Finishing
-
Bisque fire:
Once bone dry, fire the bowls to bisque temperature (usually cone 04) to prepare them for glazing. -
Sand the specks (optional):
After firing, lightly sand the exterior if the clay body feels too rough. Wipe away all dust with a wet sponge. -
Apply the glaze:
Dip the bowls into a matte white or semi-transparent matte glaze. A satin finish works best here; a high-gloss glaze will reflect too much light and hide the subtle clay texture. -
Check the thickness:
Ensure the glaze application isn’t too thick. You want the dark specks of the clay body (iron pyrite or manganese) to bleed through the white glaze during firing. -
Wipe the bottoms:
Clean the glaze completely off the foot or bottom surface of each bowl with a wax resist or a damp sponge to prevent them from sticking to the kiln shelf. -
Final firing:
Fire correctly to maturity (likely cone 5 or 6 for stoneware). The heat will draw the iron specks through the glaze, creating that signature speckled eggshell look.
Level Up: Gold Rim
After the final glaze firing, apply a thin line of gold luster to the uneven rim and re-fire at a low temperature for a touch of modern luxury.
Stack your finished pieces on a shelf to enjoy their sculptural beauty even when they aren’t in use


Slab Plates With Soft Rims
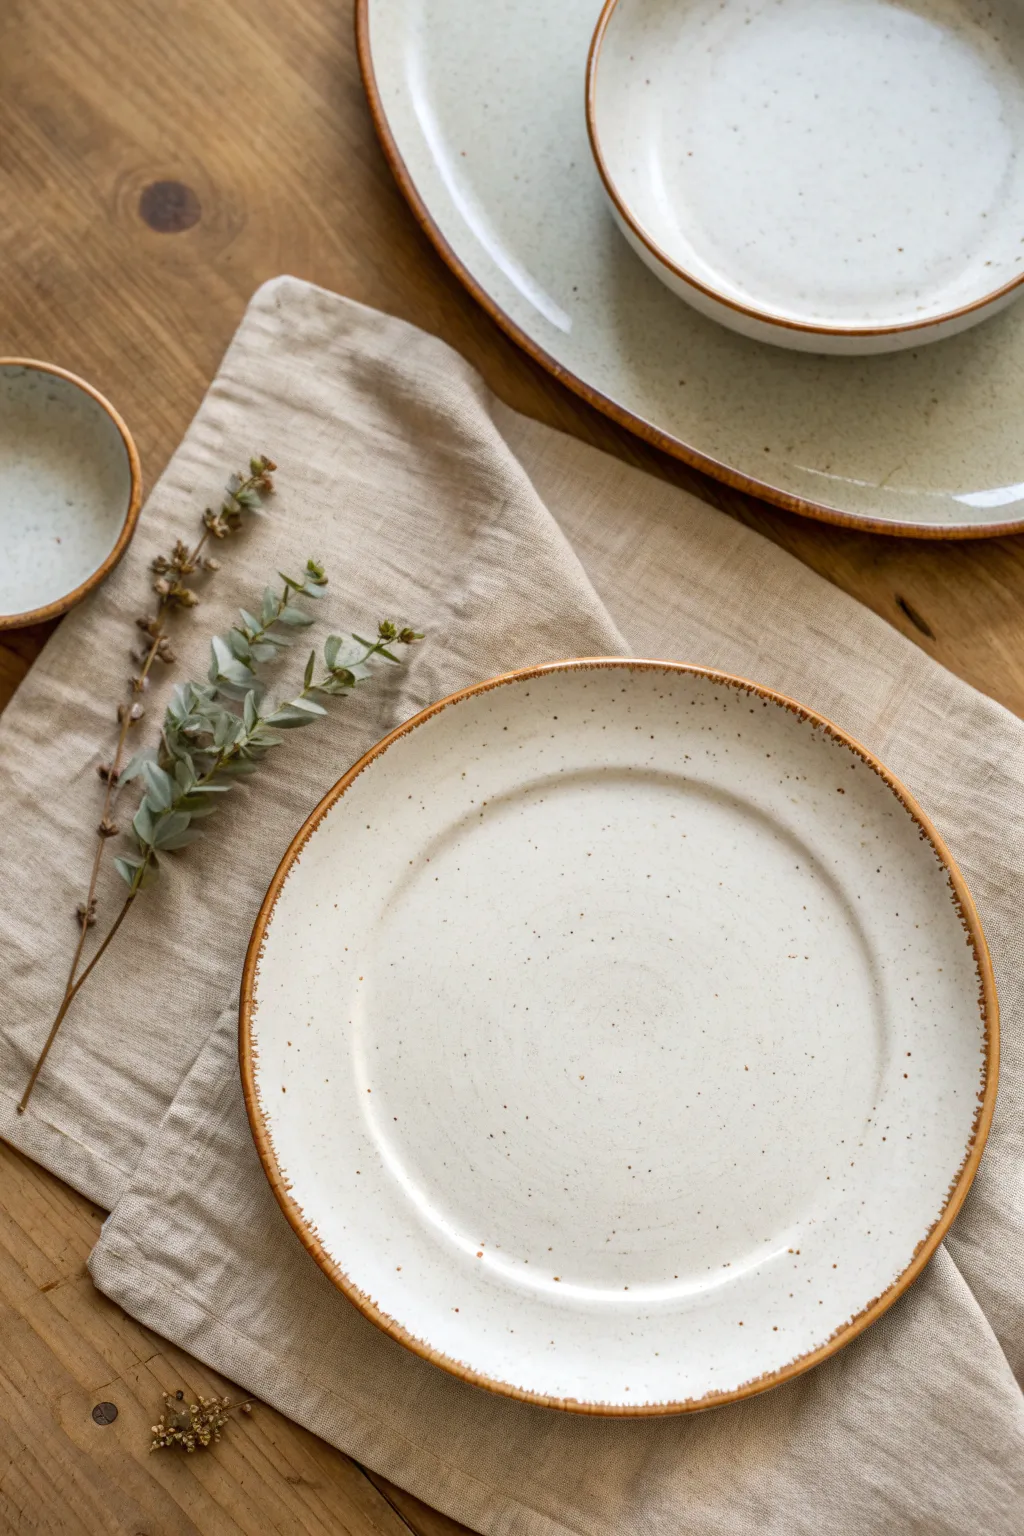
These simple yet elegant plates feature a gentle, organic rim and a classic speckled finish that mimics the charm of wheel-thrown pottery. Using a slab-building technique, you can create a perfectly imperfect matching set with beautiful, earthy russet edges.
Step-by-Step
Materials
- Speckled stoneware clay (mid-fire)
- Slab roller or heavy rolling pin
- Canvas work surface
- Wooden guide strips (1/4 inch thickness)
- Circular bat molds or GR Pottery Forms (various sizes)
- Rubber kidney rib
- Needle tool
- Fettling knife
- Sponge
- Chamois leather strip
- Potter’s weighted banding wheel (optional)
- White satin matte glaze
- Iron oxide wash or rust-colored underglaze
- Wax resist
Step 1: Creating the Forms
-
Roll the slab:
Begin by wedging your speckled stoneware clay to remove air bubbles. Place it on your canvas and use your guide strips or slab roller to create a large, even sheet of clay approximately 1/4 inch thick. Compress the slab on both sides with a rubber rib to align the clay particles and prevent warping later. -
Cut the circles:
Place your circular form or template onto the clay slab. Using a needle tool, trace around the form, leaving an extra inch or 1.5 inches of clay allowance beyond the edge of the form depending on how wide you want your final plate rim to be. -
Soften the slab:
Lift the cut clay circle gently and drop it onto the table a few times from a low height. This stretches the clay slightly and relaxes the memory, helping it drape more naturally over the mold without springing back. -
Mount on the form:
Center your clay slab over your chosen mold or GR Pottery form. If you are using wooden forms, ensure they are dusted with a little cornstarch so the clay doesn’t stick. Gently press the center of the slab down so it sits flat against the top face of the mold. -
Shape the rim:
Using a damp sponge or your fingers, gently press the overhanging clay down around the curve of the mold to establish the rim’s angle. Don’t pull the clay; just guide it down to fit the form. -
Refine the edge:
While the plate is still on the mold (ideally on a banding wheel), use a rubber rib to compress the rim and smooth out any finger marks. Hold a damp chamois leather against the very edge of the clay while spinning the wheel to create a completely smooth, rounded lip.
Warped Plates?
Plates warp due to uneven drying. Dry them very slowly, kept rim-to-rim or face down on a drywall board. Avoid drafts and don’t rush the process.
Step 2: Drying and Bisque
-
Initial drying:
Let the plates stiffen up to a leather-hard state while still on the forms. This usually takes a few hours or overnight depending on humidity. Don’t let them dry completely, or they might crack as they shrink against the non-shrinking mold. -
Remove and clean:
Pop the plates off the molds once they hold their shape. Flip them over and use a rib to smooth the bottom surface. You can add a maker’s mark at this stage if desired. -
Slow drying:
Place the plates rim-down on a flat board to discourage warping, or stack them rim-to-rim with a sheet of newsprint in between. Cover loosely with plastic to ensure even, slow drying for several days before bisque firing. -
Bisque fire:
Load your kiln and bisque fire the bone-dry greenware according to your clay body’s specifications, usually to cone 04.
Level Up: Texture
Before cutting your circles, roll a piece of linen or lace into the slab surface. The glaze will break beautifully over the subtle texture.
Step 3: Glazing the Rustic Rim
-
Clean the bisque:
Wipe down your bisque-fired plates with a damp sponge to remove any kiln dust. This ensures the glaze adheres properly. -
Applying the rim definition:
Dip a small sponge into your iron oxide wash or rust-colored underglaze. Gently dab or wipe this onto the very edge of the rim. You want the oxide to stain the rim dark brown/orange to create that defining contrast seen in the inspiration piece. -
Wipe back excess:
I prefer to take a clean damp sponge and wipe away any oxide that dripped too far down. You just want the color concentrated on the lip itself. -
Wax the foot:
Apply wax resist to the bottom foot ring of the plate (or the whole bottom if you prefer a bare clay bottom) to prevent the glaze from sticking to the kiln shelf. -
Glaze application:
Using tongs or a steady hand, dip the entire plate into a bucket of satin white or creamy matte glaze. Hold it submerged for about 3 seconds to get an even coat. -
Check the rim:
As the glaze dries on the pot, check the rim. The oxide wash should bleed slightly through the white glaze during firing, but if the white glaze is too thick on the rim, you can gently wipe it with a fingertip to thin it out, revealing more of the brown edge beneath. -
Final Fire:
Glaze fire the plates to cone 5 or 6 (depending on your clay and glaze rating). The speckled clay will show through the white glaze, and the iron oxide rim will interact with the glaze to create a beautiful toasted edge.
Stack your finished set and enjoy creating a stunning table setting with your handmade ceramics


Textured Slab Mugs
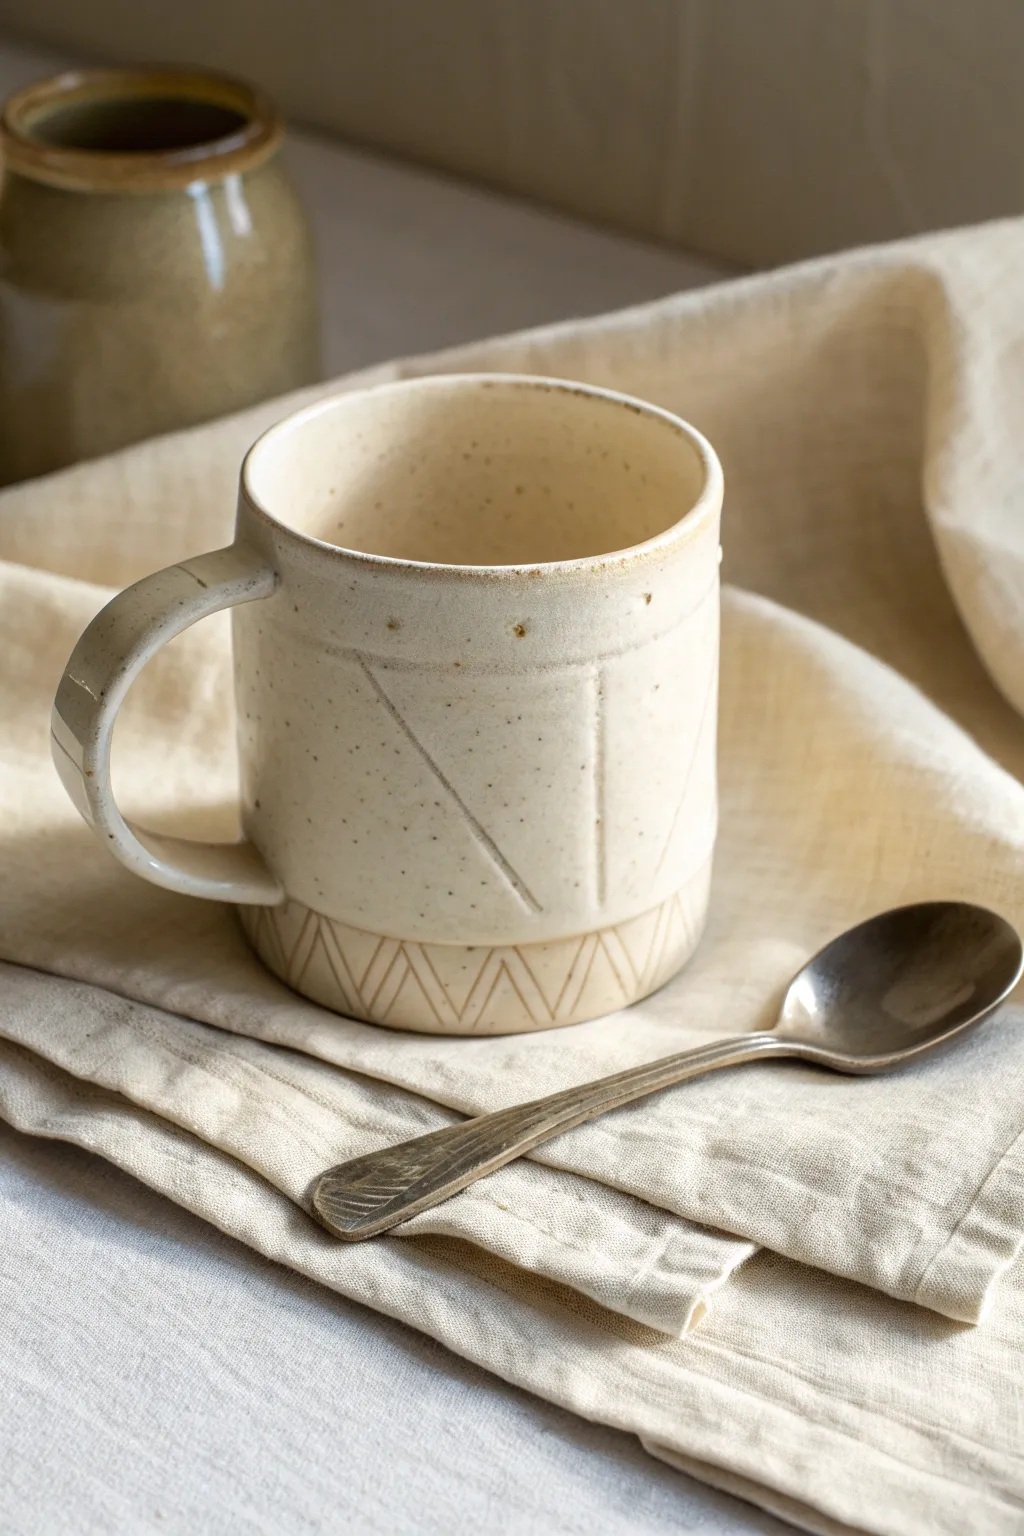
This charming, hand-built mug combines a creamy, speckled finish with simple geometric carvings for a modern yet rustic feel. The distinctive feature is the subtle zigzag pattern around the base and the clean lines etched into the body, all achieved through basic slab construction.
Step-by-Step Guide
Materials
- Speckled buff stoneware clay
- Rolling pin
- Canvas working surface or slab mat
- Fettling knife
- Template (paper or cardstock for mug body)
- Scoring tool or serrated rib
- Slip (clay and water mixture)
- Wooden modeling tool or needle tool
- Soft sponge
- Small coil of clay (for handle)
- Creamy satin matte glaze
Step 1: Slab Preparation
-
Roll the slab:
Begin by rolling out your speckled stoneware clay on a canvas surface until it is approximately 1/4 inch thick. Aim for an even thickness throughout the entire slab to ensure consistent drying later. -
Smooth the surface:
Take a rubber kidney or a slightly damp rib and compress both sides of the slab. This aligns the clay particles, preventing warping in the kiln, and removes any canvas texture. -
Cut the body:
Using your rectangular template, cut out the main body of the mug with a fettling knife. The height should be around 4-5 inches.
Clean Lines
Wait until the clay is leather hard before doing final cleanup on your carvings. If the clay is too wet, the tool drags; if it’s leather hard, the crumbs brush right off.
Step 2: Texturing and Forming
-
Create the base pattern:
Before assembling, identify the bottom inch of your slab. Using a needle tool or the edge of a wooden tool, carefully carve a repeating zigzag or triangle pattern along this strip. Keep the pressure consistent for clean lines. -
Carve the body details:
Above the zigzag border, carve a few large, intersecting geometric lines. Don’t overthink the placement; a few bold diagonal lines create excellent visual interest. -
Bevel the edges:
Cut the short ends of your rectangular slab at a 45-degree angle. This beveling allows for a stronger, more seamless joint when you roll the clay into a cylinder. -
Score and slip:
Score the beveled edges aggressively and apply a generous amount of slip. Bring the ends together to form a cylinder. -
Join the seam:
Firmly press the seam together. Use a wooden tool to blend the clay across the joint on both the inside and outside, ensuring the wall thickness remains consistent.
Step 3: Adding the Base and Handle
-
Attach the floor:
Roll out a small piece of slab for the base. Place your cylinder on top, trace around it, and cut out the circle. Score and slip both the bottom of the cylinder and the edge of the base, then join them. -
Pull a strap handle:
Pull a thick strap of clay or cut a strip from your remaining slab. Smooth the edges so it feels comfortable to hold, rounding the corners slightly. -
Shape the handle:
Curve the clay into a ‘C’ shape and let it set up for about 15-20 minutes until it holds its form but is still flexible. -
Attach the handle:
Score and slip the attachment points on the mug body and the handle ends. Press the handle firmly onto the mug, blending the clay into the body for a seamless connection. -
Clean up:
Wipe away any excess slip or burrs with a slightly damp sponge, being careful not to erase your carved textures.
Wax Resist Detail
Paint wax resist into the carved geometric lines before glazing. This keeps the lines raw and creates a higher contrast between the bare speckled clay and the creamy glaze.
Step 4: Finishing
-
Dry slowly:
Loosely cover the mug with plastic to let it dry slowly and evenly. This is crucial for slab pieces to prevent warping at the seam. -
Bisque fire:
Once bone dry, fire the piece to bisque temperatures (usually Cone 04 or 06). -
Glaze application:
Dip or brush your mug with a creamy satin matte glaze. The glaze will break beautifully over the speckled clay and pool slightly in your carved lines, highlighting the texture. -
Final firing:
Fire the mug to maturity (Cone 5 or 6 depending on your clay body) to finish your piece.
Enjoy sipping your morning coffee from a mug that feels as good to hold as it looks


Little Trinket Dishes
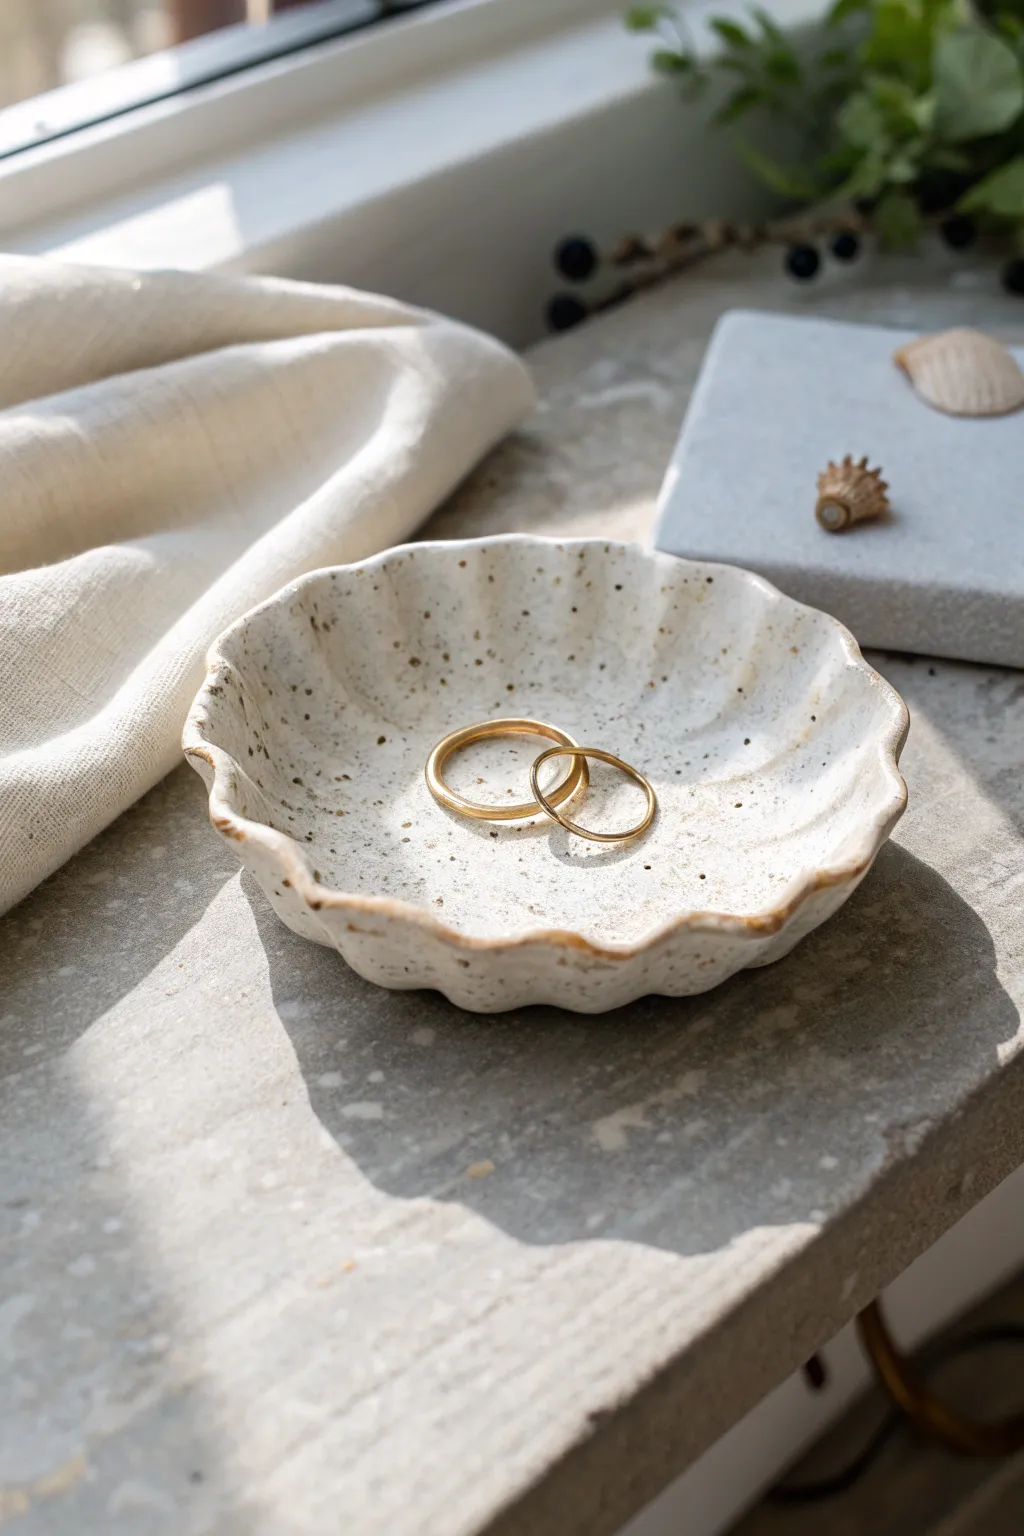
This charming, rustic trinket dish features a gentle scalloped edge and a beautiful speckled glaze that mimics the look of a natural eggshell. It’s the perfect size for holding your favorite rings or everyday jewelry on a windowsill or bedside table.
Detailed Instructions
Materials
- White stoneware clay (preferably speckled, or add grog)
- Rolling pin
- Canvas mat or wooden board (to prevent sticking)
- Round cookie cutter or jar lid (approx. 4-5 inches)
- Small sponge
- Wooden modeling tool or chopstick
- Bowl (for shaping)
- Speckled white glaze (if using non-speckled clay) or Clear glaze (if using speckled clay)
- Kiln (or oven, depending on clay type used)
Step 1: Shaping the Base
-
Prepare your clay:
Start by taking a ball of white stoneware clay roughly the size of a tennis ball. Wedge it thoroughly on your canvas mat to remove any air bubbles, which helps prevent cracking later. -
Roll out the slab:
Using your rolling pin, flatten the clay ball into a slab. Aim for a consistent thickness of about 1/4 inch. If you want a more organic feel, slight variations in thickness are perfectly fine. -
Smooth the surface:
Before cutting, take a damp sponge or a rib tool and gently smooth the surface of the clay slab to remove any canvas texture or rolling pin marks. -
Cut the circle:
Place your round cookie cutter or jar lid onto the clay slab. Press down firmly to cut out a perfect circle, then peel away the excess clay from the outside. -
Soften the edges:
Run a damp finger or a small piece of sponge around the cut edge of the circle. This rounds off the sharp cut angle, giving the piece a more finished, handmade look.
Step 2: Creating the Form
-
Lift the edges:
Gently lift the clay circle from your work surface. Carefully pinch the edges upward slightly to begin defining the bowl shape. -
Form the scallops:
Using your thumb and forefinger, gently push the rim in and out at regular intervals to create a wavy, scalloped effect. I like to support the clay from underneath while doing this to keep the curve gentle. -
Refine the waves:
Go around the rim a second time, emphasizing the peaks and valleys of the scallops. The goal is an organic, not perfectly symmetrical, wave pattern. -
Add texture (optional):
If your clay isn’t naturally speckled, you can gently press coarse sand or grog into the surface now for texture, though painting speckles later is easier. -
Slump drying:
Place your clay dish inside a small bowl lined with a paper towel or cheesecloth. This supports the curved shape while the clay dries to a leather-hard state.
Cracking Up?
If the rim cracks while shaping, your clay might be too dry. Dip your fingers in water and smooth the crack immediately, or spritz the slab before bending.
Step 3: Finishing and Glazing
-
Bisque fire:
Once the dish is bone dry, fire it in the kiln according to your clay’s specific temperature requirements (usually Cone 04 or 06). -
Clean the bisque:
Wipe the fired piece with a damp sponge to remove any kiln dust before glazing. -
Apply the glaze:
If you used speckled clay, simply brush on a clear gloss glaze. If your clay was plain white, use a ‘speckled white’ glaze to achieve the look in the photo. -
Detail the rim:
For that subtle rustic edge, gently wipe a tiny bit of the glaze off the very rim with a sponge, allowing the natural clay body to peek through slightly after firing. -
Glaze fire:
Place the dish back in the kiln for the final glaze firing (often Cone 5 or 6 for stoneware) to melt the glass and seal the clay.
Faux Speckles
No speckled clay? Mix a tiny amount of granular ilmenite or manganese into your regular white glaze to create those lovely rustic spots manually.
Give your new dish a home near a window where the light can catch those delicate curves

The Complete Guide to Pottery Troubleshooting
Uncover the most common ceramic mistakes—from cracking clay to failed glazes—and learn how to fix them fast.
Spoon Rests and Soap Dishes

This project creates a beautiful, minimalist set featuring a gently warped oval bowl and a matching soap dish, both finished with a milky speckled glaze and defined rims. The organic, hand-built aesthetic brings a wabi-sabi charm suitable for both kitchen and bathroom counters.
How-To Guide
Materials
- White stoneware clay with speckles (or standard white clay)
- Rolling pin
- Canvas or cloth work surface
- Needle tool or fettling knife
- Smooth red rib tool
- Sponge
- Cardboard or paper templates (oval and circle)
- Small bowl for shaping (slump mold)
- Slip (clay mixed with water)
- Scoring tool or fork
- Milky white or clear glaze
- Brown iron oxide or stain for the rim
- Kiln for firing to cone 5/6 (or appropriate temp for your clay)
Step 1: Preparing the Slabs
-
Wedge the clay:
Begin by wedging your speckled stoneware clay thoroughly to remove air bubbles and ensure an even consistency. -
Roll out the slab:
Place the clay on your canvas and roll it out into a large slab. Aim for a thickness of about 1/4 inch (approx 0.6 cm). Ensure it’s even by turning the precise slab periodically. -
Compress the slab:
Use your smooth red rib to compress the clay on both sides. This aligns the clay particles, reducing the chance of warping later and giving you a lovely smooth surface.
Step 2: Shaping the Spoon Rest Bowl
-
Cut the organic oval:
Place your oval template onto the slab. Using your needle tool, cut around the shape. Don’t worry about being perfectly symmetrical; the charm lies in the organic form. -
Soften the edges:
Run a damp sponge or your finger along the cut edge to round it over removing sharp corners. -
Form the curve:
Gently lift the clay oval and place it inside a shallow bowl lined with a piece of plastic or cloth. Press it gently to take on the curve. -
Create the irregular rim:
While in the mold, gently push down on one or two sections of the rim to create that distinctive wavy, organic profile shown in the photo. -
Refine the surface:
Once the clay has stiffened slightly to leather-hard, remove it from the mold. Use your rib to smooth out any textures from the mold cloth.
Smooth Moves
Use a damp chamois strip on the rim immediately after cutting the clay. It compresses the edge better than a sponge and creates a pro-level buttery smooth rim.
Step 3: Creating the Soap Dish
-
Cut the base:
From the remaining slab, cut a circle or slightly irregular round shape for the soap dish. It should be smaller than your bowl. -
Add a raised rim:
Roll a very thin coil of clay. Score and slip the outer edge of your base, then attach the coil to create a slightly raised lip. -
Blend the coil:
Use your thumb or a modeling tool to blend the coil seamlessly into the base so it looks like one piece, not an attached ring. -
Texture the base (optional):
If you want ridges for drainage like the photo implies, gently press a dowel or tool handle into the center of the dish to create subtle grooves.
Make it Match
Create a matching toothbrush holder by rolling a slab into a cylinder and finishing the rim with the same iron oxide detail for a complete bathroom set.
Step 4: Finishing and firing
-
Dry slowly:
Loosely cover your pieces with plastic to let them dry slowly. This prevents cracking, especially with flat slabs. -
Bisque fire:
Once bone dry, fire the pieces in a kiln to bisque temperature (usually cone 04). -
Apply the rim stain:
Dip a small brush into iron oxide wash or a brown underglaze. carefully paint just the very edge of the rim on both pieces to get that rustic brown definition. -
Sponge away excess:
If the line gets too thick or messy, wipe it back with a damp sponge so only a subtle stain remains on the rim. -
Glaze application:
Dip or brush your milky white glaze over the entire piece (except the bottom foot). The glaze should be translucent enough to let the clay’s natural speckles show through. -
Final wipe:
I always do a final check to ensure the bottom of the pots are completely free of glaze before firing. -
Glaze fire:
Fire again to the maturity temperature of your clay and glaze combination (typically cone 5 or 6).
Now you have a serene, custom ceramic set perfectly ready for daily use
Nesting Bowls for Snacks
These beautifully rustic nesting bowls are a perfect introduction to wheel throwing or hand-building with clay, featuring a cohesive yet varied color palette. The speckled clay body gives them a delightful, earthy texture that shines through the semi-transparent glazes.
How-To Guide
Materials
- Speckled stoneware clay (approx. 5-7 lbs)
- Potter’s wheel (or slab roller/rolling pin for hand-building)
- Throwing sponge
- Wire cutter
- Rib tools (wooden and flexible metal)
- Needle tool
- Trimming tools
- Chamois strip
- Kiln
- Underglazes (terracotta/rust red, dark blue)
- Clear or semi-transparent matte white glaze
- Satin finish cream glaze
Step 1: Preparing and Throwing
-
Weigh your clay:
Cut your clay into four distinct portions of increasing weight. A good ratio is roughly 1 lb, 1.5 lbs, 2.5 lbs, and 3.5 lbs to ensure the finished bowls nest comfortably. -
Center the first ball:
Start with the smallest ball of clay. Slam it onto the wheel head and use water and steady pressure to center it perfectly before opening. -
Open and pull the walls:
Open the centered clay and gently pull the walls upward. For nesting bowls, aim for a continuous curve rather than a flat bottom, creating a smooth, rounded interior. -
Shape the profile:
Use a flexible metal rib on the inside to compress the clay and refine that seamless curve. Mimic this curve on the other bowls so they sit flush inside one another. -
Finish the rim:
Compress the rim gently with a chamois strip or sponge. A rounded, slightly thickened rim adds durability and visual softness to the set. -
Repeat for all sizes:
Throw the remaining three bowls, using calipers or a ruler to check the diameter of the previous bowl. The next bowl’s interior bottom needs to be slightly wider than the previous bowl’s foot. -
Dry to leather hard:
Wire the bowls off the bat and let them dry slowly under loose plastic until they reach a leather-hard state suitable for trimming.
Uneven Nesting?
If bowls wobble when stacked, your interior curves don’t match the exterior foot profile. Use a contour gauge tool during trimming to match the curve of the bowl below it.
Step 2: Trimming and Texture
-
Trim the foot rings:
Center each bowl upside down on the wheel. Trim away excess weight from the bottom and carve a neat foot ring. I like to keep the foot rings relatively distinct to give the bowls a bit of lift. -
Add texture (optional):
While the wheel is spinning slowly, you can use a trimming tool to carve subtle horizontal grooves on the exterior of the largest bowl adds that wonderful tactile ripple seen in the main bowl. -
Bisque fire:
Once fully bone dry, load the bowls into the kiln and bisque fire them to Cone 04 (or your clay body’s recommendation).
Step 3: Glazing Design
-
Clean the bisque:
Wipe down all bisque-fired pieces with a damp sponge to remove dust, which ensures the glaze adheres properly. -
Glaze the largest bowl:
Dip the largest bowl into a satin cream glaze. Let the speckled clay body show through by not applying it too thickly. -
Create the rust accent:
For the second largest bowl, apply a band of rust-red specific glaze or underglaze to the exterior rim area, then dip the rest in the cream or clear glaze. -
Glaze the middle bowl:
Dip the third bowl entirely in a milky white glaze that allows the clay specks to populate the surface. -
Detail the smallest bowl:
Pour a denim-blue glaze into the interior of the smallest bowl and swirl to coat. Dip the exterior rim in the same blue, leaving the bottom raw or lightly coated in clear to create that layered look. -
Final Fire:
Wipe the foot rings clean of any glaze and fire to the final maturity temperature of your clay (likely Cone 5 or 6) to vitrify the stoneware.
Level Up: Rim Dipping
Double-dip just the rims of all bowls in a contrasting glaze (like the blue shown) to visually tie the whole set together as a cohesive family.
Now you have a stunning, functional set ready for serving snacks or simply displaying on your table


What Really Happens Inside the Kiln
Learn how time and temperature work together inside the kiln to transform clay into durable ceramic.
Lidded Keepsake Boxes
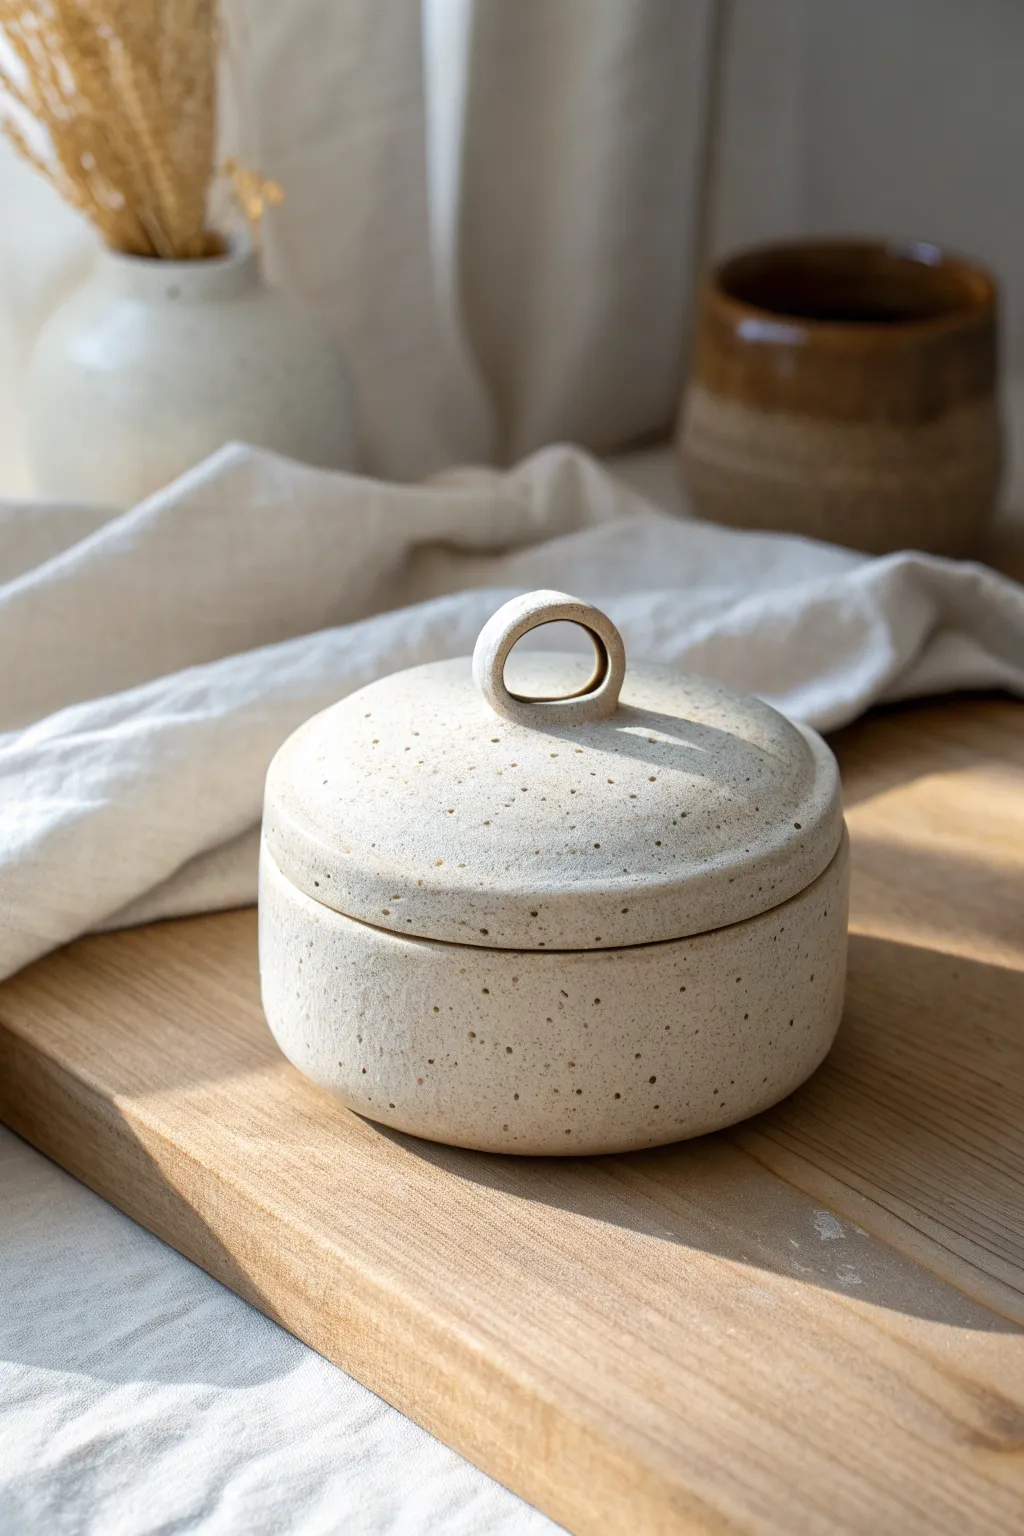
This charming, rustic lidded jar features a creamy, speckled finish and a distinctive loop handle, perfect for storing jewelry or small treasures. Its organic imperfections and soft matte texture give it a timeless, hand-crafted feel that warms up any shelf.
Detailed Instructions
Materials
- Speckled stoneware clay (mid-fire)
- Rolling pin
- Canvas work surface or slab mat
- Needle tool
- Fettling knife
- Flexible metal or rubber rib
- Serrated rib or scoring tool
- Slip (clay mixed with water)
- Circle templates (paper or cookie cutters)
- Sponge
- Wooden modeling tool
- Matte white or transparent glaze
Step 1: Creating the Base Form
-
Roll the Slab:
Begin by wedging your speckled clay to remove air bubbles. Roll it out into an even slab, aiming for a thickness of about 1/4 inch. I like to flip the slab over halfway through rolling to ensure the canvas texture is minimal on both sides. -
Cut Components:
Using your templates, cut out two identical circles for the base and the lid. Then, cut a long rectangular strip that will become the wall of the jar. Measure the circumference of your circle to determine the length needed, adding a little extra for the overlap. -
Prepare the Wall:
Take the rectangular strip and bevel the short edges at a 45-degree angle. This angled cut allows for a stronger, cleaner seam when you join the ends together to form a cylinder. -
Score and Slip:
Generously score the beveled edges of your rectangle and the outer edge of one clay circle. Apply slip to the scored areas. -
Assemble the Cylinder:
Curve the rectangle into a ring and join the beveled ends. pressing firmer at the bottom and working your way up. Smooth the seam inside and out with a rib so it becomes invisible. -
Attach Base:
Place the cylinder onto the scored base circle. Press down gently to connect them. Use a wooden tool to blend the clay from the outside wall down onto the base, sealing the join completely. -
Refine the Form:
Use a damp sponge to smooth the connection point. Gently paddle the outside of the cylinder with a flat wooden tool to ensure the walls are vertical and the shape is perfectly round.
Step 2: Building the Lid
-
Form the Flange:
To keep the lid from sliding off, you need an inner flange. Roll a thin coil or cut a narrow strip of clay. Attach this to the underside of your second clay circle, inset slightly from the edge so it fits snugly inside the jar base. -
Test the Fit:
Once the flange is attached and smoothed, carefully test the fit on the jar base. It should sit comfortably without being too tight, as clay shrinks during drying. -
Create the Loop Handle:
Roll a small, thick coil of clay for the handle. Bend it into a tight ‘O’ or ring shape. Flatten the bottom of the ring slightly where it will touch the lid to create a better attachment surface. -
Attach the Handle:
Score the center of the lid top and the bottom of your loop handle. Apply slip and press the handle firmly into place. Use a small tool to blend the clay at the seam, ensuring a seamless transition. -
Dome the Lid:
While holding the lid in your hand, gently press squarely on the center from the underside to create a very subtle dome shape. This adds elegance and prevents the lid from warping downwards during firing.
Clean Seams
When blending seams, always move clay in two directions: drag clay across the join line first, then smooth along the length of it. This weaves the clay particles together for maximum strength.
Step 3: Finishing Touches
-
Smoothing and Texture:
Once the clay is leather hard, use a flexible metal rib to smooth the entire surface. This compresses the clay particles and brings some of the speckles to the surface. -
Rim Refinement:
Run a damp chamois or sponge over the rim of the jar and the edge of the lid. Sharp edges can become brittle after firing, so aim for a soft, rounded lip. -
Slow Drying:
Place the lid on the box with a piece of paper towel in between to prevent sticking. Cover loosely with plastic to let the piece dry slowly and evenly, preventing warpage. -
Bisque Fire:
Fire the piece in a kiln to cone 04 (or your clay body’s bisque temperature). -
Glazing:
Apply a matte white or clear glaze. Because the clay is speckled, a semi-transparent glaze works beautifully to let those natural spots show through. Wipe the bottom of the jar and the contact points of the lid clean before the final firing.
Dual-Tone Effect
Try using raw clay on the exterior and glazing only the interior. The contrast between the rough, speckled raw clay and a glossy, colorful interior glaze creates a stunning, modern tactile experience.
Once fired, you’ll have a beautiful, functional vessel that highlights the simple beauty of natural clay
Tile Coasters With Stamped Texture
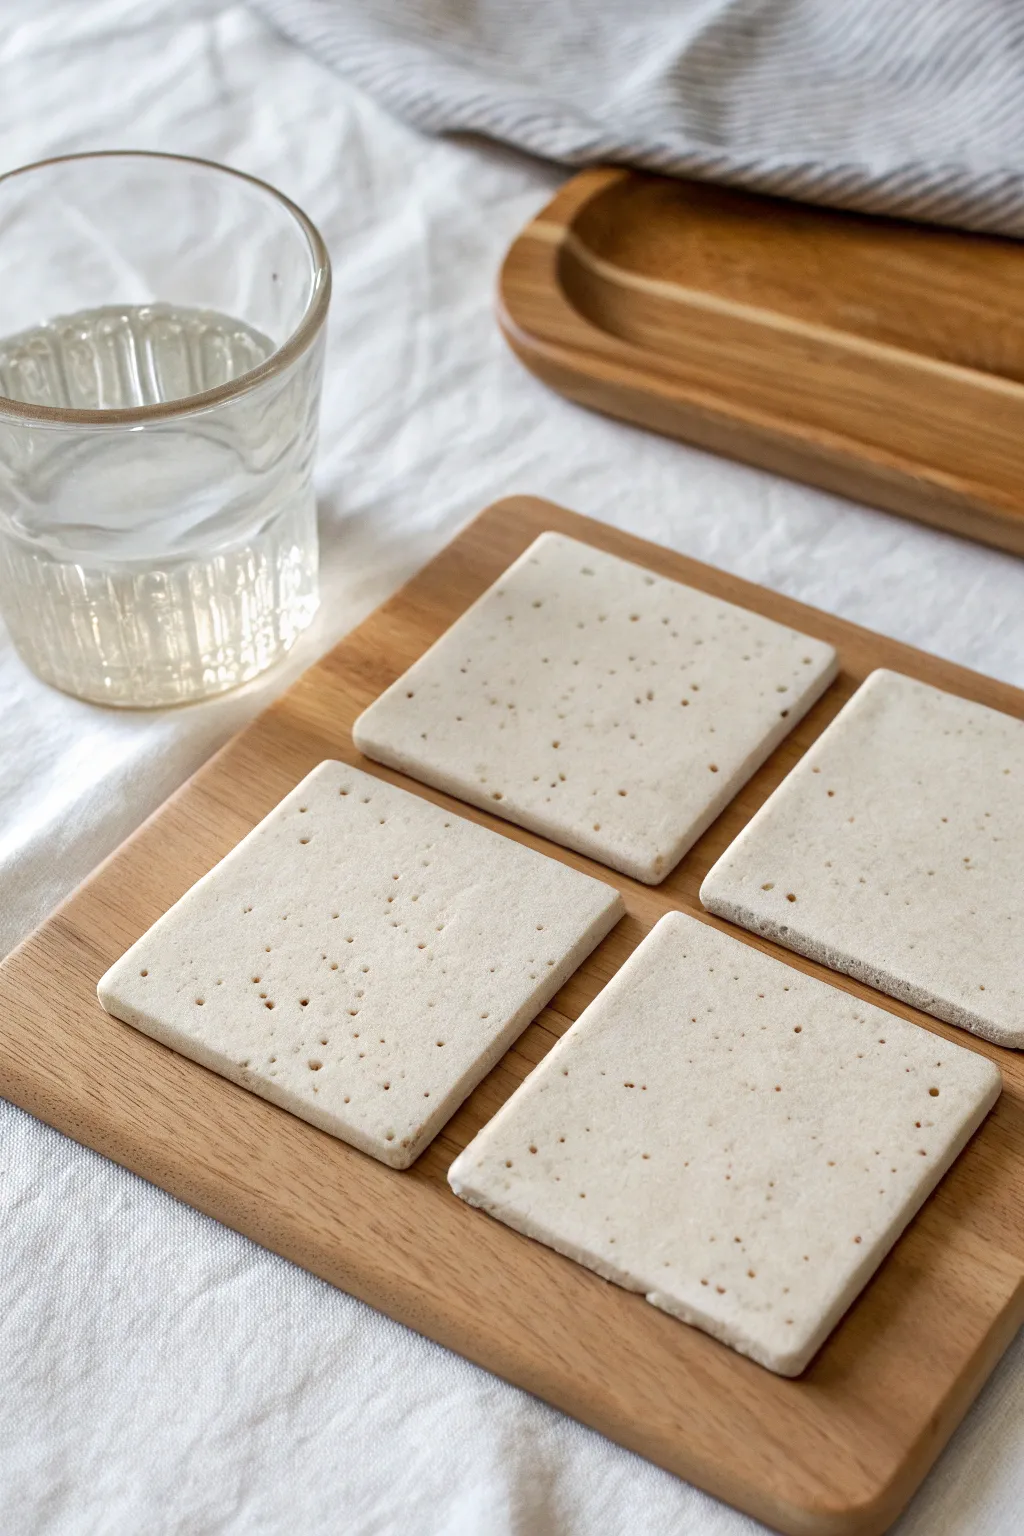
These understated coasters bring a touch of organic warmth to any table setting with their gentle texture and natural clay finish. The beauty lies in their simplicity, featuring a clean square shape and a delicately stamped random dot pattern that mimics natural stone.
Step-by-Step Guide
Materials
- Light-colored stoneware clay (smooth or fine grog)
- Rolling pin
- Two thickness strips (approx. 1/4 inch or 6mm)
- Square cookie cutter (4×4 inch) or ruler and needle tool
- Canvas mat or slab mat for rolling
- Clean sponge
- Wooden skewer or toothpick (for texturing)
- Flexible rib tool
- Matte transparent glaze (optional
Step 1: Preparation and Rolling
-
Prepare the workspace:
Set up your canvas or slab mat on a sturdy table. Having a textured surface like canvas prevents the clay from sticking, but keep in mind that the texture will transfer to the bottom of your coasters. -
Wedge the clay:
Take a manageable chunk of your light stoneware clay and wedge it thoroughly. This removes air bubbles and ensures the moisture is evenly distributed, which is crucial for flat tiles. -
Set the guides:
Place your thickness strips on either side of the clay. I usually aim for about 1/4 inch thickness; significantly thinner might warp, while thicker makes the coasters heavy. -
Roll the slab:
Using your rolling pin, roll the clay out smoothly over the strips. Pass the roller over several times in different directions to compress the clay particles, which helps prevent warping later. -
Smooth the surface:
Take your flexible rib tool and gently glide it over the surface of the clay slab. This compresses the clay further and erases any texture from the rolling pin or canvas.
Warped Corners?
To fix slight warping, flip the leather-hard tiles upside down and place a small weight (like a bag of rice) on the center while they dry slowly.
Step 2: Cutting and Refining
-
Measure and cut:
If using a square cutter, press it firmly into the slab. If cutting by hand, measure 4-inch squares with a ruler and slice cleanly with a needle tool or fettling knife. -
Release the tiles:
Carefully lift away the excess clay around your squares first, then gently lift the coasters. Placing them on a separate board lined with paper helps avoid distortion. -
Soften the edges:
Dip your finger or a sponge lightly in water and run it along the sharp cut edges. You want to round them off slightly so they aren’t sharp after firing. -
Check for flatness:
Look at the tiles at eye level to ensure they haven’t bent during handling. If they have, gently press them flat against your board again.
Step 3: Texturing and Drying
-
Begin the texture:
Using the blunt end of a wooden skewer or a small stylus, gently press small dots into the surface of the clay. Vary the pressure slightly for organic depth. -
Vary the spacing:
Create a random pattern rather than a grid. Cluster a few dots closer together in some areas and leave more open space in others to mimic natural stone porosity. -
Clean up burrs:
If the poking tool created any tiny raised bumps or ‘burrs’ around the holes, let the clay stiffen for an hour, then lightly brush your finger over them to knock them down. -
Slow drying setup:
Sandwich the coasters between two pieces of drywall or wooden ware boards. This specific technique forces the clay to dry slowly and evenly from both sides. -
Monitor the drying:
Let them dry completely to the bone-dry stage. This usually takes a few days depending on humidity. Don’t rush this, or the corners will curl.
Consistent Thickness
If you don’t have rolling strips, use two stacks of playing cards or identical wooden rulers on either side of your clay to ensure perfectly even slabs.
Step 4: Firing and Finishing
-
Bisque fire:
Fire the bone-dry coasters in a kiln to bisque temperature (usually cone 04). This hardens the clay and prepares it for glazing. -
Optional glazing:
For a truly raw look like the image, you can leave the clay unglazed if it is fully vitrified high-fire clay. However, a thin layer of matte transparent glaze makes them easier to clean. -
Final firing:
Fire the coasters a second time to the maturation temperature of your specific clay body (e.g., cone 5 or 6). Ensure they lay perfectly flat on the kiln shelf. -
Sand the bottom:
Once cool, lightly sand the bottom of the coasters with wet-dry sandpaper to ensure they won’t scratch your table.
Now you have a set of clean, modern coasters ready to protect your surfaces with style

TRACK YOUR CERAMIC JOURNEY
Capture glaze tests, firing details, and creative progress—all in one simple printable. Make your projects easier to repeat and improve.
Butter Dishes That Feel Handmade
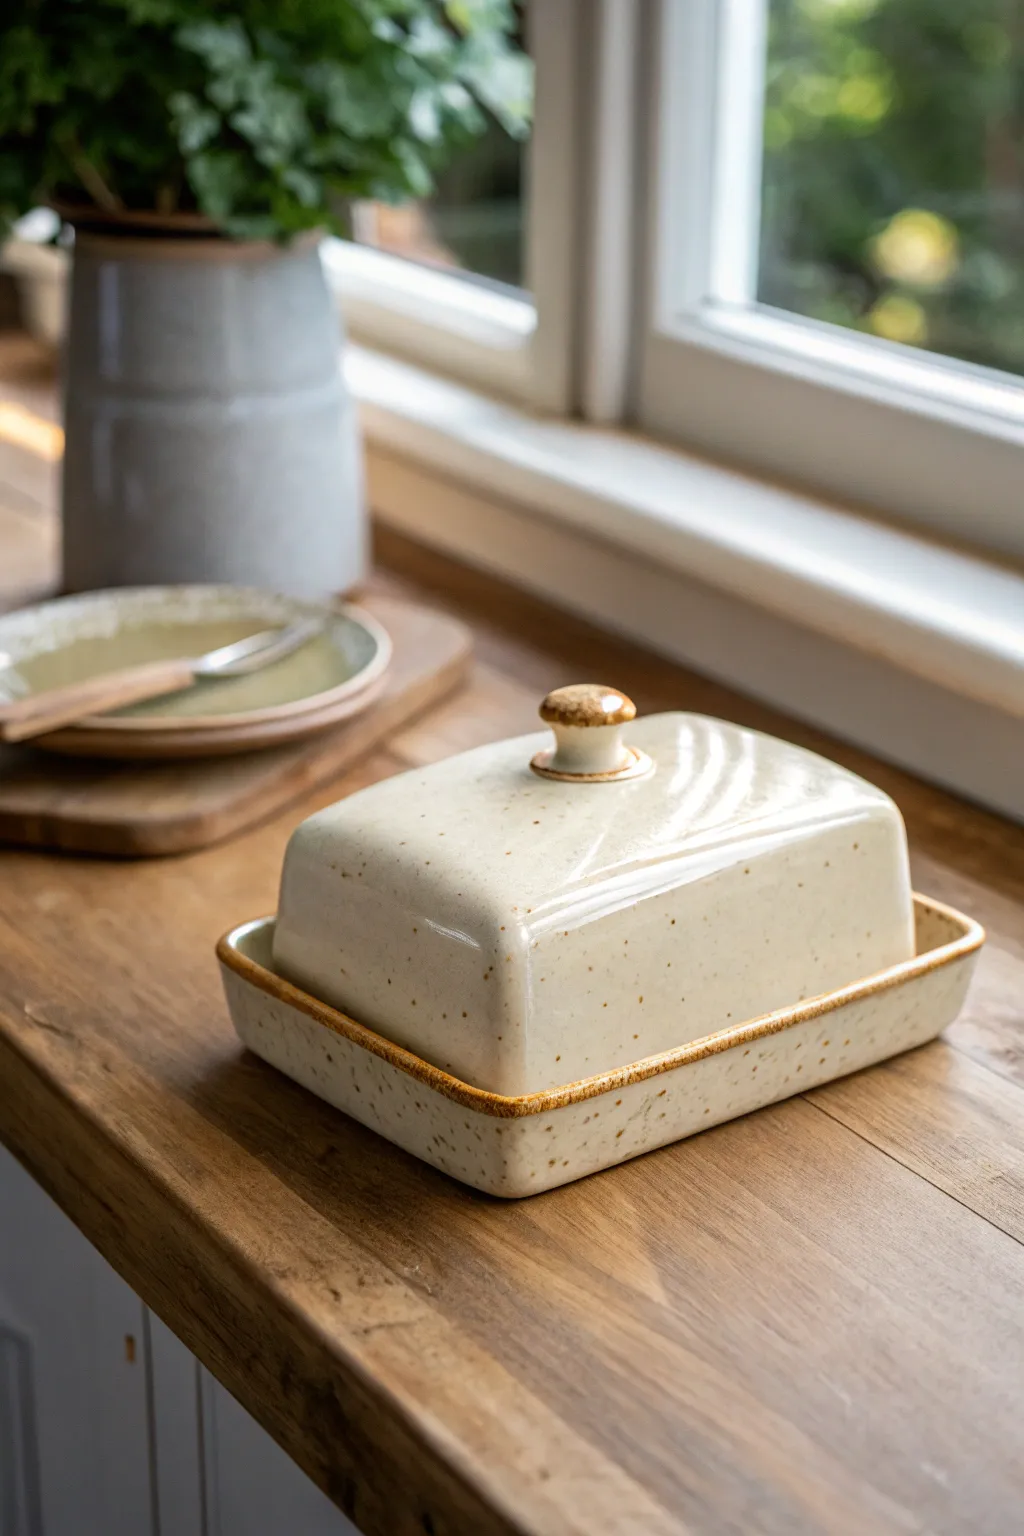
This charming, handmade butter dish strikes the perfect balance between rustic warmth and modern simplicity. With its speckled cream glaze and exposed clay rim, it brings a cozy, farmhouse-style aesthetic right to your kitchen counter.
Detailed Instructions
Materials
- Speckled Stoneware Clay (mid-fire)
- Durable Cream/White Glaze (food safe)
- Canvas working board
- Rolling pin
- Guide sticks (approx. 1/4 inch thick)
- Fettling knife or needle tool
- Ribs (metal and rubber)
- Sponge
- Scoring tool (or serrated rib)
- Slip (clay mixed with water)
- Small paintbrush for glazing
- Clear wax resist (optional)
Step 1: Forming the Base Dish
-
Roll the Slabs:
Begin by wedging your speckled clay thoroughly to remove air bubbles. Roll out a slab onto your canvas using guide sticks to ensure an even thickness of about 1/4 inch. -
Cut the Base Pieces:
Measure and cut a rectangle for the floor of the dish, roughly 4 x 7 inches (adjust based on your butter stick size, leaving room for shrinkage). Cut four narrow strips for the walls, about 1 inch tall. -
Assemble the Dish Walls:
Score the edges of the base and the bottom of the wall strips. Apply slip generously. -
Attach and Compress:
Press the walls onto the base. Use your thumb or a wooden tool to blend the seams on the inside and outside, ensuring a strong bond. Smooth the corners so they are slightly rounded rather than sharp. -
Refine the Rim:
Use a damp sponge to smooth the top rim of the base dish. It should look slightly softened, not razor-sharp.
Clean Rims
Use a damp sponge on the unglazed rims right before firing. This exposes the grit in the clay, enhancing the toasted brown color that contrasts with the cream glaze.
Step 2: Constructing the Lid
-
Create the Lid Slab:
Roll a second slab of clay. You can drape this over a rectangular mold if you have one, or build it using the slab method. Let’s do slab-building: cut a top rectangle slightly smaller than your base’s interior. -
Cut Side Panels:
Cut four side panels for the lid. These need to be tall enough to clear a stick of butter—usually about 2 to 2.5 inches. -
Bevel and Join:
For a cleaner box shape, bevel looking edges at a 45-degree angle. Score and slip all meeting points. -
Assemble the Box:
Join the sides to the top piece. Gently use a paddle or flat board to tap the sides, ensuring the walls are straight and the box shape is uniform. -
Round the Top Edges:
I like to take a soft rubber rib at this stage and gently run it over the corners where the top meets the sides. This creates that soft, seamless ‘melted’ look seen in the photo, rather than a sharp boxy edge. -
Check the Fit:
Carefully place the lid onto the base dish. Ensure there is enough wiggle room so the lid doesn’t get stuck during firing, but not so much that it slides off.
Step 3: Adding the Knob & Finishing
-
Form the Handle:
Roll a small ball of clay into a knob shape. Flatten the bottom and slightly flare the top to create a comfortable grip. -
Attach the Knob:
Score the center of the lid and the bottom of the knob. Apply slip and press firmly. Clean up any excess slip with a damp brush. -
Drying:
Dry the piece slowly under loose plastic to prevent warping, especially for the boxy lid. Once bone dry, bisque fire the pieces. -
Wax Resist Application:
Apply wax resist to the very bottom of the base dish. More importantly, carefully apply a thin line of wax resist to the rim of the base AND the bottom rim of the lid. This creates the unglazed, toasted clay detail. -
Glazing:
Dip or brush your cream glaze over the lid (avoiding the knob top if you want that exposed clay look) and the interior/exterior of the base. Wipe back any glaze that touched your waxed rims. -
Final Fire:
Fire the piece to the temperature recommended for your specific clay and glaze (usually Cone 5 or 6). This will reveal the beautiful iron speckles through the creamy glaze.
Textured Grip
Before the clay dries, gently press a subtle canvas or linen texture onto the knob’s top surface. It adds tactile interest and better grip for greasy fingers.
Now you have a functional piece of art ready to elevate your morning toast routine
Pour-Over Coffee Drippers
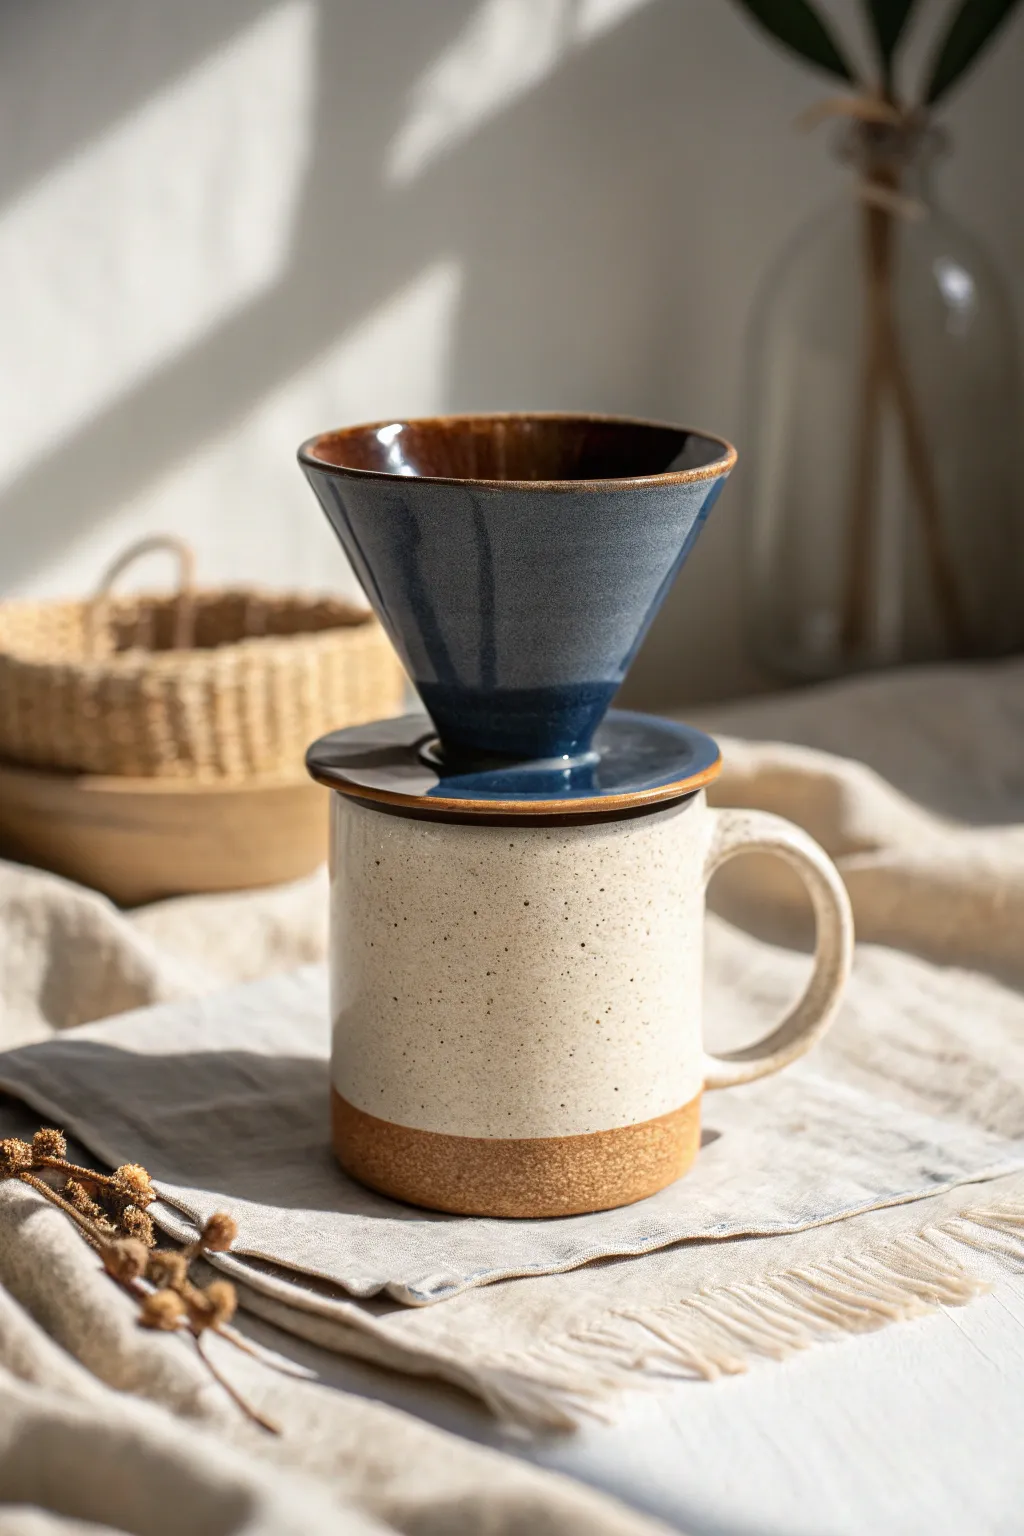
Elevate your daily brew with this sophisticated two-piece ceramic set featuring a speckled mug and a contrasting blue pour-over cone. The combination of raw clay textures and glossy glazes creates a modern, earthy aesthetic perfect for slow mornings.
How-To Guide
Materials
- Stoneware clay (speckled or buff)
- Pottery wheel (optional, can be hand-built)
- Rolling pin and canvas
- Circle cutter or template
- Scoring tool and slip
- Sponge
- Wire cutter
- Trimming tools
- Glossy white glaze
- Dark denim blue glaze
- Rich brown glaze (for dripper interior)
Step 1: Creating the Mug
-
Form the cylinder:
Begin by throwing a cylinder on the wheel or slab-building a reliable tube shape. For this look, aim for straight, vertical walls with a flat bottom, keeping the rim slightly rounded for drinking comfort. -
Trim the foot:
Once leather hard, trim the bottom to create a clean, sharp angle at the base. Leave the bottom half-inch un-trimmed if you want to emphasize the raw clay texture shown in the photo. -
Pull a handle:
Pull a medium-thick strap handle from a lug of clay. Give it a classic C-curve shape that allows for a comfortable grip. -
Attach the handle:
Score and slip the attachment points on both the mug body and handle. Press firmly to join, smoothing the seams with a damp sponge or modeling tool until invisible.
Uneven Flow?
If coffee drains too slowly, your drain hole is too small or the glaze clogged it. Use a drill bit to carefully widen the hole after firing if necessary, or make it larger in the wet stage next time.
Step 2: Constructing the Dripper
-
Throw the cone:
Throw a wide, V-shaped bowl without a bottom, or form a cone from a slab. The angle needs to be roughly 60 degrees to match standard paper filters. Ensure the walls are even to prevent warping. -
Make the base disk:
Roll out a slab of clay about 1/4 inch thick. Cut a circle that is slightly wider than the mug’s rim (approx 4-5 inches diameter) to ensure it sits safely on top. -
Cut the drip hole:
In the center of your disk, cut a hole roughly the size of a quarter. This regulates the coffee flow. Smooth the edges of this hole meticulously so it doesn’t tear the paper filter. -
Sculpt the flange:
On the underside of the disk, add a small ring of clay or trim a recessed area that fits *inside* the mug’s rim. This prevents the dripper from sliding off while you pour hot water. -
Join cone to base:
Score and slip the bottom edge of your V-shaped cone and attach it securely to the center of the top of the disk. Reinforce the joint with a tiny coil of clay on the inside seam. -
Dry slowly:
Place the dripper upside down to dry so gravity helps maintain the connection between the heavy cone and the flat disk. Cover loosely with plastic to ensure even drying.
Step 3: Glazing and Firing
-
Bisque fire:
Once bone dry, fire both pieces to cone 04 (or your clay’s specific bisque temperature). -
Wax the mug base:
Apply wax resist to the bottom inch of the mug’s exterior. This creates the beautiful contrast between the raw, sandy clay and the smooth glaze. -
Glaze the mug:
Dip the mug into a creamy, speckled white glaze. Shake off excess gently and check the rim for drips. -
Glaze the dripper interior:
Pour a rich, glossy brown glaze into the interior of the cone. Swirl it to coat completely and pour out the excess. -
Dip the dripper exterior:
Hold the dripper by the base and dip the cone portion into a deep denim blue glaze. I find overlapping the blue slightly onto the top of the base disk creates a cohesive look. -
Glaze the disk:
Carefully brush or dip the flat disk section in the same blue glaze, ensuring you wipe the underside (where it touches the kiln shelf) completely clean. -
Final firing:
Fire the pieces to maturity (likely cone 6 for stoneware). Ensure the dripper is stilted or wiped clean on the bottom to prevent sticking to the shelf.
Texture Twist
Carve internal vertical ribs inside the cone before bisque firing. This helps airflow between the paper filter and the clay wall, improving the brew speed and extraction quality.
Enjoy the meditative process of brewing coffee with a set you created with your own hands
Salt Cellars and Pinch Pots
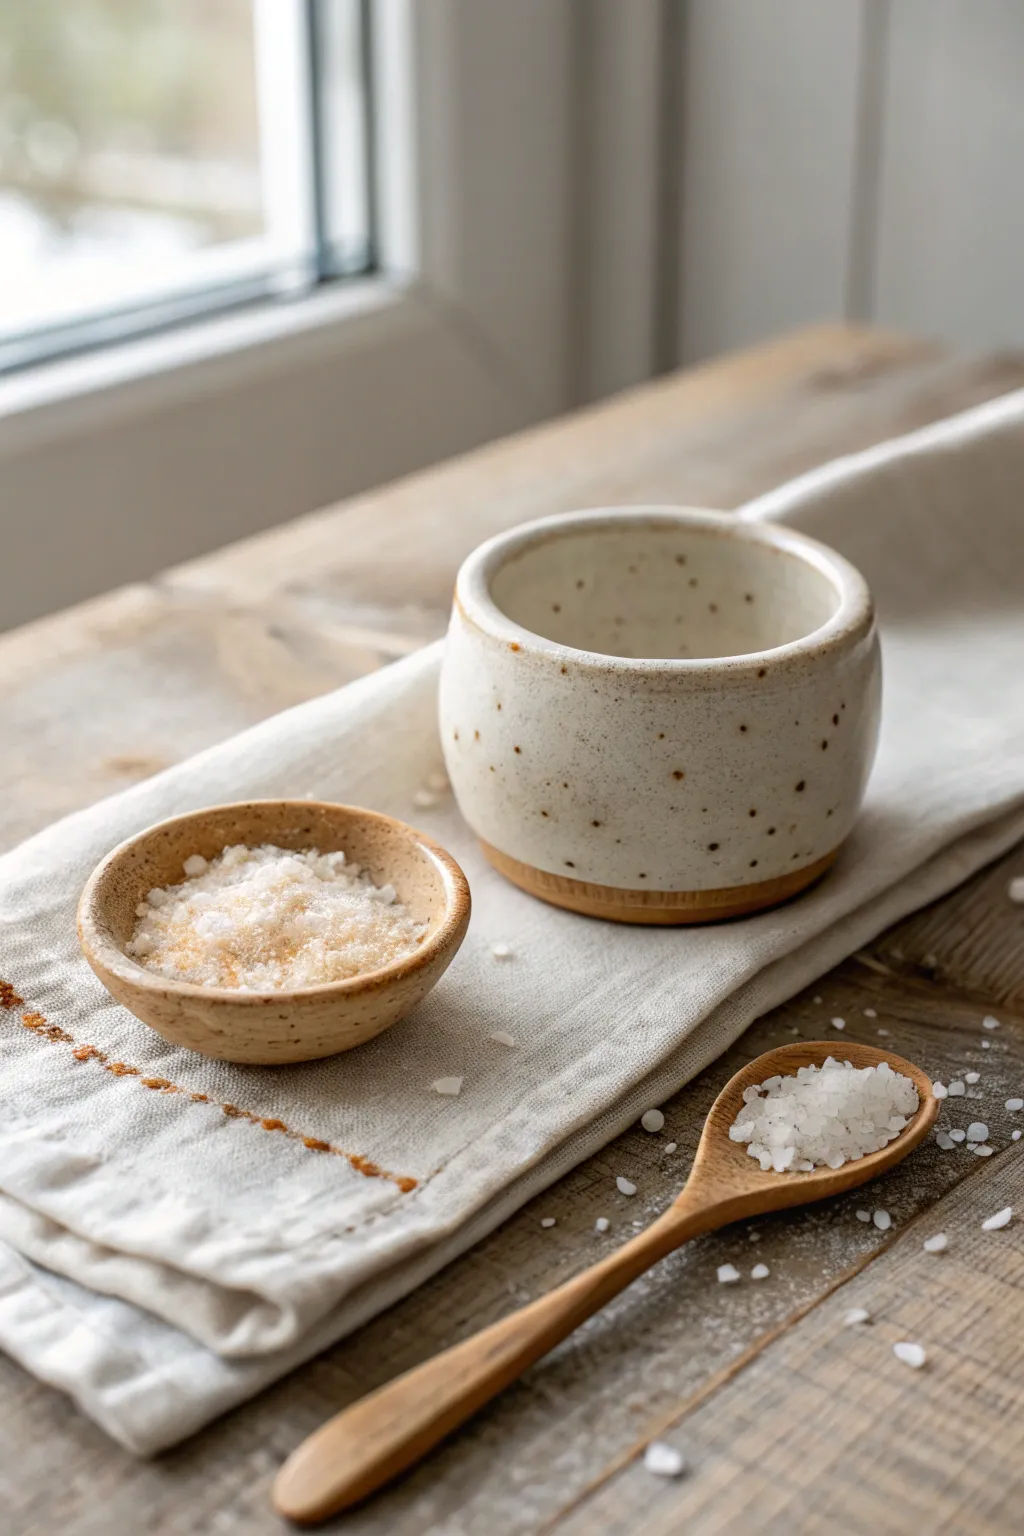
This charming two-piece set features a larger vessel perfect for storing specialty salts and a matching miniature pinch pot for serving. Their rustic appeal comes from the exposed raw clay base contrasting with a warm, speckled cream glaze.
Step-by-Step
Materials
- Speckled stoneware clay (like a buff or toasted stoneware)
- Pottery wheel (optional, can be hand-built)
- Needle tool
- Rib tool (wooden and metal)
- Wire cutter
- Sponge
- Loop trimming tool
- Creamy matte white glaze (food safe)
- Kiln
Step 1: Forming the Main Vessel
-
Wedging the clay:
Start by wedging a pound of speckled stoneware clay to remove air bubbles and ensure consistency. -
Centering:
Place the clay ball on the wheel head and center it using even pressure and water until it spins without wobbling. -
Opening the form:
Press your thumbs into the center to open the clay, leaving about a half-inch thick floor for the base. -
Pulling the walls:
Gently pull the clay upwards to create a cylindrical shape. Aim for a slightly rounded, substantial wall rather than something paper-thin to maintain the rustic look. -
Shaping the rim:
Compress the rim with a chamois or sponge to make it smooth and rounded, ensuring it’s comfortable to touch. -
Refining the shape:
Use a wooden rib on the exterior to smooth out throwing lines and create a clean, vertical canvas for the glaze later. -
Cutting off:
Run a wire cutter underneath the pot and set it aside on a ware board to firm up to leather-hard.
Uneven Glaze Line?
If your dip line is jagged, use a damp sponge to clean up the glaze edge before firing. A steady hand and a banding wheel make cleaning the line much easier.
Step 2: Creating the Mini Pinch Pot
-
Forming the ball:
Take a much smaller amount regarding clay, roughly the size of a golf ball, and roll it into a sphere. -
Opening the pinch pot:
Insert your thumb into the center of the ball while cupping it in your other hand. Rotate the clay while gently pinching the walls between your thumb and fingers. -
Shaping the bowl:
Widen the form into a shallow, open bowl shape. I like to keep the walls slightly thick to match the larger vessel’s aesthetic. -
Smoothing:
Use a slightly damp sponge to smooth the interior and rim, removing any fingerprint marks or cracks.
Step 3: Finishing and Glazing
-
Trimming the bases:
Once leather hard, flip the larger vessel and use a loop tool to trim the base, revealing the raw clay texture. You can gently hand-burnish the bottom of the pinch pot. -
Bisque firing:
Load both pieces into the kiln for a bisque fire (usually Cone 04 or 06) and fire according to your clay’s schedule. -
Waxing the foot:
Apply wax resist to the bottom inch of the larger vessel and the bottom half of the pinch pot. The exposed clay is a key design element here. -
Glazing:
Dip both pieces into a creamy, matte white glaze. Shake off excess gently. -
Checking the speckle:
If your clay isn’t naturally speckled, you can lightly flick iron oxide onto the wet glaze using a toothbrush for that peppered look. -
Glaze firing:
Fire the pieces again to maturity (often Cone 5 or 6). Ensure the unglazed bottoms don’t touch the kiln shelf directly if you skipped waxing. -
Sanding:
Once cool, use fine-grit sandpaper to smooth the unglazed raw clay foot so it won’t scratch your table.
Enhancing the Speckle
For more pronounced spots, choose a clay body with heavy iron grog or ‘reduction’ speckles. The glaze’s chemistry interacts with the iron to create the dots.
Fill your new handmade set with flaky sea salt and enjoy the tactile pleasure of using your own ceramics
Ring Cones and Jewelry Holders
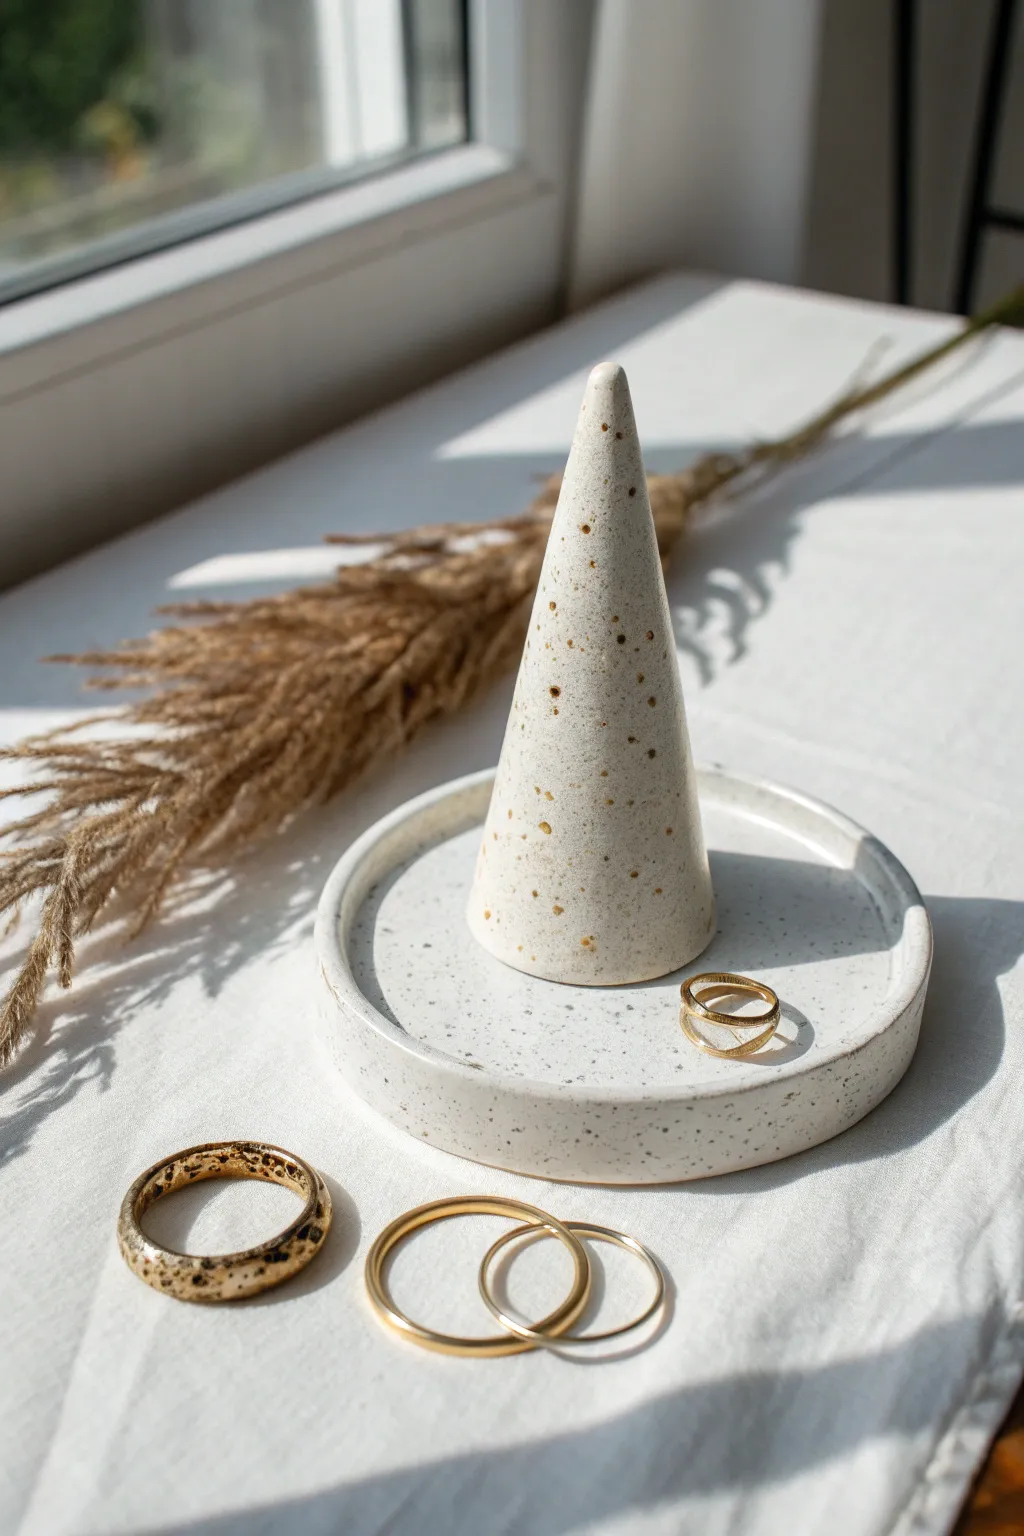
Create a minimalist and functional home for your rings with this two-piece speckled clay set. The tall cone keeps rings organized vertically, while the matching shallow catch-all dish is perfect for storing studs or bracelets.
How-To Guide
Materials
- Speckled stoneware clay (white or cream)
- Available glaze (clear, matte finish recommended)
- Clay roller or rolling pin
- Fettling knife or craft knife
- Needle tool
- Small circular cookie cutter (approx. 4-inch)
- Sponge
- Scoring tool (or fork)
- Slip (clay and water mixture)
- Guide sticks or slats (approx. 1/4 inch thick)
- Smooth wooden board or canvas mat
Step 1: Shaping the Cone
-
Prepare the Clay:
Begin by wedging a small ball of speckled clay to remove air bubbles. This ensures your cone won’t crack during firing. -
Form the Basic Cone:
Roll the ball between your palms to elongate it slightly. Place it on your work surface and roll it back and forth, applying more pressure to one end to create a tapered carrot shape. -
Refine the Shape:
Stand the cone upright on its base. Gently pat the sides with a flat wooden paddle or your fingers to straighten the lines. You want a distinct definition between the wide base and the pointy tip. -
Flatten the Base:
Pick up the cone and tap the bottom firmly against the table a few times. This creates a completely flat surface so it won’t wobble later. -
Smooth the Surface:
Take a slightly damp sponge and run it over the cone from tip to base to remove fingerprints and smooth out any small bumps. I like to do this gently so I don’t warp the tip.
Step 2: Creating the Tray
-
Roll the Slab:
Using guide sticks on either side of your clay, roll out a second portion of clay into a smooth slab about 1/4 inch thick. -
Cut the Base:
Place your circular cutter on the slab and press down firmly to cut out the base of your dish. If you don’t have a cutter, trace a circle with a needle tool and cut freehand. -
Make the Rim Coil:
Roll a thin coil of clay, roughly the thickness of a pencil. Ensure it is long enough to go around the circumference of your circular base. -
Score and Slip:
deeply score the outer edge of the circular base and one side of the coil. Apply a generous amount of slip to the scored areas. -
Attach the Rim:
Place the coil onto the edge of the base. Press it down firmly to ensure a strong bond. Cut off any excess coil length and blend the two ends together seamlessly. -
Blend the Seams:
Using a modeling tool or your finger, smudge the clay from the coil down onto the base on the inside of the dish. Do the same on the outside to make the seam invisible. -
Refine the Rim:
Pinch the rim gently to square it off, giving it a modern, clean look similar to the photo. Use a wet finger to smooth the top edge.
Clean Edges Only
For that sharp, professional look, run a slightly damp chamois strip over the rim of the tray right before drying. It compresses the clay and removes rough spots.
Step 3: Finishing Touches
-
Slow Drying:
Cover both pieces loosely with plastic wrap. Let them dry slowly over a few days to the bone-dry stage to prevent warping. -
Bisque Fire:
Fire the pieces in a kiln to cone 04 (or according to your clay’s instructions) for the bisque firing. -
Glazing:
Dip both pieces into a clear matte glaze. Wipe the bottom of the tray and the bottom of the cone clean with a sponge so they don’t stick to the kiln shelf. -
Final Fire:
Fire the pieces again to the final temperature required for your specific stoneware clay.
Integrated Design
Instead of separate pieces, score and slip the bottom of the cone directly to the center of the wet tray before drying to create a single, unified jewelry stand.
Place your favorite rings on the cone and enjoy the elegant simplicity of your handmade set
Wall Hangings From Clay Slabs
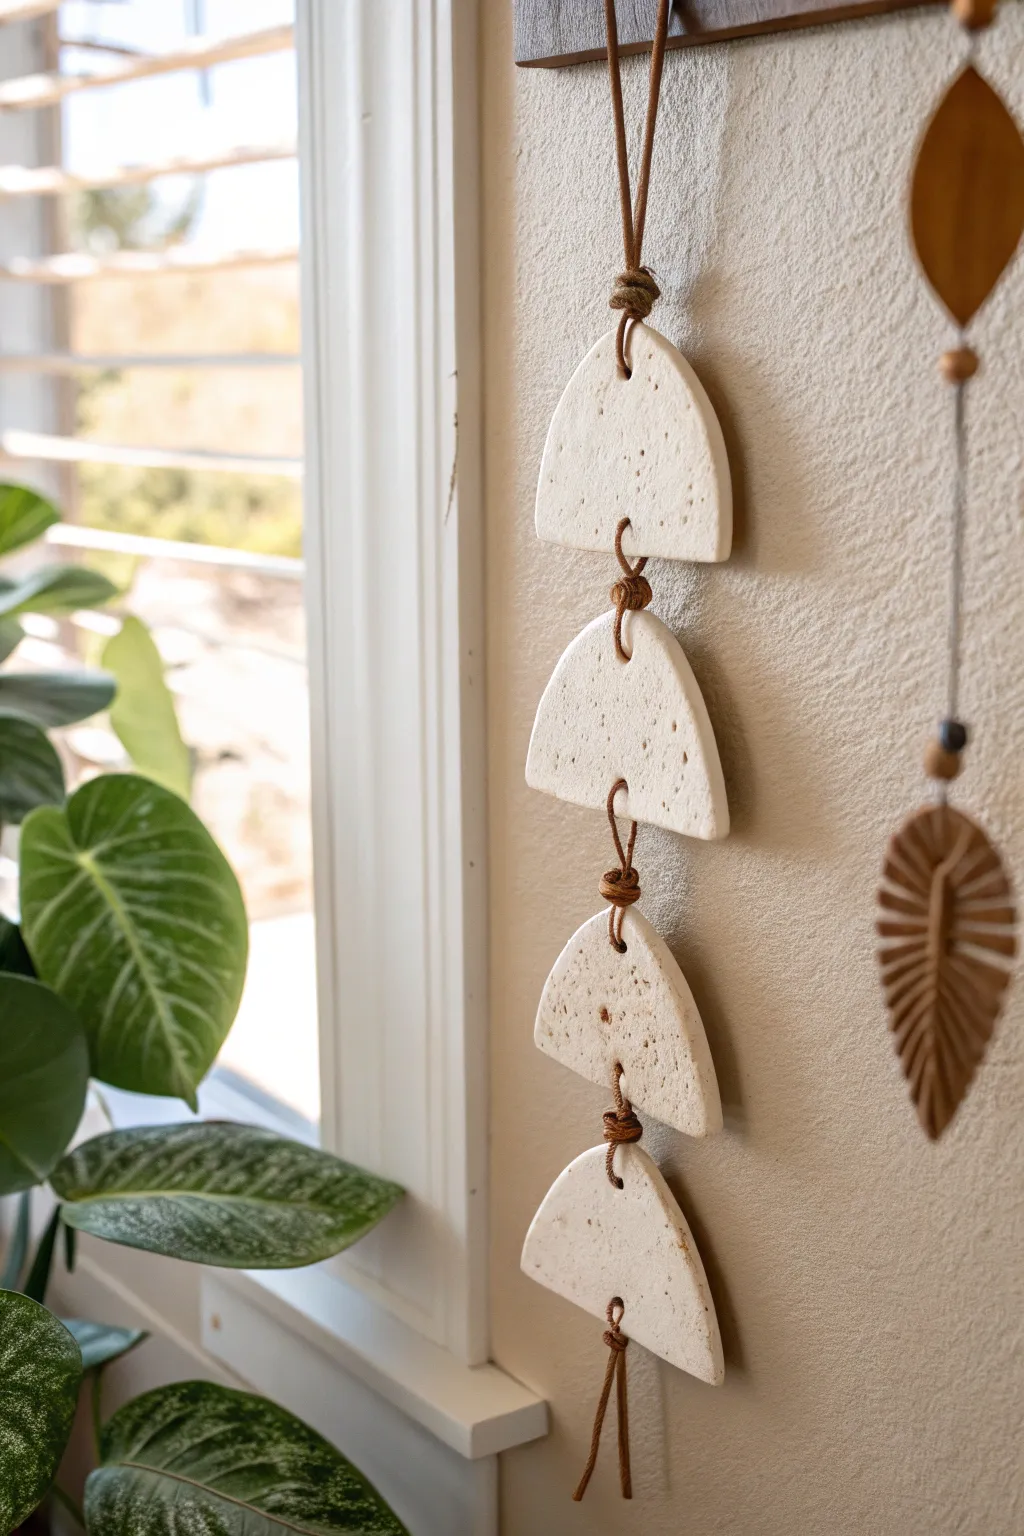
Embrace organic minimalism with this stacked wall hanging featuring textured clay semi-circles strung on rustic cord. The natural speckled finish and simple geometric shapes create a calming, earthy accent perfect for a sunny corner.
Step-by-Step Guide
Materials
- White polymer clay or air-dry clay (preferably with speckles)
- Small amount of black pepper or dried coffee grounds (if clay isn’t pre-speckled)
- Rolling pin
- Circle cookie cutter (approx. 3-4 inches diameter) or a jar lid
- Craft knife or clay blade
- Wooden skewer or chopstick
- Medium grit sandpaper
- Leather cord, suede lace, or thick jute twine (brown)
- Parchment paper
- Ruler
Step 1: Preparing the Clay Shapes
-
Condition the clay:
Begin by warming up your clay in your hands until it is pliable. If you are using plain white clay and want the speckled look shown in the image, knead in a small pinch of cracked black pepper or dried coffee grounds until evenly distributed. -
Roll out the slab:
Place your clay on a sheet of parchment paper to prevent sticking. Use your rolling pin to roll the clay out into an even slab, aiming for a thickness of about 1/4 inch. -
Cut the circles:
Using your circle cutter or a jar lid as a template, cut out two large circles. Since you need four semi-circles total, two full circles will provide enough material. -
Bisect the shapes:
Take your craft knife or clay blade and carefully slice each circle directly down the center to create two equal semi-circles. You should now have four half-moon shapes. -
Smooth the edges:
Dip your finger in a little bit of water (for air-dry clay) or baby oil (for polymer) and run it along the cut edges to soften any sharp corners for a more organic, finished look. -
Create hanging holes:
Use a wooden skewer to poke a hole at the top center of the curve on each piece. Then, poke a second hole directly centered on the flat bottom edge. Important: The bottom-most piece only needs one hole at the top curve. -
Double-check hole size:
Make sure your holes are wide enough to accommodate your leather cord doubled over. Wiggle the skewer around slightly to enlarge them if necessary, as clay can shrink slightly during drying.
Step 2: Firing and Finishing
-
Dry or bake:
If using polymer clay, bake according to the package instructions (usually 275°F/135°C for 15-30 minutes). If using air-dry clay, let the pieces sit on a flat surface for 24-48 hours until completely hard. -
Sand for texture:
Once fully cured and cooled, take your medium grit sandpaper and lightly sand the surface and edges. This enhances the stone-like texture and removes any fingerprints. -
Cut the cord:
Cut a long length of leather cord or suede lace, approximately 3-4 feet long. It’s better to have too much than too little at this stage.
Uneven Hanging?
If the pieces tilt to one side, the holes aren’t centered. Use a small dab of clear glue inside the hole to fix the cord in the perfect center position so it hangs straight.
Step 3: Assembly
-
Attach the bottom piece:
Start with the bottom piece (the one with only one hole). Thread the cord through the hole from front to back, leaving a decorative tail hanging down. -
Secure the decorative tail:
Tie a knot at the front of the hole to secure the bottom piece. For the decorative tail shown in the photo, tie another knot about 2 inches down and let the ends fray slightly. -
Start the stacking chain:
Travel up the cord about 1.5 to 2 inches from the top of the bottom shape and tie a sturdy overhand knot. This knot will support the next clay piece. -
Thread the next piece:
Take your next semi-circle. Thread the cord through the bottom flat-edge hole (back to front) and then through the top curved-edge hole (front to back). -
Create the knot detail:
I like to add a visible knot at the top of each ceramic piece for visual interest. To do this, tie a knot in the cord immediately after it exits the top hole of the clay piece. -
Repeat the pattern:
Leave another 1.5-inch gap of cord, tie a support knot, and thread the next semi-circle in the same manner. Repeat this until all four pieces are attached. -
Create the top loop:
After the final top knot on the highest semi-circle, measure out enough cord to create a hanging loop. Fold the cord over and wrap the loose end around the base of the loop creating a gathered knot to finish securely.
Level Up: Material Contrast
Add wooden beads between the clay semi-circles or a large tasseled fringe at the very bottom for extra texture and a distinct boho-chic vibe.
Hang your new mobile near a window where the light can catch the subtle texture of the clay
Cutout Lanterns for Cozy Light
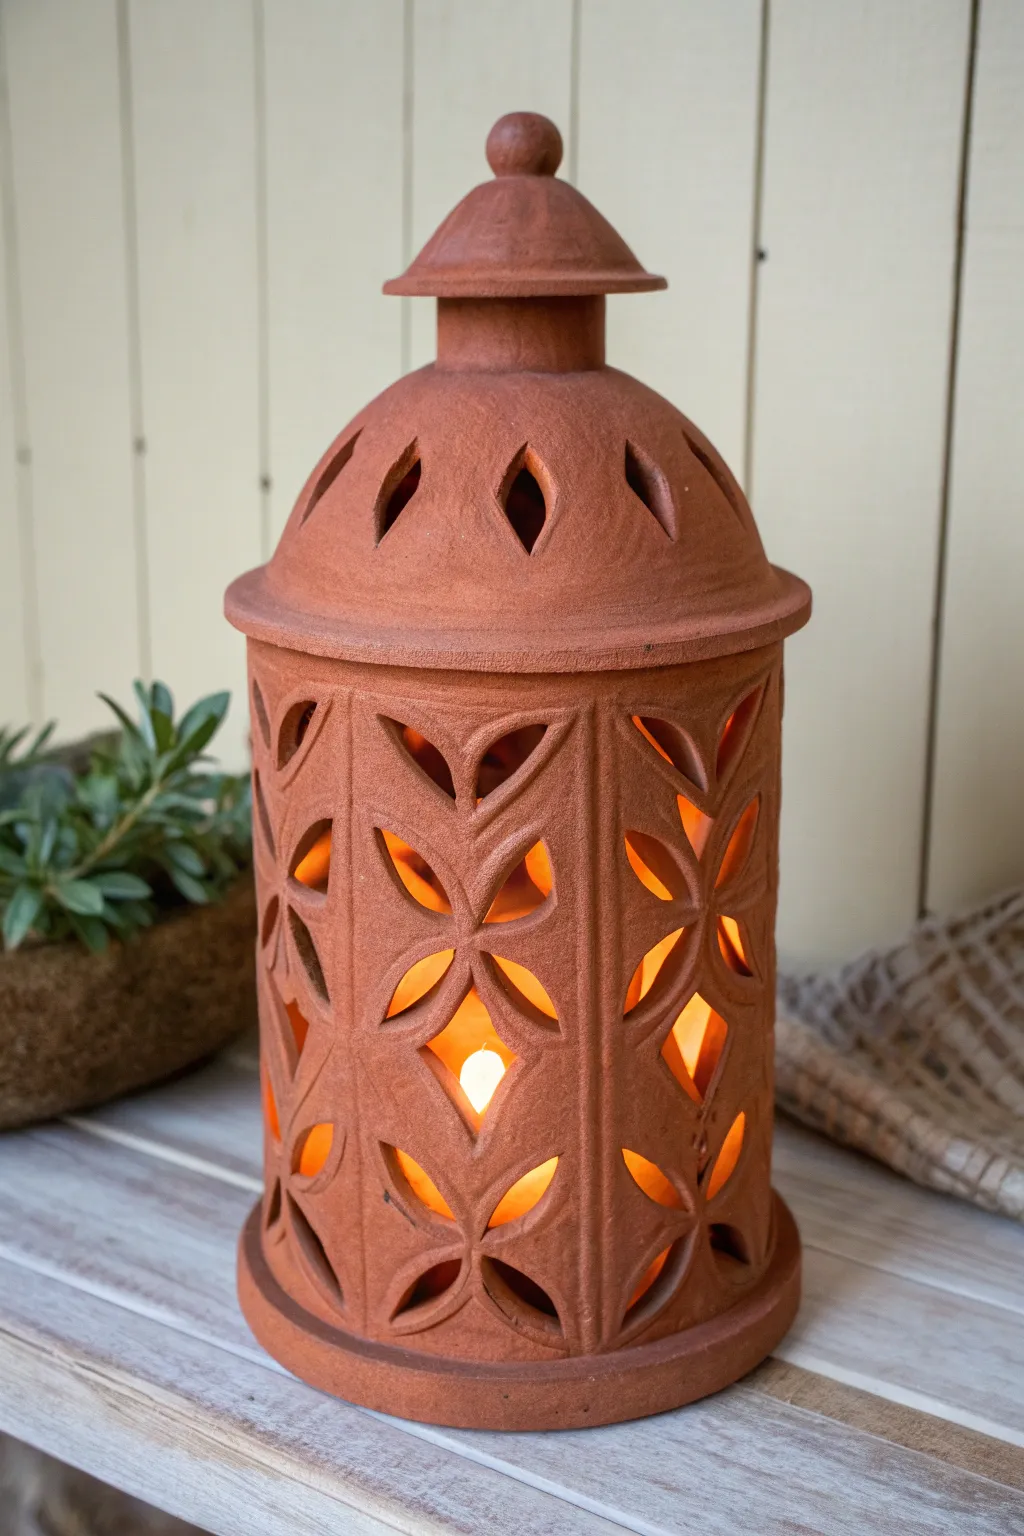
Bring a warm, flickering glow to your evenings with this hand-built terracotta lantern, featuring intricate leaf-shaped cutouts. The unglazed red clay offers a rustic, earthy texture that looks beautiful both indoors and out.
Step-by-Step
Materials
- Red earthenware or terracotta clay (low-fire)
- Rolling pin
- Guide sticks (1/4 inch thickness)
- Fettling knife
- Needle tool
- Small circle cutter
- Leaf-shaped cutter (optional) or paper ‘petal’ template
- Clay scoring tool
- Slip (clay mixed with water)
- Banding wheel or lazy susan
- Sponge
Step 1: Building the Cylinder Body
-
Roll the slab:
Begin by rolling out a medium-sized slab of red clay. Use guide sticks on either side of your clay to ensure an even 1/4 inch thickness throughout. -
Cut the rectangle:
Measure and cut a large rectangle. For a lantern similar to the photo, aim for roughly 12 inches wide by 8 inches tall. -
Form the cylinder:
Carefully lift the slab and curl it into a cylinder, overlapping the ends slightly. Score the overlapping edges deeply and apply slip. -
Join the seam:
Press the scored edges together firmly. Use your fingers or a modeling tool to smooth the seam both inside and outside until it disappears completely. -
Create the base:
Roll a smaller slab and cut a circle slightly larger than your cylinder’s diameter (about 1 inch wider). Score and slip the bottom of the cylinder and attach it centered on this disc base.
Step 2: Carving the Design
-
Map out the grid:
Lightly trace vertical lines down the cylinder to divide it into panels (about 4 or 6 sections). This creates the ‘frames’ for your flower motifs. -
Trace the pattern:
Using a paper template shaped like a long, pointed petal or leaf, lightly trace a four-petaled flower design within each panel. Center them so the points almost touch your vertical lines. -
Cut the shapes:
When the clay is leather hard, use a sharp fettling knife to carefully cut out the negative space leaves. I find it helpful to support the wall from the inside with my other hand while cutting. -
Smooth the edges:
Once the cutouts are removed, use a slightly damp sponge or your fingertip to round over the sharp cut edges for a finished look. -
Define the borders:
Using a modeling tool, press distinct vertical grooves between your cutout panels to emphasize the structural columns seen in the image.
Slumping Walls?
If the cylinder walls buckle while building, the clay is too wet. Stuff the inside lightly with crumpled newspaper or plastic bags to support the shape while it stiffens to leather hard.
Step 3: Constructing the Lid
-
Form the dome:
Roll a slab and drape it over a rounded mold (like a small bowl covered in plastic) to create the domed top. Trim the edges to match the cylinder’s width. -
Add lid cutouts:
Cut a few smaller teardrop shapes near the top of the dome to allow heat to escape. Add a small decorative rim at the very bottom edge of this dome. -
Build the finial:
Create a small, tiered knob for the top. Make a tiny cylinder neck, add a small cone roof, and top it with a spherical bead of clay. -
Attach the finial:
Score and slip the finial components securely to the center of the dome. -
Final drying and firing:
Allow both the main body and the lid to dry slowly under plastic to prevent warping. Fire to cone 04 (or according to your clay body specs) once fully bone dry.
Clean Up Trick
Don’t try to clean up the little clay crumbs from cutting while the clay is wet. Wait until the piece is bone dry, then use a stiff brush to easily sweep away the debris.
Place a tea light inside and watch the shadows dance across your table
Ruffled-Edge Trays and Platters
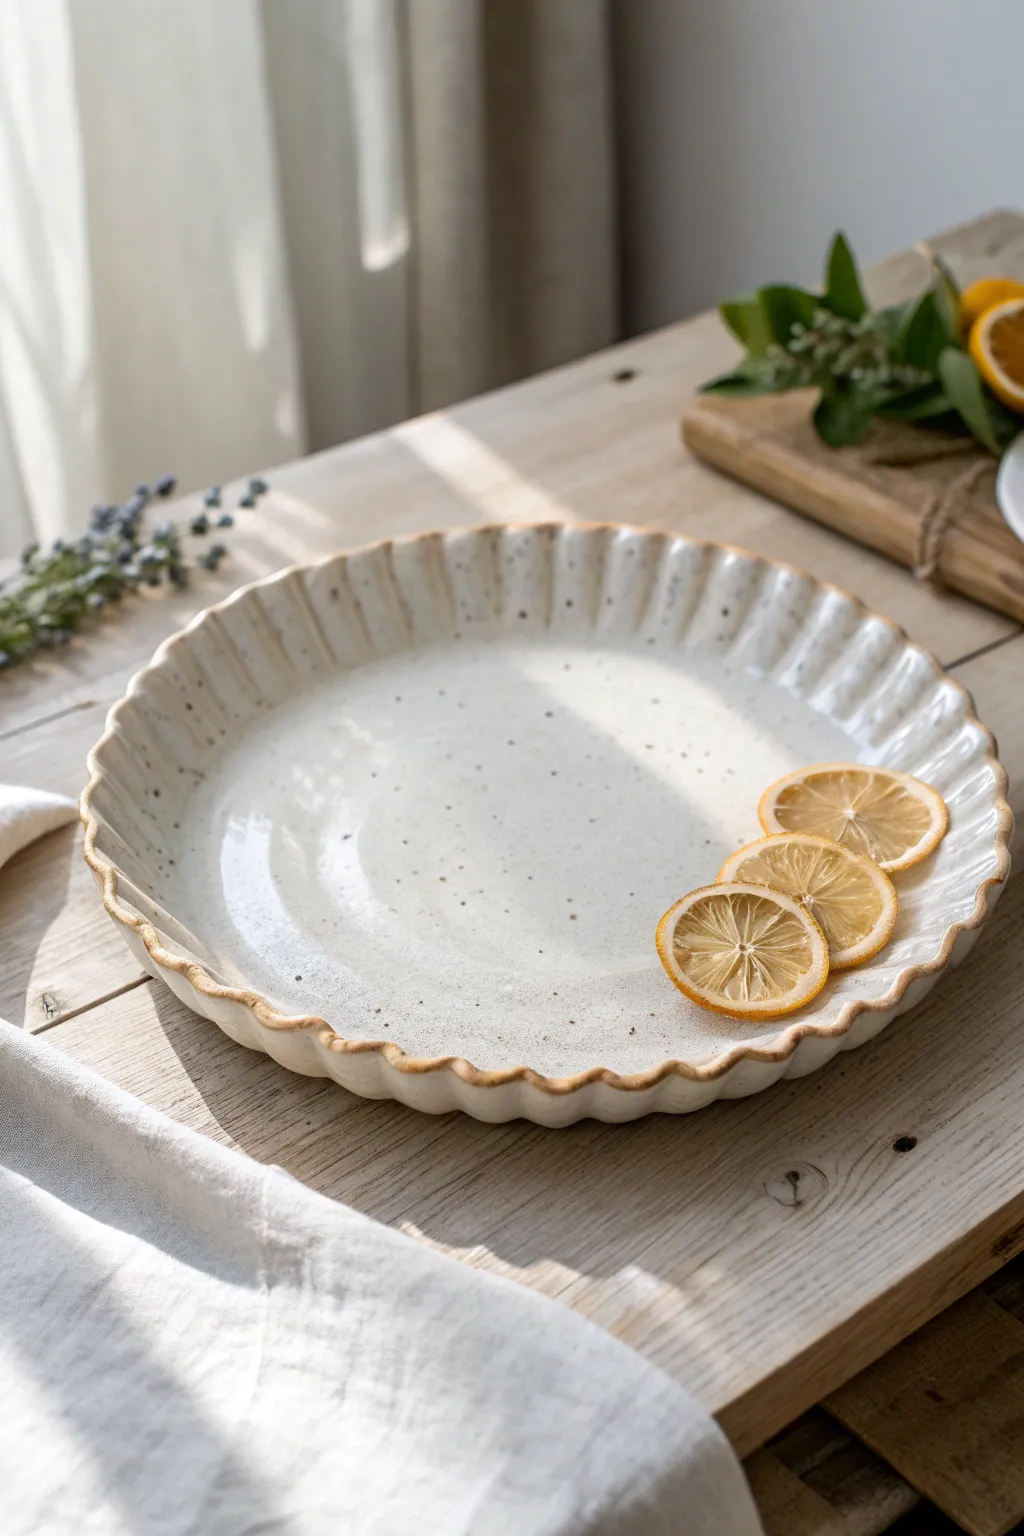
This charming, shallow ceramic platter features a warm, creamy glaze with delicate speckling and a signature fluted rim that catches the light beautifully. Its organic shape and hand-built character make it perfect for serving baked goods or simply displaying seasonal fruits.
Detailed Instructions
Materials
- Speckled stoneware clay (white or buff)
- Rolling pin
- Guide sticks or slats (approx. 1/4 inch thick)
- Circular template or large plate (approx. 10-12 inches)
- Needle tool or fettling knife
- Rib tool (smooth wood or rubber)
- Soft sponge
- Canvas or heavy fabric mat
- Modeling tool or wooden spoon handle
- Creamy semi-translucent white glaze
- Wax resist (optional)
Step 1: Forming the Base
-
Prepare the slab:
Begin by wedging your speckled stoneware clay thoroughly to remove air pockets. Place a ball of clay on your canvas mat between two guide sticks to ensure an even thickness. -
Roll it out:
Roll the clay firmly until the rolling pin rests on the guide sticks. Rotate the clay periodically so the canvas texture doesn’t become too deeply embedded and to keep the shape relatively circular. -
Smooth the surface:
Using a soft rubber or wooden rib, compress the clay surface on both sides. This is crucial for preventing warping later and creates that smooth canvas for your glaze. -
Cut the circle:
Place your circular template or an upside-down dinner plate onto the slab. Using a needle tool, trace around the edge to cut out a perfect circle, then peel away the excess clay.
Use a Foam Support
Work on a piece of upholstery foam. The foam supports the curved underside while you press the ruffles, preventing the walls from collapsing flat.
Step 2: Creating the Ruffles
-
Soften the rim:
Run a damp sponge or your finger along the sharp cut edge of the circle. This rounds it off nicely and prevents sharp, chipped edges on the finished piece. -
Lift the edges:
Gently lift the outer 1.5 inches of the circle upwards to create a shallow bowl shape. You can place the slab into a shallow slump mold or a large bowl with a towel inside to support this curve while you work. -
Mark spacing:
Lightly mark the rim at even intervals—about an inch apart—to guide where your flutes will go. I find this helps keep the rhythm consistent, even if the result meant to look organic. -
Form the flutes:
Using your thumb and forefinger, or the handle of a wooden spoon, gently press down into the rim at your marked intervals while supporting the underside with your other hand. -
Refine the waves:
Go back around the rim and define the shape by pinching the raised sections slightly. The goal is a gentle, undulating wave rather than a sharp crimp. -
Clean up the rim:
Once the ruffles are formed, use your sponge one last time to smooth over any fingerprints or stress marks on the rim, ensuring the transition from the flat base to the fluted wall feels seamless.
Add a Foot Ring
Before drying, flip the leather-hard platter and attach a coiled foot ring. This adds height and elegance, making it look less like a pie plate and more like a centerpiece.
Step 3: Finishing and Glazing
-
Slow drying:
Allow the platter to dry slowly under a loose sheet of plastic for the first day to prevent the rim from drying faster than the base, which can cause cracking. -
Bisque fire:
Once bone dry, fire the piece to bisque temperature (usually cone 04) according to your clay body’s instructions. -
Wax the foot:
Wipe the bisque ware down with a damp sponge to remove dust. Apply wax resist to the bottom foot ring to keep the glaze from fusing your platter to the kiln shelf. -
Apply the glaze:
Pour a creamy, semi-translucent white glaze into the platter, swirl it to coat the interior, and pour out the excess. Dip the rim or brush the exterior to match. -
Enhance the texture:
If your glaze is too thick, quickly wipe the rim with a damp sponge. This thins the glaze on the high points of the ruffles, allowing the dark clay speckles and toasty clay body to show through, highlighting the texture. -
Glaze fire:
Fire the piece to maturity (often cone 5 or 6 for stoneware). The heat will interact with the iron speckles in the clay, bleeding them through the white glaze for that classic farmhouse look.
Once cooled, your platter is ready to bring a touch of handcrafted warmth to your kitchen table
Lace- and Leaf-Impressed Serving Pieces
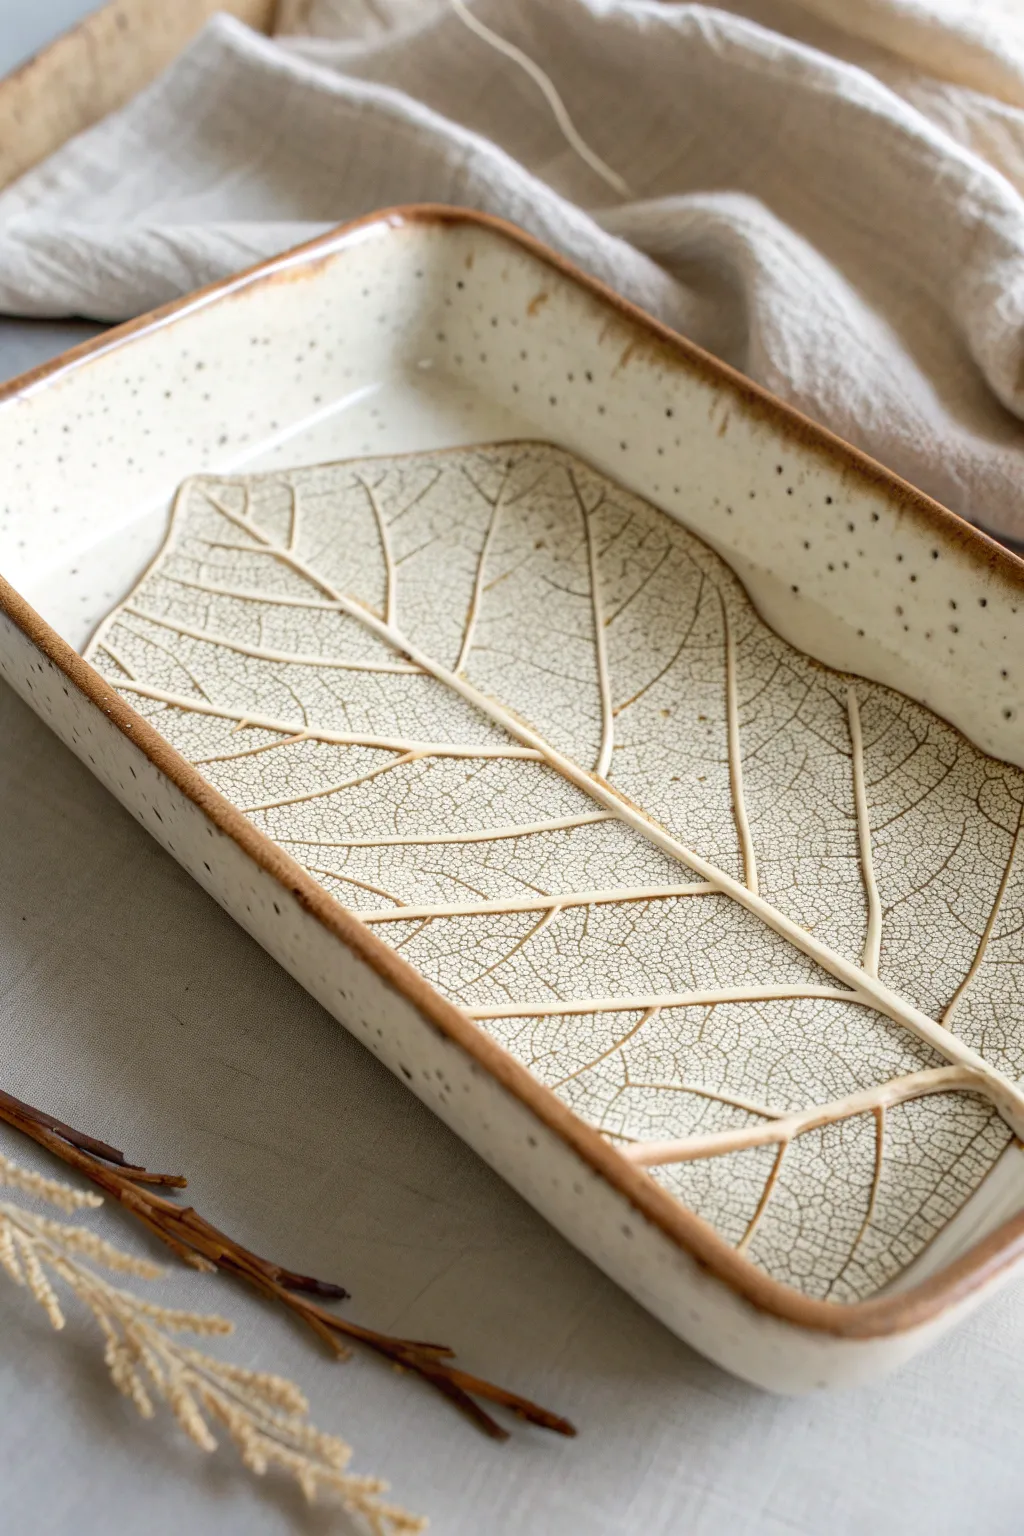
Capture the delicate skeleton of nature with this elegant rectangular serving tray, featuring a deeply impressed leaf design. The combination of speckled clay, oxide washes, and a wiped-back technique creates a rustic yet refined fossil-like effect perfect for your table.
Step-by-Step Tutorial
Materials
- Speckled buff stoneware clay slab (approx. 1/4 inch thick)
- Large fresh leaf with prominent veins (like Hosta or Hydrangea)
- Rectangular drape mold or slump mold
- Rolling pin
- Canvas work surface
- Needle tool or fettling knife
- Rib tool (rigid and soft)
- Small sponge
- Red iron oxide wash or brown underglaze
- Clear transparent glaze (cone 5/6 compatible)
- Soft brush for wash application
- Kiln
Step 1: Slab Preparation and Impression
-
Roll the slab:
Begin by rolling out your speckled buff stoneware clay on a canvas surface until it is an even 1/4 inch thickness. Smooth both sides with a soft rib to compress the clay particles and remove canvas texture. -
Position the leaf:
Select a large leaf with a strong vein structure. Place it vein-side down onto the center of your smoothed slab. This ensures the most detailed impression. -
Embed the leaf:
Use your rolling pin to firmly roll over the leaf once. Apply steady pressure so the leaf becomes flush with the clay surface but avoid thinning the slab too much. -
Cut the shape:
Place your rectangular template or mold guide over the clay, centering the leaf design. -
Refine the edges:
Cut around the template using a needle tool or fettling knife. Once cut, smooth the raw edges with a damp sponge or your finger to remove any sharp burrs.
Veins Not Showing?
If your impression looks weak, use a pony roller or a small brayer directly on the leaf before cutting the shape. This concentrates the pressure locally.
Step 2: Forming the Tray
-
Peel away nature:
Carefully lift the corner of the leaf stem and peel the leaf off the clay to reveal the impression. Do this slowly to avoid tearing the leaf or distorting the clay. -
Shape the rim:
Lift the clay slab and gently drape it into your slump mold or over a drape mold. Press the clay softly to conform to the shape. -
Define the corners:
Pay special attention to the corners of the rectangular shape, gently pressing them to ensure a crisp form without cracking. -
Dry partially:
Allow the tray to dry to a leather-hard state. This usually takes a few hours depending on humidity; the clay should be firm but clearly cool to the touch. -
Clean up:
Remove the tray from the mold. Use a slightly damp sponge to smooth the rim perfectly and ensure the bottom is flat so it won’t wobble.
Step 3: Color and Glazing
-
Bisque fire:
Once bone dry, fire the piece to bisque temperature (usually Cone 04) to prepare it for glazing. -
Apply the wash:
Mix a wash of red iron oxide and water (or use a dark brown underglaze). Brush this liberally over the entire leaf impression and the rim of the tray. -
The wipe-back:
Using a clean, damp sponge, wipe away the excess oxide from the surface. I find wringing the sponge out frequent helps keep the surface clean while leaving the dark color trapped deep in the veins. -
Highlight the rim:
Leave a slightly heavier concentration of the oxide wash on the very edge of the rim to create that distinct brown border seen in the example. -
Clear glaze application:
Dip or brush a clear gloss glaze over the entire interior of the tray. This will seal the clay and make the oxides pop. -
Final wipe:
Ensure the foot or bottom of the tray is completely free of glaze to prevent sticking to the kiln shelf. -
Glaze fire:
Fire the tray to maturity (typically Cone 5 or 6 depending on your clay body specifications).
Botanical Mix-Up
Create a set of nesting trays using different sized leaves from the same plant family. Try fern fronds or fig leaves for distinctly different skeleton patterns.
Once cooled, your tray is ready to bring a touch of woodland charm to your next dinner party