When I’m brainstorming clay bowl design ideas, I like to think of a bowl as a tiny stage: the inside is the “wow” moment, and the outside is the teaser. Here are my favorite bowl designs to try, from classic crowd-pleasers to the kind of creative twists that make you do a double-take.
Blue-and-White Geometric Lines
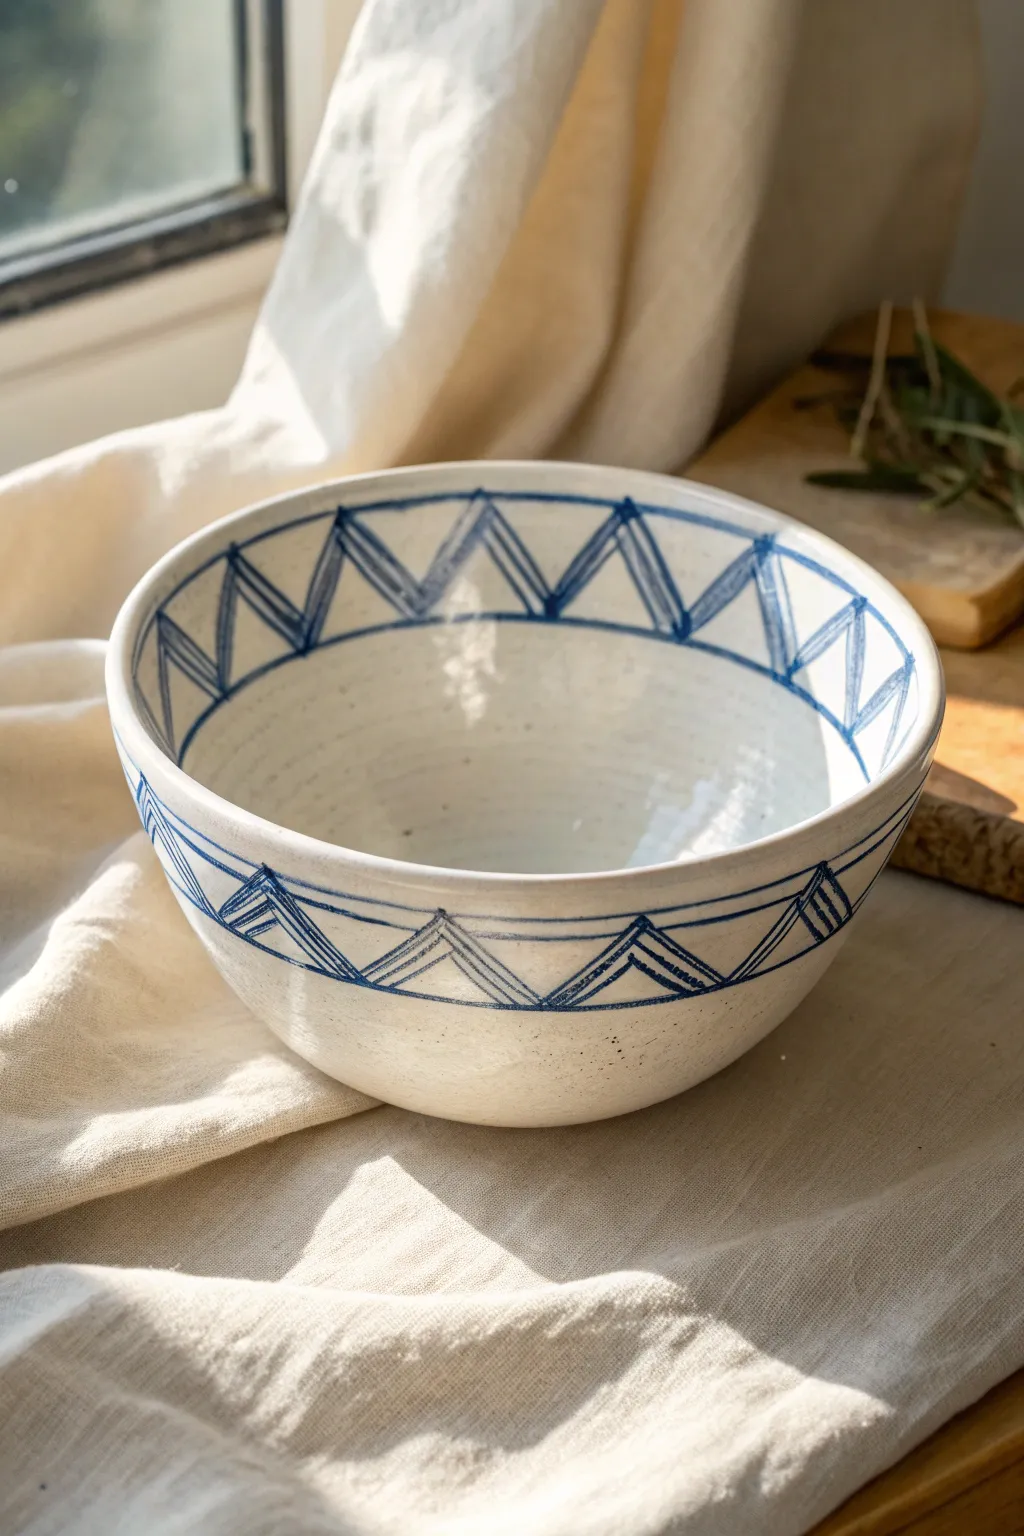
Embrace the timeless appeal of blue and white pottery with this hand-built or wheel-thrown bowl featuring striking geometric patterns. The alternating triangular motifs create a rhythmic visual movement that looks sophisticated yet feels reassuringly handmade.
How-To Guide
Materials
- Stoneware clay (white or light speckled)
- Pottery wheel (or rolling pin and slump mold for hand-building)
- Rib tool
- Sponge
- Trimming tools
- Cobalt oxide wash or blue underglaze
- Fine liner brush (size 0 or 00)
- Ruler or measuring tape
- Pencil (optional)
- Clear transparent glaze
- Kiln
Step 1: Forming the Bowl
-
Prepare your clay:
Wedge about 2-3 pounds of stoneware clay thoroughly to remove air pockets. A white clay body works best to make the blue pop later. -
Center and open:
Center the clay on the wheel head. Open the clay up, pulling the floor out to be fairly wide if you want a substantial serving bowl size. -
Pull the walls:
Pull the walls up and outward into a gentle curve. Aim for a generous depth but keep the rim slightly distinct and vertical to accommodate the pattern. Smooth the interior curve with a rib tool to erase throwing lines. -
Refine the rim:
Compress the rim with a chamois or sponge. It needs to be smooth and even, as the pattern will frame this area. -
Dry to leather hard:
Cut the bowl from the wheel and let it dry slowly until it reaches a sturdy leather-hard stage. It should be firm enough to handle without warping. -
Trim the foot:
Flip the bowl over and center it on the wheel. Trim a clean foot ring, removing excess weight from the bottom walls. Smooth the surface with a rib after trimming.
Step 2: Applying the Design
-
Plan the spacing:
Lightly mark even intervals around the rim using a flexible ruler and a soft pencil. These marks will be the peaks of your triangles. -
Draft the horizontal guides:
If you are nervous about freehanding, you can lightly etch or draw two parallel horizontal lines around the exterior and interior rim. These will define the top and bottom boundaries of your zigzag band. -
Mix the cobalt wash:
Prepare your cobalt oxide wash or blue underglaze. It should be an inky consistency—opaque but fluid enough to flow off a liner brush. -
Paint the exterior band boundaries:
Using a fine liner brush, paint a solid blue line circling the bowl’s exterior, about an inch or two down from the rim. Add a second line closer to the top edge. -
Outline the exterior zigzags:
Connect your top and bottom guide lines with diagonal strokes to form a continuous zigzag pattern around the bowl. Try to keep the angles consistent. -
Add internal details:
Inside each large triangle formed by the zigzag, paint two or three smaller, concentric triangles (chevrons). These simple lines add the characteristic geometric density shown in the image. -
Repeat on the interior:
Move to the inside of the bowl. Replicate the exact same process: border lines first, followed by the primary zigzag, and finally the interior chevron details. I like to stabilize my hand against the table while doing the inside work. -
Clean up smudges:
If you make a mistake, gently scrape the underglaze off with a sharp tool rather than wiping, which can smear blue pigment into the white clay pores.
Steady Hand Trick
Rest your pinky finger on the clay surface as a pivot point while painting lines. A banding wheel is also vital—spin the wheel slowly while holding the brush still for horizontal lines.
Step 3: Glazing and Firing
-
Bisque fire:
Let the bowl dry completely to bone dry. Fire it in the kiln to bisque temperature (usually cone 04 or 06). -
Wax the foot:
Apply wax resist to the foot ring to prevent glaze adhesion on the bottom. -
Apply clear glaze:
Dip the entire bowl into a clear, glossy transparent glaze. This will seal the clay and make the cobalt decoration shine vividly. -
Glaze fire:
Load the kiln carefully and fire to the maturity temperature of your clay and glaze (typically cone 5/6 or cone 10). -
Sand the foot:
Once cool and unloaded, sand the unglazed foot ring lightly to ensure it won’t scratch your table surface.
Variation Idea
Try reversing the pattern: paint the background solid blue and scratch the geometric lines through it (sgraffito) to reveal the white clay beneath for a negative-space effect.
Fill your new bowl with fruit or simply display it by a window to let the light catch those crisp blue lines


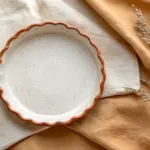
Speckled Egg Finish Bowl
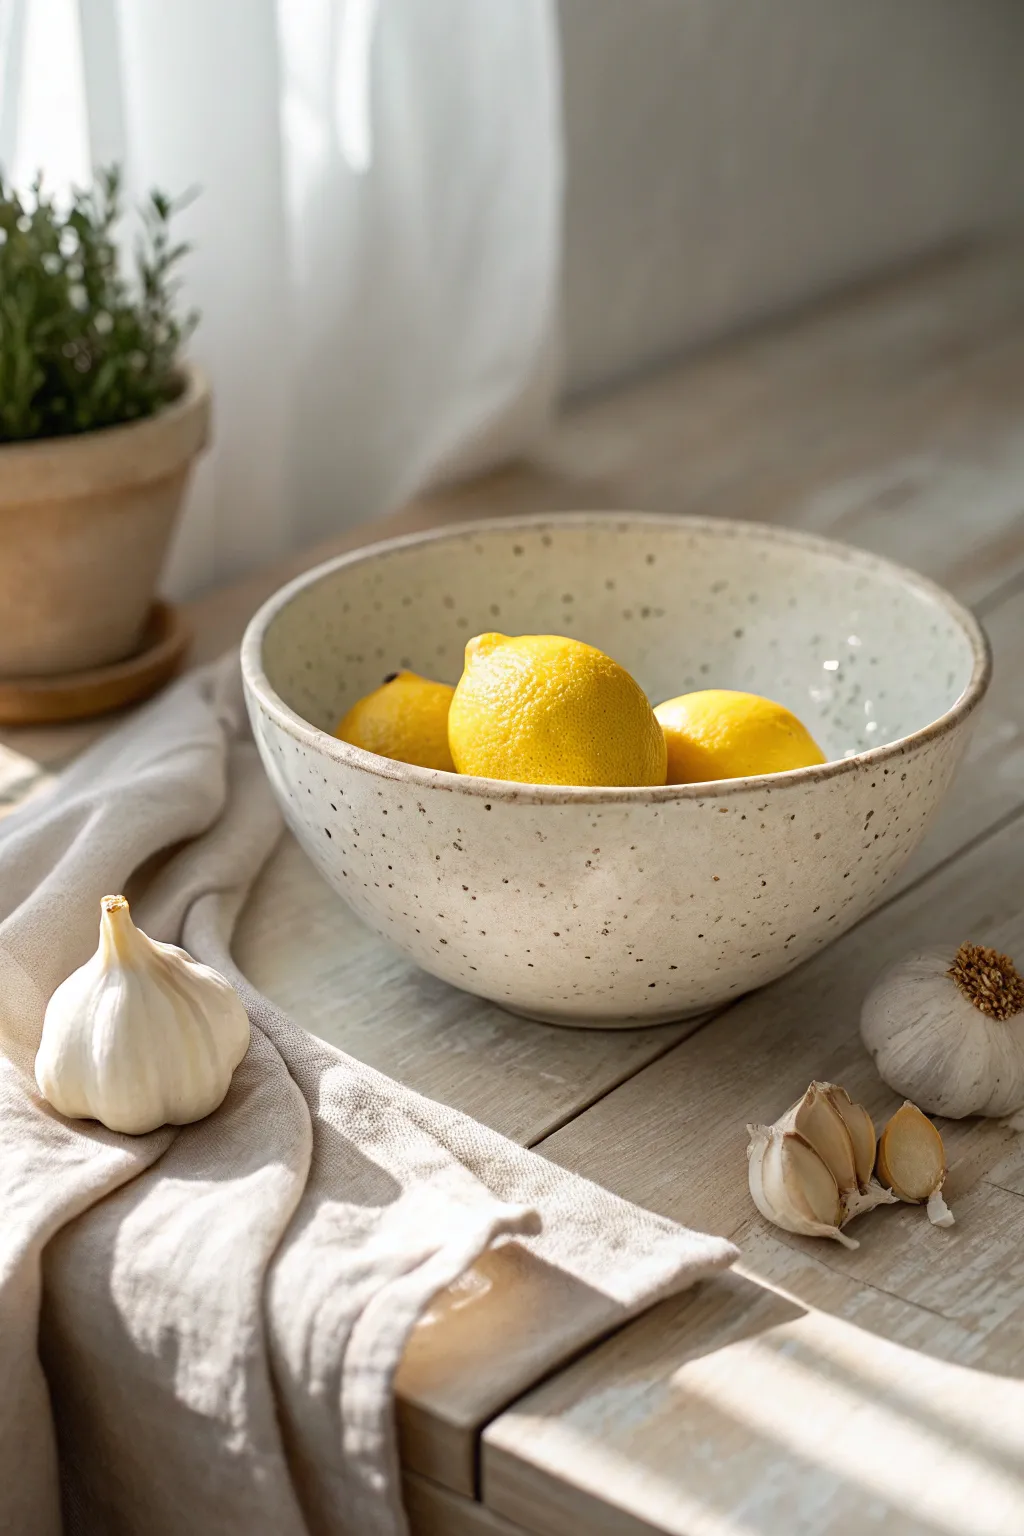
Recreate the charm of a rustic farmhouse kitchen with this speckled eggshell bowl project. You’ll learn how to achieve that coveted natural stone look using clay body inclusions or glaze techniques for a piece that feels both modern and timeless.
Step-by-Step Tutorial
Materials
- White or buff stoneware clay (with speckles, or plain)
- Granular manganese or ilmenite (if adding speckles manually)
- Pottery wheel
- Rib tool (wooden or silicone)
- Wire cutter
- Trimming tools
- Sponge
- Soft fan brush
- Satin matte white or cream glaze
- Kiln
Step 1: Preparing the Clay Body
-
Choose your clay:
For the most authentic look, start with a stoneware clay body that already contains granular manganese or iron specks. If you are using plain white clay, you can wedge in a small amount (about 1-2%) of granular ilmenite or manganese. -
Wedge thoroughly:
Wedge your clay ball (about 3-4 lbs for a bowl of this size) until it is completely consistent. This ensures the speckles are evenly distributed and eliminates air bubbles.
Bleed-Through Trick
If using speckled clay, make your white glaze layer slightly thinner than usual. A thin application allows the iron pyrite spots to burn easier.
Step 2: Throwing the Form
-
Center on the wheel:
Secure the clay to the wheel head and center it using steady pressure and water for lubrication. -
Open the form:
Open the clay to create a flat bottom, roughly 4-5 inches wide. Don’t go too deep; leave about half an inch for the foot. -
Pull the walls:
Pull the walls up and outward, aiming for a gentle, open curve. The bowl in the image has a continuous curve rather than steep sides. -
Refine the curve:
Use a kidney-shaped rib on the inside of the bowl to compress the clay and define that smooth, hemispherical shape. -
Address the rim:
Gently compress the rim with a chamois or sponge. For this organic look, avoid making the rim too sharp or perfectly level; a tiny bit of undulation adds character. -
Cut and dry:
Wire the bowl off the wheel and set it aside until it reaches a leather-hard state.
Rough Surface?
If protruding speckles make the surface feel like sandpaper after firing, lightly sand the surface with 400-grit wet/dry sandpaper under running water.
Step 3: Trimming and Finishing
-
Center for trimming:
Once leather-hard, invert the bowl onto the wheel. Center it and secure it with lugs of clay. -
Trim the exterior:
Trim away excess clay from the bottom third to match the interior curve, creating a uniform wall thickness. -
Carve the foot ring:
Carve a modest foot ring. It should be wide enough to support the bowl’s curve but not too tall. -
Smooth the surface:
Before bisque firing, I like to run a slightly damp sponge over the exterior to bring the grog or speckles closer to the surface texture. -
Bisque fire:
Fire the piece to cone 04 (or your clay’s specific bisque temperature).
Step 4: Glazing Process
-
Wipe down:
After the kiln cools, wipe the bisque ware with a damp sponge to remove any dust that could prevent glaze adhesion. -
Select the glaze:
Choose a satin or matte glaze in a soft white or almond cream. A transparent or semi-opaque glaze works best to let the clay’s natural speckles show through. -
Glaze application:
Pour the glaze inside the bowl, swirl to coat, and pour out. For the exterior, you can dip the bowl or brush it on if you have a smaller volume of glaze. -
Clean the foot:
Meticulously wipe all glaze off the foot ring with a sponge to prevent it from fusing to the kiln shelf. -
Creating faux speckles:
If your clay body wasn’t speckled, now is the time to fake it. Dip a stiff toothbrush into iron oxide wash or watered-down dark glaze and flick the bristles to spatter tiny dots over the wet white glaze. -
Final Fire:
Fire to the maturation temperature of your glaze and clay (typically Cone 5 or 6 for electrical kilns). The heat will cause the speckles to bleed slightly through the white glaze, creating the eggshell effect.
Fill your finished bowl with fresh lemons or bright produce to really make those earthy tones sing


Pressed Fern and Wildflower Imprints
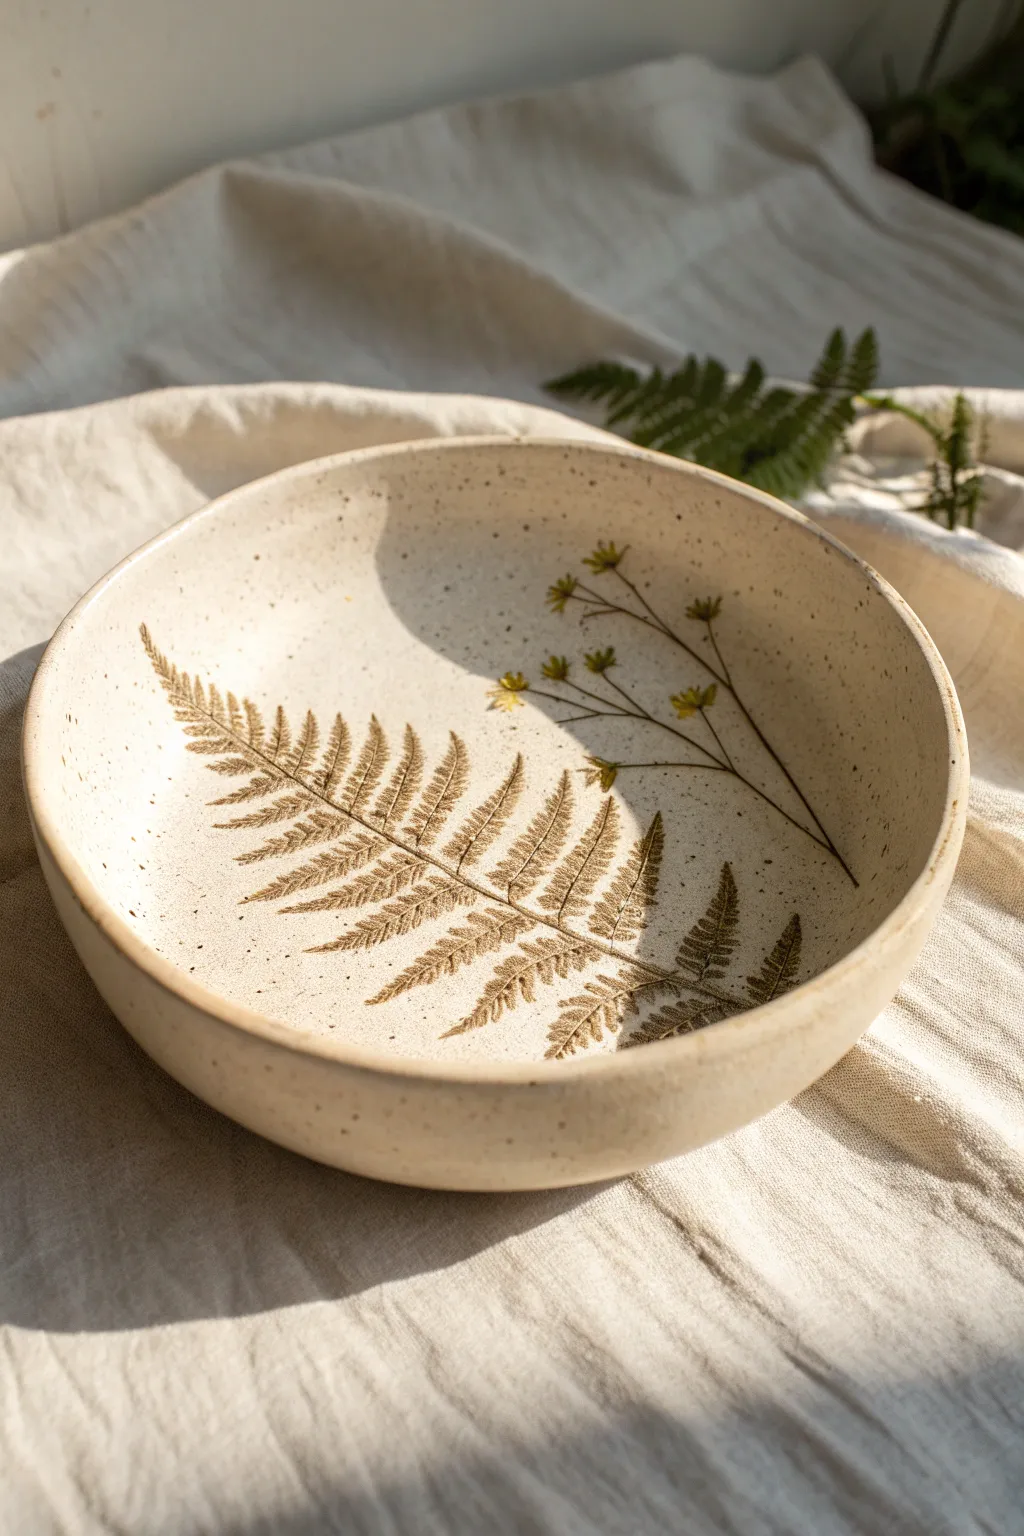
Capture the delicate beauty of a woodland walk with this handcrafted ceramic bowl, featuring the stunningly detailed imprint of a fern frond and dainty wildflowers. The natural warmth of the speckled clay combined with the crisp, earthy brown of the botanical inlay creates a piece that feels both rustic and refined.
Step-by-Step
Materials
- Speckled stoneware clay (white or buff)
- Fresh fern frond
- Small wildflowers or delicate weeds (stems and blooms)
- Rolling pin
- Canvas mat or slab roller
- GR Pottery Form (shallow bowl shape) or a plaster hump mold
- Rib tool (firm and soft)
- Needle tool or fettling knife
- Red iron oxide wash or brown underglaze
- Small sponge
- Clear matte or satin glaze
- Weighted bag or sandbag (for weighting the mold)
- Kiln
Step 1: Preparing the Slab
-
Wedge the Clay:
Begin by thoroughly wedging your speckled stoneware clay. This removes air pockets and aligns the particles, ensuring a smooth surface for your botanicals. -
Roll the Slab:
Roll out a slab of clay to a thickness of approximately 1/4 inch on your canvas mat. Try to keep the thickness consistent across the entire piece so the bowl dries evenly. -
Smooth the Surface:
Use a firm rib tool to compress the clay slab. Drag it across the surface in overlapping strokes to remove any canvas texture and create a pristine canvas for your plants.
Step 2: Botanical Impressions
-
Select and Arrange:
Place your fresh fern frond diagonally across the slab. This creates a dynamic composition. Add a few small wildflower stems near the top curve to balance the heavy line of the fern. -
Initial Press:
Gently press the plants into the clay with your fingertips first to set them in place so they don’t shift during rolling. -
Roll in the Texture:
With the rolling pin, roll firmly over the plants once. Commit to a single, confident pass to avoid ghost images or double impressions. -
Remove the Botanicals:
Carefully find the stem edge of the fern and wildflowers with a needle tool. Slowly peel them away to reveal the deep, intricate impression left behind in the clay.
Freshness Counts
For the crispest impressions, use freshly picked plants. Dried or brittle ferns tend to crumble into the clay, leaving debris that is hard to pick out without ruining the texture.
Step 3: Shaping the Bowl
-
Cut the Circle:
Place your bowl mold or a circular template over the impressed area. Frame the composition so the fern runs nicely through the center. Cut around the shape using a needle tool. -
Lift the Slab:
Gently lift the clay circle. I find it easiest to support the slab with a ware board or bat to prevent warping the impression while moving it. -
Form Over Mold:
Drape the clay slab over your hump mold or press it into a slump mold. Only gently coax the clay to the shape; do not press firmly on the textured area or you’ll lose detail. -
Refine the Rim:
While the clay is on the mold, use a damp sponge or chamois to smooth the rim of the bowl, ensuring it is rounded and pleasant to the touch. -
Dry Slowly:
Allow the bowl to dry slowly to leather hard stage while still on the mold. Covering it loosely with plastic helps prevent the rim from drying too fast compared to the base.
Dual-Tone Effect
Try painting the wildflower blooms with a tiny dab of yellow underglaze before the bisque firing, leaving the stems and fern with just the iron oxide for a subtle pop of color.
Step 4: Adding Color & Firing
-
Bisque Fire:
Once bone dry, fire the bowl to bisque temperature (usually cone 04) to prepare it for glazing. -
Apply Oxide Wash:
Mix red iron oxide with water to a watercolor consistency. Brush this wash liberally into the fern and flower impressions, ensuring it gets into every tiny vein. -
Wipe Back:
Use a damp, clean sponge to wipe away the oxide from the high points of the surface. The dark color should remain only in the recessed lines of the plant imprints. -
Glazing:
Dip or brush a clear matte or satin glaze over the entire interior of the bowl. This seals the clay while allowing the speckled clay body and the iron oxide detail to show through clearly. -
Final Fire:
Fire the bowl to the maturity temperature of your clay (typically cone 5 or 6 for stoneware). Ensure the kiln is well-ventilated. -
Post-Fire Check:
Once cool, check the foot of the bowl for any sharp spots and sand them down with wet silicon carbide sandpaper if necessary.
Now you have a permanent record of the season’s foliage preserved in a functional piece of art.


Simple Leaf-Stamped Rim Band
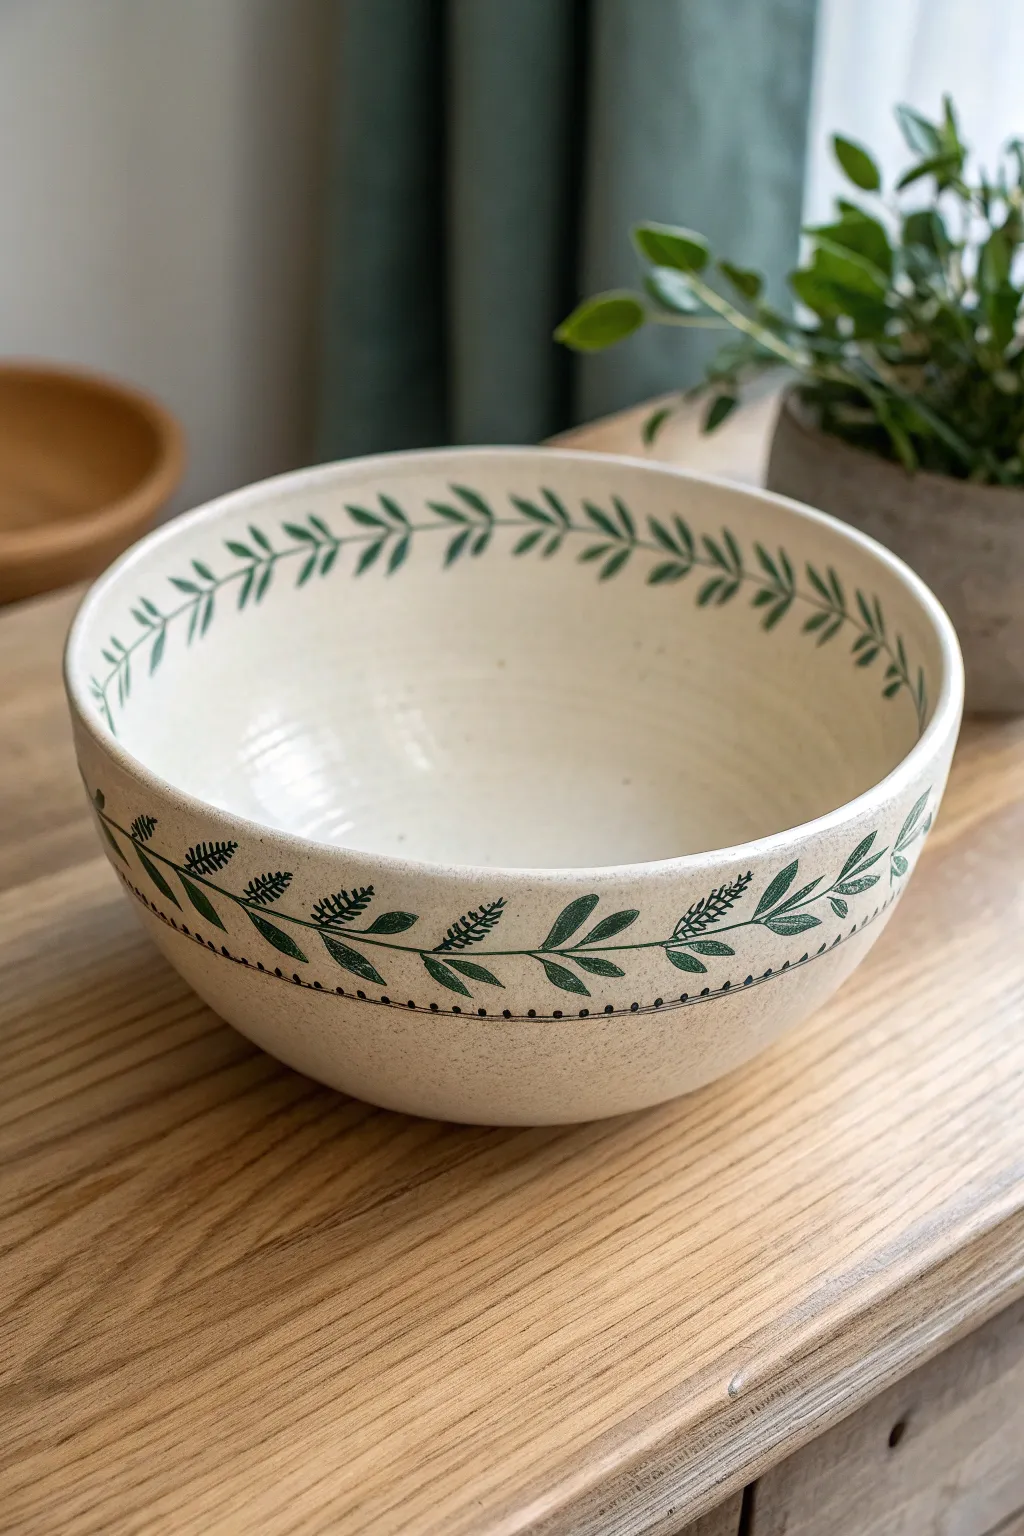
This project transforms a classic speckled clay bowl into a botanical treasure featuring a delicate band of stamped greenery. The dual-sided design brings nature to both the interior rim and the exterior, connected by a subtle dotted border.
Step-by-Step Guide
Materials
- Speckled stoneware clay (white or light buff)
- Pottery wheel or slab roller (and bowl mold)
- Green underglaze (forest green or similar earth tone)
- Small tapered paintbrush (size 0 or 2)
- Leaf stamps (flexible rubber or hand-carved lino)
- Needle tool or fine dotting tool
- Sponge
- Clear matte or satin transparent glaze
- Kiln access
Step 1: Forming the Bowl
-
Prepare your clay:
Wedge your speckled stoneware clay thoroughly to remove air bubbles. You want a consistent consistency to ensure the walls pull up evenly. -
Shape the vessel:
Throw a medium-sized bowl on the wheel, aiming for a wide, open curve. Alternatively, roll a slab and drape it over a slump mold for a more organic, hand-built feel. -
Refine the rim:
While the clay is still plastic, compress the rim with a chamois or sponge. Create a smooth, slightly rounded edge that will be comfortable to the touch. -
Let it firm up:
Allow the bowl to dry to a leather-hard state. This is crucial; if the clay is too wet, the stamping will deform the walls.
Step 2: Applying the Exterior Design
-
Plan the spacing:
Lightly mark four equidistant points on the exterior to guide your pattern placement, ensuring the leaf garland meets neatly at the end. -
Apply underglaze to the stamp:
Brush a thin, even coat of forest green underglaze onto your leaf stamp. Avoid overloading it, as excess underglaze can smudge or obscure the fine vein details. -
Stamp the main leaves:
Press the stamp gently against the exterior wall, about an inch below the rim. Support the wall from the inside with your hand to prevent denting. -
Create the vine connection:
Using a fine liner brush and the same underglaze, hand-paint a thin, flowing line connecting the stamped leaves into a continuous garland. -
Add detail foliage:
Paint small fern-like fronds or additional tiny leaves along the vine to fill gaps and create a lush, organic look. -
Add the dotted border:
Dip a needle tool or small dotting tool into black or dark green underglaze. Carefully dot a straight line just beneath the leaf garland to frame the design.
Stamp Smearing?
If your stamp is sliding, the clay is too wet. Wait an hour for it to stiffen. If the image is faint, apply slightly thicker underglaze to the stamp surface.
Step 3: Decorating the Interior
-
Mirror the pattern:
Repeat the stamping process on the interior rim. Position the leaves slightly closer to the edge so they are visible even when the bowl is filled. -
Paint interior stems:
Hand-paint the connecting stems on the inside. I find that keeping the interior design slightly simpler than the exterior prevents the bowl from looking too busy. -
Clean up smudges:
If any underglaze smudges occur, gently scratch them away with a needle tool once dry, or wipe carefully with a barely damp sponge corner.
Add Texture
Carve lightly into the stamped leaves with a needle tool before firing. This sgraffito technique adds physical texture that the glaze will break over nicely.
Step 4: Glazing and Firing
-
Bisque fire:
Once the bowl is bone dry, load it into the kiln for a bisque firing (usually cone 04 or 06). This sets the shape and makes the piece porous for glazing. -
Wipe down:
Use a damp sponge to wipe the bisque ware, removing any kiln dust that could repel the glaze. -
Apply clear glaze:
Pour a clear matte or satin glaze inside the bowl, swirl to coat, and pour out the excess. Dip the exterior or brush the clear glaze over the outside design. -
Final wipe:
Clean the foot of the bowl thoroughly with a sponge to ensure no glaze touches the kiln shelf. -
Glaze fire:
Fire the piece to the maturity temperature of your clay and glaze (typically cone 5 or 6 for stoneware). Allow the kiln to cool completely before unloading.
Your finished bowl will serve as a lovely, functional piece of art perfect for salads or displaying fruit on your counter

The Complete Guide to Pottery Troubleshooting
Uncover the most common ceramic mistakes—from cracking clay to failed glazes—and learn how to fix them fast.
Watermelon Slice Bowl
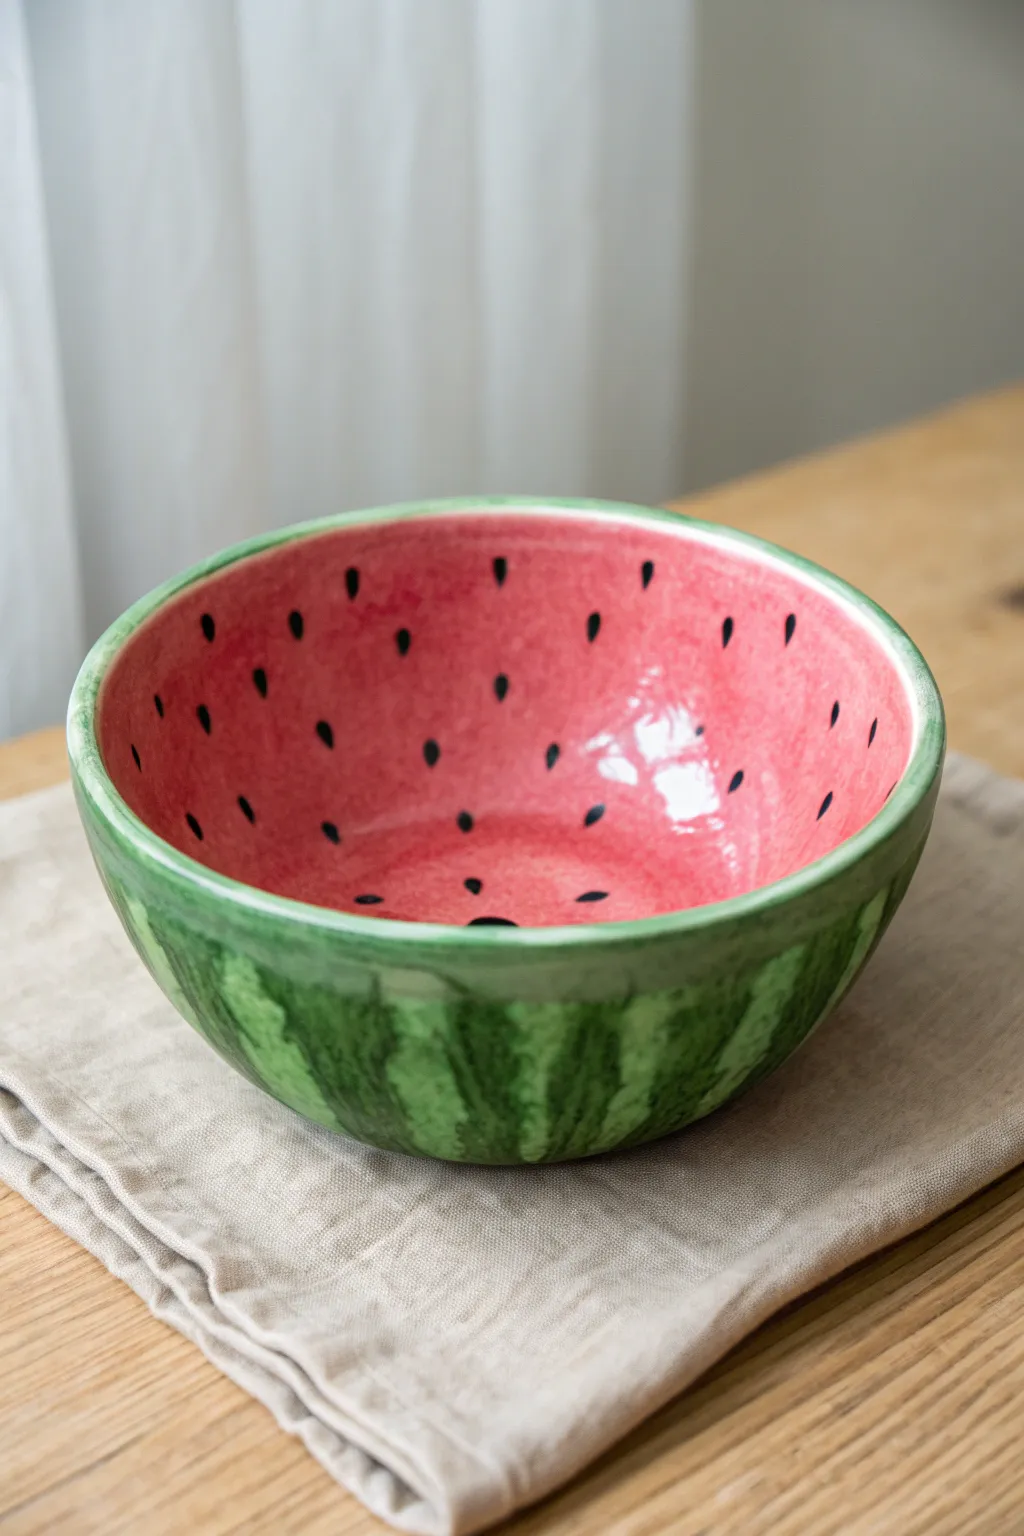
Bring a burst of summer freshness to your table with this delightful ceramic bowl disguised as a juicy watermelon. From the textured green rind exterior to the speckled pink interior, this project is perfect for serving seasonal fruit or salad.
Step-by-Step Tutorial
Materials
- Earthenware or stoneware clay body
- Pottery wheel throw or hand-building tools (rolling pin, slump mold)
- Underglazes: Dark Green, Light Lime Green, Bright Red/Pink, Black, White
- Clear glossy glaze (food safe)
- Sponge
- Rib tool
- Soft fan brush
- Small detail brush
- Needle tool
- Kiln access
Step 1: Forming
-
Prepare the Clay:
Wedge your clay thoroughly to remove air bubbles. For a medium-sized serving bowl like this, star with about 2-3 pounds of clay. -
Shape the Bowl:
Throw a simple, deep hemispherical bowl on the wheel. If hand-building, roll a slab to 1/4 inch thickness and drape it over a slump mold, smoothing the surface with a rib. -
Refine the Rim:
While the clay is leather hard, trim the rim to be slightly rounded rather than sharp. This mimics the natural edge of a melon slice. -
Smooth the Surface:
Use a damp sponge to wipe down the entire piece, removing any throwing rings or texture marks. The interior needs to be particularly smooth for the seeded design. -
Bisque Fire:
Allow the bowl to dry completely to the bone-dry stage. Fire in the kiln to cone 04 (or your clay’s specific bisque temperature).
Step 2: Painting the Rind (Exterior)
-
Apply Base Green:
Using a soft fan brush, apply two coats of the light lime green underglaze to the entire exterior of the bowl. -
Paint the Vertical Stripes:
Load a brush with dark forest green. Starting from the bottom center, paint wavy, uneven stripes going up toward the rim. -
Feather the Edges:
While the dark strokes are still slightly wet, gently feather the edges into the lighter background using a damp brush to create that organic, mottled watermelon rind look. -
Detail the Rim:
Paint a thin band of white underglaze right along the very top edge of the rim. This represents the white pith between the skin and the fruit.
Juicy Highlights
Add a tiny white dot to each black seed before the clear glaze step. This creates a reflection effect, making the seeds look wet and glossy.
Step 3: Painting the Fruit (Interior)
-
Apply Interior Color:
Coat the entire inside of the bowl with three distinct layers of bright red or pink underglaze. Let each layer dry to the touch before adding the next for solid opacity. -
Create Depth:
I like to water down a tiny bit of darker red and sponge it randomly near the center bottom 1/3 of the bowl to create a juicier, riper appearance. -
Plan Seed Placement:
Visualize where the seeds will go. They shouldn’t be in perfect rows, but rather scattered randomly around the upper two-thirds of the bowl interior. -
Paint the Seeds:
Using a small detail brush and black underglaze, paint small teardrop shapes. The pointed end of the teardrop should face toward the center of the bowl. -
Refine the Pith Line:
If your red paint got onto the white rim, clean it up with a small brush and fresh white underglaze to keep that separation crisp.
Go Yellow!
For a unique twist, swap the red interior for a bright, sunny yellow to create a ‘Yellow Doll’ variety watermelon bowl instead.
Step 4: Finishing
-
Clear Glaze Application:
Once the underglaze is completely dry, dip the entire bowl into a clear, food-safe glossy glaze. -
Wipe the Foot:
Use a sponge to wipe all glaze off the very bottom foot ring of the bowl so it doesn’t fuse to the kiln shelf. -
Final Fire:
Fire the piece again to the maturation temperature of your glaze (typically cone 06 or 6 depending on your materials).
Once fired, fill your new creation with fresh fruit salad to see the colors pop
Citrus Segment Bowl
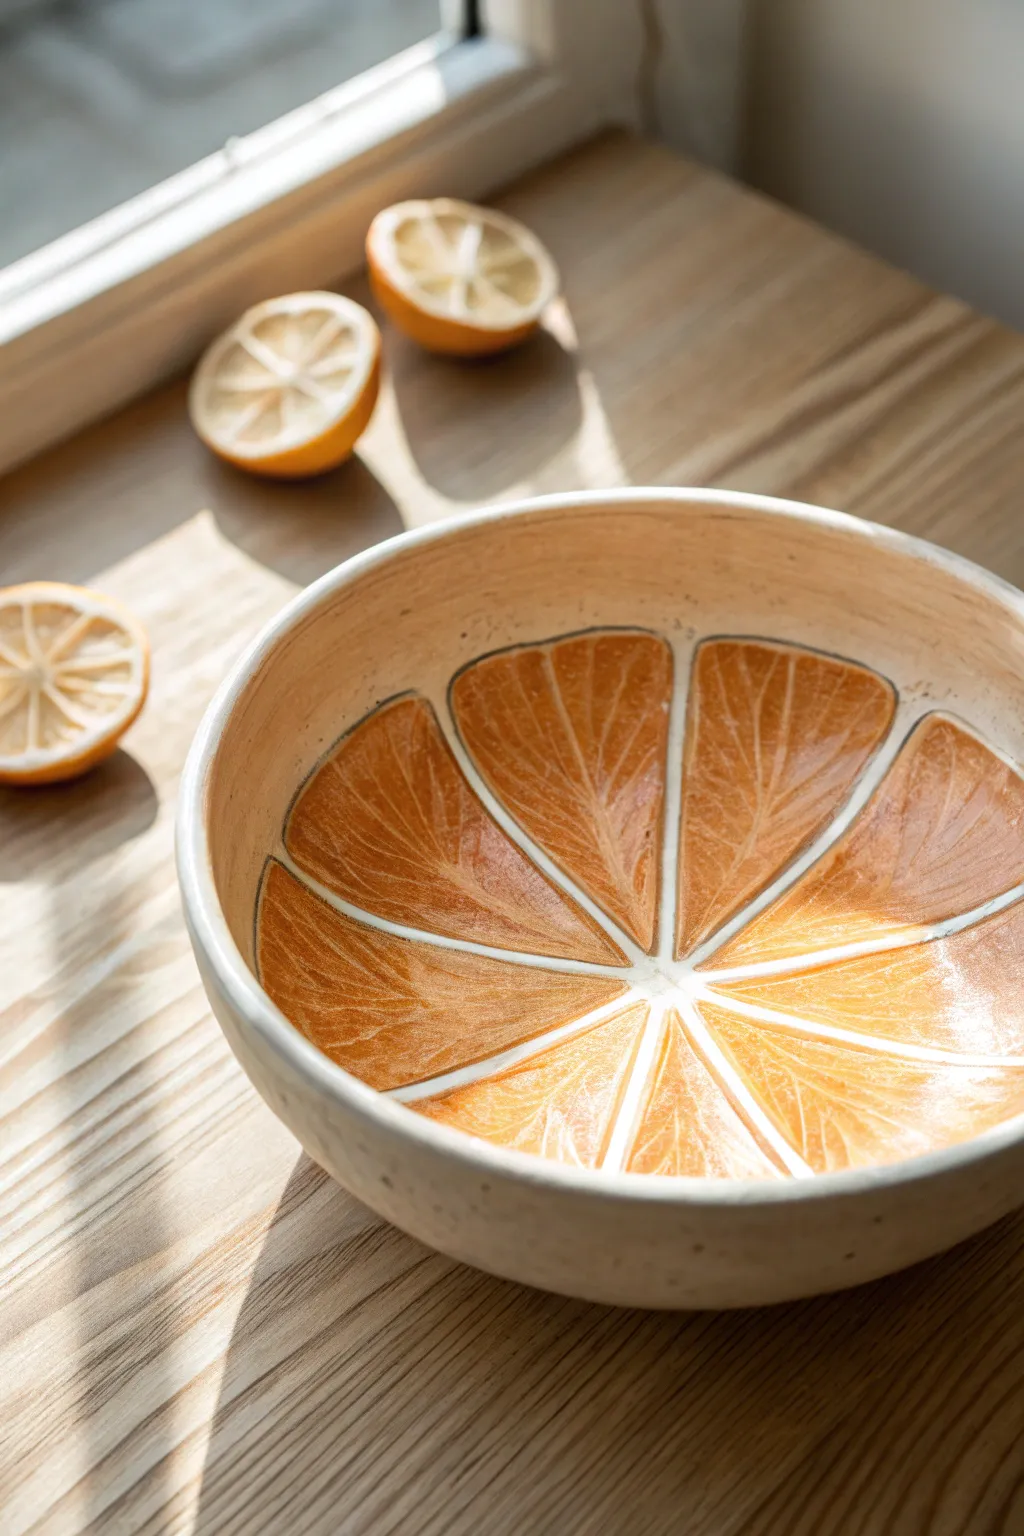
Brighten up your table with this delightful ceramic bowl that captures the sun-drenched juiciness of a fresh orange. Featuring carved segment lines and semi-translucent glazes, the interior radiates warmth while keeping a natural, earthy feel on the exterior.
How-To Guide
Materials
- Light stoneware or porcelain clay body
- Pottery wheel or slab roller (and bowl mold)
- Rib tools (wood and metal)
- Needle tool
- Sgraffito or carving loop tool (small)
- Underglazes (Bright Orange, Deep Orange, White)
- Speckled matte glaze (for exterior)
- Food-safe clear gloss glaze
- Small synthetic brushes
- Sponge
Step 1: Forming the Base
-
Prepare the Clay:
Begin by wedging about 2-3 pounds of light stoneware clay until it is uniform and free of air bubbles. A lighter clay body is crucial here because it allows the orange colors to pop vibrantly later on. -
Throw or Mold the Bowl:
Center your clay on the wheel and throw a wide, open bowl shape with relatively thick walls (about 1/4 inch). Alternatively, roll out a slab and slump it over a bowl mold for a more hand-built feel. -
Refine the Shape:
Use a rib tool to smooth the interior curve, ensuring there are no bumps. The inside needs to be a perfect canvas for your citrus design. Trim the rim so it’s rounded and smooth. -
Leather Hard Drying:
Let the bowl dry slowly to a leather-hard state. It should be firm enough to handle without warping but soft enough to carve cleanly.
Juicy Texture Trick
Before applying the clear glaze, dab small spots of transparent yellow glaze over the orange sections. During firing, these melt differently, creating subtle color variation like real pulp.
Step 2: Carving the Citrus Design
-
Map the Segments:
Find the center point at the bottom of the bowl. Using a needle tool, lightly sketch 8 to 10 radial lines extending from the center to just below the rim, dividing the bowl into equal ‘pie slices’. -
Outline the Membrane:
Inside each slice, sketch the rounded shape of a fruit segment. Leave a uniform gap (about 1/8 to 1/4 inch) between your sketched segment and the sketched radial lines; these gaps will represent the white pith/membrane. -
Carve the Borders:
Using a small loop tool or V-groove carving tool, gently carve out the lines separating the segments. You want distinct channels, but don’t cut too deeply—just enough to create a physical barrier for the glaze. -
Add Texture:
This is where I like to get detailed. Use a needle tool to scratch very faint, feathery lines inside each segment, radiating from the center outward. This mimics the fibrous texture of real citrus fruit pulp. -
Clean Up Burrs:
Once your carving is done, use a slightly damp sponge or a soft brush to smooth away any clay crumbles or sharp burrs left from the carving process.
Step 3: Glazing and Finishing
-
Bisque Fire:
Fire the piece to bisque temperature (usually Cone 04) to prepare it for glazing. -
Paint the Segments:
Apply a bright orange underglaze into the segment shapes. Use a slightly watered-down wash for the first layer to settle into the textured scratches you made. -
Build Depth:
Layer a deeper orange or reddish-orange underglaze near the outer edges of each segment. This gradient adds volume and makes the fruit look juicy and three-dimensional. -
Highlight the Pith:
Carefully paint the raised clay strips between the segments (the membrane lines) with a crisp white underglaze or slip. Keep your hand steady to maintain clean lines. -
Exterior Glazing:
Apply a speckled matte glaze (cream or oatmeal color) to the exterior of the bowl. This contrasts beautifully with the glossy, colorful interior. -
Clear Coat:
Once the underglazes are dry, apply a coat of food-safe clear gloss glaze over the entire interior. This seals the design and gives it that vital ‘wet fruit’ shine. -
Rim Detail:
Wipe the rim with a damp sponge to expose the natural clay body slightly, creating a nice frame for your artwork. -
Final Fire:
Load the kiln carefully and fire to the maturation temperature of your clay and glaze (typically Cone 5 or 6). Allow it to cool completely before removing.
Go Exotic
Switch up your color palette to make other fruits! Use pinks for a ruby grapefruit, pale yellows for lemon, or bright greens for a lime version.
Now you have a refreshing centerpiece that brings a splash of permanent summer to your kitchen


What Really Happens Inside the Kiln
Learn how time and temperature work together inside the kiln to transform clay into durable ceramic.
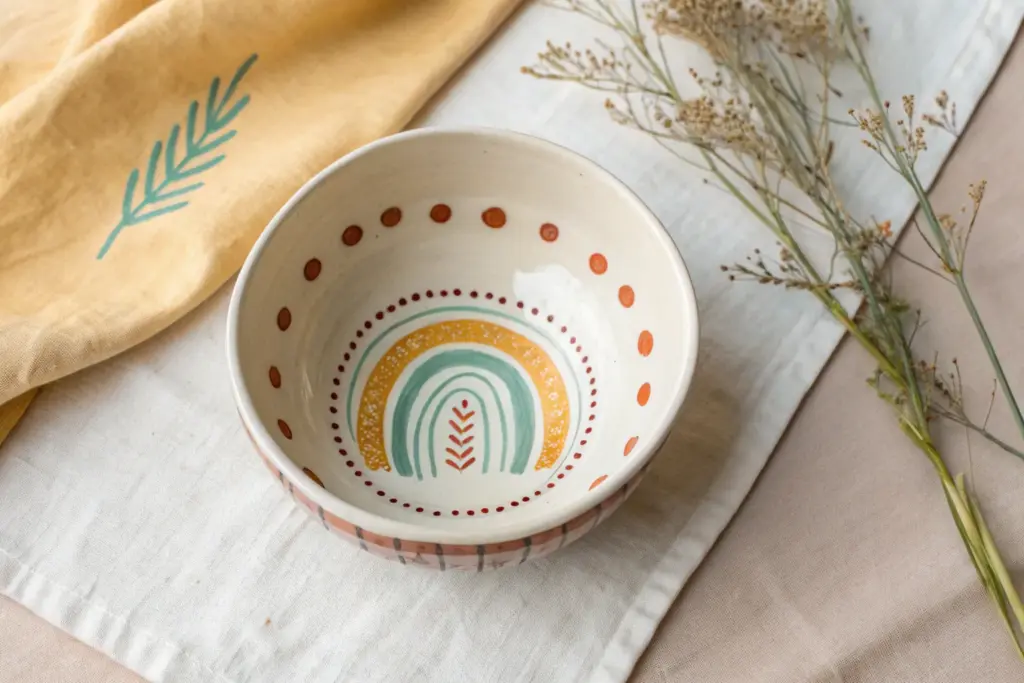
Big Bloom Flower-Center Bowl
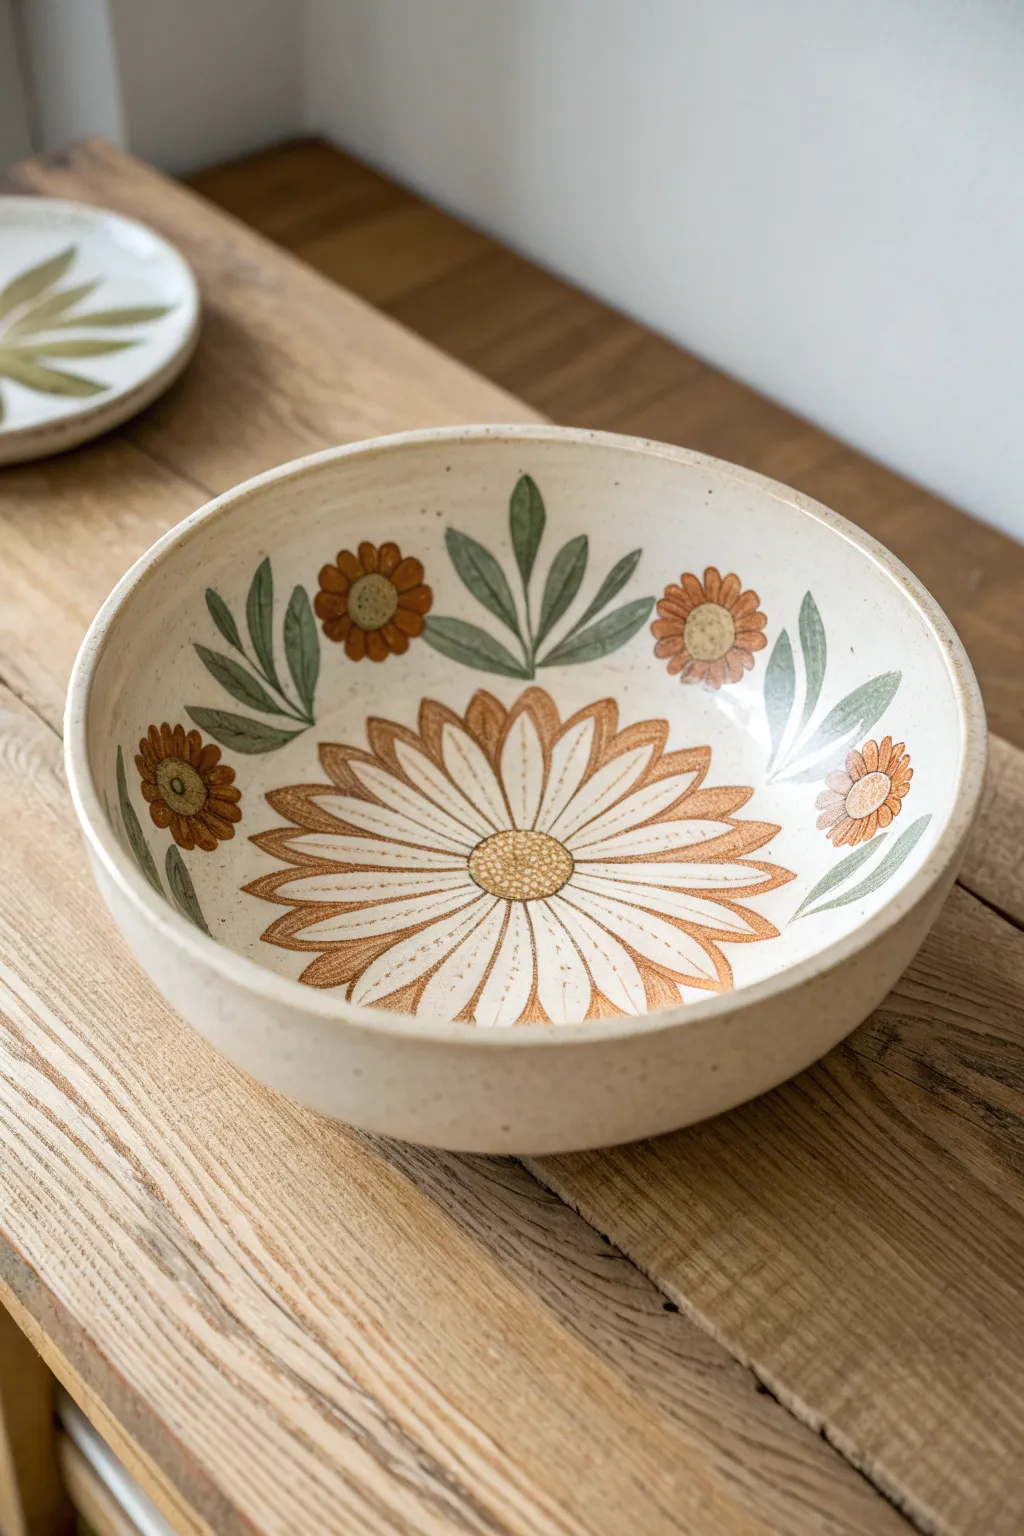
This charming ceramic bowl features a bold, sunburst-style flower at its center, surrounded by delicate fern sprays and smaller blooms. The warm rust and sage tones against a speckled cream background give it a distinctive vintage-modern feel perfect for brightening any table.
Step-by-Step Tutorial
Materials
- Light-colored speckled stoneware clay (or white clay with grog)
- Pottery wheel or rolling pin and slump mold
- Rib tool (wooden or silicone)
- Needle tool
- Underglaze pencils or fine liner brush
- Underglazes: Rust Orange, Burnt Sienna, Sage Green, Deep Forest Green
- Clear matte or satin food-safe glaze
- Sponge
- Detail brushes (sizes 0 and 2)
- Wax resist (optional)
Step 1: Forming the Vessel
-
Prepare the Clay:
Begin by wedging your speckled stoneware clay thoroughly to remove air bubbles. This project works best with a clay body that has some natural iron speckling, as it adds depth to the final unpainted areas. -
Create the Base Shape:
Throw a medium-sized bowl on the wheel with relatively steep, curved walls. Aim for a wide, open basin rather than a tall cylinder to give you plenty of ‘canvas’ space for the interior painting. Alternatively, roll out a slab and drape it over a slump mold. -
Refine the Rim:
While the clay is still plastic, compress the rim with a chamois or your finger to ensure it is smooth and resistant to chipping. Keep the rim squared off slightly for a modern look. -
Trim the Foot:
Allow the bowl to dry to a leather-hard state. Flip it over and trim a neat foot ring, smoothing away any trimming marks with a damp sponge.
Fixing Smudges
If you accidentally drip underglaze where you want raw clay, don’t wipe it while wet! It will stain the pores. Wait for it to dry completely, then gently scrape it off with an X-Acto knife.
Step 2: Sketching the Design
-
Mark the Center:
With the bowl still in a leather-hard state, locate the exact center of the interior basin. You can make a tiny indented dot with a needle tool to guide your radial design. -
Draft the Large Petals:
Using a very light touch with a needle tool or a pencil (the graphite will burn off), sketch long, slender petals radiating from the center dot. These should extend about halfway up the bowl’s curve. -
Sketch the Border Elements:
In the negative space above the large petals, draw three small circles evenly spaced around the upper rim. Between these circles, sketch simple stems with fern-like fronds extending upward.
Watercolor Effect
To get softer petals, water down your underglaze slightly. Use overlapping strokes so the color pools at the petal tips, creating a natural gradient similar to watercolor painting.
Step 3: Painting the Underglaze
-
Paint the Central Pollen:
Mix a small amount of Burnt Sienna with a touch of yellow underglaze. Using a size 2 brush, dab small dots closely together to create the textured center of the main flower. -
Outline the Big Blooms:
Load a fine liner brush with Burnt Sienna underglaze. Carefully outline the long central petals. I find rotating the bowl on a banding wheel helps keep these lines steady. -
Fill the Petal Tips:
Using Rust Orange underglaze, paint the outer tips of the central petals, fading the color out as you move toward the center. This creates a shaded, dimensional effect rather than a solid block of color. -
Detail the Rim Flowers:
Paint the smaller flowers near the rim using the same Rust Orange for the petals and a dotted Sienna center, echoing the style of the main bloom but on a smaller scale. -
Paint the Greenery:
Switch to your Sage Green underglaze. Paint the fern leaves with single, fluid strokes for each frond. Use a slightly darker Forest Green for the central vein of the leaves to add contrast. -
Clean Up Edges:
If any underglaze smudged, gently scratch it away with a cleanup tool or wipe carefully with a barely damp sponge corner once the paint is dry to the touch.
Step 4: Glazing and Firing
-
Bisque Fire:
slowly dry the piece completely. Load it into the kiln for a bisque fire (usually cone 04 or 06) to harden the clay and set the underglaze. -
Wipe Down:
After the kiln cools, wipe the bisqueware with a damp sponge to remove any dust that might prevent the glaze from adhering properly. -
Apply Clear Glaze:
Pour a clear matte or satin glaze into the bowl, swirl it to coat the entire interior, and pour out the excess. This finish preserves the raw look of the speckled clay while making it food safe. -
Glaze the Exterior:
Dip or brush the exterior with the same clear glaze. Wipe the foot ring completely clean with a wet sponge to prevent it from sticking to the kiln shelf. -
Final Fire:
Fire the bowl to the maturity temperature of your specific clay and glaze combination (typically Cone 5 or 6 for stoneware).
Once cooled, your bowl is ready to hold fresh fruit or serve a warm meal with a touch of botanical style
Delicate Floral Stems on the Interior
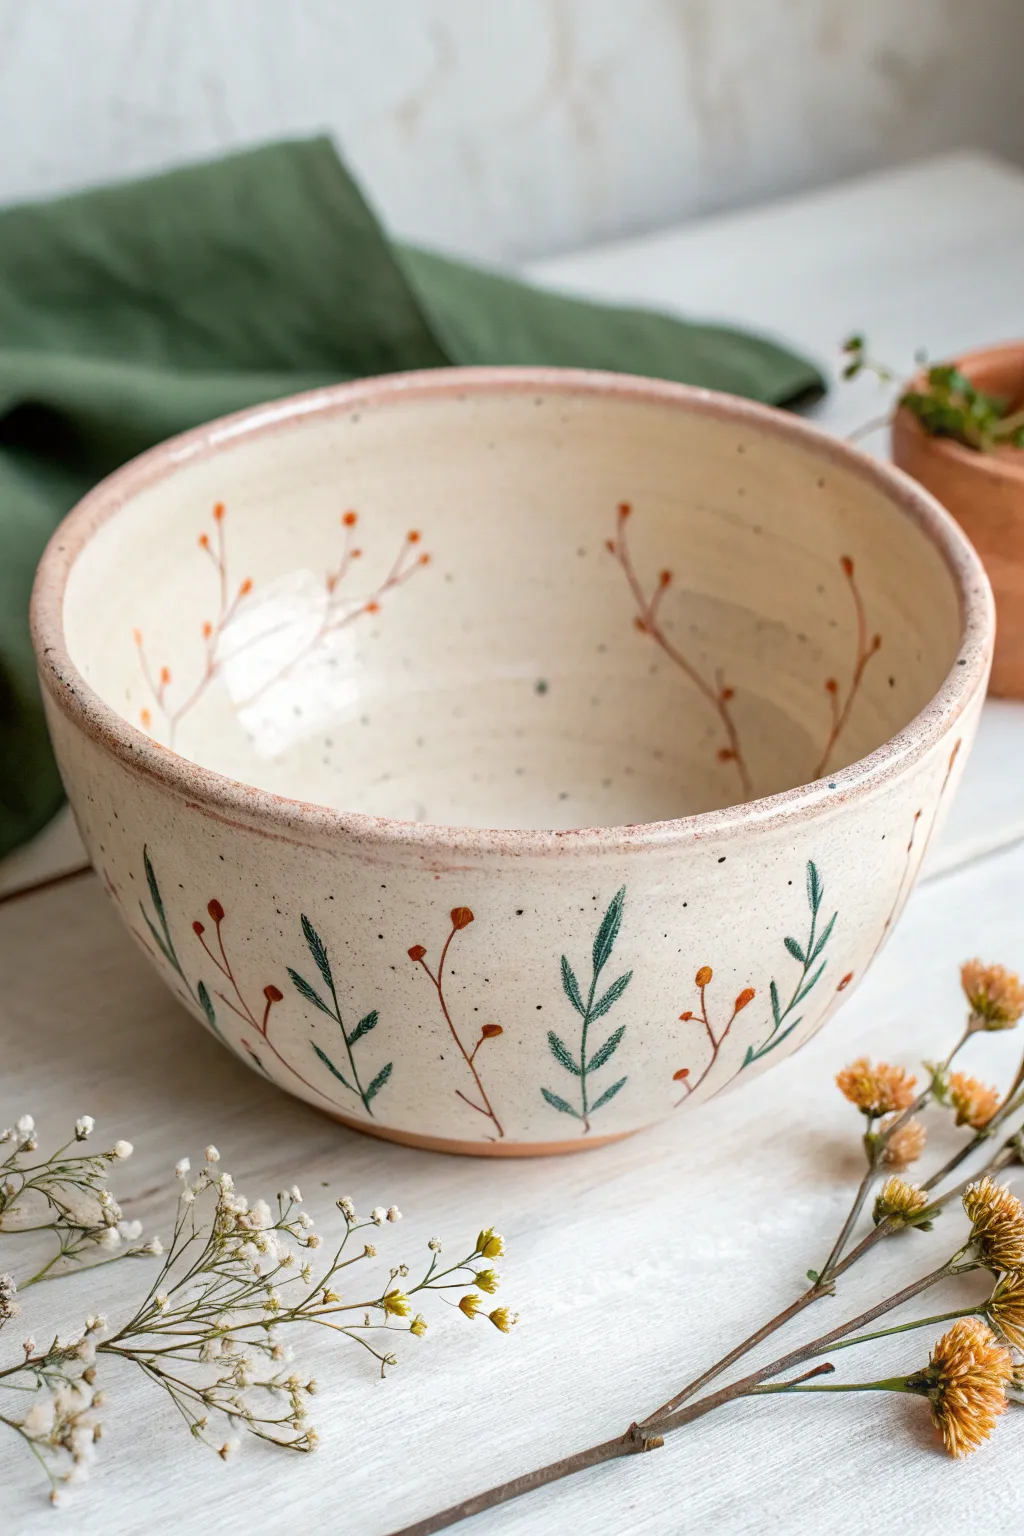
Bring the gentle beauty of a summer field to your table with this hand-thrown ceramic bowl. Featuring delicate stems that seem to sway in a breeze, the design combines a natural speckled clay body with minimalist floral underglaze painting for a whimsical, organic finish.
Detailed Instructions
Materials
- Speckled stoneware clay (mid-fire)
- Pottery wheel and throwing tools (sponge, rib, wire cutter)
- Trimming tools
- Underglaze (Dark Green, Burnt Orange/Terracotta)
- Fine liner brush (size 0 or 00)
- Clear transparent glaze (cone 5/6 compatible)
- Wax resist
- Kiln
Step 1: Throwing and Shaping
-
Prepare the clay:
Begin by thoroughly wedging about 1.5 to 2 pounds of speckled stoneware clay to remove air bubbles and ensure consistency. -
Center on the wheel:
Throw the clay onto the wheel head and center it using steady pressure and water for lubrication. -
Open and pull the walls:
Open the centered clay and pull up the walls to create a deep, rounded bowl shape. Aim for a gentle curve that widens at the rim. -
Refine the rim:
Smooth the rim with a chamois or your sponge. I find that leaving the rim slightly thicker and uneven adds to the rustic, handmade charm visible in the reference photo. -
Dry to leather hard:
Wire cut the bowl from the bat and let it dry slowly until it reaches a leather-hard state, firm enough to handle but not chalky. -
Trim the foot:
Invert the bowl on the wheel and trim a clean foot ring. This elevates the form and gives the bowl a professional finish.
Step 2: Painting the Design
-
Plan placement:
Visualize where your stems will grow. The design features stems on both the interior and exterior. -
Paint interior stems:
Using a fine liner brush and burnt orange underglaze, paint thin, spindly stems rising from the bottom center up the inside walls. Keep your hand loose to create natural, organic curves. -
Add exterior foliage:
On the outside, alternate between the orange flowering stems and simple green leafy stems. Use the dark green underglaze for the leaves, painting them with tiny, swift strokes that taper at the ends. -
Add floral details:
Return to your orange stems. Add small dots or tiny clusters at the tips of the branches to represent flower buds. Vary the size slightly for interest. -
Clean up:
If you smudge any underglaze, gently scratch it off with a needle tool once dry rather than wiping, which can smear the pigment into the clay pores. -
Bisque fire:
Allow the bowl to dry completely (bone dry) before loading it into the kiln for a bisque firing (usually Cone 04).
Brush control secret
Load only the very tip of your liner brush with underglaze. This keeps lines incredibly thin and prevents creating heavy blobs.
Step 3: Glazing and Finishing
-
Wax the foot:
Apply wax resist to the bottom foot ring to prevent glaze from adhering to the kiln shelf. -
Rim detailing:
For that subtle pinkish rim seen in the image, wipe away a thin line of glaze after dipping, or apply a very watered-down wash of iron oxide or pink underglaze to the bare rim before the main glaze. -
Apply clear glaze:
Dip the entire bowl into a clear, transparent glaze. This allows the natural speckles of the clay and your painted design to show through clearly. -
Glaze fire:
Load the glazed bowl into the kiln for the final glaze firing, typically to Cone 5 or 6 depending on your clay and glaze specifications. -
Cool and inspect:
Let the kiln cool completely before opening. Inspect your bowl for any sharp spots on the foot, sanding them down if necessary.
Go wild
Try using a different color palette for the seasons—tiny blue buds for spring or red berries for winter.
Now you have a stunning, functional piece of art ready for your morning cereal or soup

TRACK YOUR CERAMIC JOURNEY
Capture glaze tests, firing details, and creative progress—all in one simple printable. Make your projects easier to repeat and improve.
Scalloped Petal Rim Bowl
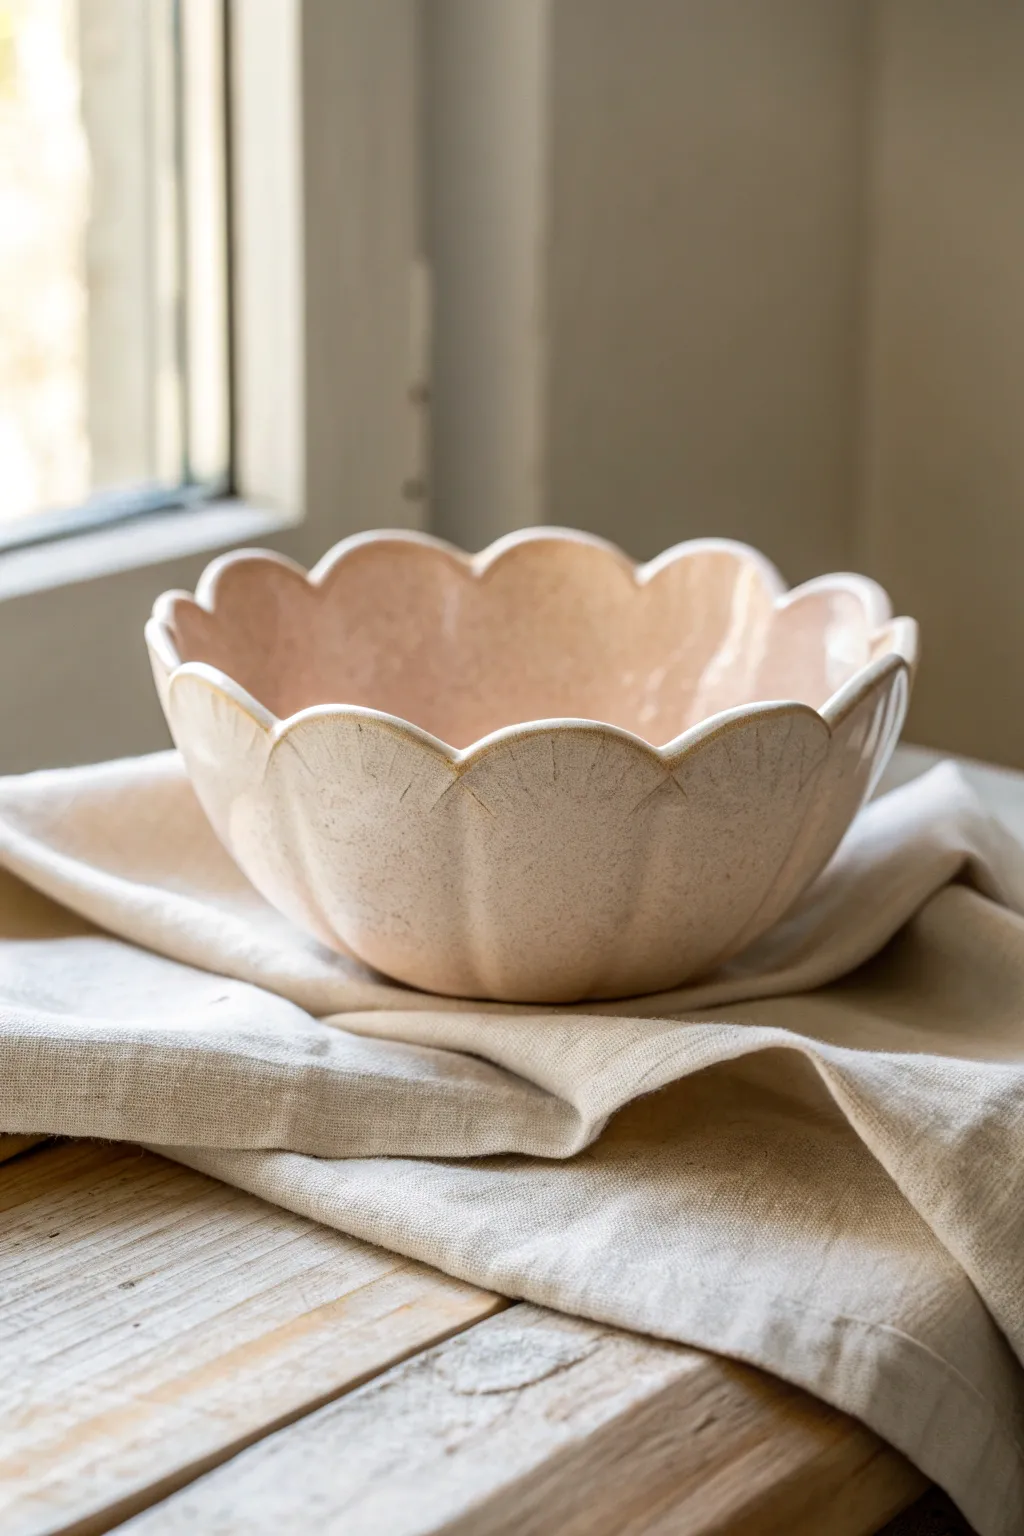
Embrace organic forms with this gentle, petal-edged bowl featuring a soft blush speckled glaze. The repeating scallops give it a floral elegance, perfect for holding fruit or acting as a standalone centerpiece.
Step-by-Step Tutorial
Materials
- White stoneware or porcelain clay body
- Rolling pin
- Wooden guide strips (1/4 inch thick)
- Canvas work surface
- Large slump mold or a smooth mixing bowl
- Flexible rib tool
- Needle tool
- Fettling knife
- Sponge
- Round cookie cutter or jar lid (approx. 2-3 inches)
- Blush/pink matte speckled glaze
- Clear dipping glaze (optional)
Step 1: Forming the Base Slab
-
Prepare the Clay:
Begin by wedging your white stoneware clay thoroughly to remove any air bubbles. This step is crucial for preventing cracks during firing. -
Roll the Slab:
Place the clay on your canvas surface between the 1/4-inch wooden guide strips. Roll the clay out firmly until your rolling pin rests on the guides, ensuring an even thickness across the entire slab. -
Compress the Surface:
Take a damp sponge or a flexible rib and gently run it over the surface of the slab. This compresses the clay particles, aligns them, and removes the canvas texture. -
Cut the Circle:
Using a needle tool, cut a large circle from the slab. You can trace around a dinner plate or a circular template to get a perfect round shape.
Step 2: Creating the Scalloped Rim
-
Mark the Scallops:
Before cutting, I find it helpful to lightly layout the design. Use your round cookie cutter or jar lid to gently press semi-circles along the very edge of your clay circle. Space them so they touch, creating a continuous wavy line. -
Cut the Petal Shape:
Carefully cut along the curved marks you just made using a fettling knife or needle tool. Remove the excess clay triangles from between the scallops. -
Refine the Edges:
Smooth the freshly cut edges with a damp sponge or your finger. Sharp raw clay edges can become razor-sharp after firing, so take time to round them off now. -
Define the Petals:
Using the side of a modeling tool or a dull pencil, gently press a vertical indentation starting at the low point between each scallop and fading toward the center of the bowl. This creates the illusion of individual petals.
Slumping Issues?
If the clay slumps too fast and loses the petal detail, let the slab stiffen slightly on the table for 20 minutes before placing it into the mold.
Step 3: Shaping and Drying
-
Slump the Clay:
Carefully lift your scalloped slab and drape it *inside* your slump mold or bowl. Ensure the center of the slab aligns with the center of the mold. -
Secure the Shape:
Gently press the slab against the walls of the mold using a soft sponge. Work from the center outward to avoid trapping air pockets. -
Enhance the Rim:
While in the mold, gently push the scalloped edges slightly outward or inward depending on your preference to give the rim a natural, blooming movement. -
Dry Slowly:
Cover the mold loosely with plastic to allow for slow, even drying. Let it sit until leather-hard before removing it from the mold. -
Bisque Fire:
Once the bowl is bone dry, load it into the kiln for a bisque firing to cone 04 (or as your clay requires).
Texture Pop
To emphasize the petal lines, wipe away a tiny bit of glaze from the high points of the indentations with a damp sponge before final firing.
Step 4: Glazing and Finishing
-
Clean the Bisqueware:
Wipe the fired bowl with a damp sponge to remove any kiln dust that might resist the glaze. -
Apply Glaze:
Pour your blush speckled glaze into the interior, swirl to coat, and pour out the excess. Dip or brush the exterior to match. I generally aim for two thick coats if brushing. -
Highlight the Texture:
As the glaze dries a bit, make sure it breaks slightly over the petal indentation lines. This variation in thickness often enhances the speckled effect. -
Glaze Fire:
Fire the piece again to the maturation temperature of your specific clay and glaze combination (usually cone 5 or 6 for stoneware).
Now you have a serene, blooming vessel ready for your table or shelf
Wavy Asymmetrical Rim Design
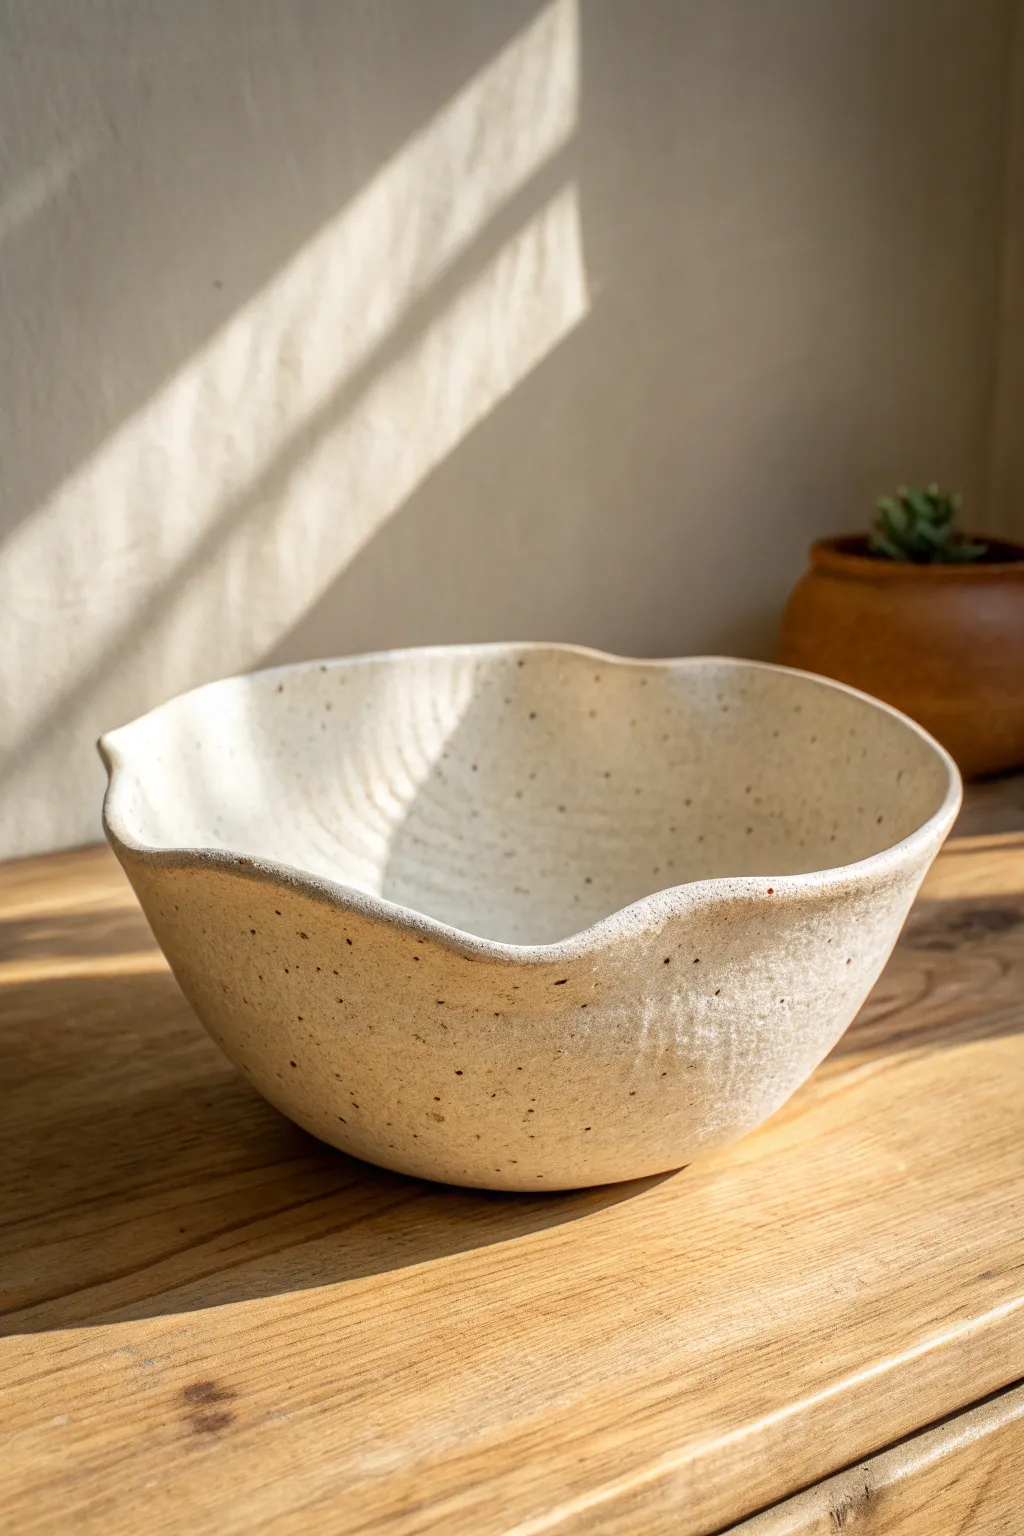
Embrace the natural fluidity of clay with this speckled, asymmetrical bowl that celebrates imperfection. The design features a gently sloping, gently pinched rim that mimics the organic curves found in nature, finished in a matte, creamy glaze.
Step-by-Step Guide
Materials
- Speckled clay body (stoneware recommended)
- Pottery wheel
- Throwing sponge
- Wooden rib tool
- Cutting wire
- Needle tool
- Trimming tools
- Matte white or cream glaze
- Kiln access
Step 1: Throwing the Base Form
-
Prepare the clay:
Begin by wedging roughly 2-3 pounds of speckled clay until it is uniform and free of air bubbles. Slam it onto the center of your wheel head. -
Center the clay:
Use your hands and water to center the clay. Apply pressure to cone perfectly, then press it back down into a hockey puck shape. -
Open the form:
Press your thumbs into the center to open the clay, leaving about a quarter-inch depth for the floor. Pull the floor out to determine the bowl’s width. -
Compress the floor:
Run your finger or a sponge across the floor from the center to the right edge several times to compress the clay, preventing future cracks. -
Pull the walls:
Using one hand inside and one outside, gently pull the clay upward. Aim for a ‘V’ shape initially, keeping the walls relatively thick at the rim for future shaping. -
Shape the curve:
Use a wooden rib on the inside of the bowl while supporting the outside with your hand or a sponge. Push gently outward to create a rounded, continuous curve from base to rim.
Chamois Smoothing
For that butter-smooth rim shown in the photo, wrap a small strip of wet chamois over the rim while the wheel spins slowly before you start altering the height.
Step 2: Creating the Wavy Rim
-
Slow the wheel:
Bring the wheel to a complete stop or a very slow crawl. The wavy rim is a hand-building modification done on a thrown form. -
Moisten the rim:
Lightly dampen your fingers. The rim needs to be pliable but not so wet that it collapses. -
Establish the peaks:
Decide where you want the high points of your wave. Gently push the clay upward from underneath the rim with your thumb while supporting the sides with your index fingers. -
create the valleys:
Between your peaks, use a gentle downward pressure with your index finger to create the ‘valleys’ of the wave. I like to vary the spacing so it looks accidental and organic rather than mathematically precise. -
Refine the edge:
Use a damp sponge or a piece of soft leather (chamois) to smooth over the manipulated rim, softening any sharp edges created during the pinching process. -
Wire off:
Run your cutting wire under the base of the bowl to separate it from the wheel head, then let it dry to leather-hard.
Step 3: Trimming and Glazing
-
Trim the foot:
Once leather-hard, flip the bowl over. Center it on the wheel and trim away excess clay from the base to create a defined foot ring that mirrors the curve of the inside. -
Bisque fire:
Allow the bowl to dry completely (bone dry) before loading it into the kiln for a bisque firing (usually Cone 04). -
Glaze application:
Pour a matte cream or white glaze inside the bowl, swirl to coat, and pour out. Dip the exterior to coat the outside walls. -
Clean the foot:
Wipe the foot ring completely clean with a sponge to prevent the pot from sticking to the kiln shelf. -
Final fire:
Fire the bowl to the maturity temperature of your clay and glaze (typically Cone 5 or 6 for stoneware). The speckles from the clay body should show through the translucent cream glaze.
Slumping Rims?
If the waves collapse, the clay is too wet or the walls are too thin. Wait 20 minutes for the clay to firm up slightly before attempting to manipulate the shape again.
Now you have a stunning, organic centerpiece ready to hold fruit or serve side dishes at your next gathering
Two-Tone Dip-Glaze Look
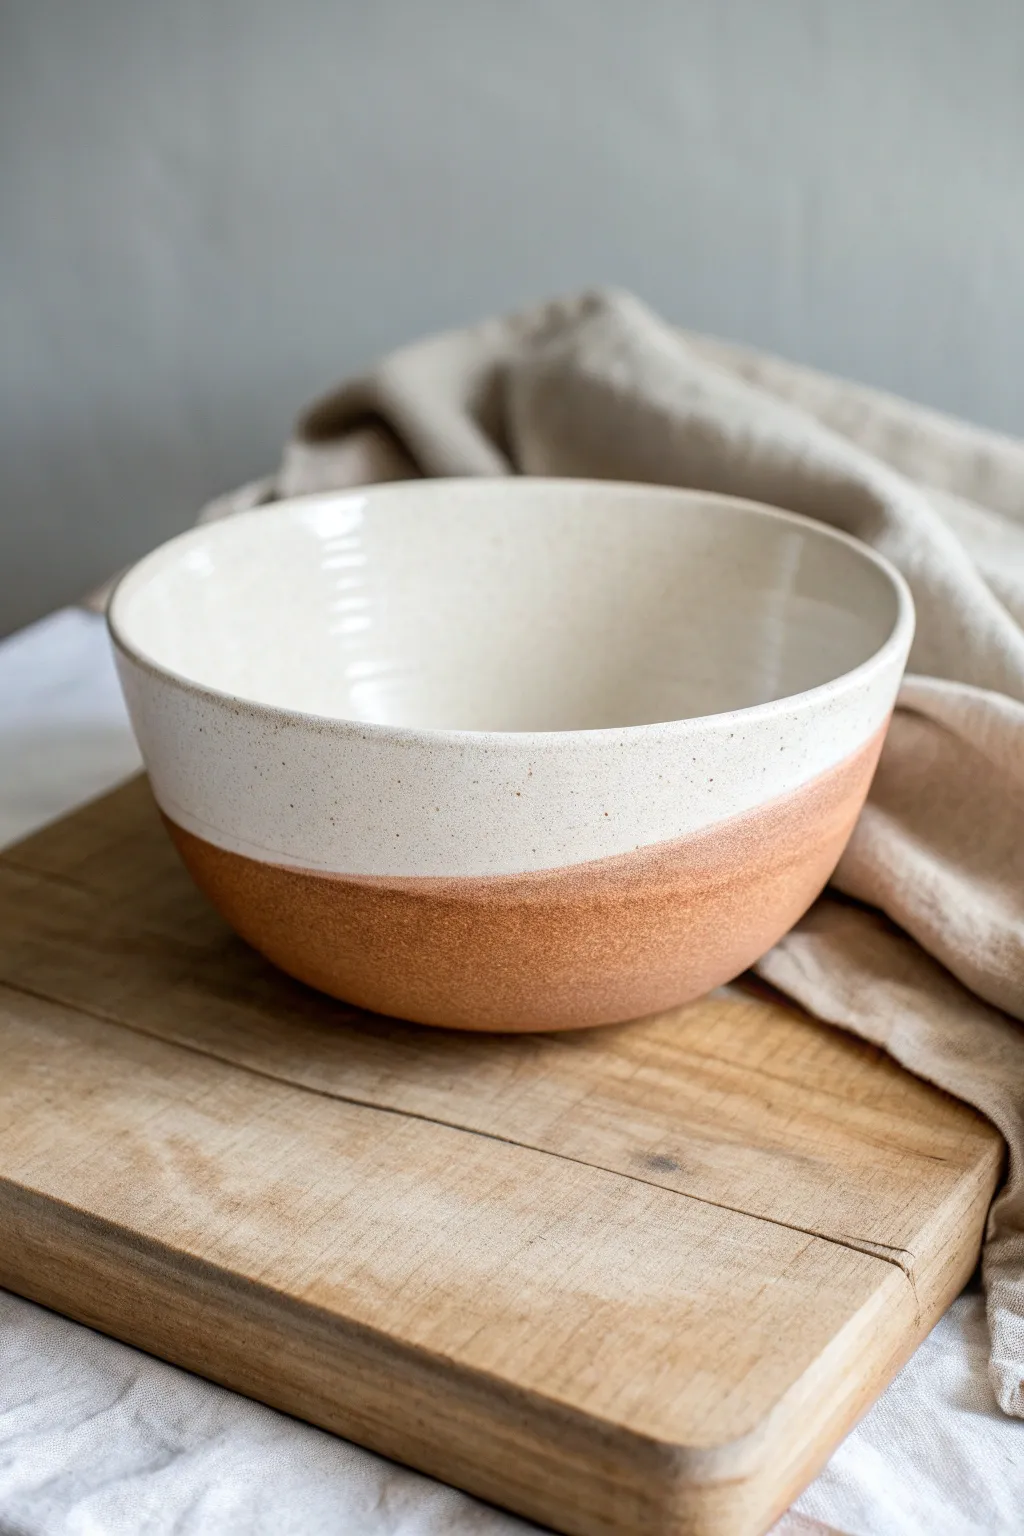
Achieve a stunning minimalist aesthetic with this semi-glazed ceramic bowl project, balancing raw textured clay with smooth, glossy white finish. This design highlights the natural beauty of the earth while providing a clean, functional surface for everyday use.
Step-by-Step
Materials
- Stoneware clay (speckled or warm buff)
- Pottery wheel (or slab roller for hand-building)
- Pottery tools (rib, needle tool, wire cutter, trimming tools)
- Sponge and bucket of water
- Bisque-fire kiln
- Glossy white dipping glaze
- Wax resist (optional)
- Large glaze bucket or wide-mouth container
- Glaze-fire kiln
Step 1: Forming the Bowl
-
Prepare the Clay:
Begin by wedging about 1.5 to 2 pounds of stoneware clay to remove air bubbles. A speckled buff clay works beautifully here, as the specks will show through the glaze later. -
Center and Open:
Throw the ball of clay onto your wheel head and center it securely. Open the clay down to your desired depth, leaving about a quarter-inch for the floor. -
Pull the Walls:
Slowly pull the walls upward and outward to create a classic U-shape or V-shape curve. Aim for an even thickness from bottom to rim, tapering just slightly at the very top. -
Refine the Shape:
Use a smooth kidney rib on the interior to compress the clay and remove finger ridges. While smoothing, ensure the interior curve is continuous without sharp corners. -
Address the Rim:
Using a chamois or a damp sponge, gently compress the rim to make it durable and rounded. This is crucial for eating vessels. -
Dry to Leather Hard:
Cut the bowl from the wheel with a wire tool and let it dry until it reaches a leather-hard state—firm enough to handle but still carved easily.
Straight Lines
To get a perfectly crisp horizon line, hold the bowl perfectly level when dipping. Don’t hesitate; a steady, quick plunge creates a better line than a slow one.
Step 2: Trimming and Bisque
-
Expose the Foot:
Center the leather-hard bowl upside down on the wheel. Secure it with clay lugs or a chuck. -
Trim the Exterior:
Trim away excess weight from the bottom third of the bowl. Create a clean, definable foot ring. I like to run my finger over the raw clay here to ensure the texture feels pleasant. -
Smooth the Transition:
Use a damp sponge to smooth out any trimming marks on the exterior wall where you cut the clay, blending the trimmed area with the thrown wall. -
Slow Drying:
Allow the bowl to dry completely. Cover it loosely with plastic for the first day to even out the moisture, then uncover it to finish. -
Bisque Fire:
Load the bone-dry bowl into the kiln and bisque fire it to Cone 04 (or your clay body’s specific bisque temperature).
Make it Pop
Choose a clay body with high manganese speckling. When fired in oxidation, these specks will bleed through the white glaze, adding depth and unity between the two halves.
Step 3: Glazing the Two-Tone Look
-
Clean the Bisqueware:
Once cool, wipe the bisque bowl with a damp sponge to remove any kiln dust that could prevent the glaze from adhering properly. -
Wax the Foot (Optional):
Apply wax resist to the very bottom foot ring. This saves you from wiping it off later, though for this dipped style, you can skip it if you are careful. -
Prepare the Glaze:
Mix your glossy white glaze thoroughly. It should have the consistency of heavy cream to ensure an opaque, even oat-color coat. -
The Dip:
Hold the bowl by the foot. In one smooth motion, dip the bowl straight down into the glaze bucket, stopping exactly where you want the line to be—usually about 2/3 down the exterior. -
Quick Removal:
Pull the bowl out immediately. Shake it gently once to remove excess drips, then hold it upside down for a few seconds so the glaze sets. -
Clean Up:
If any glaze splattered onto the raw clay area below the dip line, wipe it away completely with a clean, damp sponge. -
Final Fire:
Load the bowl into the glaze kiln. Fire to the maturity temperature of your clay and glaze (typically Cone 5 or 6 for stoneware).
Enjoy using your new beautifully balanced bowl for your morning oatmeal or evening soup
Soft Ombre Gradient Wash

Capture the soft, fleeting colors of a beach sunset with this dual-textured clay bowl. By combining a vibrant blue interior with a gentle peach rim and raw, speckled clay base, you’ll create a functional piece of art that feels perfect in any home.
Step-by-Step Guide
Materials
- Stoneware clay (speckled or buff)
- Pottery wheel (or slab roller/pin for hand-building)
- Rib tool
- Wire cutter
- Trimming tools
- Bisque kiln firing
- Deep ocean blue glaze (glossy)
- Coral or peach glaze (semial-transparent preference)
- Wax resist emulsion
- Sponge
- Glaze brushes (fan brush and detail brush)
- Glaze kiln firing
Step 1: Forming the Vessel
-
Center and open:
Begin by wedging your speckled stoneware clay thoroughly to remove air bubbles. Thrown a roughly 2-pound ball onto the wheel head, center it, and open the form wide to establish the bowl’s interior curve. -
Pull the walls:
Gently pull the clay upwards and outwards. Aim for a distinct half-sphere shape, keeping the walls even but slightly thicker at the rim to support the ombre glaze effect later. -
Refine the curve:
Use a smooth rib tool on the interior while supporting the outside with your hand. This compresses the clay and removes throwing lines, creating that perfect smooth surface for the interior blue glaze. -
Clean the rim:
Using a chamois or a damp sponge, compress the rim. I like to leave it slightly rounded and soft, rather than sharp, as this helps the glaze break beautifully over the edge. -
Dry to leather hard:
Wire the bowl off the wheel but leave it on a bat to stiffen. Allow it to dry slowly until it reaches a leather-hard state where it can hold its shape without warping. -
Trim the foot:
Flip the bowl over and center it on the wheel. Trim away excess weight from the base, carving a clean foot ring. Smooth the raw clay surface with a damp sponge to reveal the natural speckles.
Step 2: The Glazing Process
-
Bisque fire:
Once bone dry, load the bowl into the kiln for a bisque firing (usually Cone 06 or 04). This hardens the clay and prepares it to accept glaze. -
Wax the exterior base:
Apply wax resist to the bottom third of the exterior and the foot ring. We want to keep this area raw to show off the beautiful sandy texture of the speckled clay. -
Clean bisque dust:
Wipe the entire piece down with a damp sponge to remove any kiln dust, which can cause pinholes in your final glaze. -
Pour the interior:
Pour your deep ocean blue glaze inside the bowl. Roll the bowl around quickly to coat the entire interior surface evenly, then pour out the excess. Clean any drips off the rim immediately. -
Dip the rim:
Holding the bowl upside down by its foot, dip just the top 2 inches of the rim into the coral/peach glaze. Hold it there for 3 seconds to get a good coating, then lift straight up. -
Create the overlap:
If you want a slight gradient where the blue meets the peach on the rim, you can dab a tiny bit of the peach glaze just inside the lip. The two glazes will interact during firing. -
Clean the distinct line:
Check the exterior where the peach glaze stops. If the line is ragged, use a damp sponge to wipe it into a neat, straight horizontal line that divides the glazed top from the raw bottom. -
Sponge texture:
Because the bottom section is unglazed, inspect it one last time. If any peach glaze dripped onto the wax or raw clay, scrape it off gently to ensure the speckles remain crisp. -
Re-check the foot:
Ensure absolutely no glaze remains on the very bottom of the foot ring, or it will fuse to your kiln shelf. Wipe it clean one final time.
Clean Lines
For a sharper line between the peach glaze and raw clay, apply a band of masking tape or wax resist at the halfway point before dipping the rim.
Step 3: Final Firing
-
Load the kiln:
Place the bowl in the glaze kiln. Ensure it isn’t touching other pots, as the glaze on the rim might bubble slightly. -
Fire to temperature:
Fire to the maturation temperature of your specific clay and glaze combination (commonly Cone 5 or 6 for stoneware). Allow the kiln to cool naturally before opening.
Creative Twist
Swap the peach rim for a running white glaze. It will interact with the blue interior at the lip, creating a frothy ‘sea foam’ effect.
Enjoy using your new bowl, where the contrast between the glossy interior and the sandy, raw exterior brings a tactile joy to every meal
Terrazzo Confetti Pattern
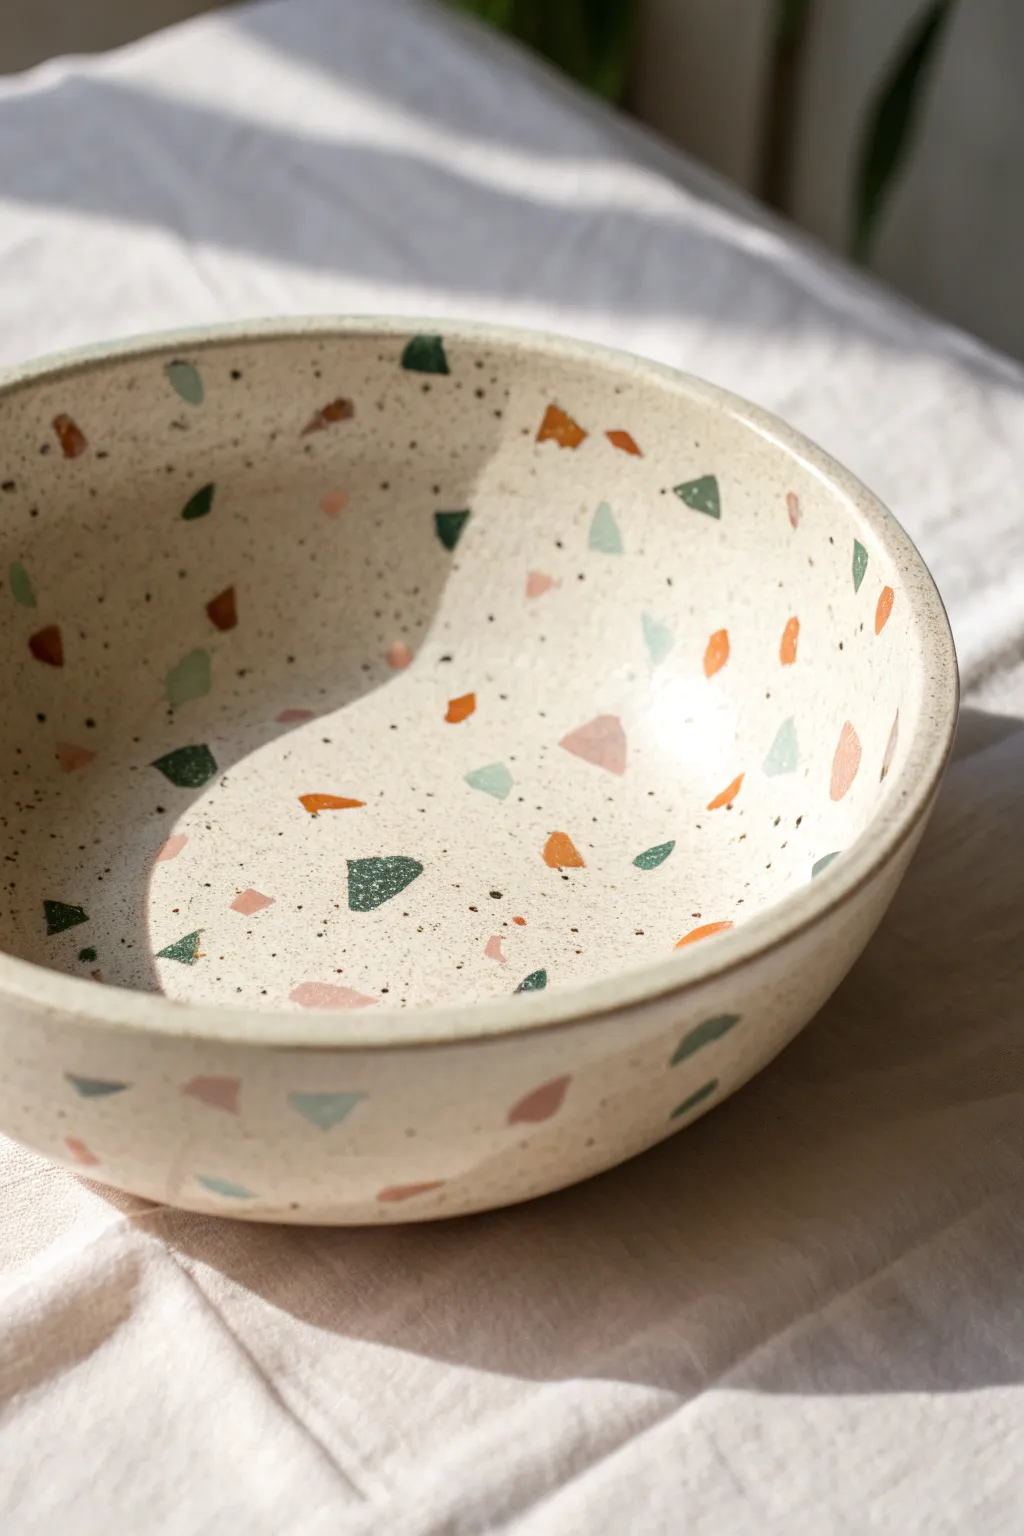
This project captures the playful spirit of postmodern design with a handmade ceramic bowl featuring scattered shards of color and subtle speckling. The result is a smooth, creamy vessel interrupted by joyful bursts of green, orange, and pink ‘confetti’ that feels modern yet timeless.
How-To Guide
Materials
- Light-colored stoneware clay (white or cream)
- Mason stains or ceramic pigments (green, orange, pink, blue)
- Speckled clay body (or granular manganese to add separately)
- Rib tool (wooden or silicone)
- Rolling pin
- Canvas work surface
- Bisque mold or slump mold (bowl shape)
- Sponge
- Needle tool
- fettling knife or X-Acto blade
- Clear transparent glaze
- Kiln
Step 1: Preparing the Confetti
-
Mix your colors:
Take four small balls of your base white clay, each about the size of a golf ball. Knead a different mason stain into each one until the color is uniform—aim for a muted palette of sage green, burnt orange, pale pink, and soft blue to match the reference. -
Roll thin slabs:
Roll each colored ball into a very thin slab, approximately 1/8 inch thick. The thinner these are, the more delicate your final confetti will look. -
Cutting shards:
Using a fettling knife or X-Acto blade, cut the colored slabs into random geometric shapes. Create a mix of small triangles, trapezoids, and irregular shards, keeping them mostly under 1/2 inch in size. -
Leather hard drying:
Let these colored shards dry slightly until they are leather hard. They need to be firm enough to handle without squishing but soft enough to bond with the main bowl.
Moisture Management
Ensure your base slab is wetter than the colored shards. If the shards are too wet, they will smear when you roll them in. Leather-hard shards maintain their crisp geometric shapes best.
Step 2: Forming the Bowl Base
-
Prepare the main body:
Wedger your main body of clay. If you aren’t using a pre-speckled clay body, knead in a very small amount of granular manganese or iron filings to achieve that peppered look seen in the photo. -
Roll the main slab:
Roll out a large slab of your speckled clay to a consistent thickness of about 1/4 inch. Smooth it out with a rib tool to compress the clay particles. -
Scatter the confetti:
Take your leather-hard colored shards and scatter them randomly over the surface of your wet slab. Don’t overthink the placement; randomness helps the natural terrazzo look. -
Embed the shards:
Use your rolling pin to gently roll over the slab again. You want to press the colored shards flush into the surface of the clay so they become one seamless layer. -
Rib and compress:
Run a rib tool firmly over the surface to ensure the inlaid pieces are tightly bonded and the surface is perfectly smooth. -
Slump molding:
Carefully lift your slab and drape it over or inside your chosen bowl mold. I find pressing it gently into the curve with a soft sponge helps maintain the shape without marring the surface. -
Trim the rim:
Once the clay has stiffened slightly on the mold, use a needle tool to trim the excess clay around the rim to create an even, circular edge. -
Smooth the edge:
Use a damp chamois or sponge to round over the cut rim so it is soft and comfortable to the touch.
Double-Sided Design
For a true terrazzo effect, flip your slab over after rolling in the first side and add confetti to the back as well. This way, the pattern is visible inside and outside the finished bowl.
Step 3: Finishing and Firing
-
Bisque fire:
Allow the bowl to dry slowly and completely before loading it into the kiln for a bisque firing (usually Cone 06/04). -
Sanding (Optional):
If the confetti pieces feel slightly raised after bisque firing, lightly sand the surface with wet-dry sandpaper to ensure a perfectly flush finish. -
Glazing:
Apply a clear, transparent glaze over the enter peace. Make sure it is food-safe if you intend to eat from the bowl. -
Wipe the foot:
Clean off any glaze from the bottom foot of the bowl to prevent it from sticking to the kiln shelf. -
Glaze fire:
Fire the bowl to the maturity temperature of your clay body (likely Cone 5/6 or Cone 10).
Now you have a stunning, durable piece of functional art that brings a pop of scattered color to your table
Carved Fluted Texture Outside
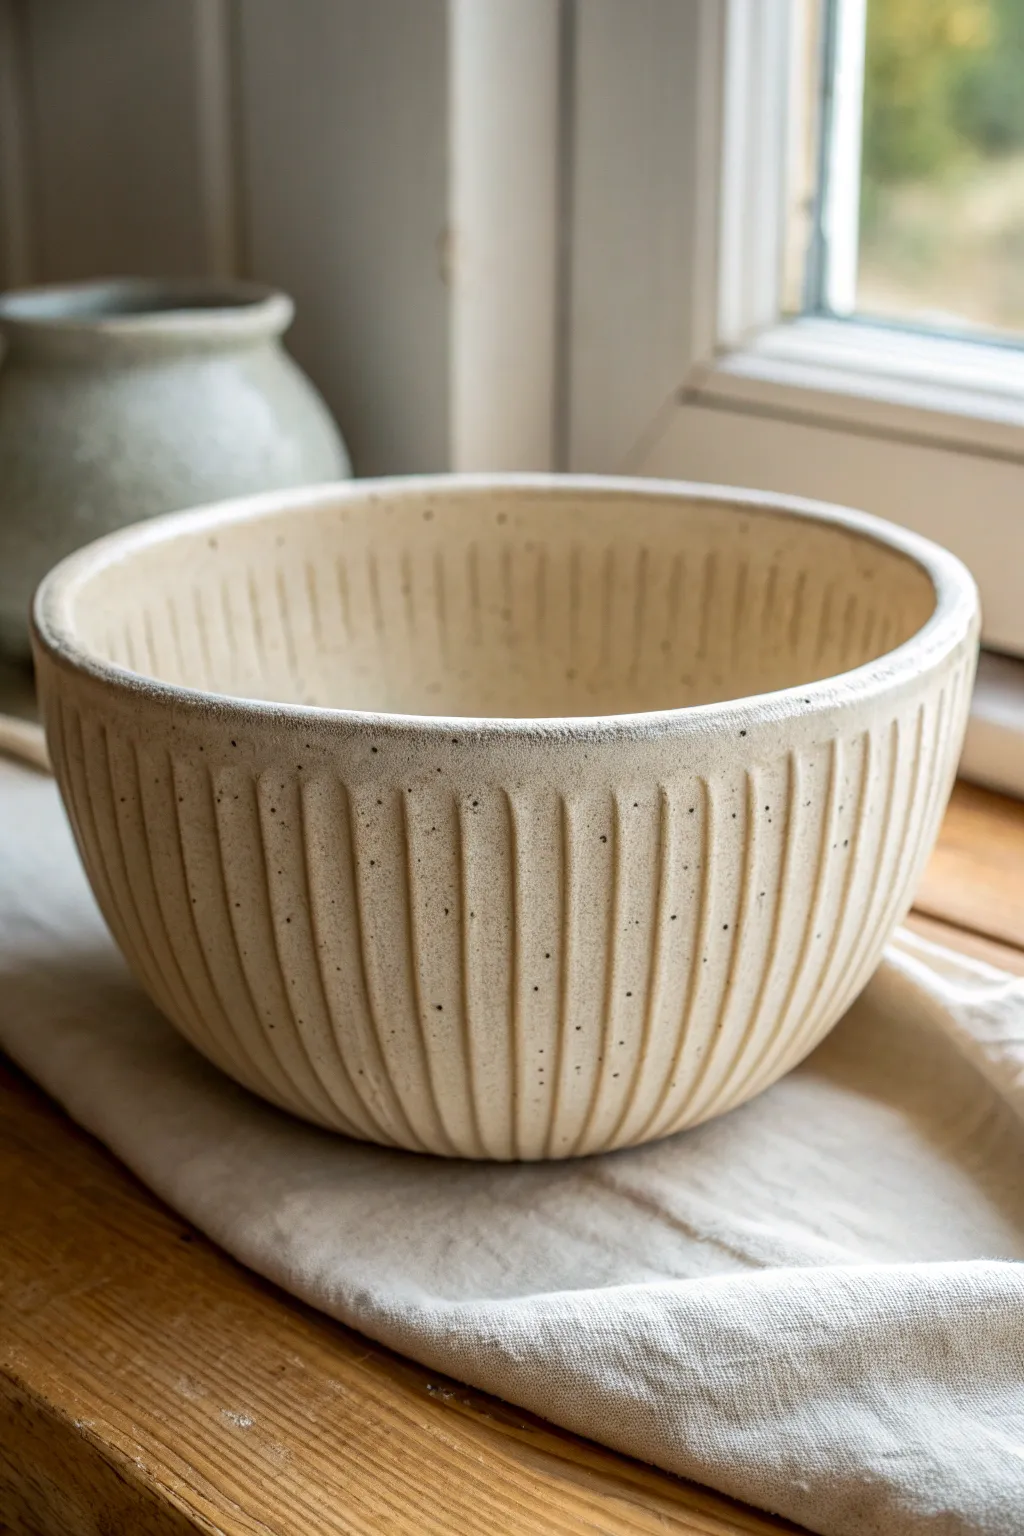
This project features a beautifully textured stoneware bowl with distinct, vertical fluting that adds tactile interest and visual rhythm. The black speckled clay body shines through a matte glaze, giving the piece a rustic yet refined finish perfect for your kitchen table.
Step-by-Step Guide
Materials
- Speckled buff stoneware clay
- Pottery wheel
- Throwing tools (sponge, needle tool, wire cutter, rib)
- Small bat
- Trimming tools (large and small loop tools)
- Soft flexible ruler or measuring tape
- Carving tool (fluting tool or sharp ribbon tool)
- Sponge for smoothing
- Matte white or clear matte glaze
- Kiln
Step 1: Throwing the Form
-
Center the clay:
Begin with about 2-3 pounds of speckled stoneware clay. Wedge it thoroughly to remove air pockets, then slap it onto the wheel head and center it firmly. -
Open and pull the walls:
Open the clay to a flat interior bottom, compressing well to prevent cracking. Pull the walls upward and outward to create a deep, open bowl shape. Keep the walls slightly thicker than usual—about 1/4 to 3/8 inch—to accommodate the deep carving later. -
Refine the curve:
Use a smooth kidney rib on the inside of the bowl to define a continuous, gentle curve from the floor to the rim. This interior smoothness contrasts beautifully with the textured exterior. -
Set the rim:
Compress the rim with a piece of chamois or your finger. A slightly rounded, defined rim works best here, acting as a visual stop for the carved lines. -
Dry to leather hard:
Wire the bowl off the bat but leave it in place if possible, or move it carefully to a ware board. Let it dry slowly until it reaches a sturdy leather-hard state. It should be firm enough to handle without deforming but soft enough to carve easily.
Uneven Spacing?
If your last few flutes don’t fit the spacing perfectly, don’t panic. Gently smudge the last 3-4 lines and re-carve them slightly wider or narrower. The eye rarely notices a subtle adjustment.
Step 2: Trimming and Planning
-
Secure for trimming:
Place the bowl upside down on the wheel head. Center it perfectly using circular taps. Secure it with small clay lugs or a chuck if the rim is uneven. -
Trim the profile:
Using a sharp loop tool, remove excess weight from the base and lower walls. Aim for a clean, uniform curve that matches the interior shape. Smooth the surface with a metal rib to remove any grog lines. -
Mark the spacing:
Before carving, use a soft measuring tape to measure the circumference of the rim. Divide this number by your desired number of flutes to get even spacing. Make tiny tick marks with a needle tool along the rim to guide your vertical cuts.
Sharper Ridges
Let the clay get slightly harder than normal leather-hard before carving. The drier the clay, the crisper the ‘tear’ or cut will be, reducing the need for cleanup.
Step 3: Carving the Flutes
-
Select your tool:
Choose a U-shaped wire loop tool or a specialized fluting tool. The width of the tool will determine the width of your valleys. -
Start the first cut:
Starting just below the rim bead, place your tool against the clay. Drag the tool downward in a straight, confident line toward the center of the base, following the curve of the bowl. -
Maintain constant pressure:
Apply even pressure throughout the stroke to keep the depth consistent. Deeper cuts create more dramatic shadows, but be careful not to cut through the wall. I usually ease off the pressure slightly as you reach the very bottom to taper the cut. -
Repeat around the bowl:
rotate the bowl and repeat this process at each tick mark. Try to keep your hand steady and your speed consistent for uniform ridges. The ridges between the cuts should be sharp and relatively evenly spaced. -
Clean up the debris:
Once all lines are carved, small clay crumbs or ‘burrs’ will remain on the edges. Let the bowl dry a bit more until bone dry or semi-dry, then gently brush these away with a soft bristle brush. Don’t smudge them while they are wet. -
Soften the edges:
Take a barely damp sponge and lightly wipe the exterior. This smooths the sharpest peaks of rigid clay just enough to make the bowl comfortable to hold, while maintaining the visual definition of the fluting.
Step 4: Glazing and Firing
-
Bisque fire:
Load the thoroughly dried bowl into the kiln for a bisque firing (typically Cone 04 or 06). This prepares the clay for glazing. -
Wax the foot:
Apply wax resist to the foot ring and bottom of the bowl to prevent glaze from sticking to the kiln shelf. -
Apply the glaze:
Pour a matte white or clear matte glaze inside the bowl, swirl to coat, and pour out. For the exterior, dip or spray the glaze. A matte finish is crucial here—it allows the texture and the clay’s natural speckles to remain the focus rather than being obscured by glossy reflections. -
Wipe the rim (optional):
If glaze has pooled too thickly in the flutes, gently dab them with your finger to ensure the texture reads clearly. You want the glaze to break over the sharp ridges, revealing the brown clay beneath. -
Glaze fire:
Fire the bowl to the maturity temperature of your clay body (likely Cone 5/6 or Cone 10 for stoneware). Handle carefully as you load the kiln to avoid chipping the delicate ridges.
Once fired, the interaction between the deep vertical grooves and the speckled clay creates a timeless piece that feels wonderful in the hand.
Marbled Coil-Built Swirl Bowl
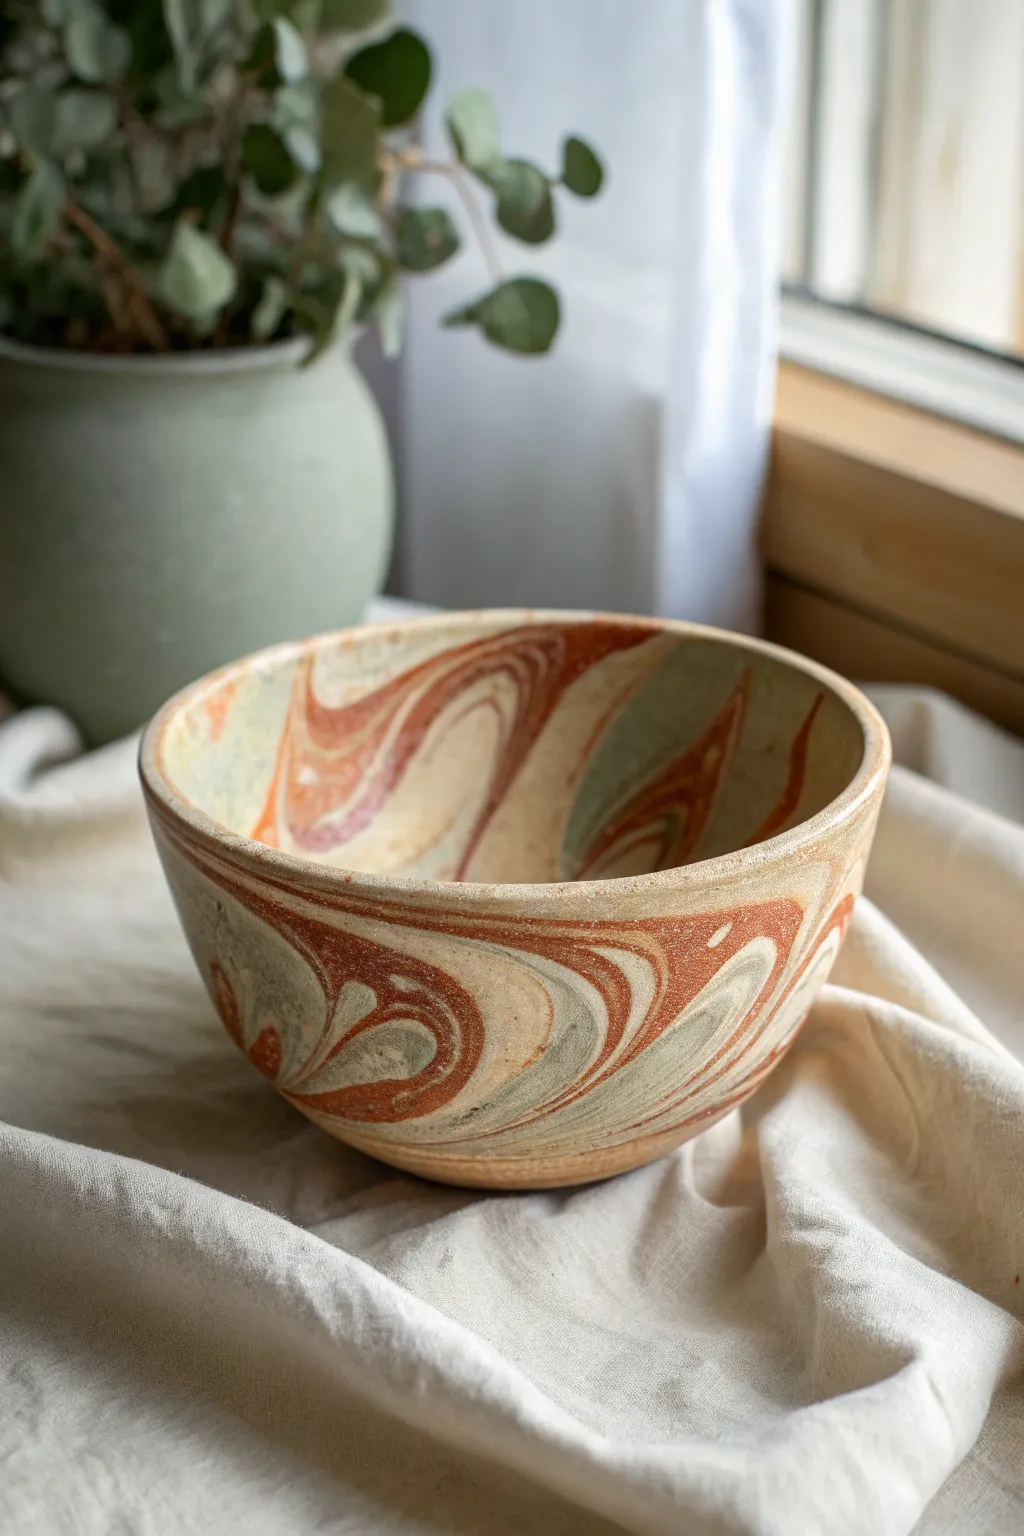
Capture the organic movement of sedimentary rock with this stunning marbled pottery bowl. Using contrasting clay bodies—creamy white, terracotta, and soft sage green—you’ll create fluid, swirling patterns that look beautiful from every angle.
Step-by-Step
Materials
- White stoneware clay
- Red earthenware or terracotta clay
- Green mason stain (or pre-coloured green clay)
- Pottery wheel (optional, but recommended for symmetry)
- Rib tool
- Wire cutter
- Sponge
- Clear glaze (transparent)
- Rolling pin (if hand-building)
Step 1: Preparing the Clays
-
Mix your colors:
If you don’t have pre-colored green clay, wedge a small amount of green mason stain into a portion of your white stoneware clay until the color is uniform. You now have three distinct clay bodies: white, red, and green. -
Portion the clay:
Divide your clay so you have roughly 50% white clay, 30% red clay, and 20% green clay. This ratio keeps the design light and airy rather than muddy. -
Create logs:
Roll each color of clay into several thick logs or varied shapes. They don’t need to be perfect cylinders; irregularity helps the final pattern look more organic. -
Stack and twist:
Bundle the logs together vertically, alternating colors. Pick up the entire bundle and twist it like a towel to begin spiraling the colors together. -
Wedge lightly:
Perform a very light wedging—just a few turns. If you over-wedge, the colors will blend into a single muddy brown. You want distinct striations to remain visible.
Muddy Colors?
If your stripes are blurring into gray, you likely wedged too much. Stop wedging as soon as the clays are stuck together but before they fully blend.
Step 2: Forming the Bowl
-
Center carefully:
Slam your marbled ball onto the wheel head. Center the clay quickly and efficiently; excessive centering will blur your crisp lines. -
Open the clay:
Open the mound to create the floor of your bowl. As you pull the clay outward, you will immediately see the swirls stretching. -
Pull the walls:
Pull up the walls of the bowl. Be mindful that different clays may have different shrinkage rates or plasticities, so pull gently and steadily to avoid tearing at the seams where colors meet. -
Shape the profile:
Use a rib tool on the inside curve to push the belly of the bowl out, creating that rounded, inviting shape seen in the photo. Smooth the inner surface to compress the clay particles.
Step 3: Revealing the Pattern
-
Trim the surface:
Once the bowl is leather-hard, the outer pattern might look smeared from the throwing process. Use a sharp trimming tool to shave off the outer skin of the clay. -
Clean the rim:
Smooth the rim with a damp sponge or chamois. This area often shows a beautiful cross-section of your marbling, so keep it clean. -
Enhance the swirls:
If I notice a dull spot in the pattern during trimming, I remove a slightly deeper layer there to reveal fresh, contrasting clay underneath. -
Check the foot:
Trim a neat foot ring at the base. This lifts the bowl and gives the marbled pattern a distinct starting point at the bottom.
Neriage Technique
For sharper, geometric patterns, try ‘Neriage’: slice your colored logs into blocks and press them into a mold instead of throwing on the wheel.
Step 4: Finishing
-
Bisque fire:
Allow the bowl to dry slowly to prevent cracking where the different clays join. Fire to bisque temperature (usually Cone 04 or 06). -
Apply clear glaze:
Dip the entire bowl into a clear, glossy glaze. Using a colored glaze would hide your hard work, so transparent is the only way to go here. -
Wipe the foot:
Clean any glaze off the foot ring with a damp sponge to prevent it from fusing to the kiln shelf. -
Final firing:
Fire the piece to the maturation temperature of your highest-fire clay. The clear glaze will melt and make the red and green colors pop vibrantly against the white.
Now you have a functional piece of art that mimics the natural beauty of geological strata
Faceted Origami-Style Bowl
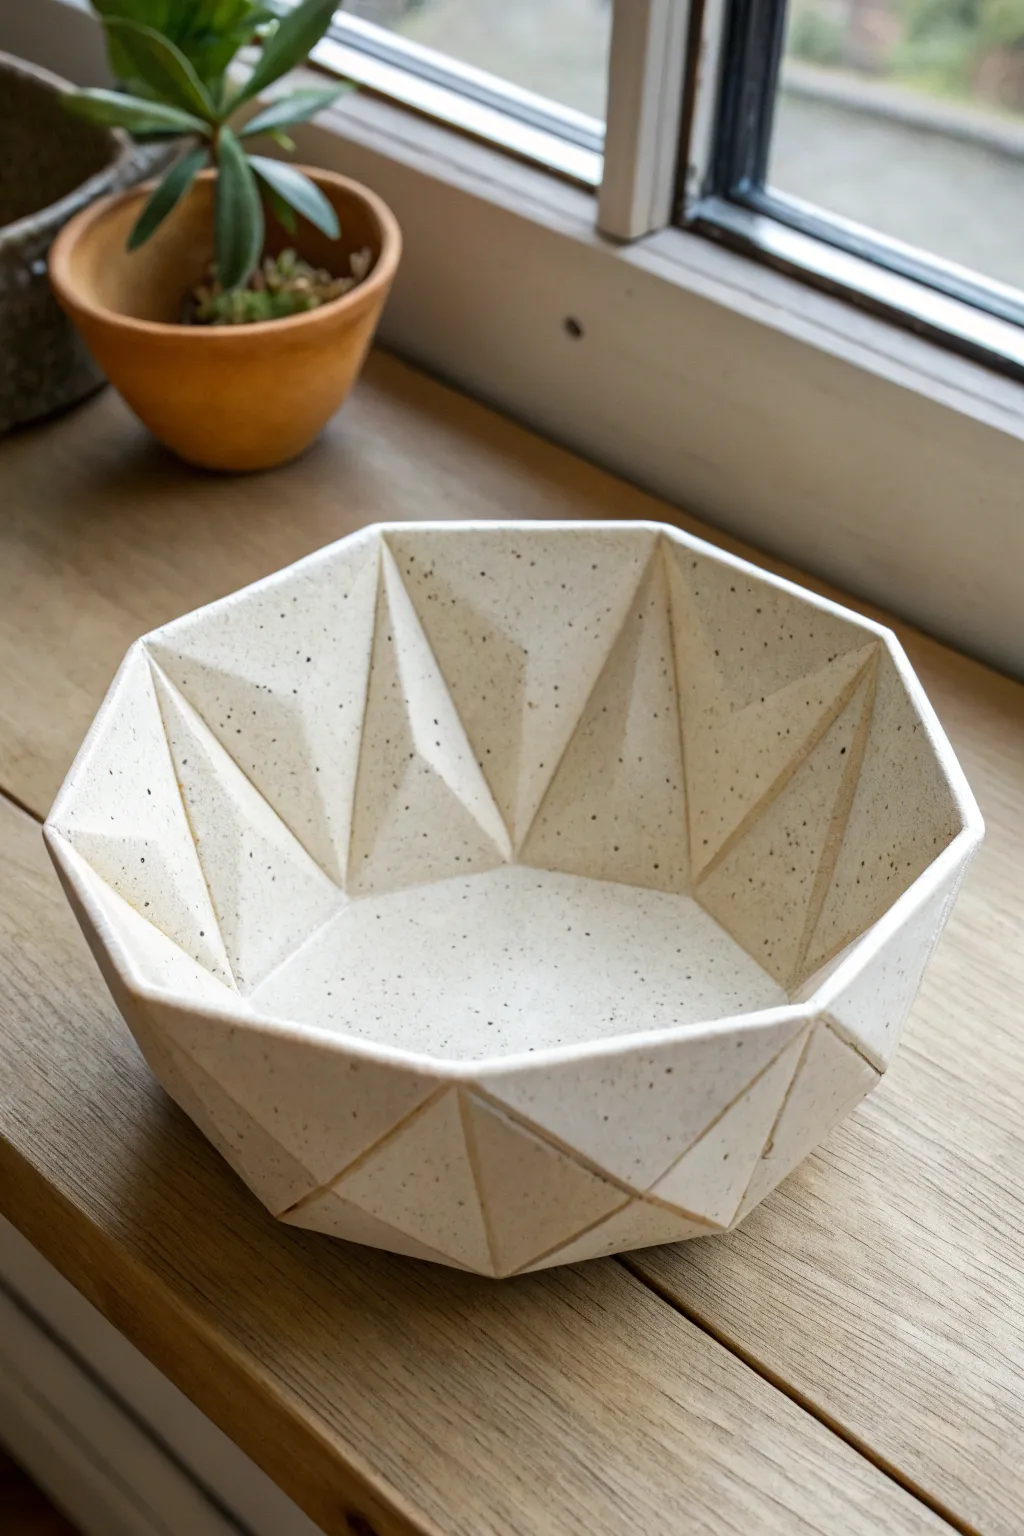
This stunning bowl brings the crisp folds of paper origami into the realm of durable ceramics. With its sharp, faceted interior and speckled cream finish, it serves as a modern centerpiece that looks deceptively complex but relies on careful template work.
Step-by-Step Tutorial
Materials
- Speckled stoneware clay (white or cream body)
- Rolling pin
- Two 1/4 inch wooden guide strips
- Fettling knife or X-Acto blade
- Paper or cardstock (for templates)
- Ruler and pencil
- Scoring tool (or serrated rib)
- Slip (clay and water slurry)
- Bowl mold (or a similarly shaped bowl to slump into)
- Clean sponge
- Clear matte glaze
Step 1: Designing and Cutting
-
Draft your template:
Begin by drawing a hexagon on cardstock to serve as your base. Then, design a trapezoid shape for the side walls. To achieve the faceted look, you will need to divide this trapezoid into three distinct triangular sections to guide your folding later. -
Prepare the clay:
Slice a manageable chunk of speckled stoneware clay. Wedge it thoroughly to remove air bubbles, ensuring the speckles are evenly distributed throughout the body. -
Roll the slab:
Place your clay between the 1/4 inch guide strips on a canvas surface. Roll the clay out into a smooth, even slab. I like to flip the slab once during rolling to ensure the canvas texture doesn’t get too deep on one side. -
Transfer templates:
Lay your cardstock templates onto the slab. You will need one hexagon for the base and six identical wall pieces. Trace lightly around them with a needle tool before committing to the cut. -
Cut the shapes:
Using a fettling knife or sharp blade, cut out your clay shapes. Be sure to hold the knife perpendicular to the table for straight, vertically clean dges, which are crucial for joining later.
Step 2: Building the Faceted Form
-
Create the crease lines:
On each of the six wall panels, identify where your ‘origami’ folds need to be. Lightly score these lines on the interior side of the clay—do not cut all the way through—to help the clay fold cleanly without cracking. -
Bevel the edges:
Cut a 45-degree bevel on the long sides of your wall panels where they will connect to each other. This increases the surface area for the join and makes the geometric angles sharper. -
Score and slip the base:
Score the edges of your hexagonal base and the bottom edge of your first wall panel. Apply a generous amount of slip to the roughened areas. -
Attach the first wall:
Press the first wall panel onto the base. Gently bend the panel along your pre-scored fold lines so it starts to take on that faceted, three-dimensional triangular shape. -
Assemble the ring:
Repeat the process for the remaining five walls. As you add each panel, score and slip the vertical seams where the walls touch. Press them firmly together, reinforcing the connection from the inside with your thumb. -
Refine the facets:
Once the basic bowl shape is assembled, use a flat wooden rib or a ruler to press against the facets. This sharpens the planes and ensures the ‘fold’ lines are crisp and straight. -
Smoothing seams:
Roll a very thin coil of damp clay and press it into the interior seams where the walls meet the base. Smooth this out completely to ensure the bowl is watertight and sturdy.
Cracks at the folds?
If clay cracks when bending facets, it’s too dry. Spray lightly with water, wrap in plastic for an hour to rehydrate, then try bending again gently.
Step 3: Finishing and Firing
-
Initial drying:
Let the bowl dry slowly under a loose sheet of plastic. This is critical for geometric shapes, as uneven drying can warp those straight lines you worked so hard to create. -
Bisque fire:
Once the piece is bone dry, fire it to cone 04 (or your clay body’s bisque temperature). This hardens the clay and prepares it for glazing. -
Glazing:
Dip the bowl into a clear or transparent matte glaze. A transparent glaze is essential here because it allows the beautiful natural speckles of the clay body to show through. -
Wipe the foot:
Use a damp sponge to meticulously clean any glaze off the bottom of the bowl so it doesn’t fuse to your kiln shelf. -
Final firing:
Fire the piece to maturity (usually cone 6 or 10 for stoneware). The heat will vitrify the clay and melt the glaze into a smooth, durable finish.
Pro Tip: Sharp Edges
After assembling, use a slightly damp sponge to compress the rim. Don’t round it over; keep it square to maintain the crisp, paper-folded aesthetic.
Enjoy using your modern geometric bowl as a fruit display or a standalone sculptural piece.
Pierced Cutout Rim With Threaded Detail
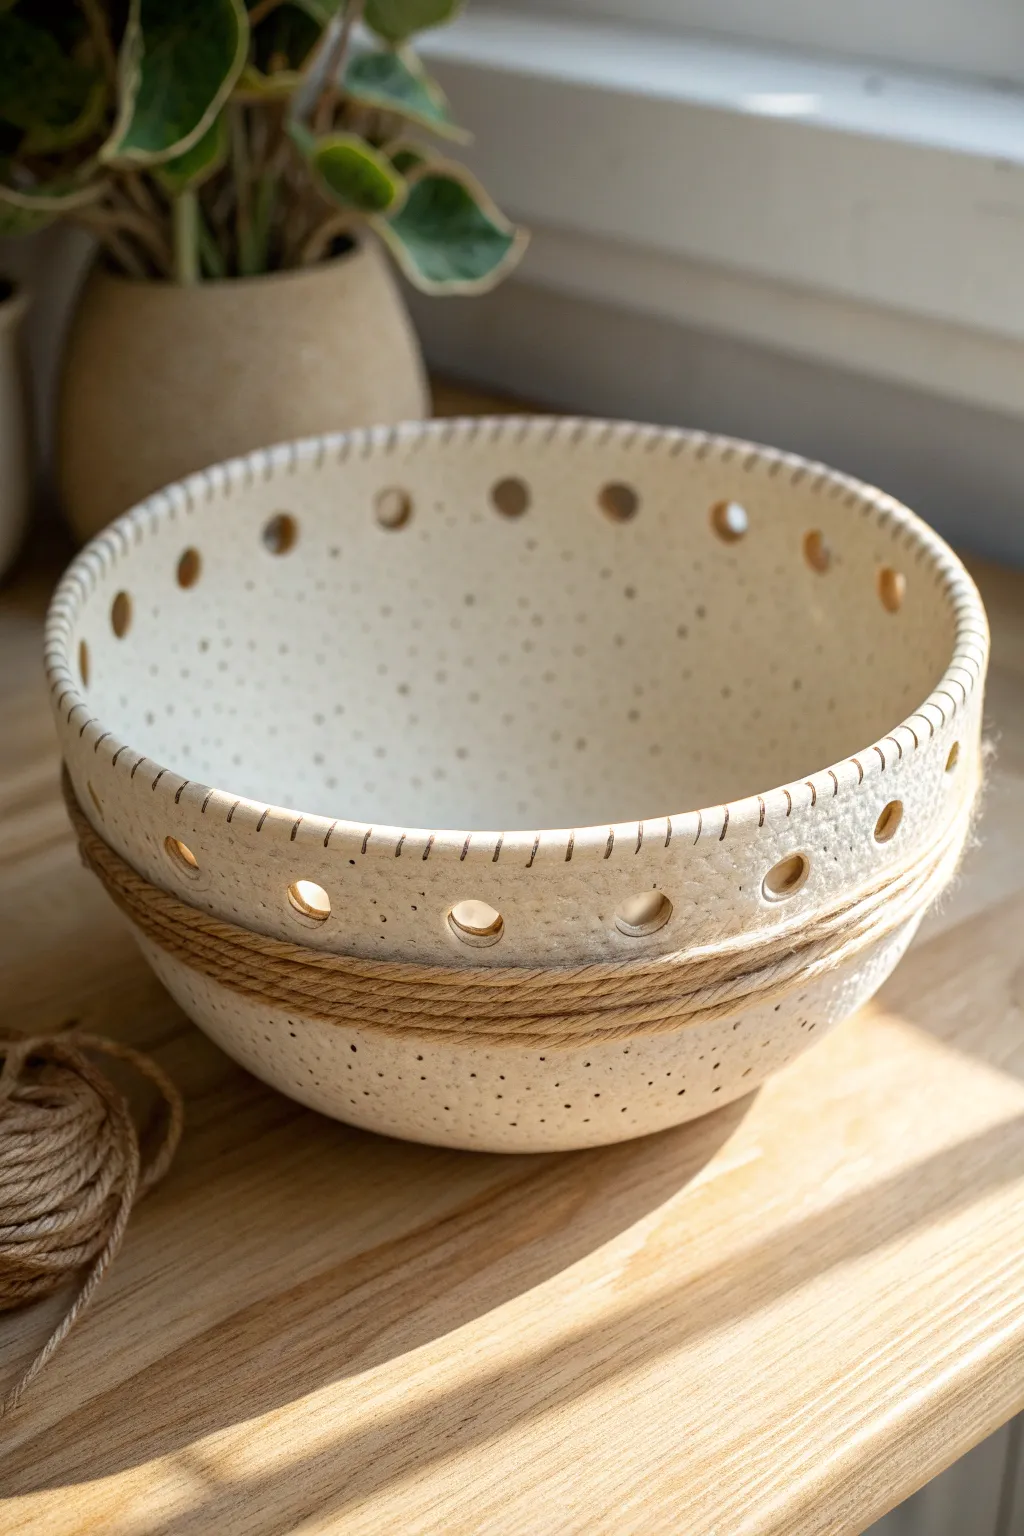
Embrace rustic charm with this beautiful ceramic project that combines speckled clay texture with functional pierced details. The organic warmth of coiled jute twine nestled into the bowl’s form creates a stunning contrast against the creamy, dotted stoneware.
Step-by-Step Guide
Materials
- Speckled cream stoneware clay (cone 5/6)
- Pottery wheel (or materials for hand-building)
- Throwing sponge
- Wire cutter
- Rib tool (wooden or silicone)
- Hole cutter tool (approx. 1/2 inch or 10mm)
- Needle tool
- Trimming tools
- Jute twine
- Clear matte glaze
Step 1: Forming the Bowl
-
Prepare the Clay:
Begin by wedging about 2-3 pounds of speckled stoneware clay to remove air bubbles. Ensure the consistency is even to prevent warping later. -
Center and Open:
Throw the ball of clay onto your wheel head and center it firmly. Open the clay up, establishing a rounded, continuous curve for the interior floor. -
Pull the Walls:
Pull the walls up into a gentle curve. You are aiming for a classic hemispherical bowl shape, but keep the walls slightly thicker than usual (about 1/4 inch) to support the carving and piercing later. -
Create the Channels:
Using a rounded rib or your thumb, gently press a horizontal indentation around the belly of the bowl while the wheel spins slowly. This groove needs to be deep enough to eventually hold the jute twine securely. -
Refine the Rim:
Compress the rim with a chamois or sponge. I like to leave the rim slightly squared off rather than perfectly round to give the hash marks a crisp edge. -
Wire Off and Dry:
Wire the bowl off the bat and let it dry to a solid leather-hard state. It needs to be firm enough to be handled without deforming but soft enough to cut cleanly.
Clean Cuts Pro-Tip
Twist the hole cutter slightly as you pull it out of the clay, rather than just pulling straight back. This helps release the clay plug cleanly without tearing the delicate wall.
Step 2: Adding Texture and Detail
-
Trim the Foot:
Once leather-hard, center the bowl upside down on the wheel. Trim a clean, simple foot ring that complements the roundness of the vessel. -
Mark the Hole Placement:
Turn the bowl right side up. Using a ruler or division tool, lightly mark even intervals around the upper rim where your cutouts will go. Aim for roughly 1.5 to 2 inches apart. -
Pierce the Clay:
Use a sharp hole cutter tool to punch clean circles at your marked spots. Support the wall from the inside with your hand to prevent the clay from caving in as you press. -
Clean the Edges:
Once the holes are cut, use a damp sponge or a soft brush to smooth away any sharp burrs or crumbs around the cutouts. -
Add Rim Texture:
Using a needle tool or a dull knife edge, press small vertical hash marks all along the very top edge of the rim. Space them evenly to create a stitched look.
Step 3: Finishing and Assembly
-
Bisque Fire:
Allow the bowl to dry completely (bone dry) before loading it into the kiln for a bisque firing. -
Glaze Application:
Dip or spray the bowl with a clear matte glaze. This allows the natural speckles of the clay body to shine through without adding distraction. Wipe the foot ring clean. -
Glaze Fire:
Fire the piece to the maturity temperature of your specific clay body (likely Cone 5 or 6 for stoneware). -
Secure the Jute:
Once the ceramic is fired and cool, take your jute twine. Tightly wrap it around the indented channel you created during the throwing phase. -
Tie and Tuck:
Wrap the twine 3-4 times until the groove is filled. Tie a tight knot, trim the ends short, and tuck the knot underneath the wrappings so it is hidden from view.
Level Up: Colored Cord
Swap the rustic jute for dyed leather cord, macramé cotton, or even copper wire to match different interior decor styles while keeping the same ceramic base.
Now you have a stunning, texturally rich vessel perfect for holding fruit or simply displaying as an art object