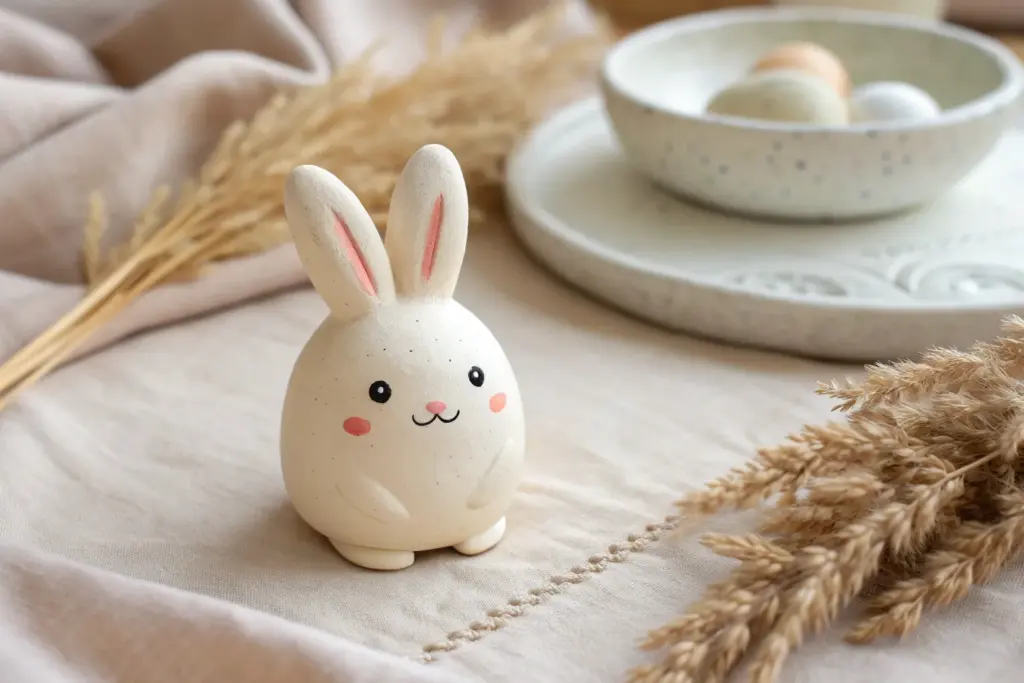
When you want cute clay animals, the trick is keeping everything tiny, rounded, and full of personality with just a couple of dot eyes and a little mouth. Here are my favorite miniature animal ideas you can make with polymer clay or air-dry clay, even if you’re brand-new to sculpting.
Chubby Kitty Minis
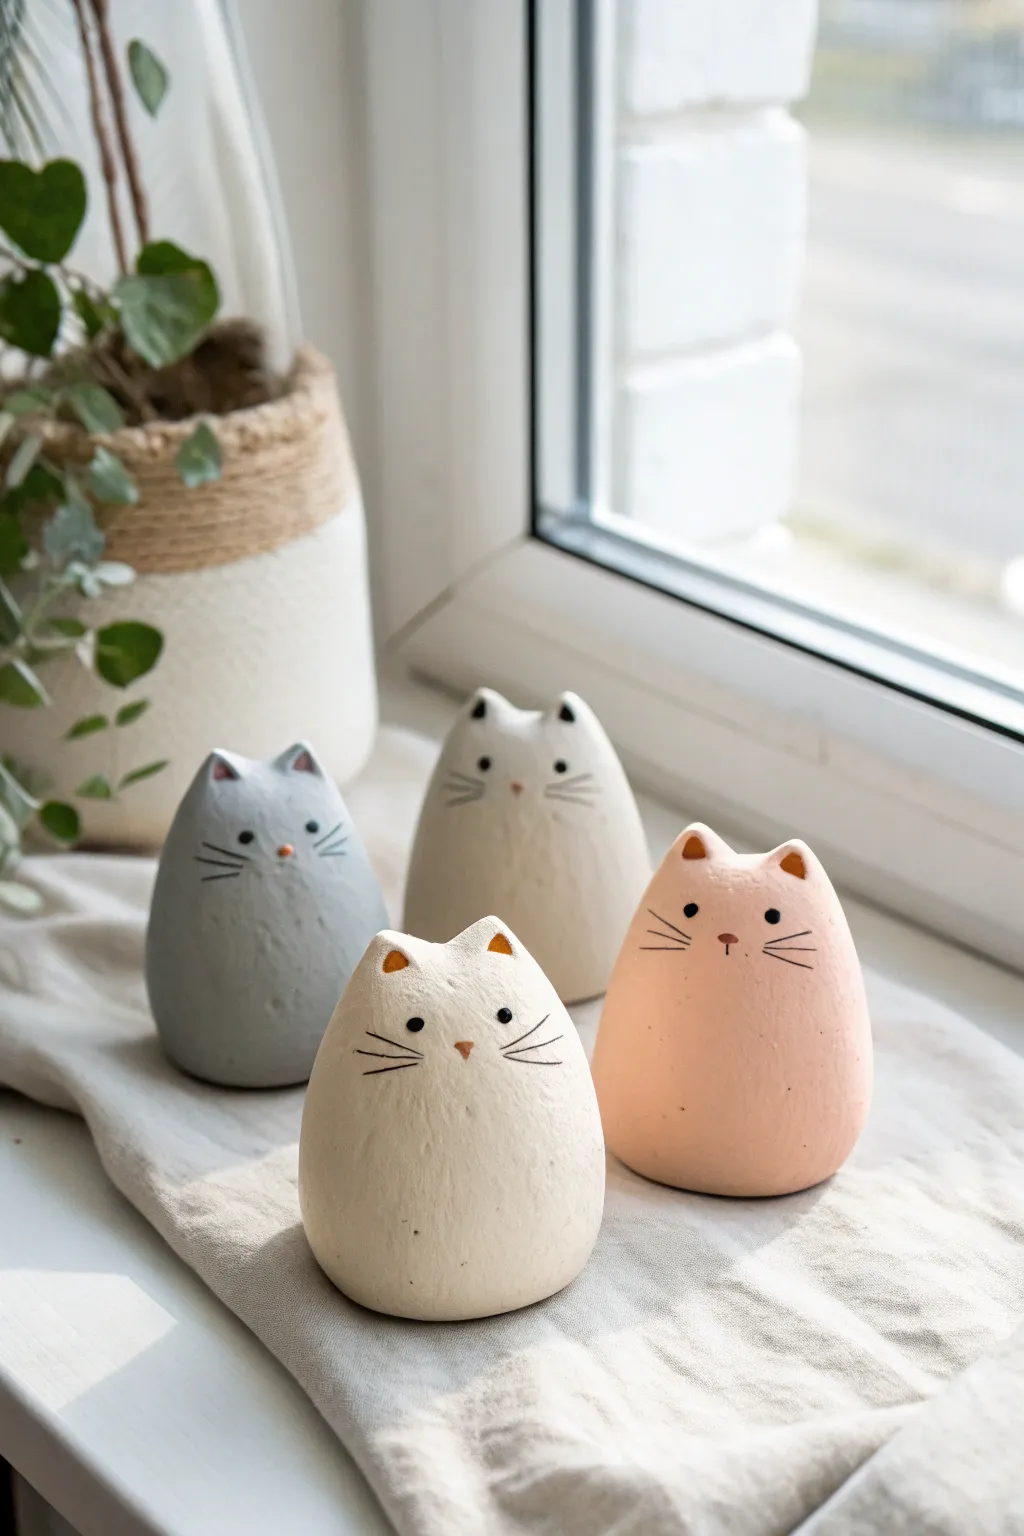
These delightfully rotund cat figurines rely on a simple egg-like shape and minimal details for their charm. Their smooth, tactile finish and subtle pastel tones make them perfect for brightening up a windowsill or desk.
Step-by-Step Guide
Materials
- Air-dry clay (white or light grey)
- Acrylic paints (pale pink, light grey, white, charcoal black, mocha brown)
- Fine-grit sandpaper
- Small cup of water
- Pointed sculpting tool or toothpick
- Fine detail paintbrush (size 0 or 00)
- Matte sealant/varnish spray
Step 1: Shaping the Body
-
Create the base:
Start with a ball of clay roughly the size of a plum. Roll it firmly between your palms to warmth it up and remove any major air bubbles. -
Shape the ovoid:
Gently taper the top of the ball to create a smooth, egg-like shape that is slightly wider at the bottom for stability. Tap the bottom lightly on your work surface to flatten it so the cat stands on its own. -
Form the ears:
Use your thumbs to gently pinch up two small triangles at the very top of the tapered end. These shouldn’t be separate attachments; pull them directly from the main body of clay for a seamless look. -
Refine the ears:
Smooth the curve between the ears with a dampened fingertip so the head has a natural dip. -
Smooth the surface:
Dip your finger in a little water and run it over the entire figurine to erase fingerprints and small cracks. Aim for a very clean, stone-like surface.
Cracks happen
If you see hairline cracks while drying, mix a tiny bit of fresh clay with water to make a paste (slip) and fill them in. Let dry and sand smooth.
Step 2: Drying and Sanding
-
Let it dry:
Place your cat in a dry, room-temperature area. Depending on your brand of clay, allow it to dry for 24-48 hours until it turns chalky white and feels room temperature to the touch. -
Sand for smoothness:
Once fully dry, take fine-grit sandpaper and gently buff the entire surface. This step is crucial for getting that porcelain-like finish visible in the photo. -
Dust off:
Wipe the figurine down with a slightly damp cloth or a dry brush to remove all the clay dust before painting.
Step 3: Painting and Details
-
Base coat:
Mix your acrylics to get soft pastel shades. For the grey cat, mix white with a tiny dot of black. For the peach cat, mix white with a touch of orange or brown. Apply two thin coats of your chosen base color, letting each dry completely. -
Paint the inner ears:
Using a slightly darker shade of your base color (or a warm terracotta for the white cats), carefully paint the inside triangle of each ear. -
Dot the eyes:
Dip the non-brush end of your paintbrush into black paint. Gently dot two eyes onto the face, spacing them wide apart for that innocent expression. -
Paint the nose:
Using your finest brush, paint a very small, inverted triangle for the nose. Use a soft brown or muted pink rather than harsh black. -
Add whiskers:
With the tip of your fine brush and thinned black paint, draw three short, horizontal lines on each cheek. Keep your hand steady and lift the brush at the end of the stroke to taper the line. -
Add the mouth:
Paint a tiny vertical line extending down from the nose triangle to suggest the mouth. -
Seal:
Once all paint is bone dry, spray the figurine with a matte sealant. This protects the finish without making it look plasticky or glossy.
Add a tail
Before drying, roll a thin snake of clay and wrap it around the bottom back of the figure to create a tail that hugs the body.
Group your finished kitties together to create a calm and adorable display for your home


Tiny Bunnies With Carrots
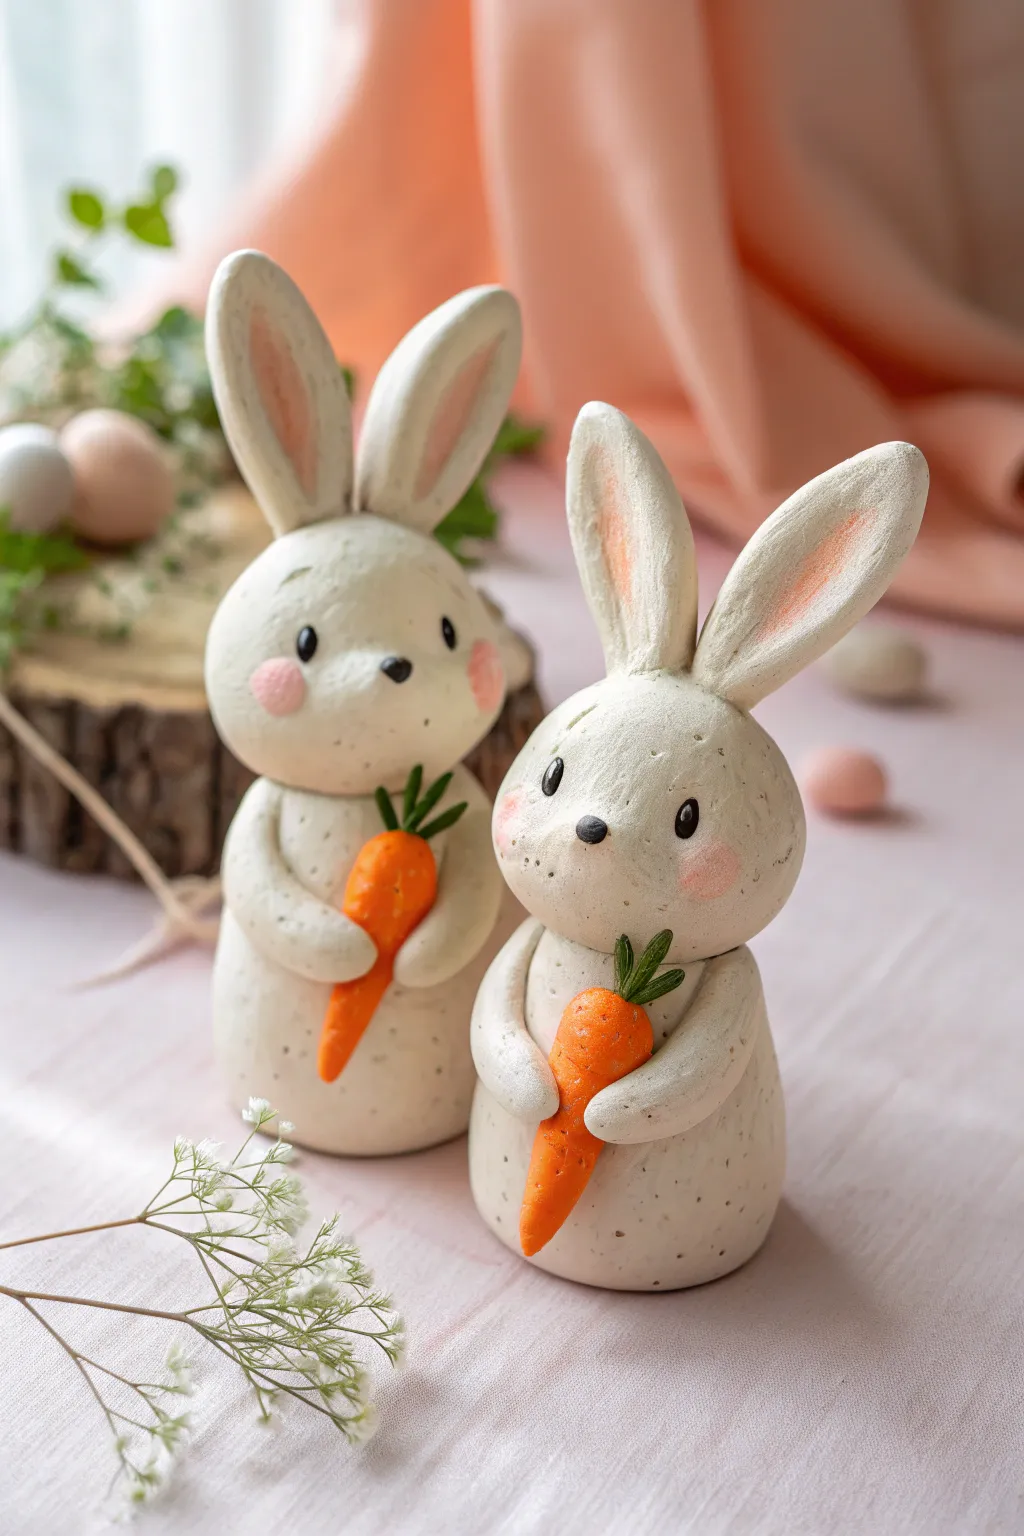
These adorable bunnies hold their carrot prizes with pride, featuring a charming rustic texture and sweet, rosy cheeks. Their speckled, stone-like finish gives them a timeless quality perfect for spring mantelpieces or handmade gifts.
Step-by-Step Tutorial
Materials
- White air-dry clay or polymer clay
- Orange and green clay (or acrylic paints)
- Black clay (or black acrylic paint/beads)
- Black pepper or dried coffee grounds (for speckling)
- Pink chalk pastel or blush
- Pointed sculpting tool or toothpick
- Small soft brush
- Water (for smoothing)
- Needle tool
- Aluminum foil (optional, for armature)
Step 1: Preparing the Speckled Clay
-
Mix the texture:
Start by conditioning your white clay until it is soft and pliable. To achieve that organic, speckled look shown in the photo, knead in a pinch of coarse black pepper or dried coffee grounds. Keep folding until the specks are evenly distributed throughout the white mass. -
Form the body:
Roll a smooth ball of clay about the size of a tangerine for the body. Gently shape it into a rounded teardrop or egg shape, tapping the bottom on your work surface so it sits flat and stable. -
Create the head:
Roll a second, slightly smaller ball for the head. Flatten the bottom slightly and press it firmly onto the top of the body. If using air-dry clay, score the joining surfaces and add a dab of water to ensure a strong bond.
Natural Speckles
Don’t over-knead the clay after adding pepper or coffee grounds. Leaving the mix slightly uneven creates a more convincing natural stone texture.
Step 2: Adding Facial Features
-
Sculpt the ears:
Create two long, teardrop-shaped logs for ears. Flatten them gently with your thumb. Use a sculpting tool to press an indentation down the center of each ear to create the inner ear canal. -
Attach the ears:
Press the ears onto the top of the head. Position them so they point slightly outward or one leans a bit for character. Blend the clay at the seam where the ears meet the head using a clay tool or your finger to make the transition seamless. -
Make the muzzle:
Roll a small, flattened oval of white clay and attach it to the lower half of the face area to create a defined muzzle. Use a needle tool to poke small dots on either side for whisker holes. -
Add the nose:
Take a tiny speck of black clay, roll it into a triangle with rounded corners, and press it onto the top center of the muzzle. -
Insert the eyes:
For the eyes, roll two small balls of black clay and press them into the face above the muzzle. Alternately, use small black beads or create deep indentations to be painted later. -
Blush the cheeks:
Before the clay dries, take a soft brush and pick up some pink pastel dust (scrape a pastel stick with a knife to get powder). Gently dry-brush pink circles onto the cheeks and paint the inner recesses of the ears.
Step 3: Adding the Carrot
-
Form the carrot:
Using orange clay, roll a cone shape. Texture the surface by lightly pressing horizontal lines with a knife tool to mimic the wrinkly skin of a real carrot. -
Add the greens:
Roll tiny snakes of green clay. gather three or four together and attach them to the wide top of the carrot cone. -
Position the arms:
Roll two sausage shapes of the speckled white clay for arms. Attach them to the sides of the body, curving them forward towards the tummy. -
Secure the prize:
Place the finished carrot against the bunny’s chest. Gently press the ends of the arms over the carrot so it looks like the bunny is hugging it tight. I find it helpful to use a dab of liquid clay or water here to keep the heavy carrot from sliding down.
Heavy Head Check
If the head keeps drooping or sliding off before drying, insert a piece of toothpick or crumpled foil wire into the neck to act as an internal spine.
Step 4: Finishing Touches
-
Final smoothing:
Dip your finger in a little water (or baby oil for polymer clay) and gently smooth out any fingerprints, being careful not to smudge the pink pastel blush. -
Highlighting (Optional):
Add tiny white dots to the black eyes using white acrylic paint. This spark of life makes a huge difference in the cuteness factor. -
Drying or baking:
If using polymer clay, bake according to the package instructions. If using air-dry clay, allow it to dry for 24-48 hours in a cool, dry place away from direct sunlight to prevent cracking.
Now you have a charming pair of garden friends ready to brighten up your shelf


Baby Bear Cub Charms
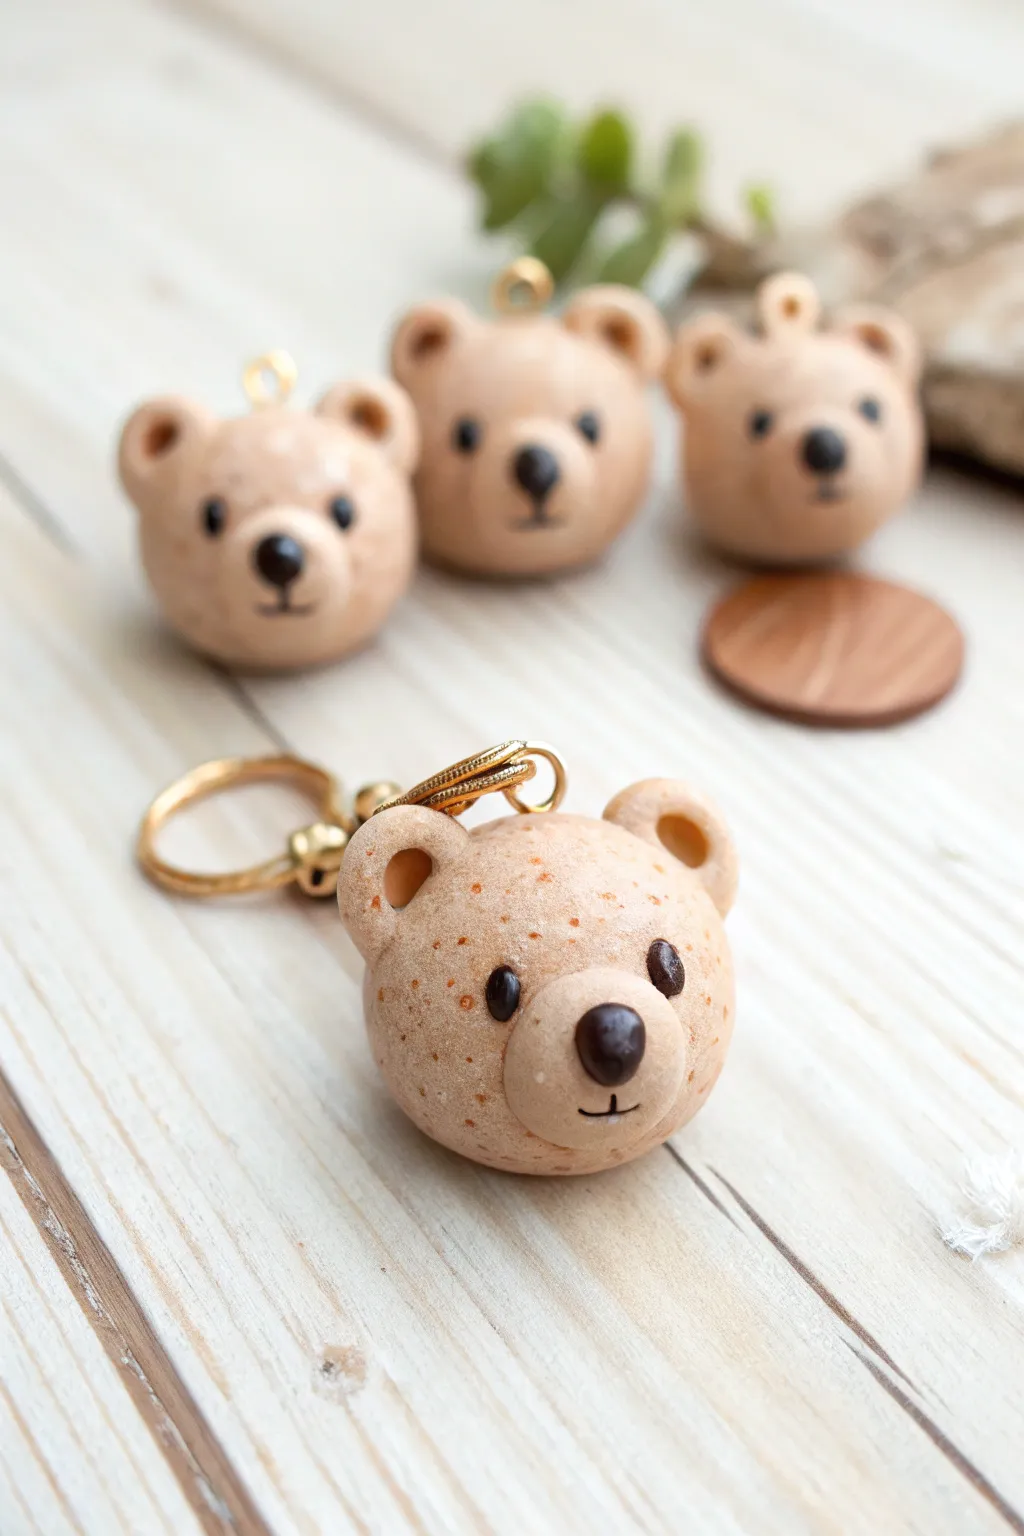
These adorable, cookie-style bear charms are perfect for beginners looking to create sweet handmade accessories. With their realistic speckled texture and simple round shapes, they make charming keychains or thoughtful gifts for animal lovers.
Step-by-Step
Materials
- Polymer clay (light biscuit/beige color)
- Polymer clay (dark brown/chocolate color)
- Faux cinnamon spice mix (brown acrylic paint or shaved brown pastels)
- Liquid clay (translucent or brown)
- Gold screw eye pins
- Ball stylus tool
- Gold keychain hardware and jump rings
- Pliers
- Oven for baking
Step 1: Creating the Base
-
Prepare the Clay Species:
Start by conditioning your light beige polymer clay until it is soft and malleable. To achieve that ‘cookie dough’ look, I like to mix in a tiny amount of shaved brown soft pastel chalk or specks of brown acrylic paint. Knead it thoroughly until the speckles are evenly distributed throughout the dough. -
Form the Head:
Roll a smooth, seamless ball of the speckled clay approximately the size of a large gum ball or small walnut. This will be the main head piece. -
Create the Muzzle:
Take a smaller piece of the same speckled clay and roll it into a tiny ball, then flatten it slightly into an oval disc. Press this gently onto the lower center of the main head ball to form the muzzle area. -
Shape the Ears:
Roll two very small equal-sized balls of the beige clay for the ears. Press them gently onto the top left and right sides of the head. -
Indent the Ears:
Using a ball stylus tool, press firmly into the center of each ear ball to create a cup shape, blending the clay slightly where the ear meets the head to ensure a secure bond.
Step 2: Adding Features
-
Mark Eye Sockets:
Use a smaller ball tool to make two small indents above the muzzle where you want the eyes to sit. This helps the eyes stay in place rather than protruding too much. -
Insert the Eyes:
Roll two tiny, grain-of-rice sized pieces of dark chocolate brown clay into balls. Place them into the eye sockets you just created. You can secure them with a tiny dot of liquid clay if needed. -
Add the Nose:
Roll a slightly larger ball of the dark brown clay for the nose. Press it onto the upper center of the muzzle piece, flattening it just enough so it looks like a soft triangle or oval. -
Detail the Mouth:
Using a very thin needle tool or a sharp blade, carefully press a vertical line extending down from the nose, and a small horizontal curve underneath it to create a subtle smile. -
Secure the Hardware:
Take a gold screw eye pin. Dip the threaded end into a bit of liquid clay for extra grip, then screw it gently into the exact top center of the bear’s head.
Making It Look Real
For a realistic baked texture, gently tap the beige clay surface with a toothbrush before baking. This removes fingerprints and adds ‘fur’ depth.
Step 3: Finishing Up
-
Bake the Bears:
Place your bear heads on a baking sheet or tile. Bake according to the temperature and time instructions on your specific package of polymer clay (usually around 275°F or 130°C for 15-30 minutes). -
Cool Down:
Allow the clay pieces to cool completely inside the oven or on a wire rack. Do not handle them while hot as the clay is still fragile. -
Glaze (Optional):
For a bit of shine on the eyes and nose, apply a tiny drop of gloss glaze using a toothpick. Leave the rest of the fur matte for a natural look. -
Attach to Keychain:
Using pliers, open a jump ring and thread it through the eye pin on the bear’s head. Attach the other end to your gold keychain hardware or lobster clasp. -
Final Secure:
Close the jump ring tightly with your pliers, ensuring the gap is completely shut so the charm doesn’t slip off.
Fixing Tinted Clay
If your white/beige clay gets dirty or picks up lint, wipe it gently with a Q-tip dipped in rubbing alcohol or baby oil before baking.
Now you have a delightful little bear companion ready to hang on your bag or keys


Round Frog Pocket Pals

These delightfully chubby frog pals are perfect for beginners thanks to their simple, rounded shapes and minimalist features. Their soft mint green color and tiny pink cheeks give them an irresistibly sweet expression that instantly brightens up any desk or shelf.
Step-by-Step Guide
Materials
- Polymer clay (Mint Green, Light Pink, Black)
- Small ball stylus tool
- Modeling tool or toothpick
- Needle tool
- Baking sheet
- Parchment paper
- Oven (for curing)
- Glaze (optional, matte or gloss)
Step 1: Shaping the Bodies
-
Mix the perfect green:
If you don’t have a pre-mixed mint green, combine white polymer clay with a very small amount of bright green. Knead thoroughly until the color is uniform and the clay is soft and pliable. -
Form the main shapes:
Divide your green clay into two portions—one larger for the big frog and one smaller for the baby. Roll each piece into a smooth, seamless ball between your palms. -
Create the slouch:
Gently tap the bottom of each ball on your work surface to flatten the base so they sit without rolling. Then, use your thumb to slightly push the mass downward, giving them a squat, chubby look rather than a perfect sphere.
Step 2: Adding the Legs
-
Make the thigh shapes:
For the larger frog, roll two chickpea-sized balls of green clay. Flatten them slightly into thick discs. -
Attach rear legs:
Press these discs onto the lower sides of the large frog’s body, blending the seam slightly at the back so they look integrated. -
Form the front arms:
Roll two thin logs of green clay, slightly tapered at one end. These will be the front arms. -
Attach front arms:
Place the arms vertically on the front of the body, starting just below the ‘chin’ area and reaching down to the surface. Position them so they look like they hold the body up. -
Add tiny feet:
For feet, flatten small tear-drop shapes of clay and tuck them under the legs. Use a needle tool to press two small indents into each foot to create toes. -
Repeat for the baby:
Repeat the leg and arm process for the smaller frog, scaling down the size of the clay pieces appropriately.
Fixing Smudges
Did dust or fingerprints get on your light green clay? Before baking, wipe the surface gently with a q-tip dipped in a tiny bit of rubbing alcohol or acetone to smooth and clean it.
Step 3: Detailed Features
-
Create eye sockets:
Using a large ball stylus or the rounded end of a paintbrush, gently press two indentations into the top of the head where the eyes will sit. This helps secure the eyes better. -
Make the eyes popping:
Roll two small balls of the green clay for the eye mounds. Place them into the indentations you just made. Press a tiny black clay ball into the center of each green mound. -
Add rosy cheeks:
Roll very tiny balls of light pink clay. Flatten them into thin circles and gently press them onto the cheeks, just below and to the side of the eyes. -
Decorative spots:
I like to add a few extra pink spots to the sides or back of the larger frog for texture. Simply flatten tiny pink clay balls and press them flush against the green body. -
Carve the smile:
Using a needle tool or a very sharp blade, carefully press a curved line into the clay to form the mouth. To make the black line visible, roll an incredibly thin thread of black clay and lay it into this groove. -
Nostrils:
Use a needle tool to poke two tiny holes above the mouth for the nose.
Lily Pad Base
Create a home for your frogs by rolling out a darker green sheet of clay and cutting a notched circle shape. Texture it with a needle tool to look like a leaf vein pattern.
Step 4: Baking and Finishing
-
Prepare for baking:
Place your frogs on a baking sheet lined with parchment paper. -
Bake:
Bake the frogs according to the package instructions for your specific brand of polymer clay (usually 275°F/135°C for 15-30 minutes per 1/4 inch of thickness). -
Cool down:
Let the frogs cool completely in the oven with the door slightly ajar to prevent cracking from thermal shock. -
Optional glaze:
If you want a shiny finish, apply a coat of polymer clay glaze. For the matte look seen in the photo, you can leave them as-is or use a matte varnish.
Enjoy displaying your adorable new amphibious friends

The Complete Guide to Pottery Troubleshooting
Uncover the most common ceramic mistakes—from cracking clay to failed glazes—and learn how to fix them fast.
Mini Axolotl Friends
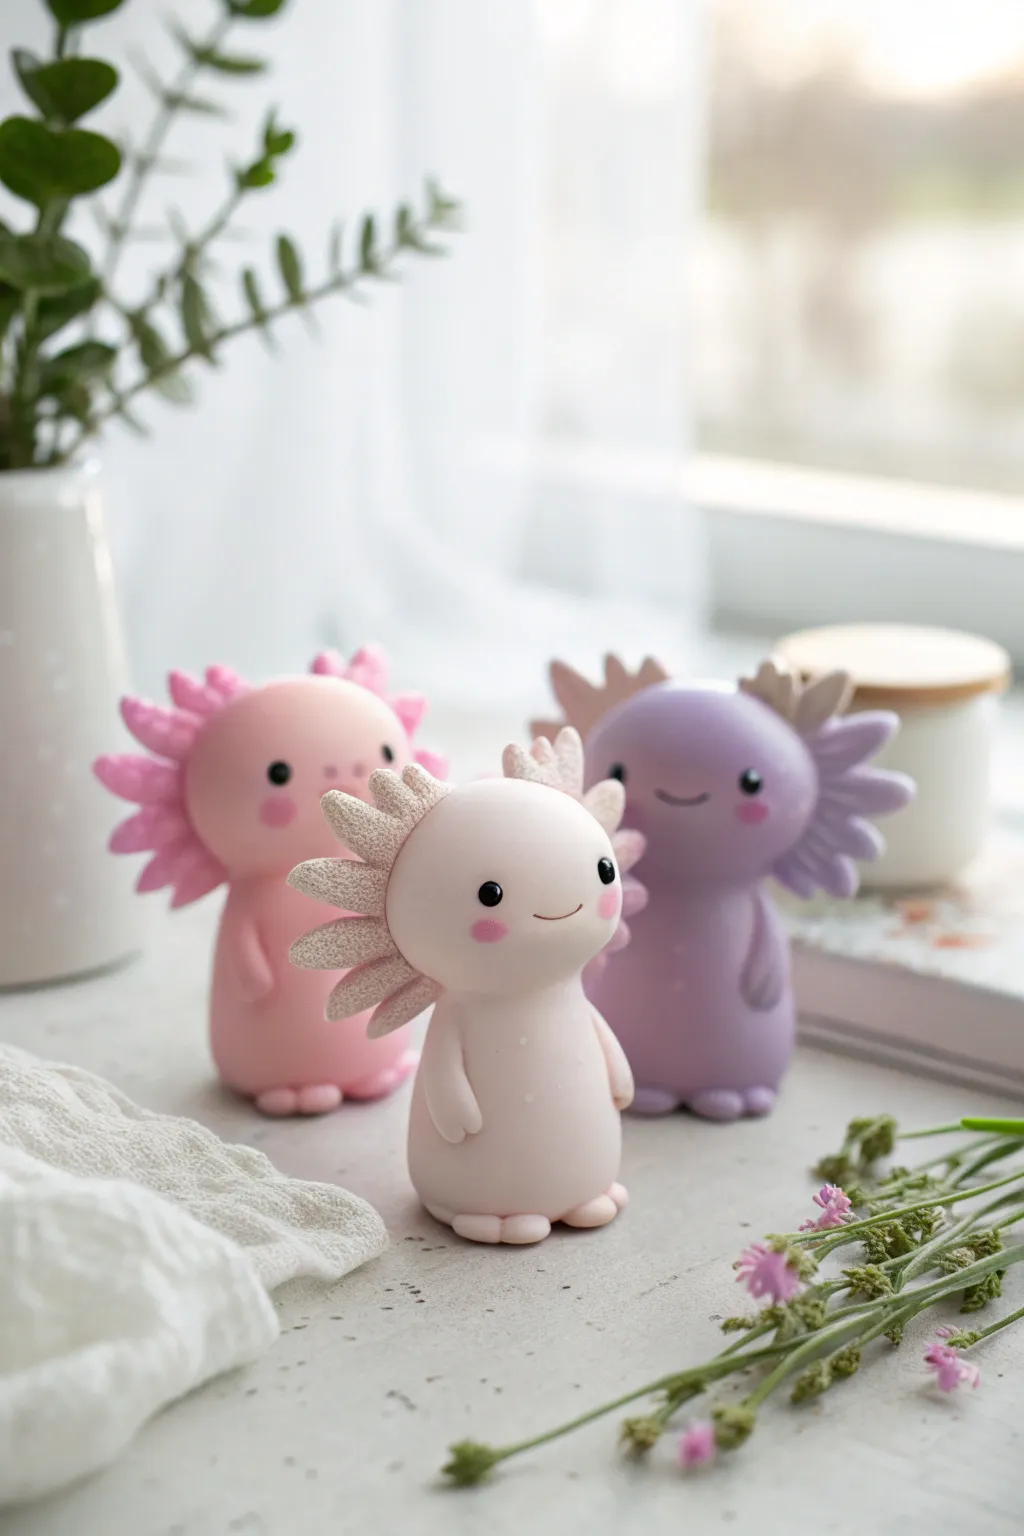
Create a trio of delightful amphibian friends with smooth, matte finishes and gentle pastel hues. These standing axolotl figures feature charmingly simple faces and stylized gill branches, making them perfect desk companions.
How-To Guide
Materials
- Polymer clay (baby pink, lavender, pale peach/white, black)
- Clean work surface (glass or ceramic tile)
- Dotting tools or ball stylus set
- Needle tool
- Soft pastel chalks (pink/red for blushing)
- Small soft paintbrush
- Oven for baking
- Cornstarch or baby powder (optional, to prevent sticking)
Step 1: Shaping the Bodies
-
Prepare the Clay:
Start by conditioning your clay thoroughly until it is soft and pliable. You will need three main colors: soft pink, pale lavender, and a very light peach or off-white. -
Form the Base Shape:
For each axolotl, roll a smooth ball of clay about the size of a golf ball. Then, gently roll it into a thick, rounded cylinder shape that is slightly wider at the bottom for stability. -
Refine the Head:
Using your fingers, gently pinch and smooth the upper third of the cylinder to define a slight neck indentation, separating the large, round head from the body without attaching a separate piece. -
Smooth the Surface:
Check for fingerprints. I like to lightly dust my finger with cornstarch and rub the clay surface to ensure it is perfectly matte and smooth.
Step 2: Adding the Face and Limbs
-
Tiny Feet:
Roll two small, pea-sized balls of matching clay. Flatten them slightly and press them underneath the front of the body to create protruding feet. -
Detailing Toes:
Use a needle tool or a dull knife edge to press two small indentations into each foot, creating three simple toes. -
Simple Arms:
Roll two small teardrop shapes for the arms. Press the wider end of the teardrop against the side of the body, blending the seam slightly so the arm hangs naturally. -
Eye Sockets:
Use a medium-sized ball tool to press two indentations into the face where the eyes will go. Space them widely apart for that cute, ‘kawaii’ look. -
Placing the Eyes:
Roll two tiny balls of black clay. Place them into the sockets you just made and gently flatten them so they sit flush with the face. -
The Smile:
Use a needle tool or a small curved tool to impress a tiny, U-shaped mouth right between the eyes.
Lint Defense
Light clay attracts dust like a magnet. Keep baby wipes nearby to clean your hands frequently, and keep a piece of scrap clay to roll over your work surface to pick up lint before starting.
Step 3: Creating the Gills
-
Gill Stalk Prep:
For the characteristic external gills, you will need a slightly darker or contrasting shade for variety, or you can use the same body color. Roll out six small cone shapes per axolotl. -
Attaching Gills:
Attach three cones to the left side of the head and three to the right, arranging them in a fan shape. Blend the base of each cone onto the back of the head so they stay secure. -
Texturing:
Using a needle tool or a very specific texture tool, gently stipple or poke the surface of the gill stalks to give them a fuzzy, coral-like texture.
Level Up: Texture
For the pale axolotl, try mixing translucent clay with white and adding glitter or flocking powder to the gill spikes for a magical, shimmering, or fuzzy effect.
Step 4: Finishing Touches
-
Blushing Cheeks:
Before baking, scrape a little pink soft pastel chalk into a powder. Use a soft brush to gently dust pink ‘cheeks’ underneath the eyes. -
Baking:
Place your figures on a baking sheet or tile. Bake according to your specific clay brand’s instructions (usually 275°F/130°C for 15-30 minutes). -
Cooling:
Allow the figures to cool completely in the oven with the door cracked open to prevent thermal shock cracks. -
Protection:
If desired, apply a matte varnish to protect the surface, or leave them natural for that soft clay look shown in the photo.
Line up your new colorful trio on a windowsill to bring a little aquatic joy to your room
Penguins With Cozy Scarves
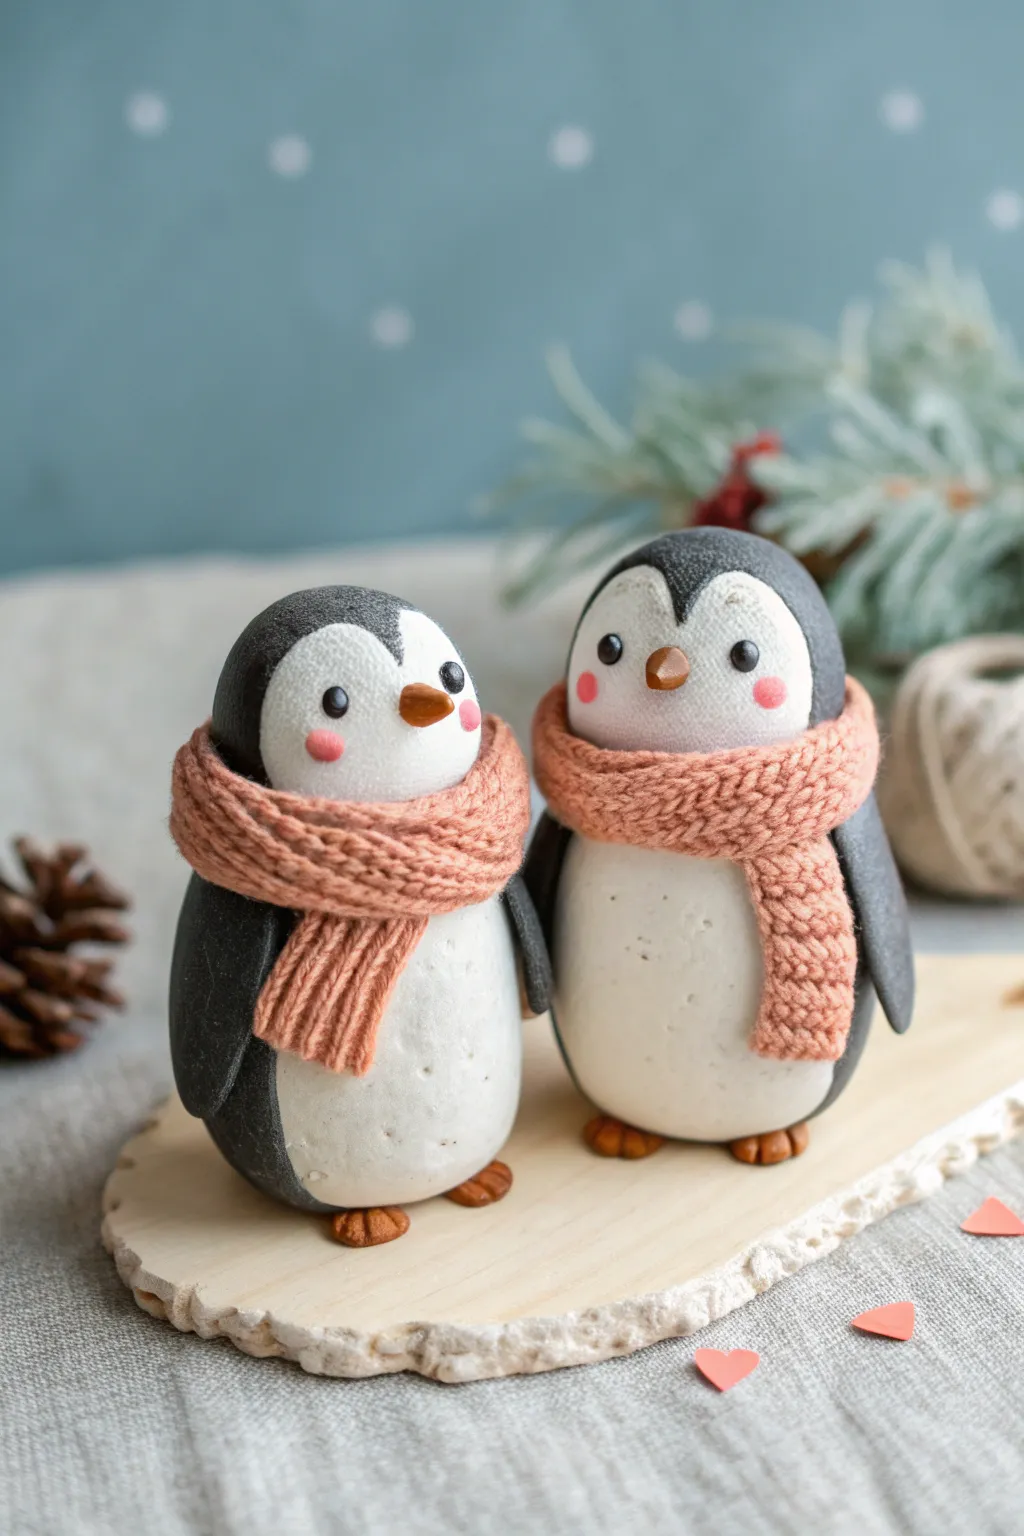
Create these adorable winter companions using simple shapes and textures that give them a rustic, handcrafted feel. Their speckled bodies and miniature knitted-style scarves make them perfect for holiday decor or a sweet handmade gift.
How-To Guide
Materials
- White polymer clay (fimo or sculpey)
- Black polymer clay
- Burnt orange or terracotta polymer clay
- Soft pink pastel chalk or blush powder
- Ball stylus tool
- Needle tool or toothpick
- Texture sponge or toothbrush
- Rolling pin
- Craft knife
- Black acrylic paint (optional for eyes)
- Liquid clay or bake and bond
Step 1: Shaping the Bodies
-
Mix the Speckled White:
Start by conditioning your white clay until it’s soft and pliable. To achieve that natural, stony look seen in the photo, mix in a tiny pinch of black pepper or black embossing powder. Knead it thoroughly until the specks are evenly distributed. -
Form the Base Shape:
Divide your white clay into two balls, making one slightly larger than the other. Roll each ball between your palms to smooth out any lines, then shape them into elongated, sturdy egg shapes. Flatten the bottom gently on your work surface so they stand upright on their own. -
Add Texture:
Take a texture sponge or an old clean toothbrush and gently tap it all over the surface of the white egg shapes. This removes fingerprints and gives the clay a lovely porous, organic texture. -
Create the Black Hood:
Roll out a sheet of black clay to about 2mm thickness. Use a round cutter or your craft knife to cut a large circle, then slice out a wide ‘V’ shape or a heart-top curve from one side to create the signature widow’s peak forehead. -
Attach the Hoods:
Drape the black clay over the top and back of each white body. Gently smooth the edges down to blend the seam slightly, ensuring the black covers the back and sides like a cape, leaving the white belly exposed.
Dirty Clay Blues?
White clay attracts dust easily! Keep a pack of baby wipes nearby and clean your hands and tools thoroughly before handling the white clay parts.
Step 2: Adding Facial Features
-
Make the Beaks:
Take a tiny amount of terracotta or burnt orange clay and roll two small cones. Press these gently into the center of the white face area, curving the tip slightly downward for a cute expression. -
Insert the Eyes:
Use a small ball tool to make two indentations for eyes. Roll tiny balls of black clay and press them into these sockets. Alternatively, you can bake the figures first and paint the eyes on later for precision. -
Apply Blush:
Scrape a little pigment from a soft pink pastel chalk. Use a soft brush or your finger to gently dab rosy cheeks just below the eyes. Do this before baking so the pigment bonds with the raw clay. -
Add the Flippers:
Shape two teardrops of black clay for each penguin. Flatten them slightly and attach them to the sides of the body, just where the black ‘hood’ ends. Curve the tips slightly outwards to give them movement. -
Create the Feet:
Form small flattened ovals from your orange clay. Use a needle tool or knife to make two indentations on the front edge of each foot to create toes. Tuck these slightly under the front of the body so the tummy rests on them.
Pro Tip: Realistic texture
For the scarf, gently dab the surface with a piece of denim or coarse fabric before baking to imprint a fuzzy, wool-like texture over the twists.
Step 3: Creating the Cozy Scarves
-
Prepare the Scarf Clay:
Mix orange clay with a bit of white to get a softer, peachy-knitted color. Roll this out into two long, thin snakes or snakes of clay. -
Create the Knit Texture:
Here is a trick I love: take two very thin strands of the scarf-colored clay and twist them together tightly to look like yarn. Make several of these twisted strands. -
Assemble the Scarf Strip:
Lay 3 or 4 of your twisted strands side-by-side and gently press them together to form a flat, wide strip that resembles a chunky knit pattern. -
Wrap the Penguins:
Wrap this textured strip around the penguin’s neck. Cross one end over the other at the front, letting the tails hang down naturally. -
Add Fringe Detail:
Use a needle tool or craft knife to make tiny cuts at the very ends of the scarf tails to mimic yarn fringe.
Step 4: Finishing Touches
-
Final Inspection:
Check your penguins from all angles. Smooth out any accidental fingernail marks and ensure the scarves are sitting snugly against the necks. -
Bake:
Place your penguins on a parchment-lined baking sheet or a ceramic tile. Bake according to your polymer clay package instructions (usually around 230°F – 265°F / 110°C – 130°C for 30 minutes). -
Cool Down:
Let the figures cool completely in the oven with the door slightly ajar. This gradual cooling prevents cracks. -
Optional Varnish:
If you want the eyes and beaks to shine, apply a tiny dot of gloss varnish to them. Leave the body and scarf matte for a realistic fabric and stone effect.
Place your finished duo on a shelf or windowsill to bring a warm touch to the coldest days of the year.


What Really Happens Inside the Kiln
Learn how time and temperature work together inside the kiln to transform clay into durable ceramic.
Koalas Hugging Leaves
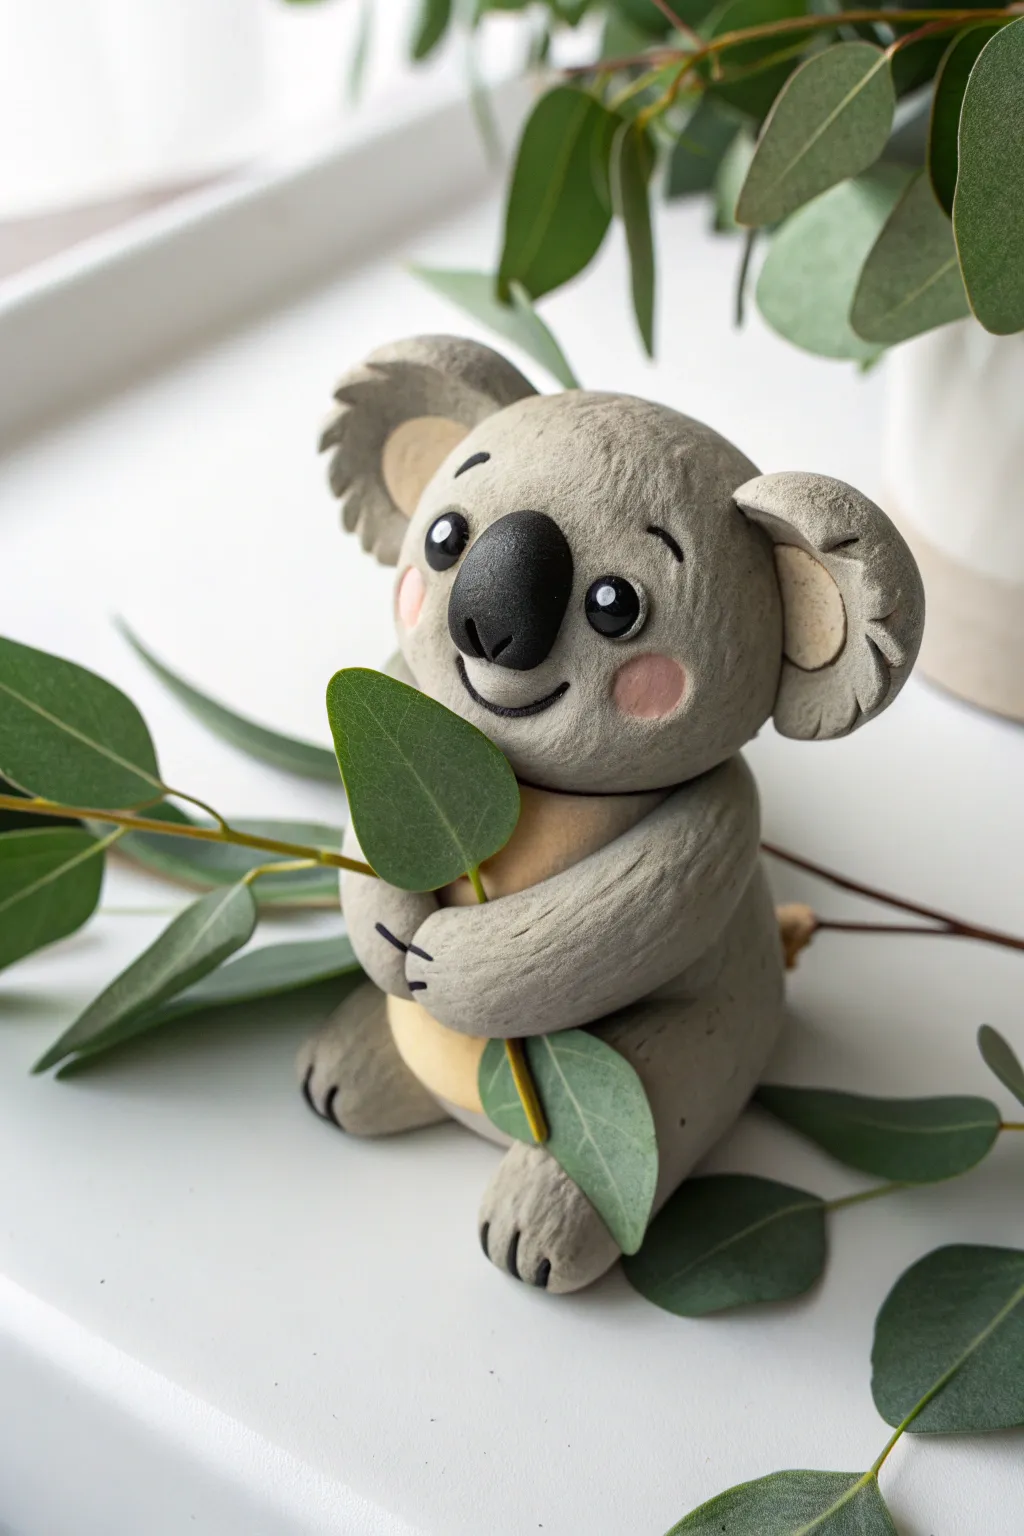
Create an adorable desk companion with this textured polymer clay koala, captured in a sweet moment hugging its favorite snack. The gentle stone-like texture and soft pink cheeks give this figurine a high-quality, professional finish that is surprisingly easy to achieve.
Step-by-Step Tutorial
Materials
- Polymer clay: Grey, Black, Pale Beige/Cream, and Pink
- Fresh eucalyptus twig (real or faux)
- Needle tool or toothpick
- Ball stylus tool
- Stiff bristle brush (e.g., old toothbrush) for texturing
- Flexible blade or craft knife
- Baking sheet and parchment paper
- Oven (per clay manufacturer instructions)
- Optional: Gloss varnish for eyes and nose
- Wire armature (optional) or toothpick for internal support
Step 1: Sculpting the Head
-
Shape the base:
Begin with a large ball of grey clay for the head. Roll it until smooth, then press gently to flatten the back slightly so it isn’t perfectly spherical. -
Texture the fur:
Before adding features, I like to use a stiff bristle brush or an old toothbrush to tap over the entire surface of the grey ball. This creates a realistic, fuzzy fur texture. -
Make the ears:
Form two medium-sized balls of grey clay and flatten them into thick discs. Indent the center of each with a large ball tool or your thumb. -
Detail the ears:
Fill the ear indentations with smaller flattened discs of pale beige clay. Use your stiff brush to texture the grey rims, then use a needle tool to cut small notches into the outer edges for a tufted look. -
Attach ears and cheeks:
Press the ears onto the sides of the head, blending the clay at the join point. Add two small, flattened circles of pink clay for blush cheeks and texture them lightly to blend.
Fur Texture Trick
To keep the texture consistent, hold the clay piece lightly with plastic wrap while texturing other areas. This prevents your fingerprints from smoothing out the work you just did.
Step 2: Face Features
-
Add the nose:
Roll a large, oval-shaped piece of black clay. Press this firmly onto the center of the face, slightly higher than the cheeks. Use a needle tool to mark two nostril slits. -
Create the eyes:
Make two small balls of black clay and flatten them slightly. Press them into position on either side of the nose. Add a tiny white dot of clay to each eye for a reflective highlight. -
Carve the smile:
Using a needle tool or a small curved blade, carefully impress a smiling mouth line just below the nose. You can widen the ends slightly for a sweeter expression. -
Eyebrows:
Roll two minuscule threads of black clay and curve them gently above the eyes to give the koala a friendly, surprised expression.
Step 3: Body and Assembly
-
Form the torso:
Creates a pear-shaped piece of grey clay slightly smaller than the head. Flatten the bottom so it sits stably. -
Add the tummy:
Take a piece of the pale beige clay, flatten it into an oval, and press it onto the front of the body for the lighter belly patch. Texture the grey areas with your brush. -
Head assembly:
Insert a toothpick or short piece of wire into the top of the body, then carefully press the finished head onto it to secure the connection. -
Sculpt the sitting legs:
Roll two thick sausages of grey clay for the legs. Press them against the bottom sides of the body. Use a knife to mark three toe indentations on the end of each foot. -
Upper arms:
Create two longer grey clay sausages for the arms. Attach them at the shoulders, curving them forward as if reaching to hold something in the lap. -
Holding the branch:
Take your eucalyptus twig and place it across the koala’s belly. Position the arm ends (hands) over the stem to hold it in place. Gently press the clay paws around the stem. -
Final touches:
Go over any smooth spots with your texture brush one last time, being careful not to mess up the facial features. Mark three claw lines on the hands. -
Bake:
Bake the figurine according to your clay package instructions. If you used a real twig, keep an eye on it, though fresh wood usually withstands low clay-baking temps fine. -
Gloss finish:
Once fully cooled, brush a coat of gloss glaze over the nose and eyes to make them look wet and shiny against the matte fur.
Tree Stump Base
Instead of having the koala sit directly on the table, create a textured brown clay cylinder to look like a tree stump or branch for it to perch on for extra height.
Now you have a charming little marsupial friend ready to hang out on your bookshelf.
Snails With Swirly Shells
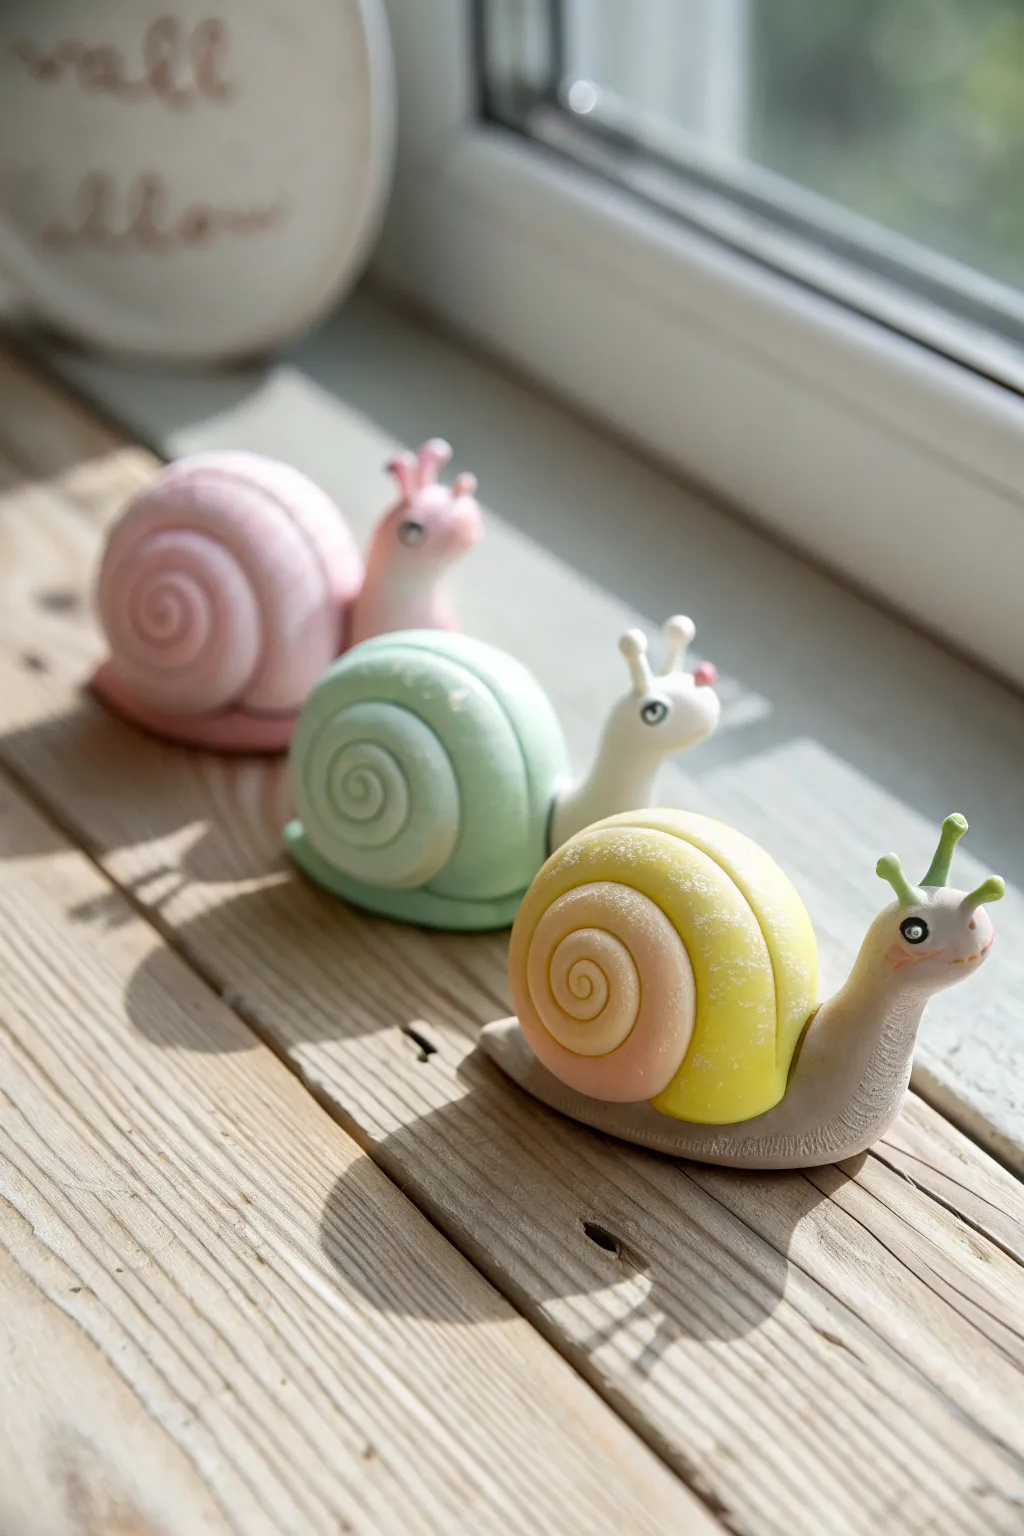
These adorable little snails brighten up any windowsill with their soft pastel colors and cheerful expressions. The project combines simple coil techniques with smooth blending to create three unique characters perfect for a spring display.
Detailed Instructions
Materials
- Polymer clay in pastel pink, mint green, white, yellow, pale orange, and grey
- Clean work surface (tile or glass mat)
- Small dotting tool or ball stylus
- Pointed clay tool or toothpick
- Black acrylic paint or fine-tip permanent marker
- Gloss varnish (optional)
- Soft paintbrush
- Oven for baking polymer clay
Step 1: Preparing the Shells
-
Mix your colors:
Start by conditioning your clay until soft. For the pink snail, mix a bit of white into pink clay to get two shades: a lighter pastel pink and a slightly deeper rose. -
Roll the coils:
Roll both shades of pink clay into long, even snakes about 6-8 inches long. Aim for a thickness similar to a pencil, tapering slightly at one end. -
Create the two-tone effect:
Gently press the two pink snakes side-by-side. If you want the beautiful gradient look seen in the yellow snail, blend the yellow and light orange clay together slightly before rolling. -
Coil the shell:
Starting from the tapered end, roll the clay strip into a tight spiral. Keep the sides flat so the shell stands upright easily. -
Repeat for others:
Create the mint green shell using a single color snake, scoring a line down the middle with a tool to mimic the two-strand look. Then, make the yellow shell using a blend of yellow and pale orange.
Clean Clay Tip
Keep wet wipes handy! Switching between colors like grey and white can transfer lint or pigment. Clean hands ensure those pastel shells stay bright and pure.
Step 2: Sculpting the Bodies
-
Form the base shapes:
Roll three pieces of clay into teardrop shapes for the bodies. Use soft pink for the first, white for the green-shelled snail, and grey for the yellow-shelled snail. -
Flatten the foot:
Gently flatten the bottom of each teardrop so they sit stable on your surface. Curve the ‘tail’ end slightly upward. -
Texture the skin:
Using a needle tool or toothpick, gently scratch vertical lines along the bottom edge of the snail body to create a realistic, rippled ‘foot’ texture. -
Shape the head:
Bend the thicker end of the teardrop upward and smooth it into a rounded head shape. It should look like it’s perking up to look around. -
Attach the shells:
Press a shell firmly onto the back of each body. I find it helps to add a drop of liquid clay or bake-and-bond adhesive here to ensure they stay put during baking.
Step 3: Adding Details
-
Make the antennae:
Roll tiny logs of contrasting clay for the eye stalks. For the grey snail, use bright green; for the others, match their shell or body color. -
Attach antennae:
Press the stalks onto the top of the head. Add tiny balls to the tips for a cute, cartoony finish. -
Create the faces:
Use a dotting tool to impress small sockets for the eyes. Add a tiny smile using the edge of your tool. -
Refine the surface:
Check for fingerprints. Smooth them out gently with a fingertip dipped in a tiny bit of baby oil or cornstarch. -
Bake the batch:
Place your snails on a ceramic tile or baking sheet. Bake according to your polymer clay package instructions (usually 275°F/135°C for 15-30 minutes). -
Cool down:
Let the snails cool completely in the oven before moving them to prevent cracking. -
Paint the eyes:
Once cool, use a fine-tip brush and black paint to fill in the eye sockets. Add a tiny white dot as a highlight for extra cuteness.
Make It Sparkle
Before baking, lightly brush the shells with pearl ex mica powder or white glitter eyeshadow to give them a magical, shimmering finish like real snail trails.
Arrange your trio on a sunny ledge to enjoy their company all day long

TRACK YOUR CERAMIC JOURNEY
Capture glaze tests, firing details, and creative progress—all in one simple printable. Make your projects easier to repeat and improve.
Otters Holding Little Hearts
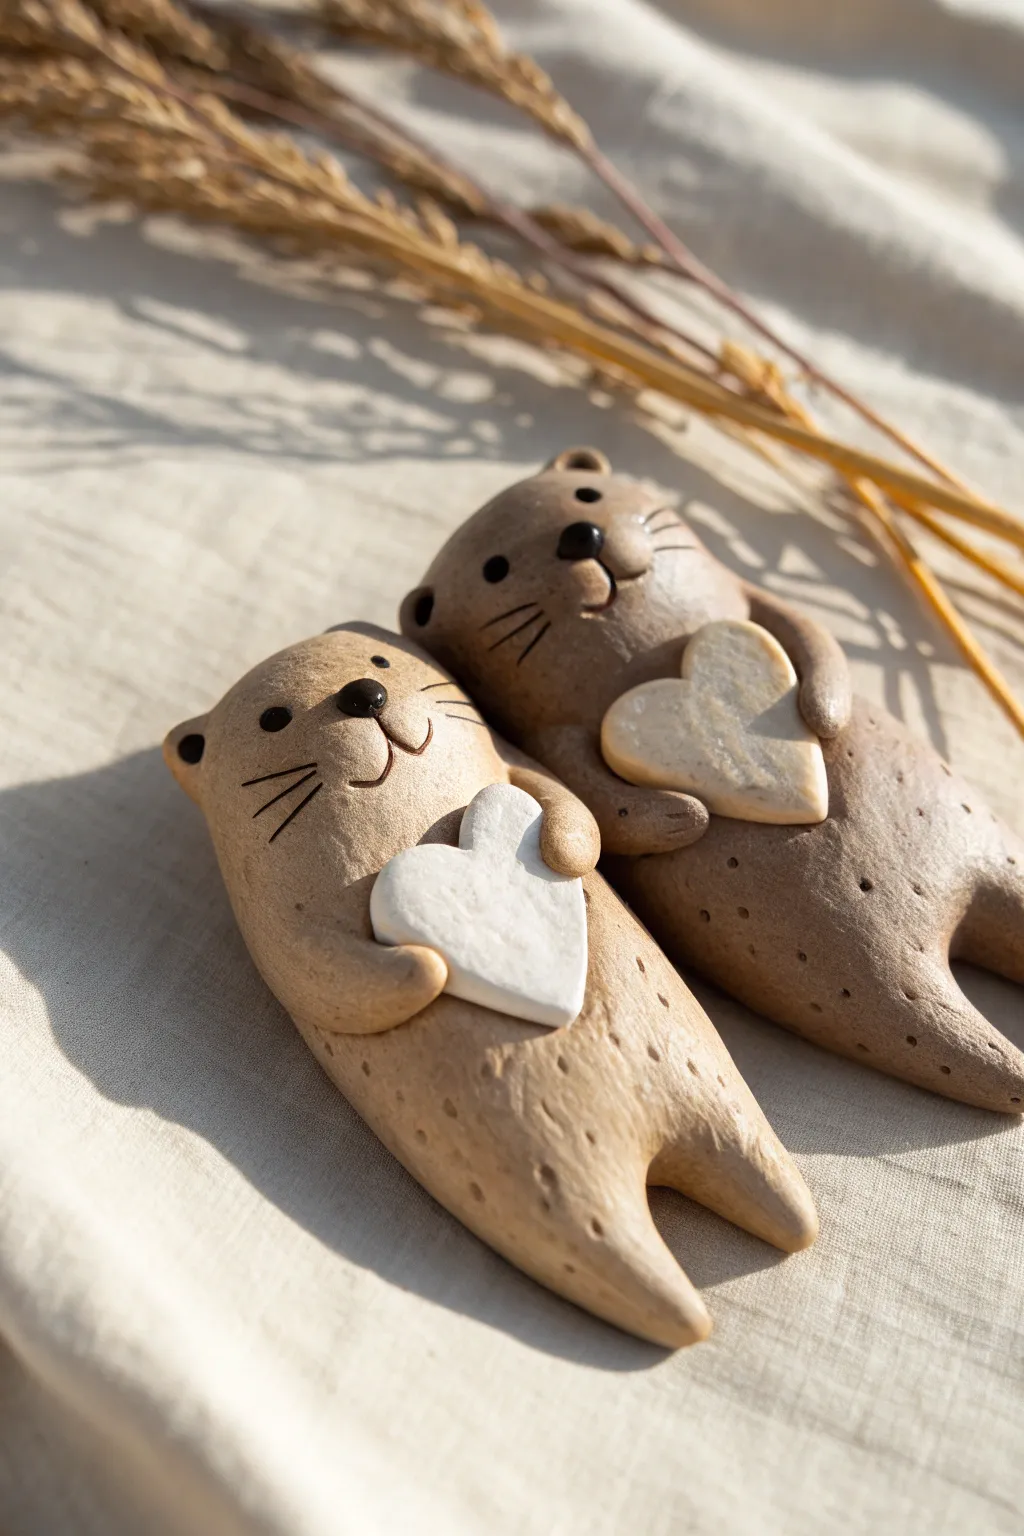
These utterly adorable clay otters are seen floating on their backs, each clutching a heart to their chest. With their speckled fur texture and sweet, simple expressions, they make perfect charms, magnets, or desk companions.
Step-by-Step Guide
Materials
- Light brown or biscuit-colored polymer clay
- White or cream polymer clay
- Small amount of black polymer clay
- Needle tool or toothpick
- Small blending tool or dotting tool
- Old toothbrush or stiff bristle brush
- Black acrylic paint (optional, for whiskers)
- Fine liner brush (size 000)
- Baking sheet and parchment paper
- Oven (per clay manufacturer instructions)
Step 1: Shaping the Bodies
-
Mix the base color:
Start by conditioning your light brown clay until it’s soft and pliable. If you want a speckled effect like the original image, you can mix in tiny flecks of darker brown or black clay, or use a ‘granite’ style polymer clay. -
Form the main torso:
Roll two equal-sized balls of the brown clay, then elongate them into thick, slightly flattened log shapes. These should be rounded at the top for the head and slightly tapered at the bottom. -
Create the legs:
At the bottom of the log, use your finger or a modeling tool to gently press an indentation in the center, separating the clay into two stubby legs. Smooth the edges so they look round and soft. -
Shape the arms:
Roll four small sausage shapes from the brown clay for the arms. Attach two to the sides of each body, blending the shoulder seam smoothly into the torso so they look integrated, not just stuck on. Curve them inward so they will hold the heart. -
Add the ears:
Make four tiny balls of brown clay. Press these onto the sides of the head area and create a small indentation in the center of each with a dotting tool to form the ears.
Clay Too Soft?
If your clay gets too warm and sticky to hold detail, pop the figures in the fridge for 10 minutes. This firms it up, making it easier to texture without squishing the shape.
Step 2: Adding Details & Texture
-
Create the hearts:
Condition a small amount of white or cream clay. Flatten it slightly and use a mini heart cutter or cut a heart shape freehand with a craft knife. Make two hearts. -
Position the hearts:
Place a heart on the chest of each otter. Gently press the otter’s arms over the edges of the heart to make it look like they are gripping it tightly. -
Texture the fur:
This is the secret to the organic look. Take an old toothbrush or a stiff brush and gently tap it all over the brown clay surface. This creates a realistic, matte fur texture. -
Add the tail:
Roll a tapered cone relative to the body size. Attach this to the back or tuck it slightly underneath the side if you want it visible from the front, blending the seam thoroughly.
Step 3: Facial Features
-
Form the muzzle:
Adding a defined muzzle is optional, but for these, simply press gently into the face area to flatten it slightly where the nose will go. -
Add the nose:
Roll a minuscule ball of black clay for the nose. Press it firmly onto the center of the face, slightly above the middle line. -
Sculpt the mouth:
Use a needle tool or very fine blade to press a vertical line down from the nose, splitting into an inverted ‘V’ shape to create a smiling mouth. -
Create the eyes:
For the eyes, you can either press two small black clay balls onto the face or use a dotting tool to make indentations that you will paint later. I find using clay beads gives a nice 3D effect. -
Add whisker spots:
Use a needle tool to poke three tiny dots on each side of the muzzle area to suggest whisker follicles.
Make Them Magnets
Before baking, gently press a small, strong neodymium magnet into the back of the otter. Remove it, bake the clay, then superglue the magnet into the indentation.
Step 4: Finishing Touches
-
Bake the clay:
Place your otters on parchment paper on a baking sheet. Bake according to the time and temperature instructions on your specific package of polymer clay. Let them cool completely. -
Paint the whiskers:
Once cool, use a size 000 brush and black acrylic paint to carefully paint delicate lines for the whiskers, originating from the dots you textured earlier. -
Optional shading:
If desired, brush a tiny amount of brown pastel chalk dust on the ears or toes before sealing to add depth. -
Seal the piece:
Choose a matte varnish to protect the clay while keeping that natural, stony look. Glossy varnish might make them look wet, which is also cute for otters.
Enjoy your sweet pair of hand-holding otters as a reminder of friendship and love
Easy Safari Animal Set
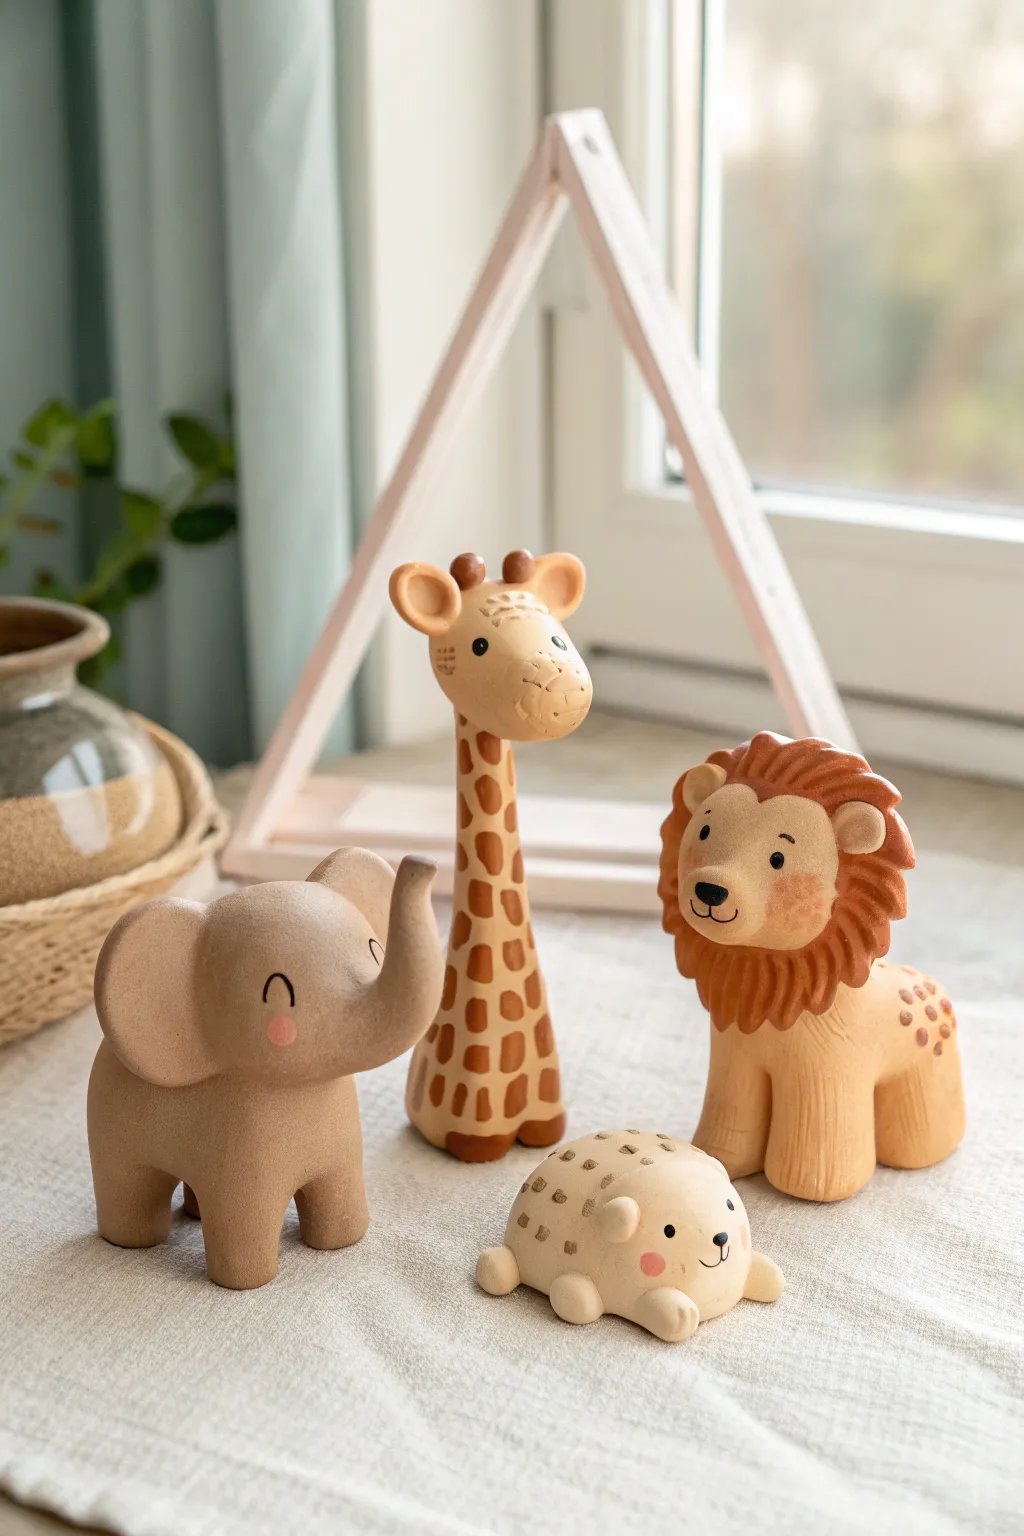
Bring the savannah to your crafting table with this adorable set of handmade clay animals. Featuring smooth, matte finishes and gentle pastel details, these sturdy little friends—an elephant, giraffe, lion, and hedgehog—are perfect for imaginative play or nursery decor.
Step-by-Step Tutorial
Materials
- Air-dry clay or polymer clay (beige/tan base color)
- Acrylic paints (brown, pink, black, rust)
- Fine-grit sandpaper
- Small detail brushes
- Ball stylus tool or toothpick
- Water cup (for smoothing)
- Matte varnish (optional)
Step 1: The Gentle Elephant
-
Body Basics:
Start with a medium ball of clay and roll it into a thick, rounded cylinder for the body. Pull four short, stout legs from the bottom, pressing them flat against your work surface so the elephant stands steadily. -
Head and Trunk:
Roll a slightly smaller ball for the head. Pinch and pull the front center to elongate it into a trunk, curling the tip upward for a happy expression. -
Ears and Assembly:
Flatten two small circles of clay into discs. Attach them to the sides of the head, smoothing the seams at the back but leaving them slightly flared. Attach the head to the body, blending the clay at the neck for a strong bond.
Step 2: The Tall Giraffe
-
Base Structure:
Form a tall, tapering cone shape. Use your fingers to press the bottom flat so it stands upright—this forms the body and the long neck in one piece. -
Head Sculpting:
Shape an oval for the head. Add two tiny horns (ossicones) on top and two small ears just below them. I like to use a drop of water here to ensure these tiny parts stick well. -
Connecting:
Place the head onto the tapered neck. Gently smudge the clay downward from the jaw to the neck to secure it without losing the definition of the jawline.
Seamless Smoothness
Keep a small bowl of water nearby. Dip your finger and run it over the clay before it dries to erase fingerprints and create that polished, store-bought look.
Step 3: The Mighty Lion
-
Seated Stance:
Create a unified body and head shape that is slightly taller than the elephant. Pinch out two thick front legs distinct from the body to make it look like the lion is sitting proudly. -
Adding the Mane:
Roll a snake of clay and flatten it. Wrap this around the lion’s face. Use a crafting knife or toothpick to score lines all around this ring to create texture, looking like fur. -
Finishing Features:
Attach two small rounded ears poking out from the top of the mane.
Cracks Appearing?
If you see small cracks as the clay dries, make a ‘slurry’ by mixing a tiny bit of clay with water. Paint this paste into the cracks and smooth it over.
Step 4: The Little Hedgehog
-
Simple Shape:
Roll a smooth, egg-shaped lump of clay. The wider end will be the body and the slightly pointed end will be the nose. -
Tiny Limbs:
Add four tiny balls of clay to the bottom for feet and two small, round ears near the top of the head area.
Step 5: Painting and Details
-
Smooth Finish:
Once all figures are fully dry (wait 24-48 hours for air-dry clay), gently sand any rough fingerprints or bumps with fine-grit sandpaper. -
Giraffe Spots:
Mix a warm brown paint. Paint irregular square-like patches all over the giraffe’s neck and body. Paint the mane and horn tips in the same brown. -
Lion’s Coat:
Paint the lion’s mane a rust-orange color. Use a lighter brown to add spots on the animal’s rear flank. -
Texture Hacking:
For the hedgehog, use a fine brush to paint rows of small brown dashes across the back to simulate spikes without needing to sculpt them. -
Faces:
Using a very fine brush or a toothpick dipped in black paint, add simple curved eyes and noses. Add rosy pink cheeks to the elephant, lion, and hedgehog for extra cuteness.
Arrange your finished safari team on a shelf or play mat and enjoy their charming company
Mini Farmyard Cuties
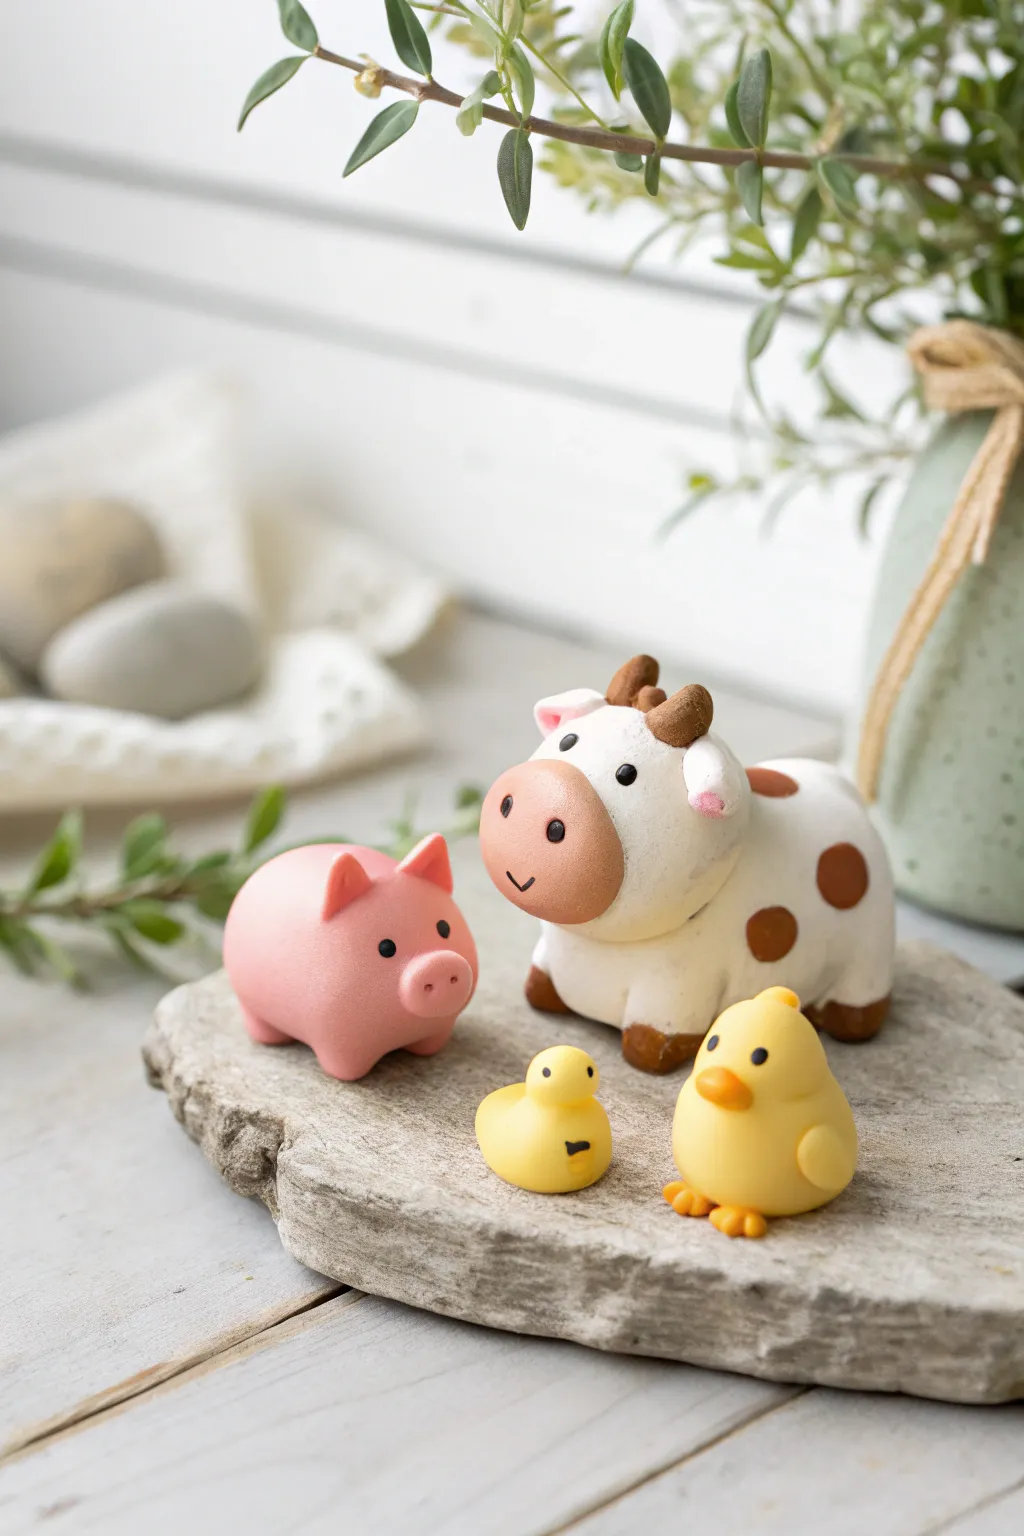
Bring a touch of the countryside to your desk or shelf with this adorable set of polymer clay farm animals. This project features a chunky cow, a round piglet, and two tiny yellow birds, all styled in a soft, matte finish that looks timeless and sweet.
Step-by-Step Guide
Materials
- Polymer clay (White, Pink, light Yellow, Brown, Orange, Black)
- Clay blending tools or silicone shapers
- Needle tool or toothpick
- Small ball tool
- Soft pastel chalks (pink) and a soft brush for blushing
- Oven for baking (follow clay manufacturer’s instructions)
- Baking sheet and parchment paper
- Isopropyl alcohol and cotton swabs (for smoothing)
Step 1: Crafting the Cow
-
Create the body:
Start with a large ball of white clay. Roll it into a smooth, slightly flattened oval shape to form the main body of the cow. -
Add the legs:
Roll four small equal-sized balls of white clay. Gently press them onto the bottom of the body to act as sturdy, stubby legs. -
Form the head and muzzle:
Roll a slightly smaller white ball for the head and attach it to the front of the body. For the muzzle, take a piece of light brown clay, flatten it into an oval, and press it onto the lower half of the face. -
Sculpt the ears and horns:
Make two small white teardrops for ears, pressing the centers with a ball tool. Add pink clay inside the ears. For horns, roll two tiny cones of brown clay and attach them between the ears. -
Add spots and hooves:
Take tiny pieces of brown clay, flatten them into irregular circles, and press them onto the cow’s body for spots. Add small brown discs to the bottom of each leg for hooves. -
Detail the face:
Using a needle tool, create two small nostrils on the muzzle. Press two tiny black clay balls above the muzzle for eyes and add a tiny V-shape mouth with a tool.
Sticky Situation?
If clay gets too soft or sticky while shaping tiny parts like the bird beaks, pop it in the fridge for 10 minutes to firm it up.
Step 2: Shaping the Pig
-
Form the pig shape:
Roll a medium ball of pink clay. Shape it into a smooth, round oval, slightly tapering it at the front for the nose. -
Create the snout:
Flatten the front tip of the oval slightly to define the snout area. Use a needle tool to poke two distinct nostrils right in the center. -
Add ears and eyes:
Form two small triangles from pink clay for the ears and attach them to the top of the head. Add two tiny black beads of clay for the eyes, placing them wide apart for a cute look. -
Attach the feet:
Roll four tiny balls of pink clay and attach them underneath to give the pig a stable base.
Farmyard Fun
Make a tiny textured base or ‘mud puddle’ from brown clay for the pig to sit in, or add a tiny green clay leaf for the cow to chew on.
Step 3: Making the Birds
-
Sculpt the chick:
Roll a ball of yellow clay into a pear shape, keeping the bottom wide and the top slightly rounded for the head. -
Add wings and beak:
Press two small flattened yellow circles onto the sides for wings. Form a tiny orange triangle for the beak and attach it to the face. -
Create the duckling:
Make a smaller version of the chick using a slightly lighter yellow clay, focusing on a more elongated, swimming shape if desired, or keep it seated. -
Add bird feet:
For the standing chick, shape two tiny orange pieces into three-toed feet and press them under the body so they poke out slightly.
Step 4: Finishing Touches
-
Apply blush:
Use a soft brush to apply a tiny amount of pink pastel chalk dust to the cheeks of the cow and pig for a rosy glow. -
Smooth and bake:
Check all figures for fingerprints. I like to lightly brush them with baby oil or alcohol to smooth them out before baking. Bake according to your clay package directions.
Enjoy arranging your new miniature farm family on a shelf or gifting them to a friend
Dessert-Themed Animal Hybrids
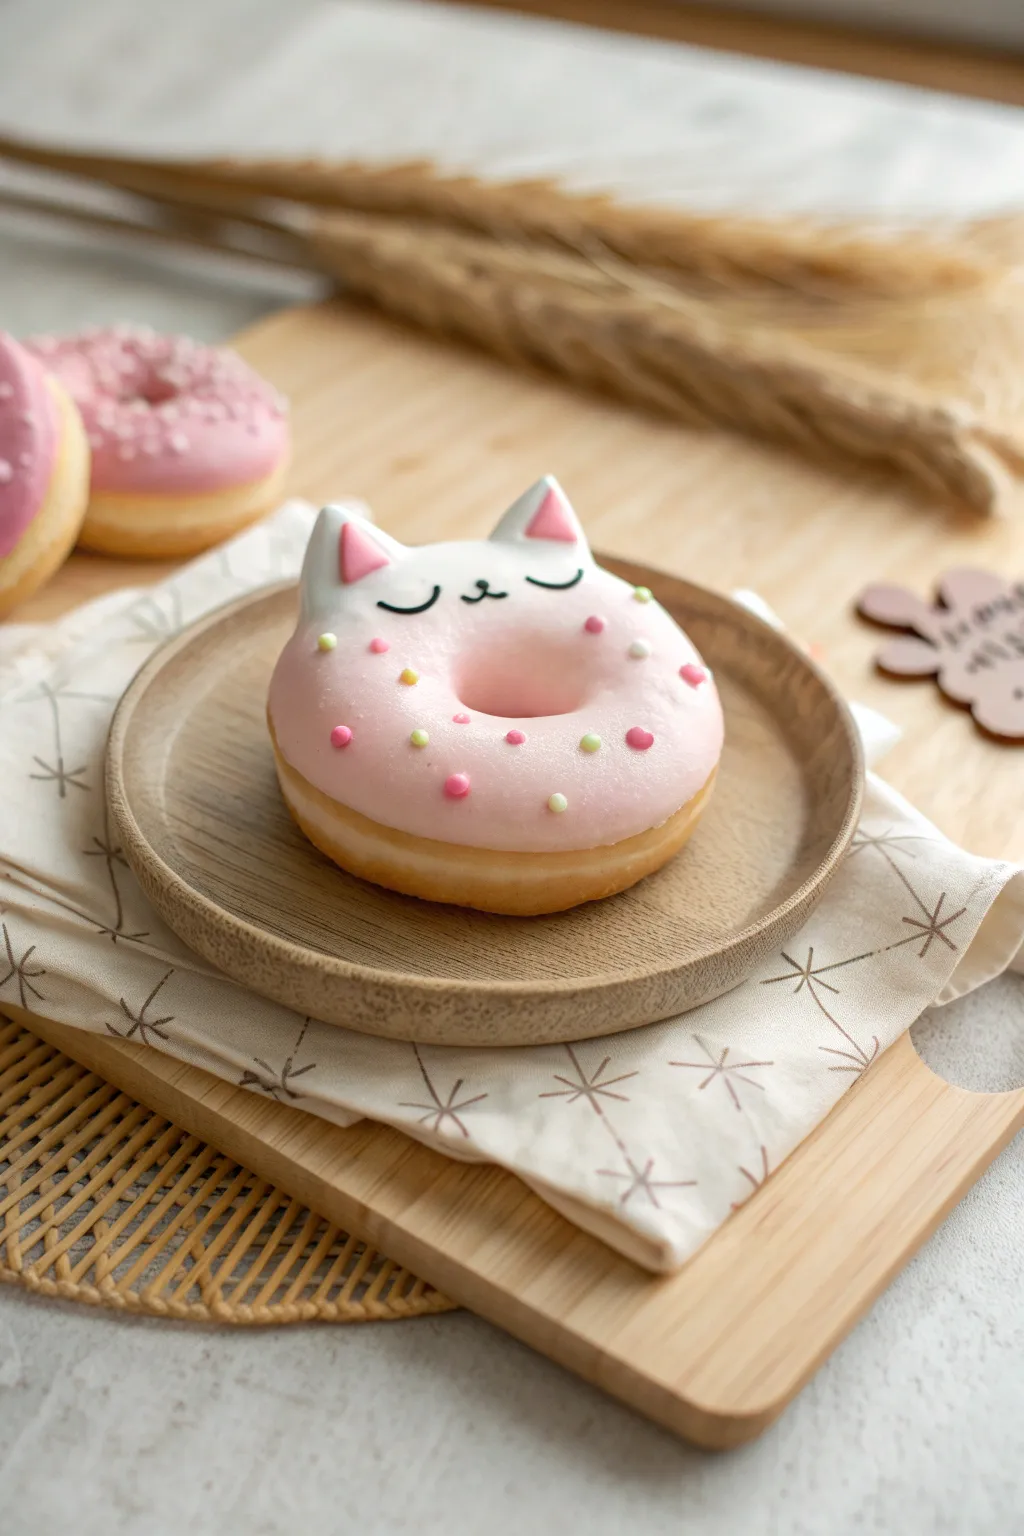
Combine the sweetness of a bakery treat with the charm of a feline friend in this adorable polymer clay project. This tutorial guides you through sculpting a realistic donut base topped with smooth icing and delicate cat ears.
Detailed Instructions
Materials
- Polymer clay (beige/tan, translucent, pale pink, white, bright pink)
- Liquid polymer clay (Translucent Liquid Sculpey or similar)
- Chalk pastels (orange, brown, yellow/ochre)
- Soft paintbrush for shading
- Ball tool or dotting tool
- Detail needle tool
- Black acrylic paint or fine-tip black marker
- Gloss glaze or UV resin
- Basic sculpting tools
- Aluminum foil (optional, for texturing)
- Circle cutter (small)
Step 1: Baking the Dough Base
-
Mix the Dough Color:
Start by mixing beige polymer clay with a small amount of translucent clay and just a tiny pinch of white. This creates a realistic, baked-dough appearance rather than a flat, plastic look. -
Form the Shape:
Roll your mixed dough color into a smooth ball about 2 inches in diameter, then gently flatten it into a thick disc. Use your thumb to press down slightly in the center to begin the donut shape. -
Create the Donut Hole:
Use a small circle cutter or the back of a large paintbrush to punch a hole directly in the center. Smooth the inner edges with your finger so the hole looks baked, not cut. -
Add Texture:
Crumple a small ball of aluminum foil and roll it gently over the entire surface of the donut to create a cake-like sponge texture. Pay special attention to the rounded sides. -
The Golden Bake:
Using a soft brush, dust shaved chalk pastels in shades of yellow ochre and light brown around the outer edges and the bottom of the donut. Create a “tan line” of unshaded clay right in the middle to mimic how real donuts fry.
Mastering the Texture
Use a toothbrush instead of foil for a tighter crumb texture. Tap gently, don’t drag, or you’ll scratch the clay instead of texturing it.
Step 2: Frosting and Facial Features
-
Prepare the Icing:
Soften your pale pink clay until it is extremely pliable. You can mix in a few drops of liquid polymer clay to make it slightly stickier and easier to drape, resembling melted fondant or thick glaze. -
Apply the Glaze:
Roll the pink clay into a thin sheet and cut a rough circle slightly larger than your donut hole but smaller than the donut’s outer edge. Place it on top, smoothing the edges downward to look like gravity is pulling the icing. -
Cutting the Ears:
From a thicker slab of white clay, cut two small triangles for the ears. They should be sturdy enough to stand upright. -
Inner Ear Detail:
Cut two slightly smaller triangles from bright pink clay and press them onto the front of the white triangles to create the inner ear. -
Attach the Ears:
Press the base of the ears firmly onto the top edge of the pink icing. Use a silicone tool to blend the white clay at the back of the ears into the pink icing just a bit for a seamless bond. -
Refine the Connection:
Add a tiny bit of liquid clay at the connection points if needed to ensure the ears don’t pop off after baking. -
Sprinkle Placement:
Roll incredibly tiny balls of bright pink, yellow, and white clay. Press these sporadically into the pink icing while it’s still soft to simulate round sprinkles.
Fixing Smudged Pastels
If your brown shading looks muddy or too dark, wipe it off gently with a baby wipe or a bit of rubbing alcohol before baking and re-apply lighter layers.
Step 3: Finishing Touches
-
Bake the Piece:
Bake the donut according to your specific clay brand’s temperature instructions, usually for about 15-20 minutes. Let it cool completely before proceeding. -
Draw the Face:
Using a very fine paintbrush and black acrylic paint (or a fine-tip permanent marker), draw two curved lines for sleeping eyes and a tiny ‘3’ shape for the mouth in the center. -
Glazing:
Apply a coat of gloss glaze or UV resin specifically to the pink icing area. This gives it that sugary, wet-glaze shine while keeping the dough part matte. -
Final Cure:
If using UV resin, cure under a UV lamp. If using air-dry glaze, allow it to set fully in a dust-free area.
Display your new bakery-cat creation on a mini plate or turn it into a sweet charm for a keychain
Cube-Shaped Critters
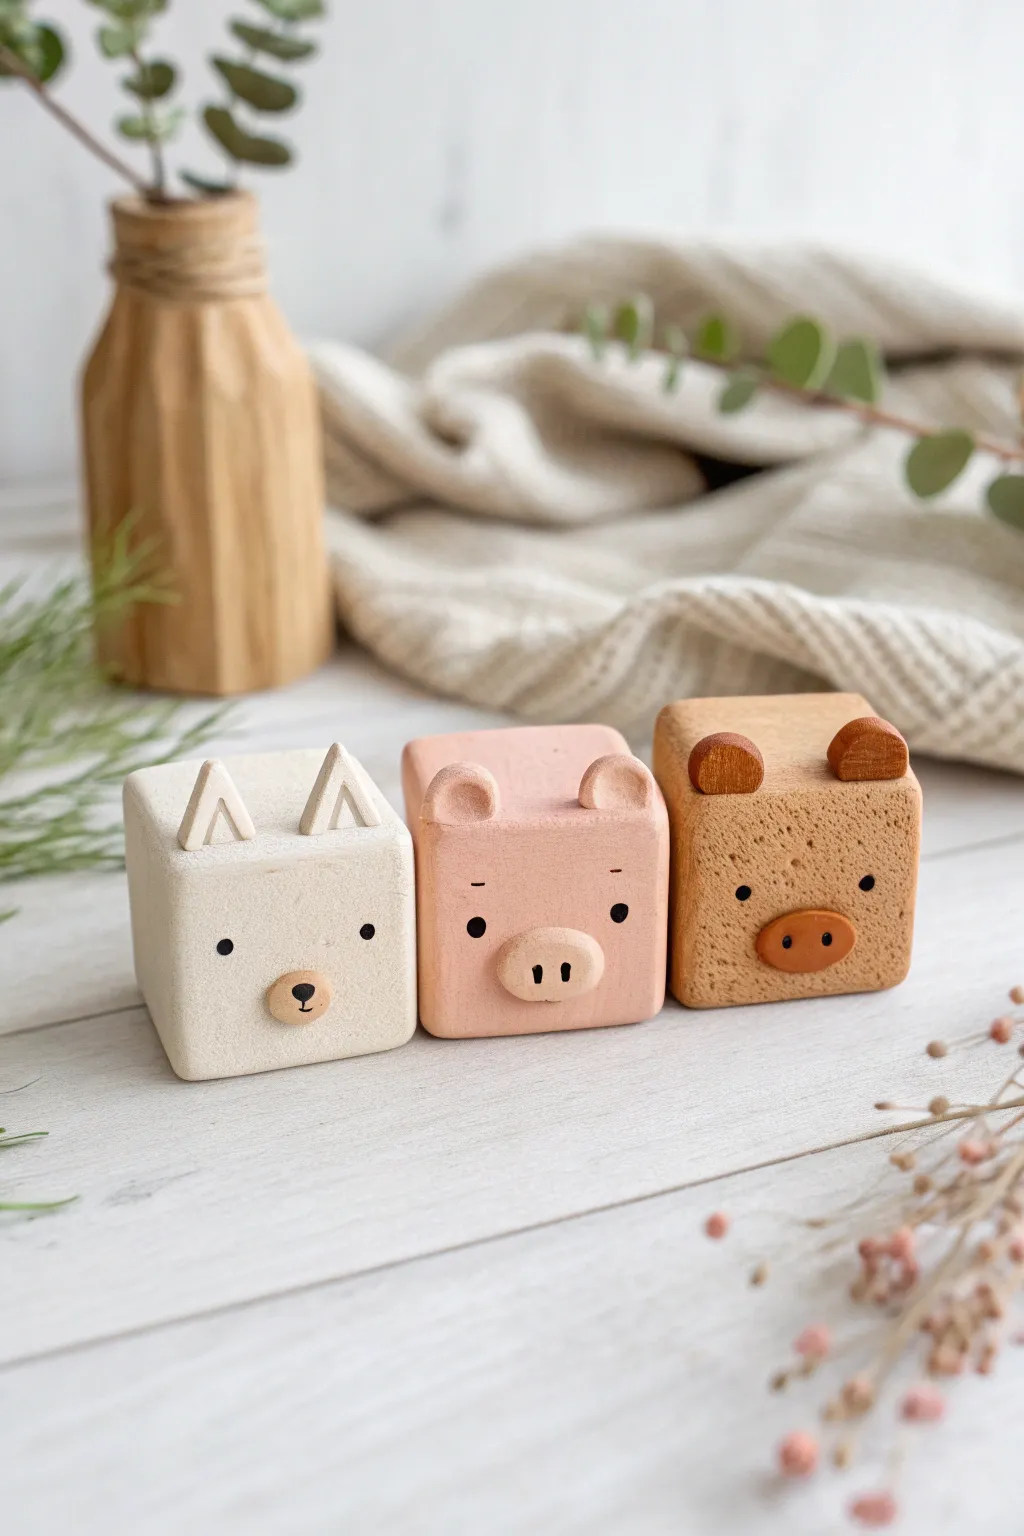
These adorable cube-shaped critters prove that you don’t need complex anatomy to make charming characters. With their minimalist square bodies and tiny features, this trio—a wolf, a pig, and a bear—makes for a perfect beginner-friendly sculpting project.
Step-by-Step Tutorial
Materials
- Polymer clay (white, soft pink, light brown/tan)
- Acrylic paint (black)
- Fine-point dotting tool or toothpick
- Sharp crafting blade or clay knife
- Smooth work surface (tile or glass)
- Sandpaper or a texture sponge (optional)
- Oven and baking sheet
Step 1: The Base Cubes
-
Conditioning:
Start by thoroughly conditioning your clay until it is soft and malleable. You will need separate balls for white, pink, and tan clay. -
Shaping the blocks:
Take a portion of white clay and roll it into a smooth ball, then gently press it against your work surface to flatten one side. Rotate and repeat until you have formed a rough cube. -
Refining edges:
Use your blade or a flat acrylic block to gently press against the sides of the cube, sharpening the corners and ensuring the faces are flat. Repeat this process for the pink and tan clay to create three identical base blocks.
Sticky Situation?
If your clay cubes are getting distorted or leaving fingerprints while you work, try popping them in the fridge for 10 minutes to firm them up before adding details.
Step 2: The White Wolf
-
Ear shapes:
Form two very small triangles from white clay. I usually flatten a small snake of clay and slice triangles from it for uniformity. -
Attaching ears:
Press the triangles onto the top front edge of the white cube. Use a small tool to blend the back seam so they stay attached. -
Ear details:
Roll two incredibly thin, tiny strings of white clay. Press these into the center of the triangular ears to create an inner ‘V’ shape detail. -
Snout creation:
Make a tiny flattened oval of tan clay (the same color you’ll use for the bear) and press it onto the lower center of the face.
Make Them Useful
Before baking, use a blade to slice a deep slit across the top of the animal (behind the ears). After baking, these become adorable photo or card holders.
Step 3: The Pink Pig
-
Rounded ears:
Roll two small balls of pink clay and flatten them slightly. Pinch one side to create a teardrop shape. -
Attaching pig ears:
Attach these to the top corners of the pink cube, curved side up. Use a small ball tool to indent the center of each ear slightly for depth. -
Snout sculpting:
Create a flattened oval from pink clay and press it onto the center of the face. -
Nostrils:
Using your smallest dotting tool or a needle, poke two vertical oval holes into the snout.
Step 4: The Brown Bear
-
Bear ears:
Mix a tiny bit of brown paint or darker clay into your tan clay to get a darker contrast color. Form two small semi-circles. -
Placement:
Press these semi-circles firmly onto the top edge of the tan cube. -
Bear snout:
Using that same darker brown shade, make an oval snout and attach it lower on the face, matching the placement of the others. -
Texture:
Before baking, you can gently tap the surface of the bear with a texture sponge or stiff brush to give it a fuzzy appearance.
Step 5: Finishing Touches
-
Baking:
Bake your pieces according to the clay manufacturer’s instructions, usually at 275°F (130°C) for about 15-30 minutes depending on thickness. -
Cooling:
Let the cubes cool completely before painting; painting hot clay can make the acrylic gummy. -
painting eyes:
Dip a dotting tool into black acrylic paint. Dot two wide-set eyes on each face. For the pig, add tiny eyebrows. -
painting noses:
Add a tiny black nose to the wolf and bear snouts. For the pig, the nostrils are already sculpted, but you can darken them slightly if desired.
Arranging your trio together on a shelf or desk immediately adds a touch of whimsy to your space
Night-Sky Bats and Owls
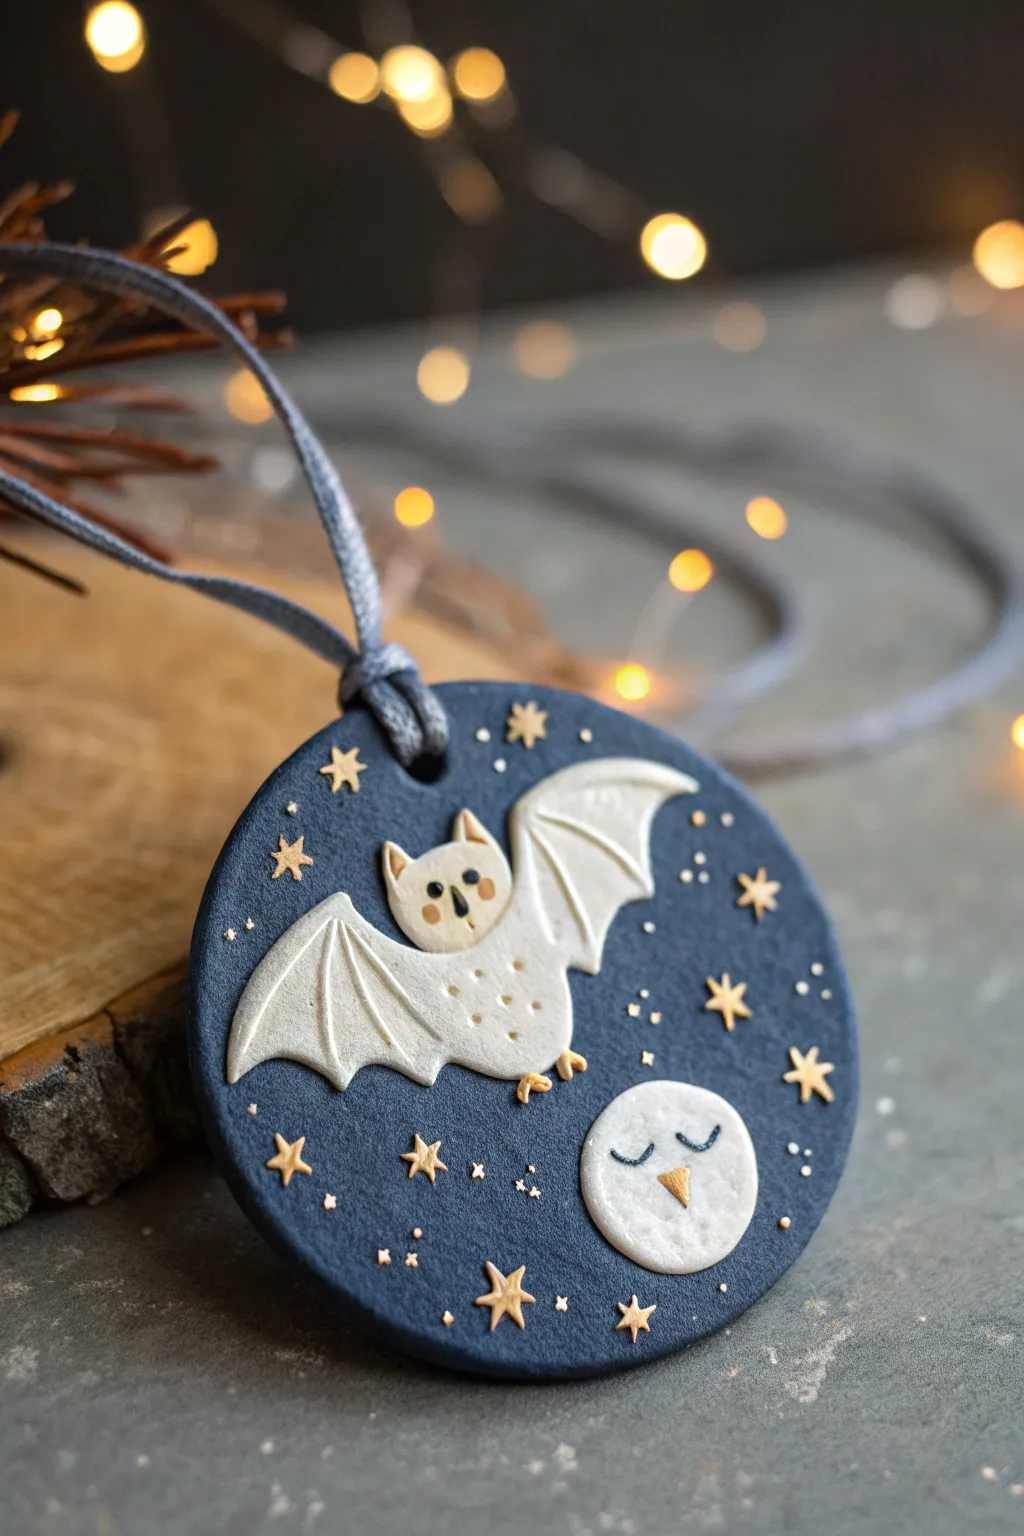
Capture the magic of a starry night with this charming circular pendant, featuring a textured white bat soaring through a deep midnight blue sky. With its shimmering gold accents and sweet sleeping moon companion, this piece makes a perfect autumn decoration or Halloween keepsake.
Step-by-Step Guide
Materials
- Polymer clay (midnight blue, white)
- Acrylic rolling pin
- Circle cutter (approx. 3 inches)
- Needle tool or toothpick
- Gold acrylic paint
- Fine detail paintbrush
- Small ball stylus tool
- Sandpaper based on clay instructions
- Grey silk cord or ribbon
- Oven for baking clay
Step 1: Forming the Base
-
Condition the clay:
Start by kneading the midnight blue clay until it is soft and pliable. This prevents cracks during baking. -
Roll the slab:
Roll the blue clay out to an even thickness of about 1/4 inch. If you have a pasta machine dedicated to crafts, setting 1 works well. -
Cut the shape:
Use your circle cutter to punch out the main ornament shape. Smooth the edges gently with your finger to remove any stray bits. -
Create the hanging loop:
Roll a small snake of blue clay, loop it over, and press the ends securely onto the top back of the circle. Use a tool to blend the seams so it holds strong.
Clean Clay Tip
White clay picks up dust instantly. Wash your hands thoroughly and wipe down your work surface with a baby wipe before handling the white clay parts to keep them pristine.
Step 2: Sculpting the Characters
-
Shape the bat body:
Roll a small ball of white clay and flatten it slightly into an oval. Press this onto the center-left of your blue circle. -
Form the wings:
Create two triangles of white clay. Attach them to the sides of the body, then gently pull the outer points upward to mimic a flying motion. -
Texture the wings:
Using a needle tool or the back of a knife, press vertical lines into the wings to create the ‘webbed’ bat wing structure. -
Add bat details:
Add two tiny triangles for ears on top of the head. Use a small ball tool to indent the chest area for texture, like little fur tufts. -
Create the sleeping moon:
Roll a smaller ball of white clay and flatten it into a perfect circle. Place this in the lower right corner. This acts as a stylized moon with a face. -
Add moon features:
Using your needle tool, gently etch two curved lines for closed eyes on the moon face.
Make it Sparkle
Before baking, brush a tiny amount of mica powder over the blue background. This gives a subtle, celestial shimmer that looks like a galaxy without needing glitter.
Step 3: Starry Details & Baking
-
Scatter tiny stars:
Roll extremely tiny balls of white clay. Press them flat onto the blue background around the bat and moon. -
Shape the stars:
Use your needle tool to pull the edges of these tiny flattened balls outward, creating 5-point star shapes directly on the slab. -
Add background texture:
For extra depth, prick tiny holes randomly in the blue background using a needle tool to represent distant stars. -
Bake the piece:
Place your ornament on a baking sheet lined with parchment paper. Bake according to your brand of clay’s specific temperature instructions, usually between 230°F to 275°F for 15-30 minutes. -
Cool completely:
Let the piece cool down fully before handling. The clay is strongest once it returns to room temperature.
Step 4: Painting & Finishing
-
Paint the stars:
Dip a fine detail brush into metallic gold acrylic paint. Carefully paint over the raised star shapes you sculpted. -
Highlight the bat:
Paint a tiny gold triangle for the bat’s nose and use black paint for the eyes. I find a toothpick works better than a brush for these dots. -
Paint the moon face:
Fill in the etched eye lines with black or dark blue paint. Paint a small gold triangle nose in the center of the moon face. -
Add final sparkle:
Use the tip of your brush to add tiny dots of gold paint in the empty blue spaces for extra star clusters. -
Attach the cord:
Once the paint is fully dry, thread the grey silk cord through the loop you created earlier and tie a secure knot.
Hang this lovely nocturnal scene in a window or on a festive branch to enjoy its peaceful vibe
Stackable Animal Totem Beads
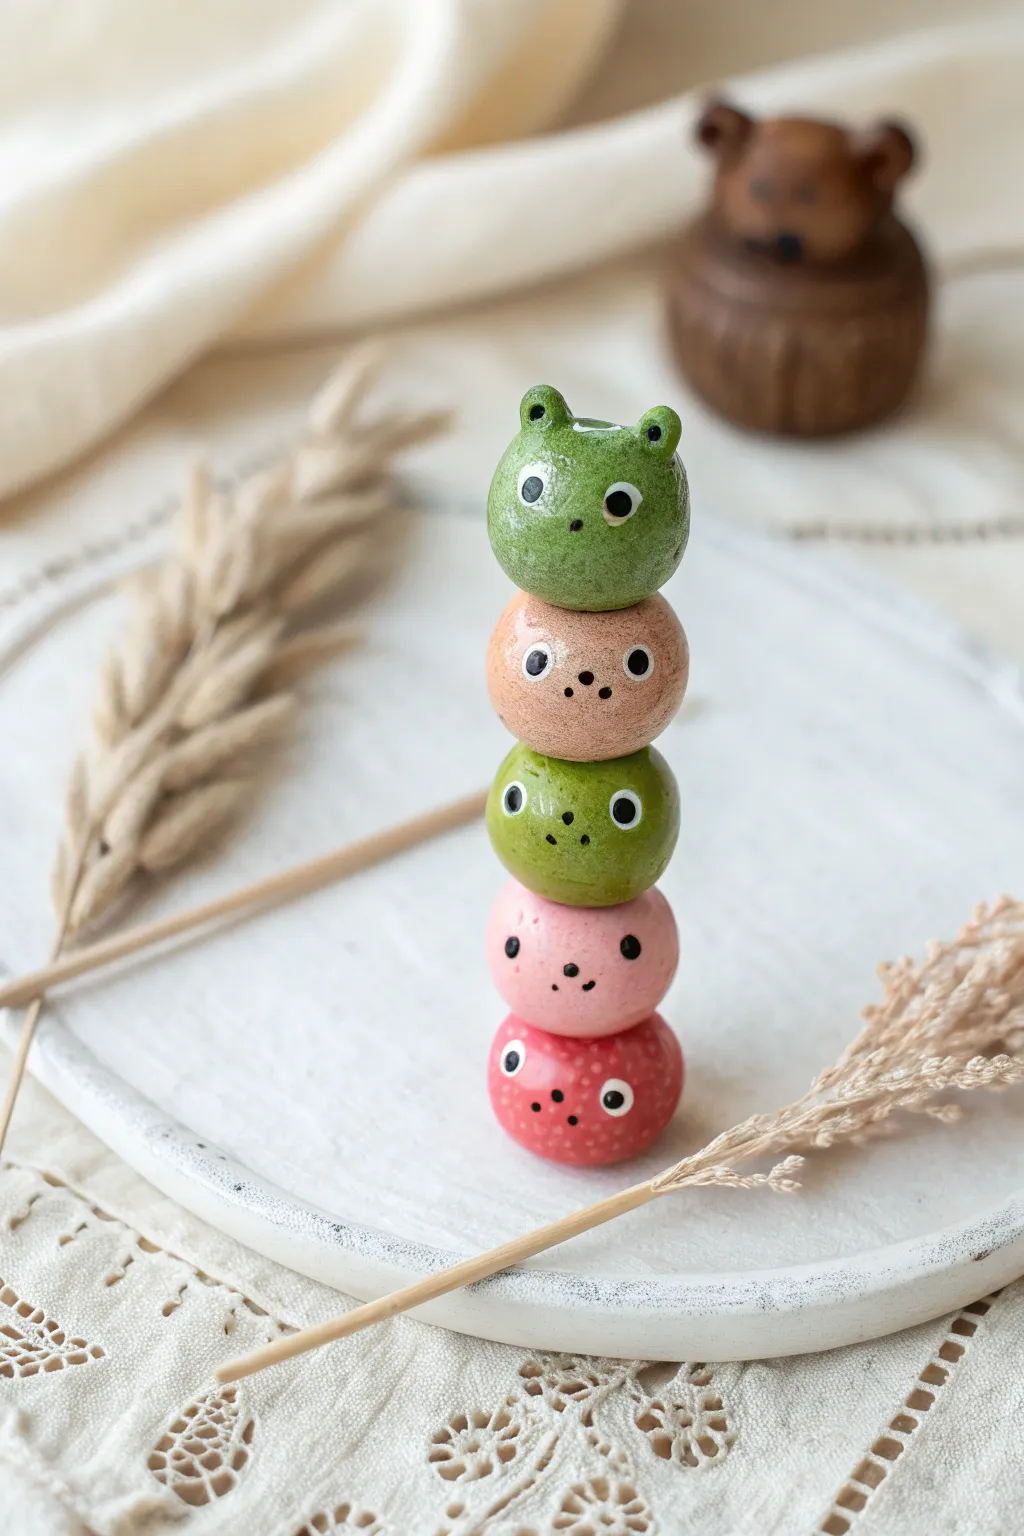
Create a charming tower of friends with these stackable clay animal beads. This project features a delightful mix of frogs, bears, and other critters, all sporting glossy finishes and simple, expressive faces that are perfect for jewelry or decor.
How-To Guide
Materials
- Polymer clay (green, tan, pink, red)
- Aluminum foil (for cores)
- Modeling tools (dotting tool, needle tool)
- Black acrylic paint
- White acrylic paint
- Fine detail paintbrush
- Gloss glaze or UV resin
- Bamboo skewer or piercing pin
- Oven (for baking polymer clay)
- Baking sheet with parchment paper
Step 1: Shaping the Base Beads
-
Create foil cores:
To save clay and keep the beads lightweight, tightly roll small balls of aluminum foil, roughly 1/2 inch in diameter. Make five of these cores. -
Condition the green clay:
Start with the green clay for the frogs. Knead it until it’s soft and pliable, then flatten a portion into a sheet thick enough to cover a foil core. -
Cover the cores:
Wrap the green clay around two of the foil balls. Roll them between your palms until the seams disappear and they are perfectly smooth spheres. -
Form the other colors:
Repeat the covering process to make one tan bead, one pink bead, and one red bead. -
Pierce the holes:
Use a needle tool or bamboo skewer to carefully pierce a vertical hole through the center of each bead. Twist the tool gently as you push to avoid distorting the round shape.
Fixing Wonky Holes
If the bead hole closes up during baking, carefully use a small hand drill or pin vice to re-open it. Do not force a needle through, or the baked clay might crack
Step 2: Adding Animal Details
-
Sculpt frog eyes:
For the two green frog beads, roll two very tiny balls of green clay. Attach them to the top of the bead, spacing them slightly apart, and blend the bottom edges into the main bead using a modeling tool. -
Add frog nostrils:
Use a needle tool or a small dotting tool to impress two shallow indentations for nostrils just below the eye line. -
Create bear ears:
For the tan and pink beads, make tiny, slightly flattened spheres for ears. Press them onto the upper sides of the head. I like to use a small ball tool to make a little indentation inside the ear for depth. -
Texture the red bead:
The bottom red bead has a subtle texture. Use a toothbrush or a texture sponge to gently tap the surface, giving it a slightly pitted, organic look compared to the smooth upper beads. -
Bake the beads:
Arrange your beads on a baking sheet lined with parchment paper. Bake according to your customized polymer clay package instructions (usually around 275°F or 135°C for 15-30 minutes). -
Cool down:
Allow the beads to cool completely before handling. This ensures the clay is fully hardened and ready for painting.
Turn it into Jewelry
Instead of a totem, thread these onto elastic cord with small gold spacer beads between each animal to create a chunky, colorful statement bracelet
Step 3: Painting and Finishing
-
Paint the eyes:
Dip a medium-sized dotting tool into black acrylic paint. Stamp two solid circles onto the front of each bead for the eyes. -
Add noses and mouths:
Using a very fine detail brush or the tip of a toothpick, paint small black dots for noses (on the bear/pig) and tiny curved lines for mouths if desired. -
Highlight the eyes:
Once the black paint is dry, use a tiny dotting tool or toothpick with white paint to add a small reflection highlight to each eye. This brings the characters to life instantly. -
Detail the red bead:
For the bottom red creature, add small black dots across the surface to resemble seeds or spots, giving it a berry-like appearance. -
Seal with glaze:
Apply a coat of gloss glaze or UV resin to each bead. This protects the paint and gives them that polished, ceramic-like shine seen in the photo. -
Assemble the totem:
Once the glaze is cured or dry, thread the beads onto a cord or skewer in your favorite order to complete your vertical totem.
Now you have a cheerful stack of clay friends ready to brighten up your desk or become a unique necklace pendant