I love how clay stop motion lets you tell a tiny story with just a lump of clay, a steady setup, and a little patience. Here are my go-to beginner-friendly ideas that keep the characters simple, the sets stable, and the movement super satisfying frame by frame.
Squishy Blob Character With Big Eyes
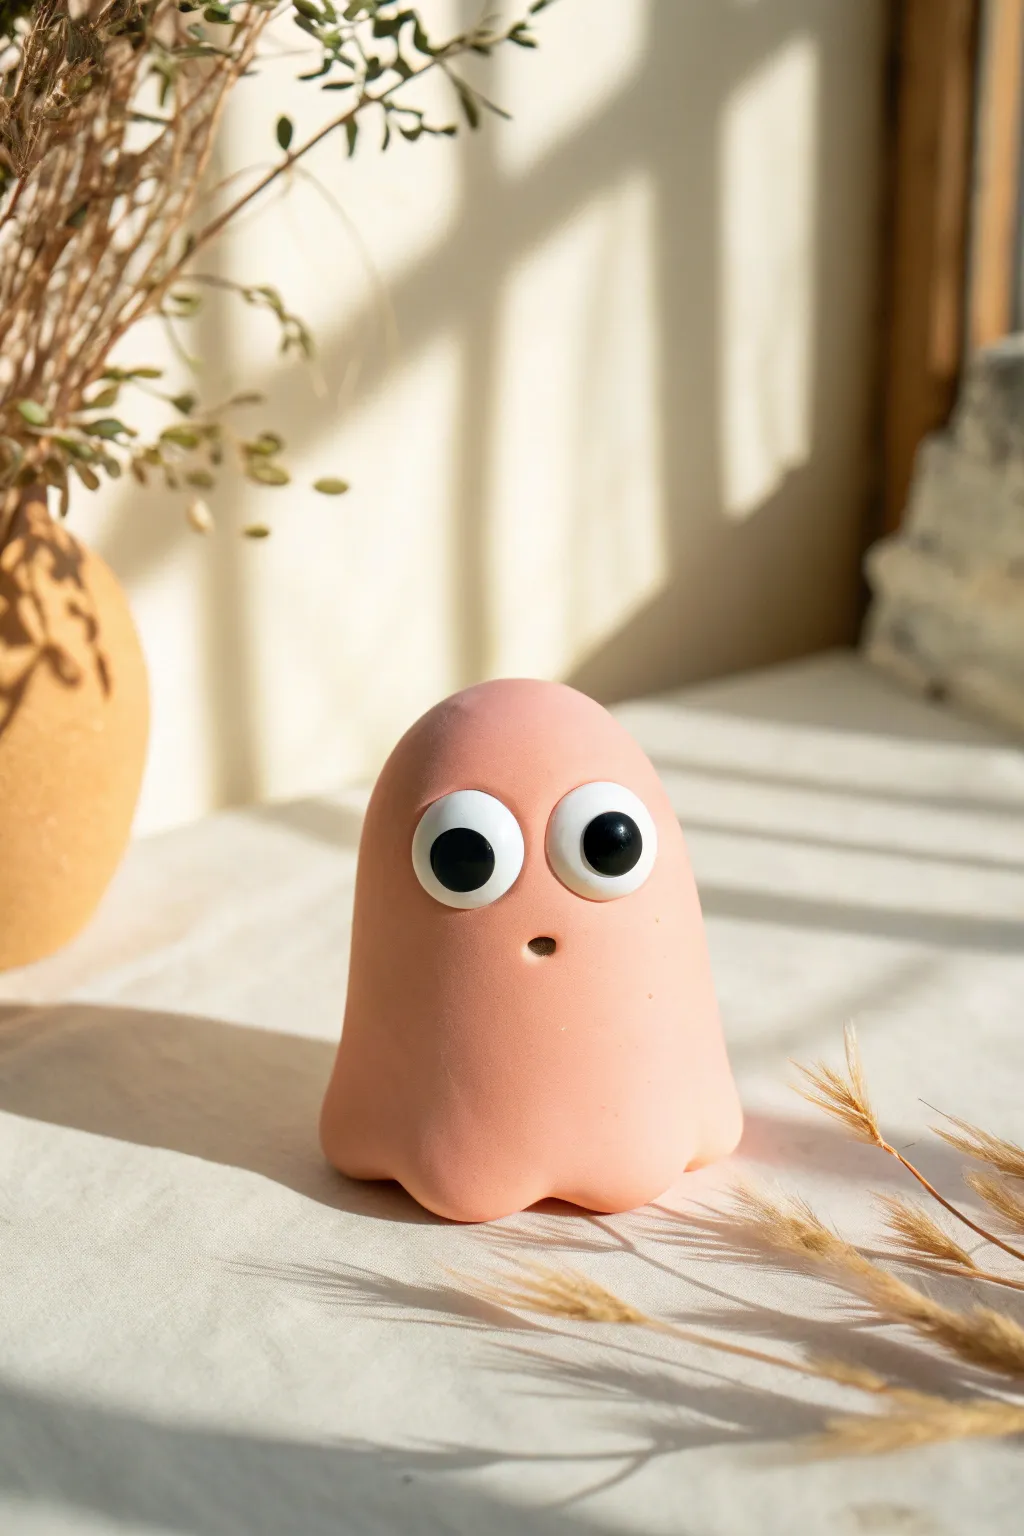
Create a hilariously expressive character perfect for beginner stop motion animation using soft polymer clay. This simple pink ghost-like figure features oversized eyes and a smooth, matte finish that reads beautifully on camera.
How-To Guide
Materials
- Pink polymer clay (soft variety)
- White polymer clay
- Black polymer clay
- Small ball stylus tool (or a toothpick)
- Smooth work surface (ceramic tile or glass mat)
- Baby oil or clay softener (optional)
- Soft paintbrush
- Rubbing alcohol
Step 1: Forming the Body
-
Condition the clay:
Begin by taking a generous amount of pink polymer clay and kneading it thoroughly in your hands until it becomes warm and pliable. This conditioning step prevents cracks later on. -
Shape the base mound:
Roll the pink clay into a smooth ball free of seams. Place it on your work surface and gently press it down to create a stable base, forming a dome shape. -
Elongate the form:
Gently squeeze and pull the top of the dome upwards to create a taller ‘ghost’ silhouette. The top should be rounded and smooth, not pointy. -
Create the bottom ripple:
Using your thumb and forefinger, gently pinch the very bottom edge of the clay outwards to create a slight skirt. -
Define the feet:
Press your finger indentations into the skirt area to create soft, wave-like bumps that serve as simple feet. This gives the character a ‘melting’ or squishy appearance. -
Smooth the surface:
Dip your finger in a tiny bit of baby oil helps remove fingerprints. Rub the entire surface gently until it looks flawless and matte.
Pro Tip: Eye Shine
For extra life, add a tiny dot of white clay to the black pupils as a highlight, or coat just the eyes with gloss glaze after baking.
Step 2: Creating the Face
-
Prepare the eye sockets:
Use your thumbs to press two shallow, wide indentations onto the front of the face where the eyes will sit. This helps the eyes look integrated rather than just stuck on. -
Make the whites:
Roll two equal-sized balls of white clay. Flatten them slightly into thick discs—they should be large enough to dominate the face for that ‘startled’ look. -
Attach the whites:
Press the white discs firmly into the indentations you made. Ensure they are touching in the middle for a goofy, crosseyed potential. -
Create the pupils:
Roll two much smaller balls of black clay. Flatten these slightly as well. -
Position the gaze:
Place the black pupils onto the white sclera without pressing down hard yet. Adjust their position—placing them slightly off-center adds more personality. -
Secure the eyes:
Once happy with the gaze, press the black dots down firmly to fuse the clays together. -
Add the mouth:
Take a small ball stylus tool or the blunt end of a paintbrush. Press it directly into the pink clay below the eyes to create a perfectly round, surprised ‘O’ mouth.
Step 3: Finishing Touches
-
Final smooth check:
Check the back and sides for any accidental nail marks. Lightly brush with a soft brush dipped in a little rubbing alcohol to smooth out any last lint or dust. -
Prepare for baking:
If you are planning to animate this, you might not bake it so it stays movable. If you want a static figure, follow the baking instructions on your specific package of clay. -
Cooling down:
Allow the figure to cool completely inside the oven if you baked it; this prevents thermal shock and cracking.
Troubleshooting: Dirty Clay
Pink clay picks up dust easily. Keep baby wipes nearby to clean your hands constantly, especially before handling the white clay parts.
Now you have a charming little character ready to star in your next scene


Face Swap Emotions on One Head
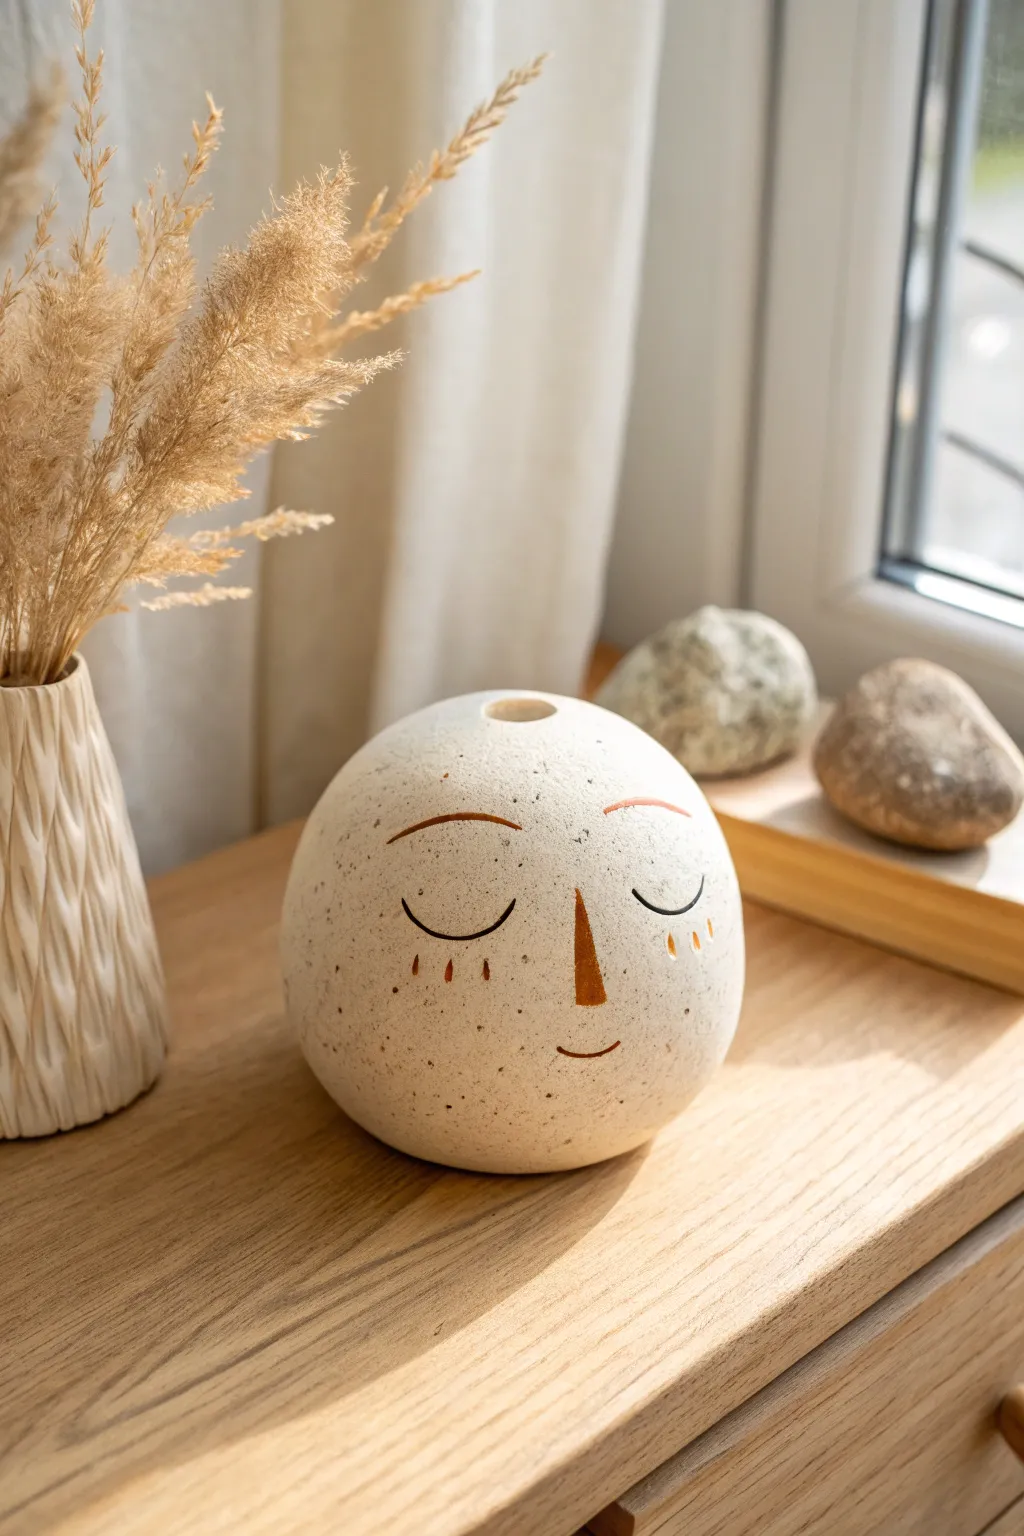
Create a charming, minimalist character using a simple sphere form and expressive facial features. This speckled, stone-like sculpture serves as a versatile canvas for emotions, perfect for practicing stop-motion expressions or simply adding a serene touch to your shelf.
Step-by-Step
Materials
- Air-dry clay (white or light grey)
- Acrylic paints (black, terracotta/rust, white)
- Old toothbrush or stiff bristle brush
- Fine detail paintbrush (size 0 or 00)
- Water cup
- Sandpaper 3-pack (medium to fine grit)
- Clear matte varnish or sealant
- Sculpting tools (specifically a smoothing rib)
- Rolling pin
- Small bowl of water
Step 1: Sculpting the Base Form
-
Condition the Clay:
Start by taking a generous amount of air-dry clay. Knead it thoroughly in your hands until it feels warm and pliable, eliminating any air pockets that could cause cracking later. -
Form a Sphere:
Roll the clay between your palms or on your work surface to create a smooth, even ball. Aim for the size of a large grapefruit or small cantaloupe. -
Refine the Shape:
Gently tap the ball on your table to create a very subtle flat spot on the bottom so it won’t roll away. Use a metal or kidney rib tool to smooth out any bumps on the surface. -
Create the Top Opening:
If you want this to function as a dry vase or holder, gently press your thumb into the top center. Widen the hole slightly, smoothing the rim with a wet finger. -
Dry Completely:
Set your sphere in a cool, dry place away from direct sunlight. Let it dry for at least 24-48 hours. I find flipping it upside down halfway through helps the bottom dry evenly.
Smooth Operator
dip your finger in water and smooth the clay surface constantly while working. This prevents later sanding work.
Step 2: Creating the Stone Textures
-
Sanding:
Once bone dry, use medium-grit sandpaper to remove any major imperfections. Follow up with fine-grit sandpaper for a porcelain-smooth finish. -
Base Coat:
Paint the entire sphere with an off-white or creamy beige acrylic paint. Let this layer dry completely. -
Speckling Technique:
Dilute a small amount of black or dark grey paint with water. Dip an old toothbrush into the mixture. -
Applying the Speckles:
Hold the toothbrush about 6 inches from the sphere and run your thumb across the bristles to flick tiny droplets onto the surface. Rotate the ball to get even coverage, creating that faux-stone look. -
Add Warmth:
Repeat the speckling process very lightly with a watered-down brown or tan paint to add depth and warmth to the texture.
Step 3: Painting the Features
-
Map the Face:
Lightly sketch the closed eyes, nose, and mouth placement using a pencil. Keep the features centered and symmetrical for a calm expression. -
Paint the Nose:
Using the terracotta or rust-colored paint, paint a simple, elongated triangle for the nose. A flat brush works best here for crisp edges. -
Detail the Eyes:
Switch to your finest detail brush and black paint. Carefully trace the downward curves for the sleeping eyes. Add small, delicate lashes if desired. -
Add Expressions:
Paint thin, arched eyebrows above the eyes using the rust color or brown. Add a tiny, curved smile line in black near the bottom. -
Cheek Accents:
Add three tiny vertical dash marks or teardrop shapes under each eye using the rust paint to simulate blushing cheeks. -
Seal the Work:
Once all paint is perfectly dry, apply a coat of clear matte varnish. This protects the paint and unifies the sheen, making it look like finished ceramic.
Change the Mood
Since this is for stop motion, paint the features on clear acetate strips instead. Stick them on to swap expressions!
Place your finished character near a window to let the natural light highlight its stone-like texture


Worm Wiggle Across a Tabletop
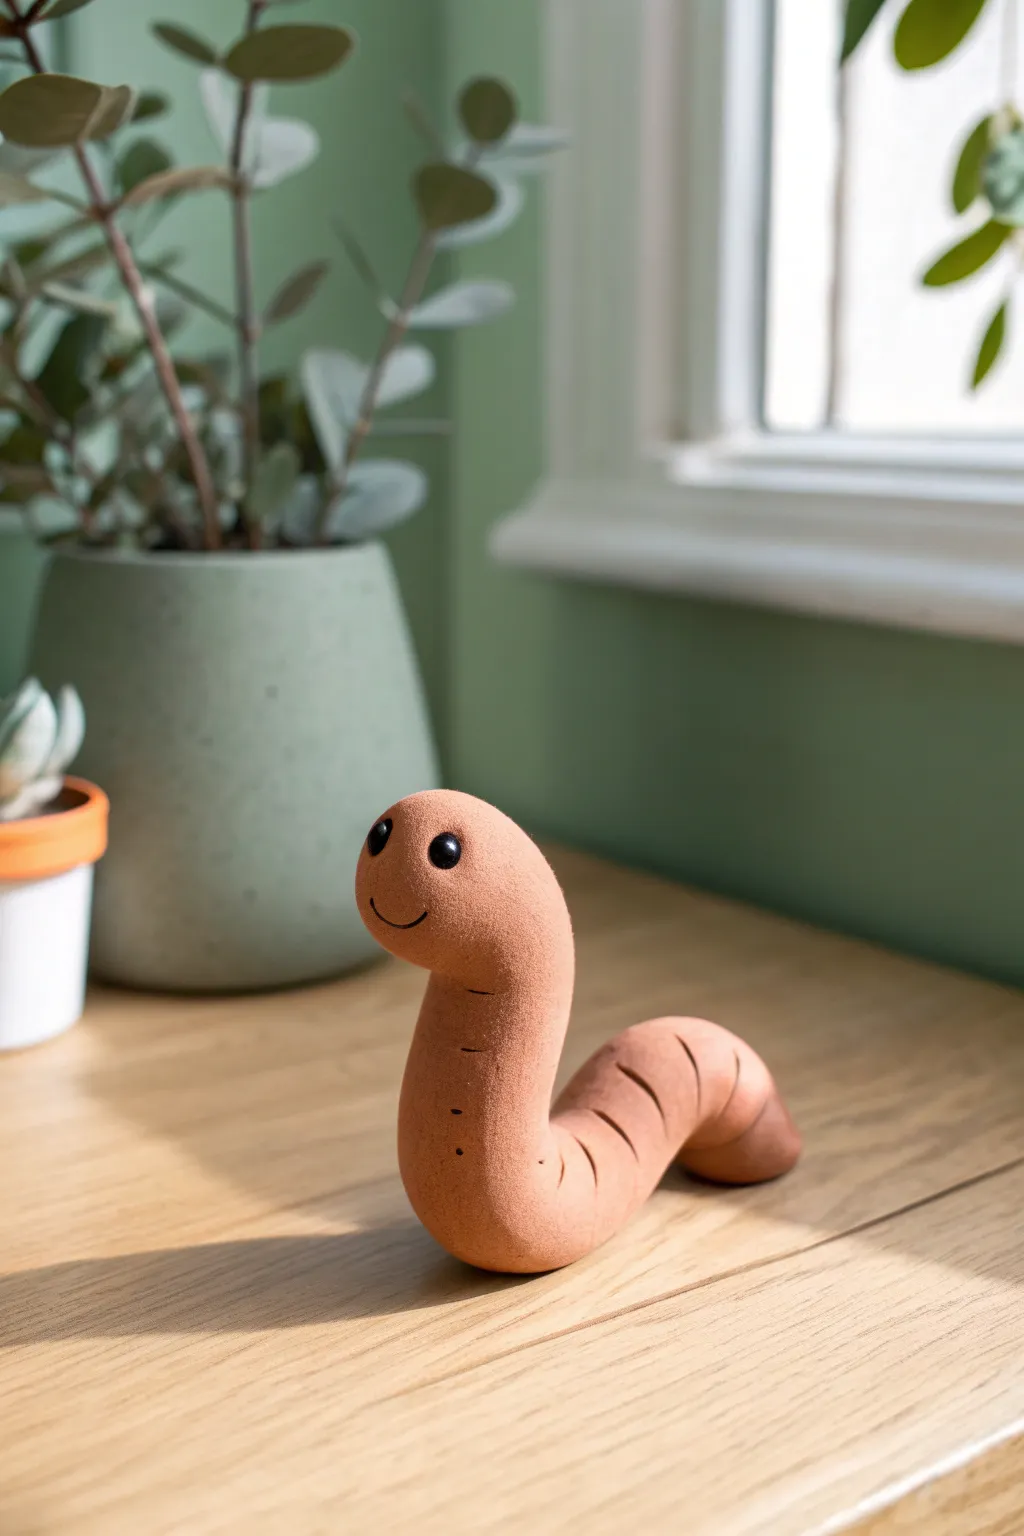
Bring your stop-motion animations to life with this charming, minimalist earthworm character. Crafted from smooth polymer clay with a classic segmented body, this little guy is designed to be sturdy enough for posing yet simple enough for beginners to sculpt perfectly.
Step-by-Step Guide
Materials
- Polymer clay (terracotta or muted pink/tan color)
- Black polymer clay (small amount)
- Needle tool or toothpick
- Ball stylus tool
- Aluminum crafting wire (16-gauge or 18-gauge)
- Wire cutters
- Small rolling pin or acrylic roller
- Baking sheet and parchment paper
- Oven (for baking polymer clay)
Step 1: Building the Armature
-
Prepare the core wire:
Cut a piece of aluminum wire approximately 5-6 inches long. This will act as the spine of your worm, allowing you to bend and pose it later without the clay cracking or sagging. -
Loop the ends:
Using pliers or just your fingers, bend both ends of the wire back on themselves to create small, tight loops. This prevents the sharp wire from poking through the clay and gives the clay something to grip onto. -
Curve the spine:
Gently bend the wire into an ‘S’ shape or a simple curve that mimics how a worm lifts its head. This pre-shape makes sculpting easier, though the final puppet will be moveable.
Step 2: Sculpting the Body
-
Condition the clay:
Take your terracotta or pink/tan clay and knead it thoroughly in your hands until it is soft, warm, and pliable. Conditioning is crucial to prevent cracks during baking. -
Create a log:
Roll the conditioned clay into a smooth, even log or snake on your work surface. It should be slightly longer than your wire armature and about 3/4 of an inch thick. -
Insert the armature:
Carefully press your wire spine into the center of the clay log. I find it easiest to slice the log lengthwise halfway, tuck the wire in, and then smooth the seam closed with my thumbs. -
Refine the shape:
Roll the clay log gently between your palms or on the table to smooth out any seams and ensure the wire is perfectly centered. The clay should taper slightly at the tail end but remain rounded at the head. -
Round the head:
Use your fingers to gently dome the head end, making it smooth and bulbous. This will be the face of your character.
Smooth Moves
Use a tiny amount of baby oil or clay softener on your fingertips while smoothing the body. It eliminates fingerprints instantly and creates that flawless, professional skin texture.
Step 3: Adding Details
-
Mark the segments:
Using a needle tool or a dull knife, gently press indentation lines across the back of the worm. Space them evenly along the body, starting below the ‘neck’ area. -
Curve the segments:
Instead of straight lines, try to give these indentations a slight curve to emphasize the roundness of the body. Don’t cut all the way around; focus on the top and sides visible to the camera. -
Make eye sockets:
Take a ball stylus tool and press two small, shallow divots into the front of the head where you want the eyes to sit. Spacing them slightly apart gives a cute, innocent look. -
Create the eyes:
Roll two tiny spheres of black clay. They should be very small—no bigger than a peppercorn. Press them firmly into the sockets you just created. -
Add the smile:
Use the edge of a small spoon tool, a straw cut in half, or your needle tool to impress a tiny, simple curved smile below the eyes. Keep it subtle for that minimalist charm. -
Add subtle texture:
If you want a more organic look like the photo, lightly tap the surface of the clay with a clean toothbrush or rough sponge to remove fingerprints and add a matte, skin-like texture. -
Extra detailing:
For added realism, use a needle tool to add three tiny dots or pores on the chest area below the neck, just like in the reference image.
Magnetic Personality
Embed strong neodymium magnets into the bottom of the worm before baking. Use a metal sheet under your table setup to keep the worm glued down while you animate the upper body movements.
Step 4: Baking and Finishing
-
Pre-bake check:
Give your worm a final once-over. Smooth out any accidental fingernail marks and ensure he is standing up nicely on his own. -
Bake the puppet:
Place the worm on a parchment-lined baking sheet. Bake according to your specific polymer clay’s package instructions (usually around 275°F or 135°C for 15-30 minutes). -
Cool down:
Let the worm cool completely in the oven with the door cracked open. This gradual cooling makes the clay stronger. -
Matte finish:
The clay typically has a natural matte finish, but if yours is too shiny, you can brush on a layer of matte varnish to knock back the glare for better photos.
Now your little character is ready to wiggle his way into your first stop-motion scene


Snail Slide With a Spinning Shell
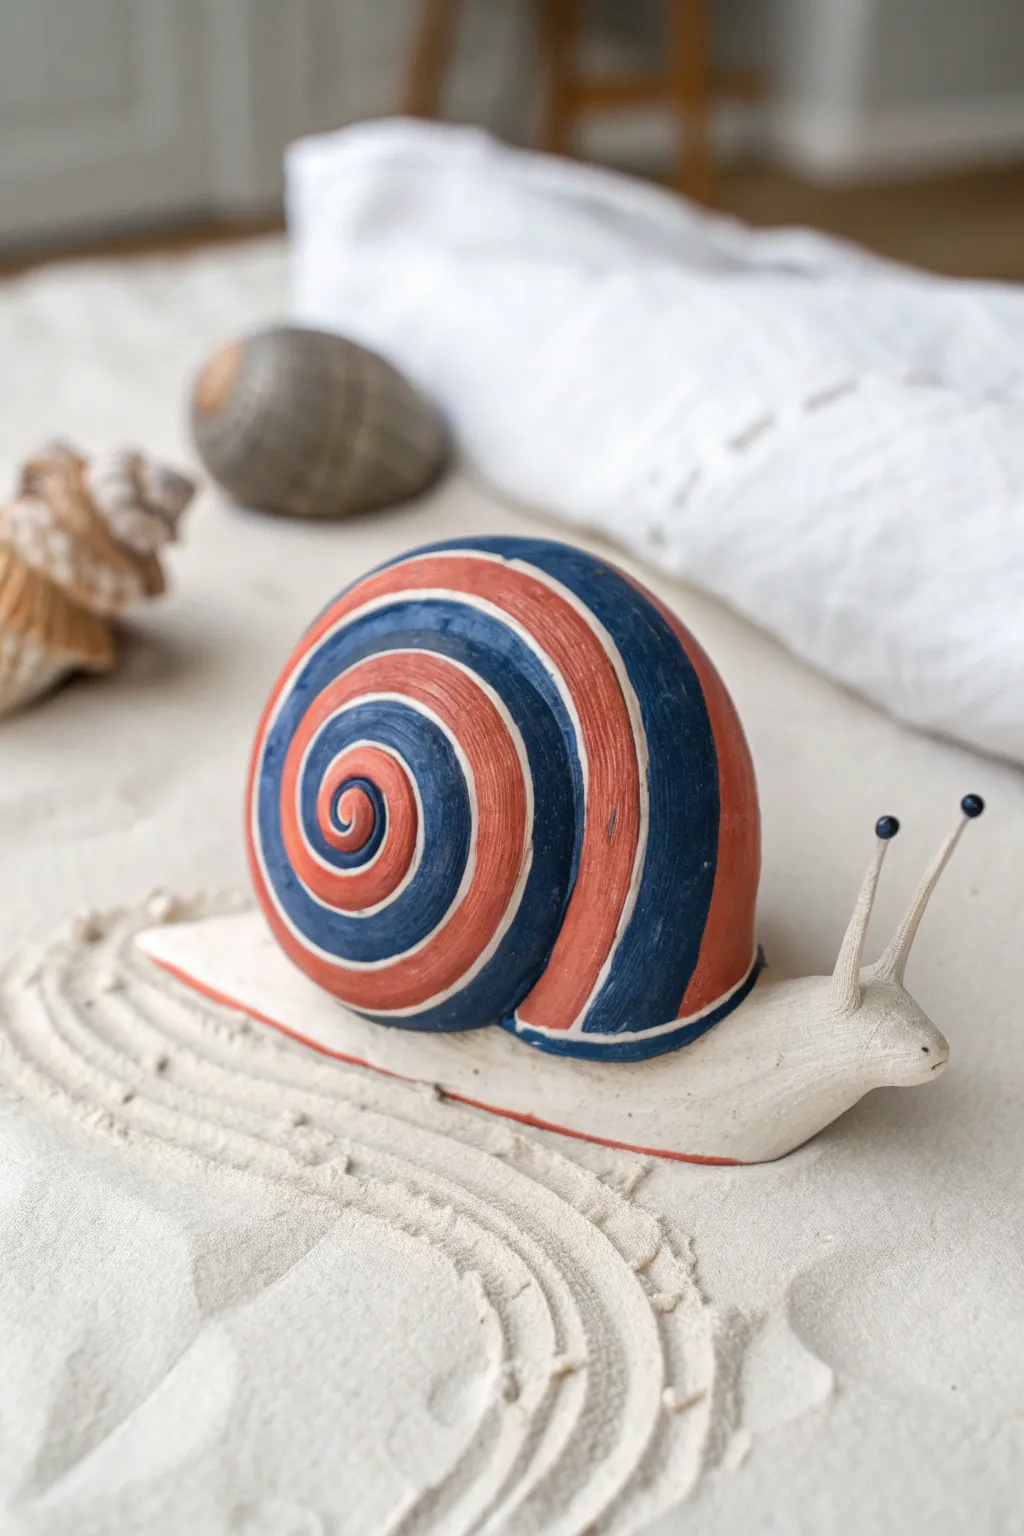
Sculpt a charming little gastropod characterized by its bold, hypnotic shell and inquisitive eyestalks. This polymer clay creation features a matte, textured finish that gives it a wonderfully tactile, handcrafted feel perfect for stop-motion adventures.
Step-by-Step Tutorial
Materials
- White or Beige Polymer Clay (for body)
- Blue Polymer Clay (Deep Navy)
- Orange Polymer Clay (Terra Cotta shade)
- Sculpting tools (needle tool, ball stylus)
- Wire armature (thin crafting wire)
- Acrylic roller
- Small black beads or black clay (for eyes)
- Sandpaper or texture sponge
- Oven for baking
Step 1: Forming the Body
-
Shape the Base:
Start with a block of white or beige clay. Roll it into a thick log, tapering one end significantly to create the tail and the other slightly less for the head. -
Flatten the Foot:
Gently press the log down onto your work surface to flatten the bottom. This creates the ‘foot’ of the snail, giving it a stable base to sit on. -
Curve the Tail:
Slightly curve the tapered tail end to one side. This adds a sense of movement and organic life to the sculpture so it doesn’t look too stiff. -
Sculpt the Head:
Lift the thicker front end upward. Use your fingers to smooth and roundup the neck area where it meets the ground. -
Create Eyestalks:
For durability, insert two short pieces of thin wire into the head. Wrap small bits of beige clay around these wires, creating thin, upright stalks. -
Add the Eyes:
Top each stalk with a tiny black bead or a very small ball of black clay. Press them gently into place to secure the gaze.
Drooping Eyestalks?
If the eyestalks keep bending before baking, chill the sculpture in the freezer for 10 minutes to harden the clay temporarily.
Step 2: Creating the Spiral Shell
-
Prepare Color Strands:
Roll out long, even snakes of both the deep blue and terra cotta orange clay. Aim for a thickness of about 1/4 inch each. -
Twist and Combine:
Lay the blue and orange strands side by side. Gently twist them together or simply press them parallel, then roll them into a single, thicker bi-color log. -
Form the Coil:
Starting from one end, tightly curl the clay log inward to start the spiral. Continue wrapping the log around this center point, keeping the colors aligned. -
Shape the Shell:
As you coil, allow the center to push outward slightly to create a dome shape, rather than a flat pancake coiled disc. -
Refine the Stripes:
Once the shell is large enough, use a tool to gently smooth the ridges if you want a cleaner look, or leave the coil definition for texture. -
Attach Shell to Body:
Place the shell onto the back of the beige body. Press firmly to bond the raw clay pieces together, smoothing the clay underneath slightly to seal the seam.
Step 3: Finishing Touches
-
Add Texture:
Take a texture sponge or even a stiff toothbrush and gently tap it over the beige body to give it a skin-like, matte appearance rather than smooth plastic. -
Define the Mouth:
Use a needle tool or small blade to cut a tiny slit under the head for the mouth, giving the snail a hint of personality. -
Final Inspection:
Check the balance of your snail. Ensure the shell isn’t too heavy on one side, which might cause it to tip over during baking. -
Bake:
Bake the snail according to your polymer clay package instructions. I suggest tenting foil over it to prevent the white clay from scorching. -
Sand Finish:
Once baked and fully cooled, you can lightly sand any rough fingerprints off the shell to make the stripes pop.
Make it Spin
Embed a small magnet in the body and a separate magnet in the shell before baking. This lets you detach and rotate the shell for animation!
Now you have a steady little friend ready to slowly slide across your desk or star in your next scene

The Complete Guide to Pottery Troubleshooting
Uncover the most common ceramic mistakes—from cracking clay to failed glazes—and learn how to fix them fast.
Bouncy Ball Squash-and-Stretch Loop
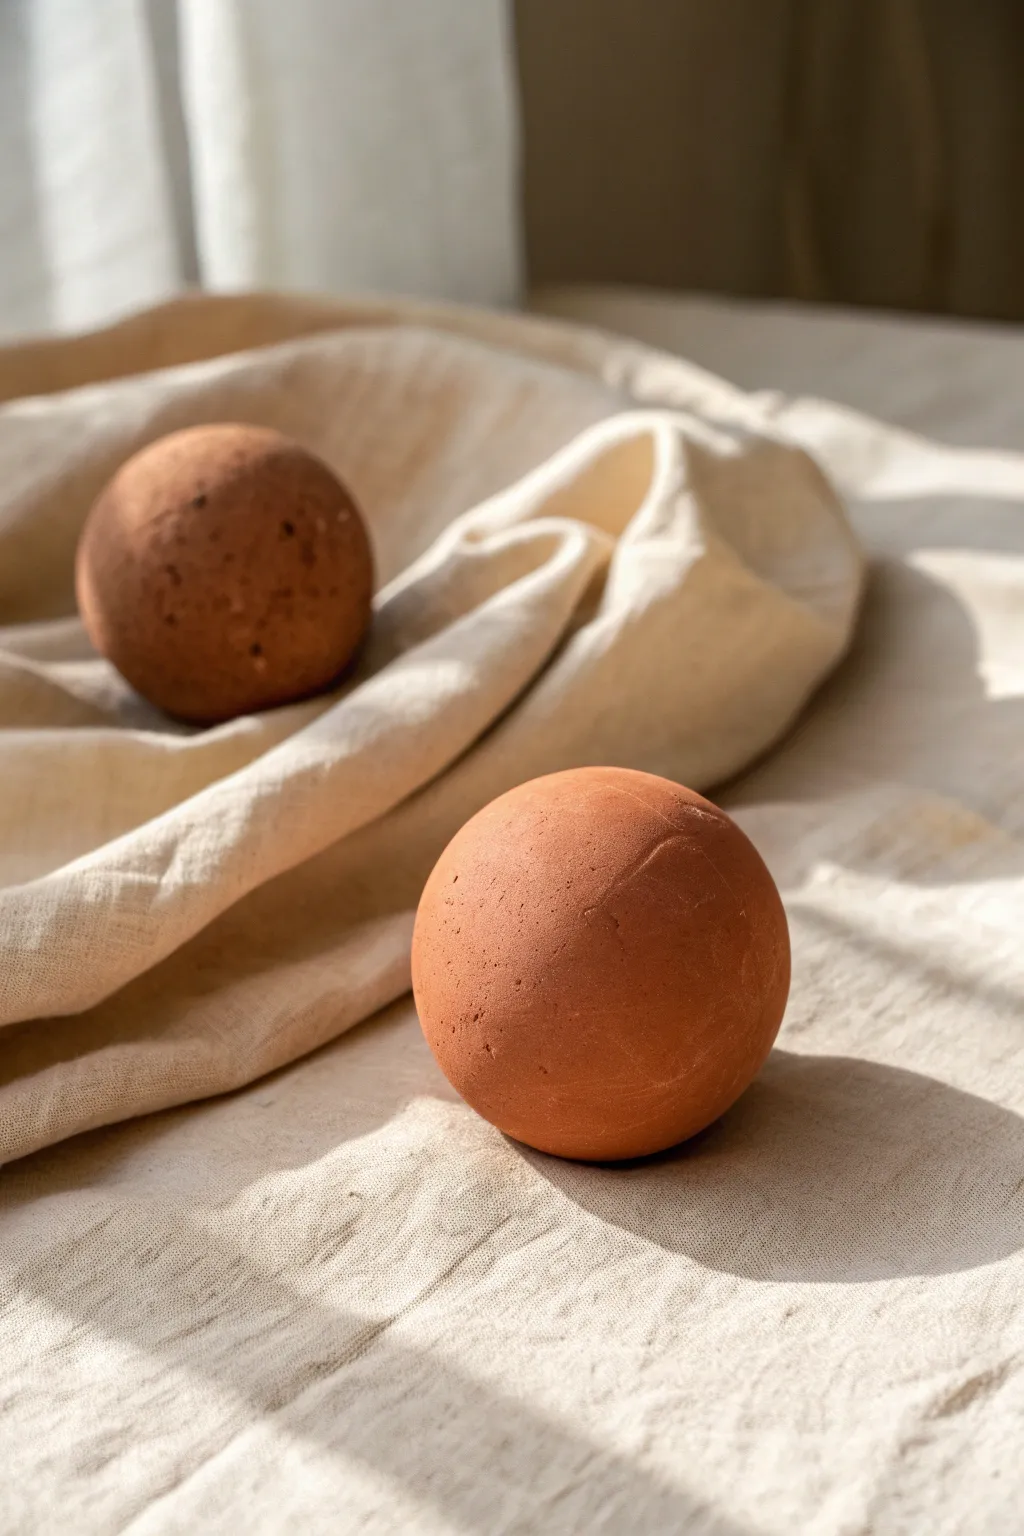
Before you can animate a convincing bounce, you need the perfect subject. This guide focuses on creating two smooth, weighted clay spheres with a natural terracotta finish, ideal for practicing squash-and-stretch principles on a neutral backdrop.
Step-by-Step Guide
Materials
- Terracotta-colored modeling clay (polymer or oil-based)
- Small rolling pin (acrylic is best)
- Fine-grit sandpaper (400-600 grit)
- Soft buffing cloth or denim scrap
- Cooking oil or baby oil (optional for smoothing)
- Clean work surface (glass or polished stone recommended)
Step 1: Conditioning & Shaping
-
Warm the Clay:
Begin by taking a substantial chunk of terracotta-colored clay. Work it thoroughly in your hands for several minutes. The heat from your palms is essential to make it pliable and eliminate any internal air pockets that could cause cracks later. -
Divide the Portions:
Split your conditioned clay into two portions. Aim for one slightly larger than the other to create visual variety in your scene. I usually make the foreground ball about 2 to 2.5 inches in diameter. -
Initial Rolling:
Place the first chunk of clay between your palms. Roll it vigorously in a circular motion. Apply firm pressure at first to compress the material, then gradually lighten your touch as the shape becomes more spherical. -
Check for Seams:
Inspect the ball closely for any fold lines or seams. If you find one, smudge it smooth with your thumb and re-roll. Creating a seamless surface now saves a lot of retouching time during animation.
Uneven Roll?
If your ball keeps turning out egg-shaped, try rolling it between two flat surfaces (like two acrylic blocks) instead of using your hand. This forces a uniform spherical shape.
Step 2: Refining the Surface
-
Table Rolling:
Move the ball to your clean, flat work surface. Cup your hand slightly over the ball and roll it in wide circles. This hard surface helps eliminate lumpy fingerprints that hand-rolling might have left behind. -
Oil Smoothing:
If using polymer clay, apply a tiny drop of baby oil to your finger and lightly glide it over the surface. This breaks down the very outer layer of clay just enough to melt away fine fingerprints. Use sparingly to avoid a sticky mess. -
Texture Check:
For that realistic, raw earthenware look seen in the photo, you don’t want a plastic-like shine. Gently tap the surface with a piece of heavy paper or smooth fabric to mattify any glossy spots created by the oil. -
Second Ball Creation:
Repeat the rolling and smoothing process with your second, smaller portion of clay. Ensure this one has the same matte finish so they look like a matching set.
Level Up: Texture
Roll your finished spheres gently over a patch of rough canvas or fine concrete to imprint a subtle, porous texture that catches the light beautifully.
Step 3: Finishing Touches
-
Creating ‘Squash’ Copies:
Though the image shows perfect spheres, for the animation you’ll need variations. Create 2-3 additional balls, but deliberately press them slightly flat against the table to mimic the ‘squash’ frame of an impact. -
Creating ‘Stretch’ Copies:
Similarly, create 2-3 elongated versions. Roll these gently into slight oval shapes to represent the ball accelerating through the air. -
Final Surface Buffing:
Once your main hero spheres are shaped, take a piece of denim or soft cloth and very gently buff them in a circular motion. This adds a professional, subtle sheen without making them look wet. -
Cooling Down:
If you used an oil-based plasticine that softens with heat, place your finished spheres in the fridge for 10 minutes. This firms them up, making them less susceptible to accidental dings when you set up your scene.
Now you have a set of professional-looking props ready to bring your squash-and-stretch animation to life
Two Blobs Meet and Merge
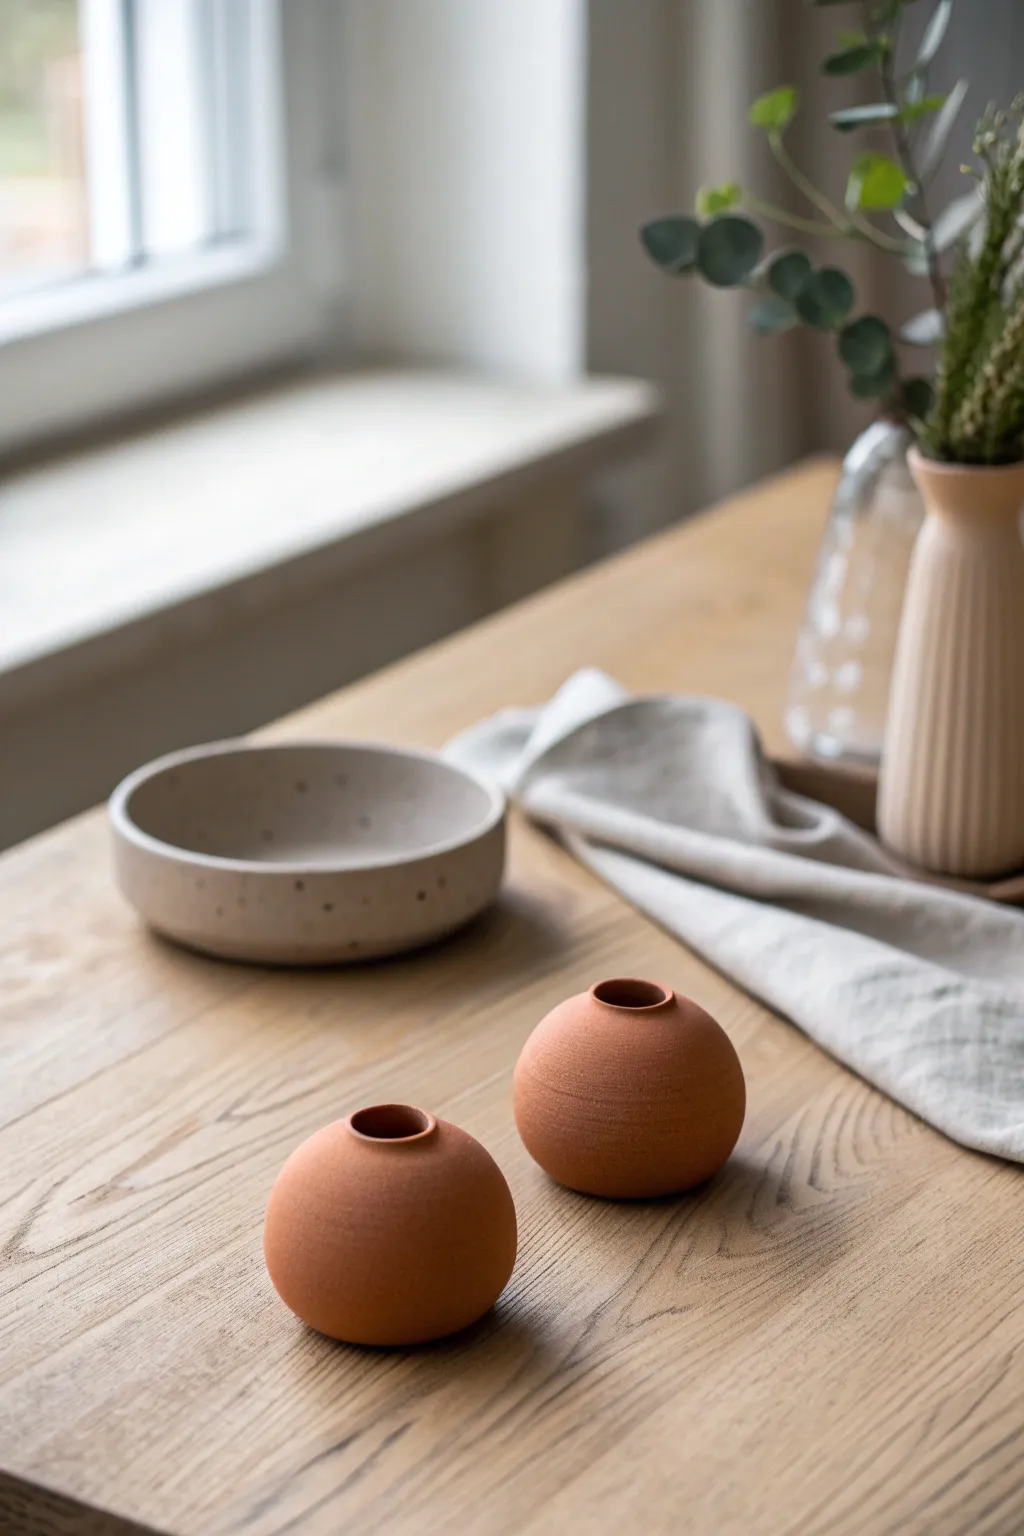
These charming, minimalist sphere vases are the perfect introduction to working with terracotta-colored clay, resulting in smooth, modern forms that look beautiful even when empty. Their warm, earthy tone and matte finish create a natural aesthetic that pairs wonderfully with wooden surfaces and simple greenery.
Step-by-Step
Materials
- Terracotta-colored air-dry clay or polymer clay
- Rolling pin
- Small wooden paddle or flat spatula
- Sponge
- Water cup (if using air-dry clay)
- Fine-grit sandpaper (220-400 grit)
- Modelling tool with a small round tip
- Damp cloth
- Clear matte varnish (optional)
Step 1: Forming the Base
-
Portion the clay:
Begin by cutting two equal-sized blocks of clay from your larger supply. Aim for amounts roughly the size of a tangerine for each vase to match the scale seen in the photo. -
Condition the material:
Knead the clay thoroughly in your warm hands. Whether using polymer or air-dry clay, this conditioning phase is crucial to prevent internal air bubbles and ensure a smooth, crack-free surface later. -
Roll spheres:
Roll each portion of clay between your palms or against a clean work surface to create a perfect sphere. Take your time here; any lumpiness now will be harder to fix once the clay starts to firm up. -
Create stability:
Gently tap the bottom of each sphere against your table surface. This creates a small flat spot so the round vases will sit securely without rolling away.
Water Work
Keep a small bowl of water nearby to constantly wet your fingers. This prevents the clay from dragging and creates that seamless, stone-like surface.
Step 2: Shaping the Vessel
-
Open the form:
Locate the exact top center of your sphere. Using your thumb or a rounded modeling tool, gently press down to create indention, but do not go all the way through. -
Widen the interior:
Carefully expand the hole slightly by rotating your thumb or tool inside the opening. Keep the mouth of the vase quite narrow—about the width of a finger—to maintain that enclosed, spherical look. -
Define the rim:
Use your dampened fingertip to smooth the rim of the opening. The edge should be slightly rounded, not sharp or jagged. If cracks appear at the rim, dab a tiny bit of water and smooth them out immediately. -
Refine the curve:
Cup the sphere in your hands and gently rotate it, checking for any accidental dents caused during the opening process. Push gently from the inside if you need to restore the full roundness.
Step 3: Surface Texture
-
Initial smoothing:
If using air-dry clay, take a slightly damp sponge and wipe the entire exterior surface. This removes fingerprints and creates a uniform texture. For polymer, use a tiny amount of baby oil. -
Create the matte finish:
To achieve the specific matte, earthy look in the photo, avoid polishing the clay too much. You want to leave the natural grain of the material visible. -
Dry or Bake:
Follow the instructions for your specific clay. If air-drying, let them sit for 24-48 hours away from direct heat to prevent cracking. If baking polymer, place them on a ceramic tile in the oven.
Speckled Effect
Mix dried coffee grounds or black pepper into your clay before rolling the sphere to emulate the speckled texture seen in the larger bowl.
Step 4: Post-Processing
-
Check for imperfections:
Once fully cured or dry, inspect the surface. Look for any sharp ridges or bumps that disrupt the spherical profile. -
Sand for softness:
Using fine-grit sandpaper, very gently buff the surface. I find doing this in a circular motion helps maintain the roundness. You aren’t trying to remove material, just softening the texture to look like unglazed pottery. -
Wipe down:
Clean off all sanding dust with a damp cloth or sponge. The clay should look rich and uniform in color again. -
Optional sealing:
If you plan to use these with stop motion animation where they will be handled frequently, apply a very thin coat of ultra-matte varnish. However, leaving them raw best mimics the reference image.
Place your finished mini vases on a wooden surface to admire how the warm clay tones complement the natural grain of the wood


What Really Happens Inside the Kiln
Learn how time and temperature work together inside the kiln to transform clay into durable ceramic.
Tiny Creature Builds a Mini Tower
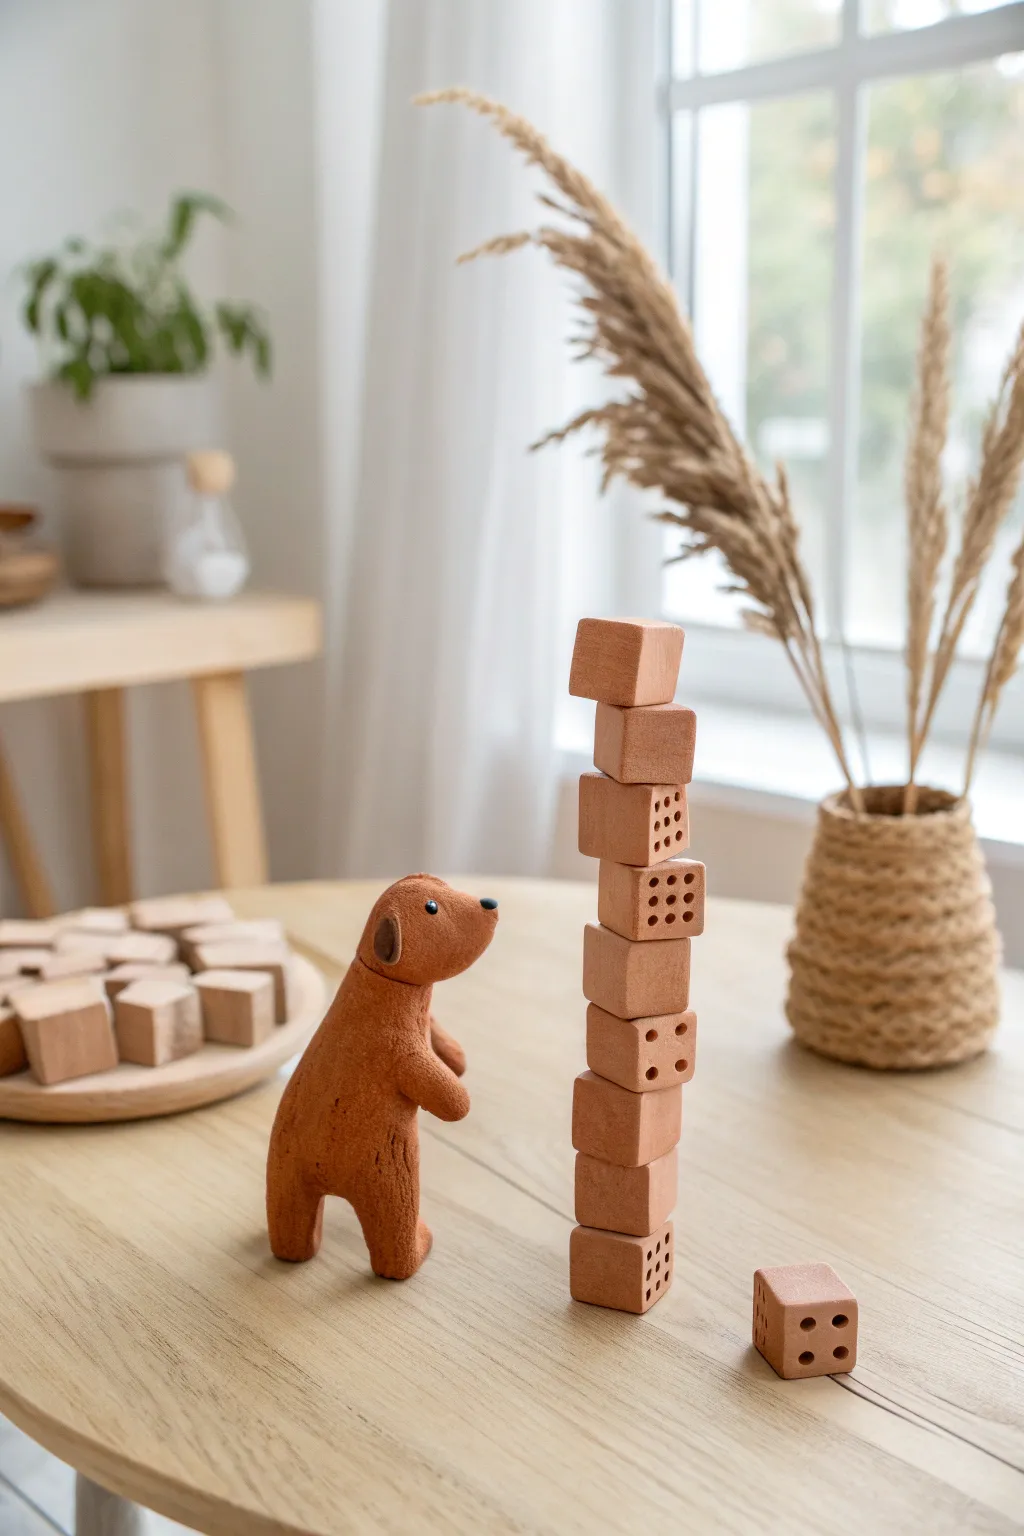
Create a charming stop-motion ready scene featuring a textured brown bear and a set of rustic, handmade clay building blocks. This project combines simple geometric sculpting with character design to make a playful, tactile set perfect for animation.
Step-by-Step Tutorial
Materials
- Terracotta-colored polymer clay (or air-dry clay)
- Dark brown polymer clay (for nose/ears)
- Black glass bead or small ball of black clay (for eye)
- Clean rolling pin
- Square clay cutter (approx. 1 inch)
- Toothbrush or texturing sponge
- Ball stylus tool
- Creating knife or blade
- Fine grit sandpaper
- Matte varnish (optional)
Step 1: Sculpting the Bear Character
-
Form the main body:
Start by conditioning a large lump of terracotta clay. Roll it into a smooth oval shape, slightly tapering the top to form the neck area where the head will attach. -
Shape the legs:
Pull two thick sections from the bottom of your oval to form the legs. Blunt the ends so the bear can stand securely on its own—test the balance frequently as you shape. -
Create the head:
Roll a smaller ball of terracotta clay for the head. Gently pinch the front to pull out a rounded snout shape, making sure it isn’t too pointy. -
Attach the head:
Press the head onto the tapered neck of the body. Blend the clay at the seam using a modeling tool or your finger so the neck looks natural and sturdy. -
Add the arms:
Roll two small sausage shapes for the arms. Attach them to the upper torso, bending them slightly forward as if the bear is reaching for the blocks. -
Texture the fur:
This is a key detail. Take a clean toothbrush or a coarse texturing sponge and firmly tap it all over the bear’s body. This creates that lovely, soft ‘stuffed animal’ texture seen in the photo. -
Add facial features:
Use tiny flattened discs of dark brown clay for the ears and a small triangle for the nose. Press a small black bead or clay ball into the side of the head for the eye.
Wobbly Tower?
If your clay blocks refuse to stack straight, tape a piece of sandpaper to a table and sand each side of the cube in a figure-8 motion for perfectly flat surfaces.
Step 2: Making the Building Blocks
-
Prepare the slab:
Roll out a significant amount of terracotta clay into a thick, even slab. I find using depth guides helps keep the thickness consistent, which is crucial for stacking. -
Cut the cubes:
Use a square cutter or a sharp blade to cut out at least 15-20 identical squares. You can stack layers if your cutter isn’t deep enough, or hand-shape them into cubes. -
Refine the shapes:
Gently tap each side of your cubes against your work surface to flatten them and sharpen the corners. They need to be flat enough to stack high without wobbling. -
Create dice markings:
Select about half of your blocks to turn into dice. Using a ball stylus tool, press indentations into the faces to mimic dice patterns (dots of 1, 2, 4, etc.). -
Apply texture:
Lightly dab your toothbrush or sponge over the surface of the blocks. You want them to have a similar matte, stone-like texture to the bear, but perhaps a bit subtler.
Step 3: Finishing Touches
-
Baking or drying:
If using polymer clay, bake exactly according to the package directions (usually around 275°F/135°C). Use an oven thermometer to ensure you don’t scorch the color. If using air-dry clay, let them sit for 24-48 hours. -
Sanding imperfections:
Once fully cured and cooled, check the bottoms of your blocks. If any are rounded or uneven, lightly sand them flat against a piece of fine-grit sandpaper. -
Final assembly check:
Test your scene by stacking the blocks into a tower and placing the bear next to it to ensure the scale relationships look correct.
Level Up: Animation Ready
Embed small neodymium magnets inside the bear’s feet and the bottom blocks before baking. This allows you to secure them to a metal baseplate for gravity-defying poses.
Now you have a timeless, handcrafted toy set ready for display or your next animated film
Snowman Builds Up, Then Melts Down
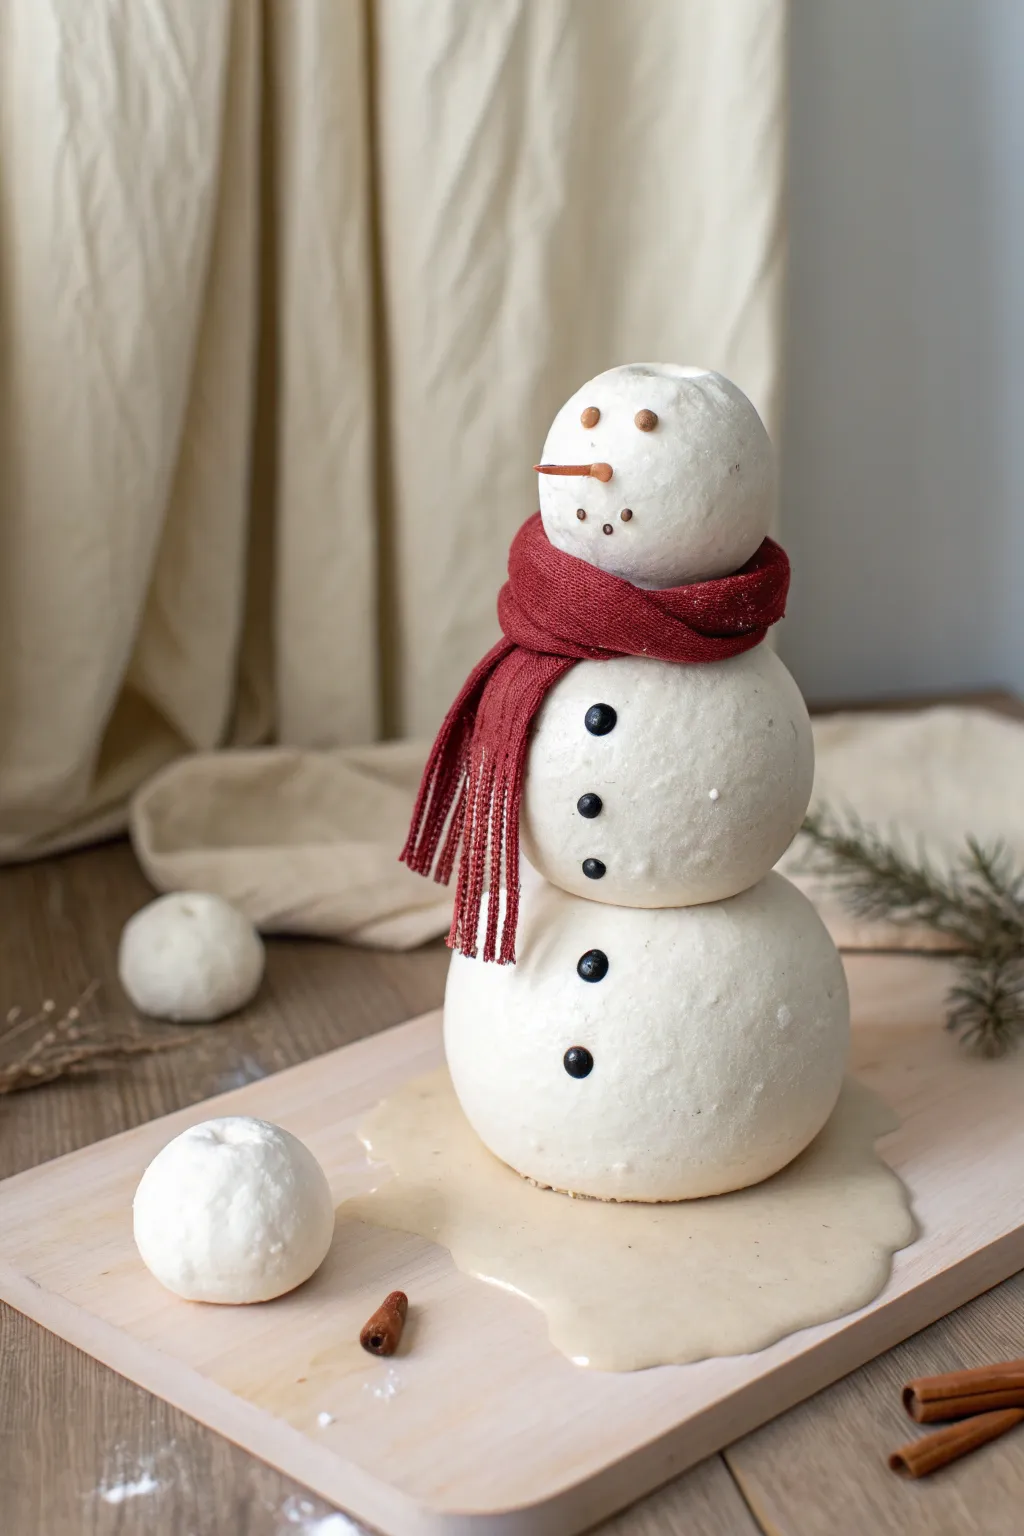
Bring the magic of winter indoors with this charming clay snowman that appears to be slowly melting away. This project uses different sizes of textured white clay spheres and a clever liquid clay base to capture a whimsical moment of transformation.
Step-by-Step Guide
Materials
- White air-dry clay or modeling clay
- Liquid polymer clay (translucent or white mixed with beige)
- Red textured fabric or felt scrap
- Small black beads or black clay
- Orange polymer clay or painted wood splinter
- Toothpicks or wire armature
- Small cinnamon sticks (optional props)
- Wooden board or work surface
- Texture tool (clean toothbrush or stiff bristle brush)
- Gloss varnish (optional)
Step 1: Creating the Melting Base
-
Prepare the puddle:
Begin by creating the illusion of melted snow. If using polymer clay, mix liquid clay with a tiny drop of beige or off-white paint to get a ‘slushy’ color. Pour this onto your wooden board in an irregular, spreading puddle shape. -
Shape the base:
If you are using air-dry clay instead of liquid, roll out a thin, irregular slab of clay. Smooth the edges down so they taper seamlessly onto the wooden board, mimicking liquid spreading out. -
Add melting texture:
While the base is wet, gently drag a toothpick through the edges to create uneven, organic lines that look like flowing water.
Slumping Snowman
If the spheres are sagging before they dry, insert a supportive dowel through the center of the entire stack, or let each ball stiffen slightly before stacking.
Step 2: Forming the Snowman Body
-
Roll the bottom sphere:
Take a large portion of white clay and roll it into a sphere for the base of the snowman. It should be the largest of the three balls. -
Flatten the connection:
Gently press the bottom of this sphere against a flat surface to flatten it slightly. This ensures it sits stably on your ‘melted’ puddle base. -
Stack the middle section:
Roll a second sphere, slightly smaller than the first. I find it helps to insert a toothpick or wire piece halfway into the bottom sphere before pressing this middle one on top for stability. -
Add the head:
Roll the smallest sphere for the head. Secure it to the top of the middle section, again using a small piece of wire or toothpick if needed to keep it from sliding. -
Texture the snow:
To get that realistic packed-snow look, take a clean toothbrush or a stiff bristle brush and gently stipple the surface of all three spheres. Lightly tap the bristles all over the clay to remove smooth fingerprints and add a porous texture.
Real Snow Texture
Mix a small amount of baking soda or fine white glitter into your clay body before rolling. This adds a subtle sparkle that catches the light like fresh snow.
Step 3: Adding Details and Accessories
-
Create the nose:
Shape a tiny cone from orange clay. Gently texture it with horizontal lines to resemble a carrot, then press it firmly into the center of the head sphere. -
Place the eyes and mouth:
Use tiny black beads or very small balls of black clay. Press two above the nose for eyes and arranged smaller dots in a curve below for a mouth. -
Add buttons:
Press larger black beads or clay balls down the front of the middle and bottom spheres to serve as coal buttons. Push them in slightly so they look embedded in the ‘snow’. -
Make the scarf:
Cut a long, thin strip of red textured fabric or felt. Wrap it snugly around the neck area, between the top and middle spheres. -
Style the scarf drape:
Let one end of the scarf hang down the front. You can fray the ends of the fabric with a needle to create fringe tassels.
Step 4: Final Touches and Staging
-
Position the loose snowballs:
Create one or two extra clay snowballs—some slightly misshapen—and place them on the board near the main figure to suggest leftover building materials. -
Scatter props:
Place a few small cinnamon sticks casually around the base. These act as ‘arms’ that might have fallen off or haven’t been attached yet. -
Blend the snowman to the base:
Where the bottom sphere meets the liquid puddle, use a sculpting tool to smooth a tiny bit of the sphere’s clay downwards, blending it into the puddle to enhance the melting effect. -
Final drying:
Allow the entire structure to dry or cure according to your clay manufacturer’s instructions. -
Optional gloss:
For a wet snow look, touch a little gloss varnish just on the puddle and the very top of each sphere where the sun would hit.
Now you have a captured moment of winter fun that will last forever on your shelf

TRACK YOUR CERAMIC JOURNEY
Capture glaze tests, firing details, and creative progress—all in one simple printable. Make your projects easier to repeat and improve.
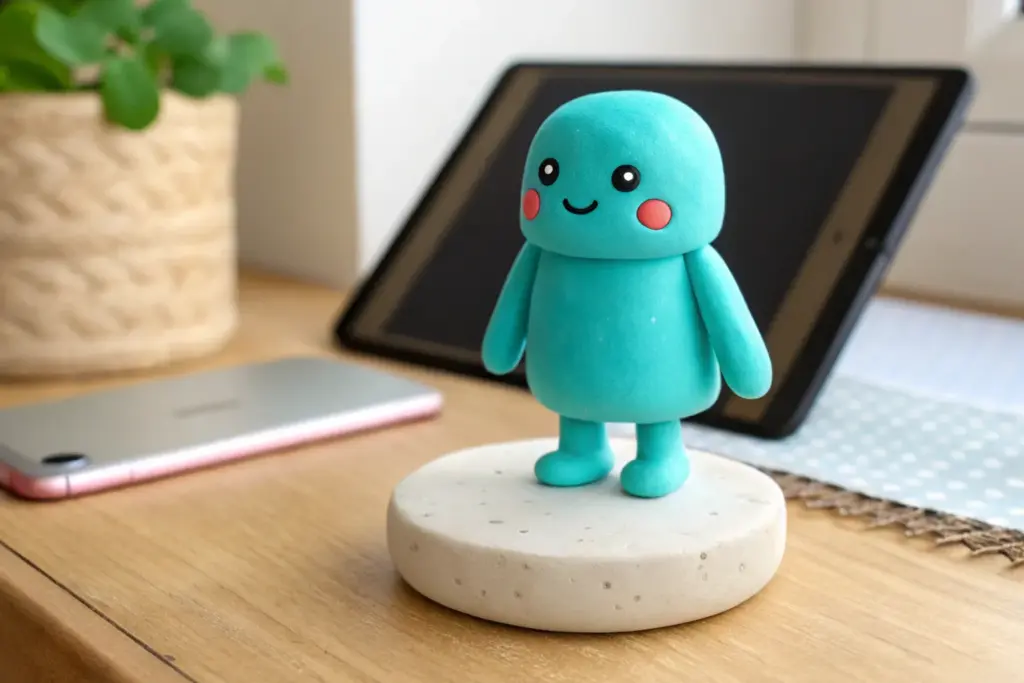
Clay Water Ripples Around a Floating Ring
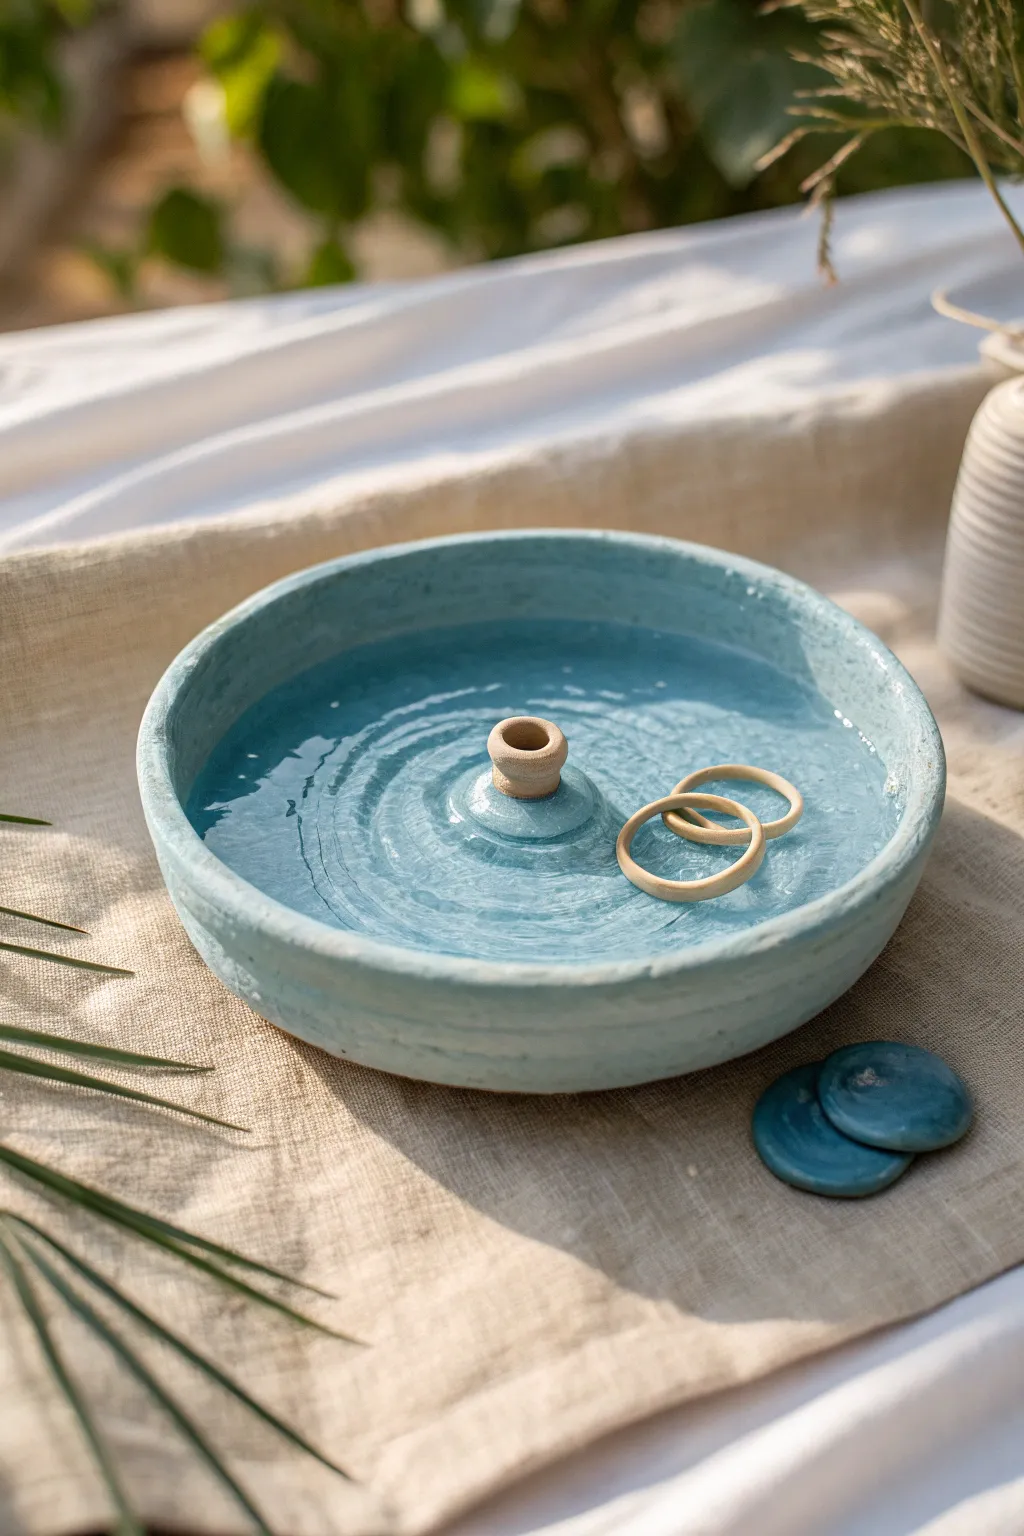
Capture the stillness of water with this beautiful ceramic-style basin project, designed to hold actual water for stop-motion effects or display. Its textured teal finish and integrated central pedestal make it a perfect stage for capturing mesmerizing fluid dynamics.
Detailed Instructions
Materials
- Air-dry clay or polymer clay (white)
- Pottery wheel (optional, hand-building works too)
- Modeling tools (rib tool, sponge, needle tool)
- Rolling pin
- Teal acrylic paint
- Turquoise glossy glaze or waterproof sealant
- Small wooden craft rings
- Clear resin (optional alternate to water)
- Fine-grit sandpaper
Step 1: Forming the Basin Base
-
Prepare the Clay:
Start by conditioning your clay. If you are using air-dry clay, knead it until it is pliable and smooth. Roll out a large slab about 1/2 inch thick to form the bottom of your bowl. -
Cut the Base:
Use a round template or a bowl to cut a perfect circle from your clay slab. This will determine the overall diameter of your finished ripple basin. -
Build the Walls:
Roll out long coils of clay. Stack these coils around the perimeter of your base circle to build up the walls. I usually aim for a height of about 2-3 inches. -
Smooth the Form:
Using your fingers and a damp sponge or a rib tool, blend the coils together on both the inside and outside. Ensure the connection between the base and the wall is seamless to prevent leaks later. -
Create the Texture:
Instead of smoothing it perfectly, leave slight horizontal striations or use a rough sponge to dab the exterior. This gives it that handmade, rustic pottery look seen in the image.
Leak Prevention
If you suspect your clay is porous, line the interior with a thin layer of UV resin before adding water. It cures instantly and seals cracks.
Step 2: Sculpting the Interior Features
-
Form the Pedestal:
Create a small, hollow cylinder or mound in the exact center of the bowl. This pedestal should rise just below where your water line will be. -
Add the Central Cap:
Sculpt a small, trumpet-shaped cap—almost like the top of a volcano—and attach it to your central pedestal. Smooth the edges down so it looks like one continuous piece. -
Detail the Ripple Texture:
Use a modeling tool to carve very subtle, concentric rings into the bottom of the basin floor. These will visually enhance the effect of water ripples when filled. -
Make the Side Discs:
With leftover clay, form two small, flat discs about the size of coins. Press your thumb into the center to create a slight indentation.
Dynamic Ripples
For stop motion, use clear hair gel instead of water. It holds the shape of ripples longer, allowing you to animate the ‘movement’ frame by frame.
Step 3: Finishing and Waterproofing
-
Dry Completely:
Based on your clay type, let the piece dry fully. For air-dry clay, this might take 24-48 hours. Ensure it is bone dry before proceeding. -
Sand Imperfections:
Gently sand the rim of the bowl to make it level. Briefly pass over any sharp jagged bits on the exterior, but keep the rustic texture intact. -
Base Coat Painting:
Mix a light teal or turquoise acrylic paint. Apply a solid coat to the entire interior and exterior of the bowl, as well as the side discs. -
Highlighting:
Dry brush a bit of white paint onto the rim and the raised textures of the exterior to add dimension. -
Leave the Cap Natural:
Paint the very top rim of the central pedestal in a beige or light wood tone to mimic the contrast shown in the reference image. -
Sealing is Key:
Apply multiple coats of a high-gloss waterproof sealant or resin. This is crucial: the bowl must be fully waterproof to hold the water without dissolving the clay. -
Prepare the Rings:
Take your small wooden craft rings and ensure they are clean. You can lightly sand them if they have rough edges. -
Final Assembly:
Once your sealant is cured, fill the basin with water until it touches the central pedestal. Gently place the wooden rings on the surface to float.
Enjoy the tranquil atmosphere your new handcrafted water basin brings to your studio space
Pond Scene With a Jumping Frog Pop
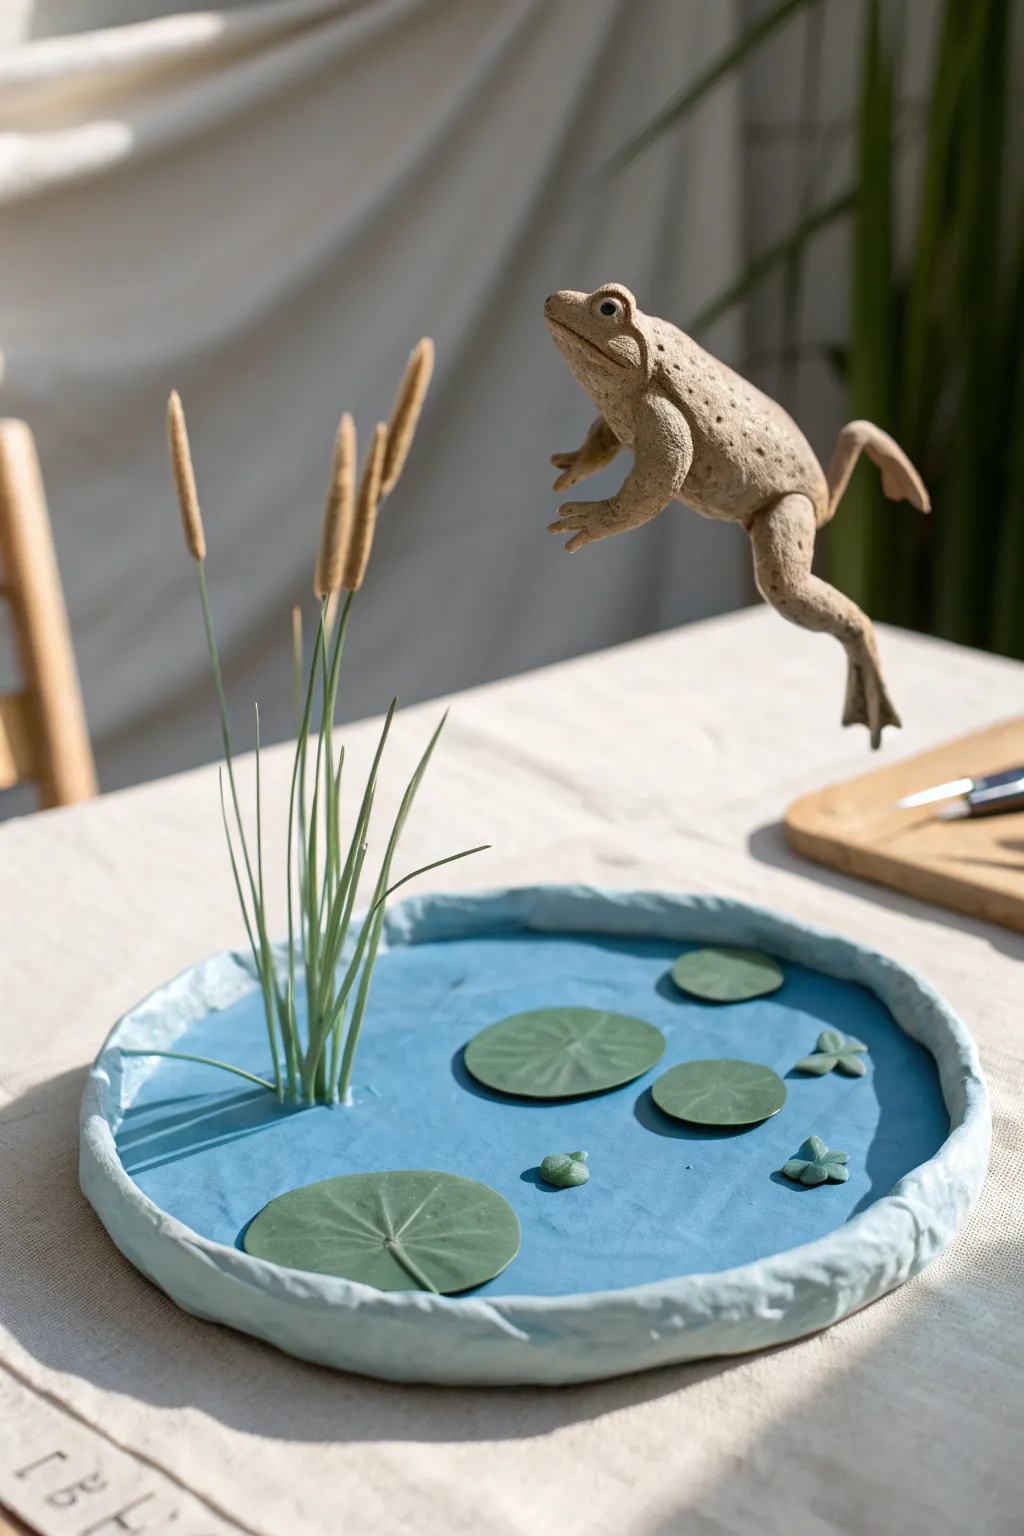
Capture the perfect moment of action with this dynamic clay scene featuring a textured frog suspended mid-jump over a serene pond. The water effect is achieved with a smooth, shallow base, contrasting beautifully with the matte, speckled finish of the amphibian.
Step-by-Step Guide
Materials
- Light brown or beige polymer clay (for the frog)
- Light blue polymer clay (for the water)
- Green polymer clay (various shades for plants)
- Rigid craft wire or armature wire (14-16 gauge)
- Thin floral wire (for reeds)
- Ceramic or foil bowl form (to shape the base)
- Detailing tools (needle tool, ball stylus)
- Texture sponge or stiff bristle brush
- Brown acrylic paint (for washing/antiquing)
- Matte varnish
- Wire cutters and pliers
Step 1: Shaping the Pond Base
-
Create the water surface:
Roll out a large slab of light blue clay to about 1/4 inch thickness. Gently press this into a shallow bowl form or shape a rim by hand to create an irregular, organic circular edge. -
Texture the water:
Smooth out the center entirely, but use your fingers or a soft tool to create very subtle ripples near where the lily pads will sit. -
Make the lily pads:
Flatten small balls of green clay into thin discs. Cut a small ‘V’ shape out of one side of each disc to create the classic lily pad silhouette. -
Add vein details:
Using a needle tool, gently score lines radiating from the center of each lily pad to the outer edges. Place these pads randomly on the blue water surface, pressing lightly so they adhere.
Hidden Supports
To photograph the jump, use a ‘rig’ (a wire glued to the frog’s belly) that you can erase later in software, or hide the wire behind the tall reeds.
Step 2: Sculpting the Reeds
-
Prepare the stems:
Cut several lengths of thin floral wire. Coat them thinly with light green clay, rolling them on your work surface to ensure the clay is smooth and even. -
Form the cattails:
Mix a small amount of beige or light brown clay. Form small elongated cylinders and attach them to the tops of the tallest green stems. -
Plant the reeds:
Insert the wire ends of your reeds into a cluster on one side of the pond base. Smooth the clay at the insertion point to make them look like they are growing out of the water.
Floppy Reeds?
If your reed stems are drooping before baking, prop them up with crumpled paper towels or tin foil supports until the clay hardens in the oven.
Step 3: Sculpting the Frog
-
Build the armature:
This is crucial for the floating effect. Cut a strong piece of rigid wire. One end will anchor into the table or base (outside the frame), and the other will support the frog’s belly. Bend it into an arc. -
Form the body core:
Wrap aluminium foil tightly around the upper end of the wire to create a rough oval shape for the frog’s body. This reduces weight and saves clay. -
Cover with clay:
Sheet your beige clay and wrap it around the foil core. Smooth the seams until you have a seamless frog body shape. -
Add the legs:
Roll four coils of clay. Bend the back legs into a ‘Z’ shape to simulate the extension of a jump. The front legs should be reaching forward. Blend these onto the body. -
Sculpt the face:
Add two small balls of clay for the eyes and sculpt eyelids over them. Use a knife tool to carve a wide, slight curving line for the mouth. -
Apply skin texture:
Gently press a coarse sponge or the tips of a stiff brush all over the frog’s skin to create a realistic, bumpy amphibian texture. -
Baking the pieces:
Bake the pond base and the frog (supported by its wire) according to your clay package instructions. Let them cool completely.
Step 4: Finishing Touches
-
Antiquing the frog:
Dilute brown acrylic paint with water. Brush it over the textured frog, then quickly wipe away the excess with a paper towel. The paint will stay in the textured crevices, highlighting the skin detail. -
Assembly for photos:
For the photo setup, position the frog’s support wire so it is hidden behind the reeds or out of frame, making the frog appear to levitate over the pond.
Once assembled, your suspended frog will bring a wonderful sense of energy and motion to your display
Pinch Pot Creature Hatches From a Bowl

Create this charmingly rustic scene featuring a simple, textured pinch pot and a tiny, round bear character resting inside. The natural terracotta tones and speckled finish give this project a warm, earthy feel perfect for stop motion storytelling or shelf display.
Step-by-Step Tutorial
Materials
- Terracotta or brown stoneware clay (air-dry or kiln-fire)
- Needle tool or toothpick
- Small sponge
- Water slip (clay mixed with water)
- Black acrylic paint (or underglaze)
- Fine detail paintbrush
- Old toothbrush (for speckling)
- Canvas or cloth work surface
Step 1: Creating the Rustic Bowl
-
Form the base ball:
Start with a lump of clay about the size of a tennis ball. Roll it firmly between your palms until you have a smooth, consistent sphere with no cracks. -
Open the pot:
Hold the sphere in one hand and gently push your thumb into the center, stopping about a half-inch from the bottom. This creates the initial opening. -
Pinch the walls:
Using a rhythmic pinching motion with your thumb on the inside and fingers on the outside, slowly rotate the clay. Gently thin the walls, working from the bottom up to the rim. -
Shape the uneven rim:
Don’t aim for perfection here. Allow the rim to remain slightly organic and wavy, which adds to the handmade charm seen in the photo. -
Create surface texture:
Lightly dab a dry sponge or perhaps a crumpled piece of plastic wrap against the clay surface to remove fingerprints and add an earthy, porous texture. -
Flatten the bottom:
Gently tap the bowl onto your table to create a flat spot so it sits stably without wobbling.
Stop Motion Ready
Make the bear slightly smaller than the bowl’s interior so you can animate it rattling around or popping up peek-a-boo style.
Step 2: Sculpting the Tiny Bear
-
Roll the body:
Take a much smaller piece of clay, roughly the size of a walnut. Roll it into a perfect little sphere. This simple shape is the key to the bear’s cute, minimalist look. -
Shape the ears:
Pinch off two tiny, pea-sized bits of clay. Roll them into balls and then slightly flatten them into small semi-circles. -
Attach the ears:
Score (scratch) the top of the head and the bottom of the ears. Add a dab of water or slip, then press the ears firmly onto the head. Blend the back seam downward with a tool to secure them. -
Make the snout:
Roll a very tiny ball of clay and press it onto the lower center of the face. Flatten it slightly so it protrudes just a little bit. -
Refine the texture:
Just like the bowl, dab the bear gently with a textured sponge to ensure it matches the rustic finish of its container.
Cracked Clay?
If edges crack while pinching, your clay is too dry. Dip your fingers in water and smooth the cracks immediately before continuing.
Step 3: Finishing Details
-
Initial drying:
Let both pieces dry until they are leather hard (firm but not bone dry). This prevents them from deforming while you add the final touches. -
Add speckles:
Dip an old toothbrush into watered-down dark brown or black paint (or underglaze). Run your thumb over the bristles to flick tiny speckles across both the bowl and the bear. -
Paint the face:
Using your finest brush and black paint, add two small dots for eyes. Paint a tiny black nose onto the center of the snout. -
Final drying or firing:
If using air-dry clay, allow the pieces to dry completely for 24-48 hours. If using ceramic clay, follow your specific firing schedule.
Once dry, place your bear into its new home for a cozy, handcrafted display
Pottery Wheel Spin Illusion With Clay Rings
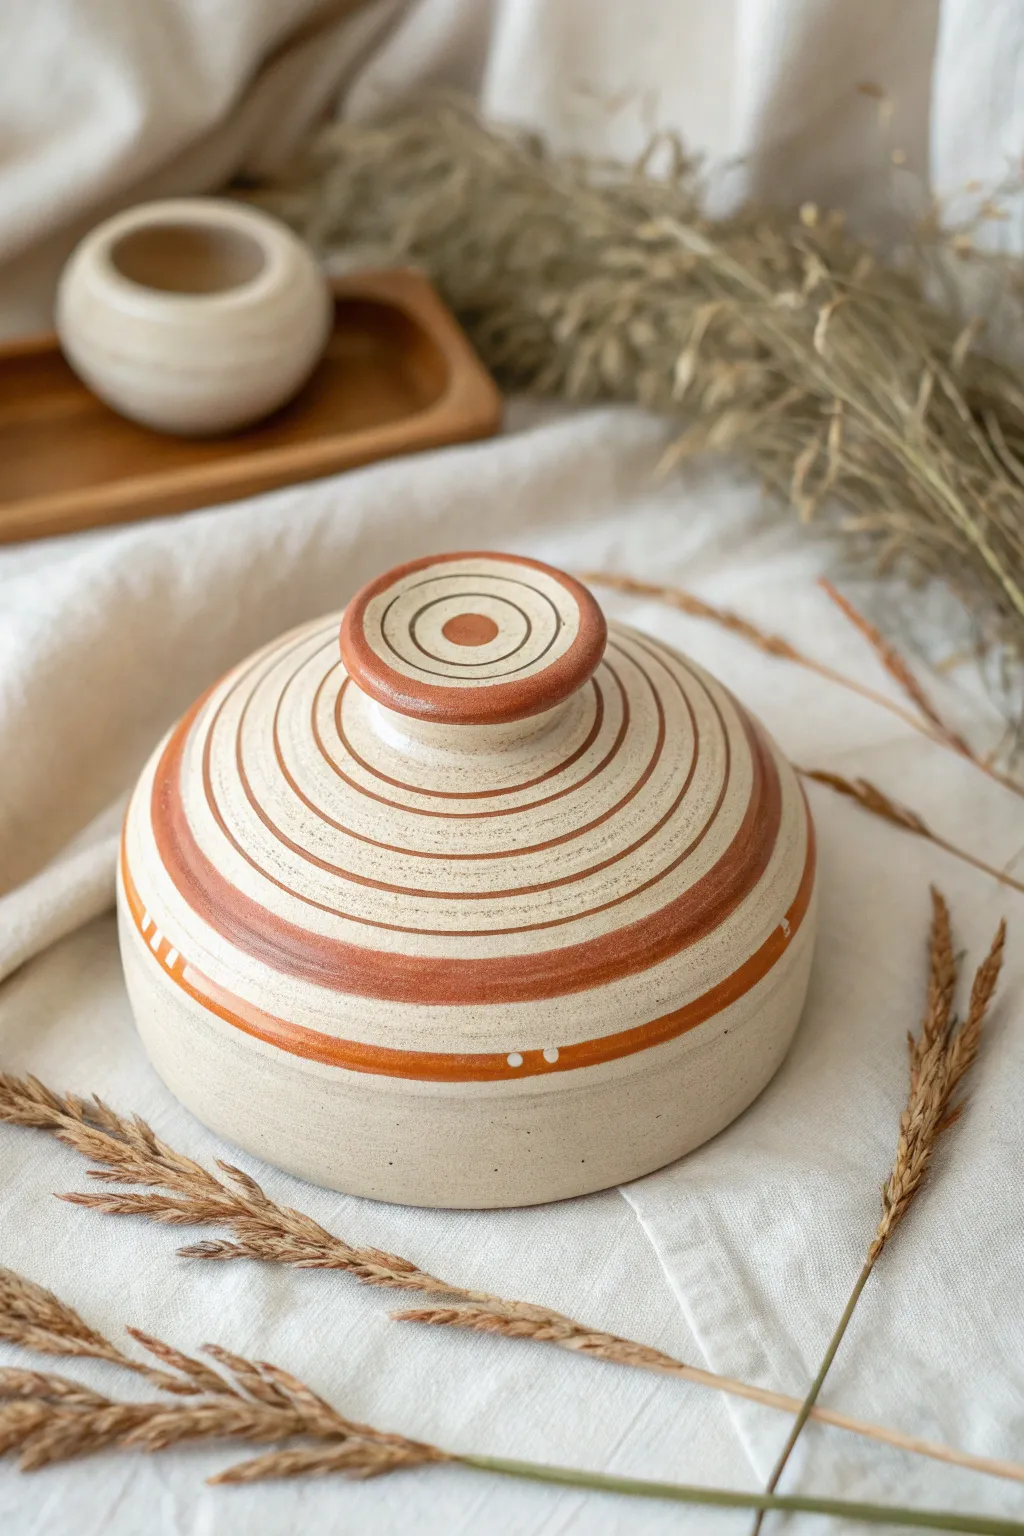
Create a mesmerizing effect with this wheel-thrown lidded jar, featuring precise concentric rings that look incredible in motion. The warm terracotta bands against the speckled cream clay give it a rustic yet modern geometric appeal.
Detailed Instructions
Materials
- Stoneware clay (speckled or buff)
- Pottery wheel
- Throwing tools (sponge, rib, wire cutter)
- Trimming tools
- Calipers
- Underglaze (Terracotta or Red Iron Oxide)
- Fine liner brush or banding wheel brush
- Clear glaze
- Banding wheel (if not painting on the pottery wheel)
Step 1: Throwing the Base Form
-
Center the clay:
Start with a prepared ball of speckled stoneware clay. Center it firmly on the wheel head, ensuring there is no wobble before opening. -
Open and pull the walls:
Open the clay to create a flat internal floor. Pull the walls up to form a low, wide cylinder. Aim for a distinct, sharp corner where the wall meets the floor specifically for this boxy shape. -
Shape the gallery:
At the rim, use your thumb or a tool to press inwards slightly and down, creating a ‘gallery’—the internal shelf where the lid will eventually sit. Keep this edge crisp. -
Refine the profile:
Use a metal or wooden rib to smooth the outside walls, ensuring they are perfectly vertical or slightly domed depending on your preference. Cut the pot off the bat but leave it to dry to leather-hard.
Wobbly Lines?
If your brush jumps, your clay might be too dry or rough. Lightly sand the surface smooth before painting, and thin your underglaze slightly with water for better flow.
Step 2: Creating the Lid
-
Measure with calipers:
Before throwing the lid, measure the diameter of the gallery on your base pot using calipers. Lock them in place so you have an exact guide. -
Throw the lid inverted:
Center a smaller amount of clay. Flatten it into a thick disk. Check the width against your calipers frequently. You want the lid to fit snugly inside the gallery. -
Form the dome:
Shape the underside of the lid (which is currently facing up) into a gentle curve. This ensures the finished piece has that nice domed profile seen in the photo. -
Trim the knob:
Once the lid is leather hard, flip it over and trim the top side. Carve out a raised ring knob in the center. I find creating a recessed circle in the middle of the knob adds a nice professional detail.
Make it Spin
Film your finished jar spinning on a banding wheel. The concentric circles create a hypnotic ‘warp speed’ optical illusion perfect for stop motion clips.
Step 3: Decoration and Glazing
-
Center for decorating:
Place the leather-hard jar (with lid on) back on the wheel or a banding wheel. Center it perfectly; this is crucial for the rings to be concentric. -
paint the main bands:
While spinning the wheel slowly, hold a brush loaded with terracotta underglaze steady against the surface. Create the thickest band around the shoulder of the dome. -
Add detail lines:
Using a finer brush, paint the thinner concentric circles moving upward toward the knob. Keep your hand braced to ensure the lines don’t wobble. Vary the spacing slightly for visual interest. -
Accent the knob:
Paint the rim of the knob and place a solid dot of color in the very center depression. This creates a bullseye effect. -
Bisque fire:
Once bone dry, load the pieces into the kiln for a bisque firing. -
Clear glaze application:
Dip or spray a transparent clear glaze over the entire piece. This will seal the clay and make the red bands pop without obscuring the clay bodies’ natural speckles. -
Final firing:
Fire the kiln to the maturity temperature of your clay and glaze (likely Cone 5 or 6). Allow it to cool completely before opening.
Now you have a stunning geometric jar that looks just as good stationary as it does spinning on the wheel
Texture Morph From Smooth to Crackled
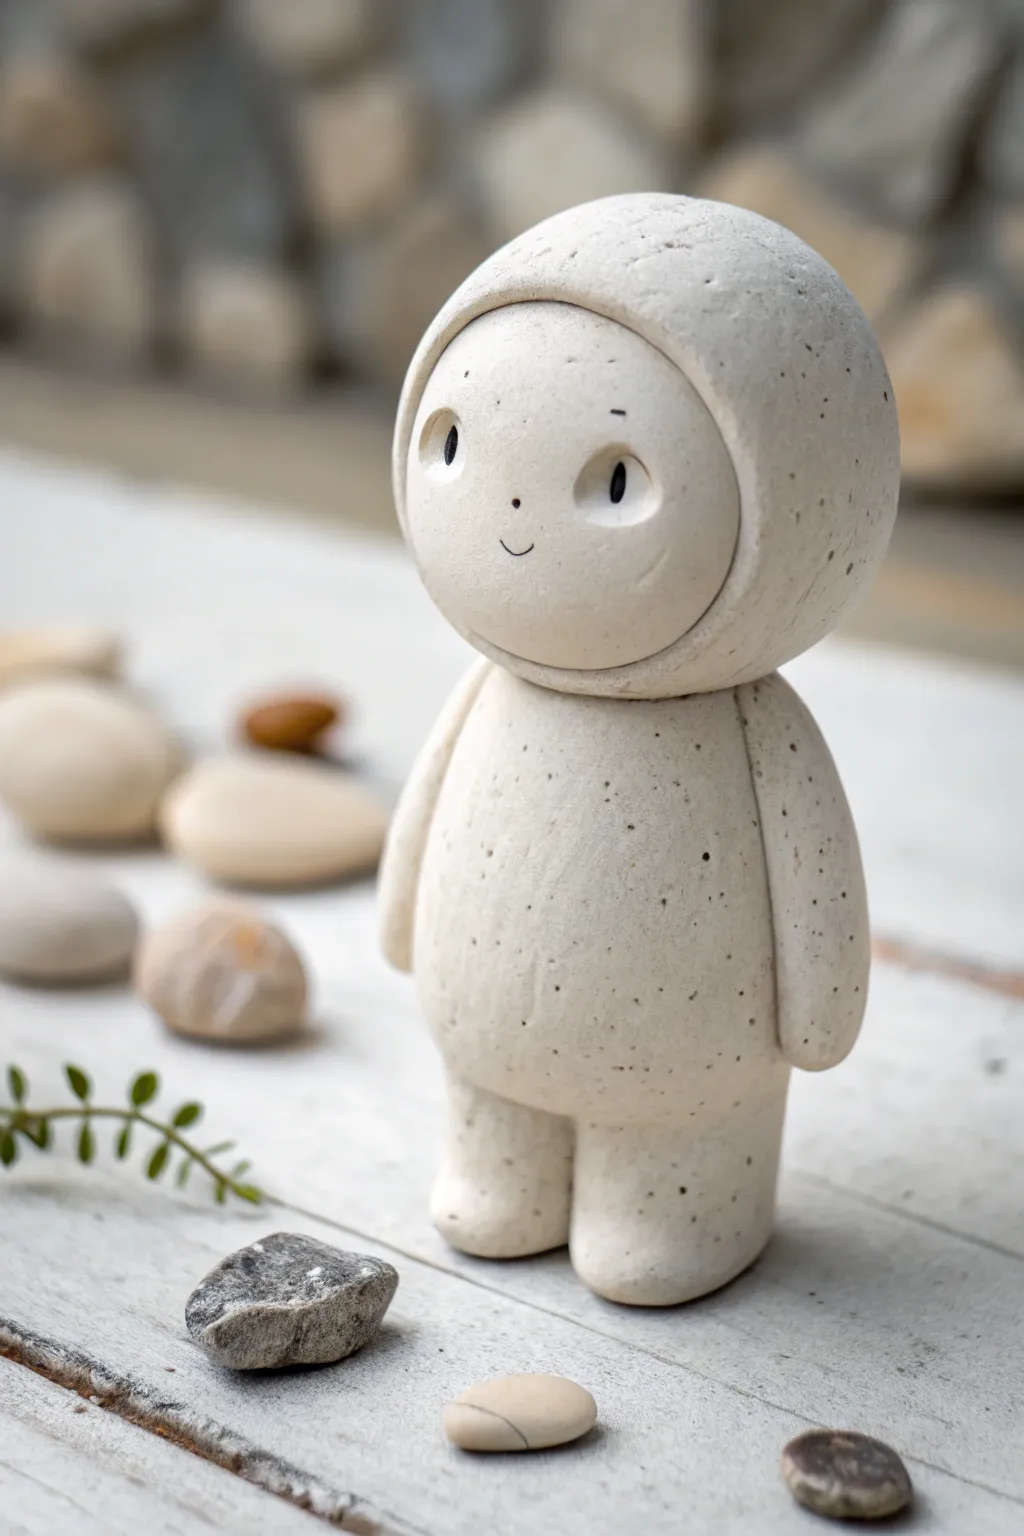
Create this charming, minimalist figurine featuring a smooth, matte finish and subtle speckled texture that mimics natural stoneware. Its simple, rounded forms and gentle expression make it a perfect character for peaceful stop motion sequences or shelf display.
How-To Guide
Materials
- White polymer clay or air-dry stone clay
- Fine black sand or dried coffee grounds (for speckling)
- Black acrylic paint
- Fine-point paintbrush or toothpick
- Sculpting tools (ball styluses, silicone shapers)
- Rolling pin
- Aluminum foil (for armature core)
- Fine-grit sandpaper (400-600 grit)
- Matte varnish or sealant
Step 1: Preparing the Clay Body
-
Sourcing the Speckle:
If your clay isn’t pre-speckled, you’ll need to create that faux-stone look manually. Take a lump of white clay and sprinkle in a pinch of fine black sand or very finely ground dried coffee. -
Kneading the Mix:
Fold and knead the clay thoroughly until the speckles are evenly distributed throughout the mass. The goal is a random, organic distribution rather than clumps of black. -
Forming the Core:
Crumple a small piece of aluminum foil into a tight oval shape, roughly an inch tall. This reduces the amount of clay needed and keeps the figure lightweight for animation. -
Covering the Body:
Flatten a portion of your speckled clay into a sheet about 1/4 inch thick. Wrap this around your foil core, smoothing the seams until you have a seamless, pill-shaped torso.
Step 2: Sculpting the Head and Hood
-
Shaping the Head Sphere:
Roll a separate ball of clay for the head. It should be slightly larger than the width of the body to give it that cute, stylized proportion. Press it gently to flatten the bottom. -
Creating the Face Indentation:
Use your thumb to gently press an indentation into the front of the sphere. This creates the ‘hood’ ridge around the face area. -
Defining the Hood Edge:
With a flat sculpting tool or silicone shaper, refine the line where the face meets the hood. The transition should be soft but distinct, deeper at the sides and shallower at the chin. -
Attaching the Head:
Score the top of the body and the bottom of the head. Add a tiny drop of water (for air-dry) or liquid clay (for polymer) and press the head firmly onto the body. -
Blending the Neck:
Use a modeling tool to smooth the clay at the neck joint primarily on the back and sides, leaving a slight defined crease at the front to suggest the chin line.
Stone Effect
Mix a tiny amount of grey or beige acrylic paint into your white clay before sculpting. This tints the base color slightly, making the ‘white’ look more like natural, unglazed ceramic.
Step 3: Limbs and Details
-
Creating Arm Sausages:
Roll two small, tapered ropes of clay for the arms. They should be simple shapes with no detailed fingers, ending in rounded nubs. -
Attaching the Arms:
Press the arms against the sides of the body. Blend the clay at the shoulder attachment point so it looks like one continuous piece, but leave the arm hanging slightly loose at the bottom. -
Forming the Legs:
For the legs, create two short, stout cylinders. These need to be wide enough to support the figure’s weight if it is standing. -
Securing the Stance:
Flip the figure over and attach the legs to the base of the torso. Blend the seams thoroughly. Tap the feet on a flat surface to ensure the figure stands perfectly upright without wobbling. -
Eye Sockets:
Using a small ball stylus, press two shallow dimples into the face area where the eyes will go. Spacing them wide apart adds to the innocent character design.
Stop Motion Ready
Embed small neodymium magnets into the bottom of the feet before hardening. This lets you anchor the character firmly to a metal baseplate during animation frames.
Step 4: Finishing Touches
-
Initial Smoothing:
Before curing or drying, dip your finger in water (or clay softener) and gently rub the entire surface to remove fingerprints and tool marks. -
Curing or Drying:
Let your clay dry completely according to package instructions. If using polymer clay, bake it in the oven at the recommended temperature. -
Sanding for Texture:
Once fully hardened, use fine-grit sandpaper to buff the surface. This removes any final bumps and creates a beautiful matte stone-like texture. -
Painting the Eyes:
Dip a toothpick or fine brush into black acrylic paint. Carefully fill the indented eye sockets. I find a toothpick offers better control for these tiny dots. -
Adding the Smile:
Using the very tip of your tool with the tiniest amount of black paint, draw a delicate, thin curve for the smile just below the center of the face. -
Sealing:
Finish the piece with a coat of matte varnish. Avoid glossy finishes, as the goal is to maintain the look of raw earthenware pottery.
Now your little stoneware friend is ready to explore a miniature world of pebbles and leaves
Color Shift Mood Change Character
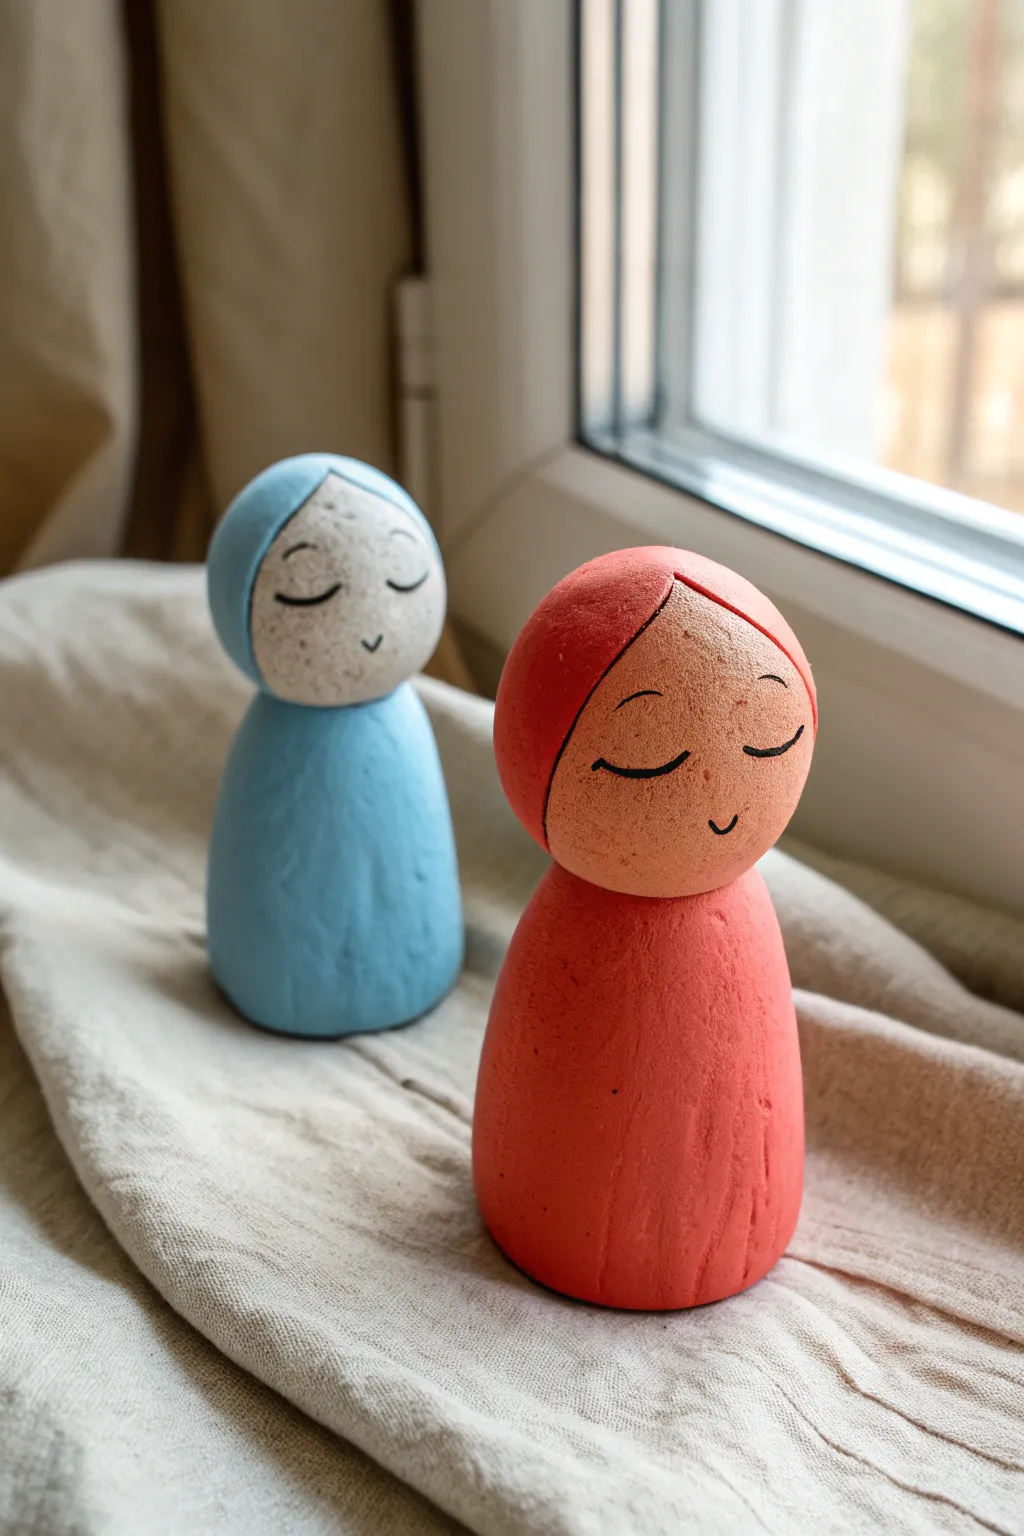
These charming, smooth-textured figurines feature soft, rounded forms and painted expressions that evoke a sense of calm. With their simple color blocking and stylized hoods, they make perfect, expressive characters for a stop motion story or just sweet windowsill decor.
Step-by-Step Tutorial
Materials
- Air-dry clay (white or light grey)
- Wooden spoon or smooth rolling tool
- Water in a small cup
- Acrylic paints (Cornflower Blue, Coral Red, Titanium White, Black)
- Small fine-detail paintbrush
- Medium flat paintbrush
- Fine-grit sandpaper (400 grit)
- Matte finish varnish or sealant
Step 1: Shaping the Bodies
-
Prepare the Clay:
Start by conditioning a chunk of air-dry clay in your hands until it is warm and pliable. Divide it into two equal portions for your two characters. -
Form the Base:
Roll one portion into a smooth ball, then gently roll it back and forth on your work surface using your palm to create a teardrop or cone shape. Flatten the bottom so it stands securely. -
Refine the Silhouette:
Use your fingers to smooth out the transition from the base to the neck area. The goal is a seamless, gown-like shape that tapers slightly upward. -
Create the Head:
Roll a smaller ball of clay for the head. It should be proportional to the body, roughly the size of a large grape or small walnut depending on your base size. -
Attach the Head:
Score the top of the body and the bottom of the head with a needle tool or toothpick. Apply a dab of water (slip) and press the head firmly onto the neck area, blending the clay slightly if needed for a strong bond.
Step 2: Sculpting Details
-
Adding the Hood:
Roll out a small, thin pancake of clay. Drape this over the top and back of the head to create the hood shape, leaving the face area exposed in a circle or oval. -
Blending the Seams:
Gently smooth the edges of the hood into the body clay so it looks like a continuous garment. Keep the line around the face crisp and slightly raised. -
Define the Hair Line:
Use a modeling tool or the edge of a credit card to press a very subtle line indicating where the hair or forehead meets the hood, if you want extra dimension. -
Smoothing Texture:
Dip your finger in a little water and run it over the entire figure to remove fingerprints. I like to let this dry briefly and do a second pass to get it ultra-smooth. -
Drying:
Let the figures dry completely for 24-48 hours. They should feel room temperature and hard, not cool to the touch, before you proceed.
Cracks Appearing?
If small cracks form while drying, mix a tiny bit of fresh clay with water to make a paste (slip). Fill the cracks, smooth over, and let dry again.
Step 3: Painting & Finishing
-
Sanding:
Once dry, lightly sand any bumps or rough patches with fine-grit sandpaper. Wipe away the dust with a barely-damp cloth. -
Base Coat – The Bodies:
Paint the body and the hood of the first figure with Cornflower Blue. It may need two thin coats for full opacity. -
Second Character Base:
Repeat the process for the second figure using Coral Red for the body and hood. Leave the face areas unpainted for now. -
Painting the Faces:
Mix a tiny amount of Titanium White with a drop of orange or brown to create a skin tone suitable for your clay base. Paint the circular face area carefully. -
Adding Texture (Optional):
To mimic the stone-like texture in the photo, you can stipple the wet paint slightly with a dry spongy brush or add minute speckles of a darker shade. -
Drawing the Expressions:
Using your finest detail brush and black paint (or a fine-tip opaque marker), paint two simple curved lines for sleeping eyes and a tiny ‘v’ or curve for a smile. -
Adding Hair Details:
Paint a simple swooping line across the top of the forehead area to suggest bangs or hair peeking out from the hood. -
Sealing:
Protect your work with a coat of matte spray varnish. This eliminates any shiny paint streaks and gives the figures a unified, professional finish.
Make Them Move
For stop motion, embed small magnets in the base before drying. This lets you secure them on a metal set floor so they don’t tip over during shooting.
Set your finished characters near natural light to admire their peaceful expressions