I never get tired of making ceramic houses—they’re the perfect mix of simple building shapes and endless personality. If you’re craving fresh ceramic house ideas, here are my favorite directions to play with, from classic cozy cottages to delightfully unexpected twists.
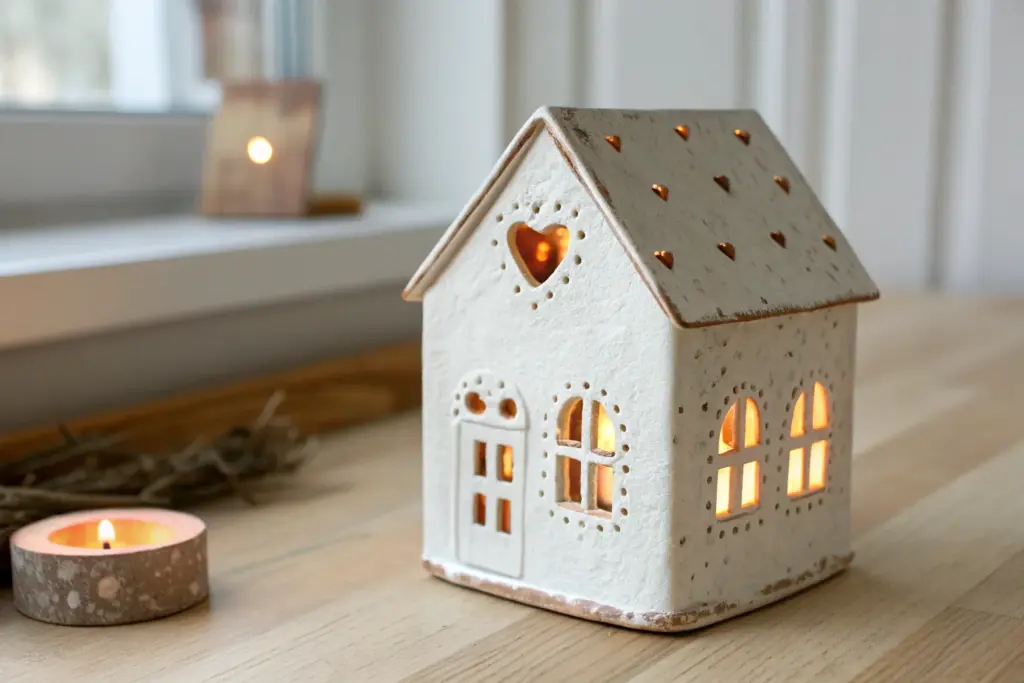
Classic Tea Light House Luminary
This charming ceramic house luminary captures the warmth of a Scandinavian winter with its simple lines and soft, speckled white finish. The cutout windows allow candlelight to dance through, creating a serene and inviting atmosphere on any tabletop or mantel.
How-To Guide
Materials
- White stoneware clay (speckled or plain)
- Rolling pin
- Two wooden guide strips (approx. 1/4 inch thick)
- Fettling knife or craft knife
- Paper templates (walls and roof)
- Small square and arch shaped clay cutters
- Slip (clay mixed with water)
- Scoring tool or old fork
- Small paintbrush
- Sponge
- Sandpaper or green scrubby
Step 1: Preparation and Cutting
-
Prepare your templates:
Sketch your house design on cardstock first. You will need two pentagon shapes for the front and back walls (combining house base and gable) and two rectangular shapes for the side walls. Create two additional rectangles for the roof panels, ensuring they are slightly longer than the house depth for an overhang. -
Roll out the slab:
Place your clay between two wooden guide strips on a canvas surface. Roll the clay out until the rolling pin rests on the guides, ensuring a perfectly even thickness of about 1/4 inch across the entire slab. -
Cut the main shapes:
Lay your paper templates onto the smooth clay slab. Using a fettling knife held vertically, carefully trace around each template to cut out your two front/back pieces, two side walls, and two roof panels. -
Design the facade:
Before assembling, lay the front wall piece flat. Use small square cutters to remove clay for the upper windows. For the arched door and lower windows, you can use a shaped cutter or carefully freehand the cut with your craft knife. -
Add side details:
Repeat the window cutting process on the side walls to match the aesthetic. Don’t forget to cut a few small circular holes in the roof panels or near the gable peak for heat ventilation. -
Texture and refine:
If you want the speckled stone look shown in the photo but only have plain clay, gently press coarse sand or grog into the surface now. Smooth any rough cutting burrs with a damp sponge or your fingertip. -
Dry to leather hard:
Let all your cut pieces sit uncovered for a few hours until they reach the leather-hard stage. They should be firm enough to hold their shape when stood up, but still dark with moisture and able to be scored.
Clean Cuts Hack
Let the clay dry slightly before cutting windows. If it’s too wet, the knife will drag and warp the delicate window frames.
Step 2: Assembly and Finishing
-
Bevel the edges:
For cleaner corners, cut a 45-degree angle along the vertical edges where the walls will meet. This miter joint creates a stronger bond and a sharper corner than a simple butt joint. -
Score the heavy joints:
Rough up the beveled edges with your scoring tool or fork. Apply a generous amount of slip to these roughened areas. I find it helpful to wait a few seconds for the slip to get tacky before joining. -
Construct the walls:
Stand the walls up and press the scored corners together firmly. Use a small coil of clay on the inside seams to reinforce the joint, smoothing it flat with your finger or a modeling tool. -
Attach the roof:
Score and slip the top edges of your wall structure and the underside contact points of your roof panels. Place the roof panels on, ensuring they meet perfectly at the peak. -
Seal the peak:
Where the two roof panels meet at the top, add a tiny coil of clay along the seam and smooth it down to merge the two slabs into one continuous piece. -
Clean the seams:
Wipe away any excess slip that squeezed out during assembly with a damp brush. The goal is to make the house look like a single, cohesive form rather than separate glued pieces. -
Add surface details:
Use a needle tool to gently poke small decorative indentations around the windows or on the roof for extra texture, mimicking the organic look of the reference image. -
Slow drying:
Loosely cover the finished house with plastic sheeting to let it dry slowly over several days. This prevents the walls from warping or cracking as the moisture leaves the clay. -
Bisque fire:
Once bone dry, fire the piece in a kiln to bisque temperature (usually cone 04). If you used speckled clay, this firing will bring out the natural texture. -
Final touches:
Since the house in the image has a raw, matte finish, you can skip glazing entirely or apply a very thin matte clear wash. Fire a second time if using glaze, or simply sand the bottom smooth if leaving raw.
Warping Walls?
If walls start leaning during assembly, prop them up with crumpled newspaper or foam blocks on the inside until the joints stiffen.
Place a tea light inside your completed house and watch the warm glow illuminate your handiwork.


Minimalist White Nordic House Set
Embrace the understated elegance of Scandinavian design with this set of three minimalist white clay houses. Their clean lines and matte finish make them perfect for a serene mantle display or a cozy winter centerpiece.
Step-by-Step Guide
Materials
- White polymer clay or air-dry clay (approx. 500g)
- Rolling pin
- Parchment paper or silicone mat
- Sharp craft knife or scalpel
- Ruler
- Square cookie cutters (tiny, for windows)
- Fine-grit sandpaper (400-600 grit)
- Clay sculpting tool or toothpick
- Cardstock or paper for templates
- Acrylic roller or smooth glass jar
Step 1: Planning and Preparation
-
Draft your templates:
Cut three distinct house shapes from cardstock. To match the image, create one tall narrow house, one medium wide house, and one smaller squat house. Keep the angles of the roofs sharp and triangular. -
Condition the clay:
Take your white clay and knead it thoroughly in your hands until it becomes warm, soft, and pliable. This prevents cracks later on. -
Roll the slab:
Place the clay between two sheets of parchment paper. Roll it out to a uniform thickness of about 1/4 inch (6mm). This thickness gives the houses stability so they stand upright easily.
Step 2: Cutting and Shaping
-
Apply the templates:
Lay your paper templates gently onto the rolled clay slab. Smooth them down slightly so they don’t shift while you work. -
Cut the silhouettes:
Using your craft knife and ruler, cut straight down into the clay around the templates. Keep the blade perpendicular to the surface for clean vertical edges. -
Remove excess clay:
Peel away the scrap clay from around your house shapes first, then carefully lift the templates off the clay pieces. -
Smooth the edges:
Dip your finger in a little bit of water (for air-dry clay) or baby oil (for polymer) and gently run it along the cut edges to soften any harsh sharpness.
Uneven Windows?
If your hand-cut windows look wonky, use a nail file or a small piece of sandpaper wrapped around a matchstick to file the inside edges square after the clay has fully hardened.
Step 3: Adding Details
-
Mark window positions:
Lightly impress a grid for the windows on the medium and small houses. The image shows a simple four-pane grid. For the tall house, you might just do two vertical windows. -
Cut the windows:
Use a tiny square cutter to punch out the window holes cleanly. If you don’t have a cutter, carefully hand-cut squares with your scalpel. -
Add the attic hole:
Use a small circular cutter or the end of a straw to punch a single round hole near the peak of the roof on each house. -
Detail the depth:
If the window cuts look rough, use a flat sculpting tool to smooth the inside of the window frames. -
Create the block shape:
Since these are solid blocks rather than hollow structures, cut a long strip of clay the same width as your house thickness. Wrap this around the perimeter if you are building hollow, but simpler is better: simply ensure your initial slab was thick enough to stand alone.
Level Up: Speckled Effect
Knead in a tiny pinch of black pepper or dried used coffee grounds into your white clay before rolling. This mimics the look of high-end speckled stoneware pottery.
Step 4: Finishing Touches
-
Initial drying or baking:
If using polymer clay, bake according to package instructions (usually 275°F/130°C for 15-30 mins). If using air-dry clay, let them sit in a cool, dry place for 24-48 hours. -
Rotate while drying:
For air-dry clay, flip the houses every few hours to ensure even drying and prevent warping. -
Sand for perfection:
Once fully cured or dry, use fine-grit sandpaper to buff out any fingerprints or uneven textures on the surface. I like to do this outside to avoid dust. -
Clean the dust:
Wipe the houses down with a barely damp cloth or a soft brush to remove all sanding residue. -
Matte finish:
Leave the clay raw for that powdery look, or apply a very matte varnish if you want to protect them from handling marks.
Arranged together on a wooden tray, your little village brings a peaceful, architectural charm to any corner of your home


Whimsical Storybook Cottage House
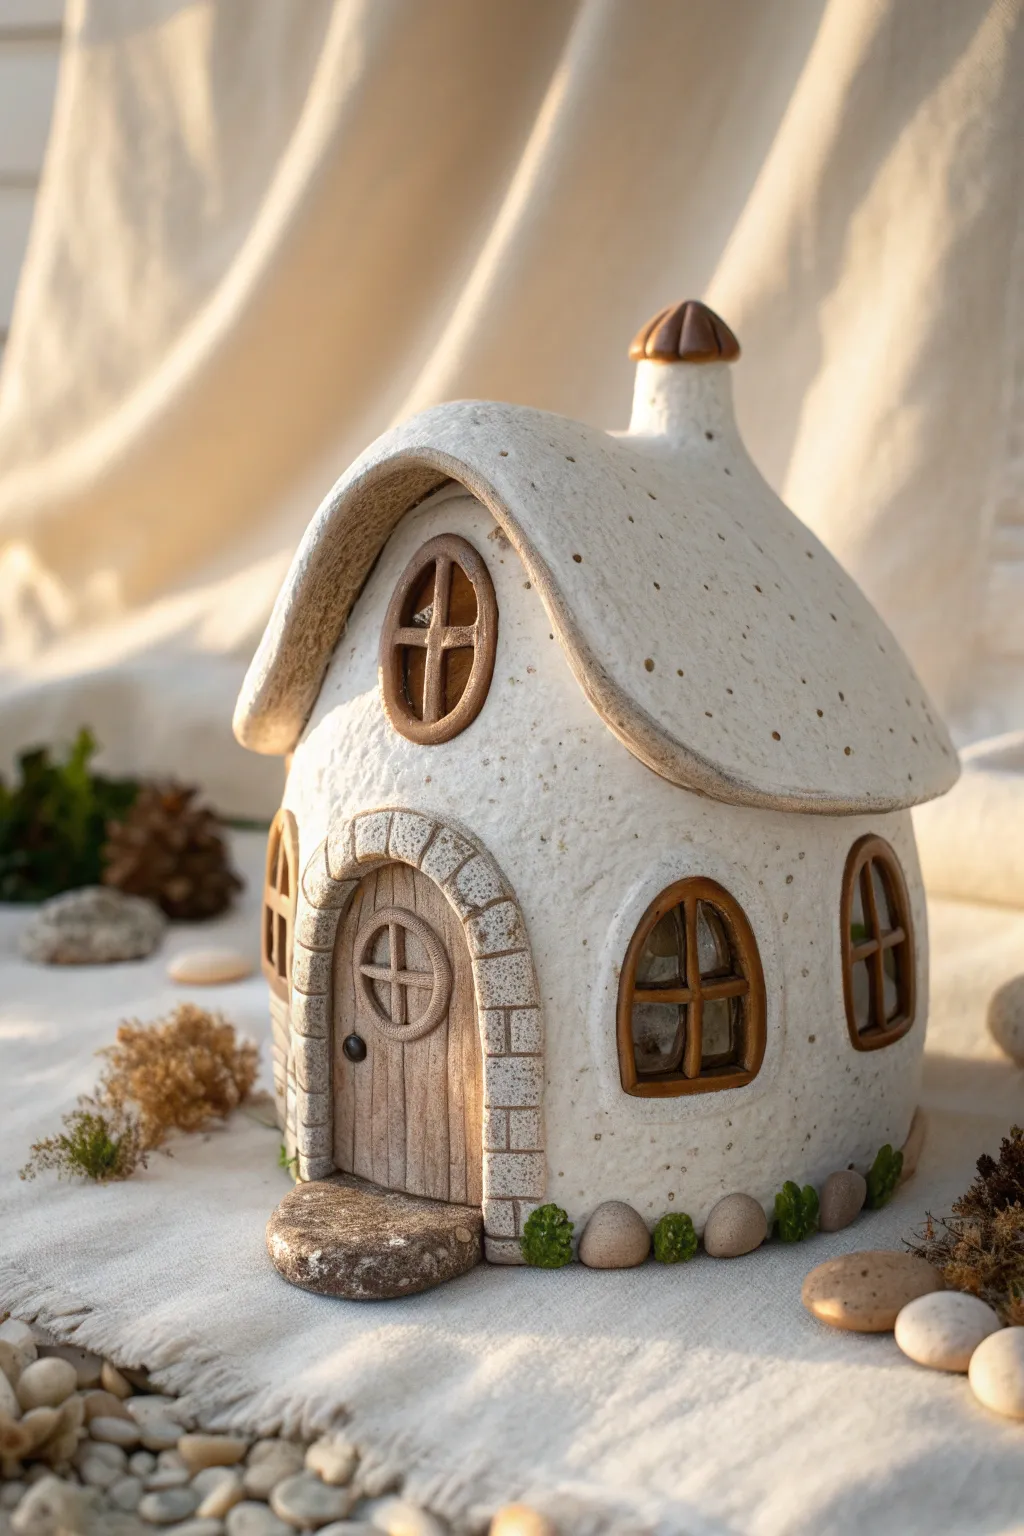
This charming ceramic luminary captures the magic of a forest hideaway with its speckled creamy clay and warm, wood-toned accents. The sloped, curvy roof and arched windows give it a delightful “melted” look that feels straight out of a fairy tale.
Step-by-Step
Materials
- Speckled buff stoneware clay (or white clay with sand added)
- Rolling pin and guide sticks (1/4 inch thickness)
- Fettling knife and needle tool
- Slip and score tool
- Wooden modeling tools
- Small round cookie cutters (or varied caps)
- Brown underglaze or iron oxide wash
- Clear matte glaze
- Sponge and water
- Plastic wrap (for slow drying)
Step 1: Constructing the Base Structure
-
Roll the Slabs:
Begin by rolling out your speckled clay to an even 1/4 inch thickness using guide sticks. You will need enough for four walls, a floor, and the roof sections. Compress the clay with a rib to prevent warping later. -
Cut the Walls:
Cut four wall pieces. Unlike a standard house, give two of the walls a gentle outward curve at the sides to create that ‘puffed’ storybook shape. Cut a circular base slab slightly larger than the footprint of your walls. -
Assemble the Body:
Score and slip the edges of your walls and the base. Join them together to form the main room, smoothing the seams on the inside with a coil reinforcement and on the outside with a rib until the joins are invisible. -
Shape the Form:
Once assembled, gently push from the inside out to exaggerate the roundness of the cottage properly. If the clay is too soft, stuff the inside with crumpled newspaper to help it hold this bulbous shape while it firms up.
Sagging Roof?
If the roof droops too much during construction, prop up the overhanging eaves with crumpled paper towels or small sponges until the clay becomes leather hard.
Step 2: Roof and Architectural Details
-
Create the Swooping Roof:
Cut a large rectangular slab for the roof. Drape it over the top of your structure, allowing the eaves to hang low and curvy. I like to pinch the ends of the roof peak slightly upwards to give it that whimsical flair. -
Add the Dormer:
Fashion a small triangular clay wedge and attach it to the front slope of the roof. Then, drape a smaller slab over this wedge to create the dormer window housing, blending the clay seamlessly into the main roof. -
Sculpt the Chimney:
Roll a small coil into a tapered cylinder for the chimney. Attach it to the roof peak, creating a small decorative cap for the top. Make sure to hollow it out if you plan to use this with a candle. -
Carve the Door Arch:
Roll a thick flattened coil and slip it onto the front face to create the door surround. Use a needle tool to carve deeper lines, mimicking large, rustic stone blocks. -
Add the Doorstep:
Create a distinct, flattened oval of clay and attach it firmly at the base of the door arch to serve as the stone step.
Step 3: Detailing and Surface Texture
-
Cut the Windows:
Using a knife, carefully cut out the arched window openings on the main walls and the round window in the dormer. Save the cutout clay pieces to texture as ‘glass’ if you don’t want open holes. -
Frame the Windows:
Roll very thin coils of clay. Score and slip them around the window borders to create frames. Add cross-sections inside the openings to form the windowpanes. -
Texture the Walls:
Instead of smoothing the walls perfectly, use a stiff bristle brush or a textured sponge to dab the exterior walls gently. This enhances the stucco-like appearance of the speckled clay. -
Details on the Roof:
Use a needle tool to poke tiny, random pinholes all over the roof surface. This adds visual interest and mimics the texture seen in the reference image without needing individual shingles. -
Base Landscaping:
Roll tiny pebbles of clay and attach them around the base of the house. Mix in small, rough bits of clay to simulate moss patches.
Make it Glow
Leave the bottom open or cut a hole in the back for an electric tea light. The light will spill beautifully through the windows and the tiny roof pinholes.
Step 4: Finishing and Glazing
-
Slow Drying:
Cover the house loosely with plastic to let it dry slowly and evenly. This is crucial to prevent the roof from cracking at the peak. -
Bisque Fire:
Once bone dry, fire the piece to cone 04 (or your clay body’s bisque temperature). -
Apply Oxide Wash:
Paint an iron oxide wash or brown underglaze onto the door, window frames, chimney cap, and base stones. Wipe back any excess with a damp sponge so the color stays mostly in the crevices. -
Glaze Application:
Apply a clear matte glaze or a satin white glaze over the entire piece. If you used speckled clay, the specks will show through beautifully; if using white clay, you might want a speckled glaze. -
Final Firing:
Fire the piece to maturity (Cone 5 or 6 typically for stoneware). This will melt the glaze and permanently fuse the clay particles.
Place your finished cottage on a shelf or mantle to add a touch of handcrafted magic to your home decor


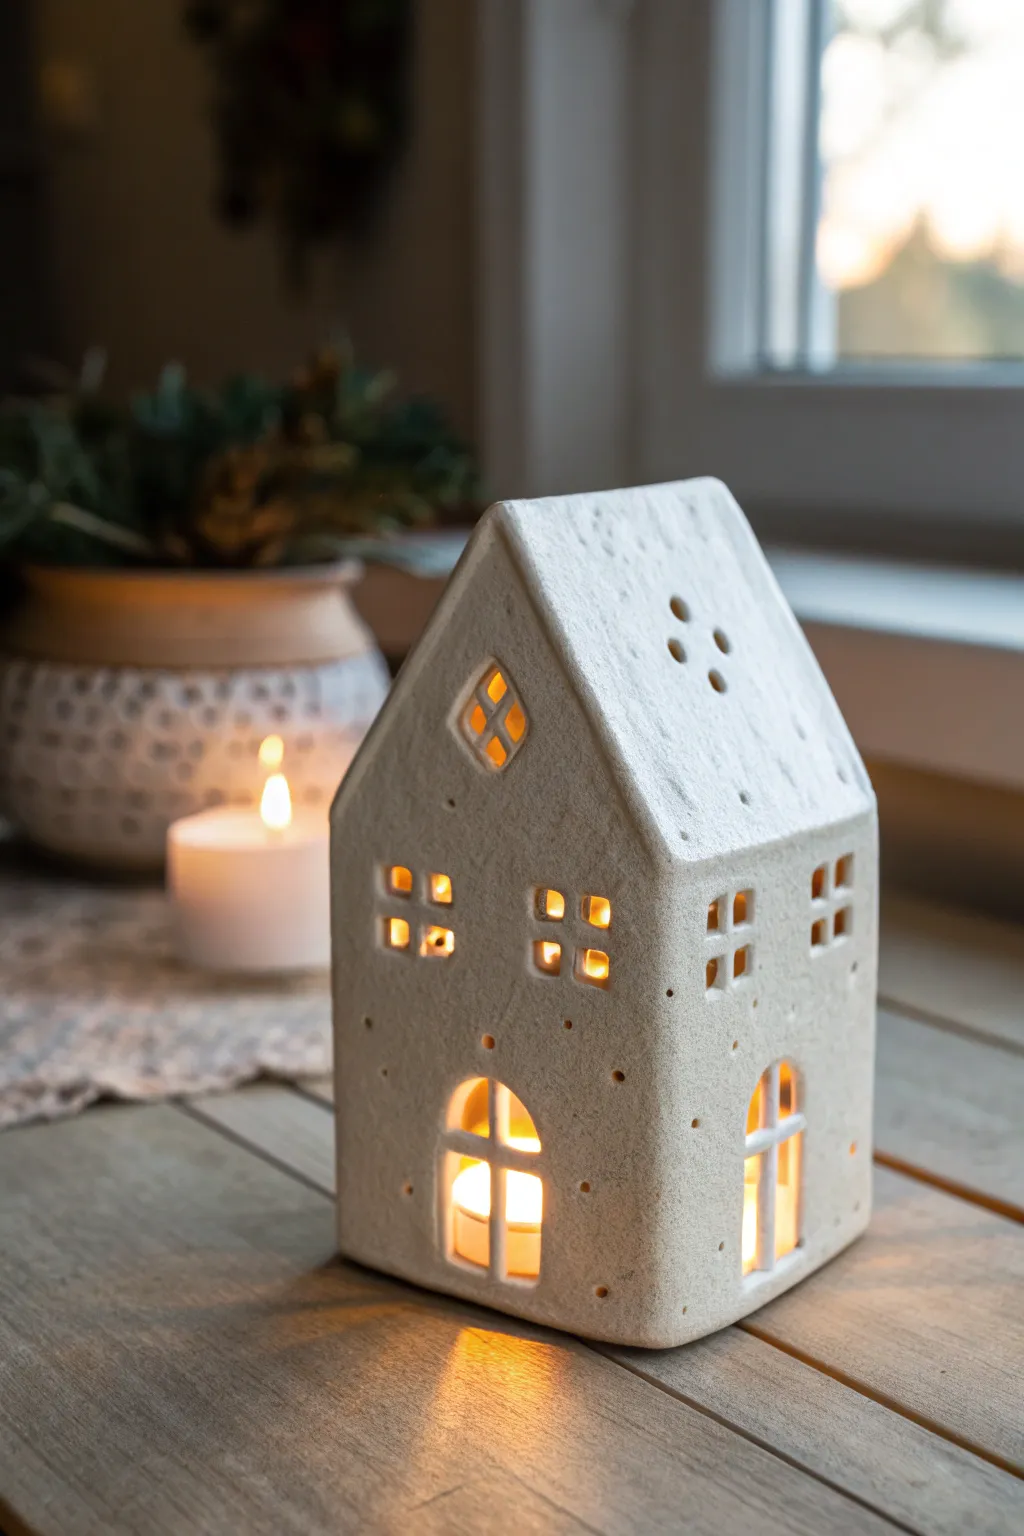
Slab-Built Modern Tiny House
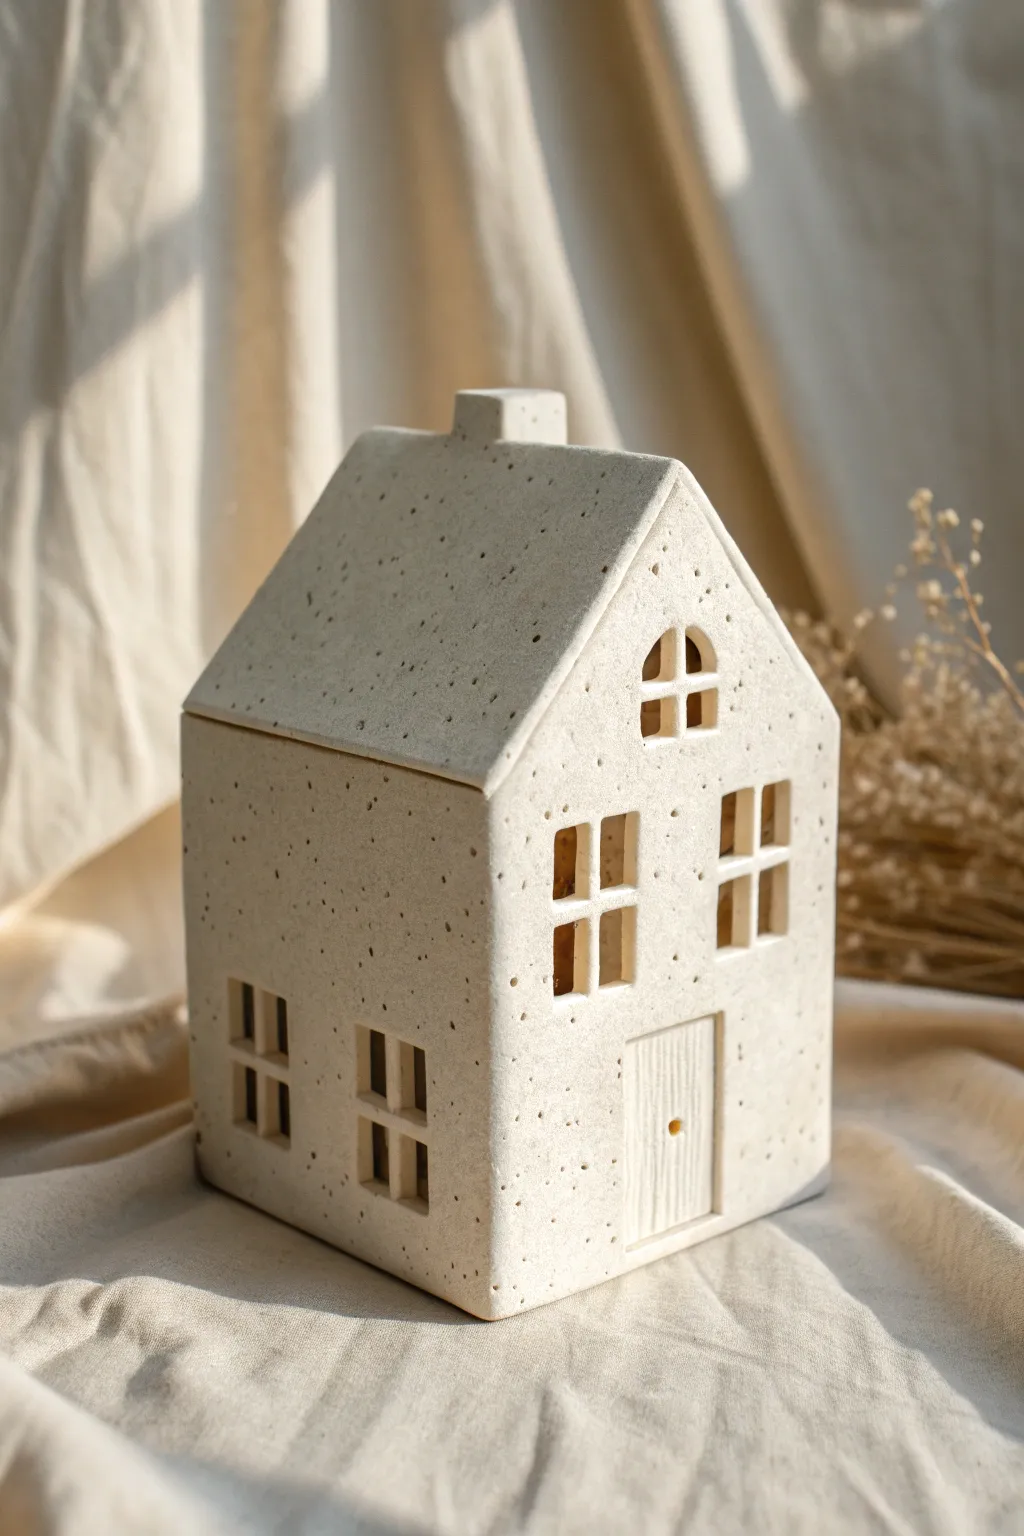
This charming, minimalist architectural piece brings the warmth of a cottage into your home with its textured clay body and clean lines. Designed as a functional luminary or a standalone sculpture, the unglazed speckled surface gives it a timeless, organic feel.
Step-by-Step
Materials
- Speckled buff stoneware clay
- Rolling pin with guide strips (approx. 1/4 inch or 6mm)
- Fettling knife or X-Acto blade
- Serrated rib or scoring tool
- Heavy paper or cardstock for templates
- Slip (clay mixed with water)
- Ruler
- Needle tool
- Wooden modeling tool
- Sponge
Step 1: Planning and Slab Preparation
-
Create templates:
Begin by sketching your house dimensions on cardstock. You will need two rectangular side walls, a front and back wall with peaked gables, two rectangular roof panels, and a small chimney strip. Cut these out carefully. -
Roll out the clay:
Roll your speckled stoneware clay into a smooth, even slab about 1/4 inch thick. Use guide strips to ensure uniform thickness across the entire sheet. -
Texture and compress:
Compress the slab on both sides with a rubber rib to align clay particles; this prevents warping later. If you want the speckled texture to be more prominent, gently wipe the surface with a damp sponge to reveal the grog. -
Cut the components:
Lay your paper templates onto the slab. Using a needle tool or fettling knife, trace and cut out all walls, roof pieces, and the chimney. Save the excess clay for slip or repairs. -
Firm up slabs:
Let the cut pieces sit until they reach a ‘leather-hard’ state. They should be stiff enough to hold their shape upright but still flexible enough to score and join without cracking.
Clean Cuts
When cutting windows, let the clay stiffen slightly first. Use a very sharp blade and cut straight down; dragging the knife can warp the straight lines of the window panes.
Step 2: Adding Details
-
Cut window openings:
While the walls are lying flat, measure and mark your window placements. Use a sharp X-Acto knife to cut out the rectangular panes. For the arched attic window, use a small round cutter or freehand the curve, then cut out the segments. -
Create the door:
Lightly incise the outline of the door on the front wall without cutting all the way through. Use a needle tool to draw vertical plank lines for texture, and press a small hole to mimic a doorknob. -
Miter the edges:
To create seamless 90-degree corners, cut the vertical edges of your four wall pieces at a 45-degree angle. This ensures a tight fit and a cleaner exterior finish.
Step 3: Assembly
-
Wait for leather hard:
Check your pieces again. If they flop over when held up, wait longer. Joining soft clay now will result in sagging walls. -
Score and slip:
Aggressively score the mitered edges of your walls. Apply a generous amount of slip to the scored areas. -
Join the walls:
Stand the walls up and press the corners together firmly. I like to reinforce the interior seams by pressing a thin coil of clay into the corners and smoothing it out with a wooden tool. -
Attach the roof:
Score the top edges of the gabled walls and side walls. Place your roof panels on top. Ensure the peak meeting point is thoroughly scored and slipped so it doesn’t split during firing. -
Add the chimney:
Form a small hollow rectangle for the chimney. Cut the bottom at an angle to match the slope of the roof, score the attachment point, and press it firmly into place. -
Clean and refine:
Use a barely damp sponge to smooth any rough edges or fingerprints. Be careful not to smear away the textural details of the windows or door planks. -
Dry slowly:
Loosely cover the house with plastic for the first day to equalize moisture, then uncover to let it dry completely before bisque firing. -
Fire:
Fire the piece to cone 5 or 6 (or whatever your clay body specifies). This piece looks best unglazed to highlight the raw, speckled stone texture.
Glow Up
Before attaching the roof, cut a large hole in the bottom slab (or leave the bottom open) so you can place an LED tea light inside to illuminate the windows.
Once fired, place this little architectural gem on a shelf where the light can play across its textured surface

The Complete Guide to Pottery Troubleshooting
Uncover the most common ceramic mistakes—from cracking clay to failed glazes—and learn how to fix them fast.
Sweet Door and Window Add-Ons
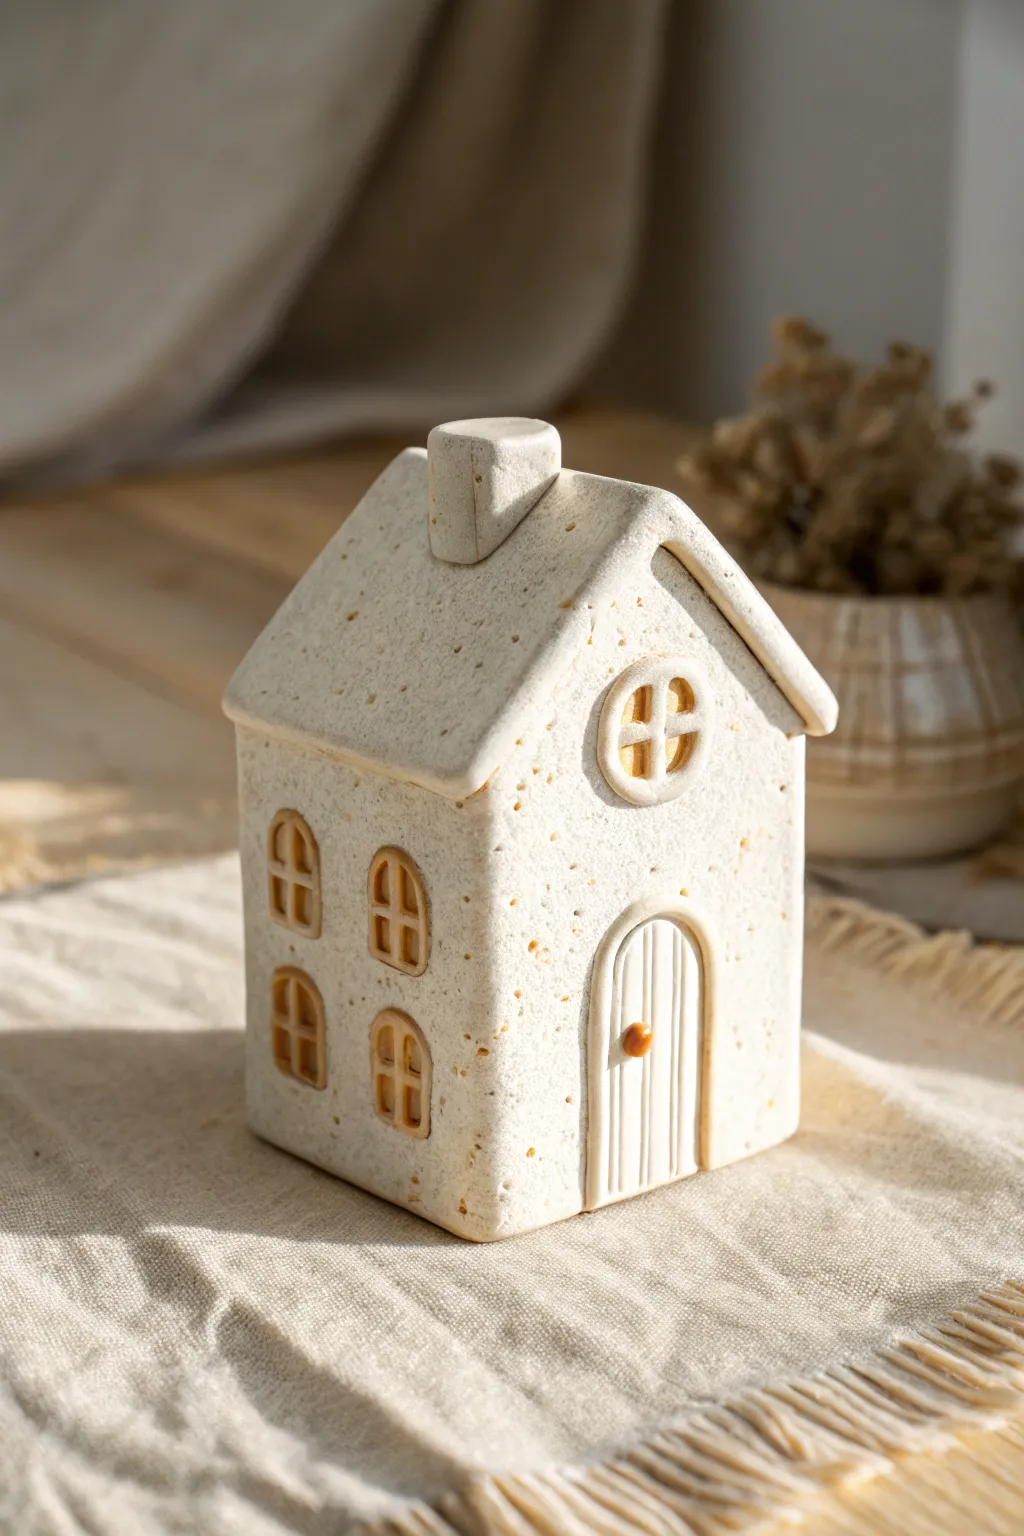
Create a charming, minimalist ceramic house that celebrates the beauty of raw, speckled clay. With its inviting arched door and perfectly imperfect windows, this piece makes a delightful shelf accent or a cozy luminary.
Detailed Instructions
Materials
- Speckled stoneware clay (mid-fire)
- Slab roller or rolling pin with guide strips
- Fettling knife or X-Acto blade
- Ruler
- Score and slip tool (or serrated rib)
- Small loop tool or carving set
- Template paper or cardboard
- Sponge
- Clear or matte glaze (optional)
- Banding wheel (helpful but not required)
Step 1: Slab Construction
-
Roll your slabs:
Start by rolling out your speckled clay to a consistent thickness, just under 1/4 inch. If you want sturdy walls that won’t warp, avoid going too thin. -
Cut the components:
Using paper templates, cut out your four walls. You will need two rectangular side walls and two gable-end walls (rectangles with a triangle top). Don’t forget two rectangular pieces for the roof and a small strip for the chimney. -
Initial drying:
Let your slab pieces sit until they reach a ‘soft leather-hard’ state. They should hold their shape when lifted but still be flexible enough to bend slightly without cracking. -
Miter the edges:
For a seamless look, cut 45-degree angles on the vertical edges of your walls where they will meet. This creates stronger corners and cleaner lines. -
Assemble the walls:
Score the mitered edges thoroughly and apply slip. Press the walls together firmly to create the box shape. I like to reinforce the interior seams with thin coils of clay smoothed down. -
Attach the roof:
Score and slip the top angled edges of your gable walls. Place your roof slabs on top, ensuring they meet at the peak with a slight overhang on the sides if desired. Smooth the peak seam well.
Clean Cuts Tip
When cutting out the window panes, let the added clay frames stiffen up slightly first. If the clay is too soft, the delicate cross-bars inside the windows will drag and distort.
Step 2: Adding the Details
-
Mark window locations:
On one side wall, lightly scratch grid lines to mark the position of four windows. Ensure they are evenly spaced. -
Carve the frames:
Instead of cutting holes immediately, add small arched slabs of clay onto the surface for the window frames. Score and slip them into place to create relief. -
Detail the panes:
Using a sharp needle tool or knife, carefully cut out the negative space within the arched frames to create the window panes, leaving a cross of clay in the center. -
Create the front door:
Roll a small oval-topped slab for the door. Score the front wall and attach this slab. Use a modeling tool to press vertical lines into it, simulating wood planks. -
Add door frame and knob:
Roll a very thin snake of clay and attach it around the door slab as a frame. Add a tiny ball of clay for the doorknob. -
The attic window:
Create a small circular porthole window on the front gable using the same relief method: add a clay circle, frame it with a thin coil, and cut out the four quadrants. -
Make the chimney:
Form a small rectangular tube from your chimney strip. Cut the bottom at an angle that matches the slope of your roof. -
Attach chimney:
Score and slip the angled bottom of the chimney and attached it near the roof peak. Smooth the connection point so it looks seamless.
Step 3: Refinement and Finish
-
Smooth the surface:
Use a slightly damp sponge to wipe down the entire house. This smooths out rough tool marks and exposes the beautiful speckles in the clay body. -
Dry slowly:
Cover the house loosely with plastic for the first day to equalize moisture, then uncover to let it dry completely to bone dry state. -
Bisque fire:
Fire the piece to cone 04 (or your clay’s specific bisque temperature). -
Glazing decision:
For the look in the image, leave the exterior unglazed to show off the clay’s texture. You might choose to clear glaze just the inside to strengthen it. -
Final firing:
Fire to the maturation temperature of your specific clay body (likely cone 5 or 6 for speckled stoneware).
Make It a Luminary
Cut a large circular hole in the bottom slab (or leave the bottom open entirely) so you can safely place an LED tea light inside to make the windows glow.
Place your finished cottage on a sunny shelf where the natural light can play across the textured surface
Shingle, Thatch, or Tile Roof Details

These charming ceramic luminaries feature distinctly textured roofs—one mimicking rustic wooden shingles and the other a coarse, stucco-like thatch. Their matte white finish and warm internal glow create a cozy, handmade village aesthetic perfect for a mantelpiece.
Step-by-Step Tutorial
Materials
- White earthenware or stoneware clay
- Rolling pin
- Guide sticks or slats (approx. 1/4 inch thick)
- Needle tool
- Fettling knife
- Ruler
- Slip (clay slurry)
- Scoring tool (or serrated rib)
- Brown iron oxide wash or brown underglaze (for the taller house)
- Sponge
- Cardstock or paper (for templates)
- Wooden modeling tool (for ribbing effect)
- Coarse sandpaper or texturing brush
Step 1: Creating the Structure
-
Plan and cut templates:
Before touching clay, sketch out simple house shapes on cardstock. You will need two pentagon shapes for the front/back walls and two rectangles for the side walls. Make the taller house narrower and the smaller house squatter for variety. -
Roll out the slab:
Roll your clay out onto a canvas board between guide sticks to ensure an even thickness. I find a 1/4-inch slab is sturdy enough to stand but thin enough to let light filter through windows gracefully. -
Add surface texture:
Before cutting, gently dab the entire surface of the slab with a coarse sponge or a crumpled ball of aluminum foil. This creates the pitted, stucco-like texture seen on the walls of both houses. -
Cut the walls:
Place your paper templates onto the textured clay. Using a needle tool, trace and cut out your wall pieces. Keep the excess clay for the roofs and bases. -
Cut windows and doors:
While the walls are flat, carefully cut out the window squares and arched doorways. Use the needle tool for corners and a small square cutter if you have one. Be mindful to leave enough clay between window panes so they don’t collapse. -
Dry to leather hard:
Let the wall pieces sit until they are leather hard—firm enough to hold their shape without bending, but soft enough to join. This usually takes a few hours depending on humidity.
Step 2: Assembly and Roofing
-
Bevel the edges:
Cut 45-degree angles on the vertical edges of your walls where they will meet. This ensures a clean, strong corner joint. -
Score and slip:
Score the beveled edges aggressively and apply a generous amount of slip. Press the walls together to form the box of the house, reinforcing the inside seams with a thin coil of soft clay. -
Create the ribbed roof (Taller House):
Cut two rectangular slabs for the roof. Before attaching, use a wooden modeling tool or the side of a ruler to press parallel indentations horizontally across the slabs. This mimics wood shingles or metal ribbing. -
Create the dotted roof (Smaller House):
Cut the roof slabs for the smaller cottage. Use a needle tool or a stiff-bristled brush to poke random, dense stippling all over the surface, creating a porous, stone-like appearance. -
Attach the roofs:
Score and slip the top edges of your house walls. Place the roof panels on, ensuring they overhang slightly at the eaves. Join the peak of the roof firmly with slip and smooth the seam. -
Make the bases:
Cut simple rectangular slabs slightly larger than the footprint of each house. Smooth the edges, but leave the texture relatively plain so the house remains the focal point.
Clean Windows Tip
Use a damp paintbrush to smooth inside the window cutouts after the clay dries slightly. Sharp, jagged clay bits can become very sharp after firing.
Step 3: Finishing Touches
-
Bisque fire:
Allow the houses to dry completely (bone dry). Fire them in the kiln to cone 04 (or your clay’s specified bisque temperature). -
Apply oxide wash:
For the taller house with the ribbed roof, mix water with brown iron oxide or use a watered-down brown underglaze. Paint it over the roof area. -
Wipe back:
Immediately wipe the roof with a damp sponge. The dark color will stay in the recessed ‘ribs’ emphasizing the texture, while the high points return to a lighter clay tone. -
Glaze application:
Dip or brush a matte white glaze over the bodies of the houses. For the smaller house, glaze the roof white as well to keep the ‘sugar cube’ look. Avoid clogging the window holes with thick glaze. -
Final firing:
Fire the pieces again to the glaze temperature appropriate for your clay body and glaze choice.
Add Warmth
Before the final firing, apply a tiny amount of yellow underglaze strictly to the inside edges of the window frames to enhance the glow of the votive candle.
Now you have a set of architectural luminaries ready to warm up your evening decor


What Really Happens Inside the Kiln
Learn how time and temperature work together inside the kiln to transform clay into durable ceramic.
Distressed and Weathered Finish House
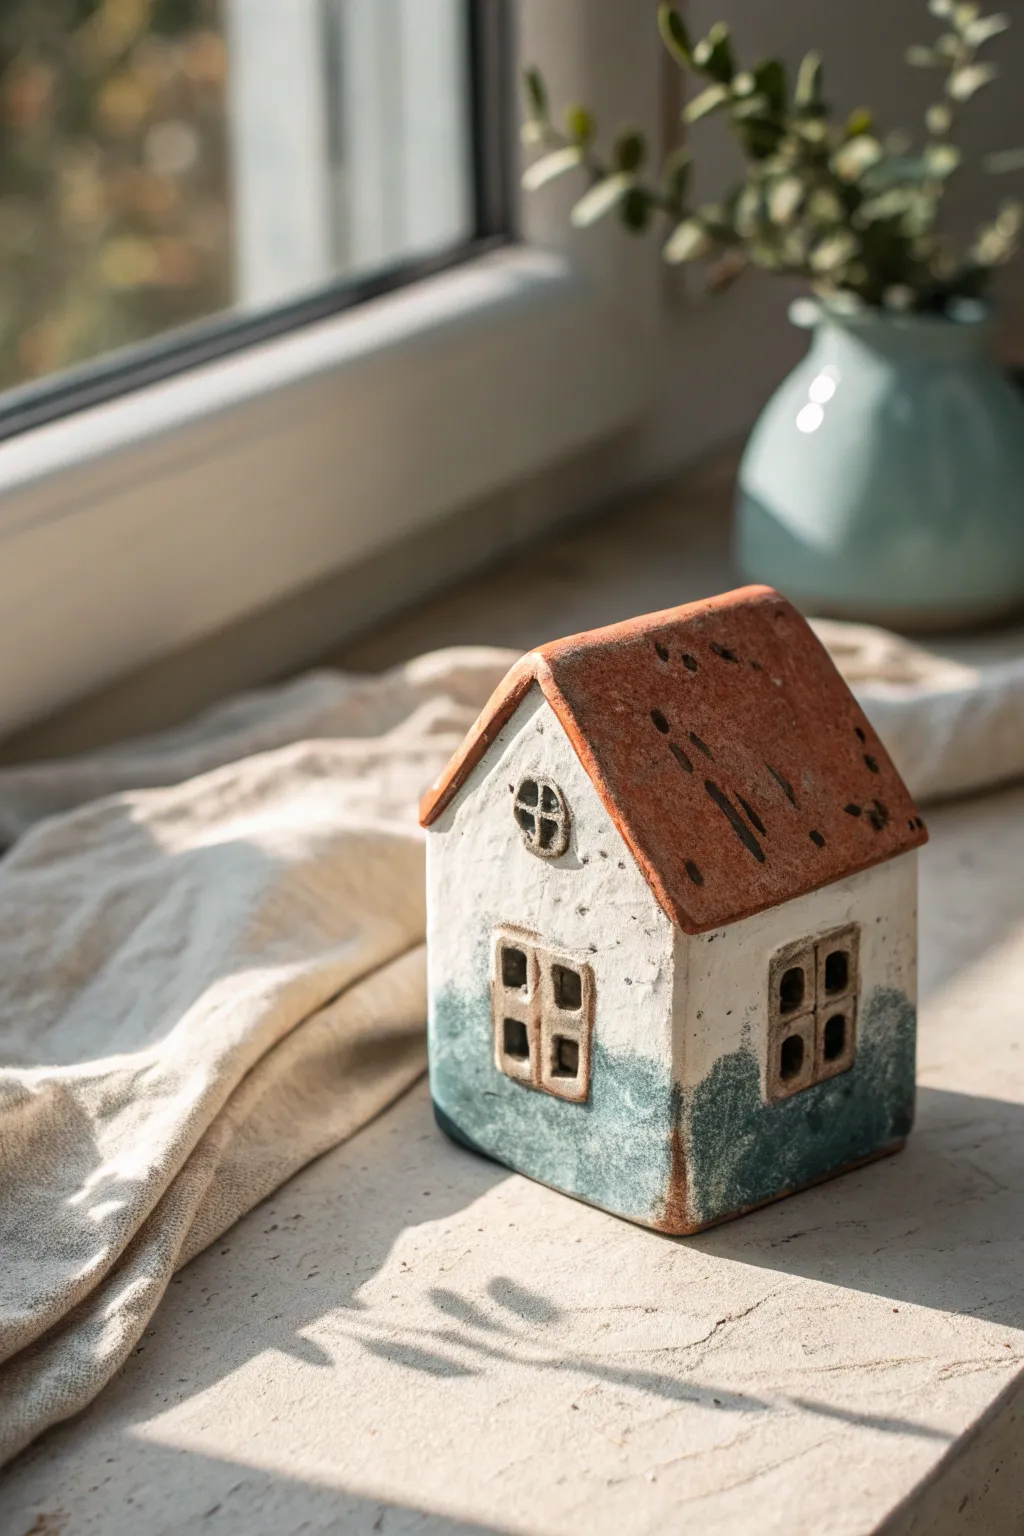
This little ceramic abode captures the beauty of age with its weathered white walls and dipped blue base. The combination of exposed terracotta edges and intentionally imperfect glazing gives it a delightful, time-worn character perfect for any windowsill.
How-To Guide
Materials
- Stoneware clay (buff or terracotta)
- Rolling pin
- Fettling knife
- Paper template (walls and roof)
- Slip (clay slurry)
- Serrated rib tool
- White matte glaze
- Teal or sea-green reactive glaze
- Red iron oxide wash (optional)
- Clean sponge
- Detail carving tool
- Small paintbrush
Step 1: Constructing the Form
-
Roll your slabs:
Begin by rolling out your clay to an even slab, approximately 1/4 inch thick. Aim for a consistent thickness to ensure even drying and prevent warping later. -
Cut the components:
Using your paper templates, cut out four wall pieces (two peaked ends, two rectangular sides) and two roof panels. Let these pieces stiffen to a ‘leather hard’ stage so they can stand up without slumping. -
Score and slip:
Creating strong joints is crucial. Use your serrated tool to roughen the edges that will connect, apply a generous amount of slip, and press the four walls together to form a box. -
Reinforce the corners:
Add a tiny coil of soft clay to the interior corners of your box structure. Smooth this coil down with your finger or a tool to act as an internal reinforcement. -
Attach the roof:
Score and slip the top edges of the walls and the underside of your roof panels. Place the roof pieces on, ensuring they meet at the peak. Smooth the peak seam together gently.
Uneven Glaze Line?
Don’t fret if the blue and white glaze overlap messily. This organic blending looks more authentic than a taped-off line. Embrace the drips
Step 2: Adding Details
-
Carve the windows:
Once the house is fully assembled and sturdy, use a sharp needle tool or fettling knife to cut out rectangular windows on the sides and small circular or arched attic windows. -
Form the window frames:
Roll very thin coils of clay and frame the window openings you just cut. Added tiny cross-pieces to create the mullions (the vertical and horizontal bars). -
Texture the roof:
Using a needle tool, poke random groupings of small holes or scratches onto the roof surface to simulate weathering or nail marks. -
Soften the edges:
Rub a slightly damp sponge over all corner edges. You don’t want sharp lines here; the goal is a soft, eroded look that mimics old stone or plaster. -
Bisque fire:
Allow the house to dry completely (this may take several days). Once bone dry, fire it in the kiln to cone 04 for the bisque stage.
Step 3: Glazing technique
-
Wax the windows:
Apply a wax resist carefully to the window frames and mullions. This keeps the raw clay color visible, adding warmth and contrast to the final piece. -
Apply the white base:
Brush or dip the main body of the house in a matte white glaze. Don’t worry about perfect coverage; if some clay shows through, it adds to the distressed effect. -
Create the weathered bottom:
Dip just the bottom third of the house into a teal or sea-green reactive glaze. I like to hold it at a slight angle or let it drip naturally to avoid a severe straight line. -
Color the roof:
Apply a reddish-brown glaze or an iron oxide wash to the roof. If using a wash, wipe some of it back with a sponge so it settles into the texture holes you made earlier. -
Distress the edges:
Before firing, take a clean, damp sponge and gently wipe the glaze off the very edges of the roof and corners of the house to expose the clay body underneath. -
Final wipe down:
Check the very bottom foot of the house to ensure no glaze is on the surface that touches the kiln shelf. -
Glaze fire:
Fire the piece again, this time to the maturity temperature of your clay and glaze (typically cone 5 or 6 for stoneware).
Light From Within
Cut a large hole in the bottom of the house before firing. This lets you pop an LED tea light inside to illuminate the windows at night
Place your finished house on a sunny shelf where the light can catch the subtle texture differences in the glaze
Bright Painted Fantasy House
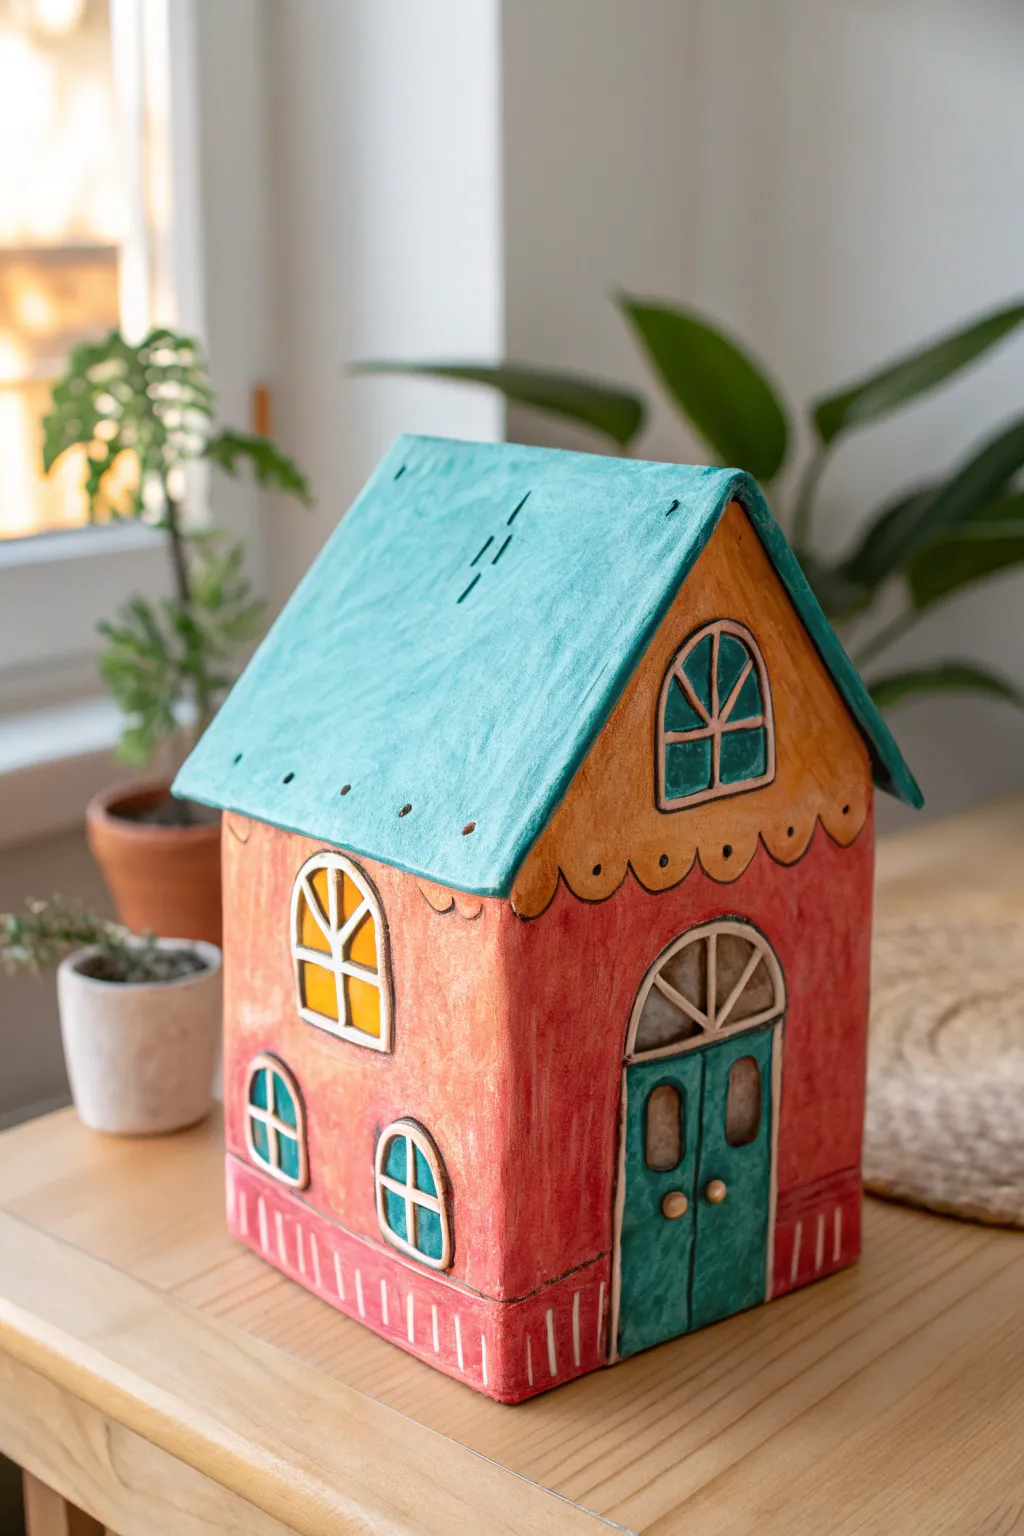
This charming ceramic house features a vibrant color palette of teal, warm orange, and rustic red, bringing a touch of fairytale magic to any shelf. The project combines slab-building techniques with detailed underglaze work to capture that delightful, hand-painted folk art aesthetic.
Step-by-Step Tutorial
Materials
- Low-fire white earthenware clay
- Rolling pin and guide strips (canvas cloth optional)
- Fettling knife or X-Acto knife
- Paper templates (roof, side walls, front/back walls)
- Scoring tool and slip
- Modeling tools (wooden sculpting tools)
- Underglazes: Teal, Burnt Orange, Bright Red, Yellow, White, Dark Green
- Clear transparent glaze
- Small paintbrush assortment (flat and detail round)
- Kiln
Step 1: Slab Building the Structure
-
Roll your slabs:
Begin by rolling out your white earthenware clay to an even thickness of about 1/4 inch. Use guide strips on either side of your rolling pin to ensure the thickness is consistent, which helps prevent warping later. -
Cut the components:
Place your paper templates onto the slab. You’ll need two rectangular side walls, two pentagonal pieces for the front and back (with the peaked roof shape), and two rectangular roof panels. Cut cleanly around them with a fettling knife. -
Let the clay stiffen:
Allow your cut pieces to dry to a ‘leather-hard’ state. This is crucial; if the clay is too soft, the house will slump; if too dry, it won’t join properly. I usually verify they can stand on their edge without bending before proceeding. -
Cut window and door openings:
Before assembling, use a sharp knife to carefully cut out the arched doorway and the various arched windows. Don’t discard the clay if you want to make raised frames, or simply carve the details in later. -
Assemble the walls:
Score the vertical edges of your walls and apply slip generously. Press the side walls against the front and back walls to form a box. Use a small clay coil on the interior seams to reinforce the joints, smoothing it out completely. -
Attach the roof:
Score and slip the top angled edges of the walls. Place your roof slabs on top, creating the peak. Ensure the roof overhangs slightly. Seal the top seam where the two roof slabs meet with an extra coil and smooth it down.
Clean Lines
Use a slightly damp sponge to wipe back any underglaze mistakes on the white frames before firing. It acts like an eraser on bisque ware!
Step 2: Adding Details and Texture
-
Create the scalloped trim:
Roll a thin coil or small strip of clay and attach it where the roof meets the wall or simply carve a scalloped line directly into the clay to separate the upper ‘gable’ area from the lower wall. -
Sculpt window and door frames:
Roll very thin coils of clay to create the raised outlines for the windows and the arch over the door. Score and slip these into place around your cutouts. Add small vertical coils for window panes. -
Add the baseboard details:
At the bottom of the house, use a modeling tool to carve vertical lines, simulating a picket fence or wainscoting effect along the base. -
Texturize the roof:
Using a needle tool or knife, add tiny dash marks or faint imperfections to the roof surface to give it a weathered, hand-hewn appearance. -
Bisque fire:
Allow the house to dry completely (bone dry). This may take several days depending on humidity. Fire the piece in the kiln to cone 04 (or your clay body’s specifications) for the bisque firing.
Slumping Walls?
If walls start bowing during assembly, lightly stuff the inside of the house with crumpled newspaper or plastic bags to support the clay while it stiffens.
Step 3: Painting and Glazing
-
Apply the roof color:
Using a soft brush, apply three coats of teal underglaze to the roof. Let each coat dry slightly before adding the next to ensure solid coverage. -
Paint the upper walls:
Paint the triangular gable area (the upper section under the roof) with a warm burnt orange or mustard yellow underglaze. -
Fill the main walls:
Apply a bright rustic red underglaze to the main body of the house. Be careful to paint neatly around the window frames. -
Detail the woodwork:
Use a fine detail brush to paint the window frames white. For the windows themselves, use a bright yellow to mimic warm light from inside, and paint the double doors a deep teal or dark green. -
Add decorative stripes:
Paint the vertical carved lines at the base of the house with white underglaze to make the ‘fence’ detail pop against the red background. -
Final glazing:
Once the underglaze is completely dry, apply a coat of clear transparent glaze over the entire piece. Fire the house again to the recommended temperature for your glaze (typically cone 05 or 06).
Place a small LED tea light inside your finished house to see the windows glow with a cozy warmth

TRACK YOUR CERAMIC JOURNEY
Capture glaze tests, firing details, and creative progress—all in one simple printable. Make your projects easier to repeat and improve.
Ceramic Birdhouse With a Removable Roof
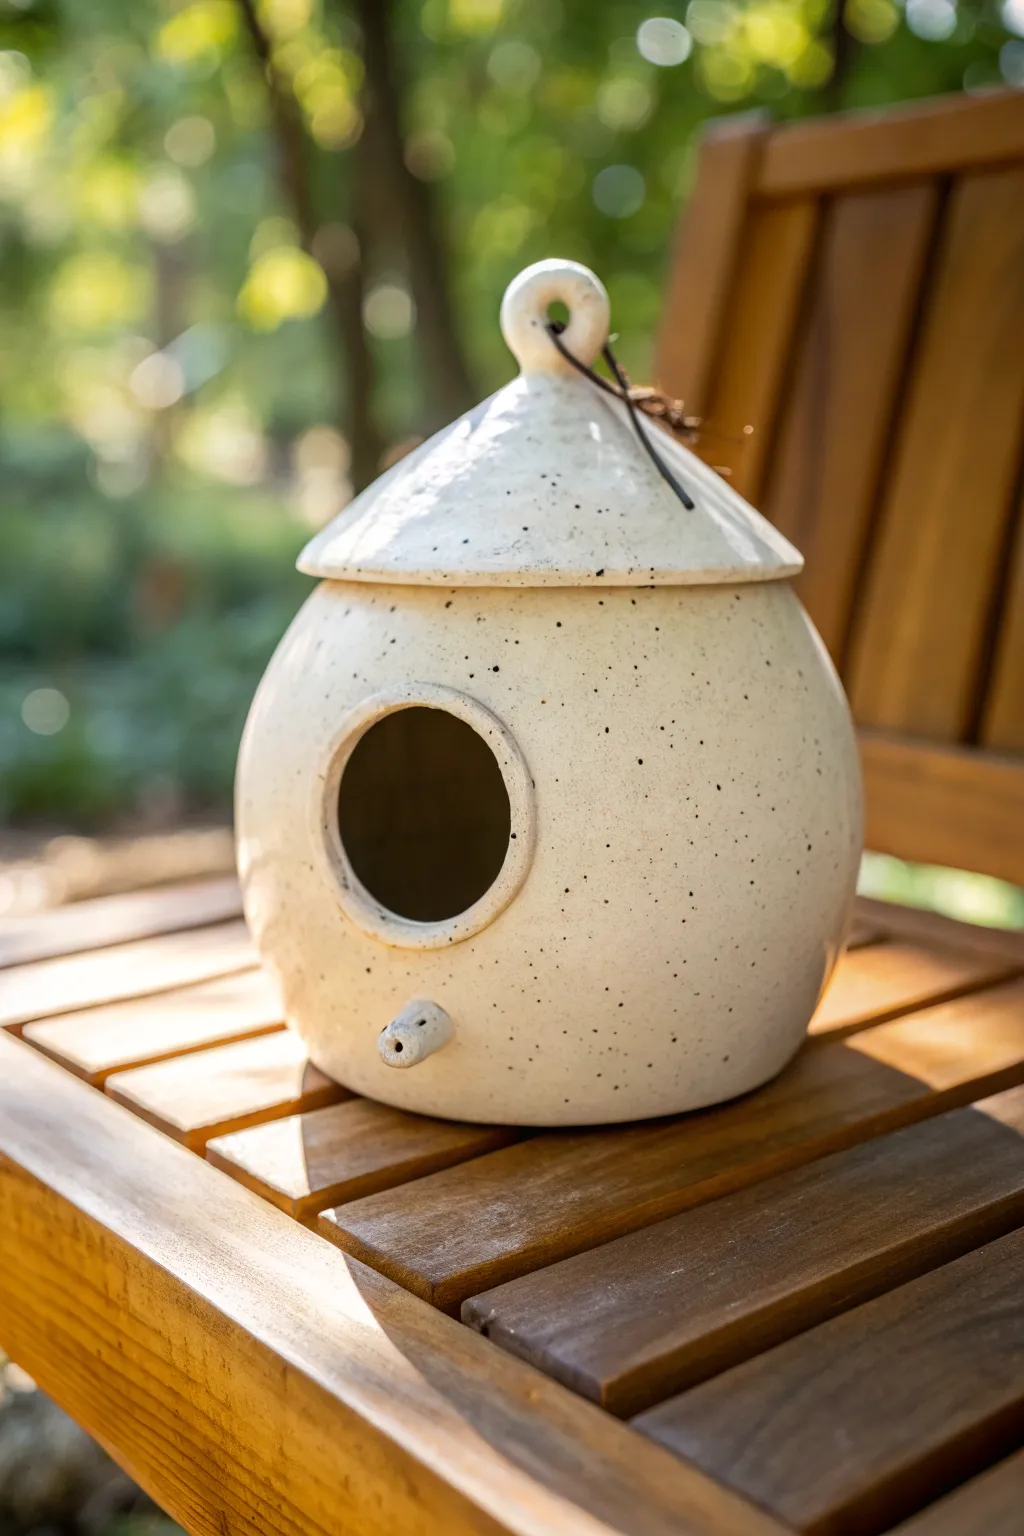
This charming, bulbous birdhouse features a speckled cream glaze and a practical removable roof for easy seasonal cleaning. Its organic, rounded shape and conical lid create a whimsical, fairytale aesthetic perfect for any garden setting.
Step-by-Step
Materials
- Stoneware clay (smooth or speckled)
- Pottery wheel
- Throwing tools (sponge, rib, needle tool, wire cutter)
- Trimming tools
- Circle cutter or cookie cutter (approx. 1.5 – 2 inches)
- Liquid wax resist
- Cream speckled glaze (cone 5/6 or suitable for your clay)
- Leather cord or twine
- Score and slip tools
- Kiln
Step 1: Throwing the Body
-
Center and open:
Begin by wedging about 3-4 pounds of clay. Center it firmly on the wheel and open it up, leaving a floor thickness of about a quarter-inch. -
Pull the walls:
Pull the walls up into a cylinder first. Ensure you have enough height to eventually form a spherical shape. -
Belly out the form:
Using a rib on the outside and your hand on the inside, gently push the belly of the pot outward to create a round, spherical volume. Keep the neck slightly narrower, but ensure the rim is wide enough to support the lid. -
Finish the rim:
Compress the rim with a chamois or sponge to ensure it’s smooth and sturdy. This flat, slightly inward-sloping gallery will hold the lid. -
Dry to leather hard:
Wire the pot off the bat and let it dry slowly until it reaches a leather-hard state, where it’s firm enough to handle without deforming.
Stuck Lid Solution
If your lid rocks or doesn’t sit flat, apply a grinding paste to the rim after the final firing and rotate the lid against the body to grind them into a perfect fit.
Step 2: Creating the Lid and Perch
-
Throw the lid:
Using a smaller amount of clay (about 1-1.5 pounds), throw a conical shape upside down (like a bowl) or right-side up off the hump. If throwing right-side up, shape it into a cone and create a small loop handle at the very peak. -
Measure for fit:
Use calipers to measure the opening of your birdhouse body and ensure the lid’s base matches perfectly. Remember to account for shrinkage if the moisture levels differ significantly. -
Make the perch:
Hand-build a small, thick cylinder or cone of clay for the perch. You can poke a decorative hole in the end if desired. -
Trim the pieces:
Once the body and lid are leather hard, trim the excess clay from the bottom of the body and refine the underside of the lid to ensure a snug fit.
Step 3: Assembly and Finishing
-
Cut the entry hole:
Identify the ‘front’ of your spherical body. Use a circle cutter or a needle tool to carefully cut out a round entrance hole, smoothing the edges with a damp sponge. -
Attach the perch:
Score and slip the area directly below the entrance hole and the back of your perch piece, then press them firmly together. Clean up any excess slip. -
Create the hanging loop:
If you didn’t throw a loop on top of the lid, now is the time to attach a coil loop or drill horizontal holes through the finial for the cord. -
Bisque fire:
Allow all pieces to dry completely (bone dry) before loading them into the kiln for a bisque firing. -
Glaze application:
Dip or brush your cream speckled glaze onto the body and lid. Avoid glazing the flange where the lid touches the body—use wax resist here to prevent them from fusing. -
Glaze fire:
Fire the pieces to the temperature recommended for your specific clay and glaze combination. -
Add the cord:
Once cool, thread a sturdy leather cord or weather-resistant twine through the top loop to finish the piece.
Pro Tip: Ventilation
Drill a few small drainage holes in the floor and near the top rim (hidden under the lid overhang) to keep the interior dry and cool for the birds.
Hang this lovely handmade home in a quiet tree and wait for your first feathered tenants to arrive.
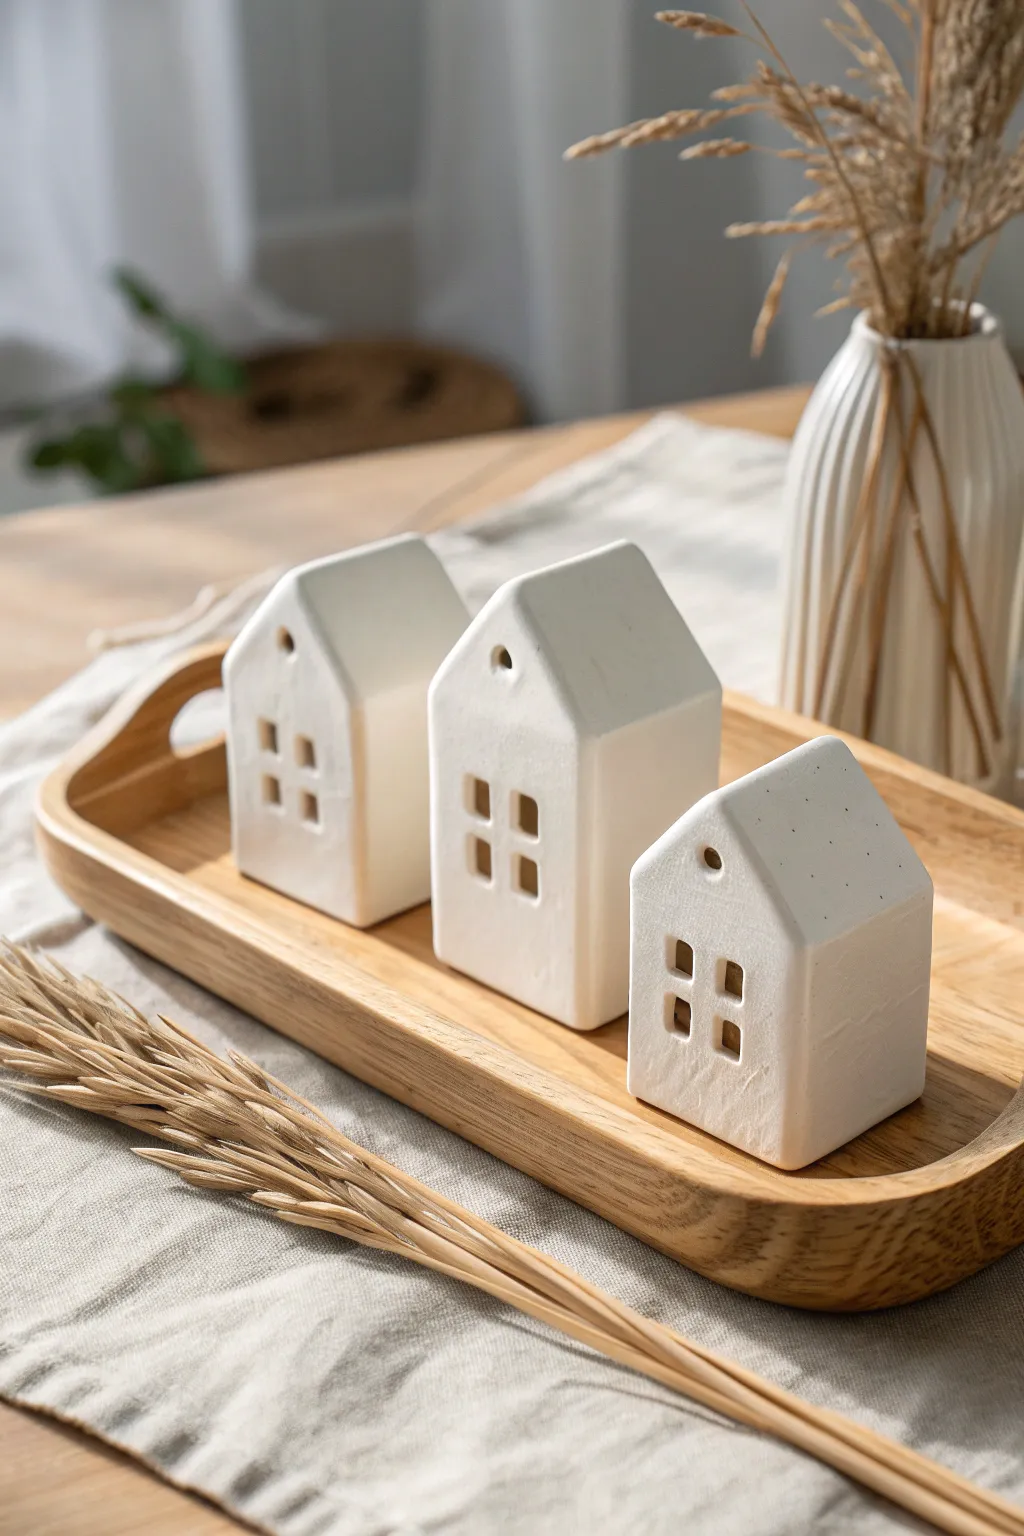
Mini House Bud Vase Row
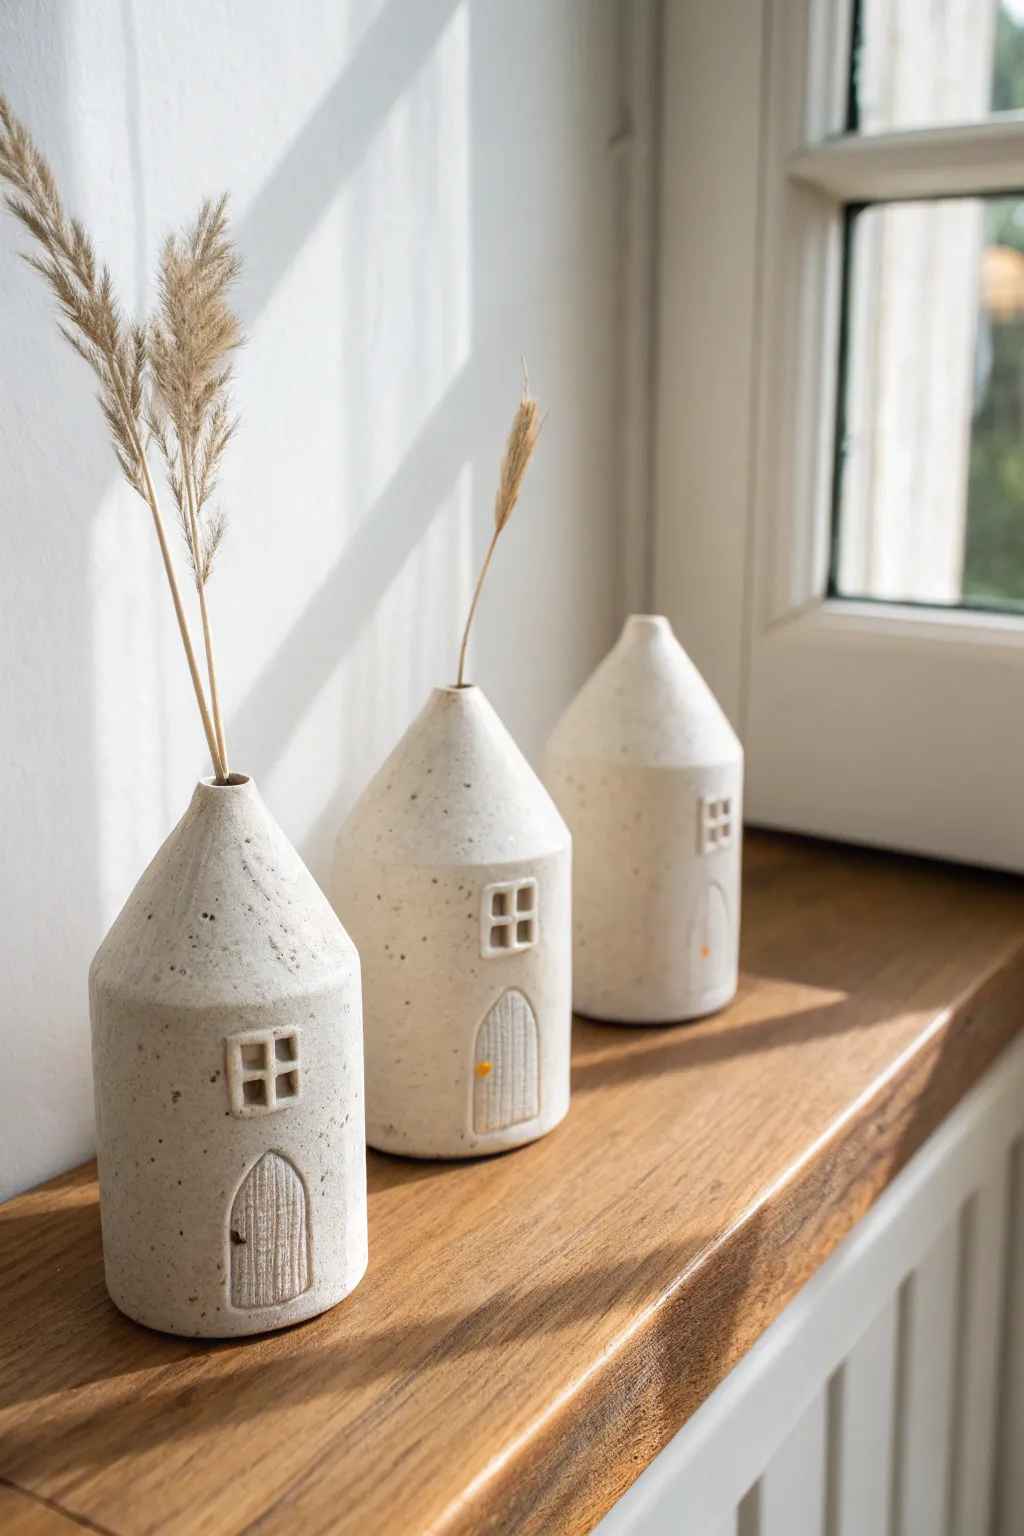
Bring a touch of architectural charm to your windowsill with these delightful ceramic house bud vases. Featuring a speckled clay body and minimal details, they create a cohesive village perfect for displaying dried pampas grass or wheat stems.
How-To Guide
Materials
- Speckled stoneware clay (mid-fire)
- Clay rolling pin
- Canvas work surface or slab mat
- Needle tool
- Fettling knife
- Sharp rectangular cutter (optional)
- Slip and scoring tool
- Small circular hole cutter (for the opening)
- Wooden modeling tool
- Smooth sponge
- Clear matte glaze (food safe if holding water)
- Kiln
Step 1: Forming the Body
-
Roll the slab:
Begin by rolling out your speckled stoneware clay into an even slab, approximately 1/4 inch thick. Compress the slab on both sides with a rib tool to align the clay particles and prevent warping later. -
Cut the walls:
Measure and cut a rectangle for the body cylinder. A rectangle about 4 inches tall by 7 inches wide is a good starting point for these petite houses. -
Form the cylinder:
Score the short ends of your rectangle and apply slip. Gently curve the slab to form a cylinder, overlapping the scored ends slightly. -
Seal the seam:
Press the seam firmly together. Support the inside with your hand while smoothing the outside seam with a wooden tool or rib until it is invisible. -
Add a base:
Place your cylinder on a fresh piece of slab and trace around it. Cut out the circle, score and slip the meeting edges, and attach the base securely, smoothing the join upwards.
Step 2: Creating the Roof
-
Shape the cone:
To create the slanted roof, gently dart the top of your cylinder. Cut four small ‘V’ shapes from the top rim, spacing them evenly. -
Close the roof:
Bring the cut edges of the ‘Vs’ together. This will pull the walls inward to form a conical roof shape. Score, slip, and smooth these seams carefully so the transition looks organic. -
Refine the peak:
Gently paddle the roof area to round out any sharp angles created by the darts, aiming for that smooth, soft dome shape seen in the image. -
Create the opening:
Use a small hole cutter or needle tool to create a clean opening at the very peak of the roof for your botanical stems. Smooth the rim with a damp sponge.
Clean Lines
When smoothing the roof seams, support the clay wall from the inside with a long wooden spoon handle. This prevents the roof from collapsing while you press on the outside.
Step 3: Adding Details & Finishing
-
Carve the door:
Using a needle tool, lightly sketch an arched door at the base. Once happy with the placement, carve slightly deeper to define the outline. -
Texture the door:
I like to use a dull tool to press vertical lines inside the door arch to simulate wooden planks, giving it a textural contrast to the smooth walls. -
Add the window:
Cut a tiny square of clay from your scraps. Attach it above the door using slip. Carefully press a ‘cross’ indentation into it to mimic window panes. -
Bisque fire:
Allow the houses to dry slowly under plastic to prevent cracking. Once bone dry, bisque fire them according to your clay body’s specifications (usually cone 04). -
Glaze application:
These houses rely on the raw clay beauty, so apply a very thin coat of clear matte glaze, or leave the exterior unglazed (raw) and only glaze the interior if you plan to hold fresh water. -
Final firing:
Glaze fire the pieces to temperature (likely cone 5 or 6). Once cool, sand the bottoms lightly to ensure they sit flat on your shelf.
Golden Hour Glow
Before firing, apply a tiny dot of yellow underglaze to the door handle or window frames. It adds a subtle, warm pop of color that mimics a lit cottage.
Arrange your trio on a sunny ledge and fill them with dried grasses for an instant cozy atmosphere
House Diorama on a Wood Slice Base
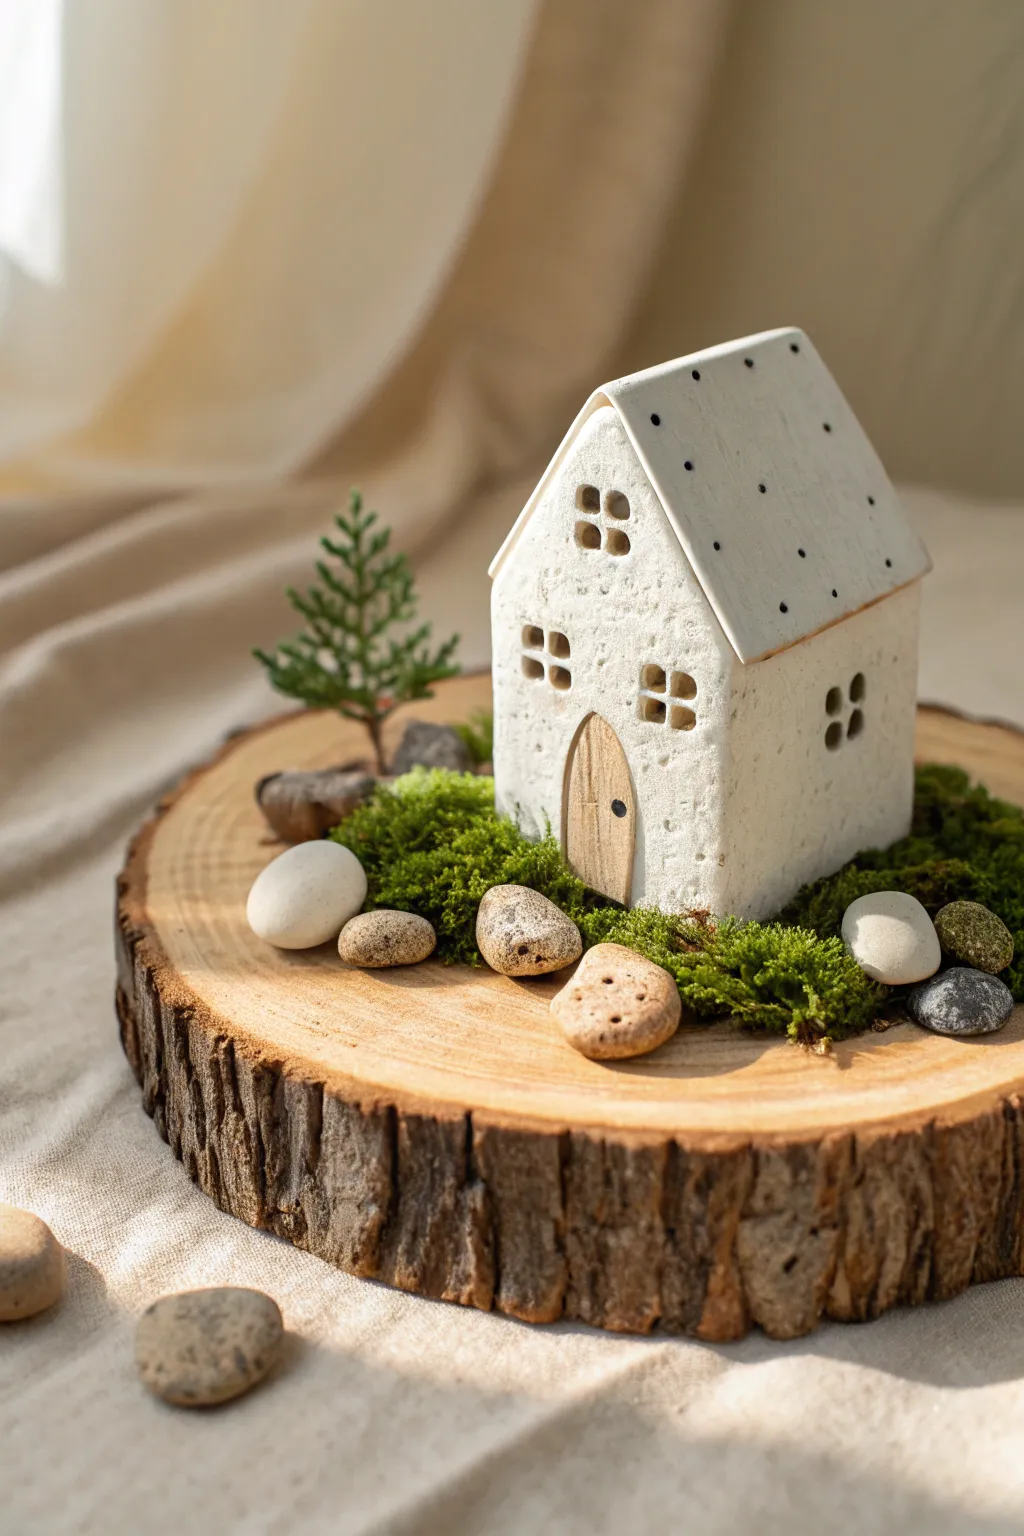
This rustic diorama captures the charm of a cozy woodland retreat, featuring a handmade-style clay house perched on a natural timber round. The combination of textured white walls, mossy landscaping, and smooth river stones creates a serene, nature-inspired display piece.
Step-by-Step
Materials
- White polymer clay or air-dry clay
- Rolling pin and craft knife
- Wood slice base (approx. 6-8 inch diameter)
- Acrylic paints (black, warm brown, cream)
- Thin balsa wood sheet
- Preserved reindeer moss (dark and light green)
- Assorted small pebbles and river stones
- Miniature plastic pine tree
- Texture tool or rough sponge
- Super glue or strong craft adhesive
- Fine-grit sandpaper
- Needle tool or toothpick
Step 1: Constructing the Clay House
-
Roll and texture:
Begin by conditioning your clay and rolling it out to a 1/4-inch thickness. Before cutting, press a rough sponge or crumpled aluminum foil gently into the surface to create a stucco-like stone texture. -
Cut the walls:
Cut out two pentagon shapes for the front and back walls (where the point is the roof peak) and two rectangular side pieces. Ensure the heights match so the corners align perfectly. -
Carve windows:
Use a small square cutter or your craft knife to carefully remove clay for the windows. Create a four-pane grid on the front upper window and simple squares for the others. Smooth any rough edges with your finger. -
Assemble the structure:
Score the edges of your wall pieces and apply a tiny amount of water or liquid clay bond. Press the walls together to form the house box, reinforcing the inside seams with a thin snake of clay for stability. -
Adding the roof:
Roll out a smoother slab of clay for the roof. Cut two rectangular panels that are slightly wider than the house to create an overhang. Attach these to the peaks of your walls, smoothing the top seam where they meet. -
Detailing the door:
Cut an arched doorway opening in the front wall. From your balsa wood sheet, cut a matching arch shape. Use a needle tool to score vertical wood grain lines into the balsa wood to simulate planks. -
Baking or drying:
If using polymer clay, bake according to the package instructions (usually 275°F for 15-30 minutes). If using air-dry clay, allow it to cure fully for 24-48 hours until hard.
Step 2: Painting and Finishing
-
Painting the roof:
Once the house is cool and dry, dilute a small amount of cream paint and give the roof a light wash if you want to soften the stark white. Let this dry completely. -
Adding roof dots:
Dip the tip of a toothpick or a small dotting tool into black acrylic paint. Carefully apply evenly spaced dots in vertical rows along the roof panels to mimic nail heads or slate tiles. -
Finishing the door:
Paint the balsa wood door with a warm brown acrylic wash, letting the darker pigment settle into the scored grain lines. Add a tiny black dot for the doorknob. Glue the door into the arched opening.
Natural Texture Hack
For ultra-realistic stone walls, gently press a clean, real rock or piece of rough sandpaper against the wet clay walls before assembling the house.
Step 3: Landscaping the Base
-
Prepare the wood slice:
Clean your wood slice with a dry cloth to remove loose sawdust. arrange your house, tree, and larger stones on the surface first to determine the best layout without glue. -
Secure the house:
Apply a generous amount of strong adhesive to the bottom edges of your ceramic house and press it firmly onto the center-right of the wood slice. -
Plant the tree:
Drill a tiny shallow hole in the wood slice where you want the tree, put a dab of glue on the tree trunk base, and insert it. Alternatively, build a small mound of glue and moss to support it. -
Lay the moss foundation:
Spread adhesive around the base of the house. Press clumps of preserved moss into the glue, mixing shades of dark and light green to create natural depth and shadows. -
Position the stones:
Nestle the larger river stones into the moss while the glue is still tacky, making them look partially buried. I like to place a large flat stone near the door to act as a doorstep. -
Final touches:
Fill in any gaps with smaller pebbles or tiny bits of moss. Inspect the scene from all angles to ensure no glue globs are visible and everything feels grounded.
Wobbly Walls?
If your clay walls are sagging during assembly, support the inside corners with small crumpled balls of paper or cardboard. Remove them carefully once the clay begins to harden.
Now you have a charming miniature scene that brings a touch of the forest into your home
Modular Mix-and-Match House Village Blocks
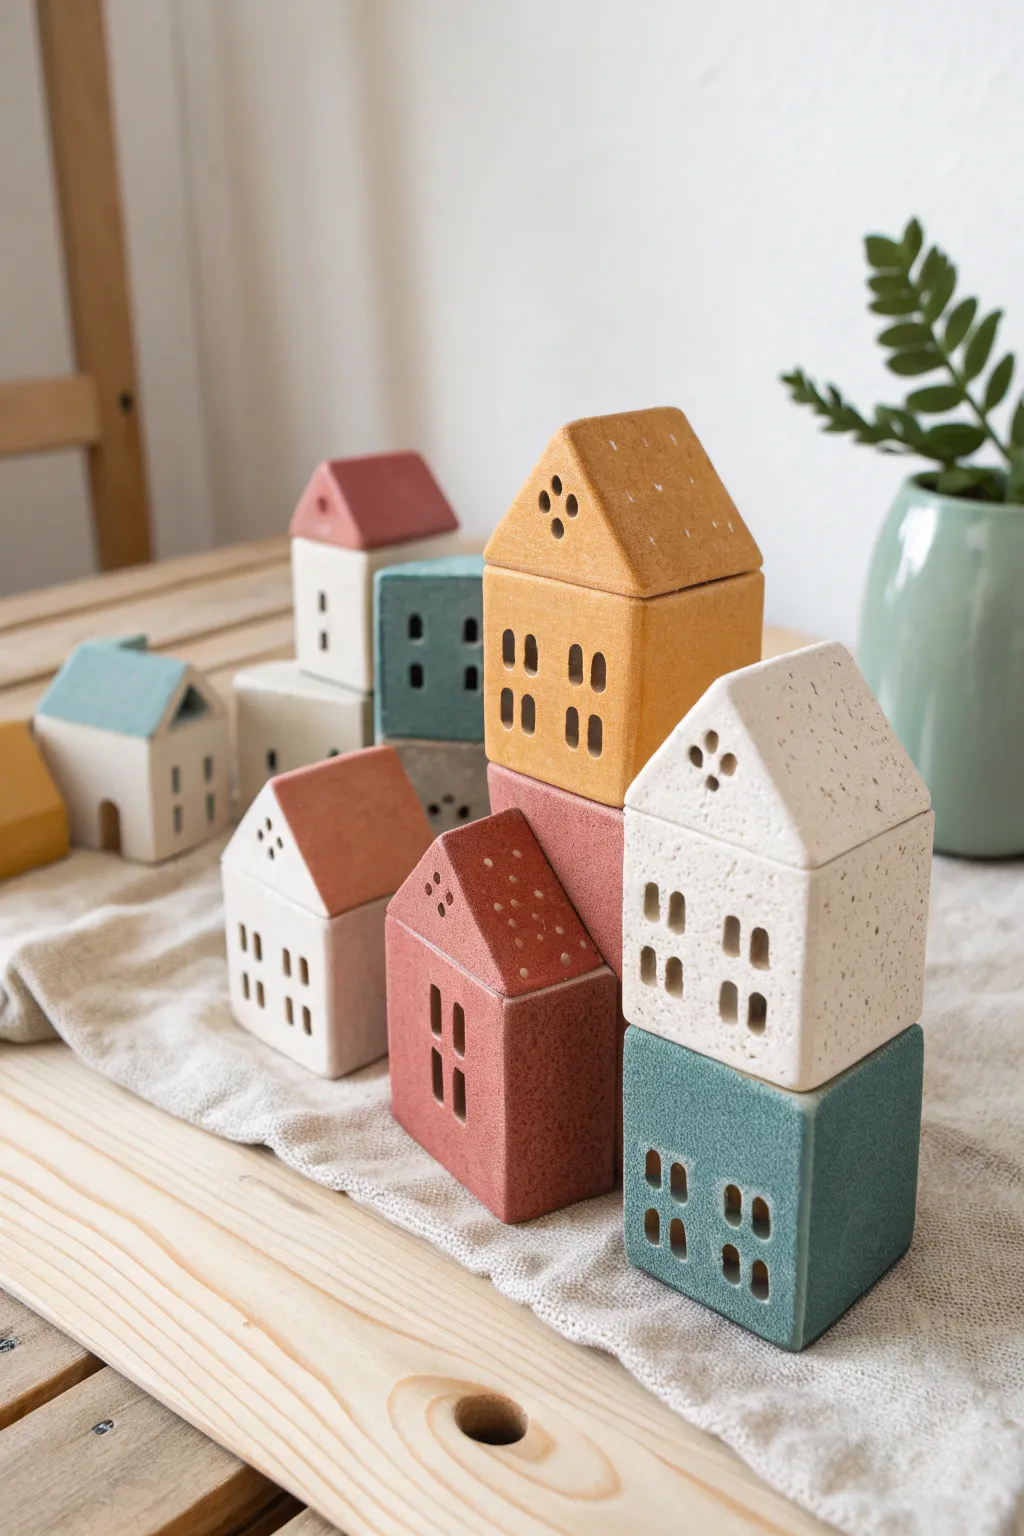
These charming, mix-and-match ceramic houses are perfect for building your own customizable little village on a mantle or shelf. The speckled clay body and simple block forms create a modern, tactile feel that invites play and rearrangement.
Step-by-Step Tutorial
Materials
- Speckled stoneware clay (mid-fire recommended)
- Clay slab roller or rolling pin with thickness guides
- Fettling knife
- Ruler
- Small square cookie cutters or template card
- Circular hole punch tool (straw or small cutter)
- Slip and scoring tool
- Sponge
- Underglazes (muted pastels: sage, terracotta, mustard)
- Matte transparent glaze (optional)
- Kiln access
Step 1: Preparing the Forms
-
Roll the Slabs:
Begin by wedging your speckled clay to remove air bubbles. Roll it out into an even slab, approximately 1/4 inch thick. Using slat guides here ensures perfect uniformity for clean geometric shapes. -
Cut the Base Cubes:
Measure and cut strips of clay 2.5 inches wide. From these strips, cut four identical squares to create the walls of your base cube. -
Cut the Roof Pieces:
For the peaked roof tops, cut two pentagon shapes (a square with a triangle on top) for the front and back, and two rectangular side pieces that match the height of the pentagon’s side walls. -
Dry Assembly:
Let the cut pieces stiffen to a soft leather-hard stage. This is crucial; if the clay is too wet, the sharp corners will slump during construction.
Sharp Corner Tip
To get those ultra-sharp corners, don’t just smooth by hand. Once leather hard, gently tap the house on a flat table against each side to square it up.
Step 2: Construction
-
Bevel the Edges:
Carefully bevel the vertical edges of your wall pieces at a 45-degree angle. This allows the corners to meet flush without a visible seam, creating that solid block look. -
Score and Slip:
Rough up the beveled edges with your scoring tool and apply a generous amount of clay slip. This acts as the glue for your structure. -
Assemble the Walls:
Join the four walls together to form a hollow tube. Gently press the seams together from both the inside and outside to ensure a bond. -
Add the Roof or Lid:
If you are making separate stacking blocks, cap the cube with a flat square slab. If making a single house, attach the roof pieces you cut earlier. -
Create Stacking Lips:
For the modular effect shown in the teal friction-fit blocks, add a small interior flange or lip to the bottom of the upper house pieces so they sit securely on the cubes below.
Preventing Cracks
If seams are cracking during drying, your clay was likely too dry when joining. Score deeper, use more slip, and wrap tightly in plastic for 24 hours to rehydrate.
Step 3: Detailing and Refining
-
Clean and Smooth:
Once assembled, use a damp sponge to smooth away rough join lines, but try not to over-smooth as you want to keep the geometric sharpness. -
Carve Windows:
Using a small square cutter or a steady hand with a knife, cut out the window shapes. Vary the patterns—some with two tall windows, others with four smaller panes. -
Add Attic Vents:
Take a small circular tool or a drinking straw to punch out decorative ventilation holes near the peaks of the roofs. -
Texture the Surface:
I like to gently pat the exterior with a wooden paddle or a rough cloth to bring out the grog in the clay and enhance that stone-like texture. -
Slow Drying:
Cover the houses loosely with plastic and let them dry very slowly to prevent warping. Once bone dry, bisque fire them according to your clay body’s specifications.
Step 4: Glazing and Finishing
-
Apply Underglaze:
Select your pastel palette. Apply 2-3 coats of underglaze to the exterior, leaving the interior bare or clearing it out with a sponge. -
Create the Speckle Effect:
If your clay isn’t naturally speckled, you can flick a stiff toothbrush loaded with iron oxide wash or brown underglaze across the surface. -
Wax Resist:
Apply wax resist to the bottom edges and any contact points where blocks will stack to prevent them from fusing together in the kiln. -
Final Fire:
Fire the pieces to the final glaze temperature. For the look in the photo, leave the underglaze matte (unglazed) for a raw finish, or apply a very thin matte clear coat.
Once cooled, arrange your new architectural wonders into a skyline that matches your mood