
Whenever I need a quick win at the studio, I reach for polymer clay heishi beads—they turn into the cutest women’s clay bead bracelets with just a little color planning. Here are my favorite design directions to help you build bracelets that feel grown-up, wearable, and totally you.
Classic Rainbow Heishi Stack
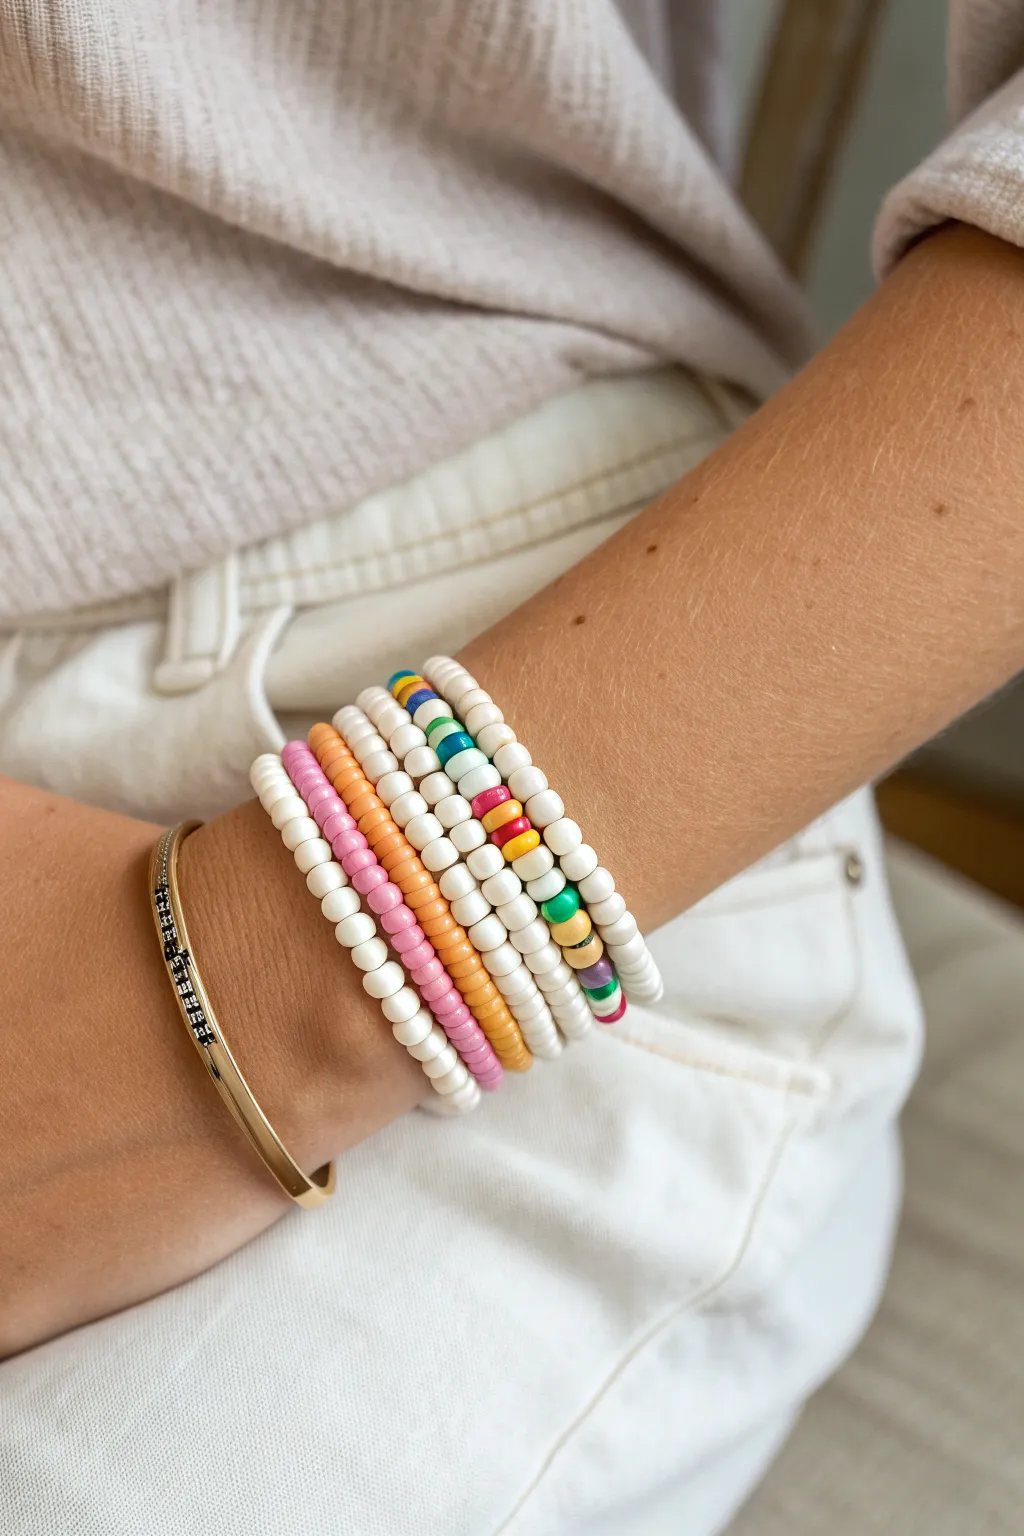
Brighten up your everyday look with this playful, beach-ready bracelet stack that combines classic whites with juicy pops of summer color. The mix of solid and patterned strands creates a relaxed, effortless vibe perfect for warm weather or lifting winter spirits.
Step-by-Step Tutorial
Materials
- White 6mm clay heishi beads
- Bubblegum pink 6mm clay heishi beads
- Soft orange/peach 6mm clay heishi beads
- Assorted accent discs (yellow, green, dark blue, lavender, red)
- 0.8mm clear elastic stretch cord
- Flat nose jewelry pliers (optional)
- Small craft scissors
- Super glue or jewelry adhesive
- Tape or bead stopper
- Optional: Gold cuff bracelet for layering
Step 1: Planning and Prep
-
Measure your wrist:
Wrap a piece of string around your wrist to find your perfect fit, then add about half an inch for comfort. Cut your elastic cord to this length plus an extra 4 inches to make tying knots easier later. -
Secure the ends:
Place a bead stopper or a simple piece of tape on one end of each pre-cut elastic string so your beads don’t slide right off while you work. -
Organize your colors:
Gather your beads into small piles or a divided tray. You will be making three distinct styles: solid colors, solid white, and white with color pops.
Bumpy Bracelets?
If your bracelet twists or won’t lay flat, the string is likely tied too tightly. You need a tiny bit of slack between beads so they can rotate around your wrist.
Step 2: Creating the Solid Strands
-
Start the all-white bracelet:
Thread white heishi beads onto your first elastic cord until you reach your measured length minus that half-inch allowance. The beads should sit comfortably without gaps. -
String the pink strand:
Repeat the process with the bubblegum pink beads for your second bracelet. Keep the tension consistent so the beads lay flat against each other. -
Create the orange strand:
String your third bracelet entirely with the soft orange or peach beads. Double-check that it matches the length of the previous two bracelets.
Knot Security
Use GS Hypo Cement for the elastic knots. Its fine needle applicator places glue precisely inside the knot without fusing the surrounding beads together.
Step 3: Designing the Accent Bracelets
-
Begin the first patterned strand:
Take a new cord and start with a base of about 8-10 white beads. -
Insert color pops:
Add a small sequence of colorful accent beads. You can do a single bead (like yellow) or a trio (blue, green, yellow). I prefer mixing up the order to keep it feeling organic. -
Continue the pattern:
Resume stringing white beads for another inch or so, then add another colorful accent section. Repeat this until the bracelet is complete. -
Vary the designs:
Create three more bracelets using this white-and-color method. Make sure the colorful sections don’t align perfectly across all bracelets; randomness looks better here. -
Space the accents:
For one of the strands, try spacing single colored beads further apart, perhaps every 15 white beads, for a lighter look.
Step 4: Finishing Touches
-
Pre-stretch the cord:
Before tying, give each bracelet a gentle tug to pre-stretch the elastic. This prevents it from sagging after the first wear. -
Tie the surgeon’s knot:
Remove the tape/stopper. Cross the ends, loop one under twice, pull tight, then make another standard overhand knot to secure it. -
Apply adhesive:
Place a tiny drop of super glue or jewelry cement right on the knot. Let it dry completely before moving it. -
Hide the knot:
Trim the excess string close to the knot, then gently slide a bead over the knot to conceal it inside the hole. -
Complete the stack:
Arrange your seven new clay bracelets on your arm. Add a structured gold cuff or bangle to the bottom of the stack to elevate the casual clay texture.
Now you have a vibrant, summer-ready stack that looks just as good with a swimsuit as it does with a sweater


Clean White and Gold Minimal Bracelet
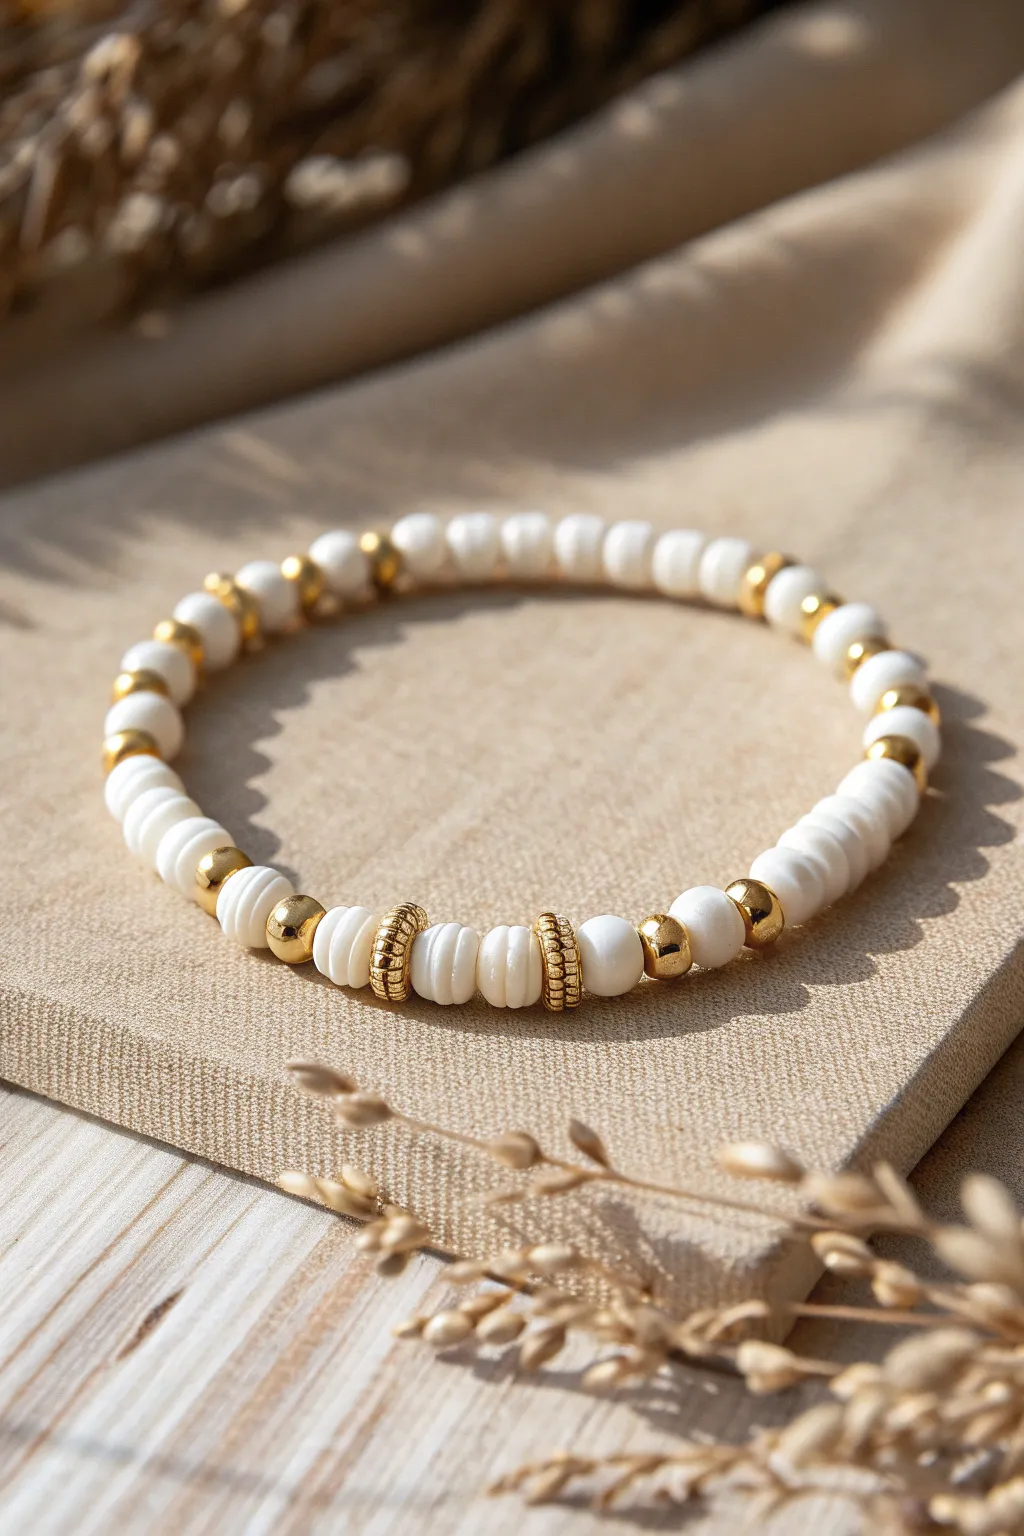
This elegant bracelet pairs crisp white heishi beads with warm gold accents for a look that is both sophisticated and beach-ready. The subtle rhythm of mixed metallic textures breaks up the white, creating a versatile accessory perfect for stacking or wearing solo.
How-To Guide
Materials
- White polymer clay heishi beads (approx. 4-6mm)
- Gold tone metal spacer beads (round, 3-4mm)
- Gold tone textured/ribbed disc spacer beads (decorative)
- Strong elastic bead cord (0.8mm clear)
- Jewelry glue or clear nail polish
- Scissors
Step 1: Preparation
-
Measure your wrist:
Wrap a piece of string or a flexible measuring tape around your wrist to find your size. Add about half an inch to this measurement to ensure the bracelet fits comfortably without being too tight. -
Cut the cord:
Cut a piece of elastic cord about 10-12 inches long. This extra length is crucial—I always prefer having too much cord than struggling to tie a knot with tiny ends. -
Pre-stretch the elastic:
This is a key step often missed: firmly pull on the elastic cord a few times before stringing. This ‘pre-stretching’ prevents the bracelet from loosening up and sagging after you wear it a few times. -
Secure one end:
Attach a piece of tape to one end of the cord or use a bead stopper clip. This simple safety measure will save you from the heartbreak of beads sliding off the other end while you work.
Knot Slipping?
If your knots slip undone, try using a textured elastic cord rather than a super smooth silicone one. The textured surface grips itself better.
Step 2: Creating the Pattern
-
Start with the focal section:
Begin stringing beads in the center of your cord to create the focal point shown in the image. Thread on three white heishi beads, followed by one textured gold disc spacer. -
Add the central gold accent:
Place three more white heishi beads, then another textured gold disc. This creates a mirrored center section grounded by those distinct ribbed gold pieces. -
Transition to rounds:
On either side of your focal section, add a slightly larger, smooth gold round bead. This changes the texture from the flat discs to something more substantial. -
Establish the main rhythm:
Now, begin the repeating pattern for the rest of the bracelet. String three to four white heishi beads, followed by one small smooth gold metal spacer bead. -
Repeat the pattern:
Continue this pattern: 3-4 white beads, 1 gold spacer. Repeat this sequence until you have nearly reached your desired length. -
Check the symmetry:
Periodically hold the ends of the cord together to ensure your pattern looks balanced on both sides of that initial focal section. -
Test the fit:
Wrap the unfinished strand around your wrist. The ends should meet comfortably with no gaps, without needing to stretch the elastic tightly yet.
Luxe Upgrade
Swap the standard white polymer clay beads for genuine white shell heishi or mother-of-pearl discs. The natural iridescence adds a high-end shimmer.
Step 3: Finishing Touches
-
Preparing to knot:
Remove the tape or bead stopper. Carefully bring the two ends of the elastic together, ensuring there is no slack between the beads. -
Tie the first knot:
Make a simple overhand knot. Pull it tight, but gently, so the beads snug up against each other without buckling. -
The surgeon’s knot:
For the second knot, make a loop like you’re tying a shoelace, but pass the tail end through the loop twice instead of once. This friction helps hold the elastic in place. -
Tighten securely:
Pull all four strands (the two loose ends and the two bracelet sides) firmly to lock the knot. You should feel it tighten into a small, secure ball. -
Add adhesive:
Dab a tiny drop of jewelry glue or clear nail polish directly onto the knot. Let it dry completely for a few minutes before moving it. -
Hide the knot:
Once the glue is dry, trim the excess tails to about 2mm. Gently pull the elastic so the knot slides inside the hole of the nearest large gold bead or a group of heishi beads to hide it.
Slide your new bracelet on and enjoy the effortless elegance it adds to your daily attire


Preppy Color-Blocked Bands
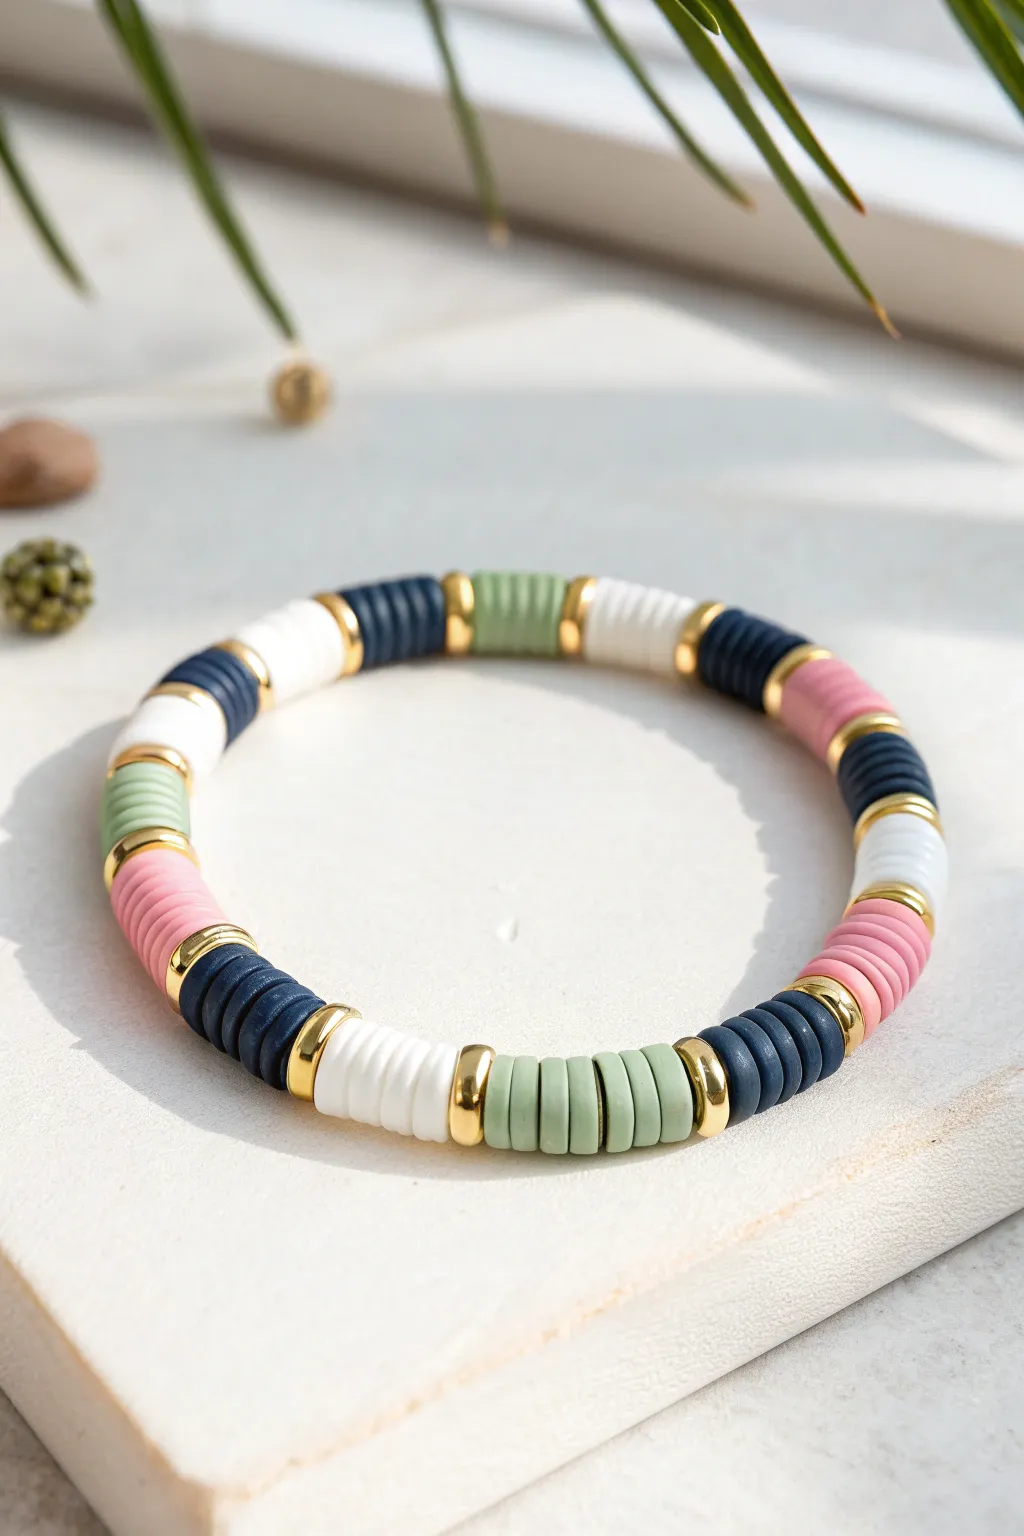
This chic bracelet combines the laid-back vibe of heishi clay beads with polished gold accents for a preppy, sophisticated look. The alternating color blocks in navy, sage green, white, and soft pink create a versatile accessory that stacks beautifully or stands out on its own.
Detailed Instructions
Materials
- Polymer clay heishi beads (Navy Blue, Sage Green, White, Soft Pink)
- Gold spacer beads, 6mm (round/smooth finish)
- Elastic stretch cord (0.7mm or 0.8mm)
- Jewelry glue or clear nail polish
- Scissors
Step 1: Planning and Prep
-
Measure your wrist:
Wrap a piece of string around your wrist to find your comfortable size, then add about an inch to that measurement. This will be the length of your beaded section. -
Prepare the cord:
Cut a length of elastic cord about 10-12 inches long. Having this extra length makes it much easier to tie the final knots securely without fumbling. -
Pre-stretch the elastic:
Hold the ends of your cut cord and give it a few firm tugs. Pre-stretching helps prevent the bracelet from loosening up immediately after you wear it. -
Secure the end:
Place a piece of tape or a binder clip on one end of the cord so your beads don’t slide off while you work.
Knot Slipping Out?
If your knot won’t stay hidden inside the bead hole, try enlarging the hole of one clay bead slightly with a bead reamer or needle to tuck the knot inside that instead.
Step 2: Creating the Pattern
-
Start with a gold spacer:
Thread one gold spacer bead onto the cord. This will acts as your section divider. -
First color block: Navy:
Thread approximately 7 to 8 navy blue clay disc beads. Aim for a block length of about half an inch. -
Add a gold accent:
Slide on another gold spacer bead to cap off the navy section. -
Second color block: Sage Green:
Thread 7 to 8 sage green heishi beads followed by a gold spacer. -
Third color block: White:
Add your white clay beads (roughly the same count as before) and finish the section with a gold spacer. -
Fourth color block: Navy (Repeat):
Since navy is a dominant color in this design, adding another navy block here creates a nice rhythm. Don’t forget the gold spacer after. -
Fifth color block: Pink:
Add a pop of color with 7 to 8 soft pink beads, capped with a gold spacer. -
Sixth color block: Navy (Repeat):
Add another block of navy beads followed by a gold spacer. -
Seventh color block: White (Repeat):
Repeat the white section just like before. -
Check the fit:
At this point, wrap the unfinished strand around your wrist. If it reaches all the way around comfortably, you are ready to tie. I usually check to ensure the pattern ends so that a gold bead will meet a clay bead seamlessly.
Perfect Symmetry
Count your beads exactly for each section (e.g., exactly 8 discs per color). Even slight variations in thickness can look uneven, so counting creates a truly polished look.
Step 3: Finishing Touches
-
Tie the first knot:
Remove the tape/clip and bring the two ends together. Tie a simple overhand knot and pull it down close to the beads. -
Secure with a surgeon’s knot:
Tie a second knot, but loop the end through twice before pulling tight. This extra loop creates a surgeon’s knot which is much more secure for elastic. -
Pull firmly:
Pull on all four strands (the two tail ends and the two bracelet sides) to tighten the knot fully. -
Glue the knot:
Dab a tiny drop of jewelry glue or clear nail polish directly onto the knot. Let it dry for a few minutes. -
Hide the mechanism:
Trim the excess cord ends close to the knot. If possible, gently tug the bracelet so the knot slides inside one of the gold spacer beads to hide it completely.
Slip on your new colorful band and enjoy the custom pop of color it adds to your wrist stack


Skinny Stripe Pattern Bracelet
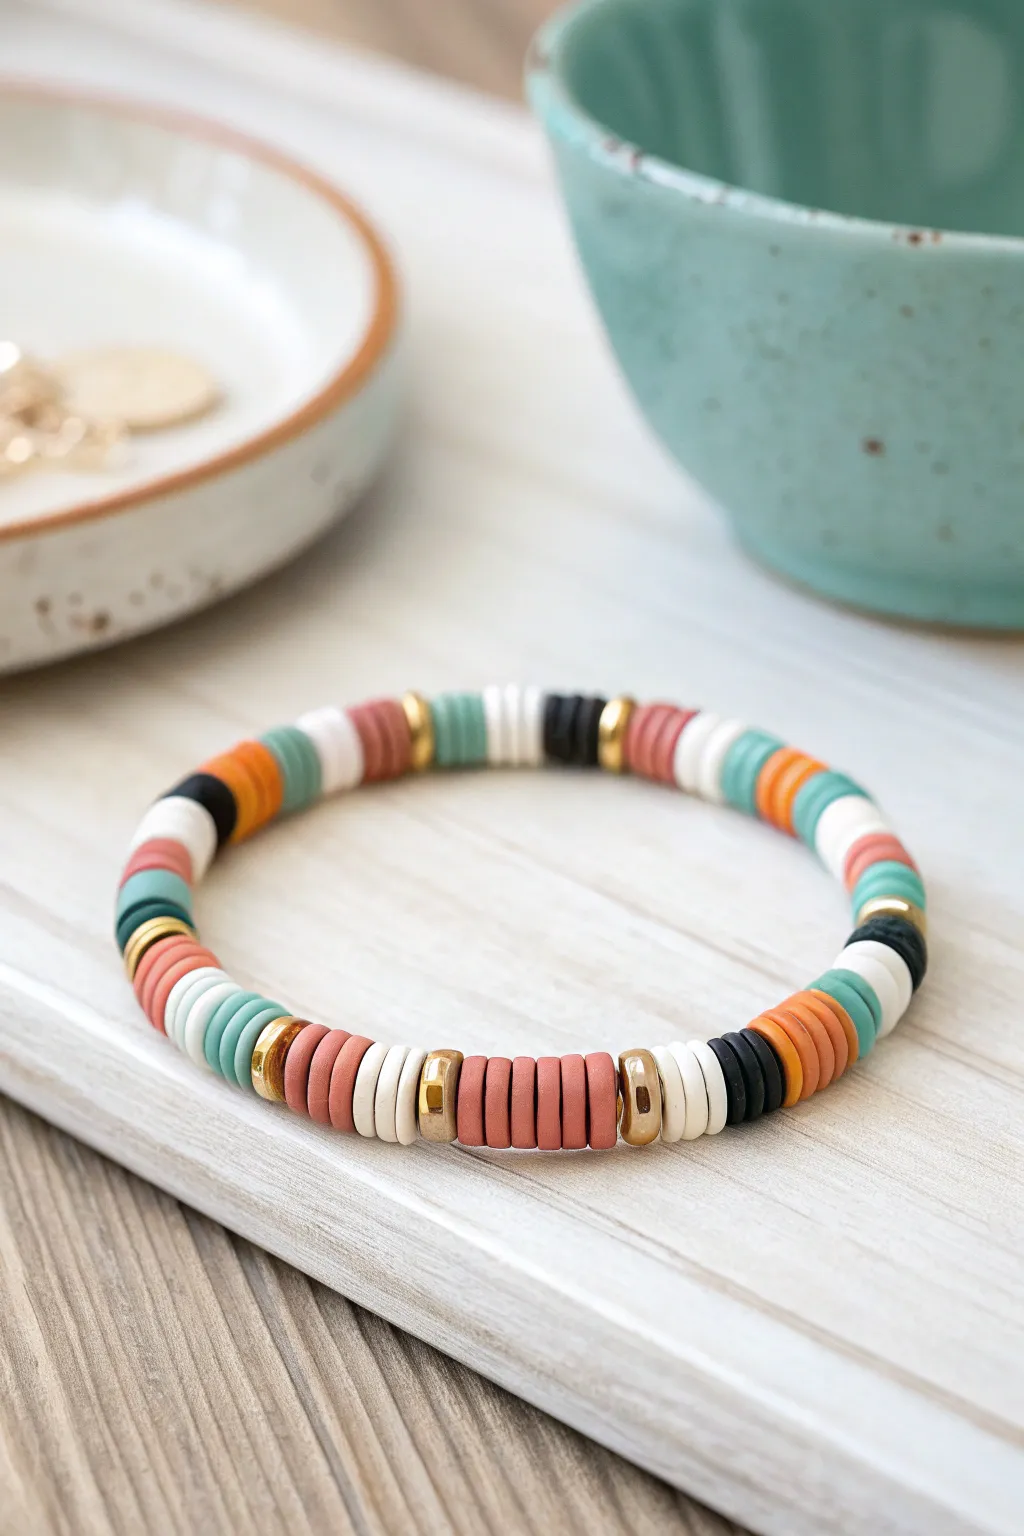
This trendy piece combines warm earthy tones with pops of teal and gold, creating a versatile accessory perfect for stacking. The alternating pattern of flat polymer clay heishi beads offers a lightweight and comfortable fit for everyday wear.
Step-by-Step Tutorial
Materials
- 6mm Polymer clay heishi beads (Terra cotta/rust)
- 6mm Polymer clay heishi beads (White/Cream)
- 6mm Polymer clay heishi beads (Teal/Sage green)
- 6mm Polymer clay heishi beads (Orange/Mustard)
- 6mm Polymer clay heishi beads (Black)
- 4-6mm Gold square or disc spacer beads
- 0.8mm Stretch elastic cord (clear)
- Scissors
- Super glue or jewelry cement
- Bead stopper or tape
- Ruler or measuring tape
Step 1: Preparation and Setup
-
Measure your wrist:
Wrap your measuring tape around your wrist to find your size. Add about 0.5 to 1 inch to this measurement depending on how loose you want the fit. -
Cut the elastic:
Cut a piece of elastic cord about 10-12 inches long. Having extra length makes tying the knot significantly easier at the end. -
Pre-stretch the cord:
Gently pull on the elastic cord a few times to pre-stretch it. This crucial step helps prevent the bracelet from stretching out and sagging after you wear it a few times. -
Secure the end:
Attach a bead stopper to one end of the cord, or simply tape it down to your table so your beads don’t slide off while you work.
Pattern Randomness
Don’t stress about a perfect pattern repeat. Grouping random numbers of colored beads (3 teal, then 5 rust, then 2 black) creates that effortless boho vibe.
Step 2: Stringing the Pattern
-
Start the main segment:
Beginning with your focal color, string 5 rust/terra cotta beads onto the elastic. -
Add gold accents:
Slide on one gold spacer bead, followed by 3 white beads, and then another gold spacer bead to cap the white section. -
Create the contrast block:
For a darker pop, add 4 rust beads, followed by one gold spacer. The pattern in the image varies slightly, so feel free to mix up bead counts for an organic look. -
Introduce the cool tone:
Add 3-4 white beads, and then transition to a cool color with 3 teal/sage green beads. -
Add vibrancy:
Thread on 3 orange/mustard beads. These warm tones complement the rust color perfectly. -
Incorporate neutrals:
Add a small accent of black by stringing just 2 or 3 black beads. The high contrast helps define the sections. -
Repeat the sequence:
Continue this alternating pattern: a block of 4-5 beads in a solid color, separated by sections of white or contrasting stripes. -
Check the symmetry:
I like to vary the pattern slightly as I go—sometimes doing 5 rust beads, other times doing a mixed section like black-orange-teal-white—to keep it dynamic like the reference photo. -
Test the fit:
Once you have strung about 6.5 to 7 inches of beads (or your target length), wrap the strand around your wrist to check the fit. The two ends should meet comfortably without gaps.
Step 3: Finishing Touches
-
Tie the first knot:
Remove the bead stopper carefully. Bring the two ends of the elastic together and tie a simple overhand knot, pulling it tight to bring the beads together. -
Secure with a surgeon’s knot:
Loop the elastic ends twice over and through (like a double overhand knot) before tightening. This is a surgeon’s knot and is much more secure for stretchy jewelry. -
Apply adhesive:
Place a tiny drop of super glue or jewelry cement directly onto the knot. Be careful not to get glue on the surrounding beads if possible. -
Hide the knot:
While the glue is still slightly tacky, try to slide the knot inside the hole of the nearest heishi bead or gold spacer to conceal it. -
Trim excess cord:
Once the glue is completely dry, use your scissors to trim the excess elastic tails as close to the bead as possible.
Knot Slipping?
If your surgeon’s knot won’t hold, try tightening it slowly while pulling on all four strands (the two tails and the two bracelet loops) simultaneously.
Now you have a stylish, custom-fit bracelet ready to add to your daily jewelry stack

The Complete Guide to Pottery Troubleshooting
Uncover the most common ceramic mistakes—from cracking clay to failed glazes—and learn how to fix them fast.
Soft Ombré Fade Bracelet
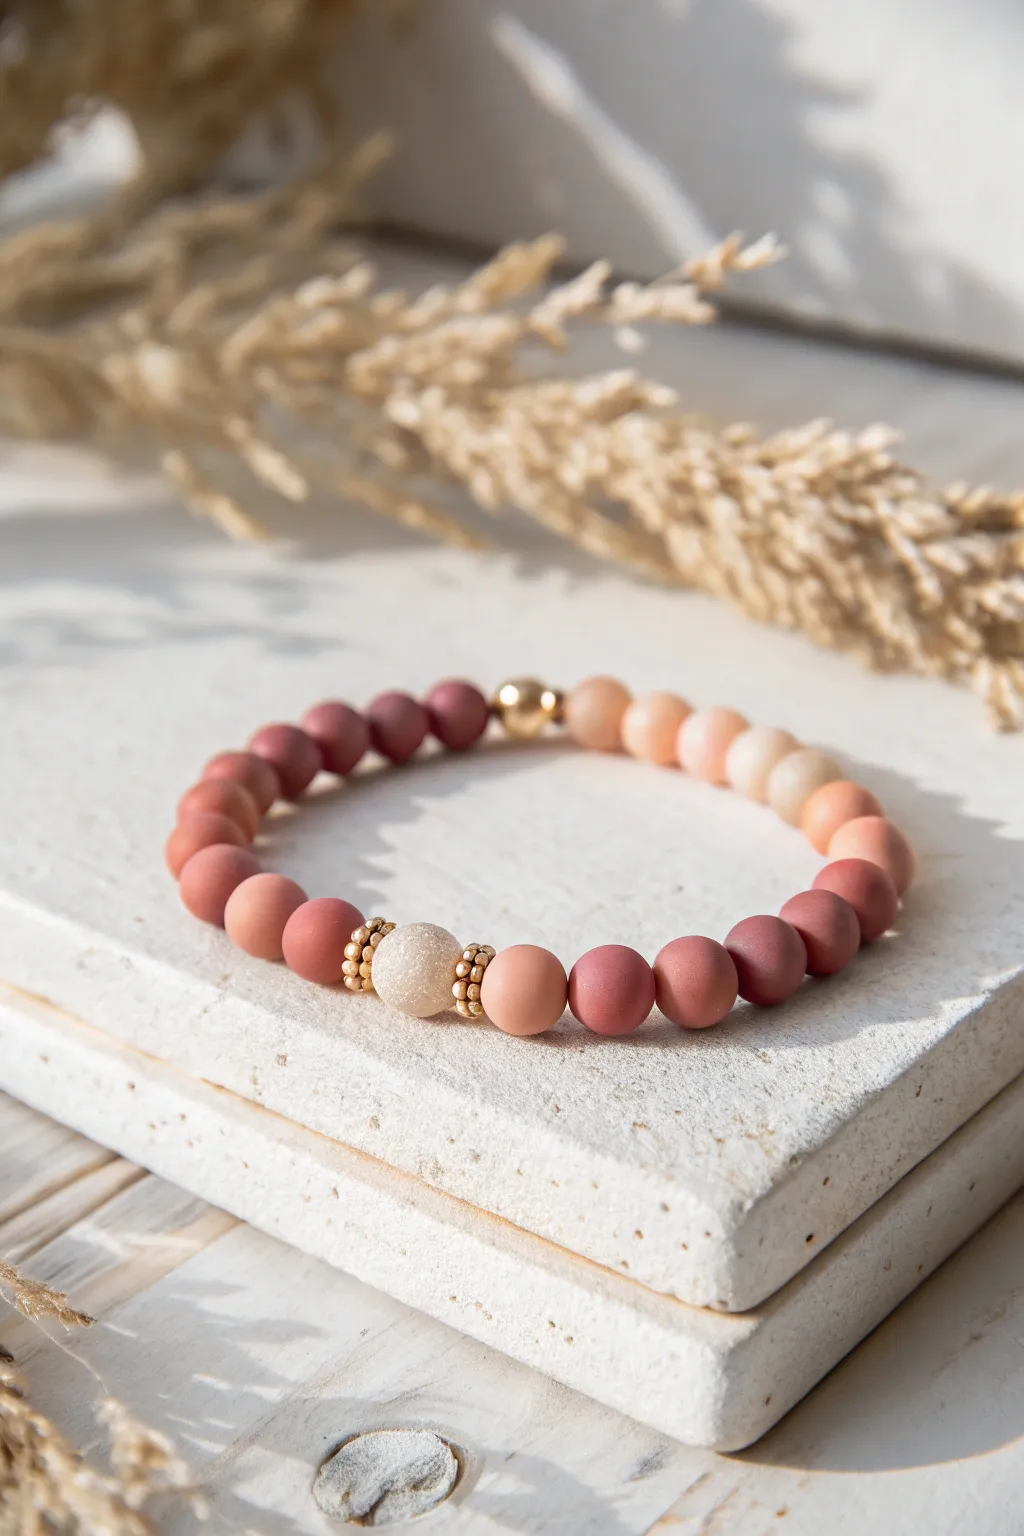
Capture the warmth of a desert sunset with this sophisticated beaded bracelet featuring a soft gradient of matte clay beads. The design transitions seamlessly from pale peach to deep terracotta, anchored by a textured focal bead and elegant gold accents.
Detailed Instructions
Materials
- 8mm matte polymer clay or ceramic beads (colors: cream/pale peach, soft pink, mauve, terracotta/brick red)
- 10mm textured focal bead (frosted quartz or druzy-style, cream/white)
- Small gold daisy spacer beads (approx. 4mm)
- One 6mm polished gold round bead
- Strong elastic beading cord (0.7mm or 0.8mm)
- Jewelry glue or clear nail polish
- Scissors
Step 1: Color Planning
-
Measure your wrist:
Wrap a piece of string around your wrist to find your size, then add about half an inch for a comfortable fit. Most adult bracelets are around 7 inches. -
Lay out the palette:
Before stringing, arrange your matte beads on a bead board or a towel. Group them by shade: cream/pale peach, light pink, dusty rose, and deep terracotta. -
Create the gradient:
Line up the beads to create a smooth transition. Start with the lightest color, move into the pinks, then the roses, and finish with the darkest terracotta.
Step 2: Designing the Focal Points
-
Prepare the elastic:
Cut a piece of elastic cord about 10-12 inches long. I like to pre-stretch the elastic by pulling it gently a few times; this prevents the bracelet from loosening up later. -
Secure the end:
Place a bead stopper or a piece of tape on one end of your cord so beads don’t slide off while you work. -
Start with the centerpiece:
Thread on three small gold daisy spacers. -
Add the textured bead:
Slide on your large, textured cream focal bead next. -
Complete the center accent:
Follow the focal bead with three more gold daisy spacers to frame it symmetrically.
Smooth Finishes
To hide the knot easily, ensure the bead you plan to hide it in has a slightly larger hole than the others. The large focal bead is usually perfect for this.
Step 3: Stringing the Ombré
-
Begin the gradient:
On the right side of your centerpiece, start stringing your beads. Begin with the medium-tone dusty rose beads (about 3-4 beads). -
Transition to dark:
Continue adding the darkest terracotta beads. Add roughly 6-8 of these, depending on your wrist size. -
Insert the back accent:
Once you have enough dark beads to cover almost half the bracelet, slide on the single 6mm polished gold bead. This acts as a chic detail for the underside of the wrist. -
Reverse the gradient:
Now, work backwards through your color palette on the other side of the gold bead. Add the dark terracotta beads first. -
Continue the fade:
Strings the dusty rose beads next, mirroring what you did on the first side. -
Add the lightest tones:
Finish the strand by adding the light pink and finally the pale peach/cream beads near the focal point. Check the length around your wrist to ensure a perfect fit.
Texture Play
Swap the matte terracotta beads for lava stone beads. This adds grit and allows the bracelet to double as an essential oil diffuser.
Step 4: Finishing Touches
-
Tie the knot:
Remove the tape or stopper. Bring the two ends of the elastic together and tie a surgeon’s knot (loop the elastic twice before pulling tight). -
Secure the bond:
Apply a tiny dab of jewelry glue or clear nail polish directly onto the knot. Let it dry for a few minutes. -
Hide the knot:
Once the glue is tacky but not fully set, gently pull the elastic so the knot slides inside the hole of the large focal bead or one of the adjacent beads. -
Trim excess:
Carefully snip off the extra elastic ends close to the bead, being careful not to cut the main cord.
Wear this piece alone for a delicate touch or stack it with gold bangles for a textured look
Monochrome Black With Metallic Spacers
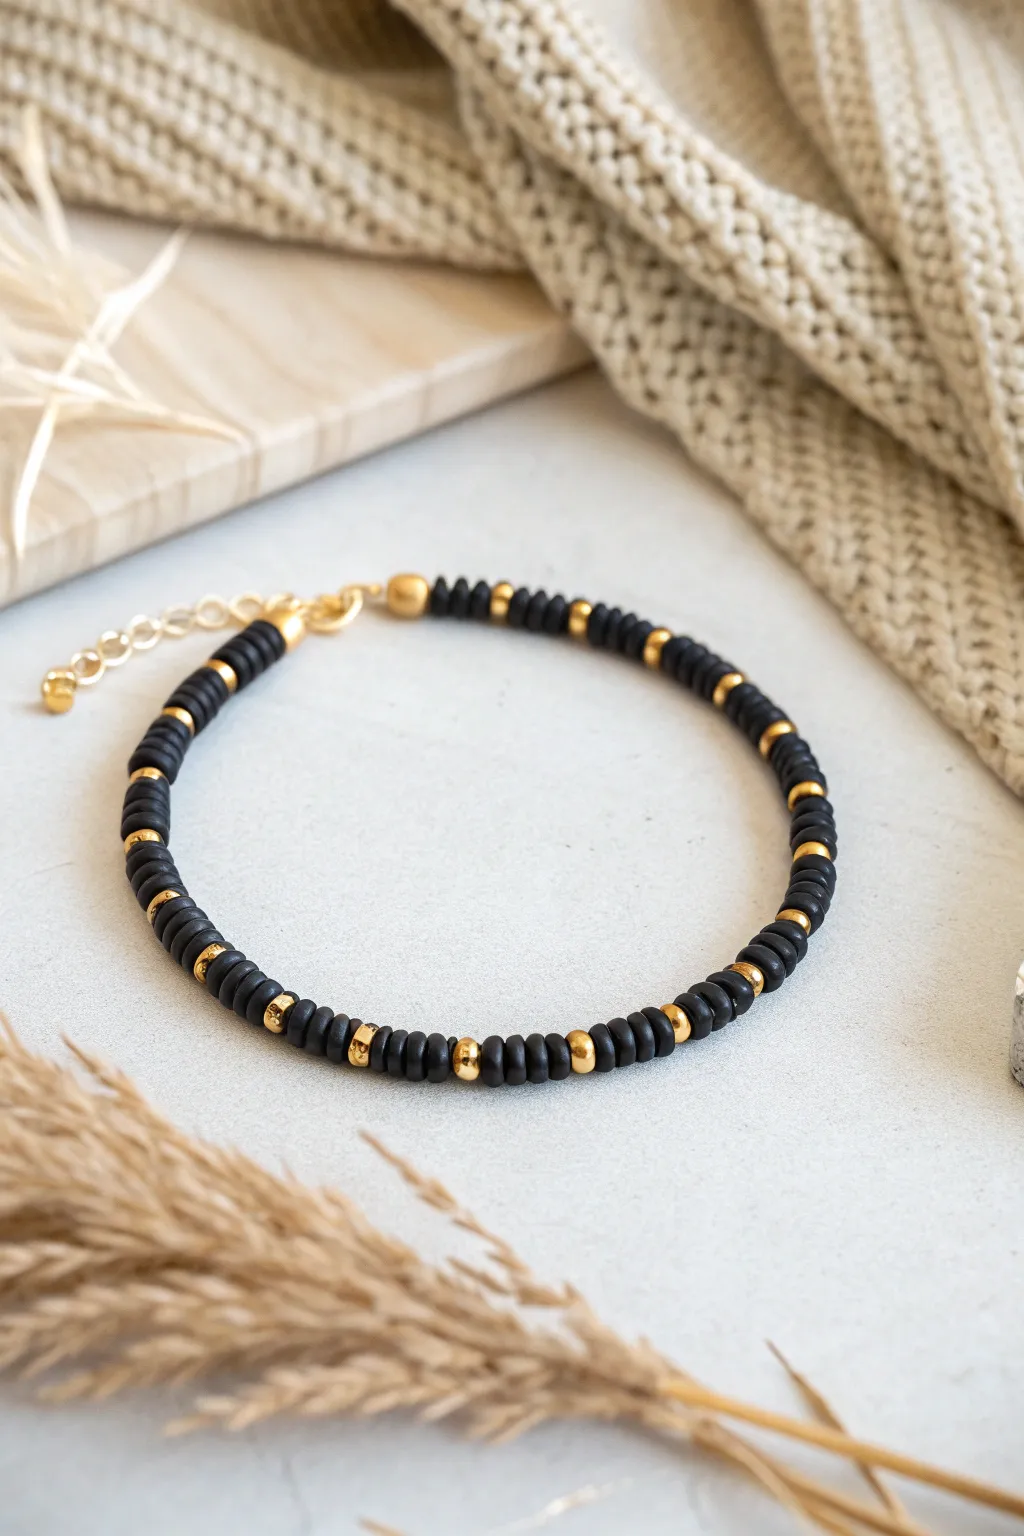
Embrace the sleek sophistication of monochrome with this elegant bracelet design that pairs matte black clay discs with gleaming gold accents. The high contrast between the muted Heishi beads and the metallic spacers creates a versatile accessory perfect for stacking or wearing solo.
Step-by-Step Guide
Materials
- 6mm black polymer clay disk beads (Heishi beads)
- 3mm or 4mm gold-plated rondelle or round spacer beads
- Gold-plated crimp beads (2)
- Gold-plated crimp covers (2, optional)
- Gold jump rings (4mm or 5mm)
- Gold lobster clasp
- Gold extension chain (optional but recommended)
- Beading wire (gold or neutral color, 0.38mm or 0.45mm)
- Tape measure or ruler
- Wire cutters
- Flat nose pliers
- Crimping pliers
Step 1: Preparation & Planning
-
Measure your wrist:
Wrap a flexible measuring tape around your wrist where you want the bracelet to sit. Note this measurement and add about 1/2 to 1 inch depending on how loose you prefer the fit. -
Cut the wire:
Cut a length of beading wire that is about 4 inches longer than your final desired length. This extra length ensures you have plenty of room to work with the clasp without struggling. -
Secure one end:
Place a bead stopper or a piece of masking tape on one end of the wire. This simple step prevents your beads from sliding off while you focus on the pattern.
Uneven Spacing?
Clay beads can vary in thickness. If your gold spacers look uneven, try grouping the black beads by physical height (stacking them) rather than counting them individually.
Step 2: Creating the Pattern
-
Start with gold:
Thread on one gold crimp bead followed by a jump ring or the loop of your extension chain. Loop the wire back through the crimp bead to create a secure loop. -
Crimp the start:
Using your crimping pliers, flatten the crimp bead firmly to lock the wire in place. If you are using crimp covers, gently close one over the flattened crimp bead now for a polished look. -
Begin the sequence:
Thread on three black clay disk beads to start the pattern. I find this creates a nice transition from the clasp hardware. -
Add first accent:
Slide on one gold spacer bead. This establishes the rhythm of your design. -
Establish the repeat:
Thread on four or five black clay beads. The image shows varying sections, but a count of four to five creates a balanced spacing. -
Continue the pattern:
Add another gold spacer, followed by your set number of black beads. Repeat this sequence—black section, gold spacer—until you reach roughly halfway. -
Check symmetry:
Pause and lay the bracelet flat. Ensure your gold spacers are sitting nicely between the clay disks and aren’t getting swallowed by uneven bead thickness. -
Fill the length:
Continue the pattern until the beaded section is about 1 inch short of your final desired length to account for the clasp assembly. -
End with black:
Finish the beading sequence with three black clay beads to match the beginning of the strand.
Choker Transformation
Make this strand 14-16 inches long to create a trendy choker necklace instead. The flat clay beads sit perfectly against the collarbone for a modern look.
Step 3: Finishing Touches
-
Prepare the closure:
Thread on a crimp bead followed by your gold lobster clasp. -
Loop back:
Take the tail end of the wire and thread it back through the crimp bead and through the first few black beads. Pull the wire until the loop is snug against the clasp but still has movement. -
Secure the end:
Use your crimping pliers to flatten this final crimp bead securely. Give the clasp a gentle tug to ensure it holds firm. -
Trim excess wire:
Using flush cutters, trim the remaining wire tail as close to the beads as possible so no sharp ends poke out. -
Final adjustment:
If you are using crimp covers, apply the second one over the final crimp bead now, gently rounding it with your pliers.
Enjoy wearing your sophisticated new accessory compatible with almost any outfit


What Really Happens Inside the Kiln
Learn how time and temperature work together inside the kiln to transform clay into durable ceramic.
Neutrals With a Single Pop Color
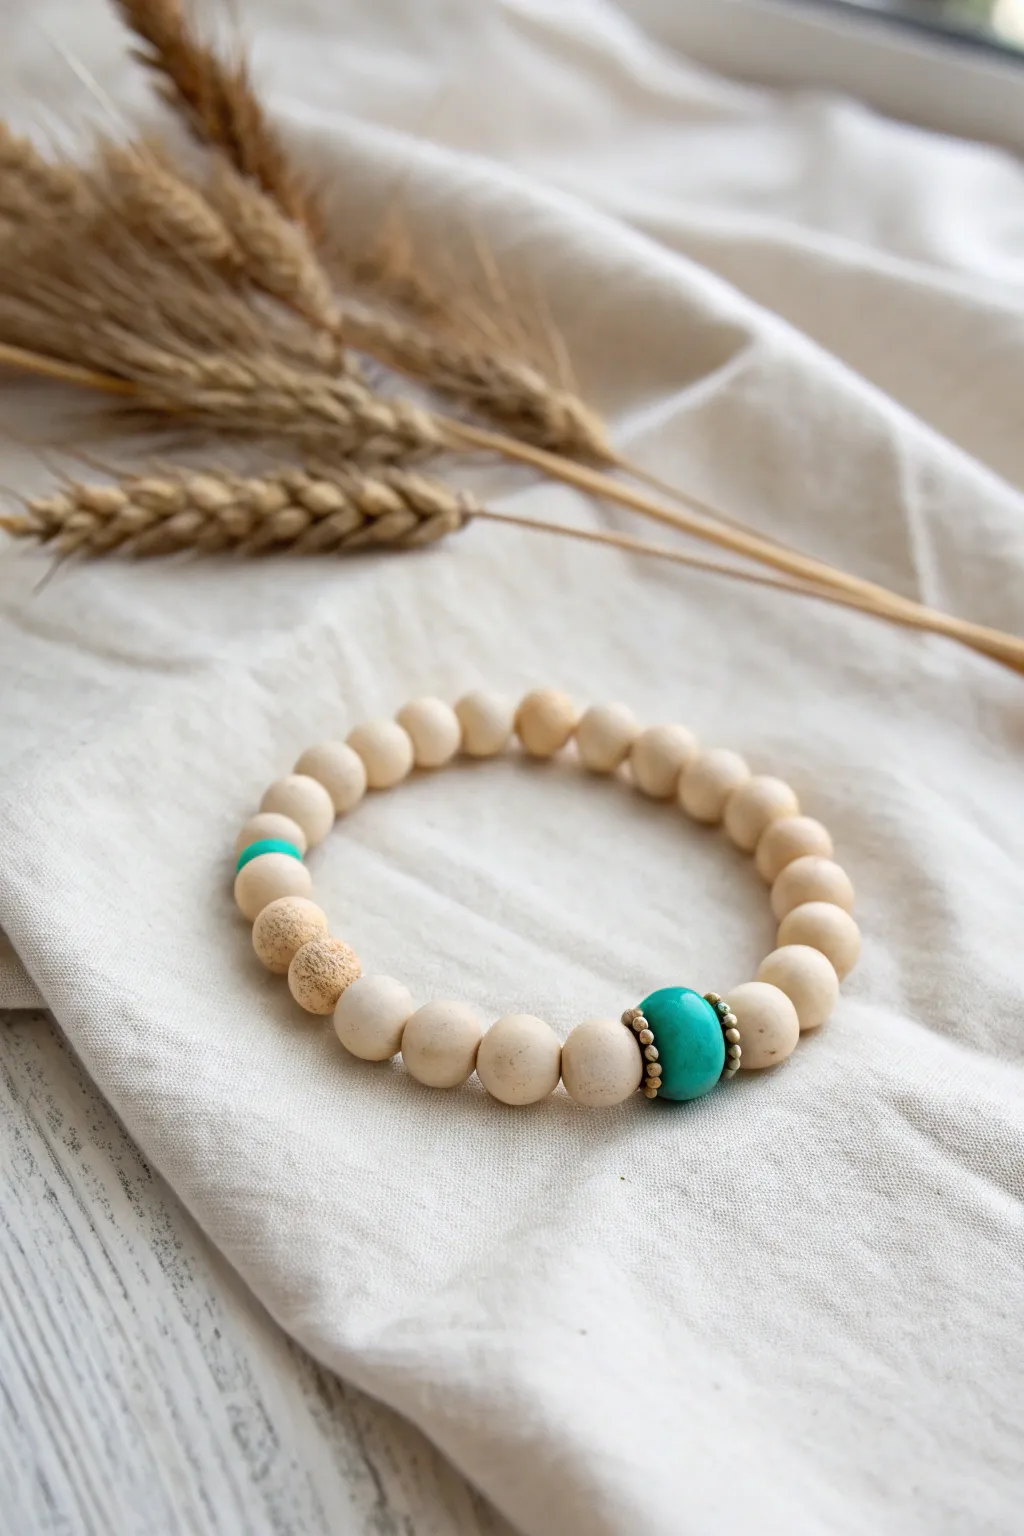
Embrace simplicity with this understated bracelet design, featuring smooth, neutral clay beads highlighted by a striking pop of turquoise. The combination of matte beige textures and bright, semi-precious color creates a piece that feels both earthy and modern.
Step-by-Step
Materials
- 20-25 round beige polymer clay or unfinished wood beads (8-10mm)
- 1 large round turquoise bead (10-12mm)
- 1 smaller turquoise heishi or round bead (6-8mm)
- 2 tiny gold or brass spacer discs/beads
- Strong elastic jewerly cord (0.8mm clear)
- Jewelry glue or clear nail polish
- Scissors
- Bead stopper or tape
- Small piece of linen or a bead board
Step 1: Planning and Preparation
-
Measure your wrist:
Before cutting any cord, wrap a measuring tape around your wrist to find your exact size. Add about half an inch to this measurement for a comfortable fit that isn’t too tight. -
Prepare the workspace:
Lay out your bead board or a soft piece of linen cloth on a flat surface. This prevents your round beads from rolling away while you work on your layout. -
Sort your beads:
Examine your beige beads for slight color variations. I like to group the slightly darker, textured ones together to create a subtle gradient effect near the accent bead. -
Layout the design:
Arrange the beads in a circle on your cloth to verify the pattern. Place the large turquoise bead at the bottom center as the focal point, flanked by the gold spacers. -
Cut the cord:
Cut a piece of elastic cord roughly 10-12 inches long. This generous length gives you plenty of room to tie the knot securely without struggling. -
Secure the end:
Place a bead stopper or simply a piece of masking tape on one end of the cord to stop your beads from sliding off as you string them.
Knot Security
When pulling the knot tight, do it slowly. Ideally, hide the knot inside the large turquoise bead as it typically has the largest hole.
Step 2: Stringing the Pattern
-
Start with neutrals:
Begin stringing about half of your beige clay beads onto the cord. Keep the tension loose enough that the beads can move slightly. -
Add the secondary accent:
Slide on the smaller turquoise bead. This creates an asymmetrical point of interest if the bracelet rotates on your wrist. -
Bead the textured section:
Thread on two or three of the slightly darker or more textured beige beads next. These act as a transition leading toward the main focal point. -
String the remaining neutrals:
Add the rest of the beige beads until you reach the center point of your design, continuing to check the length against your wrist occasionally. -
Prepare the focal point:
Slide on the first tiny gold spacer bead. These little metallic touches add a professional finish and frame the color beautifully. -
Add the main turquoise bead:
Thread the large turquoise bead next. Ensure the hole is large enough for the elastic knot to eventually hide inside if you prefer that placement. -
Complete the pattern:
Add the second gold spacer bead immediately after the turquoise one finishing the centerpiece arrangement.
Texture Play
Mix smooth polymer clay beads with rough, unfinished wood beads for a more tactile, organic feel that adds depth to the neutral tones.
Step 3: Finishing Touches
-
Check the fit:
Bring the two ends of the elastic together carefully to form a circle around your wrist. The beads should touch without gaps, but shouldn’t pinch your skin. -
Pre-stretch the cord:
Give the ends of the elastic a few gentle tugs. This pre-stretching step prevents the bracelet from loosening up significantly after you start wearing it. -
Tie the surgeon’s knot:
Cross the ends, wrap one side under twice, pull tight, and then tie a standard overhand knot on top to secure it. -
Secure with glue:
dab a tiny drop of jewelry glue or clear nail polish directly onto the knot. Let it dry completely for a minute or two. -
Hide the knot:
Trim the excess cord close to the knot, then gently pull the elastic so the knot slides inside the hole of the nearest large bead.
Slip on your new bracelet and enjoy how the pop of blue brightens up your neutral wardrobe palette
Pastel Mix With Spacer Rhythm
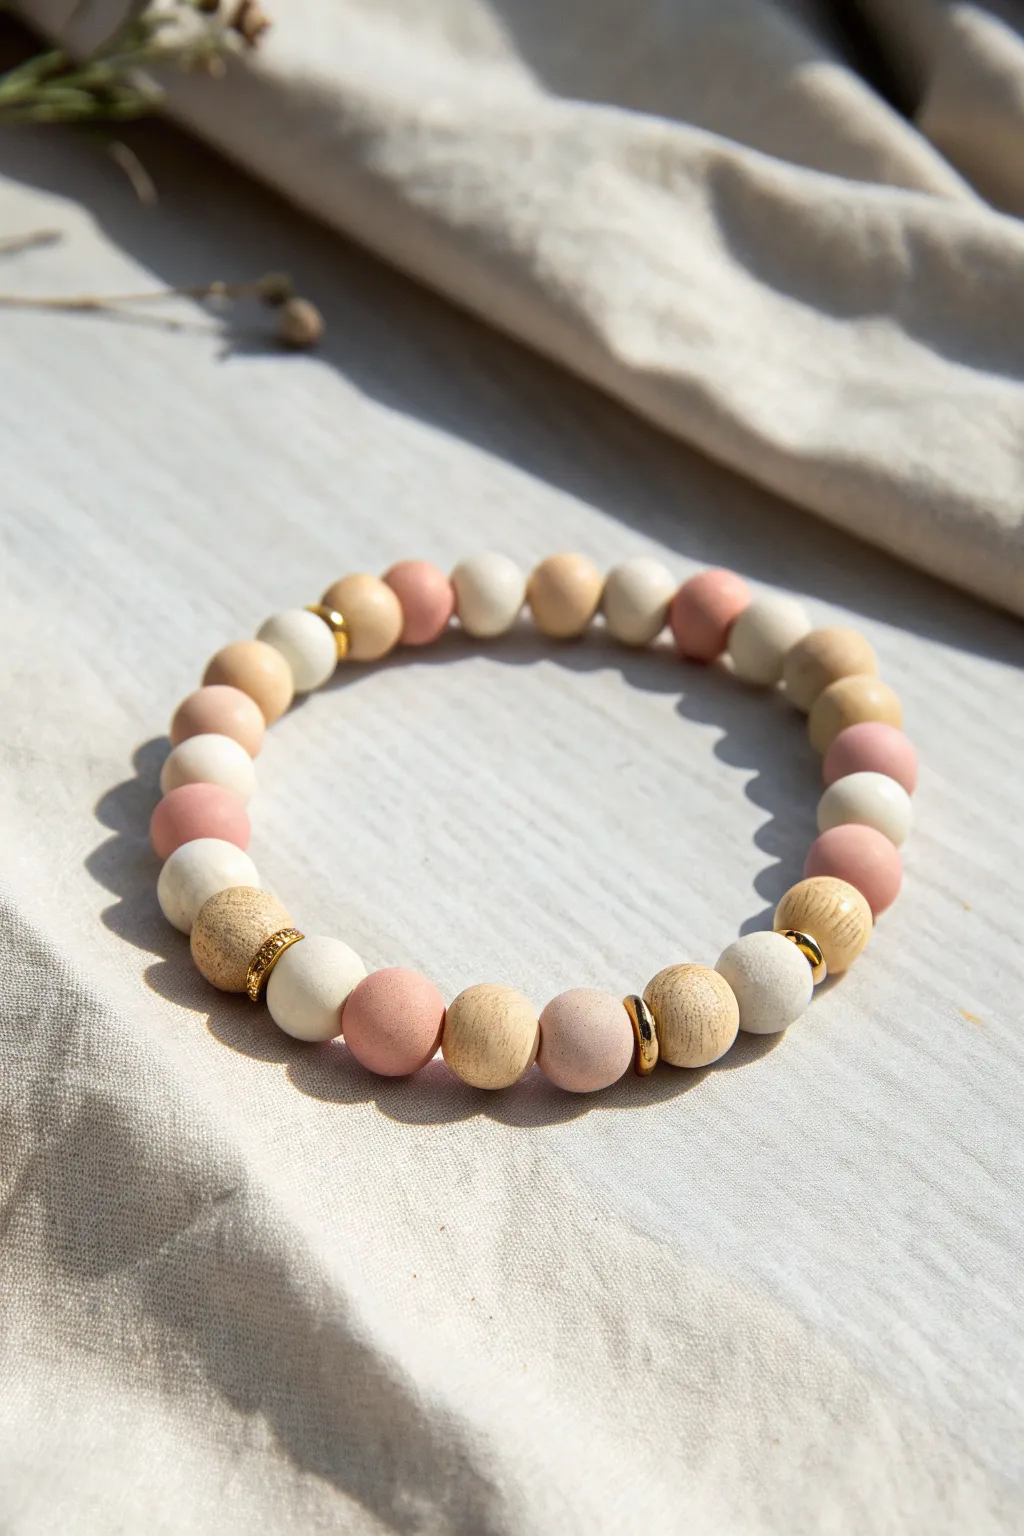
This gentle bracelet combines the warmth of natural wood tones with soft, matte polymer clay beads in cream, blush, and dusky pink. The design features a thoughtful rhythm interrupted by elegant gold spacers, creating a sophisticated yet down-to-earth accessory perfect for everyday wear.
How-To Guide
Materials
- 10mm or 12mm polymer clay beads (matte finish) in three colors: Cream/Off-White, Blush Pink, and Dusty Rose
- 10mm or 12mm unfinished wood beads (light natural tone)
- Gold tone heishi spacer beads (curved/wavy disc style) or simple gold rings approximately 6-8mm
- Strong elastic cord (0.8mm or 1mm thickness)
- Jewelry glue (e.g., G-S Hypo Cement or E6000)
- Scissors
- Bead stopper or a simple piece of tape
- Beading needle (optional, but helpful for elastic)
Step 1: Preparation & Sorting
-
Measure your wrist:
Wrap a flexible measuring tape around your wrist where you want the bracelet to sit. Add about 0.5 to 1 inch to this measurement depending on how loose you prefer the fit. -
Pre-stretch the elastic:
Cut a piece of elastic cord about 10-12 inches long. Before threading, pull on the elastic firmly a few times. This pre-stretching prevents the bracelet from sagging shortly after you finish it. -
Secure the end:
Attach a bead stopper or simply fold a piece of tape over one end of the cord to stop your beads from sliding off while you design. -
Sort your palette:
Lay out your beads on a bead board or a soft towel. You need your creams, blush pinks, dusty roses, and natural wood beads clearly separated.
Knot Slipping Out?
If your knot keeps popping out of the bead hole, the hole might be too small. Try widening it gently with a bead reamer, or ensure the knot is hidden inside a wooden bead.
Step 2: Designing the Pattern
-
Understand the rhythm:
The pattern shown relies on blocks of color separated by wood and gold accents. Notice that the beads aren’t totally random; they flow in small gradients. -
Create the main gradient:
Start by laying out a sequence like this: One Cream, one Blush Pink, one Dusty Rose. Repeat this ‘light-to-dark’ trio a few times to see how much length it covers. -
Integrate the focal sections:
Instead of a continuous pattern, break it up with ‘wood sections.’ Based on the image, place a wood bead, then a gold spacer, then a cream or pastel bead, then another gold spacer, and finally another wood bead. -
Refine the sequence:
I prefer to lay the entire design flat before stringing. Try this sequence from the image: …Wood, Gold Spacer, Cream Clay, Gold Spacer, Wood, Dusty Rose, Cream, Blush, Wood, Blush, Cream… -
Check the spacing:
Ensure your gold spacers are acting as ‘bookends’ for specific focal beads. In the reference, they frame a white/cream bead beautifully between two wooden ones.
Step 3: Stringing & assembly
-
Begin stringing:
Thread your beads onto the elastic cord, following the layout you created. If using a large-hole wood bead, you might not even need a needle. -
Tips for spacers:
When threading the gold wavy spacers, ensure they are oriented correctly so they cup the bead next to them, rather than flaring away from it. -
Verify length:
Once all beads are strung, wrap the strand around your wrist to check the fit. There should be no gaps showing the elastic, but it shouldn’t pinch your skin. -
Adjust if necessary:
Add or remove one bead if the fit isn’t right. It’s usually best to add/remove from a solid color section rather than displaying the symmetrical spacer pattern. -
Tie the knot:
Remove the tape/stopper. Bring the two ends together and tie a surgeon’s knot (right over left and loop through twice, then left over right and loop through once). -
Tighten securely:
Pull the elastic ends firmly—but not to the breaking point—to tighten the knot. You want the beads to just touch each other snugly. -
Secure with glue:
Apply a tiny dot of jewelry glue directly onto the knot. Be careful not to get glue all over the adjacent beads. -
Hide the knot:
While the glue is still tacky but not wet, slide the knot inside the hole of the nearest large-hole bead (usually the wooden ones have larger holes than clay). -
Trim the excess:
Once the glue is fully dry (refer to your glue’s package instructions), use sharp scissors to trim the excess elastic cord close to the bead.
Mattify It
Want an even softer look? If your wood beads are too shiny, lightly sand them with fine-grit sandpaper for a raw, organic texture that matches the clay.
Slip on your new creation and enjoy the calming, muted tones of your handcrafted jewelry.

TRACK YOUR CERAMIC JOURNEY
Capture glaze tests, firing details, and creative progress—all in one simple printable. Make your projects easier to repeat and improve.
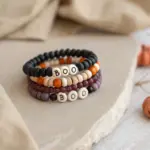
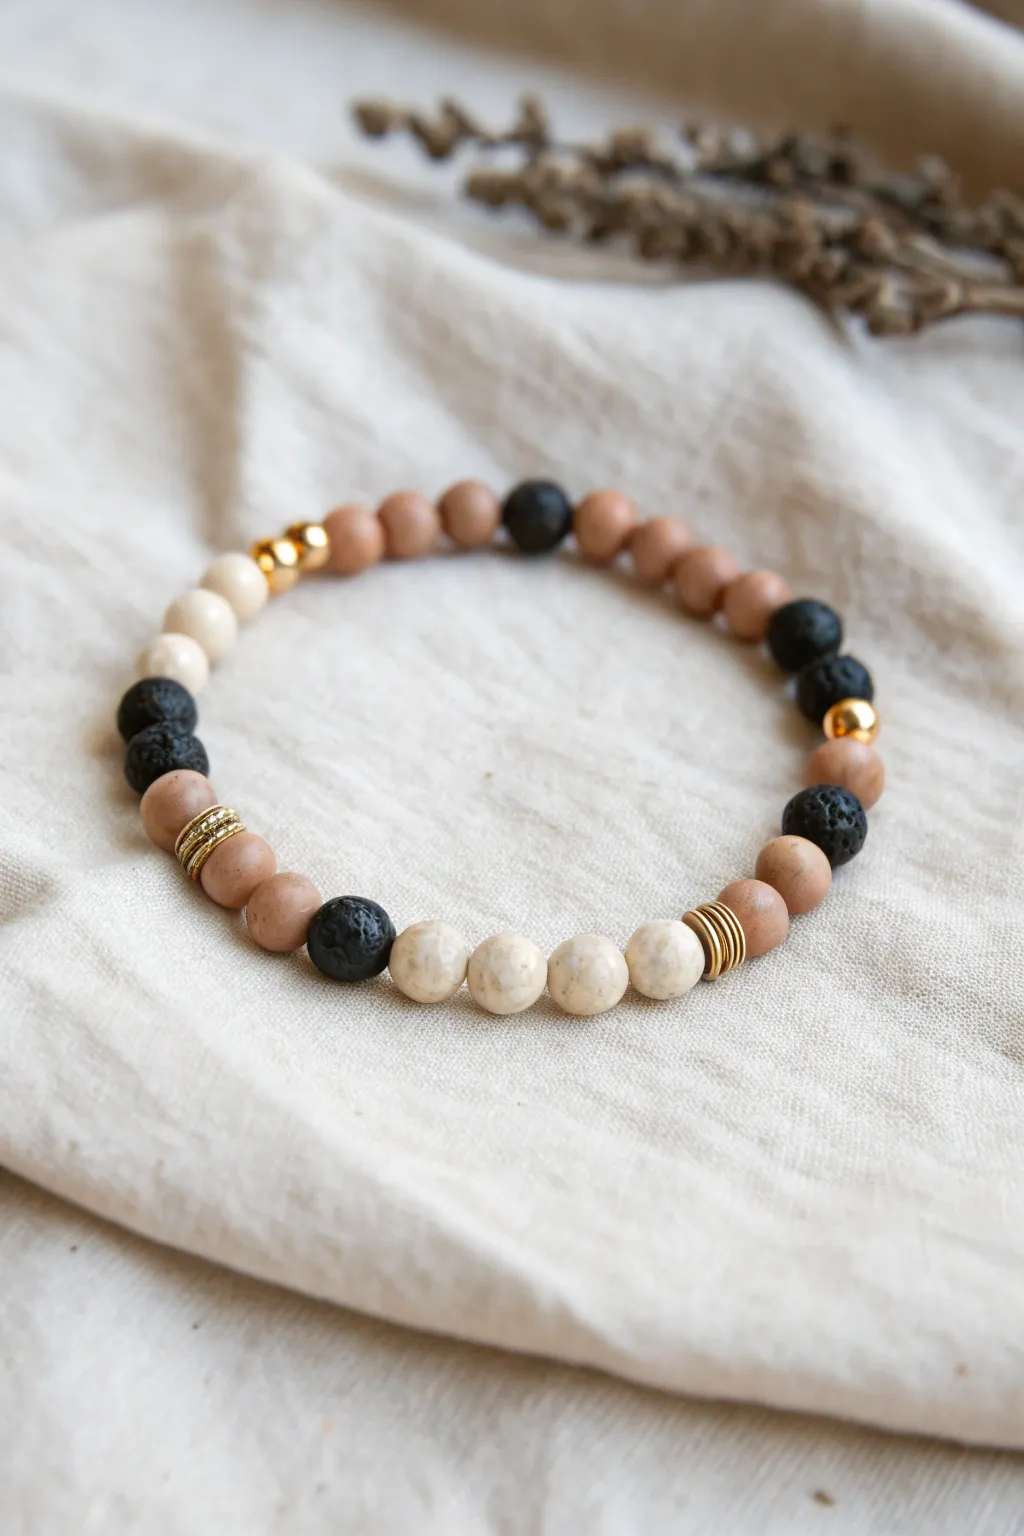
Initial Bead With Balanced Color Sides
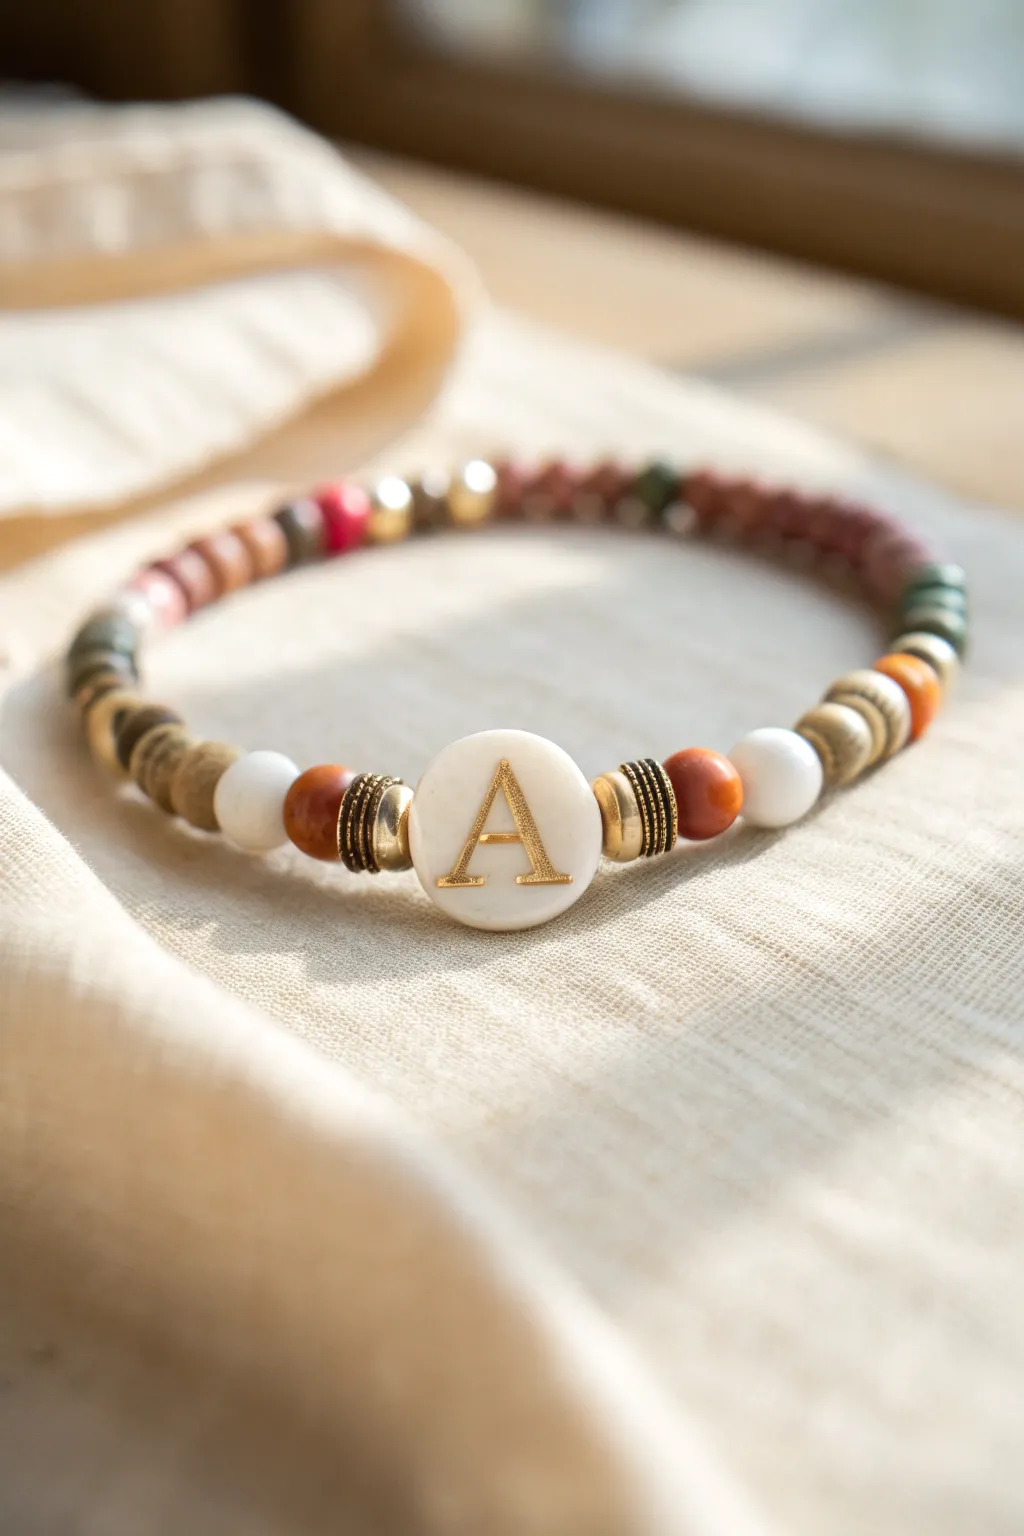
This elegant beaded bracelet centers a classic gold-inlaid initial on a creamy white disc, flanked by a striking rhythm of earth-toned beads. The symmetrical design uses warm browns, terracottas, and creamy whites to create a sophisticated piece that feels personalized and modern.
Step-by-Step Tutorial
Materials
- Stretch cord (0.8mm or 1mm thickness)
- Large white circular focal bead with gold inlaid letter ‘A’
- 4 ribbed antique gold spacial beads (approximately 6-8mm)
- 2 smooth round terracotta/red jasper beads (8mm)
- 2 smooth white round beads (8mm)
- Small brass or gold spacer beads
- Assorted earthy gemstone or wooden beads (6mm and 8mm mix) in browns, greens, and tans
- Jewelry glue (GS Hypo Cement recommended)
- Scissors
Step 1: Setting the Stage
-
Measure and Cut:
Cut a piece of stretch cord about 10-12 inches long. This extra length is crucial so you aren’t struggling to tie the knot later. -
Pre-stretch the Cord:
Gently pull on the cord a few times to pre-stretch it. This prevents the bracelet from sagging or loosening immediately after you wear it. -
Secure the End:
Place a bead stopper or simply a piece of tape on one end of your cord so your beads don’t slide right off while you work.
Symmetry Hack
Lay your beads out on a bead board or a towel in a straight line before stringing. Start from the center bead and build outward to ensure perfect balance.
Step 2: Creating the Focal Point
-
Start with the Initial:
Begin by threading your central white focal bead with the gold letter ‘A’. Slide it to the middle of your working area on the cord. -
Add Metal Spacers:
Immediately on either side of the letter bead, add a ribbed antique gold spacer bead. These frame the initial beautifully. -
Add the Red Accents:
Next, string one round terracotta (or red jasper) bead on the left side, and one on the right side. -
Layering Gold Texture:
Flank those red beads with another ribbed antique gold spacer on each side. -
White Balance:
Add a smooth white round bead to both the left and right sides. This echoes the color of the central initial bead. -
Transition Spacers:
Place a small grouping of 2-3 tiny brass or wood spacer discs after the white beads on both sides to transition into the main band.
Step 3: Building the Band
-
Establish the Pattern:
You will now work simultaneously on both sides to maintain symmetry. Select your medium-brown wooden or stone beads. -
Add Texture Variety:
String about three textured or striped brown beads on the left, then do the same on the right. -
Introduce Green Tones:
Add a darker green or moss-colored bead to each side to deepening the earthy palette. -
Mix the Back Section:
For the rest of the bracelet (the part that sits under the wrist), alternate between small gold spacers, reddish beads, and brown wood beads. -
Check the Length:
Wrap the strand around your wrist to check the fit. Add or remove the smaller accent beads at the ends until it sits comfortably without digging in.
Mix Your Finishes
Combine matte wooden beads with polished gemstones and shiny metal spacers. The contrast between matte and gloss makes the bracelet look high-end.
Step 4: Finishing Touches
-
Tie the Knot:
Bring the two ends together. Tie a surgeon’s knot (right over left twice, then left over right) and pull it tight. -
Hide the Knot:
I prefer to dab a tiny dot of jewelry glue on the knot for security before cutting the excess. -
Tuck and Trim:
Once dry, trim the cord ends close to the knot. If possible, gently tug the knot inside one of the adjacent large beads to hide it completely.
Now you have a personalized, earthy accessory that looks perfect stacked with gold bangles or worn on its own
Tiny Heart Accents for a Feminine Touch
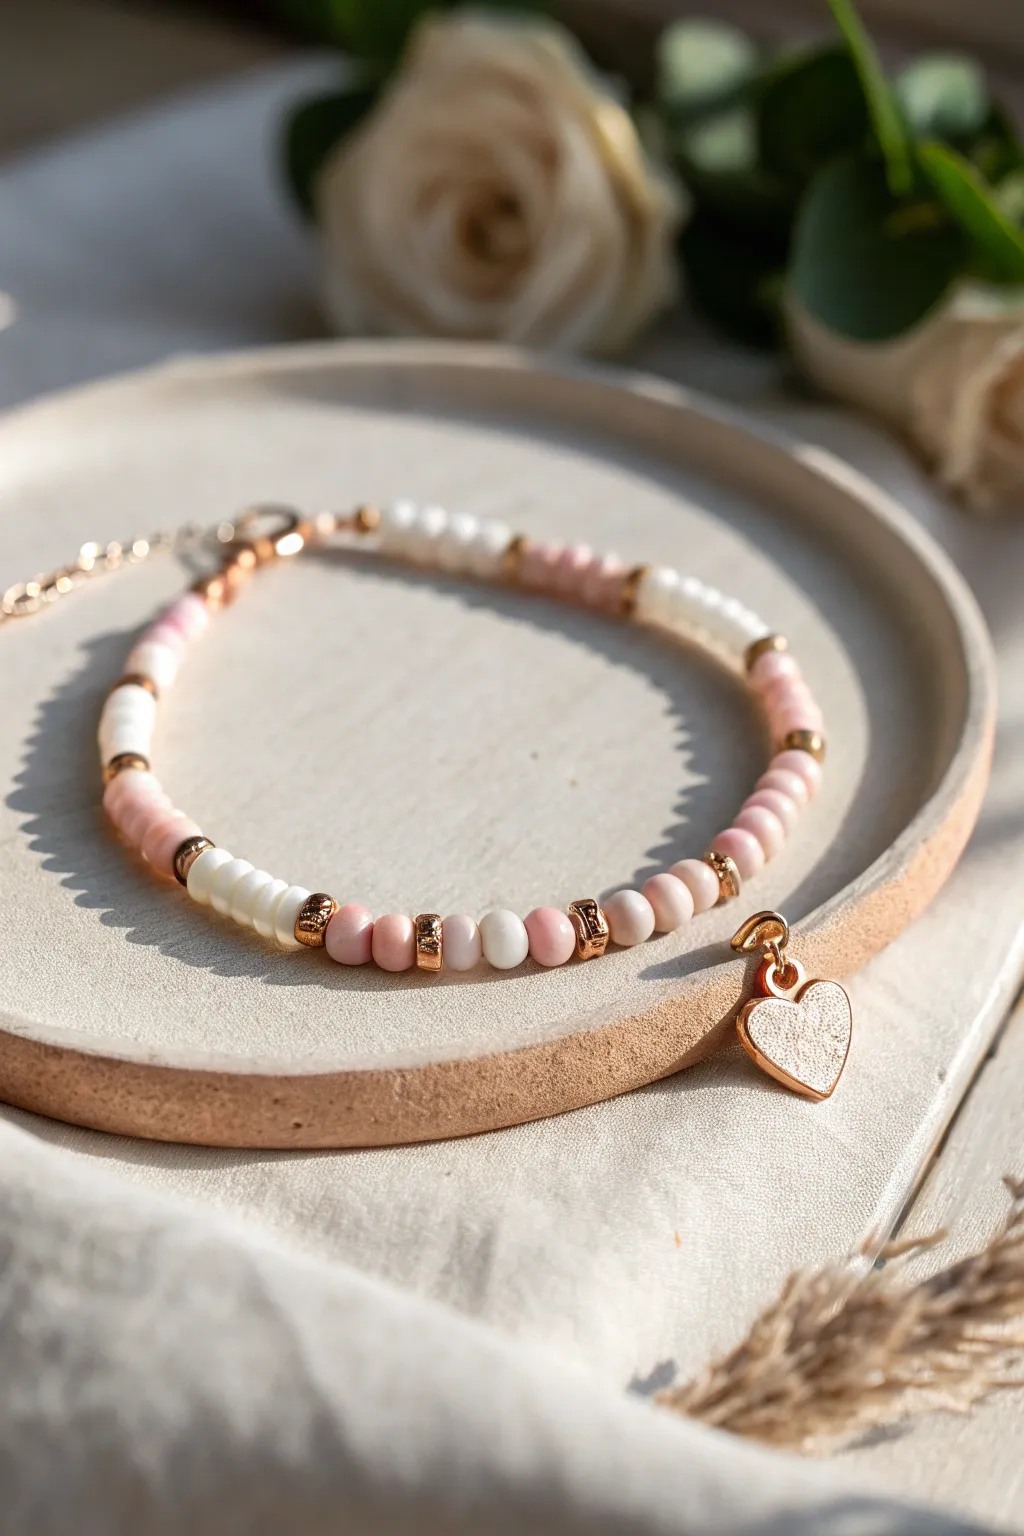
Capture the essence of gentle romance with this delicately structured bracelet that mimics the soft hues of rose quartz and pearl. Featuring a sequence of petite clay beads interspersed with metallic spacers and a singular, touching heart charm, this accessory is the perfect everyday reminder of love.
Step-by-Step Guide
Materials
- 4mm round polymer clay beads (light pink)
- 4mm round polymer clay beads (creamy white)
- 4mm round polymer clay beads (pink and white marbled)
- Small gold-tone disc spacer beads (approx. 4mm)
- Elastic beading cord (0.7mm or 0.8mm)
- Gold-tone heart charm with jump ring
- Jewelry adhesive (e.g., E6000 or Hypo Cement)
- Scissor or jewelry snips
- Bead stopper or tape
- Measuring tape
Step 1: Planning and Preparation
-
Measure your wrist:
Begin by wrapping a measuring tape comfortably around your wrist to determine the ideal length. Add about 0.5 inches to this measurement to ensure the bracelet isn’t too tight once the bulk of the beads is added. -
Cut the cord:
Cut a piece of elastic cord roughly 10-12 inches long. This extra length is crucial for tying secure knots later without struggling against tension. -
Secure the end:
Attach a bead stopper or simply place a piece of tape over one end of your cut cord. This little safety net prevents your carefully arranged beads from sliding off while you work. -
Layout your pattern:
Before threading, lay out your beads on a soft cloth or bead board. The pattern shown uses segmented blocks of color separated by gold spacers. Try arranging them in groups of 4-6 beads of the same color before switching.
Loose Charm?
If the heart charm doesn’t hang right or twists around, add a tiny 2mm gold bead on either side of its jump ring. This acts as a buffer and keeps the charm facing forward.
Step 2: Stringing the Pattern
-
Begin the first segment:
Start by threading a gold spacer bead, followed by a sequence of 4-5 creamy white beads. I find that starting with a metal element often helps hide the knot later. -
Add a spacer:
Slide on another gold disc spacer. These metallic accents act as ‘punctuation’ marks in your design, breaking up the soft clay colors nicely. -
Thread the middle pinks:
Add a segment of the solid light pink clay beads. Aim for a consistent number, perhaps 5 beads, to keep the symmetry balanced. -
Incorporate texture:
After another gold spacer, add a section of the marbled pink-and-white beads. This subtle variation adds depth and mimics the look of natural stone. -
Repeat until halfway:
Continue this pattern—gold spacer, color block, gold spacer—until you have reached the approximate midpoint of your measured length.
Make it Luxe
Swap the round clay beads for actual semi-precious stones like Rose Quartz and Moonstone chips for a weightier, higher-end feel while keeping the same soft palette.
Step 3: Adding the Feature Piece
-
Attach the charm:
At the center point of your design, slide the jump ring of your gold heart charm directly onto the elastic cord. Ensure the heart faces outward. -
Mirror the pattern:
Continue stringing beads on the other side of the charm. To maintain a balanced look, simply reverse the color order you used for the first half, working your way backwards through your earlier choices. -
Check the fit:
Once you have used all your planned beads, wrap the unfinished bracelet around your wrist. The ends should meet comfortably without stretching the elastic excessively.
Step 4: Finishing Touches
-
Pre-stretch the cord:
Gently pull tightly on both ends of the elastic cord a few times. This ‘pre-stretching’ prevents the bracelet from loosening up and sagging after you wear it for the first time. -
Tie the knot:
Remove the bead stopper and tie a surgeon’s knot. This involves looping the cord through twice like a standard overhand knot, but with an extra pass for security. -
Secure with glue:
Apply a tiny dab of jewelry adhesive drectly onto the knot. Be careful not to get glue on the surrounding beads, as it can cloud their finish. -
Let it dry:
Allow the glue to dry completely according to the manufacturer’s instructions. Patience here ensures your bracelet won’t pop apart unexpectedly. -
Trim the tails:
Once dry, use your scissors to snip off the excess elastic tails, getting as close to the knot as possible without cutting the knot itself. -
Hide the mechanism:
Ideally, gently pull the elastic until the knot slips inside the hole of the nearest bead or gold spacer, concealing it for a professional finish.
Slip your new bracelet on and enjoy the customized, boutique look you just created by hand.
Pearl and Clay Bead Contrast
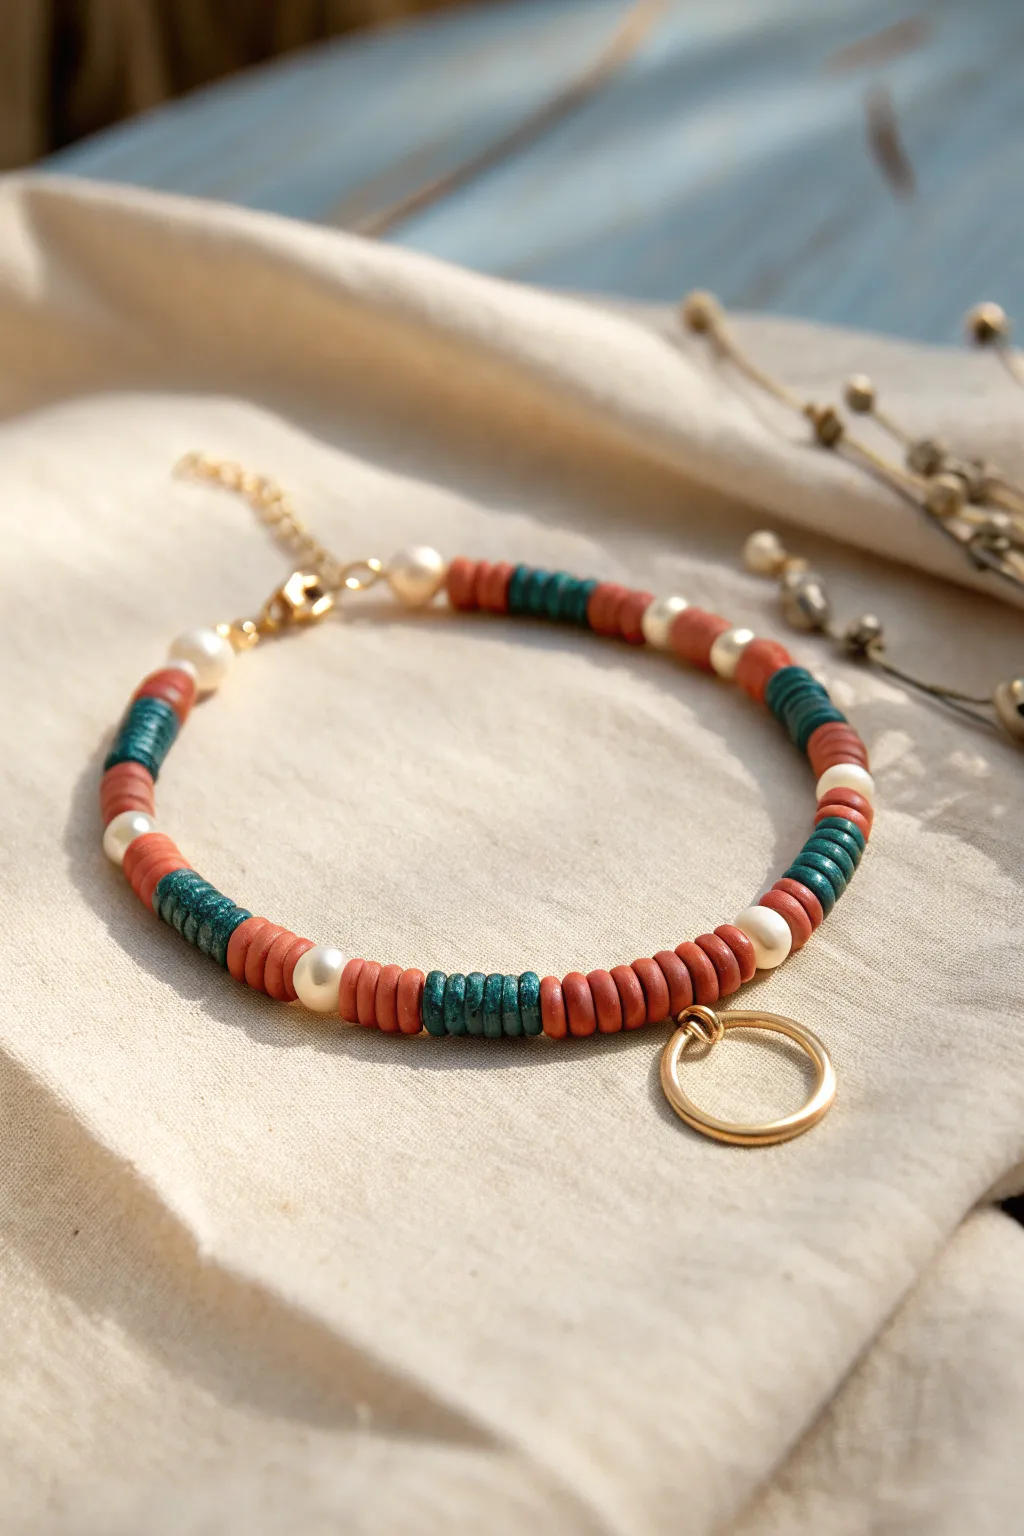
This elegant bracelet design bridges earthy charm and classic sophistication by pairing rustic clay discs with lustrous pearl accents. The interplay between the warm terracotta tones, deep teal sections, and gold hardware creates a versatile accessory perfect for stacking.
Detailed Instructions
Materials
- Reddish-brown (terracotta) flat clay heishi beads (approx. 4-6mm)
- Dark teal flat clay heishi beads (approx. 4-6mm)
- Small white round pearls (approx. 4-6mm)
- Gold beading wire or strong elastic cord
- 2 Gold crimp beads
- 2 Gold bead tips or calm shell covers (optional but recommended for a clean finish)
- Gold jump rings (4-6mm)
- Gold lobster clasp
- Gold extension chain
- Large gold decorative ring (roughly 10-12mm)
- Flat nose pliers
- Wire cutters
- Ruler or measuring tape
Step 1: Planning and Prep
-
Measure your wrist:
Before cutting any wire, measure your wrist circumference. Add about one inch to this measurement to account for the thickness of the beads and the clasp assembly. -
Cut the beading wire:
Cut a length of gold beading wire according to your measurement, leaving an extra 2-3 inches on each end for manipulating the crimps and clasps easily. -
Secure the first end:
Thread a crimp bead onto one end of the wire, followed by a jump ring or the loop of your extension chain. Loop the wire back through the crimp bead. -
Crimp and cover:
Use your flat nose pliers to flatten the crimp bead securely. If you are using a bead tip or clam shell, attach it now to hide the crimp for a more polished look.
Uneven Tension?
If the bracelet feels stiff, you strung the beads too tightly. Leave a tiny gap—about 1mm—of wire near the clasp before crimping to allow flexibility.
Step 2: Stringing the Pattern
-
Start with pearls:
Begin the sequence by threading a single white pearl onto the wire. This anchors the pattern beautifully right near the clasp. -
First terracotta section:
Thread on about 5 to 6 terracotta clay beads. These act as the primary warm tone for the bracelet. -
Add a teal accent:
Slide on roughly 4 to 5 dark teal clay beads. This creates a bold block of contrasting color against the rust tones. -
Return to terracotta:
Add another small section of terracotta beads, aiming for about 3 to 4 beads this time. -
Insert a pearl spacer:
Place a single white pearl on the wire. This acts as a visual palate cleanser before the pattern repeats or shifts. -
Build the central section:
Continue the pattern: a block of terracotta, a block of teal, and another block of terracotta. Vary the lengths slightly if you want an organic feel, or keep counting exact bead numbers for precision. -
Add the focal charm:
Once you reach a point slightly off-center or wherever you prefer the dangle, slide a gold jump ring directly onto the main wire between two sections of clay beads. Attach the large gold decorative ring to this jump ring later, or slide the ring on directly if it fits. -
Complete the beading:
Continue your pattern—pearl, terracotta, teal, terracotta—until you are about 0.5 inches short of your total desired length. -
Finish with a pearl:
End the beading sequence with one final white pearl to mirror the beginning of the bracelet.
Step 3: Finishing Touches
-
Prepare the final crimp:
Slide a crimp bead onto the remaining wire tail. -
Attach the clasp:
Thread the wire through the loop of your gold lobster clasp. -
Secure the end:
Pass the wire back through the crimp bead and pull it tight, ensuring there is no slack in the beaded strand but enough room for the bracelet to drape naturally. -
Crimp firmly:
Flatten the crimp bead with your pliers. I usually give a gentle tug here just to ensure everything is locked in tight. -
Trim excess wire:
Snip off the excess tail of wire as close to the crimp bead as possible. If you can, tuck the tiny sharp end back into the nearest pearl. -
Attach the gold ring:
If you didn’t slide the large golden ring directly onto the wire earlier, use a jump ring now to attach it to the loop you created in the middle of the bracelet.
Level Up: Texture Mix
Swap the teal clay beads for tiny faceted gemstones like turquoise or malachite. The sparkle creates a stunning contrast against the matte clay.
Now you have a chic, handcrafted piece that looks perfect on its own or stacked with gold bangles
Gemstone Nugget Breaks Between Heishi
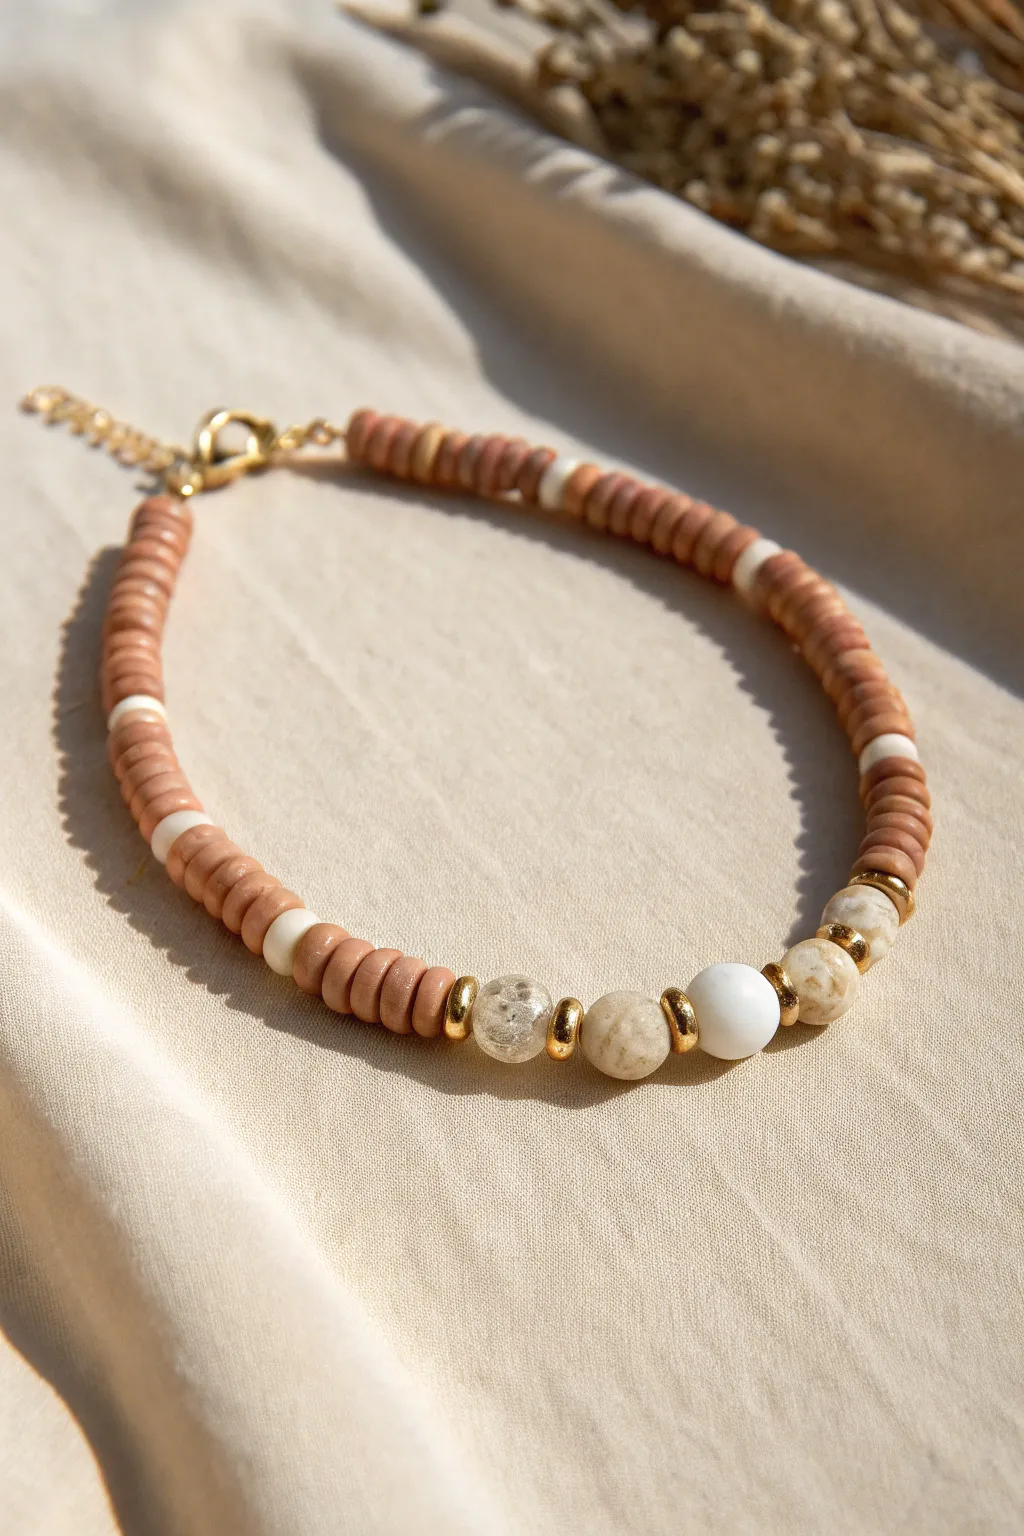
This earthy, bohemian design combines the rustic texture of clay heishi beads with the elegance of natural stone and gold accents. The warm terracotta tones paired with creamy neutrals create a versatile accessory perfect for stacking or wearing solo.
Step-by-Step Guide
Materials
- Terracotta/coral flat clay heishi beads (approx. 4-6mm)
- White or cream flat clay heishi spacer beads
- Gold tone disk spacer beads (3-4mm)
- White round accent bead (8mm, jade or similar)
- Cream speckled round bead (8mm, jasper or similar)
- Clear/cloudy round bead (8mm, quartz or glass)
- Gold beading wire or strong elastic cord
- 2 Gold crimp beads
- 2 Gold crimp covers (optional)
- Gold lobster clasp
- Gold extension chain
- 2 Gold jump rings (4-5mm)
- Jewelry pliers (chain nose and flat nose)
- Wire cutters
Step 1: Setting the Foundation
-
Measure and cut:
Begin by measuring your wrist and adding about 4 inches to determine your wire length. Cut a piece of beading wire or elastic cord to this length to ensure you have plenty of room to work with the ends. -
Secure the first end:
Thread a crimp bead onto one end of the wire, followed by a jump ring or the loop of your extension chain. Loop the wire back through the crimp bead. -
Crimp firmly:
Use your flat nose pliers to flatten the crimp bead securely against the wire, creating a tight loop. If you are using a crimp cover, gently close it over the flattened crimp bead now for a professional finish. -
Start the pattern:
Begin stringing your terracotta heishi beads. Thread on approximately 1.5 to 2 inches of these flat clay beads. This will form one side of the bracelet strap.
Uneven Tension?
If the bracelet feels stiff or curls up when laid flat, you likely pulled the wire too tight before crimping. Leave a tiny 1-2mm gap of slack wire before the final crimp.
Step 2: Creating the Pattern
-
Add first accent:
Slide on one single white/cream heishi spacer bead to break up the color. -
Resume main color:
Continue with another section of terracotta heishi beads, roughly 1 inch long. -
Second accent point:
Add another single white heishi spacer. -
Short clay section:
Add a short segment of terracotta beads, about 0.5 inches long, leading up to the center focal point. -
Transition to center:
Place one white heishi spacer followed by a very small group (about 3-4) of terracotta beads.
Elevate It
Swap the round central beads for freshwater pearls or rough-cut gemstones like turquoise nuggets to change the vibe from earthy to beachy luxe.
Step 3: Building the Focal Point
-
First gold accent:
Slide on a gold disk spacer bead. -
Add the first stone:
Thread the cream speckled round bead (jasper) onto the wire. -
Center spacing:
Add another gold disk spacer, followed by the white round bead (jade), and another gold disk spacer. -
Complete the trio:
Add the clear/cloudy round bead next. I prefer to frame this last stone with a final gold disk spacer to balance the metallic shine. -
Mirror the strap:
Now, reverse the pattern you created on the first side. Start with the small group of 3-4 terracotta beads, then a white spacer. -
Continue the mirror:
Add the 0.5-inch terracotta section, a white spacer, the 1-inch terracotta section, a white spacer, and finally the long 1.5-2 inch terracotta section.
Step 4: Final Assembly
-
Check the fit:
Wrap the unfinished strand around your wrist to verify the size. Add or remove a few heishi beads from the ends if adjustments are needed for a perfect fit. -
Prepare the closure:
Thread a crimp bead onto the open end of the wire, followed by the jump ring attached to your lobster clasp. -
Secure the end:
Pass the wire back through the crimp bead and pull it taut, leaving just a tiny bit of slack so the beads can move comfortably. -
Final crimp:
Flatten the crimp bead with pliers and trim the excess wire tail close to the bead. Apply a crimp cover if desired.
Now you have a beautifully textured bracelet ready to add a warm touch to any outfit
Yin-Yang Center With Balanced Colors
This harmonious design balances sturdy lava stones with soft, earthy clay tones and shining gold accents for a look that feels grounded yet elegant. It serves as a beautiful reminder of equilibrium, perfect for layering or wearing as a standalone statement piece.
Step-by-Step Guide
Materials
- Stretch cord (0.8mm or 1mm thickness)
- Black lava stone beads (8mm)
- Matte tan/terracotta polymer clay beads (8mm)
- Cream or fossil jasper stone beads (8mm)
- Small gold spacer beads (round)
- Gold disc spacer beads (heishi style)
- Jewelry glue or clear nail polish
- Scissors
- Bead stopper or tape
- Ruler
Step 1: Preparation
-
Measure the cord:
Cut a piece of stretch cord about 10-12 inches long. This gives you plenty of extra room for tying the knots later. -
Secure the end:
Place a bead stopper or a piece of tape on one end of the cord to prevent your beads from sliding off while you work. I always double-check this, as chasing rolling beads is never fun. -
Sort your beads:
Lay out your beads on a soft surface or bead board. Group them by color: black lava, matte tan, cream, and your gold accents.
Essential Tip
Use essential oils on the black lava beads. Their porous nature absorbs oil, turning your bracelet into a personal aromatherapy diffuser.
Step 2: Stringing the Pattern
-
Start the cream section:
Begin by sliding on four cream-colored stone beads. These will form one of the lighter anchors of the bracelet. -
Add first transition:
Place one black lava bead next to the cream beads to create a high-contrast transition. -
Introduce the warmth:
Slide on two matte tan clay beads. Follow this with a stack of three gold disc spacers for a metallic texture break. -
Continue the warm section:
Add two more matte tan clay beads, followed by a single black lava bead. -
Create the light segment:
Thread on four more cream-colored beads. This mirrors the starting cluster, maintaining visual balance. -
Add gold accents:
Slide on two small round gold beads, followed by three matte tan beads. -
Center focus point:
Place one black lava bead in the center of this section to act as a darker focal point. -
Complete the loop:
Finish the pattern with three matte tan beads, followed by a single black lava bead, then another stack of three gold disc spacers. -
Final beads:
Add your last two matte tan beads and two black lava beads. Finish with a single round gold bead to catch the light. -
Check the length:
Wrap the unfinished strand around your wrist. The ends should meet comfortably without stretching the cord.
Step 3: Finishing Touches
-
Pre-stretch the cord:
Gently pull on both ends of the elastic a few times. This pre-stretching prevents the bracelet from springing loose and sagging after the first wear. -
Tie the knot:
Remove the tape or stopper. Tie a standard surgeon’s knot (right over left, left over right) and pull it very tight. -
Secure with glue:
Dab a tiny drop of jewelry glue or clear nail polish directly onto the knot. Let this dry for a few minutes to ensure it won’t slip. -
Hide the knot:
Trim the excess cord ends to about 2mm. Gently tug the bracelet so the knot slides inside the hole of a neighboring bead, hiding it from view.
Make It Yours
Swap the matte tan clay beads for sandalwood beads to add a subtle, natural fragrance that complements the earthy aesthetic.
Enjoy the grounded energy of your new handcrafted accessory every time you glance at your wrist
Coastal Blue and Sand Stack
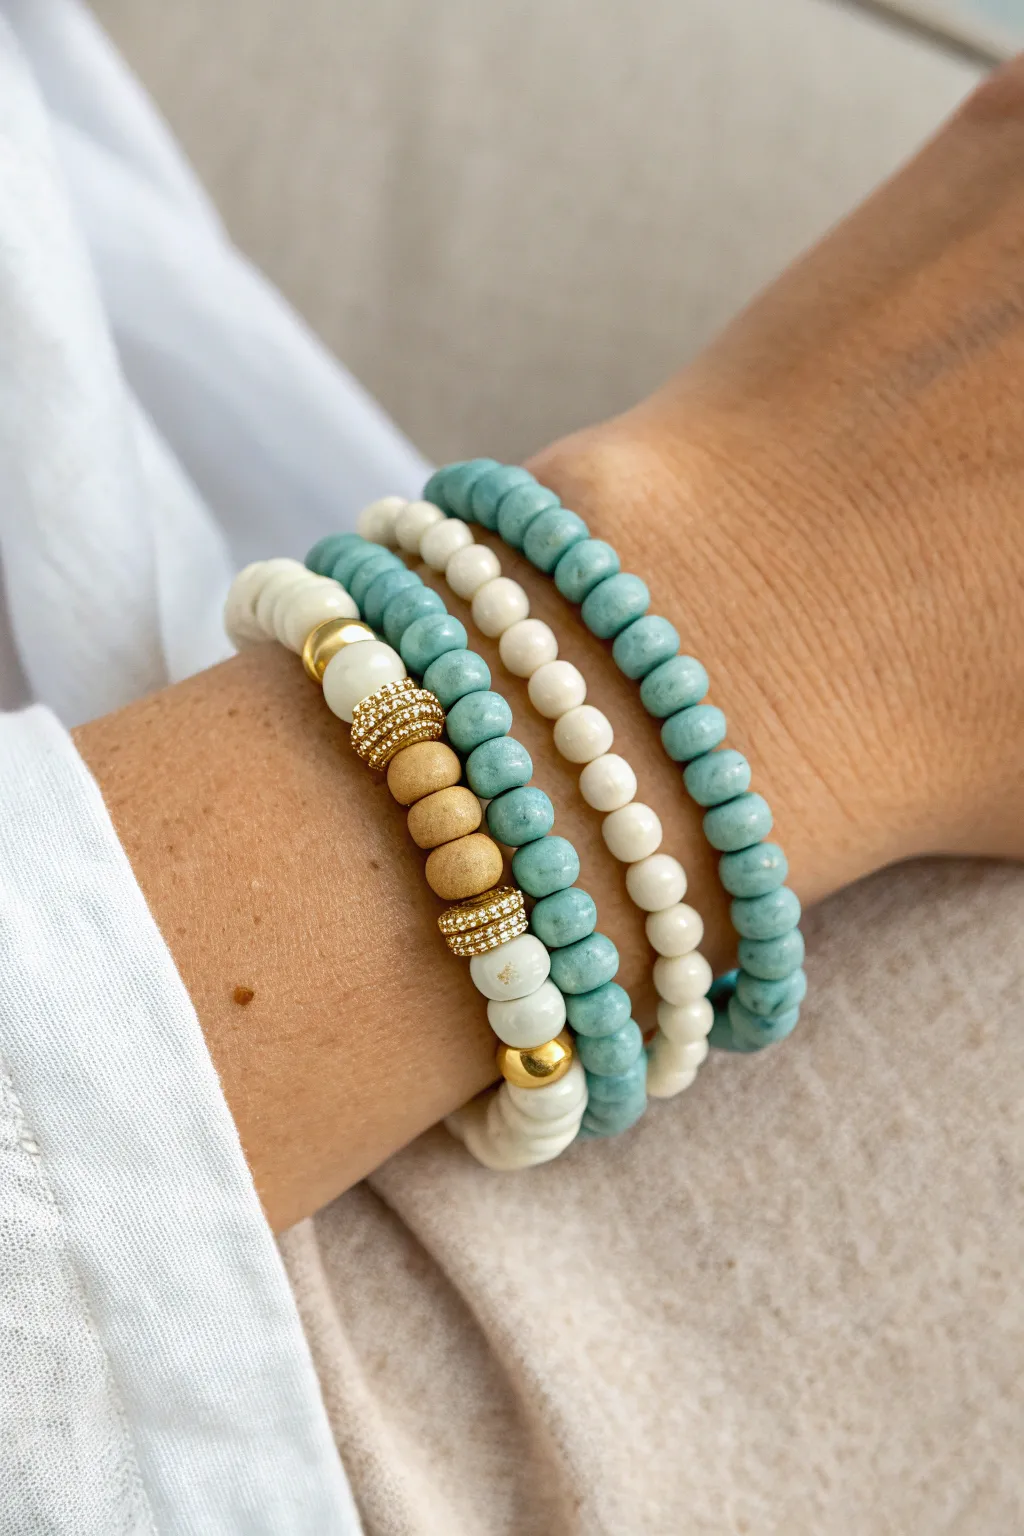
Capture the essence of a tranquil beach day with this trio of textured bracelets featuring sea-foam blues, sandy neutrals, and touches of glamorous gold. This stack combines organic Heishi-style beads with sparkling accents for a look that is casual enough for daytime yet elegant enough for evening wear.
Step-by-Step Tutorial
Materials
- Matte turquoise blue heishi/clay disk beads (approx. 6-8mm)
- Glossy cream or off-white round ceramic or wood beads (6-8mm)
- Matte tan/sand wood beads (8mm)
- Gold rondelle spacer beads with pavé crystal accents
- Smooth gold ball spacer beads (6mm)
- Elastic stretch cord (0.8mm or 1.0mm recommended)
- Clear jewelry adhesive (e.g., G-S Hypo Cement)
- Scissors or jewelry snips
- Bead stopper or decorative tape
Step 1: The Sea-Foam Solo
-
Prepare your cord:
Cut a piece of elastic cord about 10-12 inches long. This generous length makes tying the knot much easier later. Pre-stretch the cord by tugging on it gently a few times to prevent sagging later. -
Secure the end:
Attach a bead stopper or a piece of tape to one end of the cord so your beads don’t slide off while you work. -
String the blue beads:
Thread the matte turquoise heishi beads onto the cord one by one. I find it meditative to check for any irregular beads and discard them as I go to ensure a uniform look. -
Check the fit:
Continue stringing until the bracelet measures your desired wrist size. Wrap it around your wrist to check; the two ends should touch comfortably without stretching the cord.
Knot Security
When tightening your elastic knot, pull on all four strands (the two tail ends and the two bracelet loops) simultaneously to ensure it locks tight without slipping.
Step 2: The Cream Classic
-
Start the second strand:
Cut another length of elastic cord, pre-stretch it, and secure the end just like the first bracelet. -
Thread the cream beads:
Begin stringing the glossy cream-colored round beads. These should be fairly uniform in size to create a smooth, simple texture that contrasts with the other two designs. -
Measure and finish:
String enough beads to match the length of your first blue bracelet. Keep the pattern simple—just the cream beads—so it acts as a palate cleanser in the stack.
Step 3: The Sandy Focal Point
-
Visualize the pattern:
This bracelet is the showstopper. The pattern centers on a focal section: Gold Ball – White Bead – Crystal Rondelle – Tan Wood – Tan Wood – Tan Wood – Crystal Rondelle – White Bead – Gold Ball. -
String the base:
On your prepared cord, string enough of the turquoise blue heishi beads to cover about half of the bracelet length. These will sit at the back of your wrist. -
Begin the transition:
Add a single glossy cream bead, followed by a smooth gold ball spacer. This helps transition from the blue back to the neutral front. -
Add the sparkle:
Slide on a gold rondelle spacer with pavé crystals. The sparkles really catch the light against the matte beads. -
Create the center:
Thread on three matte tan wood beads. These represent the ‘sand’ element and add a lovely, grounded texture to the center of the stack. -
Mirror the design:
Reverse the pattern to finish the focal point: add another crystal rondelle, followed by a gold ball spacer, then a cream bead. -
Complete the loop:
Finish the strand by adding more turquoise heishi beads until this bracelet matches the length of the others.
Material Mix-Up
Add texture by swapping the smooth gold ball beads for hexagonal gold nuts or brushed brass spacers for a more rustic, weathered beach look.
Step 4: Finishing Touches
-
Tie the surgeon’s knot:
Remove the bead stopper from the first bracelet. Cross the ends, loop one over twice (instead of once like a regular shoelace knot), and pull tight. Repeat this knotting process for security. -
Secure with glue:
Dab a tiny drop of jewelry adhesive directly onto the knot. Let it dry for a few minutes before moving on. -
Hide the knot:
If the bead hole is large enough, gently tug the cord so the knot slides inside a bead to hide it. Trim the excess cord ends close to the knot. -
Repeat for all bracelets:
Follow the same knotting and gluing steps for the other two bracelets in the stack.
Slip on your new stack and enjoy the breezy coastal vibes they bring to your outfit
Earthy Boho Palette With Warm Accents
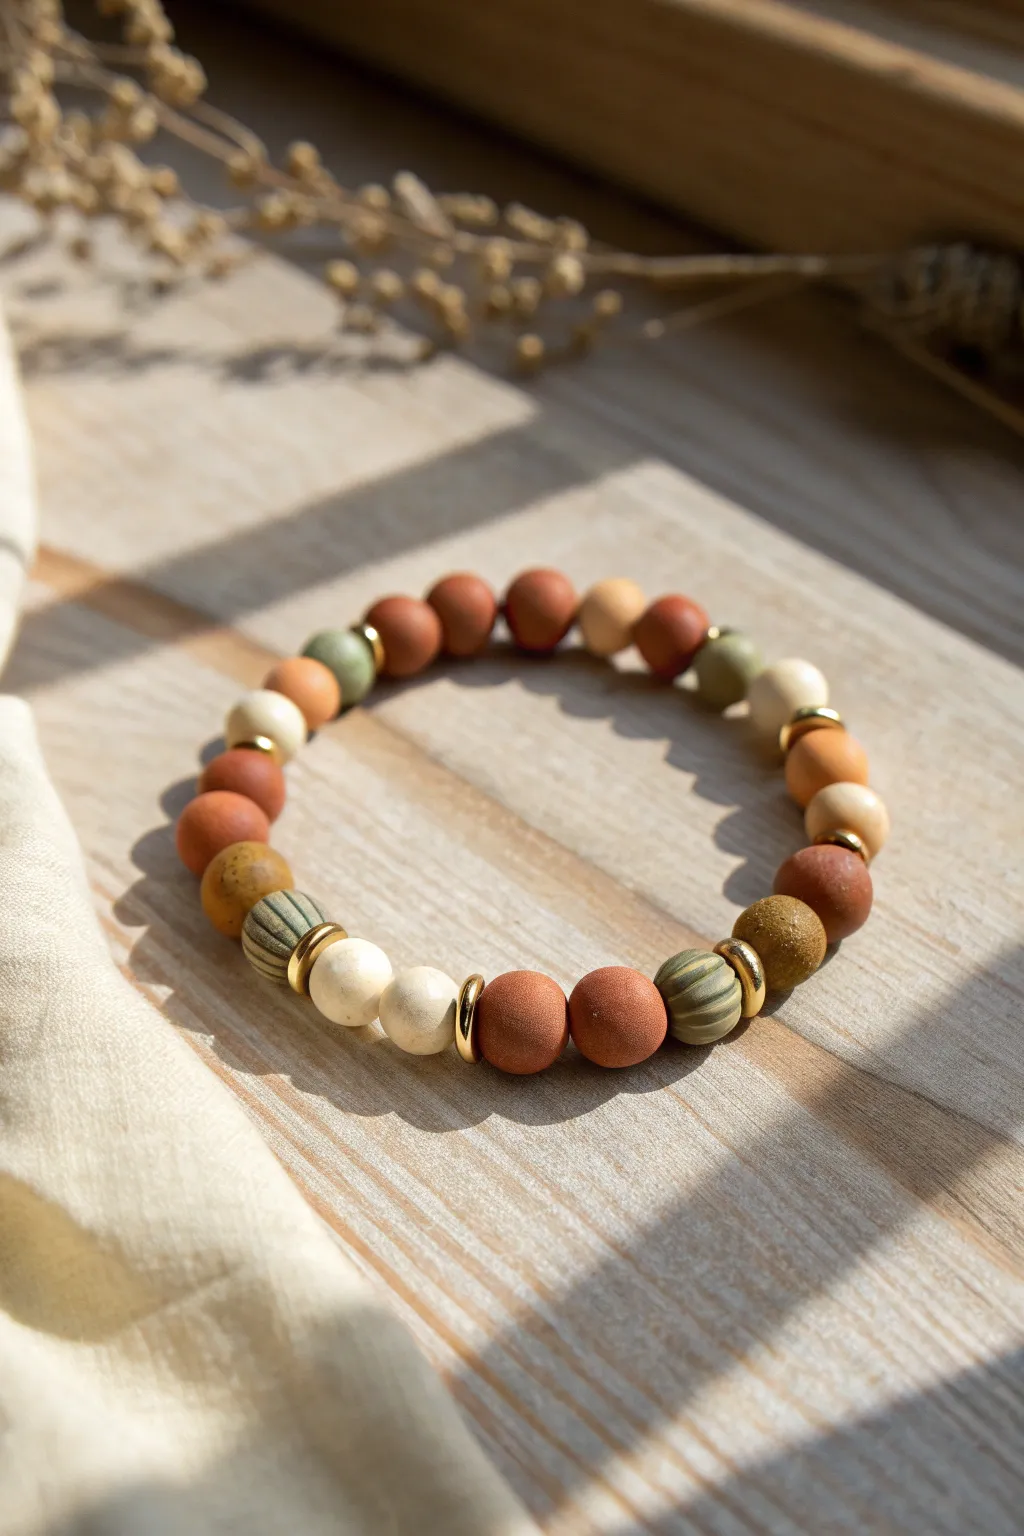
Capture the warmth of the desert with this earthy, bohemian bracelet made from polymer clay. The matte finish and muted tones of terracotta, sage, and cream create a sophisticated accessory that pairs perfectly with casual linen or denim.
Detailed Instructions
Materials
- Polymer clay in terracotta/rust
- Polymer clay in sage green
- Polymer clay in cream/off-white
- Polymer clay in mustard yellow
- Gold tone disc spacer beads (approx. 4mm)
- Strong elastic bead cord (0.8mm)
- Bead rolling tool or acrylic block
- Needle tool or bead piercing pins
- Sharp tissue blade
- Fine grit sandpaper (400-600 grit)
- Super glue or jewelry cement
Step 1: Preparing the Clay Beads
-
Condition the clay:
Start by warming up each color of polymer clay in your hands until soft and pliable. This step is crucial for preventing cracks later. -
Portion the clay:
Pinch off small pieces of the terracotta, cream, and mustard clays. Aim for pieces that are roughly equal in volume to ensure your beads end up mostly uniform in size. -
Roll the solid beads:
Roll each pinch of clay between your palms or using an acrylic block on a flat surface to create perfect spheres. You’ll need about 15-20 solid color beads depending on your wrist size. -
Create the textured stripes:
For the special textured beads, mix a small amount of sage green with a tiny bit of cream to marble it slightly, or keep it solid sage. Roll it into a ball. -
Add stripe details:
Use your needle tool to gently press vertical indentations all around the circumference of these sage green beads to mimic a carved, striped texture. -
Pierce the beads:
Carefully insert a bead piercing pin or needle tool through the center of each sphere. Rotate the pin as you push to avoid squishing the bead’s shape. -
Baking:
Arrange your pierced beads on a baking sheet or tile. Bake according to your brand of clay’s instructions (usually around 275°F/135°C for 15-30 minutes). -
Cool and finish:
Let the beads cool completely. I like to lightly buff them with fine-grit sandpaper to achieve that soft, matte, stone-like texture seen in the photo.
Step 2: Assembly & Finishing
-
Cut the cord:
Cut a piece of elastic cord about 10-12 inches long. Pre-stretch the cord by pulling on it firmly a few times; this prevents the bracelet from stretching out later. -
Plan your pattern:
Lay out your beads on a design board or towel. A nice pattern is a block of solid colors, separated by a gold spacer, then a textured sage bead. -
Create spacing visual:
Try grouping two similar warm tones (like two terracotta beads) next to each other, followed by a gold spacer for a metallic pop. -
String the beads:
Thread your beads onto the elastic cord following your planned pattern. Keep checking the length by wrapping it around your wrist. -
Tie the knot:
Once you have the desired length, tie a surgeon’s knot (loop the clear end through twice before pulling tight). -
Secure the knot:
Place a tiny drop of super glue or jewelry cement directly onto the knot. Let it dry for a minute. -
Hide the knot:
If possible, tuck the knot inside the hole of one of the adjacent beads. -
Final trim:
Trim the excess elastic cord close to the knot using sharp scissors, being careful not to nick the main knot.
Natural Stone Look
Does the clay look too plastic? After baking, tumble the beads with sandpaper or rub them vigorously with denim fabric to create a soft, matte, organic finish.
Distorted Holes?
If holes squish while piercing, refrigerate the raw rolled beads for 15 minutes first. The cold clay holds its shape much better against the needle tool.
Slip on your new bracelet and enjoy the subtle warmth it adds to your outfit
Marble and Terrazzo-Inspired Focal Mix
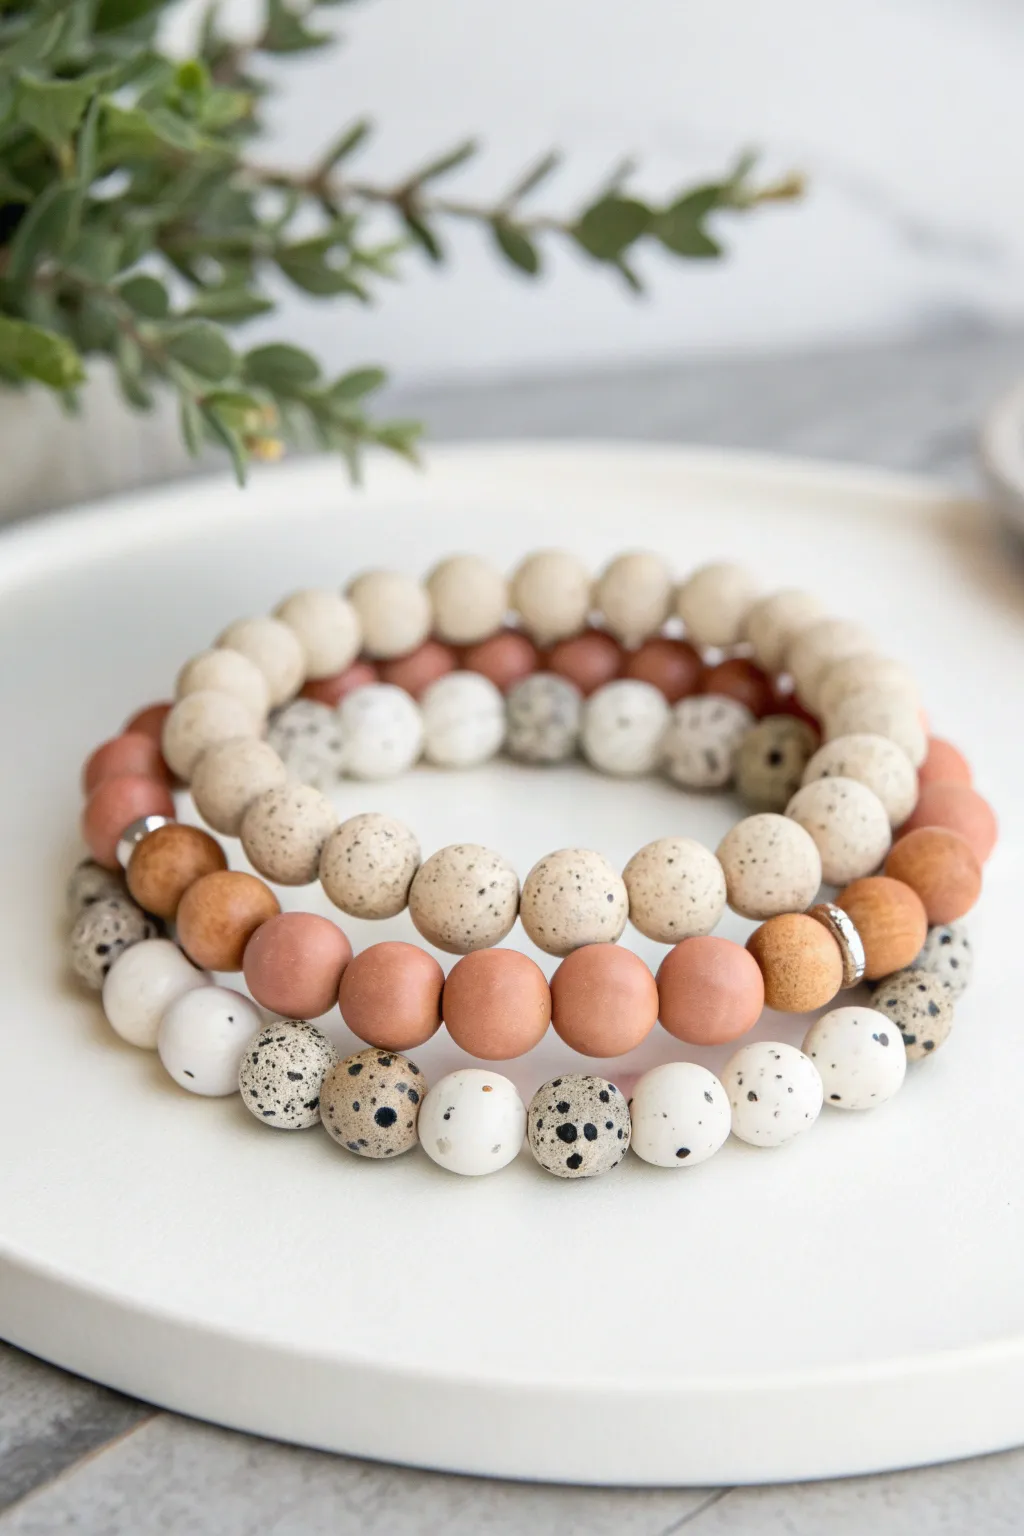
This trio of bracelets perfectly balances the warmth of terra cotta with the modern cool of speckled stone and polymer clay, creating a seamless marble and terrazzo-inspired look. The combination of textures—from the smooth matte finish of the clay to the natural spotting on the white beads—makes this stack an effortless everyday accessory.
Step-by-Step Guide
Materials
- 10mm round terra cotta polymer clay beads (or natural terra cotta stone beads)
- 10mm Dalmatian jasper beads (or white clay beads with black speckles)
- 10mm sand/beige speckled polymer clay beads
- Silver or gold spacer beads (approximately 4mm)
- Strong elastic stretch cord (0.8mm or 1.0mm recommended)
- Hypo-cement or jewelry glue
- Beading needle (optional but helpful)
- Scissors
Step 1: Planning & Pre-Stretching
-
Measure your wrist:
Before you begin, measure your wrist with a flexible tape measure. Add about half an inch to your measurement to ensure a comfortable fit that isn’t too tight. -
Pre-stretch the cord:
Cut three lengths of elastic cord, each about 10-12 inches long. Give each piece a few firm tugs to pre-stretch the elastic; this crucial step prevents the bracelets from stretching out and sagging after you wear them a few times. -
Secure one end:
Place a bead stopper or a piece of tape on one end of your first cord to stop beads from sliding off while you work.
Knot Slipping?
If your elastic knots slip, try a dab of G-S Hypo Cement right on the knot. Let it dry for 24 hours before trimming the tails or hiding it in a bead.
Step 2: Bracelet 1: The Speckled Sand Solo
-
Select your beads:
For the top bracelet shown, gather your sand or beige speckled polymer clay beads. These should have a matte, stony finish. -
String the beads:
Thread the beads onto the elastic cord one by one until you reach your desired length (usually about 20-22 beads for an average wrist). -
Add a hidden accent:
If you wish to mimic the middle bracelet’s style, you can sneak a small metal spacer bead in the back, but for a pure look, you can stick solely to the clay beads. -
Check the fit:
Wrap the strand around your wrist to verify the size. It should sit comfortably without digging into your skin. -
Knot securely:
Tie off the bracelet using a surgeon’s knot (right over left, left over right, looping the second tie through twice). Pull tight. -
Hide the knot:
Dab a tiny drop of jewelry glue on the knot, trim the excess cord, and gently pull the knot inside one of the bead holes to hide it.
Design Pro Tip
Mix finishes for depth! Use matte polymer clay for the colored beads and polished stone (like jasper) for the speckled ones to create tactile contrast.
Step 3: Bracelet 2: The Terra Cotta Mix
-
Prepare the pattern:
This middle bracelet is the focal point, mixing solid terra cotta beads with speckled accents. Lay out a pattern alternating sections of 5-6 terra cotta beads with 5-6 beige speckled beads. -
Incorporate metal accents:
Insert a silver or gold spacer bead at the transition points between the terra cotta and the beige sections to define the color block. -
String and finish:
Thread your pattern onto the second piece of pre-stretched elastic. Perform the same fit check and surgeon’s knot process as the first bracelet.
Step 4: Bracelet 3: The Dalmatian Terrazzo
-
Gather the terrazzo beads:
For the bottom strand, use the Dalmatian jasper or white black-speckled clay beads. This high-contrast bead anchors the set. -
Create a focal section:
I like to create an asymmetrical look here by stringing mostly Dalmatian beads, but interrupting them with a small section of 3-4 terra cotta beads in the center. -
Add final spacers:
Place a metal spacer bead on either side of that terra cotta focal section to make the reddish-brown color pop against the white and black. -
Tie and glue:
Secure this third bracelet with a tight surgeon’s knot, applying glue and hiding the knot inside a large-hole bead if possible. -
Review the stack:
Put all three bracelets on together. Roll them onto your wrist rather than stretching them excessively to keep the elastic in top shape.
Enjoy mixing and matching your new eclectic stack with different outfits for a grounded, earthy vibe