If you want an easy clay date that’s more giggles than pressure, small projects are the sweet spot. I’m sharing my favorite clay date ideas that use simple shapes and still turn into cute keepsakes you’ll actually want to display.
Matching Pinch Pots for Two
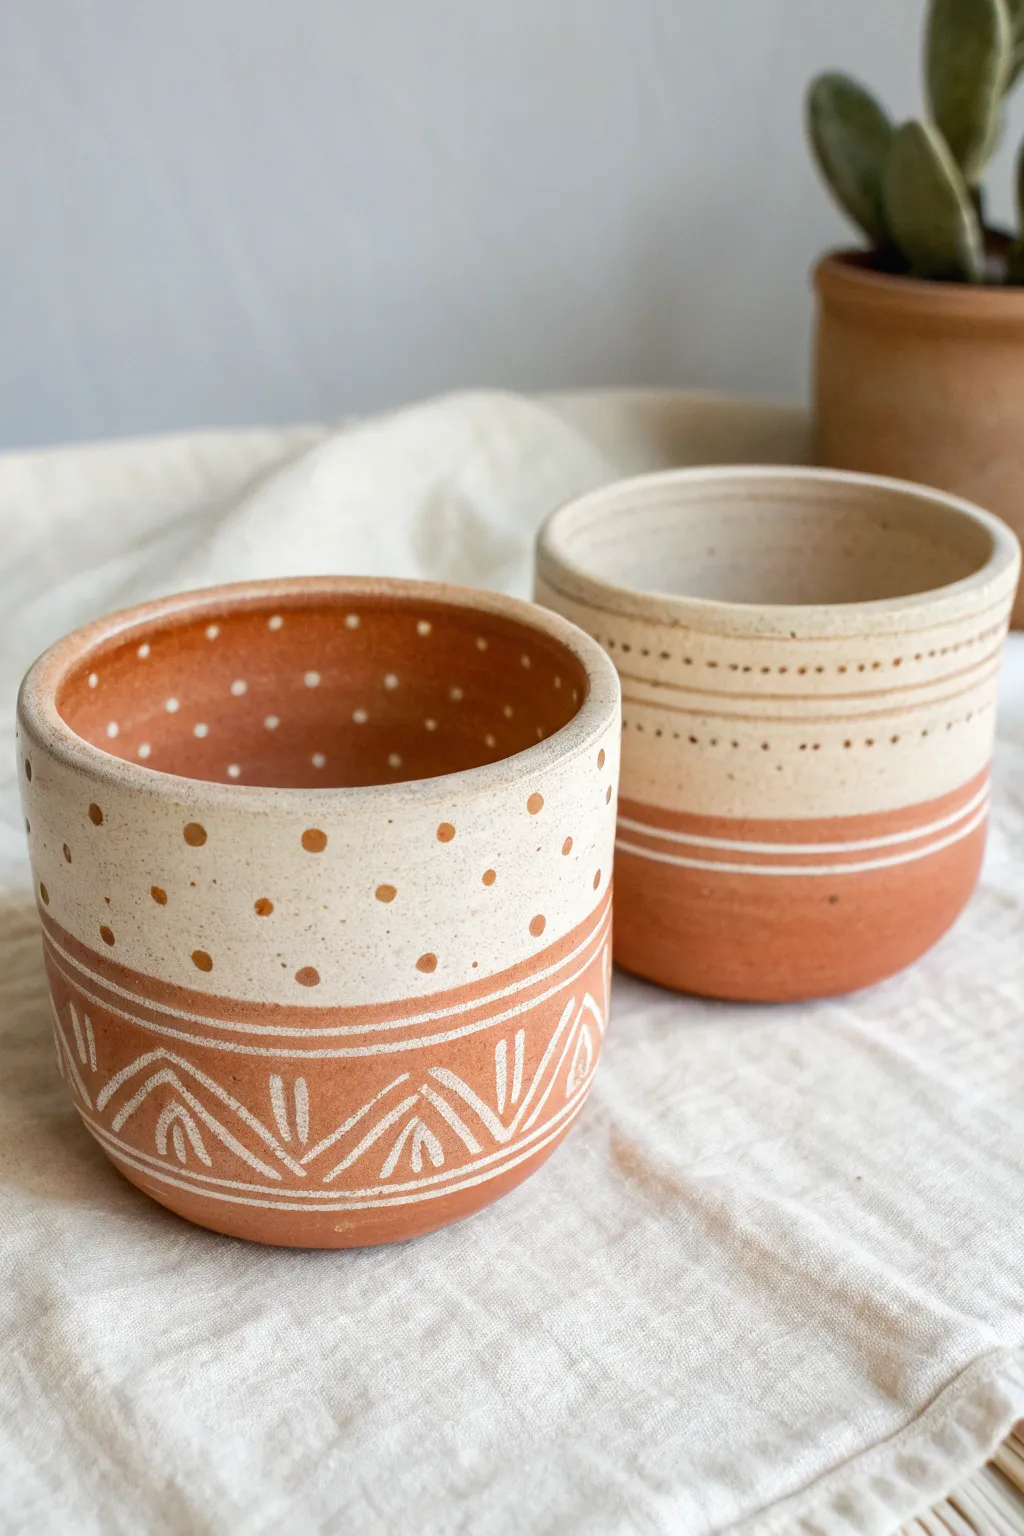
Create a charming set of matching-but-distinct clay vessels that blend earthy terracotta tones with crisp white detailing. These pinch pots feature complementary designs utilizing sgraffito carving and wax resist techniques for a professional, artisanal finish.
How-To Guide
Materials
- Red earthenware or terracotta clay body
- White underglaze or white slip
- Small sponge
- Carving tool (or a dull pencil/needle tool)
- Clean paintbrush
- Clear glaze (optional, for functionality)
- Kiln (or air-dry clay alternatives if not firing)
Step 1: Forming the Base
-
Prepare the clay:
Start with two equal-sized balls of red clay, roughly the size of a tennis ball. Knead them well to remove any air bubbles. -
Pinch the form:
Press your thumb into the center of the first ball, stopping just before you reach the bottom. Using a rhythmic pinching motion, rotate the clay while gently squeezing the walls between your thumb and fingers to thin and raise them. -
Refine the shape:
Aim for a cylindrical shape with straight walls rather than a bowl shape. Tap the bottom gently on a table to flatten it so the pot sits stable. -
Repeat for the second pot:
Create the second vessel trying to match the height and width of the first. It’s okay if they aren’t identical twins; fraternal twins have more character. -
Smooth the surfaces:
Once the pots are formed, use a slightly damp sponge or a ribbed tool to smooth out fingerprints on the exterior walls for a clean canvas.
Step 2: Applying Design Layers
-
Dry to leather hard:
Let the pots sit until they are leather hard—stiff enough to handle without deforming but still cool to the touch. -
Paint the top sections:
On the first pot (the foreground design), paint a thick band of white underglaze covering the top two-thirds of the exterior. Apply 2-3 coats for opacity. -
Paint the background pot:
For the second pot, reverse the ratio or vary the coverage. In the example, the white underglaze covers the top three-quarters. -
Add stripe details:
While you have the white underglaze out, paint horizontal white stripes around the raw terracotta base of the second pot to create contrast. -
Let the underglaze set:
Allow the white underglaze to dry until it’s no longer tacky but hasn’t fully hardened. This is the sweet spot for carving.
Clean Lines Tip
Don’t sweep away carving crumbs immediately! If the underglaze is still damp, brushing will smear the color into your fresh lines. Wait until bone dry to brush.
Step 3: Carving the Sgraffito
-
Carve the bottom pattern:
For the foreground pot, use your carving tool to scratch through the raw red clay at the bottom. Carve a horizontal line around the base, then create a repeated chevron or ‘mountain’ pattern above it. -
Detail the chevrons:
Add smaller vertical dashes inside each chevron triangle to mimic a leaf or woven texture. The white clay dust will accumulate, but don’t brush it off yet. -
Add the polkadots:
Using the tip of your tool, gently carve small divots into the white underglaze section of the foreground pot to reveal the red clay underneath. I usually stagger the dots for a playful look. -
Texture the background pot:
On the second pot, use fine scratching motions to carve horizontal dotted lines into the white underglaze, creating a textured, banding effect. -
Clean up the lines:
Once the carving is totally complete and the pots are bone dry, gently brush away the clay crumbs with a soft, dry brush to reveal the crisp lines.
Level It Up
Try inlay (Mishima) instead of sgraffito: carve lines into raw clay first, fill them with white slip, then scrape the surface flush for a smooth, seamless finish.
Step 4: Finishing Touches
-
Bisque fire:
Fire the pieces to cone 04 (or according to your clay’s instructions) to set the design permanently. -
Apply clear glaze:
Dip or brush a clear glaze over the entire interior to make them water-tight. For the exterior, you can glaze the whole thing or leave the raw clay sections unglazed for texture. -
Final firing:
Process the glaze firing according to your materials, usually cone 05 or 06, to melt the glaze into a glassy finish.
Enjoy using your new custom vessels for morning espresso or as home for a small succulent


Mini Animal Besties Set
Create a pair of adorable, speckled frog figurines that make charming desk companions or garden accents. These glossy green friends feature simple rounded shapes and expressive eyes, perfect for a relaxing clay crafting session.
Step-by-Step
Materials
- Polymer clay (white or light grey) or air-dry clay
- Aluminum foil (for the core)
- Acrylic paints (sage green, white, black, light pink)
- Glossy varnish or resin (high gloss)
- Paintbrush (flat shader and fine liner)
- Toothbrush or stiff bristle brush
- Ball stylus tool
- Water cup and paper towels
Step 1: Sculpting the Base Form
-
Make the foil core:
Crumple a small piece of aluminum foil into a tight ball, slightly flattened at the bottom. This saves clay and helps the frog keep its chubby, rounded shape without getting too heavy. -
Cover the core:
Roll out a sheet of your clay to about 1/4 inch thickness. Wrap it completely around the foil ball, smoothing the seams together until you have a seamless, egg-like shape. -
Shape the body:
Gently gently press the clay ball against your work surface to create a flat base so the frog sits stably. Refine the top to be slightly narrower than the bottom, giving it a classic pear silhouette. -
Add the eyes:
Roll two small, equal-sized balls of clay. Attach them to the top of the head, spacing them slightly apart. Blend the bottom edges of these eye mounds into the main body so they look integrated, not just stuck on.
Uneven Speckles?
If the splatter painting gets too heavy in one spot, quickly dab it with a damp sponge or paper towel while wet to lift the excess paint, then try again.
Step 2: Adding Details
-
Form the arms:
Roll two small logs of clay for the arms. They should be slightly thicker at the bottom (the hands) and tapered at the top. -
Attach the arms:
Press the arms onto the sides of the belly, curving them slightly inward. Use a modeling tool or your finger to smooth the top attachment point into the body, leaving the ‘hand’ end raised slightly for dimension. -
Define the mouth:
Using a thin needle tool or the edge of a clay knife, gently press a long, varied curve across the face. Make it slightly crooked or asymmetrical to give your frog a quirky personality. -
Add feet details:
For the feet, you can either sculpt tiny semi-circles at the base or, for a simpler look like the photo, etch small curved lines at the very bottom front to suggest toes tucked underneath. -
Smooth everything:
dip your finger in a little water (for air-dry clay) or baby oil (for polymer) and gently rub the entire surface to remove fingerprints and ensure a super smooth finish before drying. -
Cure or dry:
Bake your polymer clay according to package instructions, or let air-dry clay sit for 24-48 hours until fully hardened and white.
Garden Accents
If using polymer clay, embed a heavy magnet or a small stone into the bottom before baking. This weights them down so they can sit securely in flower pots.
Step 3: Painting and Glazing
-
Apply base coat:
Paint the entire frog with a sage or moss green acrylic paint. You may need two coats for full opacity. Let this dry completely. -
Create the speckles:
Dip an old toothbrush or stiff brush into diluted dark green or brown paint. Run your thumb across the bristles to flick tiny speckles onto the frog’s body. I suggest practicing on paper first to control the spray. -
Paint the eyes:
Paint the eye mounds white. Once dry, add a large black circle in the center for the pupil. For extra life, add a tiny white dot in the upper corner of the pupil as a reflection. -
Add blush and mouth:
Dilute a tiny bit of pink paint and dab it softly on the cheeks for a blush effect. Use a fine liner brush with dark grey or black paint to trace the mouth indentation you carved earlier. -
Apply the glaze:
This is the most crucial step for the ceramic look. Apply a thick coat of high-gloss varnish or UV resin over the entire piece. The thick gloss mimics the fired glaze of real pottery.
Place your finished glossy pair on a desk or shelf where their goofy smiles can brighten your day


Easy Heart Coaster Duo
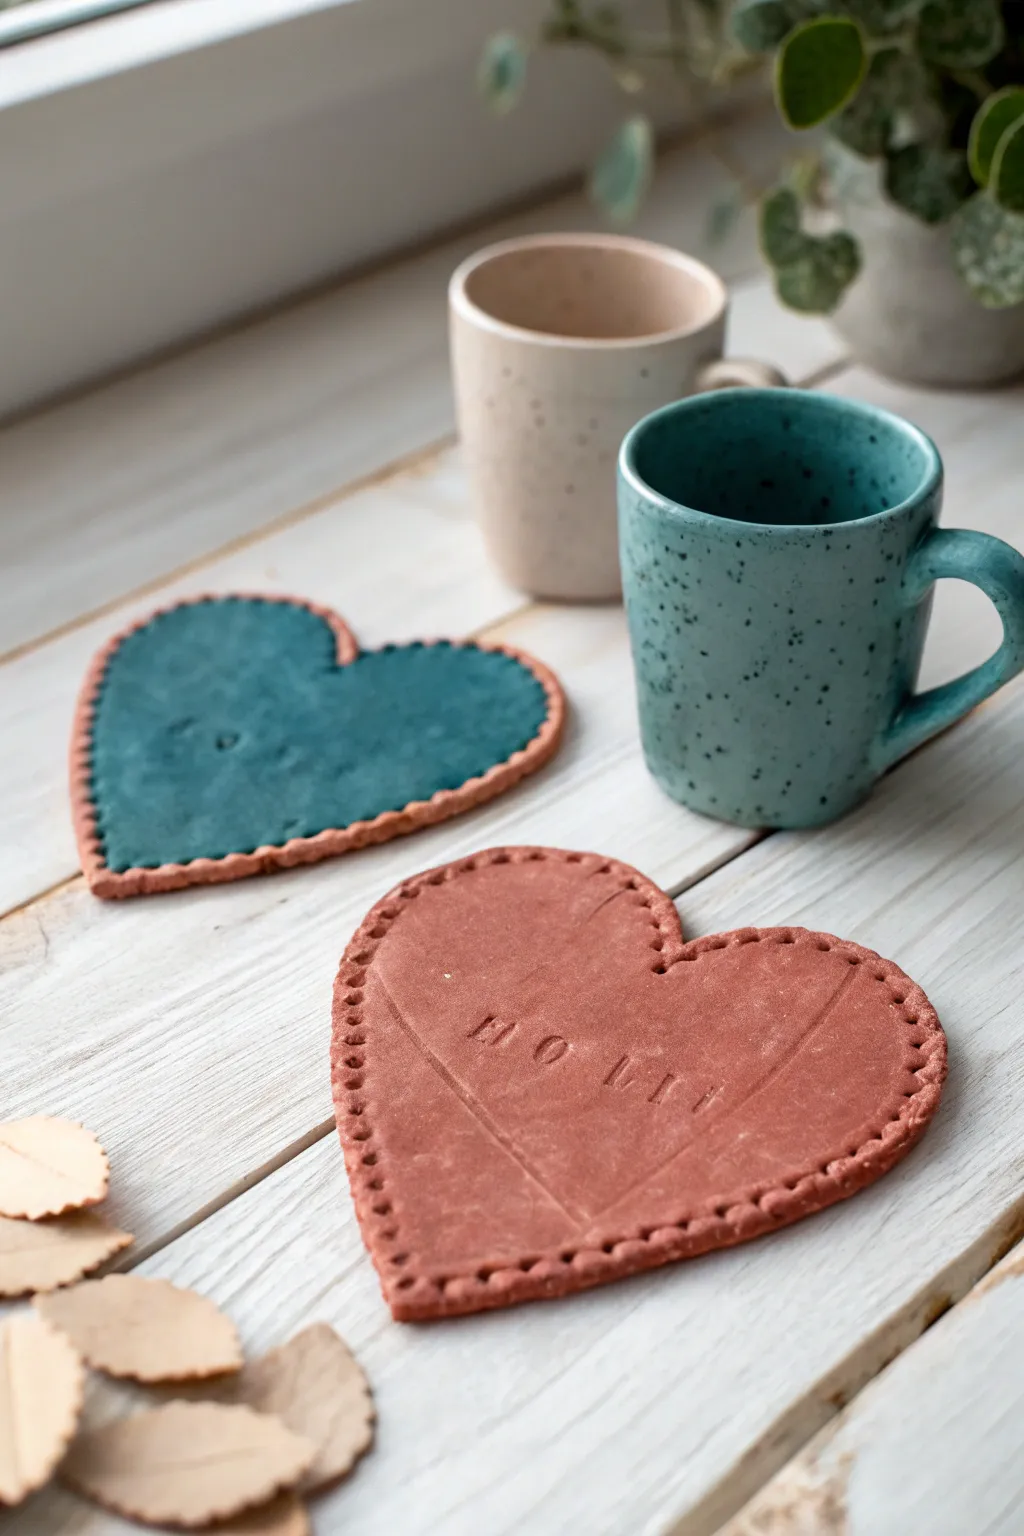
These charming heart-shaped coasters blend a rustic, handmade aesthetic with a faux-leather look created entirely from clay. The duo features contrasting earthy tones—a deep teal and a warm terracotta—accented by a clever stitched border effect.
How-To Guide
Materials
- Air-dry clay (white or pre-colored)
- Acrylic paints (Teal/Dark Turquoise and Terracotta/Reddish-Brown)
- Rolling pin
- Parchment paper or canvas mat
- Heart-shaped cookie cutter (large enough for a mug)
- Needle tool or toothpick
- Dull pencil or small stylus tool
- Letter stamps (optional)
- Fine-grit sandpaper
- Matte sealant or varnish
Step 1: Shaping the Clay Foundation
-
Prepare your workspace:
Lay down parchment paper or a canvas mat on a flat surface to prevent the clay from sticking. This also helps you rotate the work without deforming it. -
Condition the clay:
Take a handful of clay and knead it thoroughly in your hands until it is warm, pliable, and free of cracks. -
Roll the slab:
Using your rolling pin, roll the clay out into an even slab. Aim for a thickness of about 1/4 inch (6mm)—thick enough to be sturdy under a mug, but not chunky. -
Cut the hearts:
Press your large heart-shaped cookie cutter firmly into the clay. Create two separate hearts. If you don’t have a cutter, sketch a heart on paper, cut it out, and trace around it with a knife. -
Smooth the edges:
Dip your finger in a little water and gently run it along the cut edges of the hearts to soften any sharp ridges or rough spots left by the cutter.
Preventing Curling
Clay coasters love to curl edges upward as they dry. To stop this, sandwich them between two wooden boards or heavy books once they are ‘leather hard’ (dry to touch but still cool).
Step 2: Adding Texture and Detail
-
Create the stitch holes:
Using a needle tool or toothpick, poke small, evenly spaced holes around the entire perimeter of both hearts, about 1/8 inch from the edge. Try to keep the spacing consistent to mimic real sewing. -
Connect the stitches:
Use a dull pencil or a small stylus simply to press a small indentation between each hole. This creates the illusion of thread connecting perforations. -
Impress faint lines:
For the terracotta heart, use a ruler or straight edge to very lightly press a geometric pattern or intersecting lines across the surface if desired, just like the faint ‘X’ seen in the reference. -
Stamp your message:
If you are using letter stamps, gently press a word like ‘HOME’ or initials into the center of the heart. Don’t press too deep; a subtle impression looks more elegant. -
Initial drying phase:
Let the coasters sit undisturbed for about 24-48 hours. Flip them over halfway through the drying process to ensure both sides dry evenly and to prevent curling. -
Sanding:
Once bone dry, take fine-grit sandpaper and lightly buff the edges and surface to remove any final bumps or fingerprints.
Step 3: Painting and Finishing
-
Base coat application:
Paint one heart completely with the teal acrylic paint and the other with the terracotta shade. I like to use a slightly watered-down first coat to let it soak into the clay pores. -
Second coat coverage:
If the first coat looks streaky after drying, apply a second, opaque layer of paint to get that rich, solid color finish. -
Highlight the stitching:
To make the ‘stitches’ pop, you can lightly dry-brush a slightly lighter shade of the base color over the perforated edges, catching the raised parts of the clay. -
Seal the coaster:
Since these are coasters, protection is key. Apply two coats of matte waterproof varnish or sealant. This prevents water rings from damaging your paint job. -
Final cure:
Allow the sealant to cure completely according to the manufacturer’s instructions before placing any hot mugs on your new creation.
Fixing Cracks
If small cracks appear during drying, make a paste of clay and water (slip) and fill the crack. Smooth it over with a damp finger, let it dry again, and sand it flush.
Now you have a lovely set of personalized coasters ready for your next coffee break


Tiny Candle Holder Pair

These charming ceramic votive holders add a warm, handmade touch to any space with their speckled finish and delicate geometric detailing. Creating this matching pair is a perfect beginner project that balances simple construction with refined decorative techniques.
Step-by-Step
Materials
- White or light-colored air-dry clay (or polymer clay)
- Small circular cookie cutter (approx. 2 inches)
- Rolling pin
- Ruler
- Craft knife or clay slicer
- Slip (clay mixed with water) or liquid clay adhesive
- Smoothing tool or sponge
- Fine-point dotting tool or toothpick
- Speckled cream acrylic paint (or glaze if firing)
- Raw sienna or tan acrylic paint
- Matte sealant
Step 1: Forming the Base
-
Prepare your clay:
Start by wedging your clay to remove any air bubbles, then roll it out into a smooth, even slab that is approximately 1/4 inch thick. -
Cut the bases:
Using your circular cookie cutter, punch out two identical circles. These will serve as the bottoms for your candle holders. -
Measure the walls:
Calculate the circumference of your base circles. Cut two rectangular strips of clay that are this length plus a tiny bit for overlap, and about 1.5 to 2 inches tall.
Step 2: Assembling the Cylinders
-
Attach the walls:
Score (scratch hatch marks) the edges of your base circles and the bottom edge of your rectangular strips. Apply a little slip or adhesive to the scored areas. -
Wrap the clay:
Carefully wrap the rectangular strip around the base circle, ensuring it sits continuously on top of the base edge rather than outside it. -
Seal the seam:
Where the two ends of the rectangle meet, blend the clay together thoroughly. I like to use a vertical sweeping motion with a sculpting tool to knit the clay together, then smooth it out. -
Smooth the interior:
Use a slightly damp sponge or your finger to smooth the inside seam where the wall meets the floor, ensuring a watertight seal for wax safety later. -
Refine the rim:
Gently tap the top rim with a flat object or smooth it with a damp sponge to get that nice, rounded lip seen in the photo.
Pro Tip: Seamless Join
Cut the ends of your wall strip at a 45-degree angle (beveled). This creates a larger surface area for the join and makes the seam much easier to hide.
Step 3: Decoration & Finish
-
Create the patterned band:
Before the clay dries, identify a band about half an inch from the bottom. You can lightly mark parallel lines with a ruler to guide you. -
Add the dots:
Using a dotting tool or the blunt end of a toothpick, gently press a row of indentations into the clay within the band area. Don’t puncture through; just leave an impression. -
Dry completely:
Allow your pieces to dry fully. For air-dry clay, this usually takes 24-48 hours. Rotate them occasionally so the bottoms dry evenly. -
Base coat painting:
Paint the entire holder (inside and out) with a speckled cream paint. If you can’t find speckled paint, use a cream base and gently flick brown paint spots onto it with an old toothbrush. -
Paint the accent band:
Once the base is dry, carefully paint the band area near the bottom with a raw sienna or tan color to mimic the look of unglazed stoneware. -
Highlight the dots:
Dip a fine-tip brush or toothpick into white or cream paint and carefully fill inside the indented dots on the tan band to make them pop. -
Seal the piece:
Apply a coat of matte sealant or varnish to protect the paint and give the holder a finished ceramic look.
Troubleshooting: Cracking?
If you see tiny cracks forming as the clay dries, patch them immediately with a small amount of fresh clay paste (clay mixed with a few drops of water) and smooth over.
Place a tealight inside your new holders and enjoy the cozy atmosphere they create

The Complete Guide to Pottery Troubleshooting
Uncover the most common ceramic mistakes—from cracking clay to failed glazes—and learn how to fix them fast.
Photo Holder Tokens You Swap
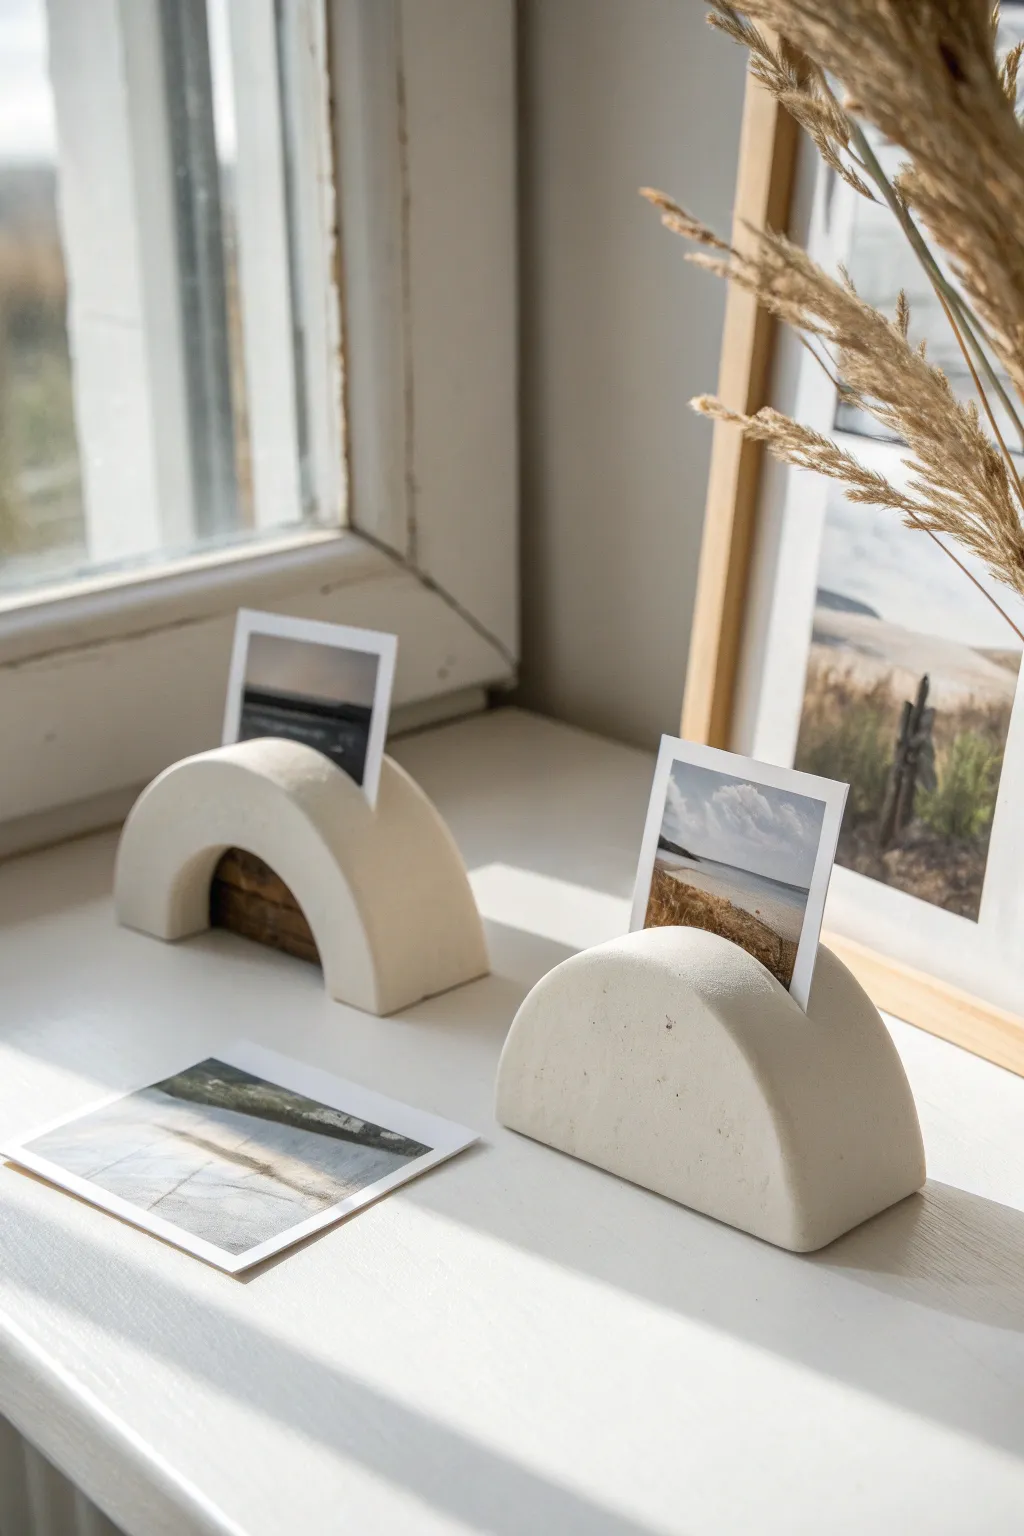
Create a sleek, modern way to display your favorite memories with these geometric photo holders. Their clean, white finish and simple shapes make them a perfect minimalist accent for any windowsill or desk.
Step-by-Step Tutorial
Materials
- Air-dry clay (white) or polymer clay
- Rolling pin
- Sharp craft knife or clay blade
- Round cookie cutter or a bowl (approx. 4-5 inches diameter)
- Ruler
- Sandpaper (fine grit)
- Small bowl of water
- Acrylic sealer (matte)
Step 1: Preparing the Clay Base
-
Condition the clay:
Begin by taking a generous amount of white air-dry clay and kneading it in your hands. You want it warm and pliable to prevent cracks later on. -
Roll it out:
On a clean, flat surface, roll the clay into a thick slab. Aim for a thickness of about 1 to 1.5 inches. It needs to be substantial enough to stand upright on its own. -
Smooth the surface:
Before cutting, run your fingers or a slightly damp sponge over the surface of the slab to remove any rolling pin marks or fingerprints.
Cracks Appearing?
If small hairline cracks appear while drying, mix a tiny bit of fresh clay with water to make a paste perfectly suited for filling them in before sanding.
Step 2: Shaping the Holders
-
Cut the circle:
Use your large round cookie cutter or place a bowl upside down on the clay as a guide. Cut a perfect circle out of your thick clay slab using the craft knife. -
Create the semi-circles:
Using your ruler as a straight edge, cut the circle exactly in half. This will give you two semi-circle shapes that act as the base for both designs. -
Form the arch design:
Take one of the semi-circles to create the arch holder used on the left. Find a smaller circular cutter or use a small jar lid. Center it along the bottom flat edge and cut out a smaller semi-circle to create the negative space, forming a rainbow arch shape. -
Refine the solid design:
For the solid semi-circle holder shown on the right, simply keep the second half as is, but tap the flat bottom on the table gently to ensure it stands perfectly straight. -
Smooth the edges:
Dip your finger in a little water and run it along all cut edges to soften the sharp corners. I find this step crucial for getting that professional, finished look.
Add Cool Texture
Before the clay dries, gently press a piece of rough linen or canvas onto the surface to give the holder a subtle, fabric-like organic texture.
Step 3: Creating the Photo Slot
-
Measure the slit:
Using a ruler, mark a straight line directly across the top center of the curved edge on both pieces. -
Cut the groove:
Carefully press the craft knife blade down into the clay along your mark. Rock the blade slightly back and forth to widen the slit just enough to fit a photo card, about 1/2 inch deep. -
Test the fit:
If you have a spare piece of thick cardstock, gently test the slot width. If the clay is too sticky, let it sit for 20 minutes before refining the cut.
Step 4: Finishing Touches
-
Dry thoroughly:
Place your pieces on a drying rack or parchment paper. Air-dry clay takes time—allow at least 24 to 48 hours. Flip them occasionally to ensure even drying. -
Sand for perfection:
Once fully cured and hard, take your fine-grit sandpaper and gently buff the surface. Focus on the edges and the photo slot area to remove any burrs. -
Clean off dust:
Wipe the holders down with a slightly damp cloth to remove all sanding dust. -
Seal the piece:
Apply a thin coat of matte acrylic sealer. This protects the clay from moisture and yellowing while keeping that raw, natural stone appearance.
Slide your favorite snapshot in and enjoy your handmade decor piece
Magnet Minis With Silly Faces
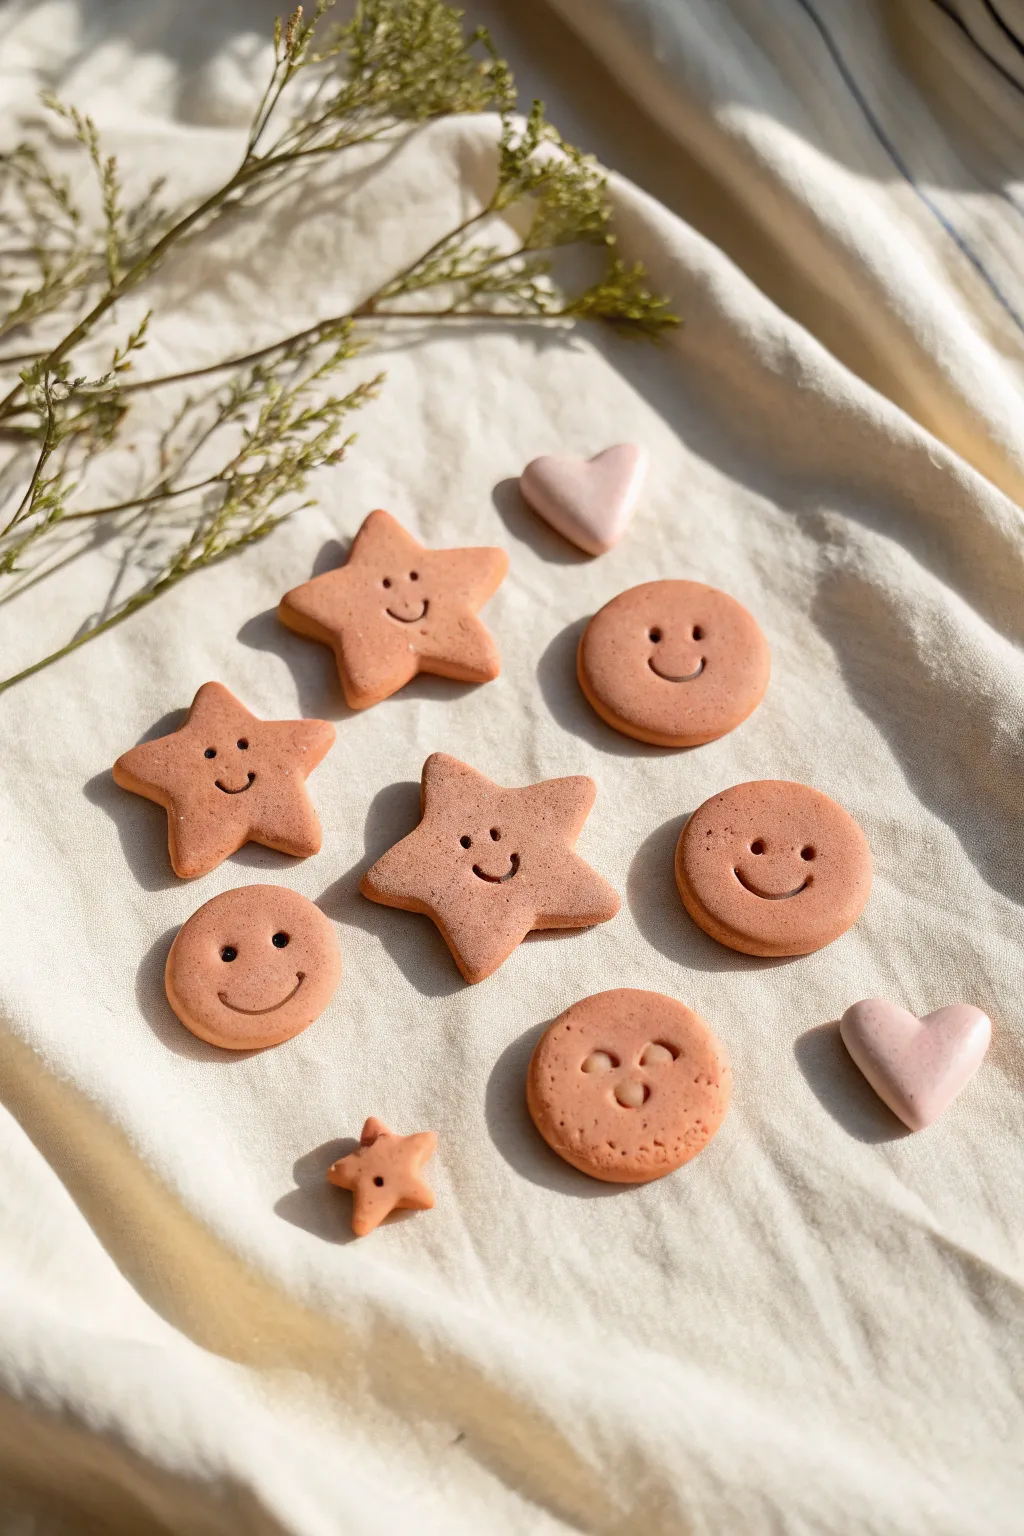
Create a cheerful collection of mini magnets featuring warm terracotta tones and simple, expressive faces. These charming little stars, circles, and hearts add a touch of whimsy to any fridge or locker, making them perfect for a quick and rewarding creative session.
Step-by-Step
Materials
- Terracotta-colored polymer clay (or air-dry clay)
- Small heart-shaped cookie cutter (approx. 1 inch)
- Small star-shaped cookie cutter (approx. 1.5 inch)
- Small round cookie cutter (approx. 1.5 inch)
- Rolling pin or smooth glass jar
- Parchment paper or silicone mat
- Ball stylus tool (small and medium sizes)
- Needle tool or toothpick
- Small strong magnets
- Super glue or E6000 adhesive
- Fine-grit sandpaper (optional)
- Pale pink polymer clay (for the hearts)
Step 1: Prepping the Dough
-
Condition the Clay:
Begin by taking a chunk of your terracotta-colored polymer clay. Work it between your palms, kneading and rolling it until it becomes soft, pliable, and free of cracks. -
Create a Smooth Canvas:
Place the conditioned clay onto a piece of parchment paper to prevent sticking. Using your rolling pin, flatten the clay to an even thickness of about 1/4 inch (6mm). You want it thick enough to hold the facial details without tearing. -
Prepare the Accent Color:
Repeat the conditioning and rolling process with a smaller amount of the pale pink clay. Roll this piece slightly thicker if you want the hearts to look puffier, closer to a 3/8 inch thickness.
Step 2: Shaping the Characters
-
Cut Out the Forms:
Press your star and circle cutters firmly into the terracotta sheet. Lift the cutters straight up and gently push the clay shapes out. Use the heart cutter on the pink clay sheet. -
Soften the Edges:
Freshly cut clay can have sharp, distinct edges. Gently tap around the perimeter of each shape with your fingertip to round them off slightly for a softer, more finished look. -
Dealing with Scraps:
Gather your leftover terracotta scraps. You can re-roll these to cut more shapes, or hand-mold a tiny star or two for variety, like the smallest one seen in the collection.
Sticky Situation?
If clay sticks to your cutter, dip the cutter in cornstarch or water before pressing down. This acts as a release agent for clean cuts every time.
Step 3: Adding Personality
-
Mark the Eyes:
Using a small ball stylus or a blunt tool end, press two vertical indentations into the clay to create the eyes. Place them somewhat wide apart to achieve that cute, ‘kawaii’ aesthetic. -
Carve the Smiles:
Take your needle tool or a toothpick. Gently drag a curved line below the eyes to form a smile. I find it helps to rock the tool slightly to create a U-shape rather than just scratching the surface. -
Deepen the Features:
Go back over your impressed lines to ensure they are deep enough to remain visible after baking, but be careful not to push all the way through the clay. -
Add Cheeks (Optional):
For extra character, you can use the smallest ball tool to add tiny dimples or blushing cheeks at the ends of the smile line.
Freckle Texture
Mix dried coffee grounds or black pepper into the clay before rolling to create a speckled, faux-ceramic stoneware effect.
Step 4: Baking and Assembly
-
Bake the Pieces:
Transfer the parchment paper with your clay shapes onto a baking sheet. Bake according to the specific temperature and time instructions on your package of polymer clay (usually around 275°F or 135°C for 15-30 minutes). -
Cool Down:
Once baking is complete, remove the tray from the oven and let the pieces cool completely. The clay hardens fully as it cools, so don’t handle them while hot. -
Smooth Imperfections:
Inspect your cooled pieces. If there are any rough spots or fingerprints on the edges, lightly buff them away using fine-grit sandpaper. -
Attach the Magnets:
Flip the shapes over. Apply a small dot of strong adhesive, like E6000 or super glue, to the center of the back. -
Secure and Set:
Press a small magnet firmly into the glue dot. Allow the adhesive to cure fully according to the glue manufacturer’s instructions before sticking them to your fridge.
Your new magnetic friends are now ready to hold up your grocery lists and photos with a smile


What Really Happens Inside the Kiln
Learn how time and temperature work together inside the kiln to transform clay into durable ceramic.
Two-Part Friendship Keychains
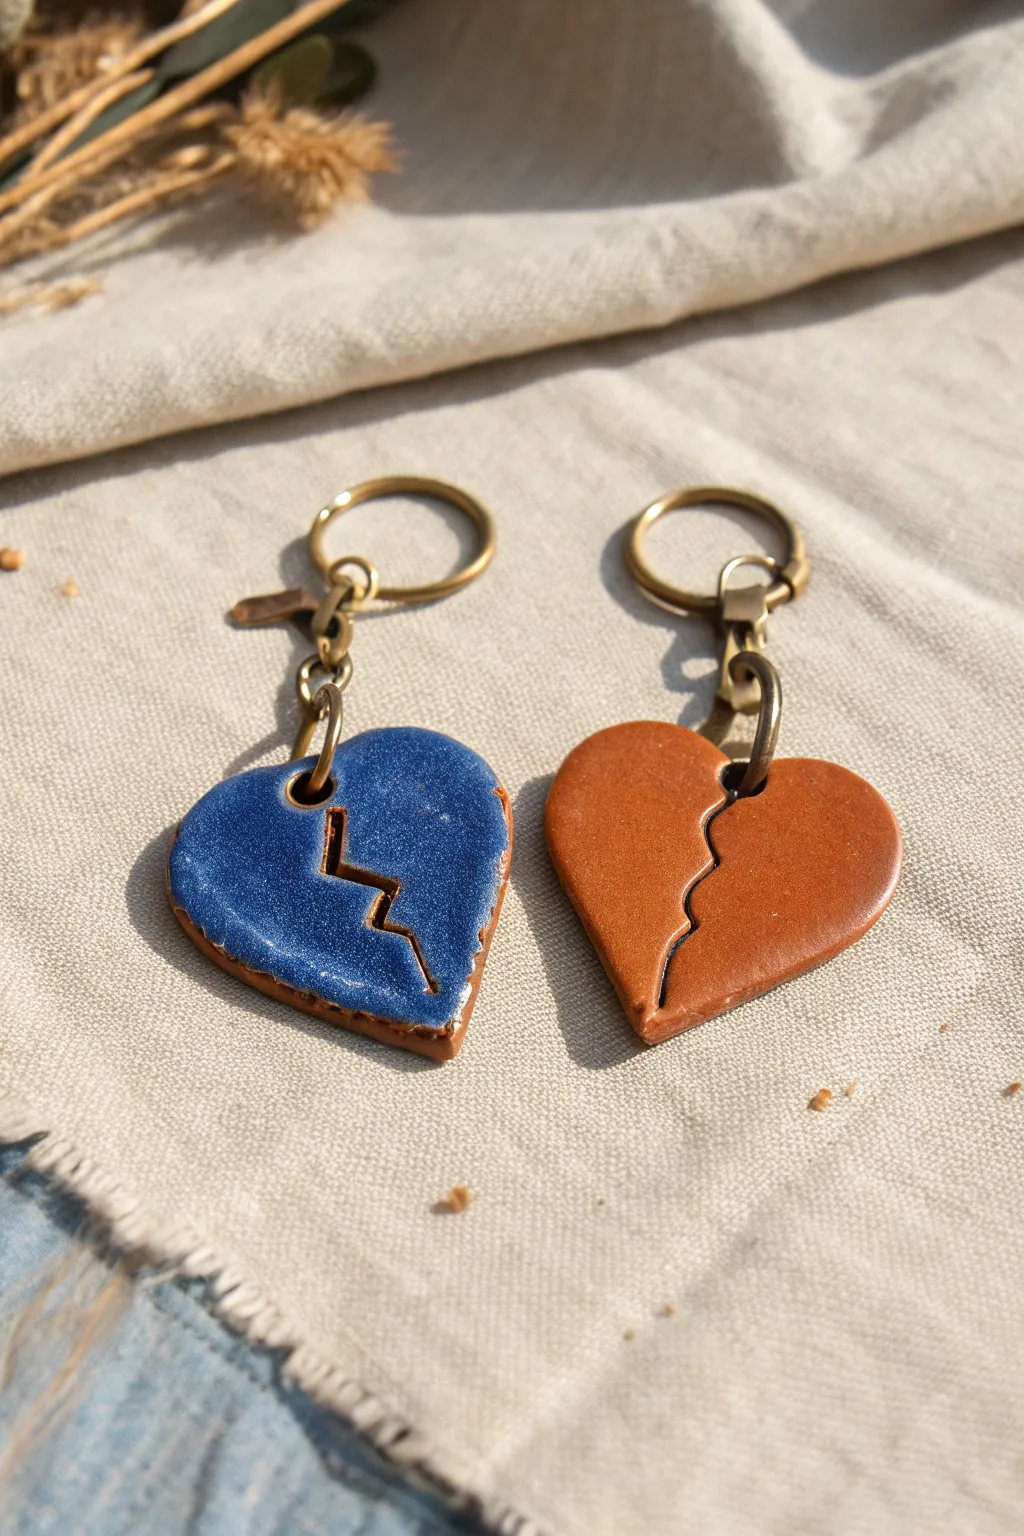
Celebrate a special bond with these charming two-part heart keychains, crafted to fit perfectly together like puzzle pieces. One half features a glossy, speckled blue finish while the other mimics the warm, matte look of leather, creating a beautiful contrast.
Step-by-Step Tutorial
Materials
- Polymer clay (terracotta or leather-effect, and white)
- Acrylic rolling pin
- Heart-shaped clay cutter (medium size)
- Sharp craft knife or scalpel blade
- Modeling tool with a small round tip
- Sandpaper (fine grit)
- Blue acrylic paint (glossy or metallic)
- Gloss varnish or resin (optional for the blue side)
- Keyrings with jump rings and lobster clasps
- Pliers
- Oven (if using polymer clay)
Step 1: Shaping and cutting
-
Condition the clay:
Begin by kneading your chosen clay until it is soft and pliable. If you want the leather look for one half, use a terracotta or specifically labeled ‘leather effect’ polymer clay. -
Roll out the slab:
Use your acrylic rolling pin to flatten the clay into a slab about 4-5mm thick. Ensure the thickness is even so the keychain feels substantial. -
Cut the heart shape:
Press your heart-shaped cutter firmly into the clay slab to create a clean heart silhouette. Remove the excess clay from around the shape. -
Create the jagged split:
Take your sharp craft knife and carefully cut a jagged, lightning-bolt style line down the center of the heart. Separate the two halves gently. -
Smooth the edges:
Use your fingertip or a soft silicone tool to gently smooth the cut edges of the split line so they aren’t too sharp, but keep the definition so they still interlock visually. -
Punch holes:
Use a small round tool or a straw to punch a hole near the top of each heart half. Make sure the hole is large enough for your jump rings but not too close to the edge to prevent breakage.
Uneven Split?
If the two halves distort while cutting and don’t match perfectly, gently push them back together on the work surface before baking to reshape them as a single unit.
Step 2: Baking and Decorating
-
Bake the clay:
Place your clay pieces on a baking tile or parchment-lined tray. Bake according to the manufacturer’s instructions for your specific brand of clay. -
Cool and sand:
Once baked and fully cooled, inspect the edges. If there are any rough spots, lightly sand them with fine-grit sandpaper for a professional finish. -
Paint the blue half:
Select one half to be the ‘blue’ side. Apply a coat of deep blue acrylic paint. I like to dab the paint on thick to create texture. -
Add speckling effect:
To mimic the ceramic glaze look in the photo, you can flick a toothbrush dipped in white or lighter blue paint over the wet blue base, creating tiny speckles. -
Seal the blue half:
Once the paint is dry, apply a thick coat of gloss varnish or a thin layer of UV resin to the blue half to give it that shiny, glazed ceramic appearance. -
Finish the leather half:
Leave the other half unpainted if you used colored clay, or paint it with a matte terracotta acrylic. The goal is to keep it looking natural and matte to contrast with the glossy blue side.
Make it Personal
Before baking, use small letter stamps to impress initials or a significant date on the back of each half for a hidden, personalized touch no one else can see.
Step 3: Assembly
-
Prepare the hardware:
Gather your keyrings and jump rings. Open a jump ring sideways using two pairs of pliers to avoid distorting the circle. -
Attach the ring:
Loop the open jump ring through the hole in one of the clay hearts. Add the keychain hardware before closing the jump ring securely. -
Repeat for the second half:
Repeat the attachment process for the second half of the heart. -
Double check security:
Give the jump rings a little tug to ensure they are closed tight and the clay moves freely on the ring.
Now you have a unique set of keychains ready to be shared with your favorite person
Inside-Joke Mascots

These adorable, minimalist figurines are the perfect low-stress project to represent you and your partner or an inside joke you share. Their charm comes from the speckled, stone-like finish and their simple, joyful expressions.
Step-by-Step Tutorial
Materials
- White or beige polymer clay (approx. 2oz per figure)
- Speckled clay (or combine beige clay with black pepper/faux granite crafting sand)
- Acrylic paints (black, coral/pink)
- Fine detail paintbrush or dotting tool
- Ball tool or rounded end of a paintbrush
- Clay sculpting tools (or a toothpick)
- Parchment paper or ceramic tile (for baking)
- Matte varnish (optional)
Step 1: Shaping the Bodies
-
Prepare the Clay:
Start by conditioning your clay until it is soft and pliable. If you don’t have pre-speckled clay, knead in a tiny pinch of coarse black pepper or craft sand into your beige clay until it’s evenly distributed for that stone-like look. -
Form the Base Shape:
Roll two balls of clay, roughly the size of a golf ball or slightly larger. Gently roll one end of each ball slightly narrower to create an egg-like or bowling pin shape. -
Flatten the Bottom:
Tap the wider bottom end of your shapes onto your work surface so they stand up straight and sturdy on their own without wobbling. -
Smooth the Surface:
Using the warmth of your fingers, gently rub away any fingerprints or seams. The surface should be perfectly smooth and rounded like a river stone.
Uneven Standing?
If your figure wobbles, gently press the figure and feet down onto a hard surface before baking to level everything out.
Step 2: Adding Limbs
-
Create Tiny Arms:
Roll two very small sausage shapes for the arms. These should be thin and taper slightly at the bottom, looking almost like little flippers. -
Attach the Arms:
Press the arms onto the sides of the body, starting about midway down. Use a sculpting tool or your thumb to smooth the top attachment point into the body so it looks seamless, leaving the bottom hanging slightly free. -
Make the Feet:
Roll two tiny spheres for the feet. Flatten them just slightly so they look like little buns. -
Attach the Feet:
Place the body on top of the two feet, positioning them close together near the front center. Press down gently to secure the bond without squashing the feet flat.
Step 3: Baking and Painting
-
Check for Imperfections:
Before baking, give your mascot one final inspection. Smooth out any last nicks with a drop of baby oil on your finger if using polymer clay. -
Bake:
Bake your figurines according to the clay manufacturer’s instructions (usually 275°F/135°C for 15-30 minutes per 1/4 inch thickness). -
Cool Down:
Let the figures cool completely before painting. They are fragile while warm. -
Dot the Cheeks:
Dip a small round tool or the back of a brush into coral or pink paint. Stamp two round circles for the rosy cheeks. -
Paint the Eyes:
Using a very fine detail brush or a smaller dotting tool, place two black dots slightly higher than the cheeks for eyes. -
Draw the Smile:
With your finest brush and black paint (or a fine-tip permanent marker), draw a tiny, curved ‘u’ shape directly between the cheeks for a sweet smile. -
Seal (Optional):
If you want to protect your paint job, apply a thin coat of matte varnish. Avoid glossy finishes to maintain that natural stone aesthetic.
Make Them Unique
Add tiny accessories like a bow tie, a miniature hat, or hold a tiny clay heart to personalize your mascot characters.
Set your finished buddies on a windowsill or desk where their smiles can brighten your day

TRACK YOUR CERAMIC JOURNEY
Capture glaze tests, firing details, and creative progress—all in one simple printable. Make your projects easier to repeat and improve.
Stamped Pattern Ring Dishes
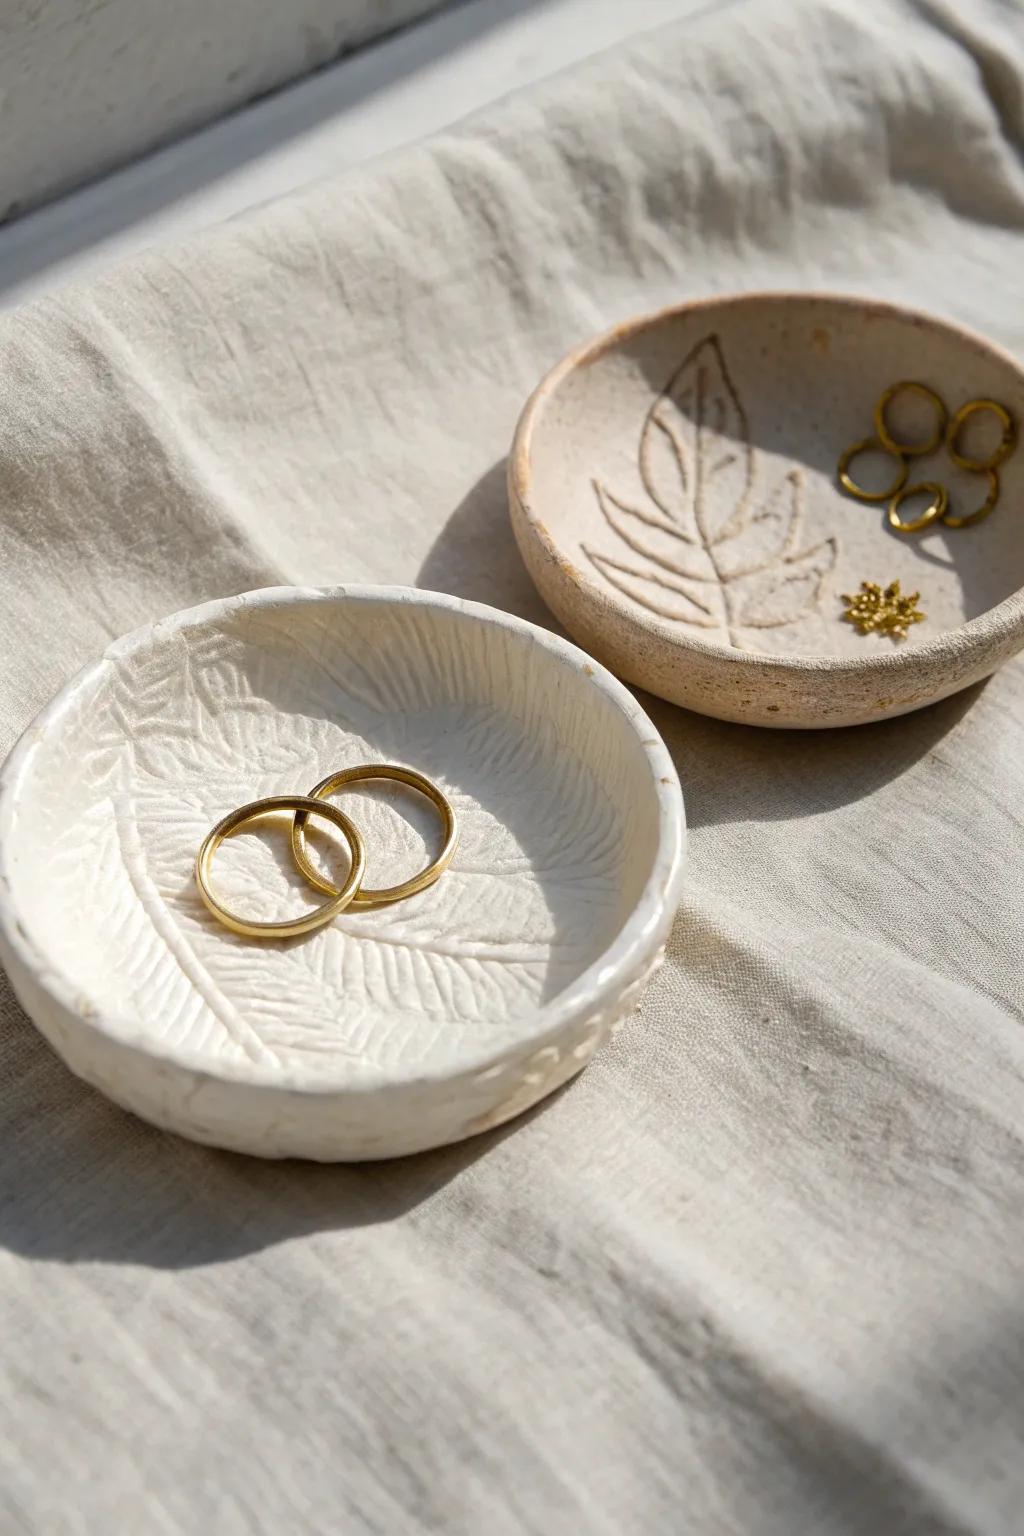
These delicate ring dishes capture the organic beauty of nature with subtle leaf impressions and a rustic, handmade finish. Perfect for holding your favorite jewelry, this project uses simple stamping techniques to create sophisticated texture on air-dry or polymer clay.
Step-by-Step
Materials
- White or terracotta air-dry clay (or polymer clay)
- Small rolling pin
- Real leaves with prominent veins (ferns work beautifully)
- Round cookie cutter or a glass
- Craft knife or needle tool
- Sponge or fine-grit sandpaper
- Small bowl for shaping
- Acrylic sealer or varnish (matte or satin finish)
Step 1: Prepping and Rolling
-
Condition the clay:
Begin by taking a handful of clay and kneading it in your hands to warm it up. You want it to be pliable and smooth, free of any cracks. -
Roll out the slab:
Place the clay on a clean, flat surface. Using your rolling pin, roll the clay out evenly until it is about 1/4 inch thick. Aim for a consistent thickness so the dish dries evenly. -
Smooth the surface:
Dip your finger in a tiny bit of water and gently run it over the surface of the clay slab to remove any fingerprints or imperfections.
Stamp Clarity Tip
If your leaf sticks to the clay, lightly dust the leaf with cornstarch or baby powder before pressing it down. This acts as a release agent.
Step 2: Creating the Impressions
-
Select your botanicals:
Choose fresh leaves with stiff, raised veins on the back side. Ferns, as seen in the white dish, create a intricate, fossil-like pattern. -
Position the leaf:
Place your chosen leaf vein-side down onto the rolled clay. You can position it dead center for a focal point or off-center for an artistic look. -
Roll the impression:
Gently roll over the leaf with your rolling pin. Apply firm, even pressure to push the veins into the clay, but be careful not to make the slab too thin. -
Reveal the texture:
Carefully find the stem or edge of the leaf and slowly peel it away to reveal the botanical imprint. -
Alternative: The carved look:
If you prefer the style of the beige dish, use a needle tool to gently scratch a leaf design into the clay surface instead of stamping a real leaf. I find light, sketched lines look more organic than perfect geometric ones.
Gilded Edges
For a luxe upgrade, paint just the very rim of the dish with liquid gold leaf or metallic acrylic paint after the sealer has fully dried.
Step 3: Cutting and Shaping
-
Cut the circle:
Position your round cookie cutter or glass over the most interesting part of the texture. Press down firmly to cut out your dish shape. -
Refine the edges:
Peel away the excess scrap clay. Dip your finger in water again and gently smooth the cut rim of the circle to soften any sharp angles. -
Form the curve:
Pick up your clay circle and gently press it into the bottom of a small bowl to give it a curved shape. Alternatively, gently pinch up the edges with your fingers if you want a more organic, uneven rim. -
Textured rim option:
For the white fern dish, you can gently tap the edges of the rim with the side of a tool or a textured stamp to continue the pattern up the sides.
Step 4: Finishing Touches
-
Let it dry:
Leave the clay inside the bowl (or resting on a curve) to dry completely. This usually takes 24-48 hours for air-dry clay. -
Sand for smoothness:
Once fully dry, check for rough spots on the rim. Use a piece of fine-grit sandpaper to gently buff the edges until they feel polished. -
Highlight the texture (Optional):
To make the veins pop, you can do a light color wash: mix a tiny bit of brown paint with water, brush it over the texture, and immediately wipe the surface with a paper towel, leaving pigment only in the deep crevices. -
Seal the dish:
Apply a coat of matte or satin varnish to protect the clay from moisture and give it a finished professional look. -
Cure time:
Allow the varnish to dry completely according to the manufacturer’s instructions before placing any jewelry in your new dish.
Now your beautiful botanical dishes are ready to display your favorite rings and treasures
Cute Pocket Totems You Name
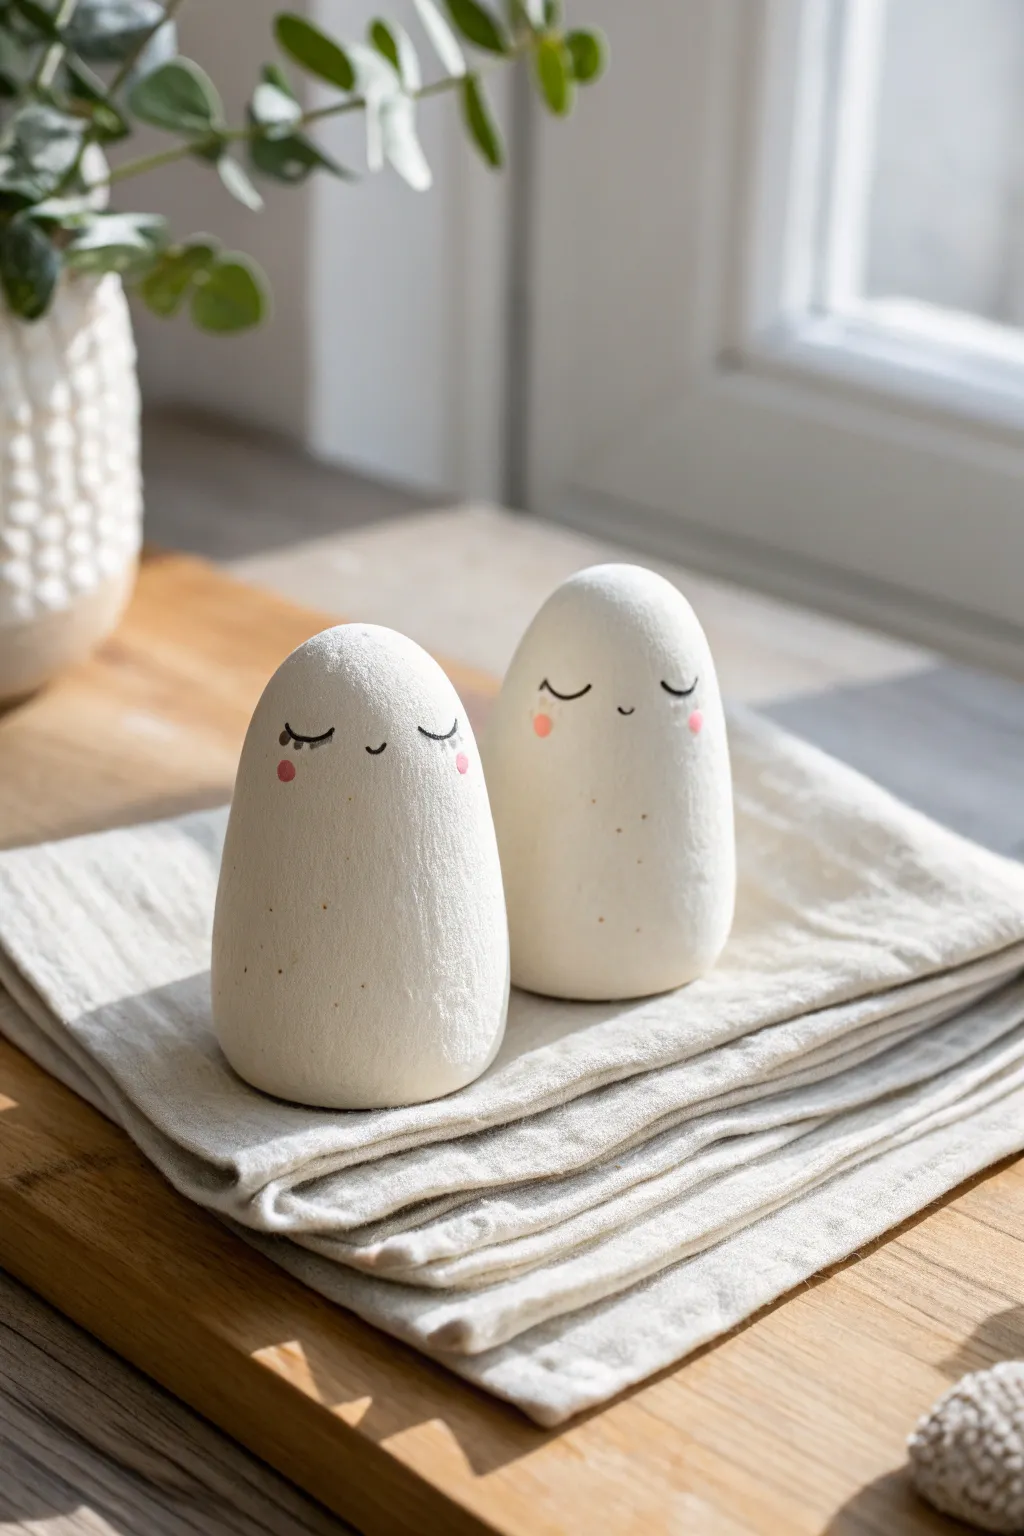
Create a pair of charming little spirits that radiate calm and friendship perfect for keeping in your pocket or perching on a windowsill. These soft, egg-shaped totems feature sweet painted expressions and a lovely, organic matte texture that feels wonderful to hold.
Step-by-Step
Materials
- White polymer clay or air-dry clay (approx 2-3 oz)
- Fine-grit sandpaper (400-600 grit)
- Acrylic paint (black and soft pink)
- Very fine detail paintbrush (size 00 or 000)
- Dotting tool or toothpick
- Matte spray varnish or Mod Podge Matte
- Clean work surface (tile or clay mat)
- Aluminium foil (optional core)
Step 1: Shaping the Spirits
-
Condition the Clay:
Begin by warming the white clay in your hands. Knead it thoroughly for several minutes until it becomes soft, pliable, and free of cracks. -
Divide into Portions:
Split your clay into two equal balls. If you want them to be slightly different sizes like in the photo, make one ball slightly larger than the other. -
Form the Base Shape:
Take the first ball and roll it between your palms until it is perfectly smooth. Gently flatten the bottom on your work surface so it can stand upright on its own. -
Elongate the Body:
Using gentle finger pressure, stroke the clay upward to create a rounded cone or tall egg shape. The top should be domed, not pointy. Aim for a height of about 2 to 3 inches. -
Smooth Imperfections:
Look closely at the surface. Rub your thumb over any fingerprints or seams to create a consistent, organic texture. If you’re using water-based clay, a slightly damp finger works wonders here. -
Repeat for the Partner:
Form the second totem using the same method. Place them next to each other to ensure they look like a compatible pair, adjusting their lean or height as desired. -
Cure or Dry:
If using polymer clay, bake according to the package directions (usually 275°F/135°C for 15-30 minutes depending on thickness). If using air-dry clay, let them sit undisturbed in a cool, dry place for 24-48 hours until fully hardened.
Smooth Operator
Before baking polymer clay, wipe your fingerprints off gently with a little baby oil or rubbing alcohol on a brush. This saves you tons of sanding time later.
Step 2: Adding Personality
-
Surface Preparation:
Once fully cured and cooled, lightly sand the surface with fine-grit sandpaper. This isn’t just to smooth bumps; it creates a slightly toothy texture that mimics stone and helps the paint adhere better. -
Wipe Clean:
Remove all sanding dust with a slightly damp cloth or a soft brush. The surface must be perfectly clean before painting. -
Plan the Faces:
Before painting, visualize where the faces will go. They should be positioned slightly higher than the vertical center of the shape to give them a ‘looking up’ or peaceful appearance. -
Paint the Lashes:
Load your finest detail brush with black acrylic paint, thinned slightly with a drop of water for better flow. Paint two small, downward-curving arcs for the closed eyes. Add tiny flicks at the outer corners for lashes. -
Add the Smile:
Directly between and slightly below the eyes, paint a minuscule ‘u’ shape for the mouth. Keep the line very thin and delicate. -
Create Rosy Cheeks:
Dip a dotting tool or the flat end of a toothpick into the soft pink paint. Dab off the excess on a paper towel, then gently stamp a small circle under each eye. -
Add Texture Speckles (Optional):
To mimic the natural look in the photo, dip an old toothbrush or stiff brush into watered-down light brown or beige paint. Flick the bristles from a distance to create very faint, microscopic speckles on the ‘body’ of the ghost. -
Seal the Project:
Finish by applying a coat of clear matte varnish. I find that a matte finish is crucial here to maintain that soft, stone-like aesthetic rather than a plastic shine.
Seasonal Spirits
For a level-up, knit tiny miniature scarves for them out of scrap yarn, or sculpt tiny clay pumpkins to place next to them for autumn decorating.
Place your little clay companions on your desk and enjoy the sense of calm they bring to your space
Couple’s “Favorite Things” Tiles
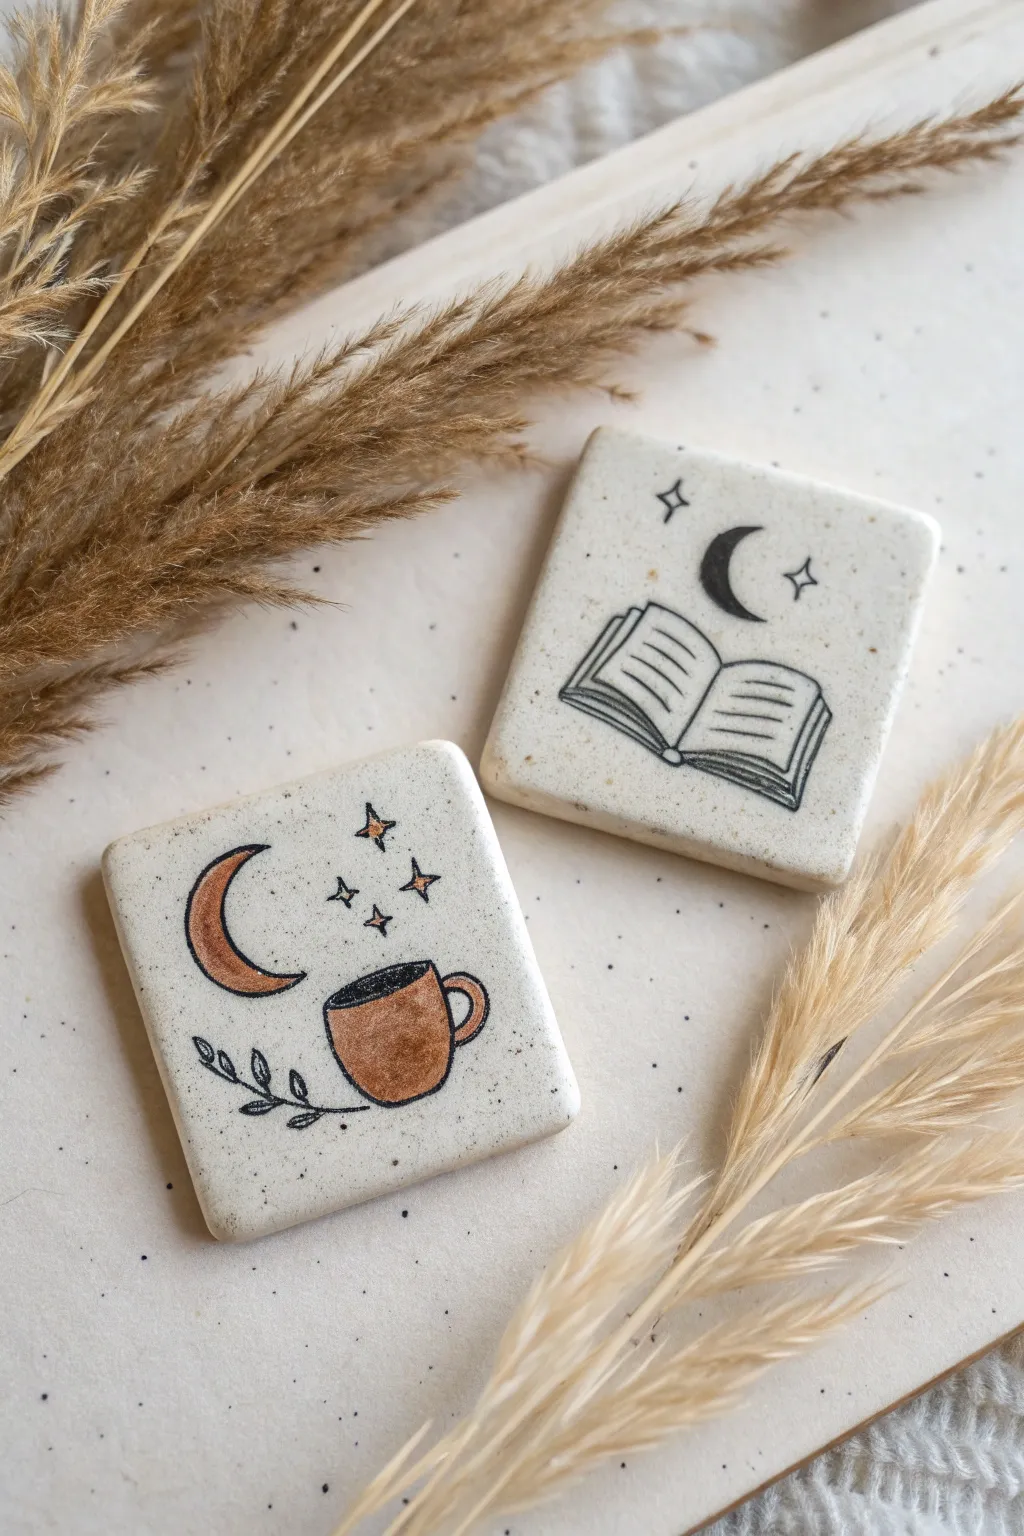
Capture the magic of a relaxing evening with these charming, minimalist clay tiles featuring hand-drawn celestial and cozy motifs. Their speckled, creamy finish and simple line art make them a peaceful addition to any desk or bedside table.
Step-by-Step Tutorial
Materials
- White or speckled air-dry clay (or polymer clay)
- Rolling pin
- Square cookie cutter (approx 3.5 inches)
- Fine-grit sandpaper
- Fine-point permanent marker or acrylic paint pen (black)
- Metallic acrylic paint (bronze or copper)
- Small detail paintbrush
- Clear matte varnish or sealant
- Parchment paper or craft mat
- Water and sponge for smoothing
Step 1: Shaping the Canvas
-
Prepare the slab:
Begin by kneading your clay to remove air bubbles, then roll it out on parchment paper to an even thickness of about 1/4 inch. If you want that speckled look but only have white clay, you can knead in some black pepper or dried coffee grounds before rolling. -
Cut the shapes:
Press your square cutter firmly into the slab to create two matching tiles. If you don’t have a cutter, use a ruler and a craft knife to measure and slice precise squares. -
Smooth the edges:
Dip your finger in a little water and gently run it along the cut edges of each square to soften the sharpness and remove any loose clay crumbs. -
Dry completely:
Place the tiles on a flat surface away from direct heat to dry. Air-dry clay usually takes 24-48 hours. Flip them over halfway through the process to ensure even drying and prevent warping. -
Refine the surface:
Once bone dry, take your fine-grit sandpaper and lightly buff the surface and edges. You want the top to be perfectly smooth so your pen doesn’t snag later.
Step 2: Adding the Illustrations
-
Plan the designs:
Lightly sketch your design with a pencil first. For the ‘Cozy Reading’ tile, draw an open book in the lower center with a crescent moon and diamond stars floating above. -
Sketch the ‘Warm Drink’ tile:
On the second tile, pencil in a simple mug shape, a larger crescent moon on the left, a leafy sprig at the bottom, and a few scattered four-point stars. -
Inking the book:
Using your black fine-point pen, trace over the book outline. Add thin, parallel lines inside the ‘pages’ to suggest text, but keep them slightly uneven for a hand-drawn feel. -
Inking the celestial elements:
Fill in the crescent moon with solid black ink on the book tile. Draw the stars as simple diamond shapes or crosses. -
Inking the mug tile:
Trace the mug, the leafy sprig, and the stars. For the moon on this tile, draw the outline but leave the inside empty for now. -
Fill the coffee:
Color in the liquid inside the mug using the black marker to show a dark, rich coffee or tea.
Smooth Lines Tip
If using a paint pen, test the flow on paper first. Applying too much pressure on the clay can create divots, so use a light hand and let the ink flow.
Step 3: Painted Details & Finishing
-
Mix the metallic tone:
Prepare a small amount of bronze or copper acrylic paint. I find that slightly watering it down helps it flow better into the small shapes. -
Paint the warm accents:
Carefully fill in the body of the mug and the crescent moon on the second tile with the metallic paint. You might need two coats for full opacity. -
Add subtle highlights:
For a little extra sparkle, you can add tiny dots of the copper paint to the centers of the stars on the book tile. -
Let the paint set:
Allow the ink and paint to dry completely for at least an hour to prevent smearing during the sealing process. -
Apply protection:
Brush on a thin layer of matte varnish or spray with a clear sealant. This step is crucial to protect the clay from moisture and keep your artwork crisp. -
Final cure:
Let the sealant cure according to the manufacturer’s instructions before using your new decorative tiles.
Gift Set Idea
Glue a strong magnet to the back to turn these into fridge art, or attach a cork backing to turn them into functional, non-slip coasters.
Enjoy displaying your cozy hand-crafted tiles on your desk or bookshelf
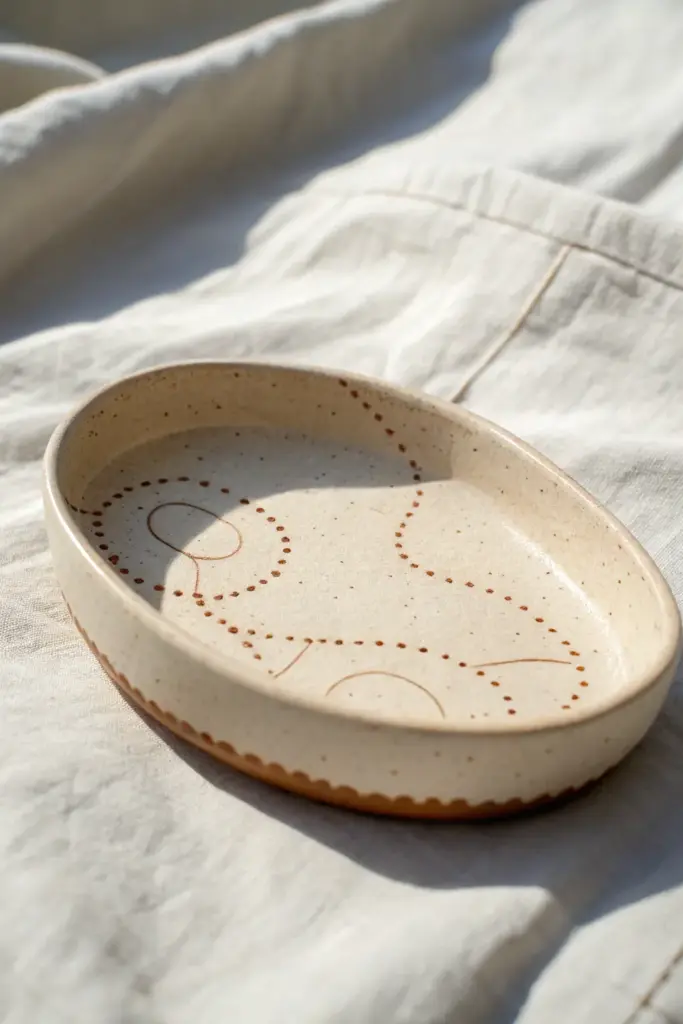
Memory Map Trinket Tray
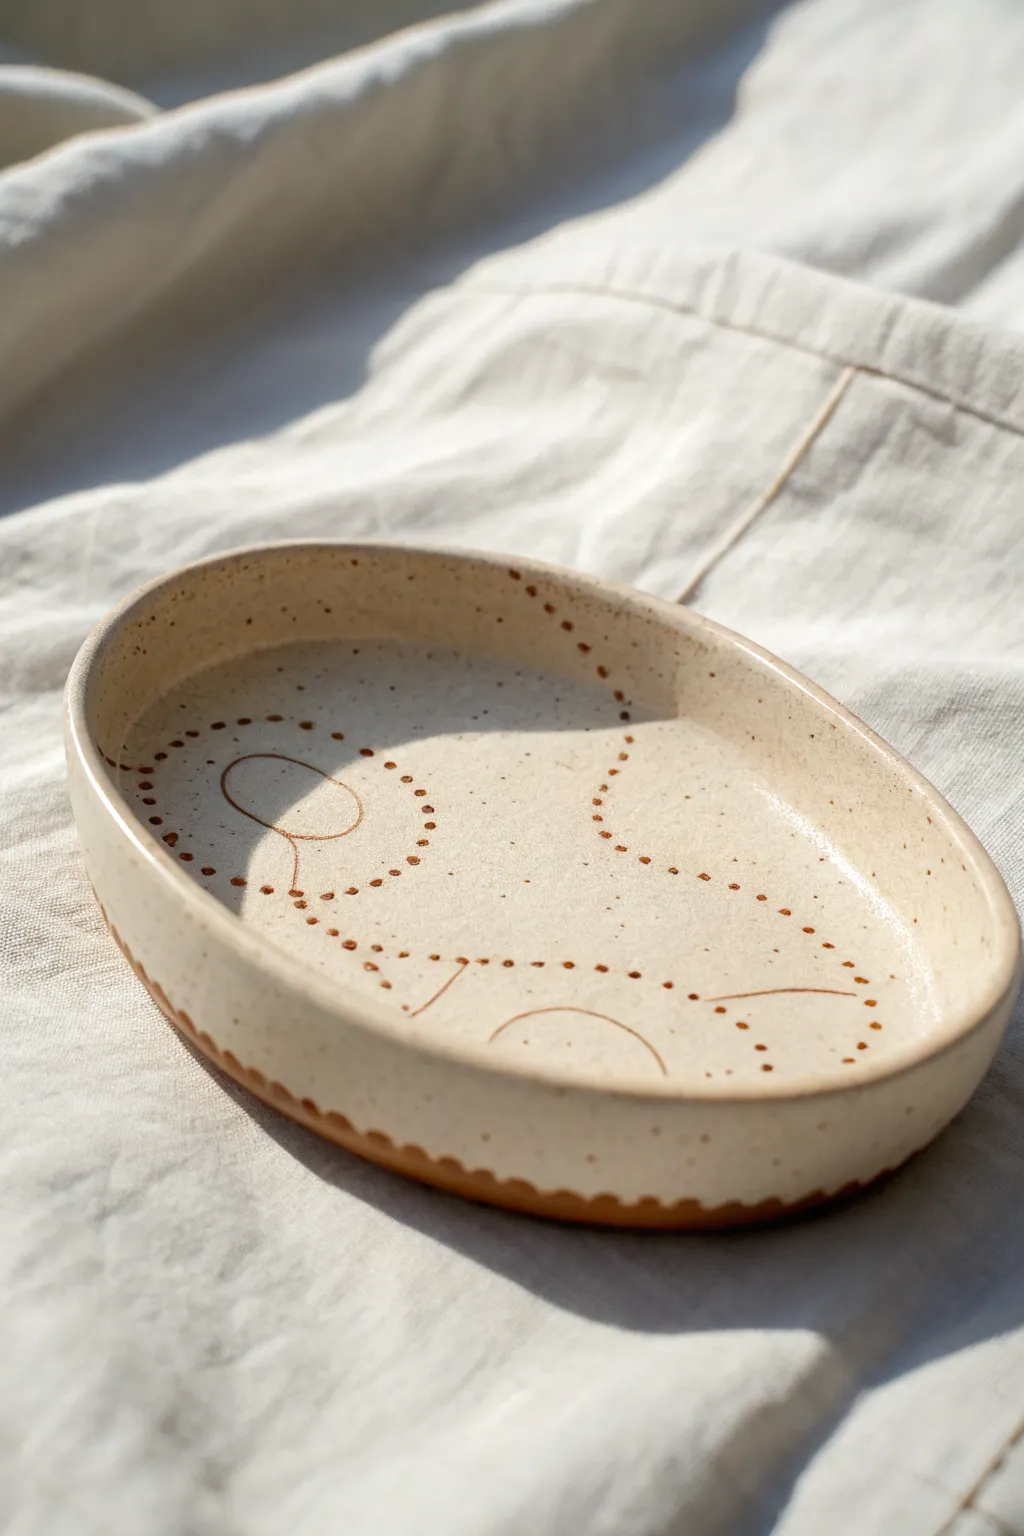
Immortalize a special place or just explore abstract cartography with this lovely speckled clay tray. By combining simple slab building with delicate slip-trailing or underglaze detailing, you create a functional piece that feels like a hidden treasure map.
Step-by-Step Guide
Materials
- Speckled buff stoneware clay (or white clay with speckles)
- Rolling pin
- Canvas or cloth to roll on
- Oval paper template (approx 6×4 inches)
- Needle tool or fettling knife
- Small sponge
- Rubber kidney rib
- Slip trailer (bulb applicator) filled with reddish-brown underglaze or slip
- Fine-point detail brush
- Clear or transparent cream nesting glaze
Step 1: Shaping the Dish
-
Roll the slab:
Begin by wedging your clay to remove air bubbles, then slam it onto your canvas. Roll it out into an even slab, aiming for about 1/4 inch thickness. Occasionally lift and flip the clay so it doesn’t stick to your work surface. -
Cut the oval:
Place your paper oval template onto the slab. Using your needle tool held vertically, trace around the template to cut out your base shape. -
Smooth the surface:
Before manipulation, run a rubber kidney rib gently over the clay surface to compress the particles and remove any canvas texture. This makes for a much smoother final writing surface. -
Turn up the rim:
Gently lift the edges of the oval with your fingertips. Pinch upward to create a wall about 3/4 inch high. I like to work slowly around the circumference twice or thrice to ensure the height is even. -
Refine the edge:
Run a slightly damp sponge along the rim to soften any sharp edges created during the pinching process. Ensure the wall stands vertically or slightly flared out depending on your preference.
Smooth Operator
If your slip trailer gets clogged, use a thin sewing needle to clear the nozzle instantly. Keep the tip submerged in water when pausing your work.
Step 2: Designing the Map
-
Plan your path:
Lightly sketch your design into the leather-hard clay using a dull pencil or tool. Think about abstract landscapes—maybe a winding path, a lake, or a constellation of dots. -
Apply dotted lines:
Fill a slip trailer with a reddish-brown underglaze or clay slip that contrasts with your base clay. Gently squeeze consistent dots along your imaginary pathways. Keep the pressure steady to avoid blobs. -
Add line details:
Using a fine-point detail brush dipped in the same underglaze, paint simple geometric shapes like circles or arches within the dotted areas to anchor the composition. -
Decorate the exterior:
Don’t forget the outside! Add a ring of small dots or a scalloped pattern along the very bottom edge of the exterior wall to frame the piece. -
Dry slowly:
Updates to clay thickness can cause warping, so cover the tray loosely with plastic and let it dry slowly to the bone-dry stage before bisque firing.
Step 3: Glazing and Finishing
-
Bisque fire:
Fire the piece to cone 04 (or your clay’s specific bisque temperature) to harden it for glazing. -
Wax the bottom:
Apply wax resist to the bottom contact points and slightly up the side if you want that raw clay aesthetic on the lower rim shown in the example. -
Apply clear glaze:
Dip or brush a transparent or semi-transparent cream glaze over the entire interior. This will seal the clay while letting your underglaze design and the natural clay speckles show through. -
Clean up:
Use a sponge to wipe away any glaze that dripped onto the waxed areas or the raw clay exterior rim. -
Final fire:
Fire the piece to maturity (usually cone 5/6 for stoneware). The heat will fuse the glaze and bring out the rich color of the slip-trailed dots.
Warped Walls?
If the oval shape distorts while drying, place a small bag of sand or dry rice inside the tray as a weight to hold the flat bottom down effectively.
Once cooled, your personalized tray is ready to hold rings, keys, or fond memories of your crafting session