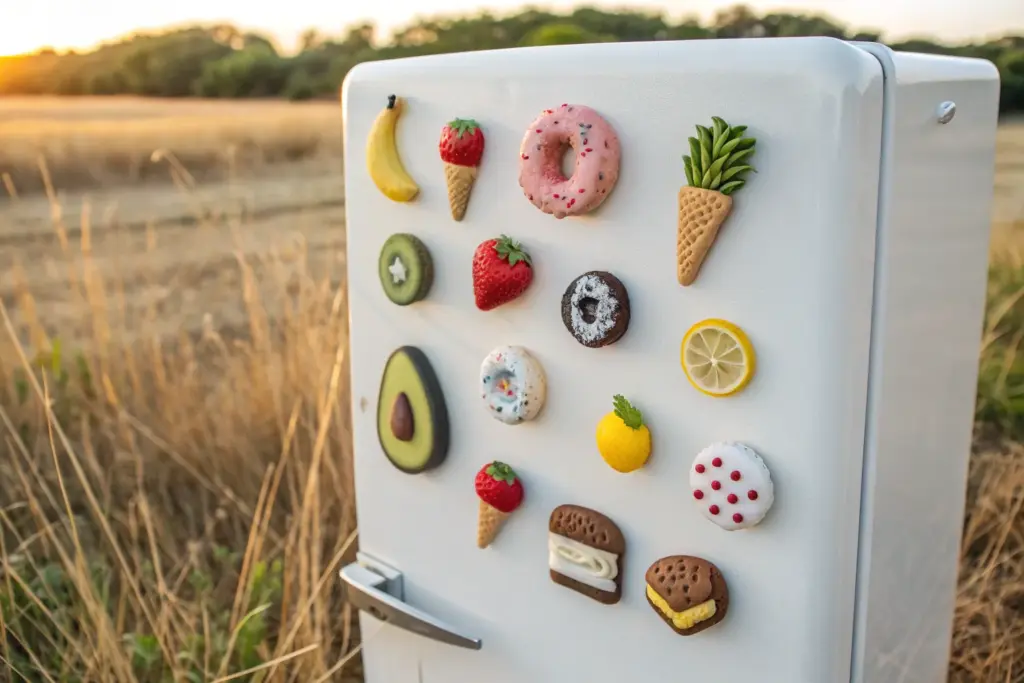
If your fridge is begging for a little personality, mini clay magnets are the quickest way to add it. I love how these tiny projects let you play with polymer clay color and texture without committing to a big sculpture.
Pizza Slice Cuties
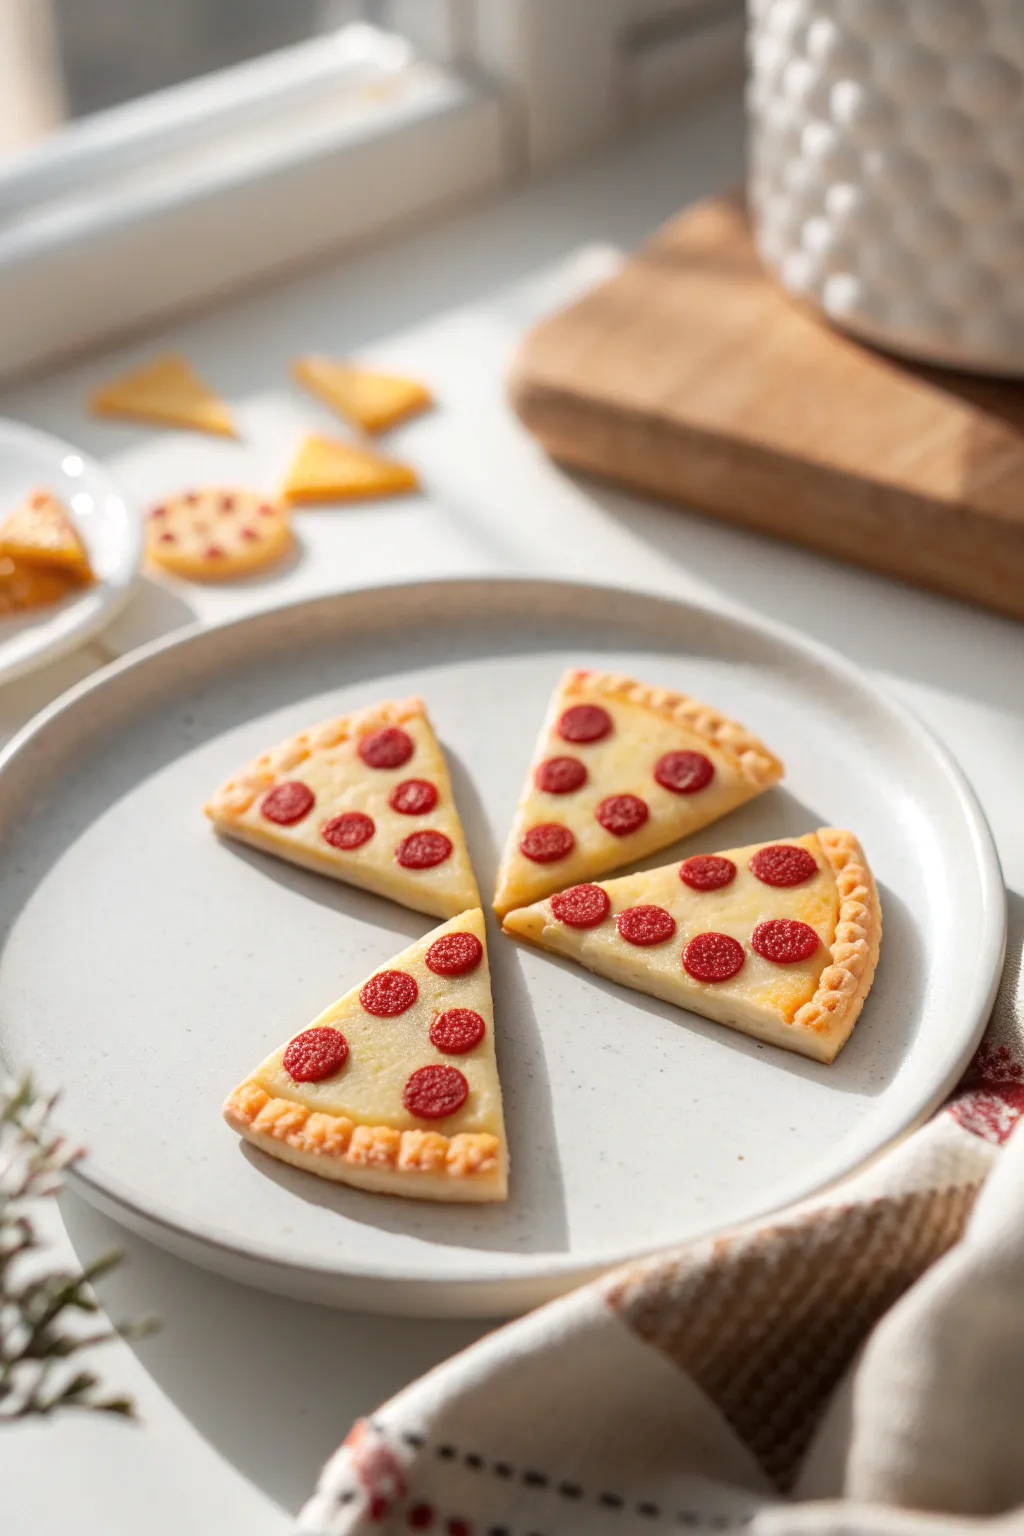
These miniature pizza slice magnets are almost too cute to stick on the fridge, featuring a golden baked crust and tiny pepperoni details. They add a delicious pop of fun to any magnetic surface while being surprisingly simple to sculpt.
Step-by-Step Tutorial
Materials
- Polymer clay (white, translucent, yellow, red, orange, and beige/ecru)
- Liquid clay (optional, for sauce)
- Needle tool or toothpick
- Soft pastel chalks (orange, golden brown, burnt umber)
- Small paintbrush
- Clean tile or glass work surface
- Craft blade
- Small round magnets
- Strong craft glue (E6000 or similar)
- Matte or satin glaze (optional)
Step 1: Mixing the Dough & Cheese
-
Create the crust color:
Start by mixing a large portion of beige or ecru clay with a tiny pinch of white to get a classic dough shade. Condition it well until soft and pliable. -
Mix the cheese shade:
Combine translucent clay with a very small amount of white and a tiny speck of yellow. Using translucent clay gives the cheese that realistic, semi-melty look after baking. -
Prepare the pepperoni red:
Mix a true red clay with a touch of brown or translucent to take away the artificial brightness, aiming for a deep, cured-meat color.
Step 2: Sculpting the Slices
-
Shape the base triangle:
Roll your crust color into a ball, flatten it slightly, and cut it into neat triangles using your craft blade. Soften the sharp cut edges with your fingertip. -
Add the crust rim:
Roll a thin snake of the crust-colored clay. Attach it along the curved top edge of your triangle. -
Blend the crust:
Use a silicone tool or your finger to smooth the seam where the rim meets the bottom of the slice, melting the clay together so it looks like one piece of dough. -
Texture the crust:
Take a toothbrush or a balled-up piece of aluminum foil and gently tap it over the raised crust rim to give it a convincing baked texture. -
Create the crimps:
Using a needle tool, press small indentations along the outer edge of the crust rim to mimic the look of hand-tossed dough being pinched. -
Apply the cheese layer:
Flatten a small piece of your cheese mixture and lay it on the main area of the triangle, keeping it just inside the crust rim. -
Texture the cheese:
Lightly stipple the cheese area with your needle tool or texture sponge so it isn’t perfectly smooth.
Fixing “Raw” Looks
If the pizza looks too pale after baking, you can add more shading with brown acrylic paint. Dilute it heavily with water and do a quick wash over the crust.
Step 3: Toppings, Shading & Assembly
-
Make the pepperoni:
Roll your red clay into a very thin sheet or tiny log. Use a small round cutter (a straw works great here) to punch out little circles. -
Place the toppings:
Arrange 4-6 pepperoni slices on each pizza wedge. Press them down gently so they look embedded in the cheese rather than floating on top. -
Texture the pepperoni:
Dab the center of each pepperoni slice with a textured tool to make it look meaty and cooked. -
Pre-bake shading:
Shave some orange and golden brown pastel chalk into a powder. Brush this dust gently over the crust rim and lightly over the cheese for a baked effect. -
Adding burnt edges:
I like to use a tiny bit of darker brown pastel just on the very crimped edges of the crust to simulate perfectly oven-browned dough. -
Bake the clay:
Bake your pieces according to the clay manufacturer’s instructions (usually 275°F/135°C for 15-30 minutes). Let them cool completely. -
Attach the magnet:
Flip the cooled pizza slice over. Apply a dab of strong glue to the back and press your round magnet firmly into place. -
Seal (Optional):
If you want a slight shine, brush a thin layer of satin glaze over the cheese and pepperoni, leaving the crust matte.
Level Up: Melty Cheese
Mix liquid clay with yellow chalk dust until thick. Drizzle this over the finished slice before baking for realistic, 3D melted cheese strands.
Once the glue sets, you can display your mini pizzeria creations on the fridge for everyone to admire


Strawberry Snack Set
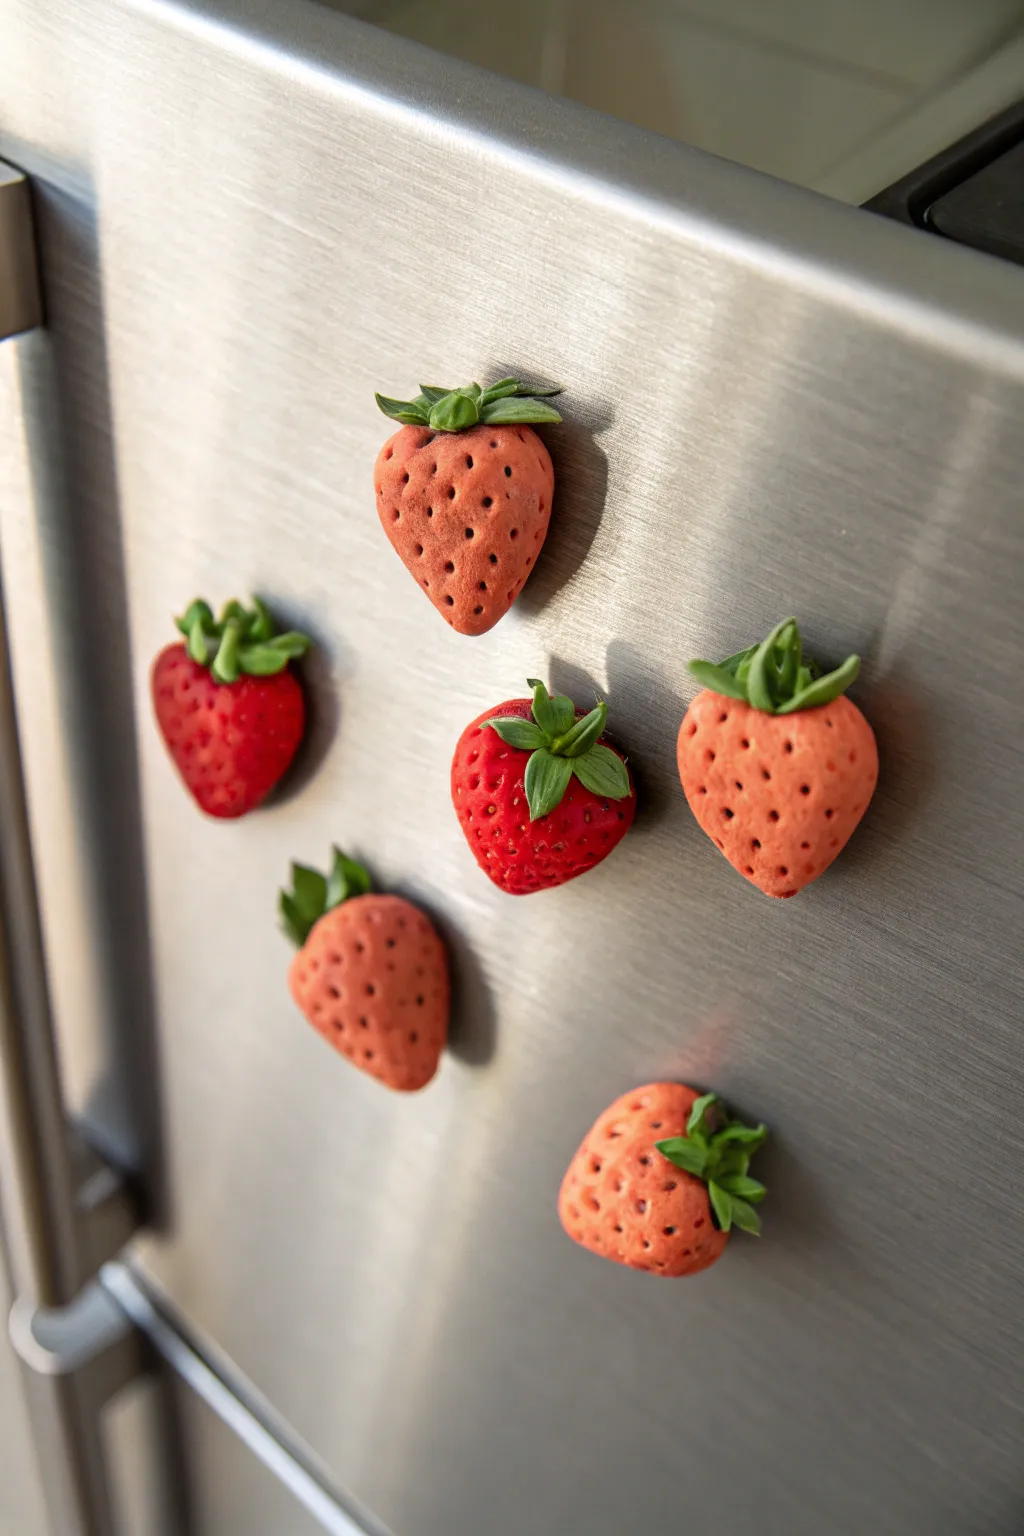
These charming polymer clay strawberry magnets allow you to display your love for fresh fruit right on your refrigerator door. The set features a mix of vibrant ripe berries and softer pink varieties, each with textured seeds and realistic leafy caps.
Step-by-Step
Materials
- Polymer clay (Bright Red, Pale Pink/Salmon, Leaf Green)
- Small round magnets (neodymium or ceramic)
- Needle tool or toothpick
- Small ball tool
- Dotting tool or very fine dried paintbrush
- Clay adhesive or heavy-duty craft glue
- Clay blade or craft knife
- Baking sheet and parchment paper
- Acrylic paint (dark brown/black) – optional for seeds
- Matte or satin glaze (optional)
Step 1: Shaping the Berry Base
-
Condition the Clay:
Begin by conditioning the red and pink polymer clay separately until it is soft and pliable. For the lighter berries shown, you might want to mix a small amount of white into your red clay or use a salmon pink shade. -
Roll Spheres:
Roll the clay into six balls, roughly the size of a large marble or a small walnut, depending on how big you want your final magnet to be. -
Form the Cone Shape:
Gently roll one end of each ball between your palms to taper it, creating a soft cone or heart shape that mimics a natural strawberry. Flatten the back slightly against your work surface so it will sit flush against the fridge later. -
Embed the Magnet:
Press a magnet gently into the flat back of each strawberry to create an indentation. Remove the magnet, add a drop of clay adhesive or Bake & Bond, and press the magnet back in to secure it permanently.
Step 2: Pitting and Stemming
-
Create Seed Indentations:
Using a needle tool or a very small ball tool, press tiny holes all over the surface of the strawberry cone. Keep the pattern somewhat uniform but natural. -
Seed Depth:
Press deep enough to create a shadow but not so deep that you distort the overall shape of the berry. -
Make the Sepals:
Roll out a thin sheet of green clay. Using a craft knife, cut out small star shapes, or shape small teardrops of green clay individually. -
Texture the Leaves:
Use your needle tool to score a central vein down each green leaf segment for added realism. -
Attach the Caps:
Place the star-shaped green cap onto the wider, flat top of the strawberry. Gently press the center down to bond it. -
Curl the Steps:
Use your finger or a tool to gently curl the tips of the green leaves upward or downward so they don’t look stiff. I find this creates a much more organic, ‘fresh-picked’ look. -
Add the Pedicel:
Roll a tiny little cylinder of green clay to act as the tough stem remnant in the very center of the leaves, pressing it firmly into place.
Natural Texture
Before adding seeds, gently roll the raw strawberry over a piece of fine sandpaper or an old toothbrush. This mimics the microscopic fuzzy texture real strawberries have.
Step 3: Finishing Touches
-
Bake the Clay:
Place your strawberries on a parchment-lined baking sheet. Bake according to your polymer clay manufacturer’s instructions (usually around 275°F/135°C for 15-30 minutes). -
Cool Down:
Let the magnets cool completely before handling them, as the clay is fragile when hot. -
Highlight the Seeds (Optional):
If you want high-contrast seeds, dilute a tiny bit of brown acrylic paint with water. Brush it over the pitted surface. -
Wipe Away Excess:
Immediately wipe the surface with a damp paper towel or baby wipe. The dark paint will remain in the seed holes while cleaning up the surface. -
Seal:
If you prefer a glossy, juicy look, apply a coat of glaze. For the velvet texture seen in the photo, leave the clay raw or use a very matte varnish.
Color Gradient
Use soft pastels to dust the tips of the pink berries with a darker red, or brush a little yellow chalk powder near the leafy cap for an ‘unripe’ gradient effect.
Now your kitchen has a perpetually fresh harvest ready to hold up your grocery lists and photos


Sunny-Side Egg Smiles
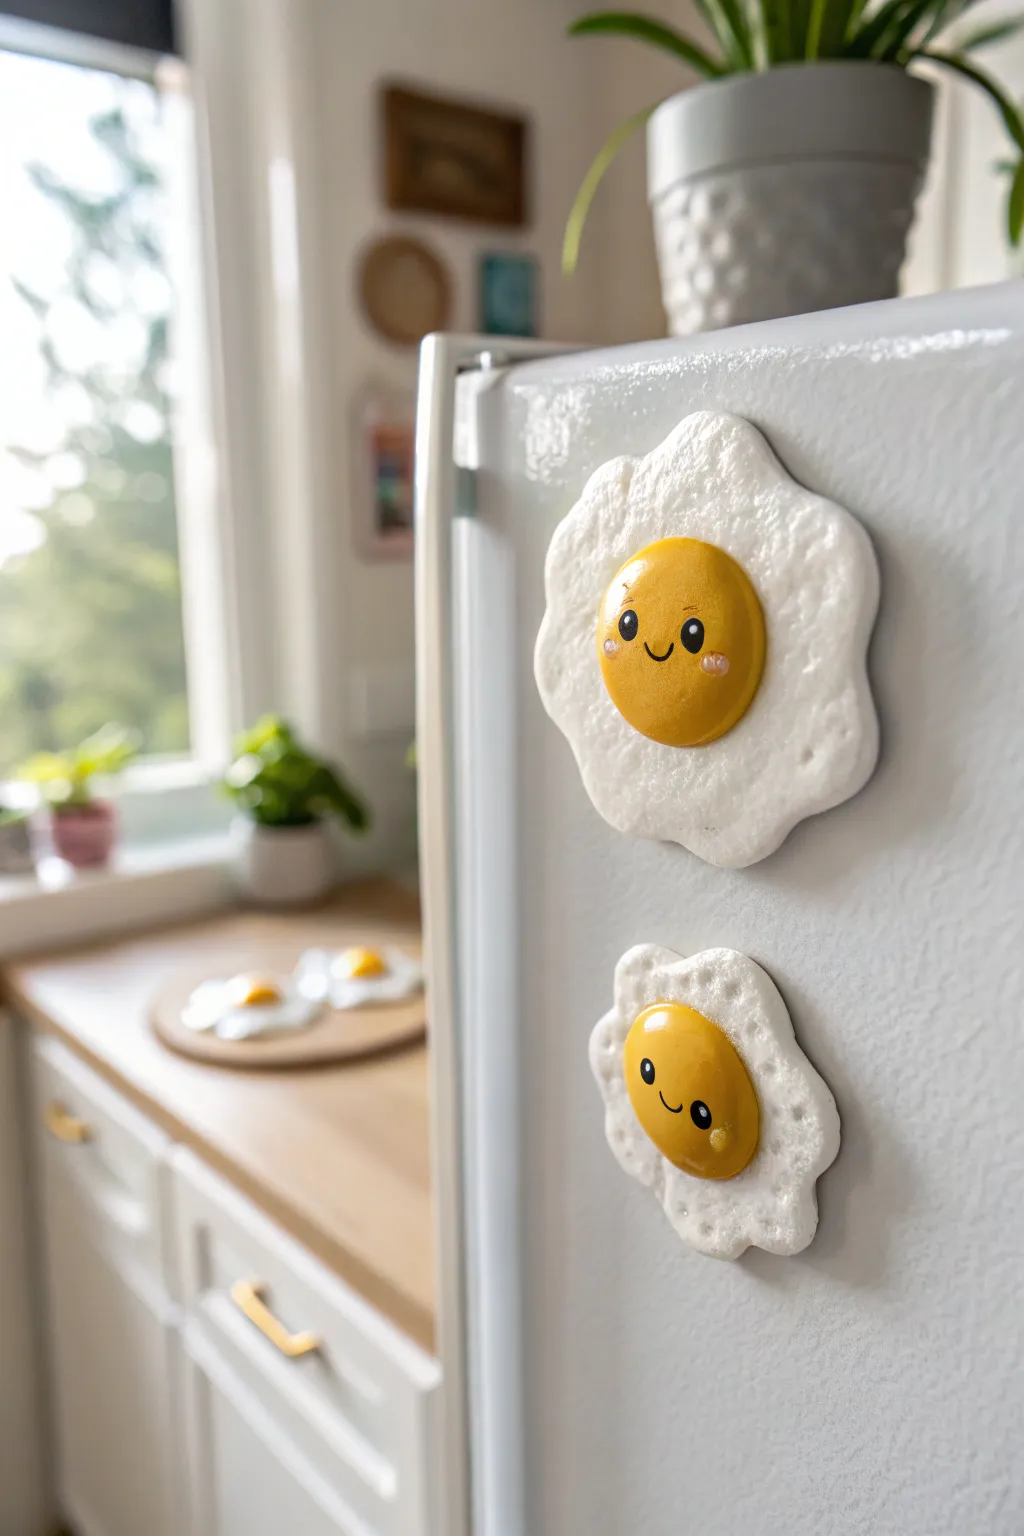
These adorable egg magnets bring a cheerful morning vibe to your kitchen with their crinkly edges and glossy, smiling yolks. Their textured egg whites and cute, expressive faces make them a perfect beginner-friendly sculpting project.
Step-by-Step
Materials
- White polymer clay
- Yellow polymer clay (sunny yellow)
- Black acrylic paint
- White acrylic paint
- Pink chalk pastel or blush
- High-gloss polyurethane varnish or glaze
- Strong round magnets
- Super glue (E6000 or strong gel glue recommended)
- Ball tool or dotting tool (large and small sizes)
- Needle tool or toothpick
- Texture tool (crumpled aluminum foil or stiff toothbrush)
- Fine detail paintbrush
- Soft paintbrush for pastels
- Oven for baking clay
Step 1: Sculpting the Egg Whites
-
Condition the white clay:
Begin by kneading your white polymer clay until it is soft and pliable. This conditioning step is crucial to prevent cracking later. -
Form the base:
Roll the clay into a ball about 1 to 1.5 inches in diameter for the large egg, or smaller for the tiny one. Press it flat onto your work surface with your palm. -
Create the organic shape:
Use your fingers to push and pull the edges outward, creating an irregular, wavy outline. Real eggs aren’t perfect circles, so embrace the asymmetry. -
Thin the edges:
Gently pinch around the perimeter of the shape to thin the edges out, leaving the center slightly thicker to support the yolk. -
Add fried texture:
Take a ball of crumpled aluminum foil or a stiff toothbrush and press it repeatedly all over the surface of the white clay. This mimics the bubbly, cooked texture of an egg white.
Clean Clay Tip
Keep baby wipes nearby! Yellow clay picks up dust easily. Clean your hands and tools thoroughly before handling the yellow clay to keep the yolk bright.
Step 2: Adding the Yolk
-
Form the yolk:
Roll a smaller ball of yellow clay until it is completely smooth and free of fingerprints. -
Attach the yolk:
Press the yellow ball gently into the center of your textured white base. Flatten it slightly so it looks like a dome rather than a sphere. -
Blend the seam:
Using a large ball tool or your finger, very gently smooth the bottom edge of the yolk where it meets the white to ensure they bond, though keeping a distinct separation looks best for this cartoon style. -
Bake the clay:
Transfer your eggs to a baking sheet lined with parchment paper. Bake according to your specific clay manufacturer’s instructions (usually 275°F/135°C for 15-30 minutes). -
Cool down:
Allow the clay pieces to cool completely before moving on to painting. Painting on hot clay will dry the paint too fast and make it gummy.
Step 3: Painting the Face
-
Paint the eyes:
Using a large dotting tool or the back of a paintbrush dipped in black acrylic paint, stamp two distinct circles onto the yellow yolk for eyes. Let this dry fully. -
Add the smile:
With an extremely fine detail brush and black paint, carefully draw a small ‘U’ shape between the eyes for the mouth. -
Create eye highlights:
Dip a small dotting tool or toothpick into white acrylic paint. Add a small white dot in the upper corner of each black eye to bring the character to life. -
Apply rosy cheeks:
I like to scrape a little pink chalk pastel into powder. Use a soft, dry brush to pick up the powder and gently dust small circles just below the eyes for a blushing effect. -
Add cheek highlights:
For extra cuteness, use a tiny dotting tool to add three minuscule white dots onto the pink cheek area.
Bacon Buddy
Make a complete breakfast set by sculpting textured wavy strips of maroon and white clay to create crispy bacon magnets to sit alongside your eggs.
Step 4: Finishing and Assembly
-
Glaze the yolk:
Apply a coat of high-gloss polyurethane varnish or glaze specifically to the yellow yolk area. This makes it look wet and shiny like a real egg, contrasting nicely with the matte white texture. -
Attach the magnet:
Once the glaze is cured and dry, flip the egg over. Apply a drop of super glue or strong gel adhesive to the center of the back. -
Secure firmly:
Press your round magnet into the glue and hold it firmly for 30 seconds to ensure a tight bond. Let the glue cure fully before stickig it to your fridge.
Now your fridge has a little dose of protein-packed happiness to greet you every morning


Mushroom Forest Minis

Bring a touch of the forest floor to your kitchen with these charming little toadstools. Each mushroom features a classic bright red cap dotted with white and a textured stem, perfectly sized to hold up your grocery lists and photos.
How-To Guide
Materials
- Polymer clay (Bright Red)
- Polymer clay (Beige or Ecru)
- Polymer clay (White)
- Clay sculpting tools (needle tool or toothpick, ball tool)
- Small round magnets (neodymium preferred)
- Super glue or E6000 adhesive
- Parchment paper or baking tile
- Gloss glaze (optional)
Step 1: Sculpting the Caps
-
Prepare the Red Clay:
Begin by conditioning the bright red polymer clay in your hands until it becomes soft and pliable. This warmth prevents cracking later. -
Form the Base Shape:
Roll small pieces of red clay into balls. Create varying sizes, ranging from the size of a pea to a large marble, to give your forest variety. -
Dome the Caps:
Gently press each red ball onto your work surface to flatten the bottom, then use your fingers to round out the top into a smooth dome shape. -
Add White Spots:
Condition a tiny amount of white clay. Roll miniature balls—some distinct, some tiny specks—and press them randomly onto the red domes. Flatten them slightly so they look integrated into the cap.
Loose Spots?
If the white dots fall off after baking, use a tiny dab of liquid clay or translucent Sculpey specifically as ‘glue’ before rebaking them for 10 minutes.
Step 2: Creating the Stems
-
Prepare Beige Clay:
Condition your beige or ecru clay. Roll it into a thick log shape. -
Cut Stem Segments:
Cut segments of the beige log. Make some short and stubby, others slightly taller and tapered, matching the scale of your prepared caps. -
Shape the Stems:
Roll each segment slightly between your fingers to smooth it out. I like to taper ‘them slightly at the top where they will join the cap. -
Add Stem Texture:
Using a needle tool or a toothpick, score vertical lines down the length of each stem. Vary the pressure to create a natural, organic wood-like texture. -
Detail the Underside:
Flip a red cap over. Take a pinch of beige clay and flatten it into a disk roughly the size of the cap’s underside to create the gills area, pressing it gently into place. -
Attach Cap to Stem:
Press the top of a textured stem firmly into the center of the beige underside. You can blend the clay slightly at the join point with a tool for extra security.
Twist on Texture
Rub a tiny bit of brown acrylic paint into the stem grooves and wipe away the excess before baking to make the wood grain texture pop.
Step 3: Baking and Assembly
-
Embed the Magnet (Optional):
If you want flush magnets, press your magnet into the back of the stem now to create an indentation, then carefully remove it before baking. -
Bake the Mushrooms:
Arrange your completed mushrooms on parchment paper or a baking tile. Bake according to your customized clay package instructions (usually 275°F/135°C for 15-30 minutes). -
Cool Down:
Allow the pieces to cool completely in the oven or on a wire rack. They will be fragile while hot, so resist touching them until cool. -
Attach the Magnets:
Apply a small dot of strong adhesive, like E6000 or super glue, to the back of the stem or into the indentation you made earlier. -
Secure the Magnet:
Press the magnet firmly into the glue. Let the adhesive cure fully according to the manufacturer’s timeframe before placing on the fridge. -
Apply Glaze:
For a dewy, wet look, brush a coat of gloss glaze over the red caps. Keep the stems matte for a nice textural contrast.
Now you have a scattered little forest ready to organize your fridge

The Complete Guide to Pottery Troubleshooting
Uncover the most common ceramic mistakes—from cracking clay to failed glazes—and learn how to fix them fast.
Panda Head Magnets
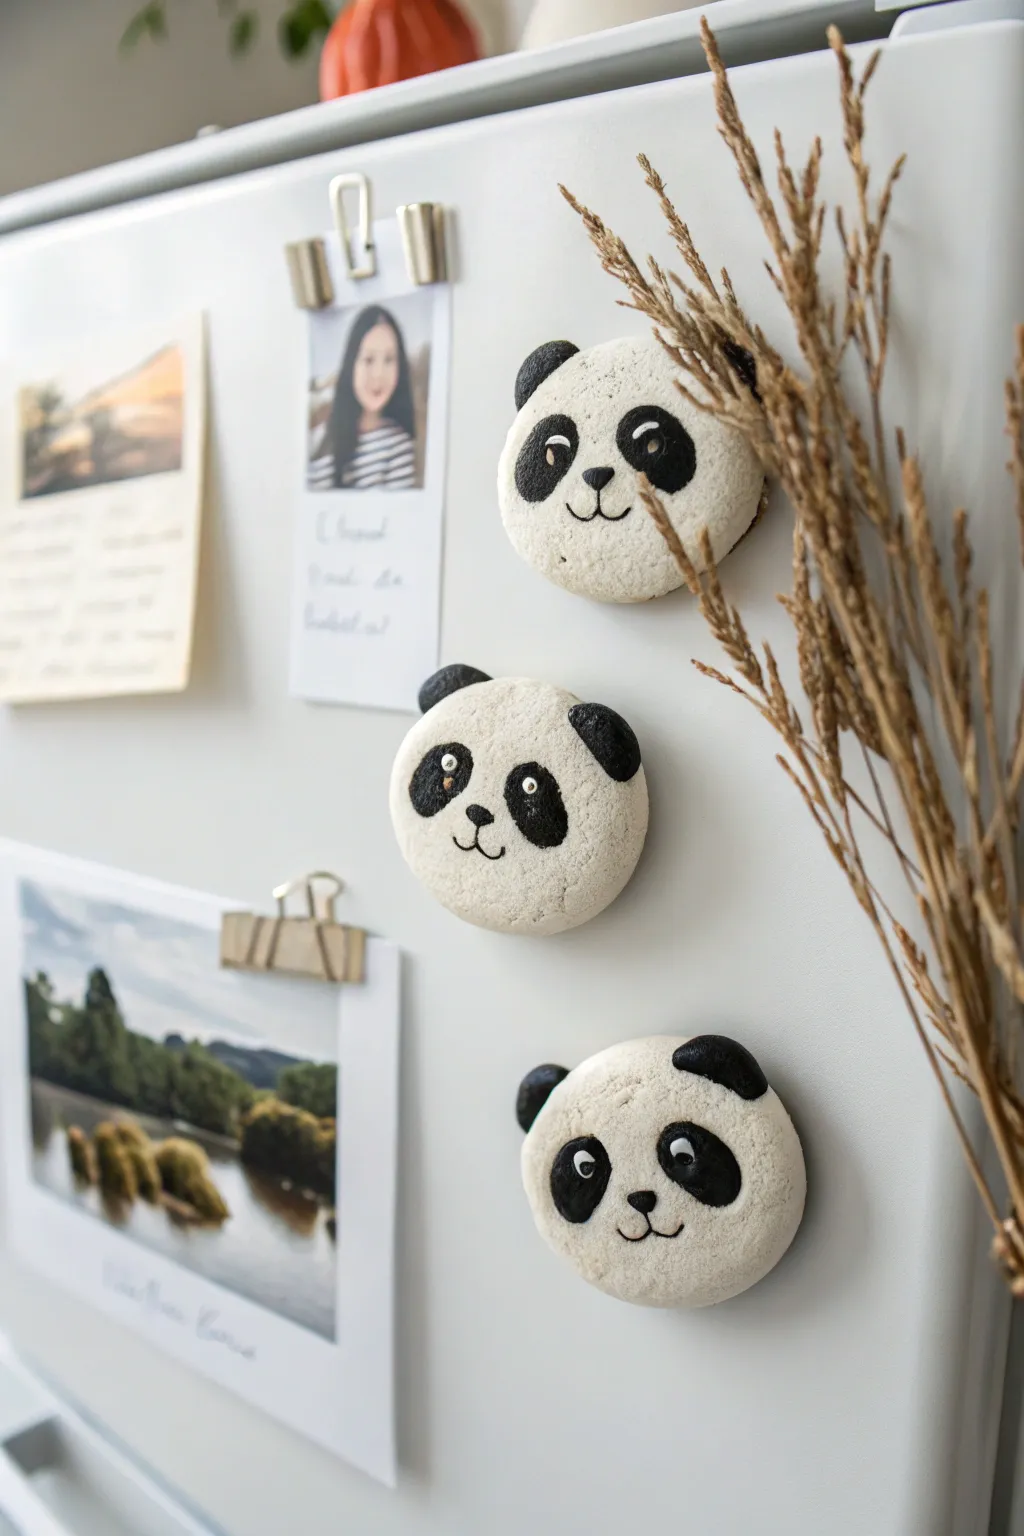
Add a touch of whimsy to your kitchen with these adorable panda head magnets that look almost like sugar cookies. Their textured white surface and simple painted details give them a charming, handmade quality perfect for holding up photos and notes.
Step-by-Step Tutorial
Materials
- White polymer clay or air-dry clay
- Aluminum foil
- Rolling pin
- Circle cookie cutter (approx. 2 inches)
- Black acrylic paint
- Fine detail paintbrush
- Ball stylus or toothpick
- Strong craft magnets
- Super glue or E6000
- Sandpaper or a stiff bristle brush (for texturing)
- Matte varnish (optional)
Step 1: Shaping the Clay Base
-
Condition the clay:
Begin by kneading your white clay until it is soft and pliable. If you are using polymer clay, make sure it’s warm enough so it won’t crack when flattened. -
Create the core:
Ball up a small amount of aluminum foil into a flattened disk shape. This saves clay and keeps the magnet lightweight, preventing it from sliding down the fridge later. -
Cover the foil:
Flatten a piece of white clay and wrap it completely around your foil disk. Smooth out any seams with your thumb so you have a seamless, slightly flattened round shape. -
Refine the shape:
Gently press the clay disk onto your work surface to flatten the back. It should be about 1/2 inch thick, resembling a macaron shell or a thick cookie. -
Add texture:
To get that rustic, stone-like or cookie-like finish seen in the photo, gently tap the surface of the clay with sandpaper or a stiff bristle brush. I like to do this lightly just to break up the smooth plastic look of the clay.
Step 2: Adding Features & Baking
-
Form the ears:
Roll two small pea-sized balls of clay for each panda. Press these onto the top corners of the head. -
Secure the ears:
Blend the bottom seam of the ears into the head using a modeling tool or your finger to ensure they don’t pop off later, but leave the top parts distinct and rounded. -
Create the nose:
Take a tiny pinch of white clay, roll it into a small oval, and press it into the center of the face to create a slight snout 3D elevation. -
Dry or Bake:
Follow the instructions for your specific clay. For polymer clay, bake on a parchment-lined sheet at the recommended temperature (usually 275°F/135°C) for about 15-20 minutes. For air-dry clay, let them sit undisturbed for 24-48 hours. -
Cool down:
Allow the clay pieces to cool completely before moving on to painting. Painting warm clay can cause the paint to become tacky or peel.
Paint Slipping?
If your acrylic paint beads up on the polymer clay surface, try lightly scuffing the cured clay with fine-grit sandpaper before painting to give it ‘tooth’.
Step 3: Painting & Assembly
-
Paint the ears:
Using black acrylic paint and a small brush, carefully paint the ear protrusions. You don’t need to be perfectly smooth; a slightly patchy application adds to the organic look. -
Paint the eye patches:
Paint two large, slanted oval shapes for the iconic panda eye patches. Make sure they angle slightly downward toward the nose. -
Add the nose and mouth:
Paint a small black nose on the raised snout area. Using a very fine liner brush, paint a simple ‘w’ shape or curved anchor shape for the mouth mouth directly beneath the nose. -
Add the eyes:
Once the black eye patches are dry, use a dotting tool or the back of a paintbrush dipped in white paint to add the whites of the eyes. Stick to the upper inner or outer corners for a cute expression. -
Add pupils:
Place a tiny black dot inside the white eye area to complete the gaze. -
Seal the piece:
To protect your paint job, coat the front of the panda with a layer of matte varnish. This keeps the finish looking natural rather than glossy. -
Attach the magnet:
Flip the panda over. Apply a drop of super glue or E6000 directly to the center of the back. -
Press and hold:
Press your magnet firmly into the glue. Hold it there for 30 seconds to ensure a tight initial bond, then let it cure according to the glue instructions.
Add Dimension
Instead of painting the eye patches flat, try indenting the eye area slightly with your thumb before baking to give the socket more depth and shadow.
Pop these little guys onto your fridge and enjoy their friendly faces every time you reach for a snack
Bow Knot Pops
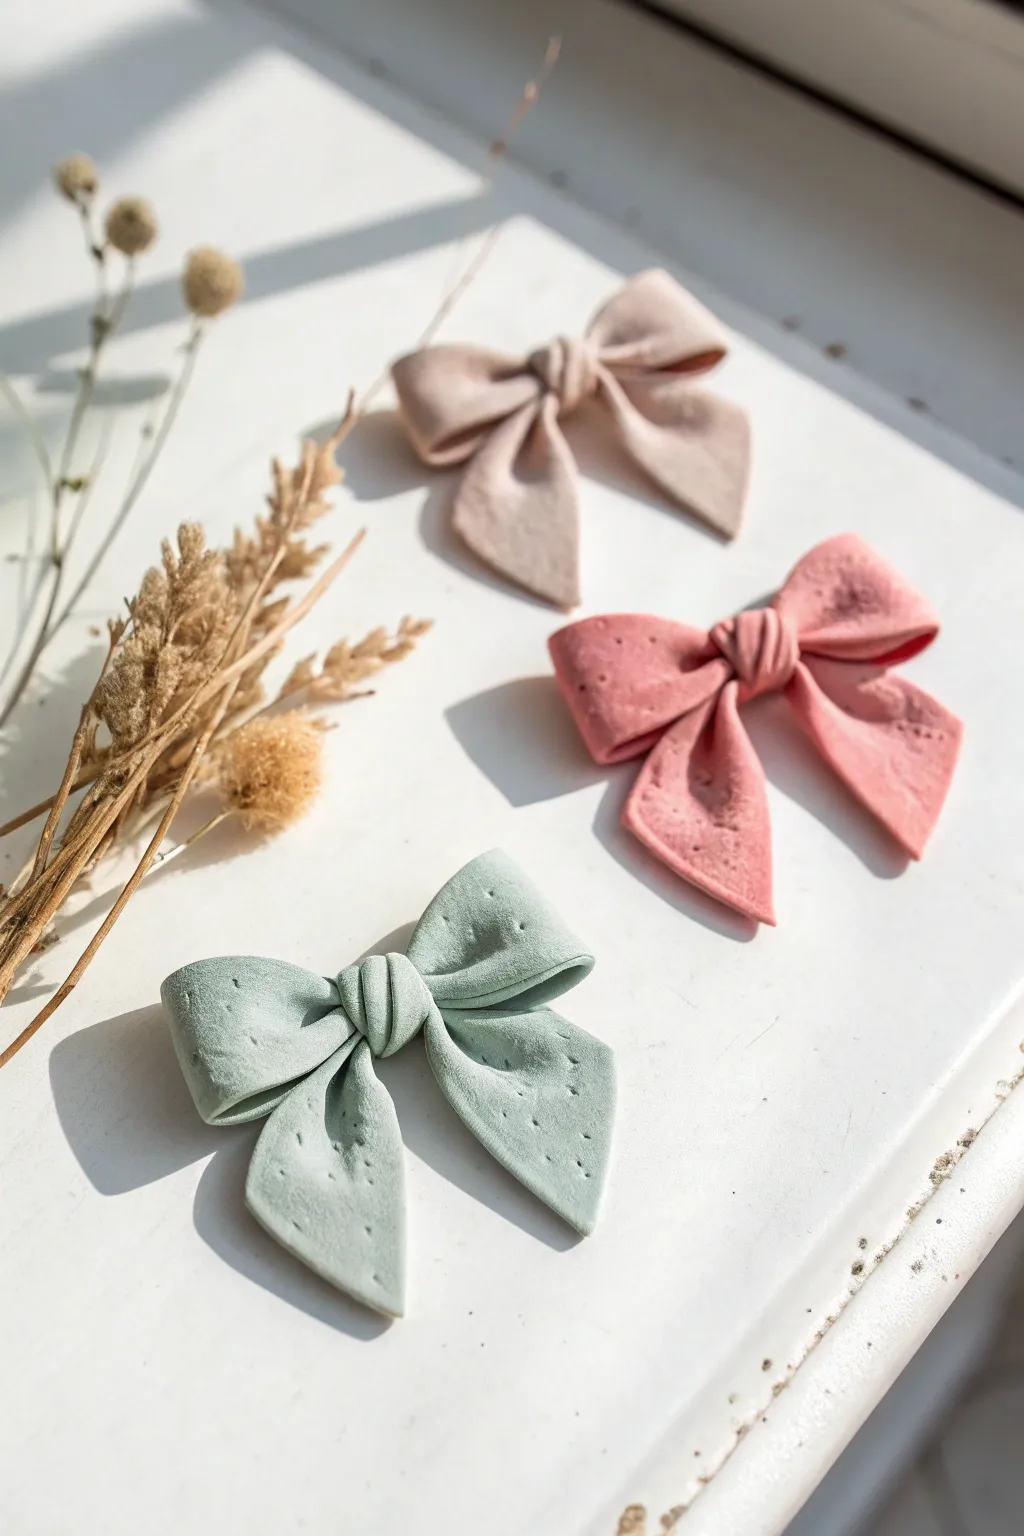
These charming little bows bring a soft, textural touch to your fridge or magnetic board. Crafted from polymer clay with a delightful speckled finish, they mimic the look of fabric while offering the durability of stone.
Detailed Instructions
Materials
- Polymer clay (beige, dusty rose, sage green)
- Faux granite or black pepper (ground finely)
- Clay roller or pasta machine
- Flexible tissue blade or craft knife
- Small dotting tool or toothpick
- Needle tool
- Strong craft glue (E6000 or similar)
- Small neodymium magnets
- Oven for baking
Step 1: Preparing the Clay
-
Condition the clay:
Start by warming the polymer clay in your hands, kneading it until it becomes soft and pliable. This prevents cracking later on. -
Create the speckled effect:
To achieve that organic look, sprinkle a tiny pinch of ground black pepper or specialized faux granite specks into your conditioned clay. -
Mix thoroughly:
Fold and knead the clay repeatedly to distribute the specks evenly throughout the color block. -
Roll it out:
Using a clay roller or pasta machine, flatten the clay into a sheet about 2-3mm thick. You want it sturdy but not bulky.
Texturing Trick
Use a toothbrush to gently tap the surface of the unbaked clay. This creates a subtle, matte texture that looks incredibly like suede.
Step 2: Shaping the Bow
-
Cut the main strip:
Use your flexible blade to cut a clean rectangle, approximately 3 inches long and 0.75 inches wide. This will form the loops. -
Cut the tails and center:
Cut a second strip for the tails (a bit shorter than the main strip) and a very small, narrow strip for the center knot. -
Form the loops:
Take the main rectangle and fold both ends toward the center so they meet in the middle. Press gently to adhere them without squishing the loops flat. -
Pinch the center:
Gently pinch the middle of your folded rectangle to create that classic cinched bow shape. I like to fuss with the folds here to make them look soft like fabric. -
Shape the tails:
Take the tail strip and pinch its center as well. Place the looped piece on top of the tail piece. -
Wrap the knot:
Wrap the smallest strip of clay around the center of both the loops and tails to bind them together. Trim any excess clay at the back. -
Detail the tails:
Use your blade to cut a ‘V’ notch into the ends of the tails for a finished ribbon look. -
Add texture:
Using a needle tool or toothpick, gently poke tiny holes sporadically across the surface. This imitates the pores of leather or woven fabric texture seen in the photo.
Customize It
Before baking, lightly brush gold mica powder onto the edges of the bow loops for a vintage, gilded elegance.
Step 3: Baking and Finishing
-
Prop the loops:
Before baking, you might want to tuck small folded pieces of cardstock inside the loops to keep them perky and open in the oven. -
Bake:
Place your bows on a baking sheet and bake according to your clay manufacturer’s instructions (usually around 275°F for 15-30 minutes per 1/4 inch thickness). -
Cool down:
Allow the bows to cool completely on the baking sheet. Polymer clay hardens fully as it cools. -
Attach the magnet:
Apply a dab of strong adhesive to the back of the center knot. -
Secure and dry:
Press a neodymium magnet firmly into the glue. Let it cure fully according to the glue’s instructions before sticking it to your fridge.
Enjoy arranging your new collection of sweet, speckled bows.


What Really Happens Inside the Kiln
Learn how time and temperature work together inside the kiln to transform clay into durable ceramic.
Mini Envelope Notes

Turn simple polymer clay into an adorable, miniature envelope magnet that adds a touch of charm to your fridge door. With its realistic two-tone paper look and a tiny heart seal, this project is perfect for holding grocery lists or sweet reminders.
Step-by-Step Tutorial
Materials
- Polymer clay (tan/terracotta color)
- Polymer clay (light beige/cream color)
- Polymer clay (red)
- Rolling pin or pasta machine
- Clay blade or sharp craft knife
- Ruler
- Liquid polymer clay (optional)
- Strong adhesive (like E6000)
- Round ceramic or ferrite magnet
- Textured fabric or sandpaper (optional)
Step 1: Shaping the Envelope Base
-
Condition the base clay:
Start by taking your tan or light terracotta-colored clay and kneading it in your hands until it becomes soft and pliable. This conditioning step prevents cracks later. -
Roll out the sheet:
Using your rolling pin, flatten the tan clay into a smooth, even sheet about 1/8 inch thick. Try to keep the thickness uniform so the magnet sits flat. -
Add texture (optional):
If you want a paper-like texture, gently press a piece of coarse fabric or fine-grit sandpaper onto the surface of the clay before cutting. -
Cut the rectangle:
With your ruler and clay blade, cut a clean rectangle. This will form the main body of the envelope. Aim for about 2 inches by 1.5 inches, or whatever size suits your needs.
Step 2: Creating the Flap and Seal
-
Prepare the flap clay:
Condition a piece of the light beige clay. Roll it out to the same thickness as your base piece. -
Cut the triangle:
Cut a triangle from the beige clay. The long edge of the triangle should match the width of your tan rectangle perfectly. -
Join the pieces:
Place the beige triangle on top of the tan rectangle so the long edge aligns with the top edge of the rectangle, pointing downward. Gently press the seam to adhere them without distorting the shape. -
Soften the edges:
Use your fingertip to very gently smooth the edges of the triangle so it looks like a folded paper flap rather than a sharp, cut piece of clay. -
Make the heart seal:
Take a tiny pinch of red clay. Roll it into a ball, flatten it slightly, and use a needle tool or knife to indent the top center and shape the bottom into a point, creating a small heart. -
Attach the heart:
Place the red heart exactly at the point of the beige triangle flap. Press it down gently to secure it; a dab of liquid clay can help it stick permanently.
Sticky Situation?
If fingerprints are marring your smooth clay surface, lightly brush the unbaked clay with a tiny amount of baby oil or cornstarch to smooth them away instantly.
Step 3: Baking and Assembly
-
Bake the clay:
Place your finished envelope on a baking sheet lined with parchment paper or a ceramic tile. Bake according to your customized clay brand’s package instructions (usually around 275°F for 15-30 minutes). -
Cool down:
Allow the clay to cool completely in the oven or on a wire rack. Do not try to attach the magnet while the clay is still warm, as the glue won’t set properly. -
Apply adhesive:
Squeeze a small dot of strong adhesive, like E6000 or super glue gel, onto the center of the back of the cooled clay envelope. -
Attach the magnet:
Press your round magnet firmly into the glue. I like to let this dry face-down for at least a few hours to ensure a secure bond.
Stamp It Out
Before baking, use tiny alphabet stamps to press initials or words like ‘love’ into the clay body for a personalized message that looks embossed.
Pop this charming letter on your fridge and enjoy a permanent piece of happy mail every day
Texture Sampler Magnet Tiles
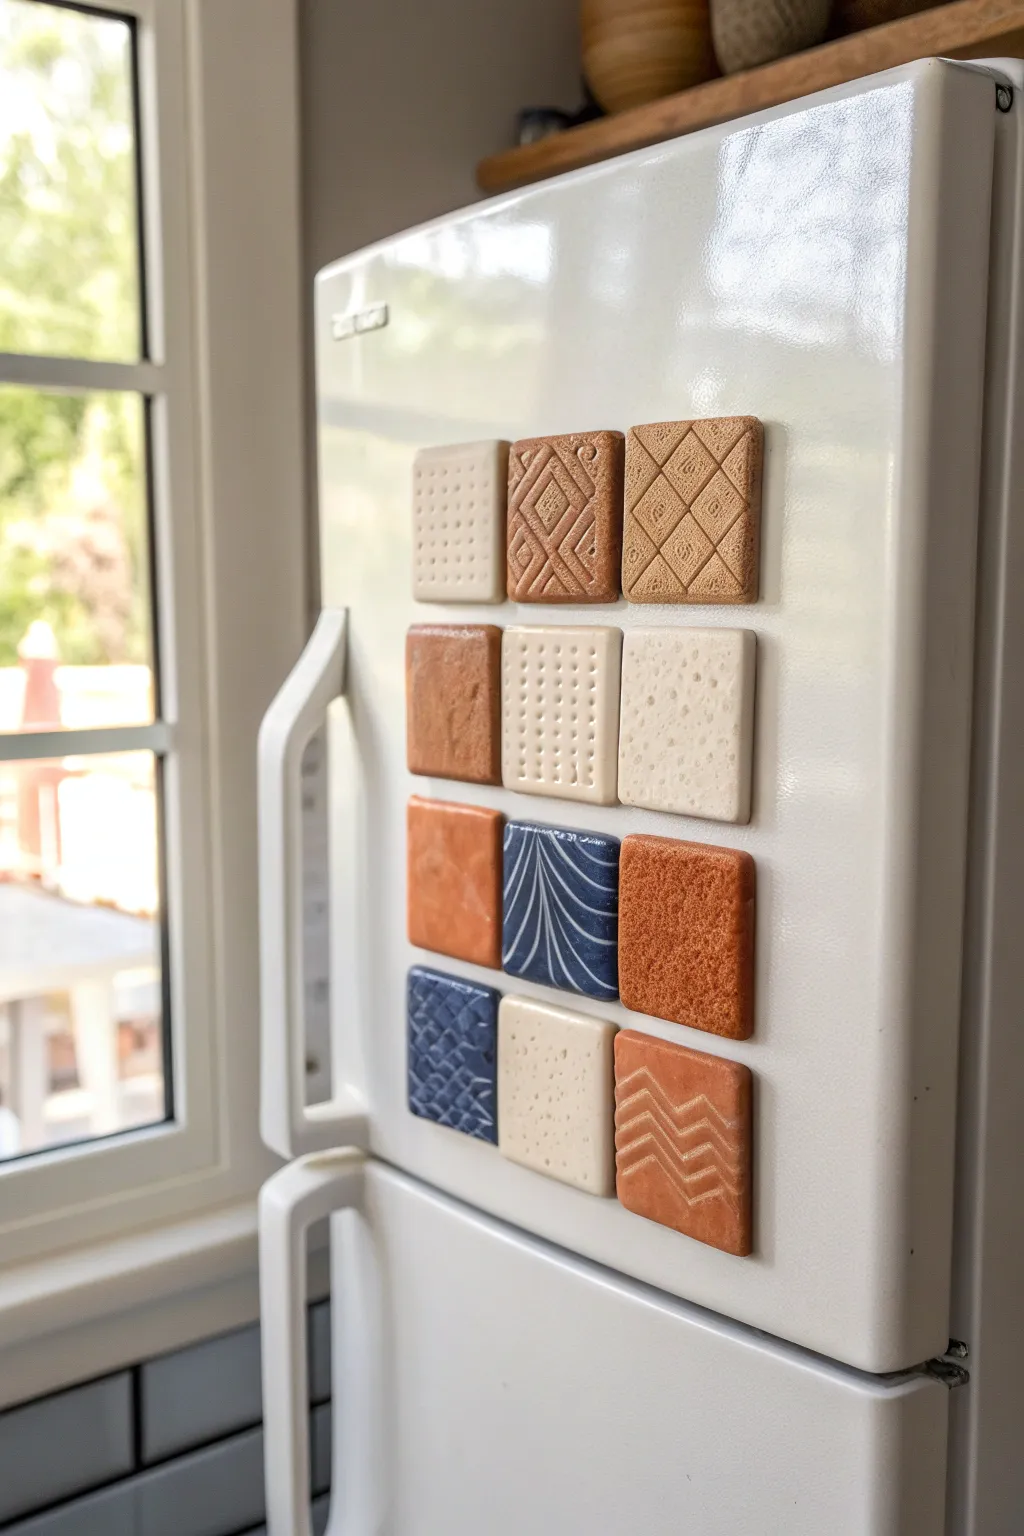
Turn your fridge into a modern art display with these tactile, faux-ceramic square magnets. Combining earthy terracotta tones with deep blues and creams, this project explores simple surface design techniques to create a cohesive grid of mini-tiles.
Detailed Instructions
Materials
- Polymer clay (white, terracotta, navy blue, beige)
- Acrylic rolling pin
- Square cookie cutter (approx. 1.5-inch)
- Texture tools (toothpicks, stamps, fabric scraps, mesh)
- Ceramic tiles or parchment paper (for baking)
- Round neodynium magnets
- Strong craft glue (E6000 or similar)
- Satin varnish (optional)
- Sandpaper (fine grit)
Step 1: Preparing the Base Tiles
-
Condition the clay:
Begin by kneading your polymer clay blocks until they are soft and pliable. Keep your colors separate to avoid accidental blending. -
Roll out slabs:
Using your acrylic rolling pin, roll each color of clay out to an even thickness, aiming for about 1/4 inch thick. This thickness gives the tiles a substantial, ceramic feel. -
Cut the squares:
Press your square cookie cutter firmly into the clay slabs. You will need roughly 12 squares total for a grid like the one shown, so mix and match the quantity of colors as desired. -
Refine the edges:
Before texturing, gently smooth the cut edges with your fingertip to remove any sharp burrs or drag marks from the cutter.
Sticky Situation?
If clay sticks to your texture stamps, lightly dust the clay surface with cornstarch or spray the tool with water before pressing down.
Step 2: Adding Texture & Detail
-
Create the dotted pattern:
For the dotted tiles, take a blunt tool like a knitting needle or the back of a small paintbrush. Press row by row into the wet clay to create a uniform grid of indentations. -
Impress diamond designs:
To mimic the crisscross diamond look, use a straight edge or a specialized clay texture sheet. Press gently so you don’t distort the square shape. -
Carve organic lines:
For the blue tile with the radiating white lines, create the blue square first. Then, gently carve thin, curved lines into the surface using a needle tool. If you want the high-contrast look, you can backfill these lines with white paint after baking. -
Add chevron zig-zags:
On a terracotta square, press a bent wire or a chevron stamp repeatedly to create the stacked zig-zag pattern near the bottom edge. -
Create rough stone texture:
For the simpler, grainy-looking tiles, press a piece of coarse sandpaper or a scrunched-up ball of aluminum foil onto the surface of the clay. -
Mimic fabric weaves:
If you have a scrap of burlap or coarse linen, press it onto a beige square to leave a subtle, woven impression similar to the top-left tile. -
Final shape check:
Texturing can sometimes spread the clay out. Gently tap the sides of your squares against a flat surface to ensure they remain perfectly square.
Step 3: Baking and Assembly
-
Bake the tiles:
Place your finished clay squares on a ceramic tile or baking sheet lined with parchment. Bake according to your customized clay package instructions (usually 275°F for 15-30 minutes). -
Cool down:
Allow the tiles to cool completely in the oven with the door cracked open. This gradual cooling helps prevent cracks. -
Light sanding:
Once cool, rub the edges and corners with fine-grit sandpaper to mimic the smooth finish of fired ceramic tiles. -
Attach magnets:
Flip the tiles over. Apply a small dot of strong craft glue to the center of each back. -
Press and hold:
Press a neodymium magnet firmly into the glue. I usually let these sit upside down for at least 24 hours to ensure a permanent bond. -
Optional varnish:
If you want a glazed look, brush a thin coat of satin varnish over the terracotta and blue tiles, leaving the beige ones matte for contrast.
Faux Glazing
Mix a tiny drop of liquid clay with shavings of a different color, then smear it into textured crevices for a speckled, reactive-glaze effect.
Arrange your mini gallery on the fridge and enjoy the satisfying click of your handmade tiles