Mini terracotta pots are my favorite tiny blank canvases—cheap, sturdy, and ready to become something adorable with just a little paint and imagination. Here are my go-to mini terracotta pot craft ideas that feel classic first, then get delightfully quirky as we go.
Painted Mini Herb Planter Trio
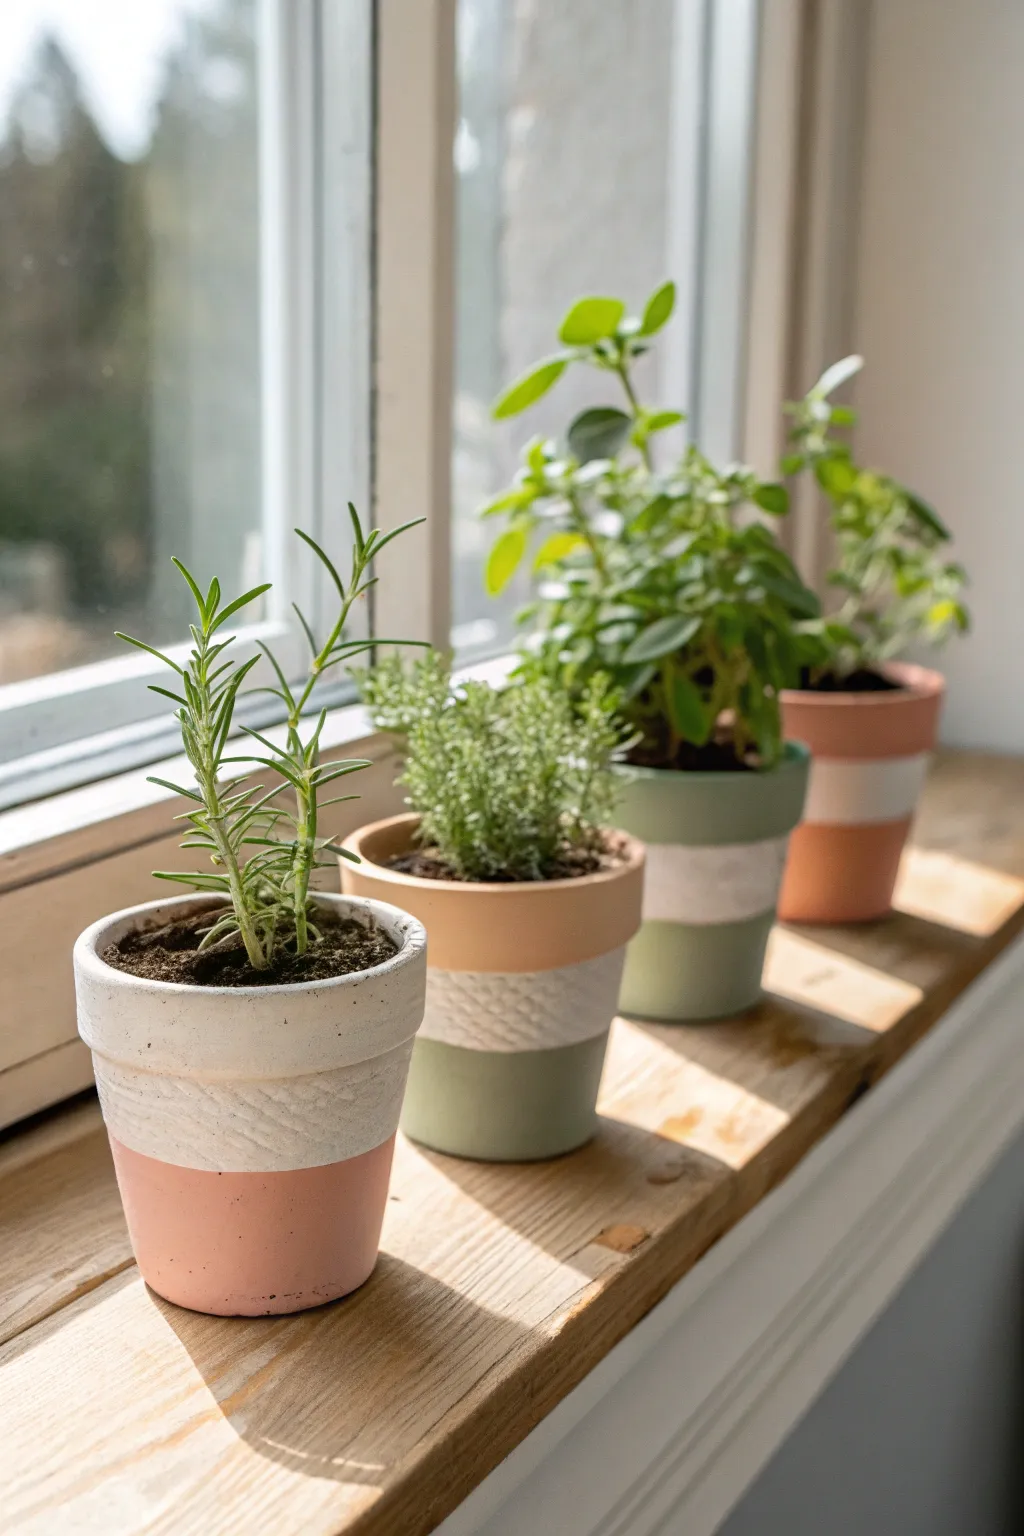
Bring a fresh spectrum of color to your windowsill with these modern, dipped-effect terracotta pots. Combining matte paint with a subtle, textured relief creates a sophisticated home for your favorite kitchen herbs.
Step-by-Step Tutorial
Materials
- Small terracotta pots (approx. 4-inch diameter)
- Acrylic craft paints: Matte white, sage green, blush pink/coral
- Medium flat paintbrush
- Small detail paintbrush
- Painter’s tape or Washi tape
- Lightweight spackling paste or texture medium
- Palette knife or popsicle stick
- Toothpick or skewer tool
- Clear matte sealant spray
- Small herbs for planting
Step 1: Base Preparation
-
Clean the surface:
Before starting, wipe down your terracotta pots with a damp cloth to remove any warehouse dust or oils. Let them dry completely so the tape adheres well. -
Plan your zones:
Decide on the layout for each pot. In the reference, the pots feature three distinct horizontal zones: a top rim, a middle textured band, and a colored base. Varying the width of these bands slightly adds visual interest. -
Tape the first line:
Apply a strip of painter’s tape horizontally around the pot, dividing the middle section from the bottom section. Ensure the tape is pressed down firmly to prevent bleed-through.
Clean Lines Secret
Before painting your color, brush a tiny bit of the *base* color (or clear matte medium) over the tape edge first to seal it against bleeds.
Step 2: Creating the Texture
-
Apply texture paste:
Using a palette knife or popsicle stick, scoop up a small amount of lightweight spackling paste. Apply it to the middle band of the pot (above your tape line) in a layer about 1/8 inch thick. -
Smooth the band:
work your way around the circumference, aiming for a relatively even surface, though slight imperfections add to the handmade charm. -
Etch the pattern:
While the paste is still wet, take a toothpick or skewer. I like to scratch diagonal lines in one direction first, spacing them closely together. -
Cross-hatch detail:
Go back over the same area with diagonal lines in the opposite direction to create a woven, basket-weave, or cross-hatch texture. -
Dry completely:
Allow the textured band to dry fully. This usually takes 1-2 hours depending on humidity; the paste will turn opaque white when dry.
Level Up: Ombré Effect
Mix white into your base color for each pot in a set of three to create a gradient collection, going from saturated to pastel across the windowsill.
Step 3: Painting the Color Blocks
-
Paint the texture:
Once dry, paint the textured middle band with matte white acrylic paint using a flat brush. While painting, dab the bristles into the crevices to ensure full coverage. -
Paint the top rim:
Extend the white paint (or choose a contrasting color) up to the rim of the pot. Two coats maximize opacity. -
Address the bottom section:
Remove the initial tape carefully. Now, re-tape over the bottom edge of your white textured section to protect it. -
Apply base colors:
Paint the bottom third of each pot in your chosen pastel shades—blush pink for one, sage green for another, and perhaps natural terra cotta for a third. -
Repeat coats:
Let the first coat dry for 20 minutes before applying a second coat for a solid, streak-free finish. -
Remove tape:
Peel off the tape while the final coat is still slightly tacky to ensure a crisp, clean line between the colored base and the white texture.
Step 4: Finishing and Planting
-
Touch ups:
Use a small detail brush to fix any little bleeds or uneven spots where the colors meet. -
Seal the work:
Spray the exterior of the pots with a clear matte sealant. This protects the paint from water damage when you water your plants. -
Add drainage:
Place a small piece of mesh or a pottery shard over the drainage hole inside the pot to keep soil in. -
Plant the herbs:
Fill with potting soil and transplant your rosemary, thyme, or basil. Gently press the soil down around the roots. -
Final wipe:
Wipe away any loose soil from the painted rim to get them ready for display.
Place your new trio in a sunny spot and enjoy fresh herbs right at your fingertips


Mini Pot People Shelf Sitters
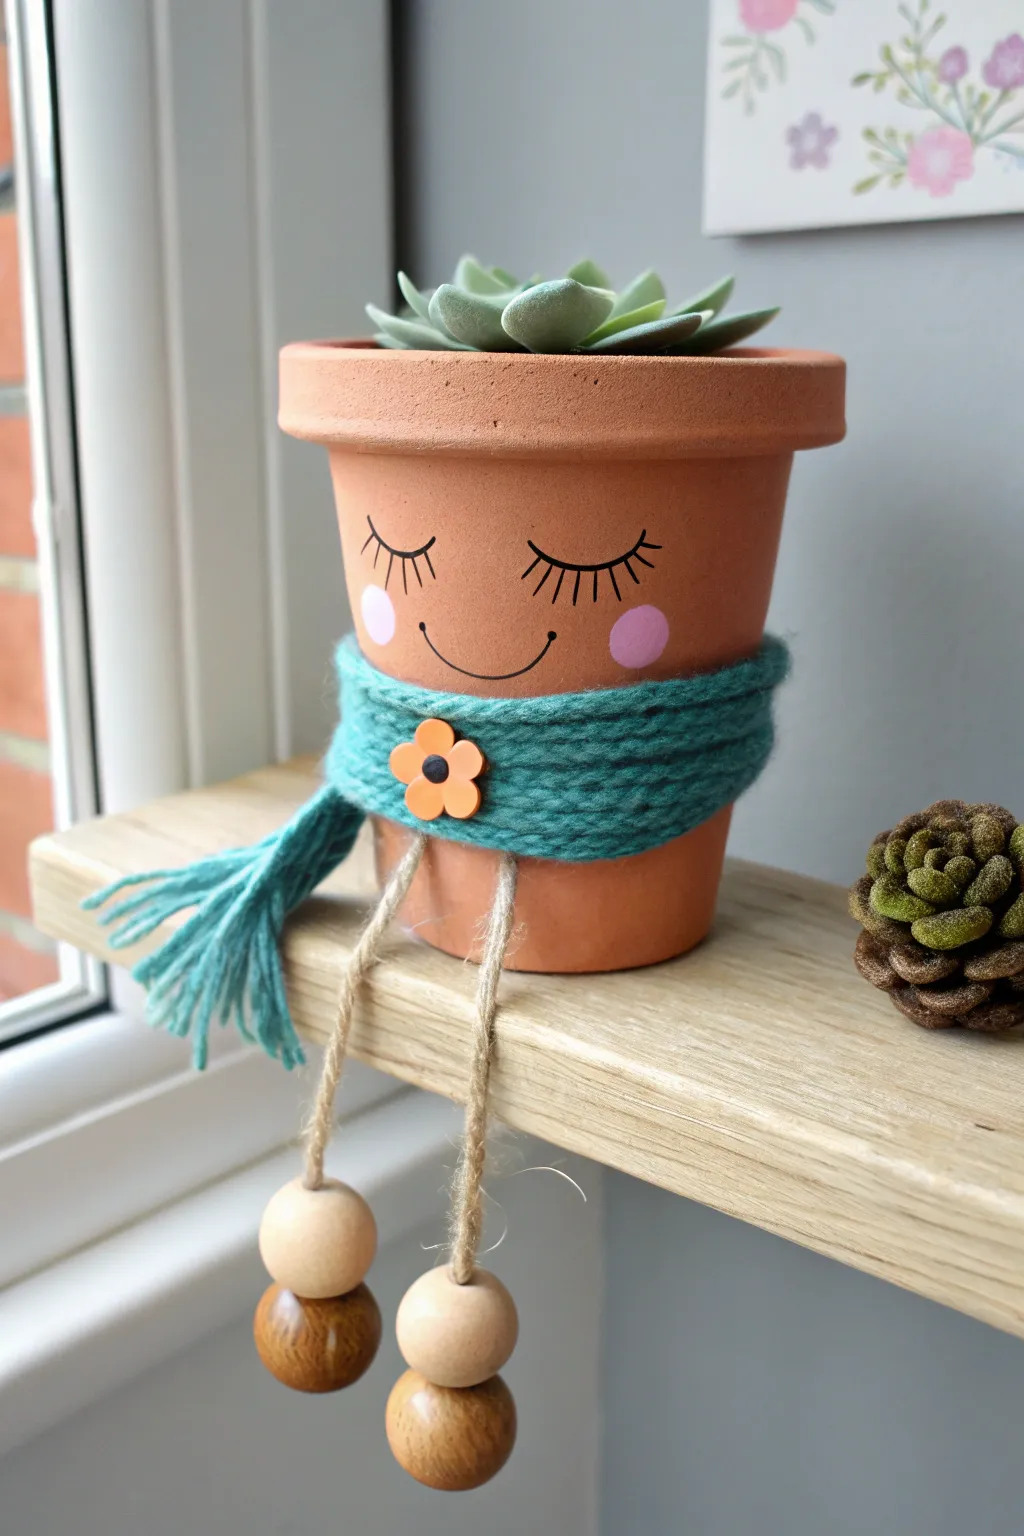
Transform a simple terracotta pot into an adorable shelf sitter with a serene, sleeping face and winter accessories. This charming character features dangly bead legs and a wrapped yarn scarf that brings texture and personality to any windowsill.
How-To Guide
Materials
- Small terracotta pot (clean and dry)
- Black permeant marker (fine tip)
- Pink acrylic paint
- Small round paintbrush or sponge dauber
- Teal or greenish-blue yarn (worsted weight)
- Jute twine
- 4 Wooden beads (2 large, 2 medium/small)
- Orange flower button
- Hot glue gun and glue sticks
- Scissors
Step 1: Preparing the Pot Face
-
Draw the eyes:
Position your terracotta pot right-side up. Using a fine-tip black permanent marker, carefully draw two downward curves for the closed eyelids about one-third of the way down from the rim. -
Add lashes:
Draw several short, straight lines radiating downward from each eyelid curve to create delicate eyelashes. Keep them fairly uniform in length. -
Create the smile:
Centered between and slightly below the eyes, draw a simple, gentle upward curve for the smile. Add tiny tick marks at the ends of the smile for dimples. -
Paint the cheeks:
Dip a small round brush or a sponge dauber into pink acrylic paint. Dab off excess paint onto a paper towel, then gently press circle cheeks onto the pot just outside the smile line. -
Let it dry:
Allow the painted cheeks to dry completely before handling the pot further to avoid smudging your work.
Smudge Doctor
Make a mistake with the marker? Don’t panic. Use a tiny bit of sandpaper to gently buff away the black ink from the terracotta surface, then try again.
Step 2: Crafting the Legs
-
Cut the twine:
Cut two lengths of jute twine, each about 8-10 inches long. You can always trim them later if they look too long. -
Thread the beads:
Take one piece of twine and thread a medium wooden bead on first, followed by a larger dark-stained wooden bead. -
Knot the ends:
Tie a thick, secure knot at the very bottom of the twine to hold the beads in place. Trim any excess twine below the knot. -
Repeat for the second leg:
I repeat the process exactly for the second leg, making sure the knots line up so the legs are equal in length. -
Attach legs to pot:
Flip the pot over. Apply two dots of hot glue to the inside front rim of the pot (which is currently the bottom). Press the top ends of the twine into the glue and hold until set.
Make it Wintery
Swap the flower button for a tiny snowflake charm and paint the beads white to give your pot person a snowy, seasonal theme suitable for the holidays.
Step 3: Adding the Scarf
-
Start the wrap:
Apply a small dab of hot glue to the back of the pot, just under the rim. Press the end of your teal yarn into the glue to anchor it. -
Wrap the scarf:
Begin winding the yarn around the pot multiple times. Keep the strands close together to create a thick, cozy band that looks like a scarf. -
Create the tail:
Once the band is thick enough, cut the yarn, leaving a tail of about 4 inches hanging down on the left side. -
Make the fringe:
Cut several 4-inch strands of yarn. Fold them in half and loop them through the hanging tail or glue them behind the main wrapped section to create a fringed scarf end. -
Secure the yarn:
Use tiny dots of hot glue periodically as you wrap or underneath the fringe to ensure everything stays securely in place. -
Attach the accessory:
Place a dab of hot glue on the wrapped yarn, slightly off-center to the left. Press the orange flower button firmly onto the yarn.
Place your new friend on a shelf and enjoy the smile it brings to your room


Animal-Face Mini Terracotta Pots

Transform a humble terracotta pot into a charming woodland creature with this sweet fox design. With its minimalist sleeping face and warm autumnal tones, this planter brings a cozy, nature-inspired vibe to any shelf.
Detailed Instructions
Materials
- Small terracotta pot (clean and dry)
- Acrylic paint: White, black, burnt orange, and pale pink
- Small flat paintbrush
- Fine detail paintbrush (size 0 or 00)
- Pencil for sketching
- Matte spray sealer or Mod Podge (optional)
- Water cup and paper towels
Step 1: Prepping the Base
-
Clean surface:
Ensure your terracotta pot is completely free of dust or price sticker residue. Wipe it down with a damp cloth and let it dry fully before painting. -
Sketch the face:
Using a pencil, lightly sketch the outline of the fox’s face. Start by drawing a broad ‘M’ shape or a heart-top shape about halfway down the pot to define where the orange fur meets the white muzzle. -
Add feature guides:
Lightly mark where the triangular ears will go near the rim, and sketch two small arcs for the sleeping eyes and a tiny oval for the nose.
Fixing Mistakes
Smudged the black paint? Wait for it to dry completely, then paint over the mistake with opaque white or orange. Do not wipe while wet.
Step 2: Blocking in Color
-
Paint the white muzzle:
Using the flat brush, paint the lower section inside your pencil outlines white. You want this area to be solid, so apply a second coat if the terracotta color shows through. -
Apply the orange fur:
Paint the upper section of the pot with burnt orange acrylic paint, carefully following the curved line you sketched earlier. Extend this color all the way to the top rim. -
Paint inside:
Don’t forget to paint the inside of the rim orange as well, stopping just below where the soil line would be. This gives it a polished look. -
Drying time:
Let the base coats dry completely. I prefer to wait about 20 minutes to ensure the colors don’t bleed when we add details.
Step 3: Adding the Details
-
Paint the ears:
Using a smaller brush and black paint, create two triangular outlines for the ears near the top rim within the orange section. -
Ear interiors:
Fill the inside of these black triangles with white paint to create the inner ear fluff. -
Draw the sleeping eyes:
Switch to your finest detail brush. Dip it in black paint and carefully trace the two downward curved arcs on the white section for the closed eyes. -
Add the nose:
Paint a small, solid black oval or inverted triangle right at the center point where the orange and white sections meet. -
Forehead texture:
using the very tip of your fine brush, add a few tiny, vertical black dashes on the orange forehead area to suggest fur texture. -
Cheeky details:
Mix a tiny bit of red with white (or use pale pink) and dab two small spots or hearts on the cheeks, just below the outer corners of the eyes.
Make it a Set
Create a woodland trio by painting a gray raccoon and a brown bear on two other pots using the same face template style.
Step 4: Finishing Touches
-
Clean up lines:
If any lines look shaky, you can go back with the original background color (orange or white) to sharpen edges once the black paint is dry. -
Seal the work:
To protect the paint from water damage when you water your plant, spray the entire exterior with a clear matte sealer. -
Final dry:
Allow the sealer to cure according to the bottle instructions before adding soil.
Pop in a small succulent or some dried grasses to complete your adorable fox planter


Mini Pot Tea Light Luminaries
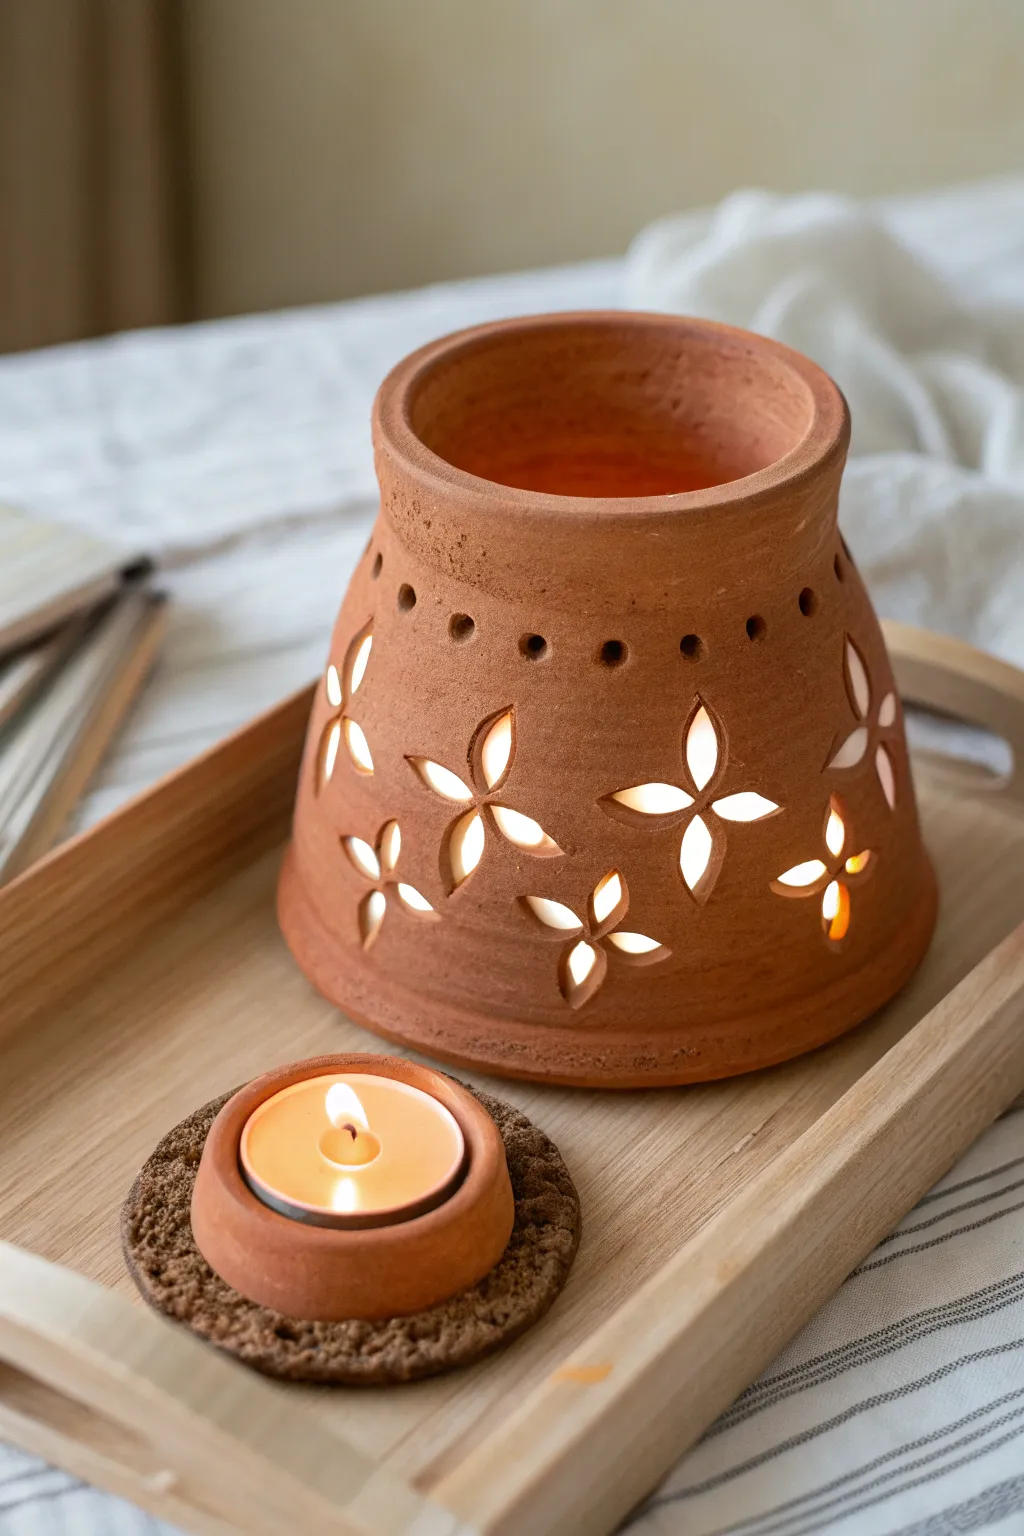
Transform a humble gardening basic into a glowing decor piece featuring intricate clover or star-shaped cutouts. This project flips a standard terracotta pot upside down to create a warm, rustic lantern perfect for cozy evenings.
Step-by-Step
Materials
- Standard terracotta pot (4-6 inch)
- Small terracotta saucer (matching size)
- Pencil or white charcoal pencil
- Paper template (optional)
- Rotary tool (e.g., Dremel)
- Diamond-tipped burr bits (various sizes)
- Sanding block or fine-grit sandpaper
- Water spray bottle
- Safety glasses and dust mask
- Tea lights (wax or LED)
- Cork coaster or felt pad (optional base)
Step 1: Preparation and Design
-
Soak the terracotta:
Begin by soaking your terracotta pot in a bucket of water for at least 30 minutes to an hour. Soaked clay produces less dust and is much easier to carve without cracking. -
Prepare your workspace:
While the pot soaks, set up a workspace outdoors or in a well-ventilated area, as carving clay gets dusty. Lay down an old towel to cushion the pot and catch debris. -
Invert the pot:
Once soaked, wipe off excess surface water and turn the pot upside down; the bottom of the pot will become the top of your luminary. -
Sketch the pattern:
Using a pencil or white charcoal pencil, lightly sketch your design onto the damp clay. For the look in the photo, draw evenly spaced four-petaled flowers or stars around the wide part of the pot. -
Add detail markers:
Mark spots for smaller holes around the rim (the pot’s original bottom) to add extra ventilation and decorative flair.
Cracking Issues?
If the clay cracks while drilling, you are likely pressing too hard. Let the rotary speed do the work. Also, ensure the pot stays damp throughout the entire carving process to keep the clay soft.
Step 2: Carving the Clay
-
Gear up:
Put on your safety glasses and dust mask before turning on any power tools. Clay dust is fine and you want to keep it out of your eyes and lungs. -
Equip the rotary tool:
Insert a small diamond-tipped burr bit into your rotary tool. A sphere or cone shape works best for starting the initial plunge cuts. -
Drill pilot holes:
Start by gently drilling a small hole in the center of each petal shape. Don’t press too hard; let the tool do the work to prevent the pot from cracking. -
Enlarge the cutouts:
Switch to a slightly larger bit or carefully move the tool sideways to widen the holes into the intended petal shapes. Keep the pot damp by spritzing it occasionally if it starts to dry out. -
Create the rim decorations:
Using a small drill bit, create the row of small, circular ventilation holes around the top rim (the pot base) that you marked earlier. -
Refine the edges:
Go back over your cutouts with a detail bit to sharpen the points of the stars and smooth any jagged internal edges.
Step 3: Finishing Touches
-
Sand the surface:
Once the carving is complete, use a fine-grit sandpaper or a sanding sponge to gently smooth the outer surface of the pot, removing any stray pencil marks or rough patches. -
Wash and dry:
Rinse the pot thoroughly under running water to remove all clay dust from the intricate cutouts. Let it dry completely in the sun, which might take a full day. -
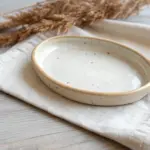
Prepare the saucer:
Take the matching terracotta saucer and simply clean it up; in the photo, the saucer is used separately as a secondary tea light holder, placed on a textured coaster. -
Assemble the luminary:
Place the main carved pot over a lit tea light on a heat-safe tray or wooden board. I prefer using LED candles here to avoid soot buildup inside the lantern. -
Style the set:
Arrange the carved luminary alongside the saucer candle holder on a wooden tray to complete the rustic display.
Level Up
Paint the inside of the pot with metallic gold or copper acrylic paint. When the candle is lit, the interior will reflect the light, creating a warmer, brighter glow through the cutouts.
Enjoy the cozy ambiance created by the flickering light dancing through your custom carved designs

The Complete Guide to Pottery Troubleshooting
Uncover the most common ceramic mistakes—from cracking clay to failed glazes—and learn how to fix them fast.
String Light Mini Pot Shades
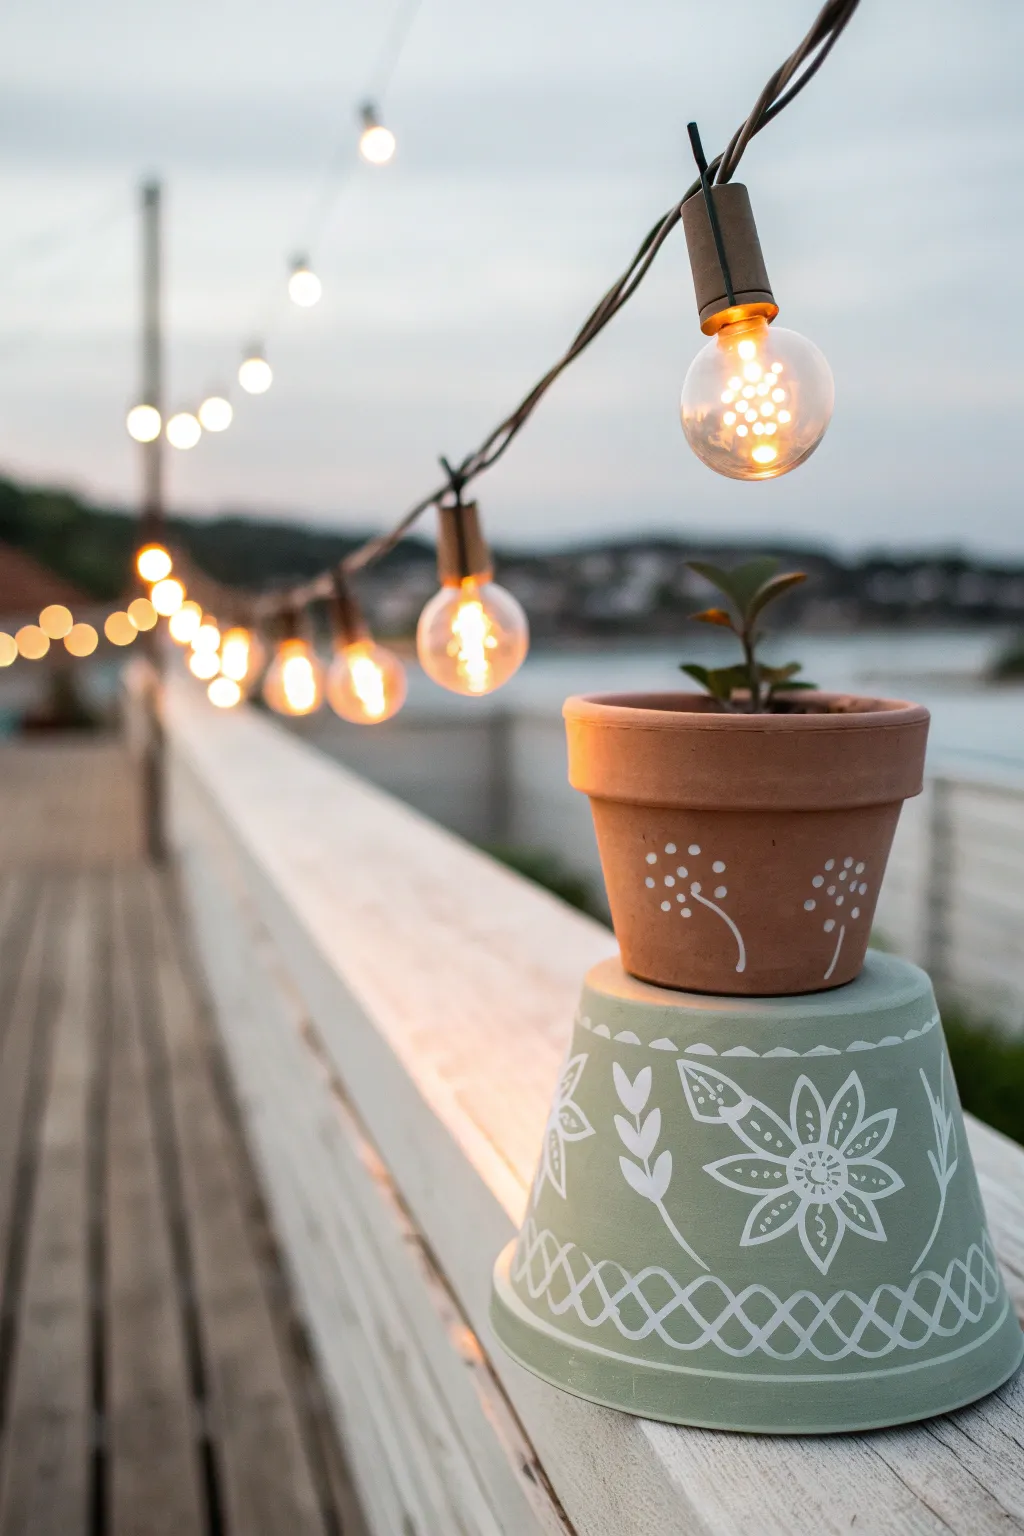
Transform ordinary garden center finds into a charming, dual-level display piece with this simple stacking project. By combining delicate white paintwork on natural clay with a soft sage green base, you’ll create a lovely little home for a succulent that looks great on any patio railing.
Step-by-Step Guide
Materials
- One medium terracotta pot (for the base)
- One small terracotta pot (nestable on top of the base)
- Sage green acrylic outdoor craft paint
- White acrylic paint (paint pen or fine brush)
- Fine detail paintbrush (size 0 or 1)
- Pencil for sketching
- Water basin and paper towels
- Strong craft glue or E6000 (optional, for stability)
- Small succulent or seedling
- Potting soil
Step 1: Preparing the Base
-
Clean the surface:
Begin by wiping down both terracotta pots with a damp cloth to remove any pottery dust or sticker residue. Let them dry completely so the paint adheres properly. -
Paint the base coat:
Take the larger, medium-sized pot and flip it upside down. Using a flat brush, apply a coat of sage green acrylic paint to the exterior. Don’t worry about the inside since it will be hidden. -
Apply a second coat:
Once the first layer is dry to the touch—usually about 15 minutes—apply a second coat of green to ensure solid, opaque coverage without streaks. Let this dry fully.
Paint Slipping?
Terracotta is porous and can absorb moisture quickly. If paint soaks in too fast, prime the surface with a clear matte sealer first to create a smoother canvas.
Step 2: Decorating the Base
-
Sketch the floral design:
Lightly trace your design onto the upside-down green pot using a pencil. Create a large central flower shape and trailing vines with leaves on the sides. -
Add the cross-hatch rim:
Near the bottom rim (which is now the top), sketch a band of crisscrossing lines to form a lattice pattern. -
Paint the main flower:
Using your white paint and a fine detail brush, carefully go over your pencil lines for the large flower. I find steadying my hand against the table helps with these curves. -
Fill in the details:
Add small dots to the center of the flower and tiny dashes inside the petals for texture. -
Paint the vines:
Trace the leafy vine shapes with white paint. Use a slightly heavier pressure at the base of the leaf and lift up for the tip to get a tapered look. -
Complete the lattice border:
Paint the crisscrossed lines around the rim you sketched earlier. Add a single dot in each diamond space created by the crossing lines.
Step 3: Decorating the Top Pot
-
Keep it natural:
Leave the smaller pot unpainted to provide a warm contrast against the cool green base. -
Paint dandelion puffs:
Using the white paint, create simple dandelion-style flowers. Start by painting a thin, curved stem rising from the bottom edge. -
Add the seeds:
At the top of each stem, dab small dots in a loose semi-circle to represent the fluffy seed head of the flower. -
Repeat the pattern:
Add two or three of these simple white flower designs around the circumference of the small pot.
Pencil Marks
Use a white charcoal pencil instead of standard graphite on the green painted surface. It shows up better and wipes away easily with water if you make a mistake.
Step 4: Assembly
-
Seal the paint:
If this will live outdoors permanently, apply a clear matte acrylic sealer over your painted designs to protect them from the elements. -
Stack the pots:
Place the painted green pot upside down on your surface. Set the smaller natural pot right-side up on top of the green pot’s base. -
Secure the stack (optional):
If you are in a windy area, apply a ring of E6000 or strong craft glue to the bottom of the small pot before pressing it onto the green base. -
Plant:
Fill the top pot with potting soil and gently nestle your small succulent or seedling into the dirt.
Now you have a delightful, hand-painted pedestal planter ready to brighten up your garden space
Mini Pot Topiary Cones
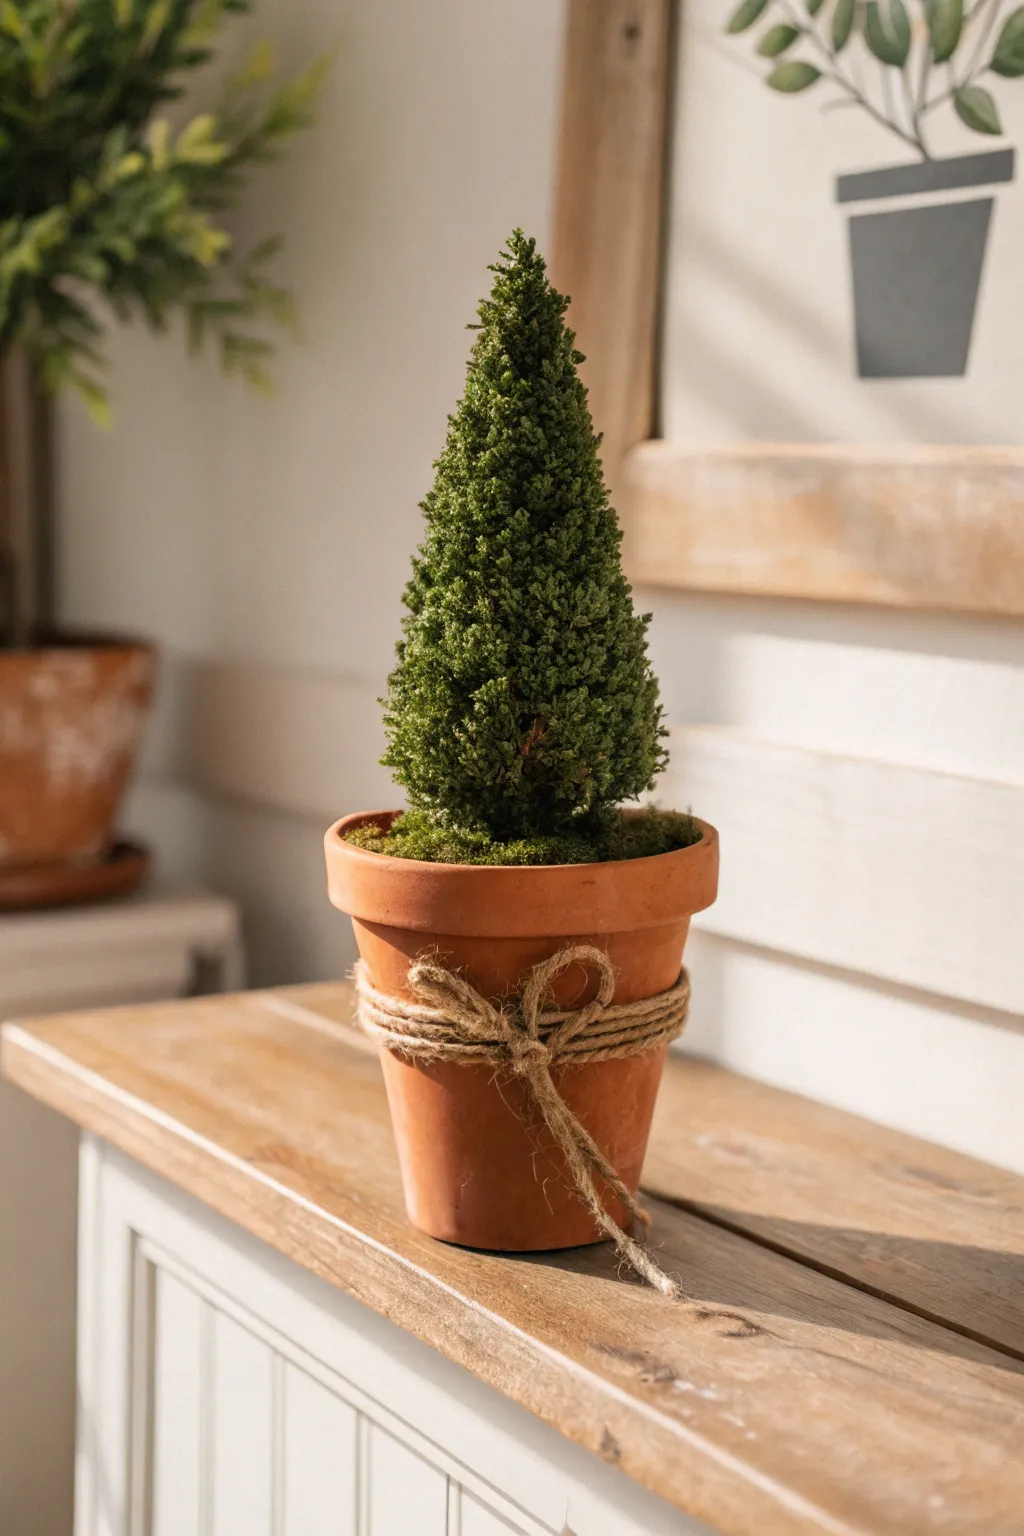
This charming project combines the earthy warmth of terracotta with fresh greenery to create a farmhouse-style accent piece perfect for mantels or shelves. With its simple cone shape and rustic twine detailing, this miniature topiary brings a touch of effortless nature indoors.
Step-by-Step
Materials
- Small terracotta pot (roughly 4-inch diameter)
- Faux boxwood or preserved moss cone (sized to fit pot)
- Floral foam block or dry foam
- Jute twine or thin manila rope
- Moss sheet or loose florist moss
- Hot glue gun and glue sticks
- Serrated knife (for cutting foam)
- Scissors
Step 1: Preparing the Pot Base
-
Clean surface:
Begin by wiping down your terracotta pot with a dry cloth to remove any dust. This ensures the best possible adhesion for the glue later on. The pot should be completely dry before you start working. -
Shape the foam:
Cut your floral foam block using a serrated knife so that it fits snugly inside the terracotta pot. It should fill the pot quite tightly to provide a stable base for the tree. -
Secure the foam:
Apply a dab of hot glue to the bottom of the foam piece and press it firmly into the bottom of the pot. While friction often holds it, I like to glue it for extra security so the topiary doesn’t wobble. -
Level the top:
Trim the top of the foam so it sits about half an inch below the rim of the pot. This little recession is crucial because it leaves room to tuck in the decorative moss later without it spilling over.
Step 2: Wrapping the Twine Detail
-
Anchor the twine:
Locate the center point of the pot’s height. Apply a small dot of hot glue here and press the end of your jute twine into it to anchor the beginning of your wrap. -
Wrap cylinder:
Begin wrapping the twine horizontally around the pot. Keep the tension tight so the loops don’t sag. Create a band of about 5-6 rows of twine, keeping them pushed close together so no terracotta shows through the loops. -
Secure the end:
Once you have a nice thick band, cut the twine and secure the end with another small dot of hot glue, ideally on the same ‘back’ side where you started. -
Create the bow:
Cut a separate length of twine about 10 inches long. Tie this into a simple shoelace bow. Fiddle with the loops to make them even and symmetrical. -
Attach the bow:
Glue the bow directly onto the front center of your wrapped twine band. This covers the visual weight of the band and adds that cute rustic farmhouse touch seen in the photo.
Uneven Twine Wrapping?
If the twine slips on the tapered pot, add tiny dots of hot glue every quarter turn to keep the rows perfectly horizontal.
Step 3: Assembling the Greenery
-
Check the fit:
Before gluing, test fit your greenery cone on top of the foam. The base of the cone should rest just below the rim of the pot for the most natural look. -
Secure the tree:
Apply a generous amount of hot glue to the top surface of the floral foam. Center your cone tree carefully and press it down firmly. Hold it in place for 30 seconds while the glue sets. -
Fill the gaps:
Take small chunks of loose moss or cut strips from your moss sheet. You want to cover the exposed floral foam completely. -
Tuck the edges:
Use the tip of your scissors or a craft stick to gently tuck the moss down between the edge of the cone and the inner rim of the pot. This creates a seamless transition from plant to pot. -
Final fluffing:
Gently fluff out the branches of your topiary cone if it looks a bit mashed from handling. Rotate the pot and trim any stray moss strands that look unruly.
Weathered Pot Look
For an aged look, lightly brush the terracotta with watered-down white acrylic paint and wipe it off immediately before starting.
Place your finished topiary in a sunny spot to enjoy its eternal greenery without any watering required


What Really Happens Inside the Kiln
Learn how time and temperature work together inside the kiln to transform clay into durable ceramic.
Stamped Pattern Mini Pots
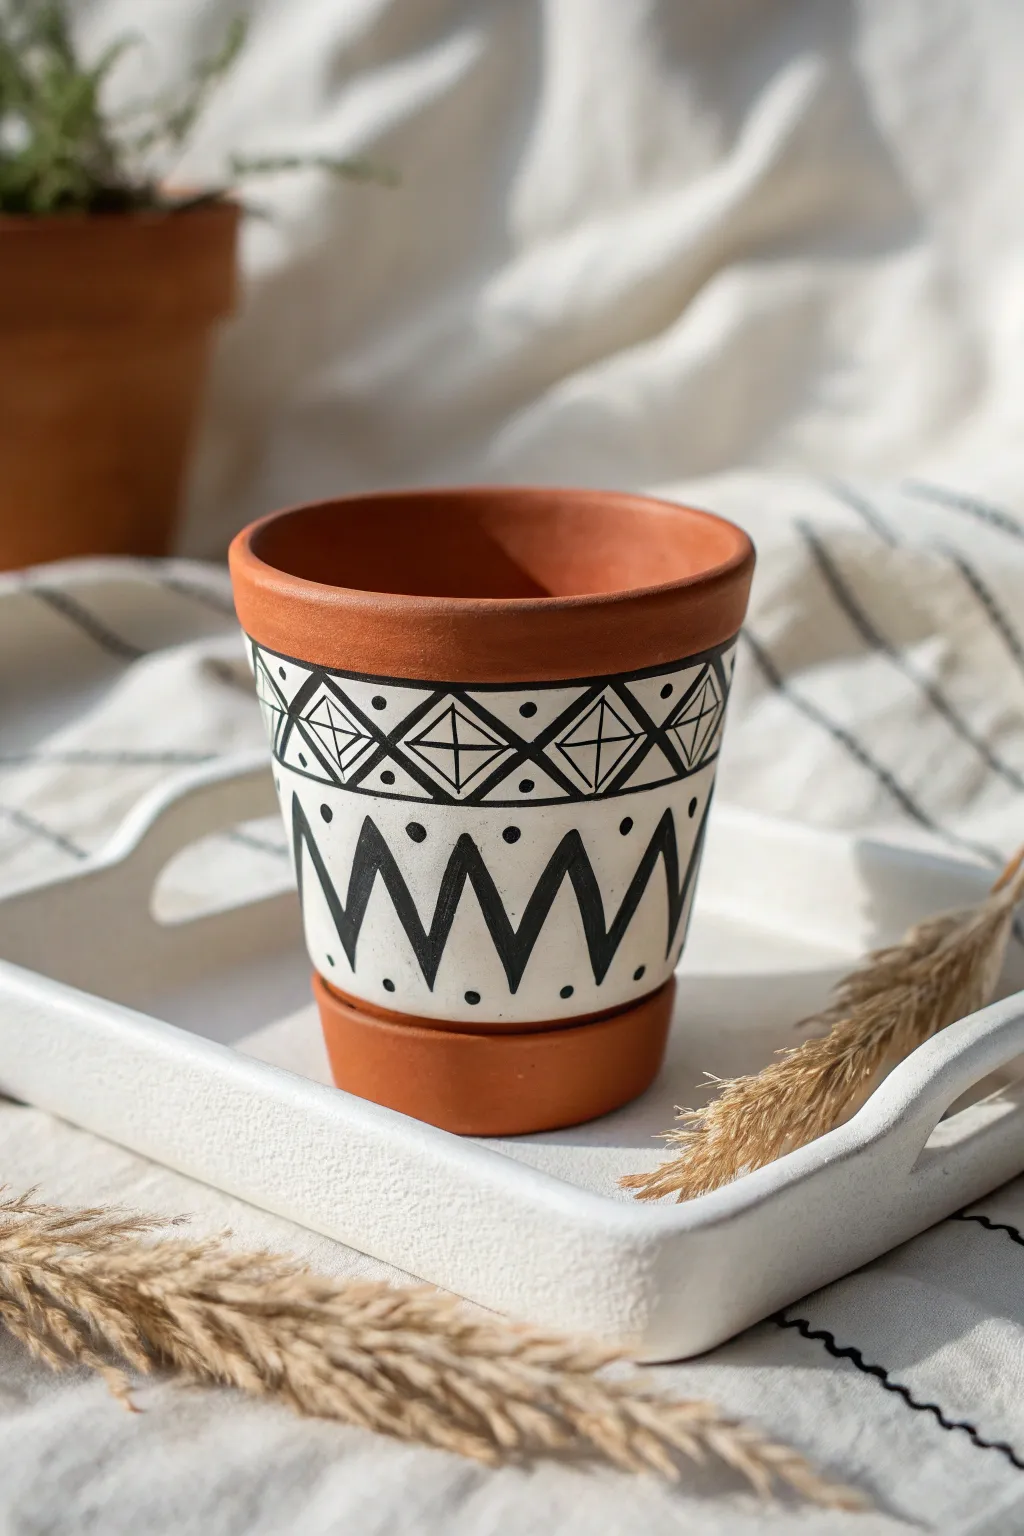
Transform a plain terracotta vessel into a striking piece of decor with this high-contrast geometric design. The crisp black lines against a white background create a modern bohemian look that perfectly houses your favorite succulents.
Step-by-Step Guide
Materials
- Mini terracotta pot (approx. 3-4 inch diameter)
- White acrylic craft paint (matte finish)
- Black acrylic paint or black fine-tip paint pen
- Small flat paintbrush
- Small round detail brush (size 0 or 1)
- Pencil and eraser
- Ruler or measuring tape
- Clear matte sealant spray (optional)
Step 1: Preparation and Base Coat
-
Clean surface:
Wipe down your terracotta pot with a damp cloth to remove any dust or debris, then let it dry completely. -
Initial base coat:
Using the flat paintbrush, apply a layer of white acrylic paint to the main body of the pot. -
Create clean edges:
Carefully paint up to the rim, leaving the top thick ceramic lip unpainted to expose the natural terracotta color. Do the same for the bottom saucer or lower edge if applicable. -
Second coat:
Once the first layer is dry, apply a second coat of white to ensure full opacity and hide any brushstrokes. -
Dry time:
Allow the white base to cure fully for at least an hour; painting over wet acrylic can cause the layers to lift.
Step 2: Drafting the Design
-
Mark horizontal bands:
Using a pencil, lightly draw a horizontal line around the circumference of the pot, separating the white area into an upper band (about 1/3 of the height) and a lower band (the remaining 2/3). -
Section the top band:
In the top band, make small tick marks at even intervals to guide the spacing of your diamond shapes. -
Sketch the diamonds:
Connect your tick marks to draw a continuous row of diamonds (rhombuses) inside the upper band. -
Detail the diamonds:
Draw a smaller diamond inside each larger one, then add a vertical line splitting the inner diamond in half. Add a horizontal line to create a cross shape within that inner diamond. -
Sketch the zigzags:
In the larger lower section, draw a bold zigzag line that spans nearly the full remaining height.
Clean Lines Hack
Use a flexible sewing measuring tape to mark your spacing dots. If you struggle with straight lines on a curved surface, thin masking tape is a lifesaver.
Step 3: Painting the Pattern
-
Outline the top band:
Using your black paint and detail brush (or paint pen), trace the horizontal line separating the two bands, as well as the top edge of the white paint. -
Fill the diamonds:
Carefully trace over your penciled diamond patterns. I find keeping a steady hand easier by resting my pinky finger against the pot for stability. -
Add connecting triangles:
In the triangular spaces between the diamonds, draw smaller nested triangles to fill the gaps, mirroring the style shown in the image. -
Dot details:
Place a single black dot in the center of the negative space between the diamonds and the dividing line. -
Paint the zigzag:
Paint the large zigzag line in the bottom section, making the strokes slightly thicker than the fine lines used in the diamonds. -
Add lower dots:
Place a small black dot inside each upper ‘V’ of the zigzag and inside each lower inverted ‘V’ near the bottom edge. -
Cleanup:
Once the black ink needs to dry, gently erase any visible pencil marks that weren’t covered by paint.
Add Color
While the black and white is classic, try painting the top rim in gold leaf or swapping the black lines for a deep navy blue for a nautical twist.
Step 4: Finishing Touches
-
Inspect edges:
Check the borders where the white paint meets the terracotta; use a small damp brush to clean up any smudges. -
Seal the work:
If you plan to put a real plant inside, spray the entire pot with a clear matte sealant to protect the paint from water damage.
Now your custom-painted pot is ready to add a stylish touch to any windowsill or shelf
Chalk Label Mini Pot Gift Favors
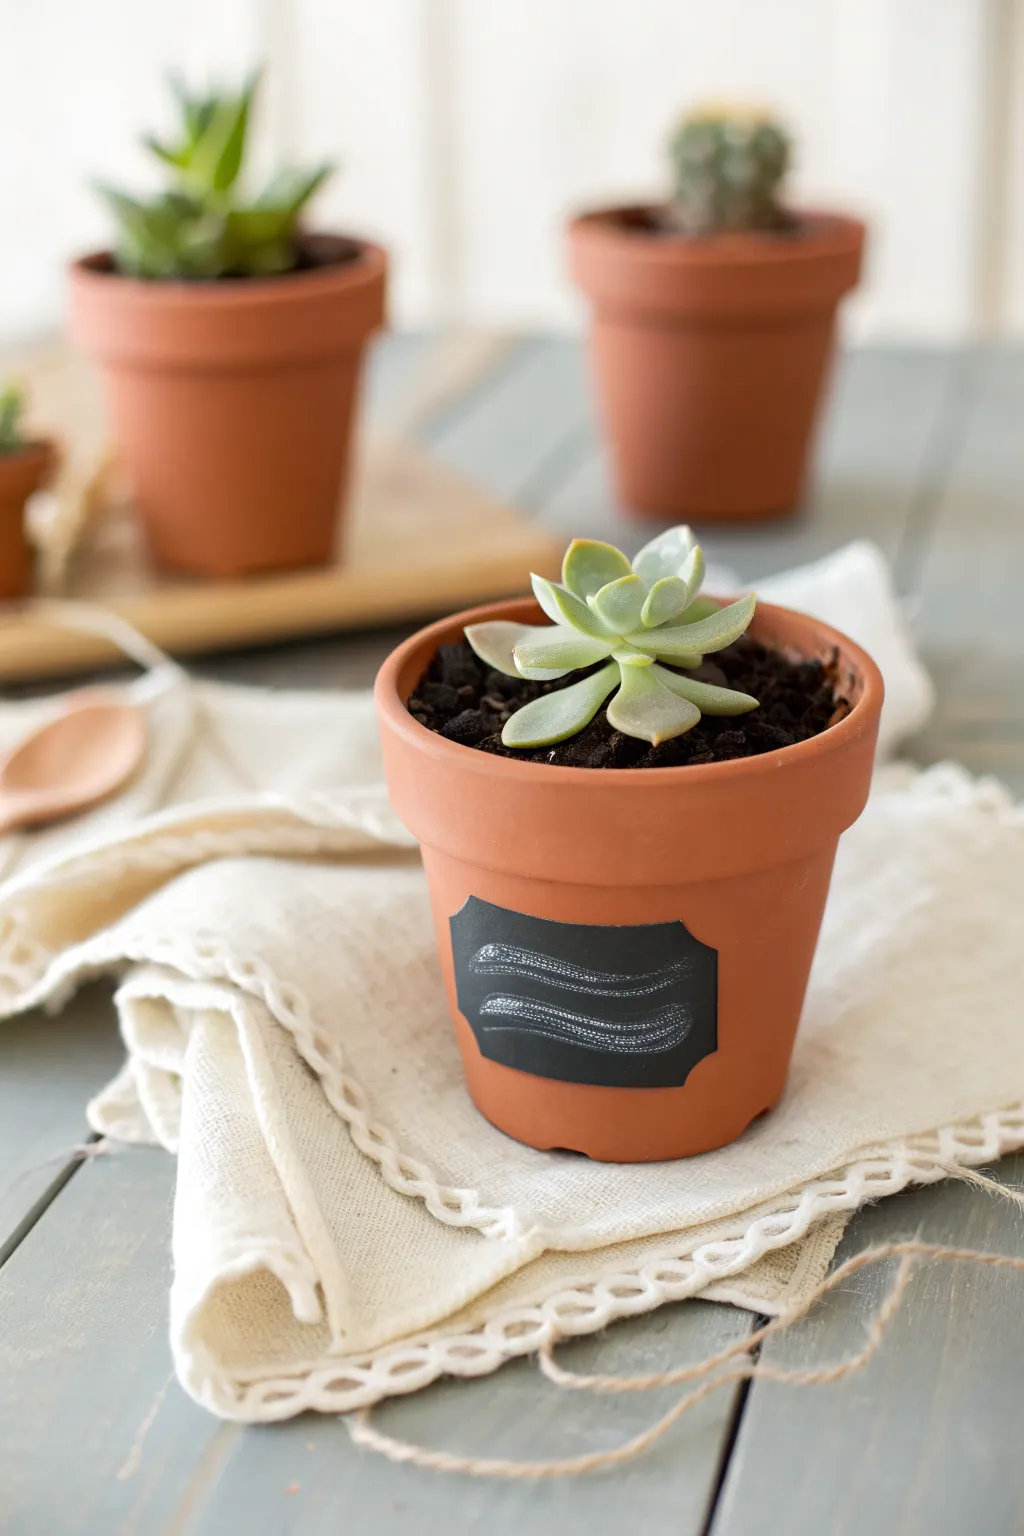
These charming mini terra cotta pots double as adorable party favors or windowsill decor. Featuring customizable chalk labels and hardy succulents, they bring a touch of rustic greenery to any setting.
How-To Guide
Materials
- Mini terra cotta pot (approx. 2-3 inches)
- Small succulent or cactus
- Cactus potting mix
- Adhesive chalkboard vinyl (or pre-cut chalkboard labels)
- White liquid chalk marker (fine tip)
- Scissors
- Small spoon or gardening scoop
- Paper towel or cloth
Step 1: Preparing the Pot
-
Clean surface:
Begin by wiping down the exterior of your terra cotta pot with a barely damp cloth. Removing any clay dust is crucial for the sticker to adhere properly. -
Dry completely:
Allow the pot to air dry for several minutes. If the clay retains moisture, the label will peel off over time. -
Cut the label:
If you are using a sheet of chalkboard vinyl, cut out a small rectangle with notched corners to mimic a vintage label shape, sizing it to fit the pot’s curve. -
Apply the label:
Peel the backing off your vinyl label and press it firmly onto the center of the pot. Smooth it out with your thumb from the center outward to eliminate air bubbles.
Curve Control
Use a flexible chalkboard vinyl rather than stiff cardstock. This ensures the label hugs the tapered shape of the pot without wrinkling at the edges.
Step 2: Designing the Label
-
Prime the marker:
Shake your liquid chalk marker well and pump the tip on a scrap piece of paper until the white ink flows smoothly. -
Draw the design:
Draw three wavy, parallel horizontal lines across the label using a steady hand. I like to start from the left and pull quickly to the right for a more natural stroke. -
Add detail:
Go back over the lines lightly if needed to increase opacity, creating a textured, chalk-like appearance. -
Dry the ink:
Let the chalk design dry completely for at least 5 minutes before handling the pot again to avoid smudging your artwork.
Top Dressing
Finish the look by adding a layer of fine white aquarium gravel or sand over the soil for a polished, high-contrast appearance.
Step 3: Planting and Finishing
-
Add base soil:
Using a small spoon, fill the bottom third of the pot with specialized cactus potting mix. -
Prepare the plant:
Gently remove your mini succulent from its nursery container, lightly loosening the root ball with your fingers. -
Position the plant:
Place the succulent into the pot, ensuring it sits centered and straight. -
Fill the gaps:
Carefully spoon more soil around the edges of the plant until the roots are covered and the soil line is just below the rim. -
Compact slightly:
Gently tap the base of the pot on your work surface to settle the soil, adding a pinch more on top if the level drops too much. -
Clean up:
Brush away any stray soil granules from the rim or leaves using a dry, soft brush or your fingers.
Place your finished pot on a textured linen napkin to complete the cozy, natural aesthetic

TRACK YOUR CERAMIC JOURNEY
Capture glaze tests, firing details, and creative progress—all in one simple printable. Make your projects easier to repeat and improve.
Mini Terracotta Pot Wind Chime
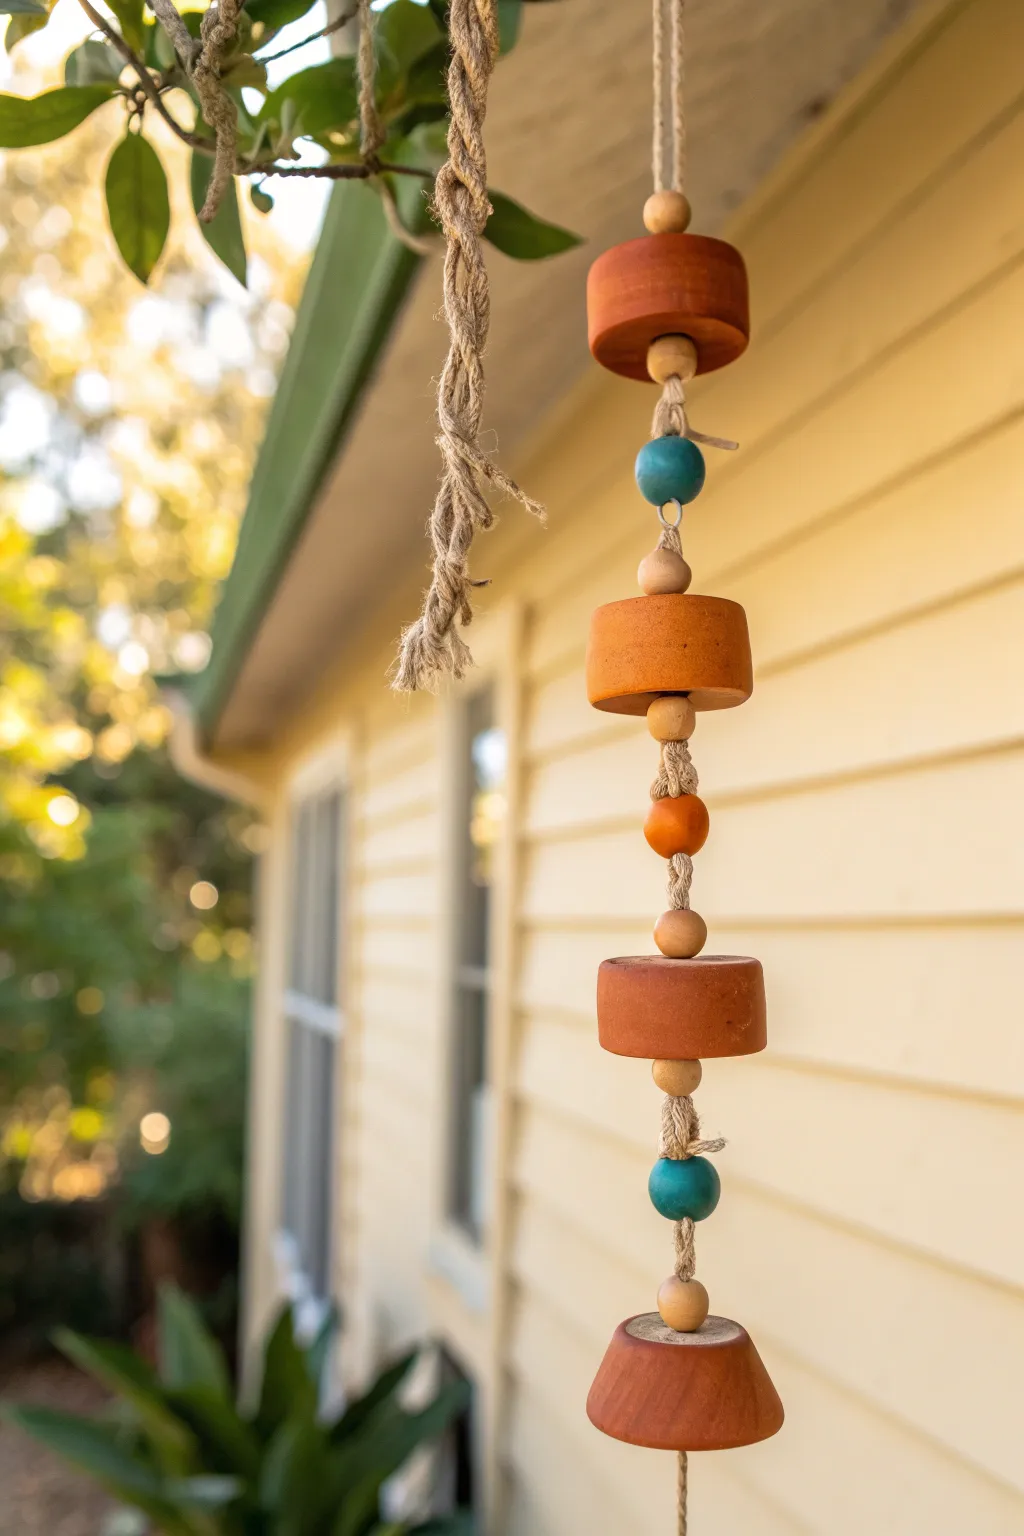
Transform simple terracotta shapes into a rhythmic vertical display that combines earthy textures with pops of teal and orange. This wind chime balances rustic jute twine with smooth wooden beads for a charming outdoor accent.
Step-by-Step Guide
Materials
- 3 cylindrical mini terracotta beads or sliced pot rims (approx. 1.5 inch diameter)
- 1 inverted mini terracotta pot (bell shape) for the bottom
- Jute twine or heavy hemp cord
- Assorted wooden beads: 4 large natural (approx. 15mm), 2 medium teal (10-12mm), 1 medium orange (10-12mm)
- Scissors
- High-grit sandpaper (optional, for smoothing terracotta edges)
Step 1: Preparation & First Tier
-
Prepare the Cord:
Cut a length of jute twine approximately 3 to 4 feet long. Fold it in half to create a loop at the top for hanging, and tie a sturdy overhand knot about 2 inches down from the fold to secure the loop. -
Start with Wood:
Thread both tail ends of the jute through a single large, natural wooden bead. Push the bead all the way up to the knot you just tied. -
Add the First Terracotta Piece:
Take one of your cylindrical terracotta beads. If you are using sliced pot rims instead, ensure the edges are sanded smooth first. Thread the twin strings through the center hole. -
Secure the First Section:
Slide a second large natural wooden bead onto the cords, pushing it snug against the bottom of the terracotta cylinder. Tie a double overhand knot directly beneath this wooden bead to hold the entire first section in place.
Uneven Hanging?
If the terracotta cylinders tilt too much, the hole might be too large for the knot. Add a small washer or a tiny seed bead between the knot and the terracotta to stabilize it.
Step 2: Building the Middle Sections
-
Add Color:
Create some visual spacing by tying another knot about 1.5 inches down from the previous one. Thread on a teal wooden bead, resting it on the new knot. -
Create a Separation Knot:
Tie a knot immediately below the teal bead to lock it in position, then tie another knot about 1 inch lower to prepare for the next large bead. -
Second Wood Accent:
Thread on a large natural wooden bead, resting it on the lowest knot. -
Second Terracotta Cylinder:
Slide the second terracotta cylinder onto the twine. It should sit directly on top of the large wooden bead you just placed, rather than having the bead below it. -
Secure Heavy Bead:
Thread the orange wooden bead onto the twine. Position it below the terracotta cylinder. -
Knotting the Orange Bead:
Tie a chunky knot directly under the orange bead. I find that wrapping the twine around twice before pulling tight helps support the weight of the ceramic above it.
Make it chime louder
Add a metal washer or a small copper bell inside the bottom inverted pot. When the wind blows, the internal wooden bead will strike metal instead of clay for a brighter sound.
Step 3: Final Tier & Bell
-
Third Terracotta Cylinder:
Leave a 1.5-inch gap of bare twine, then add a large natural wooden bead followed by your third terracotta cylinder. -
Locking the Third Tier:
Secure this section with a sturdy knot right underneath the terracotta piece to keep it from sliding down. -
Lower Decorative Segment:
Leave another short gap of twine (about 1 inch). Tie a knot, add your second teal bead, and tie another knot immediately underneath it to keep it stationary. -
Prepare for the Bell:
Tie a knot roughly 1.5 inches below the last teal bead. Add the final large natural wooden bead so it rests on this knot. -
Attach the Bell:
Thread the twine through the drainage hole of the inverted bell-shaped mini pot. The pot should rest on top of the wooden bead acting as a clapper or stop. -
Final Securement:
Tie a very large, secure double or triple knot inside the bell pot if needed, or simply let the wooden bead handle the weight. Trim any excess twine hanging from the bottom to your desired length.
Now you can hang your creation on a porch hook and enjoy the gentle clatter of clay in the breeze
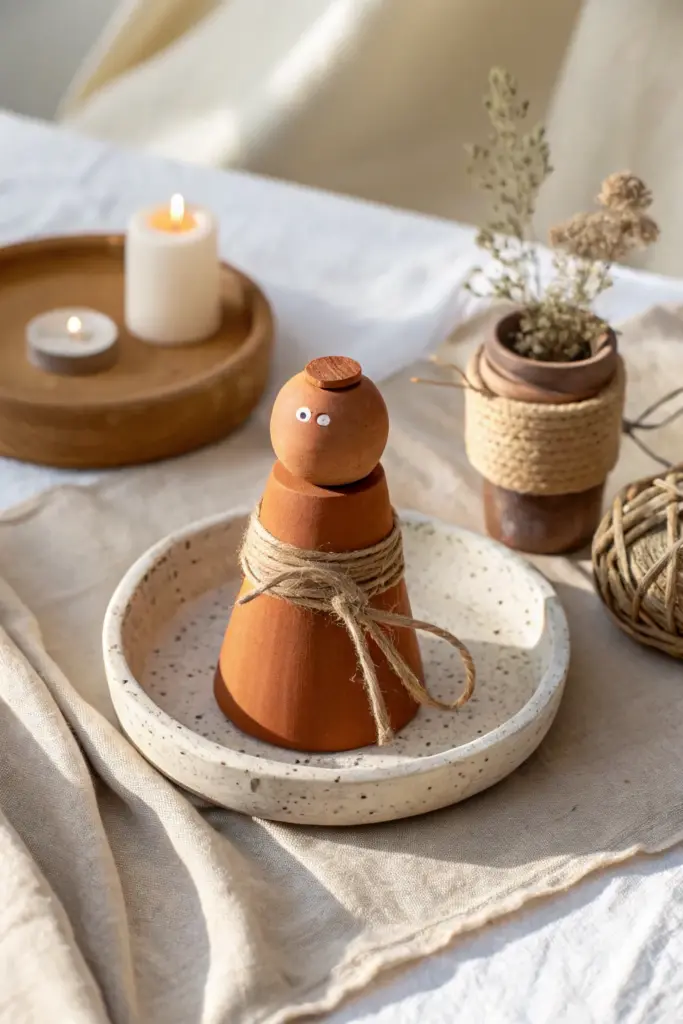
Mini Pot Nativity-Style Figurines

Transform humble garden supplies into a charming, minimalist nativity figure with earthy tones and rustic textures. This simple stacked design uses the natural warmth of terracotta and jute twine to create a stylized character perfect for a holiday mantel display.
Step-by-Step
Materials
- Small terracotta pot (approx. 2-3 inches, standard conical shape)
- Large wooden bead or spun cotton ball (sized to fit the pot’s base)
- Small wooden button or flat wooden plug (for the ‘hat’)
- Terracotta-colored acrylic paint (matte finish)
- Natural jute twine
- Tiny googly eyes (self-adhesive or glue-on)
- Hot glue gun and glue sticks
- Paintbrush (flat shader)
- Scissors
Step 1: Preparing the Base
-
Clean surface:
Begin by wiping down your terracotta pot with a slightly damp cloth to remove any pottery dust or price tag residue. Let it dry completely so the paint adheres properly. -
Invert the pot:
Flip the pot upside down. The wider rim will be the base of your figurine, and the drainage hole will receive the head. -
Paint selection:
If your wooden bead or spun cotton ball doesn’t match the pot’s clay color, mix a terracotta shade of acrylic paint. You want the head and body to look like a cohesive, singular material. -
Painting the head:
Paint the round wooden bead fully. I find it helpful to stick the bead on a skewer or pencil to paint all sides without getting messy fingers. Allow this to dry to the touch. -
Painting the cap:
While the head dries, paint the small flat wooden button or plug in the same terracotta shade. This will serve as a simplified hat or bun on top.
Step 2: Assembly
-
Attach the head:
Once the paint is dry, apply a ring of hot glue around the drainage hole on the inverted pot’s bottom (now the shoulders). -
Secure the bead:
Press the painted wooden bead firmly onto the glue ring. hold it in place for ten seconds to ensure it sets straight and doesn’t tilt. -
Add the cap:
Apply a tiny dot of hot glue to the very top center of the head bead. Press the small painted wooden button flat onto this spot.
Glue Gun Pro-Tip
Use a low-temp glue gun if possible. The glue dries faster on porous terracotta and you’re less likely to burn your fingers while wrapping the twine securely.
Step 3: Decoration & Details
-
Position the eyes:
Take two tiny googly eyes. Peel off the backing if self-adhesive, or use a toothpick to apply a speck of craft glue to the back of each. -
Place the face:
Stick the eyes near the top third of the head sphere. Keeping them widely spaced gives the character a quirky, innocent expression. -
Start the sash:
Cut a long length of jute twine, about 24 inches to be safe. You want plenty of excess to create a bulky wrap. -
Anchor the twine:
Dab a small drop of hot glue on the back of the pot, right where the ‘neck’ meets the shoulder. -
Wrapping technique:
Press the center of your twine into the glue, then bring both ends around to the front. Cross them over each other. -
Building layers:
Continue wrapping the twine around the ‘shoulders’ of the figurine, crossing back and forth to create a thick, rustic shawl appearance. -
Tying the knot:
Once the wrapped section looks substantial enough (usually 3-4 passes), bring the ends to the front one last time. -
Final bow:
Tie a simple knot or a floppy bow in the front. Let the tails hang down naturally against the terracotta body. -
Trim ends:
Trim the twine tails if they are dragging too much, but leaving them slightly long adds to the rustic charm.
Level Up: Texture
Before painting the head, mix a pinch of baking soda into your acrylic paint. This creates a gritty, clay-like texture that makes the wood look exactly like pottery.
Set your finished figurine on a tray with a candle to enjoy its simple, handmade warmth