A clay picture frame is the easiest way to turn an everyday photo into something that feels truly handmade and personal. I love how a few simple clay details—texture, color, and a little dimension—can make your memories look like tiny pieces of art.
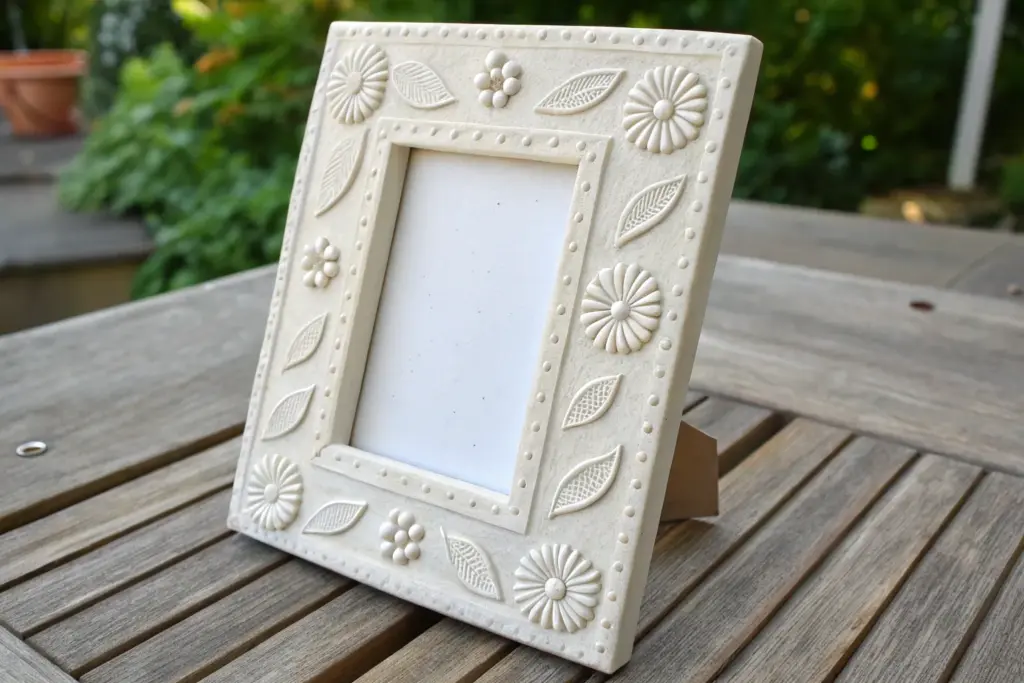
All-Over Daisy Border Frame
Bring a touch of cottagecore charm to your desk or mantel with this delightful daisy-covered frame. The textured petals and sunny yellow centers create a cheerful, tactile border that perfectly highlights your favorite memories.
Step-by-Step Tutorial
Materials
- Wide, flat wooden picture frame (unfinished)
- Air-dry modeling clay (white)
- Acrylic paints: Creamy off-white, sunny yellow, warm ochre
- Sculpting tools (needle tool, ball stylus)
- Paintbrushes (flat shader, fine detail brush)
- Craft glue or tacky glue
- Rolling pin
- Fine-grit sandpaper
- Matte varnish (spray or brush-on)
- Aluminum foil or wax paper
Step 1: Prepping the Base
-
Prepare the frame:
If your wooden frame is rough, give it a quick sanding with fine-grit sandpaper to ensure a smooth surface for the clay to adhere to. Wipe away any dust with a damp cloth. -
Base coat painting:
Paint the entire wooden frame with a creamy off-white acrylic paint. This acts as a primer and ensures that any gaps between the flowers will look cohesive. Let this dry completely. -
Create texture (optional):
For a rustic look like the example, dry brush a tiny amount of warm ochre or light brown paint over the cream base to simulate worn wood grain.
Natural Variation
Don’t make every petal identical. Vary the length and curve of the petals slightly. This irregularity mimics nature and makes the finished piece look more organic.
Step 2: Sculpting the Daisies
-
Make the centers:
Pinch off small pieces of air-dry clay and roll them into balls about the size of a pea. You’ll need about 14-16 of these, depending on your frame size. -
Texture the centers:
Gently press each ball slightly flat. Use a needle tool or an old toothbrush to stipple the surface, creating a dense, pollen-like texture. -
Form petal drops:
Roll small teardrop shapes out of white clay. For each flower, you will need roughly 8-10 petals. I like to make a large batch of these teardrops first so the assembly goes faster. -
Flatten the petals:
Press each teardrop flat with your thumb. Use a sculpting tool or knife to indent a shallow line down the center of each petal for a realistic look. -
Assemble the flowers:
On a piece of wax paper, arrange the petals in a circle, overlapping them slightly at the center. Place a textured ball in the middle and press gently to bond them. Use a dab of water if the clay feels dry. -
Create half-flowers:
Notice how some flowers in the example hang off the edge? For these, create only half a circle of petals and cut the center ball in half. This creates a natural, overflowing look.
Sticky Clay Fix
If your air-dry clay is sticking to your fingers or tools, dip your finger in a tiny bit of water or use baby oil on your tools to smooth it out easily.
Step 3: Assembly and Finishing
-
Dry fit placement:
Before gluing, lay your sculpted daisies onto the frame to plan the spacing. Aim for an organic pattern, alternating full flowers with the partial ones on the edges. -
Glue the flowers:
Apply a strong craft glue to the back of each flower and press it onto the wooden frame. If you are using fresh clay on wood, you can use PVA glue; if the clay is already dry, use a strong tacky glue. -
Allow to dry:
Let the clay dry completely according to the package instructions. This usually takes 24 hours. The white clay might shrink slightly, which is normal. -
Paint the petals:
Paint the petals with the same creamy off-white used on the frame base. This integrates the clay with the wood. Use two coats if necessary for full coverage. -
Paint the centers:
Carefully paint the textured centers with sunny yellow acrylic paint. Use a detailed brush to get into the stippled texture without getting yellow on the white petals. -
Add depth:
Mix a tiny drop of orange or brown into your yellow paint. Dab this darker shade right at the very bottom edge of the yellow center to give it a 3D shadow effect. -
Distress (optional):
Once the paint is dry, you can very lightly sand the edges of the petals to reveal a bit of the raw clay texture, enhancing the rustic stone-like appearance. -
Seal the artwork:
Finish with a coat of matte spray varnish. This protects the clay from moisture and gives the frame a professional, unified sheen.
Now you have a charming, handcrafted frame ready to hold a treasured photo


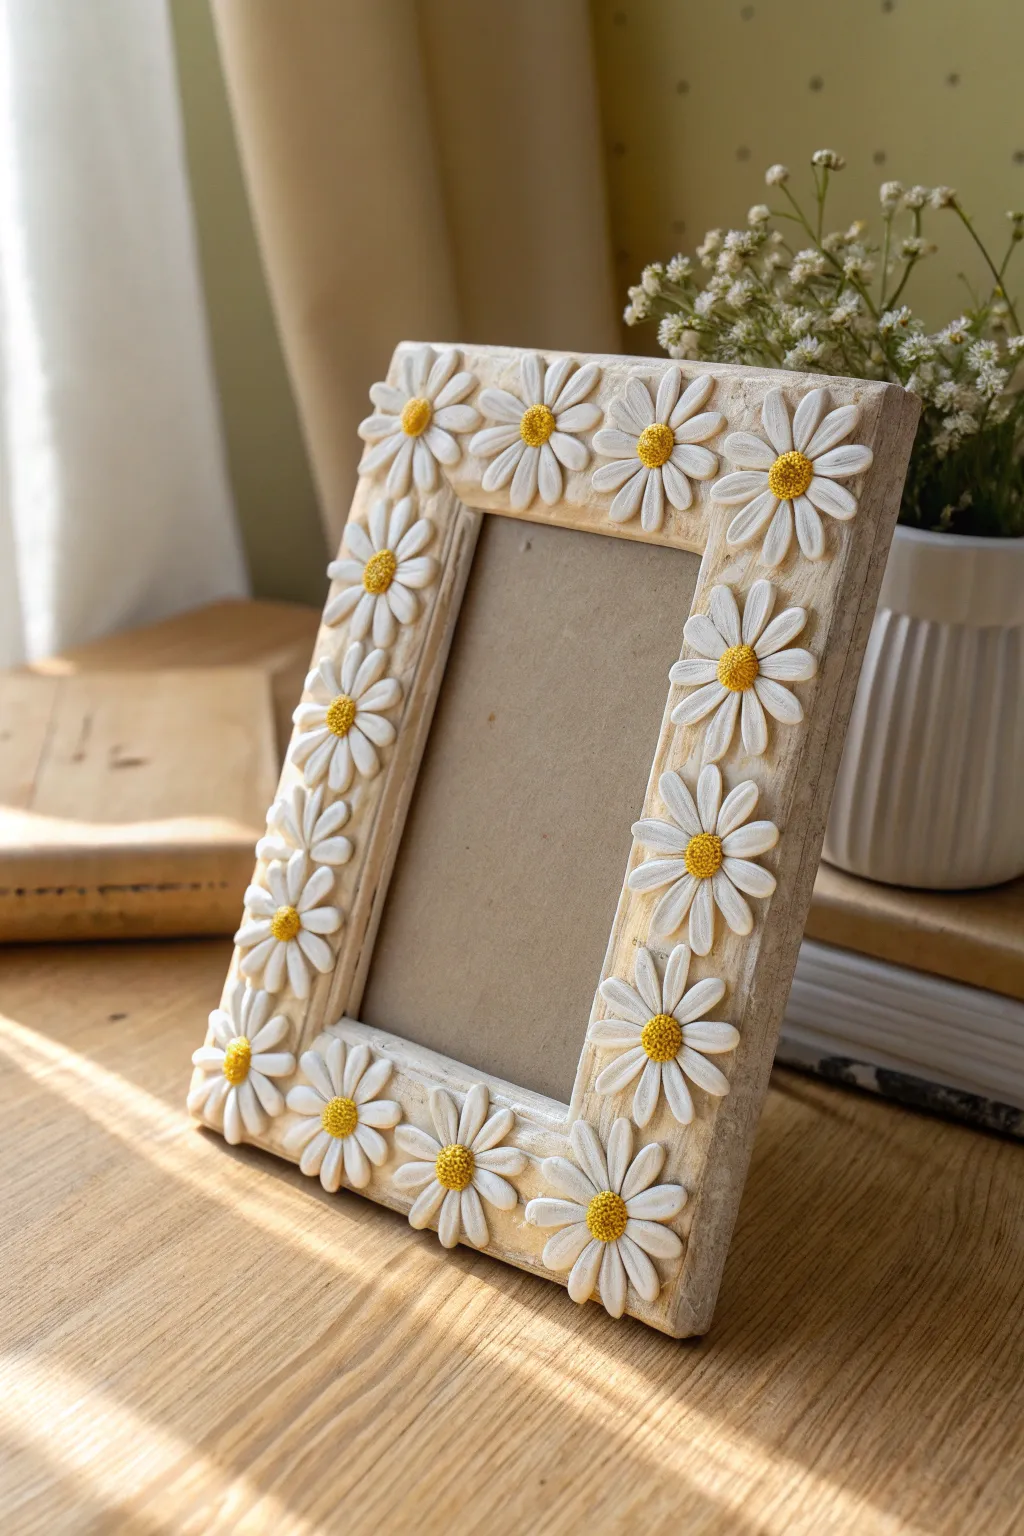
Starry Night and Moon Frame
Transform a plain wooden frame into a celestial masterpiece with this starry night project. Featuring textured clay stars and a crescent moon against a deep blue backdrop, it’s the perfect way to display sleepytime memories or favorite quotes.
Detailed Instructions
Materials
- Wide-rimmed wooden picture frame
- White air-dry clay or polymer clay
- Rolling pin
- Star-shaped cookie cutters (various sizes)
- Round cookie cutter (for the moon)
- Clay sculpting tools or a toothpick
- Navy blue acrylic paint
- White or silver acrylic paint
- Medium flat paintbrush
- Fine-point paintbrush or dotting tool
- Strong craft glue (like E6000 or Tacky Glue)
- Sandpaper (fine grit)
- Matte varnish (optional)
Step 1: Painting the Base
-
Prep the Frame:
Remove the glass and backing from your wooden frame. If the wood is rough, give it a quick sanding with fine-grit sandpaper to ensure a smooth surface for painting. -
Apply Base Color:
Squeeze out a generous amount of navy blue acrylic paint. Using a medium flat brush, paint the entire front and sides of the frame. Don’t worry about making it perfectly smooth; visible brushstrokes add a nice texture that mimics a painted sky. -
Second Coat:
Allow the first layer to dry completely (about 20 minutes). Apply a second coat to ensure opaque, deep blue coverage. Let this dry thoroughly before attaching any decorations.
Step 2: Sculpting the Celestial Shapes
-
Condition the Clay:
Take a chunk of white clay and knead it until it’s soft, pliable, and free of cracks. If you are using polymer clay, the warmth of your hands will help condition it. -
Roll It Out:
Use a rolling pin to flatten the clay to an even thickness, roughly 1/8 to 1/4 inch thick. You want the shapes to be sturdy but not too heavy for the frame. -
Cut the Stars:
Use your star-shaped cutters to punch out about 8-10 stars. I like to use at least two different sizes to create visual interest. Since the clay is white, you won’t need to paint these later unless you want extra shimmer. -
Texture the Stars:
Before the clay hardens, use a toothpick or a fine sculpting tool to gently press a cross-hatch or grid pattern onto the surface of each star. This subtle detail gives them a charming, handmade look. -
Shape the Moon:
To make the crescent moon, use a round cutter to cut a circle. Then, position the cutter slightly off-center over the circle you just cut and cut again. This will leave you with a perfect crescent shape. -
Dry or Bake:
If using air-dry clay, lay your shapes on a flat surface and let them dry for 24 hours. If using polymer clay, bake them according to the package instructions (usually around 275°F for 15-30 minutes) and let them cool.
Make It Sparkle
Brush a very thin layer of pearlescent mica powder or glitter glaze over the white clay stars before gluing them down. This catches the light beautifully without overpowering the blue.
Step 3: Assembly and Detailing
-
Dry Fit the Layout:
Once your clay pieces are hard, arrange them on the blue frame to find a composition you like. Place the moon in a corner (usually top right) and scatter the stars somewhat randomly around the other sides. -
Glue the Pieces:
Apply a dab of strong craft glue to the back of each clay shape and press them firmly onto the painted wood. Hold each one for a few seconds to ensure initial contact. -
Mix the Starlight Color:
While the glue sets, prepare a small amount of white paint. You can mix in a tiny drop of silver if you want a subtle sparkle for the distant stars. -
Dot the Background:
Dip a fine-point brush or a dotting tool into the white paint. Gently dab small dots onto the blue background in the empty spaces between your clay shapes. -
Vary Dot Sizes:
Create depth by making some dots slightly larger than others. Group a few distinct tiny dots together to mimic constellations. -
Seal (Optional):
For longevity, you can brush a coat of matte varnish over the entire frame once the paint is fully dry. This protects the clay from moisture and keeps the blue paint vibrant. -
Reassemble:
Once everything is dry and cured, place the glass and backing back into the frame, ready for your photo.
Clay Won’t Stick?
If the clay stars pop off after the glue dries, the wood paint might be too slick. Lightly sand the specific spot on the frame where the star goes to give the glue a better grip.
Now you have a serene, handcrafted frame that brings a touch of magic to any room


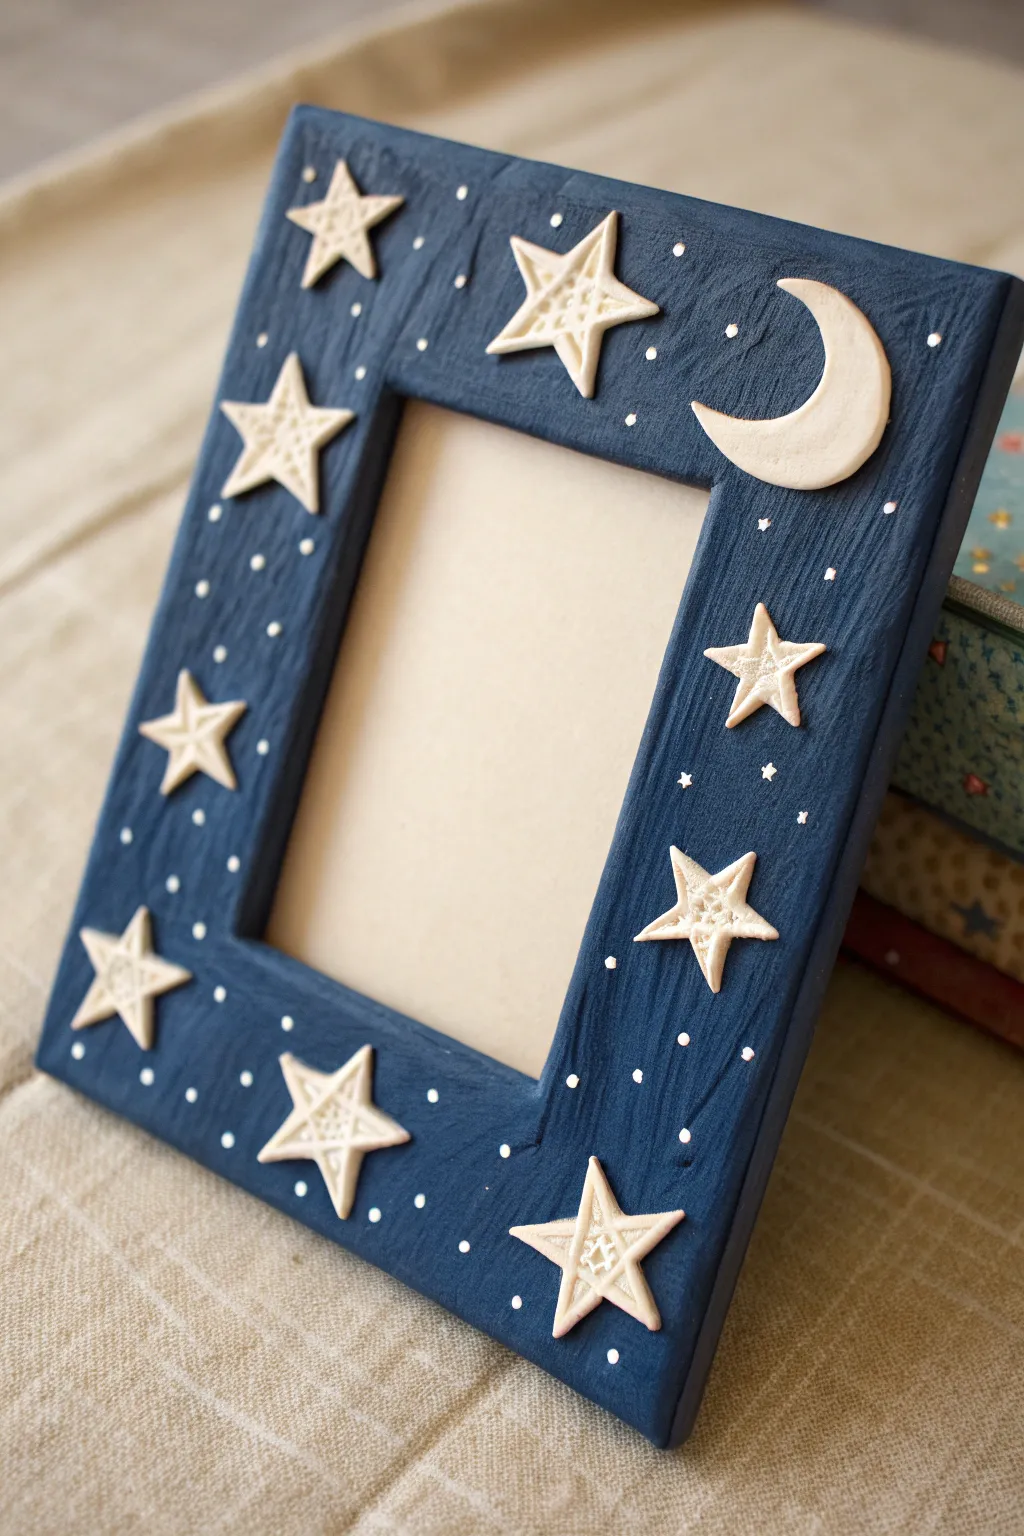
Evergreen Forest Silhouette Frame
Bring the quiet beauty of a winter forest indoors with this charming ceramic-style picture frame. Featuring a speckled finish and a rhythmic border of stamped evergreen trees, this project balances rustic simplicity with a refined, tactile quality.
Step-by-Step Tutorial
Materials
- Polymer clay (white or beige)
- Speckled clay inclusion (e.g., ground black pepper or black embossing powder)
- Rolling pin or clay pasta machine
- Pine tree rubber stamp (approx. 1 inch tall)
- Ruler
- Craft knife or scalpel blade
- Cardboard or stiff paper for templates
- Dark green acrylic paint
- Paper towels or damp sponge
- Matte finish varnish (optional)
- Strong craft glue (E6000 or similar)
- Frame backing and glass (from a cheap thrift store frame)
Step 1: Preparing the Clay Base
-
Mix the Speckled Dough:
Start with a block of white or beige polymer clay. To achieve that natural, stoneware pottery look, knead in a small pinch of ground black pepper or coarse black embossing powder. Mix until the speckles are evenly distributed throughout the clay block. -
Roll Out Slabs:
Roll your clay out into a long, even sheet, aiming for a thickness of about 1/4 inch. If you have a pasta machine dedicated to clay, run it through on a medium-thick setting to ensure perfect uniformity. -
Cut the Strips:
Measure the frame backing you intend to use. Using a ruler and a sharp craft knife, cut four strips of clay. The width of the strips should be slightly wider than your tree stamp (roughly 1.5 to 2 inches wide). -
Create Mitered Corners:
At the ends of each strip, cut 45-degree angles. Use a plastic protractor or a simple paper template to get the angles precise so the corners will meet flush without gaps.
Uneven Stamping?
If your stamp is sticking or pulling up clay, dust the rubber stamp lightly with cornstarch or baby powder before each impression. This acts as a release agent for crisp lines.
Step 2: Stamping and Texturing
-
Test Your Stamp:
Press your pine tree stamp into a scrap piece of clay first. You want a deep impression that captures the branches’ texture, but not so deep that it distorts the strip’s shape. -
Stamp the Border:
Starting from the center of each strip and working outward, press the stamp firmly into the soft clay. Align the trees point-to-base, leaving just a millimeter or two between them for a continuous forest effect. -
Refine the Edges:
Stamping might cause the sides of your clay strips to bulge slightly. Gently use your ruler or a flat tool to push the edges back into a straight line. -
Assemble the Frame Face:
Lay the four strips on a baking sheet lined with parchment paper. Press the mitered 45-degree corners together. You can use a little liquid clay (or ‘Bake and Bond’) on the seams to fuse them securely. -
Inspect the Seams:
Smooth the corner seams gently with your finger or a clay tool so they look seamless, though the distinct sections are part of the charm.
Step 3: Baking and Finishing
-
Bake the Clay:
Bake the assembled frame according to the temperature and time instructions on your specific package of polymer clay. I always recommend using an oven thermometer to prevent scorching. -
Cool Completely:
Allow the frame to cool completely on a flat surface. Don’t rush this, as warm clay is still flexible and can warp. -
Apply the Antiquing:
Dilute a small amount of dark green acrylic paint with a drop of water. Brush this mixture generously over the stamped trees, ensuring it gets into every deep crevice and branch detail. -
Wipe Back Excess:
Immediately wipe the surface with a damp paper towel or sponge. The goal is to remove the green paint from the raised surface of the clay while leaving it trapped inside the stamped depressions. -
Detail Clean-Up:
If the green paint stained the flat areas too much, use a Q-tip dipped in rubbing alcohol to scrub the ‘stoneware’ surface clean, making the trees pop. -
Assembly:
Once the paint is dry, glue your beautiful new clay face onto the simple frame backing you measured earlier. Let the adhesive cure fully before inserting your photo.
Add Rustic Depth
Before baking, lightly texture the smooth areas of the clay with a toothbrush or crumpled foil. This mimics the porous surface of real fired ceramics.
This handcrafted frame adds such a cozy, woodland touch to any photo fortunate enough to be placed inside


Boho Rainbow Arch Frame
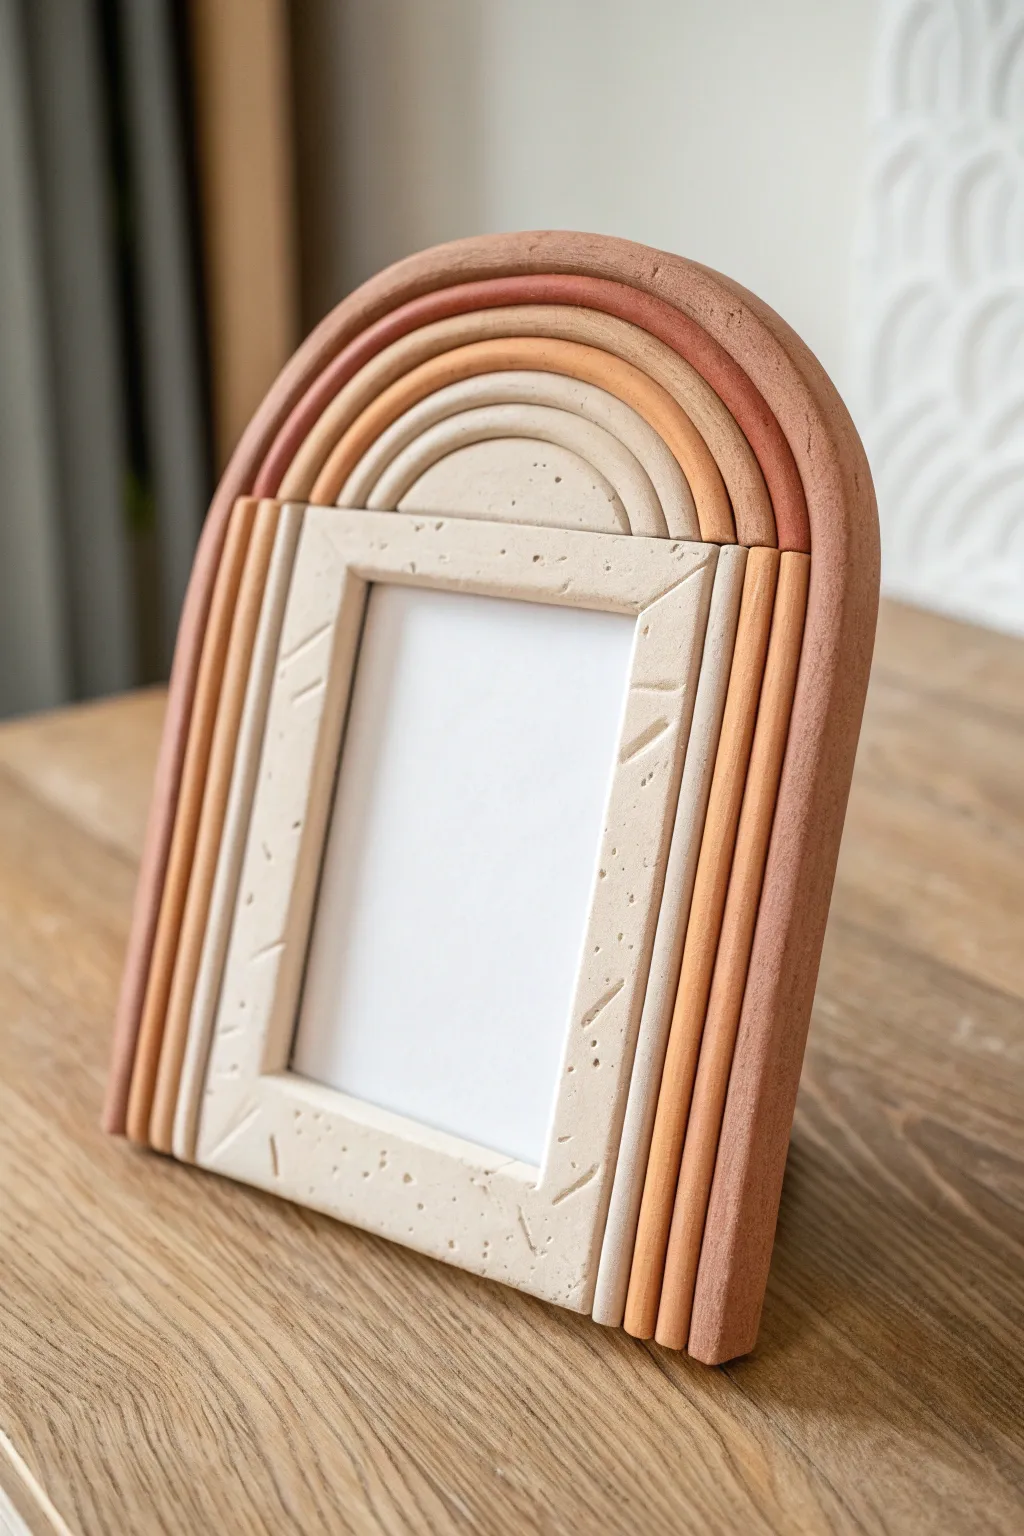
Transform ordinary clay into a trendy, terracotta-toned decor piece with this beautiful arch frame project. The design combines organic textures with soft, warm hues to create a stunning home for your favorite vertical 4×6 photo.
Step-by-Step Tutorial
Materials
- Air-dry clay (white, terracotta, and beige)
- Acrylic rolling pin
- Sharp craft knife or scalpel
- Ruler
- Needle tool or toothpick
- Cardboard or stiff paper for templates
- Small bowl of water
- Sponge or fine-grit sandpaper
- Strong craft glue (e.g., E6000)
- Small piece of glass or acrylic sheet (cut to size)
- Cardboard backing
Step 1: Planning & Base Creation
-
Draft the template:
Start by sketching your frame shape on cardstock. Draw a central rectangle measuring roughly 4×6 inches (or your desired photo size), then draw a tall arch over it. Leave a border of about 1.5 inches around the rectangle to accommodate the clay coils. -
Roll out the base:
Using a plain white or beige air-dry clay, roll out a large, flat slab about 5mm (1/4 inch) thick. This will be the structural backing that holds everything together. -
Cut the base shape:
Place your cardstock template over the rolled clay. Using your craft knife, cut out the entire arch shape, including the central window where the photo will go. Keep the edges clean and vertical. -
Create the inner frame box:
Roll out a strip of light beige or speckled clay, also about 5mm thick. Cut four strips to frame the central window directly. I find mitered corners (45-degree angles) look best, but simple butt joints work too. Texture this inner frame by gently pressing a needle tool into it to create random divots and dashes. -
Attach the inner frame:
Score the back of your textured strips and the front of your base slab around the window. Apply a little water or slip, and press the strips down firmly to create the raised inner border.
Seamless Coils
To prevent coils from cracking apart as they dry, score/scratch the sides where they touch each other and add a little water before pressing them together.
Step 2: Forming the Rainbow Arches
-
Mix your colors:
Prepare three distinct clay colors: a deep terracotta/brick red, a muted peach or rust orange, and a cream/light beige. If you only have white clay, knead in a small amount of acrylic paint to dye the clay before rolling. -
Roll the coils:
Roll creating long, even snakes (coils) for each color. You will need thick coils (about 1cm diameter) for the outer arches and slightly thinner ones for the inner details. Use your rolling pin or a flat board to gently flatten the back of the coils so they sit flush. -
Fit the first arch:
Take your cream/beige coil and drape it over the textured inner frame you just built. Measure it so it creates a perfect tight arch over the top and runs straight down the sides to the bottom edge. Trim the ends flush with the base. -
Fit the middle arch:
Repeat the process with the peach/orange clay coil. Snug it tightly against the first cream coil, ensuring there are no gaps between them. -
Fit the outer arch:
Finally, place the thickest terracotta coil on the outside edge. This should align perfectly with the outer edge of your base slab. Trim any excess clay at the bottom.
Step 3: Assembly & Finishing
-
Secure the coils:
Lift each coil one by one, score the underside and the base slab, apply a dab of water, and press them back into place. Gently smooth the seams between coils on the backside if possible, or just press them firmly together laterally to ensure they fuse as one unit. -
Refine the edges:
Use your finger dipped in water to smooth the bottom edges and the rounded top of the arch so the layers look seamless and unified. -
Add texture:
If the clay looks too smooth, lightly tap the surface of the terracotta and peach coils with a dry sponge or stiff brush to give them a stone-like, matte texture. -
Dry thoroughly:
Let the frame dry flat on a wire rack or mesh screen for at least 24-48 hours. Rotate it occasionally to prevent warping. -
Sand imperfections:
Once fully dry and hard, use fine-grit sandpaper to smooth out any sharp edges or uneven spots on the bottom or back. -
Final assembly:
Cut a piece of cardboard slightly larger than the photo window. Glue narrow strips of cardboard on three sides of the back of the frame to create a slot, then glue the backing cardboard over that. This creates a pocket to slide your glass and photo into from the top.
Speckled Stone Effect
For the inner frame, mix used coffee grounds or cracked black pepper into the white clay. When it dries, it mimics the look of real speckled ceramic or stone.
Slide in your favorite memory and display your handmade masterpiece on a shelf or desk

The Complete Guide to Pottery Troubleshooting
Uncover the most common ceramic mistakes—from cracking clay to failed glazes—and learn how to fix them fast.
Heart and Love Note Letter Tiles Frame
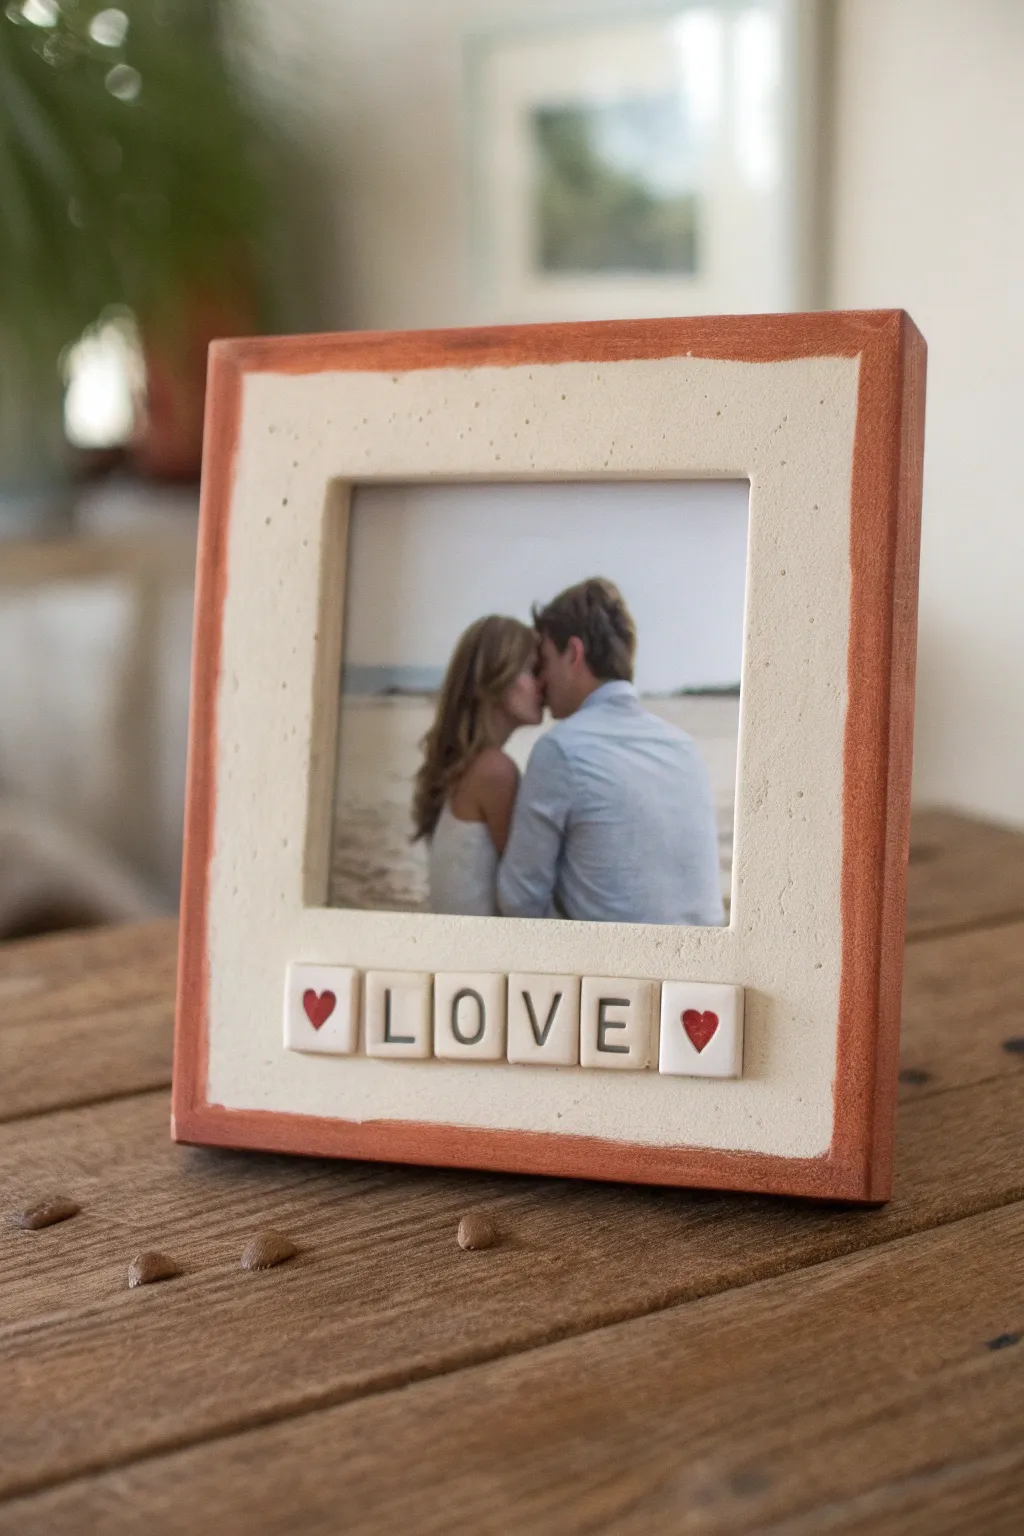
Capture the warmth of your favorite memories with this textured clay frame, featuring a rustic terracotta-style border and personalized letter tiles. The charming grid of “LOVE” tiles and stamped hearts adds a sweet, handmade touch perfect for gifts or bedside tables.
Detailed Instructions
Materials
- White or cream-colored air-dry clay (or polymer clay)
- Square wooden picture frame (unfinished)
- Acrylic paint: Terracotta or reddish-brown
- Rolling pin
- Craft knife
- Sandpaper (fine grit)
- Small square cookie cutter (approx. 0.5 – 0.75 inch)
- Letter stamps for clay
- Red acrylic paint
- Fine detail paintbrush
- Strong craft glue (E6000 or similar)
- Texture tool (toothbrush or stiff bristle brush)
- Matte varnish or sealant
Step 1: Preparing the Tiles
-
Roll the clay:
Start by conditioning a small portion of your white clay and rolling it out on a non-stick surface to a uniform thickness of about 1/8 inch. -
Cut squares:
Using your small square cutter, punch out six identical square tiles. If you don’t have a cutter, use a ruler and craft knife to measure and cut precise squares. -
Stamp the letters:
Gently press your letter stamps into the center of four tiles to spell L-O-V-E. You want the impression deep enough to hold paint later, but not so deep it distorts the square shape. -
Add heart details:
On the remaining two tiles, use a small heart stamp or a sculpting tool to indent a heart shape in the center. -
Dry the tiles:
Set the tiles aside on a flat surface to dry completely according to your clay package instructions. I like to flip them over halfway through drying to prevent curling.
Step 2: Creating the Frame Face
-
Roll the frame layer:
Roll out a larger sheet of the same white clay, slightly thinner than your tiles but large enough to cover the face of your wooden frame. -
Apply adhesive:
Spread a thin, even layer of glue onto the front surface of the wooden frame. -
Attach the clay:
Carefully lift your clay sheet and lay it over the glued frame. Gently smooth it down with your fingers to remove air bubbles. -
Trim edges:
Use a sharp craft knife to trim the excess clay flush with the outer and inner edges of the wooden frame. Clean up any jagged bits with your fingers. -
Texturize the surface:
Take a toothbrush or a stiff bristle brush and stipple the wet clay surface all over. This creates that lovely organic, speckled stone texture seen in the photo. -
Create the tile indents:
While the frame clay is still soft, gently press your *dried* tiles into the bottom section of the frame where you want them to sit. Press just enough to create a shallow seat for them, then remove the tiles. -
Dry the frame:
Allow the clay-covered frame to dry completely. This may take 24 hours depending on humidity and clay thickness.
Clean Lines
Sand the edges of your dried clay tiles with an emery board before painting. Sharp, crisp corners make the tiles look like real ceramic pieces.
Step 3: Painting and Assembly
-
Paint the border:
Dip a flat brush into terracotta or reddish-brown acrylic paint. Carefully paint the outer edges and the side thickness of the frame. -
Create the rough edge:
Bring the paint slightly onto the front face of the frame, creating a deliberately uneven, hand-painted border roughly 1/4 inch wide. This frames the white clay beautifully. -
Fill the letters:
Mix a small amount of dark grey or black paint with water to make a wash. Paint it into the stamped letters, then immediately wipe the surface with a damp cloth, leaving the dark color only in the recesses. -
Paint hearts:
Using a fine detail brush and red acrylic paint, carefully fill in the indented hearts on the end tiles. -
Seal the pieces:
Apply a coat of matte varnish to both the frame and the individual tiles to protect the clay and paint. -
Attach tiles:
Apply a dot of strong craft glue to the back of each tile and place them into the shallow indents you created earlier, ensuring they are straight and centered. -
Insert photo:
Once everything is dry and bonded, place your favorite photo inside the frame and secure the backing.
Message Swap
Make extra tiles with magnets on the back and embed a metal strip under the frame’s clay. You can then swap out words like ‘BABY’ or dates seasonally.
Place your finished frame in a well-lit spot to highlight the subtle texture of the clay
Faux Ceramic Glaze Look Frame
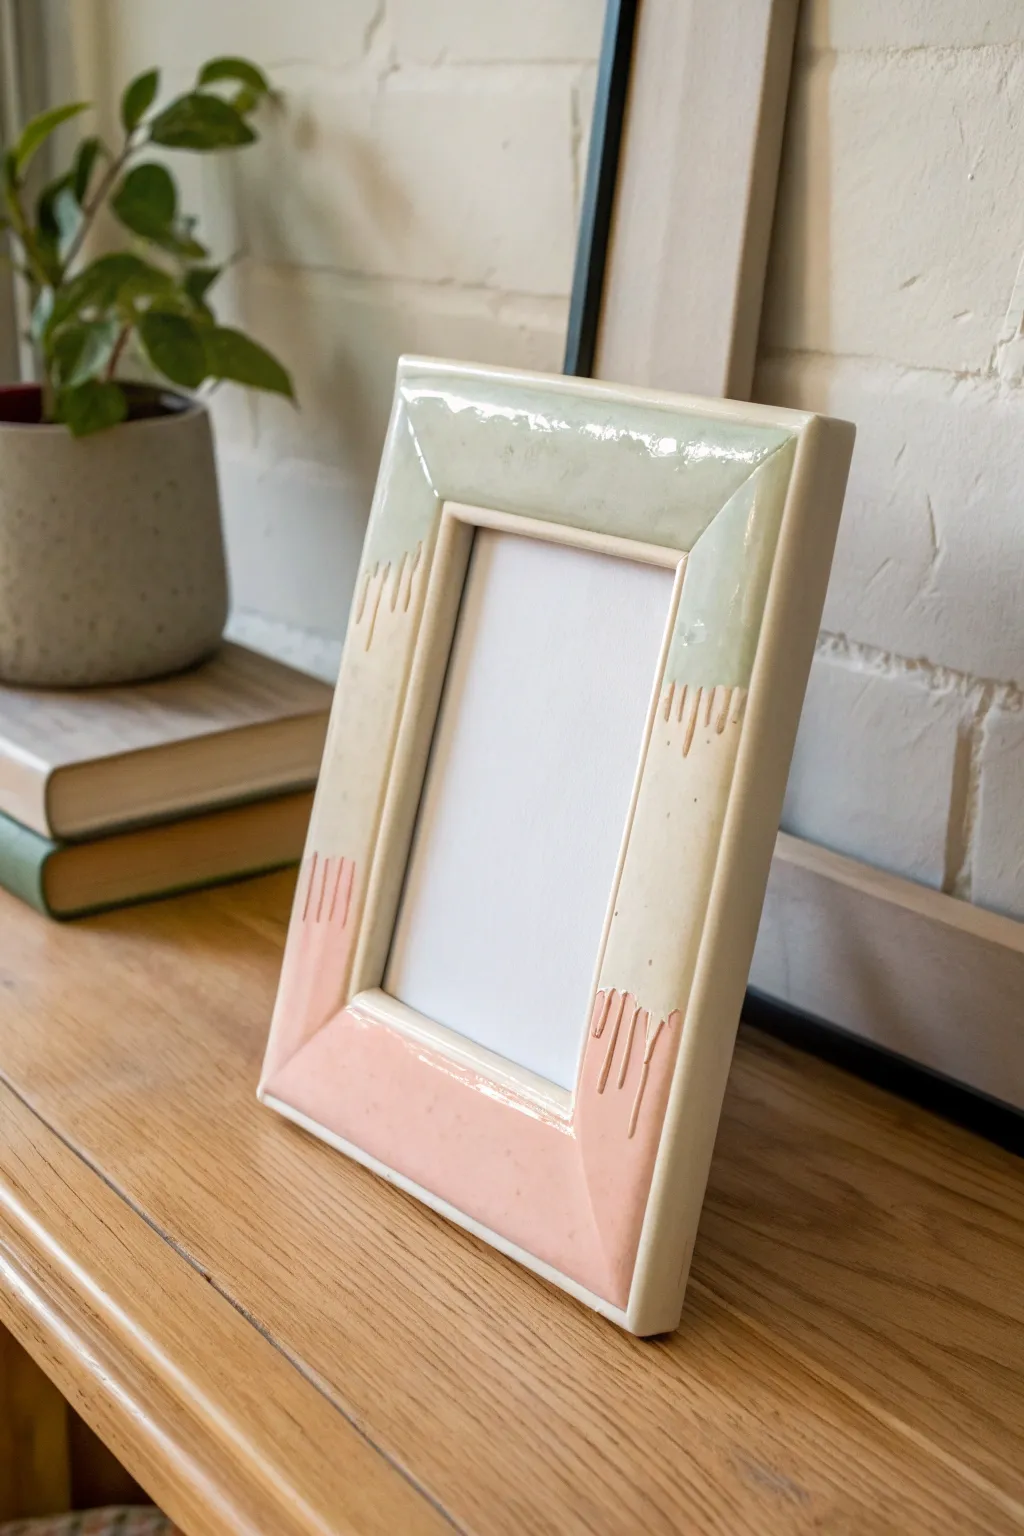
Achieve the high-end look of glazed pottery without a kiln using air-dry clay and a clever painting technique. This project mimics the organic beauty of dripping ceramic glazes with textured carvings and a glossy finish.
Step-by-Step Guide
Materials
- Air-dry clay (white)
- Rolling pin
- Craft knife or clay cutter
- Flat, wide wooden picture frame (as a base)
- Clay sculpting tools (specifically a needle tool or small loop tool)
- Acrylic paints (Mint green, Peach/Coral, Cream)
- High-gloss varnish or polyurethane sealer
- Fine grit sandpaper
- Water and bowl
- Strong craft glue (e.g., E6000)
Step 1: Sculpting the Clay Base
-
Prepare the Base:
Remove the glass and backing from your wooden frame. Lightly sand the wood surface to give the glue and clay something to grip onto. -
Roll the Clay:
Roll out your air-dry clay to an even thickness of about 1/4 inch. You want enough to cover the face of the frame but not so thick that it becomes heavy. -
Cut to Size:
Lay the clay slab over the wooden frame. Use your craft knife to trace the inner and outer measurements, cutting the clay slightly larger than the frame to account for shrinkage. -
Attach the Clay:
Apply a thin layer of craft glue to the wooden frame. Carefully lift the clay rectangle and press it onto the wood. Smooth it down gently from the center outwards to remove air bubbles. -
Refine the Edges:
Trim any excess clay flush with the frame’s edges. Use a little water on your finger to smooth the sharp corners and soften the look, mimicking the rounded edges of fired ceramic.
Fixing Clay Cracks
If minor cracks appear while drying, mix a small amount of fresh clay with water to make a paste (slip) and fill them in. Sand smooth once dry.
Step 2: Creating the Glaze Texture
-
Mark the Drip Zones:
Using a needle tool, lightly sketch where your ‘glaze’ colors will stop. For this design, mark a wavy line near the top corners for the green and the bottom corners for the peach. -
Carve the Drips:
This is the signature detail. Use a small carving tool to etch vertical lines extending from your wavy ‘glaze’ lines into the negative space. Vary the lengths to look like running liquid. -
Indent the Drip Ends:
At the bottom of each vertical carved line, press a small round indentation. This creates the illusion of a droplet gathering at the end of the glaze run. -
Smooth the Carvings:
Take a damp paintbrush and run it over your carved lines. This removes little clay crumbs and ensures the texture looks molded rather than scratched. -
Drying Time:
Set the frame aside to dry completely. This usually takes 24-48 hours depending on humidity. Flip it occasionally if possible to ensure even drying.
Level Up: Speckled Clay effect
Before vanishing, flick dilute brown paint onto the cream sections specifically with an old toothbrush to mimic speckled stoneware clay.
Step 3: Painting and Glazing
-
Sanding:
Once bone dry, use fine-grit sandpaper to remove any rough patches or fingerprints. Wipe away the dust with a barely damp cloth or dry brush. -
Base Coat:
Paint the entire frame, including the ‘drip’ areas, with a creamy off-white acrylic paint. This acts as your raw ceramic body color. Let it dry. -
Painting the Mint:
Painting the top section with a soft mint green. Follow the wavy line you carved, carefully painting inside the carved drip channels but stopping exactly where the carving ends. -
Painting the Peach:
Repeat the process on the bottom corners using a peach or coral shade. Be precise with the drips; the color should look like it flowed down and pooled in the carvings. -
Touch Ups:
If your paint strayed outside the carved lines, use a small detail brush with the cream base color to tidy up the edges. -
Sealing for Shine:
Apply a thick coat of high-gloss varnish. I find that a thick layer is key here—it creates that wet, glassy look characteristic of real ceramic glazes. -
Final Assembly:
Once the varnish is cured and hard, reassemble your frame with the glass and backing.
Now you have a trendy, ceramic-style frame ready to display your favorite photo


What Really Happens Inside the Kiln
Learn how time and temperature work together inside the kiln to transform clay into durable ceramic.
Marbled Clay Border Frame
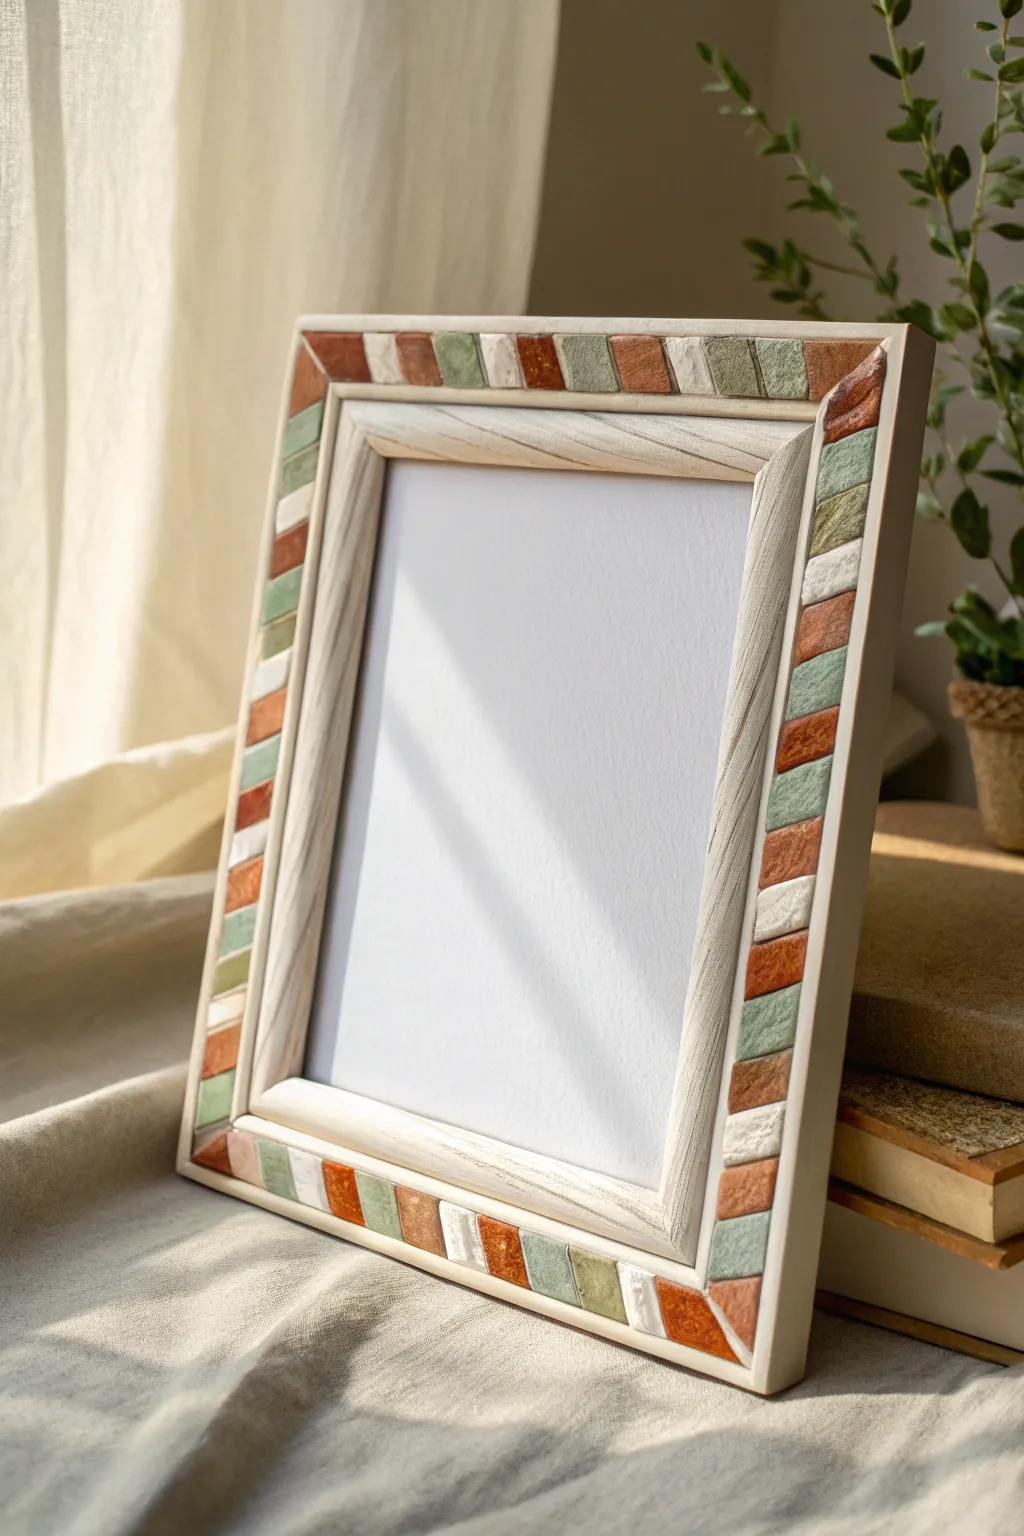
Transform a plain wooden frame into a rustic work of art using simple polymer clay techniques. This project mimics the look of high-end stone inlay with warm terracotta, sage, and cream tones arranged in a charming diagonal pattern.
Step-by-Step
Materials
- Flat, wide wooden picture frame (unfinished)
- Polymer clay (terracotta/burnt orange, sage green, antique white)
- Liquid polymer clay or strong craft glue
- Rolling pin or pasta machine
- Sharp craft knife or tissue blade
- Ruler
- Fine-grit sandpaper
- Texture sponge or stone texture tool
- Acrylic paint (cream/off-white) for the inner rim
- Matte spray sealant
Step 1: Creating the Faux Stone Tiles
-
Condition the clay:
Begin by thoroughly conditioning your three colors of polymer clay until they are soft and pliable. If you want a more natural stone look, you can mix slight streaks of translucent clay into the sage and orange. -
Roll out sheets:
Roll each color of clay into a sheet of uniform thickness, roughly 1/8 inch (3mm). I prefer using a pasta machine for this to ensure every tile is exactly height-matched. -
Add texture:
To mimic the look of cut stone, gently press a texture sponge or even crumpled aluminum foil onto the surface of your clay sheets. You don’t want deep gouges, just a subtle surface disturbance. -
Measure the frame width:
Measure the width of the flat border section of your wooden frame where the tiles will sit. This measurement will determine the length of your rectangular tiles. -
Cut the rectangles:
Using your sharp blade and a ruler, cut the textured clay sheets into small rectangles. Aim for a width of about 0.5 inches (1.2cm) for each tile, keeping the length matched to your frame border. -
Create variation:
Don’t worry if the cuts aren’t perfectly mechanical; slightly organic edges add to the rustic charm seen in the photo. -
Bake the tiles:
Arrange all your cut tiles on a ceramic tile or baking sheet covered with parchment paper. Bake according to your specific clay brand’s instructions (usually 275°F/130°C for 15-30 minutes) and let them cool completely.
Uneven Tiles?
If your baked tiles aren’t sitting flat, the wood frame might be warped. Use a layer of epoxy clay underneath the tiles to level the surface as you glue.
Step 2: Frame Assembly
-
Prep the inner frame:
While the tiles cool, focus on the inner part of the wooden frame. Paint the inner rim (and the outer edge if desired) with a cream-colored acrylic paint. -
Create the twisted texture:
If your base frame is plain wood, replicate the inner texture by rolling a long snake of white clay, twisting it gently to look like rope, and flattening it slightly. Glue this directly onto the inner bevel of the frame before baking, or use air-dry clay for this specific detail. -
Dry fit the pattern:
Once your tiles are cool, lay them out on top of the frame to plan your pattern. The image uses a repeating sequence of terracotta, white, green, and white, arranged at a slight diagonal tilt. -
Adjusting the fit:
You might need to sand the edges of some tiles to make them fit snugly against each other, especially at the corners. -
Glue the first side:
Apply a strong adhesive or liquid clay to one side of the frame border. Press the tiles firmly into place, maintaining that consistent diagonal orientation. -
Continue around the frame:
Work your way around the remaining three sides. At the corners, you can either miter the tiles (cutting them at a 45-degree angle) or simply abut them for a blockier look. -
Fill gaps (optional):
If there are significant gaps between your tiles, you can use a small amount of tile grout or a mixture of liquid clay and chalk pastel to fill the seams, though the dry-stack look is very effective. -
Final finish:
Once the glue is fully cured, give the entire tiled surface a light coat of matte spray sealant to protect it from dust and unify the sheen.
Faux Stone Trick
After baking, lightly sand the surface of the tiles with fine-grit sandpaper. This removes the plastic sheen and reveals a realistic, matte stone texture.
Now you have a stunning, artisanal frame ready to highlight your favorite photo or print
Speckled Stoneware Style Frame
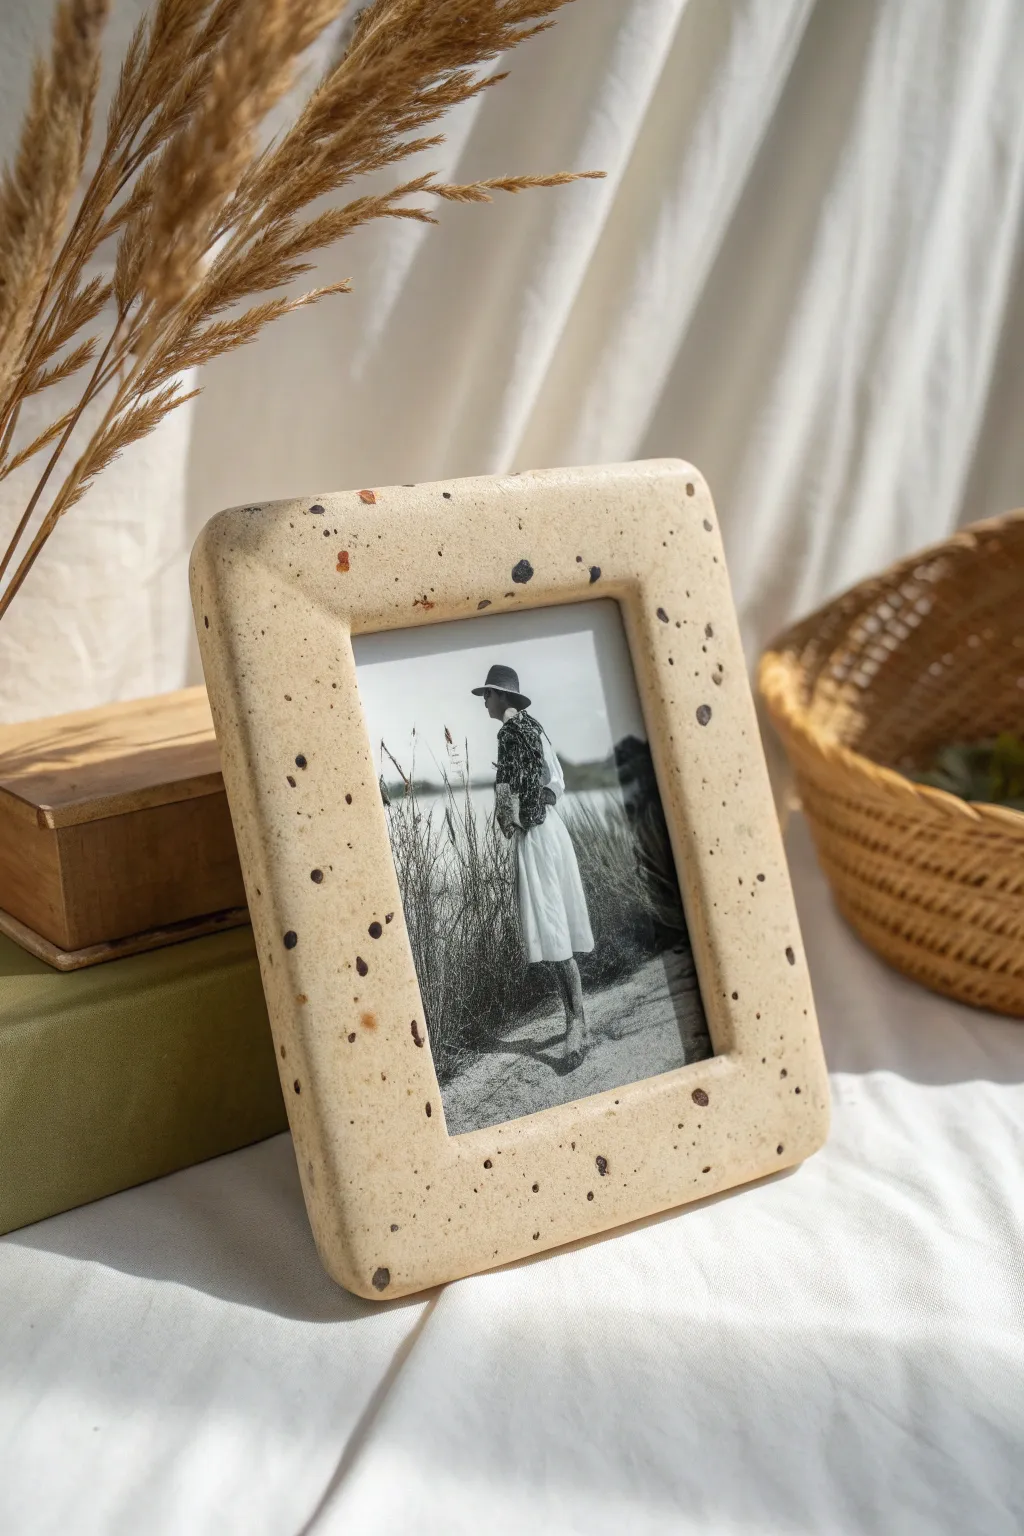
Achieve the high-end look of ceramic stoneware without a kiln using this polymer clay technique. This chunky, terrazzo-style frame features a warm beige base with scattered organic specks, perfect for displaying nostalgic black and white photos.
Step-by-Step Guide
Materials
- Polymer clay (beige or sand color as base)
- Polymer clay (black, brown, and terracotta for inclusions)
- Acrylic rolling pin or clay machine
- Rigid tissue blade or craft knife
- Ruler
- Cardstock or paper for template
- Smooth work surface (ceramic tile or glass mat)
- Oven
- Sandpaper 400-800 grit (optional)
- Matte finish varnish (optional)
Step 1: Preparing the ‘Stoneware’ Base
-
Condition the base clay:
Start by conditioning your beige or sand-colored polymer clay until it is soft and pliable. Use enough clay to create a slab about 1/4 inch thick that is larger than your final frame size. -
Create the inclusions:
Take tiny pinches of black, dark brown, and terracotta-colored clay. Roll these into very small, irregular crumbs and chips. You want a mix of fine dust-like particles and slightly larger, distinct chunks to mimic stone. -
Mix the specks:
Sprinkle your clay crumbs onto the flattened base clay. Fold the clay over to trap them, then roll it out slightly. Repeat folding and rolling just enough to distribute the specks throughout the block without blending the colors into streaks. -
Form the main slab:
Roll your speckled mixture into a final, uniform slab. Aim for a thickness of roughly 1/4 to 3/8 inch for that chunky stoneware aesthetic. I like to use depth guides to ensure the thickness is perfectly even.
Step 2: Shaping the Frame
-
Make a template:
Cut a rectangle from cardstock representing the full outer size of your frame, then cut out the inner window where the photo goes. Place this template gently onto your clay slab. -
Cut the outer shape:
Using a rigid tissue blade or sharp craft knife, cut straight down around the outer edge of the template. Keep your blade vertical to ensure straight sidewalls. -
Cut the inner window:
Carefully cut out the center rectangle. Remove the excess clay from the middle; you can save this for future projects or make matching magnets. -
Basic beveling:
Use your fingers to gently press down the inner and outer edges of the frame face. You aren’t slicing clay away, but rather smushing the sharp corners to create a pillowed, soft bevel. -
Refine the corners:
Using the pad of your thumb, smooth the four outer corners to round them off. The goal is to remove the sharp geometric look and make it feel more organic and molded. -
Add surface texture:
Inspect the surface. If any specks are protruding too much, press them gently flat. You can lightly roll over the surface one last time with very little pressure to unify the texture.
Secret Ingredient
For realistic texture, try mixing in actual coarse black pepper for the black specks. It bakes perfectly fine and adds natural, organic variation!
Step 3: Backing and Baking
-
Create a recess (optional):
If you want the glass and photo to sit flush, gently carve a shallow ledge on the back of the inner window opening using a loop tool, or plan to simply tape the photo to the back for a simpler finish. -
Final smoothing:
Dip your finger in a tiny bit of rubbing alcohol or cornstarch and rub it lightly over the clay to remove any fingerprints or dust before baking. -
Bake the frame:
Place the frame on a ceramic tile or a parchment-lined baking sheet. Bake according to your polymer clay brand’s specific temperature instructions, usually for about 30-45 minutes to ensure durability. -
Cooling:
Allow the frame to cool completely in the oven or on a flat surface. Do not try to move it while hot, as it will be fragile.
Smudged Specks?
If your colored chips are smearing into streaks, your clay is too warm or you’re rolling too aggressively. Cool the clay in the fridge for 10 min.
Step 4: Finishing Touches
-
Sanding:
Once cool, use wet/dry sandpaper (start with 400 grit) under running water to gently sand the edges and surface if you want an ultra-smooth stone feel. This also helps reveal the specks more clearly. -
Matte finish:
For a true ceramic look, the clay is often fine left raw. However, if you want extra protection, apply a very thin coat of matte varnish. Avoid glossy finishes to maintain the natural stoneware vibe. -
Assembly:
Secure your photo (and a piece of cut glass or acrylic if desired) to the back of the frame using strong tape or by gluing a backing card over the photo area.
Pop in a favorite black and white portrait to complete this charming, rustic display

TRACK YOUR CERAMIC JOURNEY
Capture glaze tests, firing details, and creative progress—all in one simple printable. Make your projects easier to repeat and improve.
Mini Relief Scene Picture Frame
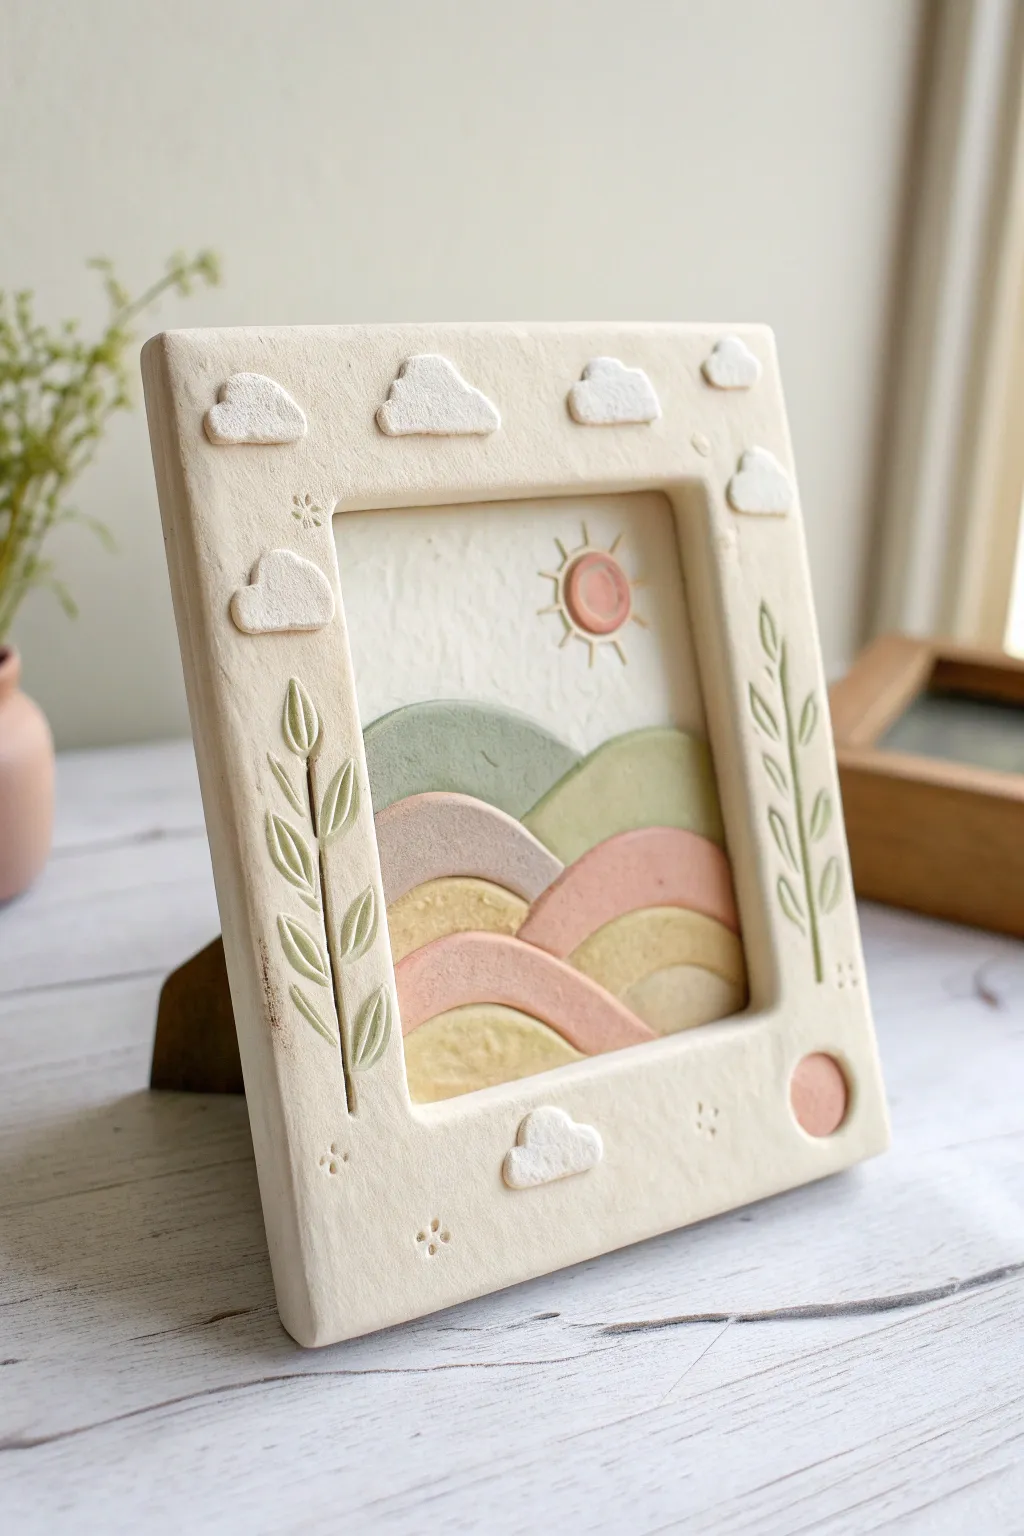
Bring a touch of serene nature indoors with this charming clay relief project that acts as both frame and artwork. Featuring rolling pastel hills and textured cloud details, this piece combines gentle dimension with a soft, matte finish for a truly unique decor item.
Detailed Instructions
Materials
- White classic air-dry clay (or polymer clay)
- Wide rolling pin
- Clay knife or craft scalpel
- Small needle tool for detailing
- Rolling guides (or wooden slats) for even thickness
- Water cup and slip (clay water paste)
- Acrylic paints (Sage Green, Blush Pink, Muted Yellow, Cream)
- Small flat paintbrush
- Fine-grit sandpaper
- Cardboard backing or wood panel (approx 5×7 inches)
- Matte varnish (optional)
Step 1: Sculpting the Base and Frame
-
Roll the base slab:
Start by conditioning your clay, then roll out a large, even slab about 1/4 inch thick. Use rolling guides to ensure the thickness is consistent. Cut a rectangle that matches your desired backing size (e.g., 5×7 inches). This will be the backboard for your scene. -
Create the frame border:
From the remaining clay, roll four strips that are slightly thicker than your base slab. Cut them to form a frame border that fits perfectly around the perimeter of your base rectangle. -
Attach the frame:
Score the edges of the base slab and the undersides of the frame strips with your needle tool. Apply a little clay slip (water and clay mix) as glue, then press the strips firmly onto the base. Smooth the seams with your finger or a sculpting tool until the transition is invisible.
Cracking Issues?
If you see tiny hairline cracks as the clay dries, mix a small amount of fresh clay with water to make a paste and fill them in just before sanding.
Step 2: Building the Relief Scene
-
Cut the hill shapes:
Roll out a fresh, thinner slab of clay (about 1/8 inch). Freehand cut curved, organic hill shapes. You’ll need about 4-5 layers of varying sizes to create depth. -
Layer the hills:
Starting from the ‘furthest’ hill at the top, begin layering your cutouts inside the frame. Score and slip the back of each piece before pressing it down. Overlap them slightly as you move downward to create a sense of distance. -
Add a sun:
Roll a small clay ball and flatten it into a perfect circle. Attach this near the top right of the scene. Use your needle tool to gently etch radiating lines for sunbeams directly into the background slab.
Step 3: Adding Decorative Details
-
Sculpt fluffy clouds:
Form small, irregular blobs of clay and flatten them slightly. Arrange these around the top and bottom borders of the frame. Press them down gently to adhere, keeping their puffy texture intact. -
Carve leafy vines:
On the side pillars of the frame, use a modeling tool to add vine details. You can either carve into the clay (subtractive) or roll tiny thin coils for stems and attach small teardrop shapes for leaves (additive), depending on the look you prefer. -
Texture the background:
For the sky area behind the sun, gently tap the clay surface with a stiff bristle brush or a crumpled ball of foil to give it a subtle, stony texture. -
Add finishing marks:
Use your needle tool to stamp tiny starbursts or dots on the frame corners for extra whimsy. Smooth away any harsh fingerprints with a slightly damp brush before setting the piece aside.
Pro Tip: Clean Lines
When painting the hills, use a slightly angled brush. This helps get crisp lines right up against the edge of the overlapping clay layer above it.
Step 4: Painting and Finishing
-
Dry completely:
Let the frame dry fully. For air-dry clay, this usually takes 24-48 hours. Using a wire rack helps air circulate underneath. -
Sand potential rough spots:
Once bone dry, take fine-grit sandpaper and very gently smooth the outer edges of the frame specifically, leaving the textured interior untouched. -
Paint the hills:
Using gentle pastel acrylics, paint each hill section. I like to alternate between sage greens, muted yellows, and soft blush pinks to distinguish the layers. Keep the paint application thin so the clay texture shows through. -
Define the sun and leaves:
Paint the sun circle a soft terracotta or coral color. Use a fine brush to paint the leaves green. If you did relief carving for the leaves, simply filling the recessed lines with paint works beautifully. -
Whiten the clouds:
Paint the puffy cloud shapes on the frame pure white or cream to make them pop against the natural clay tone (or paint the frame beige first if your clay dried grey). -
Seal the work:
Finish with a coat of matte varnish to protect the paint and give the piece a unified, professional finish.
Place your lovely relief frame on a stand or hang it up to add a peaceful vibe to any corner of your room
Fruit and Citrus Slice Frame
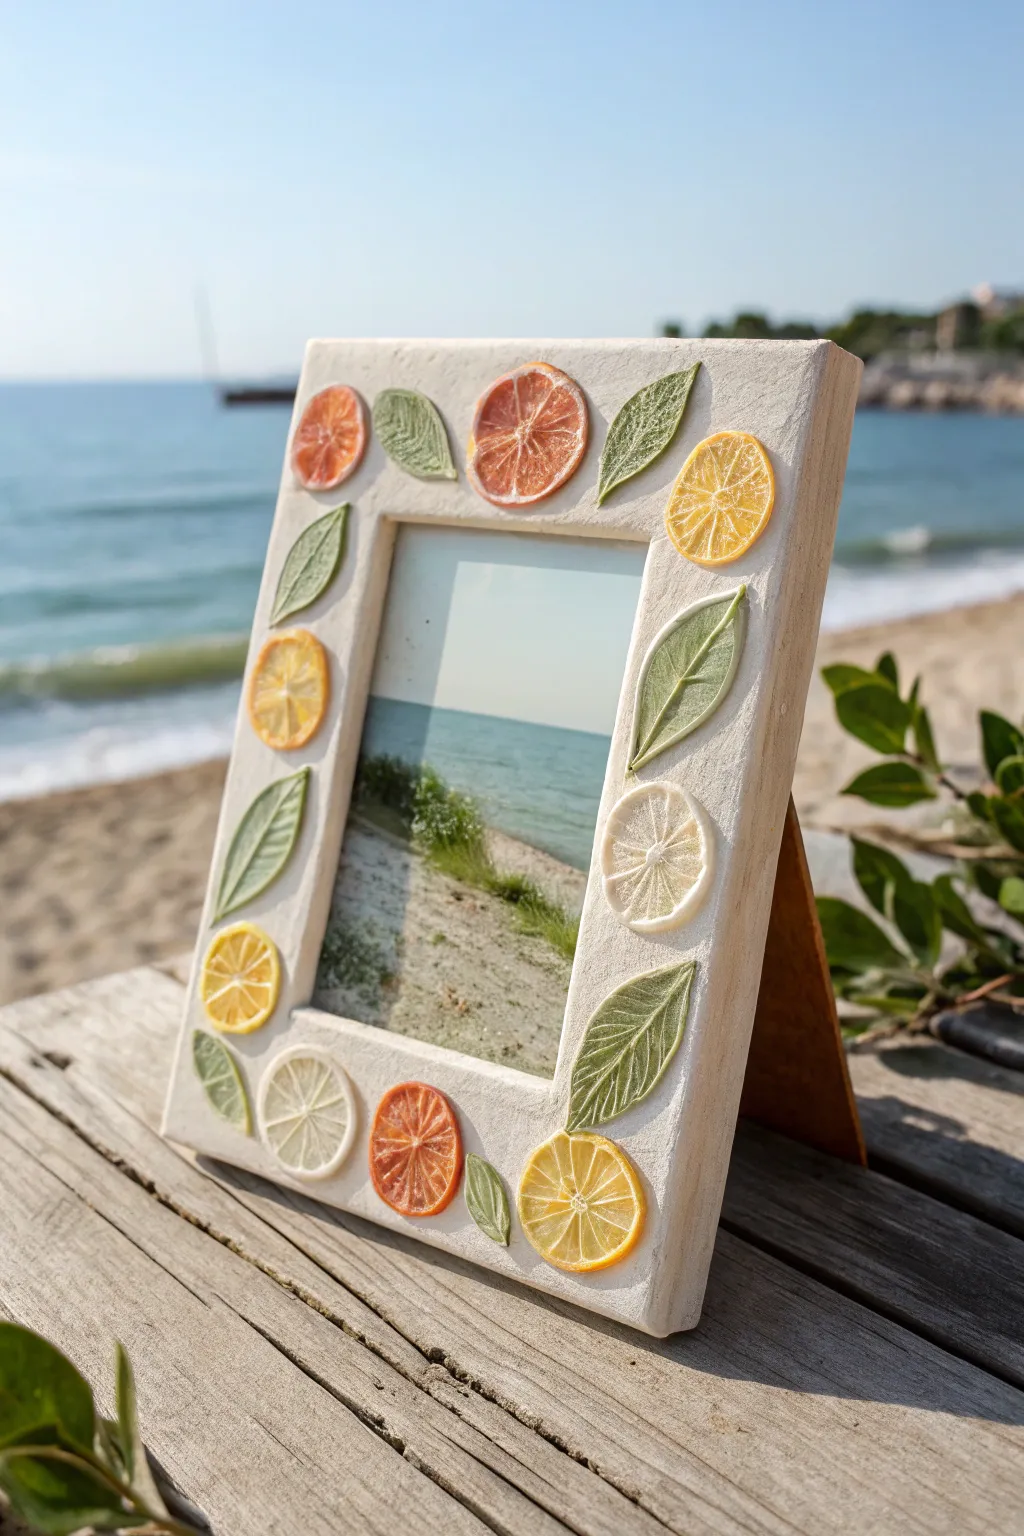
Bring the zest of summer into your home with this delightful picture frame adorned with realistic citrus slices and leaves. The textured white clay base provides a rustic backdrop for the translucent, sun-kissed fruit details.
Step-by-Step Tutorial
Materials
- Wooden picture frame (flat profile preferred)
- Air-dry clay (white)
- Translucent polymer clay (yellow, orange, white)
- Green polymer clay (for leaves)
- Basic clay sculpting tools (needle tool, small knife)
- Texture sponge or stiff brush
- Rolling pin
- PVA glue or heavy-duty craft glue
- Gloss varnish or resin
Step 1: Creating the Frame Base
-
Prepare the base:
Start with a clean, dry wooden frame. Remove the glass and back panel so you are working only with the frame border itself. -
Roll the clay sheet:
Roll out a sheet of white air-dry clay to about 3mm thickness. It needs to be large enough to cover the face of your frame. -
Apply the clay:
Apply a thin layer of PVA glue to the wooden frame face. Carefully lay your clay sheet over it, pressing down gently to remove air bubbles. Trim the excess clay from the inner and outer edges using a craft knife. -
Texture the surface:
While the clay is still wet, dab a texture sponge or a stiff-bristled brush all over the surface. This creates that lovely, slightly rough stucco or plaster effect seen in the photo.
Step 2: Sculpting the Citrus Slices
-
Make the citrus cane:
Using translucent polymer clay, create a ‘cane’. Start by rolling a log of the fruit colour (orange or yellow). Wrap this log in a very thin sheet of white clay to mimic the pith. -
Create segments:
Stretch this log until it’s thin, then cut it into 8 equal lengths. Reshape each length into a triangular wedge. -
Assemble the fruit disc:
Arrange the wedges in a circle with the white points meeting in the center. Wrap the entire bundle in another thin layer of white clay for the outer rind, followed by a final thin layer of the fruit-colored clay for the skin. -
Slice the fruit:
Gently compress and roll the cane to adhere the pieces. Once it’s the diameter you want (about 1-1.5 inches), use a very sharp blade to slice thin cross-sections. You will need a mix of orange, lemon yellow, and pale grapefruit colours. -
Add surface detail:
Take a needle tool and gently scratch radial lines into the fruit flesh of each slice to mimic the juicy texture of citrus segments. I like to do this before baking to add realism.
Juicy Realism
Mix a tiny amount of liquid clay with your fruit colors during the cane stage. This increases translucency after baking, making the segments look more like real fruit flesh.
Step 3: Sculpting the Leaves
-
Shape the leaves:
Condition green polymer clay and roll it out thinly. Cut small almond shapes freehand or use a leaf cutter. Vary the sizes slightly for a natural look. -
Veining texture:
Press a real leaf into the clay or use a needle tool to draw a central vein with smaller veins branching off. Ensure the edges are slightly tapered.
Scented Finish
Mix a drop of lemon or orange essential oil into the final varnish layer on the fruit slices. The frame will release a subtle citrus scent when warmed by sunlight.
Step 4: Assembly and Finishing
-
Initial bake:
Bake your polymer clay fruit slices and leaves according to the package instructions. Keep them separate from the air-dry frame for now. -
Arrange the composition:
Once the air-dry clay on the frame is leather-hard but not fully cured, or fully dry (gluing works for both), plan your layout. Alternate between fruit slices and leaves, angling them to create a sense of movement around the border. -
Attach the elements:
Glue the baked polymer pieces onto the frame using strong craft glue. If your frame clay is still slightly soft, you can press them in gently to embed them slightly. -
Let it dry:
Allow the entire frame assembly to dry completely. This might take 24 hours depending on the thickness of your air-dry clay base. -
Gloss the fruit:
To make the fruit slices look juicy and fresh, carefully paint a layer of gloss varnish or UV resin just over the fruit parts (avoiding the white pith and the textured frame background). -
Final touches:
Reassemble the frame with the glass and backing, and insert your favorite beach-themed photo.
Your refreshing citrus frame is now ready to hold your brightest memories
Cute Animal Corner Sculpt Frame
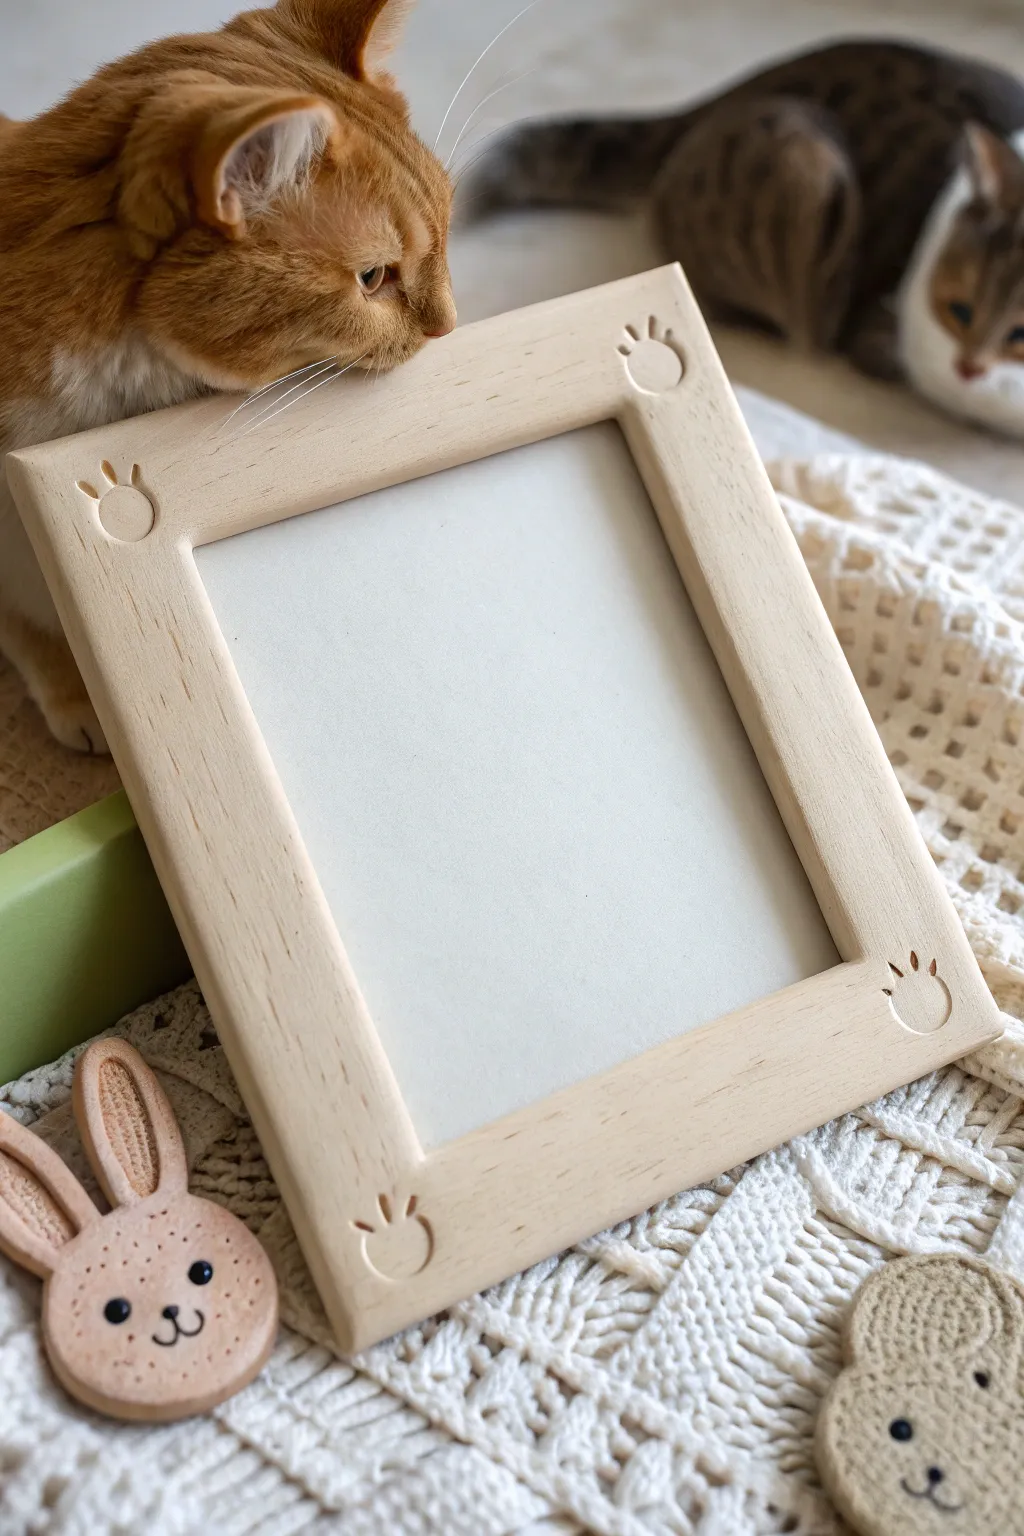
This charming project creates a faux-wood frame featuring subtle, recessed corner designs that resemble stylized paw prints or little abstract crowns. With a smooth clay finish and natural coloring, it makes a perfect minimalist display for pet portraits or nursery art.
Step-by-Step Guide
Materials
- Air-dry clay (smooth texture, not paper clay)
- Rolling pin with guide rings (or two slats of even thickness)
- Ruler and craft knife
- Sandpaper (fine grit, 220-400)
- Small ball stylus tool or dotting tool
- Flat, square cardboard or wooden base (optional for support)
- Acrylic paints: Cream, beige, light brown (for wood effect)
- Soft synthetic paintbrushes (wide flat and small detail)
- Matte finish varnish or sealant
- Wood glue (optional, if building on a base frame)
Step 1: Shaping the Base Frame
-
Prepare the workspace:
Lay down a non-stick surface or parchment paper. Knead your air-dry clay thoroughly until it is pliable and free of cracks. -
Roll an even slab:
Roll out the clay to a uniform thickness of about 1/4 to 1/2 inch. Using guide rings on your rolling pin ensures the frame surface will be perfectly level. -
Measure the dimensions:
Decide on your frame size (e.g., 5×7 inches) and lightly mark a rectangle on the clay slab with your ruler before cutting. -
Cut the outer edge:
Using a sharp craft knife and a ruler as a straight edge, careful slice the outer perimeter of the rectangle. Keep the knife vertical to ensure square edges. -
Cut the inner window:
Measure the border width (about 1 to 1.5 inches) inward from each side. Mark the inner rectangle and carefully cut it out to create the frame opening. -
Smooth the edges:
Dip your finger in a tiny bit of water and run it along both the inner and outer cut edges to soften any sharp corners or burrs left by the knife.
Keep it Straight
To prevent the clay sides from bowing inward while drying, place a rectangular object (like a playing card box) wrapped in plastic wrap inside the window opening.
Step 2: Sculpting and Texturing
-
Mark the corners:
Plan where your corner designs will go. They should be centered in the mitered area of each corner, roughly half an inch from the outer edge. -
Create the main circular recession:
Press the rounded end of a large paintbrush handle or a large ball tool gently into the clay to create a shallow, circular dimple. Do not press all the way through. -
Add the upper details:
Using a smaller stylus tool or the tip of a toothpick, press three small indentations directly above the main circle to form the ‘toes’ or crown points. -
Add subtle wood grain (optional):
If you want a hint of texture, lightly drag a stiff-bristles brush down the length of the frame sides. Keep it very subtle for the smooth look shown in the photo. -
Correct distortions:
Check that pressing the designs didn’t warp the straight lines of your frame. Nudge the edges back into place with your ruler if needed. -
Allow to dry completely:
Let the frame dry flat on a wire rack or mesh screen for 24-48 hours. Turn it over halfway through to ensure even drying and prevent warping.
Level Up: Color Pop
Instead of a natural wood wash, paint the recessed paw/crown indentations with a pastel color like mint or blush pink for a cute, modern contrast against the beige.
Step 3: Finishing the Faux Wood Look
-
Sand for smoothness:
Once fully dry and hard, gently sand the entire surface with fine-grit sandpaper. Focus on flattened the top surface and slightly rounding the sharp 90-degree edges. -
Base coat application:
Mix a very light beige or cream acrylic paint. Apply a solid coat over the entire frame, including the sides and inside edges. Let this dry. -
Create a wash:
Dilute a light brown paint with water until it is very runny and translucent. I find a 1:4 paint-to-water ratio works best here. -
Apply the wood tone:
Brush the watery brown wash over the cream base. Use long, single strokes going in one direction to mimic grain. The wash will settle slightly darker in your corner indentations, highlighting them naturally. -
Wipe back excess:
Immediately wipe the surface gently with a paper towel or rag to remove excess paint, leaving a stained wood appearance. -
Seal the project:
Apply a coat of matte varnish to protect the paint and give it that soft, natural wood finish without unwanted shine. -
Attach backing (final step):
Once dry, glue a piece of cardstock or a cardboard stand to the back to hold your photo in place.
Pop in your favorite photo and enjoy this serene, handcrafted addition to your decor
Pressed Botanicals Imprint Frame

Capture the delicate beauty of nature directly into your home decor with this textured clay frame project. Using fresh leaves and air-dry clay, you’ll create a sophisticated sage-green piece featuring gorgeous, lifelike botanical impressions.
Detailed Instructions
Materials
- Air-dry clay (white or light grey)
- Wide, flat wooden picture frame (w/ glass removed)
- Acrylic paint (sage green, white, possibly a drop of grey)
- Fresh botanical clippings (ferns, distinctive leaves, small wildflowers)
- Rolling pin
- Craft knife or clay tool
- Sandpaper (fine grit)
- Mod Podge or matte varnish sealant
- Strong craft glue (E6000 or similar)
- Small rolling tool or brayer (optional)
- Water and sponge
Step 1: Preparation & Clay Rolling
-
Prepare your base:
Start with a plain, flat wooden frame. Remove the glass and backing board so you don’t accidentally get clay on them. Lightly sand the wood surface to give the glue something to grip onto. -
Condition the clay:
Take a large chunk of air-dry clay and knead it until it’s soft and pliable. If it feels too dry or cracks, work in a tiny amount of water with your fingers. -
Tint the clay (Optional):
I prefer to knead a small amount of green acrylic paint directly into the wet clay for a base color. Alternatively, you can leave it white and paint the entire surface later. Aim for a consistent, pale green tone if mixing now. -
Roll out slabs:
Roll the clay out on a clean surface or non-stick mat to a thickness of about 1/4 inch (approx 5-6mm). Try to keep the thickness as even as possible. -
Cut to size:
Measure the width and length of your frame sides. Cut four strips of clay that are slightly larger than the frame’s actual dimensions to allow for trimming later.
Pick Perfect Plants
Choose leaves with pronounced, thick veins on the backside for the clearest prints. Ferns, sage, and hydrangea leaves work exceptionally well for deep texture.
Step 2: Creating the Impressions
-
Arrange your botanicals:
Lay your clay strips flat. Place your fresh leaves and ferns onto the clay surface. Think about the composition—varying angles and overlapping elements usually look more natural than stiff rows. -
Press into the clay:
Using a small roller or just the rolling pin, firmly roll over the leaves. You want to press them deep enough to capture the veins and stems, but not go all the way through the clay strip. -
Remove the vegetation:
Carefully peel the leaves off the clay. Do this slowly; use the tip of a craft knife or a needle tool to lift the edge of a leaf without gouging the clay surface. -
Refine the impressions:
Check for any loose bits of organic matter left in the grooves and gently pick them out with tweezers. Smooth any accidental fingernail marks with a damp sponge.
Gilded Touch
Once the green paint is dry, lightly dab a tiny amount of gold metallic wax or paint onto the deepest parts of just a few flower impressions for a luxe, antique feel.
Step 3: Assembly & Finishing
-
Glue clay to the frame:
Apply a generous layer of strong craft glue to the front of the wooden frame. Carefully lift your patterned clay strips and press them onto the wood. Be gentle so you don’t squash your leaf designs. -
Trim the edges:
While the clay is still wet, use a sharp craft knife to trim the excess clay flush with the inner and outer edges of the wooden frame. Use a little water on your finger to smooth these cut edges. -
Blend the corners:
Where the four clay strips meet at the corners, use a modeling tool to blend the seams together so it looks like one continuous piece of stone. Smooth over the join with a damp finger. -
Let it dry completely:
Allow the frame to dry for 24-48 hours. Keep it away from direct heat sources to prevent cracking. The clay will become lighter in color and hard to the touch. -
Sand and smooth:
Once fully dry, use fine-grit sandpaper to gently smooth the outer edges and corners. Do not sand the leaf impressions, or you will lose the detail. -
Apply paint wash:
Mix sage green acrylic paint with a little water. Brush this wash over the entire frame. The thinner paint will settle into the deep recesses of the leaf veins, highlighting the texture beautifully. -
Add detail highlights:
For extra dimension, dry-brush a lighter, creamy green or off-white over the raised surfaces. This emphasizes the relief effect. -
Seal the work:
finish with a coat of matte varnish or Mod Podge to protect the clay from moisture and dust, giving it a durable finish.
Now you have a stunning, nature-inspired frame ready to hold your favorite memory.
Mixed-Media Clay and Pebble Frame
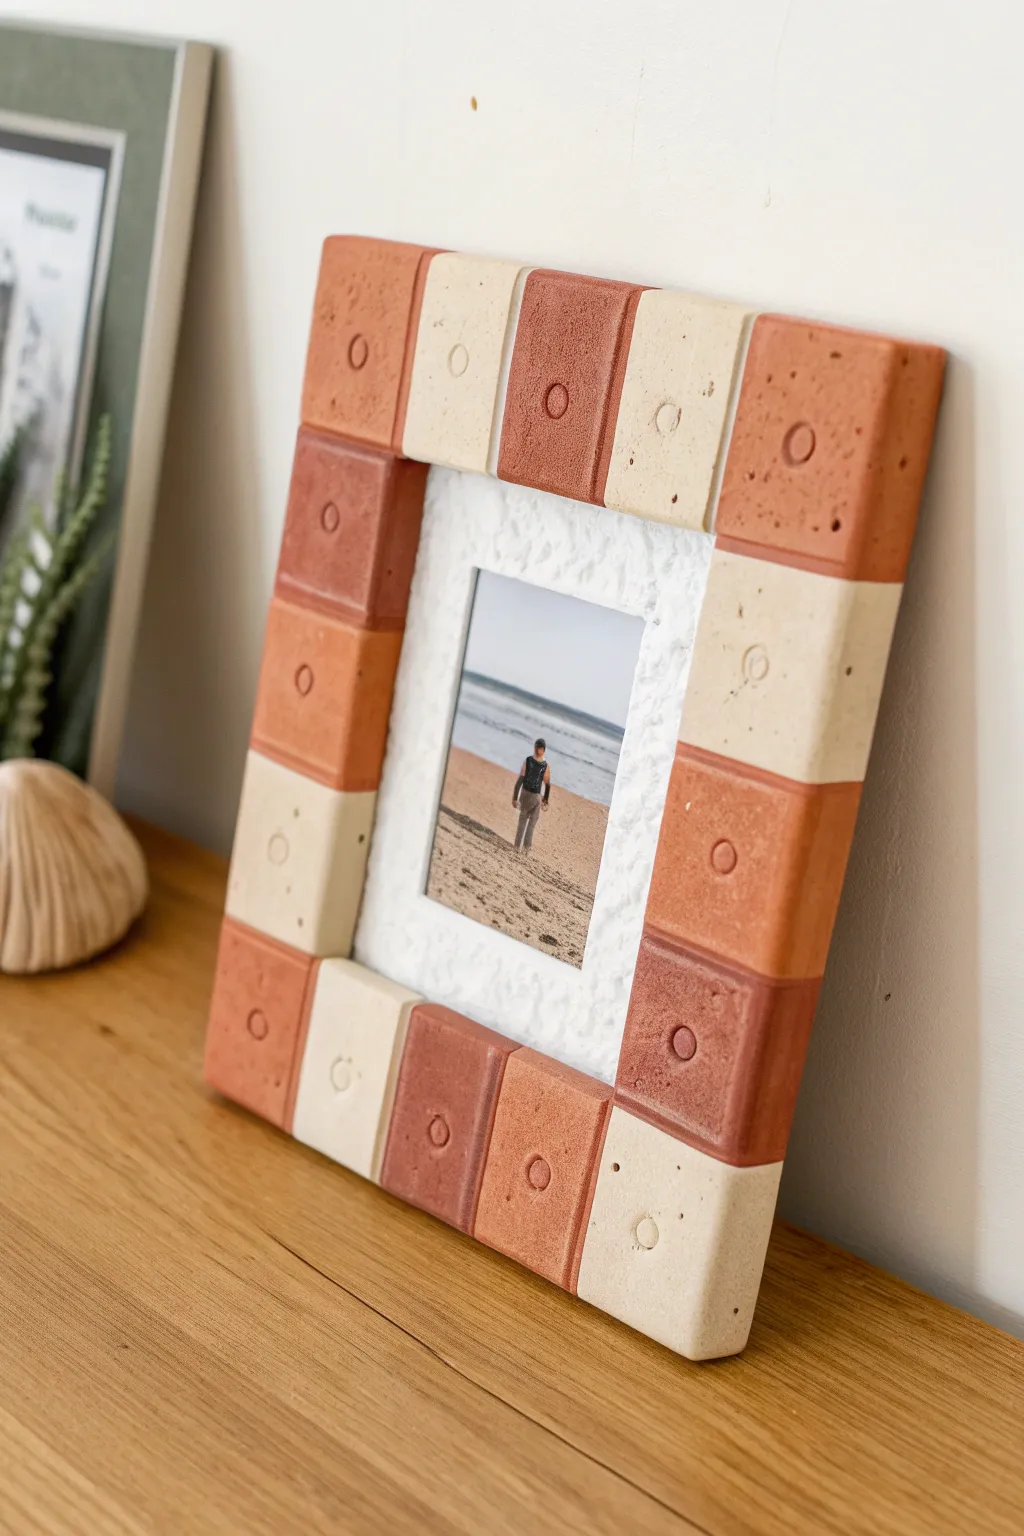
Bring an architectural, boutique-hotel vibe to your desk with this striking geometric frame. By combining terracotta and cream-colored polymer clay into uniform tiles, you’ll create a structured yet warm border that perfectly highlights your favorite memories.
Step-by-Step Tutorial
Materials
- Polymer clay (terracotta/brick red color)
- Polymer clay (cream/beige color)
- Wooden picture frame base (flat, wide molding)
- Small circular clay cutter or bottle cap
- Rolling pin or pasta machine
- Ruler
- Craft knife or clay blade
- Strong craft glue (E6000 or similar)
- Rough sandpaper or toothbrush (for texture)
- White textured cardstock (for the mat)
Step 1: Prepping the Clay Tiles
-
Condition the clay:
Begin by kneading your terracotta and cream polymer clays separately until they are soft, pliable, and free of any air bubbles. -
Roll out slabs:
Roll each color into a thick, even slab. Aim for a thickness of about 1/4 inch (6mm) to give the frame substantial depth and a chunky look. -
Measure your frame:
Measure the width of your wooden frame base. You want your clay tiles to match this width exactly. -
Calculate tile length:
Determine how many tiles you need per side. Divide the length of the frame side by the number of desired tiles to get the length for each individual rectangle. -
Cut the rectangles:
Using your ruler and clay blade, carefully cut out rectangular tiles from both clay colors based on your measurements. You will need enough to cover the entire perimeter.
Step 2: Adding Texture and Detail
-
Soften the edges:
Gently tap the edges of each rectangle with your finger to soften the sharp cuts; this gives them a more handmade, ceramic tile appearance. -
Add surface texture:
Lightly press a piece of rough sandpaper or the bristles of a toothbrush onto the surface of each tile to create a porous, stone-like texture. -
Create the signature circle:
Press your small circular cutter or a bottle cap gently into the center of each rectangle. Don’t cut all the way through; just create a clear, recessed ring. -
Add corner details:
Use a needle tool or toothpick to add tiny prick marks or ‘air pockets’ randomly around the surface for extra realism. -
Bake the tiles:
Arrange your tiles on a baking sheet lined with parchment paper. Bake according to the specific temperature and time instructions on your package of clay.
Uneven Tiles?
If your tiles aren’t perfectly uniform after baking, use a nail file or fine-grit sandpaper to gently smooth the sides so they fit snugly against each other without gaps.
Step 3: Assembly
-
Cool and arrange:
Let the tiles cool completely. Arrange them on top of your wooden frame base in an alternating color pattern to ensure the fit is correct. -
Glue the tiles:
Apply a strong craft glue to the back of each tile and press them firmly onto the wooden frame. I like to hold each one for ten seconds to ensure the initial bond grabs. -
Prepare the insert:
Cut a piece of textured white cardstock to fit the frame’s opening. This adds that fluffy, high-end matting look seen in the example. -
Mount the photo:
Center your chosen photograph on the textured cardstock and secure it with double-sided tape or photo corners. -
Final assembly:
Place the glass (if using), the textured mat with the photo, and the backing board into the frame, securing the clips on the back.
Level Up: Speckled Effect
Mix black pepper or dried herbs into the cream clay before rolling. This creates a gorgeous, organic granite effect that looks incredibly high-end.
Now you have a stylish, architectural piece of decor ready to display