Cute clay keychains are my favorite quick project because you get a tiny burst of joy you can actually use every day. Here are some sweet, beginner-friendly ideas that lean into kawaii charms, simple shapes, and those irresistible little details.
Smiling Mini Doughnut Charm
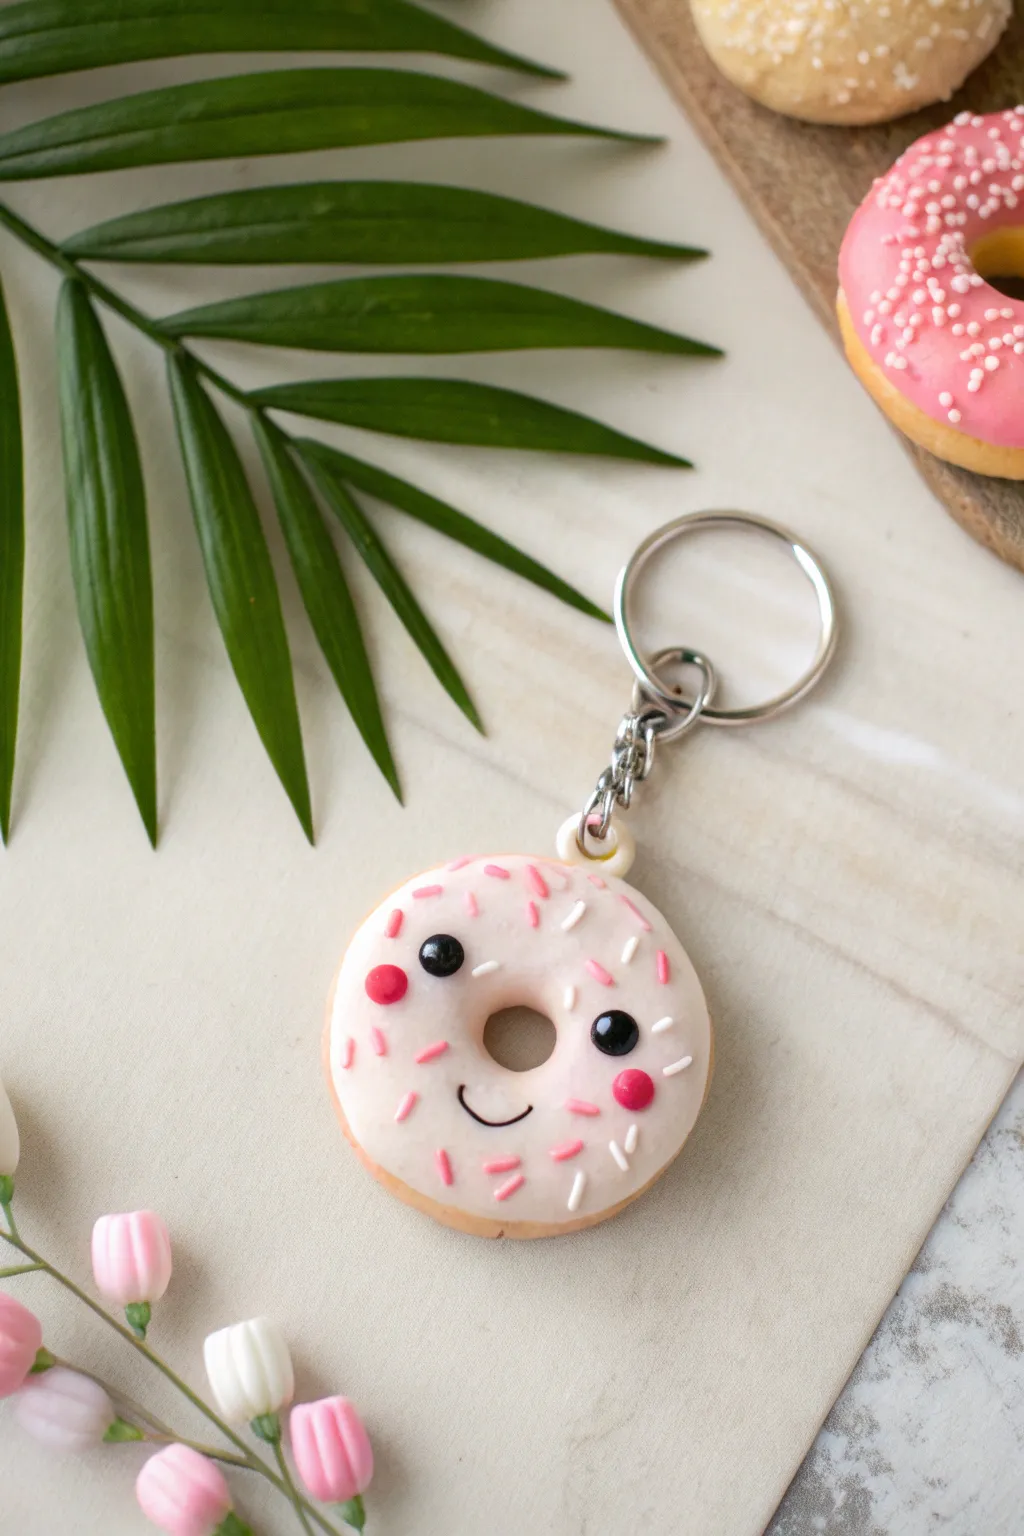
This adorable mini donut charm combines sweet pastel aesthetics with a cheerful personality, making it the perfect accessory for your keys or backpack. With its glossy white frosting, tiny pink sprinkles, and rosy cheeks, this polymer clay creation is almost cute enough to eat.
Step-by-Step
Materials
- Light tan polymer clay (dough)
- White or cream polymer clay (frosting)
- Pink polymer clay (sprinkles and cheeks)
- Black polymer clay (eyes and mouth)
- Keychain hardware with screw eye pin
- Liquid polymer clay (optional, for adhesion)
- Gloss glaze or UV resin
- Baking tile or parchment paper
- Dotting tool or small ball styluses
- Needle tool or toothpick
- Small circle cutters (or bottle caps/straws)
- Craft blade
- Soft paintbrush
Step 1: Shaping the Base
-
Condition the clay:
Start by kneading your light tan clay until it is soft, pliable, and free of any cracks. -
Form the doughnut:
Roll the tan clay into a smooth ball, roughly the size of a walnut, then gently flatten it into a thick disc shape using your palm to keep the edges rounded. -
Create the center hole:
Use a small circle cutter, the back of a paintbrush, or even a straw to punch a clean hole directly in the center of your disc. -
Soften the edges:
Gently tap and smooth the inner cutout area with your finger or a smoothing tool so the hole looks baked and puffy rather than sharp and cut.
Sprinkle Tip
Pre-bake your sprinkle clay snake for 5 minutes before cutting. It makes chopping tiny, uniform pieces much easier without squishing them.
Step 2: Frosting and Face
-
prepare the frosting:
Roll out a piece of white or cream clay until it is quite thin, about 1-2mm thickness. -
Cut the frosting shape:
Use a cutter slightly larger than your doughnut base to cut a circle of white clay. If you want a dripping effect, use a needle tool to cut a wavy, irregular edge. -
Apply the frosting:
Place the white clay on top of the tan base. Carefully punch out the center hole to match the doughnut, and gently press the edges down so they curve over the sides naturally. -
Add the eyes:
Roll two tiny balls of black clay and press them onto the upper half of the frosting. Flatten them slightly to ensure they stick well. -
Give it cheeks:
Create two small balls of pink clay, slightly larger than the eyes, and press them below and to the outside of the eyes for a rosy blush effect. -
Creating the smile:
For the mouth, roll an extremely thin snake of black clay. Cut a tiny U-shape and carefully place it centered between the cheeks using a needle tool.
Make it Scented
Mix a tiny drop of vanilla or strawberry fragrance oil into the clay dough before baking for a scratch-and-sniff charm effect.
Step 3: Sprinkles and Hardware
-
Making sprinkles:
Roll a very thin snake of pink clay—I find it helpful to roll it against a glass surface for smoothness. Do the same with a bit of white clay. -
Cutting sprinkles:
Using your craft blade, chop the thin snakes into tiny, rice-sized segments. -
Decorating:
Scatter the pink and white sprinkles randomly across the frosting, pressing them down lightly so they don’t fall off during baking. -
Shading (Optional):
For extra realism, lightly brush soft pastel chalk dust (in an orange-brown shade) onto the tan dough edges to simulate a baked look. -
Insert hardware:
Screw the eye pin into the top of the doughnut. If the clay is soft, you can dip the end in liquid clay or bake-and-bond before inserting for extra security.
Step 4: Baking and Finishing
-
Bake:
Bake the doughnut according to your polymer clay package instructions (usually 275°F/130°C for 15-30 minutes). -
Cool down:
Let the piece cool completely before handling it, as warm clay is fragile. -
Add highlights:
Using white acrylic paint and a toothpick, add a tiny white reflection dot to each black eye to bring the character to life. -
Glaze:
Apply a coat of gloss glaze or UV resin over the frosting area only to make it looked shiny and sugary, while keeping the dough matte. -
Assemble:
Once the glaze is dry, use jump rings and pliers to attach the eye pin to your keychain ring.
Now you have a sweet little companion to brighten up your daily travels


Happy Avocado Half Bestie Set
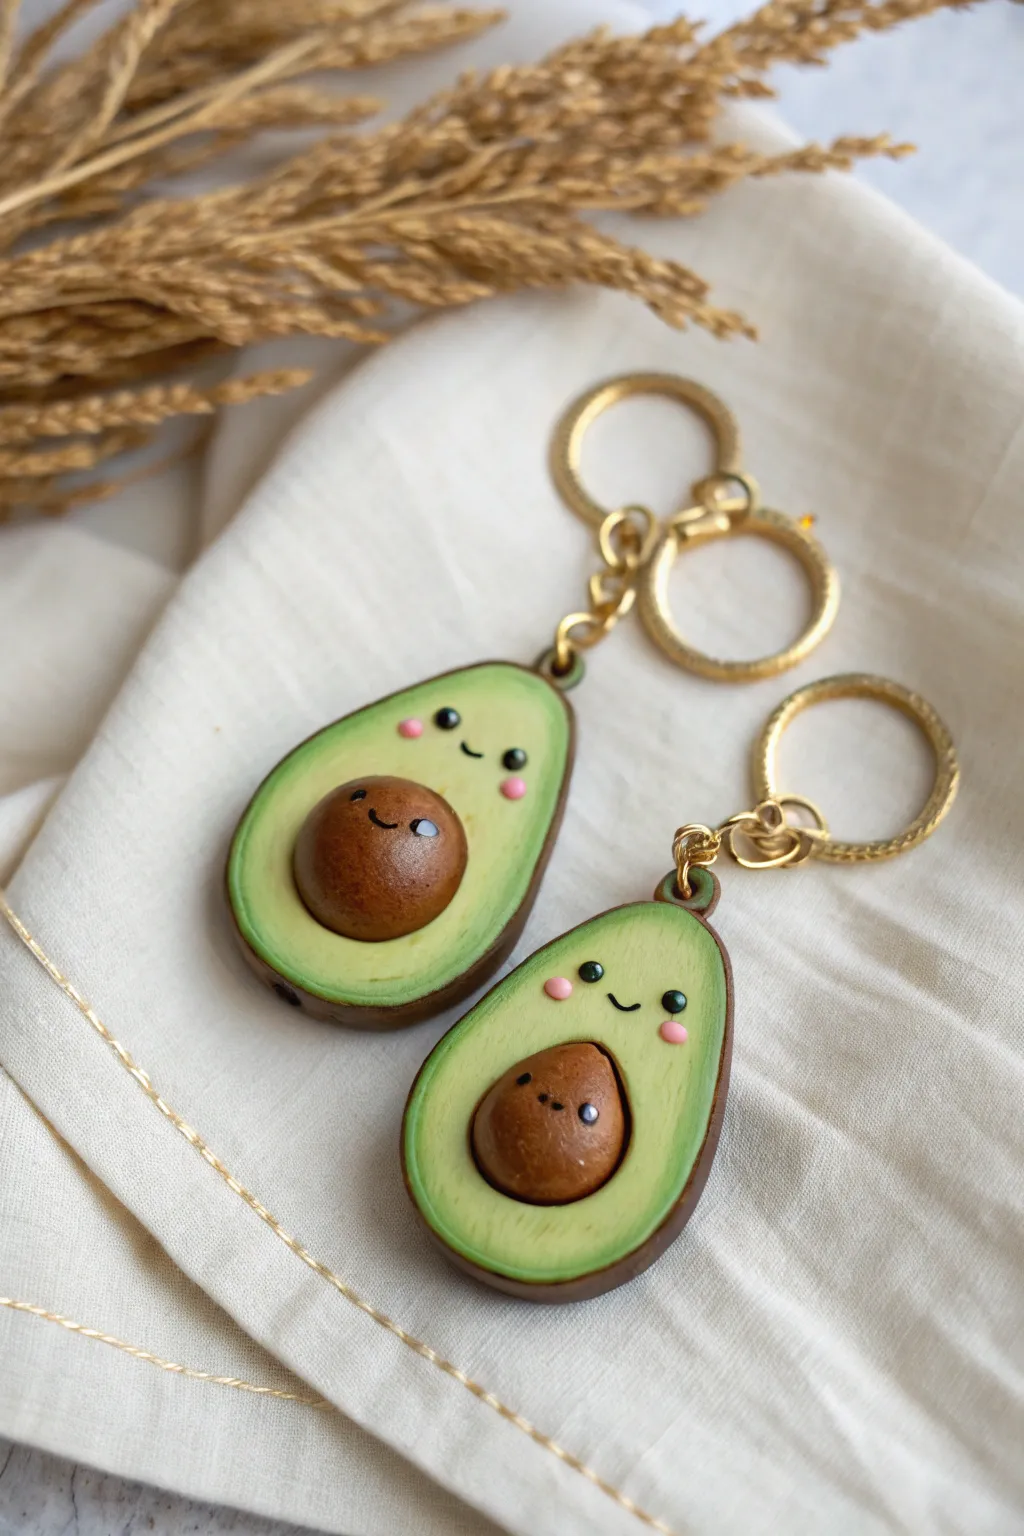
These adorable matching avocado keychains are the perfect symbol of friendship, featuring happy little faces on both the fruit and the pit. Made from polymer clay with sweet rosy cheeks and sturdy gold hardware, they make a delightful gift for your other half.
How-To Guide
Materials
- Polymer clay: Dark brown (skin), light lime green (flesh), pale yellow-green (inner gradient), medium brown (pit)
- Black acrylic paint or fine detail marker
- Pink chalk pastel or pink acrylic paint
- Gloss glaze or UV resin
- Clay roller or pasta machine
- Teardrop-shaped cutter (approx. 1.5 – 2 inches)
- Ball stylus tools (various sizes)
- Needle tool
- Gold screw eye pins
- Gold keychain rings and jump rings
- Jewelry pliers
- Soft paintbrush
- Oven for baking
Step 1: Shaping the Avocado Base
-
Condition the clay:
Start by kneading your lime green and pale yellow-green clays until they are soft and pliable. You want a smooth consistency to avoid cracks during baking. -
Create a gradient blend:
To achieve that realistic avocado look, press a chunk of lime green and a chunk of pale yellow-green together. Roll them out, fold, and roll again repeatedly until the transition between the two colors is soft and seamless. -
Roll the slab:
Roll your blended clay out to a thickness of about 1/4 inch. Ensure the lighter yellow-green part is near the center of where your shape will be cut. -
Cut the shape:
Use your teardrop cutter to punch out two identical avocado shapes. If you don’t have a cutter, you can hand-sculpt this by rolling a ball into a pear shape and flattening it gently. -
Smooth the edges:
Gently run your finger around the cut edge of the clay to soften the harsh lines left by the cutter. The goal is a rounded, organic fruit look. -
Add the skin layer:
Roll out a very thin sheet of dark brown clay. Place your green avocado on top of it and carefully cut around the perimeter, smooth the brown clay up the sides to create the textured skin.
Fixing Fingerprints
Noticed fingerprints on your unbaked clay? lightly brush the surface with a tiny amount of baby oil or cornstarch before baking to smooth them away instantly.
Step 2: Adding Details and Personality
-
Indent for the pit:
Using a large ball tool or just your thumb, press a gentle indentation into the lower, wider part of the avocado where the pit would naturally sit. -
Form the pit:
Roll a ball of medium brown clay. For one keychain, make a full round pit that fits snugly into the indentation you just made. For the other keychain, you can make a slightly flatter version to represent the seed sticking out slightly less. -
Attach the pit:
Place the brown ball into the indentation. Press it down firmly enough so it adheres, but be careful not to distort the main avocado shape. -
Sculpt the faces:
Using your smallest ball tool relative to the size of the pit, make tiny indentations for the eyes on the brown pit. Do the same on the upper green section of the avocado flesh. -
Insert hardware:
Carefully screw a gold eye pin into the very top center of each avocado. I find twisting it in slowly helps prevent the clay from bulging or cracking. -
Texture the skin:
Use a crumpled piece of aluminum foil or a stiff toothbrush to texturize only the dark brown outer skin, giving it that rough, pebbled avocado feel.
Pro Tip: Secure Hardware
For extra durability, remove the eye pin after baking, add a drop of super glue or liquid clay to the hole, and screw it back in. It will never fall out!
Step 3: Finishing Touches
-
Apply blush:
Scrape a little pink chalk pastel into a powder. Use a soft, dry brush to gently dust rosy cheeks onto the green flesh and the brown pit before baking. -
Bake the clay:
Bake your pieces according to your polymer clay manufacturer’s instructions, usually around 275°F (135°C) for 15-30 minutes depending on thickness. Let them cool completely. -
Paint facial features:
Once cool, use a fineliner brush and black acrylic paint to fill in the eyes and paint a tiny smile between the cheeks. Add a tiny white dot to the eyes for a ‘sparkle’ effect. -
Glaze and assemble:
Coat the front face (green and pit) with a gloss glaze or UV resin for a polished shine. Once dry, use pliers to attach the jump ring and keychain loop to the eye pin.
Clip these onto your keys or share one with your best friend for a charm that stays cute forever.


Egg and Toast Matching Pair
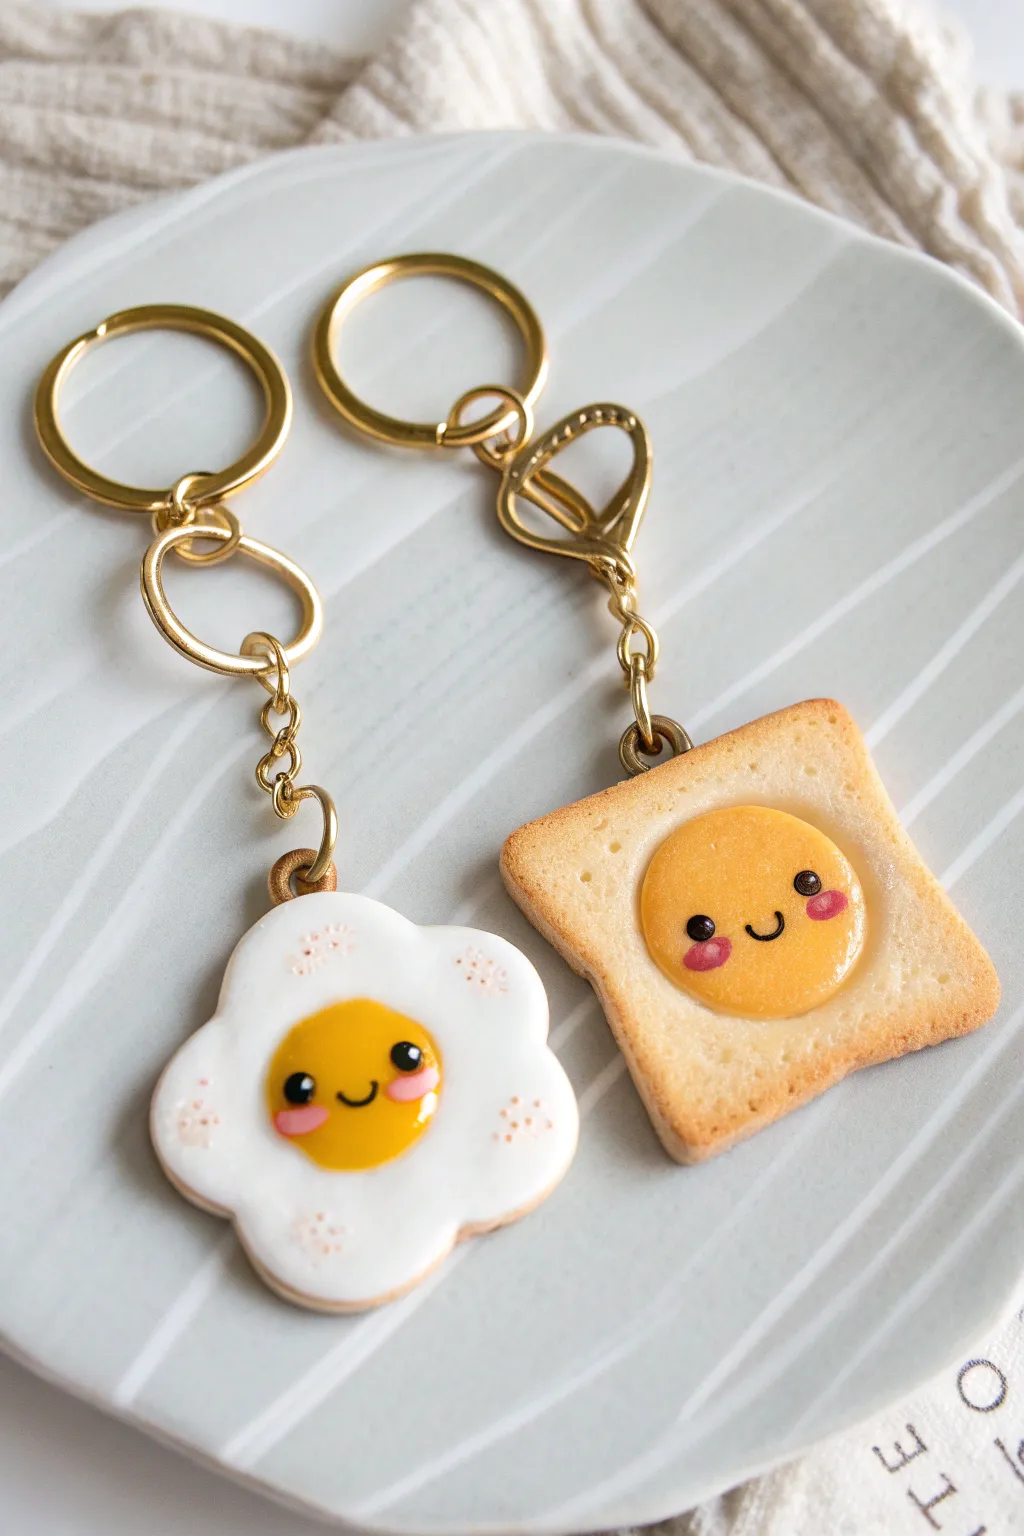
Celebrate the perfect pairing with this adorable egg and toast matching keychain set, ideal for sharing with your bestie. Using polymer clay and some careful detailing, you’ll create textured, golden-brown miniatures with sweet, smiling faces that fit perfectly together.
Step-by-Step Guide
Materials
- White polymer clay
- Translucent white polymer clay (optional, for egg white depth)
- Yellow polymer clay (egg yolk shade)
- Beige/Tan polymer clay (bread dough)
- Soft pastels (brown, orange, yellow)
- Black acrylic paint
- Pink acrylic paint or clay
- UV resin or gloss glaze
- Needle tool or stiff toothbrush (for texturing)
- Small ball tool
- Gold screw eye pins
- Gold keychain rings and jump rings
- Flower-shaped cookie cutter (small)
Step 1: Sculpting the Egg
-
Mix and flatten:
Condition your white clay until it’s soft and pliable. Flatten it into a thick pancake, about 4-5mm thick. -
Shape the white:
Use a small flower-shaped cutter to punch out the egg white base. Gently soften the sharp cut edges with your fingertip to make it look organic and soft. -
Add texture:
Use a needle tool to scratch and dimple the very edges of the flower shape, mimicking the crispy, fried edges of a sunny-side-up egg. Dust a tiny bit of orange-brown pastel chalk on these textured spots for a cooked look. -
Create the yolk:
Roll a small ball of yellow clay. Flatten it slightly so it’s a dome, not a sphere, and press it firmly into the center of your flower shape.
Step 2: Sculpting the Toast
-
Form the bread:
Condition your beige clay and roll it into a square slab about the same thickness as the egg. Use a blade to cut a clean square shape. -
Shape the crust:
Indent the top edge slightly to create the classic dip in a slice of bread. Soften the corners so they aren’t sharp. -
Texture the surface:
Take a stiff toothbrush or a texturing tool and tap it all over the surface of the bread to create a realistic, porous crumb texture. Avoid the very center where the ‘yolk’ will go. -
Shade the crust:
Scrape some brown soft pastel into a powder. Use a soft brush to apply this powder heavily around the outer edges (the crust) and lightly over the surface for a toasted effect. -
Add the center:
Roll a yellow ball of clay identical in size to the egg’s yolk. Flatten it into a dome and press it into the center of the toast slice. This creates the ‘toad in the hole’ look.
Fixing Dull Pastels
If your pastel shading disappears after baking, you applied it too lightly. Next time, apply layers more heavily than you think—clay absorbs pigment as it cures.
Step 3: Detailing and Assembly
-
Attach hardware hole:
Insert a gold screw eye pin into the top center of the toast and the top petal of the egg. I find adding a drop of liquid clay on the screw threads helps secure it permanently before baking. -
Bake:
Bake both pieces according to your polymer clay package instructions. Let them cool completely before painting. -
Paint facial features:
Using a very fine detail brush or a dotting tool, dab two small black dots for eyes on both yellow yolks. Paint a tiny ‘U’ shape between them for a smile. -
Add blush:
Dip a toothpick in pink paint and tap two tiny rosy cheeks just under the eyes. -
Apply gloss:
Once the paint is dry, coat ONLY the yellow yolk sections with UV resin or a high-gloss glaze. This makes the yolk look wet and shiny while keeping the whites and toast matte. -
Attach keychains:
Using pliers, open a jump ring and connect your clay charms to the gold keychain findings.
Add Sparkle
Mix a tiny pinch of white glitter or mica powder into the white clay for the egg. It gives a subtle, glistening effect that mimics a freshly fried egg white.
Clip these onto your keys or backpack to carry a little breakfast cheer wherever you go


Tiny Bubble Tea With Blush Cheeks
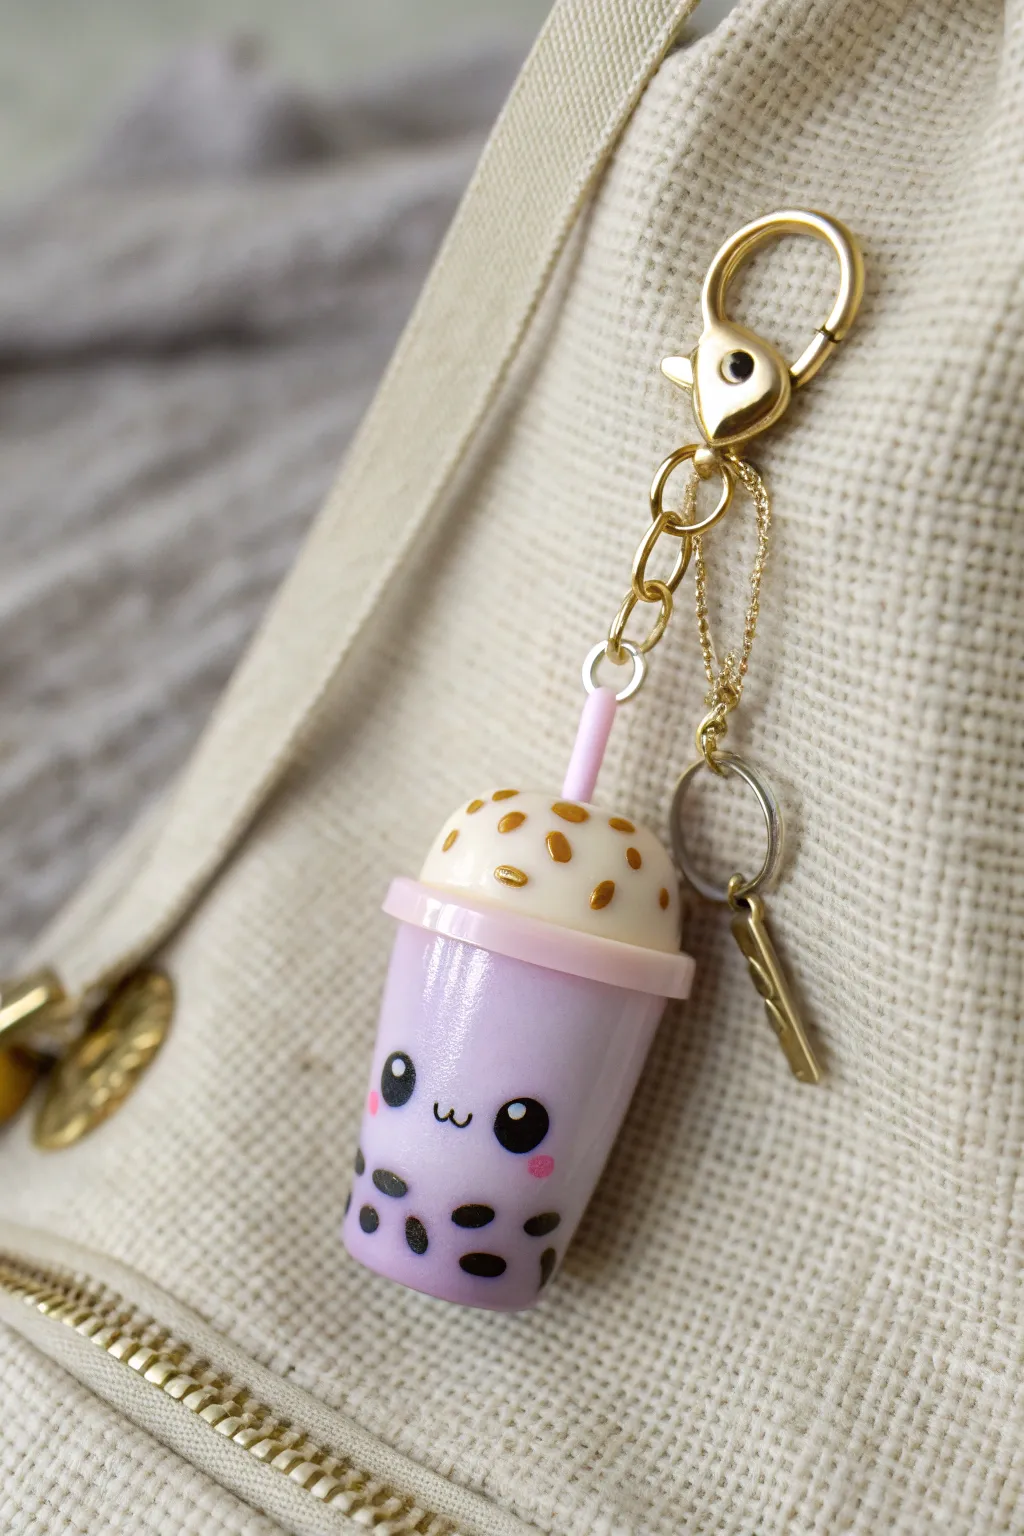
Carry a sip of cuteness with you everywhere using this adorable miniature bubble tea keychain. With its pearlescent purple tea, smiling face, and golden toppings, it is the perfect accessory to sweeten up your favorite tote bag.
Step-by-Step
Materials
- Polymer clay (translucent purple/lavender, skin-tone beige, pale pink, black)
- Liquid polymer clay (translucent or Fimo liquid)
- Gold acrylic paint or metallic gold clay
- Headpin or eye screw
- Gold keychain hardware (lobster clasp, chain)
- Glazing resin or UV resin
- Fine detail brush or dotting tool
- X-Acto knife or clay blade
- Needle tool
- UV light (if using UV resin)
- Oven (for baking polymer clay)
Step 1: Shaping the Cup Base
-
Mix the perfect purple:
Start by mixing a small amount of translucent clay with lavender clay. You want a semi-transparent, milky look that mimics actual taro milk tea, rather than a solid, opaque block of color. -
Form the cylinder:
Roll your purple mixture into a smooth ball about the size of a large marble, then gently taper it into a cylinder that is slightly wider at the top than the bottom, resembling a disposable cup. -
Flatten the surfaces:
Press the top and bottom against your work surface to ensure they are perfectly flat. The cup should stand up on its own without wobbling. -
Add the rim:
Roll a very thin snake of pale pink clay. Press this flat to create a ribbon and wrap it around the very top edge of your purple cylinder to create the cup’s distinct rim, blending the seam carefully at the back.
Step 2: Creating the Pearls and Essentials
-
Make the boba pearls:
Take your black clay and roll tiny, uniform spheres. You’ll need about 10-12 pearls. I find it easiest to roll a thin snake first and cut equal segments before rolling them into balls. -
Embed the tapioca:
Press the black pearls gently onto the lower third of the purple cup. Don’t just stick them on; press them in slightly so they look submerged in the ‘liquid’ rather than floating on the surface. -
Form the domed lid:
Using the beige or cream-colored clay, roll a ball slightly smaller than the diameter of your cup’s rim. Slice the bottom off to create a dome shape and press this onto the top of the pink rim. -
Insert the straw:
Cut a short piece of thick pink wire or a baked variety of pink clay to act as the straw. Poke a hole in the center of the beige dome and insert the straw securely. -
Secure the hardware:
Insert a headpin or eye screw directly into the top of the dome, near the straw. Ensure it goes deep enough into the cup base for stability.
Smudged Smile?
If you mess up the painted face, wipe it quickly with a q-tip dipped in rubbing alcohol before it dries. Acetone works too, but can eat into unbaked clay.
Step 3: Finishing Details
-
Paint the face:
Using a needle tool or very fine brush dipped in black acrylic paint, carefully draw two oval eyes and a small ‘w’ mouth in the center of the cup. -
Add the blush:
With a dotting tool and neon or bright pink paint, tap two tiny cheeks right under the outer edges of the eyes for that signature kawaii look. -
Apply the gold accents:
Once the main clay body is baked according to package instructions and cooled, use a fine brush to paint irregular gold spots onto the beige dome lid to simulate fancy toppings or caramel drizzle. -
Seal for shine:
Coat the entire piece (except the metal hardware) in a layer of UV resin or glossy glaze. This gives the ‘cup’ a plastic realism and protects the painted face. -
Cure the resin:
Place under a UV light for 2-3 minutes or let air-dry depending on your sealant choice. The finish should be hard and glass-like. -
Assembly:
Open the jump ring on your gold keychain hardware and attach it to the eye pin on your finished boba charm.
Pro Tip: Depth Effect
Mix just a drop of liquid clay with your purple clay block. It makes the ‘tea’ slightly more translucent, so the black pearls look deeper inside the cup.
Now you have a refreshing little charm that adds a pop of sweetness to any zippered bag

The Complete Guide to Pottery Troubleshooting
Uncover the most common ceramic mistakes—from cracking clay to failed glazes—and learn how to fix them fast.
Chubby Cat Face Charm
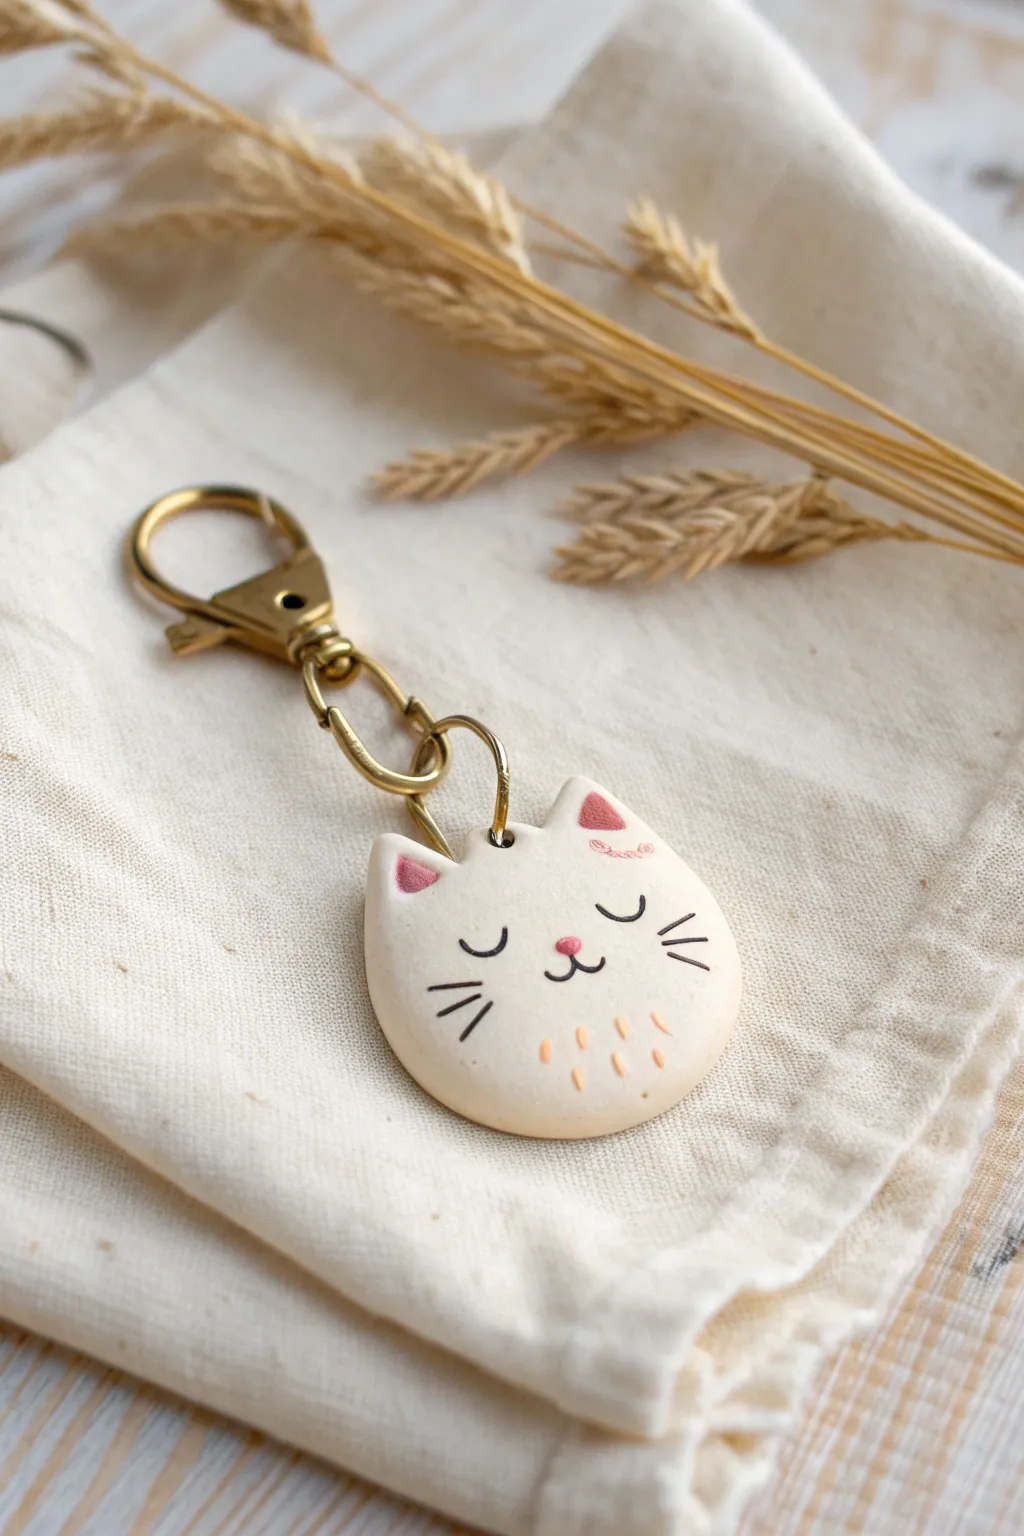
This adorable, chubby cat face charm is the perfect introduction to polymer clay modeling. With its simple round shape and sweet painted details, you’ll create a charming accessory that adds a touch of personality to your keys or bag.
Step-by-Step Guide
Materials
- White or cream polymer clay
- Rolling pin or pasta machine
- Round clay cutter (approx. 1.5 inches)
- X-Acto knife or clay blade
- Small ball stylus or needle tool
- Black acrylic paint
- Pink acrylic paint
- Pastel orange or peach acrylic paint
- Fine detail paintbrush (size 000)
- Small screw eye pin
- Jump rings (gold finish)
- Lobster clasp keychain finding (gold finish)
- Jewelry pliers
- Glaze or varnish (matte or satin recommended)
Step 1: Shaping the Base
-
Condition the clay:
Begin by kneading your white or cream polymer clay in your hands until it is soft, pliable, and free of cracks. This conditioning step is crucial for a smooth final finish. -
Roll it out:
Roll the clay into a flat slab, approximately 1/4 inch thick. You want it substantial enough to hold the hardware but not too heavy. -
Cut the circle:
Use your round cutter to punch out a perfect circle from the slab. Smooth the edges gently with your fingertip to remove any sharp ridges left by the cutter. -
Form the ears:
Take a small scrap of clay and roll it into a tiny ball, then shape it into a triangle. Repeat for the second ear, ensuring they are roughly the same size. -
Attach the ears:
Press the triangles onto the top edge of your circle. Use a sculpting tool or your finger to blend the seams perfectly so the ears look like they are part of the main shape, not just stuck on. -
Insert hardware:
Carefully screw the eye pin into the center top of the head, right between the ears. I prefer to add a dab of liquid clay or bake-and-bond on the threads for extra security. -
Bake:
Place your cat face on a baking sheet or ceramic tile. Bake according to the manufacturer’s instructions for your specific brand of clay—usually around 275°F (135°C) for 15-30 minutes. -
Cool down:
Allow the clay to cool completely before moving to the painting stage. Painting on warm clay can ruin your brushes and make the paint dry clumpily.
Step 2: Painting Details
-
Paint the ears:
Using a small brush and pink paint, carefully fill in the inner triangles of the ears. A soft, muted pink works best for this gentle look. -
Add the nose:
Paint a tiny, inverted triangle or heart shape in the center of the face with the same pink paint to create the nose. -
Draw the eyes:
Switch to your finest detail brush and black paint. Carefully paint two downward-curved crescents for the sleeping eyes. Keep them symmetrical. -
Add the mouth:
Paint a small anchored ‘w’ shape directly under the nose to connect the mouth features. -
Whiskers:
With a very light touch, flick three short, straight lines on each cheek for the whiskers. -
Chest details:
Using the peach or pastel orange paint, create small vertical dashes near the bottom of the circle to mimic soft chest fur. -
Seal the piece:
Once the paint is thoroughly dry, apply a thin coat of matte or satin glaze to protect your artwork from scratches and wear.
Clean Clay Pro Tip
White clay picks up dust instantly. Keep a pack of baby wipes or rubbing alcohol nearby to clean your hands and tools before touching the white clay.
Step 3: Assembly
-
Open the jump ring:
Using two pairs of pliers, twist a jump ring open sideways (never pull it apart outwards). -
Connect parts:
Slide the open jump ring through the eye pin on the cat’s head and the loop of your lobster clasp mechanism. -
Close the loop:
Twist the jump ring back into a closed position, ensuring the ends meet perfectly flush so the charm doesn’t slip off later.
Uneven Paint Troubleshooting
If your fine lines look shaky, use a toothpick or a needle tool dipped in paint instead of a brush. It acts like a tiny pen for more control.
Now you have a sweet little companion to keep your keys organized and cheerful
Sleepy Bear Biscuit Charm
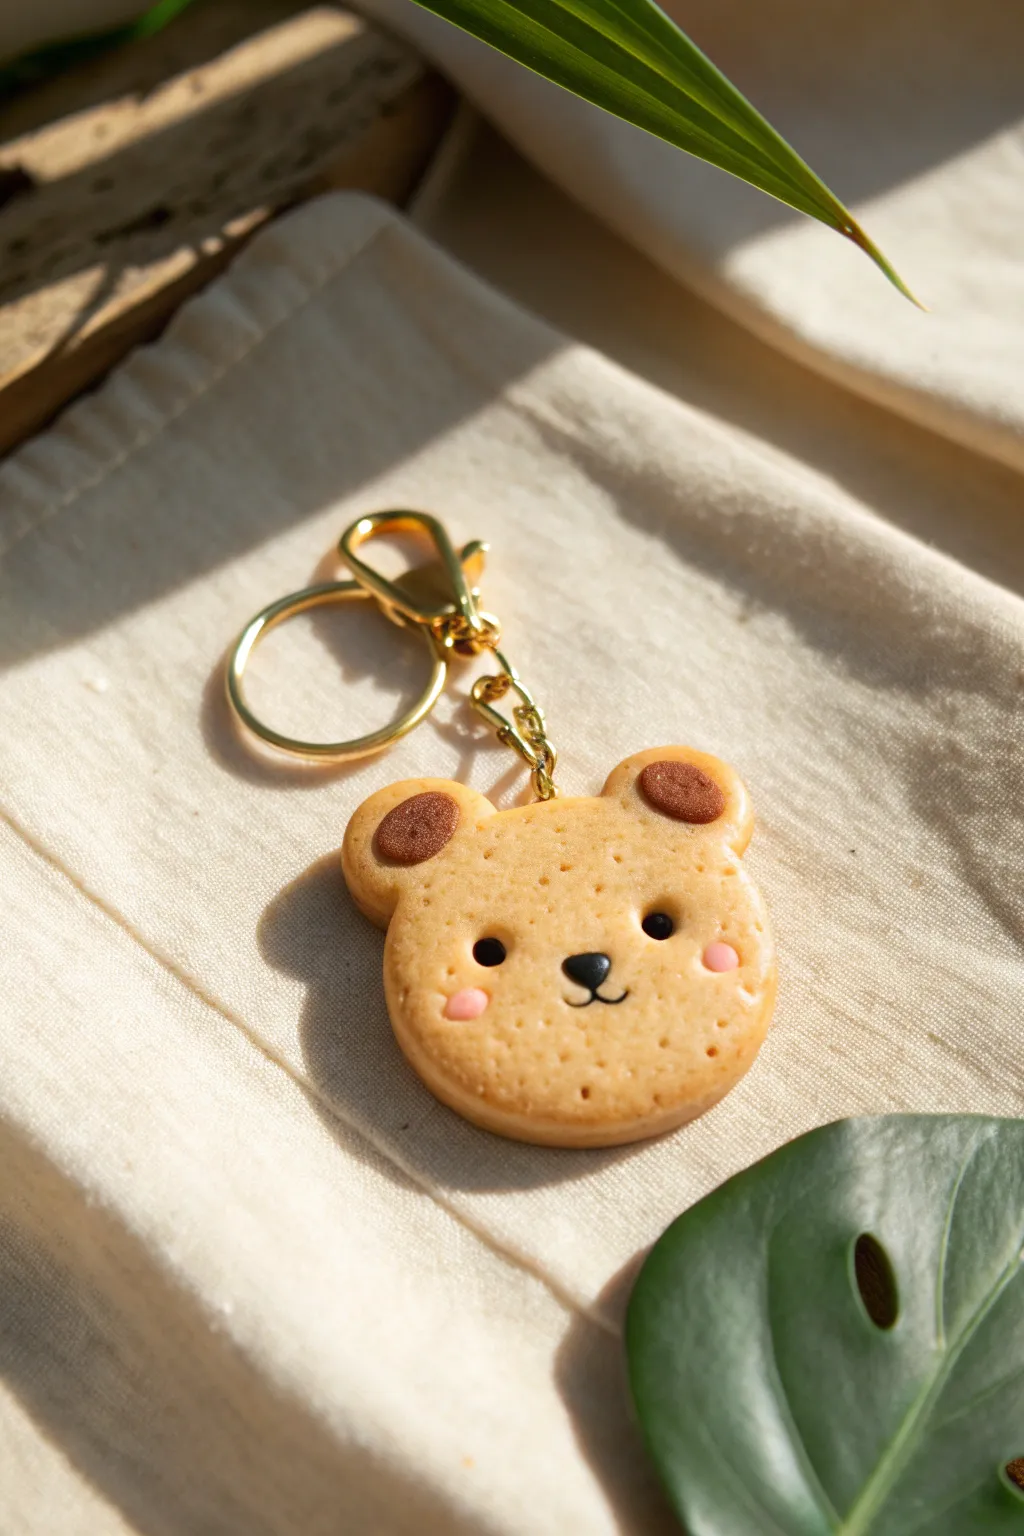
Transform a simple lump of dough into this adorably realistic bear biscuit charm. With its golden baked texture and sweet little face, it looks almost good enough to eat—but please don’t!
Detailed Instructions
Materials
- Light tan polymer clay (biscuit dough color)
- Dark brown polymer clay (ears)
- Black polymer clay (eyes/nose)
- Pink polymer clay (cheeks)
- Soft pastels (yellow ochre, brown, orange)
- Soft fluffy paintbrush
- Pointed detailing tool or needle tool
- Ball tool (small and medium)
- Sandpaper or stiff toothbrush (for texturing)
- Eye pin
- Gold keychain hardware
- Strong craft glue or E6000
- Polymer clay glaze (optional)
Step 1: Shaping the Base
-
Condition the Clay:
Start by taking your light tan polymer clay and kneading it in your hands until it becomes soft, pliable, and free of cracks. -
Form the Head:
Roll the clay into a smooth ball about the size of a large walnut, then gently flatten it into a thick disc. This will be the main ‘cookie’ shape. -
Refine the Shape:
Use your fingers to round the edges so they look soft and baked rather than sharp. You want it to look like dough that has risen slightly in the oven. -
Create Ear Indents:
Use a medium ball tool to press two gentle indentations into the top corners of your biscuit where the ears will sit.
Fixing Falling Facial Features
If tiny eyes or mouths won’t stick to the textured surface, apply a microscopic dot of liquid sculpey or liquid clay as an adhesive before placing them.
Step 2: Adding Texture & Details
-
Texturing the Surface:
Gently tap a clean, stiff toothbrush or a piece of crumpled sandpaper over the entire front and sides of the bear. This mimics the porous texture of a baked cookie. -
Making the Ears:
Roll two small balls of tan clay for the ears. Flatten them slightly and press them firmly into the indentations you made earlier. -
Inner Ear Detail:
Take two tiny balls of dark brown clay, flatten them into discs, and press them into the center of each ear to create the chocolate centers. -
Biscuit Pores:
Using a needle tool or small dotting tool, poke random small holes all over the face (avoiding the very center where the features will go). This creates that classic digestive biscuit look. -
Adding the Hook:
Insert a metal eye pin into the top center of the head. I find adding a tiny dab of liquid clay or translucent bake-and-bond on the pin helps secure it better.
Step 3: The Baking Effect
-
Preparing Pastels:
Shave a small amount of yellow ochre, orange, and brown soft pastels into a powder on a piece of scrap paper. -
Shading the Edges:
Dip a soft fluffy brush into the orange-brown powder mixture and gently dust the edges of the bear biscuit to give it a ‘golden brown’ baked appearance. -
Highlighting Texture:
Lightly brush the pastel over the textured surface of the face, letting the color catch in the toothbrush indentations for realistic depth.
Level Up: Cream Filling
Make a second biscuit back and sandwich a layer of white clay between them to turn this into a bear sandwich cookie charm.
Step 4: Face & Finishing
-
Eye Sockets:
Use a small ball tool to press two indents for the eyes halfway down the face, spaced slightly apart. -
Placing Black Eyes:
Roll two tiny balls of black clay and press them into the eye sockets. Ensure they are the same size for a balanced expression. -
Nose and Mouth:
Place a small triangular piece of black clay between the eyes for the nose. Then, roll an extremely thin snake of black clay to form the small ‘w’ shape for the mouth and attach it below the nose. -
Rosy Cheeks:
Take two minuscule pieces of pink clay, flatten them into ovals, and place them under the eyes for a blushing look. -
Baking:
Bake your charm according to the temperature and time instructions on your specific package of polymer clay. Let it cool completely. -
Assembly:
Once cool, carefully open the jump ring on your gold keychain hardware using pliers, loop it through the eye pin, and close it securely.
Clip this sweet little bear onto your keys or bag and enjoy your calorie-free treat every day.


What Really Happens Inside the Kiln
Learn how time and temperature work together inside the kiln to transform clay into durable ceramic.
Strawberry With a Cute Face
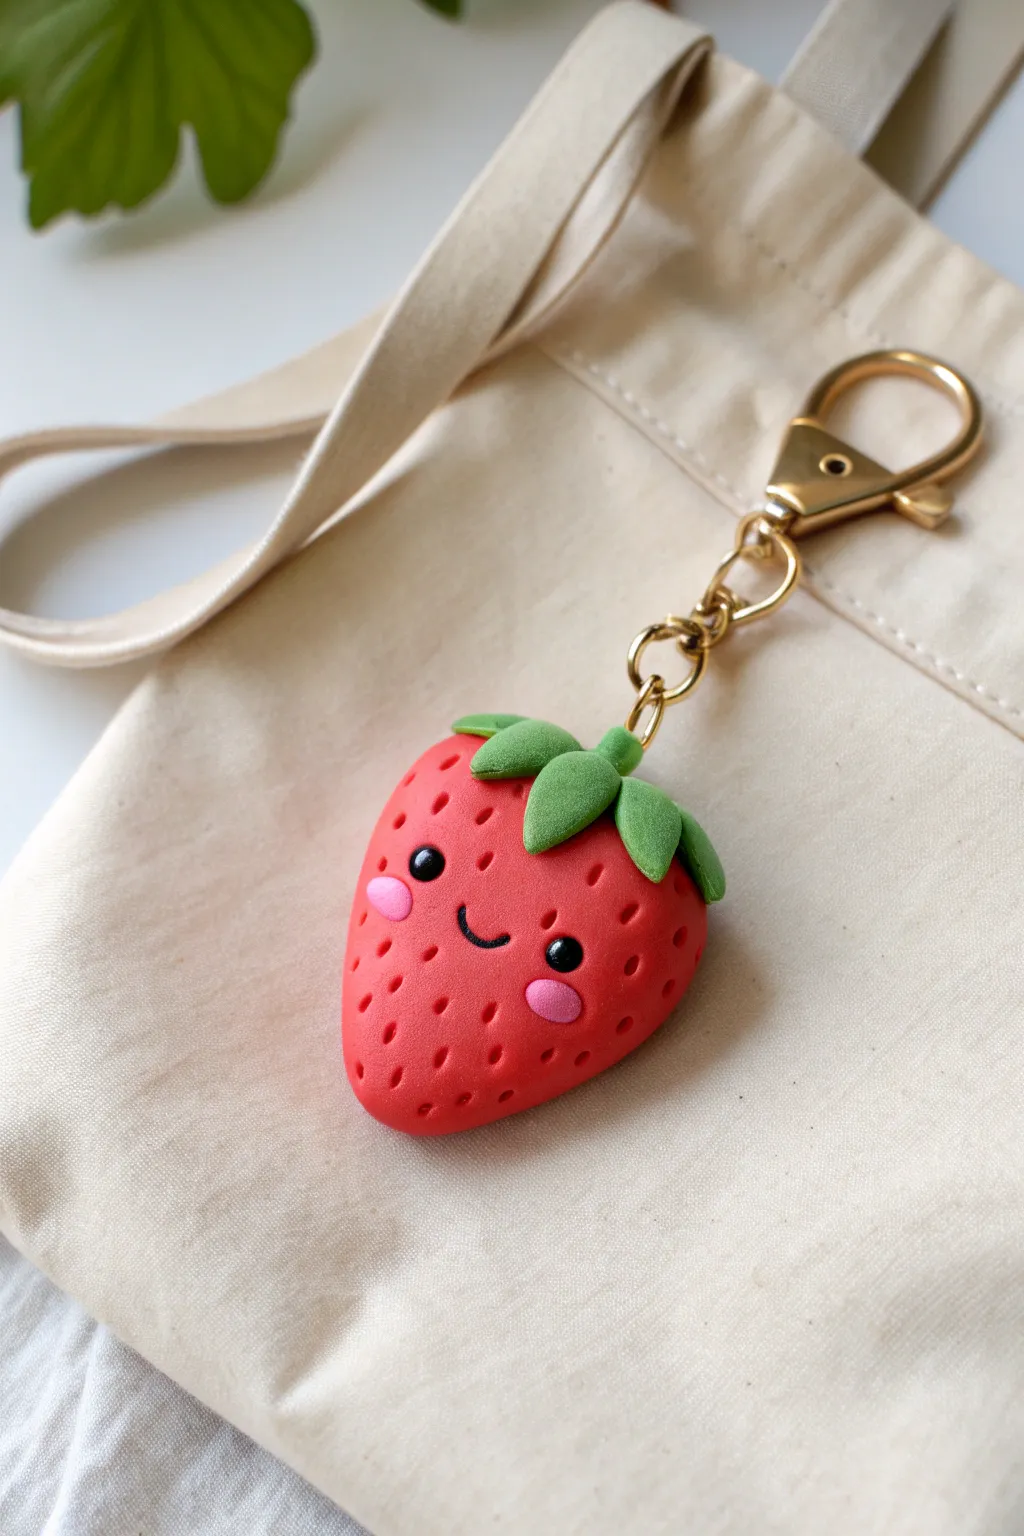
This adorable strawberry keychain brings a pop of fruity fun to your bag or keys. With its sweet little smile, rosy cheeks, and leafy hat, this beginner-friendly polymer clay project is impossible to resist.
Step-by-Step Tutorial
Materials
- Red polymer clay
- Green polymer clay
- Black polymer clay
- Light pink polymer clay
- Needle tool or toothpick
- Small ball stylus tool
- Eye pin (gold finish)
- Gold keychain clasp with chain and jump ring
- Gloss glaze (optional)
- Small paintbrush
- Clay roller or pasta machine
Step 1: Shaping the berry
-
Condition the clay:
Start by taking a chunk of red polymer clay and kneading it in your hands until it becomes soft, warm, and pliable. This prevents cracks later on. -
Form the base:
Roll the red clay into a smooth ball about the size of a walnut, ensuring there are no seams or lines. -
Create the taper:
Gently gently roll one side of the ball between your palms to create a teardrop shape. Flatten the wider end slightly and press the rounded point just a bit so it isn’t too sharp; you want a chubby, soft strawberry shape.
Step 2: Adding texture and hardware
-
Texture the seeds:
Using a needle tool or a toothpick, press small indentations all over the surface of the strawberry. Keep the pressure even but random for a natural seed look. -
Save space for the face:
Leave a small, smooth oval area in the center of the ‘front’ side without seed indentations. This is where the face will go. -
Insert the hardware:
Take a gold eye pin and trim it if necessary so it doesn’t poke through the bottom. Push it down into the center of the wide top of the strawberry. I like to add a tiny dab of liquid clay or bake-and-bond on the wire for extra security.
Seed Spacing Secret
Don’t line up the seed holes in perfect rows. Staggering them like bricks creates a much more organic and realistic fruit texture.
Step 3: Creating the leafy top
-
Make the leaves:
Take small pea-sized bits of green clay and flatten them into teardrops. You will need about 4 or 5 leaves. -
Shape the foliage:
Press the leaves onto the top of the strawberry, arranging them around the eye pin. Use your finger to gently curve the tips downward so they hug the fruit. -
Blend the stem:
Take a tiny bit of green clay, roll it into a short snake, and wrap it around the base of the eye pin where it meets the leaves to create a finished stem look.
Make it Sparkle
Before baking, brush a tiny amount of pearl mica powder over the pink cheeks. It gives them a sweet, highlighting shimmer.
Step 4: Adding the face
-
Position the eye sockets:
Use a small ball stylus to gently press two indentations into the smooth area you saved earlier. These spots will hold the eyes. -
Add the eyes:
Roll two tiny spheres of black clay. Place them into the eye sockets you just made and press gently to secure them. -
Create the cheeks:
Roll two slightly larger flattened ovals of light pink clay. Press these onto the berry surface just below and to the outside of the eyes. -
Make the smile:
Roll an extremely thin, thread-like snake of black clay. Cut a tiny u-shaped segment and carefully place it between the eyes to form a smile, using a needle tool to nurture the curve into place.
Step 5: Finishing touches
-
Bake:
Bake the piece according to your specific clay brand’s instructions (usually around 275°F or 135°C for 15-30 minutes). Let it cool completely before handling. -
Assembly:
Once cool, use pliers to open the jump ring on your keychain finding. Loop it through the eye pin on top of the strawberry and close it securely. -
Glaze (Optional):
For a shiny, juicy finish, apply a thin coat of gloss glaze over the red part of the strawberry, avoiding the green leaves for a nice matte contrast.
Clip this cheery little fruit onto your favorite tote bag and enjoy the smiles it brings
Puffy Heart With Tiny Letter
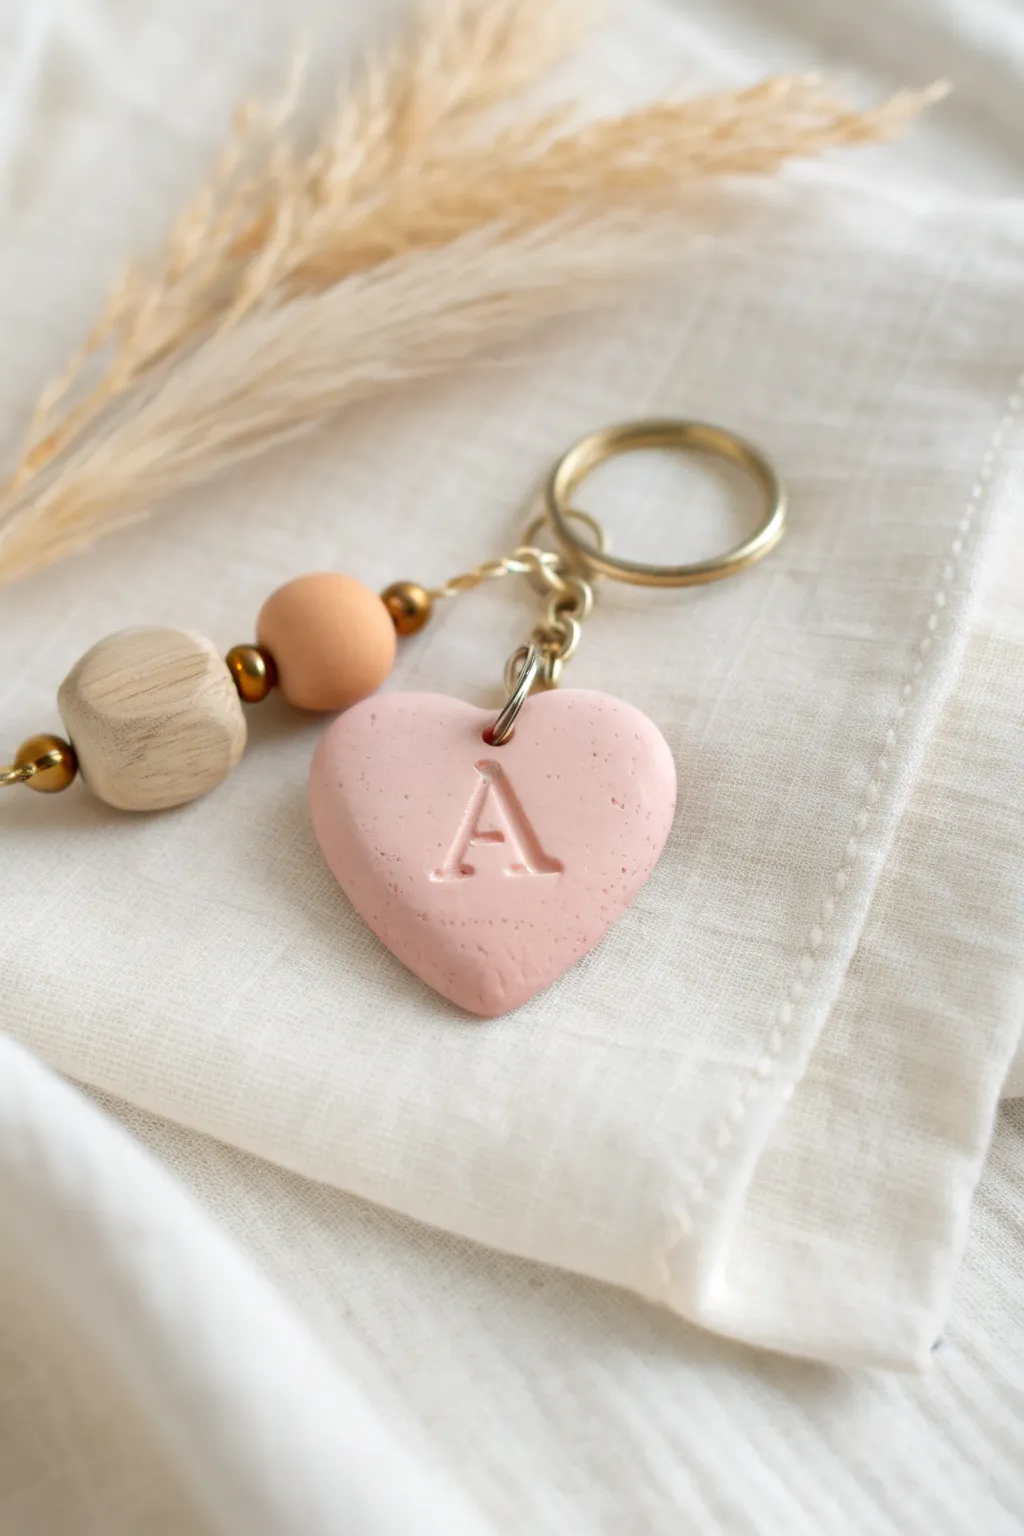
This charming keychain combines a soft, matte clay finish with natural wood and gold accents for a trendy bohemian look. The puffy heart shape and personalized initial make it an incredibly sweet gift or a personalized accessory for your own keys.
Step-by-Step Tutorial
Materials
- Pink polymer clay (matte finish/soufflé type)
- Small heart-shaped cookie cutter (approx. 1.5 – 2 inches)
- Small letter stamp set
- Gold keychain ring and chain assembly
- Gold jump ring (8-10mm)
- Gold eye pin
- Wooden cube bead (natural finish)
- Terracotta-colored round wooden or silicone bead
- Gold spacer beads (heishi or small round)
- Needle tool or toothpick
- Jewelry pliers (round nose and flat nose)
- Clay roller
- Parchment paper or baking tile
- Oven
Step 1: Sculpting the Heart
-
Condition the Clay:
Begin by warming the pink polymer clay in your hands. Knead and roll it until it is soft, pliable, and free of cracks. This ensures a smooth final surface. -
Roll to Thickness:
Roll your clay out on a smooth surface or parchment paper. Aim for a thickness of about 1/4 inch (6mm). You want it substantial enough to hold the puffy shape without being too heavy. -
Cut the Shape:
Press your heart-shaped cutter firmly into the clay. Give it a gentle wiggle before pulling up to ensure a clean cut. -
Smooth the Edges:
Once cut, use your finger to gently rub the edges of the heart. This softens the sharp cut lines, giving it that rounded, ‘puffy’ appearance seen in the photo. -
Add Texture (Optional):
If your clay is too smooth, you can gently lightly tap it with a toothbrush or piece of sandpaper to mimic the stone-like texture shown in the image. -
Stamp the Initial:
Center your letter stamp over the heart. Press down firmly and evenly, but not so deep that you distort the back of the clay. Rock it slightly if needed to get a clear impression. -
Create the Hanging Hole:
Use a needle tool or toothpick to pierce a hole near the top center of the heart. Make the hole slightly larger than your jump ring’s thickness, as clay can shrink slightly or the hole can close up during baking. -
Bake:
Place the heart on parchment paper or a ceramic tile. Bake according to your specific clay package instructions (usually around 275°F/130°C for 15-30 minutes). Let it cool completely before handling.
Clean Prints Only
Before stamping the letter, lightly dust the stamp face with cornstarch or dip it in water. This prevents the clay from sticking inside the crevices of the letter.
Step 2: Assembling the Hardware
-
Prepare the Beaded Link:
Take a gold eye pin. Slide on a gold spacer bead first, then the natural wooden cube bead. -
Add Secondary Beads:
Follow the cube with another gold spacer, then the terracotta round bead, and finish with a final gold spacer. -
Close the Loop:
Using your round nose pliers, bend the remaining wire of the eye pin into a loop at the top, securing the beads in place. Trim excess wire if necessary. -
Open the Jump Ring:
Use two pairs of pliers to twist open your large gold jump ring. Never pull rings apart; always twist side-to-side to preserve the circle shape. -
Attach the Heart:
Slide the jump ring through the hole in your baked clay heart. Before closing it, hook on the bottom loop of your beaded eye pin component. -
Connect to Key Ring:
Take the top loop of your beaded component and attach it to the chain of the main gold key ring. If the chain doesn’t have an open link, use a small jump ring to connect them. -
Final Check:
Ensure all jump rings and loops are tightly closed so no parts can slip out. Your custom keychain is now ready to use.
Fingerprint Fixer
If you notice fingerprints on your smoothed heart before baking, lightly brush the surface with a tiny amount of baby oil or clay softener to melt them away.
Now you have a stylish, handmade accessory ready to organize your keys.

TRACK YOUR CERAMIC JOURNEY
Capture glaze tests, firing details, and creative progress—all in one simple printable. Make your projects easier to repeat and improve.
Mini Cloud and Star Duo
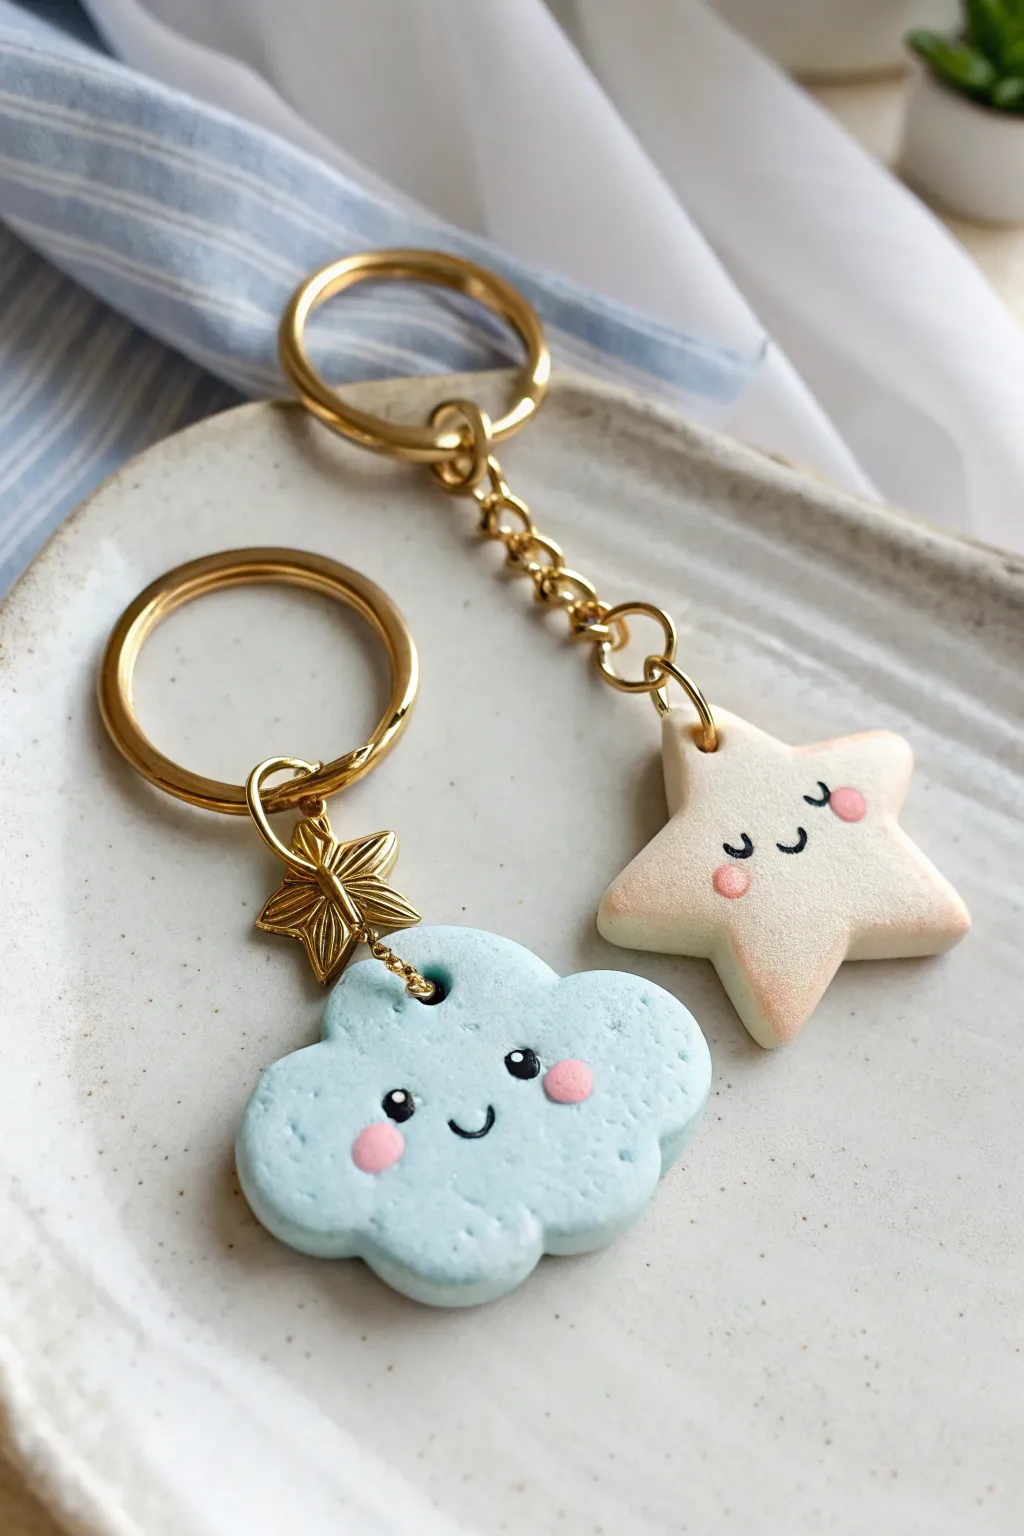
Capture a little piece of the sky with these adorable polymer clay companions, featuring sweet, smiling faces and blushing cheeks. The soft pastel blue cloud and shimmering pearl star make a perfect matching set for best friends or adding a touch of cheer to your own keys.
Step-by-Step
Materials
- Polymer clay: Pastel Blue, Pearl White (or Translucent/White mix), Pink, Black
- Gold keychain hardware: split rings, chains, jump rings
- Gold star charm (optional)
- Clay roller or pasta machine
- Cookie cutters: Cloud (approx. 2 inch) and Star (approx. 1.5 inch)
- Needle tool or toothpick
- Ball stylus tool (small)
- Eye pin or screw eye pins (gold)
- Soft pastel chalk (pink) and a soft brush
- Gloss glaze or UV resin (optional for eyes)
- Jewelry pliers (round nose and flat nose)
- Oven for baking clay
Step 1: Shaping the Cloud base
-
Condition the blue clay:
Start by warming the pastel blue clay in your hands, kneading it until it is soft and pliable. This conditioning step is crucial to prevent cracks later. -
Roll out the slab:
Using your acrylic roller or pasta machine, roll the blue clay out to a thickness of about 1/4 inch (6mm). You want it thick enough to hold the hardware securely. -
Cut the shape:
Press your cloud cutter firmly into the clay. If the clay sticks, you can gently dust the cutter with cornstarch first. Remove the excess clay and smooth the edges with your fingertip to round them off nicely. -
Add texture:
To get that slightly fluffy, organic texture seen in the photo, gently dab the surface with a stiff toothbrush or a crumpled ball of aluminum foil. Keep the pressure light so you don’t distort the shape. -
Insert the hardware:
Insert a gold screw eye pin into the top center of the cloud. I like to add a tiny dab of liquid clay or Bake & Bond to the screw threads before inserting to ensure it stays put after baking.
Dirty Clay Disaster?
White clay picks up everything! Have baby wipes nearby to clean hands/tools between colors. If dust gets on raw clay, gently wipe it away with a Q-tip dipped in rubbing alcohol.
Step 2: Creating the Star
-
Prepare the pearl clay:
Clean your hands thoroughly to avoid transferring blue lint, then condition the pearl or white clay. Roll it to the same 1/4 inch thickness as the cloud. -
Cut the star:
Use your star cutter to stamp out the shape. Like the cloud, take a moment to gently soften the sharp cut edges with your finger for a more finished, rounded look. -
Add the hardware:
Insert a screw eye pin into the top point of the star, ensuring it goes in straight and doesn’t poke through the sides.
Pro Tip: Eye Socket Trick
Before adding the black clay balls for eyes, use a ball tool to make shallow divots in the face. This seats the eyes into the clay so they don’t pop off later.
Step 3: Adding the Faces
-
Mark eye placement:
Use your needle tool to make tiny guide marks where you want the eyes to sit. Spacing them slightly far apart gives that cute ‘kawaii’ look. -
Create the cloud’s eyes:
Roll two tiny balls of black clay. Press them gently onto the cloud’s marked spots. Flatten them slightly so they aren’t bulging too much. -
Add the cloud’s smile:
Roll a very thin ‘snake’ of black clay. Cut a tiny U-shape and gently press it into the clay between the eyes using your needle tool to curve it perfectly. -
Detail the eyes:
With the smallest stylus or a toothpick, add a microscopic dot of white clay to the upper right corner of each black eye for a sparkling highlight. -
Sculpt the star’s face:
For the sleeping star, we won’t use black clay balls. Instead, press your needle tool or a small U-shaped cutter into the clay to create indented closed eyelids. Use the needle tool to carve a tiny smile. -
Apply blush:
Scrape a little pink pastel chalk into a powder. Using a soft, dry brush or a Q-tip, gently dust pink circles onto the cheeks of both the cloud (below the eyes) and the star (near the smile points).
Step 4: Baking and Assembly
-
Bake the pieces:
Place your charms on a ceramic tile or baking sheet line with parchment paper. Bake according to your brand of clay’s instructions (usually 275°F/135°C for 30 minutes). -
Cool down:
Let the pieces cool completely inside the oven by cracking the door; this helps prevent thermal shock and brittleness. -
Seal (Optional):
If you want extra shine, brush a thin layer of glaze over the eyes or the whole piece. UV resin creates the most durable, glass-like finish. -
Attach the cloud hardware:
Using your pliers, open a large jump ring. Thread on the cloud’s eye screw, the gold star charm, and the large keychain ring. Close the jump ring securely. -
Attach the star chain:
For the star, attach a short length of gold chain (about 1 inch) to the eye pin using a small jump ring. Attach the other end of the chain to the large keyring.
Attach your new sky-themed buddies to your bag or keys and enjoy their happy little faces every day
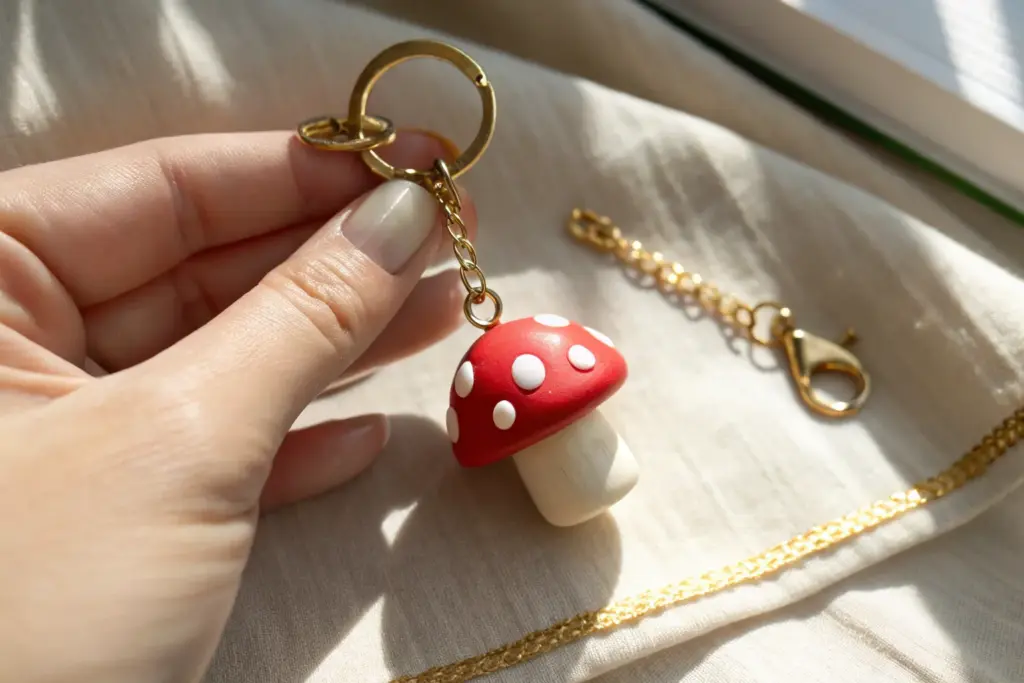
Tiny Mushroom With a Sweet Face

Bring a touch of the forest to your everyday carry with this adorable spotted mushroom keychain. With its classic red cap, tiny spots, and sweet little smile, this polymer clay charm is a beginner-friendly project that radiates pure joy.
Step-by-Step Guide
Materials
- Polymer clay: Red, White, Black, Pink
- Gold tone eye pin (about 1 inch)
- Gold tone large jump ring
- Gold tone swivel clasp keychain finding
- Ball tool or dotting tool
- Needle tool or toothpick
- Small round cutter (optional, for shaping)
- Liquid polymer clay or Bake & Bond
- Acrylic roller
- Craft knife
- Gloss glaze or UV resin (optional)
- Small paintbrush
- Pliers (round nose and flat nose)
- Oven
Step 1: Shaping the Base
-
Condition the Clay:
Start by conditioning your white polymer clay until it is soft and pliable. Roll it into a smooth ball free of any cracks or lines. -
Form the Stem:
Gently roll the white ball into a short, thick cylinder shape. Tap the bottom on your work surface to flatten it slightly so the mushroom can stand upright on its own. -
Round the Top:
Use your fingers to smooth and round off the top of the cylinder where the cap will eventually sit. This creates a solid foundation for the head. -
Prepare the Eye Pin:
Take your gold eye pin. If it’s too long, trim it so only about 3/4 inch remains below the loop. I like to bend the very tip of the wire into a small hook or zigzag; this acts as an anchor inside the clay. -
Insert the Hardware:
Push the eye pin straight down into the center of the white stem. Push it deep enough that the loop sits right on top of the rounded clay, but don’t submerge the loop itself.
Dirty Clay?
White clay picks up lint easily. Keep a pack of baby wipes nearby and clean your hands and tools thoroughly between colors, especially before handling the white stem or spots.
Step 2: Creating the Cap
-
Shape the Red Clay:
Condition a piece of red clay similar in volume to your white stem. Roll it into a ball, then flatten the bottom against your table to create a hemisphere or dome shape. -
Refine the Dome:
Use your fingers to gently pull the edges of the red dome downwards, creating a slight curve underneath. You want it to look like a true mushroom cap, not just a half-circle. -
Attach Cap to Stem:
Apply a tiny dab of liquid polymer clay to the top of the white stem around the eye pin. Carefully thread the eye pin through the center of the red cap and slide the cap down until it rests snugly on the stem. -
Smooth the Connection:
Gently press the cap down to ensure a tight bond. The metal loop of the eye pin should now be protruding from the very top center of the red cap.
Step 3: Adding Details & Baking
-
Make the Spots:
Condition a very small amount of white clay. Roll tiny little balls in various sizes. Press these randomly all over the red cap, flattening them flush with the surface to create polka dots. -
Create the Eyes:
Roll two miniscule balls of black clay. Position them on the white stem, slightly lower than the cap line, and press them gently into place to flatten them. -
Add the Highlights:
For that signature sparkle, take the tiniest speck of white clay possible and place it in the upper corner of each black eye. -
Sculpt the Smile:
Roll an incredibly thin snake of black clay. Cut a tiny U-shape segment with your craft knife and position it between the eyes to create a smile. Alternatively, you can paint this on after baking. -
Apply Blush:
Take two small amounts of pink clay, flatten them into ovals, and place them underneath each eye for rosy cheeks. -
Bake:
Bake the piece according to your specific clay brand’s instructions (usually 275°F/130°C for 15-30 minutes). Let it cool completely inside the oven to prevent cracking.
Level Up: Texturing
Before baking, use a stiff toothbrush to gently tap the white stem. This creates a subtle, realistic organic texture that contrasts beautifully with the smooth, shiny red cap.
Step 4: Assembly
-
Optional Glaze:
If you want a shiny finish like the photo, apply a coat of gloss glaze or UV resin to the mushroom cap and eyes. Cure or dry as directed. -
Attach Jump Ring:
Using two pairs of pliers, twist open your large gold jump ring. Thread it through the loop of the eye pin sticking out of the mushroom cap. -
Add Keyring:
Before closing the jump ring, slide on the gold swivel clasp chain. -
Final Close:
Twist the jump ring closed securely, ensuring the gap is completely sealed so your cute mushroom doesn’t slip off.
Now you have a charming little companion ready to guard your keys
Little Octopus Chibi Charm
This adorable little sea creature is crafted from smooth polymer clay in a lovely shade of lilac. With its cute spotted head and tiny tentacle details, it captures the essence of chibi style perfectly.
Step-by-Step
Materials
- Light purple/lilac polymer clay
- Slightly lighter purple polymer clay (for spots)
- Black polymer clay
- Gold keychain mechanism with chain and screw eye pin
- Dotting tools (various sizes)
- Small blade or craft knife
- Glossy varnish or UV resin
- Fine paintbrush
Step 1: Sculpting the Head and Body
-
Prepare the base:
Condition your main lilac clay until it is soft and pliable, then roll it into a smooth, crack-free sphere about the size of a ping-pong ball. -
Form the head shape:
Gently press the sphere onto your work surface to flatten the bottom slightly, keeping the top nice and round for the octopus’s head. -
Create the tentacles:
Roll eight small, equal-sized logs of the same lilac clay. These should be short and tapered at one end to form the tentacle tips. -
Attach tentacles:
Arrange the eight tentacles in a circle underneath the flattened bottom of the head, pressing them gently to adhere them to the main body. -
Curl the tips:
Give the tentacles some personality by curling the tapered ends upward slightly, creating a playful, wavy motion. -
Blend the seams:
Use a silicone tool or your finger to carefully smooth the seam where the tentacles meet the head, ensuring the piece looks like one solid unit.
Fingerprint Fix
Before baking, brush your clay lightly with a bit of baby oil or cornstarch to smooth out any accidental fingerprints.
Step 2: Adding Details and Features
-
Create suction cups:
Using a small dotting tool, press two rows of small indentations along the underside of each lifted tentacle tip to mimic suction cups. -
Make the spots:
Take tiny amounts of the lighter purple clay and flatten them into incredibly thin, small circles of varying sizes. -
Apply the spots:
Gently press these lighter spots onto the left side of the octopus’s forehead area, clustering them naturally. -
Form the eyes:
Roll two very small balls of black clay and flatten them into ovals. Press these onto the face, spacing them wide apart for that cute chibi look. -
Add eye sparkle:
Place a teeny-tiny dot of white clay (or white paint after baking) in the upper corner of each black eye for a highlight. -
Carve the smile:
Use a small, curved blade or a needle tool to impress a tiny, U-shaped mouth right between the eyes.
Step 3: Assembly and Finishing
-
Insert hardware:
Screw the threaded eye pin into the very top center of the head. I like to remove it, add a dab of liquid clay or glue, and re-insert it for extra security. -
Bake the piece:
Bake your octopus according to the clay manufacturer’s instructions (usually 275°F/130°C for 15-30 minutes). -
Cool down:
Allow the piece to cool completely before handling it further to prevent fingerprints or distortion. -
Varnish touches:
For a wet look, apply a coat of gloss glaze or UV resin specifically to the eyes to make them shine. -
Attach the chain:
Using jewelry pliers, open the jump ring on your gold keychain and loop it through the eye pin on the octopus’s head, then close it securely.
Hardware Helper
Twist the eye pin as you push it into the raw clay. This creates ‘threads’ inside that help grip the glue later on.
Now your charming little sea creature is ready to tag along on all your daily adventures
Fruit Slice Charm Set With Faces
These vibrant fruit slice keychains combine realistic citrus textures with adorable kawaii watermelon characters. Perfect for summer accessories, this project teaches you two distinct polymer clay techniques: translucent cane-work for the lemon and character sculpting for the melon.
Step-by-Step Tutorial
Materials
- Polymer clay: translucent, yellow, white, lime green, dark green, pink/red, black
- Liquid polymer clay (translucent)
- Small circle cutter (approx. 1 inch)
- Small blade or X-Acto knife
- Needle tool or toothpick
- Two gold keychain rings with chains
- Four gold eye pins
- Jewelry pliers (round nose and flat nose)
- Gloss glaze or UV resin (optional)
- Oven for curing
Step 1: Creating the Realistic Lemon Slice
-
Mix the citrus color:
Start by mixing translucent clay with a very small amount of bright yellow. You want the clay to remain mostly see-through after baking, so be sparing with the pigment. -
Form the segments:
Roll your yellow-translucent mix into a log. Flatten a thin sheet of white clay and wrap it around the log. Gently squeeze and roll this cane to elongate it, then slice it into equal sections and pinch one side of each to form a teardrop shape. -
Assemble the wheel:
Arrange the teardrop segments in a circle, points facing inward, to form the lemon wheel. Place a tiny snake of white clay in the very center to fill the gap. -
Add the rind:
Roll out a sheet of white clay and wrap it around your assembled wheel. Follow this with a slightly thicker sheet of yellow clay for the outer peel. -
Texture and slice:
Gently compress the cane to ensure layers adhere. Slice a thick coin (about 4-5mm) from the cane. Use a needle tool to gently texture the skin of the lemon for realism. -
Seeds and details:
Press tiny black clay seeds into the translucent segments or paint them on later. Insert an eye pin into the top of the rind.
Texturing Tip
Before baking, gently tap the pink watermelon flesh with a clean creative toothbrush or sandpaper. This creates a realistic, gritty fruit texture compared to the smooth rind.
Step 2: Sculpting the Kawaii Watermelons
-
Prepare the melon base:
Condition your pink or red clay. Roll it into a smooth, thick sheet (approx. 5mm) and use your circle cutter to punch out two rounds. -
Make the triangular slice:
Take one of the pink rounds and cut a triangular wedge shape from it. Smooth the cut edges with your finger to remove any sharpness. -
Layer the rind:
Roll a thin snake of white clay and a slightly thicker snake of lime green clay. Wrap the white strip along the curved bottom edge of the triangle, followed by the green strip. -
Make the round slice:
For the circular melon charm, wrap the entire perimeter of the second pink round with a white strip, followed by a green strip to create the full rind. -
Blend the layers:
Gently roll the edges on your work surface to blend the seams between the pink, white, and green clay so they bond securely. -
Create the faces:
Roll tiny balls of black clay for the eyes and press them firmly onto both melon pieces. Roll incredibly thin snakes of black clay to form the small U-shaped smiles and place them between the eyes. -
Add highlights:
Use a needle tool or toothpick to place a microscopic dot of white paint or tiny white clay onto the black eyes to give them that sparkling ‘kawaii’ look. -
Add seeds:
Roll very small, thin tapered logs of black clay for the seeds. Arrange them radially around the faces on both charms.
Step 3: Assembly and Finish
-
Insert hardware:
Trim your eye pins to an appropriate length (about 1cm) and insert one into the top of each watermelon charm. I find adding a tiny dab of liquid clay to the pin helps it stick permanently. -
Bake:
Bake all three pieces according to your clay manufacturer’s instructions, typically around 275°F (130°C) for 15-20 minutes. Let them cool completely. -
Glaze:
For a juicy look, coat the fruit flesh areas with gloss glaze or UV resin, leaving the rinds matte for texture contrast. -
Chain assembly:
Using your pliers, open the jump rings on the keychain findings. Attach the lemon slice and the triangular watermelon to one chain for a tiered look, and the round watermelon to the second chain.
Make it Juicy
Mix a tiny drop of fruit-scented essential oil into the glaze before applying it to the finished charms for a scratch-and-sniff sensory experience.
Now you have a refreshing set of fruit charms ready to brighten up your bag or keys