If you’ve ever made a jar, you know it’s basically pottery magic: a simple container that can turn into a whole mood. Here are my favorite ceramic jar ideas—from classic lidded staples to playful, “how did you make that?” shapes you’ll want to try next.
Classic Lidded Kitchen Canister
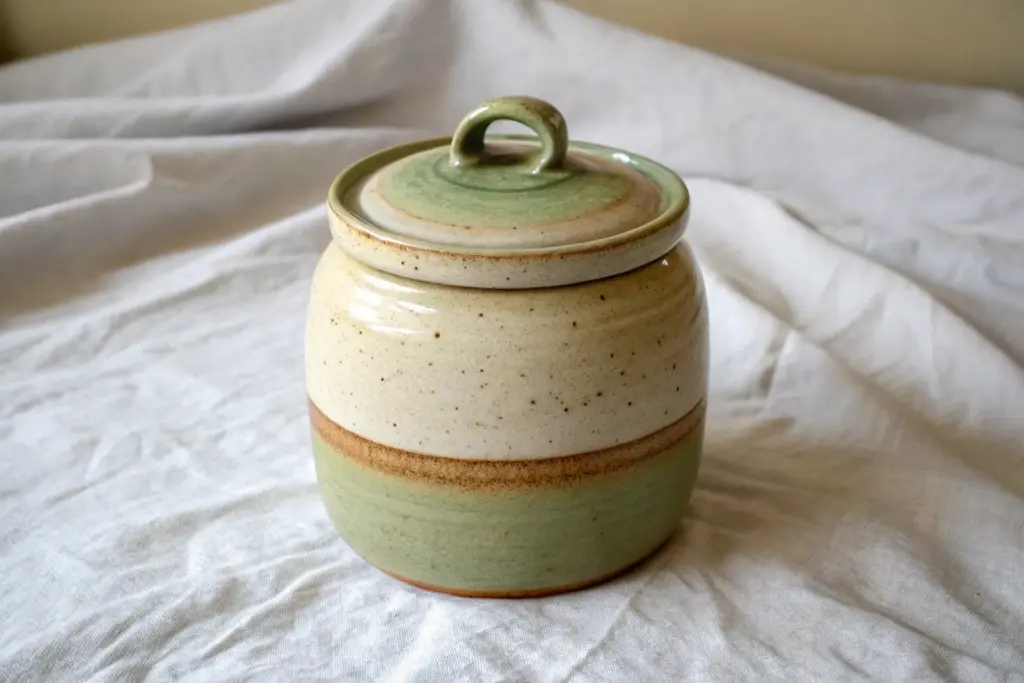
Bring classic simplicity to your kitchen counter with this timeless lidded canister project. Featuring a speckled clay body and a warm, oatmeal-toned glaze, this piece relies on clean lines and a precise fit for a professional finish.
Step-by-Step Guide
Materials
- Speckled stoneware clay (approx. 3-4 lbs)
- Pottery wheel
- Throwing sponge
- Wooden throwing ribs
- Metal kidney rib
- Needle tool
- Wire cutter
- Calipers
- Trimming tools
- Clear or semi-transparent glossy glaze
Step 1: Throwing the Body
-
Prepare the Clay:
Begin by intensely wedging about 2.5 to 3 lbs of your speckled stoneware clay. Thorough wedging ensures there are no air bubbles, which is critical for a cylinder of this height. -
Center and Open:
Center the clay firmly on the wheel head. Open the clay to a flat bottom, aiming for a floor width of about 5 inches. Compress the floor with a flat rib to prevent S-cracks later. -
Pull the Walls:
Pull the walls up into a straight cylinder. Aim for an even thickness of about 1/4 inch from bottom to top. It’s better to keep the rim slightly thicker at this stage to support the lid gallery. -
Create the Gallery:
Using the side of your finger or a specialized wooden stick, press down gently on the inner half of the rim to create a sunken ledge (the gallery). This is where the lid will sit. -
Measure with Calipers:
Take your calipers and measure the exact diameter of the gallery ledge you just created. Lock the calipers in place; do not change this measurement, as you will need it for the lid. -
Clean and Define:
Use a wooden rib to smooth the exterior walls, removing throwing lines if you prefer a smoother look. I like to press a subtle decorative groove just below the rim using the corner of the rib. -
Wire Off:
Run a wire underneath the pot to separate it from the wheel head, then carefully set it aside on a ware board to firm up to leather-hard.
Fitting Troubles
If the lid shrinks more than the pot and becomes too loose, glaze the edge of the lid heavily. The extra thickness of the glaze can sometimes bridge the gap for a tighter fit.
Step 2: Throwing the Lid
-
Throw Off the Hump:
Center a large lump of clay (3-4 lbs) to throw the lid ‘off the hump.’ Isolate a small amount of clay at the top, enough for a flat disc. -
Shape the Lid:
Flatten the isolated clay into a thick disc. Check the width against your locked calipers regularly. You want the lid to fit *inside* the measurement, but barely. -
Form the Knob:
While the clay is still attached to the hump, pinch and shape a small knob in the center of the disc. Smooth it into a rounded button shape. -
Refine and Cut:
Use a wooden tool to clean up the underside edge of the lid. When satisfied, use a needle tool or wire to cut the lid from the hump, keeping it level.
Step 3: Trimming and Assembly
-
Trim the Jar:
Once leather hard, center the jar upside down on the wheel. Trim excess weight from the bottom and refine the foot ring. -
Fit the Lid:
Flip the lid upside down (resting the knob in a chuck or a clay coil) and trim the underside. Test the fit with the jar frequently. It should slide in easily but not rattle. -
Check the Groove:
If the exterior groove on the jar softened during drying, redefine it now with a carving tool to ensure the glaze breaks beautifully over that line later. -
Bisque Fire:
Slowly dry both pieces until bone dry, then load them into the kiln for a bisque firing to roughly Cone 04.
Pro Tip: Measuring
When measuring the gallery for the lid, measure the wet clay, then make the lid exactly that size. Since both are the same clay, they will shrink at the same rate during drying.
Step 4: Glazing
-
Wax the Contact Points:
Apply wax resist to the gallery ledge on the jar and the outer rim of the lid where they will touch. This prevents the lid from fusing to the jar during firing. -
Dip the Interior:
Pour your transparent or oatmeal glaze inside the jar, swirl it around to coat completely, and pour out the excess. -
Glaze the Exterior:
Dip the exterior of the jar and the lid into the glaze bucket. Hold them for 3-4 seconds to achieve the right thickness. -
Touchups:
Once the glaze is dry, rub out any fingerprints. Double-check that no glaze is sitting on the waxed areas. -
Final Fire:
Fire the pieces to maturity (likely Cone 6 or 10 depending on your clay). The heat will draw out the iron speckles through the light glaze.
Once cooled, fill your canister with cookies or coffee beans and enjoy the handmade touch in your kitchen


Simple Round Trinket Jar
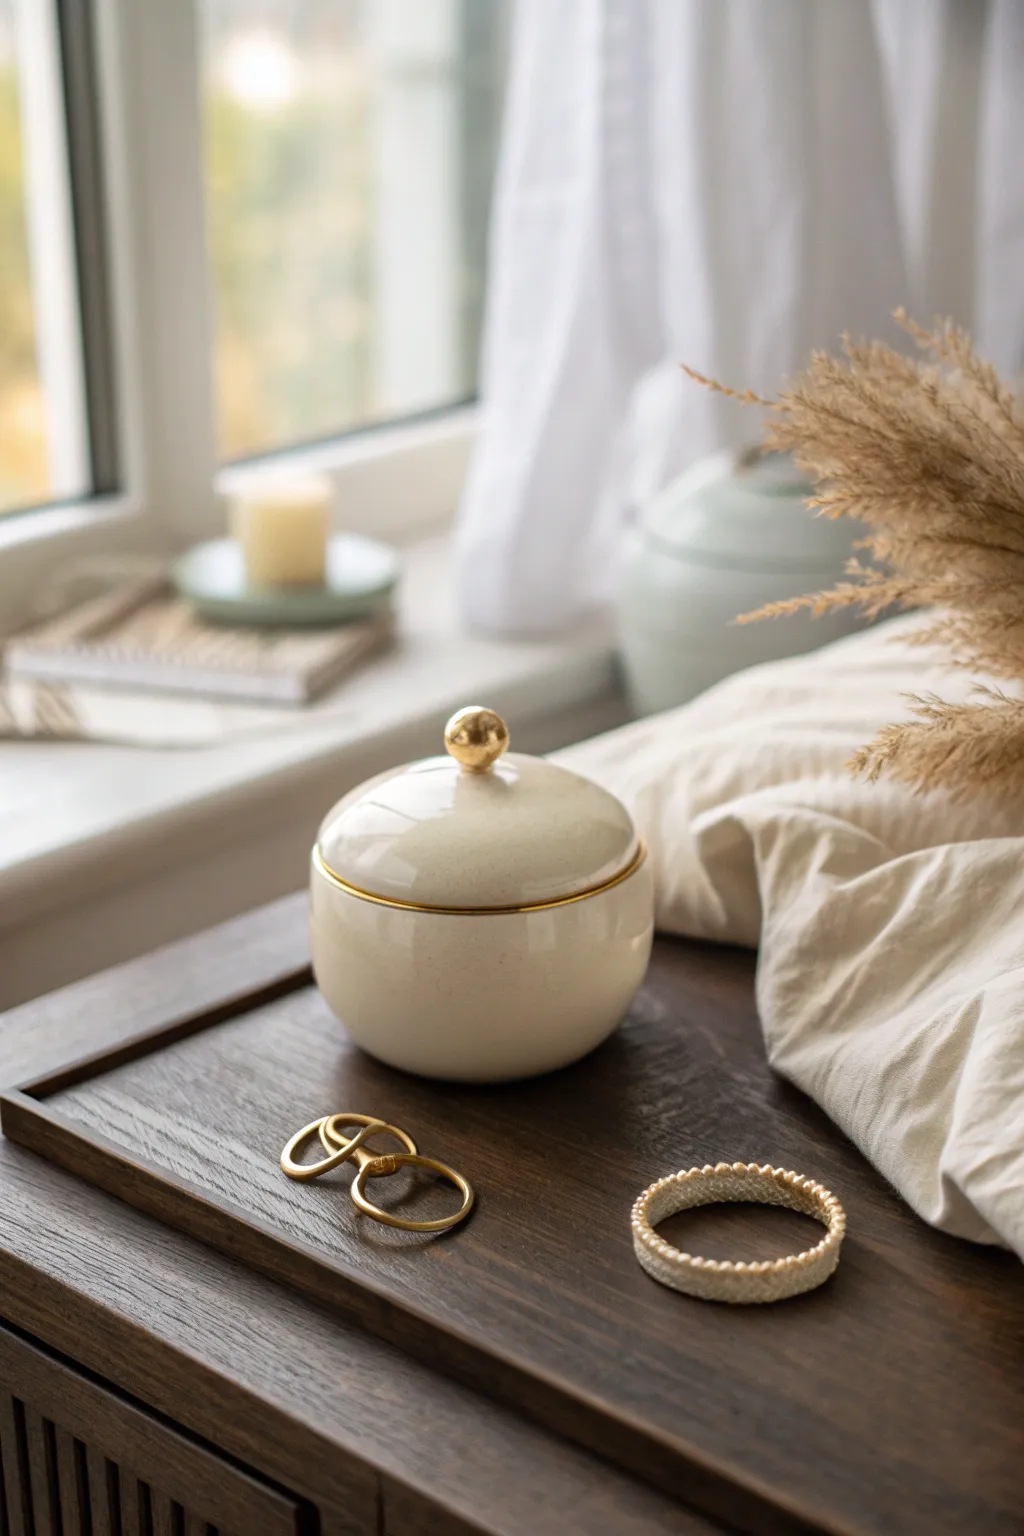
This minimalist, cream-colored ceramic jar brings a touch of understated luxury to any vanity with its delicate gold rim and spherical knob. It is the perfect size for storing rings or small keepsakes while adding a warm, neutral aesthetic to your space.
How-To Guide
Materials
- White earthenware or stoneware clay (approx. 1 lb)
- Pottery wheel (or hand-building tools for pinch method)
- Small sponge
- Pin tool
- Rib tool (wooden or silicone)
- Wire clay cutter
- Cream or off-white glossy glaze
- Gold luster overglaze
- Small detail brush specific for luster work
- Kiln access
Step 1: Forming the Body
-
Center the clay:
Begin with a well-wedged ball of clay on the wheel. Center it firmly, creating a low, wide mound rather than a tall tower. -
Open the form:
Open the clay to create a flat inside bottom. Since this is a trinket jar, you don’t need a deep interior—about 2 inches of depth is usually sufficient. -
Pull the walls:
Pull the walls up gently, curving them outward to create a rounded belly shape. Keep the walls even, aiming for about a quarter-inch thickness. -
Define the gallery:
At the rim, use your finger or a specialized tool to press a small ledge (gallery) into the inside of the rim. This is where the lid will sit. -
Refine the shape:
Use a rib tool on the exterior while the wheel is spinning to smooth out throwing lines and perfect that satisfying round curve. -
Cut from wheel:
Run a wire cutter underneath the pot and set it aside on a ware board to stiffen to leather-hard.
Dedicated Brushes
Gold luster is oily and difficult to clean. Keep one specific small brush only for gold work; never use your regular glazing brushes or the residue will ruin future projects.
Step 2: Creating the Lid
-
Measure the opening:
Using calipers, measure the diameter of the gallery you created on the jar body. This measurement is crucial for a snug fit. -
Throw the lid:
Using a smaller amount of clay, throw a low, domed shape upside down (like a small bowl). Ensure the rim width matches your caliper measurement. -
Trim the lid:
Once leather-hard, trim the excess clay from the dome shape so it has a smooth, gentle curve that mimics the jar’s body. -
Add the knob:
Roll a small, perfect sphere of clay. Score and slip the center of the lid and the bottom of the sphere, then attach it firmly. Smooth the connection point so it looks seamless.
Step 3: Glazing and Gilding
-
Bisque fire:
Once bone dry, fire both pieces in the kiln to bisque temperature (usually cone 04). -
Apply base glaze:
Dip or brush your cream-colored glaze onto the entire jar and lid. Wipe the foot of the jar clean. -
Glaze fire:
Fire the pieces again to the maturity temperature of your chosen clay and glaze (often cone 5 or 6). -
Apply gold luster:
Using a dedicated brush and extreme care, paint a thin line of gold luster around the rim where the lid meets the body. Paint the entire spherical knob gold as well. -
Final firing:
Place the pieces back in the kiln for a third, low-temperature firing (usually cone 018) to set the gold luster.
Texture Play
Before the first firing, try gently pressing a piece of linen onto the clay surface for a subtle textile texture that glaze will break beautifully over.
Step 4: Finishing Touches
-
Inspect the gold:
Check the gold accents for any smudges. If done correctly, they should be bright and reflective. -
Sand the bottom:
Use a sanding block or diamond pad to smooth the unglazed foot ring on the bottom of the jar so it doesn’t scratch your furniture.
Place your finished jar on a bedside table to catch your daily jewelry items


Bathroom Cotton Swab Jar
Bring the calming vibes of a spa into your bathroom with this rustic, ceramic-look storage jar. Using air-dry clay and a clever speckling technique, you can mimic the high-end look of fired stoneware without needing a kiln.
Step-by-Step Guide
Materials
- Air-dry clay (white or cream)
- Rolling pin
- Sturdy cylindrical form (like a PVC pipe or glass jar for shaping)
- Clay sculpting tools (knife vs needle tool)
- Water and sponge
- Sandpaper (medium and fine grit)
- Acrylic paints (creamy white, burnt sienna, dark brown/black)
- Old toothbrush
- Matte varnish or sealant
- Wooden knob (store-bought)
- Strong craft glue (E6000 or similar)
Step 1: Forming the Base
-
Prepare the workspace:
Cover your surface with canvas or parchment paper to prevent sticking. Take a large ball of air-dry clay and knead it until it’s pliable and smooth. -
Roll out the slab:
Roll the clay out into a large, even rectangle, aiming for about 1/4 inch thickness. Use guide sticks on either side if you have trouble maintaining an even thickness. -
Cut to size:
Measure the height and circumference of your cylindrical form. Cut a rectangular strip of clay that is slightly longer than the circumference to allow for overlap. -
Wrap the form:
Loosely wrap your form with a piece of paper first to help the clay slide off later. Then, wrap your clay rectangle around the cylinder. -
Join the seam:
Score the overlapping edges by scratching them up with a needle tool. Apply a little water (slip) and press the edges firmly together. -
Smooth the joint:
Use a modeling tool or your finger to smooth the seam completely so it disappears. It should look like a continuous cylinder. -
Create the bottom:
Roll out a separate small disk of clay for the base. Place your cylinder on top of it, score the contact points, and blend the clay from the base up into the walls to seal it. -
Refine the rim:
Trim the top rim to be level. I recommend using a slightly wet sponge to soften the lip, making it look like wheel-thrown pottery.
Cracks happen!
If small cracks appear during drying, make a paste of clay and water (slip) to fill them. Let it dry again, then sand smooth.
Step 2: Lid & Drying
-
Form the lid:
Roll a flat disk slightly wider than your jar’s opening. Create a small inner lip on the underside (a smaller circle of clay) to keep the lid from sliding off. -
Slow drying:
Tent plastic wrap loosely over your pieces to let them dry slowly. This prevents cracking. Wait 24-48 hours until completely dry and white. -
Sand for smoothness:
Once bone dry, sand the entire surface. Start with medium grit to remove big bumps, then switch to fine grit for a silky finish.
Step 3: Faux Ceramic Finish
-
Base coat:
Paint the jar and the clay portion of the lid with a creamy white acrylic paint. It might need two coats for full opacity. -
Detailing the rim:
Mix a small amount of burnt sienna paint with water to make a glaze. Paint a thin, uneven line around the neck of the jar to mimic exposed clay. -
The splatter technique:
Dilute dark brown or black paint slightly. Dip an old toothbrush into it, and run your thumb across the bristles to flick tiny speckles onto the jar. -
Control the speckles:
Go lightly at first; you can always add more. I find doing a few practice flicks on a piece of paper helps gauge the paint consistency. -
Seal the piece:
Apply two coats of matte varnish. This seals the porous clay and gives it that authentic stoneware sheen while protecting it from bathroom humidity. -
Finish the lid:
Paint the top of the flat clay lid with a wood-tone brown to match your knob, brushing in streaks to simulate grain. -
Attach the knob:
Once the paint is dry, use strong craft glue to attach the wooden knob to the center of the lid.
Waterpoofing Upgrade
Use a glossy resin coating on the inside if you plan to store anything wet, though air-dry clay is best kept for dry items only.
Place your new artisan-style jar on the counter and fill it with essentials for instant organization


Matching Spice Jar Mini Set
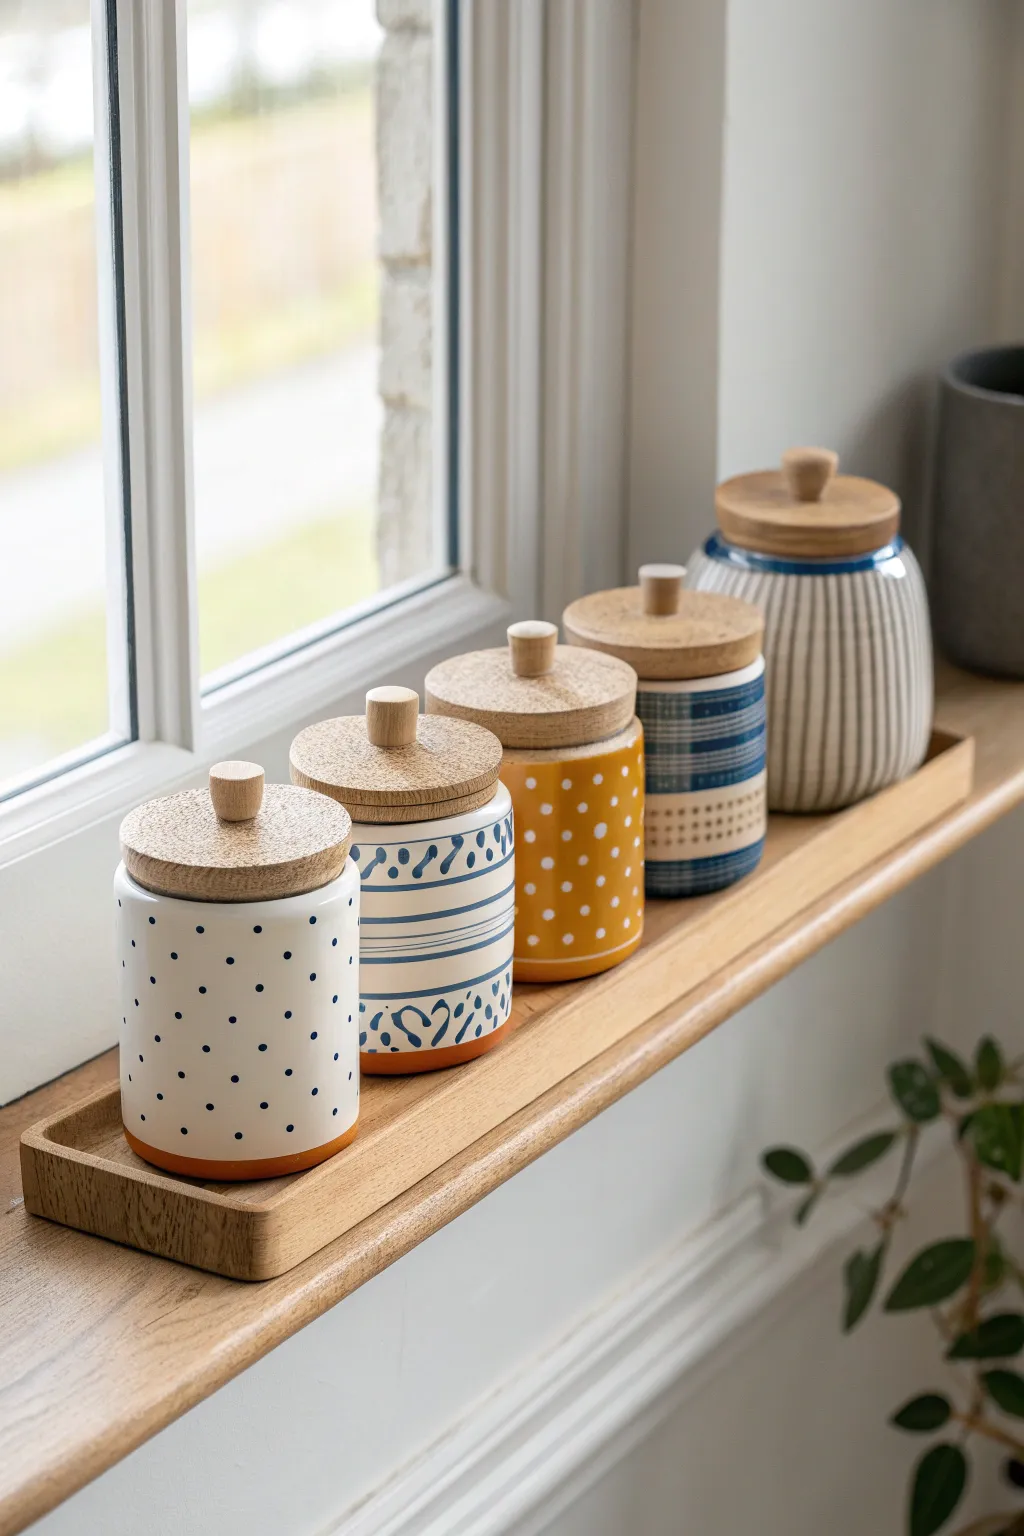
Bring a touch of cottage charm to your windowsill with this mismatched yet cohesive set of hand-ainted ceramic storage jars. Using simple geometric patterns like polka dots and plaids, you create a delightful collection that looks like a curated antique find.
Detailed Instructions
Materials
- 5 plain white ceramic jars with wooden lids (cylindrical)
- Porcelain or ceramic paints (Navy Blue, Ochre Yellow, Warm Grey, White, Burnt Orange)
- Fine detail paintbrush (size 0 or 1)
- Flat shader brush (size 4 or 6)
- Rubbing alcohol and cotton pads
- Pencil for sketching
- Ruler or flexible measuring tape
- Masking tape (optional for straight lines)
- Oven (for curing paint)
Step 1: Preparation
-
Clean the surfaces:
Before laying down any color, wipe the exterior of all ceramic jars thoroughly with rubbing alcohol on a cotton pad. This removes invisible oils and ensures your paint adheres perfectly for a lasting finish. -
Plan your palette:
Group your jars mentally. We are aiming for variety: one classic white with blue dots, one patterned blue and white, one bold ochre yellow, one blue plaid, and one grey striped jar. This mix keeps the set interesting.
Step 2: Painting the Polka Dot Jars
-
Create the Navy Dot Jar:
Start with the first white jar. Dip the back end of your paintbrush handle into the Navy Blue paint. Dot it onto the ceramic surface in a staggering grid pattern. Re-dip frequently to keep the dots consistent in size. -
Base coat the Yellow Jar:
For the third jar, use your flat brush to apply an even coat of Ochre Yellow. You may need two thin coats for full opacity, letting the first dry completely before adding the second. -
Add white dots:
Once the yellow base is fully dry to the touch, use the back of a clean brush handle dipped in White paint to create a polka dot pattern similar to the first jar. -
Add the terracotta detail:
Paint a thin band of Burnt Orange paint around the very bottom rim of the Navy Dot jar to give it a dipped, earthy look.
Paint Consistency Pro Tip
If your ceramic paint feels too thick or drags, mix in a tiny drop of painting medium or water. It helps detailed lines flow more smoothly.
Step 3: Painting the Patterned Jars
-
Mark the Blue Wave Jar:
On the second jar, lightly use a pencil and ruler to mark horizontal bands around the circumference. This acts as a guide for your different pattern sections. -
Paint waves and stripes:
Using your fine detail brush and Navy Blue paint, fill the sections. Alternate between thin horizontal pin-stripes and a loose, hand-painted wave or vine motif. Don’t worry about machine perfection; the hand-drawn wobble adds character. -
Create the Plaid Jar:
For the fourth jar, paint thick horizontal bands of Navy Blue. Once dry, use a thinned-down grey or lighter blue to paint vertical lines over them, creating a woven textile effect. Add tiny dots between the lines for extra texture. -
Stripe the Grey Jar:
For the largest jar, use Warm Grey paint. Start from the top and paint vertical lines down the sides. I prefer freehanding these to keep the organic feel, but you can use masking tape if you want crisp edges. -
Finish the Grey Jar rim:
Add a single, bold Navy Blue stripe around the neck of the grey jar to tie it visually to the rest of the blue-themed set.
Level Up: Custom Labels
Use a white paint pen to write whimsical spice names on the side or top of the wooden lids for functional organization.
Step 4: Finishing Touches
-
Clean up edges:
Inspect all your jars. If you have any smudges or drips, use a damp cotton swab or a toothpick to gently scrape away unwanted paint before it cures. -
Dry time:
Allow the jars to air dry for at least 24 hours. This is crucial before baking, as moisture trapped under the skin of the paint can cause bubbling in the oven. -
Bake to cure:
Place the jars (without the wooden lids!) into a cold oven. Turn the heat to 300°F (150°C—check your specific paint instructions). Bake for 30-35 minutes, then turn the oven off and let the jars cool down completely inside the oven to prevent cracking. -
Assemble the set:
Once cool, place the wooden lids back on. Arrange them on a shallow wooden tray to complete the display.
Now you have a charming, clear-coated set ready to organize your kitchen essentials or gift to a friend

The Complete Guide to Pottery Troubleshooting
Uncover the most common ceramic mistakes—from cracking clay to failed glazes—and learn how to fix them fast.
Cookie Jar With Chunky Lid Knob
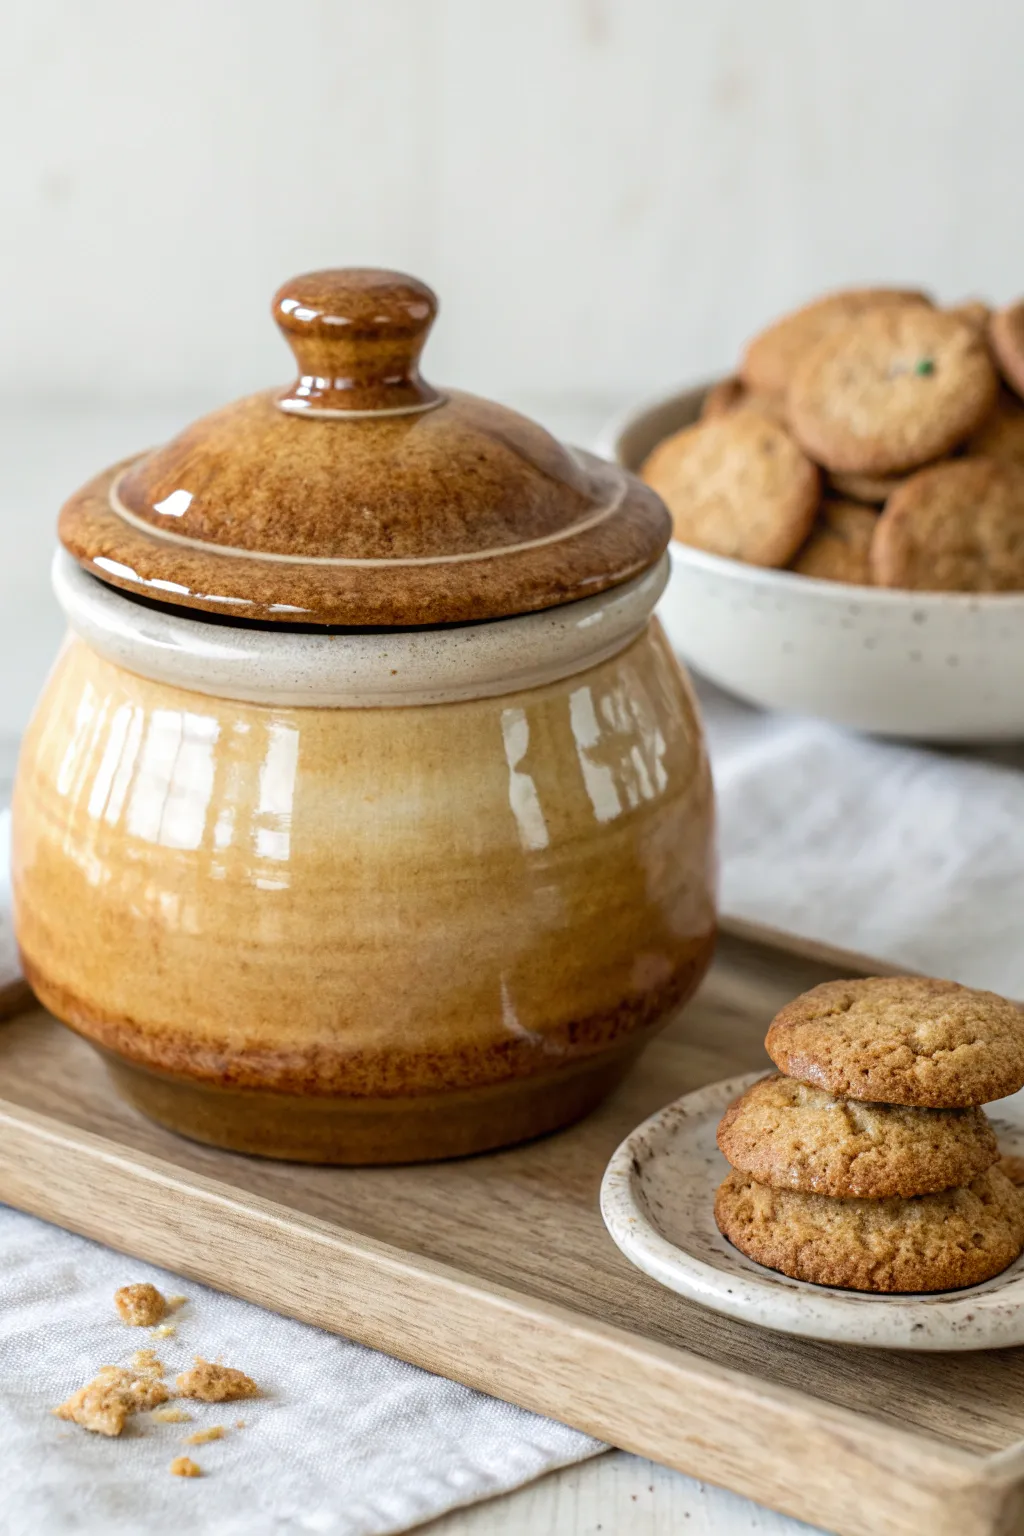
This charming, wheel-thrown jar features a comforting, earthy aesthetic with its warm caramel glaze and glossy finish. With a generously sized knob on the lid, it’s designed specifically for easy access to your favorite treats.
Step-by-Step Guide
Materials
- Stoneware clay (approx. 3-4 lbs)
- Pottery wheel
- Throwing tools (sponge, wooden rib, wire cutter)
- Trimming tools
- Calipers
- Warm amber/caramel reactive glaze
- Clear glossy glaze (optional, if the caramel isn’t glossy enough)
- Kiln
Step 1: Throwing the Jar Body
-
Center and open:
Begin by centering about 2.5 lbs of stoneware clay on the wheel. Open the clay wide enough to accommodate the volume you want for cookies, leaving the floor about half an inch thick. -
Pull the walls:
Pull the walls up into a cylinder first. Aim for even thickness from bottom to top, keeping the rim slightly thicker for stability. -
Shape the belly:
Using a wooden rib on the outside and your hand on the inside, gently push the clay outward from the belly to create a pleasing, rounded curve. I like to do this gradually over a few passes to maintain tension. -
Create the gallery:
At the rim, use a wooden tool or your thumb to split the clay, creating a distinct gallery (ledge) for the lid to sit on. This needs to be flat and sturdy. -
Measure the opening:
Before removing the pot from the wheel, carefully measure the inside diameter of the gallery using calipers. Lock the calipers in place; you will need this exact measurement for the lid.
Step 2: Creating the Lid
-
Throw the lid structure:
Center a smaller lump of clay (about 1 lb). Throw a low, wide dome shape right on the wheel head or a bat. -
Verify the fit:
Check the diameter against your locked calipers. Ensure the outer rim of the lid matches the gallery measurement precisely. -
Form the chunky knob:
While throwing the lid, you can either pull a knob from a central lump of clay left at the top, or throw the lid upside down and attach a knob later. For the style in the image, throwing it ‘right side up’ as a solid piece often works best for that integrated look. -
Refine the knob shape:
Shape the knob to have a distinct ‘neck’ and a rounded top button. It needs to be large enough to grip easily, matching the ‘chunky’ aesthetic. -
Dry to leather hard:
Wire the pieces off the wheel and let both the jar and lid dry slowly until they reach a leather-hard state.
Wobbly Lid Syndrome?
If the lid rattles, apply a small amount of grinding paste to the gallery and twist the lid back and forth to sand it into a perfect fit.
Step 3: Trimming and Assembly
-
Trim the jar foot:
Center the jar upside down on the wheel. Trim away excess clay from the bottom to create a foot ring that mirrors the curve of the belly. -
Refine the lid:
Trim the underside of the lid to remove excess weight. Test the fit on the jar frequently; it should sit snugly in the gallery without rattling. -
Bisque fire:
Once bone dry, load both pieces into the kiln for a bisque firing to cone 04 (or your clay body’s specifications).
Pro Tip: Glaze Break
Choose a glaze known to ‘break’ over edges. This naturally highlights the throwing rings and the contours of the chunky knob.
Step 4: Glazing
-
Wax the contact points:
Apply wax resist to the foot of the jar, the gallery ledge where the lid sits, and the underside rim of the lid to prevent them from fusing together. -
Apply the warm toner:
Dip or brush your warm amber/caramel glaze over the entire exterior and lid. The glaze shown has variation, so slightly uneven application can actually enhance the rustic look. -
Layering for depth:
For the darker rim effect seen in the photo, dip just the very top edge of the lid and the jar rim into the glaze a second time, or use a slightly darker iron-oxide wash on these high points. -
Glaze fire:
Fire the pieces to maturity (likely cone 5 or 6 depending on your stoneware). Allow the kiln to cool completely before opening.
Fill your jar with homemade cookies and enjoy the functional beauty of your work
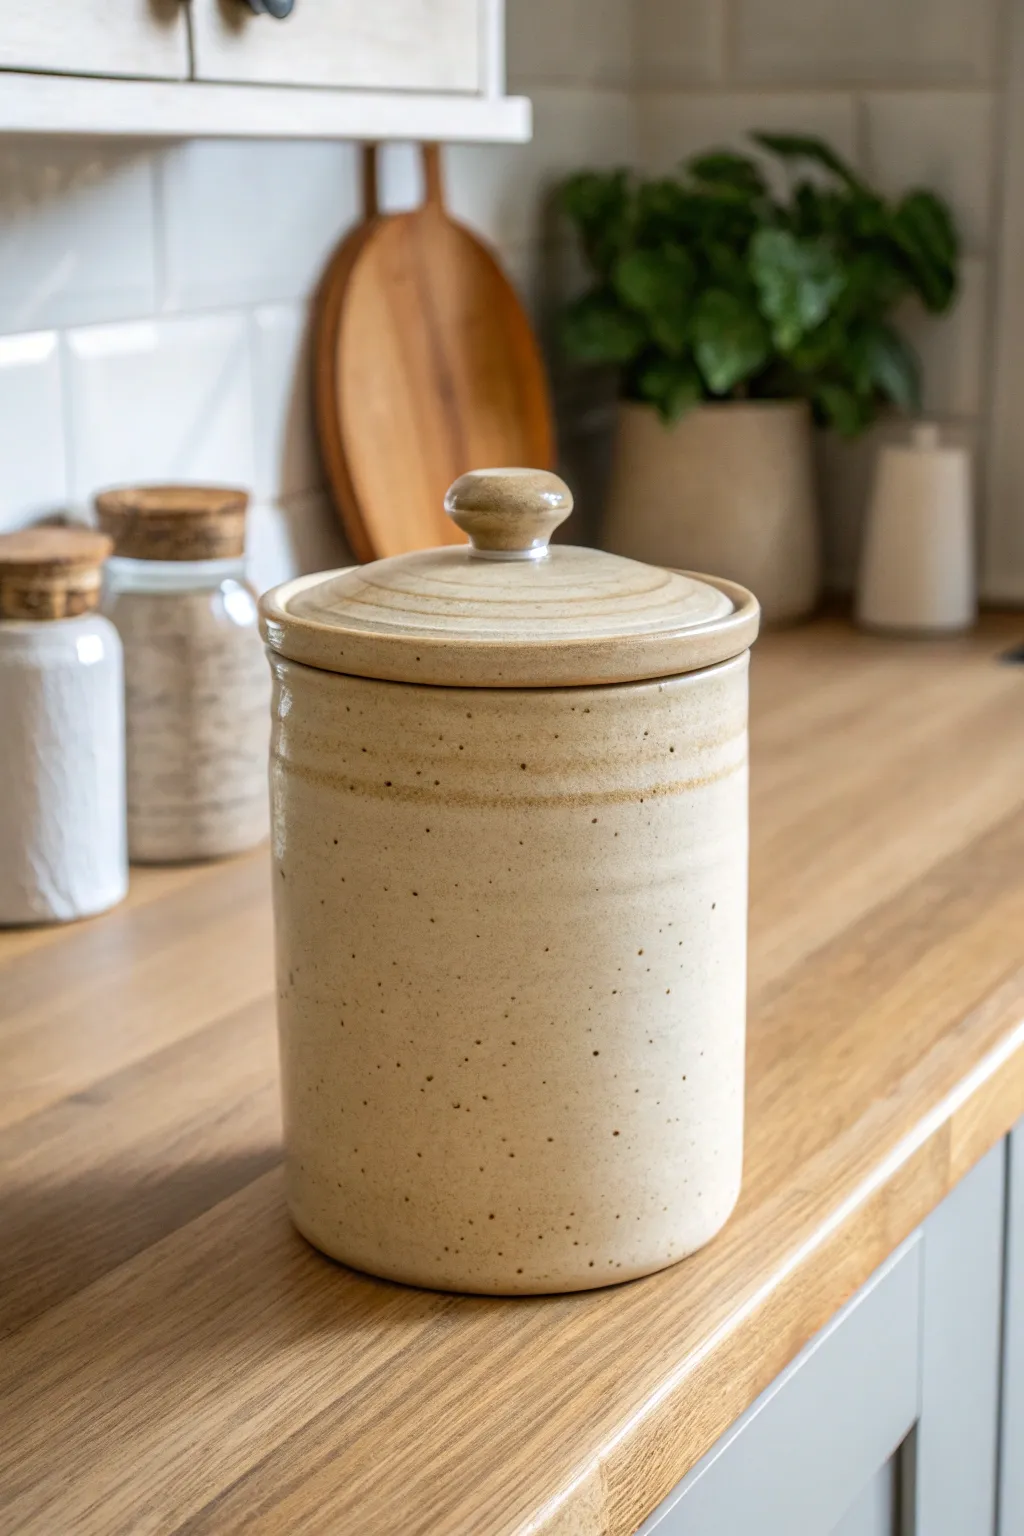
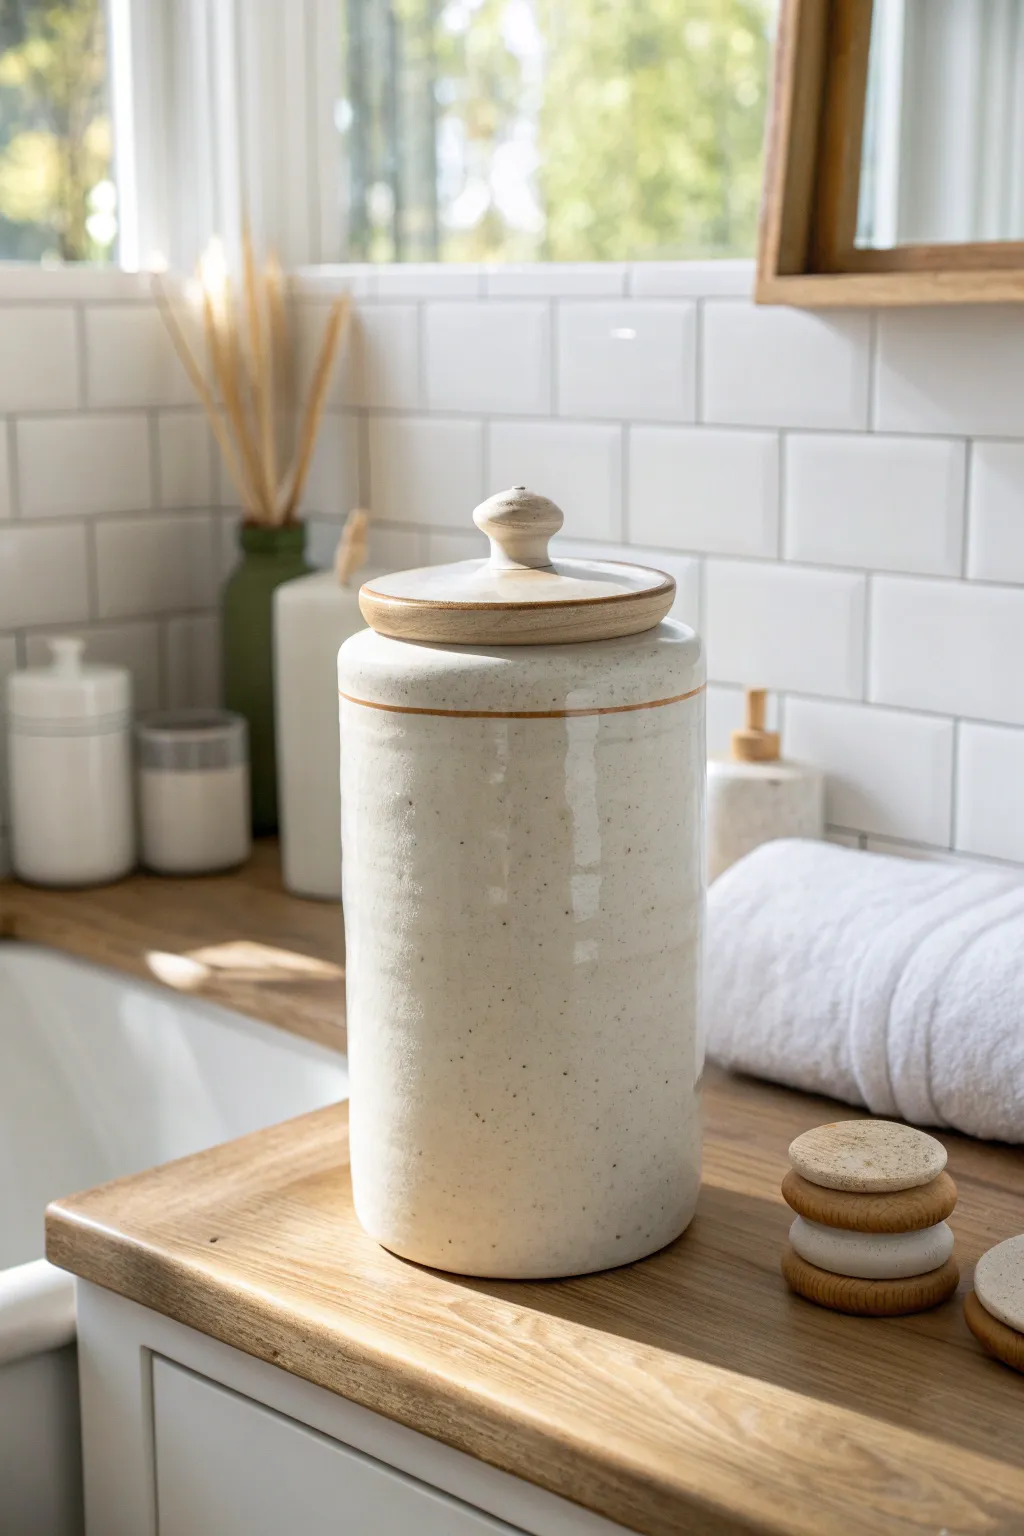
Minimal Flush-Fit Lid Jar
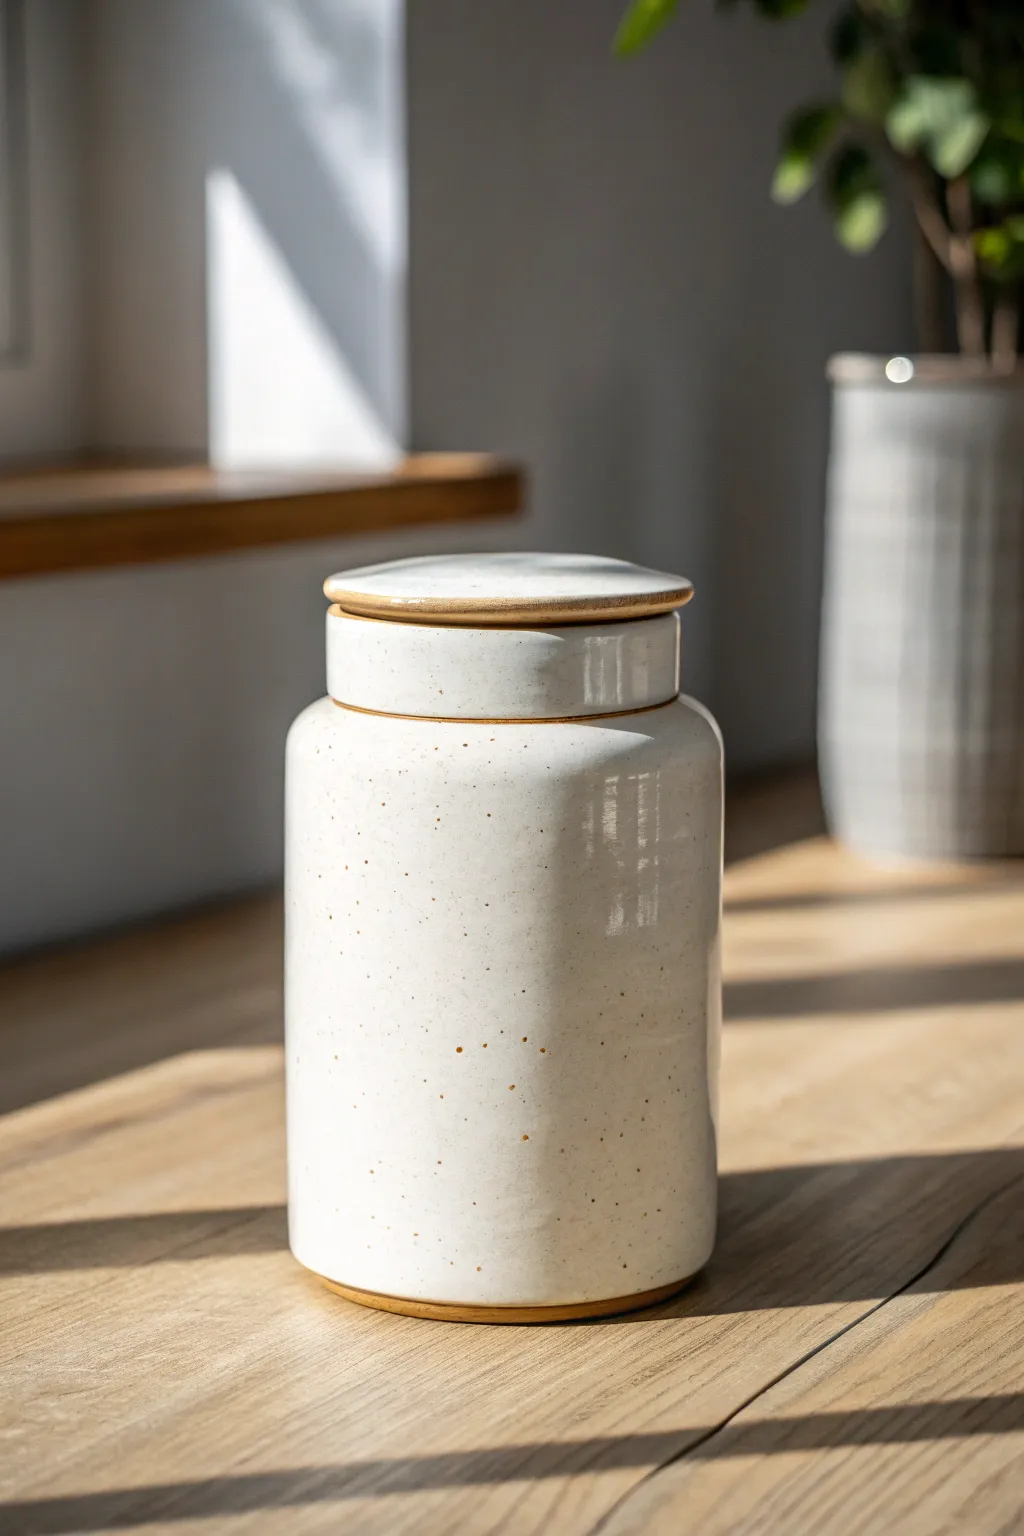
This elegant storage jar features clean lines, a perfectly flush-fitting lid, and a classic speckled glaze finish. The subtle exposure of raw clay at the rim and foot adds warmth and definition to the minimalist cylindrical form, making it a timeless addition to any counter.
Detailed Instructions
Materials
- Stoneware clay (smooth or lightly grogged)
- Pottery wheel
- Throwing tools (sponge, rib, wire cutter)
- Trimming tools
- Calipers or ruler
- Speckled white dipping glaze
- Wax resist
- Kiln
- Needle tool
Step 1: Throwing the Gallery Base
-
Center and Open:
Begin with about 2-3 lbs of wedged clay on the wheel. Center it firmly and open the clay floor to your desired width, likely around 3-4 inches for a jar of this proportion. -
Pull the Cylinder:
Pull the walls straight up to form a cylinder. Aim for even thickness, but leave the rim slightly thicker than usual to accommodate the gallery you will create next. -
Create the Gallery:
Using a wooden tool or your thumb, split the thick rim. Push the inner half down about half an inch to create a shelf (gallery) for the lid to sit on. Keep the outer wall vertical and clean. -
Measure the Opening:
Use calipers to measure the exact inner diameter of the jar’s opening *above* the gallery shelf. This measurement is crucial for a flush fit. Lock your calipers at this size. -
Refine and Smooth:
Use a metal or wooden rib to smooth the exterior walls, removing any throwing spirals for that sleek, vertical look. Cut the jar from the bat with a wire tool.
Shrinkage Rate
Remember clay shrinks! If you want a specific final size, throw the wet clay about 10-12% larger than your target to account for drying and firing.
Step 2: Creating the Flush Lid
-
Throw the Lid:
Center a smaller lump of clay (about 1 lb). Throw a low, thick disk. You want to create a shape that mimics a small bowl but with very thick walls. -
Check Measurements:
Using the locked calipers, ensure the outer diameter of the lid matches the measurement you took earlier. It needs to slot perfectly inside the upper rim of the jar. -
Trim the Flange (Optional):
I usually prefer to throw the lid upside down as a solid chunk, then trim the flange later, but you can also throw a small flange underneath during this stage if you are comfortable.
Add a Leather Pull
Drill a small hole in the center of the lid before firing. Thread a loop of brown leather cord through it after the glaze firing for a tactile, rustic handle.
Step 3: Trimming and Fitting
-
Dry to Leather Hard:
Allow both the jar and the lid to dry to a leather-hard state. The clay should be firm enough to handle without warping but soft enough to carve. -
Trim the Jar Foot:
Invert the jar on the wheel (centering it carefully) and trim the bottom. Create a slight bevel at the foot to create that shadow line seen in the image. -
Refine the Lid Fit:
Place the lid upside down on the wheel. Trim away excess clay until the lid creates a T-shape profile: the top part should sit flush with the jar’s outer wall, while the bottom part drops into the gallery. -
Test the Fit:
Repeatedly test the lid on the jar as you trim. It should fit snugly without sticking. Remember, the glaze will add thickness, so a tiny bit of wiggle room is actually good here. -
Smooth the Edges:
Use a damp sponge or your finger to soften any sharp corners on the lid and the jar rim. Sharp edges tend to repel glaze.
Step 4: Glazing and Finishing
-
Bisque Fire:
Load the pieces into the kiln for a bisque fire. Ensure the lid is fired separately or placed on the jar only if completely dry and you are sure it won’t fuse. -
Wax Resist Application:
Apply wax resist to the foot of the jar. Crucially, apply wax to the gallery shelf (inside the jar rim) and the contact points on the lid where it will touch the shelf. This prevents the lid from fusing shut. -
Accent Line Waxing:
For the look in the photo, carefully wipe a thin line of wax around the very top edge of the lid and the bottom edge of the jar to leave raw clay exposed after dipping. -
Glaze Dipping:
Stir your speckled white glaze thoroughly. Dip the jar quickly and evenly. Dip the lid separately. If you waxed correctly, the glaze will bead off the contact points. -
Cleanup:
Use a damp sponge to wipe any stray glaze droplets off the waxed areas to ensure a clean, sharp line where the raw clay meets the white glaze. -
Glaze Fire:
Fire to the temperature required by your clay and glaze combination (likely Cone 5 or 6). Once cooled, check the fit one last time.
Now you have a beautifully functional jar ready to organize your kitchen or hold precious keepsakes


What Really Happens Inside the Kiln
Learn how time and temperature work together inside the kiln to transform clay into durable ceramic.
Apothecary-Style Tall Jar

This elegant, tall ceramic jar captures the charm of vintage apothecary vessels with its creamy, speckled glaze and subtle raw clay accents. It features a fitted lid with a delicate knob, making it perfect for storing dried herbs, salts, or small treasures.
How-To Guide
Materials
- Speckled stoneware clay (approx. 2-3 lbs)
- Pottery wheel
- Throwing sponges
- Needle tool
- Wooden throwing ribs
- Wire cutter
- Trimming tools
- Calipers
- Cream/Oatmeal matte glaze
- Wax resist
- Kiln
Step 1: Throwing the Jar Body
-
Center and open:
Begin with about 1.5 to 2 lbs of wedged speckled clay on the wheel. Center it firmly, then open the clay down to the bat, leaving about a 1/4-inch thickness for the floor. -
Establish the floor:
Compress the floor with your fingers or a flat tool to prevent cracking later. This step is crucial for functional ware. -
Pull the walls:
Slowly pull the walls straight up into a cylinder. Aim for a height of about 6-7 inches. Keep the walls even, tapering slightly inward toward the top to create that slight shoulder. -
Refine the shape:
Using a wooden rib on the outside and your hand on the inside, smooth the walls to remove throwing lines. Ensure the silhouette is very straight and vertical, characteristic of apothecary jars. -
Form the gallery:
At the rim, slightly thicken the clay and use a tool or your finger to split the rim or push it down to create an indented ‘gallery’ (a shelf) where the lid will sit. Measure the diameter of this gallery with calipers now. -
Clean up and cut:
Use a wooden undercut tool to trim excess clay from the base. Wire the pot off the bat and set it aside to stiffen to leather-hard.
Wobbly Lids?
If your lid rocks after firing, use a little grinding paste or wet sandpaper. Rotate the lid back and forth on the jar rim to grind them into a perfect, airtight match.
Step 2: Creating the Lid
-
Throw the lid off the hump:
Using the remaining clay, center a mound on the wheel. We will create the lid ‘off the hump’ (using just the top portion of a large centered mass). -
Shape the lid:
Form a small, shallow bowl shape. Use your calipers to ensure the outer rim matches the gallery measurement of your jar exactly. -
Add the knob:
Before cutting it off, shape a small, rounded knob in the center of the lid. I like to keep this simple and unobtrusive to match the minimal aesthetic. -
Refine and cut:
Smooth the surface with a sponge or chamois. Use your needle tool to cut underneath the lid, separating it from the hump carefully.
Step 3: Trimming and Finishing
-
Trim the jar:
Once leather-hard, center the jar upside down on the wheel. Trim the bottom to clean up the foot, adding a slight bevel at the base to create a shadow line. -
Trim the lid:
Flip the lid upside down (using a chuck or the jar itself if stable) and trim the underside to remove excess weight and refine the fit. -
Fit test:
Check the fit of the lid on the jar. It should sit snugly without rattling. If it’s too tight, carefully sand or trim a tiny amount off the lid edge. -
Bisque fire:
Let both pieces bone dry completely, then load them into the kiln for a bisque firing (usually Cone 06 or 04).
Pro Tip: Caliper Magic
When measuring the gallery for the lid, set your calipers slightly looser than the exact measurement. Clay shrinks, and having a lid slightly too small is better than one that won’t fit at all.
Step 4: Glazing
-
Wax resist:
Apply wax resist to the bottom of the jar and, importantly, the rim gallery and the underside edge of the lid where they touch. This prevents the lid from fusing to the jar. -
Apply glaze:
Dip the jar into a cream or oatmeal matte glaze. Pour glaze inside and swirl to coat, then dip the exterior. Dip the lid separately, holding it by the knob (or using tongs). -
Detailing the rim:
For the look in the photo, wipe back the glaze just slightly at the sharp edges of the shoulder and the very bottom rim with a damp sponge to let the raw, toasted clay peek through. -
Final fire:
Load into the kiln for the final glaze firing (e.g., Cone 6). Ensure the lid is not on the jar unless you have applied alumina wadding to prevent sticking.
Once cooled, fill your new handmade vessel with bath salts or dried blooms and enjoy the serene, organic touch it adds to your space
Stamped Texture All-Over Jar

Bring the warmth of rustic farmhouse pottery into your kitchen with this lovely hand-built ceramic jar. Featuring a speckled clay body and a repeating deep blue leaf motif, it’s the perfect vessel for storing dry goods or simply admiring on a shelf.
Detailed Instructions
Materials
- Speckled stoneware clay (mid-fire or high-fire)
- Pottery wheel (or slab roller for hand-building)
- Throwing tools (sponge, rib, wire cutter)
- Modeling tool or wooden knife
- Calipers
- Leaf-shaped foam stamp or sponge stamp
- Cobalt blue underglaze
- Small round detail brush
- Clear matte or satin glaze
- Wax resist
Step 1: Forming the Body
-
Wedging:
Begin by thoroughly wedging about 3-4 pounds of speckled stoneware clay to remove air bubbles and ensure consistency. -
Centering:
Secure the clay on the wheel bat and center it perfectly. This is crucial for a symmetrical jar and lid fit. -
Opening the jar:
Open the clay and pull up the walls to form a cylinder. Since this is a storage jar, aim for straight, vertical walls with a slight curve inward at the shoulder. -
Refining the shape:
Use a metal or wooden rib to smooth the outside, removing throwing rings to create a flat canvas for your pattern. -
Forming the gallery:
At the rim, thicken the clay slightly and use a tool or your finger to split the rim, creating a small internal ledge (gallery) where the lid will sit. -
Measuring:
Use calipers to measure the diameter of your gallery ledge precisely. Lock the calipers in place. -
Wiring off:
Run a wire underneath the pot to separate it from the bat, but leave it on the bat to firm up to leather-hard.
Step 2: Creating the Lid
-
Throwing the lid:
Using a smaller ball of clay (about 1 pound), center and flatten it into a thick disk. Use your caliper measurement to ensure the lid’s flange will fit inside the jar’s gallery. -
Adding the knob:
You can either throw the knob directly from the excess clay in the center of the disk or attach a coil later. For this look, a sturdy, rounded knob works best. -
Trimming:
Once both pieces are leather-hard, trim the bottom of the jar to create a clean foot ring. Trim the underside of the lid to remove excess weight. -
Fitting check:
Gently test the fit of the lid on the jar. It should slot in comfortably without being too tight, accounting for glaze thickness later.
Stamp Consistency
Test your stamp on a scrap slab of clay first. If the impression is too faint, the glaze might obscure it. Press firmly enough to create a slight texture.
Step 3: Applying the Design
-
Planning the spacing:
Lightly mark vertical lines or a grid on the jar with a pencil to guide your stamp placement, ensuring the pattern wraps around evenly. -
Stamping the leaves:
Dip your leaf-shaped foam stamp into cobalt blue underglaze. Press it firmly onto the leather-hard clay in a repeating vertical pattern. I like to re-load the underglaze every two stamps for consistent color. -
Enhancing the stems:
Using a small detail brush saturated with the same underglaze, hand-paint a central stem and smaller veins over each stamped leaf impression to define the shape. -
Decorating the lid:
Paint a simple flower or starburst pattern on the top surface of the lid using the brush. Paint the knob and the outer rim of the lid with a solid coat of blue. -
Bisque firing:
Allow the entire piece to dry slowly and completely before firing it to bisque temperature (usually cone 04 or 06).
Vintage Patina
After the bisque fire, wipe a diluted brown iron oxide wash over the piece and sponge it off. This will settle into the stamp texture for an aged look.
Step 4: Glazing and Finishing
-
Waxing:
Apply wax resist to the foot of the jar, the gallery ledge, and the contact points on the lid to prevent them from fusing together in the kiln. -
Clear coating:
Dip the jar and lid into a clear matte or satin glaze. This allows the speckled clay body and the blue design to shine through without gloss glare. -
Cleanup:
Wipe away any glaze drips on the waxed areas with a damp sponge. -
Final fire:
Fire the piece to the maturity temperature of your clay and glaze (typically cone 5 or 6 for stoneware).
Once cooled, fill your beautiful new jar with coffee beans or flour and enjoy the handmade touch it adds to your countertop

TRACK YOUR CERAMIC JOURNEY
Capture glaze tests, firing details, and creative progress—all in one simple printable. Make your projects easier to repeat and improve.
Carved Sgraffito Pattern Jar
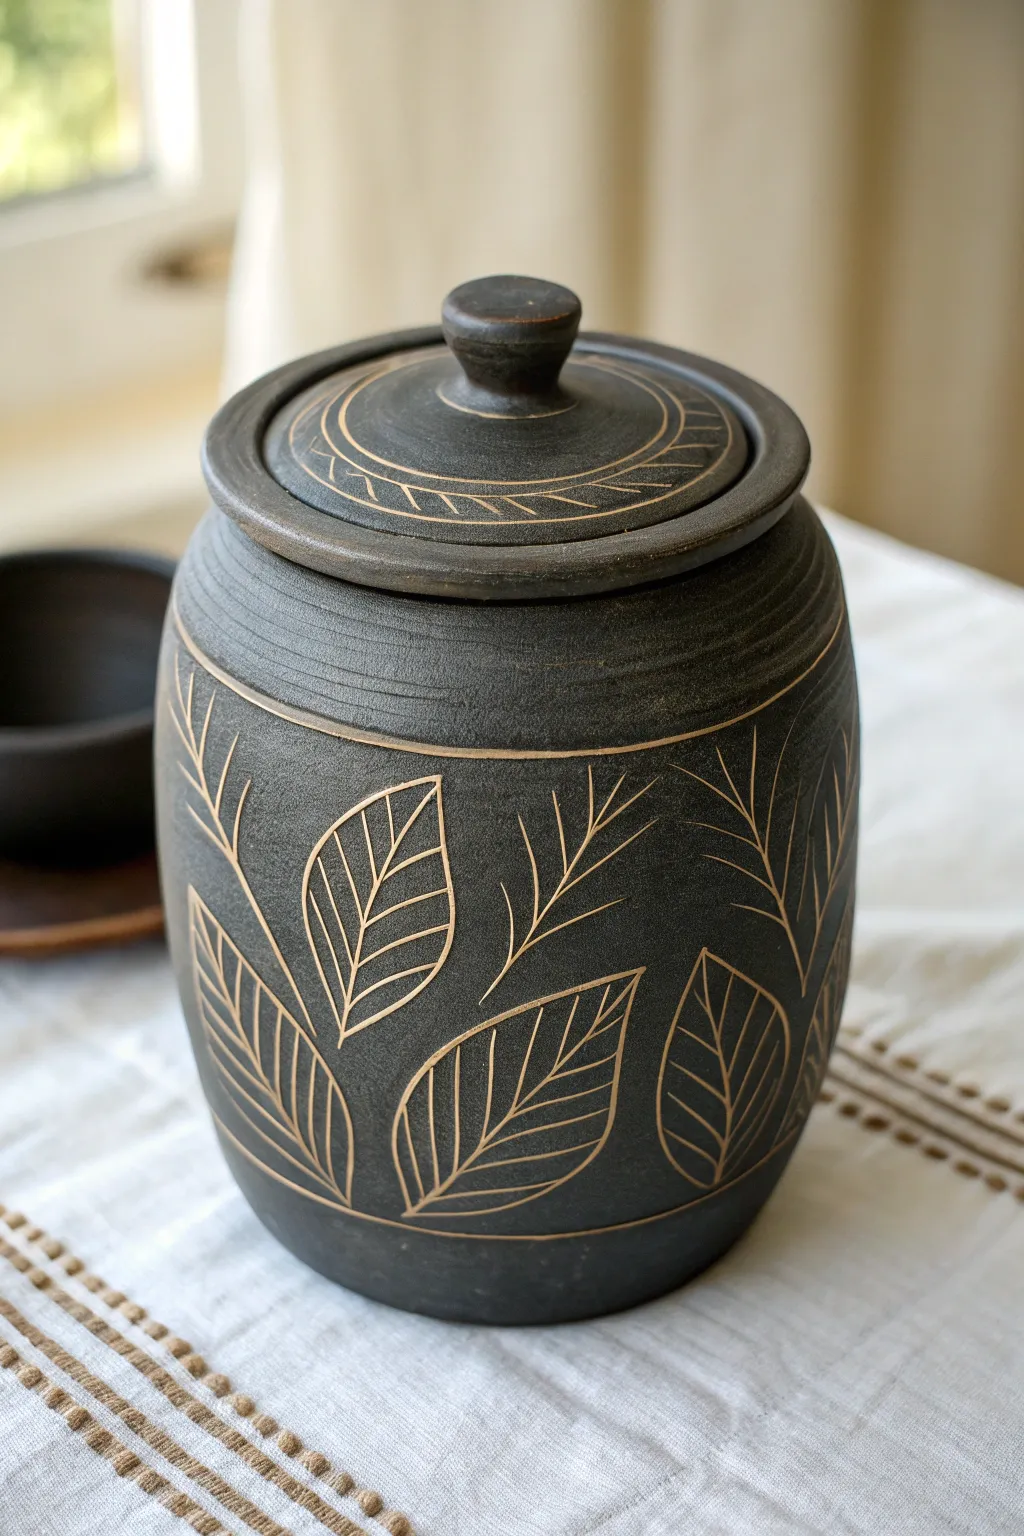
This elegant lidded jar relies on the striking contrast between a deep charcoal surface and the warm, raw clay body underneath. By carving stylized botanical motifs through the dark exterior, you reveal the natural earth tones hidden below.
Step-by-Step Guide
Materials
- Stoneware clay (buff or brown)
- Pottery wheel
- Throwing tools (sponge, rib, wire cutter)
- Calipers
- Black underglaze or black terra sigillata
- Soft fan brush
- Sgraffito tool or fine loop tool
- Needle tool
- Trimming tools
- Clear matte glaze (optional, for interior)
Step 1: Forming the Jar & Lid
-
Center and throw:
Start with about 3-4 lbs of well-wedged clay. Center it on the wheel and open it up, pulling the walls into a tall cylinder first, then gently swelling the belly outward to create a rounded, classic jar shape. -
Refine the rim:
Create a gallery for the lid to sit in by splitting the rim or compressing it downwards with a rib. Ensure the rim is thick enough to support the lid but visually balanced. -
Smooth the surface:
While the wheel is spinning slowly, run a metal or rubber rib up the exterior. This removes throwing lines and creates the smooth ‘canvas’ needed for clean carving later. -
Measure for the lid:
Using calipers, measure the interior diameter of your gallery seating. This measurement is crucial for a tight-fitting lid. -
Throw the lid:
Using a smaller amount of clay (about 1 lb), throw a lid ‘off the hump’ or directly on a bat. Ensure the flange matches your caliper measurement. Add a small, solid knob at the center, shaping it into a simple mushroom profile.
Jagged Lines?
If your carving tool is tearing the clay rather than slicing it, your pot is too dry. Mist it lightly with water and wrap it in plastic for an hour to rehydrate the surface slightly before trying again.
Step 2: Surface Treatment & Carving
-
Trim to leather hard:
Allow both pieces to dry to a leather-hard state. Trim the foot of the jar and refine the underside of the lid so the weight feels balanced. -
Apply the darkness:
Using a soft fan brush, apply 2-3 even coats of black underglaze or terra sigillata to the entire exterior of the jar and the top of the lid. I find rotating the banding wheel while brushing helps avoid streak marks. -
Dry to the touch:
Let the underglaze dry until it’s no longer tacky but the clay underneath is still leather hard. If it gets bone dry, carving will chip rather than slice. -
Map the lid design:
Place the lid on a banding wheel. Using a needle tool, lightly spin the wheel to scratch two concentric circles near the rim. Carve short, diagonal hash marks between these circles to create the border pattern. -
Outline the shoulder line:
On the main jar body, carve a horizontal line encircling the jar just below the shoulder curve. This acts as the upper boundary for your botanical design. -
Draft the leaves:
Lightly scratch the outline of large, simple leaf shapes with a needle tool. Aim for an organic scatter pattern—some pointing up, some angled sideways. -
Carve the leaf veins:
Using a sharp sgraffito tool or small loop tool, carve the central vein of each leaf first, pressing firmly to reveal the raw clay color. -
Add detail veins:
Carve the smaller veins branching off the center. Keep your lines confident and smooth; hesitation creates jagged edges. -
Add sprigs:
Between the large leaves, carve thinner, fir-tree-like sprigs. These act as filler and add variety to the texture. Simple, quick strokes work best here. -
Clean the burrs:
Once the carving is done and the clay is slightly drier, gently brush away the clay crumbs (burrs) with a stiff brush or rub lightly with a scouring pad. Don’t do this while wet, or you’ll smear black back into the lines.
Step 3: Finishing
-
Bisque fire:
Fire the kiln to cone 04 (or your clay’s bisque temperature). This sets the form and the underglaze. -
Glaze the interior:
Pour a clear or liner glaze inside the jar for functionality. Wipe any drips off the exterior immediately. -
Final fire:
Fire to the maturation temperature of your clay body (likely Cone 5/6 or 10). Because the outside is unglazed (or matte), the textural contrast remains the star.
Burnished Finish
For a silky, stone-like feel, apply terra sigillata instead of underglaze. Buff the black surface with a soft cloth or plastic bag before carving to create a soft, natural sheen.
Now you have a stunning vessel perfect for storing tea or simply admiring on a shelf
Two-Tone Raw Clay and Glaze Jar
This project celebrates the raw beauty of clay by pairing it with a smooth, dipping glaze technique. By masking off a sharp angle, you create a striking contrast between the textured, warm stoneware and the cool, creamy speckled finish.
Detailed Instructions
Materials
- Speckled brown stoneware clay
- Pottery wheel
- Throwing tools (rib, sponge, wire cutter)
- Trimming tools
- Calipers
- Creamy matte or satin white glaze
- Wax resist (liquid)
- Small sponge brush or bristle brush
- Masking tape (optional for straighter lines)
- Kiln
Step 1: Throwing the Vessel
-
Center and Open:
Start with a well-wedged ball of speckled stoneware clay on your wheel head. Center it firmly, then open the clay to create the floor of your jar, keeping it flat and about a half-inch thick. -
Pull the Walls:
Pull the walls up into a cylinder. Aim for straight vertical sides, ensuring an even thickness from bottom to top. Use a metal or wooden rib to smooth the exterior and compress the clay, removing throwing lines if you want a sleek surface. -
Form the Gallery:
At the rim, slightly thicken the clay and use a modeling tool or your finger to split the rim, pressing down the inner half to create a ‘gallery’—this represents the shelf where the lid will sit. -
Measurements:
Before cutting the pot off the wheel, use calipers to measure the diameter of the gallery seating area. Lock the calipers at this measurement; you’ll need this exact size for the lid. -
Cut and Dry:
Wire the jar off the bat and set it aside until it reaches leather-hard consistency.
Uneven Glaze Lines?
If the glaze line looks ragged after dipping, let the glaze dry completely, then use a sharp X-Acto knife to gently scrape and straighten the edge against the raw clay.
Step 2: Creating the Lid
-
Throw the Lid:
With a smaller ball of clay, throw a low, flat dome. Use your caliper measurement to exact the diameter that will fit inside your jar’s gallery. -
Refine the Knob:
You can throw a knob intimately attached to the lid now, or throw the lid upside down and attach a separate knob later during trimming. For the look in the image, a simple, mushroom-shaped knob works perfectly. -
Check the Fit:
Carefully check the lid against the jar (if the jar is sturdy enough) or rely on your calipers. It’s better to be slightly larger and trim it down than too small.
Texture Play
Before bisque firing, use a rasp or trimming tool to add vertical texture to the ‘raw’ bottom area. The glaze will break beautifully over the transition point.
Step 3: Trimming and Bisque
-
Trim the Foot:
Once leather hard, center the jar upside down on the wheel. Trim the bottom to create a clean, flat foot or a slight foot ring, refining the shape of the lower wall. -
Clean the Lid:
Trim the underside of the lid to remove excess weight and sharpen the flange that will sit in the gallery. -
Bisque Fire:
Allow both pieces to dry slowly and completely to avoid warping. Load them into the kiln for a bisque firing (usually cone 04 or 06).
Step 4: Glazing the Diagonal
-
Cleaning:
Wipe the bisque-fired jar and lid with a damp sponge to remove any kiln dust. This ensures the glaze adheres properly. -
Mark the Line:
Visualize a diagonal line cutting across the body of the jar. You can lightly pencil this line on the bisque ware as a guide. -
Apply Wax Resist:
Using a sponge brush, apply liquid wax resist heavily to the bottom portion of the jar, following your diagonal line exactly. Ensure the wax covers the entire bottom and the diagonal edge perfectly. -
Wax the Lid Mechanism:
Apply wax to the flange of the lid and the gallery of the jar (where clay touches clay) so the lid doesn’t fuse shut during firing. -
Dipping:
Hold the jar by the foot (over the waxed area) and dip it swiftly into your creamy white glaze. The glaze will bead off the waxed bottom section, leaving a clean diagonal line. I find a quick dip prevents the glaze from getting too thick. -
Clean the Drips:
Immediately use a damp sponge to wipe any stray beads of glaze remaining on the waxed bottom section. -
Glaze the Lid:
Dip the lid completely (holding by the waxed flange) or pour glaze over it. Ensure the knob is coated. -
Glaze Firing:
Load the kiln, making sure the lid is fired separately (not on the jar) to prevent sticking. Fire to the maturity temperature of your clay and glaze (likely cone 5 or 6).
Fill your new modern jar with coffee beans or treats and enjoy the tactile contrast every time you reach for it
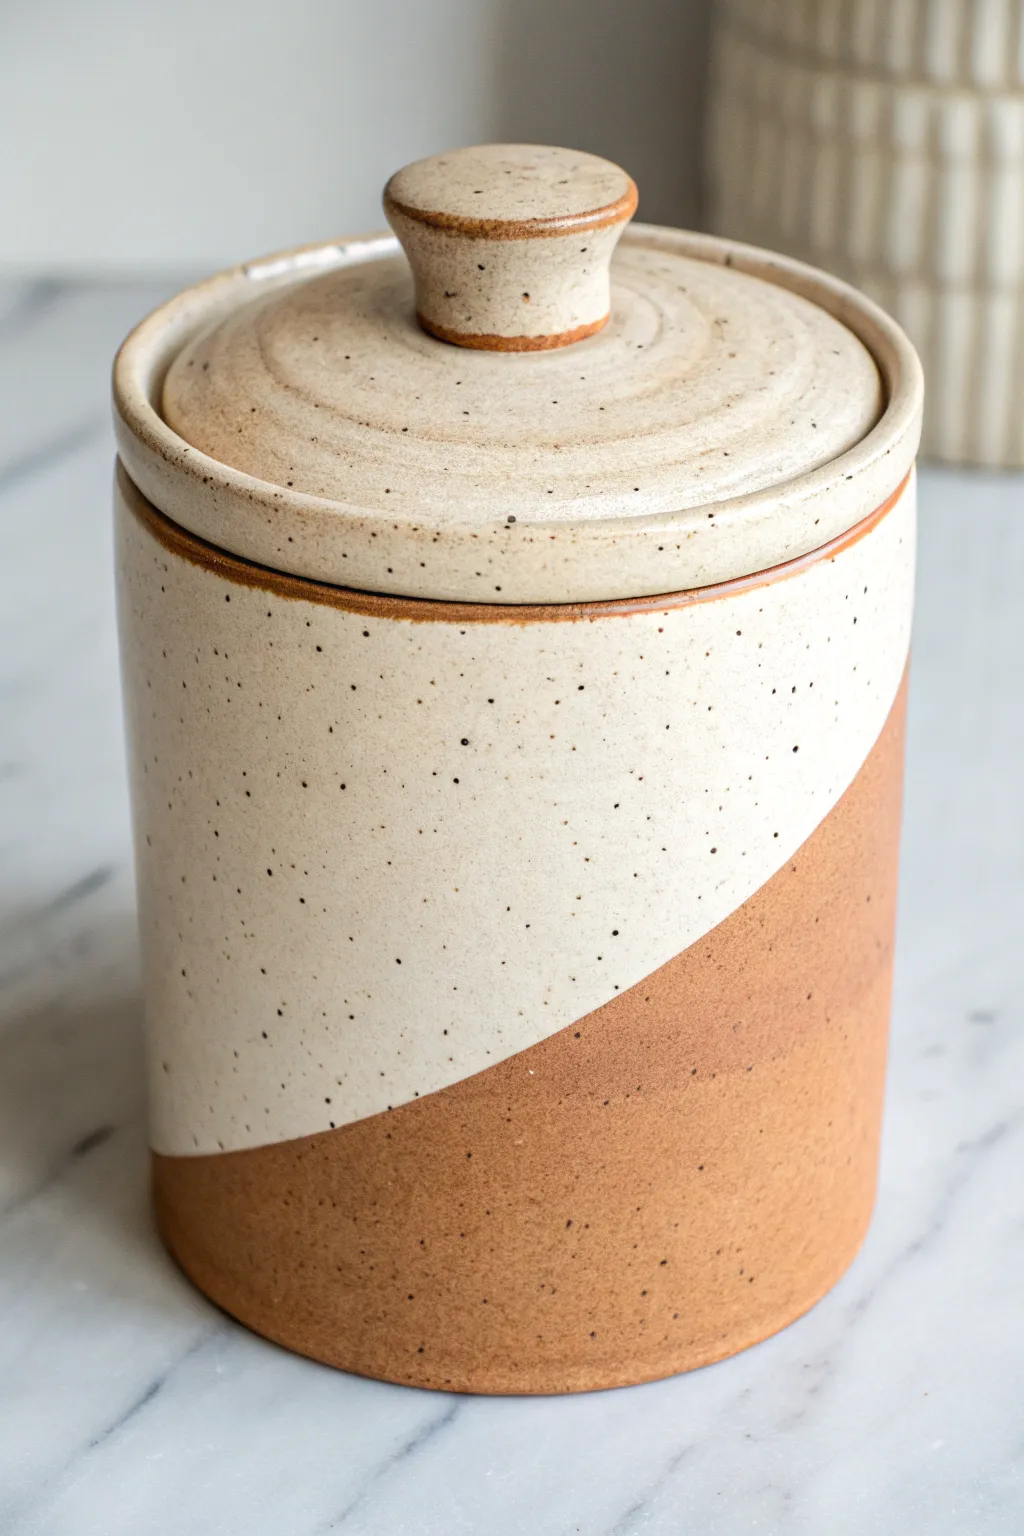
Speckled Ombre Glaze Jar
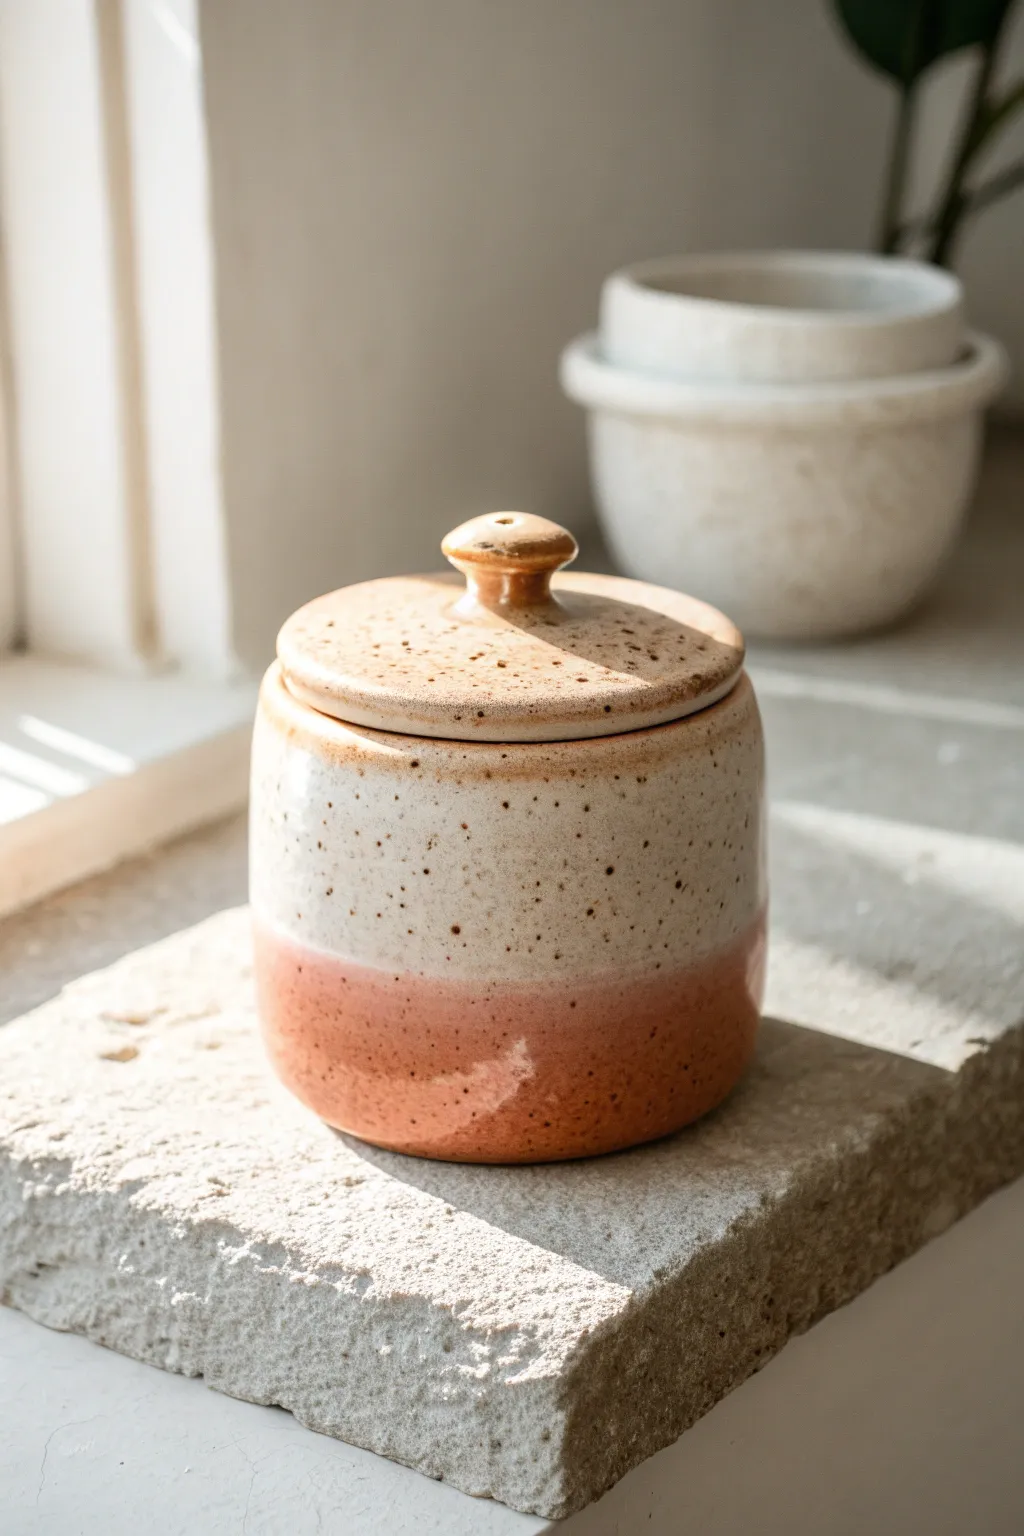
Capture the warmth of golden hour with this wheel-thrown lidded jar, featuring a cozy ombre effect that shifts from creamy oatmeal to warm terracotta. The speckled finish adds an earthy, organic texture that makes this piece feel instantly timeless and perfect for storing kitchen treasures.
Step-by-Step Guide
Materials
- Speckled clay body (stoneware recommended)
- Pottery wheel
- Throwing tools (sponge, wire cutter, ribs)
- Calipers
- Trimming tools
- Creamy white dipping glaze
- Terracotta or warm coral dipping glaze
- Wax resist
- Glaze brushes
- Kiln
Step 1: Throwing the Body
-
Center the clay:
Start with about 1.5 to 2 pounds of well-wedged speckled clay. Secure it firmly to the wheel head and center it using steady pressure and moderate speed. -
Open the form:
Drill your thumb into the center, stopping about a half-inch from the bottom. Open the floor to your desired width, compressing the base thoroughly to prevent future cracks. -
Pull the walls:
Slow the wheel down slightly. Perform two to three pulls to raise the walls into a cylinder. Aim for an even thickness, keeping the rim slightly thicker for stability. -
Shape the belly:
Using a rib tool inside the pot, gently push the wall outward to create a subtle, rounded belly shape while supporting the outside with your sponge. -
Create the gallery:
At the rim, use a wooden tool or your thumb to split the clay slightly, creating a small inset shelf (gallery) where the lid will eventually sit. Measure the gallery diameter with calipers before cutting the pot off the wheel.
Clean the Fade
To get a smoother ombre blend rather than a hard line, I like to sponge the area where the two glazes overlap while they are still slightly damp.
Step 2: Creating the Lid
-
Throw the lid off the hump:
Using a larger lump of clay, center just the top portion. This is often easier for small lids than throwing directly on a bat. -
Shape the flange:
Flatten the top section and define the underside flange. Check your caliper measurement frequently to ensure it will fit snugly into the jar’s gallery. -
Form the knob:
While the clay is still plastic, shape a small, rounded knob in the center. I like to pinch a small waist under the knob to make it easier to grip. -
Refine and cut:
Clean up the edges with a soft sponge to expose the speckled texture, then use a needle tool to cut the lid from the hump.
Lid Wobble?
If the lid rattles after the final firing, mix a tiny amount of grinding paste with water, apply it to the gallery, and twist the lid back and forth to grind it flush.
Step 3: Trimming and Bisque
-
Dry to leather hard:
Allow both pieces to dry slowly under plastic until they are firm enough to handle without deforming. -
Trim the jar base:
Invert the jar on the wheel and trim the bottom corners to create a clean lifted foot. Smooth the surface with a metal rib to remove grog marks. -
Fit the lid:
Test the lid fit now. If it’s too tight, you can carefully trim the flange; if it’s too loose, you might need to throw a new lid. -
Bisque fire:
Once fully bone dry, load both pieces into the kiln and bisque fire to cone 04 (or your clay body’s specifications).
Step 4: Glazing the Ombre
-
Wax the foot:
Apply wax resist to the bottom of the jar and the contact points of the lid to prevent the lid from fusing shut during firing. -
Dip the top color:
Hold the jar by the foot and dip the top 2/3 into the creamy white glaze. Shake off excess drips immediately and let it dry to the touch. -
Dip the bottom color:
Clean the rim if needed, then hold the jar by the rim. Dip the bottom 1/3 into the terracotta/coral glaze, slightly overlapping the white glaze to create a transition zone. -
Enhance the speckle:
If your glaze is very opaque, you can gently wipe the surface with a damp sponge after the glaze dries to reveal the natural clay speckles underneath. -
Glaze the lid:
Dip the lid into the creamy white glaze, being careful not to get glaze on the flange area where it touches the jar. -
Final fire:
Load the kiln, placing the lid on the jar only if you are confident in your wax job, otherwise fire them side-by-side. Fire to unmatched maturity (usually Cone 5/6).
Place your finished jar where the sunlight can catch the gloss and highlight those beautiful natural speckles
Faceted Geometric Jar
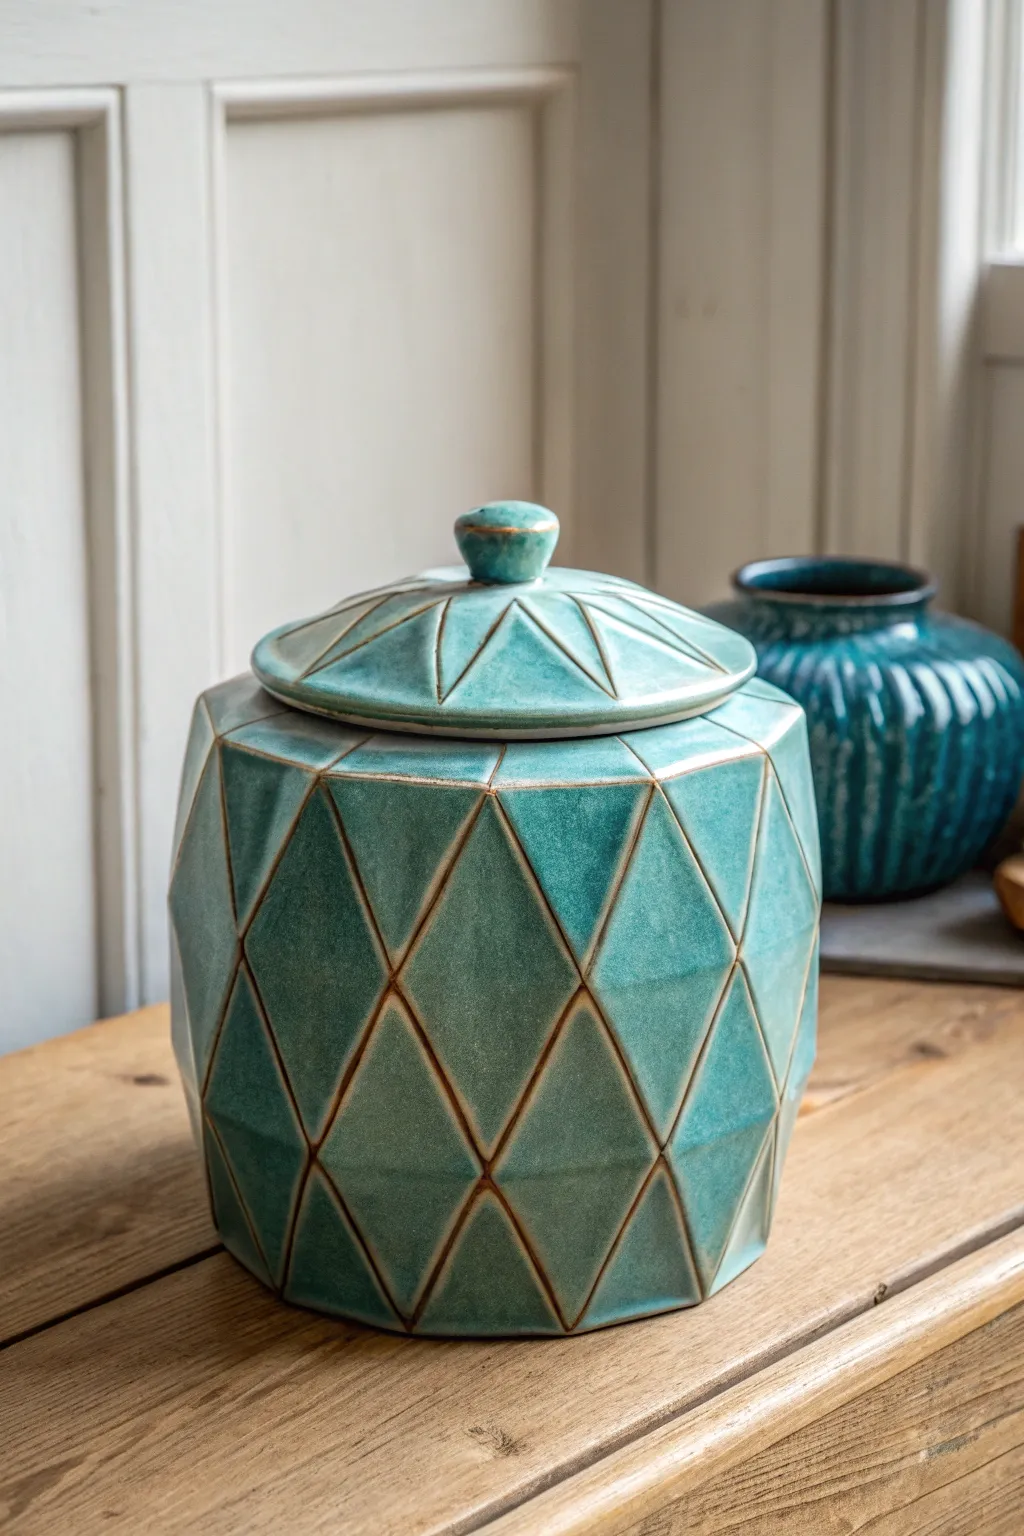
Embrace structure and shine with this striking ceramic jar, characterized by its bold diamond-shaped facets and rich teal glaze. The geometric relief creates a modern sculptural feel, while the antiqued edges add depth and a touch of rustic warmth.
Step-by-Step Tutorial
Materials
- Stoneware clay (smooth body recommended)
- Rolling pin and guide strips (approx. 1/4 inch thick)
- Cardstock or thin plastic sheet (for templates)
- X-Acto knife or potter’s knife
- Ruler and protractor
- Slip and scoring tool
- Rib tool (smooth metal or rubber)
- Sponge
- Teal celadon or breaking glaze (cone 5/6)
- Iron oxide wash or brown underglaze
- Potter’s wheel (optional, for lid creation)
- Kiln
Step 1: Designing and Preparing the Slabs
-
Draft the template:
Begin by designing your geometric net on cardstock. Draw a series of interconnected diamonds to form a strip that will become the wall of the jar. For this specific look, aim for three horizontal rows of diamonds. -
Roll the clay:
Roll out a large slab of stoneware clay to a consistent thickness of about 1/4 inch using guide strips to ensure evenness. -
Smooth the surface:
Compress the slab on both sides with a rubber rib. This not only smooths the texture but aligns the clay particles to prevent warping during drying. -
Cut the primary shape:
Place your template over the slab and carefully cut out the long rectangular strip. You can lightly trace the internal diamond lines now to use as a guide for faceting later.
Pro Tip: Sharp Edges
Let the clay reach a firm leather-hard stage before doing final carving. Soft clay will drag and warp, but firm clay cuts cleanly for crisp facets.
Step 2: Forming the Faceted Body
-
Create the cylinder:
Stand the slab up and curve it into a cylinder. Bevel the vertical ends at a 45-degree angle to create a seamless overlap join. -
Join the seam:
Score the beveled edges aggressively and apply slip. Press the ends together firmly, smoothing the seam both inside and out so it disappears completely. -
Attach the base:
Roll a smaller slab for the floor. Place your cylinder on top, trace around it, cut the circle, score and slip both contact points, and attach the base firmly. -
Define the facets:
Using your traced guides, press or carve along the diamond grid lines. I like to use a flat modeling tool to gently push the center of each diamond slightly outward while pressing the grid lines inward to enhance the 3D relief. -
Sharpen the geometry:
Once the clay is leather hard, go back over the ‘peaks’ and ‘valleys’ of the diamonds with a blade or hard rib to sharpen the edges. Crisp lines are crucial for this geometric style.
Troubleshooting: Warping
If your jar goes oval during drying, leave the lid on the jar while it dries. This helps both pieces shrink together and maintain a perfect fit.
Step 3: Creating the Lid
-
Form the lid slab:
Create a slightly domed circle of clay that fits the diameter of your jar’s opening. You can do this by slumping a slab over a plaster mold or throwing it on the wheel. -
Add the flange:
Attach a small coil or strip of clay to the underside of the lid, inset slightly from the edge, to ensure it sits securely inside the jar rim without sliding off. -
Carve the radial pattern:
On the top surface of the lid, carve radiating triangles that mimic the diamond pattern of the body, starting from the center and widening toward the rim. -
Attach the knob:
Model a small, sturdy knob. Score and slip the center of the lid and attach the knob securely, smoothing the transition point.
Step 4: Glazing and Finishing
-
Bisque fire:
Once the piece is bone dry, fire it to bisque temperature (usually Cone 04 or 06) to prepare it for glazing. -
Apply oxide wash:
Mix iron oxide with water and brush it into all the recessed lines and crevices of the faceted pattern. Wipe away the excess with a damp sponge, leaving the dark color only in the grooves. -
Glaze application:
Dip or spray the entire jar with a teal celadon or a glaze known to ‘break’ over edges. This type of glaze naturally thins out on sharp ridges (revealing the clay color) and pools in textures. -
Clean the foot:
Wipe any glaze off the bottom of the jar and the contact points of the lid to prevent them from fusing to the kiln shelf. -
Final firing:
Fire the kiln to the maturity temperature of your chosen clay and glaze (typically Cone 5 or 6 for stoneware) to achieve that glossy, durable finish.
Once cooled, your geometric jar is ready to serve as a stunning centerpiece or stylish storage container
Slab-Built Square Jar With Seams
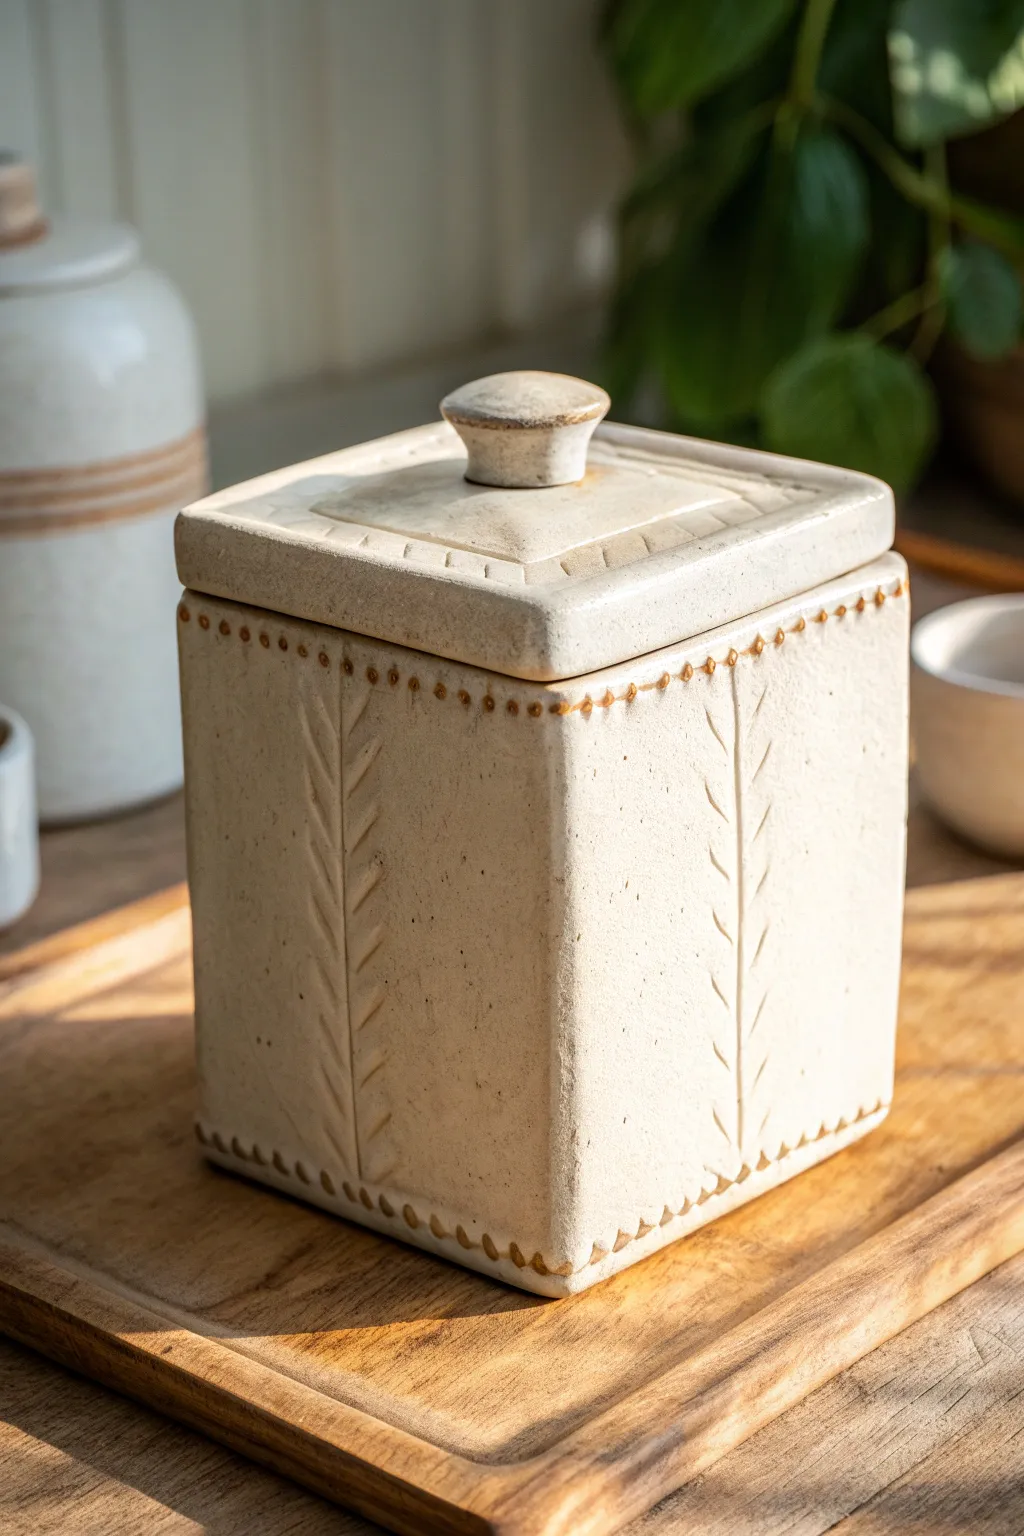
Embrace the beauty of hand-built pottery with this charming square jar, featuring warm, earthy tones and delicate texture work. The design highlights the construction process by turning the seams into decorative elements, while a simple carved wheat motif adds organic elegance to the sides.
How-To Guide
Materials
- Light-colored stoneware clay (smooth or with fine grog)
- Rolling pin and guide strips (approx. 1/4 inch thick)
- Fettling knife or creative cutting tool
- Ruler or square templates
- Serrated rib and scoring tool
- Slip or vinegar
- Small round piping tip or stylus tool (for beading)
- Carving tool or needle tool
- Sponge
- Matte white or cream glaze
- Iron oxide wash (optional)
Step 1: Preparing the Slabs
-
Roll out the clay:
Begin by rolling out a consistent slab of clay, using guide strips to ensure an even thickness of about 1/4 inch. Smooth the surface with a rib to compress the clay particles, which helps prevent warping later. -
Cut the walls and base:
Using a ruler and fettling knife, cut four identical rectangles for the walls (e.g., 4×5 inches) and one square for the base (e.g., 4×4 inches). Let these pieces stiffen to soft leather-hard; they need to hold their shape when stood up. -
Bevel the edges:
carefully bevel the vertical edges of your wall pieces and all edges of the base at a 45-degree angle. This creates stronger miter joints and sharper corners compared to butt joints.
Step 2: Assembling the Box
-
Score and slip:
Aggressively score the beveled edges and apply slip or vinegar. I find vinegar works quickly for firm slabs. -
Join the walls:
Attach the first wall to the base, applying firm pressure. Add the second wall, joining it to the base and the corner of the first wall. Continue until the box is closed. -
Reinforce the interior:
Use a thin coil of clay on the interior seams to reinforce them. Smooth this coil down with your finger or a tool so the inside is seamless. -
Define the exterior corners:
Instead of smoothing the exterior corners perfectly, gently paddle them to sharpen the square shape. Leave the faint line of the join visible as a guide for your decoration.
Dry Fit First
Before applying slip, hold your leather-hard slabs together dry to check the fit. If corners don’t meet perfectly, use a rasp or serrated rib to shave down angles for a tighter structural bond.
Step 3: Lid Construction
-
Cut the lid slab:
Cut a square slab slightly larger than your box opening to account for shrinkage and overhang. -
Form the pyramid shape:
Gently press the center of the lid slab upward while supporting the edges to create a subtle vaulted or pyramidal shape. You can also achieve this by pinching slightly from the corners toward the center. -
Add the flange:
Flip the lid over and attach small strips of clay or lugs just inside the perimeter. These will sit inside the jar mouth to keep the lid from sliding off. -
Attach the knob:
Fashion a small, rounded knob from a ball of clay. Score and slip the center of the lid peak and attach the knob securely.
Level Up: Gallery Ledge
Instead of a simple lid, build a ‘gallery’ ledge inside the rim of the jar walls. This allows the lid to sit flush with the top of the box for a sleeker, more modern profile.
Step 4: Texture and Design
-
Create the beaded seams:
Using a small hollow tube (like a piping tip) or a rounded stylus, press small circles or dots along the top rim and the bottom edge of the jar. -
Decorate the lid edge:
Continue this beaded texture along the outer edge of the lid to tie the pieces together visually. -
Mark the vertical lines:
Use a straight edge to lightly impress a vertical line down the center of each face of the jar. -
Carve the wheat motif:
Starting from the bottom of the vertical line, carve angled dashes upwards and outwards on both sides, resembling a stylized wheat stalk or fern leaf. Keep the pressure consistent for uniform depth. -
Refine the surface:
Once bone dry, gently wipe away any sharp burrs from the carving with a scour pad or stiff brush, but don’t over-smooth the texture.
Step 5: Glazing and Finishing
-
Bisque fire:
Fire the piece to cone 04 (or your clay’s bisque temperature). -
Apply oxide wash (optional):
To get the look in the image, brush an iron oxide wash over the textured areas (dots and carving) and then sponge it off, leaving the dark color only in the recesses. -
Glaze application:
Dip or brush a matte creamy-white glaze over the entire piece. If you used the oxide wash, ensure the glaze is translucent enough to let the darker details show through. -
Final firing:
Glaze fire to maturity (likely cone 5 or 6 depending on your clay body).
Now you have a beautifully textured container perfect for kitchen storage or as a standalone decor piece
Coil-Built Ribbed Jar
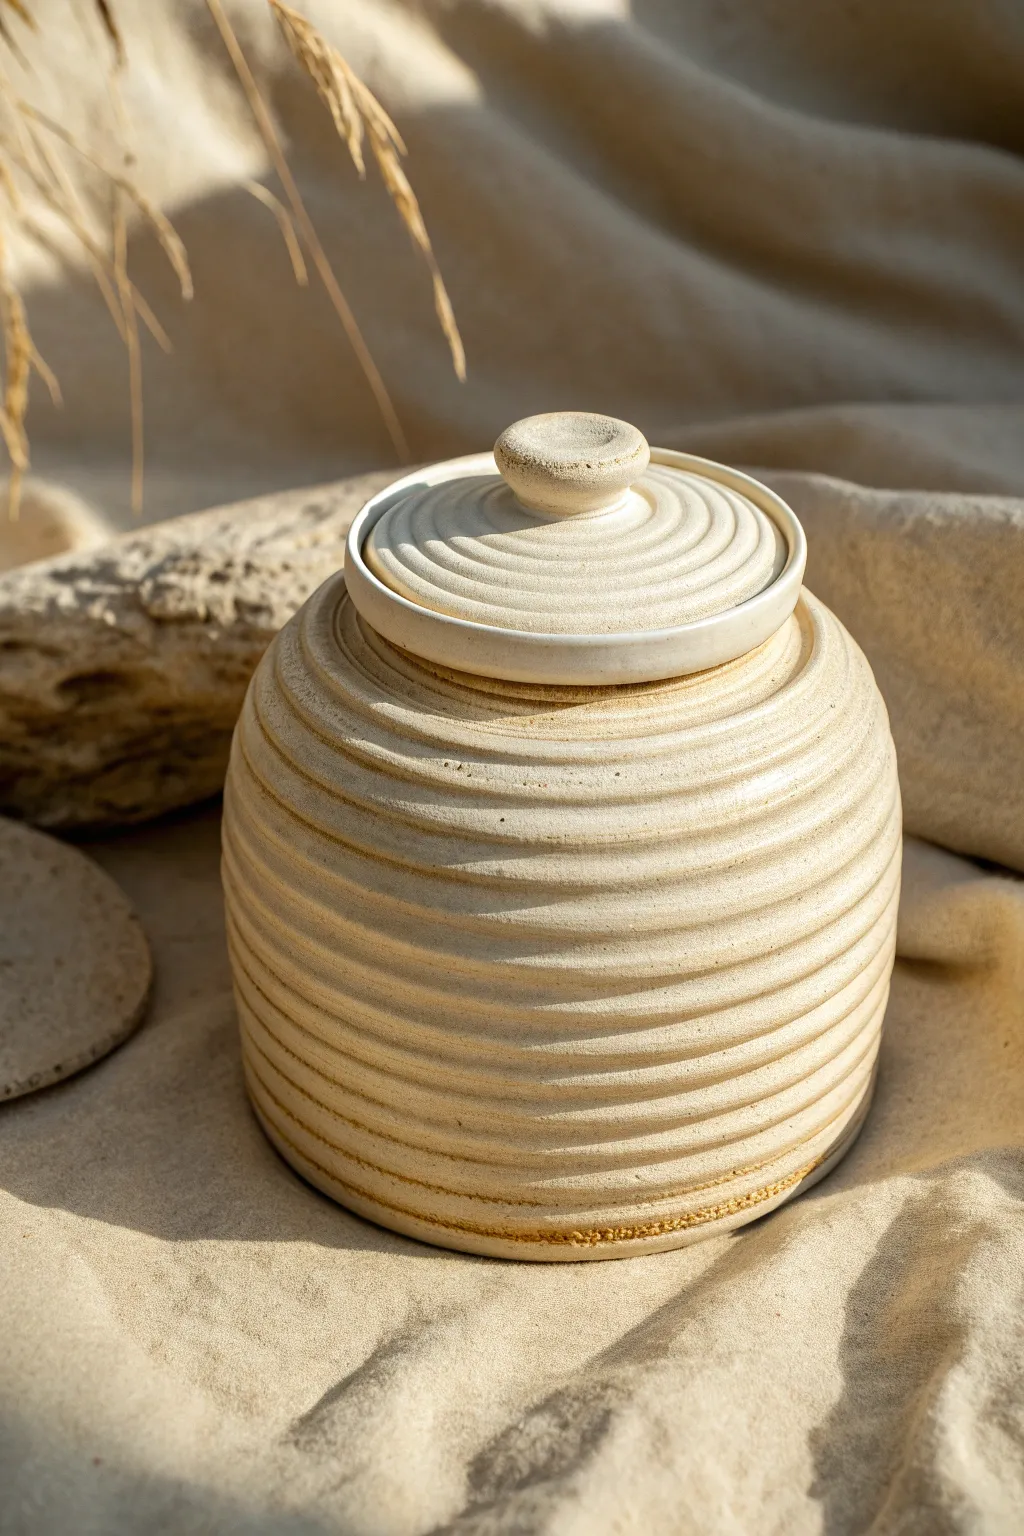
This rustic lidded vessel mimics the calming, rhythmic patterns of sand dunes with its deeply grooved texture. The consistent ribbing creates a tactile surface that beautifully catches glaze, highlighting the natural warmth of the clay body underneath.
Detailed Instructions
Materials
- Stoneware clay (smooth or speckled)
- Pottery wheel (recommended) or banding wheel
- Wooden sculpting tool with a rounded edge
- Pointed wooden tool or needle tool
- Metal rib
- Soft sponge
- Calipers
- Cutting wire
- Matte white or beige glaze
Step 1: Throwing the Body
-
Center and open:
Begin with about 2-3 pounds of wedged clay. Secure it to the wheel head and center it thoroughly. Open the clay up, leaving a floor about 1/2 inch thick. -
Pull the cylinder:
Pull the walls up into a basic cylinder shape. For this specific bulbous form, you want to leave the walls slightly thicker than usual to accommodate the deep carving or pressing of the ribs later. -
Shape the belly:
Using a rib on the inside and your fingers on the outside, gently push the belly of the pot outward to create a rounded, hive-like curve. Narrow the neck slightly at the top, creating a distinct gallery (ledge) for the lid to sit on. -
Create the texture:
With the wheel spinning at a slow-to-moderate speed, take the rounded end of a wooden tool. Starting from the bottom, press firmly into the clay to create horizontal grooves. Move up gradually to create a continuous spiraling rib or distinct parallel rings. -
Define the ridges:
Go back over your grooves to ensure they are even. I like to smooth the ‘valleys’ with a slightly damp sponge to remove sharp burrs while keeping the ‘peaks’ crisp. -
Finish the rim:
Compress the rim with a chamois or sponge. Measure the diameter of the gallery seating area with your calipers before cutting the pot off the wheel.
Wobbly Ribs?
If your grooves look shaky or uneven, your wheel speed is likely too slow or your hand isn’t braced. Lock your elbows into your body for stability and increase wheel momentum slightly.
Step 2: Creating the Lid
-
Throw off the hump:
Use a smaller amount of clay or throw ‘off the hump’ (throwing a small item from a large mound of centered clay). Create a low, flat bowl shape that matches your caliper measurements. -
Texture the lid:
Applying the same technique as the body, carve concentric rings into the top surface of the lid, starting from the center and working outward. -
Add the knob:
You can throw a small knob directly onto the lid while it’s spinning, or attaching a small ball of clay and hand-shaping it. Ensure the knob has a slight texture or rim to match the aesthetic. -
Trim underneath:
Once leather hard, flip the lid over and trim away excess weight from the underside. Ensure the flange fits perfectly into the gallery of your jar.
Step 3: Finishing and Glazing
-
Bisque fire:
Allow both pieces to dry slowly to prevent warping. Once bone dry, bisque fire them to your clay body’s recommended temperature (usually cone 04). -
Wax resist:
Apply wax resist to the bottom of the jar, the contact points of the lid, and the gallery ledge to prevent the lid from fusing to the pot during firing. -
Glaze application:
Dip or spray the piece in a matte white or sandy beige glaze. The key here is not to apply it too thickly; you want the glaze to break over the high points of the ribs to reveal the clay texture. -
Wipe back (optional):
For an even more rustic look, gently wipe the raised ridges with a damp sponge after the glaze dries but before firing, exposing more raw clay. -
Final firing:
Fire to the maturation temperature of your glaze (typically cone 5 or 6 for stoneware). Let the kiln cool completely before unloading.
Raw Clay Accent
Leave the bottom inch of the jar unglazed. This ‘bare clay’ foot creates a beautiful contrast with the glazed upper body and connects the piece visually to the earth.
The repetitive process of carving these ribs is a meditative way to finish a studio session
Animal Character Jar With Sculpted Lid
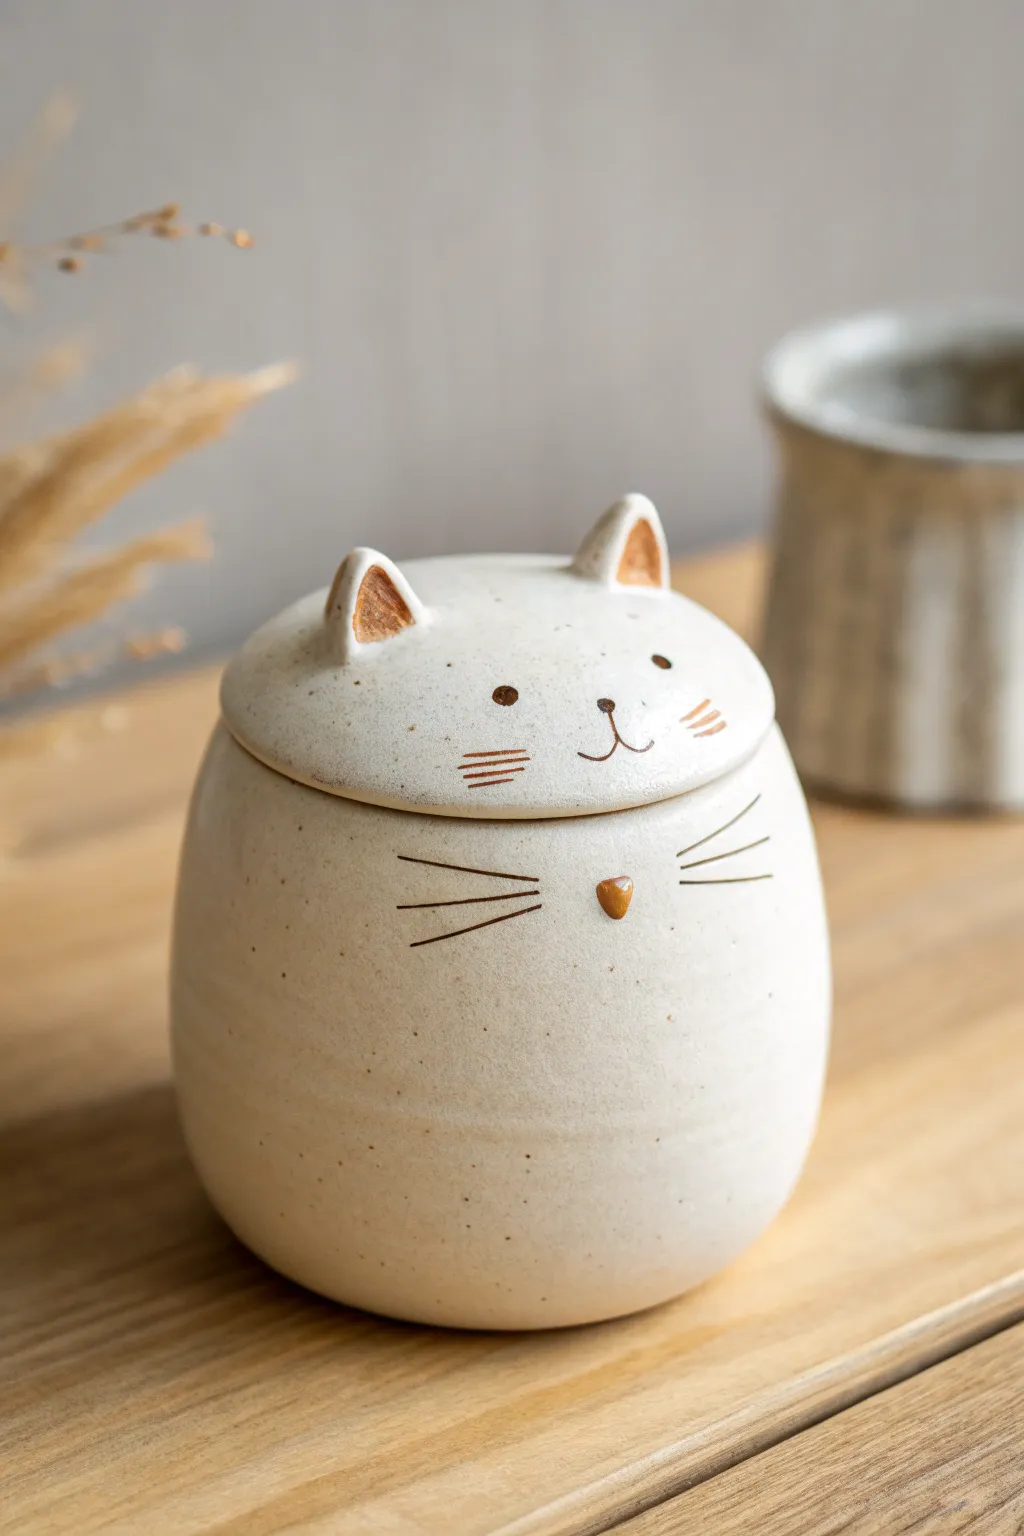
This adorable ceramic jar captures the charm of a chubby cat with its rounded form and simple, sweet facial features. Finished with a speckled matte white glaze and delicate brown details, it adds a touch of playful character to any kitchen counter or desk.
Step-by-Step Tutorial
Materials
- White stoneware clay with speckles (or standard white clay)
- Pottery wheel (or rolling pin and slab tools for hand-building)
- Needle tool
- Loop trimming tool
- Small sponge
- Scoring tool or fork
- Underglaze (dark brown or black)
- Small pointed detail brush
- Matte white glaze (semi-opaque to show speckles)
- Clear glaze (optional, for inside)
- Kiln
Step 1: Throwing and Shaping the Base Forms
-
Throw the body cylinder:
Center about 1.5 – 2 lbs of speckled clay on your wheel. Open the form and throw a cylinder, but shape it with a distinct outward belly curve. You want a bulbous, egg-like shape that tapers in slightly at the rim. -
Create the gallery:
At the rim of your jar body, use your thumb or a gallery tool to create a small ledge (gallery) inside the lip. This is where the lid will sit securely. -
Throw the lid:
Center a smaller ball of clay (about 0.5 – 0.75 lbs). Throw it upside down as a shallow bowl that matches the outer diameter of your jar. Measure carefully with calipers to ensure it fits the gallery you just made. -
Initial refinement:
Before removing the pieces from the wheel, smooth the surfaces with a rib to remove throwing rings, starting the process of creating that clean, modern look. Wire them off and let them dry to leather hard.
Uneven Glaze?
If your white glaze looks streaky over the underglaze, your brushwork might be repelling the liquid glaze. Lightly sponge the painted areas before dipping to help adhesion.
Step 2: Sculpting the Cat Features
-
Trim the forms:
Once leather hard, trim the bottom of the jar to a smooth, rounded foot. Trim the lid top (which was the bottom of the bowl) into a gentle dome shape that continues the curve of the jar’s body. -
Shape the ears:
Roll out a small slab or pinch two small triangles of clay. Thicken them slightly at the base and taper them at the top. Use your finger to create the inner ear indentation. -
Attach the ears:
Score and slip the top of the domed lid and the base of your ears. Attach them firmly, smoothing the clay down so the seam disappears completely. They should look like they grew out of the lid, not just stuck on. -
Add the nose:
Roll a tiny, lentil-sized piece of clay into a soft triangle. Score and slip to attach this to the main jar body, positioned slightly below the rim line where the lid meets the jar.
Step 3: Decorating and Glazing
-
Bisque fire:
Let the piece dry completely (bone dry) and then bisque fire it to cone 04 (or your clay’s specific bisque temperature). -
Wax resist application:
Apply wax resist to the gallery of the jar and the contact ring of the lid to prevent them from sticking together during the glaze firing. -
Painting the details:
Using a dark brown underglaze and a fine brush, paint the facial features. Paint the inside of the ears a warm amber or brown tone. Paint three whiskers on each cheek of the jar body. -
Add upper face details:
On the lid section, paint two small circular eyes and a small ‘w’ mouth shape right at the edge of the rim. Add three small horizontal dash marks on the cheeks of the lid portion for texture. -
Glazing the body:
Dip the entire jar and lid into a matte white glaze. I prefer a glaze that is slighty translucent so the clay’s natural speckles show through. Ensure the glaze isn’t too thick over your underglaze painting. -
Clean up:
Wipe back any glaze that may have dripped onto the nose if you want raw clay exposed there, or simply glaze over it if you want the nose color to be subtle. -
Final wipe:
Use a damp sponge to meticulously clean the waxed gallery and foot ring. Any glaze left here will fuse the lid shut. -
Glaze fire:
Load into the kiln and fire to the maturity of your clay and glaze (typically Cone 5 or 6 for stoneware). Allow the kiln to cool naturally before unloading.
Lid Fit Pro-Tip
Make the lid while the jar is still on the wheel. Use calipers to measure the jar’s gallery, then throw the lid to match that measurement instantly for a perfect fit.
Once cooled, fill your new feline friend with treats or tea leaves and enjoy the company