When I’m craving a creative reset, I reach for air dry clay or polymer clay and make something I’ll actually use. These clay craft ideas for adults are meant to feel polished, modern, and right at home in your everyday space.
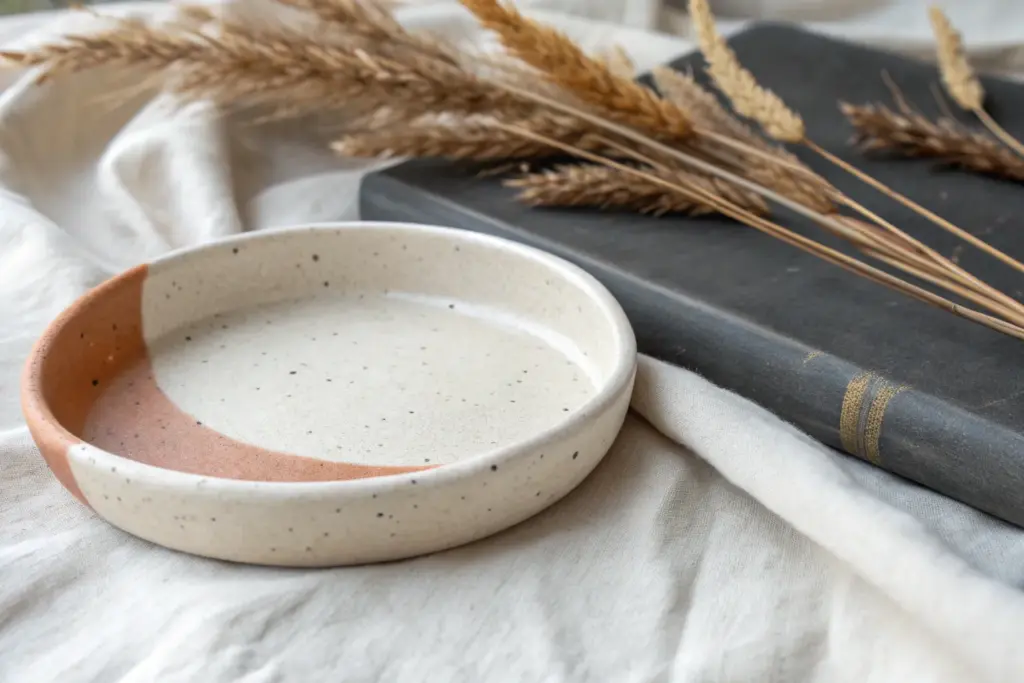
Minimal Ring Dish With Botanical Imprints
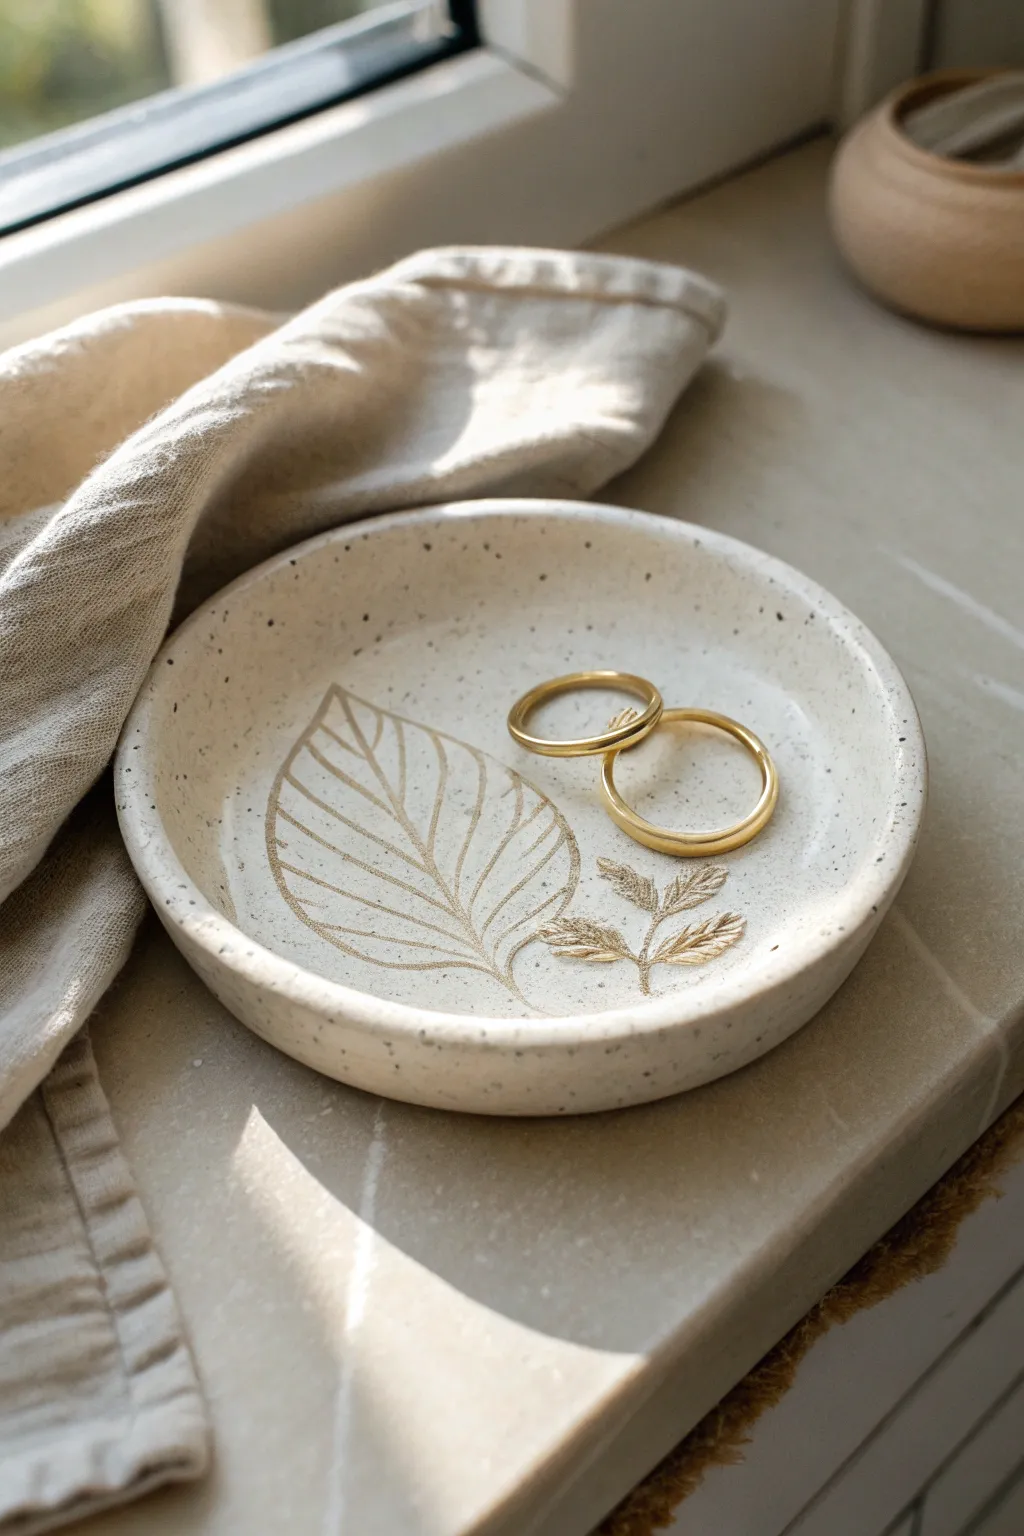
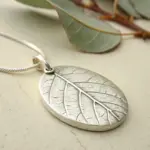
This elegant trinket tray combines the earthy texture of speckled clay with the luxurious shine of gold botanical details. It is the perfect understated piece to hold your daily jewelry on a bedside table or windowsill.
Detailed Instructions
Materials
- Speckled air-dry clay (or polymer clay with granite effect)
- Small rolling pin
- Circle cutter or small bowl (approx. 4-5 inches)
- Real leaves with distinct veins (or rubber stamps)
- X-Acto knife or craft knife
- Sponge and water
- Fine grit sandpaper
- Gold leaf paint or liquid gilding
- Fine detail paintbrush
- Gloss varnish or clear sealant
Step 1: Shaping the Base
-
Condition the clay:
Start by taking a handful of speckled clay and kneading it in your hands until it becomes warm and pliable, which prevents cracking later on. -
Roll it out:
Place the clay on a smooth work surface and roll it out to an even thickness of about 1/4 inch. If you want a uniform look, use depth guides on either side. -
Cut the circle:
Place your circle cutter or a small bowl upside down onto the slab. Press down firmly to cut a perfect circle, then peel away the excess clay. -
Prepare the botanical texture:
Select your leaves. Fresh leaves with thick, raised veins on the back work best for a deep impression. -
Make the impression:
Arrange the leaves vein-side down onto the clay circle in your desired composition. Gently roll your rolling pin over them once to press them into the surface without distorting the dish’s shape. -
Remove the botanicals:
Carefully lift the leaves off the clay by the stem. Start slow to ensure you don’t smudge the crisp lines of the imprint. -
Form the rim:
Gently lift the edges of the circle with your fingertips to create a slight curve. You can place the clay inside a shallow bowl to help it hold this curved shape while it dries. -
Smoothing touches:
Dip your finger or a sponge in a tiny bit of water and run it along the rim to smooth out any rough cutting marks.
Cracked Edges?
If small cracks appear on the rim while drying, make a slip paste (clay mixed with water) and smooth it into the cracks, then sand flat once dry.
Step 2: Finishing and Gilding
-
Let it dry completely:
Allow the dish to air dry for 24-48 hours. It should be light in color and hard to the touch with no cold spots. -
Sand the edges:
Once fully dry, take a piece of fine-grit sandpaper and lightly buff the rim and any uneven surface spots to get a professional, stone-like finish. -
Dust off debris:
Wipe the dish down with a slightly damp cloth or a dry brush to remove all sanding dust before painting. -
Prepare the gold paint:
Shake your liquid gilding or gold leaf paint well. Pour a tiny amount onto a palette or scrap piece of paper. -
Fill the imprint:
Dip your fine detail brush into the gold. Carefully paint inside the depressed lines of the leaf imprint. I prefer to use very little paint on the brush so it doesn’t pool in the deep crevices. -
Detail the veins:
Continue tracing the finest veins of the leaf. If you go outside the lines, you can sometimes gently scrape it away with a craft knife once dry. -
Seal the dish:
After the gold has dried (usually 1 hour), apply a coat of gloss varnish or clear sealant over the entire top surface to protect the clay from moisture and oils.
Sharper Impressions
Place a piece of parchment paper over your leaves before rolling. This prevents the roller from getting sticky and ensures even pressure.
Enjoy displaying your rings on this sophisticated piece of handmade decor


Modern Polymer Clay Arch Earrings
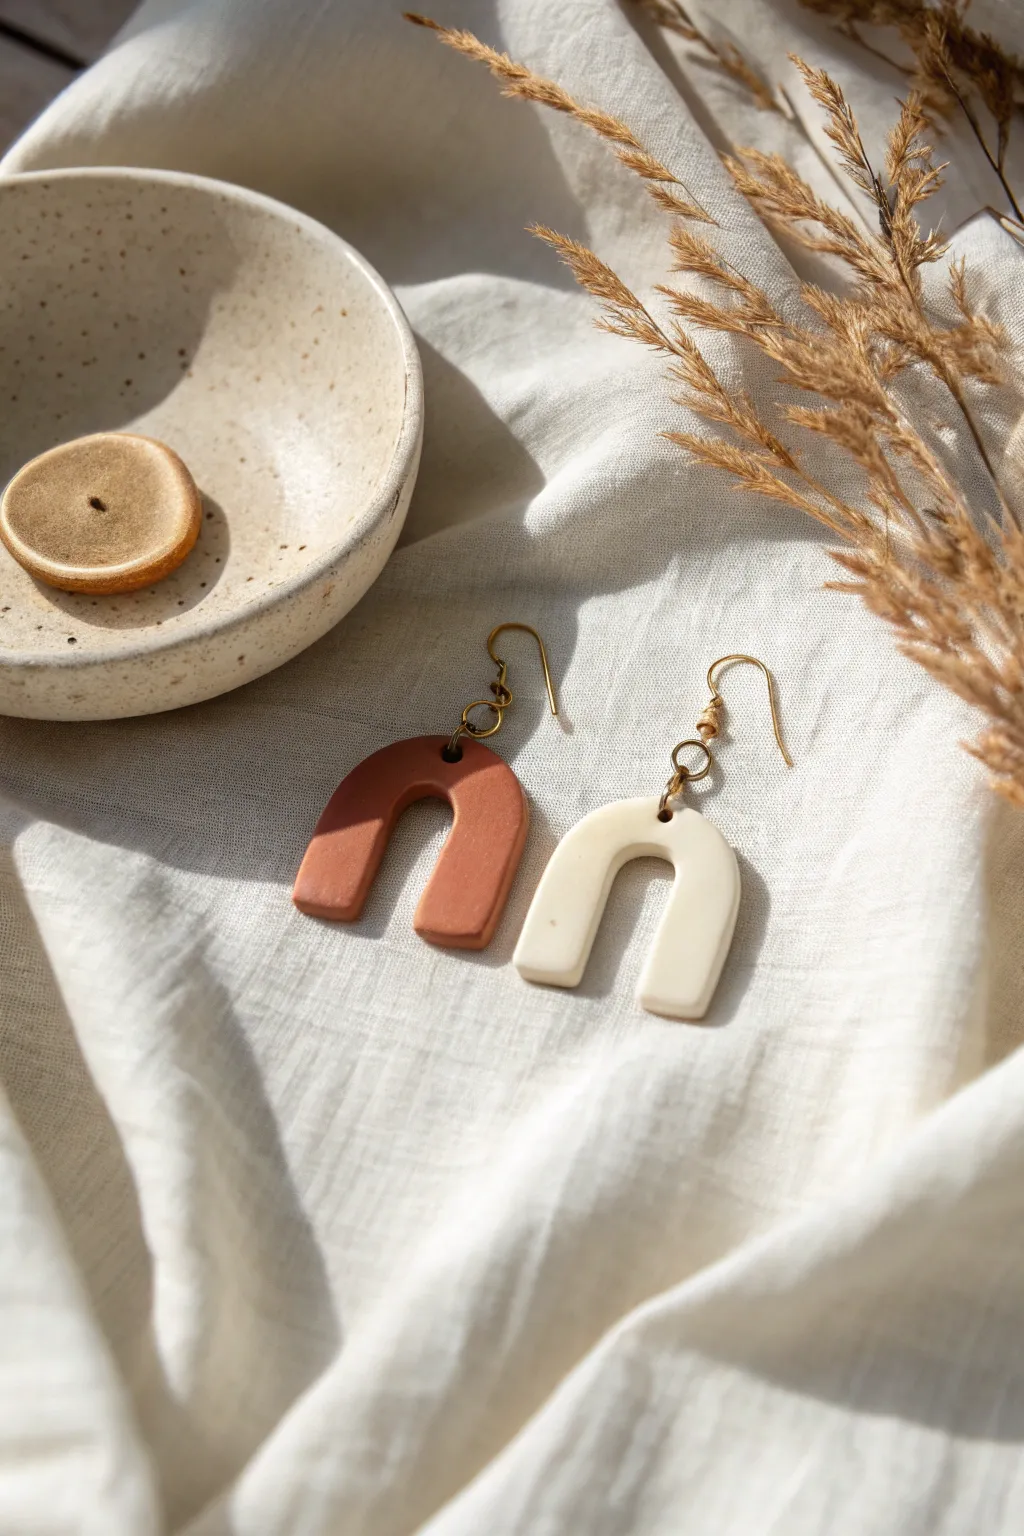
These minimalist arch earrings capture a modern desert aesthetic with their matte finish and warm, earthy tones. The simple U-shape design is perfect for beginners, offering a stylish payoff with minimal special equipment needed.
Step-by-Step
Materials
- Polymer clay (Terracotta and Cream/White colors)
- Acrylic rolling pin or pasta machine
- U-shaped clay cutter (arch shape) or a craft knife with a paper template
- Clean ceramic tile or glass work surface
- Parchment paper
- Hand drill or small needle tool
- Fine-grit sandpaper (400-600 grit)
- 4 Gold jump rings (6mm or 8mm)
- 2 Gold fish-hook earring wires
- Jewelry pliers (flat nose and round nose)
- Baby wipes (for cleaning hands/tools)
Step 1: Prepping the Clay
-
Clean your space:
Before starting, wipe down your work surface and rolling pin with a baby wipe or alcohol to ensure no dust or lint gets trapped in light-colored clay. -
Condition the cream clay:
Start with the lighter color first. Break off a portion of the cream clay and knead it in your hands until it becomes soft, pliable, and warm. -
Roll it out:
Place the conditioned cream clay on your tile. Roll it flat to an even thickness of about 3mm to 4mm. If you have a pasta machine, use a medium-thick setting. -
Condition the terracotta clay:
Repeat the kneading process with the terracotta clay. Wash your hands between colors to avoid staining the cream clay with rusty residue from the terracotta. -
Roll the second slab:
Roll the terracotta clay out to the exact same thickness as your first slab so the earrings match in weight and profile.
Step 2: Cutting and Baking
-
Check for air bubbles:
Inspect your rolled slabs. If you see surface bubbles, gently pierce them with a needle and smooth the air out with your finger. -
Cut the shapes:
Press your U-shaped cutter firmly into the cream clay. Wiggle it slightly to ensure a clean cut, then lift. Repeat for the terracotta clay. -
Alternative cutting method:
If you don’t have a specific cutter, lightly press a paper U-shape template onto the clay and carefully trace around it with a sharp craft knife. -
Smooth the edges:
Before baking, run a fingertip dipped in a tiny bit of cornstarch or water along the cut edges to soften any harsh lines or burrs. -
Add holes:
Use a needle tool or toothpick to poke a hole at the very top center of each arch. Make sure the hole is big enough for your jump rings. -
Bake carefully:
Transfer the pieces (on the tile or parchment) to a baking sheet. Bake according to your clay package instructions—usually around 275°F (135°C) for 30 minutes. Tent with foil to prevent scorching.
Fingerprints everywhere?
If you notice fingerprints on raw clay, lightly brush them with a little acetone or baby oil on a Q-tip before baking to smooth them out instantly.
Step 3: Finishing and Assembly
-
Cool down:
Let the clay cool completely inside the oven or on a cooling rack. The clay reaches its full strength only after it has fully cooled. -
Sand for perfection:
Once cool, use fine-grit sandpaper to buff the edges and flat surfaces. This gives that professional, smooth matte look. I find wetting the sandpaper slightly keeps dust down. -
Open the jump rings:
Using two pairs of pliers, twist a jump ring open sideways (never pull it apart outwards). -
Attach the wire:
Loop the open jump ring through the hole in the clay arch, then hook the earring finding onto the ring. -
Close the ring:
Twist the jump ring back into a closed position, ensuring the ends meet perfectly flush so the wire doesn’t slip out. -
Final wipe:
Give the earrings a final wipe with a damp cloth to remove sanding dust, revealing the rich, matte colors.
Pro Tip: Baking Magic
Bake your pieces on a bed of cornstarch or plain copy paper. This prevents shiny spots from appearing where the clay touches the baking sheet.
Now you have a stunning, lightweight pair of custom earrings ready to wear or gift.


Marbled Pendant Necklace Charms
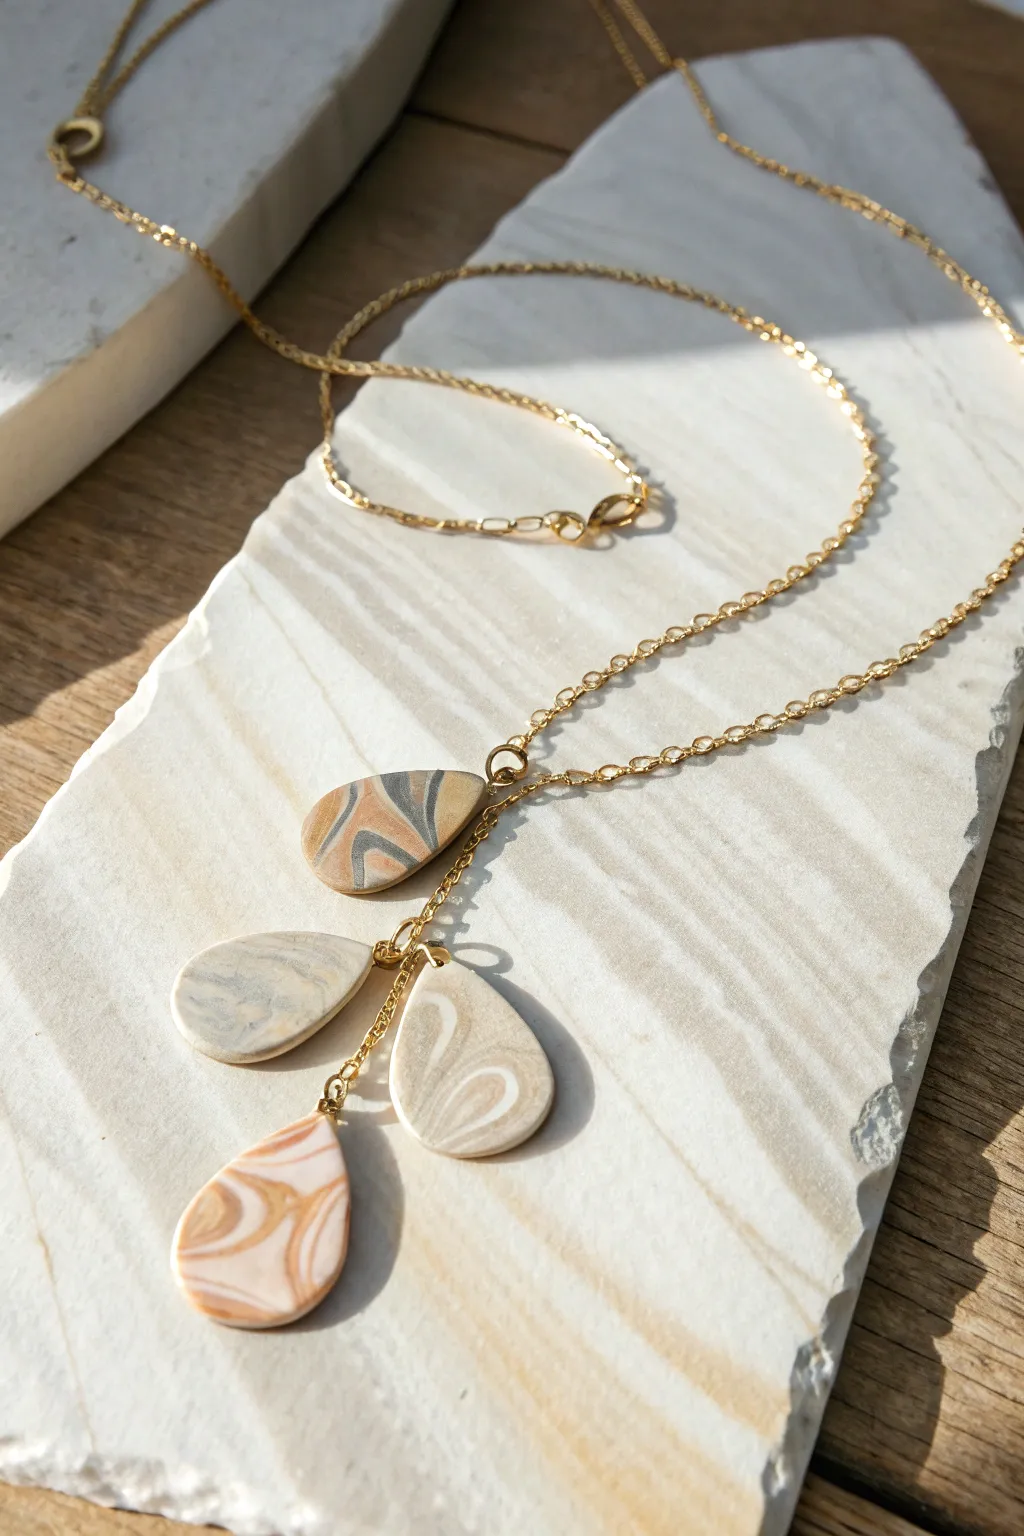
Elevate your jewelry collection with these sophisticated polymer clay pendants that mimic the organic beauty of polished agate. Using a simple marbling technique with neutral earth tones, you’ll create a chic, cascading necklace that pairs perfectly with everything from cozy sweaters to summer dresses.
Detailed Instructions
Materials
- Polymer clay (white, translucent, beige, light grey, warm terracotta)
- Clay roller or pasta machine
- Scalpel or craft knife
- Teardrop shape cutter (small/medium)
- Hand drill or pin vibe
- Needle tool
- Wet/dry sandpaper (400 to 1000 grit)
- UV resin or glossy water-based varnish (optional for shine)
- Gold jewelry chain (cable style)
- Gold jump rings (4mm and 6mm)
- Jewelry pliers (round nose and flat nose)
Step 1: Marbling the Clay
-
Condition the Clay:
Begin by thoroughly conditioning each color of polymer clay until it is soft and pliable. You want a mix of opaque colors (beige, grey, terracotta) and perhaps some translucent clay to add depth to the stone effect. -
Form Snakes:
Roll each color into a thin ‘snake’ or log, about 4 inches long. Since the pendants are mostly neutral, use more of the white and beige clay, and keep the terracotta and grey snakes thinner to act as accents. -
Twist Together:
Gather all the snakes into a bundle and twist them together tightly. The more you twist, the finer your marble lines will become. -
Fold and Roll:
Fold the twisted rope in half and roll it smooth again on your work surface. Repeat this twisting, folding, and rolling process 2-3 times until you see the colors beginning to streak and merge nicely. -
Create the Slab:
Roll the remaining log into a ball. Using your roller or a pasta machine on a medium setting (approx. 3mm thick), flatten the ball into a slab to reveal the organic swirled pattern.
Stone Effect Pro Tip
Add tiny flecks of gold leaf or black pepper into the translucent clay before mixing. This creates realistic mineral inclusions found in real agate stones.
Step 2: Shaping and Baking
-
Select the Pattern:
Inspect your slab to find the most interesting sections of marbling. Look for areas where the contrast between the greys and warm browns creates distinct, stone-like striations. -
Cut the Shapes:
Using your teardrop cutter, press firmly into the selected areas of the slab. Cut out four identical teardrop shapes. If you don’t have a cutter, you can trace a paper template with a scalpel. -
Smooth the Edges:
Gently lift the shapes and smooth the raw cut edges with your fingertip. This softens the look and removes any sharp clay burrs before baking. -
Pierce Holes:
Use a needle tool to poke a hole near the pointed top of each teardrop. Ensure the hole is large enough for your jump rings but not so close to the edge that the clay creates a weak point. -
Bake:
Place the pieces on a ceramic tile or baking sheet lined with parchment paper. Bake according to your specific clay brand’s instructions (usually 275°F/130°C for 30 minutes).
Step 3: Finishing and Assembly
-
Sand and Buff:
Once cool, submerge the pieces in water and sand the edges and surface lightly with wet/dry sandpaper. Start with 400 grit to shape and move up to 1000 grit for a silky smooth finish. -
Optional Glazing:
For the high-shine look seen in the photo, apply a thin layer of UV resin or gloss varnish to the front of each pendant. Cure or let dry completely. -
Prepare the Chain:
Cut your gold chain to your desired necklace length. Additionally, cut three very short segments of chain (approx 0.5 to 1 inch) to allow the pendants to hang at staggered lengths. -
Attach Pendants:
Open a small jump ring using two pliers. Thread it through the hole of a clay teardrop and one of the short chain segments (or directly onto the main chain for the highest bead). Close the ring securely. -
Assemble the Cluster:
Attach the main necklace chain ends to a clasp. Finally, attach the staggered chain segments holding the pendants onto the center point of the main necklace chain using a larger jump ring, creating a cascading cluster effect.
Level Up: Mix & Match
Instead of identical shapes, try mixing circles and teardrops, or make one ‘statement’ pendant significantly larger than the others for an asymmetrical look.
Wear your new agate-inspired necklace with pride, knowing each swirl is one-of-a-kind art you created by hand


Terrazzo-Style Clay Coasters
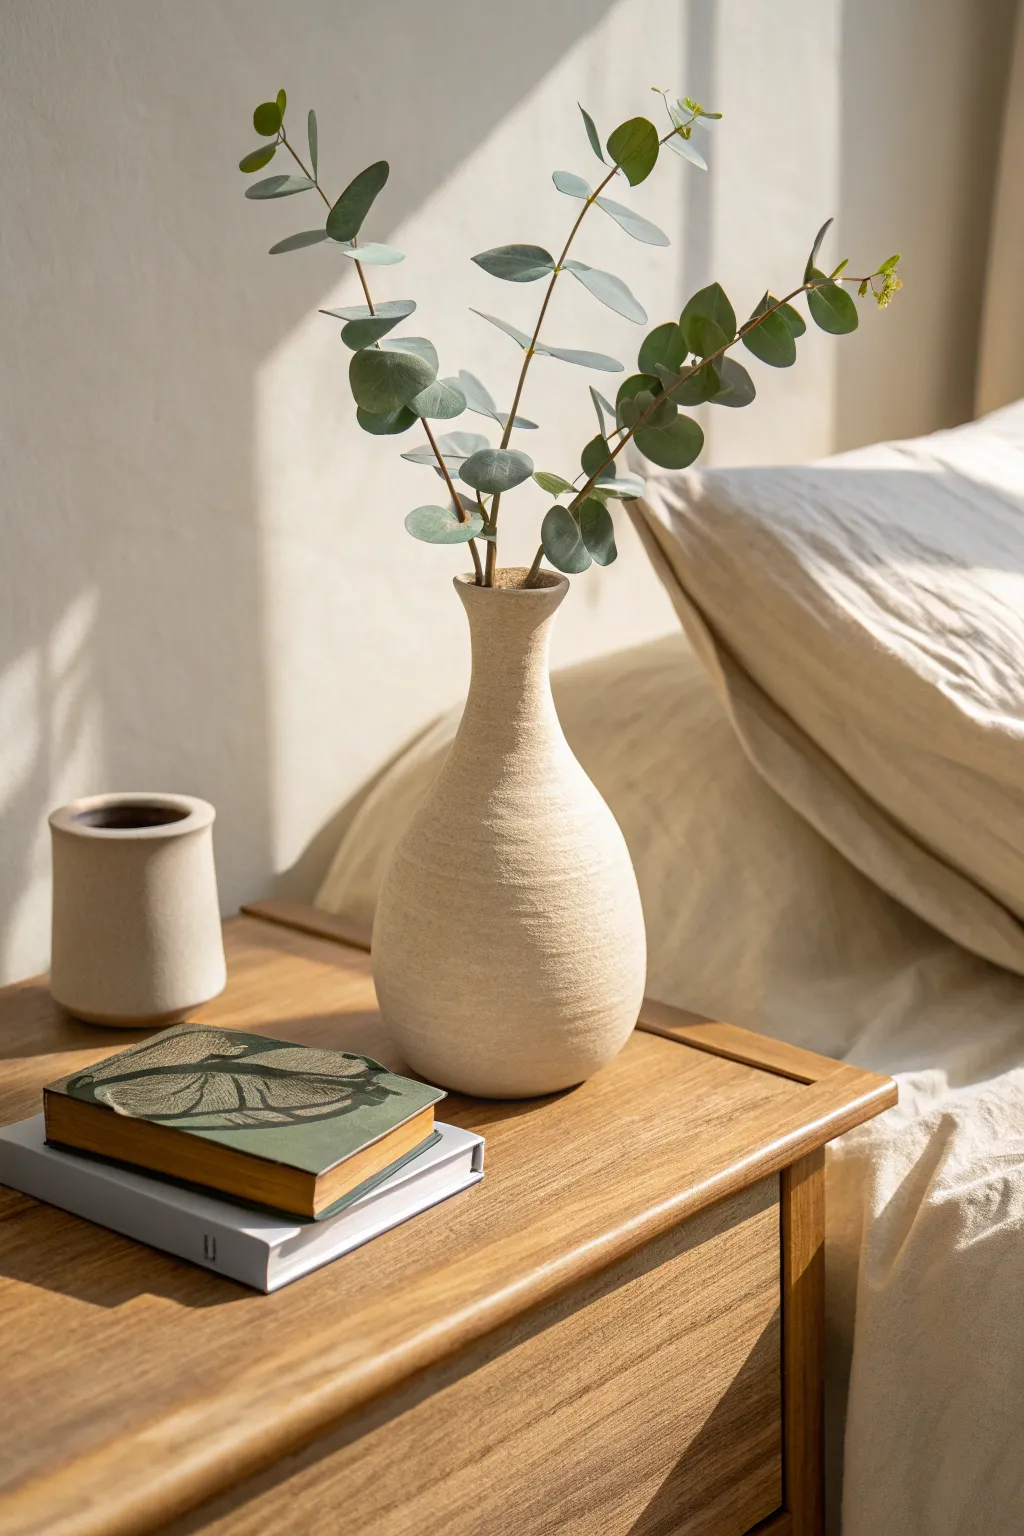
Bring the timeless elegance of Italian terrazzo into your home decor without the heavy lifting of pouring concrete. These polymer clay coasters feature a creamy white base speckled with organic shards of rust, olive, slate, and charcoal for a sophisticated, modern finish that mimics real stone.
How-To Guide
Materials
- White or cream polymer clay (approx. 200g)
- Small amounts of colored polymer clay (terracotta/rust, olive green, slate blue, black, grey)
- Acrylic rolling pin
- Square cookie cutter (approx. 4 inches) or a sharp craft knife and ruler
- Parchment paper or baking mat
- Oven (for baking)
- Wet/dry sandpaper (grits 400, 600, 1000)
- Matte or satin polymer clay varnish (optional)
- Soft brush
- Rolling guides or playing cards (to ensure even thickness)
Step 1: Prepping Your Terrazzo Chips
-
Condition the colors:
Start by conditioning your small amounts of colored clay (terracotta, olive, slate, black) until they are soft and pliable. Roll each color out into a very thin sheet, roughly 1-2mm thick. -
Bake the color sheets:
Place these thin colored sheets on parchment paper and bake them for about 10-15 minutes according to the package temperature directions. We want them partially baked so they are brittle enough to chop but not fully cured. -
Create the chips:
Once the colored sheets are cool, use your craft knife to chop them up into random, jagged bits. Aim for a variety of sizes—some tiny specks and some larger, chunky shards—to create an authentic terrazzo look.
Step 2: Forming the Base
-
Condition the white clay:
Work the large block of white or cream clay in your hands until it is completely smooth and free of air bubbles. This base needs to be soft enough to accept the colored chips. -
Initial Rolling:
Roll your white clay out into a thick slab, approximately 1/4 inch thick. Don’t worry about the shape just yet, just ensure you have enough surface area for your coasters. -
Add the chips:
Sprinkle your chopped colored chips generously over the top of the white clay slab. I like to press them down gently with my fingers first to ensure they stick before the next step. -
Embed the chips:
Use your acrylic roller to roll over the slab again. This forces the chips into the clay body and creates a smooth, unified surface. Roll in different directions to avoid distorting the pattern too much. -
Check density:
If there are large empty white spaces, add more chips to those specific areas and roll again until you are happy with the distribution.
Clean Rolling
Wipe your work surface and rolling pin with a baby wipe before starting the white base. Dust shows up easily on white clay, and keeping tools clean ensures a pure, bright background.
Step 3: Cutting and Baking
-
Cut the squares:
Place your square cutter or template over the most attractive parts of the slab. Press down firmly to cut your coaster shapes. If using a knife and ruler, measure carefully to ensure 4×4 inch squares. -
Smooth the edges:
Gently run your finger along the cut edges to soften them slightly. This removes the sharp ‘drag’ marks left by the cutter and gives a more stone-like finish. -
Final Bake:
Transfer the cut squares to a baking sheet lined with parchment paper. Bake for roughly 30-45 minutes (check your clay brand’s specific time) to ensure durability. Thicker pieces need a longer bake time to fully cure. -
Cool down:
Allow the coasters to cool completely on a flat surface. placing a heavy book on top while they cool can help prevent any slight warping.
Stone Texture
Skip the varnish and instead buff the cured clay vigorously with a piece of denim or a microfiber cloth. This creates a natural, semi-matte sheen that looks and feels incredibly like real polished stone.
Step 4: Finishing Touches
-
Sand for texture:
Once cool, wet the sandpaper and sand the surface of each coaster in a circular motion. Start with 400 grit to expose the chips clearly, then move to 600 and 1000 for a buttery smooth finish. -
Wash and dry:
Rinse the coasters under cool water to remove all the sanding dust and dry them thoroughly with a lint-free cloth. -
Seal (Optional):
For extra protection against drink condensation, apply a thin layer of matte polymer clay varnish. Let it dry completely according to the bottle instructions. -
Add backing:
To protect your furniture, you can glue a small square of cork or felt to the bottom of each coaster.
Set these out on your coffee table and enjoy the organic, modern vibe they add to your space

The Complete Guide to Pottery Troubleshooting
Uncover the most common ceramic mistakes—from cracking clay to failed glazes—and learn how to fix them fast.
Geometric Air Dry Clay Planter
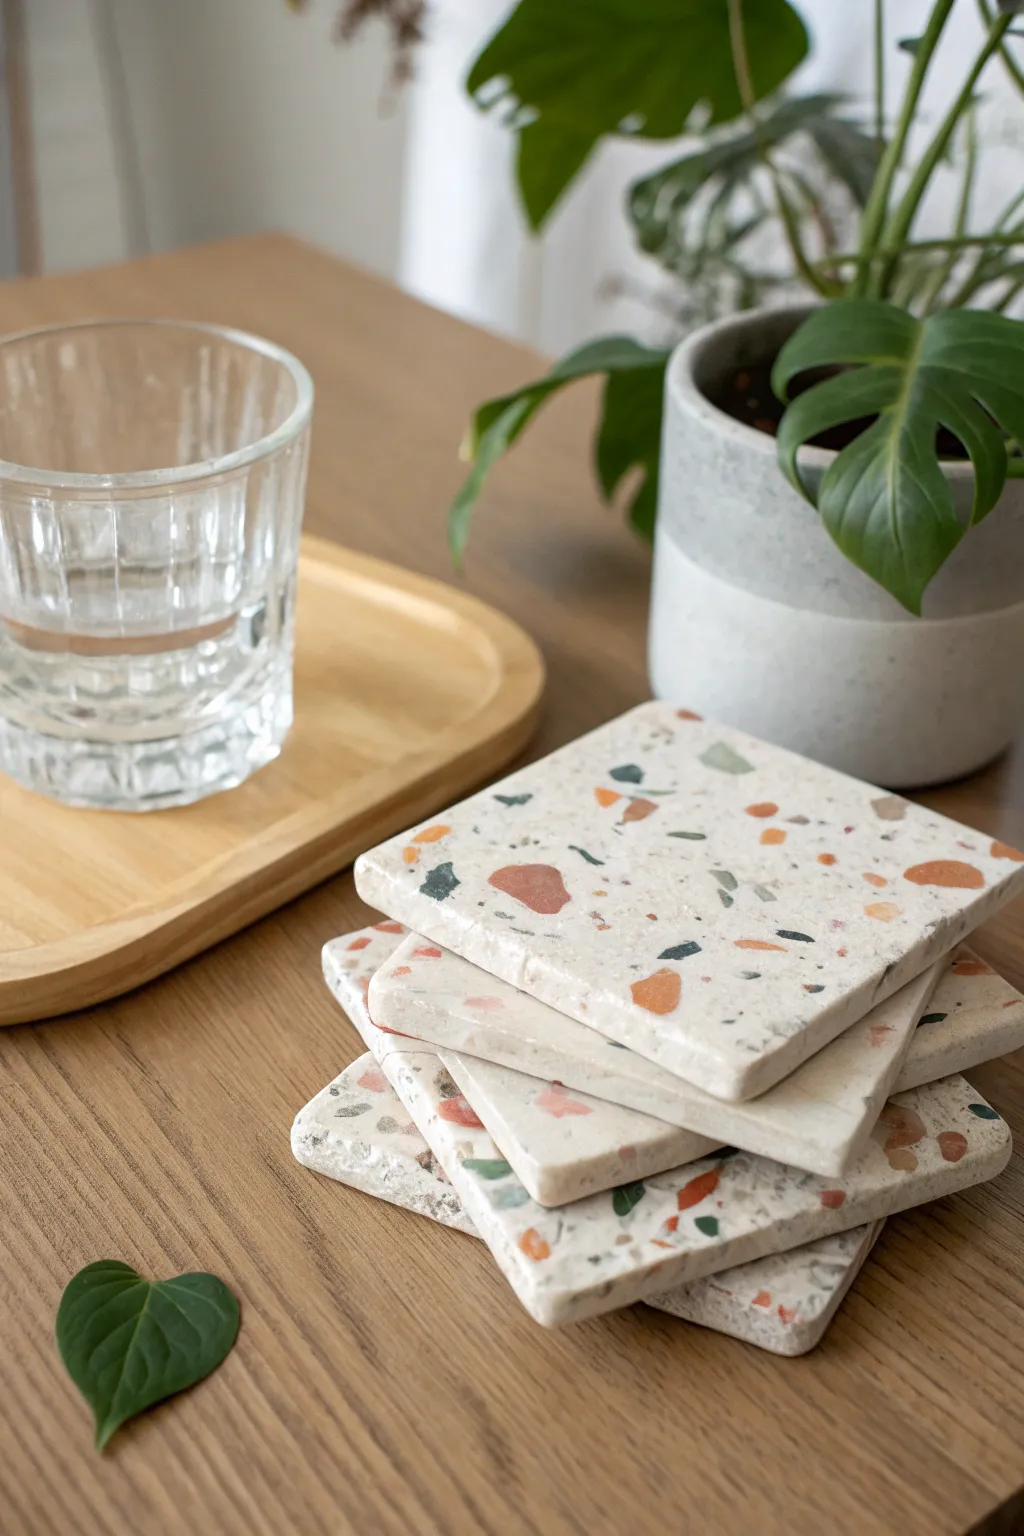
Bring a touch of minimalist elegance to your windowsill with this striking geometric planter. The sharp, faceted angles catch the light beautifully, giving the impression of carved stone while actually being lightweight air dry clay.
How-To Guide
Materials
- White or light grey air dry clay (stone-effect clay works beautifully)
- Non-stick rolling mat or parchment paper
- Rolling pin
- Sharp craft knife or scalpel (X-Acto)
- Ruler (metal preferred)
- Template (printed hexagon and triangles)
- Small bowl of water
- Fine-grit sandpaper (220-400 grit)
- Matte varnish or sealant
Step 1: Preparing the Base
-
Prepare your template:
Before toughing the clay, draw or print a template on cardstock. You will need a hexagon for the base (approx. 3-4 inches wide) and a set of matching trapezoids or triangles that will form the walls. -
Condition the clay:
Take a large chunk of air dry clay and knead it well. The warmth of your hands will make it pliable and reduce the chance of cracking later. -
Roll the slab:
Roll out the clay on your non-stick mat until it is an even slab, roughly 1/4 inch thick. Use guide sticks if you have them to ensure uniform thickness. -
Cut the base:
Place your hexagon template onto the clay slab. Using your sharp knife and ruler, cut straight down to create a clean-edged hexagonal base. Set this aside but keep it covered.
Step 2: Constructing the Geometric Walls
-
Cut the primary wall pieces:
You will need a strip of clay for the walls. Instead of cutting individual facets immediately, cut a long rectangular strip that is wide enough for the height of your pot. -
Score the fold lines:
This is the trick to getting those sharp angles. Instead of cutting separate pieces, lightly score vertical lines on the *inside* of your clay strip where you want the corners to be. Don’t cut all the way through. -
Create the faceted texture:
On the *outside* of the strip, use your knife to carefully shave away planes of clay. Think of it like whittling wood. Slice off thin, angled sections to create irregular triangles and diamonds. This creates the ‘low poly’ look. -
Refine the edges:
Dip your finger in a little water and smooth out any burrs or rough crumbs of clay left by the knife, but be careful not to round over your sharp faceted edges. -
Form the cylinder:
Gently bend the strip at your scored lines to form a hexagonal tube. Score and slip the ends where they meet, pressing them firmly together to seal the ring.
Clean Cuts Pro-Tip
Keep your craft knife clean. Wipe the blade with a damp cloth after every few cuts. Clay residue drags on the blade and creates ragged edges that are hard to fix later.
Step 3: Assembly and Finishing
-
Join base to walls:
Score the edges of your hexagon base and the bottom edge of your wall ring. Add a dab of water (or slip) to both surfaces. -
Secure the join:
Press the walls onto the base. Use a modeling tool or your finger to smooth the clay on the *inside* seam to effectively weld the two pieces together. -
Refine the exterior seam:
Check the outside seam at the bottom. I like to use a flat tool to gently press the clay downward to hide the join line, maintaining the geometric planes. -
Top rim adjustment:
If the top rim looks too uniform, slice off small angles to continue the faceted pattern all the way to the edge. -
Slow drying:
Place the pot in a cool, dry area away from direct sunlight. Let it dry slowly for 24-48 hours. Rotate it occasionally to ensure even airflow. -
Sanding:
Once bone dry, take your fine-grit sandpaper and very gently sand the flat planes. This sharpens the ridges between the facets and gives it that professional, stone-like finish. -
Sealing:
Apply two coats of matte varnish to the exterior. For the interior, use a waterproof sealant if you plan to put a real plant inside, though using a plastic nursery pot insert is safer.
Level Up: Faux Stone
Mix black pepper or used coffee grounds into white clay before rolling. When you sand the finished piece, it reveals the speckles, looking exactly like granite.
Now you have a stunning, architectural home for your favorite succulent
Slim Bud Vase With a Matte Finish
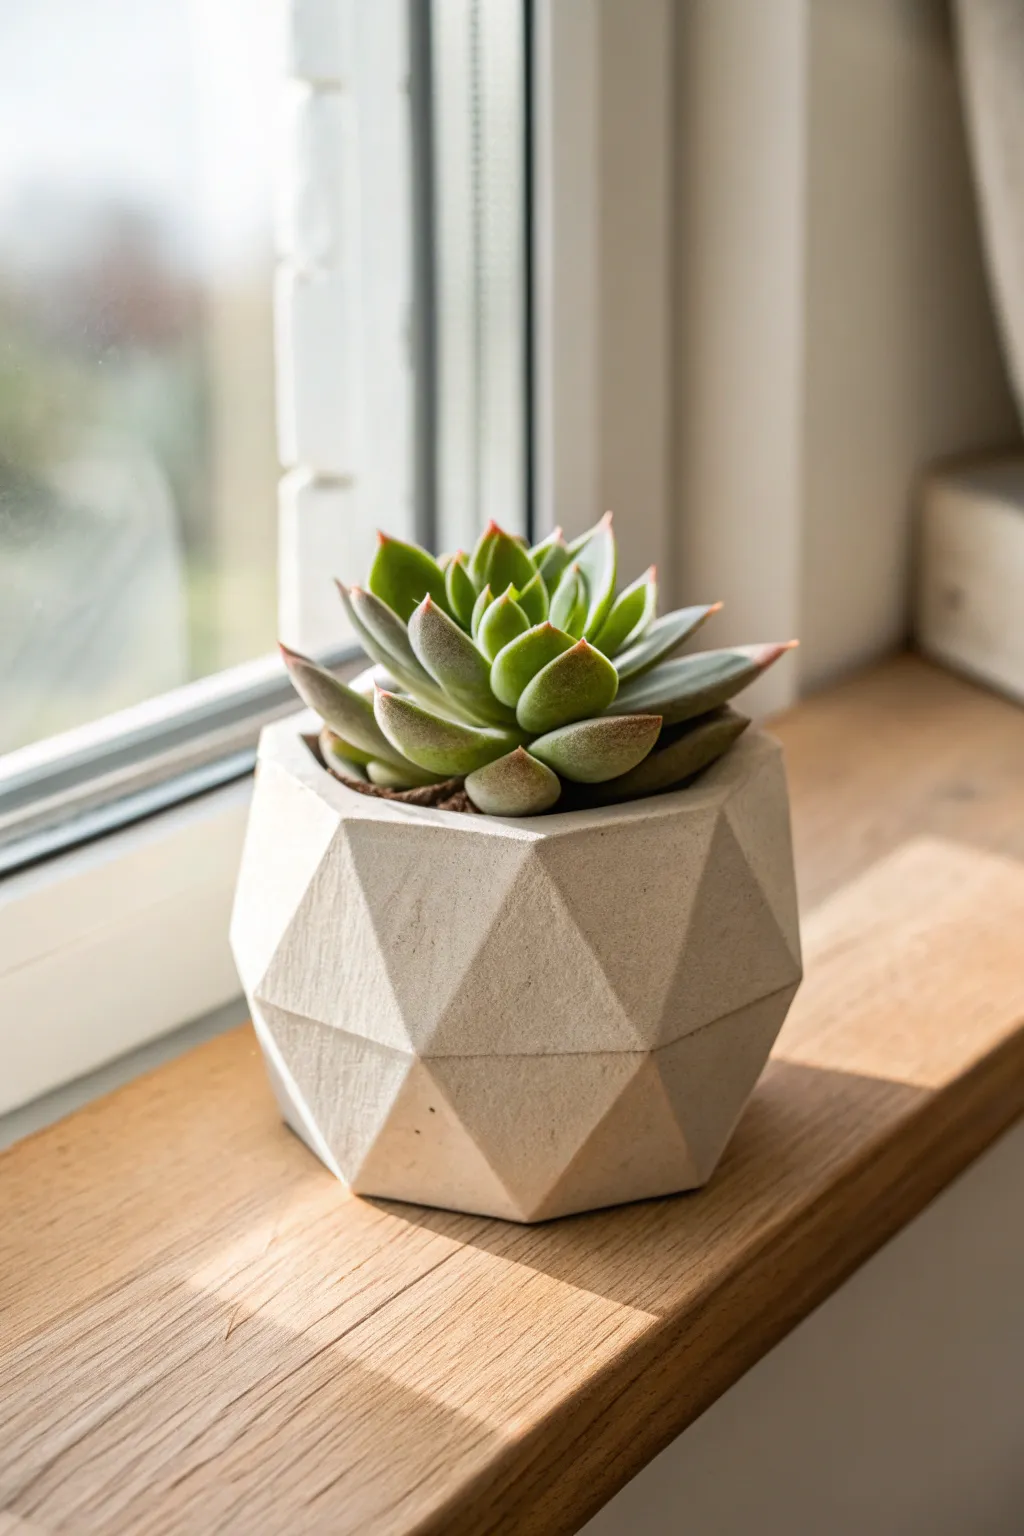
This elegant bud vase features a slender neck and a gently widening base, perfect for displaying eucalyptus or dried botanicals. Its simple silhouette and textured matte finish bring a calming, organic touch to any bedside table or shelf.
Step-by-Step Guide
Materials
- Air-dry clay (stone or white color)
- Rolling pin
- Clay cutting tool or knife
- Small bowl of water
- Sponge
- Sandpaper (medium and fine grit)
- Glass bottle or dense foam cone (optional structural support)
- Matte sealant or varnish
- Baking soda (optional for texture)
- Acrylic paint (beige or cream, optional)
Step 1: Forming the Base
-
Prepare the clay:
Begin by removing a generous amount of air-dry clay from the package. Knead it thoroughly in your hands to warm it up and remove any air bubbles, which helps prevent cracking later. -
Roll a coil:
On a clean, flat surface, roll the clay into a long, thick snake or coil. Aim for a thickness of about half an inch to ensure the walls of your vase will be sturdy. -
Create the base:
Coil the clay snake into a tight spiral to form a flat disk about 3 to 4 inches in diameter. Smoother the coils together on both sides using your thumb or a modeling tool until the surface is uniform. -
Build the walls:
It’s time to build upward. Place a fresh coil on top of the outer edge of your base. Blend the clay downward into the base on both the inside and outside to secure the bond.
Step 2: Shaping the Silhouette
-
Build upward:
Continue stacking coils one on top of the other. As you build the lower section, place each coil slightly outward from the one below it to create the widening belly of the vase. -
Blend as you go:
Don’t wait until the end to smooth your coils. After every two or three layers, use your fingers or a rib tool to blend the seams perfectly smooth. I like to keep a damp sponge nearby to moisten the clay just slightly, which aids in smoothing. -
Narrow the neck:
Once you have reached the widest part of the vase (about 4 inches high), begin stacking the coils slightly inward. This will start to close the form and create the tapered shoulder. -
Refine the neck:
Continue narrowing the form until you have a neck width of about 1.5 to 2 inches. Build this neck section straight up for another 3 inches to achieve that elegant, elongated look shown in the photo. -
Form the rim:
At the very top, gently flare the clay outward just a tiny bit to create a subtle lip. Use a wet finger to round off the rim so it isn’t sharp or uneven.
Cracks happen
If small cracks appear during drying, create a slip by mixing a little clay with water into a paste. Fill the cracks, smooth over, and let dry again.
Step 3: Finishing and Texture
-
Initial smoothing:
Look over the entire piece. Use a slightly damp sponge to wipe away any fingerprints or major bumps. The goal is a smooth, continuous curve from base to rim. -
Add surface texture:
The vase in the image has a lovely, slightly granular organic texture. To replicate this, gently dab the surface with a coarse sponge or a crumpled ball of aluminum foil while the clay is still soft. -
Dry properly:
Let the vase dry completely. This usually takes 24 to 48 hours depending on humidity. Don’t rush this step, or cracks might appear. -
Sanding:
Once bone dry, use fine-grit sandpaper to knock down any sharp ridges or uneven areas, but be careful not to sand away the nice texture you added. -
Faux-stone finish:
To get that specific matte, sandy look, mix a little baking soda into a beige or cream acrylic paint. The baking soda adds grit and flattens the sheen. -
Painting:
Apply the textured paint mixture in horizontal strokes, mimicking the turning marks of a potter’s wheel. Two thin coats are usually better than one thick one. -
Seal the piece:
Finish with a matte spray sealant to protect the paint without adding shine. Remember that air-dry clay is not waterproof, so use a glass insert or dried flowers only.
Waterproof it
To use fresh flowers, insert a small glass spice jar or test tube inside the clay vase neck before the clay hardens to ensure it fits.
Place your finished vase near a window where the light can catch its subtle texture and enjoy the serene vibe it adds to your space


What Really Happens Inside the Kiln
Learn how time and temperature work together inside the kiln to transform clay into durable ceramic.
Stackable Desk Organizer Trays
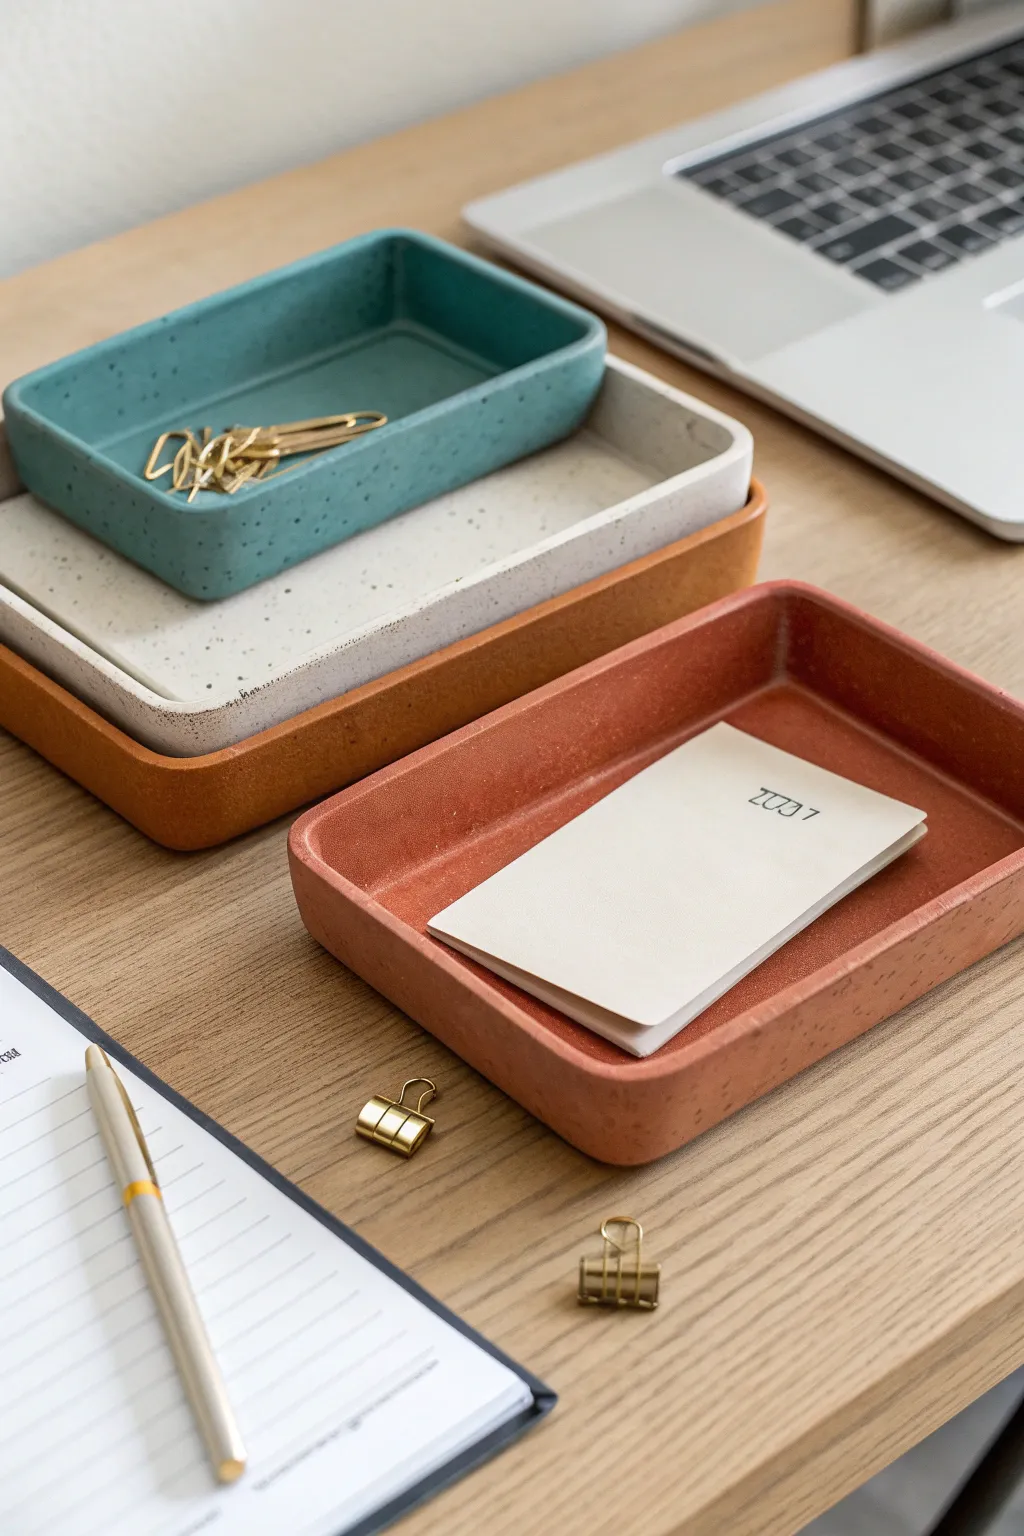
Bring order to your workspace with these sleek, stackable organizer trays that mimic the look of speckled stoneware. This project offers a satisfying geometric design achievable with just a few simple tools, resulting in a cohesive set perfect for holding everything from paperclips to pocket notebooks.
Step-by-Step
Materials
- Polymer clay (terracotta, white/granite, teal/sage)
- Black pepper or dried coffee grounds (for speckling)
- Acrylic rolling pin
- Clay blades or craft knife
- Rectangle cookie cutters (gradation of sizes) OR cardstock and ruler
- Baking sheet and parchment paper
- Fine-grit sandpaper (400 and 600 grit)
- Matte varathane or clay sealer (optional)
- Oven (if using polymer clay)
Step 1: Planning and Prepping the Clay
-
Determine sizes:
Decide on the dimensions for your nesting set. You will need four distinct sizes that fit inside one another with a small gap. You can create paper templates to test the fit before cutting any clay. -
Condition the clay:
Begin by conditioning your polymer clay blocks until they are soft and pliable. If the clay feels too stiff, warm it in your hands or add a tiny drop of clay softener. -
Create the faux-stone look:
Mix a small amount of coarse black pepper or dried used coffee grounds into your colored clay. Knead it thoroughly to distribute the particles evenly, creating that trendy speckled ceramic effect seen in the reference photo. -
Roll out the base slabs:
Using your acrylic roller or a pasta machine on the thickest setting (approx 1/4 inch), roll out a smooth, consistent slab for each color you intend to use.
Baking Support
To keep the walls perfectly straight while baking, fill the center of the trays with cornstarch or polyester batting. This stops the walls from slumping inward due to heat.
Step 2: Forming the Tray Bases
-
Cut the base shapes:
Place your rectangle templates or cutters onto the rolled slabs. Use a sharp clay blade to cut the base rectangles for all four trays—large terracotta, medium white/grey, small teal, and the smallest terracotta tray. -
Smooth the edges:
Gently run your finger along the cut edges of the bases to soften any harsh corners or drag marks left by the blade. -
Prepare the joining area:
Lightly score the perimeter of the base rectangles where the walls will attach. This texturing helps the clay bond more securely.
Step 3: Building the Walls
-
Cut the wall strips:
Roll out more clay to the same thickness as your bases. Cut long, even strips for the walls. The height should be consistent across all trays, roughly 0.75 to 1 inch tall. -
Attach the first wall:
Place a strip of clay along one edge of the base, sitting it on top of the slab rather than against the side. Press down firmly to adhere. -
Complete the perimeter:
Continue wrapping the clay strip around the remaining sides. If your strip isn’t long enough, simply join a new piece, blending the seam thoroughly with a modeling tool or your fingertip. -
Reinforce the seams:
On the inside of the tray, use a thin ‘snake’ of clay pressed into the corner where the wall meets the floor. Smooth this out entirely to create a seamless, strong curve. -
Refine the corners:
For the rounded look shown in the image, gently pinch and smooth the exterior corners. I find it helpful to use a curved sculpting tool to ensure the inside corners are rounded rather than sharp right angles.
Seamless Blending
Can’t hide a seam? Use a tiny bit of liquid polymer clay (Bake & Bond) on the joint before smoothing. It acts like spackle and helps fuse the clay pieces perfectly.
Step 4: Refining and Baking
-
Check straightness:
Inspect the walls from all angles. If they are bowing out, gently push them inward. Use a ruler to ensure the top edges are level. -
Final smoothing:
Dip your finger in a little rubbing alcohol or baby oil and lightly brush over the entire surface to remove fingerprints and dust before baking. -
Bake the trays:
Place your trays on a parchment-lined baking sheet. Bake according to the manufacturer’s instructions for your specific brand of clay—usually 275°F (135°C) for 30 minutes per 1/4 inch of thickness. -
Cooling period:
Let the trays cool completely in the oven with the door slightly ajar. This gradual cooling helps prevent cracks. -
Sanding for finish:
Once cool, use wet sandpaper (start with 400 grit, finish with 800) to sand the top rim and any rough spots. This gives the piece that professional, matte stoneware feel.
Stack your new organizers on your desk and enjoy a clutter-free view
Incense Holder With Clean Lines
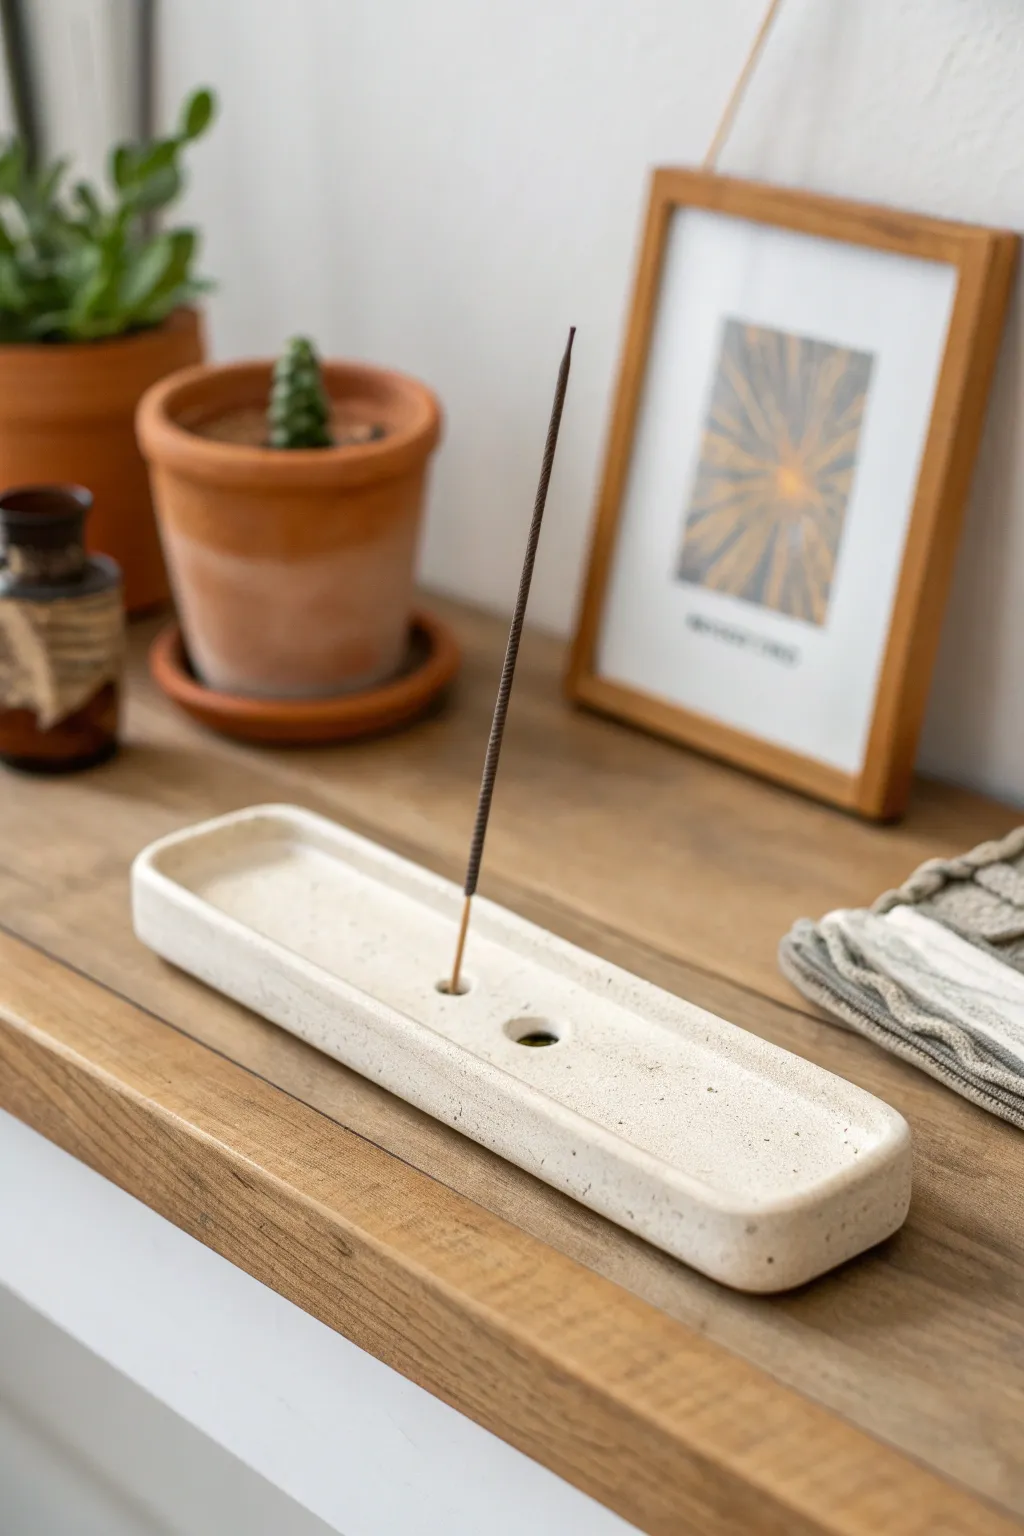
Embrace simplicity with this sleek, low-profile incense holder that features clean lines and a modern speckled finish. Its functional design serves as both a calming home accessory and a stylish catch-all for your favorite scents.
How-To Guide
Materials
- Air-dry clay or polymer clay (white or cream)
- Black pepper or dried coffee grounds (for speckling, optional)
- Acrylic rolling pin
- Sharp craft knife or clay blade
- Ruler
- Fine-grit sandpaper (400 and 600 grit)
- Small circular cutter or straw (for larger hole)
- Incense stick (for sizing the small hole)
- Water bowl and sponge
- Matte sealant or varnish
Step 1: Preparation & Shaping
-
Prepare the Clay:
Start by conditioning your clay block until it is soft and pliable. If you want to achieve the speckled stone look shown in the photo, knead in a pinch of ground black pepper or dried coffee grounds until they are evenly distributed throughout the white clay. -
Roll the Slab:
Place the clay on a smooth work surface. Use your acrylic roller to flatten the clay into a long, even slab. Aim for a thickness of about 1/4 to 1/3 inch to ensure the base is sturdy enough to sit flat without warping. -
Cut the Rectangle:
Using a ruler as a guide, cut a precise rectangle from your slab. A good size for this project is approximately 8 inches long by 2.5 inches wide, though you can adjust dimensions based on your space. -
Round the Corners:
Instead of leaving sharp 90-degree angles, gently curve the four corners. You can use a small coin or bottle cap as a template to cut around, or simply smooth them into a radius with your fingertip.
Stone Effect
For a concrete look, mix grey acrylic paint into your white air-dry clay before rolling, not after drying.
Step 2: Forming the Rim
-
Create a Coil:
Roll a long, thin snake of clay to serve as the raised wall. It needs to be long enough to go around the entire perimeter of your rectangle base. -
Attach the Wall:
Score the outer edge of your rectangular base and brush on a little water (or liquid clay if using polymer). Lay the coil directly on top of this scored edge. -
Blend the Seams:
Using a modeling tool or your thumb, smooth the clay from the coil down onto the base on both the inside and outside. The goal is to make the wall and base look like one seamless piece. -
Refine the Shape:
Once blending is complete, use your fingers to pinch and shape the wall so it stands straight up with a uniform height. Keep the profile low and sleek. -
Smooth Texture:
Dip a sponge in water working with air-dry clay (or use baby oil for polymer) and gently wipe the entire surface to remove fingerprints and tool marks.
Warping Issues
If the long tray curls up while drying, gently weigh down the ends with books once it’s leather-hard.
Step 3: Detailing & Finishing
-
Center Positioning:
Find the approximate center of the tray length-wise. This is where your incense functional points will go. -
Create the Stick Holder:
Take a standard incense stick and press the wooden end vertically into the clay near the center. Wiggle it slightly to ensure the hole is just loose enough for the stick to stand upright, but tight enough to hold it steady. -
Add a Second Hole:
Create a slightly larger decorative hole or holder for cone incense next to the stick hole. A straw or small circular cutter works perfectly to punch out this clean circle. -
Drying Phase:
I prefer to let air-dry clay cure slowly away from direct sunlight to prevent cracking, usually for 24-48 hours. If using polymer clay, bake according to the package instructions. -
Sanding:
Once fully cured, use fine-grit sandpaper to buff away any rough edges, especially around the rim and corners. This step is crucial for that store-bought, professional matte finish. -
Seal the Piece:
Finish by applying a clear matte varnish. This seals the speckles in place and protects the holder from ash stains without making it look glossy or plastic-like.
Light your favorite incense and enjoy the serene atmosphere created by your new handmade piece.

TRACK YOUR CERAMIC JOURNEY
Capture glaze tests, firing details, and creative progress—all in one simple printable. Make your projects easier to repeat and improve.
Tea Light Holder With Cutout Patterns
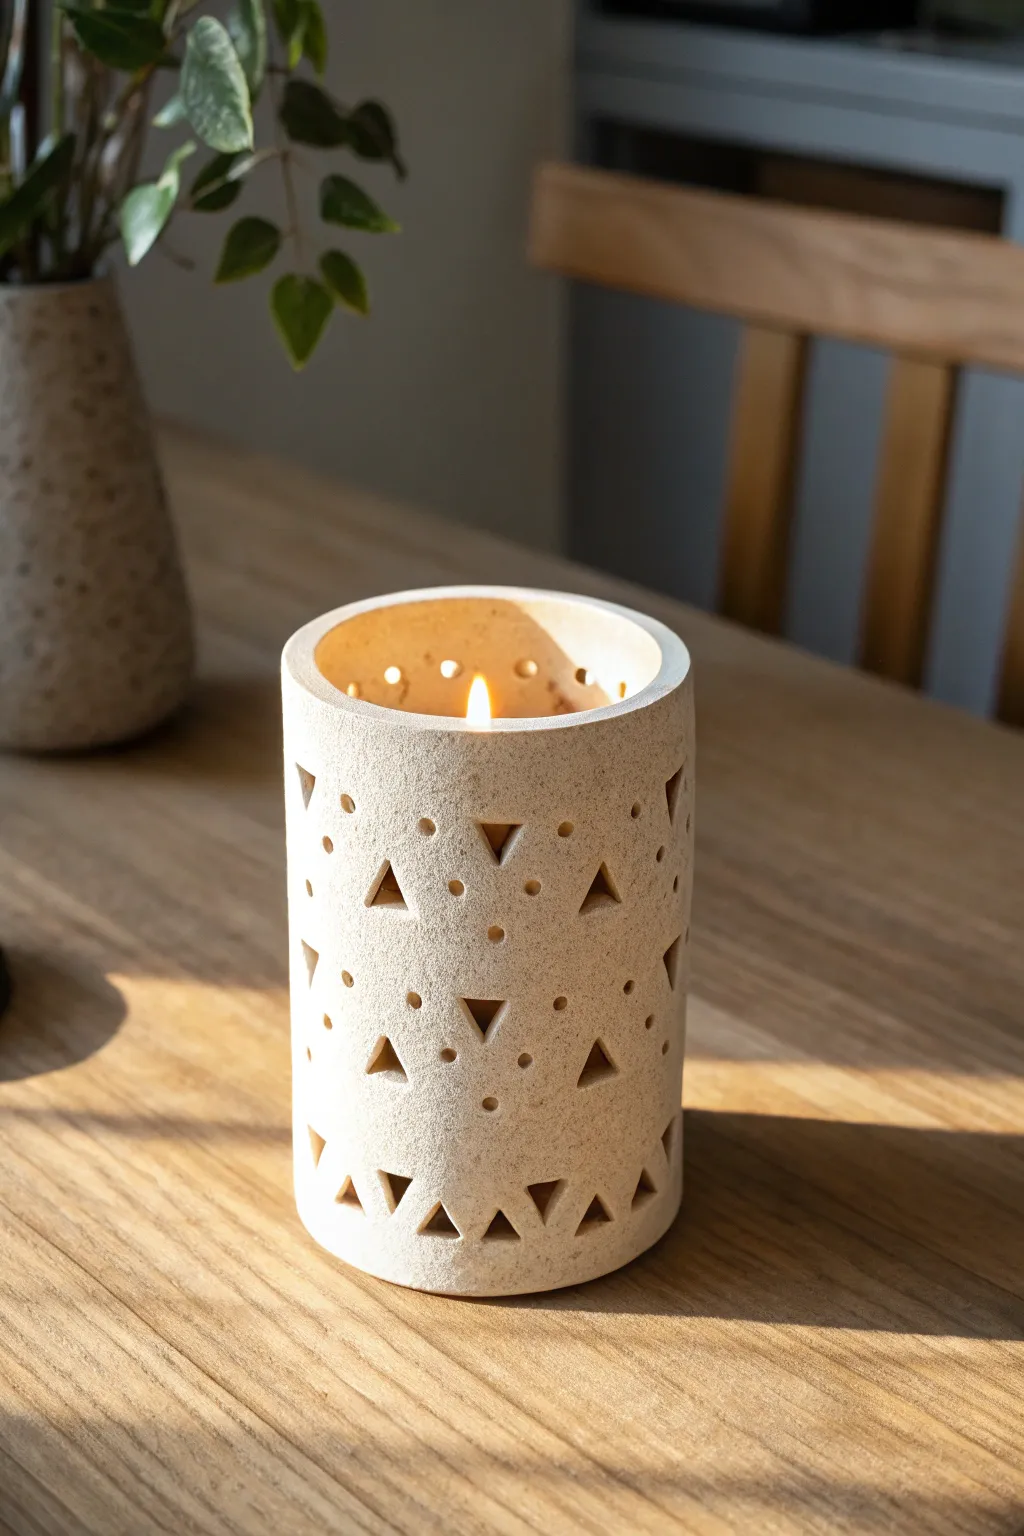
Illuminate your evenings with this sleek, textured cylindrical tea light holder featuring precise geometric cutouts. The design uses negative space to cast playful shadows, turning a simple tube of clay into a modern lighting accessory.
Step-by-Step Tutorial
Materials
- Speckled oatmeal stoneware clay or textured polymer clay
- Rolling pin
- Two long wooden guide strips (approx. 5-6mm thick)
- Can, jar, or forming tube (approx. 3-inch diameter)
- Newsprint or paper towel
- Needle tool
- Small triangular clay cutter (approx. 0.5 inch)
- Small circular punch or drill bit (approx. 2-3mm)
- Fettling knife or craft knife
- Scoring tool and slip (if using air-dry or ceramic clay)
- Sponge and water
- Sandpaper (fine grit)
Step 1: Forming the Cylinder
-
Prepare the Clay:
Begin by wedging your speckled clay to remove air bubbles and ensure a uniform consistency. If you are using polymer clay, condition it until it is pliable but firm. -
Roll the Slab:
Place your clay between two wooden guide strips on a canvas surface. Roll the clay out into a long rectangle until the rolling pin rests on the guides, ensuring a perfectly even thickness of about 5-6mm. -
Measure and Cut:
Wrap a piece of paper around your forming tube (can or jar) to determine the circumference. Add about 1/2 inch for the overlap seam. Use this template to cut a precise rectangle from your clay slab using the fettling knife. -
Prep the Form:
Wrap your forming tube in a sheet of newsprint or paper towel. I find this crucial because it prevents the clay from sticking to the tube and allows for easy removal later. -
Construct the Cylinder:
Drape the clay rectangle around the paper-covered tube. Bring the two shorter ends together. -
Seal the Seam:
For ceramic clay, score (scratch) both touching edges and apply slip before pressing them firmly together. For polymer, use a bit of liquid clay. Smooth the seam inside and out with a rib tool or your finger until it is invisible.
Step 2: Creating the Pattern
-
Plan the Layout:
While the clay is still on the tube, lightly mark a grid or horizontal guide lines with a needle tool to keep your pattern straight. Don’t press too hard; these are just faint guides. -
Cut the Base Triangles:
Starting near the bottom, use the triangular cutter to punch out a row of shapes. Space them evenly apart, pressing the cutter all the way through to the paper underneath. -
Remove Cutouts:
Carefully pick out the removed triangle pieces with a needle tool. Keep the edges crisp. -
Add Inverted Rows:
Move upwards and cut a second row of triangles. For visual interest, position these triangles inverted (pointing down) in the spaces between the first row’s upward-pointing triangles. -
Punch the Dots:
Using a small circular punch or the back of a drill bit, create the dot details. Place single dots between triangles or arrange clusters of three dots in open spaces to create variety. -
Refine the Rim:
If the specific design calls for it, punch a few decorative holes or half-circles near the very top rim of the cylinder to allow more light to escape upwards.
Warping Walls?
If the cylinder slumps when you remove the tube, the clay was too wet. Let it stiffen on the form longer next time, or use a hair dryer briefly to help set the shape before removal.
Step 3: Finishing Touches
-
Initial Drying:
Let the piece firm up slightly (leather hard for ceramic) while still on the tube to hold its shape. Remove the tube and paper carefully once the clay can support itself without slumping. -
Clean the Edges:
Once leather hard or semi-cured, use a damp sponge or your finger to gently soften the sharp edges of the cutouts. This prevents them from being jagged after firing. -
Dry Completely:
Allow the clay to dry fully according to the manufacturer’s instructions. This usually takes 24-48 hours for air-dry or ceramic clay. -
Smoothing:
Gently sand the exterior with fine-grit sandpaper to remove any fingerprints or surface imperfections. Be gentle around the delicate cutout areas. -
Final Fire or Bake:
Fire the piece in a kiln (bisque then glaze fire, if desired) or bake in a home oven if using polymer clay. The natural speckled finish looks beautiful unglazed, but a clear matte glaze can protect the surface.
Glow Up
Apply a gold luster to the interior after firing. When the candle is lit, the gold will reflect through the cutouts, creating a much warmer and more radiant light.
Place a tea light inside and watch the cozy geometric shadows dance on your table
Clay Ring Cone Organizer
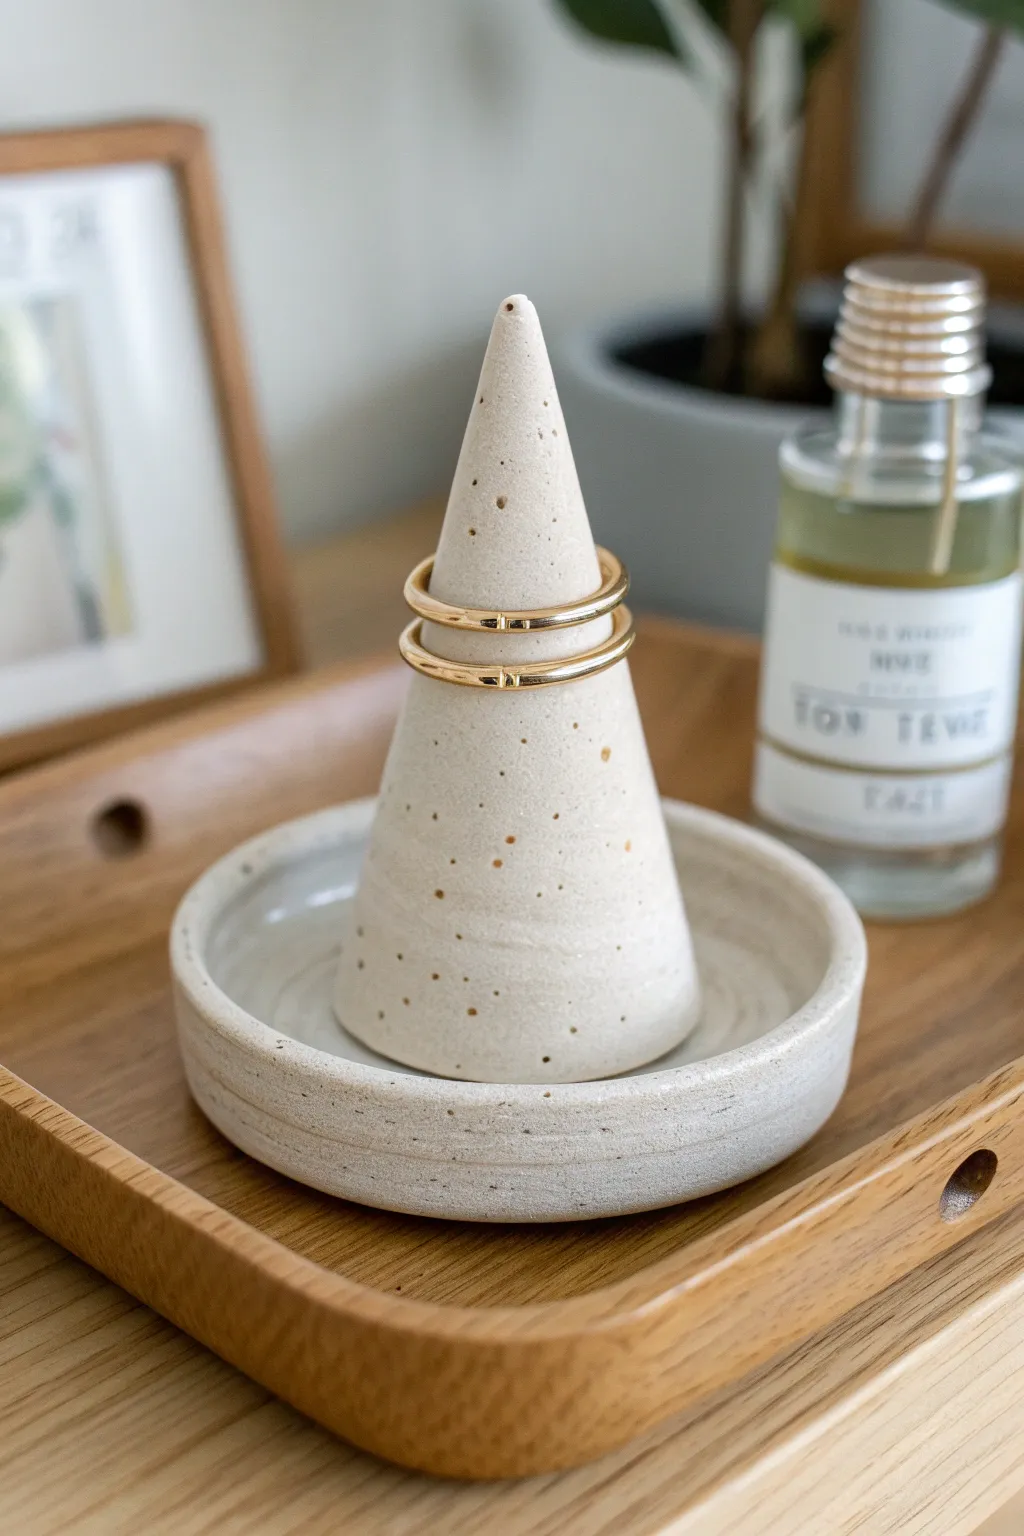
Minimalist and functional, this two-piece ring organizer combines a sleek conical form with a shallow catch-all dish. The speckled oatmeal finish gives it a trendy ceramic look without requiring a kiln, making it a perfect modern accent for any vanity.
Step-by-Step Guide
Materials
- White or beige air-dry clay (or polymer clay)
- Course ground black pepper or dried coffee grounds (for speckles)
- Acrylic rolling pin
- Craft knife or clay slicer
- Small bowl or circle cutter (approx. 4 inches)
- Cardstock or stiff paper
- Tape
- Fine-grit sandpaper
- Bowl of water and sponge
- Matte spray varnish or sealant
Step 1: Preparing the Clay
-
Mix the speckles:
Begin by flattening a chunk of your white or beige clay. Sprinkle a small pinch of course ground black pepper or dried coffee grounds onto the surface. Fold the clay over and knead it thoroughly until the speckles are evenly distributed throughout the mass to mimic a stoneware effect. -
Roll it out:
Using your acrylic roller, roll the speckled clay out on a smooth surface until it is about 1/4 inch thick. Ensure the thickness is consistent to prevent cracking during drying.
Seamless Merging
For invisible seams, use a cross-hatch motion with your tool or fingernail to drag clay across the join before smoothing it out with water.
Step 2: Forming the Cone
-
Create a template:
Cut a quarter-circle wedge shape out of cardstock or stiff paper. This will act as the template for your cone. -
Cut the clay:
Lay the cardstock template onto your rolled clay and trace around it with your craft knife. Remove the excess clay and set it aside for the base. -
Shape the cone:
Gently lift the clay wedge and bring the two straight edges together to form a cone shape. Overlap the edges slightly or butt them together, pressing firmly to join them. -
Smooth the seam:
Dip your finger in a little water and rub it up and down the seam until it disappears completely. If you are using polymer clay, use a smoothing tool or a touch of clay softener instead of water. -
Refine the shape:
Stand the cone upright on your work surface. If the bottom is uneven, gently slice it with your blade to make it level. Roll the cone slightly between your palms to ensure the tip is rounded and not too sharp.
Step 3: Creating the Base Dish
-
Cut the base:
Re-roll your remaining clay if necessary. Use a large circle cutter or trace around a small bowl (about 3-4 inches wide) to cut a perfect circle. -
Create the rim:
Roll a long, thin snake of clay, roughly the thickness of a pencil. Place this snake on top of the circle’s outer edge to create a raised rim. -
Blend the rim:
Using a modeling tool or your finger, blend the clay snake downward into the base on both the inside and outside seams. The transition should be seamless, creating a solid, lipped dish. -
Check the fit:
Place your cone in the center of the wet dish to check the proportions. I like to press the cone down very gently just to mark its spot, but don’t attach them permanently unless you want a single solid unit. -
Smooth edges:
Use a damp sponge to wipe around the rim of the dish and the bottom of the cone to remove any fingerprints or rough textures.
Gold Rim Accent
Add a touch of luxury by painting just the very edge of the dish rim with liquid gold leaf or metallic acrylic paint after the sealant dries.
Step 4: Finishing Touches
-
Allow to dry:
Let both pieces dry completely. If using air-dry clay, this will take 24-48 hours. Turn the pieces occasionally to ensure even airflow. If using polymer clay, bake according to the package instructions. -
Sand for smoothness:
Once fully cured or dry, use fine-grit sandpaper to gently buff the surface. Pay special attention to the rim of the dish and the tip of the cone to make them buttery smooth. -
Seal the project:
In a well-ventilated area, spray the cone and dish with a matte varnish. This seals the textural speckles in place and gives the piece a professional, finished appearance.
Now you have a chic, speckled organizer ready to display your favorite jewelry pieces
Photo and Place Card Stand
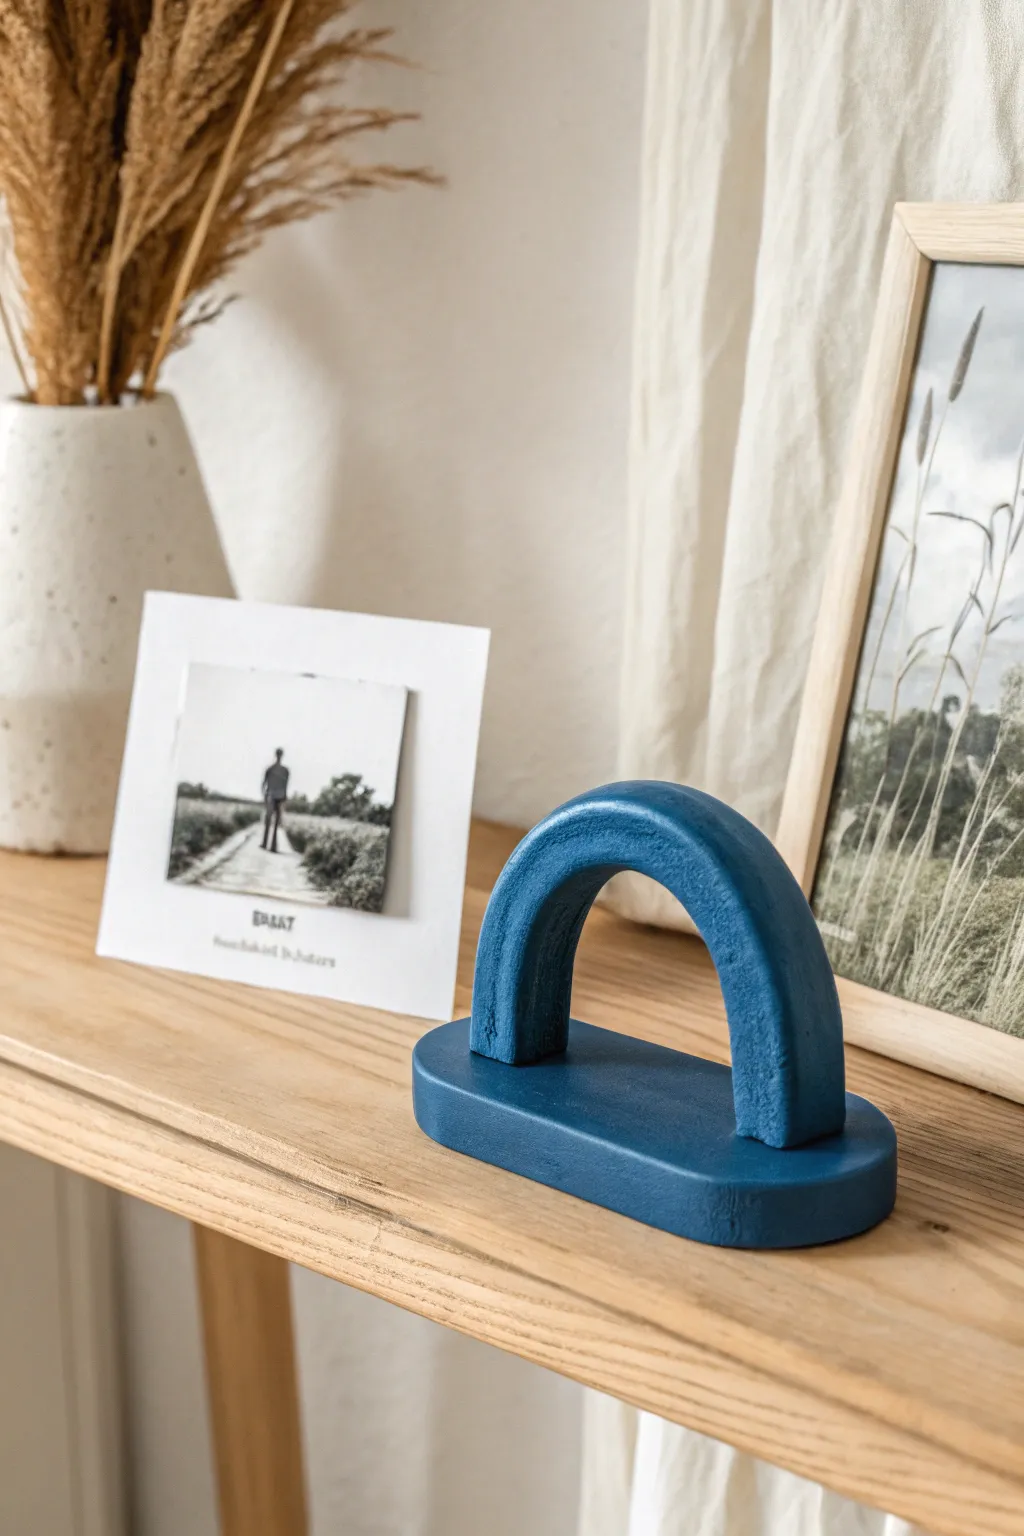
This minimalist deep blue photo stand combines a structural arch with a solid base, offering a sophisticated way to display cherished snapshots or place cards. The smooth, matte finish gives it a contemporary ceramic look without needing a kiln, making it a perfect weekend project for organizing your workspace or styling a shelf.
Detailed Instructions
Materials
- Air-dry clay (white or terracotta)
- Rolling pin
- Sharp crafting knife or clay wire
- Sandpaper (fine grit)
- Acrylic paint (deep denim or navy blue)
- Matte sealant or varnish
- Small bowl of water
- Ruler
- Clay smoothing tool or sponge
- Flat paintbrush
Step 1: Sculpting the Components
-
Condition the clay:
Start by taking a generous handful of air-dry clay and kneading it in your hands to warm it up. This conditioning process helps prevent cracks later on. -
Roll the base slab:
Place about half of your clay on a flat surface and use a rolling pin to flatten it. Aim for a thickness of about 1/2 inch to ensure the base is heavy enough to support the arch. -
Cut the base shape:
Using your crafting knife, cut an elongated oval shape. You can freehand this for an organic organic look, or use a paper template if you prefer perfect symmetry. -
Smooth the base edges:
Dip your finger or a small sponge into water and run it along the cut edges of the oval to soften any harsh lines. -
Create the arch coil:
Take the remaining clay and roll it into a thick snake or coil. It should be roughly the same thickness as your base slab. -
Form the arch:
Bend the clay coil into a tight ‘U’ shape. Check the width against your base piece to ensure it fits comfortably with room on the sides. -
Cut arch ends:
Trim the bottom ends of the arch so they are perfectly flat and flush. This is crucial for the arch standing upright.
Step 2: Assembly and Refining
-
Score the connection points:
Use your knife to make small hatched scratches on the bottom of the arch legs and on the top surface of the base where the arch will sit. -
Apply slip and attach:
Dab a little water (or clay slip) onto the scored areas to act as glue. Firmly press the arch onto the base. -
Blend the seams:
Use a modeling tool or your finger to smooth the clay where the arch meets the base. I like to blend the clay downwards to create a seamless transition, though leaving a distinct line is also a stylistic choice. -
Final smoothing:
Do a final pass over the entire piece with a damp sponge to remove fingerprints. Check the structure from all angles to ensure the arch is vertical. -
drying time:
Set the stand aside in a dry, room-temperature spot. Let it dry completely for 24-48 hours, flipping it occasionally so the bottom of the base dries evenly.
Fixing Cracks
If hairline cracks appear while drying, don’t restart. Mix a tiny bit of fresh clay with water to make a paste, fill the crack, let it dry, and sand smooth.
Step 3: Finishing Touches
-
Sand for perfection:
Once fully dry and hard, gently sand the piece with fine-grit sandpaper. Focus on any rough edges or uneven spots on the arch curve. -
Wipe clean:
Use a dry cloth or tack cloth to remove all sanding dust before painting; otherwise, the paint will look gritty. -
Apply the base coat:
Paint the entire sculpture with your chosen deep blue acrylic paint. Use long, smooth strokes to minimize brush texture. -
Add a second coat:
Allow the first layer to dry, then create opacity with a second coat. Ensure you get paint into the inner curve of the arch. -
Seal the piece:
Finish by applying a clear matte varnish. This protects the paint from chipping and gives the piece that professional, finished quality.
Create Texture
Before drying, mix baking soda into your acrylic paint later. This creates a grainy, stone-like texture that mimics unglazed pottery or sandstone.
Once dry, simply lean your favorite photo or postcard against the arch for an instant display upgrade
Statement Wall Hanging Tiles
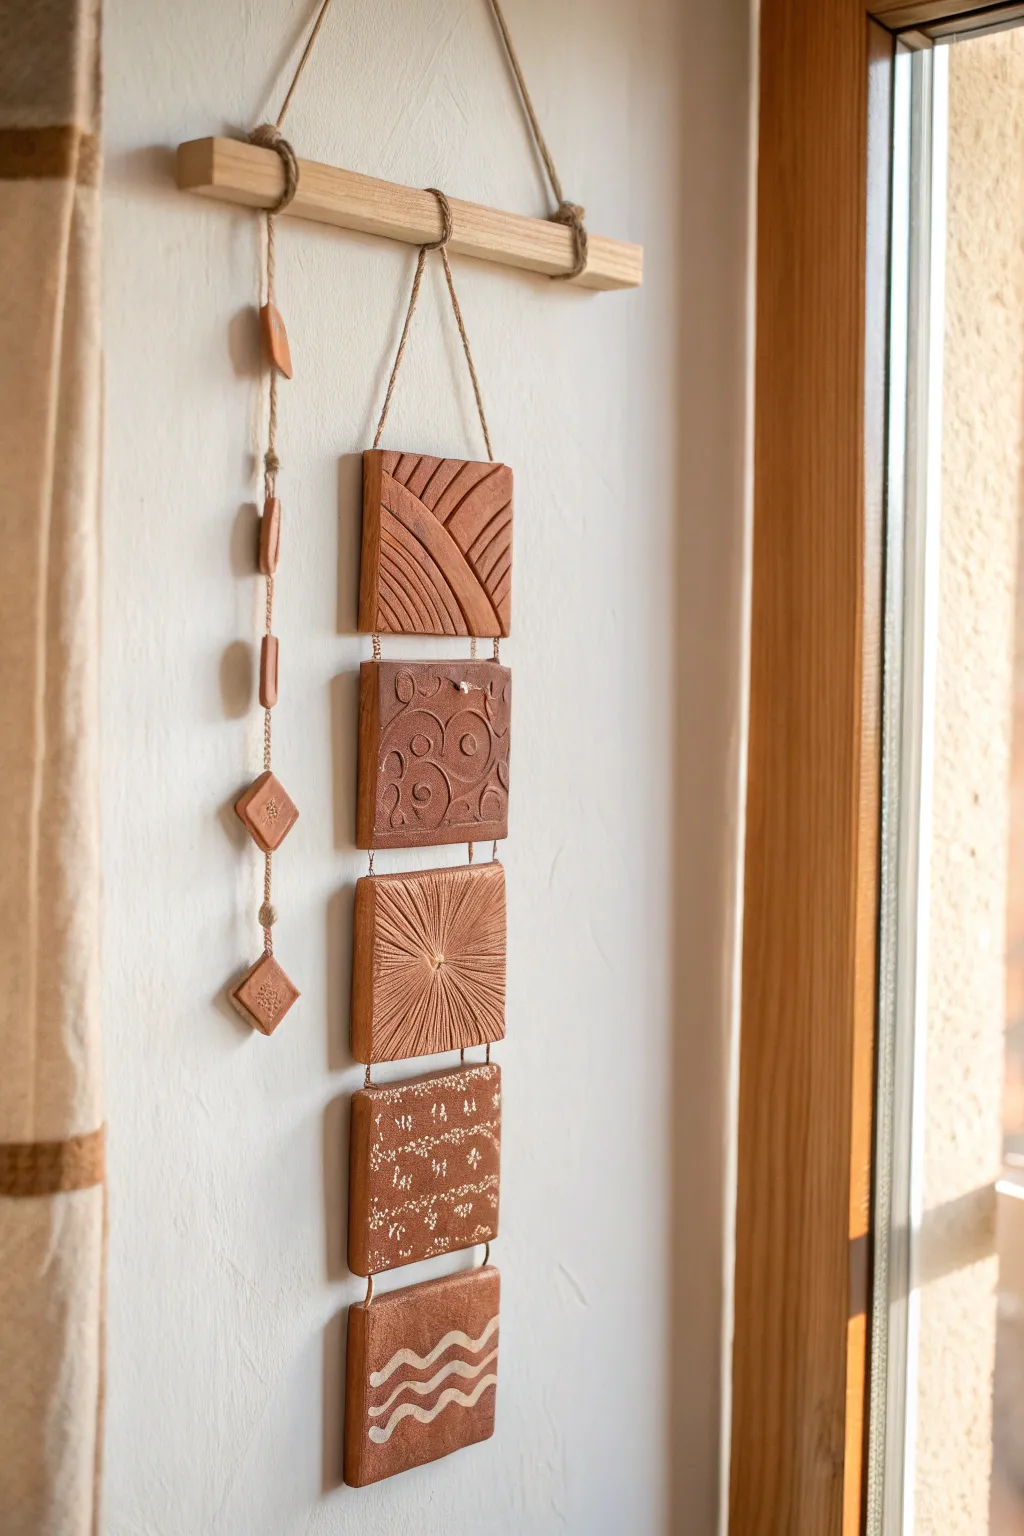
Bring earthy warmth to your living space with this striking vertical wall hanging featuring textured clay tiles. This statement piece combines rustic terracotta tones with geometric and organic patterns for a sophisticated yet grounded aesthetic.
How-To Guide
Materials
- Terracotta-colored air-dry clay or polymer clay
- Rolling pin
- Square cookie cutter (approx. 3-4 inches) or ruler and knife
- Wooden dowel (approx. 12 inches)
- Jute twine or hemp cord
- Texturing tools (combs, needle tools, lace, or stamps)
- White or cream acrylic paint
- Fine detail paintbrush
- Straw or skewer (for poking holes)
- Sandpaper (fine grit)
- Matte varnish (optional)
Step 1: Preparing the Clay Base
-
Condition the Clay:
Begin by kneading your terracotta clay until it is soft, pliable, and free of cracks. If you are using air-dry clay, keep a small bowl of water nearby to smooth out any edges as you work. -
Roll Uniform Slabs:
Roll out the clay to a consistent thickness of about 1/4 inch. Using guide sticks on either side of your rolling pin is a great trick to ensure the thickness is perfectly even across the entire slab. -
Cut the Tiles:
Cut out five identical squares using your cutter or a sharp craft knife and ruler. These will form the main vertical column of your hanging. -
Create Smaller Elements:
With the leftover clay, cut out several small shapes for the side accent strand. Create a mix of small rectangles (beads) and diamond shapes to add variety to the composition. -
Smooth the Edges:
Dip your finger in a little water and run it along the cut edges of every piece to soften sharp corners and remove any burrs from the cutting process.
Clean Lines Tip
If your carving tool drags clay and creates jagged edges, lay a piece of cling wrap over the clay before pressing your design. It creates incredibly smooth, rounded impressions.
Step 2: Designing and Texturing
-
Create the First Tile: Linear Geometry:
For the top square, use a clay needle tool or a dull knife to carve a deep diagonal line. On one side, carve straight parallel lines; on the other, carve parallel arched lines to create a mixed geometric look. -
Create the Second Tile: Swirls:
Use a ball-stylus tool or the end of a paintbrush to impress swirling, organic vine patterns into the second square. Press deeply enough to create a distinct relief. -
Create the Third Tile: Sunburst:
Find the center of the third square. Using a needle tool, draw radiating lines outward from the center point to the edges, mimicking a sunburst or starburst texture. -
Create the Fourth and Fifth Tiles:
Leave the surface of the fourth and fifth tiles relatively smooth for now, as these will be decorated with paint after drying. You can lightly texture the fourth one if desired for a more rustic look. -
Add Suspension Holes:
This step is crucial: use a straw or skewer to poke holes in the top and bottom of every square tile. For the small beads and diamonds, pierce them straight through the center so they can be strung later.
Step 3: Finishing and Assembly
-
Allow to Cure:
Let all your clay pieces dry completely according to the package instructions. Air-dry clay usually takes 24-48 hours; aim for a slow dry away from direct heat to prevent warping. -
Sand Imperfections:
Once fully hard, gently sand the edges and surfaces with fine-grit sandpaper to achieve a professional, finished look. -
Paint Details:
On the fourth tile, use a fine brush and white paint to dab small dots or ‘flowers’ in horizontal rows. on the bottom (fifth) tile, paint bold, wavy horizontal lines. -
Connect the Main Tiles:
Cut short lengths of jute twine. Tie the bottom of the first tile to the top of the second tile using simple knots, leaving about an inch of space between them. Repeat until all five large tiles are linked in a column. -
Assemble the Side Strand:
Take a long piece of twine and knot your small beads and diamond shapes onto it at irregular intervals. I like to leave varying gaps between these small shapes to keep the visual weight light. -
Mount to Dowel:
Tie the top of your main tile column to the center of the wooden dowel. Tie the smaller accent strand to the left side of the dowel. -
Add the Hanger:
Cut a final length of thick jute twine and tie it securely to both ends of the wooden dowel to create the main hanger.
Level Up: Mixed Media
Add wooden beads or brass geometric shapes between the clay tiles during assembly. The contrast between matte clay and shiny metal adds a modern, high-end touch.
Hang your new clay art near a window to let the natural light highlight those beautiful textures you created
Moon-Phase Wall Garland
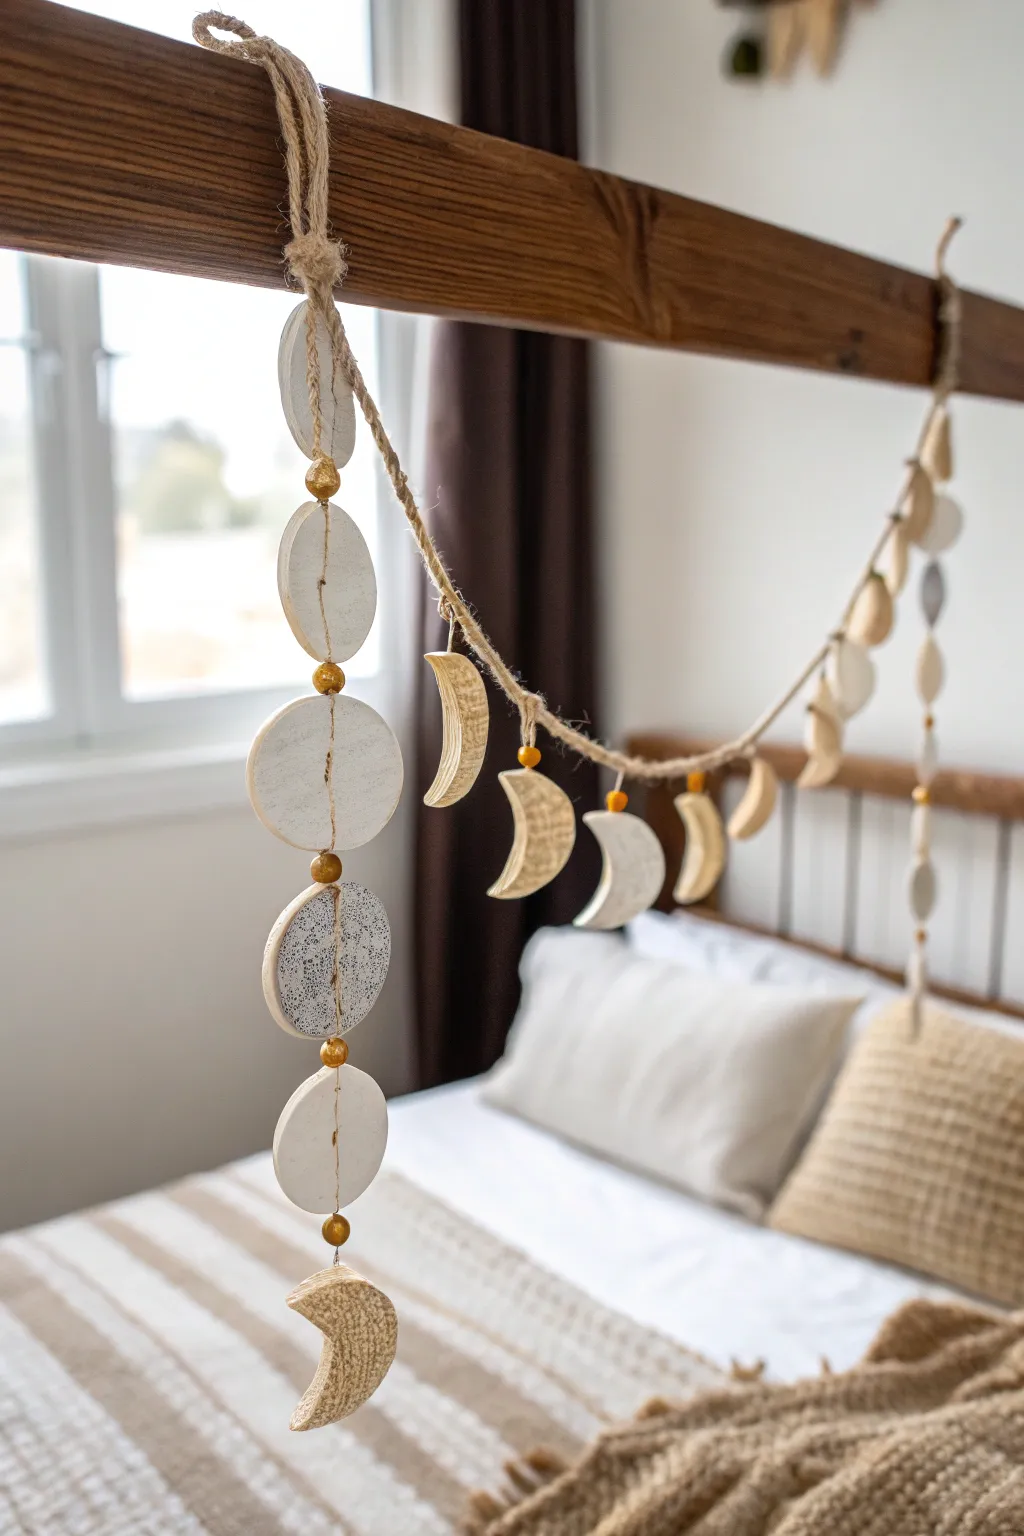
Bring the celestial cycles indoors with this rustic and serene moon phase garland. Using simple air-dry clay and natural twine, you’ll create a textured, hanging art piece perfect for adding a touch of bohemian charm to a bedroom or nursery.
Step-by-Step
Materials
- White air-dry clay (or oven-bake polymer clay)
- Rolling pin
- Circle cookie cutters (approx. 2-3 inches diameter)
- Small craft knife or clay sculpting tool
- Medium-grit sandpaper
- Wooden skewer or toothpick
- Jute twine or hemp cord
- Small wooden beads (gold or natural)
- Acrylic paint (white, light gray, black)
- Old toothbrush or stiff bristle brush
- Matte sealant or varnish (optional)
Step 1: Shaping the Moons
-
Prepare the Clay:
Begin by conditioning your clay. If using air-dry clay, knead it briefly until it is pliable but not sticky. Roll it out on a smooth, non-stick surface to an even thickness of about 1/4 inch. -
Cut the Base Circles:
Using your circle cutter, stamp out approximately 15-20 circles. This number depends on how long you want your garland to be and creates the base for both the full moons and the crescents. -
Create Crescent Shapes:
Take about half of your cut circles. Use the same circle cutter to slice into these circles off-center, removing a sliver to leave behind a crescent moon shape. Keep the cutout pieces; they can often be re-rolled for more shapes. -
Add Texture:
While the clay is still wet, you can add subtle texture. I like to gently press a crumpled piece of aluminum foil or a coarse fabric onto the surface of a few moons to give them that cratered look. -
Pierce Hanging Holes:
Using a wooden skewer, poke holes into the clay. For the vertical hanging strand shown on the left, you will need holes at the very top and very bottom of the circles. For the garland swag, poke a single hole horizontally through the top or two holes near the top edges depending on how you want them to hang.
Smooth Operator
Use a tiny bit of water on your finger to smooth out any cracks or fingerprints on the raw clay before letting it dry to minimize sanding later.
Step 2: Drying and Decorating
-
Let it Cure:
Allow your clay pieces to dry completely according to the package instructions. For air-dry clay, this usually takes 24-48 hours. Flip them halfway through so they dry evenly and don’t warp. -
Sand the Edges:
Once fully hardened, take your sandpaper and gently smooth the rough edges of every piece. This gives the project a professional, finished look. -
Base Painting:
Paint most of the pieces with a coat of creamy white or light beige acrylic paint. Let this base coat dry completely. -
Create the Speckled Effect:
To mimic the speckled moon shown in the image, mix a watery black or dark gray paint. Dip an old toothbrush into the paint, point it at the clay, and run your thumb across the bristles to flick tiny specks onto a few select circles. -
Optional Gilding:
If you want a bit of shine, lightly brush a dry brush with gold paint over the textured crescent moons to catch the high points.
Add an Aroma
Knead a few drops of essential oil like lavender or eucalyptus into the raw clay. The porous material will hold the scent and act as a passive diffuser.
Step 3: Assembly
-
Cut the Main Line:
Cut a long piece of jute twine for the main horizontal garland. Measure the space where you intend to hang it first to ensure you have enough length, plus extra for the loops at the ends. -
String the Garland:
Begin threading your horizontal garland. Alternate between a clay crescent moon and a wooden bead. Secure the moons by tying a simple knot around the hanging hole or threading the twine through if you made two holes. -
Create the Vertical Drop:
For the vertical hanging section shown in the photo, cut a shorter piece of twine. Tie a large loop at the top for hanging. -
Attach Vertical Components:
Thread the twine through the top hole of a full moon circle, pull it down the back, and out the bottom hole. Slide on a gold bead, then tie a knot to hold it in place. -
Continue the Vertical Strand:
Repeat this pattern—circle, bead, knot—until you have a stack of three or four moons hanging vertically. Finish the bottom with a final crescent moon tied securely at the end. -
Final Adjustments:
Hold up your garland to check the spacing. Gently slide the beads and moons along the twine until they sit exactly where you want them, then tighten any loose knots.
Hang your lunar creation near a window or above a bed to enjoy the peaceful vibes it brings to your space
Chic Napkin Rings for Dinner Parties
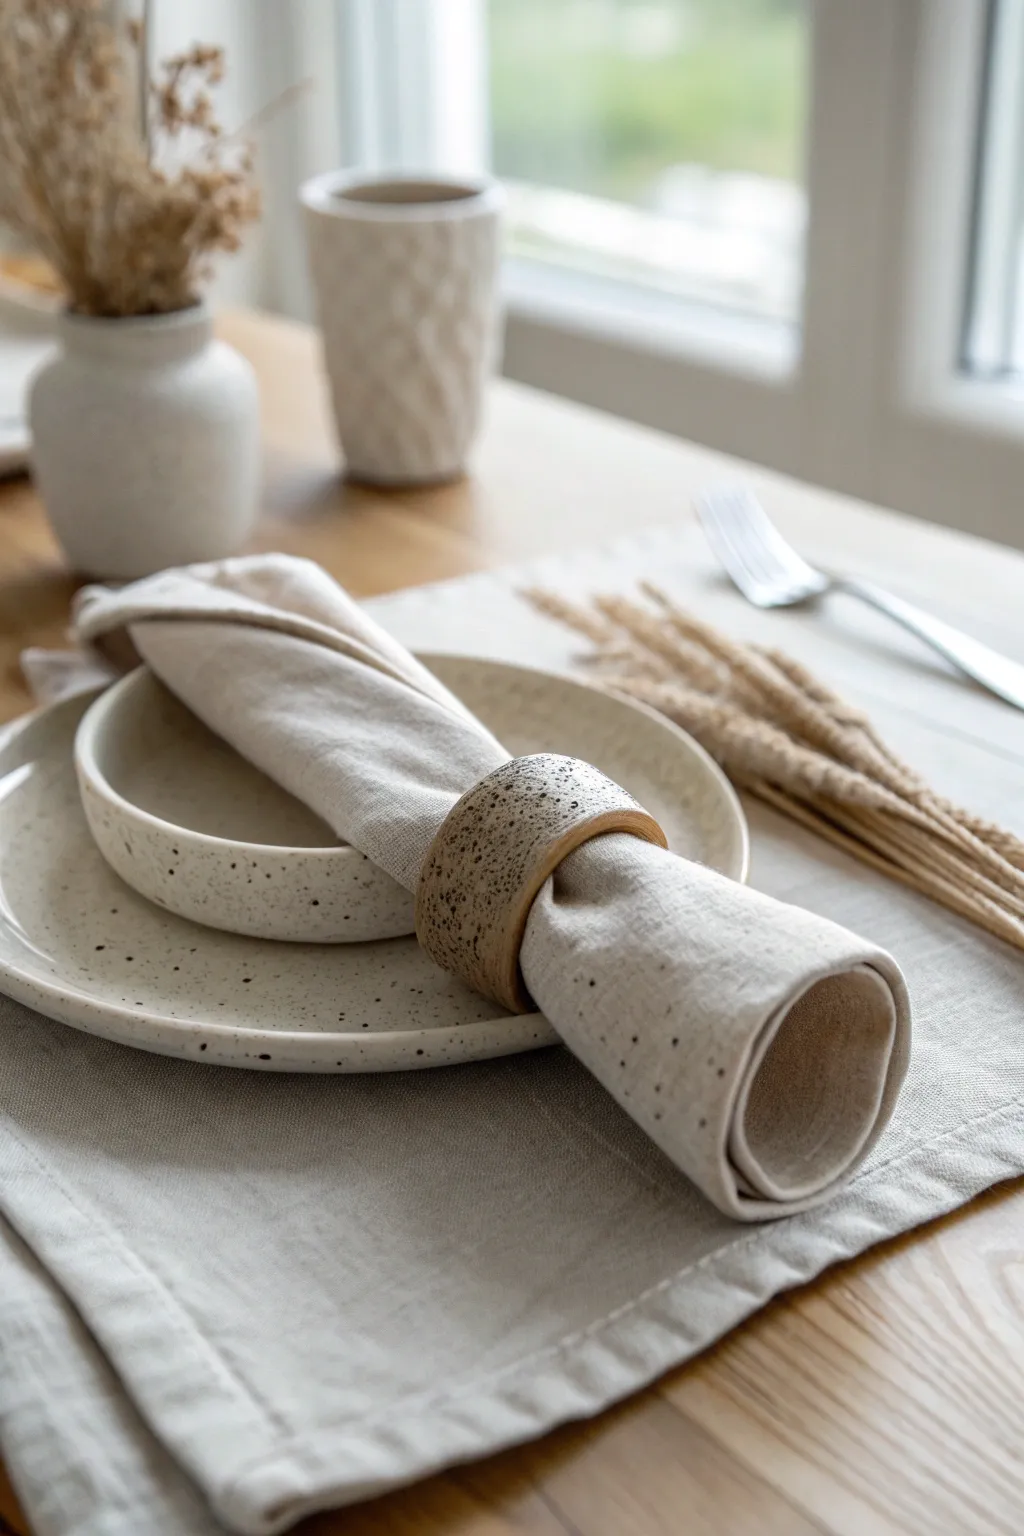
Elevate your table setting with these minimalist, faux-stoneware napkin rings that bring an organic touch to any dinner party. The wide band design combined with a speckled, sandy finish creates a modern yet rustic aesthetic that pairs beautifully with linen textiles.
How-To Guide
Materials
- White polymer clay (approx. 2oz per ring)
- Black pepper or black embossing powder (for speckles)
- Sandpaper (medium and fine grit)
- Wide rolling pin or pasta machine
- sharp craft knife or tissue blade
- Cardboard tube (from foil or paper towels)
- Parchment paper
- Ruler
- Matte spray varnish or sealant
- Sponge or textured fabric (optional for surface texture)
Step 1: Preparing the Clay
-
Condition the Clay:
Start by warming the white polymer clay in your hands. Knead and roll it repeatedly until it becomes soft, pliable, and easy to work with without cracking. -
Add the Speckles:
Flatten your conditioned clay into a pancake shape. Sprinkle a generous pinch of coarse black pepper or black embossing powder onto the surface. This creates that authentic ceramic stoneware look. -
Incorporate the Texture:
Fold the clay over the speckles and knead thoroughly to distribute the particles evenly throughout the entire block. Check the cut edge occasionally to ensure the speckles run deep, not just on the surface. -
Roll Out the Slab:
Using a rolling pin or pasta machine on its thickest setting, roll the clay out into a long, even strip. I aim for a thickness of about 4-5mm to ensure the ring feels substantial and mimics real pottery.
Pepper Protocol
Don’t use fine table pepper; it can discolor the clay yellow during baking. Coarse cracked pepper or specialized embossing powder keeps the speckles crisp and black.
Step 2: Shaping the Ring
-
Cut the Strips:
Use a ruler and a sharp craft knife to cut a clean, straight rectangular strip. The strip should be approximately 1.5 inches wide and 6 inches long (adjust length based on the circumference of your cardboard tube). -
Prepare the Form:
Wrap a piece of parchment paper around your cardboard tube. This step is crucial so the clay doesn’t stick to the cardboard while drying or baking. -
Form the Circle:
Gently lift your clay strip and wrap it around the parchment-covered tube. Bring the two ends together until they just touch. -
Bevel the Seam:
To create a seamless join, slice the ends at a 45-degree angle where they overlap. This allows for a stronger bond and a smoother surface than a simple butt joint. -
Blend the Connection:
Press the angled ends together firmly but gently. Use a modeling tool or your fingertip to smooth the clay over the seam line until it disappears completely. -
Refine the Shape:
While the clay is on the tube, gently tap the edges to ensure they aren’t sharp. You can also lightly press a textured sponge onto the surface for a more rustic, matte feel.
Rough Luxe
Before baking, gently roll the handle of a toothbrush over the clay surface. The subtle texture mimics hand-thrown pottery and catches the light beautifully.
Step 3: Baking and Finishing
-
Bake:
Preheat your oven according to the polymer clay manufacturer’s instructions (usually around 275°F or 130°C). Place the cardboard tube upright on a baking sheet and bake for about 30-45 minutes. -
Cool Down:
Allow the clay to cool completely inside the oven or on a wire rack before attempting to remove it from the tube. Removing it while hot can warp the shape. -
Remove the Form:
Slide the clay ring off the cardboard tube and peel away the parchment paper from the inside. -
Sand the Edges:
Using medium-grit sandpaper, gently sand the top and bottom rims of the ring to smooth out any unevenness. Follow up with fine-grit sandpaper for a polished finish. -
Sand the Service:
Lightly sand the exterior surface. This exposes more of the black speckles and enhances the stone-like appearance effectively. -
Seal (Optional):
To protect your napkin ring from food stains, apply a light coat of matte spray varnish. Avoid glossy finishes if you want to maintain the natural, raw ceramic look shown in the photo.
Now you have a set of bespoke napkin rings ready to anchor your next dinner party tablescape
Chunky Bookends With Color Blocking
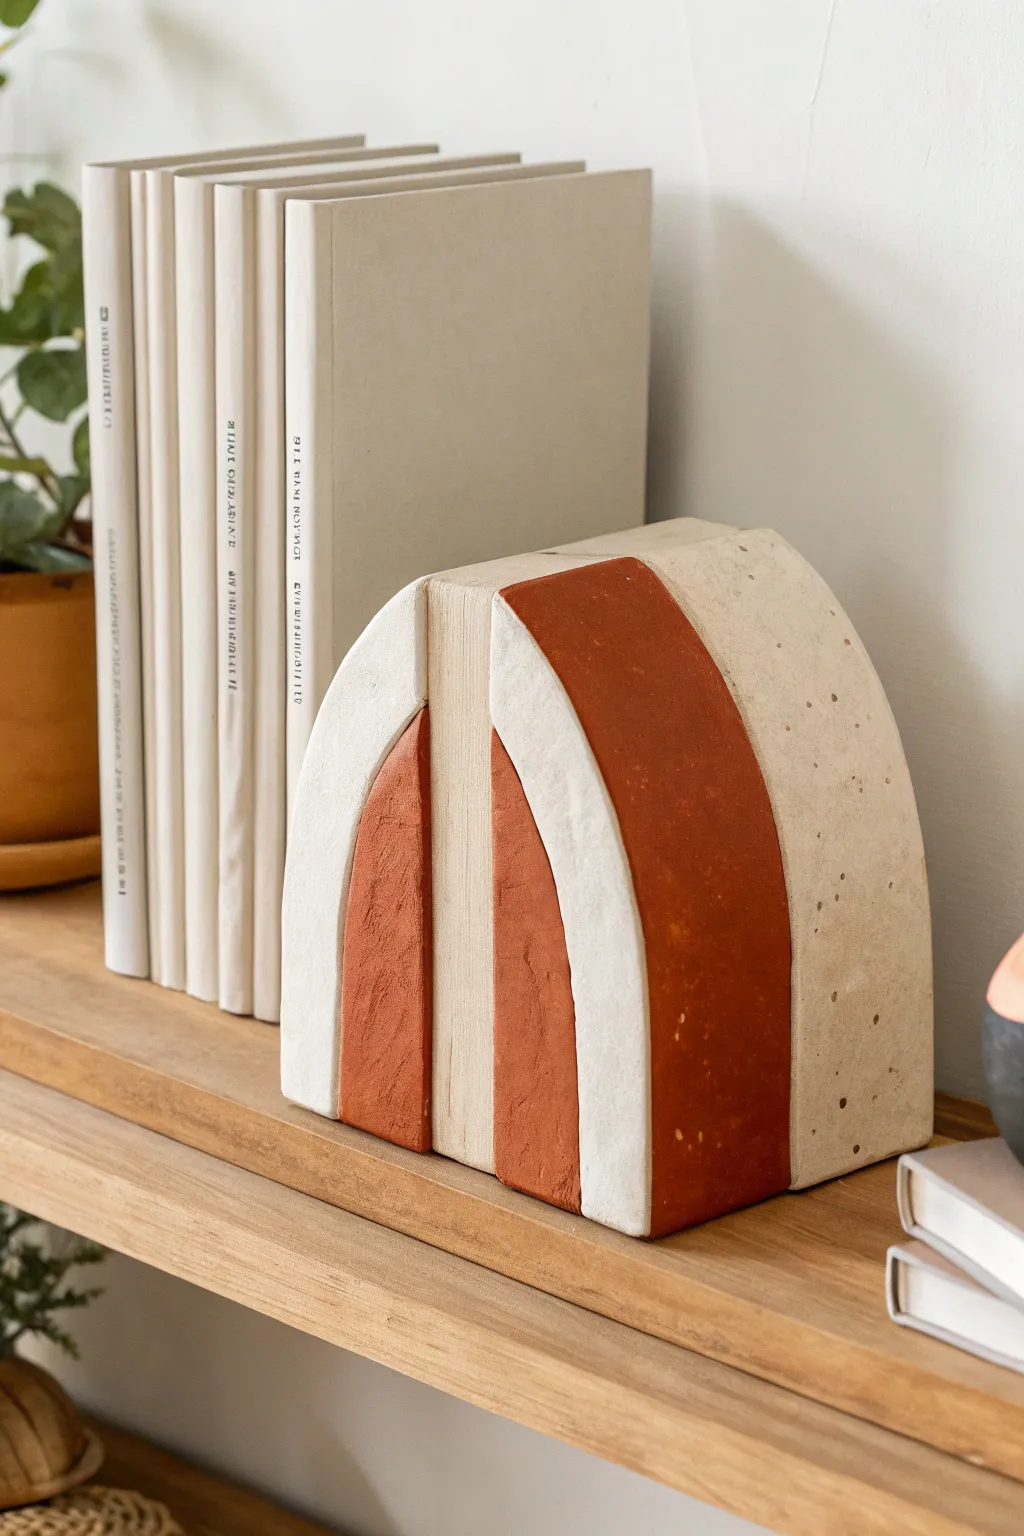
Bring monumental style to your bookshelves with these chunky, color-blocked bookends that mimic the look of expensive stone decor. The geometric arch shape paired with warm terracotta and cool cream tones creates a sophisticated focal point for your favorite reads.
Step-by-Step
Materials
- White cement or fast-setting concrete mix
- Cardboard (thick sheets for mold making)
- Packing tape
- Hot glue gun
- Cooking spray or petroleum jelly (mold release)
- Sandpaper (medium and fine grit)
- Acrylic craft paint (terracotta orange and warm cream)
- Painter’s tape
- Foam paintbrushes
- Clear matte sealer finish
Step 1: Constructing the Mold
-
Design the arch profile:
On a piece of stiff cardboard, draw the side profile of your bookend. Aim for a shape about 6 inches high and 4 inches deep, with a flat bottom and back, curving into a smooth arch at the top. -
Cut the side walls:
Cut out your drawn shape. Use this first cutout as a template to trace and cut three more identical pieces. You will need two side walls for each of the two bookends. -
Prepare the spacer strips:
Cut long strips of cardboard to determine the thickness of your bookends. For the chunky look in the photo, make these strips about 2.5 to 3 inches wide. -
Assemble the mold structure:
Using hot glue, attach the cardboard strips between two side walls to create a hollow container. Ensure the seams are completely sealed tight so no liquid concrete leaks out. -
Waterproof the interior:
Line the entire inside of your cardboard mold with packing tape. Overlap the strips carefully to create a smooth, waterproof surface that will leave a nicer finish on the concrete.
Stubborn Bubbles?
If you see surface holes after demolding, mix a tiny paste of cement and water (slurry) and rub it into the pits with your finger. Sand smooth once dry.
Step 2: Casting
-
Apply mold release:
Lightly coat the taped interior of your mold with cooking spray or a thin layer of petroleum jelly. This ensures the dry concrete slides out easily without getting stuck. -
Mix the concrete:
In a disposable bucket, mix your white cement or concrete with water according to package directions. Aim for a consistency similar to peanut butter—pourable but thick enough to hold some shape. -
Pour the mixture:
Slowly pour the concrete into your molds. Fill them to the top edges, using a stick or spoon to push the mix into the curved corners. -
Remove air bubbles:
Tap the sides of the mold vigorously and lift and drop the mold gently on the table table several times. This vibrates the concrete, forcing air bubbles to the surface for a solid finish. -
Level and cure:
Smooth the open top (which will be the bottom of the bookend) with a flat edge. Let the concrete cure undisturbed for at least 24-48 hours, or as specified by your mix instructions.
Step 3: Finishing and Painting
-
Demold the bookends:
Once fully hardened, carefully peel away the cardboard and tape. The mold is usually destroyed in this process, revealing your raw concrete form. -
Sand the surface:
Use medium-grit sandpaper to smooth out any ridges left by the tape or rough edges. Follow up with fine-grit paper for a polished, stone-like texture. Wipe away all dust with a damp cloth. -
Map out the design:
Look at the photo for reference. The design consists of a central colored arch flanked by cream stripes. Apply painter’s tape to block off the areas you want to keep as raw concrete or paint a different color. -
Paint the first color:
Using a foam brush, dab—don’t drag—your terracotta paint onto the exposed section. Dabbing helps work the paint into the porous concrete texture. -
Add the second color:
Once dry, move your tape to expose the next section. Apply the warm cream or white paint to create the lighter stripe, ensuring crisp lines between the colors. -
Clean up the edges:
Peel off the tape while the paint is still slightly tacky to prevent chipping. If any paint bled under the tape, gently scrape it away or touch it up with a small brush. -
Seal the project:
Protect your work and prevent the concrete from shedding dust by applying a coat of clear matte sealer over the entire bookend.
Adding Weight
Mix clean pebbles or small stones into your wet concrete mix. This adds heaviness without costing extra, helping the bookends support taller books.
Enjoy styling your shelf with these custom architectural pieces that look like heavy stone sculptures
Handmade Domino Set in Neutral Tones
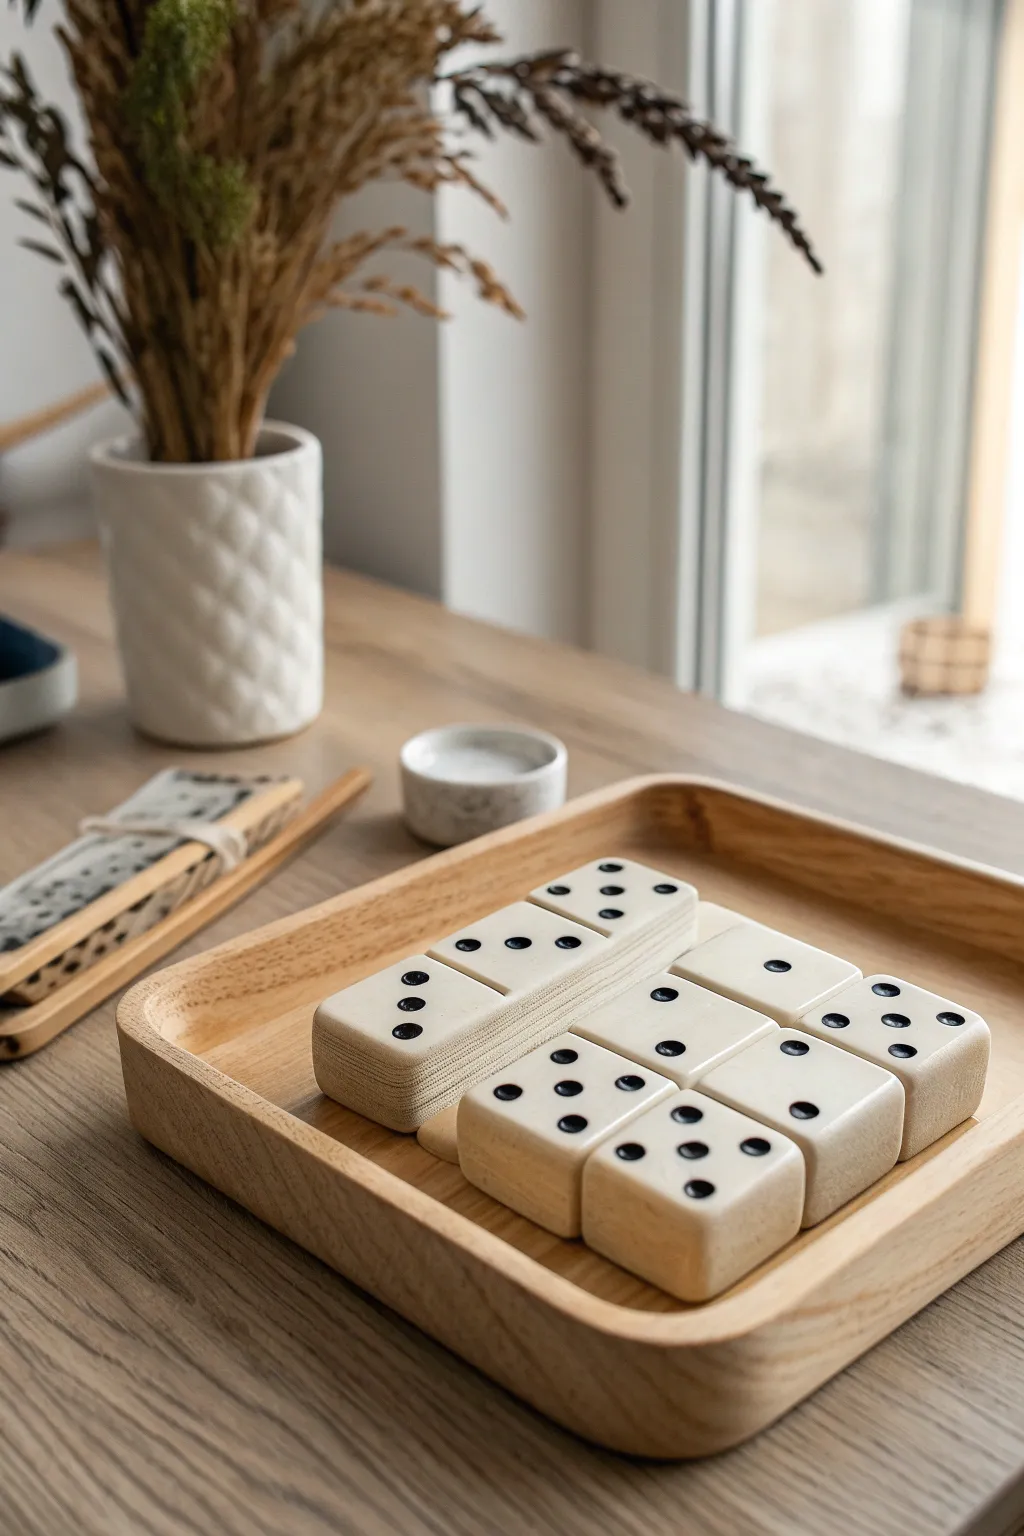
Bring a touch of organic warmth to game night with this handmade clay domino set, featuring a soft, creamy finish and deep charcoal pips. The thick, rounded tiles feel satisfyingly substantial in the hand and look just as beautiful displayed in a tray as they do in play.
How-To Guide
Materials
- White polymer clay or air-dry clay (approx. 500g)
- Acrylic rolling pin
- Depth guides or two identical wooden rulers (approx. 1/4 inch thick)
- Rectangular cookie cutter (1 x 2 inches) or sharp craft knife
- Fine-grit sandpaper (400 and 600 grit)
- Black acrylic paint
- Fine-point dotting tool or small drill bit
- Matte spray varnish or sealant
- Ruler
- Soft paintbrush
Step 1: Shaping the Tiles
-
Condition the clay:
Begin by kneading your white clay thoroughly until it becomes soft, pliable, and free of cracks. If using polymer clay, the warmth of your hands is essential here to prevent crumbling later. -
Roll out the slab:
Place your depth guides on either side of your clay ball on a smooth work surface. Roll the clay into an even slab about 1/4 inch thick; the guides ensure every domino is exactly the same height for fair stacking. -
Cut the rectangles:
Using a rectangular cutter or a ruler and craft knife, carefully cut out 28 tiles. If cutting by hand, measure 1-inch by 2-inch rectangles precise to ensure uniformity. -
Smooth the edges:
Gently tap the cut edges of each tile with your finger to soften the sharp corners. I find that dipping a finger in a tiny bit of water (for air-dry clay) or baby oil (for polymer) helps achieve that smooth, stone-like curve seen in the photo. -
Impress the center line:
Use the back of a knife blade or a ruler edge to gently press a shallow indentation across the middle of each tile, dividing the two square playing fields without cutting all the way through. -
Create the pips:
Using a reference chart for a standard double-six set, press your dotting tool into the clay to create distinct divots for the numbers. Make these indentations deep enough to hold paint later, but not so deep they distort the tile.
Step 2: Refining and Baking
-
First smoothing pass:
Inspect each tile for fingerprints or lint. Lightly buff them away with a smooth cloth or your fingertip before the clay hardens. -
Cure the clay:
If using air-dry clay, let the tiles dry on a wire rack for 24-48 hours, flipping occasionally. For polymer clay, bake according to the package instructions (usually 275°F/135°C for 15-30 minutes) on a parchment-lined sheet. -
Sand for perfection:
Once fully cured and cooled, take the 400-grit sandpaper and gently sand all sides. Focus on rounding the corners and edges even further to mimic the soft shape in the image. -
Polish the surface:
Follow up with 600-grit sandpaper for a velvety smooth finish. Wipe away all white dust with a slightly damp cloth.
Crumbly Edges?
If your clay cracks while cutting, your blade might be dull or the clay too dry. Clean the blade often and use a tiny bit of water (air-dry) or clay softener (polymer) to smooth cuts immediately.
Step 3: Finishing Details
-
Paint the pips:
Dip your fine brush or dotting tool into black acrylic paint. Carefully fill the indented dots you created earlier. -
Clean up overflow:
Don’t worry if the paint spills out of the indentations. Let it dry for a minute, then wipe the surface of the tile with a damp paper towel. The paint will stay in the recessed dots but wipe off the high smooth surface, leaving crisp edges. -
Seal the set:
To protect the white clay from dirt and oils during gameplay, apply two light coats of matte spray varnish. Let the first coat dry completely before flipping the tiles to spray the underside. -
Final cure:
Allow the varnish to cure fully (usually 24 hours) to prevent the tiles from feeling tacky when stacked.
Level Up: Color Tinting
Knead a tiny speck of brown or beige paint into the white clay before rolling. This creates a faux-stone or ‘bone’ color that looks more vintage and hides dust better than pure white.
Now you have a stunning, conversation-starting game set ready for your next cozy gathering
Abstract Face Mini Sculpture
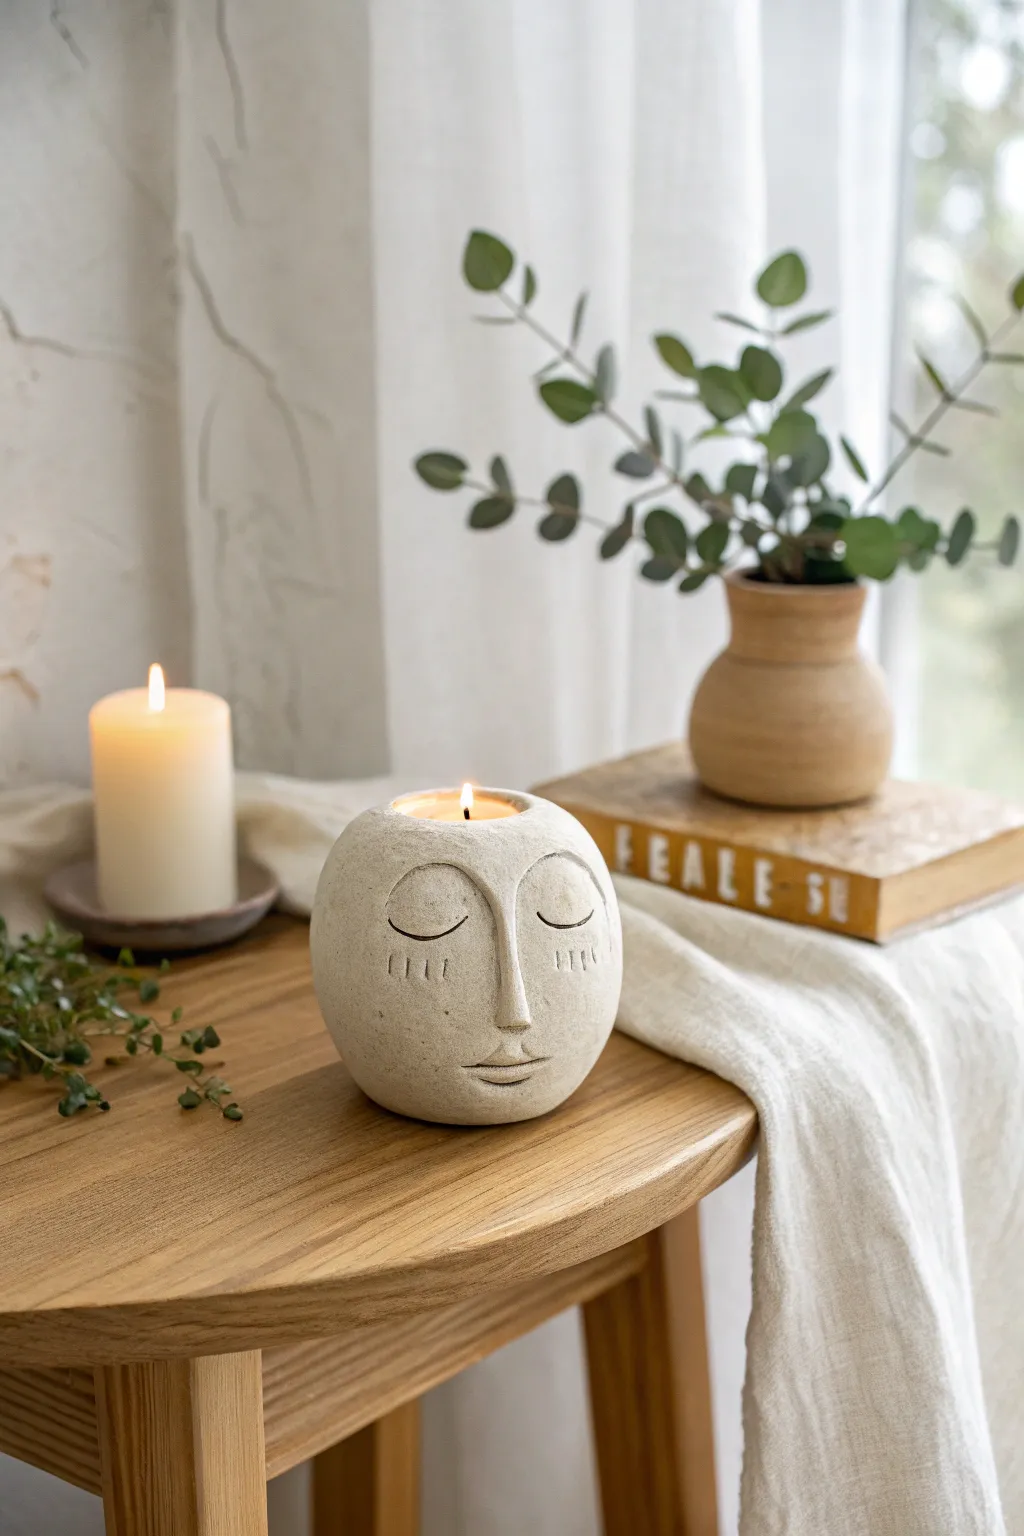
Sculpt a moment of calm with this minimalist, abstract face vessel that doubles as a tea light holder. Its textured, stone-like finish and peaceful expression bring an artful, meditative quality to any tabletop or shelf vignette.
Detailed Instructions
Materials
- Air-dry clay (white or light grey)
- Small bowl of water for smoothing
- Rolling pin
- Needle tool or toothpick
- Loop carving tool
- Tea light candle (for sizing)
- Sponge or textured rock (for distressing)
- Fine-grit sandpaper
- Acrylic paint (stone grey, cream, and beige)
- Paintbrush
- Protective sealant (optional)
Step 1: Forming the Base
-
Prepare the Clay:
Start by taking a large handful of air-dry clay. Knead it thoroughly in your hands to warm it up and remove any air bubbles, which helps prevent cracking later. -
Shape the Sphere:
Roll the clay into a smooth, solid ball. It should be roughly the size of a large grapefruit or small melon, heavy enough to sit stably. -
Create the Opening:
Press your thumb gently into the top center of the sphere to create an indentation. Widen this hollow until it is perfectly sized to fit your tea light candle—keep the fit snug but allow a little wiggle room for removal. -
Flatten the Bottom:
Gently tap the bottom of the sphere against your work surface. This creates a flat base so your sculpture won’t roll away once finished.
Crack Control
If you see cracks forming while drying, mix a tiny bit of clay with water to make a paste (slip) and fill them in immediately, then smooth over.
Step 2: Sculpting Features
-
Add the Nose:
Roll a small, elongated coil of clay. Score the center of the face area and the back of the coil, moisten with water, and press the coil vertically onto the sphere to form the nose bridge. -
Blend the Nose:
Use your fingers or a modeling tool to smooth the edges of the nose into the main sphere so it looks seamless, rather than stuck on. I tend to leave the bridge defined but blend the sides fully. -
Outline the Eyes:
Using a needle tool, lightly sketch two large semi-circles for the closed eyelids. Ensure they are symmetrical on either side of the nose bridge. -
Carve the Lids:
With a loop tool, gently carve shallow channels along your sketched lines to define the curve of the eyelids. -
Add Eye Details:
Use the needle tool to imprint small, vertical dashes below the eyelid curves to represent eyelashes, and sketch arched eyebrows high above the lids. -
Sculpt the Mouth:
Carve a simple horizontal line for the mouth. Use a small tool to press a tiny indentation right in the center of the lower lip area to give it a soft, pouty shape.
Step 3: Texturing and Finishing
-
Texturize the Surface:
To achieve that ancient stone look, gently pat the entire surface (avoiding the carved lines) with a rough sponge, a crumpled ball of foil, or even a real textured rock. -
Dry Completely:
Set the piece aside in a cool, dry place. Allow it to air dry for 24-48 hours until it is fully hard and chalky white. -
Sand Imperfections:
Once dry, lightly sand any sharp burrs or unintentional bumps, but keep the overall texture rough. -
Apply Base Coat:
Paint the entire sculpture with a base coat of cream or off-white acrylic paint. -
Do the Stone Effect:
Mix a diluted wash of beige and grey paint. Dab it onto the surface with a sponge, then immediately wipe most of it off with a paper towel. The darker color will settle into the texturing and carved lines. -
Final Touches:
If the carved lines (eyes and mouth) aren’t visible enough, carefully trace them with a very thin brush dipped in watered-down grey paint to make them pop.
Functional Twist
Before drying, use a straw to poke holes through the top of the ‘head’ to turn this into a dried flower holder instead of a candle vessel.
Place your finished sculpture in a well-lit spot to let the shadows play across the textured face