Halloween is my favorite excuse to make pottery that’s equal parts cozy and spooky, especially when it glows from the inside. Here are some Halloween pottery ideas you can actually pull off at home or in a studio, from quick paint-friendly pieces to more sculptural builds.
Ghost Tea Light Holders
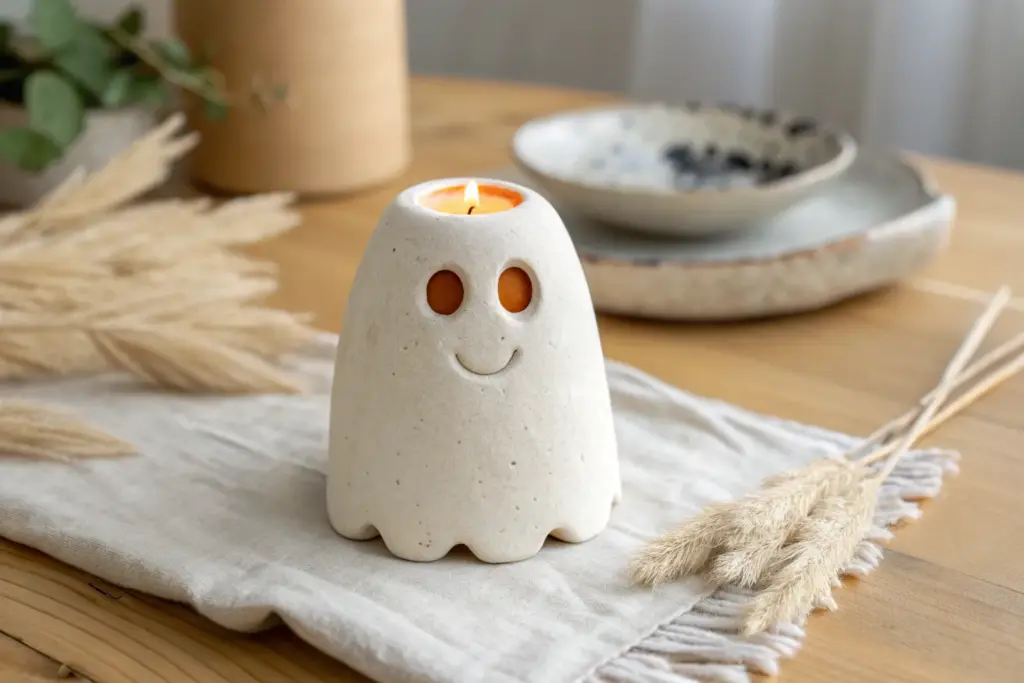
These charming little specters bring an inviting glow to your Halloween décor with their simple, draped forms and flickering eyes. Perfect for beginners and seasoned potters alike, this project captures the whimsical movement of a classic sheet-ghost using straightforward hand-building techniques.
Step-by-Step Guide
Materials
- White earthenware or stoneware clay (smooth body)
- Small rolling pin
- Fettling knife or needle tool
- Wooden sculpting tool or smooth rib
- Small round cutter or bubble tea straw (for eyes)
- Sponge
- Clear or glossy white glaze
- Kiln
- Canvas working mat
- Small styrofoam cone or makeshift paper armature
Step 1: Forming the Ghost Shape
-
Prepare the workspace:
Begin by setting up your canvas mat to prevent the clay from sticking. Wedge a ball of white clay about the size of a large orange to remove air bubbles. -
Roll the slab:
Roll your clay ball into a consistent slab, aiming for a thickness of about 1/4 inch. Avoid making it too thin, or the folds won’t hold their shape later. -
Cut the base shape:
Using your needle tool, cut a rough circle from the slab. It doesn’t need to be geometrically perfect; an approximate 8-10 inch diameter usually works well for a standard tea light size. -
Create a temporary armature:
Set up a support for the inside of the ghost. You can use a Styrofoam cone covered in plastic wrap or a simple ball of newspaper taped into a cone shape. This ensures the ghost stands tall while you work. -
Drape the clay:
Gently lift your clay circle and center it over the top of your armature. Let gravity do the initial work, allowing the edges to fall naturally towards the table.
Step 2: Sculpting the Details
-
Form the folds:
Use your fingers to gently pinch and encourage vertical folds in the clay, mimicking the look of a hanging bed sheet. I like to smooth the peaks of these folds with a damp sponge to keep them soft looking. -
Flare the bottom:
Gently flare the bottom edges of the clay outward where they touch the table. This creates a stable base and enhances the ‘floating’ illusion. -
Smooth the surface:
Take a soft rib tool or a slightly damp sponge and go over the entire surface. Erase any fingerprints or canvas textures to ensure a smooth, ghostly finish. -
Mark the face:
Decide where the eyes and mouth will go. Lightly mark the spots with your needle tool before comitting to the cut. -
Cut the features:
Use a small circular cutter or a straw to punch out two eyes. For the mouth, a smaller hole or tiny oval works best to give it a surprised expression. -
Refine the openings:
After cutting the holes, smooth the raw edges inside the eyes and mouth with a wet paintbrush or finger so they aren’t sharp or jagged.
Slumping Issues?
If the clay folds are collapsing or tearing at the top, your clay was likely too wet. Let the slab stiffen slightly on the canvas before draping it over the armature.
Step 3: Firing and Glazing
-
Dry partially:
Let the ghost sit on the armature until it reaches leather-hard stage. This prevents it from collapsing when you remove the support. -
Remove armature:
Carefully lift the ghost and remove the paper or foam support from underneath. Check the interior for any rough spots and smooth them out. -
Bisque fire:
Allow the piece to dry completely (bone dry) before loading it into the kiln for the bisque firing. Fire according to your clay body’s specifications (usually Cone 04). -
Apply glaze:
Once the bisque firing is complete and the piece is cool, wipe it down with a damp sponge to remove dust. A dip process works best here to get even coverage inside the folds, but brushing works too. -
Check the glaze thickness:
Ensure the glaze isn’t pooling too thickly in the deep recesses of the folds, as this can cause crawling or running during firing. -
Clean the foot:
Wipe the very bottom rim of the ghost completely clean of glaze so it doesn’t fuse to your kiln shelf. -
Glaze fire:
Fire the piece again to the maturation temperature of your glaze (e.g., Cone 06 or Cone 6). Let it cool slowly in the kiln.
Make it Sparkle
For a magical twist, use a pearlescent white glaze or overglaze luster. You can also cut tiny stars into the back of the ghost to cast shaped shadows on the wall.
Place a battery-operated tea light inside and watch your friendly spirit flicker to life


Jack-o’-Lantern Votive Cups

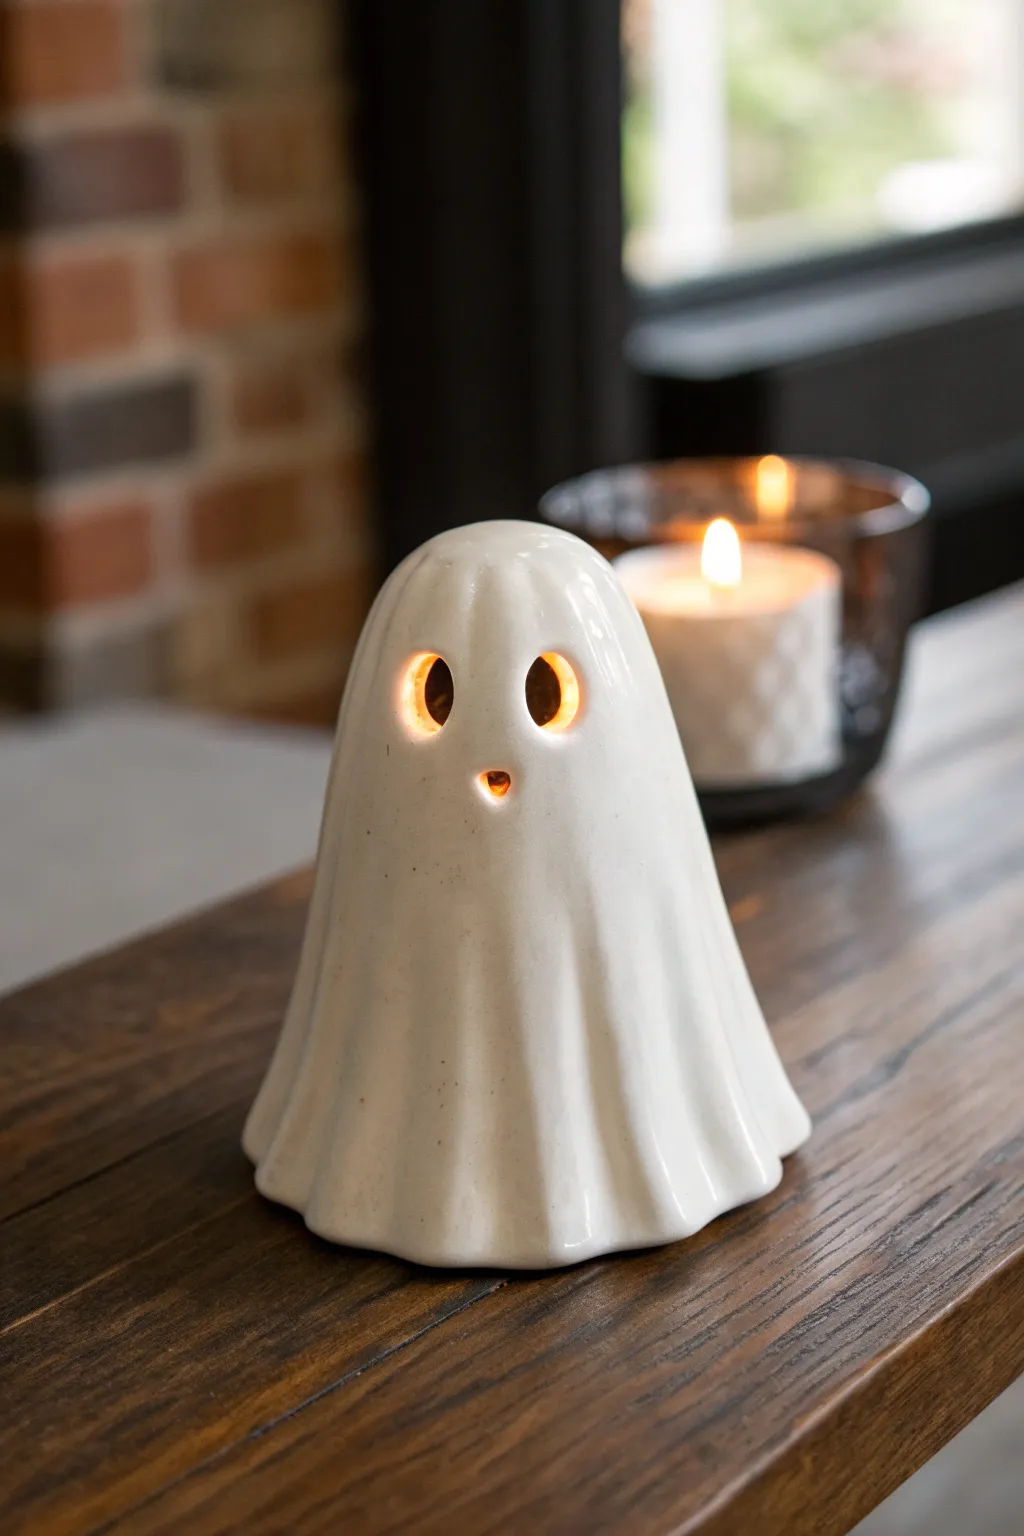
These charming little pottery votives add a warm, festive glow to any Halloween setting with their cheerful carved faces and starry textured skin. The unglazed, speckled terracotta finish gives them an earthy, handmade feel that looks beautiful even when unlit.
Step-by-Step
Materials
- Terracotta or Speckled Buff Clay
- Pottery wheel (or basic pinch pot tools)
- Fettling knife or X-Acto knife
- Needle tool
- Small circular hole punch or drill bit tool
- Sponge
- Rib tool
- Tea light candle
Step 1: Forming the Body
-
Throw the base shape:
Start with a small ball of clay, about 1 pound. Center it on the wheel and open it up, creating a floor about 3 inches wide. Pull the walls up and curve them inward at the top to create an enclosed, pumpkin-like sphere, leaving an opening at the top just wide enough for a tea light (about 2.5-3 inches). -
Alternative method: Pinch pot:
If you don’t have a wheel, form a smooth ball of clay in your hands. Push your thumb into the center and gently pinch the walls while rotating the clay, aiming for an even thickness and a rounded, enclosed shape. -
Smooth the exterior:
While the clay is still plastic but holding its shape, use a flexible metal or rubber rib to smooth the outside curve, removing any finger marks or slip trails. -
Define the rim:
Use a chamois or a damp sponge to compress and smooth the top rim. I prefer to keep this edge slightly rounded so it doesn’t chip easily later. -
Dry to leather hard:
Set the piece aside to dry until it reaches a leather-hard state. It should be firm enough to handle without warping, but soft enough to carve easily.
Step 2: Carving the Face
-
Sketch the expression:
Take your needle tool and very lightly sketch the jack-o’-lantern face onto the surface. For this look, draw two triangles for eyes, a smaller triangle for the nose, and a wide, upturned crescent smile. -
Cut the eyes and nose:
Using a fettling knife or a sharp X-Acto blade, carefully cut out the triangular shapes. Keep your blade perpendicular to the surface for a clean, straight cut through the wall. -
Carve the mouth:
Cut along your smile lines. Remove the clay strip carefully. Then, use a damp paintbrush or your finger to smooth the cut edges immediately so they aren’t sharp or jagged. -
Clean up the interior:
Reach inside (or gently shake the pot upside down) to remove any clay crumbs that fell in during carving.
Cracking Smiles?
If the corners of the mouth crack during drying, compress the clay at the corners with a rounded tool immediately after cutting. Also, dry very slowly under plastic.
Step 3: Adding Texture and Finish
-
Add the spotted texture:
Using a small hole punch tool (like a Kemper hole cutter) or the dull end of a drill bit, gently press small indentations all around the surface. Don’t punch all the way through; just create small divots for texture. -
Vary the placement:
Scatter the dots randomly around the back and sides, and place a few strategically near the eyes and mouth to mimic freckles or skin texture. -
Drill vent holes (optional):
If you plan to use a real flame candle, poke two or three tiny holes near the top rim on the back side to help heat escape. -
Final sponge wipe:
Wipe the entire piece down one last time with a barely damp sponge. This smooths any burrs from the texture tool and softens the carved edges. -
Slow drying:
Cover the pot loosely with plastic to let it dry slowly and evenly. Since the rim is thicker than the carved areas, slow drying prevents cracking. -
Bisque fire:
Once bone dry, fire the piece to bisque temperature (usually cone 04). -
Finishing touches:
To recreate the look in the photo, leave the pot unglazed to show off the raw clay body. If you want it food safe or glossy, apply a clear glaze, but bare clay works perfectly for votives. -
Final firing:
Fire the piece to maturity (Cone 5/6 for stoneware or appropriate temp for your clay). Once cool, pop in a tealight and enjoy the glow.
Make it a Ghost
Use white clay or porcelain instead of terracotta. Elongate the shape slightly and carve round, wailing eyes and mouth for a spooky ghost companion.
Now you have a timeless little pumpkin that will never rot and perfectly captures the cozy spirit of the season


Pumpkin Candy Bowl Centerpiece
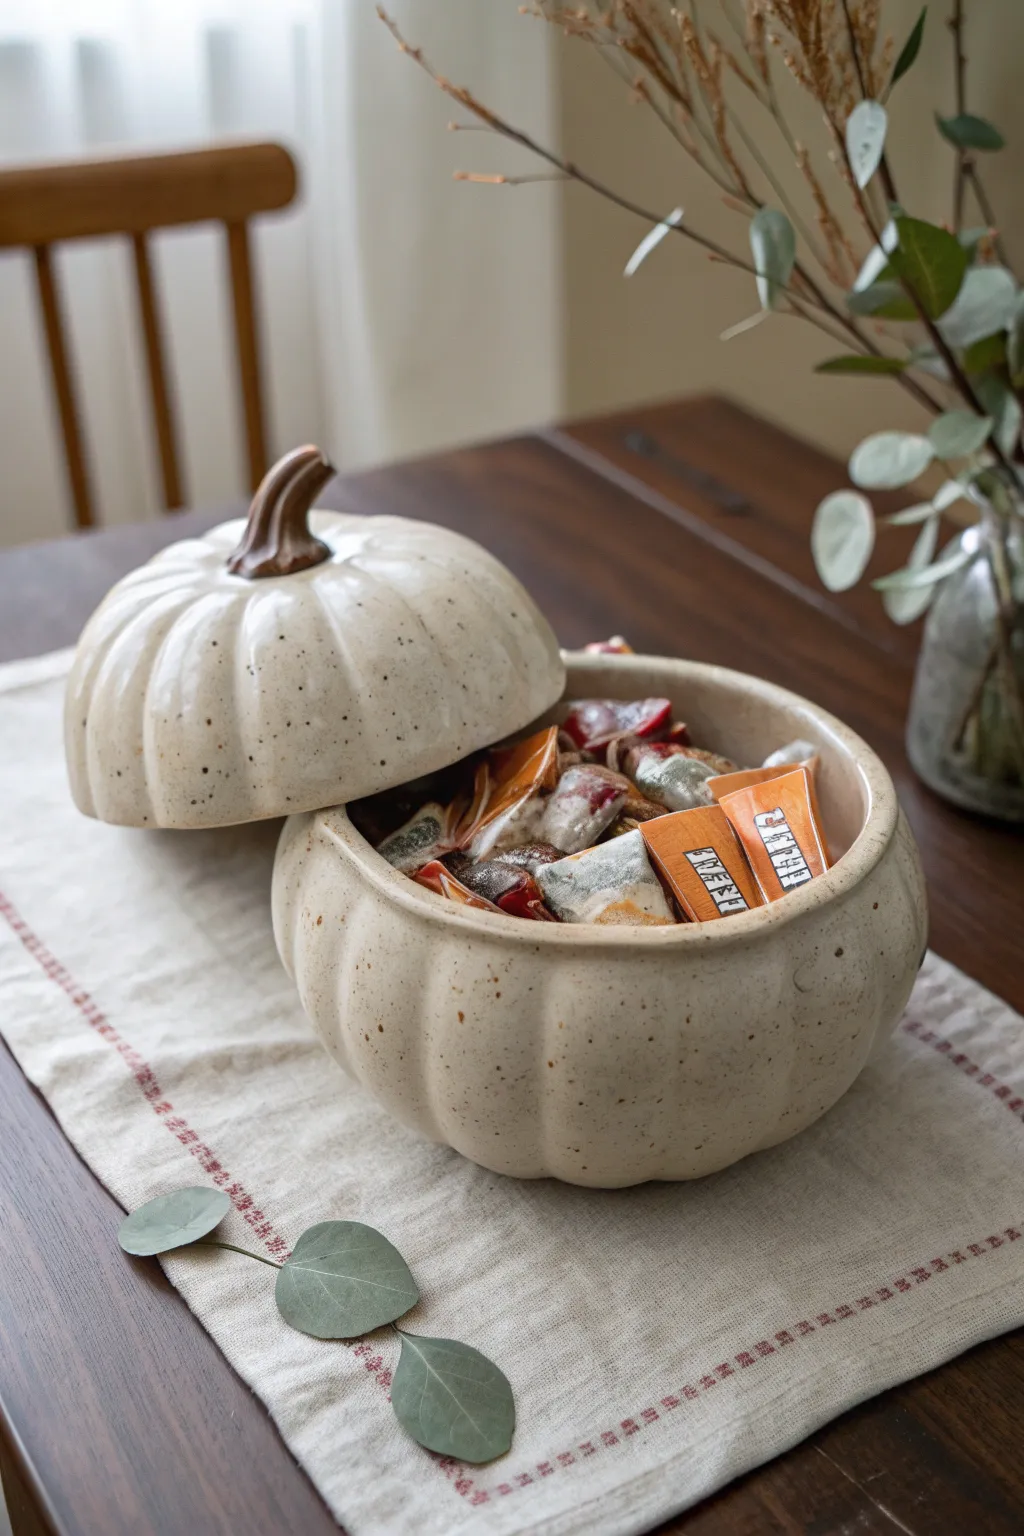
This charming, wheel-thrown or hand-built ceramic pumpkin bowl features a warm, speckled cream glaze and a realistic stem handle, making it the perfect seasonal vessel for your Halloween treats. Its generous volume and snug-fitting lid create a sophisticated centerpiece that feels both rustic and modern.
Step-by-Step Tutorial
Materials
- Stoneware clay (smooth or with grog)
- Pottery wheel (or rolling pin/slab roller for hand-building)
- Rib tool (wood and metal)
- Needle tool
- Loop trimming tool
- Sponge
- Calipers
- Speckled cream/oatmeal glaze
- Iron oxide wash or brown glaze (for the stem)
- Kiln
Step 1: Creating the Body
-
Throw the base form:
Begin by centering about 3-4 pounds of clay on the wheel. Open the clay and pull the walls up and out to create a rounded, bulbous belly shape that curves back in slightly at the top rim. -
Shape the gallery:
At the rim, carefully split the clay thickness or push the clay inward to create a gallery (a ledge) where the lid will eventually sit. Ensure this ledge is flat and smooth. -
Create the pumpkin ribs:
While the wheel is spinning slowly or stopped, use your fingers or a soft rib to gently press vertical indentations from the bottom to the top of the pot. I like to do this from the inside out to push the clay volume, creating the segmented pumpkin look. -
Measure for the lid:
Before removing the pot from the wheel, use calipers to measure the exact diameter of the gallery seating area.
Natural Shape Tip
Don’t make your pumpkin perfectly symmetrical! Slightly pushing the clay off-center or altering the rim height adds organic charm.
Step 2: Crafting the Lid
-
Throw the lid:
Using a smaller amount of clay (about 1.5 pounds), throw a shallow dome shape upside down (like a bowl). Use your caliper measurement to ensure the rim matches the gallery of your base pot exactly. -
Trim the lid:
Once the lid is leather hard, trim away excess clay to match the curvature of your pumpkin body. You want a continuous curve from the body through the lid. -
Add lid texture:
Mirror the vertical ribbing lines on the lid so they align with the lines on the body when the lid is placed on top. Use a modeling tool to deepen these grooves slightly.
Step 3: The Stem Handle
-
Pull a stem:
Take a small ball of clay and hand-model a thick, tapering stem. Give it a slight twist or curve to make it look organic and vine-like. -
Attach the stem:
Score and slip the center of the lid and the base of your stem. Press firmly to attach, smoothing the connection point so it looks like it grew from the pumpkin. -
Refine textures:
Use a needle tool or small loop tool to carve vertical striations into the stem for a realistic wooden texture.
Lid Fit Issues
If the lid rattles after firing, apply a tiny amount of grinding paste (valve grinding compound) to the rim and spin the lid to sand it flush.
Step 4: Glazing and Firing
-
Bisque fire:
Let the piece dry completely (greenware stage) and fire it in the kiln to cone 04 (or your clay’s specific bisque temperature). -
Wax the contact points:
Apply wax resist carefully to the gallery ledge on the body and the rim of the lid where they touch. This prevents the lid from fusing to the pot during firing. -
Glaze the body:
Dip or brush the main body and lid (excluding the stem) with a speckled cream or oatmeal stoneware glaze. Ensure an even coat. -
Glaze the stem:
Carefully brush a rich brown glaze or an iron oxide wash onto the stem handle. Wipe away any drips that run onto the cream section. -
Final fire:
Load the kiln, placing the lid on the pot (if you are confident in your waxing) or side-by-side using stilts. Fire to the maturity temperature of your clay and glaze (typically cone 5 or 6).
Fill your new ceramic creation with seasonal candies and center it on your table for immediate autumn ambiance


Spooky Mug With Webs and Bats
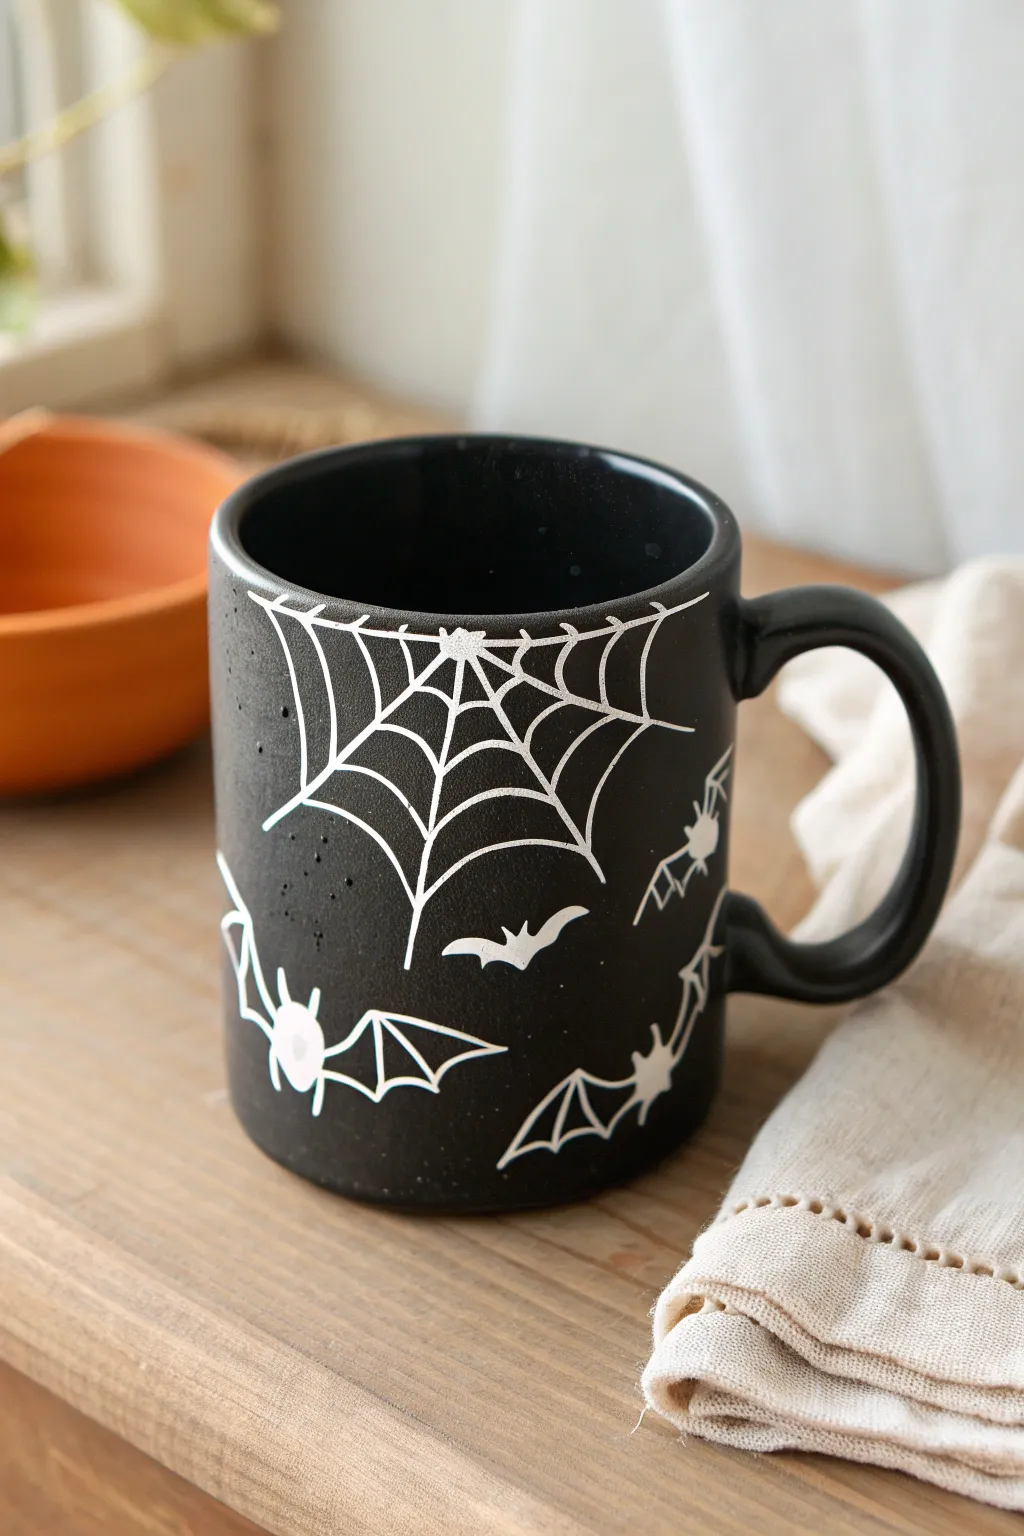
Embrace the Halloween spirit with this strikingly simple black mug featuring delicate white spiderwebs and fluttering bats. The high-contrast design uses the sgraffito technique to carve crisp white lines into dark underglaze, creating a finish that feels both modern and handcrafted.
Step-by-Step Guide
Materials
- Bisque-fired ceramic mug (white clay body)
- Black underglaze
- Soft fan brush
- Pencil (graphite)
- Small loop tool or needle tool
- Damp sponge
- Clear transparent glaze
- Kiln access
Step 1: Preparation & Base Coat
-
Clean surface:
Begin by wiping down your bisque-fired mug with a slightly damp sponge to remove any dust or oils that might resist the glaze. -
Stir underglaze:
Mix your black underglaze thoroughly to ensure the pigment is evenly distributed, aiming for a heavy cream consistency. -
First coat application:
Using a soft fan brush, apply a smooth, even layer of black underglaze over the entire exterior of the mug, including the handle. -
Let it dry:
Allow the first coat to dry until it loses its wet sheen and is dry to the touch, usually about 10–15 minutes. -
Second coat:
Apply a second layer of black underglaze, brushing in a cross-hatch direction (perpendicular to your first stroke) to ensure solid, opaque coverage. -
Third coat check:
If I see any streakiness, I like to apply a third thin coat just to be safe, then let the mug dry completely until it’s room temperature.
Clean Lines Pro Tip
Keep a damp sponge nearby while carving. Wipe your tool tip frequently to prevent black flakes from getting stuck and dragging across your clean white lines.
Step 2: Designing the Spooky Scene
-
Sketch the web:
Lightly sketch your design directly onto the dry black underglaze with a graphite pencil. Start with a central point near the top rim for the main spiderweb. -
Radial lines:
Draw four to five long lines radiating outward from that center point, extending down towards the middle of the mug. -
Connecting the web:
Connect the radial lines with small, curved horizontal strokes to create the classic scalloped spiderweb look. -
Outline bats:
Sketch small bat shapes fluttering around the bottom half of the mug, varying their sizes and wing angles for visual interest. -
Optional bugs:
Add tiny spiders or mites crawling near the web lines if you have extra space to fill.
Underglaze Troubleshooting
If the underglaze chips off in large chunks while carving, it is likely applied too thickly or wasn’t fully dry. Let it dry longer or apply thinner layers next time.
Step 3: Carving & Finishing
-
Select your tool:
Choose a sharp sgraffito carving tool—a fine-point loop tool works best for thick lines, while a needle tool creates very delicate scratches. -
Carve the web:
Gently scratch through the black underglaze along your pencil lines to reveal the white clay body underneath. Use steady, confident strokes. -
Carve the bats:
scratch out the outlines of the bats. For the solid white bat bodies, scratch away all the black paint inside your outline. -
Detail work:
Go back over your lines to clean up any ragged edges, ensuring the white clay shows through clearly. -
Clean up dust:
Carefully brush away the clay crumbs (burrs) created by carving using a large, dry soft brush. Do not blow on the dust, as this is unsafe. -
Bisque fire again (Optional):
Some artists prefer to bisque fire the piece again to set the underglaze permanently before glazing, which prevents smudging. -
Clear glaze application:
Dip or brush a coat of clear transparent glaze over the entire piece to seal the design and make it food safe. -
Final firing:
Fire the mug in the kiln according to the clear glaze manufacturer’s recommended cone temperature.
Now brew your favorite potion and enjoy your beautifully handcrafted seasonal mug

The Complete Guide to Pottery Troubleshooting
Uncover the most common ceramic mistakes—from cracking clay to failed glazes—and learn how to fix them fast.
Cauldron Cocoa Mugs
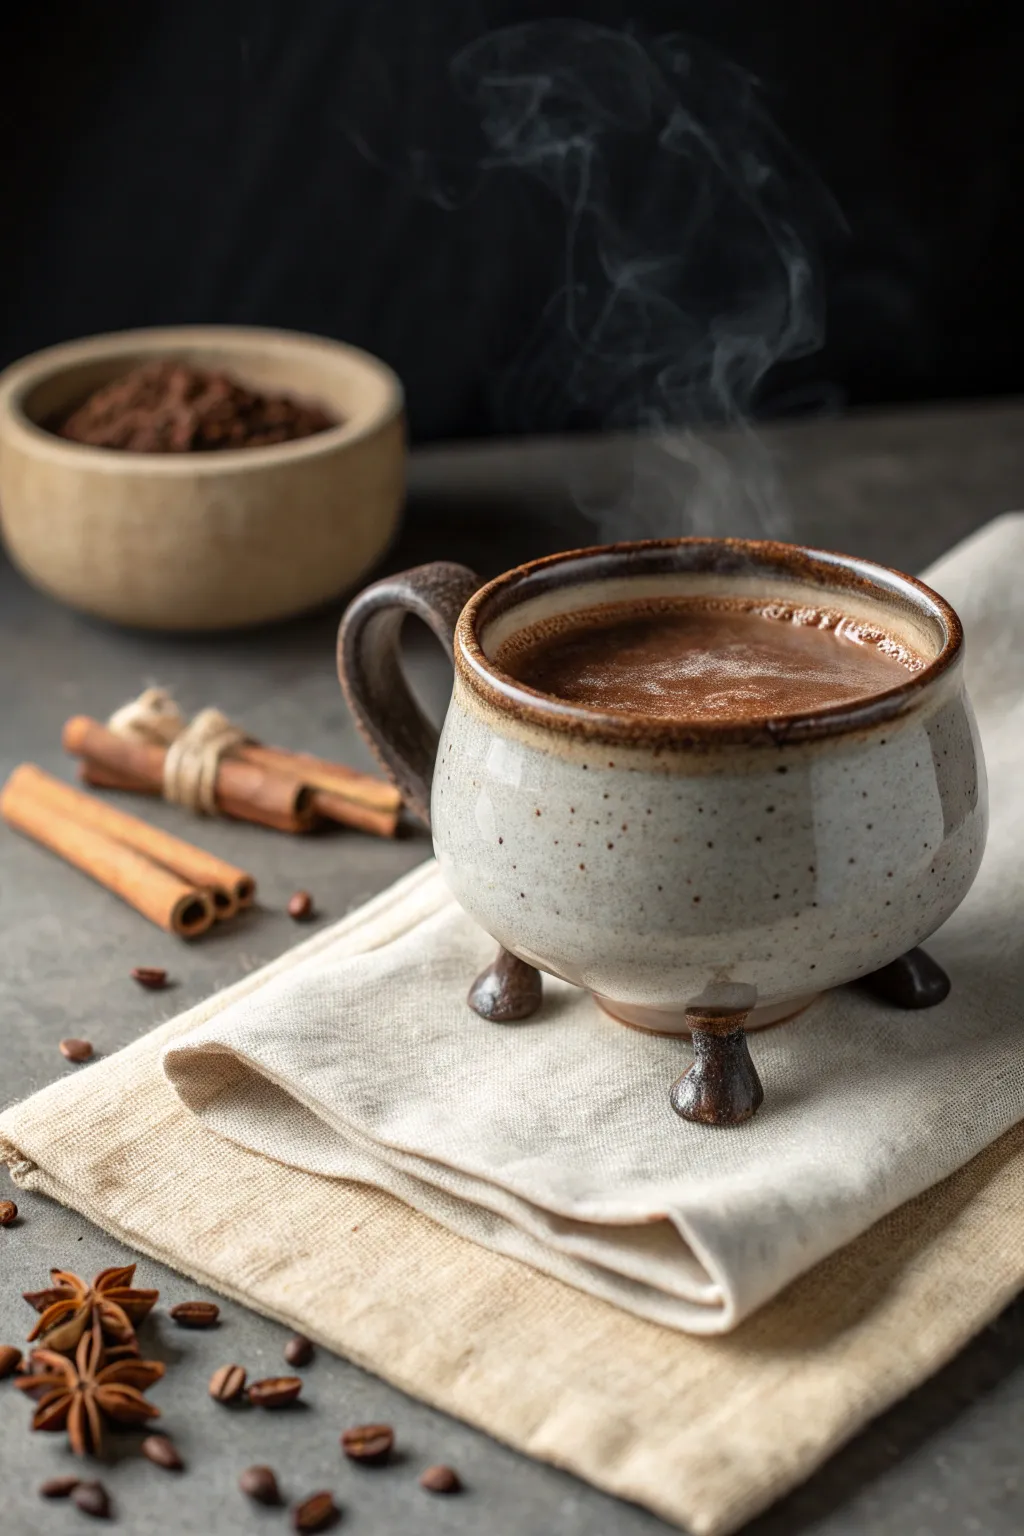
Embrace the witchy vibes of Halloween with this charming, three-legged cauldron mug. Crafted from speckled stoneware, its rounded belly and rustic tripod feet make it the perfect vessel for steaming potions or rich hot chocolate.
How-To Guide
Materials
- Speckled stoneware clay
- Pottery wheel (or rolling pin for hand-building)
- Rib tool
- Needle tool
- Sponge
- Scoring tool (or fork)
- Slip
- Loop tool for trimming
- Dark brown glaze (for rim and feet)
- Glossy clear glaze
Step 1: Throwing the Body
-
Center and open:
Begin with about 1.5 lbs of well-wedged speckled clay on your wheel. Center it firmly, then open the clay, keeping a slightly thicker floor than usual to support the eventual curve. -
Pull the walls:
Pull up the walls into a standard cylinder first. Ensure you have even thickness from bottom to top, aiming for about a quarter-inch thick. -
Shape the belly:
Using a rib tool on the inside and your hand on the outside, gently push the clay outward to create a bulbous, rounded belly shape, characteristic of a cauldron. -
Collar the rim:
As you round the belly, the top opening might get too wide. Gently collar the rim inward to create a slightly narrower neck, then flair the lip out just a tiny bit for comfortable drinking. -
Refine the surface:
Run a clean rib over the exterior to smooth out throwing lines and compress the clay, highlighting the speckles in the stoneware.
Leveling the Feet
Place a small wooden board on top of the inverted feet while the clay is soft. Press down gently until the board is level to ensure the mug won’t rock.
Step 2: Adding Feet and Handle
-
Trim the bottom:
Once the mug is leather hard, trim the bottom to be rounded and smooth. You don’t need a deep foot ring since we are adding legs, just a clean curve. -
Form the feet:
Roll out three small, equal-sized balls of clay. Shape them into tapered cones or stubby cylinders depending on your preference for the cauldron’s legs. -
Score and slip:
Mark three equidistant spots on the bottom of the rounded base. Score the mug surface and the attachment point of the feet, apply slip, and press them firmly into place. -
Smooth the connections:
Use a small modeling tool or your finger to smooth the clay where the feet meet the body, ensuring a seamless transition so they don’t pop off during firing. -
Check for balance:
Gently set the mug down on a flat board to ensure it sits level on its new tripod legs; adjust the height of individual feet by pressing down lightly if it wobbles. -
Pull a handle:
Pull a strap of clay for the handle. For this rustic look, a slightly thicker, robust handle works best. -
Attach the handle:
Attach the handle to the side of the mug, ensuring the top attachment is near the rim and the bottom curve flows back into the belly. I prefer to curve it generously to mimic the roundness of the pot.
Witchy Details
Before the clay dries, stamp moon phases or star symbols around the rim for an extra magical touch that reveals itself under the clear glaze.
Step 3: Glazing and Finishing
-
Bisque fire:
Allow the mug to dry completely slowly to prevent cracking at the joints. Fire to cone 04 (or your clay body’s bisque temperature). -
Wax resist the bottom:
Apply wax resist to the very bottom of the three feet to prevent them from sticking to the kiln shelf. -
Dip in clear:
Dip the entire mug into a glossy clear glaze. This will seal the clay and make those natural speckles pop without obscuring the clay body color. -
Accent the rim:
Dip just the top inch of the rim into a dark, iron-rich brown glaze. Let it overlap slightly with the clear glaze for a nice transition. -
Paint the feet:
Using a brush, apply the same dark brown glaze to the handle and the three legs. This creates a darker, cast-iron aesthetic for the structural parts. -
Glaze fire:
Fire the mug to maturity (Cone 5, 6, or 10 depending on your stoneware). Ensure the feet are wiped clean on the very bottom before loading.
Once fired, fill your cauldron with a warm brew and enjoy the cozy, magical weight of your handmade creation
Haunted House Luminary
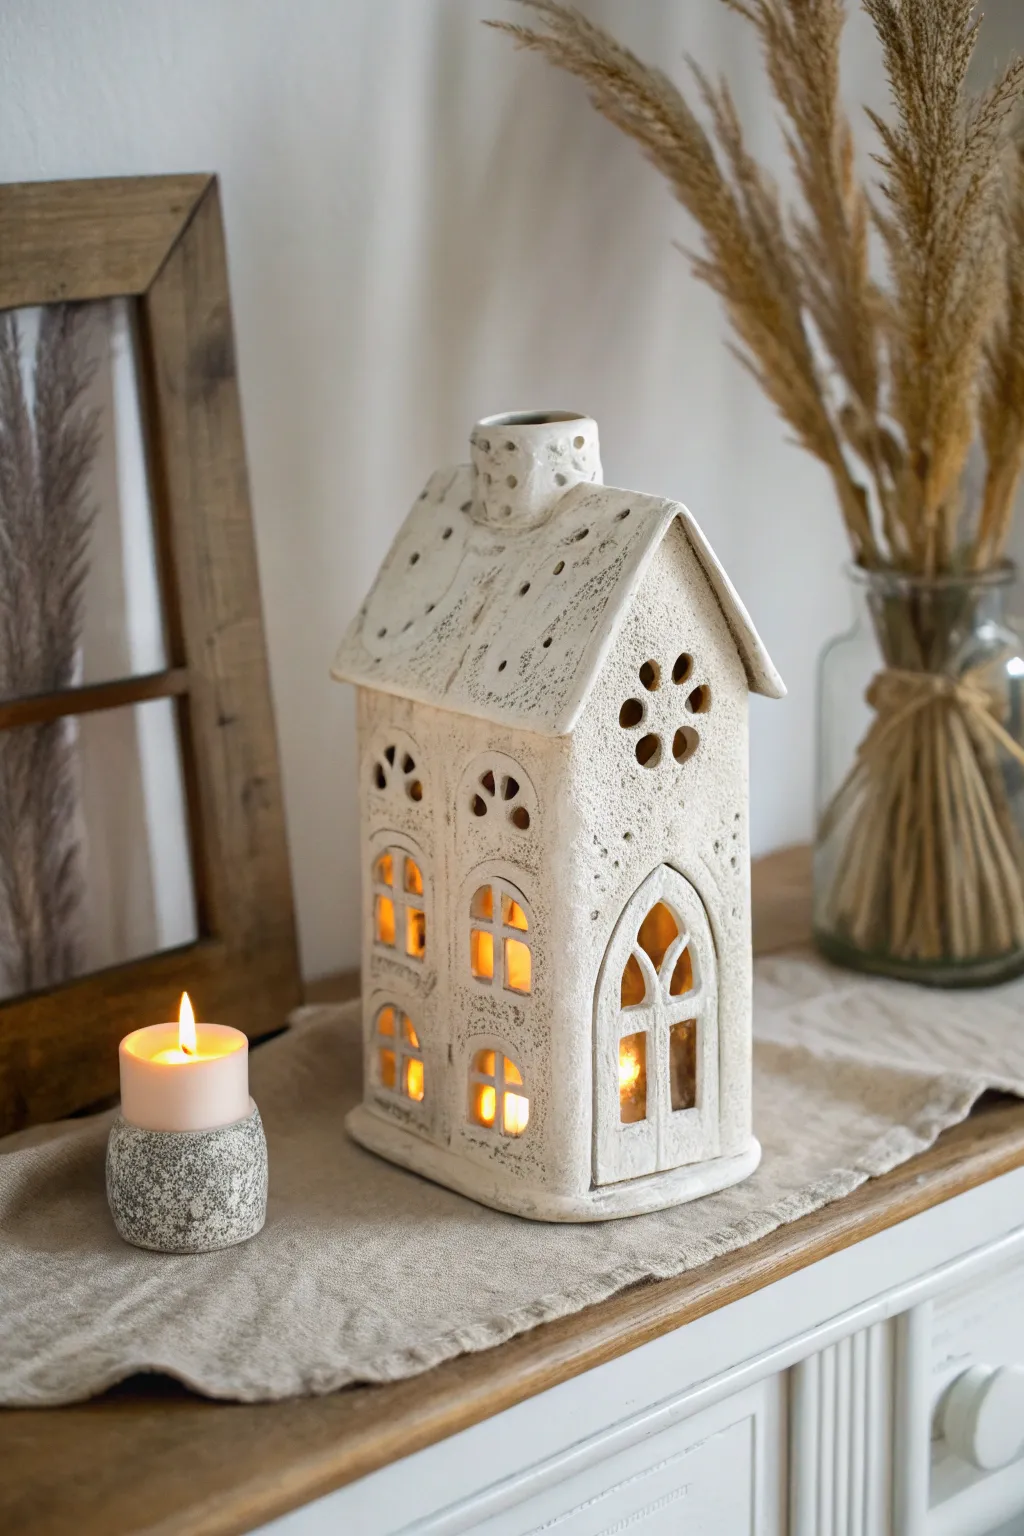
Create a cozy, slightly spooky atmosphere with this handcrafted ceramic house luminary. Its rustic, textured finish and warm, glowing windows make it a sophisticated addition to any Halloween mantel display.
Step-by-Step
Materials
- Stoneware clay (groggy or speckled clay adds nice texture)
- Rolling pin and canvas or slab roller
- Fettling knife or needle tool
- Paper templates (walls, roof, floor)
- Slip and scoring tool
- Textured sponge or burlap (optional for surface texture)
- Rectangular and arched clay cutters (or use a knife)
- Drill bit tool or chemical hole punch
- White or cream matte glaze
- Black oxide wash or dark underglaze (for antiquing)
- Kiln
Step 1: Slab Construction
-
Prepare templates:
Sketch and cut out paper templates for the house components: two tall gable-end walls, two rectangular side walls, two roof rectangles, and a base. This house is taller than it is wide, so accentuate the height in your wall templates. -
Roll out slabs:
Roll your clay into an even slab, approximately 1/4 inch thick. Compression is key here to prevent warping later, so smooth both sides with a rib tool. -
Texture:
If you want that aged stone look right from the start, gently press a piece of coarse burlap or a textured sponge into the surface of your slabs before cutting. -
Cut components:
Lay your paper templates onto the leather-hard clay and trace around them with a needle tool. Cut out all pieces cleanly with a fettling knife. -
Dry to leather hard:
Let the pieces stiffen up until they can hold their shape without bending. This is crucial for standing up those tall walls.
Uneven Wobbly Walls
If walls sag during assembly, leather-hard clay was too wet. Use props (boxes or jars) to support walls while the slip sets, or dry longer.
Step 2: Carving Details
-
Cut lower windows:
On the front panel, cut out two arched windows near the bottom. Leave a thin strip of clay in the center to create a mullion, or add a separate thin coil later to divide the pane. -
Add upper windows:
Above the main windows, cut smaller arched openings. For the attic space under the gable, I like to create a decorative circular cutout or a small rose window pattern using a small round cutter. -
Side ventilation:
Don’t forget the sides and back—cut matching arched windows there too. This is essential for airflow so your candle burns properly. -
Chimney prep:
Fashion a small cylinder for the chimney. Use a drill tool to poke random, decorative holes in it, which will let smoke and light escape. -
Roof detailing:
Take your roof slabs and use a small hole punch or drill bit to create patterns of tiny dots along the edges or surface, simulating wear or decorative tiling.
Spooky Light FX
Use colored transparent glazes inside the windows (yellow or orange) to create a permanent ‘glow’ even when unlit.
Step 3: Assembly
-
Score and slip:
Thoroughly score and slip all connecting edges of your walls and base. Join the four walls first, reinforcing the inside seams with a thin coil of clay smoothed down. -
Attach the roof:
Score the top edges of the walls and attach the two roof panels. Ensure they meet cleanly at the peak. Smooth the peak seam well. -
Mount the chimney:
Score the spot on the roof ridge where the chimney will sit. Attach the chimney securely, smoothing the connection point so it looks seamless. -
Optional door frame:
Roll a thin coil or cut a narrow strip of clay and attach it around the main door or lower windows to create a protruding stone frame effect. -
Slow drying:
Cover the house loosely with plastic and let it dry very slowly to prevent cracking, especially at the join lines.
Step 4: Buttermilk Finish
-
Bisque fire:
Fire the piece to bisque temperature (usually Cone 04 or 06). -
Apply wash:
Mix a very watered-down black iron oxide or dark stain. Brush it over the entire piece, getting into every texture mark and window crevice. -
Wipe back:
Using a damp sponge, wipe away most of the dark wash, leaving it only in the recessed deep textures to emphasize the ‘old stone’ look. -
Glaze application:
Pour or dip the house in a matte white or creamy antique glaze. The glaze should be somewhat opaque but break over the edges where the dark wash will show through. -
Final fire:
Fire to the maturity temperature of your clay and glaze (often Cone 5 or 6 for stoneware). The result should be a durable, stone-like finish.
Place a tea light inside and watch your haunted cottage come to life with a flickering warmth


What Really Happens Inside the Kiln
Learn how time and temperature work together inside the kiln to transform clay into durable ceramic.
Black Cat Candle Jar
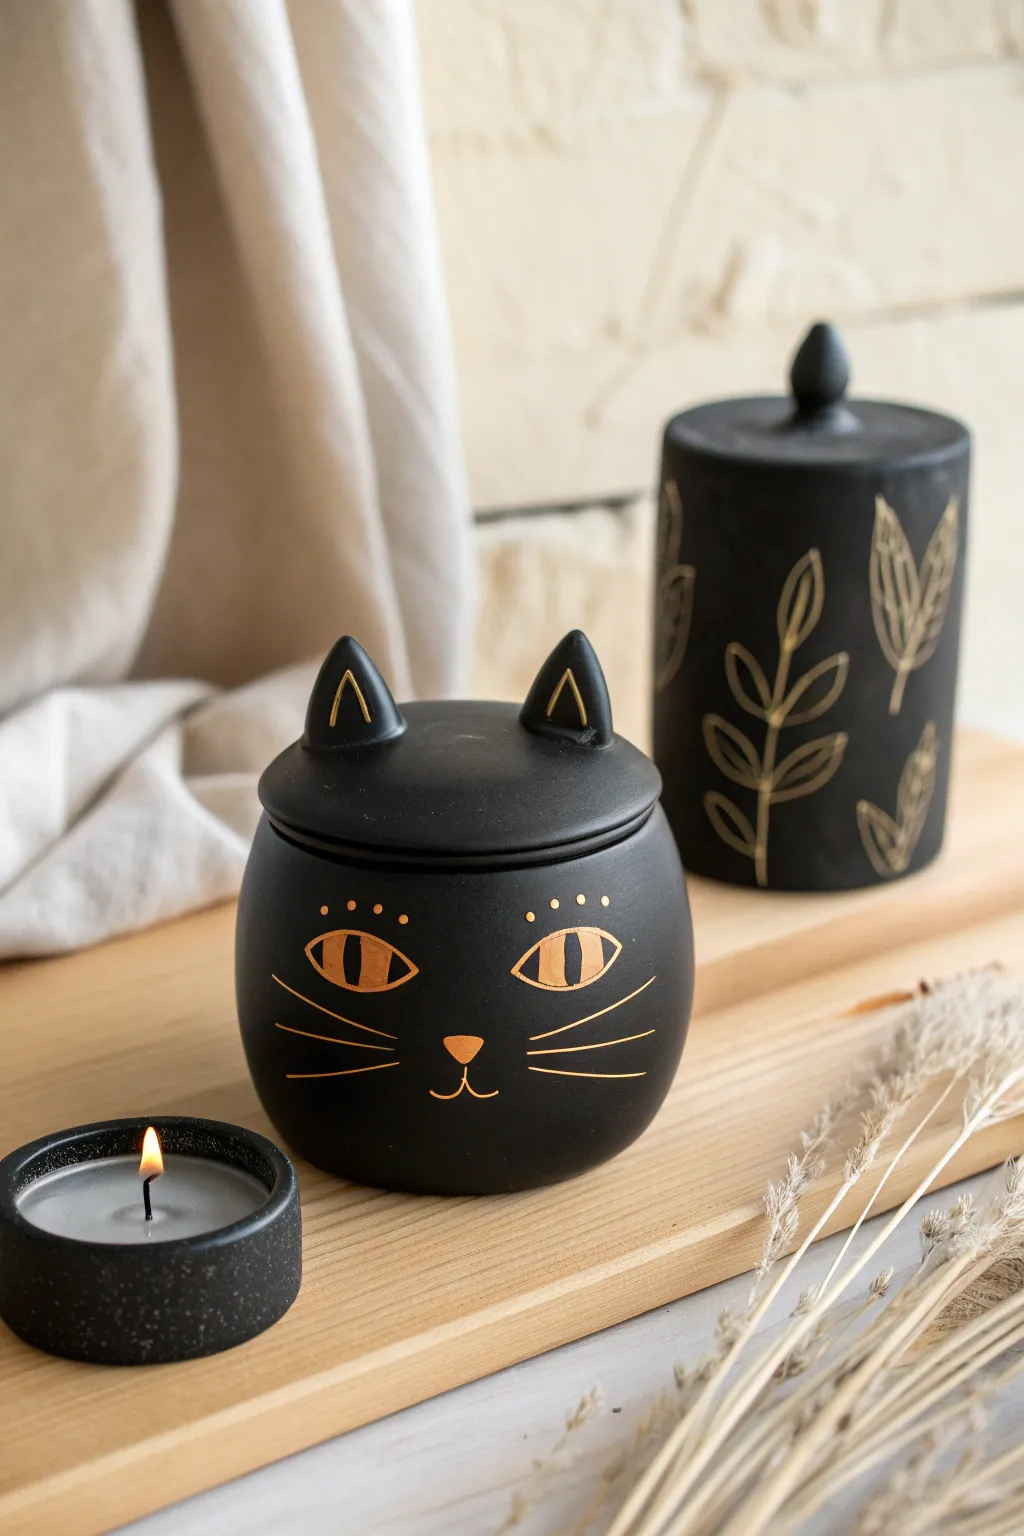
This whimsical black cat candle jar combines sleek modern pottery with festive Halloween charm. The matte black finish paired with subtle gold detailing creates a sophisticated piece that looks great all year round, not just in October.
Detailed Instructions
Materials
- White earthenware clay or stoneware clay
- Pottery wheel (or rolling pin for hand-building)
- Rib tool
- Sponge
- Pin tool or needle tool
- Clay trimming tools
- Matte black underglaze or glaze
- Gold luster or gold paint (post-firing)
- Fine liner paintbrush
- Clear glaze (optional for inside)
- Kiln
Step 1: Throwing or Building the Form
-
Center the clay:
Begin with a ball of clay about the size of a large orange. Center it on your pottery wheel, ensuring it feels stable and symmetrical before opening. -
Open and pull the walls:
Open the centered clay and pull the walls up to create a rounded, bulbous shape. You want a distinct curve for the cat’s head, narrowing slightly at the rim. -
Refine the shape:
Use a rib tool on the exterior while pushing gently from the inside to smooth the surface and define that nice, round curve. -
Create the gallery:
At the rim, split the clay slightly or push down to create a small gallery (a ledge) where the lid will eventually sit. -
Throw the lid:
Using a smaller amount of clay, throw a flat lid that precisely measures the diameter of your jar’s gallery. I usually measure twice with calipers to be sure. -
Trim the lid:
Once the lid is leather hard, trim the underside to remove excess weight and refine the fit. -
Add the ears:
Hand-build two small triangular shapes for ears. Score and slip the top of the lid, then firmly attach the ears, smoothing the seams so they look like one continuous piece.
Clean Lines Tip
Rest your painting hand on a steady surface or use a mahl stick to keep your hand from shaking while applying the delicate whiskers.
Step 2: Refining and Bisque Fire
-
Smooth the surface:
Wipe down the entire piece with a slightly damp sponge to remove any finger marks or rough texture. -
Dry slowly:
Let the jar and lid dry slowly under loosely wrapped plastic to prevent warping, especially around the rim. -
Bisque fire:
Once bone dry, load the pieces into the kiln for a bisque firing.
Add a Scent
Turn this into a functional candle by pouring soy wax and a pumpkin spice fragrance oil directly into the finished jar.
Step 3: Glazing and Decoration
-
Apply base color:
Apply 2-3 coats of matte black underglaze or glaze to the exterior of the jar and lid. Ensure even coverage for that solid, shadowy look. -
Glaze the interior:
If you plan to use this for food or liquid, pour a clear glossy glaze inside. If it’s just for a candle, the black glaze works inside too. -
Glaze fire:
Fire the piece again according to the temperature requirements of your chosen black glaze. -
Paint the gold details:
Using a very fine liner brush and gold luster (or gold enamel paint for a no-fire option), carefully paint the triangular ear insets. -
Add the eyes:
Paint large almond shapes for the eyes, leaving a slit of black in the center for the pupil. -
Draw the face:
Add the small triangular nose, the mouth curves, and the three whiskers on each side using delicate, confident strokes. -
Final cure or fire:
If using real gold luster, fire the piece a third time at a lower temperature (usually cone 018). If using paint, allow it to cure fully.
Now you have a charming feline guardian ready to hold your favorite autumn scents
Witch Hat Ring Dishes
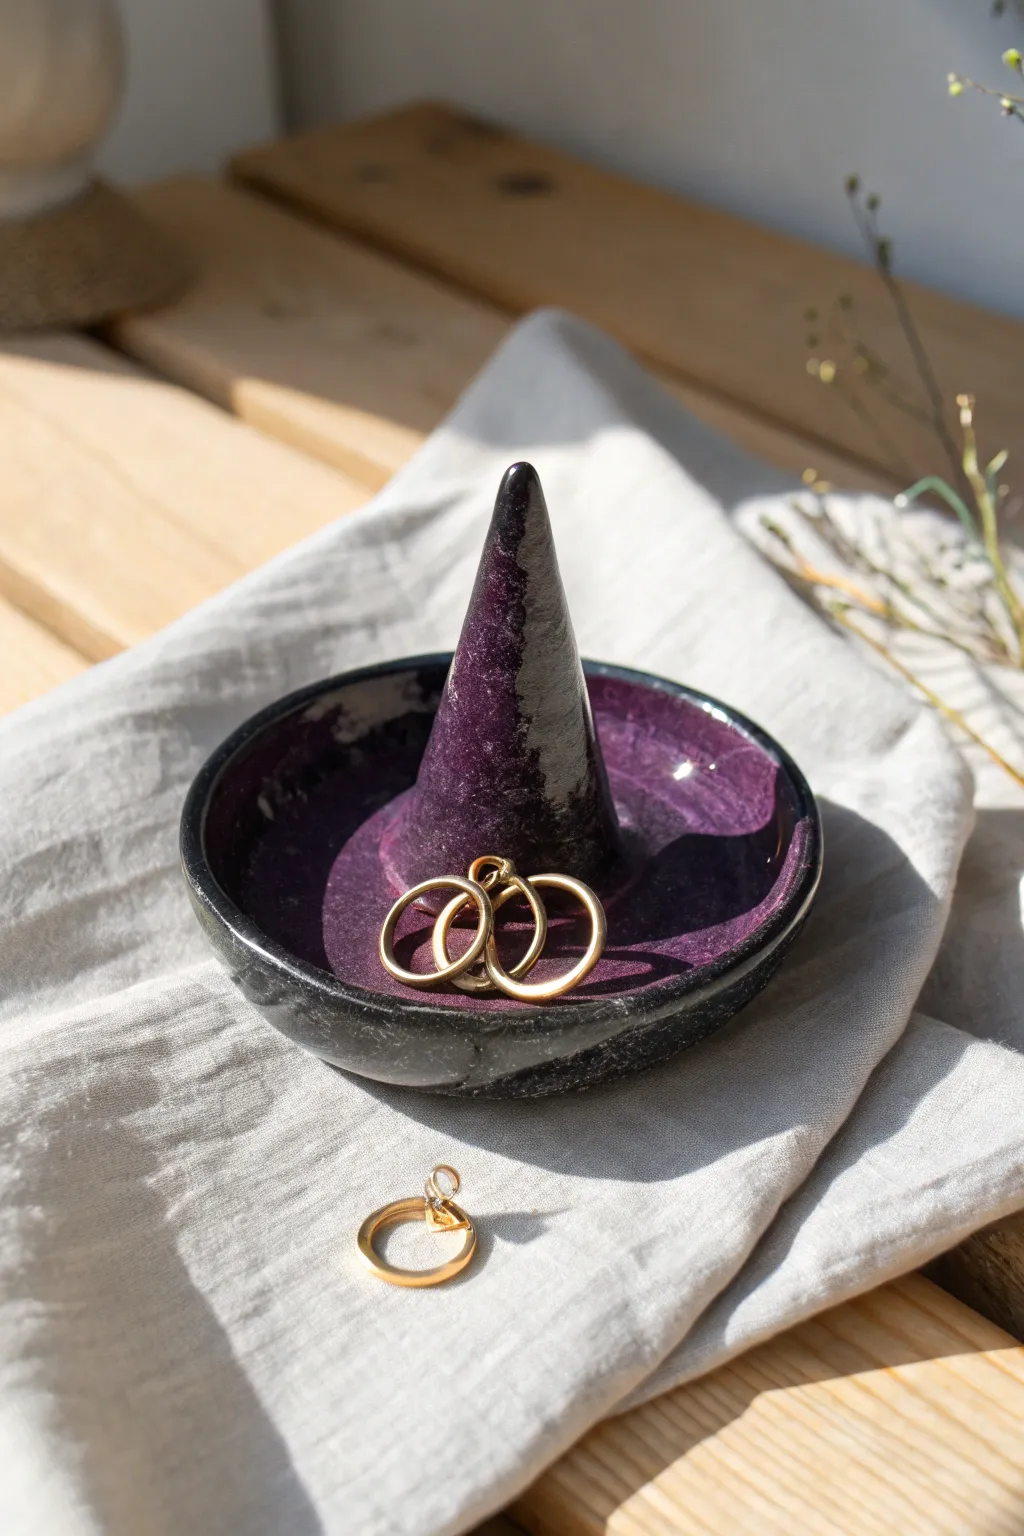
Cast a spell on your jewelry storage with this darkly elegant witch hat ring dish. Its deep purple glaze and distinctive conical shape make it the perfect resting place for your favorite magical trinkets.
Detailed Instructions
Materials
- Stoneware clay (smooth body recommended)
- Pottery wheel (or can be hand-built)
- Throwing bats
- Pin tool or needle tool
- Wire cutter
- Sponge
- Rib tool (metal or rubber)
- Trimming tools
- Underglaze (deep purple)
- Clear glaze or glossy black glaze
- Kiln
Step 1: Forming the Base Dish
-
Center the Clay:
Start by wedging about 1 pound of clay to remove air bubbles. Secure it to your wheel head and use water to center it perfectly. A centered mound is crucial for the symmetry of the hat brim. -
Open the Mound:
Press your thumbs into the center to open the clay, but don’t go as deep as you would for a mug. Leave a thicker floor (about 1/2 inch) because we will be attaching a cone later, or pulling one from the center. -
Flatten the Floor:
Compress the floor with your fingers or a flat tool. Pull the walls out gently to create a wide, shallow bowl shape. This serves as the ‘brim’ of the witch hat. -
Curve the Rim:
Use a sponge or a soft rib to gently curve the outer rim inward slightly. This creates a lip that keeps jewelry contained within the dish.
Cone Wobble Fix
If your hat point keeps slumping over while wet, insert a chopstick or thin dowel into the center of the cone for internal support until it firms up leather hard.
Step 2: Sculpting the Hat Cone
-
Option A: Pulling from Center:
If you left a thick hump in the middle while opening, use your fingers to pull that excess clay upward into a cone shape directly. This is tricky but creates a seamless piece. -
Option B: Attaching a Coil:
It’s often easier to make the cone separately. Roll a thick coil of clay into a carrot shape. Score and slip the center of your dish floor and the bottom of your clay cone. -
Refine the Connection:
Press the cone firmly into the center. Use a modeling tool to blend the seams completely so the cone looks like it grew out of the dish. -
Shape the Point:
Gently squeeze and pull the clay upward to sharpen the tip of the hat. A slightly crooked tip adds character, but keeping it straight is classic. -
Smooth the Surface:
Run a damp sponge or a soft rubber rib over the entire cone to remove fingerprints and ensure a sleek, magical finish.
Cosmic Dust
Before the final firing, flick a stiff toothbrush loaded with white or gold overglaze onto the dark purple surface to create a starry night galaxy effect.
Step 3: Finishing and Glazing
-
Dry to Leather Hard:
Let the piece dry slowly until it is leather hard. This is the perfect stage for trimming any excess weight from the bottom of the dish. -
Trim the Foot:
Flip the dish over (you may need a chuck or foam bat to protect the point) and trim a neat foot ring. This elevates the brim off the table slightly. -
Bisque Fire:
Allow the piece to dry completely (bone dry) before loading it into the kiln for a bisque firing. -
Apply Purple Base:
Once bisqued, apply 2-3 coats of deep violet underglaze to the inside of the dish and the cone. I like to leave the application slightly uneven to create depth. -
Add Dark Accents:
Use a sponge to dab a bit of black underglaze or glaze around the rim and the very tip of the hat for a shadowed, moody look. -
Clear Glaze:
Dip or brush a coat of clear transparent glaze over the entire piece to make those purple tones pop and give it a glossy, glass-like surface. -
Glaze Fire:
Fire the piece again to your clay body’s recommended glaze temperature (often Cone 5 or 6 for stoneware).
Place this enchanting dish on your vanity and let it hold your treasures safe

TRACK YOUR CERAMIC JOURNEY
Capture glaze tests, firing details, and creative progress—all in one simple printable. Make your projects easier to repeat and improve.
Tombstone Place Cards

These miniature ceramic tombstones add a playfully morbid touch to your Halloween table setting while guiding guests to their seats. Their speckled, stone-like texture and classic arched shape mimic real grave markers, creating a sophisticated yet spooky centerpiece detail.
Step-by-Step
Materials
- Speckled clay body (buff or gray stoneware)
- Rolling pin
- Canvas work surface or slab mat
- Pottery knife or fettling knife
- Needle tool
- Paper template (arch shape)
- Ruler
- Scoring tool or serrated rib
- Slip (clay and water slurry)
- Wooden modeling tool or flat rib
- Cardstock and fine-tip pen
- Double-sided tape or adhesive dots
- Clear matte glaze (optional)
Step 1: Shaping the Slab
-
Roll the clay:
Start by wedging your speckled clay to remove air bubbles, then roll it out into an even slab. Aim for a thickness of about 1/4 to 3/8 inch to ensure the tombstone stands up straight without warping. -
Create a template:
Sketch a simple arch shape on a piece of paper or cardstock to serve as your tombstone guide. Cut a separate rectangle for the base, making it slightly wider and deeper than the arch to provide stability. -
Cut the main shape:
Place your arch template onto the clay slab and trace around it with a needle tool. Use your fettling knife to make clean, vertical cuts, removing the excess clay. -
Cut the base:
Measure and cut the rectangular base piece from the same slab. It’s helpful to smooth the edges of this piece immediately with a slightly damp sponge to remove any sharp burs.
Pro Tip: Weathering
Before firing, wipe the clay with a damp dark slip or iron oxide wash, then sponge most of it off. The dark pigment will stay in the crevices, making the ‘stone’ look ancient.
Step 2: Adding Dimension and Detail
-
Create the border:
To mimic the recessed panel look, roll a very thin coil of clay—think spaghetti thickness. Alternatively, you can cut a second, slightly smaller arch from a thinner slab if you prefer a layered relief look. -
Define the nameplate area:
I prefer to lightly impress a rectangular shape into the center of the arch using a flat tool or a small block. This creates a guide for where the name card will eventually sit and adds visual depth. -
Refine the surface:
Use a damp sponge or a soft rib to smooth out the flat surfaces. Since we want a stone effect, don’t worry about making it perfectly pristine; a few dings add character. -
Soften the edges:
Run a finger or a chamois cloth along the cut edges of the arch to round them off slightly, making the piece look like weathered stone rather than freshly cut clay.
Level Up: Cracks
Use a needle tool to carve tiny hairline cracks into the corners of the tombstone arch. These faux defects make the miniature monuments look wonderfully old and decrepit.
Step 3: Assembly and Finishing
-
Score the connection points:
Score the bottom edge of the upright tombstone piece and the center of the rectangular base where they will join. You need a rough texture for a strong bond. -
Apply slip:
Dab a generous amount of slip onto the scored areas of both pieces. It acts as the glue that fuses the clay particles together. -
Join the pieces:
Press the tombstone firmly onto the base. Wiggle it very slightly to lock the pieces together, checking from the side to ensure it is standing perfectly vertical at a 90-degree angle. -
Reinforce the seam:
Roll a tiny coil of clay and press it into the seam where the arch meets the base. Smooth this coil out with a modeling tool to create an invisible transition and strengthen the joint. -
Final texture check:
Look over the piece for any unwanted fingerprints. If you want more ‘age,’ tap the surface lightly with a rock or coarse sponge to enhance the stony texture. -
Dry slowly:
Place the assembled place cards under plastic to dry very slowly. Uneven drying might cause the intricate connection between the base and the arch to crack. -
Bisque fire:
Once bone dry, fire the pieces in a kiln to cone 04 (or your clay body’s specifications). This hardens the clay permanently. -
Glazing (Optional):
You can leave the raw stoneware for a natural look, or apply a clear matte glaze to seal it. Avoid thick, glossy glazes which might obscure the speckled clay texture. -
Add the names:
After the final firing is complete and the piece is cool, cut small rectangles of white cardstock or sturdy paper. Write your guests’ names in a gothic or serif font. -
Mount the cards:
Attach the name cards into the recessed center area using a small piece of double-sided tape or a glue dot.
Set these heavy little markers at each setting to give your table a grounding, Gothic charm that guests will love taking home
Monster Face Goblets

This whimsical monster goblet is the perfect Halloween vessel, featuring a speckled pumpkin-orange glaze and a playful three-eyed grin. The simple, bold lines and primitive toothy smile give it a charming folk-art feel that is spooky but sweet.
Detailed Instructions
Materials
- Stone stoneware clay (or similar wheel-throwing clay)
- Pottery wheel
- Throwing tools (sponge, rib, wire cutter)
- Trimming tools
- Underglaze pencil or fine brush
- Black underglaze
- White underglaze
- Speckled orange stoneware glaze (glossy)
- Small detailing brushes
- Clear glaze (optional, depending on your orange glaze)
- Kiln
Step 1: Throwing the Form
-
Center the clay:
Start with a ball of well-wedged clay (about 1.5 – 2 lbs) on the wheel. Secure it firmly and center it using steady pressure and water. -
Open the vessel:
Open the centered clay, but don’t go all the way to the bat. Leave a substantial amount of clay at the base—more than you would for a mug—because we need to pull a stem later. -
Pull the walls:
Pull the walls upward to create the cup portion. Aim for a rounded, bulbous shape that sits comfortably in two hands. Smooth the rim with a chamois. -
Shape the stem:
Using a rib or your fingers, compress the clay at the base of the cup inward to create a waist. Keep the very bottom flared out to form a sturdy foot. -
Refine the profile:
Use a metal rib to smooth the exterior, defining the curve between the cup bowl and the flared stem. Cut the goblet off the wheel and let it dry to leather hard.
Step 2: Trimming & Surface Prep
-
Trim the foot:
Once leather hard, place the goblet upside down on a chuck or in a Giffin Grip. Trim the underside of the foot to create a clean, recessed area, removing excess weight. -
Smooth the surface:
Wipe the exterior gently with a damp sponge to remove any trimming marks or burrs. The surface needs to vary smooth for the face design. -
Sketch the design:
Lightly sketch your monster face using a dull pencil. Mark out three large circles for eyes and a wide line for the mouth. Add a zig-zag border near the rim.
Use Underglaze Pencils
For the black outlines, try a black underglaze pencil on bisque ware. It gives a sketchier, crayon-like texture that enhances the ‘monster’ look.
Step 3: Painting the Monster
-
Outline in black:
Using a very fine liner brush and black underglaze, paint over your pencil lines. Create the zig-zag rim, the three eye circles, and the wide mouth line. -
Add the teeth:
Paint triangular spikes hanging down from the top lip of the mouth line to create teeth. I find it easier to brace my pinky against the pot for stability here. -
Fill the eyes:
Using white underglaze, carefully fill in the three large eye circles. You may need 2-3 coats for solid opacity against the clay body. -
Fill the teeth:
Fill the small triangular teeth with white underglaze as well. Be careful not to paint over your black outlines. -
Add pupils:
Once the white underglaze is dry to the touch, paint a solid black dot in the center of each eye. -
Stem details:
While you have the black underglaze out, paint two parallel horizontal rings around the stem of the goblet. -
Bisque fire:
Load the bone-dry goblet into the kiln and bisque fire to cone 04 (or your clay’s specific bisque temperature).
Make it a Set
Make a matching set by varying the number of eyes (one cyclops, two eyes, or five!) or changing the mouth expression on each different goblet.
Step 4: Glazing & Final Fire
-
Wax resist:
Apply wax resist carefully over the white parts of the eyes and teeth. This prevents the orange glaze from tinting your monster’s bright smile. -
Apply orange glaze:
Dip the entire goblet into a speckled orange stoneware glaze. Alternatively, brush on 3 coats, ensuring even coverage. -
Clean the lines:
If the orange glaze is opaque, you might need to wipe it back slightly from the black lines with a sponge so the drawing shows through, or rely on the glaze breaking over the texture. -
Glaze the interior:
Pour the same orange glaze inside the cup, swirl to coat, and pour out the excess. Make sure the rim is fully coated. -
Wipe the foot:
Thoroughly wipe all glaze off the bottom of the foot where it will touch the kiln shelf. -
Final firing:
Fire the goblet to the maturation temperature of your glaze and clay (typically cone 5 or 6 for stoneware).
Now you have a delightfully spooky goblet ready to hold your favorite witches’ brew
Potion Bottle Bud Vases
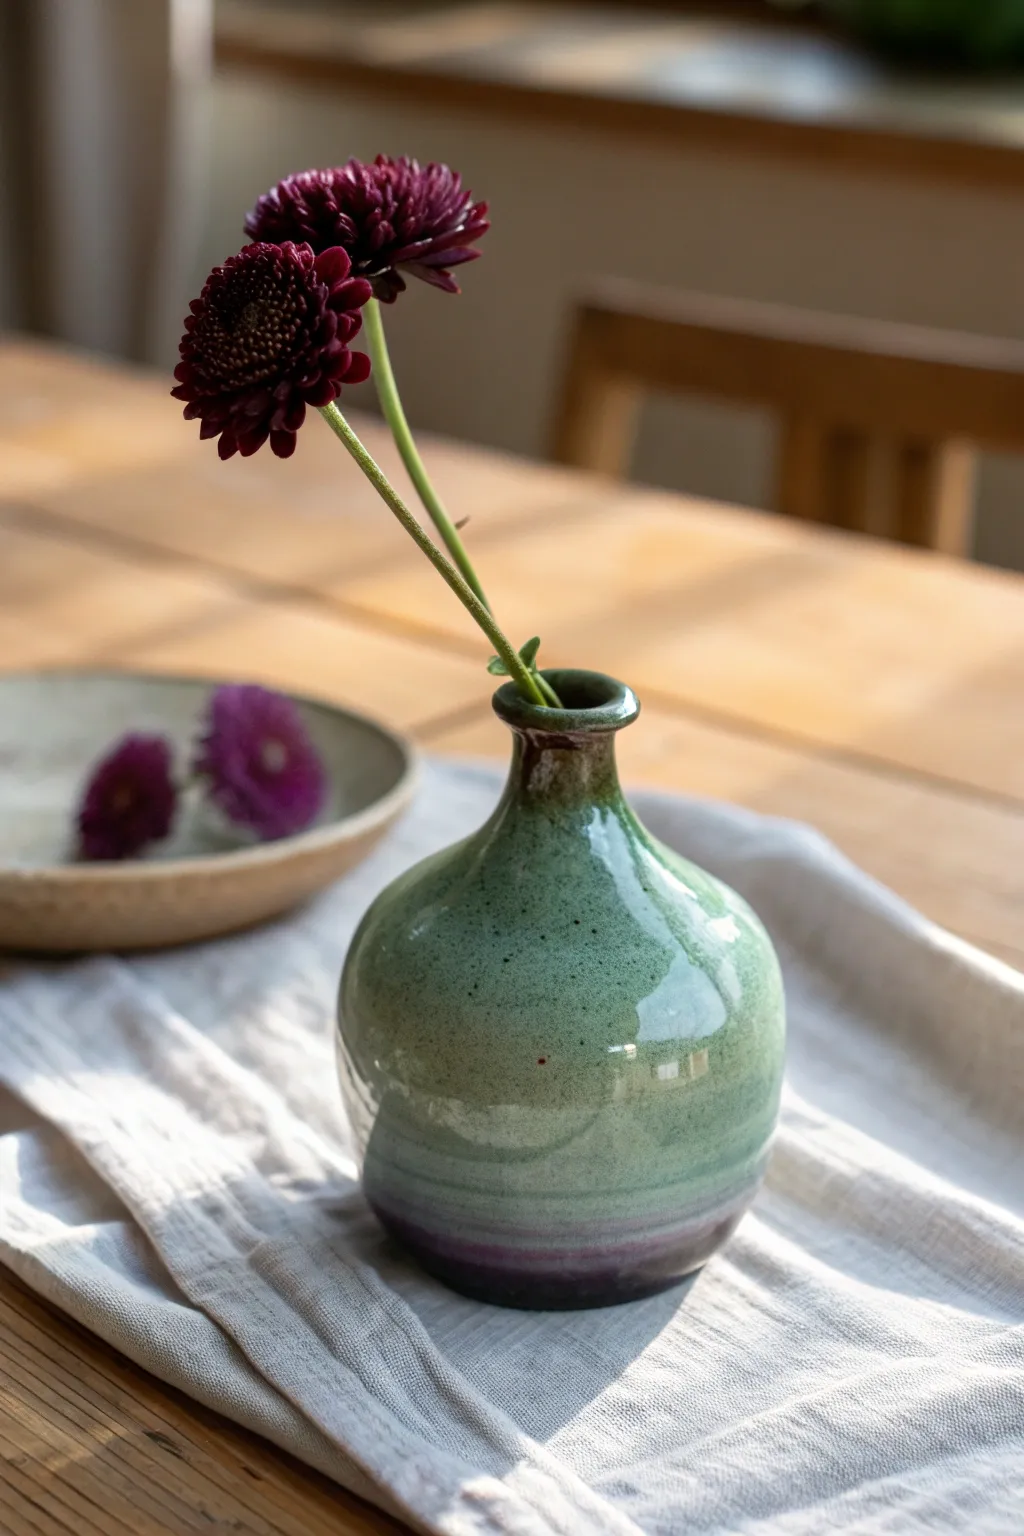
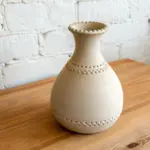
Transform a simple lump of clay into a mysterious vessel perfect for holding your most potent floral ingredients. This small-necked potion bottle features a glossy, speckled green glaze that fades into deep purple hues, evoking the look of a witch’s bubbling brew.
Step-by-Step Guide
Materials
- Stoneware clay (smooth or with grog)
- Pottery wheel
- Medium throwing sponge
- Needle tool
- Wire cutter
- Wooden throwing rib
- Trimming tools (loop tools)
- Speckled green glaze (glossy)
- Deep purple or eggplant glaze
- Small soft fan brush
- Wax resist
Step 1: Throwing the Form
-
Center the clay:
Start with a ball of clay about the size of a large orange. Secure it to the wheel head and center it well, as symmetry is key for a bottle shape. -
Open and compress:
Open the clay down to the bat, leaving about a quarter-inch for the floor. Compress the bottom with your sponge or a wooden tool to prevent S-cracks later. -
Pull the cylinder:
Create your initial pulls to form a standard cylinder walls. Keep the walls slightly thicker than you would for a mug, as you’ll need material to belly out the form. -
Shape the belly:
Using a rib on the outside and your hand on the inside, gently push the clay outward from the bottom to create a rounded, bulbous base. Leave the top third of the cylinder relatively straight. -
Collar the neck:
Create the ‘bottle’ look by collaring the top third inward. Use wet hands to encircle the clay and gently squeeze inward while the wheel spins, gathering the clay toward the center. -
Refine the rim:
Once the neck is sufficiently narrow (about finger-width), use your needle tool to trim the top edge if it’s uneven. Smooth the rim with a chamois or sponge, flaring it out very slightly. -
Cleanup:
Use a wooden modeling tool to undercut the base, creating a shadow line. Run a wire tool under the pot to separate it from the bat.
Collaring Issues
If the neck ripples or twists while narrowing it, you’re squeezing too hard or the clay is too dry. Add a little slip, speed up the wheel slightly, and use gentler pressure.
Step 2: Trimming and Bisque
-
Dry to leather hard:
Allow the piece to dry slowly until it is firm enough to handle without deforming but still cool to the touch. -
Trim the foot:
Center the pot upside down on the wheel. Use a sharp loop tool to trim away excess weight from the bottom and define a clean foot ring. -
Smooth the surface:
At this stage, I like to run a slightly damp sponge over any trimming marks to ensure the glaze will flow smoothly over the curves. -
Bisque fire:
Load the bone-dry vase into the kiln and bisque fire it to cone 04 (or your clay body’s specific requirement).
Aged Aesthetic
Before the bisque firing, gently tap the leather-hard exterior with a textured paddle or a rough stone. This creates an ancient, weathered look tailored for a witch’s cupboard.
Step 3: Glazing the Potion
-
Wax the foot:
Apply wax resist carefully to the bottom of the foot ring and slightly up the side to prevent glaze from running onto the kiln shelf. -
Dip the base coat:
Dip the entire vase into your speckled green glaze. Hold it by the foot and submerge it quickly but fully. Shake off excess drips and let it dry. -
Apply the bottom gradient:
Once the green layer is dry to the touch, brush a band of deep purple glaze around the bottom third of the vessel. -
Feather the transition:
Use a barely damp brush to feather the top edge of the purple band, blending it slightly into the green to create a soft, ombre haze rather than a hard line. -
Final Fire:
Glaze fire the piece to the recommended temperature for your glaze (typically cone 5 or 6 for stoneware). The heat will melt the specs and blend the colors into that magical finish.
Place a single dark bloom in your finished vase and watch your potion bottle come to life
Sgraffito Night Sky Plates
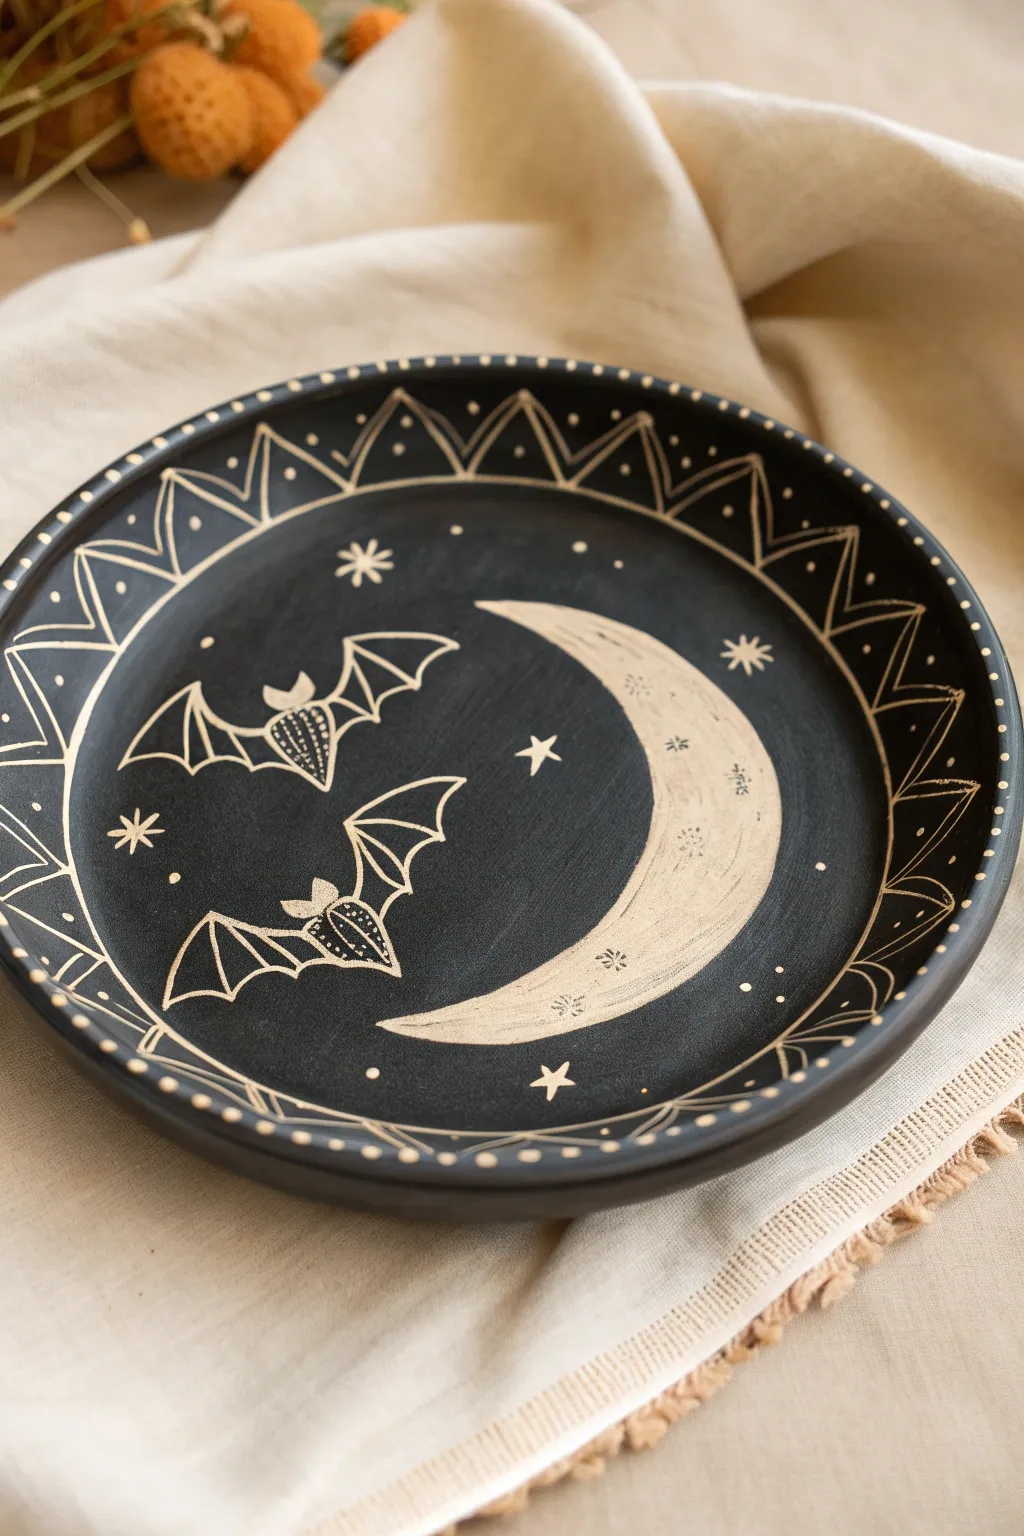
This striking ceramic project uses the satisfying technique of sgraffito to carve crisp details into a dark surface, revealing the lighter clay body beneath. The result is a moody, magical plate featuring dancing bats and a crescent moon that’s perfect for your Halloween table setting.
Step-by-Step Guide
Materials
- Leather-hard clay plate (white stoneware or porcelain recommended)
- Black underglaze
- Wide soft bristle brush (hake or fan brush)
- Sgraffito tools (ribbon tool, needle tool, small loop tool)
- Pencil
- Tracing paper (optional)
- Damp sponge
- Clear transparent glaze
- Kiln access
Step 1: Preparation & Underglazing
-
Check clay consistency:
Ensure your formed clay plate is at a perfect leather-hard stage. It should be firm enough to handle without warping, but soft enough to carve into easily. If it feels too tacky, let it dry for another hour. -
Clean surface:
Gently wipe the surface of the plate with a clean, barely damp sponge. This removes any dust or grog that might interfere with a smooth underglaze application. -
Apply first coat:
Using a soft, wide brush, apply a generous coat of black underglaze to the entire interior surface of the plate. Brush in one direction for even coverage. -
Layer up:
Allow the first coat to become touch-dry (it will look matte instead of glossy), then apply a second coat brushing in the opposite direction (cross-hatching). I usually do three coats total to ensure solid opacity. -
Rim detail:
Don’t forget the rim! Carefully paint the very edge of the plate so the black transitions cleanly to the underside. -
Drying:
Let the underglaze dry until it is no longer tacky to the touch. The clay should still be leather-hard underneath; if it gets bone dry, carving becomes brittle and chippy.
Clean Lines Pro Tip
Keep your tools sharp! Dull loop tools drag and tear the clay rather than slicing it cleanly. If your lines look jagged, pause and sharpen your tool or switch to a fresh blade.
Step 2: Designing & Carving
-
Plan the layout:
Lightly sketch your design directly onto the black surface using a regular pencil. The graphite will shine slightly against the matte black, making it visible, but will burn off in the kiln. -
Carve the moon:
Start with the large crescent moon on the right side. Use a wider ribbon tool to scrape away the black underglaze, revealing the white clay underneath. Keep your strokes following the curve of the moon. -
Outline the bats:
Switch to a fine needle tool or small diamond-point tool to scratch the sharp outlines of the distinctive bat wing shapes. -
Detail the wings:
Inside the bat wings, use the needle tool to draw the structural lines (the ‘fingers’ of the wing). Add tiny dots or texture on the bat bodies for extra interest. -
Add texture to the moon:
Return to the large moon shape. Use a needle tool to scratch small ‘x’ shapes and dots into the white area you cleared earlier to mimic craters and texture. -
Create the border:
Carve a continuous line just inside the rim of the plate. Then, carve a zigzag pattern (triangles) between this line and the outer edge. -
Decorate the border triangles:
Inside each triangle along the rim, add a single straight line down the center. Add small dots in the negative spaces between the triangles. -
Scatter the stars:
Fill the empty black space around the bats and moon with varied stars. Carve some as simple five-pointed lines and others as single dots to create depth. -
Cleanup:
Use a large, dry, soft brush to gently sweep away all the clay crumbs (burrs) created by carving. Do not rub them with your finger, or you might smear the black underglaze into your white lines.
Step 3: Firing & Finishing
-
Bisque fire:
Allow the plate to dry completely to the bone-dry stage. Load it into the kiln for a bisque firing (usually cone 04 or 06). -
Clear glaze application:
Once bisqued, wipe the plate down with a damp sponge to remove dust. Apply a coat of clear transparent glaze over the entire piece. -
Glaze firing:
Fire the plate for the final glaze firing according to your clay body’s specifications (typically cone 5 or 6 for stoneware).
Gilded Level Up
After the final glaze firing, apply a low-fire gold overglaze luster to the stars or the moon craters and fire a third time (cone 018) for real metallic shine.
Now you have a stunning, food-safe piece of art that captures the mystery of a midnight sky.
Haunted Ship Candy Dish
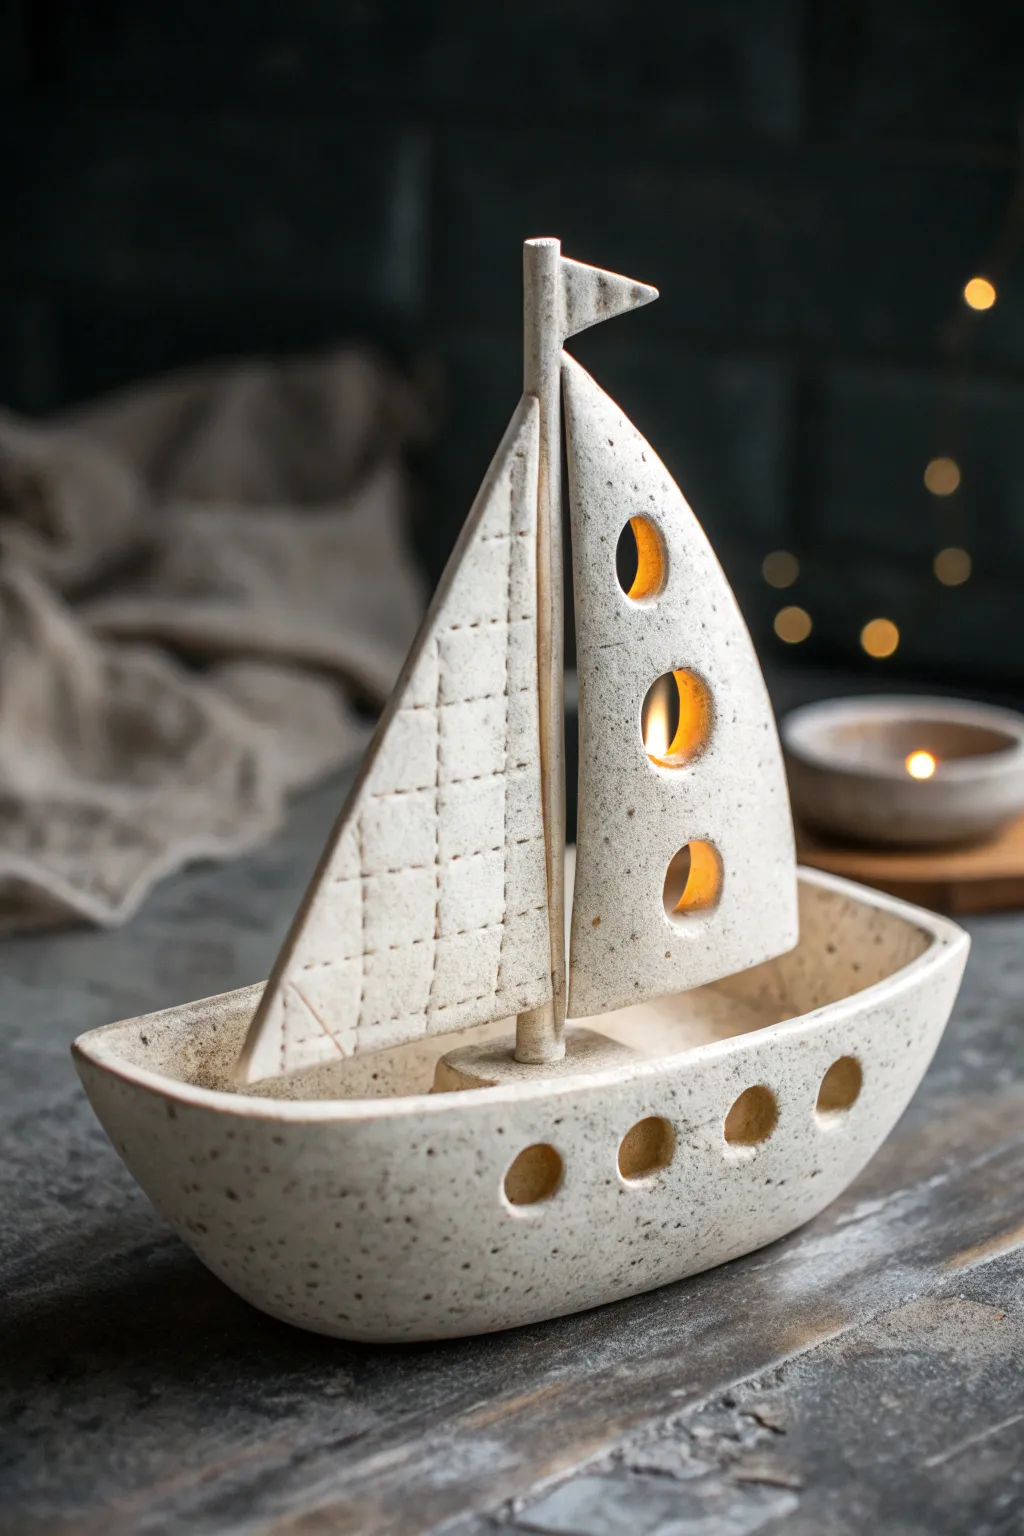
Set sail for spooky shores with this charming ceramic vessel, perfect for holding treats or flickering LED tea lights. The piece features a wonderful speckled stoneware finish and textured sails that evoke the tattered remains of a ghost ship.
Step-by-Step Guide
Materials
- Speckled stoneware clay
- Rolling pin
- Slab roller (optional)
- Needle tool
- Fettling knife
- Scoring tool (or serrated kidney)
- Slip (clay mixed with water)
- Circular hole cutters (various sizes)
- Wooden dowel (approx. 1/4 inch diameter)
- Canvas or ware board
- Sponge
- Clear matte glaze
Step 1: Constructing the Hull
-
Roll the slab:
Start by rolling out a medium-sized slab of speckled clay to about 1/4 inch thickness. Ensure the thickness is even to prevent warping during firing. -
Cut the hull shape:
Using a needle tool, cut a large, elongated oval shape which will become the body of your ship. It should be roughly 10 inches long and 5 inches wide. -
Form the boat shape:
Gently lift the sides of the oval, curving them upwards to create the boat’s concave form. Pinch the two ends together to form the prow and stern, smoothing the seams on both the inside and outside so they disappear completely. -
Refine the rim:
Run a damp sponge along the top rim of the hull to smooth out any sharp edges or unevenness created during the pinching process. -
Add portholes:
Once the clay is leather-hard, use a small circular hole cutter to punch four evenly spaced holes along one side of the hull. -
Create the mast anchor:
Form a small mound of clay and attach it firmly to the center floor of the boat using the score and slip method. Poke a vertical hole in the center of this mound to accept the mast later.
Slumping Sails?
If the sails are too heavy and won’t stand straight while wet, prop them up with crumpled newspaper or small sponges until the clay reaches leather-hard stiffness.
Step 2: Creating the Sails
-
Cut the triangular sails:
Roll a second slab, slightly thinner than the hull. Cut two triangles: one large right-angled triangle for the main sail, and a smaller right-angled triangle for the jib. -
Texture the jib:
On the smaller triangle, use your needle tool to lightly draw a grid pattern. Press gently to create indentations without cutting all the way through, mimicking sewn fabric panels. -
Cut sail details:
On the larger main sail, use circular cutters in three different sizes to punch out vertical holes. This adds visual interest and allows candlelight to shine through. -
Prepare the mast:
Shape a long, thin cylinder of clay or use an extruder to create the mast. It needs to be tall enough to support both sails. -
Assemble the sail unit:
Lay the mast flat on your work surface. Score and slip the vertical edges of both sails and attach them to the mast—one on each side. -
Add the flag:
Cut a tiny triangle for a pennant flag and attach it to the very top of the mast, pointing away from the main sail.
Step 3: Assembly and Finishing
-
Connect mast to hull:
Insert the bottom of your mast assembly into the anchor point you created in the hull. Use plenty of slip and blend the clay downwards to ensure a strong connection. -
Dry slowly:
This shape creates tension as it dries. Tent that plastic loosely over the ship to let it dry very slowly, preventing the mast from cracking away from the hull. -
Bisque fire:
Once bone dry, fire the piece to cone 04 (or your clay body’s bisque temperature). -
Glaze application:
Dip or brush a clear matte glaze over the entire piece. I find a matte finish highlights the natural speckles of the clay much better than a high gloss. -
Final firing:
Fire the piece to maturity (likely cone 5/6 for stoneware) to finish safely fusing the clay and glaze.
Ghostly Glow
Design the portholes specifically for LED tea lights. Measure your electric candles first and cut the hull holes slightly larger to accommodate shrinkage.
Fill the hull with candy corn or glowing lights to bring your phantom ship to life
Halloween Mask Wall Hanging
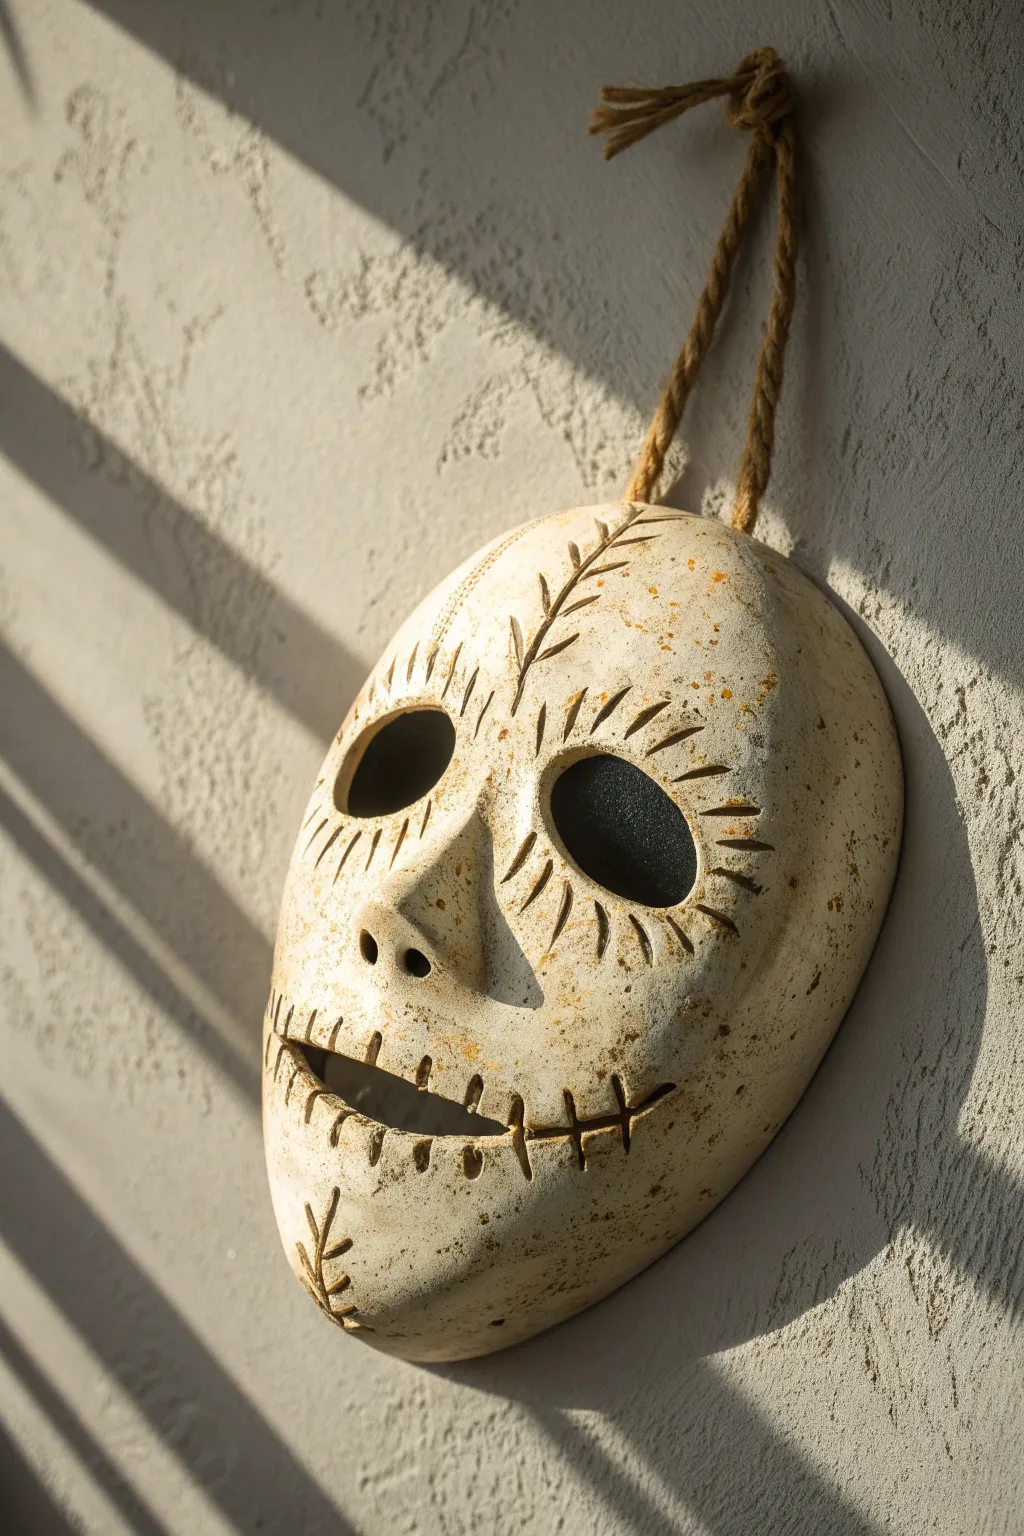
Embrace the eerie season with this charmingly rustic ceramic skull mask, perfect for adding a touch of Day of the Dead flair to your walls. The textured finish and earthy speckles give it an ancient, weathered look that feels both spooky and sophisticated.
How-To Guide
Materials
- Stoneware clay (buff or speckled)
- Pottery slab roller or rolling pin
- Plaster mold (face shape) or DIY newspaper armature
- Needle tool
- Loop tool or carving tools
- Sponge
- Fettling knife
- Hole punch or drinking straw
- Iron oxide wash or dark underglaze
- Matte clear glaze
- Twine or rustic rope for hanging
Step 1: Forming the Base
-
Roll the slab:
Begin by rolling out a slab of stoneware clay to a uniform thickness, roughly 1/4 to 3/8 of an inch thick. Ensure the slab is large enough to cover your intended mold size with a bit of overhang. -
Shape the mask:
Drape your clay slab over a convex plaster mold shaped like a face. If you don’t have a mold, create a rounded armature using crumpled newspaper covered in masking tape and plastic wrap. -
Smooth the surface:
Gently press the clay onto the mold form, smoothing it with a rib tool or damp sponge to remove canvas textures and air bubbles. -
Trim the edges:
Using a fettling knife or needle tool, cut the excess clay away to create a clean oval perimeter for your skull shape.
Step 2: Sculpting Features
-
Mark specific features:
Lightly sketch the placement of the eyes, nose, and mouth using a dull pencil or needle tool to ensure symmetry before committing to cuts. -
Create the eyes:
Cut out two large, almond-shaped eye sockets using your needle tool. Smooth the rough cut edges with a damp finger or sponge to soften them. -
Form the nose:
Add a small piece of clay to the nose area and model it into a triangular bone shape, blending the edges seamlessly into the main mask body. -
Open the nostrils:
Use the back of a small paintbrush or a rounded tool to impress two deep nostril holes into the bottom of the nose shape. -
Carve the mouth:
Cut a long, curved slit for the mouth. Gently widen it by pressing the clay inward slightly, giving it a hollow, open appearance. -
Add stitching details:
Score vertical lines crossing the mouth opening to resemble teeth or sutures. Press firmly enough to create deep grooves but not cut all the way through.
Oxide Magic
Don’t wipe the sponge too aggressively when removing oxide. A light touch leaves a subtle, antique patina on the smooth areas.
Step 3: Detailing and Finishing
-
Add decorative texture:
Carve radiating lines around the eye sockets to mimic eyelashes or sun rays. I like adding a fern-like leaf pattern on the forehead and chin for an organic touch. -
Create hanging mechanism:
Using a hole punch tool or a straw, punch two holes at the very top of the mask, spaced about 2 inches apart. -
Bisque fire:
Allow the clay to dry slowly to the bone-dry stage, then bisque fire it according to your clay body’s specifications (usually Cone 04). -
Apply oxide wash:
Brush an iron oxide wash or watered-down dark underglaze over the entire mask, making sure it gets deep into the carved lines and textures. -
Wipe back:
Using a damp sponge, wipe away the majority of the oxide from the raised surfaces, leaving color only in the recessed lines and textures to highlight the design. -
Glaze and final fire:
Apply a thin coat of matte clear glaze if desired, or leave the clay raw for a rougher texture, then fire to the final temperature (e.g., Cone 5/6). -
String it up:
Once cool, thread a length of rustic natural twine through the top holes and knot it securely to create the hanger.
Slumping Issues?
If the clay slumps off your homemade newspaper mold, let the slab stiffen to soft-leather hard before forming it.
Hang your new ceramic skull on a textured wall to let shadows play across its features throughout the day