A handmade clay mug is basically a tiny blank canvas you get to hold in your hands every morning. Here are my favorite clay mug design ideas—starting with the classics you’ll see everywhere (for a reason) and moving into the fun, unexpected stuff that makes people say, “Okay, where did you get that mug?”
Classic Minimalist Glaze Dip
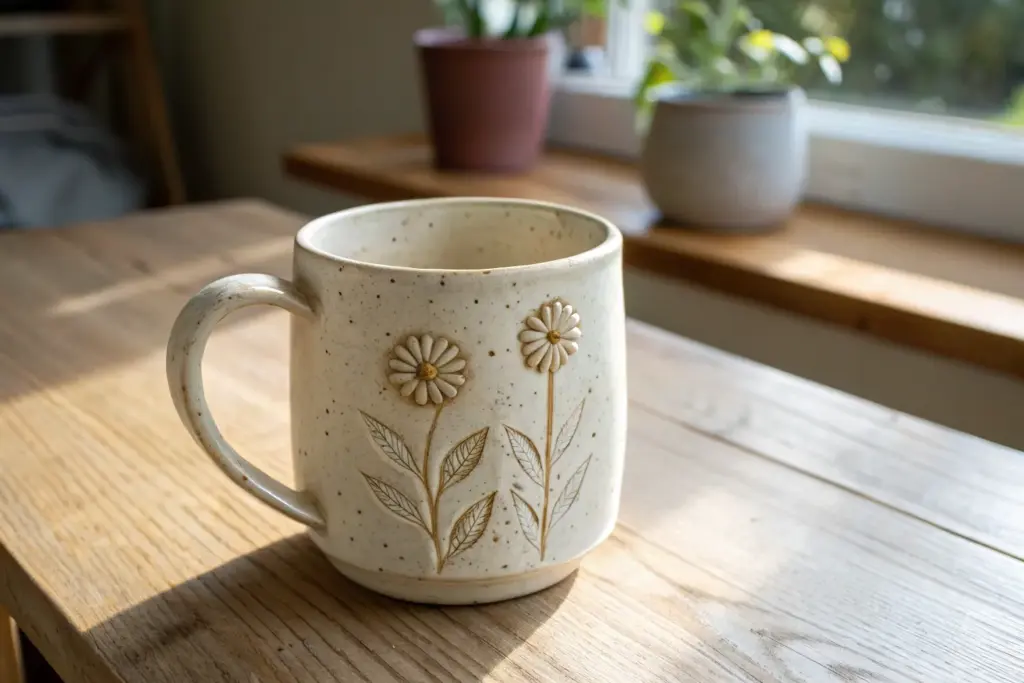
This classic design highlights the natural beauty of stoneware clay by contrasting its raw, earthy texture with a smooth, creamy glaze. The speckled finish adds a vintage, cozy warmth perfect for your morning coffee ritual.
How-To Guide
Materials
- Speckled stoneware clay (approx. 1 lb)
- Pottery wheel
- Throwing sponge
- Wooden rib tool
- Wire cutter
- Needle tool
- Trimming tools
- Sponge for smoothing
- Glossy cream or white speckled glaze
- Wax resist (liquid)
- Glaze tongs (optional)
- Kiln
Step 1: Throwing and Shaping
-
Center the clay:
Begin by wedging your speckled stoneware clay thoroughly to remove air bubbles. Place it firmly on the center of your wheel head and use water and pressure to center the clay into a smooth mound. -
Open the form:
Drill your thumbs down into the center of the mound, leaving about a quarter-inch of clay at the base for the floor. Pull the clay outward to establish the width of your mug’s interior. -
Pull the walls:
Using firm, steady pressure, pull the clay upward to create the walls of the cylinder. Aim for a height of about 4 inches, keeping the walls even in thickness from bottom to top. -
Shape the belly:
Gently push the walls outward from the inside using a rib or your fingers to create a slight, rounded curve towards the bottom, tapering just slightly inward at the rim for that classic mug silhouette. -
Refine the rim:
Use a chamois or a wet sponge to compress and round the rim. This makes it comfortable to drink from and prevents chipping later on. -
Cut from wheel:
Slide a wire cutter underneath the base of the mug to separate it from the wheel head, then carefully lift it onto a ware board to stiffen to leather-hard.
Step 2: Trimming and Handling
-
Trim the foot:
Once leather-hard, center the mug upside down on the wheel. Trim away excess weight from the bottom and crave a neat foot ring, which defines where the raw clay will be visible. -
Pull a handle:
Take a separate small lump of clay and pull a handle using water and long, stroking motions until it is the desired thickness and length. Curve it and let it stiffen slightly. -
Attach the handle:
Score the mug wall and the attachment points of the handle. Apply slip, press the handle firmly into place—aligning the top attachment near the rim—and smooth the seams with a damp sponge or modeling tool. -
Bisque fire:
Allow the mug to dry completely (bone dry). Load it into the kiln and bisque fire it to the appropriate cone (usually Cone 04 or 06, depending on your clay body).
Clean Lines
For a perfectly straight glaze line without using wax on the walls, wrap masking tape around the mug at the 1/3 mark before dipping. Peel it off immediately after dipping while wet.
Step 3: Glazing the Dip
-
Clean the bisque:
Wipe the fired mug with a damp sponge to remove any kiln dust, which can prevent the glaze from adhering properly. -
Wax the bottom:
Apply liquid wax resist to the bottom of the foot ring. While strict dipping lines don’t require wax, I find applying wax up the side wall to your desired ‘dip line’ creates the crispest transition. -
Prepare the glaze:
Stir your cream speckled glaze thoroughly. Ensure it is a dipping consistency—similar to heavy cream. -
Execute the dip:
Holding the mug by the foot (or using glaze tongs), dip the mug upside down into the bucket. Submerge it until the glaze reaches your wax line or about two-thirds down the exterior. -
Glaze the interior:
If you didn’t fully submerge the inside during the dip, pour glaze into the mug, roll it around to coat the entire interior surface, and pour the excess out. -
Clean up:
Once the glaze is dry to the touch, use a damp sponge to wipe any stray glaze droplets off the raw clay bottom or the waxed area to ensure a clean line. -
Final firing:
Load the mug into the kiln for the glaze firing (typically Cone 5 or 6). Make sure the unglazed bottom sits directly on the shelf or a stilt.
Thumb Rest
Add a small, flattened button of clay to the top of the handle curve before firing. It gives your thumb a designated resting spot and adds a custom ergonomic touch.
Now you have a beautifully balanced mug that feels as good in the hand as it looks on the shelf


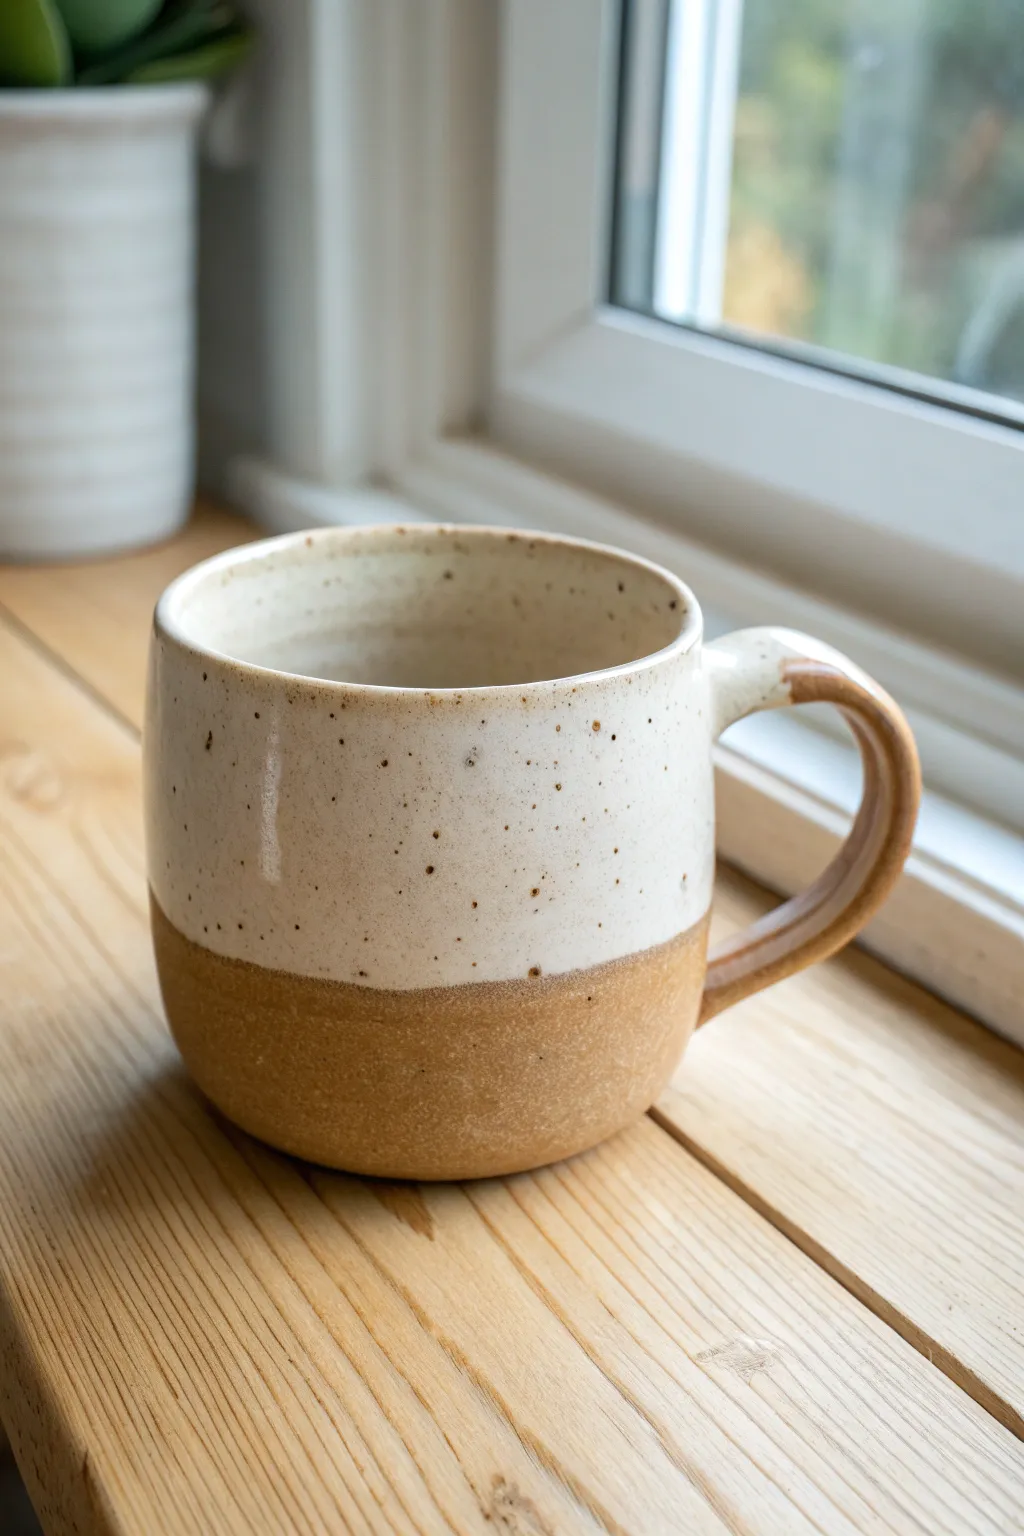
Speckled Stoneware Look
Capture the cozy charm of a farmhouse kitchen with this speckled pottery project. Using speckled buff clay and a transparent glaze, you’ll create a durable, earthy mug that highlights the natural beauty of the material.
Detailed Instructions
Materials
- Speckled buff clay body (mid-range cone 5-6)
- Potter’s wheel
- Throwing sponge
- Wire cutter
- Wooden rib tool
- Needle tool
- Trimming tools (loop tool)
- Bucket of water
- Serrated rib or scoring tool
- Slip (clay mixed with water)
- Clear transparent glaze (cone 5-6)
- Kiln
Step 1: Throwing the Form
-
Prepare the Clay:
Begin by wedging about 1 to 1.5 pounds of speckled buff clay. Wedging removes air bubbles and aligns the clay particles, which is crucial for easier throwing. -
Center on the Wheel:
Slap the clay onto the center of your wheel head. Using moistened hands and firm pressure, cone the clay up and push it back down until it spins perfectly smooth and center without wobbling. -
Open the Clay:
Press your thumbs into the center of the mound to open it up, stopping about a half-inch from the bottom. This floor thickness is essential for later trimming. -
Pull the Walls:
Gently pull the clay upwards between your fingers to create the cylinder walls. Aim for an even thickness, roughly 1/4 inch, from bottom to top. -
Shape the Cylinder:
Use a wooden rib on the outside against your inside hand to straighten the walls. I like to keep the shape relatively straight but allow a very slight curve inward at the top for heat retention. -
Refine the Rim:
Compress the rim using a small piece of chamois leather or just your fingers. A smooth, rounded rim is vital for comfortable drinking. -
Define the Foot:
Use a wooden tool to undercut the bottom of the wall slightly, creating a guideline for where the mug meets the wheel head. This makes wire-cutting easier later. -
Cut and Dry:
Slide a wire cutter firmly under the mug to release it. Slide the bat off or lift the mug gently to a ware board. Let it dry to a ‘leather hard’ state.
Uneven Drying?
If your handle cracks away from the mug while drying, wrap the entire piece in plastic for 24 hours to re-balance the moisture, then uncover slowly.
Step 2: Trimming and Handle
-
Trim the Base:
Once leather hard, center the mug upside down on the wheel. Use a loop tool to trim away excess weight from the bottom and carve out a neat foot ring. The image shows a slight reveal of raw clay at the very base, so keep that area clean. -
Pull the Handle:
Take a separate nugget of clay and pull a handle using water and downward stroking motions. You want a strap that is thick enough to hold but comfortable in the hand. Curve it and let it stiffen slightly. -
Score and Slip:
Identify where you want the handle attached. Score (scratch) both the mug body and the handle ends with a serrated tool. Apply slip generously to both scored areas. -
Attach the Handle:
Press the handle firmly onto the mug. Use your thumb to smooth the clay from the handle onto the mug body, eliminating any seams. Ensure the curve has enough clearance for fingers. -
Dry Slowly:
Cover the mug loosely with plastic to ensure the handle and body dry at the same rate. This prevents cracking. Once bone dry, it’s ready for the bisque firing (usually Cone 04).
Step 3: Glazing and Finishing
-
Bisque Fire:
Fire the mug in a kiln to bisque temperature. This hardens the clay but leaves it porous enough to accept glaze. -
Clean the Bisque:
Wipe the creative dust off the bisque-fired mug with a damp sponge. Any dust left behind can cause the glaze to crawl or adhere poorly. -
Wax the Foot:
Apply wax resist to the bottom of the foot ring and slightly up the side (about 1/4 inch) to recreate that raw clay band seen in the photo. -
Dip Glaze:
Dip the mug into a clear or transparent glossy glaze. A transparent glaze is key here because it allows the dark speckles of the clay body to show through beautifully. -
Clean and Fire:
Wipe away any glaze droplets from the waxed foot area. Load it into the kiln and fire to the clay’s maturity temperature (likely Cone 5 or 6 for stoneware). -
Cool Down:
Allow the kiln to cool completely before opening. The thermal shock of opening too early can cause the glaze to craze or the pot to crack.
Iron Oxide Boost
Create bigger ‘speckles’ by flicking iron oxide wash onto the raw clay with a toothbrush before the bisque firing for a more dramatic spotting effect.
Enjoy your morning coffee knowing you crafted the vessel yourself


Hand-Painted Simple Florals
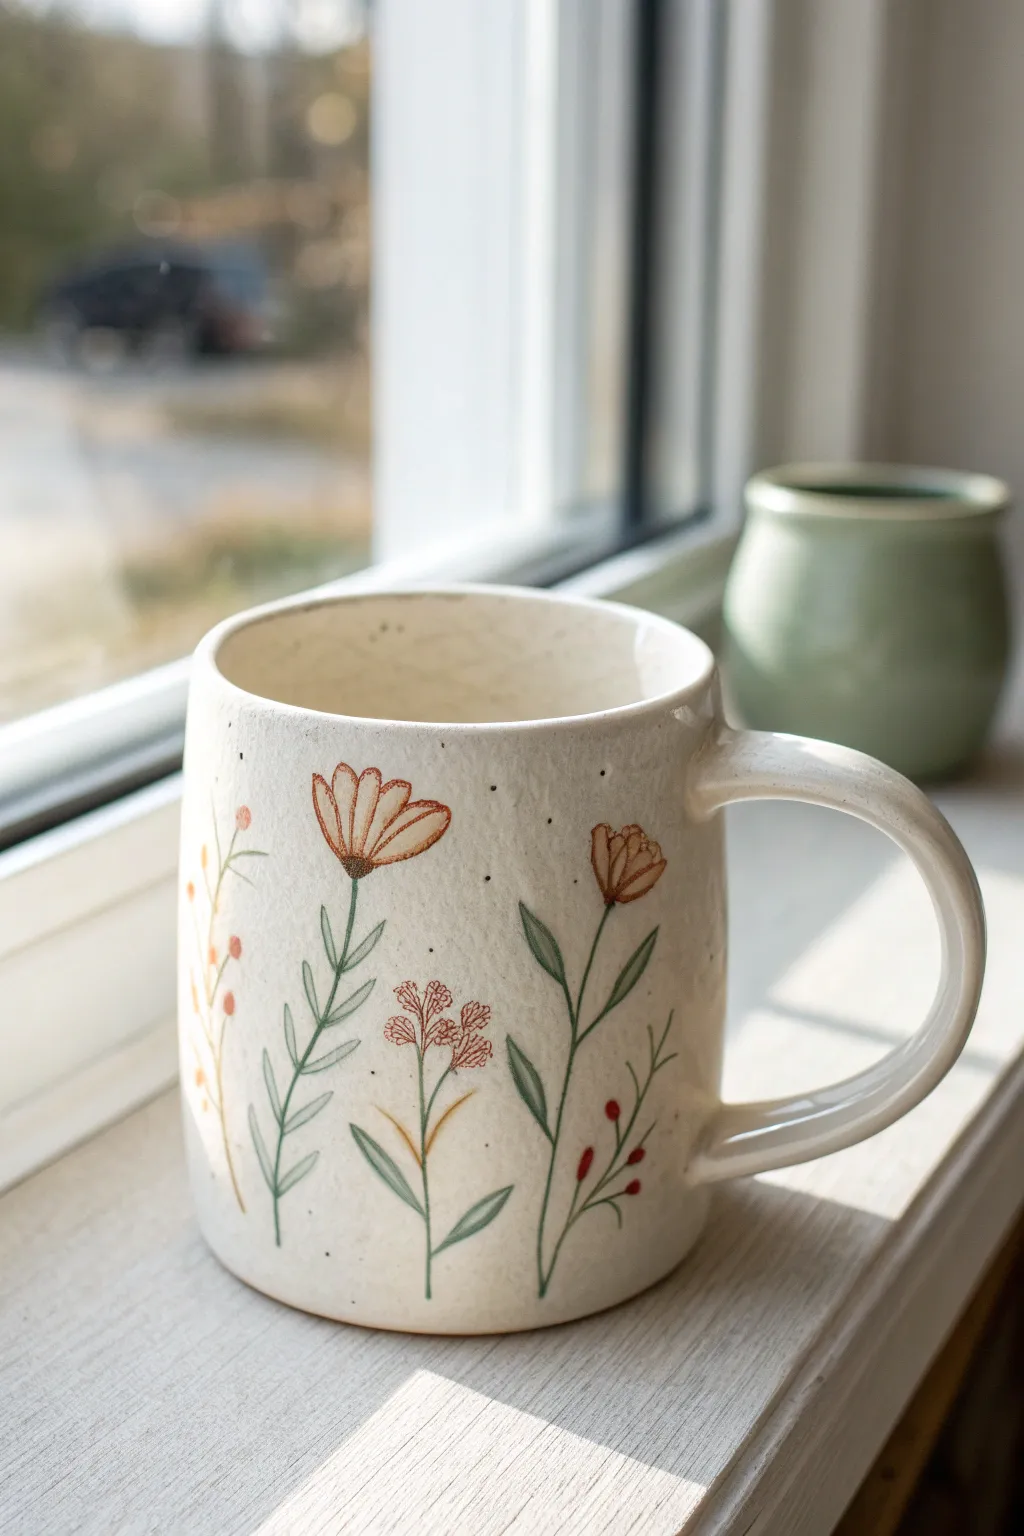
Capture the charm of a sunlit meadow on your morning coffee cup with this delicate hand-painted design. Using underglazes on speckled clay, you will create a sweet array of wildflowers featuring thin stems, rusty orange petals, and tiny berry accents.
Step-by-Step Tutorial
Materials
- Bisqueware mug (preferably a speckled clay body)
- Underglaze pencil (black or dark brown) – optional
- Underglaze paints (rust orange, sage green, forest green, deep red, muted yellow)
- Fine detail brush (size 0 or 00)
- Small round brush (size 2)
- Clear transparent glaze
- Sponge and water
- Palette for mixing
Step 1: Planning and Sketching
-
Surface Preparation:
Begin by wiping down your bisqueware mug with a damp sponge. This removes any kiln dust that might interfere with underglaze adhesion and gives you a clean slate. -
Mapping the Stems:
Visualize three main floral elements spaced slightly apart. If you aren’t confident freehanding, lightly sketch the vertical stem lines using a regular pencil; the graphite will burn off in the kiln, leaving your guide marks temporarily visible.
Step 2: Painting the Foliage
-
Mixing Greens:
Prepare two shades of green on your palette. I generally like to mix a tiny bit of brown into my sage green to earthy it up for the stems, keeping a darker forest green reserved for the leaves. -
Line Work:
Using your finest detail brush (size 00) and the lighter sage mix, paint thin, wavering vertical lines for the stems. Don’t make them perfectly straight; a slight curve feels more organic. -
Adding Leaves:
Switch to the darker forest green. Paint pairs of elongated, pointed leaves branching off the stems. Press down slightly at the base of the leaf and lift as you pull away to create a tapered point. -
Varying Leaf Shapes:
For the middle flower, make the leaves smaller and closer to the stem. For the outer flowers, create longer, sweeping leaves that reach upward. -
Drying Time:
Allow the green layer to dry until it is chalky and explicitly matte before moving to the flowers to avoid smearing the colors.
Smudged Lines?
If your fine lines look blurry, your underglaze might be too thick. Thin it with a drop of water until it has the consistency of ink for sharper details.
Step 3: Adding Blooms and Details
-
Main Flower Petals:
For the large bloom on the left, use a rust orange underglaze. Paint five or six loose, tear-drop shaped petals fanning out from the top of the stem. Leave a small gap in the center. -
Secondary Flower:
On the right stem, paint a smaller, cup-shaped bloom using a slightly darker amber or rust tone. Use short, upward strokes to mimic the texture of tight petals. -
Central Sprig:
For the middle plant, dab tiny clusters of muted pink or light rust at the top to create a textured, seeded look, rather than full petals. -
The Berry Accent:
On the far right, near the handle or edge of the design, add a small branch with tiny red dots. Use the very tip of your brush handle dipped in deep red underglaze to stamp perfectly round berries. -
Clean Up:
If you made any mistakes, gently scratch the dried underglaze off with a needle tool or a stiff brush.
Add Dimension
Apply a tiny dot of white underglaze to the center of the red berries or the tips of leaves before glazing to create a permanent ‘highlight’ effect.
Step 4: Outlining and Finishing
-
Fine Outlining:
This step makes the design pop. Using a very thinned-down brownish-black underglaze and your finest brush, loosely outline the orange petals and the flower centers. The lines should be scratchy and broken, not solid cartoon outlines. -
Adding Speckles:
If your clay body isn’t naturally speckled, you can flick a stiff toothbrush dipped in iron oxide wash or brown underglaze across the surface to mimic the speckled pottery look. -
Glazing:
Once the underglaze is completely dry, dip the entire mug into a clear transparent glaze. Ensure the coat is even to avoid milkiness over your painting. -
Final Fire:
Fire the mug according to your clay and glaze instructions (typically cone 5 or 6 for stoneware) to seal the design and reveal the final glossy finish.
Enjoy sipping your warm drink from this lovely piece of handmade art that celebrates the simple beauty of nature


Bold Brushstroke Bands
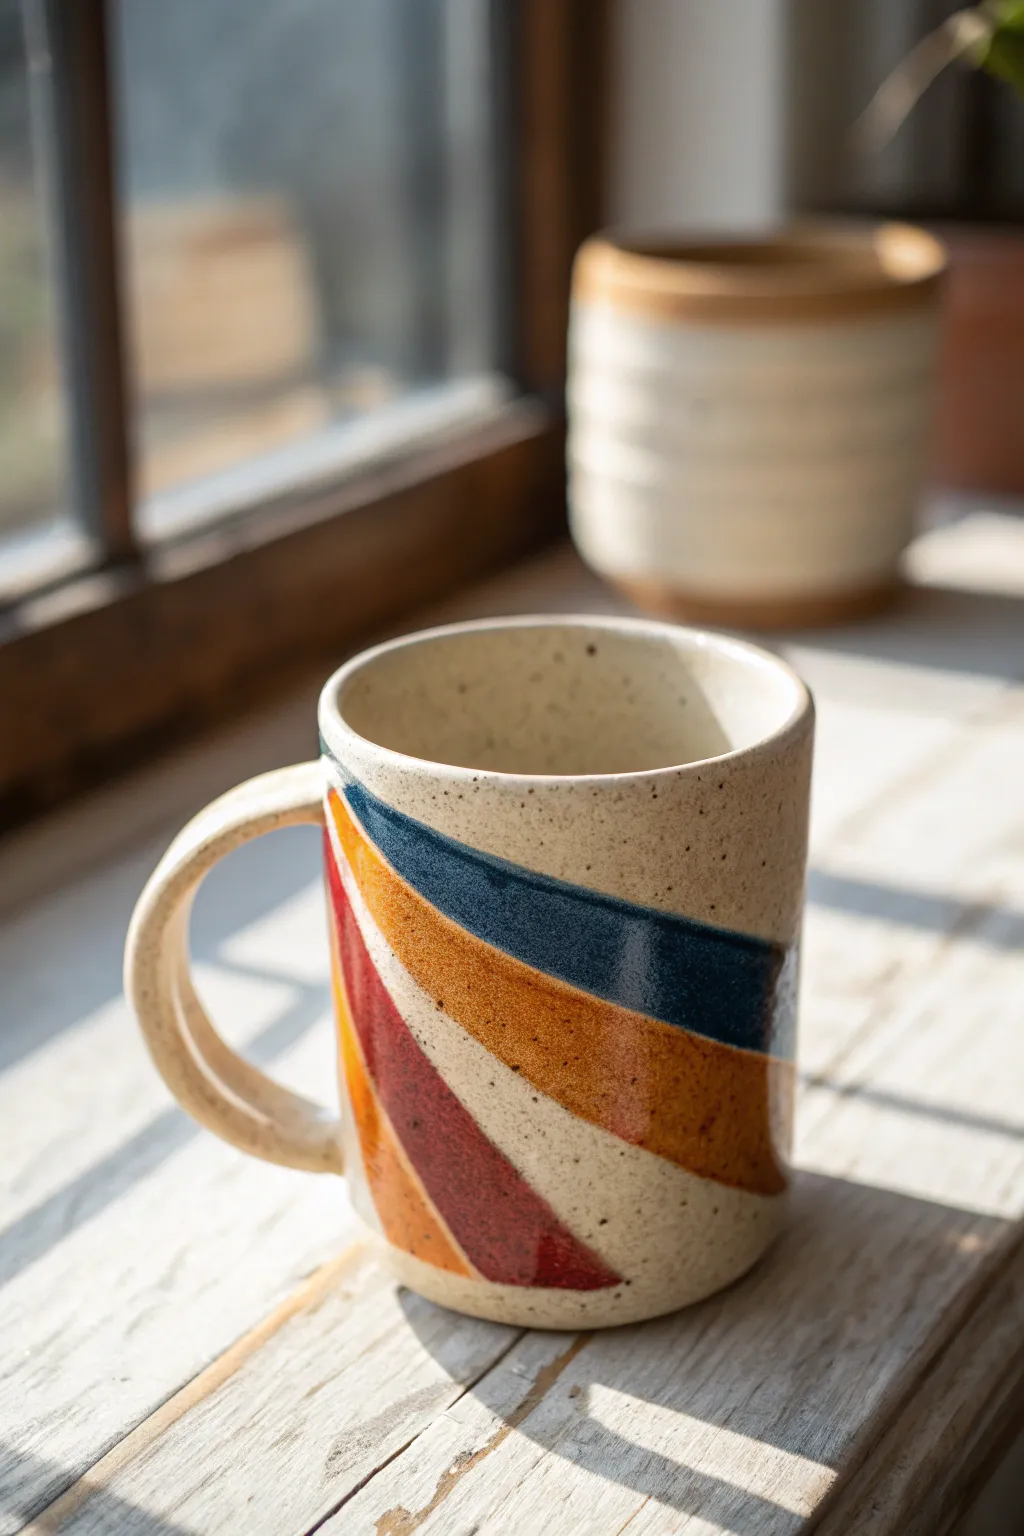
Create a stunning statement piece with this retro-inspired mug featuring sweeping, bold bands of color on speckled clay. The design relies on overlapping underglaze strokes to evoke a stylized sunrise, perfect for brightening up your morning coffee routine.
Step-by-Step Guide
Materials
- Speckled stoneware clay (cone 5/6)
- Pottery wheel
- Throwing tools (sponge, rib, wire cutter)
- Trimming tools
- loop tool for handle pulling
- Underglazes: Navy Blue, Burnt Orange, Deep Red, Golden Yellow
- Wide flat brush (hake or synthetic)
- Clear transparent glaze (cone 5/6)
- Kiln
Step 1: Throwing and Trimming
-
Centering the Clay:
Start with about 1 lb of well-wedged speckled stoneware clay. Center it firmly on the wheel head, ensuring it feels stable and symmetrical before opening. -
Opening and Pulling:
Open the clay and compress the bottom well to prevent S-cracks. Begin pulling the walls upward, aiming for a straight cylinder with a uniform thickness. Leave the rim slightly thickened for durability. -
Shaping the Profile:
Using a rib tool on the exterior, gently push the belly of the pot out slightly to create a very subtle curve, whilst keeping the overall sides vertical. Smooth the exterior surface to remove throwing lines, as these will disrupt your brushstrokes later. -
Drying to Leather Hard:
Wire cut the mug from the batt and let it dry slowly until it reaches a leather-hard state. It should be firm enough to handle without deforming but still hold some moisture. -
Trimming the Foot:
Invert the mug on the wheel and secure it with lugs of clay. Trim any excess weight from the bottom, creating a distinct foot ring that visually lifts the mug off the table.
Brushstroke Confidence
For the crispest lines, don’t paint slowly. A fast, confident hand movement creates cleaner edges. Practice the swoop on paper first to get the muscle memory right.
Step 2: Handle Attachment
-
Pulling the Handle:
Pull a strap of clay for the handle directly from a lug of wet clay. Aim for a wide, flat profile that mimics the bands you will paint later. Let this stiffen slightly into an arch shape. -
Scoring and Slipping:
Identify where the handle will attach. Score the contact points on both the mug body and the handle ends deeply with a serrated tool. Apply vinegar or slip generously. -
Attaching the Handle:
Press the handle firmly onto the mug body. Use a small wooden tool or your thumb to blend the seams completely smooth, ensuring a strong bond. Check the alignment to ensure it is vertical.
Wax Resist Method
Apply jagged strips of painter’s tape or wax resist between your bands before glazing. This keeps the raw speckled clay visible as distinct separators between colors.
Step 3: Surface Decoration
-
Cleaning the Surface:
Once the handle is attached and the mug is leather hard, wipe the surface with a barely damp sponge to remove any dust or burrs. -
Planning the Bands:
Visualize three diagonal swoops across the face of the mug. The goal is energetic, confident movement, not geometric perfection. -
Painting the Navy Band:
Load a wide flat brush with Navy Blue underglaze. Starting from the upper right (near the handle), pull the brush diagonally down towards the middle left in one fluid motion. -
Painting the Orange Band:
Clean your brush or switch to a fresh one. Load it with Burnt Orange. Paint a second band just below the blue one, following the same diagonal trajectory. It’s okay if they barely touch or have a tiny gap showing the raw clay. -
Painting the Red Accent:
With the Deep Red underglaze, add a third, thicker band at the bottom, sweeping upwards to meet the orange. I like to let the brush run a bit dry at the end of the stroke to show texture. -
Adding the Yellow Highlight:
If desired, add a very thin sliver of Golden Yellow on the edge of the orange band for extra pop. -
Bisque Firing:
Allow the mug to dry completely until bone dry. Fire it in the kiln to bisque temperature (usually cone 04/06).
Step 4: Glazing and Finishing
-
Applying Interior Glaze:
Pour a glossy clear glaze into the interior of the mug, rotate quickly to coat, and pour out the excess. Wipe the rim clean. -
Dipping the Exterior:
Dip the entire exterior of the mug into the clear glaze. Since you want the speckles and underglaze to show through vividly, ensure the glaze application isn’t too thick. -
Final Cleanup:
Wipe the foot ring clean of any glaze using a wet sponge to prevent it from fusing to the kiln shelf. -
Glaze Firing:
Fire the mug to your clay body’s vitrification point (cone 5 or 6). Let the kiln cool naturally before removing your finished piece.
Now enjoy your coffee knowing you created a piece of functional art used daily

The Complete Guide to Pottery Troubleshooting
Uncover the most common ceramic mistakes—from cracking clay to failed glazes—and learn how to fix them fast.
Sgraffito Line Art Mug
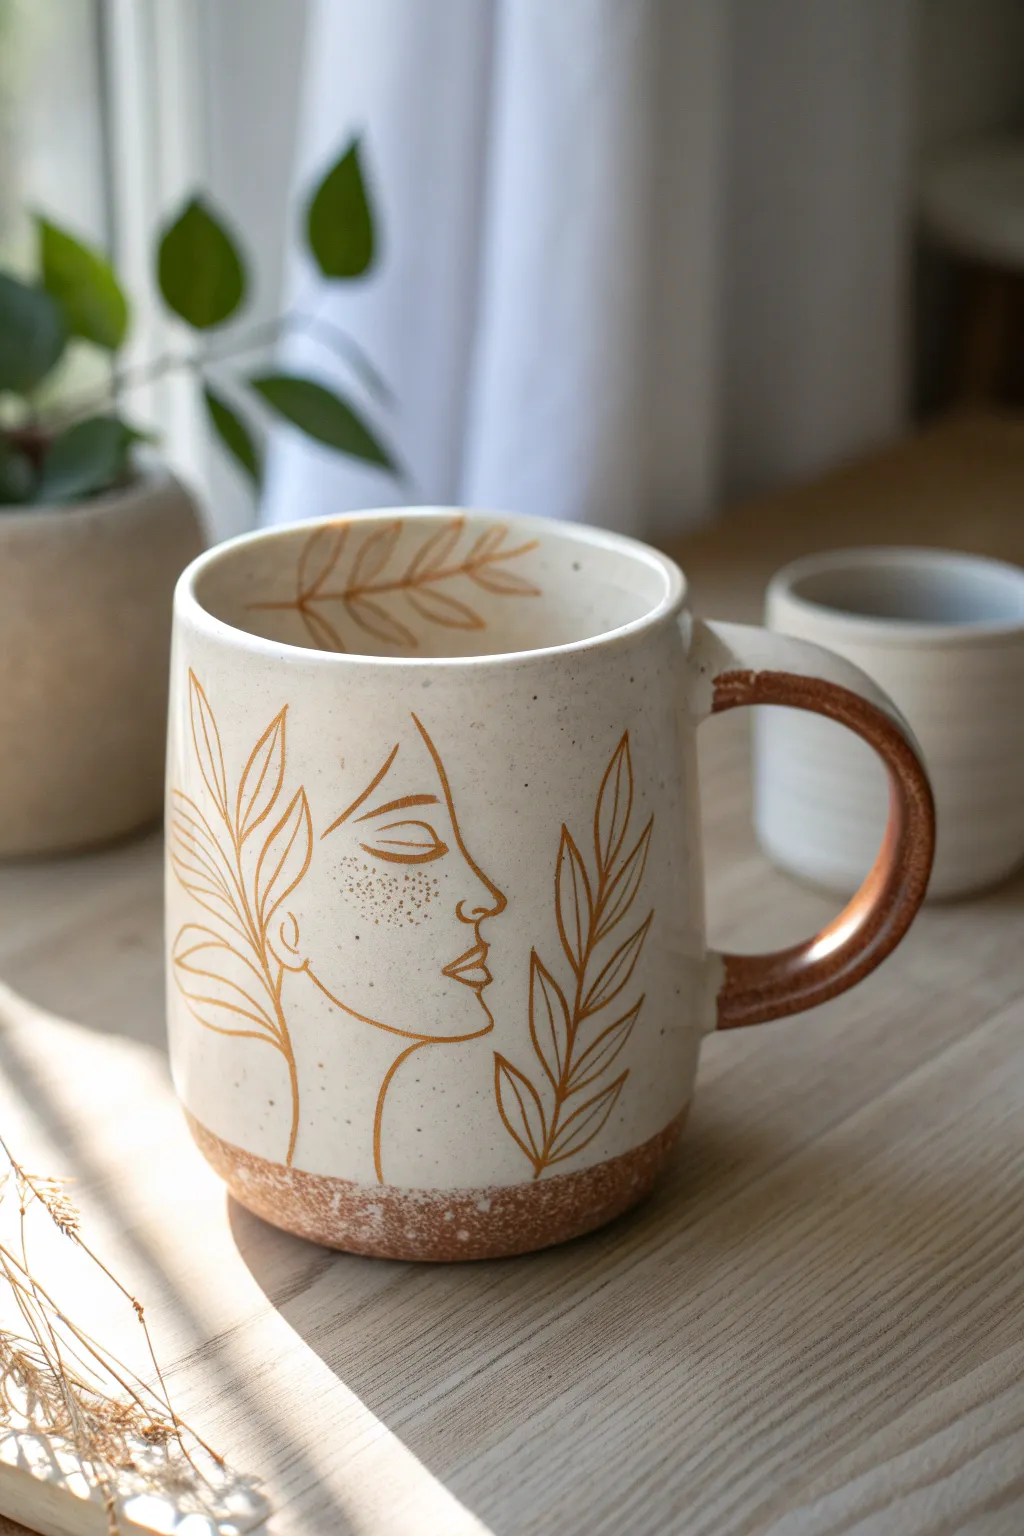
This elegant mug combines serene line art with a warm, speckled finish for a piece that feels both modern and organic. The design features a delicate profile face framed by leafy botanical elements, rendered in a stunning metallic amber glaze that glows against the cream clay body.
Detailed Instructions
Materials
- White or cream stoneware clay body (speckled optional)
- Pottery wheel or slab roller
- Ribs (metal and wooden)
- Needle tool
- Loop trimming tools
- Wax resist
- Soft fan brush
- Fine liner brush (size 0 or 00)
- Amber/copper semi-transparent glaze (food safe)
- Clear matte or satin glaze
- Sponge
- Mishima or Sgraffito tools (optional depending on technique)
Step 1: Forming the Base
-
Throw the cylinder:
Begin by wedging your clay thoroughly to remove air bubbles. Center about 1 to 1.5 lbs of clay on your wheel to throw a cylinder approximately 4 inches tall and 3.5 inches wide. -
Shape the walls:
Pull the walls up evenly, aiming for a straight-sided cylinder with just a subtle fullness in the middle. Smooth the surface with a metal kidney rib to compress the clay and remove throwing lines. -
Form the rim:
Pay special attention to the rim, thickening it slightly and rounding it with a chamois or sponge for a comfortable drinking edge. -
Pull the handle:
While the cylinder firms up slightly, pull a strap handle from a separate piece of clay. Aim for a comfortable C-shape that balances the mug’s visual weight. -
Attach the handle:
Once the body has reached ‘leather hard’ (stiff but still cold to the touch), score and slip the attachment points. Attach the handle securely, ensuring the bottom attachment curves smoothly back into the mug body. -
Trim the foot:
Turn the mug over and trim the bottom to create a defined foot ring. This elevates the form and gives the piece a professional finish.
Clean Lines Only
If you smudge the amber glaze outside the lines, wait for it to dry completely. It scrapes off cleanly as a powder much easier than wiping it wet.
Step 2: Creating the Design
-
Plan your placement:
Lightly sketch your design onto the leather-hard clay using a very soft pencil or a needle tool just barely grazing the surface. Place the profile face centrally, flanked by botanical stems. -
Draft the face:
Draw the continuous line profile first. Start at the forehead, flow down the nose bridge, and curve back for the lips and chin. Keep the line fluid and unbroken where possible. -
Add foliage:
Draw the upward-reaching stems on either side of the face. Keep the leaves simple and elongated, mirroring the curve of the mug to create movement. -
Including inner details:
Don’t forget the design inside the rim. Sketch a simple leaf branch trailing along the inner upper edge for a hidden surprise while drinking. -
Carving the lines:
Using a fine carving tool or needle tool, incise these lines slightly into the clay. You aren’t cutting through, just creating a shallow channel for the glaze to pool or sit in.
Step 3: Glazing and Finishing
-
Bisque fire:
Let the mug dry completely (bone dry) and fire it to bisque temperature (usually cone 04 or 06) according to your clay body’s instructions. -
Wax resist application:
Once fired, wipe the bisqueware with a damp sponge to remove dust. Apply wax resist to the foot ring so glaze won’t stick to the bottom. -
Inlay the line work:
Using a fine liner brush, carefully paint the amber/copper glaze into the incised lines of your face and leaves. You can be generous here; wipe away any excess that spills onto the flat surface with a slightly damp sponge, leaving glaze trapped only in the grooves. -
Paint the handle and base:
Use a larger brush to apply the same amber glaze to the entire handle and a band around the bottom of the mug (about 0.5 inches high) to create that grounded, earthy look. -
Add freckles:
For the charming freckles on the cheek, dip a stiff bristle brush in the amber glaze and flick it lightly with your thumb to splatter tiny dots onto the designated area. -
Clear glaze dip:
Once the detail work is dry, dip the entire mug into a clear matte or satin glaze. This seals the white clay and protects the design without obscuring it. -
Final wipe:
I always double-check the foot ring one last time to ensure no stray glaze droplets are present before loading the kiln. -
Glaze fire:
Fire the mug to your clay’s maturity temperature (likely cone 5 or 6). This final firing will melt the clear coat and turn the amber detail glossy and rich.
Gold Luster Accent
After the final firing, apply a real gold luster overcoat to just the leaves or the handle and do a third, low-temp firing for an ultra-luxury finish.
Enjoy sipping from your handcrafted masterpiece, knowing the serene reflection is entirely your own creation
Carved Geometric Texture

This project features a cozy, rustic mug crafted from buff stoneware clay, showcasing intricate hand-carved geometric bands. The design relies on the natural texture of the raw clay, enhanced by deep V-shaped zigzag carving that catches the light beautifully.
How-To Guide
Materials
- Buff stoneware clay (cone 5/6 recommended)
- Pottery wheel (or rolling pin/slats for slab building)
- Rib tool (metal or wood)
- Needle tool
- Loop tool or ribbon tool (v-tip preferred)
- Sponge
- Wire cutter
- Scoring tool
- Clear matte glaze or transparent semi-matte glaze
Step 1: Forming the Vessel
-
Prepare the Clay:
Begin by wedging about 1 to 1.5 pounds of buff stoneware clay thoroughly to remove air bubbles and ensure consistency. -
Throw the Cylinder:
Center your clay on the wheel and throw a straight-sided cylinder. Aim for a wall thickness of about 1/4 inch to allow enough depth for carving without puncturing the wall. -
Shape the Profile:
Gently belly out the bottom slightly for volume, keeping the top half relatively straight. Use a rib to smooth the exterior walls perfectly, removing throwing lines which might interfere with your geometric pattern. -
Define the Bands:
While the wheel is spinning slowly, use a needle tool or the corner of a wood tool to lightly incise horizontal guide lines. You want to create a central divider line to separate the top and bottom carving sections. -
Dry to Leather Hard:
Allow the mug to dry to a sturdy leather-hard stage. It should be firm enough to handle without warping but soft enough to carve cleanly.
Keep it Clean
Wait until the clay is bone dry to brush off carving crumbs. If you try to remove them while the clay is wet, they will just smear back into the grooves.
Step 2: Carving the Texture
-
Sketch the Zigzags:
Using a needle tool with very light pressure, sketch your zigzag pattern around the top band. Don’t worry about perfection; rustic irregularity adds charm. -
Carve the Top Band:
Using a sharp ribbon tool or V-tip loop tool, carve out the material between your zigzag lines. Dig deep enough to create shadow, but leave the ‘peaks’ of the zigzag raised. -
Refine the Ridges:
Go back over the raised zigzag lines to sharpen them. I like to lightly sponge the edges afterwards to soften any sharp clay crumbs. -
Create the Divider:
Carve a horizontal groove or use a texture roller to create a distinct separation line between the top and bottom sections. -
Carve the Bottom Pattern:
For the bottom half, create a variation on the top design. Carve larger triangular shapes or inverted chevrons, nesting smaller triangles inside them for added detail. -
Add Small Details:
Use the tip of a small loop tool or a blunted pencil to poke small indentation dots or tiny X marks inside the larger open spaces of the bottom pattern.
Level Up: Oxide Wash
Before glazing, apply a red iron oxide wash and wipe it back with a sponge. The dark oxide will stay in the deep carved lines, making the pattern pop.
Step 3: Handle and Finish
-
Pull the Handle:
Pull a strap handle from a lug of clay. It should be slightly oval in cross-section and proportionate to the mug. -
Attach the Handle:
Score and slip the attachment points on both the mug and the handle. Press the handle firmly onto the side, smoothing the joints well for a seamless transition. -
Clean Up:
Use a barely damp sponge to wipe away any sharp burrs created during carving. Be careful not to wash away the texture definition. -
Bisque Fire:
Once bone dry, bisque fire the mug to your clay body’s recommended temperature (usually cone 04). -
Glazing:
Dip or pour a clear matte or very light translucent glaze over the entire piece. This highlights the clay’s natural color while protecting the surface. -
Final Fire:
Glaze fire to cone 5 or 6 (depending on your clay). The heat will seal the mug and bring out the toasty buff stone color.
Enjoy your morning coffee in a mug that feels as good to hold as it looks


What Really Happens Inside the Kiln
Learn how time and temperature work together inside the kiln to transform clay into durable ceramic.
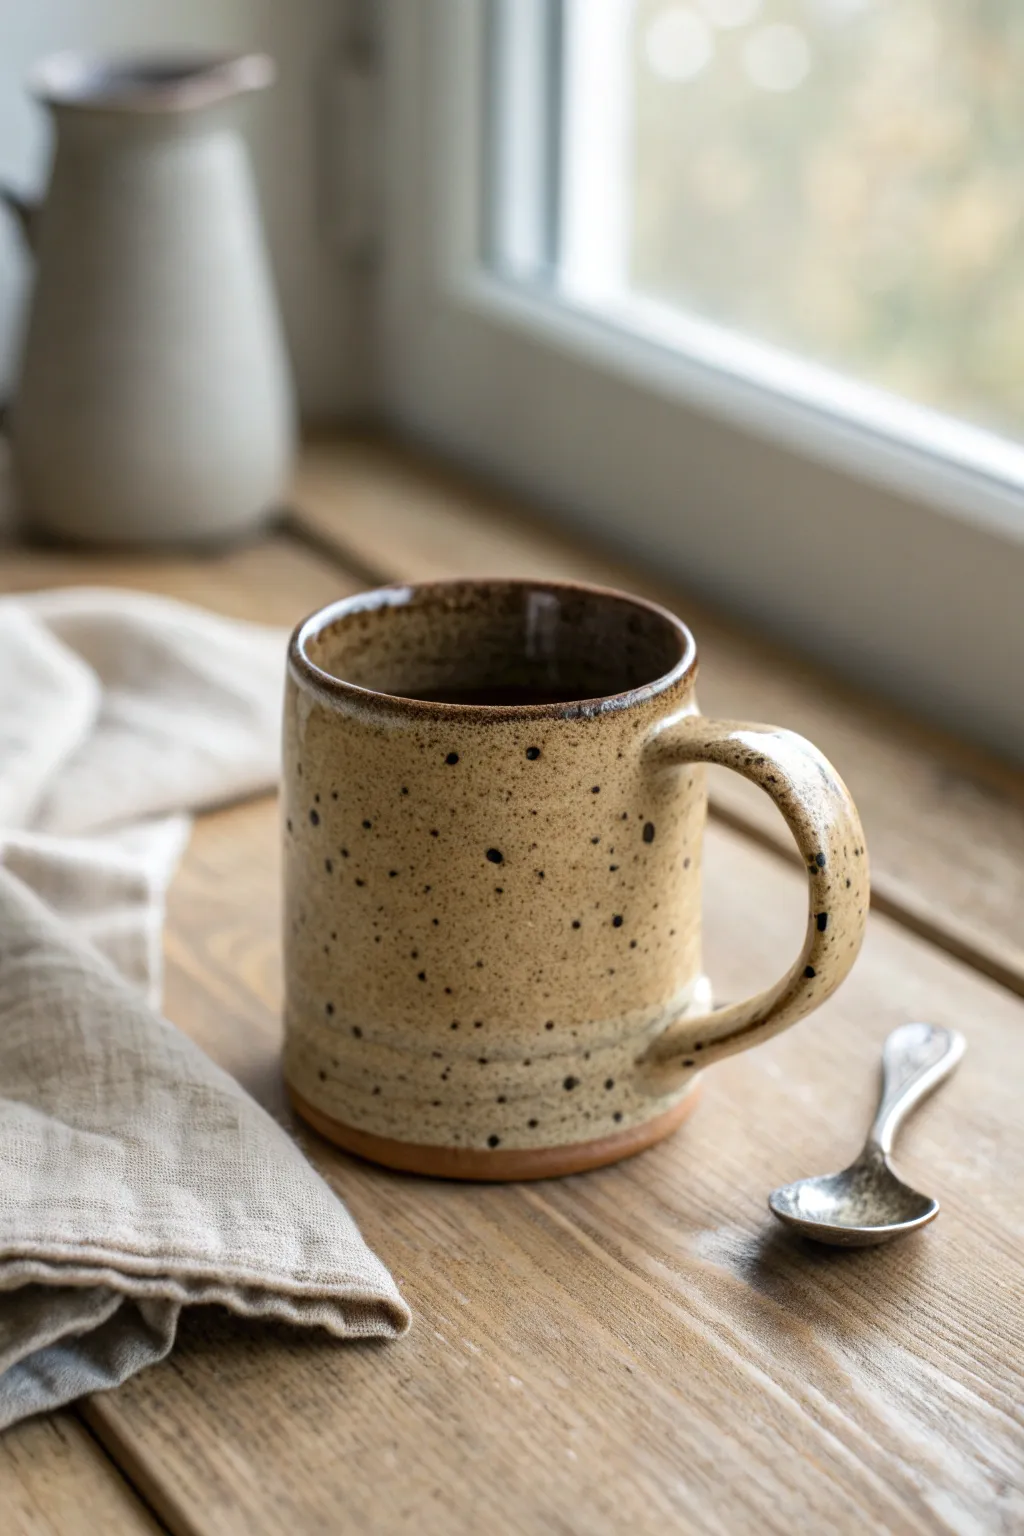
Stamped Pattern All Over
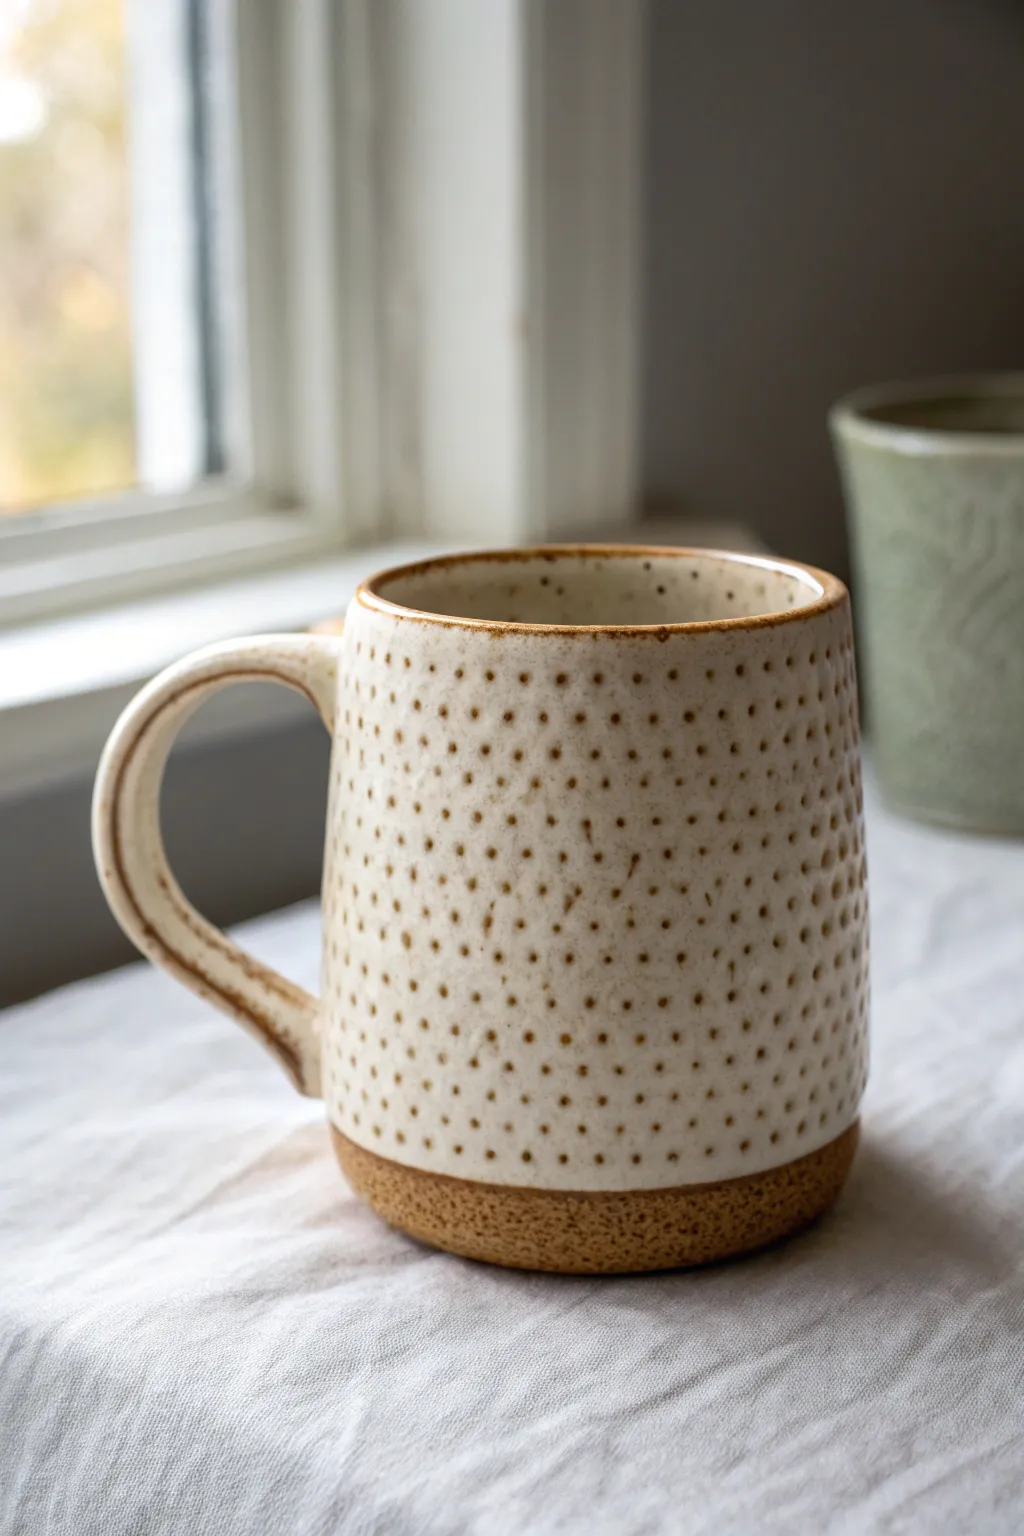
This handmade ceramic mug showcases the beauty of combining raw texture with clean, repetitive patterns. The design features a warm, toasted clay base and a uniform dotted motif that gives the piece a tactile, modern feel.
Step-by-Step Tutorial
Materials
- Speckled clay body (stoneware recommended)
- Pottery wheel and tools
- Rolling pin or slab roller (if hand-building)
- Small round stamp tool (dowel, drill bit end, or custom tool)
- Sponge
- Cutting wire
- Rib tool (metal or wood)
- Scoring tool or fork
- Slip (liquid clay)
- Matte white glaze
- Kiln
Step 1: Forming the Vessel
-
Prepare the Clay:
Begin by wedging about 1 to 1.5 pounds of speckled stoneware clay to remove air bubbles and ensure a consistent texture. -
Center and Open:
Throw the clay onto the center of your wheel head. Center it firmly, then open the clay to your desired floor width, keeping in mind that this mug has a fairly straight, cylindrical profile. -
Pull the Walls:
Pull the walls up primarily vertically, aiming for an even thickness throughout. Leave the rim slightly thicker than the walls to prevent chipping later. -
Shape the Cylinder:
Use a rib tool on the exterior while supporting the interior with your fingers to smooth the surface and create a straight-sided form with a very subtle taper towards the top. -
Refine the Rim:
Use a chamois or a damp sponge to compress and round off the rim, ensuring it will be comfortable to drink from. -
Dry to Leather Hard:
Cut the mug from the wheel bat and allow it to dry slowly until it reaches a leather-hard state, where it is firm enough to handle without deforming but still holds moisture.
Step 2: Adding Texture and Handle
-
Trim the Base:
Center your leather-hard mug upside down on the wheel. Trim away excess weight from the bottom, creating a distinct foot ring or a designated unglazed area near the base as seen in the photo. -
Mark Guide Lines:
While the pottery wheel is spinning slowly, I like to lightly hold a tool against the surface to create very faint horizontal guide lines. This helps keep the stamped pattern level as you work around the mug. -
Stamp the Pattern:
Using your small round tool (like the blunt end of a drill bit or a wooden dowel), press small indentations into the clay. Work row by row, rotating the mug manually, keeping the spacing consistent. -
Pull a Handle:
Pull a handle strap from a fresh lump of clay. Create a comfortable C-shape curve and let it stiffen slightly until it matches the moisture content of the mug body. -
Attach the Handle:
Score and slip the attachment points on both the mug and the handle. Press the handle firmly onto the mug, smoothing the joints with your thumb or a modeling tool to ensure a seamless connection. -
Clean Up:
Use a damp sponge to smooth away any burrs created by the stamping process or any rough edges around the handle attachment. Let the mug dry completely to the bone-dry stage.
Stamp Spacing Secret
Don’t aim for perfect grids. Slightly offsetting the dots in each subsequent row creates a more organic, pleasing visual texture that forgives small spacing errors.
Step 3: Glazing and Firing
-
Bisque Fire:
Load the bone-dry mug into the kiln and bisque fire it to the appropriate cone (usually around Cone 04) to prepare it for glazing. -
Wax the Base:
Apply wax resist to the bottom inch of the mug, covering the foot and the lower textured area. This creates the beautiful contrast between the raw, toasted clay and the glazed upper section. -
Apply Glaze:
Dip the mug into a matte white glaze. Hold it upside down for a few seconds to let excess glaze drip off, ensuring the coat isn’t too thick, which could fill in your texture. -
Clean the Line:
Wipe away any rogue glaze drips from the waxed area with a damp sponge to ensure a crisp, clean line where the glaze meets the raw clay. -
Glaze Fire:
Fire the mug a second time to the maturation temperature of your specific clay and glaze combination (often Cone 5 or 6 for stoneware). -
Final Polish:
Once cool, use fine-grit sandpaper to briefly smooth the unglazed bottom of the mug so it doesn’t scratch your tables.
Try a Colored Clay
Swap standard stoneware for a dark brown or black clay body. The high contrast between a dark raw base and a light glaze creates a dramatic, modern look.
Enjoy your morning coffee in a mug that feels as good in your hand as it looks on your table
Slip-Trailed Raised Doodles
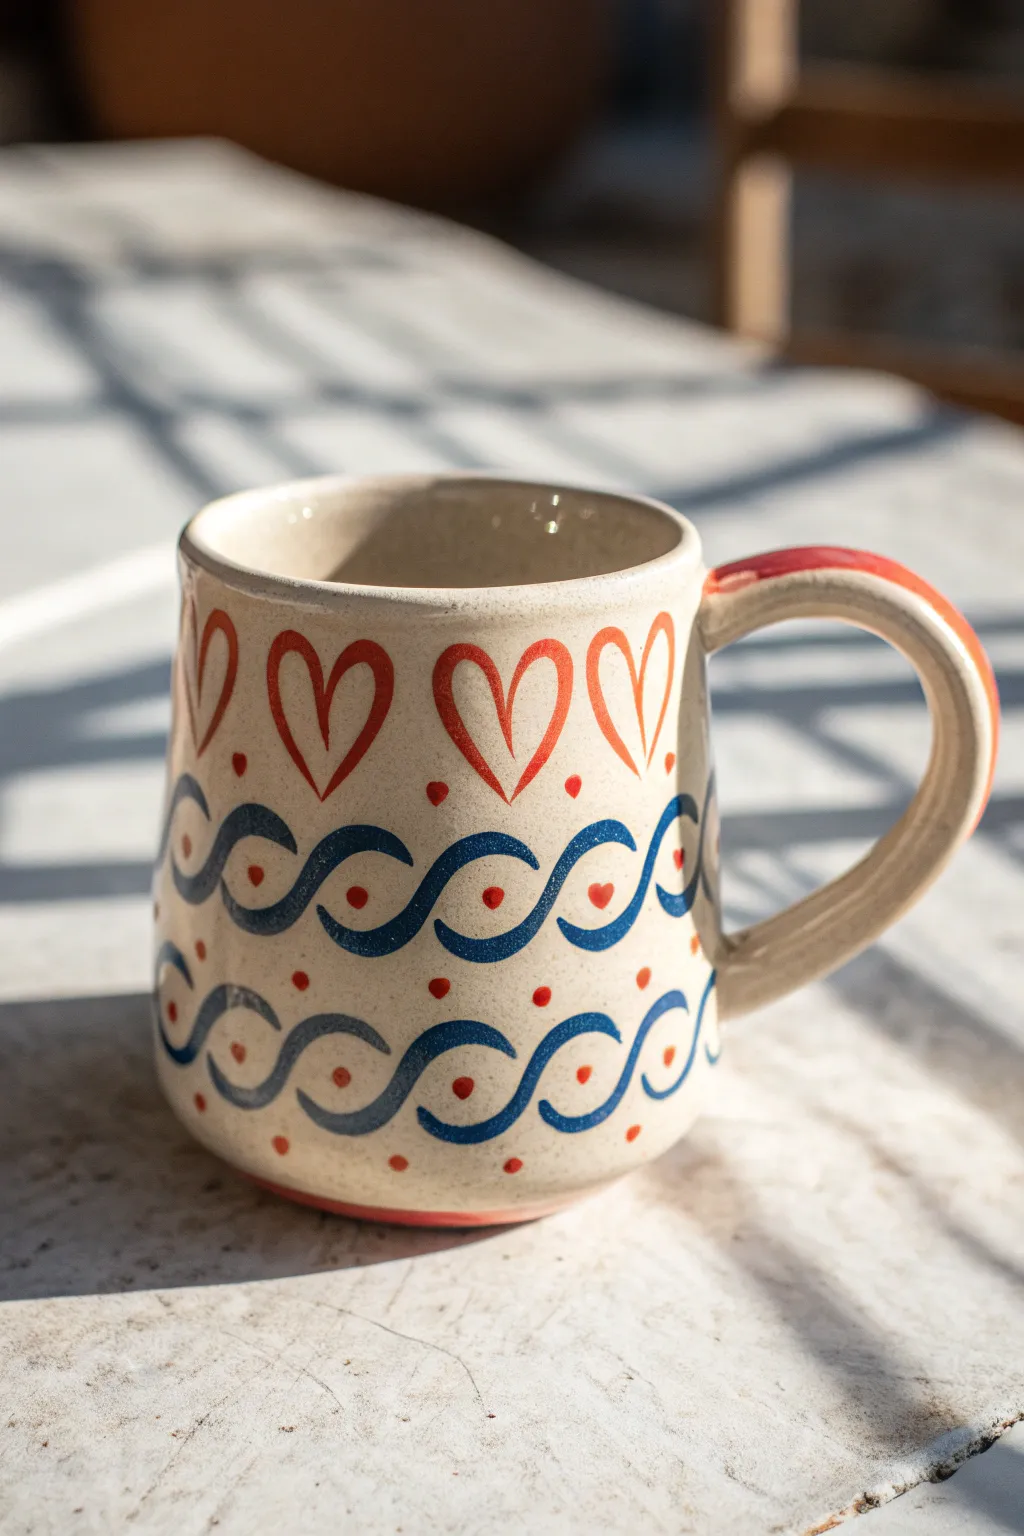
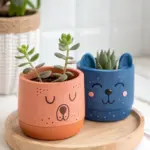
Capture a playful folk-art aesthetic with this slip-trailed ceramic mug design, featuring raised heart motifs and undulating blue waves. The tactile surface and cheerful red and blue palette make your morning coffee feel extra special.
Step-by-Step
Materials
- Stoneware clay body
- Pottery wheel (or slab roller/hand-building tools)
- Slip trailers (applicitor bulbs with fine needle tips)
- Colored slips or underglaze (Red/Orange, Deep Blue)
- Clear or transparent glossy glaze
- Sponge
- Trimming tools
- Rib tool
- Wire cutter
- Needle tool
Step 1: Forming the Mug Body
-
Throw the Cylinder:
Begin by centering about 1 pound of clay on the wheel. Open the ball and pull up the walls to create a standard cylinder shape found in most mug forms, aiming for even thickness. -
Shape the Belly:
Using a rib tool on the inside, gently press outward while supporting the outside to create a subtle curve or ‘belly’ to the mug. This slight roundness gives the slip design a nice surface to wrap around. -
Refine the Rim:
Compress the rim with a chamois or your finger to ensure it is smooth and comfortable for drinking. A slightly thickened rim adds visual weight and durability. -
Create the Handle:
Pull a strap handle from a lug of clay. Ensure it is thick enough to be comfortable but not heavy. Attach it securely to the leather-hard body using the score and slip method, blending the seams well.
Smooth Operator
If your slip leaves sharp ‘hershey kiss’ peaks when you lift the nozzle, gently tap them down with a slightly damp finger once the slip has set to a soft leather-hard state.
Step 2: Designing with Slip
-
Outline the Grid:
Once the mug is leather-hard, lightly sketch horizontal guidelines around the circumference using a needle tool or faint pencil line. You need three distinct bands: a top band for hearts, and two lower bands for waves. -
Load the Slip Trailers:
Fill one slip trailer with your red/orange slip and another with the deep blue. Test the flow on a scrap piece of clay; the consistency should be like thick yogurt that holds its shape without running. -
Pipe the Hearts:
Starting on the top band, squeeze the red slip trailer to draw a row of open hearts. Try to keep them evenly spaced. Don’t worry about perfection; the handmade wobble adds charm. -
Create the Waves:
Using the blue slip, draw a continuous S-curve wave pattern in the middle band. Repeat this wave pattern on the bottom band, ensuring the peaks and valleys align somewhat rhythmically with the layer above. -
Add Connecting Lines:
Go back over your blue waves. If you want the ‘double-line’ look seen in the inspiration, carefully pipe a second, thinner line parallel to the first, or simply use a tool to carve a channel through a thick slip line to create two ridges. -
Dot the Details:
With the red slip, place small dots inside the curves of the blue waves. Alternating the placement (top curve, bottom curve) creates a balanced pattern. -
Fill the Gaps:
Add tiny red dots between the hearts and near the bottom rim to fill any negative space that feels too empty. -
Handle Accents:
Pipe a line or simple geometric pattern down the back of the handle using the red slip to tie the design together.
Step 3: Glazing and Firing
-
Bisque Fire:
Allow the mug to dry completely. This is crucial for slip trailing, as the added moisture can cause cracking if rushed. Fire to cone 04 (or your clay’s bisque temperature). -
Apply Clear Glaze:
Dip the bisqued mug into a clear, glossy glaze. I prefer a quick dip to ensure the coating isn’t too thick, which could obscure the raised texture of the trailing. -
Wipe the Foot:
Clean the bottom of the mug and a few millimeters up the side with a damp sponge to prevent the glaze from adhering to the kiln shelf. -
Final Firing:
Fire the mug to maturity (likely cone 5 or 6 for stoneware). Once cool, sand the base if there are any rough spots.
Texture Twist
For a varied look, leave the exterior raw clay unglazed and only glaze the interior and the slip lines themselves with a fine brush for a matte-gloss contrast.
Now you have a charming, textured mug perfect for gifting to a loved one or keeping for your own cozy mornings

TRACK YOUR CERAMIC JOURNEY
Capture glaze tests, firing details, and creative progress—all in one simple printable. Make your projects easier to repeat and improve.
Textured Rim and Foot Detail
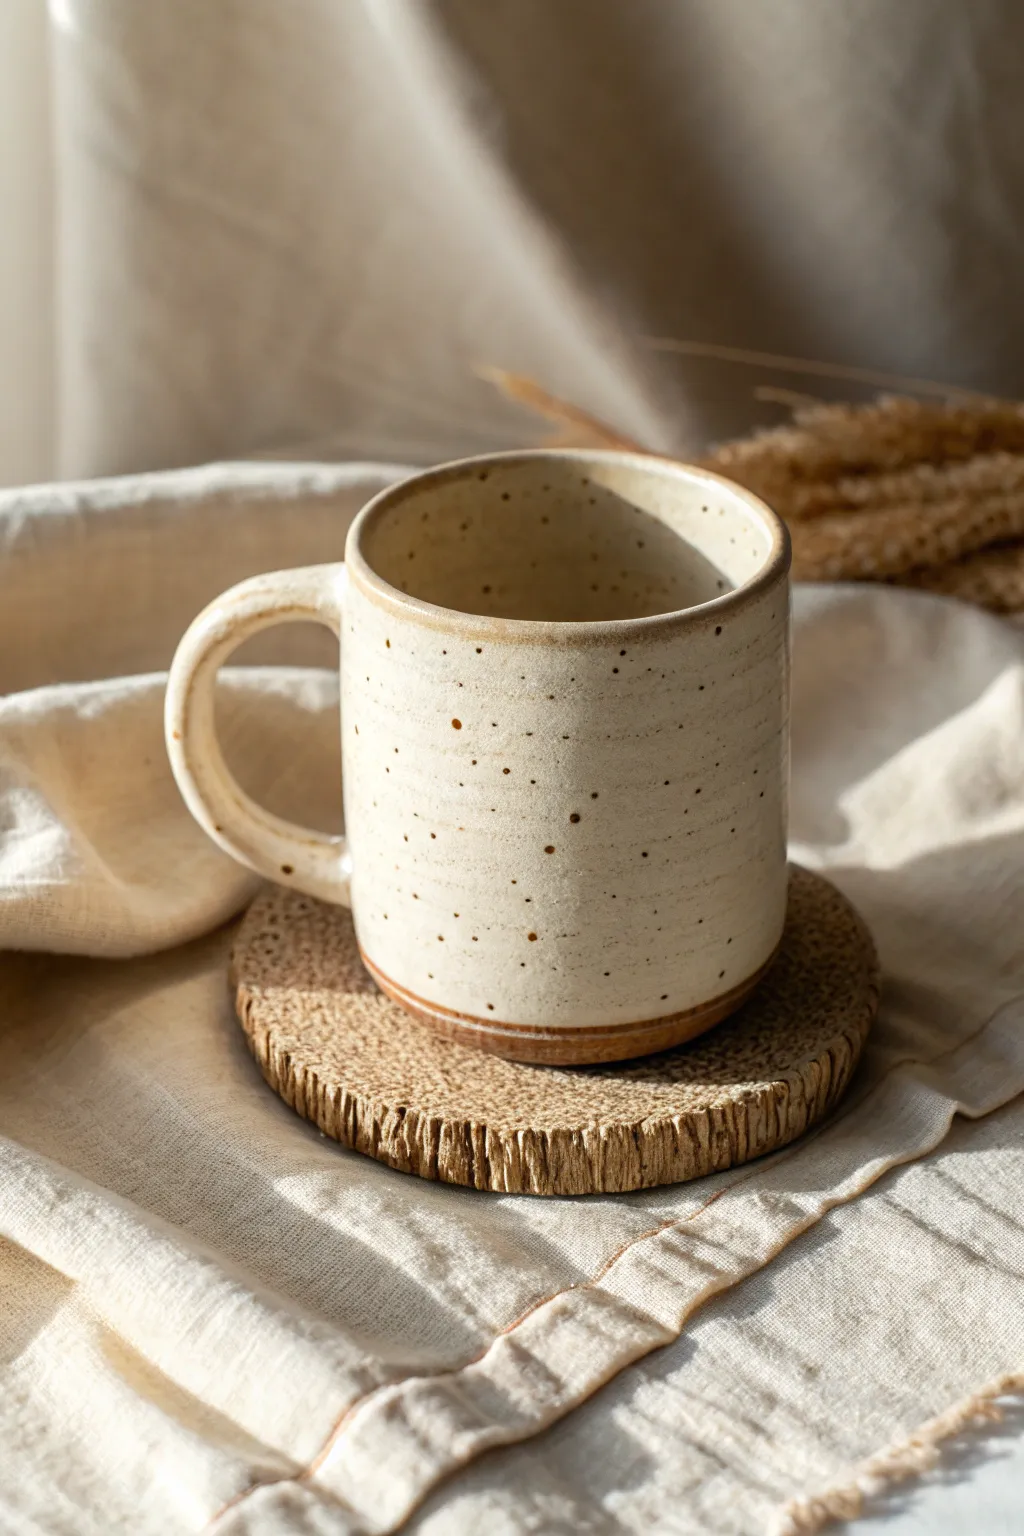
Embrace the beauty of simplicity with this handmade ceramic mug, featuring subtle horizontal ribbing and a classic exposed clay foot. The warm, speckled cream glaze pairs perfectly with the raw stoneware base for a rustic yet modern aesthetic.
Step-by-Step Guide
Materials
- Speckled stoneware clay (mid-fire)
- Pottery wheel (or can be hand-built)
- Throwing sponge
- Needle tool
- Wire cutter tool
- Rib tool (wooden or silicone)
- Loop trimming tools
- Serrated rib (optional)
- Cream or Oatmeal speckled glaze (cone 5/6)
- Wax resist
- Kiln
Step 1: Throwing the Cylinder
-
Prepare the Clay:
Start by wedging about 1 to 1.5 lbs of speckled stoneware clay. Wedging removes air bubbles and ensures the clay particles are aligned, which makes throwing much smoother. -
Center on the Wheel:
Slam your clay ball onto the center of the wheel head. Using moistened hands and steady pressure, center the clay until it spins without wobbling. -
Open the Form:
Press your thumbs into the center of the mound to open it up, stopping about 1/4 inch from the bat to leave enough thickness for the floor. -
Pull the Walls:
Gently pull the clay upward into a vertical cylinder shape. Aim for even walls, keeping the top slightly thicker for the rim. -
Shape the Belly:
Using a sponge or your fingers inside the cylinder, gently push outward to give the mug a slight curve, keeping the overall profile mostly straight and classic.
Wobbly Walls?
If walls collapse while pulling, use less water and slower wheel speed. A heat gun can slightly stiffen the clay mid-throw to save a drooping form.
Step 2: Adding Texture and Trimming
-
Create Horizontal Ridges:
While the wheel is spinning slowly, gently press a soft rib or your finger against the outside wall. Move up slowly to create subtle, organic spiral ridges visible through the glaze. -
Refine the Rim:
Compress the rim with a chamois or your sponge to make it smooth and distinct, ensuring it’s comfortable for drinking. -
Cut and Dry:
Run your wire tool under the base to separate it from the bat. Let the mug dry to a leather-hard state. -
Trim the Foot:
Invert the leather-hard mug onto the wheel. Use a loop tool to trim away excess weight from the bottom, carving out a defined foot ring. -
Define the Step:
Create a sharp transition line where the foot meets the body. This ‘step’ is crucial for the design, as it acts as a natural stopping point for the glaze.
Step 3: Handle and Final Touches
-
Pull a Handle:
Pull a strap of clay for the handle. For this design, a simple ‘ear’ shape works best. Ensure it’s thick enough to hold comfortably but proportional to the mug. -
Attach the Handle:
Score and slip both the attachment points on the mug and the handle ends. Press them firmly together, smoothing the seams with a modelling tool or wet finger. -
Bisque Fire:
Allow the mug to dry completely (bone dry) before loading it into the kiln for a bisque firing (usually to Cone 04).
Clean Glaze Lines
For that perfect crisp line at the foot, apply the wax resist while the pot spins on a banding wheel for steadiness.
Step 4: Glazing and Firing
-
Wax the Foot:
Apply wax resist to the bottom of the foot and up the side about 1/4 inch. This preserves the raw clay look seen in the photo. -
Glaze Application:
Dip the mug into a cream or oatmeal speckled glaze. Hold it upside down for a few seconds to let excess drip off, then turn upright immediately. -
Clean the Line:
Even with wax, I like to use a damp sponge to wipe any stray glaze droplets off the foot ring to ensure a crisp, clean line between glaze and raw clay. -
Glaze Fire:
Load the mug into the kiln for the final glaze firing, typically Cone 5 or 6 depending on your clay and glaze specifications.
Once cooled, your durable stoneware mug is ready for your morning coffee routine
Statement Handle Shape
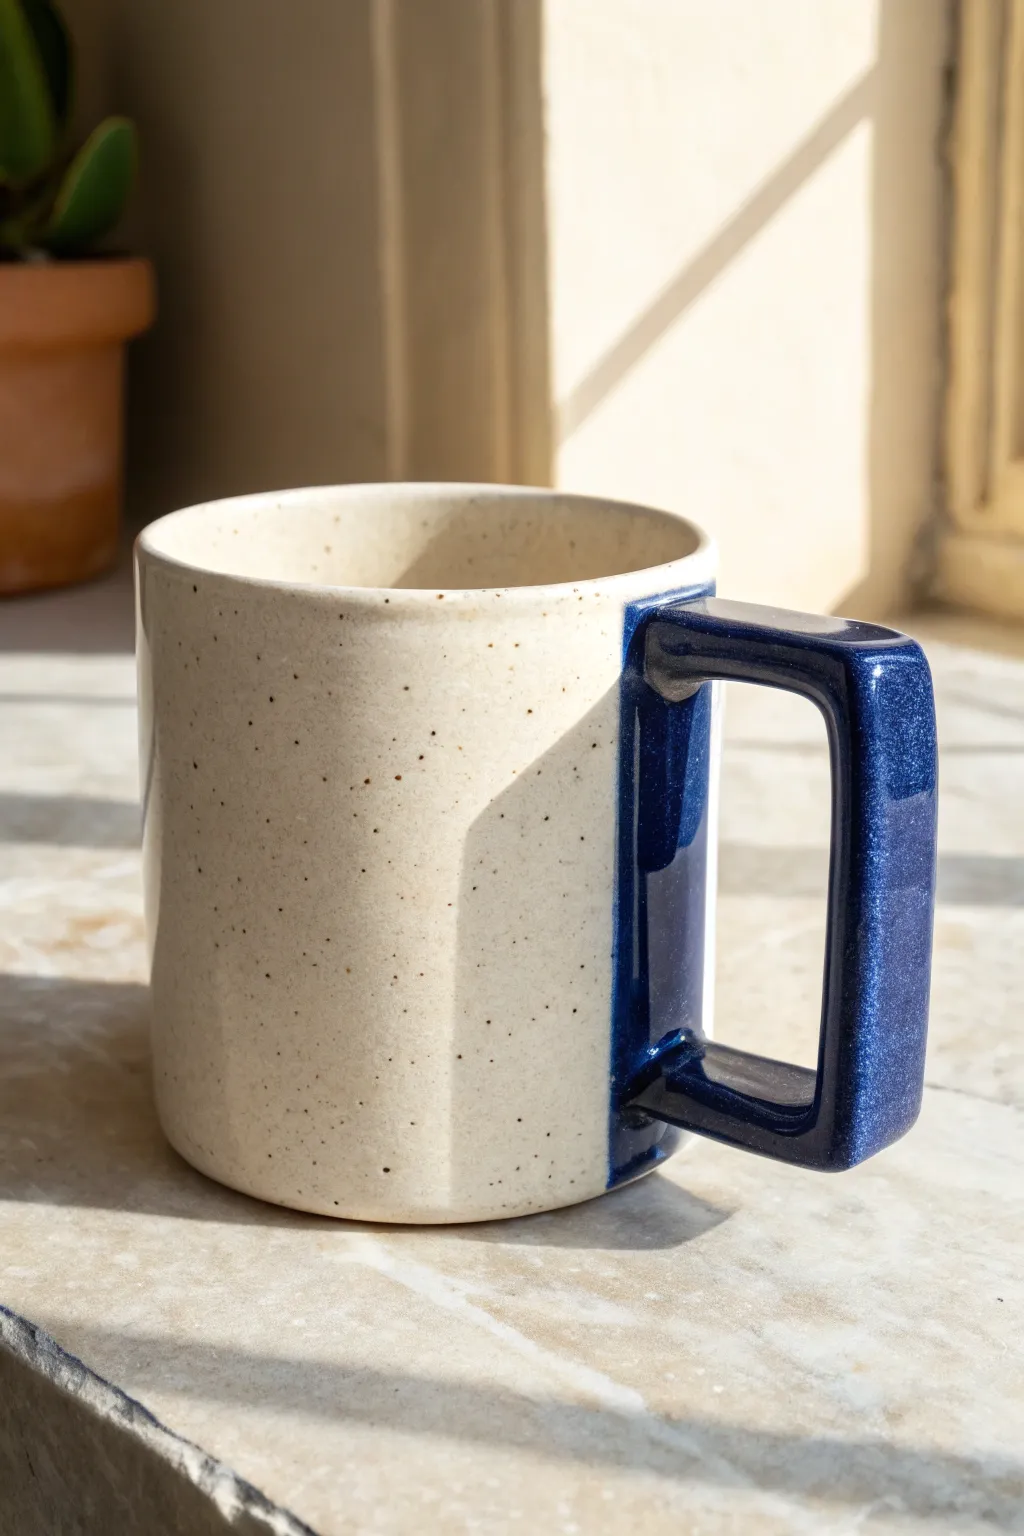
Elevate a simple cylinder mug with a bold, architectural handle that makes gripping a delight. This project combines natural, speckled clay with a striking deep blue glaze accent for a modern, high-contrast look.
Detailed Instructions
Materials
- Speckled stoneware clay (e.g., Cone 6)
- Pottery wheel (or slab roller/rolling pin for hand-building)
- Throwing tools: sponge, ribs (metal and wood), wire cutter
- Trimming tools
- Needle tool
- Fettling knife
- Serrated rib or scoring tool
- Slip
- Ruler
- Clear glaze (glossy)
- Deep cobalt blue glaze (opaque/glossy)
- Wax resist
- Soft glazing brush
Step 1: Forming the Body
-
Throw the cylinder:
Begin by wedging about 1 pound of speckled clay. Center it on the wheel and open the floor to your desired width, keeping in mind shrinkage rates. -
Pull the walls:
Pull the walls up into a straight, even cylinder. Aim for a distinct vertical profile rather than a curve, as this complements the geometric handle. -
Clean and compress:
Use a metal rib to smooth the exterior and remove throwing lines. Compress the rim with a chamois or sponge for a comfortable drinking edge. -
Wire off so it can dry:
Run a wire tool under the base and set the cylinder aside on a ware board until it reaches a leather-hard state.
Cracking at the Join?
If hairline cracks appear at the handle seams during drying, compress the area immediately with a hard tool and wrap the whole mug tightly in plastic for 2 days to equalize moisture.
Step 2: Sculpting the Statement Handle
-
Pull a thick strap:
While the body firms up, pull a thick, flat strap of clay for the handle directly from a lump of clay, or roll a consistent coil and flatten it gently. -
Shape the rectangle:
Instead of curving the handle, lay the strap on a table and fold it into a squared ‘C’ shape. You want sharp 90-degree corners. -
Dry to match consistency:
Allow the shaped handle to stiffen until it is leather-hard. It needs to be rigid enough to hold that sharp rectangular shape without sagging. -
Cut to size:
Use a fettling knife to cut the attachment points at a 45-degree angle or flush, ensuring the vertical section of the handle remains parallel to the mug wall.
Step 3: Assembly and Refining
-
Trim the mug:
Once leather-hard, center the mug body upside down on the wheel and trim the bottom to create a clean, flat foot. -
Score the attachment points:
Hold the handle up to the mug to find the perfect placement. Mark the spots, then aggressively score both the mug surface and huge handle ends. -
Attach with slip:
Apply a generous amount of slip to the scored areas. Press the handle firmly onto the mug body. -
Reinforce the seams:
Use a small wooden tool or your finger to smooth the clay around the connection points. I usually add a tiny coil of clay here to ensure a seamless transition. -
Refine the geometry:
Using a slightly damp sponge, sharpen the corners of the handle and wipe away any excess slip. Ensure the handle looks crisp and architectural. -
Slow drying:
Cover the mug loosely with plastic to let it dry slowly. This prevents the handle from pulling away as the clay shrinks.
Go Sharper
For an even more modern look, try slicing the handle strap with a wire cheese cutter to give it perfectly flat, razor-sharp edges before forming the rectangle shape.
Step 4: Glazing the Design
-
Bisque fire:
Fire the bone-dry mug to bisque temperature (usually cone 04) according to your clay body’s specifications. -
Wax the handle zone:
This is crucial for the two-tone look. Carefully apply wax resist exactly where the handle meets the body if you want a sharp line, or prepare to dip carefully. -
Glaze the interior and body:
Pour clear glaze into the interior, coat, and pour out. Then, dip the exterior of the mug body into the clear glaze, stopping right before the handle. -
Paint the handle:
Using a soft brush, apply three coats of the deep cobalt blue glaze only to the handle. Carefully cut in the line where the handle meets the mug body for that color-blocked effect. -
Final Cleanup:
Wipe the foot clean of any glaze with a damp sponge. -
Glaze fire:
Load the kiln and fire to the final temperature (e.g., Cone 6). Ensure the handle isn’t touching any other pots.
Enjoy your morning coffee with a grip that feels sturdy and looks like modern art
3D Floral Appliqué Mug
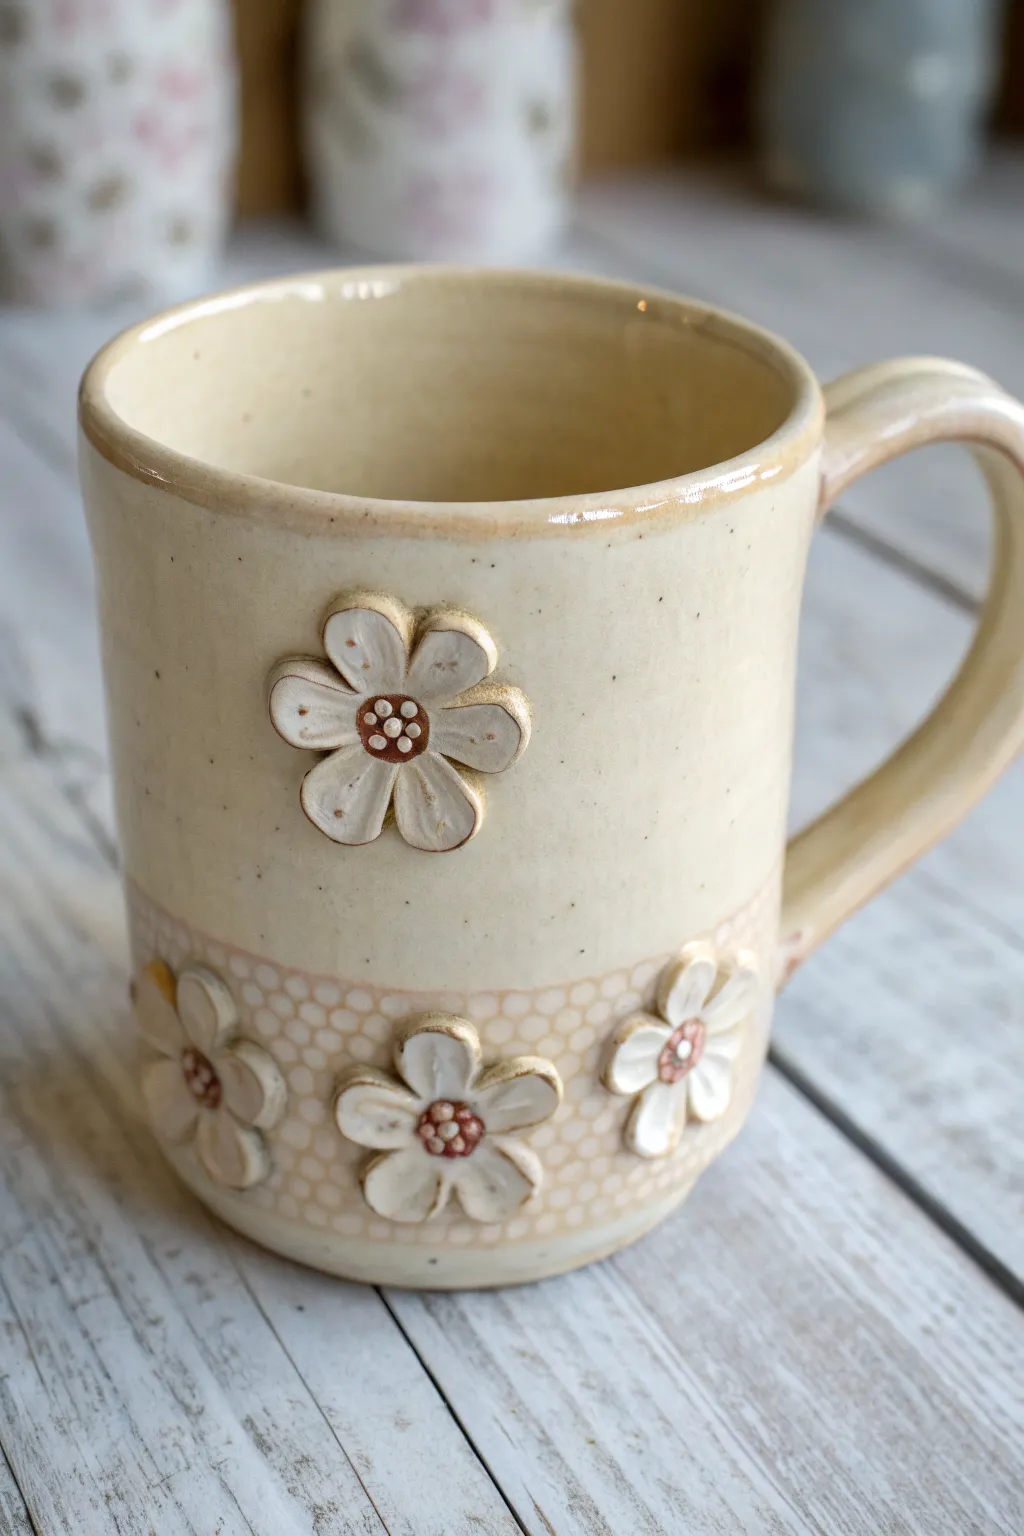
This charming handmade mug combines delicate 3D floral elements with a subtle honeycomb texture for a piece that feels as lovely as it looks. The creamy speckled glaze highlights the raised details, making it a perfect cozy addition to your morning routine.
Step-by-Step Guide
Materials
- Stoneware clay (speckled or buff)
- Pottery wheel (or slab roller for hand-building)
- Sponge and bucket of water
- Pin tool
- Rib tool (wooden or metal)
- Honeycomb pattern roller or texture mat
- Small flower cookie cutter or modeling tool
- A sharp knife (fettling knife)
- Scoring tool (serrated rib)
- Slip (clay slurry)
- Clear or light cream glossy glaze
- Underglazes (terracotta/rust for centers, white for petals)
- Small paintbrush
Step 1: Building the Base Form
-
Throw the Cylinder:
Begin by wedging about 1-1.5 lbs of clay. Center it on the wheel and open it up to create the floor. Pull the walls up into a straight, even cylinder, aiming for a height of about 4-5 inches. Keep the rim slightly thickened for durability. -
Refine the Shape:
Use a rib tool on the inside and outside to smooth the walls and remove throwing lines. I like to gently collar the rim inward just a hair to give the mug a pleasing silhouette. -
Trim the Base:
Once the cylinder is leather hard, trim away excess clay from the bottom to create a clean foot ring. Smooth any sharp edges with a damp sponge. -
Texture the Lower Band:
To create the honeycomb band, you can either gently roll a texture roller against the bottom third of the cylinder while it spins slowly, or, for more precision, press a honeycomb texture mat into a thin strip of clay and attach it as an overlay. -
Pull and Attach Handle:
Pull a strap handle from a lug of clay. Let it stiffen slightly into a curve. Score and slip the attachment points on the mug body, then firmly attach the handle, blending the seams seamlessly.
Cracking around flowers?
If cracks appear around the appliqués during drying, your clay was likely too dry when attaching. Wrap the mug tightly in plastic for 2 days to re-homogenize the moisture levels.
Step 2: Sculpting the Florals
-
Make the Flower Shapes:
Roll out a small slab of clay to about 1/8 inch thickness. Use a small flower cutter to punch out five or six blossom shapes. Alternatively, you can hand-model individual petals and join them together. -
Sculpt the Petals:
Use a modeling tool to gently press indentations into each petal to give them a concave, organic look. Smooth the edges so they look soft, not sharp. -
Create the Centers:
Roll tiny balls of clay for the flower centers. Press them flat into the middle of your flower shapes. Use a needle tool or small stamp to create the ‘seeds’ texture in the center. -
Attach the Appliqués:
Decide on your placement—one large focal flower on the upper body and a row of smaller ones along the honeycomb band works beautifully. Score the back of the flowers and the mug surface thoroughly. -
Secure the Blooms:
Apply slip generously to the scored areas. Press the flowers firmly onto the mug so no air is trapped. Clean up any oozing slip with a small, damp brush.
Step 3: Glazing and Finishing
-
Bisque Fire:
Allow the mug to dry completely (bone dry). Fire it to cone 04 (or your clay body’s bisque temperature). -
Apply Underglaze Details:
Using a fine brush, paint the petals with a white underglaze to make them pop against the clay body. Paint the flower centers with a rust or terracotta colored underglaze. -
Wax Resist (Optional):
If you want the texture of the raw clay to show through on specific parts, carefully apply wax resist over the flowers before dipping. -
Glaze Application:
Dip the entire mug into a clear or semi-transparent cream glaze. This will seal the clay while allowing the speckles and underglaze colors to show through. Make sure the glaze isn’t too thick, or it might obscure the honeycomb texture. -
Wipe the Foot:
Clean the bottom of the foot ring with a damp sponge to prevent the mug from sticking to the kiln shelf. -
Final Firing:
Fire the mug to maturity (usually cone 5 or 6 for stoneware). Let the kiln cool completely before unloading.
Clean Texture Tip
Dust your honeycomb texture roller or mat with a little cornstarch before pressing it into the clay. This acts as a release agent and keeps the pattern crisp without sticking.
Enjoy your morning coffee in a mug that literally blooms in your hands
Mushroom and Forest Add-Ons
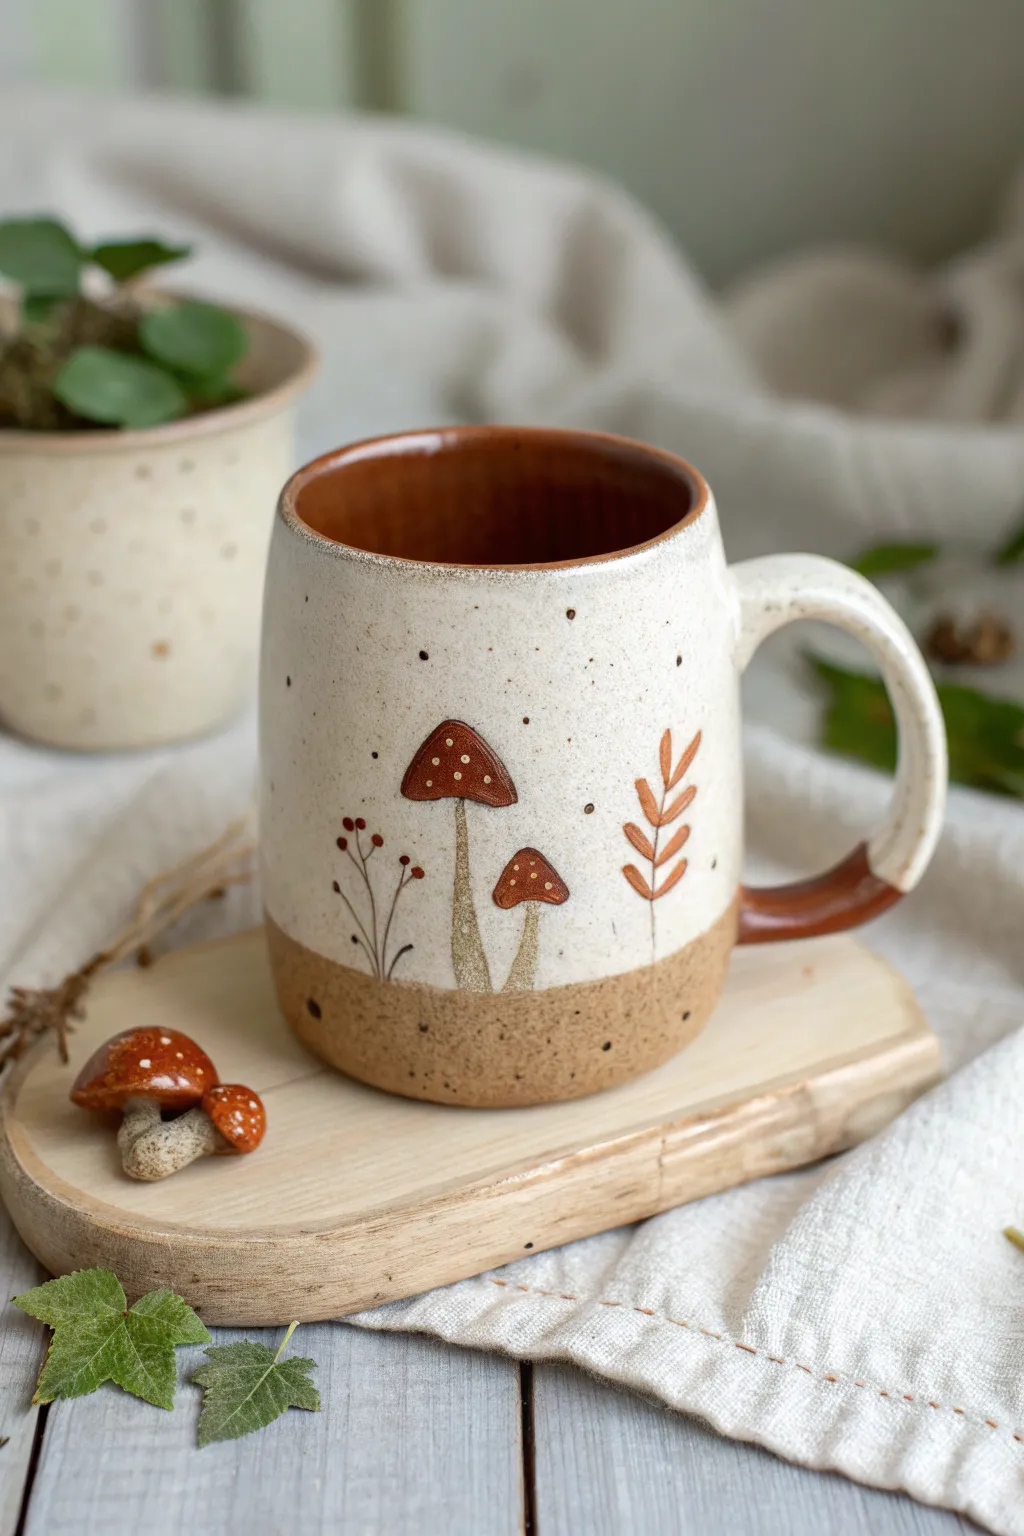
Bring the calming vibes of a forest floor into your kitchen with this handcrafted ceramic mug. Featuring gentle speckles, warm earthy tones, and hand-painted mushroom illustrations, this project perfectly balances rustic charm with delicate detailing.
Step-by-Step Tutorial
Materials
- Speckled stoneware clay (mid-fire)
- Pottery wheel (or rolling pin for slab building)
- Rib tool
- Wire cutter
- Fettling knife
- Sponge
- Underglazes: Rust red, deep brown, ochre yellow, forest green
- Fine detail brushes (liner brush and size 0 round)
- Clear transparent glaze (cone 5/6 compatible)
- Wax resist
- Kiln
Step 1: Forming the Mug
-
Throw the Body:
Begin by centering about 1-1.5 lbs of speckled stoneware clay on your wheel. Evenly pull the walls into a tall cylinder, slightly tapering the rim inward to mimic the cozy shape in the photo. -
Shape the Base:
Use a rib tool to clean up the exterior profile. Create a clear definition where the wall meets the floor of the mug, but keep the bottom edge rounded for a comfortable hold. -
Trim and Smooth:
Once the mug is leather hard, trim away excess clay from the bottom. I find that leaving a slightly thicker, heavier bottom adds a nice stability to this specific design. -
Pull the Handle:
Pull a strap of clay for the handle. The handle in the reference is a classic C-shape with a thumb rest curve. Make sure the thickness matches the mug wall. -
Attach the Handle:
Score and slip the contact points on both the mug body and handle. Press firmly to attach. Use a damp sponge or finger to smooth the join so it looks seamless.
Smudged Lines?
If your underglaze lines smudge during glazing, bisque fire the mug a second time after painting but before glazing. This ‘locks’ the intricate drawing in place.
Step 2: Decorating the Surface
-
Plan the Design:
With the mug at a firm leather-hard stage, lightly sketch your mushroom layout using a needle tool or pencil. The design sits just above the bottom third of the mug. -
Paint the Mushroom Caps:
Using rust red underglaze, fill in the triangular caps of the mushrooms. You may need two thin coats for opaque coverage, letting the first coat dry to the touch. -
Add Stem details:
Mix a diluted wash of ochre and brown underglaze. Paint the stems with a slightly translucent touch to let the speckled clay show through, giving it texture. -
Create the Foliage:
Using a thin liner brush and the rust or ochre underglaze, paint the simple leaf sprigs. Keep the lines fluid and organic; they don’t need to be perfectly symmetrical. -
Add Tiny Details:
Dip a fine-point tool or the back of a brush into white underglaze (or leave raw clay spots if you are precise) to create the signature dots on the mushroom caps. -
Paint the Base Band:
Rather than glazing, leave the bottom inch of the mug raw clay to create the two-tone effect. You can enhance this by applying a light wash of brown iron oxide to the raw clay band if your clay body isn’t naturally dark enough. -
Handle Detail:
Paint the bottom curve of the handle with the same rust red/brown mix used on the mushrooms to visually connect the handle to the base design. -
Bisque Fire:
Once bone dry, load the mug into the kiln for a bisque fire (usually Cone 04) to set the design and prepare the clay for glazing.
Sculptural Pop
Make slight indentations with a sculpting tool where the mushroom caps sit before painting. The glaze will pool slightly in the recess for added depth.
Step 3: Glazing and Finishing
-
Wax Resist:
Carefully apply wax resist to the bottom inch of the mug (the raw clay band) and the painted section of the handle. This prevents glaze from adhering to these earthy accents. -
Inside Glazing:
Pour a darker amber or rust-colored glossy glaze into the interior of the mug. Swirl it to coat the entire inside and pour out the excess. -
Exterior Glazing:
Dip the exterior of the mug into a clear transparent glaze. The wax will protect the bottom band, while the clear glaze will make your mushroom illustrations pop. -
Clean Up:
Use a sponge to wipe away any stray droplets of glaze that may have beaded up on the waxed areas. The transition line should be crisp. -
Final Firing:
Fire the mug to maturity (likely Cone 5 or 6 depending on your clay). Ensure the bottom is wiped clean so it doesn’t stick to the kiln shelf.
Now you have a cozy, woodland-inspired vessel that is perfect for morning coffee or afternoon tea
Cute Mini Icons Scatter Pattern
Transform a plain ceramic mug into a piece of usable art with this delightful scatter pattern featuring sweet cherries, crescent moons, and twinkling stars. The speckled finish and hand-painted details give it a cozy, warm-hearted aesthetic perfect for your morning coffee.
How-To Guide
Materials
- Bisque-fired ceramic mug (preferably speckle clay body)
- Underglaze paints (Rust orange/terracotta, deep red, dark green, dark teal)
- Fine detail brush (Size 000 or liner brush)
- Small round brush (Size 2 or 4)
- Clear dipping glaze (transparent)
- Pencil for sketching
- Water cup and paper towels
- Sponge
Step 1: Preparation & Sketching
-
Clean surface:
Begin by gently wiping down your bisque mug with a slightly damp sponge to remove any kiln dust or oils from your hands, ensuring a clean canvas for your design. -
Plan icon placement:
Visualize the spacing of your icons. The charm of a scatter pattern lies in its random yet balanced nature. You want roughly equal distance between the main elements—the cherries and moons. -
Light sketching:
Using a regular pencil, lightly sketch the outlines of your crescents and cherries onto the bisque. Don’t worry about erasing mistakes; the graphite will burn off completely in the kiln.
Keep it Crisp
Underglaze dries fast! If your brush drags, mix a tiny drop of water or glazing medium into your paint puddle to help the liner brush glide smoothly.
Step 2: Painting the Main Icons
-
Paint the moons:
Dip your small round brush into the rust-orange or terracotta underglaze. Fill in the crescent moon shapes. I usually apply two to three thin coats here to ensure the color is opaque and vibrant after firing. -
Paint the cherries:
Switch to your deep red underglaze. Carefully paint the round cherry fruits. Like the moons, layering ensures a rich color, so apply a second coat once the first is dry to the touch. -
Add stems and leaves:
Using your finest detail brush (size 000), pick up the dark green underglaze. Paint thin, delicate lines connecting the cherries, and add a small, single leaf to each pair.
Mix It Up
Try swapping the cherries for tiny mushrooms or lemons while keeping the celestial elements for a different ‘cottagecore’ vibe.
Step 3: Adding the Sparkle Details
-
Draw large stars:
With the rust orange underglaze and detail brush, paint five-pointed outline stars scattered between the larger icons. Keep the lines as thin as possible for a delicate look. -
Add starbursts:
Using dark teal underglaze, paint simple eight-point starbursts (an asterisk shape). Use just the very tip of your brush to keep these crisp. -
Incorporate tiny accents:
Look for empty spaces in your composition. Add tiny red or orange single dots to fill visible gaps without crowding the design. -
Create the speckle effect:
If your clay body isn’t naturally speckled, you can mimic the look. Flick a stiff toothbrush dipped in watered-down black underglaze over the mug, or manually paint tiny random black dots with your smallest brush.
Step 4: Glazing & Final Firing
-
Dry completely:
Allow the underglaze decorations to dry completely, ideally overnight, to prevent smudging during glazing. -
Sponge cleanup:
If you have any underglaze on the foot of the mug (the bottom ring it sits on), wipe it away cleanly with a sponge. -
Apply clear glaze:
Dip the entire mug into a clear, transparent glaze. Ensure the coating is even; hold it upside down for a few seconds to let excess drips run off. -
Check the foot:
Re-check the foot of the mug. Wipe away any clear glaze from the bottom contact points to prevent the mug from fusing to the kiln shelf. -
Final fire:
Fire the piece in the kiln according to the specific temperature guidelines of your clear glaze (usually Cone 5 or 6 for stoneware).
Once cooled, your custom mug offers a handmade touch to every beverage you serve
Face Mug With Simple Features
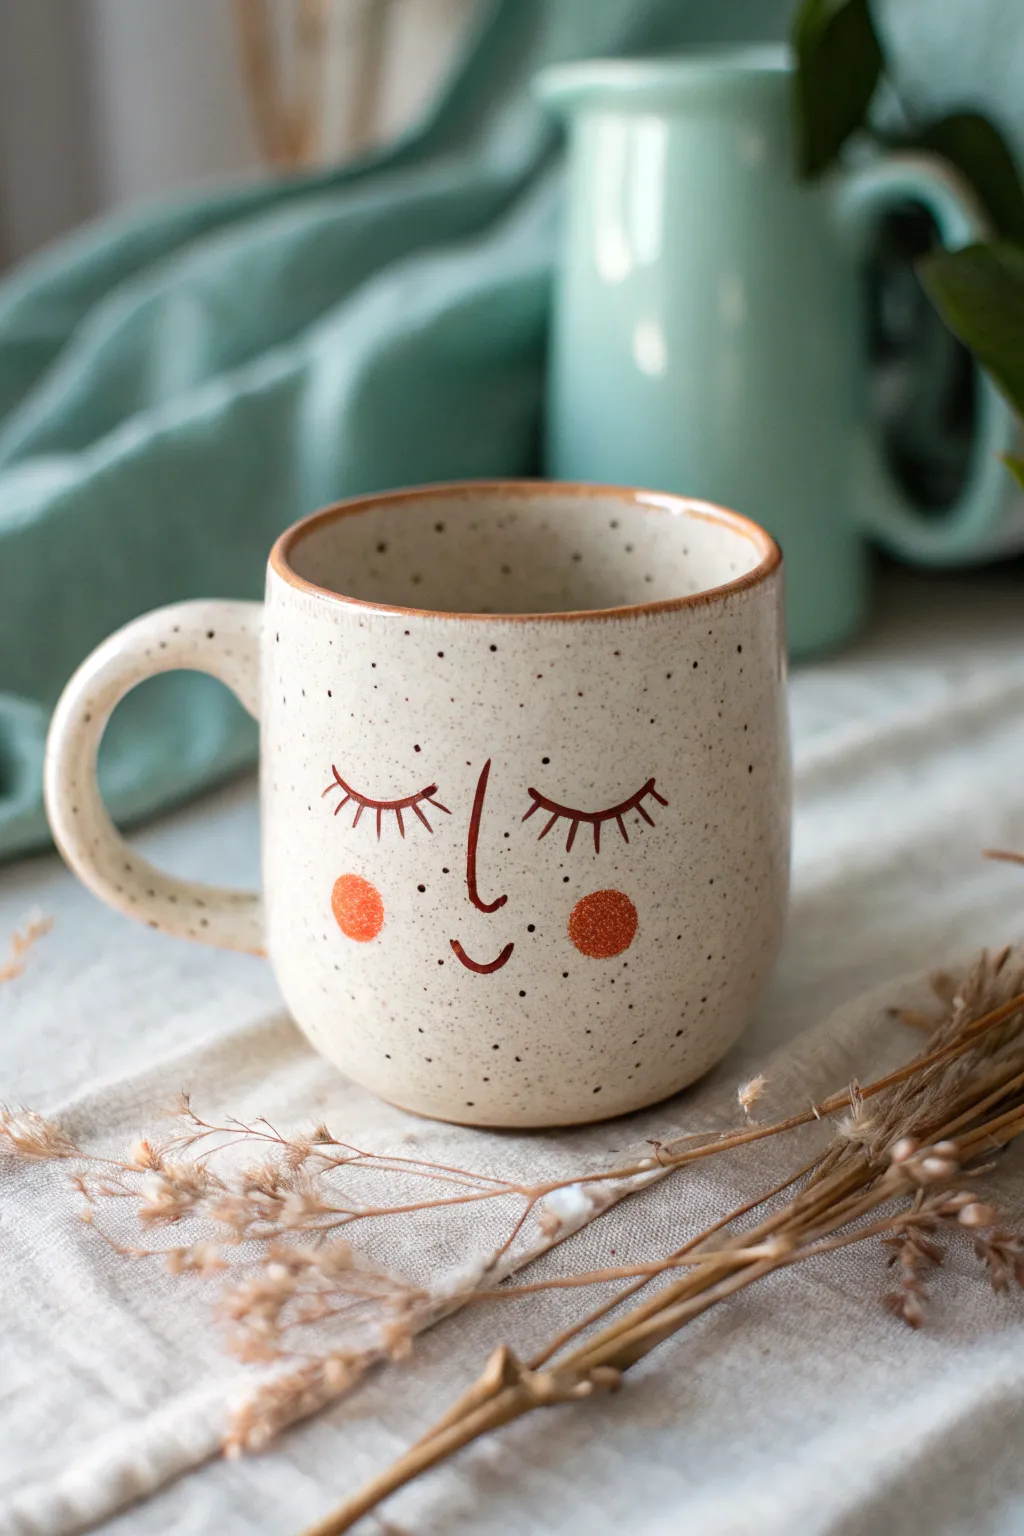
This charming ceramic mug features a minimalist, sleeping face design that brings a sense of calm to your morning coffee. Using speckled clay and simple underglaze techniques, you can achieve this sweet, dreamy expression on a sturdy, handmade vessel.
Step-by-Step
Materials
- Speckled stoneware clay (Cone 5/6)
- Pottery wheel (or rolling pin for hand-building)
- Needle tool
- Rib tool (kidney)
- Sponge
- Wire cutter
- Trimming tools
- Scoring tool
- Slip
- Dark brown underglaze (or oxide pencil)
- Orange/Terracotta underglaze
- Fine detail brush (liner brush)
- Small round brush
- Clear transparent glaze
Step 1: Forming the Mug Body
-
Prepare the Clay:
Begin by thoroughly wedging about 1 to 1.5 lbs of speckled stoneware clay to remove air bubbles and align the particles. -
Center and Open:
Throw the clay onto the wheel head and center it. Open the form, pulling the floor out to your desired width, leaving about 1/4 inch thickness for the base. -
Pull the Walls:
Pull the walls up into a simple cylinder shape. Aim for a slightly rounded bottom that tapers very gently inward at the rim to keep the heat in your beverage. -
Refine the Rim:
Use a chamois or a wet sponge to compress and smooth the rim. This makes the finished mug comfortable to drink from. -
Wait for Leather Hard:
Cut the cylinder from the wheel and let it dry slowly until it reaches a leather-hard state. It should be firm enough to handle without warping.
Step 2: Adding the Handle & Trimming
-
Trim the Foot:
Place the mug upside down on the wheel (centering it carefully) and trim the excess clay from the bottom to create a neat foot ring. -
Pull a Handle:
Pull a handle from a small luggage of fresh clay. Create a classic `C` shape that allows enough room for two or three fingers. -
Attach the Handle:
Score the attachment points on both the mug body and the handle ends. Apply slip generously and press the handle firmly onto the mug. -
Clean the Joins:
Wipe away excess slip with a damp sponge and ensure the transition between the handle and mug is seamless.
Smudged Underglaze?
If you make a mistake while painting the face, simply let the underglaze dry for a moment and gently scratch it off with a needle tool before trying again.
Step 3: Painting the Face
-
Plan the Features:
Lightly sketch the face placement using a pencil. I find that placing the features slightly lower on the mug body makes it look cuter. -
Paint the Lashes:
Using a fine liner brush and dark brown underglaze, paint two downward curves for the sleeping eyes. Add short, distinct vertical strokes for the eyelashes. -
Add the Nose:
Paint a simple `L` shape or a vertical line with a small loop at the bottom to form the nose, keeping the line weight consistent with the eyes. -
Create the Smile:
Just below the nose, add a small, gentle `u` curve for the smiling mouth. -
Apply the Cheeks:
Switch to a small round brush and orange underglaze. Paint two solid circles on either side of the face for the rosy cheeks. -
Bisque Fire:
Once the underglaze is dry, load the mug into the kiln for a bisque firing (usually to Cone 04).
Pro Tip: Consistent Cheeks
To get perfectly round and identical cheeks, use the flat end of a drill bit or a round sponge stippler dipped in underglaze as a stamp.
Step 4: Glazing and Finishing
-
Wax the Foot:
Apply wax resist to the bottom foot ring to prevent glaze from sticking to the kiln shelf. -
Apply Clear Glaze:
Dip the entire mug into a clear, transparent glaze. This will seal the clay and make the speckles pop without obscuring the face design. -
Clean the Rim:
If the clear glaze is thick, wipe the very edge of the rim slightly to expose a thin line of the darker clay body, creating a natural frame. -
Final Fire:
Fire the mug to maturity (Cone 5 or 6, depending on your clay body specifications). -
Sand the Bottom:
After the kiln cools, sand the unglazed foot ring lightly to ensure it won’t scratch your table surface.
Now you have a cozy, personalized mug ready for your favorite hot drink
Sculpted Creature Handle Surprise
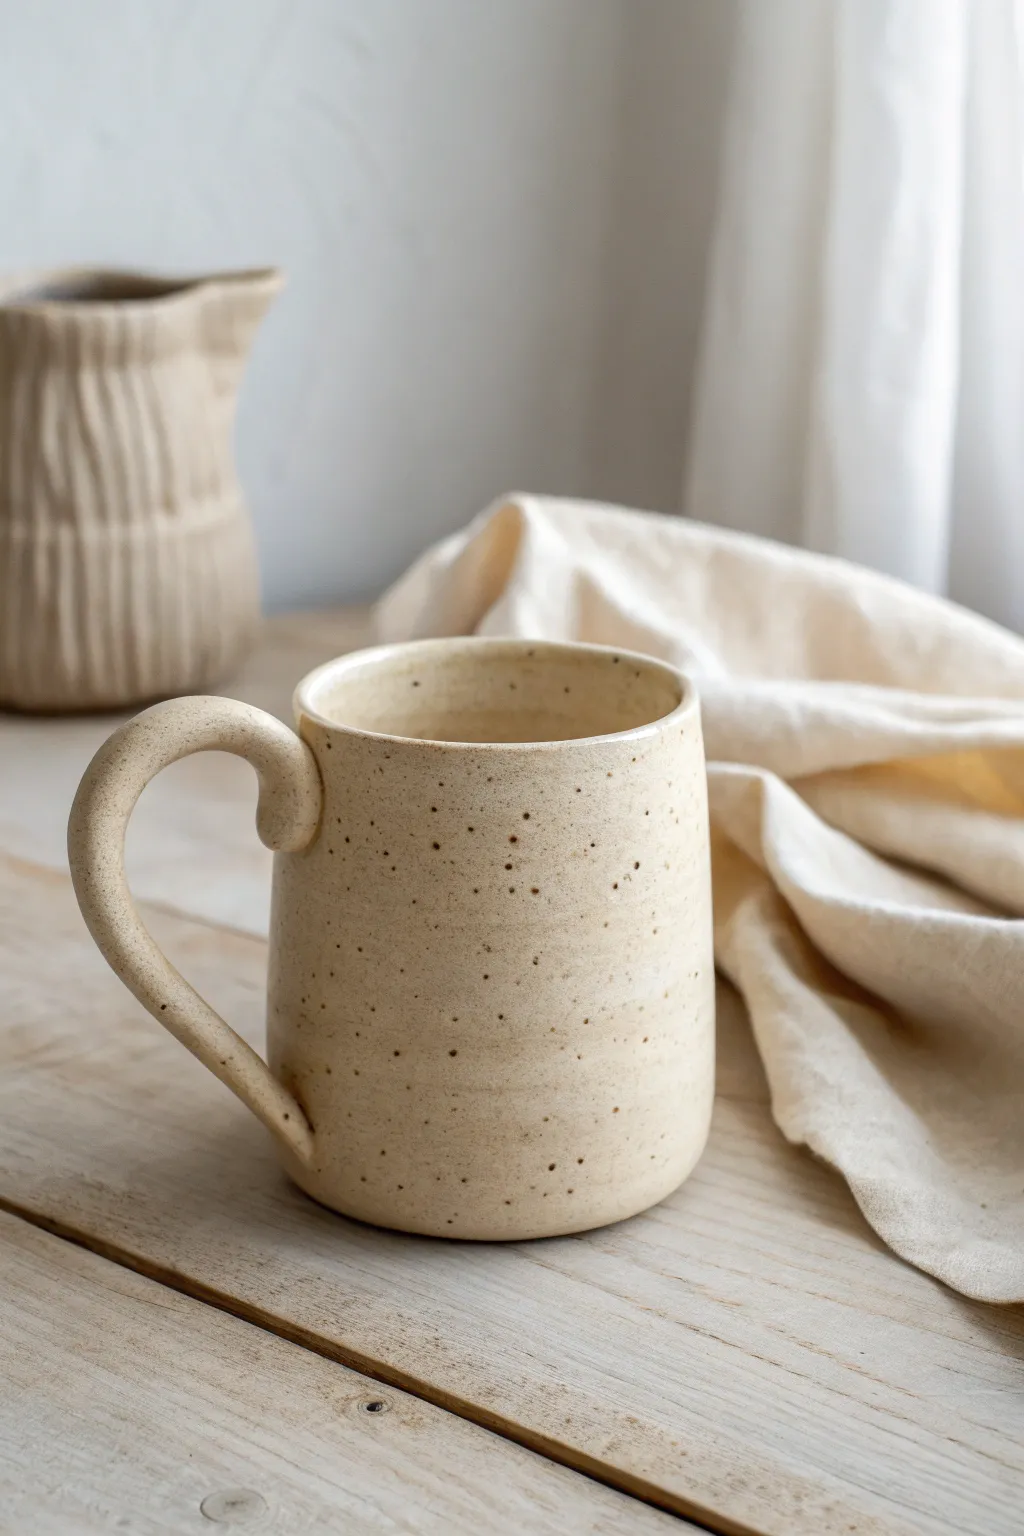
Capture the essence of understated rustic beauty with this hand-built ceramic mug, featuring a soothing matte cream glaze and natural clay speckles. Its gently tapered silhouette and comfortable ear-shaped handle make it a perfect everyday companion for your morning rituals.
How-To Guide
Materials
- Speckled stoneware clay (mid-fire)
- Pottery wheel (optional, can be hand-built)
- Rib tool (wood or metal)
- Needle tool
- Wire cutter
- Sponge
- Fettling knife
- Serrated rib or scoring tool
- Slip (clay mixed with water)
- Matte white or cream glaze
- Kiln
Step 1: Forming the Body
-
Prepare the Clay:
Begin by wedging about 1 to 1.5 pounds of speckled stoneware clay to remove any air bubbles and ensure a uniform consistency. -
Center and Open:
If throwing on the wheel, center your clay mound and open it up, leaving a base thickness of about a quarter-inch. -
Pull the Walls:
Pull the clay upward to create a cylinder. Aim for a height of roughly 4-5 inches. Keep the walls even, avoiding thick spots near the base. -
Shape the Taper:
Using a rib tool on the outside and your fingers inside, gently collar the top rim inward slightly to create a subtle taper. The base should be slightly wider than the rim for stability. -
Smooth the Surface:
Take a soft rib or a damp sponge and run it up the side of the pot to remove throwing lines, creating a smooth canvas for the speckles to shine later on. -
Refine the Rim:
Use a chamois or a piece of plastic to compress and round off the drinking rim so it feels smooth against the lips. -
Cut and Dry:
run a wire cutter under the base to release it from the bat. Set the cylinder aside until it reaches a leather-hard state.
Crack Prevention
If hairline cracks appear at the handle join during drying, compress the seam immediately with a wooden tool and wrap the mug tightly in plastic for 24 hours to rehydrate.
Step 2: Creating and Attaching the Handle
-
Pulling a Handle:
Take a carrot-shaped lump of clay. Holding the thick end, wet your hand and pull downward rhythmically to stretch the clay into a long, tapered strap. -
Shape the Curve:
Once the strap is the desired thickness, curve it into a question-mark shape or ‘ear’ shape and lay it on its side to firm up until it holds its form without collapsing. -
Trim to Fit:
Hold the handle up to your leather-hard mug body. Trim the attachment points at an angle so the handle flows naturally out of the mug wall. -
Score the Surfaces:
Use a serrated rib or needle tool to scratch up the contact points on both the mug body and the handle ends. -
Apply Slip:
Dab a generous amount of slip onto the scored areas. This acts as the glue for your clay join. -
Attach and Compress:
Press the handle firmly onto the mug. Support the wall from the inside with one hand while pressing from the outside to prevent warping. -
Clean the Seams:
I like to use a small damp brush or modeling tool to smooth out the excess slip around the connection points, blending the clay so it looks like one continuous piece. -
Slow Drying:
Cover the mug loosely with plastic to ensure the handle and body dry at the same rate, preventing cracking.
Level Up: Texture
Before the clay dries, gently press a piece of coarse linen fabric against the handle or lower body to add a subtle tactile element that contrasts with the smooth glaze.
Step 3: Glazing and Firing
-
Bisque Fire:
Once bone dry, fire the mug in a bisque kiln to approximately Cone 04 to prepare it for glazing. -
Wax the Base:
Apply wax resist to the bottom foot of the mug to prevent glaze from adhering to the kiln shelf. -
Apply Glaze:
Dip the mug into a matte white or cream glaze for 3-5 seconds. Shake off excess drips and let it dry. -
Final Fire:
Fire the mug to maturity (likely around Cone 5 or 6 depending on your clay body). The heat will draw out the iron or manganese speckles through the creamy glaze.
Now you have a beautifully simple mug ready to hold your favorite warm beverage