
If you’ve ever wished your walls could hold a little more beauty (and a little more stuff), ceramic wall pockets are the cutest solution. I love how a simple slab of clay can turn into a hanging pocket for flowers, plants, or everyday bits you want within reach.
Classic Envelope Wall Pocket
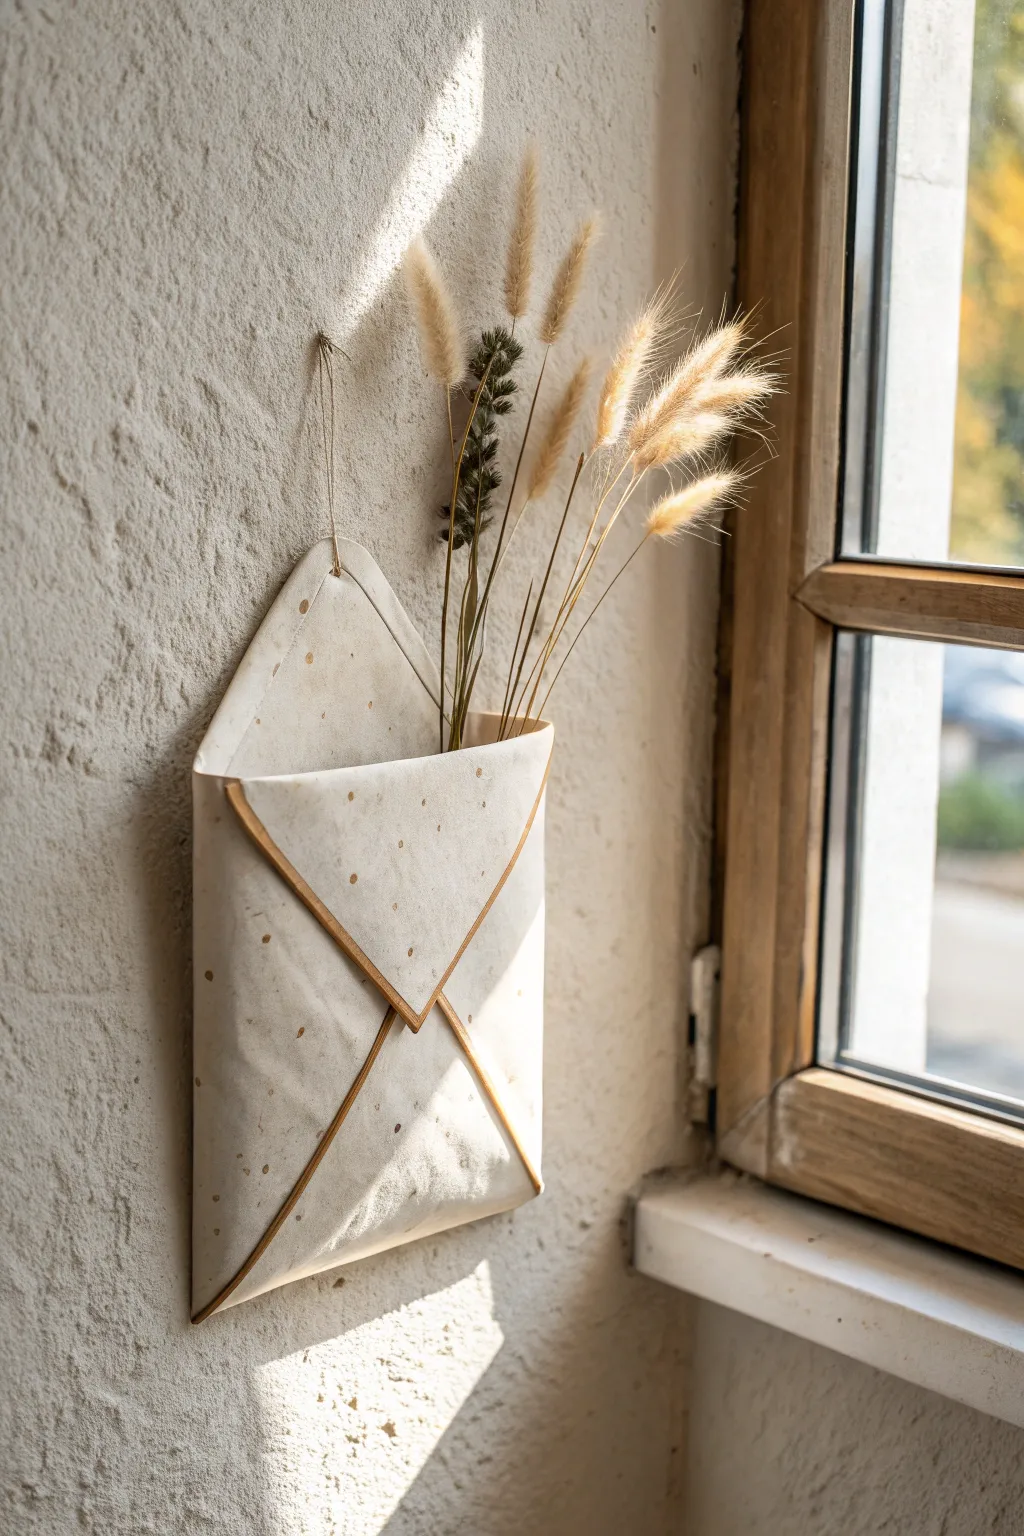
This charming ceramic piece mimics the fold of a traditional paper envelope but freezes it in time with stoneware durability. The subtle speckled clay body and touches of gold luster on the edges give it an elegant, artisanal finish perfect for displaying dried stems.
Step-by-Step Guide
Materials
- Speckled stoneware clay (mid-fire)
- Rolling pin
- Canvas mat or slab roller
- Fettling knife or X-Acto tool
- Paper envelope template (create your own)
- Serrated rib
- Smooth rubber rib
- Needle tool
- Sponge
- Slip (clay slurry)
- Clear matte glaze
- Gold luster overglaze
- Small dedicated brush for luster
- Kiln
Step 1: Forming the Envelope
-
Roll the Slab:
Begin by wedging your speckled stoneware clay to remove air bubbles. Roll it out into a smooth, even slab that is roughly 1/4 inch thick. I find that going much thinner than this can make the walls warp during firing. -
Create a Template:
Cut a template out of paper or cardstock in the shape of an open envelope. It should look like a large square in the center with four triangular flaps attached to the sides (top, bottom, left, right). The bottom flap should be slightly longer than the rest to form the front pocket. -
Cut the Shape:
Place your paper template onto the clay slab. Using your fettling knife or X-Acto tool, carefully trace around the template to cut out the clay shape. Keep the knife upright to ensure clean, 90-degree edges. -
Smooth the Surface:
Use a smooth rubber rib to compress both sides of the clay slab. This removes the canvas texture and aligns the clay particles, which helps prevent cracking later. -
Fold the Sides:
Gently fold the left and right triangular flaps inward toward the center of the square base. Do not press them down yet; just check their positioning. -
Score and Slip:
Mark where the flaps overlap. Use a serrated rib or needle tool to score (scratch) the texture into the clay where the flaps will join. Apply a generous amount of slip to these scored areas. -
Secure the Back Seam:
Press the left and right flaps together firmly where they meet in the middle. Smooth the seam with your finger or a tool so they become one solid unit. This forms the back wall of your pocket. -
Fold the Bottom Up:
Fold the bottom triangular flap upward. This will become the front face of the envelope. Check that it overlaps the side flaps nicely. -
Attach the Front:
Score and slip the edges of this bottom flap and the corresponding areas on the side flaps. Press the bottom flap onto the folded sides firmly to close the pocket. -
Check the Interior:
Reach inside the pocket carefully to smooth the inner seams. You want to ensure there is enough volume inside to hold flower stems. -
Position the Top Flap:
The top triangular flap remains open and upright. You can gently curve it slightly outward or keep it flat against the imaginary wall to simulate an open letter. -
Add a Hanging Hole:
Use a hole punch tool or a straw to create a clean hole near the top point of the upper flap. This will be essential for hanging the piece later.
Slumping Flaps?
If the clay is too soft and the front flap sags, stuff the inside of the envelope with crumpled newspaper or plastic wrap to support the shape while it dries to leather hard.
Step 2: Finishing and Glazing
-
Refine the Edges:
Once the clay is leather hard, use a damp sponge to smooth all sharp edges and refine the rim. Pay special attention to the overlapping ‘V’ shape on the front. -
Bisque Fire:
Allow the piece to dry completely slowly to avoid warping. Bisque fire it in the kiln according to your clay body’s specifications (usually Cone 04). -
Glaze Application:
Dip the bisqued envelope into a clear matte glaze. This seals the clay while allowing the natural speckles of the stoneware to show through. Wipe the foot or back clear if firing directly on a shelf. -
Glaze Fire:
Fire the piece again to the glaze temperature (typically Cone 5 or 6). Let the kiln cool completely before unloading. -
Apply Gold Luster:
Using a small, dedicated brush, carefully paint a line of gold luster overglaze along the exposed edges of the triangular flaps. Follow the ‘V’ lines on the front and the perimeter of the top flap. -
Decal Firing:
Place the piece back in the kiln for a final, lower-temperature firing (around Cone 018) to set the gold. Ensure you have good ventilation during this firing as lusters fume.
Clean Lines
When painting the gold luster, rest your hand on a steady surface. If you smudge it, luster can be wiped away with a little alcohol before firing.
String a piece of natural twine or leather cord through the top hole and fill your permanent envelope with your favorite dry florals


Minimal Half-Moon Wall Pocket
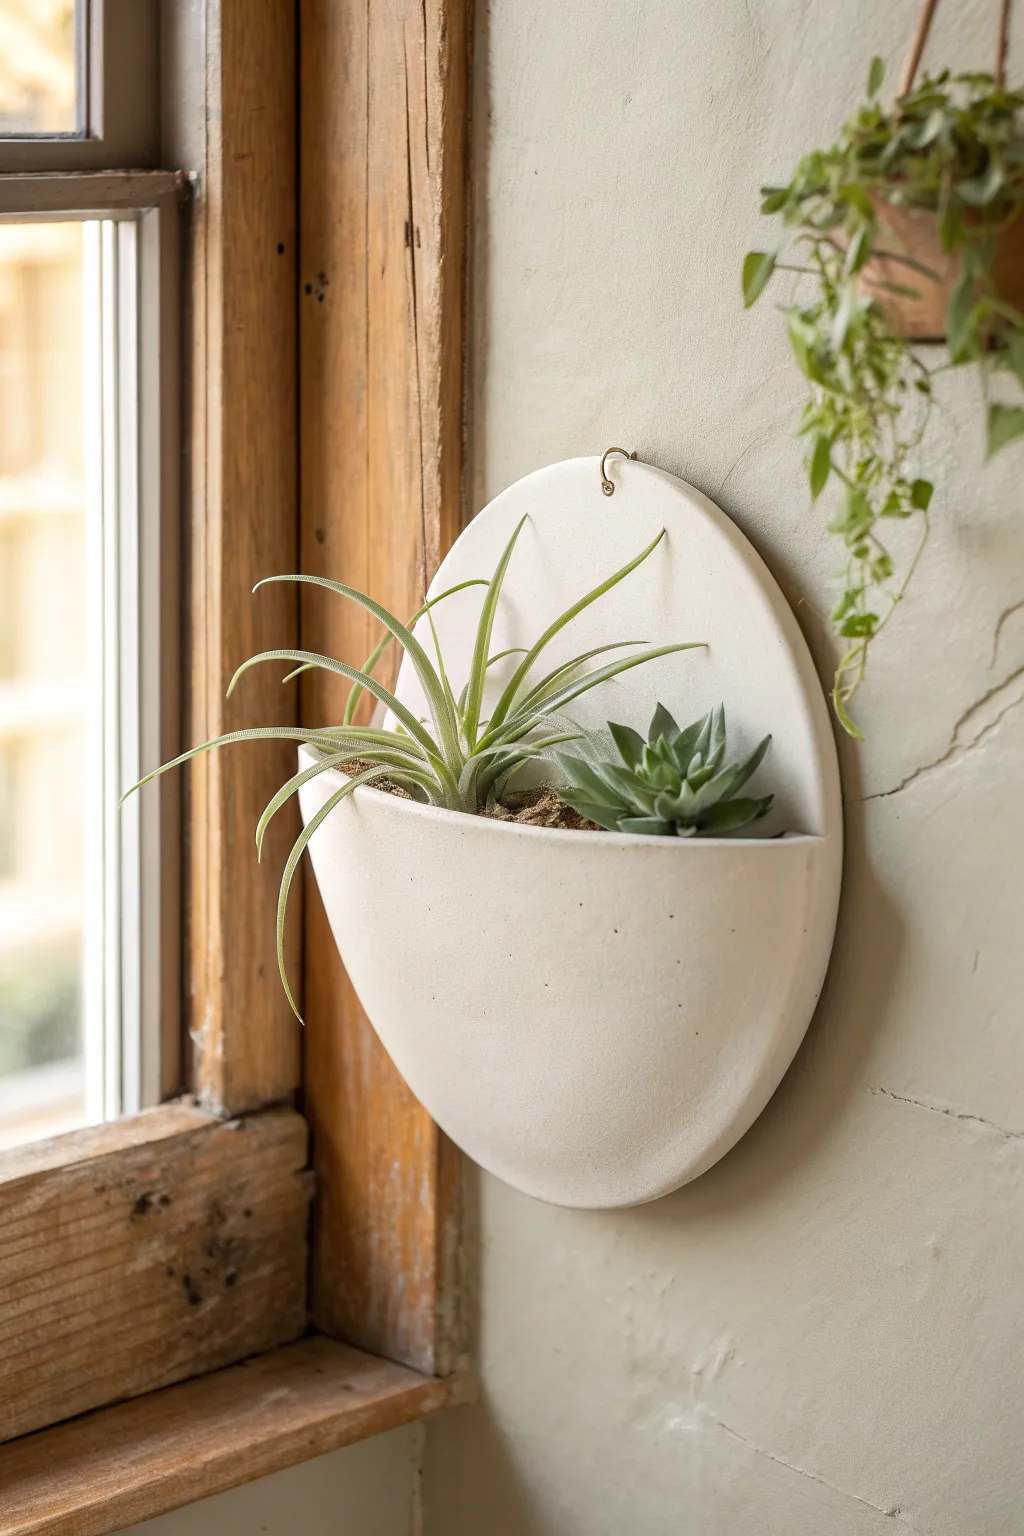
Embrace simplicity with this sleek, half-moon wall pocket that perfectly frames your favorite air plants or succulents. The matte white finish and gentle geometric curve create a calming, modern accent for any sun-drenched corner.
How-To Guide
Materials
- White stoneware clay (mid-fire or low-fire)
- Rolling pin
- Canvas work surface or slab mat
- Needle tool or fettling knife
- Circle template (pot lid or paper cutout, approx. 6-7 inches)
- Small sponge
- Slip and scoring tool (or fork)
- Newspaper or paper towels
- High-temp metal hanging wire (kanthal or nichrome)
- Sandpaper (fine grit)
- Clear matte glaze (optional)
- Kiln
Step 1: Creating the Slab Base
-
Roll the clay:
Begin by wedging your white stoneware clay to remove air bubbles. Roll it out into a smooth, even slab about 1/4 inch thick. I like to flip the slab once or twice during rolling to ensure the canvas texture is minimal. -
Cut the primary circles:
Using your circular template, cut two identical circles from the slab with your needle tool. These should be roughly 6 to 7 inches in diameter. -
Refine the edges:
Smooth the cut edges of both circles with a damp sponge to remove any sharp burs or crumbs of clay.
Clean Edges Pro-Tip
After assembling, wipe the entire rim with a barely damp chamois strip. This compresses the clay particles and gives that professional, seamless ‘manufactured’ edge look.
Step 2: Forming the Pocket
-
Create the pocket front:
Take one of your clay circles and cut it in half horizontally. Note that you can cut it slightly larger than half if you want a deeper pocket, but a true half-circle works perfectly for this look. -
Score the connection points:
On the full circle (the backplate), score the outer rim along the bottom half where the pocket will attach. Do the same on the curved edge of your half-circle piece. -
Apply slip:
Apply a generous amount of joining slip to the scored areas on both pieces. -
Attach the pocket:
Gently press the half-circle onto the full circle, matching up the curves. Press firm enough to adhere, but start gently to avoid squishing the clay thin. -
Seal the seam:
Use a small wooden modeling tool or your finger to smooth the seam where the two pieces meet on the outside edge. The goal is to make it look like one continuous piece of clay. -
Volumize the pocket:
To ensure the pocket isn’t flat against the back, gently bulge the front half-circle outward. I usually stuff a loosely crumpled ball of newspaper or paper towel inside the pocket to hold this shape while it dries.
Step 3: Finishing Touches & Firing
-
Add the hardware:
Form a small ‘U’ shape from your high-temp wire. Insert this into the top center of the backplate. Make sure it goes deep enough to be secure, but leave a small loop exposed for hanging. -
Dry slowly:
Tent the piece loosely with plastic and allow it to dry very slowly over several days. This prevents the backplate from warping as the pocket shrinks. -
Bisque fire:
Once bone dry, bisque fire the piece according to your clay body’s specifications (usually Cone 04). -
Sanding:
After the bisque fire, use fine-grit sandpaper to smooth any rough spots on the surface. Since we are aiming for a raw look, the surface needs to be impeccable. -
Glazing decisions:
For the exact look in the photo, leave the exterior unglazed (raw ceramic) or apply a very thin matte white glaze. If you plan to water real plants heavily inside, apply a clear glaze to the *interior* only. -
Final firing:
Fire the piece a final time to the maturity temperature of your clay (likely Cone 5 or 6 for stoneware). -
Planting:
Once cool, arrange your Tillandsia (air plant) and a small succulent inside. Using dry moss or pebbles at the bottom can help position them perfectly.
Level Up: Texture
Before cutting your circles, gently press a linen cloth or lace into the slab. A subtle texture adds depth to the white surface while keeping the minimalist vibe.
Hang your new ceramic pocket near a window and enjoy the organic modern touch it adds to your room


Heart-Shaped Wall Pocket
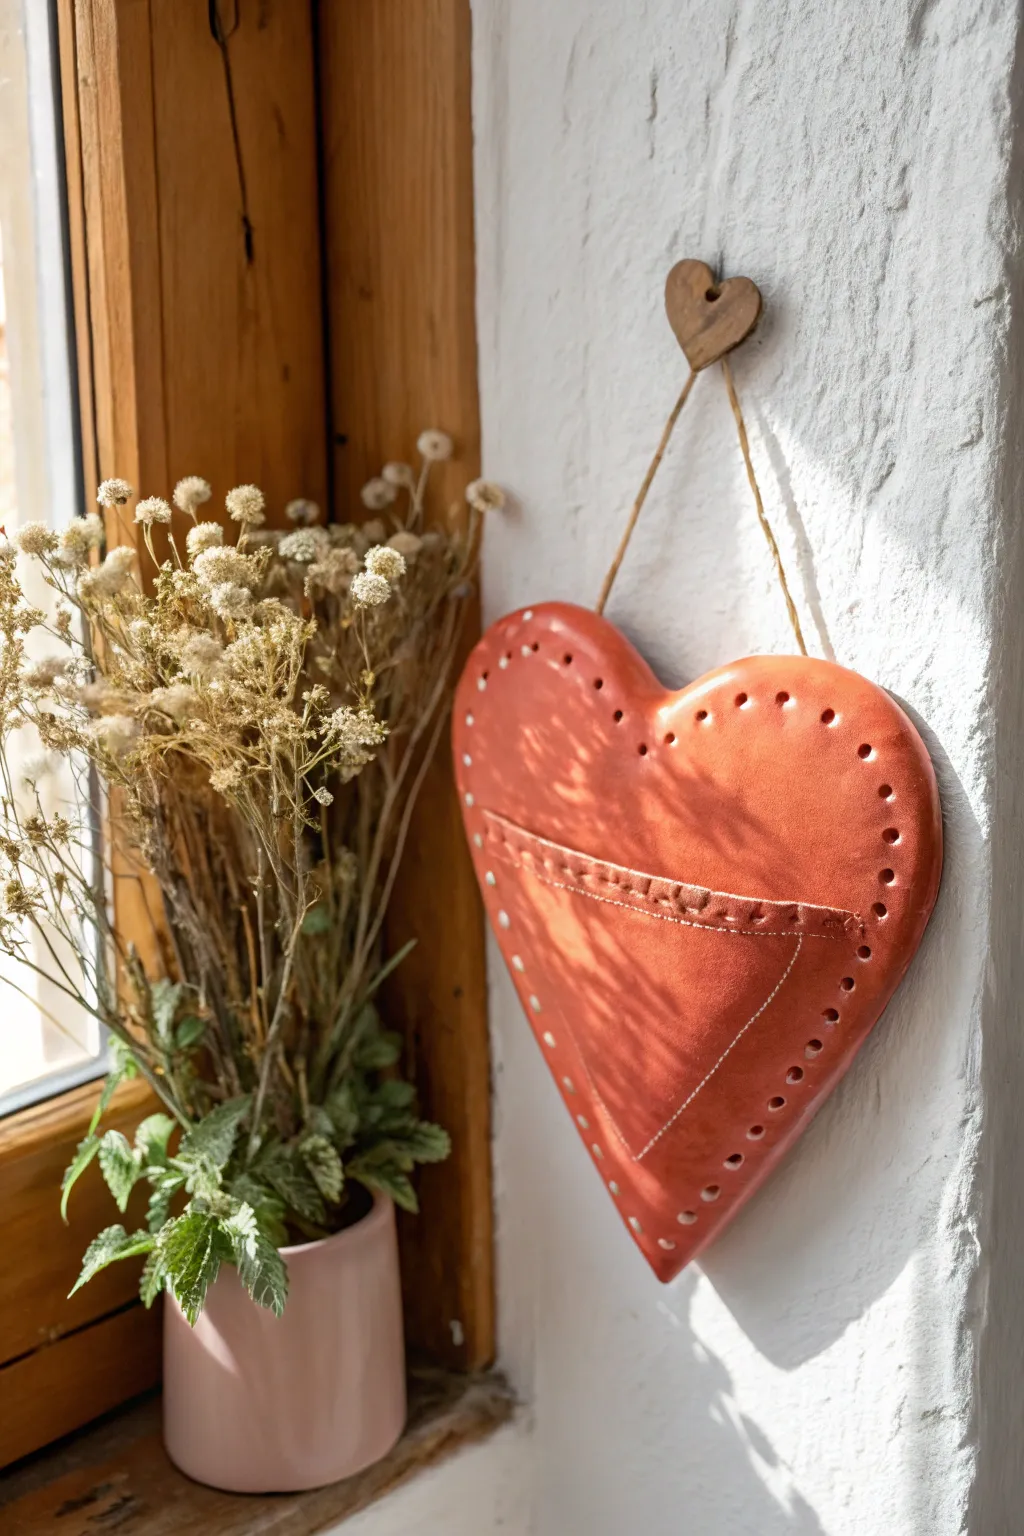
Add a touch of warmth to any corner with this charming ceramic heart pocket, perfect for holding dried blooms or love notes. Finished in a rich, glossy terracotta glaze, its stitched details and pierced edges give it a sweet, handmade leather-look quality.
Step-by-Step
Materials
- Earthenware or stoneware clay (terracotta color recommended)
- Heart-shaped paper template (approx. 6-8 inches wide)
- Rolling pin
- Canvas mat or slab roller
- Needle tool or fettling knife
- Tracing wheel or spur tool (for stitch marks)
- Small hole punch or straw (for border holes)
- Scoring tool (or serrated rib)
- Slip (liquid clay)
- Sponge
- Rolling tool or smooth rib
- Terracotta or orange-red glossy glaze
- Clear glaze (optional if using terracotta clay)
- Kiln access
- Jute twine or leather cord for hanging
- Small wooden heart bead or button (optional)
Step 1: Forming the Heart Base
-
Roll the Slabs:
Begin by wedging your clay to remove air bubbles, then roll out a smooth slab about 1/4 inch thick. You will need enough clay for the main heart body and the front pocket section. -
Cut the Main Shape:
Place your large heart template onto the slab. Using your needle tool, cut cleanly around the perimeter. Smooth the cut edges with a damp sponge to remove any sharp burrs. -
Create Volume:
To give the heart that puffy, pillow-like appearance seen in the photo, gently press a small bundle of newspaper or a slump mold into the back of your clay heart while it is still plastic, or simply curve the edges inward slightly so it isn’t perfectly flat.
Cracking Seams?
If the pocket separates from the backing during drying, your clay was likely too dry when joining. Wrap the specific area in wet paper towels and plastic to rehydrate and mend with fresh slip.
Step 2: Adding the Pocket
-
Cut the Pocket Piece:
Using the same template as a guide, cut a smaller piece of clay that matches the bottom curve of the heart but goes straight across about halfway up. This will be the front pouch. -
Texture the Rim:
Before attaching, focus on the straight top edge of this pocket piece. Use a tracing wheel or a needle tool to create a line of faux ‘stitches’ running parallel to the rim. This mimics the look of sewn leather. -
Score and Slip:
Thoroughly score the outer edges of the pocket piece and the corresponding matching area on the main heart body. Apply a generous amount of slip to the scored areas. -
Attach the Pocket:
Press the pocket piece firmly onto the main body. Use a modeling tool to blend the seam on the very outer edge, ensuring a strong bond so it doesn’t separate during firing. -
Puff the Pouch:
Gently insert a loosely crumpled piece of paper towel into the pocket opening. This prevents the clay from sagging and sticking to the back wall while it dries.
Make It Truly Leather
After the final glaze firing, thread actual leather cord or thick embroidery floss through the decorative perimeter holes for a mixed-media look that feels very authentic.
Step 3: Detailing and Drying
-
Punch the Border Holes:
Using a small circular hole cutter or a drinking straw, punch evenly spaced holes around the entire perimeter of the heart. These decorative holes add to the rustic aesthetic. -
Add Hanging Holes:
Ensure you punch two holes at the top lobes of the heart specifically for the twine handle later. Make sure these are not too close to the edge to support the weight. -
Smooth Everything:
Go over the entire piece with a slightly damp sponge. Pay special attention to the punched holes, smoothing away any clay crumbs. -
Slow Drying:
Cover the piece loosely with plastic to let it dry slowly for a few days. Uneven drying can cause warping, especially with slab pockets.
Step 4: Glazing and Finishing
-
Bisque Fire:
Once bone dry, fire the piece to bisque temperature (usually cone 04) in a kiln. -
Apply Glaze:
Brush or dip the piece in a warm, terracotta-colored glaze. If you used red clay, a simple clear gloss glaze will enhance the natural color beautifully. I like to make sure the glaze doesn’t clog the decorative holes. -
Glaze Fire:
Fire the piece again to the maturation temperature of your specific glaze. -
Attach Hanging Cord:
Thread a length of natural jute twine through the two top holes. Tie secure knots on the front or back, depending on your preference. -
Add the Wooden Accent:
For that final detail shown in the image, thread the top loop of your twine through a small wooden heart bead or knot it around a small piece of driftwood before hanging.
Hang your new ceramic heart near a window to let the sunlight catch those glossy curves


Tall Cylinder Vase Wall Pocket
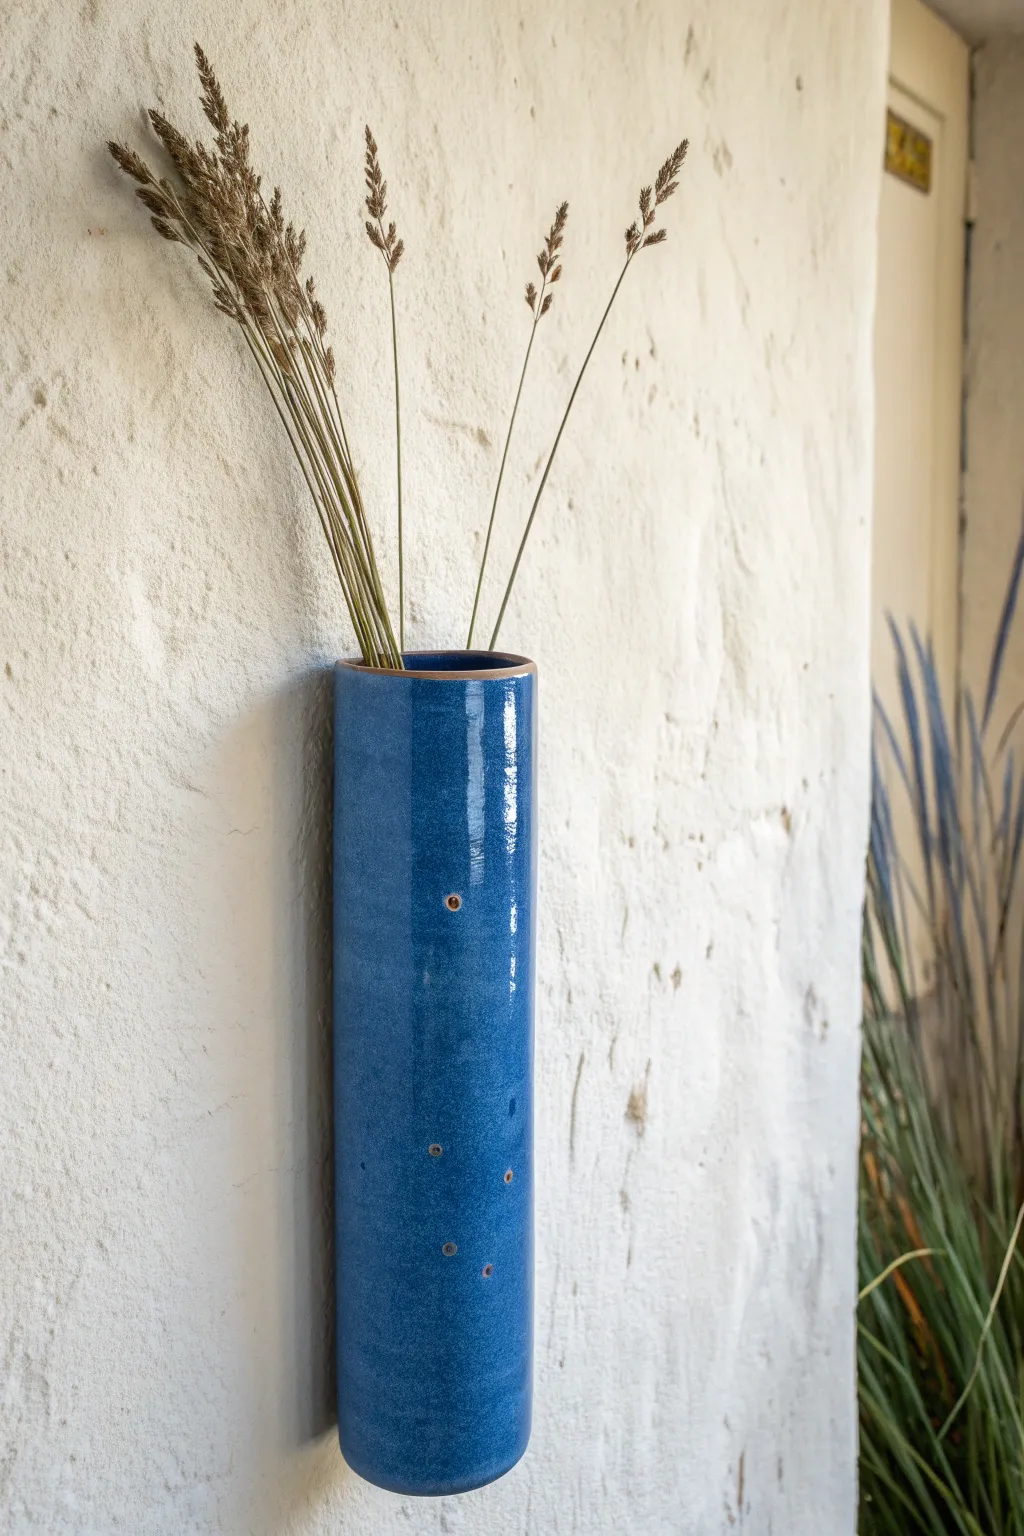
This sleek, elongated wall pocket brings a modern yet rustic touch to vertical spaces with its glossy, speckled blue glaze. Perfect for holding dried grasses or minimal stems, its cylindrical form is both functional and architecturally striking.
Detailed Instructions
Materials
- Stone stoneware clay (light or buff colored)
- Rolling pin
- Canvas work surface
- Rolling slats or guide sticks (approx. 1/4 inch)
- Cylindrical form (PVC pipe or sturdy mailing tube, 3-4 inch diameter)
- Newspaper or paper towel
- Fettling knife
- Needle tool
- Serrated rib or scoring tool
- Slip (clay mixed with water)
- Hole punch tool or drill bit (for mounting hole)
- Small circle cutter (optional, for decorative dots)
- Glossy blue speckled glaze
- Wax resist
- Kiln
Step 1: Forming the Cylinder
-
Prepare the slab:
Begin by wedging your stoneware clay thoroughly to remove air bubbles. Roll it out on your canvas between two guide sticks to ensure an even thickness of about 1/4 inch. -
Measure and cut:
Determine the height of your vase. For the tall look in the photo, measure a rectangle approximately 12-14 inches tall. The width should be the circumference of your forming tube plus a slight overlap. -
Wrap the form:
Wrap your PVC pipe or forming tube with a sheet of newspaper to prevent sticking. Carefully lift the clay slab and wrap it around the paper-covered tube. -
Join the seam:
Where the two edges of the slab meet, score both sides vigorously with a serrated rib. Apply slip to the scored areas. -
Smooth the connection:
Press the scored edges together firmly. Use a wooden modeling tool or your thumb to drag clay across the seam, blending it until the join is invisible. I find smoothing from the inside first helps structural integrity. -
Create the base:
Roll a small separate piece of slab for the bottom. Place your tube (with the clay cylinder on it) onto this slab and trace around it with a needle tool. -
Attach the bottom:
Score and slip the bottom edge of the cylinder and the circular base piece. Press them together firmly and blend the clay upwards from the base to the wall to seal it.
Step 2: Refining and Mounting
-
Remove the form:
Once the clay has stiffened slightly to leather-hard (usually after an hour or two), carefully slide the PVC pipe out. Peel away the newspaper from the inside. -
Flatten the back:
To ensure it hangs flush against the wall, gently tap the back of the cylinder against your work surface to create a flat vertical plane. Don’t flatten it too much, just enough for stability. -
Add the mounting hole:
On the flat back side, measure about 1-2 inches down from the top rim. Use a hole punch tool or drill bit to create a clean hole for a screw or nail. -
Detailing (Optional):
The example image features small, subtle unglazed dots. You can gently impress small circles into the front surface now, or apply wax resist in small dots later before glazing. -
Smooth the rim:
Use a damp sponge or chamois cloth to compress and smooth the top rim. This prevents sharp edges after firing.
Warping Woes?
If your cylinder warps while drying, dry it vertically on a wire rack so air reaches the bottom. Rotate it quarter-turn daily.
Step 3: Glazing and Firing
-
Bisque fire:
Let the piece dry slowly and completely under loose plastic for several days. Fire it to cone 04 (or your clay’s bisque temperature) in the kiln. -
Wax the rim and bottom:
Apply wax resist to the very bottom of the vase and the top rim if you want the raw clay accent seen in the photo. If you created indented spots, add a drop of wax in each one. -
Apply glaze:
Pour a glossy, speckled blue glaze into the interior, swirl to coat, and pour out. Then, dip the exterior or brush on 2-3 even coats. -
Clean up:
Use a damp sponge to wipe away any glaze beads that may have settled on the waxed areas to ensure crisp lines. -
Final fire:
Fire the kiln to the maturity temperature of your clay and glaze combination (typically Cone 5 or 6 for stoneware).
Dual-Tone Design
Glaze the interior a contrasting color like bright yellow or white for a fun pop of hidden color when viewed from above.
Hang your new ceramic pocket on a sturdy screw and fill it with distinct grasses to complete the look

The Complete Guide to Pottery Troubleshooting
Uncover the most common ceramic mistakes—from cracking clay to failed glazes—and learn how to fix them fast.
Tapered Cone Flower Wall Pocket
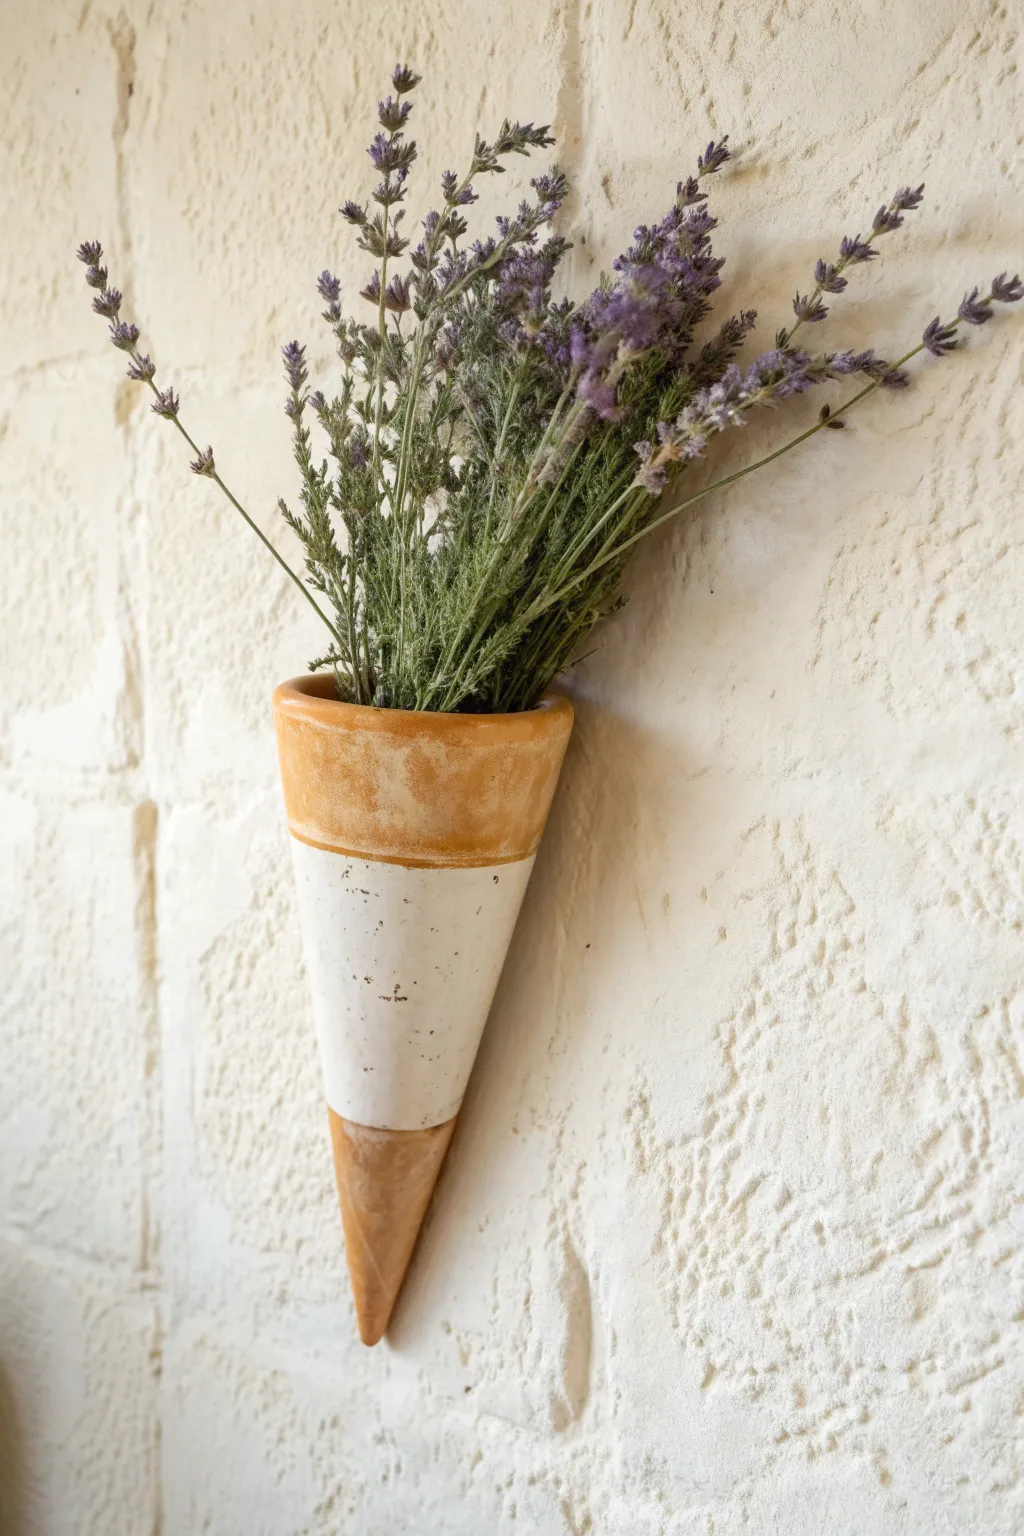
Bring a touch of minimalist charm to your vertical space with this tapered ceramic wall pocket. Mimicking the shape of a classic waffle cone, this piece combines warm, earthy glazes with a speckled creamy center to create the perfect home for dried botanicals.
Step-by-Step Tutorial
Materials
- Stoneware clay (smooth or speckled)
- Rolling pin and canvas mat
- Cone form or sturdy paper/cardstock for template
- Scoring tool or needle tool
- Slip (clay and water slurry)
- Small sponge
- Sanding sponge
- Pottery hole cutter (small)
- Loop tool for trimming
- Wax resist
- Ochre/Honey colored glaze
- Speckled white or cream matte glaze
- Kiln access
Step 1: Forming the Cone Body
-
Roll the slab:
Begin by rolling out a slab of stoneware clay to a uniform thickness of about 1/4 inch. Ensure the surface is smooth and free of air bubbles. -
Cut the shape:
Using a needle tool, cut a wedge shape from the slab. Imagine a slice of pie with the point cut off slightly; this will form the cone’s body. -
Bevel the edges:
On the two straight sides of your wedge, bevel the edges at opposing 45-degree angles. This allows the seam to overlap cleanly without adding bulk. -
Score and slip:
Rough up the beveled edges with your scoring tool and apply a generous amount of slip to act as glue. -
Join the seam:
Wrap the clay around a paper cone form or your hand to bring the edges together. Press the seam firmly from the inside and outside to bond the clay. -
Refine the shape:
Use a wooden rib or your fingers to smooth over the vertical seam until it disappears completely. Gently flare the top opening slightly if desired. -
Create the hanging hole:
Near the top back rim of the cone, use a small hole cutter to punch a clean hole. This is crucial for mounting the piece on the wall later.
Slumping Seam?
If the cone collapses while soft, stuff the inside with crumpled newspaper or plastic bags to support the shape while it stiffens up.
Step 2: Drying and Bisque Firing
-
Slow drying:
Place the cone upside down on its rim to dry slowly. Cover it loosely with plastic for the first day to prevent warping. -
Greenware sanding:
Once bone dry, use a sanding sponge to gently smooth the rim and the tip, ensuring there are no sharp burrs. -
Bisque fire:
Load the bone-dry cone into the kiln and fire to roughly cone 04 (depending on your specific clay body specifications) to prepare it for glazing.
Clean Lines
Use automotive detailing tape instead of wax for ultra-crisp glaze lines. Remove the tape immediately after the glaze dries to the touch.
Step 3: Glazing the Bands
-
Clean the bisque:
Wipe the fired cone with a damp sponge to remove any kiln dust, which can prevent glaze from adhering properly. -
Apply wax resist:
I find it helpful to use wax resist to define the lines. Paint a thin line of wax separating where you want the white section to meet the ochre sections. -
Dip the middle:
Hold the cone by the top and bottom. Carefully brush or pour the speckled white glaze onto the middle section. Use a damp sponge to wipe back any drips that cross your intended lines. -
Glaze the tip:
Dip the pointed bottom tip into the ochre or honey-colored glaze. Let this dry completely before moving to the top. -
Glaze the rim:
Dip the top rim into the same ochre glaze. You can dip it slightly deeper on the outside to create a wider band, just like in the reference image. -
Check the interior:
For a wall pocket holding dried flowers, the inside can remain unglazed, or you can pour a simple clear liner glaze inside for waterproofing. -
Final wipe:
Ensure the hanging hole is clear of glaze. If glaze has filled it, use a small drill bit or tool to clear it out.
Step 4: Final Firing
-
Glaze fire:
Load the piece into the kiln again. Fire to the maturity temperature of your clay and glaze (typically cone 5 or 6 for stoneware). -
Mount and display:
Once cool, hang your pocket on a nail or hook and fill it with dried lavender, wheat, or wildflowers.
Now you have a stunning, handmade vessel ready to display your favorite everlasting blooms.
Scalloped Rim Wall Pocket
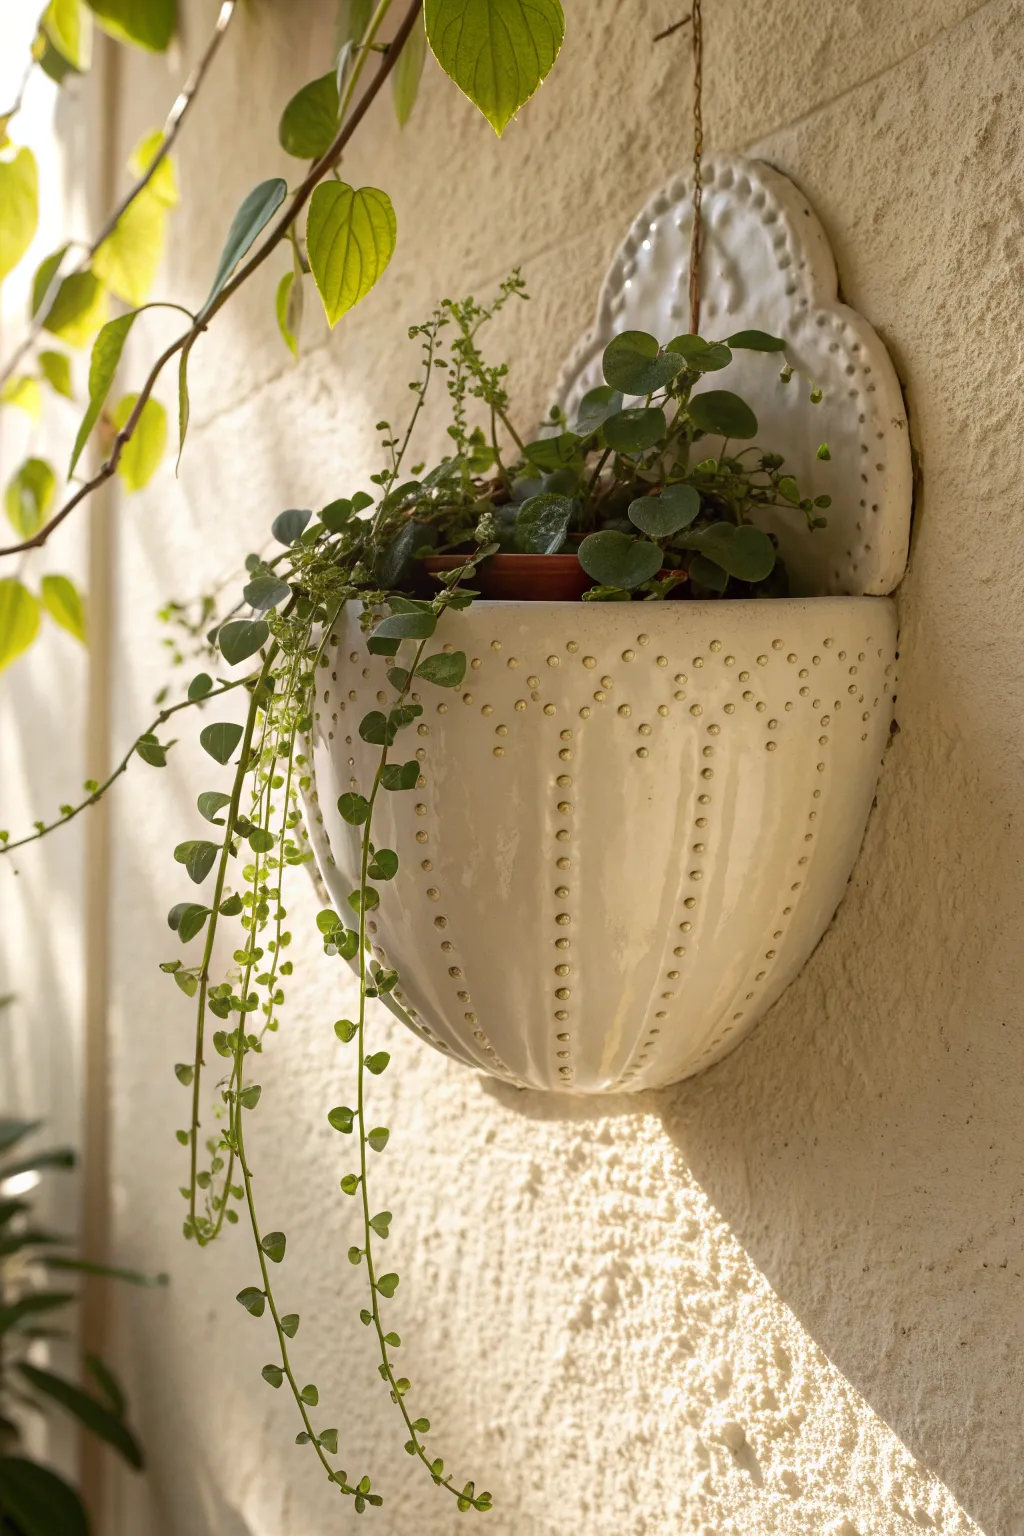
Embrace organic texture with this delicate wall pocket, featuring a soft white finish and subtle dotted details. The scalloped rim and ribbed belly create a vintage-inspired vessel perfect for cascading trailing plants like creeping Jenny or string of hearts.
Detailed Instructions
Materials
- Earthenware or stoneware clay body (white recommended)
- Rolling pin
- Guide sticks or smooth slats (approx. 1/4 inch thick)
- Needle tool
- Fettling knife
- Rib tool (flexible metal or rubber)
- Scoring tool (or serrated rib)
- Slip (clay and water mixture)
- Small round piping tip or drill bit (for texture)
- Wooden modeling tool with a slightly pointed end
- Sponge
- Bisque mold or a small balloon (optional, for shaping)
- Glossy white glaze
- Kiln access
Step 1: Creating the Backplate
-
Roll the slab:
Begin by wedging your clay thoroughly to remove air bubbles. Arrange your guide sticks on a canvas-covered surface and roll out a smooth slab of clay, ensuring an even thickness of about 1/4 inch. -
Smooth the surface:
Use a flexible rib tool to compress the clay slab on both sides. This aligns the clay particles, preventing future warping, and creates a pristine surface for your texture. -
Cut the backplate shape:
Sketch or trace a tombstone-like shape onto the clay: a flat bottom, straight vertical sides, and an arched top. Use your needle tool to cut this shape out cleanly. -
Sculpt the scalloped rim:
Along the upper arch of the backplate, gently press your finger or a rounded modeling tool into the edge to create an undulated, scalloped profile. Keep the curves soft and rhythmic. -
Add pierced details:
Using a small tool, like the back of a drill bit or a specialized clay texturing tool, press a border of small indented dots along the scalloped edge. Be careful not to press all the way through; you just want surface dimples. -
Create the hanging hole:
At the very top center of the arch, use a straw or a hole cutter to remove a clean circle of clay. This will comfortably hold the hanging wire later.
Step 2: Forming the Pocket
-
Cut the pocket slab:
From the remaining slab, cut a semi-circle shape. The straight edge of this semi-circle should be slightly longer than the width of your backplate to allow for the curve. -
Shape the belly:
Gently curve this semi-circle over a mold, a ball of newspaper, or simply cup it in your hands to create a convex, bowl-like form. This creates the volume needed for the plant pot. -
Add vertical ribbing:
While the pocket is shaped but still soft, use a modeling tool to press vertical indentations from the bottom center fanning upwards. These ribs give the piece its characteristic structural look. -
Texture the ribs:
Following the lines of your vertical ribs, press a line of small dots up the center of each rib using your texture tool, matching the aesthetic of the backplate. -
Score and slip:
Score (scratch) the outer edges of the backplate’s bottom half and the corresponding inner edges of your pockets. Apply a generous amount of slip to these rough areas. -
Attach the components:
Press the pocket firmly onto the backplate. I prefer to reach inside the pocket to support the clay while pressing from the outside to ensure a tight bond without collapsing the shape. -
Reinforce the seam:
Roll a very thin coil of clay and press it into the interior seam where the two pieces meet. Smooth this down with a modeling tool to ensure the pocket won’t separate during firing.
Clean Texture
When impressing the dots, wrap your tool tip in a tiny piece of thin plastic wrap. This prevents the clay from sticking to the tool and leaves a smoother, burr-free impression.
Step 3: Finishing and Firing
-
Refine the edges:
Once the piece has stiffened to a ‘leather hard’ state, take a slightly damp sponge and smooth gently over all cut edges. This softens any sharpness that might chip later. -
Check the hanging point:
Double-check your hanging hole to ensure it’s clean and hasn’t been blocked by any burrs of clay during handling. -
Slow drying:
Loosely cover the wall pocket with plastic to let it dry slowly. Uneven drying forces the backplate to warp, so patience is key here. -
Bisque fire:
Once bone dry, fire the piece in the kiln to bisque temperature (usually cone 04). This prepares it for glazing. -
Glaze application:
Dip or brush a glossy white glaze over the entire piece. Ensure the glaze doesn’t pool too thickly in the dotted textures, or you might lose that lovely detail. -
Final firing:
Fire the piece again to the maturity temperature of your clay and glaze. Once cool, thread a sturdy wire or twine through the hole for hanging.
Antique Wash
For a vintage look, apply a dark oxide wash into the dots and ribs, then wipe the surface clean with a sponge before glazing. This emphasizes the texture beautifully.
Hang your finished pocket on a sunlit wall and enjoy the shadow play created by the textured ribs.


What Really Happens Inside the Kiln
Learn how time and temperature work together inside the kiln to transform clay into durable ceramic.
Two-Tone Dipped Glaze Wall Pocket
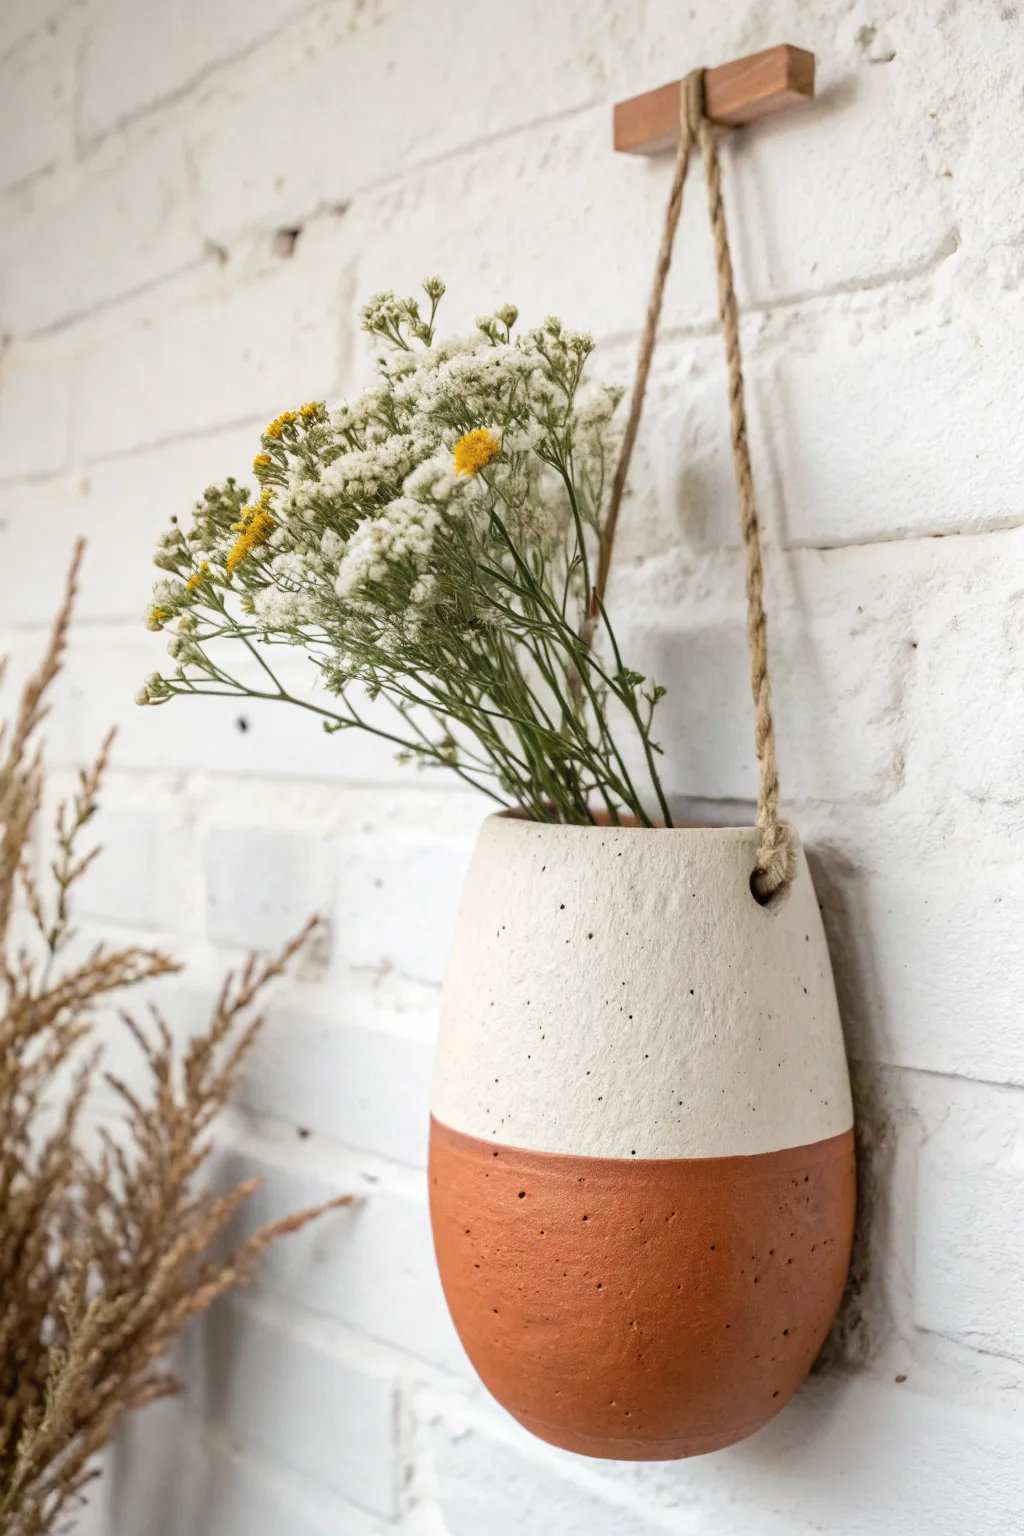
Embrace the beauty of raw clay and clean lines with this two-tone hanging wall pocket. By leaving the bottom portion exposed, you create a stunning textural contrast between the earthy terracotta and the smooth, speckled cream glaze.
Step-by-Step Guide
Materials
- Terracotta clay (low-fire earthenware)
- Rolling pin
- Canvas work surface
- Needle tool
- Paper template (long rectangle with rounded ends)
- Small cup of water or slip
- Scoring rib or fork
- Sponge
- Creamy white dipping glaze
- Wax resist emulsion
- Paintbrush for wax
- Jute or hemp rope
- Wooden dowel or strong stick (for hanging)
- Kiln access
Step 1: Forming the Pocket
-
Prepare your template:
Before touching clay, cut a paper template. You want a shape roughly resembling a tombstone or a long tongue—about 12 inches tall and 8 inches wide. The bottom edge should be fully rounded. -
Roll your slab:
Roll your terracotta clay out on the canvas until it is an even 1/4-inch thickness. Compress the slab with a rib to align the clay particles, which helps prevent warping later. -
Cut the shape:
Place your template on the slab and cut around it using the needle tool. Remove the excess clay. -
Fold the form:
Gently lift the bottom rounded edge and fold it upwards to create the ‘pocket.’ Stop when the front lip is about 3-4 inches below the top back edge. -
Score the edges:
Where the front flap meets the back slab along the sides, gently open it back up. Use your needle tool or fork to scratch up (score) the contact points on both surfaces. -
Seal the seams:
Apply a dab of water or slip to the scored areas and press them firmly together. Use your thumb or a wooden tool to blend the clay across the seam so it becomes one solid piece. -
Volume check:
At this point, the pocket might look flat. Stick your hand inside and gently push the belly of the pocket outward to give it a nice, round volume for holding flower stems. -
Create hanging holes:
Use a hole cutter or a drinking straw to punch two holes near the top corners of the back panel. Make sure they are level with each other and at least 1/2 inch away from the edge. -
Smooth and dry:
Run a damp sponge over all sharp edges to round them off. Let the piece dry slowly under loose plastic to the bone-dry stage, then bisque fire it according to your clay’s instructions.
Step 2: Glazing and Finishing
-
Prepare for glazing:
Wipe your bisque-fired piece with a damp sponge to remove any kiln dust. This ensures the glaze adheres properly. -
Wax resist application:
This is crucial for the clean line. Determine where you want the glaze to stop (about halfway down). Paint a coat of wax resist over the entire bottom section that you want to remain raw terracotta. -
Refine the line:
I find that double-checking the wax line creates the best finish. Ensure the wax edge is straight and crisp, as this dictates your final design. -
The dip:
Stir your cream speckled glaze thoroughly. Holding the piece by the waxed bottom, dip the top section into the bucket. Let the glaze overlap slightly onto the wax (it will bead up), ensuring full coverage of the top. -
Clean the resist:
As soon as the glaze dries to the touch, use a damp sponge to wipe any glaze beads off the waxed bottom area. Any glaze left on the wax will fire onto the clay, ruining the clean line. -
Clear the holes:
Check your hanging holes. If glaze has filled them, twist a small rolled-up piece of sandpaper or a tool inside to clear them out. -
Glaze fire:
Fire the piece again, this time to the temperature required by your specific glaze and clay body. -
Attach the suspension:
Cut a length of jute rope (about 24 inches). Thread one end through the left hole from back to front, and tie a secure knot on the front side. -
Secure the loop:
Bring the rope up to form a triangle, looping it once around a small wooden dowel or piece of driftwood at the apex, then thread the other end through the right hole and knot it. -
Final arrangement:
Tuck dried baby’s breath, statice, or wildflowers into the pocket and hang it on a sturdy hook.
Warped Pocket?
If the back of your pocket curls away from the wall during drying, weigh down the top flat section (avoiding the pocket belly) with a small sandbag while it dries to leather-hard.
Texture Twist
Press a piece of lace or burlap into the clay slab before cutting out your shape. The glaze will break beautifully over the texture while leaving the terracotta smooth.
Hang your finished pocket near a window where the natural light can highlight the contrast between the matte clay and the glossy glaze
Lace-Pressed Texture Wall Pocket
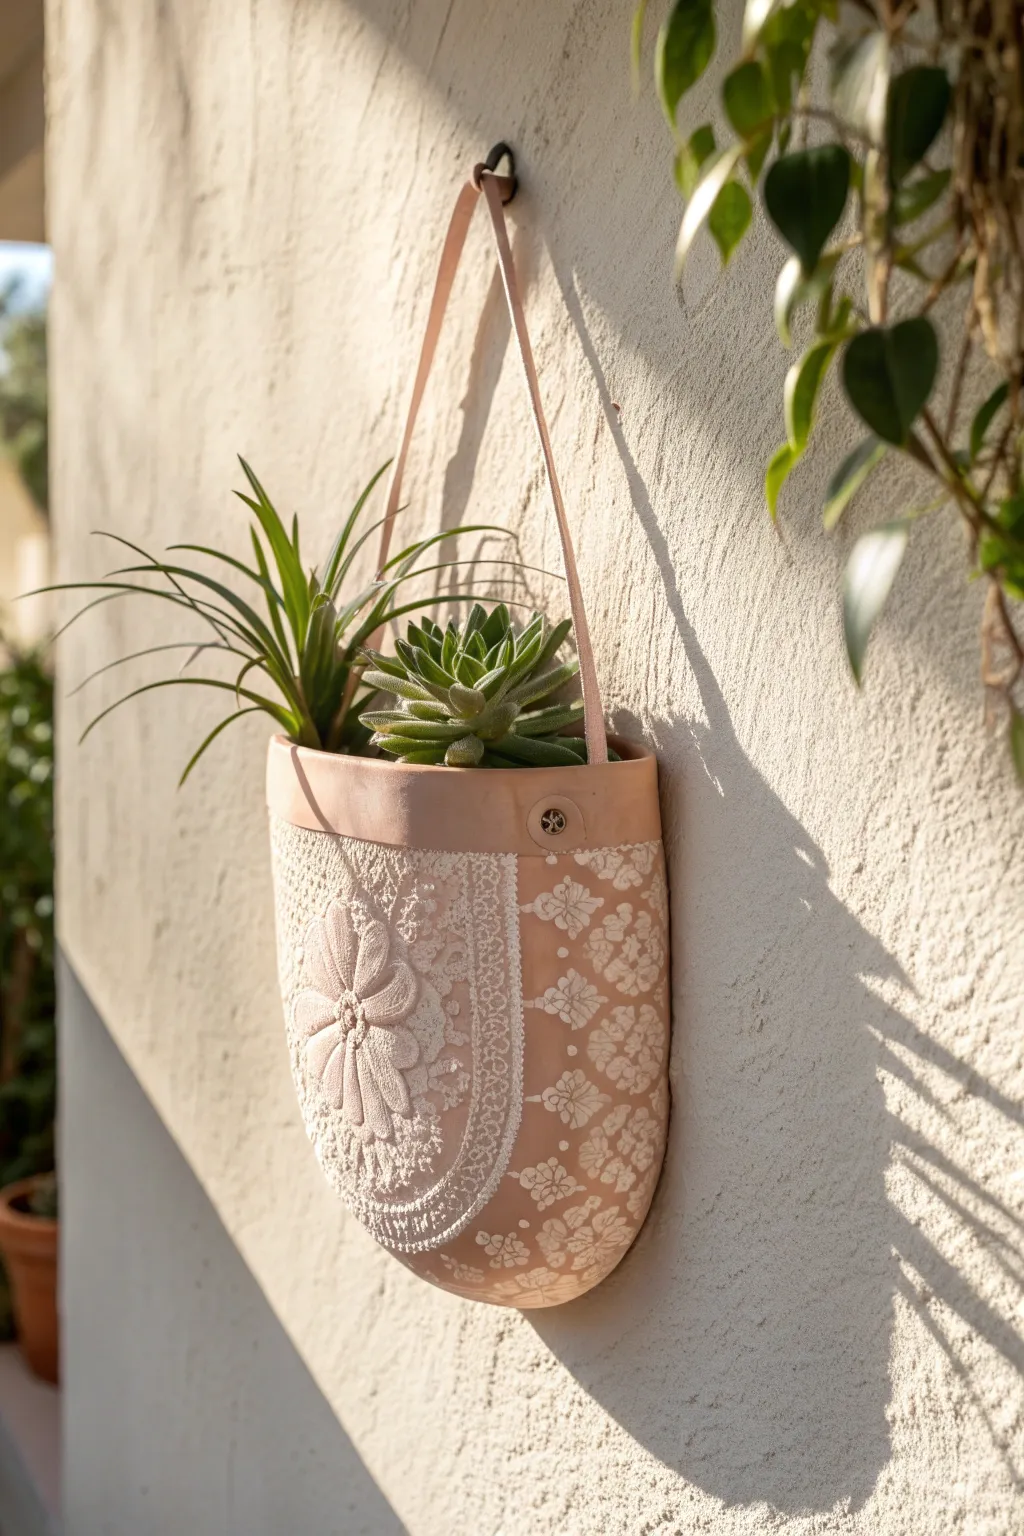
Capture the delicate beauty of vintage textiles in permanent form with this charming ceramic wall pocket. By rolling lace directly into clay, you create an intricate, textural relief highlighted with white slip that perfectly cradles your favorite succulents.
Detailed Instructions
Materials
- Terra cotta or low-fire earthenware clay (approx. 2-3 lbs)
- Vintage lace doily or textured lace fabric scrap
- Rolling pin
- Canvas mat or slab roller
- Fettling knife or needle tool
- Paper template (semi-circle shape)
- White underglaze or slip
- Sponge
- Small paintbrush
- Clear matte glaze (optional)
- Leather cord or stripping (1/4 inch wide)
- Hole punch or drinking straw
- Scoring tool (or fork)
- Slip (clay mixed with water)
Step 1: Creating the Textured Slab
-
Prepare the workspace:
Begin by setting up your canvas mat to prevent the clay from sticking. Wedge your terra cotta clay thoroughly to remove any air bubbles, which ensures a smooth surface for the texture transfer. -
Roll the initial slab:
Roll out the clay into an even slab, aiming for a consistent thickness of about 1/4 inch. Smooth out any canvas texture from the top surface with a rib tool or damp sponge. -
Position the lace:
Gently lay your lace doily or fabric scrap over the clay slab. If you have a specific focal point, like a central flower pattern shown in the example, position it where the front of the pocket will be. -
Impress the texture:
Use your rolling pin to firmly press the lace into the clay. Roll over it a single time with steady pressure to get a deep, clean impression without shifting the fabric. I find standing up gives me better leverage for this step. -
Reveal the pattern:
Carefully peel back the lace from a corner to reveal the raised pattern. Handle this slowly to avoid distorting the fresh clay imprint.
Step 2: Forming the Pocket
-
Cut the shape:
Place your semi-circle paper template over the textured slab. Use a fettling knife or needle tool to cut around the template. You will need a large semi-circle that can fold into a cone or pocket shape, plus a separate back piece if you aren’t doing a simple fold. -
Bevel the edges:
For a cleaner seam, slightly bevel the edges at a 45-degree angle where the clay will join together. This increases the surface area for a stronger bond. -
Score and slip:
Score the edges you intend to join using a serrated tool or fork until they are rough. Apply a generous amount of slip (clay slurry) to these scored areas. -
Assemble the form:
Gently fold the slab to create the pocket shape. Press the slipped edges together firmly. You can support the inside with crumpled newspaper to help it hold its voluminous shape while the seams stiffen. -
Smooth the seams:
Use a modeling tool or your finger to smooth the join line on the inside and outside, blending the clay so the seam becomes invisible, taking care not to smudge your lace texture. -
Add a rim band:
Cut a thin, smooth strip of leftover clay (about 1 inch wide) to create the top rim. Score and slip this band onto the top edge of the pocket for a finished, tailored look similar to the example. -
Create hanging holes:
Use a drinking straw or a small circular cutter to punch holes on the sides of the rim band. Ensure they are evenly spaced and not too close to the edge to support the weight of the planter.
Clean Imprints
Dust the clay slab lightly with cornstarch before laying down the lace. This prevents the fabric from sticking to the wet clay and ensures the lace peels away cleanly without tearing fine fibers.
Step 3: Finishing and Decoration
-
Bisque fire:
Allow the piece to dry slowly and completely under a loose plastic sheet to prevent warping. Once bone dry, fire the piece to bisque temperature (usually cone 04) based on your clay body specifications. -
Apply the inlay:
Once bisque fired, brush white underglaze or slip strictly over the textured areas. Work the liquid into the deep recesses of the lace imprint. -
Wipe back:
Using a slightly damp sponge, gently wipe the surface of the texture. The white color should remain in the depressed lines while the raised clay surface returns to the natural terra cotta color, creating a high-contrast ‘Mishima’ style effect. -
Final glaze fire:
Apply a clear matte glaze if you want the piece to be water-tight, or leave the terra cotta unglazed for better breathability for succulents. Fire the piece a second time according to your glaze instructions. -
Attach the leather:
Thread a long strip of leather cord through the holes. Knot the ends securely on the inside of the pocket or use decorative rivets if you feel adventurous.
Antiqued Look
Instead of white slip, use a dark brown oxide wash or stain. Wipe it back aggressively to leave dark shadows in the lace texture, giving the piece an aged, unearthed archaeological feel.
Hang your new planter in a sunny spot and enjoy the interplay of organic greens against the timeless texture of lace

TRACK YOUR CERAMIC JOURNEY
Capture glaze tests, firing details, and creative progress—all in one simple printable. Make your projects easier to repeat and improve.
Leaf-Imprint Wall Pocket
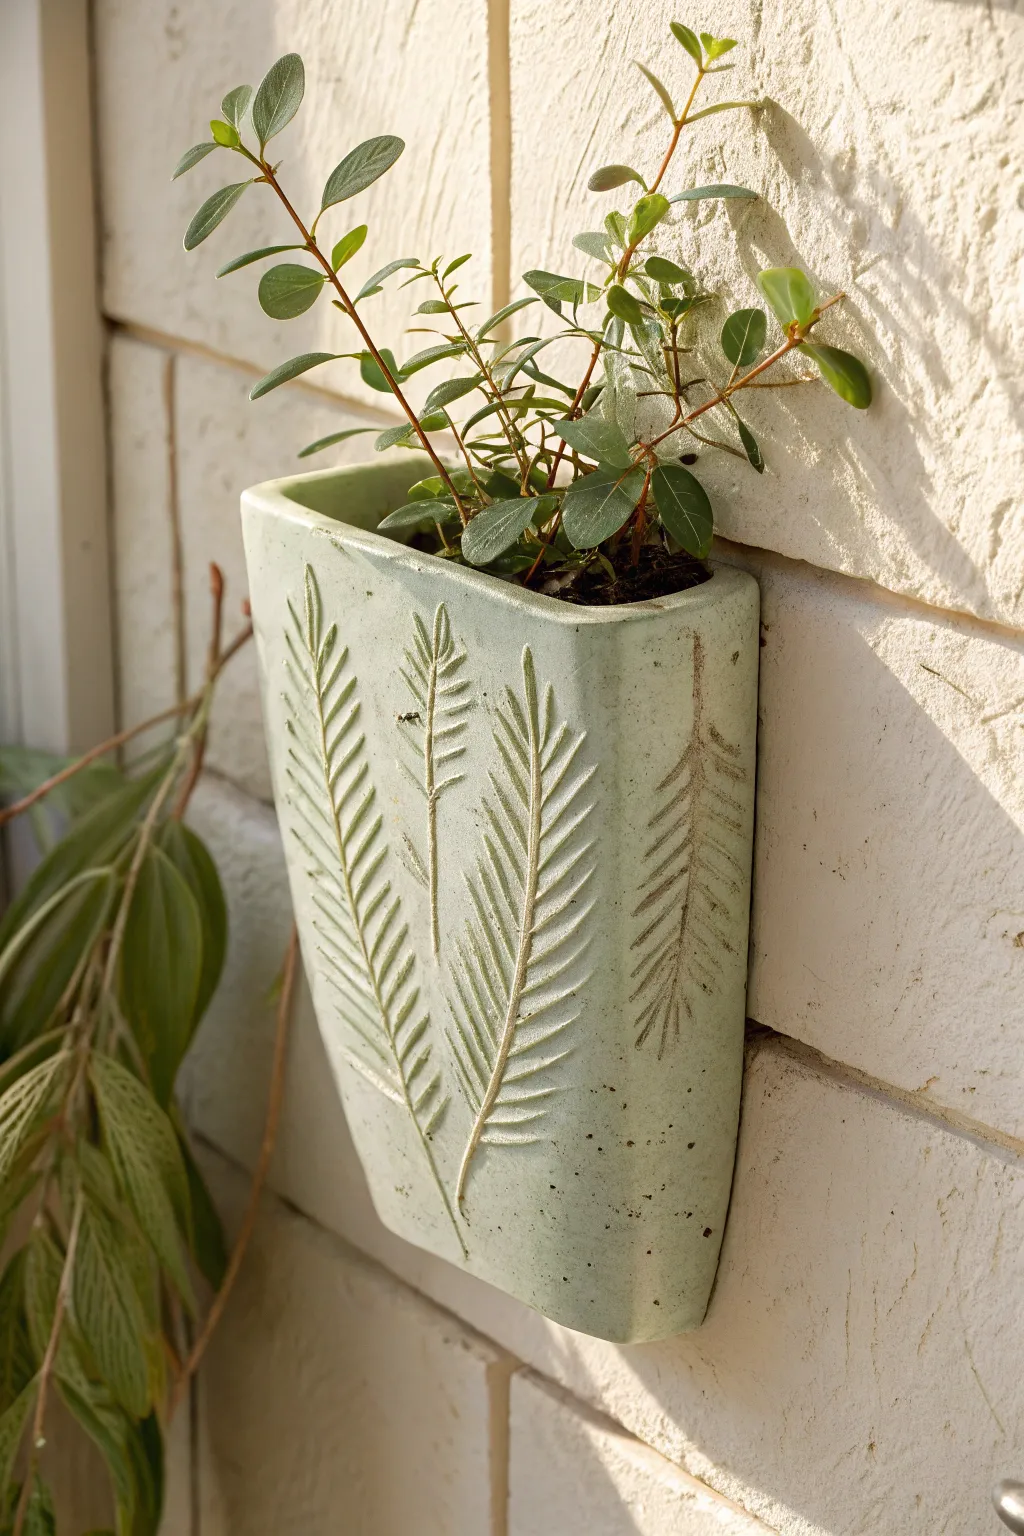
Capture the delicate beauty of nature directly into clay with this elegant wall pocket project. Using fresh fern fronds or leaves to impress texture, you’ll create a lovely, functional vessel perfect for holding trailing plants or dried stems.
Step-by-Step Tutorial
Materials
- Mid-fire stoneware clay (white or light colored)
- Rolling pin
- Canvas work surface or slab mat
- Needle tool
- Fettling knife
- Serrated rib or scoring tool
- Slip (clay mixed with water)
- Fresh fern fronds or sturdy leaves with prominent veins
- Small sponge
- High-temperature wire (optional, for hanging holes)
- Celadon or translucent glaze (soft green shown)
- Kiln access
Step 1: Preparing the Slab
-
Roll the clay:
Start by wedging your clay to remove air bubbles, then roll it out into a rectangular slab about 1/4 inch thick. Aim for an even thickness to prevent warping later. -
Smooth the surface:
Use a soft rib tool to compress the clay and smooth out any canvas texture. This blank canvas is essential for getting a clean leaf impression. -
Arrange the botanicals:
Select fresh fern fronds or leaves. Place them vein-side down onto the clay slab in your desired pattern. The vein side creates the deepest, most detailed impression. -
Roll in the texture:
Gently roll over the leaves with your rolling pin to press them into the clay. You want them flush with the surface but not completely buried. Careful not to roll so hard that your slab becomes too thin. -
Reveal the design:
Carefully peel back the leaves using a needle tool to lift the stems. This is the most satisfying part, revealing the crisp fossils left behind.
Step 2: Constructing the Pocket
-
Cut the shape:
Cut a large trapezoid shape from your textured slab. This will fold around to become the front and sides. You will also need a separate, smaller piece for the back panel. -
Bevel the edges:
Angle your fettling knife to cut 45-degree bevels on the vertical edges where the front piece will join the back panel. This creates a stronger, cleaner joint. -
Form the pocket:
Gently curve the textured slab into a ‘U’ or semi-circle shape. Avoid folding it sharply, or you might crack the clay. -
Score and slip:
Deeply score the edges of your back panel and the corresponding edges of the curved front piece. Apply a generous amount of slip to the scored areas. -
Join the pieces:
Press the pieces together firmly. Use a wooden modeling tool to blend the clay on the interior seams so they disappear. I like to run a tiny coil of clay along the inside seam for extra reinforcement. -
Add the bottom:
Trace the bottom opening onto a scrap piece of clay to create a custom-fit floor. Score, slip, and attach this piece to close the bottom of the pocket.
Leaves sticking to clay?
If your leaves are getting stuck, dust them lightly with cornstarch before rolling. This acts as a release agent and burns out completely in the kiln.
Step 3: Finishing and firing
-
Create hanging mechanism:
Cut a small hole in the back panel near the top for a nail hanker. Alternatively, embed high-temp wire loops into the clay while it’s still plastic. -
Refine the rim:
Use a damp sponge to round off the top rim and soften any sharp edges. A smooth rim gives the piece a much more professional feel. -
Dry slowly:
Cover the pocket loosely with plastic and let it dry very slowly. Because it is vertical with seams, rushing the drying process can cause cracks. -
Bisque fire:
Once bone dry, fire the piece to bisque temperature (usually Cone 04 or 06) to prepare it for glazing. -
Apply glaze:
Dip or brush on a translucent celadon glaze. Choose a glaze that ‘breaks’ over texture—meaning it’s thinner on high points and pools in the leaf veins—to highlight your hard work. -
Final firing:
Wipe the bottom clean of any glaze and fire to the top temperature required for your clay body (likely Cone 5 or 6).
Add an Oxide Wash
Before glazing, wipe a dark oxide (like iron or manganese) into the leaf impressions and sponge it off the surface to make the texture pop dramatically.
Hang your finished pocket near a window where the light can catch the subtle texture of the leaves
Slip-Trailed Pattern Wall Pocket
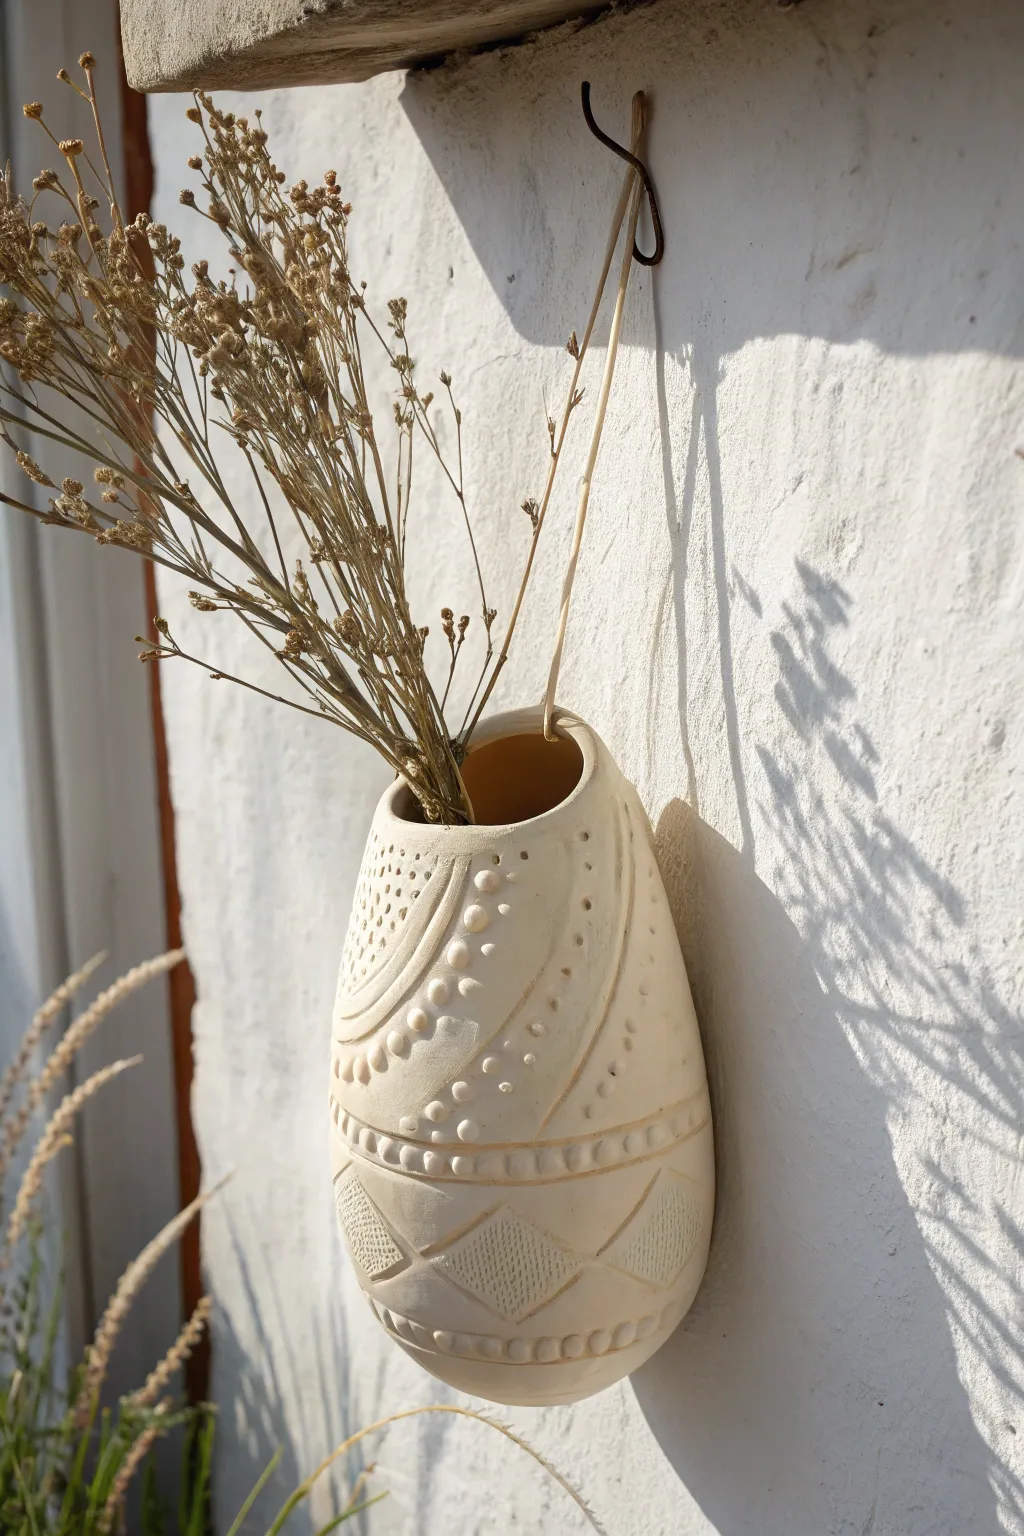
This charming ceramic wall pocket features a soft, matte finish and intricate tactile details like raised slip dots and etched geometric patterns. Its gentle, organic shape and neutral palette make it a perfect vessel for displaying dried wildflowers or grasses.
Step-by-Step Guide
Materials
- White earthenware clay or stoneware clay
- Slip trailer bottle with multiple nozzle sizes
- Thick clay slip (made from your clay body)
- Pottery needle tool
- Modeling tool or dull pencil
- Rib tool (metal or rubber)
- Hole cutter or straw
- Rolling pin
- Two wooden slats (for even rolling)
- Canvas or cloth for working surface
- Newspaper or paper towels
- Sponge
- Twine or leather cord for hanging
Step 1: Forming the Pocket
-
Roll the slab:
Begin by wedging your white clay to remove air bubbles. Place it between two wooden slats on your canvas and roll it out into a smooth, even slab about 1/4 inch thick. -
Cut the shape:
Using a needle tool, cut out a large oval shape. It should be roughly the size of a flattened rugby ball but slightly wider at the bottom. -
Create the volume:
Gently curve the slab around a crumpled ball of newspaper to create a hollow, bulbous form. The newspaper acts as internal support to keep the shape from collapsing while you work. -
Seal the seam:
Overlap the edges of the slab at the back or side. Score and slip the connection points thoroughly, then blend the clay together until the seam is invisible. Smooth the exterior with a rib tool to erase any fingerprints. -
Shape the opening:
Refine the top opening, ensuring it is circular and smooth. Use a damp sponge to round off the rim so it isn’t sharp. -
Add hanging holes:
Using a small hole cutter or a drinking straw, punch two small holes near the top rim on opposite sides. These will be used for threading the hanger later.
Step 2: Creating the Textures
-
Scribe guidelines:
Lightly trace your design onto the leather-hard clay using a needle tool. Map out the curved swoops, horizontal bands, and the diamond section at the bottom. -
Apply slip dots:
Fill your slip trailer with thick, creamy slip. I like to test the flow on a scrap piece of clay first. Squeeze gently to create rows of raised dots along your curved guidelines. Vary the size of the dots for visual interest—larger dots in the center of the curves, smaller ones trailing off. -
Create indentations:
Use the rounded end of a modeling tool to press small, circular indentations into the wet slip dots or directly into the clay body for a negative texture. -
Carve the diamond grid:
For the bottom section, incise distinct diamond outlines. Inside each diamond, use the needle tool to scratch fine cross-hatching or vertical lines to create a fabric-like texture. -
Add relief bands:
Roll tiny coils of clay and attach them horizontally across the lower third of the pot using slip. Press into these coils with a tool to create a repeated vertical tick mark pattern. -
Upper texture:
On the upper left quadrant, use a needle tool to stipple tiny, random dots, creating a perforated look that contrasts with the smooth areas.
Slip Too Runny?
If your slip dots flatten out immediately, your slip is too wet. Leave the open trailer bottle out for an hour to let some water evaporate until it’s like thick yogurt.
Step 3: Finishing and Firing
-
Slow drying:
Loosely cover the piece with plastic to let it dry very slowly. This prevents the added slip details from popping off or cracking away from the main body. -
Bisque fire:
Once bone dry, fire the piece to bisque temperature (usually cone 04) in a kiln. -
Glazing (Optional):
For the look in the photo, you can leave the exterior unglazed if your clay body is white, or apply a very thin matte white glaze. If using a glaze, ensure you wipe it back slightly so the texture remains crisp. -
Final assembly:
After the final firing, thread a piece of natural twine or leather cord through the holes you made earlier. Knot it securely on the inside. -
Styling:
Arrange a bundle of dried grasses or wheat stems in the pocket and hang it in a spot that receives raking light to highlight the textures.
Pro Tip: Clean Lines
After the slip trailing dries to leather hard, gently run a finger over the raised dots. This smooths sharp peaks without flattening the dot completely.
Hang your finished pocket and enjoy the soft, handcrafted warmth it adds to your wall
Sgraffito Line-Art Wall Pocket

Capture the essence of nature with this serene ceramic wall pocket, featuring delicate botanical carvings on a soft cream surface. The sgraffito-inspired technique reveals the raw clay texture beneath, creating a lovely contrast that perfectly frames trailing greenery.
Step-by-Step
Materials
- White or speckled stoneware clay body
- Rolling pin and guide strips (approx. 1/4 inch)
- Circular template (4-5 inch diameter) for the base
- Rectangular template for the body
- Serrated rib tool and sponge
- Needle tool
- Loop tool or Sgraffito carving tool
- Slip (clay glue) and scoring tool
- Underglaze (optional, if you want high contrast)
- Matte clear glaze
- Hole punch or drill bit (for hanging holes)
Step 1: Forming the Pocket
-
Prepare the slabs:
Begin by wedging your stoneware clay thoroughly to remove air bubbles. Roll it out into an even slab using your guide strips to ensure a consistent 1/4 inch thickness. -
Cut the shapes:
Using your paper templates, cut out a tall rectangle for the main body and a semi-circle shape for the bottom. The rectangle needs to be wide enough to curl into a semi-cylinder. -
Texture the surface:
Before assembling, smooth the surface of the clay slab with a rib tool. I find that compressing the clay here helps prevent warping later. -
Curve the body:
Gently drape the rectangular slab over a rolling pin or cylindrical form to help it take shape without cracking. Let it firm up to a ‘soft leather hard’ state so it can hold its vertical curve. -
Score and slip:
Score the edges of the semi-circle bottom and the bottom edge of your curved wall. Apply a generous amount of slip to both scored areas. -
Assembly:
Attach the wall to the base, pressing firmly to ensure a strong bond. Since this is a wall pocket, you can attach a flat slab to the back to close the cylinder, creating a D-shaped cross-section. -
Refine seams:
Use a small coil of clay to reinforce the interior seams. Smooth the exterior seams with a rib tool so the transitions are invisible. -
Create hanging mechanism:
Punch one or two keyhole cuts or simple holes into the flat back panel near the top. This is crucial for mounting firmly to the wall.
Clean Lines Pro-Tip
Wait until the clay is a firm leather-hard before carving. If the clay is too wet, the tool will drag and create ragged edges instead of crisp lines.
Step 2: Carving the Botanicals
-
Sketching the design:
Wait until the pot is leather hard. Using a needle tool with very light pressure, sketch two vertical botanical stems onto the front face. Keep the layout asymmetrical for visual interest. -
Carving outlines:
Use a small loop tool or V-tip carving tool to go over your sketched lines. Carve the main stems first, ensuring deep, clean channels. -
Leaf details:
For the left stem, carve long, slender leaves with a central vein. For the right stem, carve broader leaves, adding delicate diagonal veins inside each leaf shape. -
Refining the edges:
Brush away the clay crumbs with a soft brush. Use a damp sponge to gently soften any sharp burrs created by the carving tools, but be careful not to wash away the crispness of the lines. -
Adding texture (Optional):
If you want the carved areas to stand out more, you can inlay a darker underglaze into the lines now, or simply rely on the glaze pooling later.
Step 3: Firing and Finishing
-
Slow drying:
Loosely cover the piece with plastic to let it dry very slowly. This is vital for wall pockets to prevent the back from warping away from the front curve. -
Bisque fire:
Once bone dry, fire the piece to bisque temperature (usually Cone 04) to prepare it for glazing. -
Glazing:
Apply a coat of satin or matte white glaze. If you want the raw clay look shown in the image, you might choose to leave the outside unglazed or use a very thin matte wash. -
Glaze wiping:
If you glazed the exterior, wipe the glaze back with a sponge so it stays mostly in the carved recesses, highlighting the botanical design. -
Final firing:
Fire to the maturity temperature of your clay body (likely Cone 5 or 6). Once cool, test the water tightness before planting.
Level Up: Color Wash
Apply a diluted iron oxide wash over the carving and wipe it back. The dark oxide will settle into the veins of the leaves, giving it an antique look.
Hang your new planter near a window and watch your favorite trailing ivy bring the artwork to life
Speckled Terrazzo-Style Wall Pocket
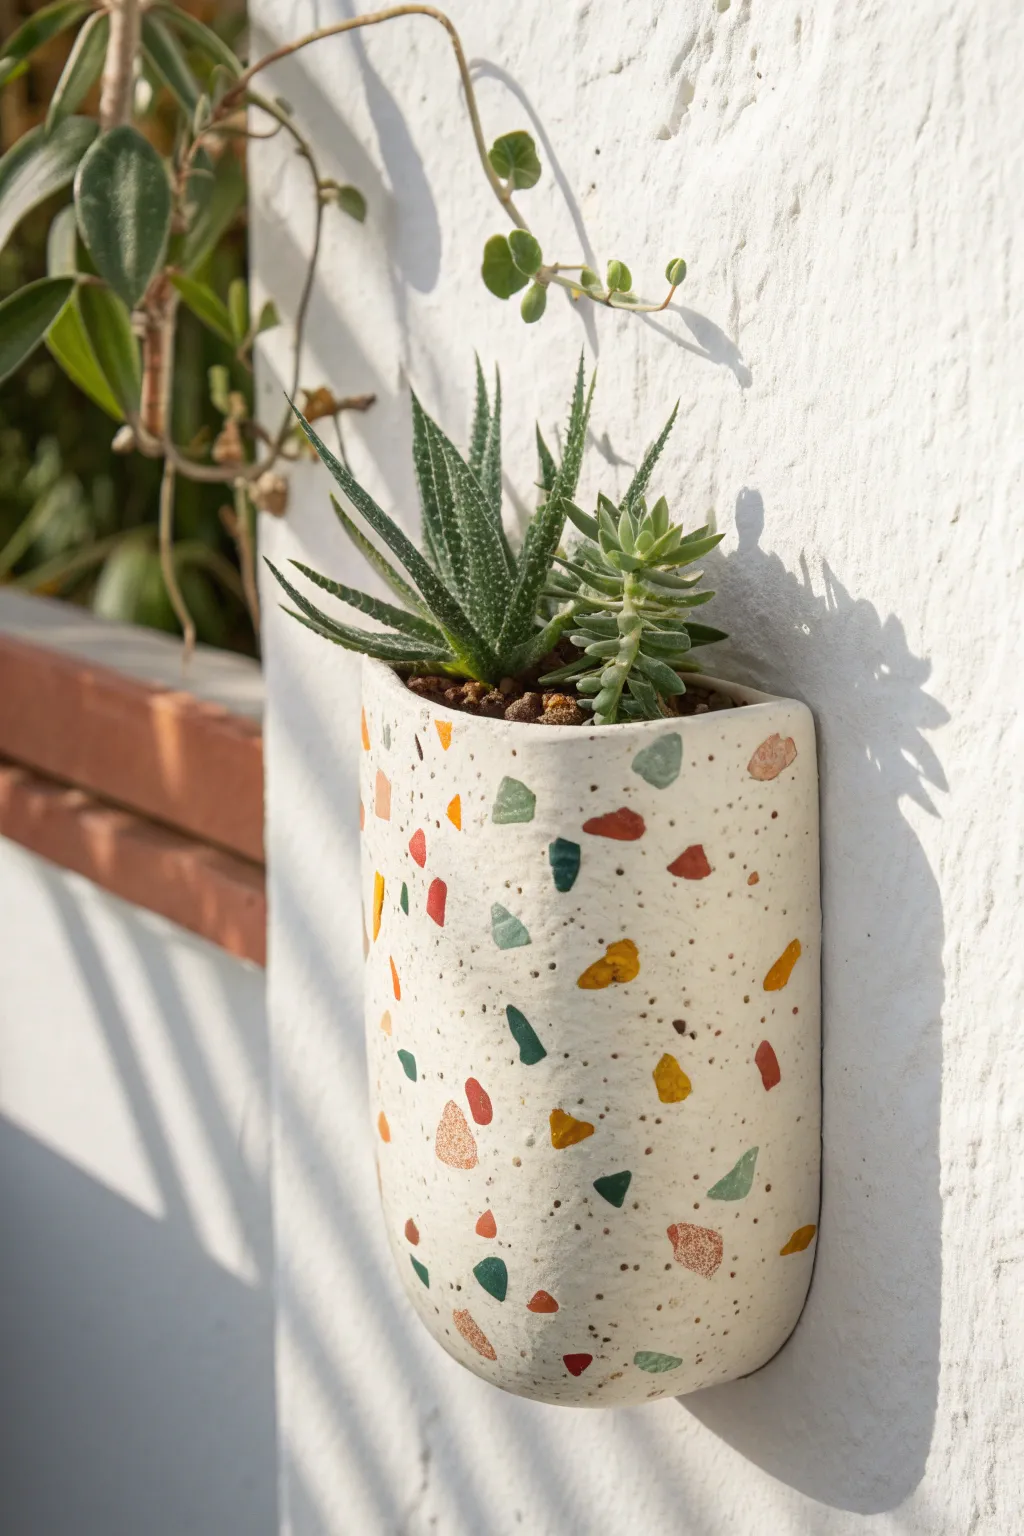
Bring a burst of Mediterranean warmth to your walls with this handmade ceramic pocket featuring a vibrant, faux-terrazzo finish. Using simple slab-building techniques and colorful inclusions, you’ll create a chic, speckled home for your favorite small succulents.
Detailed Instructions
Materials
- White or cream-colored air-dry clay or polymer clay (oven-bake)
- Polymer clay in assorted colors (terracotta, turquoise, mustard yellow, forest green)
- Rolling pin
- Parchment paper or craft mat
- Craft knife or scalpel
- Half-circle paper template (approx. 5 inches wide)
- Small bowl or curved form (for drying shape)
- Cardboard spacer
- Sandpaper (medium and fine grit)
- Gloss or matte varnish (optional)
- Strong craft glue (if joining pieces post-dry)
Step 1: Prepping the Terrazzo ‘Chips’
-
Create color sheets:
Roll out small amounts of your colored polymer clays (terracotta, turquoise, yellow, green) into very thin sheets. -
Bake the sheets:
If using oven-bake clay, bake these thin sheets according to the package instructions until hard. If using air-dry clay, let them dry completely until brittle. -
Crush into chips:
Once hardened, break the colored sheets into irregular, jagged shards. You want a variety of sizes, from tiny specks to pieces about the size of a fingernail. -
Sort the sizes:
Separate your chips slightly so you have a good mix ready to grab without searching for specific colors later.
Step 2: Building the Wall Pocket
-
Roll the base slab:
Take a large ball of your white base clay and roll it out into a slab about 1/4 inch thick on your parchment paper. -
Embed the color:
Sprinkle your colored chips generously over the white slab. Press them down firmly so they stick, but don’t worry about them being flush yet. -
Add texture:
For that speckled look, sprinkle sand or dried coffee grounds sparingly over the clay for extra grit. -
Final roll:
Place a second sheet of parchment paper over the top and roll over the slab again. This presses the colored chips into the clay to create a flat, unified surface. -
Cut the shapes:
Using your paper template, cut out two identical D-shapes (half circles). One will be the back, and one creates the front pocket. -
Form the pocket:
Take the front piece and gently curve it. If you’re using polymer clay, you can start assembling now. -
Join the edges:
Score the curved edges of both pieces where they will touch. Apply a little water or liquid clay (slip) to the seams. -
Seal the seam:
Press the curved edges of the front piece against the back piece. Smooth the seam with your finger or a modeling tool so it looks like one solid unit. -
Create the opening:
Ensure the top of the pocket remains open. I like to insert a crumpled piece of paper or a cardboard spacer wrapped in foil to keep the pocket from collapsing while it sets. -
Add a hanging hole:
Use a straw or small tool to punch a hole in the top center of the back panel for hanging later.
Chips falling out?
If chips pop out while sanding, mix a tiny bit of white glue with white clay dust to fill the hole, let dry, and sand again.
Step 3: Finishing Touches
-
Cure the clay:
Bake (for polymer) or dry (for air-dry) your piece according to the manufacturer’s directions. Ensure it is fully supported so it doesn’t warp. -
Sand for reveal:
Once fully cured and cooled, sand the surface vigorously. This is the magic step that removes the top layer of white clay to reveal the sharp, colorful shapes of the terrazzo chips underneath. -
Reference check:
Check your progress against the look you want; sand more if the colored chips aren’t vibrant enough. -
Seal and protect:
Wipe away all dust with a damp cloth. Apply a coat of matte or satin varnish to seal the clay and make the colors pop. -
Plant and hang:
Fill with a small amount of soil and your chosen succulents, then mount it to a sunny wall.
Pro Tip: Depth Control
Make your colored ‘chips’ slightly thicker than you think necessary. This ensures they don’t disappear completely when you roll them into the white base slab.
Now you have a stunning, modern planter that adds a touch of artistic flair to any vertical space
Matte Outside, Glossy Inside Wall Pocket
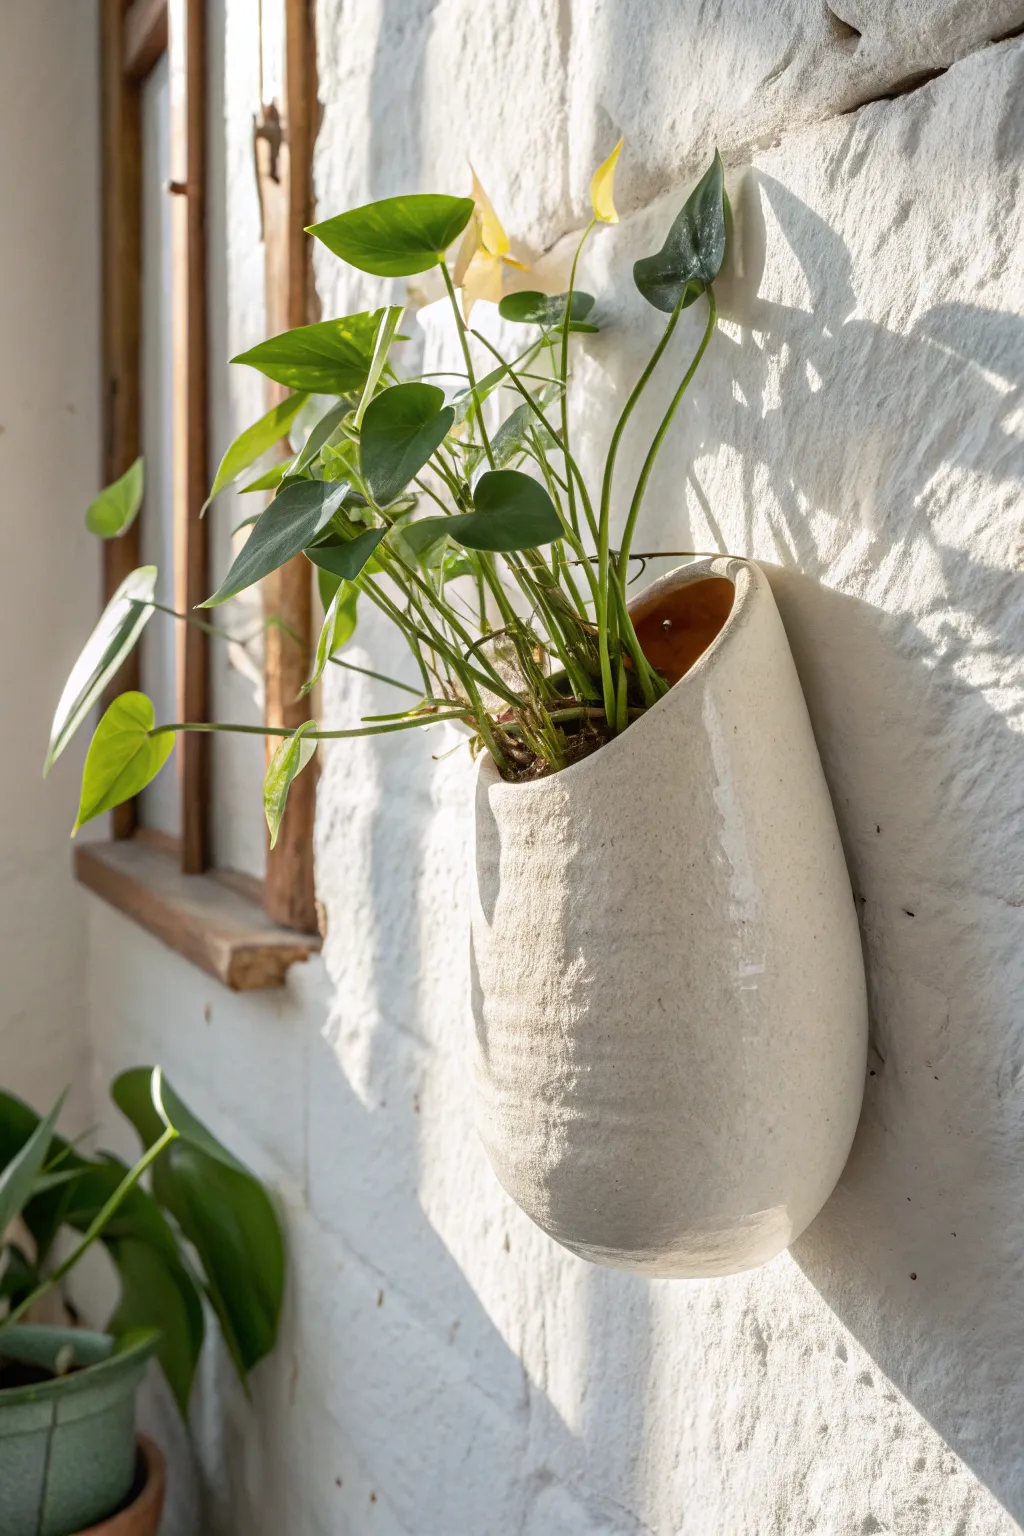
Embrace the contrast of textures with this organic, teardrop-shaped wall planter that features a raw, stone-like exterior and a sealed, glossy interior. This ceramic project blends seamlessly with rustic or modern decor, offering a perfect home for cascading pothos or ferns.
Step-by-Step Tutorial
Materials
- Stoneware clay (groggy or speckled clay adds nice texture)
- Pottery wheel or slab roller (depending on your preferred method)
- Rib tool
- Needle tool
- Sponge
- Pottery wire
- High-gloss clear glaze
- Matte white glaze or underglaze (optional, if clay body isn’t white)
- Wax resist
- Kiln
- Wall hanging hardware (screw or hook)
- Drill bit for ceramics (if making hole post-firing) or hole punch tool
Step 1: Forming the Body
-
Prepare the Clay:
Begin by wedging your clay thoroughly to remove air bubbles. Ensure the consistency is even and workable, creating a ball roughly the size of a large grapefruit. -
Shape the Cone:
You can throw a closed form on the wheel and cut it in half, but for this specific organic look, hand-building with slabs works beautifully. Roll out a slab to about 1/4 inch thickness. -
Cut the Pattern:
Cut a large semi-circle or pie-wedge shape from your slab. This will be folded to create the cone. -
Check the Texture:
If you want that extra rough, stucco-like texture seen in the photo, now is the time to distress the slab. I like to gently press a rough sponge or piece of canvas into the clay surface before forming. -
Join the Seam:
Score and slip the straight edges of your semi-circle. Bring them together to form a cone shape, overlapping slightly, and press firmly to seal the seam from the inside. -
Smooth the Join:
Use a rib tool on the inside to smooth out the seam so it’s invisible. On the outside, blend the seam but try to maintain the rough texture you created.
Don’t Forget Drainage
Even for wall pockets, drainage matters. Add a tiny hole at the very bottom, or use plastic nursery pots inside so you can remove the plant to water it.
Step 2: Refining and Hanging
-
Flatten the Back:
Since this will hang against a flat wall, gently press the cone against your work table to flatten one side of the exterior. Do this while the clay is still plastic but firm enough to hold shape. -
Add a Back Slab:
Measure the opening you’ve created on the back. Cut a matching piece of slab, score and slip, and attach it to close off the back of the pocket completely. -
Create the Hanging Hole:
Before the clay dries, use a hole punch tool or a straw to create a clean hole near the top of the back panel. Reinforce the area around the hole by compressing the clay slightly. -
Define the Opening:
Shape the top opening of the pocket. You can leave it irregular for an organic feel or smooth the rim with a damp sponge for a cleaner edge. -
Slow Dry:
Cover the piece loosely with plastic and let it dry slowly to the leather-hard stage, then uncover to let it reach bone dry. This prevents warping. -
Bisque Fire:
Load your bone-dry piece into the kiln and fire to cone 04 (or your clay’s specific bisque temperature).
Step 3: Glazing and Finishing
-
Clean the Bisque:
Wipe down the fired piece with a damp sponge to remove any kiln dust. This ensures the glaze adheres properly. -
Glaze the Interior:
Pour a high-gloss clear glaze (or a color if you prefer) into the pocket. Swirl it around to coat the entire interior surface thoroughly, then pour out the excess. -
Wipe the Rim:
Clean up any drips on the rim immediately. The transition from glossy inside to matte outside should be crisp at the top edge. -
Treat the Exterior:
To achieve the matte look, you can either leave the raw clay bare (if it’s a nice white stoneware) or brush on a matte white glaze. If glazing the outside, keep the coat thin to preserve the surface texture. -
Wax Resist:
Apply wax resist to the bottom and the back side where it will touch the wall or kiln shelf, preventing it from sticking during the firing. -
Glaze Fire:
Fire the piece again to the final temperature required for your clay and glaze combination (typically Cone 5 or 6). -
Plant and Hang:
Once cool, inspect the watertight seal. Add a small layer of gravel for drainage, pop in your plant, and mount it securely to the wall.
Add Color Depth
Before the matte glaze, wipe a dark iron oxide wash over the textured exterior and sponge it off. The dark color will stay in the crevices, highlighting the texture.
Now step back and admire how the light plays off the different textures of your living wall art
Centered Nail Hole Wall Pocket
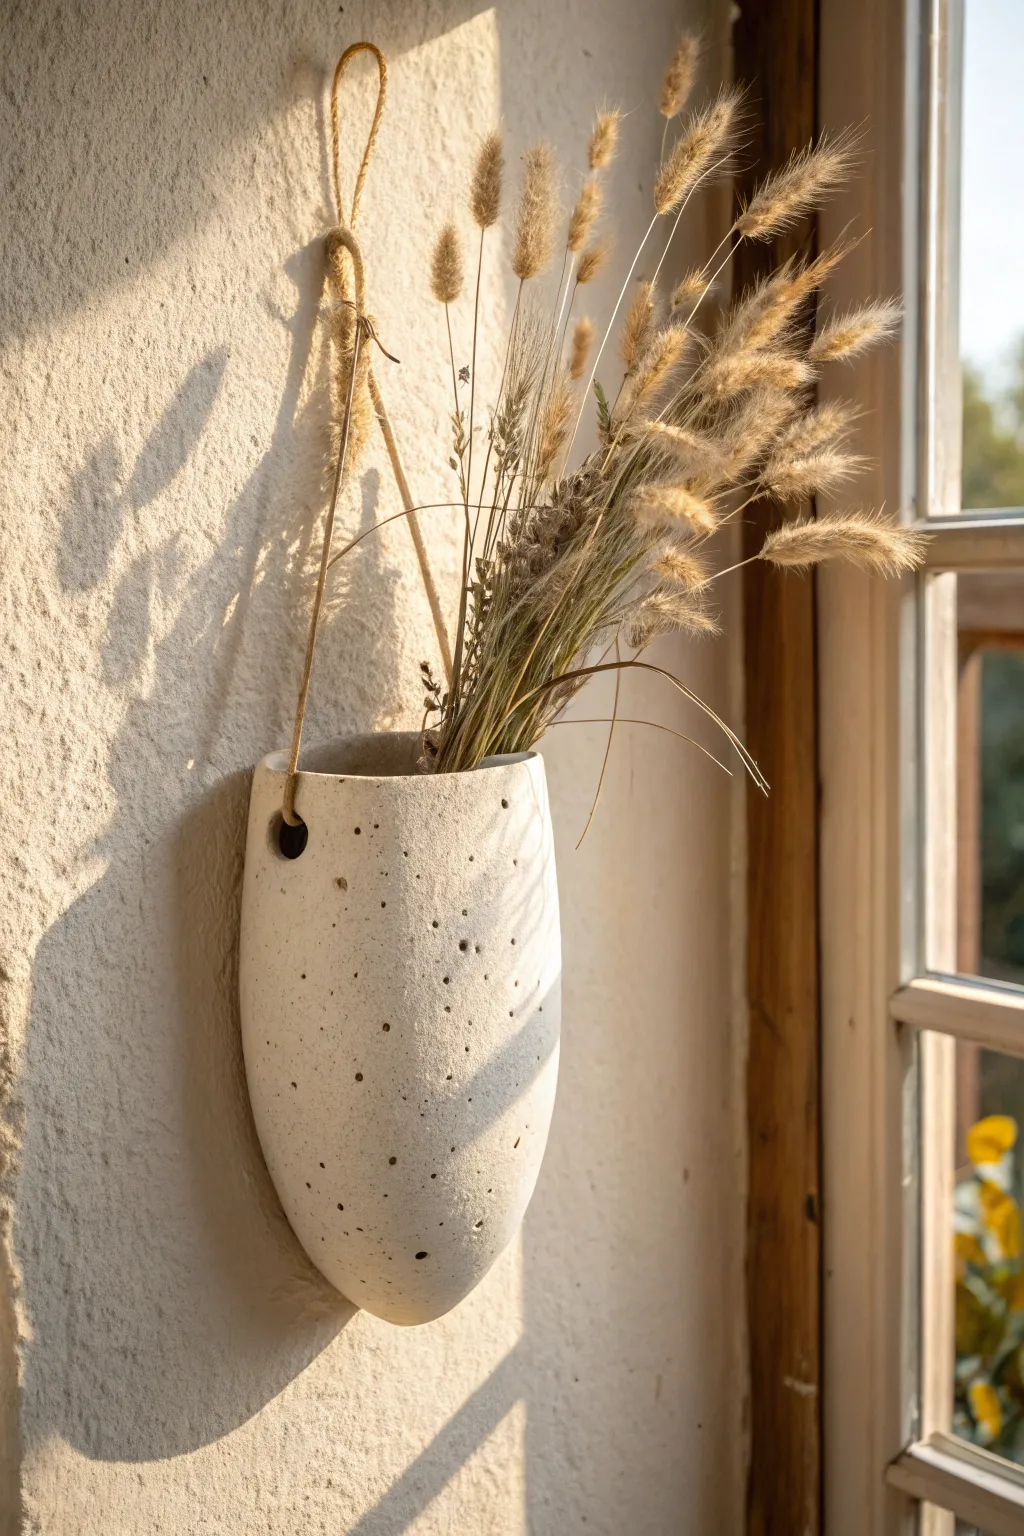
Bring earthy, rustic charm to your walls with this handmade ceramic-style pocket vase. Its beautiful speckled texture and organic shape make it the perfect vessel for displaying dried grasses or faux botanicals in any sunlit corner.
Step-by-Step
Materials
- Air-dry clay (white or light grey)
- Rolling pin
- Cardstock or paper (for template)
- Small bowl with water (for slip)
- Pottery needle tool or craft knife
- Sponge
- Black pepper or dried coffee grounds (for speckling)
- Sandpaper (fine grit)
- Jute twine or rustic rope
- Drill with small bit (or a straw for wet clay holes)
Step 1: Preparing the Clay Body
-
Create the texture:
Before rolling, grab a handful of air-dry clay and knead in a generous pinch of coarse black pepper or used (dried) coffee grounds. This creates that authentic, speckled ceramic look visible in the photo without needing special glazes. -
Roll the slab:
Roll your speckled clay out on a smooth surface to about a 1/4 inch thickness. Try to keep the thickness consistent so it dries evenly. -
Make a template:
Sketch a tall, elongated U-shape on cardstock to serve as your template. You’ll need two pieces: a back panel (the full U-shape) and a front panel (slightly shorter and wider than the back to create the pocket volume).
Step 2: Forming the Pocket
-
Cut the shapes:
Place your templates onto the rolled clay and carefully trace around them with a needle tool or craft knife to cut out your two main pieces. -
Score the edges:
Use your needle tool to make small hatch marks (scoring) along the outer edges of the back piece and the corresponding inner edges of the front piece. This rough surface helps them bond. -
Apply slip:
Dip your finger in water and run it over the scored areas to create a sticky ‘slip’ paste. -
Press together:
Gently curve the front piece over the back piece, lining up the edges. Press firmly along the seam to join the clay. Be sure to leave the top open. -
Smooth the seams:
To make it look like a single solid piece, smudge the clay across the seam line with your thumb or a wet sponge until the join is invisible. -
Create volume:
I like to gently stuff the inside of the pocket with crumpled newspaper or plastic wrap at this stage; this supports the rounded shape while the clay begins to set.
Natural Texture
For a truly organic finish, gently press a real stone or piece of rough bark into the wet clay surface instead of using artificial texturing tools.
Step 3: Finishing Details
-
Add hanging holes:
While the clay is still wet, use a straw or a large dowel to punch two holes near the top rim on either side. These will anchor your rope handle. -
Texturizing the surface:
Take a stiff-bristled brush or a crumpled ball of foil and lightly tap the exterior surface. This removes fingerprints and enhances that rough, stone-like quality. -
Initial pocking:
Use a needle tool or toothpick to create a few larger, deliberate divots or holes scattered across the surface for extra character, imitating natural stone erosion. -
Dry thoroughly:
Prop the pocket up in a safe, dry place for at least 24 to 48 hours. Turn it occasionally to ensure air reaches all sides. -
Refining the shape:
Once fully bone dry, use fine-grit sandpaper to smooth out any sharp edges on the rim or bottom, but leave the main surface texture rough. -
Seal the piece:
Apply a clear matte varnish or sealant to protect the clay. This is crucial if you plan to hang it in a humid area, though remember air-dry clay is not waterproof. -
Attach the hanger:
Cut a length of jute twine. Thread one end through the left hole from the outside in and tie a sturdy knot on the inside. Repeat on the right side. -
Style with botanicals:
Fill your new wall pocket with lightweight dried flowers, wheat stalks, or ornamental grasses to complete the rustic aesthetic.
Make It Waterproof
If you want to use fresh flowers, hide a small, thin plastic test tube or floral water vial inside the dried pocket to hold water safely.
Hang your creation near a window to catch the shadows and enjoy the natural warmth it adds to your room
Two-Hole Twine-Hung Wall Pocket
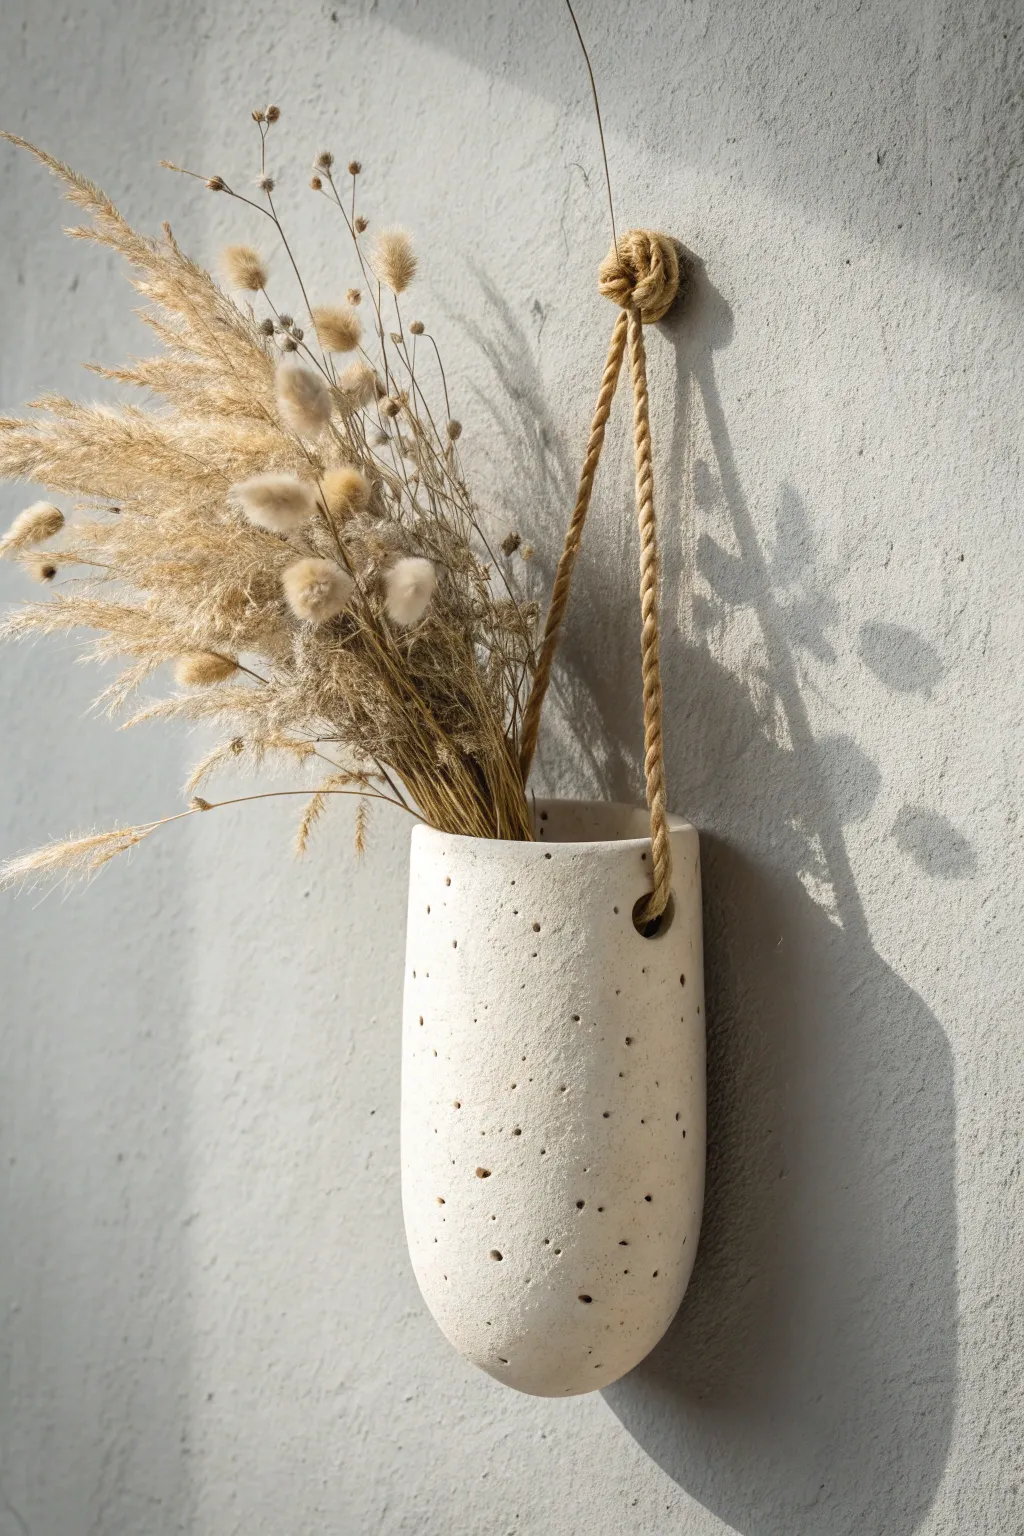
Embrace organic texture with this simple hanging planter that features a naturally speckled clay body and a relaxed, rounded form. The rustic finish and sturdy twine suspension make it the perfect vessel for displaying dried grasses or wildflowers.
Step-by-Step Tutorial
Materials
- Speckled cream stoneware clay (or white clay with grog)
- Rolling pin
- Cardboard mailing tube (approx. 3-4 inches diameter)
- Newsprint or paper
- Needle tool
- Scoring tool or fork
- Slip (clay mixed with water)
- Sponge
- Hole punch tool or drinking straw
- Thick jute rope or twine
- Metal rib tool
- Kiln (or access to a firing service)
Step 1: Forming the Body
-
Prepare your clay:
Begin by wedging your speckled stoneware clay thoroughly to remove any air bubbles. You want a consistent, workable texture that isn’t too sticky. -
Roll a slab:
Roll out a slab of clay to an even thickness of about 1/4 inch. If you want a unified texture, smooth both sides with a rubber rib to compress the clay structure. -
Prepare the mold:
Wrap your cardboard mailing tube in a sheet of newsprint. This simple step prevents the wet clay from adhering to the cardboard and makes removal effortless later. -
Cut the rectangle:
Measure and cut a rectangle from your slab that is large enough to wrap around the tube with a slight overlap, plus the desired height for your pocket (about 8-10 inches). -
Wrap the form:
Gently lift the clay slab and wrap it around the paper-covered tube. Bring the two long vertical edges together. -
Join the seam:
Score the overlapping edges deeply and apply a generous amount of slip. Press the edges firmly together to create a bond. -
Smooth the connection:
Use a wooden modeling tool or your finger to blend the seam completely until it disappears. I prefer to smooth clay down the seam in one direction, then up in the other to lock it tight.
Make It Look Ancient
Mix coarse sand or coffee grounds into your clay body before rolling. They burn out during firing, leaving deeper pits and a truly weathered texture.
Step 2: Shaping and Detailing
-
Seal the bottom:
While the clay is still on the tube, carefully pinch the bottom edges of the cylinder together. You want to curve the clay inward to create that rounded, half-sphere bottom shown in the photo. -
Reinforce the base:
Add a small coil of clay to the interior of the pinched bottom if necessary, smoothing it well to ensure it is watertight and sturdy. -
Remove the mold:
Once the cylinder can support its own weight (usually after 30-60 minutes of stiffening), gently slide the cardboard tube and paper out. -
Create the texture:
To mimic the porous, weathered look, gently poke random, shallow divots into the surface using a needle tool or a stiff brush. Don’t puncture all the way through. -
Add hanging holes:
About one inch down from the top rim, use a hole punch tool or a straw to create two holes directly opposite each other. These must be large enough for your rope to pass through. -
Refine the rim:
Smooth the top rim with a damp sponge or a piece of chamois leather to ensure there are no sharp edges. -
Dry thoroughly:
Allow the piece to dry slowly under loose plastic for a day, then uncover it to let it reach bone-dry status. This prevents warping.
Step 3: Finishing Up
-
Bisque fire:
Fire the piece in a kiln to bisque temperature (usually cone 04). This hardens the clay permanently. -
Glaze application:
Apply a matte white or opaque cream glaze. If your clay body is naturally speckled, a semi-transparent white glaze is ideal to let those spots show through. -
Final firing:
Fire the piece again to the maturation temperature of your specific clay and glaze combination. -
Attach the suspension:
Cut a length of thick jute rope. Thread one end through a hole from the outside in, tie a secure knot on the inside, and repeat on the other side. -
Top knot detail:
Bring the two rope ends together at the top and create a decorative overhand knot or a wrapped loop for hanging.
Preventing Cracks
Seams are the weak point. If your vertical seam cracks during drying, score it deeper, add vinegar to your slip, and compress the join firmly again.
Hang your new ceramic pocket in a sunny spot and enjoy the touch of handmade warmth it brings to your wall
Hidden Back Hanger Wall Pocket
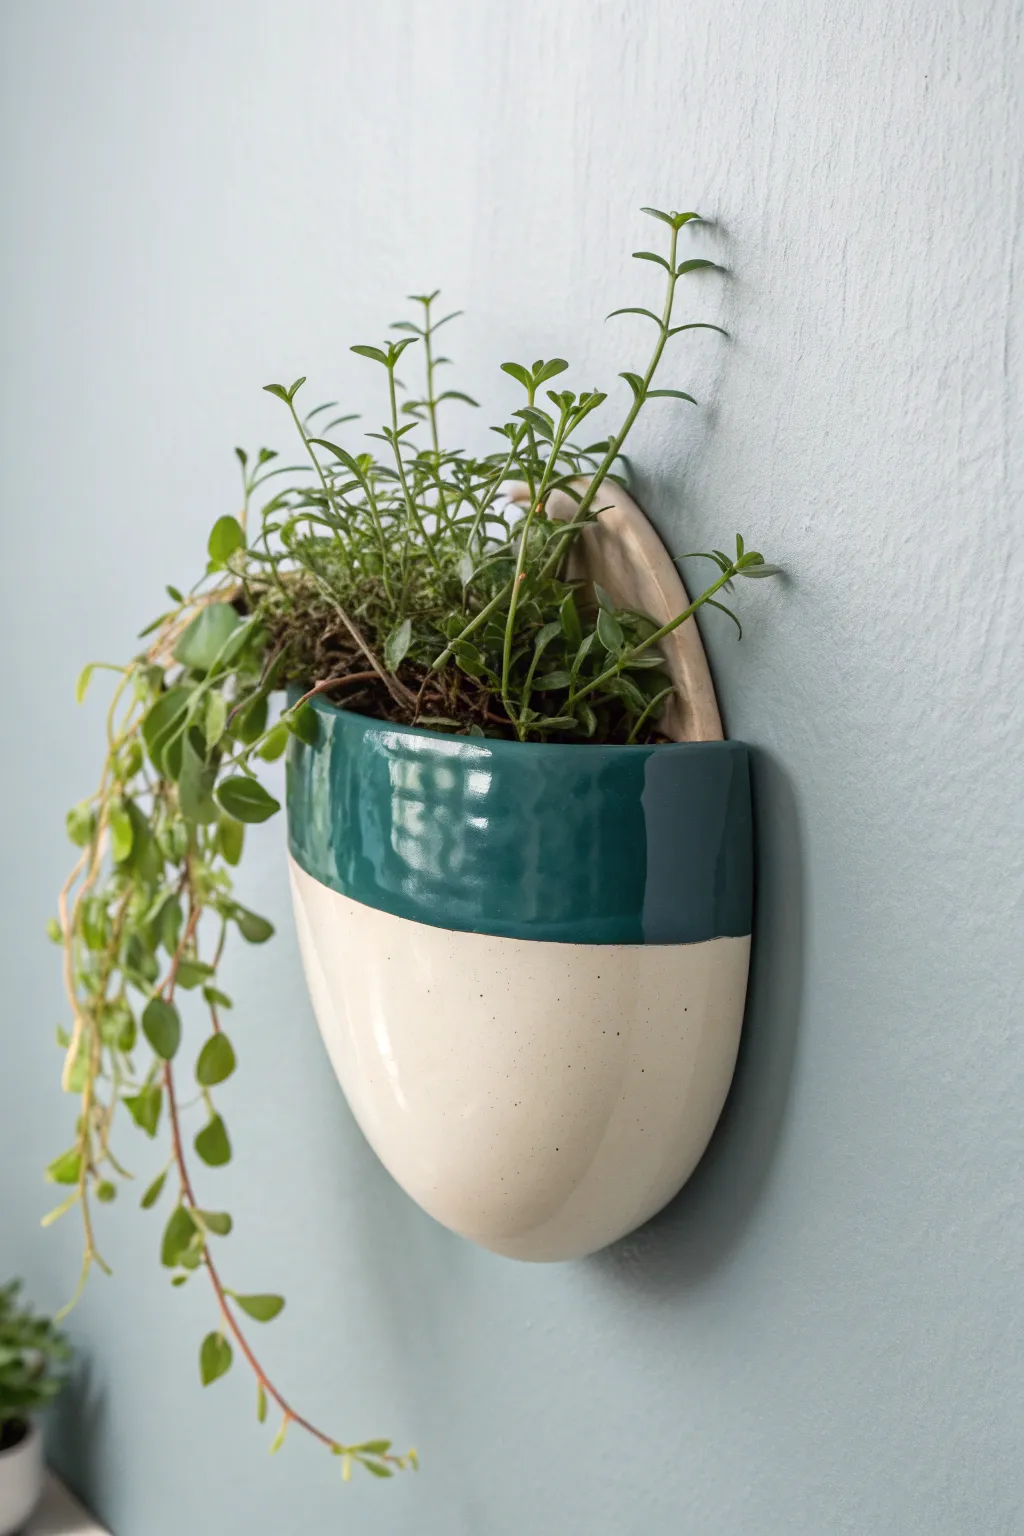
This elegant wall planter combines functionality with modern aesthetics, featuring a sleek two-tone glaze of deep teal and creamy speckle. The clever half-moon design sits flush against your wall, hiding the hanging mechanism for a clean, floating effect perfect for trailing greenery.
Detailed Instructions
Materials
- Earthenware or stoneware clay (approx. 2-3 lbs)
- Rolling pin
- Canvas work surface or clay mat
- Needle tool
- Potter’s knife or fettling tool
- Rib tool (kidney scraper)
- Slip (liquid clay)
- Scoring tool or fork
- Sponge
- Small round cookie cutter or straw (for drainage hole)
- Deep teal/forest green glaze
- Cream/speckled white glaze
- Kiln access
- Paper template (semicircle)
Step 1: Forming the Slab Body
-
Roll the Slab:
Begin by wedging your clay to remove air bubbles, then roll it out on your canvas into an even slab about 1/4 inch thick. Consistent thickness is key here to prevent warping later. -
Cut the Back Plate:
Using your needle tool and a template, cut out a D-shape or tall arch. This flat piece will be the back that rests against the wall. Don’t discard the excess clay yet. -
Cut the Front Pocket:
Roll a rectangular strip of clay that is long enough to curve around the perimeter of your back plate’s curved edge. The height should match the desired depth of your pocket. -
Texture and Smooth:
Before assembling, run a soft rib tool over both sides of your slab pieces to compress the clay particles. This strengthens the walls and creates a pristine surface for glazing. -
Score the Edges:
Take your scoring tool and rough up the curved edge of the back plate and the bottom edge of your front strip where they will connect.
Step 2: Fabricating the Pocket
-
Join the Seams:
Apply slip generously to the scored areas. Gently curve the rectangular strip around the back plate’s edge, pressing firmly to create a bond. -
Add a Reinforcement Coil:
I like to roll a very thin coil of clay and press it into the interior seam where the walls meet the back. Smooth this out with your finger or a modeling tool to ensure a watertight seal. -
Shape the Bottom:
To get that rounded, bulbous bottom seen in the image, gently paddle the lower section of the pocket wall while supporting it from the inside with your hand. You want it to taper slightly inward. -
Create the Hanger:
On the back plate (near the top flat edge), use a specialized hole cutter or create a secure keyhole cutout. Ensure the clay is thick enough here to support the weight of wet soil. -
Drainage is Vital:
Using a small straw or hole punch, create a drainage hole at the absolute lowest point of the pocket to prevent root rot.
Clean Lines
Use automotive detailing tape or thin masking tape to create a perfectly straight line between the two glazes if you aren’t confident in your freehand dipping skills.
Step 3: Glazing and Finishing
-
Bisque Fire:
Allow the piece to dry slowly under plastic to prevent cracking, then fire it to bisque temperature (usually Cone 04) based on your clay body. -
Wax Resist Method:
Once out of the bisque kiln, wipe away dust. Apply wax resist to the bottom third of the exterior if you want raw clay exposed, or prepare to dip the whole bottom. -
The Cream Dip:
Dip the bottom two-thirds of the planter into your cream or white speckled glaze. Hold it there for 3 seconds to get an opaque coat, then let it dry completely. -
The Teal Dip:
Carefully dip the top rim section into the deep teal glaze, slightly overlapping the cream section. The overlap creates that beautiful transition line. -
Glaze Fire:
Load the kiln for the final glaze firing (often Cone 5 or 6). Make sure the back of the planter is free of glaze stilt marks by wiping it clean or using stilts.
Driftwood Texture
Before the clay dries, press a piece of rough canvas or actual tree bark into the top section to add organic texture that the teal glaze will break over beautifully.
Once cooled, mount your new planter securely and fill it with a spill of teardrop peperomia for a living wall art piece
Double-Compartment Wall Pocket
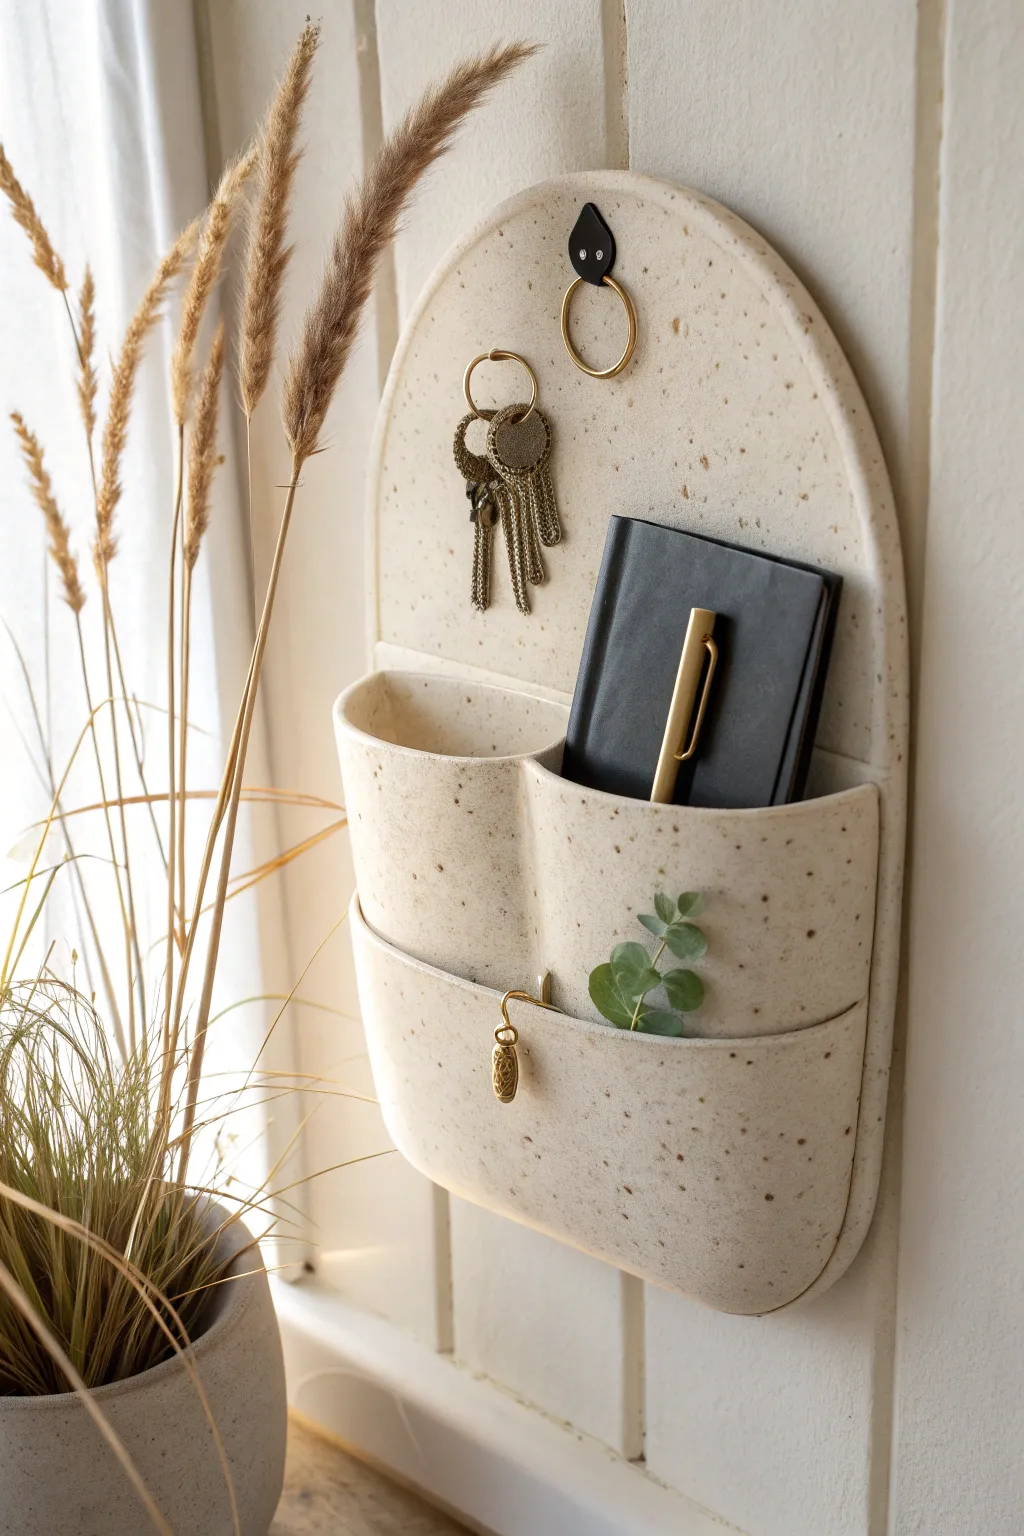
Minimalist yet beautifully textured, this arched wall pocket combines practical storage with organic charm. The creamy, speckled clay body features two tiered compartments and integrated hooks, perfect for organizing an entryway or workspace.
Step-by-Step
Materials
- Speckled cream stoneware clay (approx. 3-4 lbs)
- Rolling pin
- Canvas work surface
- Guides or slats (1/4 inch thick)
- Large paper template (arch shape)
- Needle tool
- Slip and scoring tool (or serrated rib)
- Pottery sponge
- Modeling tool (curved)
- Small metal hooks or sturdy wire loop (brass finish)
- Small leather loop and black decorative tack
- Clear matte glaze
Step 1: Preparation & Base Construction
-
Create templates:
Begin by sketching your design on paper or cardstock. You will need one large arch for the backplate (approx. 12 inches tall), and rectangular strips for the pocket fronts and sides. Cutting these out now ensures symmetry later. -
Roll out the slab:
Wedge your speckled clay thoroughly to remove air bubbles. Lay it on the canvas and roll it out into a large, even slab using your 1/4 inch guides. I like to flip the slab once or twice during rolling to prevent warping. -
Cut the components:
Place your paper templates onto the leather-hard slab. Carefully trace and cut out the main arched backplate, the front pocket panels, and the necessary curved strips for the pocket floors. -
Smooth the edges:
Once cut, run a damp sponge or a soft rib along all cut edges to compress the clay and remove any sharp burrs or crumbs. -
Form the pockets:
For the pockets, you are essentially creating balconies. Gently curve the clay strips that will form the front of the pockets so they bow outwards slightly, rather than laying flat.
Warp-Proof Dry
To keep the flat backplate perfectly straight, dry the piece flat on its back on a piece of foam or cushion. This supports the pockets while keeping gravity from pulling them down.
Step 2: Assembly & Detailing
-
Score and slip:
Aggressively score the areas on the backplate where the pockets will attach. Do the same to the edges of your pocket pieces. Apply a generous amount of slip to both surfaces. -
Attach the top pocket:
Press the top double-pocket section onto the backplate first. Use a modeling tool to firmly blend the clay seams on the inside and outside. A seamless join is crucial for strength. -
Install the center divider:
Insert a small vertical wall in the center of the top pocket to divide it into two compartments—one for the notebook, one for other accessories. Blend this in well. -
Attach the lower pocket:
Repeat the scoring and slipping process for the lower, wider pocket tier. Attach it just below the first tier, ensuring there is enough overlap for a strong bond. -
Refine the seams:
Use a damp sponge to wipe away excess slip at the connection points. Run a rounded tool along the inner seams to create a clean, professional transition between pockets and backplate. -
Add hook hardware:
While the clay is leather-hard, carefully press your brass hooks or wire loops into the clay body. Depending on the type of hook, you may need to embed a wire loop into the back of the clay or create a hole to screw hardware in post-firing. -
Create the top loop:
Near the top of the arch, pierce a small hole where the decorative leather loop will eventually go. Ensure the hole is large enough to accommodate the shrinkage of the clay.
Textured Touch
For more organic flair, gently press a rough linen cloth onto your clay slab while rolling. This adds a subtle woven texture that looks incredible under the matte glaze.
Step 3: Finishing & Firing
-
Slow drying:
Cover the piece loosely with plastic sheeting. Let it dry very slowly over several days to prevent the backplate from warping or curling as the pockets shrink. -
Bisque fire:
Once bone dry, fire the piece in the kiln to a bisque temperature (usually cone 04). This hardens the clay and prepares it for glazing. -
Glazing:
Dip the piece into a clear matte glaze, or brush on three even coats. Since the clay itself is speckled and decorative, a clear glaze will highlight the natural texture without hiding it. -
Glaze firing:
Fire the piece again to the maturation temperature of your specific clay body (likely cone 5 or 6). Ensure no glaze touches the bottom or the piece will stick to the kiln shelf. -
Final assembly:
After the kiln has cooled, attach the black leather loop at the top using a decorative black tack or rivet. Add a touch of strong adhesive behind the brass key hook if it feels loose.
Hang your new organizer near the door and enjoy having a stylish home for your essentials
Mini Trio Propagation Wall Pockets
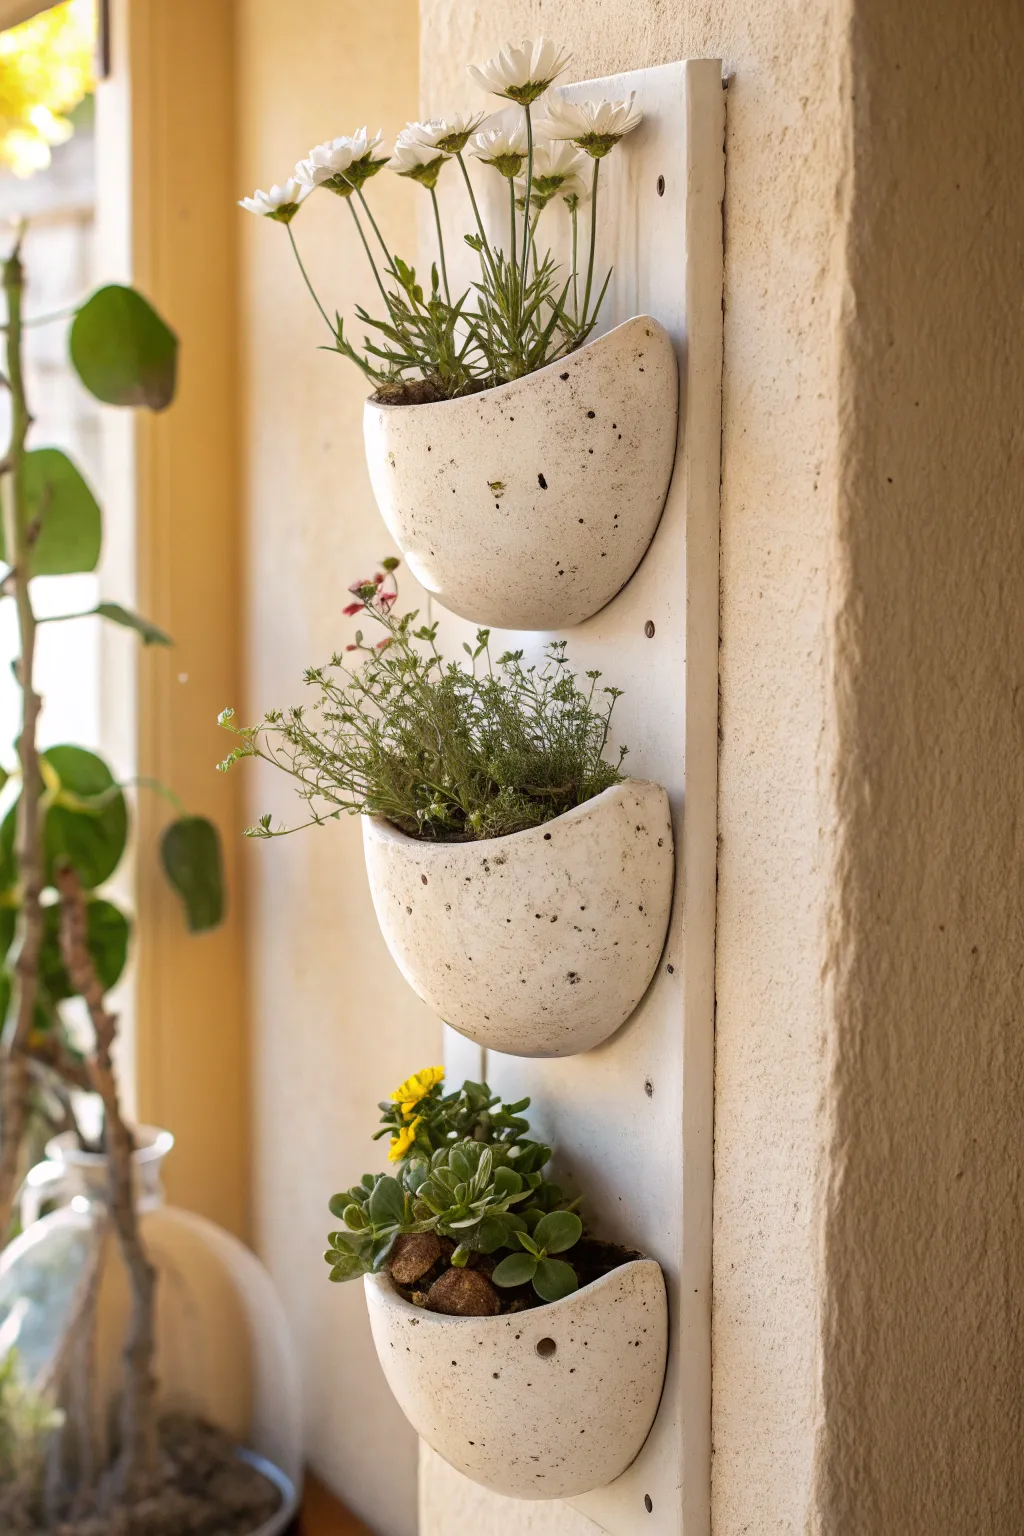
Bring vertical greenery into your living space with this charming trio of speckled ceramic-style wall pockets mounted on a simple whitewashed board. This project combines the clean lines of modern pottery with a rustic, nature-inspired finish perfect for holding succulents, herbs, or cuttings.
How-To Guide
Materials
- Air-dry clay or white polymer clay (approx. 2 lbs)
- Wooden board (approx. 6″ x 24″)
- Rolling pin
- Bowl (approx. 5-6″ diameter) to use as a mold
- Plastic wrap
- Craft knife
- Water and sponge for smoothing
- Black acrylic paint
- Old toothbrush
- Clear matte sealant spray
- White paint (for the wooden board)
- Strong construction adhesive (e.g., E6000) or screws/anchors for mounting
- Sandpaper
Step 1: Creating the Pockets
-
Prepare the Clay:
Begin by conditioning your clay. If using air-dry clay, knead it briefly to remove air bubbles. Roll out a slab to about 1/4 inch thickness on a smooth surface. -
Cut the Base Shapes:
Using your bowl as a guide, cut out three identical circles from the clay slab. These circles will form the body of your pockets. -
Create the Pocket Form:
Cut each circle in half to create semi-circles. You will actually need two semi-circles per pocket, or you can fold a single circle; for this look, we will fold a larger circle. Let’s adjust: Cut three larger circles (approx. 6-7 inches). -
Mold the Pocket:
Take your bowl and cover the outside with plastic wrap to prevent sticking. Lay your clay circle over the curved side of the bowl. Gently fold one half of the circle up to meet the other, creating a taco-like shape but with a wider opening at the top. -
Shape the Back:
While the clay is still pliable on the mold, gently flatten the back side of the pocket against a flat surface (like a book or board) so it will sit flush against the wooden mounting board later. -
Smooth the Edges:
Dip your finger or a small sponge in water and run it along the rim of the pocket to soften any sharp cut edges. Ensure the joinery at the sides is seamless if you pieced it together. -
Add Drainage (Optional):
If you plan to plant directly rather than just placing pots inside, poke a small hole in the bottom of each pocket now using a straw or skewer. -
Drying:
Allow the clay pockets to dry completely on the mold. This usually takes 24-48 hours depending on humidity. Rotate them occasionally for even drying.
Weight Watcher
Keep clay walls thin (approx 1/4″) to reduce weight. Heavy pockets slide down before glue sets and pull on wall anchors later.
Step 2: Finishing the Surfaces
-
Sand the Imperfections:
Once fully dry, gently sand the clay pockets with fine-grit sandpaper to remove any rough spots or fingerprints, focusing on the rim. -
Prepare the Speckle Paint:
Dilute a small amount of black acrylic paint with water until it is quite runny and fluid, almost like ink. -
Apply the Speckles:
Dip an old toothbrush into the thinned black paint. Hold it near the pockets and run your thumb across the bristles to flick tiny droplets onto the white clay surface. Practice on paper first to get the density right. -
Seal the Clay:
After the paint flecks dry, spray the entire surface (inside and out) with a clear matte sealant. This is crucial for moisture resistance. -
Prepare the Mounting Board:
Sand your wooden board so it is smooth. Apply a coat or two of white paint. I like to let a little wood grain show through for a more rustic texture.
Step 3: Assembly
-
Position the Pockets:
Lay your painted board flat. Arrange the three ceramic pockets vertically, spacing them evenly apart. Mark their positions lightly with a pencil. -
Attach the Pockets:
Apply a generous amount of strong construction adhesive (like E6000) to the flat back of each clay pocket. Press firmly onto the marked spots on the board. -
Secure While Curing:
Use painter’s tape or heavy books to hold the pockets in place against the board while the adhesive cures fully (usually overnight). -
Drill Mounting Holes:
Drill small pilot holes in the four corners of the wooden board or attach mounting hardware to the back so you can hang your masterpiece. -
Mount to Wall:
Screw the board into the wall using appropriate anchors. Ensure it is level before fully tightening the screws. -
Add Greenery:
Fill your new pockets with lightweight potting mix and tuck in your favorite small plants, such as succulents, herbs, or trailing vines.
Adhesion Fix
If glue isn’t holding the clay to wood, score both surfaces with a craft knife creating a cross-hatch pattern for better grip.
Step back and admire how this simple vertical garden instantly adds life and texture to your wall
Bird-Shaped Ceramic Wall Pocket
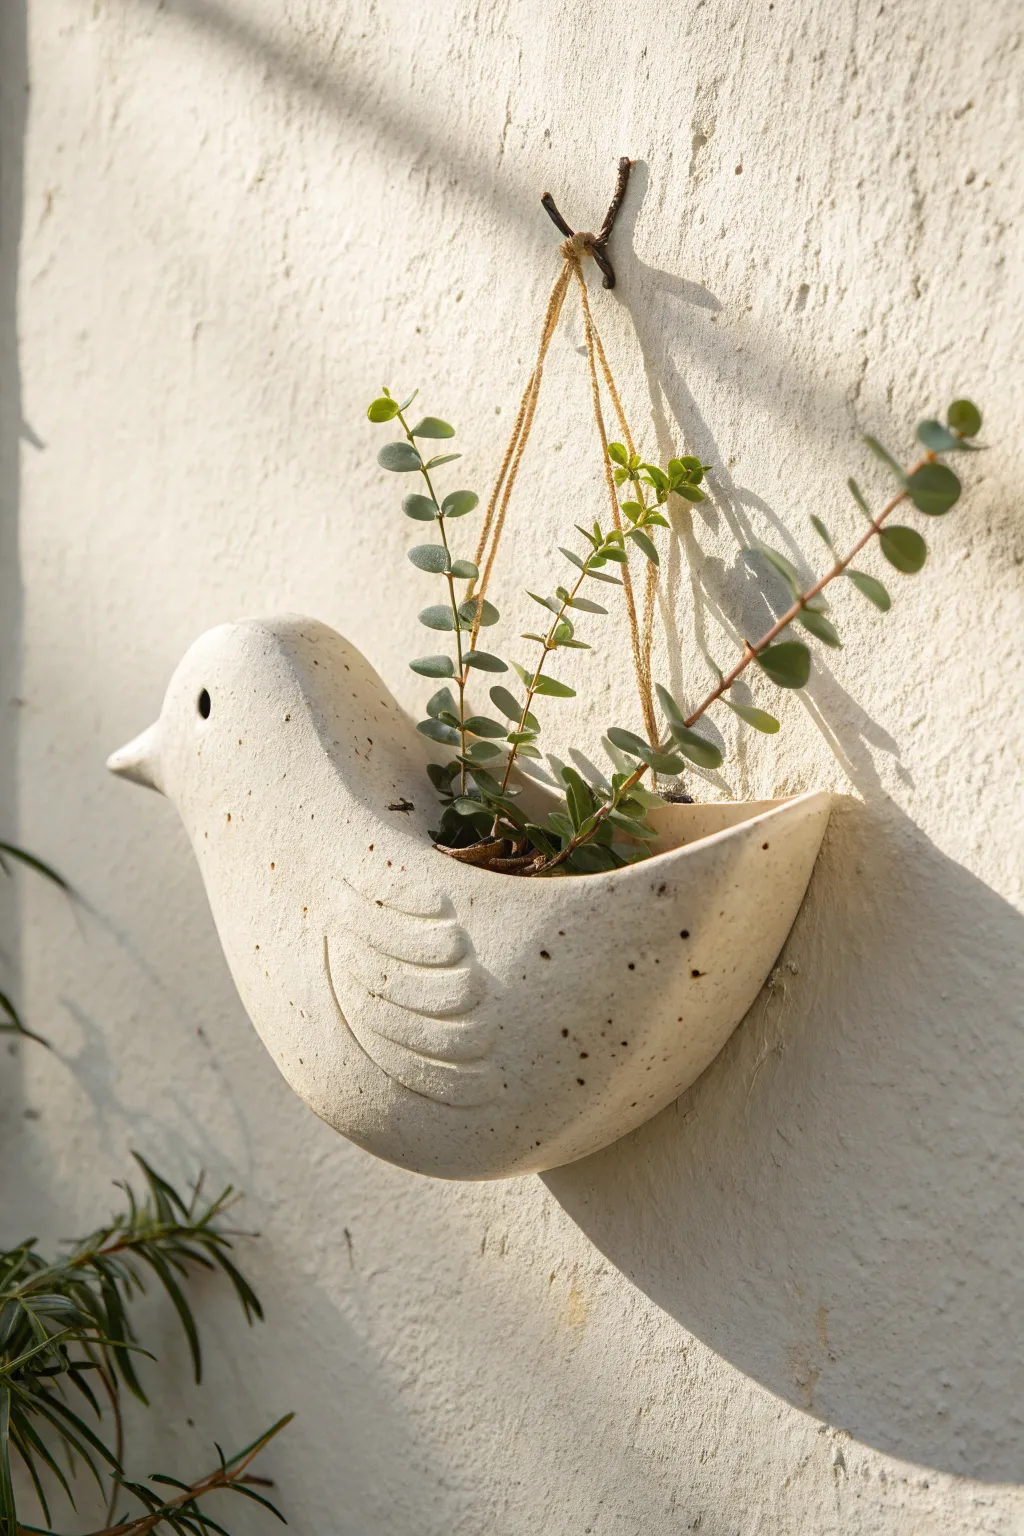
Bring a touch of avian charm to your outdoor or indoor walls with this delightful ceramic hanging planter. Shaped like a stylized bird with delicate wing details and a speckled finish, it offers the perfect nesting spot for cascading succulents or air plants.
Detailed Instructions
Materials
- White tonal stoneware clay or earthenware clay
- Pottery tools (needle tool, rib tool, modeling tool)
- Small bowl or sphere mold (optional, for starting the shape)
- Slip and scoring tool
- Sponge
- Rolling pin
- Speckled white glaze (matte or satin finish)
- Jute twine or hemp cord
- Kiln access
- Succulent or trailing plant
Step 1: Forming the Body
-
Establish the base:
Begin with a lump of white clay, roughly the size of a grapefruit. Use the pinch pot method to create a deep, elongated bowl shape. Alternatively, you can drape a rolled slab over a curved form or mold to get that smooth, rounded belly. -
Extend the tail:
While the clay is still plastic, gently pull and smooth the clay at one end of the oval opening to create an upward-sweeping point. This will become the bird’s tail and the back of the planter opening. -
Shape the chest:
At the opposite end, build up the clay slightly higher to form the chest area. This needs to be sturdy enough to support the head we will add next. -
Refine the thickness:
Use a kidney rib tool to smooth the exterior and interior walls. Aim for a consistent thickness of about 1/4 inch throughout the piece to ensure even drying and firing.
Step 2: Sculpting Details
-
Form the head:
Roll a smaller ball of clay for the head. Shape a small, conical beak protruding from one side. I find it helpful to look at the profile silhouette against a plain background to get the beak angle just right. -
Attach the head:
Score the top of the chest area and the bottom of the head piece aggressively. Apply slip to both surfaces and press them firmly together. Smooth the seam completely with a modeling tool or your finger so it looks like one continuous piece. -
Create the eyes:
Using the back of a small paintbrush or a specific hole-punch tool, press a small, deep indentation on the side of the head to create the eye. Repeat on the other side if the planter will be visible from both angles. -
Add the wings:
Roll out a small slab of clay and cut out two teardrop or wing shapes. Using a modeling tool, carve three or four curved lines into each wing to represent feathers. Score, slip, and attach these to the sides of the bird’s body. -
Pierce holes for hanging:
Before the clay hardens, use a needle tool or small drill bit to create holes on opposite sides of the top opening. Ensure they are wide enough to accommodate your jute twine after shrinkage.
Cracking at the Neck?
If the head cracks off during drying, you likely didn’t score deeply enough. For a fix, try ‘paper clay’ slip (vinegar-soaked toilet paper mixed with slip) to mend bone-dry breaks.
Step 3: Finishing and Firing
-
Final smoothing:
Wipe the entire piece down gently with a damp sponge to remove any harsh fingerprints or burrs, paying special attention to the rim of the opening. -
Drying:
Allow the piece to dry slowly under plastic for a day or two, then uncover it to become bone dry. This slow drying prevents the tail or beak from cracking. -
Bisque fire:
Load the bone-dry bird into the kiln for a bisque firing (typically Cone 04). This hardens the clay and prepares it for glazing. -
Glazing:
Apply a speckled white matte glaze. You can dip the piece or brush it on. If your glaze doesn’t have speckles, you can flick a toothbrush loaded with iron oxide wash lightly over the damp glaze to create that eggshell effect. -
Wipe the base:
Ensure the bottom of the bird (where it sits on the kiln shelf) is wiped clean of any glaze to prevent sticking. -
Glaze fire:
High fire the piece according to your clay and glaze instructions (often Cone 5 or 6 for stoneware).
Add Weathering
For a rustic, aged look, wipe a diluted wash of Burnt Umber acrylic paint into the wing crevices after the final firing, then wipe the surface clean with a cloth.
Step 4: Assembly
-
Add suspension:
Cut a length of natural jute twine. Thread the ends through the holes you created earlier and tie secure knots on the inside of the planter to hold the weight. -
Planting:
Fill the pocket with a small amount of soil and nestle in a trailing succulent like the one shown, or perhaps a String of Pearls for a different look.
Hang your finished avian creation on a sunny garden wall or fence to enjoy a unique piece of handmade decor
Modular Wall Pocket Grid

Transform a blank wall into a vertical garden oasis with this modular grid of ceramic-style pockets. Combining the rustic charm of terracotta hues with modern geometric patterns, these individual hanging planters create a cohesive, gallery-like display for your favorite dried stems or succulents.
Step-by-Step Guide
Materials
- White air-dry clay or low-fire white ceramic clay (approx. 5-7 lbs)
- Rolling pin
- Clay knife or fettling knife
- Sponge
- Slip (clay mixed with water)
- Ruler
- Circular template (can use a bowl approximately 5-6 inches diameter)
- Rectangle template (cardboard, approx 4×6 inches)
- Terracotta acrylic paint or underglaze
- Navy blue acrylic paint or underglaze
- Fine detail paint brush
- Medium round paint brush
- Small hole punch or straw (for mounting holes)
- Sandpaper (fine grit)
- Clear matte sealant or varnish
Step 1: Creating the Backing Tiles
-
Prepare the slab:
Start by rolling out a large slab of clay to an even thickness of about 1/4 inch. Use guide sticks on either side of your rolling pin if you have them to ensure uniform thickness across the board. -
Cut the rectangles:
Using your rectangular cardboard template and a sharp clay knife, cut out nine identical rectangles. These will form the base plates that mount against the wall. -
Smooth the edges:
Dip your finger or a small sponge in water and run it along the cut edges of each rectangle to compress the clay and remove any sharp burrs or crumbs. -
Add mounting holes:
While the clay is still soft, use a small tool or a straw to pierce two holes near the top corners or one centered hole of each rectangle for hanging later. Ensure the holes go all the way through.
Keep it Steady
When joining the pocket to the back, stuff a small ball of crumpled newspaper inside the pocket while it dries. This supports the clay curve and prevents it from sagging.
Step 2: Forming the Pockets
-
Cut the half-circles:
Roll out more clay to the same 1/4 inch thickness. Use your circular bowl template to cut out semi-circles. You will need one specifically sized semi-circle for each backing tile. -
Score the surfaces:
Take a needle tool or fork and score (scratch up) the curved edge of the semi-circle and the corresponding U-shaped area on the bottom half of your rectangular backing tile where they will join. -
Apply slip:
Dab a generous amount of slip onto the scored areas. This acts as the glue that bonds the two pieces of clay together permanently. -
Attach the pocket:
Gently curve the semi-circle and press its edges onto the scored area of the backing tile. The pocket should bulge outward slightly to create space for soil or stems. -
Reinforce the seam:
Roll a very thin coil of clay (like a skinny worm) and press it into the seam where the pocket meets the backing. Smooth this coil down with a modeling tool or your finger to make the transition seamless and strong. -
Final smoothing:
Use a damp sponge to wipe down the entire piece, smoothing out fingerprints and ensuring the rim of the pocket is rounded and neat. Repeat this for all nine units. -
Dry thoroughly:
Allow the pockets to dry completely. If using air-dry clay, this may take 24-48 hours. Turn them occasionally to ensure even drying and prevent warping.
Step 3: Decoration and Finishing
-
Sand imperfections:
Once fully dry (bone dry), lightly sand any rough edges or bumps with fine-grit sandpaper. Wipe away the dust with a barely damp cloth. -
Paint the sunbursts:
Using the terracotta paint, create sunburst patterns on three or four of the pockets. Start with a semi-circle at the bottom center and paint radiating lines upward toward the rim. -
Paint leaf motifs:
On two other pockets, paint large leaf shapes. Use the natural curve of the pocket to guide the spine of the leaf, then add smaller brushstrokes for the veins. -
Add geometric dots:
For a minimalist look on one or two pockets, paint a series of ascending dots or small dashes along the rim or sides using the terracotta shade. -
Create the blue accent:
Select one pocket to feature the contrasting navy blue design. Paint bold, concentric arches and geometric motifs to make this piece the focal point of your grid. -
Seal the work:
Apply a coat of clear matte sealant to protect the paint and clay. I prefer doing two thin coats rather than one thick one to avoid drips. -
Arrange and hang:
Once sealed and dry, arrange your pockets on the wall in a 3×3 grid. Fill them with dried lavender, grasses, or air plants to complete the look.
Mix & Match Media
Try leaving some pockets unpainted and using a textured tool to stamp patterns into the wet clay instead for a subtle, tactile variety in your grid.
Step back and admire your hand-crafted vertical garden as it brings a warm, Mediterranean feel to your space.