If you love the soft, puffy look of Model Magic and you’re craving something sweet and simple to sculpt, you’re in the right mindset. I pulled together my favorite cute Model Magic ideas that stay beginner-friendly but still have tons of personality.
Kawaii Donut Charms
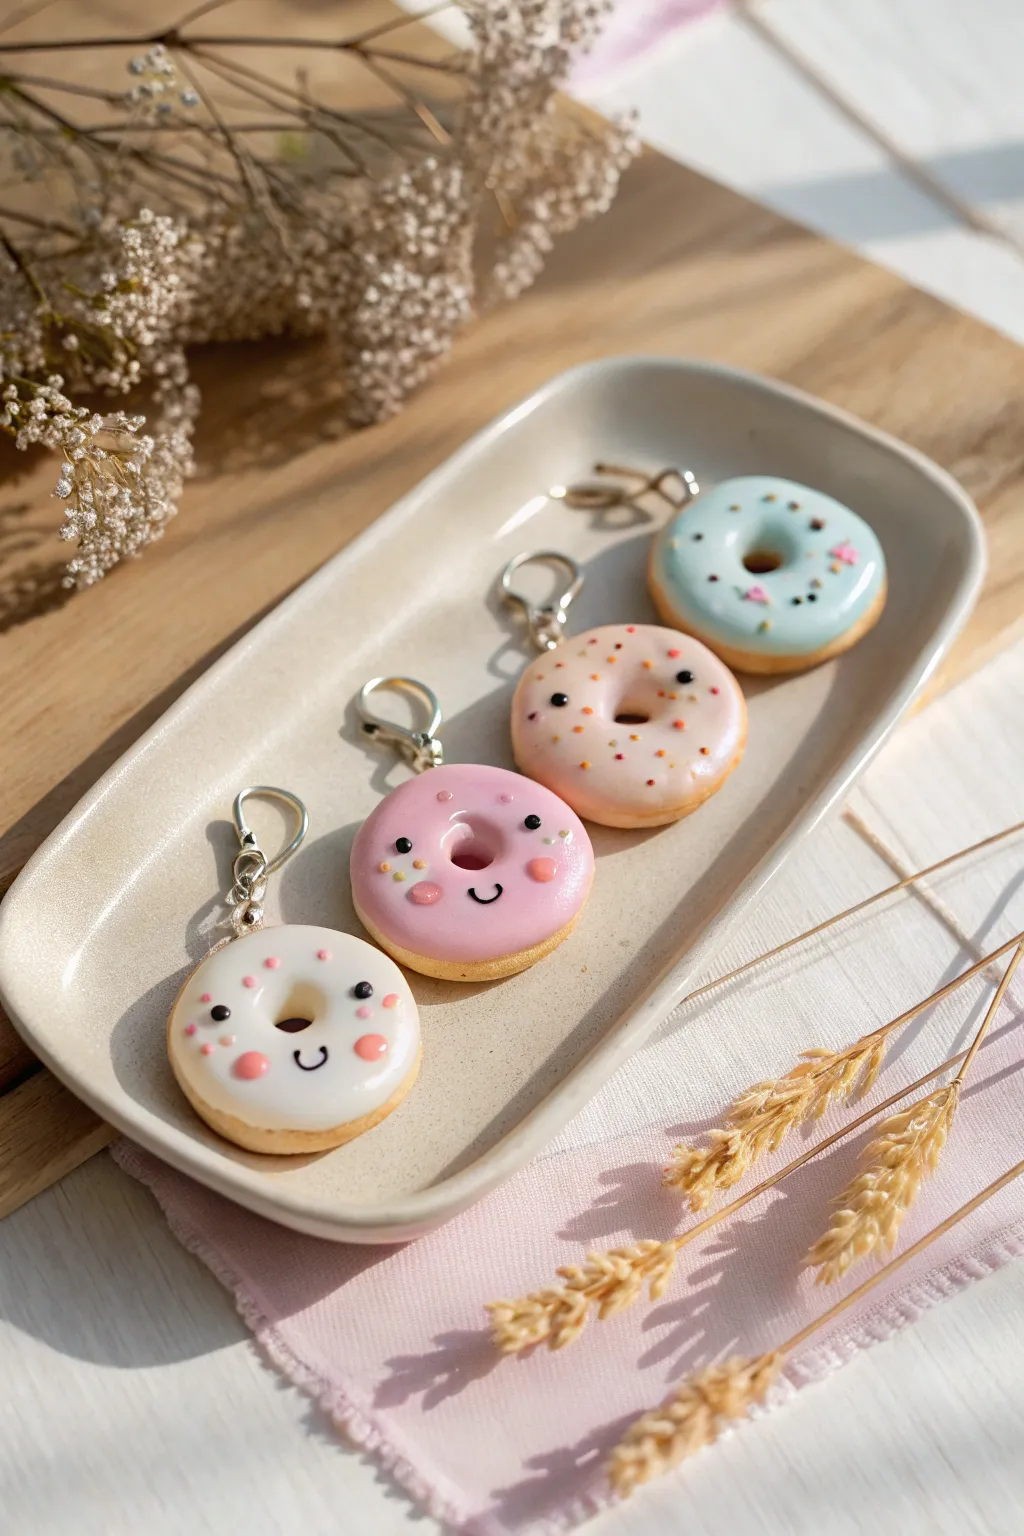
Transform simple modeling clay into a tray of adorable, bite-sized donut charms featuring sweet pastel glazes and tiny, smiling faces. These cheerful little accessories are surprisingly lightweight and perfect for turning into keychains or zipper pulls.
Step-by-Step
Materials
- Model Magic clay (white, plus pink, blue, yellow, and brown/bisque)
- Acrylic paints (black, white, various pastel colors)
- Small eye screws or hook findings
- Jump rings and lobster clasps (for keychain assembly)
- Clay sculpting tools (rolling pin, small round cutter)
- A straw or smooth pen cap (for cutting the hole)
- Fine-grit sandpaper (optional)
- Gloss glaze or Mod Podge Dimensional Magic
- Fine detail paintbrush or dotting tool
Step 1: Shaping the Dough
-
Mix the perfect dough shade:
Start by mixing a small amount of yellow and brown markers or paint into white Model Magic to create a light, golden-biscuit color. Knead it thoroughly until the color is uniform and the clay feels pliable. -
Form the base:
Roll four small balls of the dough-colored clay, each about 1 to 1.5 inches in diameter. Gently flatten each ball into a thick disc shape, keeping the edges rounded and soft to mimic a freshly fried donut. -
Punch the center:
Use a straw or a small, clean pen cap to punch a hole directly in the center of each disc. Wiggle the tool slightly as you pull it out to ensure a clean cutout, then smooth the inner edges with your pinky finger. -
Refine the texture:
Take a moment to tap out any fingerprints. The charm of Model Magic is its smooth finish, so gentle smoothing now saves time later. I like to gently roll the outer edge on my work surface to make it perfectly round.
Smooth Operator
To eliminate wrinkles in Model Magic before shaping, use a tiny drop of water or lotion on your fingers. It helps fuse the clay seamlessly for a flawless surface.
Step 2: Glazing & Faces
-
Create the frosting:
For the icing, you have two options: either flatten a thin piece of colored clay and layer it on top, or wait for the base to dry and paint it. For the look in the photo, painting works best. Mix acrylic paints into pastel blue, peach, pink, and white. -
Paint the drip:
Using a medium brush, paint the top surface of the donut. Wiggle the brush slightly at the edges to create a natural, organic ‘dripping’ icing effect that stops just before the bottom of the donut. -
Map out the sweet faces:
Once the base glaze is dry to the touch, use a very fine detail brush or a toothpick dipped in black paint to add the faces. Place the eyes wide apart and slightly low on the donut for maximum cuteness. -
Add rosy cheeks:
Dip a rounded dotting tool or the back of a paintbrush into pink or coral paint. Stamp two perfect circles right next to the smile to create blushing cheeks. -
Sprinkle time:
For the non-faced donuts (or to add detail to the faced ones), use tiny dabs of various colors to paint sprinkles. You can paint simple dots or tiny dashes to simulate jimmies.
Step 3: Assembly & Finish
-
Insert hardware:
While the clay is still slightly soft (or after drilling a tiny pilot hole if fully dry), screw a small eye hook into the top edge of the donut. Adding a dab of superglue to the threads before inserting creates a permanent bond. -
Seal the deal:
To get that realistic ‘glazed’ shine seen in the photo, coat just the icing part (or the whole donut if you prefer) with a high-gloss glaze or Mod Podge. This also protects your painted details. -
Attach the clasp:
Once the glaze is completely cured and non-tacky, use pliers to open a jump ring. Loop it through the eye screw and attach your lobster clasp key ring. -
Final drying check:
Let the finished charms sit undisturbed for at least 24 hours (or up to 72 for thicker pieces) to ensure the Model Magic hardens completely through to the center.
Hardware Help
If the eye screw feels loose in the dried foam clay, unscrew it, dip the threads in strong craft glue or epoxy, and screw it back in. Let it set overnight.
Now you have a sweet set of accessories ready to brighten up any backpack or set of keys


Chubby Sea Turtle Friend
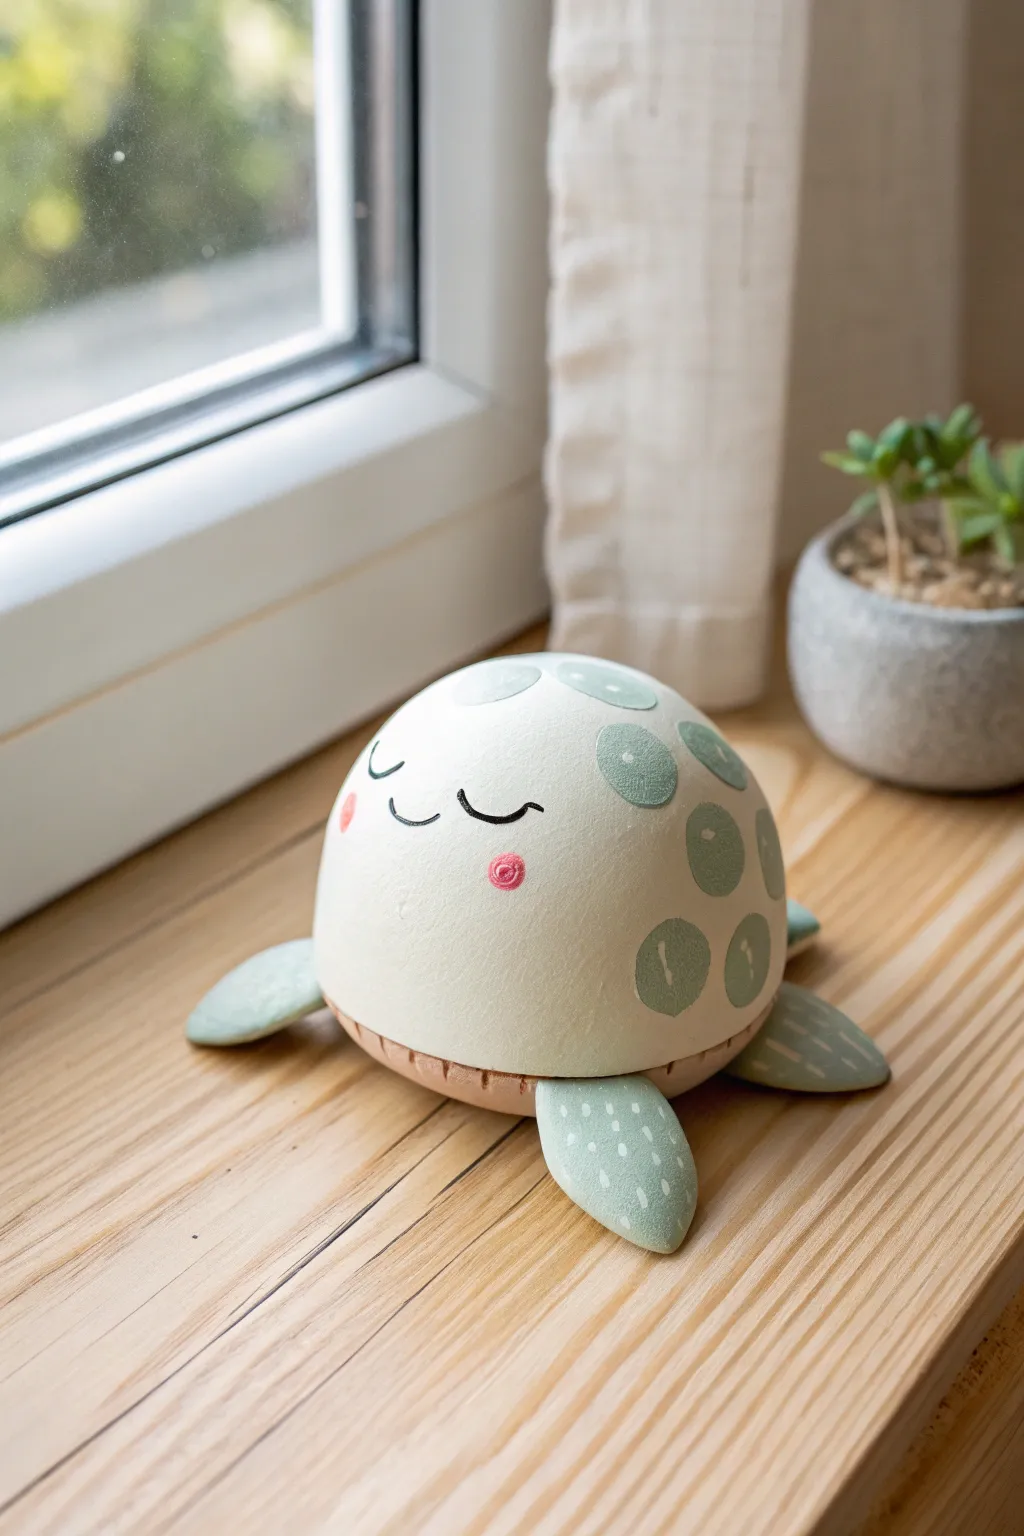
Bring this adorably round sea turtle to life using simple shaping techniques and soft pastel colors. With its smooth, dome-like shell and sleepy expression, this figurine makes a peaceful companion for your windowsill or desk.
Step-by-Step Tutorial
Materials
- White Crayola Model Magic
- Pale sage green acrylic paint (or food coloring to tint clay)
- Black fine-point permanent marker or paint pen
- Pink paint marker or small brush with pink acrylic paint
- Clay sculpting tools (or a plastic knife/toothpick)
- Rolling pin
- Small round cutter (optional)
- White acrylic paint (for details)
- Fine detail paintbrush
Step 1: Shaping the Body
-
Create the shell base:
Start by taking a large ball of white Model Magic, about the size of a tangerine. Roll it until it is perfectly smooth, then gently press the bottom onto a flat surface to create a dome shape. -
Smooth the dome:
Use your palms to refine the dome shape, ensuring the top is rounded and not too pointy. The goal here is a chubby, puffed look rather than a realistic shell. -
Mix your colors:
Take a separate chunk of white Model Magic and mix in a very small amount of sage green paint or food coloring. Knead it thoroughly until the color is uniform and pale. -
Form the flippers:
Divide your green clay into four equal parts for the flippers. Roll each into a teardrop shape, then flatten them gently with your thumb. -
Attach the flippers:
Press the rounded end of each flipper underneath the white dome body. Position two near the front and two near the back, angling them slightly outward so it looks like the turtle is swimming or resting. -
Add texture:
Using a sculpting tool or the back of a plastic knife, gently press faint vertical lines into the very bottom edge of the white dome where it meets the flippers, mimicking the scutes of a shell.
Cracks Appearing?
If the clay cracks while smoothing the dome, dip your finger in a tiny drop of water and massage the crack in a circular motion until it disappears.
Step 2: Decorating the Shell
-
Create the spots:
Roll out a thin sheet of your remaining sage green clay. Use a small round cutter or shape small balls by hand and flatten them into thin circles of varying sizes. -
Apply the pattern:
Gently press these green circles onto the white dome. Place larger ones near the back and smaller ones towards the top, smoothing the edges so they merge seamlessly with the shell. -
Detail the spots:
Once the clay has stiffened slightly, take a fine detail brush with white acrylic paint. Add tiny vertical dash marks inside the green spots on the shell. -
Detail the flippers:
Use the same white paint to add small dotted patterns to the tips of the green flippers for a cohesive look. -
Let it dry:
Allow your turtle to air dry completely. While Model Magic starts to dry quickly, I usually leave it overnight to ensure the inside is firm before drawing the face.
Step 3: Bringing it to Life
-
Draw the eyes:
Using a black fine-point marker, draw two wide U-shapes for closed, sleepy eyes. Keep them low on the front of the dome to enhance the ‘cute’ factor. -
Add lashes:
Flick the marker slightly at the outer corners of the eyes to create a single, sweet eyelash on each side. -
Draw the mouth:
directly between the eyes, draw a tiny, shallow ‘w’ shape or a simple curved smile. -
Add rosy cheeks:
Using a pink paint marker or a dab of pink paint, add small circular blushes right under the outer corners of the eyes. -
Final highlights:
For extra dimension, you can add a tiny swirl or dot of darker pink inside the blush circles to make them pop.
Make it a Set
Create a whole family by making smaller versions in different pastel shades like lavender or baby blue and stacking them pyramid-style.
Now your peaceful turtle friend is ready to guard your windowsill with a smile


Tiny Snail With Spiral Shell
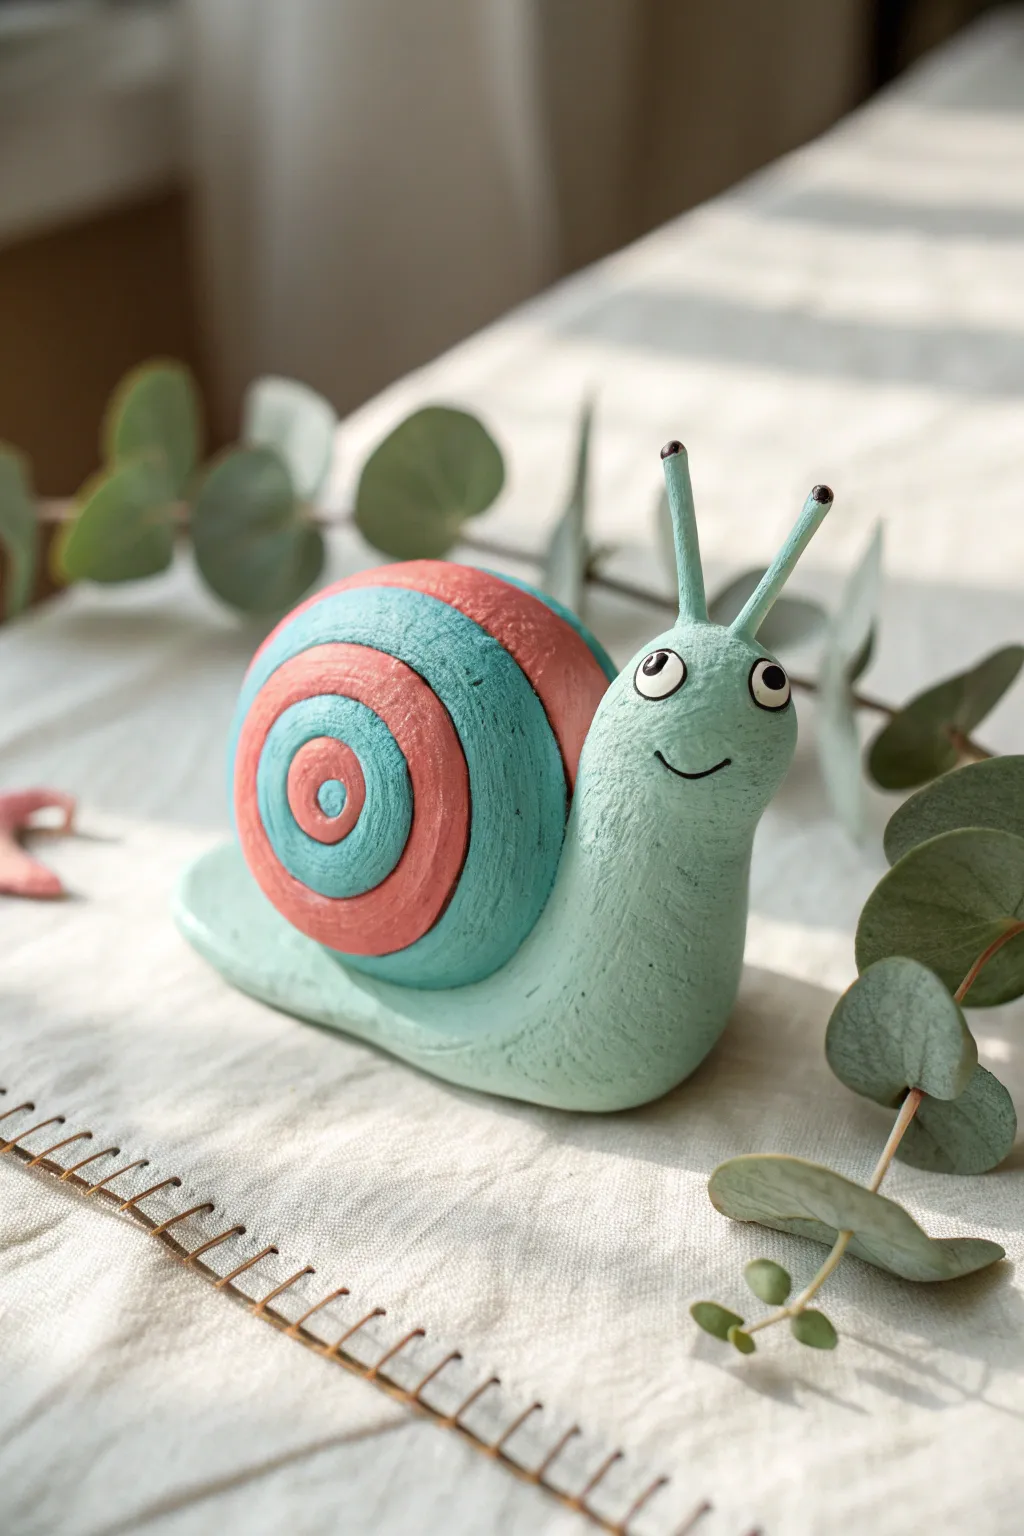
This adorable snail features a whimsical swirled shell and a friendly painted smile, making it a perfect desktop companion. Using soft pastel colors like mint and coral gives the project a gentle, modern look that is incredibly satisfying to sculpt.
Step-by-Step Guide
Materials
- Model Magic (White, Cyan, Red/Orange, or pre-colored Mint and Coral packaging)
- Black acrylic paint or black paint marker
- White acrylic paint or white paint marker
- Sculpting tools (or a toothpick)
- Clean work surface (parchment paper works well)
- Small fine-point liner brush (if using paint)
Step 1: Mixing and Shaping the Body
-
Mix the Minty Teal:
Start by creating your base color. Take a large ball of white Model Magic and mix in a tiny pinch of Cyan and an even smaller dot of Yellow to get that soft mint-teal shade. Knead until the color is completely uniform. -
Mix the Coral:
For the contrasting shell color, mix white Model Magic with a small amount of Red and a touch of Yellow. You want a soft, dusty coral pink, not a bright fire engine red. -
Form the Base Slide:
Take about two-thirds of your mint clay and roll it into a thick log. Taper one end slightly to form the tail. -
Shape the Head and Neck:
Bend the thicker end of the log upwards to create the neck and head. Use your fingers to smooth out the curve so it looks like one continuous muscle. -
Flatten the Base:
Gently press the bottom of the snail against your table surface so it sits flat and stable. You can curve the tail slightly to the side for a more natural pose.
Step 2: Creating the Spiral Shell
-
Prepare the Rings:
This shell is made of concentric rings rather than one long coil. Roll out a thick rope of the mint clay and a thick rope of the coral clay. -
Create the Center:
Take a small ball of the coral clay and flatten it slightly to be the very center point of the shell. -
Add the First Ring:
Wrap a strip of mint clay around the coral center. Smooth the seam where the ends meet so the ring looks unbroken. I prefer to roll it gently on the table edge to uniform the shape. -
Add the Second Ring:
Wrap a strip of coral clay around the previous mint ring. Make this layer slightly thicker than the last so the shell looks like it’s growing outward. -
Add the Final Ring:
Finish with a wide band of mint clay on the outside. Smooth the edges nicely so the whole component looks like a flat, circular disc with stripes. -
Dome the Shell:
Currently, the shell is flat like a target. Gently press your thumbs into the back of it to dome it slightly outward, giving it a 3D convex shape on the front side. -
Attach to Body:
Press the shell firmly onto the back of the snail’s body. If the clay has dried a bit, you can use a tiny drop of water to help it stick.
Cracking Clay?
If your Model Magic starts cracking while you roll the coils, it’s getting too dry. Knead in a tiny drop of water or lotion to restore elasticity before rolling again.
Step 3: Face and Details
-
Make Eye Stalks:
Roll two small, thin logs of mint clay for the antennae. They should be slightly tapered at the top. -
Attach Antennae:
Press these onto the top of the head. Smooth the clay at the join point with a tool or your finger so they don’t fall off. -
Sculpt the Eyes:
Create two tiny white balls of clay or Model Magic. Press them onto the face area, spacing them somewhat wide apart for that cute, derpy look. -
Paint the Pupils:
Using a tiny dotting tool or the tip of a paintbrush handle, add black dots to the white eye mounds. For extra character, place them looking slightly different directions. -
Add the Smile:
Use a very fine liner brush or a black paint marker to draw a simple curved smile line. Keep the line thin for a delicate expression. -
Texture the Skin:
Take a toothpick or a rough modeling tool and gently scratch short vertical lines up the neck and body. This imitates the wrinkly texture of snail skin. -
Dry Time:
Let the snail sit undisturbed for 24-48 hours. Model Magic shrinks slightly as it dries, so don’t be alarmed if the fit tightens up.
Make it Shine
Once fully dry, coat just the shell (not the body) with a glossy imaginative varnish or clear nail polish. This makes the shell look hard and slimy compared to the soft body.
Place your new slow-moving friend near a plant or on a windowsill to enjoy the light


Baby Penguin Pair
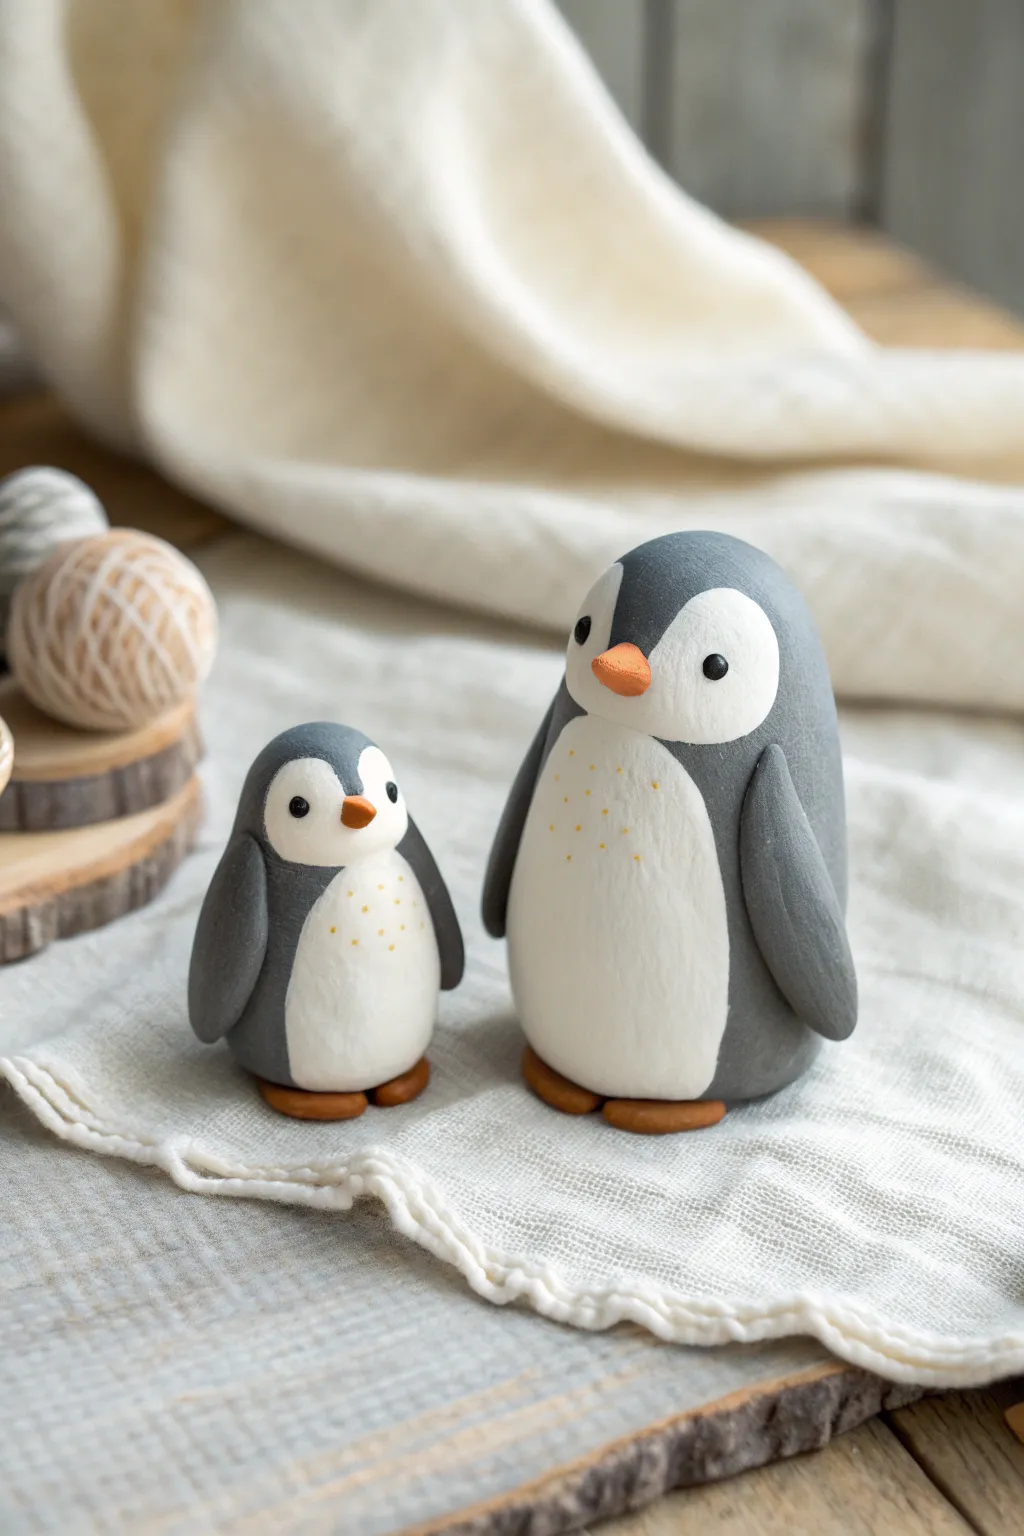
Create an adorable duo of flightless friends with this simple modeling project. These smooth, rounded penguins feature a classic grey and white design with sweet, subtle detailing that brings them to life.
How-To Guide
Materials
- Model Magic or air-dry clay (White, Grey, Black, Orange)
- Clay sculpting tools (or a toothpick and plastic knife)
- Parchment paper or smooth work mat
- Small round tool or ball stylus
- Optional: Gold or yellow paint marker for speckles
Step 1: Shaping the Bodies
-
Mix your base color:
Start by preparing your grey clay. If you don’t have pre-mixed grey, blend a small amount of black into a larger ball of white until you achieve a smooth, slate-grey tone. -
Form the large body:
Take a generous amount of the grey clay and roll it into a smooth egg shape for the parent penguin. Flatten the bottom slightly against your work surface so it stands upright securely. -
Create the small body:
Repeat the process with a smaller amount of grey clay for the baby penguin. Make sure this one is about half the height of the first to emphasize the size difference. -
Shape the white bellies:
Roll two balls of white clay. Flatten the larger one into a long oval sheet. It should be wide at the bottom and slightly tapered at the top. -
Attach the belly patches:
Press the white oval onto the front of the large grey body. Smooth the edges gently with your finger so the white clay seems to merge seamlessly into the grey. -
Add the baby’s belly:
Create a smaller oval for the baby penguin and attach it in the same manner. Ensure the top of the white patch curves nicely where the face will be.
Step 2: Adding Wings and Face
-
Form the wings:
Roll four teardrop shapes from grey clay—two large and two small. Flatten them gently to create flat, paddle-like wings. -
Attach the wings:
Press the larger wings onto the sides of the parent penguin, angling them slightly backward. Do the same for the baby penguin with the smaller wings. I find blending the shoulder joint slightly helps them stick better. -
Define the eye area:
Using the white clay already on the face, ensure the top creates a heart-shaped brow line, or add two tiny flattened circles of white to the top of the belly patch to extend the face area upwards. -
Add the eyes:
Roll extremely tiny balls of black clay. Press them gently into the white face area on both penguins. Keep them wide-set for that cute, innocent look. -
Shape the beaks:
Take a very small amount of orange clay and roll it into a tiny cone. Flatten the underside slightly to create a triangular beak. -
Attach the beaks:
Place the orange beak right between and slightly below the eyes on each penguin. Press lightly to secure it without squashing the shape.
Smooth Seams
To get that seamless look where colors meet, lightly wet your finger and rub it gently over the joint. This melts the clay surface just enough to blur the hard line between the grey and white.
Step 3: Feet and Finishing Touches
-
Make the feet:
Create four small, flattened ovals from orange clay. These don’t need distinct toes; a simple rounded shape works best for this style. -
Position the feet:
Lift each penguin carefully and place two orange feet underneath the front edge of their bodies, so just the tips are peeking out. -
Add belly speckles:
Once the clay has started to surface-dry, use a fine-point gold or yellow paint marker to add tiny, sparse dots across the upper chest area for texture. -
Smooth imperfections:
Perform a final check for fingerprints. If you see any, lightly brush them away with a tiny drop of water on your finger. -
Let them dry:
Allow your penguin pair to dry undisturbed for at least 24 hours (or up to 72 hours if the bodies are thick) until they are lightweight and firm.
Winter Texture
Before the clay dries, gently press a clean piece of fabric or a textured towel against the white belly area to give the ‘feathers’ a realistic, woven texture.
Set your finished penguin pair on a shelf or use them as chilly winter desk companions

The Complete Guide to Pottery Troubleshooting
Uncover the most common ceramic mistakes—from cracking clay to failed glazes—and learn how to fix them fast.
Little Chick In Cracked Egg
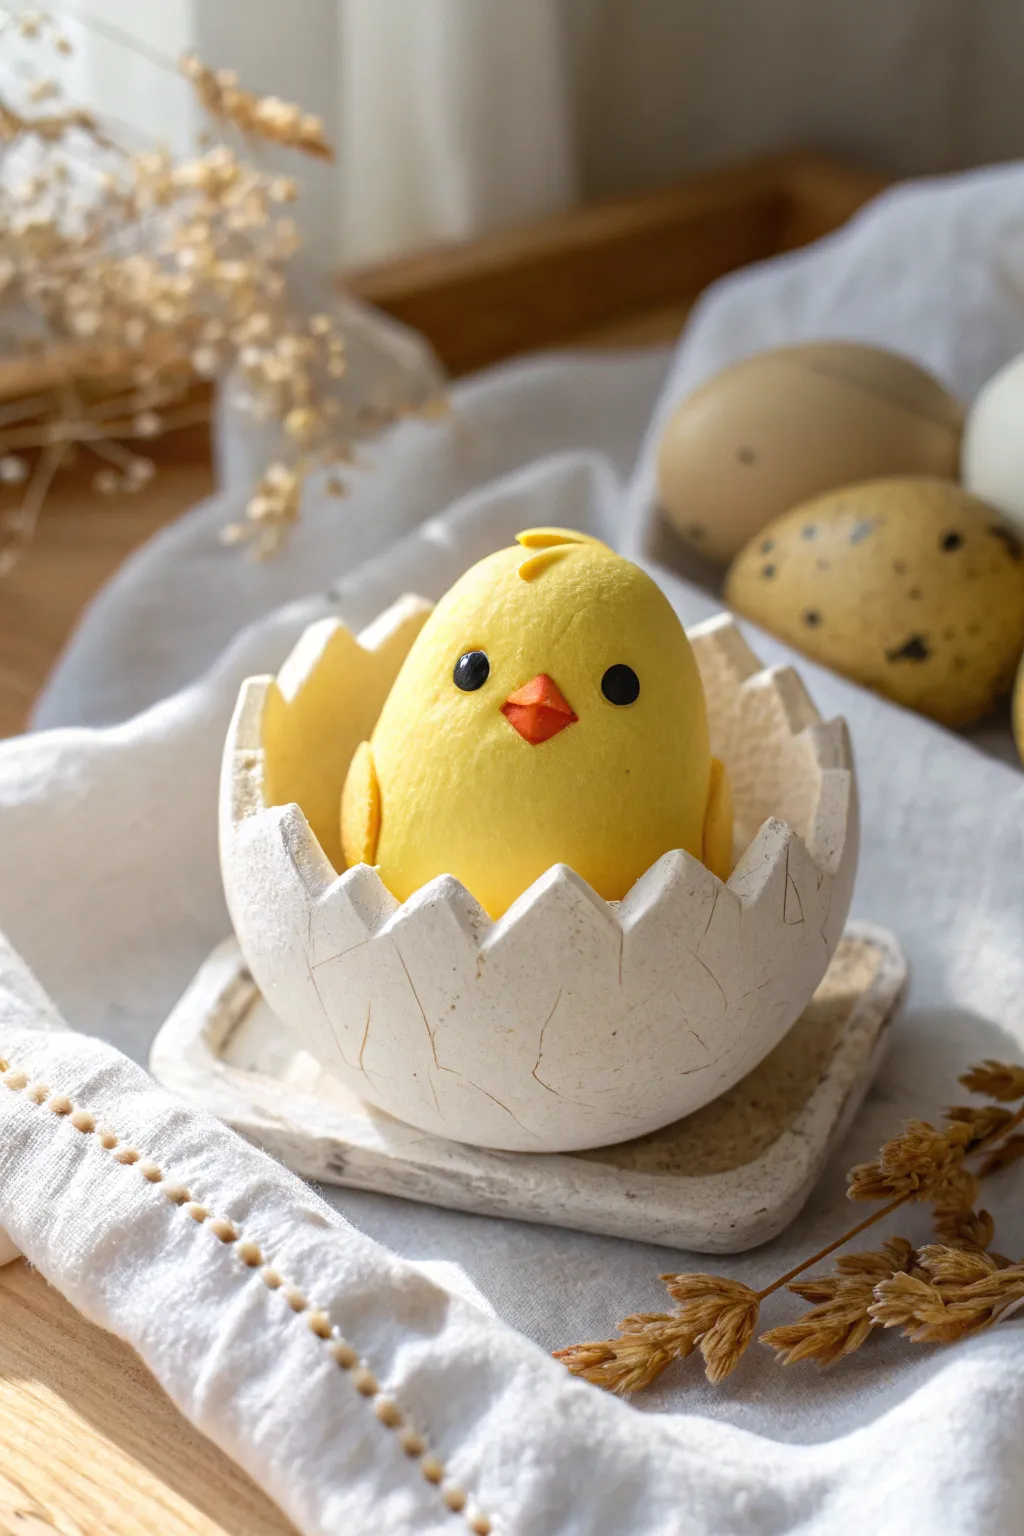
Celebrate new beginnings with this adorable baby chick peeking out from its shell. The soft, matte finish of Model Magic perfectly captures the fluffy look of the chick and the smooth texture of the eggshell.
Step-by-Step
Materials
- White Model Magic clay
- Yellow Model Magic clay
- Orange Model Magic clay
- Black Model Magic clay (or a black marker)
- Clay sculpting tools (or a plastic knife/toothpick)
- Rolling pin
- Small circle cutter (optional)
- Textured blending tool or clean toothbrush
Step 1: Sculpting the Eggshell Base
-
Form the Base:
Start by taking a golf-ball-sized amount of white clay. Roll it into a smooth ball in your palms to remove any distinctive creases. -
Create the Hollow:
Press your thumb deeply into the center of the ball. Gently pinch and rotate the clay between your thumb and fingers to widen the opening, creating a bowl shape. -
Shape the Rim:
Continue pinching the walls of the bowl upward until they are about 1/4 inch thick. Don’t worry about the edge being even yet. -
Cut the Cracks:
Use a plastic knife or clay tool to cut a zigzag pattern all around the top rim of your bowl. Pull away the excess triangles to reveal the jagged, cracked shell effect. -
Refine the Edges:
Gently tap the sharp points of your zigzag cuts with your finger to soften them slightly, so they look like broken shell rather than sharp plastic. -
Add Shell Texture:
I like to use a needle tool or toothpick to very lightly scratch faint crack lines on the outside surface of the bowl for added realism.
Crack Fixer
If your shell walls start to sag or lose their shape while drying, lightly stuff the inside with a small ball of paper towel to hold the structure until the clay firms up.
Step 2: Creating the Chick
-
Shape the Body:
Roll a piece of yellow clay into a smooth egg shape. It should be large enough to fill the white shell you just made but still peek out generously over the top. -
Fit the Chick:
Place the yellow body into the white shell to check the fit. Gently press it down so it sits securely inside. -
Texture the Feathers:
Take a clean toothbrush or a texturing tool and very lightly tap it all over the yellow clay surface. This gives the chick a soft, downy appearance instead of being perfectly smooth. -
Create Wings:
Form two small teardrop shapes from yellow clay. Flatten them slightly and attach one to each side of the body, curving them forward a bit. -
Add the Comb:
Roll a tiny pinch of yellow clay into a small teardrop and curve it slightly. Attach this to the very top of the head for a cute little feather tuft.
Step 3: Adding the Face
-
Make the Beak:
Take a tiny amount of orange clay and shape it into a small diamond. Fold it gently in half or press it onto the face to form a triangular beak. -
Position the Beak:
Press the beak onto the center of the face, slightly lower than the middle line. -
Create the Eyes:
Roll two minuscule balls of black clay. If they cover too much space, pinch some off; you want the eyes to be small and wide-set for cuteness. -
Place the Eyes:
Press the black eyes gently onto the face on either side of the beak. Ensure they are level with each other. -
Add Highlights (Optional):
For extra sparkle, you can add an extremely tiny dot of white clay to the upper corner of each black eye.
Speckled Egg
Before the white clay dries, mix in tiny flecks of brown clay or use a stiff brush to flick brown watercolor paint over the finished white shell for a realistic speckled egg look.
Now your little chick is ready to bring a touch of spring cheer to your shelf or desk
Sleepy Mini Dragon
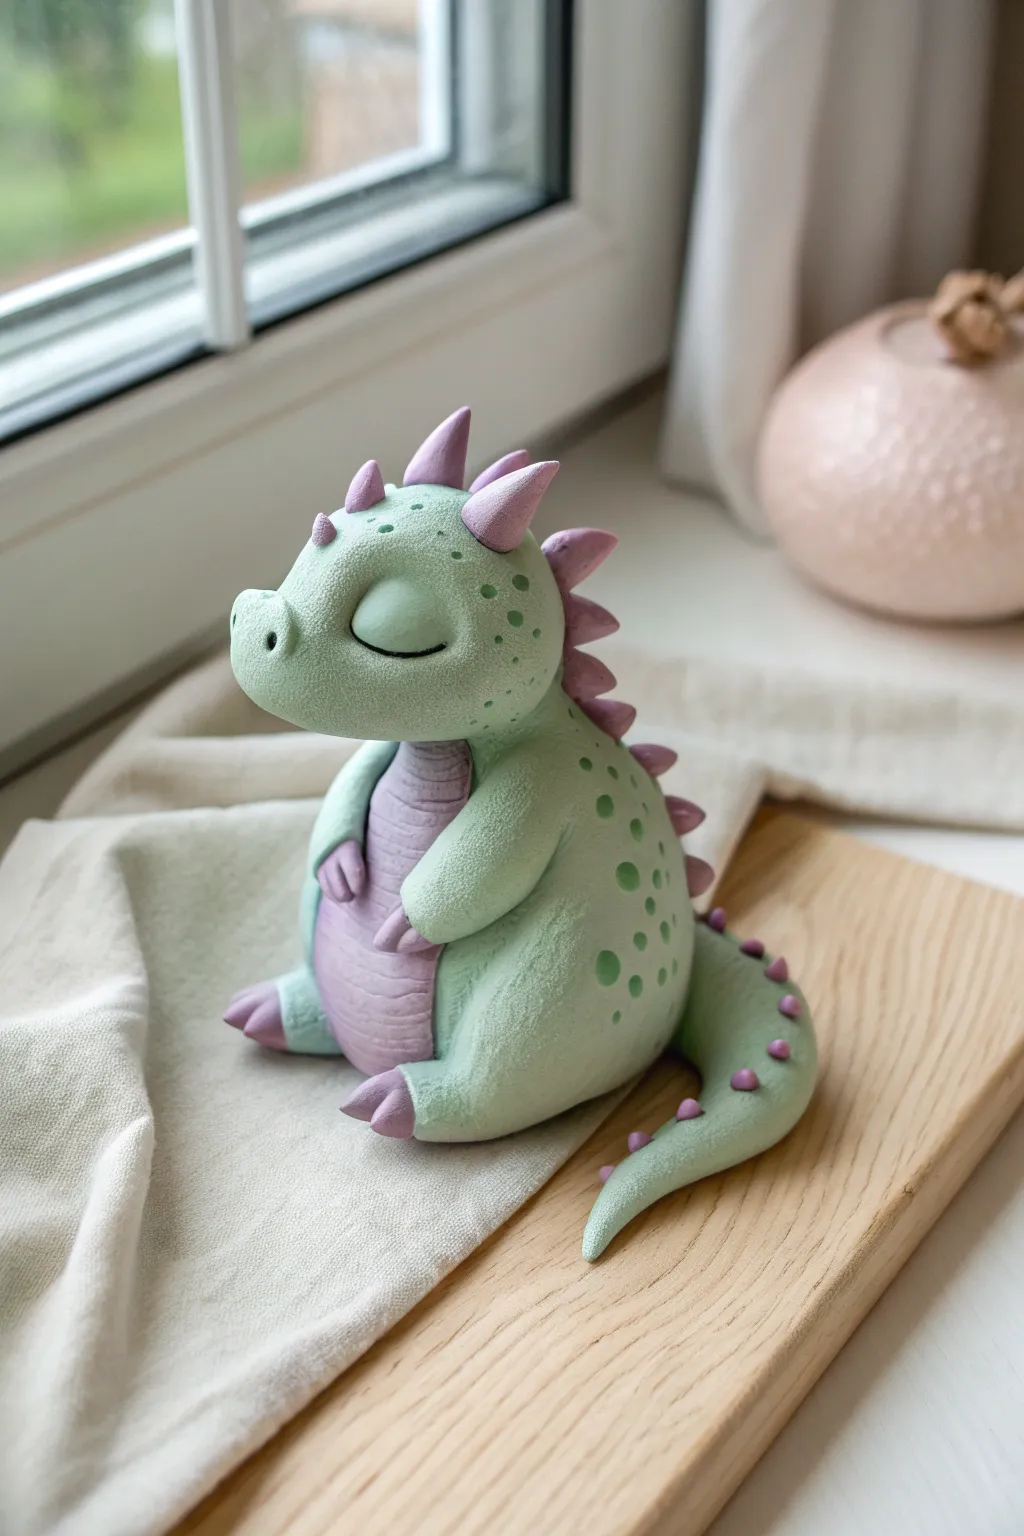
Craft a peaceful companion for your desk or shelf with this adorable sleeping dragon project. Using soft sage green and muted lilac Model Magic, you’ll sculpt a chubby, textured friend that looks like it’s taking a cozy afternoon nap.
Step-by-Step Guide
Materials
- Green Model Magic (white mixed with a tiny bit of green/blue)
- Violet Model Magic (white mixed with purple)
- Clay sculpting tools (specifically a needle tool and a small ball tool)
- Toothpicks or crumpled foil (for internal structure)
- Toothbrush or textured sponge (for skin texture)
- Black fine-point marker (optional, for face details)
Step 1: Body & Head Basics
-
Mix your colors:
Start by mixing a large ball of white Model Magic with a small pinch of green and a speck of blue to achieve that soft, minty sage color. For the accent color, mix white with purple to get a dusty lavender shade. -
Form the body:
Roll a large egg shape from the green clay for the body. Gently flatten the bottom so it sits securely on your work surface, leaning it slightly backward for a relaxed pose. -
Shape the head:
Roll a second, slightly smaller ball for the head. Pinch one side gently to pull out a rounded snout area, making sure the overall shape remains chubby and soft. -
Connect the pieces:
Insert a toothpick halfway into the top of the body, then press the head onto the exposed part of the toothpick. Angle the nose slightly downward to emphasize the sleepy look.
Seamless Smoothness
Dip your finger in a tiny bit of water to smooth out any fingerprints or seams where limbs attach before adding the texture.
Step 2: Adding the Limbs
-
Create the legs:
Roll two thick sausages of green clay. Flatten one end of each against the bottom sides of the body to attach the thighs. -
Sculpt the feet:
At the end of each leg, shape a flat foot pad. Using your lavender clay, roll three tiny cones for each foot and press them onto the toes as claws. -
Make the arms:
Roll two smaller logs for arms. Attach them high on the chest, resting them gently on the belly. -
Add hand details:
Press two small lavender cones onto the end of each arm to create simple claws, making sure they look like they are resting peacefully.
Droopy Head?
If the head is too heavy for the wet clay body, support it with a stack of coins or a small box until the neck area dries and hardens.
Step 3: Texture & Belly
-
Create the belly patch:
Roll a thin sheet of lavender clay into an oval shape. Press this onto the front of the dragon’s tummy. -
Score the belly:
Use a plastic knife or needle tool to gently press horizontal lines across the purple belly patch to create a segmented scale look. -
Texturize the skin:
I like to use a clean toothbrush or a ball of tin foil here to gently tap all over the green skin surfaces. This gives it that stone-like, matte finish seen in the photo.
Step 4: Spikes, Tail & Face
-
Form the tail:
Roll a tapered cone of green clay. Attach the thick end to the back of the body, curving the tip around to the side so it’s visible from the front. -
Prepare the spikes:
Roll several small cones of lavender clay in varying sizes. You’ll need larger ones for the head and smaller ones tapering down the back. -
Attach the spine:
Press the purple cones in a single row starting from the top of the head, down the back, and ending near the tail tip. -
Sculpt the face:
Use a needle tool or the back of a paintbrush to press shallow semi-circles for the closed eyes. Add two small holes at the end of the snout for nostrils. -
Add final spots:
Roll tiny balls of green clay (perhaps a slightly darker shade if you have it) and press them flat onto the cheeks and back for decorative spots. -
Refine the mouth:
Carve a gentle, curved line for the mouth using a clay tool, ensuring the smile is subtle and peaceful.
Allow your sleepy dragon to dry fully for 24-72 hours before placing it on display


What Really Happens Inside the Kiln
Learn how time and temperature work together inside the kiln to transform clay into durable ceramic.
Wide-Eyed Owl Buddy
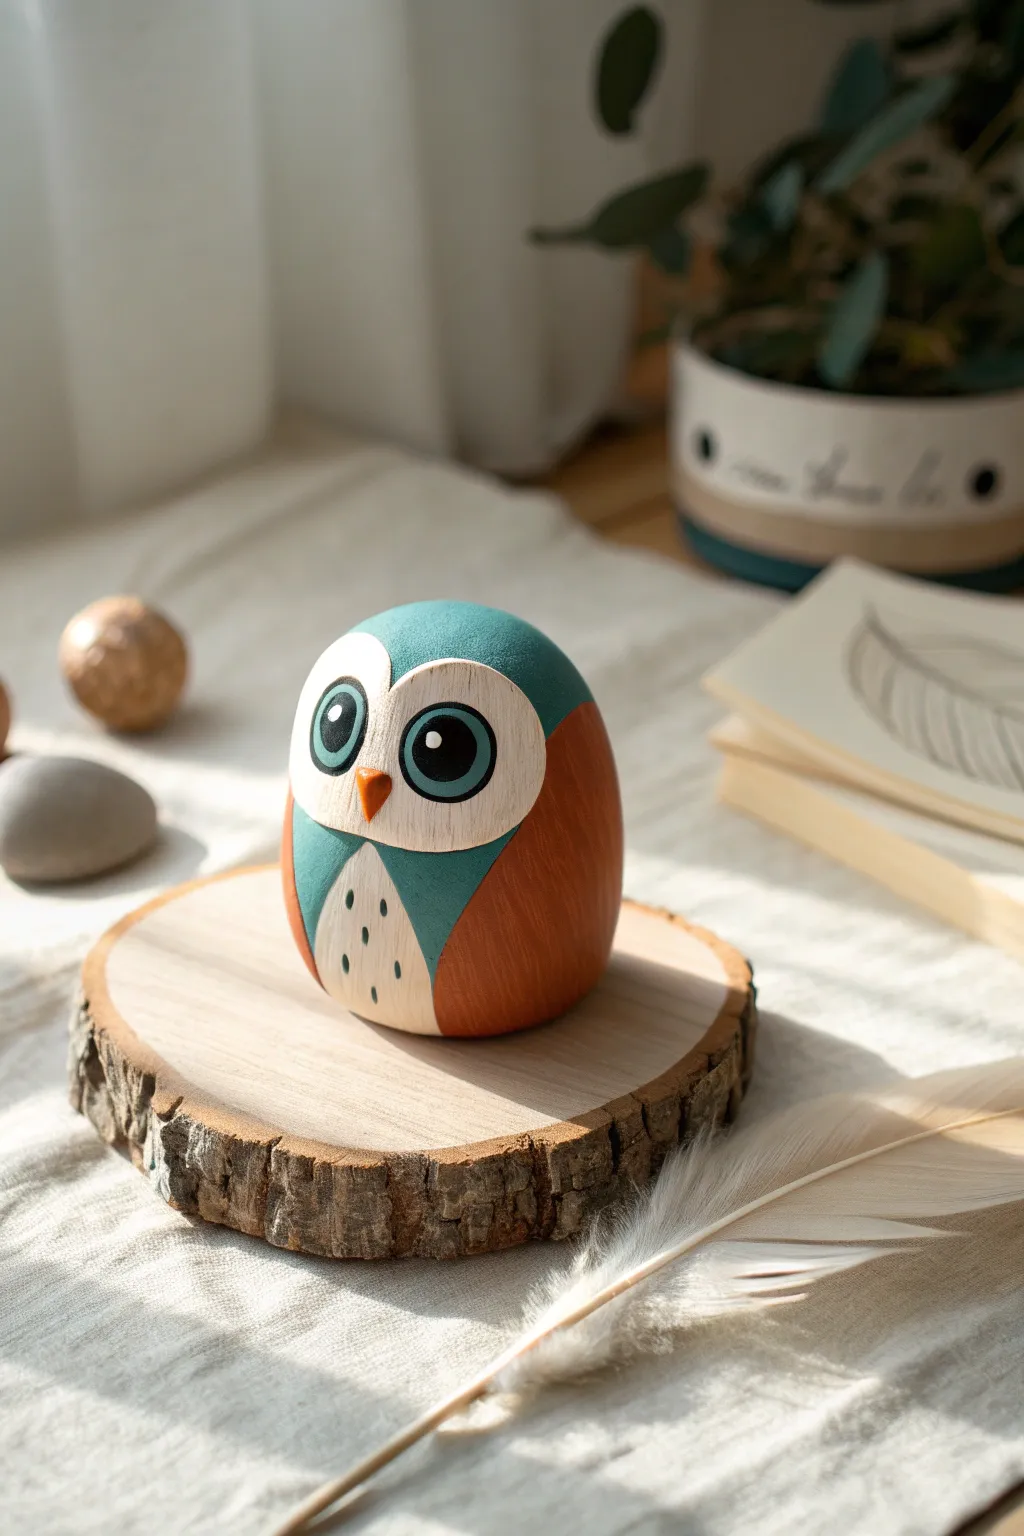
This smooth, egg-shaped owl combines geometric simplicity with charming details for a sleek, modern look. The finished piece has a polished, almost wooden toy aesthetic that feels wonderful to hold.
How-To Guide
Materials
- Model Magic (White, Teal/Turquoise, Burnt Orange, Black)
- Smoothing tool or spoon back
- Pointed sculpting tool or toothpick
- Rolling pin
- Circle cutter (small)
- Parchment paper
Step 1: Shaping the Base
-
Mix the Base Body Color:
Start by deciding on your owl’s core color. In the photo, the base is primarily the burnt orange visible on the sides. Knead your orange Model Magic until soft and pliable. -
Form the Egg Shape:
Roll the orange clay into a smooth ball between your palms, then gently taper the top end slightly to create a classic egg shape. The bottom should be wide enough for the owl to stand securely. -
Flatten the Base:
Press the egg shape gently onto your work surface to create a flat bottom. Tap it lightly to ensure it sits upright without wobbling. -
Create the Head Cap:
Take a portion of teal Model Magic and roll it into a ball, then flatten it into a thick disc. This will form the top of the head and the separation between the wings. -
Attach the Head Cap:
Place the teal disc onto the top of your orange egg shape. Gently press and smooth the edges downward so it integrates seamlessly with the orange body, covering the top third.
Step 2: Adding the Face
-
Roll out the Face Mask:
Roll a small piece of white Model Magic flat, about 1/8 inch thick. It needs to be oval-shaped or heart-shaped with a rounded bottom. -
Cut the Face Shape:
Using a tool, cut a shallow heart shape or kidney bean shape. The top should have two arches for the eyes. -
Apply the Face:
Press this white shape onto the front of the teal head cap area. Smooth the edges carefully so it looks like an inlay rather than a sticker. -
Refine the Forehead:
Ensure the teal ‘widow’s peak’ comes down slightly centrally between the white eye patches for that classic owl brow look.
Seamless Finish
To get that polished, wood-toy look, dip your finger in a tiny bit of water and rub gently over the finished clay to remove fingerprints.
Step 3: Eyes and Details
-
Make the Eye Sockets:
Use your pinky finger or a ball tool to verify the placement of the eyes on the white mask, creating two very shallow depressions. -
Create the Irises:
Roll two small balls of teal clay, flatten them slightly, and press them into the eye areas on the white mask. -
Add Pupils:
Roll two smaller balls of black clay. Press these into the center of the teal circles. Add a tiny speck of white for a highlight if you want extra life. -
Form the Beak:
Shape a tiny pyramid or cone from orange clay. Place it centrally between and slightly below the eyes. -
Detail the Chest:
Mix a little teal with white to get a lighter shade, or just use teal. Create a small inverted triangle or shield shape for the chest plumage area directly below the face. -
Add Feather Markings:
I find using a fine-point marker or a tiny bit of black clay rolled into threads works best here. Add small vertical dashes on the light chest area to simulate chest feathers. -
Smooth Everything Out:
The key to this look is smoothness. Rub your finger gently over all seams to blur the lines between colors, making it look like a painted wooden object.
Wood Slice Display
Glue your dried owl to a small craft wood slice or coaster to complete the rustic, nature-inspired presentation.
Let your little owl dry completely for 24 hours before moving it to its new perch
Mini Frog On Lily Pad
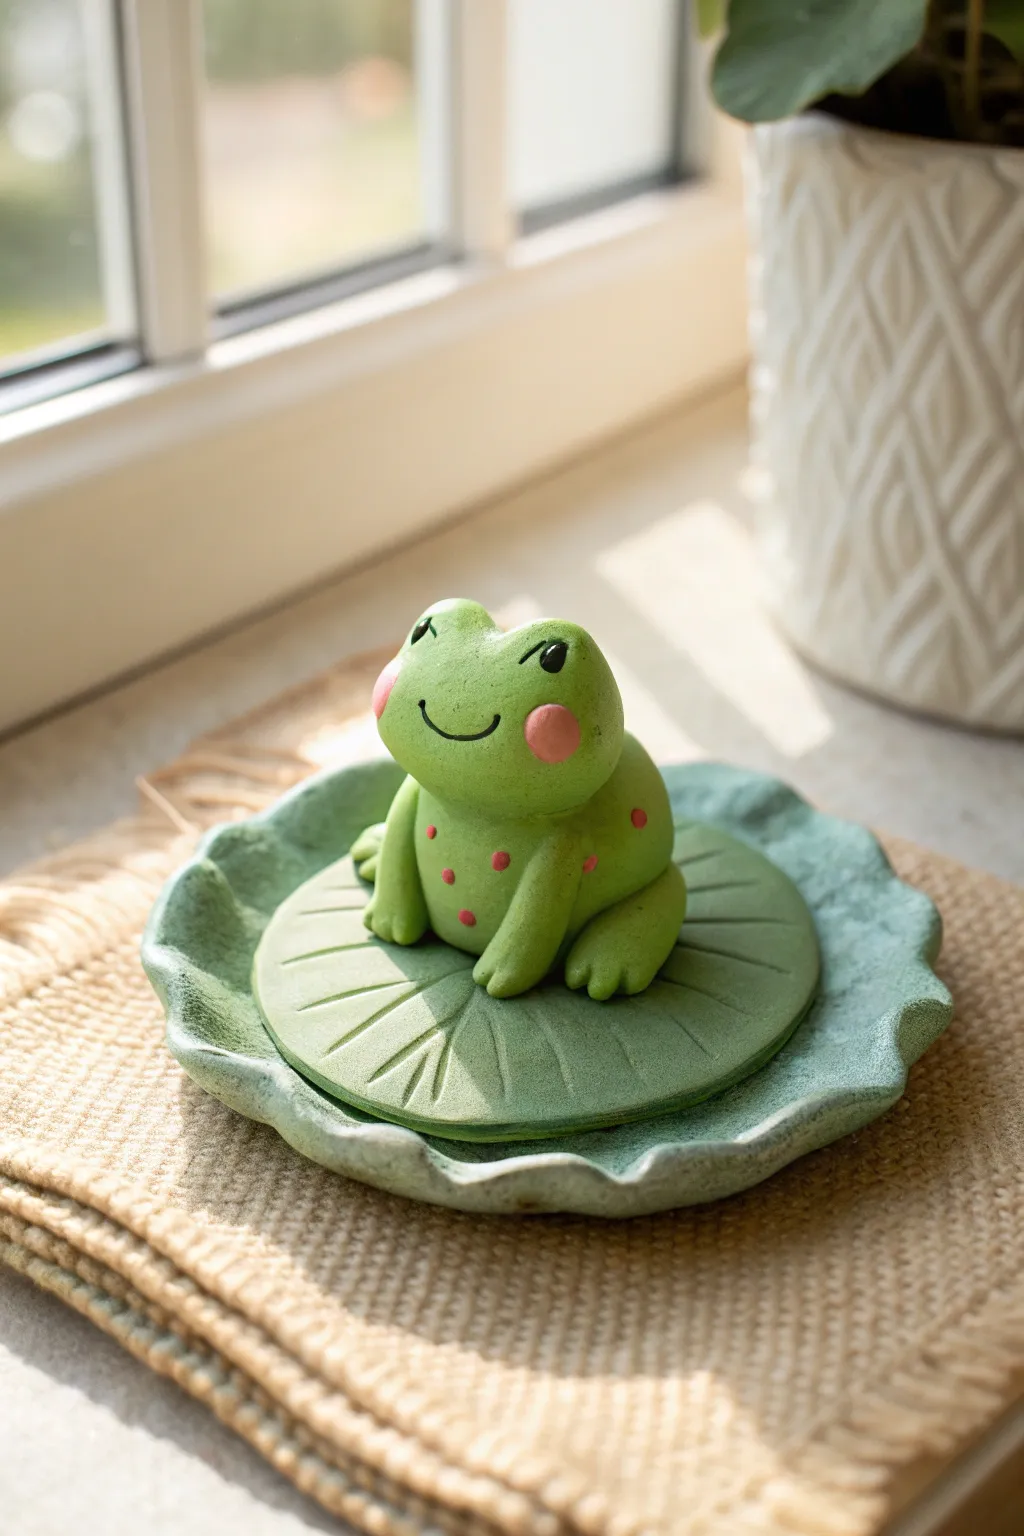
Brighten up your desk or shelf with this adorable clay frog resting on its own leafy perch. The soft, matte finish of Model Magic gives this little amphibian a charmingly smooth and cartoony appearance.
Step-by-Step
Materials
- Green Model Magic (or air-dry clay)
- Pink Model Magic
- Red Model Magic
- Black Model Magic
- Sculpting tools (needle tool, small ball tool)
- Circular cookie cutter (optional)
- Small scalloped dish (for display, optional)
- Rolling pin
- Texture tool or toothpick
Step 1: Shaping the Lily Pad
-
Prepare the base color:
Start by kneading your green clay until it is soft and pliable. If you want a slightly more muted, natural green like the photo, try mixing in a tiny pinch of white or brown clay to tone down the neon brightness. -
Roll out the leaf:
Flatten a ball of green clay onto a clean surface using a rolling pin until it is about 1/4 inch thick. Use a circular cookie cutter or just shape it with your hands into a flat, round disc. -
Add leaf veins:
Using a needle tool or toothpick, gently scribe a straight line from the center to the edge. Then, draw radiating lines outward from the center to create the vein pattern of a lily pad. -
Define the texture:
To give the leaf a bit of dimension, press down slightly along your scribed lines with a dull tool to create shallow grooves, making the sections between the veins look slightly puffy.
Cracking Clay?
If you see small cracks forming while smoothing the clay, dip your finger in a tiny drop of water and rub the area gently to re-hydrate and seal the surface.
Step 2: Sculpting the Body
-
Form the torso:
Take a generous amount of green clay and roll it into a smooth, slightly squat ball. This will be the main body/head combo, as this cute style merges them into one shape. -
Shape the eyes:
Pinch two small mounds of clay on top of the head to create raised eye sockets. Smooth the seam where these mounds join the main body so it looks like one continuous piece. -
Attach the legs:
Roll two small sausages of green clay for the front legs. Attach them vertically to the front of the body, blending the top of the leg into the body so there are no harsh lines. -
Sculpt the feet:
Flatten the bottom of each leg slightly and use a knife tool to press in two indentations, creating three little toes on each foot. -
Add hind legs:
Make two larger, curved teardrop shapes for the bulky back legs. Press these onto the sides of the body towards the back, ensuring the rounded ‘thigh’ part is prominent.
Step 3: Adding the Details
-
Create the smile:
I find using a dedicated clay tool works best here, but a plastic spoon edge works too. Press a gentle ‘U’ shape into the face to create a happy, wide smile. -
Add rosy cheeks:
Roll two tiny balls of pink clay. Press them flat onto the face at the corners of the smile to give your frog a blushing look. -
Place the eyes:
Roll tiny balls of black clay and press them into the raised eye sockets you created earlier. Add minuscule specs of white clay as highlights to bring the character to life. -
Detail the spots:
Using teeny-tiny bits of red or dark pink clay, roll small specks and press them randomly onto the frog’s body and legs for texture. -
Initial assembly:
Gently lift your frog and place it onto the center of your prepared lily pad base. Press down lightly to adhere the two pieces together. -
Final drying:
Let the entire project sit undisturbed for at least 24-48 hours. Model Magic shrinks slightly as it dries, so don’t be surprised if the fit changes just a hair.
Display Idea
Place your finished lily pad on a small scalloped ceramic dish or coaster painted soft green to mimic the rippled edges of a larger leaf, just like in the photo.
Enjoy your new adorable desk companion as it sits happily on its leaf

TRACK YOUR CERAMIC JOURNEY
Capture glaze tests, firing details, and creative progress—all in one simple printable. Make your projects easier to repeat and improve.
Tiny Mushroom Friends

Bring a touch of the forest floor into your home with these adorable, pastel-hued mushroom friends. With their cheerful hand-painted expressions and smooth, matte finish, they look just like tiny wooden turnings but are surprisingly soft to the touch.
Step-by-Step Tutorial
Materials
- White Model Magic clay
- Acrylic paints (pastel pink, sage green, light lavender, black, white)
- Fine-grit sandpaper (optional)
- Small round paintbrush
- Fine-tip detail brush
- Toothpick or sculpting tool
- Matte finish sealant spray or Mod Podge
- Small wooden dowel or skewer (for structural support)
Step 1: Shaping the Stems
-
Form the Base:
Start by taking a golf-ball-sized amount of white Model Magic. Roll it firmly between your palms to create a smooth, crack-free sphere. -
Elongate the Stem:
Gently roll the sphere back and forth on your work surface, applying slightly more pressure on one end to create a tapered cylinder. You want a distinct ‘stump’ shape that is wider at the bottom and slightly narrower at the top. -
Flatten the Bottom:
Tap the wider end of your stem firmly against the table so the mushroom can stand perfectly upright on its own. -
Insert Support:
Cut a small piece of wooden dowel or a sturdy toothpick (about 1 inch long) and insert it halfway into the top of your stem to act as an anchor for the cap later. -
Add Texture:
Using a toothpick or a fine sculpting tool, gently scratch shallow, vertical lines up and down the stem to mimic wood grain. Keep these subtle and varied for a natural look. -
Repeat for Friends:
Create two more stems, varying the heights slightly so your trio has personality.
Smooth Operator
If your dried Model Magic feels too lumpy before painting, gently sand it with a fine-grit nail file or sandpaper to achieve that perfect faux-wood smoothness.
Step 2: Creating the Caps
-
Roll the Spheres:
For the caps, roll three balls of clay slightly larger than the stems you just created. -
Shape the Domes:
Press your thumb gently into the center of each ball while cupping the outside with your fingers, pressing the clay into a smooth dome shape. Ensure the edges are rounded, not sharp. -
Attach to Stems:
Take your shaped cap and gently press it onto the exposed dowel of a stem. I like to add a tiny drop of white glue on the dowel first for extra security. -
Final Smooth:
Once assembled, check for any fingerprints or cracks. You can smooth them away with a tiny bit of water on your finger, but don’t over-wet the clay. -
Drying Time:
Let your mushrooms dry completely. Model Magic can take 24-72 hours to fully cure depending on thickness; wait until they feel lightweight and foamy throughout.
Tiny Accessories
Use leftover clay scraps to roll tiny balls or elongated cylinders. Paint them brown or green to create acorns and scattered seeds to display alongside your trio.
Step 3: Painting and Details
-
Base Color – Stems:
Mix a tiny drop of brown with plenty of white acrylic paint to get a ‘natural wood’ cream color. Paint the stems, letting the paint settle slightly into your texture lines. -
Base Color – Caps:
Paint each cap a different soft color. Use a dusty rose pink for one, and a muted sage green for the others. You might need two thin coats for opaque coverage. -
The Lavender Exception:
For the middle mushroom in the reference, paint the stem a soft lavender instead of the cream wood color. -
Adding Wood Grain:
Once the base stem coat is dry, use a very dry brush with slightly darker tan paint to lightly whisk over the vertical texture lines, highlighting the ‘wood’ effect. -
Painting the Faces:
Using your finest detail brush or a toothpick dipped in black paint, place two small dots for eyes wide apart on the cap. Add a tiny U-shape between them for a smile. -
Rosy Cheeks:
Dip the back end of your paintbrush into pink paint and gently stamp small circles next to the smile for blushing cheeks. On the pink mushroom, clarify the cheeks with a darker brownish-pink doodle. -
Polka Dots:
Using the back of a larger paintbrush or a dotting tool, stamp random white polka dots all over the colored caps. -
Sealing:
Finish by spraying the entire project with a matte clear coat to protect the paint and give it a unified, professional finish.
Arranging these little friends on a shelf or desk is sure to bring a smile to anyone’s face
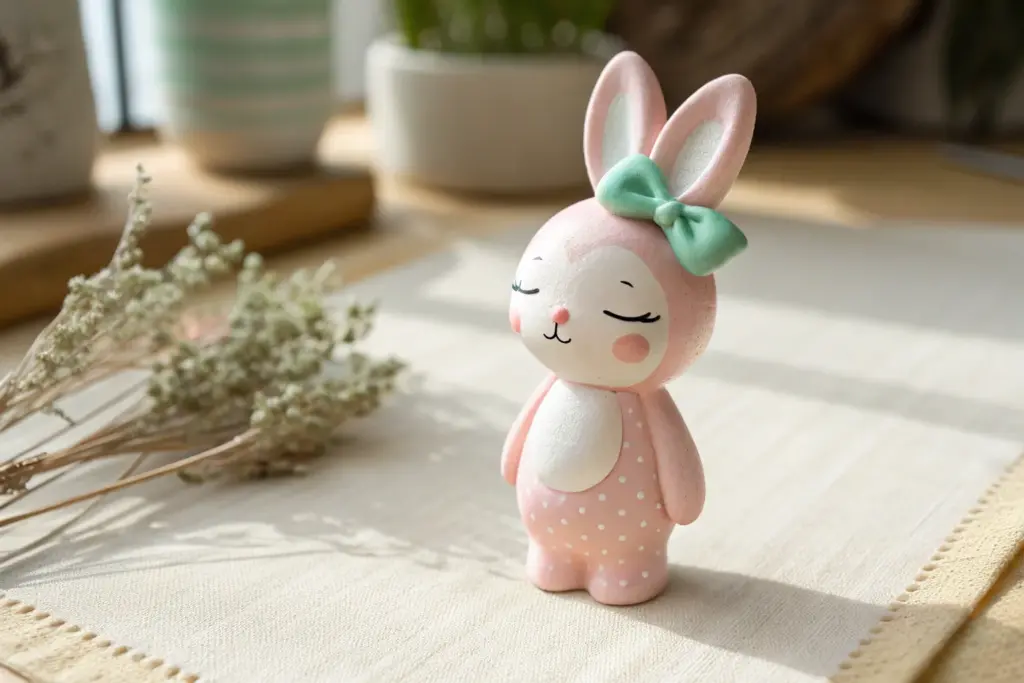
Bunny Head Charms
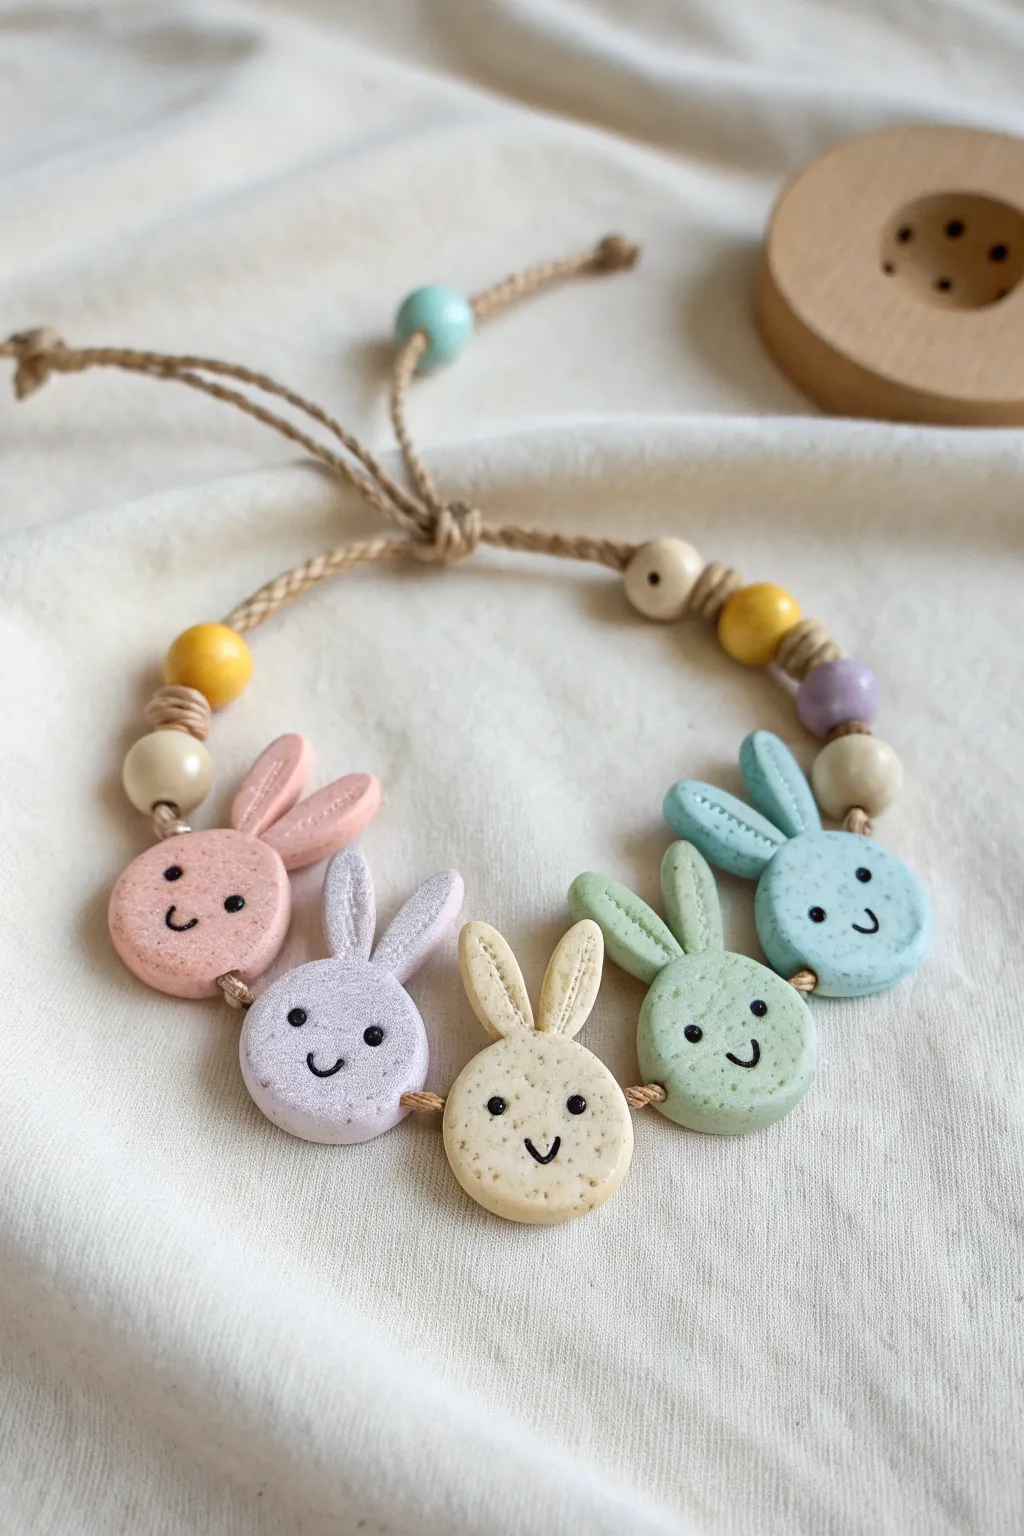
Create this adorable strand of smiling bunny faces using soft pastel clays and natural hemp cord. The finished piece combines smooth Model Magic texture with rustic wood beads for a charming, kawaii-style accessory.
Detailed Instructions
Materials
- Crayola Model Magic (white, red, blue, yellow, or pre-mixed pastel colors)
- Hemp cord or jute twine (natural beige)
- Small wooden beads (approx. 8-10mm)
- Colored wooden beads (yellow, purple)
- Black acrylic paint or fine-tip permanent marker
- Toothpick or large needle
- Clear matte varnish or Mod Podge (optional)
- Scissors
- Rolling pin (small)
Step 1: Shaping the Bunnies
-
Mix pastel shades:
If you don’t have pre-mixed pastels, take small balls of white Model Magic and knead in tiny pinches of primary colors. You’ll need five distinct shades: pink, lavender, pale yellow, mint green, and baby blue. -
Create speckles (optional):
To achieve the speckled ‘stone’ look seen in the photo, you can knead in a tiny pinch of dried tea leaves or black pepper, ensuring the clay remains smooth. -
Roll main heads:
Pinch off a grape-sized amount of clay for each bunny head. Roll them into smooth, flattened discs, about 1 inch in diameter and 1/4 inch thick. -
Shape the ears:
For each bunny, roll two smaller, rice-grain shaped pieces of matching clay. Flatten them slightly to create the ears. -
Attach ears:
Press the ears firmly onto the top edge of the round head. Because Model Magic bonds to itself, you shouldn’t need glue, but you can smooth the seam with your finger for a stronger hold. -
Create texture:
Using a dull tool or your fingernail, gently press indentations into the center of each ear to give them depth. -
Make the bead holes:
This is crucial: Take a toothpick or a thick needle and carefully pierce a hole horizontally through the entire width of the bunny head, right below the ears. Wiggle it slightly to ensure the hole is wide enough for your hemp cord. -
Dry completely:
Let the bunnies sit undisturbed for at least 24 to 48 hours. Model Magic needs to be fully cured before painting to prevent squishing.
Step 2: Adding Details
-
Paint the faces:
Using a fine-tip permanent marker or a very fine brush with black acrylic paint, draw two small dots for eyes wide apart. -
Add the smile:
Draw a tiny ‘u’ shape directly between and slightly below the eyes for the nose/mouth area. -
Seal the charms:
I prefer to brush a light coat of matte varnish over the painted faces to keep the marker from smudging and to protect the lightweight clay.
Keep it Clean
Wash your hands between mixing colors! Model Magic picks up pigment easily, so washing prevents your yellow bunny from looking muddy after handling the purple one.
Step 3: Assembly
-
Prepare the cord:
Cut a length of hemp cord approximately 24 inches long (or your desired necklace length plus extra for knots). -
Start knotting:
Tie a secure overhand knot about 6 inches from one end. Thread on a plain wooden bead. -
Add spiral accents:
Tie a series of knots or wrap the cord around itself to create the textured segment before the first bunny. -
Thread the first bunny:
Carefully slide your first bunny (the pink one) onto the cord. If the hole shrunk during drying, gently re-drill it with a needle. -
Secure with a bead:
Follow the bunny immediately with a plain wooden bead to act as a spacer. This keeps the bunnies facing forward. -
Continue the pattern:
Thread the remaining bunnies in rainbow order (pink, purple, yellow, green, blue), placing a wooden spacer bead between each one. -
Finish the strand:
After the blue bunny, add your final decorative beads and knot the cord securely to match the starting side. -
Create closure:
Tie adjustable sliding knots at the ends of the cord, adding an extra wooden bead at the very tips for a polished look.
Hole Closing Up?
If the bead holes shrink while drying, don’t force the cord through. Use a small drill bit or a metal skewer to gently re-bore the hole without cracking the dry foam.
Enjoy wearing your whimsically sweet bunny garland or gift it to a friend who loves pastel colors
Puffy Heart Keychain Tokens
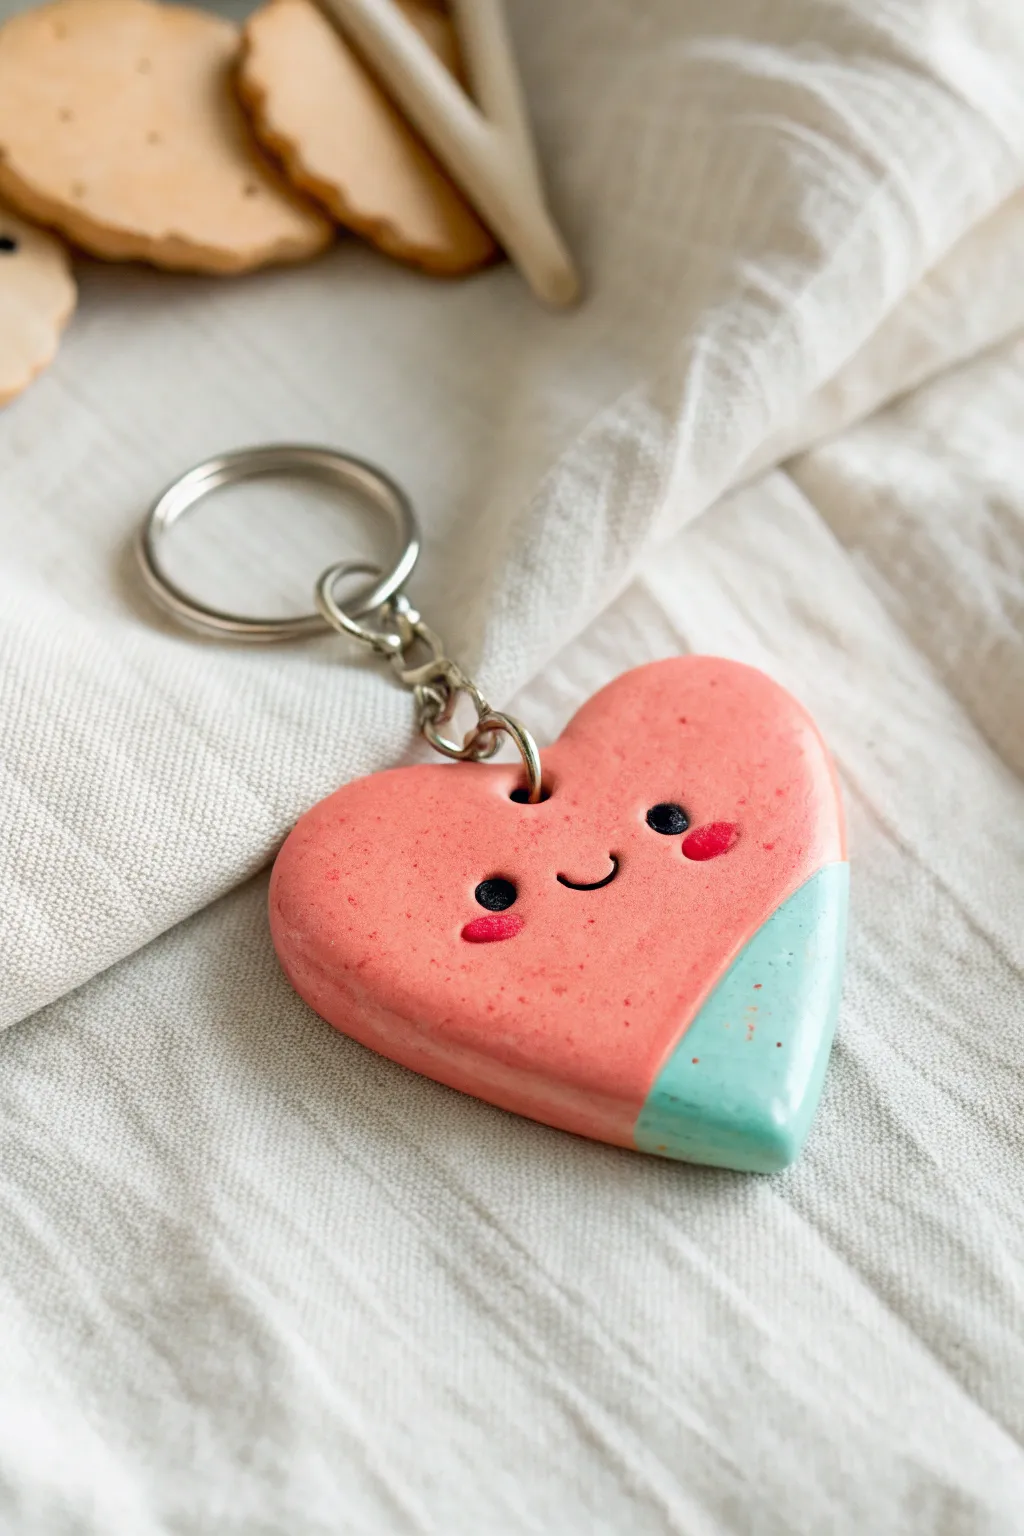
Create this sweet, glossy token that combines a warm coral pink with a cool mint dip for a cheerful accessory. The puffy, rounded shape feels satisfying to hold, while the simple kawaii face adds an irresistible charm to your keyring.
Step-by-Step
Materials
- Model Magic (White)
- Acrylic paints (Coral Pink, Mint Green, Black, darker Pink)
- Glossy glaze or Mod Podge (Gloss finish)
- Keychain ring with chain and screw eye pin
- Rolling pin or smooth round marker
- Heart-shaped cookie cutter (medium size)
- Fine grit sandpaper (optional)
- Small detail paintbrush
- Flat paintbrush
- Toothpick or dotting tool
Step 1: Shaping the Clay Base
-
Condition the clay:
Start by taking a golf-ball-sized amount of white Model Magic. Knead it thoroughly in your hands until it becomes warm, pliable, and free of any cracks. -
Roll out the slab:
Place the clay on a clean, smooth surface. Using a rolling pin, flatten it into a thick slab about 1/4 to 1/3 inch thick. You want it substantial enough to be durable and puffy. -
Cut the shape:
Press your heart-shaped cookie cutter firmly into the clay. Give it a tiny wiggle to ensure it cuts all the way through, then lift the cutter away. -
Soften the edges:
Remove the excess clay. Gently run your fingertip along the sharp edges of the heart to round them over slightly, giving it that soft, ‘puffy’ appearance rather than a harsh cutout look. -
Insert hardware:
Take your screw eye pin and carefully twist it into the top center dip of the heart. Ensure it goes deep enough to be secure but stays straight. -
Let it cure:
Set the clay heart aside on a piece of parchment paper to dry completely. Model Magic needs air exposure, so flipping it over halfway through the drying process (usually 24-48 hours) helps it dry evenly.
Step 2: Painting the Design
-
Sand imperfections:
Once fully dry and lightweight, check for any rough spots. I gently buff the edges with very fine grit sandpaper if needed to get a perfectly smooth canvas. -
Base coat color:
Paint the entire heart with the coral pink acrylic paint. Use smooth, even strokes. You will likely need two coats for full opacity, letting the first detailed layer dry before adding the second. -
Mark the dip line:
Visualize a diagonal line cutting off the bottom right corner of the heart. You can lightly mark this with a pencil or just freehand it for a more organic feel. -
Paint the mint dip:
Using the mint green paint, fill in that bottom corner section. Create a clean, straight edge where it meets the pink. Apply a second coat if the pink shows through. -
Add speckles:
To give it a stony, ceramic look, mix a tiny drop of water into a darker pink or reddish-brown paint. Dip a toothbrush or stiff brush in it and flick very fine speckles over the pink section.
Smooth Surface Secret
Before drying, dip your finger in a tiny bit of water and rub it over the raw clay surface. This acts like a slip, smoothing out fingerprints instantly.
Step 3: Adding the Face & Finishing
-
Paint the eyes:
Using a dotting tool or the back end of a paintbrush, dip into black paint and stamp two small, widely spaced eyes onto the pink area. -
Draw the smile:
With your finest detail brush and black paint, paint a tiny, shallow ‘U’ shape directly between the eyes for the smile. -
Add rosy cheeks:
Dip a fresh toothpick or small dotting tool into the darker pink paint. Place two small oval dabs just below and slightly outside the eyes to create blushing cheeks. -
Seal the piece:
Once all paint is bone dry, apply a generous coat of glossy glaze or Mod Podge over the entire front and sides. This seals the foam clay and gives it that ceramic shine. -
Attach the ring:
After the glaze is cured and not tacky, use pliers to open the jump ring on your keychain hardware and attach it to the screw eye loop on your heart.
Level Up: Texture
Before the clay dries, press a piece of lace or textured fabric into just the ‘dipped’ corner area to create a cool tactile contrast.
Clip your new handmade charm onto your bag or keys and enjoy the pop of happy color
Mini Rainbow Swirl Lollipops
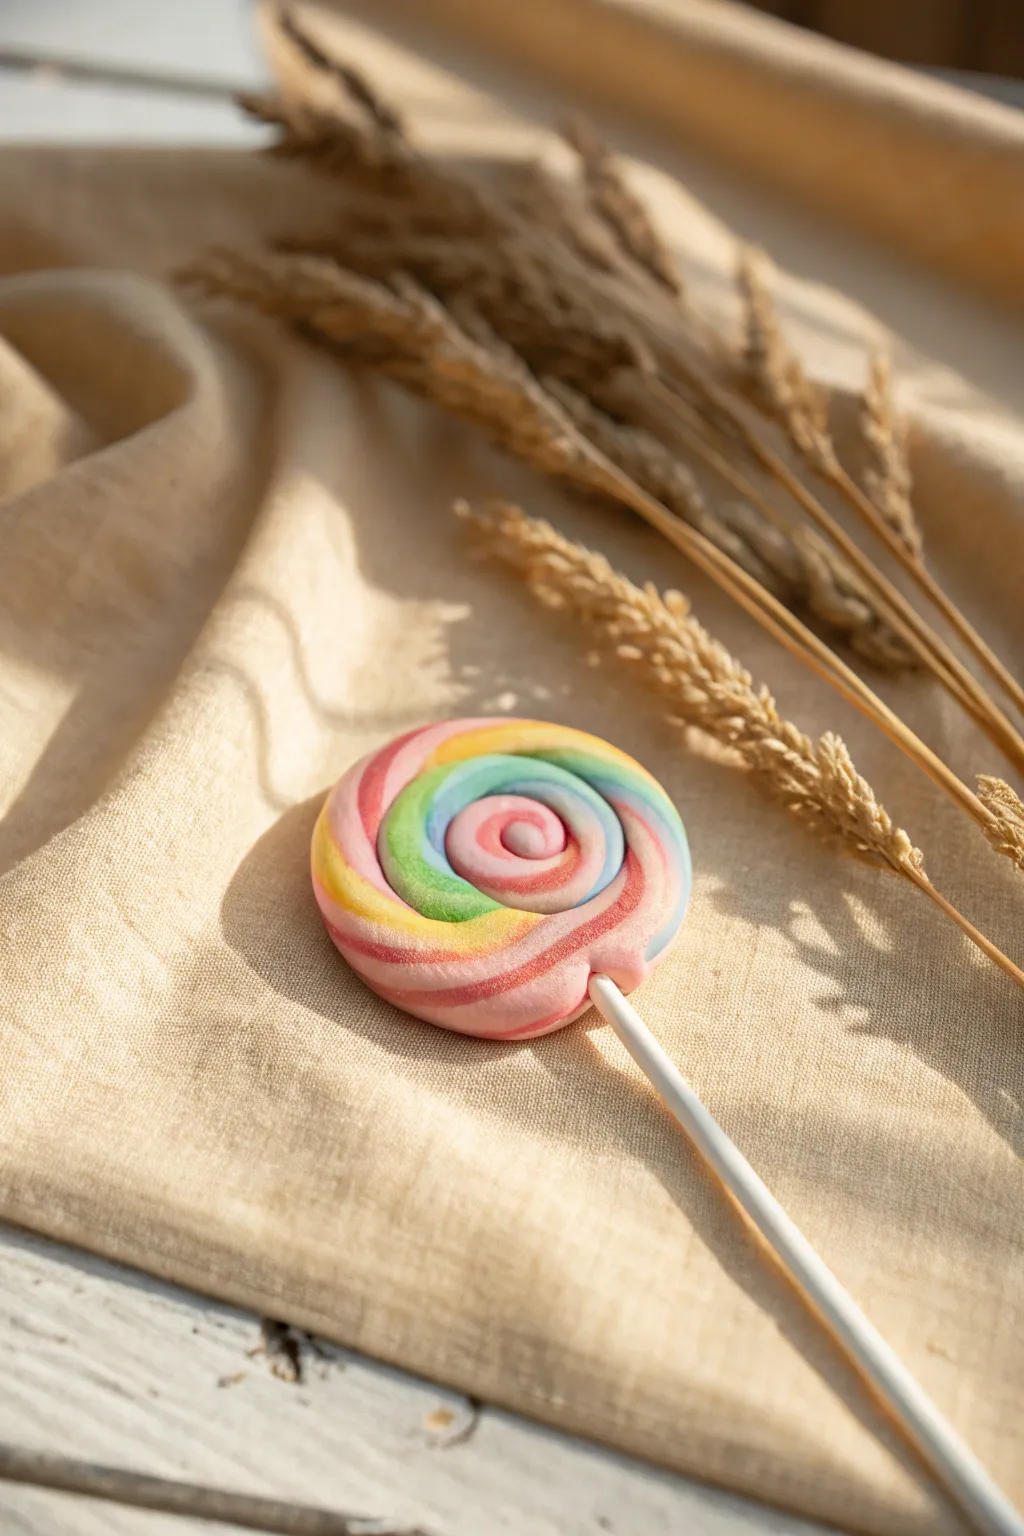
These delightful faux lollipops capture the whimsy of childhood sweets without the sugar rush. With their soft, matte finish and gentle pastel spiral, they make perfect props for photos or sweet decorations for a party table.
How-To Guide
Materials
- White Model Magic
- Model Magic in pink, yellow, blue, and green (or markers to color white clay)
- White lollipop stick (4-6 inches)
- Clean work surface or silicone mat
- Rolling pin (optional)
- Small craft knife or plastic cutting tool
Step 1: Preparing the Colors
-
Mix your base colors:
Start by preparing four small balls of Model Magic roughly the size of large grapes. You need one each in pink, yellow, blue, and light green. -
Create pastels:
If you are using pre-colored clay that looks too vibrant, mix a generous amount of plain white Model Magic into each colored ball. Knead thoroughly until the color is uniform and you achieve a soft, candy-like pastel shade. -
Form the ropes:
Take the pink ball and roll it on your work surface into a long, thin snake, about the thickness of a pencil and 8-10 inches long. Try to keep the thickness consistent. -
Repeat rolling:
Repeat the rolling process for the yellow, green, and blue balls, ensuring all four ropes are approximately the same length and thickness.
Clean Breaks
If the clay gets too sticky or warm while rolling, let it sit for 5 minutes. Slightly drier clay holds the defined twists better without smearing colors.
Step 2: Creating the Twist
-
Bundle the ropes:
Lay the four colored ropes side by side. Gently press the very ends together at one side to join them into a cluster. -
Twist them together:
Pick up the joined end and slowly twist the ropes together. You want a tight, spiraling candy-cane effect. Be careful not to pull too hard, or the clay might snap. -
Roll the twist:
Once twisted, gently roll the combined rope on the table. This fuses the strands together into one smooth, multi-colored log and eliminates gaps between the colors. -
Check the length:
Continue rolling until your twisted log is smooth and slightly thinner than before. Ideally, it should be about 12 inches long now. -
Trim the ends:
Use your plastic cutting tool to snip off the messy ends of the rope so you have a clean start and finish to your spiral.
Sugary Sparkle
Before the clay dries, brush a thin layer of liquid glue over the swirl and sprinkle with ultra-fine clear glitter to mimic real sugar granules.
Step 3: Shaping and Assembly
-
Start the coil:
Take one end of your twisted rope and begin curling it inward to form a tight spiral, just like a snail shell. -
Wind vertically:
Continue winding the rope around the center. Keep the coil flat on the table so the lollipop shape stays even. I find pressing gently as I wind helps the layers stick together. -
Tuck the end:
When you have reached your desired size (about 2-3 inches in diameter), trim any excess rope. Smooth the end into the side of the circle so it blends seamlessly and won’t unravel. -
Prepare the stick:
Take your white lollipop stick. Dip the top half-inch into a tiny bit of water or craft glue if extra hold is needed, though Model Magic usually grips well on its own. -
Insert the stick:
Carefully push the stick into the bottom of the spiral, aiming for the center. Don’t push all the way through; stop about halfway up the lollipop head. -
Reshape gently:
Inserting the stick might have slightly distorted the round shape. Gently pat the edges back into a perfect circle. -
Add texture (optional):
For a sugary look, you can lightly tap the surface with a piece of sandpaper or a texture brush, though smooth matte looks delicious too. -
Dry completely:
Lay the finished lollipop flat on a piece of parchment paper to dry. Flip it over after a few hours to ensure both sides dry evenly. Allow 24-48 hours for it to fully harden.
Once dried, arrange your pastel creations in a jar or wrap them in clear cellophane for a sweet gift presentation
Cartoon Taco With Cute Face
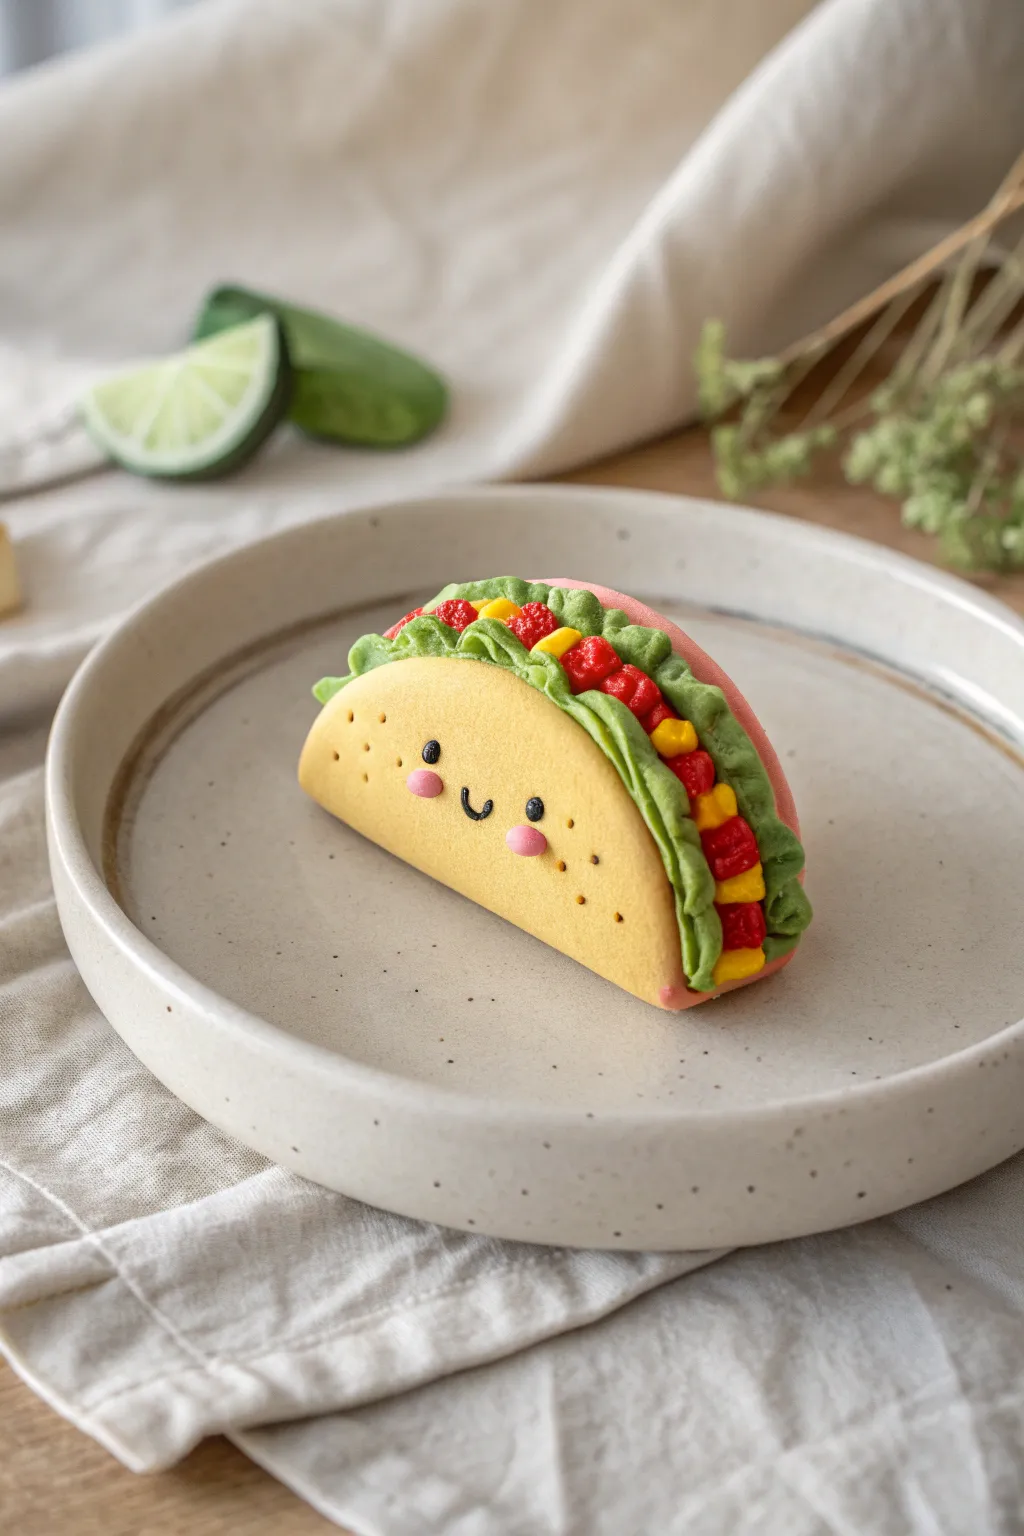
This adorable little taco friend brings a smile to anyone’s face with its rosy cheeks and vibrant fillings. Using lightweight Model Magic, you’ll sculpt a soft yellow shell stuffed with textured greens and cheerful toppings for a desk accessory that looks good enough to eat.
Step-by-Step
Materials
- Model Magic (Yellow, White, Red, Green, Black, Pink)
- Rolling pin or smooth round marker
- Circle cookie cutter (approx. 3-4 inches)
- Clay sculpting tool (pointed/needle tool)
- Toothpick or dotting tool
- Small piece of foil (optional)
Step 1: Forming the Shell
-
Mix the perfect shell color:
Start by mixing a large amount of yellow clay with a small pinch of white and the tiniest speck of red or brown if you have it. You want a warm, golden-yellow tone that resembles a corn tortilla. -
Roll it out:
Roll your mixed yellow clay into a smooth ball, then flatten it onto your work surface using a rolling pin. Aim for an even thickness, about 1/4 inch thick so it’s sturdy but not bulky. -
Cut the circle:
Use your circle cutter to punch out a perfect round shape. If the edges are a simplified or ragged, gently smooth them with your finger to keep that nice clean look. -
Create the texture:
Before folding, use a toothbrush or a ball of crumpled foil to gently press texture onto the ‘outside’ of the tortilla. This mimics the corn texture. -
Fold the taco:
Gently fold the circle in half, but don’t crease it sharply. You want a ‘U’ shape. If it keeps closing, place a small log of scrap clay or foil inside the fold temporarily to hold it open while it sets slightly.
Stay Soft
Work quickly or keep clay in an airtight bag. Model Magic starts to dry fast! If edges crack while folding, add a tiny drop of water to smooth them back together.
Step 2: Adding the Fillings
-
Prepare the lettuce base:
Take your green clay and roll it into a long, thin snake. Flatten the snake slightly with your finger. -
Ruffle the edges:
Using a toothpick or sculpting tool, press indentations along one edge of the green strip to create a wavy, ruffled lettuce effect. I like to twist it a little bit to make it look organic. -
Insert the lettuce:
Pack the inside of your taco shell with the green strip. Ensure the ruffled edges stick out generously from the top opening so they are clearly visible. -
Make tomato chunks:
Pinch off tiny bits of red clay and roll them into small, imperfect cubes or balls. You’ll need about 6-8 of these. -
Place the tomatoes:
Nestle the red chunks into the crevices of the green lettuce. Press tailored spots with a toothpick to make sure they adhere well. -
Add the cheese:
Roll very tiny, thin snakes of deep yellow or orange clay. Cut them into tiny segments to look like shredded cheddar cheese. -
Sprinkle the cheese:
Distribute the little cheese shreds randomly among the lettuce and tomatoes, pressing them down gently so they don’t fall off.
Step 3: Bringing it to Life
-
Position the eyes:
Roll two tiny spheres of black clay. Press them flat onto the center of the yellow shell, spacing them slightly apart for that cute wide-set look. -
Add eye highlights:
Take the tiniest speck of white clay imaginable and press it onto the top right corner of each black eye. This ‘sparkle’ is crucial for the kawaii effect. -
Sculpt the mouth:
Roll a microscopically thin snake of black clay. Curve it into a small ‘U’ shape and press it gently between the eyes. -
Apply rosy cheeks:
Make two small, flattened ovals from pink clay. Place them just under the outer corners of the eyes. -
Face texture:
Use a needle tool or toothpick to poke a few decorative freckles or ‘pores’ onto the shell around the face area for extra character. -
Final shaping:
Give the whole taco a gentle squeeze at the base to ensure it sits flat on the table without rolling over. Let it dry undisturbed for 24 hours.
Shell drooping?
If the taco shell keeps collapsing on the fillings, prop it up against a small wall of books or use balled-up parchment paper inside until the outer shell hardens.
Once fully dry, your happy little taco is ready to brighten up your shelf or become a play food favorite
Mini Burger Stack Buddies
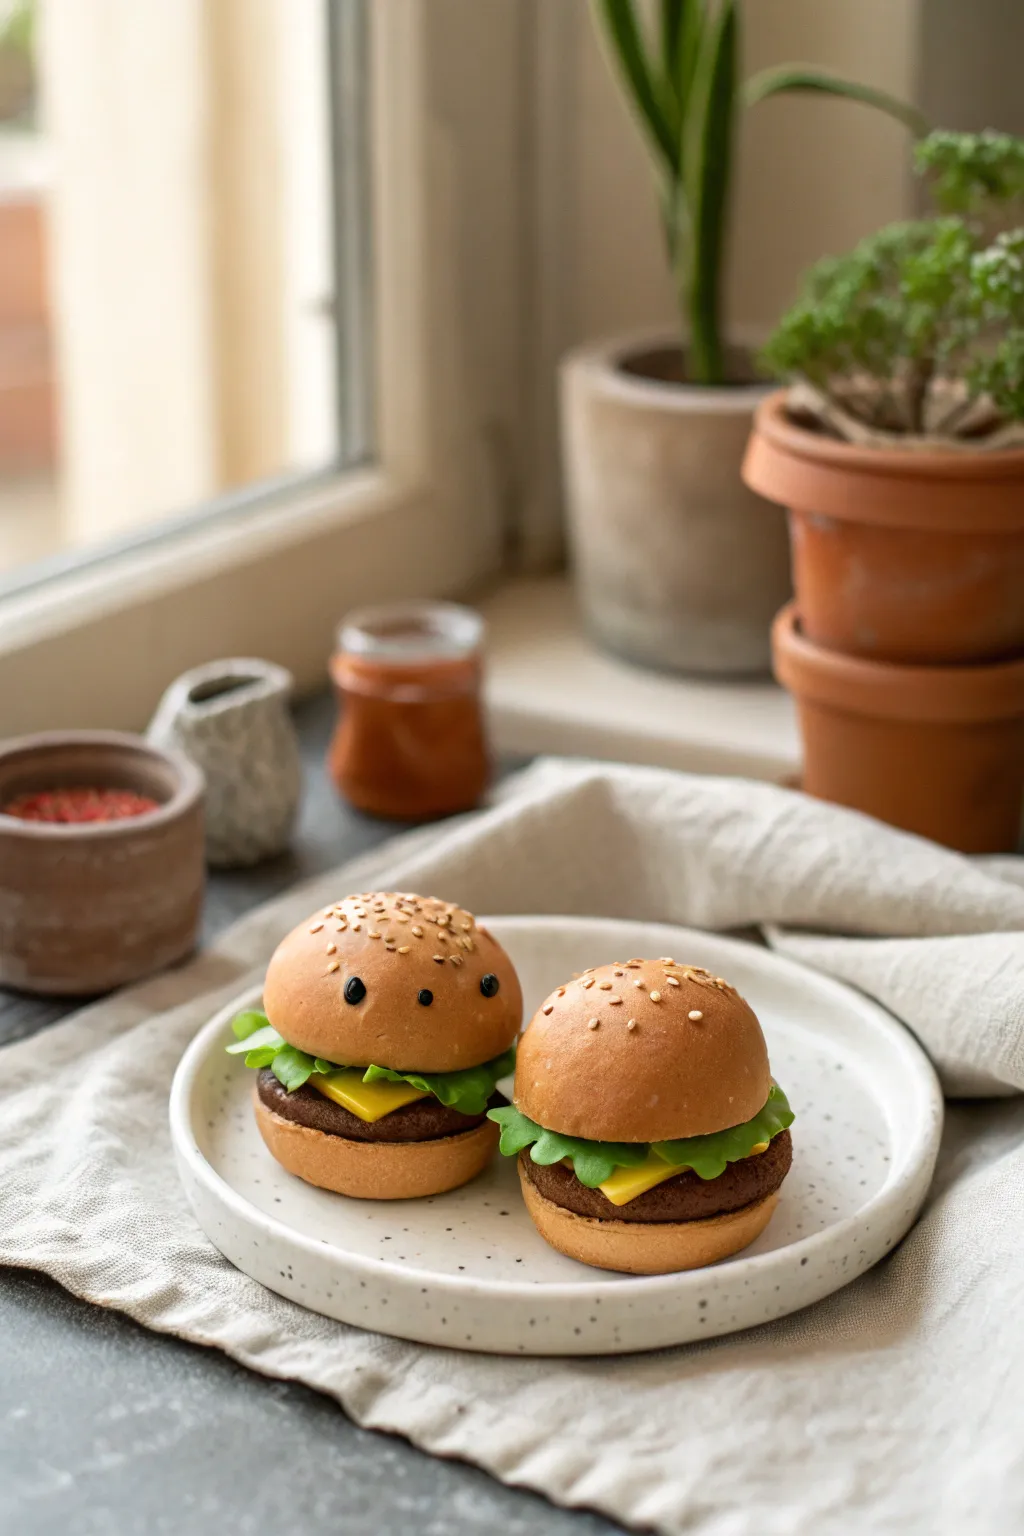
These adorable miniature sliders are crafted from lightweight modeling clay to look good enough to eat, right down to the tiny sesame seeds. With their realistic textures and optional cute faces, they make perfect desk companions or play food for a dollhouse kitchen.
Detailed Instructions
Materials
- Model Magic or air-dry clay (white, brown, yellow, green, black)
- Acrylic paints (ochre, burnt sienna) for shading
- Small ball tool or rounded toothpick
- Texture tool (old toothbrush or crumpled foil)
- Precision knife or plastic clay knife
- Gloss glaze or clear nail polish (optional)
Step 1: Creating the Buns
-
Mix the dough color:
Start by mixing a small amount of brown clay into a larger ball of white clay. You want a light, warm tan color reminiscent of baked bread. If it’s too dark, add more white. -
Form the bottom buns:
Pinch off two equal-sized pieces for the bottom buns. Roll them into smooth spheres, then gently flatten them into thick discs. Keep the edges slightly rounded rather than sharp. -
Shape the top buns:
Take two slightly larger pieces of tan clay for the tops. Roll them into balls and flatten just the bottom side, keeping a nice high dome shape on top for that classic burger look. -
Add bread texture:
Lightly tap the surface of all four bun pieces with an old toothbrush or a ball of crumpled aluminum foil. This removes the artificial smoothness and mimics the airy texture of real bread. -
Apply the seeds:
Roll extremely tiny slivers of white clay between your fingers to make sesame seeds. Press them gently onto the top domes. I like to cluster a few in the center and scatter others near the edges for a natural look.
Step 2: Preparing the Fillings
-
Make the patties:
Mix brown clay with a tiny touch of black to get a rich, cooked-meat color. Form two thick discs that are roughly the same diameter as your buns. -
Texture the meat:
Use a toothpick or a stiff brush to stipple the sides and top edges of the patties heavily. Roughing up the surface is key to making it look like ground beef rather than smooth chocolate. -
Slice the cheese:
Roll out a small piece of yellow clay until it is thin and flat. Use your precision knife or a ruler to cut out two perfect squares. The corners should drape slightly over the patty later. -
Craft the lettuce:
Take bright green clay and flatten it thinly. Tear off rough, irregular circular shapes. Use your ball tool to thin out and ruffle the edges, creating a wavy, leafy effect.
Cracking Clay?
If your Model Magic starts cracking while you work, wet your fingers slightly with water or a bit of lotion to rehydrate and smooth the clay surface.
Step 3: Assembly and Details
-
Stack the layers:
Place the bottom bun down first. Add the textured patty, then position the cheese square so the corners overhang slightly. Top with the ruffled lettuce. -
Cap it off:
Place the domed top bun on the stack. Press down gently but firmly to adhere the layers without squishing the intricate textures you created. -
Shade the buns:
For a ‘freshly baked’ look, act efficiently while the clay is setting. Dust a little burnt sienna or ochre pastel chalk (or diluted paint) onto the very top of the bun using a dry brush. -
Add a face:
To make the ‘Buddy’ version shown on the left, roll two microscopic balls of black clay. Press them into the front of the top bun, spaced slightly apart, for the eyes. -
Final coat:
If you want the cheese to look melted or the meat juicy, add a tiny dab of gloss glaze to those specific layers, keeping the bun matte.
Make it a Charm
Before the clay dries completely, screw a small eye hook into the center of the top bun. Once dry, you can attach it to a keychain or necklace.
Let your little burger buddies dry fully for 24 hours before displaying them on your desk or shelf
Finger Puppet Mini Monsters
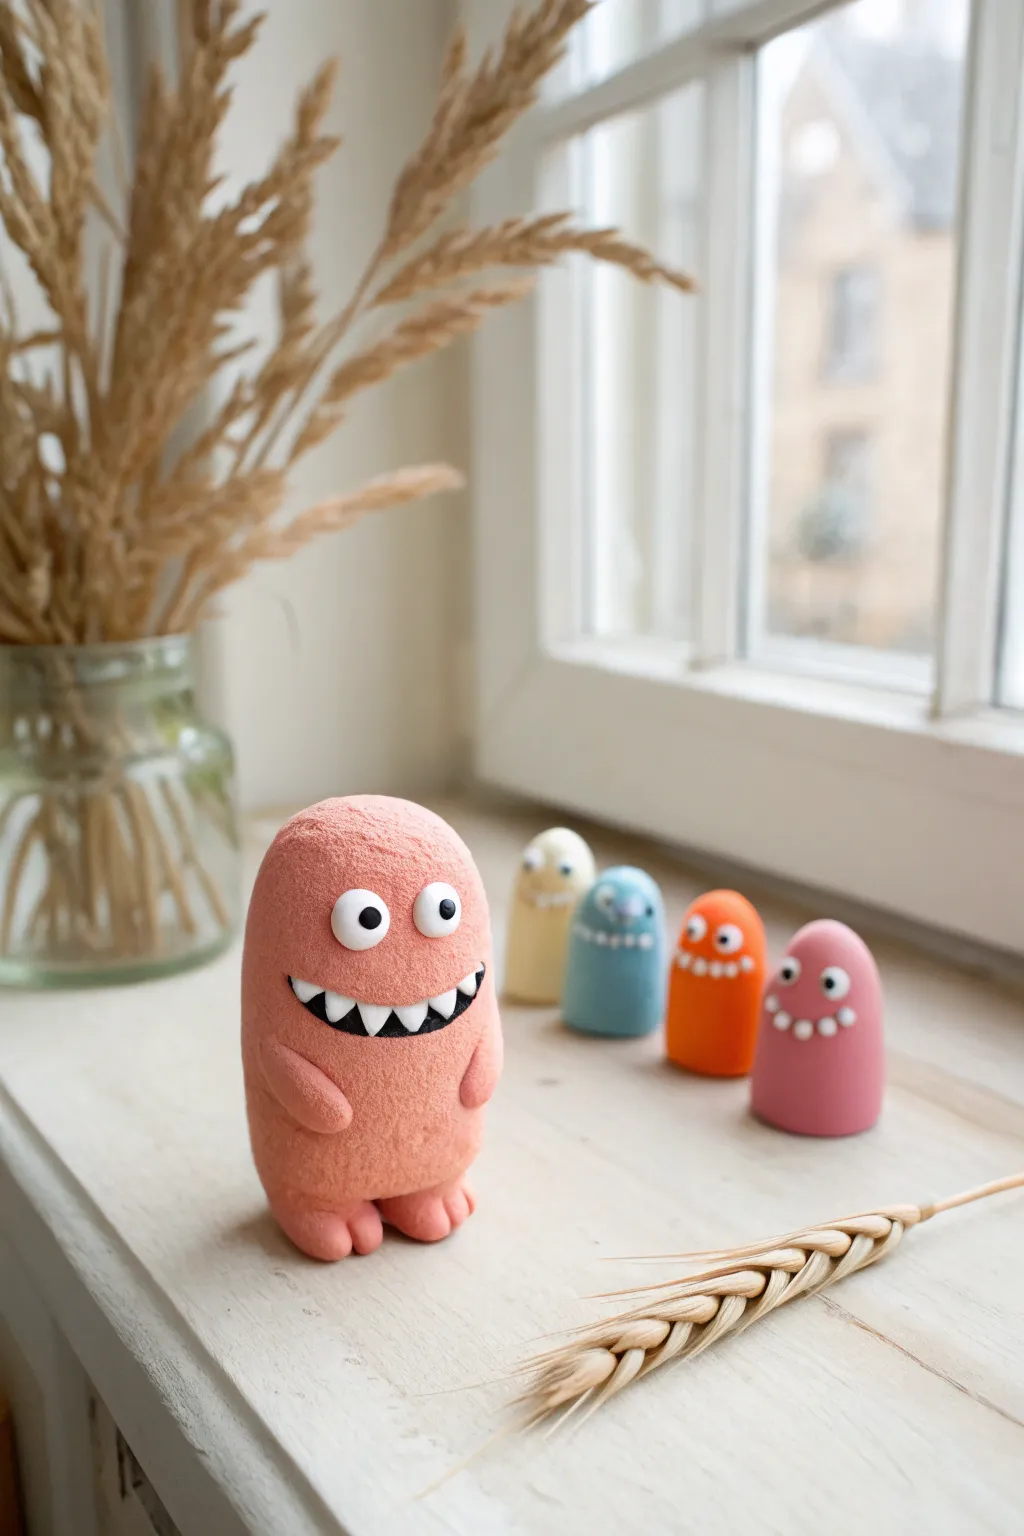
Transform simple Model Magic into a colorful crew of friendly little monsters. With their textured bodies and silly expressions, these easy-to-make figures are perfect for brightening up a windowsill or shelf.
How-To Guide
Materials
- Model Magic or air-dry clay (Pink, Orange, Blue, Yellow)
- White Model Magic
- Black fine-point marker or black clay
- Toothbrush or firm bristle brush (for texturing)
- Sculpting tool or plastic knife
- Rolling pin (optional)
- Small bowl of water
Step 1: Sculpting the Bodies
-
Create the base form:
Start with a generous handful of pink clay. Roll it into a smooth ball between your palms to remove cracks/seams. -
Shape the cylinder:
Gently roll the ball into a thick, cylindrical sausage shape with a rounded top and slightly flattened bottom so it stands upright securely. -
Form the mini background monsters:
Repeat this process with smaller amounts of yellow, blue, orange, and pink clay to create the four smaller ‘finger puppet’ style bodies seen in the background. -
Add texture:
Take a clean toothbrush or stiff bristle brush and gently tap it all over the surface of the clay bodies. This creates the fuzzy, stone-like texture visible on the monsters.
Step 2: Adding Large Monster Details
-
Create the arms:
Roll two small, bean-sized pieces of pink clay. Attach them to the sides of the large monster’s body, blending the clay where they join so they look seamless. -
Shape the feet:
Form two small, flat ovals from pink clay. Use a sculpting tool to indent two lines on the front of each to create toes. -
Attach the feet:
Press the body firmly onto the feet so the monster stands stable. I like to re-texture the connection points slightly to hide the seams. -
Carve the mouth:
Use a plastic knife or sculpting tool to gently press a wide, curved smile into the face area. Make it deep enough to inlay the teeth later. -
Darken the mouth interior:
If you have black clay, roll a thin strip and press it into the back of the mouth indent. Alternatively, wait until dry to color this area with a marker.
Texturing Tip
Don’t press too hard with the texture brush or you’ll deform the shape. Light, rapid taps work best to get that fuzzy look without squishing.
Step 3: Creating the Faces
-
Make the eyes:
Roll small balls of white Model Magic. For the large monster, make two medium-sized balls. For the smaller ones, vary the sizes (some one eye, some two). -
Attach the eyes:
Simply press the white balls onto the upper part of the bodies. The clay should stick to itself if fresh; if not, use a tiny drop of water. -
Sculpt the teeth:
Roll tiny, rice-sized triangles of white clay. Carefully press these along the top and bottom edge of the large monster’s mouth. -
Mini monster smiles:
For the background figures, roll several tiny white dots and arrange them in a smile shape directly on the body surface to mimic a toothy grin. -
Add pupils:
Once the white eyes are slightly set, use a fine-point black marker to draw pupils. You can position them looking sideways or cross-eyed for sillier expressions. -
Final drying:
Let your monster squad sit undisturbed for at least 24 hours to fully harden.
Make Them Helpful
Before the clay dries, push a strong magnet into the back of the smaller monsters to turn them into colorful fridge magnets.
Enjoy arranging your new monster family on a sunny ledge where they can watch the world go by
Cute Desk Cactus Trio
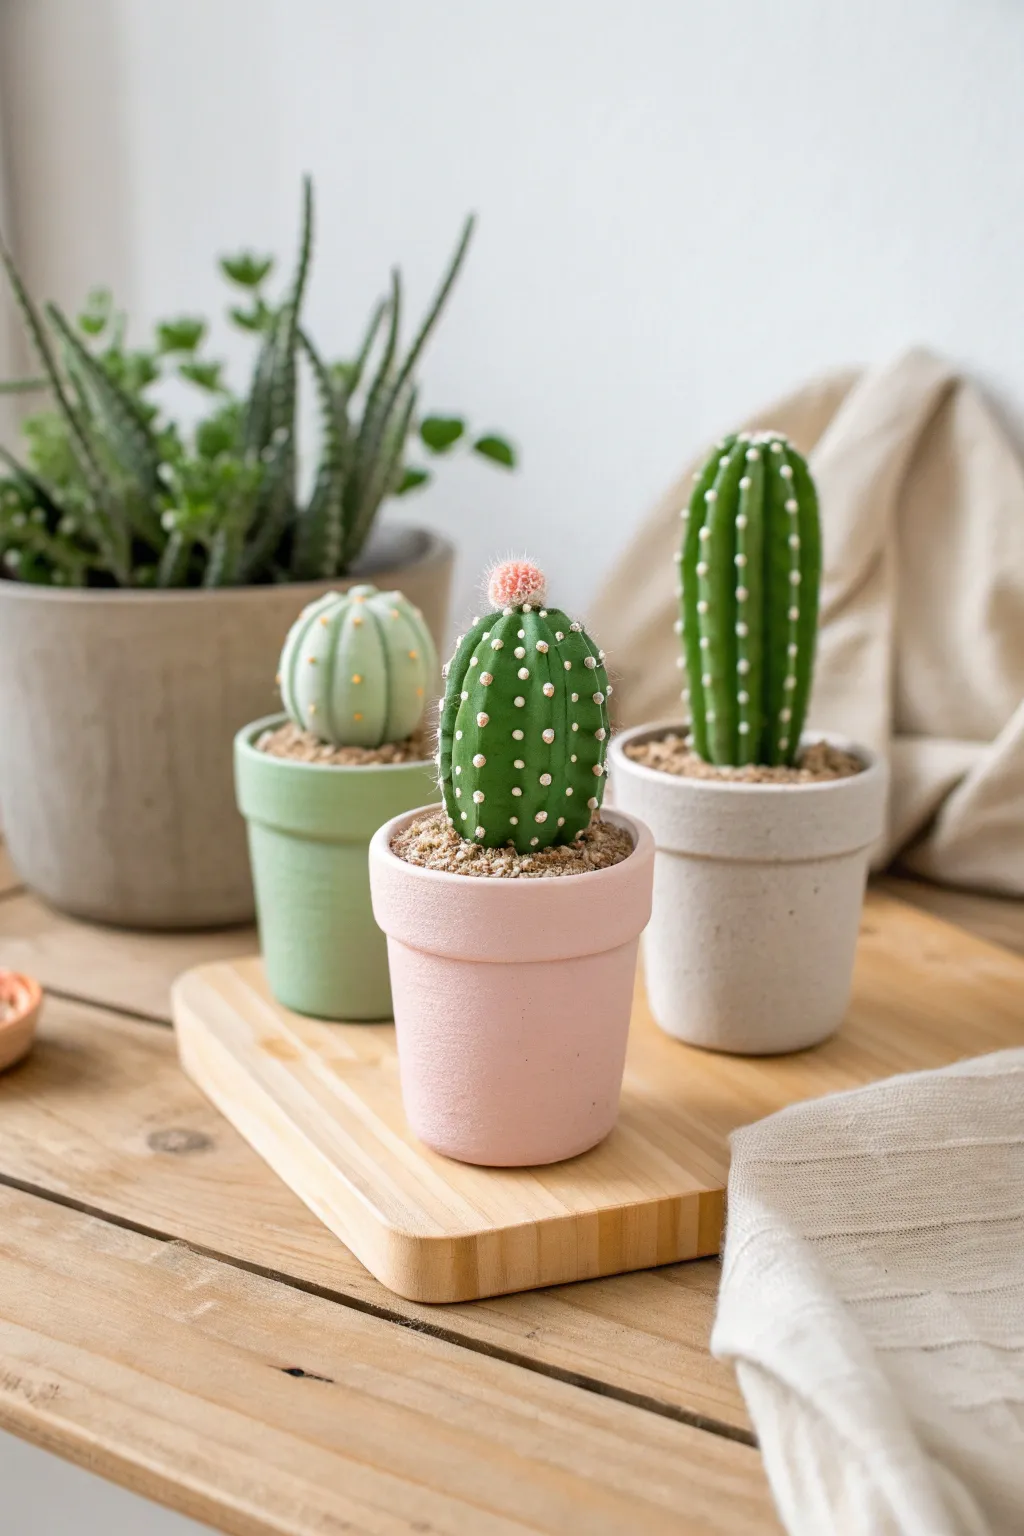
Bring a touch of the desert to your desk without the prickly thorns using these adorable Model Magic succulents. This trio features soft pastel pots and distinct cactus styles, creating a soothing and handcrafted aesthetic.
Step-by-Step Tutorial
Materials
- Model Magic clay (white)
- Acrylic paints (sage green, forest green, pastel pink, mint green, light grey, tan)
- Small paintbrushes (flat and fine tip)
- Texture tool (toothpick or needle tool)
- Sand or fine gravel (optional for texture)
- Craft glue
- Aluminum foil (optional core)
Step 1: Creating the Pots
-
Shape the Base:
Start by taking three equal portions of white Model Magic. Roll each into a smooth ball, then slightly flatten the bottom so it sits stable on your work surface. -
Form the Pot Walls:
Use your thumb to press into the center of each ball, pinching the sides up to create a small cup shape. Aim for a slightly tapered look, wider at the top and narrower at the bottom. -
Add the Rim:
Roll three thin snakes of clay. Wrap one around the top edge of each pot to create a distinct rim. Smooth the seam where the ends meet, but leave the bottom edge of the rim slightly defined. -
Dry the Pots:
Set the pots aside to dry completely. Since Model Magic shrinks slightly, letting them firm up now ensures they hold their shape when we paint them later.
Cracking Clay?
If your Model Magic starts to crack while shaping, wet your fingers slightly with water to smooth the surface again. Don’t use too much water or the clay will get slimy.
Step 2: Sculpting the Cacti
-
The Round Barrel Cactus:
Roll a sphere of clay that fits snugly into one of your pots. Use a dull knife or modeling tool to gently press vertical indentations all around the sphere to create ribs. -
The Tall Saguaro Style:
For the second cactus, roll a cylinder that is slightly taller than the pot. Round off the top dome. Like the first one, press deep vertical lines from top to bottom. -
The Short Ribbed Cactus:
Create an oval shape for the final cactus. Use your tool to create very distinct, deep vertical grooves so the sections puff out like pumpkin ridges. -
Adding the Blossom:
Take a very tiny pinch of clay and roll it into a ball. Texture it with a toothpick to look like a fuzzy flower and attach it to the top of the short ribbed cactus.
Make it Sparkle
Mix a tiny amount of iridescent glitter into the white paint for the cactus spines to make them catch the light, or use a gloss varnish on just the pots for a ceramic loop.
Step 3: Painting and Assembly
-
Painting the Pots:
Once the pots are dry, paint each one a different pastel shade: mint green, soft blush pink, and a light grey-white. You may need two coats for opaque coverage. -
Painting the Cacti:
Paint the cacti in varying shades of green. I prefer using a darker forest green for the tall one and lighter sage tones for the rounder ones to create variety. -
Coloring the Blossom:
Carefully dab a soft coral or pink onto the textured flower topper you created earlier. -
Adding the Spines:
Using a very fine-tip brush or a toothpick dipped in white or pale yellow paint, add the details. For the tall cactus, paint vertical rows of dots. on the ribs. -
Detailing the Round Cactus:
For the rounder cactus, add small clusters of dots or tiny ‘x’ shapes along the ridges to simulate spines. -
Creating the Soil:
Mix a small amount of leftover clay with brown or tan paint (or paint it after drying) to create a ‘soil’ disc that sits inside the pot rim. -
Texturing the Soil:
Before the soil clay dries, press real sand or coarse salt into it for a realistic gritty texture, or simply stipple it with a stiff brush. -
Final Assembly:
Glue the soil discs into the pots, then glue the painted cacti firmly onto the soil. Let everything set overnight.
Arrange your new low-maintenance garden on your wooden board and enjoy the greenery
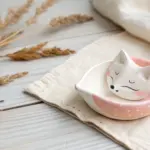
Fantasy Dessert Animal Hybrids
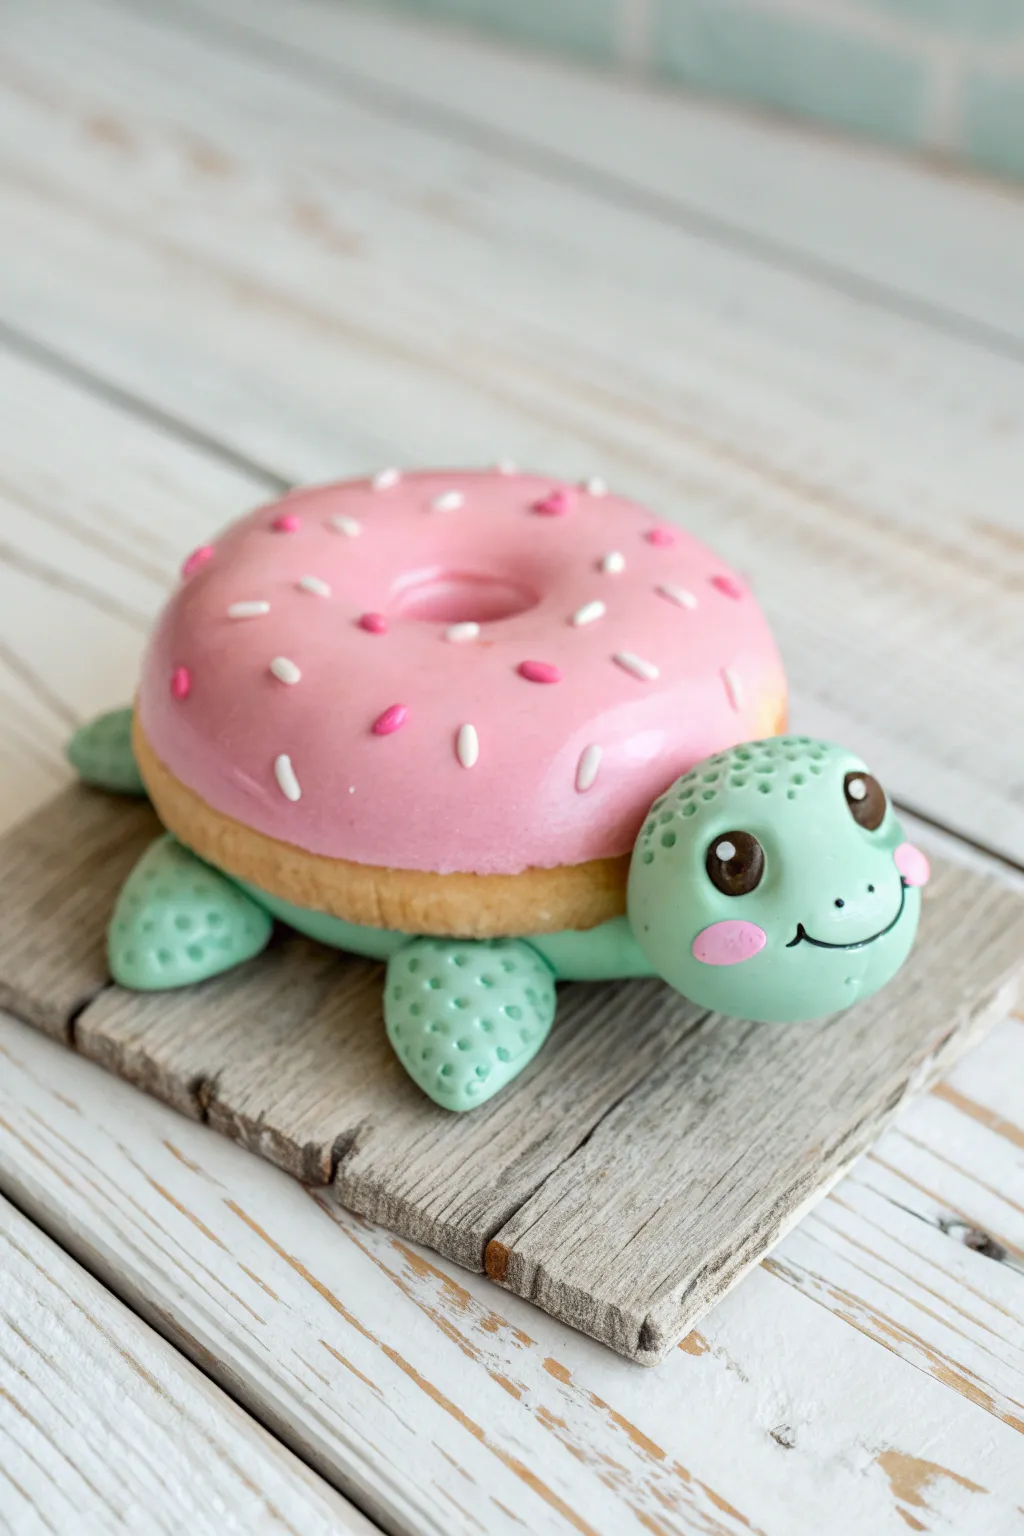
This adorable fantasy creature swaps a traditional shell for a glossy, pink-frosted donut, complete with sprinkles. It’s a charming hybrid sculpture that combines the appeal of dessert art with cute animal features, all made from lightweight modeling clay.
Detailed Instructions
Materials
- Model Magic or air-dry clay (mint green, tan/beige, pink, white, dark pink/magenta)
- Black paint or marker
- Small dotting tool or toothpick
- Clay sculpting tools (plastic knife)
- Glossy glaze or Mod Podge (optional)
- White gel pen (optional for eye highlights)
Step 1: Sculpting the Donut Shell
-
Shape the base:
Start by taking a ball of tan or biscuit-colored clay and flattening it slightly into a thick disc. This will form the doughy part of your donut shell. -
Create the hole:
Using your thumb or a rounded tool, press gently into the center of the disc to create an indentation. You don’t need to punch all the way through, just deep enough to mimic a donut hole. -
Form the frosting:
Roll out a slightly smaller ball of pink clay and flatten it into a thin disc. Lay this over the top of your tan donut base. -
Smooth the edges:
Gently press the pink clay edges down so they adhere to the tan base, allowing a rim of tan ‘dough’ to peek out at the bottom. Smooth out any fingerprints for a clean finish. -
Add the sprinkles:
Roll incredibly tiny, thin snakes of white and dark pink clay. Cut them into small segments and press them randomly onto the pink frosting.
Glazing Trick
Apply clear nail polish or gloss glaze ONLY to the pink frosting part. This contrast makes the donut look sticky and sweet while keeping the turtle body matte.
Step 2: Creating the Turtle Body
-
Mixing the body color:
If you don’t have mint green clay, mix a small amount of green into white clay until you achieve a soft, pastel mint shade. -
Form the underbelly:
Create a flat, oval slab of mint green clay that is roughly the same width as your donut. This will be the base the shell sits on. -
Shape the legs:
Roll four equal-sized tear-drop shapes from the mint clay. These will become the flippers. -
Texture the flippers:
Using a small dotting tool or toothpick, press rows of small indents into the rounded end of each flipper to give them a scaley, textured look. -
Attach the limbs:
Press the four flippers onto the underside of the belly base, positioning them so they poke out naturally. -
Add a tail:
Roll a small, pointed cone of mint clay and attach it to the rear of the body base. I like to texture this slightly too, just to match the legs.
Step 3: Assembly and Faces
-
Attach the shell:
Place your finished donut shell on top of the mint green body base. Press down gently to ensure the two main pieces bond together firmly. -
Sculpt the head:
Roll a smooth, round ball of mint green clay for the head. It should be proportional to the donut shell. -
Head texture:
Add the same dotted texture to the very top of the head, similar to the flippers, leaving the face area smooth. -
Connect the head:
Attach the head securely to the front of the body, tucking it slightly under the rim of the donut. -
Make the face:
Use a tool to impress two deep sockets for eyes. Roll tiny balls of dark brown or black clay and press them into the sockets. -
Rosy cheeks:
Take two tiny flattened circles of pink clay and press them onto the cheeks below the eyes. -
The smile:
Use a sharp tool or fingernail to impress a curved smile line connecting the cheeks. You can use a tiny bit of black clay or paint to darken the line. -
Final highlights:
Add tiny white clay dots or use white paint to add a sparkle to the eyes. Brush a glossy glaze over the pink frosting area only to make it look like real icing.
Flavor Swap
Why stop at strawberry? Make a chocolate donut turtle with brown icing, or a vanilla glaze with rainbow sprinkles for a whole bakery shelf of friends.
Allow your sweet turtle creation to dry completely for 24-48 hours before displaying it on your shelf