Every chipped plate and cracked teacup has a second life in it, and broken china mosaics are my favorite way to prove it. If you’ve got a box of pretty shards (or a dish you can’t bear to toss), these ideas will help you turn them into something you’ll actually show off.
Classic Broken China Mosaic Flower Pots
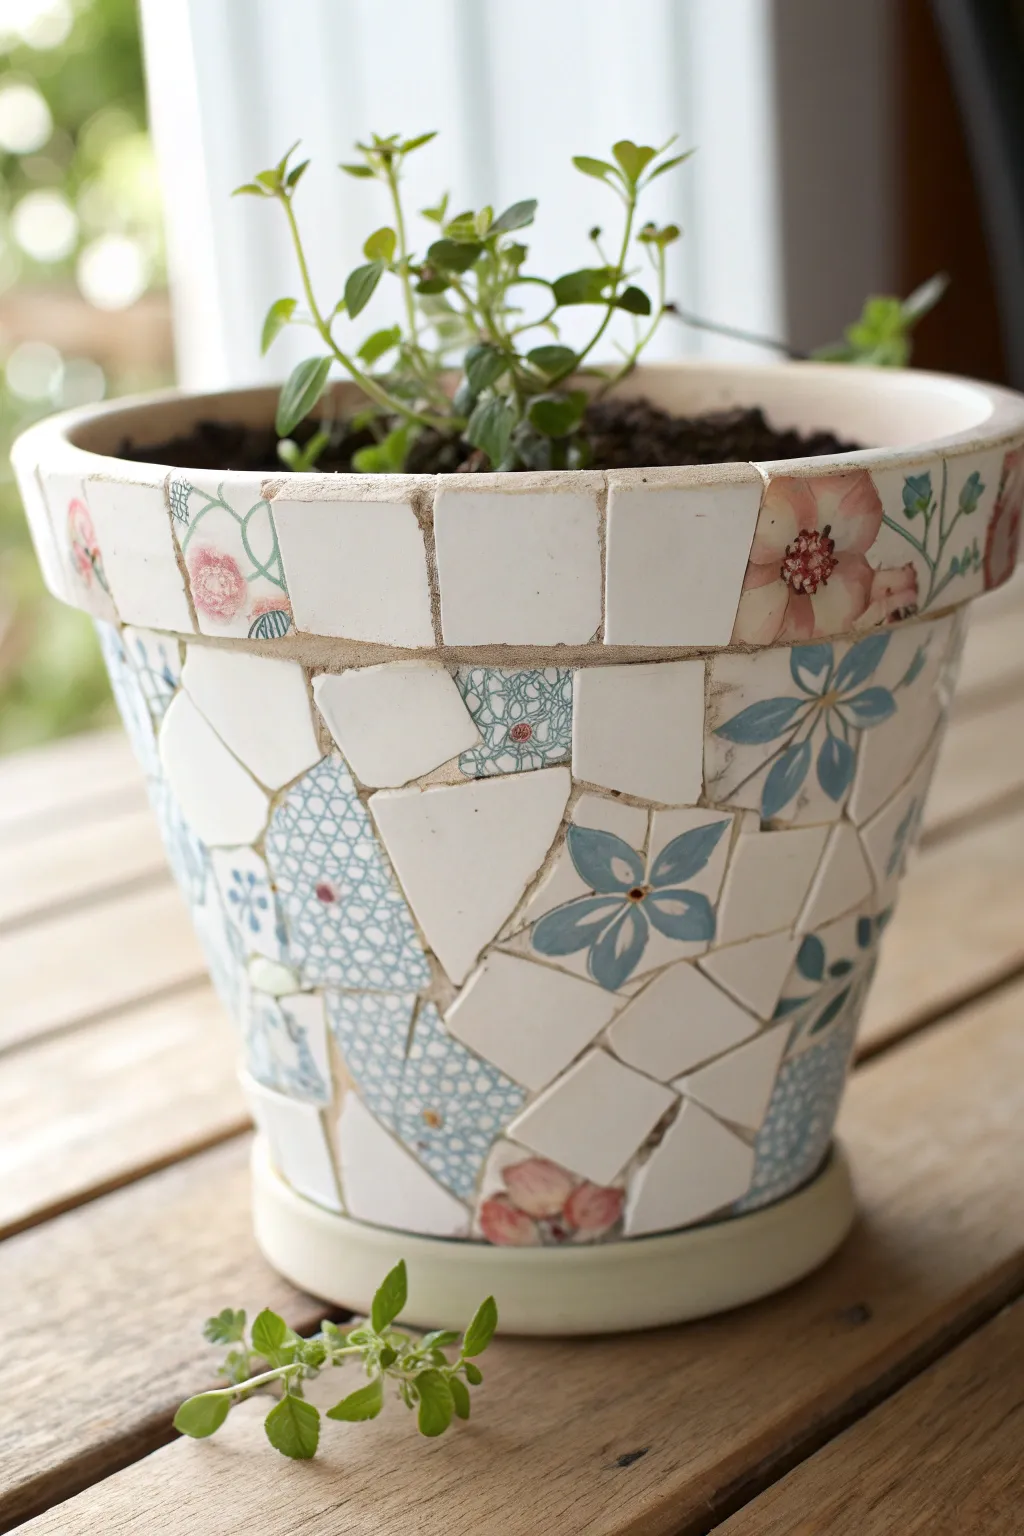
Transform a plain terra cotta pot into a cottage-core masterpiece using shards of beloved but broken china. This project combines floral motifs with clean white porcelain pieces for a rustic yet polished look that’s perfect for herbs.
Detailed Instructions
Materials
- Clean terra cotta pot (medium size)
- Vintage china plates with floral patterns (blue and pink motifs)
- Plain white china or ceramic tiles
- Tile nippers
- Hammer and towel (for initial breaking)
- Safety glasses
- Thinset mortar or tile adhesive
- Small palette knife or butter knife
- Sanded grout (light beige or off-white)
- Rubber float or sponge
- Soft cloth for buffing
- Grout sealer
Step 1: Preparing the Pieces
-
Safety First:
Before breaking any china, put on your safety glasses. Protecting your eyes from flying shards is the most critical step. -
Initial Breaking:
Wrap your floral china plates and plain white pieces separately in an old towel. Strike them gently with a hammer to create manageable large shards. -
Refining Shapes:
Use your tile nippers to trim the large shards into smaller, geometric shapes. You’ll need a mix of squares, triangles, and irregular polygons. -
Selecting Feature Pieces:
Specifically cut out the floral designs—like the pink flowers and blue star-flowers seen in the image—trying to keep the main motif intact within a single shard. -
Creating the Rim Collection:
Nip several plain white rectangular or square pieces of relatively uniform size. These will be used to create the distinct border around the top rim.
Smooth Edges
If a shard has a particularly sharp or jagged edge after nipping, use a carborundum stone or coarse sandpaper to dull it before gluing it to the pot.
Step 2: Applying the Mosaic
-
Adhesive Prep:
Mix a small batch of thinset mortar according to the package directions until it has a peanut butter consistency. -
Starting the Rim:
Butter the back of your rectangular white pieces with adhesive and press them onto the top rim of the pot. Leave a small, even gap between each piece for grout. -
Adding Rim Accents:
Intersperse the plain white rim tiles with occasional floral rim pieces to add a pop of color, just like the pink flower detail in the example. -
Placing Focal Points:
Move to the body of the pot. Apply adhesive to your large floral feature pieces (the blue flowers and patterned sections) and position them centrally on the sides. -
Filling the Field:
Fill in the spaces around your focal flowers with the plain white irregular shards. I like to dry-fit a few pieces first to find a puzzle-like fit before gluing. -
Managing Gaps:
Aim to keep the gaps between shards—the grout lines—consistent, roughly 1/8 to 1/4 inch wide. Avoid pieces touching directly. -
Drying Time:
Once the entire pot is covered, let the adhesive cure completely. This usually takes 24 hours so the shards don’t slip during grouting.
Step 3: Grouting and Finishing
-
Mixing Grout:
Mix your sanded grout with water until it feels like smooth toothpaste. An off-white or beige tone warms up the china pieces better than stark white. -
Applying Grout:
Spread the grout over the surface using a rubber float or gloved hands, pressing firmly to ensure it fills all the crevices between the shards. -
Initial Cleaning:
Let the grout set for about 10-15 minutes until it hazes over slightly. Then, gently wipe away the excess with a damp (not wet) sponge. -
Revealing the Design:
Rinse your sponge frequently and continue wiping until the china patterns are clear and the grout lines are smooth and recessed slightly. -
Final Buff:
After another hour or so when the grout is firm, polish the china pieces with a soft, dry cloth to remove the remaining haze and make them shine. -
Sealing:
Wait 2-3 days for the grout to fully cure, then apply a grout sealer to protect the pot from moisture and staining.
Pattern Play
Mix china from different sets! Combining blue willow patterns with pink English roses creates a curated, eclectic aesthetic rather than a matching one.
Plant your favorite herbs in this sturdy new home and enjoy the timeless beauty of your reclaimed china


Succulent Planters With Blue-and-White Shards
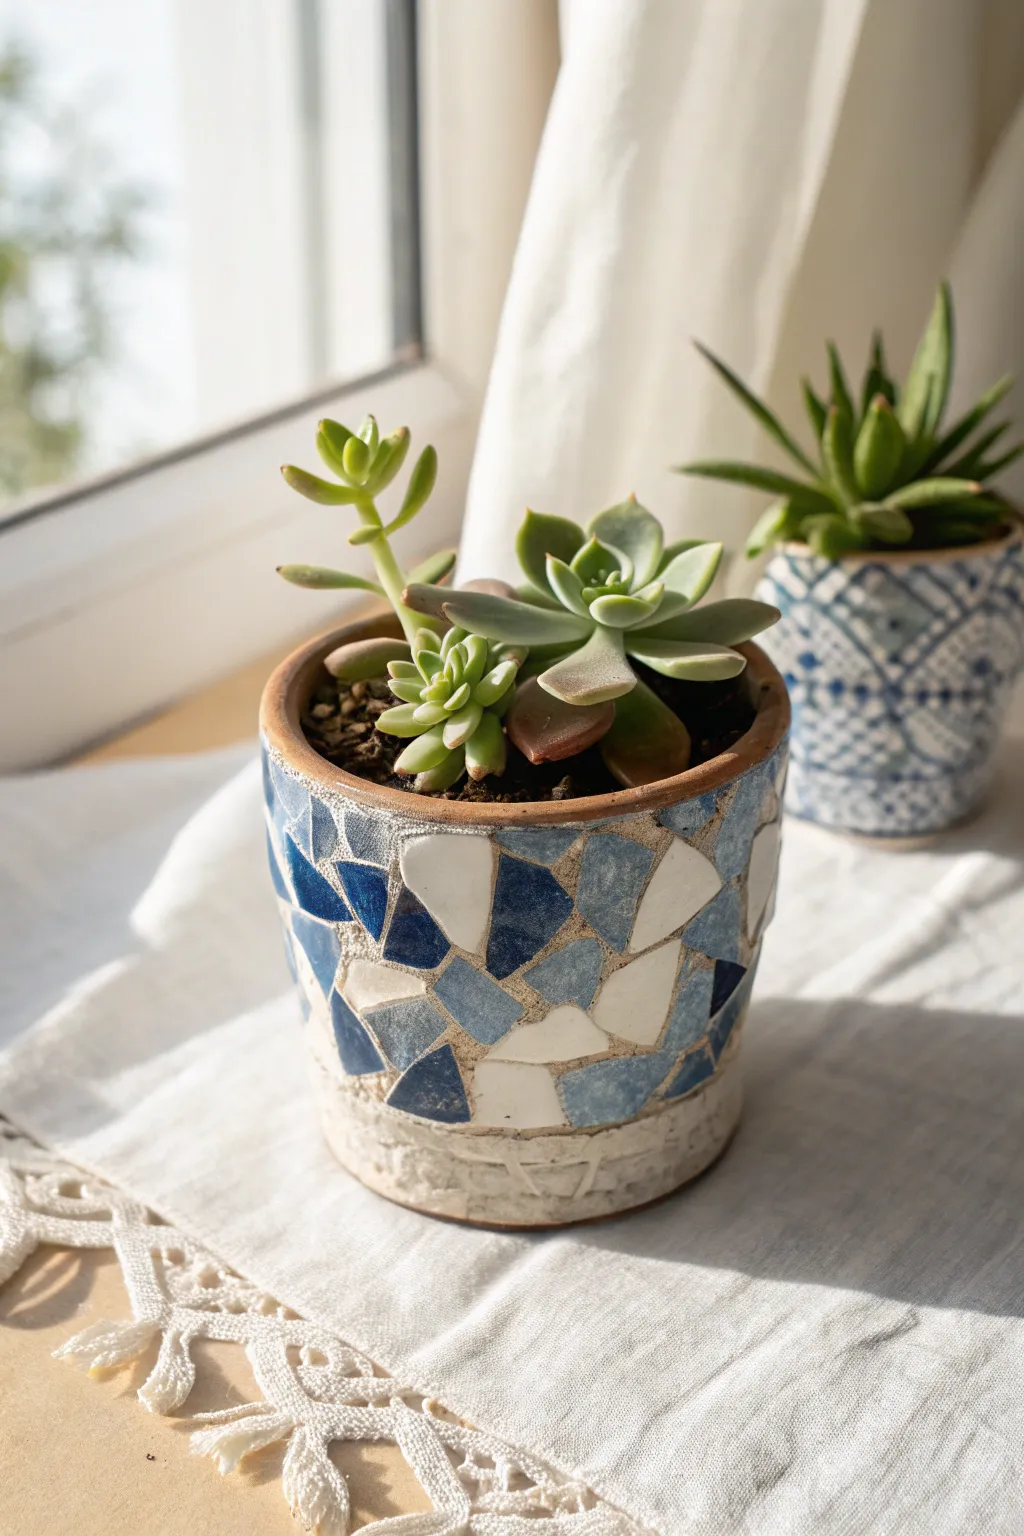
Transform a plain terracotta pot into a Mediterranean-inspired planter using shards of broken blue-and-white china. This mosaic technique creates a lovely textured surface where the deep blues and clean whites contrast beautifully with earthy grout.
Step-by-Step Guide
Materials
- Terracotta pot (4-6 inch diameter)
- Broken blue-and-white china or ceramic tiles
- Tile adhesive or thin-set mortar
- Sanded grout (beige, sand, or light gray color)
- Tile nippers or wheeled glass cutters
- Safety glasses
- Hammer and old towel (for breaking china)
- Small palette knife or craft stick
- Sponge and water bucket
- Rubber gloves
- Clean rags
- Small succulents and potting mix
Step 1: Preparing the Shards
-
Safety First:
Before you begin breaking anything, put on your safety glasses. Ceramic shards can fly unexpectedly and are extremely sharp. -
Initial Breaking:
Place your blue-and-white china pieces inside an old towel or heavy canvas bag. Gently strike them with a hammer to create manageable, large chunks rather than dust. -
Shaping the Pieces:
Using your tile nippers, trim these larger chunks into interesting geometric shapes. Aim for irregular triangles and polygons about 1 to 1.5 inches in size. -
Sorting by Color:
Separate your shards into piles: solid blue, solid white, and patterned pieces. This makes it easier to balance the colors as you glue.
Smooth Edges Pro Tip
Before gluing, rub the sharp cut edges of your china shards against a rough stone or sandpaper. This softens the “bite” and makes grouting much safer for your fingers.
Step 2: Attaching the Mosaic
-
Sealing the Pot:
If your terracotta pot is brand new, give it a quick wipe with a damp sponge to remove dust. Some crafters seal the inside with a water-based sealer to prevent moisture from popping the tiles later, but for succulents, it’s often optional. -
Applying Adhesive:
Use a palette knife to butter the back of a single shard with a moderate amount of tile adhesive. You want enough to grip, but not so much that it squishes out wildly. -
Starting the Pattern:
I like to start placing tiles just below the upper rim of the pot. Press the first shard firmly against the terracotta. -
Creating the Puzzle:
Continue gluing pieces next to the first one, leaving a consistent gap of about 1/8th to 1/4th of an inch between them. This gap is crucial for the grout later. -
Mixing Colors:
Alternate between solid blue, white, and patterned shards to keep the eye moving around the pot. Avoid clumping too many dark blue pieces in one spot. -
Filling the Surface:
Work your way down the pot, fitting piece to piece like a loose puzzle. Stop about half an inch from the bottom edge to leave a clean terracotta footer. -
Letting it Cure:
Once the surface is covered, set the pot aside. Allow the adhesive to dry completely according to the package instructions, usually at least 24 hours.
Step 3: Grouting and Finishing
-
Mixing the Grout:
Mix your sanded grout with water in a disposable container until it reaches the consistency of peanut butter. Wear your rubber gloves for this messy part. -
Applying Grout:
Scoop a handful of grout and smear it aggressively over the tiled surface. Press it deep into the gaps between the shards to ensure a solid bond. -
Removing Excess:
Run your gloved hand over the surface to scrape off the bulk of the excess grout. Ensure the edges of the shards are visible. -
The First Wipe:
Wait about 15-20 minutes for the grout to haze over. Take a damp (not soaking wet) sponge and gently wipe the tiles to clean them, rinsing the sponge frequently. -
Defining the Edges:
Use your sponge or a finger to smooth the top rim of the grout and the bottom edge where the tiles stop, creating a neat transition to the terracotta. -
Final Polish:
Allow the pot to dry for another hour until a hazy film appears again. Buff the tiles vigorously with a clean, dry rag to make the china shine. -
Planting:
Once the grout has cured for a full day, add your potting soil and tuck in your succulents, arranging them to complement the heights of your pot.
Adhesive Issues?
If shards slide down while the glue is wet, wrap a large rubber band or masking tape around the pot to hold them in place until the adhesive grabs.
Place your new planter on a sunny windowsill where the light can catch the glossy finish of the china shards


Broken China Mosaic Stepping Stones
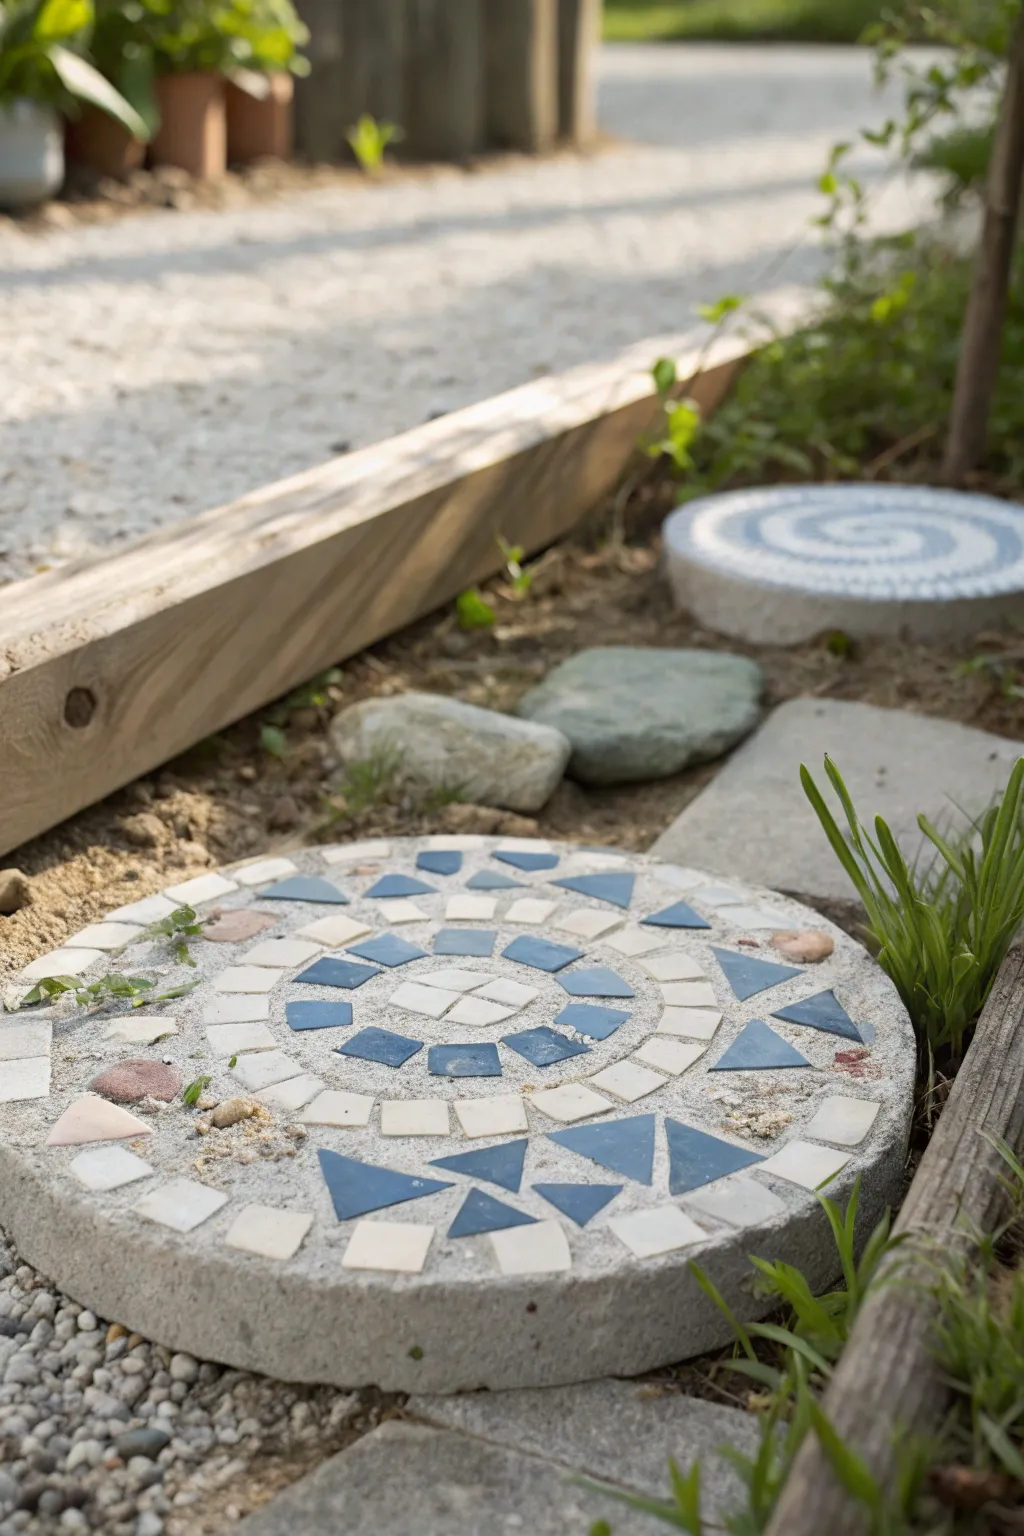
Add a touch of handcrafted charm to your garden path with these distinctively geometric stepping stones. Using simple blue and white tile shards, you’ll create a structured circular mandala pattern set in sturdy concrete.
Step-by-Step
Materials
- 12-inch round cake pan (for mold) or ready-made concrete stepping stone
- Quick-setting concrete mix (if casting your own)
- Blue ceramic tiles or plates (dark navy shade)
- White or cream ceramic tiles
- Tile nippers
- Safety glasses
- Masking tape
- Thin-set mortar (if using a pre-made stone)
- Sanded grout (light grey or white)
- Sponge and bucket of water
- Rubber spatula or grout float
- Petroleum jelly (for mold release)
- Contact paper (for indirect method – optional)
Step 1: Preparation & Design
-
Prepare the workspace:
Set up a sturdy work table outdoors or in a garage. If you are breaking tiles, always wear safety glasses to protect your eyes from flying shards. -
Create the tesserae:
Use your tile nippers to cut the blue tiles into specific shapes. You will need small squares (approx. 1/2 inch) for the inner ring and larger triangles for the outer border. -
Refine the shapes:
Nip the white tiles into small, uniform squares. Try to keep the edges relatively straight, but don’t worry about perfection; the rustic look is part of the charm. -
Dry fit the design:
On a piece of cardboard or contact paper cut to the size of your mold, arrange your pieces. Start with a central four-square diamond, then radiate outward with the blue square ring, then white, and finally the blue triangles.
Sticky Situation?
If concrete sticks to your tiles during the initial pour, clean them immediately with a damp Q-tip before it hardens, or use vinegar later to dissolve the film.
Step 2: Casting the Base
-
Lubricate the mold:
If casting your own stone, coat the inside of your cake pan generously with petroleum jelly to ensure the concrete releases easily later. -
Mix the concrete:
Combine your quick-setting concrete mix with water according to the package instructions. You want a consistency similar to peanut butter or thick oatmeal. -
Pour the mold:
Pour the concrete mixture into the greased pan, filling it about 2 inches deep. Tap the sides of the pan vigorously to release trapped air bubbles. -
Transfer the design:
While the concrete is wet but starting to firm up (usually after about 15-20 minutes), carefully transfer your tile pieces from your dry layout onto the wet concrete. Press each piece down until it is level with the surface.
Add Subtle Texture
Embed small pebbles or sea glass between the larger geometric tiles. This adds texture and catches the sunlight differently than flat ceramic.
Step 3: Grouting & Finishing
-
Let it cure:
Allow the stone to dry completely in the mold. This usually takes 24 to 48 hours depending on humidity. Don’t rush this part or the stone may crack. -
Demold the stone:
Turn the pan upside down and gently tap to release the stone. If it sticks, run a thin knife around the very edge. -
Mix the grout:
Mix your sanded grout with water until it reaches a toothpaste-like consistency. I prefer sanded grout here because it holds up better to foot traffic. -
Apply grout:
Spread the grout over the entire surface of the stone, pushing it deep into the crevices between your tiles using a rubber spatula or float. -
Wipe the excess:
After letting the grout set for about 10 minutes, take a damp (not soaking) sponge and wipe the surface in circular motions to reveal the tiles. -
Final polish:
Once a haze forms on the tiles after another 20 minutes, use a soft, dry cloth to buff the tiles until they shine. -
Seal the stone:
After the stone has cured for a few days, apply a concrete and tile sealer to protect it from weather damage and stains.
Place your new stone among the greenery and enjoy the custom path you’ve created


Pique Assiette Birdbath Bowl
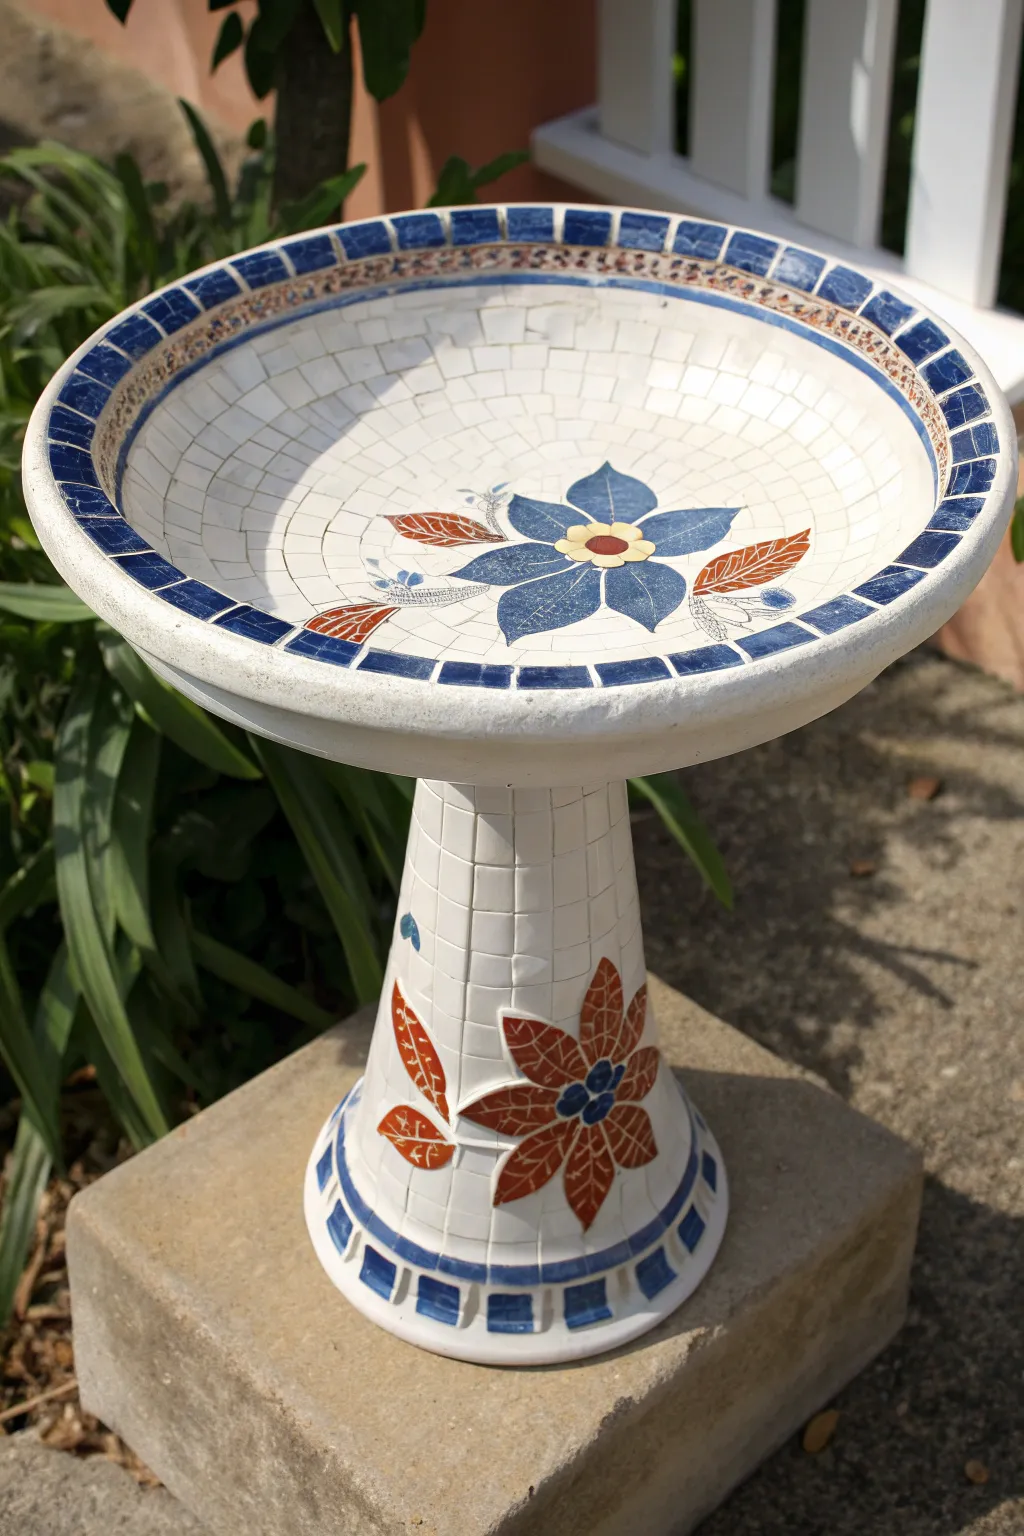
Transform a plain concrete birdbath into a stunning garden centerpiece with this precise, tile-based mosaic design. Featuring a classic blue flower motif on a crisp white background, this project combines geometric grid patterns with organic floral shapes for a timeless look.
Detailed Instructions
Materials
- Concrete birdbath (bowl and pedestal)
- White ceramic tiles (small squares)
- Blue ceramic tiles (dark and medium shades)
- Terracotta/brown ceramic tiles
- Yellow ceramic tiles (for flower center)
- Tile nippers
- Waterproof tile adhesive (thin-set mortar)
- White sanded grout for outdoor use
- Grout sealer
- Pencil
- Sponge and bucket of water
- Rubber spatula or grout float
- Protective gloves and eyewear
Step 1: Preparation and Design
-
Clean the surface:
Begin by thoroughly scrubbing your concrete birdbath to remove any dirt, moss, or loose concrete. Let it dry completely in the sun before starting, as moisture can prevent the adhesive from bonding properly. -
Sketch the pattern:
Using a pencil, lightly sketch your central flower design directly onto the inside of the bowl. Draw a large five-petaled flower in the center, flanked by leaf shapes. Repeat a similar, perhaps slightly simpler, floral motif on the pedestal base. -
Grid the background:
To keep your white background tiles organized, lightly draw concentric circles radiating from the center of the bowl. These guidelines will help you keep your tile rows straight and even as you work outward.
Uneven Surfaces?
If your tiles are sliding on the curved bowl surface, mix your adhesive slightly thicker. You can also use painter’s tape to hold specific slippery tiles in place while the glue sets.
Step 2: Tiling the Bowl
-
Create the flower center:
Start with the very center of the design. Apply a small amount of adhesive and place a yellow tile, surrounding it with a ring of contrasting tiles to define the flower’s eye. I find it easiest to work from the absolute center outwards. -
Form the blue petals:
Using your nippers, cut blue tiles to fit the petal shapes you drew. You may need to trim square tiles into slightly curved or triangular shapes to fit the petal contours. Adhere them with a consistent gap between pieces. -
Add the leaves:
Cut your terracotta-colored tiles into leaf shapes. Place these around the blue flower to add warmth and contrast to the cool tones of the centerpiece. -
Fill the background:
Begin filling the white background space using the small white square tiles. Follow your concentric circle guidelines, placing tiles row by row. Start near the flower and work your way up the sides of the bowl. -
Tile the rim:
For the upper rim, switch to a decorative border. Create a pattern of alternating blue squares and smaller detailed slivers or a contrasting textured tile to frame the bowl. Ensure the top edge is smooth so birds can land comfortably.
Step 3: Tiling the Pedestal
-
Execute the base design:
Apply the vertical grid pattern of white tiles on the pedestal’s shaft. Leave space for the secondary floral motif near the bottom. -
Detail the lower flower:
Recreate the floral design on the base using terracotta tiles for the petals and blue accents for the center, mirroring the colors used in the bowl but inverting the dominance. -
Add the base border:
Finish the very bottom of the pedestal with a strong border of blue square tiles, matching the rim of the bowl to tie the whole piece together visually.
Add Sparkle
Incorporate mirror pieces or iridescent glass gems in the center of the flowers. These will catch the sunlight and water reflections, attracting more birds to the bath.
Step 4: Grouting and Finishing
-
Mix the grout:
Once the adhesive has cured (usually 24 hours), mix your sanded grout according to the package instructions until it reaches a peanut butter consistency. -
Apply the grout:
Spread the grout over the entire surface using a rubber float or spatula. Press firmly to ensure it fills all the gaps between the tiles completely. -
Clean the excess:
Wait about 15-20 minutes for the grout to set slightly, then wipe away the excess with a damp sponge. Rinse your sponge frequently to avoid spreading a haze. -
Buff and seal:
After the grout creates a haze as it dries, buff the tiles with a soft, dry cloth until they shine. Allow the grout to cure fully for a few days, then apply a penetrating grout sealer to protect your work from the elements.
Place your finished masterpiece in a shady spot in the garden and wait for your feathered friends to arrive

The Complete Guide to Pottery Troubleshooting
Uncover the most common ceramic mistakes—from cracking clay to failed glazes—and learn how to fix them fast.
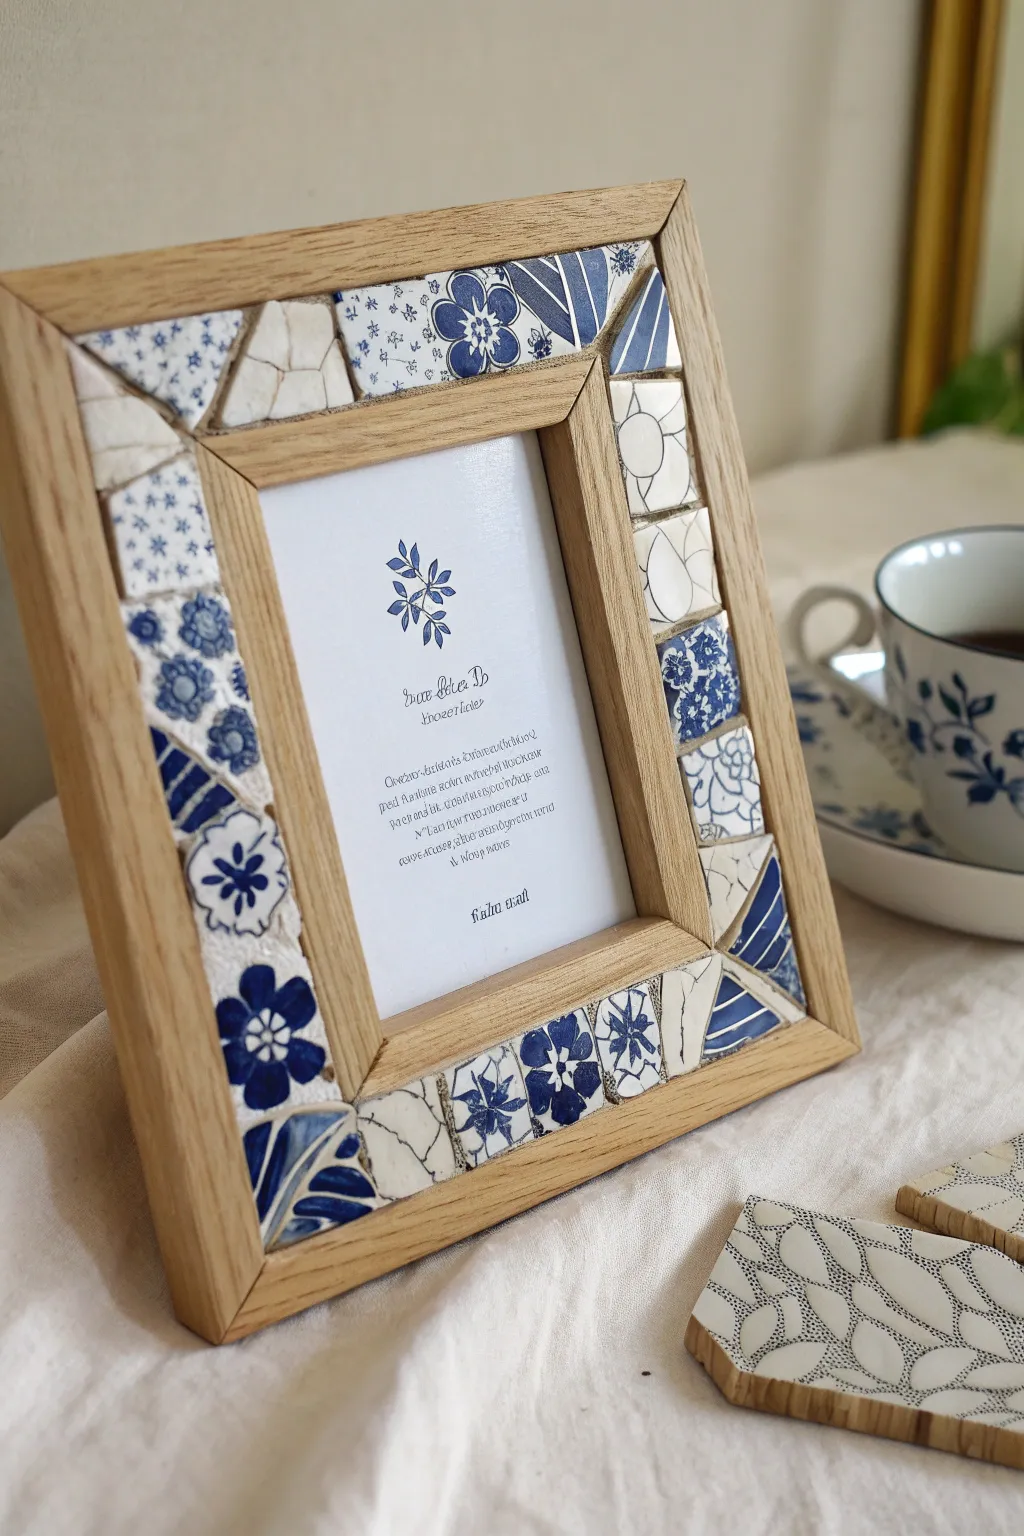
Statement Tray With Floral China Centers

Transform mismatched floral plates and a plain wooden tray into a stunning cottage-core centerpiece. This project uses the pique assiette method to highlight beautiful botanical motifs set against a clean, white background.
How-To Guide
Materials
- Unfinished wooden serving tray (rectangular)
- Floral china plates (white background preferred)
- Plain white china plates (for filler)
- Tile nippers or wheeled glass cutters
- Safety glasses
- Weldbond adhesive or clear silicone glue
- Sanded grout (light beige or ‘biscuit’ color)
- Grout sealer
- Sponge and bucket of water
- Latex gloves
- Painter’s tape
- Soft cloth or rag
Step 1: Preparation & Breaking
-
Prep the tray:
Ensure your wooden tray is clean and free of dust. If you plan to stain or paint the wooden rim, do this now and let it fully dry before beginning the mosaic work to avoid staining the grout later. -
Protect the edges:
Apply a layer of painter’s tape around the inner vertical edges of the tray. This prevents grout and glue from sticking to the wood where you don’t want it. -
Isolate the florals:
Using your wheeled nippers, carefully cut around the floral designs on your china plates. Aim to keep the main flowers intact, like the large pink rose or red buds seen in the example. -
Cut filler pieces:
Take the plain white sections of the plates and nip them into various geometric shards—triangles and irregular polygons work best for this style. Wear your safety glasses during this step to protect against flying shards.
Plate Selection Pro-Tip
Look for plates with a flat rim or shallow curve. Highly curved bowls are difficult to lay flat on a tray without rocking, which creates sharp, dangerous edges.
Step 2: Design & Adhesion
-
Dry layout:
Arrange your key floral pieces on the tray surface without glue. Place the large central rose first, then position the stems and smaller buds towards the corners to create a balanced, organic flow. -
Glue the focal points:
Once happy with the placement, lift each floral piece, apply a dab of adhesive to the back, and press it firmly back into place. -
Begin filling the background:
Start fitting the plain white shards around your floral focal points. Work from the flowers outward, treating it like a puzzle where pieces don’t quite touch. -
Manage the spacing:
Leave a gap of about 1/8 inch between all pieces. This channel is crucial for the grout to hold everything together securely. -
Complete the edges:
Continue filling out to the edges of the tray. You may need to nip specific small triangles to fill awkward gaps near the tray walls. -
Curing time:
Allow the adhesive to dry completely. We generally recommend waiting at least 24 hours to ensure the bond is strong enough to withstand grouting.
Step 3: Grouting & Finishing
-
Mix the grout:
Mix your sanded grout with water according to the package instructions until it reaches a consistency similar to peanut butter. -
Apply the grout:
Wearing gloves, spread the grout over the entire surface. Push it well into the crevices between the china shards using your fingers or a rubber float. -
Initial clean:
Let the grout set for about 10–15 minutes until it begins to haze. Dampen your sponge (wring it out very well) and gently wipe away the excess grout from the tile surfaces. -
Refine the lines:
Rinse your sponge frequently and continue wiping until the china is clean and the grout lines are smooth and slightly recessed. -
Final buffing:
Allow the grout to dry for another hour or two, then take a soft, dry cloth and buff the china pieces to remove the remaining haze and make them shine. -
Remove tape:
Carefully peel away the painter’s tape from the inner rim. If any grout seeped under, scrape it away gently with a wooden stick or fingernail while it is still somewhat soft. -
Seal the surface:
After the grout has cured for the time recommended by the manufacturer (usually a few days), apply a grout sealer to protect the surface from coffee spills or stains.
Level Up: Texture
Mix in a few pieces of relief-patterned white china (like Wedgewood style) alongside the smooth pieces to add a subtle tactile element to the background.
Now you have a durable, heirloom-quality tray ready for your next tea service
Small Tabletop With Concentric Shard Rings
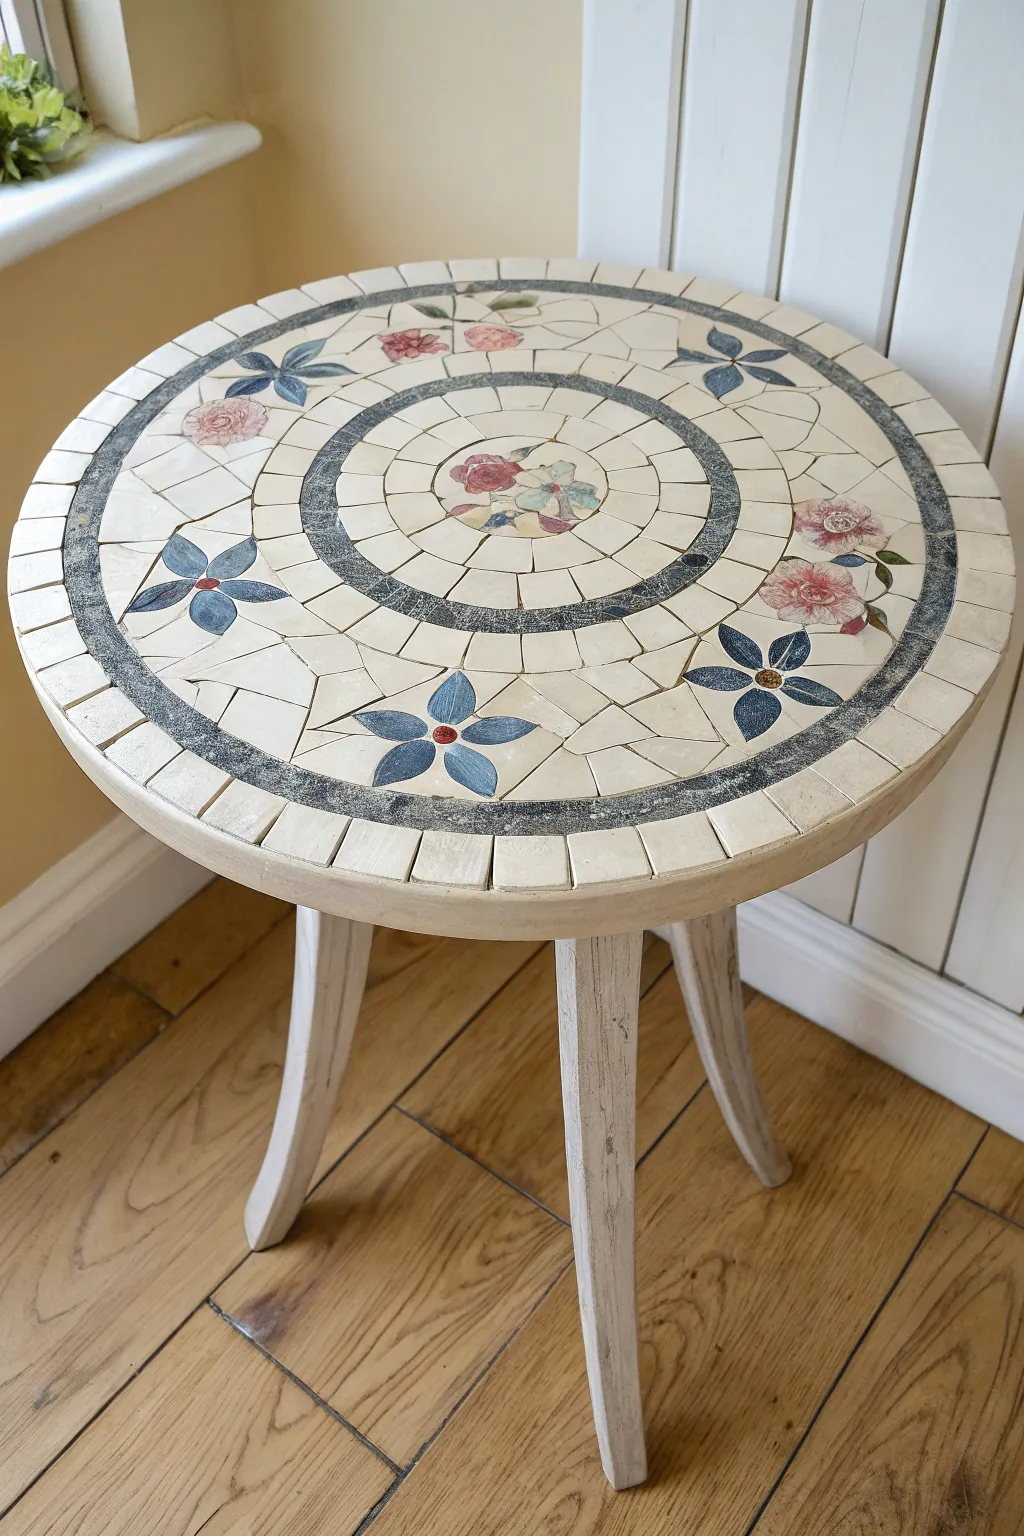
Transform a plain side table into a charming cottage-core focal point with this concentric mosaic design. Using delicate floral china fragments arranged in precise rings creates a structured yet whimsical pattern that feels like an heirloom garden path.
Step-by-Step Tutorial
Materials
- Small round wooden side table (approx. 18-24 inch diameter)
- Broken china plates (floral patterns featuring pink roses and blue flowers)
- Plain cream or off-white ceramic tiles (or plain sections of plates)
- Dark grey or slate blue mosaic tiles (for the concentric rings)
- Tile nippers (wheeled nippers work best)
- PVA glue or Weldbond adhesive
- Sanded grout (light cream or buff color)
- Grouts float or rubber spatula
- Sponge and soft cloth
- Sandpaper (medium grit)
- Chalk paint (white or cream for the legs)
- Clear wax or paintbrush sealer
Step 1: Preparation & Planning
-
Prep the Surface:
Begin by sanding the top of your wooden table to roughen the surface. This removes any old varnish and gives the adhesive a better ‘tooth’ to grab onto. Wipe away all dust with a damp cloth. -
Paint the Base:
Before tiling, paint the table legs and apron with white or cream chalk paint. Applying a distressed finish now is easier than trying to paint around the finished mosaic later. Let this dry completely. -
Mark Guidelines:
Find the exact center of the table. Using a compass or a string and pencil, draw two concentric circles: a small inner circle (about 6 inches diameter) and a larger outer circle (about 4 inches from the edge). These will dictate where your dark separator rings go.
Uneven Surface?
If shards vary in thickness, ‘butter’ back of thinner pieces with extra glue. This raises them to meet thicker pieces, creating a perfectly smooth, flat tabletop surface.
Step 2: Creating the Mosaic
-
The Centerpiece:
Select a large, special shard featuring a floral cluster—like the roses shown—for the very center. Nip it into a rough circle and glue it down right in the middle. -
Inner Cream Ring:
Cut plain cream china into irregular but fitting shapes. Glue these around your center floral piece, filling the space out to your first pencil line. Keep the gaps between pieces consistent, about 1/8th of an inch. -
First Dark Ring:
Using your dark grey or slate blue tiles, nip them into small, relatively uniform squares or rectangles. Glue these along your inner pencil circle to create a distinct, defining border. -
The Floral Band:
This is the main decorative zone. Select china pieces with specific motifs—blue star-like flowers and pink roses. Arrange them evenly around the ring, alternating the colors (e.g., blue, space, pink, space). -
Background Fill:
Fill the empty spaces between your floral motifs in this middle band with more cream shards. I like to dry-fit a few pieces first to ensure the petals aren’t overshadowed by the background pieces. -
Second Dark Ring:
Create the second defining border on your outer pencil line using the same dark grey tiles. Ensure this ring is the same width as the inner one for visual balance. -
Outer Border:
For the final edge of the table top, cut larger, rectangular cream pieces. Arrange them like a sunburst or brick pattern radiating outward to the table edge. They should slightly overhang the wood edge or sit flush with it.
Step 3: Grouting & Finishing
-
Adhesive Cure Time:
Allow the glue to dry for at least 24 hours. The tiles must be completely rigid before you apply any pressure with grout. -
Mix the Grout:
Mix your sanded cream grout with water until it reaches a peanut butter consistency. Avoid making it too runny, or it will shrink and crack as it dries. -
Spread the Grout:
Scoop the grout onto the table and spread it with a rubber float. Push the mixture deeply into all crevices, ensuring no air pockets remain. Work in sections to ensure coverage. -
Initial Clean:
Wait about 10-15 minutes until the grout starts to haze over. Take a damp (not soaking) sponge and wipe across the surface to remove excess grout. Rinse your sponge frequently. -
Final Polish:
Once the grout is dry to the touch (usually an hour later), use a soft, dry cloth to buff the china tiles until they shine and any remaining haze is gone. -
Seal the Edge:
Run a thin bead of glue or a specialized grout sealer around the very outer rim where the tiles meet the wood to prevent moisture from getting under the mosaic.
Mix Metals
For a glamorous twist, replace the dark grey separator rings with mirrored glass tiles or gold-leaf tesserae to add sparkle that catches the light.
Place your lovely new table by a sunny window and enjoy the timeless beauty of your handcrafted design


What Really Happens Inside the Kiln
Learn how time and temperature work together inside the kiln to transform clay into durable ceramic.
Picture Frame With Teacup Handle Accents
Transform a plain wooden frame into a vintage masterpiece using the classic charm of blue and white china. This project breathes new life into chipped plates or thrift store finds, creating a stunning border of intricate floral patterns.
Step-by-Step Tutorial
Materials
- Flat, wide wooden picture frame (unfinished oak or pine works well)
- Blue and white china plates (broken or thrifted)
- Tile nippers or wheeled glass cutters
- Safety glasses
- Thick towel or canvas drop cloth
- Hammer
- Weldbond glue or clear mosaic adhesive
- White or light grey sanded grout
- Rubber grout float or spatula
- Sponge and water bucket
- Soft cloth for buffing
- Paper towels
- Masking tape or painter’s tape
Step 1: Preparation & Breaking
-
Protect the frame:
Before you begin, remove the glass and backing from your wooden frame. Use masking tape to cover the inner and outer vertical edges of the wood to protect them from grout stains later on. -
Safety first:
Put on your safety glasses. This is non-negotiable when working with shards of ceramic. -
Initial breakage:
Place your china plate inside a folded thick towel or canvas drop cloth. Strike the center of the plate firmly with a hammer to create large initial shards. -
Refining the pieces:
Take the large shards and use your tile nippers to cut them into smaller, usable shapes. I find that wheeled nippers give the most precise cuts for creating triangles and trapezoids. -
Sorting the patterns:
Sort your cut pieces into piles based on their design: dark blue floral centers, geometric borders, solid white sections, and lighter patterns. This makes the design process much faster.
Step 2: Designing & Adhering
-
Dry fitting the corners:
Start by arranging pieces dry (without glue) on the corner joints of the frame. Angled pieces work best here to mimic the mitered cut of the wood. -
Filling the sides:
Continue dry fitting pieces along the flat sides. Mix the patterns, alternating between dense florals and simpler white pieces to keep the visual balance engaging. -
Check for spacing:
Aim for a gap of about 1/8th of an inch between pieces. If pieces are touching, the grout won’t hold them; if they are too far apart, the design looks disjointed. -
Gluing the pieces:
Once you are happy with a section, lift one piece at a time, apply a dab of adhesive to the back, and press it firmly onto the wood. Repeat until the entire face is covered. -
Let it cure:
Allow the adhesive to dry completely. This usually takes at least 24 hours. Don’t rush this, or pieces will slide when you grout.
Nipping Tip
When using nippers on rounded plate rims, try to cut perpendicular to the curve. This helps flatten the pieces so they adhere better to the flat frame surface.
Step 3: Grouting & Finishing
-
Mix the grout:
Mix your sanded grout with water according to the package instructions until it reaches the consistency of peanut butter. Let it slake (rest) for 10 minutes, then mix again. -
Apply the grout:
Spread the grout over the mosaic using a rubber float or spatula. Push it firmly into all the crevices between the china shards. -
Clear the excess:
Scrape off the bulk of the excess grout with the edge of your float. Let the remaining grout set for about 15-20 minutes until a haze forms. -
Clean the surface:
Dampen your sponge (wring it out well so it’s barely wet) and wipe across the tiles to remove the grout haze. Rinse the sponge frequently. -
Buff to a shine:
Wait another hour for the grout to firm up, then use a soft, dry cloth to buff the china pieces until they sparkle. -
Final touches:
Remove the masking tape from the wood edges. Reassemble your frame with the glass, backing, and your favorite photo or art print.
Make It 3D
Don’t discard the teacup handles! Nip the handle base flat and glue it onto the frame corner to act as a unique 3D hook for hanging light jewelry or keys.
Place your newly minted heirloom on a mantel or side table to add a touch of timeless elegance to your room
Mirror Border in Pique Assiette Style
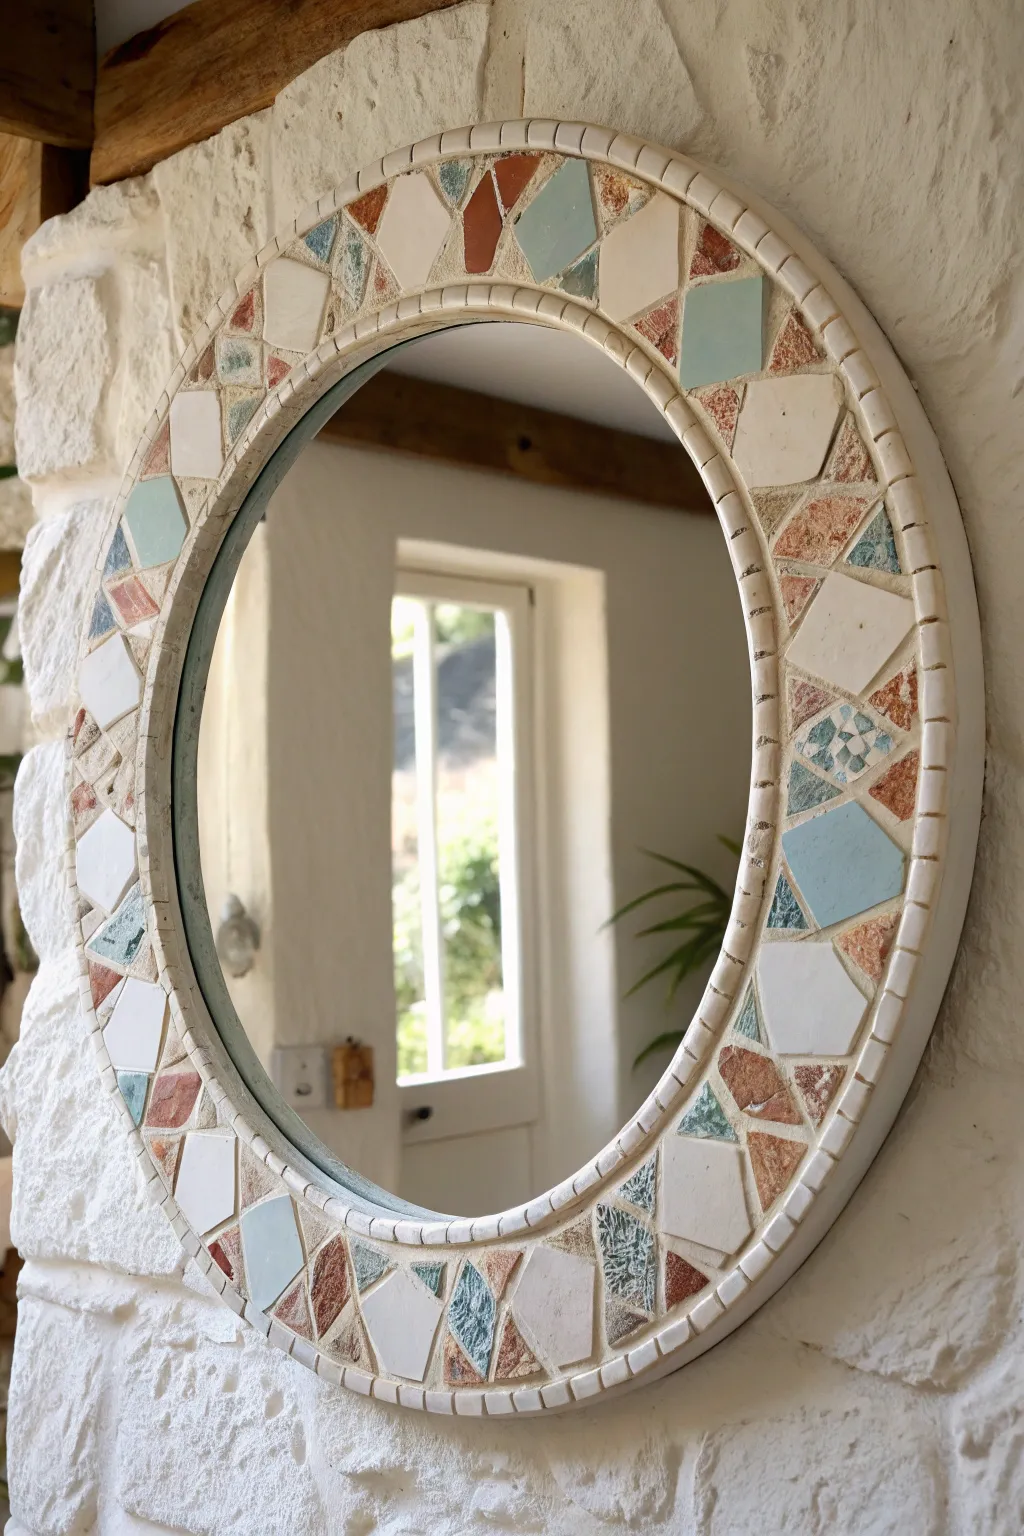
Transform a plain round mirror into a Mediterranean-inspired focal point using the pique assiette technique. This project combines shards of broken china in earthy terra cotta, soft teal, and cream tones to create a textured, timeless border.
How-To Guide
Materials
- Round mirror with a wide, flat wooden or MDF frame (approx. 24-30 inches diameter)
- Variety of china plates/tiles (colors: cream, brick red, teal, pale blue)
- Tile nippers (wheeled nippers work best for china)
- Weldbond glue or similar strong PVA craft adhesive
- Pre-mixed grout (sanded, off-white or light beige color)
- Rubber float or spreading tool
- Sponge and bucket of water
- Clean, soft rags
- Safety glasses
- Hammer and old towel (for initial breaking)
- Flexible rope molding or beaded wood trim (for edges)
- White or cream acrylic paint (for edging)
Step 1: Preparing the Frame and Edges
-
Prep the base:
Ensure your mirror frame is clean, dry, and free of dust. If the surface is very slick, sand it lightly with rough sandpaper to help the glue adhere better. -
Add the edge trim:
Measure the circumference of both the inner and outer rim of your frame. Cut lengths of flexible rope molding or beaded wood trim to fit these circles exactly. -
Secure the borders:
Glue the trim securely to the very inner and outer edges of the frame face. This creates a ‘trough’ or channel where your mosaic will sit, giving the project a professional finish. -
Paint the trim:
Paint the rope molding with a cream or white acrylic paint to match your intended grout color. I usually do this before tiling so I don’t get paint on my china pieces later.
Step 2: Creating the Mosaic Shards
-
Safety check:
Put on your safety glasses. Keep an assortment of colored plates nearby. -
Initial break:
Wrap a plate in an old towel. Tap the center firmly with a hammer to create large, random shards. Repeat this for each color family: cream, terra cotta, and teal. -
Refine the shapes:
Use your tile nippers to shape the large shards into more manageable geometric pieces. Aim for squares, irregular triangles, and trapezoids about 1 to 2 inches in size. -
Variety is key:
Cut some pieces from the patterned rims of plates and some from the flat centers to get a mix of textures and curvature.
Choosing Colors
For this authentic look, source plates in ‘earth tones.’ Look for stoneware rather than delicate fine china, as it breaks into chunkier, more rustic pieces perfect for this style.
Step 3: Laying the Design
-
Dry layout:
Before gluing, arrange a section of your shards on the frame to test the spacing. You want gaps of about 1/8 to 1/4 inch between pieces for the grout lines. -
Focus on color balance:
Distribute the colors evenly. Try not to clump all the teal or all the red in one spot; spread them out amongst the neutral cream pieces. -
Start gluing:
Apply a generous amount of Weldbond glue to the back of a shard. Press it firmly onto the frame. -
Work in sections:
Proceed section by section around the circle. I like to glue the larger ‘anchor’ pieces first, then fill in the gaps with smaller triangles. -
Mind the flatness:
Since china is curved, feel each piece as you place it. Try to keep the highest points of the shards level with your rope molding edges so no sharp corners stick up excessively. -
Let it cure:
Once the entire frame is covered, allow the adhesive to dry completely. This usually takes at least 24 hours depending on humidity.
Level Up: Pattern Play
Instead of a completely random layout, try creating a repeating pattern (like red-white-teal-white) or creating small ‘flower’ clusters at the compass points (12, 3, 6, and 9 o’clock).
Step 4: Grouting and Finishing
-
Prepare the grout:
Mix your sanded grout with water until it reaches the consistency of thick peanut butter. Let it slake (rest) for about 5-10 minutes. -
Apply grout:
Scoop the grout onto the mosaic. Use a rubber float or your gloved hand to push the mixture deeply into all tight crevices and gaps. -
Clear excess:
Scrape off the bulk of the excess grout with the edge of your float, moving diagonally across the pieces. -
First wipe:
Wait about 10-15 minutes until the grout starts to haze over. Use a damp (not dripping!) sponge to wipe the surface gently in a circular motion. -
Clean and polish:
Rinse your sponge frequently. Keep wiping until the china pieces are clean. Once dry, use a soft cloth to buff away the final haze and make the shards shine.
Hang your finished mirror in an entryway or bathroom to enjoy the handmade charm every day

TRACK YOUR CERAMIC JOURNEY
Capture glaze tests, firing details, and creative progress—all in one simple printable. Make your projects easier to repeat and improve.
Vase Makeover With Curved Shard Layout
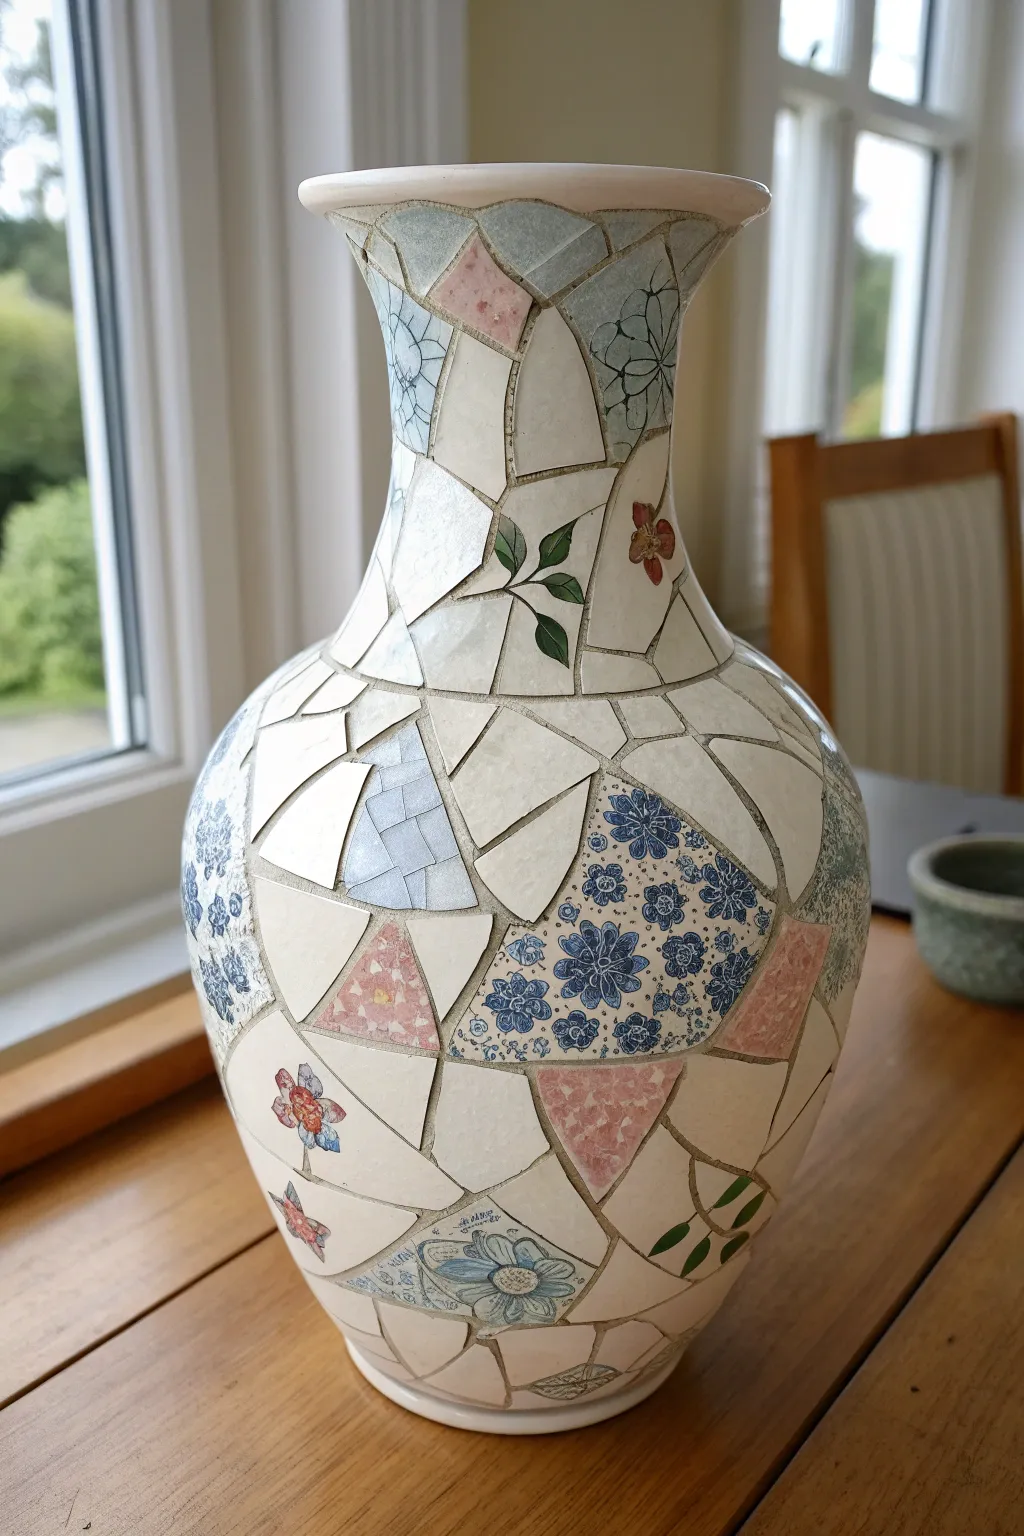
Transform a plain ceramic vase into a stunning piece of textured art using the curved shard technique. This project breathes new life into chipped teacups and plates, creating a sprawling mosaic of floral patterns and creamy ceramics that hugs every contour.
Step-by-Step Tutorial
Materials
- A smooth, sturdy ceramic or glass vase (acts as the base)
- Old china plates, saucers, and cups (floral patterns and solids)
- Tile nippers or wheeled glass cutters
- Safety glasses and heavy gloves
- Clear silicone adhesive or Weldbond glue
- Sanded grout (light gray or antique white)
- Rubber float or grout spreader
- Sponge and bucket of water
- Soft cloth for polishing
- Hammer and old towel (for initial breaking)
Step 1: Preparing the Teserae
-
Safety First:
Before you begin breaking anything, put on your safety glasses and protective gloves to shield yourself from flying porcelain chips and sharp edges. -
Initial Breakage:
Wrap your chosen china plates and saucers inside an old towel. Gently strike the center of the wrapped china with a hammer to create large, manageable chunks rather than tiny dust. -
Selecting Feature Pieces:
Unwrap the towel and sift through the pieces. Identify the shards that have specific floral motifs, leaves, or interesting patterns you want to feature prominently on the vase. -
Refining Shapes:
Use your wheeled nippers to trim the jagged edges of your selected pieces. Aim for irregular polygons—triangles and trapezoids work best for navigating the curves of a vase.
Pro Tip: Flatness Check
Before the glue sets, run your hand over the curve to check for sharp corners jutting out. Press these pieces deeper into the adhesive or swap them for smaller shards.
Step 2: Adhering the Mosaic
-
Planning the focal points:
Dry-fit your ‘feature’ pieces (the ones with flowers or unique designs) against the vase to see where they sit best. I like to space these out evenly around the widest part of the belly and the neck. -
Applying Adhesive:
Apply a dab of silicone adhesive or Weldbond to the back of a floral shard. Press it firmly onto the vase surface. Silicone is particularly good here because it has a bit of ‘grab’ that prevents pieces from sliding down vertical surfaces. -
Building the Background:
Once your focal points are set, begin filling in the gaps with plain white or solid-colored shards. Working in small sections helps maintain control. -
Managing the Curve:
As you approach the neck or the curved base, use smaller shards. Large pieces will stick out tangentially and create sharp edges, whereas smaller pieces will follow the round profile smoothly. -
Mind the Gaps:
Leave a consistent gap of about 1/8th of an inch (3mm) between pieces for the grout. Try to avoid letting the corners of four different shards meet at a single point, as this can look chaotic. -
Rim and Base:
Finish the very top rim and the bottom edge with pieces with straight, factory-finished edges if possible, or nip them carefully to create a clean line. -
Curing Time:
Allow the adhesive to cure completely. This usually takes at least 24 hours. The pieces must be rock solid before you introduce wet grout.
Level Up: Colored Grout
Tint your grout with acrylic paint or grout dye to match a specific flower color in your china. A soft pink or pale blue grout can make the patterns pop.
Step 3: Grouting and Finishing
-
Mixing the Grout:
Mix your sanded grout with water until it reaches the consistency of peanut butter or thick cake batter. Let it slake (rest) for about 10 minutes, then stir again. -
Applying Grout:
Scoop a generous amount of grout onto the vase. Using a rubber float or your gloved hands, smash the grout firmly into all the crevices between the china shards. -
Coverage Check:
Ensure every single gap is filled and there are no air bubbles trapped beneath the edges of the china. -
Initial Cleanup:
Let the grout sit for about 15-20 minutes until it begins to firm up slightly. Dampen a sponge (wring it out well so it’s not dripping) and wipe across the surface to remove excess grout. -
Haze Removal:
Rinse your sponge frequently and continue wiping until the china pieces are clean. Be careful not to drag grout out of the joints. -
Final Polish:
Wait another hour or two until a dry haze forms on the china. Take your soft dry cloth and buff the vase vigorously to make the china shine and smooth the grout lines.
Place your finished vase near a window where the light can catch the glossy curves of the china
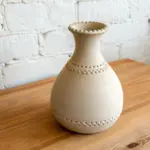
Mosaic Plant Saucer to Match Your Pot
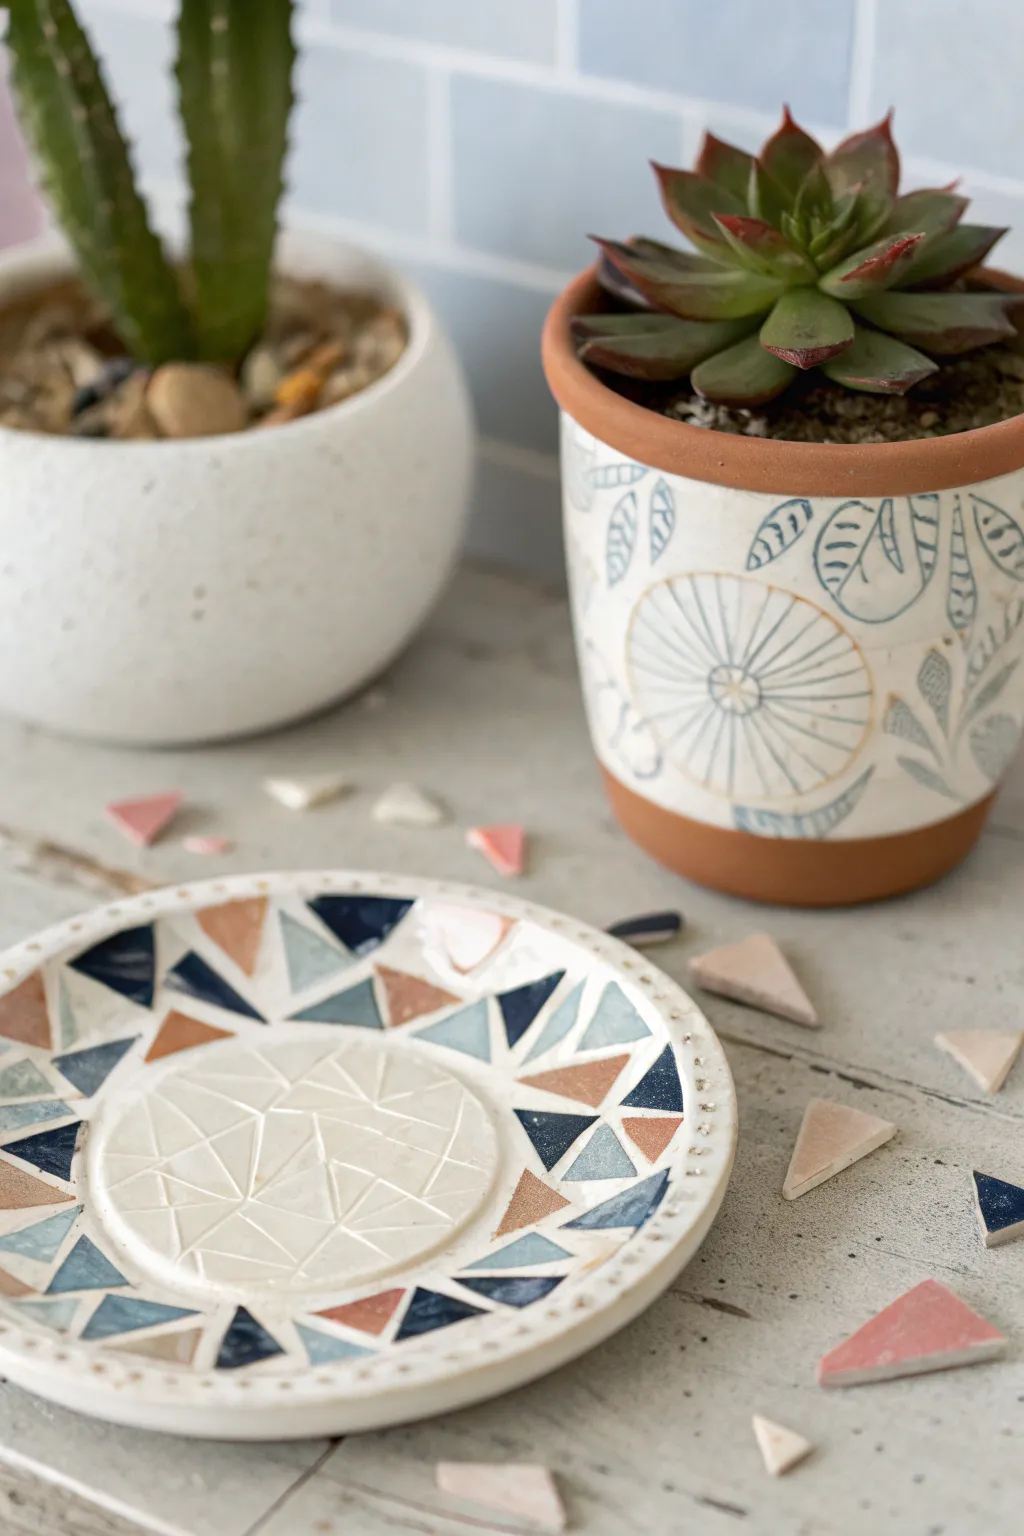
Transform a plain terra cotta saucer into a stylish, geometric accent piece featuring a crisp triangular mosaic border and a uniquely textured center. This project mirrors the clean lines and earthy tones of your favorite patterned planters, creating a cohesive look for your indoor garden.
Step-by-Step Guide
Materials
- Terra cotta plant saucer (glazed or unglazed)
- White air-dry clay or polymer clay
- Rolling pin
- Craft knife or clay sculpting tool (needle tool)
- Compass or round cookie cutter (sized for the saucer center)
- Ceramic triangular mosaic tiles (navy blue, light blue, terracotta, peach, white)
- Strong craft adhesive (e.g., E6000) or mosaic glue
- Grout (sanded, white or off-white)
- Sponge and water
- Sealer (optional, for water resistance)
Step 1: Creating the Textured Centre
-
Prepare the Clay:
Condition your white clay by kneading it until soft and pliable, then roll it out to an even thickness of about 1/4 inch on a smooth surface. -
Cut the Circle:
Measure the depression in the center of your saucer. Use a compass or a circle cutter to cut a disc of clay that fits perfectly inside this inner ring, leaving the rim exposed for tiling. -
Score the Pattern:
Using a needle tool or the back of a craft knife, gently score a geometric web pattern into the loose clay disc. Draw random intersecting straight lines to create varied triangles and polygons, but don’t cut all the way through. -
Dry the Centerpiece:
Allow the clay disc to dry completely according to the package instructions. To prevent curling, I often place a light book on top once the surface is touch-dry. -
Adhere the Center:
Once hardened, apply a generous amount of strong adhesive to the back of the clay disc and press it firmly into the center of the saucer. Let the glue cure before moving on.
Consistent Clay Depth
When rolling out the center clay piece, use two items of identical thickness (like magazines) as guides for your rolling pin to ensure the surface is perfectly flat.
Step 2: Laying the Mosaic Border
-
Sort Your Tiles:
Gather your triangular ceramic tiles. You want a mix of navy blue, soft blue, terracotta, and white to match the bohemian vibe. -
Plan the Layout:
Before gluing, dry-fit the tiles around the rim of the saucer to test the spacing. Aim for a pattern where the triangles alternate pointing in and out, creating a jagged geometric ring. -
Apply Adhesive:
Working in small sections of about 2-3 inches, apply a thin layer of adhesive directly to the rim of the saucer. -
Place the Tiles:
Press the triangular tiles into the glue. Leave very small gaps (about 1/16 inch) between them for the grout lines. Start with the outer ring of triangles, then fill in any interior gaps if your rim is wide enough. -
Final Adjustments:
While the glue is still tacky, nudge any crooked tiles into alignment to ensure the geometric pattern looks crisp. Let the adhesive dry for at least 24 hours.
Uneven Grout Lines?
If grout dries on the tile face and won’t wipe off with a sponge, use a wooden toothpick or a plastic scraper to gently chip it away without scratching the glaze.
Step 3: Grouting and Finishing
-
Mix the Grout:
Mix a small amount of sanded grout with water until it reaches the consistency of peanut butter. -
Spread the Grout:
Scoop the grout onto the mosaic rim. Use your finger or a small rubber float to push the grout firmly into the crevices between the tiles and around the edge of the central clay disc. -
Clean the Excess:
Wait about 10-15 minutes for the grout to set slightly. Then, use a damp (not soaking) sponge to wipe away the excess grout from the surface of the tiles. -
Clear Haze:
Once the grout is fully dry (usually after a few hours), buff the tiles with a soft, dry cloth to remove any lingering dusty haze. -
Seal (Optional):
If you plan to put a real plant on this saucer, brush a clear waterproof sealer over the entire piece—including the clay center and grout lines—to protect it from moisture damage.
Place your matching pot on top and enjoy the coordinated look of your handmade garden decor
Garden Bench Panel With Mixed China Patterns

Transform a plain wooden bench into a charming, cottage-style focal point by embedding contrasting panels of broken china. This project combines geometric borders with distinct floral and patterned centerpieces, creating a structured yet whimsical look.
Detailed Instructions
Materials
- Sturdy wooden bench with a recessed top (or wood strips to build a frame)
- Assorted china plates (red/white/blue color palette)
- Blue ceramic tiles for the border
- Tile nippers and hammer
- Strong tile adhesive (like thinset mortar)
- Sanded grout (light beige or off-white)
- Grout sealer
- Sponge and bucket
- Safety glasses and gloves
- Pencil and ruler
Step 1: Preparation and Design
-
Prepare the bench surface:
Ensure your wooden bench is clean, dry, and sanded. If the bench doesn’t have a recessed top, nail wooden trim strips around the perimeter to create a lip that is slightly higher than the thickness of your china pieces. -
Select your china:
Gather plates with varying patterns. For this look, aim for three distinct ‘hero’ sections: a large blue floral, a red geometric or floral, and a detailed blue patterned plate. -
Map out the grid:
Use a pencil and ruler to draw three equal square sections in the center of the bench top, leaving a uniform border space around the edges for the blue tile frame.
Step 2: Breaking and Shaping
-
Create the border pieces:
Take your solid blue ceramic tiles and use tile nippers to cut them into triangular or trapezoidal shapes. These will form the geometric border. -
Break the center plates:
Wrap your decorative plates in an old towel and strike them gently with a hammer to break them into manageable shards. Wear safety glasses during this step. -
Refine the hero shapes:
Use nippers to carefully trim around specific motifs, like the large blue daisy or the red flowers, preserving the main design elements as much as possible. -
Test the layout:
Before gluing, dry-fit your pieces onto the bench. Arrange the blue border triangles first, then place your main plate motifs in the center of each drawn square. -
Fill the gaps:
Use smaller white or neutral shards from the plate rims to fill the spaces around your main floral motifs, creating a ‘crazy paving’ background effect.
Plate Curvature Tip
Plates aren’t flat! Use more mortar under the edges of curved plate shards to level them with flatter pieces, preventing sharp, raised edges.
Step 3: Adhering and Grouting
-
Apply adhesive for the border:
Mix a small batch of thinset mortar. Butter the back of each blue border tile and press them firmly into place along the outer edges. -
Set the center panels:
Working one square section at a time, apply adhesive to the wood and press your china shards into the mortar. Keep the spacing between pieces (grout lines) consistent, about 1/8 inch. -
Level the surface:
Since plates are curved, you may need to add a bit more adhesive under thinner pieces to ensure the final surface is relatively flat and even. -
Let it cure:
Allow the adhesive to dry completely for at least 24 hours. The pieces should not move when touched. -
Mix the grout:
Mix sanded grout with water until it reaches a peanut butter consistency. I prefer a light beige color here to soften the contrast between the bold blue and red shards. -
Apply the grout:
Spread the grout over the entire surface using a rubber float or gloved hands, pushing it deep into all the crevices and gaps. -
Clean the excess:
Wait about 15-20 minutes for the grout to set slightly, then wipe the surface with a damp sponge. Rinse the sponge frequently to avoid spreading haze. -
Final polish:
Once dry, buff the tiles with a soft, dry cloth to remove any remaining haze. -
Seal the project:
Apply a weatherproof grout sealer to protect your bench from moisture and staining, especially if it will live outdoors.
Level Up: Pattern Play
Instead of a continuous border, try alternating the direction of the blue triangles to create a ‘sawtooth’ pattern for extra movement.
Place your finished bench in a sunny garden spot where the light can catch the glaze of the china
House Numbers With Bold Grout Outlines
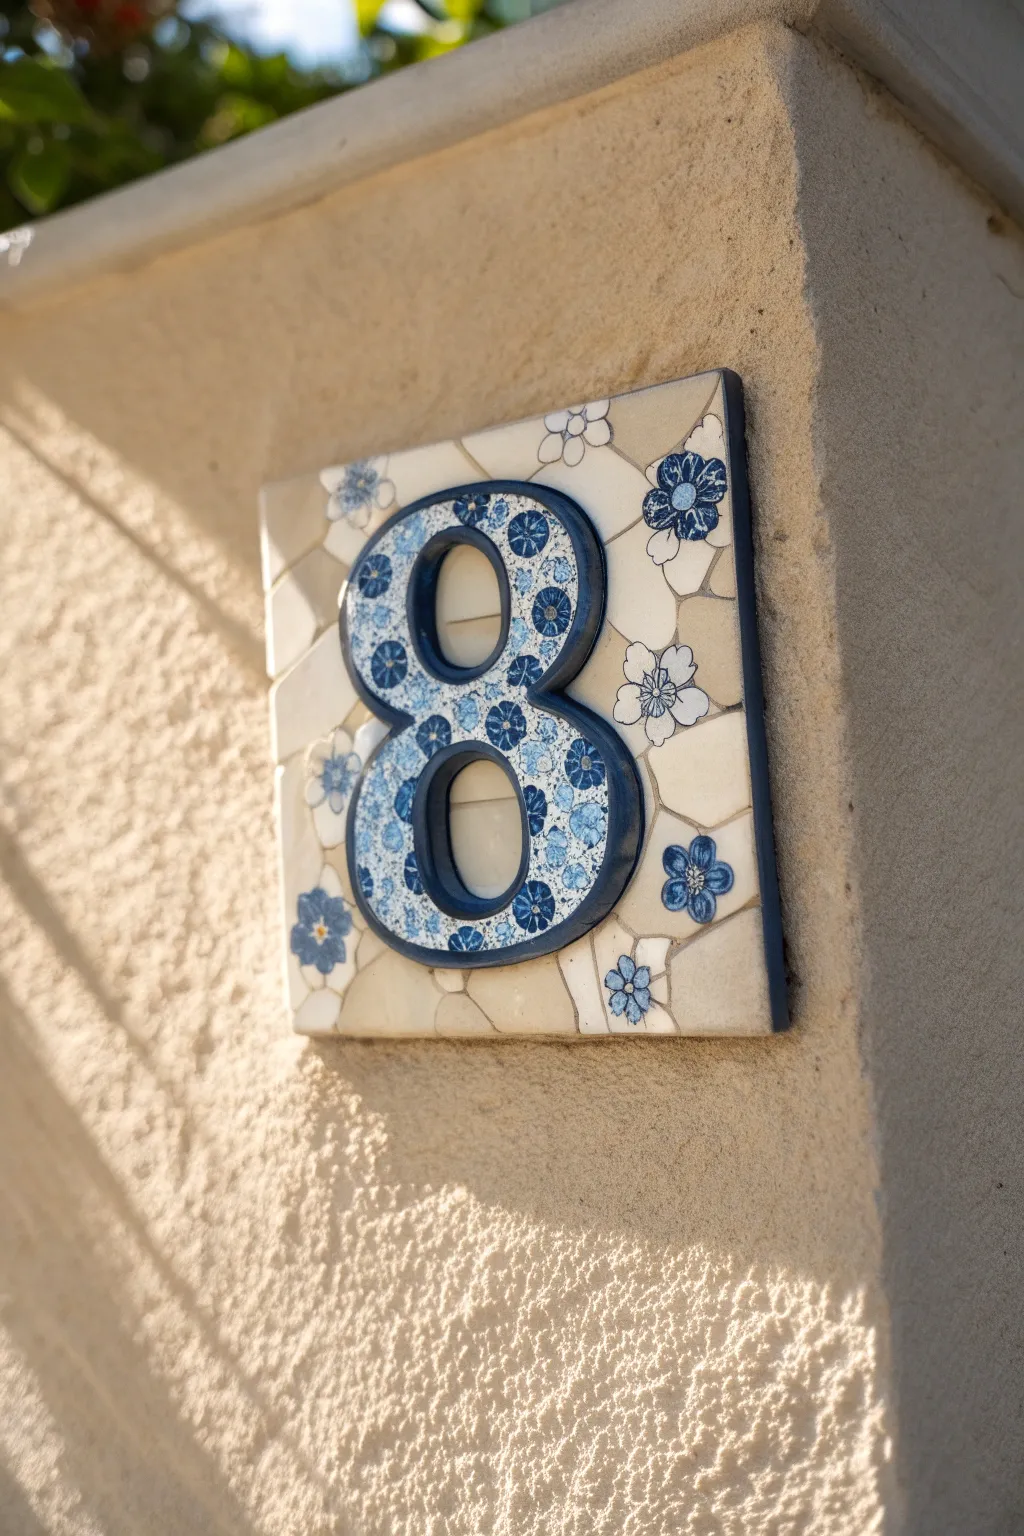
This charming house number plaque combines broken china mosaic techniques with a bold, raised number form for high visibility. The soft cream background tiles let the intricate blue floral patterns of the number take center stage.
How-To Guide
Materials
- Square ceramic tile base (approx. 6×6 inches)
- Large ceramic or metal number (with a hollow or recessed channel)
- Broken china pieces (cream/white for background)
- Blue floral patterned china or ceramic decals
- Tile adhesive (thin-set mortar or Weldbond glue)
- Dark grey or charcoal grout
- Tile nippers (wheeled nippers work best)
- Sponge and water bucket
- Grout sealer
- Small spatula or palette knife
- Safety glasses
Step 1: Preparing the Number
-
Select your number form:
Choose a large number that has a recessed channel. If you can’t find a pre-made channel number, you can create a border using clay or thin ceramic strips to form the outline of the ‘8’. -
Cut the floral focal points:
Identify the small blue floral motifs on your patterned china. Using your wheeled nippers, carefully cut these flowers into small, irregular circles or ovals that will fit inside the number channel. -
Fill the number channel:
Apply adhesive to the back of your small floral cuts. Place them inside the recessed channel of the number, fitting them tightly together to minimize gaps. Let this dry completely before moving to the main plaque.
Step 2: Creating the Background Smashed Mosaic
-
Prepare the base tile:
Ensure your square ceramic base is clean and dry. Lightly sand the surface if it is very glossy to help the adhesive grip better. -
Adhere the number:
Apply a generous amount of adhesive to the back of your finished floral number. Center it perfectly on the square base tile and press down firmly. Allow it to set for at least an hour so it doesn’t slide. -
Nipper the background tiles:
Take your cream or off-white china plates. Wearing safety glasses, nip them into random, angular geometric shapes. Aim for pieces roughly 1 inch in size, but vary them slightly for visual interest. -
Dry fit the layout:
Before gluing, arrange the cream shards around the central number. I find it helpful to place the larger pieces first, then fill in smaller gaps. Ensure you leave consistent space between pieces for the grout lines. -
Incorporate accent pieces:
If desired, intersperse 3-4 larger floral cutouts (matching the blue pattern inside the number) into the background field to tie the design together. -
Glue the background:
Lift each piece one by one, apply a dab of adhesive to the back, and press it into place. Keep the surface level as you work.
Uneven Surface?
If your china pieces have different thicknesses, use extra adhesive (buttering) on the thinner pieces to raise them flush with the thicker ones.
Step 3: Grouting and Finishing
-
Mix the grout:
Mix your charcoal or dark grey grout with water until it reaches a consistency similar to creamy peanut butter. The dark color is crucial for creating that bold outline effect. -
Apply the grout:
Spread the grout over the entire surface, pressing it firmly into all the crevices between the cream shards. Be gentle around the raised number to avoid scratching it. -
Initial clear-off:
Wait about 10-15 minutes for the grout to haze over. Using a slightly damp sponge, wipe away the excess grout from the top of the tiles. Rinse your sponge frequently. -
Define the number edge:
Pay special attention to the area where the number meets the background. Use a gloved finger or a shaping tool to smooth the grout line here, creating a distinct shadow line. -
Final polish:
Once the haze reappears, buff the tiles with a clean, dry microfiber cloth to make the china shine. -
Seal the work:
After the grout has cured for 24-48 hours, apply a penetrating grout sealer to protect the dark lines from fading and weather damage.
Save Those Edges
Professional mosaicists save the smooth, finished edges (rims) of plates for the outer perimeter of the tile. It creates a cleaner, finished frame.
Mount your beautiful new number on your exterior wall and enjoy the unique, handmade charm it adds to your entrance
Heart-Shaped Broken China Mosaic Keepsake
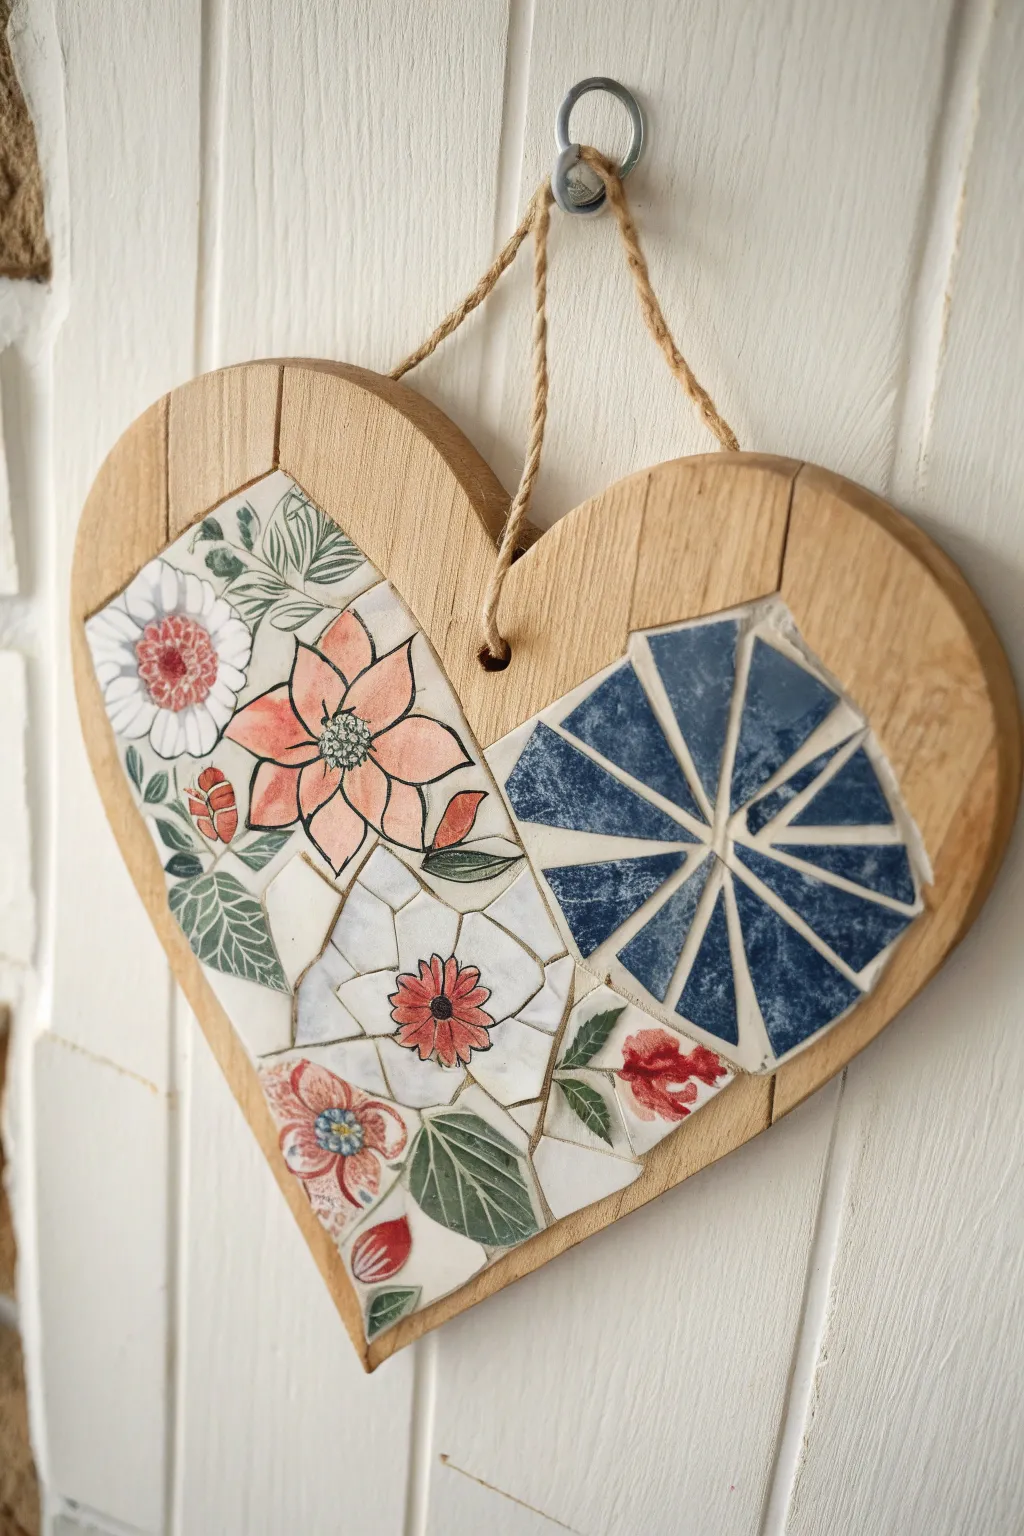
Transform treasured broken teacups and plates into a stunning wall hanging with this nostalgic heart mosaic. By combining floral motifs with geometric blue shards on a natural wood base, you’ll create a keepsake that perfectly blends rustic charm with delicate porcelain beauty.
Step-by-Step Guide
Materials
- Wooden heart plaque (approx. 8-10 inches)
- Vintage china or ceramic plates (floral patterns)
- Blue patterned or solid blue china plate
- Wheeled ceramic tile nippers
- PVA glue or specialized mosaic adhesive (e.g., Weldbond)
- White grout (sanded or non-sanded depending on gap size)
- Mixing bowl and spoon for grout
- Sponge and soft cloth
- Safety glasses
- Protective gloves
- Twine or jute cord for hanging
- Pencil
Step 1: Preparing Your Porcelain
-
Safety First:
Before breaking any china, put on your safety glasses. Start by wrapping a plate in an old towel or heavy cloth to contain flying shards. -
Initial Breakage:
Use a hammer to gently tap the wrapped plate, creating large initial pieces. You want manageable chunks, not dust, so start with light taps. -
Isolating Motifs:
Using your wheeled nippers, carefully cut around specific floral designs on your broken china pieces. Aim to preserve full flowers or distinct leaf patterns like the pink lilies and red daisies seen here. -
Creating Geometric Elements:
Take your blue china and nip it into long, triangular shards. These will form the striking ‘starburst’ or radial pattern on the right side of the heart. -
Shaping Filler Pieces:
Cut several irregular white or neutral pieces from the rim or background of your plates to use as filler between the main focal points.
Uneven Surface?
If shards vary significantly in thickness, apply extra glue to thinner pieces to raise them up. This ensures a smooth, level finish across the heart.
Step 2: Designing the Layout
-
Dry Fitting:
Place your wooden heart on a flat workspace. Arranging the pieces without glue first is crucial. Start by placing the large blue triangular shards in a radial pattern on the right side to create a focal point. -
Placing Florals:
Arrange your floral cuts on the left side, letting them follow the curve of the heart. Try to nestle leaves and petals close together to minimize large gaps. -
Refining Edges:
Inspect the pieces that touch the wooden border. Use your nippers to trim any sharp corners so the china sits neatly within the heart’s inner recessed area, if applicable, or just inside the edge. -
Filling the Gaps:
Insert your white filler pieces into the empty spaces between the floral motifs and the blue geometric section to complete the puzzle.
Heirloom Upgrade
Incorporate a single metal key, a small brooch, or a personalized ceramic charm into the design for an extra layer of sentimental value.
Step 3: Adhering and Grouting
-
Gluing Down:
Lift one piece at a time, apply a generous dab of mosaic adhesive to the back, and press it firmly onto the wood. I find it helps to hold each piece for a few seconds to ensure it grabs. -
Drying Time:
Allow the adhesive to cure completely. This usually takes at least 24 hours. Don’t rush this step, or pieces may shift during grouting. -
Mixing Grout:
Mix your white grout powder with water according to package directions until it reaches a peanut-butter consistency. For a project this size, you won’t need a large amount. -
Applying Grout:
Wear gloves and spread the grout over the entire mosaic surface, pushing it deep into the crevices between the china shards with your fingers or a spatula. -
Initial Cleaning:
Wait about 10-15 minutes for the grout to set slightly. Use a damp (not soaking) sponge to wipe away excess grout from the top of the china pieces. -
Final Polish:
Once a haze forms on the china pieces (usually after another 20-30 minutes), create a brilliant shine by buffing the surface briskly with a soft, dry cloth. -
Adding the Hanger:
Thread a length of jute twine through the hole at the top of the heart. Knot it securely to create a rustic loop for hanging.
Hang your beautiful new mosaic in a sunlit spot to watch the glazed china catch the light
Candle Holder Wrapped in China Shards
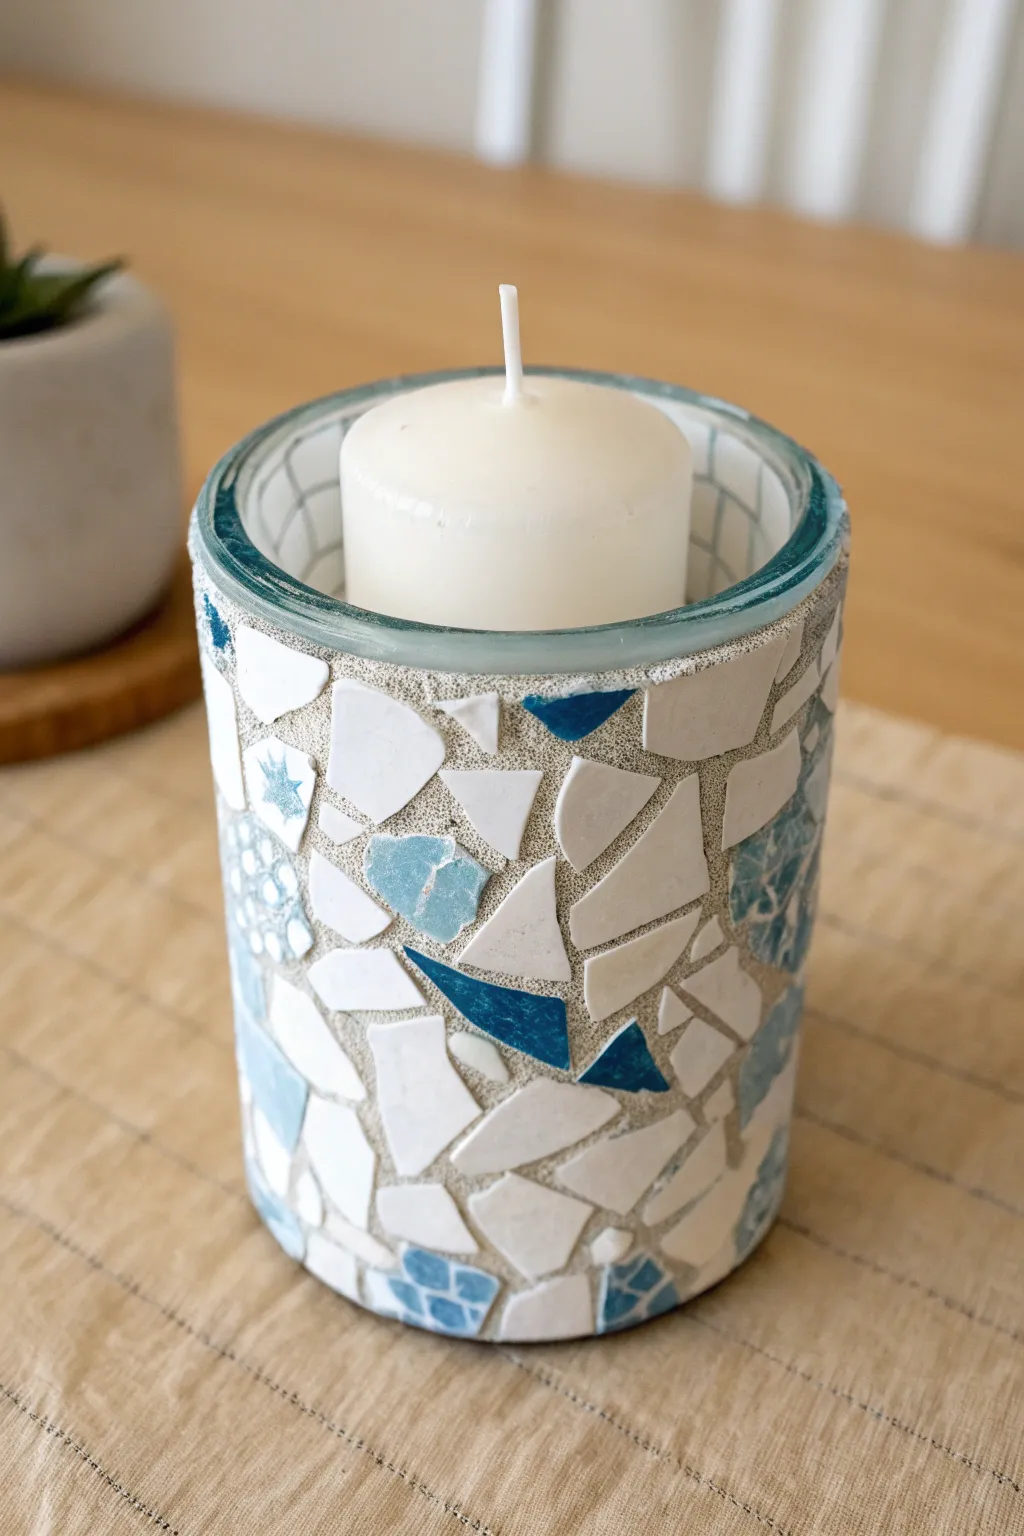
Transform a plain glass cylinder into a beachy masterpiece using broken china shards and sanded grout. The interplay of crisp white porcelain, sea-glass blues, and rough grout texture creates a stunning candle holder that feels like a treasured beach find.
Step-by-Step
Materials
- Cylindrical glass vase or hurricane holder
- Old china or ceramic tiles (white, light blue, dark blue patterns)
- Tile nippers or hammer
- Safety goggles and gloves
- Clear silicone adhesive or Weldbond glue
- Sanded grout (light grey or beige)
- Small rubber spatula or craft stick
- Sponge and water
- Soft cloth for polishing
- White pillar candle
Step 1: Preparing the Mosaic Pieces
-
Safety check:
Before breaking anything, put on your safety goggles and protective gloves to prevent injury from sharp shards. -
Break the china:
Place your china plates or tiles inside an old pillowcase or between layers of a towel. Gently strike them with a hammer to create initial large breaks. -
Refine the shapes:
Using tile nippers, trim the larger broken pieces into smaller, varied geometric shapes. Aim for triangles and irregular quadrilaterals roughly 0.5 to 1 inch in size. -
Sort by color:
Separate your shards into piles: pure white pieces, patterned blue pieces, and solid blue accents. This makes the design process much faster.
Loose Shards?
If a shard pops off during grouting, scrape the old glue off the back, apply a fresh dot of super glue (for speed), press it back in, and grout over it immediately.
Step 2: Creating the Design
-
Plan your adhesion:
Ensure the glass cylinder is clean and dry. Working in small sections prevents the glue from drying out before you place the pieces. -
Start at the rim:
Apply a dab of silicone adhesive to a piece of white china. Press it firmly onto the glass, starting near the top rim but leaving a tiny gap of bare glass at the very edge for a clean finish. -
Build the mosaic:
Continue gluing pieces, intentionally leaving gaps of about 1/8th to 1/4th inch between them. I find it helpful to rotate the glass often to check the spacing from different angles. -
Integrate color accents:
As you work your way down, intersperse the blue patterned shards and dark blue accents among the white pieces. Don’t overthink the pattern; a random distribution looks more organic. -
Check for slippage:
If pieces start sliding down the smooth glass, use small strips of painter’s tape to hold them in place while the adhesive sets. -
Complete coverage:
Cover the entire cylinder down to the bottom edge. Let the adhesive cure fully according to the manufacturer’s instructions, usually at least 24 hours.
Add Sea Glass
Mix genuine tumbled sea glass in with your china shards. The translucent frost of the glass adds depth and looks incredible when the candle is lit from within.
Step 3: Grouting and Finishing
-
Mix the grout:
Mix your sanded grout with water until it reaches the consistency of peanut butter. It should be thick enough to stay in the gaps but spreadable. -
Apply the grout:
Using a rubber spatula or gloved hands, spread the grout generously over the entire surface, pressing firmly to ensure it fills every gap between the shards. -
Clear excess grout:
Scrape off the bulk of the excess grout with the edge of your spatula or a craft stick, revealing the china surfaces again. -
Initial cleaning:
Wait about 10-15 minutes for the grout to set slightly. Then, use a damp (not soaking wet) sponge to gently wipe the surface in circular motions. -
Refine the lines:
Rinse your sponge frequently. Keep wiping until the china pieces are mostly clean and the grout lines are smooth and slightly recessed. -
Final cure:
Let the project dry for another hour or two until a powdery haze appears on the china. -
Polish to shine:
buff the china shards vigorously with a dry, soft cloth to remove the haze and make the ceramic gleam.
Place a pillar candle inside and enjoy the warm, fragmented glow of your new centerpiece
Lamp Base With Textured Rim Pieces
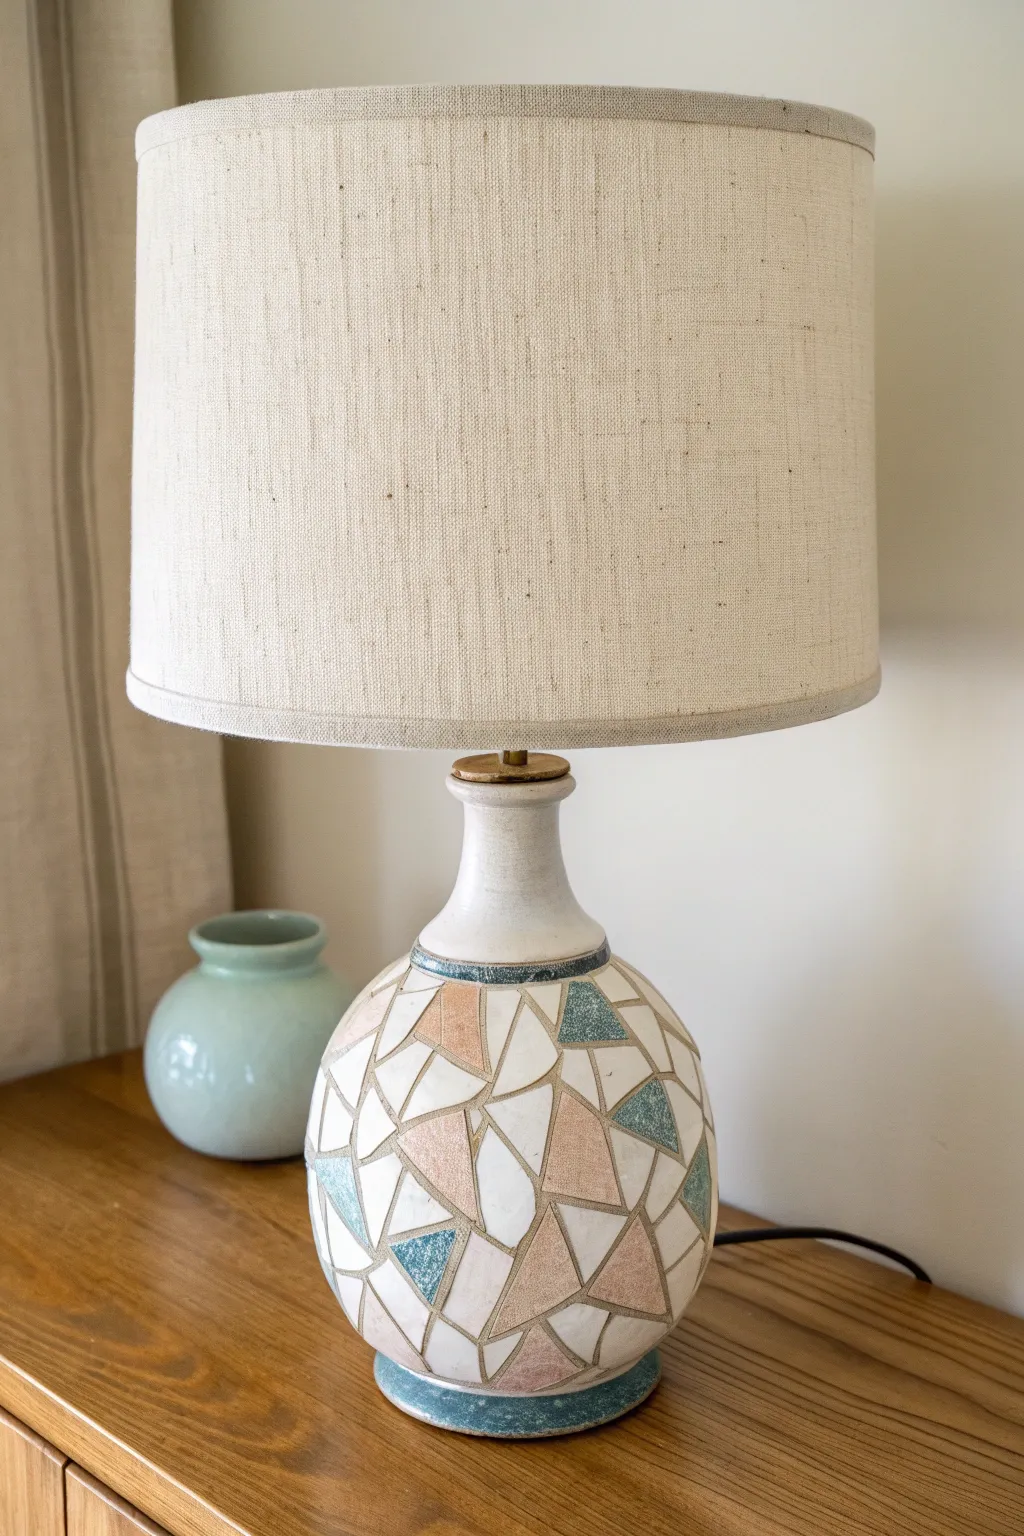
Transform a plain ceramic lamp base into a stunning piece of geometric art using broken china shards. This project features a soft palette of whites, pastel pinks, and textured teal rims to create a cozy, mid-century modern aesthetic.
Step-by-Step Tutorial
Materials
- Old ceramic lamp base (round, jug-style)
- Broken china plates or ceramic tiles (white, pastel pink, textured teal/blue)
- Tile nippers or wheeled glass cutters
- Safety mosaic adhesive (e.g., Weldbond)
- White or cream sanded grout
- Rubber grout float or spatula
- Sponge and bucket of water
- Soft cloth for polishing
- Protective eyewear and gloves
- Painter’s tape
- Sandpaper (medium grit)
Step 1: Preparation & Planning
-
Prep the lamp base:
Begin by removing the lampshade, harp, and any hardware that can be unscrewed. Clean the ceramic lamp base thoroughly with soapy water to remove dust and oils. If the surface is very glossy, scuff it lightly with medium-grit sandpaper to give the adhesive better grip. -
Protect the hardware:
Use painter’s tape to carefully mask off the electrical socket, the cord entry point, and the very top neck area if you want to leave a smooth ceramic band visible as shown in the photo. -
Define your boundaries:
Decide where your mosaic will start and stop. In this project, we are creating a defined band at the neck and a matching band at the foot using specific colored pieces. Use a pencil to lightly mark these boundary lines directly on the lamp base.
Curve Control
For very round lamp bases, nip your shards smaller than usual. Large flat pieces won’t sit flush against a tight curve and will create sharp, protruding edges.
Step 2: Creating the Shards
-
Select your china:
Gather your ceramic plates. You’ll need a good mix of solid white, soft pink, and a piece with a teal or blue rim pattern. The “textured rim pieces” mentioned are crucial for the top and bottom bands. -
Break the plates:
Put on your safety glasses. Place a plate inside a pillowcase or under a heavy towel and strike it gently with a hammer to create large initial shards. -
Refine the shapes:
Use your tile nippers to shape the shards into more precise geometric forms. Aim for triangles and irregular polygons. I like to keep the pieces roughly similar in size, about 1-1.5 inches wide, to maintain a balanced look. -
Isolate rim pieces:
Specifically cut the rim sections from your teal or patterned plate. Try to keep these pieces rectangular or slightly curved to fit the circumference of the lamp’s base and neck.
Step 3: Adhering the Mosaic
-
Start with the bands:
Apply a dab of adhesive to the back of a teal rim piece. Place it along the bottom edge of the lamp base to create the footer. Continue placing these pieces side-by-side until the bottom ring is complete. Repeat this process for the neck ring at the top. -
Fill the field:
Begin filling the large central area between your two bands. Apply glue to each individual shard (buttering the back) rather than spreading glue on the lamp, as this prevents the adhesive from drying out before you place the piece. -
Manage the spacing:
Place your pink and white triangles in a random but fitted arrangement, like a puzzle. Leave a consistent gap of about 1/8th inch between pieces for the grout lines. Rotate pieces as needed to nest them close together without touching. -
Check for flatness:
As you work your way around the curve, ensure the pieces lie relatively flat. Since the lamp is round, smaller pieces often sit better on the curve than very large flat shards. -
Let it cure:
Once the entire surface is covered, step back and check for any sliding pieces. Adjust if necessary, then let the adhesive cure completely, usually for at least 24 hours.
Color Pop
Swap the white grout for a colored grout like dark charcoal or soft grey to make the pastel china shards pop and give the lamp a more modern graphic look.
Step 4: Grouting & Finishing
-
Mix the grout:
Mix your sanded grout with water according to package instructions until it reaches a peanut butter consistency. Let it slake (rest) for 10 minutes, then stir again. -
Apply the grout:
Using a rubber float or your gloved hands, spread the grout over the lamp surface. Push it firmly into all the crevices between the shards. Ensure every gap is filled. -
Remove excess grout:
Wait about 15-20 minutes for the grout to set slightly. Use a damp (not soaking wet) sponge to gently wipe away the excess grout from the surface of the tiles. Rinse your sponge frequently. -
The haze buff:
Let the lamp dry for another hour or two until a hazy film appears. Take a soft, dry cloth and buff the tiles vigorously to remove the haze and make the china shine. -
Final assembly:
Remove the painter’s tape carefully. Reattach the harp and screw on the lampshade. If you have any sharp grout edges at the top or bottom, use fine sandpaper to smooth them down gently.
Plug in your new lamp and enjoy the warm, custom glow of your handcrafted mosaic art
Whimsical Face Sculpture Using Handles and Rims
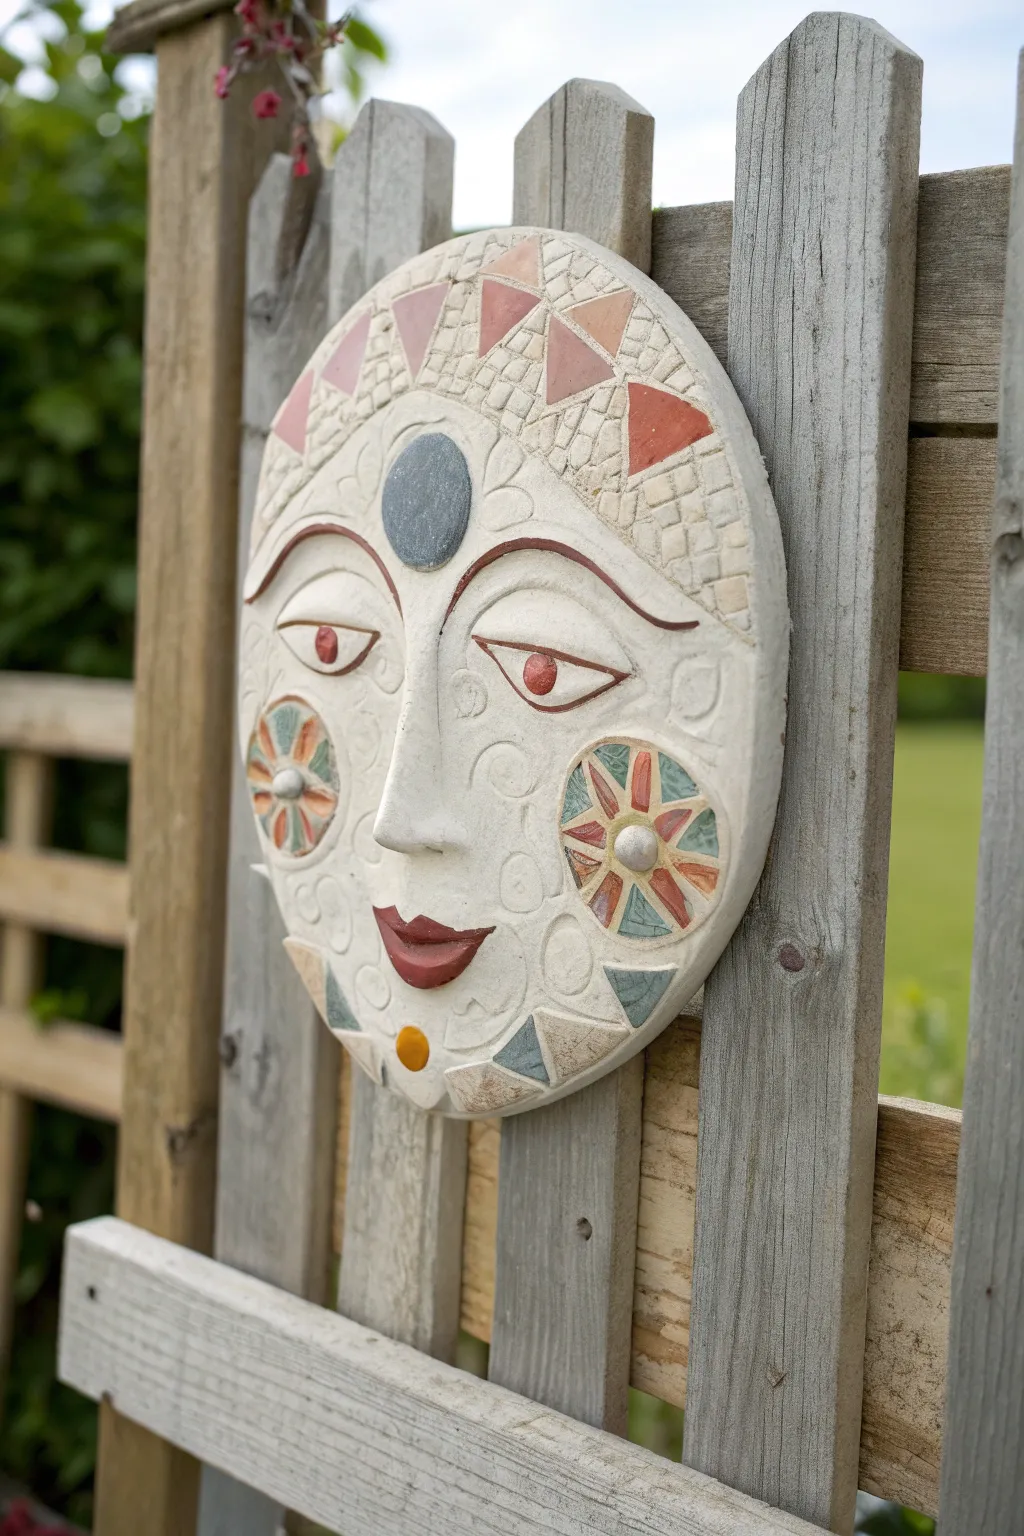
This striking garden sculpture combines the durability of cast stone with the vibrant charm of mosaic accents. With its serene expression and geometric details, this sun-faced guardian adds a touch of whimsical personality to any wooden fence or trellis.
How-To Guide
Materials
- Round stepping stone mold (approx. 10-12 inches)
- Concrete mix or hypertufa blend
- Sculpting tool set (clay shapers, carving knives)
- Broken china pieces or ceramic tiles (terracotta, slate blue, patterned pieces)
- Mosaic nippers
- Outdoor acrylic paints (cream/off-white, deep red, black)
- Weatherproof sealant or varnish
- Mirror adhesive or heavy-duty outdoor glue
- Construction adhesive for mounting
- Medium and fine-grit sandpaper
Step 1: Casting the Base
-
Prepare the Mold:
Clean your round mold thoroughly. If you are using a plastic mold, apply a thin layer of mold release or cooking spray to ensure the concrete doesn’t stick later. -
Mix the Concrete:
Mix your concrete or hypertufa blend according to the package instructions. You want a consistency similar to peanut butter—stiff enough to hold a shape but wet enough to pour. -
Pour and Level:
Pour the mix into the mold, tapping the sides repeatedly to release trapped air bubbles. Fill it to a thickness of about 1.5 to 2 inches for durability. -
Initial Sculpting:
Let the concrete set until it is semi-firm but still carveable (usually 1-3 hours depending on the mix). Carefully turn it out or leave it in the mold if you prefer working flat. Rough out the raised areas: the nose bridge, brow line, and chin. -
Refine Features:
Using sculpting tools, carve the deeper details. Define the almond-shaped eyes, the nostrils, and the smiling lips. Use a loop tool to create the circular indentations on the cheeks where the mosaics will go later.
Sticky Situation?
If your mosaic tiles slide down while the glue dries, use small strips of painter’s tape to hold them in place against the vertical curve of the forehead until set.
Step 2: Adding Texture and Pattern
-
Carve Scrollwork:
While the material is still workable, use a stylus or a small carving knife to etch the swirling, filigree-like patterns onto the skin of the face, particularly around the nose and cheeks. -
Create Mosaic Beds:
Carve out a shallow, recessed border around the upper forehead and chin. This recess needs to be just deep enough to accommodate the thickness of your china pieces so they sit flush. -
Cure the Piece:
I usually cover the piece with plastic wrap to slow down the drying process, which prevents cracking. Let it cure fully in a shaded spot for at least 48 hours.
Step 3: Applying Mosaic and Paint
-
Sand and Prime:
Once fully cured, use medium-grit sandpaper to smooth out rough ridges, then switch to fine-grit for the face. Wipe away dust and apply a base coat of cream or off-white outdoor acrylic paint to the entire face. -
Prepare China Pieces:
Use your nippers to cut triangles from terracotta-colored tiles and smaller irregular shapes from cream tiles. For the cheeks, you’ll need wedge shapes to form a radial sunburst pattern. -
Adhere the Border:
Using heavy-duty adhesive, glue the terracotta triangles into the forehead recess in a zigzag pattern. Fill the spaces between them with the smaller cream tile fragments to create a mosaic texture. -
Create the Cheeks:
In the circular cheek recesses, glue patterned or colored wedge pieces in a wheel spoke arrangement. Place a small, round tile or bead in the center as a focal point. -
Add the Third Eye:
Select a perfectly round piece of slate blue ceramic or stone. Adhere this firmly to the center of the forehead, just above the brow line. -
Paint Facial Details:
With a fine brush, paint the lips a deep brick red. Use the same red to accent the pupils of the eyes. Keep the strokes clean and deliberate. -
Define the Eyes:
Outline the eye shape and the upper eyelid crease with a thin line of deep brown or black paint to make the expression pop against the pale stone. -
Weatherproofing:
Once all paint and glue are bone dry, apply two coats of clear, matte weatherproof varnish. Ensure you get the sealant into all the carved crevices and mosaic grout lines. -
Mounting:
Attach a heavy-duty hanger to the back using construction adhesive, or drill mounting holes if you planned for them during casting. Secure the finished piece to your garden fence or post.
Glow Up
Mix glow-in-the-dark powder into your cream paint or the grout lines. The face will reveal a soft, ethereal luminescence when the sun goes down.
Enjoy the serene presence this handmade guardian brings to your outdoor sanctuary
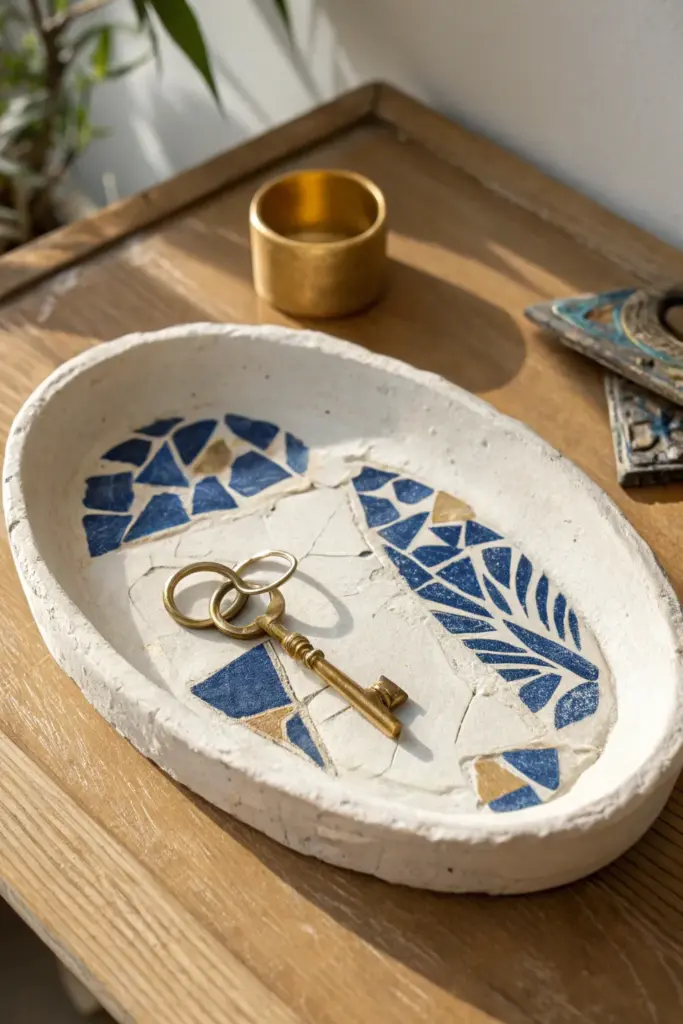
Air-Dry Clay Tray With Embedded China Shards

Transform broken blue-and-white china into a stunning catch-all dish by pressing the shards directly into air-dry clay. This technique creates a lovely textured surface that feels both ancient and refreshingly modern, perfect for holding keys or jewelry.
Step-by-Step Tutorial
Materials
- White air-dry clay (fine grit)
- Broken china shards (blue & white patterns, some gold accents)
- Rolling pin
- Oval template or bowl (optional)
- Clay carving tool or butter knife
- Small bowl of water
- Sponge
- Fine-grit sandpaper (220 grit)
- Matte spray varnish or sealant
Step 1: Preparing the Base
-
Prepare the workspace:
Lay down a non-stick mat, parchment paper, or a sturdy piece of canvas on your work surface to prevent the clay from sticking as you roll it out. -
Condition the clay:
Take a generous handful of white air-dry clay and knead it in your hands until it becomes soft, pliable, and free of cracks. I usually do this for about 2-3 minutes. -
Roll the slab:
Using a rolling pin, flatten the clay into an oval shape about 1/4 to 1/2 inch thick. Try to keep the thickness consistent across the entire surface. -
Shape the outline:
If you want a precise oval, lightly trace a template or bowl onto the clay slab. -
Cut the shape:
Use a clay carving tool or a simple knife to cut out your oval shape, removing the excess clay.
Clean Breaks
To get flat, usable shards without shattering the china into dust, wrap the plate in a towel and strike the back firmly with a hammer.
Step 2: Embedding the Mosaic
-
Select your shards:
Gather your broken china pieces. For this specific look, choose shards with deep cobalt blue patterns and perhaps a few with gold rim fragments for contrast. -
Plan the placement:
Lay the shards gently on top of the clay without pressing yet to check your composition. Aim for two main clusters on opposite sides of the oval, leaving the center relatively clear. -
Embed the shards:
Once satisfied with the arrangement, press each shard firmly into the soft clay. You want the top surface of the china to be flush or slightly recessed into the clay surface. -
Smooth the transitions:
Dip your finger in a little water and gently run it along the edges where the clay meets the china to seal any gaps. -
Add texture (optional):
If you want the subtle cracked look seen in the center, lightly score a few random lines into the plain clay sections with a needle tool.
Step 3: Forming and Finishing
-
Build the rim:
Roll a long snake of fresh clay, roughly 1/2 inch thick, to serve as the wall of your tray. -
Attach the rim:
Score the outer edge of your oval base and wet it slightly. Lay the clay coil on top of this scored edge. -
Blend the seams:
Using your thumb or a modeling tool, blend the coil downward into the base on both the inside and outside until the seam disappears and the wall is sturdy. -
Shape the walls:
Pinch the walls gently upwards to create a slight height, smoothing them with a damp sponge to get that organic, handmade finish. -
Initial drying:
Let the tray sit undisturbed for about 24-48 hours. Keep it away from direct heat sources to prevent cracking. -
Sand the edges:
Once fully dry and hard, use fine-grit sandpaper to smooth out any rough spots on the rim or the outside of the tray. -
Clean the surface:
Wipe away any clay dust with a slightly damp cloth, paying special attention to the china shards so they shine. -
Seal the piece:
Apply a coat of matte spray varnish to the entire piece to protect the clay from moisture and dirt.
Golden Touch
If your china lacks gold, use a small brush and liquid gold leaf to paint the edges of a few embedded shards after the clay dries.
Place your finished tray on a console table or dresser to add a touch of handcrafted history to your space