Blue clay is basically my shortcut to instant calm—one color, a million cute possibilities. Here are my favorite blue clay ideas you can make with polymer clay or air-dry clay, even if you’re brand-new to sculpting.
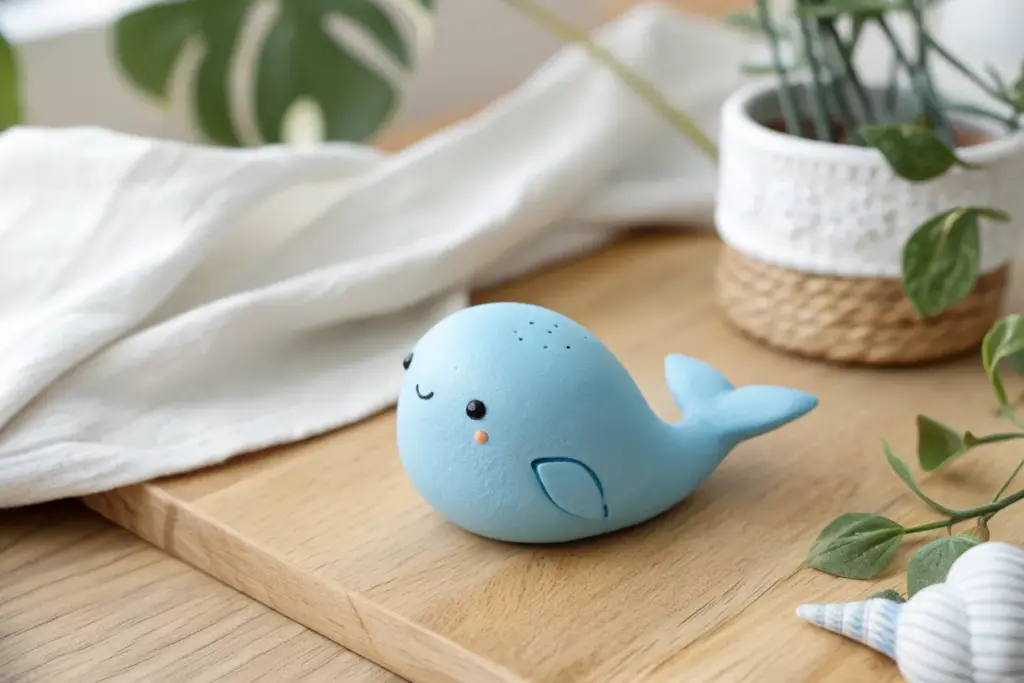
Blue Whale Mini Figurine
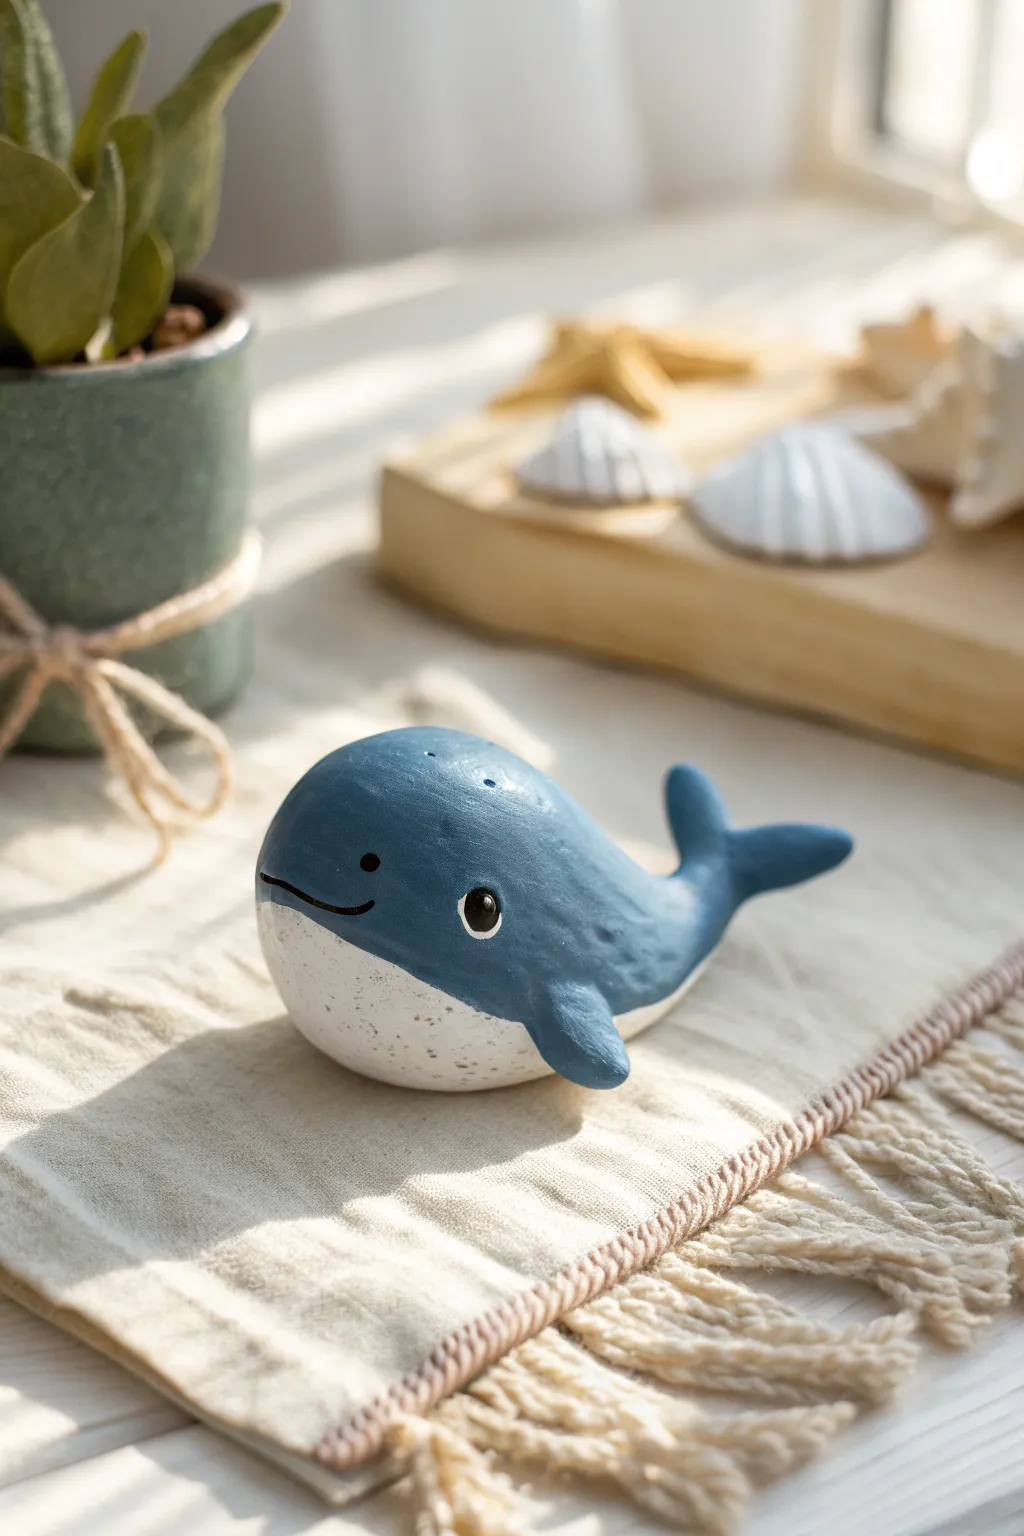
This adorable little whale brings a splash of the ocean to your desk with its cheerful smile and speckled belly. Its matte finish and rounded features make for a charmingly simple project perfect for beginners working with air-dry or polymer clay.
How-To Guide
Materials
- Blue polymer clay or air-dry clay (navy or denim shade)
- White or cream polymer clay
- Black acrylic paint or clay (for eyes)
- Fine-point paintbrush or dotting tool
- Sculpting tool with a curved edge
- Needle tool or toothpick
- Matte varnish (optional)
- Old toothbrush (for texturing/speckling)
Step 1: Shaping the Base
-
Form the Body:
Start with a ball of blue clay about the size of a golf ball. Roll it into a smooth teardrop shape, keeping one end round and bulky for the head and tapering the other end for the tail. -
Flatten the Curves:
Gently press the wider end of the teardrop against your work surface to create a slightly flat bottom so the whale sits stable. Smooth out any fingerprints as you go. -
Create the Belly:
Roll a smaller piece of white or cream clay into a ball, then flatten it into a thin, oval pancake. This should be roughly the length of the main body’s underside. -
Attach the Underbelly:
Press the white oval onto the bottom of the blue body. Use your thumb or a smoothing tool to blend the edges where the two colors meet, ensuring a seamless transition along the lower sides.
Seamless Blending Tip
To merge the white belly and blue body without a bumpy seam, roll a smooth round tool over the join line repeatedly until the clay acts as one piece. Use baby oil to help smooth polymer clay.
Step 2: Adding Fins and Tail
-
Sculpt the Tail Flukes:
Pinch the tapered end of the body to flatten it slightly. Using a sculpting tool, make a slice down the center of the tip to separate the two flukes, then gently curve them upward and outward. -
Refine Tail Shape:
Smooth the edges of the flukes so they are rounded, not sharp. I like to lift the tail slightly so it looks suspended in mid-swim. -
Form the Side Fins:
Create two small teardrops from the blue clay. Flatten them slightly to resemble paddles or flippers. -
Attach the Flippers:
Press one fin onto each side of the body, positioned slightly lower than the midline. Blend the clay at the attachment point (the shoulder) into the body using a modeling tool so they don’t fall off. -
Position the Fins:
Curve the tips of the fins slightly backward or downward to give the impression of movement.
Step 3: Face and Details
-
Carve the Mouth:
Using a needle tool or a thin blade, carve a gentle, curved line across the front of the face for a smile. Ensure it cuts through the blue section just above where it meets the white belly. -
Create Eye Sockets:
Use a round-ended tool or the back of a paintbrush to make two shallow indentations where the eyes will go, spaced widely apart for a cute look. -
Insert Eyes:
Roll two very tiny balls of black clay and press them into the sockets. Alternatively, you can wait until after baking (if using polymer) to paint them on. -
Add Highlights:
If painting the eyes, add a tiny dot of white paint to each black eye to bring them to life with a reflection. -
Add Belly Speckles:
Dilute a tiny amount of black or dark grey paint with water. Dip an old toothbrush into it and run your thumb over the bristles to gently spatter tiny speckles across the white belly area. -
Create Blowholes:
Use a needle tool or toothpick to poke two tiny holes on the very top of the head for the blowholes. -
Final Surface Check:
Before curing or drying, do a final pass over the clay. Smooth out any accidental fingernail marks or rough patches with a drop of water or baby oil. -
Cure or Dry:
Follow the instructions for your specific clay. Bake in the oven if using polymer clay, or let air-dry clay sit undisturbed for 24-48 hours.
Clay Too Sticky?
If the clay is sticking to your fingers and making the white belly dirty with blue smudges, pop it in the fridge for 10 minutes or dust your hands lightly with cornstarch before handling.
Place your finished whale on a sunny windowsill or shelf to enjoy its friendly presence every day


Cute Blue Octopus Charm
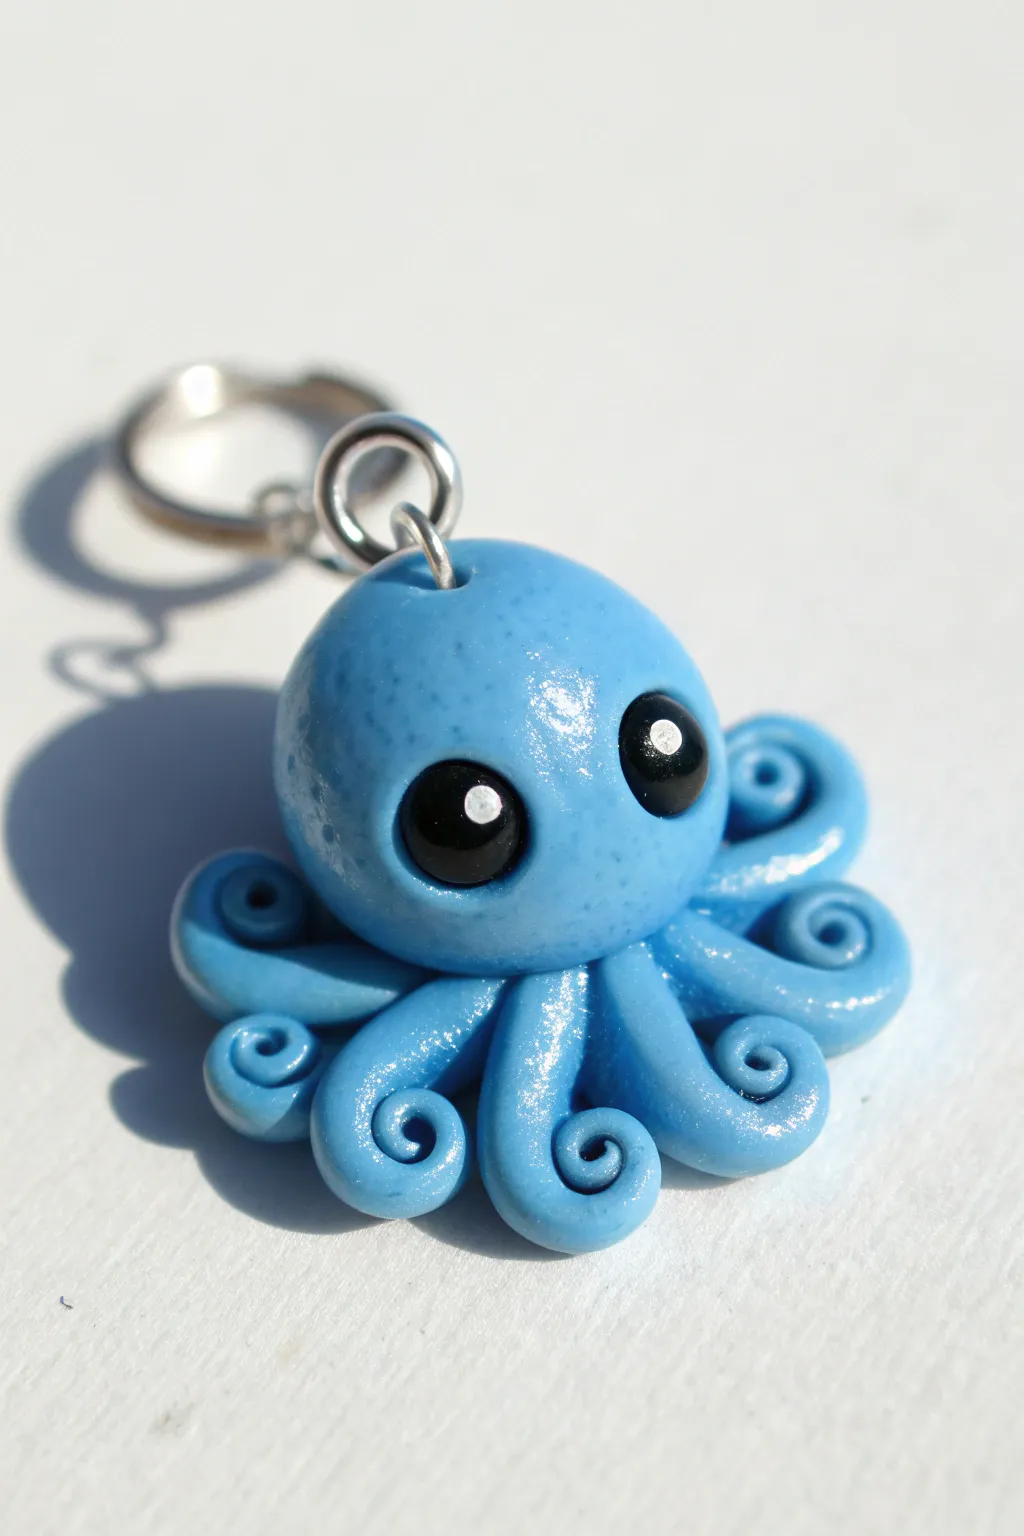
This adorable blue octopus charm features a smooth, round head and eight perfectly curled tentacles that create a playful sense of movement. With its oversized shimmering eyes and glossy finish, it makes for a delightful keychain or necklace pendant.
Step-by-Step Guide
Materials
- Polymer clay (light blue)
- Polymer clay (black)
- Acrylic paint (white)
- Dotting tool or toothpick
- Eye pin or screw eye pin
- Gloss glaze or polyurethane varnish
- Soft paintbrush
- hobby knife or clay blade
- Clean work surface (tile or glass mat)
- Oven for baking
Step 1: Shaping the Base
-
Condition the clay:
Begin by taking a chunk of light blue polymer clay and kneading it in your hands until it becomes soft, pliable, and free of cracks. -
Form the head:
Roll a portion of the blue clay into a smooth ball about the size of a large marble, or roughly 1 inch in diameter. This will serve as the main body. -
Check for imperfections:
Inspect the sphere closely for fingerprints or lint. Gently smooth them out with your finger tip or a silicone tool to ensure a flawless finish. -
Create tentacle segments:
Roll out eight smaller balls of blue clay, each approximately pea-sized. Try to keep them relatively uniform, though slight variations add character. -
Elongate the tentacles:
Take one small ball and roll it into a tapered teardrop or cone shape. Repeat this for all eight balls so you have a set of identical cones.
Smudge-Free Zone
Keep baby wipes or rubbing alcohol nearby. Clean your hands thoroughly before switching from black clay back to blue to avoid dark smudges on the light body.
Step 2: Assembly and Detailing
-
Start the circle:
Arrange the eight cone shapes in a starburst circle on your work surface, with the pointed ends facing outward and the wider ends touching in the center. -
Join the body:
Place the large head sphere directly onto the center where all the tentacle bases meet. Press down gently but firmly to bond the clay pieces together without squashing the shapes. -
Blend the seams:
Use a modeling tool or your finger to gently smudge the clay from the bottom of the head onto the tops of the tentacles underneath, ensuring a strong connection. -
Curl the tips:
Pick up one tentacle tip and verify it is tapered nicely. Starting at the very end, roll the tip inward toward the body to create a tight, spiral curl. Repeat for all eight legs. -
Prepare the eyes:
Take a tiny amount of black polymer clay and roll two small, identical spheres. Flatten them slightly into discs. -
Place the eyes:
Press the black discs onto the face area of the octopus. I like to space them somewhat wide apart to boost the cute factor. -
Insert hardware:
Take an eye pin and trim it if the shaft is too long. Insert it into the very top center of the head. Add a tiny dot of liquid clay or bake-and-bond to the shaft for extra security if you have it.
Ocean Texture
Before baking, lightly tap the head with a piece of coarse sandpaper or a toothbrush. This adds a subtle skin texture that looks amazing under glaze.
Step 3: Baking and Finishing
-
Bake the piece:
Place your octopus on a baking sheet or ceramic tile. Bake according to your clay package instructions (usually around 275°F or 130°C for 15–30 minutes). -
Cool down:
Allow the charm to cool completely before handling. The clay is still somewhat soft when hot and can easily be dented. -
Add eye highlights:
Dip a fine dotting tool or the tip of a toothpick into white acrylic paint. Place a small dot near the top right of each black eye to give it a spark of life. -
Apply glaze:
Once the paint is dry, brush a coat of gloss glaze over the entire charm. This seals the paint and gives the octopus a wet, aquatic look. -
Add the ring:
Finally, open a jump ring with pliers, loop it through the eye pin on top of the head, and attach your keychain hardware.
Now you have a charming little sea creature ready to guard your keys or brighten up a zipper pull


Mini Blue Dolphin Buddy
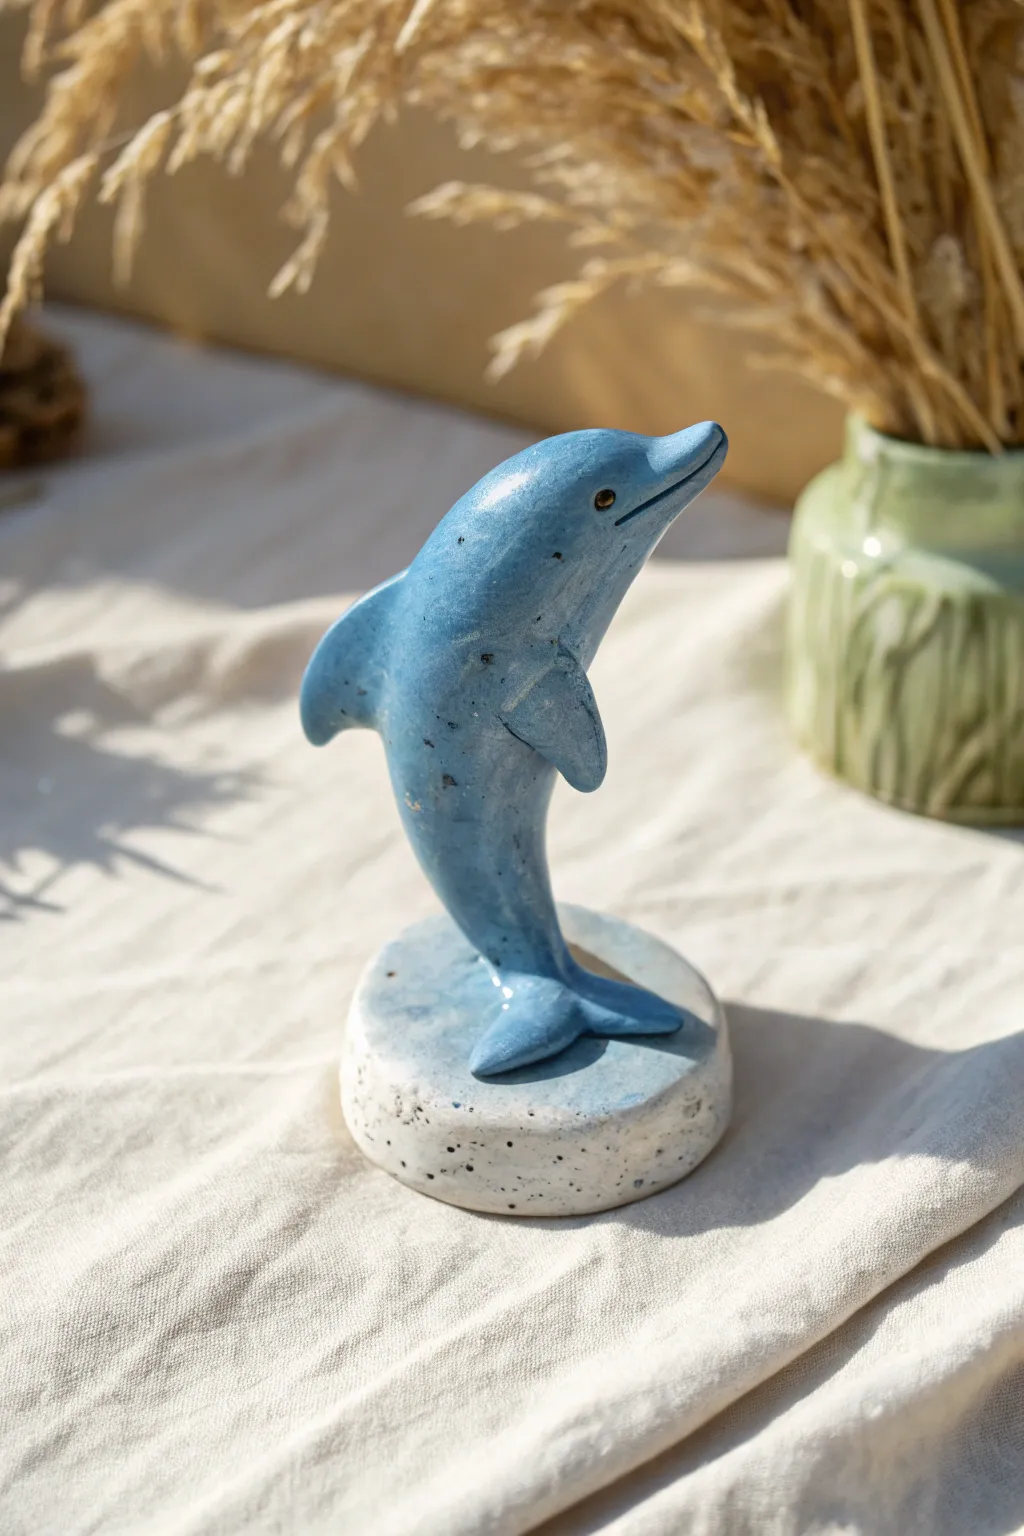
Craft a cheerful ocean friend with this sculpted mini dolphin, captured mid-leap on a stone-effect base. The glossy blue finish and speckled texture give it a polished, ceramic-like appearance without needing a kiln.
Detailed Instructions
Materials
- Polymer clay (light blue for the dolphin, white for the base)
- Black pepper or faux granite clay grit (optional for speckles)
- Sculpting tools (needle tool, smoothing tool)
- Acrylic rolling pin
- Circle cutter (approx. 2 inches)
- Liquid clay or bake and bond
- Gloss glaze or polyurethane varnish
- Soft paintbrush
- Small black bead or black clay for the eye
- Strong wire armature (optional for extra support)
Step 1: Sculpting the Base
-
Prepare the speckled clay:
Start by conditioning your white polymer clay until it’s soft and pliable. To achieve that stony look shown in the photo, mix in a tiny pinch of cracked black pepper or specialized granite grit, kneading until the speckles are evenly distributed. -
Form the puck:
Roll the white clay into a thick slab, about half an inch high. Use your circle cutter to punch out a clean, round base. Alternatively, roll a ball and flatten it gently with your palm or an acrylic block. -
Bevel the edges:
Smooth the edges of your circle with your finger to soften the sharp cut line slightly, giving it a more tumbled, organic stone feel. Set this aside on your baking tile.
Step 2: Forming the Dolphin Body
-
Create the main shape:
Take your blue clay and condition it well. Roll it into a smooth teardrop shape, keeping one end bulbous for the head and tapering the other end significantly for the tail. -
Define the snout:
At the bulbous end, gently pinch and pull the clay forward to form the dolphin’s ‘beak’ or snout. I like to use a smoothing tool to blend the transition so it looks like a natural curve rather than a separate piece. -
Shape the curvature:
Bend the entire body into a gentle ‘C’ curve. The head should be looking slightly up, while the tail curves down to obscure where it meets the base. -
Add the dorsal fin:
Form a small triangle of blue clay. Curve the back edge slightly and attach it to the top center of the dolphin’s back. Blend the seams completely down into the body using a sculpting tool so it won’t break off later. -
Attach the pectoral fins:
Make two smaller, flattened teardrop shapes. Attach one to each side of the body, just behind the head area. Smooth the join lines carefully, angling the fins slightly backward as if cutting through water.
Drooping Dolphin?
If the clay is too soft and the dolphin starts leaning, insert a short piece of wire or a toothpick into the base and up into the dolphin’s body for invisible internal support before baking.
Step 3: Detailing and Assembly
-
Sculpt the tail flukes:
Flatten the tapered tail end slightly. Use a needle tool to split the end into two flukes, then smooth them into rounded triangular shapes. Gently curl the tips upward. -
Create the mouth:
Use a sharp blade or needle tool to gently press a smile line along the beak, curving it slightly upward toward the eye area for a happy expression. -
Add the eyes:
Use a small ball tool to make an indentation where the eye should go. Press a tiny black bead or a minuscule ball of black clay into the socket. -
Mount to the base:
Apply a drop of liquid clay or bake-and-bond to the center of your stone base. Press the tail section of the dolphin firmly onto the base. You can blend a little extra blue clay around the connection point to simulate water splashing if you need more stability. -
Add texture:
Before baking, you can lightly speckle the blue clay. I sometimes flick a stiff paintbrush dipped in watered-down black acrylic paint over the raw clay for tiny spots, or you can mix black pepper into the blue clay during conditioning.
Ocean Magic
Mix a tiny amount of translucent clay into your blue clay before sculpting. This gives the dolphin a semi-transparent, jade-like quality that looks stunning when caught in the sunlight.
Step 4: Finishing Touches
-
Bake the piece:
Bake your creation according to the manufacturer’s instructions for your specific brand of clay. Usually, this is around 275°F (135°C) for 15-30 minutes. -
Cool down:
Let the sculpture cool completely in the oven with the door slightly ajar to prevent cracking from thermal shock. -
Glaze for shine:
Once fully cool, apply a coat of gloss glaze or polyurethane varnish to the dolphin to make it look wet and shiny. Leave the white base matte or give it a satin finish to contrast with the sleek dolphin body.
Set your new dolphin friend on a sunny shelf to bring a splash of coastal joy to your room


Sleepy Blue Seal Figurine
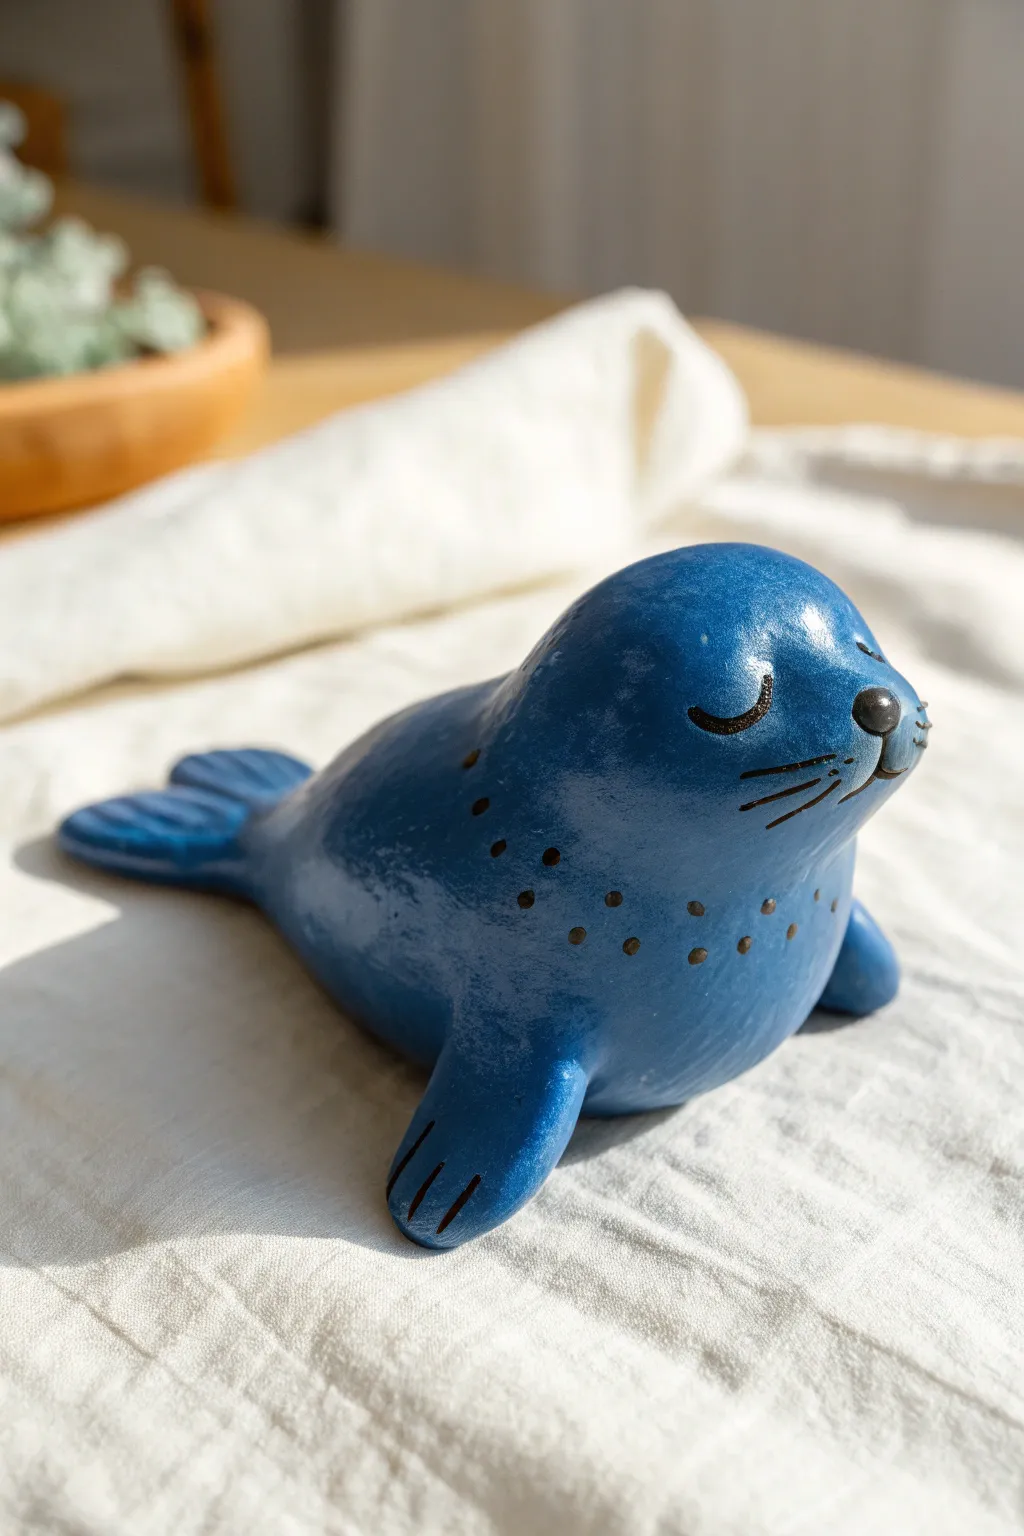
Capture the serenity of the ocean with this charming, palm-sized seal figurine. Sculpted from rich blue clay, its simple curved form and sweet sleeping expression make it a perfect beginner project that radiates calmness.
How-To Guide
Materials
- Polymer or air-dry clay (cobalt blue)
- Small amount of white acrylic paint (optional for texture)
- Black fine-point pigment liner or acrylic paint
- Small ball stylus tool
- Sculpting needle tool
- Smooth work surface or silicone mat
- Gloss glaze (optional)
Step 1: Forming the Body
-
Condition the clay:
Start by warming a golf-ball-sized chunk of blue clay in your hands. Knead it thoroughly until it is pliable and smooth to prevent cracking later. -
Shape the main mass:
Roll the clay into a smooth ball, then gently roll one end against your work surface to elongate it into a teardrop shape. This creates the basic body. -
Define the head:
Using your fingers, gently gentle press and pinch the wider end of the teardrop to differentiate the head from the body. You want a subtle neck indentation, keeping the transition smooth and organic. -
Create the seal slant:
Press the figurine gently onto your table to create a flat bottom. Simultaneously, nudge the head upwards so the seal looks like it is resting on its chest with its nose in the air.
Cracks Appearing?
If you see tiny cracks while smoothing the clay, dip your finger in a tiny bit of water (for air-dry) or baby oil (for polymer) and gently massage the surface.
Step 2: Adding Flippers and Tail
-
Form the front flippers:
Roll two small, pea-sized balls of blue clay. Flatten them slightly into teardrops and press them onto the sides of the body, just below the ‘neck’ area. -
Detail the front flippers:
Use a needle tool or knife to press three small indentations into the end of each flipper to mimic toes or webbing. -
Sculpt the tail:
At the tapered end of the body, flatten the tip horizontally. Use your sculpting tool to press a deep V-notch into the center, creating the rear flippers. -
Texture the tail:
Similar to the front flippers, carefully score lines into the tail sections to suggest fin texture.
Ice Floe Base
Create a display base by rolling out a jagged slab of white clay. Dust it with translucent glitter before drying to mimic sparkling ice for your seal to nap on.
Step 3: Creating the Face
-
Add the nose:
Roll a tiny speck of black clay (or very dark blue) into a flattened oval. Press this firmly onto the tip of the snout. -
Shape the snout:
Use a needle tool to draw a vertical line straight down from the nose, curving outward on both sides to create the classic smiling mouth shape. -
Scribe the eyes:
Using a needle tool or fine stylus, carefully press two U-shaped curves into the clay for the closed, sleeping eyes. Position them fairly wide apart for a cuter look. -
Add whisker spots:
For the characteristic seal spots, use a black fine-point pen or the very tip of a brush with black paint to dot a line of freckles horizontally across the cheeks. -
Draw the whiskers:
Add three long, thin lines radiating from the whisker spots on each side using your fine liner or paint.
Step 4: Texturing and Finishing
-
Apply decorative dots:
Using a very small ball stylus or toothpick dipped in black paint, create a ‘necklace’ of dots around the neck area. I like to stagger these slightly to look organic rather than perfectly geometric. -
Create surface interest:
If you want the mottled look seen in the photo, lightly dab a almost-dry sponge with white paint randomly over the blue body before baking/drying to simulate skin texture. -
Bake or dry:
Follow the manufacturer’s instructions for your specific clay. If baking polymer clay, ensure your figurine is stable on the tray. -
Seal the piece:
Once fully cured and cooled, you can apply a satin or gloss varnish. This deepens the blue color and gives it a wet, just-emerged-from-the-water appearance.
Now your little blue seal is ready to bring a sense of peace to your desk or shelf

The Complete Guide to Pottery Troubleshooting
Uncover the most common ceramic mistakes—from cracking clay to failed glazes—and learn how to fix them fast.
Round Blue Bird Charm
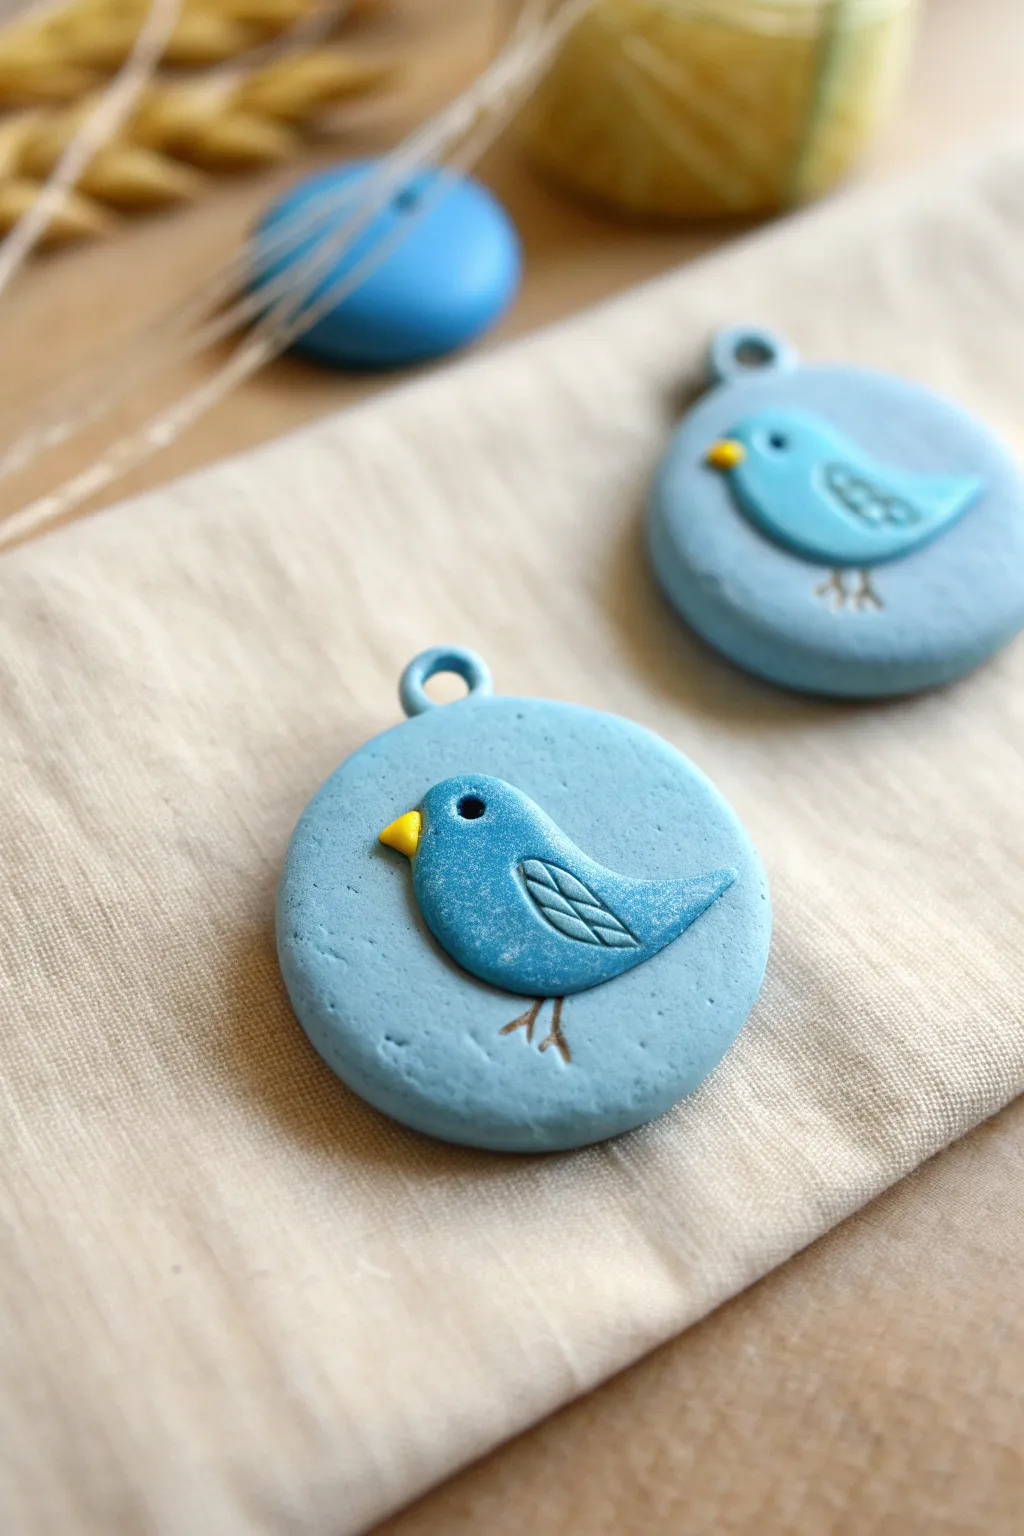
These delightful round pendants feature a stylized bluebird perched peacefully on a textured background. The charming raised design and soft matte finish make them perfect for necklaces, keychains, or sweet handmade gifts.
Step-by-Step
Materials
- Light blue polymer clay (for the base)
- Medium blue polymer clay (for the bird body)
- Yellow polymer clay (tiny amount for the beak)
- Brown acrylic paint or clay paint
- Circle cutter (approx. 1.5 – 2 inches)
- Needle tool or toothpick
- Small eye pin or jump ring
- Smoothing tool or soft brush
- Rolling pin
- Texturing sponge or sandpaper (optional)
- Gloss glaze (optional for the eye)
Step 1: Creating the Base
-
Condition the base clay:
Start by thoroughly kneading your light blue polymer clay until it is soft and pliable. This prevents cracking later on. -
Roll out the sheet:
Using your rolling pin, flatten the light blue clay into an even sheet, approximately 1/4 inch thick. You want it substantial enough to hold the charm hardware. -
Texture the surface:
Before cutting, gently dab a coarse sponge or a piece of crumpled foil over the surface. This gives the background a lovely organic, stone-like texture rather than being perfectly smooth. -
Cut the circle:
Press your circle cutter firmly into the textured clay to punch out the pendant shape. Smooth the edges with your finger to remove any sharp ridges. -
Create the loop:
Form a small loop from the same light blue clay and attach it to the very top edge of the circle, blending the seam on the back so it holds securely. Alternatively, you can insert a metal eye pin.
Sticky Situation?
If fingerprints are ruining your smooth bird, lightly dust your finger with cornstarch before smoothing the clay.
Step 2: Sculpting the Bluebird
-
Shape the bird body:
Take a small ball of the medium blue clay and flatten it slightly. Shape it into a teardrop or heavy comma shape to form the bird’s body and tail. -
Position the bird:
Place the bird shape onto the center of your textured base. Press it down gently so it adheres, but don’t squash the rounded 3D effect. -
Refine the tail:
Use your smoothing tool to slightly curve the tail upward, giving the bird a perky, happy posture. -
Add the wing:
With a needle tool, gently impress a curved line into the side of the bird’s body to suggest a wing shape. -
Detail the feathers:
Inside that wing outline, draw two or three small intersecting lines to create a simple feather pattern. -
Add the beak:
Roll a tiny, rice-sized piece of yellow clay. Press it gently onto the front of the bird’s face to form a pointed beak. -
Create the eye:
Use the needle tool or a small dotting tool to press a deep, round indentation for the eye.
Make it Sparkle
Add a tiny drop of UV resin or glossy varnish inside the eye indentation after baking to make the little bird look alive and bright.
Step 3: Finishing Touches
-
Draw the legs:
Using your needle tool, scratch two little stick-leg designs into the base clay right below the bird’s belly. -
Bake the piece:
Bake the charm according to your specific brand of clay’s instructions (usually around 275°F/130°C for 15-30 minutes). Let it cool completely. -
Highlight the legs:
Dilute a tiny drop of brown acrylic paint with water. Paint it into the leg grooves you scratched earlier. -
Wipe away excess:
Immediately wipe the surface with a damp cloth or paper towel, leaving the brown paint only inside the recessed lines for a crisp look.
Once cooled, string your new charm onto a leather cord or chain to enjoy your handiwork
Blue Fish With Textured Scales
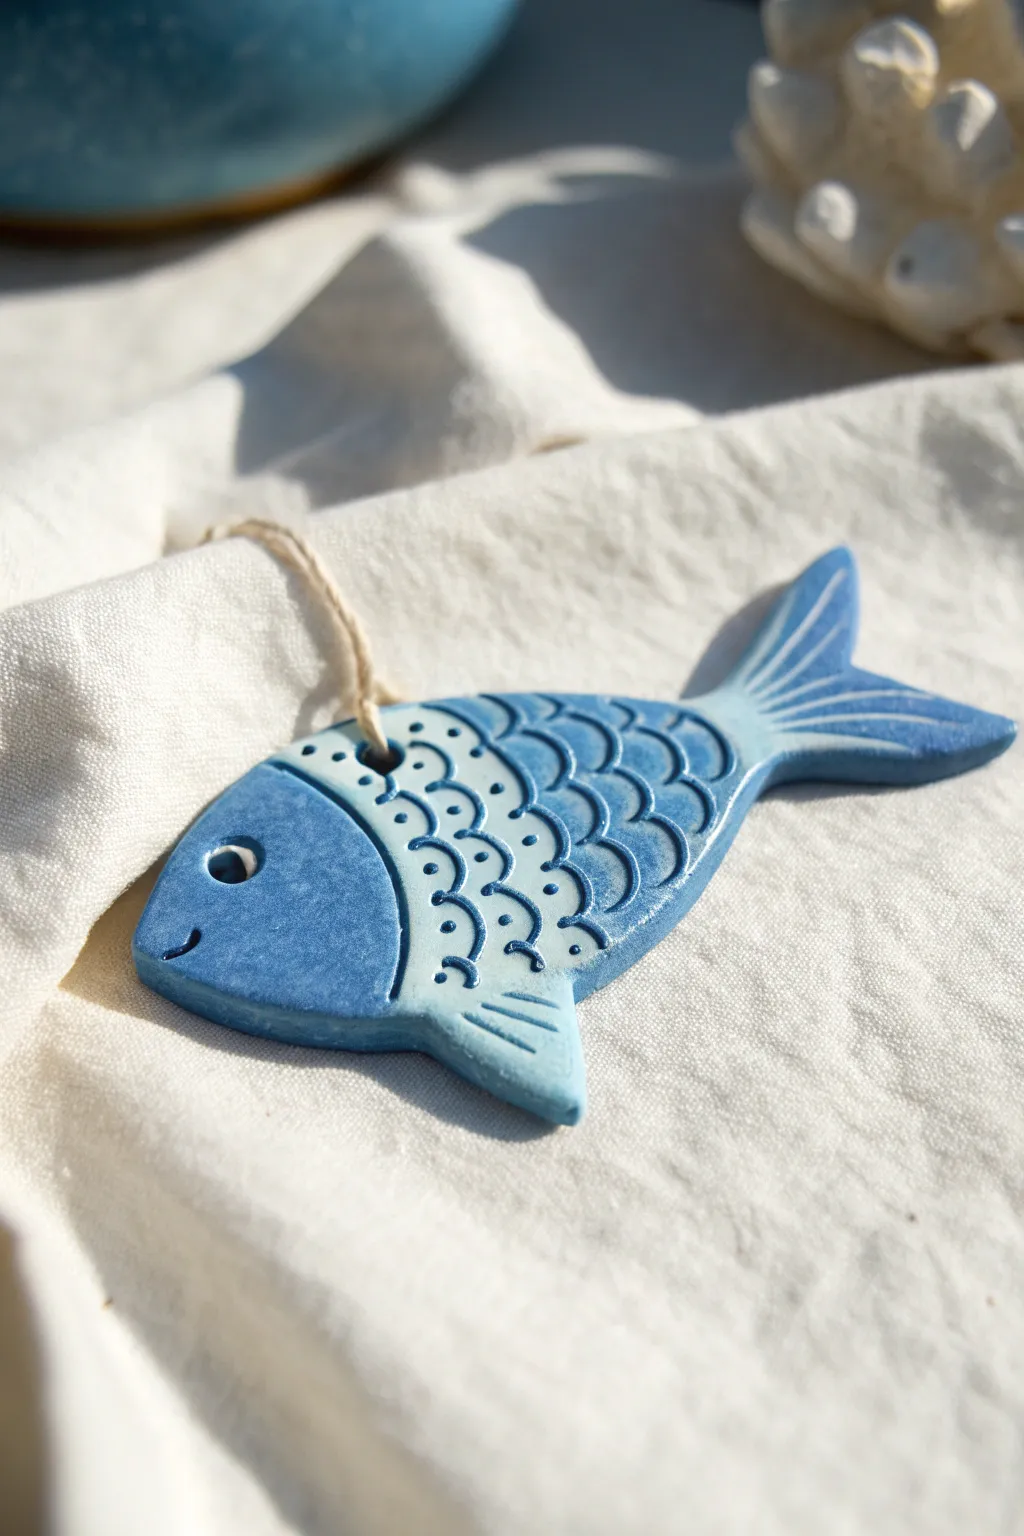
Capture the charm of the sea with this delightful ceramic fish ornament, featuring intricate scalloped scales and varying shades of oceanic blue. The distinct textures allow the glaze to pool beautifully, creating a natural depth that makes each piece feel unique.
Detailed Instructions
Materials
- White earthenware clay
- Rolling pin
- Fish-shaped cookie cutter (or paper template and knife)
- Needle tool
- Small round piping tip or drinking straw (for texture)
- Sponge
- Small drill bit or hole punch tool
- Underglaze (Light Blue and Dark Blue)
- Clear transparent glaze
- Fine paintbrush
- Twine or hemp cord
- Kiln (or air-dry clay alternatives if not firing)
Step 1: Shaping the Fish
-
Prepare the Clay:
Begin by wedging a handful of white earthenware clay to remove any air bubbles. Roll it out into a smooth slab approximately 1/4 inch thick, ensuring the surface is level. -
Cut the Shape:
Place your fish-shaped cookie cutter onto the slab and press down firmly. If using a paper template, trace around it carefully with a needle tool to cut out the silhouette. -
Clean the Edges:
Gently lift the fish from the work surface. Use a damp sponge or your finger to smooth down any rough or sharp edges left by the cutter. -
Create the Hanging Hole:
Using a small hole punch tool or the back of a drill bit, create a clean hole near the top dorsal fin area. Make sure it’s large enough to thread twine through later, keeping in mind clay shrinks slightly when fired.
Depth Through Wiping
For maximum texture pop, paint the blue glaze over the whole body and immediately wipe the raised surfaces with a clean, damp sponge. This leaves color only in the grooves.
Step 2: Adding Texture and Detail
-
Define the Head:
Use a needle tool to draw a curved line separating the head from the body. Press lightly but firmly to create a distinct groove. -
Sculpt the Eye and Mouth:
Press a small round tool into the head area to form the eye. Use the needle tool to carve a small, curved smile near the front nose. -
Create Scalloped Scales:
Starting just behind the head line, press a U-shaped tool (like the edge of a piping tip or a cut straw) into the clay to create row upon row of scalloped scales. Overlap them slightly as you move toward the tail. -
Add Dotted Accents:
Take a fine-point tool and prick a tiny dot inside the curve of each scale. This adds extra visual interest and places for the glaze to settle. -
Detail the Fins and Tail:
Carve straight, radiating lines into the tail and the bottom fin to simulate webbing. I find drawing these quickly helps them look more organic and less rigid. -
Allow to Dry:
Let the piece dry slowly under a loose plastic sheet to prevent warping until it is bone dry. Bisque fire according to your clay’s specific instructions.
Go Green
Make a school of fish by creating variation with teal, seafoam green, and deep navy glazes. Hang them at different lengths on a piece of driftwood for a mobile.
Step 3: Glazing and Finishing
-
Apply the Base Blue:
Once bisque fired, apply a coat of light blue underglaze over the scaley section of the body and the tail. Wipe back slightly with a damp sponge so the color stays strongest in the recessed textures. -
Darken the Head:
Paint the head section with a slightly darker, more saturated blue underglaze to create contrast with the body. -
Highlight the Scales:
If you want more definition, carefully drop a tiny amount of the darker blue into the deepest grooves of the scales and fin lines. -
Clear Glaze Application:
Dip the entire fish into a clear, transparent glaze. This will seal the piece and make those blue colors pop vividly after firing. -
Final Fire:
Load the kiln for the glaze firing, making sure the fish is placed on a stilt or has a waxed bottom so it doesn’t stick to the shelf. -
Add Suspension:
Once cool, thread a piece of natural hemp cord or twine through the hole and tie a secure knot to complete your hanging ornament.
Hang your finished fish near a window to let the light play off the glazed textures


What Really Happens Inside the Kiln
Learn how time and temperature work together inside the kiln to transform clay into durable ceramic.
Blue Jellyfish Pendant
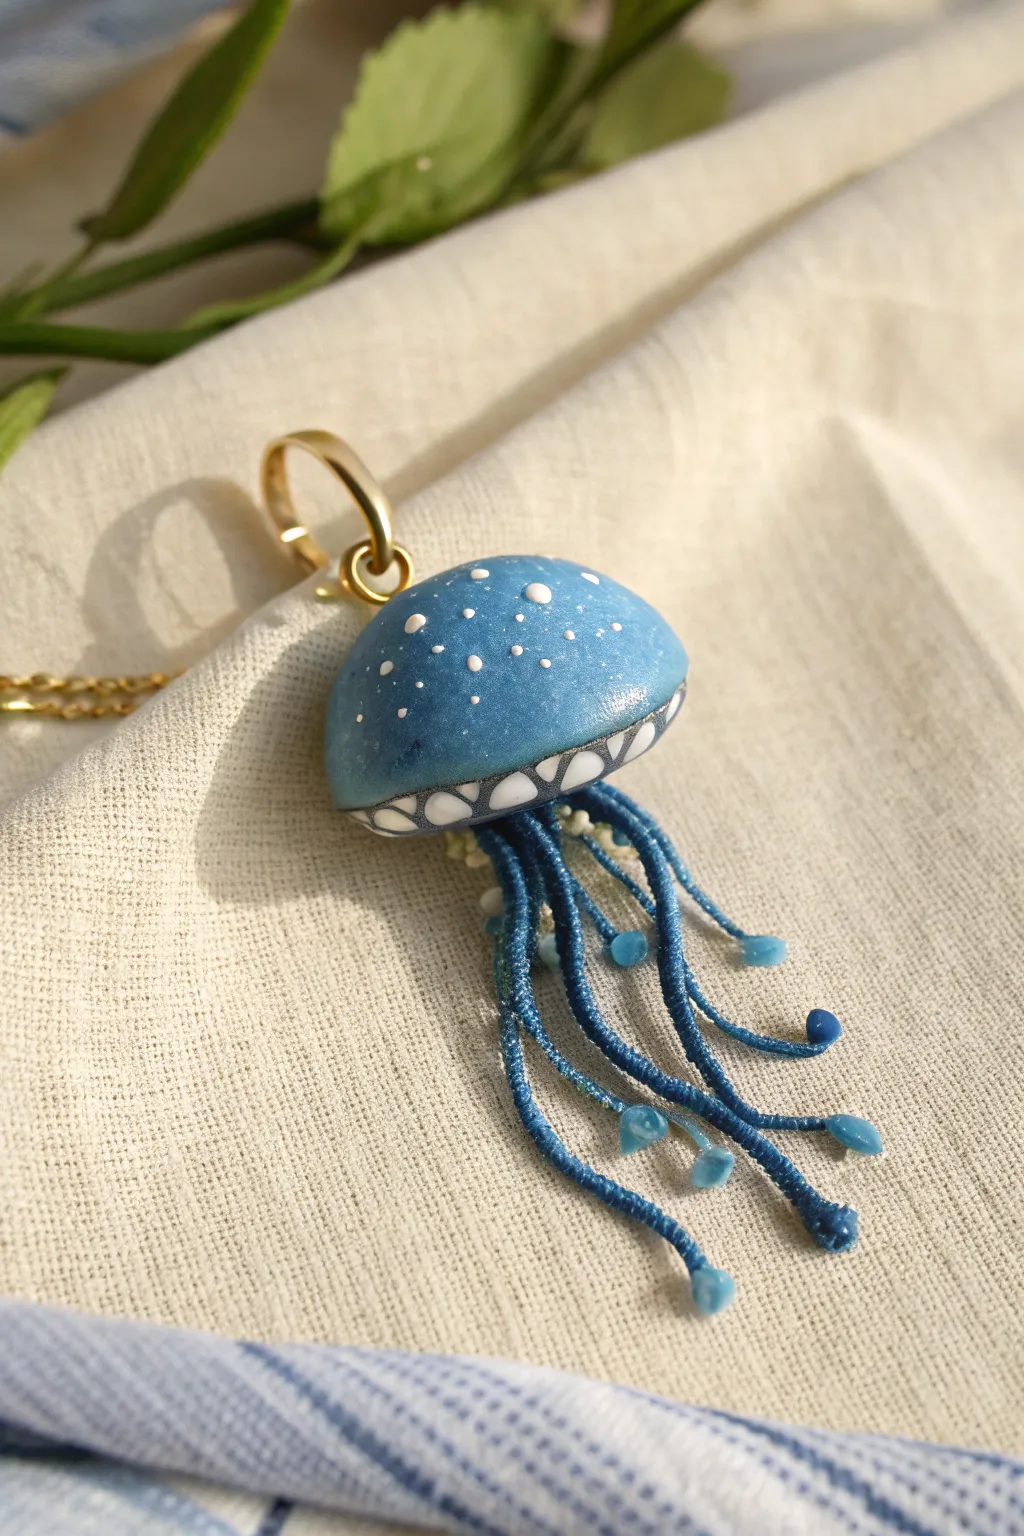
Dive into the deep blue with this whimsical jellyfish pendant, featuring a speckled clay cap and flowing, bead-tipped tentacles. The textured rim and careful threading details give this wearable art piece a charming, hand-crafted character.
How-To Guide
Materials
- Polymer clay (medium blue)
- White acrylic paint (or liquid clay/slip)
- Dark grey or black acrylic paint
- Gloss glaze (UV resin or polyurethane varnish)
- Blue waxed cord, embroidery floss, or thin macrame string
- Small translucent blue seed beads or teardrop beads
- Gold jewelry bail
- Gold jump ring
- Needle tool or toothpick
- Dotting tool or small paintbrush
- Superglue or heavy-duty jewelry adhesive
- Oven for baking
Step 1: Sculpting the Bell
-
Shape the base:
Begin by conditioning your blue polymer clay until it is soft and pliable. Roll a walnut-sized amount into a smooth ball, then gently press it onto your work surface to flatten the bottom while keeping the top domed. -
Refine the dome:
Smooth out the curvature of the dome with your fingertips to ensure there are no fingerprints. The shape should resemble a mushroom cap or a half-sphere. -
Create the mounting hole:
Before baking, use a needle tool to pierce a hole horizontally through the very top of the dome for the jump ring. Ensure the hole is wide enough for your hardware. -
Form the rim:
Flatten a small snake of the same blue clay into a ribbon. Attach this to the bottom edge of the dome to create a slightly raised rim or skirt. -
Add texture:
Using a small sculpting tool or the edge of a credit card, press vertical indentations into the rim you just added. These indentations will hold the white paint later. -
Bake the clay:
Bake the clay piece according to the manufacturer’s instructions (usually around 275°F/130°C for 15-30 minutes). Let it cool completely before painting.
Clean Edges
To get crisp white shapes on the rim, paint the white freely into the grooves, let it dry slightly, then sand the raised surface lightly to remove excess paint.
Step 2: Painting and Glazing
-
Paint the rim details:
Once cool, carefully fill the indentations on the rim with white acrylic paint. If you get paint on the raised blue sections, wipe it away quickly with a damp cloth or paper towel. -
Add the speckled pattern:
Using a fine dotting tool or the tip of a toothpick, apply small dots of white paint across the top of the blue dome. Vary the sizes slightly for a natural, organic look. -
Outline the rim:
For contrast, like in the reference image, use a very fine brush with dark grey or black paint to outline the top edge of the white rim sections. -
Apply the glaze:
Coat the entire clay bell with a high-gloss glaze or UV resin. This protects the paint and gives the jellyfish a wet, aquatic appearance. Let it dry or cure fully.
Glow Up
Mix glow-in-the-dark powder into your white paint for the dots and rim. Your jellyfish will look like bioluminescent sea life when the lights go out.
Step 3: Tentacles and Assembly
-
Prepare the cords:
Cut 6 to 8 strands of blue waxed cord or embroidery floss, each about 3 inches long. I find varying the lengths slightly adds more movement to the final piece. -
Tie the ends:
Tie a small knot at one end of each cord. Depending on your aesthetic, you can leave the knot plain or thread a small translucent bead above the knot. -
Add teardrop beads:
For the specific look in the photo, attach small blue teardrop beads or seed beads to the very tips of some strands, securing them with a tiny dab of glue or a knot. -
Bundle the tentacles:
Gather all the non-beaded ends of your cords together. Tie them into a single tight knot or bind them with thread. -
Attach to the bell:
Apply a generous amount of superglue or jewelry adhesive to the center of the flat underside of the clay bell. Press the gathered knot of tentacles firmly into the glue. -
Install hardware:
Open your gold jump ring with pliers and thread it through the hole you made in the top of the dome. Attach the gold bail to the jump ring and close it securely.
Now your ocean-inspired treasure is ready to float beautifully around your neck
Blue Sea Turtle With White Belly
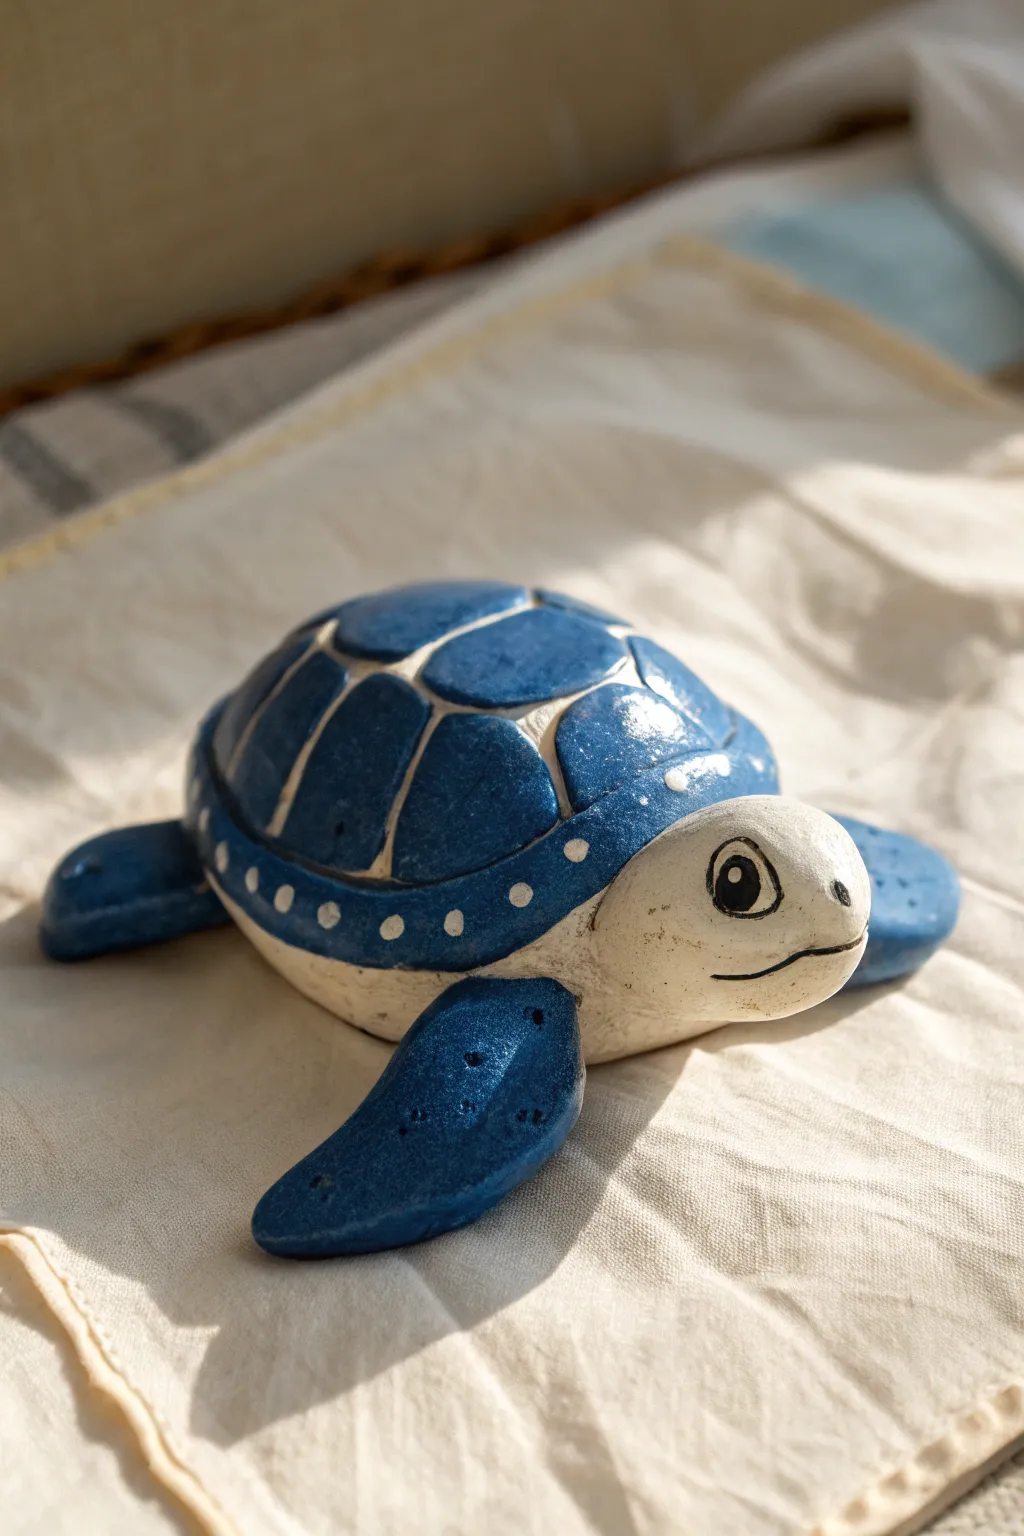
Capture the serenity of the ocean with this charming sculpted sea turtle, featuring a deep blue shell accented by crisp white shell segments. The contrast between the smooth white belly and the glossy, textured carapace makes this a delightful display piece.
Step-by-Step
Materials
- Air-dry clay (white)
- Acrylic paints: Navy blue, White, Black
- Sculpting tools (needle tool, small ball stylus)
- Paintbrushes (fine detail and flat)
- Gloss varnish or sealant
- Cup of water
- Fine-grit sandpaper (optional)
- Aluminum foil (for armature)
Step 1: Sculpting the Body
-
Form the core:
Crumple a small piece of aluminum foil into a flattened oval shape to create a lightweight armature for the shell. This saves clay and reduces drying time. -
Cover the shell:
Roll out a sheet of white clay and drape it over your foil armature. Smooth it down to create a dome shape, tucking the excess clay underneath to form a flat bottom. -
Create the belly:
Flip the dome over. Add a flat oval of clay to cover any exposed foil on the bottom, blending the edges seamlessly into the upper shell with wet fingers. -
Sculpt the head:
Roll a medium-sized ball of clay into a teardrop shape. Flatten the wider end slightly for the face and attach the narrower end to the front of the shell. Blend the clay well at the neck joint. -
Add the flippers:
Create four flattened teardrop shapes—two large for the front flippers and two smaller ones for the back. Attach them to the underside of the body, sweeping the front ones backward slightly for a swimming motion. -
Define the face:
Use a modeling tool to carefully carve a small, curved line for the mouth. Use a ball stylus to press indentations where the eyes will eventually be painted. -
Create shell texture:
Using a needle tool or a dull knife, gently carve the scute pattern into the shell. Start with a central row of pentagons or hexagons, then add surrounding shapes. Don’t cut all the way through; just create deep grooves. -
Smooth and dry:
Dip your finger in water and smooth out any fingerprints or rough edges. Let the piece dry completely according to your clay’s package instructions, which usually takes 24-48 hours.
Cracks happen?
If small cracks appear as the air-dry clay shrinks, mix a tiny bit of fresh clay with water to make a paste (slip) and fill the cracks. Sand smooth once dry.
Step 2: Painting and Finishing
-
Base coat the shell:
Once fully dry, paint the entire shell area (avoiding the grooves if possible, but it’s okay if paint gets in them) with a deep navy blue acrylic paint. -
Reinforce the grooves:
If I accidentally paint over the groove lines, I like to go back with a very fine brush and white paint to re-establish the separation between the shell segments. This ‘grout’ look is key to the design. -
Paint the dots:
Using the handle end of a paintbrush or a dotting tool, dab small white dots along the lower rim of the shell for a decorative border pattern. -
Detail the head:
Leave the head and belly the natural unpainted white (or paint white if your clay isn’t bright enough). Paint the inside of your eye indentations black, leaving a tiny white dot for a highlight. -
Add eye outline:
Use a very fine liner brush and black paint to create a thin circle around the eye and a small eyebrow marking above it for expression. -
Paint the flippers:
Paint the top surfaces of the flippers to match the navy blue shell. You can add a subtle speckled texture by flicking a toothbrush with lighter blue paint, or keep them solid. -
Highlighting:
Mix a tiny bit of white into your navy blue. lightly dab the center of each shell segment to create a subtle highlight, giving the shell a rounded, 3D appearance. -
Seal the piece:
Once the paint is thoroughly dry, apply a coat of gloss varnish. This mimics the wet look of a sea turtle emerging from the water and protects your paint job.
Make it sandy
Before sealing, apply a thin layer of glue to just the very bottom of the turtle’s belly and dip it into real fine sand for a realistic beach texture.
Place your finished turtle on a sunny shelf to remind you of warm beach days

TRACK YOUR CERAMIC JOURNEY
Capture glaze tests, firing details, and creative progress—all in one simple printable. Make your projects easier to repeat and improve.
Blue Dinosaur Desk Buddy
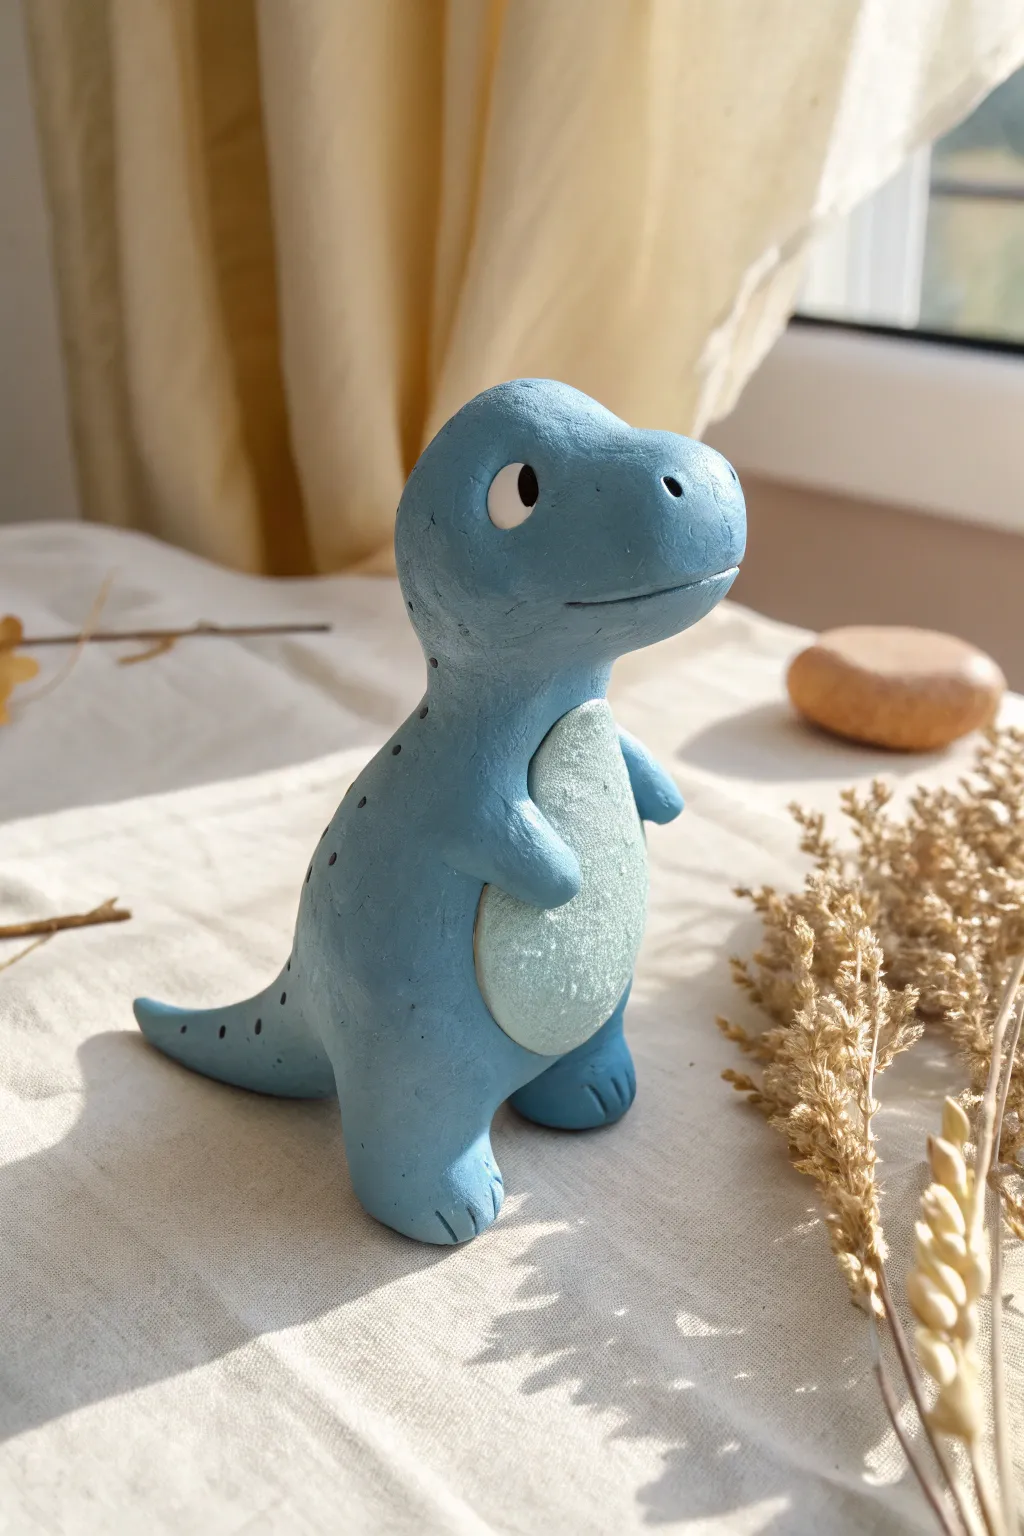
This charming little T-Rex brings a touch of prehistoric whimsy to any workspace with its soft blue hue and friendly expression. Standing upright on sturdy legs, this polymer clay creation features a smooth matte finish and a contrasting tummy patch that adds lovely dimensionality.
Step-by-Step Tutorial
Materials
- Polymer clay (medium blue)
- Polymer clay (light speckled grey or pale blue)
- Polymer clay (white and black for eyes)
- Sculpting tools (needle tool, ball stylus)
- X-acto knife or clay blade
- Rolling pin
- Aluminum foil (for armature core)
- Clear matte varnish (optional)
- Oven for baking
Step 1: Sculpting the Body
-
Form the Core:
Crumple a small amount of aluminum foil into a pear shape to create a lightweight core for the dinosaur’s body. This saves clay and helps it bake more evenly. -
Cover the Core:
Condition your medium blue clay until it is soft and pliable. Flatten a large piece and wrap it completely around the foil core, smoothing out any seams with your thumb so the surface is flawless. -
Shape the Head:
Gently manipulate the top of the pear shape to define the head. I like to press slightly at the ‘neck’ area to distinguish it from the body, then pull the snout forward to give him that classic dinosaur profile. -
Create the Tail:
Roll a cone of blue clay and attach it to the lower back of the body relative to where the face is looking. Blend the clay seams thoroughly using a sculpting tool so the tail looks like an extension of the spine.
Smooth Moves
Use a dedicated soft paintbrush dipped in rubbing alcohol to brush over the raw clay before baking. This melts away fingerprints and dust instantly.
Step 2: Adding Limbs & Details
-
Construct the Legs:
Roll two thick logs of blue clay for the legs. They need to be sturdy enough to support the body, so verify they are wide at the base. -
Attach the Legs:
Press the legs firmly onto the bottom of the body, blending the clay upwards into the hips. Stand the figure up on a flat surface to ensure he balances correctly on his own before moving on. -
Add the Toes:
Using a needle tool or a small knife, press three small indentations into the front of each foot to suggest toes. -
Form the Arms:
Roll two much smaller, teardrop-shaped pieces of blue clay for the arms. Attach them high on the chest area. -
Position the Arms:
Curve the arms slightly inward so they rest against the belly or just hang freely, giving him a cute, relaxed posture.
Step 3: Facial Features & Texture
-
Make the Tummy Patch:
Roll a thin sheet of the light speckled grey or pale blue clay into an oval shape. Press this onto the front of the belly, smoothing the edges so it sits flush against the main body. -
Create the Eyes:
Press small indentations into the sides of the head with a ball stylus. Insert tiny balls of white clay, flatten them slightly, and add minute black pupils to the center. -
Add the Smile:
Use a sharp blade or needle tool to slice a long, curved mouth line across the snout. Deepen the corners slightly to emphasize a smile. -
Nostril Details:
Poke two small holes at the very end of the snout for nostrils. -
Texture the Back:
Using a needle tool, poke a line of small, evenly spaced dots running down the back of the neck and along the spine for a subtle spinal ridge texture.
Dino Diorama
Create a tiny habitat! Glue the finished dinosaur onto a wooden coaster and add preserved moss or small dried twigs to create a prehistoric forest scene.
Step 4: Baking & Finishing
-
Pre-Bake Check:
Give the entire sculpture a final inspection. Remove any fingerprints by gently buffing the clay with a tiny bit of baby oil on your finger. -
Bake the Piece:
Place the dinosaur on a baking sheet or ceramic tile. Bake according to your specific clay manufacturer’s instructions (usually around 275°F/130°C for 15-30 minutes depending on thickness). -
Cool Down:
Allow the dinosaur to cool completely in the oven with the door slightly ajar to prevent cracking from rapid temperature changes. -
Optional Varnish:
Apply a coat of matte varnish if you want to protect the surface and unify the finish, though leaving the raw clay texture is perfectly fine too.
Now you have a loyal prehistoric friend to keep you company during your workday
Blue Elephant With Big Ears
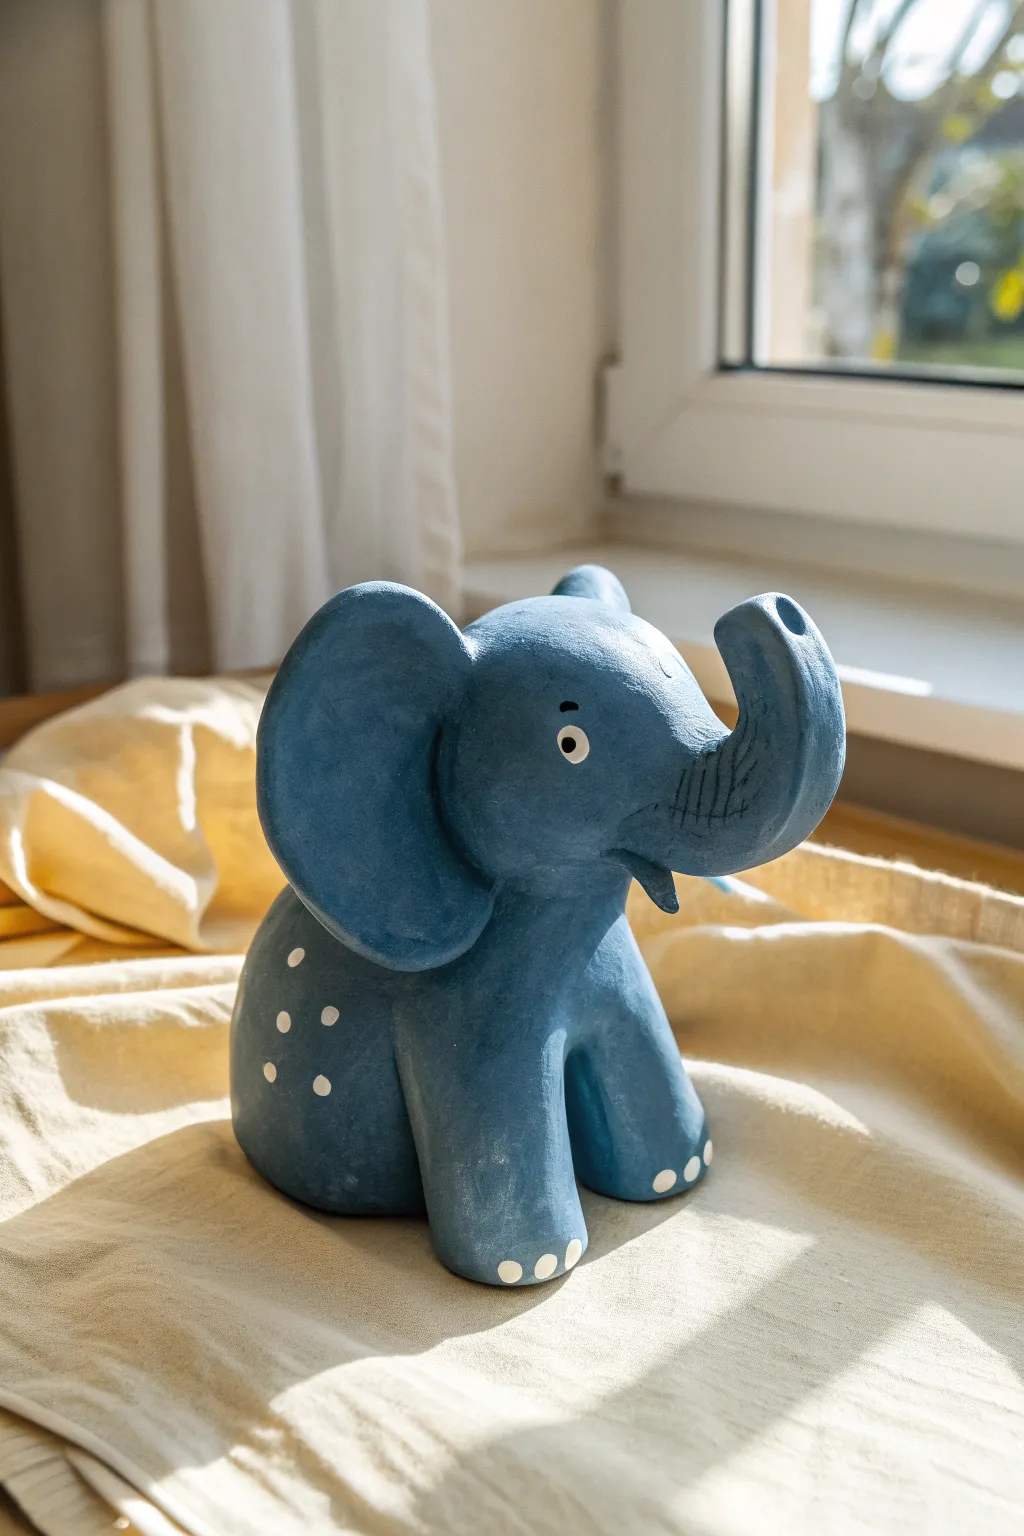
This charming, chunky blue elephant features oversized ears and a cheerful upturned trunk, making it a delightful addition to any shelf. The project combines simple geometric clay shapes with playful painted details like polka dots and expressive eyes.
Step-by-Step Guide
Materials
- Air-dry clay (white or grey)
- Blue acrylic paint (matte finish)
- White acrylic paint
- Black fine-tip marker or paint pen
- Clay sculpting tools (needle tool, smoother)
- Water cup and sponge
- Paintbrushes (medium flat, small round)
- Aluminum foil (for armature)
- Fine-grit sandpaper
Step 1: Sculpting the Body
-
Prepare the core:
Start by crumpling a piece of aluminum foil into a rounded, slightly elongated egg shape. This will be the core of the elephant’s body and helps save clay while reducing drying time. -
Cover the armature:
Roll out a slab of clay about 1/4 inch thick. Wrap this entirely around your foil egg, blending the seams together until the surface is completely smooth. -
Form the legs:
Roll four thick, sturdy cylinders of clay for the legs. They should be quite chunky to support the body. Attach them to the bottom of the body by scoring the clay (scratching crisscross lines) and adding a dab of water or clay slip. -
Blend the limbs:
Use a smoothing tool or your finger to blend the clay from the top of the legs into the body so there are no visible seams. The elephant should look like one solid unit. -
Create the head:
Roll a sphere of clay for the head, slightly smaller than the body. Attach it securely to the front of the body, again using the score and slip method. Blend the neck area smooth.
Pro Tip: Seamless Ears
When attaching heavy ears, use a small coil of fresh clay at the seam (the “armpit” of the ear) and blend it out. This acts like a weld and prevents cracking as it dries.
Step 2: Adding Features
-
Sculpt the trunk:
Roll a tapered coil of clay. Attach the wider end to the face and curve the trunk upwards. Press the end flat slightly and use a tool to create a deep indentation or hole at the tip. -
Make the ears:
Flatten two large balls of clay into thick pancake shapes. These should be generous in size. Gently cup them slightly to give them a natural curve. -
Attach the ears:
Score the sides of the head and the back edge of the ears. Press the ears firmly onto the head, smoothing the clay at the connection point so they don’t fall off. -
Shape the tusks:
If desired, add two tiny cones of clay or small points near the base of the trunk for tusks, blending them into the face. -
Add texture details:
Use a needle tool or knife to gently press horizontal lines across the topcurve of the trunk for wrinkle details. Don’t cut too deep; just indent the surface. -
Smooth and dry:
I prefer to use a slightly damp sponge to wipe down the entire sculpture, removing fingerprints. Let the elephant dry completely for 24-48 hours until hard.
Step 3: Painting and Finishing
-
Sand imperfections:
Once fully dry, check for any rough spots. Gently sand them down with fine-grit sandpaper, then wipe away the dust. -
Apply base color:
Paint the entire elephant with a coat of matte blue acrylic paint. You may need two coats to get an opaque, even finish. Let the paint dry completely between coats. -
Paint the eyes:
Using a small brush or a dotting tool, place a white circle for the eye. Once dry, add a smaller black dot in the center for the pupil. -
Add the eyebrow:
Use a very fine brush or a black paint pen to draw a small, expressive eyebrow floating just above the eye. -
Detail the wrinkles:
Take your black paint pen or a very thin brush with watered-down black paint and carefully trace the indented lines you made on the trunk to make them pop. -
Stamp the spots:
Dip the handle end of a paintbrush into white paint. Dot it onto the elephant’s rump to create the polka dot pattern. -
Paint the toes:
Using the same dotting technique or a small brush, paint three small white ovals at the bottom of each foot to represent toenails.
Troubleshooting: Cracks?
If small cracks appear while drying, don’t worry. Mix a tiny bit of fresh clay with water to make a paste (slip) and fill the cracks. Smooth it over and let it dry again.
Place your finished elephant near a window where natural light can highlight those cute painted details
Blue Koala With White Snout
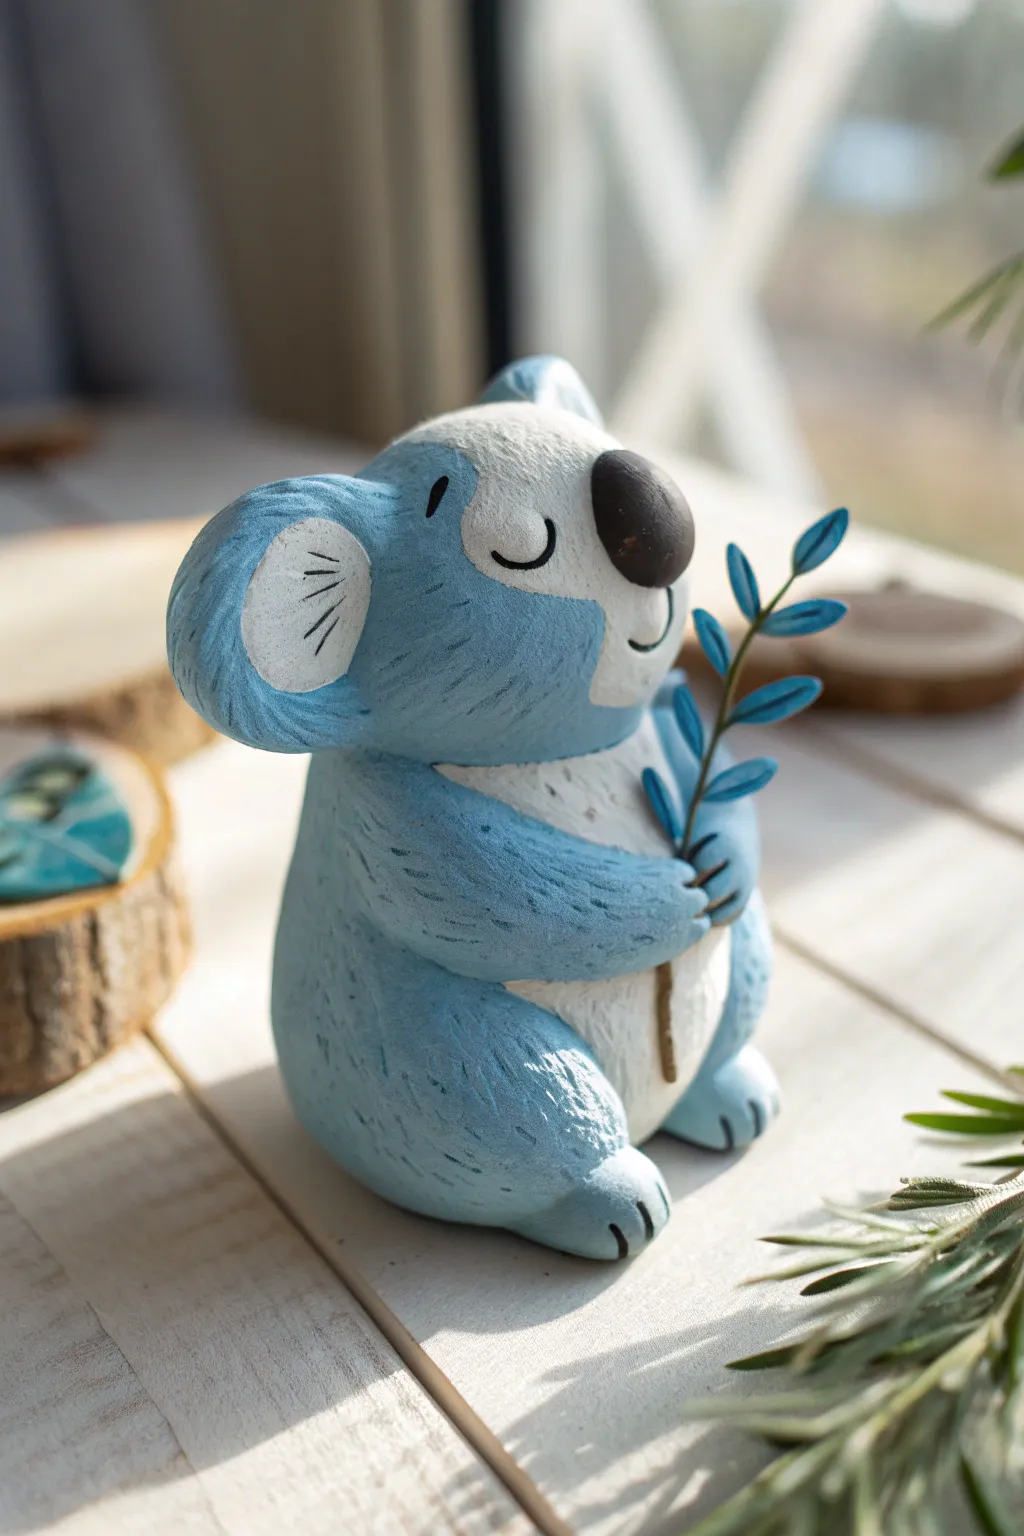
Sculpt a charming, whimsical koala using soft blue clay, finished with a bright white snout and belly for contrast. This endearing figurine holds a delicate leafy branch, making it a perfect desk companion or a sweet handmade gift.
How-To Guide
Materials
- Light blue polymer clay
- White polymer clay
- Dark brown or black polymer clay
- Thin crafting wire or armature wire
- Basic sculpting tools (ball stylus, needle tool)
- Small craft knife
- Acrylic rolling pin
- Texturing tool (stiff bristle brush or toothbrush)
- Blue acrylic paint (optional for leaf shading)
- Matte varnish
Step 1: Forming the Body and Head
-
Shape the base:
Start by conditioning a substantial ball of light blue clay. Roll it into a smooth pear shape, slightly flattened at the bottom so it sits securely without tipping over. -
Create the head:
Roll a slightly smaller ball of blue clay for the head. Press it gently onto the narrower top part of your pear-shaped body. Blend the seam at the neck carefully with a smoothing tool to make it sturdy. -
Add white belly:
Flatten a small piece of white clay into an oval. Press this onto the front of the body for the belly patch, smoothing the edges so it sits flush against the blue clay. -
Texture the fur:
Before adding limbs, use a stiff bristle brush or a clean toothbrush to gently tap all over the blue blue and white surfaces. This creates a lovely, soft fur-like texture rather than leaving it perfectly smooth.
Step 2: Facial Features and Ears
-
Sculpt the snout:
Take a small white ball of clay and flatten it into a rounded triangle or oval. Place this in the center of the face area, blending the edges softly. -
Add the nose:
Roll a tiny oval of dark brown or black clay. Position it near the top of the white snout patch, pressing it firmly so it sticks. -
Create the ears:
Form two medium-sized balls of blue clay and flatten them into thick discs. Pinch one side of each disc to attach to the head. Press a smaller white circle inside each ear for the inner ear detail. -
Mark ear details:
Use a needle tool or knife to gently incise three small lines inside the white part of the ears to suggest fur tufts. -
Draw the face:
Using a needle tool, carefully etch two curved lines for sleeping eyes and a small curve for the mouth. You can fill these indentations with a tiny bit of dark paint later or insert tiny strings of black clay now.
Loose Limbs?
If arms or heavy ears won’t stay put, use short pieces of wire or toothpicks as internal dowels to pin the pieces to the main body before baking.
Step 3: Limbs and Accessories
-
Attach the legs:
Roll two thick logs of blue clay for the back legs. Press them onto the sides of the body at the bottom, blending the hip joint into the torso. -
Add the arms:
Create two slightly smaller logs for the arms. Attach them near the neck, curving them forward as if the koala is holding something against its chest. -
Detail the paws:
Use your knife tool to press two or three small indentations into the ends of the arms and legs to create paw toes. -
Texture the new additions:
Don’t forget to go back over the ears, limbs, and snout edges with your texturing brush to match the rest of the body.
Make it a Planter
Make the koala slightly larger and hollow out the back or top of the head to hold a tiny air plant or succulent for a functional desk accessory.
Step 4: The Leafy Branch
-
Make the stem:
Cut a short piece of thin wire. Cover the bottom half with a very thin layer of brown clay to create a stem. -
Create leaves:
Roll tiny tear-drop shapes from blue clay (perhaps mixed with a little dark blue for contrast). Press a needle tool down the center of each to make a vein. -
Assemble the branch:
Press the leaves onto the upper part of the wire. I find using a dab of liquid clay helps them stay attached securely. -
Place the branch:
Tuck the stem between the koala’s arms and body, pressing the clay arms gently around it to secure the hold. -
Bake and finish:
Bake the figurine according to your clay manufacturer’s instructions (usually around 275°F/130°C for 15-30 minutes). Once cool, you can seal it with a matte varnish for protection.
Now you have a serene little blue friend to keep you company on your desk
Blue Butterfly Wing Pins
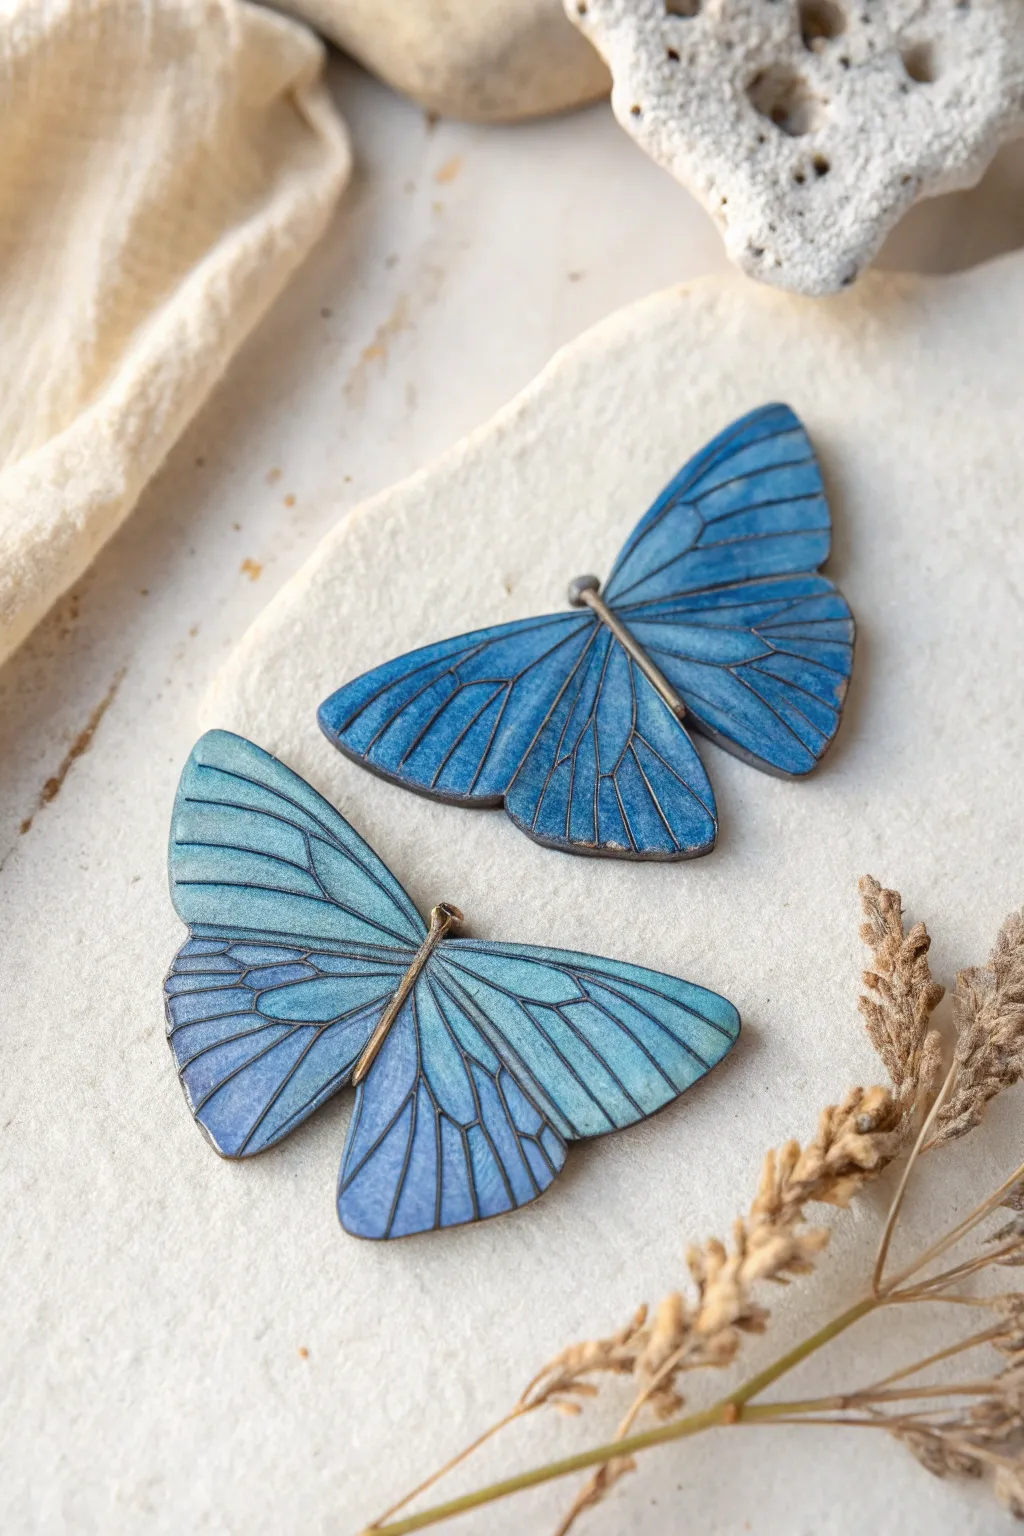
Capture the delicate beauty of nature with these stunning butterfly wing pins, featuring a captivating gradient of blues and intricate veining. This project uses polymer clay and surface techniques to create a translucent, jewel-like finish that perfectly mimics the iridescence of real wings.
Step-by-Step
Materials
- White polymer clay
- Translucent polymer clay
- Alcohol inks (Royal Blue, Turquoise, Sky Blue)
- Black acrylic paint
- Butterfly wing cutters or a paper template
- Fine detail paintbrush (00 size)
- Needle tool or scribe tool
- UV resin or gloss varnish
- UV lamp (if using resin)
- Brass or gold wire (20 gauge)
- Pin backs
- Super glue (cyanoacrylate)
- Pasta machine or acrylic roller
- Tile or glass work surface
- Wet/dry sandpaper (up to 1000 grit)
Step 1: Creating the Base
-
Condition the Clay:
Begin by mixing equal parts white and translucent polymer clay. Condition the mixture thoroughly until it is soft and pliable, ensuring there are no streaks. -
Roll out the Sheet:
Pass the clay through your pasta machine on a medium-thin setting (approx. 2mm). If rolling by hand, try to get an even thickness to ensure the wings bake consistently. -
Cut the Wings:
Use your butterfly wing cutters to punch out shapes. If you are using a paper template, place it gently on the clay and trace around it carefully with a craft knife or needle tool. -
Smooth the Edges:
Gently run your finger along the cut edges of the fresh clay to soften any harsh lines or burrs left by the cutter.
Paint Stuck on Top?
If the black paint dries too fast on the surface, lightly sand the top of the baked clay with very fine grit sandpaper (1000+) to reveal the blue color again.
Step 2: Coloring and Veins
-
Apply Base Color:
Drop a small amount of turquoise and sky blue alcohol ink onto a palette. Using a brush or a sponge applicator, dab the color onto the raw clay wings, blending the lighter blue near the center and darker turquoise toward the tips. -
Create the Gradient:
While the first layer is still slightly wet, add touches of royal blue to the very edges of the wings to deepen the gradient. Let the alcohol ink dry completely for about 10 minutes. -
Etch the Design:
Using a needle tool, lightly score the vein pattern into the surface of the clay. You don’t need to cut deep; just make a groove for the paint to settle into later. -
Initial Cure:
Bake the clay pieces according to the manufacturer’s instructions (usually 275°F/130°C for 15-30 minutes). Let them cool completely on a flat surface. -
Enhance the Veins:
Dilute a small dollop of black acrylic paint with a drop of water. Wash this over the entire wing surface, ensuring it gets into the etched grooves. -
Wipe Away Excess:
Before the paint fully dries, take a slightly damp paper towel or wet wipe and gently remove the black paint from the raised surfaces, leaving the dark pigment only in the recessed veins.
Depth with Layers
For a 3D effect, paint the veins on the baked clay, add a thin layer of liquid clay, cure, and then add the resin top coat. It creates a shadow box effect.
Step 3: Assembly and Finish
-
Form the Body:
Cut a short piece of brass wire for the butterfly body. Make a small loop at one end for the head or antennae anchor if desired. -
Attach the Body:
Glue the wire segment down the center junction where the wings meet. You can use a tiny strip of fresh clay underneath and re-bake briefly to secure it, or use strong super glue after the final bake. -
Coat with Resin:
For that glassy, professional look, apply a thin, even layer of UV resin over the front of the wings. I find using a toothpick helps guide the resin to the edges without overflowing. -
Cure the Resin:
Place the pieces under a UV lamp for 2-4 minutes until the surface is hard and tack-free. If you don’t use resin, three coats of gloss varnish will work perfectly too. -
Attach Pin Backs:
Turn the butterflies over. Sand the spot where the pin will go lightly to create a rough surface for better adhesion. -
Secure the Hardware:
Apply a drop of super glue or two-part epoxy to the pin back and press firmly onto the back of the butterfly. Let it cure fully before wearing.
Now you have a set of delicate, everlasting butterflies to adorn your favorite jacket or tote bag
Blue Cloud and Raindrop Charms
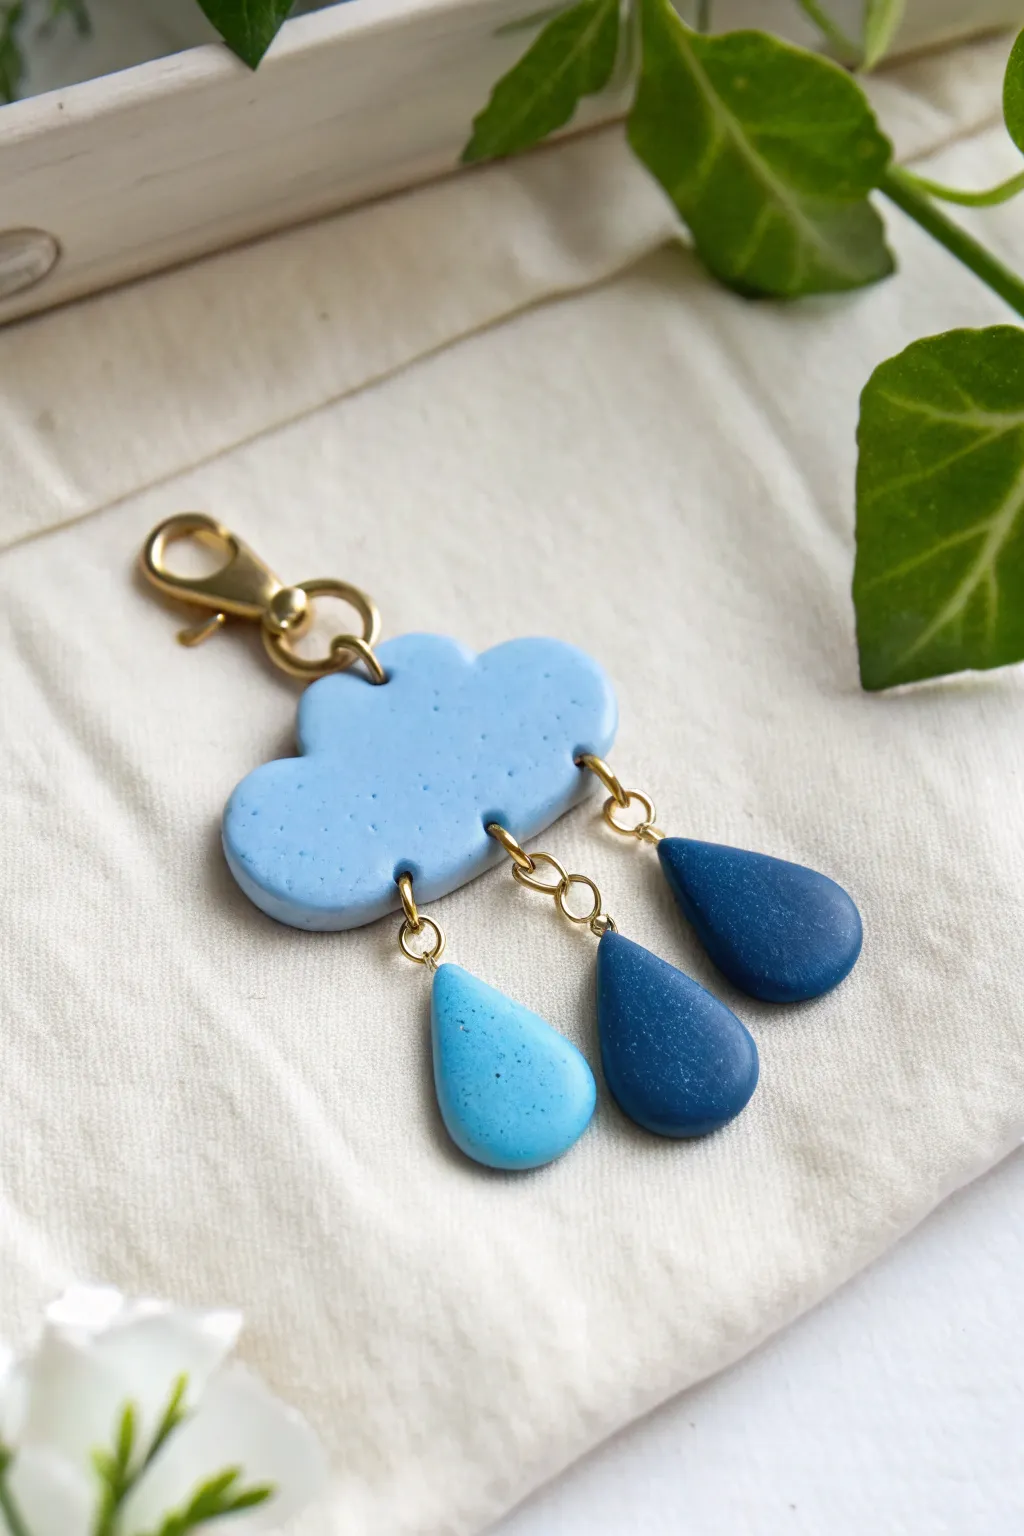
Capture the whimsy of a passing storm with this adorable polymer clay charm, featuring a textured cloud and cascading raindrops in ombre shades. The gold hardware adds a touch of brightness to the cool blue tones, making it perfect for a planner accessory or keychain.
Step-by-Step Tutorial
Materials
- Polymer clay (Light Light Blue, Medium Blue, Dark Blue)
- Black pepper or faux granite specks (optional for texture)
- Clay roller or pasta machine
- Cloud shaped clay cutter (approx. 1.5 – 2 inches)
- Teardrop shaped clay cutter (small)
- Needle tool or toothpick
- Gold jump rings (4mm and 6mm)
- Gold lobster clasp
- Jewelry pliers (flat nose and round nose)
- Baking sheet and parchment paper
- Oven
- Hand drill (or piercing tool before baking)
- Sandpaper or buffing tool (optional)
Step 1: Shaping the Cloud
-
Prepare the cloud base:
Start by conditioning your lightest blue clay until it is soft and pliable. Roll it out into a sheet approximately 3mm to 4mm thick. To achieve the speckled look seen in the photo, you can mix in a tiny pinch of ground black pepper or use a specialty ‘granite’ effect clay. -
Cut the cloud form:
Press your cloud-shaped cutter firmly into the sheet of light blue clay. wiggle it slightly to ensure a clean cut, then lift the cutter. Gently push the clay shape out if it sticks. -
Smooth the edges:
Dip your finger in a little water or cornstarch and gently rub the edges of the cloud to smooth out any harsh lines or fingerprints from handling. -
Piercing holes:
Using a needle tool, pierce a hole at the very top center of the cloud for the clasp. Then, pierce three evenly spaced holes along the bottom edge for the raindrops. Ensure the holes are large enough to fit your jump rings but not too close to the edge.
Step 2: Creating the Raindrops
-
Mix the ombre shades:
You will need three distinct shades of blue. Keep some light blue for the first drop. For the middle drop, mix equal parts light blue and dark blue. Use pure dark blue for the final drop. -
Roll and cut:
Roll out each of your three blue clay colors to the same thickness as your cloud. Use your small teardrop cutter to punch out one drop from each shade. -
Refining the shape:
If you don’t have a cutter small enough, you can hand-shape these by rolling a small ball and pinching one end into a point. Flatten them gently with an acrylic block. -
Add texture:
For a subtle speckled finish matching the cloud, I like to lightly tap the surface of the drops with a clean toothbrush or sandpaper before baking. -
Pierce the drops:
Make a small hole at the top (pointed end) of each raindrop using your needle tool. Double-check that the hole goes all the way through.
Sticky Cutter?
If clay gets stuck inside your small teardrop cutter, try dipping the cutter into cornstarch or water before pressing it into the clay slab. This acts as a release agent.
Step 3: Baking and Assembly
-
Bake the pieces:
Arrange the cloud and individual raindrops on a parchment-lined baking sheet. Bake according to your brand of polymer clay instructions (usually 275°F/135°C for 15-30 minutes). -
Cool down:
Allow the pieces to cool completely inside the oven or on a cooling rack. The clay hardens as it cools. -
Attach the drops:
Using two pairs of pliers, twist open three small gold jump rings. Loop a jump ring through the hole of the light blue raindrop and attach it to the left-most bottom hole of the cloud. -
Chain the middle drop:
For the middle (medium blue) drop, you want it to hang slightly lower. Use two jump rings linked together to attach this drop to the center hole of the cloud. -
Attach the final drop:
Attach the dark blue raindrop to the right-most hole using a single jump ring, creating a staggered, asymmetrical look. -
Add the clasp:
Open a larger or sturdier jump ring. Loop it through the top hole of the cloud and attach your gold lobster clasp before closing the ring securely.
Make It Sparkle
Mix a small amount of translucent clay or ultrafine glitter into your blue raindrop mix. After baking, coat the drops in UV resin for a wet, shiny rain effect.
Now you have a charming little storm cloud to brighten up your bag or keys
Blue Bead Set With Simple Patterns
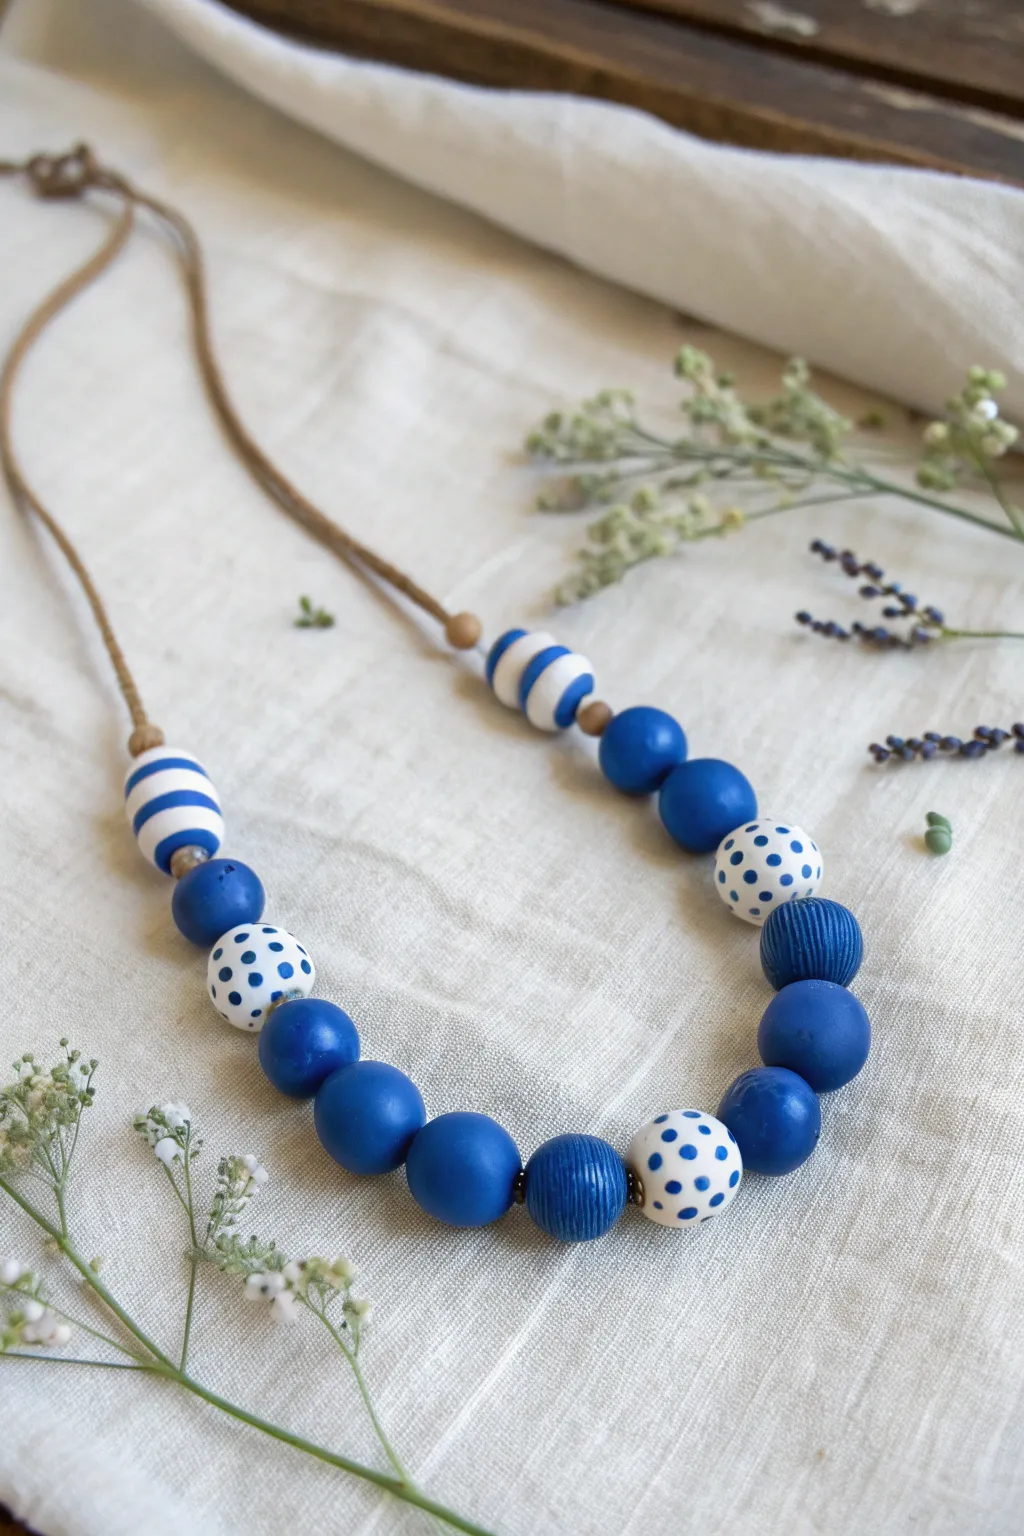
Capture the spirit of the seaside with this charming polymer clay necklace featuring a variety of blue and white patterned beads. The mix of solid blues, crisp stripes, playful polka dots, and textured accents creates a versatile accessory perfect for casual wear.
Detailed Instructions
Materials
- Polymer clay in Royal Blue and White
- Bead piercing pins or toothpicks
- Acrylic roller
- Clay blade or craft knife
- Sandpaper (wet/dry, various grits)
- Small round texture tool or coarse fabric
- Gloss or matte glaze (optional)
- Small paintbrush
- Brown waxed cotton cord or leather cord
- Small wooden spacer beads (natural finish)
- Jewelry clasp and jump rings (optional, or use adjustable knots)
- Oven for baking
Step 1: Creating the Bead Bases
-
Condition the clay:
Begin by thoroughly conditioning your blue and white polymer clay separately until they are soft and pliable. This prevents cracking later. -
Form the solid blue beads:
Roll roughly 8 to 10 equal-sized balls of the Royal Blue clay. These should be approximately 1.5 to 2 cm in diameter. Roll them between your palms until they are perfectly smooth. -
Create the white base beads:
Roll 4 balls of white clay. Two should be slightly elongated (oval) for the striped beads, and two should remain round for the polka dot beads. -
Pierce the holes:
Gently insert a bead pin or toothpick through the center of each bead. Rotate the pin as you push to avoid distorting the shape.
Smooth Seams Tip
When rolling striped or dotted beads, chill the clay in the fridge for 5 minutes before the final smoothing roll. This prevents the colors from smearing.
Step 2: Adding Patterns and Texture
-
Make the stripes:
Roll a very thin snake or use an extruder to create a thin string of blue clay. Flatten it gently. -
Apply stripes:
Wrap the flattened blue strip around the white oval beads. I like to do three distinct bands. Gently roll the bead on your work surface to embed the stripes flush with the white clay. -
Create polka dots:
Punch tiny circles of blue clay using a small straw or roll tiny balls. Press these randomly onto the two round white beads. Roll these beads again to make the surface seamless. -
Add texture:
Select two of your solid blue beads. Roll them over a coarse fabric, a texture sheet, or use a needle tool to scratch fine, consistent lines around the circumference for a ribbed look. -
Refine shapes:
Give all beads a final gentle roll to ensure fingerprint marks are smoothed out and holes are still open.
Color Variation
Mix a tiny amount of white into your blue clay for half the beads to create a subtle gradient effect, alternating between navy and lighter denim tones.
Step 3: Baking and Assembly
-
Bake the beads:
Place your beads on a baking sheet or tile. Follow the manufacturer’s instructions for your specific brand of clay regarding temperature and time (usually 275°F/130°C for 15-30 minutes). -
Cool and sand:
Allow the beads to cool completely. If there are any rough spots or fingerprints, use wet/dry sandpaper under water to buff them smooth. -
Glaze (Optional):
If you prefer a shiny finish, apply a thin coat of polymer clay glaze. For a matte, natural look like the photo, you can skip this step. -
Prepare the cord:
Cut a length of brown waxed cotton cord, approximately 30 inches long (or your desired length). -
String the center:
Start by threading the textured blue beads and the large solid blue beads in the center. Refer to the image for the specific alternating pattern. -
Add patterned beads:
Thread the polka dot beads next, followed by more solid blue beads, and finally the striped oval beads on the outer edges. -
Add spacers:
Place a small natural wooden bead or a tiny metallic spacer bead between specific transitions, particularly near the striped beads, to break up the color. -
Secure the ends:
Tie simple overhand knots on either side of the bead cluster to keep them centered. Finish the necklace with a sliding knot for adjustable length or attach a standard jewelry clasp.
Enjoy wearing your handcrafted coastal necklace on your next sunny outing
Blue Ring Dish With White Splash
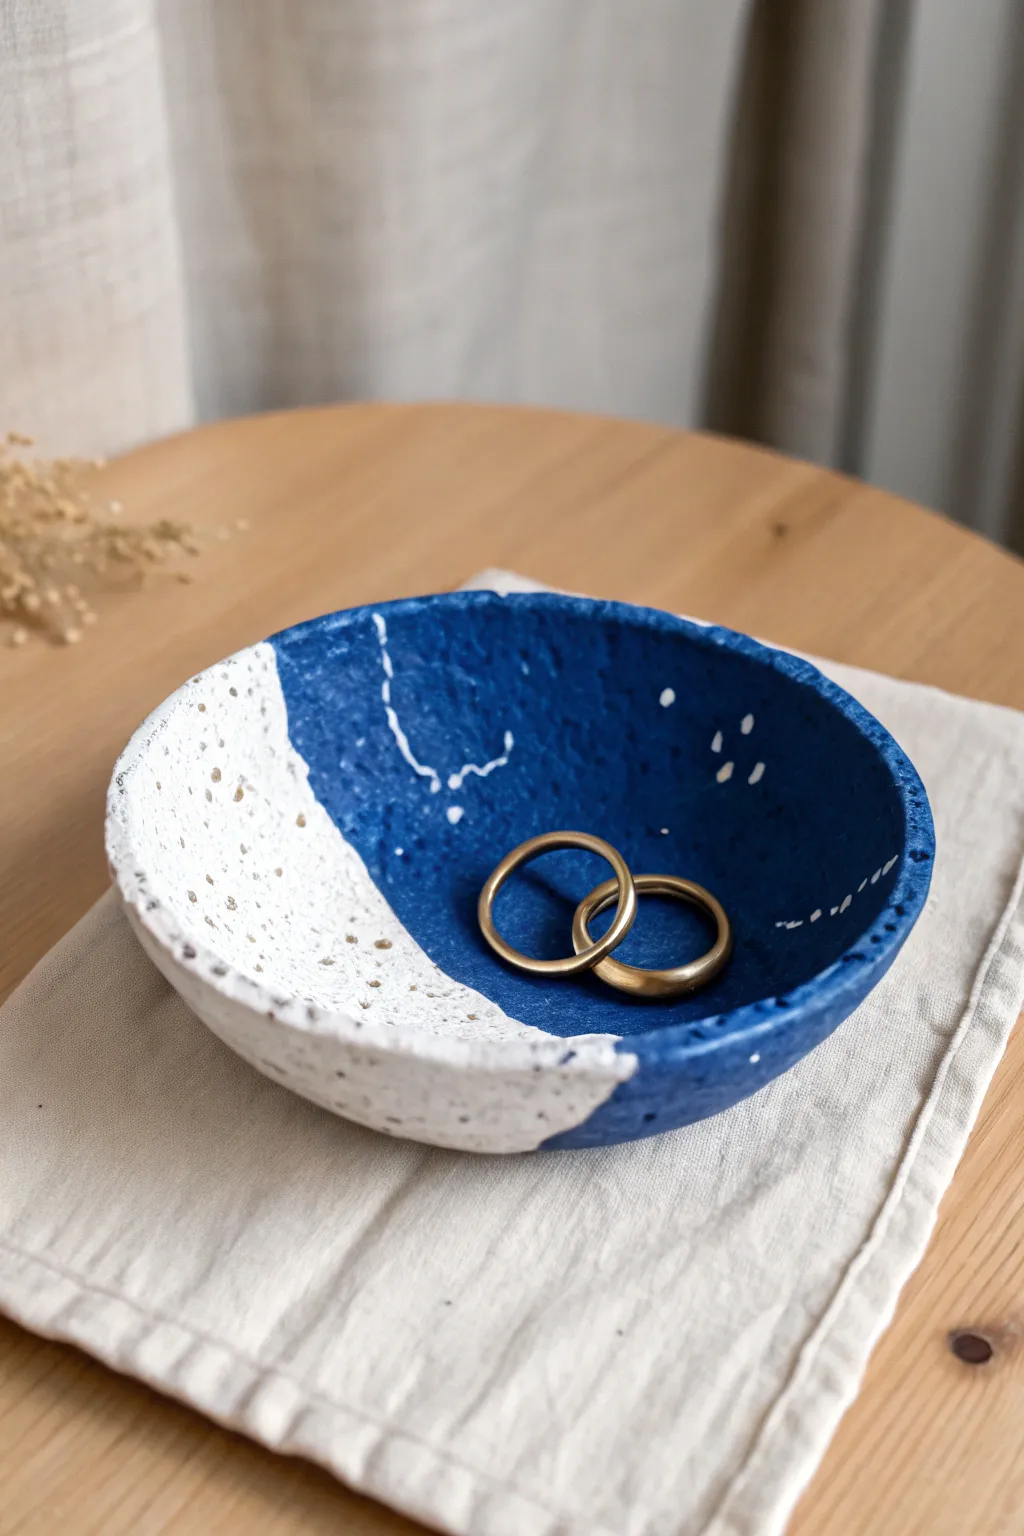
This striking ring dish balances deep midnight blue with speckled white for a look that feels both rustic and celestial. Its organic texture and bold color blocking create a perfect resting spot for your favorite jewelry pieces.
How-To Guide
Materials
- Air-dry clay (white)
- Acrylic paint (Deep ultramarine blue)
- Acrylic paint (Titanium white)
- Rolling pin
- Small bowl (to use as a mold)
- Sandpaper (medium and fine grit)
- Paintbrushes (one flat, one fine detail)
- Old toothbrush
- Matte varnish or sealant
- Craft knife or clay cutter
- Plastic wrap
Step 1: Shaping the Base
-
Condition the clay:
Start by taking a handful of air-dry clay and kneading it in your hands until it becomes soft, pliable, and warm. -
Roll it out:
Using a rolling pin, flatten the clay into a slab about 1/4 inch thick. Aim for an even thickness to prevent cracking during drying. -
Cut the circle:
Place a circular object or template (about 4-5 inches wide) onto the clay slab and cut around it using a craft knife to get a clean circle. -
Refine the edges:
Dip your finger in a little water and smooth around the cut rim to soften any sharp edges, giving it a more organic look.
Sticky Situation?
If your clay sticks to the rolling pin or work surface, try rolling it out on a piece of parchment paper or lightly dusting your tools with cornstarch.
Step 2: Molding and Drying
-
Prepare the mold:
Take a small bowl that has a curve you like. Line the inside with plastic wrap to prevent the clay from sticking. -
Form the curve:
Gently lift your clay circle and press it into the lined bowl. Smooth it down so it takes on the bowl’s concave shape, but don’t press so hard that you thin the clay out. -
Let it dry:
Allow the clay to dry completely in a cool, dry place. This usually takes 24-48 hours. I find flipping it over halfway through helps the bottom dry evenly. -
Remove and sand:
Once fully dry and hard, pop the clay out of the mold. Use medium-grit sandpaper to smooth out any major bumps, then switch to fine grit for a polished finish.
Step 3: Painting the Design
-
Mark the sections:
Lightly draw a curved line across the dish with a pencil, separating about one-third of the area for the white section. -
Apply the white base:
Paint the smaller marked section with titanium white acrylic paint. You may need two coats to ensure it is opaque and bright. -
Apply the blue base:
Paint the larger remaining section with deep ultramarine blue. Carefully paint along the curved line where it meets the white to keep a crisp edge. -
Paint the exterior:
Flip the bowl over and replicate the pattern on the outside, matching the lines so the color blocks wrap around the rim seamlessly.
Gilded Edge
For an extra touch of elegance, paint the very top rim of the bowl with gold acrylic paint or metallic leaf to frame the contrasting colors.
Step 4: Adding Details & Finish
-
Create the splatter:
Dip an old toothbrush into white paint (slightly thinned with water). Hold it over the blue section and run your thumb across the bristles to flick tiny white speckles onto the dark blue. -
Add larger stars:
Using a fine detail brush, hand-paint a few larger dots and random jagged lines on the blue section to mimic constellations or lightning cracks. -
Add speckles to white:
Clean your toothbrush and dip it into a bit of light brown or beige paint. Flick this very lightly over the white section to give it a speckled, stony ceramic look. -
Seal the piece:
Once all paint is completely dry, apply a coat of matte varnish over the entire dish to protect the paint and give it a finished, durable surface.
Now you have a stunning, handcrafted dish ready to cradle your favorite rings and trinkets
Blue Whale Phone Stand
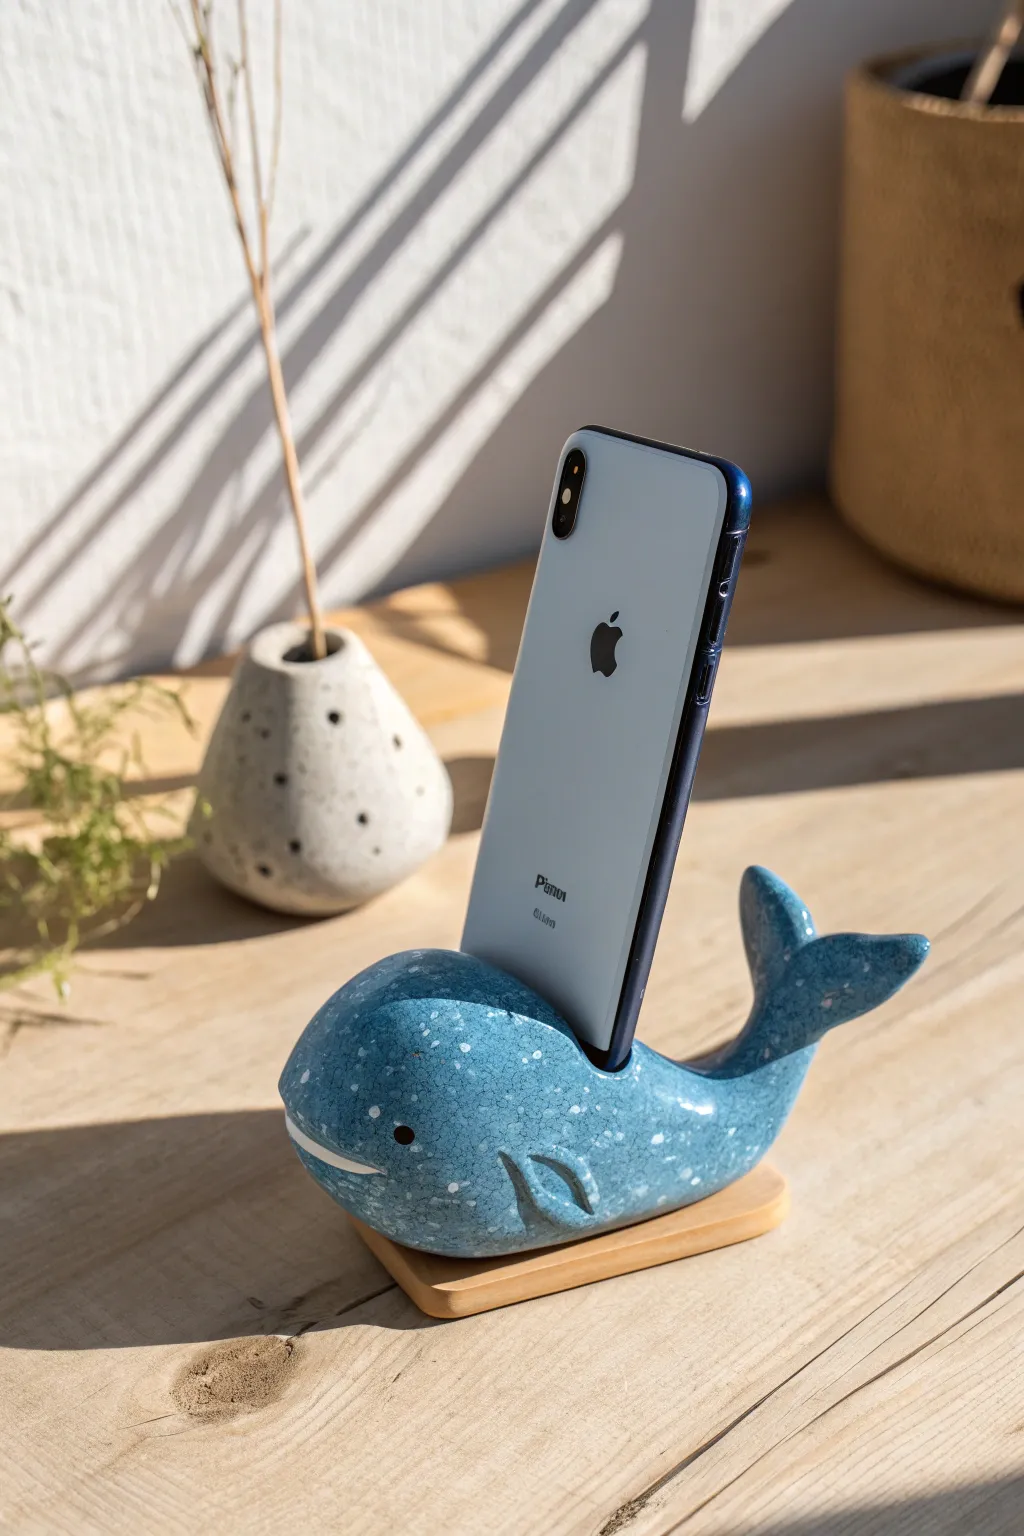
This adorable blue whale phone stand combines functionality with oceanic charm, featuring a glossy, speckled glaze finish that mimics sea spray. Sculpted from clay and mounted on a simple wooden base, it holds your device securely while adding a splash of personality to your desk.
Step-by-Step
Materials
- Polymer clay or air-dry clay (white or light grey)
- Acrylic paints (deep ocean blue, white, lighter blue, black)
- High-gloss varnish or resin
- Sculpting tools (needle tool, smoother)
- Small wooden coaster or square wood plaque
- Strong craft glue (E6000 or similar)
- Paintbrushes (small detail and medium)
- Old toothbrush (for speckling)
- Sandpaper (fine grit)
Step 1: Sculpting the Base Form
-
Condition the clay:
Begin by kneading your clay until it is soft, pliable, and free of cracks. If using polymer clay, warm it in your hands to make it easier to shape. -
Form the body:
Roll a large handful of clay into a smooth egg shape approximately the size of a mango. This will be the main body of the whale, so ensure it is substantial enough to support the weight of a phone. -
Flatten the bottom:
Gently tap the wider end of the egg shape onto your work surface to create a flat, stable bottom. The whale shouldn’t wobble when placed down. -
Pull the tail:
Pinch and pull the narrower end of the egg upwards to form the tail stem. Curve it slightly so it looks dynamic, like the whale is diving. -
Create the flukes:
Flatten the tip of the tail stem and use a knife or modeling tool to split it down the middle. Shape each side into a triangular fluke, smoothing the edges for a soft, organic look.
Slumping Tail?
If the tail droops while drying or baking, prop it up with a crumpled ball of aluminum foil or a piece of cardboard until the clay is firm enough to hold its own weight.
Step 2: Adding Details & Function
-
Create the phone slot:
Take your actual phone (with its case on, if you use one) and gently press it into the back of the whale to mark the width. Use a clay knife to carve out a deep, rectangular slot where the phone will sit. I like to make this slot slightly wider than the phone to allow for easy docking. -
Refine the slot:
Smooth the inside walls of the slot with a little water (if using air-dry clay) or baby oil (for polymer) to ensure there are no rough edges that could scratch your device. -
Add side fins:
Shape two small, flattened teardrops from extra clay. Attach one to each side of the body using a scoring tool and a bit of clay slip or liquid clay to ensure a strong bond. -
Detail the face:
Use a needle tool or a small drinking straw to create shallow indentations for the eyes. Carve a gentle, curved line wrapping around the front for the mouth. -
Cure the clay:
Bake the clay according to the manufacturer’s package instructions if using polymer, or let it air dry completely (usually 24-48 hours) if using air-dry clay.
Step 3: Painting and Finishing
-
Sand imperfections:
Once fully cured and cooled, lightly sand any fingerprints or rough ridges with fine-grit sandpaper to get a porcelain-smooth surface. -
Base coat:
Paint the entire whale with a solid coat of deep ocean blue acrylic paint. Let this layer dry completely before proceeding. -
Sponging texture:
Mix a slightly lighter blue shade. Dip a small piece of natural sponge into the paint, dab off the excess on a paper towel, and lightly sponge the top half of the whale to create depth and texture. -
Speckling effect:
Dip an old toothbrush into watered-down white acrylic paint. Run your thumb across the bristles to flick tiny white speckles over the blue paint, simulating a stone-like or wet texture. -
Paint facial features:
Use a fine detail brush to paint the eyes solid black. Carefully paint the carved mouth line with white to make it pop against the blue. -
Apply gloss finish:
To achieve that ceramic look, apply 2-3 coats of high-gloss varnish or UV resin. This protects the paint and gives it a shiny, wet appearance. -
Mount to base:
Apply a strong adhesive like E6000 to the flat bottom of the whale and press it firmly onto the center of your wooden coaster. Allow the glue to cure fully before using.
Weight it Down
Before sealing the bottom, hollow out a small cavity and insert a heavy washer or fishing weight. Cover with clay. This adds heft and prevents tipping.
Place your new aquatic friend on your desk and enjoy a tidy workspace with a touch of the sea
Blue Ombre Gradient Beads
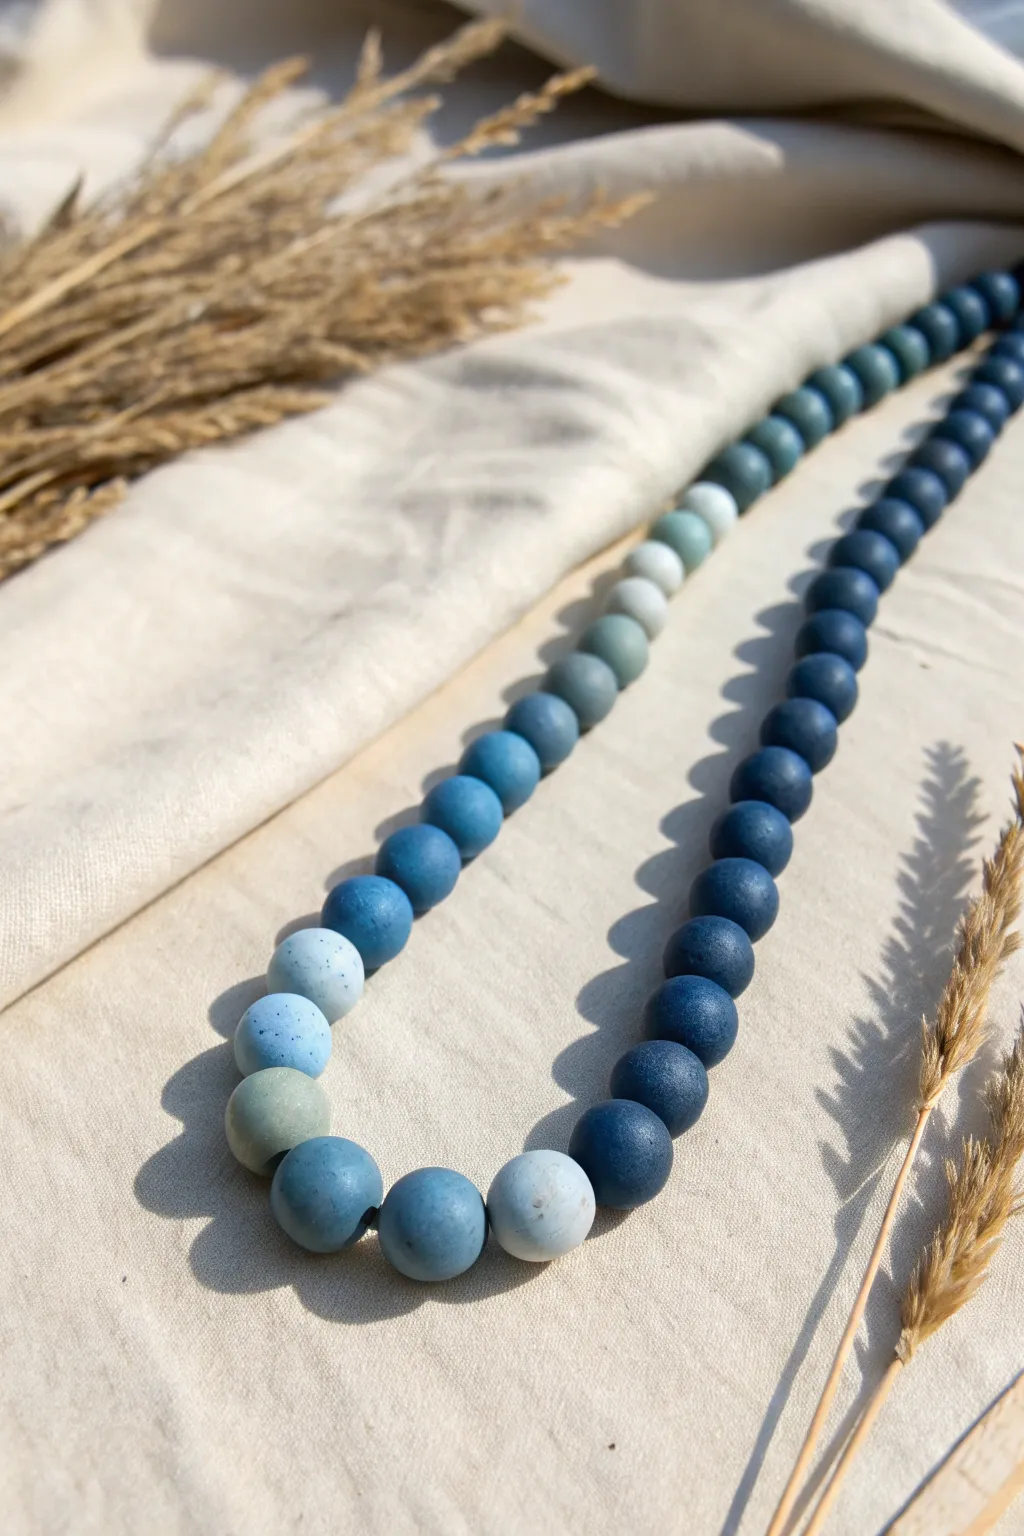
These handcrafted clay beads capture the serene transition of ocean colors, moving from deep navy to soft, foamy white. The matte, stone-like finish gives them an organic elegance perfect for modern jewelry making.
Step-by-Step
Materials
- Polymer clay in Navy Blue
- Polymer clay in White
- Polymer clay in Granite or translucent (optional for stone effect)
- Acrylic rolling pin or pasta machine
- Clay slicer blade
- Bead piercing pin or needle tool
- Ceramic tile or baking sheet
- Oven (for baking)
- Wet/dry sandpaper (400-800 grit)
- Strong waxing cord or beading wire
Step 1: Mixing the Gradient
-
Prepare your base colors:
Start by conditioning your navy blue and white polymer clay separately until they are soft and pliable. If you want that speckled, stone-like texture seen in the photo, mix a small amount of granite-effect clay into both your solid blue and white blocks before starting. -
Create the mixing ratios:
Divide your clay into five or six equal-sized portions to establish your gradient steps. You will need a pure navy pile and a pure white pile at opposite ends. -
Blend the mid-tones:
For the steps between pure blue and white, create mixtures with varying ratios. A good progression is 3:1 blue to white, 1:1 equal mix, and 1:3 blue to white. This creates a seamless transition. -
Knead thoroughly:
Take each mixed pile and knead it until the color is completely uniform. Ensure there are no streaks, as you want a solid, matte block of color for each shade. -
Form the logs:
Roll each mixed color ball into a long, even snake or log. Try to keep the thickness consistent, about half an inch in diameter, to ensure your beads end up the same size.
Seamless Rolling
To avoid fingerprints entirely, wear latex gloves or lightly dust your palms with cornstarch when rolling the final sphere shapes.
Step 2: Shaping the Beads
-
Portion the clay:
Using your clay slicer, cut the logs into equal-sized segments. Using a ruler here helps keep the volume of clay consistent for every single bead. -
Roll spheres:
Take a segment and roll it between your palms to form a smooth sphere. I find using a light circular motion with the palm of my hand creates the roundest shape without flattening any sides. -
Check sizing:
Compare your rolled beads against each other frequently. If one looks too large or small, adjust the amount of clay now before piercing. -
Create the texture:
To achieve the matte, slightly organic surface seen in the image, roll the finished spheres gently over a piece of coarse canvas or heavy paper to remove fingerprints and add subtle texture. -
Pierce the holes:
Gently twist your bead piercing pin through the center of each sphere. Twist as you push to prevent squishing the bead. Pierce from one side until the tip pokes through, then withdraw and enter from the other side to ensure a clean exit hole.
Distorted Holes?
If your beads squash into ovals when piercing, let the raw clay sit in the fridge for 15 minutes to firm up before inserting the needle tool.
Step 3: Baking and Finishing
-
Arrange for baking:
Place the beads on a ceramic tile or a baking sheet lined with plain paper. To prevent flat spots, you can nestle them into a bed of cornstarch or accordion-folded cardstock. -
Bake the clay:
Bake the beads according to the manufacturer’s instructions for your specific brand of polymer clay. Usually, this is around 275°F (130°C) for 15-30 minutes per 1/4 inch of thickness. -
Cool down:
Allow the beads to cool completely in the oven with the door slightly ajar. Sudden temperature changes can sometimes cause cracking in dense beads. -
Sanding for matte finish:
Once cool, use wet/dry sandpaper under running water to gently buff the surface. This removes any final imperfections or lint and perfects the velvety matte look. -
Clean the holes:
Use a small hand drill or twisting tool to clear out any clay debris from inside the bead holes before stringing. -
String the gradient:
Lay your beads out on a bead board to finalize the ombre pattern. String them onto your chosen cord, placing the darkest navy beads at the back and transitioning to the lightest icy blues at the center front.
Enjoy wearing your new necklace that carries the calming colors of the sea wherever you go
Blue Terrazzo Speckle Mini Planter
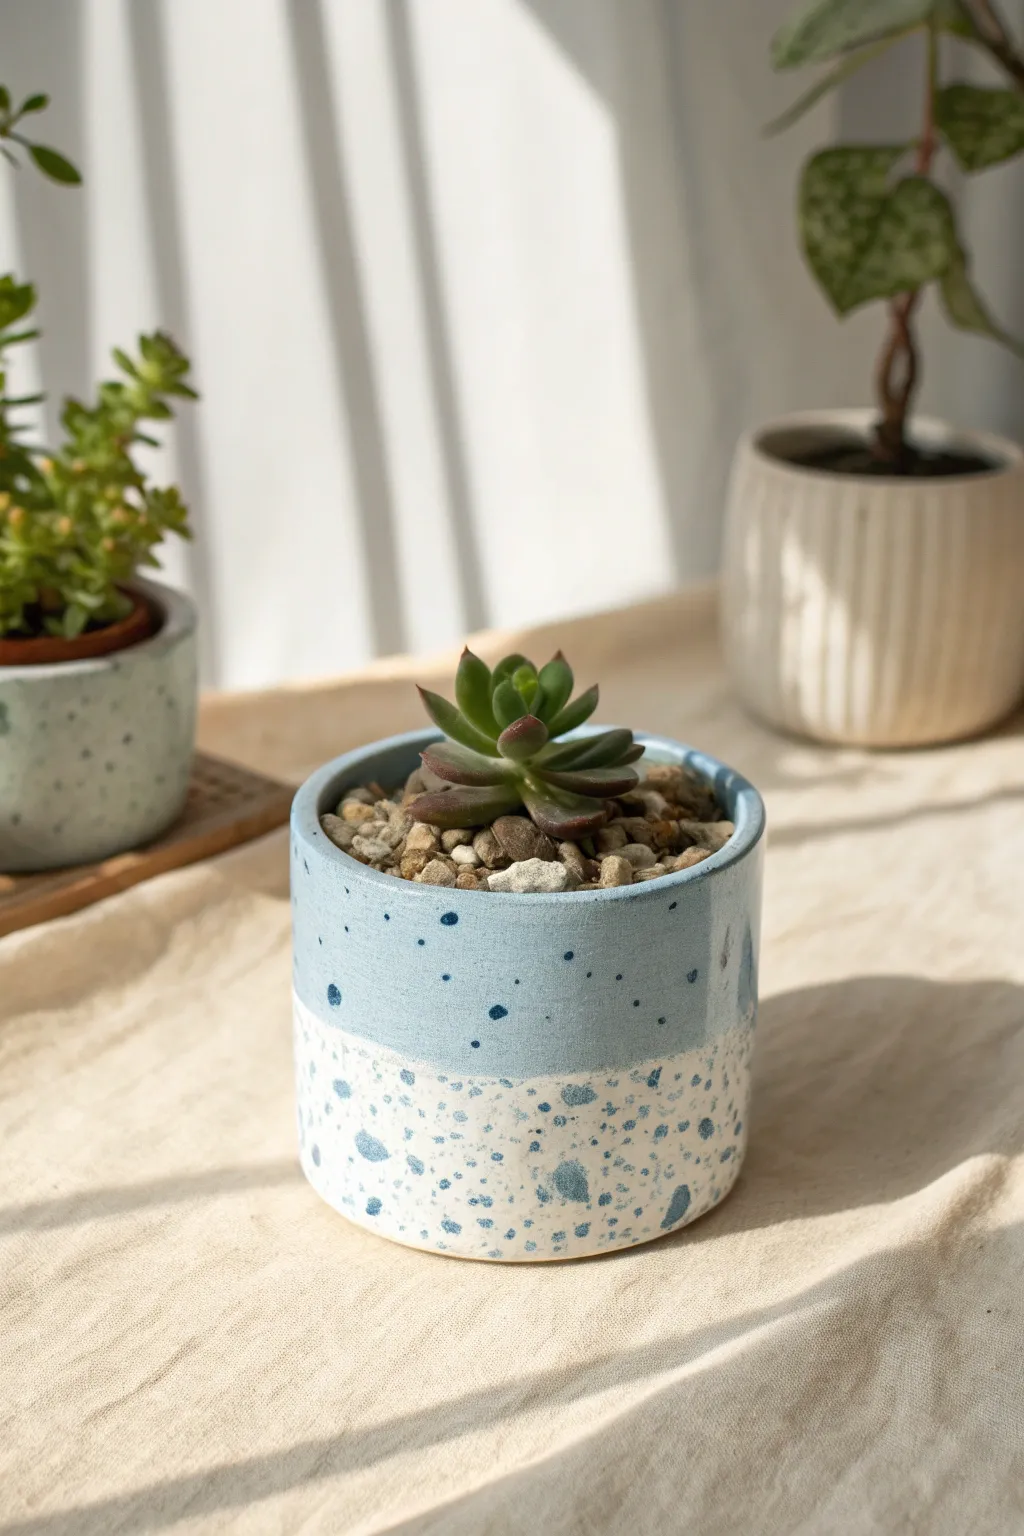
Bring a fresh, modern touch to your windowsill with this charming dual-tone planter. Featuring a serene sky-blue top and a playful white-and-blue terrazzo base, this project mimics the look of high-end ceramic glaze using accessible polymer or air-dry clay.
How-To Guide
Materials
- White polymer clay (or air-dry clay)
- Sky blue polymer clay
- Dark blue polymer clay (for speckles)
- Rolling pin or pasta machine
- Cylindrical cookie cutter or a crafting blade with a template
- Smooth work surface (ceramic tile or glass mat)
- Needle tool or toothpick
- Gloss varnish or resin (optional for a shiny finish)
- Oven (if using polymer clay)
Step 1: Prepping the Clay Base
-
Condition the Clay:
Begin by thoroughly kneading your white clay until it is soft and pliable. Do the same for your sky blue clay. This conditioning step is crucial to prevent cracks later on. -
Roll the Sheets:
Using a rolling pin or pasta machine, roll the white clay into a sheet approximately 1/4 inch thick. Repeat this process with the sky blue clay, aiming for the exact same thickness so the seam will match perfectly. -
Create the Color Split:
Using your crafting blade, cut a long straight horizontal line through both the white and blue sheets. You want two long strips that are about 1.5 to 2 inches tall each. -
Join the Seam:
Place the long edge of the blue strip against the long edge of the white strip. Gently push them together on your work surface so they bond. I like to run a finger lightly over the seam to smooth it without distorting the straight line.
Step 2: Adding the Terrazzo Effect
-
Make the Speckles:
Take a very small amount of dark blue clay and chop it finely with your blade into irregular crumbs and tiny chunks. These will be your terrazzo chips. -
Apply to White Section:
Scatter the dark blue crumbs densely over the white bottom section of your clay sheet. Press them down gently with your thumb to tack them in place. -
Apply to Blue Section:
Scatter significantly fewer dark blue crumbs onto the sky blue top section. You want a much sparser look here compared to the bottom. -
Embed the Pattern:
Place a piece of parchment paper over the entire sheet. Using your rolling pin, roll over the clay firmly one last time. This forces the speckles flat into the surface, creating a smooth finish. -
Trim to Size:
Measure the circumference needed for your desired pot size. Trim the combined sheet into a clean rectangle, ensuring the seam remains horizontal.
Clean Cuts Matter
Chill your clay sheet in the fridge for 10 minutes before the final trim. Firm clay cuts much cleaner and won’t drag, keeping your terrazzo speckles sharp.
Step 3: Assembling the Pot
-
Form the Cylinder:
Carefully lift the sheet and curl it into a cylinder shape. Overlap the vertical edges slightly or butt them together, cutting at a 45-degree angle for a cleaner join. -
Smooth the Join:
Use a modeling tool or your finger to smooth the vertical seam inside and out. Ensure the horizontal color line matches up as closely as possible. -
Cut the Base:
Roll out a separate piece of white clay for the bottom. Place your cylinder on top of it and trace around the outside with a needle tool. -
Attach the Base:
Place the cylinder onto the cut circular base. Gently smudge the clay from the base up onto the cylinder walls to create a watertight seal. A little liquid clay or water (depending on clay type) can help act as glue here. -
Add Drainage (Optional):
If you plan to plant directly into the pot, use a small cutter or straw to punch a drainage hole in the center of the base. -
Refine the Rim:
Smooth the top rim with your finger and a drop of baby oil or water to ensure it is rounded and comfortable to the touch.
Faux Ceramic Look
To mimic the imperfect glaze line, don’t make the center seam perfectly straight. A very slight, gentle wave makes it look hand-dipped.
Step 4: Finishing Touches
-
Bake or Dry:
Follow the manufacturer’s instructions for your specific clay. If baking polymer clay, consider tenting it with foil to prevent the white sections from scorching. -
Sand for Smoothness:
Once fully cured and cooled, use fine-grit wet sandpaper (400 to 1000 grit) to sand the outside. This is the secret to making the terrazzo effect really pop and look like stone. -
Seal:
Apply a coat of gloss varnish or a thin layer of UV resin to replicate the ceramic glaze look seen in the photo. This also protects the clay from moisture.
Pop in your favorite succulent and some decorative gravel to complete your miniature garden masterpiece