
When I’m building with clay coils, I love how a simple rolled “snake” can turn into a vessel that feels totally personal. Here are my favorite clay coil pot ideas—starting with the classics you’ll actually want to make, then sliding into the fun, weird, can’t-wait-to-try-it options.
Easy Pinch-And-Coil Bowl Starter
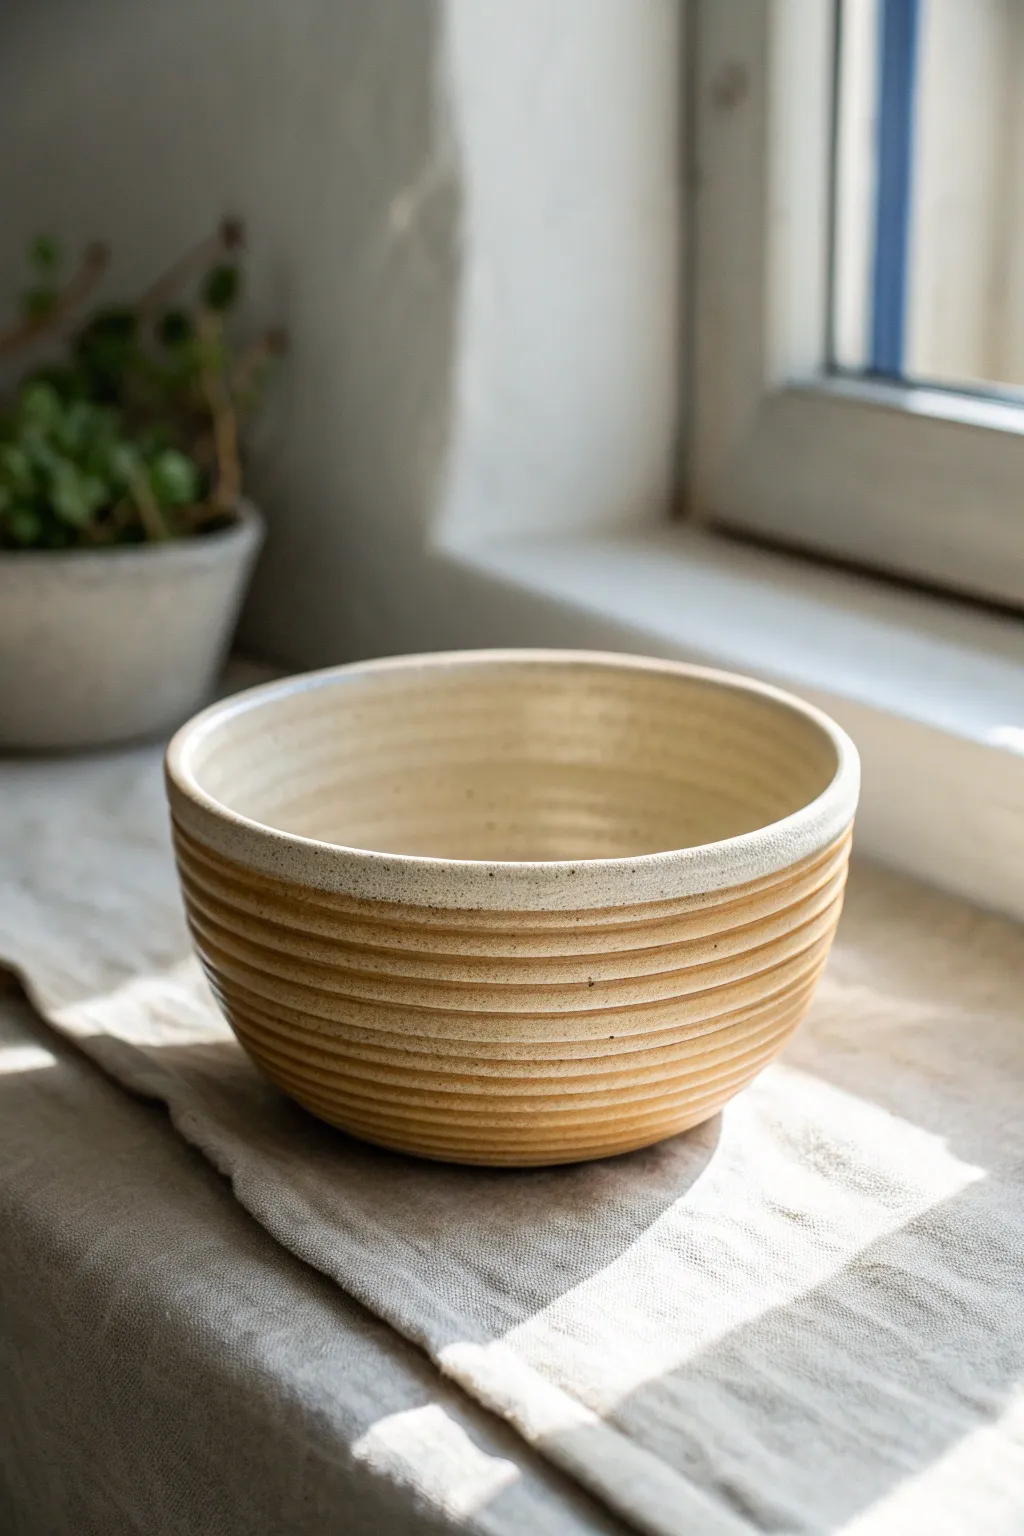
This charming ceramic bowl combines the organic feel of hand-building with the precision of wheel-like ridges. Its warm, toasty exterior glaze contrasts beautifully with a creamy, speckled interior, making it a perfect vessel for morning oats or a cozy soup.
Detailed Instructions
Materials
- Stoneware clay (speckled or buff)
- Pottery wheel (or banding wheel for hand-building)
- Rib tool (metal or wood)
- Sponge
- Wire cutter
- Loop trimming tool
- Creamy matte white glaze
- Caramel or honey-colored transparent glaze
- Kiln
Step 1: Throwing the Form
-
Center the clay:
Start by wedging about 2-3 pounds of stoneware clay to remove air bubbles. Slam it onto the center of your wheel head and use wet hands to coning it up and down until perfectly centered. -
Open the form:
Press your thumbs into the center of the spinning clay, leaving about a half-inch for the base. Pull the floor outward to establish the width of your bowl. -
Pull the walls:
Slow the wheel down slightly. With one hand inside and one outside, gently squeeze and lift the clay to pull the walls upward. Aim for a consistent thickness, though this rustic style is forgiving. -
Shape the curve:
As you make your final pulls, apply slightly more pressure from the inside hand to balloon the walls outward, creating that gentle, rounded curve visible in the photo.
Consistent Ridges
Keep your elbows locked into your ribs while carving the exterior spiral. This stabilizes your hand and ensures the spacing between ridges remains even.
Step 2: Creating the Texture
-
Refine the rim:
Before texturing, use a chamois or a wet sponge to compress and smooth the rim. A rounded, smooth lip is crucial for a comfortable eating experience. -
Carve the ridges:
While the wheel spins at a medium-slow pace, take the corner of a wooden rib tool or a loop tool. Start just below the rim. -
Spiral down:
Press the tool gently into the clay and steadily move your hand downward as the wheel turns. You are essentially creating a continuous spiral groove from the rim to the base. -
Clean up the lines:
If any clay crumbs form during the carving, wait until the pot is leather hard to brush them off. I find wiping them while wet just smears the crisp lines. -
Wire off:
Run your wire cutter under the base of the bowl to separate it from the wheel head. Let it dry to a leather-hard state.
Step 3: Trimming and Firing
-
Trim the foot:
Once leather hard, flip the bowl over and center it on the wheel. Use a sharp loop tool to trim the base, mirroring the interior curve. You can continue the spiral texture onto the foot if desired. -
Bisque fire:
Allow the bowl to dry completely (bone dry) before loading it into the kiln for a bisque fire (usually Cone 04). -
Glaze the interior:
Pour a creamy, speckled matte white glaze into the bowl. Swirl it rapidly to coat the entire interior and pour out the excess. Wipe the rim clean immediately with a damp sponge. -
Glaze the exterior:
Dip the exterior into a transparent caramel or honey glaze. This type of glaze is essential because it will pool in the ridges, appearing darker in the grooves and lighter on the peaks, emphasizing the texture. -
Clean the foot:
Sponge off any glaze from the foot ring to prevent the bowl from fusing to the kiln shelf. -
Final firing:
Fire the piece to maturity (Cone 5, 6, or 10 depending on your clay and glaze). Let the kiln cool naturally before unloading.
Two-Tone Twist
Leave the exterior raw clay without glaze! The natural toasted clay color often looks beautiful against a white interior glaze, highlighting the texture matte-style.
Now you have a beautifully textured bowl that feels as good in the hand as it looks on the shelf


Straight-Sided Coil Cup or Tumbler
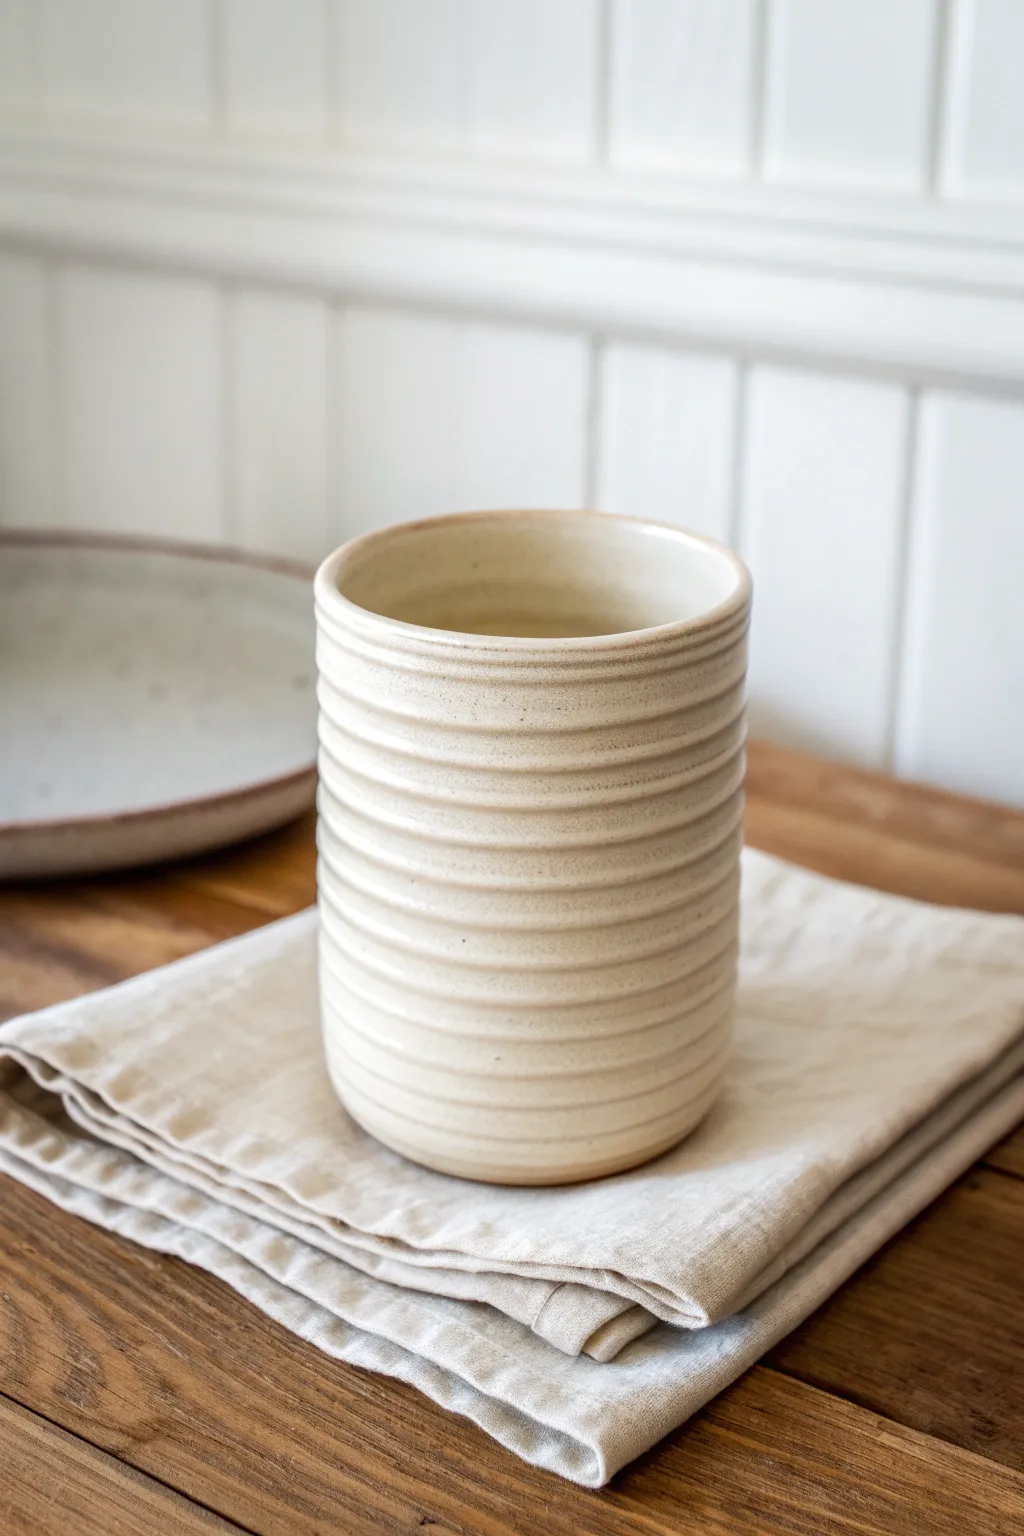
This elegant tumbler showcases the beauty of hand-built texture with its rhythmic, horizontal ridges and soft, speckled cream glaze. While created using the coiling method, the controlled smoothing gives it a refined, almost wheel-thrown aesthetic perfect for a cozy morning coffee.
How-To Guide
Materials
- Stoneware clay (speckled buff recommended)
- Clay scoring tool or fork
- Slip (clay mixed with water)
- Wooden modeling tool
- Metal or rubber rib
- Rolling pin
- Fettling knife
- Sponge
- Cream or oatmeal speckled glaze
- Canvas work surface
Step 1: Creating the Base
-
Roll the slab:
Begin by wedging your clay to remove air bubbles. Roll out a small slab of clay to approximately 1/4 inch thickness on your canvas surface. -
Cut the circle:
Using a circular template (like a cookie cutter on the rim of a jar), cut out a circle roughly 3 to 3.5 inches in diameter for the base of your tumbler. -
Score the edge:
Take your scoring tool and rough up the outer top edge of your clay circle. Apply a generous amount of slip to these scored marks to act as glue.
Consistent Coils
To get perfectly even walls, extrude your coils using a clay extruder gun rather than hand-rolling. This ensures every ridge is identical in width.
Step 2: Building the Walls
-
Make the first coil:
Roll a snake of clay on the table until it is uniform and about the thickness of your pinky finger. -
Attach the first row:
Place the coil onto the slipped edge of the base. Cut the excess so the ends meet perfectly, score those ends, and press them firmly together. -
Blend the interior:
Use your thumb or a wooden modeling tool to smear the clay from the coil downwards onto the base on the *inside* of the cup only. This seals the bottom seam securely. -
Stack subsequent coils:
Continue rolling coils and stacking them one directly on top of the other. For a straight-sided tumbler like this, ensure you are stacking vertically, not flaring out or leaning in. -
Join the seams:
As you add each layer, score and slip between the coils. I find it easiest to stack 2-3 coils at a time before blending. -
Smooth the inside:
While building, constantly smooth the *interior* walls completely flat using a tool or your finger so the individual coils disappear on the inside surface. This makes the cup easier to clean later.
Why did it crack?
Cracks between coils usually mean the clay was too dry when joining. Always score deeply and use plenty of slip. If clay feels stiff, mist it with water.
Step 3: Refining the Exterior Texture
-
Blend exterior lightly:
Unlike the inside, you want to keep the definition of the coils on the outside. However, to get the look in the photo, gently smudge the coils together just enough to seal them, but don’t smooth them flat. -
Define the ridges:
Use the rounded edge of a wooden tool to run along the grooves between the coils. Deepen and neaten these lines to create that consistent ribbed effect. -
Level the rim:
Once the cup reaches your desired height (about 4-5 inches), use a needle tool or fettling knife to slice the rim level. -
Finish the lip:
Use a damp chamois or a tightly squeezed sponge to round over the top lip. Drinkware needs a very smooth edge for comfort. -
Dry slowly:
Loosely cover the tumbler with plastic and let it dry slowly to the leather-hard stage to prevent warping.
Step 4: Glazing and Firing
-
Bisque fire:
Once bone dry, fire the piece in a kiln to bisque temperature (usually Cone 04). -
Apply wax resist:
Paint a layer of wax resist on the very bottom of the cup and slightly up the side (about 1mm) to prevent the glaze from adhering to the shelf. -
Dip into glaze:
Dip the entire cup into a cream or oatmeal-colored stoneware glaze. Hold it upside down for a few seconds to let excess drip off. -
Check the grooves:
Sometimes glaze pools too thickly in the coil grooves. Run a gloved finger gently over the ridges to ensure the texture isn’t completely drowned out by the glaze. -
Final firing:
Fire the cup to the maturity temperature of your clay and glaze (typically Cone 5 or 6 for stoneware) to achieve that durable, watertight finish.
Enjoy using your handmade tumbler for a warm beverage knowing you built it coil by coil


Mini Coil Planter for Succulents
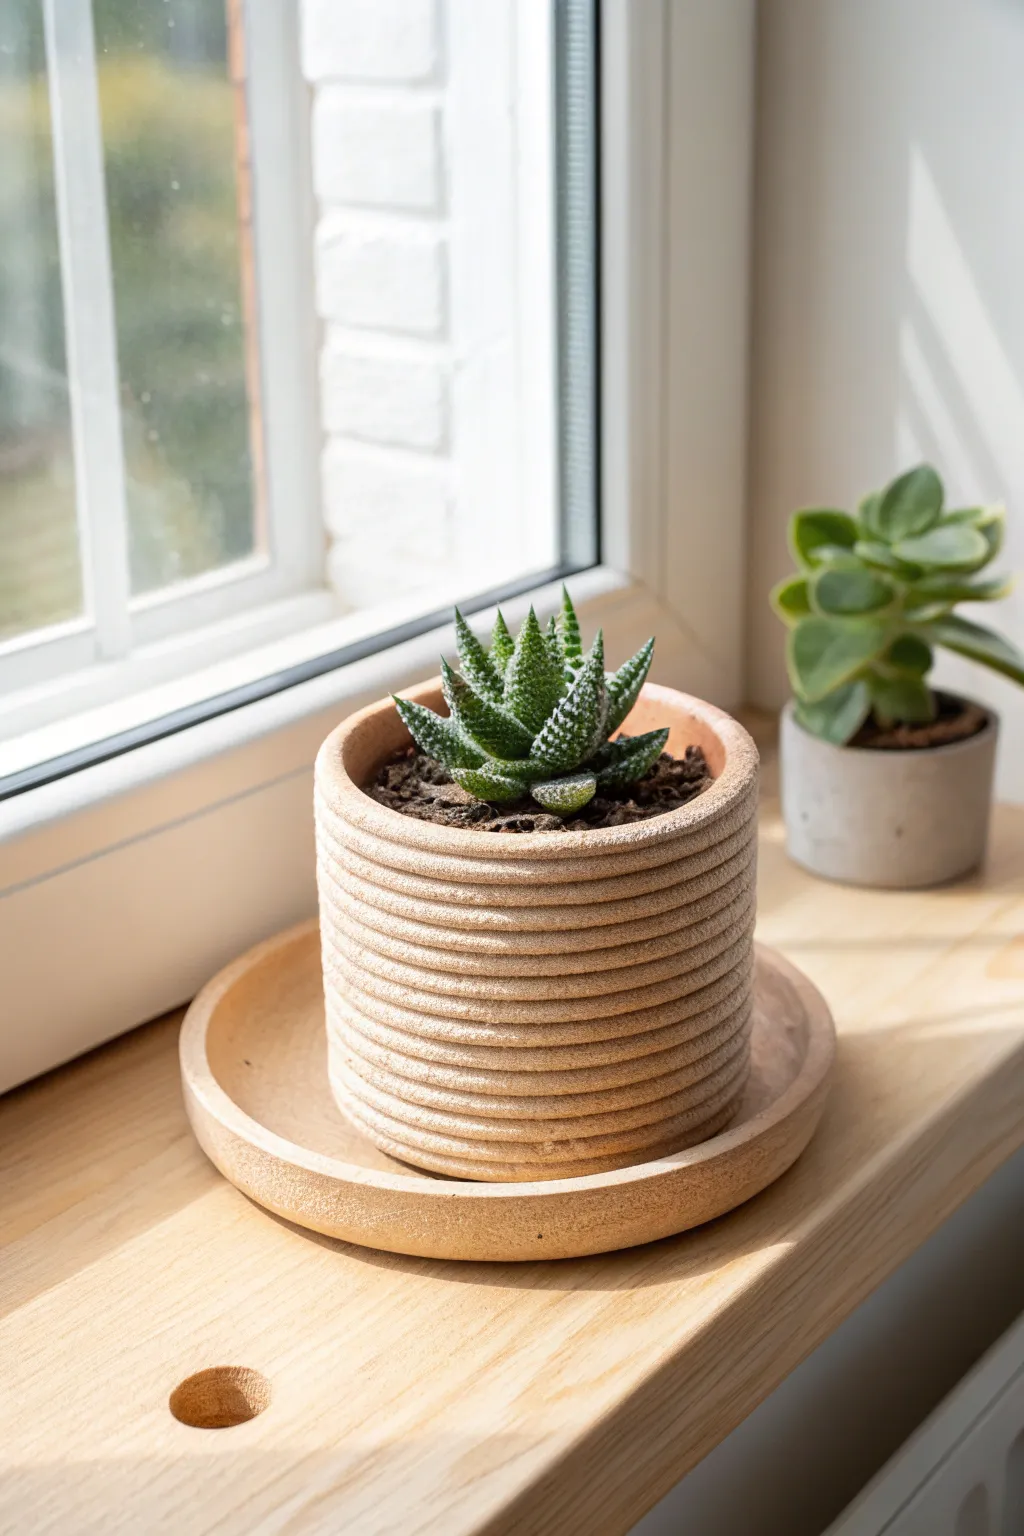
This charming planter achieves a clean, modern aesthetic through the timeless technique of coiling. Its uniform horizontal ridges and natural sand-colored finish provide the perfect textural contrast for the spiky leaves of a Haworthia or Aloe succulent.
Step-by-Step
Materials
- Air-dry clay (sand or terracotta color) or low-fire earthenware clay
- Rolling pin
- Clay knife or fettling knife
- Small sponge
- Bowl of water
- Scoring tool or a fork
- Slip (liquid clay mixture)
- Wooden sculpting tool (rib tool)
- Circle template or compass
Step 1: Creating the Base
-
Prepare the clay:
Begin by wedging your clay thoroughly to remove any air bubbles, ensuring a smooth, consistent texture that won’t crack during drying. -
Roll the slab:
Roll out a small portion of clay into a flat slab, approximately 1/4 inch thick. This will form the sturdy bottom of your pot. -
Cut the circle:
Use a circle template or a jar lid (about 4 inches in diameter) to trace and cut out a perfect circle from your slab. Smooth the edges with a slightly damp finger. -
Score the edge:
Using your scoring tool or a fork, scratch up the outer perimeter of the circle base where the first coil will sit. Brush on a little slip to act as glue.
Step 2: Building the Walls
-
Roll the first coil:
Take a chunk of clay and roll it between your palms to start a snake shape. Move it to your table and roll evenly with your fingers, working from the center outward until it’s a uniform snake about the thickness of a bulky pencil. -
Attach the first ring:
Place the coil onto the scored edge of the base. Cut the ends at a diagonal angle where they meet to create a seamless join. -
Blend the interior:
While we want the outside to show the rings, the inside needs structural integrity. Smear the clay from the coil downward onto the base using your thumb or a wooden tool to lock it in place. -
Continue rolling coils:
Prepare several more coils of the exact same thickness. I find it helpful to roll three or four at a time so they are ready to go and stay consistent. -
Stack and join:
Score and slip the top of the previous ring, then add the next coil directly on top. Repeat the diagonal cut method for the joints, staggering them so they don’t all line up on one side of the pot. -
maintain verticality:
Unlike a bowl, this planter has straight vertical walls. Check your profile frequently to ensure you aren’t flaring outward or curving inward as you stack. -
Smooth the interior seams:
After every 2-3 layers, pause to thoroughly blend the coils together on the inside surface only. This ensures the pot is water-tight (if firing) or sturdy (if air-drying). -
Build to height:
Continue stacking until the vessel is roughly 4 to 5 inches tall, or about 12-15 coils high. The repetitive texture creates that beautiful ribbed effect. -
Finish the rim:
For the final coil, pay extra attention to the smoothness. Lay it on top and gently flatten it just a fraction with your thumb to create a comfortable, non-sharp lip.
Wobbly Walls?
If your coils start sagging or the wall gets wobbly, the clay is too wet. Stop building, let the piece stiffen up for 30 minutes, then resume stacking.
Step 3: Refining and Sealing
-
Clean the exterior:
Use a barely damp sponge to gently run over the exterior coils. You aren’t trying to smooth them away, just removing any crumbly bits or fingerprints. -
Create the saucer:
Roll another slab, slightly larger than your pot base (about 5-6 inches). Turn up the edges slightly to create a shallow lip that will catch water drainage. -
Dry slowly:
Place plastic wrap loosely over the pot and saucer for the first 24 hours to let them dry slowly. This prevents warping or cracking between the coils. -
Final drying or firing:
Once bone dry, you can fire the piece in a kiln if you used earthenware clay. If using air-dry clay, let it cure completely for 48-72 hours. -
Waterproofing:
If you used air-dry clay, apply a matte waterproof sealant to the inside of the pot and the saucer to protect the clay from moisture breakdown.
Pro Tip: Seamless Look
When stacking coils, align your joints (where coil ends meet) on different sides of the pot for each layer. This prevents a weak vertical seam from forming.
Now you have a beautifully textured vessel ready to bring a touch of the desert to your windowsill


Coil Mug With a Pulled-Look Handle
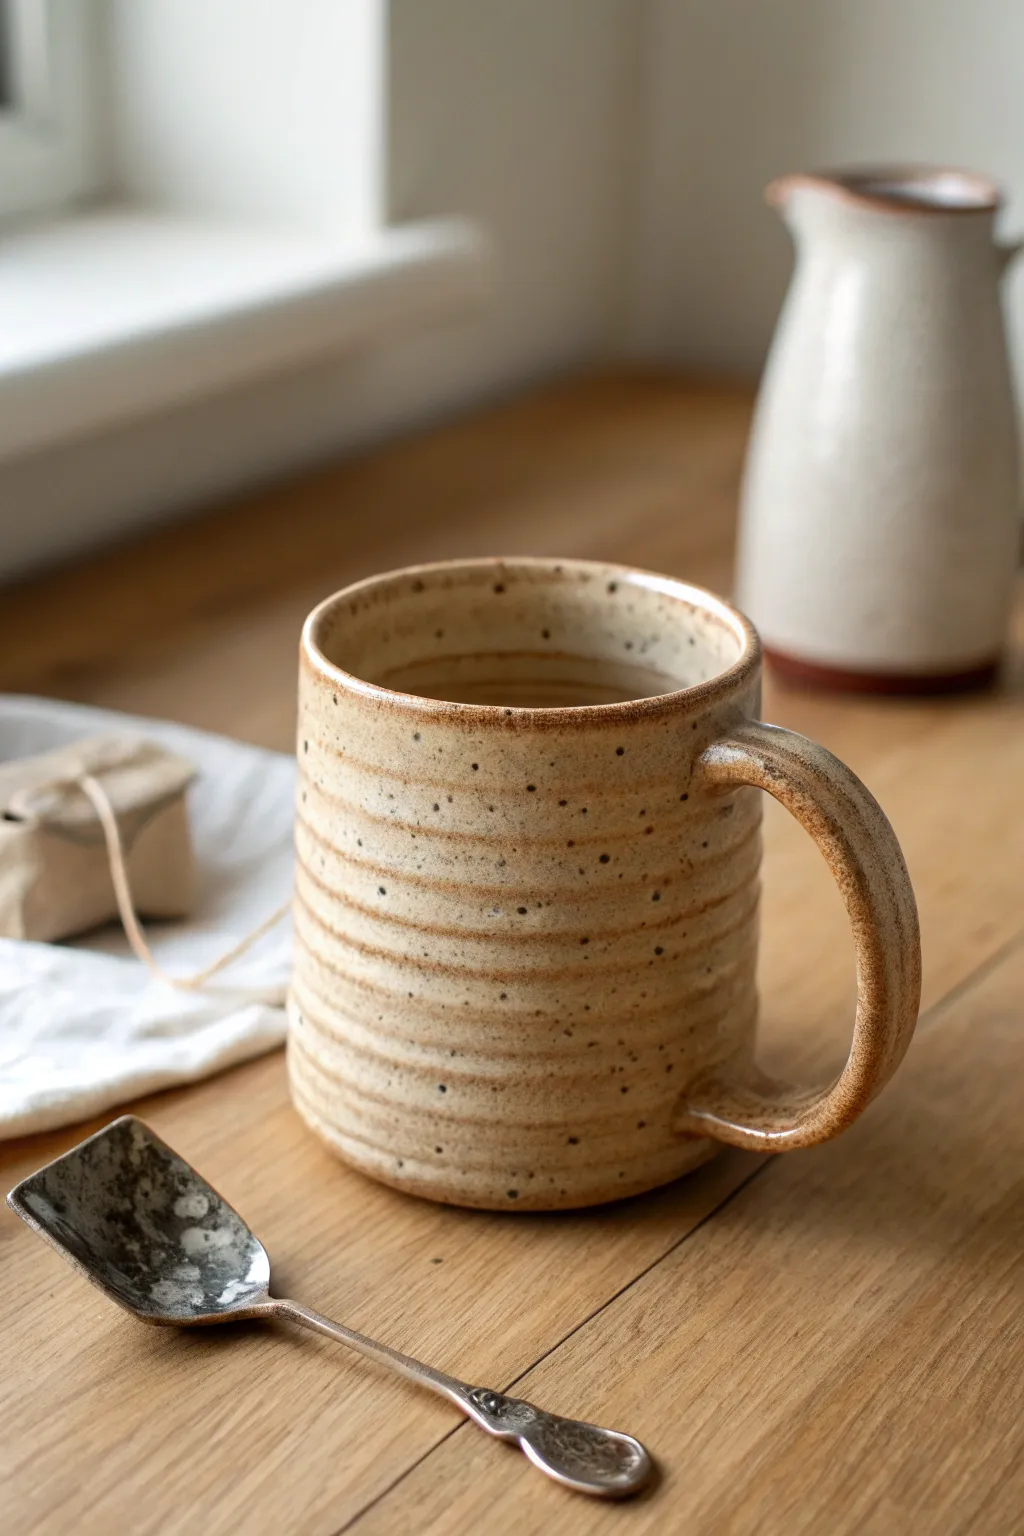
This project embraces the tactile nature of coil building to create a warm, speckled mug with distinct horizontal ridges. The result is a sturdy, comforting vessel that feels as good in your hands as it looks on your shelf.
Step-by-Step
Materials
- Speckled stoneware clay (mid-fire)
- Clay scoring tool or serrated rib
- Slip (clay and vinegar/water mix)
- Wooden modeling tool
- Small sponge
- Rib tool (rigid or rubber)
- Fettling knife
- Bucket of water
Step 1: Forming the Base
-
Roll the bottom slab:
Start by taking a small portion of your speckled clay and rolling it into a flat slab about 1/4 inch thick. This will be the floor of your mug. -
Cut the circle:
Use a round cookie cutter or a needle tool guided by a jar lid to cut out a perfect circle, approximately 3.5 inches in diameter. -
Score the edge:
Rough up the outer top edge of this circle with your scoring tool and apply a generous amount of slip. This preparation is crucial for a watertight seal.
Step 2: Building the Coils
-
Roll the first coil:
Roll a snake of clay on your table until it is uniform and about the thickness of your pinky finger. Try to keep the pressure even to avoid thin spots. -
Attach the first layer:
Place the coil directly onto the scored edge of your base. Cut the ends at an angle where they meet to increase surface area for the join. -
Blend the interior:
Using your thumb or a wooden modeling tool, smear the inside of the coil down onto the base floor. Smooth it completely so the transition is seamless. -
Stack and score:
Score and slip the top of the first coil. Roll another coil and place it on top. Repeat this process, stacking coils vertically to build the walls. -
Blend the seams:
After every two or three coils, stop to blend the coils together on the *inside* only. Leave the outside coils distinct to maintain that ribbed texture shown in the photo. -
Refine the exterior:
While we want the ridges visible, we don’t want deep crevices. Gently run a damp finger or a soft rubber rib over the outside to smooth the high points without erasing the coil lines. -
Finish the rim:
Once you reach the desired height (about 4 inches), add one final coil. Blend this one fully on both the inside and outside to create a smooth, comfortable lip for drinking.
Fixing Sagging Walls
If your mug starts to widen or slump while building, your clay is too wet. Stop building, cover the rim with plastic, and let the base stiffen for 30-60 mins.
Step 3: Handle and Finishing
-
Pull a strap:
Take a carrot-shaped lump of clay and hold the thick end. With wet hands, stroke the clay downward, pulling it into a long, uniform strap for the handle. -
Curve and dry:
Curve the strap into a ‘C’ shape and lay it on its side to stiffen slightly for about 20 minutes. This prevents it from sagging when attached. -
Score the attachments:
Hold the handle up to the mug to gauge placement. deeply score the mug wall and the contact points on the handle. -
Secure the handle:
Press the handle firmly onto the mug body. Use a wooden tool to blend the clay from the handle onto the mug wall, ensuring a strong connection. -
Smooth the joints:
Wipe away any excess slip around the handle attachments with a barely damp sponge. I find this helps define the transition between the smooth handle and the textured body. -
Final wipe:
Once the mug is leather hard, go over the rim and bottom edge one last time with a sponge to remove any sharp bits. -
Bisque fire:
Allow the mug to dry slowly under plastic for a few days before bisque firing it in the kiln. -
Glaze and final fire:
Apply a clear or transparent glaze to show off the speckles and coil texture, then fire to the clay’s maturation temperature (likely Cone 5 or 6).
Pro Tip: Highlight Texture
For the result in the photo, sponge a darker stain (like iron oxide) over the coils and wipe it back. The dark color will stay in the coil recesses.
Enjoy your morning coffee in a mug that truly celebrates the process of handbuilding

The Complete Guide to Pottery Troubleshooting
Uncover the most common ceramic mistakes—from cracking clay to failed glazes—and learn how to fix them fast.
Slump-Molded Coil Bowl Shape
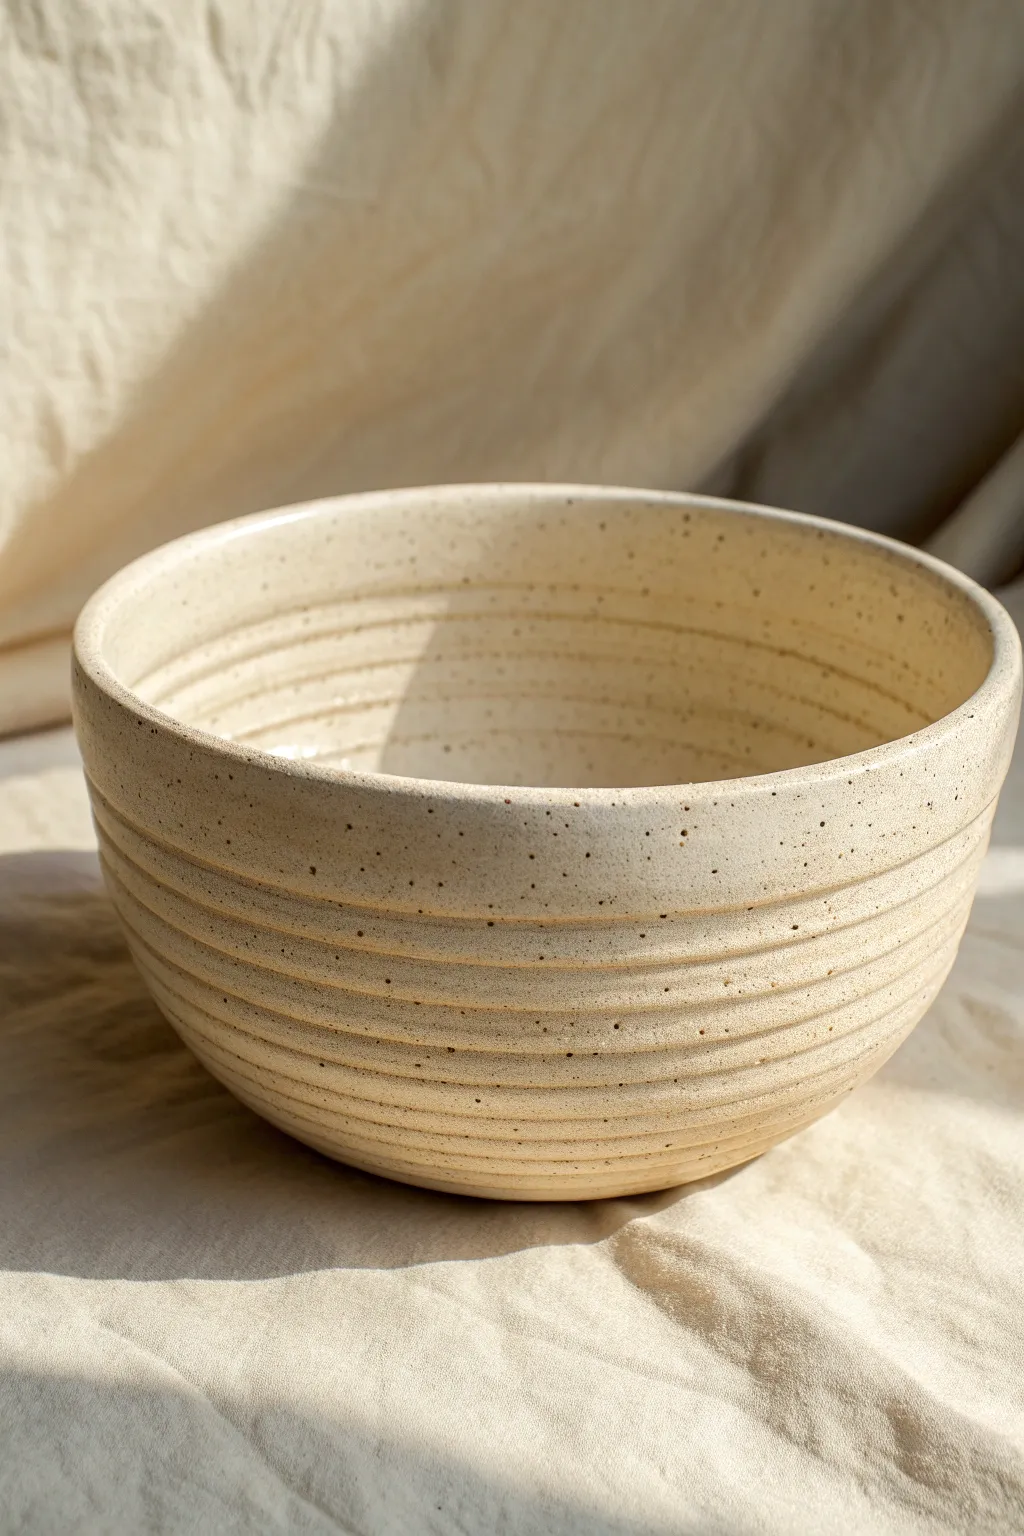
Create a beautifully textured ceramic piece that mimics the rhythmic lines of wheel-thrown pottery using humble coil techniques. This slump-molded bowl features a soothing, ribbed exterior and a creamy, speckled finish that highlights the handmade ridges.
Detailed Instructions
Materials
- Speckled buff stoneware clay (or white clay with grog)
- Bowl for use as a slump mold (glass or metal works best)
- Newsprint or thin fabric (to line the mold)
- Rolling pin
- Fettling knife or needle tool
- Serrated rib tool
- Smooth wooden or rubber rib
- Slip (clay mixed with water)
- Scoring tool (or fork)
- Clear or transparent matte glaze
- Pottery wheel (optional, for banding) or banding wheel
Step 1: Preparing the Base
-
Prep the workspace:
Begin by cleaning your work surface and gathering your clay. If you are using a slump mold, line the interior of your chosen bowl with strips of damp newsprint or a thin piece of fabric to prevent sticking. -
Roll the base slab:
Roll out a small slab of speckled clay to about 1/4 inch thickness. This will form the very bottom of your bowl. -
Cut the foot:
Place a circular template (like a jar lid or cookie cutter) on the slab and cut out a circle roughly 3-4 inches in diameter. This disc will be the anchor for your coils. -
Position the base:
Center this clay circle at the bottom of your lined slump mold. Press it down gently to ensure it conforms to the curve of the mold.
Groove Control
Running a damp sponge along the coil seams while spinning on a banding wheel softens harsh lines while keeping the rhythmic texture intact.
Step 2: Building the Coils
-
Roll consistent coils:
Roll out several long, even coils of clay. Aim for a thickness similar to a pencil or your pinky finger. Consistency here is key for that uniform, ribbed look shown in the photo. -
Score and slip:
Score the outer edge of your base circle and apply a dab of slip. Take your first coil and lay it directly on top of this edge, pressing it firmly against the mold wall. -
Blend the interior:
Smear the clay from the coil downward onto the base on the *inside* of the bowl only. Blending the inside smooths the surface for food, but leave the outside unblended to keep the distinct ridge lines. -
Stack upwards:
Continue adding coils, stacking them one directly on top of the other as you work your way up the walls of the mold. Remember to score and slip between every single layer. -
Maintain the texture:
As you stack, ensure you aren’t squishing the exterior coils flat against the mold. You want that rounded profile to remain visible against the mold’s lining. -
Finish the rim:
Once you reach the top edge of the mold, trim the final coil at a slight angle to join the ends seamlessly. Smooth the top rim with a damp sponge or a chamois cloth for a comfortable drinking edge.
Step 3: Refining and Drying
-
Initial setting:
Let the bowl sit in the mold until the clay is leather hard. This usually takes a few hours to overnight, depending on humidity. -
Remove from mold:
Gently lift the bowl out of the slump mold using the fabric or paper liner. Peel away the liner carefully. -
Accentuate the grooves:
Place the bowl on a banding wheel. Using a rounded tool or your finger, gently run it along the seams between coils on the exterior to deepen the definition and mimic the image’s ribbed effect. -
Smooth the interior:
Use a flexible metal or rubber rib to compress and smooth the interior walls further, ensuring there are no cracks where the coils joined. -
Dry slowly:
Loosely cover the bowl with plastic to let it dry slowly and evenly. This prevents warping, especially with coil-built forms.
Clay Choice Matters
To get the exact look in the photo, buy ‘Speckled Buff’ clay. If you can’t find it, knead granular manganese or iron oxide into plain white clay.
Step 4: Glazing
-
Bisque fire:
Once bone dry, fire the piece to bisque temperature (usually cone 04 or 06) in a kiln. -
Apply glaze:
Dip or brush a clear or transparent cream glaze over the entire piece. A thin application is best so the speckles of the clay body show through prominently. -
Wipe the foot:
Sponge off any glaze from the very bottom of the bowl so it doesn’t fuse to the kiln shelf. -
Final firing:
Glaze fire the piece to the maturity temperature of your clay (typically cone 5 or 6 for stoneware). The heat will interact with the iron speckles to create that lovely spotted finish.
Now you have a stunning, functional vessel that highlights the natural beauty of the material
Wavy Stacked Coils for Ripples
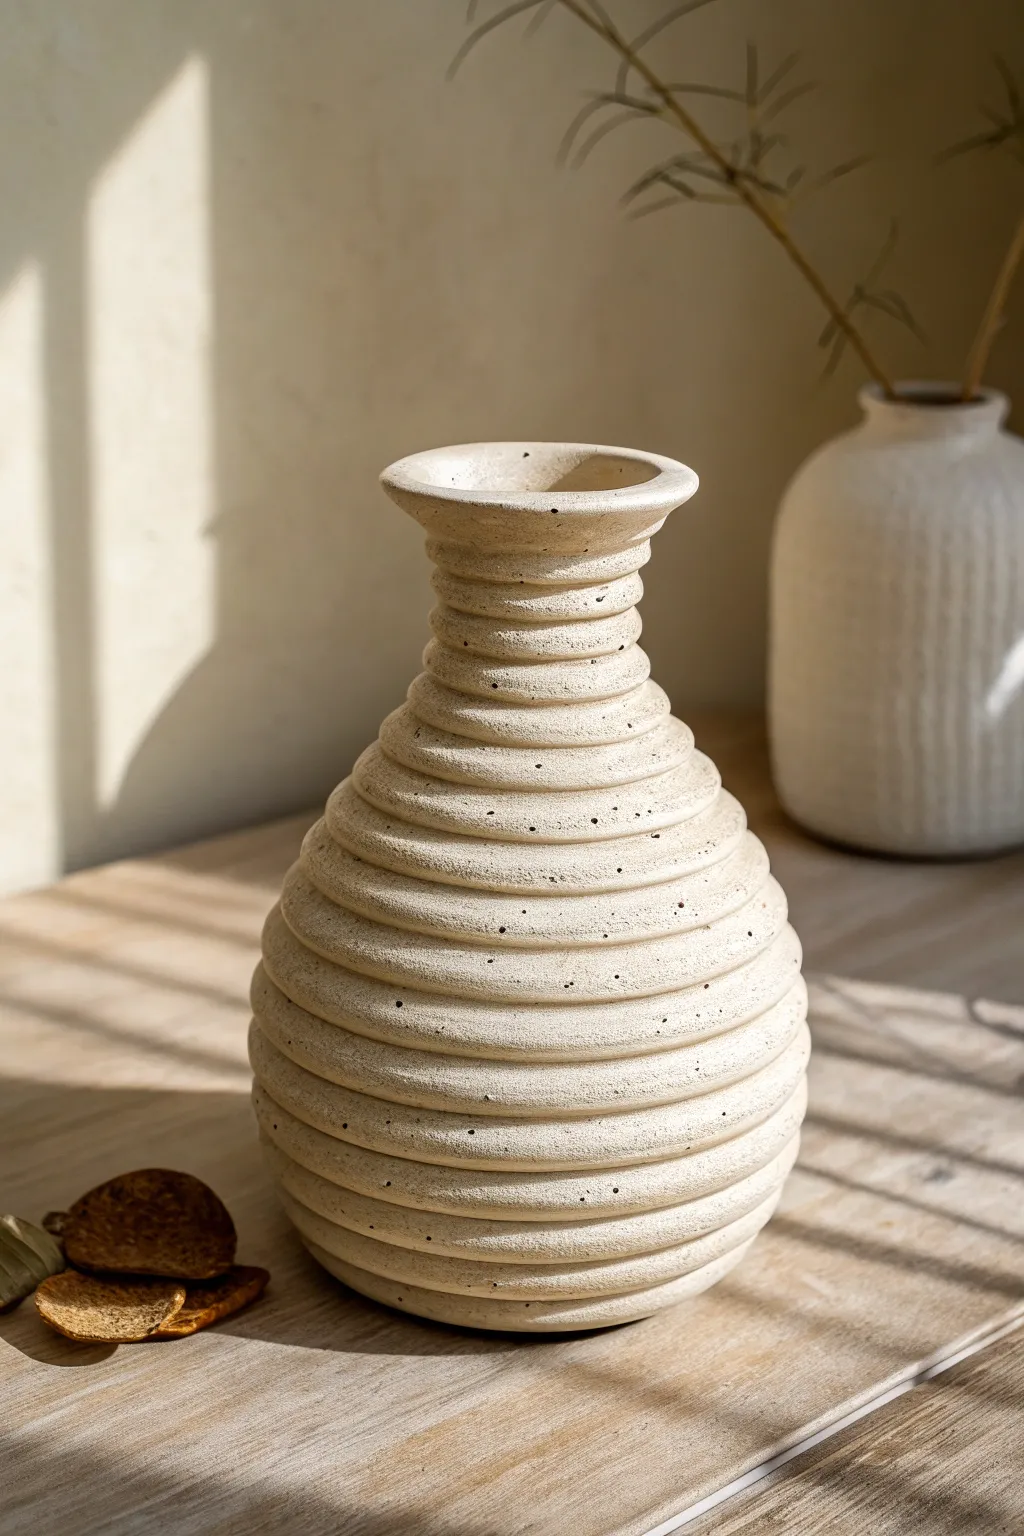
Embrace the rhythmic beauty of repetition with this coil-built vase, featuring prominent horizontal ridges that create a satisfying tactile texture. The natural speckled finish gives it a modern, organic feel that perfectly captures the play of light and shadow.
Step-by-Step Guide
Materials
- Speckled Stoneware Clay (2-3 lbs)
- Clay Extruder (optional, but recommended for uniformity)
- Scoring Tool or Serrated Kidney
- Slip (clay mixed with water)
- Wooden Modeling Tool
- Sponge
- Potter’s Wheel or Banding Wheel
- Cutting Wire
- Smooth Wooden Rib
Step 1: Creating the Base
-
Prepare the slab base:
Start by rolling out a small slab of clay, roughly 1/4 inch thick. Use a circular template or a jar lid to cut a perfect circle, about 4 inches in diameter, to serve as the foundation of your vase. -
Score and slip:
Score the outer perimeter of your circular base aggressively with your scoring tool. Apply a generous amount of slip to the roughed-up area to act as glue for your first coil.
Wobbly Walls?
If the pot starts sagging as you build, the clay is too wet. Stop adding height, cover the rim with plastic, and let the base stiffen up for an hour before continuing.
Step 2: Building the Form
-
Extrude your coils:
For that ultra-uniform look shown in the photo, use a clay extruder with a medium-round die to create long, even snakes of clay. If rolling by hand, strive for consistency, rolling them to about the thickness of your pinky finger. -
Lay the first ring:
Place your first coil onto the slipped edge of the base. Cut the ends at diagonal angles where they meet to increase the surface area for joining. -
Blend the interior only:
This is crucial for structural integrity: using your thumb or a wooden tool, smear the *inside* of the coil downward into the base. Do not smooth the outside; we want to keep those ridges defined. -
Build outward:
As you add the next few layers of coils, place each one slightly toward the outer edge of the coil below it. This will widen the form to create the belly of the vase. -
Smooth the interior seams:
After every 2-3 coils, stop to blend the inside seams completely smooth. I find using a slightly damp sponge here helps compress the clay wall while smoothing. -
Taper inward:
Once you reach the widest point of the vase (about 5-6 inches high), begin placing each new coil slightly toward the inner edge of the one below it. This will pull the form in to create the neck. -
Define the neck:
Continue stacking inward until the opening is roughly 2.5 inches wide, forming a distinct, narrower neck section. -
Flare the rim:
For the final two coils, stack them slightly outward again to create a gentle flared lip at the very top, giving the piece a finished silhouette.
Step 3: Refining the Surface
-
Clean the ridges:
Wait until the clay is leather hard. Use a rounded wooden tool or your finger wrapped in a soft plastic bag to gently run along the grooves between coils. This smooths rough bits without erasing the texture. -
Enhance the speckled look:
If your clay bodies require it, sponge the surface lightly to reveal more of the grog or speckles, cleaning away any smear marks from construction. -
Level the rim:
Check the top rim for levelness. If it’s uneven, gently use a rasp or a cheese-cutter wire to slice it perfectly flat, then round off the sharp edges with a damp chamois.
Highlight the Ridge
After glazing, gently wipe a damp sponge over the raised outer edges of the coils. This thins the glaze on the high points, letting the natural speckled clay body peek through.
Step 4: Finishing
-
Slow drying:
Cover the vase loosely with plastic to ensure slow, even drying. The distinct ridges can make the pot prone to cracking if it dries unevenly. -
Bisque fire:
Once bone dry, bisque fire the piece to cone 04 (or per your clay’s instructions) to prepare it for glazing. -
Glazing:
Apply a matte, transparent, or white satin glaze. A glossy glaze might pool in the deep grooves and obscure the texture, so a thinner matte application is best to highlight the form. -
Final smooth:
Wipe the foot of the vase clean of any glaze and fire to the final maturity temperature of your clay body (likely cone 5 or 6 for stoneware).
Place your finished vase near a window where the sunlight can dance across those rhythmic ridges