There’s something extra satisfying about turning a humble pinch pot into a sturdy, cozy handbuilt mug you actually want to use every day. These pinch pot mug ideas are the kind of studio favorites that look beautifully handmade on purpose—no wheel required.
Classic Pinch Pot Mug With Simple Coil Handle

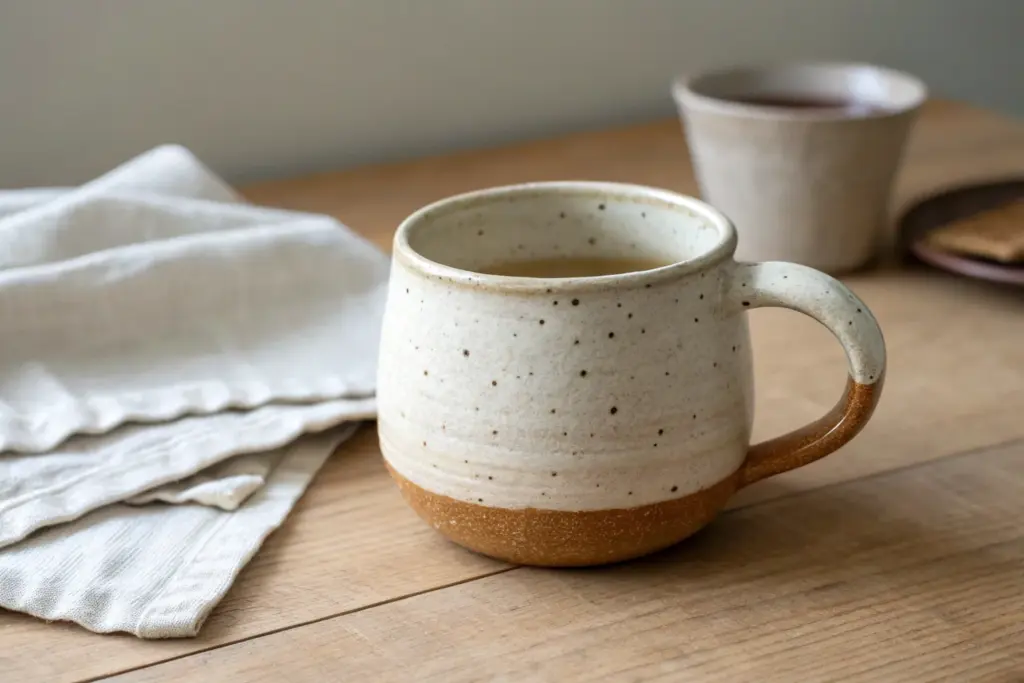
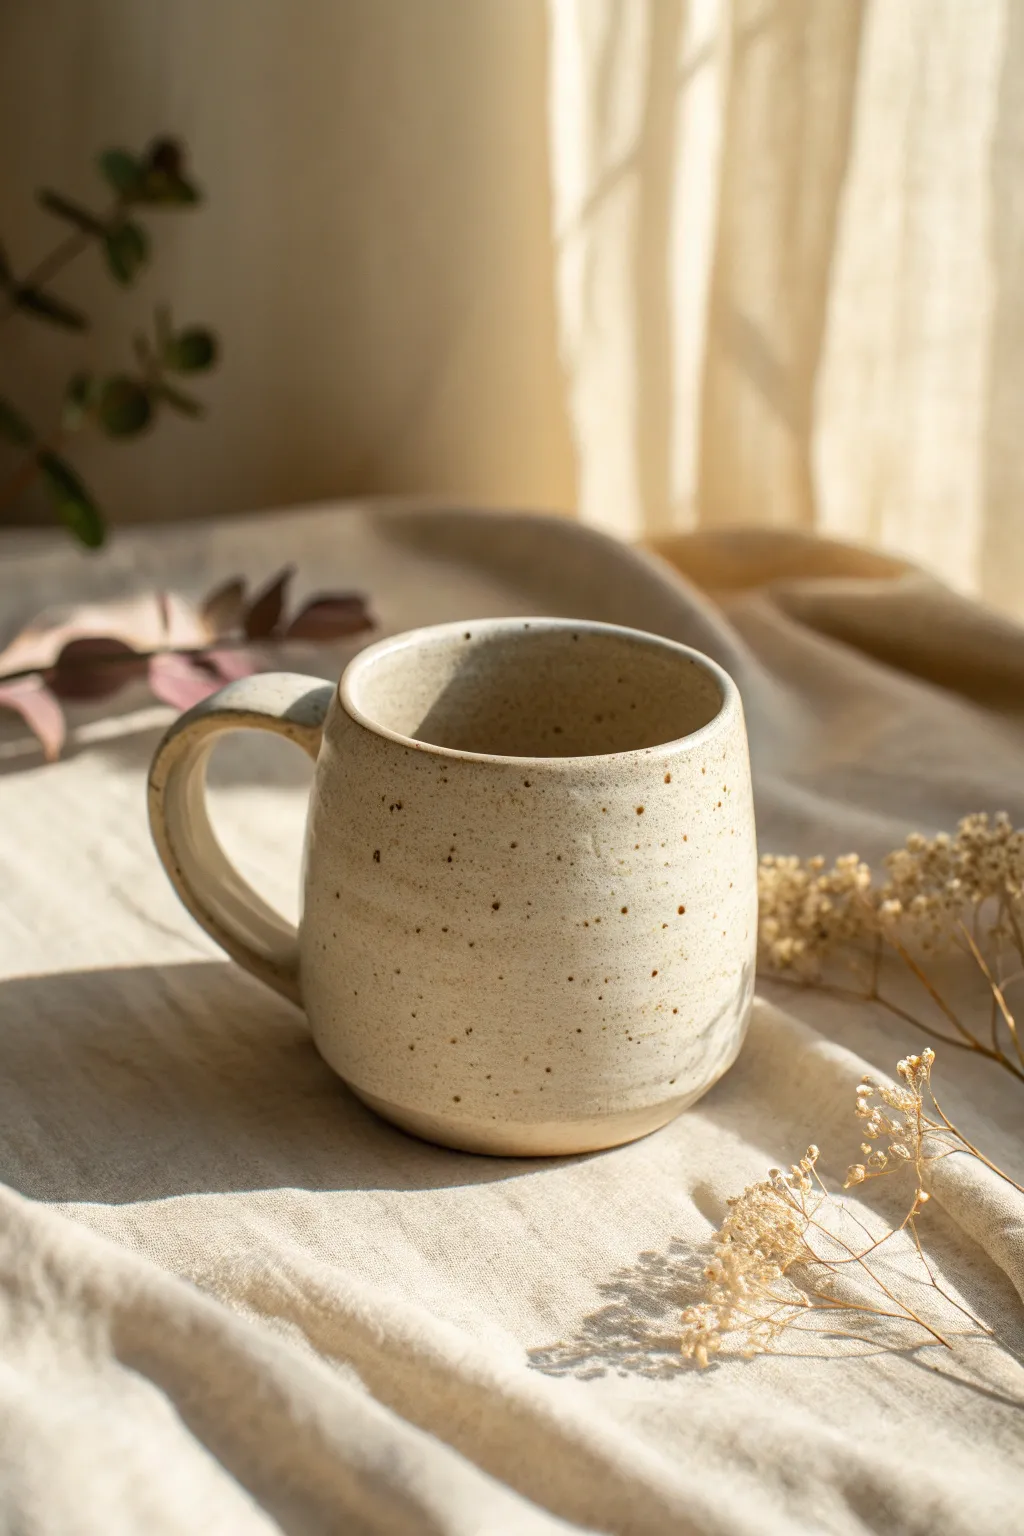
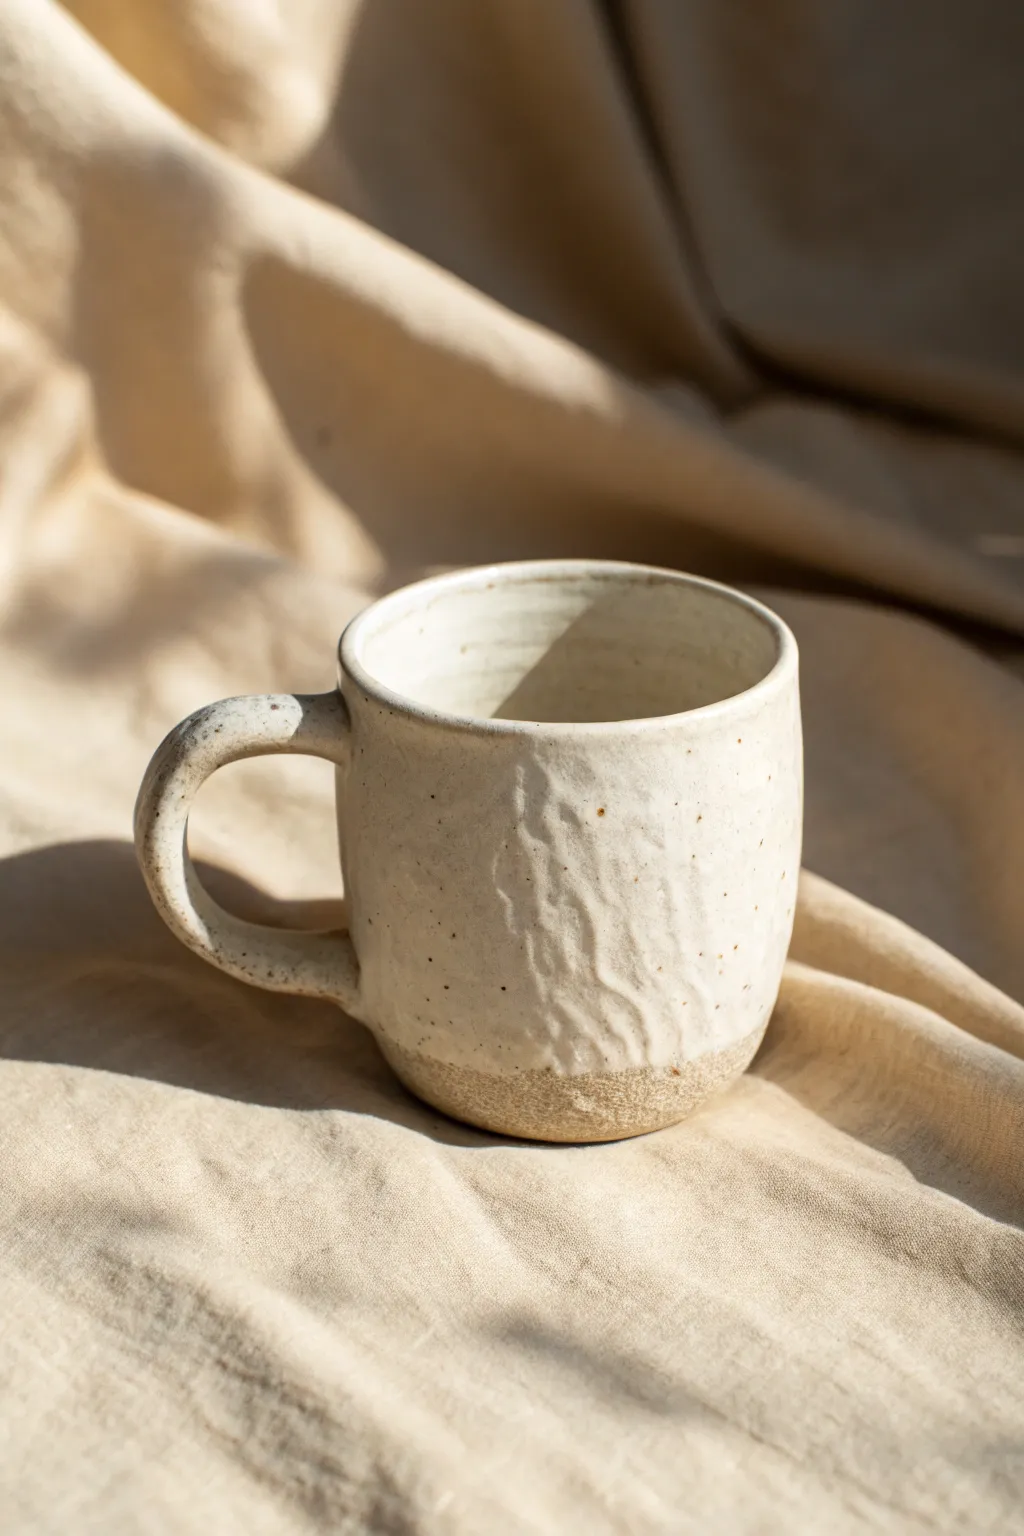
This charming mug embraces the organic beauty of hand-building, featuring a softly rounded body and a sturdy, textured handle. The speckled cream glaze over warm stoneware clay gives it a cozy, rustic appeal perfect for your morning coffee.
How-To Guide
Materials
- Speckled stoneware clay (approx. 1 lb)
- Potter’s needle tool
- Serrated rib tool or fork (for scoring)
- Slip (clay and water mixture)
- Wooden modeling tool
- Sponge
- Wire cutter
- Cream matte glaze (speckled)
- Kiln
Step 1: Forming the Mug Body
-
Prepare the clay ball:
Start by wedging your clay to remove air bubbles, then pat it into a smooth, round ball about the size of a large orange. -
Open the pot:
Hold the ball in one hand and press your thumb into the center, stopping about a half-inch from the bottom to leave enough thickness for the base. -
Pinch the walls:
Gently pinch the clay between your thumb and fingers, rotating the ball as you work. Start at the bottom and work your way up to thin the walls evenly. -
Shape the curve:
Aim for a slightly bulbous shape by pushing the belly of the pot outward from the inside while keeping the rim slightly tucked in. -
Refine the surface:
Once the walls are even (approx. 1/4 inch thick), use a damp sponge or your fingers to smooth out deep fingerprint marks, but leave faint horizontal ridges for that handmade texture. -
Flatten the base:
Gently tap the bottom of the mug on your work surface to create a flat stable base. You can also define the foot ring by pressing a small indentation with your thumb.
Rim Cracking?
If the rim starts cracking while shaping, moisten your fingers slightly and compress the rim by gently running a damp chamois or sponge over it to re-align the clay particles.
Step 2: Adding the Handle
-
Roll a coil:
Roll a piece of clay into a thick coil, about 5 inches long and slightly thicker than a pencil. I prefer to taper the ends slightly for a cleaner attachment. -
Shape the handle:
Curve the coil into a ‘C’ shape or ear shape that feels comfortable for your hand. Let it stiffen slightly for about 10-15 minutes so it holds its shape. -
Score the attachment points:
Hold the handle up to the mug to mark where it will attach. Use your serrated tool or fork to scratch up the clay surface at these attachment points on both the mug and the handle ends. -
Apply slip and attach:
Dab a generous amount of slip onto the scored areas. Firmly press the handle onto the mug body, giving it a little wiggle to ensure a strong bond. -
Blend the seams:
Use a wooden modeling tool to drag clay from the handle onto the mug body, blending the seam until it disappears. Smooth over the connection with a damp sponge. -
Final smoothing:
Run a damp finger along the inside and outside curves of the handle to smooth any sharp edges or roughness.
Perfect Handle Curves
To prevent the handle from sagging while drying, prop it up with a small wedge of foam or a rolled-up piece of paper towel placed underneath the curve.
Step 3: Finishing and Glazing
-
Bisque fire:
Allow the mug to dry slowly and completely (bone dry) before firing it in a bisque kiln to cone 04 (or your clay’s specific temperature). -
Wax the foot:
Apply a wax resist to the bottom inch of the mug and the underside to prevent glaze from running and sticking to the kiln shelf. -
Glaze application:
Dip the mug into a bucket of cream speckled glaze, holding it by the foot (or using tongs). Ensure the glaze coats the inside and outside evenly. -
Clean the foot:
Use a sponge to wipe away any stray drips of glaze from the waxed bottom area to ensure a clean firing line. -
Glaze fire:
Load the mug into the kiln for the final glaze firing, typically to cone 5 or 6 depending on your clay and glaze specifications.
Once cooled, your sturdy new mug is ready to become a comforting part of your daily routine


Pulled Handle on a Pinched Body
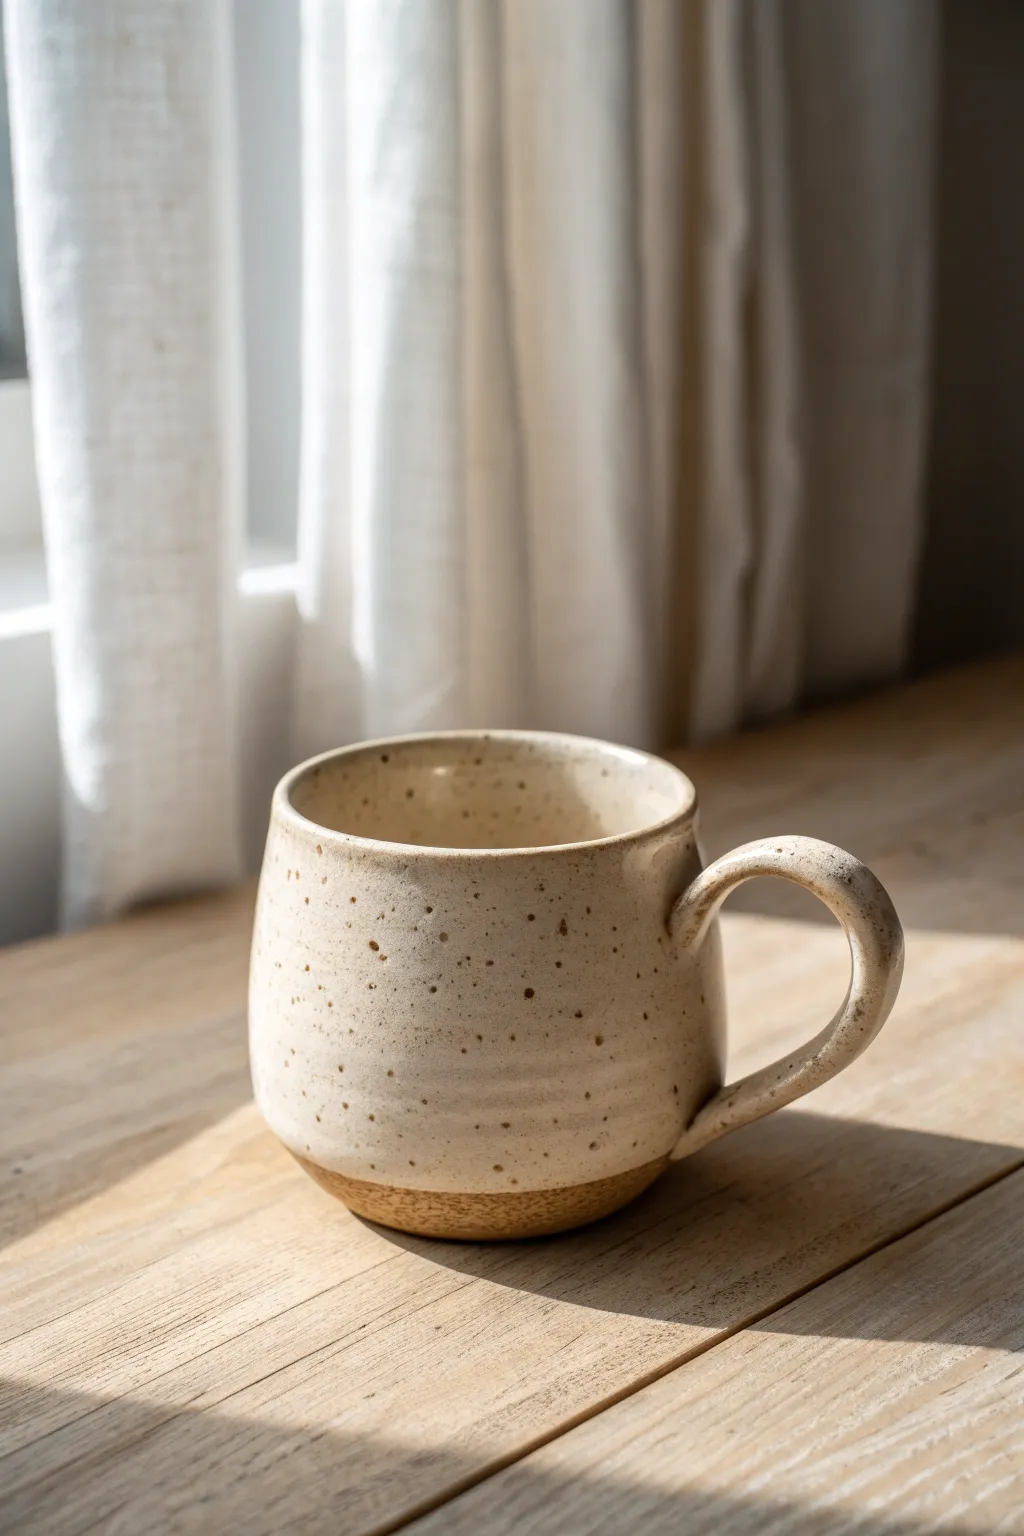
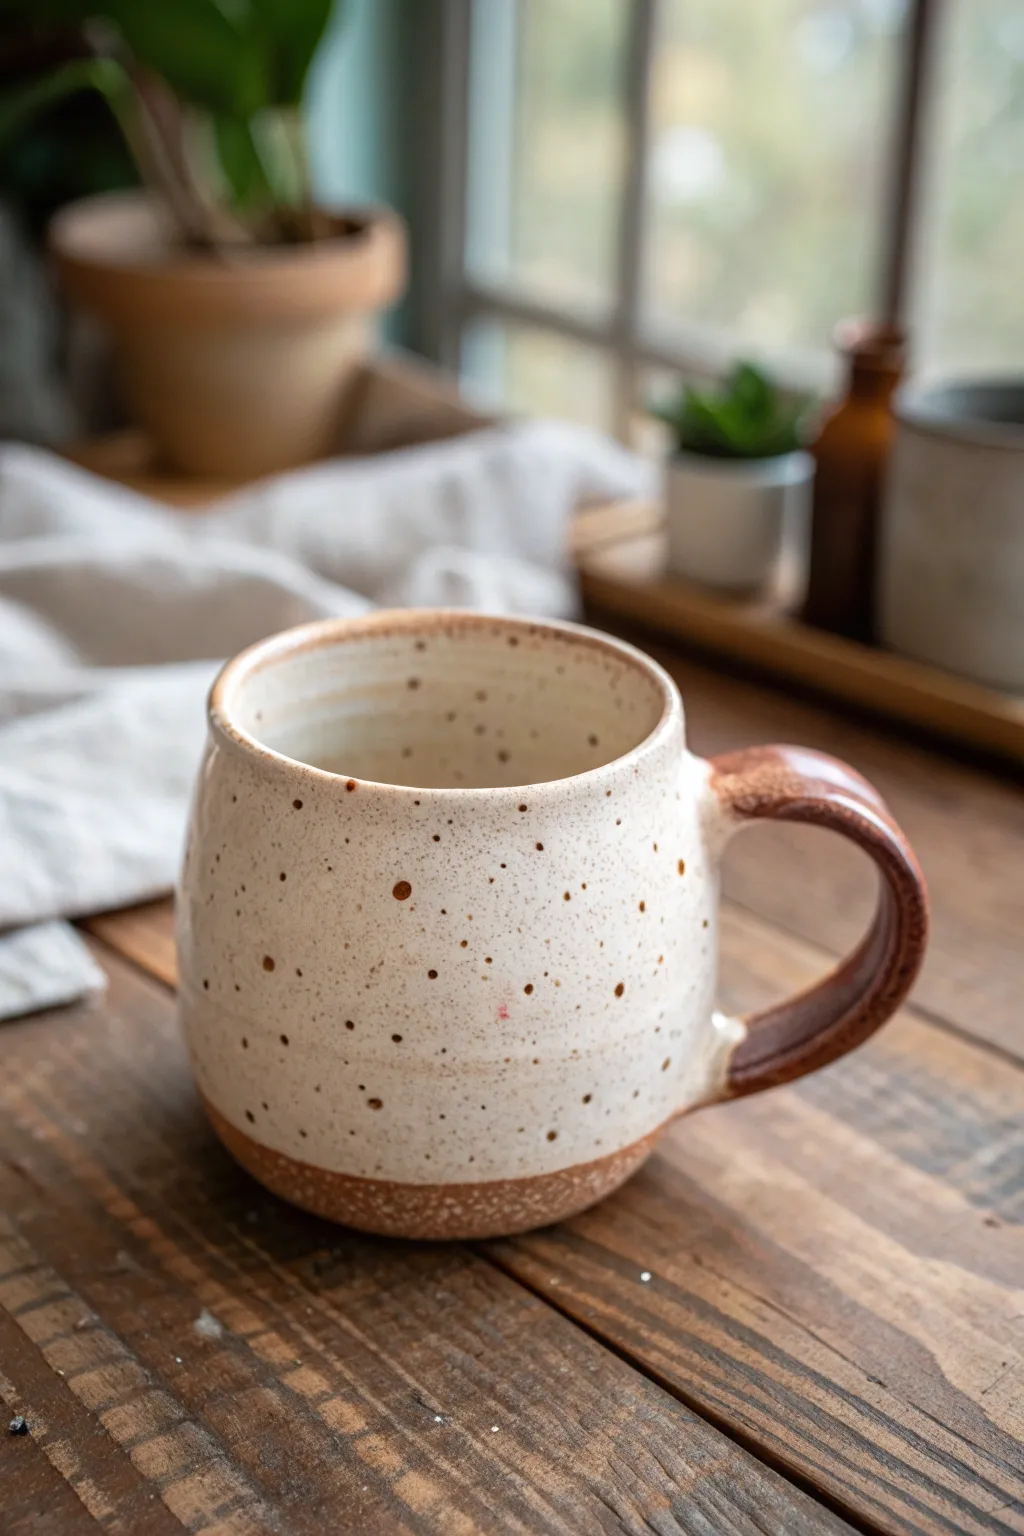
Create this cozy, rounded mug featuring a rustic clay body and a classic pulled handle that fits perfectly in the hand. The contrast between the creamy, speckled glaze and the raw, toasted clay base gives it a timeless, earthy appeal perfect for your morning coffee.
Detailed Instructions
Materials
- Speckled stoneware clay (mid-range cone 5/6)
- Water and slip
- Serrated rib or scoring tool
- Wooden modeling tool
- Smoothing sponge
- Bucket of water
- Creamy matte white glaze (speckled or sheer)
- Kiln
Step 1: Forming the Pinch Pot Body
-
Prepare the Clay:
Start with a ball of well-wedged speckled stoneware clay about the size of a large orange. Pat it into a smooth sphere. -
Open the Form:
Hold the clay in one hand and press your thumb into the center, leaving about half an inch of thickness at the bottom for the base. -
Pinch the Walls:
Begin pinching the clay between your thumb and fingers, rotating the ball as you go. Work from the bottom up to ensure even thickness. -
Shape the Belly:
Gently push the walls outward from the inside to create a rounded, bulbous shape. Keep the rim slightly tucked in rather than flared out to maintain that cozy silhouette. -
Refine the Surface:
Use a flexible rib or a slightly damp sponge to smooth out deep finger marks on the exterior while preserving the handmade undulation. -
Level the Rim:
Check your rim for unevenness. You can gently paddle it flat or slice off the very top with a needle tool if it’s too ragged, then round it off with a chamois.
Master the ‘Pull’
Use plenty of water when pulling the handle to prevent drag marks. Let gravity do the work—don’t squeeze, just stroke downward rhythmically.
Step 2: Pulling and Attaching the Handle
-
Prepare the Handle Slug:
Take a separate carrot-shaped piece of clay. Hold the thick end and wet your other hand. -
Pull the Handle:
Using water as lubrication, stroke the clay downward with even pressure to lengthen and taper it. Aim for a D-shaped cross-section. -
Curve and Set:
Once pulled to the desired thickness, curve the handle into a question-mark shape and lay it on its side to firm up until it holds its shape without drooping. -
Score the Attachment Points:
Hold the handle up to the mug to gauge placement. Generously score the mug surface and the handle ends where they will meet. -
Attach the Handle:
Apply slip to the scored areas. Press the handle firmly onto the mug body, blending the clay from the handle onto the mug with a wooden tool. -
Refine the Join:
I prefer to use a damp brush or fingertip to smooth the seam completely so it looks like the handle grew out of the pot. -
Adjust the Arch:
Before the clay hardens, make final adjustments to the curve of the handle, ensuring there is roughly two fingers’ width of space for a comfortable grip.
Step 3: Glazing and Finishing
-
Bisque Fire:
Allow the mug to dry slowly and completely. Bisque fire it to the recommended cone (usually 04) for your clay body. -
Wax the Foot:
Apply wax resist to the bottom inch of the mug’s exterior and the underside. This creates the unglazed ‘toasted’ accent seen in the image. -
Glaze the Interior:
Pour your creamy white glaze inside the mug, roll it around to coat every surface, and pour out the excess. -
Glaze the Exterior:
Dip the mug into the glaze bucket just past the wax line. Hold it there for 3-4 seconds to get an opaque coat. -
Clean Up:
Sponge off any glaze beads that are sitting on top of the waxed area to ensure a crisp line. -
Final Firing:
Glaze fire the piece to cone 5 or 6 (depending on your clay/glaze fit) to bring out the speckles in the clay.
Cracking at the Seams?
Handle cracks happen if clay moisture levels differ. Ensure your mug and handle are equally leather-hard before attaching. Damp box them together.
Once cooled, your mug is ready to add warmth and character to your daily tea ritual.


Belly-Heavy Cauldron Pinch Pot Mug
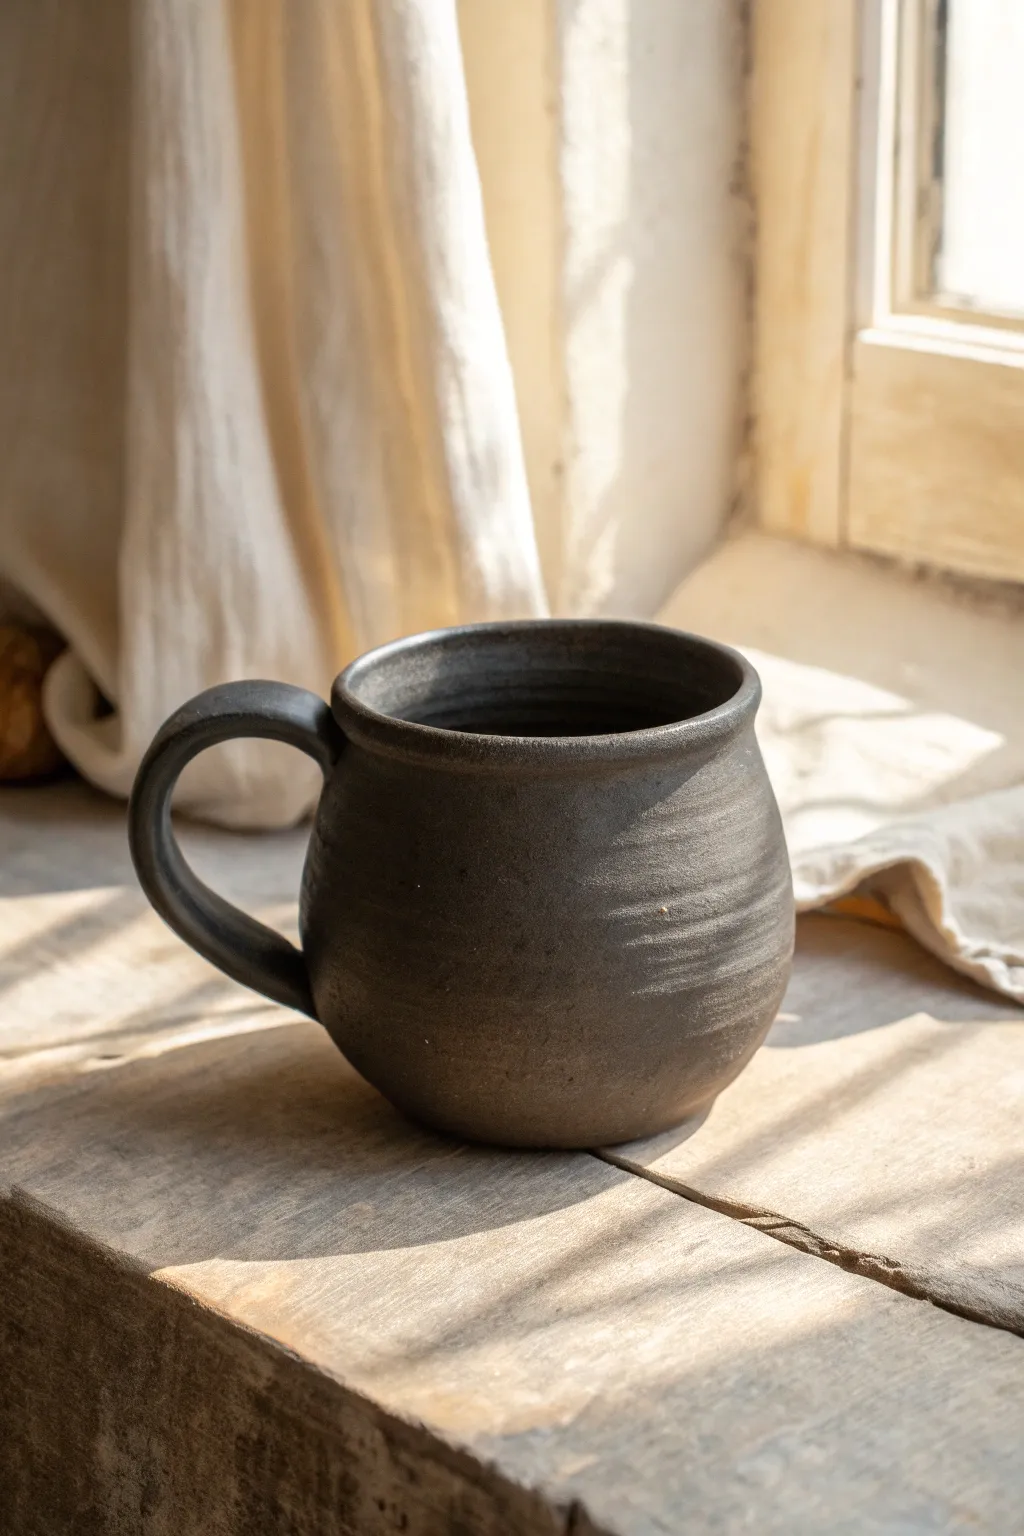
Embrace the rustic charm of this belly-heavy, cauldron-style mug, featuring a dark, matte finish and subtle horizontal ridges. Its rounded, voluminous base tapers gently toward the rim, perfect for cradling warm beverages on a cozy afternoon.
Step-by-Step
Materials
- Stoneware clay (preferably a groggy brown or black clay body)
- Black mason stain or black engobe (if using light clay)
- Matte black or gunmetal glaze
- Poring sponge
- Kidney rib tool (soft rubber)
- Serrated rib or scoring tool
- Rolling pin (for the handle)
- Kiln
- Clean water
- Wooden modeling tool
Step 1: Forming the Cauldron Body
-
Prepare the clay ball:
Start with a softball-sized lump of clay. Pat it into a smooth sphere, ensuring there are no air bubbles trapped inside. -
Open the pot:
Hold the sphere in one hand and push your thumb firmly into the center, stopping about half an inch from the bottom to create a thick base. -
Pinch the walls:
Using your thumb on the inside and fingers on the outside, begin pinching rhythmically while rotating the ball. Work from the bottom upward to thin the walls evenly. -
Shape the belly:
As you pinch, gently push the clay outward from the inside to create a bulbous, rounded bottom. I usually support the curve with my outside cupped hand to prevent it from flopping. -
Create the taper:
Once the belly is established, collar the clay inward as you reach the top third of the mug. This creates the signature cauldron neck that traps heat. -
Add surface texture:
Using your fingers or a soft rib, lightly run horizontal drag lines around the exterior while the clay is still plastic to mimic the subtle ridges seen in the reference. -
Refine the rim:
Smooth the lip with a damp sponge or piece of chamois leather, ensuring it is rounded and pleasant for drinking. -
Flat bottom check:
Tap the mug gently on a flat surface to create a stable foot so it doesn’t wobble.
Step 2: Handle and Assembly
-
Pull or roll the handle:
Create a thick coil for the handle. Flatten it slightly into an oval profile, measuring it against the mug to ensure a comfortable C-shape. -
Dry to leather hard:
Let both the body and the handle dry until they are leather hard—firm enough to hold their shape but still cool to the touch. -
Score the attachment points:
Hold the handle up to the mug to mark your spots. Thoroughly scratch (score) the mug surface and the handle ends where they will meet. -
Apply slip and attach:
Dab clay slip or vinegar onto the scored areas. Press the handle firmly onto the mug body. -
Blend the seams:
Use a wooden modeling tool to smooth the clay from the handle onto the body, reinforcing the bond. Wipe away excess slip with a damp sponge. -
Dry slowly:
Cover the mug loosely with plastic to let it dry very slowly. This prevents the handle from cracking away from the body as it shrinks.
Collapsing Belly?
If the rounded belly starts sagging while you work, stuff the inside with crumpled newspaper or a small balloon to support the shape while it firms up to leather hard.
Step 3: Finishing and Firing
-
Bisque fire:
Once bone dry, fire the piece in the kiln to bisque temperature (usually cone 04) to prepare it for glazing. -
Wax the foot:
Apply wax resist to the very bottom of the mug to prevent glaze from sticking to the kiln shelf. -
Glaze application:
Dip the mug into a matte black or gunmetal glaze. If you want the raw clay texture to show through slightly, use a thinner application or wipe it back gently with a sponge. -
Glaze fire:
Load the kiln again and fire to the maturation temperature of your specific clay and glaze combination (typically cone 5 or 6 for stoneware).
Smooth Sip Tip
Pay extra attention to the inside rim. Compressing this area with a damp sponge not only feels better on the lips but strengthens the rim against chipping.
Your moody, handcrafted cauldron mug is now ready for your favorite hot brew


Tall Mug Made by Stacking Pinched Sections
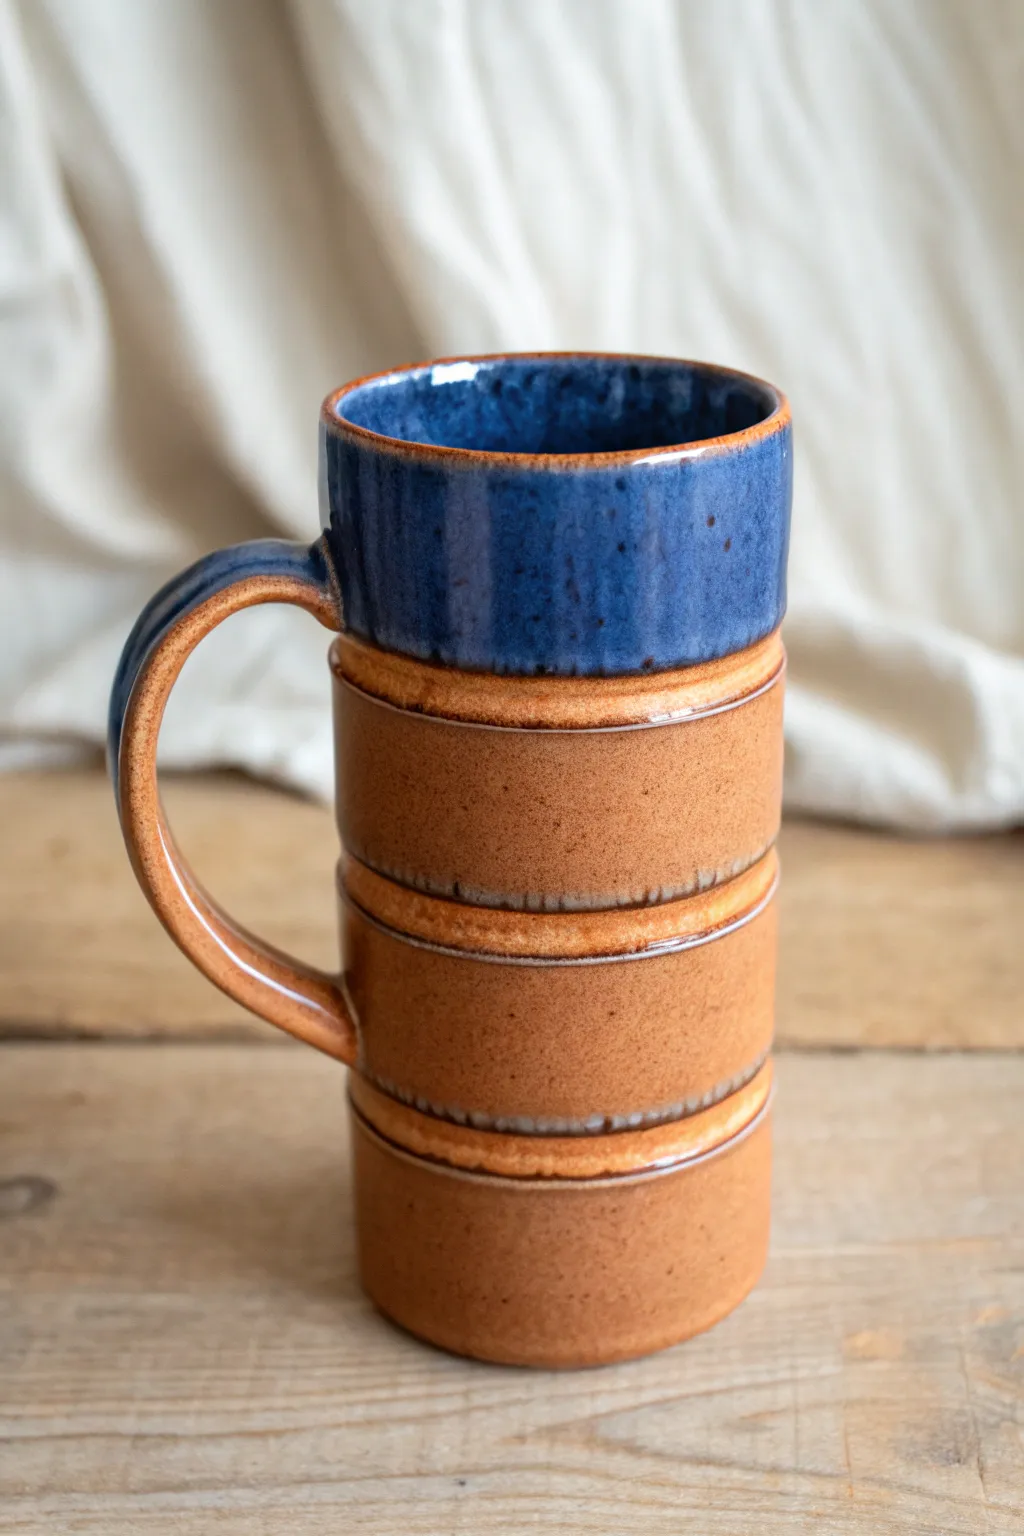
Embrace the imperfect, tactile beauty of hand-building with this tall mug constructed from four stacked sections. The design highlights the construction method with distinct ridges between tiers, topped with a striking cobalt blue dip.
Detailed Instructions
Materials
- Stoneware clay body (speckled or smooth)
- Scoring tool or serrated kidney
- Slip (clay mixed with water)
- Wooden modeling tool
- Sponge
- Cobalt blue glaze suitable for stoneware
- Clear or transparent gloss glaze (optional)
- Kiln
Step 1: Forming the Sections
-
Prepare Clay Balls:
Start by dividing your clay into four equal portions, roughly the size of a tangerine or small tennis ball. Roll them until they are smooth and round. -
Pinch the base pot:
Take your first ball and press your thumb into the center, pinching the walls gently as you rotate. Aim for a slightly wider, flatter bowl shape since this will be the bottom section. -
Pinch the wall sections:
For the remaining three balls, create bottomless rings. You can do this by pinching a pot as usual and then cutting a hole in the bottom, or by forming a thick coil and joining the ends into a ring. -
Shape into cylinders:
Refine each of the three rings and the base pot so they have vertical walls of equal diameter. They should look like short, open-ended cylinders.
Step 2: Stacking the Form
-
Score the base:
Take your base pot and deeply score the top rim using your serrated tool. Apply a generous amount of slip to the scored area. -
Attach the first ring:
Score the bottom edge of one of your cylinder rings. Place it carefully on top of the base, aligning the walls. -
Blend the interior:
Reach inside and smooth the clay downwards from the top ring onto the base to seal the seam completely. I find a wooden tool helps reach deep inside securely. -
Define the exterior seam:
Instead of smoothing the outside seamlessly, gently press the two sections together to ensure a bond, but leave the horizontal indentation visible. You can accentuate this line with a modeling tool to create that ‘stacked’ look. -
Repeat stacking:
Continue adding the next two rings one by one, scoring, slipping, and blending the interior seams while preserving the exterior ridges. -
Finish the lip:
Once the final ring is attached, smooth the top rim with a damp sponge or piece of chamois leather for a comfortable drinking edge.
Seam Splitting?
If ring seams crack during drying, compress the joins more firmly on the inside. Scoring needs to be deep and slip generous.
Step 3: Adding the Handle
-
Pull a handle:
Pull a strap of clay for the handle, tapering it slightly. Let it stiffen up a bit until it can hold an arch shape without sagging. -
Attach the handle:
Score and slip attachment points on the mug body—aim to attach the top of the handle to the second section down, and the bottom to the third section down. -
Secure the join:
Press the handle firmly onto the body. Smear the clay from the handle onto the mug to create a strong attachment, then clean up any excess slip.
Textural Twist
Before stacking, roll the outside of each ring gently over a textured mat or burlap to add surface interest to the unglazed lower sections.
Step 4: Glazing and Firing
-
Bisque fire:
Allow the mug to dry slowly to prevent cracking at the seams. Once bone dry, bisque fire it according to your clay body’s specifications. -
Wax the bottom:
Apply wax resist to the bottom of the mug and slightly up the side of the lowest ring to keep the foot clean. -
Glaze the interior:
Pour a liner glaze (like clear or white) inside the mug, swirl it to coat, and pour out the excess. Wipe any drips off the rim. -
Dip the top section:
Holding the base of the mug, dip the top section upside down into your cobalt blue glaze. Stop dipping right at the first ridge line to create that distinct color block. -
Glaze fire:
Fire the mug to glaze temperature (likely Cone 6 or 10 depending on your clay). The raw clay body on the bottom sections will create a warm contrast to the shiny blue top.
Once fired, you will have a sturdy, architectural piece perfect for your morning coffee

The Complete Guide to Pottery Troubleshooting
Uncover the most common ceramic mistakes—from cracking clay to failed glazes—and learn how to fix them fast.
Pinched Cylinder Mug With Slab Base
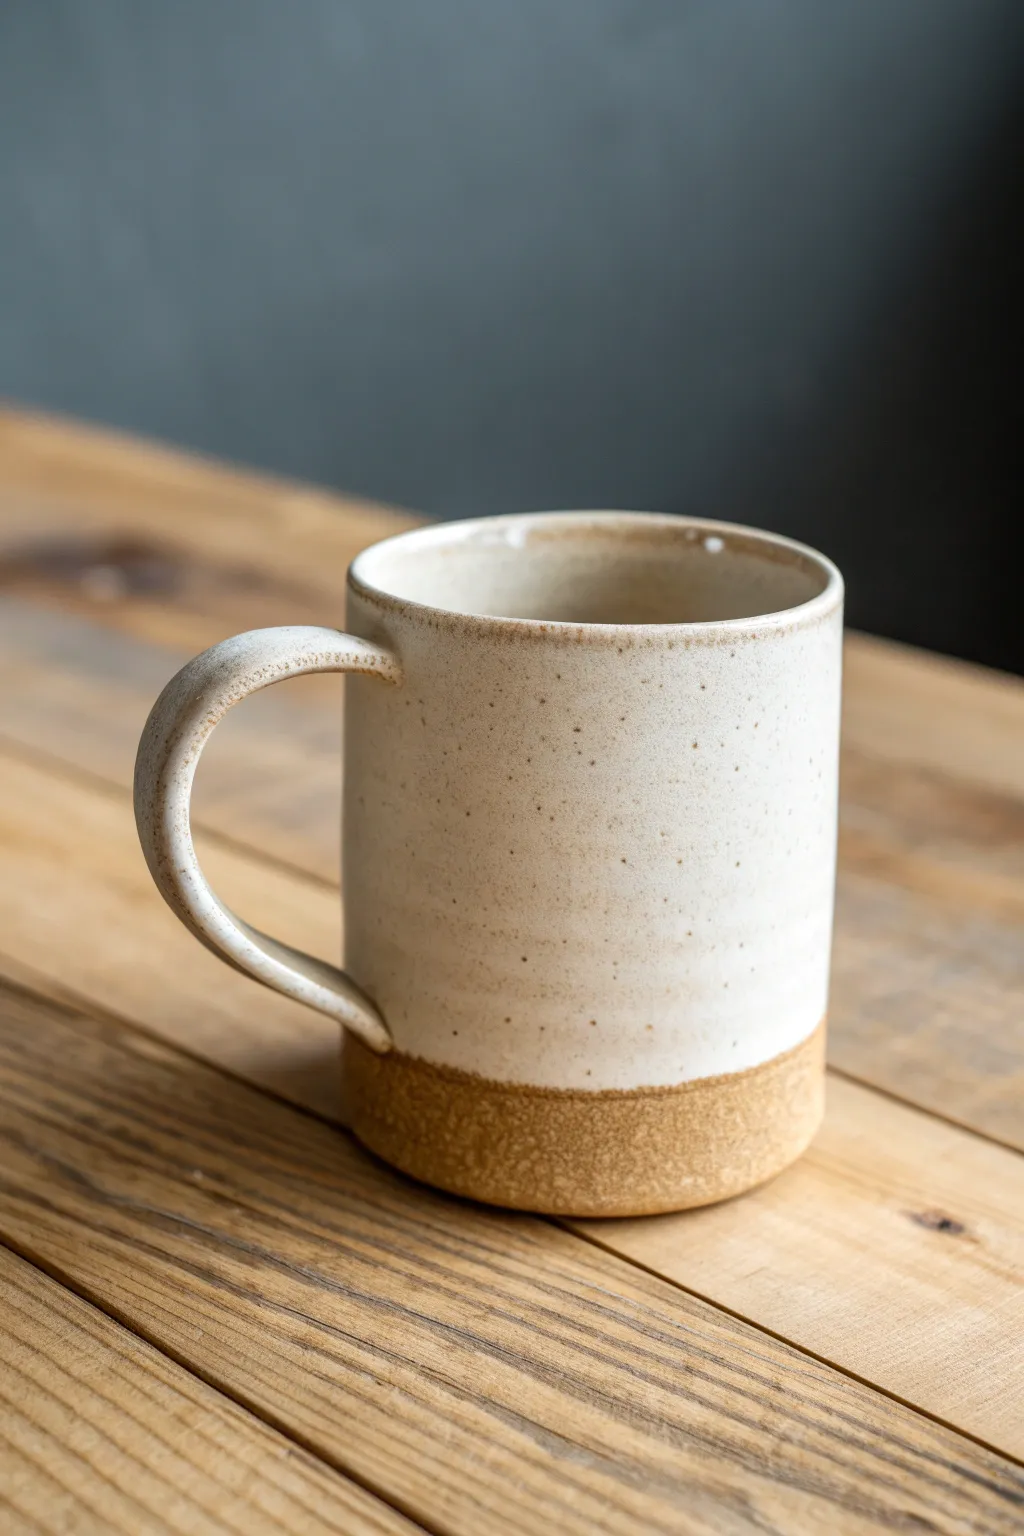
This project combines the organic feel of hand-pinching with a clean, modern silhouette for a mug that’s a joy to hold. By leaving the base unglazed, you create a beautiful textural contrast between the smooth, speckled cream glaze and the warm, gritty raw clay.
Step-by-Step
Materials
- Stoneware clay (smooth or with grog)
- Roller or rolling pin
- Fettling knife or needle tool
- Serrated rib or fork
- Slip (clay slurry)
- Wooden modeling tool
- Sponge
- Matte cream or white speckled glaze
- Paintbrush or glaze tongs
Step 1: Forming the Cylinder
-
Prepare your clay ball:
Start with a ball of well-wedged clay about the size of a large orange. Hold it in your non-dominant hand and gently press your thumb into the center, stopping about a half-inch from the bottom. -
Begin pinching:
Slowly rotate the ball while rhythmically pinching the walls between your thumb and fingers. Aim for even thickness, working from the bottom up. Don’t worry about height yet; focus on getting the walls consistent. -
Extend the walls:
As the pot opens up, gently stroke the clay upwards using your thumb on the inside and fingers on the outside to pull height into the form. Keep the rim slightly thicker than the walls for now to prevent tearing. -
Refine the shape:
Once you have a rough cylinder, use your fingers or a small wooden paddle to straighten the sides. If the opening gets too wide, gently collar the clay in by embracing the rim with both hands and squeezing slightly while rotating. -
Create the base element:
Normally pinch pots have rounded bottoms, but for this design, we want a sharp, flat base. Roll out a small slab of clay, roughly 1/4 inch thick. I prefer to compress this slab with a rib to prevent cracking later. -
Cut the base disc:
Place your pinched cylinder on top of the slab to gauge the size. Use a needle tool to trace and cut a circle slightly larger than the bottom of your cylinder. -
Attach the cylinder:
Since the bottom of your pinch pot is rounded, you may need to cut a small opening or flatten it significantly. Score the bottom edge of your cylinder and the outer edge of your slab disc rigorously. Apply slip to both scored areas. -
Blend the seams:
Press the cylinder firmly onto the disc. Use a wooden tool or your thumb to smudge the clay from the slab up onto the wall of the mug, completely hiding the seam. Smooth horizontally, then vertically.
Wobbly Walls?
If your pinch pot walls keep slumping outward, the clay is too wet or thin. Let it firm up for 30 minutes, or use a hair dryer briefly to stiffen the walls before attaching the base.
Step 2: Adding the Handle & Detail
-
Pull a strap:
Take a small carrot-shaped piece of clay. Wet your hand and stroke the clay downwards, pulling it into a long, uniform strap. Flatten it slightly so it maintains a comfortable oval cross-section. -
Shape the handle:
Curve the strap into a ‘C’ or ear shape and let it stiffen up for about 15-20 minutes on a wooden board. It needs to hold its own weight before attaching. -
Attach the handle:
Score and slip the attachment points on both the mug and the handle ends. Press the handle firmly onto the mug body, ensuring the top attachment is near the rim and the bottom loop has enough room for fingers. -
Clean and refine:
Use a damp sponge to smooth out any fingerprints, especially around the handle joints. Ensure the rim is perfectly smooth and rounded for comfortable drinking. Let the mug dry slowly under plastic to reach leather hard stage.
Step 3: Glazing the Mug
-
Bisque fire:
Once bone dry, fire the mug in a kiln to cone 04/06 (or your clay’s specific bisque temperature). Wipe the fired piece with a damp sponge to remove dust. -
Wax the base:
This is crucial for the two-tone look. Apply liquid wax resist to the bottom inch or inch-and-a-half of the mug’s exterior, as well as the entire underside. Create a straight, sharp line where the wax ends. -
Mix the glaze:
Stir your cream speckled glaze thoroughly. If dipping, ensure it has the consistency of heavy cream. If brushing, use a soft fan brush. -
Apply the glaze:
Dip the mug into the glaze up to the wax line, or pour glaze inside, swirl to coat, pour out, and then dip the exterior. The wax will repel the glaze, leaving that crisp line of raw clay. -
Clean up drips:
Even with wax, beads of glaze might form on the raw section. Use a damp sponge to wipe any stray glaze droplets off the waxed area immediately. -
Glaze fire:
Fire the mug to maturity (likely cone 5/6 or cone 10, depending on your clay and glaze choice). The unglazed section will fire to a toasted sandy color, contrasting with the smooth cream top.
Level Up: Texture Pop
Before firing, gently tap the unglazed bottom section with a stiff brush or rough stone. This enhances the tactile contrast against the smooth glazed upper section.
Now you have a stunning, modern mug perfect for your morning coffee ritual
Tankard-Style Pinch Pot Mug With Wide Bottom
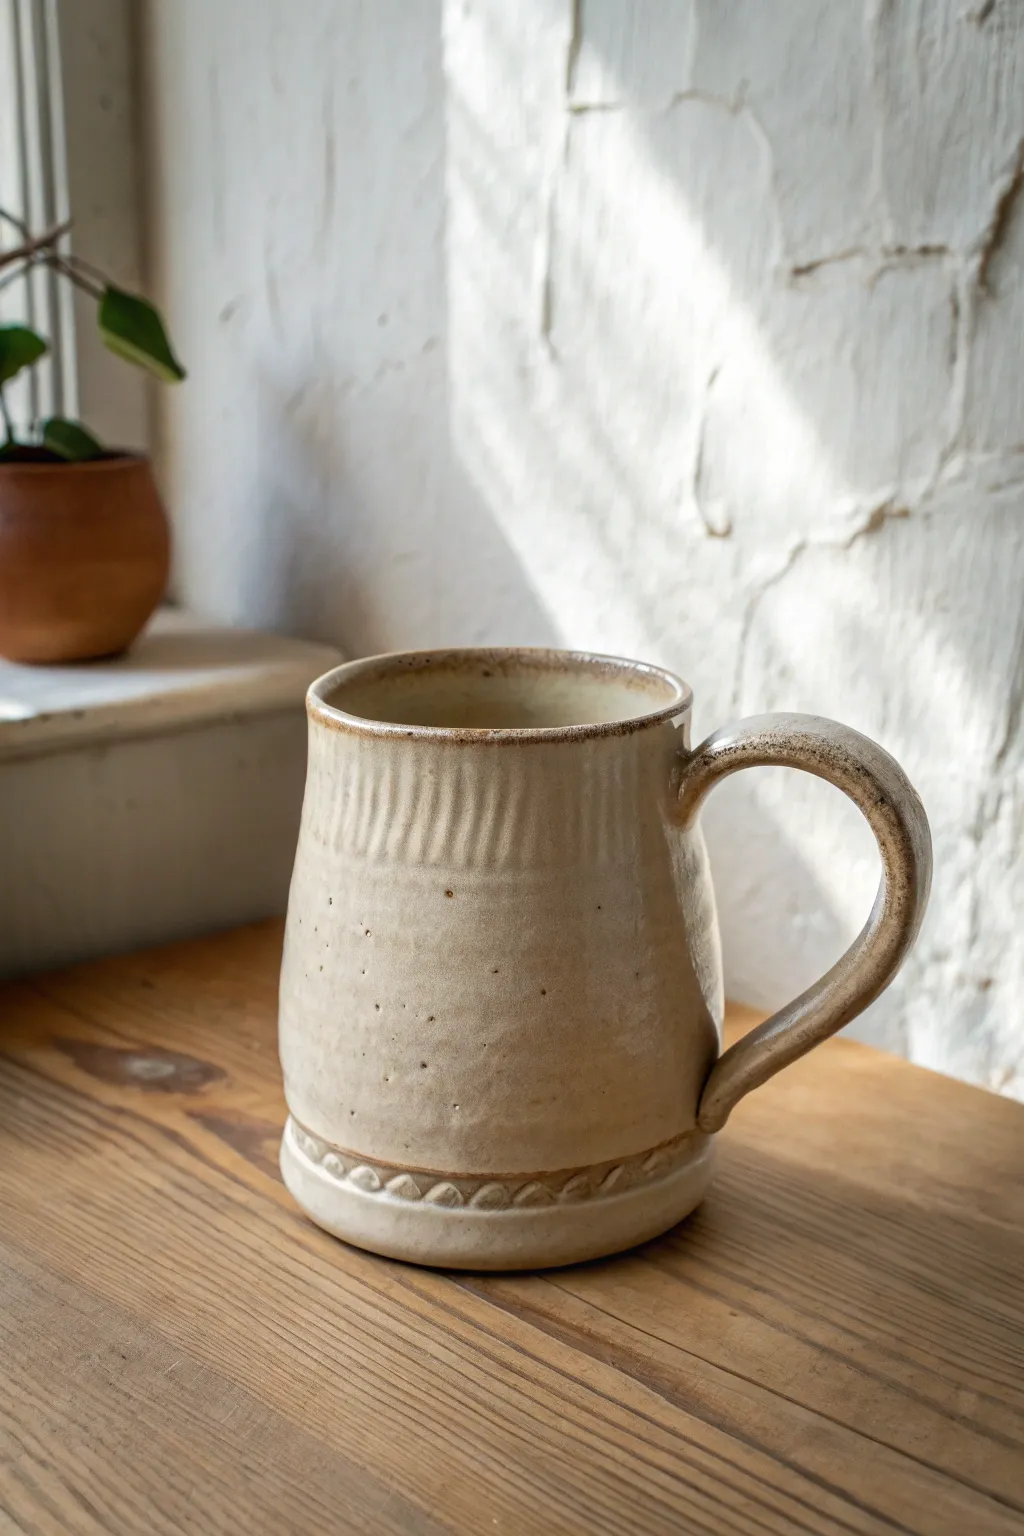
This rustic, pinch-pot style tankard features a wide, stable base and subtle textural details that give it a timeless farmhouse appeal. With its gently tapered neck and braided foot ring, you’ll create a piece that feels substantial yet cozy in the hand.
Step-by-Step Tutorial
Materials
- Stoneware clay (speckled or buff)
- Pottery wheel (optional, can be hand-built)
- Wooden modeling tool
- Pin tool
- Serrated rib or kidney tool
- Sponge
- Scoring tool
- Slip
- Clear or cream glaze (glossy)
- Carving tool or small loop tool
Step 1: Forming the Base Body
-
Prepare the clay:
Start with a ball of clay about the size of a grapefruit. Wedge it thoroughly to remove air pockets, ensuring the speckled stoneware is consistent throughout. -
Establishing the pinch pot:
Push your thumb into the center of the ball, leaving about a half-inch of thickness at the bottom. Start pinching the walls upwards, rotating the clay in your hand to keep the thickness even. -
Adding height with coils:
Since this is a tankard style, a single pinch pot might remain too short. Roll out thick coils of clay and score and slip them onto the rim of your pinched base to add height. -
Smoothing the walls:
Creating a seamless join is crucial here. Use a wooden rib or your fingers to blend the coils downwards on the outside and upwards on the inside until the seams disappear completely. -
Shaping the silhouette:
Gently belly out the bottom section by pushing from the inside while supporting the exterior. Then, slightly collar in the neck area to create that tapered tankard profile.
Clean Lines
Use a damp sponge to gently wipe the high points of the braided foot *after* glazing but before firing. This exposes raw clay for better contrast.
Step 2: Adding Textural Details
-
Refining the surface:
Once the clay is leather hard, use a metal rib to smooth the exterior, but don’t over-polish; the slight irregularity adds to the handmade charm. -
Adding the rim texture:
Just below the rim, use the edge of a wooden tool or a small loop tool to press or carve vertical lines. These should be short, distinct fluting marks that run about an inch down from the top. -
Creating the foot detail:
Roll a thin, consistent coil of clay. Gently twist it or impress it with diagonal marks to create a rope-like or braided effect. -
Attaching the foot ring:
Score and slip the very bottom edge of your mug. Attach your textured coil around the base, pressing it firmly enough to adhere but gently enough to preserve the braided pattern. -
Pulling the handle:
Pull a strap handle from a separate lug of clay. Aim for a D-shaped profile that is comfortable to grip, tapering it slightly towards the bottom. -
Attaching the handle:
Attach the handle securely. The top attachment should be just below the rim’s fluting, curved high like an ear, while the bottom attachment joins the body just above the widest part of the base.
Step 3: Finishing and Glazing
-
Bisque firing:
Allow the mug to dry slowly to prevent cracking, especially at the handle joins. Fire it to bisque temperature (usually Cone 04 or 06). -
Applying the glaze:
Choose a milky, semi-translucent cream glaze. Dip the entire mug or pour the glaze over it. I find a slightly thinner application helps the clay’s natural speckles show through better. -
Highlighting texture:
As the glaze settles, ensure it breaks slightly over the vertical ridges and the braided base, which will naturally darken those high points during firing. -
Glaze firing:
Fire the piece to maturity (Cone 5, 6, or 10 depending on your clay body). Watch for the glaze to pool slightly in the braided crevices, adding depth. -
Sanding the bottom:
Once cooled, check the foot ring. Use fine-grit sandpaper or a diamond pad to smooth any rough patches on the bottom so it sits perfectly flat on a table.
Iron Oxide Wash
Before glazing, brush a diluted iron oxide wash over the textured rim and foot, then sponge it off. The oxide stays in the cracks for deep definition.
Now you have a sturdy vessel ready for your morning coffee or evening tea


What Really Happens Inside the Kiln
Learn how time and temperature work together inside the kiln to transform clay into durable ceramic.
Footed Pinch Pot Mug With Coil Foot Ring
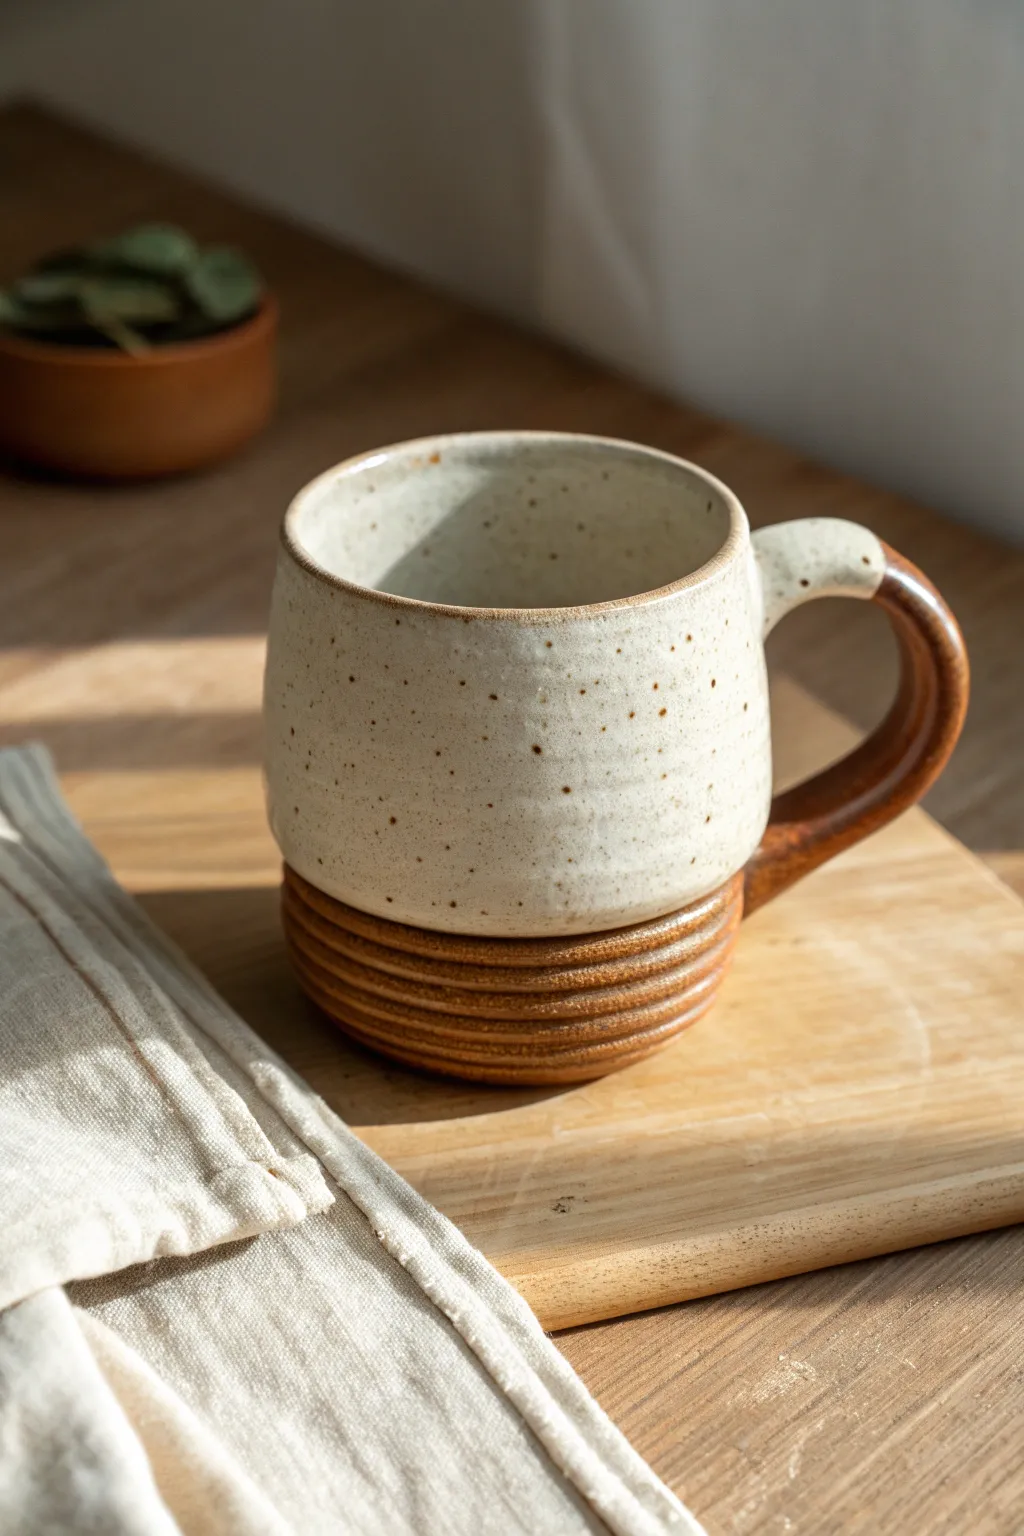
Elevate your standard pinch pot mug with a distinct, textured base that adds both height and visual interest. This project combines a creamy, speckled glaze with raw, warm stoneware accents for a cozy, rustic aesthetic.
How-To Guide
Materials
- Speckled buff stoneware clay
- Potter’s needle tool
- Scoring tool or serrated rib
- Slip (clay and water mixture)
- Wooden modeling tool
- Sponge
- Creamy matte white glaze
- Clear or amber glaze (optional for handle/foot)
- Kiln access
Step 1: Forming the Body
-
wedge and section clay:
Begin by wedging your clay to remove air bubbles. Separate a ball of clay roughly the size of a large orange for the body, and set aside two smaller lumps for the foot and handle. -
Pinch the primary form:
Create the main cup body using the pinch method. Insert your thumb into the center of the clay ball and gently pinch the walls between your thumb and fingers, rotating constantly to maintain an even thickness. -
Refine the shape:
Continue pinching until the walls are about 1/4 inch thick. Aim for a slightly rounded, U-shaped bottom rather than a flat cylinder. Smooth the lip with a damp sponge or piece of chamois leather. -
Prepare the connection point:
Flip the pinch pot upside down. Score the bottom center of the pot where the foot will be attached. Use your serrated rib to create a rough texture.
Consistent Ribs
When stacking coils for the foot, offset them slightly inward if you want a tapered look, or use a ruler to check vertical alignment for a straight cylinder.
Step 2: Creating the Coil Foot
-
Roll the coils:
Take one of your reserved clay lumps and roll it into a long, even coil about the thickness of your pinky finger. You will need enough length to circle the base of the mug 4-5 times. -
Stack the base:
Apply slip to the scored bottom of the mug. Begin coiling the clay in a tight circle directly onto the slipped area. Stack the coils upward (away from the pot bottom) to create a cylindrical foot. -
Secure the interior:
While the outside will remain ribbed, you need to secure the coils on the inside of the foot ring. Use a modeling tool to blend the coils together on the inner wall of the foot for structural integrity. -
Refine the ribs:
On the exterior, use a damp sponge or your finger to gently smooth the coils just enough to remove sharp edges, while preserving the distinct ribbed definition. Ensure the foot is level.
Wobbly Foot?
If the mug wobbles after attaching the coil foot, place a wooden board on top of the inverted foot and tap gently to level all the coils at once.
Step 3: Handle and Assembly
-
Pull the handle:
With the remaining clay, pull or roll a handle. For this specific look, aim for a tapered shape that is thicker at the top attachment point and thinner at the bottom. -
Shape the curve:
Curve the handle into a ‘question mark’ or ‘C’ shape and let it set up until it holds its form but is still flexible (soft leather hard). -
Attach the handle:
Score and slip the attachment points on both the mug body and the handle. Press the handle firmly onto the mug, ensuring the top attaches to the white body and the bottom attaches near the transition to the coil foot. -
Clean connection points:
I like to use a small, wet paintbrush to smooth the seams where the handle meets the body, ensuring a seamless visual transition.
Step 4: Finishing and Glazing
-
Bisque fire:
Allow the mug to dry slowly and completely under loose plastic to prevent cracking. Once bone dry, bisque fire it in the kiln according to your clay body’s specifications. -
Wax the foot:
Apply wax resist to the entire coil foot area and the handle if you wish to leave them unglazed or raw clay. This is crucial for achieving that two-tone look. -
Glaze the interior and upper body:
Pour the creamy white glaze inside the mug, roll it around to coat, and pour out the excess. Then, dip the top portion of the mug into the glaze, stopping right where the pinch pot meets the coil foot. -
Optional handle glaze:
If you prefer a glossy finish on the handle and foot without changing the color, brush on a clear glaze or a translucent amber glaze over those specific areas. -
Glaze fire:
Load the mug into the kiln for the final glaze firing. Ensure the foot is wiped clean of any stray glaze drips before firing.
Enjoy your morning coffee in a mug that perfectly balances modern simplicity with traditional hand-building techniques
Flared Rim Pinch Pot Latte Mug
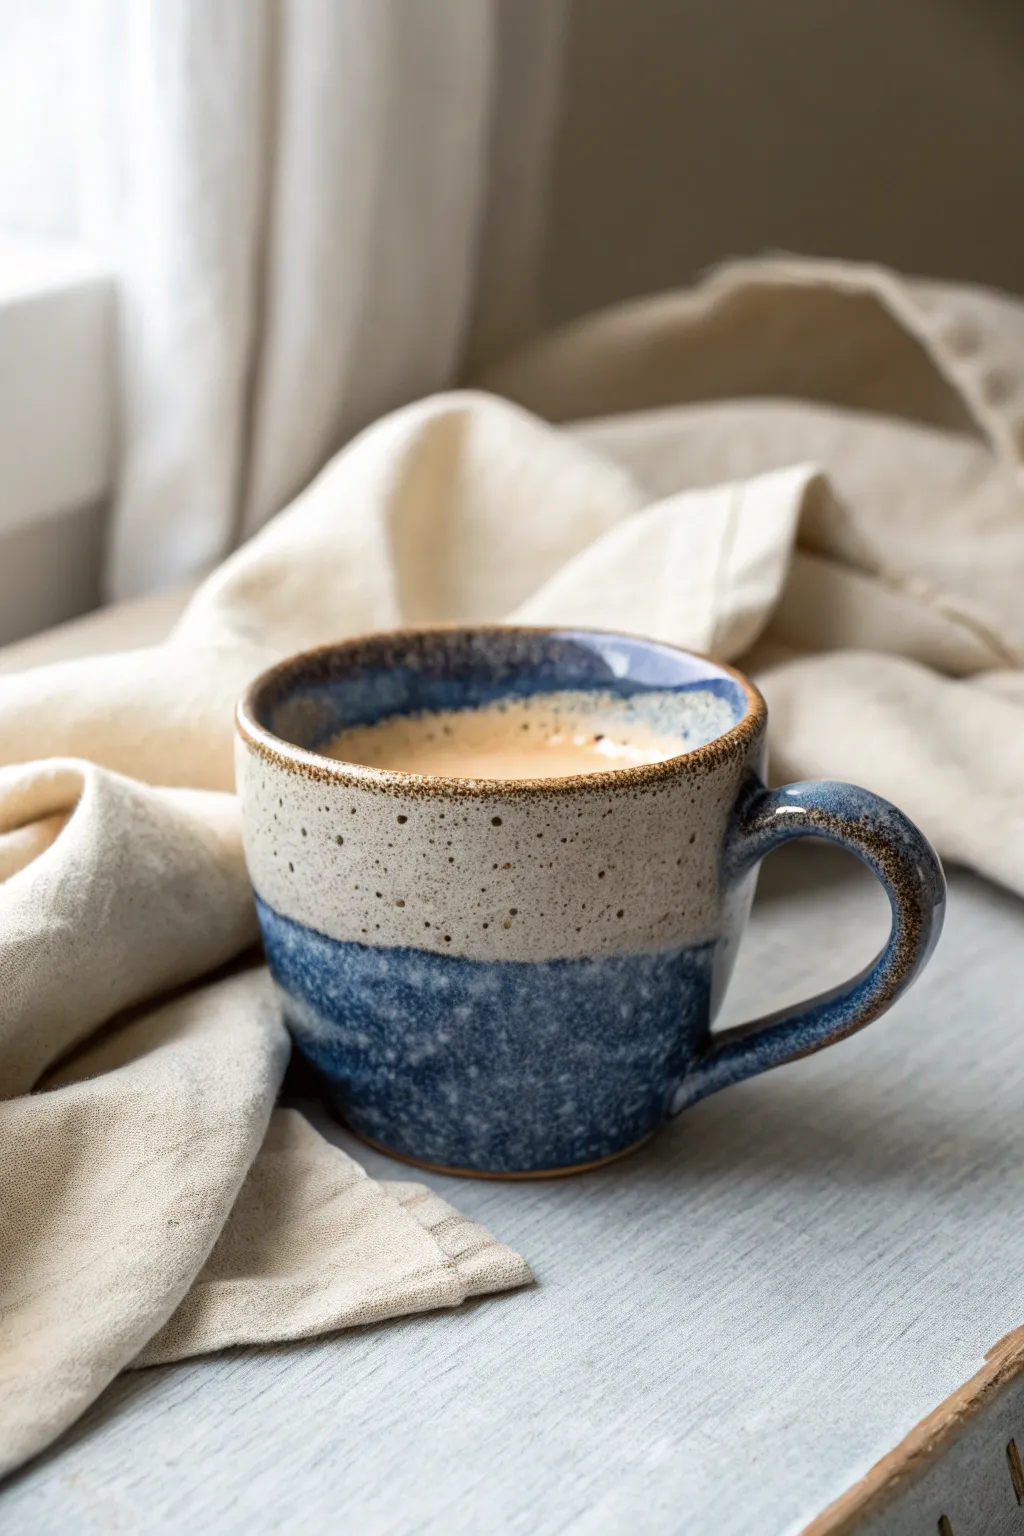
Capture the essence of slow mornings with this handcrafted pinch pot mug, featuring a comforting speckled glaze and a generous, wide rim perfect for latte art. The dual-tone finish combines earthy, raw speckles with a deep ocean blue for a rustic yet modern aesthetic.
Detailed Instructions
Materials
- Stoneware clay (speckled or buff)
- Pottery wheel (optional, can be hand-built)
- Rib tool (wooden or silicone)
- Needle tool
- Loop tool
- Sponge
- Cutting wire
- Serum or scoring tool
- Slip (clay mixed with water)
- Deep blue dipping glaze
- Clear or white speckled glaze (if using plain clay)
- Kiln
Step 1: Forming the Base
-
Prepare the Clay:
Start by wedging about 1 to 1.5 pounds of stoneware clay. If you want the natural speckles shown in the photo, ensure you choose a speckled clay body. Form it into a smooth, round ball. -
Open the Pinch Pot:
Holding the clay ball in one hand, press your thumb into the center, stopping about a half-inch from the bottom. I like to rotate the ball slowly while pressing to keep the thickness even. -
Pinch the Walls:
Begin pinching the clay between your thumb and fingers, working your way from the bottom up. Aim for consistent wall thickness, roughly 1/4 inch thick, rotating the pot constantly. -
Shape the Cylinder:
As the walls grow taller, gently coax them upward rather than just outward to create a mug shape. Use a wooden rib on the inside while supporting the outside with your hand to smooth out finger marks and refine the cylinder. -
Flare the Rim:
Once you have your desired height (about 3.5 to 4 inches), gently press the rim outward with your fingers or a moist sponge to create that subtle flare. This invites the lips and is great for sipping foamy drinks. -
Level the Top:
Use a needle tool to slice off any unevenness at the very top rim if pinching left it ragged, then smooth it over with a chamois piece or wet sponge.
Smooth Rim Tip
For a super comfortable lip feel, wrap a small piece of thin plastic (like dry cleaning bag) over the rim and run your finger over it to compress and smooth the clay.
Step 2: Adding the Handle
-
Pull a Handle:
Take a small nugget of clay and pull a handle using wet hands, using long, stroking motions until it’s about 4-5 inches long and slightly tapered. Alternatively, roll a coil and flatten it slightly. -
Curve and Dry:
Curve the handle into a ‘C’ or ear shape and lay it on its side to stiffen up slightly. Letting it set for 15-20 minutes makes attachment much easier without squashing the form. -
Score and Slip:
Hold the handle up to the mug to check the fit. Mark the attachment points, then score both the mug body and the handle ends heavily with a serrated rib or needle tool. Apply a generous dab of slip to both scored areas. -
Attach and Smooth:
Firmly press the handle onto the mug. Use your thumb to smooth the clay from the handle onto the mug body, blending the seam until it disappears completely. A small wooden modeling tool is excellent for getting into the tight corners.
Custom Glaze Line
Dip the rim at an angle, then dip the bottom at the opposite angle. This creates a dynamic, diagonal overlap line where the blue and white meet.
Step 3: Glazing and Finishing
-
Bisque Fire:
Allow your mug to dry slowly and completely (bone dry) before loading it into the kiln for a bisque fire (usually Cone 04 or 06). This prepares the clay for glazing. -
Wax the Bottom:
Apply wax resist to the foot of the mug and slightly up the side if you want a clean clay line. This prevents glaze from fusing your mug to the kiln shelf. -
Internal Glaze:
Pour a glossy white or clear glaze inside the mug, swirl it around to coat completely, and pour out the excess. Wipe any drips off the rim immediately. -
Upper Dip:
For the exterior, hold the mug by the foot. If you are using a speckled clay, dip the top half into a clear or semi-opaque white glaze. If using plain clay, use a ‘speckled vanilla’ type glaze. -
Lower Dip:
Once the top glaze is dry to the touch, hold the mug by the rim and dip the bottom half into a deep, reactive blue glaze. Overlap the two glazes slightly in the middle to create that beautiful, blurry transition line. -
Touch Ups:
Check the handle. You may need to brush glaze onto the inner curve of the handle if the dip didn’t reach it. Clean up any glaze drips on the foot with a sponge. -
Glaze Fire:
Fire the mug again to the maturity temperature of your clay and ceramic glaze (typically Cone 5 or 6). Let the kiln cool completely before opening to avoid thermal shock cracking.
Fill your new favorite mug with a warm drink and enjoy the cozy weight of your handmade creation.

TRACK YOUR CERAMIC JOURNEY
Capture glaze tests, firing details, and creative progress—all in one simple printable. Make your projects easier to repeat and improve.
Pinched Square-Profile Mug With Soft Corners
Embrace the imperfect charm of hand-building with this cozy, speckled pinch pot mug. The organic silhouette and creamy glaze create a rustic yet modern vessel perfect for your morning brew.
Step-by-Step
Materials
- Speckled warm-tone stoneware clay
- Wire cutter
- Serrated metal rib
- Soft rubber rib
- Needle tool
- Scoring tool or fork
- Small sponge
- Wide, flat paintbrush
- Creamy semi-matte glaze (cone 5/6 depending on clay)
Step 1: Forming the Base
-
Prepare your clay:
Cut a piece of clay roughly the size of a large orange. Wedge it thoroughly to remove any air bubbles, which helps prevent future cracking. -
Shape the ball:
Pat the clay into a smooth, round sphere using your palms. Find the center and gently push your thumb down into the middle, stopping about half an inch from the bottom. -
Pinch the walls:
Starting from the bottom and working your way up, pinch the clay wall between your thumb and fingers. Rotate the ball slightly with each pinch to ensure even thickness all around. -
Refine the thickness:
Continue pinching until the walls are about 1/4 inch thick. Aim for a fairly consistent thickness from base to rim, but remember that some variation adds character. -
Flatten the bottom:
Gently tap the pot on your work surface to create a flat, stable base. Check that the mug doesn’t wobble.
Evening Out Walls
If you find thick spots near the base while pinching, use a wooden spoon handle inside the pot to press outward while supporting from the outside.
Step 2: Shaping and Handle
-
Create the taper:
With the pot on the table, use your hands to gently collar the clay slightly inward near the rim. This gives it that subtle, cozy tapered look seen in the photo. -
Smooth the surface:
Run a serrated rib over the exterior to even out lumps, then follow with a soft rubber rib to compress the clay and polish the surface smooth. -
Roll the handle coil:
Roll a separate small piece of clay into a thick coil, roughly the thickness of your finger. Flatten it slightly so it’s an oval shape rather than a perfect circle. -
Shape the handle curve:
Bend the coil into an ear shape or ‘C’ shape. Hold it up to your mug body to check proportions; trim the ends with a needle tool at an angle to fit flush against the mug wall. -
Score and slip:
Score (scratch up) the attachment points on both the mug body and the handle ends. Apply a dab of water or slip (clay slurry) to these scratched areas. -
Attach the handle:
Firmly press the handle onto the mug. Support the wall from the inside with one hand while pressing from the outside to avoid deforming the mug’s shape. -
Reinforce the join:
Use a small wooden tool or your finger to smooth the clay where the handle meets the body. I like to add a tiny coil of clay around the seam and blend it in for extra strength.
Cracks At The Rim?
Tiny cracks while shaping mean the clay is getting too dry. Mist it lightly with water, compress the rim with a damp sponge, and wrap it in plastic for 30 mins to rehydrate.
Step 3: Finishing and Glazing
-
Clean the rim:
With a damp sponge or a strip of chamois leather, gently wipe the rim of the mug. This ensures it will feel pleasant against your lips when drinking. -
Slow drying:
Loosely cover the mug with plastic and let it dry slowly over a few days to the bone-dry stage. This slow process is crucial to prevent the handle from cracking away. -
Bisque fire:
Fire the piece in a kiln to bisque temperature (usually Cone 04 or 06). This makes the clay porous and ready to accept glaze. -
Prepare the glaze:
Stir your creamy semi-matte glaze thoroughly. If your clay body doesn’t have specks, you can add a small amount of granular ilmenite or manganese to the glaze for that spotted effect. -
Glaze application:
Pour glaze inside the mug, roll it around, and pour it out to coat the interior. For the exterior, either dip the mug or brush on 2-3 even coats depending on your glaze’s instructions. -
Wipe the foot:
Use a damp sponge to completely wipe any glaze off the very bottom of the mug and about 2mm up the side. This prevents it from fusing to the kiln shelf. -
Final firing:
Fire the mug to the maturity temperature of your clay and glaze (typically Cone 5 or 6 for stoneware). Allow the kiln to cool completely before opening.
Once cooled, your handmade mug is ready to be filled with your favorite warm beverage
Thumb Rest Handle Pinch Pot Mug
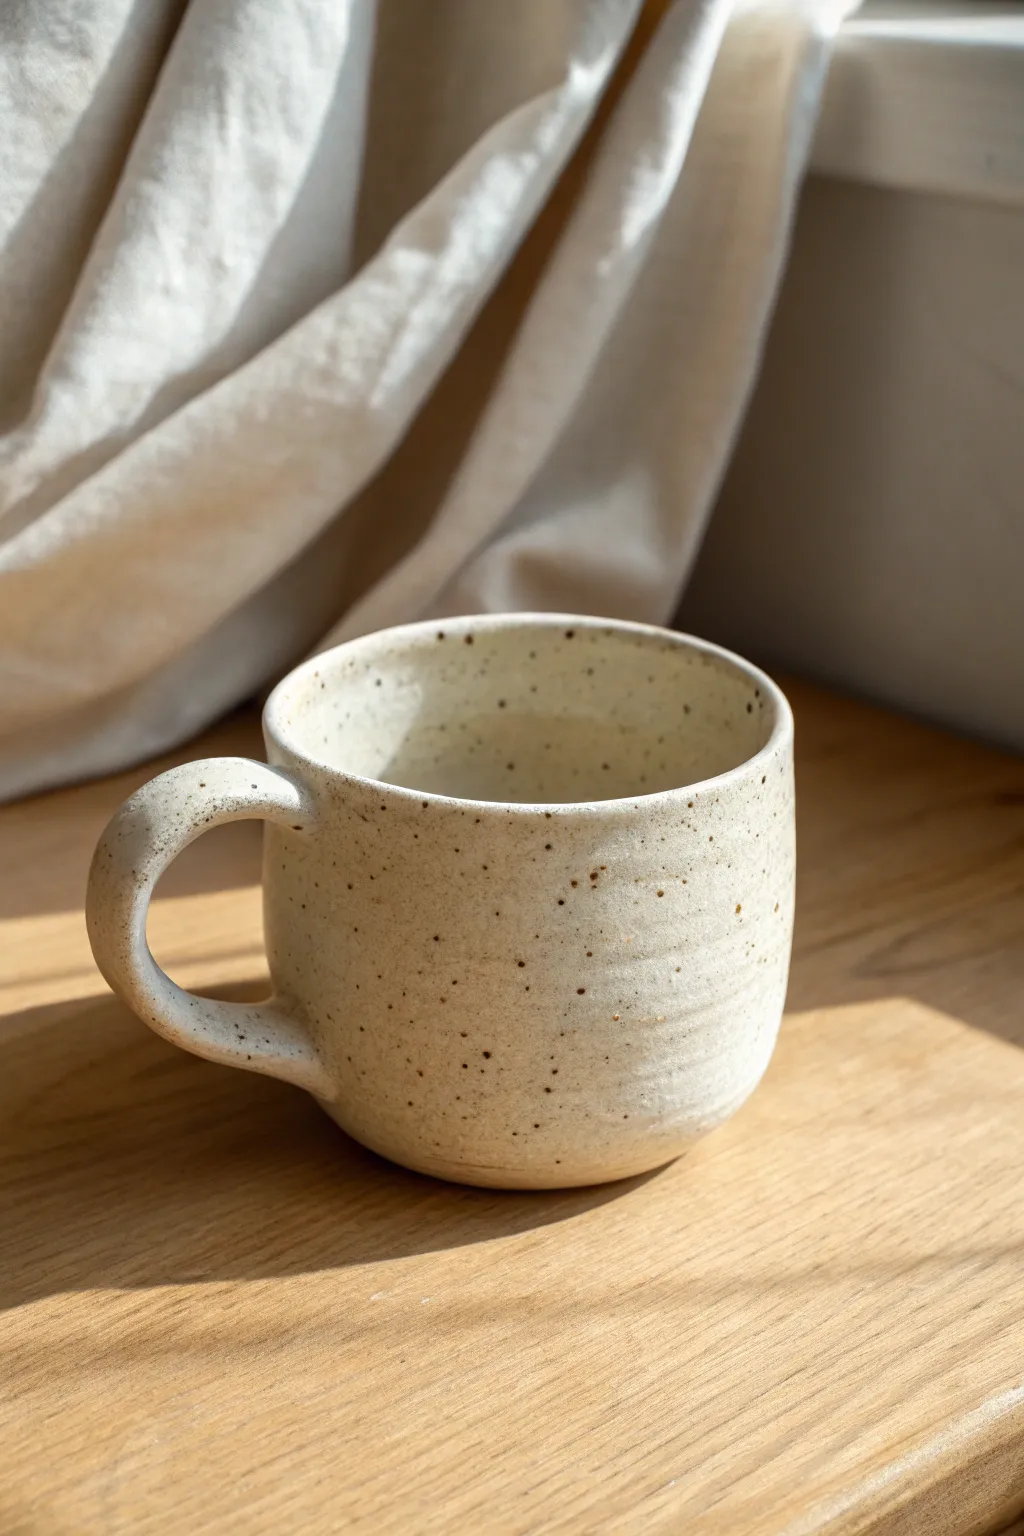
This handmade mug combines the comforting, organic feel of a pinch pot with a clean, modern form. The project highlights the beauty of speckled clay bodies, finished with a classic thumb rest handle that fits perfectly in your hand.
Step-by-Step Guide
Materials
- Speckled stoneware clay (approx 1 lb)
- Water in a small bowl
- Scoring tool or serrated kidney
- Wooden modeling tool
- Sponge
- Transparent or cream glossy glaze
- Potter’s needle
- Cutting wire
Step 1: Forming the Pinch Pot Body
-
Prepare the Clay Ball:
Start by wedging your clay thoroughly to remove air pockets. Form a smooth, round ball about the size of a large orange or grapefruit, depending on your desired mug size. -
Open the Form:
Hold the clay ball in one hand and push your thumb into the center, stopping about a half-inch from the bottom. This base thickness is crucial for stability. -
Pinch the Walls:
Establish a rhythm of pinching the clay between your thumb and fingers while slowly rotating the ball. Work from the bottom up, squeezing gently to thin the walls evenly. -
Refine the Shape:
As the walls grow taller, keep them vertical rather than letting them flare out too wide. Aim for a cylindrical shape with a slightly wider belly and a gentle taper at the rim. -
Flat Bottom Adjustment:
Gently tap the pot against your table to flatten the bottom. This ensures the mug sits securely without wobbling. -
Smooth the Surface:
Use a damp sponge or your fingers to smooth out deep fingerprint marks, though leaving faint ridges adds character. If you want the subtle horizontal texture seen in the photo, lightly drag a rib tool around the exterior.
Step 2: Creating the Handle
-
Pull a Lug:
Take a separate small lump of clay and roll it into a thick coil, slightly tapered at one end. This will become your handle. -
Shape the Curve:
Curve the coil into an ear shape. Flatten the top section slightly—this is where your thumb will eventually rest. -
Score and Slip:
Score the attachment points on both the mug body and the handle ends vigorously. Apply slip or water to the scored areas to create a sticky glue. -
Attach the Handle:
Firmly press the handle onto the mug. I find it helps to support the inside of the mug wall with one hand while pressing from the outside to prevent collapsing the form. -
Blend the Seams:
Use a wooden tool to blend the clay from the handle onto the mug body until the seam disappears. Reinforce the connection by adding a tiny coil of clay around the join if needed. -
Form the Thumb Rest:
Press your thumb firmly onto the top curve of the handle to create a comfortable indentation. This ergonomic detail is the signature of this style.
Crack Prevention
Handle cracking away? Your handle was likely drier than the mug body. Keep both components at the same moisture level (leather hard) when attaching.
Step 3: Finishing and Glazing
-
Rim Refining:
Check the rim of your mug. Use a piece of soft plastic or a chamois cloth to compress and smooth it, ensuring it will be comfortable against the lips. -
Slow Drying:
Cover the mug loosely with plastic to let it dry slowly. This prevents the handle, which dries faster, from cracking away from the body. -
Bisque Fire:
Once bone dry, fire the piece to bisque temperature (usually Cone 04) to prepare it for glazing. -
Wax the Bottom:
Apply wax resist to the bottom of the mug and slightly up the side to prevent glaze from sticking to the kiln shelf. -
Glaze Application:
Dip the mug into a transparent or semi-transparent cream glaze. This type of glaze allows the natural speckles of the clay body to shine through. -
Final Fire:
Fire the mug to maturity (Cone 5 or 6 for most stoneware). Let it cool completely before removing from the kiln.
Level Up: Texture
Before the clay dries, gently press a woven fabric against the exterior for a subtle textile pattern that glaze will break beautifully over.
Enjoy your morning coffee knowing your hands shaped the very vessel warming them
Fingerprint-Textured Pinch Pot Mug
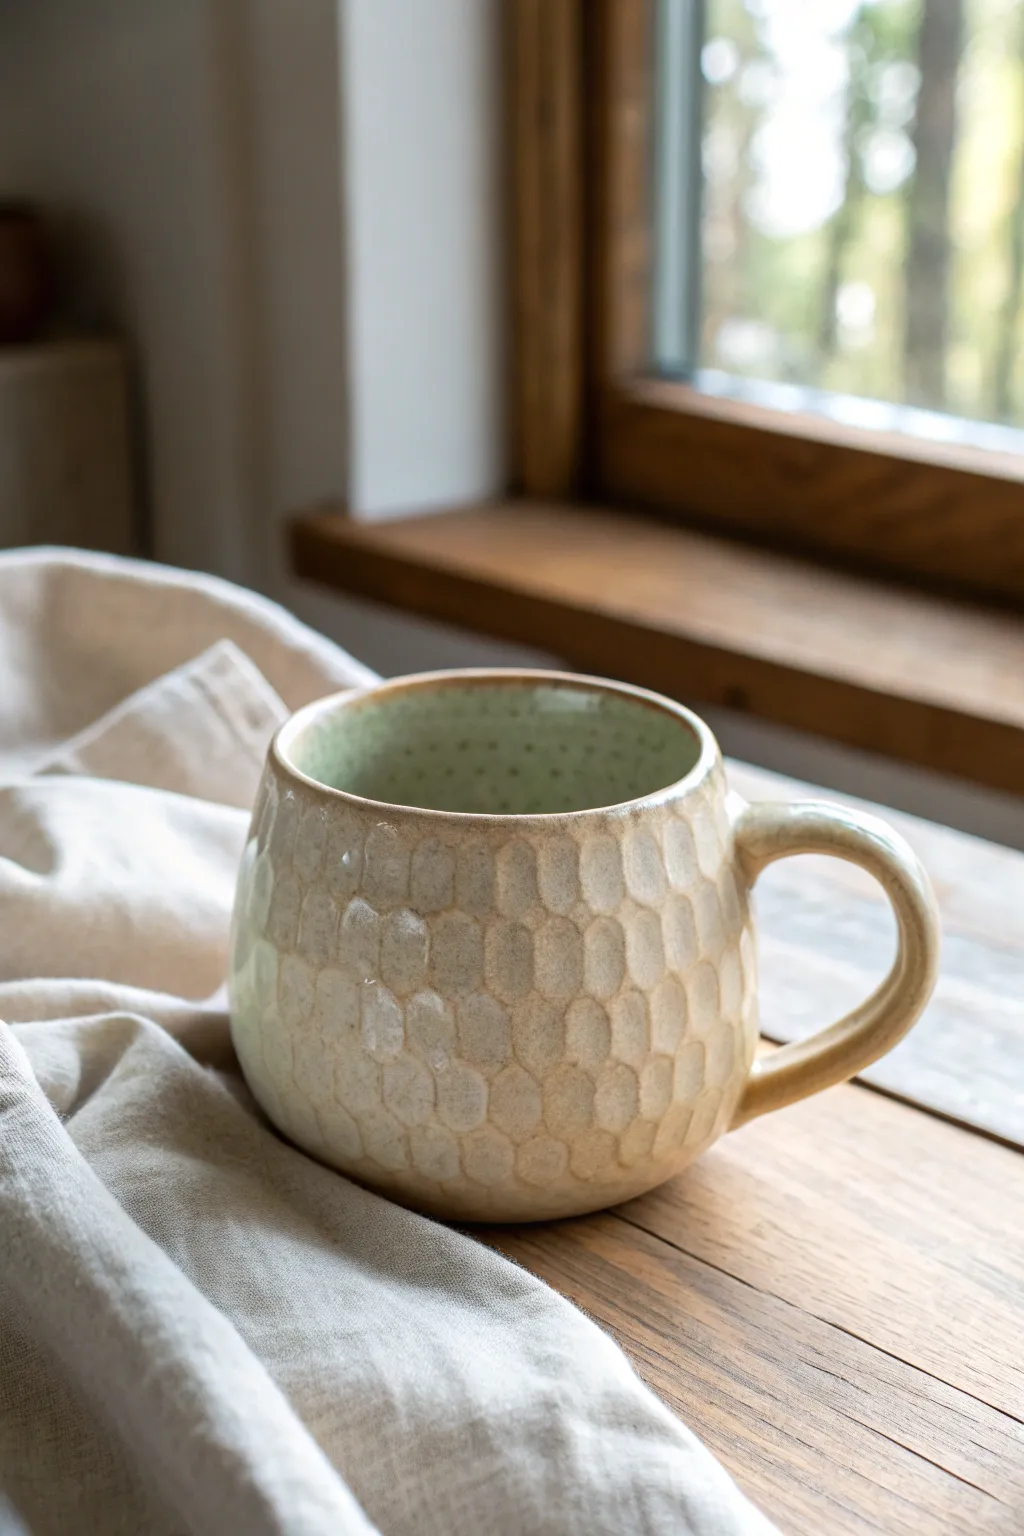
This cozy, nature-inspired mug features a tactile surface that begs to be held, created through a rhythmic pressing technique that mimics a honeycomb pattern. The soft cream glaze breaks beautifully over the texture, revealing the warm clay body beneath while a surprise celadon interior adds a pop of color.
Step-by-Step
Materials
- Stoneware clay (smooth or light speckle)
- Pottery wire cutter
- Serrated metal rib (kidney tool)
- Soft rubber rib
- Sponge
- Water cup
- Needle tool
- Modeling tool (rounded end)
- Fettling knife
- Cream/Oatmeal breaking glaze
- Celadon or light green liner glaze
Step 1: Forming the Base
-
Wedge the clay:
Begin with a baseball-sized ball of stoneware clay. Wedge it thoroughly to remove air bubbles and ensure the particles are aligned, which is crucial for preventing cracks during firing. -
Open the pinch pot:
Hold the clay ball in your non-dominant hand. Press your thumb into the center, stopping about a half-inch from the bottom. Rotate the ball while rhythmically pinching the clay between your thumb and fingers to open the form. -
Thin the walls:
Continue pinching from bottom to top, aiming for an even wall thickness of about 1/4 inch. Keep the shape slightly rounded and bulbous at the bottom, narrowing just slightly at the rim for that cozy, enclosed feel. -
Refine the rim:
Once you have your basic shape, inspect the rim. If it’s uneven, use a needle tool to slice off the top ragged edge, or gently pat it level with a flat wooden paddle. -
Smooth the surface:
Use a soft rubber rib to compress the exterior and interior walls. This removes your initial finger marks and creates a smooth ‘canvas’ for the texture we are about to add.
Uneven Drying?
Handles dry faster than the body. Wrap the handle tightly with a small strip of wet paper towel, then cover the whole mug in plastic to equalize moisture.
Step 2: Creating the Texture
-
Support the wall:
Place your left hand inside the mug to support the wall. This counter-pressure is vital so you don’t collapse the form while pressing from the outside. -
Press the pattern:
Starting at the bottom, use the tip of your thumb or a rounded modeling tool to press an indentation into the clay. I prefer using my thumb for a more organic, handmade look. -
Build the rows:
Work your way around the base in a horizontal row. For the next row up, offset the indentations—press into the ridge between two lower impressions—to create the honeycomb or scale effect. -
Reach the rim:
Continue this pattern up the entire body of the mug, stopping just below the rim to leave a smooth lip for drinking. Adjust pressure if the clay feels too soft; let it firm up slightly if needed. -
Reshape gently:
Often, the pressing process widens the pot. gently cup your hands around the mug to bring the form back to a rounder shape if it has slumped outward.
Step 3: Handle and Finish
-
Pull a handle:
Roll a coil of clay and pull it into a traditional strap handle shape using water and friction. Use your thumb to create a central groove down the handle for comfort. -
Shape the ear:
Bend the handle into a ‘C’ or ear shape and let it set up until it holds its form but is still flexible (soft leather hard). -
Attach the handle:
Score the mug surface and the attachment points of the handle. Apply slip (clay water glue), press the handle firmly onto the mug, and smooth the seams with a modeling tool. -
Dry slowly:
Cover the mug loosely with plastic to dry slowly. This ensures the handle and body shrink at the same rate, preventing separation cracks. -
Bisque fire:
Once bone dry, fire the mug in a kiln to cone 04 (or your clay’s bisque temperature) to prepare it for glazing.
Level Up: Oxide Wash
Before glazing, brush iron oxide wash over the texture and wipe it back with a sponge. This darkens the deep spots for dramatic contrast under the cream glaze.
Step 4: Glazing
-
Wax the foot:
Apply wax resist to the bottom of the mug and slightly up the side to prevent glaze from running onto your kiln shelf. -
Glaze the interior:
Pour a light green or celadon glaze into the mug, swirl it to coat the entire inside, and pour out the excess. Wipe any drips off the rim immediately. -
Glaze the exterior:
Dip the exterior into a cream or oatmeal ‘breaking’ glaze. These glazes are thinner on high points and pool in textures, which will highlight your honeycomb indentations perfectly. -
Clean and fire:
Double-check the foot is clean of glaze. Fire to the maturity temperature of your clay and glaze (likely Cone 5 or 6 for stoneware).
Enjoy your morning coffee in a vessel that feels wonderful in your hands
Super-Smooth Minimal Pinch Pot Mug
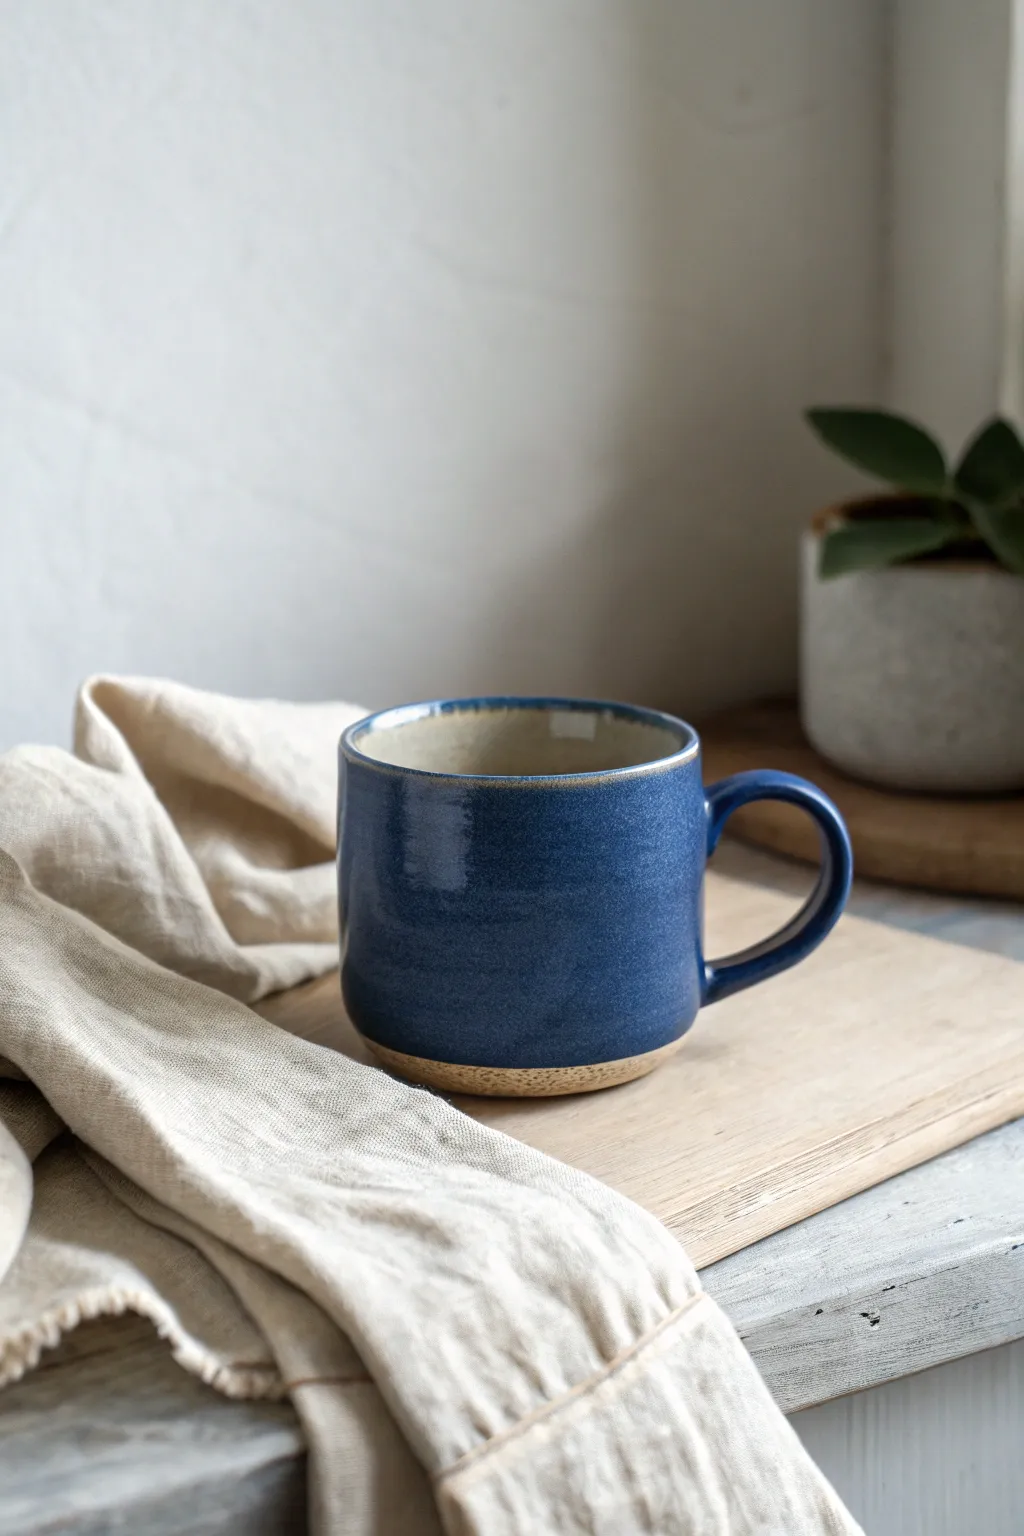
Achieve the look of minimalist wheel-thrown pottery using simple hand-building techniques with this sleek pinch pot mug tutorial. The result is a beautifully smooth vessel featuring a deep cobalt blue glaze contrasting with the natural warmth of unglazed stoneware clay.
Step-by-Step Guide
Materials
- Stoneware clay (smooth body recommended)
- Fettling knife
- Metal rib tool
- Rubber kidney tool (soft)
- Sponge
- Water cup
- Score and slip tool (or needle tool and fork)
- Wooden modeling tool
- Deep cobalt blue dipping glaze
- Wax resist emulsion
- Brush for wax resist
Step 1: Forming the Base
-
Prepare the clay:
Start with a ball of clay roughly the size of a large orange. Wedge it thoroughly to remove air bubbles and ensure a consistent texture, then pat it into a smooth sphere. -
Open the pot:
Hold the clay ball in one hand and push your thumb firmly into the center, stopping about a half-inch from the bottom. This thickness will form the foot later. -
Pinch the walls:
Begin rotating the ball while gently pinching evenly between your thumb and fingers. Work from the bottom upward, thinning the walls gradually. -
Establish the cylinder:
Aim for straight, vertical walls rather than a bowl shape. As you pinch, pull the clay slightly upward to build height, keeping the rim thickness consistent. -
Refine the surface:
Once the basic shape is formed, use a metal rib on the exterior while supporting the interior with your hand. Scrape away the finger marks to create that super-smooth, almost wheel-thrown appearance. -
Smoothing the interior:
Use a soft rubber kidney or a slightly damp sponge to compress and smooth the inside walls and floor. I find this step crucial for making the mug comfortable to clean later. -
Create the rim:
Gently compress the rim with a piece of chamois or your wet fingers to ensure it is rounded and pleasant to drink from.
Smooth, Don’t Smear
When smoothing pinch pots, let the clay firm up to leather-hard first. Smoothing very wet clay just moves it around; firmer clay actually burnishes.
Step 2: Handle and Finishing
-
Pull a handle:
Take a small nugget of clay and roll it into a thick coil. With wet hands, gently stroke the clay downward to elongate and taper it into a traditional handle shape. -
Shape the C-curve:
Bend the pulled clay into a ‘C’ or ear shape and let it stiffen slightly on a board until it can hold its own weight without sagging. -
Score and slip:
Hold the handle up to the mug body to check the placement. Mark the attachment points, then deeply score (scratch) those areas on both the mug and the handle tips. Apply slip generously. -
Attach the handle:
Press the handle firmly onto the mug. Use a wooden tool to blend the seams seamlessly so it looks like the handle grew out of the mug. -
Refine the connection:
Wipe away excess slip with a damp sponge and do a final pass with the rubber rib to ensure the transition is flawless. -
Define the foot:
Let the mug dry to leather hard. Using a trimming tool or your thumb, gently clean up the bottom edge to create a slight undercut or clearly defined straight bottom edge. -
Bisque fire:
Allow the mug to bone dry completely before loading it into the kiln for a bisque firing.
Cracks at the Handle?
Usually caused by uneven drying. Wrap the handle (but not the body) in plastic while drying to slow it down so it shrinks at the same rate as the mug.
Step 3: Glazing
-
Wax the exterior bottom:
Paint a band of wax resist around the bottom half-inch of the exterior and across the entire underside foot. This creates the bare clay reveal shown in the image. -
Wipe the interior:
Before glazing, I like to wipe the mug with a damp sponge to remove any dust that might prevent the glaze from adhering properly. -
Pour the interior:
Pour a glossy clear or white liner glaze inside the mug, roll it around to coat, and pour out the excess. Let this dry to the touch. -
Dip the exterior:
Using glazing tongs or a steady hand, dip the mug into a deep cobalt blue glaze. Submerge it fully up to the rim, holding for 3 seconds for an even coat. -
Clean the foot:
The wax resist should repel the glaze, but use a sponge to wipe away any stubborn droplets on the waxed bottom section. -
Glaze fire:
Fire the mug to the temperature recommended for your specific clay and glaze combination.
Enjoy your morning coffee in a mug that perfectly balances handmade charm with modern simplicity
Stamped Pattern Band Pinch Pot Mug
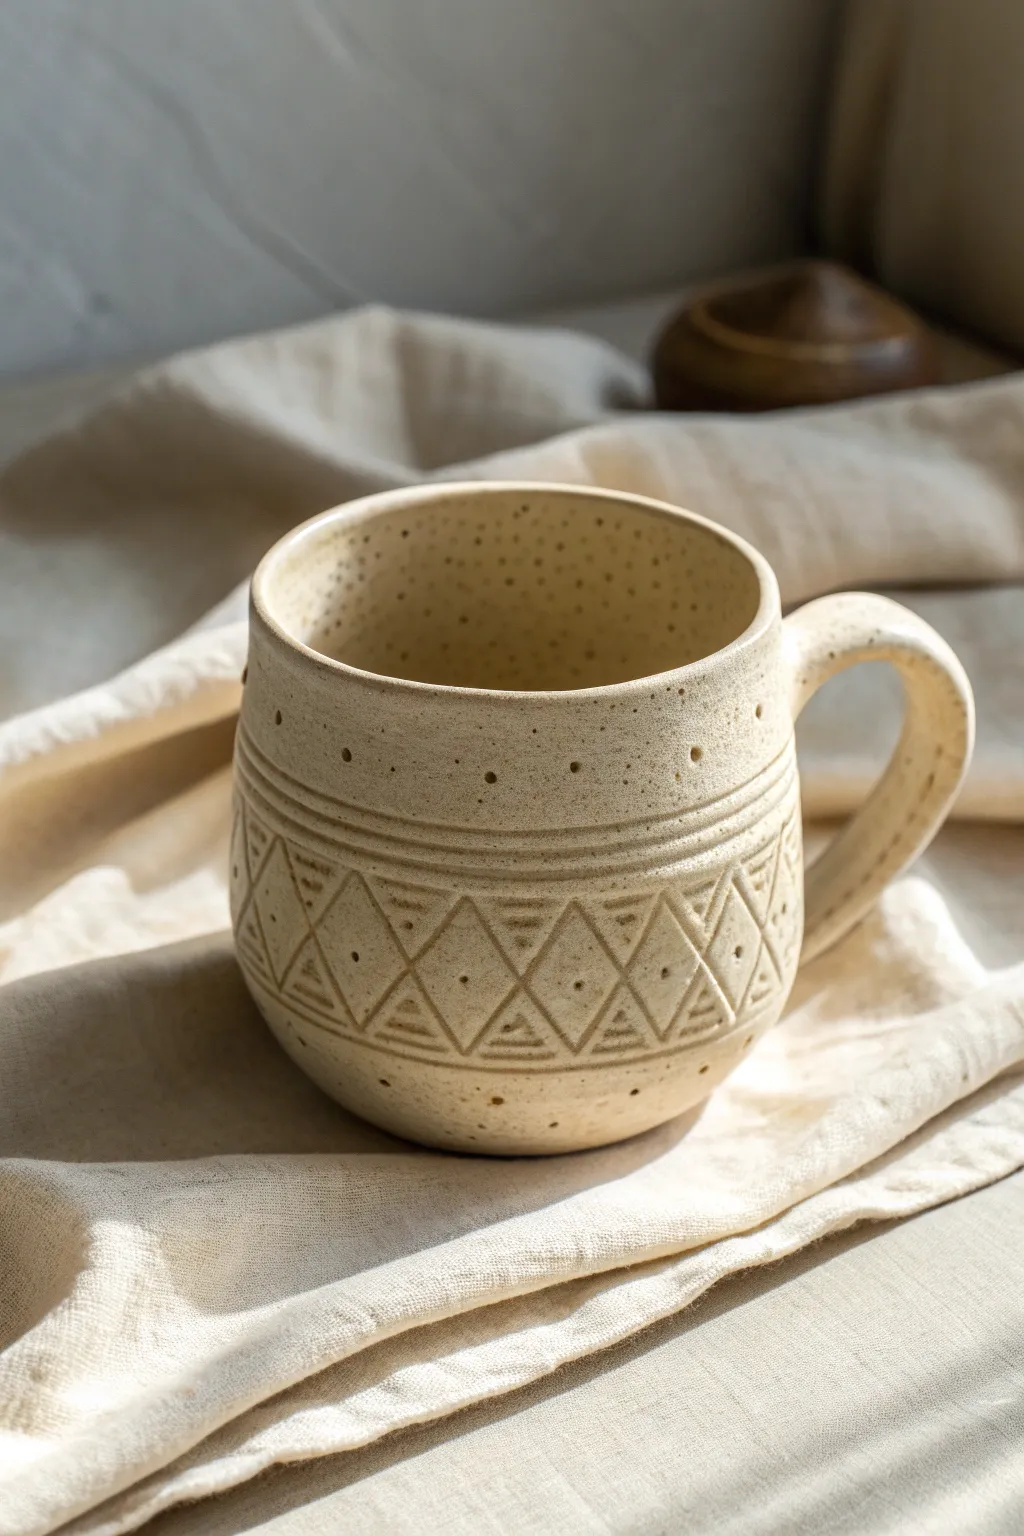
This rustic, hand-built mug combines the organic feel of a pinch pot with the precision of repeating geometric patterns. The creamy clay body features subtle speckling and a prominent textured band of diamonds and triangles.
Step-by-Step
Materials
- Speckled stoneware clay (light cream or buff firing)
- Pottery wheel (optional, but assumed pinch pot method per title)
- Fettling knife
- Serrated rib tool
- Rubber rib tool
- Needle tool
- Geometric stamp tool (triangle/diamond) or carving tools
- Small drill bit or round tool for dot accents
- Slip (clay slurry)
- Sponge
- Clear matte glaze
Step 1: Forming the Base
-
Prepare the clay:
Start with a ball of speckled clay roughly the size of a large orange. Wedge it well to remove air bubbles, then pat it into a round sphere in your hands. -
Open the pot:
Hold the clay sphere in your non-dominant hand. Press your thumb into the center, stopping about a half-inch from the bottom. This thickness is crucial for a sturdy base. -
Pinch the walls:
Begin pinching the clay between your thumb and fingers, rotating the ball as you go. Work from the bottom up, aiming for an even thickness of about 1/4 inch throughout the walls. -
Shape the curve:
As you pinch upward, encourage the belly of the mug to curve outward slightly, then gently bring the rim back in for that classic rounded shape. Smooth the interior with a damp sponge. -
Refine the surface:
Once the general shape is established, use a serrated rib to scrape the exterior walls, evening out lumps. Follow this with a rubber rib to compress the clay and create a smooth canvas for your pattern.
Stamp Clarity
Let the clay stiffen to ‘leather hard’ before stamping. If the clay is too soft, the mug walls will warp when you press down on your tools.
Step 2: Creating the Band and Pattern
-
Define the band area:
Using a needle tool, lightly score two horizontal parallel lines around the middle-to-lower section of the mug. These will serve as the boundaries for your geometric pattern. -
Carve the border lines:
Deepen your initial score lines to create distinct ridges. I find that running a rounded modeling tool over these grooves makes them look more intentional and finished. -
Stamp the zig-zag:
Using a triangular stamp or a sharp carving tool, press a repeating zig-zag line between your borders. This creates the foundational row of triangles. -
Add interior details:
Inside each large triangle created by the zig-zag, carve smaller nested triangles. This nesting effect adds depth and complexity to the band. -
Puntuate with dots:
Use a small, round tool (like the end of a paintbrush or a specialized dotting tool) to press a single dot into the center of each diamond shape formed by the triangles. -
Add rim and base accents:
To tie the design together, press a row of small, evenly spaced dots near the rim of the mug and another row near the very bottom curve.
Inlaid Color
After bisque firing, brush a dark underglaze into the carved lines and wipe away the excess with a damp sponge to make the geometric pattern pop.
Step 3: Handle and Finish
-
Pull a handle:
Take a separate small lump of clay and roll it into a coil. Flatten it slightly and pull it with wet hands to create a tapered handle strip. -
Attach the handle:
Score the attachment points on both the mug and the handle ends. Apply slip generously. Press the handle firmly onto the mug, blending the clay seams until invisible. -
Create the thumb rest:
Curve the handle into a comfortable ear shape. Just at the top curve, flatten the clay slightly to create a natural resting spot for a thumb. -
Dry slowly:
Cover the mug loosely with plastic to ensure the handle and body dry at the same rate. This prevents cracking at the attachment points. -
Bisque fire:
Once bone dry, fire the mug to cone 04 (or your clay’s specific bisque temperature). -
Glaze application:
Apply a clear matte glaze. The clear glaze allows the natural speckles of the clay body to show through, while the matte finish emphasizes the tactile quality of the carvings. -
Final firing:
Fire the mug to maturity (usually cone 5 or 6 for stoneware). Check that the glaze has settled into the carved lines without obscuring them.
Enjoy your morning coffee in this beautifully textured, handmade vessel
Carved Geometric Pinch Pot Mug
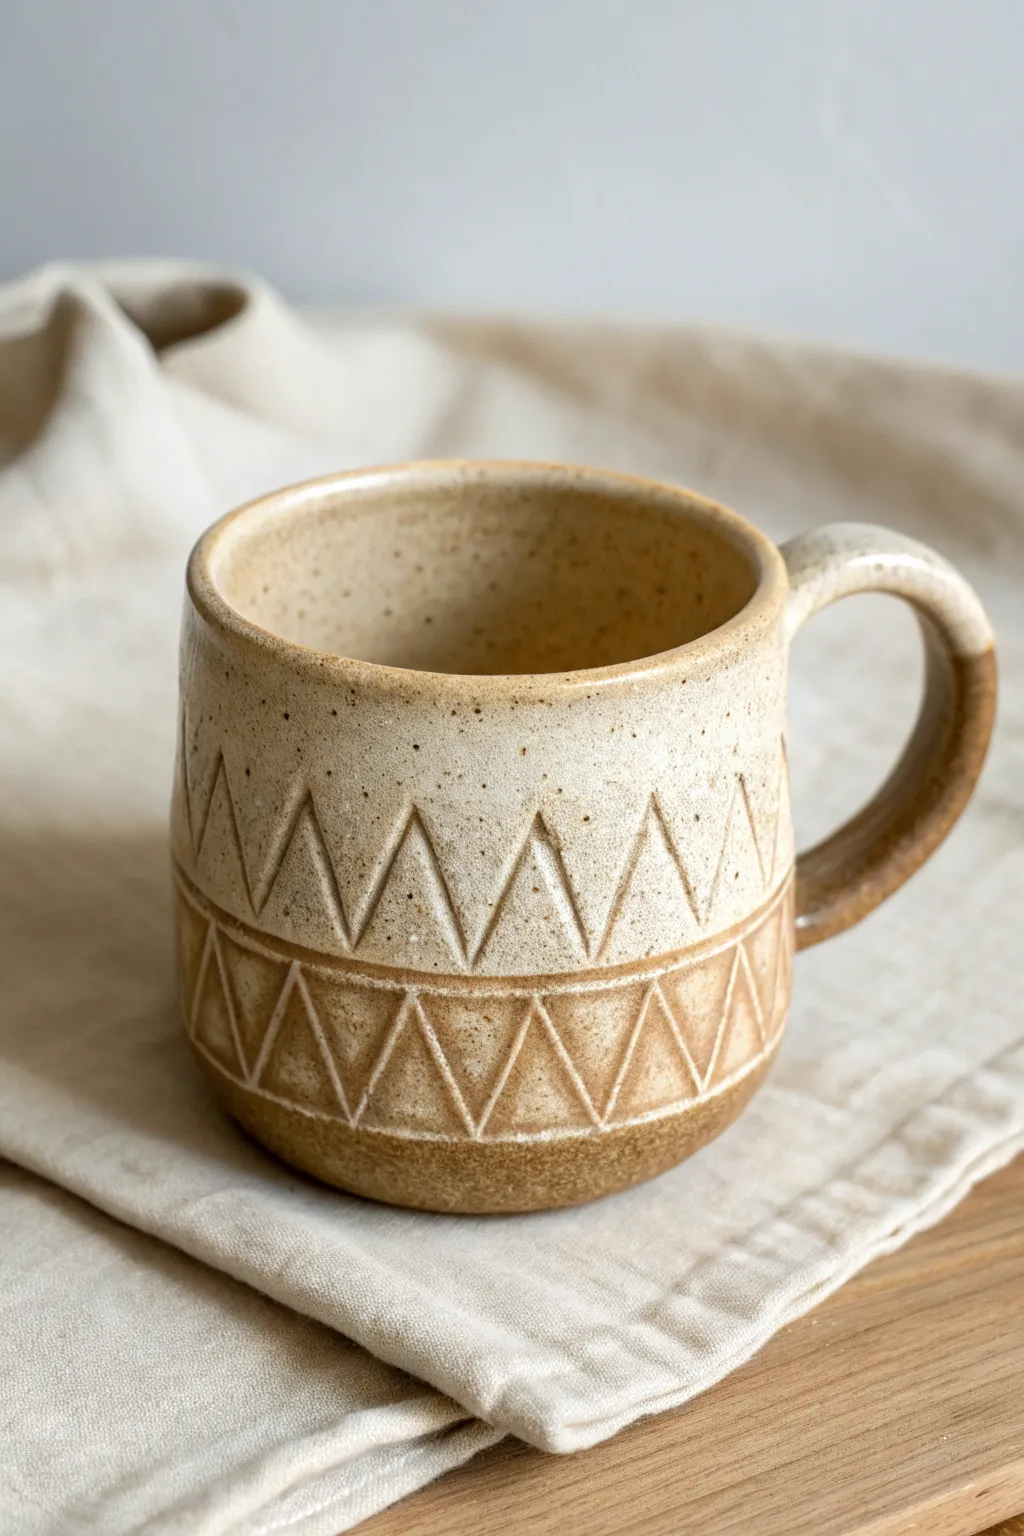
This earthy, handcrafted mug features a delightful contrast between raw clay textures and smooth glazes. The repeating geometric triangle pattern is carved directly into the clay, creating a tactile surface that feels wonderful in your hands.
How-To Guide
Materials
- Stoneware clay (speckled or buff)
- Pottery wire cutter
- Rib tool (metal or rubber)
- Needle tool
- Loop carving tool (small V-tip or U-tip)
- Sponge
- Water cup
- Scoring tool or serrated rib
- Soft paintbrush
- White or cream glaze (food safe)
- Clear glaze (optional)
Step 1: Forming the Pinch Pot Base
-
Prepare your clay:
Cut a softball-sized piece of stoneware clay. Wedge it thoroughly to remove air bubbles, then pat it into a smooth, round ball. -
Open the form:
Hold the ball in one hand and press your thumb into the center, stopping about a half-inch from the bottom. This establishes your floor thickness. -
Pinch the walls:
Rotate the ball while gently pinching between your thumb (inside) and fingers (outside). Work your way from the bottom up to the rim in a spiral motion, aiming for even wall thickness. -
Refine the shape:
Once the basic cup shape is formed, place it on a flat surface. Use a rib tool to smooth the interior and compress the walls. On the exterior, use the rib to scrape away lumpy finger marks and create a smooth, cylindrical profile.
Keeping handles straight
Look at the mug from directly above when attaching the handle. This perspective makes it much easier to ensure the handle loop is perfectly vertical and aligned with the mug body.
Step 2: Adding the Handle
-
Pull a handle:
Take a separate small lump of clay and roll it into a thick carrot shape. Wet your hands and ‘pull’ the clay downwards to elongate it into a strap shape that fits the mug’s scale. -
Shape the curve:
Curve the clay strip into a ‘C’ shape or ear shape. Let it stiffen up slightly on a board until it can hold its own weight without drooping, usually about 15-20 minutes. -
Attach the handle:
Score the mug surface and the handle ends where they will meet. Apply slip (watery clay) to the scored areas. Press the handle firmly onto the mug. -
Smooth the connection:
Use a small coil of soft clay to reinforce the joints if needed, then smooth the clay around the attachment points with your thumb or a tool so it looks seamless.
Step 3: Carving the Design
-
Leather hard stage:
Allow the mug to dry to ‘leather hard’—cool to the touch but firm enough to carve without deforming. I prefer to wait until it holds its shape effortlessly when handled. -
Plan the geometry:
Lightly sketch two horizontal parallel lines around the mug with a needle tool. One line separates the top plain section from the pattern; the other runs through the middle of the pattern area. -
Mark the triangles:
Using your needle tool, lightly scratch a zigzag pattern between your guidelines to map out the rows of triangles. Aim for a consistent size, but remember slight variations add handmade character. -
Carve the lines:
Take your small loop tool or V-tip carving tool. Carve over your sketched lines with confident strokes. Remove ribbons of clay to create deep, definitive grooves for the geometric pattern. -
Clean up burrs:
Once carved, use a slightly damp sponge or your fingertip to gently soften any sharp crumbs or clay burrs created by the carving tool.
Cracks while carving?
If the clay crumbles or cracks while carving, it is too dry. Wrap the mug in a damp paper towel and plastic bag for a few hours to rehydrate the surface slightly before trying again.
Step 4: Glazing and Finishing
-
Bisque fire:
Fire the mug in a kiln to bisque temperature (usually cone 04 or 06). This makes the pottery porous and ready for glaze. -
Wax resist (optional):
If you want the carved lines to remain raw like the bottom section, carefully apply wax resist into the grooves, or plan to wipe the glaze back. -
Apply glaze:
Dip or brush a cream or speckled white glaze onto the top two-thirds of the mug. Ensure the glaze settles into the upper carved texture but leave the bottom-most section and foot ring unglazed for that raw clay contrast. -
Wipe back:
If glaze got onto the lower raw section, wipe it clean with a damp sponge. For the carved area, you can gently wipe the surface to reveal the high points if you want more definition. -
Glaze fire:
Fire the mug again to the maturation temperature of your clay and glaze (often cone 6 for stoneware). This final firing melts the glaze and vitrifies the clay.
Enjoy your morning coffee in a vessel that feels as good to hold as it looks
Leaf-Imprint Wrap Pinch Pot Mug
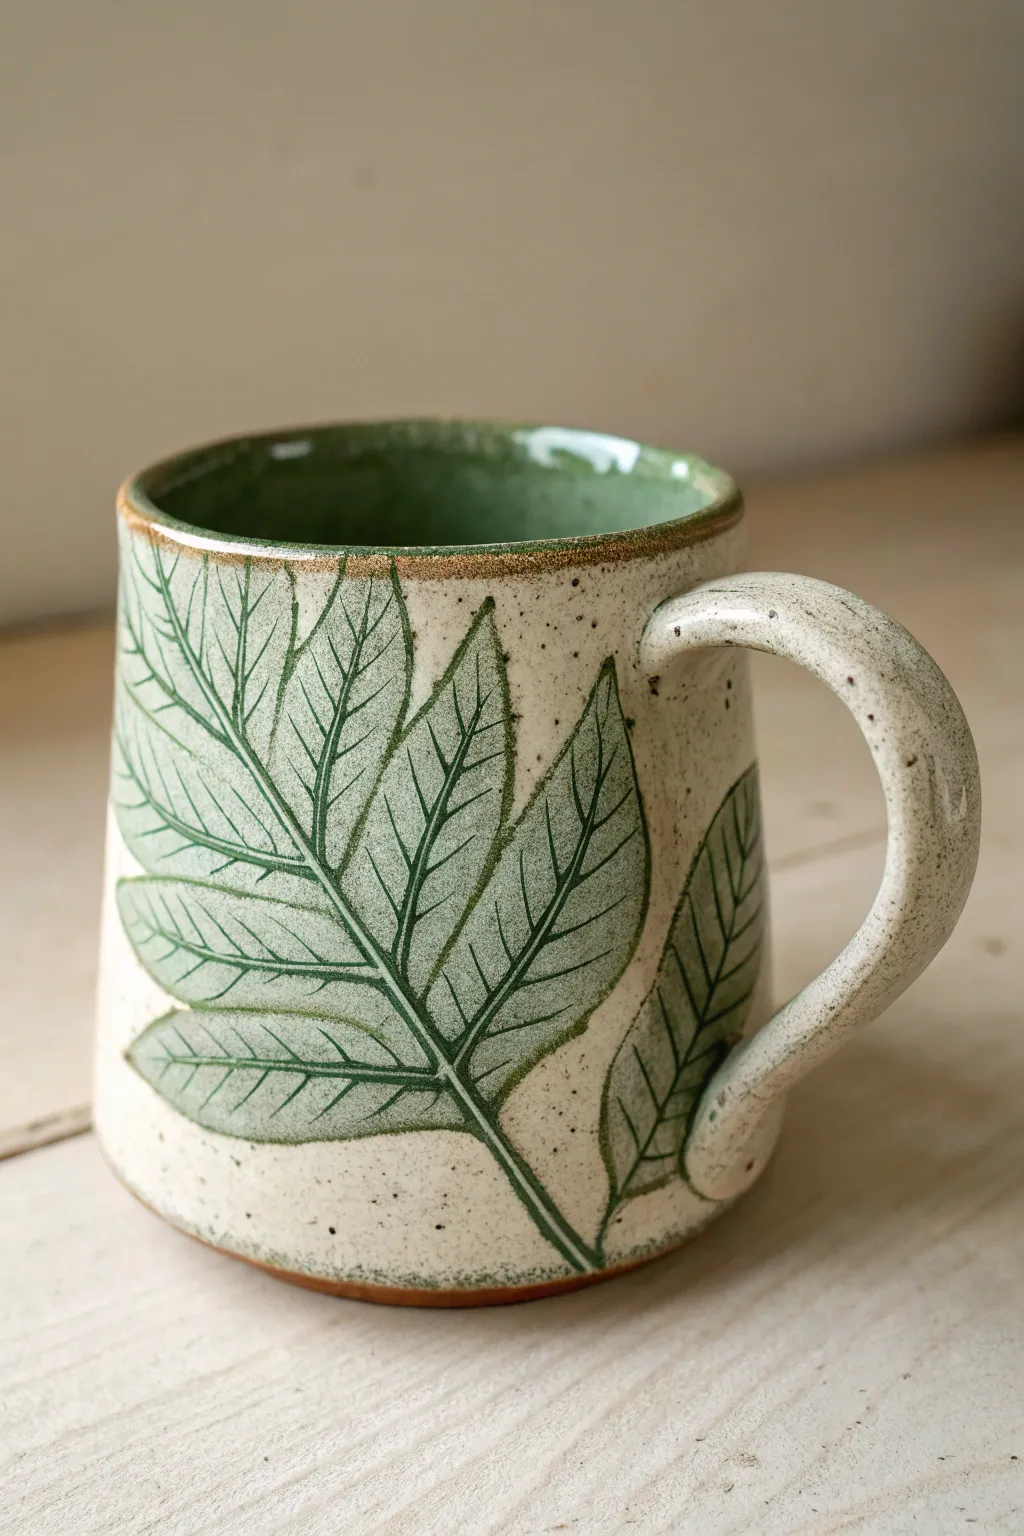
This rustic, nature-inspired mug features a speckled clay body with intricate botanical leaves carved through a layer of vibrant green underglaze. The result is a beautifully tactile piece that reveals the raw clay underneath, creating a striking contrast perfect for your morning tea.
Step-by-Step Guide
Materials
- Speckled Stoneware Clay (e.g., Speckled Buff)
- Green Underglaze (Fern or Forest Green)
- Clear Glaze (glossy)
- Pottery wheel (optional, can be hand-built)
- Rib tool
- Pin tool or needle tool
- Sgraffito loop tool (small)
- Sponge
- Fettling knife
- Kiln
Step 1: Forming the Mug Body
-
Prepare the Clay:
Wedge about 1 lb of speckled stoneware clay thoroughly to remove air bubbles. This specific clay gives the final mug that lovely peppered appearance. -
Create the Cylinder:
If using a wheel, center the clay and pull a cylinder about 4.5 inches tall. If hand-building (per the article theme), start with a pinch pot base and add coils to build up the walls, smoothing them completely with a rib. -
Shape the Walls:
Create a slight taper toward the top rim. The form should be sturdy but not heavy; aim for walls about ¼ inch thick for a comfortable weight. -
Refine the Surface:
Use a flexible rib tool to smooth the exterior perfectly. Any bumps here will disrupt your leaf drawing later, so take your time to get a clean ‘canvas’.
Smudged Lines?
If you accidentally smear green underglaze onto the raw clay areas while carving, wait for it to dry completely and gently scrape it off with an X-Acto knife or needle tool.
Step 2: Handle & Leather Hard Stage
-
Pull the Handle:
Pull a strap of clay for the handle. Allow it to curve into an ear shape that fits 2-3 fingers comfortably. Let it stiffen slightly on a ware board. -
Attach the Handle:
Once the mug body is leather hard (firm enough to hold its shape but still carveable), score and slip the contact points and attach the handle. Smooth the seams with a modeling tool or your finger. -
Clean the Rim:
Use a damp sponge to round off the rim of the mug. A sharp rim is unpleasant to drink from, so make sure it’s soft and curved.
Step 3: Applying Design & Colors
-
Apply Underglaze:
Paint 2-3 even coats of green underglaze onto the main body where you want the leaves. You can paint a solid block of color or roughly paint leaf shapes. Also, coat the entire interior of the mug with the same green. -
Sketch the Outline:
Once the underglaze is dry to the touch, lightly scratch the outline of large, pinnate leaves using a needle tool. Don’t dig deep yet; just map out where the stems and leaflets will flow. -
Carve the Negative Space:
This is the sgraffito technique. Using a small loop tool, gently carve away the clay *outside* and *between* the leaf veins. You want to expose the speckled raw clay, leaving the green underglaze raised as the leaf surface. -
Detail the Veins:
Change to a fine needle tool or a very small sharp caving tool. Etch thin lines through the green leaves to create the central veins and branching details. I find that varying the pressure here adds nice organic depth. -
Clean Up Burrs:
Carving creates little crumbs of clay. Don’t brush them off while wet or you’ll smear the green. Wait until bone dry, then use a stiff brush to whisk them away.
Add Texture
Before applying underglaze, press a real leaf into the wet clay to get actual texture. Paint the liquid glaze into the depression, then wipe the surface back to reveal the veins.
Step 4: Firing & Glazing
-
Bisque Fire:
Load the bone-dry mug into the kiln for a bisque fire (usually Cone 04). This hardens the clay and sets the underglaze design. -
Apply Clear Glaze:
Dip the entire mug into a clear glossy glaze or brush it on carefully. The clear glaze will seal the raw clay sections and make the green underglaze pop vibrantly. -
Wipe the Foot:
Use a sponge to wipe all glaze off the very button of the mug so it doesn’t fuse to the kiln shelf. -
Glaze Fire:
Fire the mug to maturity (typically Cone 5 or 6 for stoneware). The heat will bring out the iron speckles in the clay body.
Once cooled, your custom botanical mug is ready for a warm beverage
Applied Sprig Medallion Pinch Pot Mug
Embrace the imperfect beauty of hand-building with this textured pinch pot mug. Its earthy cream glaze and distinctive, wavy surface relief give it a cozy, tactile appeal perfect for your morning coffee.
How-To Guide
Materials
- Stoneware clay (speckled or buff)
- Pottery textural rib or serrated scraper
- Wooden modeling tool
- Needle tool
- Score and slip tool (or fork)
- Sponge
- Water cup
- Rolling pin (optional for handle)
- Cream or white matte glaze
Step 1: Forming the Base
-
Prepare the Clay:
Start with a ball of clay roughly the size of a large orange. Wedge it well to remove air bubbles, then pat it into a smooth, round sphere in your hands. -
Open the Pot:
Hold the sphere in one hand and press your thumb into the center, stopping about a half-inch from the bottom. This thickness is crucial for a sturdy base. -
Pinch the Walls:
Begin pinching the clay between your thumb and fingers, rotating the ball as you go. Work from the bottom up to thin the walls evenly, aiming for a consistent 1/4 inch thickness. -
Shape the Cylinder:
As you pinch upwards, gently collar the rim in slightly to counteract the natural tendency for pinch pots to flare out. Aim for a taller, more vertical cylinder shape rather than a bowl. -
Flatten the Bottom:
Tap the pot gently on your work surface to create a flat, stable foot. I like to press down on the interior floor with a damp sponge to compress the clay and prevent cracking.
Step 2: Applying Texture
-
Create the Texture:
While the clay is still soft but supportive, take a wooden tool or a small textured paddle. Press or drag it vertically up the sides of the mug to create irregular, wavy ridges. -
Refine the Relief:
For the specific look in the photo, you can add small coils of clay to the surface and smudge them in, or carve away negative space to make the ‘ridges’ pop. Keep the texture organic and flowing. -
Smooth the Rim:
Using a chamois or a damp sponge, carefully smooth the rim of the mug. A comfortable drinking lip is essential, so ensure there are no sharp texture marks here.
Textural Depth Tip
Wait until the clay is leather-hard before carving or pressing deepest textures. Soft clay gets muddy; leather-hard clay holds crisp detail.
Step 3: Adding the Handle
-
Pull or Roll a Handle:
Pull a short strap of clay for the handle, or roll a coil and flatten it slightly. Curve it into a ‘C’ or ear shape that complements the height of your mug. -
Dry Fit:
Hold the handle up to the mug to check proportions. The top attachment should eventually sit near the rim, and the bottom attachment near the lower third of the body. -
Score and Slip:
Score (scratch) the attachment points on both the mug and the handle aggressively. Apply a generous dab of clay slip to both scored areas. -
Attach Firmly:
Press the handle onto the mug with firm pressure. Wiggle it slightly to lock the clay particles together. Use a wooden tool to blend the seams until they disappear completely. -
Refine the Handle Shape:
Run a damp finger along the inside and outside of the handle to smooth it. Ensure the curve is comfortable for gripping and that the handle hangs straight.
Make it a Set
Create a matching saucer using a simple pinch method, adding the same wavy texture to the rim for a cohesive breakfast set.
Step 4: Finishing and Glazing
-
Slow Drying:
Tent the mug loosely with plastic to let it dry slowly. This ensures the handle and body dry at the same rate, preventing cracks at the seams. -
Bisque Fire:
Once bone dry, fire the mug in a kiln to the bisque temperature appropriate for your clay body (usually cone 04 or 06). -
Wax the Foot:
Apply wax resist to the bottom of the mug and slightly up the side (about 1/4 inch) to leave an exposed raw clay band, just like in the image. -
Glaze Application:
Dip the mug into a creamy, matte white or off-white glaze. The glaze should be thick enough to be opaque but thin enough to break over the textured ridges you created. -
Final Fire:
Glaze fire the piece to maturity (often cone 5 or 6 for stoneware). The heat will melt the glaze, highlighting the speckles in the clay and the beautiful surface relief.
Enjoy the warmth of your handmade creation with your favorite hot beverage
Slip-Trailed Confetti Pinch Pot Mug
Embrace the rustic charm of handmade ceramics with this cozy, rounded pinch pot mug. Featuring a warm, speckled cream glaze that contrasts beautifully with natural exposed clay at the base and handle, this piece brings an earthy elegance to your morning coffee ritual.
Step-by-Step Guide
Materials
- Stoneware clay (speckled or buff)
- Pottery wheel (optional, but instructions focus on hand-building)
- Rib tool (kidney)
- Needle tool
- Scoring tool or serrated rib
- Slip (clay slurry)
- Sponge
- Cutting wire
- Wooden modeling tool
- Glossy cream or white glaze (semi-opaque)
- Wax resist (optional)
- Kiln
Step 1: Forming the Pinch Pot Body
-
Prepare the Clay:
Start with a ball of clay roughly the size of a large orange. Wedge it thoroughly to remove air bubbles and ensure an even consistency. -
Open the Form:
Hold the clay ball in one hand and push your thumb into the center, stopping about a half-inch from the bottom to create a thick floor. -
Pinch the Walls:
Gently pinch the clay between your thumb and fingers, rotating the ball as you go. Work from the bottom up to thin the walls evenly, aiming for a consistent thickness of about 1/4 inch. -
Shape the Belly:
Preserve a rounded, bulbous shape for the bottom half of the mug. I like to cup the outside with my palm while smoothing the inside to encourage that lovely curve. -
Refine the Rim:
Gently taper the rim slightly inward or keep it straight, smoothing it with a slightly damp sponge or piece of chamois so it’s comfortable for drinking. -
Smooth the Surface:
Use a flexible rib tool on both the exterior and interior to compress the clay and remove deep finger marks, leaving a subtle texture.
Cracked Handle?
If the handle cracks at the seam during drying, create a ‘humidity tent’ with plastic. Score the crack deeper, add fresh slip, and dry extremely slowly.
Step 2: Adding the Handle
-
Pull or Roll a Coil:
Create a thick coil for the handle. You can roll it on a table or pull it with wet hands for a more tapered, traditional look. -
Shape the Arch:
Bend the coil into a ‘C’ shape or ear shape that comfortably fits two or three fingers. Let it stiffen slightly on a board until it holds its curve. -
Score and Slip:
Score (scratch) the attachment points on both the mug body and the handle ends. Apply a generous dab of slip to the scored areas. -
Attach the Handle:
Press the handle firmly onto the mug body. Use a wooden modeling tool to blend the clay at the seams until the connection is seamless and strong. -
Dry Slowly:
Cover the mug loosely with plastic to let it dry slowly to the leather-hard stage, then uncover to bone dry. This prevents the handle from cracking away from the body.
Step 3: Glazing and Firing
-
Bisque Fire:
Load the bone-dry mug into the kiln for a bisque firing (usually Cone 06 or 04) to harden the clay for glazing. -
Wax Resist:
Apply wax resist to the bottom inch of the mug’s exterior and the entire handle. This ensures the raw clay remains exposed for that beautiful two-tone effect. -
Wipe the Bottom:
Even with wax, double-check the foot of the mug is clean. Use a damp sponge to wipe away any stray dust or debris. -
Dip Glaze:
Holding the mug by the waxed handle or using glazing tongs, dip the mug into a bucket of creamy white glaze. Hold for 3 seconds and lift. -
Clean Up:
As the glaze drys, the wax will resist it, but satisfy yourself by wiping any glaze beads off the wax with a sponge for a crisp line. -
Glaze Fire:
Fire the mug again to the maturation temperature of your specific clay and glaze (typically Cone 5 or 6 for stoneware). -
Sand the Bottom:
Once cool, use fine-grit sandpaper to briefly smooth the unglazed raw clay on the bottom so it won’t scratch your table.
Speckle Magic
Use a clay body containing iron pyrite or manganese specks. As the glaze melts, these minerals bleed through, creating natural ‘confetti’ spots.
Enjoy the warmth of your new favorite mug, perfect for slow mornings and hot tea
Two-Tone Dipped Glaze Pinch Pot Mug

Embrace the rustic charm of handmade ceramics with this speckled, two-tone pinch pot mug. The half-dipped glazing technique creates a beautiful contrast against the raw, earthy clay body for a finish that feels both contemporary and timeless.
Step-by-Step Tutorial
Materials
- Speckled buff stoneware clay
- Wire cutter
- Needle tool
- Serrated rib or scoring tool
- Sponge
- Water cup
- Wooden modeling tool
- Matte white glaze
- Kiln (bisque and glaze firing compatible)
- Small paintbrush (optional)
Step 1: Forming the Cup Body
-
Prepare the clay:
Cut a piece of speckled buff clay about the size of a large orange. Wedge it thoroughly to remove air bubbles and ensure a consistent texture throughout. -
Open the pinch pot:
Roll the clay into a smooth ball. Hold it in your non-dominant hand and press your thumb into the center, stopping about a half-inch from the bottom. -
Pinch the walls:
Gently pinch the clay between your thumb and fingers, rotating the ball as you go. Work from the bottom up to thin the walls evenly to about a quarter-inch thickness. -
Shape the cylinder:
Unlike a bowl, we want vertical height. Gently coax the clay upwards rather than outwards as you pinch. I like to paddle the sides gently with a wooden spatula to flatten and straighten them. -
Refine the rim:
Use a damp sponge or a chamois cloth to compress and smooth the rim. Ensure it feels comfortable for drinking; a slightly rounded edge is best. -
Flatten the bottom:
Tap the pot gently on your work surface to create a flat, stable base. Check that it sits level without wobbling.
Wobbly Rim Woes?
If your rim gets uneven while pinching, use a needle tool to trim the top edge level while the clay is leather hard, then re-smooth with a sponge.
Step 2: Adding the Handle
-
Pull a handle:
Take a small carrot-shaped piece of clay. With wet hands, stroke the clay downwards to elongate it into a strap shape that matches your mug’s proportions. -
Curve and dry:
Bend the pulled handle into a ‘C’ or ear shape and lay it on its side. Let it stiffen slightly until it can hold its own shape without flopping. -
Score the attachment points:
Hold the handle up to the mug to mark where it will attach. Use a serrated rib or needle tool to scratch up the surface at these spots on both the mug and the handle ends. -
Slip and attach:
Apply a dab of vinegar or slip to the scored areas. Press the handle firmly onto the mug. -
Blend the seams:
Use a wooden tool to blend the clay from the handle onto the mug body, ensuring a seamless connection. Reinforce the joint with a tiny coil of clay if needed. -
Slow drying:
Cover the mug loosely with plastic to let it dry slowly. This prevents the handle from drying faster than the body, which can cause cracking.
Step 3: Creating the Two-Tone Finish
-
Bisque fire:
Once the mug is bone dry, fire it in the kiln to bisque temperature (usually Cone 04 or 06). This prepares it for glazing. -
Clean the bisque:
Why wipe it down? To remove dust that resists glaze. Use a clean, damp sponge to wipe the entire mug inside and out. -
Wax the exterior base:
For this specific look, we are leaving the bottom half bare. Apply wax resist to the bottom of the mug and up the sides to where you want the glaze line to stop. -
Glaze the interior:
Pour matte white glaze into the mug, swirl it around to coat the entire inside, and pour the excess back out. Wipe any drips off the rim immediately. -
Dip the exterior top:
Hold the mug by the foot (or using tongs) and dip the top half into the matte white glaze. Aim for an overlap with the interior rim glaze for full coverage. -
Glaze the handle:
If the dip didn’t cover the handle fully, carefully pour glaze over it or use a brush to touch up. The example shows the handle fully glazed, stopping right at the lower attachment point. -
Clean up the line:
If you didn’t use wax resist, or if glaze dripped past your line, use a damp sponge to wipe the glaze off the bottom section. You want a clear transition between the white glaze and the raw clay. -
Final smooth:
Gently rub any powdery spots on the dry glaze with a fingertip to smooth them out before firing. -
Glaze fire:
Fire the mug to the maturity temperature of your clay and glaze (often Cone 5 or 6 for stoneware). This vitrifies the clay and melts the glaze into that lovely speckled white finish.
Pro Tip: Speckle It
If you don’t have speckled clay, mix 1% granular ilmenite or manganese into plain buff clay to get those lovely dark flecks that show through the glaze.
Enjoy your morning coffee in a vessel that feels uniquely handmade and earthy
Sgraffito Illustration Pinch Pot Mug
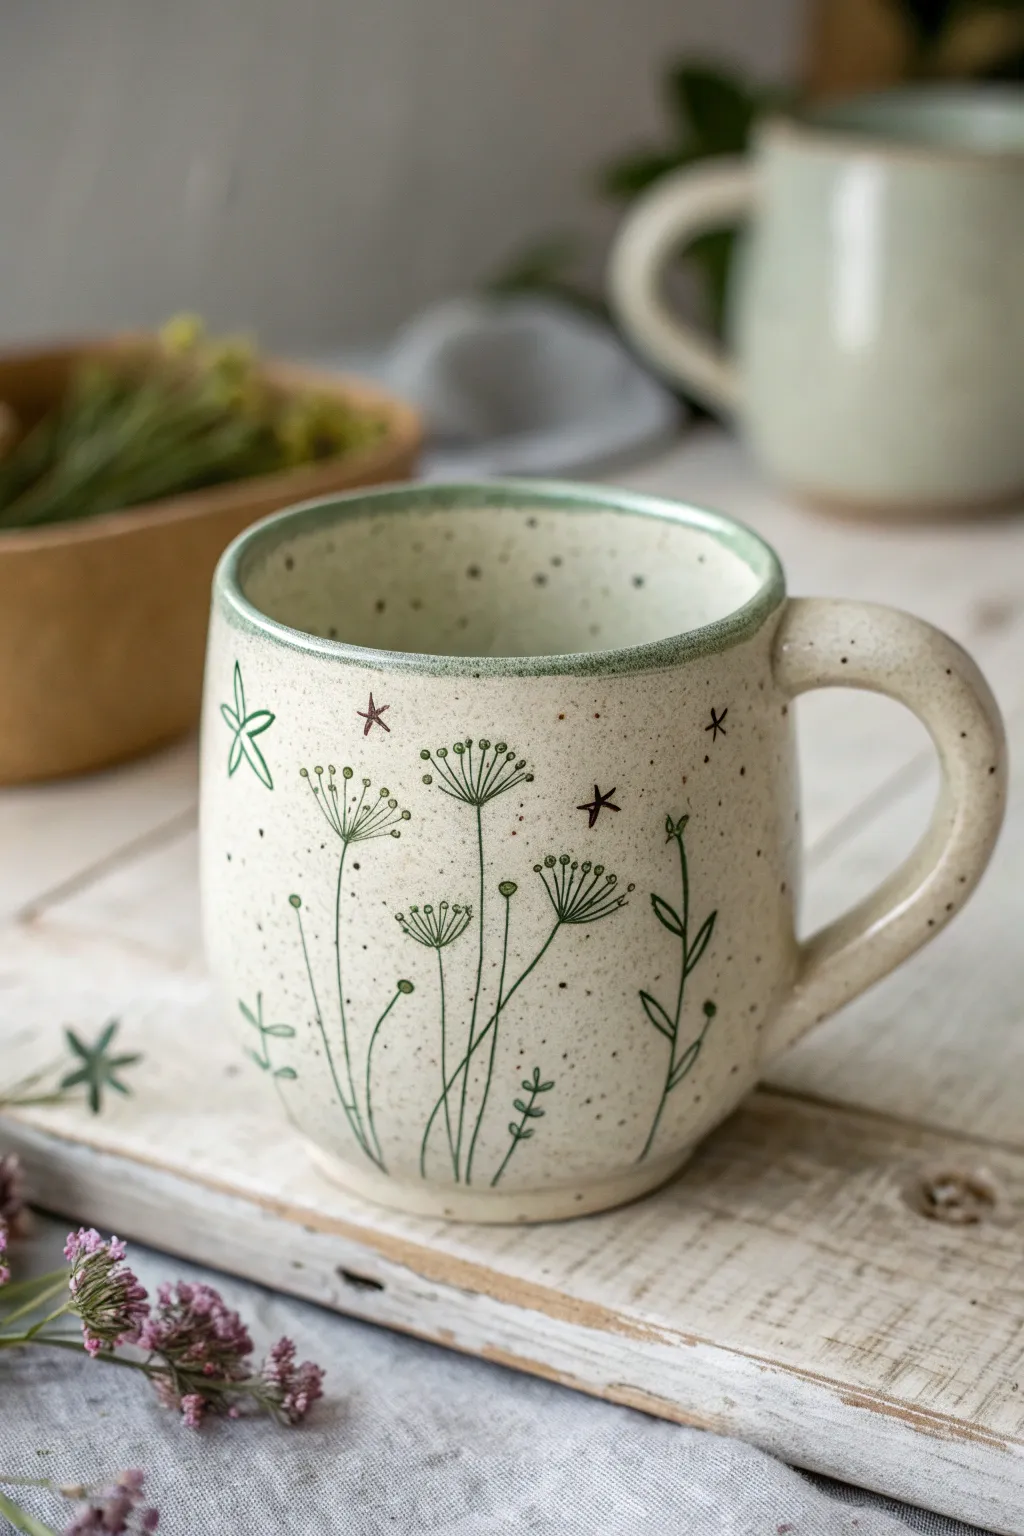
This charming project combines the organic, hand-formed feel of a pinch pot with delicate botanical illustrations scratched into the surface. The result is a speckled, cream-colored mug adorned with fine green stems, seed heads, and tiny stars, perfect for a cozy morning tea.
How-To Guide
Materials
- Stoneware clay (speckled or buff preferred)
- Needle tool
- Rib tool (metal or rubber)
- Sponge
- Slip (made from your clay body)
- Underglaze (Dark Green and Chocolate Brown)
- Small fine-point paintbrush
- Sgraffito tool or fine stylus
- Clear or Transparent Matte Glaze
- Scoring tool (or serrated rib)
Step 1: Forming the Mug Body
-
Create the pinch pot base:
Start with a ball of well-wedged clay about the size of a large orange. Push your thumb into the center, stopping about a half-inch from the bottom, and gently pinch the walls upward while rotating the ball in your hand. -
Thin and shape the walls:
Continue pinching rhythmically to thin the walls evenly. Aim for a thickness of about 1/4 inch throughout. Gently curve the walls inward slightly at the top rim to mimic the rounded shape in the example. -
Smooth the surface:
Once the general shape is established, use a rubber rib tool on the exterior and interior to compress the clay and smooth out the prominent finger marks, creating a clean canvas for your drawing. -
Form the handle:
Roll a coil of clay that is slightly thicker than a pencil. Flatten it slightly or leave it round depending on your preference, then bend it into a gentle ‘C’ or ear shape. -
Attach the handle:
Score the mug body where the handle will go and score the ends of the handle. Apply a dab of slip to both scored areas. Press the handle firmly onto the mug. -
Refine the connection:
Use a small modeling tool or your finger to smooth the clay where the handle meets the mug, ensuring a seamless transition. I like to run a damp sponge over the joint to erase any tool marks.
Step 2: Applying the Design
-
Dry to leather hard:
Let the mug dry slowly until it reaches a leather-hard state. It should be firm enough to handle without deforming but still cool to the touch and able to be carved. -
Paint the underglaze layer:
This mug actually uses a reverse sgraffito or mishima-like variation. First, paint the entire exterior (except the very bottom) with a layer of creamy white slip or underglaze if your base clay is dark. If your clay is already light/speckled like the photo, skip to the next step. -
Plan your stems:
Using a very fine liner brush and Dark Green underglaze, paint thin, vertical lines rising from the base of the mug to create the flower stems. Vary their heights for a natural look. -
Add floral details:
Paint small circles or tiny connecting lines at the top of the stems to create the ‘dandelion’ or seed-head shapes. Add small leaves branching off the main stems. -
Incorporate contrast:
Switch to a Chocolate Brown underglaze to paint small, simple five-point stars scattered in the empty spaces between the flowers. -
Sgraffito emphasis (Optional):
If you want sharper lines, let the underglaze dry, then use a sharp sgraffito tool to scratch very fine details *through* the green paint to reveal the clay underneath, like veins in the leaves or separation in the seed heads. -
Rim detail:
Dip a sponge or brush in a diluted wash of the green underglaze and gently wipe it along the very top rim of the mug to create that soft, banded effect seen in the photo.
Clean Lines Only
If your carved lines look jagged or create crumbs, your clay is too dry. Mist it lightly with water, wrap it in plastic tailored for 2 hours, and try again.
Step 3: Finishing and Glazing
-
Bisque fire:
Allow the mug to bone dry completely (this usually takes several days). Fire it in a kiln to a bisque temperature (usually Cone 04). -
Apply clear glaze:
Once glossy and cooled, dip the entire mug into a Clear or Transparent Matte glaze. A matte glaze gives that lovely soft, non-reflective finish shown in the image. -
Wipe the foot:
Use a damp sponge to meticulously wipe all glaze off the bottom of the mug where it will touch the kiln shelf preventing it from sticking during firing. -
Final firing:
Fire the mug again to the maturation temperature of your specific clay and glaze (often Cone 5 or 6 for stoneware).
Add Texture
Before painting, gently press a real wildflower sprig into the wet clay to create a subtle impression alongside your drawn designs.
Once cooled, your handmade mug is ready to hold your favorite hot beverage, bringing a touch of the meadow to your kitchen table
Double-Walled Cozy Pinch Pot Mug
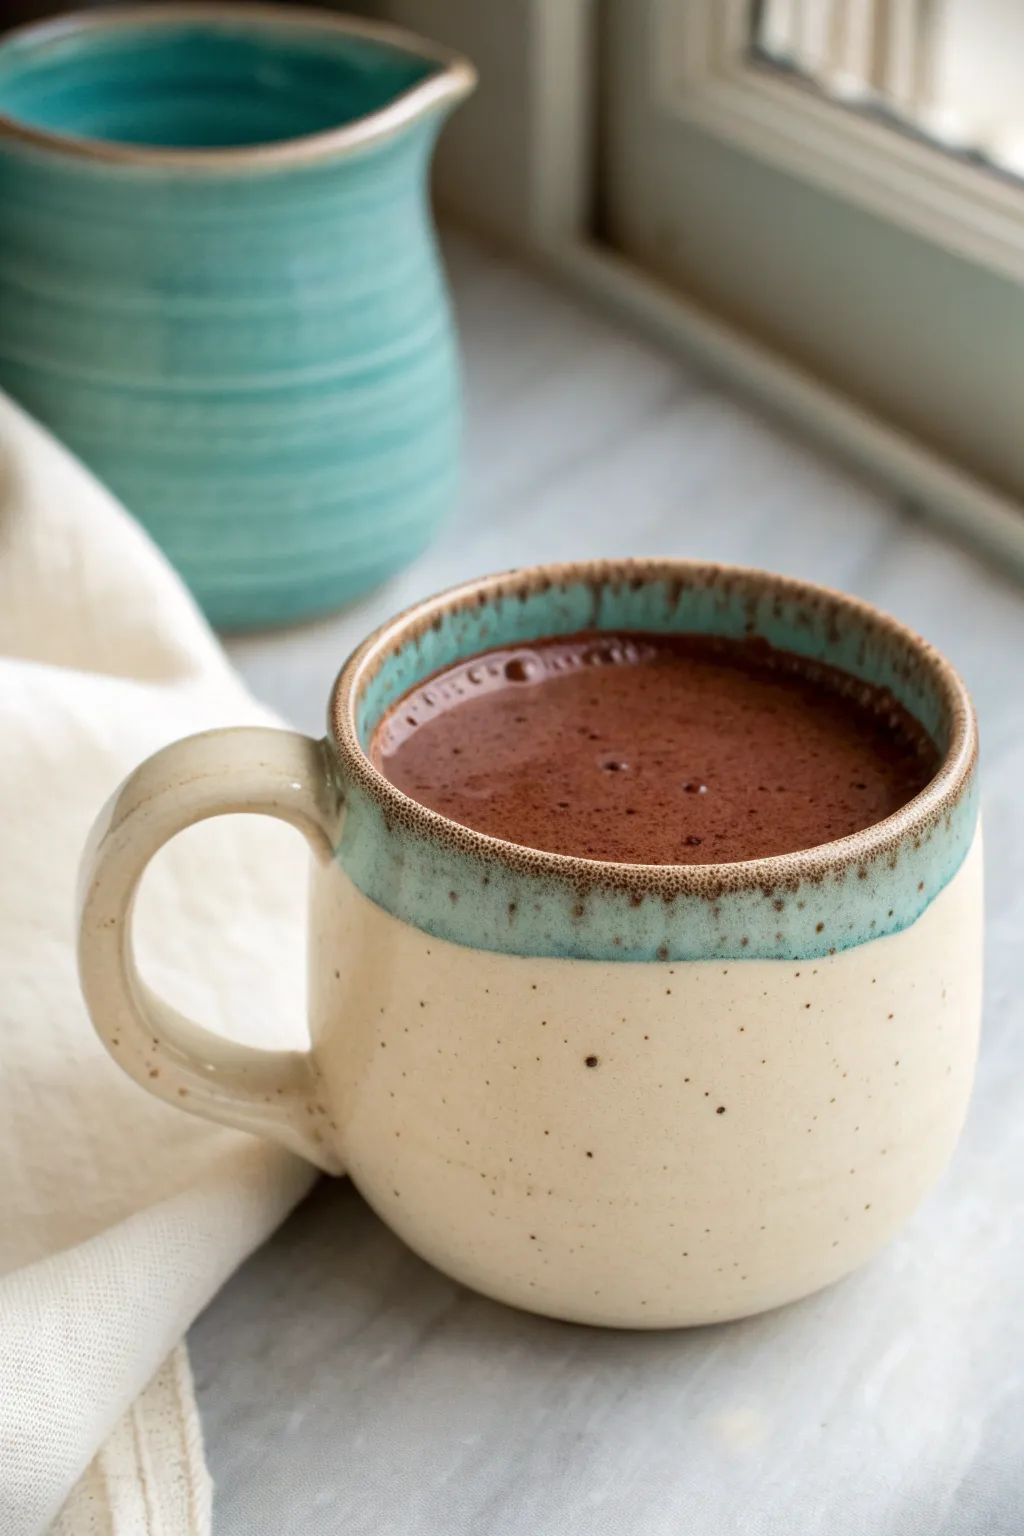
Recreate the rustic charm of this hand-formed ceramic mug, featuring a cozy rounded belly and a calming teal-glazed rim. This project combines simple pinch pot techniques with careful glazing to achieve a beautiful contrast between the raw speckled clay look and the glossy colored accents.
Step-by-Step Tutorial
Materials
- Speckled buff stoneware clay (mid-fire)
- Pottery wheel (optional, can be hand-built)
- Rib tool (kidney shaped)
- Sponge
- Water bucket
- Scoring tool
- Slip (clay and water slurry)
- Loop tool for trimming
- Teal blue glossy glaze (food safe)
- Cream or clear matte glaze (optional)
- Kiln for firing
Step 1: Forming the Body
-
Prepare the Clay:
Start with a ball of well-wedged speckled buff clay, roughly the size of a large orange. This clay type is crucial for achieving naturally occurring spots. -
Open the Form:
If using a pinch method, press your thumb into the center of the ball, stopping about a half-inch from the bottom. If throwing, center the clay and open the well. -
Shape the Walls:
Gently pinch and pull the clay upward and outward. Aim for a distinct bulbous shape at the bottom that tapers slightly inward toward the rim. This rounded ‘belly’ helps keep liquids warm. -
Refine the Surface:
Use a damp sponge on the rim to soften it. Then, take a kidney rib tool and smooth the exterior walls to remove finger marks while maintaining that organic, handmade roundness. -
Define the Rim:
Compress the rim with a piece of plastic or chamois leather. You want a very slight flare at the top edge, just enough to catch the glaze later.
Step 2: Handle and Assembly
-
Pull the Handle:
Pull a strap of clay for the handle. For this cozy aesthetic, create a handle that is sturdy but not too thick, with a gentle C-curve shape. -
Dry to Leather Hard:
Let both the cup body and the handle strap dry to a leather-hard state. The clay should be firm enough to hold its shape but soft enough to carve. -
Attach the Handle:
Score the attachment points on both the mug body and the handle ends. Apply slip generously. -
Blend the Seams:
Press the handle firmly onto the mug. Use a modeling tool or your thumb to smooth the clay where the handle meets the body so it looks like one continuous piece. I prefer wiping the seams with a damp sponge for a seamless finish. -
Bisque Fire:
Allow the mug to dry completely, which may take several days. Once bone dry, fire it in the kiln to bisque temperature (usually cone 04).
Iron Speckle Tip
Don’t see enough speckles? Some buff clays need a slower cooling cycle in the kiln to really let those iron spots bloom through the glaze.
Step 3: Glazing and Finishing
-
Wax the Bottom:
Apply wax resist to the foot of the mug and slightly up the side if you want an unglazed bottom edge. -
Glaze the Interior:
Pour your food-safe teal or turquoise glaze into the mug, swirl it to coat the entire interior, and pour out the excess. -
Dip the Rim:
Holding the base of the mug, dip the top rim upside down into the teal glaze. Aim for a dip depth of about one inch. -
Create the Drip Effect:
The dipping action naturally creates an uneven, organic line. Don’t smooth it out; let the glaze settle naturally where the blue meets the bare clay. -
Clear Glaze (Optional):
If you want the speckled body to be glossy, dip the lower exterior in a clear glaze. However, leaving it unglazed highlights the natural clay texture shown in the photo. -
Final Firing:
Fire the mug to the glaze temperature required for your specific clay body (likely cone 5 or 6). This high heat brings out the iron speckles in the clay.
Make a Set
Use the same clay and teal glaze to make a matching milk pitcher (seen in the background) by pinching a spout into a larger cylinder form.
Enjoy your warm beverages in your new favorite handmade mug