Whenever I’m staring at a plain teapot, I think of it like a tiny curved canvas just begging for painted details and a little personality. These teapot painting ideas are all about designs that feel doable at the kitchen table, but still look like something you’d proudly set out for tea.
Classic Blue-and-White Florals
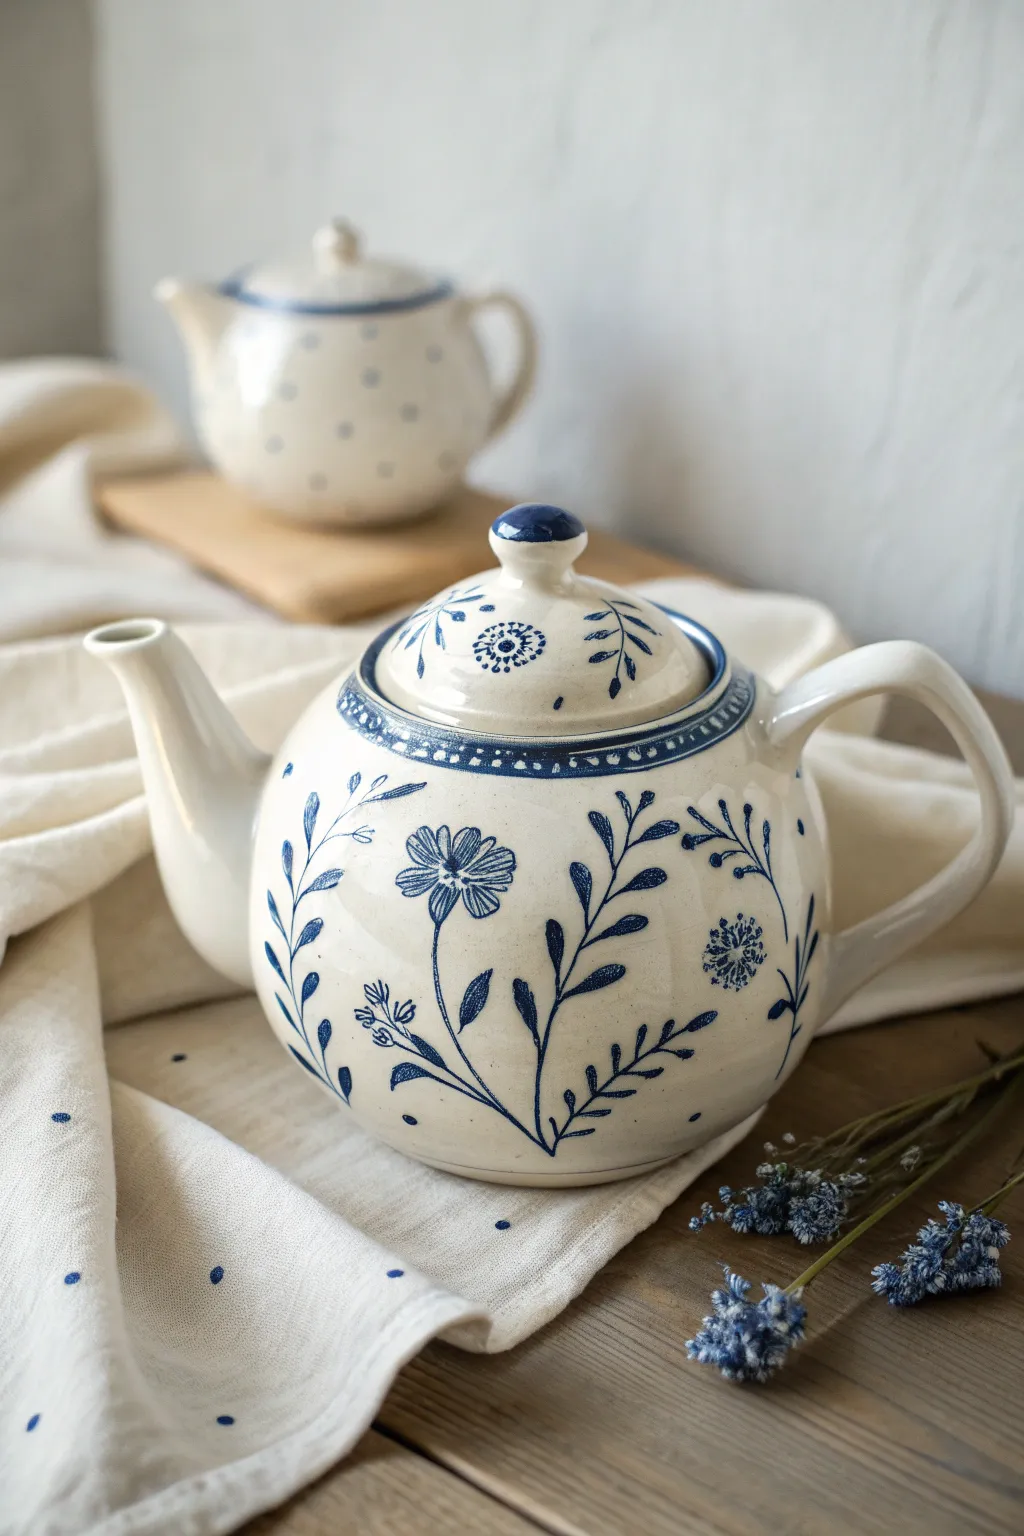
Bring the timeless elegance of classic Delftware into your kitchen with this approachable ceramic painting project. By combining simple line work with deep cobalt blue, you can transform a plain white teapot into a charming heirloom-style piece featuring delicate wildflowers and vines.
Step-by-Step
Materials
- Plain white ceramic teapot
- Ceramic paint or porcelain paint markers (Cobalt Blue/Navy)
- Rubbing alcohol and cotton pads
- Pencil for sketching
- Fine liner brush (size 0 or 00)
- Medium round brush (size 2)
- Paper plate or palette
- Oven (for curing, if required by paint type)
- Q-tips (for cleanup)
Step 1: Preparation & Planning
-
Clean surface:
Before you begin, wipe down the entire surface of the pot and lid with rubbing alcohol on a cotton pad. This removes invisible oils or fingerprints that could prevent the paint from adhering properly. -
Light sketch:
Using a soft pencil, very lightly sketch your main floral placement. You don’t need every detail, just the sweeping curves for the main stems to ensure they flow nicely around the teapot’s belly.
Step 2: Painting the Lid
-
Knob detail:
Start at the top to avoid smudging later. Paint the very top of the lid handle (the finial) a solid deep blue. -
Lid motifs:
Around the flat part of the lid, paint three or four small sprigs of leaves radiating outward. Add a small circular flower motif in the empty spaces between the sprigs, using tiny dots for the center. -
Rim border:
Carefully paint a thin blue line around the outer edge of the lid. If using a brush, steady your hand against the table for support.
Fixing Mistakes
If you smudge wet paint, don’t wipe it immediately! Let it dry slightly, then scrape it off carefully with a craft knife or toothpick, which avoids smearing blue pigment everywhere.
Step 3: Creating the Main Florals
-
Neck border:
Moving to the body of the teapot, paint a decorative band just below the rim where the lid sits. Create two parallel horizontal lines about a quarter-inch apart. -
Pattern filling:
Fill the space between your parallel lines with a simple repeating pattern, such as small dots or vertical dashes, to create a textured collar. -
Anchor stems:
Using your fine liner brush, trace over your pencil lines to create the long, thin stems. Start from the bottom of the pot and flick upward, letting the lines curve naturally. -
Adding leaves:
Along these stems, paint pairs of small, oval-shaped leaves. Use a ‘press and lift’ motion with your round brush—press down at the base of the leaf and lift as you pull away to create a sharp point. -
Main flower:
Choose a central spot for the large bloom. Paint a small circle for the center, then add elongated petals radiating outward. Don’t worry about perfect symmetry; a folksy look is desired here. -
Secondary florals:
Add smaller, dandelion-style puffs on other stems. These are created by painting a cluster of tiny dots or very short dashes in a circular shape.
Level Up: Texture
Mix a tiny amount of white relief paste with your blue paint for the flower centers. This creates raised, tactile dots that add a wonderful 3D quality to the finished ceramic.
Step 4: Refining & Curing
-
Fillers:
Look for empty white spaces that feel unbalanced. Add tiny sprigs, single leaves, or small flying insects (like simple V-shapes) to fill these gaps lightly. -
Cleanup:
Dip a Q-tip in rubbing alcohol to wipe away any stray marks, smudges, or visible pencil lines that weren’t covered by paint. -
Drying time:
Allow the paint to dry completely according to the manufacturer’s instructions. This is usually at least 24 hours. -
Baking:
Place the teapot in a cool oven, then set the temperature (usually around 300°F/150°C, but check your paint bottle). Bake for the required time, then turn the oven off and let the teapot cool completely inside before removing.
Once cooled, your custom teapot is ready to serve warm brews with a touch of handmade charm


Simple Lavender Sprigs
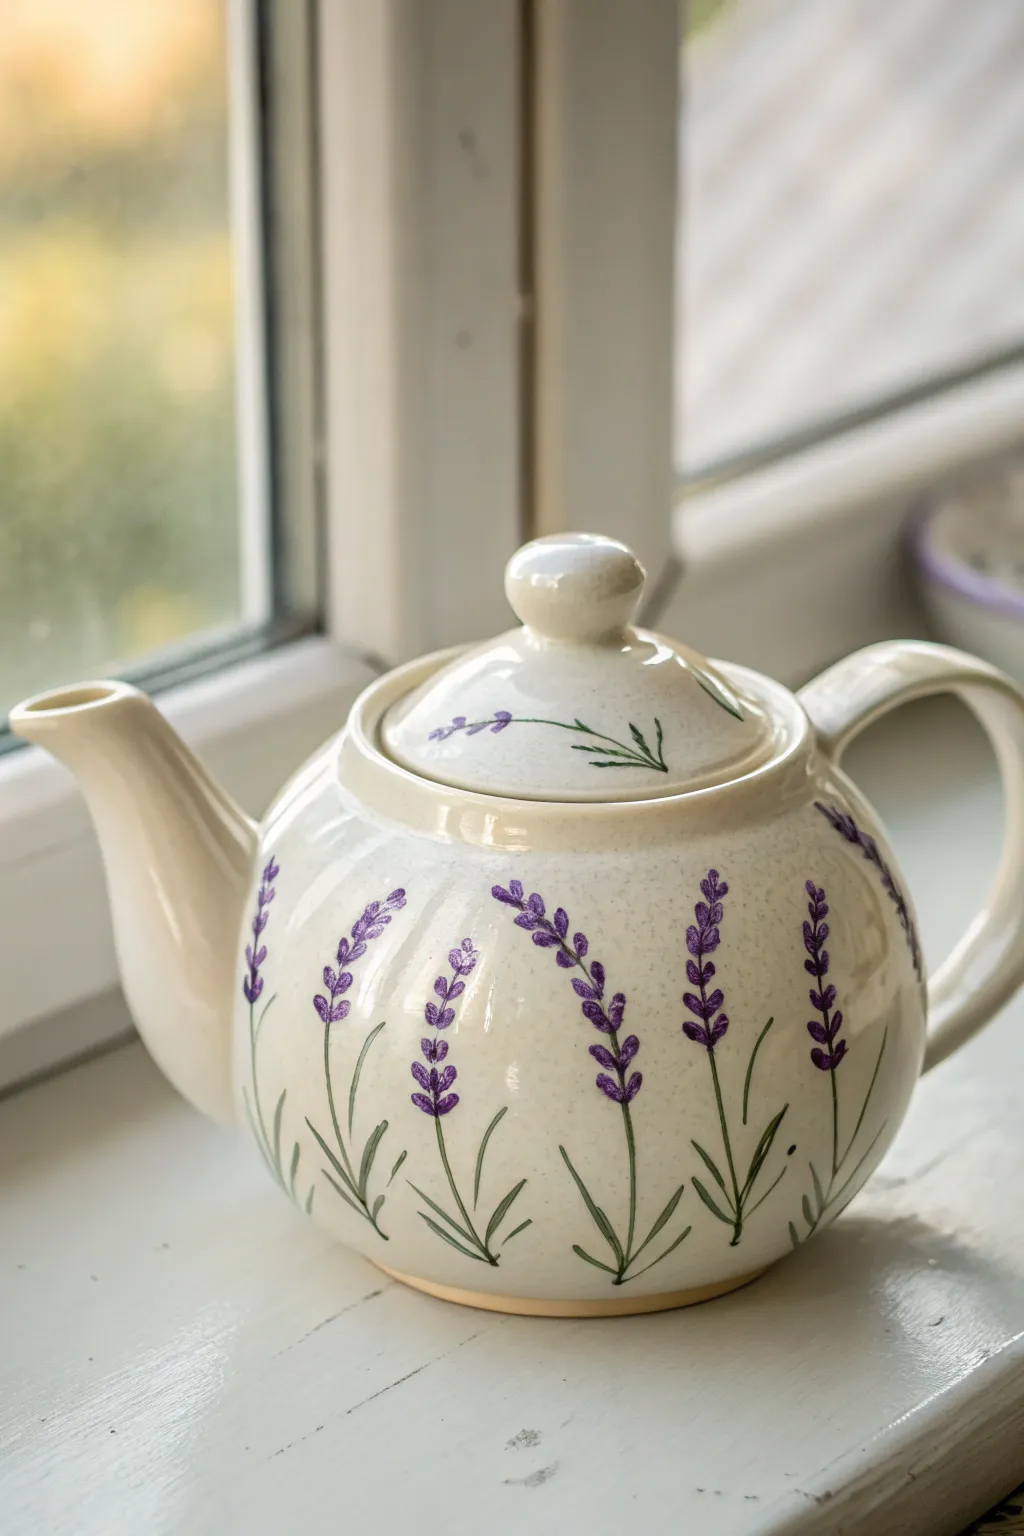
Bring the calming vibes of a French countryside cottage into your kitchen with this delicate lavender-painted teapot. The simple stalks and gentle purple buds create an elegant, airy pattern that is surprisingly easy for beginners to master.
Step-by-Step Tutorial
Materials
- White or cream ceramic teapot (clean and dry)
- Pebeo Porcelaine 150 paints (or similar ceramic paint) in ‘Olivine Green’ and ‘Parma Violet’
- Fine liner brush (size 00 or 0)
- Small round brush (size 1 or 2)
- Rubbing alcohol
- Cotton pads
- Paper palette or small ceramic tile
- Cotton swabs (for corrections)
- Oven (for baking/setting the paint)
Step 1: Preparation & Planning
-
Clean the surface:
Before you paint a single stroke, wipe the entire exterior of the teapot down with rubbing alcohol on a cotton pad. This removes invisible oils or fingerprints that could prevent the ceramic paint from adhering properly. -
Visualize the spacing:
Look at the curve of your teapot’s belly. You want to space the lavender stems fairly evenly around the circumference, leaving about 1 to 1.5 inches between each main stalk. Don’t worry about perfect symmetry; a natural variation looks better. -
Prepare the green:
Shake your olive green ceramic paint bottle well. Dispense a very small amount onto your palette. Ceramic paint dries relatively quickly, so only pour what you need for the stems first.
Wobbly Lines?
If your stems look shaky, don’t stress. Lavender is organic! Resting your pinky finger on the pot (on a dry spot) stabilizes your hand significantly.
Step 2: Painting the Stalks
-
Paint the central stems:
Load your fine liner brush with the green paint. Starting from the bottom edge of the teapot, paint a thin, slightly curved line upward. It should reach about halfway up the pot’s side. Repeat this around the pot for your main stalks. -
Add side branches:
From the base of each main stem, paint two shorter, thinner lines branching out to the left and right. These should curve upwards like arms reaching for the sun. -
Create the leaves:
Reload your liner brush. Near the bottom third of your stems, add long, slender leaves. Press the brush down lightly to start the leaf and lift off quickly to create a sharp, tapered point. -
Vary the heights:
Ensure your stems aren’t all exactly the same height. I like to let some grow a bit taller than others to mimic how lavender grows in a wild garden. -
Add lid details:
Don’t forget the lid! Paint one or two small, horizontal sprigs lying across the lid surface, curving slightly to follow the dome shape.
Step 3: Adding the Blooms
-
Switch to purple:
Clean your brush thoroughly or switch to the small round brush. Shake the violet paint well and dispense a drop onto your palette. -
Start the flower clusters:
Starting at the very tip of a green stem, paint small, dashed strokes pressing downwards. These should be tiny and clustered together. -
Build the shape:
Work your way down the stem about an inch. The cluster should be slightly tapered—thinner at the top and slightly wider at the base of the flower head. -
Leave gaps:
Lavender flowers aren’t solid blocks of color. Leave tiny gaps between your purple dashes to let the white ceramic or the green stem peek through. This adds texture and airiness. -
Add lower buds:
Below the main flower head, add one or two tiny detached purple dots on the stem to represent buds that haven’t quite joined the cluster yet. -
Complete the pattern:
Repeat this process for every stem tip, including the side branches and the sprigs on the lid. Rotate the teapot frequently to avoid smudging wet paint with your hand.
Two-Tone Depth
Mix a tiny dot of white into your purple for half the buds. Layering light and dark lavender dots adds incredible 3D volume to the flowers.
Step 4: Finishing Touches
-
Check for consistency:
Step back and look at the teapot as a whole. If any area looks too sparse, you can add a small floating sprig or extra leaves to fill the visual gap. -
Clean up mistakes:
If you made any smudges, use a damp cotton swab to wipe them away. Do this quickly before the paint begins to tack up. -
Dry time:
Allow the teapot to air dry for at least 24 hours. The paint needs to fully cure on the surface before baking. -
Bake to set:
Place the teapot in a cold oven. Set the temperature to 300°F (150°C—check your specific paint brand’s instructions). Once the oven reaches temperature, bake for 35 minutes. -
Cool down:
After the baking time is up, turn the oven off but leave the teapot inside. Let it cool down gradually with the oven to prevent the ceramic from cracking due to thermal shock.
Once baked and cooled, your beautiful custom teapot is ready to brew a relaxing cup of tea


Poppy Stems and Bold Dots
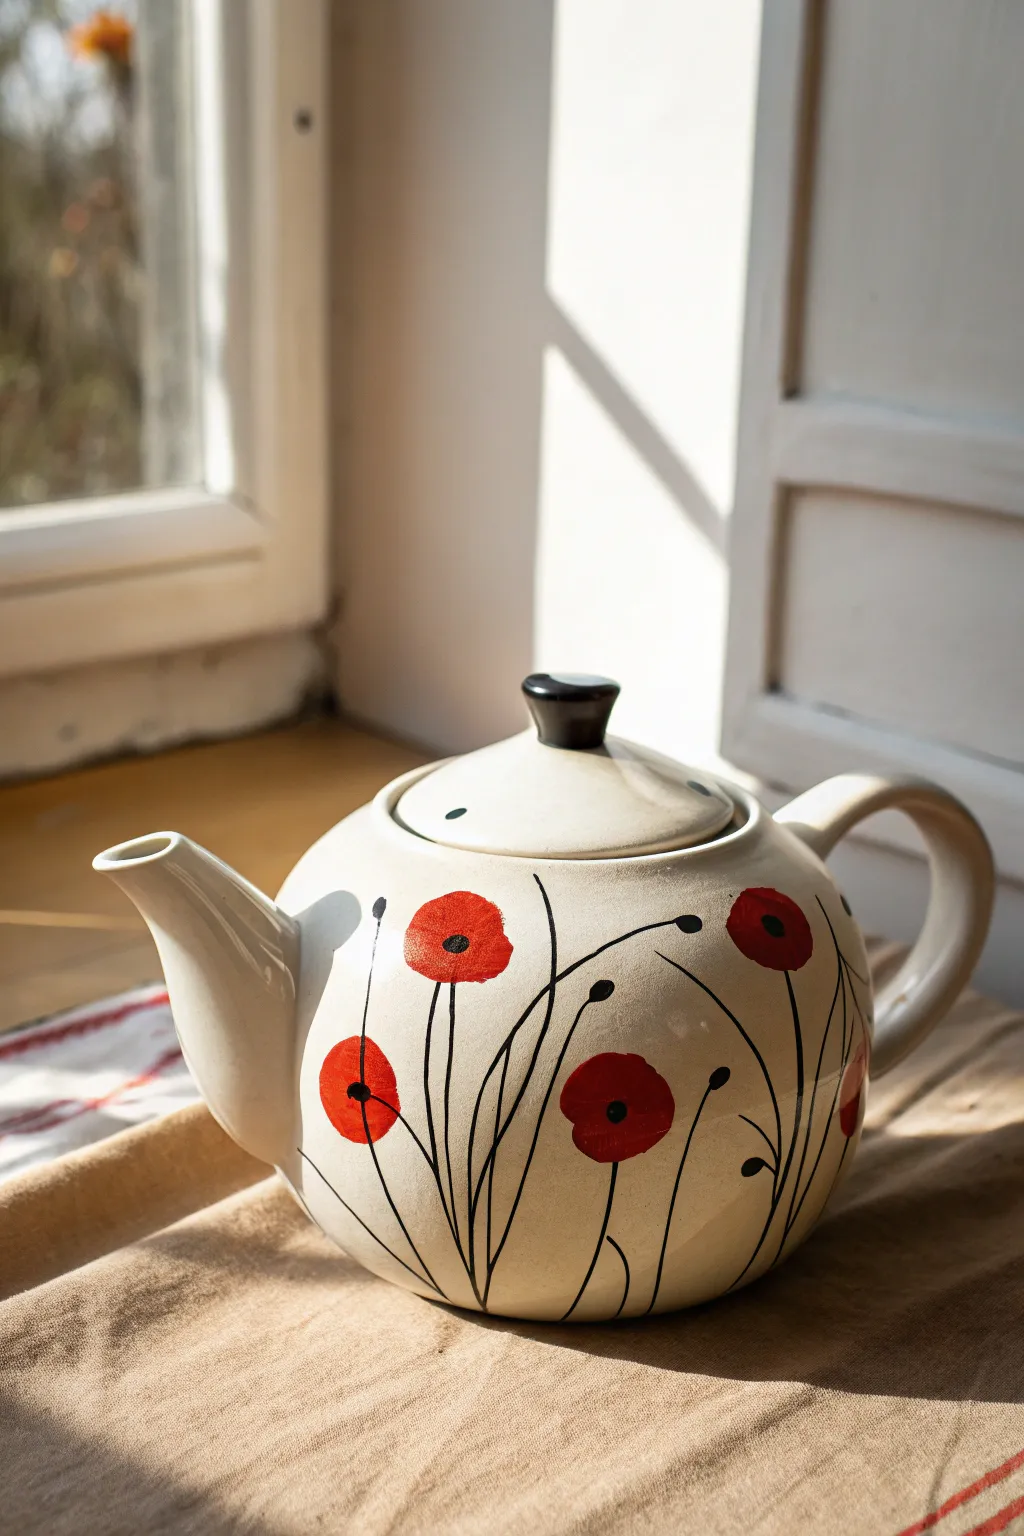
Transform a plain ceramic teapot into a cheerful display of nature with just a few strokes of red and black paint. This minimalist yet striking design features bold, round poppy blooms dancing on slender, sweeping black stems.
How-To Guide
Materials
- Plain white or cream ceramic teapot
- Ceramic or enamel paints (Bright Red, Deep Black)
- Round detail brush (Size 2 or 4)
- Fine liner brush (Size 0 or 00)
- Small round sponge dobber (optional, for perfect circles)
- Rubbing alcohol and cotton pads
- Paper palette or small dish
- Oven (if using heat-set paints)
- Clear glazing medium (optional)
Step 1: Preparation and Planning
-
Clean the Surface:
Before painting, wipe the entire exterior of the teapot with rubbing alcohol on a cotton pad. This removes any oils or fingerprints that could prevent the paint from adhering properly. -
Visualize the Layout:
Look at the curve of your teapot’s belly. Imagine where the stems will rise from the base. You want a natural, organic flow where stems start low and fan out towards the middle and upper sections.
Step 2: Painting the Blooms
-
Load the Red Paint:
Squeeze a small amount of Bright Red ceramic paint onto your palette. If the paint feels too thick, thin it slightly with a drop of medium, but keep it opaque. -
Create the First Bloom:
Using your size 4 round brush or a sponge dobber, create a solid red circle on the prominent curve of the teapot. It does not need to be a geometrically perfect circle; a slightly organic shape looks more like a real petal. -
Vary the Sizes:
Add 3-5 more red circles scattered around the pot at different heights. Make some slightly smaller than others to create depth and visual interest. -
Don’t Forget the Lid:
If your teapot design allows, you can place a small red dot or two on the lid, but keep the main focus on the body. -
Let the Red Dry:
Allow the red circles to dry completely to the touch. This prevents smudging when you add the black details later.
Wobbly Lines?
If your hand shakes while painting stems, rest your pinky finger against the teapot surface for stability. This anchors your hand and allows for smoother strokes.
Step 3: Adding Stems and Details
-
Switch to Black:
Prepare your Deep Black paint. You’ll need a fluid consistency for long smooth lines, so mixing in a tiny bit of water or medium helps the paint flow off the brush. -
Paint the Main Stems:
With your fine liner brush, start at the very bottom edge of the teapot. Pull a long, thin line upward, curving gently to meet the bottom of one of your red circles. -
Add Connecting Lines:
Repeat for every red flower. Try to vary the curve of the lines so they don’t look like stiff soldiers. Some can cross over each other near the base. -
Create the Bud Stems:
Paint several long, sweeping black lines that *don’t* connect to a red flower. Curve these stems outward and end them with a small black dot to represent a closed bud. -
Add Decorative Dots:
Along the stems or floating near the top, add tiny black dots for extra texture. I like to group these in pairs or singular specks to fill empty white space. -
Detail the Flowers:
Once the red paint is fully dry, paint a small, solid black circle in the center of each red bloom. Keep it slightly off-center for a tilted, facing-the-sun look. -
Lid Accents:
Add a few tiny black dots to the lid to tie the design together without overcrowding it.
Make it Shine
Add a tiny white highlight dot inside the black center of each flower using the tip of a toothpick. It makes the poppies look wet and glossy.
Step 4: Finishing Up
-
Final Inspection:
Check for any uneven edges on your circles or breaks in your stem lines. Touch up as needed with a clean, damp brush. -
Curing:
Follow the manufacturer’s instructions for your specific paint. Most ceramic paints require air drying for 24 hours, followed by baking in a home oven to set the design permanently.
Now you have a charming, hand-painted teapot ready to brew your favorite afternoon tea


Dotted Cherry Blossom Branches
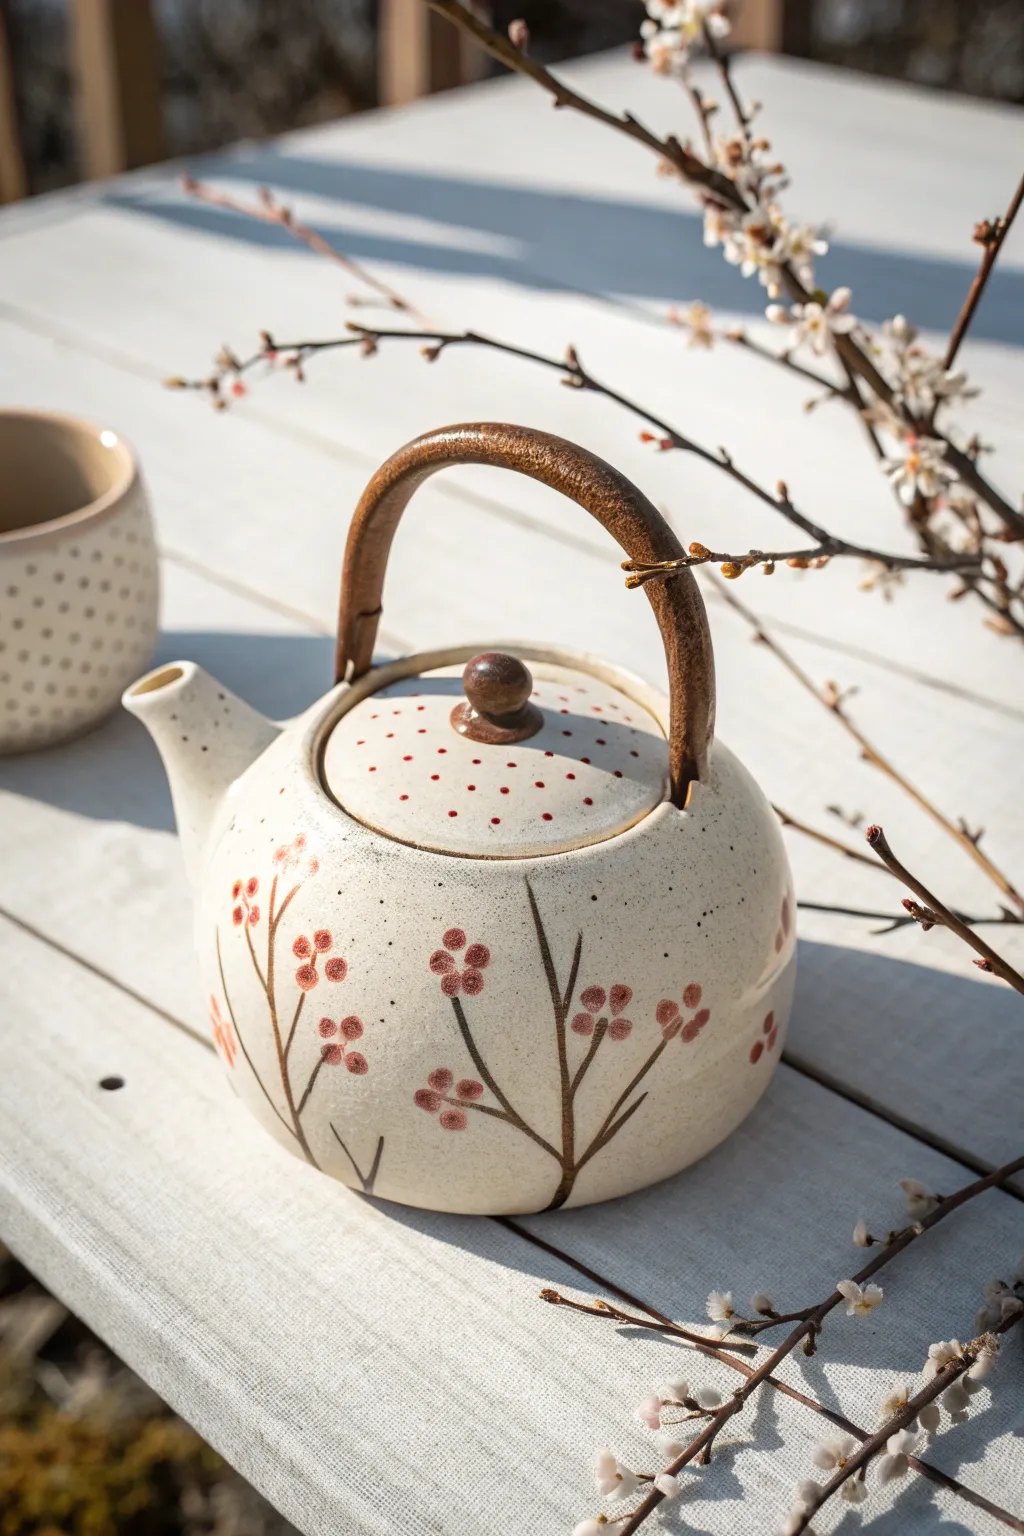
Transform a plain ceramic teapot into a piece of functional art with this delicate cherry blossom design. The combination of fine branch lines and simple dotted petals creates a rustic yet elegant look that pairs perfectly with warm tea.
Step-by-Step Tutorial
Materials
- Ceramic teapot (unglazed bisque or light glazed)
- Pebeo Porcelaine 150 paint (Dark Brown, earthy Red/Coral)
- Fine liner brush (size 0 or 00)
- Small round brush (size 2)
- Dotting tool or toothpick
- Rubbing alcohol
- Cotton pads
- Palette or small dish
- Oven (for curing)
Step 1: Preparation
-
Clean surface:
Wipe down the entire teapot with a cotton pad soaked in rubbing alcohol. This removes oils and dust, ensuring the paint adheres properly. -
Handle removal:
If your teapot has a detachable handle like the wooden one shown, carefully remove it before painting to allow full access to the surface.
Uneven Dots?
If your paint dots have peaks or varied sizes, lightly tap the bottom of the teapot on a folded towel while wet to help the paint settle flat.
Step 2: Painting the Branches
-
Load the liner brush:
Pour a small amount of dark brown porcelain paint onto your palette. Dip your fine liner brush in, rolling it slightly to keep a sharp point. -
Start the main stems:
Starting from the bottom edge of the teapot, paint thin, upward strokes to create the main branches. Let your hand tremble slightly for a natural, organic look. -
Add side branches:
Paint smaller, shorter offshoot branches coming from the main stems. Vary the angles—some pointing up, some slightly out. -
Refine the lines:
Ensure the ends of your branches taper off gently rather than ending abruptly. If a line is too thick, quickly wipe it with a damp Q-tip before it dries. -
Dry partially:
Allow the brown branch lines to dry for about 15-20 minutes so you don’t smudge them while adding flowers.
Paint Choice
For functional ware, ensure you use “food safe” or “dishwasher safe” porcelain paints and avoid painting near the rim where lips touch.
Step 3: Adding the Blossoms
-
Prepare red paint:
Dispense a small amount of the earthy red or coral paint. You want a color that contrasts gently with the base. -
Technique practice:
Practice making clusters of dots on a piece of paper first. A group of 3 or 4 dots creates a convincing bud or small flower. -
Paint flower clusters:
Using the tip of a small round brush or a dotting tool, dab clusters of 3-4 dots at the ends of the branches. -
Add floating petals:
Place a few single dots near the branches to suggest falling petals or buds just starting to open. -
Lid decoration:
Move to the lid. Instead of branches, create a simple pattern of single red dots scattered evenly across the surface for a cohesive look. -
Check consistency:
Step back and look at the teapot from a distance. Fill in any large empty spaces with a tiny twig or a single dot to balance the composition.
Step 4: Finishing Touches
-
Dry thoroughly:
Let the painted teapot sit undisturbed for at least 24 hours. The paint needs to be fully dry before baking. -
Bake to cure:
Place the teapot in a cool oven. Set the temperature to 300°F (150°C) or according to your paint manufacturer’s instructions. -
Baking process:
Once the oven reaches temperature, bake for 35 minutes. Turn the oven off and let the teapot cool down completely inside the oven to prevent cracking. -
Reattach handle:
Once the teapot is completely cool, reattach the wooden handle carefully.
Now you have a charming, hand-painted vessel ready for your next tea time.

The Complete Guide to Pottery Troubleshooting
Uncover the most common ceramic mistakes—from cracking clay to failed glazes—and learn how to fix them fast.
Polka Dots for a Tea Party Look
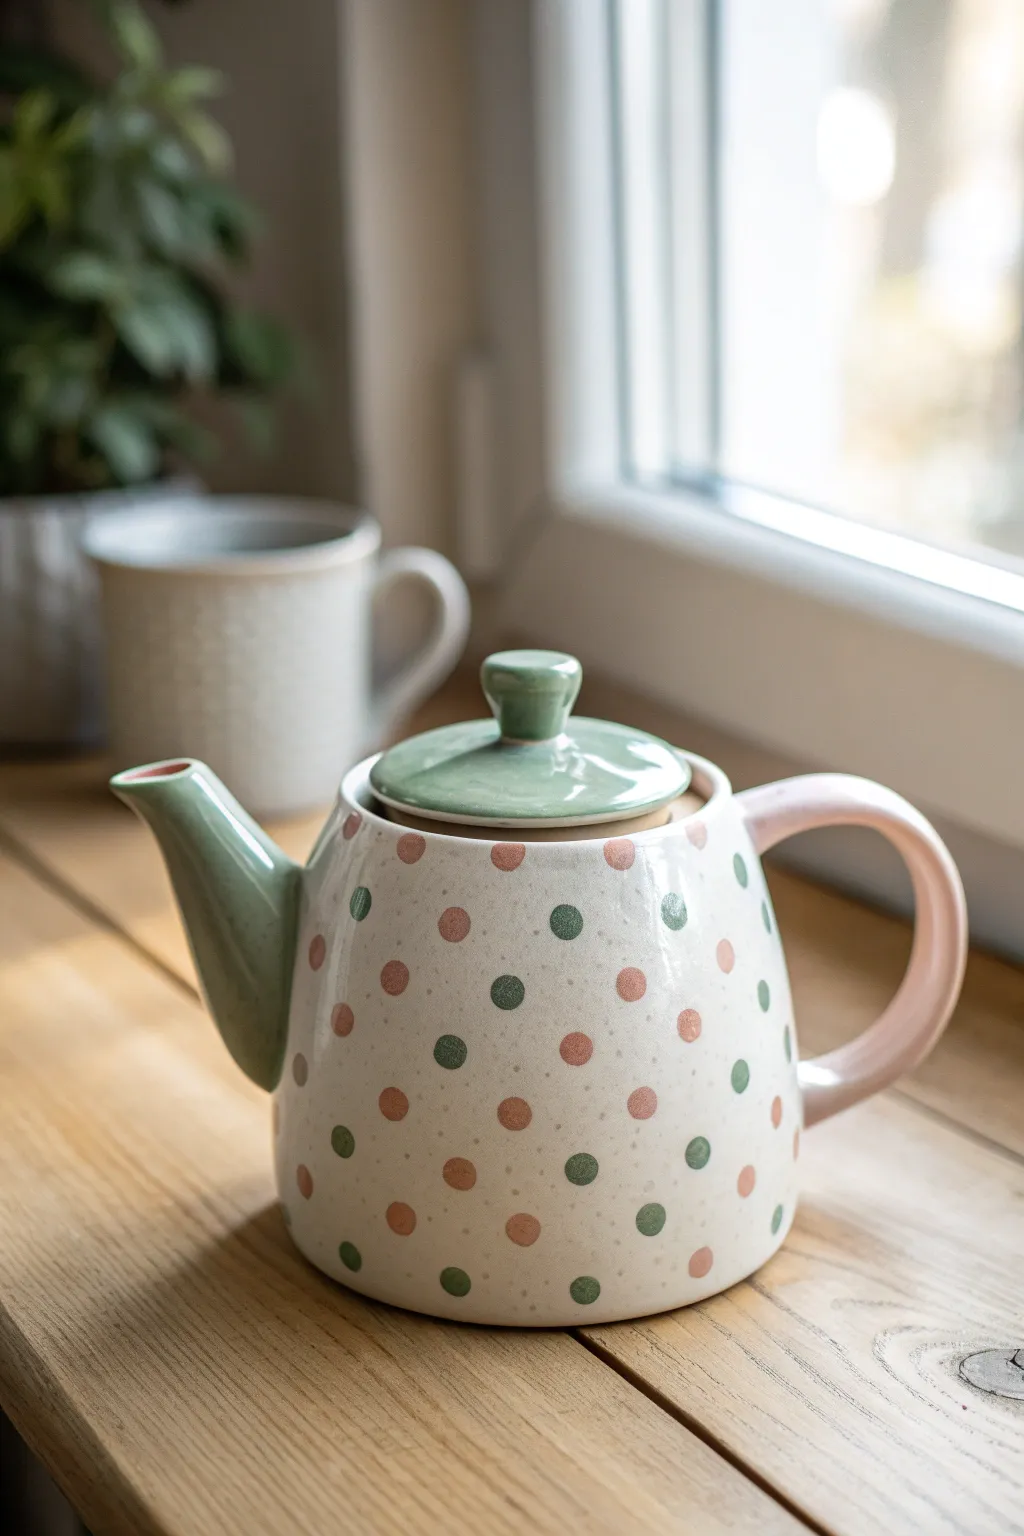
Bring a touch of playful elegance to your tea time with this delightful polka dot teapot design. Featuring a soft speckled background and pastel dots, this project transforms plain ceramic into a cozy, cottage-core centerpiece.
Step-by-Step Guide
Materials
- Plain white ceramic teapot
- Ceramic or porcelain paints (Sage Green, Dusty Rose/Pink, Cream/Off-White)
- Medium flat brush
- Small round detail brush
- Circle sponge pouncers (small size)
- Rubbing alcohol
- Paper towels
- Old toothbrush (for speckling)
- Palette or paper plate
- Gloss varnish or glaze (optional, check paint instructions)
Step 1: Preparation and Base
-
Clean surface:
Begin by thoroughly cleaning your teapot with warm soapy water. Once dry, wipe the entire surface with rubbing alcohol to remove any residual oils or fingerprints, ensuring the paint adheres perfectly. -
Mix base color:
On your palette, mix a small amount of cream or off-white paint. The goal isn’t to cover the whole pot opaquely, but to prepare a color for the speckling that matches the ceramic’s natural warmth. -
Create speckles:
Dip an old toothbrush into your cream-colored paint (you can slightly thin it with water if needed). hold it near the teapot and run your thumb across the bristles to flick tiny speckles onto the surface. This creates that lovely organic, stoneware texture. -
Dry completely:
Allow the speckles to dry fully before moving on. This usually takes about 20-30 minutes depending on your paint brand.
Dot Perfection
Don’t have a sponge pouncer? The flat end of a pencil eraser or the handle end of a large paintbrush makes perfect uniform circles.
Step 2: Blocking Colors
-
Paint the lid:
Using your medium flat brush, paint the entire lid of the teapot in the Sage Green shade. Smooth out your brushstrokes to keep the finish sleek. -
Detail the knob:
Ensure the knob on top of the lid is fully coated in the same green. I find it helpful to look at it from different angles to make sure I haven’t missed the underside of the knob. -
Paint the spout:
Carefully paint the spout using the Sage Green. Create a clean line where the spout meets the body of the teapot. You may need two coats for full opacity. -
Paint the handle:
Switch to your Dusty Rose or Pink paint. Coat the entire handle, again creating a clean, defined line where the handle attaches to the main pot body. -
Refine edges:
Use a damp cotton swab or a clean, damp brush to immediately wipe away any paint that strayed onto the main body of the teapot while painting the spout and handle.
Level Up: Texture
Mix a tiny bit of baking soda into the green paint for the spout to give it a matte, tactile ceramic feel that contrasts with the glossy dots.
Step 3: Applying Polka Dots
-
Plan spacing:
Before painting, visualize where your dots will go. The pattern in the image alternates between green and pink dots in a loose diamond arrangement. -
Load the pouncer:
Dip your small circle sponge pouncer into the Sage Green paint. Dab it on your palette a few times to ensure the paint is evenly distributed and not dripping. -
Apply green dots:
Press the pouncer onto the teapot body to create your green circles. Space them out generously to leave room for the pink dots in betwen. -
Clean and switch:
Clean your pouncer thoroughly or grab a second clean one. Load it with the Dusty Rose paint. -
Apply pink dots:
Fill in the empty spaces with pink dots. Try to place them so they sit roughly in the center of four surrounding green dots, creating an offset pattern. -
Fix imperfections:
If a dot looks uneven, use your small round detail brush to carefully round out the edges while the paint is still wet.
Step 4: Finishing Touches
-
Check the rim:
Take a look at the opening of the spout and the top rim of the teapot. If you want a polished look, add a very thin line of pink inside the very tip of the spout. -
Cure the paint:
Most ceramic paints require curing to become durable. Follow the manufacturer’s instructions, which typically involve either air-drying for 21 days or baking in a home oven. -
Baking process:
If baking, place the teapot in a cool oven, then set the temperature (usually around 350°F/176°C). Bake for 30 minutes, turn the oven off, and let the teapot cool completely inside the oven to prevent cracking.
Once cooled and cured, your charming new teapot is ready to serve up warmth at your next gathering
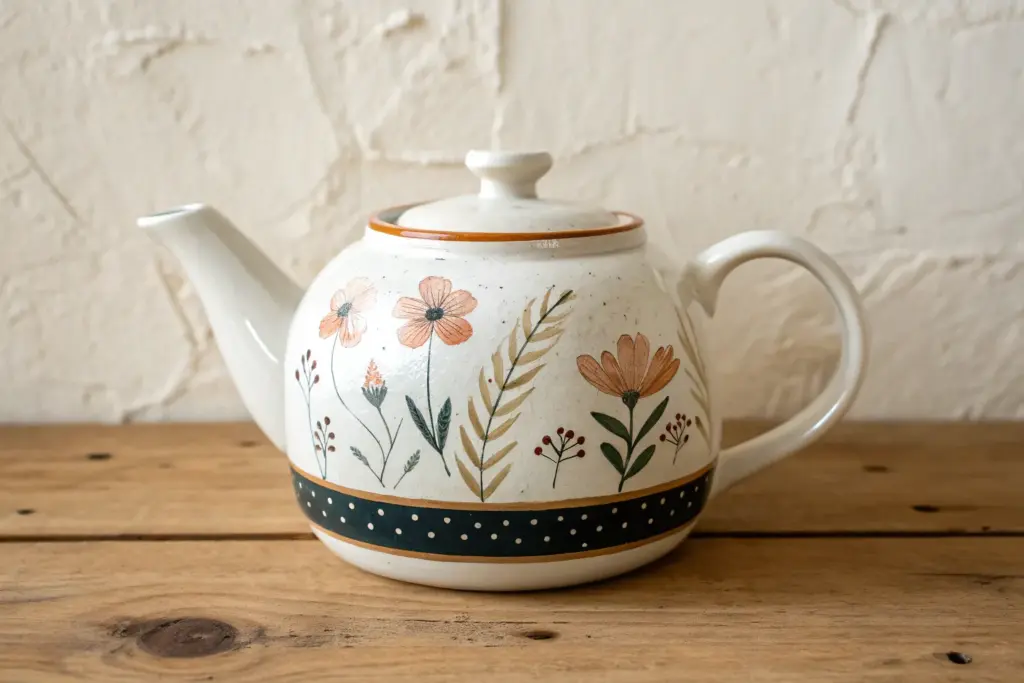
Easy Cottage Garden Mix-and-Match Flowers
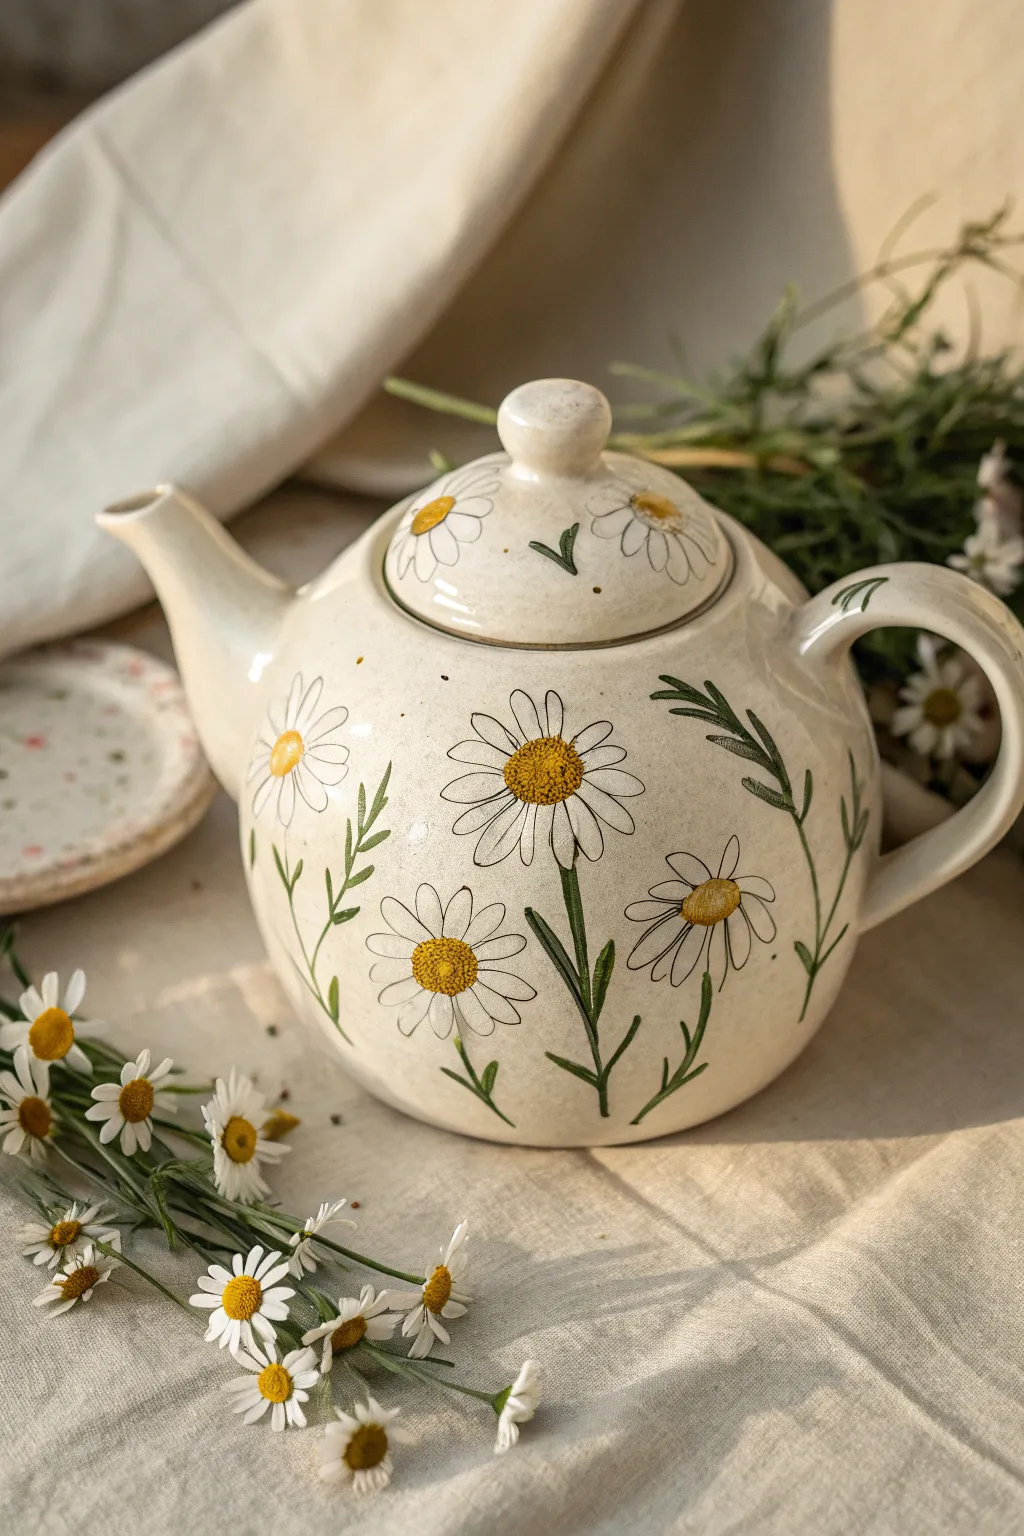
Bring the effortless charm of a cottage garden straight to your tea table with this hand-painted daisy teapot. The design uses simple brushstrokes and a soft, vintage color palette to create a rustic, airy floral pattern that looks lovely from every angle.
Detailed Instructions
Materials
- White or cream ceramic teapot (clean and dry)
- Pebeo Porcelaine 150 paints (or similar ceramic acrylics/enamels) in White, Antique Yellow, and Olive Green
- Small round synthetic brush (size 2 or 4)
- Fine liner brush (size 0 or 00) for detailing
- Pencil or water-soluble marker for light sketching
- Rubbing alcohol and paper towel
- Palette or small plate for mixing
- Domestic oven
Step 1: Preparation & Layout
-
Surface Prep:
Begin by wiping the entire teapot surface with rubbing alcohol on a paper towel. This removes any oils or fingerprints that might prevent the paint from adhering properly. -
Planning the Placement:
Mentally map out where your main flower clusters will go. Aim for asymmetry—perhaps one large cluster near the handle and a few scattered blooms on the lid and spout side. -
Light Sketching:
If you are nervous about freehanding, use a pencil to very faintly mark small circles where the center of each daisy will sit. Don’t press too hard, as graphite can sometimes smudge into ceramic paint.
Step 2: Painting the Daisies
-
Mixing the Yellow:
Squeeze out a pea-sized amount of Antique Yellow. If it feels too bright, you can mix in the tiniest speck of brown or green to mute it for that vintage look. -
Creating Centers:
Using your small round brush, paint the yellow centers first. Dab the brush to create slightly textured, imperfect circles. These act as anchors for your petals. -
Initial Petal Layer:
Load the same round brush with White paint. Starting near the yellow center, pull the brush outward to create teardrop or oval petal shapes. Keep the paint relatively thin for this first pass. -
Building Opacity:
Ceramic paints can be semi-transparent. Let the first layer dry for about 10-15 minutes, then apply a second coat of white to the petals to make them pop against the cream background. -
Adding Dimension:
I like to take a very fine liner brush with a tiny amount of diluted grey or black (or even a darker yellow mix) to outline just a few petals loosely. This gives that illustrative, sketched look seen in the photo. -
Texturing the Centers:
Once the yellow centers are tacky or dry, use the tip of a liner brush to add tiny dots of a darker yellow or light brown on top. This mimics the pollen texture of real daisies.
Loose Lines
Don’t worry about perfect outlines. Use a very fine brush to add broken, sketchy black lines around some petals for that rustic illustration style.
Step 3: Adding Greenery
-
Stem Structure:
Switch to your Olive Green paint. With the liner brush, draw thin, slightly wavy lines extending down from the flower heads. Don’t make them straight sticks; let them curve naturally with the shape of the pot. -
Broad Leaves:
For the larger leaves near the base, press down harder with your round brush to create a wider stroke, then lift up as you drag to taper the end. -
Fern-like Sprigs:
Fill in empty spaces with lighter, feathery foliage. Use quick, short flicks of the liner brush branching off a central stem to create an airy filler leaf. -
Lid Details:
Don’t forget the lid! Paint 2-3 smaller daisies on the lid, ensuring the stems curl downwards towards the rim to integrate the lid design with the pot body.
Paint Slipping?
If paint beads up or slips, the ceramic might still be oily. Wipe the specific spot again with rubbing alcohol and let it dry before repainting.
Step 4: Finishing & Curing
-
Review and Refine:
Step back and look at the composition. If a spot looks too empty, add a small floating petal or a tiny green sprig to balance it out. -
Drying Time:
Allow the teapot to air dry completely for at least 24 hours. Most ceramic paints require this rest period before baking. -
Baking Process:
Place the teapot in a cold oven. Set the temperature to 300°F (150°C) or strictly follow the paint manufacturer’s instructions. Once it reaches temperature, bake for 35 minutes. -
Cooling Down:
Turn the oven off and leave the teapot inside until the oven is completely cool. Removing it while hot can cause thermal shock and crack your beautiful work.
Now you have a charming custom centerpiece for your next afternoon tea


What Really Happens Inside the Kiln
Learn how time and temperature work together inside the kiln to transform clay into durable ceramic.
Minimal Growing Stem Border
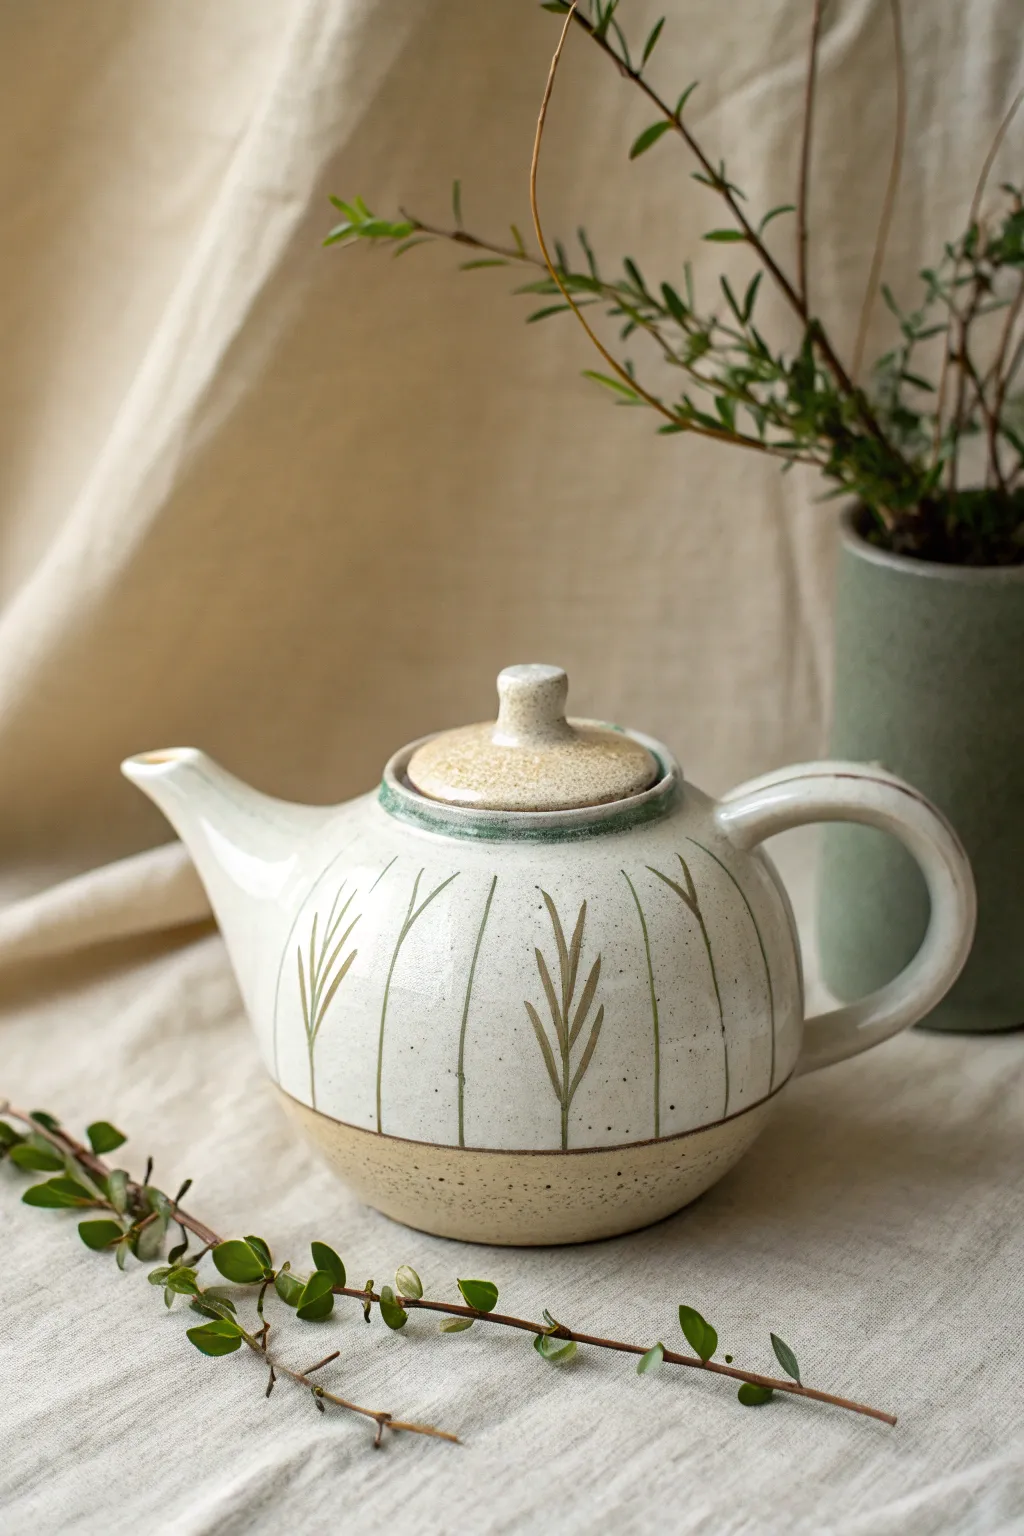
Capture the serenity of nature with this elegant teapot design, featuring delicate green stems rising against a creamy white glaze. The raw clay base and subtle botanical motif create a perfect balance between rustic and refined.
Step-by-Step Tutorial
Materials
- Bisque-fired ceramic teapot
- Wax resist
- Creamy white dipping glaze
- Underglaze pencil or thin liner brush
- Moss green underglaze
- Olive green underglaze
- Sponges
- Clean water
- Clear transparent glaze (optional, for the rim)
Step 1: Preparation & Base Glazing
-
Clean surface:
Begin by wiping down your bisque-fired teapot with a damp sponge to remove any dust or debris that might interfere with glaze adhesion. -
Mask the base:
Decide where you want the raw clay line to start. Apply a coat of wax resist to the bottom third of the teapot and the entire bottom surface to keep the clay exposed and sandy-colored. -
Mask the lid:
Apply wax resist to the main dome of the lid if you want it to match the raw base, leaving only a small rim or the knob for glazing if desired. -
Dip the body:
Stir your creamy white glaze thoroughly. Holding the teapot by the foot or using glazing tongs, dip the body into the glaze bucket, stopping right where your wax resist line begins. -
Clean the drip line:
Once the glaze is dry to the touch, use a damp sponge to carefully wipe away any glaze beads that may have gathered on the waxed areas to ensure a crisp, clean line.
Clean Lines
If your vertical lines look shaky, stabilize your painting hand by resting your pinky finger on the dry surface of the teapot as you pull the brush upward.
Step 2: Painting the Stems
-
Plan vertical spacing:
Visualize vertical lines running from the unglazed base up toward the neck. You want them spaced evenly around the circumference, roughly an inch apart. -
Paint the main stems:
Using a very fine liner brush loaded with moss green underglaze, paint thin, straight vertical lines. Start from the glaze transition line and pull the stroke upward toward the neck. -
Vary the heights:
I like to vary the termination points slightly; some lines can go all the way to the rim detail, while others can stop just short for a more organic feel. -
Add the rim accent:
Paint a thin, horizontal band of green around the neck of the teapot where the lid sits, connecting the tops of your vertical stems.
Speckled Finish
To get the speckled look shown in the image, use a clay body with grog or add a ‘speckled’ transparent overglaze if your clay is plain white.
Step 3: Adding Leaves
-
Select focal stems:
Choose alternating stems to feature leaves; leaving every other stem plain creates a cleaner, less cluttered aesthetic. -
Paint lower leaves:
On your chosen stems, paint small, elongated V-shapes starting about a third of the way up the stem. Use a slightly lighter olive green if you want subtle depth. -
taper the strokes:
Press the brush down at the stem and lift as you pull away to create a tapered, sharp leaf tip. -
Add upper leaves:
Add a second pair of leaves slightly higher up on the same stem. Keep these delicate and pointing upward to suggest growth. -
Detail the lid:
If you left an accent ring on the lid unwaxed, add a very thin green stripe to coordinate with the teapot’s neck.
Step 4: Firing
-
Final inspection:
Check the unglazed bottom section one last time for any stray smudges of green underglaze and sponge them off. -
Dry completely:
Allow the teapot to dry overnight to ensure all moisture has evaporated from the clay body. -
Glaze fire:
Fire the piece in the kiln according to the specific temperature requirements of your clay and glaze combination.
Now brew a fresh cup of tea and enjoy the peaceful atmosphere your new handmade vessel brings to the table
Modern Geometric Color Blocks
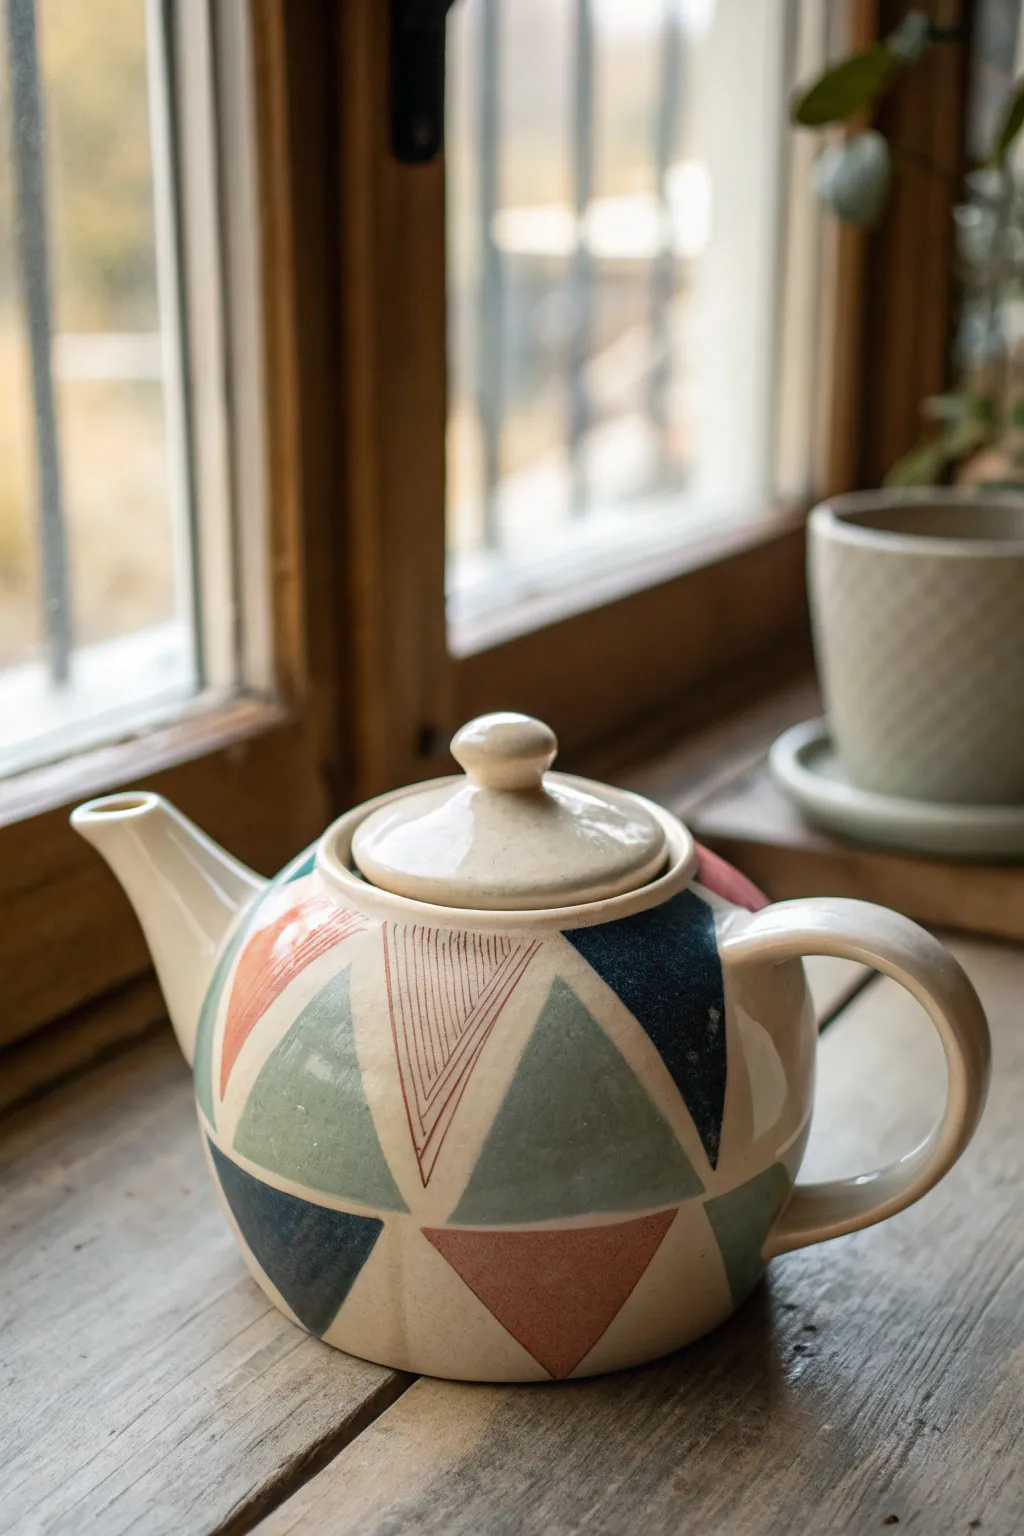
Transform a plain ceramic teapot into a modern masterpiece with this serene geometric design. Using a soothing palette of muted teal, terracotta, and navy, you’ll create interlocking triangles accented by fine line work for a sophisticated, hand-painted look.
Step-by-Step
Materials
- Plain white or cream ceramic teapot (clean and dry)
- Pebeo Porcelaine 150 paints (or similar ceramic paints) in: Terracotta (or dusky pink), Muted Teal/Sage Green, Navy Blue, Rust Red/Brown (for lines)
- Rubbing alcohol and paper towels
- Painter’s tape (1/4 inch width is ideal)
- Pencil (HB or lighter)
- Ruler or measuring tape
- Small flat synthetic paintbrush (size 4 or 6)
- Fine liner brush (size 0 or 00)
- Palette or small dish for mixing
- Oven (for curing, if using bake-on paints)
Step 1: Preparation & Planning
-
Clean the Surface:
Before you start, wipe down the entire teapot with paper towels soaked in rubbing alcohol. This removes any oils or fingerprints that could prevent the paint from adhering properly. -
Visualize the Grid:
The design relies on a grid of triangles. Imagine the body of the teapot divided into horizontal bands. Depending on the curvature, you might want two or three main bands of triangles. -
Mark Reference Lines:
Using a pencil, lightly mark horizontal guidelines around the belly of the teapot. These lines will determine the height of your triangle rows. Don’t worry, the pencil marks usually burn off in the oven or can be wiped away later. -
Sketch the Zig-Zag:
Inside your horizontal bands, lightly sketch a zig-zag line. This continuous ‘W’ shape creates the framework for your alternating upright and inverted triangles.
Step 2: Painting the Color Blocks
-
Prepare the Teal:
Squeeze out a small amount of your Muted Teal or Sage Green paint. Using your flat brush, carefully fill in random triangles. I like to scatter them so no two teal triangles touch directly. -
Apply the Navy:
Clean your brush thoroughly. Next, apply your Navy Blue to selected triangles. The dark color acts as a beautiful anchor, so try placing these near the bottom or sides to add visual weight. -
Add the Terracotta:
Fill in remaining triangles with the Terracotta or dusky pink shade. This warm tone balances the cool blues and greens nicely. -
Leave Some Blank:
Don’t feel the need to paint every single space. Leaving some triangles as the raw cream ceramic color (negative space) adds breathability to the design. -
Let it Dry:
Allow these base colors to dry for at least 30-60 minutes. They need to be touch-dry before you add the delicate line work near them.
Tape Trick
For super crisp edges on your triangles, use thin styling tape or cut pieces of painter’s tape to mask off the shapes before painting.
Step 3: Detailing & Finishing
-
Mix the Line Color:
For the detailed linear triangles, use a Rust Red or thin down your Terracotta paint slightly with a drop of medium or water (if compatible) to help it flow. -
Paint the Outlines:
Switch to your fine liner brush. Choose a few of the blank or lighter-colored triangles to embellish. Start by outlining the triangle shape with your rust color. -
Fill with Chevrons:
Inside these outlined triangles, paint smaller and smaller ‘V’ shapes nested within each other. Keep your hand steady and let the brush gliding do the work. -
Review and Touch Up:
Inspect your work. If any edges are messy, you can gently scrape away excess dry paint with a toothpick or craft knife for a sharper line. -
Clean Up Guidelines:
If any pencil marks are still visible in the unpainted areas, gently erase them or wipe them with a slightly damp Q-tip, being careful not to touch the wet paint. -
Long Dry:
Let the teapot sit for 24 hours to ensure the paint is completely dry. This step is crucial for durability. -
Bake to Cure:
Place the teapot in a cold oven. Set the temperature to 300°F (150°C) or as directed by your paint manufacturer. Bake for 35 minutes, then turn the oven off and let the teapot cool down inside completely.
Metallic Accent
After baking, use a gold oil-based marker to trace one edge of select triangles for a touch of modern luxury.
Once cooled, your new custom teapot is ready to serve up warmth and style at your next tea time

TRACK YOUR CERAMIC JOURNEY
Capture glaze tests, firing details, and creative progress—all in one simple printable. Make your projects easier to repeat and improve.
Black-and-White Line Art Faces
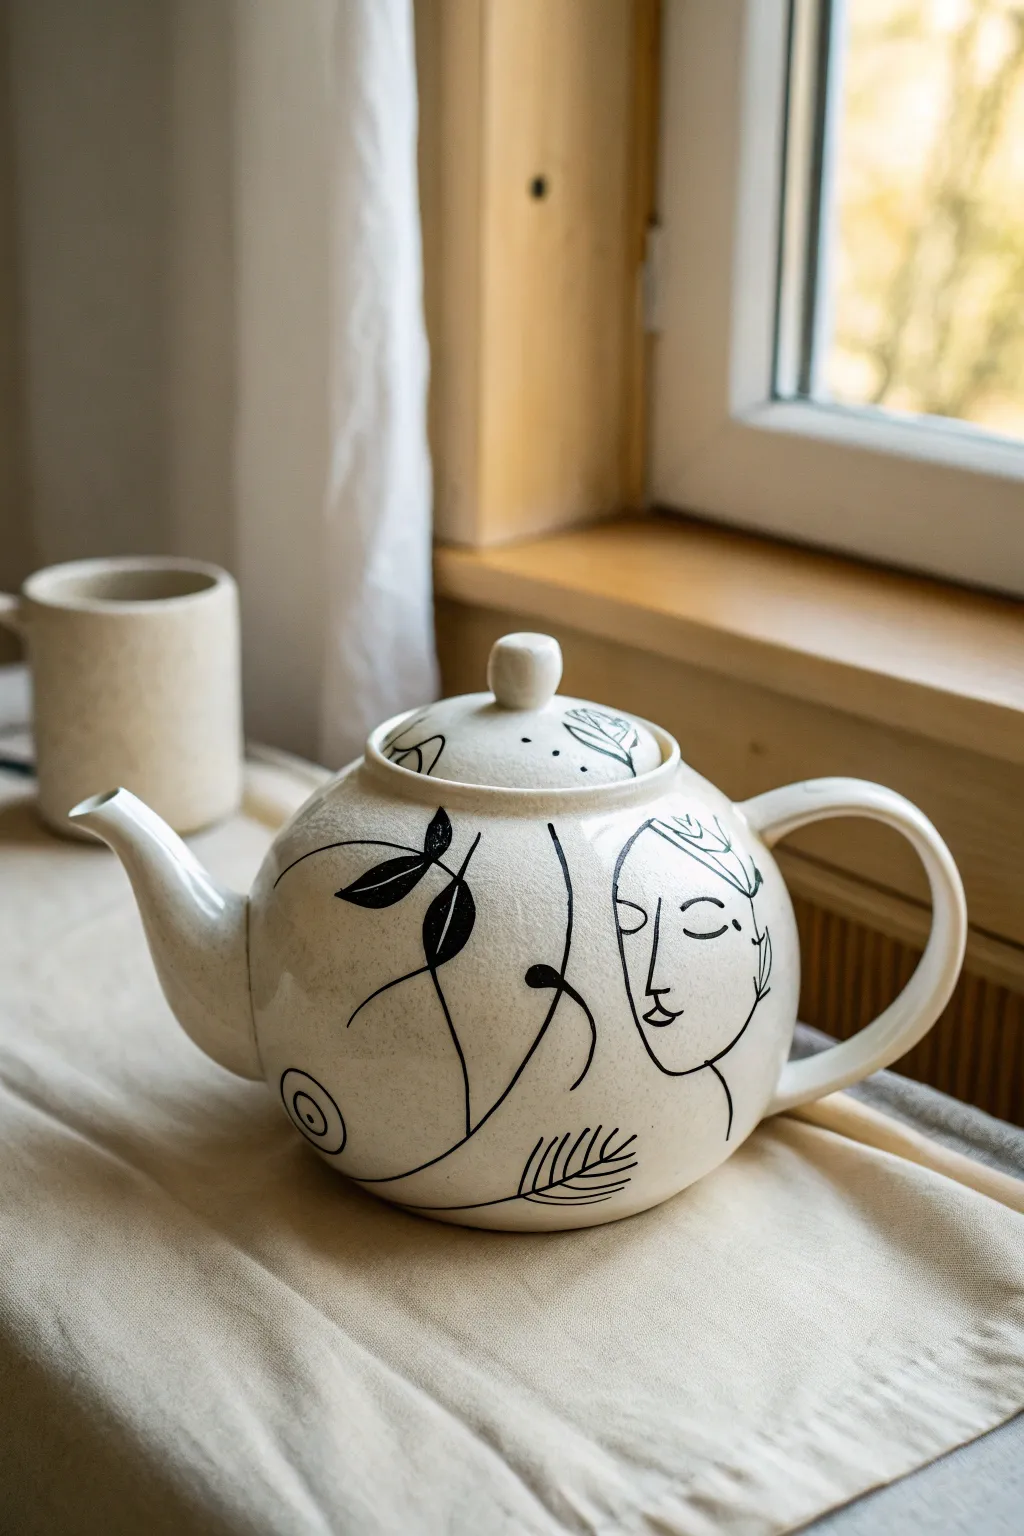
Transform a plain ceramic teapot into a piece of modern art with this elegant black-and-white line work design. The project combines abstract facial profiles with organic botanical elements for a soothing, artisanal aesthetic.
How-To Guide
Materials
- White or cream ceramic teapot (clean and dry)
- Black oil-based paint marker (fine tip)
- Black oil-based paint marker (medium tip)
- Pencil (HB or lighter)
- Eraser
- Rubbing alcohol and cotton pads
- Oven (for curing)
- Paper towels
- Cotton swabs (for touch-ups)
Step 1: Preparation & Sketching
-
Clean the surface:
Wipe down the entire exterior of the teapot with rubbing alcohol on a cotton pad to remove any oils, dust, or fingerprints. Let it dry completely. -
Rough sketch:
Lightly sketch your design directly onto the teapot using a pencil. Start with the main curve of the jawline and face profile on the right side of the pot. -
Map out the features:
Add the details of the face: a closed, peaceful eye, a simple nose line, and a small mouth. Keep lines loose and flowing. -
Add botanical elements:
On the left side of the teapot, sketch a long, winding stem that curves upward. Draw simple almond-shaped leaves attached to this stem. -
Incorporate abstract details:
Sketch a small fern frond near the bottom and a circular bullseye motif near the base. Don’t forget to add a few leaves or curves onto the lid to integrate it with the main body.
Uneven Ink Flow?
If your paint marker skips or pools, press the tip onto a piece of scrap paper a few times to re-saturate the nib before returning to the ceramic surface.
Step 2: Inking the Design
-
Outline the face:
Using the fine-tip black paint marker, carefully trace over your pencil lines for the facial profile. Use smooth, confident strokes to avoid wobble. -
Thicken key lines:
Switch to the medium-tip marker for the main stems and the outline of the face if you want a bolder look. I like to keep the facial features delicate with the fine tip. -
Fill the darker leaves:
Identify a few specific leaves on the main branch to be solid black. Use the medium marker to fill these in completely for high contrast. -
Draw the fern details:
Switch back to the fine-tip marker to draw the central spine of the fern leaf at the bottom, then flick the pen outward to create the delicate fronds. -
Execute the fine curves:
Trace the thin, sweeping curves that connect the botanical elements. These lines serve as the ‘energy’ connecting the face and the plants. -
Detail the lid:
Remove the lid and place it on a stable surface. Trace the small leaves and decorative dots you sketched earlier, ensuring the pattern flows even when the lid is on. -
Clean up errors:
If you make a mistake while the paint is wet, quickly wipe it with a damp cotton swab. If it’s dry, you can often scrape it gently with a craft knife or use a bit of alcohol. -
Let it set:
Allow the paint to air dry for at least one hour. Be careful not to smudge the design while handling the pot.
Pro Tip: Anchor Your Hand
Rest your pinky finger on the teapot surface (on a dry area) to stabilize your hand while drawing curves. This acts as a pivot point for smoother lines.
Step 3: Finishing & Curing
-
Erase guidelines:
Once the paint is fully dry to the touch, very gently erase any visible pencil marks. Brush away the eraser dust with a soft, dry brush. -
Prepare for baking:
Place the teapot and lid into a cool oven. do not preheat the oven, as the sudden temperature change could crack the ceramic. -
Bake the design:
Set the oven to 350°F (175°C) and bake for 30 minutes. The time starts once the oven reaches temperature. -
Cool down:
Turn off the oven and leave the teapot inside until the oven is completely cool. This gradual cooling prevents thermal shock.
Now you have a stunning, hand-painted teapot ready for your next relaxing tea break
Mandala Dots Around the Lid
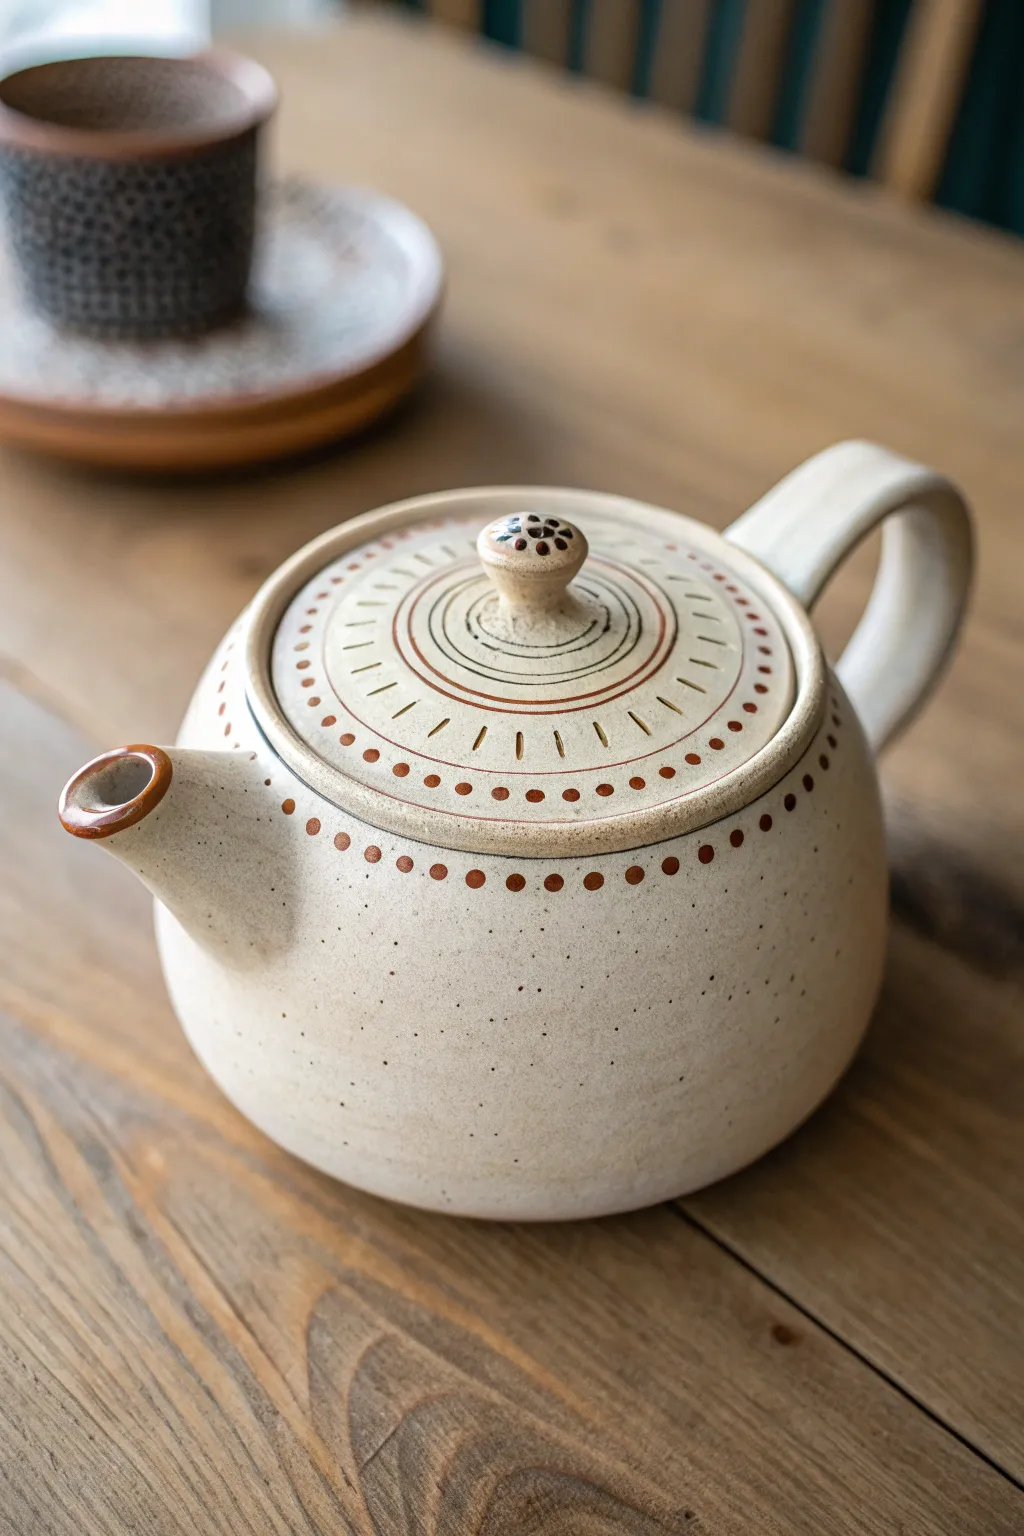
Transform a plain ceramic teapot into a warm, rustic piece of art using simple geometric patterns and earthy tones. This project focuses on concentric circles and rhythmic dot placement to create a soothing, sunburst-style mandala design on the lid.
Detailed Instructions
Materials
- Bisque or glazed ceramic teapot (cream or speckled base preferred)
- Ceramic paint or porcelain markers (Terracotta/Red-Brown color)
- Fine detail paintbrush (size 0 or 00)
- Dotting tools (various sizes) or ends of paintbrushes
- Pottery wheel/banding wheel (optional but helpful)
- Rubbing alcohol and cotton pads
- Clear ceramic sealant or glaze (if required for your paint type)
Step 1: Preparation & Base Design
-
Clean surface:
Begin by wiping down your entire teapot with rubbing alcohol on a cotton pad. This removes any oils or dust that might prevent the paint from adhering properly. -
Define the rim:
Using a fine detail brush loaded with terracotta paint, carefully paint a thin line around the very edge of the teapot’s spout opening. Keep your hand steady or rotate the teapot while holding the brush still. -
Create the main lid rings:
Place the lid on a banding wheel if you have one. If not, carefully hand-paint three concentric circles on the lid: one near the outer edge, one midway, and one closer to the knob. -
Add secondary lines:
Paint thinner, more delicate lines in between your main rings. I like to vary the line thickness slightly to give the design an organic, hand-thrown clay feel.
Step 2: Knob & Radiating Details
-
Painting the knob base:
Paint a solid ring around the base of the lid’s knob to ground the central design. -
Knob flower detail:
Using a very small dotting tool, place a central dot on the very top of the knob. Surround this with 5-6 smaller dots to create a simple flower shape. -
Sunburst dashes:
Move to the space between the middle and outer rings on the lid. Paint small, straight dashes radiating outward. Space them evenly, imagining them as rays of the sun. -
Check symmetry:
Take a moment to look at your dashes from above. If any gaps look too wide, you can carefully add a smaller dash in between, though slight irregularity adds charm.
Steady Hand Pro-Tip
Rest your pinky finger on the teapot surface while painting lines. This anchors your hand and acts as a pivot point for smoother circles.
Step 3: The Dotted Border
-
Select dotting tool:
Choose a medium-sized dotting tool or the flat end of a brush handle that matches the size of the dots shown on the teapot’s shoulder. -
Shoulder dots:
Create a ring of dots around the upper shoulder of the teapot body, just below where the lid sits. Space them about 5mm apart for a clean look. -
Lid perimeter dots:
Switch to a slightly smaller dotting tool. Add a corresponding ring of dots around the outermost edge of the lid itself. -
Inner lid dots:
Add a final ring of very small dots inside the innermost circle on the lid, surrounding the knob area.
Level Up: Texture
Use ‘puff paint’ or dimensional ceramic paint for the dots. This creates a tactile, raised surface that mimics traditional slip-trailing techniques.
Step 4: Finishing Touches
-
Review and refine:
Inspect your lines and dots. If any paint smudged, use a damp cotton swab or toothpick to gently scrape away the excess before it cures. -
Speckling (Optional):
If your base teapot wasn’t already speckled, you can flick a toothbrush loaded with watered-down brown paint to add subtle texture across the lower body. -
Drying time:
Allow the paint to dry completely according to the manufacturer’s instructions. This usually takes at least 24 hours for air-dry paints. -
Baking or sealing:
If using heat-set paints, place the teapot in a cool oven, heat to the specified temperature (often 300°F/150°C), bake for 30 minutes, and let it cool inside the oven.
Now you have a beautifully patterned teapot ready for your next cozy afternoon tea
Soft Watercolor Wash Background
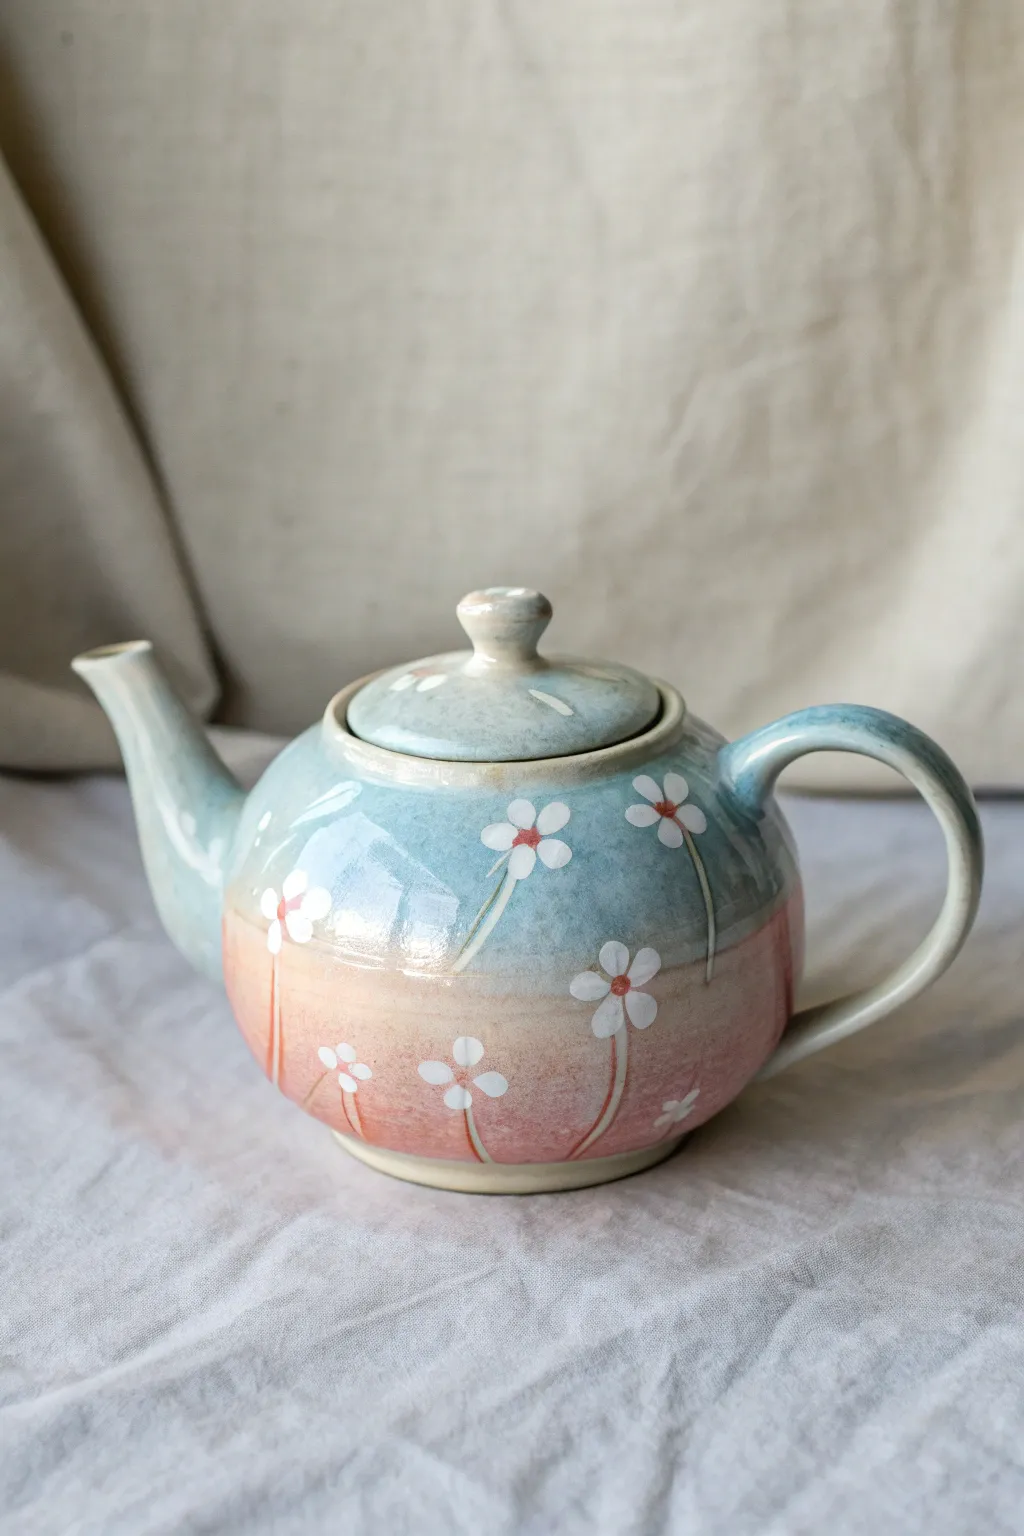
This project transforms a plain ceramic teapot into a piece of functional art with a soft, ethereal transition from morning sky blue to sunset pink. The delicate white floral motifs float atop this watercolor-style background, giving the piece a gentle, spring-like feel perfect for tea time.
Step-by-Step Guide
Materials
- Bisque-fired ceramic teapot
- Ceramic underglazes (Sky Blue, Soft Pink/Peach, Bright White, Red-Orange)
- Wide soft fan brush
- Medium round brush
- Fine detail liner brush
- Sponge
- Clear dipping glaze
- Kiln (or access to a firing service)
Step 1: Preparing the Canvas
-
Clean the surface:
Before you begin, wipe down your bisque teapot with a slightly damp sponge. This removes any dust from the shelf that could prevent the glaze from adhering properly. -
Plan your horizon line:
Visualize where you want the colors to meet. On this pot, the transition happens roughly at the widest part of the belly, keeping the pink grounded and the blue lofty. You can lightly mark this with a pencil if you need a guide; the graphite will burn off in the kiln.
Patchy Coverage?
If your gradient looks streakier than a watercolor wash, use a barely damp sponge to lightly dab the transition area. This softens harsh brush marks.
Step 2: Creating the Wash
-
Dilute the underglazes:
To achieve that signature watercolor look, thin your blue and pink underglazes slightly with water. You want a consistency closer to heavy cream than toothpaste. -
Apply the top color:
Using a wide fan brush, apply the Sky Blue underglaze to the top half of the teapot, including the lid and the spout. Use long, horizontal strokes to ensure even coverage. -
Apply the bottom color:
While the blue is still slightly damp, apply the Soft Pink underglaze to the bottom half. Bring the color up to meet the blue. -
Blend the transition:
Clean your fan brush and leave it barely damp. Where the blue and pink meet, gently brush back and forth horizontally. This blends the two hues directly on the pot, creating a soft purple-grey transition zone rather than a harsh line. -
Layering for depth:
Allow the first coat to dry until it’s chalky to the touch. I like to apply a second, slightly more watered-down coat to smooth out any brushstrokes and deepen the color saturation.
Add Texture
Before the underglaze dries completely, scratch thin lines through the stems with a needle tool (sgraffito) to reveal the white clay body underneath.
Step 3: Painting the Florals
-
Position the main blooms:
Using a medium round brush loaded with Bright White underglaze, paint simple five-petal flower shapes. Place the largest ones near the transition line where the colors blend. -
Vary the sizes:
Add smaller, three-petal or four-petal blooms lower down in the pink section and higher up in the blue section. This creates a sense of organic movement. -
Add the stems:
Switch to your fine detail liner brush. With diluted white underglaze, paint very thin, slightly curved lines extending downward from each flower head. Let them fade out as they reach the bottom of the pot. -
Center dots:
Once the white petals are dry, dip the tip of a brush handle or a small round brush into the Red-Orange underglaze. Dot the center of each flower to give it a focal point. -
Refine the petals:
If the background color is showing through your white petals too much, carefully dab a second layer of white on just the petals to make them pop.
Step 4: Finishing Up
-
Check the lid:
Don’t forget the lid! Add a small petal or simple white strokes to echo the design on the main body. -
Clear glazing:
Once the underglaze is completely dry, dip the entire teapot into a clear transparent glaze. Shake off excess gently to prevent distinct drips. -
Wipe the foot:
Use a sponge to wipe all glaze off the very bottom ‘foot’ ring of the teapot. If you leave glaze here, the pot will fuse to the kiln shelf permanently. -
Fire:
Fire the piece in the kiln according to the clay and glaze manufacturer’s instructions (usually Cone 06 or Cone 6 depending on your materials).
Now you have a stunning, hand-painted vessel ready to brighten up your morning routine
Ombre Fade From Base to Lid

Capture the serene beauty of a twilight forest with this distinctive ombre teapot design. By layering reactive glazes, you’ll create a stunning transition from a deep berry red base through a misty teal horizon line, finishing with a creamy speckled oatmeal top.
Detailed Instructions
Materials
- Bisque-fired ceramic teapot
- Wax resist (liquid or crayon)
- Deep berry red reactive glaze
- Teal blue reactive glaze
- Cream or oatmeal speckled glaze
- Soft fan brush
- Detail liner brush
- Sponge
- Bowl of clean water
- Kiln (or access to a firing service)
Step 1: Preparation and Base Coat
-
Clean the surface:
Before you begin, wipe down your bisque teapot with a slightly damp sponge. This removes any kiln dust or oils from your hands that might resist the glaze. -
Protect the bottom:
Apply wax resist to the very bottom foot of the teapot where it will sit on the kiln shelf. This prevents the glaze from fusing your pot to the shelf during firing. -
Apply the bottom color:
Using a soft fan brush, apply three coats of the deep berry red glaze to the bottom third of the teapot. Brush horizontally, allowing each coat to dry to the touch before adding the next. -
Feather the edge:
On the third coat of red, don’t create a hard line at the top. Instead, use a slightly drier brush to feather the glaze upward, creating an uneven, organic edge.
Glaze Crawling?
If you see bare spots after firing where glaze pulled away, you might have applied it too thickly or over dust. Wash, dry, re-apply glaze to spots, and re-fire.
Step 2: Creating the Horizon
-
Mix the transition color:
For the middle band, select your teal blue glaze. This needs to interact with both the red below and the cream above. -
Apply the teal band:
Paint a band of teal glaze roughly an inch wide right above your red section. Overlap the bottom of the teal slightly onto the top of the dry red glaze. -
Encourage interaction:
While the teal glaze is still damp, I like to gently dab the area where it meets the red with the tip of the brush. This promotes mingling during the firing process. -
Create vertical strokes:
Using the tip of your brush, pull tiny vertical strokes of teal upwards from the main band. These will look like abstract distant trees or a ‘bleeding’ effect once fired.
Step 3: Top Section and Lid
-
Glaze the top body:
Apply three coats of the cream or oatmeal speckled glaze to the remaining upper portion of the teapot body, including the spout and handle. -
Blend the upper transition:
Carefully bring the cream glaze down to meet the teal band. Overlap them slightly, but be careful not to completely cover your ‘tree’ strokes. -
Glaze the lid:
Paint the entire lid with the cream speckled glaze, applying three even coats to match the top of the pot. -
Add detail accents:
With a fine detail liner brush, dip into the deep berry red glaze. Carefully paint a thin rim around the opening of the spout. -
Detail the lid rim:
Paint extensive thin lines of berry red on the tiny ridge of the lid’s knob and the very edge of the lid rim to tie the design together.
Pro Tip: Gravity Drip
For a more dramatic ‘forest’ look, load your brush heavily with teal glaze and press it once at the transition line, letting a single heavy bead naturally drip down into the red zone.
Step 4: Finishing Touches
-
Check the foot:
Examine the waxed bottom foot. If any glaze has dripped onto the wax, wipe it away cleanly with a damp sponge. -
Inspect handles and spout:
Double-check the inside of the spout and the underside of the handle to ensure no bare spots remain. -
Let it dry completely:
Allow the teapot to dry for at least 24 hours to ensure all moisture has evaporated from the bisque before firing. -
Fire the piece:
Fire the teapot in a kiln according to the specific cone temperature recommended for your glazes (usually Cone 5 or 6 for stoneware).
Pour yourself a cup of tea and enjoy the warm, earthy transition of colors on your new creation
Tape-Masked Stripes and Chevrons
Transform a plain ceramic teapot into a piece of functional art with this warm, earth-toned design featuring crisp chevrons and intricate banding. The speckled beige glaze base paired with rust-colored geometric patterns creates a cozy, modern-boho aesthetic perfect for your morning brew.
Step-by-Step Tutorial
Materials
- Bisque-fired ceramic teapot (clean and dust-free)
- Speckled oatmeal or sand-colored glaze (for the base)
- Rust or terracotta colored underglaze
- High-quality masking tape (various widths: 1/8 inch, 1/4 inch)
- Detail brush (size 0 or 1 liner brush)
- Medium flat brush (for base coat)
- Pencil (optional)
- Damp sponge
- Clear transparent glaze (for sealing)
Step 1: Preparation and Base Coat
-
Clean the surface:
Begin by wiping down your bisque teapot with a slightly damp sponge. This removes any kiln dust or oils from your hands that might repel the glaze. -
Apply the base glaze:
Using a medium soft brush, apply three even coats of the speckled oatmeal glaze to the entire exterior and interior of the teapot. Allow each coat to dry until it’s chalky to the touch before applying the next. -
Check for smoothness:
Inspect your base coats for drips or heavy brush marks. You want a smooth, unified canvas for your geometric lines, so gently smooth out any ridges with your finger if necessary. -
Let it dry completely:
I prefer to let the base glaze dry for at least a few hours or overnight. If the base is damp, the tape in the next steps might peel up the glaze underneath.
Glaze Crawling?
If the rust stripes pull away during firing revealing bare clay, your underglaze might be too thick. Apply thinner, more watery layers next time, or check that your oils/lotion didn’t contaminate the surface.
Step 2: Creating the Zig-Zag Pattern
-
Establish the boundaries:
Mentally divide the central belly of the teapot. This is where your chevron ‘mountain ranges’ will live. You can lightly sketch a horizontal guide line around the circumference with a soft pencil if you need help keeping it straight. -
Paint the first zig-zag:
Dip a fine liner brush into the rust-colored underglaze. Start your first continuous zig-zag line around the middle. Keep your wrist loose to maintain sharp peaks and distinct valleys. -
Parallel lines:
Paint a second zig-zag line directly below the first, mirroring its movement. Try to keep the spacing between them consistent to create a unified band. -
Third tier:
Add a third zig-zag line below the second one. Minor wobbles are okay; they add to the hand-thrown charm of the piece. -
Clean up edges:
If any lines merged or look too thick, carefully scratch away the excess rust underglaze with a wooden skewer or needle tool to reveal the base color again.
Level Up: Texture
Instead of just painting the base, mix granular ilmenite or coarse sand into your oatmeal glaze bucket before dipping. This creates a deeply tactile, speckled surface underneath your geometric lines.
Step 3: The Herringbone Band
-
Mark the lower band:
Near the bottom curve of the pot, just before it rounds under, use masking tape to define a horizontal band about 3/4 inch wide. -
Fill the background:
Paint the space inside your tape lines with a solid coat of the rust underglaze. You may need two coats for full opacity. Remove the tape gently while the paint is still slightly damp to keep edges crisp. -
Carve the herringbone:
Once the solid rust band is dry to the touch, use a sgraffito tool or a sharp needle to carve out the herringbone pattern. Scratch diagonal V-shapes repeatedly to reveal the lighter base glaze beneath the rust strip. -
Dust off debris:
Gently blow away or brush off the carved crumbs. Be careful not to smudge the lines.
Step 4: Finishing Details
-
Add the rim detail:
Paint a solid, thick band of rust underglaze around the collar where the lid sits. -
Lid coordination:
For the lid, simply ensure it has the speckled base coat. You can leave it plain or add a tiny ring of rust around the knob for continuity. -
Clear coat application:
Since we used underglaze on top of a base glaze, you generally don’t need a clear coat if your base glaze is glossy. However, if your base feels matte or porous, apply a thin layer of clear transparent glaze over the decoration to seal it. -
Final wipe:
Wipe the foot of the teapot (the bottom ring it sits on) completely clean of any glaze with a sponge. This prevents it from fusing to the kiln shelf during firing. -
Fire the piece:
Place the teapot in the kiln and fire it to the temperature recommended for your specific clay and glaze body (usually Cone 5 or 6 for stoneware).
Once cooled, your teapot is ready to serve warmth and style at your next gathering
Spout-and-Handle Accent Colors
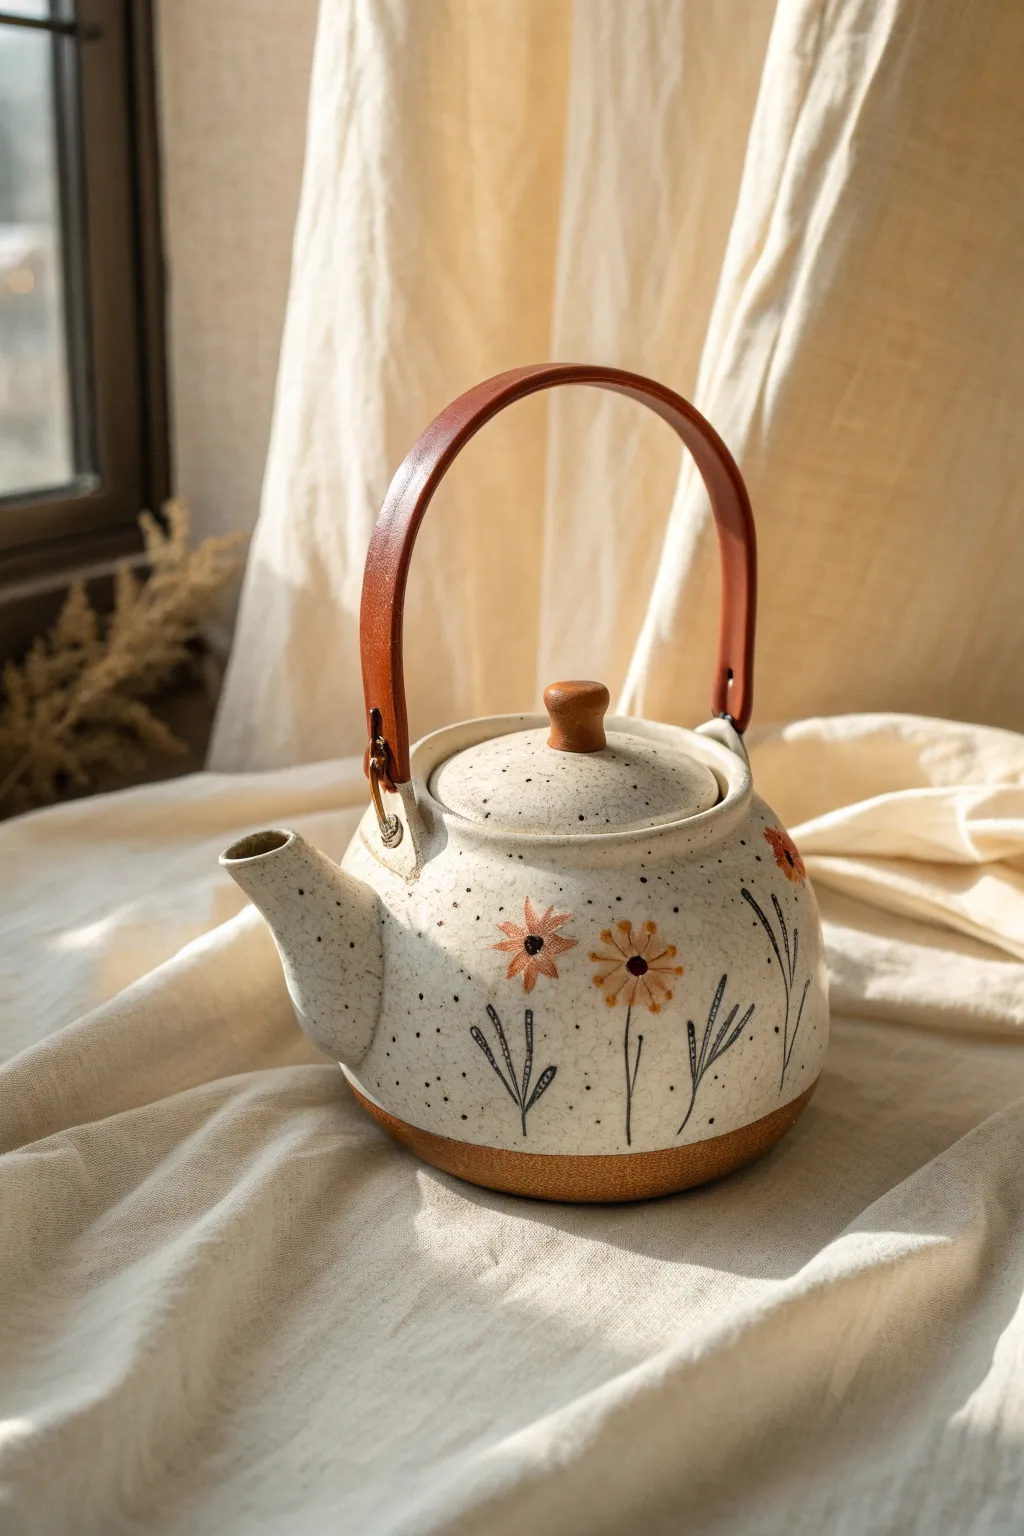
Capture the essence of a rustic cottage garden with this beautifully hand-painted teapot design. Using a speckled base and warm, earthy accent colors, you’ll create a piece that feels both cozy and sophisticated.
Step-by-Step Guide
Materials
- Ceramic teapot (clean and dry)
- Ceramic paint or enamel (off-white/cream, terracotta orange, mustard yellow, dark charcoal grey, warm brown)
- Speckling brush or old toothbrush
- Fine detail brush (size 0 or 1)
- Medium flat brush
- Small round brush
- Rubbing alcohol
- Cotton pads
- Palette
- Oven (for curing ceramic paint)
Step 1: Preparation & Base Coat
-
Clean surface:
Begin by wiping down your entire teapot with rubbing alcohol on a cotton pad. This removes oils and dust that prevent paint adhesion. -
Mix base color:
If you don’t have a speckled clay teapot, mix an off-white or cream ceramic paint. Apply an even coat over the entire body, avoiding the bottom rim if you want raw clay exposure. -
Create speckles:
Once the base is tacky but not fully dry, dilute a tiny amount of charcoal grey paint with water. Dip an old toothbrush or stiff brush into the mixture. -
Flick paint:
Run your thumb across the bristles to flick tiny specks of paint onto the teapot. Practice on paper first to control the density—you want a scattered, natural stone look. -
Dry completely:
Let this speckled base layer dry fully, preferably overnight, before adding any detailed designs.
Step 2: Painting the Wildflowers
-
Paint flower centers:
Using a small round brush, dab small circles of dark charcoal or dark brown for the flower centers. Place them randomly around the belly of the pot. -
Add orange petals:
Load your fine detail brush with terracotta orange paint. Paint small, pointed petals radiating from some of the centers to create coneflower shapes. -
Add yellow petals:
Use mustard yellow paint for the remaining flower centers, creating rounder, daisy-like blooms. Vary the petal lengths slightly for an organic feel. -
Layering details:
Once the petals are dry, add a tiny dot or second darker ring inside the flower centers to give them depth.
Oops! Big Blotches?
If your speckling technique creates large blobs instead of fine mist, quickly wipe them gently with a damp Q-tip before they dry to blend them out.
Step 3: Stems & Foliage
-
Draw stems:
With your finest liner brush and thinned charcoal grey paint, draw thin, imperfect lines stretching down from the flower heads. -
Add leaves:
Paint simple, linear leaves branching off the stems. Use loose strokes; these should look like delicate sketches rather than botanical illustrations. -
Create grass accents:
In the empty spaces between flowers, add small clusters of vertical lines to represent tall grass or wheat sprigs.
Wrap It Up
Skip painting the handle and instead wrap it tightly with real leather cord or jute twine after baking for an authentic mixed-media texture.
Step 4: Spout and Handle Accents
-
Base stripe:
Paint the bottom rim of the teapot with a warm brown tone to mimic an unglazed clay foot, giving the piece a grounded appearance. -
Texture the handle:
Paint the handle with a warm reddish-brown. While wet, streak in a slightly lighter brown vertically to simulate a leather strap texture. -
Paint the knob:
Coat the lid knob in a solid, warm wood-toned brown to match the handle aesthetic. -
Curing:
Follow the manufacturer’s instructions for your specific paint to bake the teapot in the oven. This sets the design and makes it durable.
Now you have a charming, rustic teapot ready for your next cozy afternoon tea
Underwater Fish Wraparound Scene
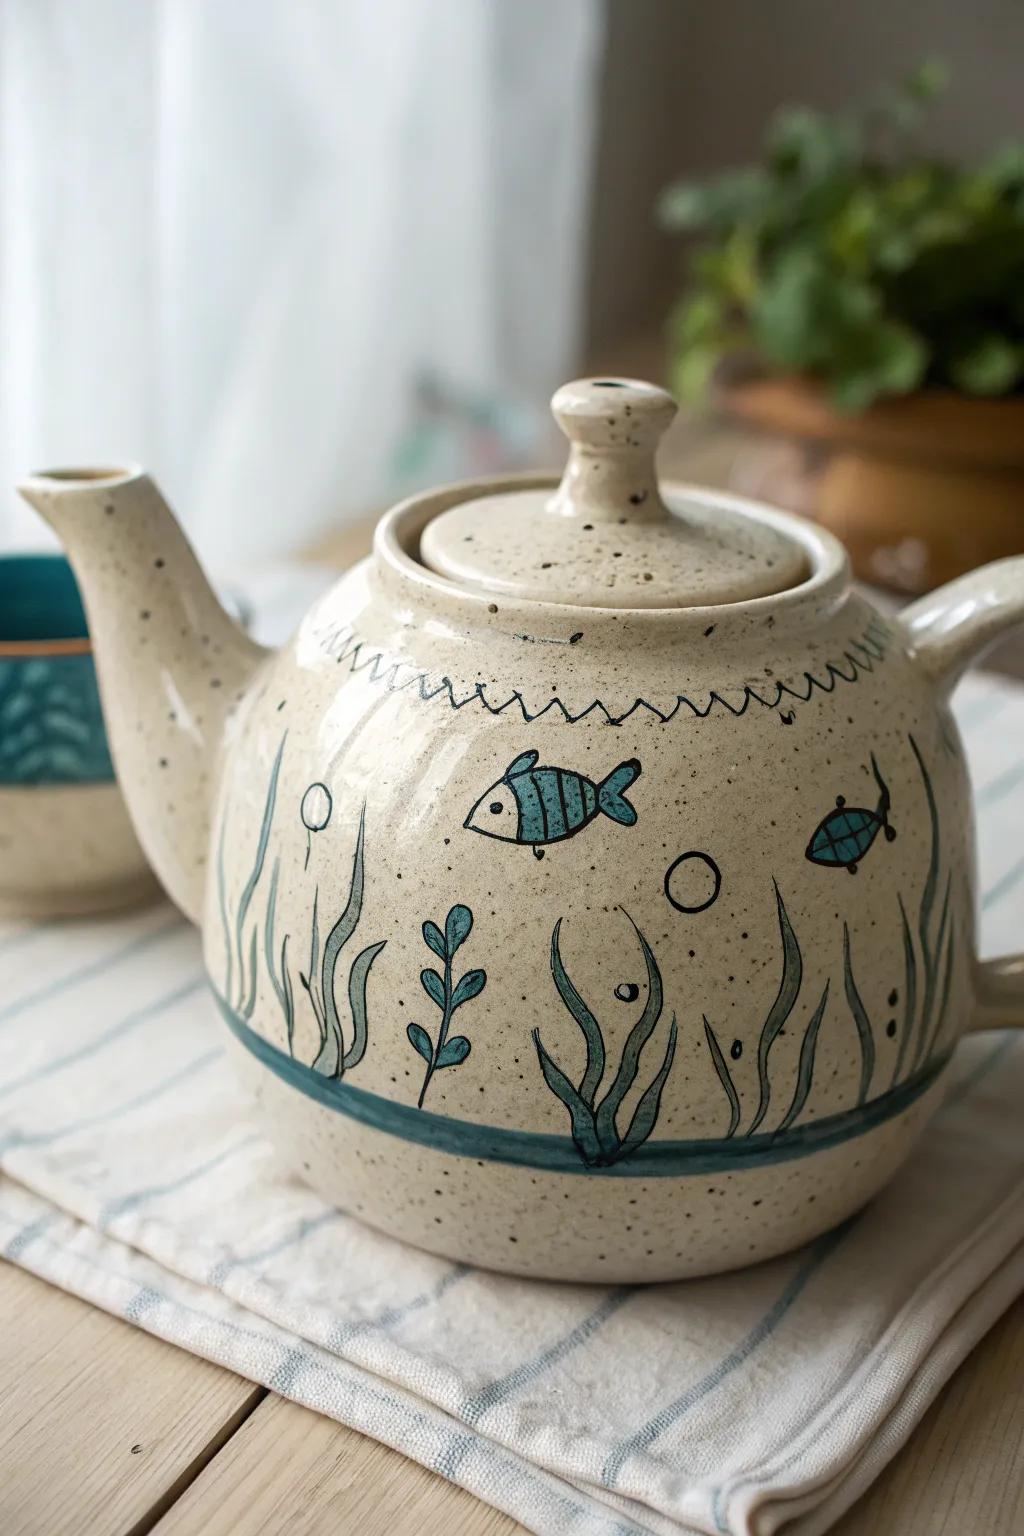
Transform a plain ceramic teapot into a delightful marine scene featuring playful fish and swaying seaweed. This wraparound design uses simple lines and charming aquatic motifs to create a functional piece of art perfect for your next tea time.
Step-by-Step Tutorial
Materials
- Bisque fired or glazed ceramic teapot (beige or speckled base preferred)
- Ceramic underglazes or porcelain paints (dark blue, teal, light blue)
- Fine liner brush (size 0 or 00)
- Small round brush (size 2)
- Pencil (for sketching on bisque)
- Clear glaze (if using underglazes)
- Water container and paper towels
Step 1: Setting the Scene
-
Surface Prep:
Begin by wiping down your ceramic teapot with a damp sponge to remove any dust or oils. If you are working on bisque, this ensures the glaze adheres properly; if you are painting on a finished mug with porcelain paints, clean it with rubbing alcohol. -
Top Border:
Near the shoulder of the pot, just below the lid opening, lightly sketch a horizontal guide line. Using your fine liner brush and dark blue paint, create a continuous zigzag or wavy line pattern along this guide to frame the top of your underwater scene. -
Bottom Ground Line:
Load your round brush with teal or a dark blue-green mix. Paint a thick, smooth band around the lower belly of the teapot. This serves as the ‘ocean floor’ from which your plant life will grow.
Step 2: Painting the Flora
-
Sketching Seaweed:
Lightly pencil in the placement of your seaweed clumps. You want them irregularly spaced around the entire pot to create rhythm. Aim for long, wavy vertical lines. -
Painting Kelp Blades:
Using a dark teal color and your liner brush, paint long, wavy blades of grass rising from the bottom band. Keep the lines relatively thin but vary the pressure slightly to give them organic movement. -
Adding Leafy Plants:
Intersperse the grassy blades with a different plant type. For this, draw a central stem and paint small, teardrop-shaped leaves in light blue climbing up the stalk. -
Defining the Plants:
Once the main color is down for the plants, come back with your darkest blue or black liner shade. Carefully outline the teal grass blades and the leafy plants to make them pop against the speckled background.
Glazing Tip
When applying clear glaze over underglaze designs, dab the first coat on rather than brushing. This prevents smearing your fine line work.
Step 3: Adding the Fauna
-
Fish Outlines:
Around the middle section of the teapot, sketch simple fish shapes. A basic oval with a triangle tail works perfectly. Orient them swimming in different directions for a natural look. -
Coloring the Fish:
Fill in the fish bodies with a solid coat of blue. I find that leaving the head area unpainted or lighter adds a nice bit of character and defines the face. -
Fish Stripes:
Once the blue base is dry to the touch, use your dark liner color to paint vertical stripes across the fish bodies. Add a small dot for the eye and outline the entire fish shape for clarity. -
Painting Bubbles:
Scattered around the fish and plants, paint small empty circles using your dark liner brush. These represent bubbles and help fill negative space without cluttering the design.
Go 3D
Add texture by using slip trailing often found in squeeze bottles for the bubbles or fish outlines before bisque firing for a tactile, raised effect.
Step 4: Finishing Touches
-
Speckling (Optional):
If your teapot wasn’t originally speckled, you can flick a toothbrush loaded with diluted brown or black paint lightly over the surface to achieve that sandy, organic texture. -
Lid Detail:
Don’t forget the lid! Paint a simple matching element, like a few small dots or a single bubble, to tie it into the main design. -
Drying:
Allow all paint to dry completely. This usually takes 24 hours for porcelain paints or until bone dry for underglazes. -
Sealing or Firing:
If using underglaze, apply a clear transparent glaze over the entire piece and kiln fire it according to clay specifications. If using porcelain markers or paints, bake the piece in a home oven as per the manufacturer’s instructions to set the design.
Now brew your favorite blend and enjoy the serene ocean vibes right at your breakfast table
Night Sky Constellations and Moons
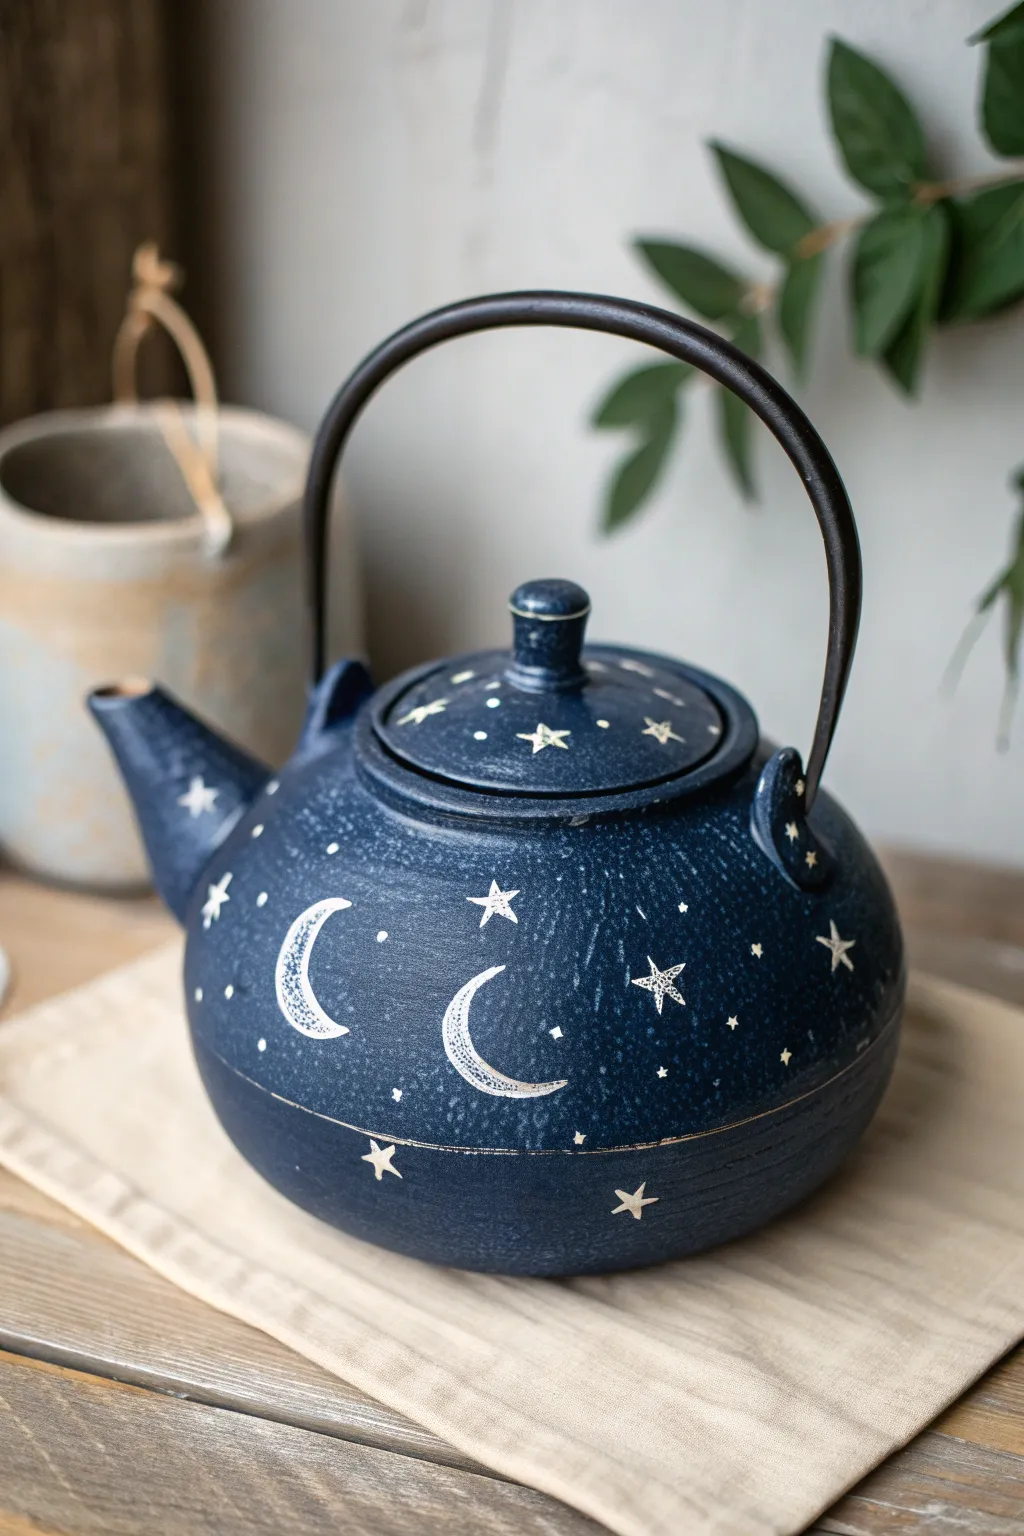
Transform a plain ceramic or cast iron teapot into a dreamy piece of starry decor. This project features a deep cobalt blue base speckled with a galaxy-like texture, accented by hand-painted silver crescent moons and twinkling constellations.
Step-by-Step
Materials
- Teapot (cast iron or ceramic)
- Black chalk paint or multi-surface acrylic
- Deep cobalt blue multi-surface acrylic paint
- Silver metallic paint
- White acrylic paint
- Sponge dabbers or sea sponge
- Fine detail brush (size 0 or 00)
- Small flat brush
- Toothbrush (for speckling)
- Matte or satin spray sealant
- painter’s tape (optional)
Step 1: Preparation and Base Coat
-
Clean the Surface:
Before you begin, wipe down your teapot thoroughly with rubbing alcohol or a mild soapy water solution to remove any oils or dust. Let it dry completely. -
Establish the Foundation:
Apply a solid base coat of black paint to the entire exterior of the teapot, including the lid. This deep undercoat adds richness to the blue we’ll add later. -
Dry and Repeat:
Allow the black coat to dry fully. If the original teapot color is showing through, apply a second thin coat of black for full opacity. -
Safety First:
If you plan to use this teapot for actual brewing, tape off the spout tip and rim where the lid sits to ensure paint doesn’t contact your tea.
Celestial Pro Tip
Mix a tiny bit of silver glitter into your clear sealant topcoat. This adds a subtle, magical shimmer that only catches the light when the teapot moves.
Step 2: Creating the Galaxy Texture
-
Sponge Application:
Dip a sea sponge or sponge dabber into your deep cobalt blue paint. Blot off the excess onto a paper towel so the sponge is almost dry. -
Dab the Clouds:
Gently dab this blue layer over the black base. Don’t aim for full coverage; leave patches of black showing through to create depth and visual texture. -
Layering Blues:
For extra dimension, mix a tiny drop of white into your blue to create a lighter shade. Sporadically sponge this lighter blue in just a few areas to suggest nebulas. -
The Speckled Stars:
Mix a small amount of white paint with a drop of water to thin it. Dip an old toothbrush into this mixture. -
Flick the Stars:
Hold the toothbrush near the teapot and run your thumb across the bristles to flick tiny specks of white paint across the surface. This creates the distant star field.
Level Up Your Design
Instead of random stars, paint distinct zodiac constellations like the Great Bear or Cassiopeia using straight lines to connect specific star points.
Step 3: Painting Moons and Constellations
-
Drafting the Design:
Once the background is dry, use a white chalk pencil to lightly sketch placement guides for your larger moons and major stars. -
Painting the Crescents:
Using your fine detail brush and silver metallic paint, carefully fill in the crescent moon shapes. I suggest starting from the center and sweeping outward to get sharp points. -
Highlighting the Moon:
Add a thin line of white paint along the inner curve of each moon while the silver is still slightly wet to create a subtle highlight. -
Adding Major Stars:
Using the same silver paint, add five-pointed stars scattered around the moons. Keep the points thin and delicate. -
Painting Tiny Stars:
Fill the empty spaces with simple small dots and tiny four-point sparkles using the very tip of your detail brush in silver. -
Lid Details:
Don’t forget the lid! Add a few smaller stars or dots around the knob to ensure the design flows seamlessly from top to bottom. -
Finishing Touches:
Inspect your work. If any silver stars look too dull against the dark background, add a second coat of paint to make them pop.
Step 4: Sealing and Protecting
-
Apply Sealant:
Once all paint is cured (wait at least 24 hours), spray the exterior with a matte or satin clear coat sealant. -
Final Cure:
Let the sealant cure fully according to the manufacturer’s instructions before handling or displaying your new celestial teapot.
Now you have a stunning centerpiece that brings the magic of a clear night sky right to your tea table
Faux Marble With a Swirled Brush Technique
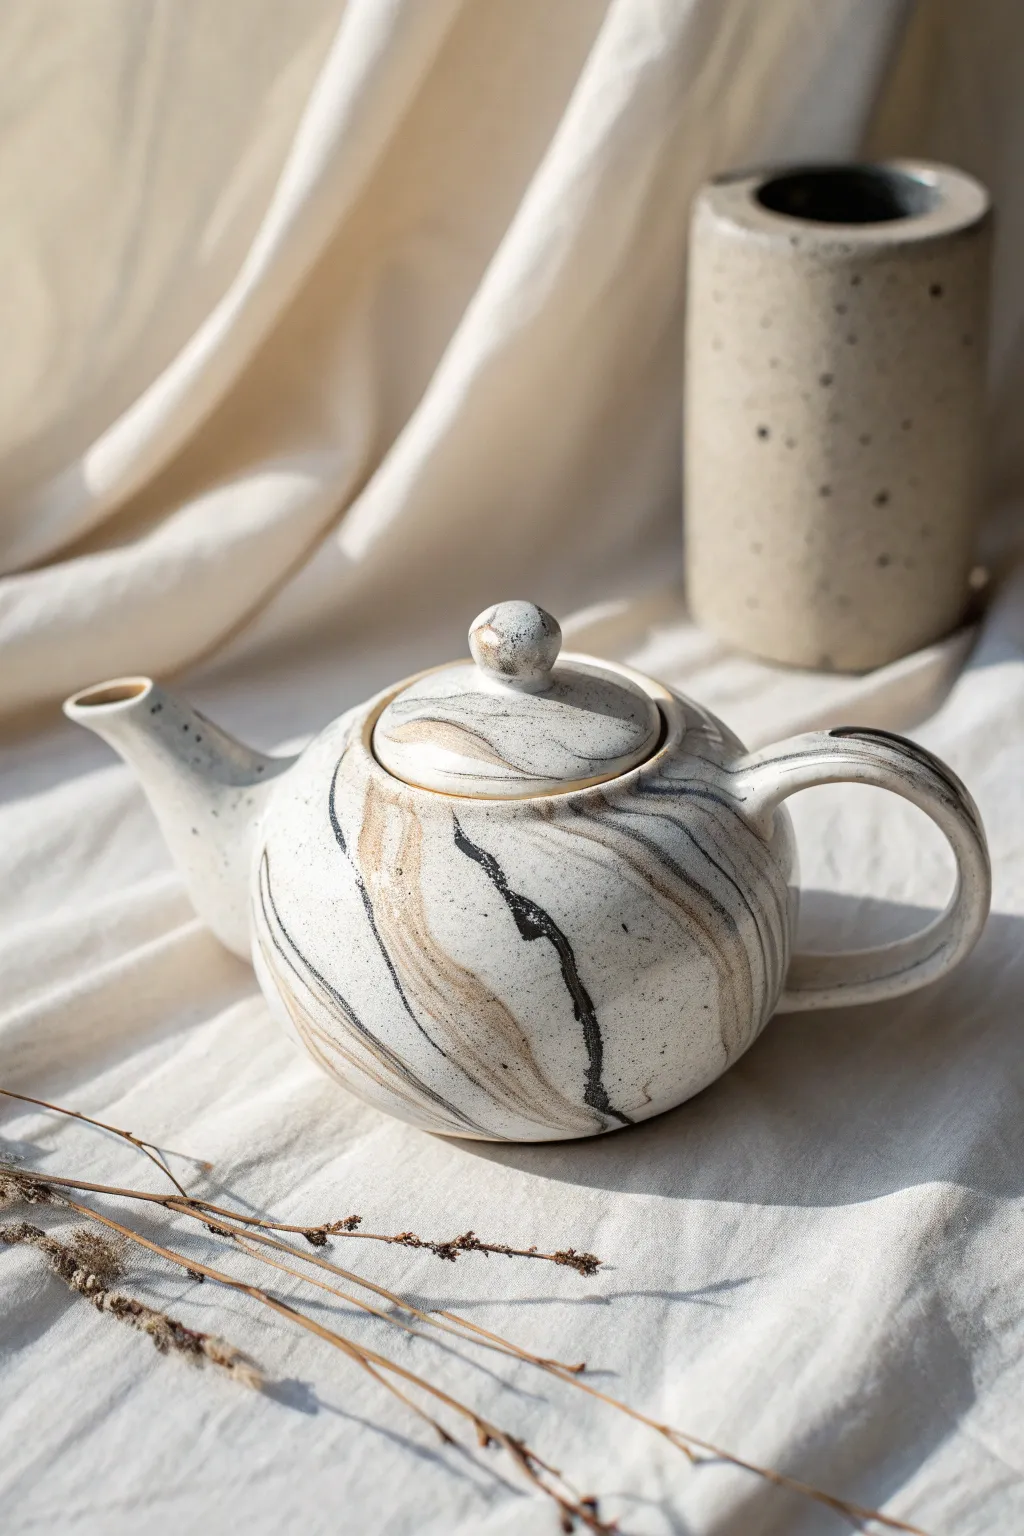
Achieve the sophisticated look of wheel-thrown agateware without a kiln using a clever fluid painting technique. This project transforms a basic white ceramic teapot into an artisanal centerpiece featuring organic ribbons of mocha, charcoal, and speckles.
Detailed Instructions
Materials
- Plain white ceramic teapot (clean and dry)
- Acrylic pouring medium
- High-flow or fluid acrylic paints (Titanium White, Burnt Umber, Carbon Black, Raw Sienna)
- Clear glazing medium or high-gloss varnish
- Soft synthetic fan brush
- Small round detail brush
- Old toothbrush (for splattering)
- Disposable mixing cups and stir sticks
- Isopropyl alcohol and lint-free cloth
- Painter’s tape
Step 1: Preparation and Base Coat
-
Clean the Surface:
Begin by thoroughly wiping down your teapot with isopropyl alcohol and a lint-free cloth. This removes any finger oils or dust that might repel the paint. -
Tape Off Areas:
If you want the inside of the spout or the inner rim to remain pristine white, carefully apply painter’s tape to those areas now. Press the edges down firmly to prevent seepage. -
Mix the Base White:
In a cup, mix Titanium White fluid acrylic with a generous amount of pouring medium (about a 1:1 ratio). You want a consistency that is creamy but flows easily, like warm honey. -
Apply the Base Layer:
Using a soft brush, coat the entire teapot and lid with the white mixture. Do not let this dry; the wet surface is crucial for the marbling effect to flow naturally.
Muddy Colors?
If your marble lines turn grey and muddy, you are over-blending. Make fewer strokes with the fan brush and wipe it clean on a paper towel after every single pass.
Step 2: Creating the Marble Veins
-
Prepare Accent Colors:
While the base is wet, quickly mix small amounts of Burnt Umber, Raw Sienna, and Carbon Black with pouring medium in separate cups. These should be fluid but slightly more pigmented than your base. -
Drafting the Lines:
Dip a fine round brush into the Burnt Umber mixture. Gently drag the tip through the wet white base, creating long, wandering curves from the bottom of the pot upwards towards the lid. -
Adding Contrast:
Repeat the previous step with the Carbon Black, observing where the brown lines flowed. I find that placing the black lines adjacent to the brown ones creates a shadowy depth that mimics real stone. -
Softening the Veins:
Take a clean, dry fan brush and extremely lightly feather the wet paint lines. Sweep the brush in the direction of the veins to elongate them and blur the sharp edges into the white background. -
Introduce Warmth:
Add touches of Raw Sienna sparingly, focusing on the wider sections of your marble veins. This introduces that sandy, earthy tone seen in the reference image. -
Swirling the Paint:
Tilt the teapot physically in your hands. Let gravity pull the wet paints slightly, causing the colors to distort and hug the curvature of the pot naturally. This creates that ‘thrown clay’ movement.
Go Geometric
Tape off a sharp horizontal line halfway up the pot before painting. Marble only the bottom half for a trendy, dipped-look contrast against plain white ceramic.
Step 3: Detailing and Sealing
-
Speckling Effect:
Once you are happy with the swirl pattern, dilute a tiny drop of black paint with water until it is very thin ink. -
Apply Splatter:
Load an old toothbrush with the inky black paint. pointing the bristles toward the pot, run your thumb across them to flick tiny speckles onto the surface. This imitates the iron spots found in natural clay. -
Refining the Lid:
Ensure the pattern on the lid aligns roughly with the pattern on the pot body. Add a concentrated swirl of black and brown to the knob of the lid for a focal point. -
Drying Time:
This step requires patience. Let the teapot sit undisturbed for at least 24 hours. Because the paint layers were thick and fluid, they need ample time to cure fully. -
Inspect and Clean:
Once dry to the touch, gently peel away any painter’s tape. Use a craft knife to carefully scrape away any stray drips on the bottom foot of the teapot. -
Varnishing:
Apply two coats of a high-gloss clear varnish or glazing medium. This mimics the shine of a fired ceramic glaze and protects your design from chipping. -
Final Cure:
Allow the varnish to cure according to the bottle instructions (often 48-72 hours) before handling or displaying your new faux-stone masterpiece.
Display your stunning new teapot on a linen cloth to highlight those beautiful organic textures