Clay bead anklets are my favorite quick-make jewelry project because they instantly give that carefree, sun-out vibe. Here are my go-to clay bead anklet ideas—from classic heishi bead color mixes to a few playful twists when you want something more personal.
Classic Rainbow Heishi Strand
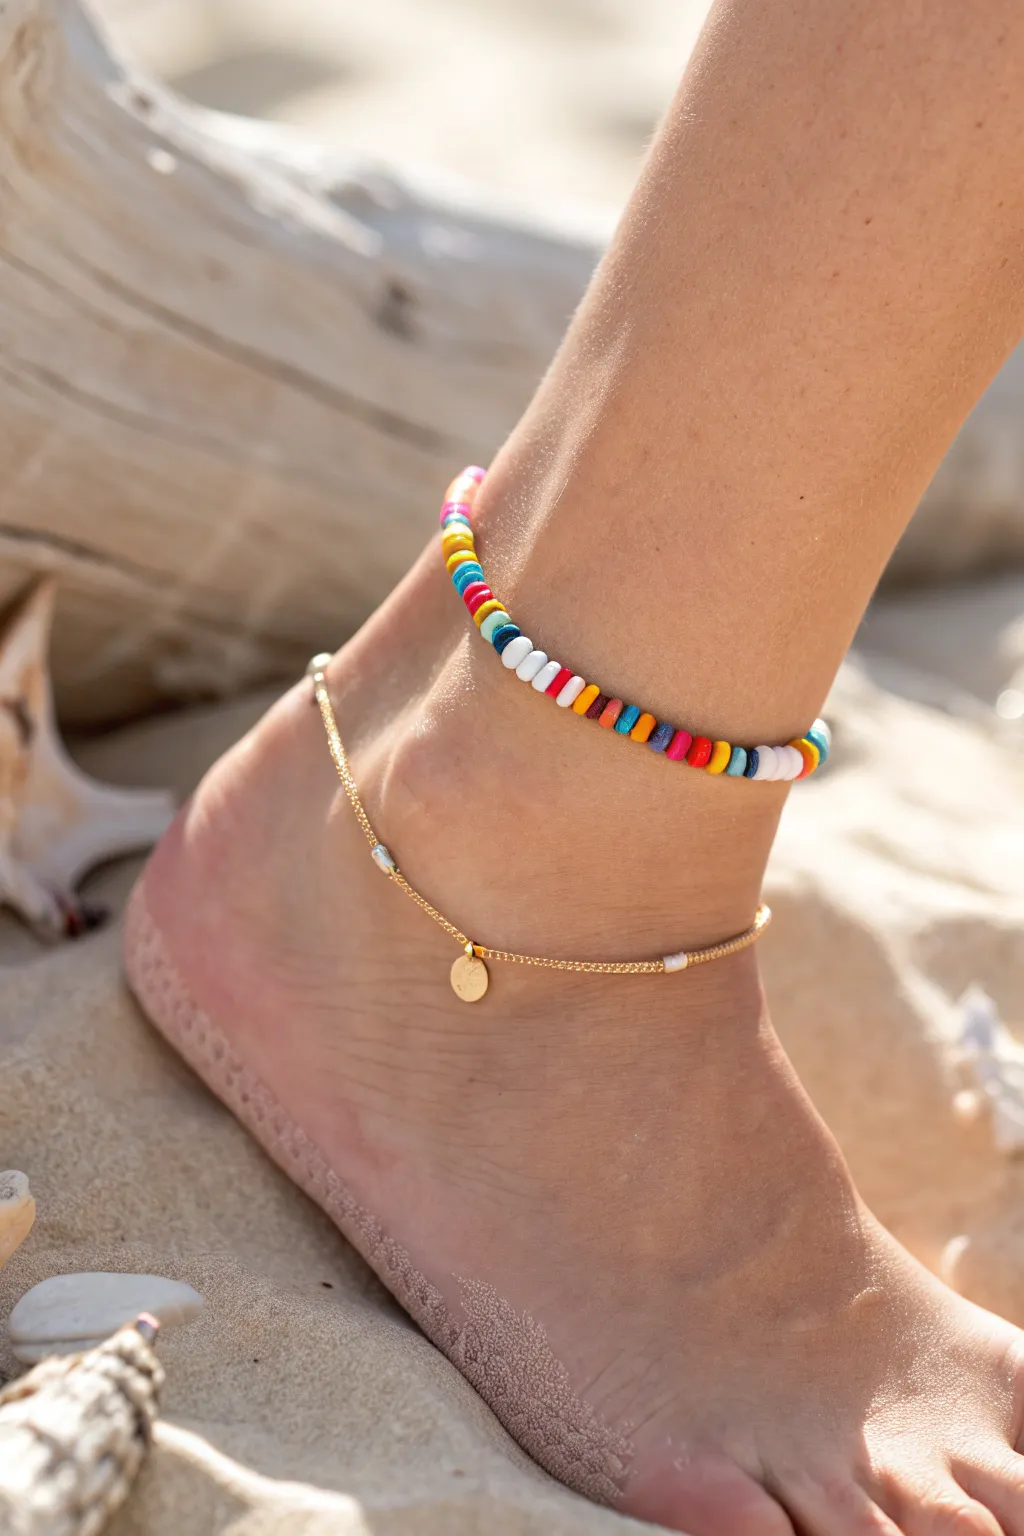
Capture the endless summer vibes with this vibrant clay bead anklet that practically glows against sun-drenched skin. Featuring a classic rainbow arrangement of polymer clay heishi discs, this lightweight accessory is the perfect everyday piece for beach lovers.
Step-by-Step Tutorial
Materials
- Polymer clay heishi beads (4mm or 6mm) in: magenta, hot pink, orange, yellow, turquoise, navy, white
- Elastic beading cord (0.5mm or 0.8mm clear)
- Small craft scissors or jewelry cutters
- Measuring tape
- Clear nail polish or jewelry glue (optional for knot security)
- Bead stopper or small binder clip
Step 1: Preparation & Sizing
-
Measure your ankle:
Using a flexible measuring tape, find the circumference of your ankle just above the bone. Add about half an inch to this measurement to ensure the anklet sits comfortably without digging into your skin. -
Cut the cord:
Cut a piece of elastic cord about 10-12 inches long. Having this extra length makes tying the final knot significantly easier than struggling with short ends. -
Pre-stretch the elastic:
Gently tug on the cut piece of elastic a few times. This pre-stretching prevents the anklet from stretching out and becoming loose after you wear it for the first time. -
Secure the end:
Place a bead stopper or a small binder clip on one end of the cord. This crucial step prevents your beads from sliding right off while you’re working.
Step 2: Creating the Pattern
-
Understand the color sequence:
Study the pattern in the reference image. The sequence generally moves through a spectrum: dark blue, light blue, yellow, orange, reds/pinks, followed by a crisp white section to break it up. -
String the first color block:
Starting with the dark blue, thread about 3 to 4 beads onto the cord. Unlike precise seed bead patterns, clay beads look great with slight variations in section width. -
Transition to light blue:
Add 3 to 4 turquoise or light blue heishi beads next. The contrast between the navy and the bright turquoise gives that oceanic feel. -
Add the sunshine colors:
Thread on your yellow beads. I like to keep this section slightly shorter, maybe 2-3 beads, to act as a bright highlight. -
Warm up the palette:
Follow the yellow with 3-4 orange beads. This creates a sunset gradient effect as it transitions into the pinks. -
Add the pink gradients:
String your hot pink or magenta beads next. Use about 4 beads here to anchor the warm side of the color spectrum. -
Insert the white spacer:
Add a slightly longer section of white beads—about 5 or 6 discs. This white space cleanses the palette before the rainbow repeats and makes the colors pop. -
Repeat the pattern:
Continue this sequence (Blue -> Turquoise -> Yellow -> Orange -> Pink -> White) until the beaded section matches your measured ankle length.
Perfect Fit Trick
Ankle sizes fluctuate with heat! Make your anklet just slightly looser than a bracelet. If it leaves an indentation on your skin, it’s too tight and will likely break.
Step 3: Finishing Touches
-
Check the fit:
Wrap the strand around your ankle to check the size before tying. It should sit loosely enough to move but tight enough to stay above the heel. -
Tie the knot:
Remove the bead stopper and tie a surgeon’s knot. This is a simple overhand knot, but you pass the tail through the loop twice instead of once for extra grip. -
Tighten securely:
Pull all four strands (the two tails and the two loop sides) firmly to tighten the knot. The elastic should stretch slightly as the knot cinches down. -
Secure with glue:
Dab a tiny drop of clear nail polish or jewelry glue onto the knot. Let this dry completely to prevent it from slipping over time. -
Trim the tails:
Once the glue is dry, use your scissors to trim the excess cord close to the knot, leaving just a tiny nub that can be tucked inside a neighboring bead if the hole is large enough.
Golden Hour Glow
Replace one of the white sections with gold spacer beads or a single gold charm. The metallic flash looks incredible against the matte finish of the clay beads.
Now you have a vibrant pop of color ready to pair with sandals or bare feet on the sand


Ocean Blue Gradient Anklet
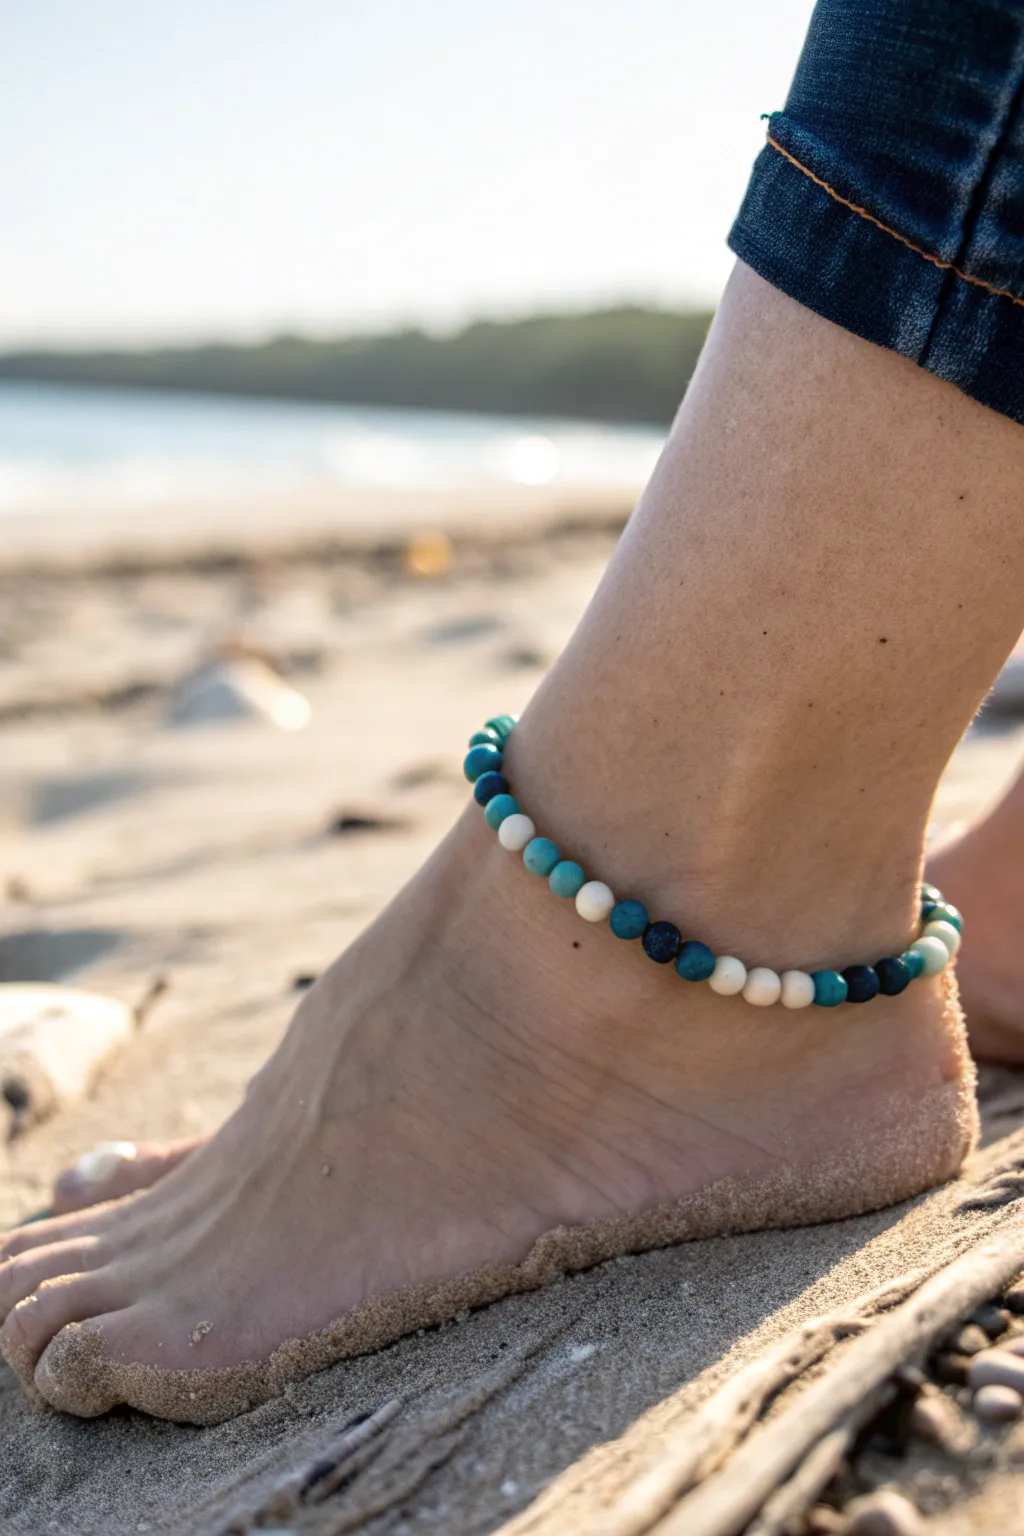
Capture the shifting hues of the ocean with this simple yet stunning beaded anklet. Using a mix of clay beads in navy, teal, turquoise, and sandy white, you’ll create a durable accessory that embodies beach vibes.
How-To Guide
Materials
- 6mm or 8mm round polymer clay beads (Navy Blue)
- 6mm or 8mm round polymer clay beads (Teal/Turquoise)
- 6mm or 8mm round polymer clay beads (Light Blue)
- 6mm or 8mm round polymer clay beads (White/Cream)
- Stretchy elastic bead cord (0.8mm recommended)
- jewelry glue (e.g., E6000 or Hypo Cement)
- Scissors
- Tape or a bead stopper
- Measuring tape
Step 1: Preparation
-
Measure Your Ankle:
Wrap a measuring tape loosely around your ankle where you want the jewelry to sit. Add about half an inch to this measurement to ensure a comfortable fit that doesn’t pinch your skin. -
Cut the Cord:
Cut a piece of elastic cord about 4 inches longer than your final measurement. This extra length gives you plenty of room to tie a secure knot later without struggling. -
Secure the End:
Place a piece of tape over one end of the cord or attach a bead stopper. This prevents your beads from sliding right off onto the floor while you’re working. -
Pre-stretch the Elastic:
Give your cord a few gentle tugs before you start beading. I find this helps prevent the anklet from stretching out permanently after the first time you wear it.
Knot Slipping?
If the knot won’t stay tight while gluing, have a friend hold your finger on the first loop, or clamp it gently with a binder clip.
Step 2: Design and Beading
-
Plan Your Pattern:
Lay out your beads on a flat surface or bead board. For the look in the photo, create an irregular pattern that groups 2-3 beads of similar shades together before transitioning to the next color. -
Create the Gradient:
Try arranging a sequence like: two navy, one teal, two turquoise, one white, two light blue. This mimics the organic, shifting colors of ocean waves. -
Start Threading:
Begin sliding the beads onto the elastic cord one by one, following your planned design. Keep the tension loose so the beads don’t bunch up. -
Check the Fit:
Once you have roughly enough beads, carefully wrap the strand around your ankle to check the length. Add or remove beads until the ends meet comfortably without stretching the cord tight. -
Verify the Pattern:
Look at the point where the two ends meet. Make sure the color transition looks natural and doesn’t create a jarring block of a single color.
Step 3: Finishing Touches
-
Prepare for the Knot:
Remove the tape or bead stopper carefully while holding both ends of the cord securely. -
The Surgeon’s Knot:
Cross the ends like a normal overhand knot, but loop the top create through the bottom loop a second time. This creates extra friction. -
Pull Tight:
Pull the cords firmly to tighten the knot. You should feel the elastic stretch slightly as the knot secures itself against the beads. -
Reinforce with Glue:
Apply a tiny dot of jewelry glue directly onto the knot. This is crucial for elastic cord, which can be slippery and prone to untying. -
Hide the Knot:
While the glue is still wet, gently slide the nearest bead over the knot to hide it inside. -
Let it Dry:
Allow the glue to cure completely according to the manufacturer’s instructions. Usually, letting it sit for at least an hour is best. -
Trim Excess:
Once dry, use your scissors to snip off the excess cord tails as close to the bead/knot as possible.
Add Some Sparkle
Intersperse small gold or silver spacer beads between the color sections to give the anklet a more refined, jewelry-store finish.
Now step out onto the sand and enjoy how your new accessory complements the beach landscape


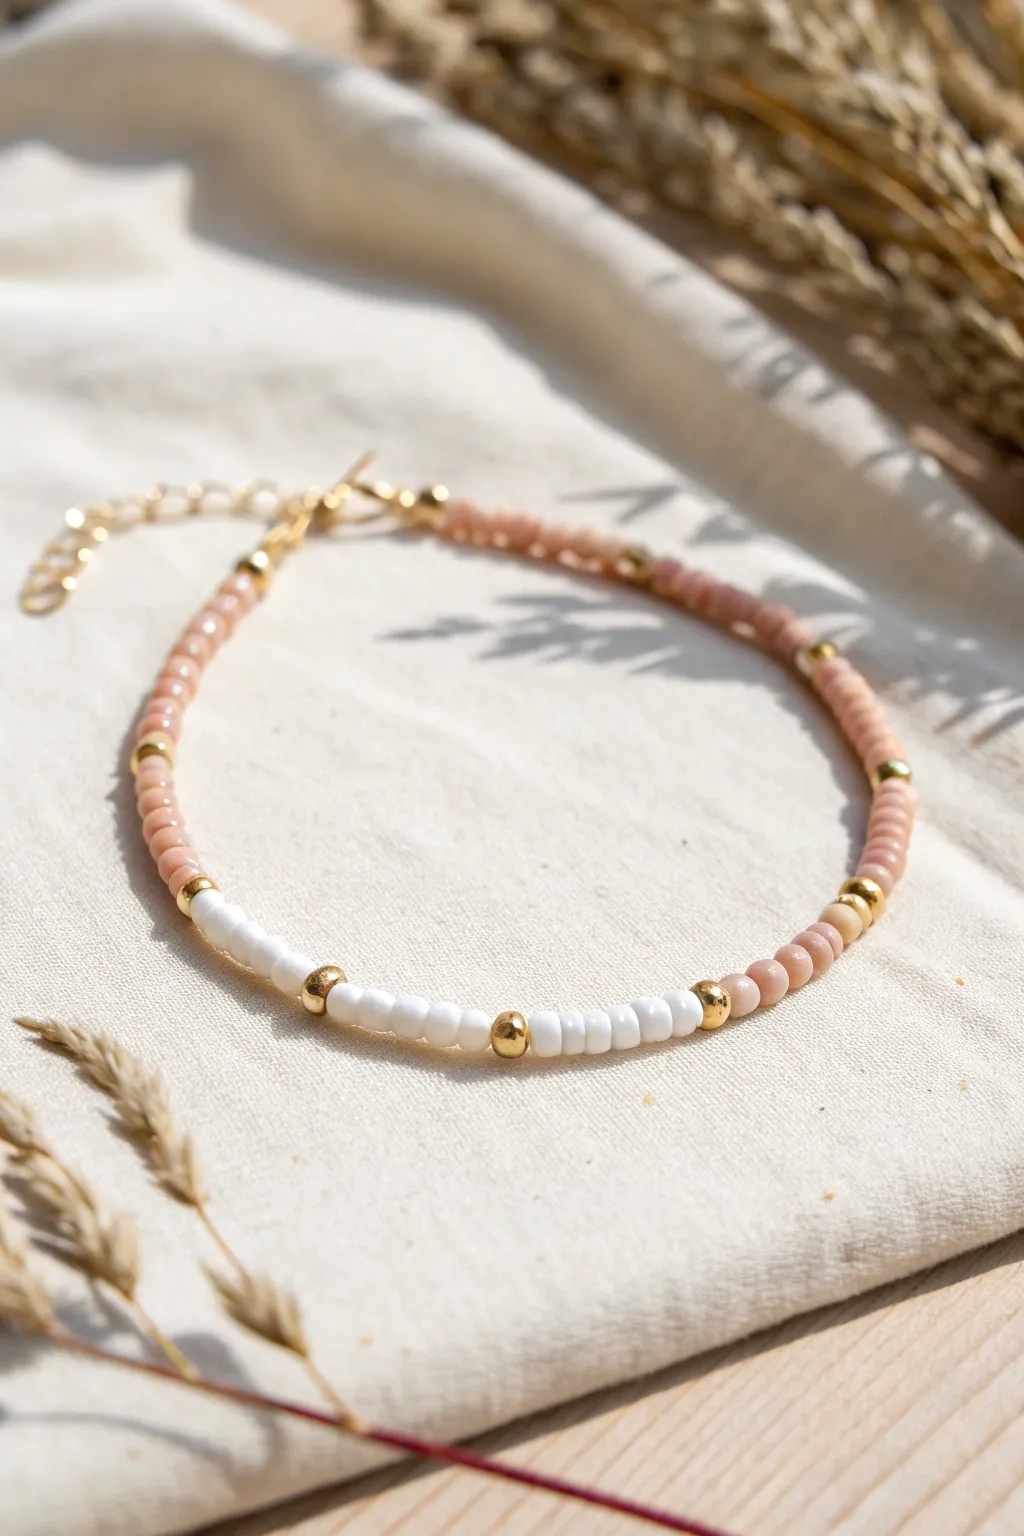
Neutral Sand-and-Cream Mix
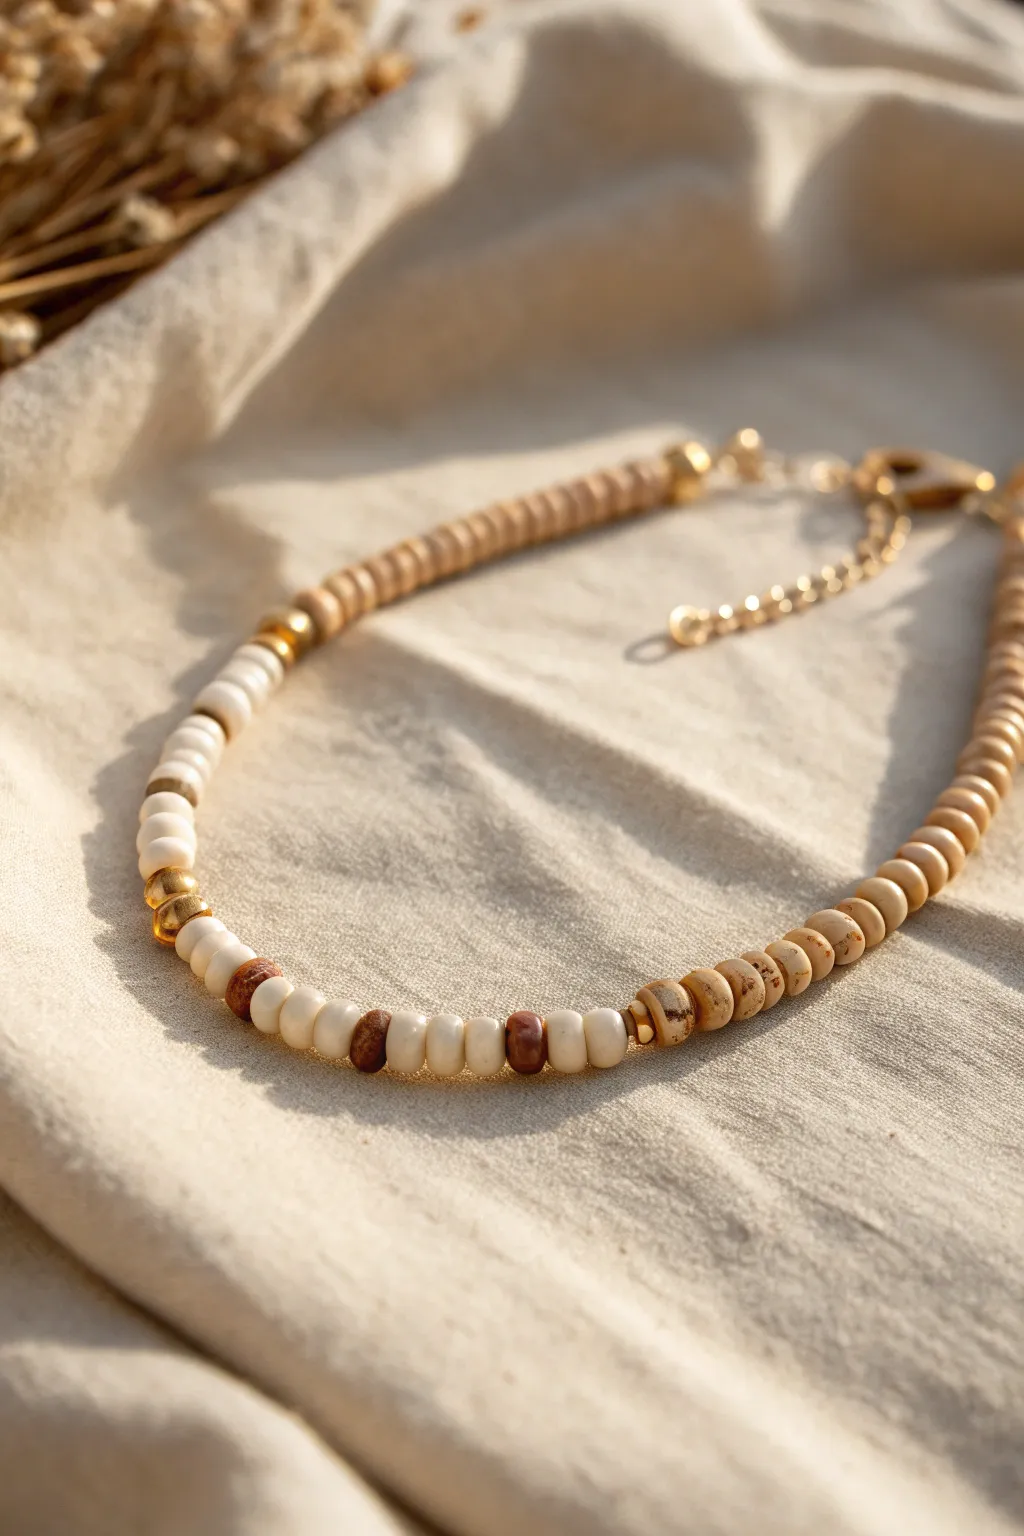
Capture the essence of a sun-drenched beach with this textured, neutral-toned anklet perfect for summer layering. Combining matte clay heishi beads, smooth cream accents, and touches of gold, this design offers a sophisticated take on classic surf style.
Step-by-Step Tutorial
Materials
- Beading wire (0.38mm or 0.45mm)
- Tan/beige clay heishi beads (approx. 4-5mm)
- White or cream cylindrical seed beads
- Brown speckled rondelle spacer beads
- Gold tone metallic spacer beads (round)
- Gold tone metallic spacer beads (flat disc)
- Small gold crimp beads
- Gold lobster claw clasp
- Gold jump rings
- Gold extender chain
- Crimp pliers
- Wire cutters
- Bead design board (optional)
Step 1: Planning and Setup
-
Measure your fit:
Before cutting any wire, measure your ankle (or wrist/neck). Add about 1 to 1.5 inches to this measurement to account for the clasp and the bulk of the larger beads. -
Cut the wire:
Cut a length of beading wire roughly 3 inches longer than your final customized measurement. This extra length gives you plenty of room to manipulate the ends without dropping beads. -
Secure the first end:
Thread one crimp bead onto the wire, followed by a jump ring or the loop of your extender chain. Loop the wire back through the crimp bead. -
Crimp it tight:
Slide the crimp bead close to the loop, ensuring the wire isn’t crossed inside the crimp. Use your crimp pliers to flatten and fold the crimp bead securely. I like to give a gentle tug here to ensure it holds.
Natural Texture Tip
Mix bead materials! Using wood or coconut shell spacers alongside the polymer clay creates that authentic, surf-shop vibe shown here.
Step 2: Creating the Pattern
-
Start with the base tone:
Begin threading the tan/beige clay heishi beads. You’ll want a substantial section of just this color, roughly 2-3 inches long, to serve as the ‘back’ or side section of the anklet. -
Transition with gold:
After the block of tan beads, slide on one small flat gold disc spacer followed by a round gold bead, and another flat disc to frame it. -
Introduce the cream beads:
Add a sequence of cream/white cylindrical beads. Thread about 5 or 6 of them to create a distinct stripe of light color. -
Add a focal accent:
Interrupt the cream section with a single small gold disc spacer to add a hint of shine. -
Continue the cream section:
Add another set of 5 to 6 cream cylindrical beads to balance the white block. -
Add the brown contrast:
Slide on a contrasting brown speckled rondelle bead, followed by three cream beads, another brown speckled bead, three cream beads, and a final brown bead. -
Transition to texture:
Thread on a small gold disc spacer followed by a textured brown/tan speckled rondelle bead.
Step 3: Finishing the Design
-
The speckled sequence:
Create the main focal section by threading roughly 10-12 of the speckled tan rondelle beads. These have a rustic, uneven texture that contrasts beautifully with the smooth cream beads. -
Mirror the pattern:
If you want a symmetrical look, reverse the steps you just did. Alternatively, for the asymmetrical look shown in the photo, simply return to your base tan heishi beads. -
Fill the length:
Continue adding the tan heishi beads until the strand reaches your desired total length minus the clasp size. -
Check the drape:
Hold the two ends of the wire together to form a circle. Ensure the pattern creates a nice curve and isn’t too stiff; if it is, remove a bead or two to loosen the tension slightly.
Stiff Wire Fix
If your anklet feels rigid, you pulled the wire too tight before crimping. Leave a tiny 1-2mm gap at the clasp to let it drape naturally.
Step 4: Securing the Clasp
-
Add the final crimp:
Thread a crimp bead onto the remaining tail of the wire. -
Attach the clasp:
Thread the wire through the loop of your lobster claw clasp and back down through the crimp bead and into the last few beads of your design. -
Final tightening:
Pull the wire taut, leaving just a tiny bit of wiggle room (about 1mm) near the clasp so the beads can move freely. -
Crimping off:
Flatten the crimp bead firmly with your pliers. Trim the excess wire tail flush against the bead hole so it doesn’t poke your skin.
Wear your new creation with sandals or bare feet to show off those natural sandy tones


Black-and-White Graphic Pattern
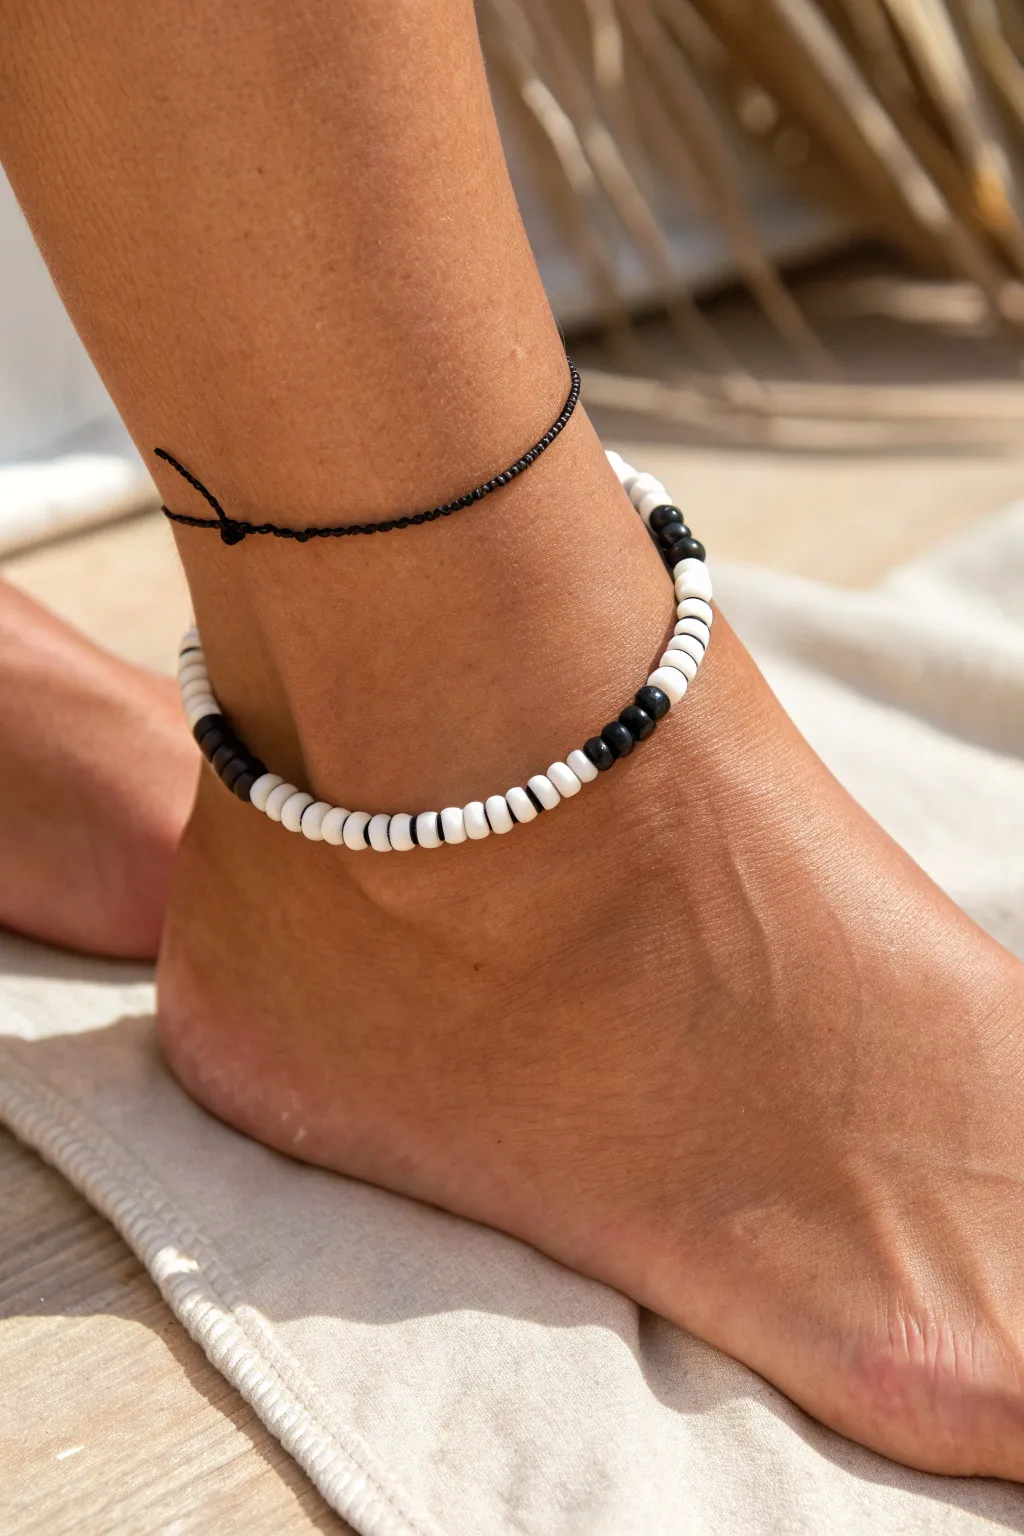
Embrace simplicity with this high-contrast black and white anklet that pairs perfectly with a minimal cord accent. Using flat clay heishi beads creates a sleek, comfortable accessory that feels modern and beach-ready all at once.
Detailed Instructions
Materials
- 4mm or 6mm flat clay heishi beads (White)
- 4mm or 6mm flat clay heishi beads (Black)
- .5mm or .8mm elastic stretch cord
- Super glue or jewelry cement
- Scissors
- Tape or bead stopper
- Ruler
- Optional: Thin black nylon cord (for the second anklet)
Step 1: Planning and Prep
-
Measure your ankle:
Using a piece of string or a flexible measuring tape, measure around your ankle right where you want the jewelry to sit. Add about half an inch to this measurement to ensure a comfortable fit that isn’t too tight. -
Cut the cord:
Cut a length of your elastic stretch cord. I always recommend cutting it about 10-12 inches long, which gives you plenty of extra room for tying knots later without struggling. -
Secure the end:
Place a bead stopper on one end of the cord, or simply tape it down to your table. This critical step prevents your hard work from sliding off while you are stringing. -
Pre-stretch the cord:
Give your elastic cord a few gentle tugs before adding any beads. This “pre-stretching” helps prevent the anklet from sagging or loosening up immediately after you wear it for the first time.
Sticky Situation
If the knot is too bulky to hide inside a bead, gently widen the hole of the hiding bead with a thick needle or awl. Be careful not to crack the clay.
Step 2: Creating the Pattern
-
Establish the main block:
Start by stringing a long section of just white beads. This design relies on asymmetry, so aim for a solid block of white that covers about two-thirds of the total length. -
Begin the transition:
For the first pattern shift, add one single black bead followed by one single white bead. -
Build the striped section:
Repeat the single black, single white sequence four or five times. This creates a small graphic transition area. -
Add the focal point:
String a solid block of roughly 10 to 15 black beads. This dark section acts as the bold focal point of the design. -
Mirror the transition:
After the black block, add another small striped section: one white, one black, repeated four or five times. -
Finish with white:
Fill the remaining length of your cord with white beads until you reach your measured target length. Wrap it around your ankle to double-check the fit before tying.
Pattern Play
Swap the white section for a bright neon color like lime green or hot pink to turn this monochrome classic into a vibrant summer statement piece.
Step 3: Finishing Touches
-
The first knot:
Remove the tape or stopper. Bring the two ends of the elastic together and tie a simple overhand knot, pulling it tight so the beads sit flush against each other with no gaps. -
The surgeon’s knot:
To secure it permanently, tie a surgeon’s knot. This is just like a standard square knot, loop the end through the circle an extra time before pulling tight. This adds extra friction. -
Apply adhesive:
Dab a tiny drop of super glue or jewelry cement directly onto the knot. I like to let this dry for a full minute to ensure the elastic doesn’t slip. -
Hide the knot:
Once dry, trim the excess cord ends close to the knot. Carefully slide the nearest bead over the knot to hide it inside the bead’s hole. -
Create the companion cord (Optional):
To recreate the full look in the photo, cut a piece of thin black nylon cord. Wrap it around your ankle alongside the beaded one, tie a simple sliding knot or square knot, and let the ends hang slightly loose.
Slip on your new creation and enjoy the sleek, modern vibe it adds to your outfit

The Complete Guide to Pottery Troubleshooting
Uncover the most common ceramic mistakes—from cracking clay to failed glazes—and learn how to fix them fast.
Pastel Sorbet Color Block
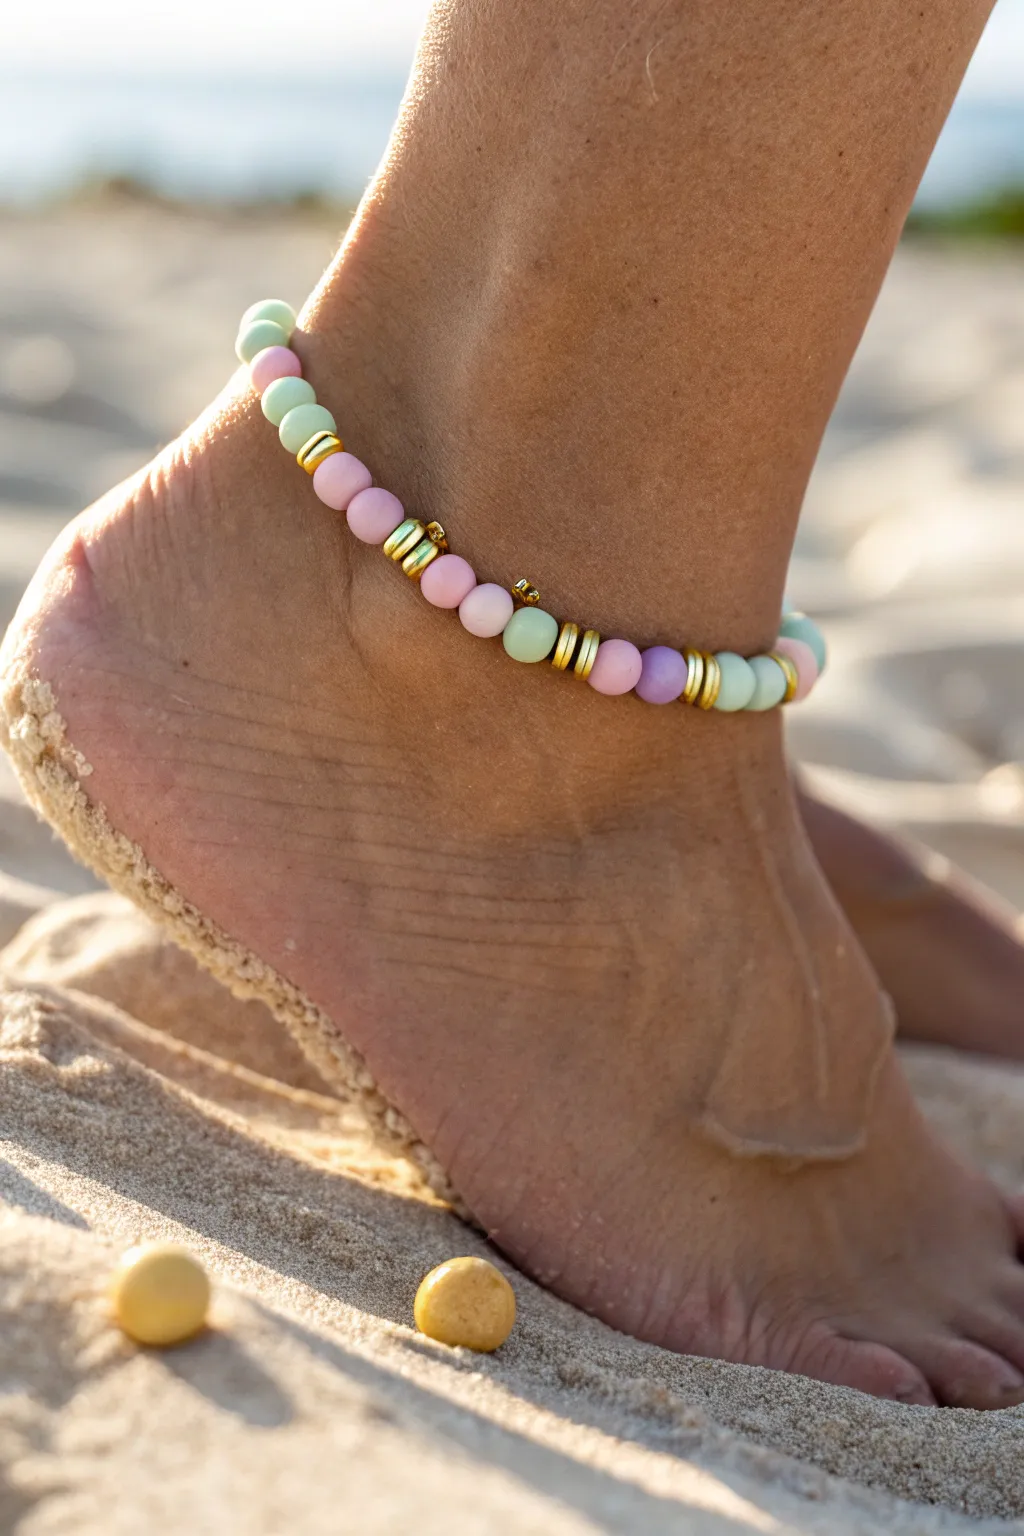
Capture the essence of summer sweetness with this delightful color-blocked anklet featuring soft matte pastels and shining gold accents. The combination of mint, lavender, and baby pink creates a refreshing ‘sorbet’ palette that looks stunning against sun-kissed skin.
Step-by-Step Guide
Materials
- Matte acrylic or polymer clay round beads (6mm) in mint green
- Matte acrylic or polymer clay round beads (6mm) in baby pink
- Matte acrylic or polymer clay round beads (6mm) in lavender
- Gold hematite or brass disc spacer beads (5mm or 6mm)
- Small gold charm (optional, like a tiny shell, star, or fruit)
- Strong elastic cord (0.8mm clear stretch cord recommended)
- Superglue or jewelry adhesive
- Scissors
- Bead stopper or a piece of masking tape
- Ruler or measuring tape
Step 1: Planning and Preparation
-
Measure your ankle:
Wrap a measuring tape loosely around your ankle right where you want the jewelry to sit. Add about 0.5 to 1 inch to this measurement to ensure a comfortable fit that isn’t too tight. -
Prepare the cord:
Cut a piece of elastic cord about 4 inches longer than your final measurement. This extra length is crucial for tying a secure knot later without struggling. -
Secure the end:
Place a bead stopper or a folded piece of masking tape on one end of the cord. This prevents your beads from sliding off while you design your pattern. -
Sort your beads:
Lay out your matte pastel beads and gold spacers on a bead board or soft cloth. Group them by color so you can easily grab them to build your blocks.
Matte Finish Magic
To keep that distinct ‘sorbet’ look, avoid glossy beads. Search specifically for “rubberized,” “matte,” or “frosted” acrylic beads.
Step 2: Creating the Color Blocks
-
Start the first block:
Begin stringing with your first pastel color. Thread on two mint green beads followed by a single plain baby pink bead. -
Establish the pattern:
Add two more mint green beads. The pattern in the photo relies on small clusters of color rather than a completely random mix. -
Add gold accents:
Slide on a gold disc spacer. These metallic elements act as dividers between your major color shifts and add a luxurious touch. -
Begin the pink section:
String two baby pink beads. Follow this with two gold disc spacers placed right next to each other for a thicker metallic band look. -
Continue the pink block:
Add two more baby pink beads followed by a single lavender bead, then finish this section with two more pink beads. -
Insert a charm (optional):
If you are using a tiny charm, slide it on now. In the image, there is a small gold accent element nestled between color transitions. -
Create the lavender section:
Thread on a gold spacer, then string your lavender beads. I like to vary the numbers slightly, perhaps doing three lavender beads, a gold spacer, and then two more lavender beads. -
Repeat until length is reached:
Continue strictly following this ‘color block’ method—grouping 4-5 beads of one main tone before switching colors—until you reach your desired ankle length.
Step 3: Finishing Touches
-
Check the fit:
Wrap the unfinished strand around your ankle to double-check the size. It should sit comfortably without pinching your skin or drooping too low. -
Pre-stretch the cord:
Gently pull tightly on both ends of the elastic cord. This ‘pre-stretching’ step helps prevent the anklet from sagging or stretching out permanently after you wear it. -
Tie the knot:
Remove the tape or bead stopper. Tie a standard surgeon’s knot: cross left over right and loop under, then right over left and loop under twice. -
Secure with glue:
Apply a tiny dot involving superglue or special jewelry cement directly onto the knot. Be careful not to get glue on the pastel beads, as it can ruin the matte finish. -
Hide the knot:
While the glue is still tacky but not wet, pull the knot inside the hole of the nearest bead if the hole is large enough. If not, trim the ends short once strictly dry.
Knot Slipping?
If your elastic knot won’t hold, try the “surgeon’s knot” technique. Loop the cord through the knot an extra time before pulling tight.
Slip on your colorful creation and enjoy having a touch of summer with you wherever you walk
Sunset Ombre Blend
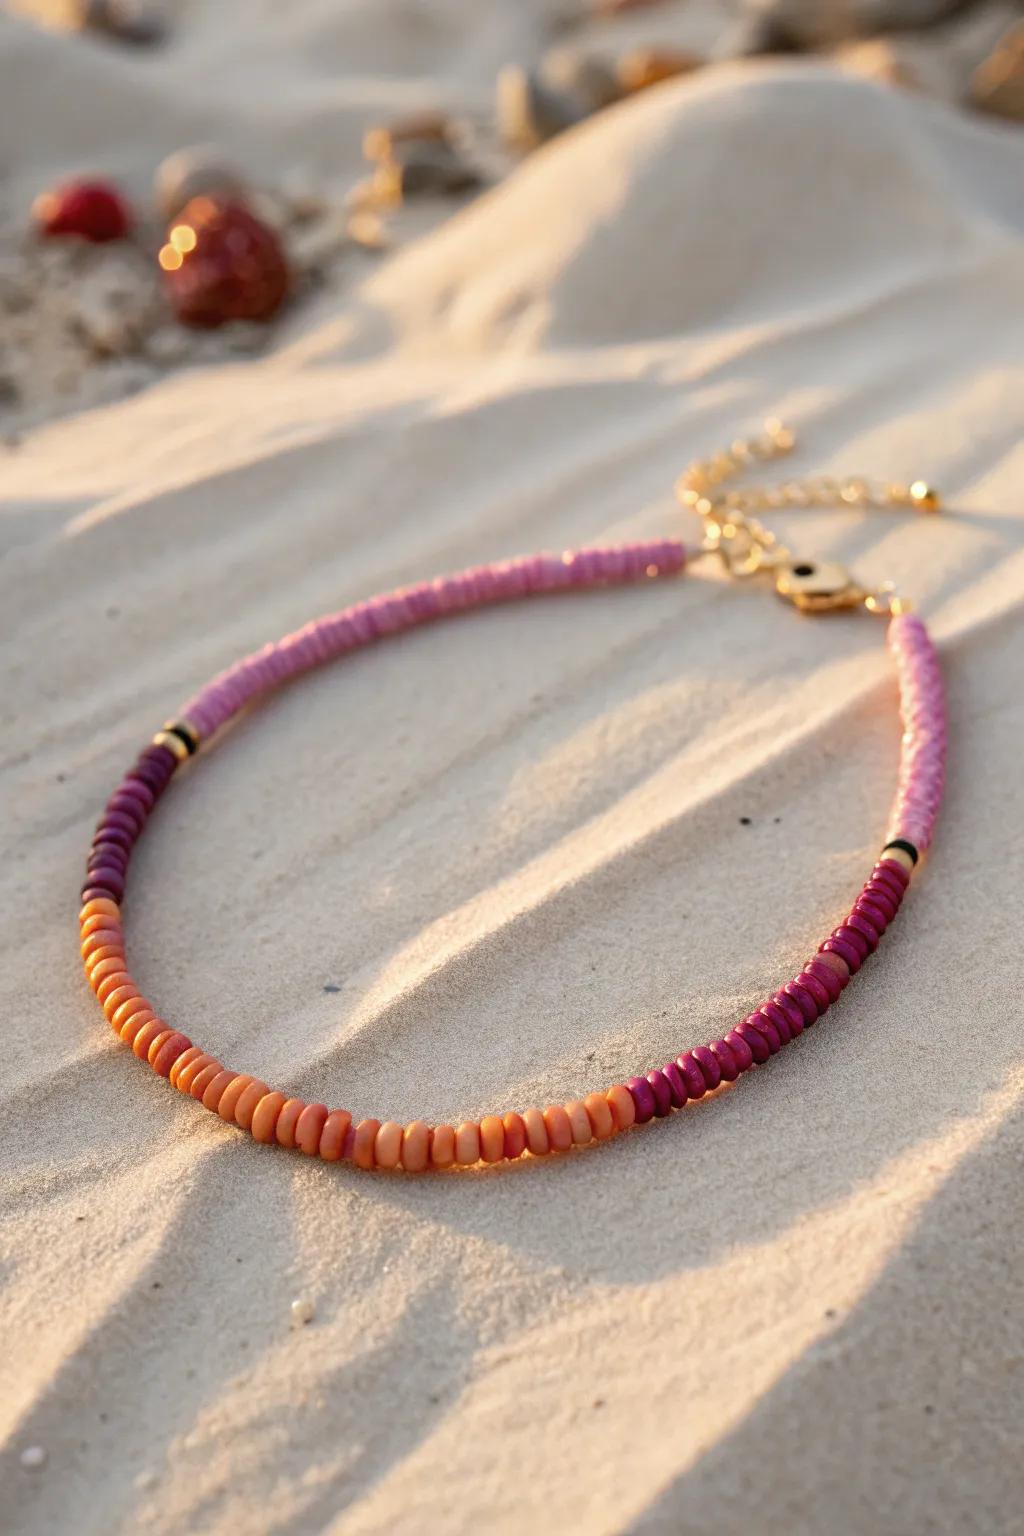
Capture the warmth of a fading beach sunset with this stunning ombre anklet featuring flat clay disc beads. The gradient shifts seamlessly from vibrant orange to deep magenta and soft pink, accented by gold touches that shimmer in the light.
How-To Guide
Materials
- 6mm flat clay disc (heishi) beads: orange, deep magenta/purple, and light mauve/pink
- Gold flat round spacer beads (approx. 4mm)
- Small black spacer beads (optional)
- Gold clasp and extension chain set
- Gold crimp beads
- Clear beading wire or strong stretch cord (0.8mm)
- Flat nose pliers
- Wire cutters
- Ruler or measuring tape
Step 1: Planning & Preparation
-
Measure the ankle:
Using your measuring tape, wrap it comfortably around your ankle where you want the jewelry to sit. Add about 0.5 inches to this measurement to account for bead bulk and ease of movement. -
Cut the cord:
Cut a length of beading wire or stretch cord that is at least 4-5 inches longer than your final measurement. This extra length makes tying knots or attaching the clasp much easier. -
Secure one end:
If using wire and a clasp, thread on a crimp bead and your clasp loop, then loop the wire back through the crimp bead. Flatten the crimp bead firmly with pliers. If using stretch cord, simple place a piece of tape over one end to stop beads sliding off.
Step 2: Creating the Sunset Gradient
-
Start with the orange section:
Begin stringing the orange clay discs. You will want roughly 2-3 inches of this solid color, essentially covering the front ‘center’ portion of the anklet. -
Check consistency:
Occasionally push the beads together to ensure they sit flat against each other without twisting. I find rolling them slightly between my fingers helps align them perfectly. -
Transition to purple:
Once the orange section is complete, mark the end of the section by adding a single black spacer bead, followed by a gold flat spacer. -
Add the deep magenta:
Begin stringing your deep magenta or purple beads. Aim for a section length of about 1.5 to 2 inches on this side. This darker color mimics the horizon right after the sun dips down. -
Create the second transition point:
Finish the magenta section just like the first: thread on a gold flat spacer first, followed by a small black spacer bead. -
String the light pink:
Now, switch to the light mauve or soft pink clay beads. Continue stringing these until you reach the clasp area on this side. -
Mirror the pattern (optional):
Return to the other side of your orange center section. Repeat the process in reverse: add your spacer accents, then the magenta beads, then spacers, and finally the light pink beads to finish the loop.
Uneven Bead Tension
If the anklet is stiff or buckles rather than draping smoothly, you’ve strung the beads too tightly. Leave a tiny gap—about 1mm—before crimping to allow flexibility.
Step 3: Finishing Touches
-
Verify length:
Wrap the beaded strand carefully around your ankle to check the fit. Remember that the clasp and extension chain will add a small amount of length. -
Add the final crimp:
Thread a crimp bead onto the open wire end, followed by the jump ring of your extension chain. -
Loop and secure:
Feed the wire back through the crimp bead and pull it taut—but not so tight that the anklet becomes stiff. The beads need room to curve. -
Flatten the crimp:
Use your flat nose pliers to squash the crimp bead flat, locking everything securely in place. -
Trim excess wire:
Snip off the remaining tail of wire as close to the crimp bead as possible using wire cutters. -
Inspect the connections:
Give the ends a gentle tug to ensure the crimps are holding tight before wearing your creation out.
Level Up: Gold Accents
Add extra sparkle by placing a single gold flat spacer bead randomly every 10-15 clay beads within the color blocks to catch the sunlight.
Slip on your colorful creation and enjoy that perpetual golden hour feeling on your ankle


What Really Happens Inside the Kiln
Learn how time and temperature work together inside the kiln to transform clay into durable ceramic.
Gold Spacer “Upgraded” Heishi Anklet
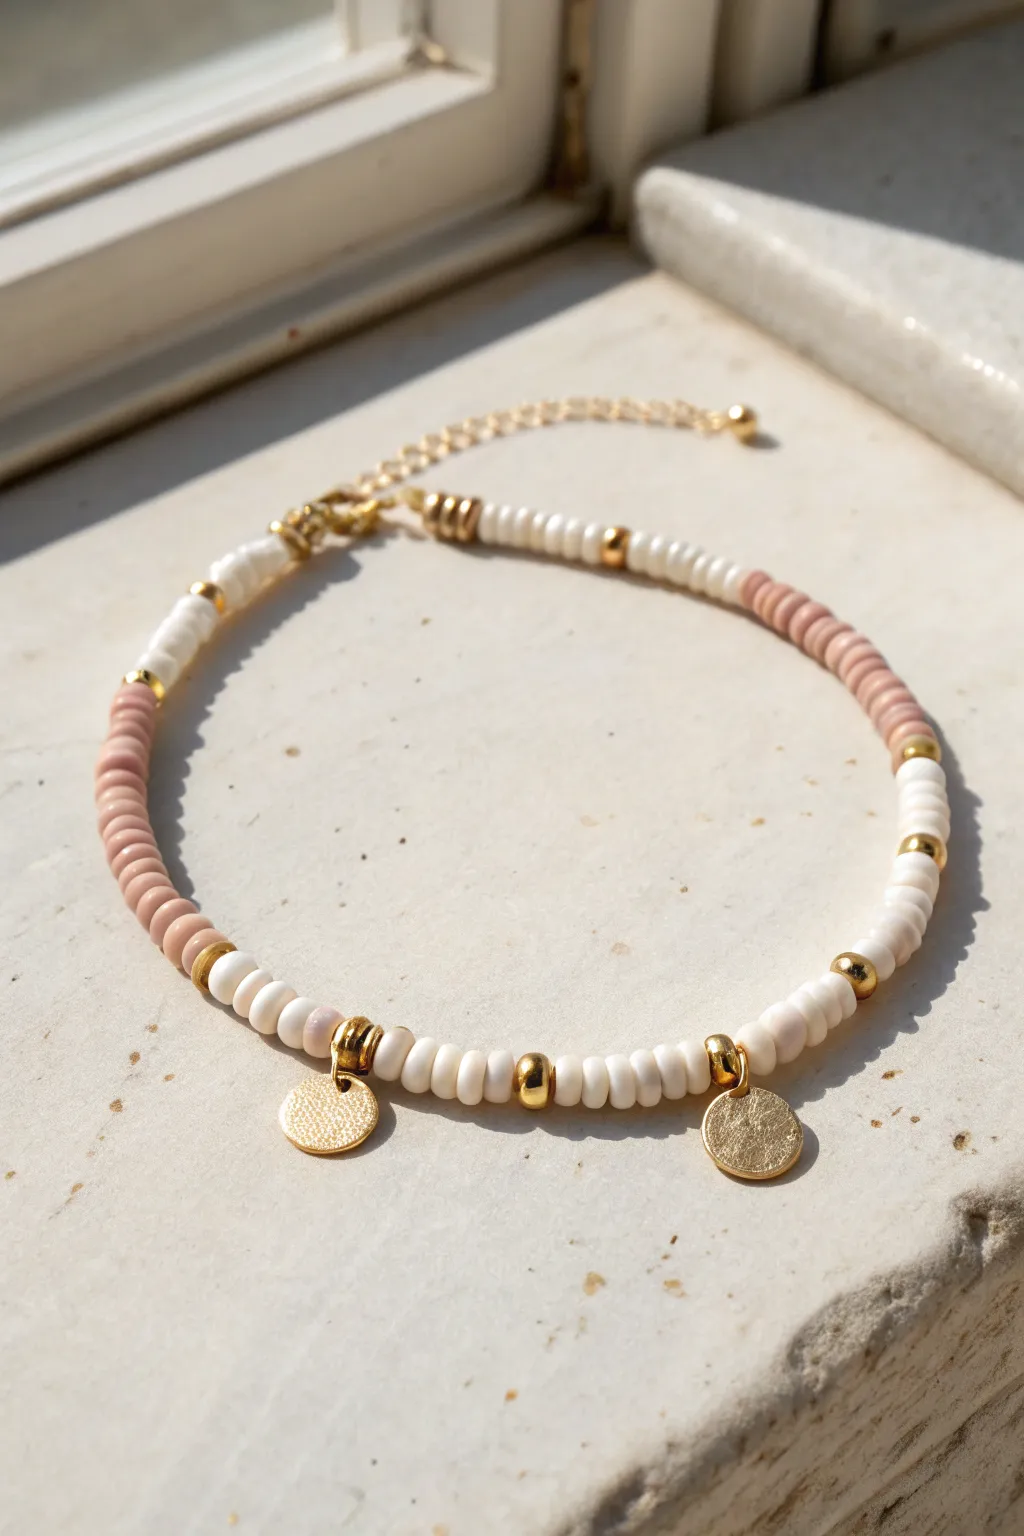
Elevate the standard summer camp bead look with this sophisticated design that mixes matte clay textures with polished gold accents. The subtle color blocking of white and muted rose, paired with delicate disc charms, creates an anklet that feels both bohemian and high-end.
Step-by-Step Tutorial
Materials
- 6mm Heishi polymer clay beads (white)
- 6mm Heishi polymer clay beads (muted rose/dusty pink)
- 4mm gold spacer beads (round)
- 6mm gold washer/spacer beads (flat disc shape)
- 2 small gold coin/disc charms with jump rings
- Elastic stretch cord (0.5mm or 0.8mm)
- Gold crimp beads or knot covers (optional)
- Gold tone lobster clasp and extender chain
- Jewelry glue (e.g., G-S Hypo Cement)
- Scissors or jewelry wire cutters
- Needle nose pliers
- Bead stopper or tape
Step 1: Planning the Pattern
-
Measure your ankle:
Wrap a flexible measuring tape around your ankle where you want the jewelry to sit. Add about half an inch to this measurement for a comfortable fit that doesn’t pinch. -
Secure the string:
Cut a piece of elastic cord about 12 inches long. Place a bead stopper or a piece of tape on one end to prevent your carefully arranged beads from sliding off. -
Establish the color blocks:
This design relies on asymmetry. Plan to have larger sections of white beads separated by a distinct block of the rose-colored beads, rather than alternating them one-by-one.
Step 2: Stringing the Beads
-
Start the first white section:
Begin threading the white Heishi beads. Add about 1 to 1.5 inches of just white beads. -
Add first gold accent:
Slide on a 4mm gold round spacer bead followed by a few more white beads. -
Transition to pink:
Create the color block section by threading roughly 2 inches of the rose/pink Heishi beads. -
Insert the second gold accent:
After the pink section, add another 4mm gold round spacer bead to mirror the other side. -
Resume white section:
Switch back to the white Heishi beads and continue stringing until you reach the front center area of your design.
Knot Slipping/Coming Undone?
Elastic is slippery! Always pre-stretch your cord before stringing. Use a surgeon’s knot, pull tight, and seal with a dot of Hypo Cement or superglue.
Step 3: Adding the Charms
-
Prepare the center segment:
The focal point uses gold washer beads and charms. Slide on a 4mm gold round spacer bead. -
Attach the first charm:
Thread on a larger gold washer bead. Open a jump ring on one of your coin charms using pliers, hook it onto the washer bead (or just beside it if the hole is too small), and close the ring securely. -
Create the spacer gap:
Thread about 6 to 8 white Heishi beads. This creates the white space between the two dangling charms. -
Add the center gold bead:
In the middle of this small white section, place one 4mm gold round bead for symmetry. -
Attach the second charm:
Repeat the charm process: slide on another 6-8 white beads, then a gold washer bead, and attach the second gold coin charm. -
Finish stringing:
Complete the length of the anklet with white Heishi beads until it matches your measured length.
Pro Tip: Gold Durability
To keep the gold spacers from tarnishing quickly against pool or ocean water, apply a thin coat of clear nail polish to the metal metal beads before stringing.
Step 4: Finishing Touches
-
Check the fit:
Carefully wrap the unfastened strand around your ankle to double-check the size before tying off. -
Add closure hardware:
Thread one end of the cord through a crimp bead and the loop of the lobster clasp. Thread it back through the crimp bead. -
Secure the crimp:
Use your pliers to flatten the crimp bead tightly. Repeat this on the other end with the extender chain. -
Knotting alternative:
If you aren’t using a clasp, tie a surgeon’s knot (right over left, left over right) with the elastic cord. Pull it extremely tight. -
Lock the knot:
Dab a tiny dot of jewelry glue onto the knot or crimp beads. Let this dry completely before snipping off the excess cord.
Now you have a chic, custom piece of jewelry ready for beach days or brunch.
Pearl-and-Heishi Beachy Mix
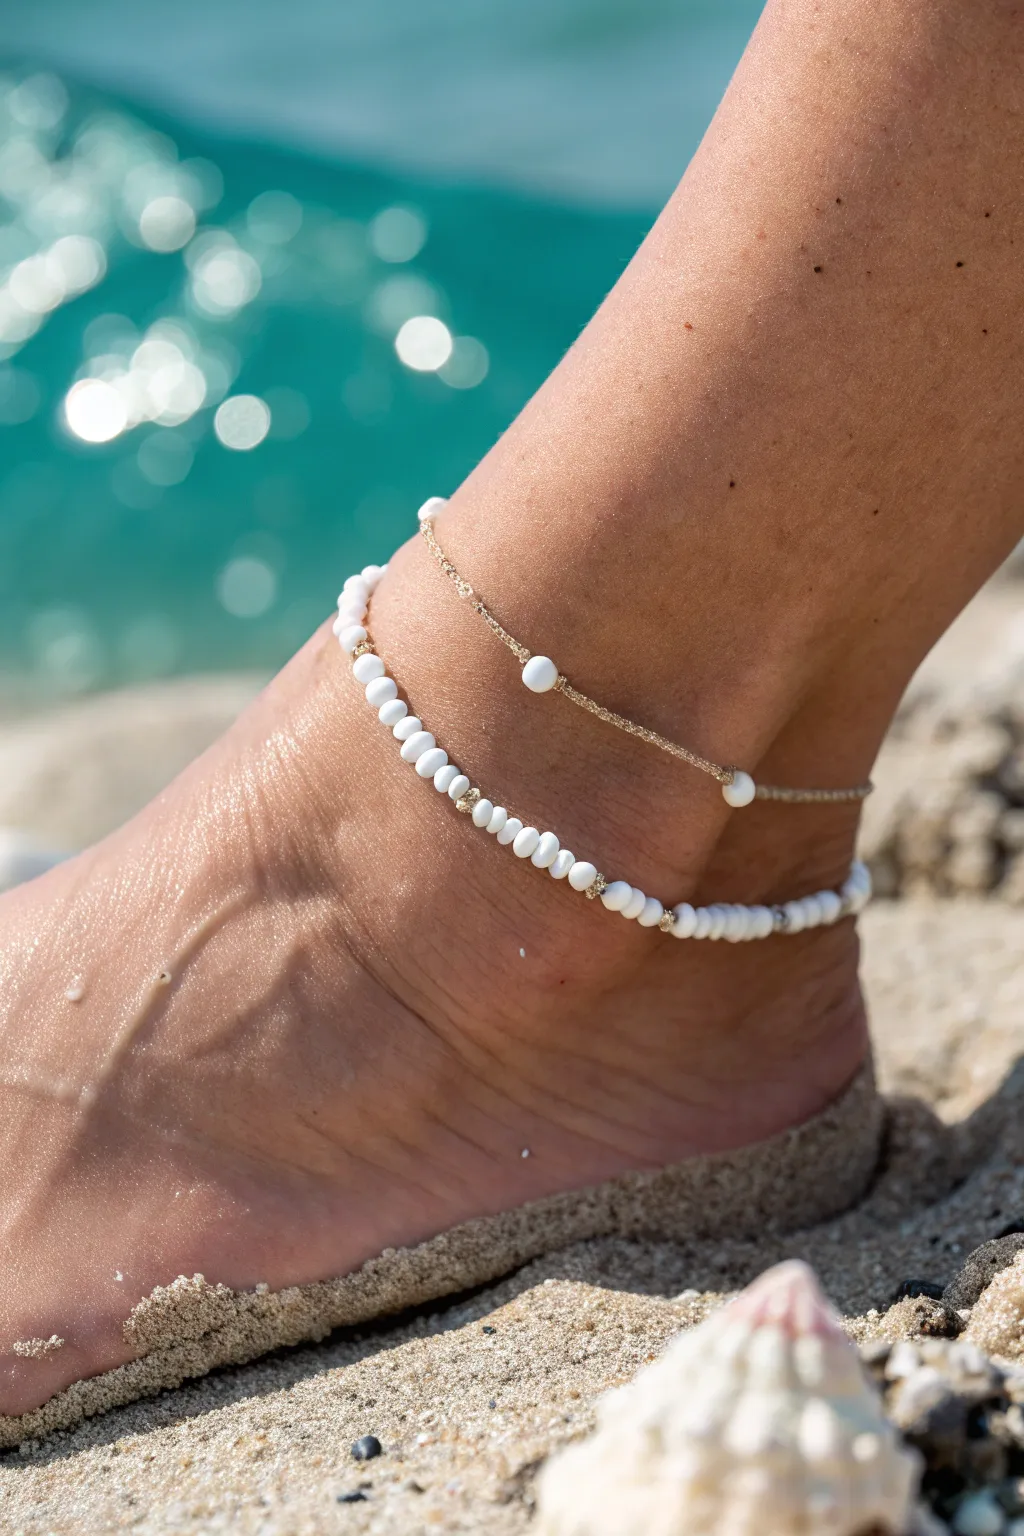
Capture the essence of a sun-drenched beach day with this elegant dual-strand anklet set. Combining a delicate gold chain with a playful strand of white seed beads and tiny gold accents, this project creates a chic, layered look perfect for summer.
How-To Guide
Materials
- Fine gold-filled or gold-plated chain (approx. 10-11 inches)
- White 3mm or 4mm seed beads (opaque finish)
- White 4mm or 6mm round pearl or stone beads (for the chain)
- Tiny gold spacer beads (2mm crimp covers or metal nuggets)
- Beading wire (0.015 or 0.018 inch diameter)
- 4 Crimp beads
- 2 Lobster clasps (small)
- 4 Jump rings (4mm or 5mm)
- 2 Crimp covers (optional)
- Wire cutters
- Chain nose pliers
- Crimping pliers
Step 1: Designing the Chain Strand
-
Measure and cut:
Begin by measuring your ankle just below the bone. Add about one inch to this measurement for a comfortable fit. Cut your gold chain to this length. -
Prepare the stations:
Decide where you want your larger white focal beads to sit. For the look in the photo, you’ll want 3-5 beads spaced unevenly for an organic feel. -
Cut the chain segments:
Using your wire cutters, carefully snip the chain at the points where you want to insert a bead. You will be threading the bead onto a tiny piece of wire to link the chain segments back together. -
Link with wire:
Cut a tiny piece of gold wire (about 1 inch). Create a small loop on one end with pliers, attach one chain segment, and close the loop. -
Add the bead:
Slide one of the larger 6mm white beads onto the wire. Trim the wire leaving just enough to make a second loop. -
Reconnect the chain:
Create a loop on the other side of the bead, catching the next segment of the gold chain before closing it tight. Repeat this for all bead stations. -
Finish the chain:
Attach a jump ring to one end of the chain and a jump ring with a lobster clasp to the other.
Pro Tip: Liquid Gold
Use gold-filled findings rather than plated if you plan to wear this in the ocean. Saltwater strips plating quickly, but gold-filled materials will last through the summer.
Step 2: Creating the Beaded Strand
-
Start the wire:
Cut a piece of beading wire about 12 inches long. Thread a crimp bead and one half of your clasp onto one end. -
Secure the start:
Loop the wire back through the crimp bead and use your crimping pliers to flatten it securely. Cover with a crimp cover for a polished look if desired. -
Begin beading:
Start threading the small white seed beads. String about 10-15 white beads to begin the pattern. -
Add gold accents:
After a section of white beads, add a single tiny gold spacer bead. This subtle sparkle breaks up the white and coordinates with the gold chain. -
Build the pattern:
Continue beading, alternating small sections of white beads with the single gold spacers. I prefer to keep the white sections slightly irregular so it doesn’t look too machine-made. -
Check the fit:
Periodically wrap the strand around your ankle. It should sit slightly lower than the chain anklet, so make it just a fraction longer. -
Secure the end:
Once you reach the desired length, add a crimp bead and a jump ring. Loop the wire back through the crimp bead and a few adjacent seed beads. -
Final crimp:
Pull the wire taut (but leave a little wiggle room for drape), crimp the bead flat, and trim the excess wire close.
Level Up: Charm It
Add a tiny seashell or starfish charm to the clasp area of the beaded strand. It adds a cute, hidden detail that dangles near the heel.
Fasten both anklets loosely around your ankle and enjoy the laid-back beach vibe you’ve created.

TRACK YOUR CERAMIC JOURNEY
Capture glaze tests, firing details, and creative progress—all in one simple printable. Make your projects easier to repeat and improve.
Seed Bead Breaks for Texture
This delicate anklet design combines the matte softness of polymer clay heishi beads with the glossy shine of seed beads for a beautiful textural contrast. The subtle peach and white color palette, punctuated by gold accents, creates a look that is both sunny and sophisticated.
Detailed Instructions
Materials
- Peach-colored flat polymer clay (heishi) beads (approx. 4-6mm)
- White glass seed beads (size 8/0 or 6/0)
- Gold tone metal spacer beads (round, approx. 4mm)
- Gold tone crimp beads (2mm)
- Gold tone crimp covers (3mm)
- Beading wire (flexible, 7-strand or highly flexible 49-strand)
- Gold tone lobster clasp
- Gold tone extender chain with jump ring
- Wire cutters
- Flat nose pliers
- Crimping pliers (optional but recommended)
Step 1: Preparation and Setup
-
Measure the wire:
Cut a length of beading wire approximately 10-12 inches long. This gives you plenty of extra room to work with for an anklet, which usually fits an ankle circumference of 9-10 inches. -
Secure the first end:
Thread a crimp bead onto one end of the wire, followed by the jump ring attached to your extender chain. -
Create the loop:
Loop the wire back through the crimp bead, creating a small loop that holds the jump ring securely but allows it to move. -
Crimp firmly:
Use your crimping pliers to flatten the crimp bead, securing the wire. If you don’t have crimping pliers, flat nose pliers will work, though the finish is slightly less rounded. -
Cover the crimp:
Place a crimp cover over the flattened crimp bead and gently squeeze it shut with pliers until it looks like a round gold bead. This adds a professional polish to the start of your strand.
Uneven Tension?
If the anklet feels stiff, you crimped too tight. Before the final crimp, curve the anklet into a circle shape; this ensures there’s enough slack for it to drape naturally around your ankle.
Step 2: Creating the Pattern
-
Start the sequence:
Begin stringing your beads. Start with a section of the peach clay heishi beads. Thread on approximately 15 to 20 of these flat discs to create the first solid block of color. -
Add a gold accent:
Slide on one round gold spacer bead. This marks the transition from the clay texture to the glass texture. -
Create the white segment:
String on about 5 to 7 white seed beads. Since seed beads vary slightly in width, just aim for a segment length of about 1/2 an inch. -
Section with gold:
Add another gold spacer bead to cap off the white section. -
Repeat the white block:
Add a second small group of 5 to 7 white seed beads followed by another gold spacer bead. This creates the ‘break’ mentioned in the design concept. -
Return to peach:
Switch back to the peach heishi beads. This time, create a much longer section that will wrap around the back of the ankle. Thread roughly 2 to 3 inches of peach beads. -
Check the length:
Wrap the strand around your ankle to check the fit. The pattern in the photo is asymmetrical, so feel free to add random small sections of white seed beads separated by gold spacers wherever you like along the strand. -
Finish the beading:
Ensure your final bead is a peach clay bead or a gold spacer, leaving about 1.5 inches of bare wire at the end.
Go Asymmetrical
Instead of a repeating pattern, try an offset design. Place the white seed bead “break” slightly off-center so it sits on the side of the ankle bone for a modern, unexpected look.
Step 3: Finishing Touches
-
Add final hardware:
Thread on a crimp bead, followed by the lobster clasp. -
Close the loop:
Pass the wire end back through the crimp bead and down through the last few beads on your strand to hide the tail. -
Secure the crimp:
Pull the wire snug (but not too tight—keep the anklet flexible!) and flatten the crimp bead with your pliers. -
Apply the cover:
Place the final crimp cover over the crimp bead and gently close it with pliers. -
Trim excess wire:
Use your flush cutters to trim the remaining wire tail as close to the beads as possible without nicking the thread.
Enjoy wearing your new mixed-texture anklet with your favorite summer sandals
Personalized Letter Bead Name Anklet
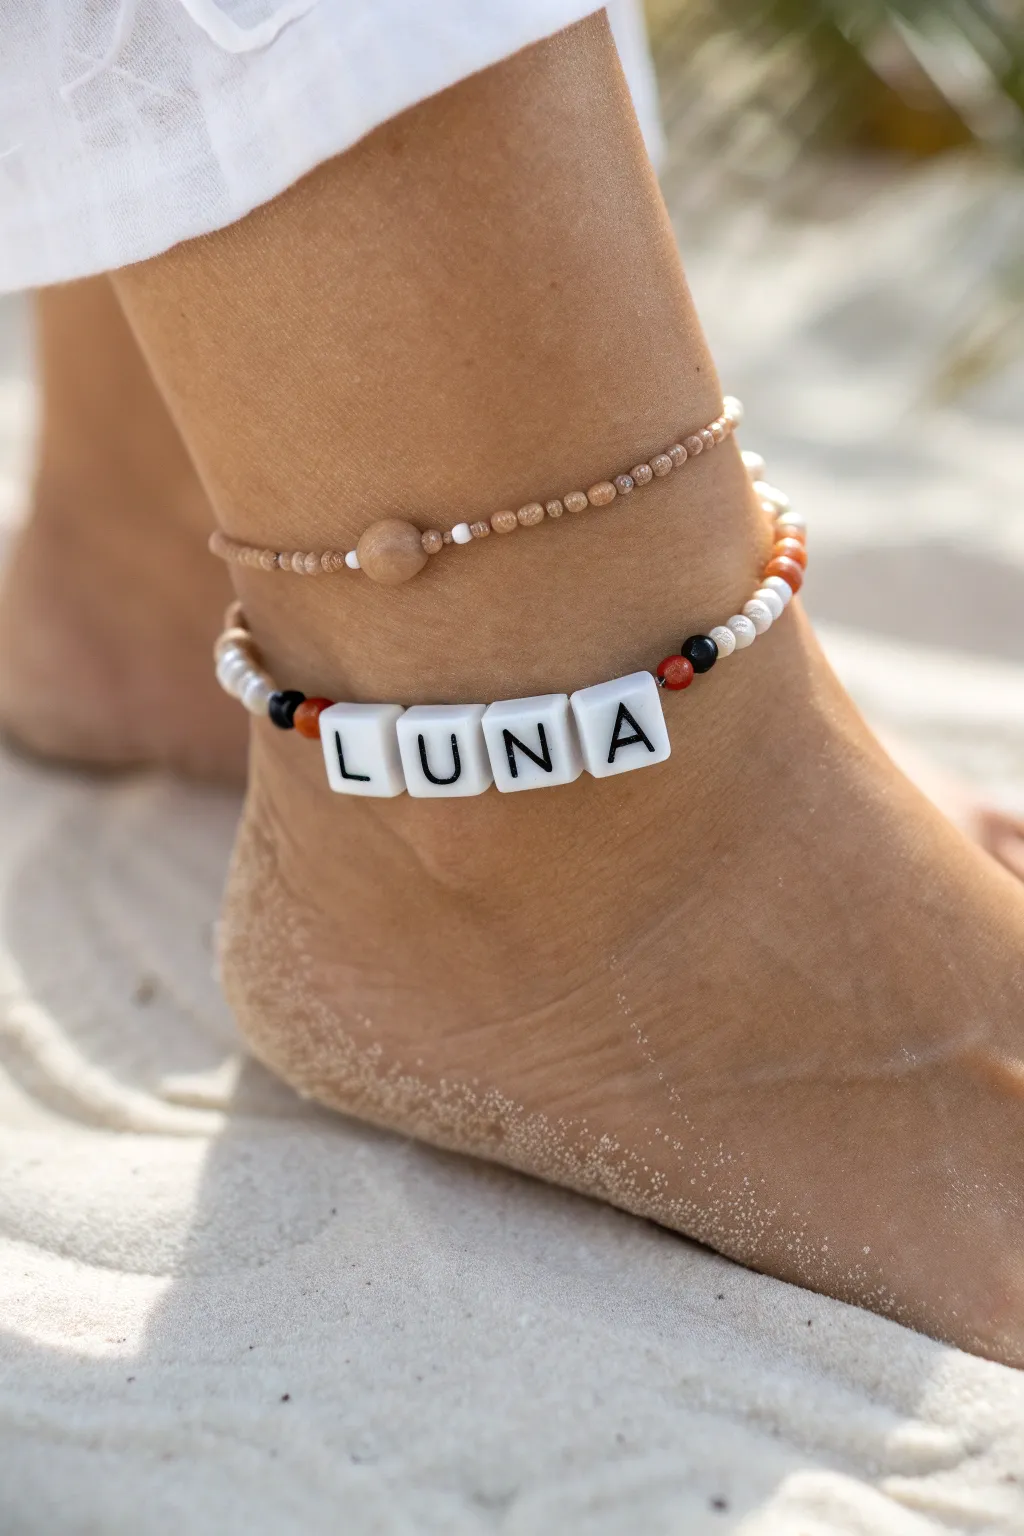
Capture the essence of a beach day with this charming beaded anklet set. Featuring natural tones, wooden accents, and a personalized name design, this duo combines a warm, earthy aesthetic with a custom playful touch.
How-To Guide
Materials
- Stretch cord (0.7mm or 0.8mm)
- Square white letter beads (spelling LUNA or your choice)
- Small round wooden beads or brown seed beads (approx. 3mm)
- White or cream seed beads
- Focal wooden bead (approx. 8-10mm)
- Red-orange seed beads or spacers
- Black seed beads
- Jewelry glue or clear nail polish
- Scissors
Step 1: The ‘LUNA’ Name Anklet
-
Measure and cut:
Measure your ankle comfortably, then add about 3-4 inches to that length. Cut a piece of stretch cord to this total length to ensure you have plenty of room for tying knots later. -
Secure the end:
Place a piece of tape on one end of the cord or attach a bead stopper clip. This prevents your beads from sliding off while you design the pattern. -
Thread the name:
Beginning in the center, thread your square letter beads onto the cord. Double-check that they are all facing the correct direction so the name reads properly. -
Add color accents:
On both the left and right sides of the letter block, thread one red-orange bead followed by one black bead. This creates a distinct border for the name. -
Create the white sections:
Thread about 4-5 white seed beads on either side next to the black beads. This bright pop of white contrasts nicely with the darker elements. -
Fill the rest of the strand:
Continue beading the rest of the cord using the small brown wooden beads or seed beads. Alternate sides occasionally to keep the name perfectly centered. -
Check fit:
Wrap the strand around your ankle to check the size. I prefer a slightly looser fit for anklets so they drape naturally over the ankle bone. -
Tie the knot:
Remove the tape/clip and tie the ends together using a strong surgeon’s knot (right over left, left over right). Pull tight to secure. -
Seal and trim:
Dab a tiny drop of jewelry glue on the knot. Allow it to dry completely, then trim the excess cord ends close to the knot.
Step 2: The Companion Earth Strand
-
Cut cord:
Cut a second length of stretch cord, using the same measurement strategy as the first anklet. -
Add the focal bead:
Thread the large 8-10kw round wooden focal bead onto the center of the cord. -
Add white spacers:
Place one white seed bead on immediate left and right of the large wooden bead to make it stand out. -
Strand assembly:
Fill the remainder of the strand on both sides using only the small brown beads. This creates a minimalist look that complements the busier name anklet. -
Final sizing:
Measure the strand against your ankle again. It often looks nice if this anklet sits slightly higher or tighter than the name anklet. -
Finish the piece:
Tie off with a surgeon’s knot, secure with a dot of glue, and trim the excess cord once dry.
Knot Security
Hide the knot inside one of the larger beads if the hole size permits. This protects the glue from water and sand friction.
Waterproofing
Coat wooden beads with a thin layer of clear matte varnish before stringing to prevent them from swelling or fading in sea water.
Now you have a custom beach-ready set that looks effortless and stylish on the sand
Tiny Smiley Accent Centerpiece
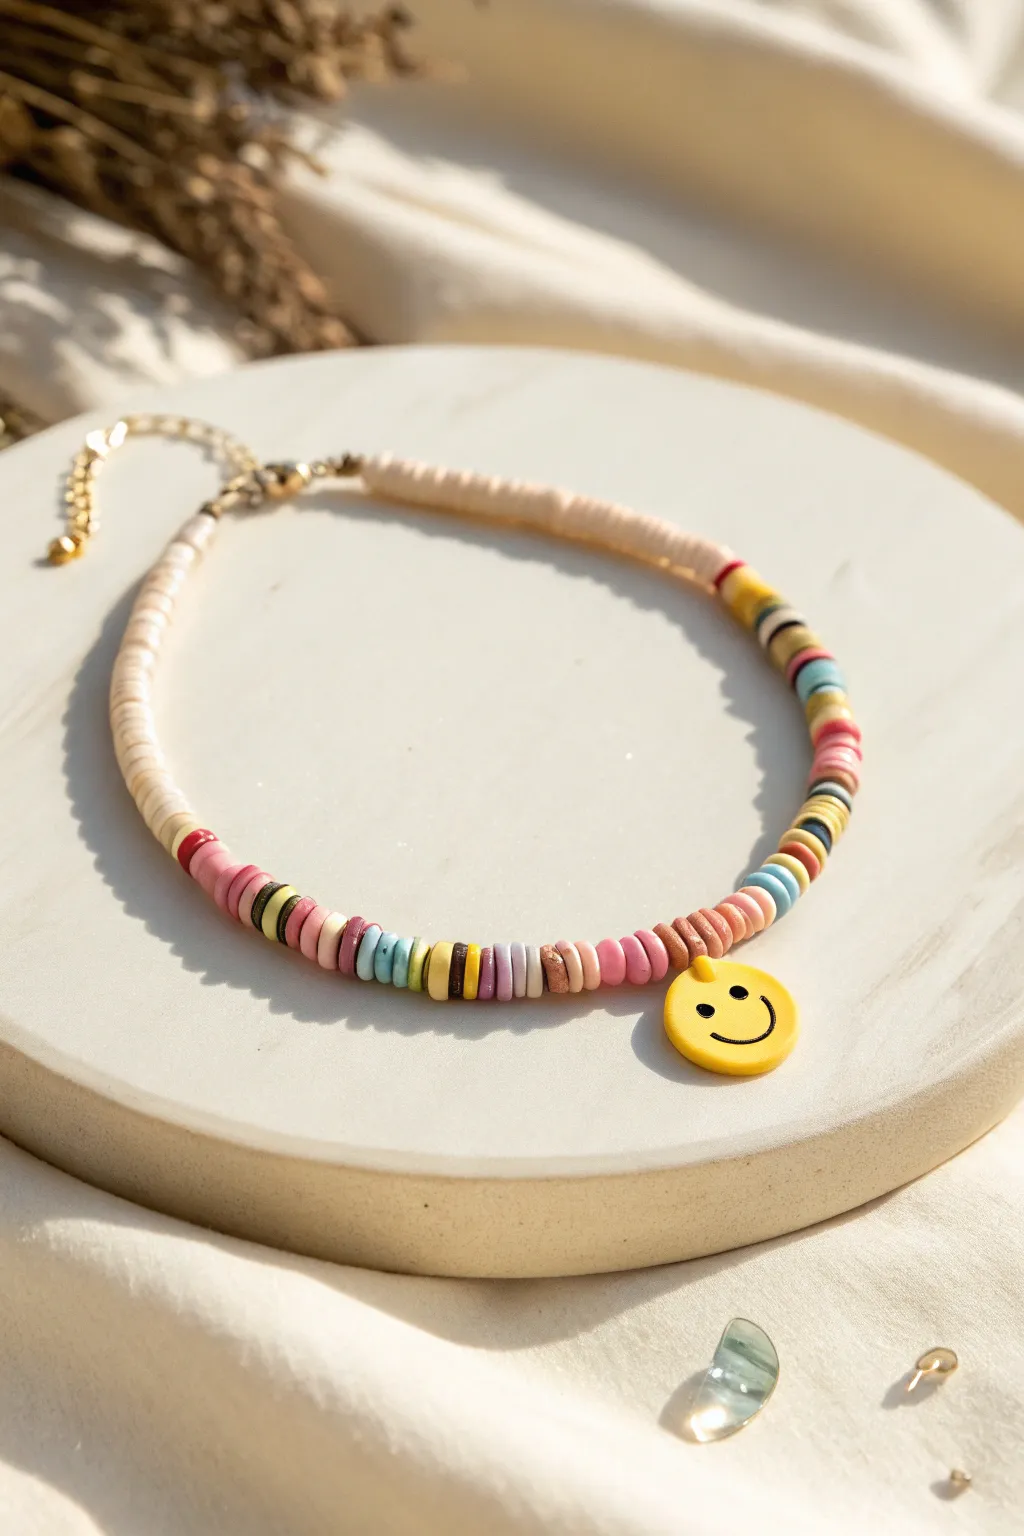
Bring a little joy to your step with this adorable and trendy clay bead anklet featuring a classic smiley face charm. The design balances a neutral beige base with a vibrant splash of multicolor discs, creating a perfect accessory for beach days or casual summer outings.
Step-by-Step Tutorial
Materials
- 6mm polymer clay disc beads (Heishi beads) in beige or cream
- 6mm polymer clay disc beads in mixed colors (pink, blue, yellow, turquoise, brown, purple)
- 1 yellow smiley face resin charm with top loop
- Elastic beading cord (0.5mm to 0.8mm)
- 2 gold crimp beads
- 2 gold jewelry wire protectors (optional but recommended)
- Gold jump rings (4mm or 5mm)
- Gold lobster clasp
- 1 inch gold extender chain with droplet charm
- Jewelry pliers (flat nose)
- Scissors or bead snips
- Super glue or jewelry cement
Step 1: Setting the Foundation
-
Measure and cut:
Begin by measuring your ankle’s circumference. Add about 6 inches to this measurement to ensure you have plenty of slack for tying knots or attaching clasps. Cut your elastic cord to this length. -
Secure the end:
Before you start beading, place a piece of tape over one end of your cord or attach a bead stopper. This prevents your beads from sliding right off while you work.
Uneven Charm?
If the smiley face flips around while wearing, add a small gold spacer bead on either side of it. This acts as a buffer and helps the charm lay flat against the skin.
Step 2: Designing the Pattern
-
String the neutral base:
Start by threading on the beige or cream-colored clay disc beads. You will need enough of these to cover approximately half to two-thirds of the anklet’s total length. -
Check the length:
Occasionally hold the string up to your ankle to see if the neutral section wraps around the back comfortably. -
Begin the color transition:
Once the neutral section is complete, switch to your mixed colors. Thread about 1.5 to 2 inches of random colorful beads. I like to alternate warm tones like pinks and yellows with cool blues to keep it balanced. -
Add the centerpiece:
Slide on your yellow smiley face charm. Ensure it sits facing forward, right in the middle of your design plan. -
Complete the color section:
Continue adding mixed colorful beads on the other side of the smiley face. Try to match the length of the first colorful section so the charm stays perfectly centered.
Step 3: Finishing Touches
-
Prepare the first crimp:
Now for the hardware. Thread a crimp bead onto one end of the elastic, followed by a wire protector loop if you are using one. -
Attach the clasp:
If using a wire protector, thread the lobster clasp onto it. Loop the tail of your elastic back through the crimp bead. If not using a protector, simply loop the elastic through the clasp ring and back into the crimp bead. -
Secure the crimp:
Use your flat nose pliers to squash the crimp bead flat, securing the wire tightly. Trim the excess tail close to the bead. -
Repeat on step opposite side:
Repeat the crimping process on the other end of the anklet, but this time attach the jump ring connected to your extender chain instead of the clasp. -
Double check security:
Gently tug on both ends to ensure the crimps are holding firm. -
Glue for durability:
Place a tiny dot of super glue or jewelry cement over the flattened crimp beads or knots for extra security. Let this dry completely before wearing. -
Final inspection:
Clip the anklet closed and check that the smiley face hangs correctly and the colors are distributed evenly.
Make It Yours
Swap the random color pattern for an ombré effect, starting with light pink near the beige and darkening to deep violet near the smiley charm.
Now you have a cheerful accessory ready to brighten up any outfit
Shell Charm Surfer Style
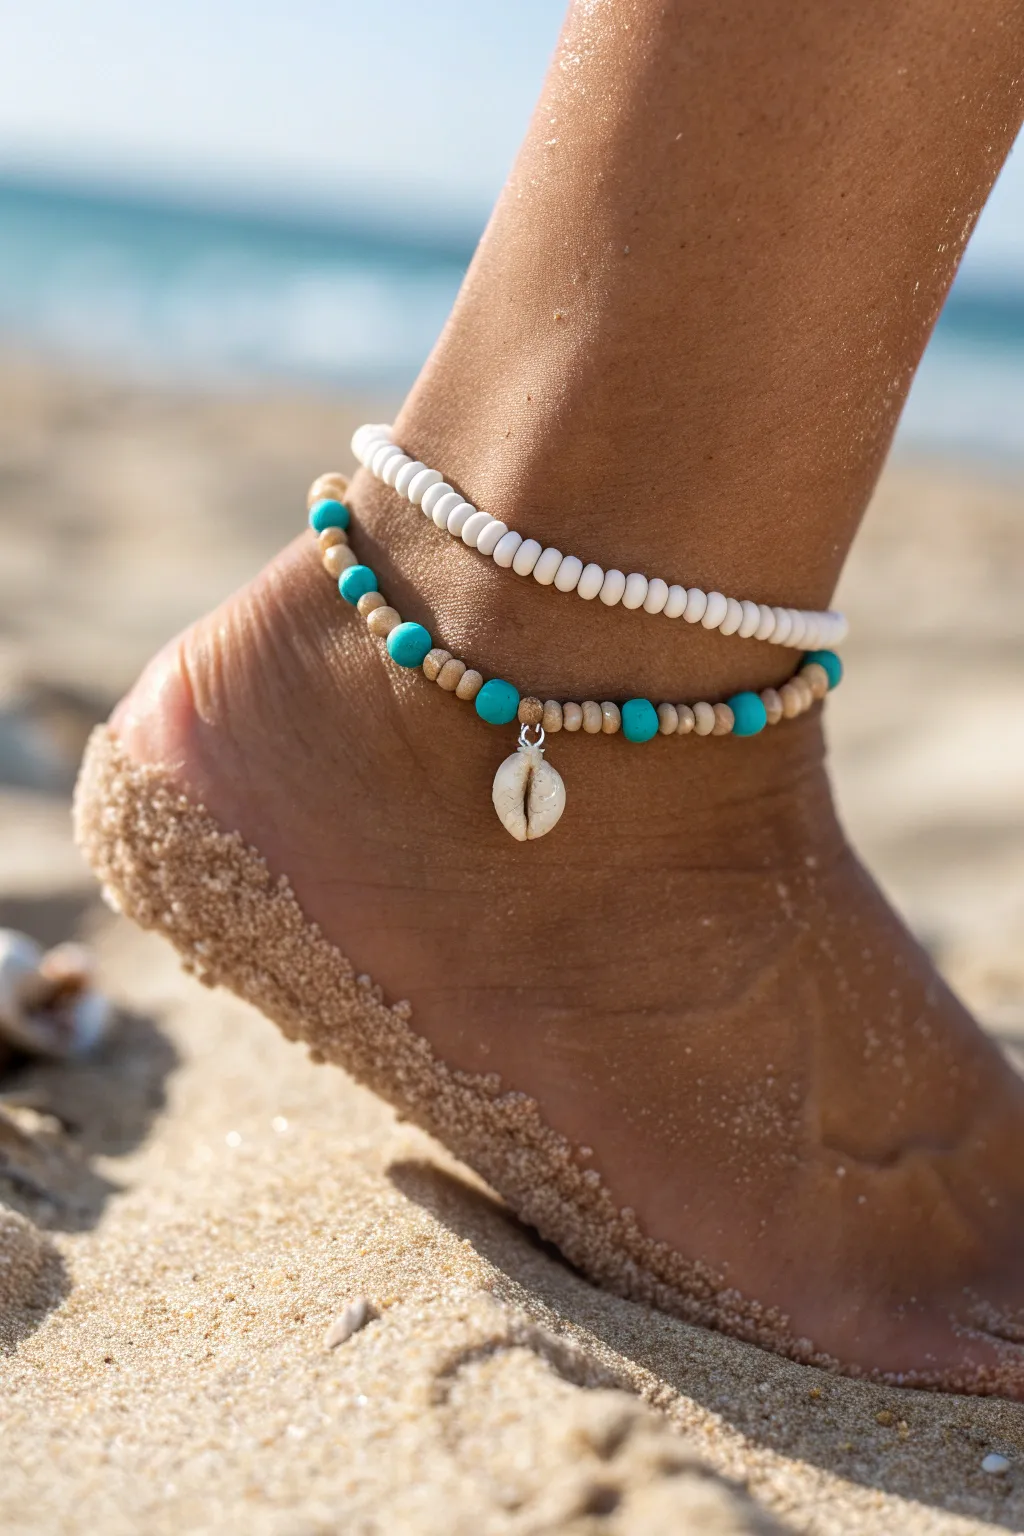
Capture the spirit of the shore with this breezy two-strand anklet set. Combining crisp white heishi beads with natural wood and pops of turquoise, this design features a classic cowrie shell charm as its centerpiece.
Step-by-Step Guide
Materials
- White polymer clay heishi beads (4-6mm)
- Small wooden spacer beads (light brown/tan)
- Turquoise round beads (approx. 4-6mm)
- Cowrie shell charm with silver connector loop
- Elastic beading cord (0.8mm clear)
- Jewelry glue or clear nail polish
- Scissors
Step 1: Designing the White Strand
-
Measure and cut:
Begin by wrapping the elastic cord loosely around your ankle to determine the length. Add about 3-4 inches of extra cord on each end to make knotting easier later, then cut. -
Pre-stretch the cord:
Before adding any beads, firmly pull on the elastic cord a few times. This pre-stretching helps prevent the anklet from sagging or stretching out permanently after you wear it. -
Start beading:
String your white polymer clay heishi beads onto the cord. Since this top strand is a solid color, you don’t need to worry about a pattern—just keep adding them until you reach your measured length. -
Check fit:
Wrap the strand around your ankle again to test the fit. It should sit comfortably without pinching, but not be so loose it slides over your heel. -
Secure the strand:
Tie a strong surgeon’s knot (right over left, left over right, looping through twice on the second pass). Pull the elastic tight so the knot is secure.
Sticky Fix
If the knot won’t stay tight while gluing, use a piece of masking tape to hold the first loop of the knot down against a table while you tie the second part.
Step 2: Creating the Charm Strand
-
Prepare the second cord:
Measure, cut, and pre-stretch a second piece of elastic cord, using the same length as your first strand. -
Add the centerpiece:
Slide the cowrie shell charm onto the middle of the cord. This will act as our anchor point for the pattern. -
Start the center pattern:
On the immediate left and right of the shell charm, thread on three wooden spacer beads. This frames the white shell with a natural tone. -
Add color accents:
After the three wood beads, add one turquoise bead on each side. The bright pop of blue mimics ocean water. -
Build the rhythm:
Continue the pattern outward from the center: add two or three wooden beads, followed by one turquoise bead. Unlike the top strand, we are creating a repeating rhythm here. -
Mix textures:
I like to vary the pattern slightly as it reaches the back of the ankle. You can switch to just wooden beads for the back section if you run out of turquoise, or maintain the pattern all the way around. -
Final sizing:
Once the beaded length matches your first anklet, double-check the fit on your ankle. -
Knot the second strand:
Tie off this strand with another secure surgeon’s knot, pulling the elastic taut to minimize gaps between beads.
Step 3: Finishing Touches
-
Seal the knots:
Apply a tiny dab of jewelry glue or clear nail polish to the knots on both anklets. This prevents them from slipping over time. -
Hide the knots:
If the bead holes are large enough, gently slide a nearby bead over the knot while the glue is still tacky to hide it inside. -
Trim excess:
Once the glue is fully dry, use your scissors to snip off the excess cord tails as close to the knot (or bead) as possible.
Make It Golden
Swap the wooden spacer beads for small gold-plated brass beads or hematite spacers. This elevates the surfer look into something chic enough for dinner.
Slip on your new beachy accessories and enjoy the summer vibes wherever you walk
Star Charm Night-Sky Palette
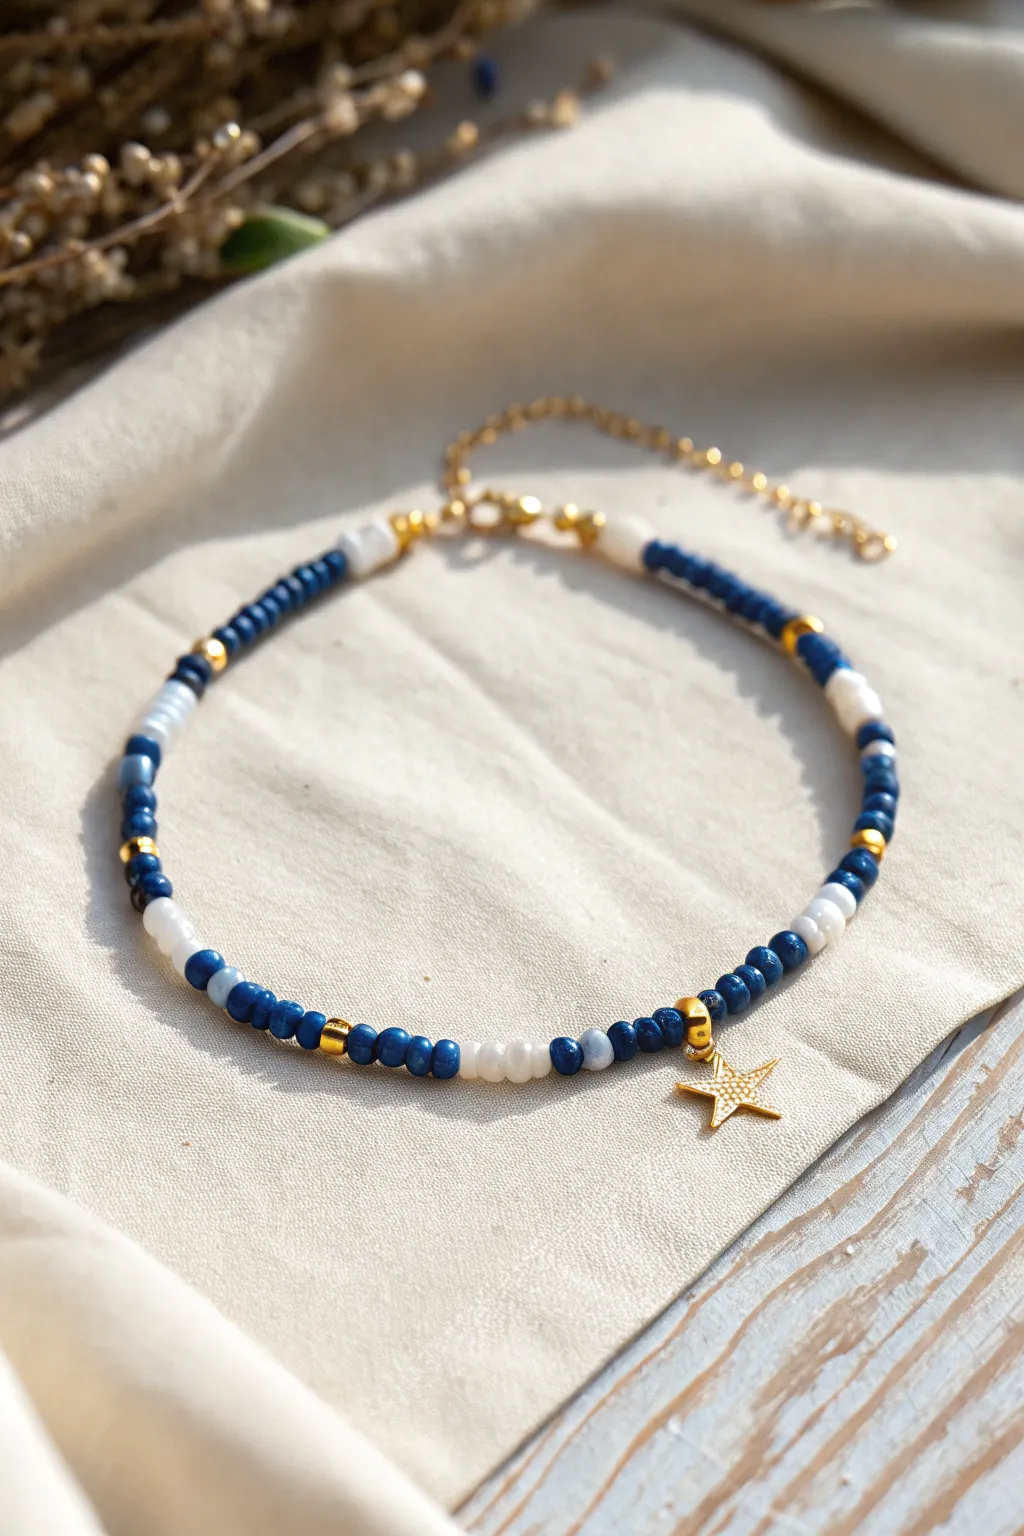
Capture the magic of a midnight sky with this delicate beaded anklet featuring deep blues, crisp whites, and gleaming gold accents. The focal point is a shimmering star charm that dangles perfectly against the ankle, making it an dreamy accessory for summer evenings.
Step-by-Step Tutorial
Materials
- Deep blue seed beads (size 8/0 or 10/0, glossy or matte finish)
- White or pearlescent seed beads (size 8/0 or 10/0)
- Gold tone spacer beads (cylindrical or heishi style)
- Gold tone crimp beads (2 pieces)
- Gold star charm with inlaid crystals or texture
- Gold jump ring (4mm or 5mm)
- Gold lobster clasp
- Gold extension chain (optional but recommended for fit)
- Beading wire (flexible, coated wire like Soft Flex)
- Wire cutters
- Flat nose pliers
- Crimping pliers
Step 1: Preparation and Setup
-
Measure the wire:
Cut a length of beading wire roughly 10-12 inches long. This gives you plenty of extra room to work with the clasp ends without struggling. -
Attach the first clasp component:
Slide a crimp bead onto one end of the wire, followed by the end loop of your extension chain (or a jump ring if you aren’t using a chain). -
Secure the start:
Loop the wire back through the crimp bead to create a small loop holding the chain. Use your crimping pliers to flatten or fold the crimp bead securely, then trim the excess tail of the wire close to the bead.
Knotting Nightmare?
If the wire creates stiff, angular shapes, it’s too tight. Leave a tiny 1mm gap of exposed wire near the clasp before crimping to allow the beads to drape naturally around the ankle.
Step 2: Creating the Pattern
-
Start the sequence:
Based on the image, begin stringing beads with a small block of color. Thread on about 7-8 deep blue seed beads to start the pattern. -
Add gold accents:
Slide on one gold spacer bead after your blue block. -
Introduce white contrast:
Add a small section of white beads. In this design, I notice the white sections are shorter, so string just 2 or 3 white beads. -
Vary the blue sections:
Thread on another gold spacer, followed by a longer section of blue beads. Notice how the blue sections vary slightly in length—some have 10 beads, some have 5—creating an organic feel. -
Mix textures:
Continue alternating blocks of blue and small accents of white, separated by gold spacers. Occasionally, you can swap a regular blue bead for a slightly larger or lighter blue bead to add depth to the ‘night sky’ look.
Step 3: Placing the Focal Charm
-
Locate the center:
Once you have beaded roughly halfway to your desired ankle circumference (usually around 4.5-5 inches for an average anklet), stop beading. -
Prepare the bail:
Slide on a gold spacer or a larger gold bead that will act as the holder for your charm. If your charm has a jump ring attached, you can string the wire directly through the jump ring now. -
Add the star:
Ensure the star charm hangs freely. I prefer to place it between two specific beads—like a blue and a white one—so it stands out clearly. -
Continue the pattern:
Resume your beading pattern on the other side of the charm, trying to mirror the general rhythm of colors you established on the first half.
Celestial Upgrade
Add a tiny crescent moon charm next to the clasp or interspersed in the bead pattern to enhance the night sky theme and add extra jingle as you walk.
Step 4: Finishing the Piece
-
Check the length:
Wrap the beaded wire around your ankle to check the fit. Remember the clasp will add about half an inch, so stop beading slightly short of the full circumference. -
Prepare the end clasp:
Slide on your second crimp bead, followed by the jump ring attached to your lobster clasp. -
Thread back through:
Pass the wire back down through the crimp bead and through the first few beads of your design. This hides the tail and makes the finish stronger. -
Crimp and trim:
Pull the wire snug (but not too tight, or the anklet will be stiff). Use your crimping pliers to secure the crimp bead, then use flush cutters to trim the wire as close as possible to the beads. -
Final adjustment:
Gently massage the bead strand to ensure there’s a little flexibility and the star charm hangs correctly downward.
Now you have a stunning, starry accessory ready to wear for your next seaside adventure
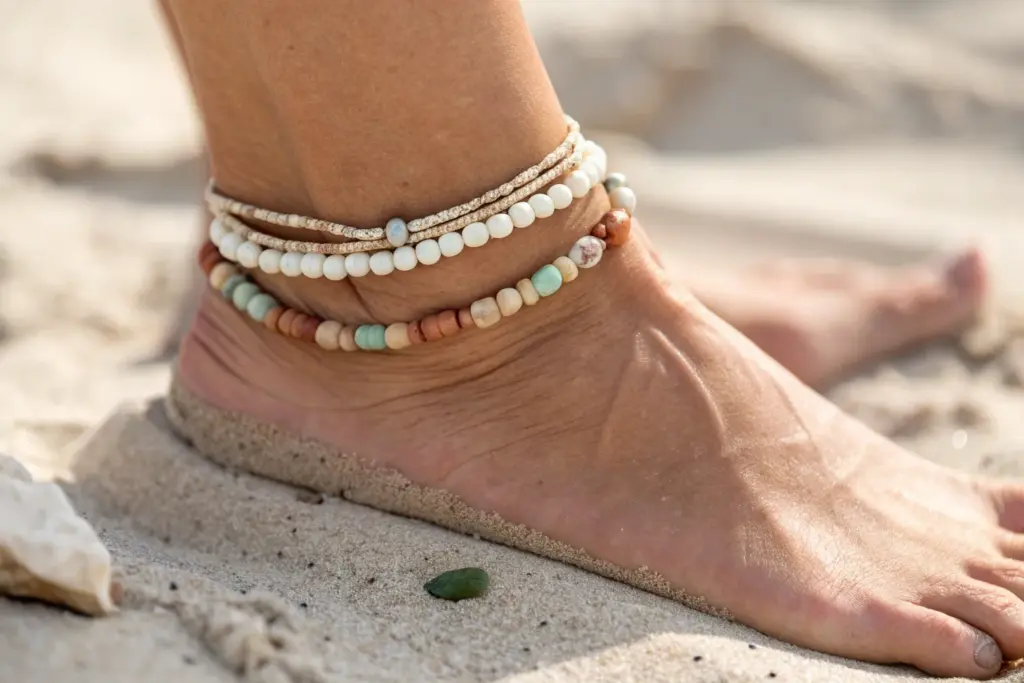
Double-Strand Stacked Anklet Set
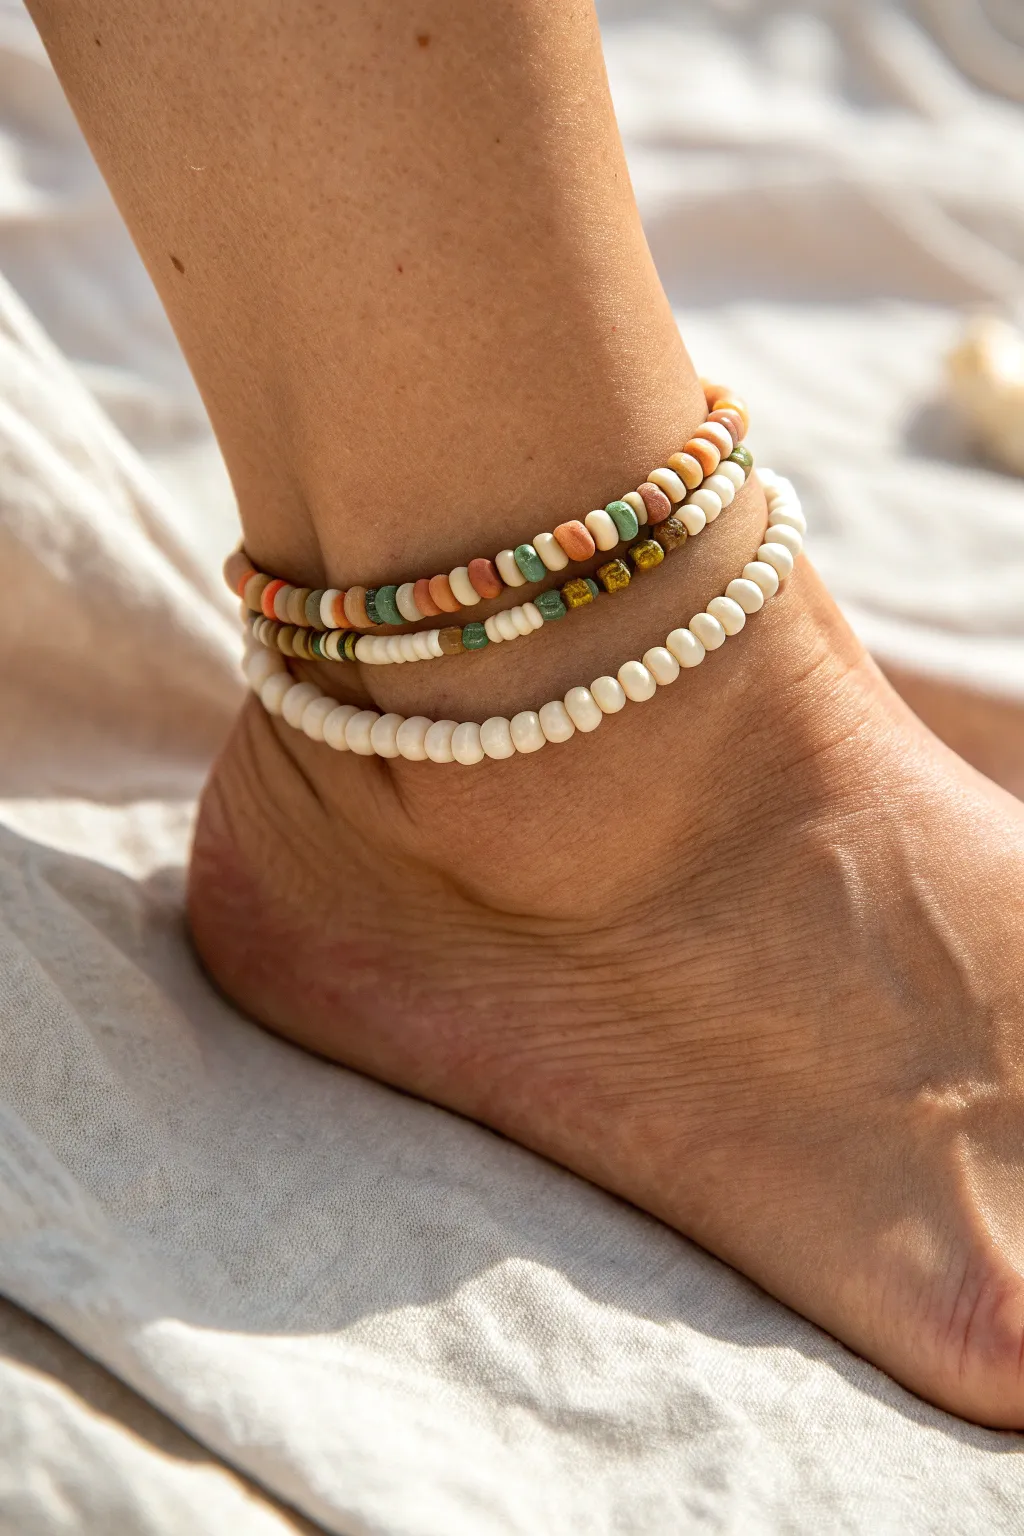
Capture the essence of a sun-soaked beach day with this layered anklet set featuring natural textures and earthy hues. By combining smooth seed beads with rustic clay discs, you create a laid-back, organic look that pairs perfectly with summer adventures.
How-To Guide
Materials
- Polymer clay heishi beads (4mm-6mm) in terracotta, sage green, cream, and brown
- Cream or ivory seed beads (sizes 6/0 or 8/0)
- Small brass or gold spacer beads (optional)
- Small wooden beads or coconut shell discs (optional for texture)
- Stretch cord (0.5mm or 0.8mm depending on bead hole size)
- Super glue or jewelry adhesive
- Scissors or bead snips
- Bead stopper or tape
- Measuring tape
Step 1: Preparation & Sizing
-
Measure the Ankle:
Use a flexible measuring tape to find the circumference of your ankle just above the bone. Add about 0.5 to 1 inch to this measurement to ensure a comfortable fit that doesn’t dig into the skin. -
Cut the Cord:
Cut two lengths of stretch cord, each about 4-5 inches longer than your final measurement. This extra length gives you plenty of room to tie secure knots later. -
Secure the Ends:
Attach a bead stopper or simply place a piece of tape on one end of each cord. This prevents your beads from sliding off while you design your pattern.
Sticky Situation
If your heishi beads are sticking together, gently rub them between your fingers to separate them. Sometimes the slicing process leaves tiny uncut bits of clay connecting them.
Step 2: Strand One: The Earthy Mix
-
Establish the Pattern:
For the colorful strand, create a random but balanced pattern. I like to alternate groups of 3-4 colored heishi beads (terracotta, sage, brown) with single cream heishi beads to break up the color blocks. -
Incorporate Texture:
Every inch or so, swap a clay bead for a small wooden bead or a brass spacer. This subtle change in material adds that authentic, handmade depth seen in the photo. -
Start Beading:
Begin threading your clay beads onto the first cord. Because the holes in heishi beads can sometimes be irregular, check that each one slides smoothly over the cord before proceeding. -
Check Length:
Periodically wrap the strand around your ankle to check the fit. Clay beads lay flat, so they might require a slightly different length than round beads to feel comfortable. -
Finalize Strand One:
Once you reach the desired length, hold the ends together to verify the pattern meets seamlessly. Add or remove a bead or two if the pattern looks interrupted.
Level Up: Connector Charm
Instead of two separate anklets, join them with a single cowrie shell or a large brass ring in the center. This turns the stack into one cohesive, multi-strand piece.
Step 3: Strand Two: Creamy Minimalist
-
Select the Beads:
For the lower strand, use purely cream-colored seed beads. Choosing a slightly larger seed bead (like a 6/0) gives it a nice visual weight that balances the flat clay beads of the first strand. -
Thread the Beads:
String the cream seed beads onto your second piece of cord. This strand is much faster to assemble since there is no complex color pattern to follow. -
Match the Lengths:
Hold this new strand up against your finished clay bead strand. They should be roughly the same length, though I prefer making the seed bead strand just a tiny bit longer so it sits naturally below the first one.
Step 4: Finishing Touches
-
Pre-stretch the Cord:
Before tying, gently pull on the ends of the cords to pre-stretch the elastic. This crucial step prevents the anklet from sagging or loosening permanently after the first time you wear it. -
Tie the Knots:
Remove the bead stoppers. Tie a surgeon’s knot (a standard overhand knot with an extra loop) for each anklet. Pull the elastic tight so the knot is snug. -
Secure with Glue:
Apply a tiny dab of jewelry glue or super glue to the knots. Be careful not to get glue on the nearby beads, as it can dull their finish. -
Hide the Knot:
If fitting, slide the knot inside the hole of the nearest large bead to conceal it. If the holes are too small, simply trim the excess cord close to the knot once the glue is fully dry.
Slip on your new stack and enjoy the casual, texture-rich vibe they add to your look
Mixed Disc Sizes for a Chunky Look
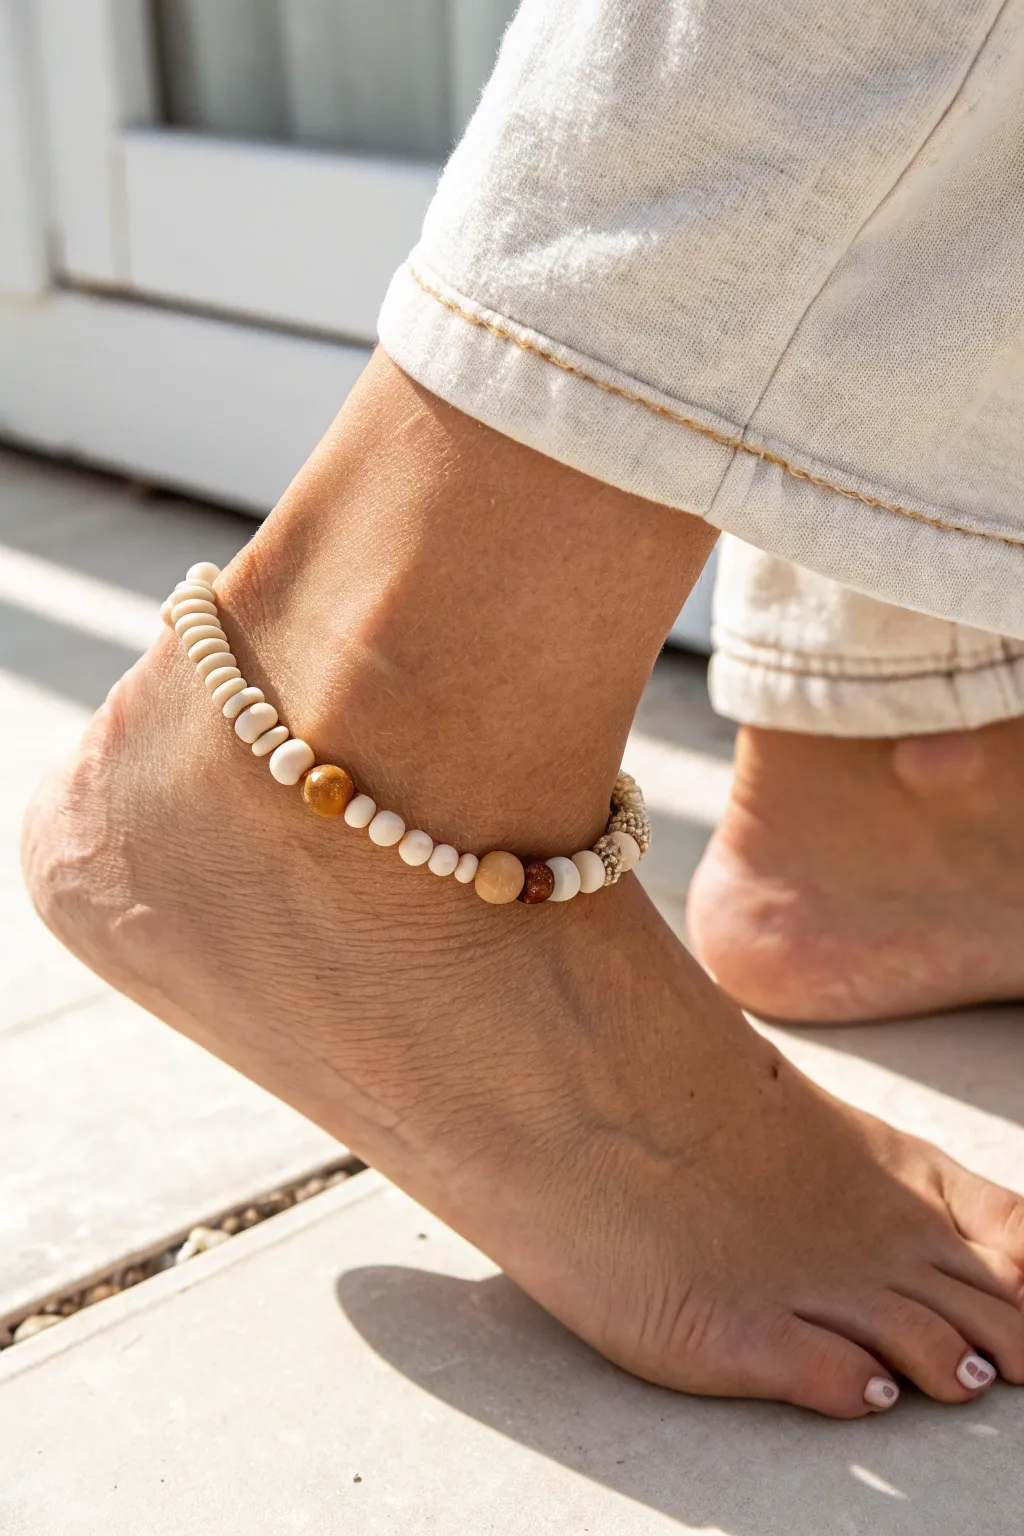
Embrace a relaxed, sun-kissed vibe with this beaded anklet that combines the smooth texture of clay discs with the earthy warmth of wooden accents. The varied bead shapes and sizes create a chunky, eclectic look perfect for beach days or casual summer styling.
Step-by-Step Tutorial
Materials
- White or cream flat clay disc beads (heishi beads), approx. 4-6mm
- Medium round wood or imitation wood beads (saddle brown/tan)
- Small round brown spacer beads
- Gold or brass textured spacer beads
- Clear elastic beading cord (0.7mm or 0.8mm)
- Jewelry glue or clear nail polish
- Scissors
- Tape or bead stopper
Step 1: Preparation
-
Measure your ankle:
Wrap a measuring tape loosely around your ankle where you want the anklet to sit. Add about half an inch to this measurement to ensure a comfortable fit that isn’t too tight. -
Cut the cord:
Cut a piece of elastic cord about 4 inches longer than your final measurement. This extra length creates tails that make tying the knot much easier. -
Secure the end:
Attach a piece of tape or a bead stopper to one end of the cord. This prevents your beads from sliding off while you design your pattern.
Step 2: Creating the Pattern
-
Start with clay discs:
Thread about 1 to 1.5 inches of the cream clay disc beads onto the cord. These will form the main body of the anklet. -
Add the first accent:
Slide on one larger, darker round wood bead. This acts as a focal point to break up the row of discs. -
Layer small spacers:
Follow the wood bead with two white clay discs, then add a small round wood bead or spacer. -
Create a mixed section:
Thread on three more white clay discs, followed by a medium-sized tan wood bead. -
Insert textured gold:
Add a small cluster of texture by placing two textured gold spacers or small gold beads next. -
Repeat the pattern:
Continue stringing beads, alternating between long sections of white clay discs (about an inch) and these mixed accent clusters. I like to vary the accent order slightly to keep it looking organic rather than perfectly symmetrical. -
Check the fit:
Periodically wrap the strand around your ankle to check the length. Keep adding beads until the ends meet comfortably without stretching the cord.
Pro Tip: Stretch Test
Before tying your final knot, give the elastic cord a few gentle tugs. This pre-stretches the material so your anklet won’t sag after the first wear.
Step 3: Finishing Up
-
Prepare to knot:
Once you have reached your desired length, remove the tape or bead stopper carefully while holding both ends of the cord firmly. -
Tie the first knot:
Tie a simple overhand knot, pulling the elastic tight enough so there are no gaps between beads, but not so tight that the anklet buckles. -
Secure with a surgeon’s knot:
For the second knot, loop the cord through twice before pulling tight. This creates a secure surgeon’s knot that is less likely to slip. -
Apply adhesive:
Place a tiny drop of jewelry glue or clear nail polish directly onto the knot. This seals the elastic and prevents it from unraveling over time. -
Hide the knot:
If possible, gently tug the cord so the knot slides inside the hole of one of the larger wood beads. This gives the piece a professional, seamless finish. -
Trim excess cord:
Once the glue is fully dry, grab your scissors and trim the excess cord ends close to the knot.
Troubleshooting: Gaps Appearing
If you see gaps between beads after tying, you didn’t pull the elastic tight enough during the first knot. Untie if possible, or cut deeper into the tail to retie.
Slip on your new creation and enjoy that effortless coastal style no matter where you are