
If you’ve got a plain frame and a lump of clay, you’re minutes away from turning a photo into a little piece of art. These clay frame ideas are my go-to studio favorites for dressing up picture frames with air-dry clay or polymer clay, from sweet and simple to total wow.
Floral Border on a Simple Frame
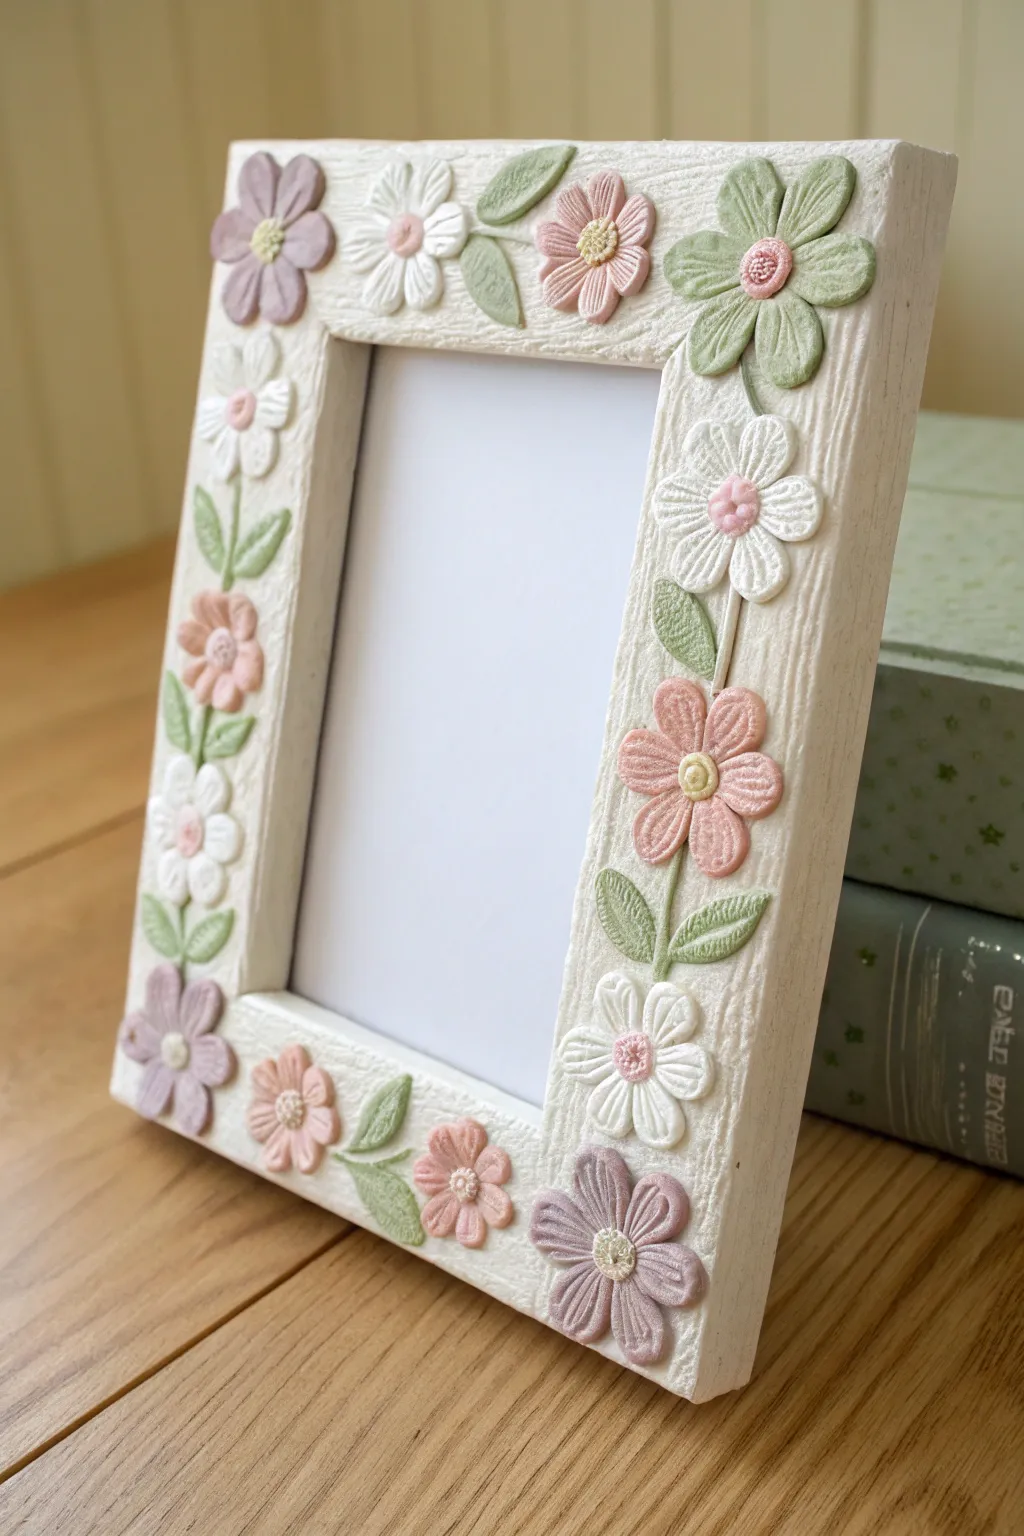
Transform a plain wooden frame into a charming cottagecore accent with delicate air-dry clay flowers. This project uses soft pastel tones and simple textured techniques to create a whimsical border that looks lovely in any nursery or craft room.
How-To Guide
Materials
- Plain wooden picture frame (flat profile preferred)
- White air-dry clay (lightweight variety works best)
- Acrylic paints (White, pastel pink, lavender, sage green, pastel yellow)
- Clay sculpting tools (needle tool, small ball stylus)
- White craft glue or PVA glue
- Rolling pin
- Small flower cookie cutters (daisy shapes)
- Small leaf cutter or craft knife
- Textured fabric or sandpaper (for frame texture)
- Matte sealant spray or varnish
Step 1: Preparing the Base
-
Base layer application:
Begin by rolling out a thin, even sheet of white air-dry clay, about 2-3mm thick. It needs to be large enough to cover the front face of your wooden frame. -
Adhering the clay:
Apply a generous layer of white craft glue to the front of the wooden frame. Carefully lay the clay sheet over the frame, smoothing it down gently to remove air bubbles. -
Trimming excess:
Use a craft knife or needle tool to trim away the excess clay from the outer and inner edges of the frame for a clean, flush fit. -
Adding texture:
Before the clay dries, press a piece of coarse sandpaper or textured fabric gently onto the surface. This creates the subtle, rough ‘stucco’ look seen in the background. -
Initial drying:
Let this base layer dry completely. I prefer to leave it overnight to ensure it doesn’t warp when we add the wet flowers later.
Clay Cracking?
If you see tiny cracks forming as the base dries, smooth a slurry of water and fresh clay into the cracks with your finger to patch them seamlessly.
Step 2: Sculpting the Botanicals
-
Coloring the clay:
Take small portions of fresh white clay and knead in a tiny drop of acrylic paint to create your colored clays: pale pink, lavender, sage green, and white. -
Cutting flowers:
Roll out the pink, lavender, and white clays separately. Use small daisy-shaped cookie cutters to punch out several flowers in varying sizes. -
Refining petals:
On each cut flower, use a needle tool or knife to gently press indentations into the petals. This adds the realistic vein texture visible in the photo. -
Creating centers:
Roll tiny balls of contrasting clay (yellow or pink) and press them into the center of each flower. User a needle tool to stipple the centers for a pollen-like texture. -
Forming leaves:
Roll out the sage green clay. Use a leaf cutter or hand-cut almond shapes. Press a central vein line down the middle of each leaf, then add smaller diagonal veins. -
Making stems:
Roll extremely thin snakes of green clay for the stems. These will connect your flowers and leaves in a trailing vine pattern.
Add Sparkle
Mix a tiny amount of iridescent mica powder into your white clay before sculpting the white flowers for a subtle, pearlescent shimmer.
Step 3: Assembly and Finishing
-
Dry fitting:
Before gluing, arrange your soft clay flowers and leaves loosely on the dried frame to plan your composition. Try grouping a large flower with a smaller one for balance. -
Attaching stems:
Apply a small dab of glue to the back of the green stems and press them onto the frame first, creating the ‘skeleton’ of your design. -
Placing leaves:
Glue the leaves along the stems. Slightly curve the tips of the leaves upward so they don’t lie perfectly flat; this adds lovely dimension. -
Mounting flowers:
Glue the flowers over the ends of the stems or in clusters. Press gently on the center only, allowing the petal tips to remain slightly lifted. -
Final touches:
Check for any gaps. If a spot looks empty, add a tiny clay bud or an extra leaf to fill the space. -
Full cure:
Allow the entire assembly to dry for at least 24 hours. The clay will shrink slightly as it dries, bonding tightly to the base. -
Sealing:
Once fully hard, spray the frame with a matte sealant. This protects the clay from moisture and dust without altering the soft, natural finish.
Once the sealant is dry, slide in your favorite memory and enjoy your handcrafted floral display


Minimal Geometric Tile Frame
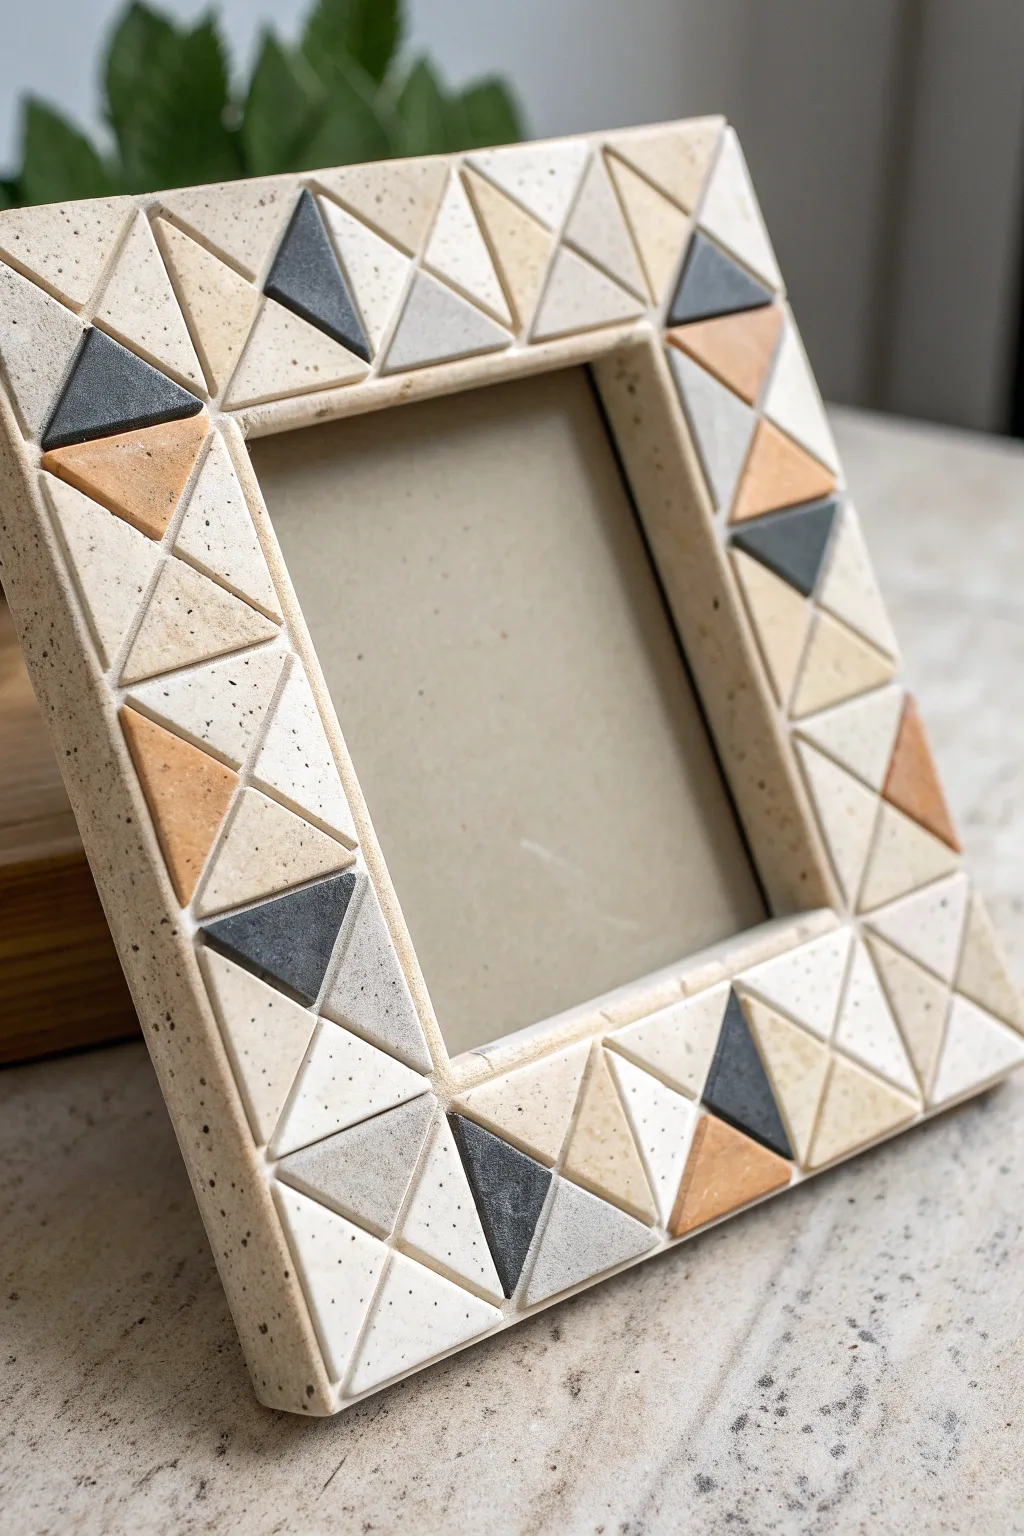
Elevate a simple wooden frame into a piece of modern art using custom-made clay tiles. This project combines the clean lines of geometric design with the organic warmth of faux-stone clay for a sophisticated, textural finish.
Step-by-Step Tutorial
Materials
- Polymer clay (colors: granite/stone effect, beige, terra cotta, dark grey)
- Flat, wide wooden picture frame (unfinished wood works best)
- Clay roller or pasta machine
- Sharp clay blade or X-Acto knife
- Ruler
- Triangle cutter (small equilateral) or template
- Strong craft glue (e.g., E6000 or heavy-duty PVA)
- Fine-grit sandpaper
- Baking sheet and parchment paper
- Oven (for curing)
Step 1: Creating the Clay Sheets
-
Condition the clay:
Start by thoroughly kneading your polymer clay blocks. You want the clay to be pliable and warm to prevent cracking. I find that the granite or stone-effect clays tend to be a bit crumbly at first, so take your time here. -
Mix custom shades:
To achieve that natural stone look, don’t use the colors straight from the package. Mix a small amount of translucent clay into your beige to add depth, and perhaps marble a tiny bit of brown into the white for variation. -
Roll out slabs:
Using a clay roller or a pasta machine on a medium setting (approx. 3mm thick), roll out sheets of each color. Aim for consistent thickness across all colors so the final surface of the frame is level. -
Add texture (optional):
If your clay is too smooth, gently press a piece of coarse sandpaper or a toothbrush onto the surface of the raw clay sheets to mimic the pitted texture of real stone.
Step 2: Cutting and Curing
-
Calculate tile size:
Measure the width of your frame’s border. You want your triangles to fit perfectly in rows. For example, if the border is 1 inch wide, you might want two rows of 0.5-inch squares (made of two triangles). -
Cut the triangles:
Using a sharp blade and ruler—or a specific triangle cutter if you have one—cut strips of clay first, then slice them diagonally to create small equilateral or right-angle triangles. Cut more than you think you need. -
Prepare the baking sheet:
Line a baking sheet with parchment paper. Carefully transfer your raw clay triangles to the sheet, grouping them by color. -
Bake the tiles:
Bake the clay pieces according to the manufacturer’s instructions (usually around 275°F or 130°C for 15-30 minutes). Ensure they are fully cured so they are durable. -
Cool and inspect:
Let the tiles cool completely on a flat surface. Once cool, inspect them and lightly sand any rough edges with fine-grit sandpaper.
Uneven Tiles?
If your baked tiles aren’t sitting flat, stick a sheet of sandpaper to a table and rub the back of the tile against it in a circular motion to level it.
Step 3: Assembly
-
Dry fit the pattern:
Before gluing, lay out your pattern on a flat surface or directly on the frame without adhesive. The design relies on ‘squares’ formed by two triangles. Most should be the neutral stone color, with random accents of the grey and terra cotta. -
Apply adhesive:
Working in small sections (about 2 inches at a time), spread a thin, even layer of strong craft glue onto the wooden frame. -
Place the tiles:
Press the tiles into the glue. Start from the inner corners and work your way out to ensure the alignment is straight against the photo opening. -
Managing spacing:
A key to the geometric look is tight spacing. Place the tiles as close together as possible, leaving only a hairline gap (or no gap) between them. This avoids the need for grouting later. -
Handle the edges:
You may have overhang at the outer edges of the frame. If so, align the inner edge perfectly and let the outer edge run slightly over, which hides the wood underneath. -
Clean up:
Check for any glue that may have squeezed up between the tiles and wipe it away immediately with a damp cloth or toothpick before it hardens. -
Final cure:
Allow the glue to cure fully for 24 hours before inserting glass and a photo to prevent any chemical fogging on the glass.
Add Grout
For a smoother finish, leave small gaps between tiles and fill with real tile grout or liquid polymer clay (bake again if using liquid clay).
Step back and admire the sophisticated, gallery-worthy texture you’ve added to your favorite photo


Botanical Imprint Texture Frame
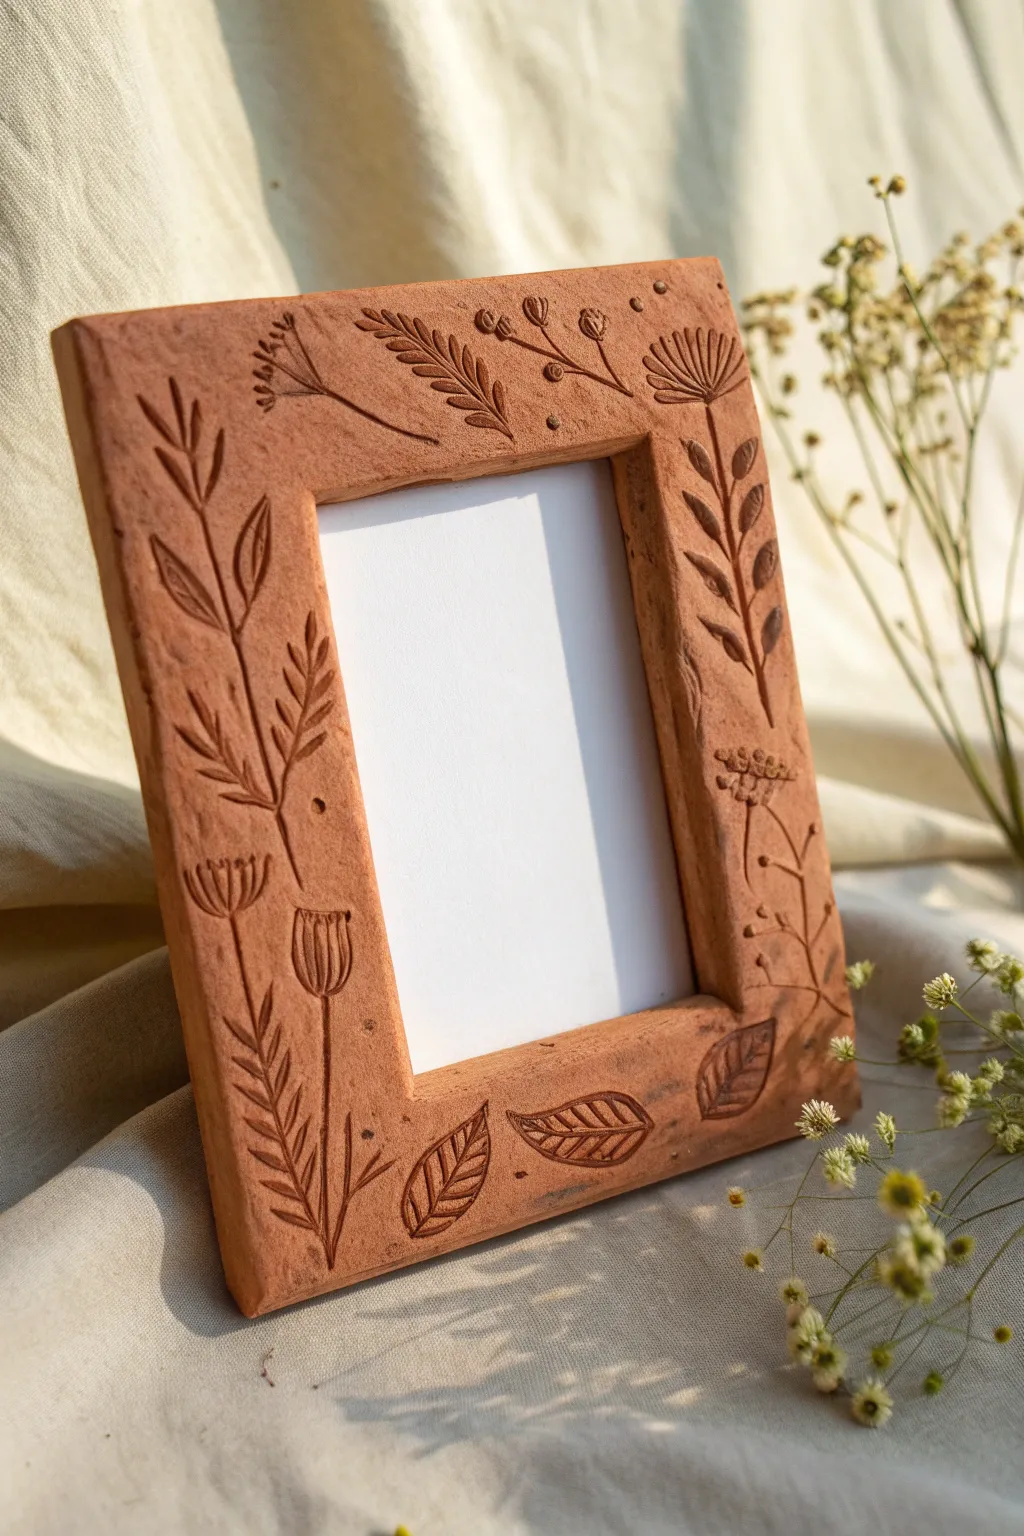
Bring the calming beauty of nature indoors with this rustic, hand-stamped clay frame. The rich terracotta tone combined with delicate wildflower impressions creates a timeless piece perfect for showcasing your favorite memories.
Step-by-Step Guide
Materials
- Terracotta-colored air-dry clay (or polymer clay)
- Acrylic rolling pin
- Parchment paper or non-stick work mat
- Ruler
- Craft knife or clay slicer
- Various rubber stamps with botanical motifs (leaves, ferns, wildflowers)
- Water in a small cup
- Fine-grit sandpaper (optional)
- E6000 glue or strong craft adhesive
- Cardboard or mat board backing
Step 1: Preparing the Clay Base
-
Condition the clay:
Begin by taking a substantial chunk of your terracotta air-dry clay. Knead it thoroughly in your hands to warm it up and ensure there are no air bubbles, which can cause cracking later. -
Roll out the slab:
Place the clay on a sheet of parchment paper. using your acrylic rolling pin, roll the clay out into an even slab. Aim for a thickness of about 1/4 inch to ensure the frame is sturdy but not too heavy. -
Measure the opening:
Decide on the photo size you want to frame (e.g., 4×6 inches). Lightly mark this inner rectangle in the center of your slab using a ruler, but don’t cut yet. -
Determine frame width:
Measure outward from your inner markings to define the frame’s width. A width of 1.5 to 2 inches works well to provide enough surface area for the botanical designs. -
Cut the shape:
Using a craft knife and your ruler as a straight edge, carefully cut out the outer rectangle first. Remove the excess clay. -
Cut the window:
Now, carefully cut out the inner window rectangle. Lift the center piece out gently. You can save this excess clay for smaller projects or backing supports.
Clean Impressions
If your rubber stamps are sticking to the wet clay, lightly dust the surface of the clay with a tiny bit of cornstarch before pressing down.
Step 2: Creating the Botanical Texture
-
Plan your composition:
Before stamping, visualize where you want your plants to grow. I like to imagine them sprouting from the bottom corners and reaching upward. -
Testing the stamps:
Press your stamps into a scrap piece of clay first. This helps you gauge how much pressure you need to get a clean, deep impression without warping the clay. -
Stamp the corners:
Start with your larger leaf or fern stamps. Press them firmly into the corners of the frame, rocking the stamp slightly to ensure the entire design transfers. -
Add vertical climbers:
Select longer, stem-like stamps for the sides. Position them so they look like they are growing up the vertical sides of the frame. -
Fill the bottom:
Use horizontal leaf designs or wider floral stamps along the bottom edge to ground the composition. -
Create detailed focus:
In the top right or left corner, add a specific focal point, like the dandelion seed head or blooming flower seen in the example image. -
Refine the edges:
While the clay is still wet, dip your finger in a little water and gently smooth the cut outer and inner edges of the frame to soften any sharpness.
Step 3: Drying and Assembly
-
Let it dry:
Leave the frame on the parchment paper to dry. Air-dry clay usually takes 24-48 hours. Flip it over halfway through the drying process to prevent curling. -
Sand imperfections:
Once fully cured and hard, check the edges. If there are any rough burrs, lightly sand them away with fine-grit sandpaper. -
Prepare the backing:
Cut a piece of cardboard or mat board slightly smaller than the outer dimensions of your clay frame. -
Create the photo pocket:
Glue the cardboard to the back of the clay frame on three sides only (left, bottom, right), leaving the top open so you can slide your photo in. -
Attach a stand:
If you want it to stand on a table, create a simple triangle easel out of the remaining cardboard and glue it to the back.
Antique Finish
Once dry, dilute darker brown acrylic paint with water and wash it over the frame. Wipe it back with a cloth to leave dark paint in the stamped grooves.
Place your favorite photo inside to complete this charming, nature-inspired display


Faux Icing Piped Border Frame
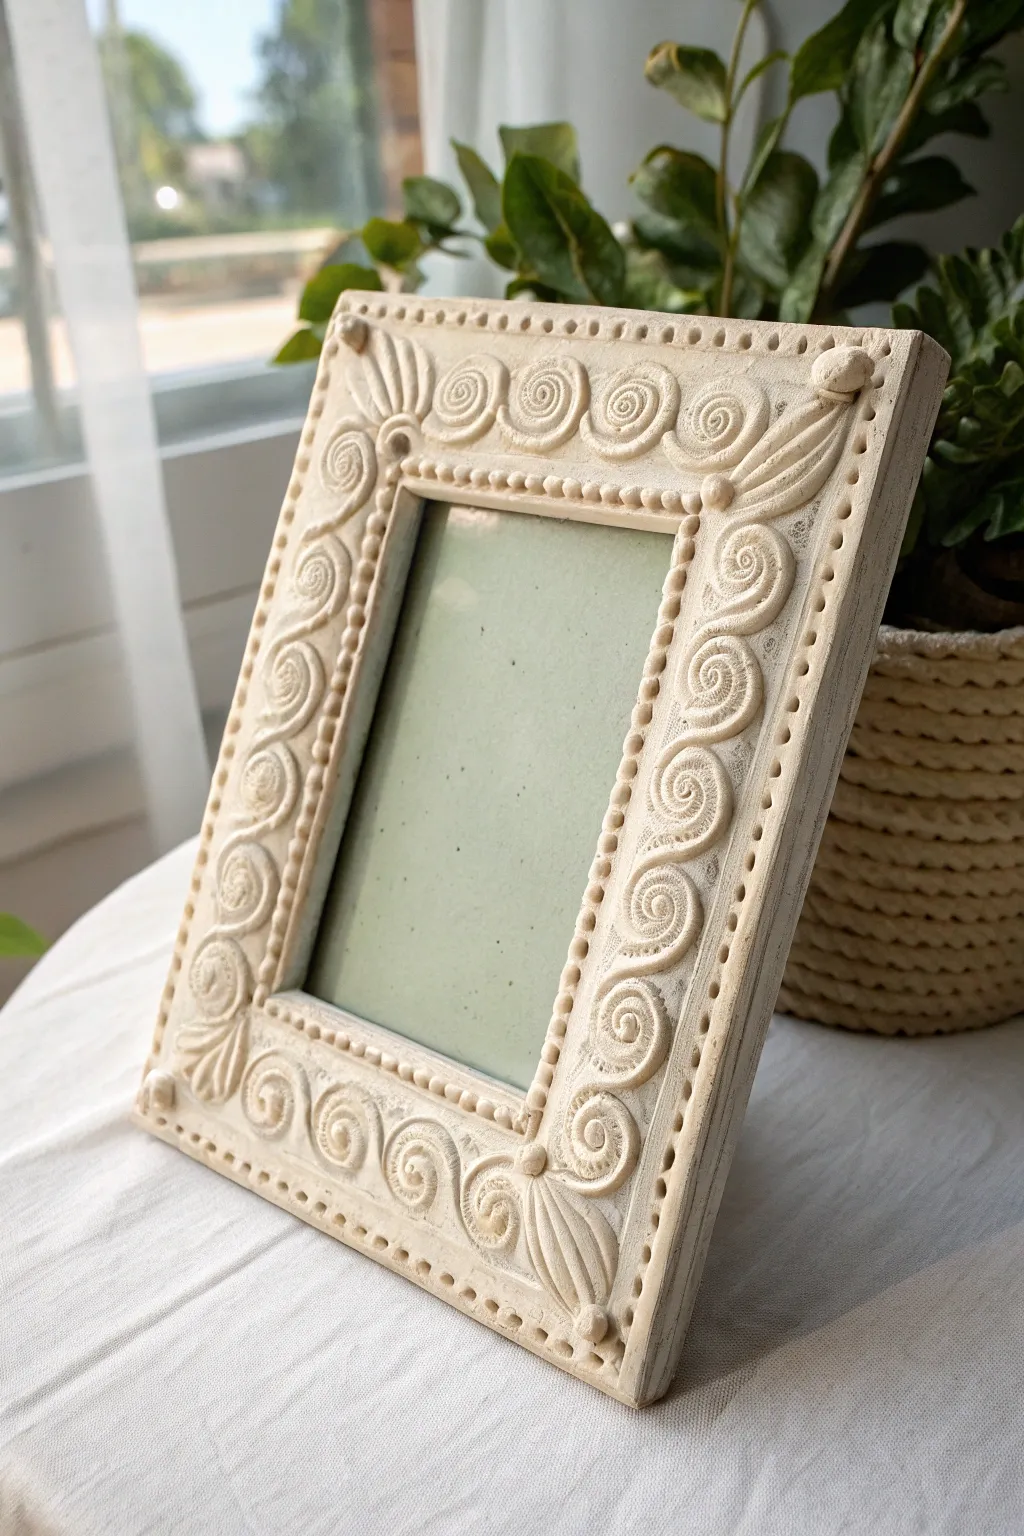
This elegant frame mimics the intricate look of royal icing piping or carved plaster, but you can achieve it easily with air-dry clay or modeling paste. The creamy scrollwork adds a sophisticated, antique charm that perfectly highlights your favorite photos.
Step-by-Step
Materials
- Wide, flat wooden picture frame (unfinished or sanded)
- Air-dry clay (white or cream) OR texture paste
- Piping bag with a fine round tip (e.g., Wilton #3 or #4)
- Small palette knife or clay sculpting tool
- Cream acrylic paint (matte)
- White acrylic paint
- Brown antiquing wax or watered-down brown paint
- Lint-free cloth
- Matte spray sealant
- Sandpaper (fine grit)
Step 1: Preparation & Base
-
Prepare the frame surface:
Begin by taking your wooden frame and removing the glass and backing. Give the entire surface a quick sanding with fine-grit sandpaper to rough it up slightly, which helps the clay and paint adhere better. -
Wipe clean:
Use a damp cloth to wipe away all the sanding dust. The surface needs to be completely clean and dry before you start applying any clay. -
Prime the frame:
Apply a base coat of cream acrylic paint to the wood. This doesn’t need to be perfect, but it ensures that no raw wood color shows through any gaps in your piping later.
Consistency Is Key
To get manageable clay ‘icing,’ add water drop by drop. If it’s too runny, the details will slump; too dry, and the bag will burst.
Step 2: Creating the Clay Texture
-
Prepare the clay mix:
If you are using regular air-dry clay, mix it with a small amount of water until it reaches a consistency similar to stiff frosting. It needs to be soft enough to pipe but firm enough to hold its shape. Alternatively, load texture paste directly into your piping bag. -
Load the piping bag:
Fit your piping bag with a small round tip. Fill the bag with your softened clay mixture, twisting the top tight to remove air pockets. -
Practice your piping:
I always squeeze a few practice lines onto a piece of cardboard first. You want to get a feel for the pressure needed to create smooth, continuous coils. -
Pipe the spiral border:
Starting at the top center of the frame, pipe a series of connecting spirals or ‘S’ scrolls. Keep the nozzle close to the surface and move at a steady pace to ensure the lines are uniform. -
Add corner details:
Instead of a spiral, pipe a fan or leaf shape at each of the four corners. You can use a palette knife to gently flatten and impress lines into these corner blobs to make them look like sculpted leaves. -
Create the beaded edges:
Along the very outer and inner edges of the frame work, pipe tiny, individual dots in a straight line. Try to keep the spacing consistent to mimic a pearl border. -
Flatten and refine:
While the clay is still wet, use a slightly damp finger or a soft brush to gently tap down any sharp peaks left by the piping tip. You want the finish to look molded, not sharp like fresh icing. -
Let it dry completely:
Allow the frame to dry for at least 24 hours. The thicker parts of the clay need to be rock hard before you proceed to the next step.
Step 3: Finishing & Antiquing
-
Sand high spots:
Once fully dry, run your fine-grit sandpaper very lightly over the top of the design. This knocks back any remaining rough textures and unifies the surface height. -
Apply the main color:
Paint the entire frame, including your piping work, with a coat of creamy off-white acrylic paint. This unifies the color of the clay and the wooden base. -
Create the wash:
Mix a tiny drop of brown paint with water, or use a prepared antiquing wax. You want a translucent, muddy liquid, not an opaque paint. -
Apply the antique wash:
Brush the darker wash over the textured areas, ensuring it gets into all the crevices of the spirals and beads. -
Wipe back:
Immediately use a lint-free cloth to wipe the surface gently. This removes the dark color from the raised areas but leaves it in the recessed grooves, highlighting the 3D texture. -
Seal the project:
Finish with a light coat of matte spray sealant to protect the clay from moisture and prevent the paint from chipping.
Cracked Clay Fix
Air-dry clay often shrinks and cracks. If cracks appear, fill them with a little fresh clay paste or spackle before painting.
Place your photo inside and display your beautifully textured creation on a mantel or side table

The Complete Guide to Pottery Troubleshooting
Uncover the most common ceramic mistakes—from cracking clay to failed glazes—and learn how to fix them fast.
Personalized Name and Date Frame
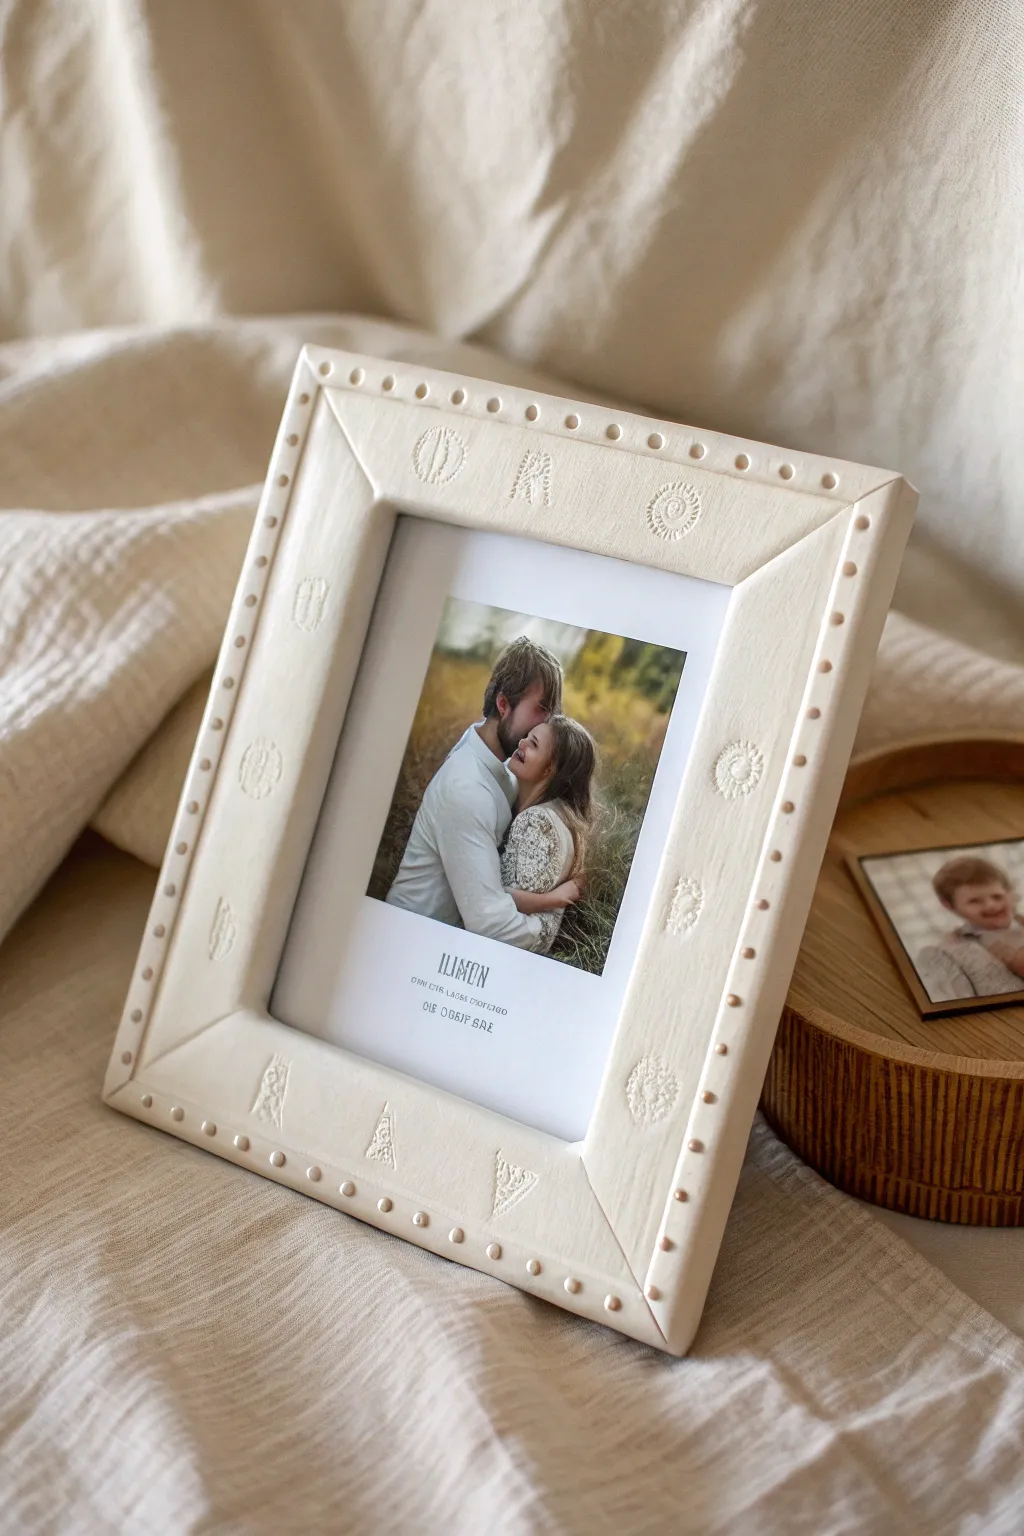
This elegant yet rustic frame combines subtle geometric stamping with a charming beaded border for a high-end pottery look. The creamy, natural finish highlights the depth of the impressions, making it a perfect keepsake for wedding or family photos.
Detailed Instructions
Materials
- White or cream-colored polymer clay (or air-dry clay)
- Rolling pin or acrylic roller
- Craft knife or clay blade
- Ruler
- Small round bead tool or chopstick (for dot details)
- Assorted patterned clay stamps (spirals, triangles, symbols)
- Parchment paper or baking mat
- Cardboard or sturdy backing board
- Strong craft glue (E6000 or similar)
- Clear matte varnish (optional)
- Printed photograph
Step 1: Preparing the Clay Base
-
Condition the Clay:
Begin by kneading your cream-colored clay until it is soft, pliable, and free of cracks. Warm clay is essential for getting those smooth beveled edges later. -
Roll Out the Slab:
Roll the clay out evenly onto parchment paper to a thickness of approximately 1/4 inch (6mm). Aim for a consistent thickness so the frame sits flat. -
Measure and Cut the Window:
Decide on your photo size (e.g., 4×6 or 5×7). Using a ruler and craft knife, cut out the central rectangular window for your photo first. -
Cut the Outer Edge:
Measure about 1.5 to 2 inches outward from your window cut to determine the frame width. Cut the outer rectangle with clean, straight lines.
Step 2: Creating the Beveled Design
-
Score the Corners:
Lightly score diagonal lines from the inner corners to the outer corners. These lines mimic the mitered joints of a wooden frame. -
Sculpt the Slant:
Gently press and smooth the clay from the center of each side *down* toward the inner window and *down* toward the outer edge. This creates a raised ridge in the middle of each frame section, giving it a 3D, cushioned profile. -
Refine the Miters:
Use your clay blade or a modeling tool to deepen the diagonal corner lines, ensuring the four sides look like distinct pieces joined together.
Clean Stamp Impressions
Dust your stamps lightly with cornstarch or baby powder before pressing them into the clay. This acts as a release agent and prevents the clay from sticking inside the stamp grooves.
Step 3: Adding Texture and Detail
-
Plan Your Stamps:
Before committing to the clay, I usually test my stamp layout on a scrap piece. You want to space the geometric symbols evenly along the center ridge of each side. -
Impress the Symbols:
Press your stamps firmly into the clay. Choose different symbols for variety—like suns, triangles, or abstract runes—placing about three distinct marks per side. -
Create the Beaded Border:
Using a small round dotting tool or the blunt end of a chopstick, press small indentations along the very outer perimeter of the frame. -
Second Beaded Row:
Repeat the dotting process along the *inner* perimeter, right next to where the photo will sit. Ensure the spacing is consistent for a polished look.
Antique Finish Idea
Mix a tiny bit of brown acrylic paint with water and brush it over the baked frame. Wipe it off immediately with a cloth; paint remains in the recessed stamps for an aged look.
Step 4: Finishing and Assembly
-
Bake or Dry:
If using polymer clay, bake according to package instructions (usually 275°F/135°C for 15-30 mins depending on thickness). If using air-dry clay, let it sit undisturbed for 24-48 hours. -
Sand Rough Edges:
Once fully cured and cooled, use fine-grit sandpaper to gently smooth any sharp edges or fingerprints left on the back. -
Optional Sealing:
Apply a thin coat of matte varnish if you want to protect the clay from dust and handling without making it shiny. -
Prepare the Backing:
Cut a piece of cardboard or backing board slightly smaller than the outer dimensions of your clay frame. -
Attach the Photo:
Center your photo on the backing board and secure it with a small amount of tape or glue. -
Final Assembly:
Apply strong craft glue to the back of the clay frame and press it firmly onto the backing board, sandwiching the photo inside.
Now you have a beautifully textured frame that preserves your memories in stone-like elegance
Terrazzo Speckle Clay Frame
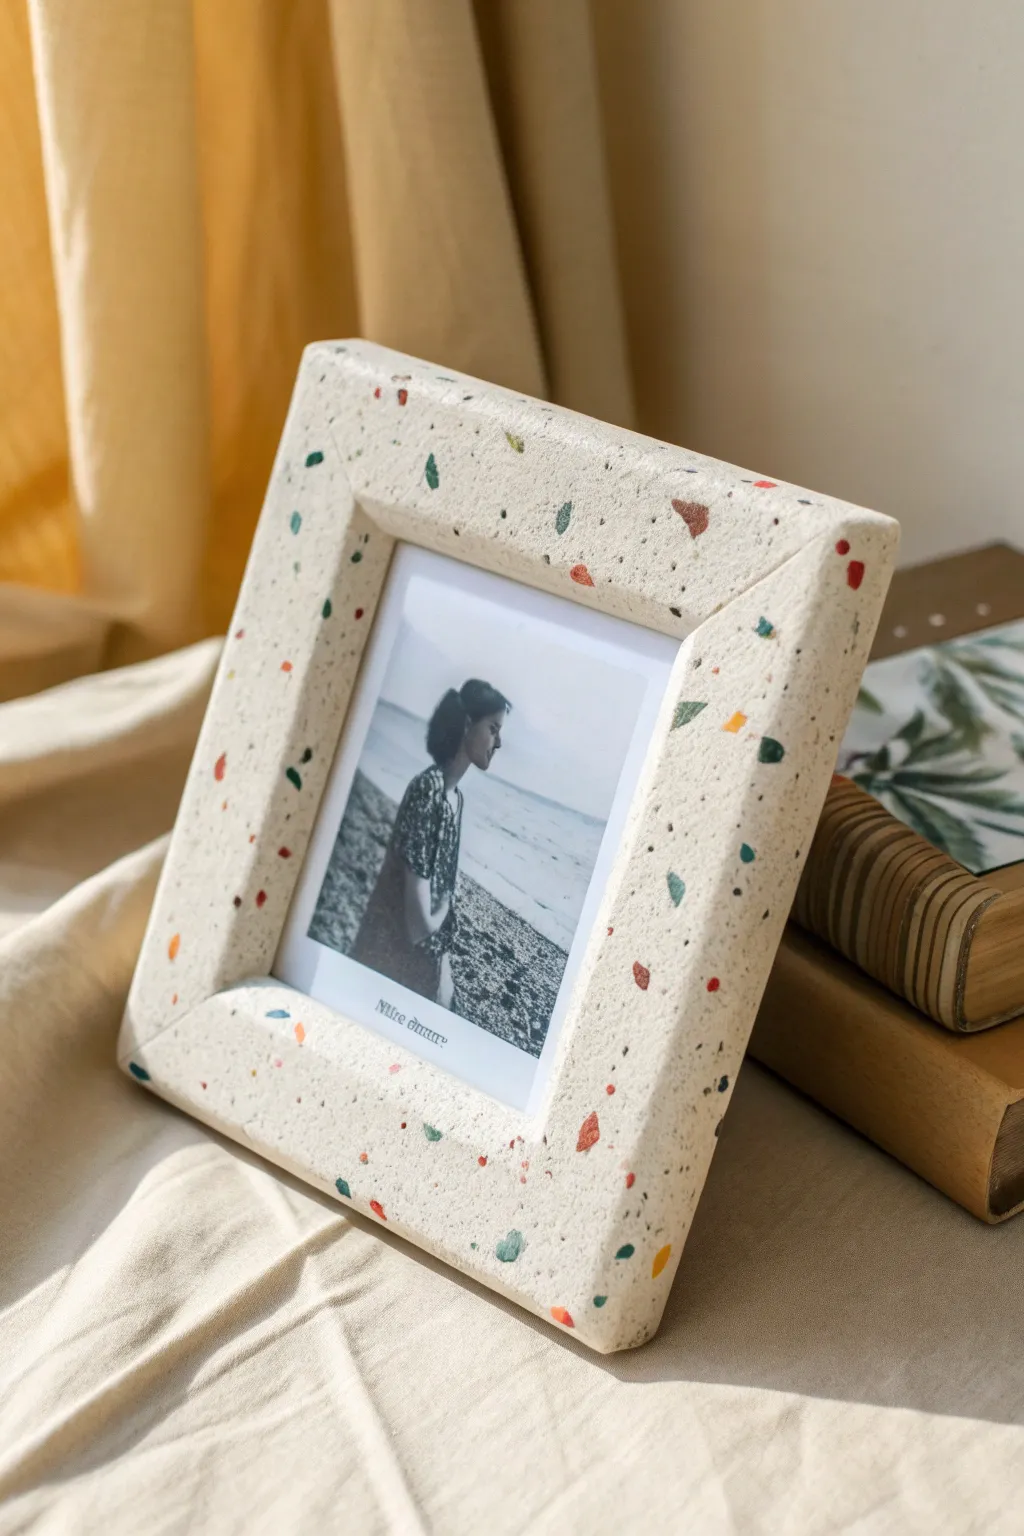
Bring the timeless elegance of Italian terrazzo into your home with this playful yet sophisticated clay frame. The neutral cream base is brought to life with irregular chips of earthy red, teal, and mustard, creating a stunning border for your favorite black-and-white prints.
Step-by-Step Guide
Materials
- White polymer clay (approx. 4 blocks)
- Small amounts of colored polymer clay (teal, rusty red, mustard yellow, dark green)
- Acrylic roller or pasta machine
- Tissue blade or sharp craft knife
- Ruler
- 45-degree angle triangle (optional)
- Parchment paper or ceramic tile
- Cardboard or a wooden frame backing (approx. 5×5 inches)
- Sandpaper (400, 600, and 1000 grit)
- Matte varnish (optional)
Step 1: Preparing the Terrazzo Chips
-
Roll Colored Sheets:
Condition your small amounts of colored clay (teal, rust, mustard, green) separately. Roll each color out very thinly, about the thickness of a playing card. -
Bake Thin Sheets:
Place these thin colored sheets on a tile or baking sheet. Pre-bake them for only 10 minutes at the manufacturer’s recommended temperature. This makes them brittle enough to chop. -
Chop into Chips:
Once the colored sheets are cool, use your fingers to crumble them or a blade to chop them into small, irregular shards. Aim for a mix of sizes, from dusty specks to larger triangles.
Dirty Clay?
White clay picks up lint easily. Keep wet wipes nearby to clean your hands and tools often. If you see dust before baking, clean it gently with a q-tip dipped in rubbing alcohol.
Step 2: Creating the Base Slab
-
Condition White Clay:
Thoroughly condition your white polymer clay until it is soft and pliable. If you want a slightly creamier stone look like the photo, mix in a tiny pinch of translucent or beige clay. -
Roll Thick Slab:
Roll the white clay out into a thick slab, approximately 1/4 inch thick. Make sure the slab is large enough to cut your frame borders from. -
Add the Chips:
Scatter your pre-baked colored chips generously over the white slab. Press them gently into the surface with your fingers so they stick. -
Embed the Pattern:
Run your acrylic roller over the slab again. Roll in different directions to embed the chips flush with the white clay. The slab will get slightly thinner and wider. -
Ensuring Flatness:
Ensure the final slab is a uniform thickness (around 3/16 inch). If there are gaps in the pattern, add more chips and roll again.
Make it Functional
Before baking, embed small magnets into the back corners to create a heavy-duty fridge frame, or press a sawtooth hanger into the clay for easy wall display.
Step 3: Constructing the Frame
-
Measure Strips:
Using your ruler and blade, cut four strips from your terrazzo slab. Each strip should be about 1 to 1.5 inches wide, depending on how chunky you want the frame. -
Cut Miters:
Cut the ends of each strip at a 45-degree angle. This allows them to join together to form a square. Measure carefully against your backing board to ensure a snug fit. -
Texture the Joins:
Before joining, rough up the diagonal cut edges slightly with a needle tool or toothbrush to help the clay bond. -
Join the Corners:
Press the 45-degree edges together firmly. I like to use a small blending tool or the back of a fingernail to smooth the seam on the back side for strength. -
Smooth the Front:
Gently smooth the front seams with your finger, but don’t over-blend or you might distort the crisp corner look. -
Refine Edges:
Use your blade to trim any uneven outer or inner edges, ensuring the frame is perfectly square.
Step 4: Finishing Touches
-
Bake the Frame:
Bake the assembled frame flat on a tile according to the clay package instructions. Tent it with foil to prevent the white clay from yellowing. -
Cool Down:
Allow the frame to cool completely before moving it; warm clay is fragile. -
Sanding Reveal:
Wet sand the surface under running water, starting with 400 grit and moving to 1000 grit. This is crucial—it grinds down the top layer of white clay to fully reveal the sharp, bright colors of the embedded chips. -
Final Buff:
Buff the frame with a soft denim cloth to give it a smooth, stone-like feel. Glue your cardboard backing or wooden frame insert to the back.
This custom terrazzo frame transforms a simple snapshot into a gallery-worthy piece of decor you can be proud of


What Really Happens Inside the Kiln
Learn how time and temperature work together inside the kiln to transform clay into durable ceramic.
Marbled Swirl Clay Frame
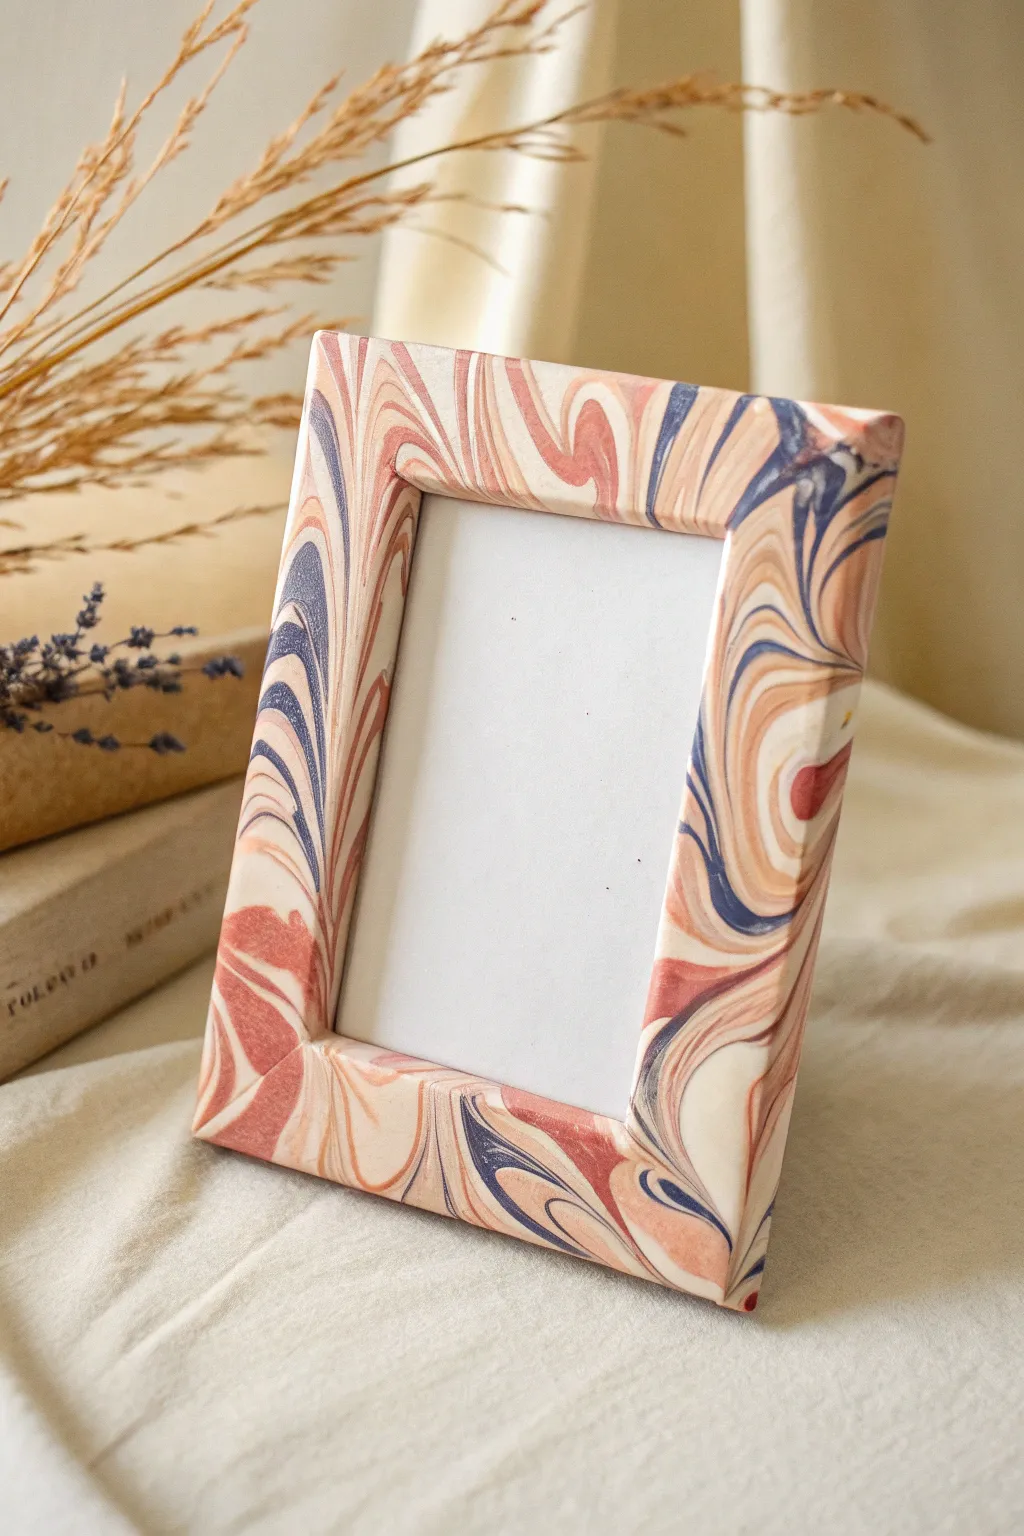
Transform plain polymer clay into a stunning, high-end decor piece with this surprisingly achievable marbling technique. The soft peach, terracotta, and navy swirls create a sophisticated pattern that looks like genuine agate or polished stone.
Detailed Instructions
Materials
- Polymer clay (White, Peach/Beige, Terracotta/Rust, Navy Blue)
- Wooden picture frame (flat profile, approximately 5×7 inches)
- Acrylic rolling pin
- Precision craft knife (X-Acto)
- Clay slicer or tissue blade
- Parchment paper or ceramic tile (work surface)
- Sandpaper (fine grit, optional)
- Matte or glossy clay varnish (optional)
- Soft paintbrush
Step 1: Prepping the Palette
-
Condition the base:
Start by taking a large chunk of white clay—this will be the dominant color in your marble mix. Knead it thoroughly in your hands until it becomes soft, pliable, and easy to stretch. -
Prepare accent colors:
Condition smaller amounts of the peach, terracotta, and navy blue clay separately. You want about one part accent color for every four parts of white to keep the look airy. -
Roll out snakes:
Roll each color, including the white, into long, thin snake-like ropes. Make the white ropes slightly thicker than the colored ones to maintain that milky background effect. -
Bundle the ropes:
Gather your clay snakes and twist them together into one large, multi-colored log. Fold the log in half and twist it again.
Step 2: Creating the Marble
-
Twist and fold:
Repeat the twisting and folding process 3-4 times. Be careful not to over-mix, or the colors will turn muddy instead of distinct swirls. -
Form a block:
Squash your twisted log into a rectangular block shape. This consolidates the clay and prepares it for slicing. -
Slice the pattern:
Using your tissue blade or sharp knife, carefully slice thin sheets off the block. I find this reveal moment so satisfying as you see the unique pattern inside. -
Lay out the sheet:
Arrange your sliced pieces onto a piece of parchment paper, slightly overlapping the edges to create a continuous surface. -
Flatten the sheet:
Use the acrylic rolling pin to gently roll over the arranged slices. Roll in multiple directions to smooth the seams and join the pieces into one solid, flat sheet about 3mm thick.
Clean Lines
Wipe your craft knife with a baby wipe between cuts. Clay residue on the blade can drag colors into the white sections, ruining the crisp marble effect.
Step 3: Covering the Frame
-
Check the size:
Place your wooden frame gently on top of the clay sheet to ensure you have enough surface area to cover the front and wrap around the sides. -
Apply adhesive (optional):
If your wooden frame is very smooth, you can brush a tiny amount of liquid clay or translucent bake-and-bond onto the wood surface for extra grip. -
Position the clay:
Lift the clay sheet and drape it carefully over the front of the frame. Press down gently from the center outwards to release any trapped air bubbles. -
Trim the center:
Use your precision knife to cut an ‘X’ shape in the center opening of the frame, slicing from corner to corner. -
Wrap the inside edges:
Fold the triangular flaps from the center opening around to the back of the frame opening. Press firmly along the inner edge to create a crisp corner. -
Trim excess:
Trim any excess clay on the back of the frame so it sits flush. Repeat this process for the outer edges, wrapping the clay around beautifully. -
Smooth the seams:
Use your finger or a soft silicone tool to gently smooth any seams at the corners, blending the clay so the marble pattern looks uninterrupted.
Golden Touch
Add thin veins of gold leaf into your clay bundle before twisting. Upon baking, you’ll have elegant metallic streaks running through the stone pattern.
Step 4: Baking and Finishing
-
Bake carefully:
Place the covered frame on a baking sheet lined with parchment paper. Bake according to your clay package instructions—usually around 275°F (135°C) for 30 minutes. -
Cool down:
Let the frame cool completely before handling. It will be slightly soft while hot but hardens as it returns to room temperature. -
Sand edges:
If there are any rough fingerprint marks or sharp edges, lightly sand them with fine-grit sandpaper under running water. -
Seal the deal:
For a polished look like the inspiration photo, brush on a thin layer of matte varnish. This protects the clay and deepens the colors slightly.
Now you have a chic, custom-framed piece ready to showcase your favorite memory on a shelf or mantle
Celestial Stars and Moon Frame
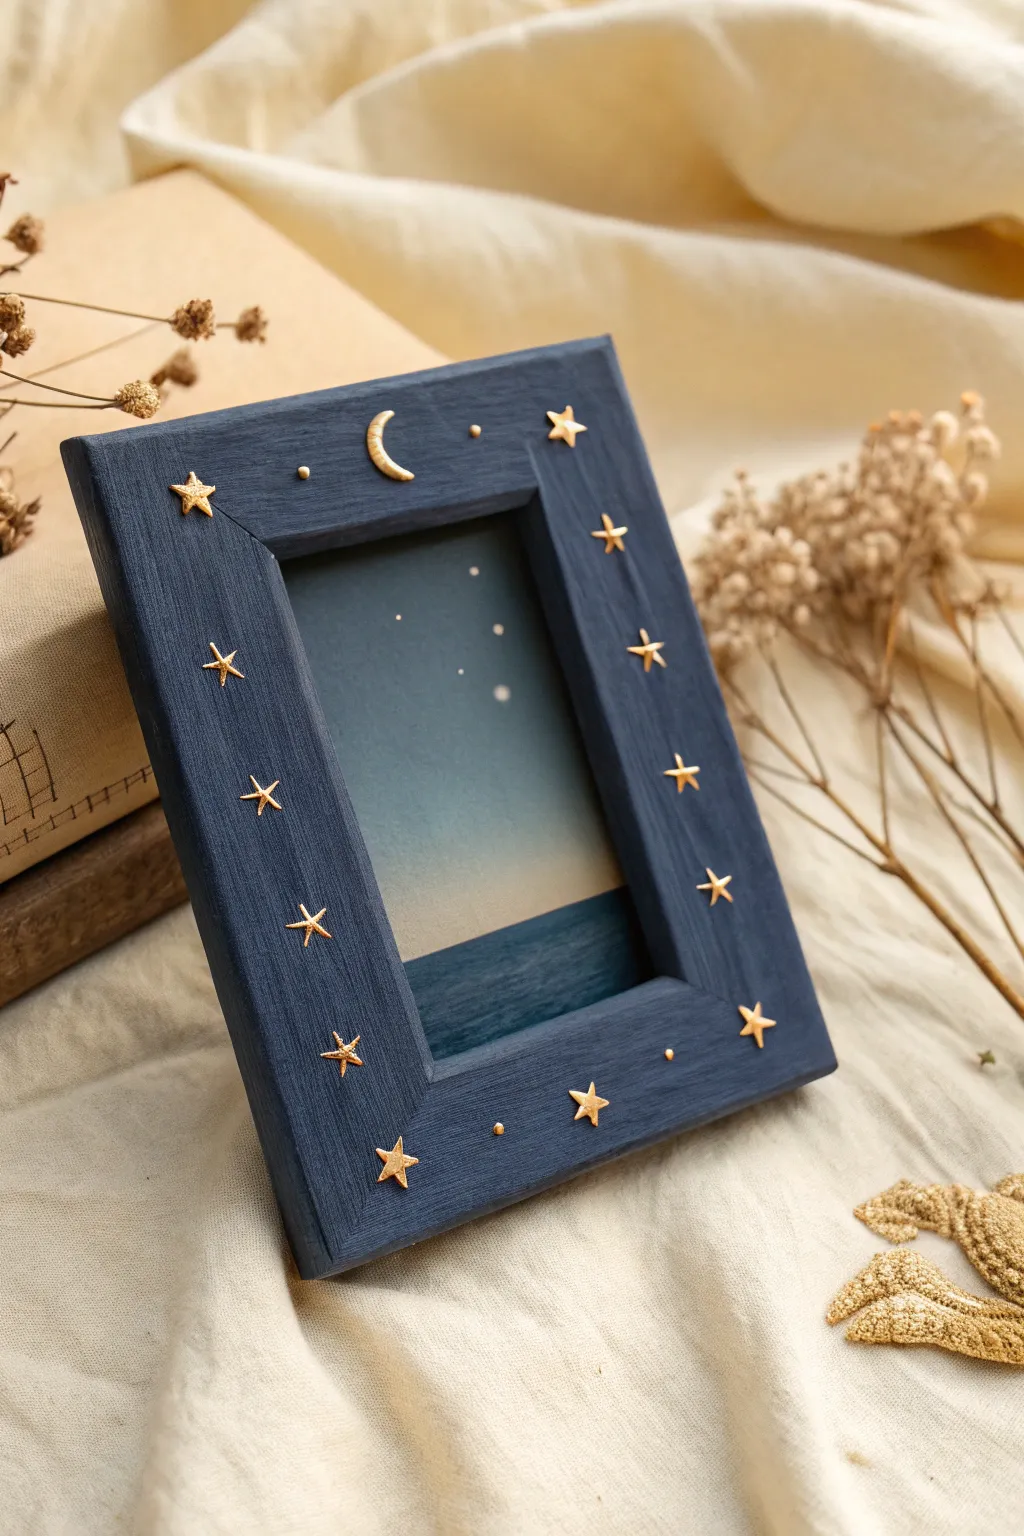
Transform a plain picture frame into a window to the cosmos with this stunning celestial design. Using deep midnight blue paint and delicate clay appliqués, you will create a dreamy, textured piece perfect for displaying serene landscapes or starry night photos.
Step-by-Step Tutorial
Materials
- Wooden picture frame (rectangular, wide border)
- Air-dry clay or polymer clay (white or gold)
- Acrylic paint: Midnight Blue or Navy Blue
- Acrylic paint: Metallic Gold
- Matte acrylic varnish/sealer
- Strong craft glue or E6000
- Paintbrushes (medium flat brush and fine detail brush)
- Clay sculpting tools or a craft knife
- Small star-shaped cookie cutters (optional)
- Sandpaper (fine grit)
- Rolling pin
Step 1: Preparing the Base
-
Prepare the frame:
Remove the glass and backing board from your wooden frame. If the frame has a glossy finish, lightly sand it with fine-grit sandpaper to help the paint adhere better. -
Base coat application:
Apply a coat of midnight blue acrylic paint to the entire front and sides of the frame. Use long, even strokes to mimic the texture of wood grain showing through. -
Add depth:
While the first coat is tacky, I like to brush on a second coat, perhaps mixing in a tiny drop of black to deepen the blue, ensuring solid coverage without losing the wood’s natural texture. -
Dry completely:
Set the frame aside to dry fully. This usually takes about 30-60 minutes depending on the thickness of your paint layers.
Glue Not Grabbing?
If the clay stars slide off, lightly sand the spot on the frame where the star will go. This removes the paint’s slickness and gives the glue a rougher ‘tooth’ to grip onto.
Step 2: Sculpting the Celestial Bodies
-
Condition the clay:
Take a small amount of clay and knead it until it is soft and pliable. If using polymer clay, ensure it is warm enough to work with without cracking. -
Roll the clay:
Roll the clay out into a thin sheet, approximately 2-3mm thick. You want the pieces to be substantial enough to handle but not so thick they look bulky on the frame. -
Cut the stars:
Use a small craft knife to cut out 5-point stars. Create about 12-14 stars of varying sizes—mostly uniform, but a few slightly smaller ones add visual interest. Alternatively, small star cutters make this process faster. -
Shape the moon:
Cut a crescent moon shape. To make it precise, you can use a small circular cutter to cut a circle, then offset the cutter and cut again to slice away the crescent shape. -
Add dimension:
Gently pinch the points of the stars and the tips of the moon to sharpen them. Use a tool to press a slight ridge down the center of each star point for a faceted, 3D look. -
Create tiny accents:
Roll very tiny balls of clay to create ‘distant stars’ or dots. You’ll need about 4-6 of these little spheres. -
Cure the clay:
If using air-dry clay, let the pieces dry for 24 hours. If using polymer clay, bake them according to the package instructions (usually 275°F/135°C for 15 minutes) and let cool.
Step 3: Gilding and Assembly
-
Paint the clay elements:
Once hardened, paint the stars, moon, and tiny dots with metallic gold acrylic paint. Use a fine brush to get into any crevices. -
Second gold coat:
Apply a second coat of gold if the first looks streaky. The gold should look solid and brilliant against the dark blue background. -
Dry the gold:
Allow the clay pieces to dry completely before handling them to avoid fingerprints on the metallic finish. -
Plan the layout:
Place the blue frame flat on your work surface. Arrange the dry gold stars and moon on the frame without glue first. Place the moon at the top center and scatter stars down the sides. -
Check balance:
Ensure the spacing looks balanced but organic. Avoid perfect symmetry; letting some stars sit slightly rotated makes the sky feel more dynamic. -
Glue the pieces:
Lift one piece at a time, apply a small dot of strong craft glue or E6000 to the back, and press it firmly onto the painted wood. -
Place tiny dots:
Glue the tiny gold dots in the empty spaces between larger stars to fill gaps and create the illusion of a glimmering galaxy. -
Seal the frame:
Once the glue is fully cured, brush a coat of matte varnish over the blue wooden areas (avoiding the gold stars if you want them to keep their high shine) to protect the paint.
Level Up: Constellations
Arrange your stars specifically to mimic real constellations like Cassiopeia or the Big Dipper on the sides of the frame for a secret astronomical detail.
Once the varnish is dry, reassemble your frame and insert your favorite mysterious image to complete the look

TRACK YOUR CERAMIC JOURNEY
Capture glaze tests, firing details, and creative progress—all in one simple printable. Make your projects easier to repeat and improve.
Forest Scene Relief Frame
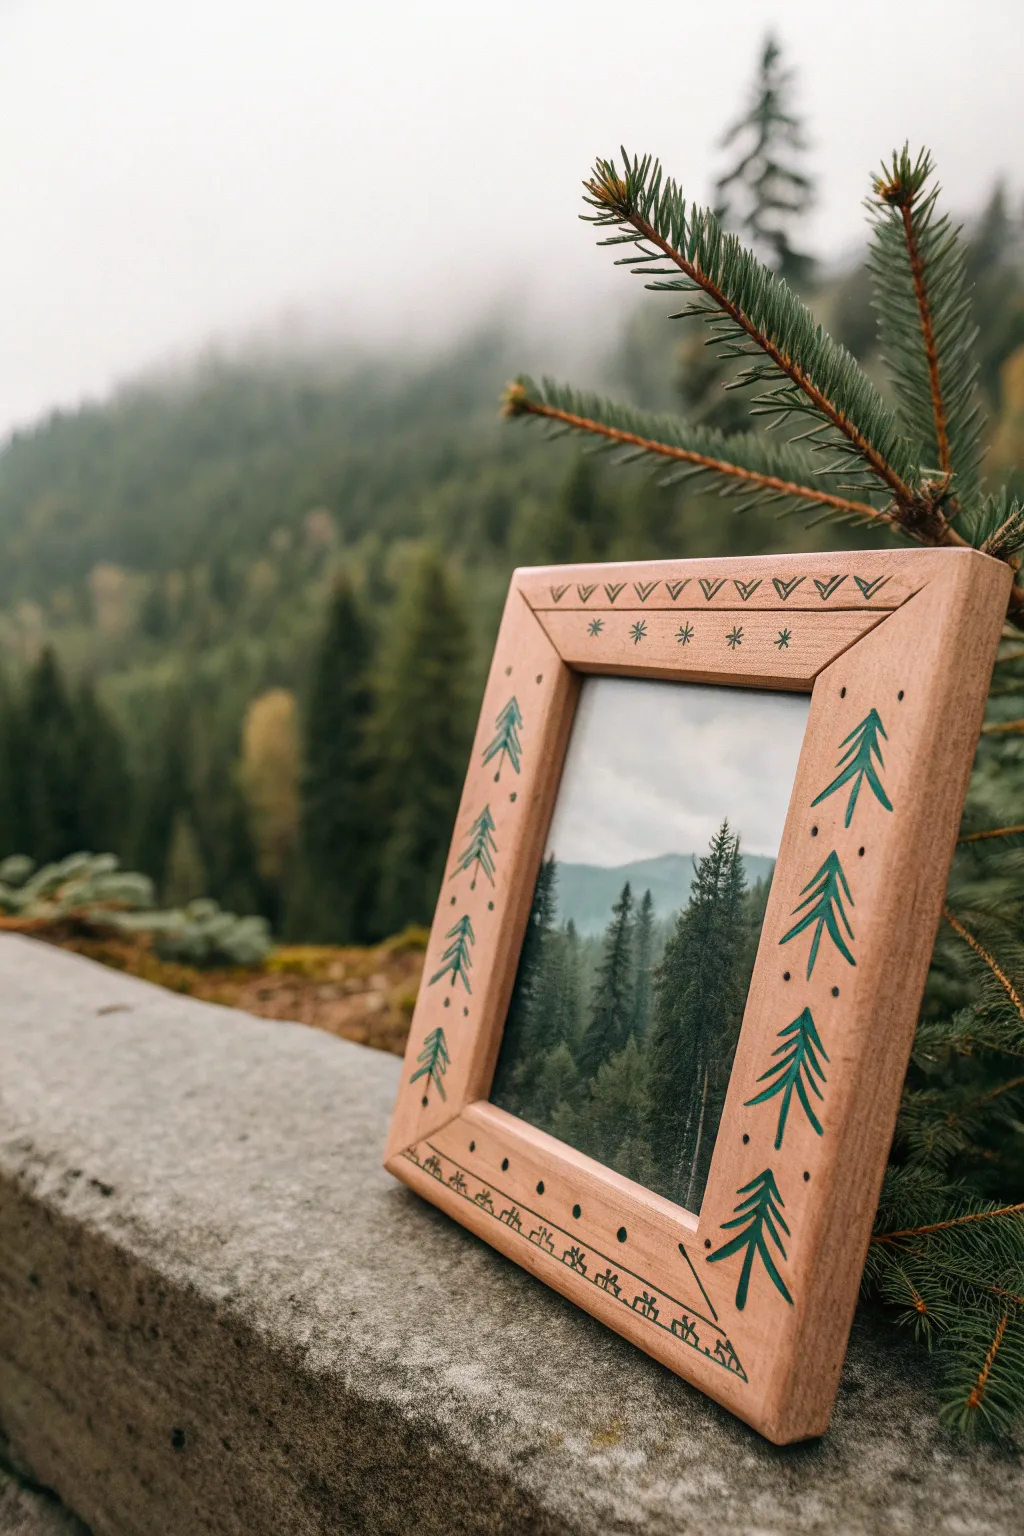
Bring the serene beauty of the misty mountains indoors with this rustic, hand-embellished frame. Using air-dry clay to create a faux-wood texture and simple painted motifs, you can transform a plain base into a cozy, cabin-ready display piece.
How-To Guide
Materials
- White or terracotta air-dry clay
- Wooden picture frame base (flat, wide profile)
- Acrylic rolling pin
- Craft knife or scalpel
- Sandpaper (medium and fine grit)
- Acrylic paints: warm beige/tan (wood tone), forest green, black
- Fine-point paintbrush (size 0 or 1)
- Matte varnish or sealant
- Wood glue or PVA glue
- Water and a small sponge
- Ruler
Step 1: Preparing the Clay Base
-
Roll the clay:
Begin by kneading your air-dry clay until it is soft and pliable. Roll it out into a flat, even sheet approximately 3-4mm thick using your acrylic rolling pin. -
Measure the frame:
Measure the width and length of each side of your wooden frame base. You will need four strips of clay that match these dimensions exactly to cover the front face. -
Cut the clay strips:
Using a ruler and craft knife, carefully cut four strips from your clay sheet. I like to cut the ends at a 45-degree angle (mitered corners) for a cleaner, more professional join, though straight cuts work too. -
Attach to the frame:
Apply a generous layer of wood glue to the face of your wooden frame. Gently press the clay strips onto the wood, smoothing out any air bubbles trapped underneath. -
Seamless corners:
At the corners where the clay strips meet, use a tiny amount of water on your finger to smudge the clay together, erasing the seam line until the frame looks like one solid piece.
Step 2: Creating Texture and Finish
-
Smooth the edges:
Run a damp sponge along the inner and outer edges of the frame to soften any sharp cuts and ensure the clay is flush with the wooden base. -
Let it dry:
Allow the frame to dry completely. This usually takes 24-48 hours depending on humidity. Rotate the frame occasionally to ensure even airflow. -
Sand for perfection:
Once fully cured, use fine-grit sandpaper to gently buff the surface. You want it smooth enough to paint on, but retaining a slight organic irregularity adds to the rustic charm. -
Base coat application:
Mix a warm beige or tan acrylic paint to mimic natural, light wood. Apply two coats to the entire clay surface, letting the first coat dry before adding the second. -
Simulate wood texture (optional):
For added depth, you can dry-brush a slightly darker tan shade in vertical strokes to create a subtle wood grain effect, though a solid matte color works beautifully too.
Clay Cracking?
If small gaps appear as the clay dries, mix a tiny bit of fresh clay with water to make a paste and fill the cracks, then sand smooth once dry.
Step 3: Painting the Forest Motifs
-
Plan the layout:
Lightly pencil in your design before painting. Mark the top edge for a geometric border, the sides for trees, and the bottom for the decorative symbols. -
Paint the top border:
Using a fine-point brush and forest green paint, create a row of small triangles pointing downward along the top edge. Below this, paint a horizontal line connecting them. -
Add snowflakes:
Just under the top border, carefully paint small, six-pointed asterisks or snowflakes spaced evenly apart. -
Paint the pine trees:
Along the vertical sides, paint stylized pine trees. Start with a central vertical line, then add downward-sweeping branches on either side. Vary the sizes slightly for a natural look. -
Add details:
Use the very tip of your brush or a toothpick to add tiny dots between the trees and along the outer edges of the frame for whimsical texture. -
Bottom border design:
On the bottom edge, paint a straight horizontal line. Above it, add small geometric symbols or rune-like shapes—think tiny houses, triangles, or crossed lines. -
Seal the artwork:
Once the green paint is perfectly dry, apply a coat of matte varnish. This protects your handiwork from dust and moisture without adding an artificial glossy shine.
Carve Instead of Paint
Before the clay dries, use a needle tool to gently etch the tree designs into the surface. Paint inside the grooves later for an embossed look.
Now slip in your favorite nature photo and place your creation near a window to catch the natural light
Cute Critter Corner Sculptures Frame
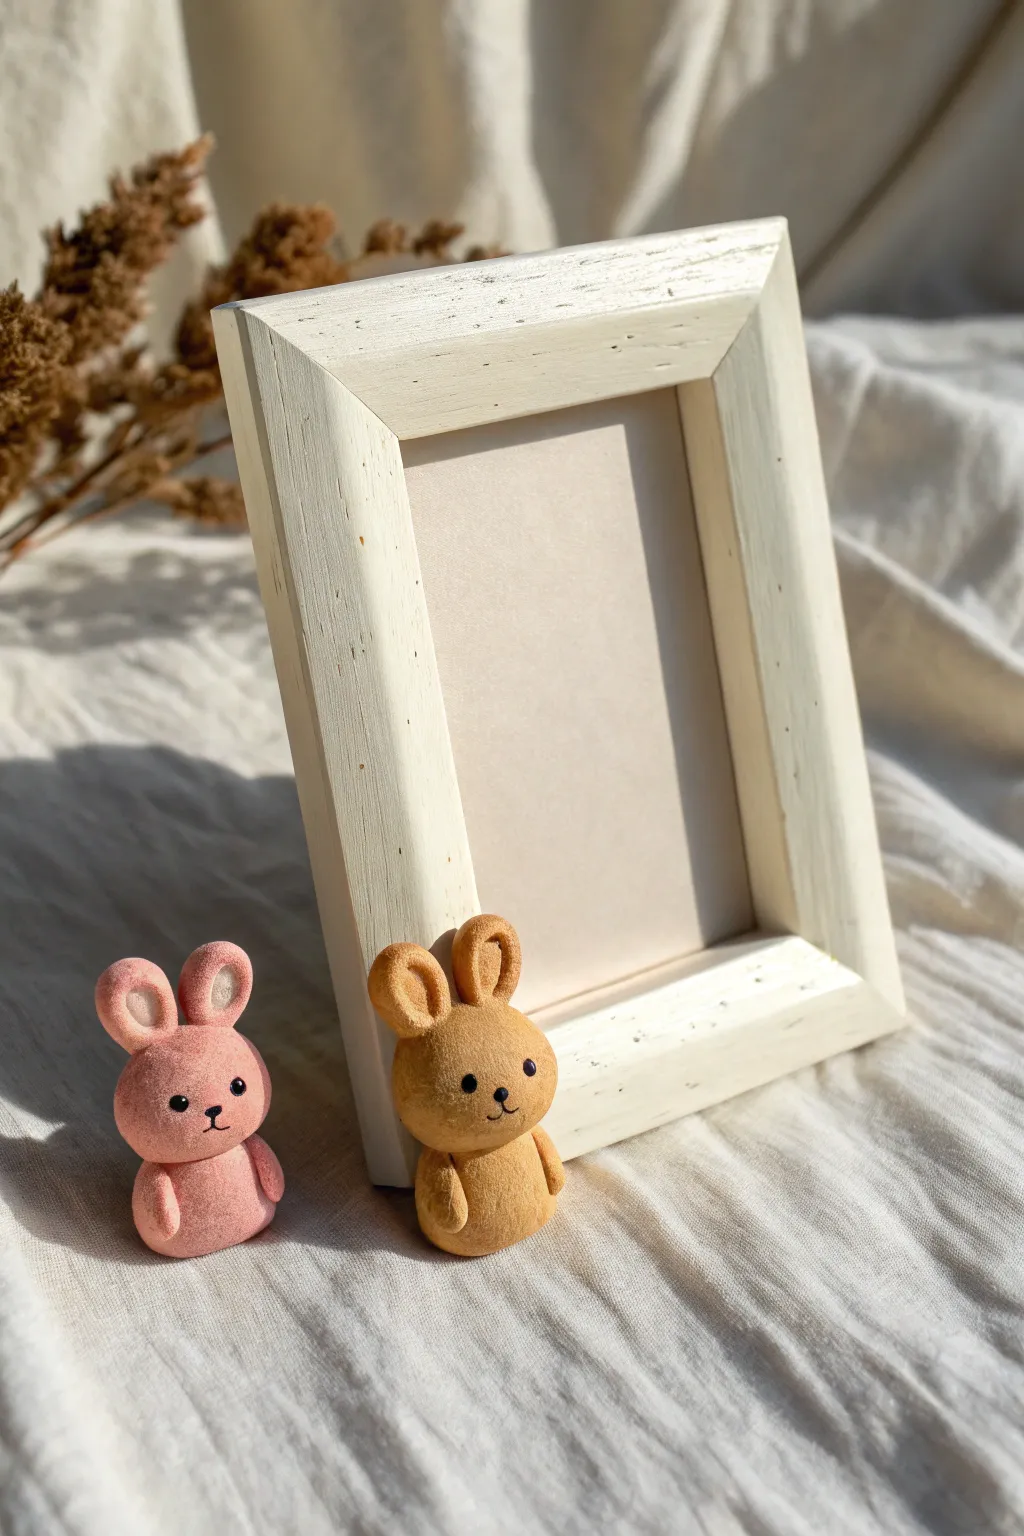
Add an adorable touch to your favorite photo display with these sweet, flocked rabbit figurines perched at the corner of a rustic cream frame. The soft texture of the bunnies contrasts beautifully with the smooth wood, creating a display that is both minimalist and incredibly cute.
Step-by-Step
Materials
- Simple wooden picture frame (cream or unfinished)
- White acrylic paint (if frame is unfinished)
- Polymer clay (white or light beige)
- Flocking powder (pastel pink and caramel brown)
- Sieve or flocking applicator
- Craft glue or tacky glue
- Small brushes for glue application
- Black acrylic paint or tiny black beads (for eyes/mouth)
- Clay sculpting tools
- Aluminum foil (for armature)
- Super glue or E6000
Step 1: Preparing the Frame
-
Frame Selection:
Choose a simple wooden frame with a wide enough molding to support your little critters. A rustic, whitewashed finish works best for this aesthetic. -
Optional Painting:
If your frame is raw wood, give it a light coat of cream or off-white acrylic paint. You can sand the edges lightly after it dries to create a distressed, vintage look.
Step 2: Sculpting the Bunnies
-
Form the Bodies:
Roll two balls of polymer clay, each about the size of a large grape. Gently flatten the bottom of each so they can stand upright independently. -
Create the Heads:
Roll two slightly smaller spheres for the heads. Attach these to the bodies. I prefer to insert a small piece of toothpick or wire between the head and body for extra stability. -
Shape the Ears:
Roll four small logs of clay. Flatten each slightly and round the ends. Attach two to the top of each head. For the pink bunny, make the ears slightly shorter and rounder; for the brown one, make them a bit taller. -
Indent the Ears:
Use a small ball tool or the end of a paintbrush to press a gentle indentation into the front center of each ear to give them depth. -
Add Arms:
Roll tiny sausage shapes for the arms. Press them against the sides of the body, curving them slightly forward as if the bunny is resting its hands on its belly. -
Bake the Clay:
Bake your clay figurines according to the package instructions (usually 275°F/135°C for 15-30 minutes). Let them cool completely before proceeding.
Patchy Fur?
If you see bald spots after the flocking dries, simply dab a tiny bit of glue on the empty area and re-apply powder. Don’t try to fix it while the first layer is still wet or it might clump.
Step 3: The Flocking Process
-
Apply Adhesive:
Working on one bunny at a time, brush a generous, even layer of craft glue over the entire surface of the polymer clay. Avoid pooling the glue, but ensure no clay is exposed. -
Apply Pink Flocking:
While the glue is wet on the first bunny, hold it over a paper plate and sift the pink flocking powder over it. Ensure heavy coverage. Gently tap the base to shake off excess, then let it sit. -
Apply Brown Flocking:
Repeat the glue and shifting process for the second bunny using the caramel or brown flocking powder. I like to be generous here; you can always tap off the extra later. -
Dry and Clean:
Allow the glue to dry completely—usually overnight is best. Once dry, use a soft, dry brush to gently sweep away any loose powder that didn’t adhere.
Clean Lines
To keep the eye area crisp, you can mask off tiny dots with liquid latex before flocking. Peel it off after flocking, then paint the bare clay black for super sharp eyes.
Step 4: Finishing Touches
-
The Eyes:
Use a toothpick dipped in black acrylic paint to carefully dot on two eyes. Alternatively, if you want a cleaner look, adhere tiny black seed beads using a dot of super glue. -
The Face Details:
With a very fine detail brush or a fine-tip permanent marker, draw a tiny ‘Y’ shape for the nose and mouth between the eyes. -
Inner Ears:
For the pink bunny, add a tiny bit of white flocking or white paint inside the ear indentations if you want extra contrast, though the monochrome look is also very sweet. -
Final Assembly:
Position the frame upright. Place the bunnies at the bottom left corner where the frame meets the surface. You can glue them directly to the frame for permanence, or leave them loose to rearrange later.
Now you have a charming, textured display that brings a bit of softness to your favorite memories
Fruit and Citrus Slice Frame
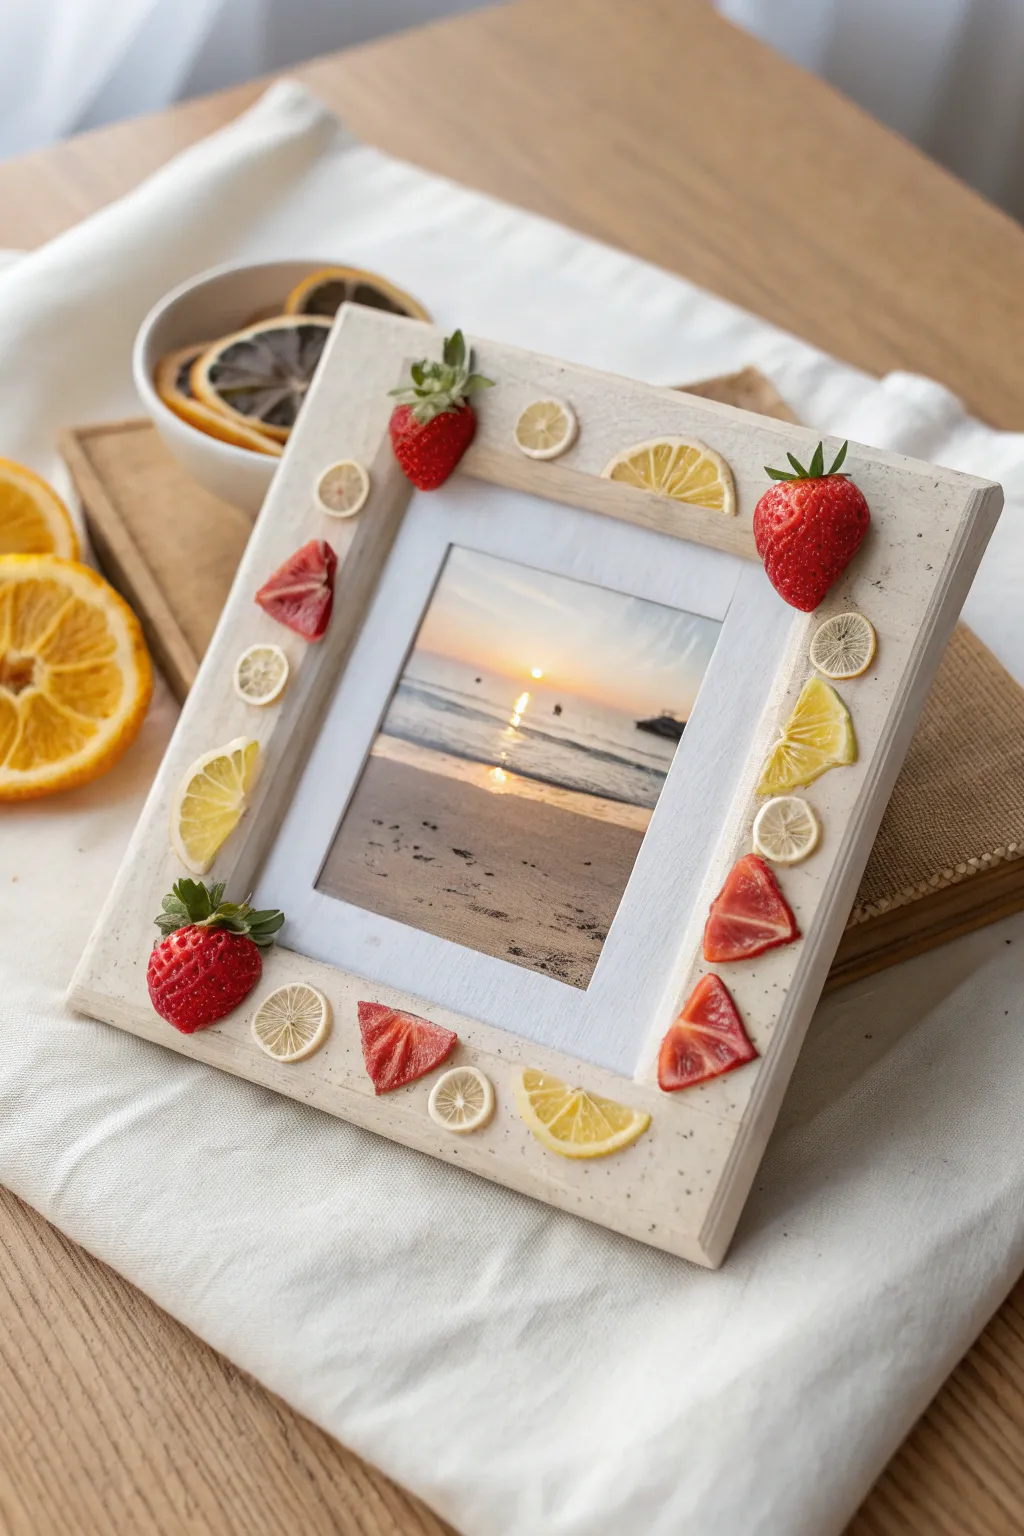
Capture the essence of a refreshing summer day with this cheerful photo frame embellishment project. Using simple polymer clay techniques, you’ll transform a plain wooden frame into a sweet, fruity display featuring vibrant strawberries and zesty lemon slices.
Step-by-Step Guide
Materials
- Plain wooden picture frame (white or light wood)
- White or cream acrylic paint (if frame is unfinished)
- Polymer clay (Red, Translucent, White, Yellow, Green)
- Liquid clay (TLS) or strong craft glue (E6000)
- Clay blade or craft knife
- Needle tool or toothpick
- Small dotting tool
- Rolling pin or clay machine
- Gloss glaze (optional)
Step 1: Preparing the Base
-
Assess the frame:
Begin with a clean, dry wooden frame. If your frame is raw wood, you may want to give it a light coat of white or cream acrylic paint to match the rustic look in the photo. -
Create a texture (optional):
For that slightly speckled, stone-like effect seen on the frame surface, you can flick a toothbrush loaded with diluted brown paint lightly over the dry white base.
Step 2: Sculpting the Strawberries
-
Form the strawberry shape:
Condition your red clay and roll three small balls. Shape them into rounded cones to mimic whole strawberries. -
Add texture:
Use a needle tool or small dotting tool to gently press seed indentations all over the surface of your red cones. -
Create the leaves:
Roll out a tiny amount of green clay. Cut small star shapes or individual teardrops. Press these onto the top (wide end) of the strawberry. -
Sculpt the stem:
Add a tiny stalk of green clay to the center of the leaves to finish the whole berries. -
Make strawberry slices:
To make the flat wedges, form a log of red clay and wrap it in a very thin sheet of white clay (for the pith), then wrap that in red again. Slice the log into triangles to reveal the inner pattern, or simply sculpt triangle wedges from red clay and paint the white core details later.
Sticky Slices?
If your lemon cane squishes while slicing, chill it in the freezer for 5-10 minutes. The firm clay will slice cleanly without distorting the pattern.
Step 3: Crafting the Lemon Slices
-
Prepare the translucent core:
Mix a small amount of yellow clay with translucent clay. Form this into a log about the diameter of a quarter. -
Divide and conquer:
Cut the yellow log into 8 equal wedges, like slicing a pie. -
Add the pith:
Roll out a vary thin sheet of white clay. Place a strip of white clay between each yellow wedge as you reassemble the log to create the segment lines. -
Wrap the cane:
Wrap the reassembled cylinder in a thin sheet of white clay, followed by a thin sheet of yellow clay for the rind. -
Reduce and slice:
Gently roll and squeeze the cane to reduce it to your desired size (some smaller for rounds, some larger for wedges). Place the cane in the fridge for 10 minutes to firm up before slicing thin rounds. -
Create wedges:
Take several of your full round slices and cut them in half or into quarters to create the lemon wedges seen on the frame sides.
Realistic Rinds
Texture the outer yellow rind of your lemon cane by rolling it gently over sandpaper before slicing. This adds realistic citrus skin texture.
Step 4: Assembly and Finishing
-
Bake the pieces:
Arrange all your fruit pieces on a tile or parchment-lined baking sheet. Bake according to your brand of polymer clay instructions (usually 275°F/135°C for 15-30 minutes). -
Cool down:
Allow the clay pieces to cool completely. They will be fragile while hot. -
Plan the layout:
Before gluing, lay your frame flat and arrange the pieces. Note how the photo balances whole strawberries at the corners with flat slices filling the gaps. -
Secure the fruit:
Using strong craft glue or liquid clay, attach the pieces to the frame. Provide gentle pressure for a few seconds on each piece. -
Add a shine (optional):
I like to brush a little gloss glaze over just the fruit parts to make them look juicy and fresh, leaving the frame matte. -
Insert memory:
Once the glue is fully cured, place your favorite summer photo inside to complete the look.
Now stepping back, you have a wonderfully vibrant frame that keeps the warmth of summer alive all year round
Round Hanging Ornament Photo Frame
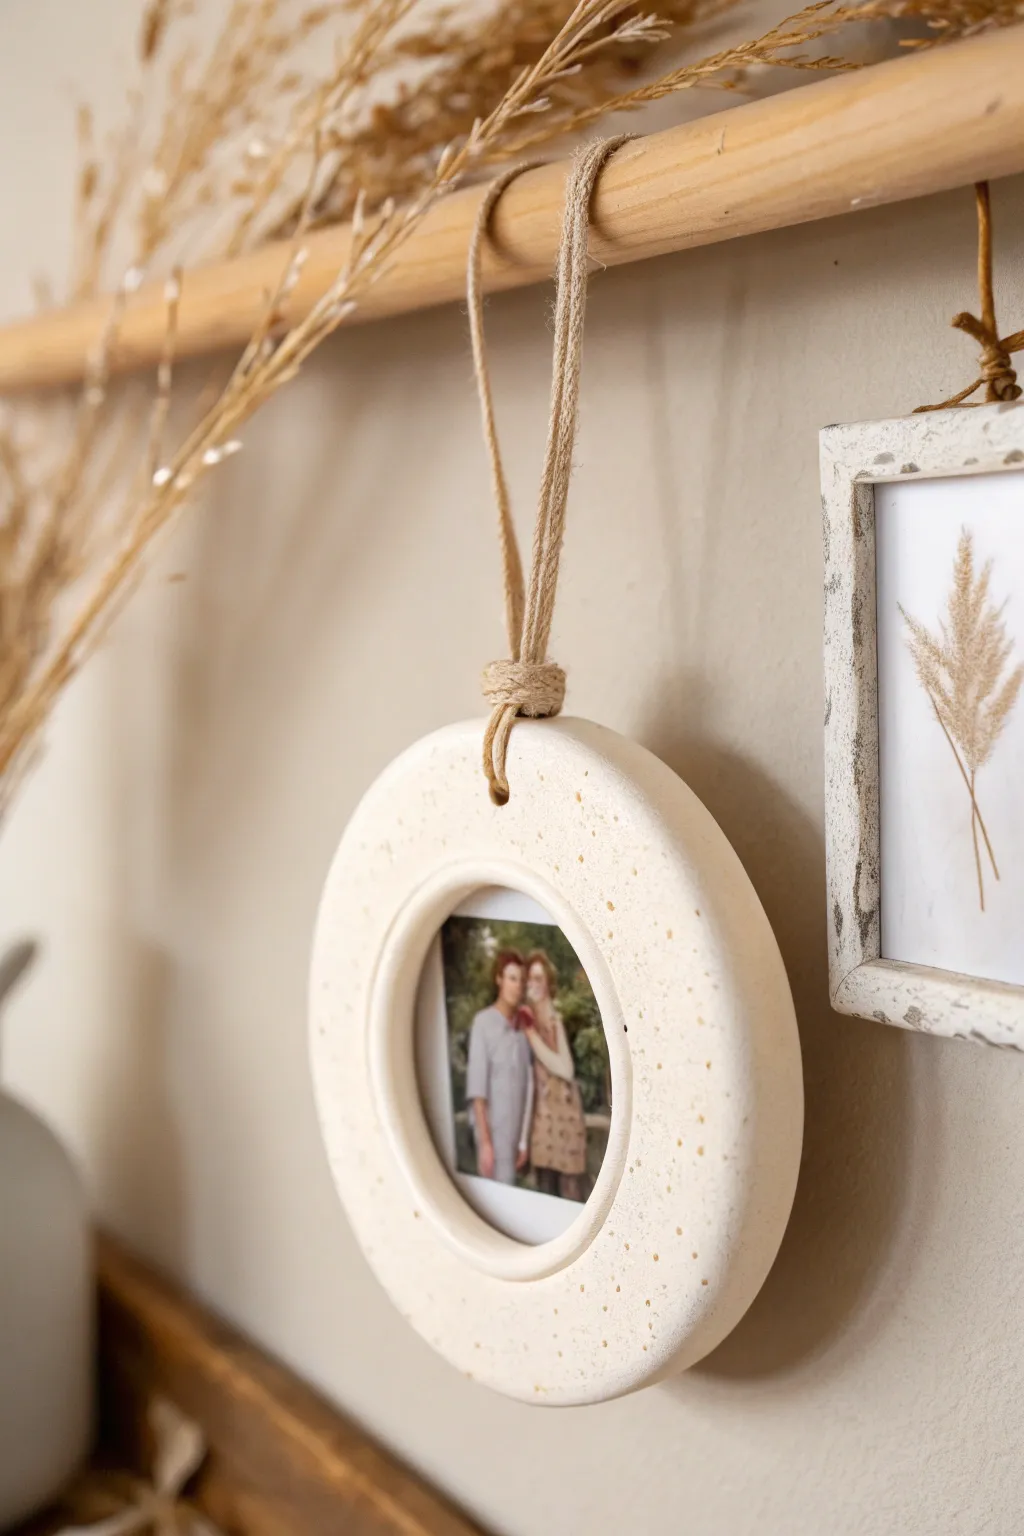
Create a modern, minimalist photo display with these chunky, donut-shaped clay frames that mimic the look of speckled stone. Suspended by rustic jute twine, they add a perfect touch of texture and warmth to any gallery wall or holiday tree.
Step-by-Step
Materials
- White polymer clay or air-dry clay (approx. 100g per frame)
- Faux granite/speckle inclusion kit (or coarse black pepper/sand)
- Rolling pin
- Two circle cutters (one large approx. 4 inches, one small approx. 2.5 inches)
- Small straw or drinking straw (for the hanging hole)
- Fine-grit sandpaper (400-600 grit)
- Jute twine or hemp cord
- Strong craft glue or E6000
- Printed photograph
- Cardstock (for backing)
- Water or clay softener (for smoothing)
Step 1: Preparing the Clay Base
-
Mix the Speckles:
Start by kneading your white clay until it is soft and pliable. To achieve that organic, speckled stone look, mix in your faux granite inclusions. If you don’t have a specific inclusion kit, I often use coarse black pepper or fine crafting sand kneaded thoroughly into the clay body. -
Roll the Slab:
Place the clay on a smooth work surface or silicone mat. Roll it out into an even slab. You want this frame to have a substantial, chunky profile, so aim for a thickness of about 1/4 to 1/2 inch. -
Cut the Outer Shape:
Take your larger circle cutter and press firmly into the clay slab to create the main body of the ornament. Remove the excess clay from around the cutter before lifting it. -
Cut the Inner Window:
Center the smaller circle cutter carefully within the larger circle. Press down to remove the center, creating a donut or ring shape. Keep the cutout center piece for other crafts or test runs. -
Add Suspension Hole:
Using a straw or a small circular tool, punch a hole directly through the clay at the top of the ring. Ensure it is centered and not too close to the edge to prevent cracking under the weight of the frame.
Step 2: Smoothing and Curing
-
Soften the Edges:
Dip your finger in a little water (for air-dry clay) or baby oil (for polymer clay) and run it gently around all cut edges. You want to round off the sharp corners created by the cutters to give it a soft, molded aesthetic. -
Texture Check:
Inspect the surface for any unwanted fingerprints. If necessary, lightly roll over the surface one last time with a roller, or tap it gently to ensure the speckles are sitting nicely. -
Bake or Dry:
If using polymer clay, bake according to the package instructions on a ceramic tile or baking sheet. If using air-dry clay, leave it on a flat wire rack for 24-48 hours, flipping it halfway through for even drying. -
Sand for Finish:
Once fully cured, use fine-grit sandpaper to buff the surface. This removes any final imperfections and reveals the ‘stone’ speckles more clearly.
Pepper Protocol
If using black pepper for speckles, seal the finished clay with a matte varnish. Unsealed organic material can eventually rot or attract moisture over time.
Step 3: Assembly and Hanging
-
Prepare the Photo:
Print your chosen photograph. Place your frame over the photo to identify the crop area, then cut the photo into a circle slightly larger than the inner window of your frame. -
Create a Backing:
Cut a piece of sturdy cardstock into a circle the same size as your photo. Glue the photo onto this cardstock to make it rigid. -
Mount the Image:
Apply a thin line of strong craft glue to the back rim of the clay frame’s window. Press the photo/cardstock combo firmly against the back, leaning a heavy book on top while it sets to ensure a tight bond. -
Attach the Twine:
Cut a length of jute twine, roughly 12 inches long. Double it over to create a loop. -
Secure the Lark’s Head Knot:
Push the folded end of the twine loop through the hole from front to back. Pull the loose ends of the twine through the loop and tighten it down to create a clean Lark’s Head knot at the top of the frame. -
Hang the Frame:
If displaying multiple frames as shown in the image, tie the loose ends of the twine onto a wooden dowel or branch, adjusting the lengths to create a staggered, gallery effect.
Stamped Texture
Before baking, gently press dried botanical sprigs or rubber stamps into the wet clay surface to add subtle, fossil-like impressions alongside the speckles.
Now you have a timeless, handcrafted keepsake that beautifully highlights your favorite memories
Shadowbox-Style Keepsake Clay Frame

Create a charming, textured keepsake holder that blends the rustic warmth of unglazed clay with delicate inlaid details. This substantial, chunky frame mimics the depth of a shadowbox and features raised floral and heart motifs in contrasting terracotta tones.
Detailed Instructions
Materials
- Air-dry clay (white or light beige)
- Air-dry clay (terracotta or reddish-brown)
- Rolling pin
- Ruler
- Craft knife or clay cutter
- Wooden skewer or needle tool
- Cardboard or foam board (for the base form)
- PVA glue or clay slip
- Small carving tools or stamps
- Fine grit sandpaper
- Matte varnish (optional)
- Small printed poem or photo
Step 1: Building the Base Structure
-
Create the core form:
Cut a square of cardboard or foam board to your desired frame size (e.g., 6×6 inches). Cut a smaller square opening in the center for your image. -
Roll the main slab:
Roll out a thick slab of naturally colored white clay, aiming for about 1/4 inch thickness to ensure durability. -
Cut the frame face:
Using your cardboard template as a guide, cut out a square frame shape from the clay slab. Leave an extra 1/2 inch of clay around both the inner and outer perimeters to wrap around the edges. -
Wrap the form:
Apply a thin layer of PVA glue to the cardboard frame. Carefully lift the clay and place it over the cardboard. Fold the excess clay over the outer and inner edges, smoothing the seams on the back. -
Add depth:
To give it that chunky shadowbox look, you can add an extra strip of clay around the inner window lip, smoothing it into the main face so it looks like one solid piece.
Seamless Joining
Always score (scratch) and slip (wet) the clay surfaces before attaching the terracotta shapes. This ensures they bond permanently and don’t pop off when drying.
Step 2: Detailed Inlay Work
-
Prepare the terracotta accents:
Roll out a very thin sheet of the terracotta-colored clay. This will be used for the decorative elements. -
Create corner flowers:
Cut four small circles from the terracotta clay. Score lines radiating from the center of each to create petals, then press a tiny dot into the middle. Adhere these to the four corners of the frame using a dab of water or slip. -
Shape the hearts:
Hand-shape or cut out several tiny hearts from the terracotta clay. Varying the sizes slightly adds a nice organic touch. -
Place the hearts:
Arrange the hearts along the top, bottom, and sides of the frame face. Press them gently into the white clay so they sit flush or slightly raised. -
Carve leaf motifs:
Using a needle tool, gently carve leaf and vine patterns directly into the white clay on the sides. You can press a tiny bit of terracotta clay into the carved grooves for color, or leave them as relief textures. -
Add the square medallions:
Create two small squares of white clay. Carve a spiral or geometric design into them, and attach them to the top and bottom center of the frame as focal points.
Preventing Warping
If the frame curls up while drying, gently weigh down the corners with small bean bags or books (placing parchment paper in between) once the surface is dry to the touch.
Step 3: Finishing Touches
-
Texturize the surface:
To mimic the stone-like texture in the photo, gently dab the surface of the white clay with a stiff bristled brush or a crumpled ball of foil. -
Create faux nail holes:
Use a skewer to poke tiny, shallow holes near the corners or randomly around the frame for a rustic, aged wood appearance. -
Slow drying:
Place the frame on a wire rack to dry. Cover it loosely with plastic wrap for the first 24 hours to prevent warping, then let it air dry completely for another 1-2 days. -
Sand and smooth:
Once bone dry, lightly sand any sharp edges or rough fingerprints with fine-grit sandpaper. -
Seal (Optional):
If you want to protect the clay from humidity, apply a layer of ultra-matte varnish. Avoid glossy finishes to keep the natural look. -
Assembly:
Tape your photo or printed poem into the recessed area from the back. Since the cardboard core is inside, you can attach a backing card or a small stand easily.
Display your handcrafted frame on a shelf where the light can catch the subtle textures and warm colors